. The following profiles are available:
Normal/Flat/Jazz/Rock/Movie/Classic/Pop/News/Podcast/Podcast Auto Adjust/My EQ
Setting up "My EQ":
To do this, please navigate to "My EQ profile setup" and confirm with . The "Bass" and "Treble" can now be set in the following menu. Confirm the "Bass" or "Treble" with the button, make the appropriate settings with the or buttons and confirm with the button. Alternatively, these settings can also be made with the knob. The active sound profile is marked with "*".
Function "Podcast Auto Adjust":
This function improves the comprehensibility when playing podcasts.
18.1.1 Audio stream quality
Select the desired level of audio quality (low, normal or high) for the available streaming service. The actualbit rate for each level depends on the service used.
18.2 Network Settings
18.2.1 Network wizard
The network assistant helps to connect the radio to the Internet. To call it up, please proceed as follows:
In the "System settings" menu select the "Network" setting and then confirm the "Network wizard". The radio now starts a search for available WLAN connections and then lists them. The various networks can be selected using the or buttons and the knob. At the end of the list there is the option to select "[New search]" or "[Manual config}".
18.2.2 Wireless network connection (WLAN)
Depending on the network, you have several options to choose from to connect to the network. Networks that support a WPS connection (Wi-Fi Protected Setup) are identified in the list by the preceding designation"[WPS ...]". Other connections are open networks or connections that are protected by the PSK method = pre-shared key (previously agreed key).
Note: An active network connection is indicated by a white symbol at the bottom right of the display. If no connection is active, this symbol is crossed out in red.
18.2.3 WPS/PSK/Open connection
A WPS connection enables the radio to be connected to your network in a simple yet protected manner. There are two options available. Establishing the connection through PBC = Push-Button-Configuration (configuration at the push of a button) or by the PIN procedure, in which the web interface of your router prompts you to enter a randomly generated sequence of numbers.
18.2.4 Setup using PBC
Select the desired network "[WPS ...]". Then select the "Press button" option with "WPS menu" and confirm. Now press the WPS button on your router or access point (AP). Please refer to the operating instructions of your router or AP for the exact procedure. .Alternatively, the process can also be started in the "Internet Settings" menu under "PBC WLAN Structure". Follow the instructions on the display.
18.2.5 Setup using a PIN
Select the desired network "[WPS ...]". Then use the "WPS menu" to select and confirm the "PIN" option. The radio now generates an 8-digit code, which you should confirm with the button and then enter the number via the user interface of the router or AP. Please refer to the Router or AP manual for more information.
18.2.6 Skip WPS/Setup using PSK (pre-shared key)
Select "Skip WPS" to establish the connection using the network key. In the case of networks without WPS support, you can go directly to the input mask. Now enter the key and confirm it with the "OK" button. If the entry is correct, the radio connects to your network and establishes an Internet connection.
18.2.7 Open connection
We recommend that you do not connect to an open network. If the network you have selected is not encrypted, you can confirm this with the button. Then the internet connection is established.
18.2.8 Manual network connection setup
If DHCP is active, please proceed as follows:
Please select the menus "Network" -> "Manual settings" -> "Wireless" -> "DHCP enable". Then enter the full SSID (network name) and confirm it with the "OK" button. Now choose the appropriate encryption method.
Please refer to the configuration of the router or AP. Depending on the method selected, the network key is now entered and confirmed with the "OK" button.
18.2.9 If DHCP is inactive, please proceed as follows:
Please select the menus "Network" -> "Manual settings" -> "Wireless" -> "DHCP disable". Now enter the information for "IP address", "Subnet mask", "Gateway address", "Primary DNS" and "Secondary DNS". The values can be set using the or on the remote control or the knob. Use the , or to select the individual number. Then proceed as described under "DHCP enable".
18.3 Show network settings
In this menu you will find all settings of the network profile currently in use. To do this, select the "View settings" menu in the "Network" menu. The values can be displayed using the or on the remote control or the knob.
18.4 Network profile
Here you can see the list of network profiles saved on the radio. If you have created several profiles, choose the one closest to the corresponding router or AP.
You can delete network profiles that are no longer required by pressing the or button on the remote control or the knob to select the profile to be deleted and confirm with the button. The active network profile is marked with "*".
Note: The active network profile cannot be deleted.
18.5 Delete network settings
In this menu you can delete the network settings of the current profile. To do this, select the "YES" button and confirm your entry with the . Selecting the "NO" button cancels the process.
18.6 Keep network connection
This menu is used to set whether the WLAN connection to the network should be maintained in standby mode. This enables you to switch on the radio using the UNDOK App (see page 28). Power consumption in standby mode is slightly higher in networked mode. Select the "YES" or "NO" button for the setting and confirm the entry with the .
19. Time settings
You can set the settings for time and date in the "Time/Date" menu. The following options are available:
The time and date can be set here manually. The values can be changed using the or button on the remote control or the knob. Use the , or button to select the individual blocks of numbers and to save the values.
Here you can specify the source from which the time and date should be updated. The following options are available:
Update from DAB: Time and date are updated via DAB.
Update from FM: The time and date are updated via FM.
Update from Network: The network updates the time and date.
No update: Time and date must be set manually.
The currently selected option is marked with "*".
In this menu you can specify whether the clock should be displayed in 12 or 24 hour format. Select with the or button, the confirmation is made with the button. The currently selected option is marked with "*".
In this menu you can specify the desired Time Zone. Select with the or button, the confirmation is made with the button. The currently selected time zone is marked with "*".
Here you can specify the setting for daylight saving / standard time. Select the current setting for daylight saving time with the or button, then confirm with the button. The current setting is marked with "*".
Here you can set whether the time should be displayed in analogue or digital format in standby mode. Select the desired setting with the or buttons and confirm with the button. The current setting is marked with "*".
20. Language
In the "Language" menu you can set the menu language of the radio. If you have started up the device with the setup wizard, the device language has already been set there. To select a language, please use the or buttons and confirm this by pressing the button. Alternatively, the selection can also be made with the knob.
The following languages are available:
Danish, German, English, Finnish, French, Italian, Dutch, Norwegian, Polish, Portuguese, Swedish, Spanish, Turkish
21. Factory reset
To reset the radio to the delivery state, please select "YES" in the menu "Factory reset". Attention:
All previous settings are deleted. If you select "NO" the process is cancelled.
Note: Be sure to reset the radio to the factory settings before you pass it on(e.g. to sell, give away or dispose of).
22. Software update
In this menu you can check whether a software update is available for the radio.
If you select "Auto-check setting" the radio automatically checks the availability of new software updates on a regular basis.
Select the menu item "Check now" to search for a new version. If newer software is found, please select "YES" to install it or "NO" to cancel the update. If "YES" the radio restarts to carry out the process.
Then the software is downloaded and you are asked with "Proceed" whether the update should be carried out. Please choose "YES" if you consent or "NO" to cancel the update. The "Warning: do not remove power" and the software version to be installed flash alternatively. When the process is complete, "Update completed" appears on the display and you can confirm the process with the button.
You can check the version number of the installed software under the "System settings" menu under "Info".
Attention!
Make sure that there is a stable power supply before you start a software update.
An interruption during an update can cause irreparable damage to the radio!
23. Setup wizard
You can start the setup wizard again in the "Setup wizard" menu. To do this, proceed as described under "4.9 Starting the setup wizard".
24. Info
In this menu you will find the version number of the current firmware, among other things. Have this ready if you want to contact customer service.
25. Lighting
The display illumination can be programmed in 3 brightness levels. The following settings can be made in the "Backlight" menu:
"Timeout": Time until the display is set to the "Dim Level" lighting level.
Choices: "On/10/20/30/45/60/90/120/180 seconds"
"ON" means that the radio always remains in the brightness level of the "On level".
"On level": Brightness of the display when the radio is switched on.
Choices: "High"/"Medium"/"Low"
"Dim level": Brightness adjustment for operation and standby.
Choices: "Medium"/"Low"
26. UNDOK - control of the radio via App
The UNDOK application (App) developed by Frontier Silicon gives you full control of radios and speakers on your smartphone.
Regardless of whether you are setting up the device for the first time, configuring Equalizer or managing your favourite channels - UNDOK offers you all the features on your smartphone or tablet and offers you even more convenience. Download the UNDOK App from the Google Play Store or the Apple App Store.
Initial setup of the device with UNDOK
When switched on for the first time, or after the radio has been set to the factory settings, the radio is in SETUP mode and a so-called micro-access point (own WLAN network) is generated. This allows your smartphone or tablet to connect to the radio.
Set up with Android
Make sure the radio is in SETUP mode. Open the UNDOK-APP on your smartphone or tablet and select the menu item "Set up audio system".
Press "NEXT" and select the menu item "SELECT THE ACCESS POINT". The WLAN menu of the devices opens up, here select "KENWOOD KR-W8000SCD". After connecting, "Connected to KR-W8000SCD" appears in the App. Follow the further instructions of the App to set up the radio completely. Finally, the radio connects to the network and you can now operate the device with the UNDOK APP by pressing "Use my audio system".
Set up with iOS
Make sure the radio is in SETUP mode. Open the UNDOK APP on your iPhone or iPad, and select the menu item "Set up audio system".
Press "NEXT" and select the menu item "SELECT THE ACCESS POINT". The WLAN menu of the devices opens up, here select "KENWOOD KR-W8000SCD". After connecting, "Connected to KR-W8000SCD" appears in the App. Follow the further instructions of the App to set up the radio completely. Finally, the radio connects to the network and you can now operate the device with the UNDOK APP by pressing "Use my audio system".
26.1 Controlling the radio with OKTIV App
Alternatively, once the radio is set up, you can also use the free OKTIV App from Frontier Silicon to control the device. However, currently an initial setup of the KR-W8000SCD is still not possible with this App.
More detailed information on downloading for iOS or Android is available at: https://www.frontiersmart.com/product/oktiv/
27. Troubleshooting
Please check the following points in case of malfunctions:
No sound
→ Plug in the mains cable properly.
→ Adjust the volume to the correct level.
→ Make sure the desired source is selected.
→ Unplug the power cord and reconnect it.
Problems with radio reception
→ Reorient the antenna.
→ Find a more suitable location.
→ Other electrical appliances interfere with the reception.
→ Location not suitable for receiving DAB+ signals.
A network connection cannot be established
→ Check the WLAN function, make sure the password is correct.
→ Reorient the WLAN antenna.
→ Try to set an IP address on the device.
→ Activate the DHCP function on the router and re-establish the connection on the device.
→ A firewall is activated in the network - set it so that access is possible.
→ Place the radio closer to the router or AP.
→ Restart the router or AP.
28. Maintenance and care
Cleaning the housing
Use a cloth lightly moistened with a mild detergent. Do not use detergents containing alcohol, ammonia or scouring agents.
Cautions on condensation
Condensation (dew) may form inside the unit if there is a significant difference between the temperature of the unit and the ambient temperature. If condensation occurs inside the unit, proper function is no longer guaranteed. In this case, you have to wait a few hours; After the moisture has dried, the device can be reused.
Special care should be taken in the following circumstances
When the unit is moved from one place to another at a much higher or lower temperature, or when the humidity at the installation site increases, etc.
Handling of CDs
Hold the CD so that you do not touch the signal surface. (The unprinted side is the playing side.)
Use only use CDs with disc marking. In some cases, CDs with this marking may not play back properly.
Notes on using a USB device
This device is capable of playing audio files stored on a flash memory or digital audio player if these devices have a USB port (these devices are referred to as USB Devices in this document).
The following restrictions apply to the usable USB Devices:
Usable USB Devices
- USB Devices that belong to the USB Mass Storage Class.
- USB Devices whose maximum power consumption is 500 mA or less.
- USB Mass Storage Class: USB Devices that the PC recognises as external storage without the need for a special driver or application software.
- Consult your dealer if you are not sure whether your USB device complies with the specifications for the USB Mass Storage Class.
- Using a USB device that is not supported may result in erroneous playback or display of the audio file.
Even if you use a USB device that meets the above specifications, audio files may not play back properly depending on the type or condition of the USB device.
Station suggestion for Internet Radio
If you cannot find an internet station or podcast in the Station List, you can create a ticket in order to add new stations or podcasts at
https://srsupport.frontier-nuvola.net/portal/en/newticket
If the submitted link of the station or podcast is supported the portal service provider adds it to the station list.
29. Disposal
Disposal of used electrical and electronic equipment and batteries.
natural_image
Two identical line drawings of a trash bin with crosshair symbols, no text or labels present.
The (crossed-out wheeled bin) symbol on the product or its packaging indicates that this product must not be handled as normal household waste, but handed in to a collection point managed by public waste management authorities or to a collection point set up by the manufacturer or distributor, free of charge.
The owners of electrical devices should usually separate the waste batteries and waste accumulators which are not firmly enclosed in the waste devices from these waste devices before handing them over to collection points. This does not apply if the waste devices are prepared for recycling with the participation of a public waste management authority. By helping to properly dispose of this product, you are protecting the environment and the health of your fellow human beings. Improper or incorrect disposal endangers the environment and health. For more information on the recycling of these electrical devices and batteries, please contact your local authority or your municipal waste disposal companies.
Disposal instructions for consumers in Germany: https://www.e-schrott-entsorgen.org/
Disposal instructions for consumers in Austria: https://www.elektro-ade.at/
Disposal instructions for consumers in Ireland: https://www.mywaste.ie/
Disposal instructions for consumers in United Kingdom: https://www.recyclenow.com/
Disposal instructions for consumers in France: https://www.quefairedemesdechets.fr
The end user is responsible for deleting data on the old device using the menu item "Factory setting" before disposal (see P. 25).
- Technical specifications KR-W8000SCD
| Power supply AC voltage ~ 100 - 240 V | |
| AC input frequency 50/60 Hz | |
| Power consumption 60 W | |
| Power consumption in standby mode 0.7 W | |
| Power consumption in networked standby mode 1.0 W | |
| CD mode |
| Signal-to-noise ratio (A filter) >70 dB | |
| Dynamic Range > 60 dB | |
| Tuner FM/DAB + |
| DAB tuning range BAND III 174.928 MHz - 239.200 MHz | |
| FM tuning range 87.50 MHz - 108.00 MHz | |
| Network connection (WLAN) |
| Supported networks WIFI IEEE 802.11a/b/g/n | |
| Supported frequency ranges | WiFi: 2.412 - 2.472 GHz, 5.18 - 5.32 GHz, 5.50 - 5.70GHz, 5.745 - 5.825GHz |
| Maximum transmission power | WIFI 2.4 G: 15.2 dBm/WIFI 5G: 14.94 dBmWIFI 5.8G: 7.27 dBm |
| Supported encryption WEP, WPA, WPA2 (PSK), WPS | |
| Supported streaming formats MP3, AAC/AAC + (up to 48 kHz, 16 bit) |
| USB devices | Playable files: MP3Compatible with USB1.1 full-speed, FAT16, FAT32Max. 500 mA, Bit rates: 32 kBit/s to 320 kBit/sNo charging function on the USB port |
| BLUETOOTH |
| BLUETOOTH version V5.2 | |
| Power class Class 2 | |
| Maximum transmission power 4.83 dBm | |
| Reach | about 10 meters (may vary depending on the environment) |
| Frequency range | 2.402 GHz - 2.480 GHz |
| BLUETOOTH profile | A2DP (Advanced Audio Distribution Profile, AVRCP (Audio/Video Remote Control Profile) |
| Connections |
| Headphone | 3.5 mm jack socket |
| Line In | Cinch |
| Line out | Cinch / variable output level |
| Subwoofer Out | Cinch / 25 - 250 Hz ±3 dB |
| Coaxial In (1/2) | Cinch |
| Coaxial Out | Cinch |
| Optical In (1/2) | Toslink |
| Optical Out | Toslink |
| Phono In (Moving Magnet) Cinch | |
| Amplifier part |
| Output capacity | 2 x 30 W RMS |
| Recommended speaker | Impedance 4 - 8 ohms; Min. 30 W nominal load per piece. |
| Dimensions and weight |
| Main unit | (W x H x D) 430 x 68 x 303 mm/3.5 kg |
| Temperature range | 5°C to 35°C |
31. Guarantee
Dear customer,
thank you for purchasing this Kenwood product. If this product shows defects in material or workmanship under normal operating conditions, we will remove these free of charge or replace the device in accordance with the following warranty provisions.
Please keep this warranty card in a safe place.
Kenwood guarantees this device for a period of two years from the date of purchase as shown on the invoice or sales receipt from the Kenwood dealer.
This warranty covers material and workmanship defects. We reserve the right to replace the product if cost-efficient repair is no longer possible. Costs for packaging and installation as well as costs and risks in connection with the actual repair are not included in the warranty and will be invoiced.
Conditions
A. To assert warranty claims, in addition to submitting this warranty card, the following information is required:
(a) Your name with full address
(b) The receipt or invoice from a retailer based in an EU country indicating the original date of purchase.
(c) The full name and address of the retailer from whom the product was purchased.
(d) The serial number and model name of the product.
Kenwood reserves the right to refuse warranty service if the aforementioned information is missing or if changes have been made to the product since it was first purchased.
B. At the time of delivery to the retailer, this product complies with all standards and safety regulations applicable in the country of destination. Modifications required to operate the device in countries outside the country of destination are not covered by the aforementioned warranty conditions. In addition, we do not accept any liability for work in this context or for damage to the product resulting from such work.
If the product is used in a country for which it was not designed and manufactured, warranty work will only be carried out if the user bears the costs for upgrading the device to nationally applicable standards and safety regulations.
In addition, if the product differs from the products sold by the official importer and if spare parts are not available for the repair of this product, the user must bear the costs of transporting the device to and from the country of purchase.
The same applies if no warranty services can be offered in the country concerned for other legitimate reasons.
C. The following are excluded from the warranty:
(a) Changes to the product, as well as normal maintenance and adjustment work, including the regular checks mentioned in the Operating Instructions.
(b) Damage to the product caused by inadequate or improper work if this work was carried out by third parties who are not authorised to carry out warranty services on behalf of the manufacturer.
(c) Damage caused by negligence, accidents, changes, improper installation, defective packaging, incorrect operation or the use of incorrect spare parts for repairs.
(d) Damage caused by fire, water damage, lightning strikes, earthquakes, inadequate ventilation, force majeure, connection to incorrect mains voltage or other causes for which Kenwood is not responsible.
(e) Damage to speakers due to overloading. Damages to other items that are not part of the product, such as: DVDs, compact discs, USB storage media, smartphones, etc.
(f) Consumable or wearing parts that have to be replaced as part of normal customer service, such as: Batteries, rechargeable batteries, lamps, etc.
(g) All products in which the serial number(s) has been completely or partially removed, changed or made illegible.
This warranty can be claimed by anyone who has purchased the product legally.
In accordance with the aforementioned warranty conditions, the product will be repaired or replaced free of charge. This right does not in any way affect other rights of the user within the framework of the applicable legal provisions.
Repairs or replacements do not extend the warranty period.
Further claims are excluded, in particular those for conversion, reduction or compensation.
JVCKENWOOD U.K. Limited
First Floor, Gleneagles, The Belfry, Colonial Way, Watford, Hertfordshire WD24 4WH
Email : Enquiries@uk.jvckenwood.com www.kenwood-electronics.co.uk
KENWOOD
KENWOOD
SMART RADIO CD-TUNER
KR-W8000SCD
NOTICE D'EMPLOI
JVCKENWOOD Corporation
Sommaire
Sommaire Page
- Avant la mise sous tension/Consignes de sécurité 3
- Déclaration de conformité 6
- Éléments et fonctions 7
- Mise en service 9
- Radio Internet 12
- Podcasts 13
- Spotify 14
- Deezer 15
- Lecteur de CD 16
- Lecteur USB 17
- Radio numérique DAB+ 18
- Radio FM 19
- BLUETOOTH Audio 20
- Ports analogiques 21
- Ports numériques 22
- Mode « Sommeil » 22
- Alarmes 22
- Paramètres système 23
18.1 Equalizer 23
18.2 Paramètres réseau 24
- Réglage de l'heure 26
- Langue 27
- Paramétrage d'usine 27
- Mises à jour du logiciel 27
- Assistant de configuration 27
- Info 27
- Éclairage 28
- Undok – commande par appli/appli OKTIV 28
- Élimination des défaillances 29
- Maintenance et entretien 29
- Mise au rebut 31
- Caractéristiques techniques 32
- Garantie 33
1. Avant la mise sous tension
CONSIGNES DE SÉCURITÉ IMPORTANTES
Attention : Lisez attentivement cette page afin d'assurer l'utilisation sûre de l'appareil !
Lire attentivement ces consignes !
- Respectez toutes les consignes de sécurité et d'action lorsque vous mettez ce produit en service.
Conserver soigneusement ces consignes !
- Conservez les consignes de sécurité et d'action afin de pouvoir vous y reporter ultérieurement.
Respecter toutes les mises en garde !
- Respectez scrupuleusement toutes les mises en garde figurant sur le produit et dans la notice d'emploi
Nettoyer uniquement avec un chiffon sec !
- Débranchez le câble d'alimentation de cet appareil de la prise secteur avant de procéder au nettoyage de ce produit. N'utilisez jamais de détergents liquides ou en aérosol.
Utilisez uniquement un chiffon légèrement humide pour nettoyer l'appareil.
Accessoires
- Utilisez uniquement les accessoires indiqués par le fabricant.
N'utilisez pas cet appareil à proximité de l'eau.
- L'appareil ne doit jamais être exposé à des gouttes ou projections d'eau – par exemple à proximité d'une baignoire, d'un lavabo, d'un évier, d'une machine à laver, dans un sous-sol humide ou à proximité d'une piscine, etc. Ne posez jamais des récipients contenant de l'eau sur l'appareil, par exemple un vase avec des fleurs.
Ventilation
- Les fentes et orifices du boîtier servent à la ventilation de l'appareil, afin d'assurer le bon fonctionnement de l'appareil et le protéger contre toute surchauffe qui pourrait occasionner une auto-ignition. N'obturez pas les orifices de ventilation. Installez l'appareil conformément aux consignes du fabricant. N'obturez pas les orifices de ventilation en posant l'appareil sur un lit, un canapé, un tapis ou un autre support mou similaire. En absence d'une ventilation suffisante, l'appareil ne doit pas être encastré dans une bibliothèque ou un placard.
Alimentation électrique
- Cet appareil ne doit être branché qu'à la tension d'alimentation indiquée appareil. Utilisez à cet effet uniquement le câble d'alimentation fourni. Si vous avez des doutes sur le type d'alimentation électrique de votre logement, veuillez vous adresser à votre revendeur spécialisé ou à votre fournisseur d'énergie local.
Câble d'alimentation
- Veillez à ce que personne ne puisse trébucher sur le câble d'alimentation. Veillez également à ce que le câble d'alimentation ne puisse pas être écrasé à proximité immédiate d'une prise secteur, y compris les prises à rallonge. Le câble d'alimentation ne doit pas non plus être écrasé à la sortie de l'appareil.
Pour le appareils équipés d'un câble d'alimentation à fiche, la prise secteur correspondante doit se trouver aussi près que possible de l'appareil et être facilement accessible.
Orages
- Débranchez l'appareil du secteur en cas d'orage ou s'il n'est pas utilisé pendant une durée prolongée.
Surcharge
- N'exposez jamais les prises secteur, rallonges ou multiprises à une surcharge, puisque cela génère un risque d'incendie ou d'électrisation.
Pénétration de corps étrangers et de liquides
- Veillez à ce qu'aucun corps étranger ou liquide ne puisse pénétrer dans l'appareil par les orifices de ventilation. Cela pourrait conduire à un contact avec des éléments sous haute tension ou un court-circuit, qui peuvent occasionner un incendie ou une électrisation. Ne déversez jamais un liquide quelconque sur l'appareil.
Maintenance
- Ne tentez jamais d'effectuer vous-même la maintenance de cet appareil, car l'ouverture ou le retrait de caches peuvent donner accès à des éléments sous tension. Tout contact avec ces éléments génère des risques. Confiez les opérations de maintenance aux collaborateurs compétents d'un service clients.
Détériorations qui requièrent une réparation
- Ne faites effectuer les opérations de maintenance et de réparation que par un service clients qualifié. La maintenance/réparation est nécessaire lorsque l'appareil a été endommagé (par ex. le boîtier), qu'un liquide a pénétré dans l'appareil, que des objets ont pénétré dans l'appareil, que l'appareil a été exposé à la pluie ou l'humidité, lorsqu'il ne fonctionne plus correctement ou est tombé.
Pièces détachées
- En cas de mise en place de pièces détachées, assurez-vous que le technicien du service clients utilise des pièces détachées prescrites par le fabricant ou présentant les mêmes caractéristiques que les pièces d'origine. Les pièces détachées non homologuées peuvent occasionner des incendies, électrisations ou autres accidents.
Contrôle de sécurité
- Après la réalisation d'opérations de maintenance ou de réparation, priez le technicien du service clients d'effectuer un contrôle de sécurité afin de s'assurer du parfait état de fonctionnement de l'appareil.
Chaleur
- N'installez pas l'appareil à proximité de surfaces chaudes telles que par exemple des radiateurs, radiateurs soufflants, poêles ou autres appareils pouvant dégager de la chaleur (y compris les amplificateurs).
Ne posez jamais des objets avec des flammes nues tels que des bougies ou des lanternes sur ou à proximité de l'appareil. Les piles installées ne doivent pas être exposés à une chaleur élevée occasionnée par ex. par la lumière directe du soleil, le feu, etc.
Batteries
- Lorsque la radio n'est pas utilisée pendant un mois ou plus, vous devez retirer les piles du compartiment à piles de la télécommande afin d'éviter qu'elles ne fuient.
Mettez immédiatement au rebut les piles qui fuient, en respectant l'ensemble des dispositions légales applicables.
Les piles qui fuient peuvent occasionner des blessures et endommager l'appareil. Ne mélangez jamais des piles de différents types ou des piles usagées avec des piles neuves.
Afin de minimiser le risque d'une électrisation, d'un incendie, etc.,
- Vous ne devez pas retirer de vis, de caches ou d'éléments du boîtier.
- Le bouton Marche/Arrêt ne coupe jamais entièrement l'alimentation électrique, quelle que soit sa position.
Pour isoler entièrement l'appareil du secteur, débranchez le câble d'alimentation de la prise secteur.
Risques liés à un volume sonore élevé
- Pour éviter les éventuels dommages auditifs, nous vous recommandons de ne pas trop prolonger l'écoute à un volume sonore élevé. Cela s'applique notamment lors de l'utilisation d'un casque audio.
Connexion réseau
- Veuillez vous assurer que la fonction de pare-feu de votre point d'accès au réseau (routeur) est activée. Reportez-vous à cet effet à la notice d'emploi de votre routeur.
- Si vous ne souhaitez pas installer de connexion réseau, il convient de ne pas installer l'assistant de configuration.
Télécommande
- Si vous exposez le capteur de la télécommande à la lumière directe du soleil ou à la lumière de tubes fluorescents à haute fréquence, des dysfonctionnements sont possibles. Dans de tels cas, le système doit être installé à un autre endroit pour éviter de tels dysfonctionnements.
- Les piles fournies sont destinées au contrôle fonctionnel et peuvent présenter une durée de vie limitée. Lorsque la portée de la télécommande diminue, il convient de remplacer les piles usagées par piles neuves.
Prudence!
Risques d'explosion
- lorsque des piles d'un type non adapté sont utilisées ;
- de températures élevées ou basses extrêmes auxquelles une pile peut être exposée pendant l'utilisation, le stockage ou le transport ;
- d'une pression atmosphérique faible à grande altitude ;
- lorsque des piles sont jetées au feu ou mises dans un four chaud ;
- lors de l'écrasement ou sectionnement mécanique d'une pile ;
- de l'exposition prolongée d'une pile à un environnement à des températures très élevées ou une pression atmosphérique très faible, qui peuvent conduire à l'explosion ou à la fuite de liquides ou gaz inflammables.
Fonction d'économie d'énergie automatique
Le modèle est équipé d'une fonction d'économie d'énergie automatique. Elle commute l'appareil en mode veille après 15 minutes lorsque le volume sonore la lecture est très faible ou que la radio est réglée sur le mode silencieux. Ce réglage ne peut pas être modifié.
Remarque : Lorsque la radio est en mode veille ou si vous ne lisez pas de fichiers USB, retirez la clé USB afin de diminuer la consommation d'énergie.
IMPORTANT POUR LES PRODUITS LASER
-
PRODUIT LASER DE LA CLASSE 1
-
PRUDENCE: Ne pas ouvrir le boîtier. L'appareil ne contient pas d'éléments dont la maintenance peut être effectuée par l'utilisateur. Faites effectuer la maintenance uniquement par des techniciens qualifiés.
Attention :
Les processus de commande décrits dans la présente notice d'emploi correspondent à la version en vigueur à la date d'impression du présent document. Les mises à jour intermédiaires du progiciel peuvent occasionner des écarts minimes des processus de commande ou des désignations d'options de menu.
Par la présente, la société JVCKENWOOD Corporation déclare que le type de dispositif radio [KENWOOD] KR-W8000SCD satisfait aux exigences de la directive 2014/53/UE. Le texte complet de la déclaration de conformité UE est disponible via l'adresse Internet suivante :
http://www.kenwood.com/euukdoc/
Pour le Royaume-Uni
Par la présente, la société JVCKENWOOD Corporation déclare que le type de dispositif radio [KENWOOD] KR-W8000SCD satisfait aux exigences de la réglementation relative aux dispositifs radio 2017. Le texte complet de la déclaration de conformité UE est disponible via l'adresse Internet suivante : http://www.kenwood.com/euukdoc/
Fabricant :
JVCKENWOOD Corporation
3-12, Moriyacho, Kanagawa-ku, Yokohama-shi, Kanagawa 221-0022, JAPON
Coordonnées en Union européenne :
JVCKENWOOD Europe B.V.
Rendementsweg 20 B-9, NL-3641 SL Mijdrecht, PAYS-BAS
Coordonnées (Royaume-Uni) :
JVCKENWOOD U.K. Limited
First Floor, Gleneagles, the Belfry, Colonial Way, Watford, Hertfordshire WD24 4WH
ROYAUME-UNI
La marque et les logos Bluetooth® sont des marques déposées de la société BLUETOOTH SIG Inc. Toute utilisation de ces marques par la société JVCKENWOOD Corporation. Fait l'objet d'une licence. Les autres marques et appellations commerciales appartiennent à leurs propriétaires respectifs.
| En raison de la plage de 5 GHz du module WiFi intégré, l’utilisation est limitée à l’intérieur des bâtiments dans les pays suivants : |
|  | |  |
| AT BE | BG CZ | DK EE FR | DE IS IE IT | | | | | | UKEL ES CY LV LI |
| | | | | | | | |
| PL PT | RO SL SK | TR FI SE CH | | | | | | UK (NI) | HR |
| AT=Autriche, BE=Belgique, BG=Bulgarie, CZ=Tchéquie, DK=Danemark, EE=Estonie, FR=France, DE=Allemagne, IS=Islande, IE=Irlande, IT=Italie, EL=Grèce, ES=Espagne, CY=Chypres, LV=Lettonie, LT=Lituanie, LU=Luxembourg, HU=Hongrie, MT=Malte, NL=Pays-Bas, NO=Norvège, PL=Pologne, PT=Portugal, RO=Roumanie, SL=Slovénie, SK=Slovaquie, TR=Turquie, FI=Finlande, SE=Suède, CH=Suisse, UK(NI) = Irlande du Nord, HR=Croatie | UK=Royau-me-Uni |
3. Éléments et fonctions
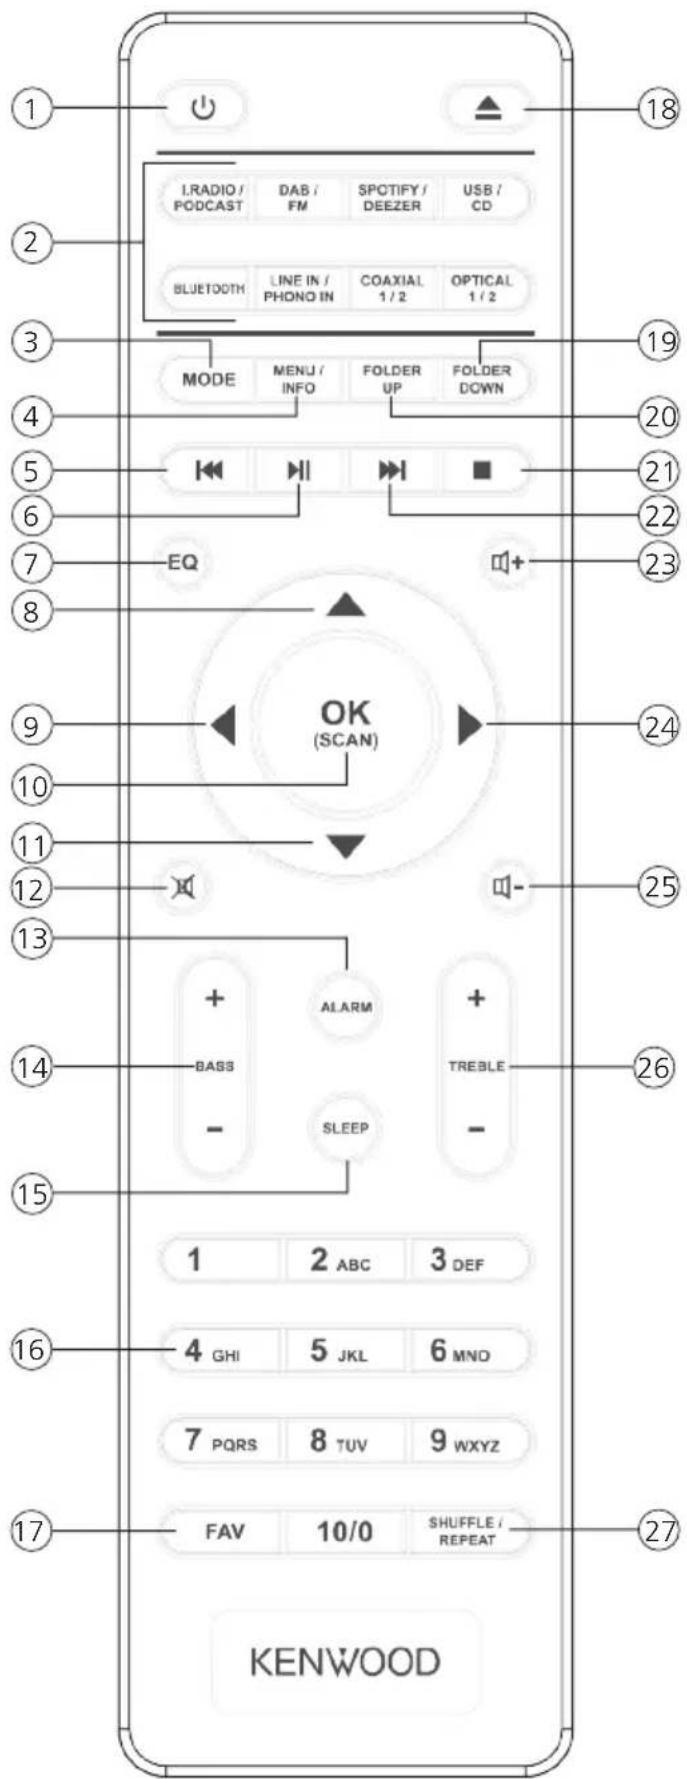
3.1 Télécommande

text_image
1
2
3
4
5
6
7
8
9
10
11
12
13
14
15
1
2 ABC 3 DEF
4 GHI 5 JKL 6 MNO
7 PQRS 8 TUV 9 WXYZ
17
FAV 10/0 SHUFFLE / REPEAT
KENWOOD
1.RADIO / PODCAST DAB / FM SPOTIFY / DEEZEER USB / CD
BLJETOOTH LINE IN / PHONO IN COAXIAL 1/2 OPTICAL 1/2
MODE MENU / INFO FOLDER UP FOLDER DOWN
OK (SCAN)
24
25
26
27
1 Veille Marche/Arrêt
2 Touches de sélection directe de la source
3 Sélection de mode
4 Menu/Infos
5 Titre précédent
6 Lecture/Pause
7 Equalizer
8 Vers le haut ; FM : Réglage de la fréquence
9 Gauche ; étape précédente
Confirmer l'entrée ; recherche de
10 station FM ; lecture : Diapositives en mode plein écran
11 Vers le bas ; FM : Réglage de la fréquence
12 Mode silencieux Marche/Arrêt (Mute)
13 Ouvrir la fonction de réveil
14 Réglage de son des basses
15 Ouvrir le minuteur de veille
16 Touches numériques 0 – 10
17 Mémoire de préréglages (favoris)
18 Éjection du CD (Eject)
19 Répertoire précédent (CD)
20 Répertoire suivant (CD)
21 Interrompre la lecture
22 Titre suivant
23 Augmenter le volume
24 À droite ; étape suivante
25 Diminuer le volume
26 Réglage de son des aigües
27 Musique : Mode aléatoire/répétition
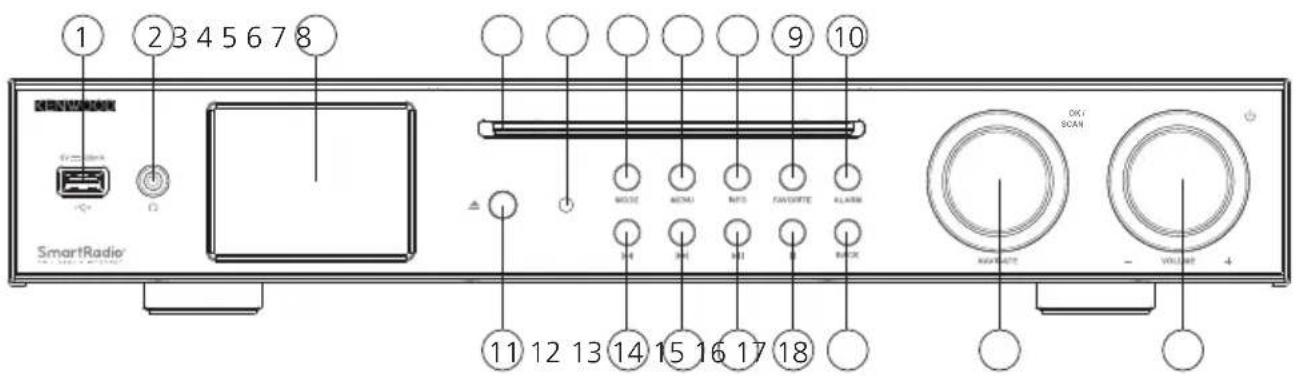
3.2 Vues de l'appareil
Face avant de l'appareil

text_image
1
2 3 4 5 6 7 8
SmartRadio
11 12 13 14 15 16 17 18
NOTES
NOTS
NOTES
NOTES
NOTES
NOTES
NOTES
NOTES
NOTES
NOTES
NOTES
NOTES
NOTES
NOTES
NOTES
NOTES
NOTES
NOTES
NOTES
NOTES
NOTES
NOTES
NOTES
NOTES
NOTES
NOTES
NOTES
NOTES
NOTES
NOTES
NOTES
NOTES
NOTES
NOTES
NOTES
NOTES
1 - Port USB
4 - Lecteur CD
7 - Menu
10 - Ouvrir la fonction de réveil
13 - Changement de titre/Recherche de titre parmi les titres suivants
16 - Précédent
2 - Sortie de casque audio
5 - Récepteur de la télécommande
8 - Info
11 - Éjection du CD (Eject)
14 - Lecture/Pause
17 - Sélectionner/confirmer
3 - Écran TFT couleur
6 - Sélection de mode
9 - Favoris (emplacements mémoire)
12 - Changement de titre/Recherche de titre parmi les titres précédents
15 - Interrompre la lecture
18 - Mode veille/Volume
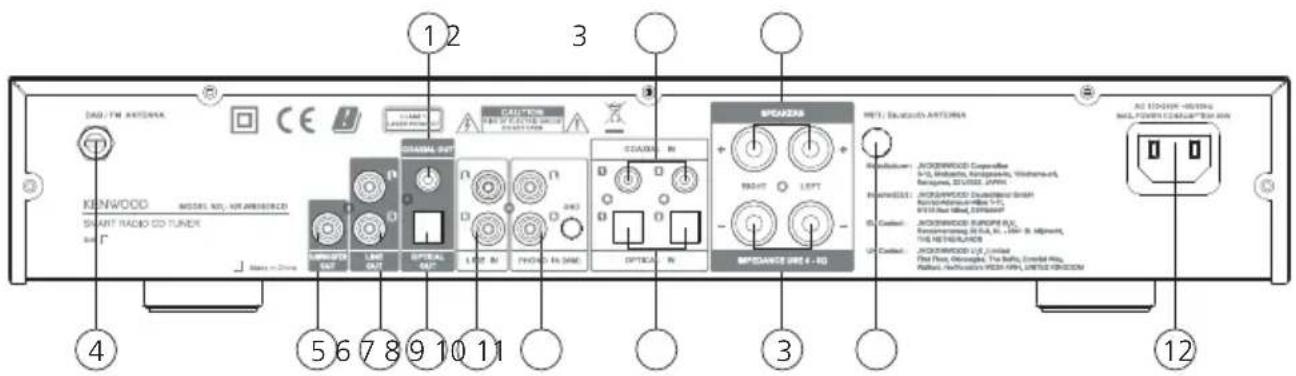
Dos de l'appareil
text_image
DAS/FM ANTIDENA
KEI WOOD
MODEL NO. OR AWRESTED
SMART RADIO CD TUNER
4
5 6 7 8 9 10 11
OFFICE OUT
LINE OUT
OPTICAL OUT
LEFT IN
PROMING OUT
OPTICAL IN
SPEAKER
RIGHT LEFT
RIPANCE OUT - NO
NOTES: AC/DCON ANTIDA
AC/DCON ANTIDA
AC/DCON ANTIDA
AC/DCON ANTIDA
AC/DCON ANTIDA
AC/DCON ANTIDA
AC/DCON ANTIDA
AC/DCON ANTIDA
AC/DCON ANTIDA
AC/DCON ANTIDA
AC/DCON ANTIDA
AC/DCON ANTIDA
AC/DCON ANTIDA
AC/DCON ANTIDA
AC/DCON ANTIDA
AC/DOCK-HEATING
MAC POWER CORPORATION
AC/DCON POWER CORPORATION
AC/DCON POWER CORPORATION
AC/DCON POWER CORPORATION
AC/DCON POWER CORPORATION
AC/DCON POWER CORPORATION
AC/DCON POWER CORPORATION
AC/DCON POWER CORPORATION
AC/DCON POWER CORPORATION
AC/DCON POWER CORPORATION
AC/DCON POWER CORPORATION
AC/DCON POWER CORPORATION
AC/DCON POWER CORPORATION
AC/DCON POWER CORPORATION
AC/DCON POWER CORPORATION
AC/DCON POWER Certification
AC/DCON POWER Certification
AC/DCON POWER Certification
AC/DCON POWER Certification
AC/DCON POWER Certification
AC/DCON POWER Certification
AC/DCON POWER Certification
AC/DCON POWER Certification
AC/DCON POWER Certification
AC/DCON POWER Certification
AC/DCON POWER Certification
AC/DCON POWER Certification
AC/DCON POWER Certification
AC/DCON POWER Certification
AC/DCON POWER Certification
A2 DOCK-HEATING
MAC POWER CORPORATION
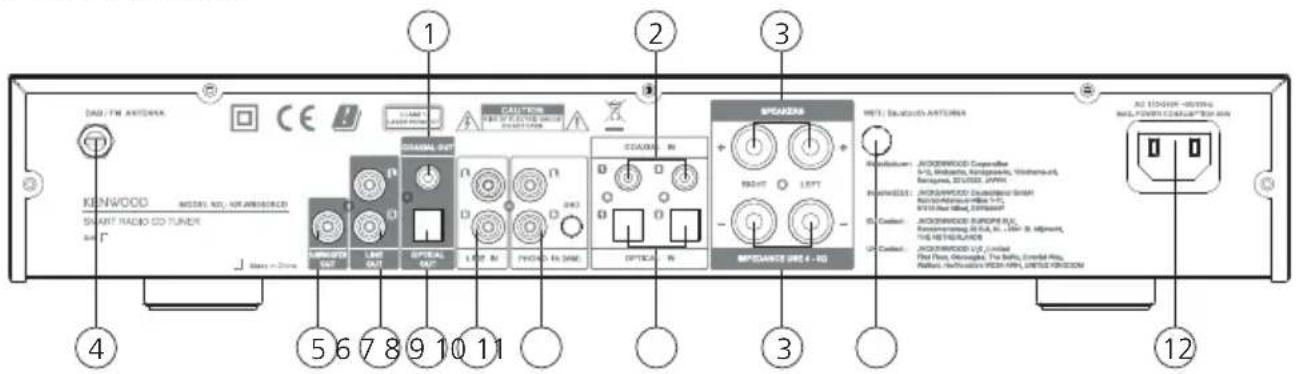
| 1 - Coaxial Out | 2 - Coaxial In 1/Coaxial In 2 | 3 - Sortie d'enceinte |
| 4 - Branchement de l'antenne DAB+/FM | 5 - Subwoofer Out | 6 - Line-Out |
| 7 - Optical Out | 8 - Line In | 9 - Phono (Moving Magnet) |
| 10 - Optical In 1/Optical In 2 | 11 - Antenne WiFi/BT | 12 - Connecteur du câble d'alimentation |
4. Mise en service
4.1 Déballage
Déballez avec précaution l'appareil en veillant à ce que tous les accessoires soient présents.
• Télécommande infrarouge
• Câble d'alimentation
- Notice d'emploi
• 2 piles AAA/LR03
• Câble audio Cinch 1,5 m
- Antenne télescopique DAB+/FM à visser
- Antenne WiFi/BT à visser
4.2 Branchement
- Vissez l'antenne DAB+/FM à la sortie correspondante.
- Vissez l'antenne WiFi/BT à la sortie correspondante.
- Ouvrez le compartiment à piles de la télécommande et insérez les piles en veillant à leur polarité. La polarité requise (+/-) est indiquée dans le compartiment à piles.
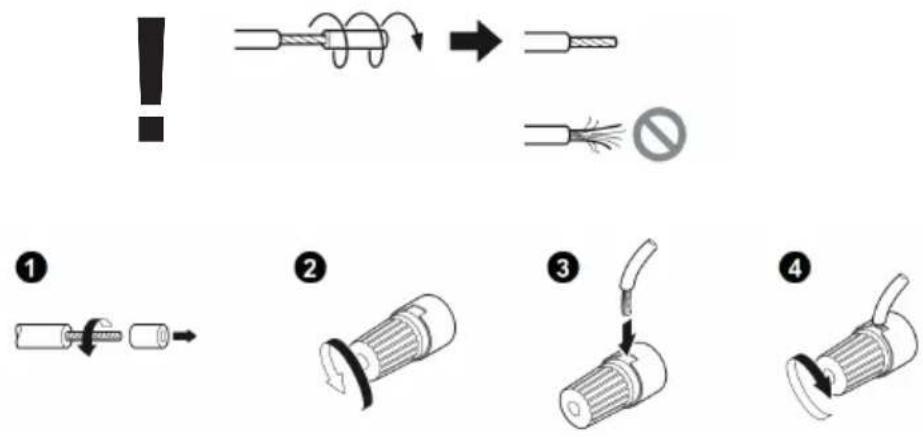
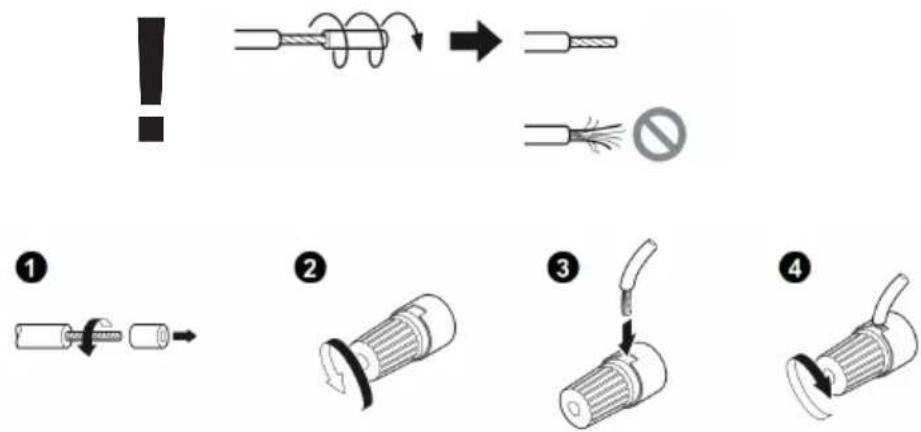
• Raccordement des enceintes :
Vous pouvez utiliser des enceintes classiques du commerce avec une impédance de 4 à 8 Ohm (recommandé : 4 Ohm) et une charge nominale efficace d'au moins 30 Watt/pièce. Torsadez les extrémités des câbles d'enceinte de sorte qu'aucun fil ne dépasse.
Ne court-circuitez jamais les extrémités positifs (+) et négatives (-) des câbles d'enceinte.
L'inversion inopinée de la polarité conduit à un son anormal et une localisation floue de la source du son. Inversez alors la polarité des câbles.
text_image
!
→
①
②
③
④
- Pour terminer, branchez le câble d'alimentation à l'appareil, puis à la prise secteur.
4.3 Connexion réseau
Afin de pouvoir recevoir les stations radio Internet, la radio doit être intégrée à un réseau. À cet effet, le routeur doit être activé et la connexion Internet établie. Assurez-vous que la connexion WiFi du routeur et le pare-feu sont activés. Reportez-vous à cet effet aussi à la notice d'emploi du routeur.
4.4 Activer/désactiver (Standby)
Appuyez sur la touche de la télécommande ou de l'appareil pour allumer la radio. Appuyez une nouvelle fois sur cette touche pour commuter l'appareil en mode veille.
Pour éteindre l'appareil entièrement, débranchez-le de l'alimentation électrique.
L'actionnement des touches de la télécommande vous permet de vous déplacer dans les menus. L'actionnement de la touche confirme la sélection. Ces processus de réglage peuvent être réalisées aussi sur l'appareil à l'aide du bouton de réglage . Tournez le bouton de réglage pour vous déplacer dans les menus et confirmez les options de menu en appuyant sur le bouton de réglage. Utilisez les touches de l'appareil ou la touche de la télécommande pour revenir au menu précédent.
4.6 Saisie de mots de passe, textes de recherche, etc.
Sélectionnez à l'aide des touches les caractères numériques et/ou alphabétiques correspondants, puis confirmez votre choix respectif en appuyant sur . Pour corriger une saisie erronée, placez le curseur sur le champ et confirmez par la touche de la télécommande. Vous supprimez ainsi la dernière saisie. Utilisez le champ « ANNULER » pour annuler entièrement la saisie. Lorsque vous avez terminé votre sélection, placez le curseur sur le champ « OK » et confirmez votre choix en appuyant sur la touche. La touche sert de touche de raccourci pour commuter entre les chiffres/lettres et .
4.7 Réglage du volume et mode « Silencieux »
Vous pouvez régler le volume en appuyant sur les touches et de la télécommande ou en tournant le bouton de réglage de l'appareil. Appuyez sur la touche pour commuter la radio en mode silencieux. Au prochain actionnement de la touche, le volume précédent est rétabli.
L'actionnement répété de la touche permet d'afficher des informations complémentaires, en fonction de la source et de la station :
- Description
- Nom de la station, du programme actuel, contenus, thèmes, etc.
- Genre
- Le style de programme (genre) de la station s'affiche.
- Niveau de signal et erreurs de signal
• Vitesse de transmission
• Informations sur le canal
• Date du jour et heure actuelle
Dans les modes « Radio FM » et « Radio numérique DAB+ », des informations sur la puissance de réception, le mode stéréo, le signal RDS (FM uniquement) et l'emplacement mémoire affecté s'affichent en bas à droite de l'écran. En absence de l'affichage correspondant, l'information n'est pas disponible.
4.9 Assistant de configuration
Lors du premier démarrage, l'assistant de configuration (« Setup Wizard ») est démarré automatiquement.
L'assistant de configuration est exécuté en anglais.
Vous pouvez fermer l'assistant et l'ouvrir ultérieurement en français.
Lors de la première mise en service, toutes les langues de menus disponibles s'affichent. Sélectionnez à l'aide des touches la langue souhaitée, puis confirmez par .
4.11 Démarrage de l'assistant de configuration
Pour faciliter la première mise en service (réglage de la date et de l'heure, configuration de la connexion Internet, etc.) et la rendre plus rapide, nous vous recommandons d'exécuter l'assistant de configuration. À cet effet, sélectionnez « OUI ». Si vous préférez ne pas exécuter l'assistant de configuration, sélectionnez « NON ».
Tous les réglages réalisés avec l'assistant de configuration peuvent être effectués aussi individuellement dans les paramètres système. En outre, l'assistant de configuration peut être exécuté une nouvelle fois à tout moment. Sélectionnez ensuite « OUI » ou « NON » pour exécuter ou non l'assistant de configuration lors du prochain démarrage de la radio. Ensuite, le menu principal s'affiche.
- Date/heure
Format 12/24
- Mise à jour automatique (date et heure)
Mise à jour DAB ou FM (recommandé)
Lors de la mise à jour automatique via le réseau radio FM/DAB/DAB+, la date et l'heure sont fournies par les sociétés de radiodiffusion. Dans le cas d'une synchronisation avec ces sources, l'heure est réglée correctement même après une panne de secteur. Cela permet notamment de conserver les horaires de réveil.
- Mise à jour de NET
Lors de la sélection de cette option, la date et l'heure sont réglées automatiquement via la connexion Internet. De plus, le fuseau horaire et les heures d'été/hiver peuvent être adaptées.
- Aucune mise à jour
La date et l'heure doivent être réglées manuellement.
- Maintien de la connexion réseau
La configuration réseau est décrite en détail dans le chapitre « Paramètres système ».
Le menu principal comprend les différentes sources audio et les possibilités de réglage :
- Radio Internet
- Podcasts
- Spotify
- Deezer
• Lecteur de musique (USB)
• DAB
• FM (UKW)
- Bluetooth
• CD
- Entrée Aux
• OPTICAL 1
• OPTICAL 2
- COAXIAL 1
- COAXIAL 2
- PHONO IN
- Mode « Sommeil »
- Alarmes
- Configuration (Paramètres système)
Lorsque vous avez sélectionné source audio, appuyez sur la touche