
DJM250BTMKII - Mischpult IBIZA SOUND - Kostenlose Bedienungsanleitung
Finden Sie kostenlos die Bedienungsanleitung des Geräts DJM250BTMKII IBIZA SOUND als PDF.
| Marke | Ibiza Sound |
| Modell | DJM250BT-MKII |
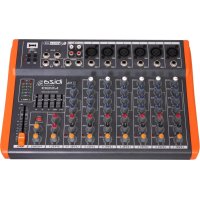
| Produkttyp | Stereo-USB-Mischpult mit integriertem MP3-Player und Bluetooth |
| Stromversorgung | 220-240 V AC, 50 Hz; Sicherung TO.5A |
| Eingänge | Mikrofon (6,35 mm Klinke): 3 mV / 2,2 kΩ; Phono (Cinch): 3,2 mV / 47 kΩ; Line (Cinch): 150 mV / 47 kΩ |
| Ausgänge | Master (sym. XLR und Cinch): 0 dB / 1 V / 600 Ω; Booth (Cinch): 0 dB / 1 V / 600 Ω; REC (Cinch): -5 dB / 0,5 V / 600 Ω; Kopfhörer (6,35 mm Klinke): 300 mW / 16-32 Ω |
| Equalizer | 3-Band pro Kanal (Höhen, Mitten, Tiefen): ±12 dB |
| Frequenzgang | 20 Hz – 20 kHz ±2 dB |
| Klirrfaktor | < 0,02 % |
| Rauschabstand | > 90 dB |
| Hauptfunktionen | 2 Kanäle, Crossfader, 3-Band-EQ pro Kanal, Mikrofoneingang mit Talkover (14 dB Dämpfung), USB/SD/Bluetooth-Player (MP3, WMA), XLR-, Booth-, REC-Ausgänge, Kopfhörer-Vorhörfunktion (Cue/PGM), LED-Masterpegelanzeige |
| Pflege und Reinigung | Nur mit einem trockenen Tuch reinigen. Keine Lösungsmittel oder Chemikalien verwenden. |
| Sicherheit | Nicht Regen oder Feuchtigkeit aussetzen; 0,5 m Abstand für Belüftung freihalten; Gehäuse nicht öffnen (Stromschlaggefahr); Magnetfeld beachten (keine empfindlichen Geräte in der Nähe) |
| Allgemeine Informationen | Abnehmbares Netzkabel; Sicherung TO.5A; Verwendung in gemäßigtem Klima; Entsorgung am Ende der Lebensdauer (nicht im Hausmüll) |
Häufig gestellte Fragen - DJM250BTMKII IBIZA SOUND
Benutzerfragen zu DJM250BTMKII IBIZA SOUND
0 Frage zu diesem Gerät. Beantworten Sie die, die Sie kennen, oder stellen Sie Ihre eigene.
Eine neue Frage zu diesem Gerät stellen
Laden Sie die Anleitung für Ihr Mischpult kostenlos im PDF-Format! Finden Sie Ihr Handbuch DJM250BTMKII - IBIZA SOUND und nehmen Sie Ihr elektronisches Gerät wieder in die Hand. Auf dieser Seite sind alle Dokumente veröffentlicht, die für die Verwendung Ihres Geräts notwendig sind. DJM250BTMKII von der Marke IBIZA SOUND.
BEDIENUNGSANLEITUNG DJM250BTMKII IBIZA SOUND
USB STEREO MIXER
TABLE DE MIXAGE STEREO USB
USB STEREOMISCHPULT
MIXER STEREO USB
MESA DE MISTURA STEREO
USB STEREO MIKSER
USB STEREO MENGPANEEL
MEZCLADOR USB ESTEREO
Ref.: DJM250BT-MKII
USER MANUAL
MANUEL D'UTILISATION
BEDIENUNGSANLEITUNG
MANUAL DE INSTRUÇÕES
MANUAL DE UTILIZARE
NAVODILA ZA UPORABO
HANDLEIDING
MANUAL DE INSTRUCCIONES
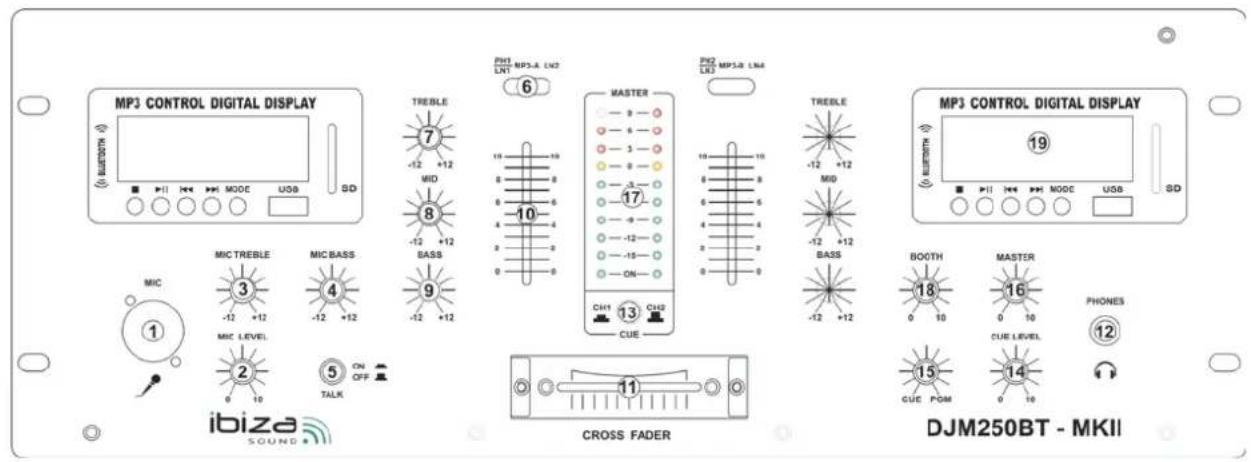
TOP PANEL:
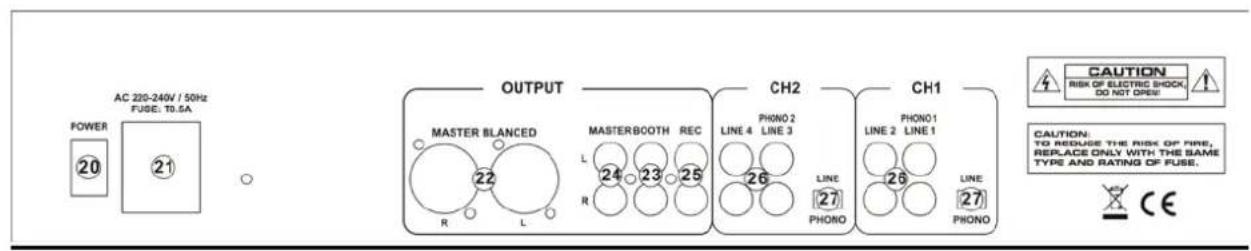
Rear Panel:

SAFETY RECOMMENDATIONS
MAGNETIC FIELD
CAUTION! Do not locate sensitive high gain equipment such as preamplifiers or tape decks directly above or below the unit. This unit has a strong magnetic field which can induce hum into unshielded devices that are located nearby. The field has strongest spots just above and below the unit. Locate the amplifier at the bottom of the rack and the preamplifier or other sensitive equipment at the top.
To prevent electric shock, do not remove top or bottom covers.
No user serviceable parts inside.
Refer servicing to qualified servicing personnel.
Disconnect power cord before removing back panel cover to access gain switch.
No naked flame sources, such as lighted candles, should be placed on the apparatus
The unit should only be used in moderate climates
This unit should be cleaned only with a dry cloth. Avoid solvents or other
cleaning detergents
A minimum distance of 0.5m around the unit must be kept to ensure sufficient ventilation and avoid overheating
WARNING! To reduce the risk of electric shock, do not expose this equipment to rain or moisture!
The exclamation point triangle is used to alert the user to important operating or maintenance instructions. The lightning bolt triangle is used to alert the user to the risk of electric shock
Controls
- Mic 1 Socket
Connect your microphone with 1/4" jack plug here.
- MIC Level Control
With this knob, you can adjust the microphone volume.
- MIC Treble
Used to increase or lower the microphone's higher frequencies.
- MIC Bass
Used to increase or lower the microphone's lower frequencies.
- Talkover Button
Press this button if you want to use your microphone. When the button is pressed, all other signal sources will be attenuated by 14dB, so that the microphone can be clearly heard. In the OFF position, all signals returns to their original level.
- Phono/Line Switch
Use this switch to select the input to be sent to the individual channel.
- Treble Control
Used to increase or lower the HIGHS of the input channel.
- Middle Control
Used to increase or lower the MIDS of the input channel.
- Bass Control
Used to increase or lower the LOWS of the input channel
- Channel Fader
Used to adjust the level of each channel.
- Crossfader
Mixes the signals of one channel with another. If the crossfader is in the center position. Both channels can be heard.
- Headphone Socket
Connect your headphone with impedance between 8 and 600 Ohms to this connector.
- Cue Button
Use this button in order to select the channel(s) to be monitored by headphones.
- HEADPHONE LEVEL CONTROL
Let you to control the volume level of headphone
- HEADPHONE CUE/PGM CONTROL
Allows you to listen simultaneously or separately to the CUE material or the active program.
- Master Control
Adjust the level of the master-output.
17. Master Level Display
The LED display shows the level of the left and right master output
18. BOOTH Control
This knob controls the overall output level leaving the booth unbalanced RCA outputs.
19. MP3 PLAYER & BLUETOOTH
To refer USB / SD / BLUETOOTH PLAYER OPERATION below
REAR PANEL DESCRIPTION
20. Power Switch
Press down the button to turn on this unit. The LED will illuminate when the power is on.
21. AC Connection
Connect the unit to an appropriate 220-240Vac outlet.
22. XLR BALANCE OUTPUT JACKS
Connect the mixer to a receiver via cables with XLR plugs
23. BOOTH OUTPUT JACKS
Connect the mixer to a second amplifier powering speakers in the DJ booth or in a remote location
24. Master Output
Master output connects to the main amplifier (DJ final mix after crossfader section), accepts RCA jacks.
25. RECORD OUTPUT JACKS
Connect the mixer to a recorder to record your mix. The output signal is the same as on the MASTER jacks.
26. Phono/Line Inputs Sockets
These inputs, for ch1-ch2 and accept RCA-plug connectors. Use phono input socket for phonograph turntables. Use line socket for CD/MP3 players. Line level musical instruments with stereo outputs such as rhythm machines or samplers should also be connected with the line input socket.
27. Inputs Switch
Set these switches based on what is plugged into Phono/ Line input jacks
USB / SD / BLUETOOTH PLAYER OPERATION
1. SD CARD SLOT
Insert your SD card into this slot.
Note: Before you eject the SD card, please set the playback in pause mode or select another playback support (USB or Bluetooth)
2. LCD DISPLAY

3. USB SOCKET
Connect your USB key to this slot. Note: Before you eject the USB key, please set the unit in pause mode or select another playback support (SD card or Bluetooth). 4. STOP: Use this button to stop playback.5. PLAY / PAUSE BUTTON
This button is used to start the playback or to enter in pause mode.6. |<< PREVIOUS
Use this button to select the previous track.7.>>| NEXT
Use this button to select the next track.8. MODE BUTTON
Simple press allows you to choose the playback support: SD, USB or bluetooth Note: If you choose Bluetooth mode, the player will enable the Bluetooth pairing system. You have to pair your Bluetooth device with the player. For that, you must to enable your Bluetooth system on your device. Your device will search the player and find the Bluetooth system called « IBIZA1 for channel one or IBIZA2 for channel two). To link your device to the player, you must to enter PIN code 0000. Now, your device and the player are linked. You must to start playback on your device to listen it on the mixer.SPECIFICATIONS
INPUTS:
Microphone....3mV / 2.2 kΩ Phono 3.2mV / 47 kΩ Line....150mV / 47 kΩOUTPUTS:
Main 0 dB / 1V 600Ω Booth.... 0 dB / 1V 600Ω Rec....-5dB / 0.5V 600Ω Phono 300mW/16-32ΩTone Control
Treble....+12dB/-12dB Middle ....+12dB/-12dB Bass ....+12dB/-12dBGENERAL:
Frequency response ....20Hz\~20 kHz ±2dB Distortion ....<0.02% S/N Ratio ...... better than 90 dB  Electric products must not be put into household waste. Please bring them to a recycling centre. Ask your local authorities or your dealer about the way to proceed.CONSIGNES DE SECURITE
CHAMP MAGNETIQUE
ATTENTION! Ne pas placer des appareils sensibles tels que des préamplificateurs ou lecteurs de cassettes directement au-dessus ou en dessous de l'appareil. L'amplificateur possède un champ magnétique puissant qui peut provoquer des interférences dans des appareils non blindés qui se trouvent à proximité. Les points les plus forts se trouvent en-dessous et au-dessus de l'appareil. Placez l'amplificateur en bas du rack et le préamplificateur et autres appareils sensibles au-dessus. Afin d'éviter un choc électrique, ne pas retirer le couvercle supérieur ou inférieur. Le boîtier ne contient pas de pièces remplaçables par l'utilisateur. Toutes les réparations doivent être effectuées par du personnel qualifié. Débranchez le cordon d'alimentation avant d'ouvrir le panneau arrière pour accéder au contrôle de gain.ATTENTION
RISQUE DE CHOC ELECTRIQUE
NE PAS OUVRIR
Il convient de conserver une distance minimale de 0.5m autour de l'appareil pour une ventilation suffisante Ne pas poser de récipients remplis de liquide tel qu'un vase sur l'appareil Aucune source de chaleur ou de flamme nue, telle que des bougies allumées, ne doit être placé sur l'appareil. L'appareil est conçu pour une utilisation dans des climats modérés. AVERTISSEMENT! Afin de réduire le risque de choc électrique, ne pas exposer cet appareil à l'humidité ou à la pluie !  Le triangle avec le point d'exclamation attire l'attention de l'utilisateur sur des instructions d'utilisation ou de maintenance importantes.  L'éclair dans le triangle attire l'attention de l'utilisateur sur un risque de choc électriqueRéglages
1. Fiche Mic 1
Branchez un microphone muni d'une fiche Jack 6.35mm.2. Contrôle de niveau micro
Réglage du volume micro3. MIC Treble
Augmentez ou diminuez les hautes fréquences du microphone.4. MIC Bass
Augmentez ou diminuez les basses fréquences du microphone.5. Bouton Talkover
Appuyez sur ce bouton lorsque vous voulez utiliser le microphone. Lorsque cette touche est enfoncée, toutes les autres sources seront atténuées de 14dB de façon à bien entendre le microphone. En position OFF, toutes les sources reviennent à leur niveau d'origine.6. Commutateur Phono/Line
Sélectionnez la source d'entrée que vous voulez envoyer dans le canal.7. Contrôle des aigus
Augmente ou diminue les hautes fréquences du canal d'entrée.8. Contrôle des médiums
Augmente ou diminue les moyennes fréquences du canal d'entrée.9. Contrôle des graves
Augmente ou diminue les basses fréquences du canal d'entrée.10. Fader canal
Règle le niveau de chaque canal11. Crossfader
Mélange les signaux de deux canaux. En position centrale, les deux canaux sont audibles.12. Fiche pour casque
Branchez un microphone d'une impédance comprise entre 8 et 600 Ohms.13. Bouton Cue
Sélectionnez le ou les canaux à pré-écouter dans le casque14. Contrôle de volume du casque
Vous permet de régler le volume de votre casque.15. Contrôle CUE/PGM du casque
Permet d'écouter en meme temps ou séparément au materiel CUE ou au programme en cours.16. Contrôle général
Règle le niveau de la sortie générale.17. Affichage du niveau général
L'afficheur à LED indique le niveau de la sortie générale gauche et droite18. Contrôle BOOTH
Ce bouton règle le niveau de sortie générale qui passe par les sorties RCA asymétriques BOOTH.19. LECTEUR MP3 & BLUETOOTH
Voir chapitre « Fonctionnement du lecteur USB / SD / BluetoothDESCRIPTION DE L'ARRIERE
20. Interrupteur M/A
Enfoncez le bouton pour mettre l'appareil sous tension. La LED s'allume lorsque la table de mixage est sous tension.21. Branchement sur le secteur
Branchez la table de mixage sur une prise secteur délivrant une tension de 220-240Vac.22. SORTIES XLR SYMETRIQUES
Branchez la table de mixage sur un amplificateur au moyen de câbles XLR.23. Sortie BOOTH
Branchez la table de mixage sur un deuxième amplificateur qui alimente des haut-parleurs dans une cabine DJ ou tout autre endroit éloigné.24. Sortie générale
Branchez la sortie générale sur l'amplificateur principal (mix final du DJ post-crossfader) au moyen de fiches RCA.25. Fiches de sortie RECORD
Branchez la table de mixage sur un enregistreur. Le signal est le même que sur la sortie MASTER.26. Fiches d'entrée Phono/Line
Ces entrées RCA desservent les canaux 1 & 2. Utilisez l'entrée phono pour des platines-disques et l'entrée LINE pour les lecteurs CD/MP3. Branchez les instruments de musique de niveau ligne équipés de sorties stéréo telles que des machines à rythme ou des échantillonneurs sur l'entrée LINE.27. Commutateurs d'entrée
Réglez les commutateurs sur la position adaptée à l'équipement que vous avez branché sur les entrées Phono/Line.FONCTIONNEMENT DU LECTEUR USB / SD / BLUETOOTH
1. PORT SD
Insérez votre carte SD dans cette fente. Note : Avant d'éjecter la carte SD, mettez le lecteur en pause ou sélectionnez une autre source (USB ou Bluetooth)2. ECRAN LCD
L'écran LCD affiche des informations sur la source telles que le nom du fichier, le temps écoulé, le temps total, le numéro du  fichier, le nombre total de fichiers, le format de fichier (MP3 ou WMA) ainsi que le mode de lecteur (répétition unique, répétition générale ou aléatoire). Note: En mode Bluetooth, le LCD n'indique que l'état de connexion (connecté ou déconnecté). Toutes les autres informations s'affichent sur la source Bluetooth.3. FICHE USB
Branchez votre clé USB sur cette fente. Note: Avant d'éjecter la clé USB, mettez le lecteur en pause ou sélectionnez une autre source (carte SD ou Bluetooth). 4. STOP : Arrêt de la lecture.5. PLAY / PAUSE
Bascule entre lecture et pause.6. |<< RETOUR
Retour au début du titre en cours ou sélection du titre précédent.7. >>| SUIVANT
Sélection du titre suivant.8. MODE
Appuyez pour sélectionner la source : SD, USB ou Bluetooth Note: Si vous choisissez le mode Bluetooth, le lecteur active la procédure de synchronisation. Vous devez synchroniser votre appareil Bluetooth avec le lecteur en activant le mode de recherche Bluetooth sur votre appareil. Vous trouverez un système appelé « IBIZA1 » pour le canal 1 et « IBIZA2 » pour le canal 2. Pour synchroniser votre appareil avec le lecteur, vous devez entrer le code 0000. Maintenant les deux appareils sont synchronisés et vous pouvez écouter votre musique.CARACTERISTIQUES TECHNIQUES
ENTREES:
Microphone....3mV / 2.2 kΩ Phono 3.2mV / 47 kΩ Ligne 150mV / 47 kΩSORTIES:
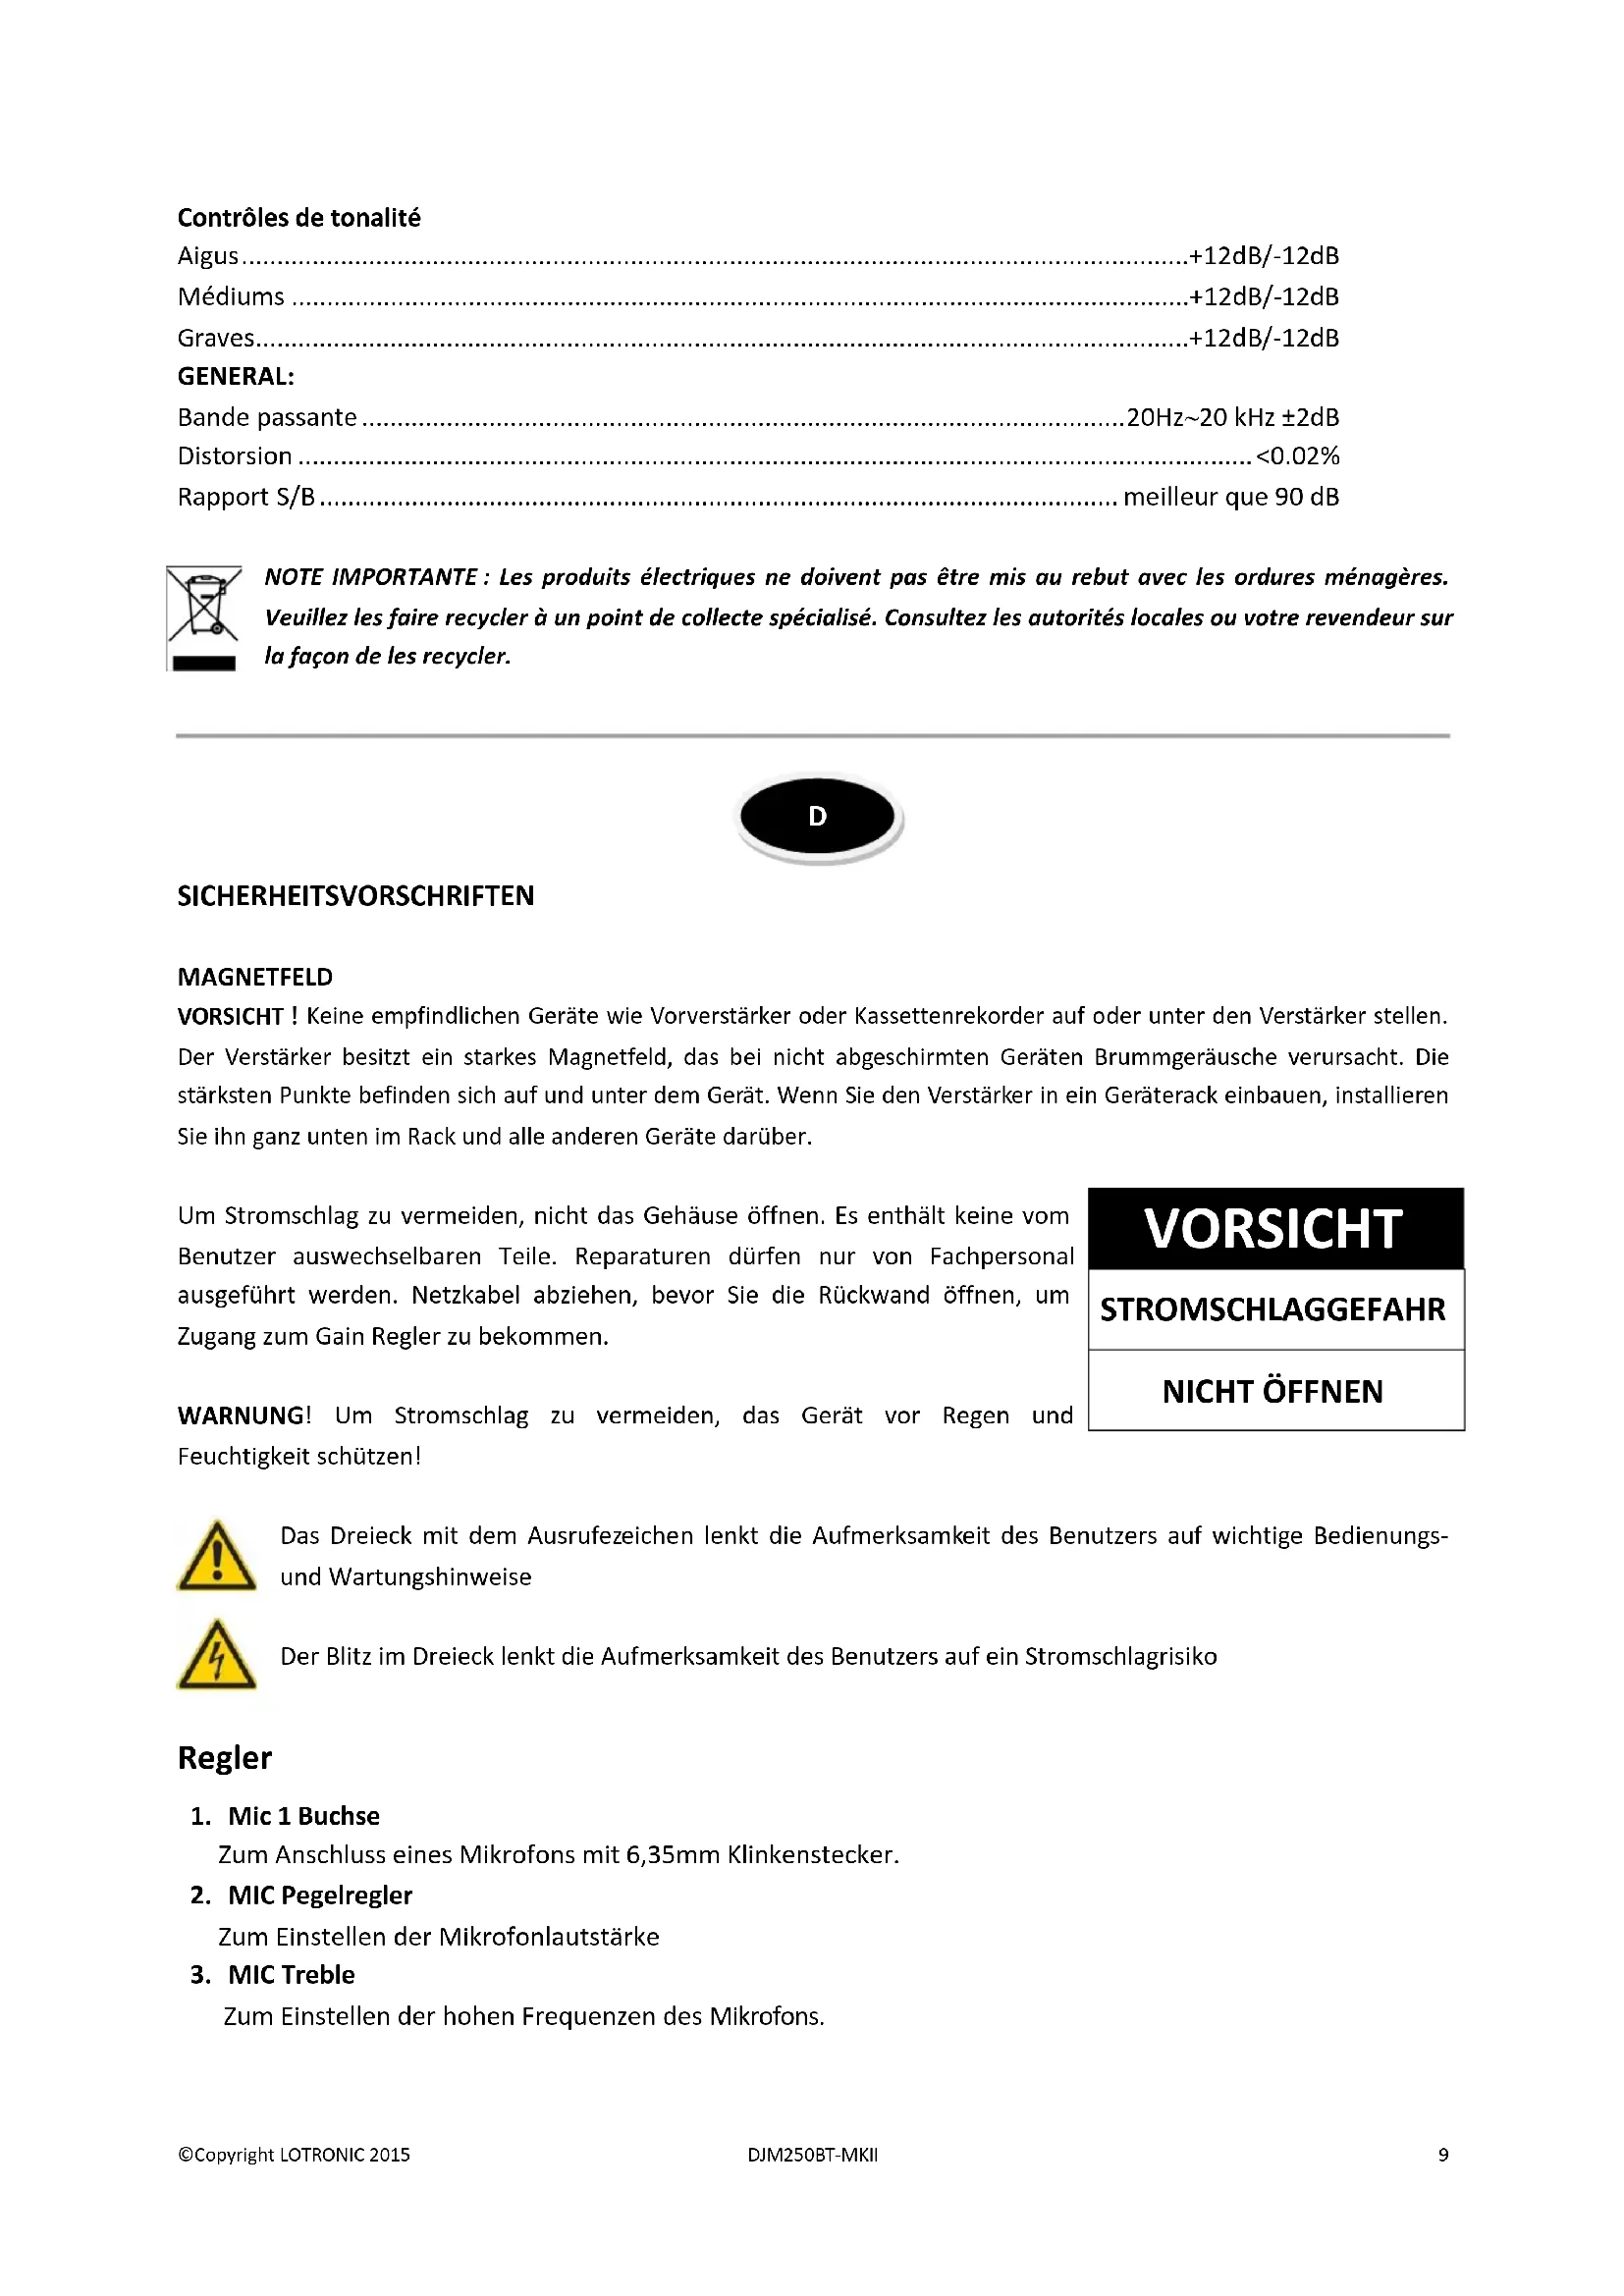
Générale.... 0 dB / 1V 600Ω Booth....0 dB / 1V 600Ω REC -5dB / 0,5V 600Ω Phono 300mW/16-32ΩContrôles de tonalité
Aigus....+12dB/-12dB Médiums ....+12dB/-12dB Graves....+12dB/-12dBGENERAL:
Bande passante....20Hz\~20 kHz ±2dB Distorsion ....<0.02% Rapport S/B......meilleur que 90 dB  NOTE IMPORTANTE : Les produits électriques ne doivent pas être mis au rebut avec les ordures ménagères. Veuillez les faire recycler à un point de collecte spécialisé. Consultez les autorités locales ou votre revendeur sur la façon de les recycler. SICHERHEITSVORSCHRIFTEN
MAGNETFELD
VORSICHT ! Keine empfindlichen Geräte wie Vorverstärker oder Kassettenrekorder auf oder unter den Verstärker stellen. Der Verstärker besitzt ein starkes Magnetfeld, das bei nicht abgeschirmten Geräten Brummgeräusche verursacht. Die stärksten Punkte befinden sich auf und unter dem Gerät. Wenn Sie den Verstärker in ein Geräterack einbauen, installieren Sie ihn ganz unten im Rack und alle anderen Geräte darüber. Um Stromschlag zu vermeiden, nicht das Gehäuse öffnen. Es enthält keine vom Benutzer auswechselbaren Teile. Reparaturen dürfen nur von Fachpersonal ausgeführt werden. Netzkabel abziehen, bevor Sie die Rückwand öffnen, um Zugang zum Gain Regler zu bekommen. WARNUNG! Um Stromschlag zu vermeiden, das Gerät vor Regen und Feuchtigkeit schützen!| VORSICHT |
| STROMSCHLAGGEFAHR |
| NICHT ÖFFNEN |
Regler
1. Mic 1 Buchse
Zum Anschluss eines Mikrofons mit 6,35mm Klinkenstecker.2. MIC Pegelregler
Zum Einstellen der Mikrofonlautstärke3. MIC Treble
Zum Einstellen der hohen Frequenzen des Mikrofons.4. MIC Bass
Zum Einstellen der tiefen Frequenzen des Mikrofons.5. Talkover Taste
Diese Taste drücken, wenn Sie das Mikrofon benutzen möchten. Wenn die Taste gedrückt ist, wird der Pegel aller anderen Quellen um 14dB gedämpft, um die Mikrofonansage deutlich hören zu können. In der OFF Stellung kehren alle Signale wieder zu ihrem ursprünglichen Pegel zurück.6. Phono/Line Schalter
Wahlschalter für die Eingangsquelle des Kanals7. Treble Regler
Stellt die HOHEN Frequenzen des Eingangskanals ein.8. Middle Regler
Stellt die MITTLEREN Frequenzen des Eingangskanals ein.9. Bass Regler
Stellt die TIEFEN Frequenzen des Eingangskanals ein10. Kanalfader
Stellt den Pegel jedes Kanals ein.11. Crossfader
Mischt die Signale der beiden Kanäle. In der mittleren Stellung sind beide Kanäle gleichzeitig hörbar.12. Kopfhörerbuchse
Zum Anschluss eines Kopfhörers mit 8 bis 600 Ohm Impedanz.13. Cue Taste
Wählt den oder die Kanäle, die im Kopfhörer vorgehört werden sollen.14. Pegelregler für den Kopfhörer
Dient zur Einstellung der Lautstärke im Kopfhörer15. CUE/PGM Regler des Kopfhörers
Sie können das CUE Signal oder das aktive Programm gleichzeitig oder separat hören.16. Master Regler
Stellt den Pegel des Masterausgangs ein.17. Master Pegel Display
Die LED zeigt den Ausgangspegel des rechten und linken Masterausgangs an.18. BOOTH Regler
Stellt den Ausgangspegel des Signals am asymmetrischen BOOTH Cinch Ausgang ein.19. MP3 SPIELER & BLUETOOTH
S. Kapitel „Bedienung des USB / SD / Bluetooth Spielers“RÜCKSEITE
20. Netzschalter
Zum Einschalten des Geräts drücken. Die LED leuchtet, wenn das Gerät eingeschaltet ist.21. AC Anschluss
An eine Netzsteckdose mit 220-240Vac Spannung anschließen.22. Symmetrische XLR Ausgangsbuchsen
Das Mischpult an einen Verstärker mit XLR Verbindern anschließen.23. BOOTH Ausgangsverbinder
Das Mischpult an einen zweiten Verstärker anschließen, der Lautsprecher in der DJ Kabine oder einem anderen Raum versorgt.24. Master Ausgang
Master Ausgang zum Anschluss an den Hauptverstärker (endgültiger Mix nach dem Crossfaderteil) über Cinch Verbinder.25. REC Ausgangsbuchsen
Cinch Verbinder zum Anschluss an ein Aufnahmegerät. Das Signal ist dasselbe wie an den MASTER Buchsen.26. Phono/Line Eingangsbuchsen
Cinch Verbinder für Kanal 1 und 2. Für Plattenspieler die Phono Eingangsbuchse benutzen. Die Line Buchse ist für den Anschluss von CD/MP3 Spielern vorgesehen. Line Pegelinstrumente mit Stereonausgängen, wie z.B. Rhythmusgeräte oder Sampler müssen ebenfalls an die Line Eingangsbuchsen angeschlossen werden27. Eingangswahlschalter
Die Stellung dieser Schalter hängt davon ab, was Sie an die Phono/Line Eingangsbuchsen angeschlossen haben.BEDIENUNG DES USB / SD / BLUETOOTH SPIELERS
1. SD KARTENSLOT
SD Karte in diesen Slot stecken. Hinweis: Bevor Sie die SD Karte auswerfen, stellen Sie den Spieler in Pausenbetrieb oder wählen Sie eine andere Audioquelle (USB oder Bluetooth)2. LCD DISPLAY
Das LCD Display zeigt Informationen wie Audioquelle, Dateiname, abgelaufene Spielzeit, Gesamtspielzeit, Dateinummer, Gesamtzahl von  Dateien, Dateiformat (MP3 oder WMA) und Abspielbetriebsart an (Einmal wiederholen, alles wiederholen, Zufallsgenerator). Hinweis: Im Bluetooth Betrieb zeigt das LCD nur den Zustand der Verbindung an (angeschlossen, nicht angeschlossen). Alle anderen Informationen erscheinen auf dem Bluetooth Gerät.3. USB PORT
Stecken sie Ihren USB Stick in diesen Port. Hinweis: Bevor Sie den USB Stick auswerfen, stellen Sie den Spieler in Pausenbetrieb oder wählen Sie eine andere Audioquelle (SD oder Bluetooth).4. STOP: Stoppt den Abspielvorgang
5. PLAY / PAUSE TASTE
Startet bzw. pausiert den Abspielvorgang.6. |<< ZURÜCK
Wiederholt den laufenden Titel oder springt zum Anfang des vorigen Titels7.>>| WEITER
Wahl des nächsten Titels8. MODE TASTE
Drücken, um die Audioquelle zu wählen: SD, USB oder Bluetooth Hinweis: Wenn Sie Bluetooth wählen, wird das Pairingsystem aktiviert. Sie müssen Ihr Bluetooth Gerät mit dem Mischpult pairen. Aktivieren Sie dazu die Bluetooth Funktion auf Ihrem Gerät. Ihr Gerät sucht nach einem Bluetooth Gerät und findet « IBIZA1“ für Kanal 1 und „IBIZA2“ für Kanal 2. Um Ihr Gerät mit dem Mischpult zu verbinden, müssen sie den Code 0000 eingeben. Nun sind das Gerät und das Mischpult miteinander verbunden.TECHNISCHE DATEN
EINGÄNGE:
Mikrofon....3mV / 2.2 kΩ Phono 3.2mV / 47 kΩ Line....150mV / 47 kΩAUSGÄNGE:
Hauptausgang 0 dB / 1V 600Ω Booth.... 0 dB / 1V 600Ω REC -5dB / 0,5V 600Ω PHONO 300mW/16-32ΩKlangregler
Treble....+12dB/-12dB Mitten....+12dB/-12dB Bass ....+12dB/-12dBALLGEMEINES:
Frequenzgang....20Hz\~20 kHz ±2dB Klirrfaktor ....<0.02% Signal/Rauschabstand ...... besser als 90 dB  Elektrogeräte gehören nicht in den Hausmüll. Sie müssen in speziellen Betrieben recycelt werden. Wenden Sie sich hierzu an die örtlichen Behörden oder Ihren Fachhändler! RORECOMANDARI PRIVIND SIGURANTA
CAMPUL MAGNETIC
ATENTIE! Nu amplasati echipamente cu amplificare mare, cum ar fi preamplificatoare sau casetofoane deasupra sau dedesubtul mixerului. Acest aparat are un camp magnetic puternic, care poate induce bruiaj dispozitivelor neecranate, care sunt situate in apropiere. Campul magnetic este puternic chiar deasupra si dedesubtul unitatii. Asezati amplificatorul in partea de jos a raftului si preamplificatorul sau alte echipamente sensibile in partea de sus. Pentru a preveni socul electric, nu scoateti partea de sus sau capacul de jos. Nu exista componente utile in interiorul mixerului. Apelati la personalul calificat in privinta intretinerii aparatului. Deconectati cablul de alimentare inainte de a scoate capacul panoului din spate pentru a accesa controlul amplificarii. AVERTISMENT! Pentru a reduce riscul unui incendiu sau al unui soc electric, feriti dispozitivul de umezeala!ATENTIE
RISC DE SOC ELECTRIC
NU DESCHIDETI
 Semnul exclamarii in interiorul unui triunghi indica prezenta unor instructiuni si avertismente de functionare prezentate in detaliu in manual.Comenzi
1. Mufa Mic 1
Mufa pentru conectare microfon.2. Control nivel MIC
Reglaj volum microfon.3. Sunete inalte MIC
Acest buton regleaza frecventele inalte ale microfonului.4. MIC Bass
Acest buton regleaza frecventele joase ale microfonului.5. Buton functie Talkover
Apasați acest buton daca doriti sa utilizati microfonul. Cand butonul este apasat, toate celelalte surse de semnal vor fi reduse cu 14dB, astfel incat microfonul sa poata fi auzit in mod clar. In poziția OPRIT, toate semnalele revin la nivelul lor initial.6. Comutator Phono/Linie
Folositi acest comutator pentru a selecta intrarea intre phono si linie.1. Control sunete inalte
Folosit pentru a mari sau a reduce SUNETELE INALTE ale semnalului de intrare.2. Control sunete medii
Folosit pentru a mari sau a reduce SUNETELE MEDII ale semnalului de intrare.3. Control bass
Folosit pentru a mari sau a reduce SUNETELE JOASE ale semnalului de intrare.4. Potentiometru de reglaj al canalului
Folosit pentru a regla nivelul fiecarui canal.5. Crossfader
Va permite sa amestecati semnalele unui canal cu altul. Daca dispozitivul crossfader este in mijloc, ambele canale pot fi auzite.6. Mufa casti
Conectati castile cu impedanta intre 8 si 600 Ohmi la acest conector.7. Buton Cue
Folositi acest buton pentru a selecta canalul (le) care vor fi monitorizate de casti.14. Control nivel casti
Va permite sa controlati nivelul volumului castilor.15. Buton Cue casti/Control PGM
Va permite sa ascultati simultan sau separat canalul selectat sau programul activ.16. Control Master
Reglati nivelul iesirii master.17. Afisare nivel Master
Afisajul LED indica nivelul iesirii master din stanga sau dreapta.18. Control BOOTH
Acest buton controleaza nivelul de iesire total care trece prin iesirile RCA asimetrice.19. MP3 PLAYER & BLUETOOTH
Pentru functionarea USB/SD/BLUETOOTH va rugam sa consultati sectiunea de mai jos.Descrierea panoului din spate
20. Comutator pornire
Apasati butonul de derulare in jos pentru a porni mixerul. LED-ul va lumina cand mixerul este pornit.21. Conexiune AC
Conectati aparatul la reteaua de 220-240VAC.22. Mufe jack pentru iesirea XLR compensata
Conectati mixerul la un receptor prin cabluri cu mufe XLR.23. Mufe iesire BOOTH
Conectati mixerul la un al doilea amplificator ce alimenteaza difuzoarele din DJ booth sau cele situate la departare.24. Iesire Master
lesirea Master conecteaza la amplificatorul principal, accepta mufe RCA.25. Mufe iesire inregistrare
Conecteaza mixerul la un aparat de inregistrare pentru inregistrare. Semnalul de iesire este acelasi cu cel al mufelor MASTER.26. Mufe Intrari Phono/Linie
Aceste intrari, pentru ch1-ch2 si accepta conectori de tipul mufelor RCA. Utilizati mufa intrarii phono pentru microfoane, utilizati intrarea de linie pentru CD/MP3. Instrumentele muzicale cu iesiri stereo, cum ar fi generatoare de ritm pot fi, de asemenea, conectate la mufa de intrare linie.27. Comutator intrari
Setati aceste comutatoare in functie de dispozitivul care este conectat in mufa intrarii Phono/ Linie.FUNCTIONARE USB / SD / BLUETOOTH PLAYER
1. Slot pentru cardul SD
Introduceti cardul SD in acest slot. Nota : Inainte de a scoate cardul SD , va rugam sa setati redarea pe modul pauza sau selectati un alt suport de redare ( USB sau Bluetooth ).2. Afisaj LCD
Ecranul LCD afiseaza informatii precum suportul de redare , numele fisierului , timpul scurs , timpul total ,  numarul fisierului, numarul total de fisiere, sistemul de fisiere (MP3 sau WMA) si modul de redare (Repetare o piesa, repetare toate, sau repetare aleatorie.) Nota : Pe modul Bluetooth , ecranul LCD indica numai starea conexiunii ( conectat sau deconectat ) . Toate informatiile de redare sunt pe dispozitivul Bluetooth .3. Mufa USB
Conectati dispozitivul USB la acest slot. Nota : Inainte de a scoate dispozitivul USB , va rugam sa setati aparatul pe modul pauza sau selectati un alt suport de redare ( card SD sau Bluetooth ) .4. STOP
Utilizati acest buton pentru a opri redarea.5. Butonul PLAY / PAUSE
Acest buton este folosit pentru a porni redarea sau pentru a intra in modul pauza.6. |<< Precedent
Utilizati acest buton pentru a selecta piesa anterioara.7. >>| Urmator
Utilizati acest buton pentru a selecta piesa urmatoare.8. Butonul MODE
O simpla apasare va permite sa alegeti suportul de redare : SD , USB sau Bluetooth. Nota : Daca alegeti modul Bluetooth, player-ul va activa sistemul de asociere al dispozitivului Bluetooth. Trebuie sa conectati dispozitivul Bluetooth cu aparatul. Pentru acest lucru, va trebuie sa activati sistemul Bluetooth al dispozitivului dumneavoastra. Aparatul va cauta dispozitivul si va gasi sistemul Bluetooth cu denumirea "IBIZA1" pentru canalul unu sau "IBIZA2" pentru canalul doi). Pentru a conecta dispozitivul la player, trebuie sa introduceti codul PIN 0000. Acum, dispozitivul si aparatul sunt conectate. Trebuie sa porniti redarea pe dispozitivul dumneavoastra pentru a asculta mixer-ul.SPECIFICATII
INTRARI:
Microfon....3mV / 2.2 kΩ Phono 3.2mV / 47 kΩ Linie....150mV / 47 kΩIESIRI:
Principala.... 0 dB / 1V 600Ω Booth.... 0 dB / 1V 600Ω REC -5dB / 0,5V 600Ω PHONE 300mV/16-32ΩControl sunet
Sunete inalte ....+12dB/-12dB Sunete medii ....+12dB/-12dB Sunete joase....+12dB/-12dBGENERAL:
Raspuns in frecventa....20Hz\~20 kHz ±2dB Distorsiune ....<0.02% Raport S/N.... > 90 dB  Produsele electrice nu trebuie reciclate impreuna cu gunoiul menajer. Va rugam sa le transportati la un centru de reciclare. Adresati-va autoritatilor locale sau fumizorului local despre procedura.RECOMENDAÇÕES DE SEGURANÇA
CAMPO MAGNETICO
AVISO! Não coloque equipamentos de alta sensibilidade, tais como amplificadores e leitores de cassetes directamente acima ou abaixo da unidade. Esta unidade tem um forte campo magnético que pode induzir ruídos em dispositivos não-blindados localizados nas proximidades. O campo tem pontos fortes logo acima e abaixo do aparelho. Localize o amplificador na parte inferior da prateleira e do pré-amplificador ou outro equipamento sensível no topo. Para evitar choques eléctricos, não remova a tampa superior ou inferior. Não existem peças substituíveis no interior. Recorra aos serviços de pessoal qualificado. Desligue o cabo de alimentação antes de remover a tampa traseira do painel para aceder ao interruptor. AVISO! De modo a reduzir o risco de electrocussão, mantenha o equipamento afastado da água ou humidade!AVISO
RISCO DE ELECTROCUSSÃO
NÃO ABRIR
 O ponto de exclamação no triângulo é usado para alertar o utilizador para importantes instruções de utilização e manutenção  O raio no triângulo é usado para alertar o utilizador para o risco de electrocussãoControlos
1. Ficha Mic 1
Ligue o seu microfone a esta entrada Jack de 1/4.2. Controlo de Nível MIC
Com este botão pode ajustar o volume do microfone.3. TREBLE MIC
Usado para aumentar ou diminuir as frequências mais altas do microfone.4. BASS MIC
Usado para aumentar ou diminuir as frequências mais baixas do microfone.5. Talkover
Pressione este botão se quiser usar o seu microfone. Quando o botão é pressionado, todas as outras fontes de sinal serão atenuadas a 14dB, de modo a que o microfone possa ser claramente ouvido. Na posição de desligado, todos os sinais voltam ao seu nível original.6. PHONO / LINE
Use esta opção para seleccionar a entrada a ser enviada para o canal individual.7. Controlo Treble
Usado para aumentar ou diminuir os altos do canal de entrada.8. Controlo de Middle
Usado para aumentar ou diminuir os médios do canal de entrada.9. Controlo de Bass
Usado para aumentar ou diminuir os baixos do canal de entrada10. Canal Fader
Utilizado para ajustar o nível de cada canal.11. Crossfader
Mistura os sinais de um canal com o outro. Se o crossfader está na posição central. Ambos os canais podem ser ouvido.12. Tomada de auscultadores
Ligue os seus auscultadores com impedância entre 8 e 600 Ohms a esta ligação.13. Botão Cue
Use este botão de modo a seleccionar o canal (ais) a ser monitorizado pelos auscultadores.14. Controlo de Nível de Auscultadores
Controla o nível de volume dos auscultadores15. Controlo CUE/PGM de Auscultadores
Permite-lhe ouvir o material em CUE ou o programa active simultaneamente ou em separado.16. Controlo Master
Ajustar o nível de saída do master.17. Indicador de Nível Master
O display LED mostra o nível da saída principal esquerda e direita18. Controlo de BOOTH
Este regulador permite-lhe controlar o nível de saída emitido pelas saídas booth RCA não balanceadas.19. Entrada USB & MP3
Menciona o leitor USB / SD / BLUETOOTH abaixoDESCRIÇÃO DO PAINEL TRASEIRO
20. Interruptor de alimentação
Pressione o botão para ligar o aparelho. O LED acende quando o aparelho está ligado.21. Ligação AC
Liga a unidade a uma ficha 220-240Vac.22. Saídas Jack XLR Balanceadas
Liga a mesa de mistura ao receptor através de cabos com fichas XLR23. Saídas Jack BOOTH
Liga a mesa de mistura a um Segundo amplificador que alimenta as colunas em DJ booth ou numa localização remota.24. Master Output
Saída Master liga o amplificador principal (ultima mistura DJ apos a secção crossfader), aceita jacks RCA25. Saídas Jack de Gravação
Liga a mesa de mistura a um gravador. O sinal de saída é o mesmo que nos Jacks MASTER.26. Fichas de entrada Phono / Line
Estas entradas, para CH1-CH2 aceita ligações RCA-plug. Utilize esta tomada de entrada phono para gira-discos. Utilize a tomada de line para leitores CD/MP3 players. Instrumentos musicais de nível line com saídas stereo, como máquinas de ritmo ou samplers também devem ser ligados à tomada de entrada line.27. Interruptores de entradas
Definir essas opções com base no que está ligado às tomadas de entrada Phono / LineOPERAÇÃO DE LEITOR USB / SD / BLUETOOTH
1. Cartão SD
Insira o cartão SD nesta ranhura. Nota: Antes de retirar o cartão SD, defina a reprodução no modo de pausa ou seleccione outro suporte para reprodução (USB ou Bluetooth)2. Display LCD
O visor LCD mostra informações como o suporte para reprodução, nome do arquivo, tempo decorrido, tempo total, número do arquivo, o número total de arquivos, sistema de arquivo (MP3 ou WMA) e modo de reprodução (Repetir um, repete todos, ou aleatório.)  Nota: No modo Bluetooth, o display LCD mostra apenas o estado da ligação (ligado ou desligado). Todas as informações de reprodução estão no dispositivo Bluetooth.3. USB
Ligue a pen USB nesta entrada. Nota: Antes de retirar a chave USB, configure o aparelho em modo de pausa ou seleccione outro suporte para reprodução (cartão SD ou Bluetooth).4. Stop
Use este botão para parar a reprodução.5. Play / Pause
Este botão é usado para iniciar a reprodução ou para entrar em modo pausa.6. |<< Anterior
Use este botão para seleccionar a faixa anterior.7.>>| Seguinte
Use este botão para seleccionar a faixa seguinte.8. Modo
Um simples toque permite-lhe escolher o suporte para reprodução: SD, USB ou Bluetooth. Nota: Se escolher o modo Bluetooth, o leitor vai iniciar o sistema de emparelhamento Bluetooth. Tem de emparelhar o dispositivo Bluetooth com o leitor. Para isso, deve activar o sistema Bluetooth no seu dispositivo. O dispositivo irá procurar o leitor e encontrar o sistema Bluetooth chamado «IBIZA1» para 1 canal ou IBIZA2 para dois canais). Para ligar o seu dispositivo ao leitor, é necessário introduzir o código PIN 0000. Agora, o seu dispositivo e o leitor estão ligados. Deverá iniciar a reprodução no seu dispositivo de modo a ouvi-lo na mesa de mistura.ESPECIFICAÇÕES
ENTRADAS:
Microfone....3mV / 2.2 kΩ Phono 3.2mV / 47 kΩ Line....150mV / 47 kΩSAÍDAS:
Main 0 dB / 1V 600Ω Booth.... 0 dB / 1V 600Ω REC....-5dB / 0,5V 600Ω PHONE 300mW/16-32ΩControlo de Tone
Treble....+12dB/-12dB Middle ....+12dB/-12dB Bass ....+12dB/-12dBGERAL:
Frequência....20Hz\~20 kHz ±2dB Distorção ....<0.02% S/N......Melhor que 90 dB  Produtos eléctricos não deverão ser postos em contentores de lixo caseiros. Por favor, deposite-os em contentores para reciclagem. Questione as autoridades locais ou onde adquiriu o produto sobre como deverá proceder.SLO
VARNOSTNA PRIPOROČILA
MAGNETNO POLJE
PREVIDNO! Ne postavljajte občutljivih naprav kot predojačevalniki ali magnetofon neposredno nad ali pod enoto. Ta naprava ima močno magnetno polje, ki lahko povzroči brnenje v nezaščitenih napravah, ki se nahajajo v bližini. Polje ima najmočnejše mesta tik nad in pod enoto. Ojačevalnik postavite na dnu omare in predojačevalnik ali druge občutljive opreme na vrh omare. Za preprečitev električnega udara, ne odpirajte zgornjega ali spodnjega pokrova.Za servis se obrnite na usposobljeno osebje za servisiranje. Odklopite napajalni kabel, preden odstranite zadnji pokrov plošče za dostop pridobiti stikalo. OPOZORILO! Da bi zmanjšali možnost električnega udara, ne izpostavljajte naprave dežju ali vlagi!CAUTION
NEVARNOST ELEKTRIČNEGA UDARA
NE ODPIRAJTE
 Klicaj v trikotniku se uporablja za opozarjanje uporabnika na pomembna navodila za uporabo in vzdrževanje.  Strela v trikotniku se uporablja za opozarjanje uporabnika na nevarnost električnega udara.Kontrole
1. MIC 1 VTIČNICA
Povežite mikrofon z 1/4 "vtič tukaj.2. MIC KONTROLA NIVOJA
S tem gumbom lahko prilagodite glasnost mikrofona.3. MIC VISOKI TONI
Uporablja se za povečanje ali znižanje je mikrofon v višje frekvence.4. MIC NIZKI TONI
Uporablja se za povečanje ali znižanje je mikrofon v nižje frekvence.5. TALKOVER GUMB
Pritisnite ta gumb, će želite uporabljati mikrofon. Ko pritisnete na gumb, vsi ostali viri signala se zmanjšajo za 14dB, tako da se lahko mikrofon jasno sliši. V položaju OFF, vse signale vrne na prvotni nivo.6. PHONO/LINE PREKLOPNIK
S tem stikalom izberete vhod, ki se pošlje v posamezni kanal.7. KONTROLA VISOKIH TONOV
Uporablja se za povečanje ali znižanje VISOKIH tonov vhodnega kanala.8. KONTROLA SREDNJIH TONOV
Uporablja se za povečanje ali znižanje SREDNJIH tonov vhodnega kanala.9. KONTROLA NIZKIH TONOV
Uporablja se za povečanje ali znižanje NIZKIH tonov vhodnega kanala.10. KANAL FADER
Uporablja se za nastavitev nivoja za vsak kanal.11. CROSSFADER
Mešanje signale enega kanala z drugim. Če Crossfader je v sredinskem položaju, se oba kanala slišiju hkrati.12. VTIČNICA ZA SLUŠALKE
Priklopite slušalke z impedanca med 8 in 600 ohmov na ta priključek.13. CUE GUMB
Uporabite ta gumb za izbiro kanala (-ov), za kontroliranje s slušalkami.14.KONTROLA NIVOJA SLUŠALK
Omogoča kontrolo glasnosti slušalk.15.KONTROLA CUE/PGM SLUŠALK
Vam omogoča, da istočasno ali ločeno poslušate CUE material ali aktivni program.16. MASTER PRIKAZOVALNIK NIVOJEV
LED zaslon prikazuje stopnjo levo in desno Master izhoda.17.VHOD ZA USB KLJUČ
USB ključ vhod.18. BOOTH KONTROLA
Ta gumb nadzira skupno izhodno nivo BOOTH nebalansiranih RCA izhodov.19.MP3 PLAYER IN BLUETOOTH
Se sklicuje na delovanje USB / SD / BLUETOOTH PREDVAJALNIKA.OPIS ZADNJE PLOŠČE
20.PREKLOPNIK NAPAJANJA
Pritisnite gumb za vklop naprave.LED bo zasvetil, ko je naprava vklopljena.21.AC POVEZAVA
Priključite na ustrezno 220-240V AC vtičnico.22.XLR BALANSIRANI IZHODI
Povežite mixer na sprejemnik preko kablov z XLR vtiči.23. BOOTH IZHOD PRIKLJUČKI
Povežite mixer na drugi aktivni zvočnik v DJ kabini ali na oddaljeni lokaciji.24.MASTER IZHOD
Master izhod povežite na glavni ojačevalec preko RCA priključkov.25.RECORD IZHOD PRIKLJUČKI
Povežite mixer z zapisovalnikom za snemanje mixa.Izhodni signal je enak kot na MASTER priključku.26. VTIČNICE PHONO/LINE VHODOV
To so vtičnice za CH1-CH2 in sprejemajo RCA konektorje. Uporabite vtičnico PHONO vhoda za gramofon. Uporabite vtičnico za CD/MP3 predvajalnike. Line nivoji glasbila s stereo izhodima, kot so ritem mašine...lahko jih povežete preko LINE vhoda.27.PREKLOPNIK VHODOV
Nastavite ta stikala na to, kaj je priključeno na vhodnih PHONO / LINEDELOVANJE USB / SD / BLUETOOTH PREDVAJALNIKA
1. SD CARD REŽA
Vstavite SD kartico v to režo. Opomba: Preden boste odstranite SD kartico, vas prosimo, nastavite predvajanje v načinu pavze ali izberite drug vir predvajanja (USB ali Bluetooth)2. LCD ZASLON
LCD zaslon prikazuje informacije v zvezi s podporo za predvajanje, ime datoteke, pretekli čas, skupni čas, številka datoteke, skupno število datotek, datotečni sistem (MP3 ali WMA) in način predvajanja (Ponovite eno, Ponovite vse ali Naključno.) Opomba: V načinu Bluetooth, LCD zaslon prikazuje samo stanje povezave (priključeno ali izključeno). Vse predvajanje informacije so na napravi Bluetooth.3. USB VRATA
Vstavite vaš USB ključ v ta vrata. Opomba: Preden boste odstranili USB ključ, vas prosimo, nastavite enoto v načinu pavze ali izberite drug vir predvajanja (SD kartica ali Bluetooth).4. STOP
Uporabite ta gumb za ustavitev predvajanja.5. PLAY / PAVZA GUMB
Ta gumb se uporablja za začetek predvajanja ali za potrditev v načinu pavze.6. |<< PREJŠNJA
Uporabite ta gumb za izbiro prejšnje skladbe.7.>>| NASLEDNJA
Uporabite ta gumb za izbiro naslednje skladbe.8. GUMB NAČINA DELOVANJA
Preprost pritisk vam omogoča, da izberete vir predvajanja: SD, USB ali Bluetooth. Opomba: Če izberete način Bluetooth, bo predvajalnik, omogočil povezovanje Bluetooth. Morate svojo Bluetooth napravo seznaniti z predvajalnikom. Za to, morate omogočiti vaš Bluetooth sistem v napravi. Vaša naprava bo poiskala predvajalnik in našla Bluetooth sistem, imenovan "IBIZA1" za prvi kanal, ali "IBIZA2" za drugi kanal. Če želite povezati napravo na predvajalnik, morate vnesti kodo PIN 0000. Zdaj sta vaša naprava in predvajalnik povezana. Morate pritisniti začetek predvajanja (Start) na vaši napravi za poslušanje glasbe na mixer-ju.TEHNIČNI PODATKI
VHODI:
Mikrofon....3mV / 2.2 kΩ Phono 3.2mV / 47 kΩ Line....150mV / 47 kΩ IZHODI:
Master 0 dB / 1V 600Ω BOOTH....0 dB / 1V 600Ω REC....-5dB / 0,5V 600Ω PHONE 300mW/16-32ΩTonske kontrole
Visoki....+12dB/-12dB Srednji ....+12dB/-12dB Nizki....+12dB/-12dBSPLOŠNO:
Frekvenčni razpon....20Hz\~20 kHz ±2dB Popačenje....<0.02% Razmerje Signal/Šum ...... več kot 90 dB  POMEMBNO:Elektirčni izdelki se ne smejo odlagati v gospodinjske odpadke. Prosimo, da jih pripeljete do centra za recikliranje. Vprašajte svoje lokalne oblasti ali svojega prodajalca o tem kako se nadaljuje NLVEILIGHEIDSINSTRUCTIES
MAGNEETVELD
LET OP! Plaats geen gevoelige toestellen zoals voorversterkers of tape decks direct boven of beneden het toestel. Dit toestel heeft een sterk magneetveld die ruis in onbeschermde toestellen in de buurt veroorzaakt. De sterkste punten zijn direct boven of beneden het toestel. Om elektrische schokken te voorkomen, niet de boven of onderafdekking verwijderen. Het toestel bevat geen van de gebruiker vervangbare onderdelen. Laat alle reparatie van een ervarene technicus uitvoeren. Ontkoppel het toestel van het lichtnet alvorens u het achterpaneel verwijdert om toegang toe de gain schakelaar te hebben.LET OP
GEVAAR VAN ELEKTRISCHE SCHOKKEN
NIET OPENEN
WAARSCHUWING! Om gevaar van elektrische schokken te vermijden stel het toestel niet bloot aan regen of vochtigheid.  De driehoek met het uitroepteken vestigt de aandacht van de gebruiker op belangrijke gebruik- of onderhoudsinstructies.  De bliksem in de driehoek vestigt de aandacht van de gebruiker op een elektrisch schokrisicoControles
1. Mic 1 connector
Sluit uw microfoon met 6.35mm jack op deze connector aan.2. MIC Level Control
Stelt het volume van uw microfoon in.3. MIC Treble
Verhoogt of vermindert de hoge frequenties van de microfoon.4. MIC Bass
Verhoogt of vermindert de lage frequenties van de microfoon.5. Talkover toets
Druk deze knop om uw microfoon te gebruiken. Indien deze knop gedrukt is worden alle anderen signaal bronnen om 14 dB verminderd om het microfoongeluid duidelijk te horen. In de OFF positie gaan alle signalen naar haar originele niveau terug.6. Phono/Line schakelaar
Kies het ingangssignaal voor het individuele kanaal.7. Treble Control
Verhoogt of vermindert de hoge tonen van het ingangskanaal.8. Middle Control
Verhoogt of vermindert de midden tonen van het ingangskanaal.9. Bass Control
Verhoogt of vermindert de lage tonen van het ingangskanaal.10. Channel Fader
Stelt het volume van elke kanaal in.11. Crossfader
Mengt de signalen van de twee kanalen. In de middenpositie zijn beide kanalen hoorbaar.12. Hoofdtelefoon connector
Sluit uw hoofdtelefoon met een impedantie tussen 8 en 600 ohm op deze connector aan.13. Cue Button
Kies het kanaal dat u in de hoofdtelefoon wilt luisteren.14. Hoofdtelefoon niveau regelaar
Stelt het volume van de hoofdtelefoon in.15. CUE/PGM Controle van de hoofdtelefoon
U kunt tegelijkertijd of separaat naar de CUE materiaal of het actieve programma luisteren.16. Master Control
Stel het niveau van de master uitgang in.17. Master Level Display
De LED display toont het niveau van de linker en rechter master uitgang.18. BOOTH controle
Stelt het uitgangsniveau van het signaal op de ongebalanceerde tulp uitgangen in.19. MP3 PLAYER & BLUETOOTH
Zie het hoofdstuk "Bediening van de USB / SD / Bluetooth Player"OMSCHRIJVING VAN HET ACHTERPANEEL
20. Power schakelaar
Drukken om het toestel aan te schakelen. De led licht op wanneer het toestel aangeschakeld is.21. AC aansluiting
Sluit het mengpaneel op een geschikte stopcontactdoos met een uitgangsspanning van 220-240Vac aan..22. Gebalanceerde XLR uitgangen
Sluit het mengpaneel dmv XLR kabels op een versterker aan.23. Booth uitgang
Sluit het mengpaneel op een tweede versterker aan die luidsprekers in de DJ booth of in een andere ruimte voedt.24. Master uitgang
De Master uitgang wordt aan de hoofdversterker aangesloten (DJ final mix naar de crossfader sectie), tulp connectoren25. REC uitgang
Sluit het mengpaneel op een recorder aan. Het uitgangssignaal is hetzelfde als op de Master uitgang.26. Phono/Line ingangsconnectoren
Deze tulp ingangen zijn voor kanaal 1 & 2. Gebruik de phono ingangsconnector voor draaitafels. Gebruik de LINE connector voor CD/MP3 players. Muziek instrumenten van lijn niveau met stereo uitgangen zoals rhythm machines of samplers moeten ook op de LINE ingangen aangesloten worden.27. Ingangsschakelaar
Stel deze schakelaars in afhankelijk van het toestel dat in de PHONO/LINE ingangsconnectoren aangesloten is.USB / SD / BLUETOOTH PLAYER BEDIENING
1. SD KAARTJE SLOT
Stek uw SD kaartje in dit slot. Opmerking: Alvorens U de SD kaart verwijdert, zet de speler in pauze modus of kies een andere audio bron (USB of Bluetooth)2. LCD DISPLAY
De LCD display toont informatie over de speler zoals naam van het bestand, afgelopen tijd, totale tijd, nummer van het bestand, aantal van bestanden,  bestand formaat (MP3 of WMA) en afspeelmodus (Repeat one, repeat all, of random.) Opmerking: In Bluetooth modus toont de display alleen de verbindingsstatus (aangesloten of niet aangesloten). Alle afspeel informatie verschijnt op de Bluetooth unit.3. USB SOCKET
Stek uw USB stick in dit slot. Opmerking: Alvorens U de USB stick verwijdert, zet de speler in pauze modus of kies een andere audio bron (SD of Bluetooth)4. STOP
Stopt het afspelen.5. PLAY / PAUZE TOETS
Schakelt om tussen afspelen en pauze.6. |<< TERUG
Gaat naar het begin van de lopende track of kiest de vorige track.7.>>| VERDER
Kiest de naaste track.8. MODE TOETS
Druk op deze toets om de audiobron te kiezen: SD, USB of Bluetooth Opmerking: Wanneer U Bluetooth kiest activeert de speler het Bluetooth pairing systeem. Activeer het Bluetooth zoeksysteem op uw toestel. Uw toestel vindt: "IBIZA1" voor kanaal 1 of "IBIZA2" voor kanaal 2. Om uw toestel met het mengpaneel te verbinden toets de pin code 0000 in. Nu zijn uw toestel en de speler verbonden.SPECIFICATIES
INGANGEN:
Microfoon....3mV / 2.2 kΩ Phono 3.2mV / 47 kΩ Lijn....150mV / 47 kΩUITGANGEN:
Main 0 dB / 1V 600Ω Booth....0 dB / 1V 600Ω REC....-5dB / 0,5V 600Ω PHONE 300mW/16-32ΩToon controle
Treble....+12dB/-12dB Midden....+12dB/-12dB Bas....+12dB/-12dBALGEMEEN:
Frequentiebereik....20Hz\~20 kHz ±2dB Vervorming....<0.02% S/R verhouding......beter dan 90 dB  BELANGRIJK: De elektrische producten mogen niet bij het huisvuil gegooid worden. Gelieve deze te laten recycleren daar waar er centra's hiervoor voorzien is. Raadpleeg de plaatselijke autoriteiten of uw verkoper ivm de manier van recycleren. ESINSTRUCCIONES DE SEGURIDAD
CAMPO MAGNETICO
ATENCIÓN! No colocar aparatos sensibles, tales como preamplificadores o lectores de casetes, encima o debajo del equipo. El equipo posee un campo magnético, que puede provocar interferencias en los equipos no blindados que se encuentren cerca. Coloque el amplificador en la parte baja del rack y el preamplificador y otros componentes sensibles, en la parte de arriba. Con el fin de evitar una descarga eléctrica, no abrir jamás el equipo. El aparato no contiene, en su interior, ninguna pieza sustituible por el usuario. Todas las reparaciones, han de ser efectuadas por un técnico cualificado. Desenchufe de la corriente antes de abrir el panel trasero para acceder a los controles de ganancia. Es conveniente dejar una distancia libre alrededor del equipo, de al menos medio metro, para asegurar una ventilación suficiente. No poner recipientes con líquidos cerca del equipo. No coloque el equipo cerca de ninguna fuente de calor. Este equipo, está diseñado para funcionar en climas moderados.ATENCIÓN
RIESGO DE DESCARGA ELÉCTRICA
NO ABRIR EL EQUIPO
ADVERTENCIAS A fin de reducir el riesgo de descarga eléctrica, no exponga el equipo a la humedad o la lluvia.  El triángulo con el signo de exclamación, llama la atención del usuario, ante unas instrucciones de uso o de mantenimiento.  El rayo dentro del triángulo, avisa al usuario de un riesgo de descarga eléctrica.Ajustes
1. Conexión Mic 1 Conecte un micrófono con clavija Jack 6.35mm. 2. Control de nivel micro Ajuste del volumen micro 3. MIC Agudo Ajuste el nivel de altas frecuencias del micro. 4. MIC Graves Ajuste el nivel de bajas frecuencias del micro. 5. Botón Talkover Ariete sobre este botón, cuando vaya a usar el Micro. Cuando este botón, esta apretado, todas las demás salidas son atenuadas 14dB, para que se oiga bien el micro. En posición OFF, todas las salidas funcionan a su nivel normal. 6. Conmutador Phono/Línea Seleccione la fuente de entrada que usted desee para este canal. 7. Ajuste el nivel de altas frecuencias agudos Ajuste el nivel de altas frecuencias del canal de entrada. 8. Ajuste el nivel de altas frecuencias medios Ajuste el nivel frecuencias medias del canal de entrada. 9. Ajuste el nivel de altas frecuencias graves Ajuste el nivel de frecuencias bajas del canal de entrada. 10. Fader canal Ajuste el nivel de cada canal 11. Crossfader Mezcle las señales de dos canales. En la posición central, los dos canales son audibles. 12. Clavija para auriculares Conecte un micrófono de una impedancia comprendida entre 8 y 600 Ohms. 13. Botón Cue Seleccione el o los canales a escuchar por los auriculares. 14. Control de volumen del auricular Ajuste el volumen de sus auriculares. 15. Control CUE/PGM del auricular Permite escuchar al mismo tiempo o separadamente la selección CUE o la música que suena por el Master. 16. Control general Ajuste el nivel de la salida general. 17. Indicador de nivel general El indicador de LED indica el nivel de salida general derecho e izquierdo. 18. Control BOOTH Permite ajustar el nivel de la salida BOOTH.19. Lector MP3 & BLUETOOTH
Ver el capítulo « funcionamiento del lector USB / SD / Bluetooth »DESCRIPCIÓN DE LA PARTE TRASERA
20. Interruptor ON/OFF
Apriete el botón, para poner en marcha el equipo. El LED, se encenderá para indicar que el equipo, está encendido.21. Conexión del enchufe
Conecte el equipo a un enchufe que ofrezca una tensión de 220-240Vac.22. Salidas XLR simétricas
Conecté la mesa de mezclas a un amplificador mediante estas clavijas23. Salida BOOTH
Conecté el mezclador a un segundo amplificador o bafles auto amplificados...24. Salida general
Conecté esta salida a un amplificador mediante estas clavijas RCA.25. Salida RECORD
Conecté esta salida a un grabador. Esta salida es idéntica a la salida MASTER.26. Entradas Phono/Línea
Utilice la entrada phono, para conectar un giradiscos de vinilos y la entrada Línea, para conectar aparatos como reproductores de CD, Tuner...También puede conectar instrumentos musicales de salida a nivel de línea, tales como cajas de ritmos, o procesadores de sonido.27. Conmutador de entrada
Ajuste este conmutador conforme al tipo de equipo conectado en las entradas Phono/Line.FUNCIONAMIENTO DEL LECTOR USB / SD / BLUETOOTH
1. PUERTO SD
Introduzca su tarjeta SD en esta ranura. Nota: Antes de sacar la tarjeta SD, ponga el lector en pausa o seleccione otra salida (USB o Bluetooth)2. DISPLAY LCD
La pantalla LCD muestra las informaciones de la fuente, tales como el nombre de la canción, tiempo de escucha, tiempo total, número total de ficheros, formato del fichero (MP3 o WMA) así como el modo de lectura (repetición única, repetición general o lectura aleatoria).  Nota: En modo Bluetooth, el LCD indica el estado de conexión (Conectado o desconectado). Las demás informaciones, se indican en el equipo reproductor de Bluetooth.3. USB
Conecté aquí su llave USB. Nota: Antes de sacar su llave USB, ponga el lector en pausa o seleccione otra salida (USB o Bluetooth) 4. STOP: Parada de la lectura.5. PLAY / PAUSE
Bascula entre lectura y pausa.6. |<< RETORNO
Retorno al principio de la lectura actual o a la anterior7. >>| SIGUIENTE
Selección del siguiente fichero.8. MODO
Apriete para seleccionar la fuente: SD, USB o Bluetooth Nota: Si selecciona el modo Bluetooth, el lector activa el procedimiento de sincronización. Usted debe sincronizar su dispositivo con este equipo, activando la búsqueda Bluetooth en su dispositivo y encontrará el equipo llamado « IBIZA1 » para el canal 1 e « IBIZA2 » para el canal 2. Para sincronizarlos, debe entrar el código 0000. En ese momento, ya tendrá sincronizado su dispositivo Bluetooth con el equipo y así poder reproducir sus ficheros a través de este.CARACTERISTICAS TÉCNICAS
ENTRADAS:
Micrófono....3mV / 2.2 kΩ Pomo 3.2mV / 47 kΩ Línea....150mV / 47 kΩSALIDAS:
General 0 dB / 1V 600Ω Booth.... 0 dB / 1V 600Ω REC....-5dB / 0,5V 600Ω AURICULARES 300mW/16-32ΩControles de tonalidad
Agudos ....+12dB/-12dB Medios....+12dB/-12dB Graves....+12dB/-12dBGENERAL:
Banda pasante....20Hz\~20 kHz ±2dB Distorsión ....<0.02% Relación S/R ...... mejor que 90 dB  NOTA IMPORTANTE: Los productos electrónicos, no deben ser tirados jamás a la basura doméstica. Llévelos a un punto de recogida y reciclado destinado a este particular y hágalo reciclar. Consulte a las autoridades locales por el punto más cercano a su domicilio. Imported from China by:  LOTRONIC SA Avenue Zénobe Gramme 11 1480 SAINTES Belgium 
- USB STEREO MIXER
- TABLE DE MIXAGE STEREO USB
- USB STEREOMISCHPULT
- MIXER STEREO USB
- MESA DE MISTURA STEREO
- USB STEREO MIKSER
- USB STEREO MENGPANEEL
- MEZCLADOR USB ESTEREO
- SAFETY RECOMMENDATIONS
- MAGNETIC FIELD
- Controls
- Master Level Display
- BOOTH Control
- MP3 PLAYER & BLUETOOTH
- REAR PANEL DESCRIPTION
- Power Switch
- AC Connection
- XLR BALANCE OUTPUT JACKS
- BOOTH OUTPUT JACKS
- Master Output
- RECORD OUTPUT JACKS
- Phono/Line Inputs Sockets
- Inputs Switch
- USB / SD / BLUETOOTH PLAYER OPERATION
- SD CARD SLOT
- LCD DISPLAY
- USB SOCKET
- PLAY / PAUSE BUTTON
- |
- 7.>>| NEXT
- MODE BUTTON
- SPECIFICATIONS
- INPUTS:
- OUTPUTS:
- Tone Control
- GENERAL:
- CONSIGNES DE SECURITE
- CHAMP MAGNETIQUE
- ATTENTION
- RISQUE DE CHOC ELECTRIQUE
- NE PAS OUVRIR
- Réglages
- Fiche Mic 1
- Contrôle de niveau micro
- MIC Treble
- MIC Bass
- Bouton Talkover
- Commutateur Phono/Line
- Contrôle des aigus
- Contrôle des médiums
- Contrôle des graves
- Fader canal
- Crossfader
- Fiche pour casque
- Bouton Cue
- Contrôle de volume du casque
- Contrôle CUE/PGM du casque
- Contrôle général
- Affichage du niveau général
- Contrôle BOOTH
- LECTEUR MP3 & BLUETOOTH
- DESCRIPTION DE L'ARRIERE
- Interrupteur M/A
- Branchement sur le secteur
- SORTIES XLR SYMETRIQUES
- Sortie BOOTH
- Sortie générale
- Fiches de sortie RECORD
- Fiches d'entrée Phono/Line
- Commutateurs d'entrée
- FONCTIONNEMENT DU LECTEUR USB / SD / BLUETOOTH
- PORT SD
- ECRAN LCD
- FICHE USB
- PLAY / PAUSE
- >>| SUIVANT
- MODE
- CARACTERISTIQUES TECHNIQUES
- ENTREES:
- SORTIES:
- Contrôles de tonalité
- SICHERHEITSVORSCHRIFTEN
- MAGNETFELD
- Regler
- Mic 1 Buchse
- MIC Pegelregler
- Talkover Taste
- Phono/Line Schalter
- Treble Regler
- Middle Regler
- Bass Regler
- Kanalfader
- Kopfhörerbuchse
- Cue Taste
- Pegelregler für den Kopfhörer
- CUE/PGM Regler des Kopfhörers
- Master Regler
- Master Pegel Display
- BOOTH Regler
- MP3 SPIELER & BLUETOOTH
- RÜCKSEITE
- Netzschalter
- AC Anschluss
- Symmetrische XLR Ausgangsbuchsen
- BOOTH Ausgangsverbinder
- Master Ausgang
- REC Ausgangsbuchsen
- Phono/Line Eingangsbuchsen
- Eingangswahlschalter
- BEDIENUNG DES USB / SD / BLUETOOTH SPIELERS
- SD KARTENSLOT
- USB PORT
- STOP: Stoppt den Abspielvorgang
- PLAY / PAUSE TASTE
- 7.>>| WEITER
- MODE TASTE
- TECHNISCHE DATEN
- EINGÄNGE:
- AUSGÄNGE:
- Klangregler
- ALLGEMEINES:
- RECOMANDARI PRIVIND SIGURANTA
- CAMPUL MAGNETIC
- ATENTIE
- RISC DE SOC ELECTRIC
- NU DESCHIDETI
- Comenzi
- Mufa Mic 1
- Control nivel MIC
- Sunete inalte MIC
- Buton functie Talkover
- Comutator Phono/Linie
- Control sunete inalte
- Control sunete medii
- Control bass
- Potentiometru de reglaj al canalului
- Crossfader
- Mufa casti
- Buton Cue
- Control nivel casti
- Buton Cue casti/Control PGM
- Control Master
- Afisare nivel Master
- Control BOOTH
- Descrierea panoului din spate
- Comutator pornire
- Conexiune AC
- Mufe jack pentru iesirea XLR compensata
- Mufe iesire BOOTH
- Iesire Master
- Mufe iesire inregistrare
- Mufe Intrari Phono/Linie
- Comutator intrari
- FUNCTIONARE USB / SD / BLUETOOTH PLAYER
- Slot pentru cardul SD
- Afisaj LCD
- Mufa USB
- STOP
- Butonul PLAY / PAUSE
- >>| Urmator
- Butonul MODE
- SPECIFICATII
- INTRARI:
- IESIRI:
- Control sunet
- RECOMENDAÇÕES DE SEGURANÇA
- CAMPO MAGNETICO
- AVISO
- RISCO DE ELECTROCUSSÃO
- NÃO ABRIR
- Controlos
- Ficha Mic 1
- Controlo de Nível MIC
- TREBLE MIC
- BASS MIC
- Talkover
- PHONO / LINE
- Controlo Treble
- Controlo de Middle
- Controlo de Bass
- Canal Fader
- Tomada de auscultadores
- Botão Cue
- Controlo de Nível de Auscultadores
- Controlo CUE/PGM de Auscultadores
- Controlo Master
- Indicador de Nível Master
- Controlo de BOOTH
- Entrada USB & MP3
- DESCRIÇÃO DO PAINEL TRASEIRO
- Interruptor de alimentação
- Ligação AC
- Saídas Jack XLR Balanceadas
- Saídas Jack BOOTH
- Saídas Jack de Gravação
- Fichas de entrada Phono / Line
- Interruptores de entradas
- OPERAÇÃO DE LEITOR USB / SD / BLUETOOTH
- Cartão SD
- Display LCD
- USB
- 7.>>| Seguinte
- Modo
- ESPECIFICAÇÕES
- ENTRADAS:
- SAÍDAS:
- Controlo de Tone
- GERAL:
- SLO
- VARNOSTNA PRIPOROČILA
- MAGNETNO POLJE
- CAUTION
- NEVARNOST ELEKTRIČNEGA UDARA
- NE ODPIRAJTE
- Kontrole
- MIC 1 VTIČNICA
- MIC KONTROLA NIVOJA
- MIC VISOKI TONI
- MIC NIZKI TONI
- TALKOVER GUMB
- PHONO/LINE PREKLOPNIK
- KONTROLA VISOKIH TONOV
- KONTROLA SREDNJIH TONOV
- KONTROLA NIZKIH TONOV
- KANAL FADER
- VTIČNICA ZA SLUŠALKE
- CUE GUMB
- 14.KONTROLA NIVOJA SLUŠALK
- 15.KONTROLA CUE/PGM SLUŠALK
- MASTER PRIKAZOVALNIK NIVOJEV
- 17.VHOD ZA USB KLJUČ
- BOOTH KONTROLA
- 19.MP3 PLAYER IN BLUETOOTH
- OPIS ZADNJE PLOŠČE
- 20.PREKLOPNIK NAPAJANJA
- 21.AC POVEZAVA
- 22.XLR BALANSIRANI IZHODI
- BOOTH IZHOD PRIKLJUČKI
- 24.MASTER IZHOD
- 25.RECORD IZHOD PRIKLJUČKI
- VTIČNICE PHONO/LINE VHODOV
- 27.PREKLOPNIK VHODOV
- DELOVANJE USB / SD / BLUETOOTH PREDVAJALNIKA
- SD CARD REŽA
- LCD ZASLON
- USB VRATA
- PLAY / PAVZA GUMB
- 7.>>| NASLEDNJA
- GUMB NAČINA DELOVANJA
- TEHNIČNI PODATKI
- VHODI:
- IZHODI:
- Tonske kontrole
- SPLOŠNO:
- VEILIGHEIDSINSTRUCTIES
- MAGNEETVELD
- LET OP
- GEVAAR VAN ELEKTRISCHE SCHOKKEN
- NIET OPENEN
- Controles
- Mic 1 connector
- MIC Level Control
- Talkover toets
- Phono/Line schakelaar
- Treble Control
- Middle Control
- Bass Control
- Channel Fader
- Hoofdtelefoon connector
- Cue Button
- Hoofdtelefoon niveau regelaar
- CUE/PGM Controle van de hoofdtelefoon
- Master Control
- BOOTH controle
- OMSCHRIJVING VAN HET ACHTERPANEEL
- Power schakelaar
- AC aansluiting
- Gebalanceerde XLR uitgangen
- Booth uitgang
- Master uitgang
- REC uitgang
- Phono/Line ingangsconnectoren
- Ingangsschakelaar
- USB / SD / BLUETOOTH PLAYER BEDIENING
- SD KAARTJE SLOT
- PLAY / PAUZE TOETS
- 7.>>| VERDER
- MODE TOETS
- SPECIFICATIES
- INGANGEN:
- UITGANGEN:
- Toon controle
- ALGEMEEN:
- INSTRUCCIONES DE SEGURIDAD
- ATENCIÓN
- RIESGO DE DESCARGA ELÉCTRICA
- NO ABRIR EL EQUIPO
- Ajustes
- Lector MP3 & BLUETOOTH
- DESCRIPCIÓN DE LA PARTE TRASERA
- Interruptor ON/OFF
- Conexión del enchufe
- Salidas XLR simétricas
- Salida BOOTH
- Salida general
- Salida RECORD
- Entradas Phono/Línea
- Conmutador de entrada
- FUNCIONAMIENTO DEL LECTOR USB / SD / BLUETOOTH
- PUERTO SD
- >>| SIGUIENTE
- CARACTERISTICAS TÉCNICAS
- SALIDAS:
- Controles de tonalidad
Marke : IBIZA SOUND
Modell : DJM250BTMKII
Kategorie : Mischpult