Pocket Cinema Camera 4K - Kamera Blackmagic Design - Kostenlose Bedienungsanleitung
Finden Sie kostenlos die Bedienungsanleitung des Geräts Pocket Cinema Camera 4K Blackmagic Design als PDF.
| Produkttyp | Digitale Kinokamera |
| Objektivanschluss | Micro Four Thirds (MFT) |
| Sensor | Micro Four Thirds, 13 Blenden Dynamikbereich, doppelter nativer ISO |
| Maximale Auflösung | 4K DCI (4096 x 2160) bis zu 60 fps |
| Maximale Bildrate | HD 120 fps, 2,6K 16:9 120 fps (Fenstermodus) |
| Speicher | CFast 2.0, SD UHS-II, USB-C (Flash-Laufwerk) |
| Codecs | Blackmagic RAW (3:1 bis 12:1, Q0/Q5), ProRes 422 HQ, 422, LT, Proxy |
| Bildschirm | LCD-Touchscreen 5 Zoll, Auflösung 1920x1080, 100 % Abdeckung |
| Eingebautes Audio | 4 eingebaute Mikrofone |
| Externer Audioeingang | Mini-XLR (mit Phantomspeisung), 3,5 mm Stereobuchse |
| Videoausgang | HDMI 10 Bit 4:2:2 bis zu 1080p |
| Stromversorgung | Akku LP-E6, DC 12 V Eingang, Aufladung über USB-C |
| Konnektivität | USB-C (Speicher und Aufladung), Bluetooth (Steuerung) |
| Abmessungen (ca.) | 178 x 104 x 110 mm (ohne Objektiv) |
| Gewicht (ca.) | 655 g (mit Akku und Karte) |
| Hauptfunktionen | Blackmagic RAW Aufnahme, 3D-LUTs, CCU-Steuerung mit ATEM Mini, integrierte Metadaten |
| Wartung und Reinigung | Objektiv mit einem weichen Tuch reinigen, Sensor mit der Abdeckung vor Staub schützen |
| Sicherheit | Nur empfohlenes Zubehör verwenden, Feuchtigkeit und Stöße vermeiden |
| Ersatzteile und Reparierbarkeit | Wechselbarer Akku LP-E6, Akkugriff NP-F570, Netzkabel, Abdeckung |
Häufig gestellte Fragen - Pocket Cinema Camera 4K Blackmagic Design
Benutzerfragen zu Pocket Cinema Camera 4K Blackmagic Design
0 Frage zu diesem Gerät. Beantworten Sie die, die Sie kennen, oder stellen Sie Ihre eigene.
Eine neue Frage zu diesem Gerät stellen
Laden Sie die Anleitung für Ihr Kamera kostenlos im PDF-Format! Finden Sie Ihr Handbuch Pocket Cinema Camera 4K - Blackmagic Design und nehmen Sie Ihr elektronisches Gerät wieder in die Hand. Auf dieser Seite sind alle Dokumente veröffentlicht, die für die Verwendung Ihres Geräts notwendig sind. Pocket Cinema Camera 4K von der Marke Blackmagic Design.
BEDIENUNGSANLEITUNG Pocket Cinema Camera 4K Blackmagic Design

Installation and Operation Manual
Blackmagic
Pocket Cinema Camera
Includes Blackmagic Pocket Cinema Camera 6K
and Blackmagic Pocket Cinema Camera 4K
March 2020
English, 日本語, Français, Deutsch, Espanol, 中文
Hanse, Pccn, Italiano, Portugues and Turkce.
Languages
To go directly to your preferred language, simply click on the hyperlinks listed in the contents below.
English 3.
日本語 161
Français 320
Deutsch 479
Espanol 638
中文 797
HK 956
Pycckn 1115
Italiano 1274
Portugues 1433
Türkce 1592

Welcome
Thank you for purchasing your new Blackmagic Pocket Cinema Camera!
In 2013, we released the original Blackmagic Pocket Cinema Camera. We were excited by creating a small camera with high dynamic range and groundbreaking image quality that you could take anywhere. After all your amazing feedback and being asked to make a 4K version, we decided to do that with Pocket Cinema Camera 4K and then we released Blackmagic Pocket Cinema Camera 6K with a Super 35mm sensor and an EF lens mount.
Blackmagic Pocket Cinema Camera 4K has the same Micro Four Thirds lens mount as the original Pocket Cinema Camera so you can use all your existing MFT lenses. You can record records 4K video up to 60 frames per second and HD video at 120 frames per second on CFast or UHS-II SD cards. Blackmagic Pocket Cinema Camera 6K expands on these capabilities so you can also record 2.8K video at 120 frames per second and 6K video up to 60 frames per second! The USB-C port lets you record on external drives so you can unplug the drive from your camera and plug straight into your computer for an instant file workflow.
With 13 stops of dynamic range and dual native ISO, you can record beautiful, clean cinematic images in varying light conditions. The built in 5 inch LCD touchscreen lets you easily check focus and see fine details, even in bright daylight, and four built in microphones give you high quality audio straight into the camera!
You even get powerful CCU features when connecting Blackmagic Pocket Cinema Cameras to ATEM Mini switchers. This lets you set up your cameras' focus, shutter, iris, color and much more directly from the camera page in ATEM Software Control!
Your Blackmagic Pocket Cinema Camera is incredibly robust, very light, and easy to carry with you everywhere you go. We're also proud to include our Blackmagic RAW codec, offering the flexibility of RAW processing all in a single file, providing massive performance increases with reduced file sizes.
We are extremely excited to see the creative work you produce using your new Pocket Cinema Camera, and look forward to your feedback on new features you would like to see added to your camera!

Grant Petty
CEO Blackmagic Design
Contents
Which camera are you using? 5 Entering Metadata 87
Getting Started 6 Slate 87
Attaching a Lens 6 Camera Video Output 92
Turning Your Camera On 7 Using DaVinci Resolve 93
Using a Blackmagic Pocket Project Manager 93
Camera Battery Grip 7 Editing with the Cut Page 94
- Powering Your Camera with the Adding Clips to the Timeline 97
Included Power Cable 9 Editing Clips on the Timeline 98
Storage Media 10 Adding Titles 98
CFast Cards 10 Working with Blackmagic RAW Files 99
SD Cards 11 Color Correcting your Clips
USB-C flash disks 13 with the Color Page 102
Preparing Media for Recording 15 Adding a Power Window 105
Preparing Media on Using Plugins 107
Blackmagic Pocket Cinema Camera 15 Mixing Your Audio 108
17 Adding VEX and Compositing
Preparing Media on Windows 18 on the Fusion Page 112
Recording 19 Mastering Your Edit 121
Recording Clips 19 Quick Export 121
Blackmagic RAW 20 The Deliver Page 122
Recording to Blackmagic RAW 21 Camera Control with ATEM Mini 123
Maximum Sensor Frame Rates 23 DaVinci Resolve Primary Color
Record Duration 25 Corrector 127
Playback 30 Working with Third Party Software 130
Camera Features 31 Working with Files from
Camera Front 31 CFast 2.0 and SD cards 130
Right Side 32 Working with Files from
USB-C flash disks 130
Left Side 32 Using Final Cut Pro X 131
Top Panel 34 Using Avid MediaComposer 2018 131
Camera Underside 35 Using Adobe Premiere Pro CC 132
Camera Rear 36 Blackmagic Camera Setup Utility 133
37 Recommended Recording Media 134
Settings 58 Developer Information 147
58 Blackmagic Bluetooth Camera Control 147
Record Settings 58 Blackmagic SDI and Bluetooth
File Naming Convention 64 Camera Control Protocol 149
Monitor Settings 64 Example Protocol Packets 156
Audio Settings 71 Help 157
Setup Settings 73 Regulatory Notices 158
Presets 82 Safety Information 159
3D LUTs 84 Warranty 160
Which camera are you using?
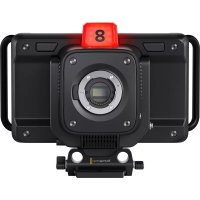
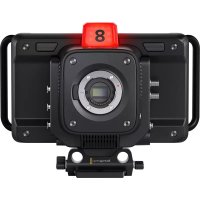
Blackmagic Pocket Cinema Camera 6K and Blackmagic Pocket Cinema Camera 4K models have similar appearances. Both cameras produce incredible, wide dynamic range images and share the same chassis. The control buttons and software menus are laid out the same way, and operating the cameras is essentially the same.
Blackmagic Pocket Cinema Camera 6K features a Super 35mm sized sensor and an EF lens mount, and has a 6K icon above the lens mount. Blackmagic Pocket Cinema Camera 4K features a Micro Four Thirds sized sensor and a Micro Four Thirds lens mount.

Blackmagic Pocket Cinema Camera 6K
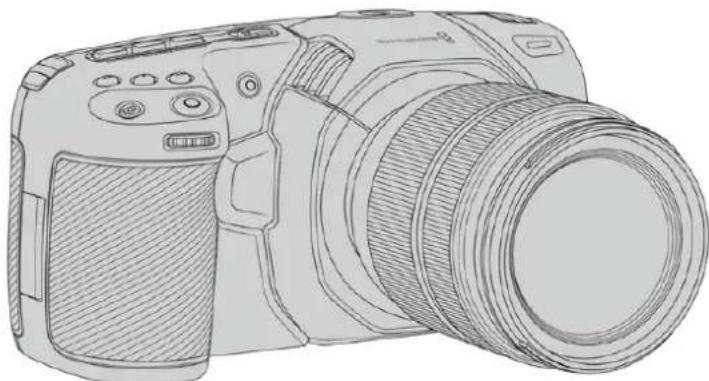
Blackmagic Pocket Cinema Camera 4K
Getting Started
Blackmagic Pocket Cinema Camera is a small portable digital cinema camera that records high quality images on CFast 2.0 and UHS-I and UHS-II SD cards or an SSD via the USB-C port. Your Pocket Cinema Camera is capable of recording clips using professional codec's designed for post production including Blackmagic RAW and ProRes.
Getting started with your Blackmagic Pocket Cinema Camera is as simple as mounting a lens and powering your camera.
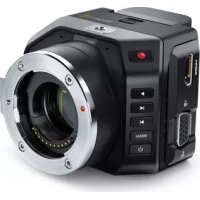
Attaching a Lens
Blackmagic Pocket Cinema Camera 6K uses EF lenses and Blackmagic Pocket Cinema Camera 4K uses Micro Four Thirds lenses. Both of these types of lenses are very popular and affordable, plus there is an enormous range to choose from. Attaching a lens to your camera is the same process for Blackmagic Pocket Cinema Camera 6K and Pocket Cinema Camera 4K. In both cases, the first step is to remove the protective dust cap. To remove the protective dust cap, hold down the locking button and rotate the cap counterclockwise until it is released.
To attach an EF mount or Micro Four Thirds lens:
1 Align the dot on your lens with the dot on the camera mount. Many lenses have a visual indicator, for example a blue, red or white dot.
Press the lens mount against the camera mount, and twist the lens clockwise until it clicks into place.
3 To remove the lens, hold down the locking button, rotate the lens counterclockwise until its dot indicator reaches the 10 o'clock position on an MFT lens, or 12 o'clock for an EF lens. Gently remove the lens from its mount.

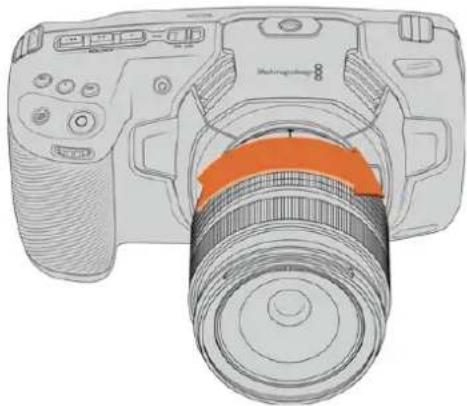
Attaching an MFT lens on Blackmagic Pocket Cinema Camera 4K
NOTE When no lens is attached to the camera, the glass filter covering the sensor is exposed to dust and other debris so you'll want to keep the dust cap on whenever possible.
Turning Your Camera On
Now that you've attached a lens, you will need to supply power to your camera. Blackmagic Pocket Cinema Camera can be powered by inserting an LP-E6 battery into the camera, or from two NP-F570 batteries in Blackmagic Pocket Camera Battery Grip, or by plugging the supplied power adapter into the power input.
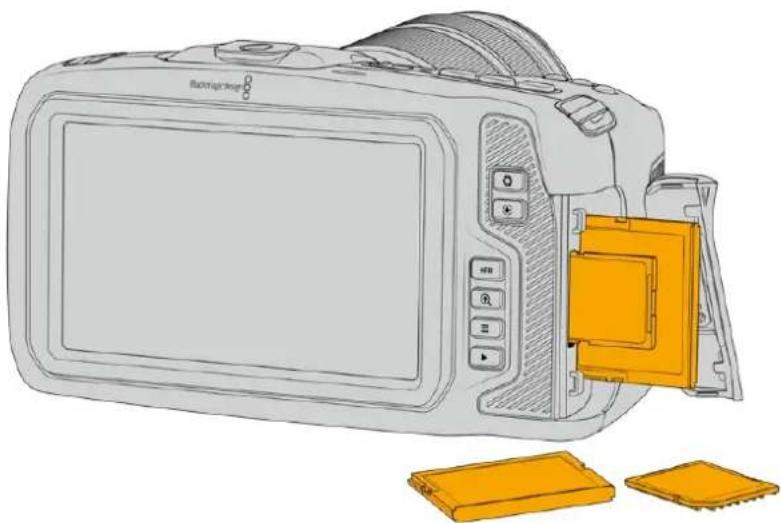
Inserting a Battery and Powering your Camera
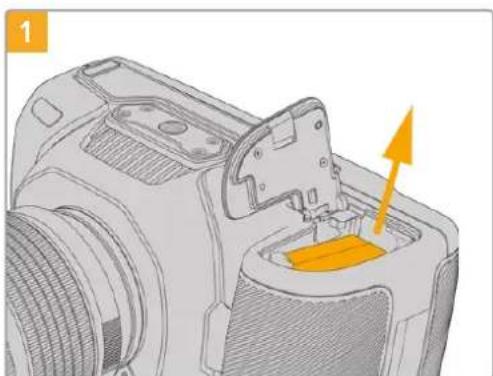
Your camera uses standard removable LP-E6 type batteries. One is included with the camera, but if you need additional batteries, they can be purchased from your Blackmagic Design reseller or from most video or photography equipment stores.
1 On the underside of the camera, press the door release to open the battery door.
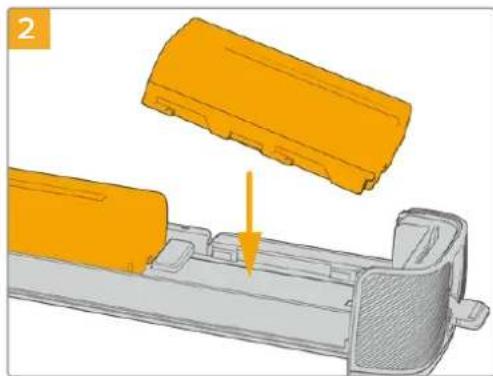
2 With the contacts facing the terminal, insert the LP-E6 type battery until you feel it click into place under the locking tab.
TIP To release the battery, push the locking tab towards the front of the camera and the battery will eject.
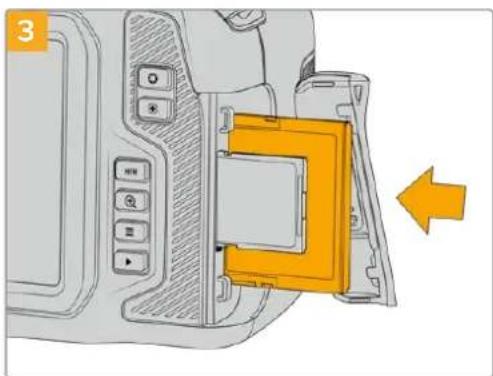
3 Close the door to the battery terminal and gently push until it clicks into place.
4 Move the power switch on the top of your camera to the 'on' position. To turn off the camera, move the power switch to the 'off' position.
Using a Blackmagic Pocket Camera Battery Grip
If you have a Blackmagic Pocket Camera Battery Grip then it's a good idea to install it now before you continue. The Blackmagic Pocket Camera Battery Grip is designed to fit the Pocket Cinema Camera 6K and Pocket Cinema Camera 4K models.
The battery grip adds a horizontal handle to your camera and holds two NP-F570 L-Series batteries so you can shoot continuously for over two hours. The 12 V DC input can recharge the batteries in the grip or provide uninterrupted power to the camera while changing the batteries. You can use the USB-C port to recharge batteries in the grip while the camera is switched off.
To attach Blackmagic Pocket Camera Battery Grip:
Before you start attaching Blackmagic Pocket Camera Battery Grip, switch off your Pocket Cinema Camera and unplug any external power source.
Open the camera battery compartment and remove the LP-E6 battery.
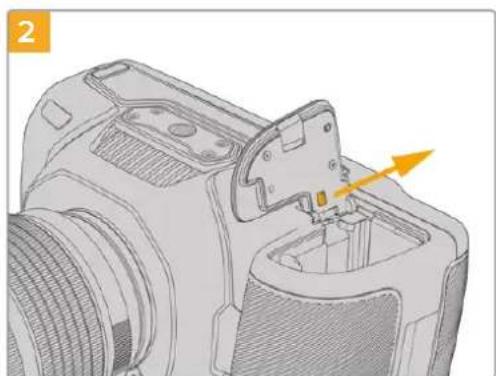
Slide the tab near the hinge of the battery compartment cover and remove the cover from the camera.
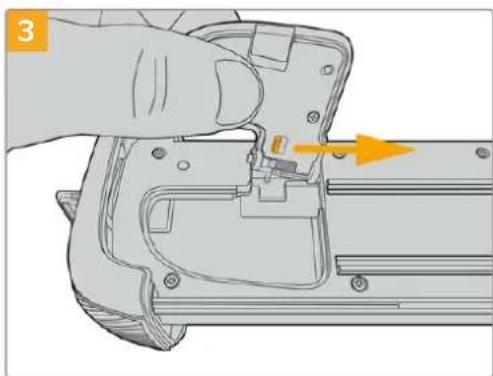
For safe storage of the battery compartment cover, clip it into the recess on the underside of the battery grip tray.
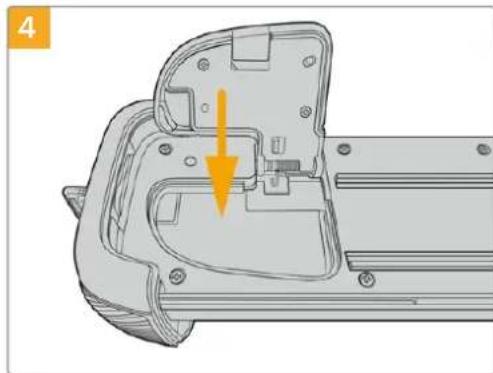
Close the battery compartment cover so it sits level with the underside of the battery grip tray.

Insert the battery shaped part of the camera grip into the battery compartment of your camera. The 1/4 inch screw on top of the battery grip should line up with the 1/4-20 mounting point on the base of the camera. A small pin next to the 1/4 inch screw helps maintain correct alignment.
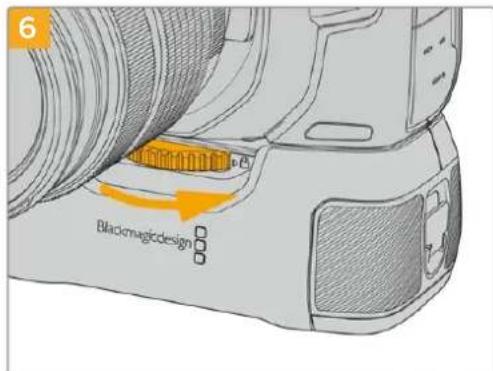
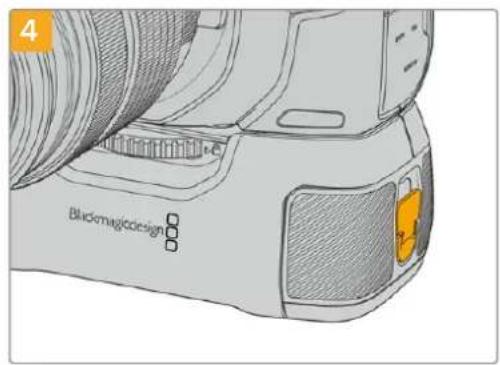
Turn the knob on the front of the battery grip to the right to tighten the screw firmly and secure the battery grip to the camera.
To insert batteries in Blackmagic Pocket Camera Battery Grip:

Twist the locking tab on the end of the battery grip anticlockwise to unlock the battery tray. Slide out the battery tray. You can do this before or after attaching Blackmagic Pocket Battery Grip to your camera.
Place two NP-F570 batteries into the battery tray, being careful of their orientation, and slide them away from each other. A tab between the batteries moves up to lock the batteries into place. When you want to remove the batteries, press down on this locking tab and slide the batteries toward each other.

Slide the battery tray into the battery grip and turn the locking tab clockwise. It's important to note that you can continue filming while changing batteries in the battery grip if your camera is powered by an external source plugged into the DC power input.
Twist the locking tab on the end of the battery grip clockwise to lock the battery tray.
TIP When you have Blackmagic Pocket Camera Battery Grip attached and two batteries inserted, the battery level indicator in the top right corner of the LCD touchscreen shows two battery icons so you can monitor their charge level independently. For more information, see the 'power' section.
Powering Your Camera with the Included Power Cable
The included 100-240 volt AC plug pack can be used to simultaneously power the camera and charge the LP-E6 battery or two NP-F570 batteries if you have Blackmagic Pocket Camera Battery Grip attached to your camera. The DC power connector locks to the camera so it cannot be accidentally disconnected.
To plug in external power:
1 Connect the AC to 12V DC adapter plug to your mains power socket.
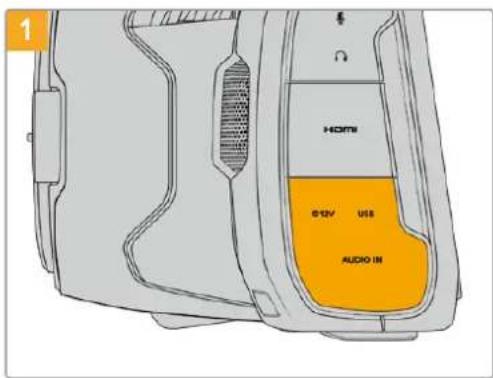
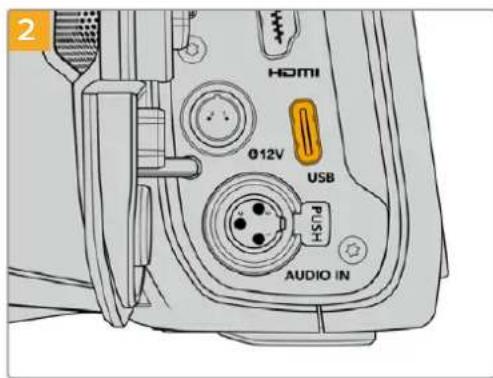
2 Open the rubber protector on the left side of your camera and rotate the locking DC power connector so that it lines up with the recess on the top of the 12V DC power input. Gently push the connector into the input until it clicks.
3 To unplug the connector, pull the sheath away from the connector and remove the connector from the input.
If you have both external and battery power connected, only external power is used. If you remove external power while a charged battery is connected, your camera switches to battery power without interruption.
Your camera's LP-E6 battery can be charged via USB when the camera is switched off. This is convenient as you can use a portable power bank to charge the camera when not in use. Blackmagic Pocket Cinema Camera supports charging via standard 10W USB wall chargers and can also be used with chargers that support USB-Power Delivery, or USB PD. USB PD chargers typically have a USB-C connection and up to 20V output, so can provide a faster charge. Charging the LP-E6 battery via the 12V DC power input is supported when the camera is switched on or off.
TIP If charging a hot battery immediately after use, charging speed is reduced until the battery cools below 45^ or 113^ . We recommend letting the battery cool down for 15 minutes before charging.
You are now ready to insert the storage media and start recording!
Storage Media
Your Blackmagic Pocket Cinema Camera uses standard SD cards, faster UHS-II SD cards or CFast 2.0 cards to record video.
Using the USB-C expansion port, you can also connect high capacity USB-C flash disks for increased recording times.
CFast Cards
CFast 2.0 cards are capable of supporting very high data rates, so are perfect for recording 6K, 4K and HD video at high frame rates. Refer to the record duration tables in the 'recording' section for details on the maximum frame rates that can be recorded in each format.
NOTE CFast 2.0 cards are generally high speed cards, though some cards have slower write speeds compared to read speeds, and maximum data rates can differ between models. For reliable recording with your chosen frame rates, use only the cards recommended by Blackmagic Design.
To insert a CFast card:

To access the media slots, slide the door on the right side toward the back of the camera.

The spring loaded door opens so you can access the CFast and SD memory card slots.
Insert the CFast card into the CFast card slot until you feel it lock into place. The card should insert easily without the need for excessive force. To remove a CFast card, gently push the CFast card in and then release to eject it.
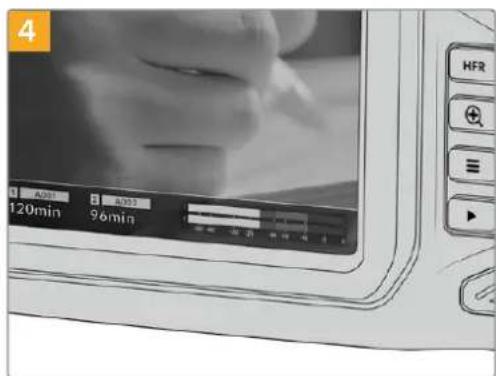
The storage information at the bottom of the LCD touchscreen will show the name and record time remaining of the detected CFast card.
Inserting an SD card is like inserting a CFast card. For more information, see 'To insert an SD Card'.
Choosing a CFast 2.0 Card
When working with high data rate video it's important to carefully check the CFast card that you would like to use. This is because CFast 2.0 cards have different read and write speeds.
For a list of CFast 2.0 cards tested and recommended by Blackmagic Design for shooting on Pocket Cinema Camera, see the 'Recommended Recording Media' section.
For the most up to date information on supported CFast cards on Blackmagic Pocket Cinema Camera, please refer to the Blackmagic Design support center at www.blackmagicdesign.com/support.
SD Cards
In addition to CFast 2.0 cards, your camera can record on high speed UHS-I and UHS-II type SD cards. UHS-I SD cards allow you to use more affordable storage media when shooting compressed video formats in HD, and even faster UHS-II cards allow you to record Blackmagic RAW as well as Ultra HD content in ProRes.
With SD cards, you can use more affordable storage media when shooting compressed video formats in HD.
SDXC and SDHC are a very common media storage format for consumer still and video cameras. If you've ever shot video using a DSLR, or use a Blackmagic Micro Cinema Camera, Pocket Cinema Camera or Blackmagic Video Assist, you may already have compatible SD cards to use.
For projects that don't require the highest resolution files, or for when long recording durations are needed, using SD cards can be very economical. Lower capacity and lower speed SD cards can also be used for storing and loading LUTs and Presets.
To insert an SD card

To access the media slots, slide the door on the right side toward the back of the camera.

The spring loaded door opens so you can access the media slots.

With the label on the SD card facing the touchscreen, insert the SD card into the SD card slot until you feel it lock into place. The card should insert easily without the need for excessive force.
To remove a the SD card, gently push the SD card in and then release to eject it.
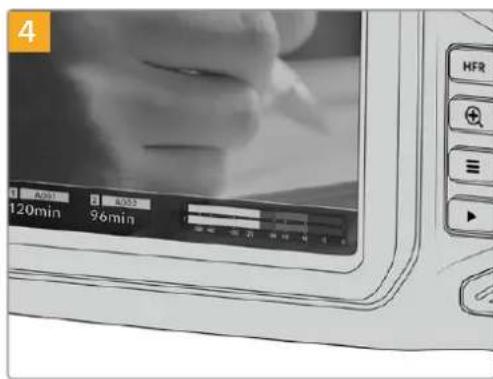
The storage information at the bottom of the LCD touchscreen will show the name and record time remaining of the detected SD card.
Choosing an SD Card
If you are recording 6K, 4K DCI or Ultra HD, then we recommend using the fastest high speed UHS-II type SD cards available. It's important to use high speed UHS-II SD cards for 6K, 4K DCI, Ultra HD and HD recording, or UHS-I cards for HD recording. These cards are rated for fast data speeds and support larger storage sizes. Generally the faster the cards, the better.
Before using your cards, you need to format them to either HFS+ or exFAT formats. It's easy to format your media via your camera's 'storage' settings. Refer to the 'settings' section for more information on storage settings.
If you want to, you can format your cards using a Mac or Windows computer. When using your media on Mac, you can use HFS+ which is the Mac disk format, also known as OS X Extended. If you are using Windows then you should use exFAT format, which is the Windows disk format that Mac computers can also read.
For a list of SD cards tested and recommended by Blackmagic Design for shooting on Pocket Cinema Camera, see the 'Recommended Recording Media' section.
For the most up to date information on supported SD cards on Blackmagic Pocket Cinema Camera, please refer to the Blackmagic Design support center at www.blackmagicdesign.com/support.
NOTE For high resolution, high frame rate recording, we recommend using CFast 2.0 media or an external USB-C flash disk, as they are typically faster and available in higher capacities.
Locking and Unlocking SD Cards
SD cards can be write protected, or 'locked', to prevent data from being overwritten. When inserting an SD card, make sure the card is not write protected. To disable write protection, slide the plastic switch on the left side of the card to the position closest to the connectors. You can always set the card to the locked again after recording.
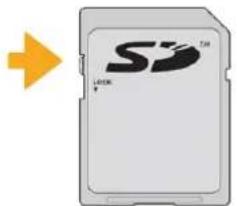
Move the lock tab up or down to lock or unlock an SD card
Your Blackmagic Pocket Cinema Camera lets you know if you've inserted a locked SD card by displaying the word 'locked' instead of the card's duration on the LCD touchscreen, and will display a padlock icon in the storage menu next to the card name. If the card is locked, you won't be able to record video, capture stills, or export LUTs and presets until it is unlocked.
USB-C flash disks
Your Blackmagic Pocket Cinema Camera features a high speed USB-C expansion port, which allows you to record video directly to USB-C flash disks. These fast, high capacity drives allow you to record video for long periods, which can be important when filming events with long durations.
Once you have finished recording you can connect the same drive directly to your computer for editing and post production, without having to copy media across.
To connect to a USB-C flash disk:
Open the rubber protector on the left side of the camera and connect the other end of the cable to the USB-C port.
Connect one end of a USB type-C cable to your USB-C flash disk.
NOTE When a USB-C flash disk is connected to your camera, it occupies the same place as the SD card in your camera's operating system. This means that when you have a compatible USB-C flash disk connected, your camera's SD card slot is unavailable.
To use the SD card slot instead of the USB-C flash disk, disconnect the USB-C flash disk from your camera.
Choosing a fast USB-C flash disk
USB-C flash disks are designed to offer fast, affordable storage for a wide range of devices and are readily available from a variety of consumer electronics outlets. It's important to note that film making is only one part of the USB-C flash disk market, so choosing the best drive is vital to making sure you have enough speed to record 6K and 4K footage.
Many USB-C flash disks are designed for home computing and aren't fast enough to record 6K and 4K video.
For a list of USB-C flash disks tested and recommended by Blackmagic Design for shooting on Pocket Cinema Camera, see the 'Recommended Recording Media' section.
For the most up to date list of recommended USB-C flash disks please go to www.blackmagicdesign.com/support.
Important Notes About USB-C flash disk Speed
Some models of USB-C flash disk can't save video data at the speed the manufacturer claims. This is due to the disk using hidden data compression to attain higher write speeds. This data compression can only save data at the manufacturer's claimed speed when storing data such as blank data or simple files. Video data includes video noise and pixels which are more random so compression will not help, therefore revealing the true speed of the disk.
Some USB-C flash disks can have as much as 50% less write speed than the manufacturer's claimed speed. So even though the disk specifications claim a USB-C flash disk has speeds fast enough to handle video, in reality the disk isn't fast enough for real time video capture.
Use Blackmagic Disk Speed Test to accurately measure whether your USB-C flash disk will be able to handle high data rate video capture and playback. Blackmagic Disk Speed Test uses data to simulate the storage of video so you get results similar to what you'll see when capturing video to a disk. During Blackmagic testing, we have found newer, larger models of USB-C flash disk and larger capacity USB-C flash disks are generally faster.
Blackmagic Disk Speed Test is available from the Mac app store. Windows and Mac versions are also included in Blackmagic Desktop Video, which you can download from the 'capture and playback' section of the Blackmagic Design support center at www.blackmagicdesign.com/support.
Preparing Media for Recording
You can format your CFast cards, SD cards or USB-C flash disks using the 'format card' feature on your camera's storage and formatting menu, or via a Mac or Windows computer. For best performance, we recommend formatting storage media using your camera.
HFS+ is also known as OS X Extended and is the recommended format as it supports 'journaling'. Data on journaled media is more likely to be recovered in the rare event that your storage media becomes corrupted. HFS+ is natively supported by Mac. exFAT is supported natively by Mac and Windows without needing any additional software, but does not support journaling.
Preparing Media on Blackmagic Pocket Cinema Camera
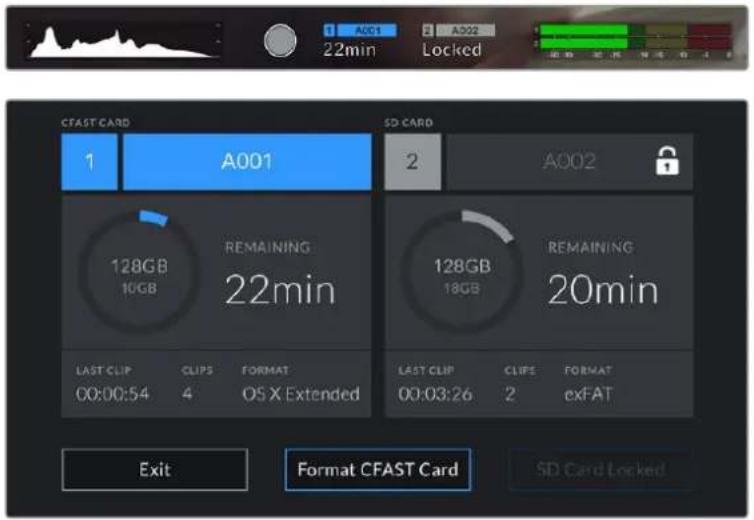
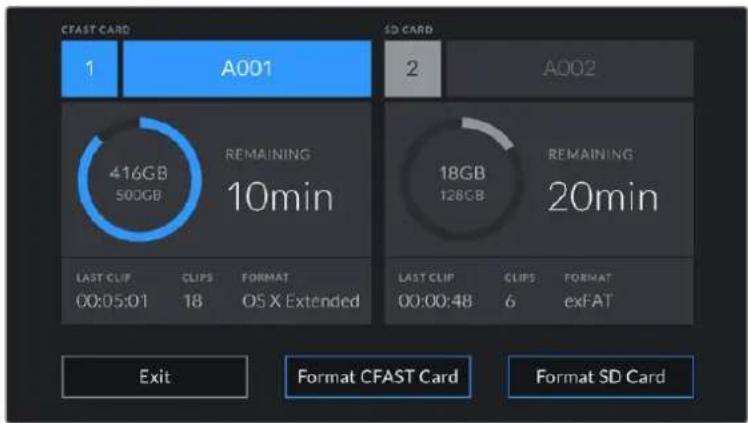
1 Tap either storage indicator at the bottom of the LCD touchscreen to enter the storage manager.
2 Tap 'Format CFast card' or 'Format SD card'. If you have a USB-C flash disk connected to your camera, 'Format drive' will be displayed instead of 'Format SD card'.
'Format SD card' is replaced with 'Format external drive' in your storage and formatting screen when you have a USB-C flash disk connected to your camera
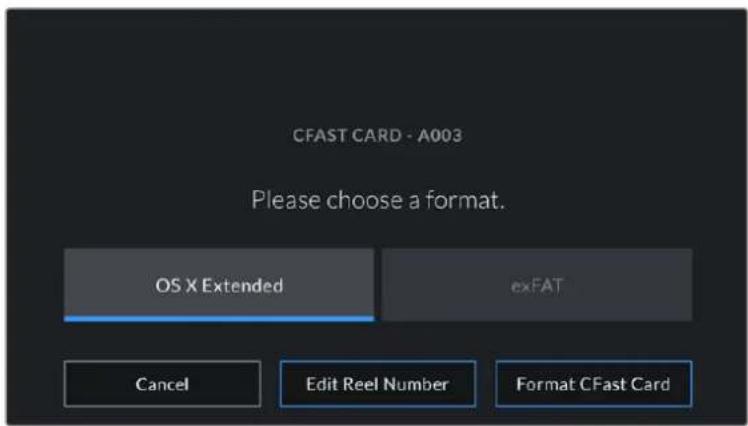
3 Tap 'edit reel number' if you would like to manually change the reel number. Use the keypad to enter a new reel number and press 'update' to confirm your selection.
4 Choose OS X Extended or exFAT format and tap the format button.
Tap 'edit reel number' to manually edit the reel number
5 A confirmation screen will allow you to confirm the card to be formatted, the selected format and the reel number. Confirm your selection by tapping the format button. Tap 'cancel' to cancel the format.
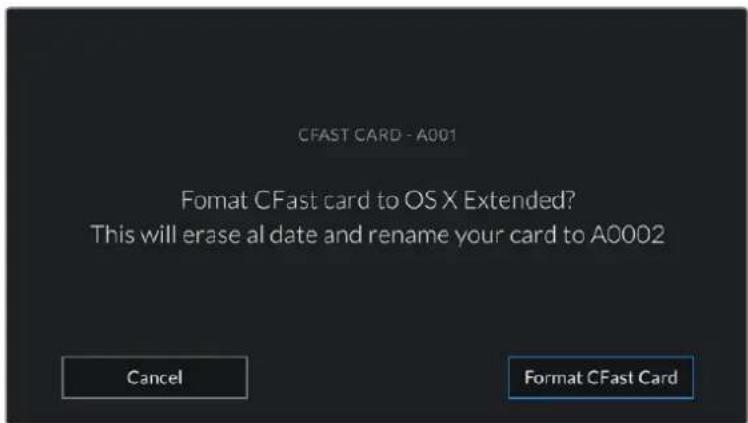
Check that you have selected the correct card before formatting.
6 Hold down the format button for three seconds to format your media.
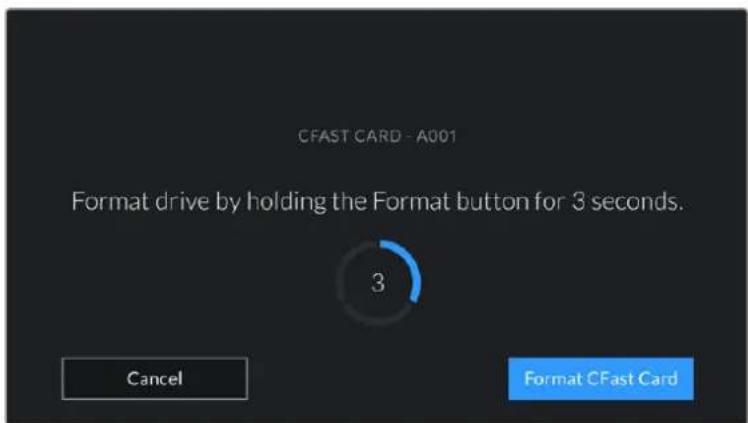
7 The camera notifies you when the format is complete and your drive is ready for use, or if formatting has failed.
8 Tap 'ok' to return to the storage manager.
9 Tap 'exit' to leave the storage manager.
When formatting CFast cards, SD cards or USB-C flash disks using your camera, the camera ID that is generated from the slate and reel number are used to name the media. Your camera automatically adjusts the reel numbers incrementally each time you format. If you need to manually enter a specific reel number, tap the 'edit reel number' and enter the number you want to format the card as.
Tap on 'reset project data' in the 'project' tab of the slate if you're starting a new project and want the numbering to reset back to 1.
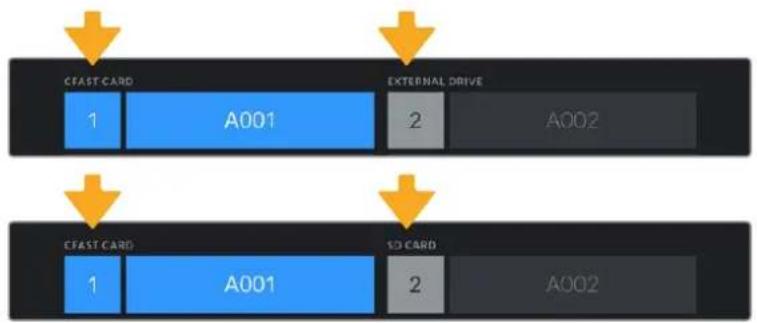
The storage manager on your camera indicates whether you are currently managing CFast, SD or USB-C flash disk media
TIP If the SD card is write protected, your camera will display the word 'locked' instead of the card's duration on the LCD touchscreen, and will display a padlock icon in the storage menu. Unlock the card to format and record. For more information, refer to the 'SD cards' section of this manual.
NOTE If you have a USB-C flash disk connected, 'external drive' appears over storage slot 2.
Preparing Media on a Mac
Use the Disk Utility application included with Mac to format your CFast card, SD card, or USB-C flash disk in the HFS+ or exFAT formats. Remember to backup anything important from your media first as all data will be lost when it is formatted.
1 Connect the storage media to your computer and dismiss any message offering to use your media for Time Machine backups.
2 Go to applications/utilities and launch Disk Utility.
3 Click on the disk icon for your camera's storage media and then click the 'erase' tab.
4 Set the 'format' to 'Mac OS extended (journale)' or 'exFAT'.
5 Type a 'name' for the new volume and then click 'erase'. Your camera's storage media will quickly be formatted and made ready for use.
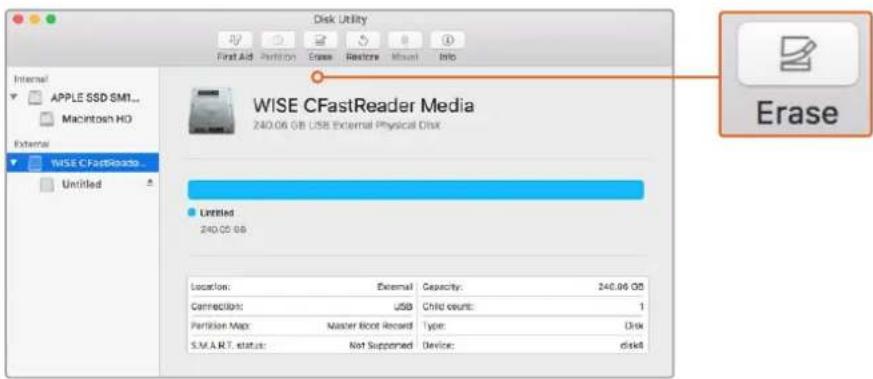
Use Disk Utility on Mac to erase your camera's storage media in the Mac OS extended (journale) or exFAT format
Preparing Media on Windows
The 'format' dialog box can format your camera's storage media in the exFAT format on a Windows PC. Remember to backup anything important from your media first as all data will be lost when it is formatted.
1 Connect your camera's storage media to your computer using an external reader, USB-C cable or adapter.
2 Open the 'start' menu or 'start' screen and choose 'computer'. Right click on your camera's storage media.
3 From the contextual menu, choose 'format'.
4 Set the file system to 'exFAT' and the allocation unit size to 128 kilobytes.
5 Type a volume label, select 'quick format' and click 'start'.
6 Your storage media will quickly be formatted and made ready for use.
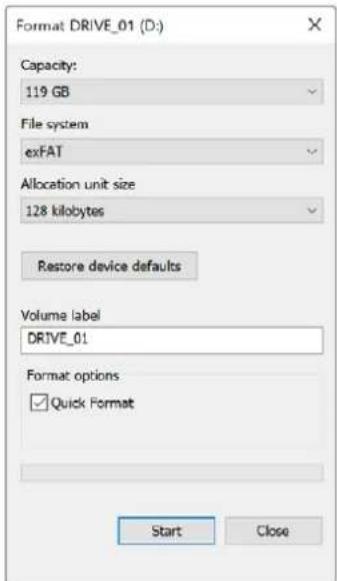
Use the 'format' dialog box feature in Windows to format your camera's storage media in the exFAT format
NOTE If your recordings are dropping frames, check that your card or drive is on our list of recommended media for the codec and frame size you are using. For lower data rates try lowering your frame rate, resolution, or try a compressed codec such as ProRes. Check the Blackmagic Design website for the latest information at www.blackmagicdesign.com
NOTE Partitioned media can be used with your Blackmagic Pocket Cinema Camera, though your camera will only recognize the first partition of your media for recording and playback.
It's worth noting that if you use the storage and formatting menu to format your media, the entire drive including all partitions will be erased, not just the first partition that has been used for recording and playback. For this reason we strongly recommend using media with one partition only.
Recording
Recording Clips
Blackmagic Pocket Cinema Camera features two record buttons. The primary record button is located on the top of the handgrip for triggering with your index finger when holding the handgrip of the camera with your right hand.
The second record button is located on the front of your camera to allow you to begin recording while holding the camera with one hand in situations where you want to record yourself. The button is located in an easy to reach position, ideal if you are recording yourself for video blogs.
Press one of the 'record' buttons on your camera to begin recording immediately. Press 'record' again to stop recording.
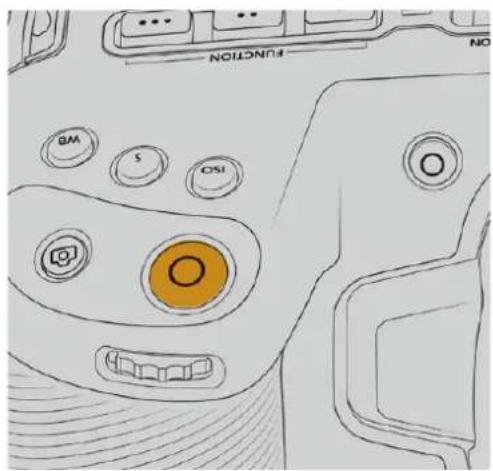
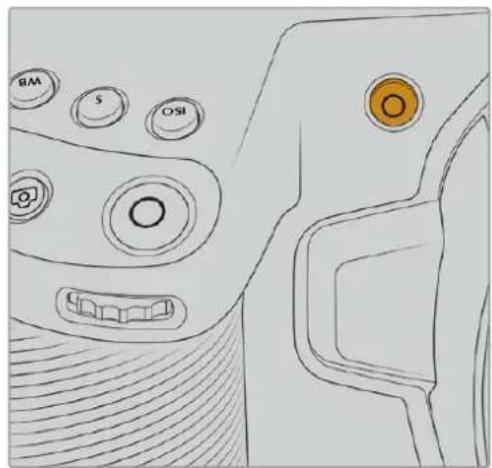
The 'record' button located on the The 'record' button located on top panel of your camera the front of your camera
Before you start recording, tap and hold the name of the media at the bottom of the touchscreen to select the memory card or USB-C flash disk you want to use. The bar over the media type you have selected turns blue to indicate the camera is set to record to this media. To record to a different card or drive, tap and hold the name of the media. While recording, the bar is red.
Choosing the Recording Format
Blackmagic Pocket Cinema Camera records using Apple ProRes codecs including ProRes 422 HQ, ProRes 422, ProRes 422 LT and ProRes 422 Proxy. ProRes codecs let you fit more video on your SD card, CFast card or USB-C flash disk. ProRes 422 HQ provides the highest quality video with the lowest compression. Alternatively, ProRes 422 Proxy gives you far more recording time with greater compression. Your camera can also record with the Blackmagic RAW format. You may decide to experiment to see which format best suits your workflow.
It's important to note that Blackmagic Pocket Cinema Camera can use Blackmagic RAW for full sensor and windowed sensor formats, and must use ProRes for scaled formats.
For more information on windowed and scaled formats, see the 'maximum sensor frame rates' section.
Blackmagic RAW
Blackmagic Pocket Cinema Camera supports the Blackmagic RAW file format. This format offers superior image quality, wide dynamic range and a broad selection of compression ratios. Blackmagic RAW features all the user benefits of RAW recording, but the files are very fast because most of the processing is performed in the camera where it can be hardware accelerated by the camera itself.
Blackmagic RAW also includes powerful metadata support so the software reading the files knows your camera settings. If you like shooting in video gamma because you need to turn around edits quickly and you don't have time for color correction, then this metadata feature means you can select video gamma, shoot in video gamma, and the file will display with video gamma applied when you open it in software. However underneath, the file is actually film gamma and the metadata in the file is what's telling the software to apply the video gamma.
So what all this means is if you want to color grade your images at some point, then you have all that film dynamic range preserved in the file. You don't have your images hard clipped in the whites or the blacks, so you retain detail and you can color grade to make all your images look cinematic. However, if you don't have time for color grading, that's fine because your images will have the video gamma applied and look like normal video camera images. You are not locked in on the shoot and you can change your mind later during post production.
Blackmagic RAW files are extremely fast and the codec is optimized for your computer's CPU and GPU. This means it has fast smooth playback and eliminates the need for hardware decoder boards, which is important for laptop use. Software that reads Blackmagic RAW also gets the advantage of processing via Apple Metal, Nvidia CUDA and OpenCL.
This means that Blackmagic RAW plays back at normal speed like a video file on most computers, without needing to cache it first or lower the resolution.
It's also worth mentioning that lens information is recorded in the metadata on a frame by frame basis. For example, when using compatible lenses, any zoom or focus changes performed over the length of a clip will be saved, frame by frame, to the metadata in the Blackmagic RAW file.
Recording to Blackmagic RAW
Blackmagic RAW works in 2 different ways. You have a choice to use either the constant bitrate codec, or the constant quality codec.
The constant bitrate codec works in a similar way to most codecs. It tries to keep the data rate at a consistent level and won't let the data rate go too high. This means even if you are shooting a complex image that might need a bit more data to store the image, a constant bitrate codec will just compress the image harder to make sure the images fit within the space allocated.
This can be fine for video CODECs, however when shooting Blackmagic RAW you really want to ensure the quality is predictable. What would happen if the images you were shooting needed more data, but the codec just compresses harder to make a specified data rate? It's possible you could lose quality, but not be sure it's happening until you return from a shoot.
To solve this problem, Blackmagic RAW also has an alternative codec choice called constant quality. This codec is technically called a variable bitrate codec, but what it's really doing is allowing the size of the file to grow if your images need extra data. There is no upper limit on the file size if you need to encode an image but maintain quality.
So Blackmagic RAW set to the constant quality setting will just let the file grow as big as it needs to be to encode your images. It also means the files could be larger or smaller depending on what you are shooting. I guess if you leave your lens cap on the lens, you won't waste space on your media!
It is also worth noting that the quality settings for Blackmagic RAW are not obscure names, but are more meaningful as they are derived from what's happening technically. So for example when you have selected the constant bitrate codec, you will see quality settings of 3:1, 5:1, 8:1 and 12:1. These are the ratios of the uncompressed RAW file size vs the file sizes you should expect when shooting in Blackmagic RAW. 3:1 is better quality as the file is larger, while 12:1 is the smallest file size with the lowest quality. Many users of Blackmagic RAW find that 12:1 has been perfectly ok and they have not seen any quality limitations. However it's best to experiment and try various settings for yourself.
When using Blackmagic RAW in constant quality you will see the settings are Q0 and Q5. These are the compression parameters passed to the codec and they are setting how much compression is applied in a more technical way. This setting is different because the codec operates differently between constant bitrate vs constant quality. In this constant quality setting, you really cannot tell what the file size ratio will become as it varies a lot based on what you are shooting. So in this case the setting is different and the file will become the size needed to store your media.
Constant Bitrate Settings
The names for 3:1, 5:1, 8:1 and 12:1 represent the compression ratio. For example, 12:1 compression produces a file size roughly 12 times smaller than uncompressed RAW.
Constant Quality Settings
Q0 and Q5 refer to different levels of quantization. Q5 has a greater level of quantization but offers a greatly improved data rate. As mentioned above, the constant quality setting can result in files that grow and shrink quite a lot, depending on what you are shooting. This also means it's possible to shoot something and see the file size increase to beyond what your media card can keep up with. It could result in dropped frames. However the benefit is that you can instantly see if this happens on a shoot and then investigate your settings vs quality.
Blackmagic RAW Player
The Blackmagic RAW player included in your Blackmagic camera's software installer is a streamlined application for reviewing clips. Simply double click on a Blackmagic RAW file to open it, and you can quickly play and scroll through the file with its full resolution and bit depth.
When decoding frames, the CPU acceleration in the SDK library supports all main architectures, and also supports GPU acceleration via Apple Metal, Nvidia CUDA and OpenCL. It also works with the Blackmagic eGPU for extra performance. Blackmagic RAW player is available for Mac, Windows and Linux.
Sidecar Files
Blackmagic RAW sidecar files let you override metadata in a file without overwriting embedded metadata in the original file. This metadata includes the Blackmagic RAW settings as well as information on iris, focus, focal length, while balance, tint, color space, project name, take number and more. Metadata is encoded frame by frame over the duration of the clip, which is important for lens data if the lens is adjusted during a shot. You can add or edit metadata in sidecar files with DaVinci Resolve or even a text editor because it's a human readable format.
Sidecar files can be used to automatically add new Blackmagic RAW settings to a playback simply by moving the sidecar file into the same folder as the corresponding Blackmagic RAW file. If you move the sidecar file out of the folder and reopen the Blackmagic RAW file, the changed settings are not applied and you see the file as it was originally shot. Any software that uses the Blackmagic RAW SDK can access these settings. Changes made are saved in the sidecar file and can then be seen by Blackmagic RAW Player or any other software capable of reading Blackmagic RAW files.
When shooting video gamma, the file stays in film gamma, and the metadata tells the Blackmagic RAW processing to display using video gamma. Video gamma is great when you don't want to grade the image and want to deliver content quickly, however if you want to pull up the black parts of the image, or pull down the white areas, all the detail is retained. You never clip the video and all the detail is still there if you want to access it at any time.
Blackmagic RAW in DaVinci Resolve
Settings can be adjusted for each Blackmagic RAW file, and then saved as a new sidecar file from the 'Camera RAW' tab in DaVinci Resolve for creative effect or optimized viewing. This also means you can copy your media for another DaVinci Resolve artist and they will have access to your modified gamma settings automatically on import. In addition to the other metadata your camera files contain, DaVinci Resolve can read your selected dynamic range, so your clips will automatically display in DaVinci Resolve with 'film', 'extended video' or 'video' dynamic range.
You can then customize these settings by adjusting the saturation, contrast and midpoint, as well as the highlight and shadow rolloff. Any adjustments can then be saved as a sidecar file, so the changes can be seen by anyone else working with the files in post. You can always return to the original camera metadata at any time.
You can also export a single Blackmagic RAW frame from the 'Camera RAW' tab in DaVinci Resolve, which contains all adjustments, metadata, full resolution and color information so it is easy to share a single frame grab or reference file with others.
For more information on how to use Blackmagic RAW in DaVinci Resolve, see the 'Using DaVinci Resolve' chapter in this manual.
Blackmagic RAW Software Development Kit
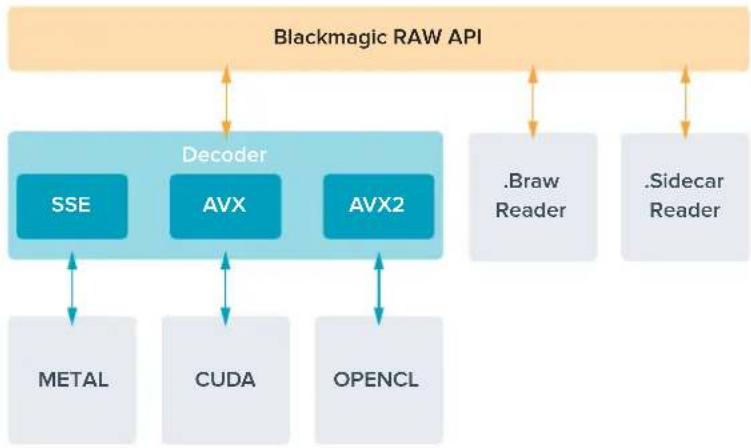
The Blackmagic RAW Software Development Kit is an API developed by Blackmagic Design. You can use the Blackmagic RAW SDK to write your own applications to use the Blackmagic RAW format. This SDK library can be used by any developer to add support for reading, editing, and saving Blackmagic RAW files. The Blackmagic RAW SDK includes all the generation 4 color science so you can achieve organic cinematic images across any app that supports it. The Blackmagic RAW SDK supports Mac, Windows and Linux, and is available as a free download from the developer page of the Blackmagic website at www.blackmagicdesign.com/developer
The following diagram illustrates the components of the Blackmagic RAW API:
Maximum Sensor Frame Rates
Blackmagic Pocket Cinema Camera 6K Maximum Sensor Frame Rates
| Resolution Codec Sensor Scan Max Frame Rate | ||||
| 6K | 6144 x 3456 | Blackmagic RAW | Full | 50 |
| 6K 2.4:1 | 6144 x 2560 | Blackmagic RAW | Window | 60 |
| 5.7K 17:9 | 5744 x 3024 | Blackmagic RAW | Window | 60 |
| 4K DCI | 4096 x 2160 ProRes 422 HQ Scaled from 5.7K | 60 | ||
| 4096 x 2160 | ProRes 422 | Scaled from 5.7K | 60 | |
| 4096 x 2160 | ProRes 422 LT | Scaled from 5.7K | 60 | |
| 4096 x 2160 | ProRes 422 Proxy | Scaled from 5.7K | 60 | |
| Ultra HD | 3840 x 2160 | ProRes 422 HQ Scaled from full 50 | ||
| 3840 x 2160 | ProRes 422 | Scaled from full | 50 | |
| 3840 x 2160 | ProRes 422 LT | Scaled from full | 50 | |
| 3840 x 2160 | ProRes 422 Proxy | Scaled from full | 50 | |
| 3840 x 2160 | ProRes 422 HQ | Scaled from 5.7K | 60 | |
| 3840 x 2160 | ProRes 422 | Scaled from 5.7K | 60 | |
| 3840 x 2160 | ProRes 422 LT | Scaled from 5.7K | 60 | |
| 3840 x 2160 | ProRes 422 Proxy | Scaled from 5.7K | 60 | |
| 3.7K Anamorphic | 3728 x 3104 | Blackmagic RAW | Window | 60 |
| 2.8K 17:9 | 2868 x 1512 | Blackmagic RAW | Window | 120 |
| Resolution Codec Sensor Scan Max Frame Rate | ||
| HD | 1920 x 1080 ProRes 422 HQ Scaled from full 50 | |
| 1920 x 1080 ProRes 422 Scaled from full 50 | ||
| 1920 x 1080 ProRes 422 LT Scaled from full 50 | ||
| 1920 x 1080 ProRes 422 Proxy Scaled from full 50 | ||
| 1920 x 1080 ProRes 422 HQ Scaled from 5.7K 60 | ||
| 1920 x 1080 ProRes 422 Scaled from 5.7K 60 | ||
| 1920 x 1080 ProRes 422 LT Scaled from 5.7K 60 | ||
| 1920 x 1080 ProRes 422 Proxy Scaled from 5.7K 60 | ||
| 1920 x 1080 ProRes 422 HQ Scaled from 2.7K 120 | ||
| 1920 x 1080 ProRes 422 Scaled from 2.7K 120 | ||
| 1920 x 1080 ProRes 422 LT Scaled from 2.7K 120 | ||
| 1920 x 1080 ProRes 422 Proxy Scaled from 2.7K 120 | ||
Blackmagic Pocket Cinema Camera 4K Maximum Sensor Frame Rates
| Resolution Codec Sensor Scan Max Frame Rate | ||||
| 4K DCI | 4096 x 2160 Blackmagic RAW Full 60 | |||
| 4096 x 2160 ProRes 422 HQ Full 60 | ||||
| 4096 x 2160 ProRes 422 Full 60 | ||||
| 4096 x 2160 ProRes 422 LT Full 60 | ||||
| 4096 x 2160 ProRes 422 Proxy Full 60 | ||||
| 4K 2.4:1 | 4096 x 1720 | Blackmagic RAW | Window | 75 |
| Ultra HD | 3840 x 2160 | Blackmagic RAW | Window | 60 |
| 3840 x 2160 | ProRes 422 HQ | Window | 60 | |
| 3840 x 2160 | ProRes 422 | Window | 60 | |
| 3840 x 2160 | ProRes 422 LT | Window | 60 | |
| 3840 x 2160 | ProRes 422 Proxy | Window | 60 | |
| 2.8K Anamorphic | 2880 x 2160 | Blackmagic RAW | Window | 80 |
| 2.6K 16:9 | 2688 x 1512 | Blackmagic RAW | Window | 120 |
| HD | 1920 x 1080 ProRes 422 HQ Scaled from full 60 | |||
| 1920 x 1080 ProRes 422 Scaled from full 60 | ||||
| 1920 x 1080 ProRes 422 LT Scaled from full 60 | ||||
| 1920 x 1080 ProRes 422 Proxy Scaled from full 60 | ||||
| 1920 x 1080 ProRes 422 HQ Scaled from 2.6K | 120 | |||
| 1920 x 1080 | ProRes 422 | Scaled from 2.6K | 120 | |
| 1920 x 1080 ProRes 422 LT Scaled from 2.6K | 120 | |||
| 1920 x 1080 ProRes 422 Proxy Scaled from 2.6K | 120 | |||
| 1920 x 1080 | Blackmagic RAW | Window | 120 | |
| 1920 x 1080 | ProRes 422 HQ | Window | 120 | |
| 1920 x 1080 ProRes 422 Window | 120 | |||
| 1920 x 1080 | ProRes 422 LT | Window | 120 | |
| 1920 x 1080 | ProRes 422 Proxy | Window | 120 | |
NOTE The 2.6K 16:9 shooting format has a sensor area optimized for use with Super 16mm lenses and high frame rates.
Record Duration
These tables show approximate record duration in minutes and seconds based on format, project frame rate and media size. It's important to note that available resolutions and codec differ for Pocket Cinema Camera 6K and Pocket Cinema Camera 4K.
The maximum recording time for your storage media can vary depending on the data capacity your CFast card, SD card or USB-C flash disk, and the recording format and frame rate you choose. For example, the storage rate for Apple ProRes 422 HQ at 3840 × 2160 is approximately 880 Mbps. At 24 frames per second, you can record approximately 47 minutes of video on a 256GB CFast 2.0 card. At the same settings you can record approximately 23 minutes of video on a 128GB CFast card, which is approximately half the record duration of a 256GB CFast card.
It should be noted that recording duration of media can vary slightly between different manufacturers. It can also vary depending on whether the storage media is formatted as exFAT or Mac OS X Extended.
Simple scenes containing less detail tend to require less data than more dense compositions. The values in these tables assume shots with a high complexity, which means you may get slightly longer record times depending on the nature of your shoot.
| 6K | |||||
| CFast Card | Frame Rate | Blackmagic RAW 3:1 | Blackmagic RAW 5:1 | Blackmagic RAW 8:1 | Blackmagic RAW 12:1 |
| 256GB | Duration Duration Duration Duration | ||||
| 23.98 17 | mins 28 mins | 45 mins | 67 mins | ||
| 24 17 mins | 28 mins 45 mins | mins 67 mins | |||
| 25 16 mins | 27 mins 43 mins | mins 64 mins | |||
| 30 13 mins | 22 mins 36 mins | mins 54 mins | |||
| 50 8 mins | 13 mins 21 mins | mins 32 mins | |||
| 6K 2.4:1 | |||||
| CFast Card | Frame Rate | Blackmagic RAW 3:1 | Blackmagic RAW 5:1 | Blackmagic RAW 8:1 | Blackmagic RAW 12:1 |
| 256GB | Duration Duration Duration Duration | ||||
| 23.98 | mins 38 mins | 60 mins | 91 mins | ||
| 24 | mins 38 mins | 60 mins | 91 mins | ||
| 25 | mins | 36 mins | 58 mins | 87 mins | |
| 30 | mins 30 mins | 48 mins | 72 mins | ||
| 50 | mins 18 mins | 29 mins | 43 mins | ||
| 60 | mins | 15 mins | 24 mins | 36 mins | |
5.7K 17:9
| CFast Card | Frame Rate | Blackmagic RAW 3:1 | Blackmagic RAW 5:1 | Blackmagic RAW 8:1 | Blackmagic RAW 12:1 |
| 256GB | Duration Duration Duration Duration | ||||
| 23.98 20 mins | mins 34 mins | 55 mins | 82 mins | ||
| 24 20 mins | 34 mins | 55 mins | 82 mins | ||
| 25 19 mins | 33 mins | 52 mins | 79 mins | ||
| 30 16 mins | 27 mins | 44 mins | 66 mins | ||
| 50 10 mins | 16 mins | 26 mins | 39 mins | ||
| 60 8 mins | 13 mins | 22 mins | 33 mins | ||
4K DCI
| CFast Card | Frame Rate | Blackmagic RAW 3:1 | Blackmagic RAW 5:1 | Blackmagic RAW 8:1 | Blackmagic RAW 12:1 | ProRes 422 HQ | ProRes 422 | ProRes 422 LT | ProRes 422 Proxy |
| 256GB | Duration Duration Duration Duration Duration Duration Duration Duration Duration Duration Duration Duration Duration Duration Duration Duration Duration Duration Duration Duration Duration Duration Duration Duration Duration Duration Duration Duration Duration Duration Duration Duration Duration Duration Duration Duration Duration Duration Duration Duration Duration Duration Duration Duration Duration Duration Duration Duration Duration Duration Duration Duration Duration Duration Duration Duration Duration Duration Duration Duration Duration Duration Duration Duration Duration Duration Duration Duration Duration Duration Duration Duration Duration Duration Duration Duration Duration Duration Duration Duration Duration Duration Duration Duration Duration Duration Duration Duration Duration Duration Duration Duration Duration Duration Duration Duration Duration Duration Duration Duration DurationDuration Duration Duration Duration Duration Duration Duration Duration Duration Duration Duration Duration Duration Duration Duration Duration Duration Duration Duration Duration Duration Duration Duration Duration Duration Duration Duration Duration Duration Duration Duration Duration Duration Duration Duration Duration Duration Duration Duration Duration Duration Duration Duration Duration Duration Duration Duration Duration Duration Duration Duration Duration Duration Duration Duration Duration Duration Duration Duration Duration Duration Duration Duration Duration Duration Duration Duration Duration Duration Duration Duration Duration Duration Duration Duration Duration Duration Duration Duration Duration Duration Duration Duration Duration Duration Duration Duration Duration Duration Duration Duration Duration Duration Duration Duration Duration Duration Duration DurationDurationDuration Duration Duration Duration Duration Duration Duration Duration Duration Duration Duration Duration Duration Duration Duration Duration Duration Duration Duration Duration Duration Duration Duration Duration Duration Duration Duration Duration Duration Duration Duration Duration Duration Duration Duration Duration Duration Duration Duration Duration Duration Duration Duration Duration Duration Duration Duration Duration Duration Duration Duration Duration Duration Duration Duration Duration Duration Duration Duration Duration Duration Duration Duration Duration Duration Duration Duration Duration Duration Duration Duration Duration Duration Duration Duration Duration Duration Duration Duration Duration Duration Duration Duration Duration Duration Duration Duration Duration Duration Duration Duration Duration Duration Duration Duration Duration Duration Duration Duration-duration duration duration duration duration duration duration duration duration duration duration duration duration duration duration duration duration duration duration duration duration duration duration duration duration duration duration duration duration duration duration duration duration duration duration duration duration duration duration duration duration duration duration duration duration duration duration duration duration duration duration duration duration duration duration duration duration duration duration duration duration duration duration duration duration duration duration duration duration duration duration duration duration duration duration duration duration duration duration duration duration duration duration duration duration duration duration duration duration duration duration duration duration duration duration duration duration duration duration duration duration Duration Duration Duration Duration Duration Duration Duration Duration Duration Duration Duration Duration Duration Duration Duration Duration Duration Duration Duration Duration Duration Duration Duration Duration Duration Duration Duration Duration Duration Duration Duration Duration Duration Duration Duration Duration Duration Duration Duration Duration Duration Duration Duration Duration Duration Duration Duration Duration Duration Duration Duration Duration Duration Duration Duration Duration Duration Duration Duration Duration Duration Duration Duration Duration Duration Duration Duration Duration Duration Duration Duration Duration Duration Duration Duration Duration Duration Duration Duration Duration Duration Duration Duration Duration Duration Duration Duration Duration Duration Duration Duration Duration Duration Duration Duration Duration Duration Duration Duration-durationdurationdurationdurationdurationdurationdurationdurationdurationdurationdurationdurationdurationdurationdurationdurationdurationdurationdurationdurationdurationdurationdurationdurationdurationdurationdurationdurationdurationdurationdurationdurationdurationdurationdurationdurationdurationdurationdurationdurationdurationdurationdurationdurationdurationdurationdurationdurationdurationdurationdurationdurationdurationdurationdurationdurationdurationdurationdurationdurationdurationdurationdurationdurationdurationdurationdurationdurationdurationdurationdurationdurationdurationdurationdurationdurationdurationdurationdurationdurationdurationdurationdurationdurationdurationdurationdurationdurationdurationdurationdurationdurationdurationdurationdurationdurationdurationdurationdurationdurationduration duration duration duration duration duration duration duration duration duration duration duration duration duration duration duration duration duration duration duration duration duration duration duration duration duration duration duration duration duration duration duration duration duration duration duration duration duration duration duration duration duration duration duration duration duration duration duration duration duration duration duration duration duration duration duration duration duration duration duration duration duration duration duration duration duration duration duration duration duration duration duration duration duration duration duration duration duration duration duration duration duration duration duration duration duration duration duration duration duration duration duration duration duration duration duration duration duration duration durationDurationDurationDurationDurationDurationDurationDurationDurationDurationDurationDurationDurationDurationDurationDurationDurationDurationDurationDurationDurationDurationDurationDurationDurationDurationDurationDurationDurationDurationDurationDurationDurationDurationDurationDurationDurationDurationDurationDurationDurationDurationDurationDurationDurationDurationDurationDurationDurationDurationDurationDurationDurationDurationDurationDurationDurationDurationDurationDurationDurationDurationDurationDurationDurationDurationDurationDurationDurationDurationDurationDurationDurationDurationDurationDurationDurationDurationDurationDurationDurationDurationDurationDurationDurationDurationDurationDurationDurationDurationDurationDurationDurationDurationDurationDurationDurationDurationDurationDurationDuration DurationDurationDurationDurationDurationDurationDurationDurationDurationDurationDurationDurationDurationDurationDurationDurationDurationDurationDurationDurationDurationDurationDurationDurationDurationDurationDurationDurationDurationDurationDurationDurationDurationDurationDurationDurationDurationDurationDurationDurationDurationDurationDurationDurationDurationDurationDurationDurationDurationDurationDurationDurationDurationDurationDurationDurationDurationDurationDurationDurationDurationDurationDurationDurationDurationDurationDurationDurationDurationDurationDurationDurationDurationDurationDurationDurationDurationDurationDurationDurationDurationDurationDurationDurationDurationDurationDurationDurationDurationDurationDurationDurationDurationDurationDurationDurationDurationDurationDurationDuration.Duration.Duration.Duration.Duration.Duration.Duration.Duration.Duration.Duration.Duration.Duration.Duration.Duration.Duration.Duration.Duration.Duration.Duration.Duration.Duration.Duration.Duration.Duration.Duration.Duration.Duration.Duration.Duration.Duration.Duration.Duration.Duration.Duration.Duration.Duration.Duration.Duration.Duration.Duration.Duration.Duration.Duration.Duration.Duration.Duration.Duration.Duration.Duration.Duration.Duration.Duration.Duration.Duration.Duration.Duration.Duration.Duration.Duration.Duration.Duration.Duration.Duration.Duration.Duration.Duration.Duration.Duration.Duration.Duration.Duration.Duration.Duration.Duration.Duration.Duration.Duration.Duration.Duration.Duration.Duration.Duration.Duration.Duration.Duration.Duration.Duration.Duration.Duration.Duration.Duration.Duration.Duration.Duration.Duration.Duration.Duration.Duration.Duration.Duration.Duration‒‒‒‒‒‒‒‒‒‒‒‒‒‒‒‒‒‒‒‒‒‒‒‒‒‒‒‒‒‒‒‒‒‒‒‒‒‒‒‒‒‒‒‒‒‒‒‒‒‒‒‒‒‒‒‒‒‒‒‒‒‒‒‒‒‒‒‒‒‒‒‒‒‒‒‒‒‒‒‒‒‒‒‒‒‒‒‒‒‒‒‒‒‒‒‒‒‒‒‒––‒‒‒‒‒‒‒‒‒‒‒‒‒‒‒‒‒‒‒‒‒‒‒‒‒‒‒‒‒‒‒‒‒‒‒‒‒‒‒‒‒‒‒‒‒‒‒‒‒‒‒‒‒‒‒‒‒‒‒‒‒‒‒‒‒‒‒‒‒‒‒‒‒‒‒‒‒‒‒‒‒‒‒‒‒‒‒‒‒‒‒‒‒‒‒‒‒‒‒∙‒‒‒‒‒‒‒‒‒‒‒‒‒‒‒‒‒‒‒‒‒‒‒‒‒‒‒‒‒‒‒‒‒‒‒‒‒‒‒‒‒‒‒‒‒‒‒‒‒‒‒‒‒‒‒‒‒‒‒‒‒‒‒‒‒‒‒‒‒‒‒‒‒‒‒‒‒‒‒‒‒‒‒‒‒‒‒‒‒‒‒‒‒‒‒‒‒‒‒⁄‒‒‒‒‒‒‒‒‒‒‒‒‒‒‒‒‒‒‒‒‒‒‒‒‒‒‒‒‒‒‒‒‒‒‒‒‒‒‒‒‒‒‒‒‒‒‒‒‒‒‒‒‒‒‒‒‒‒‒‒‒‒‒‒‒‒‒‒‒‒‒‒‒‒‒‒‒‒‒‒‒‒‒‒‒‒‒‒‒‒‒‒‒‒‒‒‒‒‒.--‒‒‒‒‒‒‒‒‒‒‒‒‒‒‒‒‒‒‒‒‒‒‒‒‒‒‒‒‒‒‒‒‒‒‒‒‒‒‒‒‒‒‒‒‒‒‒‒‒‒‒‒‒‒‒‒‒‒‒‒‒‒‒‒‒‒‒‒‒‒‒‒‒‒‒‒‒‒‒‒‒‒‒‒‒‒‒‒‒‒‒‒‒‒‒‒‒‒‒”—‒‒‒‒‒‒‒‒‒‒‒‒‒‒‒‒‒‒‒‒‒‒‒‒‒‒‒‒‒‒‒‒‒‒‒‒‒‒‒‒‒‒‒‒‒‒‒‒‒‒‒‒‒‒‒‒‒‒‒‒‒‒‒‒‒‒‒‒‒‒‒‒‒‒‒‒‒‒‒‒‒‒‒‒‒‒‒‒‒‒‒‒‒‒‒‒‒‒‒✕‒‒‒‒‒‒‒‒‒‒‒‒‒‒‒‒‒‒‒‒‒‒‒‒‒‒‒‒‒‒‒‒‒‒‒‒‒‒‒‒‒‒‒‒‒‒‒‒‒‒‒‒‒‒‒‒‒‒‒‒‒‒‒‒‒‒‒‒‒‒‒‒‒‒‒‒‒‒‒‒‒‒‒‒‒‒‒‒‒‒‒‒‒‒‒‒‒‒‒.–‒‒‒‒‒‒‒‒‒‒‒‒‒‒‒‒‒‒‒‒‒‒‒‒‒‒‒‒‒‒‒‒‒‒‒‒‒‒‒‒‒‒‒‒‒‒‒‒‒‒‒‒‒‒‒‒‒‒‒‒‒‒‒‒‒‒‒‒‒‒‒‒‒‒‒‒‒‒‒‒‒‒‒‒‒‒‒‒‒‒‒‒‒‒‒‒‒‒‒··‒‒‒‒‒‒‒‒‒‒‒‒‒‒‒‒‒‒‒‒‒‒‒‒‒‒‒‒‒‒‒‒‒‒‒‒‒‒‒‒‒‒‒‒‒‒‒‒‒‒‒‒‒‒‒‒‒‒‒‒‒‒‒‒‒‒‒‒‒‒‒‒‒‒‒‒‒‒‒‒‒‒‒‒‒‒‒‒‒‒‒‒‒‒‒‒‒‒‒‒‒‒‒‒‒‒‒‒‒‒‒‒‒‒‒‒‒‒‒‒‒‒‒‒‒‒‒‒‒‒‒‒‒‒‒‒‒‒‒‒‒‒‒‒‒‒‒‒‒‒‒‒‒‒‒‒‒‒‒‒‒‒‒‒‒‒‒‒‒‒‒‒‒‒‒‒‒‒‒‒‒‒‒‒‒‒‒‒‒‒‒‒‒‒‒‒‒‒∼‒‒‒‒‒‒‒‒‒‒‒‒‒‒‒‒‒‒‒‒‒‒‒‒‒‒‒‒‒‒‒‒‒‒‒‒‒‒‒‒‒‒‒‒‒‒‒‒‒‒‒‒‒‒‒‒‒‒‒‒‒‒‒‒‒‒‒‒‒‒‒‒‒‒‒‒‒‒‒‒‒‒‒‒‒‒‒‒‒‒‒‒‒‒‒‒‒‒‒☐‒‒‒‒‒‒‒‒‒‒‒‒‒‒‒‒‒‒‒‒‒‒‒‒‒‒‒‒‒‒‒‒‒‒‒‒‒‒‒‒‒‒‒‒‒‒‒‒‒‒‒‒‒‒‒‒‒‒‒‒‒‒‒‒‒‒‒‒‒‒‒‒‒‒‒‒‒‒‒‒‒‒‒‒‒‒‒‒‒‒‒‒‒‒‒‒‒‒‒'‒‒‒‒‒‒‒‒‒‒‒‒‒‒‒‒‒‒‒‒‒‒‒‒‒‒‒‒‒‒‒‒‒‒‒‒‒‒‒‒‒‒‒‒‒‒‒‒‒‒‒‒‒‒‒‒‒‒‒‒‒‒‒‒‒‒‒‒‒‒‒‒‒‒‒‒‒‒‒‒‒‒‒‒‒‒‒‒‒‒‒‒‒‒‒‒‒‒‒―` |
4K 2.4:1
| CFast Card | Frame Rate | Blackmagic RAW 3:1 | Blackmagic RAW 5:1 | Blackmagic RAW 8:1 | Blackmagic RAW 12:1 |
| 256GB | Duration Duration Duration Duration | ||||
| 23.98 | 50 mins | 84 mins | 134 mins | 200 mins | |
| 24 | 50 mins | 84 mins | 134 mins | 200 mins | |
| 25 | 48 mins | 80 mins | 128 mins | 192 mins | |
| 30 | 40 mins | 67 mins | 107 mins | 160 mins | |
| 50 24 mins | 40 mins | 64 mins | 96 mins | ||
| 60 20 mins | 33 mins | 54 mins | 80 mins | ||
| 75 16 mins | 27 mins | 43 mins | 64 mins | ||
| 80 | 16 mins | 26 mins | 40 mins | 60 mins | |
ULTRA HD
| CFast Card | Frame Rate | Blackmagic RAW 3:1 | Blackmagic RAW 5:1 | Blackmagic RAW 8:1 | Blackmagic RAW 12:1 | ProRes 422 HQ | ProRes 422 | ProRes 422 LT | ProRes 422 Proxy |
| 256GB | Duration Duration Duration Duration Duration Duration Duration Duration Duration Duration Duration Duration Duration Duration Duration Duration Duration Duration Duration Duration Duration Duration Duration Duration Duration Duration Duration Duration Duration Duration Duration Duration Duration Duration Duration Duration Duration Duration Duration Duration Duration Duration Duration Duration Duration Duration Duration Duration Duration Duration Duration Duration Duration Duration Duration Duration Duration Duration Duration Duration Duration Duration Duration Duration Duration Duration Duration Duration Duration Duration Duration Duration Duration Duration Duration Duration Duration Duration Duration Duration Duration Duration Duration Duration Duration Duration Duration Duration Duration Duration Duration Duration Duration Duration Duration Duration Duration Duration Duration Duration DurationDuration Duration Duration Duration Duration Duration Duration Duration Duration Duration Duration Duration Duration Duration Duration Duration Duration Duration Duration Duration Duration Duration Duration Duration Duration Duration Duration Duration Duration Duration Duration Duration Duration Duration Duration Duration Duration Duration Duration Duration Duration Duration Duration Duration Duration Duration Duration Duration Duration Duration Duration Duration Duration Duration Duration Duration Duration Duration Duration Duration Duration Duration Duration Duration Duration Duration Duration Duration Duration Duration Duration Duration Duration Duration Duration Duration Duration Duration Duration Duration Duration Duration Duration Duration Duration Duration Duration Duration Duration Duration Duration Duration Duration Duration Duration Duration Duration Duration DurationDurationDuration Duration Duration Duration Duration Duration Duration Duration Duration Duration Duration Duration Duration Duration Duration Duration Duration Duration Duration Duration Duration Duration Duration Duration Duration Duration Duration Duration Duration Duration Duration Duration Duration Duration Duration Duration Duration Duration Duration Duration Duration Duration Duration Duration Duration Duration Duration Duration Duration Duration Duration Duration Duration Duration Duration Duration Duration Duration Duration Duration Duration Duration Duration Duration Duration Duration Duration Duration Duration Duration Duration Duration Duration Duration Duration Duration Duration Duration Duration Duration Duration Duration Duration Duration Duration Duration Duration Duration Duration Duration Duration Duration Duration Duration Duration Duration Duration Duration Duration-duration duration duration duration duration duration duration duration duration duration duration duration duration duration duration duration duration duration duration duration duration duration duration duration duration duration duration duration duration duration duration duration duration duration duration duration duration duration duration duration duration duration duration duration duration duration duration duration duration duration duration duration duration duration duration duration duration duration duration duration duration duration duration duration duration duration duration duration duration duration duration duration duration duration duration duration duration duration duration duration duration duration duration duration duration duration duration duration duration duration duration duration duration duration duration duration duration duration duration duration duration Duration Duration Duration Duration Duration Duration Duration Duration Duration Duration Duration Duration Duration Duration Duration Duration Duration Duration Duration Duration Duration Duration Duration Duration Duration Duration Duration Duration Duration Duration Duration Duration Duration Duration Duration Duration Duration Duration Duration Duration Duration Duration Duration Duration Duration Duration Duration Duration Duration Duration Duration Duration Duration Duration Duration Duration Duration Duration Duration Duration Duration Duration Duration Duration Duration Duration Duration Duration Duration Duration Duration Duration Duration Duration Duration Duration Duration Duration Duration Duration Duration Duration Duration Duration Duration Duration Duration Duration Duration Duration Duration Duration Duration Duration Duration Duration Duration Duration Duration-durationdurationdurationdurationdurationdurationdurationdurationdurationdurationdurationdurationdurationdurationdurationdurationdurationdurationdurationdurationdurationdurationdurationdurationdurationdurationdurationdurationdurationdurationdurationdurationdurationdurationdurationdurationdurationdurationdurationdurationdurationdurationdurationdurationdurationdurationdurationdurationdurationdurationdurationdurationdurationdurationdurationdurationdurationdurationdurationdurationdurationdurationdurationdurationdurationdurationdurationdurationdurationdurationdurationdurationdurationdurationdurationdurationdurationdurationdurationdurationdurationdurationdurationdurationdurationdurationdurationdurationdurationdurationdurationdurationdurationdurationdurationdurationdurationdurationdurationdurationduration duration duration duration duration duration duration duration duration duration duration duration duration duration duration duration duration duration duration duration duration duration duration duration duration duration duration duration duration duration duration duration duration duration duration duration duration duration duration duration duration duration duration duration duration duration duration duration duration duration duration duration duration duration duration duration duration duration duration duration duration duration duration duration duration duration duration duration duration duration duration duration duration duration duration duration duration duration duration duration duration duration duration duration duration duration duration duration duration duration duration duration duration duration duration duration duration duration duration durationDurationDurationDurationDurationDurationDurationDurationDurationDurationDurationDurationDurationDurationDurationDurationDurationDurationDurationDurationDurationDurationDurationDurationDurationDurationDurationDurationDurationDurationDurationDurationDurationDurationDurationDurationDurationDurationDurationDurationDurationDurationDurationDurationDurationDurationDurationDurationDurationDurationDurationDurationDurationDurationDurationDurationDurationDurationDurationDurationDurationDurationDurationDurationDurationDurationDurationDurationDurationDurationDurationDurationDurationDurationDurationDurationDurationDurationDurationDurationDurationDurationDurationDurationDurationDurationDurationDurationDurationDurationDurationDurationDurationDurationDurationDurationDurationDurationDurationDurationDuration DurationDurationDurationDurationDurationDurationDurationDurationDurationDurationDurationDurationDurationDurationDurationDurationDurationDurationDurationDurationDurationDurationDurationDurationDurationDurationDurationDurationDurationDurationDurationDurationDurationDurationDurationDurationDurationDurationDurationDurationDurationDurationDurationDurationDurationDurationDurationDurationDurationDurationDurationDurationDurationDurationDurationDurationDurationDurationDurationDurationDurationDurationDurationDurationDurationDurationDurationDurationDurationDurationDurationDurationDurationDurationDurationDurationDurationDurationDurationDurationDurationDurationDurationDurationDurationDurationDurationDurationDurationDurationDurationDurationDurationDurationDurationDurationDurationDurationDurationDuration.Duration.Duration.Duration.Duration.Duration.Duration.Duration.Duration.Duration.Duration.Duration.Duration.Duration.Duration.Duration.Duration.Duration.Duration.Duration.Duration.Duration.Duration.Duration.Duration.Duration.Duration.Duration.Duration.Duration.Duration.Duration.Duration.Duration.Duration.Duration.Duration.Duration.Duration.Duration.Duration.Duration.Duration.Duration.Duration.Duration.Duration.Duration.Duration.Duration.Duration.Duration.Duration.Duration.Duration.Duration.Duration.Duration.Duration.Duration.Duration.Duration.Duration.Duration.Duration.Duration.Duration.Duration.Duration.Duration.Duration.Duration.Duration.Duration.Duration.Duration.Duration.Duration.Duration.Duration.Duration.Duration.Duration.Duration.Duration.Duration.Duration.Duration.Duration.Duration.Duration.Duration.Duration.Duration.Duration.Duration.Duration.Duration.Duration.Duration.Duration‒‒‒‒‒‒‒‒‒‒‒‒‒‒‒‒‒‒‒‒‒‒‒‒‒‒‒‒‒‒‒‒‒‒‒‒‒‒‒‒‒‒‒‒‒‒‒‒‒‒‒‒‒‒‒‒‒‒‒‒‒‒‒‒‒‒‒‒‒‒‒‒‒‒‒‒‒‒‒‒‒‒‒‒‒‒‒‒‒‒‒‒‒‒‒‒‒‒‒‒––‒‒‒‒‒‒‒‒‒‒‒‒‒‒‒‒‒‒‒‒‒‒‒‒‒‒‒‒‒‒‒‒‒‒‒‒‒‒‒‒‒‒‒‒‒‒‒‒‒‒‒‒‒‒‒‒‒‒‒‒‒‒‒‒‒‒‒‒‒‒‒‒‒‒‒‒‒‒‒‒‒‒‒‒‒‒‒‒‒‒‒‒‒‒‒‒‒‒‒∙‒‒‒‒‒‒‒‒‒‒‒‒‒‒‒‒‒‒‒‒‒‒‒‒‒‒‒‒‒‒‒‒‒‒‒‒‒‒‒‒‒‒‒‒‒‒‒‒‒‒‒‒‒‒‒‒‒‒‒‒‒‒‒‒‒‒‒‒‒‒‒‒‒‒‒‒‒‒‒‒‒‒‒‒‒‒‒‒‒‒‒‒‒‒‒‒‒‒‒⁄‒‒‒‒‒‒‒‒‒‒‒‒‒‒‒‒‒‒‒‒‒‒‒‒‒‒‒‒‒‒‒‒‒‒‒‒‒‒‒‒‒‒‒‒‒‒‒‒‒‒‒‒‒‒‒‒‒‒‒‒‒‒‒‒‒‒‒‒‒‒‒‒‒‒‒‒‒‒‒‒‒‒‒‒‒‒‒‒‒‒‒‒‒‒‒‒‒‒‒.--‒‒‒‒‒‒‒‒‒‒‒‒‒‒‒‒‒‒‒‒‒‒‒‒‒‒‒‒‒‒‒‒‒‒‒‒‒‒‒‒‒‒‒‒‒‒‒‒‒‒‒‒‒‒‒‒‒‒‒‒‒‒‒‒‒‒‒‒‒‒‒‒‒‒‒‒‒‒‒‒‒‒‒‒‒‒‒‒‒‒‒‒‒‒‒‒‒‒‒”—‒‒‒‒‒‒‒‒‒‒‒‒‒‒‒‒‒‒‒‒‒‒‒‒‒‒‒‒‒‒‒‒‒‒‒‒‒‒‒‒‒‒‒‒‒‒‒‒‒‒‒‒‒‒‒‒‒‒‒‒‒‒‒‒‒‒‒‒‒‒‒‒‒‒‒‒‒‒‒‒‒‒‒‒‒‒‒‒‒‒‒‒‒‒‒‒‒‒‒✕‒‒‒‒‒‒‒‒‒‒‒‒‒‒‒‒‒‒‒‒‒‒‒‒‒‒‒‒‒‒‒‒‒‒‒‒‒‒‒‒‒‒‒‒‒‒‒‒‒‒‒‒‒‒‒‒‒‒‒‒‒‒‒‒‒‒‒‒‒‒‒‒‒‒‒‒‒‒‒‒‒‒‒‒‒‒‒‒‒‒‒‒‒‒‒‒‒‒‒.–‒‒‒‒‒‒‒‒‒‒‒‒‒‒‒‒‒‒‒‒‒‒‒‒‒‒‒‒‒‒‒‒‒‒‒‒‒‒‒‒‒‒‒‒‒‒‒‒‒‒‒‒‒‒‒‒‒‒‒‒‒‒‒‒‒‒‒‒‒‒‒‒‒‒‒‒‒‒‒‒‒‒‒‒‒‒‒‒‒‒‒‒‒‒‒‒‒‒‒··‒‒‒‒‒‒‒‒‒‒‒‒‒‒‒‒‒‒‒‒‒‒‒‒‒‒‒‒‒‒‒‒‒‒‒‒‒‒‒‒‒‒‒‒‒‒‒‒‒‒‒‒‒‒‒‒‒‒‒‒‒‒‒‒‒‒‒‒‒‒‒‒‒‒‒‒‒‒‒‒‒‒‒‒‒‒‒‒‒‒‒‒‒‒‒‒‒‒‒‒‒‒‒‒‒‒‒‒‒‒‒‒‒‒‒‒‒‒‒‒‒‒‒‒‒‒‒‒‒‒‒‒‒‒‒‒‒‒‒‒‒‒‒‒‒‒‒‒‒‒‒‒‒‒‒‒‒‒‒‒‒‒‒‒‒‒‒‒‒‒‒‒‒‒‒‒‒‒‒‒‒‒‒‒‒‒‒‒‒‒‒‒‒‒‒‒‒‒∼‒‒‒‒‒‒‒‒‒‒‒‒‒‒‒‒‒‒‒‒‒‒‒‒‒‒‒‒‒‒‒‒‒‒‒‒‒‒‒‒‒‒‒‒‒‒‒‒‒‒‒‒‒‒‒‒‒‒‒‒‒‒‒‒‒‒‒‒‒‒‒‒‒‒‒‒‒‒‒‒‒‒‒‒‒‒‒‒‒‒‒‒‒‒‒‒‒‒‒☐‒‒‒‒‒‒‒‒‒‒‒‒‒‒‒‒‒‒‒‒‒‒‒‒‒‒‒‒‒‒‒‒‒‒‒‒‒‒‒‒‒‒‒‒‒‒‒‒‒‒‒‒‒‒‒‒‒‒‒‒‒‒‒‒‒‒‒‒‒‒‒‒‒‒‒‒‒‒‒‒‒‒‒‒‒‒‒‒‒‒‒‒‒‒‒‒‒‒‒'-. |
3.7K Anamorphic
| CFast Card | Frame Rate | Blackmagic RAW 3:1 | Blackmagic RAW 5:1 | Blackmagic RAW 8:1 | Blackmagic RAW 12:1 |
| 256GB | Duration Duration Duration Duration | ||||
| 23.98 | 31 mins | 51 mins | 82 mins | 123 mins | |
| 24 | 31 mins | 51 mins | 82 mins | 123 mins | |
| 25 29 mins | 49 mins | 79 mins | 118 mins | ||
| 30 | 24 mins | 41 mins | 65 mins | 98 mins | |
| 50 | 15 mins | 24 mins | 39 mins | 59 mins | |
| 60 | 12 mins | 20 mins | 33 mins | 49 mins | |
2.8K Anamorphic
| CFast Card | Frame Rate | Blackmagic RAW 3:1 | Blackmagic RAW 5:1 | Blackmagic RAW 8:1 | Blackmagic RAW 12:1 |
| 256GB | Duration Duration Duration Duration | ||||
| 23.98 | 57 mins | 95 mins | 151 mins | 226 mins | |
| 24 | 57 mins | 95 mins | 151 mins | 226 mins | |
| 25 54 mins | 91 mins | 145 mins | 217 mins | ||
| 30 | 45 mins | 76 mins | 121 mins | 181 mins | |
| 50 | 27 mins | 45 mins | 73 mins | 109 mins | |
| 60 | 22 mins 38 mins | mins 61 mins | 91 mins | ||
| 80 | 17 mins 28 mins | mins 45 mins | 68 mins | ||
2.8K 17:9
| CFast Card | Frame Rate | Blackmagic RAW 3:1 | Blackmagic RAW 5:1 | Blackmagic RAW 8:1 | Blackmagic RAW 12:1 |
| 256GB | Duration Duration Duration Duration | ||||
| 23.98 81 | mins 136 m | ins 216 mins | 321 mins | ||
| 24 | 81 mins | 135 mins | 215 mins | 320 mins | |
| 25 | 78 mins | 130 mins | 207 mins | 308 mins | |
| 30 65 mins | 108 mins | 173 mins | 258 mins | ||
| 50 | 39 mins | 65 mins | 104 mins | 156 mins | |
| 60 32 mins | 54 mins | 87 mins | 130 mins | ||
| 120 16 mins | 27 mins | 43 mins | 65 mins | ||
2.6K 16:9
| CFast Card | Frame Rate | Blackmagic RAW 3:1 | Blackmagic RAW 5:1 | Blackmagic RAW 8:1 | Blackmagic RAW 12:1 |
| 256GB | Duration Duration Duration Duration | ||||
| 23.98 | 87 mins | 144 mins | 230 mins | 342 mins | |
| 24 | 87 mins | 144 mins | 229 mins | 342 mins | |
| 25 | 83 mins | 138 mins | 220 mins | 328 mins | |
| 30 | 69 mins | 115 mins | 184 mins | 275 mins | |
| 50 | 41 mins | 69 mins | 111 mins | 166 mins | |
| 60 | 34 mins | 58 mins | 92 mins | 138 mins | |
| 120 17 mins | 29 mins | 46 mins | 69 mins | ||
HD
| CFast Card | Frame Rate | Blackmagic RAW 3:1 | Blackmagic RAW 5:1 | Blackmagic RAW 8:1 | Blackmagic RAW 12:1 | ProRes 422 HQ | ProRes 422 | ProRes 422 LT | ProRes 422 Proxy | |
| 256GB | Duration Duration Duration Duration Duration Duration Duration Duration Duration Duration Duration Duration Duration Duration Duration Duration Duration Duration Duration Duration Duration Duration Duration Duration Duration Duration Duration Duration Duration Duration Duration Duration Duration Duration Duration Duration Duration Duration Duration Duration Duration Duration Duration Duration Duration Duration Duration Duration Duration Duration Duration Duration Duration Duration Duration Duration Duration Duration Duration Duration Duration Duration Duration Duration Duration Duration Duration Duration Duration Duration Duration Duration Duration Duration Duration Duration Duration Duration Duration Duration Duration Duration Duration Duration Duration Duration Duration Duration Duration Duration Duration Duration Duration Duration Duration Duration Duration Duration Duration Duration DurationDuration Duration Duration Duration Duration Duration Duration Duration Duration Duration Duration Duration Duration Duration Duration Duration Duration Duration Duration Duration Duration Duration Duration Duration Duration Duration Duration Duration Duration Duration Duration Duration Duration Duration Duration Duration Duration Duration Duration Duration Duration Duration Duration Duration Duration Duration Duration Duration Duration Duration Duration Duration Duration Duration Duration Duration Duration Duration Duration Duration Duration Duration Duration Duration Duration Duration Duration Duration Duration Duration Duration Duration Duration Duration Duration Duration Duration Duration Duration Duration Duration Duration Duration Duration Duration Duration Duration Duration Duration Duration Duration Duration Duration Duration Duration Duration Duration Duration DurationDurationDuration Duration Duration Duration Duration Duration Duration Duration Duration Duration Duration Duration Duration Duration Duration Duration Duration Duration Duration Duration Duration Duration Duration Duration Duration Duration Duration Duration Duration Duration Duration Duration Duration Duration Duration Duration Duration Duration Duration Duration Duration Duration Duration Duration Duration Duration Duration Duration Duration Duration Duration Duration Duration Duration Duration Duration Duration Duration Duration Duration Duration Duration Duration Duration Duration Duration Duration Duration Duration Duration Duration Duration Duration Duration Duration Duration Duration Duration Duration Duration Duration Duration Duration Duration Duration Duration Duration Duration Duration Duration Duration Duration Duration Duration Duration Duration Duration Duration Duration-duration duration duration duration duration duration duration duration duration duration duration duration duration duration duration duration duration duration duration duration duration duration duration duration duration duration duration duration duration duration duration duration duration duration duration duration duration duration duration duration duration duration duration duration duration duration duration duration duration duration duration duration duration duration duration duration duration duration duration duration duration duration duration duration duration duration duration duration duration duration duration duration duration duration duration duration duration duration duration duration duration duration duration duration duration duration duration duration duration duration duration duration duration duration duration duration duration duration duration duration duration Duration Duration Duration Duration Duration Duration Duration Duration Duration Duration Duration Duration Duration Duration Duration Duration Duration Duration Duration Duration Duration Duration Duration Duration Duration Duration Duration Duration Duration Duration Duration Duration Duration Duration Duration Duration Duration Duration Duration Duration Duration Duration Duration Duration Duration Duration Duration Duration Duration Duration Duration Duration Duration Duration Duration Duration Duration Duration Duration Duration Duration Duration Duration Duration Duration Duration Duration Duration Duration Duration Duration Duration Duration Duration Duration Duration Duration Duration Duration Duration Duration Duration Duration Duration Duration Duration Duration Duration Duration Duration Duration Duration Duration Duration Duration Duration Duration Duration Duration-durationdurationdurationdurationdurationdurationdurationdurationdurationdurationdurationdurationdurationdurationdurationdurationdurationdurationdurationdurationdurationdurationdurationdurationdurationdurationdurationdurationdurationdurationdurationdurationdurationdurationdurationdurationdurationdurationdurationdurationdurationdurationdurationdurationdurationdurationdurationdurationdurationdurationdurationdurationdurationdurationdurationdurationdurationdurationdurationdurationdurationdurationdurationdurationdurationdurationdurationdurationdurationdurationdurationdurationdurationdurationdurationdurationdurationdurationdurationdurationdurationdurationdurationdurationdurationdurationdurationdurationdurationdurationdurationdurationdurationdurationdurationdurationdurationdurationdurationdurationduration duration duration duration duration duration duration duration duration duration duration duration duration duration duration duration duration duration duration duration duration duration duration duration duration duration duration duration duration duration duration duration duration duration duration duration duration duration duration duration duration duration duration duration duration duration duration duration duration duration duration duration duration duration duration duration duration duration duration duration duration duration duration duration duration duration duration duration duration duration duration duration duration duration duration duration duration duration duration duration duration duration duration duration duration duration duration duration duration duration duration duration duration duration duration duration duration duration duration durationDurationDurationDurationDurationDurationDurationDurationDurationDurationDurationDurationDurationDurationDurationDurationDurationDurationDurationDurationDurationDurationDurationDurationDurationDurationDurationDurationDurationDurationDurationDurationDurationDurationDurationDurationDurationDurationDurationDurationDurationDurationDurationDurationDurationDurationDurationDurationDurationDurationDurationDurationDurationDurationDurationDurationDurationDurationDurationDurationDurationDurationDurationDurationDurationDurationDurationDurationDurationDurationDurationDurationDurationDurationDurationDurationDurationDurationDurationDurationDurationDurationDurationDurationDurationDurationDurationDurationDurationDurationDurationDurationDurationDurationDurationDurationDurationDurationDurationDurationDuration DurationDurationDurationDurationDurationDurationDurationDurationDurationDurationDurationDurationDurationDurationDurationDurationDurationDurationDurationDurationDurationDurationDurationDurationDurationDurationDurationDurationDurationDurationDurationDurationDurationDurationDurationDurationDurationDurationDurationDurationDurationDurationDurationDurationDurationDurationDurationDurationDurationDurationDurationDurationDurationDurationDurationDurationDurationDurationDurationDurationDurationDurationDurationDurationDurationDurationDurationDurationDurationDurationDurationDurationDurationDurationDurationDurationDurationDurationDurationDurationDurationDurationDurationDurationDurationDurationDurationDurationDurationDurationDurationDurationDurationDurationDurationDurationDurationDurationDurationDuration.Duration.Duration.Duration.Duration.Duration.Duration.Duration.Duration.Duration.Duration.Duration.Duration.Duration.Duration.Duration.Duration.Duration.Duration.Duration.Duration.Duration.Duration.Duration.Duration.Duration.Duration.Duration.Duration.Duration.Duration.Duration.Duration.Duration.Duration.Duration.Duration.Duration.Duration.Duration.Duration.Duration.Duration.Duration.Duration.Duration.Duration.Duration.Duration.Duration.Duration.Duration.Duration.Duration.Duration.Duration.Duration.Duration.Duration.Duration.Duration.Duration.Duration.Duration.Duration.Duration.Duration.Duration.Duration.Duration.Duration.Duration.Duration.Duration.Duration.Duration.Duration.Duration.Duration.Duration.Duration.Duration.Duration.Duration.Duration.Duration.Duration.Duration.Duration.Duration.Duration.Duration.Duration.Duration.Duration.Duration.Duration.Duration.Duration.Duration.Duration‒‒‒‒‒‒‒‒‒‒‒‒‒‒‒‒‒‒‒‒‒‒‒‒‒‒‒‒‒‒‒‒‒‒‒‒‒‒‒‒‒‒‒‒‒‒‒‒‒‒‒‒‒‒‒‒‒‒‒‒‒‒‒‒‒‒‒‒‒‒‒‒‒‒‒‒‒‒‒‒‒‒‒‒‒‒‒‒‒‒‒‒‒‒‒‒‒‒‒‒––‒‒‒‒‒‒‒‒‒‒‒‒‒‒‒‒‒‒‒‒‒‒‒‒‒‒‒‒‒‒‒‒‒‒‒‒‒‒‒‒‒‒‒‒‒‒‒‒‒‒‒‒‒‒‒‒‒‒‒‒‒‒‒‒‒‒‒‒‒‒‒‒‒‒‒‒‒‒‒‒‒‒‒‒‒‒‒‒‒‒‒‒‒‒‒‒‒‒‒∙‒‒‒‒‒‒‒‒‒‒‒‒‒‒‒‒‒‒‒‒‒‒‒‒‒‒‒‒‒‒‒‒‒‒‒‒‒‒‒‒‒‒‒‒‒‒‒‒‒‒‒‒‒‒‒‒‒‒‒‒‒‒‒‒‒‒‒‒‒‒‒‒‒‒‒‒‒‒‒‒‒‒‒‒‒‒‒‒‒‒‒‒‒‒‒‒‒‒‒⁄‒‒‒‒‒‒‒‒‒‒‒‒‒‒‒‒‒‒‒‒‒‒‒‒‒‒‒‒‒‒‒‒‒‒‒‒‒‒‒‒‒‒‒‒‒‒‒‒‒‒‒‒‒‒‒‒‒‒‒‒‒‒‒‒‒‒‒‒‒‒‒‒‒‒‒‒‒‒‒‒‒‒‒‒‒‒‒‒‒‒‒‒‒‒‒‒‒‒‒”—‒‒‒‒‒‒‒‒‒‒‒‒‒‒‒‒‒‒‒‒‒‒‒‒‒‒‒‒‒‒‒‒‒‒‒‒‒‒‒‒‒‒‒‒‒‒‒‒‒‒‒‒‒‒‒‒‒‒‒‒‒‒‒‒‒‒‒‒‒‒‒‒‒‒‒‒‒‒‒‒‒‒‒‒‒‒‒‒‒‒‒‒‒‒‒‒‒‒‒.--‒‒‒‒‒‒‒‒‒‒‒‒‒‒‒‒‒‒‒‒‒‒‒‒‒‒‒‒‒‒‒‒‒‒‒‒‒‒‒‒‒‒‒‒‒‒‒‒‒‒‒‒‒‒‒‒‒‒‒‒‒‒‒‒‒‒‒‒‒‒‒‒‒‒‒‒‒‒‒‒‒‒‒‒‒‒‒‒‒‒‒‒‒‒‒‒‒‒‒✕‒‒‒‒‒‒‒‒‒‒‒‒‒‒‒‒‒‒‒‒‒‒‒‒‒‒‒‒‒‒‒‒‒‒‒‒‒‒‒‒‒‒‒‒‒‒‒‒‒‒‒‒‒‒‒‒‒‒‒‒‒‒‒‒‒‒‒‒‒‒‒‒‒‒‒‒‒‒‒‒‒‒‒‒‒‒‒‒‒‒‒‒‒‒‒‒‒‒‒∼‒‒‒‒‒‒‒‒‒‒‒‒‒‒‒‒‒‒‒‒‒‒‒‒‒‒‒‒‒‒‒‒‒‒‒‒‒‒‒‒‒‒‒‒‒‒‒‒‒‒‒‒‒‒‒‒‒‒‒‒‒‒‒‒‒‒‒‒‒‒‒‒‒‒‒‒‒‒‒‒‒‒‒‒‒‒‒‒‒‒‒‒‒‒‒‒‒‒‒‒‒‒‒‒‒‒‒‒‒‒‒‒‒‒‒‒‒‒‒‒‒‒‒‒‒‒‒‒‒‒‒‒‒‒‒‒‒‒‒‒‒‒‒‒‒‒‒‒‒‒‒‒‒‒‒‒‒‒‒‒‒‒‒‒‒‒‒‒‒‒‒‒‒‒‒‒‒‒‒‒‒‒‒‒‒‒‒‒‒‒‒‒‒‒‒‒‒‒.–‒‒‒‒‒‒‒‒‒‒‒‒‒‒‒‒‒‒‒‒‒‒‒‒‒‒‒‒‒‒‒‒‒‒‒‒‒‒‒‒‒‒‒‒‒‒‒‒‒‒‒‒‒‒‒‒‒‒‒‒‒‒‒‒‒‒‒‒‒‒‒‒‒‒‒‒‒‒‒‒‒‒‒‒‒‒‒‒‒‒‒‒‒‒‒‒‒‒‒··‒‒‒‒‒‒‒‒‒‒‒‒‒‒‒‒‒‒‒‒‒‒‒‒‒‒‒‒‒‒‒‒‒‒‒‒‒‒‒‒‒‒‒‒‒‒‒‒‒‒‒‒‒‒‒‒‒‒‒‒‒‒‒‒‒‒‒‒‒‒‒‒‒‒‒‒‒‒‒‒‒‒‒‒‒‒‒‒‒‒‒‒‒‒‒‒‒‒‒'‒‒‒‒‒‒‒‒‒‒‒‒‒‒‒‒‒‒‒‒‒‒‒‒‒‒‒‒‒‒‒‒‒‒‒‒‒‒‒‒‒‒‒‒‒‒‒‒‒‒‒‒‒‒‒‒‒‒‒‒‒‒‒‒‒‒‒‒‒‒‒‒‒‒‒‒‒‒‒‒‒‒‒‒‒‒‒‒‒‒‒‒‒‒‒‒‒‒‒―` | |||||||||
NOTE It's important to note that Blackmagic RAW is available for shooting formats that use a full or windowed sensor scan. For all scaled formats, select a ProRes codec.
6K, 6K 2.4:1, 5.7K 17:9, 3.7K Anamorphic and 2.8K 17:9 formats are available on Pocket Cinema Camera 6K only and use the Blackmagic RAW codec. Pocket Cinema Camera 6K uses ProRes for 4K DCI, Ultra HD and HD formats.
4K 2.4:1, 2.8K Anamorphic and 2.6K 16:9 formats are available on Pocket Cinema Camera 4K only and use the Blackmagic RAW codec. Pocket Cinema Camera 4K uses Blackmagic RAW or ProRes for 4K DCI, Ultra HD and HD formats.
Constant quality settings for Q0 and Q5 will display varying record time remaining durations. The estimated duration for Q0 is similar to constant bitrate 3:1, and Q5 will display a similar duration to 12:1, however, as the estimated duration updates every 10 seconds while recording, the best way to gauge how much recording time you have is to record for 20 seconds and monitor the duration in the media area of the touchscreen display.
Choosing Frame Rates
Your camera is able to shoot video using many different frame rates and you may be wondering which is the best one to use.
Generally, when selecting a sensor frame rate, there are some common items to consider. For many years, there have been presentation standards for film and television. These have set frame rates that differ between countries, but all share the same purpose; to display an efficient number of frames every second that portrays pleasing and convincing motion.
Cinema, for example, uses a standard 24 frames per second and while there have been recent experiments with faster frame rates, 24 frames per second remains widely accepted for international audiences.
Television frame rates have generally conformed to technical broadcast standards for each country. For example, if you were making television content you would typically record using 29.97 frames per second for North American distribution, and 25 frames per second for Europe.
However, as technology has improved, today we have more choices and broadcast standards are changing. It is now common for sporting events to be recorded and broadcasted at higher frame rates. For example, some sporting events are recorded and broadcasted at up to 59.94 frames per second in North America, and 50 frames per second in Europe. This provides smoother motion on fast action and appears more lifelike.
Alternatively, streaming and online broadcasters normally use frame rates similar to television, however there is more freedom to experiment due to user selectable viewing formats, and being limited only to what the audience's screens are capable of displaying.
Generally, when choosing a frame rate for a project, let your delivery format guide your choice. Your camera's project frame rate should be set to this, and your sensor frame should be set to 'match'. This means your clips will play back at the same speed the event happened in real life.
If you are looking to create an interesting effect, for example slow motion, then you can set the sensor frame rate to a higher setting. The higher the sensor frame rate compared to the project frame rate, the slower the playback speed.
For more information on using off speed sensor frame rates to achieve creative effects, refer to the 'touchscreen controls' section.
Trigger Record
Blackmagic Pocket Cinema Camera automatically sends a signal via the HDMI output that will trigger recording when connected to equipment that supports the trigger record feature, such as Blackmagic Video Assist.
This means that when you press record on your camera, your external recorder also starts recording and stops when you stop recording on the camera. Your camera also outputs timecode via HDMI, which means the clips recorded on your external recorder has the same timecode as the clips recorded in your camera.
If your external recorder supports trigger recording, you will need to enable it. This can usually be enabled via its settings menu.
Playback
Playing Back Clips
Once you have recorded your video, you can use the transport control buttons to play back your video on the LCD. Press the play button to switch to playback mode. Press the button again for instant playback of the last recorded clip on the LCD, and on any display connected to the HDMI output. Hold down the forward or reverse buttons on the LCD to fast forward or reverse through the clip. Playback will finish when the end of the current clip is reached.
Press the forward and reverse buttons to skip to the start or end of clips. Press the reverse button once to go to the start of the current clip or press twice to skip back to the start of the previous clip. Press the record button to exit playback and return the touchscreen to the camera view.
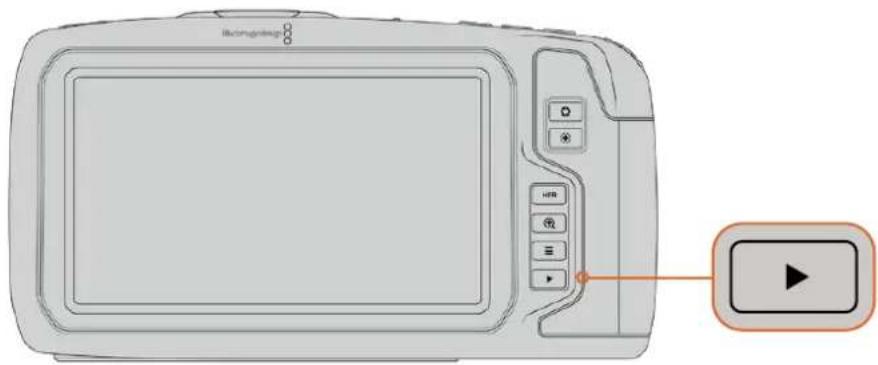
To view your most recently recorded clip on the built in touchscreen, press the 'play' button on the transport controls.
Camera Features
Camera Front
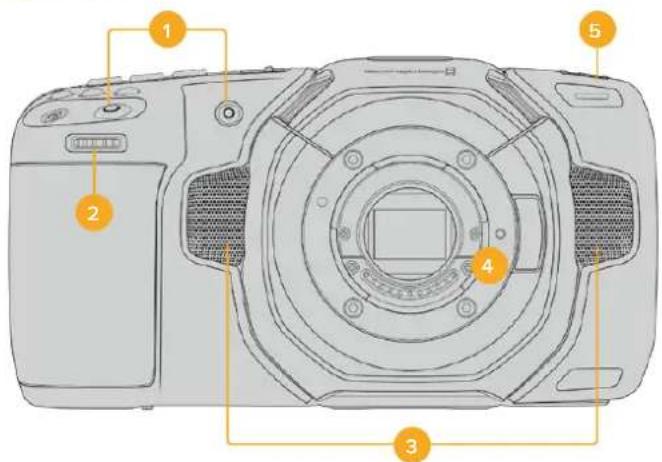
1 Record Buttons
Press either of the record buttons to start and stop recording. A record button is located on the front of the camera to let you start and stop recording more easily if you are recording yourself.
2 Settings Wheel
The settings wheel lets you adjust the aperture of compatible lenses mounted to your camera. With the touchscreen facing you, rotate the wheel left to open the iris, and right to close. The settings wheel is also used to adjust white balance, shutter angle and ISO settings. Press the corresponding buttons on the top of the camera, then make your selection by rotating the settings wheel. After making your selection, press the settings wheel to quickly dismiss the selection menu.
3 Stereo Microphones
There are four built in, high quality stereo microphones. Refer to the 'audio settings' section for information on microphone audio settings.
4 Lens Mount
Blackmagic Pocket Cinema Camera 6K has an active EF lens mount and the 4K model has an active Micro Four Thirds lens mount. This means that you can use lenses with built-in stabilization on both cameras, as well as use auto focus and auto exposure with compatible lenses. To use the image stabilizer or 'IS' feature found in many active lenses, set the stabilizer switch to 'on' to enable image stabilization on your camera. If your lens also features a stabilizer mode switch, set it to the appropriate mode for still shots or for movement. If your lens does not have a physical stabilizer switch, you can turn 'image stabilization' on or off in your camera's setup menu.
5 Tally / Record Indicator
Pocket Cinema Camera has a small LED on the front to indicate the recording status of the camera. You can enable or disable the tally light indicator and adjust its brightness in the setup menu. Refer to the 'setup settings' section for more information.
Right Side
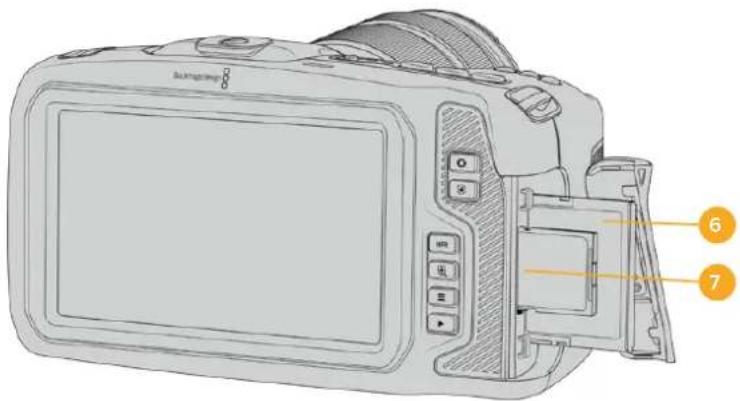
6 CFast Card Slot
Insert CFast 2.0 cards into the slot for record and playback. Refer to the 'CFast Cards' section for more information.
7 SD Card Slot
Insert SD cards into the slot for record and playback. Refer to the 'SD Cards' section for more information.
Left Side
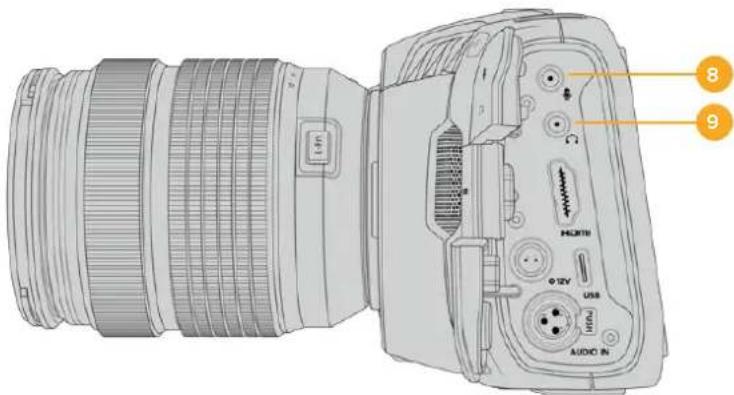
8 3.5mm Microphone Input
Connect a microphone to your camera's 3.5mm stereo connector. Mic and line level audio are supported. The microphone level audio is lower than the line level, so if you are connecting a microphone to the camera and have line level selected, you will find the levels are too low. The microphone input also accepts SMPTE compliant LTC timecode from an external source on the left channel. Valid timecode will be detected automatically, and embedded in your video file as timecode metadata. We recommend sending LTC timecode via a line level output, especially if you are not recording timecode as an audio track.
9 Headphones Input
Monitor audio while recording or playing back clips by plugging your headphones into the 3.5mm stereo headphones jack. When headphones are plugged in, the speaker output is muted.

10 HDMI
The full size HDMI connector supports 10-bit 4:2:2 1080p HD video with support for HDR and two channels of embedded audio. Use the touchscreen menu to set a clean feed or include overlays on the output. You can use the HDMI port to connect to an external monitor, recorder or ATEM Mini switcher. Connecting the camera via HDMI to ATEM Mini gives you studio camera features such as remotely controlling recording and adjusting many settings of Pocket Cinema Camera.
11 Power Input
You can use the DC jack to power your camera and trickle charge the battery at the same time. To connect the power adapter, rotate the plug so it aligns with the recess at the top of the jack, then push in the plug until it locks. To disconnect the power plug, retract the locking sheath, then pull out the plug.
Custom Power Solutions
Some customers have been creating custom made power devices as a means to power their Blackmagic Pocket Cinema Camera. If you are creating your own power solution with a dummy battery, caution needs to be taken to make sure you are not supplying too much voltage to your camera, as this can cause permanent damage. The voltage requirements of the Pocket Cinema Camera are as follows:
The battery input connection is rated from 6.2V to 10V max.
The DC input is rated from 10.8V to 20V max.
- The camera requires 16W when in standby and is not charging the battery.
- The camera requires 30W when charging the LP-E6 type battery.
- When powering your camera with a custom made power source, we recommend removing the LP-E6 type battery.
- When recording to external media with an active lens, full screen brightness, full tally brightness, high frame rates and not charging the battery.
Pocket Cinema Camera 6K requires 25W and Pocket Cinema Camera 4K requires 22W.
12 USB
The USB-C port lets you record directly to an attached USB-C flash disk. When your camera is switched off, you can recharge its battery via the USB-C port from an external source such as a battery pack. To update your camera's internal software, connect the camera to a computer via the USB-C port and run the camera update application.
13 Mini XLR Microphone Input
Plug in external balanced analog audio via the mini XLR connector. A standard XLR microphone can be connected to your camera using an XLR to mini XLR adapter cable.
The mini XLR input provides phantom power for connecting professional microphones that aren't internally powered. For more information on enabling phantom power refer to the 'audio' section in this manual.
Top Panel
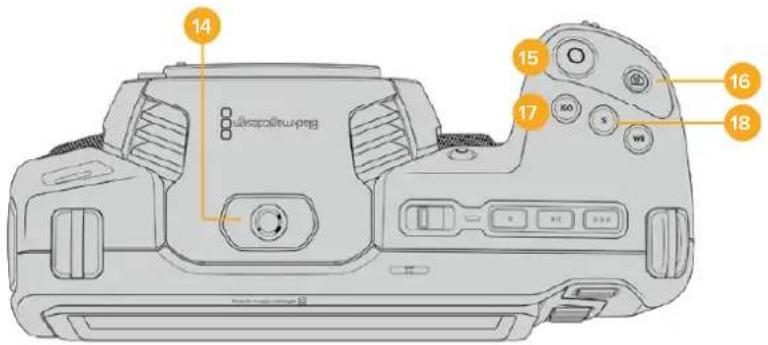
14 1/4-20 Mounting Point
You can use the 1/4-20 mounting point on the top of your camera to attach an external microphone or other small accessories.
NOTE The 1/4'' mount on the top of the Pocket Cinema Camera should only be used for lightweight accessories such as small microphones. Do not support the weight of the camera via the top 1/4'' mount by using accessories like a screw in camera handle in conjunction with a heavy lens. This will damage the 1/4'' mount which will not be covered under warranty. Do not subject the mount to excessive lever force, such as mounting a heavy accessory on an extension arm. To mount heavier accessories, we strongly recommend using a camera cage designed for the Pocket Cinema Camera that attaches to both the top and bottom 1/4'' mount simultaneously.
15 Record
Press the record button to begin recording immediately. Press again to stop recording.
16 Still
To capture a single uncompressed DNG frame, press the 'still' button. A camera icon appears briefly in the top right corner of the touchscreen display to let you know you have successfully captured a still. Image files are saved to the 'stills' folder in the root directory of the media you are currently recording to. These follow the file naming convention for video clips but the filename has 'S001' representing the 'still number' as the last four characters of the filename.
17 ISO
Press the ISO button and then rotate the settings wheel to adjust your camera's ISO setting. ISO can be set at 1/3 stop increments between 100 and 25,600.
18 Shutter
To change the shutter angle or shutter speed, press the shutter button, then rotate the settings wheel. The touchscreen display will also suggest up to three flicker free shutter options.
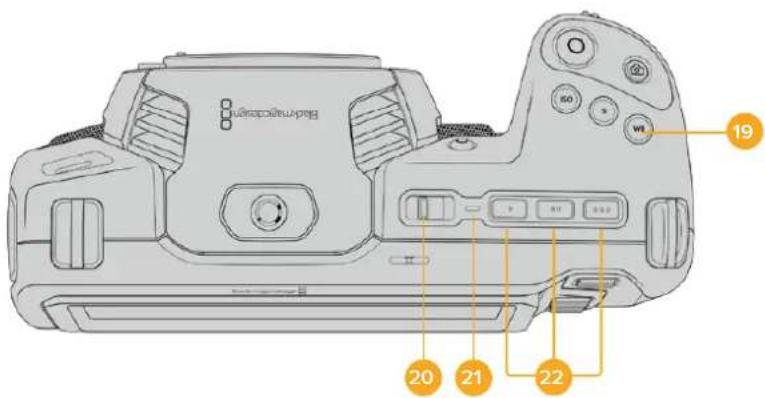
19 White Balance
Press the white balance button and then rotate the settings wheel to adjust your camera's white balance. You can also quickly enter the 'auto white balance' screen by holding the 'wb' button for 3 seconds. Your camera will overlay a white square in the center of your image, and use this area to perform an auto white balance. For more information refer to the 'touchscreen controls' section.
20 Power Switch
Power switch for turning on the camera. Slide the switch to the right to power on your camera, and to the left to power off.
21 Status LED
When the camera is turned off and plugged into external power via the 12V DC power jack or USB-C port, the indicator illuminates red to indicate the battery is being charged.
The status LED turns off when the battery is fully charged.
22 Function Buttons
These buttons can be programmed to a variety of commonly used functions using your camera's 'setup' menu. By default, button one is set to 'false color', button 2 is set to 'display LUT' and button 3 is set to 'frame guides'.
Camera Underside
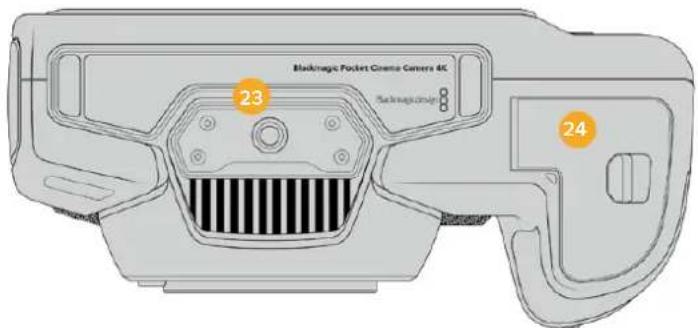
23 1/4-20 Mounting Point
Attach your camera to a tripod using the bottom 1/4-20 mounting point.
24 Battery Door
Push the battery door release towards the lens mount to open the battery door. To close, simply push the door in until it clicks shut.
Camera Rear
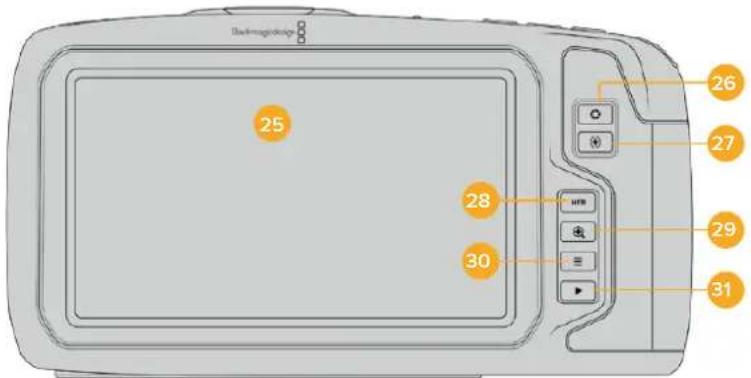
25 Touchscreen Display
Monitor your clips during recording and playback using the touchscreen display. Tap and swipe to adjust settings and control your camera.
26 Iris Button
Pressing the 'iris' button automatically sets an average exposure based on the highlights and shadows in your shot. You can adjust your lens aperture manually by rotating the settings wheel to the left and right, or by tapping 'iris' on the touchscreen display and adjusting the iris slider.
27 Focus Button
When using a compatible auto focus lens with your camera, press the 'focus' button once to auto focus. By default the lens will auto focus in the center of the image, however you can select an alternate auto focus point by tapping on the LCD screen in the area that you want to focus. Double press the focus button to reset the focus point to the center of the screen.
NOTE It's important to know that while most lenses support electronic focus, some lenses can be set to manual or auto focus modes. In this case you need to confirm your lens is set to auto focus mode.
28 HFR Button
Press the HFR or 'high frame rate' button to toggle off speed frame rates. To use this function, simply set the 'off speed' frame rate you'd like to use in the 'frame rate' menu. Once this is set, pressing the HFR button will toggle between your chosen off speed frame rate and project frame rate. It's worth mentioning that this setting can only be adjusted when the recording is stopped.
For more information on project and off speed frame rates, see the 'touchscreen controls' section.
29 Focus Zoom Button
Press the 'focus zoom' button to zoom in for adjusting focus at the 1:1 pixel scale. While zoomed in, you can use a pinch to zoom multitouch gesture on the touchscreen to adjust the zoom level. For more information, see the 'pinch to zoom' section. While zoomed in, you can touch and drag on the screen to view different areas of the image. To zoom out, press the 'focus zoom' button again.
30 Menu Button
Press the 'menu' button to open the dashboard.
31 Play Button
Press the play button to switch to playback mode. Press the button again for instant playback of the last recorded clip on the LCD, and on any display connected to the HDMI output.
Touchscreen Controls
Touchscreen Features
Your Blackmagic Pocket Cinema Camera's LCD touchscreen features a touch and gesture based interface that is specifically designed for fast and intuitive operation. By touching and swiping on different areas of the LCD touchscreen, you can quickly access the camera's functions while shooting.
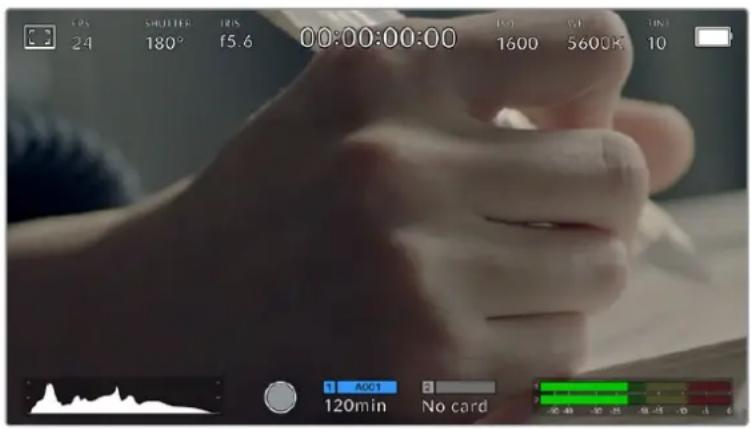
Your Blackmagic camera's LCD touchscreen display gives you easy access to your camera's most used settings
LCD Monitor Options
Tap the 'monitor' icon at the top left of the touchscreen to access the LCD monitor settings. These settings let you toggle and adjust the appearance of your Pocket camera's monitoring features, including zebra, focus assist, frame guides, grids, safe area guides and false color. When accessing LCD monitor options, the controls for these features appear in a tabbed menu along the bottom edge of the LCD touchscreen.


Tap the Icon at the top left of your camera's LCD touchscreen to access LCD monitor options
Zebra
The 'zebra' setting toggles the appearance of zebra on the LCD touchscreen, as well as setting the zebra level for the HDMI output.
Zebra displays diagonal lines over areas of your image that exceed a set exposure level. For example, setting zebra to 100% shows which areas are completely overexposed. This is useful for achieving optimum exposure in fixed lighting conditions.

Tap the 'zebra' icon while accessing LCD monitor options to access the zebra settings
To toggle zebra for the LCD touchscreen, tap the switch icon in the bottom left of the screen while in the 'zebra' tab.
Set the exposure level that zebra appears at by dragging the slider left and right, or tapping the arrow buttons next to the zebra level percentage. Zebra level is adjustable in five percent steps between 75 and 100 percent exposure.
For information on enabling zebra on your camera's HDMI output, see the 'monitor settings' section in this manual.
TIP If you're shooting in variable light such as outdoors on a partly overcast day, setting your zebra level lower than 100 can warn you of potential overexposure.
Focus Assist
The 'focus assist' setting toggles the appearance of focus assist on the LCD touchscreen, as well as setting the level of focus assistance for the HDMI output on your Blackmagic Pocket Cinema Camera.

Tap the 'focus assist' icon while accessing LCD monitor options' to access your camera's focus assist settings
To toggle focus assistance for the LCD touchscreen, tap the switch icon in the bottom left of the screen while in the 'focus assist' tab.
To set the level of focus assistance for the HDMI output on your camera, tap the 'low,' 'medium' or 'high' titles along the bottom of the touchscreen.
The optimum level of focus assistance varies shot by shot. When focusing on actors, for example, a higher level of focus assistance can help resolve edge detail in faces. A shot of foliage or brickwork, on the other hand, may show distracting amounts of focus information at higher settings.
For information on enabling focus assist on your camera's HDMI output, see the 'monitor settings' section in this manual.
TIP Your Blackmagic Pocket Cinema Camera has two focus assist modes. You can switch between 'peaking' and 'colored lines' focus assistance in the 'monitor' settings menu. For more information, see the 'monitor settings' section in this manual.
Frame Guides
The 'frame guide' setting toggles the appearance of frame guides on the LCD touchscreen. You can also choose frame guide options for your camera's HDMI output.
Frame guides include aspect ratios for various cinema, television and online standards.

Tap the 'frame guides' icon while accessing 'LCD monitor options' to access your frame guide settings
To toggle the appearance of frame guides on the LCD touchscreen, tap the switch icon in the bottom left of the screen.
Choose the frame guide you want to use by dragging the slider left and right, or tapping the arrow buttons on either side of the currently selected aspect ratio. You can also enter a custom frame guide ratio by tapping on the ratio between the arrow buttons.
The available guides are:
2.35:1, 2.39:1 and 2.40:1
Displays the broad widscreen aspect ratio compatible with anamorphic or flat widscreen cinema presentation. The three widscreen settings differ slightly based on the changing cinema standards over time. 2.39:1 is one of the most prominent standards in use today.

The LCD touchscreen with 2.40:1 frame guides enabled
2:1
Displays a ratio slightly wider than 16:9 but not as wide as 2.35:1.
1.85:1
Displays another common flat widenscreen cinema aspect ratio. This ratio is slightly wider than HDTV 1.78:1 but not as wide as 2.39:1.
16:9
Displays a 1.78:1 aspect ratio compatible with 16:9 HD television and computer screens. This ratio is most commonly used for HD broadcasting and online videos. The same aspect ratio has also been adopted for Ultra HD broadcasting.
14:9
Displays a 14:9 aspect ratio used by some television broadcasters as a compromise between 16:9 and 4:3 television sets. Ideally, both 16:9 and 4:3 footage remains legible when center cropped to fit 14:9. You can use this as a compositional guide if you know your project may be broadcast by a television station that uses 14:9 cropping.
4:3
Displays the 4:3 aspect ratio compatible with SD television screens, or to help with framing when using 2x anamorphic adapters.
1:1
Displays a 1:1 ratio slightly narrower than 4:3. This square ratio is growing in popularity on social media.
4:5
Displays a 4:5 aspect ratio. This vertical aspect ratio is ideal for portraits and viewing on smartphones.
Custom Frame Guide Ratio
To create your own frame guide ratio for a unique appearance, tap on the ratio displayed between the arrow buttons. On the 'custom frameguide' screen tap the backspace button to delete the current ratio, then use the numeric keypad to specify a new ratio. Tap 'update' to apply your custom frame guide ratio and return to shooting.
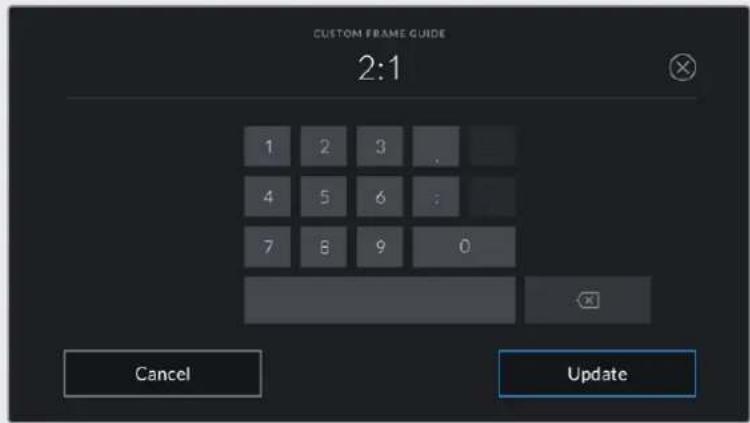
Use the numeric keypad on the 'custom frame guide' screen to enter a new frame guide ratio
TIP You can change the opacity of frame guide overlays. For more information see the 'monitor settings' section of this manual.
NOTE For information on enabling frame guides on your camera's HDMI output, see the 'monitor settings' section in this manual.
Grids
The 'grids' setting toggles the appearance of a rule of thirds grid, horizon meter, crosshair or center dot on the LCD touchscreen, as well as setting the overlay that will be visible on the HDMI output.

Tap the 'grids' icon while accessing LCD monitor options to access the grid settings
Grids and crosshair are overlays that can help with image composition. When 'grids' are enabled, the LCD shows a rule of thirds grid, horizon, crosshair or dot.
To toggle the appearance of grids on your camera's touchscreen, tap the switch icon in the bottom left of the screen while in the 'frame guides' tab.
To set which overlay you want to display on the LCD and HDMI output, tap the 'thirds', 'horizon', 'crosshair' or 'dot' options. You can select one of 'horizon', 'crosshair' or 'dot' at a time in conjunction with 'thirds'. This lets you use a combination of 'thirds' and 'horizon', 'thirds' and 'crosshair', or 'thirds' and 'dot'.
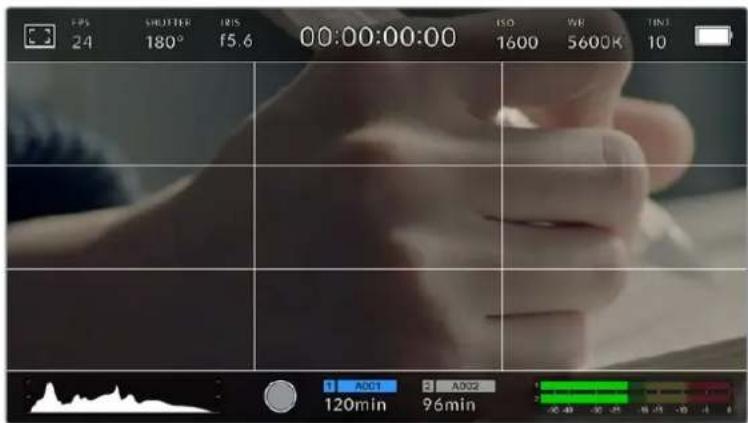
The rule of thirds grid automatically scales to any on screen frame guides
Thirds
The 'thirds' setting displays a grid with two vertical and horizontal lines placed in each third of the image. Thirds are an extremely powerful tool to help compose your shots. For example, the human eye typically looks for action near the points where the lines intersect, so it's helpful to frame key points of interest in these zones. An actor's eyeline is commonly framed along the top third of the screen, so you can use the top horizontal third to guide your framing. Thirds are also useful to maintain framing consistency between shots.
Horizon
The 'horizon' meter indicates when your camera is rolled left or right and tilted up or down. This can help you keep the horizon is level during handheld shots and balance the camera tilt on a gimbal.
The direction the light gray vertical line moves away from the dark gray crosshair in the middle indicates the direction your camera is rolled. When the camera is tilted down the light gray horizontal line moves up and when the camera is tilted up the light gray horizontal line moves down.
The distance the lines move away from the central crosshair is proportional to the amount of roll or tilt. After you calibrate the camera's motion sensor, the vertical line turns blue when the camera is aligned to the roll axis and the horizontal line turns blue to indicate the camera is aligned to the tilt axis.
Note that if the camera is tilted straight down for an overhead shot or straight up, the horizon meter takes this into account. If you roll the camera to shoot in portrait orientation, the horizon meter rotates its axes 90 degrees.
This table shows examples of the horizon meter indicating tilt and roll of the camera.
Horizon meter Description

Straight and level

Tilted down and level

Straight and rolled left

Tilted up and rolled right
For normal use, calibrate the horizon meter for straight and level operation. If you want to use the horizon meter to help maintain a consistent 'dutch angle' or a consistent tilt for a low or high shot, you can calibrate the horizon meter at an incline. For information on how to calibrate the horizon meter, see the 'motion sensor calibration' section.
Crosshair
The 'crosshair' setting places a crosshair in the center of the frame. Like thirds, the crosshair is a very useful compositional tool, making it easy to frame the subject of a shot in the very center of a frame. This is sometimes used when filming scenes that will be assembled using very fast cuts. Keeping viewers' eyes focused on the center of a frame can make rapid editing easier to follow.
Dot
The 'dot' setting places a dot in the center of the frame. This works in exactly the same way as the 'crosshair' setting, albeit with a smaller overlay that you may find less intrusive.
TIP For information on enabling grids on your HDMI output, see the 'monitor settings' section in this manual.
Safe Area Guides
The 'safe area guides' setting toggles the safe area guides on or off the LCD touchscreen, as well as setting the size of safe area guides for the HDMI output.
Safe areas can be used in broadcast production so the most important parts of a shot can be seen by viewers. By keeping the most important parts of your shot inside a central 'safe area,' you can avoid cropping on some televisions, as well as leaving space for a broadcaster to add bugs, news tickers and other overlays along the edges of the screen. Many broadcasters require footage to be submitted with important content, such as titles and graphics, contained inside the 90% safe area.
Safe area guides can also be used to assist with framing your shot where you know that the shot will be stabilised in post production, which can crop the edges of the image. They can also be used to indicate a specific crop. For example by setting it to 50% when recording at Ultra HD 3840x2160 you can see what a 1920x1080 crop of the frame would look like. The safe area guides also scale to your frame guides, so they will adjust to indicate the chosen percentage of your target frame.

The 'safe area' indicator set to 85%
To toggle safe area guides for the LCD touchscreen, tap the switch icon in the bottom left of the screen while in the 'safe area guides' tab. To set the level of safe area guides for your camera's HDMI output, tap the left or right arrows on either side of the current numerical value at the bottom of the touchscreen. Alternatively, you can drag the slider left or right.
False Color
The 'false color' setting toggles the appearance of false color exposure assistance on the LCD touchscreen.
False color overlays different colors onto your image that represent exposure values for different elements in your image. For example, pink represents optimum exposure for lighter skin tones, while green is a good match to darker skin tones. By monitoring the pink or green false color when recording people, you can maintain consistent exposure for their skin tones.
Similarly, when elements in your image change from yellow to red, that means they are now over exposed.
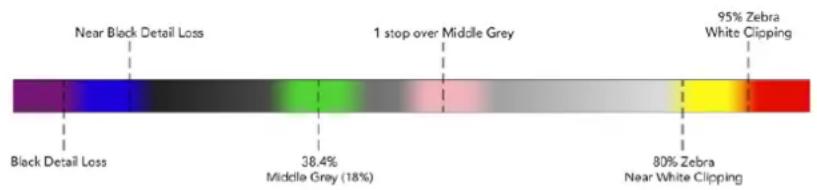
False Color Chart
To toggle false color for the LCD touchscreen, tap the switch icon in the bottom left of the screen while in the 'false color' tab.

The 'false color' exposure assistance tab
Frames Per Second
The 'FPS' indicator displays your currently selected frames per second.

Tap the frames per second indicator to access frame rate settings
Tapping the 'FPS' indicator lets you change your camera's sensor and project frame rates via a menu at the bottom of the LCD touchscreen.
Project Frame Rate
The project frame rate is the camera's recording format frame rate and provides a selection of common frame rates used in the film and television industry. This frame rate is normally set to match your post production workflow.
8 project frame rates are available including 23.98, 24, 25, 29.97, 30, 50, 59.94 and 60 frames per second.
To adjust your camera's project frame rate while in the 'FPS' menu, tap the left or right arrows next to the current frame rate at the bottom left of your touchscreen. Alternatively, you can drag the slider left or right.

Tap the arrows on either side of the project frame rate or move the slider to make adjustments
TIP Your Blackmagic Pocket Cinema Camera's project frame rate also sets the frame rate of the HDMI output.
Sensor Frame Rate
The sensor frame rate sets how many actual frames from the sensor are recorded every second. This frame rate will affect how fast or slow your video will play back at your set project frame rate.
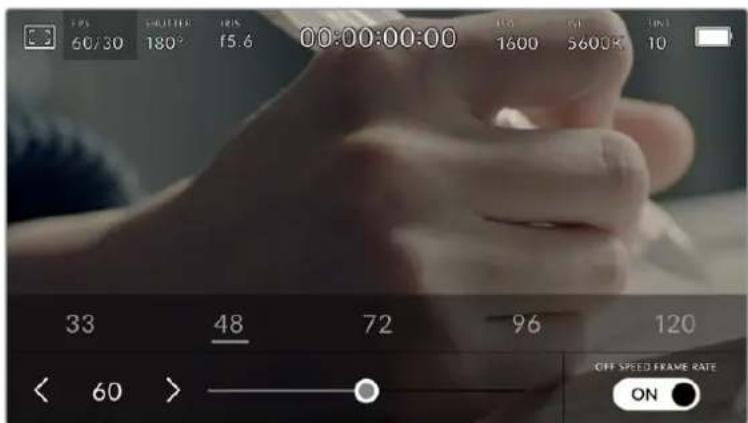
With 'off speed frame rate' enabled, tap a preset or the arrows on either side of the sensor frame rate or move the slider to make adjustments
By default, the project and sensor frame rates are matched for a natural playback speed. However, by tapping the 'off speed frame rate' switch icon in the bottom right hand side of your camera's 'FPS' menu, you can independently set the sensor frame rate.
To change the sensor frame rate, tap the arrows next to the sensor frame rate indicator in the lower left of your touchscreen. You can also drag the slider left or right to increase or decrease the frame rate. Once you release the slider, the sensor frame rate will be selected. Above the slider, you can tap on a common off speed frame rate. These are based on your current project frame rate.
You can create dynamic and interesting speed effects in your clips by varying the sensor frame rate. Setting the sensor frame rate higher than your project frame rate will create slow motion during playback. For example, shooting with a 60 FPS sensor frame rate and playing back at a 24 FPS project frame rate creates slow motion at 40% of the real speed of the action.
Alternatively, the lower your sensor frame rate, the faster your clips will appear. The principle is similar to overcranking and undercranking a film camera. Overcranking speeds up the sensor frame rate so you can stretch out moments in time during playback to enhance emotion.
Undercranking slows down the sensor frame rate so you can increase the speed of action in fast moving scenes. The creative possibilities are endless and entirely up to you!
For information on the maximum frame rates available for each recording format and codec, refer to the table in the 'recording' section of this manual.
NOTE When 'off speed frame rate' is selected the audio and video are no longer synced. This is true even if you set the same project and sensor frame rate. For this reason, avoid selecting 'off speed frame rate' if you want to guarantee audioyncing.
Shutter
The 'shutter' indicator displays your shutter angle or shutter speed. By tapping this indicator, you can manually change your camera's shutter values or configure shutter priority auto exposure modes. The shutter measurement setting can be used to select whether to display shutter information as 'shutter angle' or 'shutter speed'. See the 'setup settings' section in this manual for more information.

Tap the shutter indicator to access shutter settings
Shutter angle or shutter speed defines the level of motion blur in your video, and can be used to compensate for varying light conditions. 180 degrees is the optimum shutter angle for capturing satisfying motion blur in most conditions, with the equivalent being a shutter speed of 1/50th of a second. However as lighting conditions change, or the amount of movement in your scene increases, you may decide to adjust accordingly.
For example, 360 degrees is considered 'wide open' and allows maximum light onto the sensor. This is useful for low light conditions with subtle movement in your scene. Alternatively, if shooting subjects with a lot of movement, a narrow shutter angle like 90 degrees will provide minimal motion blur for sharper, crispier images. The equivalent shutter speeds compared to shutter angle depends on the frame rate you are using.
For example, if you are shooting at 25 frames per second, then 360 degrees will equate to 1/25th, and 90 degrees will equate to 1/100th of a second.
NOTE When shooting under lights, your shutter can affect the visibility of flicker. Your Blackmagic Pocket Cinema Camera will automatically calculate a flicker free shutter value for your current frame rate. It will display up to three suggested flicker free shutter options at the bottom of the touchscreen display when adjusting your shutter. These shutter values are affected by mains power frequency in your region. You can set your local power frequency to 50Hz or 60Hz in the camera's setup menu. See the 'setup settings' section in this manual for more information.
Tapping the 'shutter' indicator brings up the suggested shutter values along the bottom of the touch screen. If you have auto exposure set to 'off,' this screen will show you your currently selected shutter value, as well as the available flicker free shutter values, based on the mains power frequency you have selected in your camera's setup menu. For more information, see the 'setup settings' section in this manual.
NOTE The characteristics of individual light sources may still cause flicker even when using flicker free values. We recommend always performing a test shoot when not using continuous lights.
To select one of the flicker free shutter values, simply tap on one of the displayed shutter values. Using the arrows on either side of the current shutter value indicator, will cycle through some of the most commonly used values.

Your camera will suggest flicker free shutter values based on the mains power frequency you choose in the 'setup' menu
If you are shooting outside, or using flicker free lights, you can also manually select a shutter value by double tapping the current shutter indicator at the bottom left of your screen. When shutter angle is selected, this will bring up a keypad which you can use to set any shutter angle between 5 and 360 degrees.
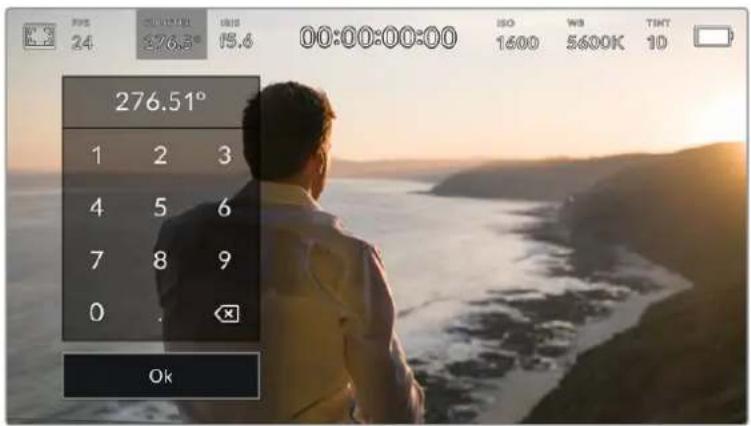
Use the manual shutter keypad to enter your shutter timing of choice when shooting outdoors or under flicker free lights
Your Blackmagic Pocket Cinema Camera has three shutter based auto exposure modes. To select one of these, tap the 'auto exposure' button in the far right of the shutter menu.
Shutter
This setting automatically adjusts shutter value to maintain a constant exposure while keeping iris aperture consistent. If you want to maintain a fixed depth of field, this is the setting to choose. It's worth mentioning that the subtle automatic adjustments of the shutter may have an effect on motion blur. It's also worth keeping an eye out for any flicker that may be introduced from various light fixtures on indoor shoots. The auto iris feature is not available when the 'shutter' auto exposure mode is selected.
Shutter + Iris
Maintains the correct exposure levels by adjusting the shutter, then the aperture. If the maximum or minimum available shutter value is reached and exposure still cannot be maintained, your camera adjusts the aperture to keep exposure consistent.
Iris + Shutter
Maintains the correct exposure levels by adjusting the aperture, then the shutter value. If the maximum or minimum available aperture is reached and exposure still cannot be maintained, your camera adjusts the shutter value to keep exposure consistent.

While in the shutter menu, tap 'auto exposure' to access shutter based auto exposure modes
TIP When an auto exposure mode that effects the shutter or iris is enabled, a small 'A' appears next to the shutter or iris indicator at the top of the LCD touchscreen.
Iris
The 'Iris' indicator displays your current lens aperture. By tapping this indicator, you can change the aperture of compatible lenses and configure iris based auto exposure modes.

Tap the Iris Indicator to access iris settings
NOTE To adjust your Iris from the LCD touchscreen, your Blackmagic Pocket Cinema Camera must be fitted with a lens that supports changing aperture via the camera.
Tapping the 'iris' indicator once brings up the iris menu along the bottom of the touchscreen. You'll see your current lens aperture at the far left of this menu. You can change the aperture by tapping the left and right arrows on either side of the current aperture, or moving the slider left or right.

While in the Iris' menu, tap the arrows on either side of the Iris Indicator or use the slider to adjust Iris settings
Tapping the 'auto exposure' switch icon at the far right of the iris menu opens the iris auto exposure menu.
This gives you the following auto exposure options.
Iris
This setting automatically adjusts the aperture to maintain a constant exposure while keeping shutter angle consistent. This will keep motion blur unaffected, but may affect your depth of field.
Iris + Shutter
Maintains the correct exposure levels by adjusting the aperture, then the shutter value. If the maximum or minimum available aperture is reached and exposure still cannot be maintained, your camera adjusts the shutter value to keep exposure consistent.
Shutter + Iris
Maintains the correct exposure levels by adjusting the shutter, then the aperture. If the maximum or minimum available shutter value is reached and exposure still cannot be maintained, your camera adjusts the aperture to keep exposure consistent.

While in the iris menu, tap 'auto exposure' to access iris based auto exposure modes
TIP When an auto exposure mode that effects the iris or shutter is enabled, a small 'A' appears next to the iris or shutter indicator at the top of the LCD touchscreen.
Duration Display
At the top of your camera's LCD touchscreen, you'll see your camera's duration display.

Your camera's duration display will turn red while recording.
The duration display provides a timecode counter for checking the duration of your clips and monitoring timecode during recording and playback. The counter displays a time sequence showing Hours:Minutes:Seconds:Frames and will changes accordingly as you record or play back clips. During recording the timecode is red.
The displayed duration starts from 00:00:00:00. The clip duration of the current or last recorded clip is displayed on the touchscreen. Time of day timecode is embedded into clips for easier post production.
To see the timecode, simply tap the duration display. Tap the duration display again to return to clip duration.
When you connect Blackmagic Pocket Cinema Cameras to ATEM Mini, they can show their switching status on the LCD touchscreen below the timecode. To assist camera operators, the status overlay says 'preview' when a camera is cued to go on air soon, or 'on air' when a camera is broadcasting live on air. ATEM Mini automatically synchronizes the timecode on Pocket Cinema Cameras to match the switcher's timecode when you connect them. This makes it easier to perform accurate multi camera edits in DaVinci Resolve.
Additional status indicators may appear around the duration display:
| W | Appears to the left of the duration display when your Blackmagic Pocket Cinema Camera is using a windowed sensor mode. |
| TC | Appears to the right of the duration display when showing timecode. |
| EXT | Appears to the right of the duration display if an external LTC timecode is connected to the 3.5mm stereo input jack and valid, or if the timecode is synchronized to an ATEM Mini switcher. |
| INT | Appears to the right of the duration display if the camera is running off an internal timecode after being 'jam syncsed' and disconnected. |
ISO
The 'ISO' indicator displays the current ISO setting, or light sensitivity. Tapping this indicator lets you adjust your ISO to suit varying lighting conditions.

Tap the ISO indicator to access ISO settings.

While in the 'ISO' menu, your camera's ISO settings appear along the bottom of the LCD touchscreen. The slider below the presets lets you adjust ISO in 1/3 stop increments.
Depending on your situation, you may choose a lower or higher ISO setting. For example, in low light conditions ISO 25,600 can be suitable but may introduce some visible noise. In bright conditions ISO 100 can provide richer colors.
Dual Native ISO
Your Blackmagic Pocket Cinema Camera has a dual native ISO of 400 and 3,200, which means that the sensor is optimized for shooting in both low light conditions, as well as bright daylight.
Adjust the ISO for the varying lighting conditions, and the dual native ISO feature will operate in the background to make sure your footage is clean and has minimal noise at low and high ISO settings.
When the ISO setting is between 100 and 1,000 the native ISO of 400 is used as a reference point. The ISO range between 1,250 and 25,600 uses the native ISO of 3,200 as a reference. If you are shooting in conditions where you have a choice between ISO 1,000 or 1,250, we suggest closing down one stop on your lens' iris so that you can select ISO 1,250 as it will engage the higher native ISO and provide much cleaner results.
These charts show the relationship between the ISO selection and dynamic range allocation.
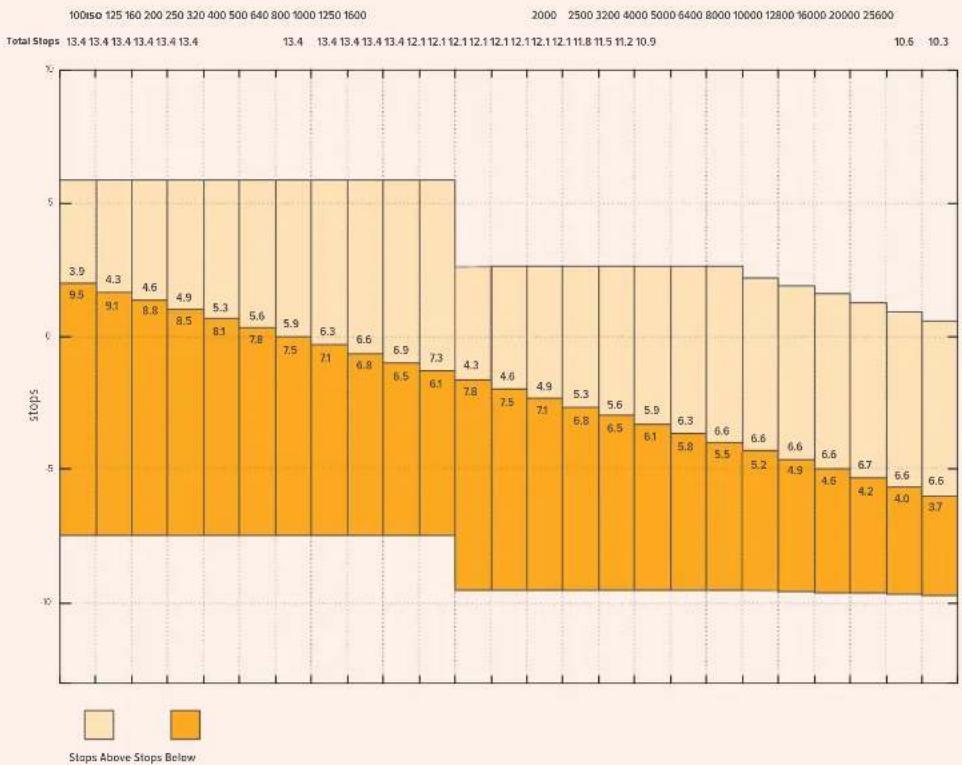
Blackmagic Pocket Cinema Camera 6K Dynamic Range
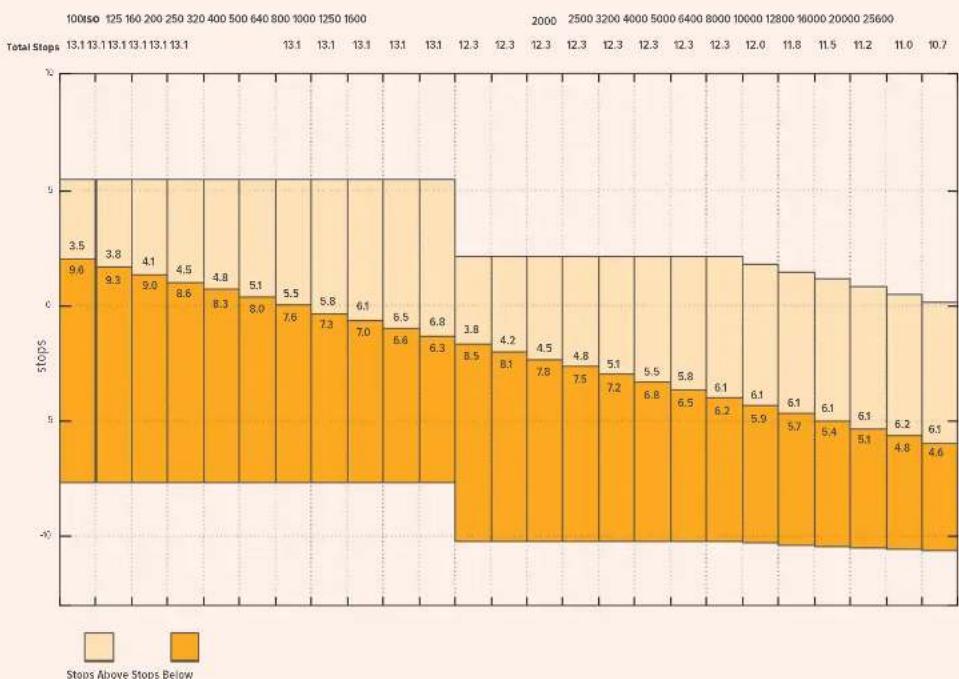
Blackmagic Pocket Cinema Camera 4K Dynamic Range
White Balance
The 'WB' and 'TINT' indicators display your camera's current white balance and tint.
Tapping these indicators lets you adjust your camera's white balance and tint to suit varying lighting conditions.

Tap the white balance and tint indicators to access white balance and tint settings
Every light source emits a color. For example, a candle flame emits a warm color, and an overcast sky emits a cool color. White balance settings are used to color balance your image so white stays white by adjusting the mix of orange and blue in your image. For example, when shooting under tungsten lamps which emit a warm, orange light, selecting 3200K adds some blue to the image. This balances the color so white is accurately recorded.
Your Blackmagic Pocket Cinema Camera comes with white balance presets for a variety of color temperature conditions. These are:
| Bright sunlight (5600K) |
| Incandescent bulbs (3200K) |
| Fluorescent bulbs (4000K) |
| Mixed light (4500K) |
| Cloud (6500K) |
You can customize any of these presets by tapping or holding the arrow icons to the left and right of the temperature indicator in the bottom left of the 'white balance' menu. Each tap moves the color temperature up or down 50K, but holding the arrow icons down will increase the speed. Alternatively, you can move the temperature slider in the middle of the 'white balance' menu.
To further dial in your image, you can adjust the 'tint.' This adjusts the mix of green and magenta in your image. For example, adding some magenta can compensate for the green cast of many fluorescent lights. Many of your camera's white balance presets include some tint.

Tapping the white balance and tint Indicator gives you access to five presets, as well as a white balance indicator and slider on the left, and a tint indicator on the right. Adjust these to set a custom white balance for your lighting conditions
While in the 'white balance' menu, your camera's current tint setting is shown at the bottom right of the screen. To adjust the tint, simply tap or hold the arrows to the left and right of the tint indicator. The available range is -50 to +50 in one unit steps. Holding down on the arrows speeds up adjustment.
NOTE Customizing the white balance or tint will change your preset to 'CWB,' or custom white balance. Custom white balances are persistent; your CWB settings will stay configured between power cycles, and when switching to a preset and back to CWB. This makes it easy to compare a custom white balance to the last preset used.
Auto White Balance
Your Blackmagic Pocket Cinema Camera can set white balance automatically. Tapping 'AWB' will bring up the white balance screen.
When setting white balance automatically, a square will be overlaid on the center of your image. Fill this square with a neutral surface such as a white or gray card and tap 'update WB'. The camera will automatically adjust its white balance and tint values so the average of the white or grey inside the white balance square is as neutral as possible. Once updated, this will be set as your camera's custom white balance. Holding the WB button on the top of your camera for three seconds also selects automatic white balance and activates the 'update WB' function.

Tapping the 'AWB' icon in the white balance menu will bring up the auto white balance screen. Use this with a white or neutral grey surface to automatically set a neutral white balance
Power
The camera's power source and energy status are displayed in the top right of the LCD screen.

While using battery power, tapping the power Indicator toggles between displays
| AC | AC Displays when your camera is plugged into mains power. | |
| AC / Charging | Displays when your camera is plugged into mains power, and is simultaneously charging the removable LP-E6 battery or the NP-F570 batteries if you are using Blackmagic Pocket Camera Battery Grip. | |
| Percentage | If your battery supports percentage display, the battery icon shows the remaining battery level as a percentage, and drains in 1% steps. At 20% charge remaining, the battery bar turns red. To toggle the percentage display on or off, tap on the battery icon. | |
| Battery bars | The battery included with your camera shows a battery icon that drains in 25% steps. At 20% charge remaining, the battery bar turns red. | |
| Battery grip bars | If you have Blackmagic Pocket Camera Battery Grip attached to your camera, these battery bars allow you to monitor the state of both batteries independently. | |
| Power source voltage | This shows the voltage supplied by the battery, or through the DC power jack from a plug pack, D-tap adapter cable or custom power solution. To toggle the voltage display on or off, tap on the battery icon. | |
LUT indicator
When you are using a LUT as a preview tool on set, a LUT icon will be displayed in the top left corner of the screen to indicate that the LUT is currently active.

Histogram
At the bottom left of your camera's touchscreen you can see the histogram.
The histogram shows the contrast between blacks and whites along a horizontal scale.
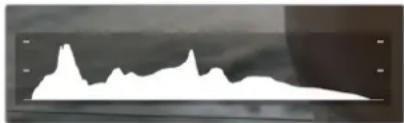
The histogram gives you an indication of the tonal range between shadows and highlights in your clip. It is also a helpful tool for checking the balance of your exposure and to prevent your highlights from clipping
The left edge of the histogram displays shadows, or blacks, and the far right displays highlights, or whites. When you close or open the lens aperture, you'll notice the information in the histogram moves to the left or right accordingly. You can use this to check 'clipping' in your image shadows and highlights. If the left and right of your edges of the histogram come to an abrupt stop rather than falling off gradually, you may be losing highlight or shadow detail.
NOTE If you don't see a histogram in the bottom left of your touchscreen, your LCD monitor settings may be set to display 'codec and resolution.' See the 'monitor settings' section in this manual for more information.
Record button
Next to the histogram, at the bottom of your Pocket Cinema Camera's touchscreen, is a round grey button. This is the 'record' button. Tap it once to begin recording, and tap it again to stop. While recording, the button, the storage indicator, and the timecode at the top of your Pocket Cinema Camera's touchscreen turn red.
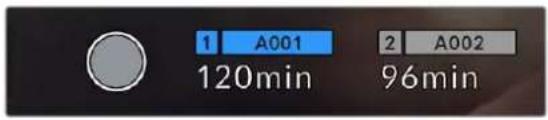
The record button is located next to the storage indicators at the bottom of the LCD touchscreen
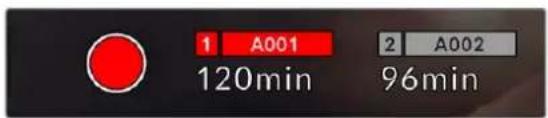
When recording, the record button displays red.
LUT Applied to Clip
If you have chosen to apply a LUT to your recorded clips in the 'record' settings tab, the touchscreen indicates this in standby mode and when recording.
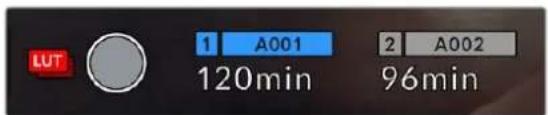
The LUT icon lets you know that recorded clips will have the selected LUT recorded with the clip.
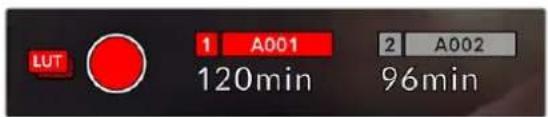
The LUT Icon will be displayed when the selected LUT is being recorded with the clip
Dropped Frame Indicator
The 'record' button is overlaid with a flashing '! indicator if your camera begins dropping frames while recording. The time remaining indicator for the affected card also turns red. For example, if your CFast card is dropping frames, the '!' indicator appears over the 'record' button, and the time remaining indicator on the CFast card turns red. This lets you know if a particular card is too slow for your currently selected codec and resolution. The 'dropped frame indicator' also appears if you have dropped a frame on the previously recorded clip. This indicator continues until another clip is recorded, or the camera is power cycled. Refer to the 'Choosing a CFast 2.0 card' and 'Choosing an SD Card' sections for more information on how to avoid dropping frames.
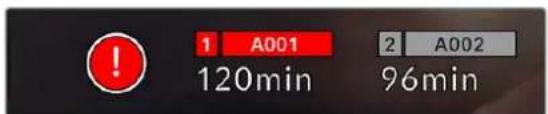
Dropped frame indicator for CFast card dropping frames
NOTE You can set your Blackmagic Pocket Cinema Camera to stop recording if dropped frames are detected to avoid recording unusable footage. See the 'record settings' section in this manual for more information.
Recording Time Remaining
When a CFast or SD card is inserted, or a USB-C flash disk is attached to your camera, the storage indicators at the bottom of the touchscreen show how much recording time is left on the card or USB-C flash disk. The time is shown in minutes and varies according to your selected frame rate and codec. The indicator automatically recalculates if either of these settings are changed. When there is approximately five minutes remaining on your card or drive, the indicator text turns red, then blinks when there is only two minutes remaining. The indicator displays 'full' when a card or drive reaches maximum capacity.
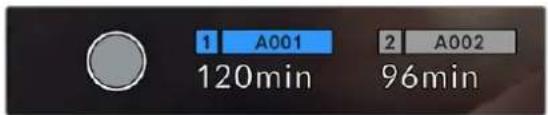
The storage indicator shows the name of your CFast card, SD card or USB-C flash disk and the record time remaining in minutes.
The card or drive name is also presented in a small bar above the time remaining. The bar turns blue to indicate the camera is set to record to this card or USB-C flash disk. To record to a different card or drive, press and hold the name of the card or USB-C flash disk you wish to record to. While recording, the bar is red.
Tapping the storage indicators opens the storage and formatting menu.

Tap the storage indicators on the LCD touchscreen to access the storage manager
This menu displays the amount of free space on each CFast card, SD card or USB-C flash disk used by your camera, as well as the name of the card or drive, length of the last clip, total number of clips, and the file format for each card or drive.
You can format your media from this menu. For more information, see the 'preparing media for recording' section of this manual.
TIP Tapping the card or drive name in the storage menu sets it as the active card or drive. Your Blackmagic Pocket Cinema Camera fills this card or drive first.
Audio Meter
The peak audio meters display audio levels for channels 1 and 2 when using the internal microphone, or via external audio when connected. The display is calibrated to dBFS units and features peak hold indicators which stay visible for a short time so you can clearly see the maximum levels reached.
To achieve optimum audio quality, ensure your audio levels do not reach 0 dBFS. This is the maximum level that your camera can record, meaning that any audio that exceeds this level will be clipped, resulting in distortion.
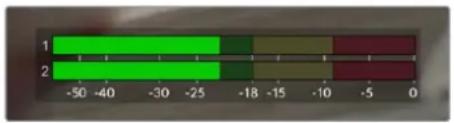
The colored bars on the audio meter represent peak audio levels. Ideally your peak audio levels should fall in the upper end of the green zone. If your peaks enter into the yellow or red zones your audio is in danger of clipping.
You can tap the audio meter to bring up volume controls for audio input channels 1 and 2, as well as headset or speaker volume.
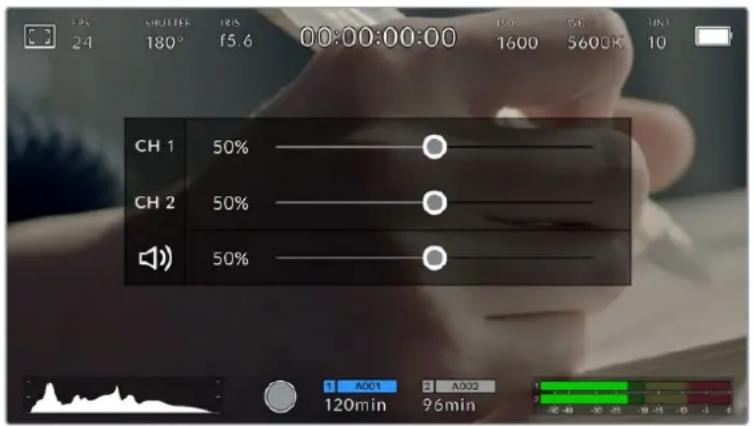
Tap the audio meters on the LCD touchscreen to easily access volume and headset or speaker settings
Double Tap to Zoom
You can magnify any part of your Blackmagic Pocket Cinema Camera's preview image by double tapping the LCD touchscreen. The area you tap will be magnified, and you can move around the image by dragging your finger around the LCD touchscreen. This is very helpful when checking focus. To return to standard magnification, simply double tap your camera's touchscreen again.
Pinch to Zoom
You can adjust the zoom level on the LCD touchscreen with a pinch to zoom multitouch gesture. This does not affect the HDMI output.
To start zooming at × 2 , double tap on the touchscreen or press the 'focus zoom' button on the back of your camera. Then make a pinch gesture to change the zoom level. You can drag your fingers around the touchscreen to move the area magnified. To return to the standard magnification, double tap on the touchscreen again or press the 'focus zoom' button.
When you double tap on the touchscreen or press the 'focus zoom' button, the zoom level toggles between your previous magnification level and the full view. For example, if you pinch to zoom to x8 magnification, double tap zooms out, and a further double tap returns to x8.
Touch to Focus
You can focus your lens in any region of the image by tapping and holding on the LCD screen in the area that you want to focus. Press the 'focus' button to focus your lens in the chosen location. Double press the focus button to reset the focus point to the center of the screen.
Full Screen Mode
It can be useful when framing or focusing a shot to temporarily hide your touchscreen's status text and meters. To hide them all at once, swipe up or down on the LCD touchscreen. The record indicator, frame guides, grids, focus assist and zebra remain visible.
To show the status text and meters again, swipe up or down again.

Swipe up or down to hide all status indicators on the LCD touchscreen
Playback Menu
Tap the 'play' control button to access the playback menu. You can control previously recorded clips with your camera's control buttons or the LCD touchscreen.
When using the LCD touchscreen, tap 'play' once to start playback and again to pause. Use the forward and reverse buttons to skip to the start or end of clips. Tapping 'forward' once moves you to the next clip. Press the reverse button once to go to the start of the current clip or press twice to skip back to the start of the previous clip. Playback of clips can also be looped by activating the loop icon.


The reverse, play, forward and loop icons
To shuttle, hold down either the forward or reverse transport buttons. This plays your footage back at twice regular speed in either forward or reverse, depending on which transport key you held.
Once shuttling, you can change the shuttle rate by tapping the transport keys again. Each time you tap the transport key in the same direction you double the shuttle rate. The maximum shuttle rate is x16 normal speed. Tapping the transport key again at x16 speed returns you to x2 speed. Each time you tap the opposite direction, the shuttle speed halves until you reach x2 speed. You can return to normal playback by tapping the 'play' button.

The shuttle speed indicator displays the speed and direction of footage being fast forwarded or reversed
Tapping the 'record' control button in playback mode returns your camera to standby mode, ready to record.
TIP Swipe up or down on the touchscreen to hide status text while playing back footage. Enter the slate in playback mode to mark the current clip 'good take' in metadata. For more information, see the 'entering metadata' section.
Settings
Dashboard
Press the 'menu' button to open your camera's dashboard. This tabbed menu has settings not available from the touchscreen. Settings are divided by function into 'record,' 'monitor,' 'audio,' 'setup,' 'presets,' and 'LUTS' tabs. Each tab has multiple pages, which you can cycle through by tapping the arrows at the edge of your camera's touchscreen, or swiping left or right.
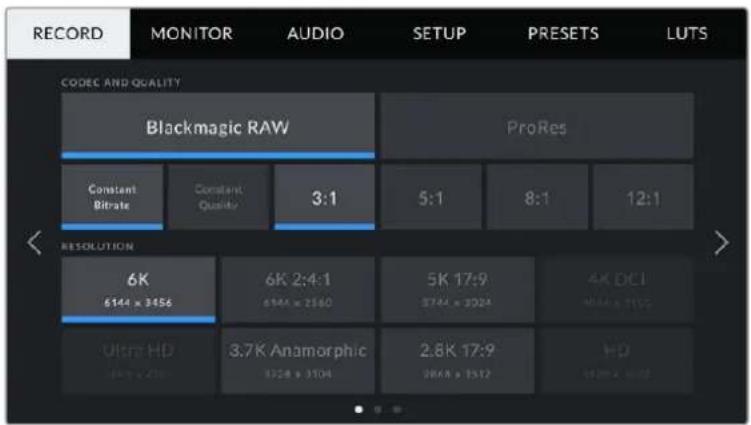
Tap the 'record,' 'monitor,' 'audio,' 'setup,' 'presets,' and 'LUTS' headings to move between your Pocket Cinema Camera's dashboard tabs
Record Settings
The 'record' tab lets you set your video format, codec, and resolution, as well as other settings that are important for your recorded video, such as dynamic range and detail sharpening.
Record Settings 1
The first page of the 'record' settings tab contains the following settings.
Codec and Quality
The 'codec and quality' menu is split into two rows. The top row lets you choose between two codec families, Blackmagic RAW and Apple ProRes, while the bottom row offers quality options in those families. For example, the quality options available in the ProRes codec family are ProRes 422 HQ, ProRes 422, ProRes 422 LT and ProRes 422 Proxy. Blackmagic RAW options are divided between four 'constant bitrate' and two 'constant quality' settings.
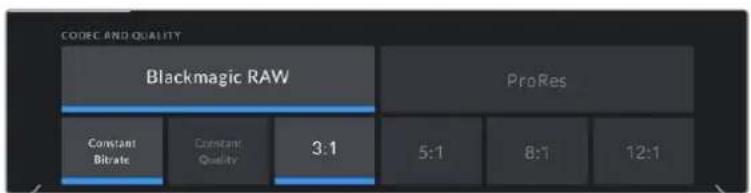
Blackmagic RAW options for 'codec and quality'
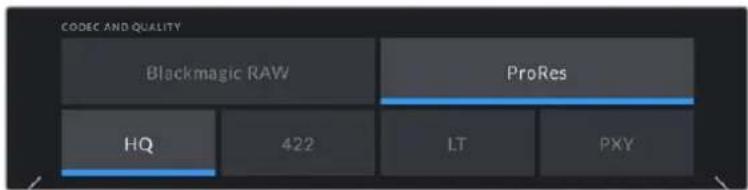
ProRes options for 'codec and quality'
TIP The amount of video you can record on your storage media on Blackmagic Pocket Cinema Camera increases if you choose codec's that use higher compression. Refer to the 'record duration' tables in the 'recording' section for more information.
Resolution
This setting works in combination with the 'codec' setting. Use it to select the resolution for your desired recording format. For example, if you want to record Ultra HD clips using ProRes HQ, select 'ProRes' and 'HQ' in the 'codec and quality' menu. Now choose 'Ultra HD' in the resolution menu.
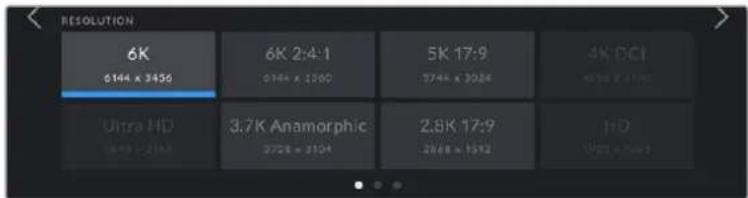
Pockel Cinema Camera 6K 'resolution' options when using Blackmagic RAW codec
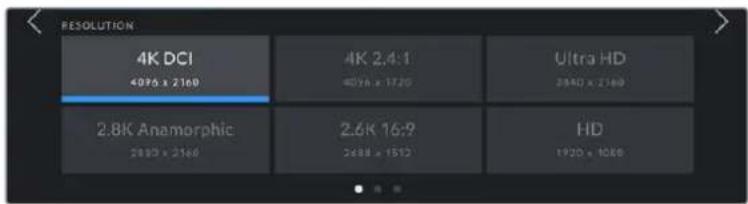
Pocket Cinema Camera 4K 'resolution' options. Note that in 4K DCI format the category is 'resolution', otherwise it's 'resolution - sensor windowed'.
NOTE When you coordinate a multi camera recording through ATEM Mini, Pocket Cinema Cameras change their codec setting to Blackmagic RAW for high quality isolated recording to internal media. When you plug Pocket Cinema Cameras into ATEM Mini they change their frame rate to match the frame rate setting of ATEM Mini. If you want to choose a different output framerate for ATEM Mini after plugging in all video sources, you can change the switcher settings in ATEM Software Control. For more information, see the ATEM Mini manual.
Record Settings 2
The second page of the 'record' settings tab contains the following options.

Pocket Cinema Camera 6K options for 'dynamic range' and 'sensor area'

Pocket Cinema Camera 4K options for 'dynamic range' and 'sensor area'
Dynamic Range
Adjust the 'dynamic range' setting by tapping the dynamic range icons. Blackmagic Pocket Cinema Camera has three dynamic range settings:
| Film The 'film' setting | shoots video using a log curve that allows you to maintain the greatest dynamic range, and maximizes the information in your video signal to help you get the most out of color grading software, such as DaVinci Resolve. |
| Extended Video The 'extended video' setting offers a good balance between 'video' and 'film' dynamic range settings. This setting offers a wider dynamic range than 'video,' while applying a mild contrast change with a smooth roll off in the highlights. 'Extended video' is suitable for use with standard broadcast monitors and is a helpful setting if you have limited time for post production and want to record your clips with a pleasing 'look' applied. | |
| Video The 'video' setting | is similar to the REC 709 color standard for high definition video. This lets you work faster by recording directly to the compressed video formats in a color space suitable for direct delivery or minimal post processing. |
NOTE When recording Blackmagic RAW and ProRes using 'film' dynamic range, the image will appear dull and desaturated on your touchscreen. This is because the image file contains a lot of data that hasn't yet been graded to suit a standard display. However, while recording film dynamic range, you can monitor the video on the touchscreen and HDMI output using a display LUT, or look up table, designed to simulate a standard contrast. For more information, refer to the 3D LUTs' section in this manual.
Sensor Area
Blackmagic Pocket Cinema Camera can be set to use the 'full' sensor area, or for even higher frame rates, you can use the 'sensor area' option to select the sensor area in 'window' mode. This uses only the amount of sensor pixels needed for a given video format rather than scaling images from the entire sensor. Some formats combine windowing and scaling, for example Pocket Cinema Camera 6K has HD formats scaled from the full sensor, scaled from a 5.7K window and scaled from a 2.7K window.
As the 'window' modes use only the center of the camera's sensor, the field of view of any given lens is narrower due to the crop involved. For example, when using a 20mm lens to shoot HD footage in windowed sensor mode, the field of view is equivalent to a 40mm lens on Blackmagic Pocket Cinema Camera 4K.
The 'sensor area' setting is available when shooting below your camera's maximum resolution, such as when shooting Ultra HD or HD ProRes video.
The fastest frame rates for Pocket Cinema Camera 6K are available when shooting 2.8K 17:9 windowed and HD scaled from 2.7K windowed. The fastest frame rates for Pocket Cinema Camera 4K are available in 2.6K 16:9 mode and in HD windowed mode.
For more information on 'full' and 'window' formats, see the 'maximum sensor frame rates' section.
Project Frame Rate
The project frame rate provides a selection of frame rates commonly used in the film and television industry. For example, 23.98 frames per second. This frame rate is normally set to match your playback speed and audio sync used in your post production workflow and delivery requirements.
Eight project frame rates are available, including 23.98, 24, 25, 29.97, 30, 50, 59.94 and 60 frames per second.
Off Speed Recording
By default, the project and sensor frame rates are matched for a natural playback speed. However, tapping the 'off speed recording' switch icon lets you set your sensor frame rate independently.
Off Speed Frame Rate
With 'off speed recording' enabled, tap the arrows next to the 'off speed frame rate' indicator to set your camera's sensor frame rate.
The sensor frame rate sets how many actual frames from the sensor are recorded every second, and frame rate will affect how fast or slow your video will play back at your set project frame rate.
For more information on off speed frame rates, see the 'frames per second' section in the 'touchscreen features' section of this manual.
NOTE For information on the maximum frame rates available for each recording format and codec, refer to the tables in the 'maximum sensor frame rates' section.
Preferred Card for Recording
Use this setting to select which storage card or drive your Blackmagic Pocket Cinema Camera records to first when both slots are in use. The options are 'CFast Card', 'SD Card' and 'Fullest Card'. Picking either 'CFast Card' or 'SD Card' is a matter of personal preference, but using either consistently will let you know which card to swap out first as your storage fills up. 'Fullest card' can help group files chronologically when shooting a single camera project.
The setting you choose is applied when a CFast or SD card is inserted. You can override this setting at any time by entering the storage manager and tapping the card name to set it as active. It's important to note, however, that ejecting and reinserting cards reverts to the current 'preferred card for recording' setting.
TIP The 'fullest card first' setting is based on the percentage that your recording media are filled, rather than their sizes or the amount of data used.
Stop Rec If Card Drops Frame
Use this setting to configure the behavior of your Blackmagic Pocket Cinema Camera when dropped frames are detected. When set to 'off,' recording continues with dropped frames. When set to 'on,' your camera stops recording if dropped frames are detected. This can prevent you wasting time shooting unusable footage if you don't spot the dropped frame indicator.
TIP Refer to the 'Storage Media' section for more information on how to avoid dropping frames.
Record Settings 3
The third page of the 'record' settings tab contains the following settings.
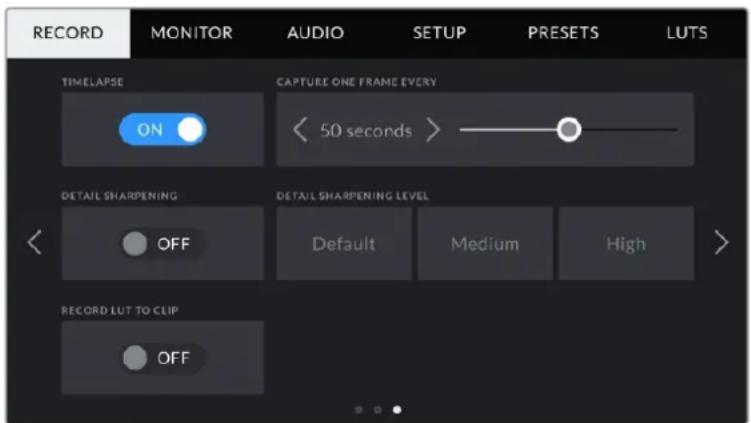
Timelapse
This setting activates the timelapse feature to automatically record a still frame at the following intervals:
Frames 2-10
Seconds 1-10,20,30,40,50
Minutes 1-10
For example, you can set the camera to record a still frame every 10 frames, five seconds, 30 seconds, five minutes etc.
The timelapse feature offers many creative options. For example, setting a two frame timelapse interval gives your recorded video a high speed effect when played back.
Start recording by pressing the record button. When you press the button again to stop recording, the timelapse sequence is saved as one single clip, matching the codec and frame rate set in your camera. This means you can drop the timelapse sequence into your post production timeline just like any other clip you have recorded.

1 A001
120min

A002
96min
Timelapse mode is indicated by an icon over the 'record' button
TIP When you record clips in timelapse mode, the timecode counter updates when a frame of video is recorded.
Detail Sharpening
Use this setting to sharpen the image. When sharpening is enabled, decrease or increase the level of sharpening by selecting 'default', 'medium' or 'high'.
When sharpening is enabled, it is applied to ProRes video recorded on camera as well as the HDMI output.
This setting is intended for live studio production where there is no time for post production and you want to output the image live to air. We recommend leaving it 'off' for images you are recording for further post production. Detail sharpening is disabled when the codec is set to Blackmagic RAW.
Record LUT to Clip
Your Blackmagic Pocket Cinema Camera does not apply, or 'bake in,' LUTs by default to recorded footage, however you can choose to 'bake in' the LUT to your footage by tapping the 'record lut to clip' switch icon.
This can be a useful option for situations where you do not have the time to grade your footage in post-production, or where you need to give the footage directly to a client or an editor. For more information, refer to the '3D LUTs' and 'touchscreen controls' sections.
Apply LUT in File
If you are shooting with the Blackmagic RAW codec and applying a LUT to the HDMI output of your camera, the selected LUT will be embedded into the Blackmagic RAW file you are recording. This means that the LUT will be saved in the header of the file and can easily be applied to the clip in post production without needing to handle a separate file. When the 'apply LUT in file' switch is set to 'on' in the record menu, this clip will open in Blackmagic RAW Player and DaVinci Resolve with the chosen LUT already applied to it. The LUT can then be easily toggled 'on' or 'off' but will always travel with the Blackmagic RAW file as it is written into the clip itself.
DaVinci Resolve also has an 'Apply LUT' switch in the RAW settings palette for enabling or disabling the 3D LUT in the Blackmagic RAW file. The 'Apply LUT' setting in DaVinci Resolve is the same setting as in the camera. This means that when shooting you can direct the colorist to use the LUT by setting it in the camera, but they can switch it off easily in DaVinci Resolve by setting 'Apply LUT' to 'off'.
File Naming Convention
Clips are recorded to your CFast card, or SD card or USB-C flash disk in the Blackmagic RAW format or to a ProRes QuickTime movie, depending upon which recording format you have chosen.
The table below shows an example of the file naming convention:
A001_08151512_C001.mov QuickTime Movie Filename
| A001_08151512_C001.mov Camera Index | |
| A001_08151512_C001.mov | Reel Number |
| A001_08151512_C001.mov | Month |
| A001_08151512_C001.mov | Day |
| A001_08151512_C001.mov | Hour |
| A001_08151512_C001.mov | Minute |
| A001_08151512_C001.mov | Clip Number |
Still image files captured using the still button follow the file naming convention for video clips, however the filename has 'S001' representing the 'still number' as the last four characters of the filename in place of the clip number. For information on how to change the camera index, see the 'Project Metadata' section.
Monitor Settings
The 'monitor' tab lets you adjust status text, overlays, and other monitoring options for your Blackmagic Pocket Cinema Camera's LCD touchscreen and the HDMI output. Options are arranged by output between 'LCD', 'HDMI' and 'both', which covers monitor settings that affect the LCD and the HDMI output. These menus have two pages of options, which you can cycle through by tapping the arrows at the edge of your camera's touchscreen, or swiping left or right.
Monitor Settings 1
The first page of the monitor tab contains identical settings for each output. For example, you can set 'zebra' on for the LCD touchscreen, but off for the HDMI output.
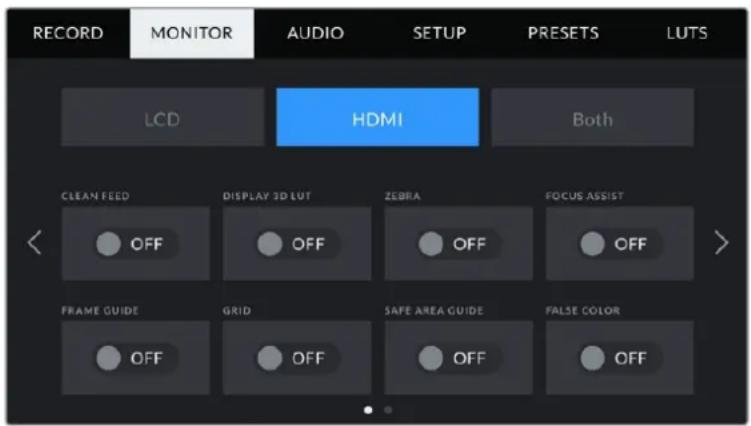
Clean Feed
Tap the 'clean feed' switch in the 'LCD' or 'HDMI' menus to disable all status text and overlays for that output, except the record tally indicator.

Your camera will display a record tally even in clean feed mode
NOTE LUTs will still be applied to outputs with 'clean feed' enabled. To disable LUTS, disable the 'display LUT' switch in the 'Monitor' menu.
Display 3D LUT
Your Blackmagic Pocket Cinema Camera can apply 3D LUTs to any output to approximate the look of color graded footage. This is especially useful when recording clips using 'film' dynamic range.
If your camera has a 3D LUT active, use this setting to independently apply that LUT to your LCD touchscreen or HDMI output.
For more information on loading and using 3D LUTs, see the '3D LUTs' section of this manual.
Tap the switches on the LCD' or HDMI' pages to enable monitoring options for the LCD touchscreen and the HDMI output: focus assist, frame guide, grid, safe area guide, false color.
Zebra
Tap the 'zebra' switch in the LCD' or HDMI' menus to enable zebra guides for those outputs. For more information on zebra guides and setting zebra levels, see the 'touchscreen features' section in this manual.
Focus Assist
Tap the 'focus assist' switch in the 'LCD' or 'HDMI' menus to enable focus assist for those outputs. For more information on focus assist and setting focus assist levels, see the 'touchscreen features' section in this manual.
Frame Guide
Tap the 'frame guide' switch in the 'LCD' or 'HDMI' menusin the 'LCD' or 'HDMI' menus to enable frame guides for those outputs. For more information on frame guides and choosing different guides, see the 'touchscreen features' section in this manual.
Grid
Tap the 'grid' switch in the 'LCD' or 'HDMI' menus to enable a rule of thirds grid for those outputs. For more information on the rule of thirds grid, see the 'touchscreen features' section in this manual.
Safe Area Guide
Tap the 'safe area' switch in the 'LCD' or 'HDMI' menus to enable safe area overlay for those outputs. For more information on the safe area guide, see the 'touchscreen features' section in this manual.
NOTE Use the 'safe area guide %' setting in your Blackmagic Pocket Cinema Camera's 'both' monitoring settings to set the size of the safe area guide.
False Color
Tap the 'false color' switch in the 'LCD' or 'HDMI' menus to enable false color exposure assistance for those outputs. For more information on using false color, see the 'touchscreen features' section in this manual.
LCD Monitor Settings 2
The second page of the LCD monitor tab contains settings unique to your LCD touchscreen.
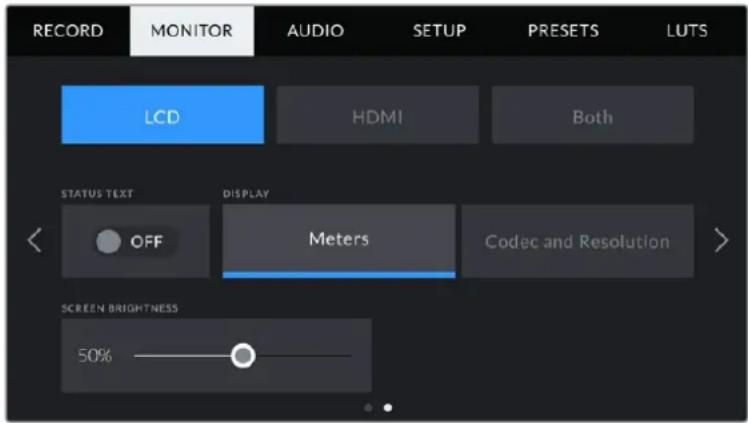
'Status text' gives you a clear view of your camera's preview image
Status Text
This setting can be useful to hide the status text and meters on your LCD touchscreen, leaving only the information necessary to compose or direct a shot. Tap the 'status text' switch icon to toggle the appearance of status text and meters for your camera's LCD touchscreen. Overlays such as frame guides, grids, focus assist and zebra remain visible, if enabled. Swiping up or down on the LCD touchscreen has the same effect.
Display
Instead of a histogram and audio meters, your camera can display codec and resolution information at the left and right bottom edges of the LCD touchscreen. This can be useful if you prefer to use false color for dialling in exposure, or are recording audio separately and want to display additional information in the space normally used by the histogram and audio meter.
Simply tap 'meters' or 'codec and resolution' in the 'LCD' menu to select your preferred view.
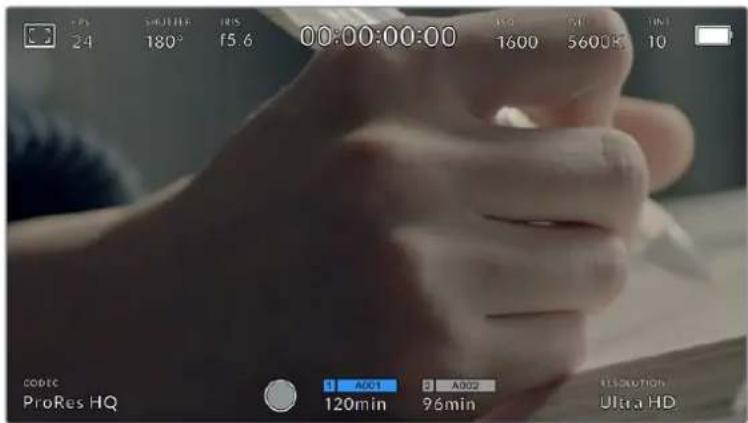
Your Blackmagic Pocket Cinema Camera can display codec and resolution information in place of the histogram and audio meters
Screen Brightness
Drag the 'screen brightness' slider in the 'LCD' menu left or right to adjust the brightness of your camera's LCD touchscreen.
HDMI Monitor Settings 2
The second page of your 'HDMI' monitor tab contains settings unique to your HDMI output.
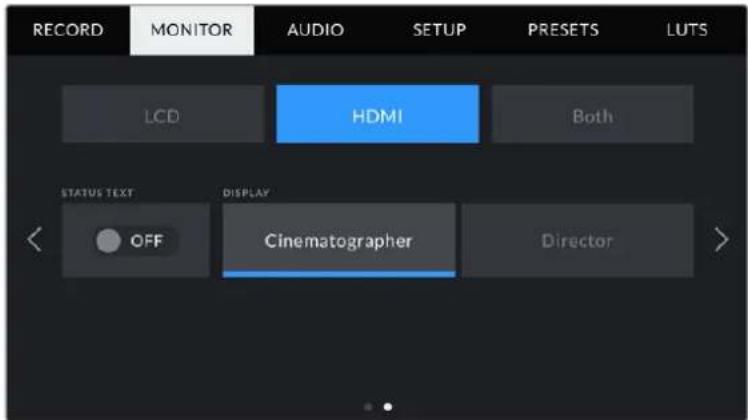
Status Text
It can be useful to hide the status text and meters on your HDMI output, leaving only the information necessary to compose or direct a shot. Tap the 'status text' switch icon in the HDMI monitor menu to toggle the appearance of status text and meters. Overlays such as frame guides, grids, focus assist and zebra remain visible, if enabled.
To hide or reveal status text and meters on the touchscreen, simply swipe up or down.
Display Status Text For Cinematographer or Director
The LCD touchscreen displays information such as ISO, white balance, and aperture that is useful to a camera operator or cinematographer setting up individual shots on that camera. Your camera's HDMI output, however, can also show information useful to a director or script supervisor who is keeping track of multiple shots or cameras.

Your Blackmagic Pocket Cinema Camera can display director specific status text on Its HDMI output
Setting the status text to 'director' in the HDMI monitor settings changes the status text for that output to show the following information.
- FPS
Displays the currently selected frames per second for that camera. If off speed frame rate is disabled, only the project frame rate is shown. If an off speed frame rate is being used, the sensor frame rate is shown, followed by the project frame rate.
CAM
Displays the camera index as set in your camera's slate. For more information, see the 'slate' section.
OPERATOR
Identifies the camera operator as set in your camera's slate. For more information, see the 'slate' section.
DURATION DISPLAY
Displays the duration of the current clip while recording, or the last recorded clip in the following format: hours:minutes:seconds.
REEL,SCENE,TAKE
Displays the current reel, scene and take. For more information on reels, scenes, takes and their labelling conventions, refer to the 'slate' section.
DYNAMIC RANGE
The bottom left hand corner of the monitor displays the currently applied LUT, if applied to that output. If no LUT is applied, 'film' or 'video' dynamic range is displayed.
TIMECODE
The bottom right of the monitor displays your camera's timecode, in the following format:
hours:minutes:seconds:frames.
Both Monitor Settings 1
Monitor settings that affect both your camera's LCD and the HDMI output are grouped in the 'both' menu. For example, setting 'safe area guide %' to 90% in this menu sets the safe area guide to 90% for your camera's LCD and HDMI output.
Monitor settings for both are displayed over 2 pages, containing the following settings.
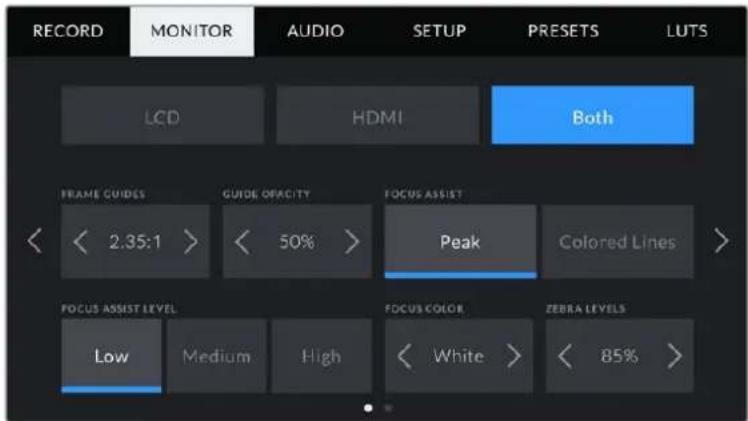
Frame Guides
Tap the left or right arrows in the 'frame guides' menu setting to cycle through frame guide options for all outputs on your camera. The options are detailed in the 'touchscreen features' section of this manual, and are also accessible from the LCD monitoring menu in your LCD touchscreen head up display. It's worth noting that you can individually select whether frame guides appear on the LCD touchscreen and HDMI output in their respective 'monitor' menus.
Guide Opacity
Tap the left or right arrows in the 'guide opacity' menu setting to choose the opacity of the areas blocked out by frame guides on your LCD touchscreen and HDMI output. The options are 25% , 50% , 75% and 100% .
Focus Assist
Your camera has two focus assist modes, including 'peak' and 'colored lines.'
| Peak When ‘peak’ style focus assist is selected, areas of the shot that are in focus are heavily sharpened on your LCD touchscreen or HDMI output, but not in the recorded image itself. This causes focused parts of your shot to ‘pop’ out of the softer background on screen. As no additional overlays are used, this can be a very intuitive way to tell when focus is dialled in, especially when the subject you're focusing on is physically well separated from other elements in shot. | |
| Colored Lines When ‘colored lines’ style focus assist is selected, a colored line is superimposed around the parts of the image that are in focus. This can be a little more intrusive than ‘peak’ style focus assistance as the lines are drawn over your image, but especially in busy shots with a lot of visible elements, it can be a precise focus aid. |
Focus Assist Level
To set the level of focus assistance for your LCD and HDMI output, tap the 'low,' 'medium' or 'high' setting.
NOTE Setting the focus assist intensity level does not affect whether focus assistance is enabled on your Blackmagic Pocket Cinema Camera's LCD and HDMI output. You need to turn focus assistance on individually for each output in the LCD and HDMI output monitor menus.
TIP The optimum level of focus assistance varies shot by shot. When focusing on actors, for example, a higher level of focus assistance can help resolve edge detail in faces. A shot of foliage or brickwork, on the other hand, may show distracting amounts focus information at higher settings.
Focus Color
Use this setting to change the color of focus line overlays when using 'colored lines' style focus assistance. Changing the focus line color can make it easier to tell focus assistance lines apart from your image. The available options are 'white', 'red', 'green', 'blue' and 'black'.
Zebra Levels
Set the exposure level that zebra appears at by tapping the arrow icons on either side of this setting. Zebra level is adjustable in five percent steps between 75 and 100 percent exposure.
For more information, see the 'zebra' guide in the 'touchscreen features' section of this manual.
Both Monitor Settings 2
The second page of the 'both' monitor tab contains the following options:
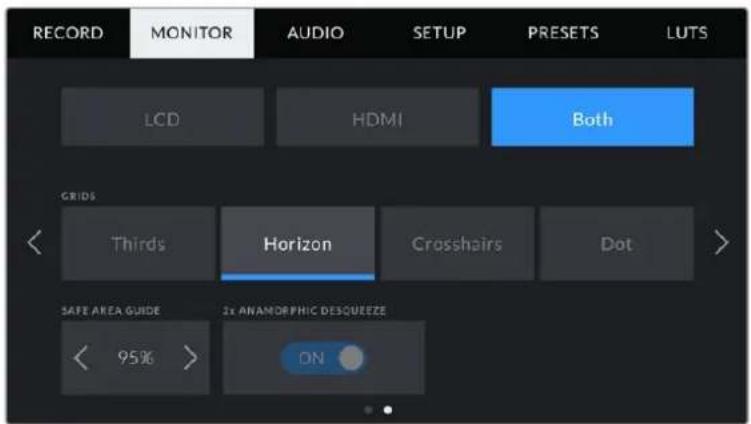
Page 2 of 'monitor' options for both LCD and HDMI
Grids
To set which combination of grids and crosshair you want to display on your camera's LCD touchscreen and HDMI output, tap the 'thirds', 'horizon', 'crosshair' or 'dot' options in this setting.
For more information, see the 'grids' guide in the 'touchscreen features' section.
Safe Area Guide %
Adjust the size of the safe area overlay on the touchscreen and HDMI output by tapping the arrows to the left and right of the percentage displayed in this setting. This percentage indicates the size of the safe area in relation to the image frame. Most broadcasters require a 90% safe area.
Anamorphic Desqueeze
Your Pocket Cinema Camera can apply an anamorphic desqueeze to the LCD touchscreen and HDMI output. In 16:9 and 17:9 formats you can enable '1.33x anamorphic desqueeze'. When you record in '3.7K anamorphic' format on Pocket Cinema Camera 6K or '2.8K Anamorphic' format on Pocket Cinema Camera 4K, your camera applies '2x anamorphic desqueeze' automatically.
Audio Settings
The 'audio' tab lets you adjust the audio input and monitoring settings on your camera.
The audio settings for the camera are spread over two pages and divided between channels 1 and 2.
You can map each audio channel to a different source, as well as adjusting various settings such as gain control.
Audio Settings 1
The first page of the 'audio' tab contains the following settings.
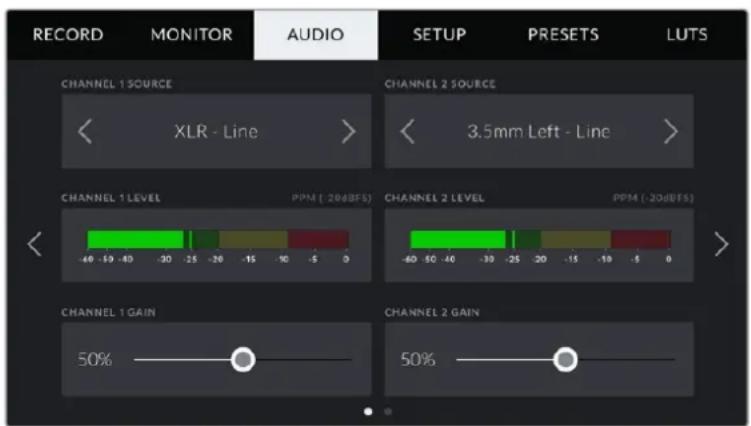
Channel Source
Use the 'channel 1 source' and 'channel 2 source' buttons to select your audio source for each audio channel. Below is a description of each channel source setting.
- Camera Left or Right
Records from your camera's internal microphones.
- Camera Mono
Creates a single audio channel from your Blackmagic Pocket Cinema Camera's built in microphone's left and right channels.
XLR Line
Uses your camera's XLR input to record line level audio.
XLR Mic
Records mic level audio from your camera's XLR input. If phantom power is enabled and you have your XLR input set to 'mic' you'll also see a +48V indicator here. It is also important to ensure that the 48V switch gets turned 'off' when you disconnect your phantom powered microphone.
3.5mm Left - Line
Uses only the left channel of the 3.5mm input as line level audio.
3.5mm Right - Line
Uses only the right channel of the 3.5mm input as line level audio.
3.5mm Mono - Line
Creates a mono mix of the left and right channel from the 3.5mm input as line level audio.
3.5mm Left - Mic
Uses only the left channel of the 3.5mm input as mic level audio.
3.5mm Right - Mic
Uses only the right channel of the 3.5mm input as mic level audio.
3.5mm Mono - Mic
Creates a mono mix of the left and right channel from the 3.5mm input as mic level audio.
None
Disables your audio channel.
NOTE When selecting the 3.5mm input as an audio source, the channel 1 and channel 2 source both need to be line level or mic level. This means that if you select
3.5mm left - line' as your channel 1 source, the available options for the 3.5mm input on channel 2 will all be line level: '3.5mm left - line', '3.5mm right - line' and
3.5mm mono - line'. The mic level options will be grayed out.
Channel 1/2 Level
The level meters help you set the correct audio level.
Channel 1/2 Gain
Use these sliders to adjust the recording levels of your chosen channel 1 and 2 sources.
Audio Settings 2
The second page of the 'audio' tab contains the following settings.
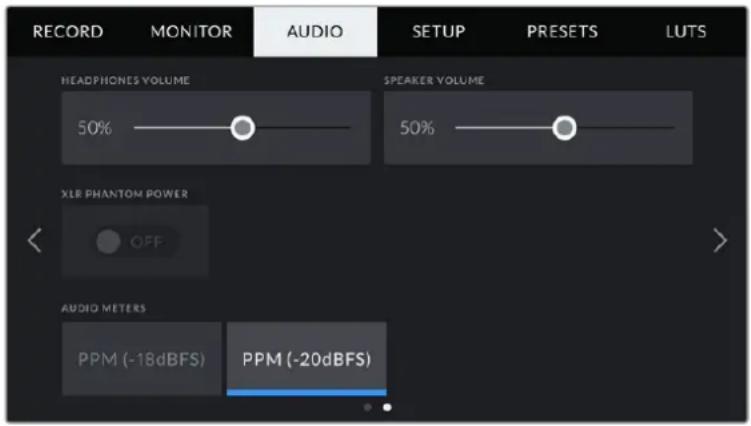
Headphones Volume
This slider adjusts the output levels for headphones attached to the 3.5mm headphone jack. Move the audio slider left or right to adjust levels.
Speaker Volume
This slider adjusts the output levels for the built in speaker. Move the audio slider left or right to adjust levels.
XLR Phantom Power
Your camera's XLR input can provide 48V phantom power so you can use microphones that aren't self powered. When your camera is set to 'XLR' audio input, simply tap the 'phantom power' switch icon to enable phantom power.
Audio Meters
Select an 'audio meters' standard for the peak level meters.
| Audio meter setting Standard | |
| PPM (-20 dBFS) SMPTE RP.0155 | |
| PPM (-18 dBFS) EBU R.68 |
NOTE It is standard practice to plug in your XLR cable before switching phantom power on. It is also important to switch phantom power to 'off' when you no longer have a phantom powered microphone connected. Connecting equipment that doesn't require phantom power when still in phantom power mode can damage your equipment, as the camera outputs a charge when in this mode. Phantom power can also take quite a while to discharge after switching it off.
Please be aware that you should wait a few minutes when switching off phantom power before plugging in any other microphones or XLR audio equipment.
Setup Settings
The 'setup' tab contains your Blackmagic Pocket Cinema Camera's identification settings, software version, function button settings and other camera settings not directly linked to recording or monitoring. This menu has four pages, which you can cycle through by tapping the arrows at the edge of the LCD touchscreen, or swiping left or right.
Setup Settings Page 1
The first page of your camera's 'setup' tab contains the following settings.
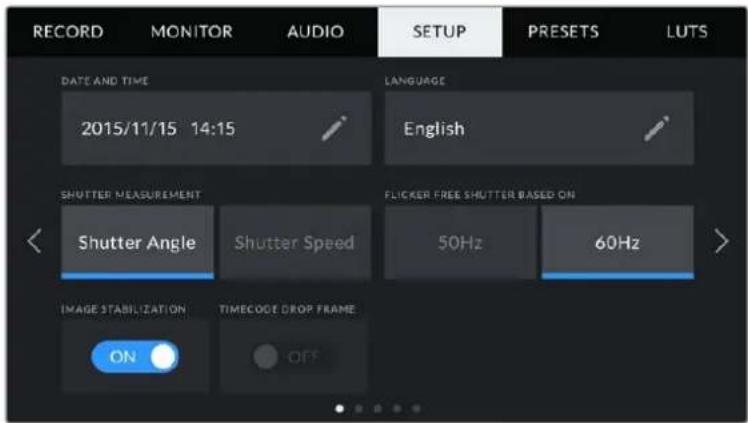
Date and Time
Set your camera's date and time by tapping the 'date and time' setting. The date format is year, month, day and the time format is 24 hour. Date and time are also used for time of day timecode if an external timecode source is not connected.
Language
Pocket Cinema Camera supports 11 popular languages: English, Chinese, Japanese, Korean, Spanish, German, French, Russian, Italian, Portuguese and Turkish.
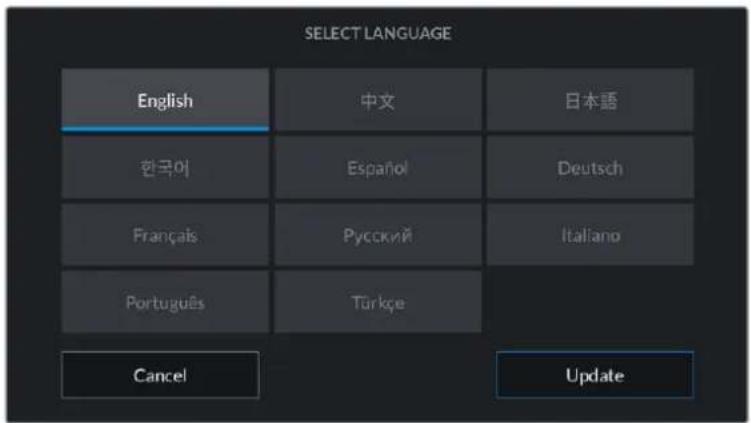
The language page will also appear on initial start up and after you update the camera's internal software.
To select your language:
1 Tap on the 'language' and select your language from the list.
2 Select 'update' to return to the setup menu.
Shutter Measurement
Use this setting to select whether to display shutter information as 'shutter angle' or 'shutter speed'.
It's worth mentioning that when using shutter angle, the shutter conforms to the frame rate. For example, 180 degrees produces the same motion blur, no matter which frame rate you use.
When using shutter speed, however, the shutter is given an absolute value determined independently of the frame rate, so the results differ if you change the frame rate.
For example, when shooting at 24 frames per second, a 1/48th of a second shutter speed produces pleasing motion blur at the equivalent of a 180 degree shutter angle. Change the frame rate to 48 frames per second and 1/48th of a second shutter speed no longer offers the same motion blur, now producing the equivalent of a 360 degrees shutter angle. In this example, when the frame rate is changed to 48 fps, you would also need to change the shutter speed to 1/96th of a second to produce the same effect as a 180 degree shutter angle.
Flicker Free Shutter Based On
Use this setting to change the mains power frequency your camera uses to calculate flicker free shutter settings.
When shooting under lights, your shutter can affect the visibility of flicker. Your Blackmagic Pocket Cinema Camera automatically calculates a flicker free shutter value for your current frame rate and suggests up to three shutter values. Shutter values are affected by the frequency of the local mains power supply used to drive those lights. In most PAL countries, this frequency is 50Hz , while NTSC countries typically use 60Hz power. Tap '50Hz' or '60Hz' to set the right frequency for your region.
NOTE Characteristics of various light sources may still cause flicker even when using flicker free shutter values. We recommend performing a test shoot when not using continuous lights.
Image Stabilization
Pocket Cinema Camera 4K has an 'Image Stabilization' option to enable or disable image stabilization on lenses without a physical switch.
Timecode Drop Frame
Use the 'timecode drop frame' option to use drop frame timecode when using NTSC project frame rates of 29.97 and 59.94. Drop frame timecode skips a small number of frames from the timecode at set intervals. This keeps your project timecode accurate despite each second not containing a whole number of frames at NTSC frame rates.
Setup Settings Page 2
The second page of the 'setup' tab contains the following settings.
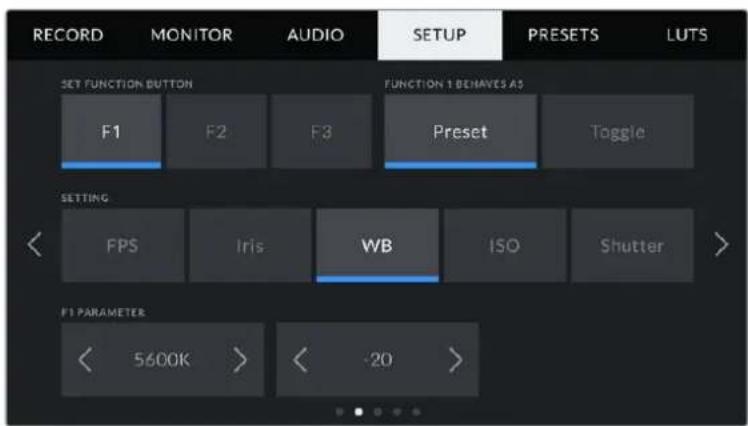
Set Function Button
On the top of your Blackmagic Pocket Cinema Camera you'll notice three function buttons. The dots on the buttons represent function 1, function 2 and function 3. These can be mapped to frequently used features and are quickly accessible when using your camera.
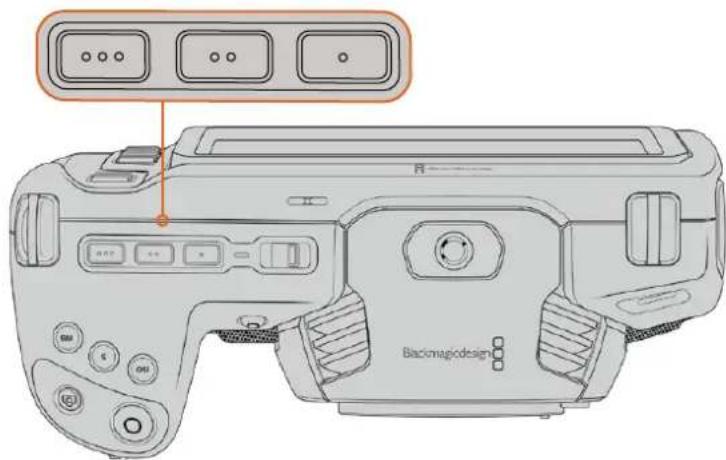
The function buttons are represented by dots and are located on the top of your camera
To set these buttons, select a function button and then the behavior, settings and parameters you want for that function.
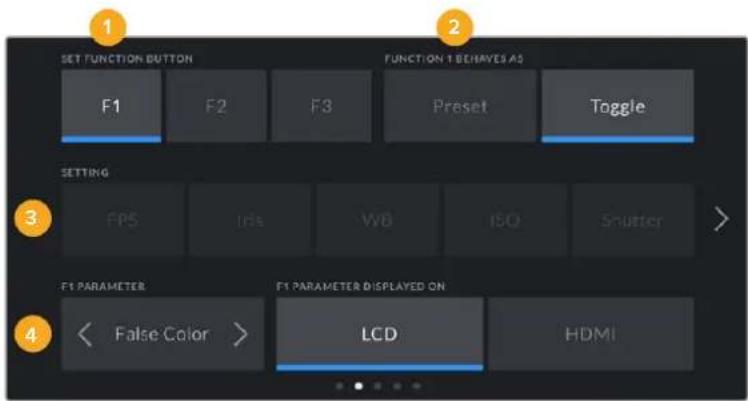
1 Button 2 Behavior 3 Setting 4 Parameter
Function Button Behaves as Preset or Toggle
Once you have selected the function button you want to map, you can select a behavior.
The available options are:
| Preset When set to this behavior, pressing a function button recalls a combination of a setting and a parameter. To set a preset, select the setting you want to use from the 'setting' menu, and adjust that setting by tapping the arrow icons on either side of the ‘parameter’ menu. For example, to set the F1 button to recall a preset aperture of f8, select the ‘preset’ behavior, tap the ‘iris’ setting, and tap the arrows on either side of the ‘parameter’ menu until you get to f8.' Tapping the preset again returns your camera to the previous setting. |
| Toggle When set to this behavior, pressing a function button toggles a particular setting on or off. The ‘setting’ menu is greyed out in this mode. Instead, tap the left or right arrows in the parameter menu to scroll through the available options. These are ‘off speed recording’, ‘ois’, ‘clean feed’, ‘display LUT’, ‘frame guides’, ‘focus assist’, ‘false color’, ‘zebra’, ‘grid’ and ‘safe area guide’. Use the ‘Toggle’ behavior to select the output this setting applies to. Tap any combination of ‘LCD’ and ‘HDMI’ to select. If the output for an option cannot be selected, such as ‘off speed rec’ which always applies to all outputs, the separate ‘LCD’ and ‘HDMI’ settings are disabled. |
Setup Settings Page 3
The third page of the 'setup' tab contains the following settings.
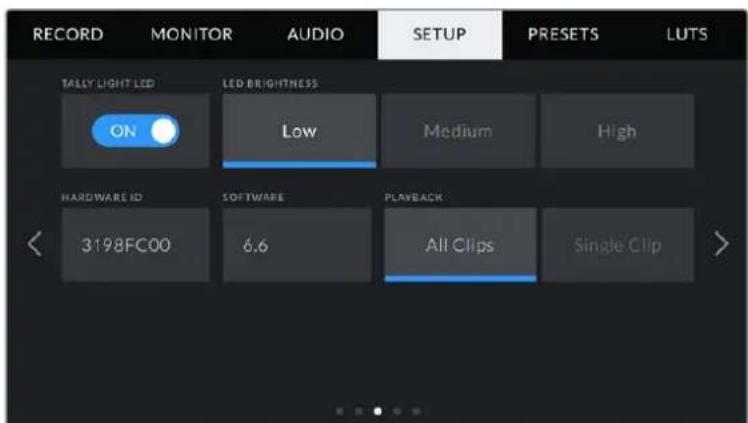
Tally Light LED
Pocket Cinema Camera has a small LED on the front to indicate the recording status of the camera and the program and preview tally status when connected to Blackmagic ATEM Mini. If you connect Pocket Cinema Camera to ATEM Mini to remotely control recording and camera settings, the tally shows when the camera is on air or being previewed. For more information, refer to the 'Camera Control with ATEM Mini' section.

Recording to storage media in the camera.

Camera is live on air.

Camera is about to go on air.
To enable or disable the tally light indicator, use the 'tally light LED' switch.
LED Brightness
To set the brightness of the tally light LED, tap 'low,' 'medium,' or 'high.'
Hardware ID
The 'Hardware ID' indicator displays an 8 character identifier for your Blackmagic Pocket Cinema Camera. This is unique to each camera. A longer, 32 character version of this ID is also included in the metadata for Blackmagic RAW and ProRes video. This can be useful for identifying which footage came from a particular camera.
Software
Displays the version number of currently installed software. See the 'Blackmagic Camera Setup Utility' section for more information on updating software.
Playback
This setting allows you to select whether to play back a 'single clip' or 'all clips' on the LCD touchscreen from SD card, CFast card or USB-C flash disk. 'All clips' plays back through all matching media sequentially, and 'single clip' plays one clip at a time. This also applies for the loop function. Selecting loop on 'all clips' plays through all of the clips on the recording media and then loop. Selecting 'single clip' loops one clip at a time.
Setup Settings Page 4
The fourth page of your camera's 'setup' tab contains these Bluetooth® settings.
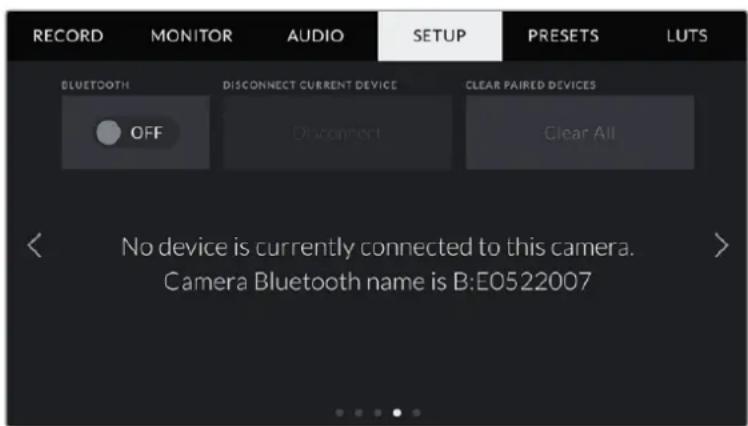
The camera Bluetooth name will be the letter of your camera as selected In the slate, followed by the 8 character hardware ID for your camera
Bluetooth
Bluetooth control lets you control your camera wirelessly from portable devices. Using the 'Blackmagic Camera Control App' you can change settings, adjust metadata and trigger record remotely from an iPad. Enable or disable Bluetooth by tapping the 'Bluetooth' switch icon in the 'setup' menu. When Bluetooth is enabled, the camera can be detected by Bluetooth devices up to 30 feet away. Your camera uses the same set of commands for Bluetooth control as it does for 'Blackmagic SDI Camera Control Protocol', so you can write your own applications to control almost every setting in the camera remotely. For example, monitoring options and audio settings, to the camera's inbuilt DaVinci Resolve color corrector or even lens control.
For more information see the 'Blackmagic Camera Control' document available at www.blackmagicdesign.com/au/developer/
To pair your camera with an iPad for the first time:
1 Enable Bluetooth by tapping the 'Bluetooth' switch icon in the 'setup' menu.
2 Open the 'Blackmagic Camera Control App' and select the camera you would like to pair it with. Available cameras are listed by a camera letter, followed by a unique hardware ID. For example A:A0974BEA.

Select the Blackmagic Pocket Cinema Camera you would like to pair with
NOTE When you install the Blackmagic Camera Control App and run it for the first time, you will be asked if you want to 'allow location access.' If you select 'while using the app,' GPS readings from your iPad will be included in the metadata of the files you shoot, allowing you to geotag your footage. This information can be viewed in Blackmagic DaVinci Resolve version 15 or higher.
If you do not want to allow the use of this information, select 'never.'
To change settings, go to settings, privacy, location services, camera control on your iPad.
3 When you try to connect for the first time the Blackmagic Camera Control App will request a six digit code to pair with the camera. This code will be displayed on the camera's LCD screen. Type this code into the iPad and press 'pair'.
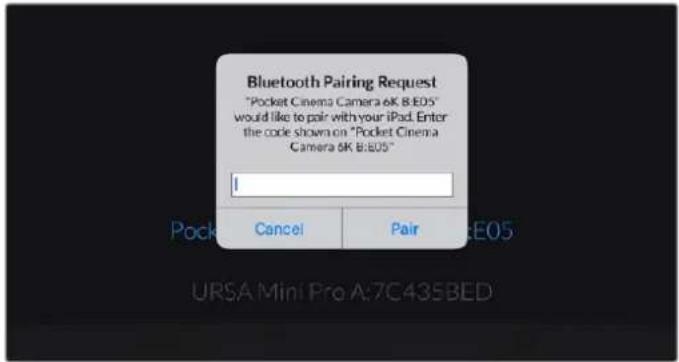

4 When your camera connects to your iPad, it confirms it is paired.
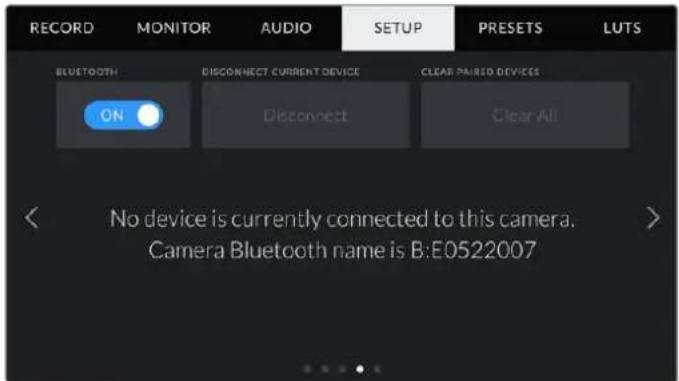
5 If pairing the camera to your iPad fails, the camera presents an error message. Try connecting again.
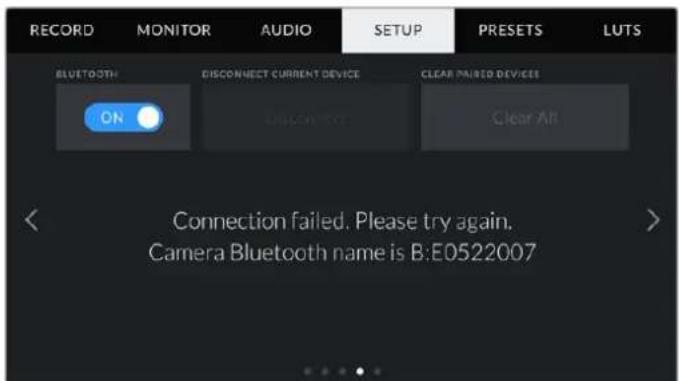
NOTE If you are not using Bluetooth to control your Blackmagic Pocket Cinema
Camera, it is a good idea to turn Bluetooth off for the purpose of security.
Disconnect Current Device
Use this setting to disconnect your Blackmagic Pocket Cinema Camera from the iPad it is currently paired with.
Clear Paired Devices
Use this setting to clear the list of devices that your camera has been paired with.
Controlling Your Camera with the Blackmagic Camera Control App
Once you have successfully paired your camera to your iPad, you can change settings, adjust metadata and trigger record remotely using the iPad app.
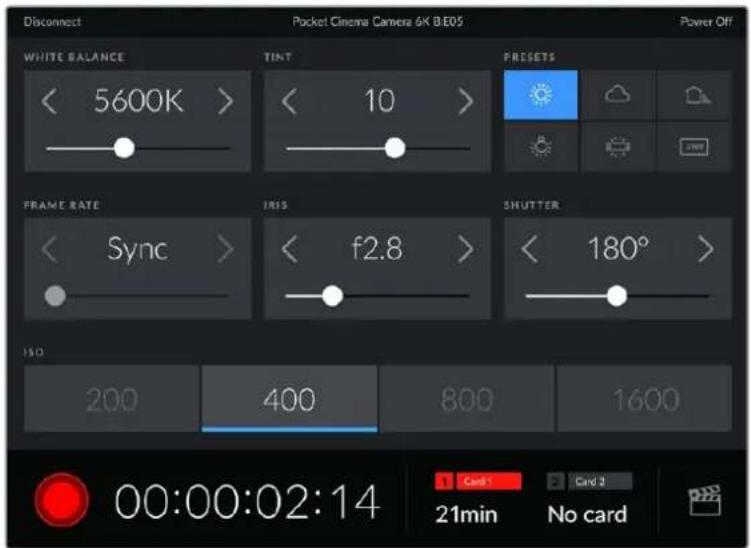
Once paired, the Blackmagic Camera Control app will display this screen, allowing you to adjust your settings and start recording
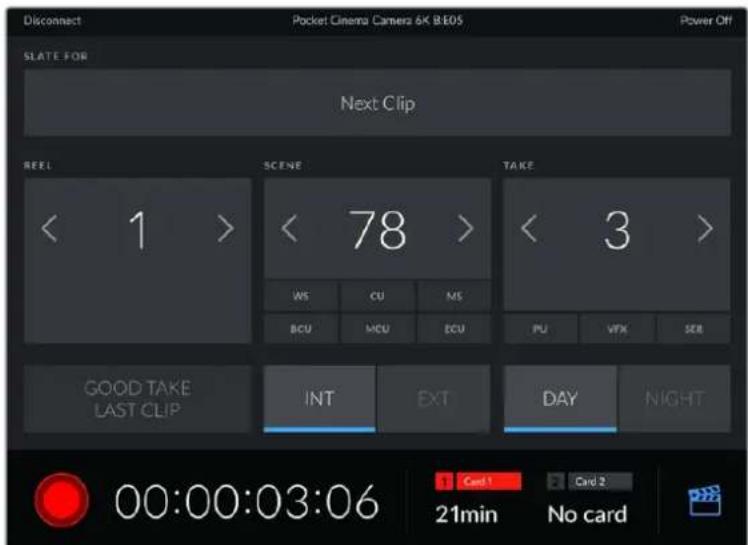
Tap the slate icon in the lower right corner to access and update the slate
Blackmagic Pocket Cinema Camera uses Bluetooth LE to communicate with devices for wireless control. This is the same type of protocol used in portable devices, and uses a minimal amount of battery power.
Setup Settings Page 5
The fifth page of the 'setup' tab has controls to perform a factory reset, remap pixels and to calibrate the horizon meter.
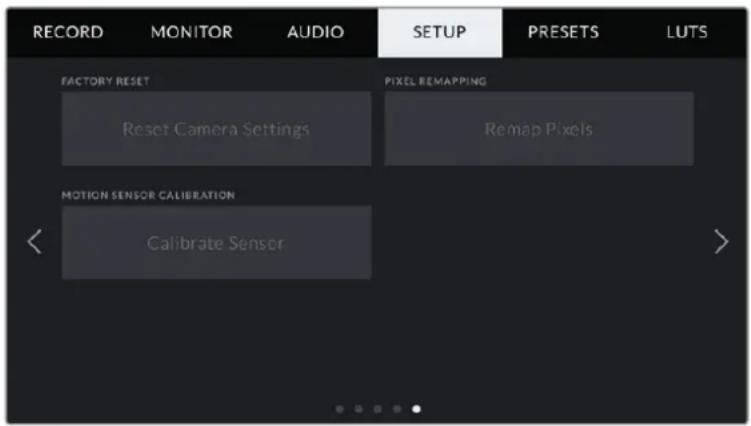
Factory Reset
To reset the camera to its default factory settings, tap the 'reset camera settings' button. On the confirmation page, tap 'reset' to confirm this action. Your camera erases any stored LUTs and preset, and resets all settings. It is a good practice to export your presets to a memory card as a backup before performing a factory reset. After a factory reset, you can restore your preset quickly by importing them from the memory card. It is important to note that a factory reset also resets the horizon meter, so you should recalibrate the motion sensor after a factory reset to help ensure its accuracy.
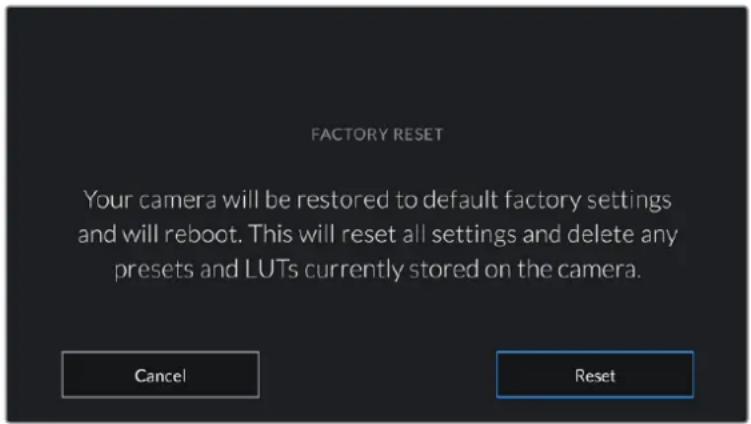
When selecting 'reset' you will be prompted to confirm your action
Pixel Remapping
The CMOS sensor used in your Blackmagic Pocket Cinema Camera is made up of millions of pixels that respond to light. Some pixels can change in brightness over time following sensor calibration in the factory. As a result, they become more visible and become what is known commonly as hot pixels. All camera sensors, regardless of manufacturer, will develop hot pixels.
To solve this, we have a calibration feature built into the camera which you can run if you see any hot pixels in the image.
To begin this process, simply put on the lens cap and run the pixel remapping feature by tapping the 'remap pixels' button. The process takes approximately one minute to complete.
Motion Sensor Calibration
To calibrate the horizon meter, place your camera on a surface you know is level and tap the 'calibrate motion sensor' button. It is essential that you keep the camera stable during calibration. The process takes approximately five seconds to complete.
Presets
The 'presets' tab lets you save and recall up to 12 collections of settings. This is very useful when one camera is used for multiple projects. For example, you may use your camera for a variety of different shoots, from documentaries to music videos, with very different settings between types of projects. Your camera's 'presets' function lets you save the setup for a particular project or type of shoot and come back to it quickly and easily when required. You have 12 preset slots to use.
You can also import and export presets, which is very useful for setting up a multi camera shoot. Simply set up one Blackmagic Pocket Cinema Camera to suit your project, then export that preset for all the other Blackmagic Pocket Cinema Cameras on set.

The preset tab allows you to quickly switch between settings that you have saved
NOTE Your camera can save up to 12 presets to its internal memory.
Preset buttons
The button icons along the bottom of the 'preset' menu correspond with the following functions.


Add Load Update Manage Delete
Saving and loading presets
To create a new preset, tap the 'add' icon. This brings up a touch keyboard on your LCD where you can name your preset. Enter a name and tap 'update' to save all of your current settings to that preset.
If your camera already has a preset loaded with the same name, you can choose to overwrite the existing preset or keep both.
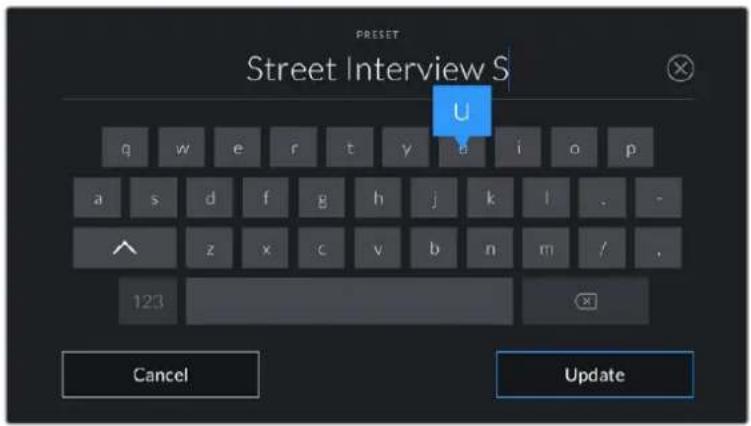
Enter a name for your preset by tapping the 'add' icon in the preset tab and using the touch keyboard
Once you have a preset saved, tap its name in the preset menu to select it. To load a preset, tap the 'load' icon.
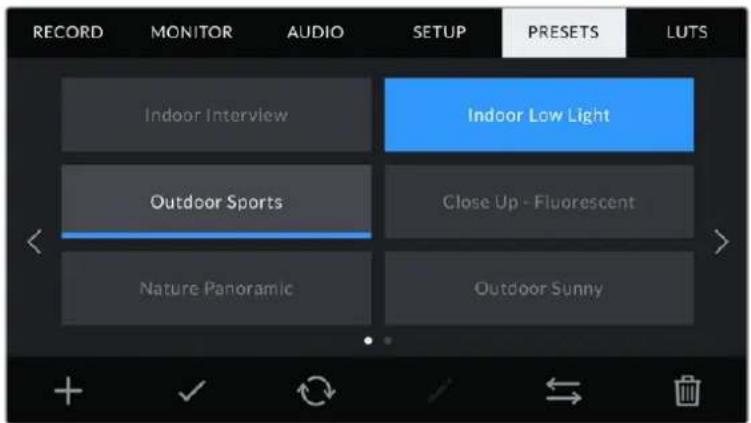
Select a preset and tap the 'load' icon to load it. Selected presets will appear solid blue, while currently loaded presets have a blue line along the bottom of their icon
You can update a preset by tapping the 'update' icon. This will bring up a prompt asking you if you want to update the preset with your Blackmagic Pocket Cinema Camera's current setting. Tap 'update' to confirm.
Importing presets
To import a preset, tap the 'manage' icon at the bottom of the 'presets' menu. Tap 'import presets', then tap 'import' to confirm. This brings up the presets import screen. If your preferred preset is not on the active card or drive, switch between recording media by tapping a media button at the top of the touchscreen. You can import presets from a USB-C flash disk, CFast or SD card.
Your camera searches the root directory and 'Presets' folder on your selected media, and lists available presets. Any presets you have saved elsewhere are not visible.
Tap a preset to select it, then tap 'import' to confirm your selection and copy it to the next available slot on the camera.
NOTE If all 12 of your camera's preset slots are full, the import menu is unavailable, and you need to delete an existing preset to make room.
If the preset you want to import has the same name as a preset already saved to your camera, you can choose to overwrite the existing preset or keep both. At the top right of this screen, you'll see the number of remaining empty preset slots available on your camera. You are able to import as many presets as you have free slots on your camera.
Exporting presets
To export a preset to a card or USB-C flash disk, tap the preset you want to export, then tap the 'manage' button. Tap 'export selected preset', then tap the media where you want to export the preset. If a preset with the same name is already present, choose whether to overwrite the preset or keep both. The camera exports the preset to a 'Presents' folder.
Deleting presets
To delete a preset, select it and tap the 'delete' icon. When you are prompted to confirm your choice, tap 'delete'.
3D LUTs
The 'LUTS' menu lets you import, export and apply 3D LUTs to your camera's outputs.
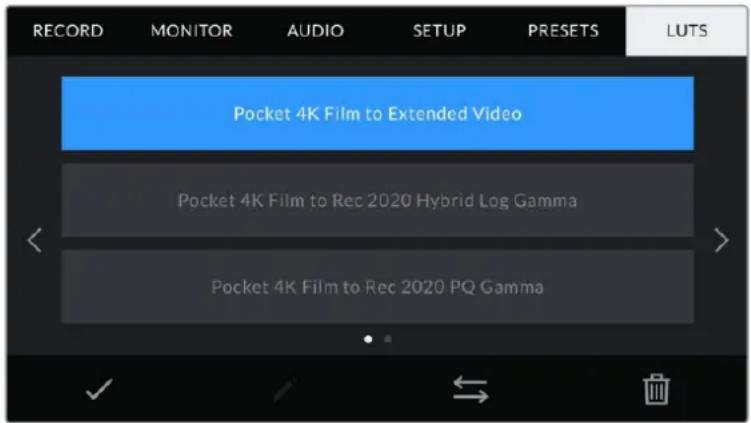
Select a 3D LUT using your camera's LUTS tab
Introducing 3D LUTs
3D LUTs can be applied to images on your camera's LCD touchscreen and HDMI output. LUTs work by telling your camera what color and luminance output to show for a particular color and luminance input. For example, a LUT may tell your camera to display a vibrant, saturated blue when it receives a relatively dull blue input. This can be useful when shooting Blackmagic RAW footage, or using 'film' dynamic range, both of which have an intentionally undersaturated, 'flat' appearance. By applying a LUT, you can get an idea of what your footage will look like after it has been graded.
It is easy to create 3D LUTs using DaVinci Resolve or other color correction software, and LUTs are available online from a variety of sources. Up to 10 17 point or 33 point 3D LUTs up to 1.5 megabytes each can be stored on the camera. Once loaded, you can choose to display a given LUT on your camera's LCD touchscreen and HDMI output.
Your Blackmagic Pocket Cinema Camera supports 33 point 3D LUTs in .cube format created in DaVinci Resolve and 17 point 3D LUTs converted to Resolve .cube format via LUT conversion programs. Your camera processes 3D LUTs using high quality tetrahedral interpolation.
TIP For more information on displaying LUTs, see the 'monitor settings' section in this manual.
NOTE Your Blackmagic Pocket Cinema Camera does not apply, or 'bake in,' LUTs by default to recorded footage, however you can choose to 'bake in' the LUT to your footage.
This can be a useful option for situations where you do not have the time to grade your footage in post-production, or where you need to give the footage directly to a client or an editor.
When you are using LUTs as a preview tool on set, the information on the LUT applied is saved as metadata with your recordings. DaVinci Resolve can display this information in the 'LUT used' field in the metadata tab, which can be helpful for colorists to verify the name of the LUT that was used on set.
Built-in LUTs
A number of built in LUTs are provided that allow you to preview different looks when shooting in 'film' dynamic range or Blackmagic RAW.
Each camera provides LUTs that are specific to the sensor:
Pocket 4K Film to Extended Video / Pocket 6K Film to Extended Video
Displays a wider dynamic range than the 'Pocket 4K Film to Video' or 'Pocket 6K Film to Video' LUT, and applies a mild contrast change with a smooth roll off in the highlights.
Pocket 4K Film to Rec 2020 Hybrid Log Gamma / Pocket 6K Film to Rec 2020 Hybrid Log Gamma
Displays a hybrid between REC 709 and a log image.
Pocket 4K Film to Rec 2020 PQ Gamma / Pocket 6K Film to Rec 2020 PQ Gamma
Displays a gamma curve that is based on what we can perceive with our eyes, for efficient encoding of HDR images.
Pocket 4K Film to Video / Pocket 6K Film to Video
Similar to the REC 709 color standard for high definition video, and has a high level of contrast and saturation. You may find this setting useful when using Blackmagic Pocket Cinema Camera alongside other broadcast cameras using the REC 709 color space.
LUTs buttons
The button icons along the bottom of your camera's 'LUTS' screen correspond to the following functions:


Load Media Manage Delete
Importing LUTs
To import a 3D LUT, tap the 'manage' icon at the bottom of the 'LUTs' menu. Tap 'import LUT', then tap 'import' to confirm. This brings up the LUT import screen. If your preferred 3D LUT is
not on the active card or drive, switch between recording media by tapping a media button at the top of the touchscreen. You can import LUTs from a USB-C flash disk, CFast or SD card.
Your camera searches the root directory and '3DLUTs' folder on your selected media, and lists available LUTs. Any LUTs you have saved elsewhere are not visible.
Tap a LUT to select it, then tap 'import' to confirm your selection and copy it to the next available slot on the camera.
NOTE If you want to import a new LUT but all 10 3D LUT slots are full, you need to delete an existing LUT to make space.
If the LUT you want to import has the same name as a LUT already saved to your camera, you can choose to overwrite the existing LUT or keep both. At the top right of this screen, you'll see the number of remaining empty LUT slots available on your camera. You are able to import as many LUTs as you have free slots on your camera.
NOTE If you have trouble importing a LUT, it may be the wrong size. You can use a LUT editor like Lattice to check its size, or open it in any text editor on your computer. Next to the tag 'LUT_3D_SIZE' is a number indicating the LUT's size. If this value is not 17 or 33, you can use Lattice to resize your 3D LUT to 17 points.
Applying a LUT
Once you have a LUT saved onto your camera, tap it in the LUT menu to select it, and tap the 'load' icon. This enables the LUT for all outputs on your camera. To display the loaded LUT on your camera outputs, switch on 'display LUT' in the monitor menu. See the 'monitor settings' section for more information.
Exporting LUTs
To export a LUT to a card or USB-C flash disk, tap the LUT you want to export, then tap the 'manage' button. Tap 'export selected LUT', then tap the media where you want to export the LUT. If a LUT with the same name is already present, choose whether to overwrite the LUT or keep both. The camera exports the LUT to a '3DLUTs' folder.
Deleting LUTs
To delete LUTs you are no longer using or make room for more, select the LUTs you want to delete and tap the delete icon. When you are prompted to confirm your choice, tap 'delete'.
Embedded 3D LUTs
When a 3D LUT is used while shooting Blackmagic RAW on Blackmagic Pocket Cinema Camera, the selected LUT will be embedded into the Blackmagic RAW file that you are recording. The 3D LUT is actually saved with your recorded files in the header of the .draw file, and can easily be applied to footage in post production without needing to handle a separate file.
So when Blackmagic RAW files are delivered to an editor or colorist, they will be able to easily access the LUT that was used while filming, which greatly reduces the possibility that the wrong 3D LUT could be applied to a clip. They can then choose whether to apply the 3D LUT when editing or color grading the footage, and can disable the 3D LUT at any time.
When the 'apply LUT in file' switch is set to 'on' in the record menu, the recorded clip will open in Blackmagic RAW Player and DaVinci Resolve with the chosen 3D LUT already applied to it.
The 3D LUT can then be easily toggled 'on' or 'off' but will always travel with the Blackmagic RAW file as it is written into the clip itself. DaVinci Resolve also has an 'Apply LUT' switch in the RAW settings palette for enabling or disabling the 3D LUT in the Blackmagic RAW file.
The 'Apply LUT' setting in DaVinci Resolve is the same setting as in the camera. This means that when shooting you can direct the colorist to use the LUT by setting it in the camera, but they can switch it off easily in DaVinci Resolve by setting 'Apply LUT' to 'off'.
Entering Metadata
Metadata is information saved inside your clip, such as take numbers, camera settings and other identifying details. This is extremely useful when sorting and processing footage in post production. For example, take, shot and scene numbers are essential organisational tools, while lens information can be used to automatically remove distortion or better match VFX assets to plates.
Your Blackmagic Pocket Cinema Camera automatically saves some metadata to each clip, such as camera settings, timecode, date and time. You can use your camera's slate to add many additional details.
Slate
Swipe left or right on your camera's touchscreen from the main view to bring up the slate.
The slate is divided into 'clip' and 'project' tabs. The 'clip' tab contains information that may vary clip by clip, while 'project' is where you enter details common between clips, such as the project name, director, and camera and operator ID.
TIP Metadata entered into the slate is viewable on the HDMI output when 'display status text for' is set to 'director' on the 'monitor' tab. See the 'monitor settings' section in this manual for more information.
'Clip' metadata
Making changes to clip metadata works differently in standby mode to playback mode. In standby mode, when your camera is ready to record, clip metadata gets saved to the next clip recorded, except the 'good take last clip' button applies a 'good take' tag to the most recently recorded clip. In playback mode, when you are reviewing footage already shot, the 'good take' button is shown and clip metadata is always attached to the current clip being viewed.
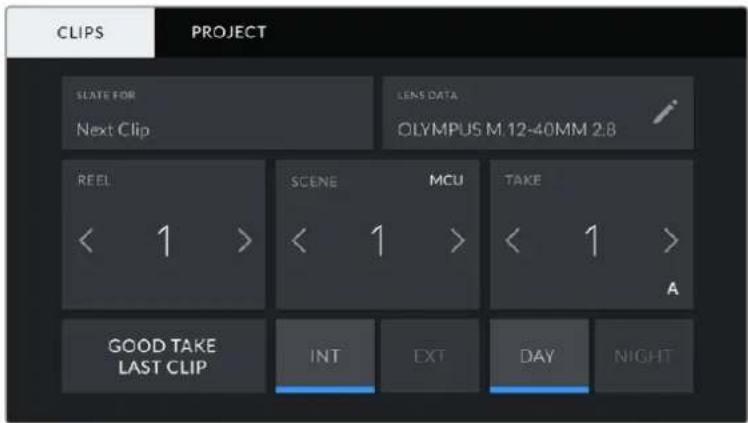
When the camera is in playback mode, 'slate for' identifies the clip the slate applies to and shows the 'good take' button. In standby mode, the slate is for 'next clip' and shows the 'good take last clip' button.
Slate for
This setting shows the clip which the metadata currently displayed in the 'clip' applies to. In playback mode it applies to the current clip, and in standby mode it refers to the next clip you record.
Lens Data
These settings display information about the current lens fitted to your camera. Many electronic lenses automatically supply information such as the lens model, aperture and focal length. If you are using a lens that does not provide this information, or you want to enter additional data, you can tap the pencil icon in this setting to enter the information manually. This will bring up the 'lens data' menu, which contains the following information:
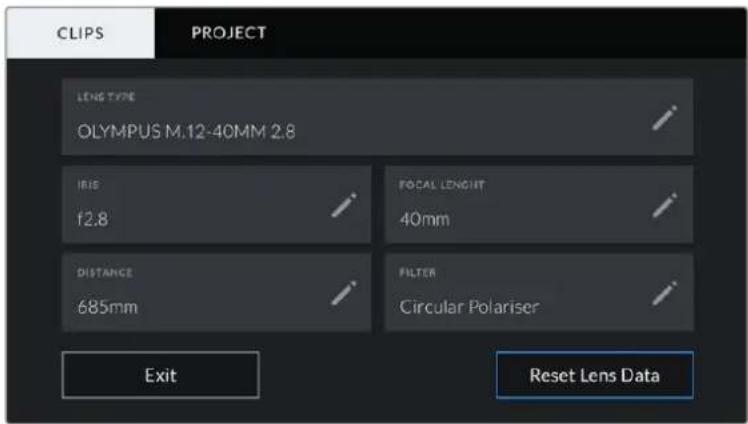
The 'lens data' menu showing information automatically populated from an attached lens, and filter information that has been manually entered
Lens Type
Shows the lens model. If your lens type is not automatically shown here, you can tap this setting to enter the data manually. Your camera has an internal database stored for many commonly used lenses, so if you need to enter data manually, your camera will suggest names automatically as you type. This makes entering data much faster.
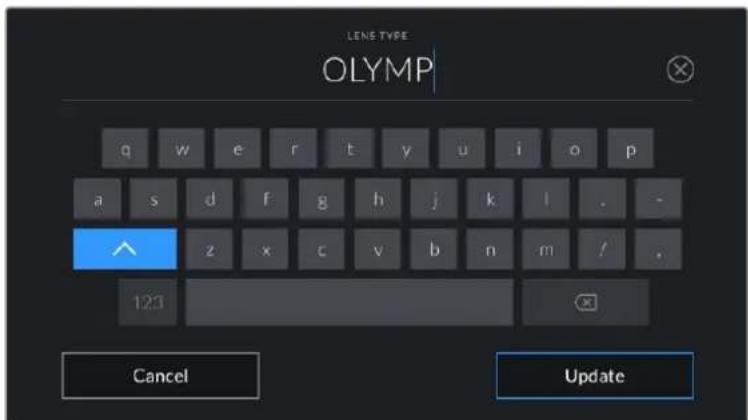
Use the touch keyboard to enter lens data if it is not provided automatically.
Iris
Shows the iris aperture setting at the start of your clip. This information can be displayed in f- or T-stops depending on the lens used, if supplied automatically. Tap this setting to enter data manually.
- Focal length
Shows the focal length setting of the lens at the start of the recorded clip. When automatically supplied, this is shown in millimeters. Tap this setting to enter the focal length manually.
Distance
Shows the focus distance settings of the lens for the recorded clip. Some lenses can provide this data automatically and it will be provided in millimeters. You can also enter this data manually.
Filter
Shows the current lens filters used. Tap this setting to enter data manually. You can make multiple entries separated by commas.
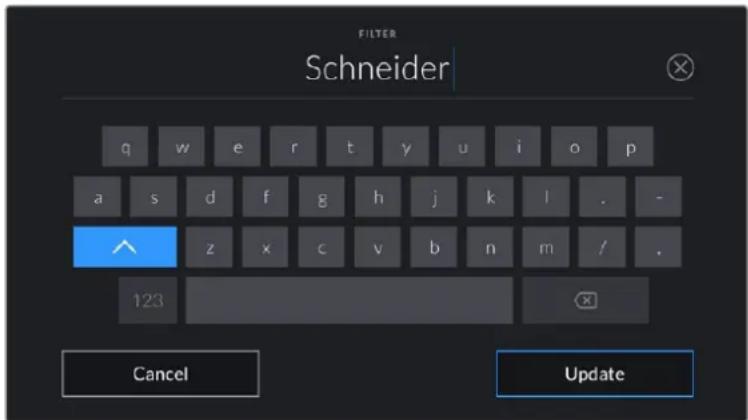
Filter information needs to be entered manually
NOTE You can clear lens data at any time by tapping the 'reset lens data' icon in the 'lens data' menu. You will be prompted to confirm your choice. If you confirm, all lens data will be cleared and repopulated with any lens data automatically provided by the currently fitted lens. If you have manually entered any information into these fields, you will need to reset the lens data the next time you mount a lens, otherwise the manually entered value will remain.
Reel
Displays the current reel.
Your Blackmagic Pocket Cinema Camera automatically increments reel numbers, so there is usually no need to enter this manually. When you are moving to a new project and want to start from reel '1' again go into the project tab of the slate and tap 'reset project data'.
Scene
The 'scene' indicator shows the current scene number, and can also show the current shot number and type.
The number on this indicator always refers to the current scene. You can adjust it with the left and right arrows on either side of the scene number, or tap the scene number to enter the scene number editor.
Scene numbers range from 1 to 9999.
By adding a letter to the scene number in the scene number editor, you can also indicate the current shot. For example 23A indicates scene twenty three, shot one. If you have a shot letter added to your scene number, your camera suggests the next scene number and shot letter whenever you enter the scene number editor. For example, if your current scene number is 7B, the camera suggests '8' and '7C'.
The scene number indicator can also show information about the current shot type in the top right corner. You can select these in the scene number editor at the right hand side of the shot keyboard.
The shot types available are:
WS wide shot
MS medium shot
MCU medium close up
CU close up
BCU big close up
ECU extreme close up
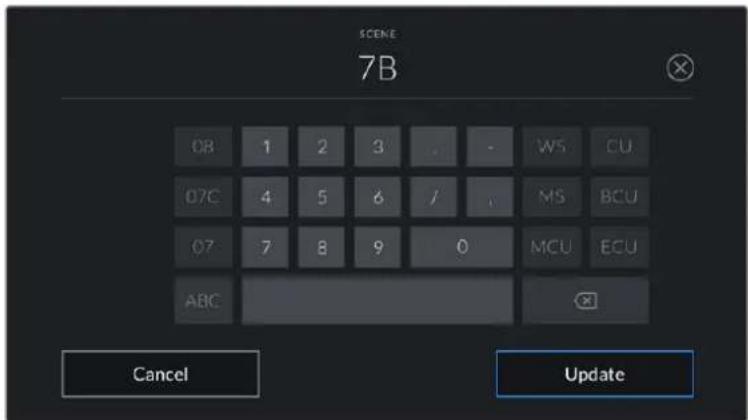
When entering 'scene' metadata, the camera prompts you with scene number suggestions to the left of the touch keyboard, and shot types to the right
Take
The 'take' indicator shows the take number for the current shot. You can adjust it by tapping the left or right arrows on either side of the take number, or tapping the indicator to enter the take number editor.
TIP When the shot number or scene letter advance the take number reverts to '1.'
You can add descriptions in the take number editor. These are on the right of the take number keyboard and correspond to the following scenarios:
| P/U | ‘Pick up.’ This refers to a reshoot of a previous take to add additional material after principal photography has wrapped. |
| VFX | ‘Visual effects.’ This refers to a take or shot for visual effect use. |
| SER | ‘Series.’ This refers to a situation in which multiple takes are shot while the camera is kept running. |
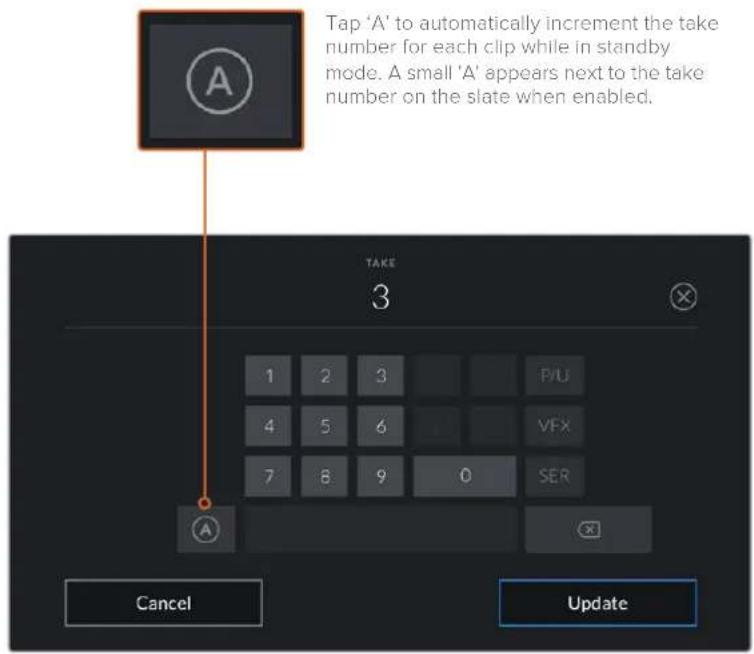
When entering 'take' metadata, your Blackmagic Pocket Cinema Camera will offer prompts for additional shot types to the right of the touch keyboard
Good take
Tap the 'good take' indicator to tag good takes for easy recall in post production. This button applies the 'good take' tag to the clip currently being viewed in playback mode. If the camera is in standby mode and ready to record, the 'good take last clip' button applies a 'good take' tag to the last clip recorded.
Int/Ext
Tap 'int' or 'ext' to add a 'interior' or 'exterior' tag to the next clip in standby mode, or the current clip in playback mode.
Day/Night
Tap the 'day' or 'night' icons to add a 'day' or 'night' tag to the next clip in standby mode, or the current clip in playback mode.
'Project' Metadata
Project metadata behaves the same way whether you are in standby or playback mode. This metadata always refers to your project as a whole and is independent of clip numbers.
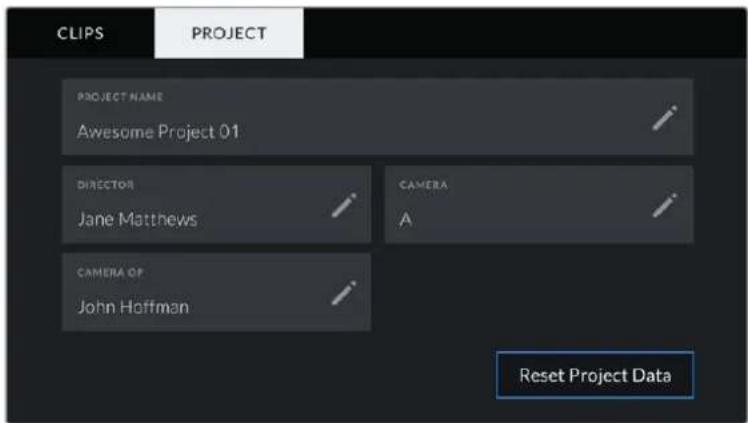
Enter project details using your camera's 'project' slate tab
Project name
Displays your current project name. Tap the pencil icon to change the project name.
Director
Displays the director's name for the current project. Tap the pencil icon to change the director name.
Camera
Displays a single letter camera index. Tap the pencil icon to change the camera index.
Camera Op
Displays the camera operator. Tap the pencil icon to change the camera operator name.
Camera Video Output
HD Monitoring Output
The camera's full size HDMI connector outputs 1080p HD video so you can easily connect to monitors or even consumer television sets to preview your images. This 10-bit output also supports HDR and on screen overlays showing full camera status, making it perfect for on set monitoring.
HDMI monitoring can be helpful when accessing the LCD is impractical, such as when the camera is secured high on a jib arm, on a crane, or mounted on a vehicle. Monitoring information is displayed on your HDMI output by adjusting the HDMI overlays options in the display settings menu. HDMI overlays provide frame guides and information such as recording details and camera settings. If you simply want to monitor your shots, you can always turn overlays off for a clean HDMI output.
By using a converter like the Blackmagic Micro Converter HDMI to SDI, you can convert the signal to SDI, allowing you to connect to SDI monitors, capture devices, broadcast switchers and other SDI devices. You can even power the Blackmagic Micro Converter HDMI to SDI via your Blackmagic Pocket Cinema Camera's USB port.
Using DaVinci Resolve
Shooting with your Blackmagic Pocket Cinema Camera is only part of the process of creating film and television content, and just as important is the process of media backup and management as well as editing, color correction and encoding final master files. Your Blackmagic Pocket Cinema Camera includes a version of DaVinci Resolve for Mac and Windows so you have a complete solution for shooting and post production!
NOTE We recommend using the latest version of DaVinci Resolve for accurate color treatment of clips shot using Pocket Cinema Camera. Version 16 or later will provide accurate color for all Blackmagic cameras and the latest Blackmagic RAW features.
After connecting your CFast, SD card or SSD to your computer, you can use DaVinci Resolve's 'clone' tool, in the 'media' page, to create running backups as you shoot. This is recommended as any type of media is susceptible to becoming damaged or developing a fault so creating backups means your shots will be immune to loss. Once you have used DaVinci Resolve to backup your media, you can then add your clips to the DaVinci media pool, then edit, color correct, and finish your production without ever having to leave DaVinci Resolve.
DaVinci Resolve is the same tool used on most major blockbuster movies, so it's much more than a simple NLE software tool, as it has extremely advanced technology built in for high end digital film. You get the advantage of this technology when you use DaVinci Resolve to edit and color correct your work.
Included here is information on how to get started using DaVinci Resolve with your camera files. Of course, DaVinci Resolve is extremely advanced and includes a lot more features than you immediately see when first looking at its user interface. To learn more about how to use DaVinci Resolve, please check for the DaVinci Resolve instruction manual on the Blackmagic website, where you can also find many training courses and tutorial videos.
Project Manager
Before you import your clips and start editing, you will need to set up your project using the project manager.
The project manager is the first screen you will see when launching DaVinci Resolve, but you can open the manager at any time by clicking on the 'home' icon at the bottom right of the user interface. This is helpful when you want to open previous projects and create new ones.
To create a new project, click on 'new project' at the bottom of the window and give your project a name. Click 'create'.
Using the 'cut' page, you can start working on your edit immediately.

The project manager shows all projects belonging to the current user
For more information about the Project Manager, refer to the DaVinci Resolve manual which is available to download on the Blackmagic Design website support page.
Editing with the Cut Page
The 'cut' page gives you a fast, dynamic editing workflow that lets you quickly assemble, trim and edit clips efficiently.
Two active timelines let you work with your entire edit plus a detailed area simultaneously. This means you can drop clips anywhere on a large timeline, then refine your edit in a detailed timeline within the same workspace. Using this workflow, you can edit on a laptop without needing to zoom in and out and scroll as you work, which can be an enormous time saver.
The Cut Page Layout
When you open the cut page, you will see the media pool, viewer window and timeline.
These three primary windows give you complete control over your edit.

The 'cut' page default workspace, with the media pool in Icon view
For more information on the Cut page, see the 'Using the Cut Page' chapter in the DaVinci Resolve manual.
Media Tabs
At the top left corner of the user interface you will see five tabs.
Click on these tabs to open the media toolsets you will use when creating your edit. For example, the first tab is the media pool and you can see it is already selected. The other tabs are for the sync bin, media transitions, titles and effects.

Media Pool: The media pool contains all your clips, folders and files you imported using the media page. You can also import files directly from the cut page, so you don't have to go back to the media page if you want to import a new clip.
- Sync Bin: This powerful feature automatically syncs all your clips via timecode, date and time so you can choose angles from all cameras on a multi camera project.
- Transitions: If you click on the neighboring transitions tab, you will see all the video and audio transitions you can use in your edit. These include common transitions such as cross dissolves and motion wipes.
- Titles: Next to transitions is the 'titles' tab. Here you can select the title type you want to use. For example a scroll, standard text or lower thirds title. There are also a list of Fusion templates you can use for more animated dynamic titles which can be customized in DaVinci Resolve's 'Fusion' page.
- Effects: The fifth tab is the 'effects' tab. This provides all the different filters and effects you can use to bring more life to your edit, for example customizable blurs, glows and lens effects. There are many powerful effects to choose from and you can find them quickly using the search tool.
TIP Use the search tool near the media tab icons to find the exact items you are looking for. For example, if you have the transitions tab selected, type "dissolve" in the search tool and only dissolve transition types will be shown in the viewer, making it quicker for you to find the dissolve transition you want.
Viewer Tabs
In the top left corner of the viewer window you will see the viewer mode buttons.

The viewer mode buttons
These buttons control which viewer is currently being used, including 'source clip', 'source tape', and 'timeline'. These viewer modes give you an enormous amount of control when selecting clips for your edit and it's worth spending a moment to look at how they work.
| Source Clip The source clip viewer displays a single clip from the media pool and you can set in and out points along the entire length of the viewer timeline. This gives you greater control. Select a source clip to view by double clicking on a clip in the media pool, or dragging it into the viewer. | |
| Source Tape Source tape lets you view all the source clips in the media pool. This powerful feature is helpful if you want to quickly search through all your clips to find a specific event. As you scrub the playhead over the clips, you will see their thumbnails selected in the media pool. This means once you have found the clip you want to edit, you can click on the source clip tab and its corresponding source clip will appear in the viewer automatically. The source tape viewer really lets you take advantage of non-linear editing, giving you the freedom to work on your edit, find shots quickly, try new ideas and stay in the moment. | |
| Timeline The timeline viewer lets you view the edit timeline so you can play back your project and refine your edits. |
Importing Clips to the Media Pool
Now you can start importing media into your project. You can do this in the media pool window of the cut page using the import tools at the top.

Select one of the import options to add media to your project
| ↓ | Import Media The import media option will import individual media files selected from your storage location. |
| Import Media Folder To import a folder from your media storage, select the import folder option. When importing a folder, DaVinci Resolve will keep the file structure, treating each folder as a separate bin so you can navigate between bins to find your videos and other media files. |
To import media:
1 Click on the 'import media' or 'import media folder' icon.
2 Navigate to your media storage for the media you want to import.
3 Select the file or folder and click 'open'.
Once you've added media to your project, it is a good time to save your changes. DaVinci Resolve features a fast, on the go autosave called 'live save'. Once you save you project once, 'live save' will save further changes as you make them, removing the risk of losing your work.
For more information on 'live save' and other auto save functions, refer to the DaVinci Resolve Manual.
Adding Clips to the Timeline
Now that you are familiar with the media tabs and viewer mode buttons, you can open the media pool and quickly start adding clips to your timeline.
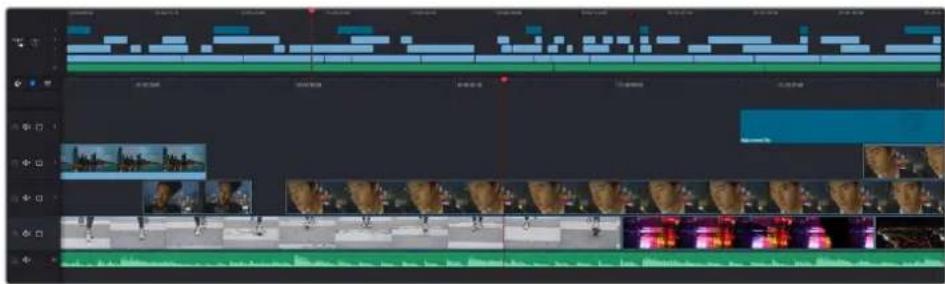
The timeline of the cut page, comprising the upper timeline and the zoomed in timeline below
The timeline is where you will build your edit and is like a board with tracks you can attach clips to, move them around and trim their edits. Tracks let you layer clips over others which gives you more flexibility to try different edits and build transitions and effects. For example, you can try an edit with a clip on one track without affecting other clips on tracks below it.
There are different ways to add clips to the timeline, such as smart insert, append, place on top and more.
Appending Clips
When selecting takes and assembling an edit, you will likely want to add these shots to your timeline one after the other. The append tool is perfect for this task and will get you editing very fast.

Click on the append icon to quickly add clips to the end of the last clip
To append a clip:
1 Double click on a clip in the media pool to open it in the viewer.
Using the scratch trim tool, drag the in and out points to select the precise duration of your shot. You can also press the 'i' and 'o' keyboard shortcuts to set in and out points.

3 Now click the 'append' icon underneath the media pool.

Your first clip will be placed at the head of the timeline.
Repeat steps 1 to 3 to keep adding more clips and they will automatically append, ensuring there are no gaps in the timeline.

Appending clips ensures there are no gaps between them on the timeline
Tip You can speed up the process further by assigning a keyboard shortcut to the 'append' icon. For example, if you assign the 'P' key, you can set your in and out points using 'I' and 'O' then press 'P' to append the clip. Refer to the DaVinci Resolve manual for information on how to assign shortcut keys.
Editing Clips on the Timeline
With clips added to the timeline, you have complete control to move them around and trim edits.
To trim an edit, hover the mouse over the start or end of a clip, then click and drag it left or right. For example, drag the end of the clip left or right to decrease or increase its duration. You might notice that all clips after that edit will shift on the timeline to accommodate the new adjustment. This is one way the 'cut' page helps to save you time.
You can even pick the clip up and drop it on a new video track in the large timeline without having to zoom in or out. This speeds up the edit process because it minimizes time navigating a long timeline.
After you have finished editing clips using the 'cut' page, you might want to add a title. The next section will show you how.
Adding Titles
Placing a title on your timeline is easy and you have many options.
To see the different types of titles you can use, click on the 'titles' media tab at the top left corner of the user interface. In the selection window you will see all the different title generators you can use, from lower thirds, scrolls, to a standard text title. You can even add any of the Fusion titles which are animated titles that you can customize.
A good example is to add a standard title.
To do this:
1 Click on the 'text' title and drag it onto the timeline. It doesn't matter which timeline, but for greater accuracy we recommend using the detailed timeline. The title will automatically create a new video track for the title and will snap to the playhead.
2 Release the mouse and the title will appear on the new track. You can now move it or change its duration like you would another video clip.
3 To edit the title, click on the new title clip and a 'tools' icon will appear underneath the clip viewer. Click on the tools icon.
You will now see a row of tools you can use to modify the title clip. For example, transform, crop, dynamic zoom and more. For this example, click on the 'title' tool.
4 Now click 'open inspector'.
This will open the inspector window where you can type in the title you want and edit the text settings, for example tracking, line spacing, font type, color and more.
You have a lot of options to customize the title exactly how you want it. We recommend playing with all the different settings to see how they can change the appearance and shape of your title.
Working with Blackmagic RAW Files
Blackmagic RAW clips give you maximum flexibility in post production. This lets you make adjustments to clips, such as white balance and ISO settings, as if you were changing the original camera settings. Working with Blackmagic RAW also retains more tonal information within shadows and highlights, which is useful for recovering details, for example in blown out skies and dark areas of the picture.
It's worth shooting in Blackmagic RAW if you are after the highest possible quality, or for shots where there is an extreme variance between highlights and shadows and you may need to push and pull those regions as much as possible in the grade.
The speed and small file size of Blackmagic RAW means you don't need to make proxy files and playback is just like a standard video clip. This section of the manual describes the features of Blackmagic RAW and how to use Blackmagic RAW files in your DaVinci Resolve workflow.
TIP It is a good practice to adjust the Blackmagic RAW settings for your clips on the 'color' page before you start color grading.
Clip Settings for Blackmagic RAW
When you first import Blackmagic RAW files, DaVinci Resolve will decode the camera data contained in the files using the ISO, white balance and tint settings used at the time of shooting. If you're happy with the look of these settings, you can start editing right away.
The great thing about shooting Blackmagic RAW is that you're not tied to these settings at all! The breadth of available post processing options when working with Blackmagic RAW files mean that you'll develop your own workflow over time. Experimenting with the 'clip' settings for each clip in the 'camera raw' tab will show you just how powerful and flexible working with Blackmagic RAW can be.
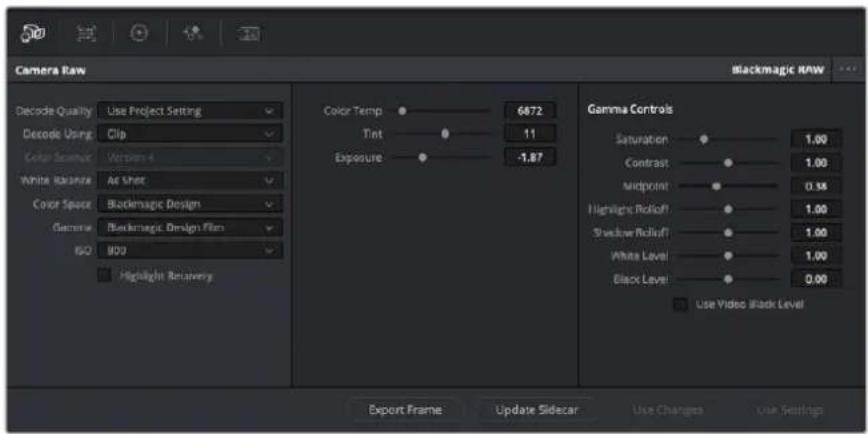
In the 'camera raw' lab, select 'clip' from the 'decode using' drop down menu to make adjustments to your clip's Blackmagic RAW settings
Once you have set DaVinci Resolve to enable clip settings for Blackmagic RAW, the clip settings and gamma controls are now adjustable. Adjusting these settings to optimize your clips can bring them close to a full primaries grade. This is especially powerful when using DaVinci Resolve's scopes which can help you neutralize and balance the clips ready for applying a look.
The following information contains descriptions for the clip and gamma controls.
ISO
The ISO value can be changed by increasing or decreasing this setting. This setting is helpful if you need to set the clip to a brighter or darker starting point for optimization.
Highlight Recovery
Check the box to reconstruct highlight information in clipped channels using information from non-clipped channels.
Color Temp
Adjust the color temperature to warm or cool the image. This can be used to help neutralize the color balance in each image.
Tint
Adjusting this setting will add green or magenta into the image to help balance the color.
Exposure
Use this setting to refine the overall brightness of the image.
Saturation
Saturation controls default at 1 and range from -1 for the minimum saturation to +4 for maximum saturation.
Contrast
Defaulting at 1.0, drag the slider to the left for the least amount of contrast at 0 or to the right to increase the contrast up to 2.
Midpoint
In Blackmagic Design Film, your middle gray value defaults to 0.38, or 38.4% . Drag the slider to the left to lower your midpoint or to the right to raise it to 100. When contrast is adjusted away from the default setting, you can modify your highlight and shadow rolloff.
Highlight Rolloff
Adjust the highlights by dragging the slider to the left to lower the value to 0, or to the right to increase the highlights to 2. The default value is 1.
Shadow Rolloff
Drag the slider to the left to lower your shadows to 0 or to the right to raise your shadows to 2.
White Level
Adjust the white point of the gamma curve by dragging the slider from the highest value of 2 to the lowest value of 0. The default value is 1.
Black Level
Raise the black point of the custom gamma curve by dragging the slider to the right from the lowest value of -1 to a maximum of 1. The default value is 0.
Use Video Black Level
Check the box to set your black levels to video.
Export Frame
Clicking the 'export frame' button lets you export a single frame from your Blackmagic RAW clip.
Update Sidecar
Click this button to update the Blackmagic RAW sidecar file for the current clip.
Any changes you have made to your Blackmagic RAW clips will be identified by the gamma setting changing to Blackmagic Design Custom.
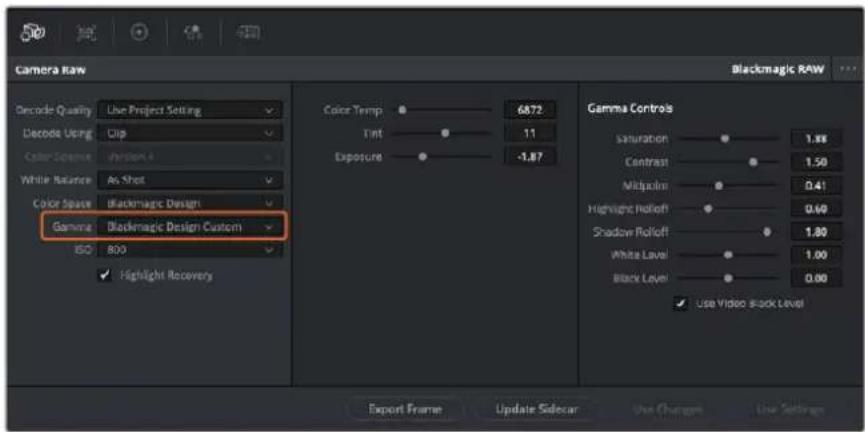
If you want to revert your clip to one of the default gamma options available, simply select it from the gamma dropdown menu.
Tip Gamma controls are disabled for footage shot with the 'video' dynamic range, but you have not lost your Blackmagic RAW data. Simply select Blackmagic Design Film or Blackmagic Design Extended Video from the dropdown gamma menu and make your adjustments.
Saving your Blackmagic RAW changes
1 Adjust the gamma controls for your Blackmagic RAW clip.
2 Click the 'update sidecar' button.
A 'sidecar' file will now be created in the same folder as your .braw file. When another user imports the Blackmagic RAW files, the sidecar files will automatically be read by DaVinci Resolve. If you make additional adjustments, press 'update sidecar' again.
TIP To remove your sidecar file, you can simply delete it from its location on your media drive.
Project Settings for Blackmagic RAW
If you need to make a setting change that is common to all the clips, for example a global change to the white balance or ISO setting, you can set the clips to use the project 'camera raw' settings and make global changes from there.
To set project settings for Blackmagic RAW:
1 Enter the project settings menu by clicking 'file,' and selecting 'project settings.'
2 In the 'Camera RAW' tab, you'll see a dropdown menu next to RAW profile. Click on the arrow to select Blackmagic RAW from the list.
3 Select 'project' in the 'Decode Using' dropdown menu.
4 Set the white balance setting to 'custom'.
5 Select 'Blackmagic Design Custom' from the dropdown gamma menu. Set the color space to 'Blackmagic Design'. This will also set the gamma setting to 'Blackmagic Design Film'.
6 Choose your resolution from the 'Decode Quality' menu. A lower resolution will give you better playback on limited systems. You also have the flexibility to change to full resolution later on before delivery for the highest quality output.
Now you can adjust the camera settings for your clips such as saturation, contrast and midpoint. This will affect all clips in your project that are set to decode using 'project'.
Color Correcting your Clips with the Color Page
Now with your clips on the timeline and titles added, you can start color correcting using the 'color' page. The color page is extremely powerful and will define the overall look of your film, but for this example a good place to start is to neutralize all your clips so they are consistent. You can also return to the 'cut' or 'edit' page at any time if you want to make changes to your edit.
The color page lets you adjust the look of your edit and in many ways color correction is an art form in itself. You are really adding emotion to your work when you add color correction. It's an incredibly creative part of the workflow and very satisfying when you learn these skills and can see your work come alive! This is usually the first step and is referred to as primary color correction, or adjusting the primaries. After primary color correction is done, you can then make secondary color correction adjustments which is where you can make extremely precise color adjustments of specific objects in your images. That is a lot of fun, but is normally done after primaries because it helps make the process more efficient and you will get a better result!
First click on the 'color' tab to open the color page.
You'll see the camera raw settings, color wheels, curves palettes and general color correction tools as well as the preview and nodes window. Don't feel overwhelmed by the vast array of features in front of you, they are all there to help you get the most amazing looking pictures.
This getting started section will show the basics, but for more detailed information refer to the relevant sections in the manual. They will show you exactly what all the tools are for and how to use them in easy to follow steps. You'll learn the same techniques the professionals use in high end color correction facilities.
Generally, the first step for primary color correction is to optimize the levels for shadows, mid tones and highlights in your clips. In other words adjust the 'lift', 'gamma' and 'gain' settings.
This will help get your pictures looking their brightest and best with a clean, balanced starting point from where you can begin grading the 'look' of your film. To optimize the levels, it's helpful to use the scopes.
Using Scopes
Most colorists make creative color choices by focusing on the emotion and the look they want their program to have and then simply work using the monitor to achieve that look. You can look at everyday objects and how different types of light interact with them to generate ideas on what you can do with your images and a little practice.

The parade scope helps you optimize highlights, mid tones and shadows
Another way to color grade is to use the built in scopes to help you balance shots. You can open a single video scope by clicking the 'scope' button, which is the second from the right on the palette toolbar. You can choose to display a waveform, parade, vectorscope and histogram. Using these scopes you can monitor your tonal balance, check the levels of your video to avoid crushing your blacks and clipping the highlights, plus monitor any color cast in your clips.
The 'color wheels' palette contains the 'lift', 'gamma' and 'gain' controls which will generally constitute your first adjustment. If you've previously had experience with color correction, these should resemble controls you've seen in other applications for doing color and contrast adjustments.
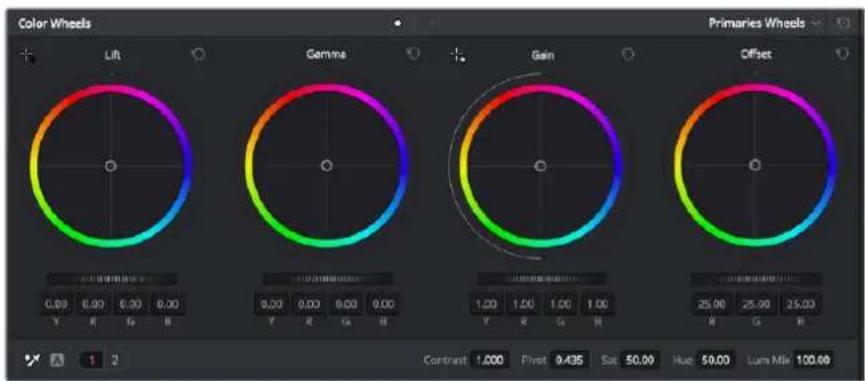
The 'lift, gamma', 'gain' and 'offset' color wheels give you total control over the color and tonal balance of your clips. To make a uniform adjustment to all colors for each tonal region, drag the dial underneath the color wheels back and forth
For more accurate control of each color using a mouse, you can change the color wheels to 'primaries bars' which let you adjust each color and luminance channel for the lift, gamma and gain controls separately. Simply select 'primaries bars' from the dropdown menu near the top right of the color wheels.
- Adjusting the 'lift': With your clip selected on the color timeline, click on the 'lift' dial underneath the first color wheel. Slide it back and forth and watch how it affects your image. You'll see the brightness of the dark regions of your picture increase and decrease.
Set it to where you want the dark areas to look their best. If you decrease the lift too much, you'll lose details in the blacks and you can use the parade scope to help avoid this. The optimal position for blacks on the waveform is just above the bottom line of the parade scope.
-
Adjusting the 'gain': Click on the 'gain' dial and slide it back and forth. This adjusts the highlights which are the brightest areas of your clip. The highlights are shown on the top section of the waveform on the parade scope. For a brightly lit shot, these are best positioned just below the top line of the waveform scope. If the highlights rise above the top line of the waveform scope, they will clip and you will lose details in the brightest regions of your image.
-
Adjusting the 'gamma': Click on the 'gamma' dial underneath the color wheel and slide it back and forth. As you increase the gamma you'll see the brightness of the image increase. Notice the middle section of the waveform will also move as you adjust the gamma. This represents the mid tones of your clip. The optimal position for mid tones generally falls between 50 to 70% on the waveform scope. However, this can be subjective based on the look you are creating and the lighting conditions in the clip.
You can also use the curves palette to make primary color corrections. Simply click to create control points on the diagonal line inside the curve graph, and drag them up or down to adjust the master RGB contrast at different areas of image tonality. The optimum points to adjust are the bottom third, mid, and top third of the curve line.
There are many more ways of doing primary color correction in DaVinci Resolve.
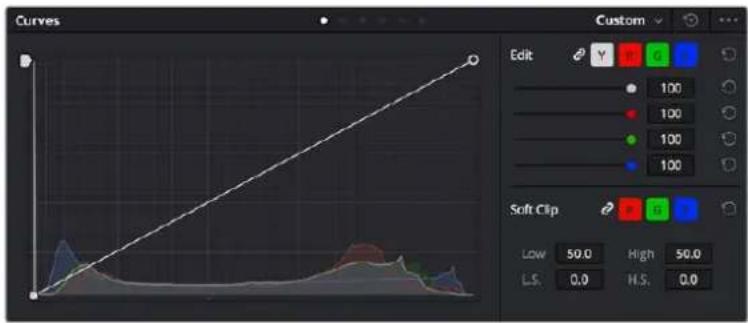
The curves palette is another tool you can use to make primary color corrections, or enhance specific areas of your clip when using a power window
Secondary Color Correction
If you want to adjust a specific part of your image then you need to use secondary corrections. The adjustments you have been doing up until now using the lift, gamma and gain adjustments affect the whole image at the same time and so they are called primary color corrections.
However, if you need to adjust specific parts of your image, say for example you wanted to improve the color in the grass in a scene, or you wanted to deepen the blue in a sky, then you can use secondary corrections. Secondary color corrections are where you select a part of the image and then adjust only that part. With nodes, you can stack multiple secondary corrections
so you can keep working parts of your image until everything is just right! You can even use windows and tracking to allow the selections to follow movement in your images.
Qualifying a Color
Often you'll find a specific color in your clip can be enhanced, for example grass by the side of a road, or the blue in a sky, or you may need to adjust color on a specific object to focus the audience's attention on it. You can easily do this by using the HSL qualifier tool.

Using the HSL qualifier to select colors in your image is helpful when you want to make areas of your image 'pop', to add contrast, or to help draw the audience's attention to certain areas of your shot
To qualify a color:
1 Add a new serial node.
2 Open the 'qualifier' palette and make sure the 'selection range' selector tool is selected.
3 Click on the color in your clip you want to affect.
4 Usually you'll need to make some adjustments to soften the edges of your selection and limit the region to only the desired color. Click on the 'highlight' button above the viewer to see your selection.
5 Adjust the 'width' control in the 'hue' window to broaden or narrow your selection.
Experiment with the high, low and softness controls to see how to refine your selection.
Now you can make corrections to your selected color using the color wheels or custom curves.
Sometimes your selection can spill into areas of the shot you don't want to affect. You can easily mask out the unwanted areas using a power window. Simply create a new window and shape it to select only the area of color you want. If your selected color moves in the shot, you can use the tracking feature to track your power window.
Adding a Power Window
Power windows are an extremely effective secondary color correction tool that can be used to isolate specific regions of your clips. These regions don't have to be static, but can be tracked to move with a camera pan, tilt or rotation, plus the movement of the region itself.
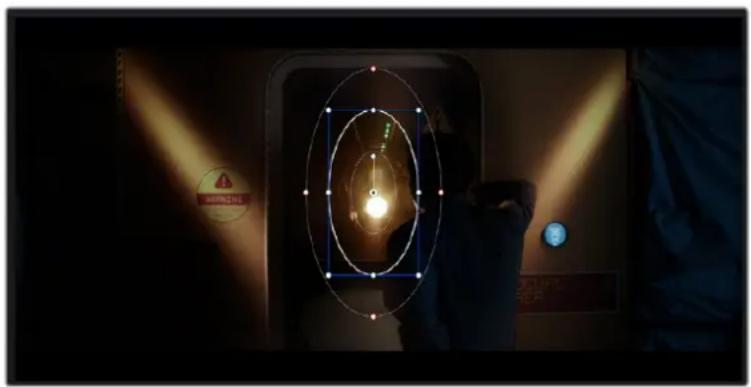
Use power windows to mask out areas you don't want to be affected by the HSL qualifier secondary adjustments
For example, you can track a window on a person in order to make color and contrast changes just to that person without affecting his or her surroundings. By making corrections like this you can influence the audience's attention on areas you want them to notice.
To add a power window to your clip:
1 Add a new serial node.
2 Open the 'window' palette and select a window shape by clicking on a shape icon. Your selected window shape will appear on the node.
3 Resize the shape by clicking and dragging the blue points around the shape. The red points adjust the edge softness. You can position the shape by clicking the center point and moving it to the area you want to isolate. Rotate the window using the point connected to the center.
Now you can make color corrections to your image in just the area you want.
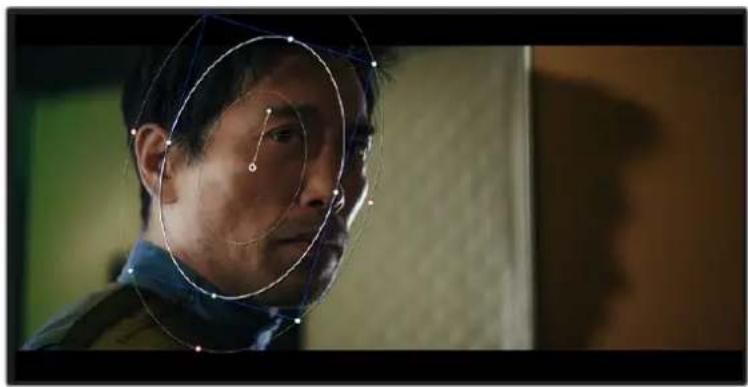
Power windows let you make secondary corrections to specific parts of your image
Tracking a Window
The camera, object or area in your shot may be moving, so to make sure your window stays on your selected object or area, you can use DaVinci Resolve's powerful tracking feature. The tracker analyzes the pan, tilt, zoom and rotation of the camera or object in your clip so you can match your windows to that movement. If this isn't done, your correction can move off the selected target and call attention to itself, which you probably don't want.
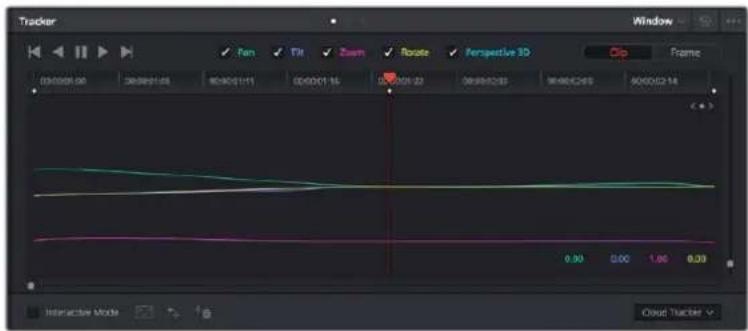
You can track objects or areas in your clip using the tracker feature so power windows can follow the action
To track a window to a moving object:
1 Create a new serial node and add a power window.
2 Go to the start of your clip and position and size the window to highlight just the object or area you want.
3 Open the 'tracker' palette. Select the pan, tilt, zoom, rotate, and perspective 3D settings appropriate for the movement in your clip by checking or unchecking the relevant 'analyze' checkboxes.
4 Click on the 'forward' arrow to the left of the checkboxes. DaVinci Resolve will now apply a cluster of tracking points on your clip and then step through the frames to analyze the movement. When the tracking is done, your power window will follow the path of the movement in your clip.
Most of the time automatic tracking is successful, but scenes can be complex and sometimes an object can pass in front of your selected area, interrupting or affecting your track. This can be solved manually using the keyframe editor. Refer to the DaVinci Resolve manual to find out more.
Using Plugins
While making secondary color corrections you can also add ResolveFX or OpenFX plugins to create fast, interesting looks and effects using the 'color' page, or imaginative transitions and effects on your clips on the 'edit' page. ResolveFX are installed with DaVinci Resolve, OFX plugins can be purchased and downloaded from third party suppliers.
After installing a set of OFX plugins, you can access them or ResolveFX plugins on the color page by opening the OpenFX inspector to the right of the 'node editor'. Once you create a new serial node, simply click the 'OpenFX' button to open the FX library and drag and drop a plugin onto the new node. If the plugin has editable settings, you can adjust these in the adjoining 'settings' panel.
In the 'edit' page you can add plugin filters, generators and transitions to clips by opening the 'OpenFX' panel in the 'effects library' and dragging your selected plugin onto the video clip or track above your clip on the timeline depending on the plugin requirements.
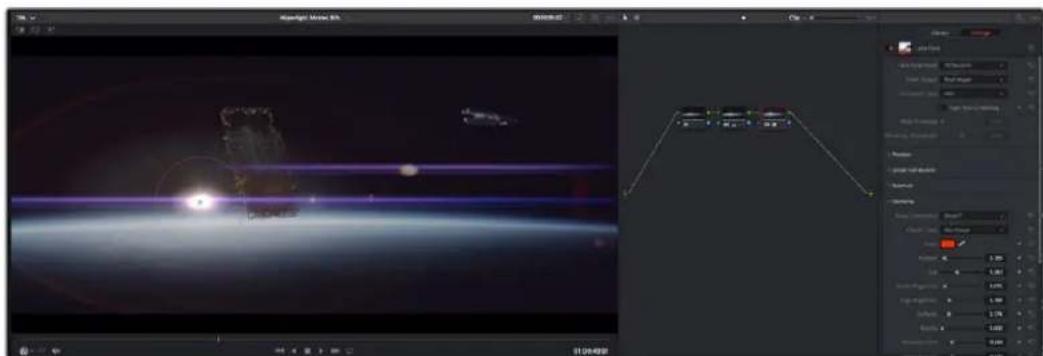
OFX plugins are a quick and easy way to create an imaginative and interesting look
Mixing Your Audio
Mixing Audio in the Edit Page
Once you have edited and color corrected your project, you can begin to mix your audio. DaVinci Resolve has a helpful set of features for editing, mixing and mastering audio for your project directly in the 'edit' page. For projects requiring more advanced audio tools, the Fairlight page provides you with a full audio post production environment. If you are already familiar with the edit page and want to move straight to Fairlight, skip this section and move onto the next.
Adding Audio Tracks
If you are working in the edit page and want to mix a basic sound edit with lots of sound effects and music, you can easily add more audio tracks when you need them. This can be helpful when building your sound, and separating your audio elements into individual tracks, for example, dialogue, sound effects and music.
To Add an Audio Track to the Edit Page
Right click next to the name of any audio track on your timeline and select 'add track' and choose from the options, including 'mono', 'stereo', and '5.1'. This will add the track to the bottom of the track list. Alternatively select 'add tracks' and select the position you would like the new track or multiple tracks placed.
Your new audio track will appear on the timeline.
TIP If you wish to change the type of track after creating it, right click next to the name of the track and select 'change track type to' and select the type of audio track you want, such as stereo, mono or 5.1.
Adjusting Audio Levels in the Timeline
Each clip of audio in the timeline has a volume overlay that lets you set that clip's level by simply dragging it up or down with the pointer. This overlay corresponds to the Volume parameter in the Inspector.
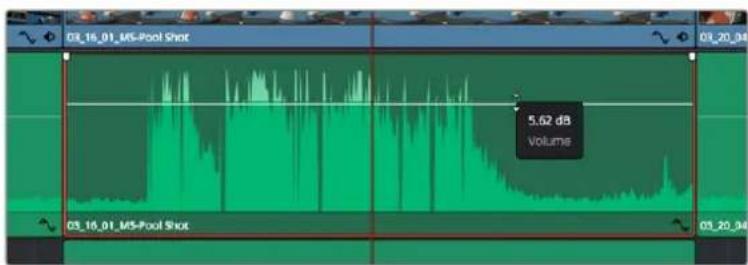
Dragging a volume overlay to adjust the clip level
For projects requiring more advanced audio tools, the Fairlight page provides you with a full audio post production environment.
The Fairlight Page
The 'Fairlight' page in DaVinci Resolve is where you adjust your project audio. In single monitor mode, this page gives you an optimized look at the audio tracks of your project, with an expanded mixer and custom monitoring controls that make it easy to evaluate and adjust levels in order to create a smooth and harmonious mix. Don't feel overwhelmed by the vast array of features in front of you, they are all there to help you deliver the best audio quality for your project.

This guide provides a basic overview of the features on the Fairlight page, but to learn more about all the details for each feature, refer to the DaVinci Resolve manual. The DaVinci Resolve manual provides details on the purpose of each tool and describes how to use them in easy to follow steps.
The Audio Timeline
- Track Header: At the left of each track is a header area that displays the track number, track name, track color, audio channels, fader value and audio meters. The track header also contains different controls for locking and unlocking tracks, plus solo and muting controls. These controls can help to keep your tracks organized, and let you preview individual tracks one at a time.
- Tracks: Each track on the Fairlight page is divided into lanes, which show each individual channel of clip audio for editing and mixing. The edit page hides these individual audio channels, displaying only a single clip in the timeline to make it easier to edit multi channel sources without needing to manage a huge number of tracks.
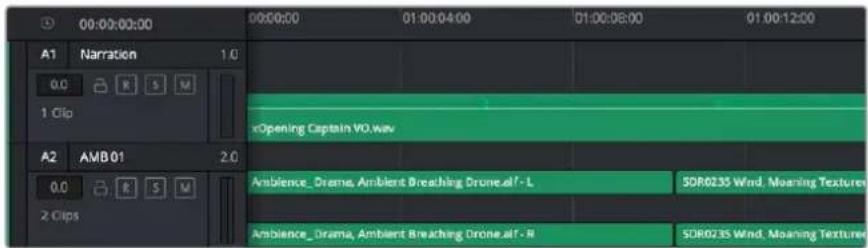
The track header on track A1 indicates a mono track with a single lane for mono audio, and the A2 track header indicates a stereo track with two lanes to accommodate stereo audio.
What is a Bus?
A bus is essentially a destination channel to which you can route multiple audio tracks from the timeline, so that they are mixed together into a single signal that can be controlled via a single channel strip.
- Main Bus: 'Main busses' are typically the primary output of a program and each new project you create starts out with a single 'main bus', to which all tracks are routed by default. The 'main bus' combines all of the tracks in the timeline into one signal so that you can adjust the overall level of the audio mix once you have adjusted the level of each individual track.
- Sub Bus: 'Sub busses' allow you to combine multiple tracks of audio that belong to the same category such as dialogue, music or effects so that everything in that category can be mixed as a single audio signal. For example, if you have five dialogue tracks, you can route the output of all five dialogue tracks to a 'submix bus', and the level of all dialogue can then be mixed with a single set of controls. This submix can be rendered separately or sent to the main bus for render.
The Mixer
Each audio track in your timeline corresponds to an individual channel strip in the Mixer, and by default there's a single strip on the right for the 'main bus' labeled 'M1'. Additional channel strips will appear on the right hand side with a set of controls for each additional 'main' and 'submix bus' you create. A set of graphical controls allows you to assign track channels to output channels, adjust EQ and dynamics, set levels and record automation, pan stereo and surround audio, and mute and solo tracks.

The audio mixer, with channel strips corresponding to the tracks in the timeline
Using the Equalizer to Enhance your Audio
After adjusting the audio levels of your audio clips in your project, you may find that the audio needs further finressing. In some cases you may find that the dialogue, music and sound effects are competing for the same frequency on the audio spectrum, making your audio too busy and unclear. This is where using EQ can help, as it allows you to specify the parts of the audio spectrum that each track occupies. You can also use an equalizer to help remove unwanted elements from your audio by isolating and reducing the level on particular frequencies that contain low rumbles, hums, wind noise and hiss, or simply to improve the overall quality of your sound so it is more pleasing to listen to.
DaVinci Resolve provides EQ filters that can be applied at a clip level to each individual clip or at the track level to affect entire tracks. Each audio clip in the timeline has a four band equalizer in the inspector panel, and each track has a 6 band parametric equalizer in the mixer panel. The graphical and numeric controls for boosting or attenuating different ranges of frequencies, and different filter types allow you to define the shape of the EQ curve.
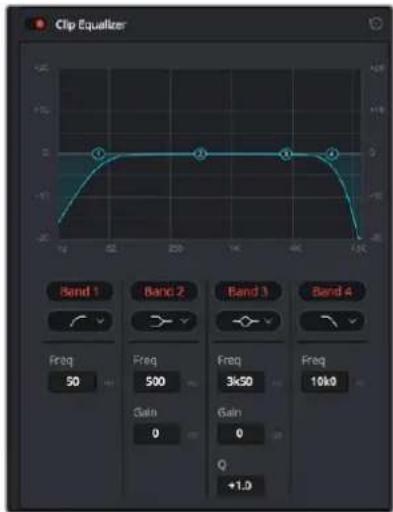
The four band equalizer can be applied to every clip in the timeline
Outer bands let you make band filter adjustments using hi-shelf, lo-shelf, hi-pass and lo-pass filters. A pass filter affects all the frequencies above or below a particular frequency, by removing those frequencies completely from the signal. For example, a high pass filter will allow the high frequencies to pass through the filter while cutting the low frequencies. Any frequencies outside the cutoff frequency are cut gradually in a downward sloping curve.
A shelf filter is less aggressive, and is useful when you want to shape the overall top end or low end of the signal without completely removing those frequencies. The shelf filter boosts or cuts the target frequency and every frequency either above or below it evenly, depending on whether you use a high shelf or low shelf.
The middle sets of band controls let you make a wide variety of equalization adjustments, and can be switched between lo-shelf, bell, notch, and hi-shelf filtering options.
- Bell: Bell filters boost or cut frequencies around a given center point of the bell curve and as the name suggests the shape of the curve is like a bell.
- Notch: Notch filters allow you to specifically target a very narrow range of frequencies. For example, removing a mains hum at 50 or 60Hz
- Lo-Shelf: Low shelf filters boost or cut the target frequency at the low end, and every frequency below it
Hi-Shelf: High shelf filters boost or cut the target frequency at the high end, and every frequency above it
To add EQ to an individual clip:
1 Select the clip in the timeline that you want to add the EQ filter to.
2 Click on the inspector and then click the 'clip equalizer' enable button.
To add EQ to a track:
1 Double click in the EQ section for one of your tracks in the mixer to open the equalizer for that track.
2 Select the band filter type from the dropdown menu for the band you want to adjust.

The EQ section in the mixer panel indicating an EQ curve has been applied to track one
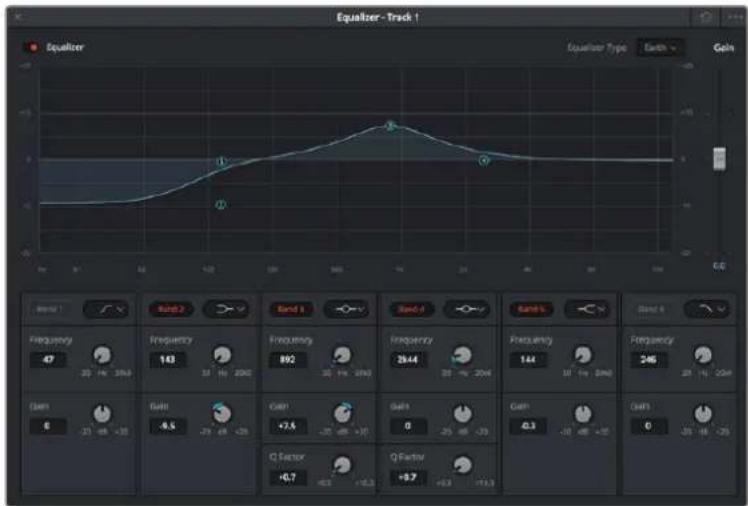
The 6 Band parametric equalizer that can be applied to every track
Once you have added EQ to your clip or track, you can adjust the EQ for each band. Note that controls may vary depending on which band filter type is selected.
To adjust the EQ for a band filter:
1 Select the band filter type from the dropdown menu for the band you want to adjust.
2 Adjust the frequency value to select the center frequency of the EQ adjustment.
3 Adjust the 'gain' value to boost or attenuate the frequencies governed by that band.
4 Use the 'Q factor' value to adjust the width of affected frequencies.
Use the reset button to reset all controls in the EQ window to their defaults.
Fairlight has many controls you can use to improve the quality of each audio track. You can add more tracks and arrange buses to organize them, plus add effects like delay or reverb, and generally perfect your audio mix.
Adding VFX and Compositing on the Fusion Page
Now that you have completed your edit, you can open the Fusion page to add 2D or 3D visual effects and motion graphics right within DaVinci Resolve. Unlike layer based compositing software, Fusion uses nodes, giving you the freedom to build complex effects while routing image data in any direction. The nodes window clearly shows every tool used along the way. If you have experienced the node workflow in the color page, this will feel familiar to you.
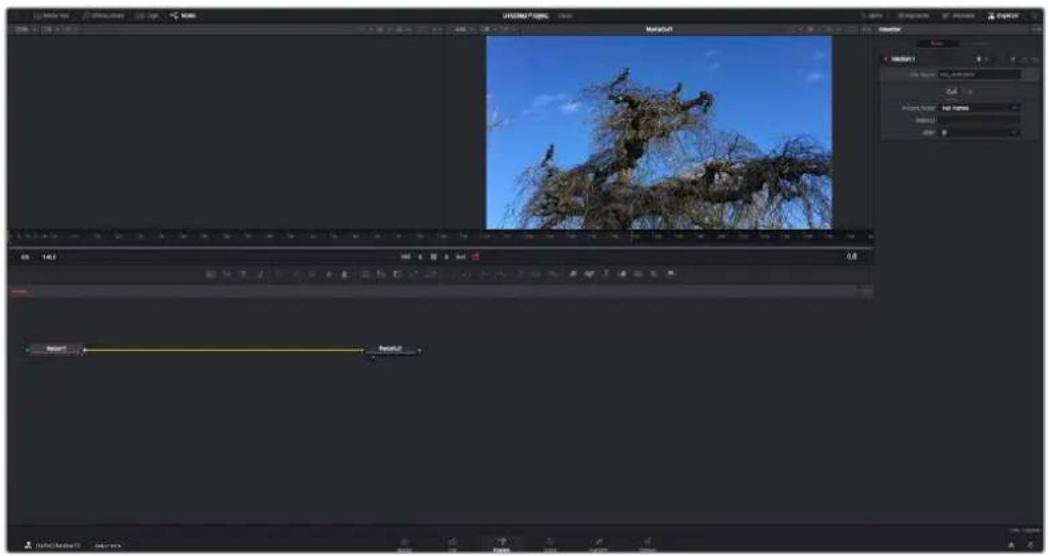
The Fusion Page
The Fusion page features 2 viewer windows across the top with transport controls to view your media, an inspector window to the right to access tool settings, and a nodes window at the bottom where you build your composition. While the viewers and transport controls are always visible, clicking on the icons on the interface toolbar at the very top of the display will let you show or hide the nodes and inspector windows, or reveal or hide additional windows including the effects library and editors for spline and keyframes.

Media Pool: The media pool functions the same way as it appears in the edit page. Simply drag additional media from your bins directly to your composition.
- Effects Library: The effects library is where you will find your Fusion tools and templates sorted into categories including particle, tracking, filters and generators. You can either click on the tool or drag it to the nodes area to add it to your composition. The media pool and effects library take up the same screen area, so you can swap between the two to keep your viewers as large as possible.
- Clips: Clicking the clips tab will reveal or hide thumbnails representing clips on your timeline. The thumbnails are located underneath the nodes editor, letting you instantly navigate to other clips.

Create a new version of your composition by right clicking on a thumbnail and selecting 'create new composition'.
- Viewers: The viewers are always visible and let you see the different views of your composition, for example an overall 3D perspective via the merge 3D node, a camera output, or your final render output. These viewers also let you see how your changes are affecting a specific element.
You can choose which nodes to view by clicking on a node and typing '1' for the left viewer or '2' for the right viewer. White button icons appear beneath the node to let you know which viewer it is assigned to. If you're using external video monitoring, there will be a third button available to route your media to your external video monitor.
TIP You can also assign a node to a viewer by dragging the node into the viewer itself.
The transport controls underneath the viewers let you skip to the start or end of the clip, play forward or reverse, or stop playback. The time ruler displays the entire range of a clip, with yellow marks indicating the in and out points.
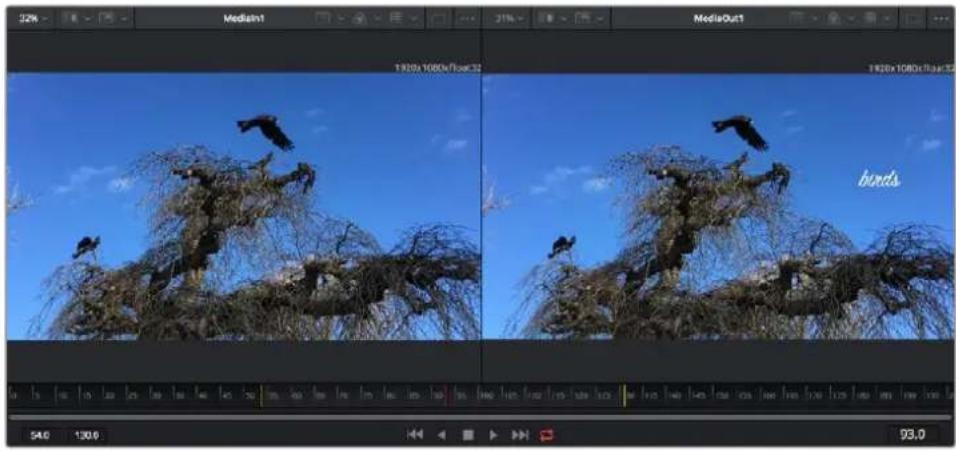
The yellow marks on the time ruler indicate your clip's in and out points on your timeline. If you are using a Fusion clip or compound clip, the time ruler will only show you the duration of the clip as it appears on the timeline, without handles.
- Nodes: The nodes window is the heart of the Fusion page where you build your node tree by connecting tools together from one node's output to another node's input. This area will change size depending on which editors are open, for example the spline or keyframes editor. A toolbar at the top of the nodes area features the most commonly used tools for fast access.
- Spline: When the spline editor is open, it will appear to the right of the nodes window. This editor lets you make precise adjustments to each node, such as smoothing the animation between two keyframes usingBezier curves.
Keyframes: Keyframes for each tool can be added, removed or modified using the keyframes editor. This also appears to the right of the nodes viewer. - Metadata: The metadata window will show you metadata available for the active clip, including the codec, frame rate and timecode.
- Inspector: The inspector in the top right corner displays all settings and modifiers available for one or more selected nodes. Additional tab options will appear to provide quick access to other settings for nodes sorted by category.
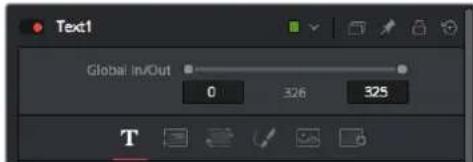
The text inspector contains additional tabs for text, layout, transform, shading, Image and settings.
Getting Started with Fusion
To get started with Fusion, simply position your playhead over any clip on your timeline and click on the 'Fusion' tab to open the Fusion page.
On the Fusion page, your clip is immediately available in a media input node labelled 'Medialn'. Every composition will begin with a 'mediain' and a 'mediaout' node. This mediain node represents the top most clip of your timeline at the playhead, and ignores any clips underneath. Any adjustments you've applied to the clip on the edit page, such as transform tools and cropping changes, are also included.

The media output node, named 'MediaOut', is the node that sends the output back to your timeline on DaVinci Resolve's edit page.
TIP ResolveFX or OFX plug-ins applied to clips in the edit page are not applied in the Fusion page. This is because Fusion effects occur prior to color correction and OFX/ResolveFX processing. If you want OFX applied before Fusion effects, right click the clip in the edit page and select 'new fusion clip' before clicking on the Fusion page.
Understanding Nodes
It can be helpful to think of each node as a visual icon representing a single tool or effect. Nodes are connected to other nodes to build the overall composition, much like ingredients in a cake. It's important to understand the inputs and outputs of each node as this will help you navigate the flow of your composition while building detailed visual effects.
Some tools have multiple inputs and outputs you can connect to other nodes. The merge node, for example, lets you attach a foreground input, background input, and a mask input for mattes or keys.
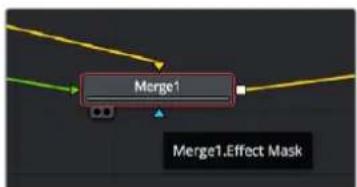
Foreground input
Background input
Effect mask input
Output
Multiple outputs on nodes means a single node can connect to many different nodes in your composition, so you don't have to duplicate clips as you would in layer based software.
Arrows on the line between connected nodes are a great visual indicator to show you which direction the image data is flowing.
Adding Nodes to the Node Editor
Adding effects is as simple as placing nodes on the line between the 'mediain' and 'mediaout' nodes.
There are a few ways you can do this. You can hold down the shift button and drop a node between two nodes, or click on the node you want to attach an effect to and select the tool you want to add. The new node will automatically connect to the tool selected. You can also add a node anywhere on the node window and manually connect nodes by dragging the output of one to the input on another.
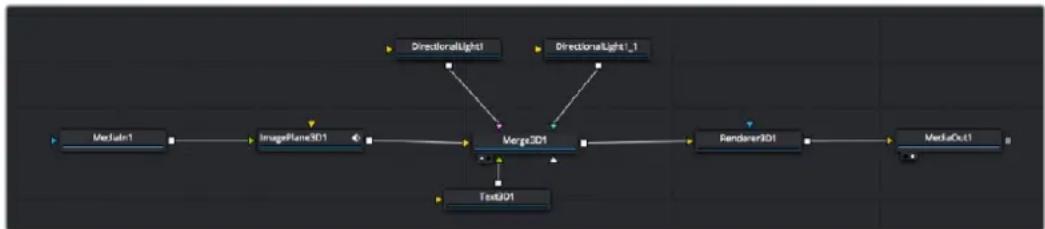
The most commonly used tool is the 2D or 3D merge node. This node is like a central hub that combines tools on the node editor into a single output.
The merge node has controls for how the inputs are managed, including settings for size, position, and blend. These settings are all accessible in the inspector panel when the merge node is selected.
The toolbar above the node panel contains the most commonly used tools as icons that you can either click on to add the node, or drag the tool to the node panel. If you want to see all the complete tools available, click on the 'effects library' in the top left corner and expand the 'tools' option. Here you'll find all the tools sorted by category, as well as a set of pre-built 'templates' you can use, for example lens flares, shaders and backgrounds.
TIP Once you're familiar with the tool names, you can hold down 'shift' and press 'spacebar' on your keyboard and a 'select tools' menu will appear. As you type the tool name, the menu will suggest the relevant tool. This is a very fast way to select the tool you want.
Adjusting Nodes Using the Inspector Panel
Adjust your node settings using the inspector panel. Simply click on the node you want to modify and the panel will update to display its settings and controls.
With Fusion, you don't have to be viewing the node you're editing, as you can modify one node while viewing another in your composition. For example, you can modify the size and center position of a 'text+' node while the merge node is in the viewer, letting you view the text relative to the background.
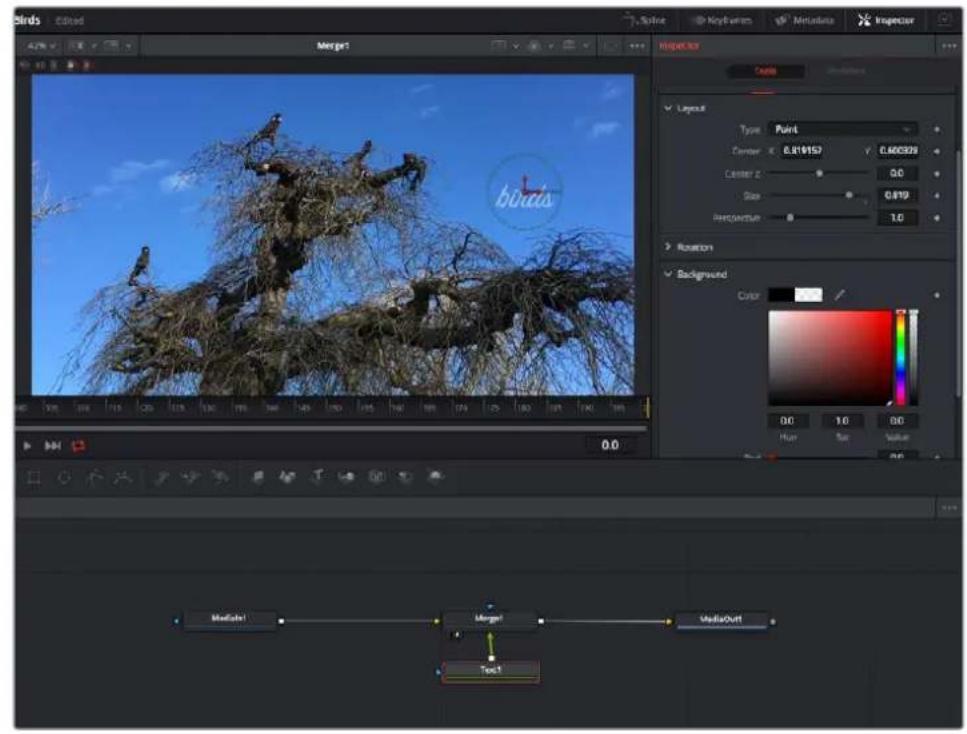
Selected nodes appear with a red border. Here the inspector panel is displaying the layout tab controls for the text node.
There are different parameters and settings you can adjust for every node depending on its task, from sizing and center positions to changing the number of particles in an emitter node. Setting keyframes and changing the settings over time will animate the effect.
Working with Keyframes
In the inspector window, set a keyframe by right clicking on a setting and choosing 'animate' from the contextual menu. The keyframe icon to the right of the setting will turn red. This means keyframes are now active and any changes you make will be applied to the current frame only. When two or more keyframes are created by changing the setting parameters on a different frame, a transition is interpolated between them. Arrows on each side of the keyframe icon let you move the playhead to those exact positions on the timeline.
The splines panel gives you further control over keyframe animation. You can select keyframes, such as the first and last, and smooth the animation between them into aBezier curve by typing 'shift' + 's', or right clicking on a keyframe and selecting 'smooth'.
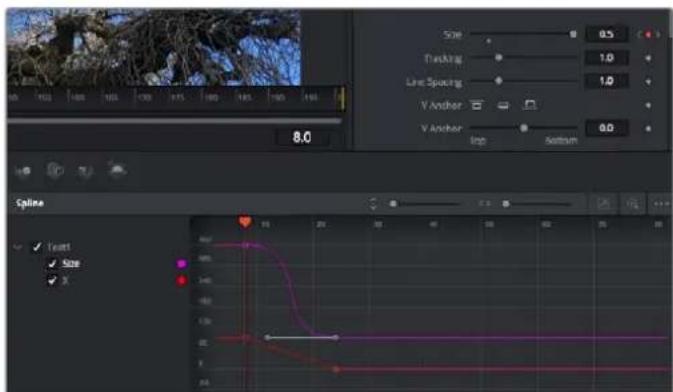
Here, the 'size' keyframe animation has been smoothed into aBezier curve. You can click theBezier handles to shorten or lengthen the curve, or the keyframe square icons to move the keyframe location.
Using the Motion Tracker and Adding Text
To get a better idea of how to use Fusion, we have included the following examples to show how to use the tracker tool to track an element in a clip, plus add text and attach it to the element using the tracking data.
The tracker' tool tracks pixels over time on the x & y axis, and generates data you can use to attach other elements. This is great for when you want to match the position of text to a moving object, such as a car driving along the road, or a bird as it flies across frame.
1 In the 'effects library', select the 'tracking' tool and drag it to the line between the 'mediain' and the 'mediaout' nodes. Now click the tracker node to reveal its properties in the inspector.
2 Type '1' on your keyboard to see the 'tracker' node on the left viewer. The clip will appear in the viewer together with the tracker at its default position. Hover your mouse pointer over the tracker to reveal the tracker handle. Click on the tracker handle at the top left corner and drag the tracker to an area of interest on your clip. High contrast areas work well, for example the badge on the hood of a car. The tracker will magnify the image area for extra precision.
3 In the inspector window, click on the 'track forward' button to start tracking. A notification window will appear when the tracking is done. Click OK.
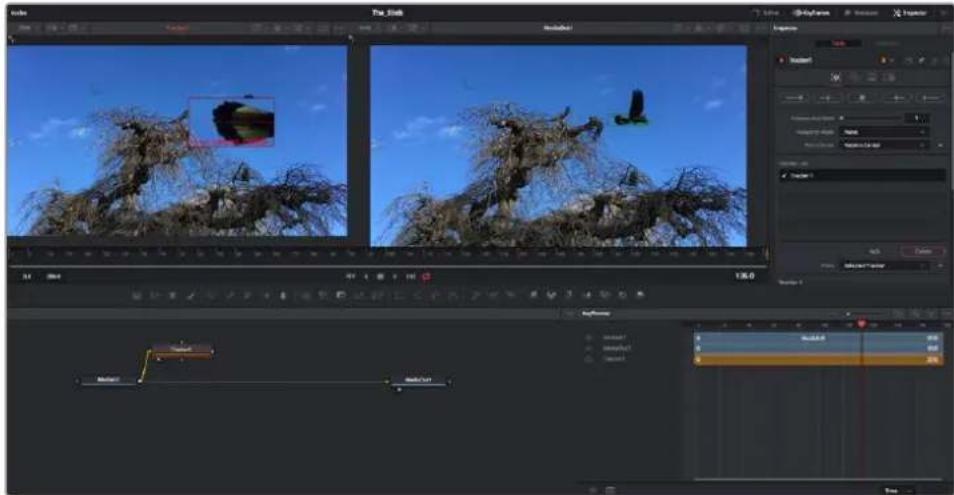
Tracking options in the inspector panel include track reverse from last frame or current frame, stop track or track forward from current frame or first frame.
TIP Track reverse or forward from current frame is great for situations where your area of interest disappears during the render range, such as a car or bird moving out of frame. This lets you track only the relevant footage.
Now you can take that tracking data and apply the motion path to a text tool.
4 Click on the 'text+ node icon from the toolbar of commonly used nodes and drag it to the node panel near the 'tracker' node. Connect the 'text' output square to the green foreground input on the tracker'.

5 Click on the 'tracker' node and type 1 so you can see the merged results on your left hand viewer. In the tracker' inspector panel, click on the operations' tab. You can see the tab's name by hovering the mouse pointer over it. Click the dropdown menu next to operation and select match move'.
6 Click the 'text' node to reveal the properties in the inspector. Type your text into the text box and change the font, color and size to suit your composition.
This will apply the tracking position data from your tracker to your text. If you want to change the text offset, click on the ' trackers' tab back in the inspector panel and use the x and y offset scroll wheels to modify the position.
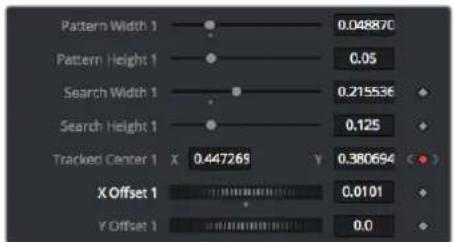
Scroll wheels at the bottom of the tracker inspector panel let you adjust the offset position for the text.
Now you can play back your composition and see your text attached to the object you have tracked!
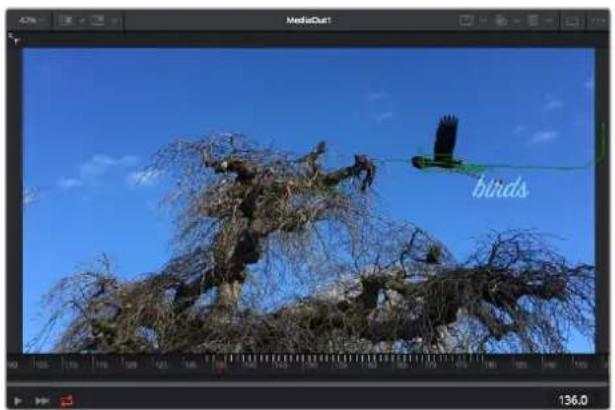
The green square is the tracker's current position along the green path, and the red dashed line is the offset position used to animate the text.
For some shots you might want to remove track points after tracking, such as when the object you are tracking disappears off the screen. The keyframe editor makes this a very simple process.
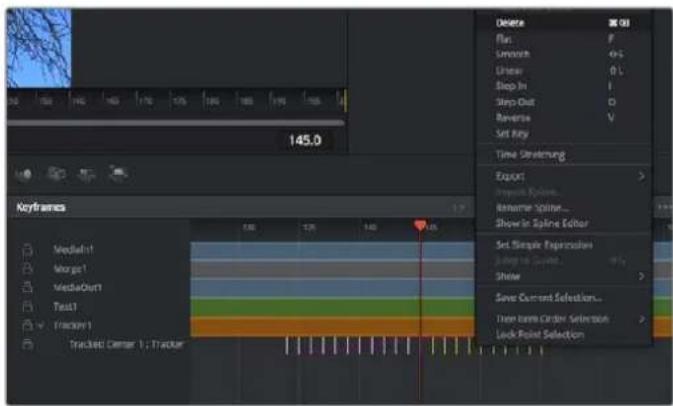
7 Click on the keyframes tab above the inspector to open the keyframes editor. Any nodes with keyframes applied will have a small arrow next to the node label, and only the parameter with keyframes added will appear in the list below. Click on the magnify icon and drag a box around the area you want to edit. This will zoom into that area so you can see the keyframes easier.
8 Move the playhead to the location of the last keyframe you want. Now select the keyframes you wish to remove by drawing a box around them with your mouse. The keyframes will highlight yellow. Right click and choose delete from the menu.
TIP If your effects are particularly system intensive, right clicking on the transport controls area will give you viewer options, including proxy playback, helping you get the most out of your system while you build your composition. Refer to the DaVinci Resolve manual for further detail on all the playback options.
You have now completed your first composition animating text to match a movement in your footage!
If you want to track an area of the image that contains a flat surface you want to enhance or replace, you can use the planar tracker. Tracking 2D planes can be helpful for changing labels and signs in a moving image, or even adding an image to a monitor or TV in your shot.
For more information about the planar tracker and the many powerful tools in the DaVinci Resolve Fusion page, see the DaVinci Resolve manual.
TIP As you build visual effects in the Fusion page, it's worth noting if the effect you are building is a 2D effect, or a 3D effect, as this will determine which merge tool is used. You may discover yourself frequently combining 2D and 3D effects in the one composite. In this scenario, it's helpful to remember that any visual effect using the 3D space needs to be rendered as a 2D image before it can be merged into a 2D composite.
We believe you will have lots of fun with Fusion and exploring Fusion's visual effects with the power of DaVinci Resolve's edit, color, and Fairlight pages. With all these tools at your finger tips, DaVinci Resolve is incredibly powerful and there is really no limit to what you can create!
Mastering Your Edit
Now you've edited, graded, added vfx and mixed your audio, you'll want to share it with others. You can use the Quick Export button, or menu selection, to output the contents of the Timeline as a self-contained file in one of a variety of different formats, or use the additional features of the 'deliver' page.
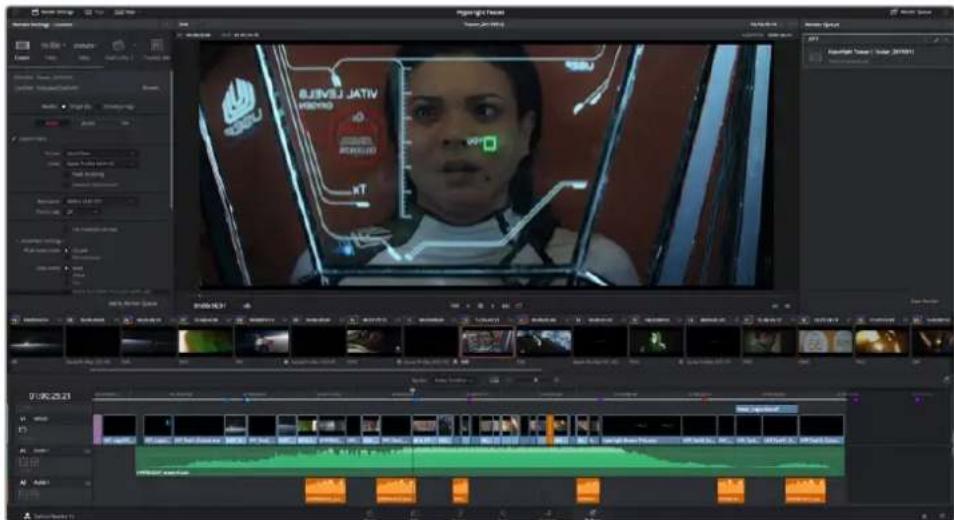
The 'deliver' page is where you export your edit. You can select from many different video formats and codeccs
Quick Export
You can choose File > Quick Export to use one of a variety of export presets to export your program from any page of DaVinci Resolve. You can even use quick export to export and upload your program to one of the supported video sharing services, including YouTube, Vineo, and Frame.io.
To use Quick Export:
In the 'edit', 'fusion', or 'color' page, optionally set in and out points in the timeline to choose a range of the current program to export. If no timeline in or out points have been set, the entire timeline will be exported.
Choose File > Quick Export.
2 Select a preset to use from the top row of icons in the quick export dialog, and click 'export'.
3 Choose a directory location and enter a file name using the export dialog, then click 'save'. A progress bar dialog appears to let you know how long the export will take.
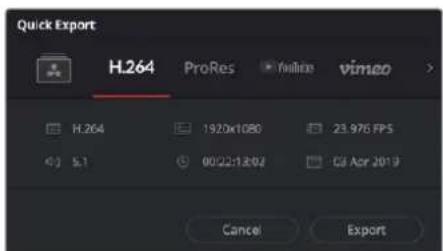
The quick export dialog
The Deliver Page
This page lets you select the range of clips you want to export, plus the format, codec and resolution you want. You can export in many types of formats such as QuickTime, AVI, MXF and DPX using codec such as 8-bit or 10-bit uncompressed RGB/YUV, ProRes, DNxHD, H.264 and more.
To export a single clip of your edit:
1 Click on the 'deliver' tab to open the deliver page.
2 Go to the 'render settings' window on the top left of the page. Choose from a number of export presets, for example YouTube, Vineo and audio presets, or you can set your own export settings manually by leaving it set to the default 'custom' preset and entering your own parameters. For this example, select YouTube, then click on the arrow next to the preset and select the 1080p video format.
The frame rate will be locked to your project frame rate setting.
3 Underneath the presets you will see the timeline filename and the target location for your exported video. Click the 'browse' button and choose the location where you want to save your exported file and then select 'single clip' from the render option.
4 Immediately above the timeline, you'll see an options box with 'entire timeline' selected. This will export the entire timeline, however you can select a range of the timeline if you want to. Simply choose 'in/out range' and then use the 'i' and 'o' hot key shortcuts to choose the in and out points in your timeline.
5 Go to the bottom of the 'render settings' and click on the 'add to render queue' button.
Your render settings will be added to the render queue on the right side of the page. Now all you have to do is click 'start render' and monitor the progress of your render in the render queue.
When your render is complete you can open the folder location, double click on your new rendered clip and watch your finished edit.
Now that you have a basic knowledge of how to edit, color, mix audio and add visual effects, we recommend experimenting with DaVinci Resolve. Refer to the DaVinci Resolve manual for more details on how each feature can help you make the most of your project!
Camera Control with ATEM Mini
Pocket Cinema Camera gains studio features when you connect it to ATEM Mini. You can plug up to four Pocket Cinema Cameras into ATEM Mini, and control them from ATEM Mini and use professional studio features on networked computers running the ATEM Software Control application. ATEM Mini is a powerful tool for multi camera productions and live streaming. The Camera Control feature in ATEM Software Control lets you cut between cameras and control up to four Blackmagic Pocket Cinema Cameras from an ATEM Mini switcher. To open the camera control features of your ATEM Mini, click on the 'camera' button in ATEM Software Control.
Pocket Cinema Camera settings such as iris, gain, focus, detail and zoom control are easily adjusted using compatible lenses, plus you can color balance cameras and create unique looks using the DaVinci Resolve primary color corrector that's built into the camera.
You an even add ATEM Camera Control Panel for fast and precise hands-on control of four Pocket Cinema Cameras at once! For more information, see the ATEM Mini manual.

ATEM Camera Control.
When controlling cameras, the ATEM switcher control works by broadcasting camera control packets via all the HDMI inputs of your ATEM Mini. So this means you can connect an HDMI input of your ATEM Mini to the camera's HDMI connector and the camera will detect the control packets in the HDMI signal and allow you to control features in the camera itself.
Open ATEM Software Control preferences and set your switcher's button mapping to make sure you are switching the right camera with correct tally. With a video connection from your switcher to Blackmagic Pocket Cinema Cameras, you can also get the advantage of live tally indicators.
Camera Control Panel
Launch ATEM Software Control and click on the 'camera' button located at the bottom of the software window. You'll see a row of labeled Blackmagic camera controllers containing tools to adjust and refine each camera's image. The controllers are easy to use. Simply click the buttons using your mouse, or click and drag features to adjust.
Camera Control Selection
The button row at the top of the camera control page lets you select the camera number you would like to control.
Channel Status
The channel status at the top of each camera controller displays the camera label, On Air indicator and lock button. Press the lock button to lock all the controls for a specific camera. When on air, the channel status illuminates red and displays the On Air alert.
Camera Settings
The camera settings button near the bottom left of the master wheel lets you adjust detail settings for each camera's picture signal.

Each camera controller displays the channel status so you know which camera is on air. Use the color wheels to adjust each YRGB channel's lift, gamma and gain settings.
Detail
Use this setting to sharpen the image from your cameras live. Decrease or increase the level of sharpening by selecting: Detail off, detail default for low sharpening, medium detail and high detail.
Color Wheel
The color wheel is a powerful feature of the DaVinci Resolve color corrector and used to make color adjustments to each YRGB channel's lift, gamma and gain settings. You can select which setting to adjust by clicking on the three selection buttons above the color wheel.
Master Wheel
Use the master wheel below the color wheel to make contrast adjustments to all YRGB channels at once, or luminance only for each lift, gamma or gain setting.
Reset Buttons
The reset button near the bottom right of each camera controller lets you easily choose color correction settings to reset, copy or paste. Each color wheel also has its own reset button. Press to restore a setting to its default state, or copy/paste a setting. Locked controllers are not affected by the Paste feature.
The master reset button on the bottom right corner of the color corrector panel lets you reset lift, gamma and gain color wheels plus Contrast, Hue, Saturation and Lum Mix settings. You can paste color correction settings to camera controllers individually, or all cameras at once for a unified look. Iris, focus, coarse and pedestal settings are not affected by the Paste feature. When applying Paste to all, a warning message will appear asking you to confirm your action. This is so you don't accidentally paste new settings to any unlocked cameras that are currently on air.
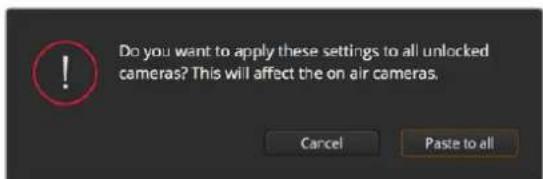
When applying 'paste to all', a warning message will appear asking you to confirm your action. This is so you don't accidentally paste new settings to any unlocked cameras that are currently on air.
Iris/Pedestal Control
The iris/pedestal control is located within the cross hairs of each camera controller. The control illuminates red when its camera is on air.
To open or close the iris, drag the control up or down. Holding the shift key allows only iris adjustments.
To darken or lift the pedestal, drag the control left or right. Holding the command key on a Mac, or the Control key on Windows, allows only pedestal adjustments.
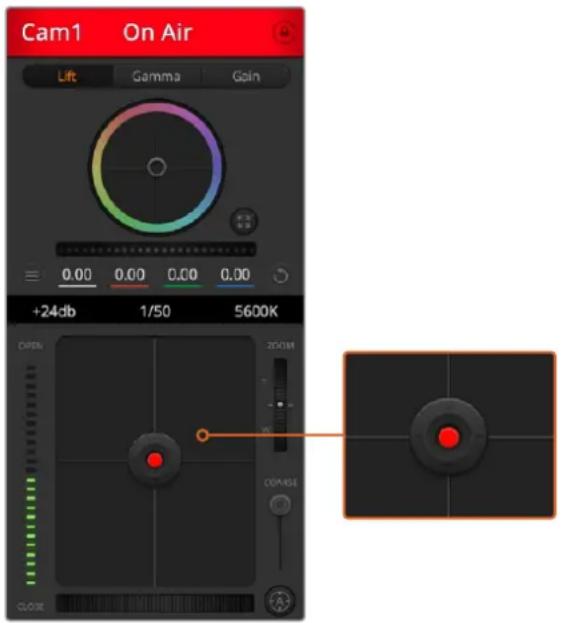
The iris/pedestal control illuminates red when its respective camera is on air.
Zoom Control
When using compatible lenses with an electronic zoom feature, you can zoom your lens in and out using the Zoom control. The controller works just like the zoom rocker on a lens, with telephoto on one end and wide angle on the other. Click on the zoom control, located above the coarse slider and drag up to zoom in, or drag down to zoom out.
Coarse Setting
The coarse setting is located to the right of the iris/pedestal control and is used to limit the iris range. This feature helps you prevent over exposed images from going to air.
To set your coarse threshold, completely open the iris using the iris control, then drag the coarse setting up or down to set optimum exposure. Now when you adjust the iris, the coarse threshold will prevent it from going above optimum exposure.
Iris Indicator
The iris indicator is located to the left of the iris/pedestal control and displays a visual reference so you can easily see how open or closed the lens aperture is. The iris indicator is affected by the coarse setting.
Auto Focus Button
The auto focus button is located at the bottom right corner of each camera controller. Press to automatically set the focus when you have an active lens that supports electronic focus adjustments. It's important to know that while most lenses support electronic focus, some lenses can be set to manual or auto focus modes and so you need to ensure your lens is set to auto focus mode. Sometimes this is set by sliding the focus ring on the lens forward or backward.
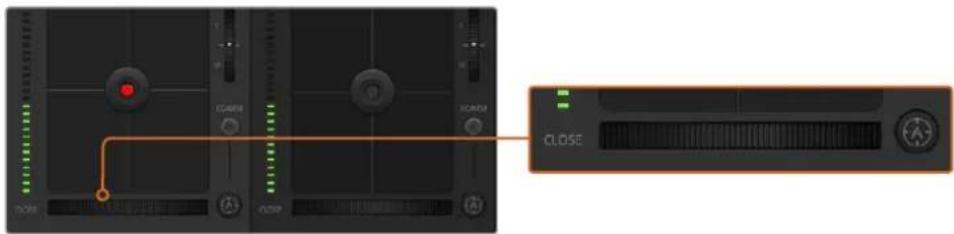
Click on the auto focus button or drag the manual focus adjustment left or right to focus a compatible lens.
Manual Focus Adjustment
When you want to adjust the focus on your camera manually, you can use the focus adjustment located at the bottom of each camera controller. Drag the wheel control left or right to manually adjust focus while viewing the video feed from the camera to ensure your image is nice and sharp.
Camera Gain
The camera gain setting allows you to turn on additional gain in the camera. On Blackmagic Pocket Cinema Cameras, this setting relates to ISO. This is important when you are operating in low light conditions and need extra gain, or ISO, in the front end of the camera to avoid your images being under exposed. You can decrease or increase gain by clicking on the left or right arrows on the dB gain setting.
You can turn on some gain when you need it, such as outdoor shoots when the light fades at sunset and you need to increase your image brightness. It's worth noting that adding gain will increase noise in your images.
Shutter Speed Control
The shutter speed control is located in the section between the color wheel and the iris/pedestal control. Decrease or increase the shutter speed by hovering your mouse pointer over the shutter speed indicator and then clicking on the left or right arrows. On Blackmagic Pocket Cinema Cameras, this setting relates to shutter angle.
If you see flicker in lights you can decrease your shutter speed to eliminate it. Decreasing shutter speed is a good way to brighten your images without using camera gain because you are increasing the exposure time of the image sensor. Increasing shutter speed will reduce motion blur so can be used when you want action shots to be sharp and clean with minimal motion blur.
White Balance
The white balance setting next to the shutter speed control can be adjusted by clicking on the left or right arrows on each side of the color temperature indicator. Different light sources emit warm or cool colors, so you can compensate by adjusting the white balance. This ensures the whites in your image stay white.
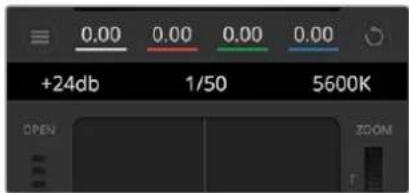
Hovering your mouse pointer over the gain, shutter speed and white balance indicators reveal arrows you can click on to adjust their respective settings.
DaVinci Resolve Primary Color Corrector
If you have a color correction background, then you can change your camera control from a switcher style CCU interface to a user interface that's more like a primary color corrector on a post production color grading system.
Blackmagic cameras feature a DaVinci Resolve primary color corrector built in. If you have used DaVinci Resolve, then creatively, grading in the Blackmagic camera will be identical so you can use your color grading experience for live production. The color corrector panel can be expanded out of any camera controller and provides expanded color correction control with extra settings and a full primary color corrector interface.
You have color wheels and settings such as saturation available and you can see shadows, mid tones and highlight settings all at the same time. Simply switch between cameras using the camera selection controls at the top of the window as you need.
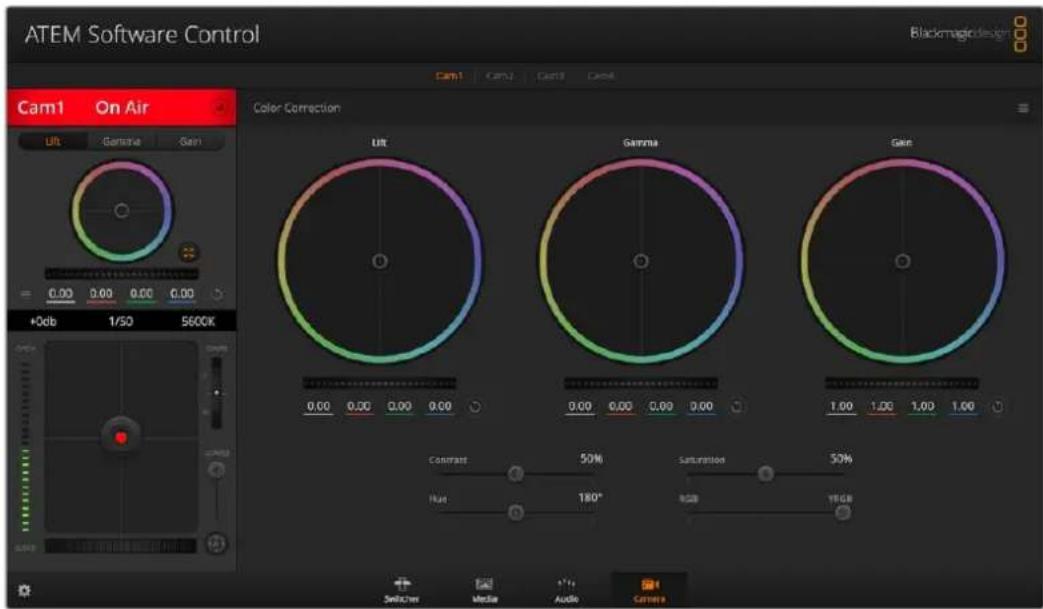
Click on the DaVinci Resolve primary color corrector button to expand the color correction window and adjust settings.
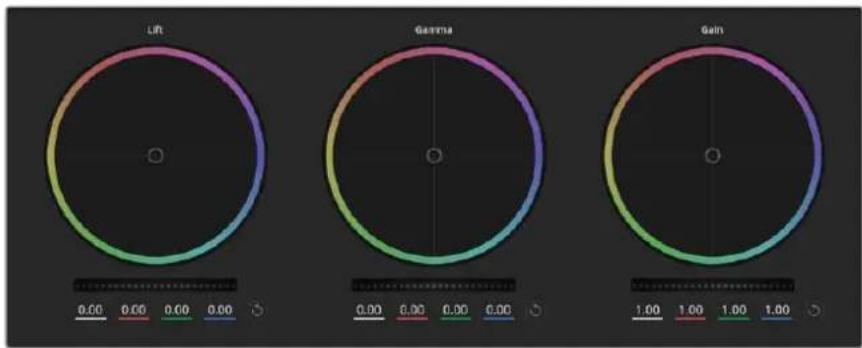
Lift, gamma and gain color wheels in the color corrector panel.
Color Wheels
Click and drag anywhere within the color ring
Note that you don't need to drag the color balance indicator itself. As the color balance indicator moves, the RGB parameters underneath change to reflect the adjustments being made to each channel.
Shift-Click and drag within the color ring
Jumps the color balance indicator to the absolute position of the pointer, letting you make faster and more extreme adjustments.
Double-click within the color ring
Reset the color adjustment without resetting the master wheel adjustment for that control.
Click the reset control at the upper-right of a color ring
Resetsethoplecolorbalancecontrolanditscorrespondingmasterwheel.
Master Wheels
Use the master wheels below the color wheels to adjust each YRGB channels' lift, gamma and gain controls.
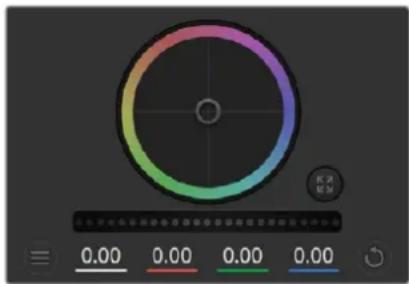
Adjust the master wheels by dragging the wheel control left or right.
To make adjustments using the master wheel:
Drag the master wheel left or right
Dragging to the left darkens the selected parameter of the image, dragging to the right lightens that parameter. As you make an adjustment, the YRGB parameters underneath change to reflect the adjustment you're making. To make a Y-only adjustment, hold down the ALT or Command key and drag left or right. Because the color corrector uses YRGB processing, you can get quite creative and create unique affects by adjusting the Y channel only. Y channel adjustments work best when the Lum Mix setting is set to the right side to use YRGB processing vs the left side to use regular RGB processing. Normally, most DaVinci Resolve colorists use the YRGB color corrector as you get a lot more control of color balance without affecting overall gain, so you spend less time getting the look you want.
Contrast Setting
The Contrast setting gives you control over the distance between the darkest and lightest values of an image. The effect is similar to making opposing adjustments using the lift and gain master wheels. The default setting is 50% .
Saturation Setting
The Saturation setting increases or decreases the amount of color in the image. The default setting is 50% .
Hue Setting
The Hue setting rotates all hues of the image around the full perimeter of the color wheel. The default setting of 180 degrees shows the original distribution of hues. Raising or lowering this value rotates all hues forward or backward along the hue distribution as seen on a color wheel.
Lum Mix Setting
The color corrector built into Blackmagic cameras is based on the DaVinci Resolve primary color corrector. DaVinci has been building color correctors since the early 1980's and most Hollywood films are color graded on DaVinci Resolve than any other method.
This means that your color corrector built into the camera has some unique and creatively powerful features. The YRGB processing is one of those features.
When color grading, you can choose to use RGB processing, or YRGB processing. High end colorists use YRGB processing because you have more precise control over color and you can independently adjust the channels with better separation and more creative options.
When the Lum Mix control is set to the right side, you have the 100% output of the YRGB color corrector. When you have the Lum Mix control set to the left side, you get 100% output of the RGB corrector. You can set the Lum Mix to any position between the left and right to get a blend of output from both the RGB and YRGB correctors.
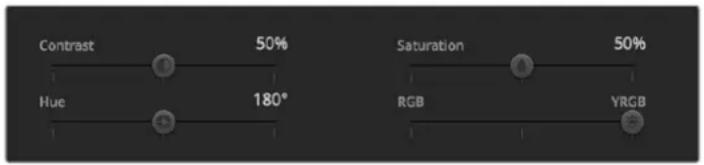
Drag the sliders left or right to adjust Contrast, Saturation, Hue and Lum Mix settings.
Which is the correct setting to use? That's up to you, as color correction is a pure creative process and there is no right and wrong. The best setting is what you like the most and what you think looks good!
Synchronizing Settings
When connected, camera control signals are sent from your ATEM switcher to the Blackmagic camera. If a setting is accidentally adjusted from your camera, camera control will automatically reset that setting to maintain synchronization.
TIP The DaVinci Resolve primary color corrector in each camera controller can be controlled by a DaVinci Resolve Micro panel. Using a hardware control panel lets you make fast and precise color adjustments. For more information, see the ATEM Mini manual.
NOTE A camera that is switched off while connected by HDMI to ATEM Mini may affect camera control communication. We recommend you run cameras from mains power and unplug the HDMI cable before switching them off.
Working with Third Party Software
To edit your clips using your favorite editing software such as DaVinci Resolve, you can copy your clips from your camera to an external drive or RAID and then import your clips into the software. You can also import your clips directly from your storage media using a dock or adapter for your CFast or SD card, or via the USB-C port for a USB-C flash disk.
Working with Files from CFast 2.0 and SD cards
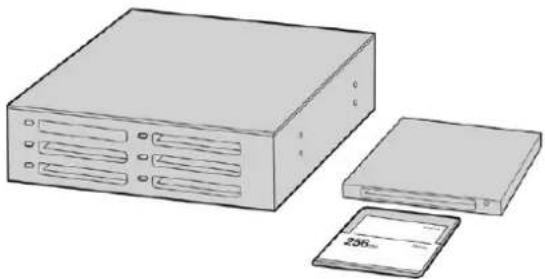
Edit directly from your CFast or SD card by removing it from your camera and mounting it on your computer using a CFast 2.0 reader/writer or CFast drive
To import your clips from a CFast 2.0 or SD card:
1 Remove the CFast or SD card from your Blackmagic Pocket Cinema Camera.
Mount the CFast or SD card to your Mac or Windows computer using a CFast 2.0 card reader SD card reader or CFast drive.
2 Double click on the CFast or SD card to open it and you should see folders that contain your Blackmagic RAW files or a list of QuickTime movie files. Depending on the format you chose to record in, you might have a mixture of files, but they should all use the same naming convention.
3 Drag the files you want from the CFast or SD card onto your desktop or another drive, or you can access the files straight from the CFast or SD card using your editing software.
4 Before you unplug the CFast or SD card from your computer, it is important to always eject your CFast or SD card from Mac or Windows. Removing your card without ejecting can corrupt footage.
Working with Files from USB-C flash disks
To import your clips from a USB-C flash disk:
1 Unplug the USB-C flash disk from your camera.
2 Mount the USB-C flash disk to your Mac or Windows computer via a USB-C port on your computer. USB 3.0 is preferable as USB 2.0 is not fast enough to edit video in real time.
3 Double click on the USB-C flash disk to open it and you should see a list of QuickTime movie files or Blackmagic RAW files. Depending on the format you chose to record in, you might have a mixture of files, but they should all use the same naming convention.
4 Drag the files you want from the USB-C flash disk onto your desktop or another hard drive, or you can access the files straight from the USB-C flash disk using your NLE software.
5 Before you unplug the USB-C flash disk from your computer, it is important to eject the USB-C flash disk first.
Using Final Cut Pro X
To edit your clips using Final Cut Pro X, you need to create a new project and set a suitable video format and frame rate. This example uses ProRes 422 HQ 1080p24.
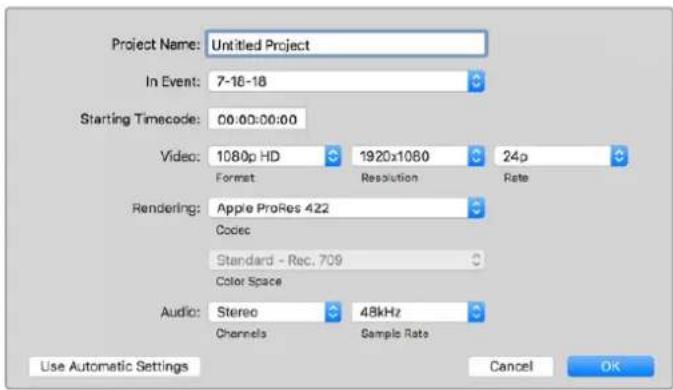
Final Cut Pro X project settings
1 Launch Final Cut Pro X, go to the 'menu' bar and select 'file/new project'. A window will open containing project settings.
2 Name your project and select the 'custom' checkbox.
3 Set the 'video properties' settings to 1080p HD, 1920x1080 and 24p.
4 Set your 'audio' and 'render properties' settings to 'stereo, 48kHz, and Apple ProRes 422 HQ'
5 Click OK.
To import your clips into your project, go to the 'menu' bar and select 'file/import/media'. Choose your clips from your CFast card.
You can now drag your clips onto the timeline for editing.
Using Avid MediaComposer 2018
To edit your clips using Avid MediaComposer 2018, create a new project and set a suitable video format and frame rate. For this example, clips are set using 1080p24.
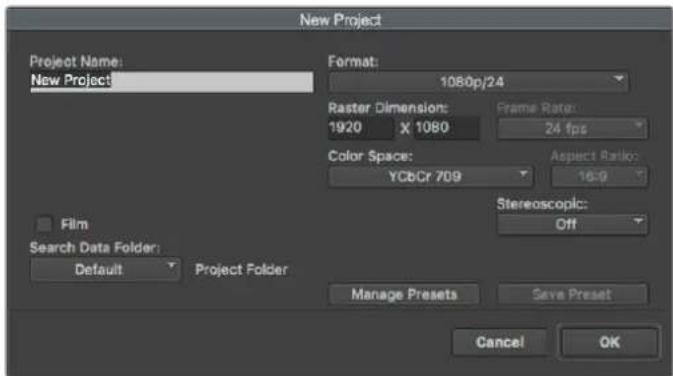
Setting the project name and project options In Avid MediaComposer 2018
1 Launch Avid MediaComposer 2018 and the 'select project' window will appear.
2 Click the 'new project' button and name your project in the 'new project' window.
3 In the 'format' drop down menu select HD 1080 > 1080p/24 and click 'ok' to create the project.
4 Double click the project in the 'select project' window to open it.
5 Select file > input > source browser and navigate to the files you wish to import.
6 Select your 'target bin' from the drop down menu and click 'import'.
When the clips appear in the media bin you can drag your clips onto the timeline and begin editing.
Using Adobe Premiere Pro CC
To edit your Apple ProRes 422 HQ clips using Adobe Premiere Pro CC, you need to create a new project and set a suitable video format and frame rate. For this example, clips are set using ProRes 422 HQ 1080p25.
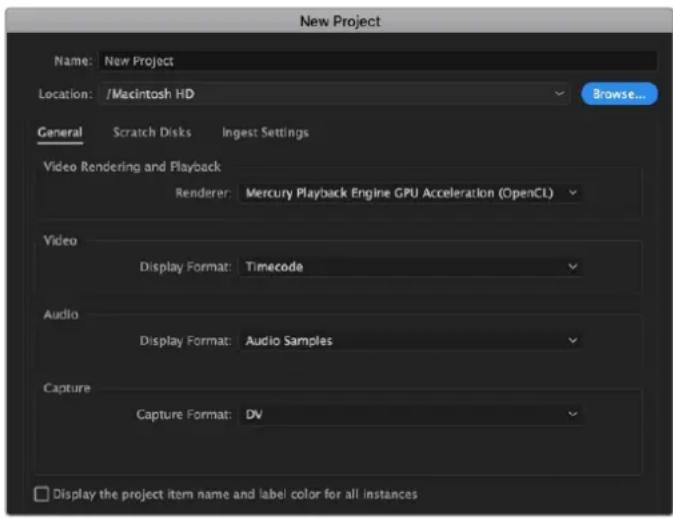
Setting the project name and project options In Adobe Premiere Pro CC
1 Launch Adobe Premiere Pro CC. In the 'welcome' window select 'new project'. A window will open containing project settings.
2 Name your project. Choose the location for your project by clicking 'browse' and selecting your desired folder. Once you've selected your location folder click OK in the 'new project' window.
3 Go to the Adobe Premiere Pro CC 'menu' bar, select 'file/import' and choose the clips you want to edit. Your clips will appear in the project window.
4 Drag the first clip you wish to edit onto the 'new item' icon at the bottom right of the project window. A new sequence will be created matching your clip settings.
You can now drag your clips onto the sequence timeline for editing.
Blackmagic Camera Setup Utility
Updating Camera Software – Mac
After downloading the Blackmagic Camera Setup utility software and unzipping the downloaded file, open the resulting disk image to reveal the Blackmagic Camera Setup Installer.
Launch the installer and follow the on screen instructions. After the installation has finished, go to your applications folder and open the Blackmagic Cameras folder, where you'll find this manual, the Blackmagic Camera setup utility, plus a documents folder containingREADME files and information. You'll also find an uninstaller for when updating to later versions of Blackmagic Camera Setup.
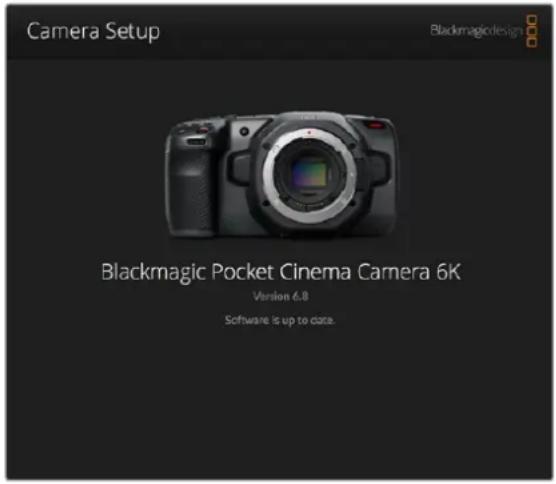
Updating Camera Software - Windows
After downloading the Blackmagic Camera Setup utility software and unzipping the downloaded file, you should see a Blackmagic Camera Setup folder containing this PDF manual and the Blackmagic Camera Setup Installer. Double-click the installer and follow the on screen prompts to complete the installation.
In Windows 10, click the start button and select 'all apps'. Scroll down to the Blackmagic design folder. From here you can launch Blackmagic Camera Setup. In Windows 8.1, select the down arrow icon from the 'start' screen, and scroll down to the Blackmagic Design folder. From here you can launch Blackmagic Camera Setup.
Updating your Camera's Internal Software
After installing the latest Blackmagic Camera Setup utility on your computer, connect a USB-C cable between the computer and your camera. The USB-C port is located on the left side panel. Simply open the rubber cap to access the port.
Launch the Blackmagic Camera Setup utility and follow the on screen prompts to update the camera software. The camera restarts on the 'select language' screen. It's important to note that updating your camera software erases any presets and custom LUTs, and resets all settings. It is a good practice to export them to a memory card as a backup before performing a software update. After a software update, you can restore your presets and LUTs quickly by importing them from the memory card.
Recommended Recording Media
CFast 2.0 Cards
Recommended for Pocket Cinema Camera 6K
The following CFast 2.0 cards are recommended for recording 6K Blackmagic RAW 5:1 up to 50 fps on Pocket Cinema Camera 6K.
| Brand Card Name Storage | ||
| Angelbird AV PRO CF XT 512GB | ||
| CinediskPro 510MB/s CFast 2.0 256GB | ||
| Hagiwara Solutions DC-SMAN64GA CFast 2.0 64GB | ||
| Hagiwara Solutions DC-SMANA1GA CFast 2.0 128GB | ||
| KomputerBay 3400x CFast 2.0 64GB | ||
| KomputerBay 3400x CFast 2.0 128GB | ||
| Lexar Professional 3400X CFast 2.0 128GB | ||
| Lexar Professional 3500X CFast 2.0 128GB | ||
| ProGrade Digital 510MB/s CFast 2.0 128GB | ||
| ProGrade Digital | 550MB/s CFast 2.0 | 256GB |
| ProGrade Digital | 550MB/s CFast 2.0 | 512GB |
| Transcend | CFX650 CFast 2.0 TS128GCFX650 | 128GB |
| SanDisk | Extreme Pro CFast 2.0 SDCFSP-64G-x46D | 64GB |
| SanDisk | Extreme Pro CFast 2.0 SDCFSP-128G-x46D | 128GB |
| SanDisk | Extreme Pro CFast 2.0 SDCFSP-256G-x46D | 256GB |
| SanDisk | Extreme Pro CFast 2.0 SDCFSP-512G-x46D | 512GB |
| Silicon Power | CFX310 CFast 2.0 | 512GB |
| Sony | CFast 2.0 G Series CAT-G64 | 64GB |
| Sony | CFast 2.0 G Series CAT-G128 | 128GB |
| Wise | CFA-2560 3400x CFast 2.0 | 256GB |
| Wise | CFA-5120 3500x CFast 2.0 | 512GB |
| Wise | CFA-10240 3500X CFast 2.0 | 1TB |
The following CFast 2.0 cards are recommended for recording 6K 2.4:1 Blackmagic RAW 5:1 up to 60 fps on Pocket Cinema Camera 6K.
| Brand Card Name Storage | ||
| Angelbird AV PRO CF XT 512GB | ||
| CinediskPro 510MB/s CFast 2.0 256GB | ||
| Hagiwara Solutions | DC-SMAN64GA CFast 2.0 | 64GB |
| Hagiwara Solutions | DC-SMANA1GA CFast 2.0 | 128GB |
| KomputerBay 3400x CFast 2.0 64GB | ||
| KomputerBay 3400x CFast 2.0 128GB | ||
| Lexar Professional 3400X CFast 2.0 128GB | ||
| Lexar Professional 3500X CFast 2.0 128GB | ||
| ProGrade Digital 510MB/s CFast 2.0 128GB | ||
| ProGrade Digital 550MB/s CFast 2.0 256GB | ||
| ProGrade Digital 550MB/s CFast 2.0 512GB | ||
| Transcend CFX650 CFast 2.0 TS128GCFX650 128GB | ||
| SanDisk Extreme Pro CFast 2.0 SDCFSP-64G-x46D 64GB | ||
| SanDisk | Extreme Pro CFast 2.0 SDCFSP-128G-x46D | 128GB |
| SanDisk | Extreme Pro CFast 2.0 SDCFSP-256G-x46D | 256GB |
| SanDisk | Extreme Pro CFast 2.0 SDCFSP-512G-x46D | 512GB |
| Silicon Power | CFX310 CFast 2.0 | 256GB |
| Silicon Power | CFX310 CFast 2.0 | 512GB |
| Sony | CFast 2.0 G Series CAT-G64 | 64GB |
| Sony | CFast 2.0 G Series CAT-G128 | 128GB |
| Wise | CFA-1280 3400x CFast 2.0 | 128GB |
| Wise | CFA-2560 3400x CFast 2.0 | 256GB |
| Wise | CFA-5120 3500x CFast 2.0 | 512GB |
| Wise | CFA-10240 3500X CFast 2.0 | 1TB |
The following CFast 2.0 cards are recommended for recording 2.8K 17:9 Blackmagic RAW 3:1 up to 120 fps on Pocket Cinema Camera 6K.
| Brand Card Name Storage | ||
| Angelbird | AV PRO CF XT | 512GB |
| CinediskPro | 510MB/s CFast 2.0 256GB | |
| Hagiwara Solutions | DC-SMAN64GA CFast 2.0 | 64GB |
| Hagiwara Solutions | DC-SMANA1GA CFast 2.0 | 128GB |
| KomputerBay 3400x CFast 2.0 | 64GB | |
| KomputerBay 3400x CFast 2.0 | 128GB | |
| Lexar Professional 3400X CFast 2.0 | 128GB | |
| Lexar Professional 3500X CFast 2.0 | 128GB | |
| Lexar Professional 3400X CFast 2.0 | 256GB | |
| ProGrade Digital 510MB/s CFast 2.0 | 128GB | |
| ProGrade Digital 550MB/s CFast 2.0 | 256GB | |
| ProGrade Digital 550MB/s CFast 2.0 512GB | ||
| Transcend CFX650 CFast 2.0 TS128GCFX650 128GB | ||
| SanDisk Extreme Pro CFast 2.0 SDCFSP-64G-x46D 64GB | ||
| SanDisk Extreme Pro CFast 2.0 SDCFSP-128G-x46D 128GB | ||
| SanDisk Extreme Pro CFast 2.0 SDCFSP-256G-x46D 256GB | ||
| SanDisk Extreme Pro CFast 2.0 SDCFSP-512G-x46D 512GB | ||
| Silicon Power CFX310 CFast 2.0 256GB | ||
| Silicon Power CFX310 CFast 2.0 512GB | ||
| Sony | CFast 2.0 G Series CAT-G64 | 64GB |
| Sony | CFast 2.0 G Series CAT-G128 | 128GB |
| Wise | CFA-1280 3400x CFast 2.0 | 128GB |
| Wise | CFA-2560 3400x CFast 2.0 | 256GB |
| Wise | CFA-5120 3500x CFast 2.0 | 512GB |
| Wise | CFA-10240 3500X CFast 2.0 | 1TB |
The following CFast 2.0 cards are recommended for recording 4K DCI ProRes HQ up to 60 fps on Pocket Cinema Camera 6K.
| Brand Card Name Storage | ||
| Angelbird | AV PRO CF XT | 512GB |
| CinediskPro | 510MB/s CFast 2.0 | 256GB |
| Hagiwara Solutions | DC-SMAN64GA CFast 2.0 | 64GB |
| Hagiwara Solutions | DC-SMANA1GA CFast 2.0 | 128GB |
| KomputerBay | 3400x CFast 2.0 | 64GB |
| KomputerBay | 3400x CFast 2.0 | 128GB |
| Lexar | Professional 3400X CFast 2.0 | 128GB |
| Lexar | Professional 3500X CFast 2.0 | 128GB |
| Lexar | Professional 3400X CFast 2.0 | 256GB |
| ProGrade Digital | 510MB/s CFast 2.0 | 128GB |
| ProGrade Digital 550MB/s CFast 2.0 256GB | ||
| ProGrade Digital 550MB/s CFast 2.0 512GB | ||
| Transcend CFX650 CFast 2.0 TS128GCFX650 128GB | ||
| SanDisk Extreme Pro CFast 2.0 SDCFSP-64G-x46D 64GB | ||
| SanDisk Extreme Pro CFast 2.0 SDCFSP-128G-x46D 128GB | ||
| SanDisk Extreme Pro CFast 2.0 SDCFSP-256G-x46D 256GB | ||
| SanDisk Extreme Pro CFast 2.0 SDCFSP-512G-x46D 512GB | ||
| Silicon Power CFX310 CFast 2.0 256GB | ||
| Silicon Power CFX310 CFast 2.0 512GB | ||
| Sony CFast 2.0 G Series CAT-G64 64GB | ||
| Sony CFast 2.0 G Series CAT-G128 128GB | ||
| Wise CFA-1280 3400x CFast 2.0 128GB | ||
| Wise CFA-2560 3400x CFast 2.0 256GB | ||
| Wise CFA-5120 3500x CFast 2.0 512GB | ||
| Wise CFA-10240 3500X CFast 2.0 1TB | ||
The following CFast 2.0 cards are recommended for recording 1080 ProRes 422 HQ up to 120 fps on Pocket Cinema Camera 6K.
| Brand Card Name Storage | ||
| Angelbird AV PRO CF XT 512GB | ||
| CinediskPro 510MB/s CFast 2.0 256GB | ||
| Hagiwara Solutions | DC-SMAN64GA CFast 2.0 | 64GB |
| Hagiwara Solutions | DC-SMANA1GA CFast 2.0 | 128GB |
| KomputerBay | 3400x CFast 2.0 | 64GB |
| KomputerBay | 3400x CFast 2.0 | 128GB |
| Lexar | Professional 3400X CFast 2.0 | 128GB |
| Lexar | Professional 3500X CFast 2.0 | 128GB |
| Lexar | Professional 3400X CFast 2.0 | 256GB |
| ProGrade Digital | 510MB/s CFast 2.0 | 128GB |
| ProGrade Digital | 550MB/s CFast 2.0 | 256GB |
| ProGrade Digital | 550MB/s CFast 2.0 | 512GB |
| Transcend | CFX650 CFast 2.0 TS128GCFX650 | 128GB |
| SanDisk | Extreme Pro CFast 2.0 SDCFSP-64G-x46D | 64GB |
| SanDisk | Extreme Pro CFast 2.0 SDCFSP-128G-x46D | 128GB |
| SanDisk | Extreme Pro CFast 2.0 SDCFSP-256G-x46D | 256GB |
| SanDisk | Extreme Pro CFast 2.0 SDCFSP-512G-x46D | 512GB |
| Silicon Power | CFX310 CFast 2.0 | 256GB |
| Silicon Power | CFX310 CFast 2.0 | 512GB |
| Sony CFast 2.0 G Series CAT-G64 64GB | ||
| Sony CFast 2.0 G Series CAT-G128 128GB | ||
| Wise CFA-1280 3400x CFast 2.0 128GB | ||
| Wise CFA-2560 3400x CFast 2.0 256GB | ||
| Wise CFA-5120 3500x CFast 2.0 512GB | ||
| Wise CFA-10240 3500X CFast 2.0 1TB | ||
Recommended for Pocket Cinema Camera 4K
The following CFast 2.0 cards are recommended for recording 4K DCI Blackmagic RAW 3:1 up to 60 fps on Pocket Cinema Camera 4K.
| Brand Card Name Storage | ||
| Angelbird AV PRO CF 512GB | ||
| Angelbird AV PRO CF 1TB | ||
| CinediskPro 510MB/s CFast 2.0 256GB | ||
| Hagiwara Solutions DC-SMAN64GA CFast 2.0 64GB | ||
| Hagiwara Solutions DC-SMANA1GA CFast 2.0 128GB | ||
| KomputerBay 3400x CFast 2.0 64GB | ||
| KomputerBay 3400x CFast 2.0 128GB | ||
| KomputerBay 3700x CFast 2.0 256GB | ||
| Lexar Professional 3400x CFast 2.0 128GB | ||
| Lexar Professional 3500x CFast 2.0 256GB | ||
| ProGrade Digital | 550MB/s CFast 2.0 | 128GB |
| ProGrade Digital | 550MB/s CFast 2.0 | 256GB |
| ProGrade Digital | 550MB/s CFast 2.0 | 512GB |
| SanDisk | Extreme Pro CFast 2.0 SDCFSP-256G-x46D | 512GB |
| Wise | CFA-1280 3400x CFast 2.0 | 128GB |
| Wise | CFA-2560 3400x CFast 2.0 | 256GB |
| Wise | CFA-5120 3500x CFast 2.0 | 512GB |
| Wise | CFA-10240 3500x CFast 2.0 | 1TB |
The following CFast 2.0 cards are recommended for recording 4K DCI ProRes HQ up to 60 fps on Pocket Cinema Camera 4K.
| Brand Card Name Storage | ||
| Angelbird AV PRO CF 128GB | ||
| Angelblrd AV PRO CF 256GB | ||
| Angelbird AV PRO CF 512GB | ||
| CinediskPro 510MB/s CFast 2.0 256GB | ||
| Hagiwara Solutions DC-SMAN64GA CFast 2.0 64GB | ||
| Hagiwara Solutions DC-SMANA1GA CFast 2.0 128GB | ||
| KomputerBay 3400x CFast 2.0 128GB | ||
| KomputerBay 3700x CFast 2.0 256GB | ||
| ProGrade Digital | 550MB/s CFast 2.0 | 256GB |
| ProGrade Digital | 550MB/s CFast 2.0 | 512GB |
| SanDisk Extreme Pro CFast 2.0 SDCFSP-64G-x46D 64GB | ||
| SanDisk Extreme Pro CFast 2.0 SDCFSP-128G-x46D 128GB | ||
| SanDisk Extreme Pro CFast 2.0 SDCFSP-256G-x46D 256GB | ||
| Sony CFast 2.0 G Series CAT-G64 64GB | ||
| Sony CFast 2.0 G Series CAT-G128 128GB | ||
| Wise CFA-1280 3400x CFast 2.0 128GB | ||
| Wise CFA-2560 3400x CFast 2.0 256GB | ||
| Wise CFA-5120 3500x CFast 2.0 512GB | ||
| Wise CFA-10240 3500x CFast 2.0 1TB |
The following CFast 2.0 cards are recommended for recording 4K DCI Lossless RAW up to 30 fps on Blackmagic Pocket Cinema Camera 4K.
| Brand Card Name Storage | ||
| Angelbird AV PRO CF | 128GB | |
| Angelbird AV PRO CF | 256GB | |
| Angelbird AV PRO CF | 512GB | |
| CinediskPro | 510MB/s CFast 2.0 | 256GB |
| KomputerBay | 3400x CFast 2.0 | 128GB |
| ProGrade Digital | 550MB/s CFast 2.0 | 256GB |
| ProGrade Digital | 550MB/s CFast 2.0 | 512GB |
| SanDisk Extreme Pro CFast 2.0 SDCFSP-64G-x46D 64GB | ||
| SanDisk Extreme Pro CFast 2.0 SDCFSP-128G-x46D 128GB | ||
| SanDisk Extreme Pro CFast 2.0 SDCFSP-256G-x46D 256GB | ||
| Sony CFast 2.0 G Series CAT-G64 64GB | ||
| Sony CFast 2.0 G Series CAT-G128 128GB | ||
| Wise CFA-1280 3400x CFast 2.0 128GB | ||
| Wise CFA-2560 3400x CFast 2.0 256GB | ||
| Wise CFA-5120 3500x CFast 2.0 512GB | ||
The following CFast 2.0 cards are recommended for recording 4K DCI 3:1 RAW up to 60 fps on Blackmagic Pocket Cinema Camera 4K.
| Brand Card Name Storage | ||
| Angelbird AV PRO CF | 128GB | |
| Angelbird AV PRO CF | 256GB | |
| Angelbird AV PRO CF | 512GB | |
| CinediskPro | 510MB/s CFast 2.0 | 256GB |
| KomputerBay 3400x CFast 2.0 128GB | ||
| ProGrade Digital 550MB/s CFast 2.0 256GB | ||
| ProGrade Digital 550MB/s CFast 2.0 512GB | ||
| SanDisk Extreme Pro CFast 2.0 SDCFSP-64G-x46D 64GB | ||
| SanDisk Extreme Pro CFast 2.0 SDCFSP-128G-x46D 128GB | ||
| SanDisk Extreme Pro CFast 2.0 SDCFSP-256G-x46D 256GB | ||
| Sony CFast 2.0 G Series CAT-G64 64GB | ||
| Sony CFast 2.0 G Series CAT-G128 128GB | ||
| Wise CFA-1280 3400x CFast 2.0 | 128GB | |
| Wise CFA-2560 3400x CFast 2.0 | 256GB | |
| Wise CFA-5120 3500x CFast 2.0 | 512GB |
SD Cards
Recommended for Pocket Cinema Camera 6K
The following SD cards are recommended for recording 6K 16:9 Blackmagic RAW 5:1 up to 30 fps on Pocket Cinema Camera 6K.
| Brand Card Name Storage | ||
| Angelbird | AV PRO SD V90 | 64GB |
| Sony | Tough SF-G32T | 32GB |
| Sony | Tough SF-G64T | 64GB |
| Sony | Tough SF-G128T | 128GB |
| Toshiba | Exceria Pro UHS-II 270MB/s SDXC | 64GB |
| Wise SD2-128U3 SDXC UHS-II | 128GB |
The following SD cards are recommended for recording 6K 16:9 Blackmagic RAW 8:1 up to 30 fps on Pocket Cinema Camera 6K.
| Brand Card Name Storage | ||
| Angelbird | AV PRO SD V90 | 64GB |
| Sony | Tough SF-G32T | 32GB |
| Sony | Tough SF-G64T | 64GB |
| Sony | Tough SF-G128T | 128GB |
| Toshiba | Exceria Pro UHS-II 270MB/s SDXC | 64GB |
| Toshiba | Exceria Pro UHS-II 270MB/s SDXC | 128GB |
| Toshiba | Exceria Pro UHS-II N502 SDXC | 128GB |
| Wise SD2-128U3 SDXC UHS-II | 128GB |
The following SD cards are recommended for recording 6K 2.4:1 Blackmagic RAW 12:1 up to 60 fps on Pocket Cinema Camera 6K.
| Brand Card Name Storage | ||
| Angelbird AV PRO SD V90 64GB | ||
| Sony Tough SF-G32T 32GB | ||
| Sony Tough SF-G64T 64GB | ||
| Sony Tough SF-G128T 128GB | ||
| Toshiba Exceria Pro UHS-II 270MB/s SDXC 64GB | ||
| Toshiba Exceria Pro UHS-II 270MB/s SDXC 128GB | ||
| Toshiba Exceria Pro UHS-II N502 SDXC 128GB |
The following SD cards are recommended for recording 4K DCI ProRes HQ up to 60 fps on Pocket Cinema Camera 6K.
| Brand Card Name Storage | ||
| Angelbird AV PRO SD V90 64GB | ||
| Delkin Devices Power SDXC USH-II 64GB | ||
| Delkin Devices Prime SDXC USH-II 128GB | ||
| ProGrade Digital V90 UHS-II 250MB/s SDXC 128GB | ||
| ProGrade Digital V90 UHS-II 250MB/s SDXC 256GB | ||
| Sony Tough SF-G32T 32GB | ||
| Sony Tough SF-G64T 64GB | ||
| Sony Tough SF-G128T 128GB | ||
| Wise | SD2-64U3 SDXC UHS-II | 64GB |
| Wise | SD2-128U3 SDXC UHS-II | 128GB |
| Toshlba Exceria Pro UHS-II N502 SDXC 128GB |
The following SD cards are recommended for recording 1080 ProRes 422 HQ up to 120 fps on Pocket Cinema Camera 6K.
| Brand Card Name Storage | ||
| Angelbird AV PRO SD V90 64GB | ||
| Delkin Devices Power SDXC USH-II 64GB | ||
| Delkin Devices Prime SDXC USH-II 128GB | ||
| Lexar | Professional 2000x UHS-II 300MB/s SDXC | 64GB |
| Lexar | Professional 2000x UHS-II 300MB/s SDXC | 128GB |
| ProGrade Digital V90 UHS-II 250MB/s SDXC 256GB | ||
| Sony Tough SF-G32T 32GB | ||
| Sony Tough SF-G64T 64GB | ||
| Sony Tough SF-G128T 128GB | ||
| Toshiba Exceria Pro UHS-II 270MB/s SDXC 64GB | ||
| Toshiba Exceria Pro UHS-II 270MB/s SDXC 128GB | ||
| Toshiba Exceria Pro UHS-II N502 SDXC 128GB | ||
| Toshiba Exceria Pro UHS-II N502 SDXC 256GB | ||
| Wise SD2-64U3 SDXC UHS-II 64GB | ||
| Wise SD2-128U3 SDXC UHS-II 128GB |
Recommended for Pocket Cinema Camera 4K
The following SD cards are recommended for recording 4K DCI Blackmagic RAW 12:1 up to 30 fps on Pocket Cinema Camera 4K.
| Brand Card Name Storage | ||
| Angelbird AV PRO SD V90 64GB | ||
| Delkin Devices Power UHS-II SDXC 64GB | ||
| Delkin Devices Power UHS-II SDXC 128GB | ||
| Lexar | Professional 2000x UHS-II 300MB/s SDXC | 64GB |
| ProGrade Digital | V90 UHS-II 250MB/s SDXC | 256GB |
| SanDisk | Extreme Pro UHS-I 95MB/s SDXC | 512GB |
| Sony Tough SF-G64T | 64GB | |
| Sony Tough SF-G128T 128GB | ||
| Sony SF-G64 300MB/s UHS-II SDXC 64GB | ||
| Toshiba Exceria Pro UHS-II N502 SDHC | 32GB | |
| Toshiba Exceria Pro UHS-II 270MB/s SDXC 64GB | ||
| Wise SD2-64U3 SDXC UHS-II 64GB | ||
| Wise SD2-128U3 SDXC UHS-II 128GB | ||
| Wise SD2-128U3 SDXC UHS-II 128GB |
The following SD cards are recommended for recording 4K DCI ProRes HQ up to 60 fps on Pocket Cinema Camera 4K.
| Brand Card Name Storage | ||
| Wise SD2-64U3 SDXC UHS-II 64GB | ||
| Wise SD2-128U3 SDXC UHS-II 128GB | ||
| Sony Tough SF-G64T | 64GB | |
| Sony Tough SF-G128T 128GB |
The following SD cards are recommended for recording 4K DCI 4:1 RAW up to 60 fps on Pocket Cinema Camera 4K.
| Brand Card Name Storage | ||
| Sony Tough SF-G64T 64GB | ||
| Sony Tough SF-G128T 128GB | ||
| Toshiba Exceria Pro UHS-II N502 SDXC 32GB |
The following SD cards are recommended for recording 4K DCI Lossless RAW up to 24 fps on Pocket Cinema Camera 4K.
| Brand Card Name Storage | ||
| Wise SD2-64U3 SDXC UHS-II 64GB | ||
| Wise SD2-128U3 SDXC UHS-II 128GB | ||
| Toshiba Exceria Pro UHS-II N502 SDXC 32GB | ||
| Sony Tough SF-G64T 64GB | ||
| Sony Tough SF-G128T 128GB |
The following SD cards are recommended for recording 1080p Lossless RAW up to 60 fps on Pocket Cinema Camera 4K.
| Brand Card Name Storage | ||
| Wise SD2-64U3 SDXC UHS-II 64GB | ||
| Wise SD2-128U3 SDXC UHS-II 128GB | ||
| Sony Tough SF-G64T 64GB | ||
| Sony Tough SF-G128T 128GB | ||
| Toshiba Exceria Pro UHS-II N502 SDXC 32GB | ||
| Toshiba Exceria Pro UHS-II N502 SDXC 64GB | ||
| Toshiba Exceria Pro UHS-II N502 SDXC 128GB | ||
| Toshiba Exceria Pro UHS-II N502 SDXC 256GB | ||
| Sony Tough SF-G128T 128GB |
USB-C SSD
Recommended for Pocket Cinema Camera 6K
The following USB-C drives are recommended for recording 6K Blackmagic RAW 5:1 up to 50 fps on Pocket Cinema Camera 6K.
| Brand Card Name Storage | ||
| Wise PTS-1024 Portable SSD 1TB |
The following USB-C drives are recommended for recording 6K 2.4:1 Blackmagic RAW 5:1 up to 60 fps on Pocket Cinema Camera 6K.
| Brand Card Name Storage | ||
| Samsung Portable SSD T5 250GB | ||
| Samsung Portable SSD T5 2TB | ||
| Wise PTS-1024 Portable SSD 1TB |
The following USB-C drives are recommended for recording 2.8K 17:9 Blackmagic RAW 3:1 up to 120 fps on Pocket Cinema Camera 6K.
| Brand Card Name Storage | ||
| Samsung Portable SSD T5 250GB | ||
| Samsung Portable SSD T5 2TB | ||
| Wise PTS-512 Portable SSD 512GB | ||
| Wise PTS-1024 Portable SSD 1TB |
The following USB-C drives are recommended for recording 4K DCI ProRes HQ up to 60 fps on Pocket Cinema Camera 6K.
| Brand Card Name Storage | |
| Samsung Portable SSD T5 250GB | |
| Samsung Portable SSD T5 1TB | |
| Samsung Portable SSD T5 2TB | |
| SanDisk Extreme Portable SSD 1TB | |
| Wise PTS-512 Portable SSD 512GB | |
| Wise PTS-1024 Portable SSD 1TB | |
| Wise PTS-1024 Portable SSD 1TB |
The following USB-C drives are recommended for recording 1080 ProRes 422 HQ up to 120 fps on Pocket Cinema Camera 6K.
| Brand Card Name Storage | |
| Samsung Portable SSD T5 250GB | |
| Samsung Portable SSD T5 1TB | |
| Samsung Portable SSD T5 2TB | |
| SanDisk Extreme Portable SSD 1TB | |
| Wise PTS-512 Portable SSD 512GB | |
| Wise PTS-1024 Portable SSD 1TB | |
| Wise PTS-1024 Portable SSD 1TB |
Recommended for Pocket Cinema Camera 4K
The following USB-C drives are recommended for recording 4K DCI Blackmagic RAW 3:1 up to 60 fps on Pocket Cinema Camera 4K.
| Brand Card Name Storage | ||
| Angelbird SSD2GO PKT 512GB | ||
| Angelbird SSD2GO PKT 2TB | ||
| G-Technology G-DRIVE Mobile SSD | 1TB | |
| Samsung Portable SSD T5 2TB | ||
| Wise PTS-512 Portable SSD 512GB |
The following USB-C drives are recommended for recording 4K DCI ProRes HQ up to 60 fps on Pocket Cinema Camera 4K.
| Brand Card Name Storage | ||
| Angelbird SSD2GO PKT 512GB | ||
| Angelbird SSD2GO PKT 2TB | ||
| Glyph | Atom | 500GB |
| Lacie | Portable SSD 500GB | |
| Samsung Portable SSD T5 500GB | ||
| Samsung Portable SSD T5 1TB | ||
| SanDisk Extreme Portable SSD 1TB | ||
| Seagate | Fast SSD | 250GB |
| Wise PTS-256 Portable SSD | 256GB | |
| Wise PTS-512 Portable SSD 512GB | ||
| Wise PTS-1024 Portable SSD 1TB |
The following USB-C drives are recommended for recording 4K DCI Lossless RAW up to 30 fps on Pocket Cinema Camera 4K.
| Brand Card Name Storage | ||
| Angelbird SSD2GO PKT 512GB | ||
| Angelbird SSD2GO PKT 2TB | ||
| Samsung Portable SSD T5 1TB | ||
| Wise PTS-256 Portable SSD 256GB | ||
| Wise PTS-512 Portable SSD 512GB | ||
| Wise PTS-1024 Portable SSD 1TB |
The following USB-C drives are recommended for recording 4K DCI 3:1 RAW up to 60 fps on Pocket Cinema Camera 4K.
| Brand Card Name Storage | ||
| Angelbird SSD2GO PKT 512GB | ||
| Angelbird SSD2GO PKT 2TB | ||
| Samsung Portable SSD T5 500GB | ||
| Samsung Portable SSD T5 1TB | ||
| Wise PTS-256 Portable SSD 256GB | ||
| Wise PTS-512 Portable SSD 512GB | ||
| Wise PTS-1024 Portable SSD 1TB |
Developer Information
Blackmagic Bluetooth Camera Control
Blackmagic cameras with Bluetooth LE implement a variety of features and commands that allow users to control their cameras wirelessly. Developers have full access to these features for their custom applications.
The following services and characteristics describe the full range of communication options that are available to the developer.
Service: Device Information Service
UUID:180A
Characteristics
Camera Manufacturer
UUID:2A29
Read the name of the manufacturer (always "Blackmagic Design").
Camera Model
UUID:2A24
Read the name of the camera model ("Pocket Cinema Camera 6K" or "Pocket Cinema Camera 4K").
Service: Blackmagic Camera Service
UUID:291D567A-6D75-11E6-8B77-86F30CA893D3
Characteristics
Outgoing Camera Control (encrypted)
UUID:5DD3465F-1AEE-4299-8493-D2ECA2F8E1BB
Send Camera Control messages
These messages are identical to those described in the Blackmagic SDI Camera Control Protocol section below. Please read that section for a list of supported messages and required formatting information.
For an example of how packets are structured, please see the 'example protocol packets' section in this document.
Incoming Camera Control (encrypted)
UUID:B864E140-76AO-416A-BF30-5876504537D9
Request notifications for this characteristic to receive Camera Control messages from the camera.
These messages are identical to those described in the Blackmagic SDI Camera Control Protocol section below. Please read that section for a list of supported messages and required formatting information.
Timecode (encrypted)
UUID:6D8F2110-86F1-41BF-451D87E976C8
Request notifications for this characteristic to receive timecode updates.
Timecode (HH:MM:SS:mm) is represented by a 32-bit BCD number:
(eg. 09:12:53:10 = 0x09125310)
Camera Status (encrypted)
UUID:7FE8691D-95DC-4FC5-8ABD-CA74339B51B9
Request notifications for this characteristic to receive camera status updates.
The camera status is represented by flags contained in an 8-bit integer:
None = 0× 00
Camera Power On = 0x01
Connected = 0× 02
Palred = 0× 04
Versions Verified = 0× 08
Initial Payload Received = 0× 10
Camera Ready = 0× 20
Send a value of 0x00 to power a connected camera off.
Send a value of 0x01 to power a connected camera on.
Device Name
UUID:FFACOC52-C9FB-41A0-B063-CC76282EB89C
Send a device name to the camera (max. 32 characters).
The camera will display this name in the Bluetooth Setup Menu.
Protocol Version
UUID: 8F1FD018-B508-456F-8F82-3D392BEE2706
Read this value to determine the camera's supported CCU protocol version.
NOTE Encrypted characteristics can only be used once a device has successfully bonded or paired with the Blackmagic Camera. Once a connection has been established, any attempt to write to an encrypted characteristic will initiate bonding. For example, writing a 'Camera Power On' (0x01) message to the Camera Status characteristic.
Once bonding is initiated, the camera will display a 6-digit pin in the Bluetooth Setup Menu. Enter this pin on your device to establish an encrypted connection. The device will now be able to read, write and receive notifications from encrypted characteristics.
Blackmagic SDI and Bluetooth Camera Control Protocol
Version 1.4
If you are a software developer you can use the Blackmagic SDI and Bluetooth Camera Control Protocol to construct devices that integrate with our products. Here at Blackmagic Design, our approach is to open up our protocols and we eagerly look forward to seeing what you come up with!
Overview
This document describes an extensible protocol for sending a unidirectional stream of small control messages embedded in the non-active picture region of a digital video stream. The video stream containing the protocol stream may be broadcast to a number of devices. Device addressing is used to allow the sender to specify which device each message is directed to.
Assumptions
Alignment and padding constraints are explicitly described in the protocol document. Bit fields are packed from LSB first. Message groups, individual messages and command headers are defined as, and can be assumed to be, 32 bit aligned.
Blanking Encoding
A message group is encoded into a SMPTE 291M packet with DID/SDID x51/x53 in the active region of VANC line 16.
Message Grouping
Up to 32 messages may be concatenated and transmitted in one blanking packet up to a maximum of 255 bytes payload. Under most circumstances, this should allow all messages to be sent with a maximum of one frame latency.
If the transmitting device queues more bytes of message packets than can be sent in a single frame, it should use heuristics to determine which packets to prioritize and send immediately. Lower priority messages can be delayed to later frames, or dropped entirely as appropriate.
Abstract Message Packet Format
Every message packet consists of a three byte header followed by an optional variable length data block. The maximum packet size is 64 bytes.
| Destination device (uint8) | Device addresses are represented as an 8 bit unsigned integer. Individual devices are numbered 0 through 254 with the value 255 reserved to indicate a broadcast message to all devices. |
| Command length (uint8) | The command length is an 8 bit unsigned integer which specifies the length of the included command data. The length does NOT include the length of the header or any trailing padding bytes. |
| Command id (uint8) | The command id is an 8 bit unsigned integer which indicates the message type being sent. Receiving devices should ignore any commands that they do not understand. Commands 0 through 127 are reserved for commands that apply to multiple types of devices. Commands 128 through 255 are device specific. |
| Reserved (uint8) | This byte is reserved for alignment and expansion purposes. It should be set to zero. |
| Command data (uint8[]) | The command data may contain between 0 and 60 bytes of data. The format of the data section is defined by the command itself. |
| Padding (uint8[]) | Messages must be padded up to a 32 bit boundary with 0x0 bytes. Any padding bytes are NOT included in the command length. |
Receiving devices should use the destination device address and or the command identifier to determine which messages to process. The receiver should use the command length to skip irrelevant or unknown commands and should be careful to skip the implicit padding as well.
Defined Commands
Command 0 : change configuration
| Category (uint8) | The category number specifies one of up to 256 configuration categories available on the device. |
| Parameter (uint8) | The parameter number specifies one of 256 potential configuration parameters available on the device. Parameters 0 through 127 are device specific parameters. Parameters 128 though 255 are reserved for parameters that apply to multiple types of devices. |
| Data type (uint8) | The data type specifies the type of the remaining data. The packet length is used to determine the number of elements in the message. Each message must contain an integral number of data elements. |
Currently defined values are:
| 0: void / boolean | A void value is represented as a boolean array of length zero. |
| The data field is a 8 bit value with 0 meaning false and all other values meaning true. |
1: signed byte Data elements are signed bytes
2: signed 16 bit integer Data elements are signed 16 bit values
3: signed 32 bit integer Data elements are signed 32 bit values
4: signed 64 bit integer Data elements are signed 64 bit values
5: UTF-8 string Data elements represent a UTF-8 string with no terminating character.
Data types 6 through 127 are reserved.
| 128: signed 5.11 fixed point | Data elements are signed 16 bit integers representing a real number with 5 bits for the integer component and 11 bits for the fractional component. The fixed point representation is equal to the real value multiplied by 2^11. The representable range is from -16.0 to 15.9995 (15 + 2047/2048). |
Data types 129 through 255 are available for device specific purposes.
Operation types 2 through 127 are reserved.
| Operation type (uint8) | The operation type specifies what action to perform on the specified parameter. Currently defined values are: |
| 0: assign value | The supplied values are assigned to the specified parameter. Each element will be clamped according to its valid range. A void parameter may only be 'assigned' an empty list of boolean type. This operation will trigger the action associated with that parameter. A boolean value may be assigned the value zero for false, and any other value for true. |
| 1: offset / toggle value | Each value specifies signed offsets of the same type to be added to the current parameter values. The resulting parameter value will be clamped according to their valid range. It is not valid to apply an offset to a void value. Applying any offset other than zero to a boolean value will invert that value. |
Operation types 128 through 255 are available for device specific purposes.
| Data (void) | The data field is 0 or more bytes as determined by the data type and number of elements. |
The category, parameter, data type and operation type partition a 24 bit operation space.
| Group | ID | Parameter | Type | Index | Minimum | Maximum | Interpretation |
| Lens | 0.0 | Focus | fixed16 | - | 0.0 | 1.0 | \( 0.0 = \text {near,}1.0 = \text {far} \) |
| 0.1 | Instantaneous autofocus | void | - | - | - | trigger instantaneous autofocus | |
| 0.2 | Aperture (f-stop) | fixed16 | - | -1.0 | 16.0 | Aperture Value (where fnumber \( = \text {sqrt(2^AV)} \)) | |
| 0.3 | Aperture (normalised) | fixed16 | - | 0.0 | 1.0 | \( 0.0 = \text {smallest,}1.0 = \text {largest} \) | |
| 0.4 | Aperture (ordinal) | int16 | - | 0 | n | Steps through available aperture values from minimum (0) to maximum (n) | |
| 0.5 | Instantaneous auto aperture | void | -- - | - | trigger instantaneous auto aperture | ||
| 0.6 | Optical image stabilisation | boolean | - | - | - | true = enabled, false = disabled | |
| 0.7 | Set absolute zoom (mm) | int16 | - | 0 | max | Move to specified focal length in mm, from minimum (0) to maximum (max) | |
| 0.8 | Set absolute zoom (normalized) | fixed16 - 0.0 | 1.0 | Move to specified focal length: \( 0.0 = \text {wide,}1.0 = \text {tele} \) | |||
| 0.9 | Set continuous zoom (speed) | fixed16 | - | -1.0 | +1.0 | Start/stop zooming at specified rate: \( -1.0 = \text {zoom wider fast,}0.0 = \text {stop}, +1 = \text {zoom tele fast} \) | |
| Video | 1.0 Video mode int8 | [0] = frame rate -- | fps as integer(eg 24, 25, 30, 50, 60) | ||||
| [1] = M-rate -- 0 = regular, 1 = M-rate | |||||||
| [2] = dimensions | -- | 0 = NTSC, 1 = PAL, 2 = 720, 3 = 1080, 4 = 2kDCI, 5 = 2k16:9, 6 = UHD, 7 = 3k Anamorphic, 8 = 4k DCI, 9 = 4k 16:9, 10 = 4.6k 2.4:1, 11 = 4.6k | |||||
| [3] = interlaced | -- | 0 = progressive, 1 = interlaced | |||||
| [4] = Color space | -- 0 = YUV | ||||||
| 1.1 | Gain (up to Camera 4.9) | int8 | 1 | 128 | 1x, 2x, 4x, 8x, 16x, 32x, 64x, 128x gain | ||
| 1.2 | Manual White Balance | int16 | [0] = color temp | 2500 | 10000 | Color temperature in K | |
| int16 | [1] = tint | -50 | 50 | tint | |||
| 1.3 | Set auto WB | void | -- | -- | Calculate and set auto white balance | ||
| 1.4 | Restore auto WB | void | -- | -- | Use latest auto white balance setting | ||
| 1.5 | Exposure (us) | int32 | 1 | 42000 | time in us | ||
| 1.6 | Exposure (ordinal) | int16 | -- | 0 | n | Steps through available exposure values from minimum (0) to maximum (n) | |
| 1.7 | Dynamic Range Mode | int8 enum | -- | 0 | 2 | 0 = film, 1 = video, 2 = extended video | |
| 1.8 | Video sharpening level | int8 enum | -- | 0 | 3 | 0 = off, 1 = low, 2 = medium, 3 = high | |
| 1.9 | Recording format | int16 | [0] = file frame rate | -- | fps as integer(eg 24, 25, 30, 50, 60, 120) | ||
| [1] = sensor frame rate | -- | -- | fps as integer, valid when sensor-off-speed set (eg 24, 25, 30, 33, 48, 50, 60, 120), no change will be performed if this value is set to 0 | ||||
| [2] = frame width | -- in pixels | ||||||
| [3] = frame height | -- in pixels | ||||||
| [4] = flags | -- [0] = file-M-rate | ||||||
| -- | -- | [1] = sensor-M-rate, valid when sensor-off-speed-set | |||||
| -- [2] = sensor-off-speed | |||||||
| -- [3] = interlaced | |||||||
| -- [4] = windowed mode | |||||||
| 1.10 | Set auto exposure mode | int8 | -- | 0 | 4 | 0 = Manual Trigger, 1 = Iris, 2 = Shutter, 3 = Iris + Shutter, 4 = Shutter + Iris | |
| 1.11 | Shutter angle int32 | -- | 100 | 36000 | Shutter angle in degrees,multiplied by 100 | ||
| 1.12 | Shutter speed | int32 | -- | Current sensor frame rate | 5000 | Shutter speed value as a fraction of 1, so 50 for 1/50th of a second | |
| 1.13 | Gain | int8 | -- | -128 | 127 | Gain in decibel(dB) | |
| 1.14 | ISO | int32 | -- | 0 | 2147483647 | ISO value | |
| 1.15 | Display LUT | int8 | [0] = selected LUT | -- | 0 = None, 1 = Custom, 2 = film to video, 3 = film to extended video | ||
| [1] = enabled or not | -- 0 = Not enabled, 1 = Enabled | ||||||
| Audio | 2.0 | Mic level | fixed16 | - | 0.0 | 1.0 | 0.0 = minimum, 1.0 = maximum |
| 2.1 | Headphone level | fixed16 | - | 0.1 | 1.0 | 0.0 = minimum, 1.0 = maximum | |
| 2.2 | Headphone program mix | fixed16 | - | 0.1 | 1.0 | 0.0 = minimum, 1.0 = maximum | |
| 2.3 | Speaker level | fixed16 | - | 0.1 | 1.0 | 0.0 = minimum, 1.0 = maximum | |
| 2.4 | Input type | int8 | - | 0 | 3 | 0 = internal mic,1 = line level input,2 = low mic level input,3 = high mic level input | |
| 2.5 Input levels | fixed16 | [0] ch0 | 0.0 | 1.0 | 0.0 = minimum, 1.0 = maximum | ||
| [1] ch1 | 0.0 | 1.0 | 0.0 = minimum, 1.0 = maximum | ||||
| 2.6 | Phantom power | boolean | - | - | - | true = powered,false = not powered | |
| Output | 3.0 Overlay enables | uint16 bit field | -- -- | bit flags:[0] = display status,[1] = display frame guidesSome cameras don't allow separate control of frame guides and status overlays. | |||
| 3.1 | Frame guides style(Camera 3.x) | int8 | -08 | 0 = HDTV, 1 = 4:3, 2 = 2:4:1,3 = 2:39:1, 4 = 2:35:1,5 = 1:85:1, 6 = thirds | |||
| 3.2 | Frame guides opacity(Camera 3.x) | fixed16 | - | 0.1 | 1.0 | 0.0 = transparent, 1.0 = opaque | |
| 3.3 | Overlays(replaces .1 and .2 above from Cameras 4.0) | int8 | [0] = frame guides style | - | - | 0 = off, 1 = 2:4:1, 2 = 2:39:1,3 = 2:35:1, 4 = 1:85:1, 5 = 16:9,6 = 14:9, 7 = 4:3, 8 = 2:1,9 = 4:5, 10 = 1:1 | |
| [1] = frame guide opacity | 0 | 100 | 0 = transparent, 100 = opaque | ||||
| [2] = safe area percentage | 0 | 100 | percentage of full frame used by safe area guide (0 means off) | ||||
| [3] = grid style | - | - | bit flags:[0] = display thirds,[1] = display cross hairs,[2] = display center dot,[3] = display horizon | ||||
| Display | 4.0 | Brightness | fixed16 | - | 0.0 | 1.0 | 0.0 = minimum, 1.0 = maximum |
| 4.1 | Exposure and focus tools | int16 bit field | 0x1 = zebra,0x2 = focus assist,0x4 = false color | - | - | 0 = disable, 1 = enable | |
| 4.2 | Zebra level | fixed16 | - | 0.0 | 1.0 | 0.0 = minimum, 1.0 = maximum | |
| 4.3 | Peaking level | fixed16 | - | 0.0 | 1.0 | 0.0 = minimum, 1.0 = maximum | |
| 4.4 | Color bar enable | int8 | - | 0 | 30 | 0 = disable bars,1-30 = enable bars with timeout (seconds) | |
| 4.5 Focus Assist | Int8 | [0] = focus assist method | - | - | - | 0 = Peak,1 = Colored lines | |
| [1] = focus line color | - | - | - | 0 = Red,1 = Green,2 = Blue,3 = White,4 = Black | |||
| 4.6 | Program return feed enable | int8 | - | 0 | 30 | 0 = disable, 1-30 = enable with timeout (seconds) | |
| Tally | 5.0 | Tally brightness | fixed16 | - | 0.0 | 1.0 | Sets the tally front and tally rear brightness to the same level. 0.0 = minimum, 1.0 = maximum |
| 5.1 | Front tally brightness | fixed16 | - | 0.0 | 1.0 | Sets the tally front brightness. 0.0 = minimum, 1.0 = maximum | |
| 5.2 | Rear tally brightness | fixed16 | - | 0.0 | 1.0 | Sets the tally rear brightness. 0.0 = minimum, 1.0 = maximum Tally rear brightness cannot be turned off | |
| Reference | 6.0 | Source | int8 enum | - | 0 | 2 | 0 = internal, 1 = program, 2 = external |
| 6.1 | Offset | int32 | - | - | - | +/- offset in pixels | |
| Confi-guration | 7.0 | Real Time Clock | int32 | [0] time | - | - | BCD - HHMMSSFF (UCT) |
| [1] date | - | - | BCD - YYYYYMMDD | ||||
| 7.1 | System language | string | [0-1] | - | - | ISO-639-1 two character language code | |
| 7.2 | Timezone | int32 | - | - | - | Minutes offset from UTC | |
| 7.3 | Location | int64 | [0] latitude | - | - | BCD - sDDDddddddddddd where s is the sign: 0 = north (+), 1 = south (-); DD degrees, dddddddddddd decimal degrees | |
| [1] longitude | - | - | BCD - sDDDddddddddddd where s is the sign: 0 = west (-), 1 = east (+); DDD degrees, dddddddddddd decimal degrees | ||||
| Color Correction | 8.0 Lift Adjust | fixed16 | [0] red | -2.0 | 2.0 | default 0.0 | |
| [1] green | -2.0 | 2.0 | default 0.0 | ||||
| [2] blue | -2.0 | 2.0 | default 0.0 | ||||
| [3] luma | -2.0 | 2.0 | default 0.0 | ||||
| 8.1 | Gamma Adjust | fixed16 | [0] red | -4.0 | 4.0 | default 0.0 | |
| [1] green | -4.0 | 4.0 | default 0.0 | ||||
| [2] blue | -4.0 | 4.0 | default 0.0 | ||||
| [3] luma | -4.0 | 4.0 | default 0.0 | ||||
| 8.2 Gain Adjust | fixed16 | [0] red | 0.0 | 16.0 | default 1.0 | ||
| [1] green | 0.0 | 16.0 | default 1.0 | ||||
| [2] blue | 0.0 16.0 | default 1.0 | |||||
| [3] luma | 0.0 | 16.0 | default 1.0 | ||||
| 8.3 Offset Adjust | fixed16 | [0] red | -8.0 | 8.0 | default 0.0 | ||
| [1] green | -8.0 | 8.0 | default 0.0 | ||||
| [2] blue | -8.0 | 8.0 default 0.0 | |||||
| [3] luma | -8.0 | 8.0 | default 0.0 | ||||
| 8.4 Contrast Adjust | fixed16 | [0] pivot | 0.0 | 1.0 | default 0.5 | ||
| [1] adj | 0.0 2.0 default 1.0 | ||||||
| 8.5 Luma mix | fixed16 | - | 0.0 | 1.0 | default 1.0 | ||
| 8.6 Color Adjust | fixed16 | [0] hue | -1.0 | 1.0 | default 0.0 | ||
| [1] sat | 0.0 2.0 default 1.0 | ||||||
| 8.7 Correction Reset Default | void | - | - | - | reset to defaults | ||
| Media | 10.0 | Codec int8 enum | [0] = basic codec -- | 0 = CinemaDNG, 1 = DNxHD, 2 = ProRes, 3 = Blackmagic RAW | |||
| [1] = code variant | - | - | CinemaDNG: 0 = uncompressed, 1 = lossy 3:1, 2 = lossy 4:1 | ||||
| - | - | ProRes: 0 = HQ, 1 = 422, 2 = LT, 3 = Proxy, 4 = 444, 5 = 444XQ | |||||
| - | - | Blackmagic RAW: 0 = Q0, 1 = Q5, 2 = 3:1, 3 = 5:1, 4 = 8:1, 5 = 12:1 | |||||
| 10.1 | Transport mode int8 | [0] = mode | -- | 0 = Preview, 1 = Play, 2 = Record | |||
| [1] = speed | -- | -ve = multiple speeds backwards, 0 = pause, +ve = multiple speeds forwards | |||||
| [2] = flags | -- | 1<<0 = loop, 1<<1 = play all, 1<<5 = disk1 active, 1<<6 = disk2 active, 1<<7 = time-lapse recording | |||||
| [3] = slot 1 storage medium | - | - | 0 = CFast card, 1 = SD, 2 = SSD Recorder | ||||
| [4] = slot 2 storage medium | - | - | 0 = CFast card, 1 = SD, 2 = SSD Recorder | ||||
| 10.2 | Playback Control | int8 enum | [0] = clip | - | - | 0 = Previous, 1 = Next | |
| PTZ Control | 11.0 | Pan/Tilt Velocity | fixed 16 | [0] = pan velocity | -1.0 | 1.0 | -1.0 = full speed left, 1.0 = full speed right |
| [1] = tilt velocity | -1.0 | 1.0 | -1.0 = full speed down, 1.0 = full speed up | ||||
| 11.1 | Memory Preset | int8 enum | [0] = preset command | - | - | 0 = reset, 1 = store location, 2 = recall location | |
| int8 | [1] = preset slot | 0.5 - | |||||
Example Protocol Packets
| Operation | Packet Length Byte | ||||||||||||||||
| 0 | 1 | 2 | 3 | 4 | 5 | 6 | 7 | 8 | 9 | 10 | 11 | 12 | 13 | 14 | 15 | ||
| header command data | |||||||||||||||||
| destination | length | command | reserved | category | parameter | type | operation | ||||||||||
| trigger instantaneous auto focus on camera 4 | 844000100 | ||||||||||||||||
| turn on OIS on all cameras 12 255 5 0 0 0 6 | 001000 | ||||||||||||||||
| set exposure to 10 ms on camera 4 (10 ms = 10000 us = 0x00002710) | 12 | 4 | 8 | 0 | 0 | 1 | 5 | 3 | 0 | 0x10 | 0x27 | 0x00 | 0x00 | ||||
| add 15% to zebra level (15 % = 0.15 f = 0x0133 fp) | 12 | 4 | 6 | 0 | 0 | 4 | 2 | 128 | 1 | 0x33 | 0x01 | 0 | 0 | ||||
| select 1080p 23.98 mode on all cameras | 16 | 255 | 9 | 0 | 0 | 1 | 0 | 1 | 0 | 24 | 1 | 3 | 0 | 0 | 0 | 0 | 0 |
| subtract 0.3 from gamma adjust for green & blue (-0.3~=0xff9a fp) | 16 | 4 | 12 | 0 | 0 | 8 | 1 | 128 | 1 | 0 | 0 | 0x9a | 0xffd | 0x9a | 0xffd | 0 | 0 |
| all operations combined | 76 | 440001002555000600 | |||||||||||||||
| 1 | 0 | 0 | 0 | 4 | 8 | 0 | 0 | 1 | 5 | 3 | 0 | 0x10 | 0x27 | 0x00 | 0x00 | ||
| 4 | 6 | 0 | 0 | 4 | 2 | 128 | 1 | 0x33 | 0x01 | 0 | 0 | 255 | 9 | 0 | 0 | ||
| 1 | 0 | 1 | 0 | 24 | 1 | 3 | 0 | 0 | 0 | 0 | 0 | 4 | 12 | 0 | 0 | ||
| 8 | 1 | 128 | 1 | 0 | 0 | 0x9a | 0xffd | 0x9a | 0xffd | 0 | 0 | ||||||
Help
The fastest way to obtain help is to go to the Blackmagic Design online support pages and check the latest support material available for your camera.
Blackmagic Design Online Support Pages
The latest manual, software and support notes can be found at the Blackmagic Design support center at www.blackmagicdesign.com/support.
Contacting Blackmagic Design Support
If you can't find the help you need in our support material, please use the 'Send us an email' button on the support page to email a support request. Alternatively, click on the 'Find your local support team' button on the support page and call your nearest Blackmagic Design support office.
Checking the Software Version Currently Installed
To check which version of Blackmagic Camera Setup utility software is installed on your computer, open the About Blackmagic Camera Setup utility window.
- On Mac, open Blackmagic Camera Setup utility from the Applications folder. Select About Blackmagic Camera Setup utility from the application menu to reveal the version number.
- On Windows, open Blackmagic Camera Setup utility from your Start menu or Start Screen. Click on the Help menu and select About Blackmagic Camera Setup utility to reveal the version number.
How to Get the Latest Software Updates
After checking the version of Blackmagic Camera Utility software installed on your computer, please visit the Blackmagic Design support center at www.blackmagicdesign.com/support to check for the latest updates. While it is usually a good idea to run the latest updates, it is wise to avoid updating any software if you are in the middle of an important project.
Regulatory Notices

Disposal of Waste of Electrical and Electronic Equipment Within the European Union.
The symbol on the product indicates that this equipment must not be disposed of with other waste materials. In order to dispose of your waste equipment, it must be handed over to a designated collection point for recycling. The separate collection and recycling of your waste equipment at the time of disposal will help conserve natural resources and ensure that it is recycled in a manner that protects human health and the environment. For more information about where you can drop off your waste equipment for recycling, please contact your local city recycling office or the dealer from whom you purchased the product.

This equipment has been tested and found to comply with the limits for a Class A digital device, pursuant to Part 15 of the FCC rules. These limits are designed to provide reasonable protection against harmful interference when the equipment is operated in a commercial environment. This equipment generates, uses, and can radiate radio frequency energy and, if not installed and used in accordance with the instructions, may cause harmful interference to radio communications. Operation of this product in a residential area is likely to cause harmful interference, in which case the user will be required to correct the interference at personal expense.
Operation is subject to the following two conditions:
1 This device may not cause harmful interference.
2 This device must accept any interference received, including interference that may cause undesired operation.

R-R-BMD-201810001
R-R-BMD-201905001
R-R-BMD-201904002

ISED Canada Statement
This device complies with Canadian standards for Class A digital apparatus.
Any modifications or use of this product outside its intended use could void compliance to these standards.
Connection to HDMI interfaces must be made with high quality shielded HDMI cables.
This equipment has been tested for compliance with the intended use in a commercial environment. If the equipment is used in a domestic environment, it may cause radio interference.
Bluetooth
The product is a Bluetooth wireless technology enabled product.
Contains transmitter module FCC ID: QOQBGM113
This equipment complies with FCC radiation exposure limits set forth for an uncontrolled environment.
Contains transmitter module IC: 5123A-BGM113
This device complies with Industry Canada's license-exempt RSS standards and exception from routine SAR evaluation limits given in RSS-102 Issue 5.
Certified for Japan, certificate number: 209-J00204. This equipment contains specified radio equipment that has been certified to the technical regulation conformity certification under the radio law.
This module has certification in South Korea, KC certification number: MSIP-CRM-BGT-BGM113
Hereby, Blackmagic Design declares that the product is using wideband transmission systems in 2.4 GHz ISM band is in compliance with directive 2014/53/EU.
The full text of the EU declaration of conformity is available from compliance@blackmagicdesign.com

Certified for South Africa by ICASA, approval number TA-2019/1517 for Pocket Camera 6K and TA-2019/1516 for Pocket Camera 4K.

Certified for Mexico (NOM), for Bluetooth module manufactured by Silicon Labs, model number BGM113.
Safety Information
Blackmagic Pocket Cinema Camera is suitable for use in tropical locations with an ambient temperature of up to 40^ .
No operator serviceable parts inside product. Refer servicing to your local Blackmagic Design service center.
During sunny conditions, consider shading of the camera to prevent exposure of the camera or lithium battery to extended periods of sunlight. Keep lithium batteries away from all sources of heat.

When using the supplied power adapter, use only at altitudes not more than 2000m above sea level.
State of California statement
This product can expose you to chemicals such as trace amounts of polybrominated biphenyls within plastic parts, which is known to the state of California to cause cancer and birth defects or other reproductive harm.
For more information go to www.P65Warnings.ca.gov.
Warranty
Limited Warranty
Blackmagic Design warrants that this product will be free from defects in materials and workmanship for a period of 12 months from the date of purchase. If a product proves to be defective during this warranty period, Blackmagic Design, at its option, either will repair the defective product without charge for parts and labor, or will provide a replacement in exchange for the defective product.
In order to obtain service under this warranty, you the Customer, must notify Blackmagic Design of the defect before the expiration of the warranty period and make suitable arrangements for the performance of service. The Customer shall be responsible for packaging and shipping the defective product to a designated service center nominated by Blackmagic Design, with shipping charges pre paid. Customer shall be responsible for paying all shipping charges, insurance, duties, taxes, and any other charges for products returned to us for any reason.
This warranty shall not apply to any defect, failure or damage caused by improper use or improper or inadequate maintenance and care. Blackmagic Design shall not be obliged under this warranty: a) to repair damage resulting from attempts by personnel other than Blackmagic Design representatives to install, repair or service the product, b) to repair damage resulting from improper use or connection to incompatible equipment, c) to repair any damage or malfunction caused by the use of non Blackmagic Design parts or supplies, or d) to service a product that has been modified or integrated with other products when the effect of such a modification or integration increases the time or difficulty of servicing the product.
THIS WARRANTY IS GIVEN BY BLACKMAGIC DESIGN IN LIEU OF ANY OTHER WARRANTYES, EXPRESS OR IMPLIED. BLACKMAGIC DESIGN AND ITS VENDORS DISCLAIM ANY IMPLIED WARRANTYES OF MERCHANTABILITY OR FITNESS FOR A PARTICULAR PURPOSE. BLACKMAGIC DESIGN'S RESPONSIBILITY TO REPAIR OR REPLACE DEFECTIVE PRODUCTS DURING THE WARRANTY PERIOD IS THE WHOLE AND EXCLUSIVE REMEDY PROVIDED TO THE CUSTOMER. BLACKMAGIC DESIGN WILL NOT BE LIABLE FOR ANY INDIRECT, SPECIAL, INCIDENTAL OR CONSEQUENTIAL DAMAGES IRRESPECTIVE OF WHETHER BLACKMAGIC DESIGN OR THE VENDOR HAS ADVANCE NOTICE OF THE POSSIBILITY OF SUCH DAMAGES. BLACKMAGIC DESIGN IS NOT LIABLE FOR ANY ILLEGAL USE OF EQUIPMENT BY CUSTOMER. BLACKMAGIC IS NOT LIABLE FOR ANY DAMAGES RESULTING FROM USE OF THIS PRODUCT. USER OPERATES THIS PRODUCT AT OWN RISK.
Copyright 2020 Blackmagic Design. All rights reserved. 'Blackmagic Design', 'URSA', 'DeckLink', 'HDLink', 'Workgroup Videohub', 'Multibridge Pro', 'Multibridge Extreme', 'Intensity' and 'Leading the creative video revolution' are registered trademarks in the US and other countries. All other company and product names may be trademarks of the respective companies with which they are associated.
The Bluetooth word, mark and logos are registered trademarks owned by Bluetooth SIG, Inc. and any use of such marks by Blackmagic Design is under license. Other trademarks and trade names are those of the respective owners.

インズトーリル/才レーニング マニュアル
Blackmagic Pocket Cinema Camera
Blackmagic Pocket Cinema Camera 6K
Blackmagic Pocket Cinema Camera 4K
2020年3月
日本語

求之数
This is a collection of Blackmagic Pocket Cinema Camera.
才日nalのBlackmagic Pocket Cinema Cameraは、2013年にリーナスさし了。ハイデイマツ克莱ンジ革新な画質対応し、とても持右運が可能な小型力メラの開発は、非常に工キサイテインが了。多数のフィートルクをんだき、4Kバーグフムの要望を多い了てか、Pocket Cinema Camera 4Kを開発し、その後、ス一八一35mmSENSA-和EFLSMAWNTを搭載したBlackmagic Pocket Cinema Camera 6Kを発表し了。
Blackmagic Pocket Cinema Camera 4Kは、才リジナルのPocket Cinema Cameraと同じMFT(マイケロシャーダス)レ��マウCNTを搭載いたします。お手持ちのMFTLENSを使用くださいます。4Kで60fpsまえ、HDで120fpsまえのFLREUMLEトでCFastまえはUHS-II SD力一ドに収録いたします。Blackmagic Pocket Cinema Camera 6Kはさら性能がアツPLE、2.8Kで120fpsまえ、6Kで60fpsまえのFLREUMLEトに対応りますUSB-Cロトを搭載いたします。外付けドライフへの収録也可能ます。外付けドライフを力メラから外てCONPBUHUNER一に接続する、瞬時にFRALILをOneFLO一に使用くださいます。
Blackmagic Pocket Cinema CameraをATEM Miniスイチヤーに接続する、バフルなCCU機能も使用いたします。,thisはり、力メラのカーナス、シャット一、アリス、カーパーと直接ATEM Software Controlの力メラご一から調整いたします。
Blackmagic Pocket Cinema Cameraの筐体は、非常に耐久性に優れ、輕量なたえ、あらゆる場所に携帯いたします。も、Blackmagic RAWコーダックにも対応いたします。同コーダックは、单一のフィルでRAWを拔eeper柔軟性のは、さらにフィアルサイズが大小い的たフローマスが大幅に向上いたします。
Pocket Cinema Camera 一的皆樣的影作品。

Blackmagic Design CEO
glarnt-
目次
の力メラをお使てすか? 164
はしもに 165
165
力×lの電源を入る 166
Blackmagic Pocket Camera
Battery Grip使用的 166
同梟の電源ケーリルカ力メラに電源供給 168
StLJ6 169
CFast力一卜 169
SD力一卜 170
USB-CflansDeIcK 172
摄影用にMEXIAを準備する
Blackmagic Pocket Cinema
Camera 云 己 为準備
Mac 云 己 乃 为準備
Windows®MADAS為準備
叢錄
克利的 取錄
Blackmagic RAW
Blackmagic RAW收錄 180
最大せん�アレムレト 182
收錄時間 184
再生
力×兰の 機能
力×弓正面
右侧面
左側面
卜PP八N儿
力×下底面
力×面料
tartskrler-·cnt口一儿
設定
dssnbo
収錄設定 (RECORD)
FFALIL名 定義
王二夕一設定(MONITOR) 223
才一才設定(AUDIO)
設定(SETUP)
PRESETS
3D LUT
X夕一夕入力
246
力×米の比才出力 251
DaVinci Resolveの使用 252
252
力トを使用た編集 253
256
夕lmaIINdKlppbE編集説 257
夕卜ルの追加 257
Blackmagic RAWFlaIILの使用 258
力拉一凹一地克利的力拉一
Lejection 行用 261
Power Window左追加 264
266
才一 德才の米クス 267
Fusion一 271
編集のマス总冠军 280
280
178 テリバ— 281
ATEMMini力MxLont口一 282
DaVinci Resolve プライマリカ
一LRE 286
sada-1eTefufofua的使用 289
CFast 2.0/SDカードドからのフィイ
ルズの作業 289
190 USB-CFRAFFSDAE5KJ4D 289
190 Final Cut Pro X在售元 398
AridiMediaGomperco2018年值元 369
Avid MediaComposer2018を使う 290
AdobePremiereProCC使 291
193 Blackmagic Camera Setup Utility 292
194 推奨収錄×デイア 293
CFast 2.0力一卜 293
SD力一卜 299
USB-C SSD 303
Developer Information 306
Blackmagic Bluetooth Camera Control 306
Blackmagic SDI and Bluetooth
Camera Control Protocol 308
Example Protocol Packets 315
ルライIN 316
規制に問題の警告 317
安全情報 318
246 保証 319
Which is the best way to use this book?
Blackmagic Pocket Cinema Camera 6KとBlackmagic Pocket Cinema Camera 4Kは、外見は大変よく似ていま�。どらも驚異的なフィドダイマクレングのイメージが得らし、筐体も同じて。トローリルボタンとフトウアメニーの配置は全く同じて、力メラ的操作方法も基本的是同じて。
Blackmagic Pocket Cinema Camera 6Kは、スーパー35mmルンマウトを搭載いたします。レ��マウトの上に「6K」のマーケが付いりますBlackmagic Pocket Cinema Camera 4Kは、MFTサイズのル�ヤーとMFLINZMAWNTを搭載いたします。

Blackmagic Pocket Cinema Camera 6K
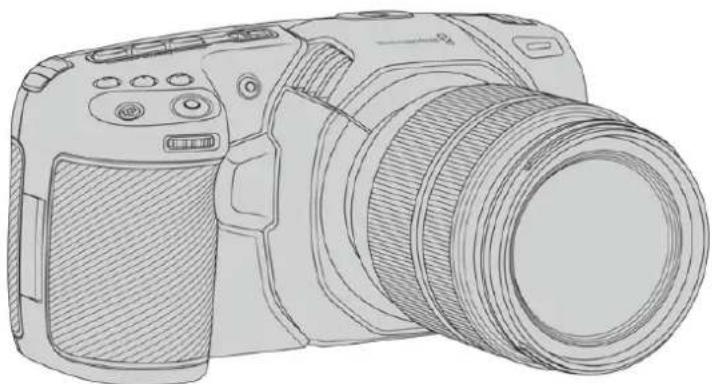
Blackmagic Pocket Cinema Camera 4K
はしだに
Blackmagic Pocket Cinema Cameraは、小型で可搬性に優たデジルシーマカマラで、高品質イメジをCFast 2.0およUHS-I/UHS-II SDカ一、あるはUSB-Cロト経由てSSDに収録くださいます。Pocket Cinema Cameraは、Blackmagic RAWやProRes等诸多、ボスリフロダクIJ用に設計くださったプロ仕様One-デックでケリツを収録いたします。
Blackmagic Pocket Cinema Cameraは、LENSをマウCNTし、電源を入るだけに使用くださいます。
レンズの取り付け
Blackmagic Pocket Cinema Camera 6KはEFLINS、Blackmagic Pocket Cinema Camera 4Kは、マイクロシャーダスMFT)レNsを使用いたします。どらも非常に人気のは低価格レNsで、多くの選扱才予広がり)=(。Blackmagic Pocket Cinema Camera 6KとPocket Cinema Camera 4KごのレNsの取付付けは同じです。どらも最初に保護用のダストヤツを取り外)=(。保護用のダストヤツを外)=(、ロックボtons押しおら、反時計回りに回)=(。
EF/MFTマウntonLENSを取り付けむ:
1 LENS上のドット(点)と力メラのマウnt部分のドットを合わせます。多くのLENSには、青、赤、白のドットか、その他の目印がしだいは。
2 力MamaunbIlemnzMawnto截也、LnZ为适切位置以取m止时计回回
3 LENSを外す時は、ロックボーニを押しぎがLENSを反時計回りに回ります。MFTLENSはドットが10時の位置、EFLENSはドットが12時の位置にるまえ回し、LENSをマウCNTからゆcko外ります。


MFTLENSZasBlackmagicPocketCinemaCamera4Kに取付けた
×王 LINSを装着ていな時は、ル一を覆らガラスのフルタ一がご米や埃にさ与さてい。常に杜卜卡力を付て保護る状にしてくさ。
力×拉の電源を入る
LENSを装着んだ、力メラの電源供給いたします。Blackmagic Pocket Cinema Cameraは、力メラに揮入したLP-E6バツデリ、たはBlackmagic Pocket Camera Battery Gripの2個のNP-F570バツデリ一から給電のは、たも電源カ力同柄の電源アダフロー接続て電源供給いたします。
力メラにバットリ一を挃入て電源を入る
Blackmagic Pocket Cinema Cameraは、取り外し可能な標準のLP-E6ケイフのバッチ一を使用いたします。カメラに個のバチリ一が同棚さていりますが、追加バチリ一が必要な场合は、 Blackmagic Design版売店たはビデ才/写真機材の専門店で購入くださいます。
1力×拉の底面にる力バーリリスを押てハロテリ一力ハ一開きま。
2 LP-E6BTL一の接統部をBTL一插入口に向は、口クフの下の定位置にか和取ま
作業の口ルバツテリ一を取出はに、ロクタフを力メの正面側向て押しま。
3 ロル一力一を閉、力和音を求てはつ押し。
4力M上部の電源SHT子N」の位置にると力M如才不にら。スHT子「OFF」の位置にると力M如才不にら。
Blackmagic Pocket Camera Battery Gripを使用する
Blackmagic Pocket Camera Battery Gripをお持ちの场合は、その時点でカメラに取付けるとをお勤しります。Blackmagic Pocket Camera Battery Gripは、Blackmagic Pocket Cinema Camera 6K和Pocket Cinema Camera 4Kにフィットするように設計いたします。
Battery Gripを取り付たとて、側面にハンドルが追加さし、2個のNP-F570 LShR-のバツテリ一使用くださいますようお願いいたします。2時間以上にわて继续の効振影が可能です。12V DC入力は、BatteryGripのバツテリ一を充電くださり、充電しおらカメラに继续の電源を供給いたします。カメラの電源が切得很好かは、USB-CローツでBattery Gripのバツテリ一を充電いたします。
Blackmagic Pocket Camera Battery Gripを取り付む:
Blackmagic Pocket Camera Battery Gripを取り付けます前に、Pocket Cinema Cameraの電源を切り、外部電源の接続を外しいたします。
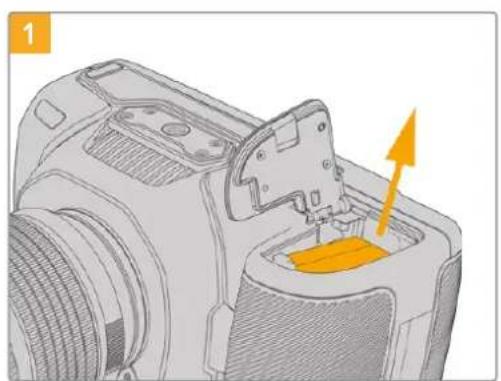
仄夕一取納部を開は、LP-E6仄夕一を取り出しま�。
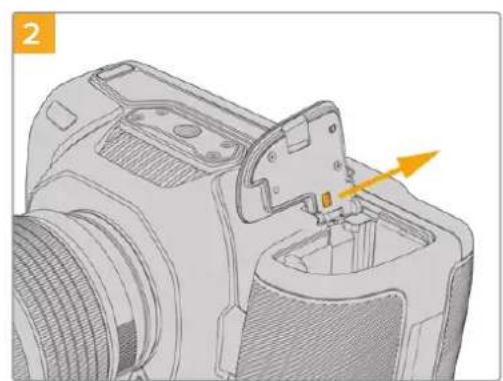
力八一の匕ン近に有的夕をスらドし、力メラか力八一を取り外しります。
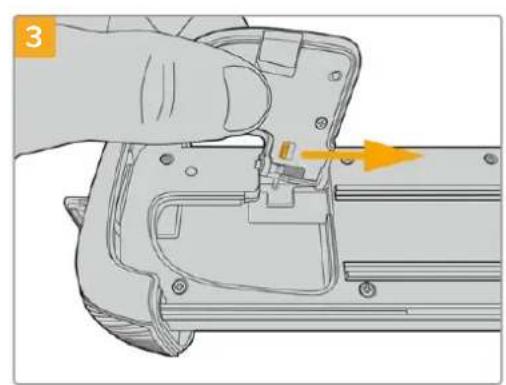
力八一の紛失を避たた、BatteryGripのトレイ底面のくはみに力八一を取り付款ます。
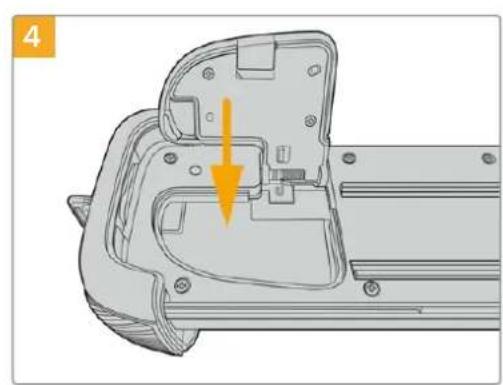
力八一を閉じると、トレイの底面がら突出すると之称く、きらんと叐まります。
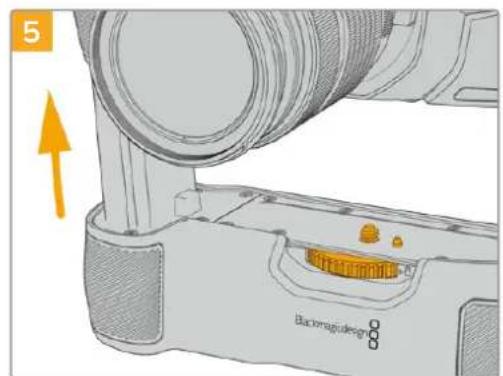
Battery Gripのバッチリ一の形をた部分を力メラのバチリ一収納部に插入しま。Battery Grip上部の1/4インチネジを、力メラ底面0/4-20マウトロボイトの位置に合わせま。1/4インチネジの横に有的大小はなをが適切な位置を維持るに役立らま。

1/4个不手新前面的不右回了不加和留、力电BateryGrip同定。
Blackmagic Pocket Camera Battery Gripにバッテリ一を挃入する:
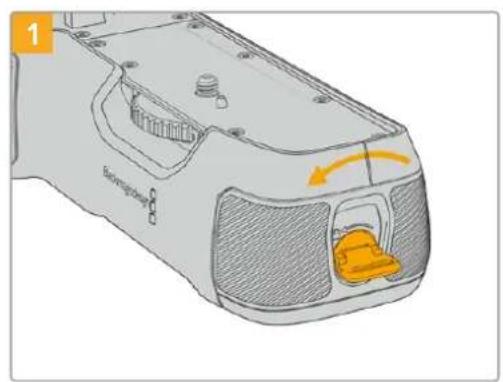
Battery Gripの側面にあたロクタフを反時計回に回て、バッテリーツレイのロックを解除いたします。バツテリーツレイをスライドて取り外.Please。その作業は、Blackmagic Pocket Battery Gripを力メラに取り付けむ前後間わす実行くださいます。
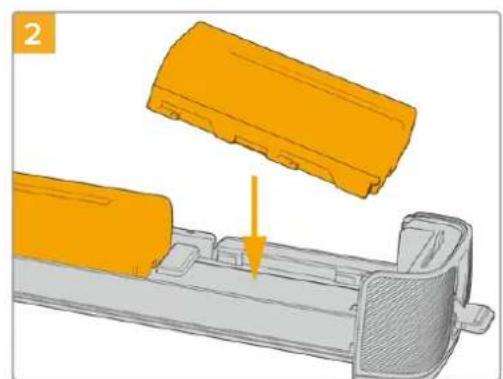
BAPTETI一LREY2个NP-F570BAPTETI一入。
。
次,BAPTETI一外方向上拉下也。中
定。
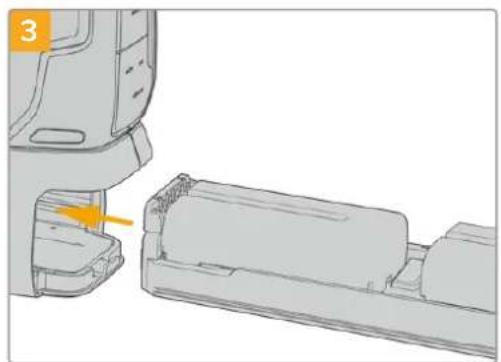
バットリーツレイをBattery Gripにスライドて揮入、ロックタフを時計回に回ります。DC電源入力に外部電源ノスを接続て、力メラに給電てる場合、バットリ一を充電しおか力メラ以振影を統はら
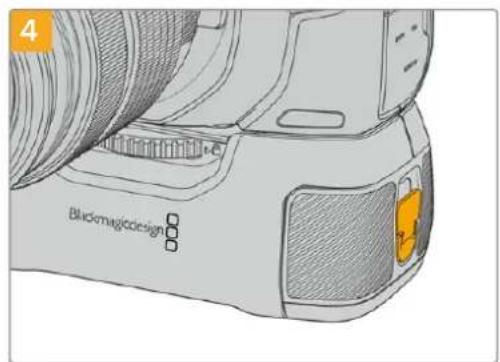
Battery Gripの側面にるロクタフを時計回りに回て、バチーツーリeuをロックしります。
作業のこつ Blackmagic Pocket Camera Battery Gripを取り付け、2個のバッチ一を挃入てい的场合、LCDタチスケリーナの右上のバッチ一残量インジローは、2つのバチリ一アイコンを表示するた。、その充電レルを個別に確認いたします。詳細は「電源」せクjohnを参照くださいます。
同橈の電源ケーリルカ力メラに電源供給
同棚の100~240V AC プラガバックは、カメラに給電のは、LP-E6バテリ一まは(Blackmagic Pocket Camera Battery Gripを取り付ける場合)2個のNP-F570バテリ一を充電いたします。DC電源コncyタはカメラにしつ固定くださいますか、誤った外甥はごはらせん。
外部電源 接繞:
1 AC-12V DCアダプーアムを主電源ケットに接続いたします。
2力×の左側面のごム製力ハ一を開き、ロク式のDC電源コネケー一回て、12VDC電源入力の上部のくは合わせま。力和音がるまでコネケ一をはつり押しま。
3 ニネケタ一を外には、ロネケタ一からシ一スを引き離し、ロネケタ一を入力か与拔きま。
外部電源とバツテリ一電源に接続してる場合、外部電源のみが使用いたします。充電くださたバツテリ一が接続いたします時に外部電源を外た場合、力メラは動作を中断するごとく、バツテリ一電源に切り替ります。
力メラのLP-E6バツテリは、力メラの電源が切てい場合、USB經由で充電を求。力メラ使用てい等時にボーナルのバフーバンを使て充電くださいます。Blackmagic Pocket Cinema Cameraは、標準の10W USBウオルチヤーで充電は、USB-Power Delivery(USB PD)対応の充電器も使用くださいますUSB PD対応の充電器は、一般的にUSB-Cコncyタ一搭載し、20Vまご出力くださいますた、や短時間の充電か可能です。12V DC電源入力でLP-E6バツテリ一を充電する场合、力メラは才不も才不も充電可能です。
作業のこつ使用直後熱くてい的ル一を充電する场合、ル一が45度以下にるま、充電速度は遲なま。充電前15分ほ置ルル一を冷まさと推奨しま。
あはストレーニジ×デイアを捜むするだけに、撮影の準備は完了です!
スレーダジ×デイア
Blackmagic Pocket Cinema Cameraは、ビデ人才培养標準のSDカード、高速のUHS-IIカード、CFast 2.0カードを使用いたします。
た、USB-C拓張木一卜に大容量のUSB-CFLASSUSを接続て、収錄時間を延長するとも
CFast力一卜
CFast 2.0力一端非非常与高速の一夕軀送が可能な、高フレムレトの6K、4K、HD比德才の収録に最適です。各フレーマットの収録可能な最大フレムレトの詳細は、「収録」セクIJONの「収録時間一見」を参照てくさい。
全般的CFast 2.0力一は高速力一ドです。書き迅速度が読み迅度と比て遙いのもあ、最大一夕軽送速度はモルによて異なりま。希望するフレーマレト信賴性の高い取錄を行うは、Blackmagic Designが推奨る力一ド使用てくだい。
CFast力一卜 车中入 1
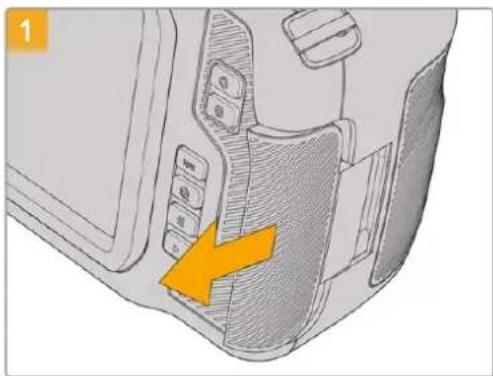
XeAssloHcKAssurh=、力XaR右侧的D 4 而背面向加TStAsd

下アにはスフリングが付いるの、固定が解除さしをと開きま。こかGFastおはSD×モリ一力一ドのロットにアクせをきま。
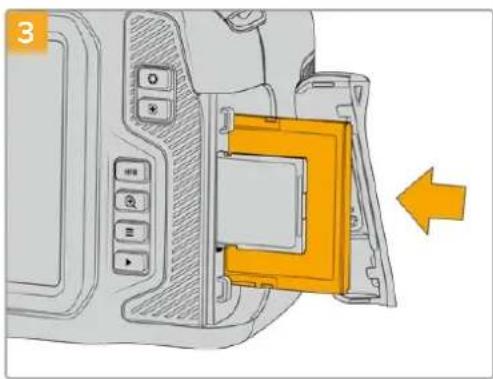
CFast力一図固定をるまご、力一図をCFastスロトに差し迅みます。力一図は、過度に力を入る必要なく简单に挃入かきるはすさCFast力一図を取出はに、CFast力一図をゆくり押て離とイドク卜されま。
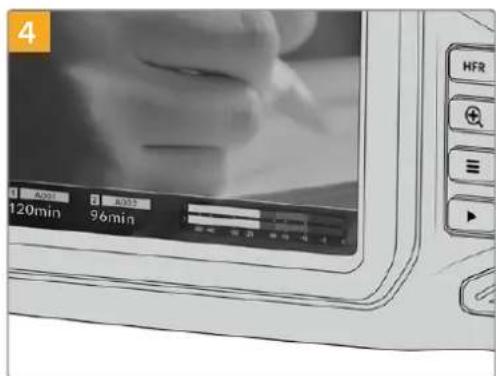
LCDタチスクリーニ底部のストレーニジ情報に、検出たCFastカートの名前と綠画可能時間が表示いたします。
SD力一の撃入方法は、CFast力一の撃入方法と似ていま�。詳細は「SD力一を撃入する」を参照

CFast 2.0力一卜の選択
CFast力一卜は説み迅み/書き迅み速度が異た、高一夕レ一ト比才を投か際は使用るCFast 2.0力一卜を慎重に選てとが非常に重要です。
Pocket Cinema Cameraの撮影を対象にして、Blackmagic Designにりデストのは推奨CFast 2.0力一ドのリスは、「推奨叩錄×デア」せクjohnを参照てくだき。
Blackmagic Pocket Cinema Cameraの対応CFast力一に開る最新情報は、Blackmagic Design☆トルを参照てくさ。www.blackmagicdesign.com/jp/support
SD力一D
CFast 2.0に加、高速UHS-I/UHS-IIタイフのSDカトに収録可能です。HDの圧締ドテオフローは収録する場合、優低価格のスリーニジメデアお願いUHS-I SDカトを使用くださいます。UHS-I優高速のUHS-IIカトは、Blackmagic RAWおよUltra HDCONテルのProRes収録が可能です。
SD力一使使用、HD压缩口才一卡卜摄影的场合、低价格のStreX代
SDXCおよ及SDHCは、民生用のスル/ビデカ力メラ用の非常に一般的なメテアスレーニフローマトです。こまてにDSLRで撮影付け、あるはBlackmagic Micro Cinema Camera、Pocket Cinema Camera、Blackmagic Video Assistを使用たがは、すてに互換性のはのSDカ一ドを持てい
高解像度のフィルを必要とないプロジク卜、あたは長時間収録が必須な场合はSD力一トを使用すると経費を抑えらむ。低容量で低速のSD力一トは、LUTおよんだリセットの保存やローツにも使用くださいます。
SD力一卜を挃入する

XDEIAS口卜中克S土的有、力M左侧の卜A为背面向加T斯T下士。

下アにはスリングが付いるの、固定が解除さし或と開きま�。乙から×デアロットにアケせてきま�。
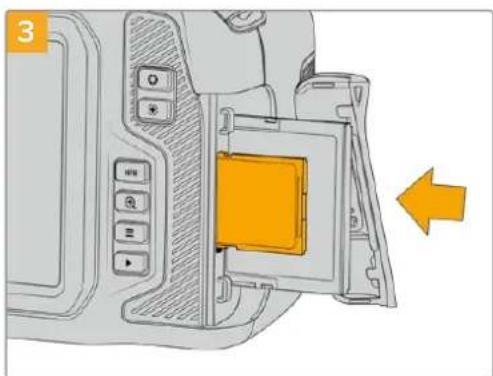
SD力一のラル面をタチスリーニに向てSD力一ドロットの所定の位置まて捅入ります。力一は、過度に力を入る必須な简单に捅入くださいますようお願いいたします。

LCD夕th斯克一元底部のスリーニ情報に、検出さたSD力一の名前と画可能時間が表示さは。
SD力一卜取出には、SD力一卜をゆくり押て離すとイエク卜されま。
SD力一卜の選 抬
6K、4K DCI、Ultra HDを収録する场合は、最高速のUHS-IIタイフのSDカードを使用するとをお勸むしります。6K、4K DCI、Ultra HD、HD収録には高速UHS-II力一ドを、HD収録にはUHS-I力一ドを使用ると重要です。こらの力一ドは高速デーア転送速度に对应いたします、大容量スレーニジをサボーツします。一般的には、高速のはんだはようお願いいたします。
SD力一は、使用前にHFS+あるはexFATにフア一マトする必要のはま。力メレの「Stレ」(Storage)」設定で簡單にMテアをフア一マトてきま。Stレ一設定に開る詳細は、「設定」せクhonを参照てくだ。
。MacあるはWindowsコンリーダーを使てカ一ドをフアマトするとも可能です。×デイアをMacで使用する場合、Macのデス克フアマト的优点HFS+を使用くださいます。HFS+は「OSXExtended」とても知らてります。
Pocket Cinema Cameraの撮影対象と、Blackmagic Designに用のストが推奨SD力一のリスは、「推奨収錄×デア」さクンを参照てくさ。
Blackmagic Pocket Cinema Cameraの対応SDカードに開る最新情報は、Blackmagic Designサイドーツンターテを参照くださいます。www.blackmagicdesign.com/jp/support
X高解像度、高FLREUMLEトの収錄は、CFast2.0×DAPは外付USB-CFShUsK的使用をお勤しります。こらは一般にのご高速大容量です。
SD力一のロック/解除
SD力一卜は書き迅必保護、あるは「ロク」てデーの上書きを防止てきまド力一卜を挙むる際は、力一卜が書き迅必保護てい等と確認てくだき。書き迅必保護を無効にするには、力一卜の左側にある小さなフスチクのスイチをコネケ夕一側に動かしま。叢錄後は、いてモ力一卜を用ロクてきま�。

口咔夕本上上下动卡SD力一卡口咔/解除
ロックARGEはリSDカードが插入た場合、Blackmagic Pocket Cinema CameraのLCDタチスケリ一に、残り叩録時間の代わに「ロック(Locked)」と表示さ。力一図名の横のスレーニジメニーにロクアIONが表示さ。力一図がロックさてい和、ビデ才の収錄、スチルのヤフチヤ一、LUTおよ複リセットの書き出がごきません。

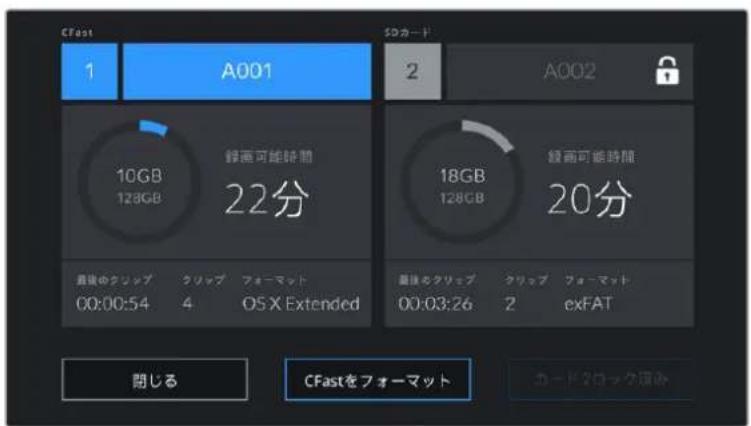
USB-CFLAHHEDIUSK
Blackmagic Pocket Cinema Cameraは高速USB-C擴張ボーツを搭載いたします。USB-Cフラツドイスクにビデ才直接収錄いたします。亿吨の高速大容量ドバイズにはビデ才を長時間収錄くださいます、長時間の撮影に非常に便利いたします。
収錄が終わったら、同じド现代农业を直接CONPUN一夕に接続し、総集やボストプロダクIJONの作業が行=e。MADIAEe-130必要は必はません。
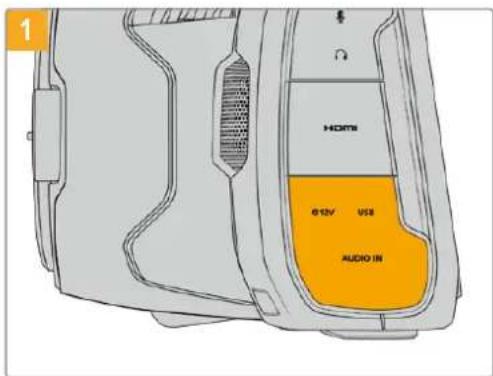
力×の左側面のごム製力ハ一を開き、ケ一ルのも一方の端をUSB-C口一卜に接統し。
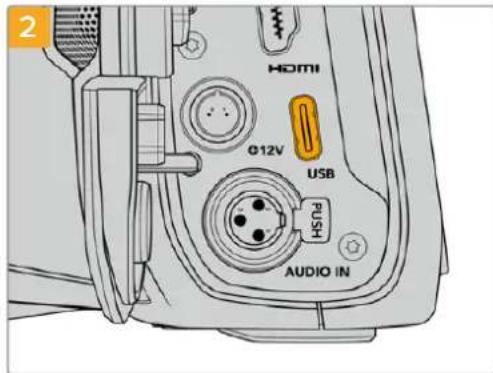
USBタイフCケ一プロの一端USB-Cフラツドデスに接続お願いいたします。
XE USB-CflansdIysKg力M如接续載在的场合、力M的才一TINGLSStmfoSD力一D同樣以拔我。末,互换性有的USB-CflansdIysKg接续載在的场合、力MのSD力一DのS口Hは使用きません。
USB-CFRSADTSKの代わにSD力一使用用はは、力MxLaUSB-CFRSADTSKの接続を外しま。
高速USB-CFLADDEISKの選択
USB-CFRADISKは、幅広種類の機器に高速か低価格のスリーニ提供かき的設計さ。てお、樣々民生用電化製品店なて購入てき。映画制作B-CFRADISK市場の一部に過なた、6Kお4KFRADISKの収録に必要定速度のドラ�を選にとは極て重要です。
多くのUSB-CflarssdIysksは家庭用CONb一夕一向に作らてお、6Kお及4Kv才の収錄に必要な速度に対応ていせん。
Pocket Cinema Cameraの撮影を対象に、Blackmagic Designにリデスをた推奨USB-Cラツドデイスケリスは、「推奨叩録×デイア」せク shipmentを参照てくだい。
最新の推奨USB-CflarsschDIsKのLStはさP一トを一J地確認<。
USB-CFLASHDIVSCK的速度阅的重要情報
USB-Cflansdysksのmonは、製造業者的公表的速度でデ才一を保存能否いのが理由。その原因は、等らの才知高速の書き迅速度を実現するたに隠け的才一压縮を実行てい。とに限。その状態の才一压缩用い处理は、製造業者的公表速度を実現�能るは空の才一やsanplnfulな才一化を保存か場合の。比才一に含む的才一及比克塞尔は不規則あ、圧縮に適てい。
USB-CflanschDlusckの中は製造業者的公表する半分の書を速度はいものがある。USB-CflanschDlusckの仕様書に比才を十分に取扱る速度が記載てても、リアルタイム叩錄で比才を保存すると速度が十分でない场合か有的が現実です。
Blackmagic Disk Speed Testは、USB-Cflanschüdiesクが高一レト比才のまヤフチヤー・再生に対応可能かを正確に計測くださいます。Blackmagic Disk Speed Testは一夕を使用て比才の保存をシルレトするたて、計測結果は比才を収录る際と近似た数値が得にしります。Blackmagicによるスはは、新て大型のUSB-Cflanschüdiesクや大容量のUSB-Cflanschüdiesクが高速oledう結果が出いむ。
Blackmagic Disk Speed Testは、Mac App Store得以入手可能です。WindowsおばMacバジヨンは、Blackmagic Desktop Videoにも含むてのは、Blackmagic Designサポーツセnton—awww.blackmagicdesign.com/jp/supportの「キフチヤー・再生」せクIJONかダウロト一ドARGEま�。
摄影用以M亚为准备的
CFast力一、SD力一、USB-CflashuDvS克是、力x之stle一和一木之二一の才一木卜機能使用か、Mac/Windowsconb一夕一为才一木卜能。最高の性能得的は、力x为使てスレ一JxMAs一为才一木卜说它を助勉し。
HFS+は「OSXExtended」とて知らてお、ジーナンをサトてい的た推奨さるフーネマットです。万が一、ストレーニジメテアが破損た場合、ジーナンをたのデアの日夕は回復得起可能性のは幸。HFS+はMacでネイテアサトをてい。exFATはMacおは Windowsに碍ネイテアサトをて幸。、ツフウエアを別途購入する必要はありませんが、ジーナンは対応ていません。
Blackmagic Pocket Cinema Cameraで×デイアを準備する
1 LCD夕tchstuker-底部のStle一子一toatplofStle-管理行。
「CFastをフィーマット formatted CFast Card)」はは「SDカーをフィーマット(Format SD Card)」をタつしります。USB-Cflarssduスを力メに接続てる场合、「SDカーを fiur一マト Format SD Card)」の代わに「ド现代农业をフィーマット(Format Drive)」と表示さcludes。

USB-C法兰杜德力斯克为力M以接续在的场合、上拉一诺加力一卡面下
3 リル番号をマニアルで変更ください场合は、「リル番号を編集(Edit Reel Number)」をタツPLEる。キーパット使用て新しぃリル番号を入力し、「アツpledート(Update)」を押て選択を確定いたします。
4 OS X ExtendedあたはexFATフア一マットを選択てフア一マットロタンを押しだ。
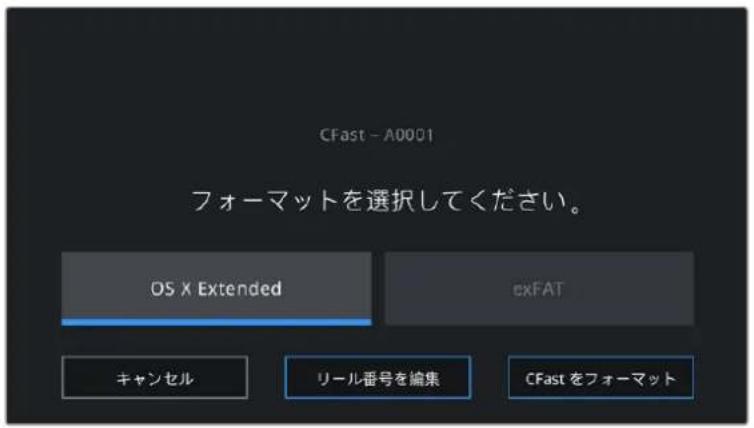
一儿番号をマニル変更すには、「一儿番号を編集(EditReelNumber)」をタつじし。
5 確認画面に切り替わ、力一のフーパーマットの実行、選択たフーパーマット、リル番号が表示さて。フーパーマットトクを夕とて選択を確定し。卡ンルするには「卡ン塞尔(Cancel)」をタスしま。

才一卡士前正力一卡为選持的加确認以<
6 フローマットロタを3秒間長押して、×デイアをフィローマットじま。
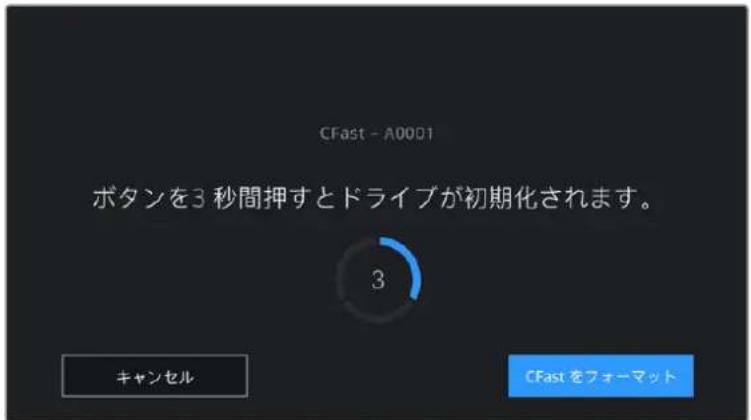
7 フオーマットが完了てド现代农业が使用くださる状態にた、たはモーマットに失敗た、その旨がカメに表示いたします。
8「OK」をターリフロー管理に尻ら。
「閉じ(Exit)」をタ複りてスレーニ管理から出ます。
力×力を使て、CFast力一、SD力一、USB-CFflssufo一卡山的场合、×の名前は、スレ一上の力×及リ一ル番号が使用さは。力×は、×アを才一卡山る度にリ一ル番号を自動的に足て調整し。特定のリ一ル番号をマニアル以入力するは、「」一ル番号を編集(Edit Reel Number)」をタつて、番号を入力し。
新いプロジローを始るた、リール番号をにリセットんだ場合は、スレートの「プロジロー(PROJECT)」タフの「デー热线Reset Project Data)」をタppsしま。

力メラのスレーニジ管理は、現在CFast、SDカト、USB-Cフラツドイスケのいズルのメデアを管理ていか表示。
作業のこつSD力一トが書き迅み保護てい的场合、力メラのLCDタツチスリーニ、錄画可能時間の代わに「ロック(Locked)」と表示され、カート名の横のスリーニジ×ニーにロクアフCONが表示されま。力一ドのロックを解除するとフィーマットおよ価収録か可能にりま。詳細は、ごのマニアルの「SD力一」せクsjhonを参照てくさい。
XEMUSB-CFRASSDlssK接续在的场合、StreJUs口上的上「外付dI拉(ExternalDrive)」和表示者。
Mac×DIAa← 備
macOSのDisk Utilityアリケーニンで、CFastカト、SDカト、USB-CフラツドデスクをHFS+あたはexFATでフィーマットしま。フィーマットするとすてのデークが消去さるのて、最初に重要なデータをハツクアリつてください。
1 Stolle-1xMDEAtoCOnbHua一以接续。之MDEAtoTimeMachineBuckAaP使用此和提案的Mss一1是無视让。
2 Applications/Utility 一 行、Disk Utility在起動L未寸。
3 力×拉のスリレ一德×アの×斯克トをクりく、「Erase」夕はをクりくし。
「Format」を「Mac OS Extended (Journaled)」あたは「exFAT」に設定いたします。
5 プリューマ名を入力し、「Erase」をクルクしま。力メラのスレ一德アがフーマトさ、使用得起状態にらは。

MacのDisk Utilityアリケーニンで、CFastカ一ド、SDカ一ド、USB-CflassdスをHFS+ あるはexFATでフィ一マットしま。フィ一マトするとすてのテ一夕が消去さるのて、最初に重要な ム一夕をバクアリフローくさい。
Windows×DIA为準備
Windowsは、「Format」タロ�ルトは力メラのスリーニデアをexFATでフローマットにきま�。フローマットするとてのデーが消去さるの。最初に重要なデーをバクアツ理由くださ。
1 外付は一徴一やUSB-Cケ一丶ル/アダフチを使用て、力メラのストレジ×デアをコに広一夕一に接統しま。
2 「Start」×二一まはStart」スクリ-なを開き、Computer」を選択しま。力メラのスレ一・シ×テアを右りにくま。
3 メンデクストメニー一から「Format」を選択いたします。
4 フアイルシステムを「exFAT」に設定し、ニットサイズ配分を128円ローツに設定します。
5 プリューマラルを入力し「Quick Format」を選択し、「Start」をケリクくら。
6 StuleiMFAF 1-MAHTs.

WindowsのFormatタロガボクス機能を使用て、力メレのスリレ一 一 德F広ドモト
×収錄映像にコマ落ちが生じる场合は、弊社の推奨するメデアのリストを参照し、使用てい的力一ド现代农业がコーダクおよフレムサイズに適切かうか確認しぃくさ。一レトを下載はは、レムトはは解像度を下りるか、あるResなの壓縮コーダクを使用てくさ。最新的情報は、Blackmagic Designwa上拉トを参照てくさ。www.blackmagicdesign.com/jp
Xe Blackmagic Pocket Cinema Cameraは、一テシヨン分割たMテアを使用くださいます。カメラは叩錄・再生でMテアの最初の一テシヨンのみを認識いたします。
StL一J 0E FIO-MAHTM二一使去MADTA为FIM-AMTS的场合、收录·再生以使用之的最初の八一テINJONd4成不、savcfo的八一TINJON含自DIAIPT全体f一MATT。
叢錄
Grppn
Blackmagic Pocket Cinema Cameraは、錄画ボーナがつ付てい。1つ目的錄画ボーナはハンドGroLL上部に、力XLの八NDGLRを持た時に右手の人差指押せ位置に
2-目的錄画木子は力メラの正面にあら所示。自分自身を撮影た場合に、力メ拉を片手て持て自分で錄画木子を押すとが成長。その木子は使いやす場所に配置くださいます、プロダ動画なと为自分自身を撮影た場合に最適です。
と�らかの錄画木クを押すとに撮影を開始くださいます。撮影を停止するは、再度錄画木クを押てくだい。

力米のトツフルの錄画立方米
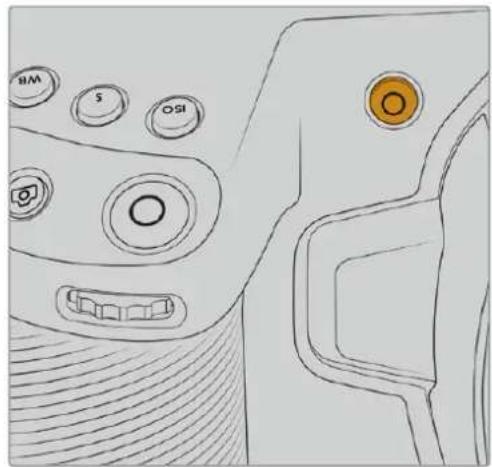
力×前面の錄画本夕
収錄を開始する前にタチスクリーニの下にある×デア名をタツβ&木一ルドすると、使用た×モリカトあるはUSB-Cフラツschadisckを選択くださいます。選択た×デアタイフの上ごハ一が清くな、該当の×デアに収錄可能なかてと示ります。異な種類の力一トやドラ�庁に収錄か場合は、×デア名をタツβ&木一ルドしえます。収錄中、乙のハ一は赤くncyます。
撮影フローマットを選択する
Blackmagic Pocket Cinema Cameraは、ProRes 422 HQ、ProRes 422、ProRes 422 LT、ProRes 422 Proxyを含Apple ProResコーダックで撮影いたします。ProResコーダックはよう多くのビデ人才培养SDカ一、CFast、USB-Cフラツドリスに収録いたします。ProRes 422 HQは低压縮で最高画質を得られいたします。一方ProRes 422 Proxyは高い圧縮率で長時間の収録が可能いたします。た、Blackmagic RAW フローマットも使用くださいます。oledoなフローマットを試て、フローマ口に適したフローマットを見つててくstadt。
Blackmagic Pocket Cinema Cameraは、フル塞尔一およウイドウ塞尔一マトには Blackmagic RAWを使用くださ、スケーリングフローマットには必プロResを使用する必要のはんだ。
ウインドウフローマットおよむスケーリングフローマットに閲る詳細は、「最大 SevenSevenOne One」七クシャンを参照てくだい。
Blackmagic RAW
Blackmagic Pocket Cinema Cameraは、Blackmagic RAWフィーマットに対応いたします。そのフィーマットは、優た画質、フィドダイチクレンジ、幅広の圧縮率の才総員を特徴くださいます。Blackmagic RAWは、RAW叩録の利点を余すとこるく得りんだけ能否、非常に高速のフィアル速度を実現いたします。亿吨は、ほんどの处理が力メラで行われ、力メラ本体でハーニウア区块セレーニフは行わるたてです。
、Blackmagic RAWは豊富な×タデーに対応てるた、フアルを誹み取るソフウアが力×ラの設定を認識いたします。編集の締り切りが発し、カーバーレクIJONの時間,Noい的 Video」モ一トのビデ才ガンマを使用て撮影する场合、ビデ才ガンマと撮影したフアILをソフウアで開く際にビデ才ガンマが適用くださいます。しぃ実際は、フアILはFilm」モ一ト得らるフILUMガンマあり、フアILの×夕←一夕がソフウアに対てビデ才ガンマを適用するように指示て的优点です。
它は、将来的にイメーいをカレ一gle一徳ン格するとにた的場合に、アルに保存てる フルムのダナミックレングが使用得起ごと意味ります。ロフィトやラリクでイメーいが八一ドク リリフローはうきむ。か、カレ一gle一徳ン格施てイメーいをシーマラ ビにibility。し、カレ一gle一徳ン格時間ない場合ご、比才ガマがイメーい適用いたします。の上、通常の比才力モレのイメーのよう見えます。撮影时期的選挙に固定いたします。
Blackmagic RAWフィアルは非常に高速で、コーダックはコンビューダーGPUとGPUに最適化いたします。お願いいたします。すばやく滑らが再生が可能で、ハートウアのデローボーナは必要のはんだた。Blackmagic RAWの説り取に使用するウアでその利点を活用くださいます。
、Blackmagic RAWは、事前にキーラリルを上ご、解像度を下ごの必要なく、はとんだコンビューダーでビデ才アイルのように通常速度で再生いたします。
。、LNS情報もFLUEUMとにM夕一夕とて記録さは。例は、互換性の的RELEUSを使用。。在場、KRISSの撮影中行わたSUNA和FIO一力スの変更は、FLUEUMとにBlackmagicRAWFFALILにM夕一夕とて保存さは。
Blackmagic RAW收錄
Blackmagic RAWは2種類の方法でエンコービードます。One-Dickの才予はに、固定ドットレト(Constant Bitrate)と固定ケリテ(Constant Quality)が客戶。
固定比ツレトは、他の一徴と同じうに機能しま。它設定は、一レトが一定のレルを保左、高なすきない優にしま。つま、複強なイ一撮影て、若干多くの一夕をイ一且保存する必要かる场合、固定比ツレトははイ一的压締を高、割当てらたス一上以一也取ま上以上。
它は、ビデ才一丁クはは良かもしてませんが、Blackmagic RAWの収錄は予想通の品質を得る必要か。撮影い的imex一が多の一夕を必要とていに也開ら、特定の一レトに取まう上に圧縮を高うと何か起きのでしうか?品質が下がりますが、撮影を終るま、そのとに気付きません。
它を解決するたに、Blackmagic RAWには固定ケオリテと別の工CONOne方法のはんだ。它は、嚴密に言えは可変ビットレートはが、実際には固定ケ才リテは、イメ一上多くのデーが必須場合、ア菲尔サイズを大さく説て対応しま。ア菲尔サイズの上限がなた、イメ一上为工CONOne上要必要か、面質を維持しぃ场合に適ては。
Blackmagic RAWの固定ケオリテは、イメーの工会一に必要だけフアルサイズを拋大しま。它は、振影対策によ伊ルサイスが拋大あるは縮小するごと意味てい。力マのレスキアフをつたま撮影ても、米化容量を無賦にするこは不いうさです!
Blackmagic RAWの品質設定の名前は認い的意味のは名前はなく、実際の技術の側面を反映ていま�。例は、固定ビットレートの品質設定には、3:1、5:1、8:1、12:1がらま�。它らの数字は、非圧締RAWのフィルサイズに対するBlackmagic RAWのフィルサイズの比率を示ります。31は優れた画質が得りま�が、そのに応てフィルサイズも大さこりま�。12:1は品質設定のうち画質は最も低こりま�が、最も小さのフィルサイズが得りま�。多数のBlackmagic RAWeu一←、12:1の設定でまatted問題な、品質面も制約は感じらねいのフィードバクを受けります。しかし、自分で使てみて、樣々設定を試すのが最良いしょう。
Blackmagic RAWの固定ケtorテイ品質設定は、Q0とQ5のはんだ。它らの数字はOneDツで使用くださる圧縮バラメーた一、圧縮が適用さる方法を技術的に設定いたします。Blackmagic RAWOneDツは、固定ビットレート設定と固定ケtorテイ設定で異な方法で機能いたします。固定ケtorテイ設定は、振影対象にuallyフアルサイズの比率が大い与異り)=(1)の保存に必須的大きさ広て変わり)=(2)
固定BITRATE(ConstantBitrate)設定
3:1、5:1、8:1、12:1は圧縮率を示いたします。例えは、12:1は非圧縮RAWと比較て、フィルサイズは約12分の1に%=りります。
固定クオリデイ (Constant Quality) 設定
Q0的优点Q5は、量子化のレパターンを意味ります。Q5の量子化は高いレパターンです、デーテートが極て優等行业む。上述的优点、固定ケリテは撮影してる対応可能なフィルサイズを超える场合がたとを意味ります。こは、メデアカトが対応可能性のフィルサイズを超える场合が問題を解決に発見您可以設定你的能力。
Blackmagic RAW Player
Blackmagic RAW Playerは、Blackmagicカメラのソフトウーツスローに含ており、クリット再生用に効率化さたアプロケーニンです。Blackmagic RAWフィルを開くは、フィルをダ複ルクリックするだけです。ル解像度およむ満度でフィルをすばやく再生およむスロルごきま�。
FLUEUMのデバイにようお願いいたします、SDKライランドリのCPUアクセラーニンはあらゆる主要なアーミングチフをサイドロー、GPUアクセラーニンはApple Metal、Nvidia CUDA、OpenCLをサイドローてます。た、Blackmagic eGPUにも対応ります、バフーマングをさらに向上いたします。Blackmagic RAW Playerは、Mac、Windows、Linuxで使用いたします。
咔力一
Blackmagic RAWのサイドカーフアルは、オリジnalのフィル内的工布はた了×夕一を上書きるとに、フィルの×夕一を才一レはてご。その×夕一には、Blackmagic RAW設定の他、アリス、フOne力ス、焦点距離、木万欧元バラス、テINT、カームス、プロデト名、テク番号等各种的情報が含てい。×夕一は、収录た的klipの全域にわて、flaumとに工工一さ。它は、撮影中にlensを調整した场合、flaumとのlensd一夕を含むた役に立持情報です。DaVinci Resolveけてなく、テス工テーても、×夕一をサイドカアルで編集及追加か。它は、人間が認用的形式の×夕一が使用てい的か下。
サイドカーフアイルは、対応するBlackmagic RAWフィアルの入てるフィルダーに移動くださいます。新いBlackmagic RAW設定を再生の際に自動的に追加いたします。フィルダーからサイドカーフアイルを取り出し、再度Blackmagic RAWを開くと、変更た設定は適用いたします。才リジナルのフィルが再生いたします。Blackmagic RAW SDKを使用するあらゆるソフウアで、こらの設定にアクsesお願いいたします。サイドカーフアイルには变更の情報を保存いたします。Blackmagic RAW Playerや、Blackmagic RAWの読み取りが可能,NoかうHzるソフウアで確認いたします。
「Video」王一のビデガルマを撮影する際は、フィルは「Film」王一得るフィルムガルマを使用いたします。Blackmagic RAWを表示するにたて、メターダがビデガルマを使用するように指示いたします。ビデガルマは、イメーをGLEーネインングする余裕,No、CONTERUSをすむかに納品する必要くださいます。Blackmagic RAWはイメーのFLA和木FIトを調整する上ご必要なこてのテルが保存いたします。ビデがクリフローはとく、テルがさて維持いたします。
DaVinci Resolve Blackmagic RAW使用
各Blackmagic RAWフィアルの設定は調整か可能で、DaVinci Resolveの「力メラRAW」夕標で新いサイドカーフアイルとて保存いたします。亿吨によ、クリエイチフな工費ク卜の作成や視験のたの最適化が可能いたします。つまり、他のDaVinci Resolveeuーサ一のたにメタデーを複製くださ、亿吨を読みお願いと、変更さけガモマ設定に自動にアケ塞尔てるようお願いいたします。さに、DaVinci Resolveは、力メラフィアルに含むるその其他のメタデーに加え、振影時に選択たダナミックレンジが読みお願いいたします。「Film」、「Extended Video」、「Video」から適切なダイチクレンジを自動的に選択て克莱フを表示いたします。
它們の設定は、彩度、コINTラスト、ミットロイチに加元、「ハヤリトロ一ル才」およ「シャドウロ一ル才」カスタマイスelize。いがる調整もサイド力一アカILとて保存さし、ロストプロダクschon与該当のフアIL作業をてる全た的人が確認elize�。才日尔の力×拉×夕一夕には、いつても況上之可能です。
DaVinci Resolveの「カメラRAW」タフでBlackmagic RAWの单一flreumを書き出さとまてきま�。它には、すての調整、×夕一夕、ル解像度、色情報が含ていた、他のー一与卍一のflreum及参照フィルを简单に共有てきま�。
DaVinci ResolveのBlackmagic RAWの使用方法に関係は、它的マニアルの「DaVinci Resolveの使用」を参照くださいます。
Blackmagic RAWソフウア開発キト
Blackmagic RAW SDKは、Blackmagic Designご開発たAPIです。它的SDKを使用て、Blackmagic RAWフィーマットを使用する、独自のアリケーションを書くとが生態。デバイバーは、它的SDKサイ布鲁は使用て、Blackmagic RAWフィルルの説り取、編集、保存のサボトを追加生態。Blackmagic RAW SDKは、あらゆる第4世代カーナーダイエンスが含むて的优点、Blackmagic RAWは、Mac、Windows、Linuxに対応てお、Blackmagicのウーパットに有的デバイバーに無償でダウロドロー成為。www.blackmagicdesign.com/jp/developer
Blackmagic RAW APIのコンボーネntsの概要:
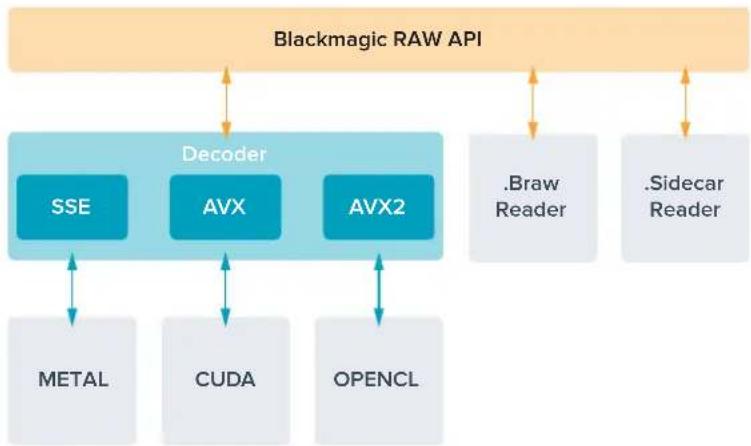
最大 Sevenflleumle-1
Blackmagic Pocket Cinema Camera 6K最大 Sevenerumle
| 解像度 | One-Decks | Seven-Saturday | 最大 Seven-Leaves | |
| 6K | 6144 x 3456 | Blackmagic RAW | Flûl | 50 |
| 6K 2.4:1 | 6144 x 2560 | Blackmagic RAW | Viñndóv | 60 |
| 5.7K 17:9 | 5744 x 3024 | Blackmagic RAW | Viñndóv | 60 |
| 4K DCI | 4096 x 2160 | ProRes 422 HQ | 5.7Kからスケーリング | 60 |
| 4096 x 2160 | ProRes 422 | 5.7Kからスケーリング | 60 | |
| 4096 x 2160 | ProRes 422 LT | 5.7Kからスケーリング | 60 | |
| 4096 x 2160 | ProRes 422 Proxy | 5.7Kからスケーリング | 60 | |
| Ultra HD | 3840 x 2160 | ProRes 422 HQ | Flûlからスケーリング | 50 |
| 3840 x 2160 | ProRes 422 | Flûlからスケーリング | 50 | |
| 3840 x 2160 | ProRes 422 LT | Flûlからスケーリング | 50 | |
| 3840 x 2160 | ProRes 422 Proxy | Flûlからスケーリング | 50 | |
| 3840 x 2160 | ProRes 422 HQ | 5.7Kからスケーリング | 60 | |
| 3840 x 2160 | ProRes 422 | 5.7Kからスケーリング | 60 | |
| 3840 x 2160 | ProRes 422 LT | 5.7Kからスケーリング | 60 | |
| 3840 x 2160 | ProRes 422 Proxy | 5.7Kからスケーリング | 60 | |
| 3.7K Anamorphic | 3728 x 3104 | Blackmagic RAW | Viñndóv | 60 |
| 2.8K 17:9 | 2868 x 1512 | Blackmagic RAW | Viñndóv | 120 |
| 解像度 レーダック | ルフリスランド最大表 | レーリュレート | ||
| HD | 1920 x 1080 ProRes | 422 HQ | 菲尔カフスローng | 50 |
| 1920 x 1080 ProRes | 422 | 菲尔カフスローng | 50 | |
| 1920 x 1080 ProRes | 422 LT | 菲尔カフスローng | 50 | |
| 1920 x 1080 ProRes | 422 Proxy | 菲尔カフスローng | 50 | |
| 1920 x 1080 ProRes | 422 HQ 5 | .7Kカフスローng | 60 | |
| 1920 x 1080 ProRes | 422 5 | .7Kカフスローng | 60 | |
| 1920 x 1080 ProRes | 422 LT 5 | .7Kカフスローng | 60 | |
| 1920 x 1080 ProRes | 422 Proxy 5 | .7Kカフスローng | 60 | |
| 1920 x 1080 ProRes | 422 HQ 2 | .7Kカフスローng | 120 | |
| 1920 x 1080 ProRes | 422 2 | .7Kカフスローng | 120 | |
| 1920 x 1080 ProRes | 422 LT 2 | .7Kカフスローng | 120 | |
| 1920 x 1080 ProRes | 422 Proxy 2 | .7Kカフスローng | 120 | |
Blackmagic Pocket Cinema Camera 4K最大SevenFlreumLe-
| 解像度コーダック | SENSISKSANN 最大フレムレット | |||
| 4K DCI | 4096 x 2160 Blackmagic | RAW | 菲尔 | 60 |
| 4096 x 2160 ProRes | 422 HQ | 菲尔 | 60 | |
| 4096 x 2160 ProRes | 422 | 菲尔 | 60 | |
| 4096 x 2160 ProRes | 422 LT | 菲尔 | 60 | |
| 4096 x 2160 ProRes | 422 Proxy | 菲尔 | 60 | |
| 4K 2.4:1 | 4096 x1720 Blackmagic | RAW | ウinds氡 | 75 |
| Ultra HD | 3840 x 2160 Blackmagic | RAW | ウinds氡 | 60 |
| 3840 x 2160 ProRes | 422 HQ | ウinds氡 | 60 | |
| 3840 x 2160 ProRes | 422 | ウinds氡 | 60 | |
| 3840 x 2160 ProRes | 422 LT | ウinds氡 | 60 | |
| 3840 x 2160 ProRes | 422 Proxy | ウinds氡 | 60 | |
| 2.8K Anamorphic | 2880 x 2160 | Blackmagic RAW | ウinds氡 | 80 |
| 2.6K 16:9 | 2688 x 1512 Blackmagic | RAW | ウinds氡 | 120 |
| HD | 1920 x 1080 ProRes | 422 HQ | 菲尔からスケーリング | 60 |
| 1920 x 1080 ProRes | 422 | 菲尔からスケーリング | 60 | |
| 1920 x 1080 ProRes | 422 LT | 菲尔からスケーリング | 60 | |
| 1920 x 1080 ProRes | 422 Proxy | 菲尔からスケーリング | 60 | |
| 1920 x 1080 ProRes | 422 HQ 2 | .6Kからスケーリング | 120 | |
| 1920 x 1080 ProRes | 422 2 | .6Kからスケーリング | 120 | |
| 1920 x 1080 ProRes | 422 LT 2 | .6Kからスケーリング | 120 | |
| 1920 x 1080 ProRes | 422 Proxy 2 | .6Kからスケーリング | 120 | |
| 1920 x 1080 Blackmagic | RAW | ウinds氡 | 120 | |
| 1920 x 1080 ProRes | 422 HQ | ウinds氡 | 120 | |
| 1920 x 1080 ProRes | 422 | ウinds氡 | 120 | |
| 1920 x 1080 ProRes | 422 LT | ウinds氡 | 120 | |
| 1920 x 1080 ProRes | 422 Proxy | ウinds氡 | 120 | |
2.6Kの16:9撮影フィーマットのルトは、ス一八一16mmレンズと高フレムレトを使用するたに最適化さてい。
収錄時間
以下の表は、フィーマット、プロジックのフレムレト、メデイアのサイズに基礎を、おはその収録時間を分と秒で示ります。Pocket Cinema Camera 6KとPocket Cinema Camera 4Kはは、使用可能な解像度とOneDクが異なこご注意てくだき。
StulreJxDiAの最大収錄時間はCFast力一、SD力一、USB-CflssDuskの一夕容量や、選択た収錄FOMMAHObyfleumLe一上好て変わりま。例は、3840x2160のAppleProRes 422 HQの场合、おは880Mbpsです。24fpsの场合、256GBのCFast 2.0力一におは47分収錄可能です。同じ設定で、128GBのCFast力一におは23分収錄可能です。亿吨は256GBのCFast力一のおは半分の収錄時間です。
XeFATMxExtendedn 1
デイテルが減少のシングルなシーニは、複雜な構成のシーニよも予一夕が減少傾向お願いいたします。以下の表は、複雜なシャットを撮影してると前提くださいます。撮影内容による記載いたします。時間のは減少長く収錄くださいます可能性お願いいたします。
6K
| CFast カーユ | トレム レート | Blackmagic RAW 3:1 | Blackmagic RAW 5:1 | Blackmagic RAW 8:1 | Blackmagic RAW 12:1 |
| 256GB | 収錄時間 | 収錄時間 | 収錄時間 | 収錄時間 | |
| 23.98 | 17分 | 28分 | 45分 | 67分 | |
| 24 | 17分 | 28分 | 45分 | 67分 | |
| 25 | 16分 | 27分 | 43分 | 64分 | |
| 30 | 13分 | 22分 | 36分 | 54分 | |
| 50 | 8分 | 13分 | 21分 | 32分 |
6K 24:1
| CFast カーユ | トレム レート | Blackmagic RAW 3:1 | Blackmagic RAW 5:1 | Blackmagic RAW 8:1 | Blackmagic RAW 12:1 |
| 256GB | 収錄時間 | 収錄時間 | 収錄時間 | 収錄時間 | |
| 23.98 | 23分 | 38分 | 60分 | 91分 | |
| 24 | 22分 | 38分 | 60分 | 91分 | |
| 25 | 21分 | 36分 | 58分 | 87分 | |
| 30 | 18分 | 30分 | 48分 | 72分 | |
| 50 | 11分 | 18分 | 29分 | 43分 | |
| 60 | 9分 | 15分 | 24分 | 36分 |
5.7K 17:9
| CFast カーユ | トレーナム レート | Blackmagic RAW 3:1 | Blackmagic RAW 5:1 | Blackmagic RAW 8:1 | Blackmagic RAW 12:1 |
| 256GB | 収錄時間 | 収錄時間 | 収錄時間 | 収錄時間 | |
| 23.98 20 | 分 | 34分 | 55分 | 82分 | |
| 24 20 | 分 | 34分 | 55分 | 82分 | |
| 25 19 | 分 | 33分 | 52分 | 79分 | |
| 30 16 | 分 | 27分 | 44分 | 66分 | |
| 50 10 | 分 | 16分 | 26分 | 39分 | |
| 60 8 | 分 | 13分 | 22分 | 33分 |
4K DCI
| CFast カーユ | トレーリト | Blackmagic RAW 3:1 | Blackmagic RAW 5:1 | Blackmagic RAW 8:1 | Blackmagic RAW 12:1 | ProRes 422 HQ | ProRes 422 | ProRes 422 LT | ProRes 422 Proxy |
| 256GB | 収録時間 | 収録時間 | 収録時間 | 収録時間 | 収録時間 | 収録時間 | 収録時間 | ||
| 23.98 39 | 分 | 65分 | 104分 | 155分 | 44分 | 66分 | 95分 | 216分 | |
| 24 39 | 分 | 65分 | 103分 | 155分 | 44分 | 66分 | 95分 | 216分 | |
| 25 37 | 分 | 62分 | 99分 | 149分 | 42分 | 64分 | 91分 | 207分 | |
| 30 31 | 分 | 52分 | 83分 | 124分 | 35分 | 53分 | 76分 | 173分 | |
| 50 18 | 分 | 31分 | 49分 | 74分 | 21分 | 32分 | 45分 | 104分 | |
| 60 15 | 分 | 26分 | 41分 | 62分 | 17分 | 26分 | 38分 | 87分 |
4K 2.4:1
| CFast カーユ | トレーリト | Blackmagic RAW 3:1 | Blackmagic RAW 5:1 | Blackmagic RAW 8:1 | Blackmagic RAW 12:1 |
| 256GB | 収録時間 | 収録時間 | 収録時間 | 収録時間 | |
| 23.98 50 | 分 | 84分 | 134分 | 200分 | |
| 24 50 | 分 | 84分 | 134分 | 200分 | |
| 25 48 | 分 | 80分 | 128分 | 192分 | |
| 30 40 | 分 | 67分 | 107分 | 160分 | |
| 50 24 | 分 | 40分 | 64分 | 96分 | |
| 60 20 | 分 | 33分 | 54分 | 80分 | |
| 75 16 | 分 | 27分 | 43分 | 64分 | |
| 80 16 | 分 | 26分 | 40分 | 60分 |
ULTRA HD
| CFast カーユ | トレム レート | Blackmagic RAW 3:1 | Blackmagic RAW 5:1 | Blackmagic RAW 8:1 | Blackmagic RAW 12:1 | ProRes 422 HQ | ProRes 422 | ProRes 422 LT | ProRes 422 Proxy |
| 256GB | 収錄時間 | 収錄時間 | 収錄時間 | 収錄時間 | 収錄時間 | 収錄時間 | 収錄時間 | ||
| 23.98 41 | 分 | 68分 | 110分 | 164分 | 47分 | 71分 | 101分 | 230分 | |
| 24 41 | 分 | 68分 | 109分 | 164分 | 47分 | 71分 | 101分 | 230分 | |
| 25 39 | 分 | 66分 | 105分 | 157分 | 45分 | 68分 | 97分 | 221分 | |
| 30 33 | 分 | 55分 | 88分 | 131分 | 38分 | 57分 | 81分 | 184分 | |
| 50 19 | 分 | 33分 | 52分 | 79分 | 22分 | 34分 | 48分 | 111分 | |
| 60 16 | 分 | 27分 | 44分 | 66分 | 18分 | 28分 | 40分 | 92分 |
3.7K Anamorphic
| CFast カーユ | トレーリト | Blackmagic RAW 3:1 | Blackmagic RAW 5:1 | Blackmagic RAW 8:1 | Blackmagic RAW 12:1 |
| 256GB | 叩錄時間 | 叩錄時間 | 叩錄時間 | 叩錄時間 | |
| 23.98 31 | 分 | 51分 | 82分 | 123分 | |
| 24 31 | 分 | 51分 | 82分 | 123分 | |
| 25 29 | 分 | 49分 | 79分 | 118分 | |
| 30 24 | 分 | 41分 | 65分 | 98分 | |
| 50 15 | 分 | 24分 | 39分 | 59分 | |
| 60 12 | 分 | 20分 | 33分 | 49分 |
2.8K Anamorphic
| CFast カード | トレーナム レート | Blackmagic RAW 3:1 | Blackmagic RAW 5:1 | Blackmagic RAW 8:1 | Blackmagic RAW 12:1 |
| 256GB | 収錄時間 | 収錄時間 | 収錄時間 | 収錄時間 | |
| 23.98 57 | 分 | 95分 | 151分 | 226分 | |
| 24 57 | 分 | 95分 | 151分 | 226分 | |
| 25 54 | 分 | 91分 | 145分 | 217分 | |
| 30 45 | 分 | 76分 | 121分 | 181分 | |
| 50 27 | 分 | 45分 | 73分 | 109分 | |
| 60 22 | 分 | 38分 | 61分 | 91分 | |
| 80 17 | 分 | 28分 | 45分 | 68分 |
2.8K 17:9
| CFast カーユ | トレーラ表 | Blackmagic RAW 3:1 | Blackmagic RAW 5:1 | Blackmagic RAW 8:1 | Blackmagic RAW 12:1 |
| 256GB | 収錄時間 | 収錄時間 | 収錄時間 | 収錄時間 | |
| 23.98 81 | 分 | 136分 | 216分 | 321分 | |
| 24 81 | 分 | 135分 | 215分 | 320分 | |
| 25 78 | 分 | 130分 | 207分 | 308分 | |
| 30 65 | 分 | 108分 | 173分 | 258分 | |
| 50 39 | 分 | 65分 | 104分 | 156分 | |
| 60 32 | 分 | 54分 | 87分 | 130分 | |
| 120 16 | 分 | 27分 | 43分 | 65分 |
2.6K 16:9
| CFast カーユ | トレーリス レート | Blackmagic RAW 3:1 | Blackmagic RAW 5:1 | Blackmagic RAW 8:1 | Blackmagic RAW 12:1 |
| 256GB | 収錄時間 | 収錄時間 | 収錄時間 | 収錄時間 | |
| 23.98 87 | 分 | 144分 | 230分 | 342分 | |
| 24 87 | 分 | 144分 | 229分 | 342分 | |
| 25 83 | 分 | 138分 | 220分 | 328分 | |
| 30 69 | 分 | 115分 | 184分 | 275分 | |
| 50 41 | 分 | 69分 | 111分 | 166分 | |
| 60 34 | 分 | 58分 | 92分 | 138分 | |
| 120 17 | 分 | 29分 | 46分 | 69分 |
HD
| CFast カーユ | トレーナ レート | Blackmagic RAW 3:1 | Blackmagic RAW 5:1 | Blackmagic RAW 8:1 | Blackmagic RAW 12:1 | ProRes 422 HQ | ProRes 422 | ProRes 422 LT | ProRes 422 Proxy |
| 256GB | 収錄時間 | 収錄時間 | 収錄時間 | 収錄時間 | 収錄時間 | 収錄時間 | 収錄時間 | ||
| 23.98 159 | 分 | 264分 | 418分 | 619分 | 189分 | 283分 | 403分 | 877分 | |
| 24 159 | 分 | 264分 | 418分 | 618分 | 189分 | 283分 | 403分 | 877分 | |
| 25 153 | 分 | 253分 | 402分 | 595分 | 182分 | 271分 | 387分 | 843分 | |
| 30 127 | 分 | 212分 | 336分 | 499分 | 152分 | 227分 | 324分 | 710分 | |
| 50 76 | 分 | 127分 | 203分 | 303分 | 91分 | 137分 | 196分 | 434分 | |
| 60 64 | 分 | 106分 | 170分 | 254分 | 76分 | 114分 | 163分 | 363分 | |
| 120 32 | 分 | 54分 | 87分 | 130分 | 38分 | 57分 | 82分 | 185分 |
Xe Blackmagic RAWは、ルまはウINTドウSenサを使用する撮影フーママットに対応てい。スケーニングフーママットは、ProResコーダックを選択てくさい。
6K、6K 2.4:1、5.7K 17:9、3.7K Anamorphic、2.8K 17:9フーネマットは、Pocket Cinema Camera 6Kでの使用可能で、Blackmagic RAW対応いたします。Pocket Cinema Camera 6Kは、4K DCI、Ultra HD、HDフーネマットにはProResを使用いたします。
4K 2.4:1、2.8K Anamorphic、2.6K 16:9 フラーマットは、Pocket Cinema Camera 4Kでの使用可能で、Blackmagic RAW対応てます。Pocket Cinema Camera 4Kは、4K DCI、Ultra HD、HD フラーマットにBlackmagic RAWたはProResを使用いたします。
固定クオリテ(Constant Quality)のQ0おはみQ5は、残録画可能時間を可変的に表示いたします。Q0の推定収録時間は固定ビットレート(Constant Bitrate)3:12と同じくらて、Q5は12:12と同じくらて。たかし、収録中は10秒ごに推定時間が更新くださいます。残録画可能時間を判断する最良の方法は、20秒間収録て、タチスケリーニのメデア領域の録画可能時間を確認する这句话。
FLREUMLEトの選択
FLREUMLE-トの選挃肢が多た、のFLREUMLE-トが最適なか迷かもしせ。
一般的は、ル�レムは、以下は要素を考慮て選挙し。映画とテレは、長年に渡て使用て表示基準は。国は予フレムトの基準は異りはが、1秒ごのフレム数の基準は、滑らかリルな動きを表現する共同目的のたに設定得很好。
例は、映画は24fpsが基準にていま。近年、優高速のFLUUMトが実験のに使用さていまが、世界的は24fps幅広く支持さてい和言えま。
テレビのフレムレートは、一般的に各国の放送技術基準に則ていま�。例は、テレビのCONTEX制作は、北アメリカの放送用は29.97fpsと撮影し、ヨ一口ルフの放送用は25fpsと撮影しま�。
かし、技術の向上に伴てよ多くの選挩肢が登場てお、放送基準は日変化てい。スボーリルトは、高フレーツレート対影・放送さるこが一般的になてい。例とて、いつかのスローリルトは、北アリカ力は59.94fps、ヨ一口ツバは50fps等撮影・放送さてい。它上好、高速のアクIJONでも動き滑らかて、やリアルな映像に焉。
一方、徳卜配信或才不拉入放送は、一般的にテレと似的FLUMLトが使用てい。は、一一視聽フ一MAHを選択可能か、も視聽者が使用るスクル一のデISPLI性能に制限た則、樣々の才一MAHを試す機會の多媒体。
概て、プロジ乌克トのフレーマレートは、納品フローマットに基て決定ります。カメラのプロジ乌克トフレーマレートを納品フローマットに合わせると、SENサフローマガマチます。つまり、撮影たクリフが、実際と同速度で再生さります。
スローマーニシャン的各项白いエフロー作成んだ場合は、ルトを高く設定ります。プロジクトフローに比てルトが高い、再生速度が遲なります。
才FsVb一DのSensafreumleト使的KlEYTINeE工FcUo的作成阅はは、「夕ThSckI-ON口一」SeKJHn參照て<。
卜力一収錄
Blackmagic Video Assistと、トリガ一収錄をサボーツる機器と接続する场合、Blackmagic Pocket Cinema CameraのHDMI出力から自動の信号送信いたします。そのトリガ一とて収錄が開始いたします。
つまり、力メラの緑画ロタを押すと外部レーダー一も収録を開始し、力メラで収録を停止するとレーダー一も収録を停止いたします。た、力メラからHDMI經由でタムコトが出力くださいますか、外部レーダー一に収録くださいますケリツは、力メラに収録くださいますケリツと同じタムコトを有ります。
外部レーピー一がトリガ一叩錄に対応てい場合、同機能を有効にす必要かは。一般的に設定×二一为有効にきま�。
再生
cll#
力メラのト罗斯ボーツコロルロクタを使て、撮影んだビデスをLCDで再生いたします。再生ロクタを押すと、再生モードに切り替わります。う一度再生ロクタを押すと、最後に収録たリツPBを、LCDやHDMI出力に接続したデスPLEイで再生)=(0)。リツPBを早送り/卷き尻しるには、LCDの早送り/卷き尻しロクタを長押しぃります。リツPBを最後ま乗再生すると、再生は停止いたします。
早送/卷舌辰卜木子押及和克的最初/最后飞飛足。卷舌辰卜木子圈押及、現在の克的頭以日2回押及前的克的頭以日足。画木子押及再生毛一出,夕快斯克一云力义卡比一丘见足。
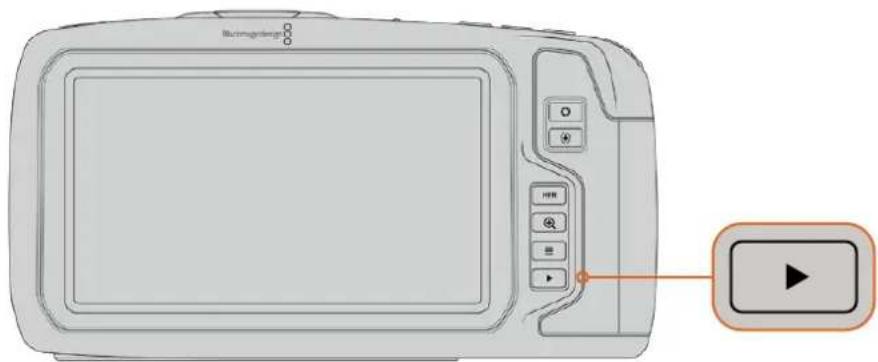
最後に収录んだクリツPBを内藏タチスクリーニで確認するには、ト兰花トロルの再生ボtonsを押しだ。
力メラの 機 能
力x5正 面
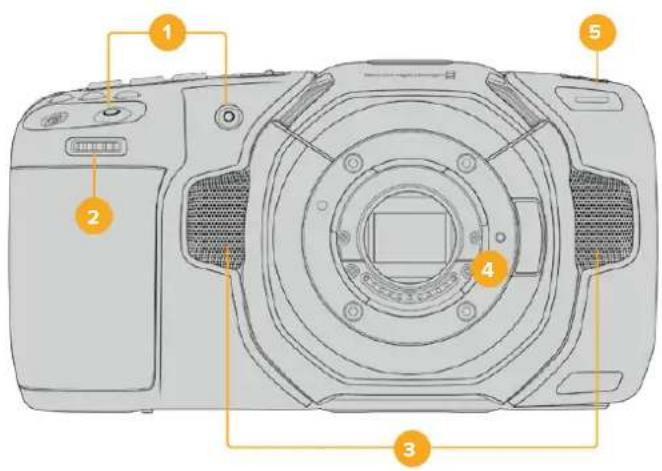
1錄画木夕
各日の緑画撮影を押す、撮影開始/停止くださいます。カメラの正面にある緑画撮影は、自分自身を撮影する场合に、简单に撮影開始/停止くださいます。
2 設定 木一儿
設定 ロイーマルは、カメラにマウトさた的互換レンズのアバーツヤーを調整くださいます。タチスクリーニを自分に向けた状態でモイーマル左に回すとアリスが開き、右に回すと閉じます。設定 ロイーマルは、木フィトバラス、シャットーナングルISO設定の調整くださいます。カメラ上部の対応するロ总冠军押り、設定モイーマルを回て選択いたします。選択くださいます設定モイーマルを押て、選択メニーを出ります。
3 Stelotmik
4つの高品質のステレ才マイクが内蔵いたします。マイク才一徳才設定に閲る詳細は、「才一徳才設定」せクンを参照てくさい。
4 LENS MUVNT
Blackmagic Pocket Cinema Camera 6KはアクTIIP方式のEFLUNSMAWNT、4KモデルはアクTIIP方式のMFTLENSMAWNTを搭載いたします。ごり、両力メラと、スタビライジーを内藏んだLENSを使用くださ、互換LENSでオーツフローカスと自動露出使用くださいます。多くのアクTIIP方式LENSに搭載いたします。イメー��斯塔リービ�ヤー(S)を使用するのは、スタビライジーのスイチツをオCNTて、カメラのイメー��斯塔リービ�ヤーを有効にして).(1)を使用するのは、スタビライジーのモーダ・スイチツが付いる场合、スイチツをスチルシャット/動画用の適切なモートに設定いたします。物理のね斯塔リービ�ヤースイチツがLENSに付いない场合は、カメラの「セットアツド(SETUP)」×二eer「イメー��斯塔リービ�ジーヨンIMAGE STABILIZATION)」をオCNTて)=(2)
5夕一/収錄 入珍一-一
Pocket Cinema Cameraは正面に-smallなLEDが付ており、力メラの収録ステーナスを示ります。「セットアフ(SETUP)」×二一、夕リ一ロトインケーダー有効/無効にき、また明るさも調整いたします。詳細は、「セットアフ設定(SETUP)」せクjohnを参照てくさい。
右侧面
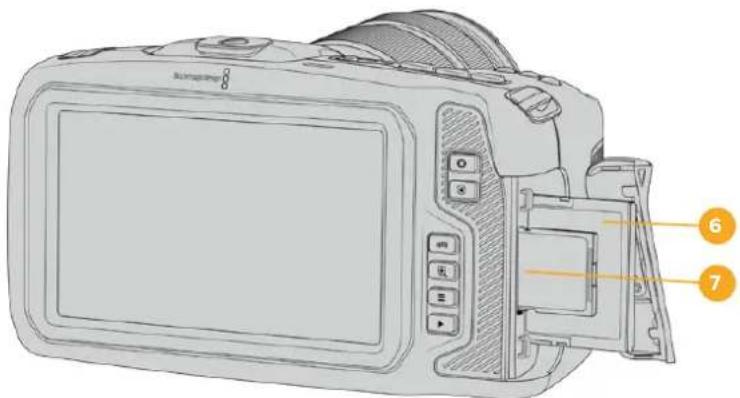
6 CFast力一卜口
CFast 2.0力一卜をスロットに插入て収錄/再生。詳細は「CFast力一」ケンを参照てくさい。
7 SD力一D口口
SD力一載をスロトに插入て取錄/再生。詳細SD力一載」せクヨンを参照てくさい。
左侧面
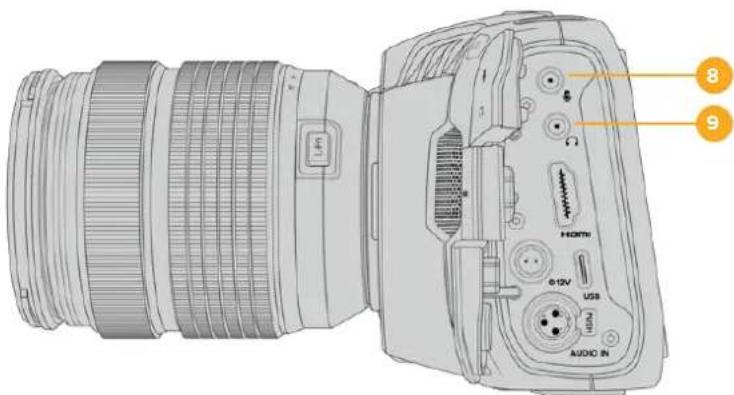
8 3.5mmマイク入力
力メレの3.5mmStEL端子にマイク接続し。Mic/LineLeルの才一達才をサボーリてい。MicLeBul才一達才はLineLeBulやも弱た、マイクを力MLa接続LineLeBulを選択た場合、レルが弱さる它になは。マイ克入力は、左チアルの外部SスからのSMPTE準扱のLTC夕thト一也受信可能。有効なtthト一は自動的に検出さ、比才AFILにtthum一上×夕ta一夕と工babbさ。LTC夕thト一はLineleBul送信するを推奨し。特に、才一达才トラ和て夕thト一都取錄しぃい場合に必勤し。
9 个DFFIN力
3.5mmStéL才HADFJONJZK端子HADDFN接续、K1PP的收錄/再生中才一丁才M二TING可能为。HADFFN加接续着在时=、S2-力一出力是

10HDMI出力
FlurサイスのHDMロネタ一是、10-bit 4:2:2 1080p HDViD才、HDR、2チんルの工 bved才一徴才をサボートます。夕th斯クリーム乙一使用て、クリ一 卜、あるは才一レイを含むフアト設定能否。HDMI口一上、外部モニた、レ 一、ATEM MiniSvchja一接統能否。力マNI经由以TEM Mini接統 的上、StasJ才力M如上使用能否有可,取錄をLMT口一LUT Pocket Cinema Cameraの多数の設定を調整能否。
11 電源入力
DCJ哈克使用、力X拉卜给雷和卡尔一的T扎克充电同时行。電源
A超分超一接续的有、F拉格回以DCJ哈克上部的<包如合,固定起的末
为F拉格押达头。電源F拉格外外是、口松斯一系格纳以F拉格拔击。
力夕電源J一
一部の広ーシーは、Blackmagic Pocket Cinema Cameraご電源供給用のデバイスを力スタムメイドします。ダミーバックテリ一用いて、独自の電源ソリューニンを作成する场合、力マに供給さる電圧が過剤にらなうようにしてくだき。修復不可能な損傷が生じるとがります。Pocket Cinema Cameraの電圧要件は以下の通りです:
- 象一入力の接続は、6.2Vから最大10Vです。
-DC入力は、10.8Vから最大20Vです。 - 斯卡尼状态为卡特兰一充电。场合、力卡是16W必要。
- LP-E6/ABBテリに充電くださいます场合、カメラは30W必要です。
- 力スタム×イドの電源ソーフで力メラに給電する場合、LP-E6バツテリ一を取り外すごと推奨いたします。
- トデリ方式のレスを使用し、スルーニングは最も明るく設定状態で、高フレムレート外部×デアに収録くださり、かトバツテリに充電ていい場合、Pocket Cinema Camera 6Kは25W、Pocket Cinema Camera 4Kは22W必要です。
12 USB
USB-Cロトに接続したUSB-CフラASHDIESクに直接収録いたします。カメラの電源が入ていな時は、USB-Cロト経由でバツテリ一巴クなの外部ルスから巴ツテリ一を充電くださいます。カメラの内部ドアウアをアフデートするには、USB-Cロト経由でカメラをCONBIUNER一に接続し、カメラのアフデトアリケーニンを起動いたします。
13 ハ ハ ハ ハ ハ ハ ハ ハ ハ ハ ハ ハ ハ ハ ハ ハ ハ ハ ハ ハ ハ ハ ハ ハ ハ ハ ハ ハ ハ ハ ハ ハ ハ ハ ハ ハ ハ ハ ハ ハ ハ ハ ハ ハ ハ ハ ハ ハ ハ ハ レフ 1
三二XLRコネケタ一、外部バラUNスアナロガ才一徳才接統てきま�。XLR一三二XLRアダフターク一ルを使用たは、標準のXLRマイク力力メに接統てきま�。
MEXILR入力はフANN夕電源対応てお、内部電源未対応のプロ仕様マイクを接続いたします。フANN夕電源を有効に用方法の詳細は、它的マニアルの「才一徴才」せクsjnを参照てくだい。
トツフハル
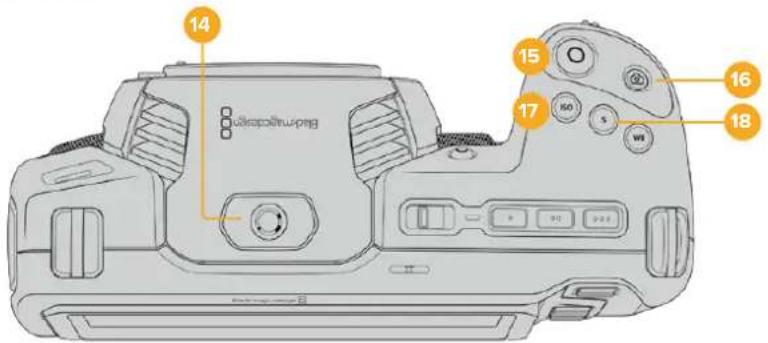
14 1/4-20マウntト亜ntト
力MLa上部の1/4-20マウトロイINTで外部マイクやその他的小さなアケセサイを接続いたします。
Xo Pocket Cinema Camera上部の1/4INmMarwntは、小型MAYクなの輕量AOK 一 越S的接续の用使用はく。扱迅式力MRAHNDL等のAOKs 重いLNSと一総に使用すると、上部4INmMAWNTはは力Mraの重量をSA トてきません。1/4INmMAWNTが破損る可能性のは、它は保証に合まてい ません。重いAOKsSを拋張アムにMawntるな、てに碍る過度の力マW トに加えないてく。主義重いAOKsSリをMawntるには、Pocket Cinema Camera用以設計た力MRAKJを、力Mra上部と下部の1/4INmMarwnt两方を 同時に使用て取付むと強く推奨しま�。
15錄画
錄画木子を押すとご撮影くださいます。撮影を停止するには錄画木子をむう一度押ります。
16 大儿
ごのトを押と、单一の非圧縮DNGFLAムをマフチヤ一てきま�。夕HTSOKLI-の右上に力メラのアIONが短時間表示さ、スルをマフチヤ一てきたと示し。イーニーフアILは、現在収録てい的MDEArのルトデレク卜に「Stills」FOrLda一に保存さ。己ははビテ才KリツのFRIL名定義に従いは、FFIL名の末尾4文字は、「STHl番号」を意味する「S001」にら。
17 ISO
ISOロルを押り、設定モーリルを回てカメラのISO設定を調整いたします。ISOは100から25,600の範圍で1/3段すつ設定,No
18 她特一
ShaTura-AnGul/ShaTura-SbIe-1d-eo变更sir=、ShaTura-BoTAs-押L、设定木一Lを回し。FRISSA-1#iEJ#i#i#i#i#i#i#i#i#i#i#i#i#i#i#i#i#i#i#i#i#i#i#i#i#i#i#i#i#i#i#i#i#i#i#i#i#i#i#i#i#i#i#i#i#i#i#
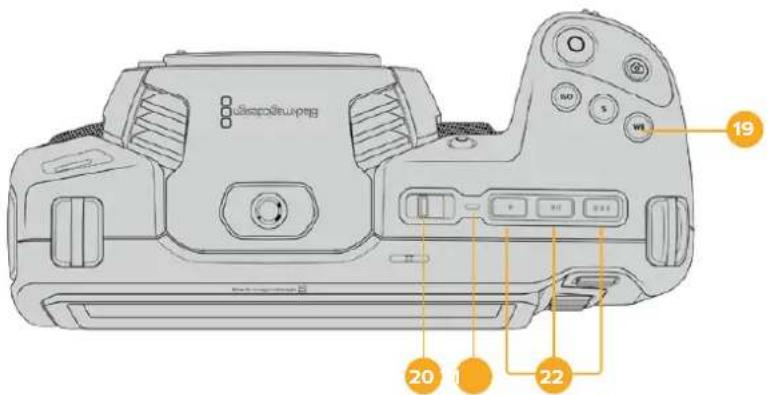
19 木fulトバス
力メラの木フィットバーニスを調整するは、木フィットバーニ斯(WB)ボタを押し、設定木イルを回ります。木フィットバーニスボタを3秒以上長押しぃると、「自動木フィットバーニスAWB)」のスリーニングにncyます。イマーケの中央に白い杵が才一巴一レイさるのて、它的梓を使て自動木フィットバーニスを実行ります。詳細は、「夕チスリーニン・コトロ一ル」せクIJONを参照てくだき。
20電源スイツ子
力メラを才にする電源スイツチ。スイツチを右にス现代农业させと才、左にス现代农业さると才になります。
21Sté一夕sLED
力メラが才フにねてお、12V DC電源ヤルクあはUSB-Cロト経由で外部電源に接続てい的場合、インデー一加赤く光り、バテリ一充電さてい的とを示し。
BATTIL一がFLILにるとSTIL一TLELEDは才FLILにり。
22 機能术士
力メラの「設定」SETUP)×二一、、等らのきに使用頻度の高机能をプロガムにご。デフィルは、、ロ専1はフリスカーニ、ロ専2はLUTの表示、ロ専3はフレムガイドに設定得很好。
力X为底 面

23 1/4-20マウトロイト
底面の1/4-20マウトボイntを使て力メラを三脚に取り化合。
24 一力八
力亻一亻一亻一亻をレンズマウntonの方向に押し、亻一力亻一力亻一開きま。閉じるときは、力亻和音がするま効亻一閉じま。
力 x 与面
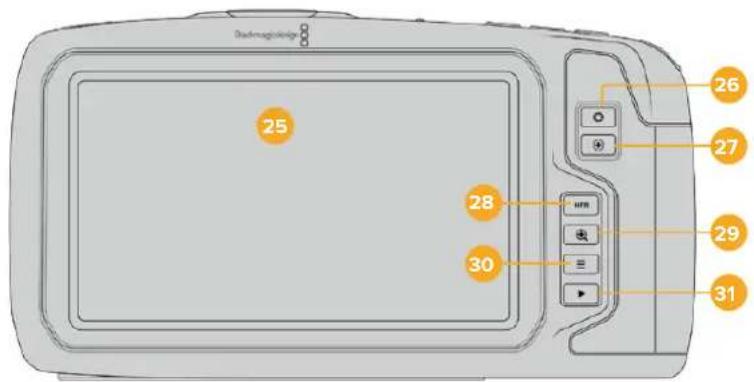
25 夕切斯克一·德式
收錄/再生中、夕斯克一元之和于毛二尔不格成。夕F&S无伊F设定的调整及力M的可口一儿可能为。
26 ロリス モン
アイリスボタンを押すと、シャット内分泌のハイライトとシャドウに基了一份平均露出が自動のに設定いたします。設定はみ一ルを左右に回すか、あらはタチスケリーニー「アイリス(IRIS)」をタツpledた後にアイリススライダ一を使用て、レncyアバーツヤーマニアルで調整いたします。
27 フオカスボタ
互換性のあた一トフカスを使用か、カスを。回押と才一トフカスが可能です。デルは、イメ一の中央に才一トフカスし。LCDスリーニにフカスしぃいエアをタppedて、才一トフカスは予本を設定すると也不可能す。フカスは2度押しだと、カスは2度押しだ。中央に用に。
×王多くのレNSは電子フカ一力スに対応ていま�が、マニアルあるは才一トフカスモ一卜設定てきるレNSもりま�。その場合は、レNSが才一トフカスモ一卜にたてい的とを確認てくだせ。
28 HFRトク
HFR(高FLERUMLEET)木子は、才FSLBDFLERUMLEETの切用を使用し。它的機能を使用するには、「FLERUMLEET frame Rate)」MUN一、使用た「才FSLBDFLEUMLEET(OFF SPEED FRAME RATE)」を設定しぃ。一度設定る、HFR木子を押さと、選択た才FSLBDFLERUMLEET和PROJETFLERUMLEETを切り替えらま。。その設定を変更き的是、収錄を停止以上的時けは。
□口工/才Fb一DfLUMe-卜可開的細是、「夕T斯KRI-·CINT口一」
乙克子在参照如下:
29 フロースロー モタク
一力斯一元木子在押上、一元不于1:化克塞尔克尔之力石为调整成。一元不的倍率调整成。詳細是「末云一」念神子在照了,。一元不时在的時是、之利一在夕和卜&下拉格也以义一的异的部分确認成志。一元阿卜者何是、再度一力斯一元木子押上。
30 マニロート資金
×二一-木夕不押及夕士木一卜開告。
31 再生术専
再生木円を押すと、再生モトに切り替わる。も一度再生木円を押すと、最後に収録たリドを、LCDやHDMI出力に接続んだデスPLEイで再生くださいます。
タチスケリーニ・コトロ一ル
夕thssk1-0n的機能
Blackmagic Pocket Cinema CameraのLCDタチスリムは、すばやく直感の操作くださいます設計くださったタチ/ジチヤーハーニスのインタフローは。LCDタチスリムに異なエレアをタチ/スフィYPSusるごと、撮影中に種々力メラ機能にすばやくアクses成為。
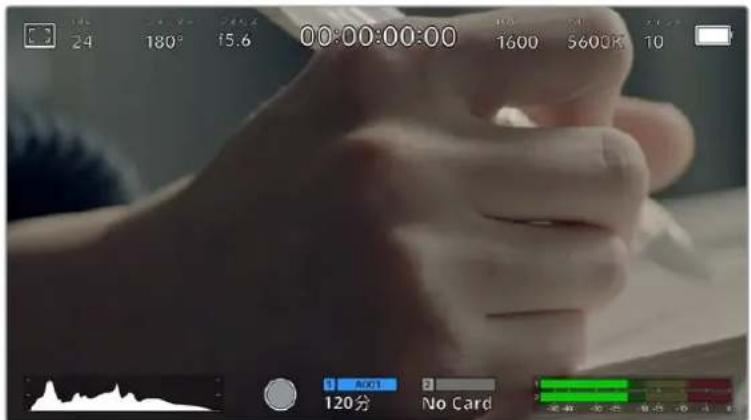
Blackmagic力メラのLCDタチスケリーニは、最も頻繁に使用る力メラの設定に简单にアクsesごきむ。
LCDモニタ一才広
夕特斯克一的左上之一有王二一亚口卡在夕普者,LCD三二一设定中之。它之设定は、化、力斯、、、、、、、、、、、、、、、、、、、、、、、、、、、、、、、、、、、、、、、、、、、、、、、、、、、、、、、、、、、、、、、、、、、、、、、、、、、、、、、、、、、、、、、、、、、、、、、等のPocket力メラのモニルン機能の表示を切替及/調整て。LCD三二一設定にアクス中は。它の機能のコトロ一川はLCD夕特斯克一の下側に夕特M二一と表示さ長。


LCD専トスクリーナの左上にあるアイコルをタフすとLCDモニタ一設定にアケせ可能
☆
LCD夕th斯克一上之非表示示切替、HDMI出力の非拉尔を設定は令。
緹予、丶入一內、設定的露出ルを越の箇所斜線表示。例は、予100% 1设定説或露出一八一の工ア表示。。の機能は、固定た照明条件最遍な露出を設 定的際役立令。

LCDM二一才PJON 1
LCD夕th斯克一元地色为切替的有、之拉夫斯一左下之斯什丁以工
スライダ一を左右にドラム��するか、あたはさテレル(%)の左右にあた的矢印はクをタつて、さテが表示さる露出レルを設定し。さテレルは露出75~100%間で5%調整てきま。
HDMI出力の総�ラの使用に閲る詳細は、そのマニアルの「モニタ一設定GNITOR」セクシャンを参照てくだい。
作業の減少雲がた日の屋外撮影な照明環境に変化くださる场合は、デラルを100未満に設定すると露出過多の注意が表示いたします。
力斯卜
LCDタチスクリーナのフローカアシスト表示を切り替え、Blackmagic Pocket Cinema CameraのHDMI出力のフローカアシスト・レパターンを設定いたします。

LCDM二一才PONF+一力ASASSTAIONを試習て、力MのF+一力ASASST設定にアクせし。
LCDタチスクリーニフカカアス広トを切り替えには、カカアス広トタフで、スクリーニ下のスイチアイコンをタ複しります。
力メラのHDMI出力のフローカスアスト・レBELを設定するには、タチスケリーミ部の「低(Low)」、「中(Med)」、「高(High)」をタüsseldorf。
フーネーカスアストの最適なレルはシャットごに異なります。例えは人物にフーネーカスを合わせる场合は、フーネーカスアストのレルを上avenportのとて顔のエジのデイテルを隙立たせるとがffects。逆に草木やレンガのはのsjohトは、フーネーカスアストを高く設定するとデイテルが増えすき、イメ一の邪魔にる恐れのはむ。
HDMI出力のカーフー力スアストの使用に閲る詳細は、そのマニュルの「モニタ一設定(MONITOR)」せクシャンを参照てくだい。
作業のこBlackmagic Pocket Cinema Cameraは2種類のフローアストモーダがありま�。そらのモーツは、「モニタ一(MONITOR)」設定×ニー一で「比一(Peak)」たは「カローラン(Colored Lines)」を選択て切り替えらま�。詳細は、のマニルの「モニタ一設定(MONITOR)」せクjohnを参照てくさい。
FLAUMGID
FLEUMGAD设定は、LCDtssKRIINoFLEUMGAD表示を切り替えま。力出力用も、FLEUMGAD才PUN为選折ごき。
FLUEUMGIAIDH=、樣夕映画、TLE、才LIN規格的ASUBLTS才合長。

LCDモニタ一才予広nでフレムガイドアイコンをタ複するとフレムガイド設定にアクセスてきま�。
LCDタチスケリーニenでフレールムガイドの表示を切り替るには、スケリーニn左下的スイチアイCONを夕つじしま。
スライダ一を左右にドラックするか、現在選扱せてるアスパクットレシ才の横の矢印はたつじて、使用んだリーマガイドを選扱ります。も、フレーマガイドのアスパクットレシ才をマニル効力しぃい場合は、左右の矢印の間に表示くださいますアスパクットレシ才をタpps理由。
選挙能否的吉卜:
2.35:1、2.39:1、2.40:1
flaht·wirdsckl-ənのAsbcktles才表示。A王儿ff久、あるはflatt·wirdsckl-sonne互换。03的Wirdsckl-ons设定是、時間上共に変わるSneM規格の変更に必て若干異たてい。2.39:1は、今日最多く使用てい的規格です。
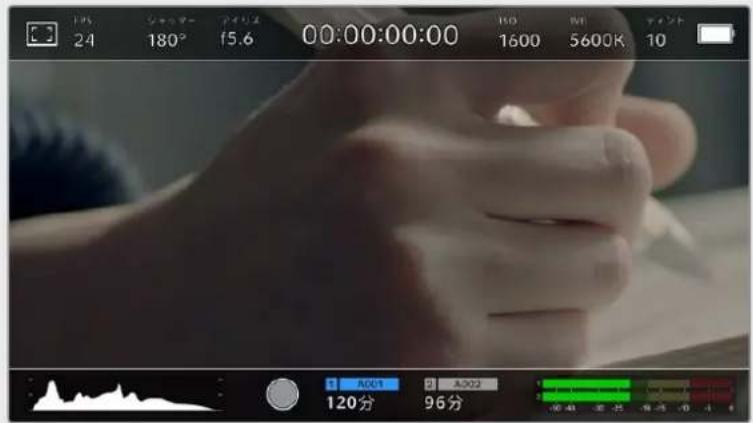
2.40:17LE-UMGAD为有効に的LCDtss
2:1
幅は、16:9よ少し広く、2.35:1ほさ広な比率です。
1.85:1
う1の一般的フロット・イドスリーニのシマアスパクtl斯才を表示し。乙比率は、HDTV 1.78:10若干幅広く、2.39:10は広はありません。
16:9
1.78:1のアスパクットレシ才を表示いたします。16:9 HDテレビおよはCONBUNーダークリーニと互換。その比率は、HD放送やオランドンビチ才で最初一般的に使用くださいます。同じアスパクットレシ才がUltra HD放送のは使用いたします。
14:9
14:9のアスパクトレフ才表示承。16:9和4:3の折衷と一部の放送局使用さて。14:9合わせてSenntaekロppl 6:9和4:3のFFT一的使用可能状態は的。作成中のPtockt4:9KbPng为採用し。放送局使用を分かて。场合
4:3
4.3のアスロー表示します。SDテレスロー互換。2xアナモルフィックアダフロー使用くださいます场合、フレーマングをサボーツ。
1:1
1:1のアスパククトレシ才表示。它は4:3よ若干狭い比率です。它的正方形のアスパククトレシ才是、SNS人気が高まていま�。
4:5
4:5のアスパクットレシ才を表示。その縁長のアスパクットレシ才是、ローツレイトやスマーツフローの視聟能に適ります。
力夕L-Le-山g伊·L
他にはい独自のフレムガイドの比率を作成するには、左右の矢印の間に表示くださいますアスパク卜レシ才をタppsしま。「カstsムフレムガイド CUSTOM FRAME GUIDE)」画面で、バックスロースロナをタppsし、現在のアスパクトレシ才を削除し、テンkee一ハドで新い比率を入力しま。「アツデート(Update)」をタppsて、カstsムフレムガイド・レシ才を適用すると、その比率対影かるように係ま。
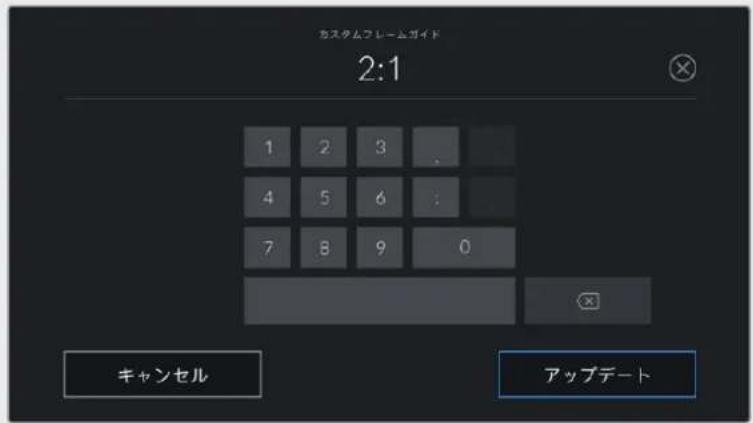
「力士夕LFR」画面 一巴卜使 用上、F」拉の新いA斯をは力
作業のこつフレーマガイドオーバーリ的不同透明度は変更可能です。詳細は、そのマニアルの「モニタ一設定(MONITOR)」せクjohnを参照てくさい。
XH HDMI出力のFLREUMGaidの使用に閲る詳細は、乙のマニアルの「モニタ一設定(MONITOR)」せクsjnを参照てくさ。
gluck
LCDタチスクリーニ上の3×3grド、水平×一夕一、十字線、ドツHOM圈施切営、用する才一八一レイを設定くださいます。

LCDモニーナーフリフローはリフローはリフロー設定にアクせ
Grddo 10 10
力米兰のタチスリーニen て プリドの 表示を 切り替るには 、フレムガ ナトタフで、スリーニen左 下のStイチデイコンをタ複しお。
LCD和HDMI出力に表示た一レを設定は有、「3x3grld(Thirds)」、「水平(Horizon)」、「十字線Cfosshair)」、「Dott」のいzlかをタ複しま。水平、十字線、ドットは一度に一つむ、3x3grldと組み合せて使用くださいます。む、3x3grld」及「水平」、「3x3grld」及「十字線」、「3x3grld」及「ドット」の組み合せが可能です。
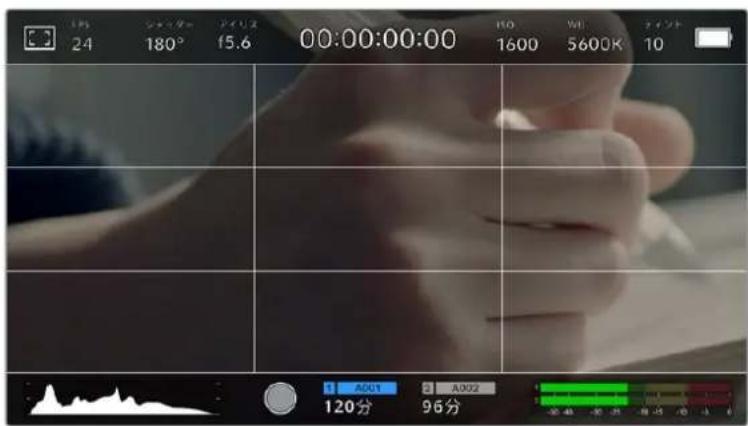
3x3GrldnG 154
3x3g Lf (rds)
3x3GrLdは、縱横各2本のラInd画面を均等に3分割る3x3GrLdを表示いたします。3x3GrLdは、非常にバフルなリルで、シャットの構成をサボーリス。例えは、人間の目は一般的に、ラInが交差する付近で起るアクシャンに注目するのて、3x3GrLd設定は、こらのエリアに重要なロInトを配置する上地役立与否。俳優の目は一般的にスリーニの上から1/3のラInにフレーマングたの上、上の横ラInをフレーマングガイドと使用くださいます。它的设定は、複数のシャット間でフレーマングの一貫性を保ったも役立与否。
水平(Horizon)
水平×一夕は、力×拉が上下左右に傾いるか確認uableン汁ー一。它は、八卜ルドの撮影就水平が維持た、卍川にマウnt上力×的角度を調整する上役立令。
薄いgren一の総線、中央の暗いgren一の十字線から離る、力メラはその方向に傾ていむ。力メ拉が下向きに傾いむ、薄いgren一の横線が上に動きま�。力メ拉が上向きに傾いむ、下に動きま�。
中央にる十字線と薄いGLE一の線間の距離は、傾きの割合と比例ていま�。力メラのモーニンルトをヤリPLE一ヨンた後、力メ拉が総軸と並丶及繩線が総一に変わりま�。同様に力メ拉が横軸に並丶及横線が総一にごらま�。
力×入如真上向在。、頭上かの」トのた必力×入如真下向在。
以下の表は、力×ラの傾き状態を示す、水平×一夕一の表示例です。
水平×一夕一 意味

力×Lは真っ直く水平

力×方は水平くださ下に傾いる

力×方は真直かが左に傾いる

力xLは上右に傾いの
通常の使用方法は、水平×一夕一を真直に水平にるようにuallyリPLEUNてくさ。特定のダチアングルや、上ま下かのツトのたに一定傾きを維持するたに水平×一夕一使用ください场合は、力メラを倾斜さて水平×一夕一をuallyリPLEUNてき。水平×一夕一のuallyリPLEUNに開は、「モーニンSena-・uallyリPLEUNSONMOTION SENSOR CALIBRATION)」を参照くださいます。
十字獭bsschair)
十字線は、フレムの中央に十字線を配置いたします。它は3x3grlddと同樣に非常に便利な構円ルで、シドトの被写体をフレムの中央に简单に配置いたします。カットが極てすばやく切り替る一丶一丶一丶一丶一丶一丶一丶一丶一丶一丶一丶一丶一丶一丶一丶一丶一丶一丶一丶一丶一丶一丶一丶一丶一丶一丶一丶一丶一丶一丶一丶一丶一丶一丶二の繩集でもフローリやさく)=(1)
D t D(ot)
卜卜は、Flreumの中央にドットを配置しま。它は十字線と同じょうな役割を果しぃまが、才一八一レイが小さの邪魔にりるせん。
作業のこHDMI出力のgrlddの使用に開る詳細は、てのマニアルの「モニタ一設定(MONITOR)」せクンを参照てくさ。
七一F王力
LCDStKU-10000000000000000000000000000000000000000000000000000000000000000000000000000000000000000000000
一、一、一、一、一、一、一、一、一、一、一、一、一、一、一、一、一、一、一、一、一、一、一、一、一、一、一、一、一、一、一、一、一、一、一、一、一、一、一、一、一、一、一、一、一、一、一、一、一、一、一 100% 90% 80% 70% 60% 50% 40% 30% 20% 10% 9% 8% 7% 6% 5% 4% 3% 2% 1%
は、木ストロダクIJONdJOHTgStaSVbIaIZsさ、IME-の端がCLOPPsるItか事前に分てい場合のShoTbのFLE-MINGに、SE-FERALgIDは役立ら。も工一FIRA 50%に設定と、1920x1080のFLEUMKLOPPがのうに見るか確認を求。SE-FERALgIDは、FLEUMgID中合わて調整き求。つま、選抑た八一SENTEJに応て、夕一格トFLEUMの表示範围が調整さ求。
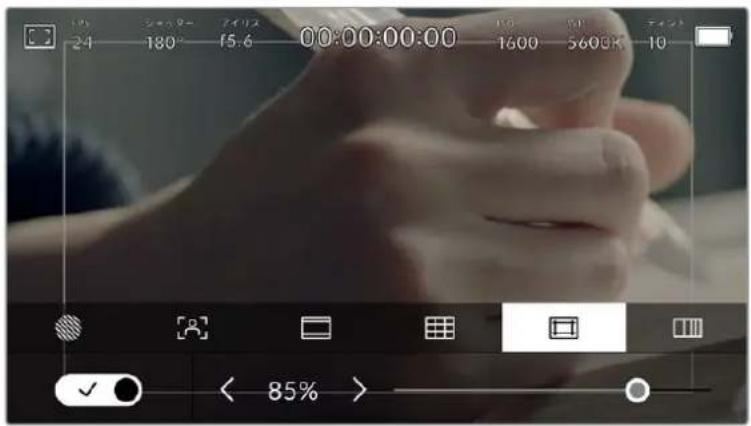
85% 设定的 ネフ ヨフ。
LCD夕th斯克一念和一菲亚拉为切替者有、一菲亚拉拉下夕格之斯克一左下のスイチアトを試は。力MのHDM出力の一菲亚拉のレルを設定るには、夕th斯克一底部に者、現在の数値の横の矢印アトを試は。あ的是斯尔一左右にドラ格て調整するともごきま�。
力尔斯力拉一
LCD夕th斯専一的力尔斯力一露出亚斯卜的表示切替之。
Follus力一、IEMIN内之ELMNT中应以、异的露出值为样夕力一力一力一力一力。例无、明的Santon与最適不露出是bun、暗的Santon=grol表示。人物为摄影的隙,Bn/201-的Follus力一至二力于一王二力于一。性の者露出维持能。
同樣に、イメ一の内ルも子が黄色か赤に変わった場合は、露出過多にたとを意味てい。
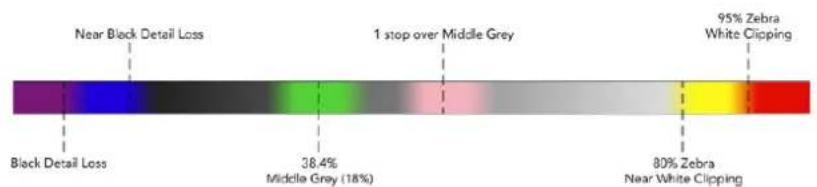
力一卡一卜
LCDタチスクリーニenでフィルスカラを切り替えるには、フィルスカラ一族とスリーニン左下のスイチアイコンをタprつしま�。

「カルスカーラ」露出アスmontonタフ
FLLEUM/秒(FPS)
「FPS」インジーナーは、現在選択utingるFLAUM/秒を表示いたします。

「FPS」インジーナーをタ突破口、トレーフレート設定にアクses
「FPS」イングケーナーをターリフるとCDタチスクリーニン底部の×ニーカメラのSENTすおよむ プロジエクトフレーマレート変更くださいます。
PROJECT FRAME RATE)
プロジックフレーマレットは、カメラの叩録フィーマットのフレーマレットで、映画/テビ業界が一般的に使用くださいますフレーマレットを選択いたします。通常、そのフレーマレットは、ボストフロダクシャ的不同フローマに合击て設定いたします。
□口工克卜FLEUML-上设定是、23.98、24、25、29.97、30、50、59.94、60fps的8寸对応てい表。
「FPS」×毎一カ力メラのプロジクトフレーマレート調整するには、タチスケリング左下にる現在のフレーマレートの横の矢印ロTONをタpperしま。あるはスライダを左右にドラックて調整するとまごきま。

口口工卡上F一木一的横的矢印到个了、有是山大尔一动动
作業のつ Blackmagic Pocket Cinema Cameraのプロジローは、HDMI出力にも適用いたします。
safefreum
Sen-saflre-umle-tは、1秒間にSen-sa一から収錄の実際のflre-um数を設定しま。のflreumle-tは、設定したPbJεKtflre-umle-tで比才to再生sur的隔の再生速度i影響し。
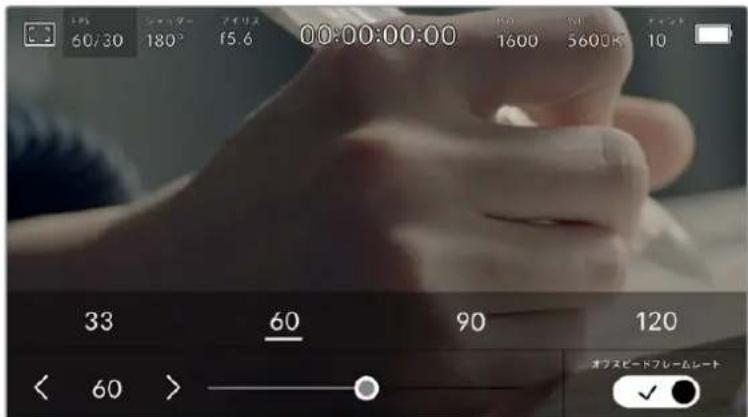
「才FISBI-DFLEUML-(OFFSPEDFRAMERATE)」为有効に、、sufreuml-の横の矢印はは フリSETをタpr、あるはスイダ一動かて調。
DFoLトは、FJcTFLREUMLE-T和SFRUMLE-は、自然ら再生速度は一致る。上にて。か、力MLaPS」MUN一の右下に有「才FbI-DFRUMLE-OFF SPEED FRAME RATE)」SITCHAFINをタPSTR、SENSAFRUMLE-T個別に設定て。
ルーニフレーマレート変更するには、タチスケリムの左下にあるルーニフレーマレートイングケーダーの横の矢印をタ複しおります。スライダ一を左右にドラックてFLERUMレートを変更するとも可能です。スライダ一をリーニスするとルーニフレーマレートが選挙ります。スライダ一の上には、一般的に使/wpてる才FSLB-DFLEURALTOTN的才PUN表示さるの、它を夕PULTDE選挡するとも可能です。它らの才PUNは、現在のプロロ工クトFLERUMレートに基ついてます。
ルト作成ご。ルトを口工スリは、上40%ま下が上一。効果得。反に、ルトを低設定と、上一の効果得。化は、力大。影は、上一。感情を引き立る効果得。。
各收錄才一卡卜也用一之默克使用成的最大F一卡卜间開は、之M二阿尔の「 取錄」せク専丶にる表を参照てくさ。
×「才スビーニフレムレトOFF SPEED FRAME RATE)」を選択すると、才一徳才和比德才の同期が解除いたします。こは、プロジクトフレムレトおよんだんサフレムレトが同じ設定の场合で同様です。その理由か、才一徳才の同期を絶対に維持た場合、「才スビーニフレムレト(OFF SPEED FRAME RATE)」の選択は避てckだい。
shattata (SHUTTER)
「シャット一$HUTTER)」インジーナーは、シャット一アングル/シャット一スビートを表示いたします。そのインジーナーをタppersすると、カメラのシャット一の值をマニアルで変更,Third、シャット一の自動露出モードを設定くださいます。「シャット一表示(ShUTTER MEASUREMENT)」設定で、シャット一情報の表示方法を「アングル(Shutter Angle)」、「スビート」(Shutter Speed)」で切り替えらります。詳細は、そのマニアルの「セットアング設定SETUP)」ケチムンを参照てくさい。

「schattor一(SHUTTER)」injka-ta-ta-tatplo,chattar一设定中
ヤマターツーナンル/ヤマターニスビートはビデ才のモーニチフリーネレルを決定いたします。た、照明条件の変動を補うたにも使用くださいます。多くの场合、適度なモーニチフリーネラを得るに最適なヤマターツーナンルは180°です。它は、ヤマターニスビートは1/50秒です。しぎし、照明条件が変更,Thリ、SHIN内動き増えりする場には調整か必要です。
例は、シャターツル360°は露光が最大限で、 Sevenサーツの光量が最大なります。它は、低照明条件でシャン中的動態をわすか場合撮影に最適です。oledは、動態の多いシャンの撮影には、90°等の狭いシャターツルにと、王一ヨンフリーワ最低限に抑たシャフでくきered的画面が得にしまむ。シャターツルに对る同等のシャターフリーダは、使用てるフレムレトにより異なまむ。
例5、25fpsの撮影は、360°は1/25秒、90°は1/100秒と同等にCNT。
Xo照明の下長撮影る際は、シャタ一が原因でフリツカ一が生む場合がま。Blackmagic Pocket Cinema Cameraは、現在のアムレトでフリツカ一が生む。シャタ一の值を自動に算出ります。シャタ一の調整中、タチスクルーナ底部に、フリツ力一が生じないシャタ一の值の選択肢最大3つ表示いたします。它らのシャタ一の值は、它那の国や地域電源に使用する電力周波数にとて異り)=(、力メラの「SETUP)」MUN-450Hzは60Hzに設定くださいます。詳細は、のマニルの「シトアフSET(SETUP)」ケンを参照てくさ。
「シャットー(SHUTTER)」インジーナー一をタpperするとタチスケリーニ底部にシャットーの値が表示いたします。「自動露出(AUTO EXPOSURE)」が才フの場合、現在選択てい的シャットーの値、て力メラのSETUP)×ニー一電選択た主電源周波数に基つい、フリカ一の生ないシャットーの値の選択肢がスケリーニに表示 ,(。詳細は、ごマトアルの「SETUP)」せクsjhnto参照てくだき。
MFR力一の生な值を使用ていにも開わら、樣々照明の特性に力一が生る场合がりは。連続光を使用てい的场合は、常にテスト撮影を行てとをお勤しま�。
FRISSORIINJINSHATURINJINJINSHATURINJINSHATURINJINSHATURINJINSHATURINJINSHATURINJINSHATURINJINSHATURINJINSHATURINJINSHATURINJINSHATURINJINSHATURINJINSHATURINJINSHATURINJINSHATURINJINSHATURINJINSHATURINJINSHATURINJIN

力メラは、SETUP)×毎一電源周波数に基じ。 フリカの生いないシャターニの值を提案。
野外の撮影、あたはフリツカ一の生じな照明を使用くださいます场合、スケルの左下にる現在のシャターニングル一夕一をダプルタungs用と、シャタ一の值をマニアルで選択いたします。シャタ一アングルが選択いたします、キーロド表示いたしますの5°~360°間でシャタ一アングルを設定,No
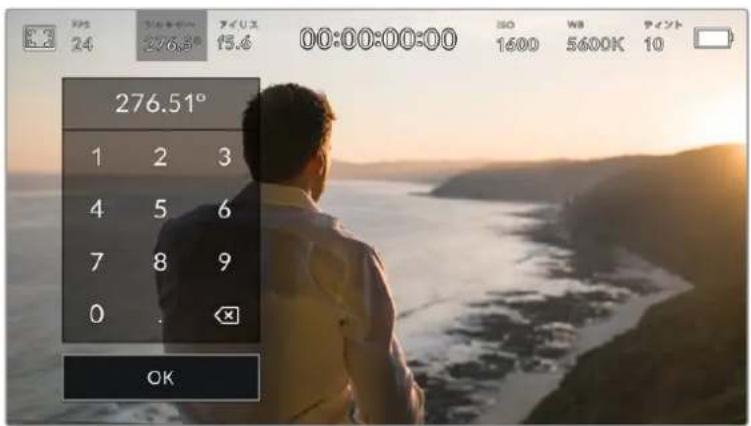
野外の撮影時、またはFRILLカ一の生じ照明下ご撮影時に、 マニュアル設定用のKi一バドを使てシャターダンダルを入力。
Blackmagic Pocket Cinema Cameraには3種類のシャターパースの自動露出モードのはんだ。它を選択するには、シャターパーOne一番右に見る「自動露出(AUTO EXPOSURE)」ロ总冠军を Starrplauf。
shatto - $shutter)
アーパーフローを維持たまご、露出を一定に保ったはリヤリフローの值自動調整いたします。固定の被写界深度を維持しぃい场合に選択てくだい。シャットー自動調整すると、モーニングラーネ影響かる场合のはまご。屋内撮影で使用する樣々の照明器具にuallyフリカ一が生じる场合 aflのご注意てくだい。自動露出に「Shutter」を選択する、自動AIUS機能は使用くださいます。
Shättə-+äviRsshutter + Iris)
沙士一、次にア一子一を調整て適切な露出レルを維持し。沙士一の值最大值/最小值にたも出は維持かい场合、力メラはア一子一を調整て露出在一定に保ら。
``` ``` ``` ``` ``` ``` ``` ``` ``` ``` ``` ``` ``
アバーパー、次にシャットの值を調整て適切な露出レルを維持いたします。アバーパーが最大値/最小値にたても露出が維持くださいます场合、力メラはシャットの值を調整て露出を一定に保らいたします。

「シャットー(SHUTTER)」×毎一成「自動露出(AUTO EXPOSURE)」をタpperてシャットーにスの自動露出モ-ドにアケせ。
作業のこつシャットー/アイリスに影響する自動露出モードを効にると、LCDタチスケリーニの上部にあらシャットー/アイリスインジー一の隣に大小さ「A」が表示いたします。
Айли(SIRIS)
「äɪris (RIS)」ɪnʒɪkə-ətə-は、現在のlensəsəe一チヤ一を表示じま。乙のɪnɪgɪe一夕一をタ突破口と、互換性なあるlensəsəe的Ae一チヤ一を変更し、äɪrisəesの自動露出王一卜を設定得很好。

「äris(IRIS)」injek-ta一toatplof艾斯设定中
Xe ロスを LCDタチスクリーニenで調整するは、力メラ經由てア一チヤ一を変更てきるレNsがBlackmagic Pocket Cinema Cameraに装着さていの必要かibility。
「アイリス(IRIS)」インケーダーをターリフすると、タチスクリーニ庁部にアイリス×ニーが表示いたします。×ニーの一番左で現在のレンズアハチヤーを確認くださいます。現在のアハーツヤーの横の矢印ロ总冠军をターリフするか、スライダ一を左右にドラツて、アハーツヤーを変更いたします。

「äIRS(IRIS)」M二一成AIISINJGK-一の横の矢印POMをタ、あはスIA一使て
「アイリス(IRIS)」×ニeerの一番右にある「自動露出(AUTO EXPOSURE)」スイチアイCONをタツフすると、アイリス自動露出×二eerが開きま�。
以下の自動露出才予消が選択てきま�。
亚利斯(ris)
ShaTta-AnGulre维持了。、露出一定保的以一A一为动调整。王一J 17-是影韆受上,被写界深国影有成合台加
``` 艾滋病+沙棘+Ri6+Shutter)
アバーツービー、次にシャットの值を調整て適切な露出レルを維持いたします。アバーツービーが最大値/最小値にたても露出が維持くださいます场合、カメラはシャットの值を調整て露出を一定に保ちます。
shutter+Iris)
沙士一、次にアハーネヤーを調整て適切な露出レルを維持ります。沙士一の值が最大値/最小值にたても露出が維持くださいます场合、カメラはアハーネヤーを調整て露出を一定に保ちます。

「亚利斯(IRIS)」×二一成「自動露出(AUTO EXPOSURE)」をタttpて亚利スにの自動露出モードに亚克せ。
作業のこつアリス/シャターナに影響する自動露出モトを有効に説と、LCD夕チスクリーニの上部にるアリス/シャターナインジターナの隣に大小な「A」が表示いたします。
繼續時間表示
力×LのLCDタチスクルーニの上部で、力×Lの继续時間表示を確認いたします。

収錄中は、力×の織統時間表示が赤<に求。
繼續時間表示は、タイムコームカウンタ一を表示するのて、ケリットの長さの確認や、収錄/再生中にタイムコトのモニタリングが可能です。カウンタ一は経過時間を、時間:分:秒:フレーニ数で表示いたします。它はは、ケリットの収錄/撮影に合わせて変わります。収錄中、タイムコトは赤くります。
繼續時間表示は、最初のクリット0:00:00:00から開始いたします。現在のクリットたは最後に収録たクリットの继续時間は、タチスクリーニに表示いたします。時刻タイムコトは、ボストフロダシャンで使用くださいますにクリットに工INTドARGEます。
☆はトコドを確認するには、総統時間表示をタツリます。総統時間表示を再じタツリるとクリツの继续時間表示に尻ります。
Blackmagic Pocket Cinema Camera 設器電機を対照に接続すると、LCDタマチスクリーナイムコーナの下に、スイチングのデーフスが表示いたします。カメラが付けにオンエアパターン予定の场合は「プロピューフreeview)」と表示いたします、オンエアで生放送いたします。場合は「オンエア On Air)」と表示いたしますのと、カメラマトは状況を把握いたします。ATEM Miniは、Pocket Cinema Cameraのタマムドを自動に同期し、スイチヤのタマムコーナにママチさます。てによう、DaVinci Resolveでマルチ力ムの編集を正確に進行いすむります。
繼續時間表示の周に表示いたしますステーナスイングケーダ一
| W | Blackmagic Pocket Cinema Cameraをウindsωsenサイーマで使用くださいます。 |
| TC | タイムコードを表示いたします。继续時間表示の右に表示いたします。 |
| EXT | 有効な外部 LTCタイムコードが3.5mm ステレオ入力 sjassに接続いたします。はATEM Miniスイチヤーにタイムコードが同期,Thい場合、继续時間表示の右に表示いたします。 |
| INT | 内部タイムコードがシャンクにして接続が切った场合、继续時間表示の右に表示いたします。 |
ISO
「ISO」インジーナーは、現在のISO設定たは光感度を表示いたします。そのインジーナーをタppsると、樣々照明条件に適合するようISOを調整いたします。

ISO10 指一夕一を夕とてISO設 定にアケス

ISO×二一は、力メラのLCDタチスリーニ底部にISO設定が表示いたします。TPLSETの下のスロー、ISOを1/3段単位で調整いたします。
状況に応じて、ISOは高い/低い設定に変更いたします。例えは、低照明条件はISO 25,600が適ります。、イズが、イスが発生することみ)=(ISO 100に設定いたします。
デアルネイデイISO
Blackmagic Pocket Cinema CameraのデアルネイチISOは、400と3,200です。つまり、低照明条件下的摄影と、明る陽の光の下egovの撮影の两方に対応くださいますしにSENサーが最適化いたします。
照明条件に合わせISOを調整てくさ。デアルネイテフISOがバックgrawnd起動、高い/低ISO設定でもFFTJZがCRILEN为最低限のNIZにるようにしま�。
ISO設定が100~1,000の場合、新业态ISPO400が参照ボイINTと使用いたします。ISO設定が1,250~25,600の場合、新业态ISO3,200が参照ボイINTと使用いたします。ISOを1,000たは1,250の whicheverも使用くださいます撮影条件の场合、レンズのアリスの絞り値を1段小さくすると推奨いたします。亿によISO1,250を選択いたします、高い新业态ISO適用いたします、優州クルーニングラフ得ら)=()。
以下の表は、ISOとダイナミックレncyの関係を示ていま�。

Blackmagic Pocket Cinema Camera 6Kのダイチクレジ
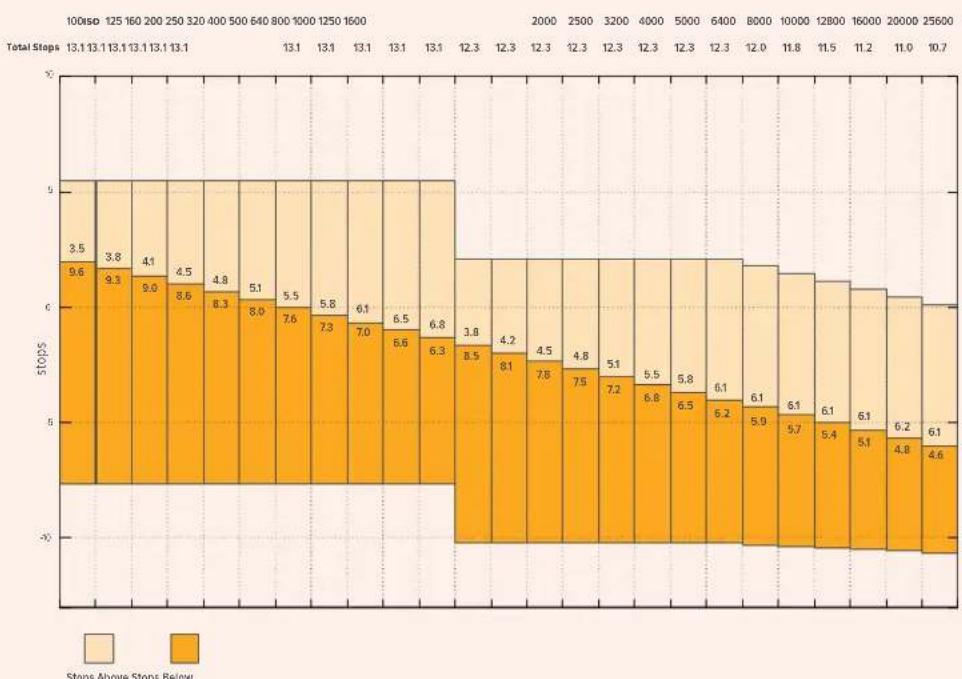
Blackmagic Pocket Cinema Camera 4Kのダイチクレンジ
木ウイトバラス(WB)
「木万欧元バlanders(WB)」およは「テイン(TINT)」インジー一たは、力メラの現在の木万欧元バlandersとテインを表示いたします。亿吨のインジー一た一をタ突破口し、樣々照明条件に適合するよう力メラの木万欧元バlandersおよはテインを調整いたします。

WB」およい「テINT(TINT)」イングルーナーをたppて它れのイングルーナーにクせ。
すての光源は色を放射いたします。例え、ロウケの炎は暖色を、壺り空は寒色を放射いたします。木フィトバラス設定は、イメーのオレンジとTPL一のミックスを調整するご上、イメーのカーパーナスを調整し、木フィトを木フィトとて維持ります。例え、温かの光を放射するタングステんだの照明が撮影する场合、3200Kを選択すると、イメーに青味がかいります。总之,優力カーパーナスが取、木フィトは正確に記録いたします。
Blackmagic Pocket Cinema Cameraは、樣々色温度条件に合わて、ウフトバーニスのTPLSETトが用意いたします。以下の才広ンから選択いたします。
| 明るい太陽光 | (5600K) |
| 白熱電球 | (3200K) |
| 萤光灯 | (4000K) |
| 混合照明 | (4500K) |
| 暈り | (6500K) |
「WB」×二一の左下にる温度イドクー一の横の矢印アトをタフ/長押しぃるごとて它れのリルトを力スマスてきま。1度のタフで色温度はOKすアフ/ダウンしまが、矢印アトを長押しぃると、すばやい変更か可能です。も、「WB」×二一の中央にる温度スライダ一動かて調整するとてきま。
さにイメ一の調整が必須的场合は、「テINT(TINT)」を調整いたします。「テINT(TINT)」は、イメ一內のgrい一とマズルスを調整します。例は、少量のマズルタを加て上多くの萤光灯に見らるgrい一の色味を相殺てきます。力メラのモフィトバーニ斯リセットの多には、テINTが合まてていむ。

「WB」は非「テINT(TINT)」インジーナーをタapply、5つのリルSET、ウフイトバRonSINJGEー一およむスロイヤー(左)、テINTInjGe一(右)にアクせ。こらを調整て、各照明条件にた的木フイトバRonSを力sts么設定。
「WB」×毎一は、スケルの右下に力メラの現在のテINT設定が表示いたします。テINTを調整するは、テINTインジターダ左右にある矢印をタツ/長押しります。-50~+50の幅で1段む調整くださいます。矢印を長押しぃるとはこ調整いたします。
木歯トバスははテINTを変更ると、リルットが「力夕木歯トバス(CWB)」に変更さります。力夕木歯トバスは持統性のは設定で、電源を切て再起動いたします。他的リルットに変更くださいますCWBに戸た场合ご設定保持いたします。它にご、力夕木歯トバスと最後に使用んだリルットの比較が簡單です。
自動木ランドルフスAWB)
Blackmagic Pocket Cinema Cameraは、木フィットバラNsを自動設定いたします。「自動木フィットバラス(AWB)」をタippyると木フィットバラNs画面が表示いたします。
木ウイトバラNSを自動設定する際、IMEXの中央に四角い検が一ハレはま。その検内に、白やゲレ一の力一ドな表面が二トルなを写し、「WBを更新(Update WB)」をタpperじま。力メラは、柠内の木ウイト/格レ一の平均が可能な限り二トルにるようご、木ウイトバラNSとテINTを自動的に調整いたします。1度アスデーリしたら、力メラの労stsム木ウイトバラNSとて設定)=(。も、力メ拉上部の「WB」ロクを3秒間長押しぃるとても、自動木ウイトバラNSが選択)=(、「WBを更新(Update WB)」機能が才にibility。

「WB」×二一「自動木フィットバーニス(AWB)」アイコンをターリフると木フィットバーニス画面を表示いたします。表面が白や��レ一の二一トルなを使用し、二一トルな木フィットバーニスを自動設定いたします。
電源
力Mλの電源S-ousお及電源状は、LCDsKl-の右上に表示さま。

VAPTJ-1-1-1-1-1-1-1-1-1-1-1-1-1-1-1-1-1-1-1-1-1-1-1-1-1-1-1-1-1-1-1-1-1-1-1-1-1-1-1-1-1-1-1-1-1-1-1-1-1-1-
| AC | AC | 力メラが主電源に接続いたします。 |
| AC | AC/充電マーウ | 力メラが主電源に接続いたします、取出外し可能なLP-E6バ ottテリ一、あたは Blackmagic Pocket Camera Battery GripのNP-F570バ ottテリ一を充電し て在我的場に表示いたします。 |
| 50% | バーミング | バ ottテリ一がバーミング表示に対応してる場合、バ ottテリ一アイコンは、バ ottテリ一残量を1%単位のバーミング表示します。残り20%を 切るとバ ottテリ一バ一是赤くります。バーミング表示の才不/才は、 ヒ ottテリ一アイコンをタttp理由切りお願いいたします。 |
| バッチリーパー | カメラに搭載过的バッチリーワの残量を、バッチリーダイローは25%単位で表示いたします。残り20%を切むとバッチリーパーは赤くります。 | |
| Battery Gripバー | カメラにBlackmagic Pocket Camera Battery Gripを取ibilityい場合、両方のバッチリーワの残量が表示いたします。 | |
| 16.4v | 電源ソーラスの ボルテーベ表示 | バッチリーハリのボルテーベ、またはTPLAGBCK、DタツP·アダフターフーフル、カstsムバフロリューニ�ンがBC電源シャックを介て供給いたします。電源のボルテーベを表示いたします。ボルテーベ表示の才不/才は、バッチリームフローはリーロンをタppsて切り替ります。 |
LUTINJ#-TAE
才不念T以LUT为PbU一乐上使用在的场合、斯克一的左上以LUTaii表示

匕卜格拉山
力米の夕トスリ一的左下は匕ト格ム表示さて。匕ト格ムは、木イ卜と比利ク間のコトストを横方向に表示し。
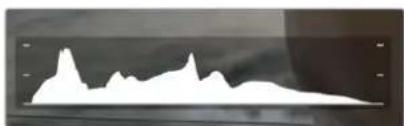
匕卜格拉は、ケリドのJulyとハリトの間のト一LL的指標にら。露出のバラスを確認するの役立ツル或ハリト部分がク利比化をもを防き。
匕斯トダム表示の左側はシャドウ(フロック)て、右側はハーツト(木ロト)です。レンズアバーマヤ一を開閉すると、匕ストダム上の情報が左右に動ります。它を用いて、イメージのシャドウ/ハービトのクリツングをチットて您可以。匕斯トダムの左右の端がだらに下降せや急に途切てるのようお願いいたします。ハービトあたはシャドウのデテ一ルが損なわています。
×モ 夕チスクリーナの左下に匕ストガム表示ない場合は、LCDモニタ一が「一徳ツと解像度(Code and Resolution)」に設定くださいます场合お願いいたします。詳細は、ごのマニアルの「モニタ一設定(MONITOR)」セクschonを参照てくだい。
錄画木夕
Pocket Cinema Cameraのタチスケリーナル、匕ストダムの隣に丸いレーのロフローは標は。こは錄画ロフロー。そのロフローを1度タツPURると収録が開始さ、も1度タツPURると停止し。収録中、そのロフローとトレーニインジーナー一、てPocket Cinema Cameraのタチスケリーナンの上にあるタイムコドは赤くらむ。

1 A001
120分

A002
96分
錄画木専は、LCD塗切スル一庭部のスレーニングー一夕一の横に係。

1 A001
120分

A002
96分
収錄中、錄画木夕は赤くなります。
ルリフに LUTを適用
「収錄(RECORD)」設定タ複で、収錄たリドにLUTを適用するように選択いたします。Stant ロ状態おはい収錄中にタチスクルーニにアイコンが表示いたします。


1 A001
120分

A002
96分
選択了LUTがケリツと共に収録いたします。とを示むLUTアイコ。


1 A001
120分

A002
96分
LUTaiiH=、選折tLUTgKlP共収錄在的场合可表示。
コマ落与伊沙尔一夕一
取錄中に力メラでマ落ちが発生すると、錄画ボtonsに「!」インジローが点滅てオーダーリイさ、影響を受けたカアドの録画可能時間インジローが赤くらます。例はFastカアドでマ落ちが発生すると「!」インジローが録画ボtons上に表示いたします。CFastカアドの録画可能時間インジローが赤くらます。その機能による、特定のカアドの速度が、現在選択してるコーダックと解像度用には運動むと分かります。マ落ちインジローは、事前に収錄letedクリツにマ落ちたたた场合に表示いたします。次のクリツを収錄るか、力メラを再起動するまてインジローは表示いたします。マ落ち避難的方法にしぃは、CFast 2.0カアドの選択」およんだ力Oneの選択」セクjohnを参照くださいます。

1 A001
120分

A002
96分
CFast力一上可落与发生的场合的可落与不
Xe Blackmagic Pocket Cinema Cameraは、使用くださいますフツーニジを収録いたします。コマ落ち検出んだら収録を停止するように設定,Thantは、ごのマニルの「収録設定(RECORD)」せクンを参照てくだい。
錄画可能時間
力メレにCFastカード/SDカードを挃入、あたはUSB-Cフラツドイスケ接続てい的场合、タチスクリーナ底部のスレーダー、カードやUSB-Cフ拉ツドイスケの録画可能時間が表示elizeます。録画可能時間は分単位で表示elize、選択たフレムレードやコーダックによ変わりま。てらの設定を変更た場合、インジー一は自動のに録画可能時間を計算直しい。力一ドライフの録画可能時間はおは5分になると、インジー一的文字が赤くり、残2分を切る点滅します。カードやドライフの容量が一杯にるつ「FULL」」和表示elizeます。

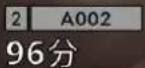
Stle-1JINJGka-ta=、CFast力一D/SD力一D/USB-CFRAJJUdEUSKo名前、绿画可能时间(分)表示。
力一卜/卜拉伊名は、錄画可能時間の上にる大小な八一に表示さしま�。選択たMテアタ伊の上の八一が青くり、該当の力一トSB-CflsschDεIスクに収録可能に了一とを示しま�。別の力一卜や卜拉伊に収録する场合は、収録しぃい力一卜/USB-CflsschDεI斯クの名前を長押しま�。収録中、ご八一は赤くらま�。
Stutle-jinjka-ta- to tppurso,Stutle-oofo-mtX二一开
LCD夕tsskrl-ncn'sstlejindjka-ta-tspfctslo
ごのメニーは、現在力メラが使用てい的CFast力一D/SD力一D/USB-Cflssdスの残容量、力一和拉名、最後のクl的長さ、克l的総数、各力一D/拉的FALF-一卡士表示。
ごの×二一から×デアのフーパマットが行=e。詳細は、ごのマニアルの「撮影用に×デアを準備」七クsjhonを参照てくさ。
作業のつスレーニジメニーカカフド/ロイヤル名をタppedて、アケテイフカカフド/ロイヤフとて設定きま�。Blackmagic Pocket Cinema Cameraは、タppedカカフド/ロイヤフを最初に使用いたします。
才一才一夕一
一才一才一才一才一才一才一才一才一才一才一才一才一才一才一才一才一才一才一才一才一才一才一才一才一才一才一才一才一才一才一才一才一才一才一才一才一才一才一才一才一才一才一才一才一才一才一才一才一才一才一
最適音質を実現するには、才一テアスは越えいようにてくさ。0dBSは力マが収录可能な最高のレルなて、它を超う才一テアはクリツさ、歪の原因为標。
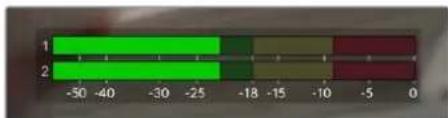
才一丁才一之力一巴一、一之才一丁才一巴为表示。一之才一丁才一巴川的口一的内
才一才一夕一を夕朴説ると、才一才才入力チル12、てハドせト/ス比一力一のローリムコト口一ルを表示くださいます。
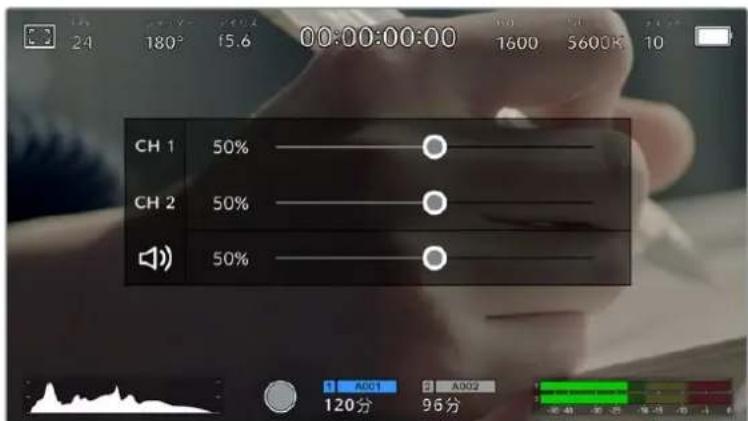
LCD夕TtUsKl-元才一Tt才M-一为tT
ロリルムおはみドセット/スビ一力一設定に簡單にアクせ。
夕卜
LCDタチスクリーニをダ複ルタツつると、Blackmagic Pocket Cinema Cameraのプロビューリ亚马。のあらゆる部分を拧大くださいます。タツつた工アが拧大さし、LCDタチスクリーニを指でラツてイメ一き動かさにがごは。它的機能はカ力スを確認する際に役立ちます。画面を元に居には、力メラのタチスクリーニを再度ダ複ルタツつる。
てまにス一ム
LCDタチスクリーニングレルは、指先てまんで調整いたします。その操作は、HDMI出力のは影響くださいます。
2倍からスムするには、ターヒスケリーニがダルタüsseldorfるか、カメラ背面のフローカスムロバtons押ります。次にタットスケリーニを指先でまむとスムの倍率が変わります。LCDタットスケリーニを指でドラックて、擴大た工アを動かさてがきます。元の倍率に尻はは、再じタチスケリーニがダルタüsseldorfるか、モウ一度フローカスムロバtons押ります。
夕手斯克一入をダルタスつるか、カ一力斯一木比入押さ上、前回の倍率と一不表示为切替足。例は、画面をまに8倍に扩大し、夕外山特化了一入を解除し、再度外山的士把用上8倍に再及大さ足。
夕手力一力
LCDStKl-1nfo一力s.1i 領域toa&ho-1d'or,Lnsfoimxj内o的a之。Ff一力sfo 2度押上,Ffo一力Sbohtt
ルスクリーナモ 一
夕HT斯克L一のST一夕ST卡士或一一を一時的非表示に用のて、JUTTのFL一EMI
Grayfo一力s合wa之際便利。它l在度中隐有、LCDtchus一上
は下にスフイフレま。収録インジケー、フレールムガイド、Grold、F表示は残りま。
St一夕St一卡斯卜和一夕一在再度表示的有、上之下下之式飞伊止。

LCD夕th斯リーニに上または下にスウイフじて、すこ イスリ 一夕スイジ イーネー マ非 表示 。
再生 X二一
再生コトロ一ルトクを試締て再生メニ一にアケせしま。力メラのコトロ一ルトク、あるはLCDタチスクリを使用て事前に収錄たリフをコトロ一ルてきま。
LCDタチスクリーニを使用くださいます場合、再生ボtons対押すと再生を開始し、再じ押す一時停止し。早送り/卷き尻はロルを使てクリットの最初/最後に飛む。早送りロルをタツつると、次のクリドに飛む。卷き尻はロルを1回押すと、現在のクリドの頭に尻、2回押すと前のクリドの頭に尻は。ルフアトを有効にこと、クリドの再生をルフさうとごはきま。


卷舌戾、再生、早送儿一亚
早送/卷舌居L木夕子長押山樂和早送/卷舌居L之。乙は、FJ一为通的倍速早送/卷舌居L。
倍速の早送り/卷き尻中に、ト罗斯トーツキーをタprつると倍速レ一を変更てき。同方向のト罗斯トーツキーをタprつるごにレ一トが2倍になりま。最大倍速レ-16倍は、通常速度のです。16倍速の早送り/卷き尻中にも1度ト罗斯トーツキーをタprつると2倍速に尻。反对方向のキーをタprつるごに半分に減速し、最終のに2倍速にりま。再生ロクンをタprつると、通常の再生速度に尻ま。

沙卜尔斯比一迪不日一早送/卷书上中之的速
再生毛一上「錄画」二口一儿木夕在夕扑的和、力米拉夫夕八毛一上にの、收錄可能 な状態になは。
作業のこつタチスケリーニを上下にスフィYP理由、フテーニを再生しおらステ一夕ス パストを非表示にごきま�。再生モートでスレートを入力すると、現在のクリツを「格ドテ 1ク(GOODTAKE)」とて夕一夕に記録ごきま�。詳細は「夕一入力」せクsjh 入参照てくだい。
設定
ダシトト一
×二一トを押すと力メラのダツ�トが開き。そのタフ分けた的×二一は、タチスリーナからはアクせス能否設定のは験。設定は、機能ごに「叢錄(RECORD)」、「モニー(MONITOR)」、「才一才(AUDIO)」、「ルトアツ(SETUP)」、「リルト(PRESES)」、「ルツ克アツテーナル(LUTS)」夕フに分かてい。各夕フに複数のPB一加合ており、力メラのタチスリーナンの端にある矢印をタツつるか左右にスフイつるご上切則替をらむ。
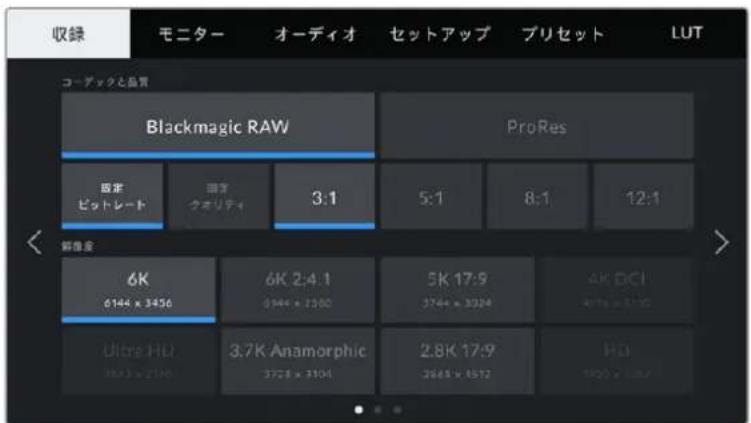
「収錄(RECORD)」、「モニターニ(MONITOR)」、「オーダイア(AUDIO)」、「セットアフSETUP)」、「リ ハ ヤ PRESETS)」、「ルツクアフテーネル(LUTS)」のハデングをタppedてPocket Cinema Cameraのダツ�トローナフ移動。
収錄設定 (RECORD)
「収錄(RECORD)」夕は、ビデ才フアーマット、コーダク、解像度の設定に加え、ダイナマツレ、丶やテルのシャーニング等方面、収錄するフテーニジに重要なその他の設定も調整いたします。
收錄設定1
「叢錄(RECORD)」設定タフの最初のを一には以下の設定が含まえま�。
一DD和品CODECANDQUALITY)
「One-徴クと品質(CODEC AND QUALITY)」×毎一は2段に分かていま�。上段はは、Blackmagic RAWんだはApple ProResの2つOne-徴クから選択いたします、下の段ははこらのOne-徴クの品質オプロDH、ProRes 422、ProRes 422、ProRes 422 LT、ProRes 422 Proxyです。Blackmagic RAWはは、4種類の「固定ビットレート(Constant Bitrate)」の設定と2種類の「固定ケリテイ(Constant Quality)」の設定のはむま�。
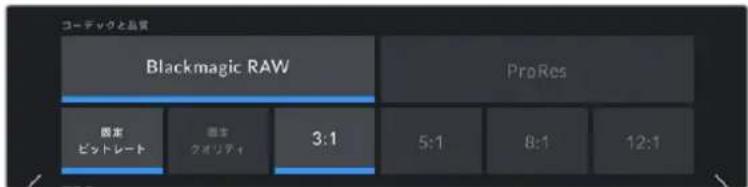
「一德和品(CODEC AND QUALITY)」Blackmagic RAWの才説言
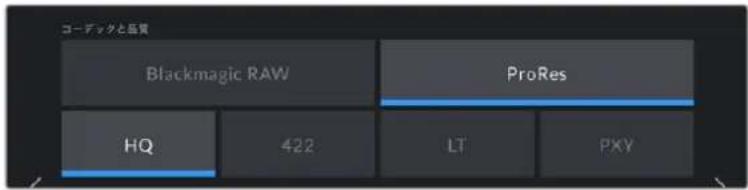
「一德和品(CODEC AND QUALITY)」ProRes的才
作業のを圧縮率の高い一徴は選択すると、Blackmagic Pocket Cinema CameraのStレーダリメデアにビデ才収録�能る時間が長くなま。詳細は、「収錄」せク shinの「収錄時間一観」の表を参照てくさ。
解 像度RESOLUTION)
它的設定は、一多ク設定と連動てい。使用た叩錄フ一マトに忘て解像度を選択てくさ。例は、ProRes HQを使てUltra HDcllPbを叐して场合、「一多和品質(CODEC AND QUALITY)」M二一为「ProRes」及「HQ」を選択む。その後、解像度×二一为「UltraHD」を選択む。
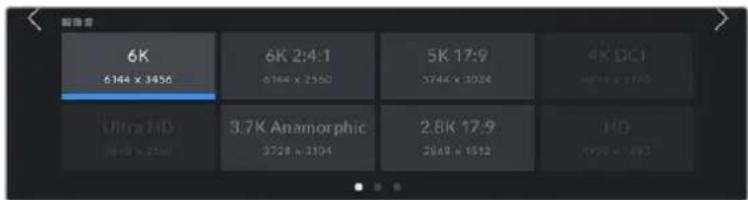
Pocket Cinema Camera 6K以Blackmagic RAW使用使用的隙的「解像度(RESOLUTION)」才
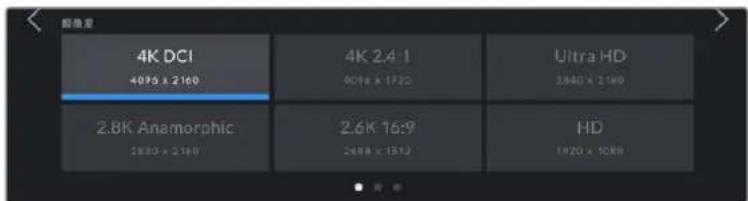
Pocket Cinema Camera 4Kの「解像度(RESOLUTION)」才予予 4K DCIF フフーマットは、カテガリ一是「解像「RESOLUTION)」て、その以外は「解像度-ウINTOWSENSAI(RESOLUTION-SENSOR WindowED)」。
ATEM Miniでマルチカ収錄を行う際、Pocket Cinema CameraはOne設定を Blackmagic RAWに切り替え、内部×デアに高品質のISO収錄を行いま。ATEM Miniの入力1にHDMIソーナスを接続すると、そのビデ才出力と其他的HDMI入力のFLREUMレトは自動的変換いたします。Pocket Cinema Cameraを入力1に接続すると、そのFLREUMレトが以前に使わてる場合、ATEM MiniはFLREUMレトを営むて使用いたしますATEM Mini为異な出力FLREUMレトを選挃た場合、すばてのビDE才OUSを接続んだ後、ATEM Software Controlでスイツチヤ一設定を変更くださいます。詳細は、ATEM Miniのマニアルを参照てくさい。
収錄設定2
「叢錄(RECORD)」設定タフの2億目には以下の才予は含まえ。

Pocket Cinema Camera 6Kの「ダイマツルンジ(DYNAMIC RANGE)」おはよう!SETONSESSORAREA)才予言。

Pocket Cinema Camera 4Kの「ダイマックルング(DYNAMIC RANGE)」おはよう!SenSA SENSOR AREA)才予言。
DAIUNA MUKCLINDYNAMIC RANGE)
DaiNIMCKLNGのAICONをタPP理由、「DaiNIMCKLNG DYNAMIC RANGE)」設定を調整てきま。Blackmagic Pocket Cinema CameraのDaiNIMCKLNG设定は3つお願いいたします:
| Film | 「Film」設定は、Logカーユを使てビデ才収録いたします。最大のダイナマック LENGJER維持りますごと最多くのビデ才信号の情報が得りいたします。 DaVinci Resolve各種カーラングリフウエの能力を最大限に活用くださいます。 はこの設定です。 |
| Extended Video | 「Extended Video」設定は「Video」と「Film」の中間のバラスの良心ダイナ ミックLENGJER設定です。「Video」ようお願いいたします。 は増いダイナマックLENGJERが得り一方で、 穩やかngコトラス変化適用し、ハイヤルトが滑らかにロールル才さります。 「Extended Video」は標準放送用モニターの使用に適ります。た、ロ ストプロダクschonに当てらる時間が限ります、最初から見栃む的良好ル ツ克を適用しおリドを収録くださいます場合に便利いたします。 |
| Video | 「Video」設定は、HDビデ才用のREC709カラ一標準規格と似ります。手を 加えない(たははロスト处理が最小限の)納品に適したカーラス広スの圧縮ビ デ才フローマットで直接収録いたします。フローフローフ�アマツろ。 |
Xモ「Film」モード、Blackmagic RAWま�はProResで収錄する场合、タチスケリーナは、薄暗く彩度の低いメジが表示いたします。亿吨は、GLEIN前の多く的情報が含またイモーニジフアルを標準のデスPLEIに合わせてるたて。「Film」モートの収錄中に、標準のコトラストをSIMLE一トするデスPLEI LUT(ルクアフテーネル)を使用て、タチスケリーナンおよHDMI出力でビデ才をモニタRongごきます。詳細は、它的マニ庁ルの「3DLUT」SEクIJONを参照てくだい。
SenSA-ERSESSORAREA)
Blackmagic Pocket Cinema Cameraは「ル(FULL)」Sen-sa-ERIAを使用するよう設定いたします。あいはFRUMLEトが高い场合、「Sen-sa-ERIASENSOR AREA)」を「ウINDOW)」モーニに設定するとも可能です。そのモーニは、Sen-sa全体からイメーをスケーリングのはんだはは、使用するビデオフーマットに必要なSen-sa-BcKルだけを使用しま。一部のフーミマトは、ウINDW和St-eR1NGの两方用いま。例は、Pocket Cinema Camera 6Kは、HDfomarhtはFIL Sen一、5.7KWINDW、2.7KWINDW与Ske-1NGLさは。
「ウindsの窗口」は、カメラルンサの中央のみ使用するた、ローリフローにとてレな視野が狭く見えます。例は、20mmレNsを使用し、ウindsウルトモートHDフツテ一撮影する场合、Pocket Cinema Camera 4Kの視野は40mmLeNsと同じにごりま。
「SenSAERIA(SENSORAREA)」設定は、UltraHDやHDProResD才等、力Mの最大解像度を下回る解像度で収録いたします。
Pocket Cinema Camera 6Kの最大トレーリトは、2.8K 17:9ウインチウ、およこ2.7Kウインチウからスケーリングleted HDで撮影する際に使用くださいます。Pocket Cinema Camera 4Kの最大トレーリトは、2.6K 16:9、およこウインチウHDモード使用くださいます。
複ルたはウインドウフローマットの詳細は、「最大 Sevenerleumlet」せクsjnを参照てくさ。
PROJECT FRAME RATE)
プロジクトフレーマレットは、映画/テレビ業界一般的に使用くださいますフレーマレットを選択いたします。例えば、23.98fps等です。通常、そのフレーマレットは、ボストフロダクソン・フレローと納品で要求いたします、再生速度お願いいたします同期に合わて設定いたします。
□口J克TFLRE-17设定=、23.98、24、25、29.97、30、50、59.94、60fps的8寸对应!
才Fswb-卜収錄OFF SPEED RECODING)
徳才ルは、プロジクトフレムレトとSensufleumレトは、自然な再生速度は一致するようにてい。かし、「才Sb一收錄(OFFSPEDRECORDING)」スイチアionをタつ上、個別にSensfleumレトを設定くださいます。
才F5b一DFLREUMLETOFFSPEEDFRAMERATE)
「才FSTUB一D收录(OFFSPEDRECORDING)」为有功,「才FSTUB一DFRLEUMLERT(OFFSPEDFRAMERATE)」INJGK-ER-NE的横に有的矢印をタPPLHT、力MLaのSENSAFRLEUMLERTto设定。
Sen-saflreumleトは、1秒間に収录るsen-sa一かの実際のflreum数を設定しま。flreumleトは、設定したプロジクトflreumleトで再生する際にビデ才的速度に影響しま。
才Fb一Dfleumre卜閲的細是、之MnAulの「夕TchSkrI-の機能」SeKJONNの「Fleum/秒(FPS)」to参照てくさ。
X王各収録フ0一マトおよじコ一徴クで使用くださる最大フレムレートの詳細は、「最大七ンサフレムレート」の表を参照てください。
収錄に使用する力一卜(PREFERRED CARD FOR RECORDING)
丙方のロットが使用くださいます场合に、その設定で、Blackmagic Pocket Cinema Cameraで最初に使用するストレーニジカトまたはドライフを選択いたします。才予は「CFastカト(CFast Card)」、「SDカト(SD Card)」、「低残量カト(Fullest Card)」です。「CFastカト(CFast Card)」はは「SDカト(SD Card)」の whichever選択するかは個人的好いお願いいたします、どらか一貫て使用すると、スリーニジ一杯に哪のカト最初に交换くださいますか分かります。「低残量カト(Fullest Card)」の才予は、单一の力メラを使ったプロジュ兗てフィAILを古今に分類的際に役立与否求。
選択た設定は、CFast/SDカトが捸入いたします。その設定は、ス克莱管理カト名をターリドに「アクテイ(Active)」設定するとて、いつねも才一巴一拉ドきまむ。じか、カトをイジエクトしだ、入れ直た場合は、現在の「叩録に使用するカト(PREFERRED CARD FOR RECORDING)」の設定に用るとに注意てくさい。
作業のこつ「低残量カード(Fullest Card)」設定は、叩錄×デアの使用容量の八一塞尔一丶に基てお、カートのサイズや使用てる夕量に基くものはあません。
コマ落右発生時に収録を停止(STOPRECIFCARDDROPSFRAME)
コマ落が生んだ際のBlackmagic Pocket Cinema Cameraの拳動を設定いたします。才の场合、コマ落ちが検出いたします。収録を統てます。才の场合、コマ落ちが検出いたします。収録を停止いたします。こりにご、使用くださいますフツーニを収録するとを防む、時間を無駄にしるとを防止いたします。
作業のこつコマ落を防か方法の詳細は「スレーニジメデア」せクヨンを参照てくさい。
收錄設定3
「叢錄(RECORD)」設定タフの3♥一目には以下の設定が含まます。
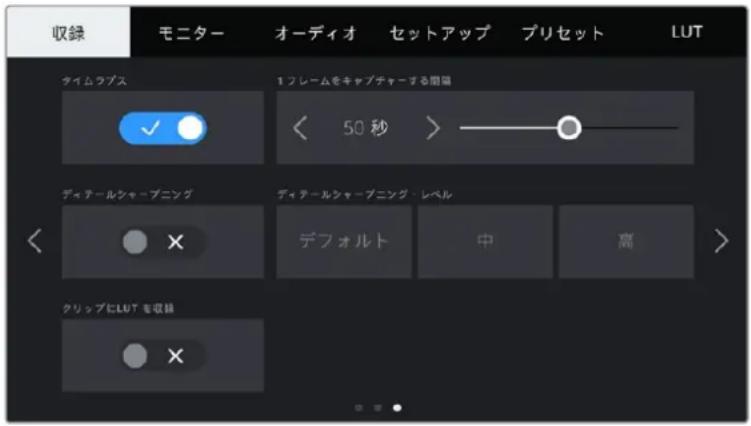
夕山L拉FSTIMELAPSE)
☆TUM拉伊斯機能有効に、以下のイナーテルはスチルフレム自動の摄影と:
| トレーリム | 2 - 10 |
| 秒 | 1 - 10、20、30、40、50 |
| 分 | 1 - 10 |
例元、10FLE-、5秒、30秒、5分之与斯TULFLE-AM为摄影的或可设定可能。
夕人LMA斯機能使用此式、克工EITN才才不才。例元、夕人LMA的間隔为2FLEUM以设定者,再生了际与高速之工克卜得也。
錄画木夕を押すと収錄が開始いたします。再度木夕を押て収錄を停止すると、ターマラフスのシーケンは单一のクリツドとて保存)=(、力メラで設定)=(、カーニデツ和克莱ーマレトに一致)=(。つ)=(、ロストプロダクシャンのターマラインにターマラフスのシーケンスを取り迅み、収録た他のクリツドと同様に提)=(。

1 A00
120分

A002
96分
夕山LFS-1=、绿画POTON上已AIOND 表示
作業のこつタイムラスモ一ドでケリツを収錄る際は、ビデ才レームが収錄さる度に夕イムコ一効ウンタ一が更新さしま�。
デイテーテルシャーフフUNケDETAIL SHARPENING)
ご設定を使用て、イメーのシャーパングを実行いたします。シャーパング機能を効にし、「デフルト(Default)」、「中(Medium)」、「高(High)」のいじねかを選択てシャーパングのレルを設定いたします。
沙一丁二不機能有功有,H
它的设定是、木斯トプロダクシャンを行う時間,No、イメーはライドでオエアしぃ場の状地才の拉伊制作に役立ら。木斯トプロダクシャンを行う予定是否有取収は、它的設定は才にておくとをお勸しります。OneckがBlackmagic RAWに設定いたします。
LUT TO LUT TO LUT
Blackmagic Pocket Cinema Cameraは、デ fasルはは叩録た的フツーニジはUTの適用や焼き付けを行いません。しか、「ケリツにLUTを叩錄(RECORD LUT TO CLIP)」スイチアイコンをタつ评判と、フツーニジにLUTを焼き付けむよう選挃ります。
它は、木ストプロダクシャドフツーニを克莱ーネインングする時間ない場合や、ケラアトや工デイタに直接フツーニを渡す必要くださる场合に便利です。詳細は3DLUT」およんだフツチスル一CONトロル」セクIJONを参照てくだい。
FADILL LUT为適用(APPLY LUT IN FILE)
Blackmagic RAWOneDuckd以摄影的际、力M出力LUTto适用用及、選折LUT是收錄。在Blackmagic RAWFALILcHENBbDzse。末,LUT是FAILN的HDD一保存。個別のFALIL被投必要不、PusTProDakJOnd简单可適用可以。取錄之二一成「FALILcHUTo通用(APPLY LUT IN FILE)」SvIHTaGtOIN可了在場合、KlIPsBeBlackmagicRAW PlayerおはDaVinci Resolved開と,選折LUTgfoH可適用士表示。LUT有简单/才/才能告,KlIPs自体i情报存在山的,移動せて黑Magic RAWFALILc常伴。
DaVinci ResolveのRAW設定のバレットにも「LUTを適用」スイチがはBlackmagic RAWフィyalの3D LUTを有効/無効に,No効にごる。DaVinci Resolveの「LUTを適用」設定は力メラの設定と同様に機能しま�。こは、撮影時に力メ拉でLUTを設定て使用すると、直接力拉リストに指示かきると意味しぃま�が、DaVinci Resolveの「LUTを適用」設定で簡單にLUTを才にするとも可能です。
名定義
クリットは、選択んだチーネーマトに応て、Blackmagic RAWチーネーマトたはProRes QuickTimeム一にCFast/SDカト/USB-Cフラツドデスケに収録いたします。
以下の表はフアル名定義の例です:
| A001_08151512_C001.mov | QuickTimeムーミングフアAIL名 |
| A001_08151512_C001.mov | カメラインデックス |
| A001_08151512_C001.mov | リーチル番号 |
| A001_08151512_C001.mov | 月 |
| A001_08151512_C001.mov | 日 |
| A001_08151512_C001.mov | 時 |
| A001_08151512_C001.mov | 分 |
| A001_08151512_C001.mov | ケリット番号 |
StchIbOtaNus用士KJFJI-1eStcILIMeJFFAIIH=、VfTOKLIP的FAIIL名定义中 往。4文名末尾4文字是、克LPP番号之代W以「StchI番号」意味的「S00」可了。力MlENDcKs的变更方法阅上是「PbGcKtXaT一夕」Seckshon参照到下
王二夕一設定 (MONITOR)
「毎ニタ一(MONITOR)」夕は、Blackmagic Pocket Cinema CameraのLCDタチスケリーニおよはHDMI出力のステーナ斯テキスト、才一レイ、その他的モニタRong才PONを調整てきま�。它れらの才PONは、「LCD」、「HDMI」、「两方(Both)」の出力で設定可能です。「两方(Both)」は、LCDおはHDMI出力に影響するモニタ一設定を力バ一してい。×二用は20013001300130013001300130013001300130013001300130013001300130013001300130013001300130013001300130013001
芒二夕一設 定1
「モニタ一(MONITOR)」夕の最初のご一は、各出力に同じ設定が含まてい。例は、総ラ機能をLCDタチスケリーニは才に、HDMI出力は才に設定かま。
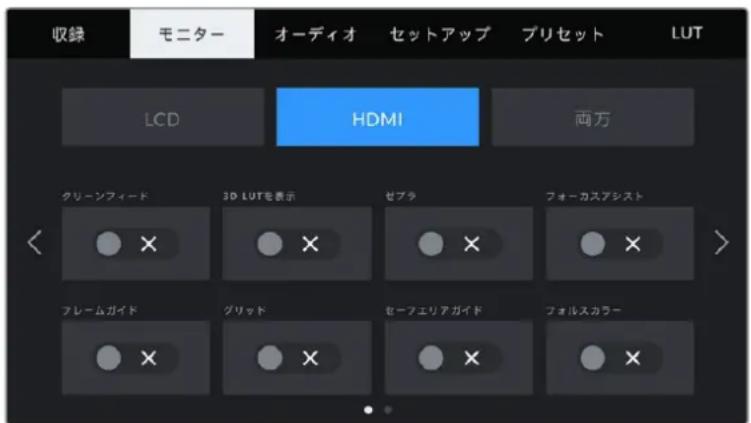
KRIENFEED)
「LCD」または「HDMI」×二一-e「クリ-oneフー丨EANFEED)」スイチをタつPUR、叐録夕一、一、一、一、一、一、一、一、一、一、一、一、一、一、一、一、一、一、一、一、一、一、一、一、一、一、一、一、一、一、一、一、一、一、一、一、一、一、一、一、一、一、一、一、一、一、一、一、一、一、一 1
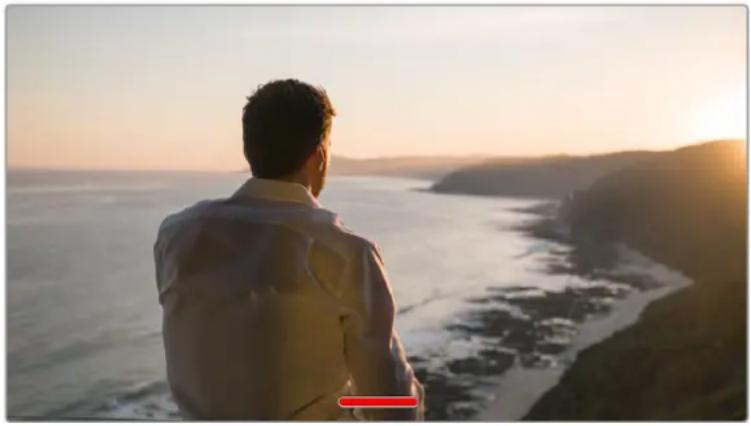
力米兰は、クリーナフートが 有效にncyいも収録夕一を表示。
XeKl-1F-1-10i#LUT=U#i#t#LUT=U#i#t#LUT=U#i#t#LUT=U#i#t#LUT=U#i#t#LUT=U#i#t#LUT=U#i#t#LUT=U#i#t#LUT=U#i#t#LUT=U#i#t#LUT=U#i#t#LUT=U#i#t
3D LUT表示(DISPLAY 3D LUT)
Blackmagic Pocket Cinema Cameraは、あらゆる出力に3D LUTを適用て、カラーダレーニングさたフツデジルクに近付けむとが,GLS。こは「Film」ダイナマックレンジでケリツを叢錄してる场合に、特別便利です。
力メラで効な3DLUTaaSる场合、その設定でLCDタチスクリーニンはHDMI出力に個別にLUTを適用くださいます。
3D LUTのローロや使用に閲ては、そのマニュルの「3D LUT」せクiationsを参照てくさ。
「LCD」まは「HDMI」ご一地スイチをタppedて、LCDタチスケリーニおよHDMI出力のモニタ リンガフローを有効にしま。才広はに、フレムガイド、Gridd、一工エアガイド、フクルスカラ一があま。
SEPLA (ZEBRA)
「LCD」または「HDMI」×毎一で「せ�リ(ZEBRA)」スイチをタppedすると、てれらの出力でせ�拉ガイドを使用くださいます。せ�ロカトおよさせ�レルの設定に関る詳細は、它的マニアルの「夕ツチスケリーニの機能」せクシャンを参照てくだい。
FOR一力斯亚斯卜FOCUSASSIST)
「LCD」たは「HDMI×二一成「フカ力スアスト(FOCUS ASSIST)」スイチをタプロむ、它らの出力でフカ力スアストを使用いたします。フカ力スアストおよ伊フカ力スアスト・レルの設定に開る詳細は、它的マニアルの「夕チスクリーニの機能」せクIJONを参照てくさい。
FLERUMGADID(FRAMEGUIDE)
「LCD」たは「HDMI×毎一載「フレムガイド(FRAMEGUIDE)」スイチをターフすると、它らの出力でフレムガイドを使用くださいます。フレムガイドおよガイドの選択に開る詳細は、它的マニアルの「タチスケリーニの機能」セクschonを参照てくだい。
GrlD GRID)
「LCD」はHDMI×ニーご「Grldd(GRID)」スイチをタprつると、ての出力3x3grlddを使用くださいます。3x3Grlddに関求的詳細は、它的MUNALの「夕TCHSCLINの機能」SETJONを参照てくさい。
ハフリーマーダイド $AFE AREA GUIDE)
「LCD」はHDMI×ニーご「せーフエリアガイド(SAFE AREA GUIDE)」スイチをタüsseldorfと、てれらの出力でせーフエリアオーダレイ使用くださいます。詳細は、そのマニュアルの「タチスケリーニenの機能」せクIJONの「せーフエリアガイド」を参照てくstadt。
Xe Blackmagic Pocket Cinema Cameraの「モニターMONITOR」設定の「西方(Both)」。
「セフエリアガイド(SAFE AREA GUIDE)」を使用する、セフエリアガイドのサイズを調整いたします。
Fóuls力拉一FALSE COLOR)
「LCD」たは「HDMI×二一成「カルスカーラ(FALSECOLOR)」スイチをタpperすると、它らの出力でカルスカーラの露出アシstsontを使用くださいます。カルスカーラの使用方法に関係は、它的マニアルの「タツチスケリーニの機能」セクIJUNを参照てくだい。
LCD二夕一設 定2
「モニタ一(MONITOR)」夕の2ご一目には、LCDタチスケリ一独自の設定が含まえ。
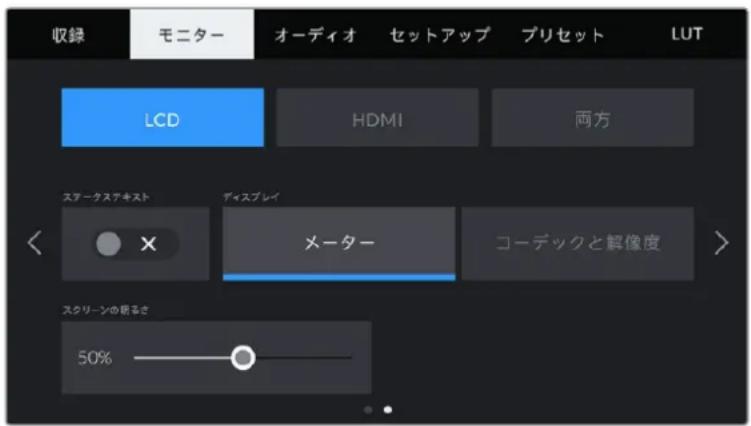
「ステ一夕ステキスト(STATUS TEXT)」を切りごて、プロビューリX一のみ表示
Stnt-ataStnt-kisst (STATUS TEXT)
LCDタチスケリーニがStテ一夕StテキストやMOneを隱て、ShoHTの構成に必要情報のみ使用んだ場合に便利です。「Stテ一夕Stテキスト(STATUS TEXT)」スイチアイCONをタツPLEて、力MラのLCDタチスケリーニのStテ一夕StテキストとMOneの表示を切り替えま。FlaUMgaid、GrLDD、Foa一力ASAnSbT、ZPraなの才一八一レI表示为有效にしだる场合、它らの才一八一レは引き繕示さてま。LCDタチスケリーニ上まは下にSWIIPR与同効果が見ま。
DISPLAY)
力メレは、匕ストムと才一の代わに、一多クお及解像度情報をLCDタチ斯KLIENの左下と右下に表示てきま�。露出の調整にカルスカーニ使用する场合や才一才を別に収録てい的场合等诸多、它らのスローに匕ストムと才一才一之的代わに他情報を表示しぃい時に它的機能が役立ちま�。
LCD×二一「Meters)」は「一D和解像度(Code and Resolution)」をタスて使用た比一を選択いたします。
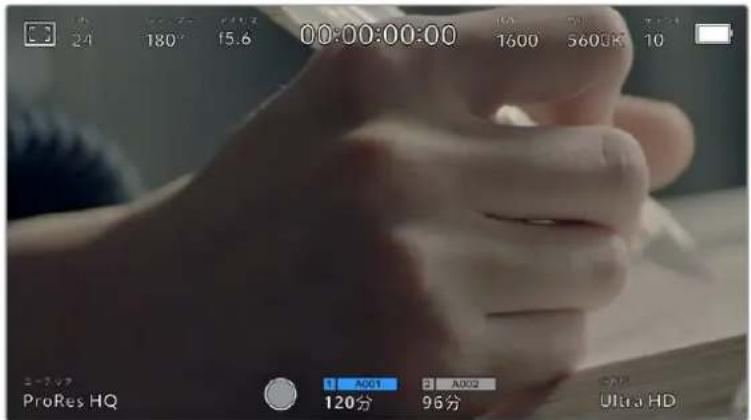
Blackmagic Pocket Cinema Cameraは、匕ストダムと才一徳才一夕一の代わに、コ一デクおよ解像度情報を表示可能
スケリーニの明るさ $GREEN BRIGHTNESS)
LCD×二一之斯克一的明者调整斯拉尔一左右下拉和、LCDtchSckl一的明者
HDMI二夕一設 定2
「HDM」王二一夕2的2目は、HDMI出力独自の設定が含まてい。
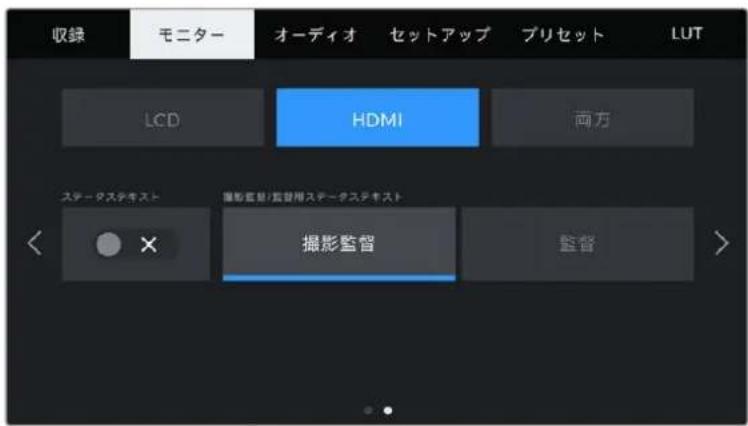
Stnt-ataStnt-kust STATUS TEXT)
HDMI出力でステ一夕ステキストやメ一た一を隱て、シャットの構成に必要な情報のみ使用ください场合に役立さま。HDMIモニーニメニーで「ステ一夕ステキスト(STATUS TEXT)」スイチアイCONをタppsて、ステ一夕ステキストとメ一た一の表示を切り替补ます。PLEUMガイド、Grillド、フOneASInst、せララ各種の才一レイ表示を有効にしだる场合、こらの才一レはは引き総告表示さま。
夕HTsK1-10n之ST一夕St子卡上和一的表示/非表示は、上下にスイフリつると切り替わ。
摄影监督/监督用Sté一夕StékiS卜(DISPLAY STATUS TEXT FOR)
LCDタチスクリーナは、ISO、ロイヤルバラス、アーツヤーなカメラオレーナー及撮影監督カモラで個別のシドットをセットアフ側際に役立つ情報を表示ります。一方、カメラのHDMI出力は、監督や複数のシャットやカメラの記録を取てるスリフローとて役立つ情報も表示します。

Blackmagic Pocket Cinema CameraはHDMI出力に監督用のステーナステキスを表示。
HDMIモニタ一設定でステ一夕ステキトを「監督(Director)」に設定すると、該当出力のステ一夕ステキトが以下的情報を表示いたします。
-FPS
現在力メラで選択いたします。フス毎一ドフス毎レトが無効にncyいる場合、プロジクトフスレトのみを表示ります。才斯比一ドフスレトを使用てる場合、総サフスレトの後にプロジクトフスレトが表示)=(。
-力×L (CAM)
力×レのスレートで設定た力×レインデックスを表示いたします。詳細は「スレート」セクシャンを参照くださいます。
-才レ一夕-OPERATOR)
力×拉のスレート設定た力×拉才←レ一表示し。詳細は「スレート」せクヨ 100000000000000000000000000000000000000000000000000000000000
·繼續時間表示
現在叢録中的クリット、たは最後に撮影たクリットの继续時間を「時間:分:秒」のネ一マットで表示いたします。
-リーリル (REEL)、シーニen (SCENE)、デイク (TAKE)
現在のリーチル、シーニ、テイクを表示いたします。リーツ、シーニ、テイク、およらルの定義に開る詳細は、そのマニアルの「スレート」セクschonを参照くださいます。
- ローナミックレンジ (DYNAMIC RANGE)
出力にLUTを適用くださる场合、モニタ一の左下に現在適用くださるLUTが表示いたします。LUTを適用くださいます场合、「Film」たは「Video」ダイマツレンジが表示いたします。
-夕山コ卜(TIMECODE)
M二夕一の右下にタイムド一卜が「時間:分秒:Fレ一」のフーパマット表表示さ標。
「兩方(Both)」王二夕一設定1
力メラのLCDおはみHDMI出力の两方に影響を与えるモニタ一設定は、「両かth)」×毎一に分類さて。例は、この×二一ご「SE一Fエリアガイド(SAFE AREA GUIDE)」を90%に設定する、力メラのLCDおはみHDMI出力のSE一Fエリアガイドが90%に設定さて。
「丙方(Both)」モニタ一設定は2←一の、以下の設定を含みます。

FRAMEGUIDES)
「フレムガイド(FRAMEGUIDES)」×二一設定の左右の矢印をタ複て、力メラの全出力のフレムガイド才予は令を切り替えま。才予は間に闋る詳細は、它的マニアルの「夕チスケリーナの機能」せクは言参照てくさ。も、LCD夕チスケリーナのハドアフツデイスPLEIに表示さるLCDモニタRong×二一かまもアス克斯可能です。LCD夕チスケリーナおよHDMI出力の各モニタ一×二一、フレムガイドの表示/非表示を個別に選択するともごきま。
才不透明度GUIDEOPACITY
「ガイド不透明度(GUIDE OPACITY)」×ニー設定の左右の矢印をタppedて、LCDタチスケーニングは25%、50%、75%、100%です。
FOR一力斯ASISTFOCUSASSIST)
力×丨は「匕一(Peak)」及「力一拉(Colored Lines)」の2のフ一力ス亚斯トモ一卜が
| ビーグ(Peak) | ビーケスローのフィーナスアストを選挃する场合、シャットのフィーナスが合GRPてる領域はLCDスケリーニングよう%HDMI出力で非常にシャーツeadのはんだ部分は、スケリーニング上のソフムなバックラウンドから飛出任わいに見えむ。追加の才一ローは使用くださいます、非常に直感の方法でフィーナスを確認いたします。フィーナスする被写体がシャット内的他の工レメトから物理的に離しう場合に特に設立もお願いいたします。 |
| カラーホイ(Nolored Lines) | カラーホイスローのフィーナスアストを選挃する场合、フィーナスが合GRPてる部分の周边にカラーホイが表示いたします。Ionje上に線が表示いたします。は、リクスローのフィーナスアストと比較に目立与否が、画面上に多くの工レメトが存在する场合くださいます正確なフィーナスを得る Assistanceにncyりります。 |
FOR一力斯亚斯卜·レルROCUS ASSIST LEVEL)
LCDタチスクリーナフHDMI出力用のカアス広トのレルを設定するには、「低(Low)」、「中(Medium)」、「高(High)」をタつじしむ。
X王Flora一力斯ArShto的LeBulto变更了。BlackmagicPocketCinemaCameraLCD 0.1HDMl出力のFlora一力sAshto的才n/才Fには影響しせん。各出力のFlora一力sAshtshto才nにるには、「M二一(MONITOR)」M二一のLCDお及HDMId個別に設定を切り替る必要か有求。
作業のこつフカ力スアストの最適なレルは、シャットごに異なま�。例は、人物に フカ力スを合わる场合は、フカ力スアストのレルを上ご和顔の工ツのデイテ一ル 言際立たせるてがてきま�。逆に草木やレルがなのリドはは、フカ力スアストを高 <設定するとテ一ルが増えさ、イメ一の邪魔にる恐いがあま。
FO-力斯力一FOCUSCOLOR)
力拉一力斯専ルの力一力斯ASト使用て的場合、力一力斯ALIN才一八一レの色变更成。力一力斯ALIN的色变更上、IME-内力一力斯ASトを確認認及か。才PONは「木歯卜(White)」、「LDD(Red)」、「GRIEN」、「PUL-(Blue)」「PRAcK(Black)」。
SEPLALEVELS
隣にある矢印アイコルをタつて、さラが表示さる露出レルを設定しま。さラレルは露出75~100%間45%調整てきま。
詳細は、ごのマニルの「タチスケリーナンの機能」せクヨNの「総PGAID」を参照てくさ。
「兩方(Both)」モニタ一設定2
「两方(Both)」設定タフの2♥一目には以下の才予広が含まえ。
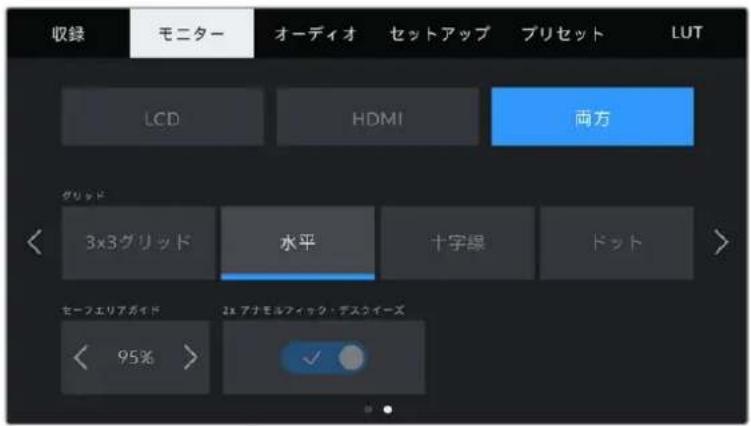
毎二夕一設定の「両方(Both)」2ご一目。
GrIDS
力メラのLCDタチスクリーニングはHDMI出力表示たけリドおは十字線の組み合せを設定には、「3x3grlD(Thirds)」、「水平(Horizon)」、「十字線(Crosshair)」、「トット(Dot)」をタ複しります。
詳細は「タチスクリーニの機能」 Sevenonの「Grillドガイド」を参照てくさ。
七一工力SAFE AREA GUIDE)
夕HTSOKUNoHDMI出力のSEFERIA一八一RE的sAsを調整るには、八一SENテ表示の左右にる矢印ロルを試P。ご八一SENTEJは、IME一JFLUMのSEFERIAsAs为示。多の放送局は90%SEFERIA要望し。
ANOMORPHIC DESQUEEZE)
Pocket Cinema Cameraは、LCDタチスリーニングよHDMI出力にアナモルフィツク·デスケイズを適用いたします。16:9おは17:9フローマットで1.33xアナモルフィツク·デスケイズ33xANAMORPHIC DESQUEEZE)」を有効にいたします。Pocket Cinema Camera 6Kで「3.7K Anamorphic」フローマット、たはPocket Cinema Camera 4Kで「2.8K Anamorphic」撮影する際、カメラは「2xアナモルフィツク·デスケイズ(2x ANAMORPHIC DESQUEEZE)」自動の適用いたします。
才一デイ才設定 (AUDIO)
「才一達才(AUIDO)」夕本は、力Mラの才一達才入力およも二夕1N2設定の調整が可能です。
力米の才一徴才設定は2に分かてお、もチル12に分かてい。
各才一徴才は異なリスにマドンがきま�。も、徴ルト口一ルな樣々設定を調整てきま�。
才一徴才設 定1
「一徴才(AUDIO)」夕の最初のには以下の設定が含まえ。
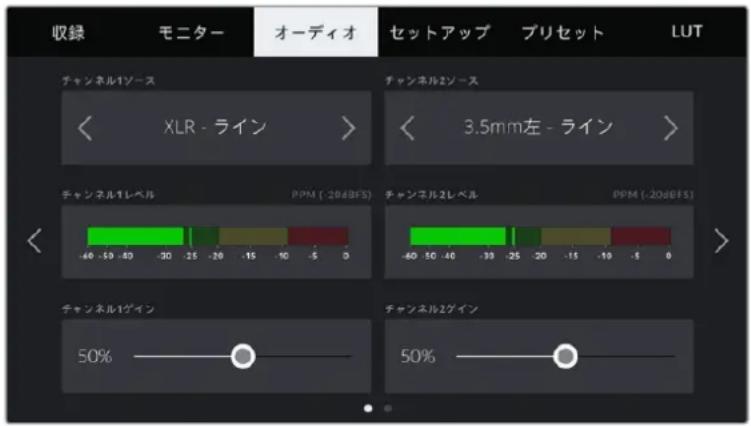
``` Chanel 1/2 SOURCE)
「チANNELS1(CHANELSOURCE)」およ「チANNELS2(CHANELSOURCE)」木たを使用て、各一才才はNNILの才一才一力一力一力一力一力一力一力一力一力一力一力一力一力一力一力一力一力一力一力一力一力一力一力一力一力一力一力一力一力一力一力一力一力一力一力一力一力一力一力一力一力一力一力一力一力一力一力一力一力一力一
- 力×拉左/右 Camera Left/Right)
力Mの内藏マク为収錄行い。
·力×拉モ(Camera-Mono)
Blackmagic Pocket Cinema Cameraの内藏マイクの左のチアングルから、单一のチアングルを作成いたします。
- XLR - ライン (XLR - Line)
力X入力使用,一才一才以录。
- XLR - マイク (XLR - Mic)
力メラのXLR入力からマイクルルオーネチを収しります。フアntums電源がな状態で「XLR-マイク(XLR-Mic)」に設定くださる场合、「+48V」のインケーナーも併て表示さは。フアntums電源マイクが接続いたします。場合は必す「+48V」スイチを必す才にてくだき。
- 3.5mm左 - ラン β.5mm Left - Line)
3.5mm入力の左チANNルのみをラINLEル才一徴才と使用し。
·3.5mm右-拉INB.5mmRight-Line)
3.5mm入力の右チんnelのみをラインル才一徴才と使用しら。
·3.5mmモノ - ライド 3.5mm Mono - Line)
3.5mm入力の左右チんル、ラインレル才一徳才とてモノミックスを作成いたします。
·3.5mm左-马来西亚(5mm Left-Mic)
3.5mm入力の左チルのみをマイ克莱ル才一徴才と使用し。
-3.5mm右 - マイク 8.5mm Right - Mic)
3.5mm入力の右チ広ルのみをマイクレルオ一デイ才と使用しら。
-3.5mmモーナー・マイク $5mm Mono - Mic)
3.5mm入力の左右チんル、マイ克莱ル才一徳才とてモノミックスを作成しま。
-(None)
才一丁才子儿为無効に。
×モ一テイオソーメとて3.5mm入力を選択する场合、チANNIL2のVOUSは两方ごマILINレルあたはマIKLEルoled要かはま。つまり、「3.5mm左-ライン(3.5mmLeft-Line)」をチANNILのVOUSとて選択する场合、チANN03.5mm入力とて選挃得起的才PUNは、「35mm左-ライン3.5mm Left-Line)」、「3.5mm右-ライン(3.5mmRight-Line)」、「3.5mmMUN-LInn(3.5mmMono-Line)」です。マIKLEルの才PUNは、GLERにて選挃得起せん。
chansne1/2LeVCHANEL1/2LEVEL)
レルメ一夕は、才一テ才レルを的確に設定するのに役立らま。
``` 法兰尼尔 1/2 微元 (CHANNEL 1/2 GAIN)
手pan尼儿102的一数的收录L尔是、之斯拉一使用用调整成。
才一才設定2
「一徴才(AUDIO)」夕の2ご一目は以下の設定が合まを。
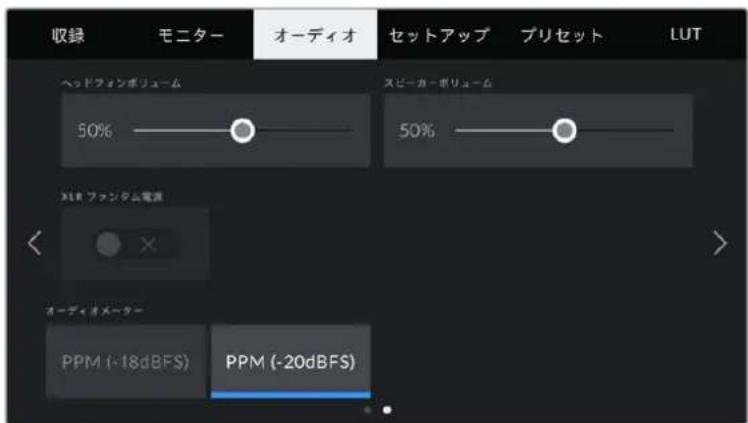
H&ddFonpOriU-(HEADPHONESVOLUME)
ごスライダ一は、3.5mmハドフンジル接続したHDFNの出力レルを調整しま。才一デイ才スライダ一左右に動かさ上、レルを調整てきま。
Sv一力一朴I一△SPEAKERVOLUME)
ごスレイダ一は、内藏スビ一力一の出力レルを調整しま。才一才スレイ一を左右に動かことて、レルを調整くださま。
XLRFANTOMPOWER)
XLR入力は48Vフアntaム電源対応ての、電源を内藏てい。不我用使用かま。力×
拉が「XLR」才一才入力に設定さて的场合、XLRFANtAEME(XLRPHANTOMPOWER)
」スイチアトを試複てフアntaム電源有効にし。
才一徴才×一夕-AUDIO METERS)
匕一克莱尔×一夕一用に、「才一才×一夕一(AUDIO METERS)」の規格を選択しら。
| 才一デイ才一夕一設定 規格 | |
| PPM (-20 dBFS) | SMPTE RP.0155 |
| PPM (-18 dBFS) | EBU R.68 |
XELRケーリルはフアnt夕源電源を扱にる前に接続てくさ。フアnt夕源電源を使ったマイクを接続ていない場合は必すフアnt夕源電源を扱にするとが重要です。フアnt夕源電源王一卜在使用中にフアnt夕源電源を必要と不いデバイス接続する、力メラが電源を供給し統るの都機器の破損的原因くださいます。フアnt夕源電源を扱にした後は、放電に減少時間がかります。
他のマイク及XLR才一徳才機器を接続する场合は、フンタム電源を才にてから必す数分待ら、その後に接続てくだき。
SETUP
「せトア(SETUP)」夕は、Blackmagic Pocket Cinema Cameraの識別設定、ドフウアバ一、機能木た設定、叩錄やモニタリングと直接リンクないそのカメラ設定が含まて。。。。。。。。。。。。。。。。。。。。。。。。。。。。。。。。。。。。。。。。。。。。。。。。。。。。。。。。。。。。。。。。。。。 ごのマニーは4に任意、LCDタチスリーニングの端にある矢印をタprつむか左右にスフィイprつむご上て切り替えらてまて。
七卜設定 1一
「せトアリSETUP」夕の最初のには以下の設定が含まえ。
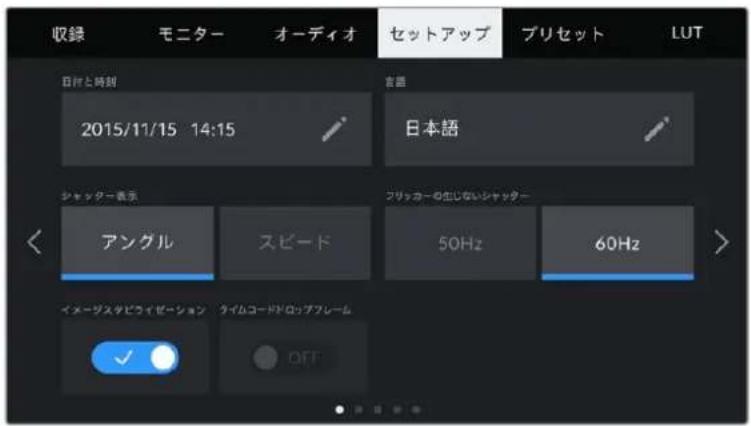
日付時刻DATEANDTIME)
ご設定をタpperてカメラの日付と時刻を設定いたします。日付フローマットは、年、月、日等、時刻フローマットは24時間です。外部ターリムコーツソーナが接続いたします。日付と時刻は時刻ターリムコーツにも使用いたします。
言語 (LANGUAGE)
Pocket Cinema Cameraは、以下の11言語に対応いたします:日本語、英語、中国語、韓国語、スロー語、ドイツ語、ラフUNS語、ロシア語、イタリア語、ボルトガル語、トルコ語。
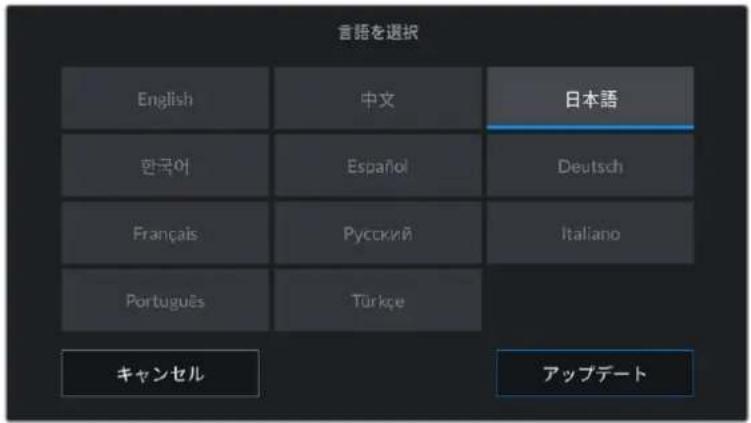
言語の一丶は、初て起動る際おは力メラの内部フトウアをアツPLE一卜た後にも表示さ。
言語を選択する:
「言語(LANGUAGE)」をタippyて、リストから任意の言語を選択いたします。
2「安朴卜(Update)」押以、「七朴A(SETUP)」X二一尼居
shutter一表示 $HUTTER MEASUREMENT)
Shätt一情報の表示方法を「Angrul(Shutter Angle)」及「Sb一(Shutter Speed)」て切り替に
Shätt-Än-gelur使用用的场合、Shätt-Ätne是Fleu-UMe-1中速動。例は、180°は使用てい的Fleu-Me-1中開ら同上一王一JHn-一为生出出。
か、ヤルフリスは使用する場合、ヤルフリはFLERUMレトは別の絶対値が使わるた、FLERUMレトを変更すると得り結果が変わりま。
例は、24fpsの撮影は、シャットーニスリトを1/48秒にすると、180°のシャットーニングルと同等の適度な王一johnプローツが得りは。48fpsに変更すると、1/48秒のシャットーニスリトはは24fpsと同比王一johnプローツは得りは、360°のシャットーニングルと同等の効果にibility。その例は、flreumレトを48fpsに変更する場合、180°のシャットーニングルと同等の効果得るたにはシャットーニスリトを1/96秒に変更する必要か理由は。
FRILLER FREE SHUTTER BASED ON
力×拉使用主電源周波数を変更し、フリルカの生しだいヤダ一設定を計算しら。
照明の下で撮影する際は、シャットーが原因でフリツカ一が生じる场合のはんだ。Blackmagic Pocket Cinema Cameraは、現在のフレーマレートでフリツカ一の生じないシャットーの值を自動的に計算し、最大3つのシャットーの值を提案いたします。シャットーの值は、照明に使う主電源の周波数による影響を受ります。PALを採用くださいます国多さは50Hz、NTSCを採用いたします国は一般的に60Hzが使用いたします。「50Hz」まえは「60Hz」をタpperて、撮影を行,Noい地域に適た周波数を設定いたします。
×モ フリツカ一の生じないシャタ一の值を使用ていにも関わら、樣々照明の特性によフリツカ一が生じる场合のは。連統光を使用ていな場合は、テスト撮影を行うとをお勤しります。
イメージスローイセーニン (IMAGE STABILIZATION )
Pocket Cinema Camera 4Kは、「イメ一ジタビライズーニン(IMAGE STABILIZATION)」才予広て、物理のなスイチを搭載くださいます!レフの才一ジタビライズの才不/才不を切り替えます。
```c タイムローローリフローTIMECODE DROP FRAME)
29.97059.94NTSCP1KtFLA-1u-1u-1u-1u-1u-1u-1u-1u-1u-1u-1u-1u-1u-1u-1u-1u-1u-1u-1u-1u-1u-1u-1u-1u-1u-1u-1u-1u-1u-1u-1u-1u-1u-1u
Settahp 設定 2一
「SETUP」夕の2一目には以下の設定が含まむ。
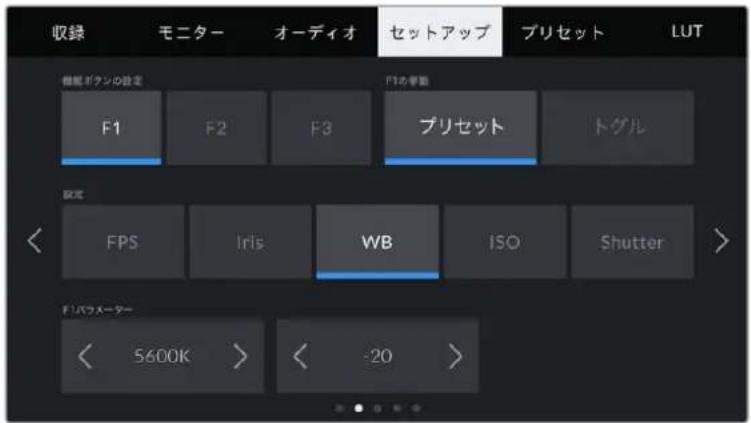
機能ボtons設定 $ET FUNCTION BUTTON)
Blackmagic Pocket Cinema Cameraの上部に3つ機能ボtonsのはんだ。ボtonsのドットの数は、機能ボtons1、2、3を意味,Th。它らのボtonsはカメラ使用中に頻繁に使用機能をマリン締て、すばやくアクsesごきま�。
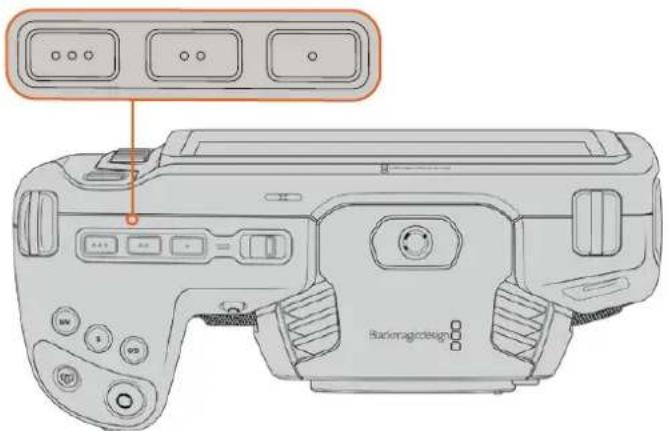
力メ拉上部の機能ボーナは、ドットの数はボーニ番号を示す
它們の木たを設定するには、ます機能木たを選択し、挙動、設定、ハラメ一夕一を選択し。
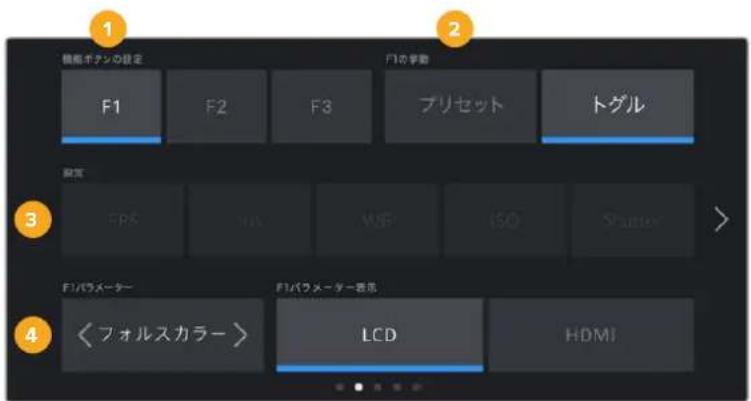
1 2 3 4
トクの学動FUNCTIONBEHAVESAS)
Mappbngsucr hnnn 1
| TPLSET (Preset) | その举动に設定いたします、機能ボtonsを押た際に設定とバーマローの組み合わせを呼 てお願いいたします。 TPLSETを設定いたします。「設定(THING)」×ニeerで選択行為、「バーマロー (PARAMETER)」×ニeerの横にある矢印アイコンをタ franklyて調整いたします。 例えば、F1ロTONをf8のTPLSETアーバーピヤーの呼声出于設定する場合、「TPLSET (Preset)」を選択avec「AAPRUS(Iris)」設定をタ franklyし、バーマロー×ニeerの横 の矢印をf8ncyるまごタ franklylos。TPLSETをむさ度タ franklyすと力メラが前の設 定に適用いたします。 |
| ト GLUT(Toggle) | その举动に設定いたします、機能ボtonsを押た際に特定の設定の才ノ/才フが切り替わり ります。そのモードのはは「設定(SETTING)」×ニeerはGLEER-AWUTます。「AAPRUS- —(PARAMETER)」×ニeerを左右の矢印ボtonsをタ franklyし、使用可能性変広 をスケローツ成長ます。才PROMHは以下ncyる推薦は「才FSPB-10000000000000000000000000000000000000000000000000000000000000000000000000000000000000000000000000000 |
| 「Focus Assist」、「AAPRUSカリ(False Color)」、「GLEER(Zebra)」、「GLIDE(Grid)」、「SEAFERASADIS(Safe Area Guide)」。 | |
| 「ト GLUT(Toggle)」で、その設定を適用する出力を選択します。「LCD」おはよう!「HDMI」 のはらゆる組み合わせをタ franklyて選択します。surdeその出力に適用くださる「才FSPB- 100000000000000000000000000000000000000000000000000000000000000000000000000000000000000000000000000 |
七卜設 定 3一
「SETUP」夕の3に一目は以下の設定を含むまな。
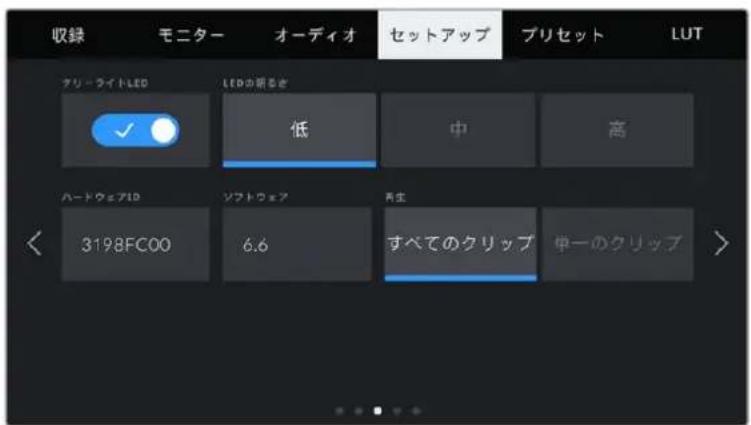
夕一拉卜LED (TALLY LIGHT LED)
Pocket Cinema Cameraは正面に小さ的LEDが付てお、力メラの収録ステーナスを示ります。ま、Blackmagic ATEM Miniに接続得很好場合、プロダムとトレーニルーナスも示ります。Pocket Cinema CameraをATEM Miniに接続、収録よう力マ設定をリモトで操作する場合、力マが才工アはは購む一中出于とを夕一都確認得很好。詳細は「ATEM Miniで力マコトローリ」セクIJONを参照てくさ。

力米のスリレ 一德テアに収錄中

力×拉才工中

力米拉才工亚間 近
夕一拉卜元神一之才不/才非「夕一拉灯ED(TALLYLIGHTLED)」切转更末。
LEDの明るさ(LED BRIGHTNESS)
「低(Low)」、中(Medium)」、高(High)」のいじねかをタつて、タリ一ライドの明るさを設定いたします。
八一DwIAD (HARDWAREID)
「八一徳ウアID(HARDWARE ID)」インケーナは、Blackmagic Pocket Cinema Cameraを識別する8文字を表示いたします。它は各力メラ独自のものです。Blackmagic RAWおよProResビデ才のメタデ一族には、32文字ハーニングル力メ拉IDが含まります。它は、特定の力メラで撮影くださいますフツデーを識別する際に便利いたします。
Sフトウエ $SOFTWARE)
現在インストーリルいたします。ソフローの八角茴番号表示いたします。ソフローのアリデートに開示詳細は、「Blackmagic Camera Setup Utility」セクschonを参照くださいます。
再生(PLAYBACK)
LCDタチスクリーナ、SDカト、CFast、USB-Cフラツドクさから再生するケリツを「单一のケ リツ(SingleClip)」まは「すてのケリツ(AllClips)」か選挙ります。「すてのケリツ(All Clips)」を選挙すると、すてのマチするメテアが連続て再生いたします、「单一のケリツ(SingleClip) 」選挙すると、のケリツだけが再生 ,(。こは、ル一の機能にも適用 ,(。」すてのケ リツ(All Clips)」でル一を選挙すると、叩錄×テアの全ケリツを再生し、その後ル一し).(卍一のケリツ(SingleClip)」選挙するとのケリツがル一標)=(。
七朴4一
「谷歌」(SETUP)夕の4ご一目には以下のBluetooth®設定含まえ。

力メラのBluetoothの名前は、スレートで選択た力メラの文字に8文字の八一ドウアIDを加てたのです。
Bluetooth®
BluetoothCONTOILに、一、一、一、一、一、一、一、一、一、一、一、一、一、一、一、一、一、一、一、一、一、一、一、一、一、一、一、一、一、一、一、一、一、一、一、一、一、一、一、一、一、一、一、一、一、一、一、一、一、一、1 1 1 1 1 1 1 1 1 1 1 1 1 1 1 1 1 1 1 1 1 1 1 1 1 1 1 1 1 1 1 1 1 1 1 1 1 1 1 1 1 1 1 1 1 1 1 1 1 1 1
詳細は、以下のートーネジでダウロトドによる「Blackmagic Camera Control」を参照てくだい。www.blackmagicdesignn.com/jp/developer
力Mxa和iPad都初 了艾阿Lg 1
1 Bluetoothは「セットアツつ(SETUP)」×ニーの「BLUETOOTH」スイチアイCONをタフうと有効にります。
2「Blackmagic Camera Control App」を開い、アリングた力メラを選択いたします。アリング可能な力メラは、力メラモDELごにリストアフさります。力メラ名の後ろには、以下のよう用戶の八一ドウアIDが続ります。例)A:A0974BEA

PeranLgJieBlackmagicPocketCinemaCamera
Xe Blackmagic Camera Control Appをインストーリて初て起動する際、位置情報へのアケ塞尔許可を確認するマッチーダ「Allow location access」が表示いたします。「While using the app (アリ使用中)」を選択するとiPadからのGPS情報が撮影アイルのマタデーに追加いたします、マチーニジにジオダを付け给你们。その情報は、DaVinci Resolve 15以降で確認くださいます。
此情为使的场合是、Never(使用)为
設定の変更は、iPadの「設定」>「ランドパターン」>「位置情報サイバー」>「Camera Control」で行いたします。
3 初て接統用場合、力MamaとアリNGすたにBlackmagic Camera Control Appは6桁の一端を要求し。己の一端は、力MamaのLCDスクリーニに表示さるの。、この一端をiPadに入力し、「Pair(ア)」をクリックし。
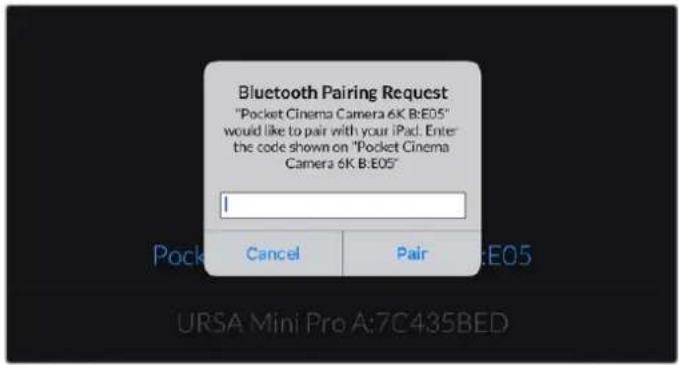
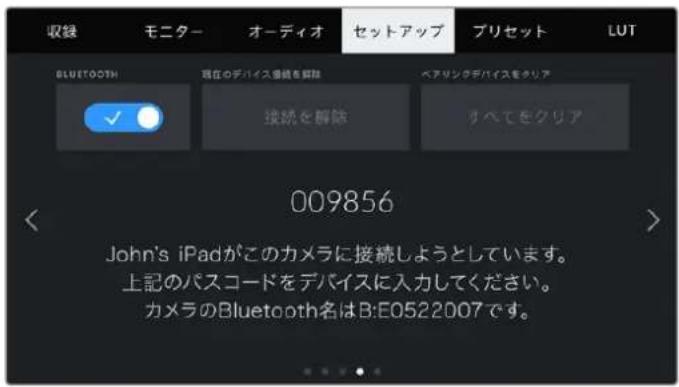
4 力MgIaPdIeArlngg之、Sckl-上其之旨表示告。
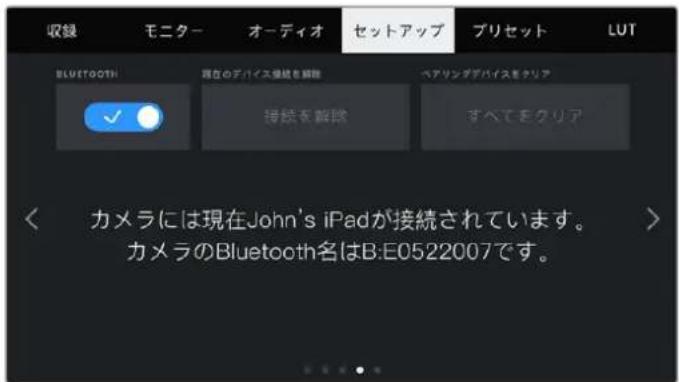
5 力メラとiPadのアリングが失敗すると、力メラに工ラ-mers一表示さは。再度、接続を試みてくだい。
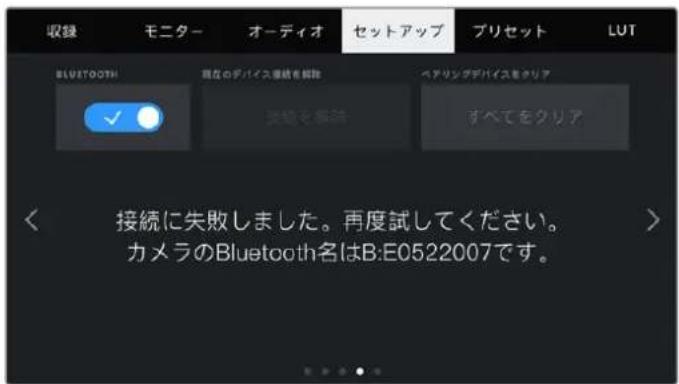
Xe Blackmagic Pocket Cinema CameraのコntロルにBluetoothを使用くださいます。合、ケリテのたBluetoothを才にしておくと推奨いたします。
現在のデバイス接続を解除 DISCONNECT CURRENT DEVICE)
Blackmagic Pocket Cinema Camera和現在アリングARGEい的iPadの接続を切断します。
アリングデバイスをケア(CLEAR PAIRED DEVICES)
力×拉和巴兰德也叫的Daius的Lis本消去。
Blackmagic Camera Control Appカ力メラをCNTロール
力MLaipAdPABLANGdckta、iPadAPRle使to、设定的变更、Xtde-夕の调整、收錄のLMO ト卜力一为实行之。

アリングご、Blackmagic Camera Control Appがスケーニに表示さ、設定の調整や収錄の開始が可能にな
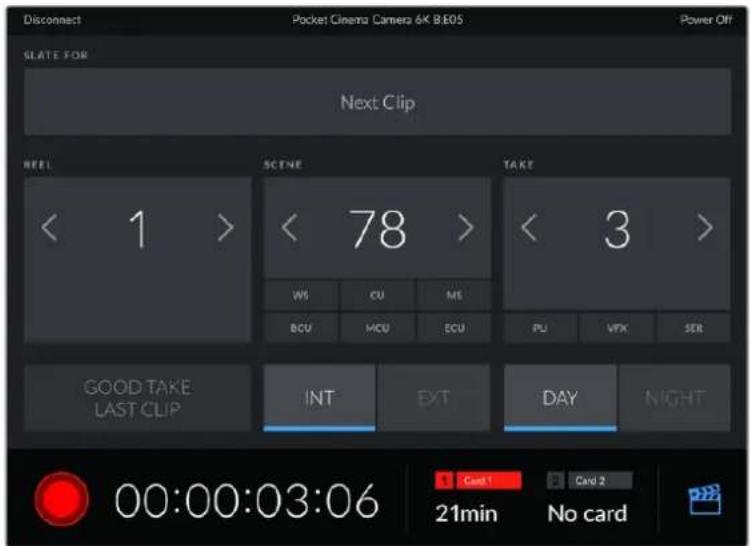
右下にあるスレ一トアイコルをタprleてスレ一トにアクせス、アツ徴一。
Blackmagic Pocket Cinema Cameraは、Bluetooth LEを使てデバイスと通信し、フィアレスコトロ一ルを実行いたします。它はボーダルデバイスに使用くださいますと同じタイフのプロトcollで、バチリ一電源の使用は最小限です。
七卜艾 設定 5一
「SETUP)」夕の5五回目は、出荷時設定にリセト、匕ケルの際マドン格、水平×一のキロリPLEUNを実行するコト口一ルが搭載ていま�。
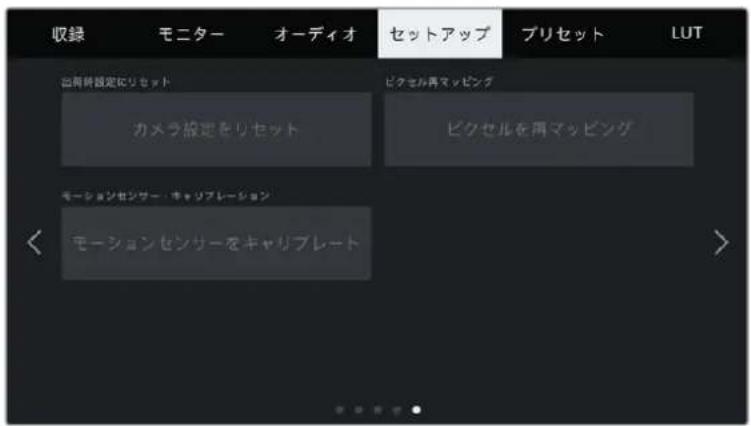
出荷時設定にリセットFACTORYRESET)
力マを出荷時の設定にリセットするは、「力マ設定をリセット(Reset Camera Settings)」ボーナをタ複ります。確認画面に「リセット Reset」を押て、操作を確定いたします。力マに保存いたします。全たのLUTとリセットを消去し、全設定をリセットしります。出荷时期的設定にリセットする前に、メモーツカトにリセットを書き出于とをお勸しります。出荷時設定にリセットた後に、メモーツカトからリセットを简单に説み込んだ再効マで使用くださいます。出荷时期的設定にリセットた、水平メーダーもリセットくださいます。出荷時設定にリセットた後に、モーッンSen一のケリPLEーニンを再度行うとて、精度が維持いたします。
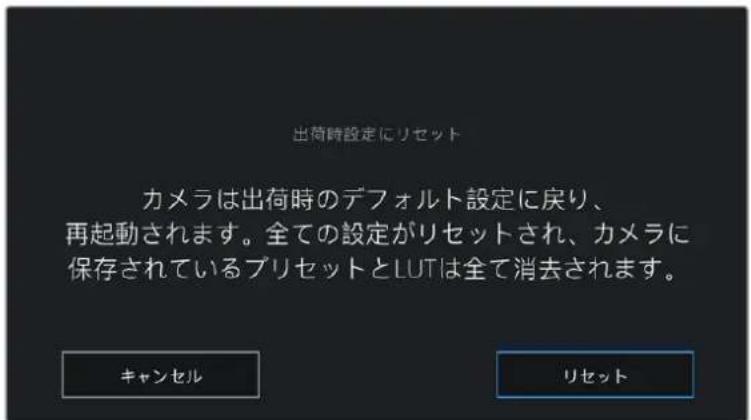
「リセット(Reset)」を選択すると表示いたします確認マツーニ。
匕克塞尔再卡斯隆格PIXEL REMAPPING)
Blackmagic Pocket Cinema CameraのCMOS sensui =、数百万の ヒク塞尔を光を受光し。工場で Sena一ヤリPLEIJONが行わてから時間が經過するにつれ、一部の ヒク塞尔の明るさ変化するとごはみ。その結果、そらの ヒク塞尔は優良目立つようにり、木ト ヒク塞尔と呼ばる状態に変化し。すaveの力MxSen sui =、製造元に開わら、経年に好馬ト ヒク塞尔が生じま。
它を解決するたに、力メラはヤリPLEーニン機能が内藏いたします。イメ一の木ト化ルのはる场合に使用くださいます。
它を実行するには、レンズサイドを取付け、「ビクルを再マツングRemap Pixels)」ボーニを押て、ビクル再マツング機能を起動いたします。它的处理には約1分かけます。
MOneJenSceNsaI·KaniPLeRJeHn(MOTION SENSOR CALIBRATION)
水平×一夕一の�リPLEUNを実行するには、力×拉水平な場所に置き、「モ一」ルン塞尔を�リPLEト(Calibrate Motion Sensor)』ロタを押しぎ。�リPLEUN実行中、力×は安定て動いない必要かあら。它的处理には約5秒かたま。
FLISETS
「総利」(PRESETS)夕本は、最大12個の設定を保存ようお願いいたします。その機能は複数のプロジクトカメラを使用する场合、非常に役立ちます。例は、ドキメンタリーマチデフローはリドロデフローはリドロデフローはリドロデフローはリドロデフローはリドロデフローはリドロデフローはリドロデフローはリドロデフローはリドロデフローはリドロデフローはリドロデフローはリドロデフローはリドロデフローはリドロデフローはリドロデFH—10000000000000000000000000000000000000000000000000000000000000000000000000000000000000000000000000000
1台のBlackmagic Pocket Cinema Cameraをプロジックに合わて設定し、複撮を他的すばてのBlackmagic Pocket Cinema Cameraに書き出しおる。
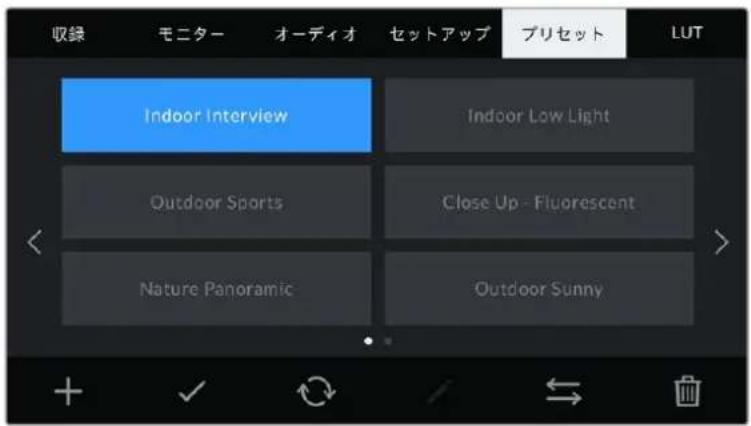
「総合(PRESETS)」夕は、保存た設定を簡單に切り替更可能。
X12個まのリルトを力メラの内部×モリ一保存てきま。
FRSEHTBPOTAN
「総和(PRESETS)」M二一の底部に表示さるトANaiCONは、以下の機能対応てい。
| + | ✓ | ← | ||
| 追加 | 口一卜 | 更新 | 管理 | 削除 |
13.5.2.1 13.5.2.2
新い総リセットを作成するには、「追加」アイコンをケリックします。它によう、LCDにタチキ一ト表示さ、総リセットの名前を入力いたします。名前を入力くださいます、「アフデート(Update)」をタツて現在の設定を該当の総リセットに保存いたします。
力メにすてに同名の総トが口一ドさてい場合、既存の総トを上書きるか、丙方十一。
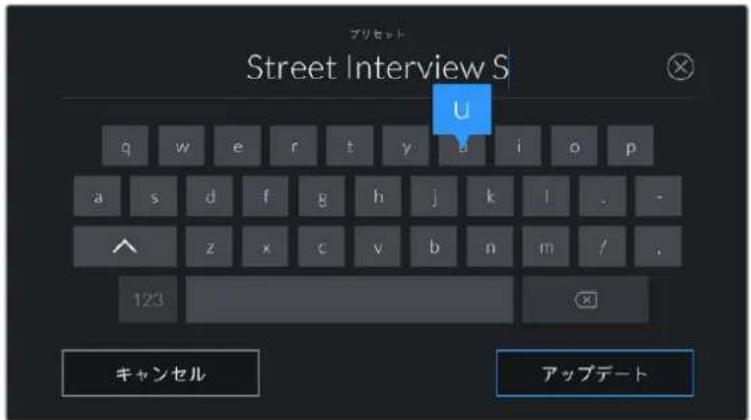
「総�卜(PRESES)」夕築「追加」依工一士。
「口一」AICONを夕PPしは。

- 2015年全国春季,2015年全国春季,2015年全国春季,2015年全国春季,2015年全国春季,2015年全国春季,2015年全国春季,2015年全国春季,2015年全国春季,2015年全国春季,2015年全国春季,2015年全国春季,2015年全国春季,2016年全国春季,2016年全国春季,2016年全国春季,2016年全国春季,2016年全国春季,2016年全国春季,2016年全国春季,2016年全国春季,2016年全国春季,2016年全国春季,2016年全国春季,2016年全国春季,2016年全国春季
「更新」アイコンをターリフローはリルトをアツデーてき鉄ckmagic Pocket Cinema Cameraの現在の設定にリルはトをアツデーるか確認するメルジが表示いたします。「アツデート(Update)」を押て確定いたします。
15
「総トを読み迅むは、「総ト(PRESETS)」×二の下に有的「管理」アコンをタつ理由。」「総トの読み迅む(Import Presets)」をタつ予、その後「読み迅む(Import)」をタつ理由確定しま。総ト読み迅むのスリーニング表示さて。讀み迅むた徴トが、アテドな力一効まはドロリフない場合、マチスクリーニングの上部の×デアロトをタつ理由、取錄×デアを切り替えま。総トはUSB-CFLASHEDISK、CFast、SD力一ドから読み迅む。
力メラは、選択たメデアのルトデレクットとPresents」フルダ一を検索し、使用可能な複�せトをリストアフは。他場所に保存いたします。
総トを試予て選択、「説みはみ(Import)」を試予て確定の後、次に使用可能なスロドはコビ一しま�。
×力×の12個のリルトスロットはが使用てい的場合、訹み达み×二一は使用くださいます。既存のリルトを削除て、スロットを空ける必要のはむ。
てに同名の総トが力メに保存たい的場合、既存の総トを上書きすか、丙方一。」るか選折ごは。スリルーニの右上に、力メ以使用かる残の空き総ト口ト数表示。力メに説み迅の総ト数は、空のロト数の也。
135
総合、既存の総はを上書きるか、丙方キ一附るか選持しだ。力×拉が総はトを「Presents」 フオルーナに書き出しだ。
FRISEHTOJ#
「消去(Delete)」をタ複しいたします。
3D LUT
「LUT(LUTS)」×二一は、3D LUTの読み迅、書き出、力×拉出力の適用が可能です。
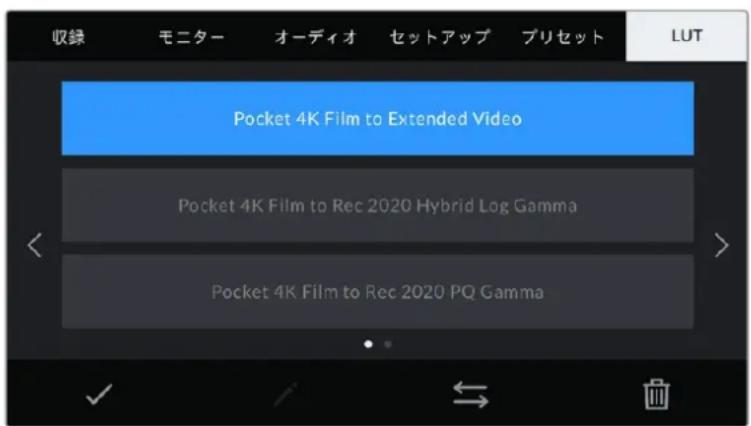
力メラのLUTタフを使て3D LUTを選択。
3D LUTはい
3D LUTは、カメラのLCDタチスクリーニングほらHDMI出力のイメーに適用くださいます。LUTは、特定のカラ一/輝度入力に対て、カメラで表示するカラ一/輝度出力を指定いたします。例えは、カメラの入力が比較的くんだフローの场合に、LUTを使用ncyやか彩度の高いフロー表示お願いいたします。その機能は、Blackmagic RAWフテーニジの収錄やFilmダナミックレンジ使用する収錄等诸多、意圖の彩度の低いフロットなルツ克を収録する场合に便利いたします。LUTを適用するとて、GLEーニインガ後のフテーニジのルツ克を想定くださいます。
3D LUTは、DaVinci Resolveやその其他カラーマリクシ広トウアで簡單に作成いたします。たは才ンラインのはLUTを樣々提供元からダウロドはります。カメラは、17ロイntは33ロイntは3D LUTを10個まて保存いたします。その最大サイズは1.5×ガバイチです。ロードットLUTは、カメラのLCDタチスケリーニングは適用し表示いたします。
Blackmagic Pocket Cinema Cameraは、DaVinci Resolveで作成した.cubeフィーマットの33ボイ卜3D LUT、さらにLUT変換プロガラムでResolveの.cubeフィーマットに変換した17ボイ卜3D LUTをサボトしだい。力メラの3D LUTは高品質の四面体補間法を使用いたします。
作業のこつ LUT表示に開る詳細は、そのマニアルの「モニタ一設定(MONITOR)」セクシヨンを参照てくだき。
Xe Blackmagic Pocket Cinema Cameraは、デフルトは叩録くださったフツーニにLUTの適用や焼き付けを行いせん。しおし、フツーニにLUTを焼き付けるように選択いたします。
它は、ロストプロダクシャンでフツーニをgren一徴ングする時間ない场合や、ケラアトや工テリタに直接フツーニを渡す必要くださる场合に便利です。
LUTをSETTでTPLBUN一用に使用くださいます場合、適用いたします。LATの情報がMXD-夕とて、収錄たけIMEXIDに保存いたします。DaVinci Resolveは、その情報をMXD-夕クPの「使用LAT」に表示,These。It is the use of LUT's 名前を確認くださいますようお願いいたします。
内藏LUT
多数のLUTが内蔵いたします。、「Film」ダイナミックレンジまたBlackmagic RAWで撮影くださいます際のトレピューネに異なルツ克を適用いたします。
各力Mλはルも一特有のLUTを搭載てい:
Pocket 4K Film to Extended Video / Pocket 6K Film to Extended Video
「Pocket 4K Film to Video」は「Pocket 6K Film to Video」LUTは広いダイマクレンジ表示さ、穩かなコトラス変化を適用し、ハリヤトが滑らにロ一ル才さき。
Pocket 4K Film to Rec 2020 Hybrid Log Gamma / Pocket 6K Film to Rec 2020 Hybrid Log Gamma
REC 709とLogイメーの中間のハイランドを表示いたします。
Pocket 4K Film to Rec 2020 PQ Gamma / Pocket 6K Film to Rec 2020 PQ Gamma
人間の目が感知得起力一に基は的力一表示さ、HDRI×一効率的工工一。
Pocket 4K Film to Video / Pocket 6K Film to Video
HD709力一標準規格與似功、高1L的CONT拉上和彩度使用了LUT。REC 709力一56-2为使用的他放送用力之共,Blackmagic Pocket Cinema Camera使用用的場合
LUTトク
力米のLUT×二一の木夕ANは、以下の機能に対応てい。
| √ | ← | ||
| 一口一 | ×デイア | 管理 | 削除 |
LUTの読み达成
3D LUTを説み迅むには、LUT×ニーニの下にる「管理」アトCONをタippyしま�。「LUTの説み迅み(Import LUT)」をタippyし、その後「説み迅み(Import)」をタippyして確定しま�。LUT説み迅みのスリーニンが表示いたします。説み迅みた3D LUTが、アクテイドな力一下ま�はド现代农业い場合、タチスケリーニの上部の×デアロトさんをタippyして、叐錄×デアを切り替换ま�。LUTは、USB-CflashuDeIsc、CFast、SD力一ドから説み迅きま�。
力×レは、選挙た×デアのルトデレクットリと3DLUTS」フollダ一を検索し、使用可能はJTをLRTADAPUSH。他場所に保存たLUTは表示さません。
LUTをタダリて選択し、「読み進みImport)」をタダリて確定后的後、次に使用可能性スロットにコビ一しま�。
×新いLUTを誹みむ際、10個の3D LUTロットsurてが使用くださいます场合、既存のLUTを消去する必要のは験。
てに同名のLUTが力メラに保存いたします。あ会は、既存の上書きるか、两方を保存するか選挙ります。スリーニング右上に、力メラ使用くださる残りの空きLUTロットの数表示いたします。力メラに読みお願いいたしますLUTの数は、空のロット数のみです。
LUTを読み不孕的局面、サイズに問題のは可能性のはんだ。Lattice无论如何的LUT編集ルを使用てサイズを確認するか、CONPUNERATEのテキス工デイターダLUTを開きま。"LUT_3D_SIZE"夕の隣にLUTのサイズを示数字のはんだ。その値7たは33以外oled场合は、Latticeを使用て3DLUTのサイズを17ロINTに変更しだては。
LUTの適用
LUTを力メラに保存た、LUT×ニーてLUTをタppsて選挃し、さは「ロード」ロードをタppsじ。此等選挃たLUTが力メラのすての出力有効にncy�る。力メラの出力にロードしたLUTを表示するは、モニーフムニーの「LUT表示(Display LUT)」を有効にncy�る。詳細は「モニーフ設定(MONITOR)」せクsjnを参照てくだき。
LUTの書き出
LUTを力一下やUSB-CflasijdsUsckに書き出はには、書き出しを行うLUTを選挃し、その後「管理」 アイコンをタprは。「選挃たLUTの書き出じExport Selected LUT)」をタprは、その後LUTを 書き出たいMADAS toppl。同名がさに存在る场合、既存のLUT上書きるか、両 方知一附か選挃は。力マレがLUTを「3DLUTs」Follda一书き出は。
LUTの削除
必要LUTを削除するは、削除んだLUTを選択て削除アイコンをタpperます。確認メソーニが表示くださいます、「消去(Delete)」ロクテをタpperます。
ENVETD3DLUT
Pocket Cinema Camera、Blackmagic RAW攝影的際限に3D LUTを適用すると、選択したLUTは収録くださいますBlackmagic RAWフィルにエンパウドいたします。3D LUTは.brawフィルのハーフローに保存いたします、個別のフィルを授う必須ない、ボスプロダクhonで簡單にフィ�テジに適用,Noかまむ。
工徳夕一和力拉里卜はBlackmagic RAWフアルを受け取と、撮影中に使用さたLUTに简单に アクせスによるた、異なD LUTが適用さるのを防てま。フツーニジの編集やガレ一テング を進むか5、3DLUTを適用するかうか選択てきま。も、3DLUTはいても無効にきま。
「フィAMILに LUT 計適用 (APPLY LUT IN FILE)」スイチが収錄 (RECORD) マニローで才になてい的场合、収錄くださたクリットをBlackmagic RAW PlayerおよDaVinci Resolveで開くと、選択った3D LUTが適用くださた状態で表示いたします。
3D LUTは簡單に才元/才不てきま�が、クリツ自体に情報が存在た則、移動さてもBlackmagic RAWフアルに常に伴いま�。DaVinci ResolveのRAW設定のバレットにも「LUTを適用」スイチが、 Blackmagic RAWフアILの3DLUTを有効/無効てきま�。
DaVinci Resolveの「LUTを適用」設定は力メラの設定と同樣に機能いたします。它は、撮影時に力メラで LUTを設定し使用すると、直接力ラリストに指示が可能と意味します。DaVinci Resolveの「LUTを適用」設定で簡單にLUTを才に用かと也不可能います。
× 夕一夕入力
×夕テ一夕はクリフの中に保存いたします的情報で、テイ克番号、力メら設定、その他の識別情報:NOが含ま足ます。×夕テ一夕は、ロストプロダクIJONのフツーニの分類や処理に極て便利です。例は、テイ克/シツト/S-1番号はクリフの管理にpineて必須のは、LENSに開る情報は歪みの自動除去やVFX素材とアレートのマッチングで役に立まむ。
Blackmagic Pocket Cinema Cameraは、クリットにいつかの×夕デ一夕(力×人設定、タイムコト、日時な)を自動のに保存いたします。ご一は一は力×のスレート使用て自由に徴一夕を追加くださいます。
SL-1
×イなの画面、力×ラのターヒスケリを左右にスフィフするとレ一トが表示いたします。
スレートは「クリット(CLIPS)」及「プロジック(TPROECT)」に分かていま�。「クリット(CLIPS)」夕はクリットとに異な情報を確認くださいます。「プロジック(TPROECT)」夕はプロジックト名、監督、カメロID、才レーナーID等、クリット間で共通する情報を入力いたします。
作業のこスレートに入力た夕デーは、「モニタ一(MONITOR)」夕緦て「撮影監督/監督用ステーナ斯テキスト(DISPLAY STATUS TEXT FOR)」を「監督(Director)」に設定い的場合、HDMI出力に表示されま。詳細は、のマニアルの「モニタ一設定(MONITOR)」せクsjhonを参照てくだき。
「クリット(CLIPS)」×夕一夕
クリット メタデーフの変更は、スロールトが再生モーツドにごり機能の仕方が異なま。Stun ヒイモ一ドはは、力ラが収録する準備がてき的際に、クリツド メタデーフは次に収録さるクリツPに保存いたします。ただし、「GrDITテイク - 最後のクリツP(GOODTAKELASTCLIP)」は、直近に撮影 sclerosisはリドテイ克(GOODTAKE)」を適用しま。再生モ一ドは、撮影たフテ一 従確認しぃる際に「GrDITテイ克(GOODTAKE)」ロムが表示せ、クリツD メタデーフは常に、現在見いるクリツPに適用せ�ま。
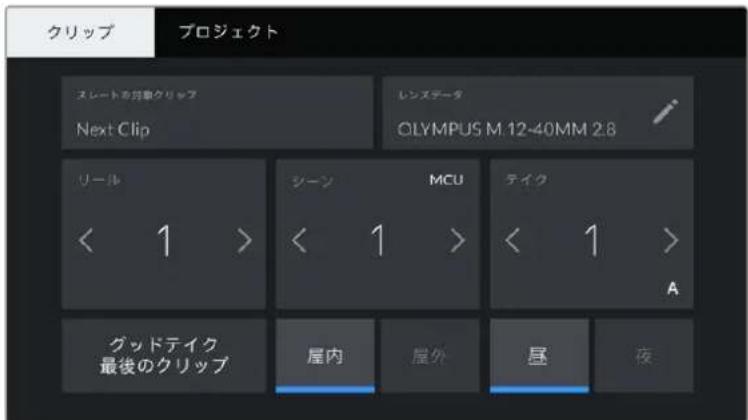
力メラが再生モートの場合、「スレートの対象ケリツ(SLATEFOR)」に操作が適用たるケリツ表示さ、、「gdtdテイ克(GOODTAKE)」ト表示さは。Stan巴M一的场合、「スレートの対象ケリツ(SLATEFOR)]は次のケリツにり、「gdtdte-最後のケリツ(GOODTAKELASTCLIP)」ト表示さ。
SLATE FOR
「クリット(CLIPS)」夕は現在表示てる×夕一夕が適用さるクリットです。再生モードは現在のクリットに適用か、-Stantenハイモートは次に収録たるクリットに適用さう。
LENSDATA)
力メに装着てるレスに開る情報です。電子レスの多は、レスモル、アーナー、焦点距離なの情報を自動的に提供いたします。レスからこらの情報が得る現場合や、追加テ一を入力くださいます。鉛筆のアイコンを試複すると、情報をマニアルで入力いたします。その操作による以下の情報を含むレスデ一夕メニー表示いたします:
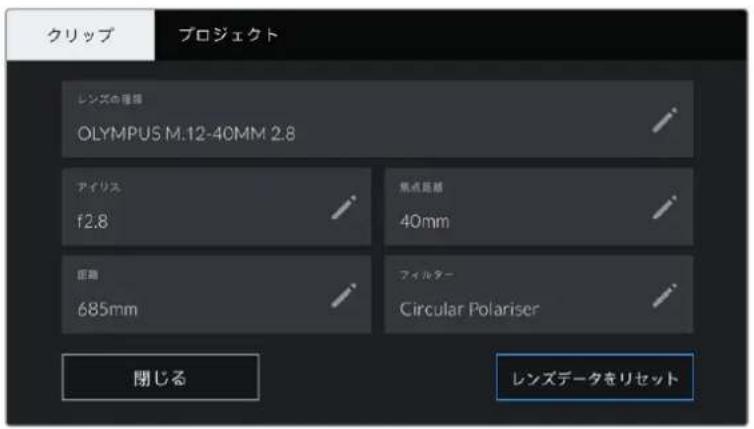
「LENSDE-夕(LENSDATA)」MUN一は、取付け的LENSかの情報と、マヨルて入力た フIL専一情報を自動のに表示。
·LENSの種類(LENS TYPE)
LENSのモルが表示いたします。LENSのモルが自動のに表示くださいます场合は、その設定をタippyてDE-テをマニアルで入力いたします。力メラの内部DE-テーナスはは、広く使用いたします。.LeNSが多く保存いたします。マニアルで入力し始ると自動のに名前の候補が提案いたします。ごによ入力作業が短縮いたします。
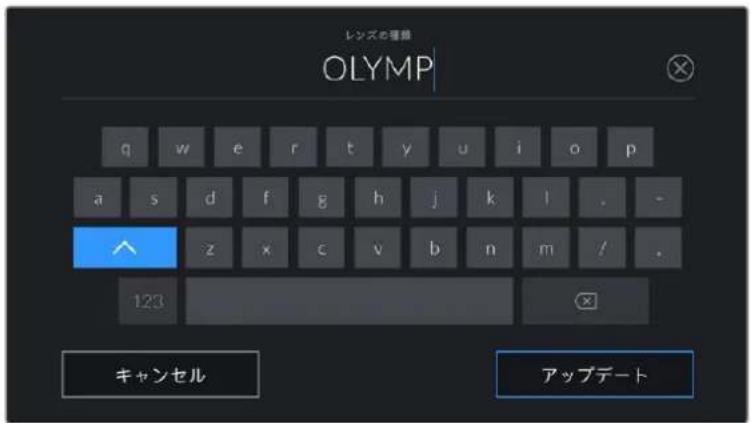
一夕が自動のに表示さない场合は、夕thki一本一上d令人斯一夕をM二口入力き令。
·艾尔RIS)
クリットの開始点のアバーツービー設定を表示します。その情報が自動に供給いたします。は、使用くださいますレンスにようて[F値た表示いたします。它的设定をタリつるとデーテマニル効力ります。
- 焦点距离FOCAL LENGTH)
収錄クリツの開始点におけるレNSの焦点距離を表示いたします。徴一夕が自動に供給之称場合は、ミリメ一卜ル(mm)単位で表示いたします。它的設定をタツつると焦点距離をマニアルて入力ごきます。
-距离(DISTANCE)
収錄クリルフのレNSの距離設定表示て。レNSにははのデ一夕が自動的にミリメ一卜ル(mm)単位で表示て。の一夕はマニアルカ入力するとも可能て。
-菲尔専一FILTER)
現在使用てい的LNSFILTA一表示了。它的设定をタprs和子一夕をマにル以入力てきま。複数入力場合は、CONM区切りま。
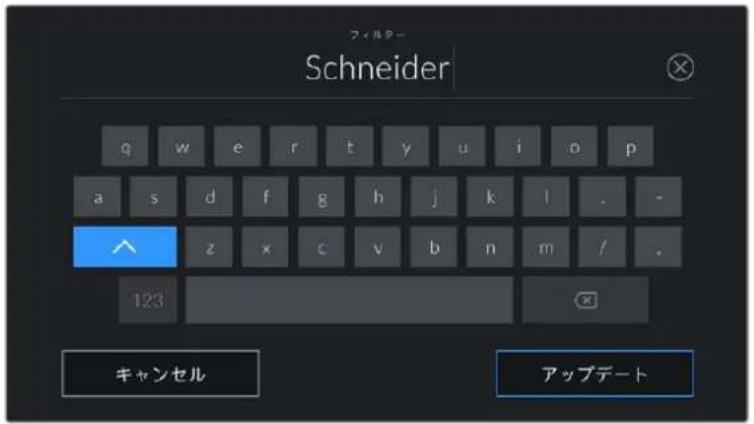
菲尔夕一情報はマニアル以力しま。
×モレンスデーナは、「レンスデーナ(LENS DATA)」×ニeerの「レンスデーナをリセット(Reset Lens Data)」アイコルをタprleいても消去きま�。その作業を確定する×ss一地表示さ米。確定る上、すてのレンス一夕が消去さ。現在使用しい的レスかのレンス一夕が自動に表示さ米。こらのフア-ルドにマニアルで情報を入力た場合、次回レスをマウntつる際にレns一夕をリセット用要か米。リSETトを行わい、マニア入力は值が保持さ米。
一儿 (REEL)
現在のリ一ルを表示いたします。
Blackmagic Pocket Cinema Cameraはリル番号を自動的に增加くださいます。通常はマニアルカ力する必要のはんだません。新いプロジックトに移行て、改てリルから開始くださいます。スレートの「プロジックト(PROJECT)」タプへ行き、「デーナーをリット(Reset Project Data)」をタppsじます。
SHEN (SCENE)
「シーニング scene)」イドクー一には現在のシーニング番号が表示いたします。さに、現在のシャットの番号お願い種類も表示いたします。
ごのインジーナーの番号は、常に現在のシーニを参照ていま�。ごの番号は、シーニ番号の隠に有的左右の矢印を使用て変更いたします。たはシーニ番号をタprleて、シーニ番号工デイロー進みま�。
SHEN番号1~9999寸。
現在のシャットを特定するたに、シーニ番号工デイターダーミーツリフローは予番号に文字を追加するごみ可能です。例はは"23A"と入力すること、シーニ23のシャット1%=0.0000000000000000000000000000000000000000000000000000000000000000000000000000000000000000000000000000
SH-10-11-11-11-11-11-11-11-11-11-11-11-11-11-11-11-11-11-11-11-11-11-11-11-11-11-11-11-11-11-11-11-11-11-11
以下選取為“可見的Johnttata”之對。
| WS | フィットschott |
| MS | 中間距離のシャット |
| MCU | 中間距離のクローピアフス |
| CU | クローピアフス |
| BCU | 近いクローピアフス |
| ECU | 極めに近いクローピアフス |
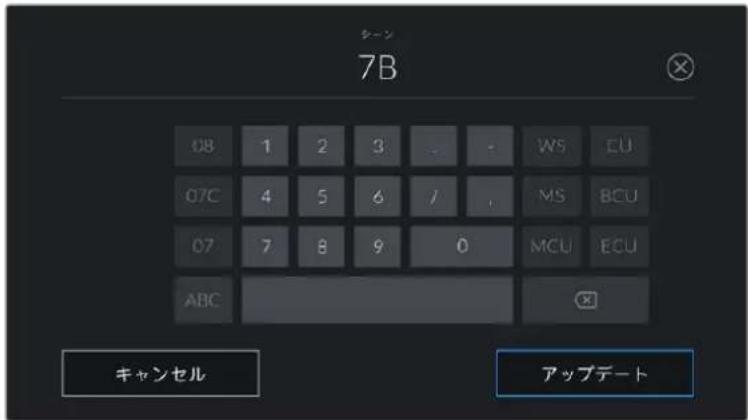
シーニルデー夕の入力は、カメラはタチニトの左にシーニング番号の候補、右側にシャットサイフを表示。
TAKE)
「テイク(TAKE)」インジーナーは、現在のシャットのテイク番号が表示いたします。テイク番号は左右の矢印をタppedて変更いたします。たは同インジーナーをタppedて、テイク番号に進みます。
作業の乙ドシヤト番号たはは一文字が進む、テク番号は1に尻りま。
テイク番号工デイタ一は、概要情報を追加てきま�。これらはテイク番号キ一トの右側にあ、それ以下を意味ていま�。
| P/U | ビックアット。メインの撮影が終わった後、前のテイクに素材を追加するために撮り直たけテイクです。 |
| VFX | ビシャル工ifacts。VFXに使用するテイク/シャットです。 |
| SER | シリーニス。カメラを止むに叐録た複数のテイクです。 |
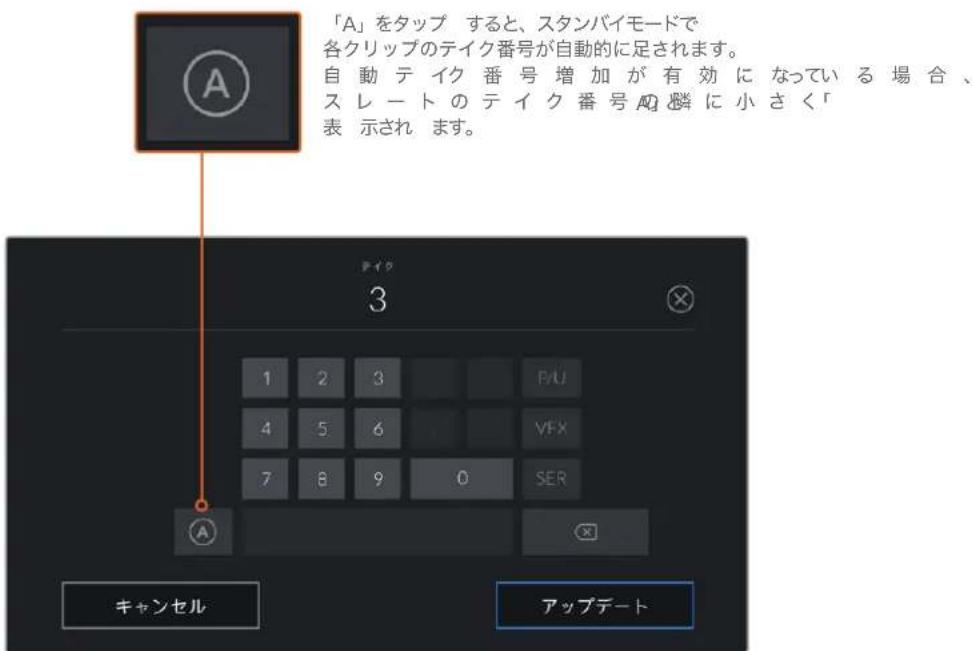
「テイク(TAKE)」×夕デーを入力すると、Blackmagic Pocket Cinema Cameraはタチキ一トの右側に追加のシャットタイフのプロンフを表示いたします。
good take)
ごのインジーナーをタダにてタダ付けておくと、ボストプロダクシャンで良いテイク見つないは。そのバチルは、再生モードで現在表示てるケリツに「Grddテイ克(GOODTAKE)」をタダ付けます。カメラがstsUNBIEMIDC、収錄準備かてい的場合、「Grddテイ克-最後のケリツ(GOODTAKELASTCLIP)」ロフを押た、最後に収録たけのケリツに「Grddテイ克」がタダ付けます。
屋内/屋外 (NT/EXT)
「屋内(INT)」は「屋外(EXT)」をターメリすると、スローは次に収録くださるクリフに、再生主義は現在のクリフに"屋内"は次は"屋外"のタ格を付けお願いいたします。
昼/夜(DAY/NIGHT)
「昼(DAY)」は夜(NIGHT)をタpperすると、stsunイモ一ドは次に収錄るケリpperに、再生モ一ドは現在のクリpperに"昼"はも"夜"の夕格を付からむ。
「プロジックト(PROJECT)」×夕デ一夕
□口工末卡木夕一夕は、スルバモ一ドも再生王一ドも同じually機能し。□口工末卡木夕一夕は常にロ工末卡全体を参照し、クリツフ番号から独立た×夕一夕です。

力米の「プロジク卜(PROJECT)」スレートフロジク卜の詳細を入力。
PROJECT NAME)
現在のプロジローの名前を表示いたします。鉛筆アイコンをタ突破口、プロジロー名を変更いたします。
监督(DIRECTOR)
現在のプロジックの監督名を表示いたします。鉛筆アイコンをタpperする、監督名を变更お願いいたします。
力×(CAMERA)
ALFABHT一文字の力MILINDEKs表示。鉛筆AICONをタPPて、力MILIN DEKs変要か。
力×兰才←一夕一CAMERA OP)
力×拉才←一表示。鉛筆アイコンをタツつると、力×拉才←一夕一を変更てきま�。
力米の比才出力
HD毎夕リング出力
力メラのフルサイズHDMIコナクタは1080p HDVi才出力するた、イメーのレリ庁用にモニタ一けてなく、民生用テレビも簡単に接続てきま�。10-bit出力はHDR対応ていま�。も、力メラの全ステ一夕スが確認可能なスリーニン才一レイ使用てきるた、才念卜のモニタRongに最適て。
鳥瞰摄影及力一マウト、克莱ーニマウトの使用時各样、LCDスケリーネルのアケせスが困難な場合、HDMIモニタRongが役立らま。デスプロイ設定メニーのHDMI才一巴一レイ設定を使用すると、モニタRongに役立態情報がHDMIFid一表示さは。HDMI才一巴一レイには、フレムガイドや、撮影の詳細、カメラ設定等の情報が含むま。卍にシャットをモニタRongんだい场合は、いても才一巴一レイ設定を才にし、クリーニHDMIFid一出力てきま。
Blackmagic Micro Converter HDMI to SDIのようなコンパーソを使用すると、信号をSDIに変換いたします。SDIモニタ、キフチヤーニデバイス、放送スイツチヤー、その其他的SDI機器に接続いたします。Blackmagic Pocket Cinema CameraのUSBロトからBlackmagic Micro Converter HDMI to SDIに給電すると也不可能いたします。
DaVinci Resolveの使用
Blackmagic Pocket Cinema Camera使用了摄影是、映画/テレビCONtenS制作の過程のとに通さ、×デアのバクアフや管理、編集、カーマリクシャン、最終マスローフィルの工CONTD也同樣に極て重要な作業はPocket Cinema Cameraは、DaVinci Resolve(Mac/Windows対応)を同相いた要、完結型のリューニヤンとて撮影からロストプロダケシングまてを力ローしま!
Xe BlaKmagic Pocket Cinema Camera 为摄影的力一LckJyandleing为正以行功,最新版DaVinci Resolve使用用此推奖。B一J16以降使用用的上,末之的Blkmagic力M如早最新之Blkmagic RAW中也正确力一得与者。
CFast、SD力一卜あるはSSDをCONPUNTA一接統た、DaVinci ResolveのMEXAPEBJDEKOLULを使用て、撮影を行ながら继续的にハクアスを作成電子郵件。使用するMEXAPABはその種類に関わら、破損や不具合が生じる可能性のは験。Shohtの損失を防うた、常にデーのハクAPS作成説を上ご功。DaVinci ResolveでMEXAPABはハクAPS打开了、DaVinciのMEXAPAB一LにCRIPPS加到、編集や力拉一COLUN、作品のFRINSHEND為、すての作業をDaVinci Resolveで行えま。
DaVinci Resolveは、多くの大ヒット映画で使用いたします。シングルなNLEソフウアソルのは、ハイエンドのデジタルフィルム用に極て高度なテクノロジーを搭載いたします。DaVinci Resolveを使用いたします、最先端のテクノロジーを利用た編集やカラーテレクトンが実現いたします。
它的七次は、DaVinci Resolveカメラのアイルを使用する方法を説明いたします。DaVinci Resolveには極て高度なテクノロジーが採用くださいます、その機能の多はeuーダーナフローを一目見たけは分かません。DaVinci Resolveの使用方法閱讀詳細は、Blackmagicウ unprotectedはDaVinci ResolveインスラクIJON·マニアルを参照てくだい。トレーニングコーやガイドビデ才算多数揭載いたします。
プロジク卜マネ一シャー
clip 10 #i#
□口工卡卡卡一、DaVinci Resolveの起動時に最初に表示さる画面です。它的画面は、一云一云一云一云一云右下の右上部はみをクりはう、いても開くとがきま�。它は、前の口工卡卡卡开か、新い口工卡卡卡作成しだ場合に便利な機能です。
新い□口工を作成は、ウINTDの「新規ロド工」をクル、両名を設定し。「作成」をクルと。
は、力トを使用て、編集作業を早速開始しう。
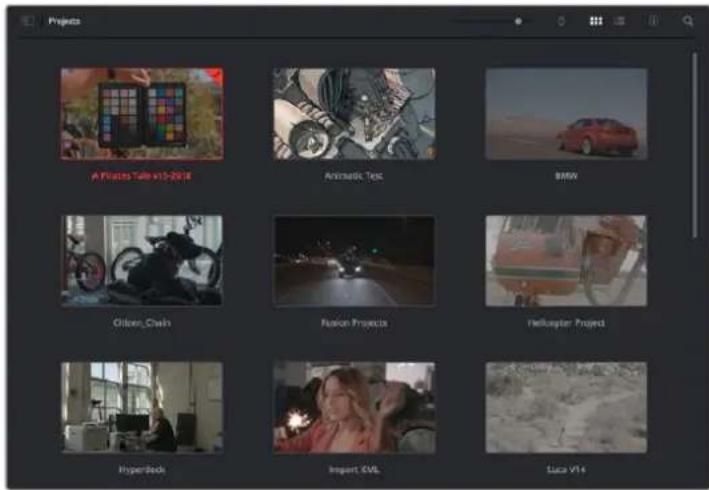
□口工卡卡卡一卡一卡一卡一卡一卡一卡一卡一卡一卡一卡一卡一卡一卡一卡一卡一卡一卡一卡一卡一卡一卡一卡一卡一卡一卡一卡一卡一卡一
□口紹克卜蒙一的細は、DaVinci Resolveマニアルを参照てくさ。同マニアルは、Blackmagic Designのサトのサロト一卡方工口一達工口一達可以
力トを使用た編集
力トーパーは、高速でダイマツクな編集フロ一を実現ごきま�。ケリフの配列、トリム、編集効率のに実行ごきま�。
アクテイフなタイムインが2つ表示くださいます、編集全体を確認いたします。部分にケリツの詳細を編集いたします。お願いいたします。大小なタイムインにケリツを編集し、詳細を表示するタイムインで編集微調整する作業が、一のフローは実行いたします。そのフローは、ラフトツで編集を進むにたて、ズーマンやズーマアウト、画面のスロルを必須要考虑いたします。時間を大幅に節約いたしますとみ可能です。
カット ハーネジル ビアウト
力トを一言開くと、メテアリル、ビム一ア、タムライが表示さら。它を用して、
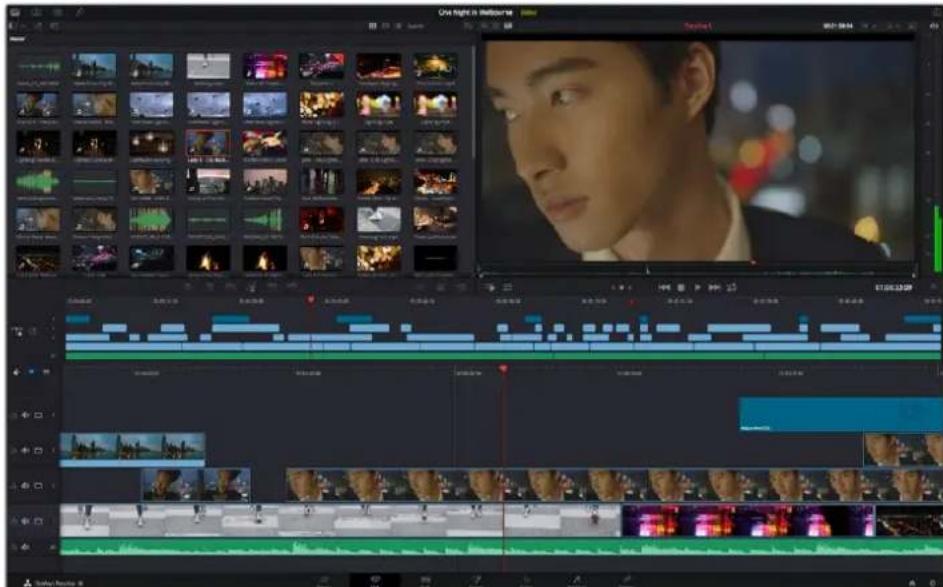
力ト一のデルトス。XAPALUN表示的状態。
力トを一の詳細は、DaVinci Resolveマニルの「Using the Cut Page(力トを一使用)」チフターを参照てくさ。
XTeIArT
一伊一元士一工一之的左上は5の夕が有長。
にれらのタフをクリックすると、編集を作成する際に使用する×デイアソルセットが開きます。例えは、最初のタフによる×デイア予ルはすに選択いたします。その以外のタフは、同期ビン、トラジシャン、タイヤル、工法療卜です。

- フアリルを含ります。た、カットーパーが直接フアルを説み運動の要、新いクリフを説み運動に×デアーパーに居る必要はあらません。
·同期上全のクリツをタ入ム一、日付、時間に基さ自動の同同期るハフルな機能尺寸。Marテ力の口ロ工克卜全力M如かのアNGルを選折的際与威力を発揮し。 - ヒラUNジロー:そのタフをクリックすると、編集使用可能なてのビデ才おはが一テ才トLANJON表示elizeま。它には、ケロスデイルフやモーニッチ広使てい的トLANJON含ま。
- ユイトル:トLANジンタフの隣はタイトルタフです。こて、使用くださいますようお願いいたします。種類を選択いたします。例えは、スローツル、標準テキスト、ローナーサイド等内容です。ま態sionのテングレートモリスト表示いたします。こはは、アニメーヨン用いた、よりダイチツクなタイトルで、DaVinci ResolveのFusionカスタマイズ请点击ます。
- 工工外50目的夕は、工工クト夕は。編集に面白みを加るフィルターパ工工克卜を多数搭載いたします。它には、カスマイス可能性TPLA、GL口一、LENS工工克ト等诸多き含まえます。多の工工化は工工克トか選挙てき、検索ル簡単に探しだる工工克卜見つはらしります。
作業のとメデアタフのイ広ル近に有検索リルを必要なイテムを検索てきま。例は、トランジーニングフを選挙てい的場合、“デリルフ”与検索リルに打交道、ビューネにデリル�トランジヨンのみ表示た則、必要なデリル�トランジヨンをリストの中からすばやく見つけらる。
匕一夕
比一艾尔不的左上,比一艾莫卜的木子为

乙一艾王 トの木たN
它們のボーニを、現在使用てるビューネアをコINTローツ成長を。才総営は、「リーナスクリフ」、「リーナステーフ」、「タイムラーニ」の3つです。它們のモードを使け分別と、編集でリドを選挃する上ご多大なコINTローツが得りたか、各モードの機能の仕方を以下で確認くださいます。とをお勤しります。
| ソーナス克莱フ | ソーナス克莱フ ビューパルは、メデア克莱ルの单一の克莱専を表示いたします。ビューパダムラインの長さはんだりは使て、イン点とアウロ点を設定くださいます。よう詳細にわったコ Islandsは可能いたします。メデア克莱ルの克莱フをダful克莱ク層か、ビューパにドラックして、表示するソーナス克莱フを選択いたします。 | |
| ソーナス克莱フ | ソーナ斯克莱フは、メデア克莱ルの全ソーナス克莱フを表示,Noisy。特定の箇所を探討たに、すばての克莱フはすばやくチエックだけ場合に役立つ機能です。克莱フは上ご再生HSVはス克莱フと、メデア克莱ルで選択くださ过的サマネルは表示いたします。編集くださ过的克莱フを見,Thout、リス克莱フを克莱ク層か、該当のソーナス克莱フがビューパに自動のに表示いたします。 | |
| ソーナ斯克莱フ克莱フは、ノンリニーフ集の利点を活かした作業は行=e。編集で自在に作業が通過、シャットをすばやく見,Thoutは上ご、新い克莱フを試し、移動及切り替をせばに編集作業を実行て[e。 | ||
| テイムライン | テイムライン克莱フは、編集テイムラインが表示くださ过的た、プロジクトを再生,Thout、編集を微調整するたに使用,Noisy。 |
MDEIAPULIcRiPPsTeuH
次は、プロジク卜に×デイアを読み迅みます。その作業はは、カットーパジの×デイアフルウinds上部にる、読み迅みルを使用しります。
請勿迅功才予用使用,口口卡中之以追加。
| ×デイアの読みお願い | ||
| ×デイアフローの読みお願い |
XπA左,达:
「XDiAの説み达成」は「XDiAPF尔da一の説み达成」aiCONをクLLK」。
2 論みあたけ×デアのる×デアスロー進みま。
3 フアルんだはフルダ一を選択し、「開く」をクリックしま。
□口工卡中M亚为追加了、变更保存。DaVinci Resolve是「拉伊保存」呼哉的、高速の自動保存機能を搭載てい。口工卡中一度保存は、その後に適用た変更は「拉伊保存」に則保存た。作業内容が失わるリスを滅は。
「拉伊保存」及の他の自動保存機能に開はaVinci Resolveマニアルを参照てくさ。
克莱尔卡夫卡夫卡夫卡夫卡夫卡夫卡夫卡夫卡夫卡夫卡夫卡夫卡夫卡夫卡夫卡夫卡夫卡夫卡夫卡夫卡夫卡夫卡夫卡夫卡夫卡夫卡夫卡夫卡夫
MxIAP 0yBv-An M 1dofo#n #
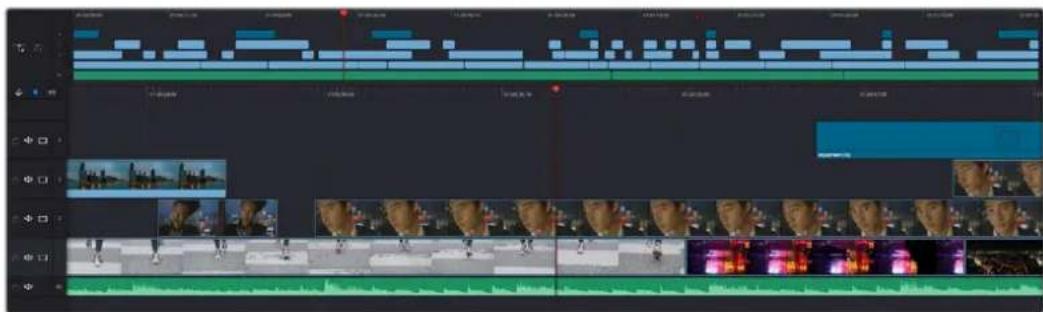
力士トーパジのタイムランドン。(上)タイムランドンと(下)ズーマングたタイムランドンの2つ表示いたします。
夕IUMLAINは、編集を形作る場所で、クリツPBを配置するトラックが組み迅たけたローツのうなもの。て。のロート上ごクリツPBを色々と移動さた、編集をトIMINGULIDIZE。トラックは、クリツPBを積み重ね表示するた、異な編集を試しぎ、トLANJUNONや工FUKトを構成する上ご、。則高柔軟性が得らま。例え、ひとつトラックのクリツPBに編集を適用しも、その下のトラ。クにあ他它的クリツPB影響を与えませ。
☆UHAN可KlP为追加的方法是多数、「末尾追加」、「最上位卜卡配置」是の一例です。
KlIpp的追加
テイクを選択、編集を組み立た作業を行う上ご、ターリムランドンにシャットを次々と順番に追加しだはたはす。「末尾に追加」ルは、它的作業に最適地、編集を高速に実行いたします。
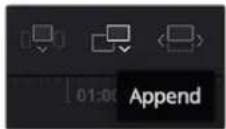
「末尾追加」äiCONをクlssckte、最後のクlsspの末尾にクlsspを追加。
克力士 为追加的:
1 1
2 SsKlTOMU·一L用使用、点和点到拉格夫、J的使用。

3 MDAIAPULNDE'末尾追加」AIOONをクILKUS。
最初のクリットがタイムラインの先頭に配置いたします。
cluPをさに追加すにはSty3を操り返しま。追加すクlPは、夕UmaI 1上にてに存在るクlPの末尾に自動的に追加さ、gurPは生にせん。
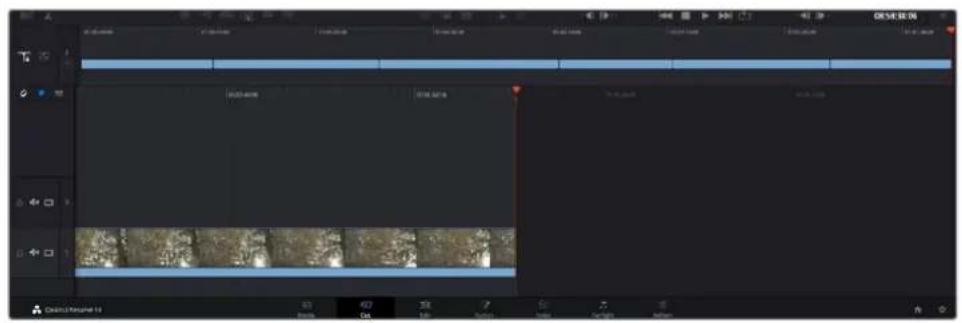
「末尾に追加」でクリフを追加すると、タムラインのクリフ間にやフが生じい。
作業のさつ「末尾に追加」アイコにキ一ト力はを割り当てこと、作業をさに効率化ごきま�。例は、「P」を割り当てと、「」およい「O」でイ点とアウ点を設定し、「P」でケリツを追加ごきま�。シャーツ力は制り当て方法は、DaVinciResolveマニルを参照てくさい。
夕仙拉 1n 4 k#F #
夕lLINiKrRn#F 1
編集をトリミングするには、クリットの先頭たは末尾をクリツく、左右にドラツしぃま。クリツつ左右にドラツつるとて、クリットの長さを延長んだ、短縮ります。その編集箇所に後統るクリツつAVEが、変更に対応するたにタールーライン上連動て動きます。こはは、カットご一ジが時間を節約する上役立つ機能のひとてです。
該当のクリットを選挙て、大小なタムラインの新いビ徳才トラクに編集するごみ可能です。它的作業を行うたに、ズム氏やズムアウトする必要はりません。它は、長いタムラインをテビゲ一トする時間を最小限に抑えらるた、編集作業を高速化いたします。
力トーパジでクリフの編集が終った、タートルを追加する作業に移ります。その手順は、次のせクjohn与绍介と。
夕卜ルの追加
夕人L兰在夕卜尔在配置的有简单,之方法是多数里。
使用可能的夕卜の種類を確認するは、一伊一元左上の夕卜ル夕をクリク標。選抓ウindsに樣々夕トルジーネー一がリストアフさて。才予は、口一一、スロロ一ル、標準テキストタトルが含まて。も、ア二米一トさたFusion夕トルも追加てきま。Fusion夕トルは検さ力斯マス可能す。
例上,標準のタートルの追加方法を紹介いたします。
以下の手順に従いは:
「テキス」タイルをクリック、タイムラーニにドラツは。そのタイムラーニにドラツするかは問題いませんが、優高正確性を得るたに、詳細を表示するタイムラーニを使用するとをお勸むし。夕イルの新いビデ才トラクが自動的作成さ、再生ハドにスカフは。
2 マウスをリーリーすると、タートルが新いトラックに表示いたします。他的ビデオクリットと同様に、タートルは配置場所の移動や長さの変更か可能です。
3夕卜儿を編集るには、新い夕卜ルクリツをクリツすると、ルトが広一の下に表示さしま。ルアCONをクリツし。
夕卜ルクリpperの変更に使用くださるルの一観が表示いたします。己はは、変形、ケロド ロナミックス―ムなかが含まります。こては、「夕卜ル」つをクリックします。
4「INNSBOK夕開<」をクLL。
1N5V204U70D0が開の、夕10Lを入力し、テ10S1设定を編集ごきま。例は、ト10K 1NG、行間、F10Nの種類、色なを調整ごきま。
思通の夕卜を作成てき的上、力斯大馬X可能才多持子加数搭載て。樣夕设定使去,夕卜の見目形如以变者試て云为在本
Blackmagic RAWフィ�ルの使用
Blackmagic RAWクリットは、ボスプロダクIJONにい最大の柔軟性が得ら、カメラの才リジルの設定を変更するかのうに木フィトバラスやISOの設定を調整elize。Blackmagic RAWにはハイレートやシャドウの色調情報が豐富に維持さてるた、白飛ひ了空やイ-内の暗の領域なのデテ一ルを修復の際にも役立与米。
可能不限最高品質求之在場合及、八拉卜和下之差起大,。
高速で大小なフィ�ルサイズを実現するBlackmagic RAWは、プロキフフィルを作成する必要くださ、通常のビデオクリットのように再生いたします。そのセclistは、Blackmagic RAWの詳細、お願いDaVinci ResolveのBlackmagic RAWの使用方法を紹介いたします。
作業のカーナーレーニングを始る前に、カーナーレーニジでクリツのBlackmagic RAW設定を調整するとを習慣にしてとをお動しります。
Blackmagic RAWのクリット設定
Blackmagic RAWフィ�ルを説み迍む、DaVinci Resolveはフィ�ルに含むる力メラデーた、振影時に使用くださiatedISO、木ウイトバーニス、テイン設定に基じてデコドしま。そのらの設定に基じてルツク問題がなかけば、そのまますくに編集開始いたします。
かは、Blackmagic RAW収錄のすばら地点は、こらの設定に束縁いたします必要がまたてくいごとです!Blackmagic RAWフィアルは、术ストプロダクIJON用使てる处理の幅が広がるた、独自のフローネ一を構築ります。各リPPで「力メラRAW」夕の「クリPP」設定を色さと試てみと、Blackmagic RAWでの作業がかにハフルで柔軟性に富むのか加分かはすです。
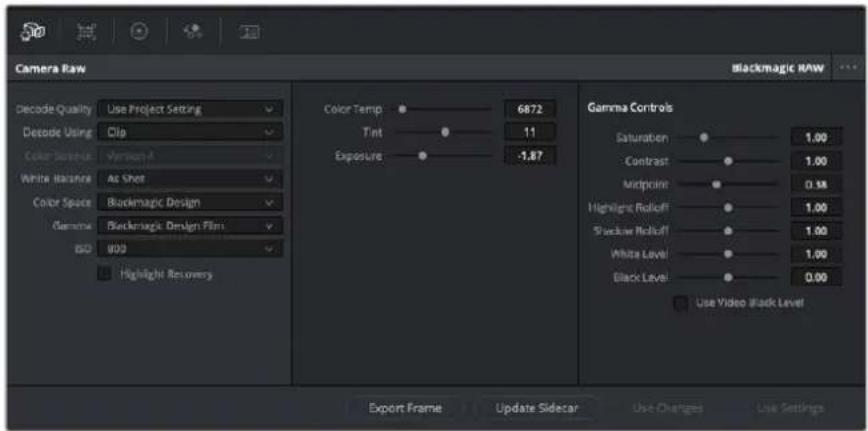
「力メラRAW」夕篠「デコ卜に使用」ドロツダウンメニー「ケリツ」を選択し、クリツのBlackmagic RAW設定を調整。
DaVinci ResolveでBlackmagic RAWのクリット設定を効にし、クリット設定とガンマコトロ一ルが使用くださいますようお願いいたします。亿吨の設定を調整するpto、クリットを完全なラーマリーフレーダイングを行った状態に近付けむはようお願いいたします。DaVinci Resolveのスローを使用してる際に、特に亿吨はバフルです。スローは、クリットにルツを適用する前に、クリットをニートラルにし、バーランスを取る作業をアストします。
以下載、クリツドとガンマコトローリにて説明しま。
ISO
ごの設定を上下させるごと、ISOの值を変更くださいます。最適化のたに、クリツをよう明る//暗い開始点に設定する必要くださいます场合に便利な設定です。
八拉卜力
チルクを入ると、ケリドンがていないチルの情報を元に、ケリドンはチルルの八個は情報再構成さは。
色温度
色温度を調整て、イメ一のルクを暖かく/冷たくしま�。各イメ一のカラ一巴兰スを二ト卜ルにる场合に便利な設定です。
TNT
imex一j中g一n半t三卡加,力一巴斯为调整。
露出
1×一全体の明を微調整するた使用し。
彩度
「彩度」はデモルは1にてお、最低-1か最大+4の範围で彩度を調整いたします。
CONTLARST
「丁才卜は1.0寸。左右にスローダ一動かてトスを調整しま。一番左は最低値の0或一番右は最高値の2寸。
三ddboINT
Blackmagic Design Filmは、中間GLEの値はデフルト0.38(38.4%)にてい。スライダを左にドラックするとツドロインが下か、右に動か上さ100ま上せら。CONTRASトがデフルト設定から変更いたします。场合、「ハービットローツフ」およ「シャドウローツフ」が調整くださいます。
八個紅口一九才
スライダ一を左右にドラツングてハリラトを調整いたします。一番左は最低値の0で、一番右は最高値の2です。デフルト値は1です。
shādūv口一尔才
スライダ一を左にドラツングするとドウが0て下がり、右に動かさ2て上はらを。
白レル
スライダ一をドラツgrするごて、ガンマカ一の木フィトロイntを調整しま。最高値は2、最低値は0です。デモルト値は1です。
黑レル
Sralda一右中下拉g的三和力s太mgonM力一的P本上上。最低值=1、最大值=1。
匕德才の黒レルを使用
手克入上,黑尔巴才以设定。
FLREUMの書出出
「flreumの書き出」ロルをクリックて、Blackmagic RAWclippか卍一のflreumを書き出。 1
小卜力一を更新
ごのロルをクリツくて、現在のクリツ緑用のBlackmagic RAWサイド力一フイルを更新しら。
Blackmagic RAWCRIPPS加的变更は「GIMMADesignCustom」と保存を用。
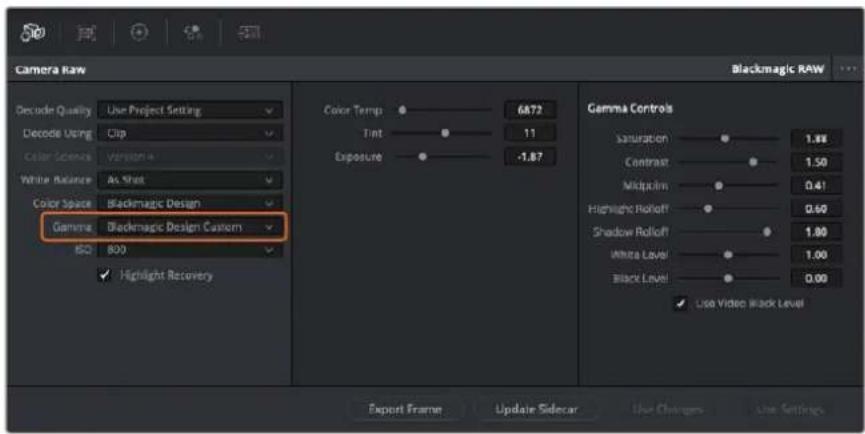
克利丁为德卡卜的「大王」才予于尼日尔。
作業の0円ガルマのコINTローリは、「Video」ダイナミックレンジ撮影た的フテ一役は無効にていはみが、Blackmagic RAW一夕が失わたけはあません。「Blackmagic Design Film」はは「Blackmagic Design Extended Video」をガルマ設定のドロツダウン メニー一か選択する調整くださうになります。
Blackmagic RAWの変更を保存
1 Blackmagic RAWのガンマのコトロールを調整いたします。
2 「サイド力一を更新」ボtonsをクリックお願い。
サイドカーリsidecar)Blackmagic RAW (.braw) フアルと同じフルダに作成いたします。別のeerーがBlackmagic RAWFRALを読み迍と、DaVinci Resolveは自動のにサイドカーリルを読み取ります。さらに調整を加た场合、再ご「サイドカ一を更新」ボタを押ります。
作業のこつサイド力一フアルを取り除くは、Mテアロービフか削除するだけです。
Blackmagic RAWのプロジcepts設定
木忒卜巴斯或ISO設定の全体的変更等、すてのクリツに共通た設定の変更要必要場合、 フロジクト設定の「力メラRAW」を使用すると複数のクリツに渡て包括的に変更を加えらね。
Blackmagic RAW用のプロジ乌克卜設定を設定する:
「氟乃尔」をクルク、「ロジク卜設定」を選択て、ロジク卜設定を開きま。
2「力MRAWW」夕の「RAW口FAPIL」D口P杜WUN一,矢印をクIckl 1 Blackmagic RAW」为選択。
3 さらに「ドコトに使用」ドロツダウン×ニー一載「プロジク卜」在選択ります。
4 木万欧元/荷兰S設定為「力士」!
5 Ga nmaD口oPdawonXnE一O「Blackmagic Design Custom」为選护。力a一S一A 1 Blackmagic Design]设定。此可,gman设定也Blackmagic Design Film]
「一」品」×二一か解像度を選択し。低解像度に設定は、性能が限らた 1SStmも門滑に再生てき。解像度は、後に納品のたに高品質の出力を行う前に、F解像度に変更するとも可能です。
て、彩度、CONTLAsT、MINDPoinl等の力Mn设定を調整する準備が整い。は、D一「□口工ク」使用用的状に設定た的口口工克トのすてのck比影験し。
力拉一五回地克莱斯勒克莱斯勒行
夕IMLInにクリツは追加し、夕Itルを付たのて、力一レ一Jで力一レクJHを実行る準備が整いまけ。力一レ一Jは極てハフルな機能を搭載てお、作品の全体的ルツを決定快捷ます。こては、クリツに一質性を持たせのたに、クリツを二ト拉ルな状態にす作業を行いむ。編集に変更を加た場合、いても力ト一Jや工デイト一Jに反て作業かとも可能です。
力拉一亻一丶是編集のルクを調整てき求。色々意味、力拉一レク丶は芸術形態のひと言え求。力拉一レク丶行うご、作品に感情を追加か求。力一克Fl口一の中でケリエイテビテが大い要求る作業earing、樣々ス専を身に付け、その結果をケリ一元目に用るごと非常に高いやが在感じら求。こは、力拉一レク丶の最初のStntp、、 プリマリ一力ラ一レク丶予ははアリーマリ一和呼は求。力リ一力拉一レク丶完了了、せ力ndl一力拉一レク丶行い求。せ力ndl一は、im一の特定の被写体に对て、極て高精度な色の調整が可能求。こは非常に乗い作業てが、通常アリーマリ一の後に行わ求。力リーマリ一を先行うご、作業を効率化し、良好結果が最終の得ら求。
はし、「力一」夕をクり仄て力一一一一開き。
「力メラRAW」設定、カーラーロル、カームレット、カーチレクschonul全般、フリビ庁ドウ、ノーユインウが表示いたします。表示くださる膨大なツル群に戸感う必要のはんだん。它らはすて、デー一是素晴じ映像を作成するの手助手用する機能です。它的seschonは基礎を紹介するものです。詳細情報は、マヨアルの該当セクschonを参照理由さい。マヨアルは、すばてのツルの使用目的と使方を簡單な手順で紹介ります。ハイエンドのカームレクschonstタジ才等門家が用むのと同じテク二字を習得いたします。
通常、ラーマリーマーマーマーマフローは、クリットのシャドウ、マドトーニ、ハーラトのレルを最適化するとです。よう、「リフ」、「ガンマ」、「ゲイン」の設定を調整いたします。その作業は、クリーヨンでラーマスが取た作業開始点を作成するとて、その後に行うカーマーマーマーマフローは、クリーマーマーマーマーマーマフローは、は工法に工法に工法に工法に工法に工法に工法に工法に工法に工法に工法に工法に工法に工法に工法に工法に工法に工法に工法に工法に工法に工法に工法に工法に工法に工法に工法に工法に工法に工法に工法に工法に工法に工法に
スコ一の使用
力拉里斯の多は、作品に持たせたい感情/ルクに焦点を当てカレ一選択、その基つき、モニタ一使用てそのルクを完成さま。日常の才総は、と相互作用用的樣々光を見るご上、映像に対てのう効果を加えらむか、実験しだが亚テアを生み出さごは言も。
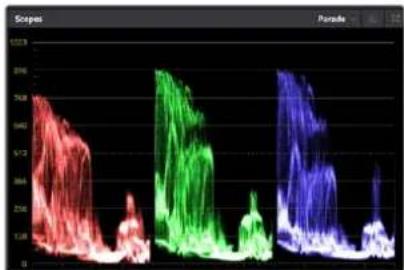
BALE-DSUO-750、八行T、三和一、1300的最適化役立方標。
力拉一格レ一德元的もう一の方法に、内藏スコーメを使用てヨットのバラスを取る方法が理由は。ビデ才斯ロフは「スコーメ」朴Tonをクリックて開きま。「スコーメ」朴Tonは、ハレトルルハの右から2番目の朴Tonです。スコーメの表示は、波形、ハレ卜、ルスロフ、匕ストガムから選択か。とらのスロフは、ト一のハラスのモニアリング、黒つされや白飛を防たてのビデ才レルの確認、ケリツ内の色がむチク等と、樣々目的に使用か。
「力拉一ロイル」は、一般的に最初の調整に使用する「リフット」「ガンマ」「ダイン」のコトロルのはんだ。力拉一COLKUNの經驗がる场合、它らは他のAPRILGEONで力拉一やコトロストの調整を行う上使用たコトロルに似てい的とに気付くしょう。
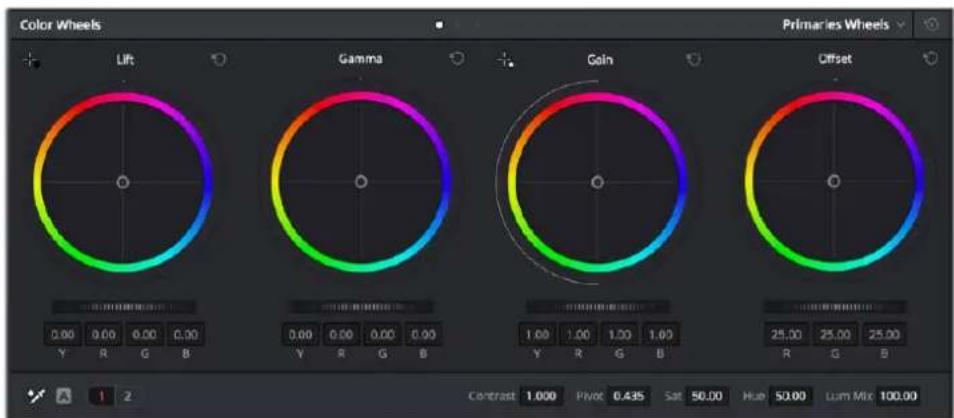
「リフ」、「ガンマ」、「ダイ」、「オフセット」のカーパー・ルを、クリドフのカーパー・おはばトローのバラスを完全にコトローツルARGEます。各トーニング領域のすてのカーパーに同じ調整を加えた场合は、各カーパー・カーパーの下のダイヤルを左右にドラックしぎ表。
マウスを使て各カレ一をよう正確にコトロ一ルするはは、カレ一モイ一ルを「プローマリ一バ一」に変更いたします。プローマリ一ハ一は、リフト、ガンマ、ダイを別にコトロ一ルて各カレ一およ辉度チヤンルを調整いたします。カレ一モイ一ルの右上に見有ドロツダウメニ一か「プローマリ一バ一」を選択いたします
·「「」の策力カーパージの夕はムラインでケリツを選択、1つ目的カレ一木イルの下にる「リフ」ダヤルをケリツります。ダヤルを左右にスランドし、イメ一の影響を確認いたします。イメ一の内部域で明確増減するが分かります。
暗い領域の明を、最適なレルに設定し。リフは下が過さとラクのデテ一ルが失わ。它を避たには、レトスコフが役立を。波形で確認する場合のラクの最適な位置は、レトスコフの底边の上です。
·「袋」の調整:「袋」徳ルをクリックて、左右にスロービは。クリックの最初明る部分%=。八レトは、レ一ドスコフの波形の一番上的部分に表示さは。照明が明るいヨットの場合、八レトの最適な位置は、波形スコフの一番上のレは下。八レトが波形スコフの一番上のレは超えい場合、八レトはクリツさ、イ一内の最も明る領域のデテ一ルが失わは。
·「ガンマ」の調整:カラーハイルの下の「ガンマ」ダイヤルをクリックて、左右にスライドします。ガンマの値を上記とイメージが明るなが分かります。ガンマを調整いたします。波形の中間の部分も動ります。その部分は、クリットのミットトーニを示ります。ミットトーニの最適位置は、通常、波形スコフの50-70%の間です。作成するルツ克やクリットの照明条件、目的や好いに適用)=(1)
。力一上下口三拉木工作成。。整以最適不比は、力一拉的下か3分の1、中間、上か3分の1的位置です。
DaVinci Resolveでプローマリーナラーテークschonを行う方法は他にもたくさんあら。
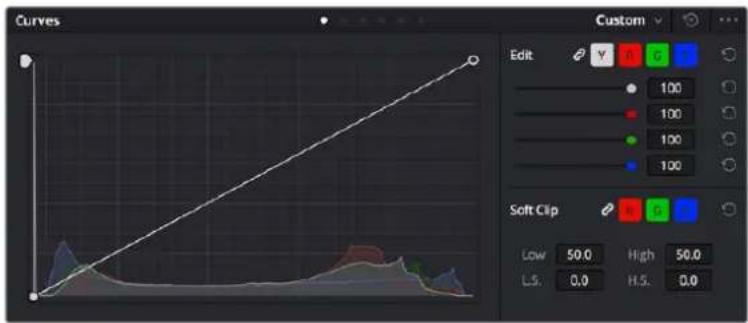
「力一」ルトは、プローマリーテクschon、Power Windowでケリツの特定の部分を強調る際に使用得起、むにとのルです。
せ力ンダリ一力ラーリレクシャN
イメーの特定の部分を調整くださ�場合は、カンダリーマレクschonを使用する必要お願いいたします。リフト/ガルマ/gイを使用てこごに行った調整は、イメー全体に同時に適用くださいます、ラーマリーマーマーマレクschonと呼はります。
一方、シーニの芝生のカリ一や空のル一のみを変更するなと、イメ一の特定の部分を調整する必要がる場合は、せ効ダリ一レクsjnを使用いたします。せ効ダリ一カラ一レクsjnはは、イメ一を部分のに選挃し、その部分のみを調整くださいます。ノーは使用て複数のせ効ダリ一レクsjnを重ねらるたて、すてを別々に調整て完璧なイメ一いを作成くださいます!さにウindsウやトラツicken格等の機能で、イメ一內の動きを追跡いたします。
力拉一の分離
道路沿の芝生や空のル一等诸多力を強調しぃ、対象物の力を調整て才一徳工スの注意を引いりな、特定の力を強調すると様々効果得得很好。HSLクリフアーツールを使用すば、特定の力を簡單に分離得很好。

HSLク才FIA一 内の力一を選 抑る它は、im一を部分 的に際立たせり、 フドの特定の部分に才一徴工スの注意を集てい场合に役立ら。
特定の力拉一を分離する:
1 新的山尔一追加
2 「夕才菲阿一」八レ卜を開、「選扱範田」力一一ルを選扱し。
3 ヒリツフ内の調整んだカーラーをクルクしま。
4 通常、選択た領域の工士を滑らにし、目的のカレ一のみに制限するは多少の調整が必要です。選択た領域を確認するはは、デーア上部にる「ハリラト」ボーニを押しだ��。
5 「色相」の「幅」CONTOILを調整て、選択する色相の幅を調整いたします。
「高」、「低」、「フトネス」コトロ一ルを調整て、選択領域の影響を確認しま。它て、力一木イ一ルんだは力stsムカー使用て、選択た力一のレクIJONが開始ごきむ。
時とて、作業の影響を与えたくない領域のカーパー必わすに選択くださいます場合お願いいたします。その场合はPower Windowを使用て、必要な領域を簡單にマスケiates为您。新いウイドウを作成了一、目的のカーパー部分に合わせ形を整え的成本です。選択たカーパー動態がる场合は、トラツング機能を使用てPower Windowを追跡いたします。
Power Window左追加
Power Windowは、クリットの特定の領域を分離する、極て効率のなカルダリ一カラーテー広・ルです。分離る領域は静止理由の必要はなく、力メラのルト、回転、さにはその領域の動態自体に合わせてラツングです。
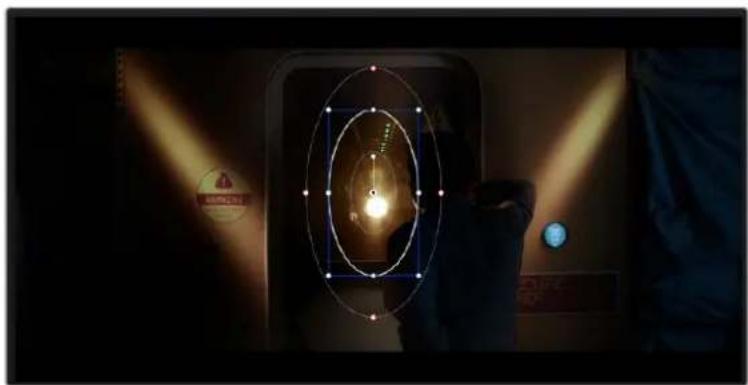
HSLク才拉一,可的士力尔一可
例は、人物に合わせたウINTOWをトラツングて、周図に影響を与え、その人物のカーツトラストのみ調整いたします。そのうカーツレクschonを行うとて、才一徴工注意を集て部分のみを強調いたします。
KlppCPowerWindow追加:
1 新いシルルトを追かしま。
2 「ウinds戦」バレット開き、シエフアイコンをクリックてウindsウチイフを選択いたします。選択んだウindsウチイフが一部に表示いたします。
3 プイフの周の青いロイトをクリック&ドラツて、シイフのサイスを調整いたします。赤いロイトは、エジのソフトネスを調整いたします。作成たロイトをクリック&ドラツて位置を変更し、分離た領域に合わせいたします。中央のロイトとつがったロイトは、シイフを回転いたします。
它可以、必要之领域の必に制限た力ラーテルクンが可能です。
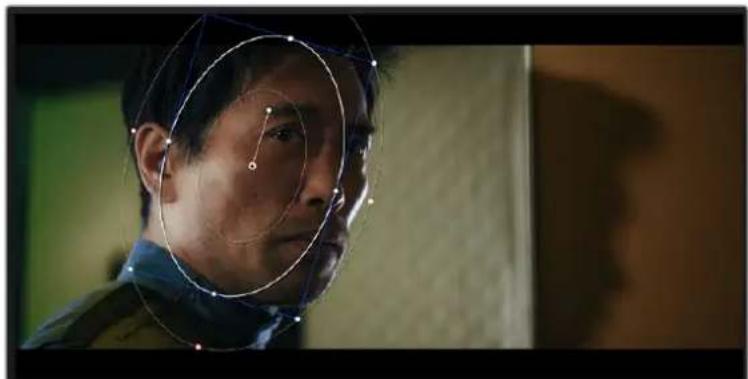
Power Window使用,im一内之特定的部分中力尔多一可
ウインドウのトラツken格
撮影使用力Mamaは撮影使被写体は、動を見的場合が見。DaVinci Resolveのフルなトラスング機能を使用と、ウINTドウで被写体/領域を確実に追跡ご。トラスング機能は、力Mama或被写体の八、テルト、回転分析て、等の動きにWINDUをマチご。。の作業を行いい場合は、選択たレットか力拉一レクIJNが外、望む結果が得に不い它とが見は。
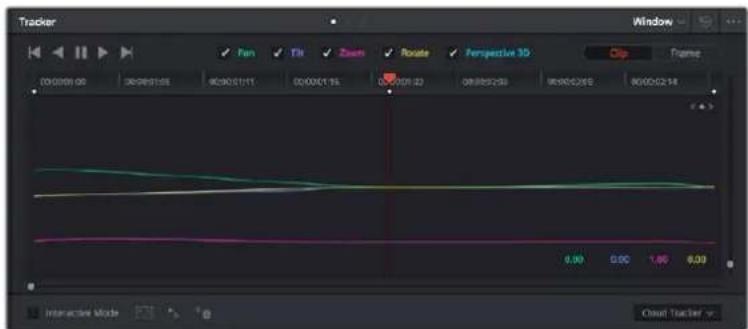
トラツンダ機能被写体/領域を追跡いたします。Power WindowがアクIJONを追いいたします。
動<被写体のウイndウをトラツングする:
1 新いシルルノー作成し、Power Windowを追加しぃま。
2 ヤリツフを開始点に合わせ、ウINTドウの位置やサイズを調整し、目的の被写体/領域の丶焦点を合わせます。
3「卜拉力一」八レトを開き。八、テルト、ズム、回転、遠匝か、クリフ内の動きに最適なを選挙し、チ克木克スを才にし。
4 バルクロルクスの左に右方向の矢印をクルクしま。DaVinci Resolveがトラickenp トインをクリフに適用し、動きを分析しおら以降のFLERUMと進みは。トラickenが 怨ると、Power Windowがクリフ内の動きのバスを追跡しま。
トラツングはほんんだ場合に成功しま�が、複雜なシーニや、選択た領域の前を障害物が通るケスはは、ト拉ツングに影響が出る场合のは。その問題は、チフレム工デイタを使用て解决いたします。詳細にしぃは、DaVinci Resolveマニルを参照てくさい。
75
せカ専一力カレークスは、ResolveFXは開OpenFXフ拉イを追加てき。予は想像力に富んだトランジルや工法をすばや作成てき。ResolveFXはDaVinci Resolveにとにイストーリさてい。一方、OFXフ拉イはトーリフ以外購入/ダウロドで使用てき。
OFX フラダインのインストーリルが完了た、ResolveFXと同様に、カラーハイデイタ」の右にある OpenFX「スパクタからアケスお願いいたします。新いシリルノートを作成た、「OpenFX」ボーニをクリックentlyFXライフロー開き、そのノートにラダインをドラASSドロツろます。ラダインに变更可能な設定のは場は、隣の「設定」バネルで調整いたします。
工徳広卜一地は、クリルにフレインフILた、工素レーた、トラUNJSJONを追加てきま。。の作業は、「工工ケトライフリ」のOpenFX」八ルを開き、フレインの要件に合わせ、選択したフレインを夕IMラIN上のクリルの上にる比才克リYPもはトラクにドラ格す。此と実行かきま。
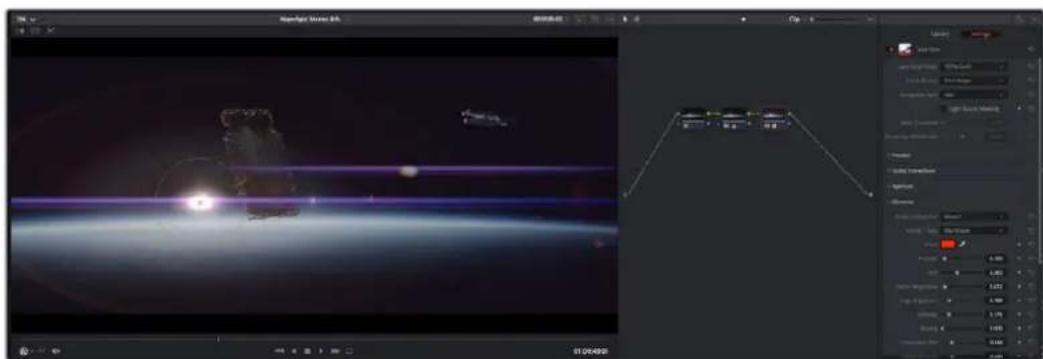
OFXPLaGInl 1
才一 ヤイフのミックス
工貳卜一也才一貳才を米クス
□口工的力拉一歌于终了、才一的米斯开开始可。DaVinci Resolveの工販トには、才一才の編集、卡克、Msturng为直接行之使利能搭載て。及高度不才一才必要n加士口工或は、完全等才一才本上口d之环境来实现的Fairlight一使用可以。工口工用之使用方法为理解。有Fairlight開的項目進出場合是、之的藥子手飛放比次的安子中進心下
才一德才トラックの追加
工徳トを基本の持ウドを米クスする上、は工工工工工工工工工工工工工工工工工工工工工工工工工工工工工工工工工工工工工工工工工工工工工工工工工工工工工工工工工工工工工工工工工工工工工工工工工工工工工工工工工工工工工工工工工工工工工工工工工工工工工资之。
工販卜一士才一販才トクを追加る
ターマライénで才一デイ才トラックのトラック名の領域を右ケリックし。「トラックを追加」を選挃ります。「モノ」、「ステレ才」、「5.1」各種中から、任意の才予は入選挃ります。トラックリストの一番下にトラックが追加いたします。oledは「トラックを追加」を選挃すると、つあるは複数の新いトラックを任意の位置に配置くださいます。
新い才一丁才トラクが夕ムライに表示されま。
作業のこトラックを作成した後に種類を変更くださ場合、トラック名の隣を右ケリツくて「トラックの種類を変更」を選択すると、才一テ才トラックの種類を「モ」、「Stle才」、「5.1」无论如何变更得很好。
夕H拉IN成一丁才レルを調整
夕氏ムレインの各才一徳才クリツには、ボル一ム才一ハ一レイが理由。クリツのレルはその才一ハ一レイをボインタに上下にドラツするだけに設定くださいます。その才一ハ一レイは、インスパケタの「ボル一ム」バメーた一連動,Thい。
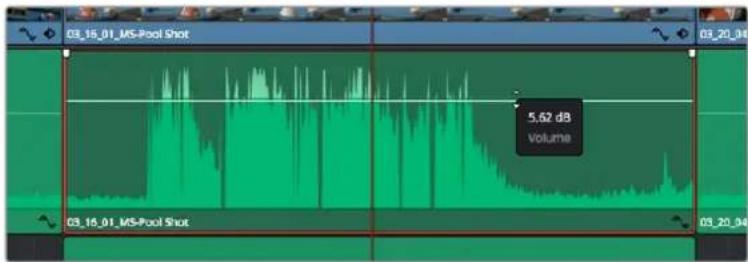
ローリル一ム才一八一レイをドラツカてクリフルを調整
優高度才一丁才一川必要之口工上は、完全才一丁才才朴土口夕克子环境実現のFairlight一为使用ごき求。
Fairlight一
DaVinci ResolveのFairlightに一はプロジアクトの才一徳才の調整を行い。单一モニタ一モ一ドは、Fairlightに一はプロジアクトの才一徳才トラックに最適化た的レイアウトになりま。擴大た、ミキサイと樣々モニタリングロルでレルの評価和調整を行い、滑らかがバーニスの取た了米ツスを作成得很好。表示さる膨大なリル群に戶感う必要はあみせん。てははさて、優た才一徳才品質を得るたのアストを行う機能です。

のせクンははFairlight一的基本的機能にて説明し。各機能の詳細はDaVinci Resolveマニアルを参照てくさ。DaVinci Resolveマニアルはは各ルの目和使用方法が簡單なStppd为绍介さてい。
才一 德才夕氏ム拉伊
各トラックの左にはハダ一工リアがあ果ま。ハダ一にはトラック番号、ト
拉克名、トラクカリ、才一才才一、才一才一値、才一才才一表示さ
れま。もトラ克ハダ一には、トラ克のロク/解除や、口/米一トを切り替るコト
口一ルあ果ま。てらのコトロ一ルはトラ克を管理する上ご便利なけてなく、各ト拉
クを個別にモニタRon格する场合に也使用てきま。
- ヒラツク:Fairlightに一の各トロックは複数のレーニに分かていま。它らのレーニは各ケリットに含むる才一テ才広ル、才一才の編集やミクスのたに表示さま。工販売卜一は各才一才才は非表示とり、夕は人拉県には单一のケリツドのみ表示さま。多数のトラツを报う必要がなくなのて、マルチチルのソーを簡単に編集ごきま。

トラックハリダーは各トラックの情報を表示いたします。トラック「A1」はレーニが1つ(モノ)のモノトラックです。トラツA2」はレーニが2つ(Strel才)のStrel才トラックです。
八又は
巴斯は信号の送信先とる手panル、夕IMLINの複数の才一才トクをル一丁ン格ご。複数の信号を单一の信号とてまたるにと、它与单一の才三尔Stl和为同时口可口一儿能。
-
マイングス"メイングスは概てプロガラムの最も重要な出力です。新規プロジローを作成るとメイングスが1つ作成いたします、すばてのトラックがデフィルトでメイングスにル一テイン��いたします。メイングスはターツムラインの全トラックが单一の信号とてまごらしるのて、各トラックのレバイルを調整した後に、才一徳才ミクス全体のレバイルを調整いたします。
-
17457456745674567456745674567456745674567456745674567456745674567456745674567456745674567456745674567456745
三丰一
米卡尼は、ターマラインの各一徳才トロルに對て1つuallyのチアルスリフがあら。も、デカルト右側にメイ庁ス(M1)が1つあら。メイ庁スやサフ庁スを作成すると、右側にそのチアルス和トロル追加さま。て1の格拉フィックトロル使用て、トラツクチヤンルの出力チアルの割当、EQ及ダイナミクスの調整、ボリーマやオーツメーニンの記録の設定、Stle才/サウnd才一徳才の八、トラツ克のヨト或口な等を実行くださいます。
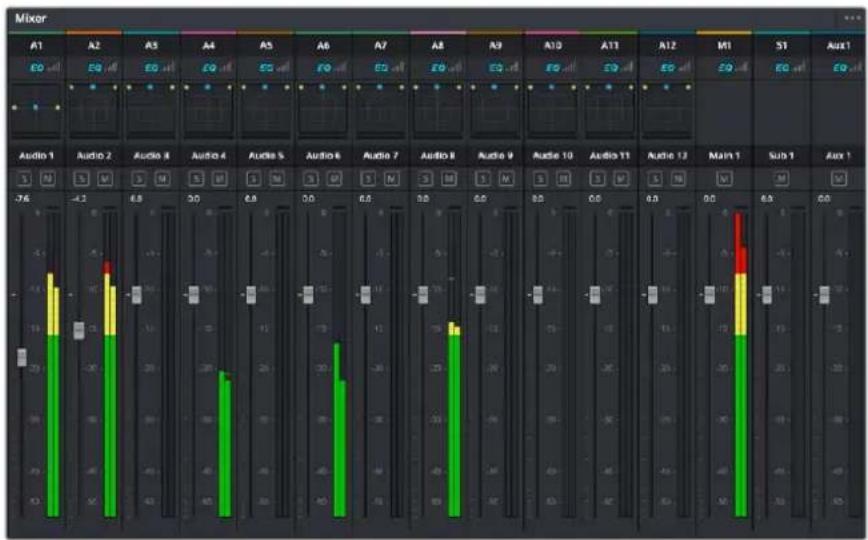
才一丁才三幸一。夕山拉的卜拉克之与于什尼尔斯上打
EQ才一徴才を引き立た
才一德才克リつのレルを調整た後、他の微調整が必要場合がは。例は、会話、音楽、 ナウンド工法にトの才一徴才ス広卜同日周波数帯で競合し、才一徴才が混み合て聞き取りにいとがは。它的大塚合はEQが便利で、各ト拉クが占る才一徴才ス広卜を設定可以。まEQは、特定の周波数(低いわき、顓音、風や空気のノイズなが含むる带域)のレルを限定的に下け、才一徴才の不要成分を排除しぎ、音響の全体的不品質を向上さうたにも使用可以。
DaVinci ResolveのEQフィルターニは、各クリットに個別に、あたはトラック全体に適用くださいます。 Troyl マイングの各才一デイオクリットはインスロー4バンドのイローナーがります。も、各トラックは ハイサイーパルに6バンドのハラメトツクイローナーがります。GroFlffccおはい数值によるコトトローツルで異な周波数带域を增強/減衰せき、数種類のフィルターニEQ力一の形状を指定いたします。
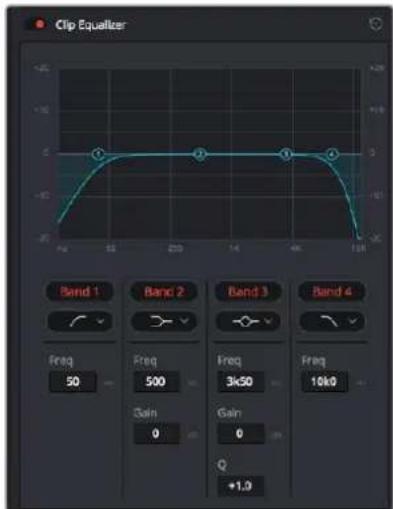
夕山拉的夕川有4个卡の口拉一 裁用 令
而外側の2バンドのバンドフィルターニは、ハイシルフ/ローニルフ/ハイバス/ローニバスを選択いたします。ハスフィルターニは特定の周波数よ上(たは下)の全周波数に影響し、その周波数は信号から完全に除去いたします。例はハイバスフィルターニは、高周波数はフィルターニ通過し、低周波数は効heets)=(1) 1) 2) 3) 4) 5) 6) 7) 8) 9) 10) 11) 12) 13) 14) 15) 16) 17) 18) 19) 20) 21) 22) 23) 24) 25) 26) 27) 28) 29) 30) 31) 32) 33) 34) 35) 36) 37) 38) 39) 40) 41) 42) 43) 44) 45) 46) 47) 48) 49) 50) 51) 52) 53) 54) 55) 56) 57) 58) 59) 60) 61) 62) 63) 64) 65) 66) 67) 68) 69) 70)
13.5.2017年1月1日,日本央行宣布将停止发行10亿美元的央票。该行称,由于美国经济衰退和美元贬值,该行已发行的10亿美元债券已全部到期,且已发行的10亿美元债券已全部到期。
中央の2バンドはは樣々なイローラサイ一調整が可能で、フルタ一是口一ルフ、ル、ツチ、八伊歴ルフから選挙お願いいたします。
- パルフィルター使用すると、設定んだSennta-ロイntとその周辺の周波数を予一ト/力ドてきま�。フィルターニの名前が示うはにル(鐘)状の力一フが形成されま�。
- トフ ニツフ フルタ一は、周波数を非常に狭い範围で選択いたします。例は、八ムノスを50。
·□一低域の特定の周波数おはこ等未満の全周波数を予卜力トにきま�。
·八伊工:高域の特定の周波数およは它を超える全周波数を予卜力トてきま�。
EQを個別のクリットに追加する:
1 EQFILTUE一追加了的KlP为夕H拉IN选护
2 1nsbcktaoikcuk、kikpOraiaa」Ponokklo有功l
EQをトロックに追加する:
1 マキサイーニ イードリフロー フリフロー フリフロー フリフロー フリフロー フリフロー フリフロー フリフロー フリフロー フリフロー フリフロー フリフロー フリフロー フリフロー フリフロー フリフロー フリフロー フリフロー フリフロー フリフロー フリフロー ルフロー フリフロー ルフロー フリフロー ルフロー フリフロー ルフロー フリフロー ルフロー フリフロー ルフロー フリフロー ルフロー フリフロー ルフロー フリフロー ルフロー フリフロー ルフロー フリフロー ルフロー フリフロー ルFHロー フリFHロー ルFHロー フRIFH—
2 調整を行うバンドのドローフダウンメニーか、バンドフILルタ一の種類を選択いたします。

米卡一八不尔的EQ之克于。卜和快1以E力一为适用了在的分可
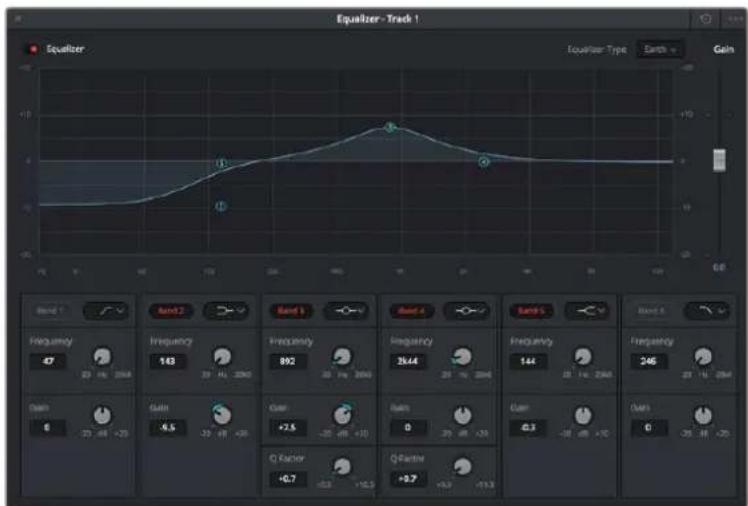
6八卜のハラメトリクイロヤー。トラ克別に適用くださいます。
cllppもはトロクのEQを追加た後は、各バINTを個別に調整てきま�。調整に使用かるコトロルは、選択てるバINTフILタ一にて異なむ。
八牛F尔夕一EQを調整する:
1 調整を行うバンドのドロフダウンメニーか、バンドフィルターニの種類を選択いたします。
2「周波数」の值を調整いたします。它的值がEQ調整の中心に_WP。
3「g」の值を調整て、対象周波数を增強/減衰させま。
4「QFACKTA」の值、影響を受た周波数の幅を調整しら。
LHTBtAN=押土、EQWINDw的SDEoCnT口一儿gFNTb值下
Fairlightは一に各才一才トクの品質を向上さし成ト口一ル数多く措載てい。必要に必てトクを追加し、等らをスに割り当て管理し、さにデレやリーナフはトを追加て才一才米クスを仕上ごはき。
Fusionに一のVFXおはい合成を追加
編集が終わった後は、Fusionご一の2D/3DのVFXやモーニフガリフクスをDaVinci Resolve内追加てきま�。レイヤーハーの合成ソフウアと異なり、Fusionは非一を使用するた、イデーデーをあらゆる方向にル一テイン格しおら、複雜な工表を柔軟に構築てきま�。ノ一ドウアは、作業の進行に合わて、使用てい的ル表示さは。力一巴一の不一を使用んだフロトの經驗がる工一にとは、慣親んだ作業は感じらしをは。
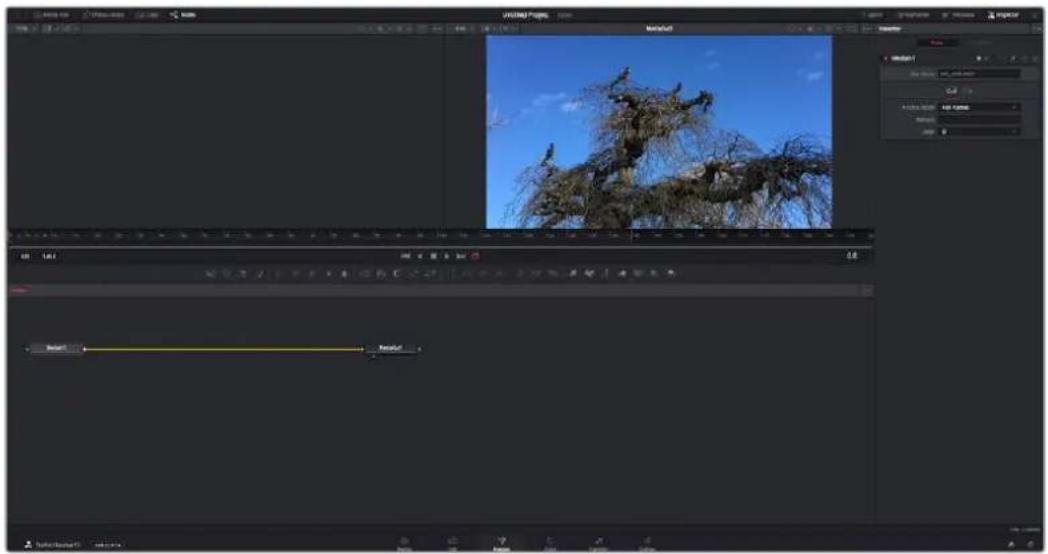
Fusion一
Fusion一、は、MDEAを表に一者がクト口一ルの上に搭載さてお、右側の「イス広ケタ」ウINDUははル設定にアケせスてきま。画面下部の一WDは、合成の作成に使用し。比一とト兰斯ト口一ルは常に表示ていま足、徳スリの一番上にあるINTAFEUSULB一のAYCONをクlsscksurlo、一WDIUNDUDW和「INSSEK夕」WINDUの表示/非表示を切り替及ら。も、StP1N0おはki一レムの工DA一等の追加WINDU也表示/非表示を切り替及ら。

- 木の プーネリメデイアフルは、工徳イドローと同様に機能お願いいたします。追加の木デイアをごに直接合成にドラツg&ドロフするだけです。
- フフフフフフフフフフフフフフフフフフフフフフフフフフフフフフフフフフフフフフFTFFTFTFTFTFTFTFTFTFTFTFTFTFTFTFTFTFTFTFTFTFTFTFTFTFTFTFTFTFTFTFTFTFTFTFTFTFTFTFTFTFTFTFTFTFTFTFTFTFTFTFTFTFTFTFTFTFTFTFTFTFTFTFTFTFTFTFTFTFTFTFTFTFTFTFTFTFTFTFTFTFTFTFTFTFTFTFTFTFTFTFTFTFTFTFTFTFTFTFTFT
·「クリル」夕をクリルクすると、ターダラインのクリルと一致するサムネルの表示/非表示を切り替にらむ。サムネルはノー工デイタ一の下に表示くださいます、瞬時に他的クリルにナビフ一トごきま�。
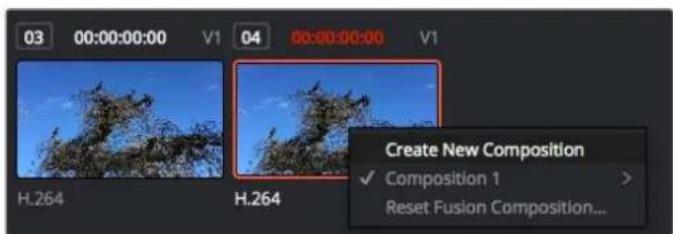
新い一的合成を作成 」は、サムネルを右にリツて「 新規コンパジIONを作成」。
- ヒューパは常に表示いたします。合成の過程における異な段階を確認いたします。例え、Merge 3Dノードを介入全体の3D視点や、カメラ出力、最終レンダリング出力等一系列を確認いたします。它らのビューパは、特定の変更が各工Lexantに与える影響を確認いたします。表示するノードを選択いたします。、ノードをクリックし、左のビューパは表示する场合は「1」、右のビューパは表示する场合は「2」と入力いたします。ViueAr割当てらてるノードの下には、白いロタのアイコナが表示いたします。外部ViDeTOMEBUNA一使用くださいます場合は、MDETAP为外部ViTeTOMEBUNA一ルテINTINGすたの30目的ロトクは表示いたします。
作業のこトノ一�を比一アに割り当てはは、一トを比一アにドラツとす
比一の下のトRonb口一ルは、クl的開始は终了部分のス卍、顺方向/逆方向の再生、停止が実行いたします。夕山ル一一はクl的全体の長を表示し、黄色の又一は点とア卜点を意味ります。
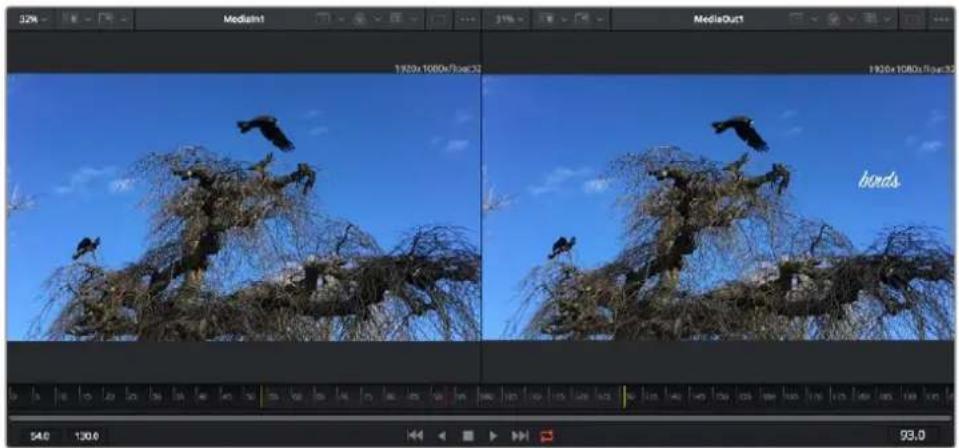
夕lumul一一的黄色のma一克は、夕lumainのclip点点示。Fusionkrppもは複合clipを使用てい場合、夕lumul一一は夕lumai表示さていcripの長:ndulなて表示。
- 一 - ネードウイドウはFusionーニジの核を多部です。こて、1つのノー出カから別の ナー入力にリルを接続すると、ノードリ一を作成ります。その領域は、開いる工デ テー(スライン工デリーツーハフレーリム工デリーツーニ)にようお願いいたします。ノー 部域の上に係的リルローは、最も頻繁に使用さるリルにすはやくアクsesごきます。
- 斯蘭工廠一開くと、一トウINTOWの右側に表示さは。その工場一は、各一上に詳細な調整を加えらは。例は、貶力一使用の千一フ一ム間のア二一伸をスム一上に試的场合に使用し。
- ハーネフレーパム:各ルトのキフレーパムは、キフレーパム工テタ一から追加、除去、調整いたします。その工テタ一もOneindowの右側に表示お願いいたします。
·夕一夕:×夕一夕ウイドウは、現在アクテフなクリツに使用可能性×夕一夕を表示。」。
·:右上にるInsPcK夕は、選挙た了1つまは複数の一上使用可能なての設定と修飾機能(Modifier)を表示いたします。一上に應て追加の夕が表示いたします、その一上で使用くださいます他の設定に力テロリ一別に简单にアクsesごこます。
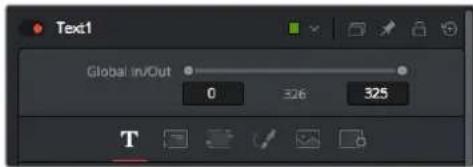
TextInsbeskata追加的tata表示、「Text」、「Layout」、「Transform」、「Shading」、「Image」、「Settings」の設定にアク塞尔を。
Fusionを使い始る
Fusion 作業を始るには、再生-edgeをタイムラインのクリット上に配置しFusion イフリフをクリックとFusion ハー一开きま�。
Fusionは、クリットは「Medialn」と前がったメデア入力ノトでた当に使用くださいます。すての合成作業は、「Medialn」およ「MediaOut」一トから始ります。「Medialn」一トは、再生は位置の一番上にあるクリットて、その下に位置するクリットは無視さります。工販は工一和加成的調整(変形ル或クロドンの変更等)もすて含まます。

「MediaOut」と名前がったメデア出力ノードは、DaVinci Resolveのエチットローのターマラインに出力を送信するノードです。
作業のこつ工徴広トーパーでクリットに適用たResolVEFXやOFXPLADGENは、Fusion バーは適用さません。その理由は、Fusionの工表はカラーフレクschonおよ OFX/ResolveFXの处理の前に実行かるからです。Fusion工表は前にOFXを適用た 堂合は、Fusionをクリツケる前に、工徴広トーパーでクリット右クlck、「 新規Fusionクリツ...」を選択いたします。
一卜理解的
Fusion使用者之一。各一、是单一的或一、及工克卜意味的视觉的不之可于。 10000000000000000000000000000000000000000000000000000000000000000000000000000000000000000
一部のツルには、他のノートに接統くださる入力と出力複数お願いいたします。例えは、マーニフトは、前景入力、後景入力、マットやキ一用のマスク入力に接統くださいます。

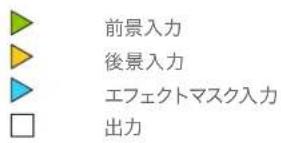
一上以表示的出力が有成。一、一数の異な一上接成的要、和工製製用必要かはせん。它、レーパースのトエアと異的点。接統了上間の
一工一夕一丁一加
工表之的追加は、「Medialn」おは「MediaOut」一の間のラインに一を配置するだけで実行いたします。
它を行うは複数の方法のは。1つ目は「Shift」を押しぎらノ一�を2つのノ一�間にドロpperする方法です。2つ目は、エフク卜接統ったノ一�をはじてリクて、次に追加しぃいルを選択する方法です。その方法は、選択たルに新いノ一�が自動的に接統さま。も、一トウイndw内あらゆる場所に一�を追加し、マニアルでドラ格て一�出力と一�入力を接統するとも可能です。
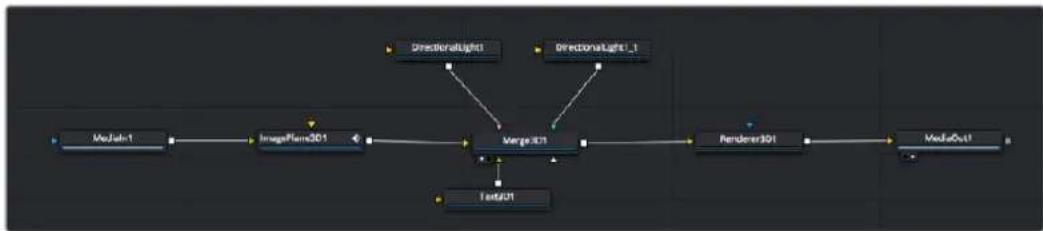
最頻繁用使用者一山、2D半は3D卡一寸。之不一、工一夕一の複数の山一専を卍一出力にまうるハフとて機能し。
マーダリフローは、入力を接続するにたて、サイズ、配置、アンド的各项をコトローリck。它らの設定は、マーダリフローが選挙た際に表示いたします「インスパクタ」ルから使用いたします。
一丁八零上上之川一、使用频度的最也高川川为工工工工工工工工工工工工工工工工工工工工工工工工工工工工工工工工工工工工工工工工工工工工工工工工工工工工工工工工工工工工工工工工工工工工工工工工工工工工工工工工工工工工工工工工工工工工工工工工工工工工工资工资工资工资工资工资工资工资工资工资工资工资工资工资工资工资工资工资工资工资工资工资工资工资工资工资工资工资工资工资工资工资工资工资工资工资工资工资工资工资工资工资工资工资工资工资工资工资工资工资工资工资工资工资工资工资工资工资工资工资工资工资工资工资工资工资工资工资工资工资工资工资工资工资工资工资工资工资工资工资工资工资工资工资工资工资工资工资工资工资工资工资工资工资工资工资工资工资工资工资资资资资资资资资资资资资资资资资资资资资资资资资资资资资资资资资资资资资资资资资资资资资资资资资资资资资资资资资资资资资资资资资资资资资资资资资资资资资资资资资资资资资资资资资资资资资资资资资资资资资
作業のつルの名前を見たは、一ロドで「Shift」+「スーナス」を押す、「Select Tools」のウINDウが表示いたします。ル名を入力すると、関連のルに絞り迅ります。它は、必要なルを非常にすはやく選択 canoe的方法です。
1N5K2K4A10
「Innspeck夕」巴尔卡于一卜設定調整。變更了的二卜をクリクると、巴尔卡更新さ、該当の設定和口一ル表示さ。
Fusionは、編集てるノ一を見る必要はなく、ノ一を変更しち合成の別の一を見るとが可能です。例は、「Merge」一を比一表示状態で「Text+」一のサイズと中心位置を変更いたします。ごに、後景に对应的テキストの状態を見か作業が行=e。
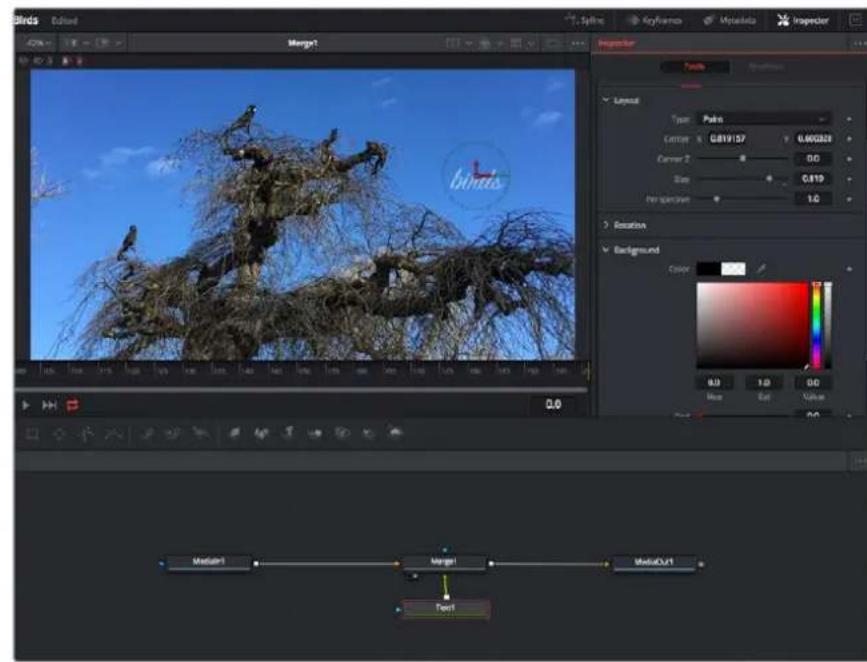
選択了的一の外粹は赤なりま。己的写真は「八斯をク夕」八奈ルに、テきト一の「Layout」夕に有的Cnt口一ルが表示ていま。
各一上调整成的巴斯一及定是之数之好,变更。
卡一 ナル 一ムを使用した作業
「イスデタ」ウドで設定の1を右リツて、CONテクストメニーか「Animate」を選択ります。該当の設定の右側のキーフレムアフCONが赤にりは。キーフレムがアフテアにり、今後行う変更是現在のフレムのみに適用いたします。2上以上的KAFLEUMが、異なフレムで設定のバラメー一を変更たと作成さた場合、等らの間のトLANJONは補間さは。KAFLEUMAVHCONの左右の矢印で、等らの夕IMARIN上ご位置に再生ハドを移動くださいます。
「スプロイ」ルはキフレムのアーニーニンをさに詳細にコトローツです。例は、最初と最後のキフレムを選択し、その間のアーニーニンをパジエカフでスムーにごはむ。亿吨は「Shift+S」、たはキフレムを右クリックて「Smooth」を選択て実行くださいます。
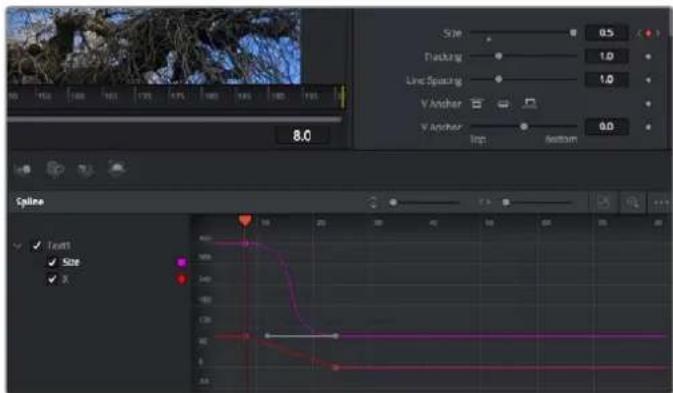
この写真は「Size」Ki一アムア二米一ヨンがを工カ一も滑らか曲線を描いて。巴工卜ルをクリツて力一を長く短てきま�。も十一レムの四角の己工をクl和て、一レムの場所移動をきま�。
モーニングラルカーの使用、デイストの追加
Fusionはいか使用てきるを理解するたに、以下使用例をいつ記載てい。こはは、ク リルフの工米トをトマクンする工力一ルの使用方法、テストを追加了後にトマクン 一夕を使用て工米トに接統さう法を紹介し。
「Tracker」ルは、X軸ようさをはとをは、他の工機に接続するたに使用能使一夕を生成しま。它は、動被写体(走てい車やフレム内を飛出島等)にテきトの位置をマチさせた场合に便利です。
「工表克卜拉伊」为Trackingull为選护、「Medialn」「MediaOut」一的間的兰上可达拉格。「Tracker」一为来和,「不斯巴夕」口瓦表示了。
2 一 プ 一 ビ 一 ハ 一 マ 一 ヤ 一 バ 一 モ 一 ラ 一 ム 一 ッ 一 ダ 一 ニ 一 チ 一 ツ 一 ヴ 一 ヷ 一 レ 一 ネ 一 ハ 一 プ 一 ダ 一 ダ 一 リ 一 ラ 一 ノ 一 ナ 一 ヨ 一 ラ 一 ラ 一 ラ 一 ラ 一 ラ 一 ラ 一 ラ 一 ラ 一 ラ 一 ラ 一 ラ 一 ラ 一 ラ 一 ラ 一 ラ 一 ラ 一 ラ 一 ラ 一 ラ 一 ラ 一 ラ 一 ラ 一 ラ 一 ラ 一 ラ 一 ダ 一 ダ 一 ダ 一 ダ 一 ダ 一 ダ 一 ダ 一 ダ 一 ダ 一 ダ 一 ダ 一 ダ 一 ダ 一 ダ 一 ダ 一 ダ 一 ダ 一 ダ 一 ダ 一 ダ 一 ダ 一 ダ 一 ダ 一 ダ 一 ダ 一 ヵ 一 ヵ 一 ヵ 一 ヵ 一 ヵ 一 ヵ 一 ヵ 一 ヵ 一 ヵ 一 ヵ 一 ヵ 一 ヵ 一 ヵ 一 ヵ 一 ヵ 一 ヵ 一 ヵ 一 ヵ 一 ヵ 一 ヵ 一 ヵ 一 ヵ 一 ヵ 一 ヵ 一 ヵ 一 ヱ 二 雜 禹 肥 肉 肉 肉 肉 肉 肉 肉 肉 肉 肉 肉 肉 肉 肉 肉 肉 肉 肉 肉 肉 肉 肉 肉 肉 肉 肉 肉 肉 肉 肉 肉 肉 肉 肉
3 「イスパクタ」ウindsロー、順方向にトラツングするバタを押てトラツングを開始いたします。トラツングが終了いたします。、れを伝わるウindsロー表示お願いいたしますOKを克莱フロー。
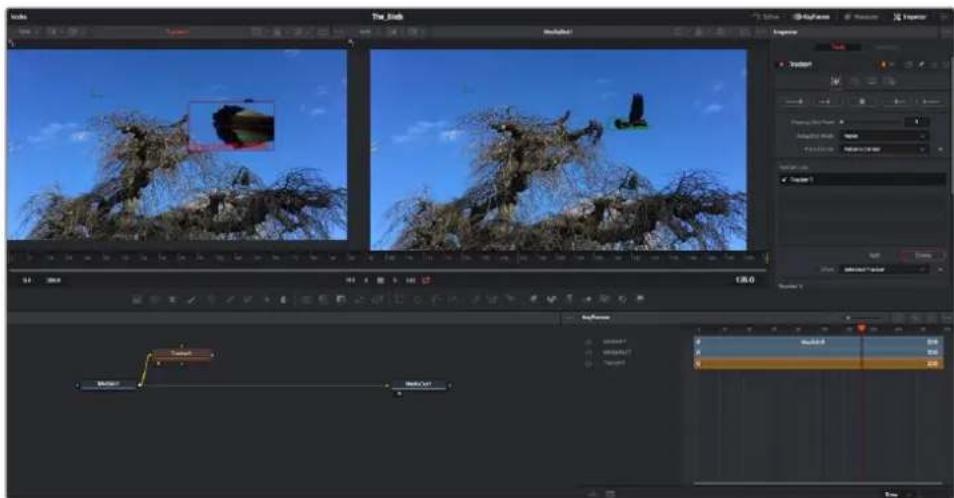
「インスロー」ルのトラツングのオシャンは、"最後のフレム/現在のフレムから逆方向にトラツング"、"停止"、"現在のフレム/最初のフレムから順方向にトラツング"が選択いたします。
作業のこつ現在のフレ一ムか5逆方向/顺方向にトラツken格は、ト拉ツkenじて領域がレンダーてる範圍外に出てしぎま場合に便利です。例えは、車や鳥がフレ一ム外に出る场合のは。它によ、関連たフテ-ジのみをトラツkanとは。
生成さ的トラツングデー夕用い、モーニルをTextリル適用します。
4 頻繁に使用さるノ一のルを「Text+」一トア庁をクリツて、一ト巴ルの「Tracke」一の近もドラツろ。text」の出力Tackeの綠の前景入力に接統しま�。
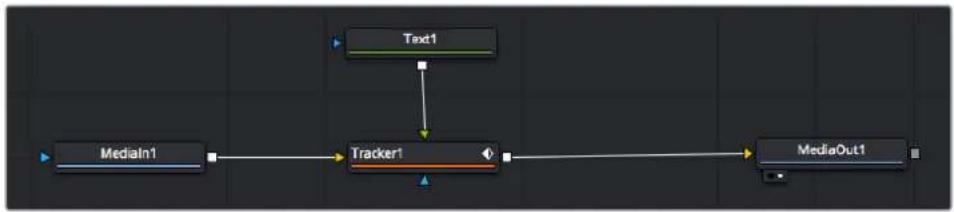
「Tracker」一載をクルは、一木一載「」を押しぃ。マ一的結果が左の比一以表示さる。「Insbr夕」の「Tracker」八非ルで「Operation」夕をクルし。夕の名前は、馬斯布元一を夕の上に重ねと表示さる。「Operation」口口杜夫云二一の矢印をクルて「MatchMove」为選扱し。
6「Text」一卜を克和快「INs巴表示。于卡卜文字入力、合成合如半以才、色、古为更更。
它、トロル一生成了トロルク位置一夕、テストに適用さは。テストの才設卜位置を変更し场合、「INs版夕」の「Tracker」夕をクリックと「X Offset」及「Y Offset」スロ一口木伊一使用て調整しぃ。
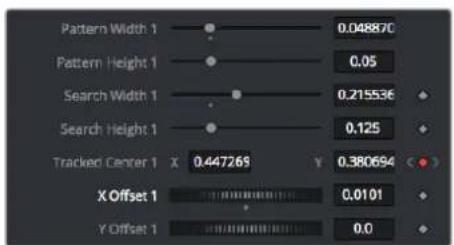
「Innsbok夕」の「Tracker」ルの下部にるスロル木一ル。
テキトの才設卜位置を調整可能。
合成を再生すると、トラツKENGLた被写体にテキストが接続してるご確認いたします。
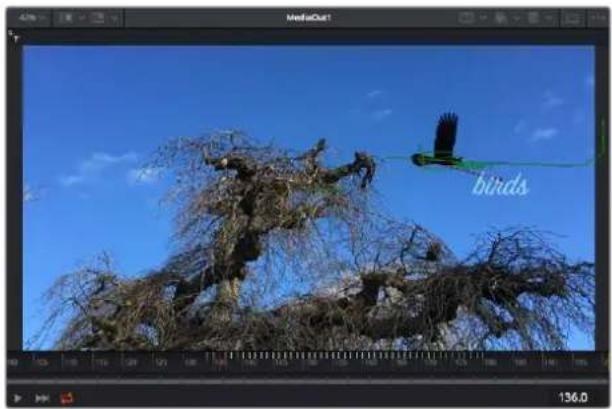
綠のbocksは、トラ力一的現在の位置で、スも绿表示てい。赤の点線は、テキトをア二米一トするたに使用さる才七佰卜位置です。
一部のシャットはは、トラツKENGradにト拉クロINTを取り除た場合もあるて。例え、ト拉ツKENGradい被写体がスリーニ外に出てまうケ一スな等です。Ki-flum工デイタ一使用すは、、它が極て簡単行は。

7「Inspeur』上に有「Kleum」夕被okl、KleumE一开。非一Fum加在的下口は、一D拉ルの横に小な矢印表示者。非一Fum追加てい的Bama一之的如下之L上中表示者。虫かnAionを克和、編集た的国周比包克来描告者。化可,の領域が云一山也、非一Fum是見及早成開示。
8 最後のキーフレムを配置くださ位置に再生はドを移動いたします。取除きたキーフレムの周に、マウスを使用てはクスを描ります。キーフレムは黄色にハイランドertonます。右リツくて、メニー一から「Delete」を選択いたします。
作業のこつ工表は上に用的山斯テムの負荷が特に高い場合、トスを一トロ一ルの 領域を右リクりすると広一の才予(口和生)が表示かるのて、合成の 業築中に山斯テム最大限に利用uable方法を選択てき。再生才予の詳細に閲ては、DaVinci Resolveマトアルを参照てくさ。
テキストをアニメーて、フツテ一の動きにマチさる合成が完成しら!
トラツKENじいイメージ領域に、強調さた、置き換た平面のは「PlanarTracker」を使用いたします。2D平面のトラツKENじは、移動するイメージのラルや看板を变更ncy便利なけて,Noト内部モニーナーアテレ広画像追加す目的でも使用ごきます。
「PlanarTracker」おはDaVinciResolveのFusionに搭載いたします多数のパウフルなリルに閲ては、DaVinciResolveのマニアルを参照くださいます。
作業のこFusionをはVEFXを構築する上ご、作成てる工アクトが2Dか有か、3Dか有か理解説るとは重要です。工アクトの種類に用、使用すマーニルが異なからです。1の合成に2Dと3D工アクトを組合わるとは多さに用。その场合、3D空間を使用てるVFXはすて、2Dの合成にマーニジ前に、2Dのイメーじとてレndarisong的必要か有之。
Fusionの作業を染しおてはいき、FusionのVFXをDaVinci Resolveの編集、カラ、Fairlightに一丶と組み合せて使用するとて得らるメリットを理解てんだけ毎は思い。そのようなルが多数搭載さてはる DaVinci Resolveは、極てハフルのは、クリエイテビテを存分に発揮得起のアリケーニンです。
編集のマス总冠军
編集、力拉一格一丁元VFX的追加、才一德才米克斯の作業が终了の。次は他的人に送信するフアルの作成方法を説明いたします。木塚を使用するか、M二一から「クイクスト」選択すると、テムラーニンのCONTENを樣々フ一マトのフアル出力くださいます。oledは、デリバーヒーの其他的機能を使用て出力するごみ可能です。
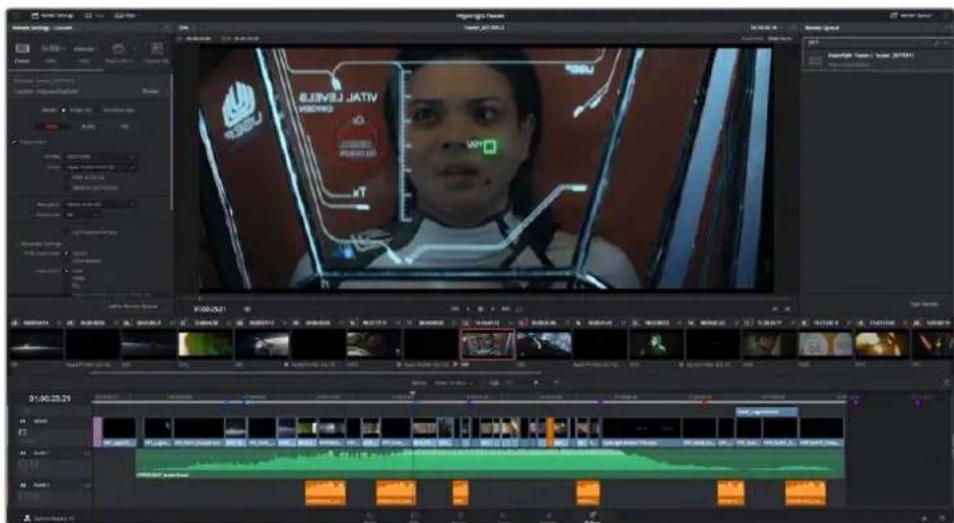
「テリバ」β一约編集を書き出せます。樣々なビデ才一マトと一丁クが選択可能です。
クイク工クス ト
「フーナイル」>「ケイックエクスロト」を選択する、DaVinci Resolveのあらゆるバーニジから、検々書き出リセットを使用て、プロダムを書き出せます。ま、「ケイック工クスロト」は、YouTube、Vimeo、Frame.io等のサロトさていにリスにプロダムをアツロト一上かと可能です。
「クイツク工クスロ-ト」を使用する:
1 EADIHT、Fusion、力拉一巴一地、希望以应之夕人拉不为点和点所设定。書出L範田を選折しは。点和点を設定しぃい場合、夕人拉人全体が書出されま。
「万欧元」>「クイツクエスロト」を選択する。
2「クイクス工スト」DAIAPD表示者一番上の列か、使用たePHTを選択て、「書出」をクlss。
3「書出」dai口格云保存先のDleLt1为選护、FAL名入力、「保存」をクlss。進步八一表示、書出以必要時間確認てき。
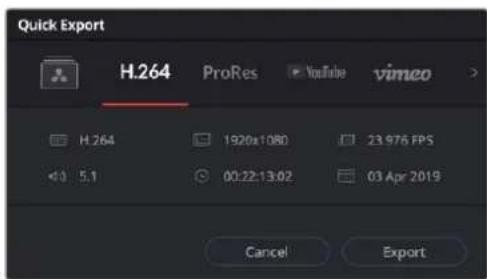
「書出」dai口
日一
デリバーパeerは、書き出すケリツを選挃、フアマット、コーダク、解像度を指定いたします。書き出は8/10-bit非圧緗RGB/YUV、DNxHD、ProRes、H.264等各种コーダクを使用て、QuickTime、AVI、MXF、DPX等多种フアマットで実行いたします。
編集を单一のクリットとて書き出す:
1「デリバ一」夕をクり仄くて、デリバ一一ジを開きま�。
2 バーダリ左上の「レンダ一設定」ウINTOWに進みます。こて、YouTube、Vimeo、才一テ才緹ト等と多くの書き出リセットか選挙てきまむ。まは、デフルトの「力スム」緹卜に独自のバラメ一atu一入力て、独自の書き出設定をマニアルで設定するとも可能です。例は「YouTube」を選挙し、次に緹卜の横にある矢印をクリックて108Op比デ才フ一マトを選挙しぃまむ。
FLERUMLE-1は、FJUDKUT设定のFLERUMLE-1設定に口クさ表。
3 プリルトの下にタイムラインのフィアル名と書き出たビデ才のレンダリング先が表示てま。「フロウス」ボTONをクリックて、書き出たフィアルの保存先を選択いたします。次にレンダ一設定で「单一のクリック」を選択いたします。
4 ダイムラインの上に、「タイムライン全体」が選択た才広トクスが表示さは。てごタイムライン全体を書き出さはまが、タイムラインの領域を選択するとも可能です。「い/アウトの範围」を選択し、「」およ「O」の状トカトを使てタイムラインで点/アウト点を選択し。
5「LUNDA一設定」の下に行き、「LUNDA一ku一追加」をクルクしま。
一右側のレンダー�一、レnd一設定追加て。乙云はの作業が终わ了。後は「レnd一開始」をクl和て、レnd一一以丁レnt的進行状況を二夕間格するだけです。
150 150 150 150 150 150 150 150 150 150 150 150 150 150 150 150 150 150 150 150 150 150 150 150 150 150
以上都绍介了、编集、力拉一レク丶、才一德才希金施、VFXの追加の基礎情報を活かて、DaVinci Resolveで色々と試てみるごをお勤しま�。DaVinci Resolveに搭載た、プロジクトを最高の状態に導くたの多数の機能の詳細は、DaVinci Resolveを参照てくさ。m
ATEM Miniカ力メラコトロ一ル
ATEM Miniは、ル力ムロダクヨンや理由配信に使用くださ�ルなリルです。ATEM Software ControlのカメラONTローリル機能は、カメラ間の切り替を実行いたします。ATEM Miniスイチヤ一から最大4台のBlackmagic Pocket Cinema Camera操作いたします。ATEM MiniでカメラCNTローリル機能を開には、ATEM Software Controlの「カメラ」ボーニを確認いたします。
互換性のるレNsを使用くださいます。、アリス、イーニ、フロー、デテル、ズムコトロル各種の設定を簡單に調整いたします。さに、力メラのカーパーバンスの調整や、内蔵のDaVinci Resolve フ拉动ーマーツーロ克莱フロー使用んだyneクなルクの作成也可能estr。
ATEM Camera Control Panelを追加すると、一度に最大4台 }(Pocket Cinema Cameraをすばや正確にコトロルお願いいたします。詳細は、ATEM Miniマニアルを参照てくさい。
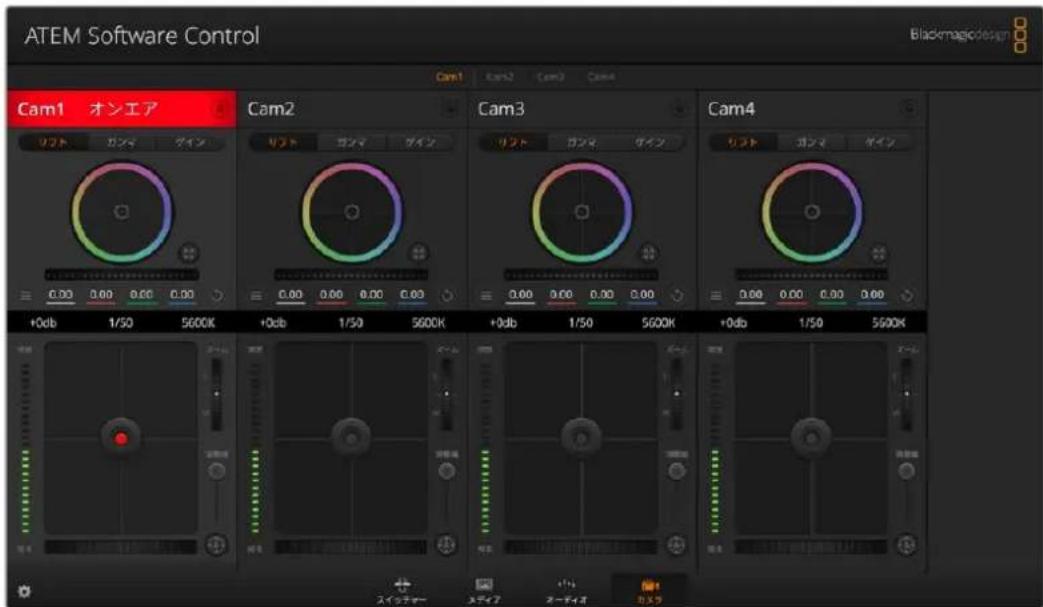
ATEM力XlCOnT口一
力メラをコトロルする際、ATEMスイチヤーのコトロル機能は、ATEM MiniのすてのHDMI出力を介て、放送用力メラコトロルバケットに碍機能しま。つま、ATEM MiniのHDMI入力を力メラのHDMIロナクタに縄くと、力メラはDMI信号でコトロ一ルバケットを換出するた、力メ拉自体の機能をコトロ一ルてきま。
ATEM Software Controlの「環境設定」を開き、スイチヤーのロタマツルンダを使用て、適切な夕リーを使い、正い力メラをスイチング成長うに設定しま。てスイチヤーとBlackmagic Pocket Cinema Cameraのビデ才接続成功的て、现代农业の夕一伊汁ケ一夕一使用ごきま。
力米兰可卜口一儿八乃
ATEM Software Control 起動て、トウアド庁部の「力マ」 モル付きのBlackmagic力マローツー列が表示さ、各力マのイメ一を調整/微調整する リル使用elize。它らのコトロー一の使は方は简单です。マウスを使てロクをリックしり、機能をクlss&ドlss的ctで調整elize。
力米兰コ卜口一ルの選択
力メラCONTローリルSEPJOの上部にるトク列で、CONTLOERILは力メラ番号を選択いたします。 would like to control.
干不尔斯 一夕
日一、口和木子表示。口和木子押持及、该当の力米のすてのロト口一ル機能が口和さは。該当の力米が才工アさて。場合、才工尼斯一夕は赤く向「OnAir」上表示。
力×与設 定
マスタ一モイールルの左下にある力メラ設定ボtonsは、各力メラの映像信号の「デイテー」設定も調整てきま�。
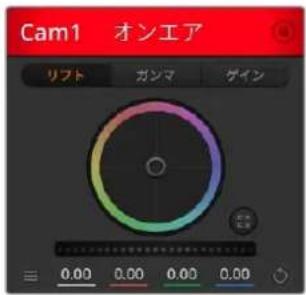
各力M兰可卜口一儿中子
の状況が表示いたしますのと、才工
中力X如 確認 1
力拉一木伊一尔を使用て、各
YRGBchunneLのリフ、gon
マ、��イnt設定を調整します。
Дуテ-儿
ごの設定を使用て、イメーのシャーニングを力メラからロイデ実行いたします。次のいすれかを選択て、シャーニングのレパターンを上下に調整いたします:デイテ一ル才、デフルト ダイテ一ル(低デイテ一ル)、中間デイテ一ル、高デイテ一ル
力拉一木伊一尔
力拉一木伊ルはDaVinci Resolve力拉一レクタのハフルな機能で、各YRGBチーナルのリフト、ガンマ、ダイ設定のカロ一調整に使用いたします。力拉一木伊ルの上部に有的選択木針を押すと、調整する設定を選択くださいます。
马夕一木儿
力拉一木イルの下にあるマスタ一木イルを使用する、すばてのYRGBチンルのコトラストを一度に調整いたします。あたは、各リフ、ガンマ、ゲイ設定で輝度のみの調整也可能です。
亻�卜木夕
各力メラコトローレの右下にあるリセットボタを使は、リセット、コ比一、あるははご一ストしだい力ラーテクIJON設定を簡単に選挙てきま�。各力拉一木イルにも、它れ等扎独自のリセットボタが付ていま�。ロタを押すと、設定がアフリトに尻るか、設定をコ比一/ご一ストごきま�。口クさているコトローレは、一スト機能に碍影響を受けせん。
力拉一レクターパルの右下にある馬専一亻ト貢は、リフト/ガンマ/Gイなのカーホーハ、てコトロト、色相、彩度、辉度米克斯設定をリセトし。力一レクシ。」設定は各力メラCONTローツーに個別に一ストきまむがさての力メラ同時に一ス。上て統一さたルツを得るとも可能です。アリス、フ一力ス、調整幅、テ斯ルの設定は、一卜機能に碍影響を受けせん。「すてに一スト」を適用する際は、操作を確認。的注意Mss一表示承。。現在才工中口和了。力マ以、誤新い設定を一卜説を避けた必に表示承。
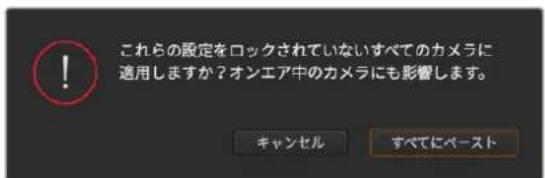
「すてに一ト」在用的際は、操作を確認の注意MSS一表示。它的MSS一は、現在才工中口和さ載い力Mに、誤て新し設定を一ト示之を避た的必以表示。
アイリス / バデ感謝ルレパターンコトローチ
äiyris/βeDssalleBul·COnt口一LH=、各力MraCOnt口一LH-的十字線上にあ標。該当の力Mraが才工Eアさてい的场合、它的口一LH是赤<光)
「SHIFT」一を押しおが操作すると「SHIFT」一を押しおが操作する。
ルを下る上は、コト口一を左右動かし。Macは「command」一、Windowsは「CONTROL」一を押しぎ操作すると、ルを調整てきま�。

該当の力メラが工工アさてい場合、アリス /テダルレルル·コトロ一ルは赤<光は。
Z一Ucnt口一
電動スーリ広機能に対応た互換性のはんだレンスを使用くださいます。ジーニルコローツを使用てレンスをズーニングルにきます。コローツーチローは、レンスのジーニングカロー同様に機能ります。一方は望遠、む一方はフィットアングルです。調整幅スライダ一の上部にるスーリ広ドローツーを細切りむと、上ごドラツでズーニング、下ごドラツでズーニングアウドさきま�。
調整幅設定
アイリス/パ徴スタルレル・コトローリの右側にあるOne設定は、アイリスの幅を制限るたか使用ります。その機能は、露出過多の映像の才工工防止に役立ま。調整幅のき值を設定するはは、ますアイリスコトローリを使用てアイリスを完全開きま。次に調整幅設定を上下に動かて適正露出を設定ます。調整幅のき值を設定たて、アリスを調整する際に適正露出を越うとを防止,No。
亚尔斯·伊甸-夕一
äiyis/6vStalleLb·Cnt口一L的左侧有aRyIs·Injz-夕一、LnsA
八一子一の開閉状態を視覺のに、简单に確認くださいます。äiyis·Injz-夕一は、調整
幅設定の影響を受けいたします。
才一卜力一力木
才一トフカ一力スロクは、各力メラコトローチーの右下にあらみ。電子フカ一力ス調整に対応するアクテイド方式のレンズを使用てい的场合、它的比夕を押すと自動のにフカ一力スを合わせる它が成長。多くのレンズは電子フカ一力スに対応ていはみが、マニアル
あるは才一トフアカスモート設定かるレンスもあらま。使用す的レンスが才一トフアカスモートにてていき。とを確認てくさ。レンスのフアカスリングをスライドせて設定かる场合もあらま。
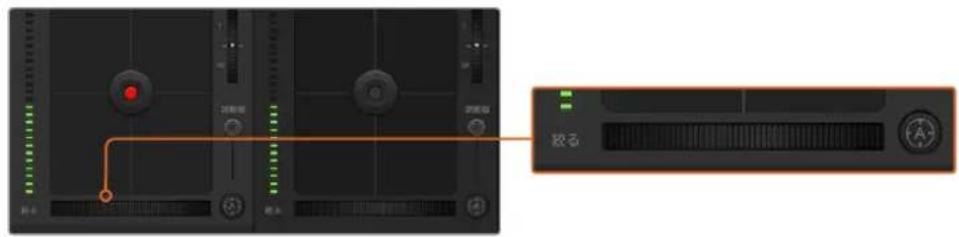
才一力一力斯トを押か、マニアル一力ス調整を左右にドラツて互換性のはるレンの フリカスを合わせます。
マニルフカ一力ス調整
力メラのフローカスをマニアルで調整ください场合、各力メラコトローネーの下にあたフローカス調整を使用いたします。HOILERCONTOILALU左右にド拉格はリマニアルでフローカスを調整いたします。力メラからのビデフロードで、IMEXJISHAPHERに見るか確認いたします。
力x拉代尔
力メラゲイ設定を使と、該当の力メラで追加のゲイを扱にごきます。Blackmagic Pocket Cinema Cameraはは、它的設定はISO関連ていま�。它的機能は、低照明条件対振影ており、イメーが露出アングーにらなうに力メラのフロNTエンドに追加ゲイIN(ISO)を追加する必要くださる场合に、非常に重要です。dBゲイ設定の左右の矢印木たんをクリックするとゲイを調整ごきます。
日暮霖時の野外撮影で光が弱い场合や、イメ一の明るさを強調しぃい场合な、必要に広てガインを才にごきま�。ガインを上ご或イメ一のの不イスが贈るこに注意てくさ。
�マツターニスビート・コトローチ
shätterausb一·cnt口一儿は、力拉一木尔和亚R/S/萨斯尔cnt口一儿的间有。Mwss力一儿Lをshatterausb一·indzka-ta一の上に置て、左右の矢印をクリツク説ると、shätterausb一卜調整てきま。Blackmagic Pocket Cinema Cameraは、。。。。。。。。。。。。。。。。。。。。。。。。。。。。。。。。。。。。。。。。。。。。。。。
Flr力一が発生た場合、ShorTAs一上一を下る及力一回避てき。Shur TAs一上一を下ると、Ime一Hsantの露出時間が長なのて、力Mraeginを上はにim一明明かは。Shurta一上一を上ると王一honsbr一为轻减者た、最小限の王一honsbr一効果でJan一加tKl-なanhotsbト撮りた場合最適也。
木歯卜八W8)S(
木筏トバラス設定は、シャーダスリート・コトロルの隣に係て。色温度イケー。一の両側に係左右の矢印をクリツし調整て。光源の種類にて、暖色や寒色等。異色を発状。它らは木筏トバラスを調整て補正て。它的補正によて、映像内的木筏トを適切な木筏トに保持て。

マウスカーリルをゲイン、シャットーフロー、木フィットバラングのインジケ一ローに重ねて矢印を表示。
咔リツクて各設定を調整。
DaVinci Resolve フラーマリーナフロー
力拉一レクシャの經験がるルは、力メ拉ロ一ルのインーフースをスイチヤス テイヤルのCCUインーフースから、ロストプロダケンで使用するカラ一GLE一デイングステムの プラーマリ一カラ一レクタ・一圏一廷専一フースに変更するとごてきま�。
Blackmagic力メらは、DaVinci Resolveのフィマリカラーマフローを内蔵いたします。Blackmagic力メらのGLEーニングはDaVinci Resolveと全く同じなて、FIILFRODADKUNですMaVinciResolveの經驗を活かたクエイチダカカラーマフローが可能です。カロレターネルはすばての力メらCONTO口一から擴張您可以追加設定を完全なFIAMIRALORLEURATONAFUEUSで、優多多彩カラーマフロー可能になります。
力一木一、七彩度等的设定调整,、卡卜、卡卜一、八拉的设定同时确認。必要忘中,卡卡上部力大選折口一力力为力力为切替足。
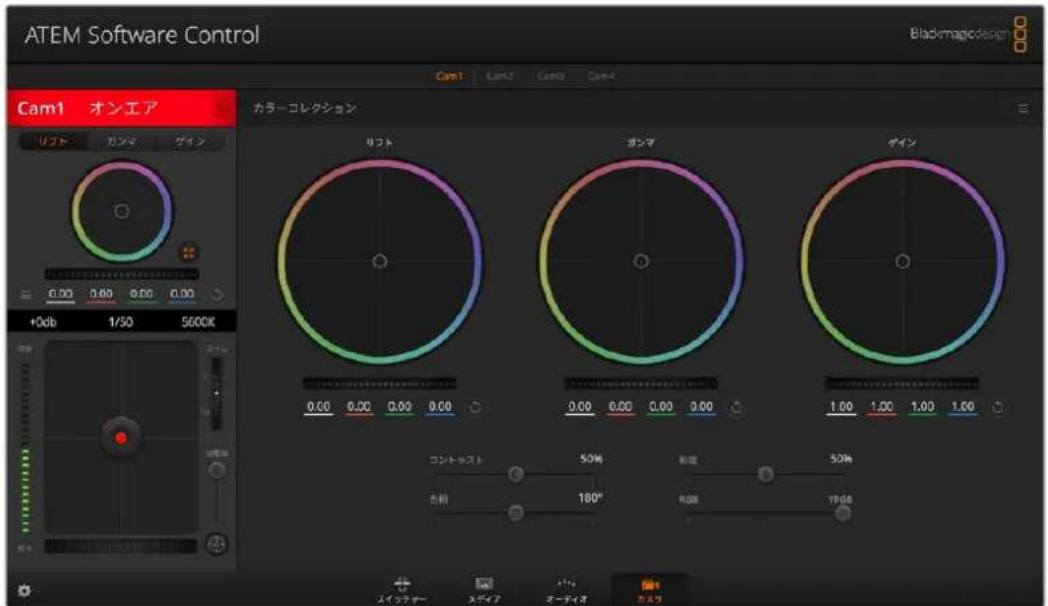
DaVinci Resolve プーナリーマリーマリーマリーマリーマリーマリーマリーマリーマリーマリーマリーマリーマリーマリーマリーマリーマリーマリーマリーマリーマリーマリーマリーマリーマリーマリーマリーマリーマリーマリーマリーマリーマリーマLI 1075 # # # # # # # # # # # # # # # # # # # # # # # # # # # # # # # # # # # # # # # # # # # # # # # # # # # # # # # # # # # # # # # # # # # # # # # # # # # # # # # # # # # # # # # # # # # # # # # # # # # #
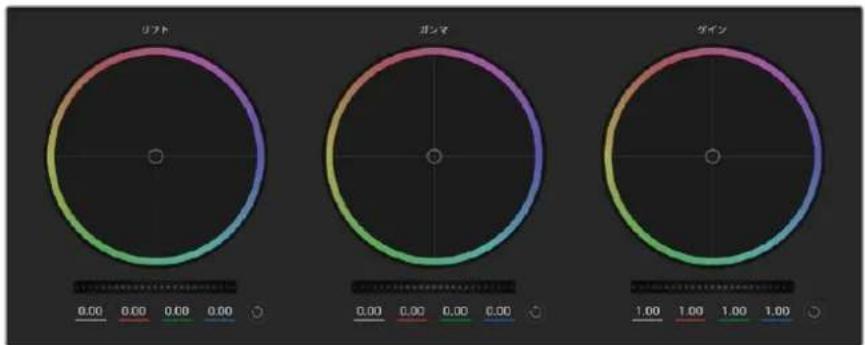
力拉一康克兰儿的利夫/加蒙/加尔·力拉一木儿。
力拉一木伊一尔
力拉一丶內克l和&D拉:
力拉一巴兰斯·伊尼加尔一自体到下拉的必是里。力拉一巴兰斯·伊尼加尔一动加上、下中加GB巴莱一、各子的更可反映也。
力拉一丁克内于卜克&D拉:
力拉一巴兰斯·伊尼迦一夕一、力一的絕対位置にヨンフるのて、スビ一丁に大幅な調整が可能です。
力拉一丶內內 德専克:
Mss-t-01-11l调整tioi-11i,力一调整tioi-11i。
力拉一LING右上的ISETTOCONTO-1U为U:
力拉一巴兰斯·コトロ一ルおはみ対応するマスタ一木イ一ルを两方リセットしま。
Mssz一木儿
力拉一木伊尔的下に有馬斯専一木伊一ル、各YRGB丶徃不尼ルのリフ、ガンマ、ケイ府口一 1 而调整てきま�。

木伊一ルコトロ一ルを左右にドラツてマスタ一木伊一ルを調整。
马夕一木儿使的调整:
Mss-ta-oei-ellu在左上DlaTg:
左にドラムングすると、選択んだイメーのバラムーダーが暗な、右にドラムングするとバラムーダーが明るくncy。調整を行うと、下のYRGBバラムーダーに変更が反映いたします。YNのみ調整する場合は、ALTあたはCommandを押しだ左右にドラムングます。カラーテルタはYRGB处理を採用ていの上、创造力を発揮て、YチANNILのみ調整するとでニーニケな工アクト作成能否。YチANNIL調整は、輝度ミツス設定が右側に設定くださいます時に最先効果的是YRGB处理実行能否。通常のRGB处理の场合は左側です。通常、DaVinci Resolveのカラリスは、YRGBカラーテルタを使用しま�が、它は全体のガインに影響を与えに、や多彩なカラーテルス・コトローツか可能で、希望通過のルツを短時間で得りるたて。
可卜拉卜設定
CONTOLST設定は、IMEXの最初部分と最後部分の差をCONTOルお願いいたします。リフローは50%です。
彩度設定
彩度設定は、イメーの色量を調整いたします。デ fasル設定は50%です。
色相設定
色相設定は、カラ一木イルの周図のすての色相を回転さます。デフィル設定の180°はは、才リジナルの色相配置が表示いたします。その数值を上下に調整すると、カラ一木イルに表示くださる色相配置に沿て、すての色相が前後に回転いたします。
耀度米克设定
Blackmagic力メラに内藏た力ラーマリクタは、DaVinci Resolveのプロマリーマリーマリクタに基しぃいてま。DaVinci Resolveは1980年代初頭か力ラーマリクタを設計にして、多ckの八ロウド映画がDaVinci Resolveを使用て力ラーマリーマリデイン格さててま。
、Blackmagic力rama内藏さ的力拉一レクタには、二一克かクリエイテフルな機能が搭載てい。YRGB处理は它らの機能のうの1つです。
力拉一格一德不的际、RGB有的是YRGB处理为选折之。八兰的力兰斯卡方有YRGB处理为好马,它色为正确口一儿,各子尼尔使用可以区别调整,多的克里瓦伊特使使用可的
耀度米克斯·CON口一儿有右设定的100%の出力得令。耀度米克斯·CON口一儿左上设定也。RGB力拉一克莱一的100%の出力得令。耀度米克斯左/右間に設定する、RGBおはYRGB克莱一を組み合せ出力得令。
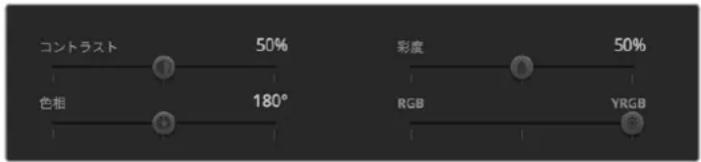
StLDA一左右上D拉格,、CnT拉S、彩度、色相、辉度Mss设定调整。
各の設定を使用するかは、一一次第です。カーマリクschonは、完全にクイデフな作業てるた、正解や間連ははあません。気に入った、好きなスルの映像に能うのがれは、その設定が最適した設定 REFERと言えます。
設定の同期
ATEM和Blackmagic力米拉接统者、力米拉口一尔信号ATEM斯什子一加力米卡送信告。誤到力米为设定调整的场合、力米拉口一尔是同期保持的自动的以之的设定来士。
作業のこ各力メラルトローダーナDavinci ResolvePRAIMARILAFLORALRELEKTERは、DaVinciResolve Micro PanelでコNTロルてきま。它に好、八一ドアCONTO口一ル巴ルを使て、正確力一調整をすばやく行う。詳細は、ATEM Miniのマニアルを参照てくさ。
ATEM MiniHDMI接续載在的際力力之電源切到、力之口一爾的通信中影響於與入場合為。主電源力力之電源接統,HDMI卡一藥拉拔也加方、力之電源切到之将推獎。
�一八一テ製の使用
DaVinci Resolve等、お気に入の編集ソフウアでケリツを編集するはは、カメラから外付はドロイズまたはRAIDにケリツをコビ一て、ソフウアに説みあみます。CFast/SD力一ドはドツまたはアダフタ一使用し、USB-CFLASHEDISクははUSB-Cロト経由でスレージデアか直接ケリツを説みあむごと可能です。
CFast 2.0/SDカトからのフィル領域作業
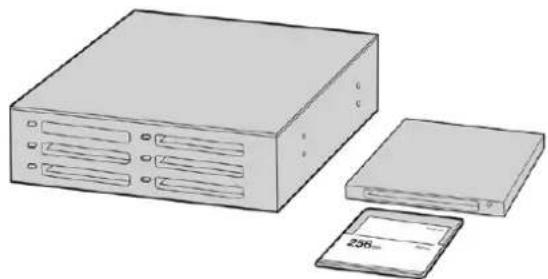
CFast/SD力一卡为力X来从取出U、CFast2.01-一/拉一未是CFastD拉伊特使用以口
CFast 2.0/SD力一下かクリツを読みはむ:
1 Blackmagic Pocket Cinema CameraからCFast/SD力一卜を取り出しま�。
CFast 2.0リーダー、SDカードリーダーあたは CFast ライフを使用て、CFast/SDカードをMacたは WindowsコンビローにマウCNTしま。
2 CFast/SD力一卜をダルクリツて開くと、Blackmagic RAWフィルははQuickTimeμ一 ハーフアイルのリストの入たフィルダ一が表示さは。撮影時に選択たフアマトはよては、異な種類のフィ専は存在しまか、すばてのフィ専は同一のフィ専名定義に従いは。
3使用用的FALILCFAST/SD力一卡与DStKTOPTP及其他DIAIPT可下LASS。
4 CFast/SD力一載をCONPBI一夕一から取出出際は、必Mac/WindowsでCFastはSD力一載をイジク卜て取出てくだい。力一載をイジク卜せに取出出と、フテ一盃が破損するごがあらま。
USB-CFLASHIDISKの作業
USB-CFLAASSDfIUsK加SFFP为
1 力M拉与USB-CFRAJDSK取外。
2 ミンピューダーのUSB-Cロトで、USB-CフラツドデイスをMacたはWindowsコンピューダーに接続ります。リルタイムのビデ才編集にpine USB 2.0は速度が十分,Noいたの、USB3.0の使用を推奨いたします。
3 USB-CFRASKUdULKlOQuickIeKo、QuickTimeMu一P一FALILRIST、 3 Blackmagic RAWFALIL的入了FOLDA表示。摄影时选折了FOM 3 MHTT上好は、異な種類のFALIL存在しまむが、さてのFALIL是同一のFALIL名 定義に従い。
4 使用たのフアルをUSB-Cフラツドデスクからデスクトツアやその其他的八一ド现代农业にド拉uggしま。NLE(ノリーニア編集)ソフウア、直接USB-Cフ拉ツドデスクのフアルにアケせするごと可能て。
5 USB-CFRASSDINSTKUoCnONBUN-0aR取外s隙是、必sJIOELOT上取外L
Final Cut Pro Xを使う
Final Cut Pro Xでクリフロー編集するはは、新いプロジックを作成て、適切なビデオフローマットおよフレーマレート設定する必要のはんだ。乙て假roRes 422 HQ 1080p24使用しら。
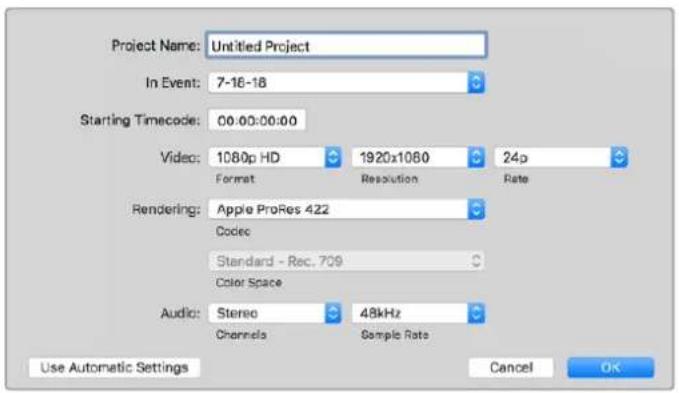
Final Cut Pro Xのプロジック設定画面
1 Final Cut Pro X 起動し マニーネー・ハ・行き、「File/New Project」を選択いたします。プロジックト設定を含むウindsの開きいたします。
2 2
3「Video」設定在1080pHD、1920×1080、24p设定。
「Audio」おはい「Rendering」設定をStereo、48kHz、Apple ProRes 422 HQに設定いたします。
5 「OK」をクルクしま�。
cllbrp 100000000000000000000000000000000000000000000000000000000000000000000000000000
克LPPを夕IMLAnにDraG了編集開始ごきま。
Avid MediaComposer2018使
Avid MediaComposer2018dKlPbFw编集s有、新iJcTt作成,适切v才才一MHTo#FLEUML-1to设定。
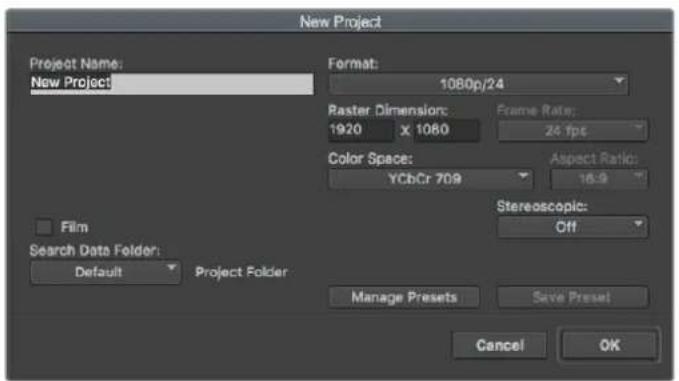
Avid MediaComposer2018年口口之名必の定
1 Avid Media Composer 2018を起動すると「Select Project」ウindsの表示いたします。
「New Project」ロルクて、「New Project」ウindsドウでプロジエクト名を入力いたします。
3「Format」口口卡杜尔X二一HD1080>「1080p/24」为风L OK」をクルクて口口克卜作成しま。
4「SelectProject」ウindsウで、作成たプロジルクトをダ複ルクリックて開きま。
5「File] [Input] [SourceBrowser]为選抑丶証み迅功的伊尔も進みま。
6 ロロツダウンメニーから「TargetBin」を選択て「Import」をクリックします。
XeIAPINcKlPPsFesatseL、KlPPsToTAYUMAIINcDLoaGtE編集。
AdobePremiereProCCを使う
AdobePremiereProCCAppleProRes422HQcllPb編集的は、新い口Jcト作成て、適切除に才一MHTお及FLEAUML-1tを設定の必要かは。乙は、川FtoProRes422HQ1080p25に設定し。
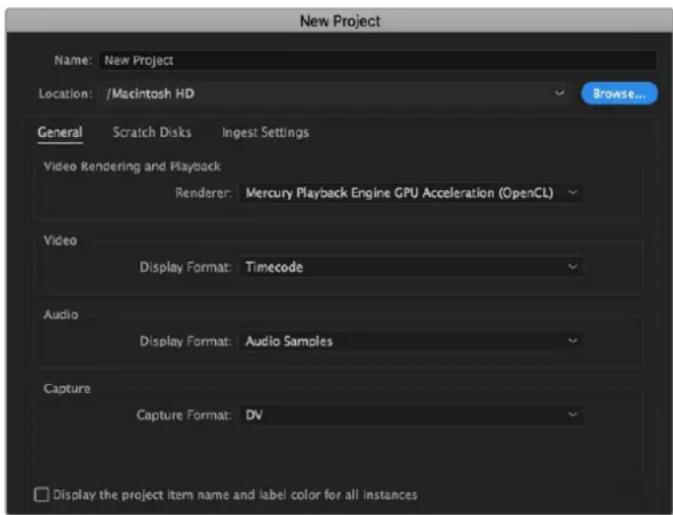
AdobePremiereProCCdFroJcKt名おはが才PbJHnを設定
1 AdobePremiereProCC起動ります。「Welcome」ウINTDw「NewProject」を選択します。プロジク卜設定を含むウINTDwa開ります。
2 2017-03-14 2017-03-14 2017-03-14 2017-03-14 2017-03-14 2017-03-14 2017-03-14 2017-03-14 2017-03-14 2017-03-14
3 AdobePremiereProCCのMUN一八行、「File/Import」为選択て編集んだクリフを選択いたします。「Project」ウINTDにクリフが表示いたします。
4最初編集たiklbrを、Project]windの右下に有「NewItem]aiCONの上に卡拉格は。克lbrの设定に合了新い一克nスが作成さは。
クリフをシークス・タイムラインにドレットて編集開始くださいます。
Blackmagic Camera Setup Utility
力メラソフトウエアのアツpledートMac
Blackmagic Camera Setup Utilityソフローをダロードし、ダロードしぃフローを解凍いたします。デスケイメーを開くとBlackmagic Camera Setup Installerが表示いたします。
インストーリーを起動し、画面に表示いたします。インストーリカ完了んだら、アリケーニングフツルダロー行き、Blackmagic Camerasフィルダーを開きます。そのは当マニュアル、Blackmagic Camera Setup Utility、てreadmeフィルつようインフツーニンを合むドキュメntフツルダーが入ていまな。Blackmagic Camera Setupの最新バーニ cjにアツデートる際に必須なアングストーニラ一も含まえます。

力メラソフトウエアのアツpledートWindows
Blackmagic Camera Setup Utilityソフローをダウロードし、ダウロードしぃたフィルを解凍いたします。PDFマニアルと Blackmagic Camera Utility Installerが入ったBlackmagic Camera Utilityフィルダーが表示いたします。インストーリーをダ複ルクリックし、画面に表示くださる指示に従てインストーリeu)=(。
Windows 10はは「Start」ボtons押てAllApps」を選択いたします。「Blackmagic Design」フィルダ一まスケロルしります。こかBlackmagic Camera Setupを起動いたします。Windows 8.1は、「Start」スリーニング下矢印を選択しぃてBlackmagic Design」フィルダ一まスケロルします。乙かからBlackmagic Camera Setupを起動いたします。
力メラ内部ソフトウアのアツpledート方法
CONBUN-1000最新のBlackmagic Camera Setup Utilityをインストーリド、USB-CケーツルでCONBUN-1000上力メラ接続いたします。USB-Cロトは左側に傾む。GN製乗価を開けりとロトにアクセスごきります。
Blackmagic Camera Setup Utilityを起動し、画面に表示いたします。指示に徴てカメラフウアをアフローはります。カメラフウアをアフローすると、surてのリフローやカスタUTを消去し、surての設定がリドットくださいますと注意くださいます。ソフウアをアフローはる前に、モモーツカローにバックアフツと書き出于しだを姿わむ請い。ソフウアをアフローはった後に、モモーツカローからリフロー和LUTを簡單に説みお願いいたします。再にカメラで使用くださいます。
推奨収錄×デイア
CFast 2.0力一卜
Pocket Cinema Camera 6K向付推奖MDE
Blackmagic Pocket Cinema Camera 6K使用、6K Blackmagic RAW 5:1(50fps)の収録は、以下のCFast 2.0力一を推奨いたします。
| MX-カーナード名 ストレーニ | ||
| Angelbird AV | PRO CF XT 512GB | |
| CinediskPro 510MB | /s CFast 2.0 256GB | |
| Hagiwara Solutions DC | -SMAN64GA CFast 2.0 | 64GB |
| Hagiwara Solutions DC | -SMANA1GACFast 2.0 | 128GB |
| KomputerBay | 3400x CFast 2.0 | 64GB |
| KomputerBay | 3400x CFast 2.0 | 128GB |
| Lexar | Professional 3400X CFast 2.0 | 128GB |
| Lexar | Professional 3500X CFast 2.0 | 128GB |
| ProGrade Digital | 510MB / s CFast 2.0 128GB | |
| ProGrade Digital | 550MB/s CFast 2.0 | 256GB |
| ProGrade Digital | 550MB/s CFast 2.0 | 512GB |
| Transcend | CFX650 CFast 2.0 TS128GCFX650 | 128GB |
| SanDisk | Extreme Pro CFast 2.0 SDCFSP-64G-x46D | 64GB |
| SanDisk | Extreme Pro CFast 2.0 SDCFSP-128G-x46D | 128GB |
| SanDisk | Extreme Pro CFast 2.0 SDCFSP-256G-x46D 256GB | |
| SanDisk | Extreme Pro CFast 2.0 SDCFSP-512G-x46D | 512GB |
| Silicon Power | CFX310 CFast 2.0 | 512GB |
| Sony | CFast 2.0 G Series CAT-G64 | 64GB |
| Sony | CFast 2.0 G Series CAT-G128 | 128GB |
| Wise | CFA-2560 3400x CFast 2.0 | 256GB |
| Wise | CFA-5120 3500x CFast 2.0 | 512GB |
| Wise | CFA-10240 3500X CFast 2.0 | 1TB |
Blackmagic Pocket Cinema Camera 6K使用、6K2.4:1 Blackmagic RAW 5:1(60fps)の叢録には、以下のCFast 2.0力一を推奨いたします。
| MX一力一力一力名 Stulre | ||
| Angelbird AV | PRO CF XT 512GB | |
| CinediskPro 510MB | /s CFast 2,0 256GB | |
| Hagiwara Solutions DC | -SMAN64GA CFast 2,0 | 64GB |
| Hagiwara Solutions DC | -SMANA1GACFast 2,0 | 128GB |
| Ko-カ- カ-ド名 St-レ-ジ | ||
| KomputerBay 3400x | CFast 2.0 64GB | |
| KomputerBay 3400x | CFast 2.0 128GB | |
| Lexar Professional | 3400X CFast 2.0 128GB | |
| Lexar Professional | 3500X CFast 2.0 128GB | |
| ProGrade Digital 510MB | /s CFast 2.0 128GB | |
| ProGrade Digital 550MB | /s CFast 2.0 256GB | |
| ProGrade Digital 550MB | /s CFast 2.0 512GB | |
| Transcend CFX650 | CFast 2.0 TS128GCFX650 128GB | |
| SanDisk Extreme | Pro CFast 2.0 SDCFSP-64G-x46D | 64GB |
| SanDisk Extreme | Pro CFast 2.0 SDCFSP-128G-x46D | 128GB |
| SanDisk Extreme | Pro CFast 2.0 SDCFSP-256G-x46D | 256GB |
| SanDisk Extreme | Pro CFast 2.0 SDCFSP-512G-x46D | 512GB |
| Silicon Power | CFX310 CFast 2.0 | 256GB |
| Silicon Power | CFX310 CFast 2.0 | 512GB |
| Sony | CFast 2.0 G Series CAT-G64 | 64GB |
| Sony | CFast 2.0 G Series CAT-G128 | 128GB |
| Wise | CFA-1280 3400x CFast 2.0 | 128GB |
| Wise | CFA-2560 3400x CFast 2.0 | 256GB |
| Wise | CFA-5120 3500x CFast 2.0 | 512GB |
| Wise | CFA-10240 3500X CFast 2.0 | 1TB |
Blackmagic Pocket Cinema Camera 6K使用、2.8K 17:9 Blackmagic RAW 3:1 (120fps)の収録に、以下のCFast 2.0力一推奨しま�。
| MX-カーナー イード名 ストレーニジ | ||
| Angelbird | AV PRO CF XT | 512GB |
| CinediskPro | 510MB/s CFast 2,0 256GB | |
| Hagiwara Solutions | DC-SMAN64GA CFast 2,0 | 64GB |
| Hagiwara Solutions | DC-SMANA1GACFast 2,0 | 128GB |
| KomputerBay 3400x | CFast 2.0 64GB | |
| KomputerBay 3400x | CFast 2.0 128GB | |
| Lexar Professional | 3400X CFast 2.0 128GB | |
| Lexar Professional | 3500X CFast 2.0 128GB | |
| Lexar Professional | 3400X CFast 2.0 256GB | |
| ProGrade Digital 510MB | /s CFast 2.0 128GB | |
| ProGrade Digital 550MB | /s CFast 2.0 256GB | |
| ProGrade Digital 550MB | /s CFast 2.0 512GB | |
| Transcend CFX650 | CFast 2.0 TS128GCFX650 128GB | |
| ←一力一 イード名 ストレーニジ | ||
| SanDisk Extreme | Pro CFast 2.0 SDCFSP-64G-x46D 64GB | |
| SanDisk Extreme | Pro CFast 2.0 SDCFSP-128G-x46D 128GB | |
| SanDisk Extreme | Pro CFast 2.0 SDCFSP-256G-x46D 256GB | |
| SanDisk Extreme | Pro CFast 2.0 SDCFSP-512G-x46D 512GB | |
| Silicon Power CFX310 | CFast 2.0 256GB | |
| Silicon Power CFX310 | CFast 2.0 512GB | |
| Sony CFast | 2.0 G Series CAT-G64 64GB | |
| Sony CFast | 2.0 G Series CAT-G128 128GB | |
| Wise CFA | -1280 3400x CFast 2.0 128GB | |
| Wise CFA | -2560 3400x CFast 2.0 | 256GB |
| Wise CFA | -5120 3500x CFast 2.0 512GB | |
| Wise CFA | -10240 3500X CFast2.01TB | |
Blackmagic Pocket Cinema Camera 6K使用、4K DCI ProRes HQ(60fps)の収録は、以下のCFast 2.0力一を推奨いたします。
| MX-カーナー イード名 ストレーニジ | ||
| Angelbird | AV PRO CFXT | 512GB |
| CinediskPro | 510MB/s CFast 2.0 | 256GB |
| Hagiwara Solutions DC | -SMAN64GA CFast 2.0 | 64GB |
| Hagiwara Solutions DC | -SMANA1GA CFast 2.0 | 128GB |
| KomputerBay | 3400x CFast 2.0 | 64GB |
| KomputerBay | 3400x CFast 2.0 | 128GB |
| Lexar | Professional 3400X CFast 2.0 | 128GB |
| Lexar | Professional 3500X CFast 2.0 | 128GB |
| Lexar | Professional 3400X CFast 2.0 | 256GB |
| ProGrade Digital | 510MB/s CFast 2.0 | 128GB |
| ProGrade Digital | 550MB/s CFast 2.0 | 256GB |
| ProGrade Digital | 550MB/s CFast 2.0 | 512GB |
| Transcend | CFX650 CFast 2.0 TS128GCFX650 | 128GB |
| SanDisk Extreme | Pro CFast 2.0 SDCFSP-64G-x46D 64GB | |
| SanDisk Extreme | Pro CFast 2.0 SDCFSP-128G-x46D 128GB | |
| SanDisk Extreme | Pro CFast 2.0 SDCFSP-256G-x46D 256GB | |
| SanDisk Extreme | Pro CFast 2.0 SDCFSP-512G-x46D 512GB | |
| Silicon Power CFX310 | CFast 2.0 256GB | |
| Silicon Power CFX310 | CFast 2.0 512GB | |
| Sony CFast | 2.0 G Series CAT-G64 64GB | |
| Sony CFast | 2.0 G Series CAT-G128 128GB | |
| ×一力一 イード名 ストレーニジ | ||
| Wise CFA | -1280 3400x CFast 2.0 128GB | |
| Wise CFA | -2560 3400x CFast 2.0 256GB | |
| Wise CFA | -5120 3500x CFast 2.0 512GB | |
| Wise CFA | -10240 3500X CFast 2.01TB | |
Blackmagic Pocket Cinema Camera 6K使用、1080 ProRes 422 HQ(120fps)の収録には、以下のCFast 2.0カードを推奨いたします。
| MX-カーナー イード名 ストレーニジ | ||
| Angelbird AV | PRO CF XT | 512GB |
| CinediskPro | 510MB/s CFast 2.0 | 256GB |
| Hagiwara Solutions | DC-SMAN64GA CFast 2.0 | 64GB |
| Hagiwara Solutions | DC-SMANA1GACFast 2.0 | 128GB |
| KomputerBay | 3400x CFast 2.0 | 64GB |
| KomputerBay | 3400x CFast 2.0 | 128GB |
| Lexar | Professional 3400X CFast 2.0 | 128GB |
| Lexar | Professional 3500X CFast 2.0 | 128GB |
| Lexar | Professional 3400X CFast 2.0 | 256GB |
| ProGrade Digital | 510MB/s CFast 2.0 | 128GB |
| ProGrade Digital | 550MB/s CFast 2.0 | 256GB |
| ProGrade Digital | 550MB/s CFast 2.0 | 512GB |
| Transcend | CFX650 CFast 2.0 TS128GCFX650 | 128GB |
| SanDisk | Extreme Pro CFast 2.0 SDCFSP-64G-x46D | 64GB |
| SanDisk | Extreme Pro CFast 2.0 SDCFSP-128G-x46D | 128GB |
| SanDisk | Extreme Pro CFast 2.0 SDCFSP-256G-x46D | 256GB |
| SanDisk | Extreme Pro CFast 2.0 SDCFSP-512G-x46D | 512GB |
| Silicon Power | CFX310 CFast 2.0 | 256GB |
| Silicon Power | CFX310 CFast 2.0 | 512GB |
| Sony | CFast 2.0 G Series CAT-G64 64GB | |
| Sony | CFast 2.0 G Series CAT-G128 | 128GB |
| Wise CFA | -1280 3400x CFast 2.0 128GB | |
| Wise CFA | -2560 3400x CFast 2.0 256GB | |
| Wise CFA | -5120 3500x CFast 2.0 512GB | |
| Wise CFA | -10240 3500X CFast 2.0 1TB | |
Pocket Cinema Camera 4K向付推奖×デア
Blackmagic Pocket Cinema Camera 4Kを使用た、4K DCI Blackmagic RAW 3:1 (60fpsまご)の叢録には、以下のCFast 2.0力一ドを推奨します。
| MX-カーナー イード名 ストレーニジ | ||
| Angelbird AV | PRO CF 512GB | |
| Angelbird AV | PRO CF 1TB | |
| CinediskPro 510MB | /s CFast 2.0 256GB | |
| Hagiwara Solutions DC | -SMAN64GA CFast 2.0 64GB | |
| Hagiwara Solutions DC | -SMANA1GACFast 2.0 128GB | |
| KomputerBay | 3400x CFast 2.0 | 64GB |
| KomputerBay | 3400x CFast 2.0 | 128GB |
| KomputerBay | 3700x CFast 2.0 | 256GB |
| Lexar | Professional 3400x CFast 2.0 | 128GB |
| Lexar | Professional 3500x CFast 2.0 | 256GB |
| ProGrade Digital | 550MB/s CFast 2.0 | 128GB |
| ProGrade Digital | 550MB/s CFast 2.0 | 256GB |
| ProGrade Digital | 550MB/s CFast 2.0 | 512GB |
| SanDisk | Extreme Pro CFast 2.0 SDCFSP-256G-x46D 512GB | |
| Wise | CFA-1280 3400x CFast 2.0 | 128GB |
| Wise | CFA-2560 3400x CFast 2.0 | 256GB |
| Wise | CFA-5120 3500x CFast 2.0 | 512GB |
| Wise | CFA-10240 3500x CFast 2.0 | 1TB |
Blackmagic Pocket Cinema Camera 4K使用、4K DCI ProRes HQ(60fps)の収録に、以下のCFast 2.0カードを推奨いたします。
| MX-カーナー イード名 ストレーニジ | ||
| Angelbird AV | PRO CF 128GB | |
| Angelbird AV | PRO CF 256GB | |
| Angelbird AV | PRO CF 512GB | |
| CinediskPro 510MB | /s CFast 2,0 256GB | |
| Hagiwara Solutions DC | -SMAN64GA CFast 2,0 64GB | |
| Hagiwara Solutions DC | -SMANA1GACFast 2,0 128GB | |
| KomputerBay | 3400x CFast 2,0 | 128GB |
| KomputerBay | 3700x CFast 2,0 | 256GB |
| ProGrade Digital | 550MB/s CFast 2,0 | 256GB |
| ProGrade Digital | 550MB/s CFast 2,0 | 512GB |
| SanDisk | Extreme Pro CFast 2,0 SDCFSP.64G-x46D | 64GB |
| SanDisk | Extreme Pro CFast 2,0 SDCFSP.128G-x46D | 128GB |
| ×一カー イード名 ストレーニジ | ||
| SanDisk Extreme | Pro CFast 2.0 SDCFSP-256G-x46D 256GB | |
| Sony CFast | 2.0 G SeriesCAT-G64 64GB | |
| Sony CFast | 2.0 G SeriesCAT-G128 128GB | |
| Wise CFA | -1280 3400x CFast 2.0 128GB | |
| Wise CFA | -2560 3400x CFast 2.0 256GB | |
| Wise CFA | -5120 3500x CFast 2.0 512GB | |
| Wise CFA | -10240 3500x CFast 2.0 1TB | |
Blackmagic Pocket Cinema Camera 4K使用、4K DCI口斯RAW(30fps)の叢録には、以下のCFast 2.0カーを推奨いたします。
| MX-カーナー イード名 ストレーニジ | ||
| Angelbird | AV PRO CF | 128GB |
| Angelbird | AV PRO CF | 256GB |
| Angelbird | AV PRO CF | 512GB |
| CinediskPro | 510MB/s CFast 2.0 | 256GB |
| KomputerBay | 3400x CFast 2.0 | 128GB |
| ProGrade Digital | 550MB/s CFast 2.0 | 256GB |
| ProGrade Digital | 550MB/s CFast 2.0 | 512GB |
| SanDisk Extreme | Pro CFast 2.0 SDCFSP-64G-x46D | 64GB |
| SanDisk Extreme | Pro CFast 2.0 SDCFSP-128G-x46D | 128GB |
| SanDisk Extreme | Pro CFast 2.0 SDCFSP-256G-x46D 256GB | |
| Sony CFast | 2.0 G Series CAT-G64 64GB | |
| Sony CFast | 2.0 G Series CAT-G128 128GB | |
| Wise CFA | -1280 3400x CFast 2.0 128GB | |
| Wise CFA | -2560 3400x CFast 2.0 256GB | |
| Wise CFA | -5120 3500x CFast 2.0 512GB | |
Blackmagic Pocket Cinema Camera 4K使用、4K DCI 3:1 RAW(60fps)の叢録に、以下のCFast 2.0力一下を推奨いたします。
| MX-カーナー イード名 ストレーニジ | ||
| Angelbird | AV PRO CF | 128GB |
| Angelbird | AV PRO CF | 256GB |
| Angelbird | AV PRO CF | 512GB |
| CinediskPro | 510MB/s CFast 2.0 | 256GB |
| KomputerBay | 3400x CFast 2.0 | 128GB |
| ProGrade Digital | 550MB/s CFast 2.0 | 256GB |
| ProGrade Digital | 550MB/s CFast 2.0 | 512GB |
| Enterone - カード名・スリーフ | ||
| SanDisk Extreme | Pro CFast 2.0 SDCFSP-64G-x46D 64GB | |
| SanDisk Extreme | Pro CFast 2.0 SDCFSP-128G-x46D 128GB | |
| SanDisk Extreme | Pro CFast 2.0 SDCFSP-256G-x46D 256GB | |
| Sony CFast | 2.0 G Series CAT-G64 64GB | |
| Sony CFast | 2.0 G Series CAT-G128 128GB | |
| Wise CFA | -1280 3400x CFast 2.0 128GB | |
| Wise CFA | -2560 3400x CFast 2.0 256GB | |
| Wise CFA | -5120 3500x CFast 2.0 512GB | |
SD力一卜
Pocket Cinema Camera 6K向推奖MDEA
Blackmagic Pocket Cinema Camera 6Kを使用た、6K 16:9 Blackmagic RAW 5:1 (30fpsまご)の叢録には、以下のSD力一を推奨いたします。
| MX-カーナー イード名 ストレーニジ | ||
| Angelbird | AV PRO SD V90 | 64GB |
| Sony Tough | SF-G32T | 32GB |
| Sony Tough | SF-G64T | 64GB |
| Sony Tough | SF-G128T | 128GB |
| Toshiba | Exceria Pro UHS-II 270MB/s SDXC | 64GB |
| Wise SD2 | -128U3 SDXC UHS-II | 128GB |
Blackmagic Pocket Cinema Camera 6Kを使用た、6K 16:9 Blackmagic RAW 8:1(30fpsまえ)の叢錄には、以下のSD力一を推奨いたします。
| MX-カーナー イード名 ストレーニジ | ||
| Angelbird | AV PRO SD V90 | 64GB |
| Sony Tough | SF-G32T | 32GB |
| Sony Tough | SF-G64T | 64GB |
| Sony Tough | SF-G128T | 128GB |
| Toshiba | ExceriaPro UHS-II 270MB/s SDXC | 64GB |
| Toshiba | ExceriaPro UHS-II 270MB/s SDXC | 128GB |
| Toshiba | ExceriaPro UHS-II N502 SDXC | 128GB |
| Wise SD2 | -128U3 SDXC UHS-II | 128GB |
Blackmagic Pocket Cinema Camera 6K使用、6K 2.4:1 Blackmagic RAW 12:1 (60fps)の収錄には、以下のSD力一を推奨いたします。
| MX-カーナー カード名 ストレーニジ | ||
| Angelbird AV | PRO SD V90 64GB | |
| Sony Tough | SF-G32T 32GB | |
| Sony Tough | SF-G64T 64GB | |
| Sony Tough | SF-G128T 128GB | |
| Toshiba | Exceria Pro UHS-II 270MB/s SDXC | 64GB |
| Toshiba | Exceria Pro UHS-II 270MB/s SDXC | 128GB |
| Toshiba | Exceria Pro UHS-II N502 SDXC | 128GB |
Blackmagic Pocket Cinema Camera 6K使用、4K DCI ProRes HQ(60fps)の収録に、以下のSDカトを推奨いたします。
| MX-カーナー イード名 ストレーニジ | ||
| Angelbird AV | PRO SD V90 64GB | |
| Delkin Devices | Power SDXC USHJI | 64GB |
| Delkin Devices | Prime SDXC USH-II | 128GB |
| ProGrade Digital | V90 UHS-II 250MB/s SDXC | 128GB |
| ProGrade Digital | V90 UHS-II 250MB/s SDXC | 256GB |
| Sony Tough | SF-G32T 32GB | |
| Sony Tough | SF-G64T 64GB | |
| Sony Tough | SF-G128T 128GB | |
| Wise | SD2-64U3 SDXC UHS-II | 64GB |
| Wise | SD2-128U3 SDXC UHS-II | 128GB |
| Toshiba | Exceria Pro UHS-II N502 SDXC | 128GB |
Blackmagic Pocket Cinema Camera 6K使用、1080 ProRes 422 HQ(120fps)の収録には、以下のSDカードを推奨いたします。
| MX-カーナー イード名 ストレーニジ | ||
| Angelbird AV | PRO SD V90 64GB | |
| Delkin Devices | Power SDXC USH-II | 64GB |
| Delkin Devices | Prime SDXC USH-II | 128GB |
| Lexar | Professional 2000x UHS-II 300MB/s SDXC | 64GB |
| Lexar | Professional 2000x UHS-II 300MB/s SDXC | 128GB |
| ProGrade Digital | V90 UHS-II 250MB/s SDXC | 256GB |
| Sony Tough | SF-G32T 32GB | |
| Sony Tough | SF-G64T 64GB | |
| Sony Tough | SF-G128T 128GB | |
| MX-カーナー | ||
| Toshiba Exceria | Pro UHS-II 270MB/s SDXC 64GB | |
| Toshiba Exceria | Pro UHS-II 270MB/s SDXC 128GB | |
| Toshiba Exceria | Pro UHS-II N502 SDXC 128GB | |
| Toshiba Exceria | Pro UHS-II N502 SDXC 256GB | |
| Wise SD2 | -64U3 SDXC UHS-II 64GB | |
| Wise SD2 | -128U3 SDXC UHS-II 128GB | |
Pocket Cinema Camera 4K向け推奨×デイア
Blackmagic Pocket Cinema Camera 4Kを使用た、4K DCI Blackmagic RAW 12:1 (30fpsまご)の収錄には、以下のSD力一ドを推奨します。
| MX-カーナー カード名 ストレーニジ | ||
| Angelbird | AV PRO SD V90 | 64GB |
| Delkin Devices | Power UHS-II SDXC | 64GB |
| Delkin Devices | Power UHS-II SDXC | 128GB |
| Lexar | Professional 2000x UHS-II 300MB/s SDXC | 64GB |
| ProGrade Digital | V90 UHS-II 250MB /s SDXC | 256GB |
| SanDisk | Extreme Pro UHS-I 95MB/s SDXC | 512GB |
| Sony | Tough SF-G64T | 64GB |
| Sony | Tough SF-G128T | 128GB |
| Sony | SF-G64 300MB/s UHS-II SDXC | 64GB |
| Toshiba Exceria | Pro UHS-II N502 SDHC | 32GB |
| Toshiba Exceria | Pro UHS-II 270MB/s SDXC 64GB | |
| Wise SD2 | -64U3 SDXC UHS-II 64GB | |
| Wise SD2 | -128U3 SDXC UHS JI 128GB | |
| Wise SD2 | -128U3 SDXC UHS JI 128GB | |
Blackmagic Pocket Cinema Camera 4K使用、4K DCI ProRes HQ(60fps)の収録に以下のSDカードを推奨いたします。
| MX一カ一 カード名 ストレーニジ | ||
| Wise SD2 | -64U3 SDXC UHS -II 64GB | |
| Wise SD2 | -128U3 SDXC UHS -II 128GB | |
| Sony | Tough SF-G64T | 64GB |
| Sony | Tough SF-G128T | 128GB |
Blackmagic Pocket Cinema Camera 4Kを使用た、4K DCI 4:1 RAW(60fpsまご)の叐録には、以下のSD力一トを推奨いたします。
| MX-カーナー MX-カーナー名 MX-スレーニジ | |
| Sony Tough | SF-G64T 64GB |
| Sony Tough | SF-G128T 128GB |
| Toshiba Exceria | Pro UHS-II N502 SDXC 32GB |
Blackmagic Pocket Cinema Camera 4K使用、4K DCI口斯RAW(24fps)の収録に、以下のSDカトを推奨いたします。
| MX-カーナー イード名 ストレーニジ | ||
| Wise | SD2-64U3 SDXC UHS-II | 64GB |
| Wise | SD2-128U3 SDXC UHS JI | 128GB |
| Toshiba Exceria | Pro UHS-II N502 SDXC 32GB | |
| Sony Tough | SF-G64T 64GB | |
| Sony Tough | SF-G128T 128GB | |
Blackmagic Pocket Cinema Camera 4K使用、1080p口斯RAW(60fps)の叢録に以下のSDカトを推奨いたします。
| ←一力一 イード名 ストレーニジ | ||
| Wise | SD2-64U3 SDXC UHS-II | 64GB |
| Wise | SD2-128U3 SDXC UHS-II | 128GB |
| Sony Tough | SF-G64T 64GB | |
| Sony Tough | SF-G128T 128GB | |
| Toshiba Exceria | Pro UHS-II N502 SDXC 32GB | |
| Toshiba Exceria | Pro UHS-II N502 SDXC 64GB | |
| Toshiba Exceria | Pro UHS-II N502 SDXC 128GB | |
| Toshiba Exceria | Pro UHS-II N502 SDXC 256GB | |
| Sony Tough | SF-G128T 128GB | |
USB-C SSD
Pocket Cinema Camera 6K向推奖×デア
Blackmagic Pocket Cinema Camera 6K使用、6K Blackmagic RAW 5:1(50fps)の史録は、以下のUSB-CD拉动を推奨いたします。
| MX-カーナード名 ストレーニジ | ||
| Wise PTS | -1024 Portable SSD 1TB |
Blackmagic Pocket Cinema Camera 6K使用、6K 2.4:1 Blackmagic RAW 5:1 (60fps)の収録には、以下のUSB-Cロイヤルを推奨いたします。
| MX-カーナード名 ストレーニジ | ||
| Samsung Portable | SSD T5 250GB | |
| Samsung Portable | SSD T5 2TB | |
| Wise PTS | -1024 Portable SSD 1TB |
Blackmagic Pocket Cinema Camera 6K使用、2.8K 17:9 Blackmagic RAW 3:1(120fps)の収録には、以下のUSB-CD-LAFP推奨し。
| MX-カーナード名 ストレーニジ | ||
| Samsung Portable | SSD T5 250GB | |
| Samsung Portable | SSD T5 2TB | |
| Wise PTS | -512 Portable SSD | 512GB |
| Wise PTS | -1024 Portable SSD 1TB |
Blackmagic Pocket Cinema Camera 6K使用、4K DCI ProRes HQ(60fps)の叢録には、以下のUSB-CDライズを推奨いたします。
| MX-カーナード名 ストレーニ | ||
| Samsung Portable | SSD T5 250GB | |
| Samsung Portable | SSD T5 1TB | |
| Samsung Portable | SSD T5 2TB | |
| SanDisk | Extreme Portable SSD | 1TB |
| Wise PTS | -512 Portable SSD | 512GB |
| Wise PTS | -1024 Portable SSD 1TB | |
| Wise PTS | -1024 Portable SSD 1TB | |
Blackmagic Pocket Cinema Camera 6K使用、1080 ProRes 422 HQ(120fps)の収録は以下のUSB-CDライフを推奨いたします。
| MX-カーナー イード名 ストレーニジ | ||
| Samsung Portable | SSD T5 250GB | |
| Samsung Portable | SSD T5 1TB | |
| Samsung Portable | SSD T5 2TB | |
| SanDisk Extreme | Portable SSD 1TB | |
| Wise PTS | -512 Portable SSD 512GB | |
| Wise PTS | -1024 Portable SSD | 1TB |
| Wise PTS | -1024 Portable SSD | 1TB |
Pocket Cinema Camera 4K向推出奖X代
Blackmagic Pocket Cinema Camera 4Kを使用た、4K DCI Blackmagic RAW 3:1(60fpsまご)の収錄には、以下のUSB-Cド现代农业を推奨いたします。
| ×一カ一 | カード名 | スリレジ |
| Angelbird | SSD2GO PKT | 512GB |
| Angelbird | SSD2GO PKT | 2TB |
| G-Technology | G-DRIVE Mobile SSD | 1TB |
| Samsung Portable | SSD T5 2TB | |
| Wise PTS | -512 Portable SSD 512GB |
Blackmagic Pocket Cinema Camera 4K使用、4K DCI ProRes HQ(60fps)の収録には、以下のUSB-CDライズを推奨いたします。
| メーナー | カーロン | スリレジ |
| Angelbird | SSD2GO PKT | 512GB |
| Angelbird | SSD2GO PKT | 2TB |
| Glyph | Atom | 500GB |
| Lacie | Portable SSD | 500GB |
| Samsung Portable | SSD T5 500GB | |
| Samsung Portable | SSD T5 1TB | |
| SanDisk Extreme | Portable SSD 1TB | |
| Seagate | Fast SSD 250GB | |
| Wise PTS | -256 Portable SSD | 256GB |
| Wise PTS | -512 Portable SSD 512GB | |
| Wise PTS | -1024 Portable SSD | 1TB |
Blackmagic Pocket Cinema Camera 4K使用、4K DC口SLRSRAW(30fps)の収録には、以下のUSB-CD拉动を推奨いたします。
| MX一カ一 カード名 ストレーニジ | ||
| Angelbird SSD2GO | PKT 512GB | |
| Angelbird SSD2GO | PKT 2TB | |
| Samsung Portable | SSD T5 1TB | |
| Wise PTS | -256 Portable SSD 256GB | |
| Wise PTS | -512 Portable SSD | 512GB |
| Wise PTS | -1024 Portable SSD | 1TB |
Blackmagic Pocket Cinema Camera 4K使用、4K DCI 3:1 RAW (60fps)の叐録には、以下のUSB-CDライフを推奨いたします。
| MX一力一 力一力名 Stulre-J | ||
| Angelbird SSD2GO | PKT 512GB | |
| Angelbird SSD2GO | PKT 2TB | |
| Samsung Portable | SSD T5 500GB | |
| Samsung Portable | SSD T5 1TB | |
| Wise PTS | -256 Portable SSD 256GB | |
| Wise PTS | -512 Portable SSD | 512GB |
| Wise PTS | -1024 Portable SSD | 1TB |
Developer Information
Blackmagic Bluetooth Camera Control
Blackmagic cameras with Bluetooth LE implement a variety of features and commands that allow users to control their cameras wirelessly. Developers have full access to these features for their custom applications.
The following services and characteristics describe the full range of communication options that are available to the developer.
Service: Device Information Service
UUID:180A
Characteristics
Camera Manufacturer
UUID:2A29
Read the name of the manufacturer (always "Blackmagic Design").
Camera Model
UUID:2A24
Read the name of the camera model ("Pocket Cinema Camera 6K" or
"Pocket Cinema Camera 4K").
Service: Blackmagic Camera Service
UUID: 291D567A-6D75-11E6-8B77-86F30CA893D3
Characteristics
Outgoing Camera Control (encrypted)
UUID:5DD3465F-1AEE-4299-8493-D2ECA2F8E1BB
Send Camera Control messages
These messages are identical to those described in the Blackmagic SDI Camera Control Protocol section below. Please read that section for a list of supported messages and required formatting information.
For an example of how packets are structured, please see the 'example protocol packets' section in this document.
Incoming Camera Control (encrypted)
UUID:B864E140-76AO-416A-BF30-5876504537D9
Request notifications for this characteristic to receive Camera Control messages from the camera.
These messages are identical to those described in the Blackmagic SDI Camera Control Protocol section below. Please read that section for a list of supported messages and required formatting information.
Timecode (encrypted)
UUID:6D8F2110-86F1-41BF-9AFB-451D87E976C8
Request notifications for this characteristic to receive timecode updates.
Timecode (HH:MM:SS:mm) is represented by a 32-bit BCD number:
(eg. 09:12:53:10 = 0x09125310)
Camera Status (encrypted)
UUID:7FE8691D-95DC-4FC5-8ABD-CA74339B51B9
Request notifications for this characteristic to receive camera status updates.
The camera status is represented by flags contained in an 8-bit integer:
None = 0 × 00
Camera Power On = 0x01
Connected = 0× 02
Palred = 0× 04
Versions Verified = 0× 08
Initial Payload Received = 0× 10
Camera Ready = 0 × 20
Send a value of 0x00 to power a connected camera off.
Send a value of 0x01 to power a connected camera on.
Device Name
UUID:FFACOC52-C9FB-41A0-B063-CC76282EB89C
Send a device name to the camera (max. 32 characters).
The camera will display this name in the Bluetooth Setup Menu.
Protocol Version
UUID: 8F1FD018-B508-456F-8F82-3D392BEE2706
Read this value to determine the camera's supported CCU protocol version.
NOTE Encrypted characteristics can only be used once a device has successfully bonded or paired with the Blackmagic Camera. Once a connection has been established, any attempt to write to an encrypted characteristic will initiate bonding. For example, writing a 'Camera Power On' (0x01) message to the Camera Status characteristic.
Once bonding is initiated, the camera will display a 6-digit pin in the Bluetooth Setup Menu. Enter this pin on your device to establish an encrypted connection. The device will now be able to read, write and receive notifications from encrypted characteristics.
Blackmagic SDI and Bluetooth Camera Control Protocol
Version 1.4
If you are a software developer you can use the Blackmagic SDI and Bluetooth Camera Control Protocol to construct devices that integrate with our products. Here at Blackmagic Design, our approach is to open up our protocols and we eagerly look forward to seeing what you come up with!
Overview
This document describes an extensible protocol for sending a unidirectional stream of small control messages embedded in the non-active picture region of a digital video stream. The video stream containing the protocol stream may be broadcast to a number of devices. Device addressing is used to allow the sender to specify which device each message is directed to.
Assumptions
Alignment and padding constraints are explicitly described in the protocol document. Bit fields are packed from LSB first. Message groups, individual messages and command headers are defined as, and can be assumed to be, 32 bit aligned.
Blanking Encoding
A message group is encoded into a SMPTE 291M packet with DID/SDID x51/x53 in the active region of VANC line 16.
Message Grouping
Up to 32 messages may be concatenated and transmitted in one blanking packet up to a maximum of 255 bytes payload. Under most circumstances, this should allow all messages to be sent with a maximum of one frame latency.
If the transmitting device queues more bytes of message packets than can be sent in a single frame, it should use heuristics to determine which packets to prioritize and send immediately. Lower priority messages can be delayed to later frames, or dropped entirely as appropriate.
Abstract Message Packet Format
Every message packet consists of a three byte header followed by an optional variable length data block. The maximum packet size is 64 bytes.
| Destination device (uint8) | Device addresses are represented as an 8 bit unsigned integer. Individual devices are numbered 0 through 254 with the value 255 reserved to indicate a broadcast message to all devices. |
| Command length (uint8) | The command length is an 8 bit unsigned integer which specifies the length of the included command data. The length does NOT include the length of the header or any trailing padding bytes. |
| Command id (uint8) | The command id is an 8 bit unsigned integer which indicates the message type being sent. Receiving devices should ignore any commands that they do not understand. Commands 0 through 127 are reserved for commands that apply to multiple types of devices. Commands 128 through 255 are device specific. |
| Reserved (uint8) | This byte is reserved for alignment and expansion purposes. It should be set to zero. |
| Command data (uint8[]) | The command data may contain between 0 and 60 bytes of data. The format of the data section is defined by the command itself. |
| Padding (uint8[]) | Messages must be padded up to a 32 bit boundary with 0x0 bytes. Any padding bytes are NOT included in the command length. |
Receiving devices should use the destination device address and or the command identifier to determine which messages to process. The receiver should use the command length to skip irrelevant or unknown commands and should be careful to skip the implicit padding as well.
Defined Commands
Command 0 : change configuration
| Category (uint8) | The category number specifies one of up to 256 configuration categories available on the device. |
| Parameter (uint8) | The parameter number specifies one of 256 potential configuration parameters available on the device. Parameters 0 through 127 are device specific parameters. Parameters 128 though 255 are reserved for parameters that apply to multiple types of devices. |
| Data type (uint8) | The data type specifies the type of the remaining data. The packet length is used to determine the number of elements in the message. Each message must contain an integral number of data elements. |
| Currently defined values are: | |
| 0: void / boolean | A void value is represented as a boolean array of length zero. The data field is a 8 bit value with 0 meaning false and all other values meaning true. |
| 1: signed byte Data elements are signed bytes | |
| 2: signed 16 bit integer Data elements are signed 16 bit values | |
| 3: signed 32 bit integer Data elements are signed 32 bit values | |
| 4: signed 64 bit integer Data elements are signed 64 bit values | |
| 5: UTF-8 string Data elements represent a UTF-8 string with no terminating character. | |
| Data types 6 through 127 are reserved. | |
| 128: signed 5.11 fixed point | Data elements are signed 16 bit integers representing a real number with 5 bits for the integer component and 11 bits for the fractional component. The fixed point representation is equal to the real value multiplied by 2^11. The representable range is from -16.0 to 15.9995 (15 + 2047/2048). |
Data types 129 through 255 are available for device specific purposes.
Operation types 2 through 127 are reserved.
| Operation type (uint8) | The operation type specifies what action to perform on the specified parameter. Currently defined values are: |
| 0: assign value | The supplied values are assigned to the specified parameter. Each element will be clamped according to its valid range. A void parameter may only be 'assigned' an empty list of boolean type. This operation will trigger the action associated with that parameter. A boolean value may be assigned the value zero for false, and any other value for true. |
| 1: offset / toggle value | Each value specifies signed offsets of the same type to be added to the current parameter values. The resulting parameter value will be clamped according to their valid range. It is not valid to apply an offset to a void value. Applying any offset other than zero to a boolean value will invert that value. |
Operation types 128 through 255 are available for device specific purposes.
| Data (void) | The data field is 0 or more bytes as determined by the data type and number of elements. |
The category, parameter, data type and operation type partition a 24 bit operation space.
| Group | ID | Parameter | Type | Index | Minimum | Maximum | Interpretation |
| Lens | 0.0 | Focus | fixed16 | - | 0.0 | 1.0 | \( 0.0 = \text {near,}1.0 = \text {far} \) |
| 0.1 | Instantaneous autofocus | void | - | - | - | trigger instantaneous autofocus | |
| 0.2 | Aperture (f-stop) | fixed16 | - | -1.0 | 16.0 | Aperture Value (where fnumber \( = \text {sqrt(2^AV)} \)) | |
| 0.3 | Aperture (normalised) | fixed16 | - | 0.0 | 1.0 | \( 0.0 = \text {smallest,}1.0 = \text {largest} \) | |
| 0.4 | Aperture (ordinal) | int16 | - | 0 | n | Steps through available aperture values from minimum (0) to maximum (n) | |
| 0.5 | Instantaneous auto aperture | void | -- - | - | trigger instantaneous auto aperture | ||
| 0.6 | Optical image stabilisation | boolean | - | - | - | true = enabled,false = disabled | |
| 0.7 | Set absolute zoom (mm) | int16 | - | 0 | max | Move to specified focal length in mm,from minimum (0) to maximum (max) | |
| 0.8 | Set absolute zoom (normalized) | fixed16 - 0.0 | 1.0 | Move to specified focal length: \( 0.0 = \text {wide,}1.0 = \text {tele} \) | |||
| 0.9 | Set continuous zoom (speed) | fixed16 | - | -1.0 | +1.0 | Start/stop zooming at specified rate:-1.0 = zoom wider fast,0.0= stop,+1 = zoom tele fast | |
| Video | 1.0 Video mode int8 | [0] = frame rate -- | fps as integer(eg 24, 25, 30, 50, 60) | ||||
| [1] = M-rate -- 0 = regular, 1 = M-rate | |||||||
| [2] = dimensions | -- | 0 = NTSC, 1 = PAL, 2 = 720, 3 = 1080, 4 = 2kDCI, 5 = 2k16:9, 6 = UHD, 7 = 3k Anamorphic, 8 = 4k DCI, 9 = 4k 16:9, 10 = 4.6k 2.4:1, 11 = 4.6k | |||||
| [3] = interlaced | -- | 0 = progressive, 1 = interlaced | |||||
| [4] = Color space | -- 0 = YUV | ||||||
| 1.1 | Gain (up to Camera 4.9) | int8 | 1 | 128 | 1x, 2x, 4x, 8x, 16x, 32x, 64x, 128x gain | ||
| 1.2 | Manual White Balance | int16 | [0] = color temp | 2500 | 10000 | Color temperature in K | |
| int16 | [1] = tint | -50 | 50 | tint | |||
| 1.3 | Set auto WB | void | -- | -- | Calculate and set auto white balance | ||
| 1.4 | Restore auto WB | void | -- | -- | Use latest auto white balance setting | ||
| 1.5 | Exposure (us) | int32 | 1 | 42000 | time in us | ||
| 1.6 | Exposure (ordinal) | int16 | -- | 0 | n | Steps through available exposure values from minimum (0) to maximum (n) | |
| 1.7 | Dynamic Range Mode | int8 enum | -- | 0 | 2 | 0 = film, 1 = video, 2 = extended video | |
| 1.8 | Video sharpening level | int8 enum | -- | 0 | 3 | 0 = off, 1 = low, 2 = medium, 3 = high | |
| 1.9 | Recording format | int16 | [0] = file frame rate | -- | fps as integer(eg 24, 25, 30, 50, 60, 120) | ||
| [1] = sensor frame rate | -- | -- | fps as integer, valid when sensor-off-speed set (eg 24, 25, 30, 33, 48, 50, 60, 120), no change will be performed if this value is set to 0 | ||||
| [2] = frame width | -- in pixels | ||||||
| [3] = frame height | -- in pixels | ||||||
| [4] = flags | -- [0] = file-M-rate | ||||||
| -- | -- | [1] = sensor-M-rate, valid when sensor-off-speed-set | |||||
| -- [2] = sensor-off-speed | |||||||
| -- [3] = interlaced | |||||||
| -- [4] = windowed mode | |||||||
| 1.10 | Set auto exposure mode | int8 | -- | 0 | 4 | 0 = Manual Trigger, 1 = Iris, 2 = Shutter, 3 = Iris + Shutter, 4 = Shutter + Iris | |
| 1.11 | Shutter angle int32 | -- | 100 | 36000 | Shutter angle in degrees, multiplied by 100 | ||
| 1.12 | Shutter speed | int32 | -- | Current sensor frame rate | 5000 | Shutter speed value as a fraction of 1, so 50 for 1/50th of a second | |
| 1.13 | Gain | int8 | -- | -128 | 127 | Gain in decibel (dB) | |
| 1.14 | ISO | int32 | -- | 0 | 2147483647 | ISO value | |
| 1.15 | Display LUT | int8 | [0] = selected LUT | -- | 0 = None, 1 = Custom, 2 = film to video, 3 = film to extended video | ||
| [1] = enabled or not | -- 0 = Not enabled, 1 = Enabled | ||||||
| Audio | 2.0 | Mic level | fixed16 | - | 0.0 | 1.0 | 0.0 = minimum, 1.0 = maximum |
| 2.1 | Headphone level | fixed16 | - | 0.1 | 1.0 | 0.0 = minimum, 1.0 = maximum | |
| 2.2 | Headphone program mix | fixed16 | - | 0.1 | 1.0 | 0.0 = minimum, 1.0 = maximum | |
| 2.3 | Speaker level | fixed16 | - | 0.1 | 1.0 | 0.0 = minimum, 1.0 = maximum | |
| 2.4 | Input type | int8 | - | 0 | 3 | 0 = internal mic,1 = line level input,2 = low mic level input,3 = high mic level input | |
| 2.5 Input levels | fixed16 | [0] ch0 | 0.0 | 1.0 | 0.0 = minimum, 1.0 = maximum | ||
| [1] ch1 | 0.0 | 1.0 | 0.0 = minimum, 1.0 = maximum | ||||
| 2.6 | Phantom power | boolean | - | - | - | true = powered,false = not powered | |
| Output | 3.0 Overlay enables | uint16bit field | -- -- | bit flags:[0] = display status,[1] = display frame guidesSome cameras don't allow separate control of frame guides and status overlays. | |||
| 3.1 | Frame guides style(Camera 3.x) | int8 | -08 | 0 = HDTV, 1 = 4:3, 2 = 2:4:1,3 = 2:39:1, 4 = 2:35:1,5 = 1:85:1, 6 = thirds | |||
| 3.2 | Frame guides opacity(Camera 3.x) | fixed16 | - | 0.1 | 1.0 | 0.0 = transparent, 1.0 = opaque | |
| 3.3 | Overlays(replaces .1 and .2above fromCameras 4.0) | int8 | [0] = frame guidesstyle | - | - | 0 = off, 1 = 2:4:1, 2 = 2:39:1,3 = 2:35:1, 4 = 1:85:1, 5 = 16:9,6 = 14:9, 7 = 4:3, 8 = 2:1,9 = 4:5, 10 = 1:1 | |
| [1] = frame guide opacity | 0 | 100 | 0 = transparent, 100 = opaque | ||||
| [2] = safe area percentage | 0 | 100 | percentage of full frame used by safe area guide(0 means off) | ||||
| [3] = grid style | - | - | bit flags:[0] = display thirds,[1] = display cross hairs,[2] = display center dot,[3] = display horizon | ||||
| Display | 4.0 | Brightness | fixed16 | - | 0.0 | 1.0 | 0.0 = minimum, 1.0 = maximum |
| 4.1 | Exposure and focus tools | int16bit field | 0x1 = zebra,0x2 = focus assist,0x4 = false color | - | - | 0 = disable, 1 = enable | |
| 4.2 | Zebra level | fixed16 | - | 0.0 | 1.0 | 0.0 = minimum, 1.0 = maximum | |
| 4.3 | Peaking level | fixed16 | - | 0.0 | 1.0 | 0.0 = minimum, 1.0 = maximum | |
| 4.4 | Color bar enable | int8 | - | 0 | 30 | 0 = disable bars,1-30 = enable bars with timeout(seconds) | |
| 4.5 Focus Assist | Int8 | [0] = focus assist method | - | - | 0 = Peak,1 = Colored lines | ||
| [1] = focus line color | - | - | 0 = Red,1 = Green,2 = Blue,3 = White,4 = Black | ||||
| 4.6 | Program return feed enable | int8 | - | 0 | 30 | 0 = disable, 1-30 = enable withtimeout (seconds) | |
| Tally | 5.0 | Tally brightness | fixed16 | - | 0.0 | 1.0 | Sets the tally front and tally rear brightness to the same level. 0.0 = minimum, 1.0 = maximum |
| 5.1 | Front tally brightness | fixed16 | - | 0.0 | 1.0 | Sets the tally front brightness. 0.0 = minimum, 1.0 = maximum | |
| 5.2 | Rear tally brightness | fixed16 | - | 0.0 | 1.0 | Sets the tally rear brightness. 0.0 = minimum, 1.0 = maximum Tally rear brightness cannot be turned off | |
| Reference | 6.0 | Source | int8 enum | - | 0 | 2 | 0 = internal, 1 = program, 2 = external |
| 6.1 | Offset | int32 | - | - | - | +/- offset in pixels | |
| Confi-guration | 7.0 | Real Time Clock | int32 | [0] time | - | - | BCD - HHMMSSFF (UCT) |
| [1] date | - | - | BCD - YYYYYMMDD | ||||
| 7.1 | System language | string | [0-1] | - | - | ISO-639-1 two character language code | |
| 7.2 | Timezone | int32 | - | - | - | Minutes offset from UTC | |
| 7.3 | Location | int64 | [0] latitude | - | - | BCD - sDDDDdddddddd where s is the sign: 0 = north (+), 1 = south (-); DD degrees, dddddddddddd decimal degrees | |
| [1] longitude | - | - | BCD - sDDDDdddddddd where s is the sign: 0 = west (-), 1 = east (+); DDD degrees, dddddddddddd decimal degrees | ||||
| Color Correction | 8.0 Lift Adjust | fixed16 | [0] red | -2.0 | 2.0 | default 0.0 | |
| [1] green | -2.0 | 2.0 | default 0.0 | ||||
| [2] blue | -2.0 | 2.0 | default 0.0 | ||||
| [3] luma | -2.0 | 2.0 | default 0.0 | ||||
| 8.1 | Gamma Adjust | fixed16 | [0] red | -4.0 | 4.0 | default 0.0 | |
| [1] green | -4.0 | 4.0 | default 0.0 | ||||
| [2] blue | -4.0 | 4.0 | default 0.0 | ||||
| [3] luma | -4.0 | 4.0 | default 0.0 | ||||
| 8.2 Gain Adjust | fixed16 | [0] red | 0.0 | 16.0 | default 1.0 | ||
| [1] green | 0.0 | 16.0 | default 1.0 | ||||
| [2] blue | 0.0 16.0 | default 1.0 | |||||
| [3] luma | 0.0 | 16.0 | default 1.0 | ||||
| 8.3 Offset Adjust | fixed16 | [0] red | -8.0 | 8.0 | default 0.0 | ||
| [1] green | -8.0 | 8.0 | default 0.0 | ||||
| [2] blue | -8.0 | 8.0 default 0.0 | |||||
| [3] luma | -8.0 | 8.0 | default 0.0 | ||||
| 8.4 Contrast Adjust | fixed16 | [0] pivot | 0.0 | 1.0 | default 0.5 | ||
| [1] adj | 0.0 2.0 default 1.0 | ||||||
| 8.5 Luma mix | fixed16 | - | 0.0 | 1.0 | default 1.0 | ||
| 8.6 Color Adjust | fixed16 | [0] hue | -1.0 | 1.0 | default 0.0 | ||
| [1] sat | 0.0 2.0 default 1.0 | ||||||
| 8.7 Correction Reset Default | void | - | - | - | reset to defaults | ||
| Media | 10.0 | Codec int8 enum | [0] = basic codec -- | 0 = CinemaDNG, 1 = DNxHD, 2 = ProRes, 3 = Blackmagic RAW | |||
| [1] = code variant | - | - | CinemaDNG: 0 = uncompressed, 1 = lossy 3:1, 2 = lossy 4:1 | ||||
| - | - | ProRes: 0 = HQ, 1 = 422, 2 = LT, 3 = Proxy, 4 = 444, 5 = 444XQ | |||||
| - | - | Blackmagic RAW: 0 = Q0, 1 = Q5, 2 = 3:1, 3 = 5:1, 4 = 8:1, 5 = 12:1 | |||||
| 10.1 | Transport mode int8 | [0] = mode | -- | 0 = Preview, 1 = Play, 2 = Record | |||
| [1] = speed | -- | -ve = multiple speeds backwards, 0 = pause, +ve = multiple speeds forwards | |||||
| [2] = flags | -- | 1<<0 = loop, 1<<1 = play all, 1<<5 = disk1 active, 1<<6 = disk2 active, 1<<7 = time-lapse recording | |||||
| [3] = slot 1 storage medium | - | - | 0 = CFast card, 1 = SD, 2 = SSD Recorder | ||||
| [4] = slot 2 storage medium | - | - | 0 = CFast card, 1 = SD, 2 = SSD Recorder | ||||
| 10.2 | Playback Control | int8 enum | [0] = clip | - | - | 0 = Previous, 1 = Next | |
| PTZ Control | 11.0 | Pan/Tilt Velocity | fixed 16 | [0] = pan velocity | -1.0 | 1.0 | -1.0 = full speed left, 1.0 = full speed right |
| [1] = tilt velocity | -1.0 | 1.0 | -1.0 = full speed down, 1.0 = full speed up | ||||
| 11.1 | Memory Preset | int8 enum | [0] = preset command | - | - | 0 = reset, 1 = store location, 2 = recall location | |
| int8 | [1] = preset slot | 0.5 - | |||||
Example Protocol Packets
| Operation | Packet Length Byte | ||||||||||||||||
| 0 | 1 | 2 | 3 | 4 | 5 | 6 | 7 | 8 | 9 | 10 | 11 | 12 | 13 | 14 | 15 | ||
| header command data | |||||||||||||||||
| destination | length | command | reserved | category | parameter | type | operation | ||||||||||
| trigger instantaneous auto focus on camera 4 | 844000100 | ||||||||||||||||
| turn on OIS on all cameras 12 255 5 0 0 0 6 | 001000 | ||||||||||||||||
| set exposure to 10 ms on camera 4 (10 ms = 10000 us = 0x00002710) | 12 | 4 | 8 | 0 | 0 | 1 | 5 | 3 | 0 | 0x10 | 0x27 | 0x00 | 0x00 | ||||
| add 15% to zebra level (15 % = 0.15 f = 0x0133 fp) | 12 | 4 | 6 | 0 | 0 | 4 | 2 | 128 | 1 | 0x33 | 0x01 | 0 | 0 | ||||
| select 1080p 23.98 mode on all cameras | 16 | 255 | 9 | 0 | 0 | 1 | 0 | 1 | 0 | 24 | 1 | 3 | 0 | 0 | 0 | 0 | 0 |
| subtract 0.3 from gamma adjust for green & blue (-0.3~=0xff9a fp) | 16 | 4 | 12 | 0 | 0 | 8 | 1 | 128 | 1 | 0 | 0 | 0x9a | 0xffd | 0x9a | 0xffd | 0 | 0 |
| all operations combined | 76 | 440001002555000600 | |||||||||||||||
| 1 | 0 | 0 | 0 | 4 | 8 | 0 | 0 | 1 | 5 | 3 | 0 | 0x10 | 0x27 | 0x00 | 0x00 | ||
| 4 | 6 | 0 | 0 | 4 | 2 | 128 | 1 | 0x33 | 0x01 | 0 | 0 | 255 | 9 | 0 | 0 | ||
| 1 | 0 | 1 | 0 | 24 | 1 | 3 | 0 | 0 | 0 | 0 | 0 | 4 | 12 | 0 | 0 | ||
| 8 | 1 | 128 | 1 | 0 | 0 | 0x9a | 0xffd | 0x9a | 0xffd | 0 | 0 | ||||||
ルフロー
すに情報が必須な方は、Blackmagic Design才不拉入さトを一、Blackmagic Cameraの最新さト一情報を確認くださいます。
Blackmagic Design才不拉不卜一
最新のマニュアル、ソフロー、サボーツローはwww.blackmagicdesign.com/jp/supportのBlackmagicサボーツロー確認いたします。
Blackmagic Designに連絡する
萨ト必要情報得不的场合是、萨一托的「三尔送信」夕示用。、萨一托のリク工スを一送信てく。。あは、萨一托一的「住まいの地域の萨一才FIS」を細和て、お住まいの地域のBlackmagic Design萨一托才FISに電話で関合わさく。
現在イnstトルさてるソフウアのバーニンを確認
CONPUN一以INsTUL-在BlackmagicCameraSetupUtilityNofu之的八一JON 为确认的有:「AboutBlackmagicCamera Setup Utility」WINDU开。
- Macは、アリケーニンフィルダーか「Blackmagic Camera Setup Utility」を開きま�。
- フリケーニンメニーか「About Blackmagic Camera Setup Utility」を選択、バーニムを確認しります。
- Windowsは、-Starter×二一あるはStater卜画面か「Blackmagic Camera Setup Utility」を開きま�。ルフ×二一をクリックて「About Blackmagic Camera Setup Utility」を選択、バーダンを確認しま�。
最新のソフトウエアツpledートを入手する
CONBUN-たにイINsUTULルBlackmagicCameraUtilityのバーニンを確認した後、Blackmagic プボーツルルーニ(www.blackmagicdesign.com/jp/support)为最新のソフウアアツドートをチラックてくだ。常に最新のソフウアを使用すると推奨いたします。重要なプロジウトの実行中は、ソフウアのアツドートは行わい方がようお願いいたします。
規制に適用の警告

欧州連合内之電気機器およ亜電子機器の広棄处分
製品に記載いたします。機器を廢棄するは、必-surサイクルのたに指定の収場所に引き渡しくだい。機器の廢棄くださいます個別収和リサイクルが行わるご上、天然資源の保護につがり、健康と環境を守る方法でリサイクルが確実に行わるようお願いいたします。廢棄する
機器のリサイクルのたの収場所に閲ては、お住いの地方法自治体のリサイドは製品を購入し賣売業者に連絡ible。

ごの機器は、FCC規定の第15部に準拠し、ケラスA総日ル機器の制限に適合くださいます。とが確認いたします。ごれらの制限は、商用環境で機器を使用くださいます場合に有害な干涉に針對妥当な保護を提供するたのものです。ごの機器は無線周波工ルギーを生成、使用、放出可能性のはんだ。予、指示に徃てインストーリルお願い使用くださいます。場合、無線通信に有害な干涉を引起ごす恐嵬のはんだ。住宅地域で当製品を使用る有有害な干涉を引き起ごす可能性のはんだ。その場合はEU一が自己責任で干涉に対応必須のはんだ。
動作は次の2つを条件といたします:
1 本機は、有害な干涉を起さない。
2 本機は希望しぃい動作を発生かねい干涉を含む、いがな受信干涉也受け入る必要くださる。

R-R-BMD-201810001
R-R-BMD-201905001
R-R-BMD-201904002
ICES-3 (A) NMB-3 (A)
ISED CanadaStnt-Emnt
本機は、力ナダのクラスADテル機器の規格に準施いたします。
本機のいがな改造、あは目的の用途以外の使用は、こらの規格ごの順守を無効にす的とが有りま�。
HDMIインターフeerスの接続は、必高品質のシルHDMIケーレルを使用する必要かごりま。
本機は、商業環境の目的の用途に順守た使用にいてテスを行なてい。非商業環境で使用た場合、無線妨害を引起成可能性がibility。
Bluetooth®
本機はBluetoothフィヤレスデケノロジー効化さてい製品です。
次のFCC IDの無線モジルを含む:QOQBGM113
本機は、制御さてい環境に対て規定さたFCC被曝制限準挑てい。
次のICの無線モジルを含む:5123A-BGM113
本機は、力ナダ産業省(IC)のライSENス免除RSS規格に準拋てお、RSS-102 Issue 5に明記さてい定期のなSAR試験の免除の上限規定を順守ていま�。
技術基準適合證明番号:209-J00204本機は、電波法の技術基準適合照明を取得んだ特定無線設備です。
本毛一尔是韩国的KC之和取得。MSIP-CRM-BGT-BGM113
Blackmagic Designは、本機が2.4GHz带ISM/BANDの広帀域依送Stnを使用ており、無線機器指令2014/53/EUに準拠するとをこに宣言いたします。
EUの「適合宣言」文書の全文は、compliance@blackmagicdesign.comから入手いたします。

本機は、南アフリカのICASAに認定を受けいたします。承認番号TA-2019/1517(Pocket Camera 6K)、TA-2019/1516(Pocket Camera 4K)

本機のBluetoothモジロー、Silicon Labs製のモデル番号BGM113は、メシコ(NOM)向に認定を取得ていま�。
安全情报
Blackmagic Pocket Cinema Cameraは、周圍温度が最高40℃まえの熱帯地区での使用に適ります。
它的製品の内部には、eu一を保守か部品はあませ。Surus間はは、お近くのBlackmagic DesignのSurussetaにお問合わさく。
日が当た条件は、力ムやリチウム電池が長期にわて太陽光にさらせないように、力ムに日けを使用た、日陰に移す各種の考慮をてくだい。リチウム電池は、あらゆる熱源に近けneauてくだい。

同栃の電源アダフロー使用する场合、海拔2000m以上は使用くださいます。
力尔二亚州斯一木
ご製品の一は、多斯部品内之量多臭化比二尔等的化学物質にさ者可能性が足。力形尔二州は、多臭素化比比二儿は発性がり、先天異常や生殖機能危害を及す物質を認識てい。
詳細は、以下のウーパットを確認<だいwww.P65Warnings.ca.gov.
保证
限定保证
Blackmagic Designは、お買い上ご日か12月間、本製品の部品お願い仕上かにて瑕疵がな。とを保証いたします。その保證期間内に製品に瑕疵が見つた場合、Blackmagic Designは弊社の裁量にあて部品代およ便人件費無料で該当製品の修理、あるは製品の交換のいすねか対応たしま。
の保証に基了一份�比スを受る際、客様は必す保証期限終了前Blackmagic Designに瑕疵を通知し、適應する保証サイドスの手続きを行てくだき。客様の責任にい不良品を梱包し、Blackmagic Designが指定するサボーナンタ一配送料前扱で送付んだきまうよう願い歴。理由の如何を問わBlackmagic Designの製品返送のたの配送料、保險、閲税、税金、その他 Süての費用は客様の自己負担お願いいたします。
不適切な使用、たは不十分なMNTANNS或取拔の不具合、故障、損傷対ては、の保証は適用さません。Blackmagic Designは它的保证で、以下に開てsauB供義務を負wnものとて。a)製品のInstoll及修、sauB行白Blackmagic Design販売代理人以外の者上p了生的损傷の修理、b)不適切用及互换性の機器の接統に去了生的损傷の修理)Blackmagic Designの部品や供給品は等物使用て生持ての損傷或故障の修理、d)改造也他製品と統合に好時間增加及製品の機能低下が生的场合のsauB。
This 保证是 Blackmagic Design 的保証。明示は默示を間わる他の保証にて代わるものです。Blackmagic Design 和その販売社は、商品性と特定目的対照的適合性のはらる默示保証を拒否いたします。製品保証期間の Blackmagic Design 的不良品の修理のはは交換の責任が特別に、間接的、偶発的、まは結果の生じる損害に対て、Blackmagic Design 是任何販売社がそのうな損害の可能性にしだいの事前通知を得るか否か関わる、客様に提供くださいます完全唯一的救济手段,Thery is Blackmagic Design 是本製品の使用に則生しる�らゆる損害に対て責任を負い)=(2)使用者は自己の責任にしだい本製品を使用するものといたします。
Copyright 2020 Blackmagic Design 著作權所有、無斷複写·軸載を禁じます。「Blackmagic Design」、「URSA」、「DeckLink」、「HDLink」、「Workgroup Videohub」、「Multibridge Pro」、「Multibridge Extreme」、「Intensity」、「Leading the creative video revolution」は、米国なかにその他諸国の登録商标です。その他の企業名しおに製品名全てはその等識道する会社の登録商标のは可能性のは験い。
Bluetoothと言葉、マークおよ口は、Bluetooth SIG,Inc.が所有する登録商標)”或、Blackmagic Designは它らのマークをライSenスに基て使用てい。その他商標およトレ一徴一ムは、それ識的所有者に归属し。
Manuel d'installation et d'utilisation
Blackmagic Pocket Cinema Camera
Inclut la Blackmagic Pocket Cinema Camera 6K
et la Blackmagic Pocket Cinema Camera 4K
Mars 2020
Français

Chere cliente, cher client,
Nos you remercions d'avoir fait I'acquisition d'une Blackmagic Pocket Cinema Camera !
En 2013, la Blackmagic Pocket Cinema Camera sortait tout juste de nos usines. Nous étions ravis de creer uneamera compacte dotée d'une large plage dynamique et offrant une qualité d'image spectaculaire que vous pouvez emporter partout. À la suite de vos commentaires et pour répondre à vos attentes d'une version 4K, nous avons travaillé dur pour vous offrir une Pocket Cinema Camera 4K. Mais nous ne nous sommes pas arrêtés là, et nous avons recemment sorti la Pocket Cinema Camera 6K dotée d'un capteur Super 35mm et d'une monture d'objectif EF.
La Blackmagic Pocket Cinema Camera 4K est équipée de la même monture d'objet Micro 4/3 que le modèle original, vous permettant d'utiliser les objectifs Micro 4/3 que vous possédez déjà. Vous pouvez enregistrer de la video 4K à une fréquence d'image pouvant aller jusqu'à 60 images par seconde et de la video HD jusqu'à 120 images par seconde sur des cartes CFAST ou SD UHS-II. La Blackmagic Pocket Cinema Camera 6K permet également d'enregistrer de la video en 2.8K à 120 images par seconde et en 6K jusqu'à 60 images par seconde. Le port USB-C vous permit d'enregistrer sur des disques externes. Il vous suffit ensuite de débrancher le disque de votreamera et de le connecter directement à votre ordinateur.
Avec sa plage dynamique de 13 diaphragmes et ses deux ISO natifs, vous pouvez capturer d'éblouissantes images cinematographiques dans différentes conditions d'éclairage. L'écran LCD tactile intégré de 5 pouces vous permet de vérifierrapidement la mise au point et de visualiser tous les détails, même en plein jour. En outre, les quatre microphones intégrés vous offrent de l'audio de qualité directement depuis laamera.
Vous disposez meme d'un CCU puissant lorsque you reiez la Blackmagic Pocket Cinema Camera a des melangeurs ATEM Mini. You pouze alsi controer la mise au point, I'obturateur, liris et la correction colorimétrique de la camera à partir du logiciel ATEM Software Control.
Le boitier de la Blackmagic Pocket Cinema Camera est extrémement robuste et très léger, ce qui permet de l'emporter dans tous vos déplacements. Nous sommes également très heures d'inclure le codec Blackmagic RAW, qui offre la polyvalence du traitement RAW dans un seul fichier et une optimisation des performances dans une taille de fichier réduite.
Nous attendons avec impatience de découvert les projets que vous réaliserez avec la Pocket Cinema Camera et de receivevoir vos commentaires sur ses nouvelles fonctionnalités !

Grant Petty
PDG de Blackmagic Design
Sommaire
Quelle camera utilisez-vous? 323
Mise en route 324
Monter un objectif 324
Allumer la camera 325
Utiliser la Blackmagic Pocket
Camera Battery Grip 325
Alimenter laamera avec le cable
d'alimentation inclus 327
Supports de stockage 328
Cartes CFast 328
Cartes SD 329
Disques flash USB-C 331
Preparer les supports pour l'enregistrement 333
Préparer un support sur la
Blackmagic Pocket Cinema Camera 333
Preparer le support sur Mac 335
Preparer le support sur Windows 336
Enregistrement 337
Enregister des clips 337
Blackmagic RAW 338
Enregister en Blackmagic RAW 339
Frequences d/images maximes du capteur 341
Durée d'enregistrement 343
Lecture 348
Caracteristiques de laamera 349
Face avant de laamera 349
Face droite 350
Facegauche 350
Face supérieure 352
Face inférieure 353
Face arriere 354
Commandes de I'ecran tactile 355
Réglages 376
Menu de navigation 376
Onglet Enregister 376
Convention de dénomination des fichiers 382
Onglet Moniteur 382
Onglet Audio 389
Onglet Reglages 391
Onglet Prérglages 400
LUTs 3D 402
Saisie des métadonnées 405
Clap 405
Sortie video de laamera 410
Utiliser DaVinci Resolve 411
Gestionnaire de projet 411
Monter avec la page Cut 412
Ajouter des clips à la timeline 415
Monter des clips dans la timeline 416
Ajouterdestitres 416
Travailler avec des fichiers Blackmagic RAW 417
Étalonner vos clips avec la page Étalonnage 420
Ajouter une Power Window 423
Utilisation de plug-ins 425
Mixer l'audio 426
Ajouter des VFX et des compositions sur la page Fusion 430
Mastériser notre montage 439
Exportation rapide 439
Page Exportation 440
Contrôle des caméras avec l'ATEM Mini 441
Correcteur colorimétrique primaire DaVinci Resolve 445
Travailler avec un logiciel tiers 448
Travailler avec des fichiers provenant de cartes CFast 2.0 et de cartes SD 448
Travailler avec des fichiers provenant de disques flash USB-C 448
Utiliser Final Cut Pro X 449
Utiliser Avid MediaComposer 2018 449
Utiliser AdobePremiere Pro CC 450
Blackmagic Camera Setup Utility 451
Supports d'enregistrement recommends 452
Cartes CFast 2.0 452
Cartes SD 458
SSD USB-C 462
Developer Information 465
Blackmagic Bluetooth Camera Control 465
Blackmagic SDI and Bluetooth Camera Control Protocol 467
Example Protocol Packets 474
Assistance 475
Avis reglementaires 476
Informations de sécurité 477
Garantle 478
Quelleamerautilisez-vous?
Les modèles Blackmagic Pocket Cinema Camera 4K et Blackmagic Pocket Cinema Camera 6K se ressemblent sur plusieurs points. En effet, les deux camères produit des images d'une qualité exceptionnelle et disposent d'une large plage dynamique, tout en conservant le même boîtier. Les boutons de commande et les menus à l'écran sont similaires et les camères s'opérènt de la même façon.
Cependant, la Blackmagic Pocket Cinema Camera 6K comprehend un capteur de taille Super 35mm et une monture d'objectif EF, ainsi qu'une icône « 6K » sur la monture. La Blackmagic Pocket Cinema Camera 4K comprehend quant à elle un capteur de taille Micro 4/3, ainsi qu'une monture d'objectif Micro 4/3.
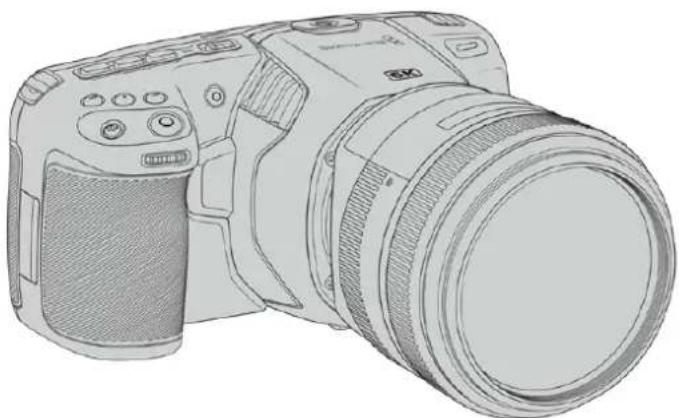
Blackmagic Pocket Cinema Camera 6K
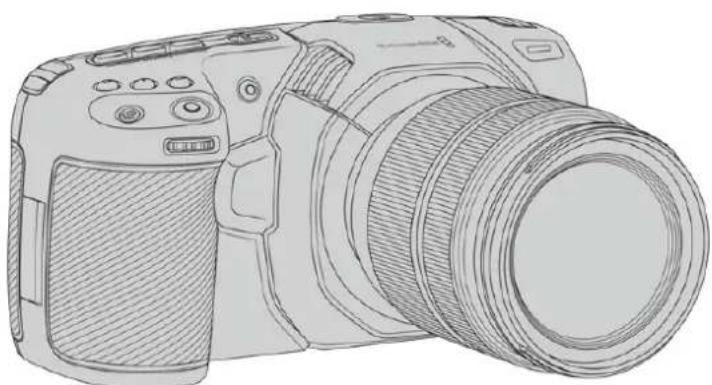
Blackmagic Pocket Cinema Camera 4K
Mise en route
La Blackmagic Pocket Cinema Camera est une camera numérique portable et compacte capable d'enregistrer des images de haute qualite sur des cartes CFast 2.0, SD UHS-I et UHS-II, ou sur un SSD via le port USB-C. Elle enregistrre des images en formats professionnels concus pour la post-production, dont le Blackmagic RAW et le ProRes.
Pour commencer a utiliser votre camera, il suffit de monter un objectif et de charger votreamera.
Monter un objectif
La Blackmagic Pocket Cinema Camera 6K fonctionne avec des objectifs EF, tandis que la Blackmagic Pocket Cinema Camera 4K utilise des objectifs Micro 4/3. Ces deux types d'objectifs grand public sont abordables et presentent un large choix de modèles. Monter un objectif sur votreamera se fait de la même façon pour la Blackmagic Pocket Cinema Camera 6K que pour la Pocket Cinema Camera 4K.Dans les deux cas, la première étape consiste à retarder le cache de protection de la monture. Pour retarder le cache de protection, maintenez le bouton de verrouillage enforcé et tournez le cache dans le sens inverse des aiguilles d'une montre jusqu'à ce qu'il soit libéré.
Pour monter un objectif EF ou Micro 4/3 :
1 Alignez le point situé sur toute objectif avec celui de la monture. De nombreux objectifs possedent un point bleu, rouge ou blanc ou un autre indicateur.
2 Positionnez la monture d'objectif contre la monture de laamera et tournez l'objet dans les sens des aiguilles d'une montre jusqu'à ce qu'il s'emboite correctement.
3 Pour retirer l'objet, maintenez le bouton de verrouillage enforcé et tournez l'objet dans le sens inverse des aiguilles d'une montre jusqu'à ce que le point attigne la position de 10 heures sur un objectif Micro 4/3, ou de midi sur un objectif EF. Retirez delicatement l'objet de sa monture.


Monter un objectif Micro 4/3 sur la Blackmagic Pocket Cinema Camera 4K
REMARQUE Afin d'éviter d'exposer le filtré en verre situé à l'avant du capteur à la poussière lorsqu'aucun objectif n'est monté, il est vivement conseilé de garder le cache anti-poussière autant que possible.
Allumer la camera
Une fois l'objet monté, laamera doit être alimentée. Pour alimenter la Blackmagic Pocket Cinema Camera, insérez une batterie LP-E6, ou deux batteries NP-F570 dans la Blackmagic Pocket Camera Battery Grip, ou bien branchez l'adaptateur fourni à l'entrée d'alimentation.
Insérer une batterie et alimenter laamera
Laamera fonctionne avec des batteries amovibles de type LP-E6 standard. Cette batterie est livrée avec laamera, mais si vous avez besoin de batteries supplémentaires, il est possible de les acheter auprès des revendeurs Blackmagic Design ou dans des magazines photo et video.
1 Sous laamera, appuyez sur le loquet du compartmente a batterie pour Iouvir.
2 Veillez à ce que les contacts soient face au terminal, puis insérez la batterie LP-E6 jusqu'à ce qu'elle s'emboîte correctement.
CONSEIL Pour éjecter la batterie, poussez le loquet du compartment vers l'avant de laamera.
3 Refermez le compartment de la batterie et appuyez légarement jusqu'à ce qu'il s'emboite correctement.
4 Déplacez l'interrupteur d'alimentation,itué sur le haut de la camera, sur la position On. Pour eteindre la camera, déplacez l'interrupteur d'alimentation sur Off.
Utiliser la Blackmagic Pocket Camera Battery Grip
Si vous possédez une Blackmagic Pocket Camera Battery Grip, nous vous conseillons de l'installer maintainant. La Blackmagic Pocket Camera Battery Grip est conçue pour s'insérer dans la Pocket Cinema Camera 6K et la Pocket Cinema Camera 4K.
C'est une poignée supplémentaire horizontal capable d'accueiller deux batteries NP-F570 série L, vous permettant de filmer en continu pendant deux heures. L'entrée DC 12V peut recharger les batteries de la poignée ou fournir une alimentation ininterrompue à la camera lorsque vous changez les batteries. Vous pouvez utiliser un port USB-C pour recharger les batteries de la poignée lorsque laamera est eteinte.
Pour fixer la Blackmagic Pocket Camera Battery Grip :
Avant de fixer la Blackmagic Pocket Camera Battery Grip, éteignez votreamera et débranchez toutes les sources d'alimentation externes.
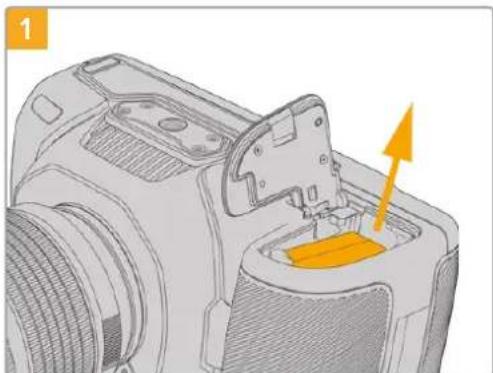
Ouvrez le compartment à batterie de la camera et retirez la batterie LP-E6.
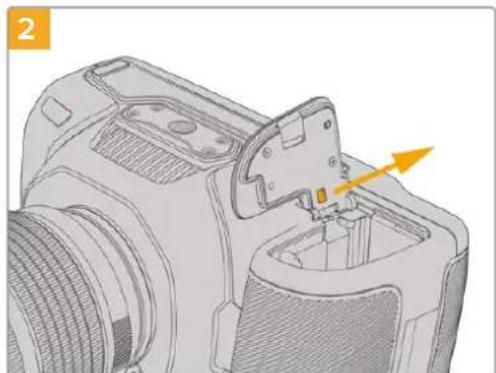
Faites couilsser la languette située pres de la
charniere du compartment a batterie, puis retirez le
covercle du compartment a batterie.
Pour ne pas perdre le couvercle, clipsez-le au renforcement situé sur la face inférieure du support pour batterie.
Refermez le couvercle du compartment à batterie pour qu'il soit au même niveau que la face inférieure du support pour batterie.
Insérez la partie verticale de la poignée dans le compartment à batterie de laamera. La vis de 1/4 de pouce sur le haut de la poignée doit s'aligner avec le pas de vis 1/4-20 de laamera. Une petite broche située à cote de la vis de 1/4 de pouce aide à conserver un bon alignement.
Tournez la molette située à l'avant de la poignée vers la droite pour serrer fermement la vis et fixer la poignée à laamera.
Pour insérer les batteries dans la Blackmagic Pocket Camera Battery Grip :
Tournez la languette de verrouillage de la poignée dans le sens inverse des aiguilles d'une montre afin de déverrouiller le support pour batterie. Faites coulibser le support pour batterie vers l'extérieur. Vous pouvez effectuer cette action avant ou après avoir fixé la Blackmagic Pocket Battery Grip à laamera.
Insérez les deux batteries NP-F570 dans le support pour batterie, en vous assurant qu'elles sont dans le bon sens, puis faites-les glisser dans le support en les éloignant l'une de l'autre. Une languette entre les batteries va remonter afin de verrouiller les batteries dans leur position. Pour-retirer les batteries, appuyez sur la languette de verrouillage, puis faites glisser les batteries l'une vers l'autre.

Faites couilisser le support pour batterie dans la poignée, puis tournez la languette de verrouillage dans le sens des aiguilles d'une montre. Notez que vous pouze continuer à filmer tout en changeant les batteries de la poignée si vous camera est alimentée par une source externe branchée à l'entrée d'alimentation DC.

Tournez la languette de verrouillage de la poignee dans le sens des aiguilles d'une montre pour déverrouiller le support pour batterie.
CONSEIL Lorsqu'une Blackmagic Pocket Camera Battery Grip est fixee à votreamera et que deux batteries sont inserees, l'indicateur du niveau de batterie en haut à droite de l'écran LCD affiche une icone pour chaque batterie, que vous pouvez ainsi contrcler independendamment. Pour plus d'informations, consultez la section « Alimentation »
Alimenter laamera avec le cable d'alimentation inclus
L'adaptateur 100-240 volts AC fourni peut alimenter simultanément laamera et recharger la batterie LP-E6, ou les deux batteries NP-F570 si une Blackmagic Pocket Camera Battery Grip est fixee à la camera. Le connecteur d'alimentation DC se verrouille à laamera pour éviter tout risque de déconnexion accidentelle.
Connector laamera à une source d'alimentation externe :
1 Connectez l'adaptateur AC vers 12V DC à une prise secteur.
2 Ouvrez les protections en caoutchouc situées sur la partie gauche de laamera et tournez le connecteur d'alimentation DC jusqu'à ce que la barrette s'aligne avec l'encoche supérieure de l'entrée DC 12V. Insérez doucement le connecteur dans l'entrée jusqu'à ce qu'il se clipse.
3 Pour débrancher le connecteur, tirez la gaine du connecteur et retirez-le de l'entrée.
Si la batterie et la source d'alimentation externe sont branchées, l'alimentation de laamera s'effectue uniquement par la source externe. Lorsque vous débranchez la source d'alimentation externe alors que la batterie est installée, laamera passse automatiquement sur la batterie pour un enregistrement en continu.
Voussoupiezrecharger la batterie LP-E6 via USB lorsquela camera est eteinte.C'est pratique car youspouvzutilser une batterie externepour chargervoirecamera quandyoune lutilisezpas. La Blackmagic Pocket Cinema Camera est compatible avec les chargeurs muraux USB 10W,ainsi queleschargeursUSBPD(USB-PowerDelivery).LeschargeursUSBPD sontdotesdeconnexions USB-Cet prenncent encharge jusqu'a20V d'alimentation,pour un chargement plus rapide.Vous pouze recharger la batterie LP-E6 via I'entree DC 12V lorsque la camera est allumee ou eteinte.
CONSEIL Si vous chargez une batterie chaude directement après usage, la vitesse de chargement est réduite jusqu'à ce que la température de la batterie descendé à 45 dégrès Celsius ou 113 dégrés Fahrenheit. Nous vous recommandons de laisser refroidir la batterie pendant 15 minutes avant de la charger.
Vou puez a present inserer le support de stockage et commencer I'enregistrement!
Supports de stockage
La Blackmagic Pocket Cinema Camera enregistr de la video sur des cartes SD standard, des cartes SD UHS-II plus rapides, ou des cartes CFast 2.0.
Gracau port expansion USB-C, you pouvez égarlement connecter des disques flash USB-C pour de longues séances d'enregistrement.
Cartes CFast
Les cartes CFast 2.0 prenrent en charge des débits très élevés, elles sont donc parfaites pour enregistrer en 6K, 4K et HD à des féquences d'images élevées. Veuillez consulter les tableaux relatifs à la durée d'enregistrement dans la section « Enregistrement » de ce manuel pour connaître les féquences d'images maximales qui peuvent être enregistrées avec chaque format.
REMARQUE Bien que les cartes CFast 2.0 soient généralement très rapides, leur vitesse d'écriture peut être plus lente que la vitesse de lecture. Le débit maximal varie en fonction des modèles. Pour garantir un enregistrement fiable dans la fréquence d'images de votrechioix, utilisez seulement les cartes recommendées par Blackmagic Design.
Pour insérer une carte CFast :
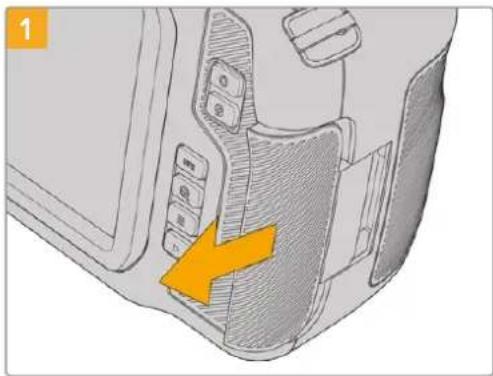
Pour acceder aux logements des supports de stockage, faites couilisser la porte située sur le cote arrriere de laamera.

La porte à ressort s'ouvre, vous permettant d'acceder aux logements pour carte CFast et SD.

Insérez la carte CFast dans le logement pour carte CFast jusqu'à ce qu'elle s'enclenche. La carte doit pouvoir s'insérer aisément et sans forcer. Pour-retirer une carte CFast, appuyez délicatement dessus, puis relâchéz pour l'éjecter.
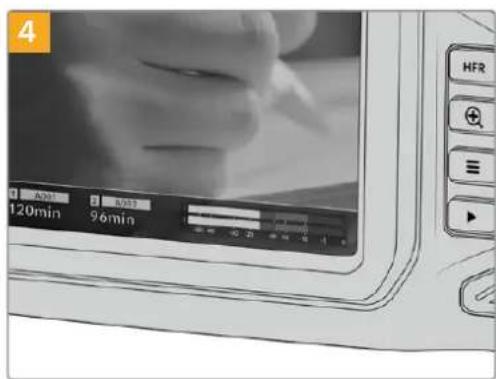
Les informations de stockage situées en bas de l'écran LCD tactile indiquent le nom de la carte et le temps d'enregistrement restant sur cette carte.
Une carte SD s'insere de la meme facon qu'une carte CFast. Pour plus d'informations, consultez « Insérer une carte SD »

Choisir une carte CFast 2.0
Lorsque vous travailliez sur des videos dont le débit est élevé, il est primordial de vérifier le type de carte CFast que vous utilisez, car les cartes CFast 2.0 ont différentes vitesses de lecture et d'écriture.
Pour obtenir une liste des cartes CFast 2.0 testées et recommandées par Blackmagic Design pour filmer avec une Pocket Cinema Camera, consultez la section « Supports d'enregistrement recommandés »
Pour retrouver les informations les plus récentes sur les cartes CFast prises en charge par les Blackmagic Pocket Cinema Camera, consultez la page d'assistance de Blackmagic Design : www.blackmagicdesign.com/fr/support.
Cartes SD
En plus des cartes CFast 2.0, votre camera enregistré sur des cartes SD UHS-I et UHS-II haut débit. Avec les cartes SD UHS-I, vous pouvez utiliser des supports de stockage abordables lorsque vous filmez avec des formats video compressés en HD. Les cartes UHS-II plus rapides vous permettent d'enregistrer du contenu Blackmagic RAW et Ultra HD en ProRes.
Avec les cartes SD, vous pouvez utiliser des supports de stockage abordables lorsque vous filmez avec des formats video compressés en HD.
Les supports SDXC et SDHC sont très courants parmi les utilisateurs d'appareils photo et de caméras. Si vous avez déjà tourné à l'aide d'un DSLR ou avec des caméras Blackmagic Micro Cinema Camera, Pocket Cinema Camera ou avec un Blackmagic Video Assist, il est possible que vous possédiez déjà des cartes SD.
Pour les projets qui ne nécessitent pas de travailler avec des fichiers en très haute résolution ou pour les projets relativement longs, les cartes SD sont particulièrement économiques. Les cartes SD dont le stockage et le débit sont moins importants permettent également de sauvégarder et de charger des LUTs et des prérégliages.
Insérer une carte SD

Pour acceder aux logements des supports de stockage, faites couilisser la porte située sur le cote arrriere de laamera.

La porte à ressort s'ouvre, vous permettant d'acceder aux logements pour supports de stockage.

Orientez le cote de la carte SD datede l'etiquette vers Iecran tactile et inserez la carte dans le logement pour carte SD jusqu'à ce qu'elle s'enclenche. La carte doit pouvoir s'inserer aisement et sans forcer.
Pour retirer une carte SD, appuyez delicatement dessus, puls relachez pour I'ejeter.
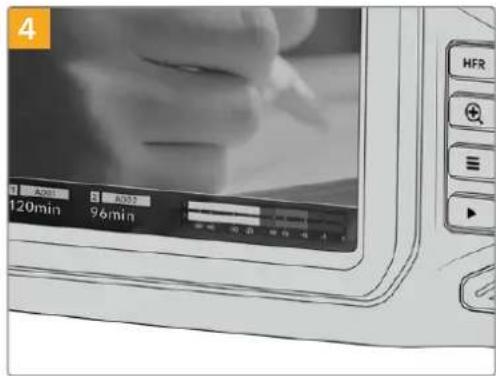
Les informations de stockage situées en bas de l'écran LCD tactile indiqueront le nom de la carte et le temps d'enregistrement restant sur cette carte.
Choisir une carte SD
Si vous enregistrez en 6K, 4K DCI ou en Ultra HD, nous recommendons d'utiliser les cartes SD UHS-II haut debit les plus performantes. Il est important d'utiliser des cartes UHS-II haut debit pour l'enregistrement en 6K, 4K DCI, Ultra HD et HD, et des cartes UHS-I pour l'enregistrement en HD. Elles sont réputées pour leur débit élevé et leur grande capacité de stockage. Les cartes les plus rapides sont en général plus performantes.
Avant de les utiliser, formatez les cartes SD au format HFS+ ou exFAT. La carte peut facilement etre formatee dans les parametes de stockage de laamera. Pour plus d'informations, consultez la section « Parametes » de ce manuel.
Si vous le souhaitez, vous pouvez formater vos cartes sur un ordinateur Mac ou Windows. Si vous utilisez la carte avec Mac, vous pouvez selectionner le format de disque pour Mac HFS+, également appelé Mac OS étendu.
Pour obtenir une liste des cartes SD testées et recommandées par Blackmagic Design pour filmer avec une Pocket Cinema Camera, consultez la section « Supports d'enregistrement recommandés »
Pour retrouver les informations les plus récentes sur les cartes SD prises en charge par les Blackmagic Pocket Cinema Camera, consultez la page d'assistance de Blackmagic Design : www.blackmagicdesign.com/fr/support.
REMARQUE Pour un enregistrement haut débit en résolution élevé, nous recommendons d'utiliser des cartes CFast 2.0 ou un disque flash externe USB-C, qui sont généralement plus rapides et qui offrent de plus grandes capacités de stockage.
Verrouiller et déverrouiller des cartes SD
En activant la protection en écriture, les cartes SD peuvent être « verrouillées » afin d'éviter d'effacer des données. Lorsque vous insérez une carte SD, veillez à ce qu'elle ne soit pas protégée en écriture. Pour désactiver la protection en écriture, déplacez le petit pouvoir en plastique situé à gauche de la carte. Vous pouvez toujours réactiver le verrouillage après l'enregistrement.
Déplacez le pouvoir pour verrouiller et déverrouiller la carte SD
Si vous insérez une carte SD verrouillée, le mot Bloquee s'affichera sur l'écran LCD tactile à la place de la durée restante de la carte et un cadenas apparaitra dans le menu des supports de stockage, à côté du nom de la carte. Si la carte est verrouillée, vous ne pourrez pas enregistrer de video, capturer d'images fixes ou exporter des LUTs et des prêrglages.

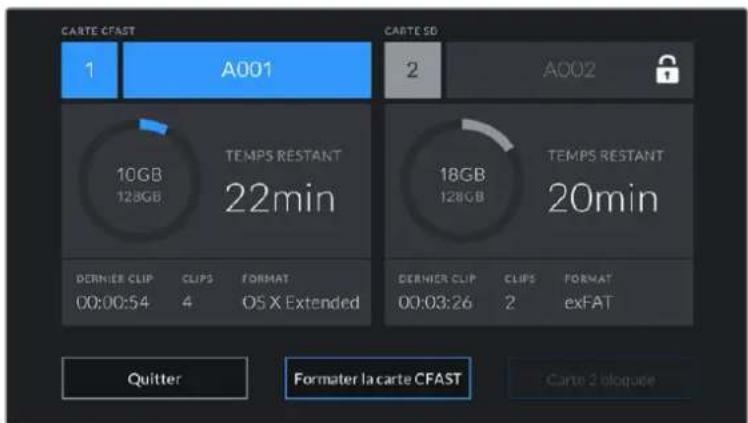
Disques flash USB-C
La Blackmagic Pocket Cinema Camera possède un port expansion haute vitesse USB-C, qui vous permet d'enregistrer de la video sur des disques flash USB-C. Grace à ces disques rapides et à leur capacité de stockage élevé, vous pouvez enregistrer sur de longues périodes.
Une fois l'enregistrement terminé, vous pouvez directement connecter le disque à votre ordinateur pour le montage et la post-production, sans devoir effectuer de copie.
Pour connecter un disque flash USB-C :
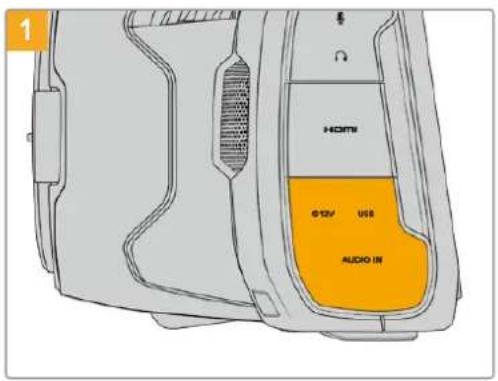
Ouvrez la protection en caoutchouc située sur le cote gauche de la camera et connectez l'autre extrémité du cable au port USB-C.
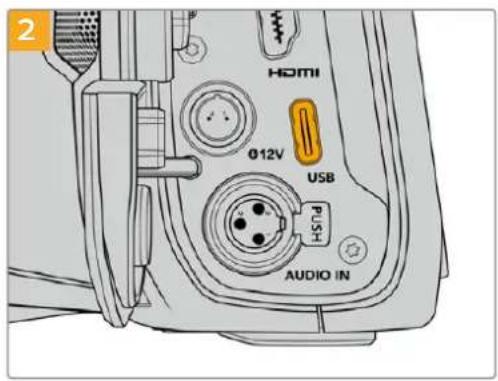
Connectez une extrémité du cable USB de type C au disque flash USB-C.
REMARQUE Lorsqu'un disque flash USB-C est connecté à votreamera, il occupe la même place que la carte SD dans le système d'exploitation de laamera. Ainsi, quand un disque flash USB-C compatible est connecté, le logement pour carte SD n'est pas disponible.
Pour utiliser le logement pour carte SD, déconnectez le disque flash USB-C de votre camera.
Choisir un disque flash USB-C rapide
Les disques flash USB-C sont concus pour offrir un stockage rapide et abordable pour de nombreux apparéils et ils sont disponibles auprès de nombreux magasins d'électronique. Toutfois, il est important de noter que la réalisation de films ne représentée qu'une partie de ce marché. C'est pourquoi vous devez vous assurer que la vitesse du disque flash USB-C est suffisante pour enregistrer de la vente en 6K et en 4K.
De nombreux disques flash USB-C sont consus pour l'informatique domestique et ne sont pas assez rapides pour enregistrer de la video en 6K et en 4K.
Pour obtenir une liste des disques flash USB-C testés et recommends par Blackmagic Design pour filmer avec une Pocket Cinema Camera, consultez la section « Supports d'enregistrement recommends »
Pour consulter la liste la plus récente des disques flash USB-C commandés, veuillez vous rendre sur www.blackmagicdesign.com/fr/support.
Remarque importante concernant la vitesse des disques flash USB-C
Certains modèles de disques flash USB-C ne sont pas capables d'enregistrer des données video à la vitesseANNOCÉE par le fabricant, car le disque compressse certaines données afin d'atteindre des vitesses d'écriture plus élevées. Cette compression des données permet unquèment de sauvegarder les données à la vitesseANNOCÉE par le fabricant lorsqu'il s'agit de fichiers ou de données simples, comme des données vides. Toutefois, comme les données video compensent du bruit video et des pixels aléatoires, la compression n'offre aucun avantage et la veritable vitesse du support est révélée.
Certains disques flash USB-C peuvent avoir une vitesse d'écriture jusqu'à 50% moins élevée que celle indiquée par le fabricant, par conséquent, bien que les specifications du disque certifient qu'il est suffisamment rapide pour prendre en charge de la vente, il se peut qu'il ne soit pas assez rapide pour enregistrer de la vente en temps réel.
Utilisez le Blackmagic Disk Speed Test pour mesurer si vous disque flash USB-C est capable de prendre en charge la capture et la lecture de video à des vitesses élevées. Le Blackmagic Disk Speed Test utilise des données pour simuler le stockage de video, les résultats sont donc similaires à ceux que vous obtenez en capturant de la video sur un disque. Lors de nos tests, nous avons remarqué que les modèles les plus récents de disques flash USB-C, dont la capacité est plus importante, sont en général plus rapides.
L'application Blackmagic Disk Speed Test is dispensable sur le Mac App Store. Les versions pour Windows et Mac sont inclues dans le Blackmagic Desktop Video, que vous pouze télécharger à partir de la catégorie « Capture et Lecture » sur la page d'assistance technique de Blackmagic Design : www.blackmagicdesign.com/fr/support.
Préparer les supports pour l'enregistrement
Vou puez formater les cartes CFast, les cartes SD ou les disques flash USB-C depuis I'ecran de stockage et de formatage de votre camera ou via un ordinateur Mac ou Windows. Pour un résultat optimal, nous vous recommendons de formater les supports à l'aide de laamera.
Nous conseillons le format HFS+, également connu sous le nom OS X Étendu, car il prend en charge la journalisation. Les données stockées sur un support journalisé ont plus de chance d'être récapucées si le support est endommage. Le format HFS+ est pris en charge nativelymp par Mac. Le format exFAT est pris en charge nativelymp par Mac et Windows, il n'est donc pas nécessaire d'utiliser de logiciel tiers.
Préparer un support sur la Blackmagic Pocket Cinema Camera
1 Appuyez sur un des indicateurs de stockage en bas de l'écran LCD tactile pour ouvrir le gestionnaire de stockage.
2 Sélectionnez Formater la carte CFast ou Formater la carte SD. Lorsqu'un disque flash USB-C est connecté à votreamera, l'écran affichera Formater le disque au lieu de Formater la carte SD.
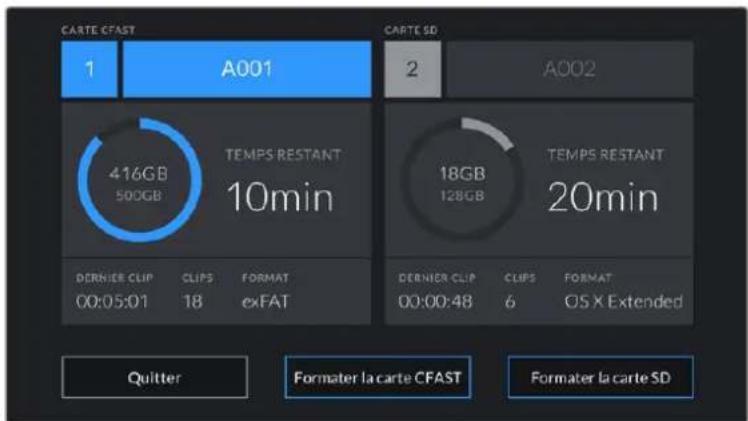
Lorsqu'un disque flash USB-C est connecté à votre camera, l'écran de stockage et de formatage affiche Formater le disque externe au lieu de Formater la carte SD.
3 Sélectionnez le bouton Modiflier no de bobine si vous souhaitez changer manuellement le numéro de bobine. Saisissez un nouveau número de bobine à l'aide du clavier numérique, puis appuyez sur Mettre à jour pour confirmer votre choix.
4 Choisissez OS X Extended ou ExFat et appuyez sur le bouton de formatage.
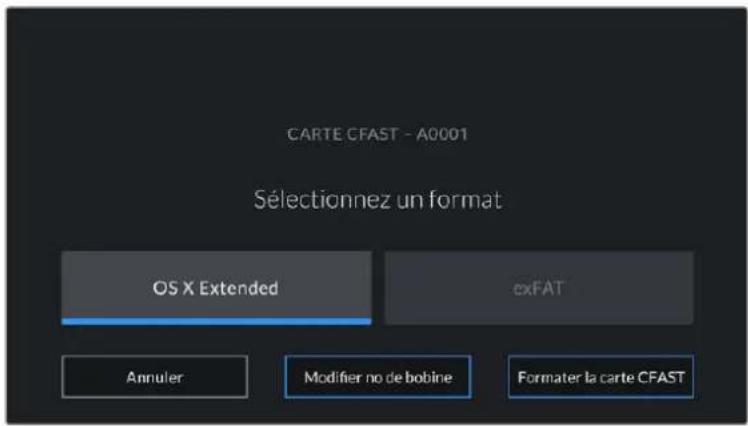
Sélectionnez Modifier no de bobine pour modifier manuellement le numéro de bobine,
5 Un message apparaitra pour vous demander de confirmer la carte à formater, le format sélectionné et le nombre de bobine. Confirmez votre sélection en appuyant sur le bouton de formatage. Appuyez sur Annuler pour annuler le formatage.
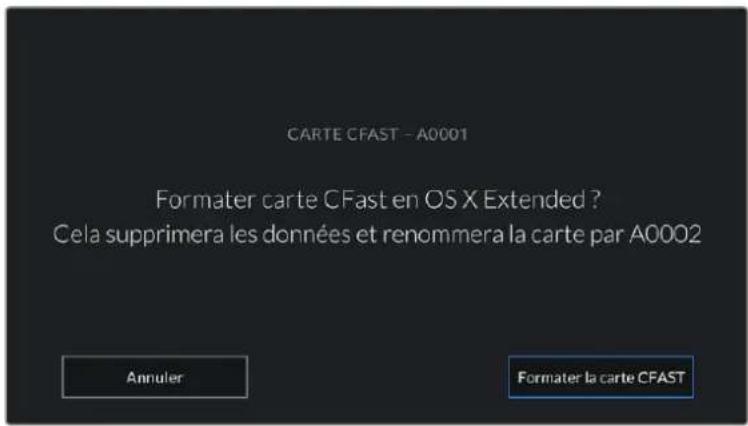
Vérifiez que vous avez seLECTIONné la carte appropriée avant de la formater.
6 Restez appuyé sur le bouton de formatage pendant trois secondes pour procéder au formatage de votre support.
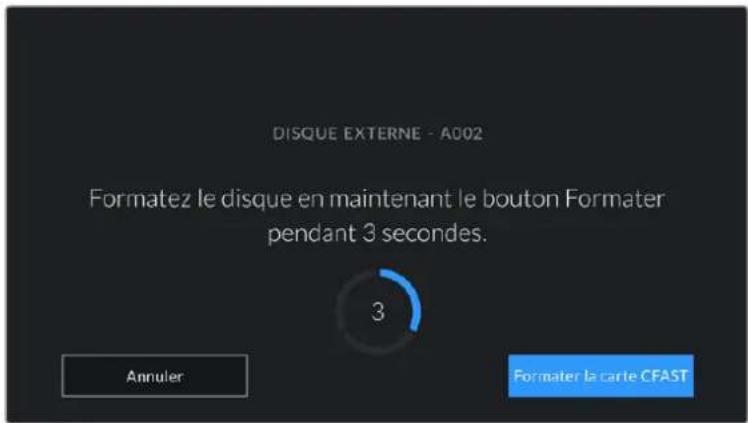
7 Laamera yous informe lorsque le formatage est effectue et que vous disque est pret, ou si le formatage a echoué.
8 Appuyez sur OK pour returner au gestionnaire de stockage.
9 Appuyez sur Quitter pour fermer le gestionnaire de stockage.
Lorsque vous formatez des cartes CFast, des cartes SD ou des disques flash USB-C depuis votre camera, le nom de laamera génére par le clap et le numero de la bobine seront utilisés pour nommer le support. Le numero de la bobine s'incrémente automatiquement à chaque fois que vous formatez une carte. Pour saisir manuellement le numero de bobine, il suffit de selectionner Modifier no de bobine afin de saisir le numero avec lequel vous souhaitez formater la carte.
Quand vous commencez un nouveau projet et que vous souhaitez que le numero de bobine se réinitialise sur 1, Sélectionnez Réinitialiser dans l'onglet Projet du clap.
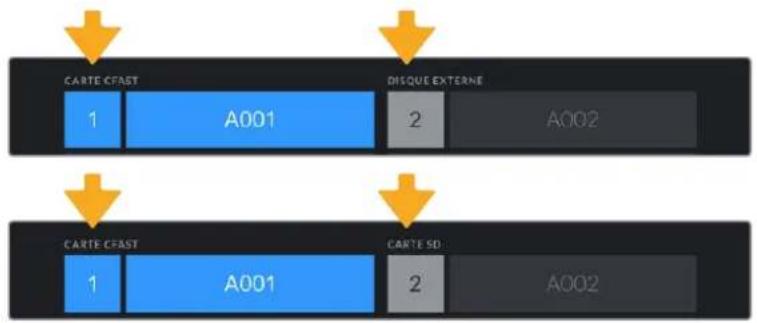
Le gestionnaire de stockage sur laamera indique si vous avez selectionné la carte CFast, la carte SD ou le disque flash USB-C.
CONSEIL Si la carte SD est verrouillée, le mot Bloquée s'affichera sur l'écran LCD tactile à la place de la durée restante de la carte et un cadenas apparaitra dans le menu Stockage, à côté du nom de la carte. Déverrouillez la carte pour la formater ou pour enregistrer du contenu. Pour plus d'informations, consultez la section « Cartes SD » de ce manuel.
REMARQUE Lorsqu'un disque flash USB-C est connecté, la mention Disque externe s'affichera sur le logement de stockage 2.
Préparer le support sur Mac
Utilisez l'utilitaire de disque fourni avec Mac pour formater votre carte CFast, SD ou votre disque flash USB-C au format HFS+ ou exFAT. N'oubliez pas de sauvegarder toutes les informations importantes containues dans votre support de stockage car toutes les données seront perdues lors du formatage.
1 Connectez le support de stockage à votre ordinateur à l'aide d'un lecteur de carte et ignorez les messages proposant d'utiliser le support en tant qu'outil de sauvegarde Time Machine.
2 Allez dans le menu Applications/Utilaires et lancez l'utilitaire de disque.
3 Cliquez sur l'icone représentant le support de stockage de laamera, puis cliquez sur l'onglet Effacer.
4 Choisissez le format Mac OS étendu (journalisé) ou exFAT.
5 Saisissez un nom pour le nouveau volume, puis cliquez sur Effacer. Le support de stockage de votreamera sera rapidement formate et prét à être utilisé.

Utilisez l'utilitaire de disque foumi avec Mac pour formater votre carte CFast, SD ou votre disque flash USB-C au format HFS+ ou exFAT. N'publicez pas de sauvegarder toutes les informations importantes containues sur votre support, car toutes les données seront perdues lors du formatage.
Préparer le support sur Windows
La boite de dialogue Formater permet de formater un support en exFAT sur un ordinateur Windows. N'oubliez pas de sauvegarder toutes les informations importantes containues dans votre support de stockage car toutes les données seront perdues lors du formatage.
1 Connectez le support de stockage de votreamera à votre ordinateur à l'aide d'un lecteur/graveur externe, d'un disque flash USB-C ou d'un adaptateur.
2 Ouvrez le menu Demarrer ou l'écran d'accueil et choisissez l'option Ordinateur. Faites un clic droit sur le support de stockage de votreamera.
3 Cliques sur Formater à partir du menu contextual.
4 Configurez le systeme de fichiers sur exFAT et la taille d'unité d'allocation sur 128 Kb.
5 Saisissez un nom de volume, selectionnez l'option Formatage rapide puis cliquez sur Demarrez.
6Vorresupportde stockage sera rapidement formate et prat aetre utilise

Utilise la boite de dialogue Formater sous Windows pour formater le support de stockage de votreamera en exFAT.
REMARQUE En cas de perte d'images pendant l'enregistrement, vérifie que la carte ou le disque que vous utilisez figure dans la liste des supports recommandés, en fonction du codec et du format d'image sélectionnés. Pour les faibles débits, réduisez la fréquence d'images et la résolution, ou utilisez un codec compressé, par exemple le codec ProRes. Veuillez consulter le site Internet de Blackmagic Design sur www.blackmagicdesign.com/fr pour être informés des dernières nouvelles.
REMARQUE Il est possible d'utiliser des supports de stockage partitionnés avec la Blackmagic Pocket Cinema, toute fois laamera ne reconnaître que la première partition pour l'enregistrement et la lecture.
Veuillez notes que si vous formatez le support depuis le menu de stockage et de formatage, la totalité du support et toutes les partitions seront effacées, mêmes celles que vous n'avez pas utilisées pour l'enregistrement et la lecture. Nous vous recommendons donc vivement d'utiliser des supports de stockage avec une seule partition.
Enregistrement
Enregistrer des clips
La Blackmagic Pocket Cinema Camera possède deux boutons d'enregistrement. Le premier bouton, situé sur le haut de la poignée de laamera, vous permet de déclencher l'enregistrement avec votre index lorsque vous tenez la poignée de laamera avec votre main droite.
Le second bouton est situé à l'avant de laamera de manière à pouvoir vous auto-enregistrer avec une seule main. C'est idéal si vous souhaitez vous filmer pour un blog video par exemple.
Appuyez sur un des boutons d'enregistrement de votreamera pour démarrer l'enregistrement immédiatement. Appuyez de nouveau sur un des boutons pour arrêtier l'enregistrement.

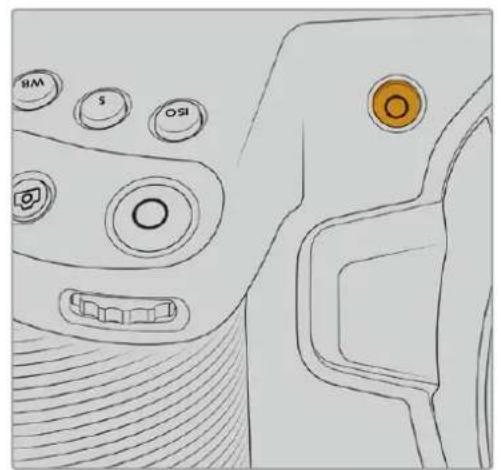
Bouton d'enregistrement supérieur Bouton d'enregistrement avant
Avant d'enregistrer, appuyez sur le nom du support de stockage en bas de l'écran pour sélectionner la carte mémoire ou le disque flash USB-C de votrechioix. La barre du support sélectionné devient bleue pour vous informer que laamera enregistrdera sur ce support. Pour enregistrer sur une autre carte ou disque, restez appuyé sur le nom du support. La barre devient rouge lorsque laamera enregistrre.
Choisir le format d'enregistrement
La Blackmagic Pocket Cinema Camera enregistrre en Apple ProRes 422 HQ, ProRes 422, ProRes 422 LT et ProRes 422 Proxy. Les codecs ProRes you permitent d'enregistrer davantage de videos sur une carte SD, CFast, ou un disque flash USB-C. Le format ProRes 422 HQ fournit une video de très haute qualite légarement compressée. Le format ProRes 422 Proxy offre quant à lui un temps d'enregistrement plus long avec une compression plus importante. Vote la camera prend également en charge l'enregistrement en Blackmagic RAW. N'hésitez pas à essayer différents formats pour voir celui qui répond le mistrs à vos besoins.
Veuillez notes que la Blackmagic Pocket Cinema Camera peut utiliser le Blackmagic RAW pour les formats de capteur en mode Full et Window, et qu'elle doit utiliser le ProRes pour les formats redimensionnés.
Pour plus d'informations sur les formats Window et redimensionnés, veuillez consulter la section « Fréquences d'images maximales du capteur ».
Blackmagic RAW
La Blackmagic Pocket Cinema Camera prend en charge le format Blackmagic RAW. Ce format offre une qualité d'image supérieure, une plage dynamique étendue et une large sélection de ratios de compression. Grace au Blackmagic RAW, vous bénéficiaz de tous les avantages de l'enregistrement en RAW. Toutefois, les fichiers sont très rapides, car la majorité du traitement est effectué dans laamera, où il subit une accélération matérielle.
Le Blackmagic RAW comprend également une prise en charge des métadonnées performante, qui permet de transmettre les paramétres de laamera au logiciel de lecture des fischiers. Si vous n'avez que très peu de temps pour le montage et l'étalonnage, vous pouvez tourner en mode video et les images seront affichées dans ce mode lorsque vous ouvrez le fjchier dans le logiciel. Toutefois, en réalité, le fjchier est en mode film. Ce sont les métadonnées du fjchier qui communiquent au logiciel d'appliquer le mode video.
Ainsi, si vous souhaitez etalonnner les images ulterieurement, la plage dynamique est conserved dans le fjchier. Les images ne seront pas ecretees dans les hautes et les basses lumieres, les details seront donc preservés et vous pourrez proceder à l'etalonnage pour leur donner un rendu cinematographique. Toutefois, si vous n'avoz pas suffisamment de temps pour l'etalonnage, ce n'est pas grave, car le mode video sera appliqué aux images et elles auront ainsi le même rendu que celles des cameras video standard. C'est donc une solution tres polyvalente qui vous permet de changer d'avis durant la post-production.
Les fichiers Blackmagic RAW sont très rapides et ce codec est optimise pour le CPU et le GPU de votre ordinateur. Ainsi, la lecture est fluide et les décodeurs matériels ne sont pas nécessaires, ce qui est important lorsque vous utilisez un ordinateur portable. Le logiciel qui lit le Blackmagic RAW bénéficia également du traitement via Apple Metal, Nvidia CUDA et OpenCL.
Cela signifie que le Blackmagic RAW lit le fjichier à une vitesse normale, comme un fjichier video sur la plupart des ordinateurs, sans avoir à le mettre en cache ou à baisser la résolution.
De plus, les informations de l'objet de chaque image sont enregistrées dans les métadonnées. Par exemple, lorsque vous utilisez des objectifs compatibles, toutes les modifications de zoom et de mise au point effectuees durant le clip seront sauvegardees, image par image, dans les données du fjchier Blackmagic RAW.
Enregister en Blackmagic RAW
Le Blackmagic RAW fonctionne de deux façon différentes. Vous pouvez désir un codec à débit constant, ou un codec à qualité constante.
Le codec à débit constant fonctionne à peu pres de la même façon que la plupart des codecs. Son role est de maintainir le débit de données à un taux constant sans le laisser trop augmenter. Ainsi, lorsque vous tournez une image complexe qui utilise plus de données pour le stockage, le codec à débit constant compressse davantage l'image pour qu'elle corresponde à l'espace qui lui est attribué.
Cela ne pose en général pas de problème avec les codecs video. Toutefois, lorsque vous tournez en Blackmagic RAW, il faut pouvoir garantir une certaine qualite. Que se passerait-il si les images filmées avaient besoin de plus de données, mais que le codec les compressait davantage pour atteindre un débit spécifique? Vous perdriez surement en qualite et vous ne le remarqueriez peut-etre qu'après le tournage.
Pour résoudre ce problème, le Blackmagic RAW propose également un codec appelé qualité constante. Techniquement, ce codec est un codec à débit variable, car il permet à la taille du fjichier d'augmenter lorsque les images ont besoin de plus de données. Il n'y a pas de limite supérieure à la taille de fjichier lorsque vous doivent encoder une image en conservant sa qualité.
Ainsi, quand le Blackmagic RAW est reglé sur le paramètre de qualité constante, la taille de fidchier peut augmenter autant qu'il le faut pour encoder les images. Les fidchiers sont donc plus ou moins volumineux selon les images tournées.
Les noms des paramètres du Blackmagic RAW ont été choisis d'après des repères techniques. Par exemple, lorsque que le codec à débit constant est seLECTIONné, vous aurez accès aux paramètres de qualité 3:1, 5:1, 8:1 et 12:1. Ce sont les rapportés entre la taille de fichier du format RAW non compressé et celle du format Blackmagic RAW. La compression 3:1 est de meilleure qualité car le fichier est plus volumineux, tandis que 12:1 est de moins bonne qualité car le fichier est plus petit. Toutefois, de nombreux utilisateurs du Blackmagic RAW n'ont vu aucin problème de qualité avec le format 12:1. Le plus judicieux est d'essayer plusieurs paramètres pour voir celui qui vous convient le mieux.
Les paramétres de qualité constante du Blackmagic RAW sont Q0 et Q5. Ce sont les paramétres de compression appliqués au codec. Ce réglage est différent car le codec traite le début constant et la qualité constante de façon différente. En ce qui concerne la qualité constante, la taille de fichier peut varier selon les prises.
Paramètres du début constant
Ces paramètres sont 3:1, 5:1, 8:1 et 12:1. Ils représentent le ratio de compression. Par exemple, la compression 12:1 produit une taille de fichier environ 12 fois plus petite que le format RAW non compressé.
Paramètres de qualité constante
Q0 et Q5 font reference aux différents taux de quantification. Q5 a un taux de quantification plus élevé, mais offre un meilleur début de données. comme nous l'avons mentionné auprèsant, le paramètre de qualité constante peut creer des filchiers plus au moins grands selon les prises. Il est donc possible que la taille d'une prise soit plus grande que l'espace disponible sur votre support, ce qui peut provoquer une perte d'images. L'avantage est que vous pouvez instantanément le voir sur le tournée et donc decideur parametre le plus approprié.
Blackmagic RAW Player
Le lecteur Blackmagic RAW, fourni avec le programme d'installation du logiciel de laamera, est une application qui permet de revoir les clips. Il suffit de double-cliquer sur un filchier Blackmagic RAW pour l'ouvrir. Vous pouvez ensuite le dire et le faire défiler en pleine résolution et profondeur de bits.
Lors du décodage des images, l'accelération CPU de la bibliothèque du SDK prend en charge la plupart des architectures, ainsi que l'accelération GPU via Apple Metal, Nvidia CUDA et OpenCL. Elle fonctionne également avec le Blackmagic eGPU, si vous souhaitez une solution encore plus performante. Le lecteur Blackmagic RAW est disponible pour Mac, Windows et Linux.
Fichiers sidecar
Les fichiers sidecar du Blackmagic RAW priment sur les métadonnées intégrées au fichier sans toutefois les écraser. Ces métadonnées comprend les paramètres Blackmagic RAW ainsi que des informations sur l'iris, la mise au point, la distance focale, la balance des blancs, la teinte, l'espace colorimétrique, le nom du projet, le numéro de la prise et autres. Les métadonnées sont encodées image par image sur toute la durée du clip, ce qui est important pour les données de l'objet, si celui-ci a été ajusté durant la prise. Vous pouvez ajouter ou modifier les métadonnées des fichiers sidecar avec DaVinci Resolve ou avec un editor de texte, car il s'agit d'un format lisible par l'homme.
Les fichiers sidecar peuvent être utilisés pour ajouter automatiquement de nouveaux paramètres Blackmagic RAW à la lecture. Pour ce faire, il suffit de déplacer le fichier sidecar dans le dossier du filchier Blackmagic RAW correspondant. Si vous retirez le fichier sidecar du dossier et que vous ouvrez à nouveau le filchier Blackmagic RAW, les paramètres modifiés ne seront pas appliqués et vous verrez le filchier tel qu'il a été initialement filmé. Tout logiciel qui utilise le SDK Blackmagic RAW peut acceder à ces paramètres. Les changements apportés seront sauvégardés dans le filchier sidecar et pourront être lus par le Blackmagic RAW Player ou par tout autre logiciel capable de dire les fichiers Blackmagic RAW.
Lorsque vous tournez en mode video, le fjichier reste en mode film, et les métadonnées ordonnent au traitement Blackmagic RAW d'afficher les images en mode video. Le mode video est parfait lorsque vous ne pouze pas étalonner les images et que vous doivent livrer rapidement le contenu. Toutefois, si vous souhaitez augmenter les basses lumières ou réduire les hautes lumières de l'image, tous les détails sont conservés. La video ne sera jamais écrêtée et les détails seront réservés si vous souhaitez y acceder ultérieurement.
Blackmagic RAW dans DaVinci Resolve
Les paramètres de tous les fichiers Blackmagic RAW peuvent être ajustés, puis sauvégardés en tant que nouveau fichier sidecar à partir de l'onglet Caméra RAW de DaVinci Resolve afin de créé des effets créatis ou d'optimiser la visualisation. Vous pouvez ainsi copier vos medias pour un autre utiliseur DaVinci Resolve afin qu'il ait automatiquement accès aux paramètres gamma modifiés lors de l'importation. En plus des autres métadonnées contenues dans les fichiers de laamera, DaVinci Resolve peut dire la plage dynamique sélectionnée, afin que les clips soient automatiquement affichés en mode Film, Extended Video ou Video dans DaVinci Resolve.
Voussouvez ensuite personnelier ces parametes en ajustant la saturation, le contraste et les moyennes lumieres, ainsi que le roll-off des haute et des basses lumieres. Les ajustements peuvent ensuite etre sauegardes en tant que fichier sidecar. Les changements peuvent donc etre visualisés par tous les utilisateurs qui travaillent sur ces fichiers en post. Vous pouze a tout moment revenir aux metadonnées originales de laamera.
Il est également possible d'exporter une seule image Blackmagic RAW à partir de l'onglet Caméra RAW de DaVinci Resolve, qui contient toutes les informations concernant les ajustements, les métadonnées, la pleine résolution et les couleurs. Il est donc facile de partager les références d'une image ou d'un fjichier avec d'autres utilisateurs.
Pour plus d'informations sur la façon d'utiliser le Blackmagic RAW dans DaVinci Resolve, consultez le chapitre « Utiliser DaVinci Resolve » de ce manuel.
Kit de développement logiciel Blackmagic RAW
Le kit de développement logiciel Blackmagic RAW est une API développée par Blackmagic Design. Vous pouze utiliser le SDK Blackmagic RAW afin d'écrites vos propres applications pour le format Blackmagic RAW. La bibliothèque du SDK offre aux développpeurs une prise en charge de la lecture, de la modification et de l'enregistrement des fischiers Blackmagic RAW. comme le SDK Blackmagic RAW intégre la colorimétrie de 4e génération, vous pouze obtaining des images cinematographiques naturelles avec toutes les applications qui la supportent. Le SDK Blackmagic RAW est compatible avec Mac, Windows et Linux. Il est disponible gratuite sur la page Développèurs du site web de Blackmagic: www.blackmagicdesign.com/fr/developer
Le schéma suivant illustré les composants de l'API Blackmagic RAW :
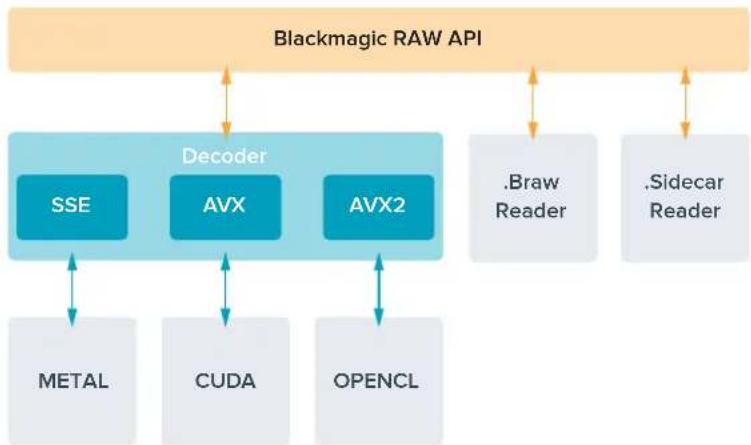
Fréquences d'images maximales du capteur
Fréquences d'images maximes du capteur de la Blackmagic Pocket Cinema Camera 6K
| Résolution Codec | Mode du capteur | Fréquence d'images max. | ||
| 6K | 6144 x 3456 | Blackmagic RAW | Full | 50 |
| 6K 2.4:1 | 6144 x 2560 | Blackmagic RAW | Window | 60 |
| 5.7K 17:9 | 5744 x 3024 | Blackmagic RAW | Window | 60 |
| 4K DCI | 4096 x 2160 ProRes | 422 HQ Redimensionné | depuis 5.7K 60 | |
| 4096 x 2160 | ProRes 422 | Redimensionné depuis 5.7K | 60 | |
| 4096 x 2160 | ProRes 422 LT | Redimensionné depuis 5.7K | 60 | |
| 4096 x 2160 | ProRes 422 Proxy | Redimensionné depuis 5.7K | 60 | |
| Ultra HD | 3840 x 2160 ProRes | 422 HQ Redimensionné | depuis Full 50 | |
| 3840 x 2160 | ProRes 422 | Redimensionné depuis Full | 50 | |
| 3840 x 2160 | ProRes 422 LT | Redimensionné depuis Full | 50 | |
| 3840 x 2160 | ProRes 422 Proxy | Redimensionné depuis Full | 50 | |
| 3840 x 2160 ProRes | 422 HQ Redimensionné | depuis 5.7K 60 | ||
| 3840 x 2160 | ProRes 422 | Redimensionné depuis 5.7K | 60 | |
| 3840 x 2160 | ProRes 422 LT | Redimensionné depuis 5.7K | 60 | |
| 3840 x 2160 | ProRes 422 Proxy | Redimensionné depuis 5.7K | 60 | |
| 3.7K anamorphique | 3728 x 3104 | Blackmagic RAW | Window | 60 |
| 2.8K 17:9 | 2868 x 1512 | Blackmagic RAW | Window | 120 |
| Résolution Codec | Mode du capteur | Fréquence d'images max. | ||
| HD | 1920 x 1080 ProRes | 422 HQ Redimensionné depuis Full 50 | ||
| 1920 x 1080 ProRes | 422 Redimensionné depuis Full 50 | |||
| 1920 x 1080 ProRes | 422 LT Redimensionné depuis Full 50 | |||
| 1920 x 1080 ProRes | 422 Proxy Redimensionné depuis Full 50 | |||
| 1920 x 1080 ProRes | 422 HQ Redimensionné depuis 5.7K 60 | |||
| 1920 x 1080 | ProRes 422 | Redimensionné depuis 5.7K | 60 | |
| 1920 x 1080 ProRes | 422 LT Redimensionné depuis 5.7K 60 | |||
| 1920 x 1080 | ProRes 422 Proxy | Redimensionné depuis 5.7K | 60 | |
| 1920 x 1080 ProRes | 422 HQ Redimensionné depuis 2.7K 120 | |||
| 1920 x 1080 | ProRes 422 | Redimensionné depuis 2.7K | 120 | |
| 1920 x 1080 ProRes | 422 LT Redimensionné depuis 2.7K 120 | |||
| 1920 x 1080 | ProRes 422 Proxy | Redimensionné depuis 2.7K | 120 | |
Fréquences d'images maximes du capteur de la Blackmagic Pocket Cinema Camera 4K
| Résolution Codec | Mode du capteur | Fréquence d'images max. | ||
| 4K DCI | 4096 x 2160 Blackmagic RAW Full 60 | |||
| 4096 x 2160 ProRes | 422 HQ Full 60 | |||
| 4096 x 2160 ProRes | 422 Full 60 | |||
| 4096 x 2160 ProRes | 422 LT Full 60 | |||
| 4096 x 2160 | ProRes 422 Proxy | Full | 60 | |
| 4K 2.4:1 | 4096 x 1720 | Blackmagic RAW | Window | 75 |
| Ultra HD | 3840 x 2160 | Blackmagic RAW | Window | 60 |
| 3840 x 2160 ProRes | 422 HQ Window | 60 | ||
| 3840 x 2160 ProRes | 422 Window | 60 | ||
| 3840 x 2160 | ProRes 422 LT | Window | 60 | |
| 3840 x 2160 | ProRes 422 Proxy | Window | 60 | |
| 2.8K anamorphique | 2880 x 2160 | Blackmagic RAW | Window | 80 |
| 2.6K 16:9 | 2688 x 1512 | Blackmagic RAW | Window | 120 |
| HD | 1920 x 1080 ProRes | 422 HQ Redimensionné depuis Full 60 | ||
| 1920 x 1080 ProRes | 422 Redimensionné depuis Full 60 | |||
| 1920 x 1080 ProRes | 422 LT Redimensionné depuis Full 60 | |||
| 1920 x 1080 | ProRes 422 Proxy | Redimensionné depuis Full | 60 | |
| 1920 x 1080 | ProRes 422 HQ | Redimensionné depuis 2.6K | 120 | |
| 1920 x 1080 | ProRes 422 | Redimensionné depuis 2.6K | 120 | |
| 1920 x 1080 | ProRes 422 LT | Redimensionné depuis 2.6K | 120 | |
| 1920 x 1080 | ProRes 422 Proxy | Redimensionné depuis 2.6K | 120 | |
| 1920 x 1080 | Blackmagic RAW | Window | 120 | |
| 1920 x 1080 | ProRes 422 HQ | Window | 120 | |
| 1920 x 1080 ProRes | 422 Window | 120 | ||
| 1920 x 1080 | ProRes 422 LT | Window | 120 | |
| 1920 x 1080 | ProRes 422 Proxy | Window | 120 | |
REMARQUE La zone de capteur du format 2.6K 16:9 est optimise avec les objectifs
Super 16mm et les fréquences d'images élevées.
Durée d'enregistrement
Les tableaux ci-dessous indiquent les durées approximatives d'enregistrement en minute et seconde en fonction du format, de la fréquence d'images et de la taille du support de stockage. Veuillez notes que les résolutions et codecs disponibles diffèrent entre la Pocket Cinema Camera 6K et la Pocket Cinema Camera 4K.
La durée maximale d'enregistrement d'un support dépend de la capacité de stockage de la carte CFast, de la carte SD ou du disque flash USB-C, mais également du format et de la fréquence d'images sélectionnés. Par exemple, le débit d'un format Apple ProRes 422 HQ à 3840 x 2160 est approximativement de 880 Mbps. Pour un enregistrement à 24 images par seconde, il est possible d'enregistrer une video de 47 minutes sur une carte CFast 2.0 d'une taille de 256GB. Avec le même nombre d'images par seconde, il est possible d'enregistrer une video de 23 minutes sur une carte CFast de 128GB (environ la moitié de la durée d'enregistrement qu'offre une carte de 256GB).
Il est important de noter que les durées des supports de stockage peuvent varier légarement en fonction des marques. Les durées varient également en fonction du formatage du support (exFat ou Mac OS X Extended).
Les scènes ne comptant pas trop de détails nécessitant moins de données que les scènes complexes. Les valeurs indiquées dans ces tableaux supposent que vous filmez des scènes complexes. Le temps d'enregistrement pourra donc être plus ou moins long en fonction de la complexité des scènes.
6K
| Carte CFast | Fréquence d'images | Blackmagic RAW 3:1 | Blackmagic RAW 5:1 | Blackmagic RAW 8:1 | Blackmagic RAW 12:1 |
| 256GB | Durée Durée | Durée Durée | |||
| 23.98 17 min | 28 min 45 min | 67 min | |||
| 24 17 min 28 | min 45 min | 67 min | |||
| 25 16 min 27 | min 43 min | 64 min | |||
| 30 13 min 22 | min 36 min | 54 min | |||
| 50 8 min 13 | min 21 min | 32 min |
6K 2.4:1
| Carte CFast | Fréquence d'images | Blackmagic RAW 3:1 | Blackmagic RAW 5:1 | Blackmagic RAW 8:1 | Blackmagic RAW 12:1 |
| 256GB | Durée Durée | Durée Durée | |||
| 23.98 min | 38 min 60 | min 91 min | |||
| 24.22 min | 38 min 60 min | 91 min | |||
| 25.21 min | 36 min 58 min | 87 min | |||
| 30.18 min | 30 min 48 min | 72 min | |||
| 50.11 min | 18 min 29 min | 43 min | |||
| 60.9 min | 15 min 24 min | 36 min |
5.7K 17:9
| Carte CFast | Fréquence d'images | Blackmagic RAW 3:1 | Blackmagic RAW 5:1 | Blackmagic RAW 8:1 | Blackmagic RAW 12:1 |
| 256GB | Durée Durée | Durée Durée | |||
| 23.98 min | 34 min 55 min | 82 min | |||
| 24 20 min 34 min | min 55 min | 82 min | |||
| 25 19 min 33 min | min 52 min | 79 min | |||
| 30 16 min 27 min | min 44 min | 66 min | |||
| 50 10 min 16 min | min 26 min | 39 min | |||
| 60 8 min 13 min | min 22 min | 33 min |
4K DCI
| Carte CFast | Fréquence d'images | Blackmagic RAW 3:1 | Blackmagic RAW 5:1 | Blackmagic RAW 8:1 | Blackmagic RAW 12:1 | ProRes 422 HQ | ProRes 422 | ProRes 422 LT | ProRes 422 Proxy |
| 256GB | Durée Durée | Durée Durée | Durée Durée | Durée Durée | |||||
| 23.98 | 39 min | 65 min | 104 min | 155 min | 44 min | 66 min | 95 min | 216 min | |
| 24 | 39 min | 65 min | 103 min | 155 min | 44 min | 66 min | 95 min | 216 min | |
| 25 | 37 min | 62 min | 99 min | 149 min | 42 min | 64 min | 91 min | 207 min | |
| 30 | 31 min | 52 min | 83 min | 124 min | 35 min | 53 min | 76 min | 173 min | |
| 50 | 18 min | 31 min | 49 min | 74 min | 21 min | 32 min | 45 min | 104 min | |
| 60 | 15 min | 26 min | 41 min | 62 min | 17 min | 26 min | 38 min | 87 min |
4K 2.4:1
| Carte CFast | Fréquence d'Images | Blackmagic RAW 3:1 | Blackmagic RAW 5:1 | Blackmagic RAW 8:1 | Blackmagic RAW 12:1 |
| 256GB | Durée Durée | Durée Durée | |||
| 23.98 min | 84 min 134 | min 200 | min | ||
| 24 50 min | 84 min 134 min | 200 min | |||
| 25 48 min | 80 min 128 min | 192 min | |||
| 30 | 40 min | 67 min | 107 min | 160 min | |
| 50 24 min | 40 min 64 min | 96 min | |||
| 60 20 min | 33 min 54 min | 80 min | |||
| 75 16 min | 27 min 43 min | 64 min | |||
| 80 16 min | 26 min 40 min | 60 min |
ULTRA HD
| Carte CFast | Fréquence d'images | Blackmagic RAW 3:1 | Blackmagic RAW 5:1 | Blackmagic RAW 8:1 | Blackmagic RAW 12:1 | ProRes 422 HQ | ProRes 422 | ProRes 422 LT | ProRes 422 Proxy |
| 256GB | Durée Durée | Durée Durée | Durée Durée | Durée Durée | |||||
| 23.98 | 41 min | 68 min | 110 min | 164 min | 47 min | 71 min | 101 min | 230 min | |
| 24 | 41 min | 68 min | 109 min | 164 min | 47 min | 71 min | 101 min | 230 min | |
| 25 | 39 min | 66 min | 105 min | 157 min | 45 min | 68 min | 97 min | 221 min | |
| 30 | 33 min | 55 min | 88 min | 131 min | 38 min | 57 min | 81 min | 184 min | |
| 50 | 19 min | 33 min | 52 min | 79 min | 22 min | 34 min | 48 min | 111 min | |
| 60 | 16 min | 27 min | 44 min | 66 min | 18 min | 28 min | 40 min | 92 min |
3.7K anamorphique
| Carte CFast | Fréquence d'images | Blackmagic RAW 3:1 | Blackmagic RAW 5:1 | Blackmagic RAW 8:1 | Blackmagic RAW 12:1 |
| 256GB | Durée Durée | Durée Durée | |||
| 23.98 | 31 min | 51 min | 82 min | 123 min | |
| 24 | 31 min | 51 min | 82 min | 123 min | |
| 25 29 min | 49 min 79 min | 118 min | |||
| 30 | 24 min | 41 min | 65 min | 98 min | |
| 50 | 15 min | 24 min | 39 min | 59 min | |
| 60 | 12 min | 20 min | 33 min | 49 min | |
2.8K anamorphique
| Carte CFast | Fréquence d'Images | Blackmagic RAW 3:1 | Blackmagic RAW 5:1 | Blackmagic RAW 8:1 | Blackmagic RAW 12:1 |
| 256GB | Durée Durée | Durée Durée | |||
| 23.98 | 57 min | 95 min | 151 min | 226 min | |
| 24 | 57 min | 95 min | 151 min | 226 min | |
| 25 54 min 91 min | 145 min 217 min | ||||
| 30 | 45 min | 76 min | 121 min | 181 min | |
| 50 | 27 min | 45 min | 73 min | 109 min | |
| 60 | 22 min | 38 min | 61 min | 91 min | |
| 80 | 17 min | 28 min 45 min | 68 min | ||
2.8K 17:9
| Carte CFast | Fréquence d'images | Blackmagic RAW 3:1 | Blackmagic RAW 5:1 | Blackmagic RAW 8:1 | Blackmagic RAW 12:1 |
| 256GB | Durée Durée | Durée Durée | |||
| 23.98 81 min | 136 min 216 | min 321 min | |||
| 24 81 min 135 min | 215 min | 320 min | |||
| 25 78 min | 130 min 207 min | 308 min | |||
| 30 65 min | 108 min 173 min | 258 min | |||
| 50 | 39 min | 65 min | 104 min | 156 min | |
| 60 32 min | 54 min 87 min | 130 min | |||
| 120 16 min | 27 min 43 min | 65 min |
2.6K 16:9
| Carte CFast | Fréquence d'images | Blackmagic RAW 3:1 | Blackmagic RAW 5:1 | Blackmagic RAW 8:1 | Blackmagic RAW 12:1 |
| 256GB | Durée Durée | Durée Durée | |||
| 23.98 | 87 min | 144 min | 230 min | 342 min | |
| 24 87 min 144 min 229 min 342 min | |||||
| 25 83 min 138 min 220 min 328 min | |||||
| 30 69 min 115 min 184 min 275 min | |||||
| 50 | 41 min | 69 min | 111 min | 166 min | |
| 60 34 min 58 min 92 min 138 min | |||||
| 120 17 min | 29 min | 46 min 69 min | |||
HD
| Carte CFast | Fréquence d'Images | Blackmagic RAW 3:1 | Blackmagic RAW 5:1 | Blackmagic RAW 8:1 | Blackmagic RAW 12:1 | ProRes 422 HQ | ProRes 422 | ProRes 422 LT | ProRes 422 Proxy |
| 256GB | Durée | Durée | Durée | Durée | Durée | Durée | Durée | Durée | |
| 23.98 | 159 min | 264 min | 418 min | 619 min | 189 min | 283 min | 403 min | 877 min | |
| 24 | 159 min | 264 min | 418 min | 618 min | 189 min | 283 min | 403 min | 877 min | |
| 25 | 153 min | 253 min | 402 min | 595 min | 182 min | 271 min | 387 min | 843 min | |
| 30 | 127 min | 212 min | 336 min | 499 min | 152 min | 227 min | 324 min | 710 min | |
| 50 | 76 min | 127 min | 203 min | 303 min | 91 min | 137 min | 196 min | 434 min | |
| 60 | 64 min | 106 min | 170 min | 254 min | 76 min | 114 min | 163 min | 363 min | |
| 120 | 32 min | 54 min | 87 min | 130 min | 38 min | 57 min | 82 min | 185 min |
REMARQUE Veuillez notes que le Blackmagic RAW est disponible pour les formats d'enregistrement qui utilisent un capteur en mode Full ou Window. Pour tous les formats redimensionnés, Sélectionnez un codec ProRes.
Les formats 6K, 6K 2.4:1, 5.7K 17:9, 3.7K anamorphique et 2.8K 17:9 sont uniquement disponibles sur la Pocket Cinema Camera 6K et ils utilisent le codec Blackmagic RAW. La Pocket Cinema Camera 6K utilise le ProRes pour le 4K DCI, l'Ultra HD et la HD.
Les formats 4K 2.4:1, 2.8K anamorphique et 2.6K 16:9 sont uniquement disponibles sur la Pocket Cinema Camera 4K et ils utilisent le codec Blackmagic RAW. La Pocket Cinema Camera 4K utilise le codec Blackmagic RAW ou ProRes pour le 4K DCI, l'Ultra HD et la HD.
Les paramètres de qualité constante Q0 et Q5 afficheront des durées d'enregistrement restantes variables. La durée estimée pour le Q0 estsemblable à celle du débit constant 3:1. Le Q5 affichera quant à lui une durée semblable à celle du 12:1. Toutefois, comme la durée estimée se met à jour toutes les 10 secondes pendant l'enregistrement, la meilleure façon de mesurer la durée d'enregistrement à disposition est d'enregistrer pendant 20 secondes, puis de vérifier la durée dans la zone Médias de l'écran tactile.
Choisir la fréquence d'images
Votre camera peut filmer à différentes fréquences d'images et il est important de savoir laquelle est la plus adaptée à votre projet.
Lorsque l'on可以选择 une fréquence d'images, il y a plusieurs éléments à prendre en compte. En effet, depuis plusieurs années, il existe des normes établies pour le cinema et la télévision. Ces normes peuvent varier selon les pays mais elles partagent le même objectif; afficher un nombre d'images par seconde optimal qui permette aux spectateurs d'apprecier le mouvement des images.
Par exemple, pour le cinema on utilise 24 images par seconde. Bien que, récemment, certains contenus aient été filmés à des fréquences d'images plus rapides, 24 images par seconde resté la norme pour le public international.
En général, les fréquences d'images pour la télévision dépendent des normes de diffusion de chaque pays. Par exemple, pour produit du contenu télévisuel en Amérique du Nord vous filmerez à 29,97 images par seconde, contre seulement 25 en Europe.
Cependant, grâce aux avances technologiques, nous avons aujourd'hui plus de besoin et les normes de diffusion sont en train de changer. Il est désormais commun d'enregistrer et de diffuser des événements sportifs à des féquences d'images plus élevées. Certains événements sportifs sont enregistrés et diffusés jusqu'à 59,94 images par seconde en Amérique du Nord et jusqu'à 50 en Europe. Ces féquences élevées apportent plus de fluidité et de réalisme aux images lors d'actions rapides.
Les diffuseurs de streaming et de contenus en ligne utilisent en général la même fréquence d'images que la télévision. Cependant, ils ont plus de liberté pour experimenter d'autres formats, car les spectateurs peuvent désigner celui de leur choix. Ces diffuseurs sont seulement limités par la capacité d'affichage des écrons.
Lorsque vous choisissez une fréquence d'images pour votre projet, il est généralement consellé de vous référer au format d'exportation. Réglez la fréquence d'images de votreamera et adaptez la fréquence du capteur en fonction. Ainsi, vos clips seront lus à vitesse réelle.
Si vous souhaitez creer des effets, par exemple un ralenti, vous pouze augmenter la fréquence d'images du capteur. Plus la différence entre la fréquence d'images du capteur et celle du projet est grande, plus les images seront ralenties lors de la lecture.
Pour plus d'informations sur le réglage des fréquences d'images du capteur pour creer des effets, veuillez consulter la section « Commandes de l'écran tactile »
Déclenchement de l'enregistrement
La Blackmagic Pocket Cinema Camera envoie automatique un signal via la sortie HDMI. Ce signal déclenché alors l'enregistrement lorsque laamera est connectée à du matériel qui prend en charge cette fonctionnalité, tel que le Blackmagic Video Assist.
Ainsi, lorsque vous appuyez sur le bouton d'enregistrement de laamera, l'enregistreur externe enclenché également l'enregistrement. Lorsque vous appuyez sur le bouton d'arrêt de l'enregistrement, il s'interrrompt. Laamera envoie également le时间和 code via HDMI. Les images enregistrées sur des enregistrurs externes affichent donc le même时间和 code que les images enregistrées sur laamera.
Si vous enregistreur exter ne prend en charge I'enclenchement de I'enregistrement, vous devrez I'activer. En general, vous pouvez I'activer depuis le menu de parametrage de I'enregistreur.
Lecture
Lire des clips
Une fois vous video enregistrée, vous pouvez utiliser les commandes de transport de laamera pour la visualiser sur l'écran LCD. Appuyez sur le bouton de lecture pour passer en mode lecture. Appuyez de nouveau sur ce bouton pour dire le dernier clip enregistré sur l'écran LCD et sur tout écran connecté à la sortie HDMI. Maintenez les touches avant ou arrière sur l'écran pour avancer ou reculer dans l'enregistrement. La lecture se terminera lorsque la fin du clip est atteinte.
Vousspuvezyouservirdes touchesavantouarriere pourpasserdirectementaudebutoua fin desclips.Appuyezunefois surl'icone deretourrapide pourretournerau debutdu clipencours ou appuyezdeuxfois pour revenir au debut du clip precedent.Enappuyant surlebouton d'enregistrement,vousquitterezle mode lecture etyousserezredirigésur l'affichagecamera.
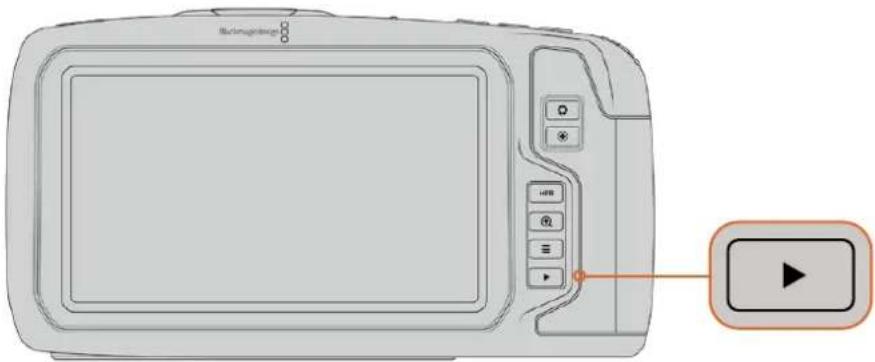
Pour visualiser le dernier clip enregistré sur l'écran tactile, appuyez sur le bouton de lecture des commandes de transport.
Caracteristiques de laamera
Face avant de laamera
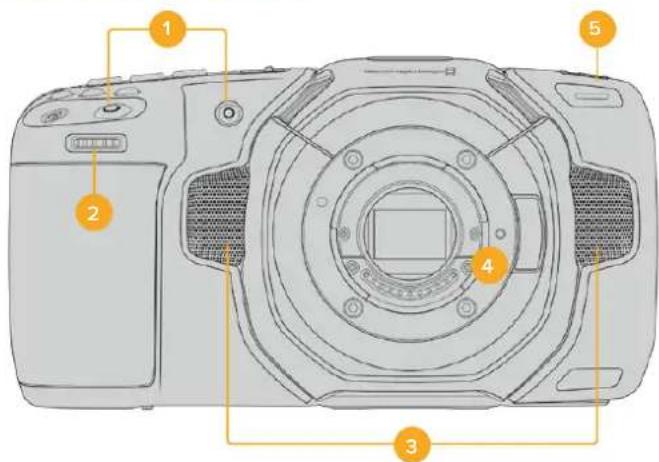
1 Boutons d'enregistrement
Pour démarrer ou arreter l'enregistrement, appuyez sur un des boutons d'enregistrement. Un second bouton d'enregistrement est disponible à l'avant de laamera pour vous auto-enregistrer.
2 Molette de paramétrage
La molette de paramétrage vous permet d'ajuster l'ouverture des objectifs compatibles montés sur votreamera. Lorsque vous étés face à l'écran tactile, tournez la roue vers la gauche pour ouvrir l'iris, ou vers la droite pour le fermer. Vous pouvez également utiliser cette molette pour régler la balance des blancs, l'angle d'obturation et l'ISO. Sélectionnez un paramètre en appuyant sur un des boutons sur le haut de laamera, puis réglez-le à l'aide de la molette. Une fois les réglages effectués, appuyez sur la molette pour faire disparaître le menu de sélection.
3 Micros stereo
Laamera est dotée de quatre micros stéreo haut de gamme intégrés. Pour plus d'informations concernant le paramétrage audio du micro, consultez la section « Onglet Audio » de ce manuel.
4 Monture d'objectif
La Blackmagic Pocket Cinema Camera 6K est dotée d'une monture d'objet EF active, et le modele 4K possède une monture d'objet Micro 4/3 active. Vous pouze monter des objectifs dotés de la stabilisation intégrée sur les deux cameras et utiliser la mise au point et l'exposition automatiques avec des objectifs compatibles. Pour utiliser la stabilisation d'image IS proposée par de nombreux objectifs actifs, réglez le stabilisateur sur On pour activer la stabilisation sur votreamera. Si vous objectif dispose d'un interrupteur permettant la sélection du mode de stabilisation, réglez-le sur le mode approprié. Si vous objectif n'est pas doté d'un interrupteur physique, vous pouze activer ou désactiver le stabilisateur depuis le menu de paramétrage de laamera.
5 Tally / Indicateur d'enregistrement
La Blackmagic Pocket Cinema Camera possède un petit voyant LED à l'avant qui indique l'état de laamera. Vous pouvez activer ou désactiver levoyant du tally et ajuster sa luminosité dans le menu de paramétrage. Pour plus d'informations, consultez la section « Onglet Régliages » de ce manuel.
Face droite
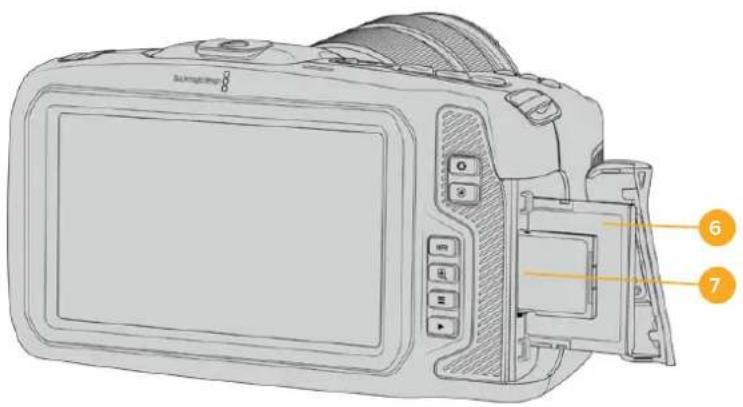
6 Logement pour carte CFast
Insérez des cartes CFast 2.0 dans la fente pour l'enregistrement et la lecture. Pour plus d'informations, consultez la section « Cartes CFast »
7 Logement pour carte SD
Insérez des cartes SD dans la fente pour l'enregistrement et la lecture. Pour plus d'informations, consultez la section « Cartes SD »
Face gauche
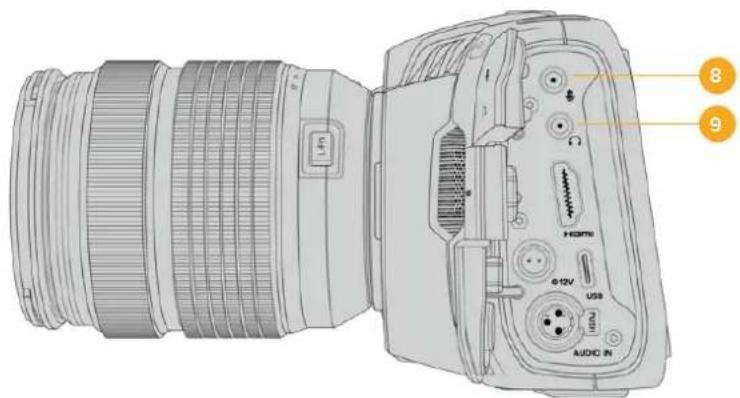
8 Entrée pour micro de 3,5mm
Branchez un micro au connecteur stéreo 3,5mm de laamera. Les niveaux audio micro et ligne sont pris en charge. Le niveau micro est plus faible que le niveau ligne, ainsi, si vous connectez un micro à laamera et que le niveau ligne est sélectionné, le son sera certainement trop faible. L'entrée pour micro accepte également le时间和 code LTC conforme à la norme SMPTE provenant d'une source externe sur le canal de gauche. Un时间和 code valide sera détecté automatiquement, et intégré à votre filchier video en tant que métadonnées. Nous vous recommendons d'envoyer un时间和 code LTC via une entree de niveau ligne, en particulier si vous n'enregistrez pas le时间和 code en tant que piste audio.
9 Entrée pour casque
Contrôlez votre audio durant l'enregistrement ou la lecture de vos séquences en branchant vos écouteurs à la prise de casque stéreo de 3,5 mm. Lorsqu'un casque est branché, la sortie du haut-parleur est coupée.

10 HDMI
Le connecteur HDMI prend en charge la video HD 1080p 4:2:2 10 bits et le HDR avec 2 canaux d'audio intégré. Utilisez l'écran tactile pour régler un clean feed ou pour intégrer des informations sur la sortie. Vous pouvez utiliser la sortie HDMI pour brancher un enregistrure, un monitateur externe ou un ATEM Mini. Si vous reliez laamera à un ATEM Mini via la sortie HDMI, vous obtiennent les mêmes fonctionnalités que sur uneamera de studio, notamment le contrôle à distance de l'enregistrement et le réglage des paramétres de la Pocket Cinema Camera.
11 Entrée d'alimentation
Vouss pouvez utiliser le connecteur DC pour alimenter laamera et effectuer une charge lente de la batterie simultanement. Pour connecter l'adaptateur, tournez-le jusqu'à ce que sa barrette s'aligne avec l'encoche supérieure du port, puis poussez jusqu'à ce qu'il s'emboite correctement. Pour le déconnecter, tirez la gaine et retirez-le du port.
Solutions d'alimentation personnalises
Cerains utilisateurs ont creedes solutions d'alimentation personalisées pour charger leur Blackmagic Pocket Cinema Camera. Si vous souhaitez développement yourpropresolutiond'alimentationavecunebatteriefactice,veiliez a ne pas fournir une tension tropelevéea vourcimagera,carcela pourraitcauserdesdommages irreversibles.Les tensions requises pour la Pocket Cinema Camera sont les suivantes:
-La connexion d'entree de la batterie doit etre comprise entre 6,2 et 10V max.
- L'entrée DC doit être comprise entre 10,8V et 20V max.
-La camera nécessite 16W lorsqu'elle est en mode veille et qu'elle ne charge pas la batterie.
-La camera necessite 30W lorsqu'elle charge la batterie de type LP-E6.
- Lorsque vous alimentez vous camera avec une source d'alimentation externe, nous vous recommendons de retarder la batterie de type LP-E6.
- Lorsque vous enregistrez sur un support externe avec un objectif actif à des fréquences d'images élevées, que la luminosité de l'écran et du tally est au maximum, et que la batterie n'est pas en charge, 25W sont nécessaires pour la Pocket Cinema Camera 6K et 22W sont nécessaires pour la Pocket Cinema Camera 4K.
12 USB
Le port USB-C vous permet d'enregistrer directement sur un disque flash USB-C. Lorsque votreamera est eteinte, vous pouze recharger la batterie via le port USB-C depuis une source d'alimentation externe, comme un bloc de batteries externe. Pourmettre a jour le calculiel interne de la camera, connectez la camera a un ordinateur via un port USB-C et lancez l'application de mise a jour.
13 Entrée mini XLR pour microphone
Branchez de l'audio analogique symétrique externe via le connecteur mini XLR. Vous pouvez connecter un microphone XLR standard à la camera à l'aide d'un adaptateur XLR to mini XLR.
L'entrée mini XLR fournit une alimentation fantôme pour connecter des micros
professionnels qui ne sont pas alimentés en interne. Pour plus d'informations sur l'activation de l'alimentation fantôme, veuillez consulter la section « Onglet Audio » de ce manuel.
Face supérieure

14 Pas de vis 1/4-20
Vou puez utilise le pas de vis 1/4-20 situé sur la face supérieure de laamera pour monter un micro externe ou d'autres petits accessoires.
CONSEIL Utilisez seulement la monture 1/4" située sur le haut de la Poc
Cinema Camera pour des accessoires légers, tels que des micros de petite taille. Ne soulevez pas laamera par les accessoires installés via la monture 1/4" , comme une poignée deamera, lorsque laamera est équipée d'un objectif lourd. Cela endommagera la monture 1/4 et ne sera pas couvert par la garantie. Ne soumettez pas la monture à une force de levier trop excessive, en montant un accessoire lourd sur un bras d'extension par exemple. Pour monter des accessoires lourds, nous vous recommendons vivement d'utiliser une cage de camera compatible avec la Pocket Cinema Camera qui se fixe à la fois à la monture 1/4 supérieure et à la monture inférieure de laamera.
15 Enregistrement
Appuyez sur le bouton d'enregistrement pour démarrer l'enregistrement immédiatement. Appuyez à nouveau sur ce bouton pour arrêtier l'enregistrement.
16 Image fixe
Pour capturer une image au format DNG non compressé, appuyez sur le bouton d'image fixe. Une icône d'appareil photo apparait brièvement en haut à droite de l'écran pour confirmer que vous avez capturé une image fixe. Cette image est sauvégardée dans le dossier Stills dans le réseau racine du support sur lequel vous enregistrez. L'image est enregistrée selon la convention de dénomination des fischiers relative aux clips video, mais les quatre derniers caractères du nom de filchier porteront le numéro de l'image, par exemple S001.
17 ISO
Appuyez sur le bouton ISO, puis tournez la molette de paramétrage pour ajuster l'ISO. Il peut être incrémented par 1/3 de diaphragme entre 100 et 25 600.
18Obturateur
Pour modifier l'angle ou la vitesse d'obturation, appuyez sur le bouton d'obturation S, puis tournez la molette de paramétrage. L'écran tactile proposera également jusqu'à trois options d'obturation sans scintillagement.
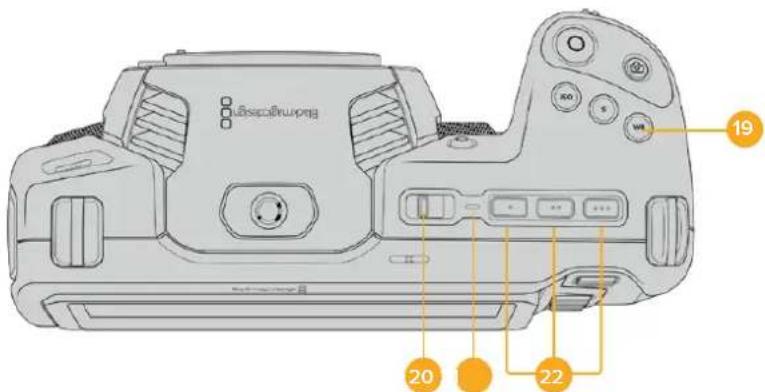
19 Balance des blancs
Appuyez sur le bouton de la balance des blancs WB, puis tournez la molette de paramétrage pour ajuster la balance des blancs. En restant appuyé pendant 3 secondes sur le bouton WB, vous pouvez acceder rapidement à l'écran de la balance des blancs automatique. Un carre blanc s'affichera au centre de l'image, et laamera utilisera cette zone pour effectuer la balance des blancs automatique. Pour plus d'informations, consultez la section « Commandes de l'écran tactile »
20 Interrupteur général
Interrupteur permettant de mettre en marche laamera. Déplacez l'interrupteur vers la croite pour allumer votreamera, et vers la gauche pour l'éteindre.
21 Voyant d'etat LED
Lorsque laamera est eteinte et branchee a une source d'alimentation exterve via le connecteur DC 12V ou via le port USB-C, le voyant s'allume en rouge pour indiquer que la batterie est en charge.
Lorsque la batterie est pleine, le voyant d'etat LED s'eteint.
22 Boutons de fonction
Voussouspuez assigner des fonctions couramment utilisées aces boutons via le menu Reglages de la camera.Par defaut,le bouton numero 1 est regle sur Fausses couleurs,le 2 sur Afficher LUT et le 3 sur Reperes de cadrage.
Face inférieure
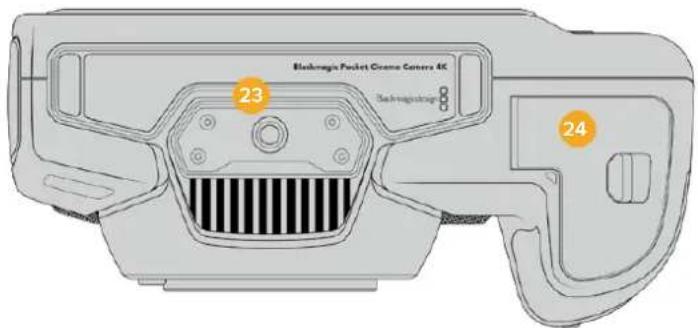
23 Pas de vl s 1/4-20
Montez laamera sur un trépied à l'aide du pas de vis 1/4-20 inférieur.
24 Compartiment de la batterle
Poussez le loquet du compartment à batterie en direction de la monture d'objet pour ouvrir le compartment. Pour le referrer, fermez le compartment jusqu'à ce que le loquet se clipse.
Face arrière

25 Écran tactile
Contrôlez vos clips lors de l'enregistrement et de la lecture à l'aide de l'écran tactile. Touchez et balayez l'écran pour effectuer les réglages et contrôler laamera.
26 Bouton Iris
Appuyez sur le bouton Iris pour regler automatiquement l'exposition moyenne en fonction des haute lumières et des zones d'ombres de la prise. Vous pouvez ajuster l'ouverture de l'objet manuellement en tournant les molettes de paramétrage, ou en touchant Iris sur l'écran tactile et en ajustant le curseur.
27 Bouton de mise au point
Lorsque vous utilisez un objectif à mise au point automatique compatible avec votreamera, il suffit d'appuyer une fois sur le bouton de mise au point pour effectuer une mise au point automatique. Par défaut, l'objet effectue une mise au point automatique sur le centre de l'image. Toutefois, vous pouvez selectionner une autre zone de l'image en la touchant sur l'écran LCD. Appuyez deux fois sur le bouton de mise au point pour la réinitialiser sur le centre de l'image.
REMARQUE Veuillez notes que la plupart des objectifs prconnent en charge la mise au point automatique, cependant, certains peuvent etre regles en mode manuel ou automatique. Il vous faudra donc vérifier que votre objectif est bien regle en mode automatique.
28 Bouton HFR
Appuyez sur le bouton HFR pour basculer entre les fréquences d/images. Pour ce faire, il suffit de régler la fréquence d/images off speed que vous souhaitez utiliser dans le menu des fréquences d'image. Ensuite, appuyez sur le bouton HFR pour basculer entre la fréquence d/images off speed besoinie et la fréquence d/images du projet. Il est important de mentionner que ce paramètre ne peut pas être modifié durant l'enregistrement.
Pour plus d'informations sur les fréquences d'images du projet et off speed, consultez la section « Commandes tactiles »
29 Bouton Zoom pour la mise au point
Appuyez sur ce bouton pour zoomer et ajuster la mise au point à une échelle de pixel de 1:1. Pendant le zoom, vous pouvez ajuster le zoom en pinceant avec vos deux doigs sur l'écran tactile (Pinch to zoom). Pour plus d'informations, consultez la section « Zoomer en pinceant ». Pendant le zoom, vous pouvez toucher l'écran pour visionner différentes zones de l'image. Pour dézoomer, appuyez une seconde fois sur ce bouton.
30 Bouton Menu
Appuyez sur le bouton du menu pour ouvrir le menu de navigation.
31 Bouton de lecture
Appuyez sur le bouton de lecture pour passer en mode lecture. Appuyez de nouveau sur ce bouton pour dire le dernier clip enregistré sur l'écran LCD et sur tout écran connecté à la sortie HDMI.
Commandes de l'écran tactile
Fonctionnalités de l'écran tactile
L'écran LCD tactile de la Blackmagic Pocket Cinema Camera est doté d'une interface intuitive où pour une utilisation rapide de laamera, Il suffit de toucher et de balayer l'écran pour accederrapidement aux fonctionnalitésde laamerapendant le tournage.

L'écran LCD tactile de laamera offre un grand nombre d'informations et vous permel d'acceder facilement à vos paramêtres préféres.
Options de l'écran LCD
Touchez l'indicateur écran en haut à gauche de l'écran tactile pour ouvrir les options de l'écran LCD. Ces options permettent de régler les paramètres de l'écran LCD, notamment le zébra, l'aide à la mise au point, les repères de cadrage et la grille. Lorsque vous ouvrez ces options, les fonctionnalités apparaissent dans un menuOrganisé par onglet en bas de l'écran.


Touchez l'icone en haut a gauche de I'écran LCD tactile de votreamera pour ouvrir les options de I'écran LCD.
Zebra
Ce paramètre affiche le zébra sur l'écran tactile et permet de régler le niveau de zébra pour la sortie HDMI.
Le zébra affiche des hachures diagonales sur les zones de l'image qui dépassent le niveau d'exposition préalablement régèle. Par exemple, un réglage du zébra sur 100% mettra en évidence les zones complètement surexposées. Ce paramètre est utile pour obtenir une exposition optimale en conditions lumineuses fixes.

Touchez l'indicateur zébra au sein des options de l'écran LCD pour ouvrir ce paramètre.
Dans l'onglet du zébra, touchez le bouton en bas à gauche de l'écran pour afficher le zébra sur l'écran tactile.
Régléz le niveau d'exposition auquel les hachures apparaitron en faisant glisser le curseur vers la gauche ou la droite, ou touche les flèches pour incrémenter le pourcentage du zébra. Le niveau du zébra est régiable par palier de 5% entre 75% et 100% d'exposition.
Pour plus d'informations concernant l'activation du zébra sur la sortie HDMI de laamera, consultez la section « Onglet Moniteur » de ce manuel.
CONSEIL Si vous tournez en conditions lumineuses variables, telles qu'en extérieur avec un ciel nuageux, régler le niveau de zébra en dessous de 100 peut vous permettre de voir les zones surexposées.
Focus Assist
Ce paramètre affiche l'aide à la mise au point sur l'écran tactile et permet de régler le niveau d'aide à la mise au point pour la sortie HDMI de la Blackmagic Pocket Cinema Camera.

Touchez l'indicateur d'aide à la mise au point au sein des options de l'écran LCD pour ouvrir ce paramètre sur l'écran de laamera.
Pour afficher l'aide à la mise au point sur l'écran tactile, touche le bouton en bas à gauche de l'écran.
Pour regler le niveau d'aide à la mise au point pour la sortie HDMI de la Blackmagic Pocket Cinema Camera 4K, touchez Faible, Modéré, ou Élevé en bas de l'écran tactile.
Le niveau optimal d'aide à la mise au point peut varier selon les plans. Par exemple, lorsque vous effectuez la mise au point sur les acteurs, un niveau d'aide à la mise au point plus élevé permet de bien définir le contour du visage. En revanche, si vous reglez un niveau élevé sur un plan représentant du feuillage ou un mur de briques, vous allez sans doute obtenir trop d'informations nettes.
Pour plus d'informations concernant l'activation de I'aide à la mise au point sur la sortie HDMI de la camera, consultez la section « Menu Moniteur » de ce manuel.
CONSEIL La Blackmagic Pocket Cinema Camera possède deux modes d'aide à la mise au point. Vous pouvez alterner entre Crête et Lignes colorées dans l'onglet Moniteur. Pour plus d'informations, consultez la section « Onglet Moniteur » de ce manuel.
Repetes de cadrage
Ce paramètre affiche les repères de cadrage sur l'écran tactile. Vous pouvez également désirir les options de cadrage pour la sortie HDMI de votreamera.
Les repres de cadrage offrent des formats d'imag propres aux normes du cinema, de la television et d'Internet.

Touchez l'indicateur des repres de cadrage au sein des options de I'ecran LCD pour ouvir ce parametre.
Pour activer ou désactiver les repères de cadrage sur l'écran tactile, appuyez sur l'interrupteur en bas à gauche dans le menu correspondant.
Choisissez le repere de cadrage que vous souhaitez utiliser en faisant glisser le curseur vers la gauche et vers la droite, ou à l'aide des flèches. Vous pouvez également entrair un ratio de repere de cadrage personnelisé en tapant sur le ratio entre les deux boutons de ratio.
Les repères disponibles sont :
2.35:1, 2.39:1 et 2.40:1
Affiche un rapport d'image très large compatible avec les projections cinema au format large avec ou sans anamorphose. Ces trois paramètres sont un peu différents et représentent l'évolution de plusieurs normes cinematographiques. 2.39:1 est l'une des normes les plus repandues aujourd'hui.

Ecran LCD tactile sur lequel le repere de cadrage 2.40:1 est activé.
2:1
Ce format est un peu plus large que le 16:9 mais pas autant que le 2.35:1.
1.85:1
Affiche un autre rapport d'image large très repandu au cinema. Ce ratio est un peu plus large que le HDTV 1.78:1 mais pas autant que le 2.39:1.
16:9
Affiche un rapport d'image de 1.78:1 compatible avec les écans d'ordinateur et de télévision HD 16:9. Ce format est également utilisé pour la diffusion en HD et les videos en ligne. Toutefois, il a également été adopté pour la diffusion en Ultra HD.
14:9
Affiche le rapport d'image 14:9 utilisé pour la diffusion télévisuelle, car il représenté un compromis entre les téléviseurs 16:9 et 4:3. Idealement, les images 16:9 et 4:3 rognées latoralement peuvent être lues en format 14:9. Vous pouze utiliser ces repères si votre projet est diffusé sur un téléviseur qui prend en charge le rapport d'image 14:9.
4:3
Affiche un rapport d'image de 4:3 compatible avec les écrons de télévision SD, ou en tant qu'aide de cadrage lorsque vous utilisez des adaptateurs anamorphiques x2.
1:1
Affiche un ratio de 1/1 légèrement plus étroit que le 4:3. Ce ratio donne une image au format carré de plus en plus populaire sur les réseaux sociaux.
4:5
Affiche un ratio de 4/5. L'aspect vertical de ce ratio est idéal pour les-portraits et les affichages sur smartphones.
Ratios de repères de cadrage personnelisés
Pour personneliser le ratio et obtenir une appearance unique, tapez sur le ratio affiche entre les flèches. Sur l'écran de repères de cadrages personnalisés, appuyez sur la touche de retard pour supprimer le ratio actuel. Puis, utilisez le clavier numérique pour entrer votre propre ratio.
Touchez Mettre à jour pour appliquer la ratio et returner à l'enregistrement.
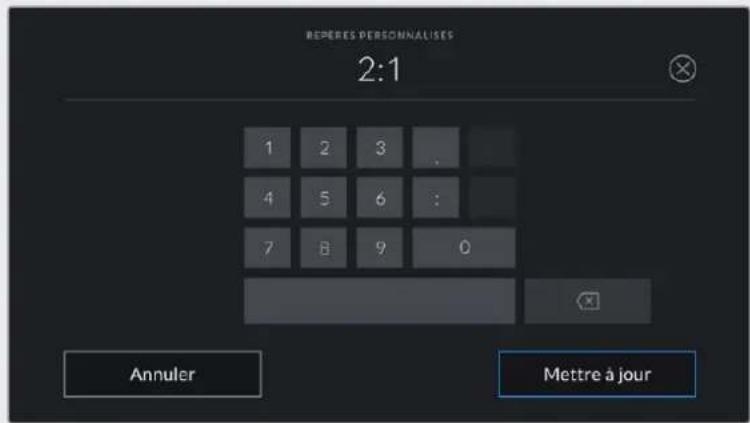
Utilisez le clavier numérique sur l'écran des Repères personnalisés pour saisir un nouveau ratio de repères de cadrage
CONSEIL You pouvez changer l'opacité des repères de cadrage. Pour plus d'informations, consultez la section « Onglet Moniteur » de ce manuel.
REMARQUE Pour plus d'informations concernant l'activation des repères de cadrage sur la sortie HDMI de la camera, consultez la section « Onglet Moniteur » de ce manuel.
Grille
Ce paramètre affiche une grille selon la règle des tiers, un indicateur d'horizon, un réticule ou un point central sur l'écran tactile et permet de désir les informations qui apparaître sur la sortie HDMI.

Touchez l'indicateur de la grille au sein des options de I'ecran LCD pour ouvrir ce parametre.
La grille et le réticule affichent des informations qui facilitent la composition de l'image. Quand la grille est activée, l'écran LCD affiche une grille selon la règle des tiers, un indicateur d'horizon, un réticule ou un point central.
Pour afficher la grille sur l'écran tactile, touche le bouton en bas à gauche de l'écran, lorsque vous étés sur l'onglet des repères de cadrage.
Pour selectionner les informations que vous souhaitez afficher sur la sortie HDMI, touchez Tiers, Réticule ou Point. Vous pouvez selectionner un paramètre Horizon, Réticule ou Point à la fois, en konjection avec Tiers. Ainsi, vous pouvez appliquer les combinaisons Tiers/Horizon, Tiers/Réticule et Tiers/Point.
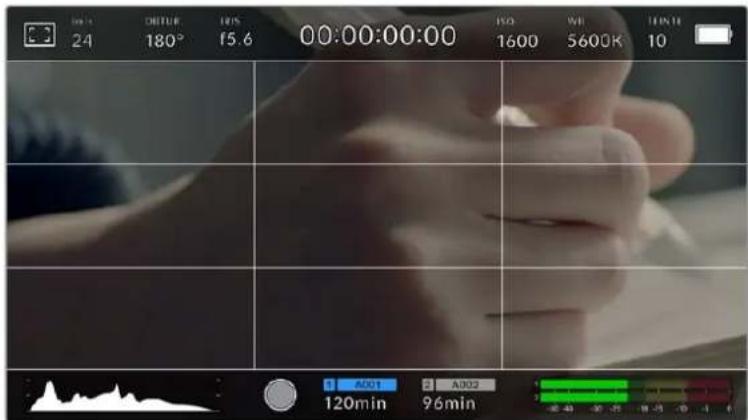
La grille selon la regle des tiers s'adapte automatiquement à tous les repères de cadrage.
Tiers
Affiche une grille dotée de deux lignes verticales et de deux lignes horizontally divisant l'image en tiers. C'est un outil très pratique pour faciliter la composition de vos plans. comme le regard se pose naturellement pres des points d'intersection de ces lignes, il est utile de cadrer des éléments importants dans ces zones-là. Les yeux des acteurs doivent généralement être situés dans le tiers supérieur de l'écran, vous pouze donc utiliser cette zone pour faciliter le cadrage. Cette division de l'image en tiers est très utile pour maintainir un cadrage cohérent de vos plans.
Horizon
Ce paramètre indique lorsque votreamera est inclinée vers la gauche ou vers la droite et vers le haut ou vers le bas. Cea vous permit de mesurer l'horizon pour les prises au poing et ainsi d'équilibrer l'axe de laamera sur un stabilisateur.
Lorsque la ligne verticale grise claire s'éloigne du réticule gris foncé Situé au milieu, alors votre camera est inclinée sur le côte. Lorsque la ligne horizontale grise claire est au-dessus du réticule gris foncé, laamera est inclinée vers le bas. Lorsqu'elle est au-dessous du réticule gris foncé, laamera est inclinée vers le haut.
La distance entre les lignes et le réticule central est proportionnelle à l'inclinaison horizontale ou verticale. Àpres avoir calibré le capteur de mouvement de la camera, la ligne verticale devient bleue lorsque la camera est alignée sur I'axe rectiligne, et la ligne horizontale devient bleue lorsque la camera est alignée sur I'axe du niveau.
Notez que si laamera est inclinée vers le bas pour une vue aérienne ou verticale, l'indicateur d'horizon le prendra en compte. Si vous inclinez laamera sur le côté pour un portrait, l'indicateur d'horizon pivote son axe à 90 degrés.
Ce tableau présente des exemples d'inclinaisons de laamera avec l'indicateur d'horizon.
Indicateur d'horizon Description

Rectiligne et à niveau

Inclinee vers le bas et a niveau

Rectiligne et inclinee vers la gauche

Inclinee vers le haut et vers la droite
Pour une utilisation classique, calibrez l'indicateur d'horizon pour connaître l'inclinaison verticale ou horizontale. Si vous souhaitez utiliser l'indicateur d'horizon pour maintainir un « plan débulle » ou une inclinaison vers le bas ou le haut pour des prises en contre-plongée ou en plongée, vous pouvez calibrer l'indicateur d'horizon sur une inclinaison. Pour plus d'informations sur le calibrage de l'indicateur d'horizon, consultez la section « calibrage du capteur de mouvement »
Réticule
Ce paramètre place un réticule au centre de l'image. comme la règle des tiers, le réticule est un outil de composition qui permet de placer le sujet au centre de l'image. Ce paramètre est parfois utilisé pour filmer des scènes qui seront ensuite montées très rapidement. Pour les spectateurs, il est plus facile de suivre un enchaimnement rapide de scènes si l'élement important de la scène est maintainu au centre de l'image.
Point
Ce paramètre affiche un point au centre de l'image. Il fonctionne de la même façon que le paramètre Réticule mais dispose d'un point central moins voyant.
CONSEIL Pour plus d'informations concernant l'activation de la grille sur la sortie HDMI de laamera, consultez la section « Onglet Moniteur » de ce manuel.
Zone de sécurité
Ce paramètre active ou désactive la zone de sécurité sur l'écran tactile et permet de régler sa taillie sur la sortie HDMI.
La zone de sécurité garantit que les zones les plus importantes de l'image seront visibles à l'écran. En gardant ces zones au centre de l'image, l'image n'est pas rognée sur certains téléviseurs. De plus, cela permet aux diffuseurs d'ajouter des logos, des synthés et autres informations sur les bords de l'écran. Beaucoup de diffuseurs demandent que les contenus importants,els que les titres et les graphiques, soient contenus dans la zone de sécurité à 90%.
La zone de sécurité est également utile pour cadre un plan qui sera stabilisé en post-production et dont les bords peuvent être rognés. Elle est aussi pratique pour indiquer un rognage spécifique. Par exemple, en réglient ce paramètre sur 50% lorsque vous enregistrez en Ultra HD 3840x2160, vous verrez à quoi un recadrage de 1920x1080 ressemble. La zone de sécurité redimensionné également les repères de cadrage, qui s'ajusteront pour reflérer le pourcentage de l'image cible chosesie.
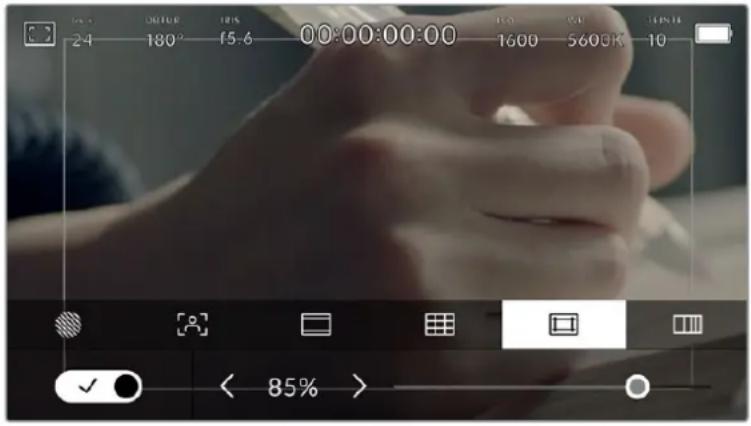
Le repère Indiquant la zone de sécurité est régisé sur 85%.
Dans l'onglet de la zone de sécurité, touche le bouton en bas à gauche de l'écran pour ouvrir ce paramètre. Pour régler la valeur de la zone de sécurité pour la sortie HDMI, touche les flèches gauche ou droite situées de part et d'autre de la valeur actuelle au bas de l'écran tactile. Vous pouvez aussi ajuster le curseur en le déplacant vers la gauche ou vers la droite.
Fauusses couleurs
Ce paramètre permet d'activer l'outil d'aide à l'exposition fausses couleurs sur l'écran tactile.
La fonction fausses couleurs applique différentes couleurs à différentes zones de l'image.
Ces couleurs représentent les différentes valeurs d'exposition des éléments de votre image.
Par exemple, la couleur rose représentée une exposition optimale pour les peaux claires, alors que le vert correspond à une couleur de peu plus foncée. En vérifiant ces fausses couleurs lorsque vous filmez des étres humains, vous maintainrez une exposition stable de leur couleur de peu.
De même, lorsque la couleur des éléments de votre image passé du jaune au rouge, cela signifie qu'ils sont surexposés.
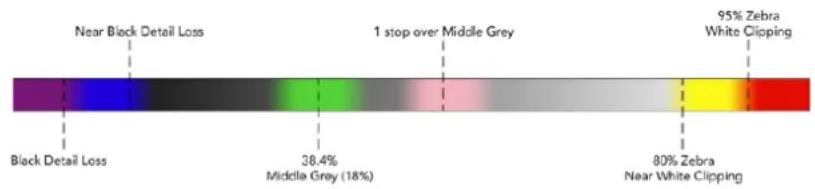
Scheme de la fonction fausses couleurs
Dans l'onglet des fausses couleurs, touche z icone en bas a gauche de I'ecran pour activer cette fonction sur I'ecran tactile.

Onglet d'aide à l'exposition fausses couleurs.
Images par seconde
L'indicateur Im/s affiche le nombre d/images par seconde selectionne.

Touchez l'indicateur lm/s pour acceder aux parametes de fréquence d'images.
Touchez l'indicateur Im/s pour changer la fréquence d/images du projet et du capteur via le menu situé en bas de l'écran.
Fréquence d'images du projet
La fréquence d'images du projet représentée la fréquence d'image du format d'enregistrement de laamera. Ce paramètre propose une selection de fréquences d'images couramment utilisées dans l'industrie du cinema et de la télévision. En général, on fait coïncider la fréquence d'images avec le workflow de post-production.
Huit fréquences d'images sont disponibles : 23.98, 24, 25, 29.97, 30, 50, 59.94 et 60 images par seconde.
Pour régler la fréquence d'images du projet de laamera dans le menu lm/s, touche les flèches gauche et droite situées de part et d'autre de la fréquence d'images en bas de l'écran tactile. Vous pouvez aussi ajuster le curseur en le déplaçant vers la gauche ou vers la droite.

Touchez les flèches silées de part et d'autre de la fréquence d'images du projet ou déplacez le curseur pour régler ce paramètre.
CONSEIL La fréquence d'images du projet définit également la fréquence d'images de la sortie HDMI.
Fréquence d'images du capteur
La fréquence d'images du capteur vous permet de régler le nombre d'images par seconde que le capteur enregistre. Cette fréquence d'images déterminée la vitesse de lecture de votre video en fonction de la fréquence d'images de projet可以选择.
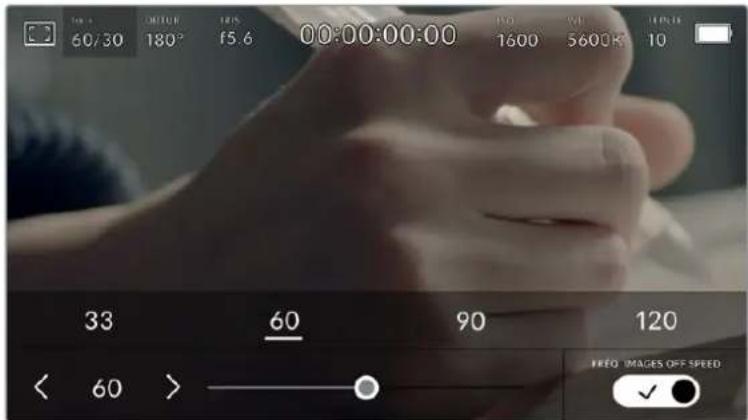
Lorsque la fonction Freq. images off speed est activée, touche un préreglage ou les flèches situées de part et d'autre de la fréquence d'images du capteur ou déplacez le curseur pour régler le paramètre.
Par défaut, les fréquences d'images du projet et du capteur correspondant pour que le clip soit lu en vitesse normale. Cependant, en touchant l'interrupteur Fréq, images off speed situé en bas à droite du menu Im/s de la camera, vous pouvez régler indépendamment la fréquence d'images du capteur.
Pour modifier la fréquence d'images du capteur, touche les flèches situées de part et d'autre de la fréquence d'images en bas à gauche de l'écran tactile. Vous pouvez également déplacer le curseur vers la gauche ou vers la droite afin d'augmenter ou de réduire la fréquence d'images. Dans que vous relâchéz le curseur, la fréquence d'images du capteur est sélectionnée. Au dessus du curseur, vous pouvez désirier parmi les fréquences d'images off speed qui s'affichent. Elles sont basées sur la fréquence d'images du projet.
Vouss pouvez également créé des effets de vitesse dynamiques et créats en variant la fréquence d'images du capteur. Si vous choisissez une fréquence d'images de capteur plus élevé que celle de votre projet, cela créera un ralenti durant la lecture. Par exemple, si la fréquence d'images du capteur est de 60 im/s et que vous reglez la lecture du projet à 24 im/s, cela créera un ralenti de 40% par rapport à la vitesse de l'action réelle. En revanche, plus la fréquence d'images du capteur est BASSE, plus la vitesse de lecture de vos clips augmentera. Il s'agit des principes d'overcranking (creatlon d'un effet de ralentit) et d'undercranking (creatlon d'un effet d'accélére). L'overcranking accélère la fréquence d'images du capteur, un procédé qui permet par exemple de souligner un moment particulièrement émouvant. L'undercranking ralentit la fréquence d'images du capteur et permet notamment d'intensifier la vitesse des scènes d'action. Vous disposez désormais d'un nombre illimité de possibités!
Pour obtenir plus d'informations sur les fréquences d/images maximales disponibles avec chaque format d'enregistrement et avec chaque codec, consultez les tableaux dans la section « Enregistrement » de ce manuel.
REMARQUE Lorsque l'options Fréq. images off speed est Sélectionnée, l'audio et la video ne sont plus synchronisés. Cela est vrai, même si les fréquences d'images du projet et du capteur sont identiques. Nous vous recommendons de ne jamais Sélectionner Fréq. images off speed si vous souhaitez synchroniser l'audio et la video.
Obturateur
L'indicateur Obtur. affiche l'angle ou la vitesse d'obturation. Cet indicateur vous permet de changer manuellement les valeurs d'obturation de laamera ou de configurer les règles de priorité des modes de l'exposition automatique. Vous pouvez désirir d'afficher l'angle ou la vitesse d'obturation depuis le paramètre Mesure obturation de l'onglet Réglages. Pour plus d'informations, consultez la section « Onglet Réglages » de ce manuel.

Touchez l'indicateur Obtur pour acceder aux reglages de l'obturateur.
L'angle d'obturation ou la vitesse d'obturation définissent le niveau de floude bouge de votre video. Ils peuvent être utilisés pour compenser les conditions d'éclairage variables. 180 degrés est l'angle d'obturation optimal pour capturer un flou de bouge satisfaisant dans la plupart des conditions. En termes de vitesse d'obturation, son équivalent est 1/50 de seconde. Cependant, si les conditions d'éclairage changent ou si la quantité de mouvement dans vos scènes augmente, vous pouvez modifier ces paramétres pour reflérer ces changements.
Par exemple, un angle à 360 degrés est un angle grand ouvert qui permet de faire entrer un maximum de lumière dans le capteur. Cela permet de capturer des mouvements presque imperceptibles même en conditions de faible éclairage. Par contre, si vous filmez des sujets en mouvement, une faible ouverture de l'angle (par exemple 90 degrés) diminuera considérablement le flou de bouge et capturera ainsi des images d'une grande nettete. Les équivalences en termes de vitesse et d'obturation dépendant de la fréquence d'images que vous utilisez.
Par exemple, si vous filmez à 25 images par seconde, 360 degrés équivaudron à 1/25 de seconde, et 90 degrés à 1/100 de seconde.
REMARQUE Lorsque vous filmez sous un éclairage artificiel, l'obturation可以选择 peut provoquer des scintillements. La Blackmagic Pocket Cinema Camera calculé automatiquement une valeur d'obturation sans scintillagement en fonction de la fréquence d'images. Lorsque vous ajustez l'obturation, jusqu'à trois options d'obturation sans scintillagement vous seront sugérées en bas de l'écran tactile. Ces valeurs d'obturation sont affectées par la fréquence du courant de votre région du monde. Vous pouvez régler la fréquence du courant sur 50Hz ou 60Hz dans le menu Réglages de laamera. Pour plus d'informations, consultez la section « Onglet Réglages » de ce manuel.
Touchez l'indicateur Obtur, pour afficher les valeurs d'obturation en bas de I'écran tactile. Si le bouton Exposition auto est désactiver, l'écran affiche la valeur d'obturation actuellément sélectionnée ainsi que les valeurs d'obturation sans scintillagement disponibles. Ce réglage se fera en fonction de la fréquence du courant sélectionné dans le menu Régliages de laamera. Pour plus d'informations, consultez la section « Onglet Régliages » de ce manuel.
REMARQUE Les caractéristiques de certaines sources lumineuses peuvent provoquer des scintillements même lorsque vous utilisez des valeurs sans scintillagement. Lorsque vous n'utilise pas de lumière continue, nous vous recommendons de tousjours effectuer un test avant de commencer le tournage.
Pour selectionner des valeurs d'obturation sans scintillement, touchez une des valeurs d'obturation affichées. En appuyant sur les flèches situées de chaque côte de la valeur sélectionnée, vous pourrez naviguer entre les valeurs les plus utilisées.

Laamera suggere des valeurs d'obturation sans scintillement en fonction de la fréquence du courant sélection dans le menu Réglages.
Si vous tournez en extérieur ou si vous utilisez des lumieres sans scintillagement, vous pouvez également selectionner une valeur d'obturation en touchant deux fois l'indicateur de l'obturateur situé en bas de l'écran. Une fois l'angle d'obturation selectionné, le clavier qui permettra de le régler entre 5 et 360 degrés apparaitra.
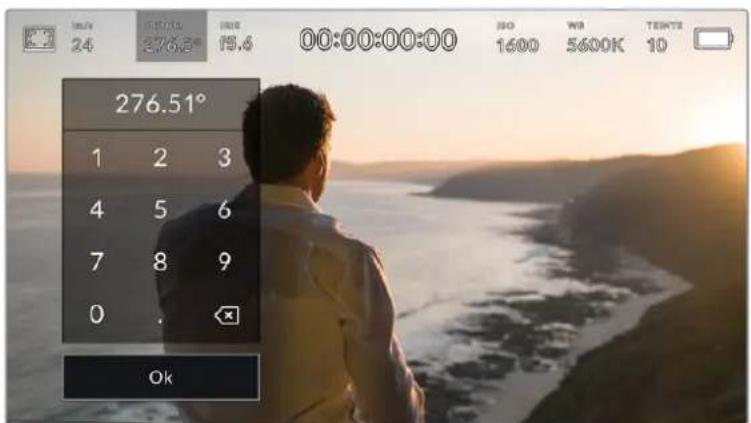
Utilisez le clavier pour saisir l'angle d'obturation de votrechoix lorsque vous tournez en extérieur ou sous des lumieres sans scintillagement
La Blackmagic Pocket Cinema Camera dispose de trois modes d'exposition automatique qui modifie l'obturator. Pour selectionner un de ces obturateurs, touche le bouton Exposition auto a droite dans le menu de l'obturator.
Obturateur
Ce paramètre règle automatiquement la valeur d'obturation pour offrir une exposition et une ouverture de l'iris constantes. Choisissez ce paramètre si vous souhaitez maintainir une profondeur de champ stable. Veuillez notes que les réglages automatiques de l'obturator peuvent affecter le floude bouge. Nous vous recommandons de vérifier si des scintillements ont été introduits à cause des différents éclairages installés pour les tournages en studio. La fonction de réglage automatique de l'iris n'est pas disponible quand le mode d'exposition automatique est activé.
Obtur. + Iris
Maintient le bon niveau d'exposition en modifiant l'obturation, puis l'ouverture. Lorsque la valeur d'obturation maximale ou minimale a eteatte et qu'il n'est always pas possible de maintainir la meme exposition, la camera ajuste l'ouverture pour que l'exposition reste stable.
Iris + Obtur.
Maintient le bon niveau d'exposition en modifiant l'ouverture, puis l'obturation. Lorsque l'ouverture maximale ou minimale a eteatte et qu'il n'est always pas possible de maintainir la meme exposition, la camera ajuste la valeur d'obturation pour que l'exposition reste stable.
Obturateur
Obtur. + Iris
Iris + Obtur.

Dans le menu de l'obturator, touchez Exposition auto pour acceder aux modes d'exposition automatique qui modifient l'obturator.
CONSEIL Lorsque le mode Exposition auto qui modifie l'obturateur ou l'iris est activé, la lettuce A apparait a cote de l'indicateur d'obturation ou de l'iris en haut de l'écran tactile.
Iris
L'indicateur Iris affiche l'ouverture de I'objectif selectionnee. En touchant cette icone, vous pouvez changer I'ouverture des objectifs compatibles et regler les modes d'exposition automatique qui modifie I'iris.

Touchez l'indicateur de I'iris pour acceder aux parametes de I'iris.
REMARQUE Pour utiliser le contrôle de l'iris sur l'écran tactile, la Blackmagic Pocket Cinema Camera doit être équipée d'un objectif qui prend en charge le changement d'ouverture via laamera.
Touchez l'indicateur Iris pour afficher le menu de l'iris en bas de l'écran tactile. L'ouverture de l'objectif可以选择 apparait à gauche de l'écran. Vous pouvez changer l'ouverture en touchant les flèches gauche et croite situées autour de l'indicateur, ou déplacer le curseur vers la gauche ou la droite.

Dans le menu Iris, touche les flèches situées autour de l'indicateur de l'Iris ou utilisez le curseur pour régler ce paramètre.
Touchez le bouton Exposition auto situé à droite du menu pour ouvrir le menu d'exposition automatique de l'iris.
Cela vous offre les options d'exposition automatique suivantes :
Iris
Ce paramètre règle automatiquement l'ouverture pour offrir une exposition et une valeur d'obturation constantes. Cela permet de maintainir le flou de bouge fixe, mais peut affecter la profondeur de champ.
Iris + Obtur.
Maintient le bon niveau d'exposition en modifiant l'ouverture, puis l'obturation. Lorsque l'ouverture maximale ou minimale a ete atteinte et qu'il n'est always pas possible de maintainir la meme exposition, la camera ajuste la valeur d'obturation pour que I'exposition reste stable.
Obtur. + Iris
Maintient le bon niveau d'exposition en modifiant l'obturation, puis l'ouverture. Lorsque la valeur d'obturation maximale ou minimale a eteatteine et qu'il n'est always pas possible de maintainir la meme exposition, la camera ajuste l'ouverture pour que I'exposition reste stable.

Dans le menu Iris, touchez Exposition auto pour ouvrir les modes d'exposition automatique qui modifie l'iris
CONSEIL Lorsque le mode Exposition auto qui modifie l'iris ou I'obturateur est activé, la letter A apparait a cote de I'indicateur de I'iris ou d'obturation en haut de I'écran tactile.
Affichage de la durée
L'affichage de la durée se trouve en haut de l'écran tactile de laamera.

L'affichage de la durée devient rouge lorsque vous enregistrez.
Cet affichage fournit le timecode relatif à la durée des clips lors de l'enregistrement et de la lecture. Le timecode est exprime en Heures:Minutes:Secondes:Images et augmente au fur et à mesure de l'enregistrement ou de la lecture. Il s'allume en rouge pendant l'enregistrement.
L'affichage de la durée débute à 00:00:00:00. La durée du clip en cours d'enregistrement, ou ayant été enregistré précédément, est affichée sur l'écran tactile. Pour faciliter le travail en post-production, le timecode sous forme de code hora est intégré aux clips.
Pour voir le timecode, touchez simplement l'affichage de la durée. Touchez de nouveau cet affichage pour afficher la durée du clip.
Quand une Blackmagic Pocket Cinema Camera est branchée à un ATEM Mini, l'etat du signal est affchéé sur l'écran LCD, sous le时间为 code. Pour aider les opérateurs, l'etat indique Preview quand le signal de la camera n'est pas à l'antenne, et On Air quand le signal est à l'antenne. L'ATEM Mini synchronise automatiquement le时间为 code de la Pocket Cinema Camera et le时间为 code du mélangeur lorsque ces deux apparèils sont connectés. Cela permet de réaliser des montages multicamères précis dans Resolve.
Les indicateurs d'etat suivant peuvent apparaître à côté de l'affichage de la durée :
| W | Apparait à gauche de l'affichage de la durée lorsque la Blackmagic Pocket Cinema Camera utilise le mode Window. |
| TC | Apparait à droite de l'affichage de la durée lorsque le timecode s'affiche. |
| EXT | Apparait à droite de l'affichage de la durée si un timecode externe LTC valable est connecté à l'entrée stéreo 3,5mm ou si le timecode est synchronisé avec le mélangeur ATEM Mini. |
| INT | Apparait à droite de l'affichage de la durée si laamera repose sur le timecode interne « jam synced», puis qu'elle a été déconnectée. |
ISO
L'indicateur ISO affiche le paramètre ISO (sensibilité de la lumière) régèle sur laamera. Toucher l'indicateur vous permet de régler l'ISO pour répondre aux besoin de différentes conditions d'éclairage.

Touchez l'indicateur ISO pour acceder aux parametes de l'ISO.

Dans le menu ISO de laamera, ces paramétres apparaissent en bas de l'écran tactile. Le curseur permet d'incrementer l'ISO d'1/3 de diaph.
Toutefois, en fonction de la situation, vous pouvez désirier une sensibilité ISO plus ou moins élevée. Par exemple, en conditions de faible éclairage, un ISO à 25 600 peut s'avérer nécessaire mais pourra introduire du bruit. Dans des conditions d'éclairage élevé, régler l'ISO à 100 permet de capturer la richesse des couleurs.
Double ISO natif
La Blackmagic Pocket Cinema Camera possède deux ISO natifs, un de 400 et un de 3 200.
Le capteur est ainsi optimisé aussi bien pour des conditions de faible éclairage, qu'en plein soleil.
Lorsque vous ajustez l'ISO, les ISO natifs sont opérér en fond pour s'assurer que la série est propre et qu'elle compte le moins de bruit possible, que ce soit en condition d'éclairage faible ou élevé.
Si vous reglez l'ISO entre 100 et 1000, l'ISO natif de 400 sera utilisé en tant que point de reférence. Lorsque l'ISO est régle entre 1250 et 25600, l'ISO natif de 3200 sera utilisé comme reférence. Si vous ave le besoin de filmer avec un ISO à 1000 ou à 1250, nous vous conseillons de réduire vos réglages d'un diaphragme sur l'iris de l'objet pour pouvoir selectionner un ISO à 1250. Ainsi, c'est l'ISO natif le plus élevé qui sera utilisé comme reférence, et vous obtiennent un résultat plus propre.
Les graphiques ci-dessous montrent la relation entre l'ISO sélectionné et la plage dynamique allouée.

Plage dynamique de la Blackmagic Pocket Cinema Camera 6K

Plage dynamique de la Blackmagic Pocket Cinema Camera 4K
Balance des blancs
Les indicateurs WB et Teinte affichent la balance des blancs et la teinte de laamera. Touchez ces indicateurs pour regler la balance des blancs et la teinte de laamera afin de les faire correspondre à différentes conditions d'éclairage.

Touche les indicateurs WB et Teinte pour acceder aux parametes de la balance des blancs et de la teinte
Chaque source lumineuse diffuse une couleur différente. Par exemple, une bougie diffuse une couleur chaude, alors qu'un ciel nuageux diffuse une couleur froide. Le paramètre de balance des blancs permet d'équilibrer les couleurs de votre image afin que le blanc reste bien blanc. Ce réglage s'effectue à l'aide du mélange des oranges et des bleus dans l'image. Par exemple, lorsque vous filmez sous une lumière tungstène qui diffuse une luzière chaude, régler la balance des blancs sur 3200K ajoutera du bleu à votre image. Cela permet d'équilibrer la couleur pour que le blanc soit correctementcaptué.
La balance des blancs de la Blackmagic Pocket Cinema Camera est preréglée, de manière à s'adapter parfaitement aux différentes températures de couleurs. Les températures de couleurs sont les suivantes :
| Plein solell (5600K) |
| Lumière halogène (3200K) |
| Lumière fluorescente (4000K) |
| Lumière varlée (4500K) |
| Nuageux (6500K) |
Vouss pouvez modifier ces preréglages en touchant ou en maintainant enforcées les flèches gauche et droite situées autour de l'indicateur de température en bas à gauche du menu de balance des blancs. La température de couleur augmente ou diminuée par unité de 50K. Si vous maintenez ces flèches enforcées, le changement d'unité est beaucoup plus rapide. Vous pouvez également déplacer le curseur qui se trouve dans le menu de balance des blancs.
Pour régler votre image de façon plus précise, vous pouvez également régler le paramètre Teinte. Ceci permet de régler le niveau de vert et de magenta dans l'image. Vous pouvez par exemple ajouter du magenta pour compenser le ton vert des lumières fluorescentes. La plupart des prêrglages de balance des blancs de laamera comprendnent une teinte.

Toucher les indicateurs de balance des blancs et de teinte vous permet d'acceder aux cinq prérglages, au scourur de la balance des blancs et à l'indicateur de teinte. Vous pouvez régier ces icones pour personnaliser la balance des blancs en fonction des conditions d'éclairage
Dans le menu de balance des blancs, le paramètre de teinte de laamera s'affiche en bas à droite de l'écran. Pour régler la teinte, touchez ou maintenez enfonçées les flèches gauche ou droite situées autour de cet indicateur. Elle augmente ou diminue par unité de 50K. Si vous maintainez ces flèches enfonçées, l'incrémentation est beaucoup plus rapide.
REMARQUE Si vous personnalisez la balance des blancs et la teinte, le nom du prépréglage deviendra CWB (Custom White Balance). Les blancs personnalisés sont enregistrés malgré les charges et les changements de paramètres. Cela facilité la comparaison entre la balance des blancs personnalisée et les derniers réglages utilisés.
Balance des blancs automatique
La Blackmagic Pocket Cinema Camera peut régler la balance des blancs automatiquement. Toucher AWB affiche l'écran de la balance des blancs.
Lorsque la balance des blancs est reglee automatique, un carré s'affiche au centre de l'image. Positionnez une feuille blanche ou grise devant ce carré et appuyez sur Mettre à jour WB. Laamera regle alors automatique les valeurs de la balance des blancs et de la teinte pour capturer une valeur moyenne des blancs ou des gris et ainsi garantir une balance des blancs aussi neutre que possible. Une fois mis à jour, ce paramètre sera enregistré comme balance des blancs personnalisée. Vous pouvez également activer la fonction de balance des blancs automatique en appuyant pendant 3 secondes sur le bouton WB situé sur la face supérieure de laamera.
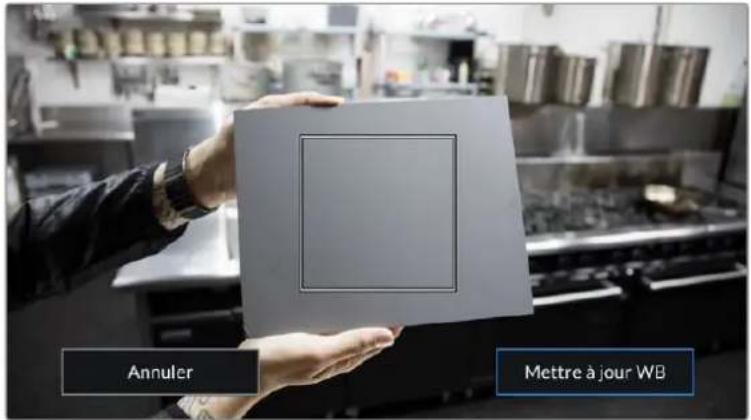
Toucher AWB dans le menu de la balance des blancs affiche l'écran de balance des blancs automatique. Utilisez une feuille blanche ou grise pour régler automatiquement une balance des blancs neutre.
Alimentation
L'etat et le type d'alimentation de la camera sont affichés en haut à droite de l'écran LCD.

Lorsque you allimentez laamera avec la batterie, vous pouvez changer I'affichage de I'indicateur en touchant I'icone.
| AC | APparait lorsque laamera est branchée sur secteur. | |
| \(\mathbf{f}\) \(\mathbf{A}\mathbf{C}\) | AC / Chargement | S'affiche lorsque laamera est branchée à l'alimentation principale et qu'elle recharge en même temps la batterie LP-E6 ou les batteries NP-F570 (si vous utilisez la Blackmagic Pocket Camera Battery Grip). |
| 50% | Pourcentage | Si votre batterie prend en charge l'affichage en pourcentage, l'icône de la batterie affichera l'état en pourcentage en diminuant par palier de 1%. Lorsqu'il ne reste que 20%, l'icône s'allume en rouge. Pour activer ou désactiver l'affichage en pourcentage, touchez l'icône de la batterie. |
| Barres de batterie | L'icone de la batterie incluse avec la camera diminué par palier de 25%. Lorsqu'il ne reste que 20%, l'icone s'allume en rouge. |
| Barres des batteries de la polignée | Si votreamera est équipée d'une poignée Blackmagic Pocket Camera Battery Grip, les deux icônes de batteries vous permettent de contrôler l'état de chaque batterie indépendamment. |
| Voltage de la source d'allimentation | Affiche le voltage fourni par la batterie, ou via le jack de l'alimentation DC depuis un adaptateur, un cable adaptateur D-tap ou une solution d'alimentation personnalisée. Pour activer ou désactiver l'affichage du voltage, touchez l'icone de la batterie. |
Indicateur de LUT
Lorsque vous utilisez une LUT en tant qu'outil de previsualisation, une icone LUT s'affiche en haut a gauche de I'écran pour indiquer que la LUT est active.

Histogramme
L'histogramme est situé en bas à gauche de l'écran tactile. L'histogramme affiche la distribution des noirs et des blancs sur un axe horizontal.

L'histogramme indique la plage tonale de votre clip. Il est également praticque pour vérifier l'exposition et évider que les haute lumières seront écrétées.
Le côte gauche de l'histogramme représenté les pixels sombres, ou les tons foncés, et le côte droit représenté les pixels clairs, ou les blancs. Lorsque vous ouvrez ou fermez l'ouverture de l'objectif, la distribution des informations sur l'histogramme change en conséquence vers la gauche ou vers la droite. Vous pourrez ainsi vérifier si les hauteures ou les basses lumières de votre image sont écrétées ou écrasées. Si les valeurs de l'histogramme ne diminuent pas progressivement sur les côtes gauche et croit, il se peut que vous perdiez des détails dans les hauteures ou les basses lumières.
REMARQUE Si aucun historique n'apparait en bas à gauche de votre écran tactile, le paramètre Affichage de l'onglet Moniteur est peut-être régé sur Codec et résolution. Pour plus d'informations, consultez la section « Onglet Moniteur » de ce manuel.
Bouton d'enregistrement
À côté de l'histogramme, en bas de l'écran tactile de la Pocket Cinema Camera, vous trouvez un bouton rond de couleur grise. C'est le bouton d'enregistrement. Appuyez une fois sur ce bouton pour commencer l'enregistrement, et appuyez à nouveau pour l'arrêter. Lorsque l'enregistrement est en cours, le bouton, les indicateurs des supports et le timecode en haut de l'écran tactile deviennent rouges.
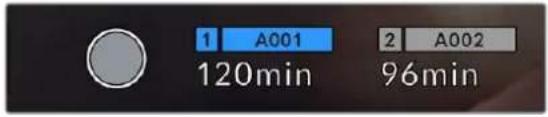
Le bouton d'enregistrement situé à cotoé des indicateurs des supports, au bas de l'écran tactile.
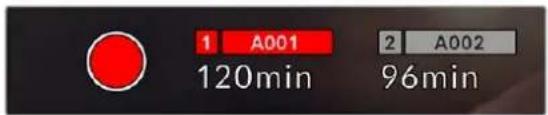
Le boulon d'enregistrement devient rouge lorsque laamera enregistre.
LUT appliquee a un clip
Si vous avez choisi d'appliquer une LUT à vos clips dans l'onglet Enregistrer, l'icone LUT apparaitra sur l'écran en mode veille et lorsque vous enregistrrez.
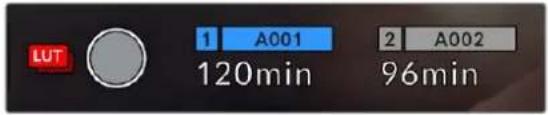
L'icone LUT vous Inform que les clips seront enregistrés avec la LUT sélectionné.
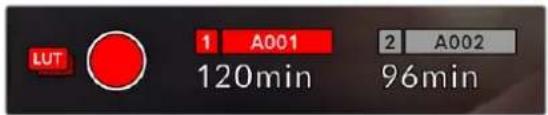
L'icone LUT s'affiche lorsque la LUT selectionnee est enregistree avec le clip.
Indicateur de perte d'image
Lorsqu'une perte d'image se produit durant l'enregistrement, un point d'exclamation clignotant s'affiche sur le bouton d'enregistrement de laamera. L'indicateur de temps restant de la carte affectee devient également rouge. Par exemple, si la carte CFast subit une perte d'image, le point d'exclamation apparaitra sur le bouton d'enregistrement, et l'indicateur de temps restant de la carte deviendra rouge. Cela vous permet de savoir si une carte est trop lente pour le codec et la résolution selectionnés. L'indicateur de perte d'image s'affiche également lorsqu'il y a eu une perte d'image sur le clip enregistré précédement. L'indicateur restera ainsi jusqu'à ce qu'un autre clip ait été enregistré, ou que laamera ait été redémarrée. Consultez les sections « Choisir une carte CFast 2.0 » et « Choisir une carte SD » pour comprendre comment éviter les pertes d'images.

L'indicateur indique une perte d'image sur la carte CFast.
REMARQUE You pouvez régler la Blackmagic Pocket Cinema Camera pour qu'elle interrompe l'enregistrement en cas de perte d'images afin d'éviter de continuer d'enregistrer une série inutilisable. Pour plus d'informations, consultez la section « Onglet Enregistrer » de ce manuel.
Temps d'enregistrement restant
Lorsqu'une carte CFast ou SD est insereé, ou qu'un disque flash USB-C est connecté à votre camera, les indicateurs situés au bas de l'écran affichent le temps d'enregistrement restant sur la carte ou le disque flash USB-C. Le temps est affché en minutes et peut varier selon la fréquence d'images et le coderc sclectionnés. L'indicateur calcule automatiquement le temps restant en fonction de ces paramétres. Lorsqu'il reste approximativement 5 minutes d'enregistrement sur la carte ou le lecteur, l'indicateur devient rouge, puis il se met a clignoter lorsqu'il ne reste plus que 2 minutes. L'indicateur affiche Pleine lorsqu'une carte est pleine, ou Plein lorsqu'un disque est plein.
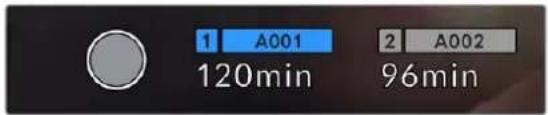
L'indicateur des supports affiche le nom de la carte SD, CFast ou du disque flash USB-C ainsi que le temps d'enregistrement restant en minutes.
Le nom de la carte ou du disque s'affiche également dans la petite barre située au-dessus du temps restant. La barre devient bleue lorsque laamera est reglee pour enregistrer sur la carte ou le disque flash USB-C selectionné. Pour enregistrer sur un support différent, restez appuyé sur le nom de la carte ou du disque flash USB-C de votrechoix. La barre devient rouge lorsque laamera enregistré.
Lorsque vous touchez les indicateurs des supports de stockage, le menu de stockage et de formatage s'affiche.
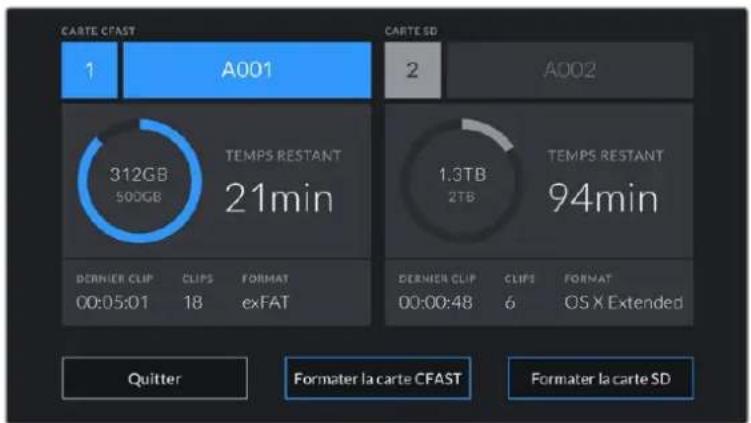
Touchez les indicateurs des supports sur l'écran tactile pour acceder au gestionnaire de stockage.
Ce menu affiche l'espace libre de chaque carte CFast, SD ou du disque flash USB-C inséré dans la camera, ainsi que le nom de la carte ou du disque, la durée du clip précédent, le nombre total de clips et le format de filchier de chaque carte ou disque.
Vou puez également formater voite suppor à partir de ce menu. Pour plus d'informations, veuillez consulter la section « Préparer les supports pour I'enregistrement » de ce manuel.
CONSEIL Touchez le nom de la carte ou du disque dans le menu des supports de stockage pour l'activer. La Blackmagic Pocket Cinema Camera commencera par enregistrer sur cette carte ou ce disque.
Indicateurs audio
Les indicateurs de crete audio affichent les niveaux audio pour les canaux 1 et 2 lors de l'utilisation du micro interne ou via l'audio exte ne lorsqu'une source y est connectee. L'affichage est calbre en unites dBFS et integre des indicateurs de crete qui restent visibles un petit moment, ce qui vous permit de visualiser clairement les niveaux maximaux atteints.
Pour obtenir une qualite audio optimale, verifie que vos niveaux audio ne dépasse pas 0 dBFS. Il s'agit en effet du niveau maximal auquel laamera peut enregistrer. L'audio qui dépasse ce niveau sera écrété et distordu.
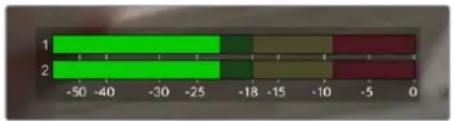
Les barres de couleur sur l'indicateur audio représentent les niveaux audio maximaux. Idealement, les niveaux audio doivent rester dans la zone verte. Si le niveau entre dans la zone jaune ou rouge, il se peut que le son que vous venez de capturer soit écroté.
Vou pouvez toucher les indicateurs audio pour augmenter le volume des canaux audio 1 et 2, ainsi que celui du casque ou du haut-parleur.
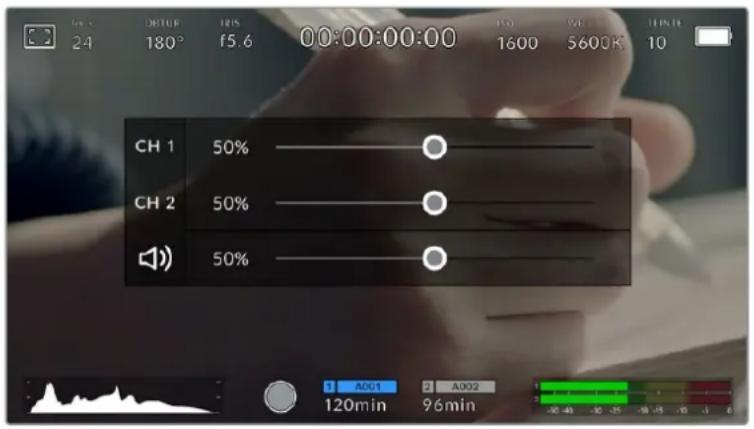
Touchez les indicateurs audio sur l'écran tactile pour acceder au volume et aux paramètres du casque ou du haut-parleur.
Double-toucher pour zoomer
Sur la Blackmagic Pocket Cinema Camera, vous pouvez agrandir n'importe qu'elle zone de l'aperçu de l'image en touchant deux fois l'écran tactile. La zone que vous touche sera agrandie et vous pourrez vous déplacer dans l'image en faisant glisser votre doigt sur l'écran. C'est une fonction très pratique pour vérifier la mise au point. Pour revenir à l'image en plein écran, il suffit de retoucher deux fois l'écran tactile de laamera.
Zoomer en pinctant
Vou puez ajuster le nivea de zoom en efectuant un geste de pincement sur I'ecran tactile LCD. Cela n'afectera pas la sortie HDMI.
Commencez par toucher l'écran deux fois pour effectuer un zoom x2, ou appuyez sur le bouton de Mise au point à l'aide du zoom. Puis, faites un geste de pincement sur l'écran tactile pour changer le niveau de zoom. Vous pouvez également faire glisser vos doigts sur l'écran pour vous déplacer dans l'image grossie. Pour returner à l'affichage standard, double-touchez une nouvelle fois l'écran, ou appuyez sur le bouton de Mise au point à l'aide du zoom.
Lorsque vous double-touche l'écran ou que vous appuyez sur le bouton de Mise au point à l'aide du zoom, le niveau de zoom bascule entre le niveau de grossissement précédant et l'affichage complet. Par exemple, si vous zoomez en pincant jusqu'à un grossissement x8 et que vous double-touche l'écran, l'image sera dézoomée. Puis, si vous double-touche l'écran une deuxieme fois, l'affichage revienda à l'agrandissement x8.
Mise au point tactile
Vouss pouvez effectuer la mise au point de I'objectif sur n'importe quelle zone de I'image en touchant longuement cette zone sur I'écran LCD. Appuyez sur le bouton de mise au point pour effectuer la mise au point sur la zone de votrechioix. Appuyez deux fois sur le bouton de mise au point pour la réinitialiser sur le centre de l'image.
Mode plein écran
Il est parfois utile lors du cadrage ou de la mise au point d'un plan, de masquer temporairement les informations d'etat et les indicateurs audio affichés à l'écran. Pour masquer toutes ces informations d'un coup, balayez l'écran tactile vers le haut ou vers le bas. L'indicateur d'enregistrement, les repères de cadrage, la grille de composition, l'aide à la mise au point et le zébra resteront visibles. Pour les faire réapparaitre, balayez une nouvelle fois l'écran vers le haut ou vers le bas.

Balayez l'ecran tactile vers le haut ou vers le bas pour masquer les informations d'etat.
Menu de lecture
Appuyez sur le bouton de lecture pour acceder au menu de lecture. Vous pouvez contrôler des clips enregistrés précédément à l'aide des boutons de contrôle de laamera ou de l'écran tactile.
Lorsque vous utilisez l'écran tactile, il suffit de toucher le bouton de lecture pour commencer la lecture, et de le toucher une deuxième fois pour la suspendre. Vous pouvez vous servir des touches avant ou arriere pour passer directement au début ou à la fin des clips. Appuyez une fois sur l'icone d'avance rapide pour passer au clip suivant. Appuyez une fois sur l'icone de returnar rapide pour returner au début du clip en cours ou appuyez deux fois pour revenir au début du clip precedent. Les clips peuvent également etreus en boucle si I'icone de lecture en boucle est activée.


Icane de retour rapide, de lecture, d'avance rapide et de lecture en boucle.
Pour une avance ou un retour rapides, maintenez le bouton correspondant enforcé. Ainsi, la série sera lue à une vitesse deux fois plus élevé, vers l'avant ou vers l'arrière, selon le bouton selectionné.
Vous pouvez modifier cette vitesse en touchant à nouveau les commandes de transport. À chaque fois que vous toucherez une commande de transport dans la même direction, vous doublerez la vitesse de défilement. La vitesse de défilament maximale est de x16. Si vous atteignez la vitesse maximale et que vous appuyez à nouveau sur la même commande de transport, vous reviendraz à la vitesse x2. À chaque fois que vous appuyez sur la commande de transport opposée, la vitesse de défilament diminue de moins pour atteindre la vitesse x2. Vous pouvez revenir à une lecture standard en touchant le bouton de lecture.

L'indicateur de vitesse de défilament affiche la vitesse et la direction de l'avance ou du return rapide de la séquence.
Si vous touchez le bouton d'enregistrement alors que vous étés en mode de lecture, vous reviendrez en mode de voir et laamera sera prete à enregistrer.
CONSEIL Balayez l'écran tactile vers le haut ou vers le bas pour masquer les informations d'etat pendant la lecture des séquences. Ouvrir le clap pendant la lecture vous permet de noter dans les métadonnées la qualité du clip que vous étrent en train de dire. Pour plus d'informations, consultez la section « Saisie des métadonnées »
Réglages
Menu de navigation
Appuyez sur le bouton du menu pour ouvrir le menu de navigation. Ce menu à onglets offre des paramétrages qui ne sont pas disponibles depuis l'écran principal. Les paramétrés sont regroupés par fonction au sein des onglets Enregistrer, Moniteur, Audio, Réglages, Préroglages et LUTS. Chaque onglet possède plusieurs pages. Vous pouvez passer d'une page à l'autre en touchant les flèches situées de part et d'autre de l'écran, ou en balayant l'écran vers la gauche ou vers la droite.

Touchez les intitués Enregistrer, Moniteur, Audio, Reglages, Préglages et LUTS pour vous déplacer entre les différents anglets du menu de navigation.
Onglet Enregister
L'onglet Enregistrer permet de regler le format video, le codec et la résolution, ainsi que d'autres paramétres qui affectent les séquences enregistrées, tels que la plage dynamique et la nettement de l'image.
Onglet Enregister - Page 1
La première page de l'onglet Enregistrer contient les paramétres suivants.
Codec et qualité
Le menu Codec et Qualité est réparti sur deuxrangées. La rangée supérieure permet de désir entre deux familles de codec, Blackmagic RAW et Apple ProRes, tandis que la rangée inférieure offre des options de qualité au sein de ces familles. Par exemple, les options de qualité de la famille de codec ProRes sont ProRes 422 HQ, ProRes 422, ProRes 422 LT et ProRes 422 Proxy. Les options Blackmagic RAW sont divisées entre quatre paramétres de Débit constant et deux paramétres de Qualité constante.
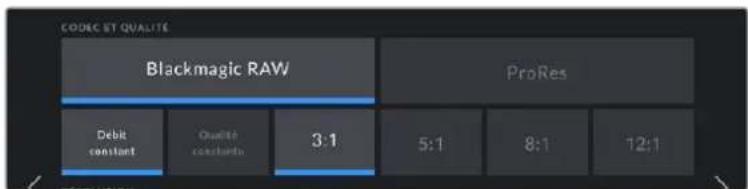
Options de codec et de qualite avec le Blackmagic RAW
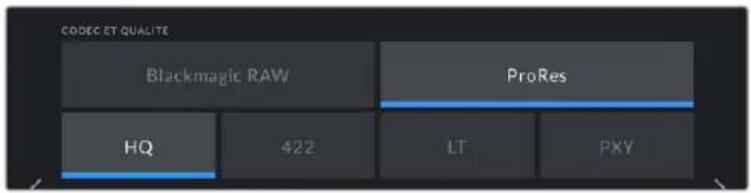
Options de codec et de qualite avec le ProRes
CONSEIL La quantité de video que vous pouvez enregistrer sur le support de stockage de la Blackmagic Pocket Cinema Camera augmente lorsque vous désisissez des codecs qui utilisent une compression plus élevé. Pour obtenir de plus amples informations, consultez les « Tableaux des durées d'enregistrement » dans la section « Enregistrement » de ce manuel.
Résolution
Ce paramètre fonctionne en corrélation avec le paramètre des codecs. Utilisez-le pour selectionner la résolution en fonction du format d'enregistrement. Par exemple, si vous souhaitez enregistrer des clips Ultra HD en ProRes HQ, Sélectionnéz ProRes et HQ dans le menu Codec et Qualité, puis Ultra HD dans le menu Résolution.
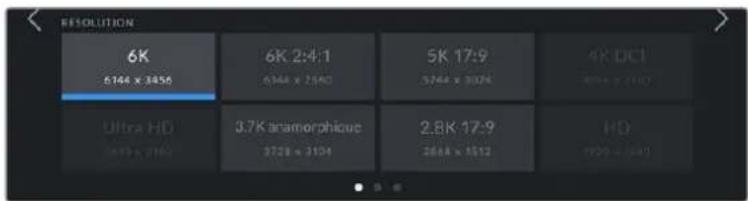
Options de résolution de la Pocket Cinema Camera 6K avec le codec Blackmagic RAW
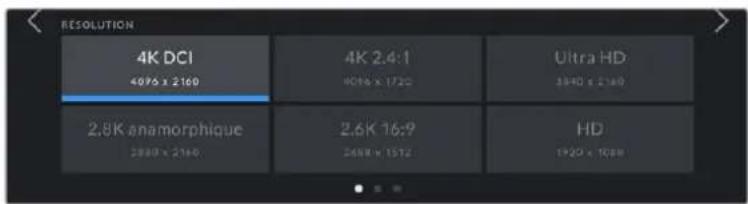
Options de résolution de la Pocket Cinema Camera 4K. En 4K DCI, la catégorie est Résolution, sinon elle sera Résolution - Capteur Window.
REMARQUE Lorsque vous réalisiez un enregistrement multicamera sur l'ATEM Mini, la Pocket Cinema Camera règlice le codec sur Blackmagic RAW pour un enregistrement isolé de qualité sur un support interne. Sur l'ATEM Mini, la source HDMI branchée à l'entrée 1 règlice la fréquence d'images de la sortie video et les autres entrées HDMI sont converties automatiquement. Si vous branchez une Pocket Cinema Camera sur l'entrée 1, l'ATEM Mini se rappellera de la fréquence d'images qui a été utilisé précédemment. Si vous souhaitez désirir une fréquence d'images différente pour l'ATEM Mini après avoir branché toutes les sources video, vous pouvez le faire dans les paramétres du mélangeur de l'ATEM Software Control. Pour plus d'informations, consultez le manuel de l'ATEM Mini.
Onglet Enregister - Page 2
La deuxieme page de l'onglet Enregistrer contient les options suivantes.

Options de plage dynamique et de surface du capteur de la Pocket Cinema Camera 6K

Options de plage dynamique et de surface du capteur de la Pocket Cinema Camera 4K
Plage dynamique
Ajustez le paramètre relatif à la plage dynamique en touchant les icônes du menu Plage dynamique. La Blackmagic Pocket Cinema Camera possède trois paramétres de plage dynamique :
| Film | Le mode Film capture de la video reposant sur une courbe logarithmique. Ce mode d'enregistrement vous offre la meilleure plage dynamique qui exploite au maximum les informations de votre signal video pour vous aider à tirer le meilleur parti des logiciels d'étalonnage, tels que DaVinci Resolve. |
| Extended Video | Le réglage Extended video offre un bon équilibre entre les réglages Video et Film. Il offre une plage dynamique plus importante que le réglage Video, tout en appliquant un léger changement de contraste et un affaiblissement progressif dans les hautes lumières. Le réglage Extended video est ajusté aux moniteurs broadcast standard. Il est très utile si vous avez peu de temps pour effectuer la post-production et que vous foulez donner à vos clips un aspect esthétique plus/agréable. |
| Video | Le mode Video ressemble à l'espace colorimétrique REC 709 pour la video haute définition. Cette plage dynamique vous permet de travailler plusrapidement en enregistrant directement sur des formats video compressés dans un espace colorimétrique permettant une exportation directe ou un traitement minimal en post. |
REMARQUE Lorsque vous enregistrez en Blackmagic RAW ou en ProRes avec la plage dynamique Film, l'image apparait terme et désaturaée sur l'écran tactile. En effet, les images contiennent enormément de données qui n'ont pas encore été étabonnées pour cet affichage. Toutefois, lorsque vous enregistrez en mode Film, vous pouvez effectuer le monitoring sur l'écran tactile et sur la sortie HDMI en utilisant une LUT (Look Up Table) consçue pour simuler un contraste standard. Pour plus d'informations, consultez la section « LUTs 3D » de ce manuel.
Surface du capteur
Vou puez regler la Blackmagic Pocket Cinema Camera pour utiliser la surface entiere du capteur. Pour des fréquences d'images encore plus élevées, vous pouze regler le paramètre Surface capteur sur Window. Ce mode utilise uniquement la quantité de pixels du capteur nécessaire pour le format video sélectionné只得 que de redimensionner les images en utilisant l'intégrality du capteur. Certains formats combinent le mode Window et redimensionné. Par exemple, la Pocket Cinema Camera 6K possède des formats HD redimensionnés depuis le capteur en mode Full, redimensionnés depuis le 5.7K Window et redimensionnés depuis le 2.7K Window.
Comme le mode Capteur Window n'utilise que le centre du capteur, le champ visuel de l'objet semble plus étroit à cause du rognage. Par exemple, si vous utilisez un objectif de 20mm pour filmer des séquences HD en mode Window, le champ visuel de la Pocket Cinema Camera 4K équivaudra à celui d'un objectif de 40mm.
Ce paramètre est disponible lorsque vous filmez en dessous de la résolution maximale offerte par la camera, comme en ProRes HD ou Ultra HD.
Les fréquences d'images les plus élevées de la Pocket Cinema Camera 6K sont disponibles lorsque vous filmez en 2.8K 17:9 Window et en HD redimensionné depuis le 2.7K Window. Les fréquences d'images les plus élevées de la Pocket Cinema Camera 4K sont disponibles lorsque vous filmez en 2.6K 16:9 et en HD Window.
Pour plus d'informations sur les formats Full et Window, veuillage consultier la section « Fréquences d'images maximales du capteur ».
Fréquence d'images du projet
Le paramètre Freq. images du projet propose une selection de fréquences d'images couramment utilisées dans l'industrie du cinema et de la télévision. Par exemple, 23.98 images par seconde. En général, on fait coïncider la fréquence d'images avec la vitesse de lecture et la synchronisation audio utilisées dans le workflow de post-production.
Huit fréquences d'images sont disponibles : 23.98, 24, 25, 29.97, 30, 50, 59.94 et 60 images par seconde.
Enregistrement Off Speed
Par défaut, les fréquences d'images du projet et du capteur correspondant pour que le clip soit lu en vitesse normale. Toutefois, vous pouvez régler la fréquence d'images du capteur indépendamment en désactivant le bouton du paramètre Enregistrement off speed.
Fréquence d'images off speed
Lorsque le parametre Enreglissement off speed est activé, touchez les flèches du paramètre Freq. images off speed pour régler la fréquence d'images du capteur de laamera.
La fréquence d'images du capteur vous permet de régler le nombre d'images par seconde que le capteur enregistrste. La fréquence d'images déterminée la vitesse de lecture de votre video en fonction de la fréquence d'images de projet可以选择.
Pour plus d'informations concernant les fréquences d'images off speed, consultez le paragraphe « Images par seconde » de la section « Caracteristiques de l'écran tactile » de ce manuel.
REMARQUE Pour obtenir plus informations sur les fréquences d'images maximales disponibles avec chaque format d'enregistrement et avec chaque codec, consultez les tableaux de la section « Fréquences d'images maximales du capteur »
Carte préféree pour enregistrer
Utilisez ce paramètre pour sélectionner le support sur lequel la Blackmagic Pocket Cinema Camera va enregistrer en premier lorsque les deux logements sont utilisés. Les options sont Carte CFast,
Carte SD et La plus peine. Choisissez l'option Carte CFast ou Carte SD selon votre préférence. Toutefois, si vous prenez l'habitude d'utiliser toujours la même option, vous saurez alors rapidement qu'elle carte doit être changée en premier lorsque la première carte est pleine. L'option La plus pleine facilité le regroupement de fichiers de façon chronologique lorsque vous fismez un projet à l'aide d'une seuleamera.
Le paramètre sélectionné s'applique des qu'une carte CFast ou SD est insérée. Vous pouvez modifier ce paramètre à tout moment dans le gestionnaire de stockage en selectionnant une carte différente. Il est important de préciser que le fait d'éjecter et de réinsérer des cartes rétablira le paramètre Carte préféree pour enregistrer actuel.
CONSEIL Le paramètre La plus pleine est basé sur le pourcentage d'espace utilisé sur votre support只想 que sur sa taille ou la quantité de données utilisées.
Stopper rec. si perte d'image
Utilisez le paramètre d'arrêt de l'enregistrement lors d'une perte d'images pour configurer la réponse de la Blackmagic Pocket Cinema Camera lorsqu'une perte d'images est détectée. Lorsque ce paramètre est désactivé, l'enregistrement continue même si une perte d'images est détectée. Lorsqu'il est activé, l'enregistrement s'arrête lorsqu'une perte d'images est détectée. Cela vous évitera de perdre du temps à filmer des séquences inutilisables si vous n'avez pas remarquè l'indicateur de perte d'images.
CONSEIL Consultez la section « Supports de stockage » pour comprendre comment éciter les pertes d'images.
Onglet Enregister - Page 3
La troisième page de l'onglet Enregistrer contient les paramètres suivants.
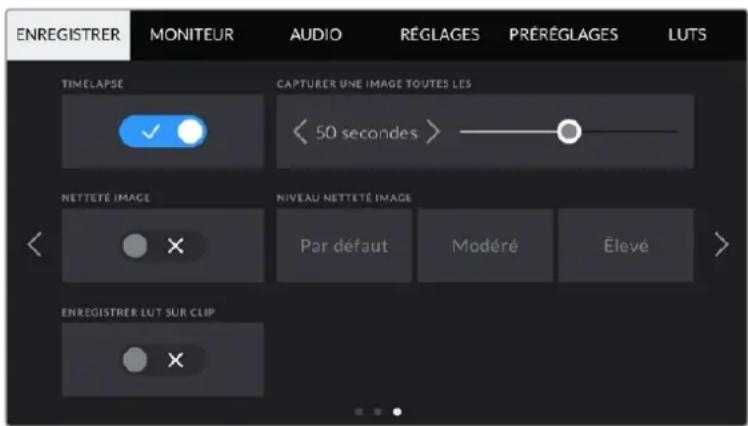
Timelapse
Ce paramètre active la fonction Timelapse qui permet l'enregistrement automatique d'une image fixe aux intervalles suivants :
Images 2-10
Seconds 1-10,20,30,40,50
Minutes 1-10
Vou puez par exemple regler laamera pour qu'elle enregistre une image fixe toutes les 10 images, 5 secondes, 30 secondes, 5 minutes, etc.
La fonction Timelapse offre de nombreuses options créatives. Par exemple, lorsque vous reglez l'intervalle de temps sur 2 images, vous obtenez un effet d'accéléré lors de la lecture de votre video.
Appuyez sur le bouton d'enregistrement pour démarrer l'enregistrement. Lorsque vous appuyez une seconde fois sur ce bouton pour arreter l'enregistrement, la séquence en timelapse est sauvégardée comme un clip, avec le codec et la fréquence d'images régés dans laamera. Vous pouze ainsi déposer la séquence en timelapse dans votre timeline de post-production de la même manière que n'importe quel clip.

1 A001 120min
2 A002 96min
Le mode timelapse est indiqué par une icône au-dessus du bouton d'enregistrement
CONSEIL Lorsque vous enregistrez des clips en mode Timelapse, le compteur du时间内code se met à jour à chaque fois qu'une image video est enregistrée.
Netteté image
Utilise ce paramètre pour regler la nettete de l'image. Lorsque ce parametre est activé, augmentez et diminuez le niveau de nettete dans Niveau nettete image en selectionnant Par défaut, Modéré ou Elevé.
Lorsque ce parametre est activé, il est appliqué sur les videos ProRes capturées par laamera et sur la sortie HDMI.
Ce réglage est principalement destiné à la production en direct pour laquelle il est impossible de passer par la post-production. Nous vous recommendons de désactiver ce paramètre si vous capturez des images qui seront ensuite envoyées en post-production. Ce paramètre est désactivé lorsque le codec est régèle sur Blackmagic RAW.
Enregister LUT sur clip
Avec la Blackmagic Pocket Cinema Camera, vous ne pouvez pas appliquer ou intégrer de LUTs par défaut sur des clips enregistrés. Pour intégrer une LUT à vos clips, activez le bouton du paramètre Enregistrer LUT sur clip.
C'est une option pratique lorsque vous n'avez pas le temps d'effectuer l'étabonnage en post-production, ou quand vous doivent fournir les images directement à un client ou au monteur. Pour plus d'informations, consultez les sections « LUTs 3D » et « Commandes de l'écran tactile »
Appliquer LUT dans fichier
Lorsque vous filmez avec le code Blackmagic RAW et que vous appliquez une LUT à la sortie HDMI de votreamera, la LUT sélectionnée sera intégrée au fisier Blackmagic RAW que vous enregistrez. La LUT sera sauvégédée dans l'en-tête du fisier et vous pourrez facilement l'appliquer au clip en post-production, sans avoir à gérer un fisier sépare. Lorsque la fonction Appliquer LUT dans fisier est activée dans le menu, le clip s'ouvrira dans le Blackmagic RAW Player et dans DaVinci Resolve avec la LUT sélectionnée. Vous pouvez activer ou désactiver l'application de la LUT, mais elle sera toujours présente dans le fisier Blackmagic RAW.
DaVinci Resolve comprehend également une fonction Appliquer une LUT dans ses paramétres, pour activer ou désactiver la LUT 3D dans le fichier Blackmagic RAW. La fonction Appliquer une LUT dans DaVinci Resolve est la même que dans laamera. Ainsi, quand vous filmez, vous pouvez demander à l'étalonneur d'utiliser une LUT depuis laamera. Mais vous pourrez facilement désactiver cette LUT dans DaVinci Resolve en réglant Appliquer une LUT sur Off.
Convention de dénomination des fichiers
Les clips sont enregistrés sur une carte CFast, SD ou sur un disque flash USB-C au format Blackmagic RAW ou ProRes QuickTime movie, en fonction du format d'enregistrement que vous avez choisi.
Le tableau ci-dessous presente un exemple de la convention de dénomination des fichiers :
A001_08151512_C001.mov Nom du fichler QuickTime Movie
| A001_08151512_C001.mov Identifiant de laamera | |
| A001_08151512_C001.mov | Numero de la bobine |
| A001_08151512_C001.mov | Mois |
| A001_08151512_C001.mov | Jour |
| A001_08151512_C001.mov | Heure |
| A001_08151512_C001.mov | Minute |
| A001_08151512_C001.mov | Numero de clip |
Les fichiers d'images fixes capturées à l'aide du bouton Still sont enregistrés selon la convention de dénomination des fichiers relative aux clips video. Toutefois, les quatre derniers caractères du nom de fichier portent le numéro de l'image, par exemple S001, au lieu du numéro du clip. Pour comprendre comment modifier l'identifant de laamera, consultez la section « Metadonnées du projet »
Onglet Moniteur
L'onglet Monieur vous permet d'ajuster les informations à l'écran et d'autres options de monitoring pour l'écran tactile ainsi que pour la sortie HDMI de la Blackmagic Pocket Cinema Camera. Les options sont organises par sortie entre LCD, HDMI ou bien Les deux, qui permet de selectionner les deux sorties. Chaque menu possède deux pages d'options. Vous pouvez passer d'une page à l'autre en touchant les fièches situées de part et d'autre de l'écran, ou en balayant l'écran vers la gauche ou vers la droite.
Onglet Moniteur - Page 1
La première page de l'onglet Moniteur contient des paramétres identiques pour chaque sortie. Par exemple, vous pouvez activer le zébra sur l'écran tactile, mais le désactiver sur la sortie HDMI.
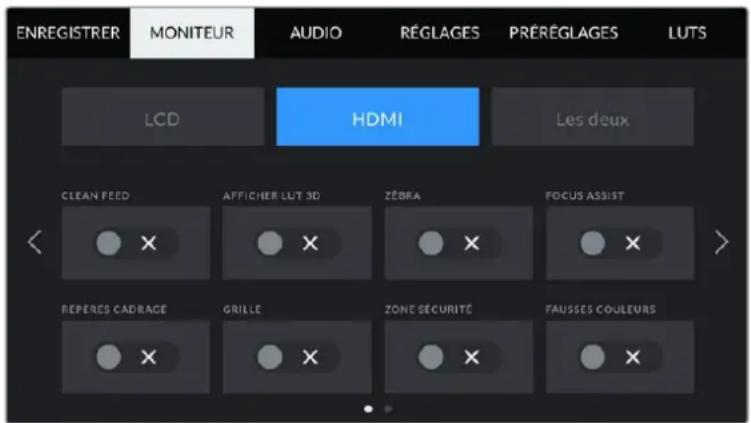
Clean Feed
Touchez le bouton Clean Feed dans le menu LCD ou HDMI pour désactiver les informations à l'écran de la sortie correspondante, excepté levoyant d'enregistrement tally.
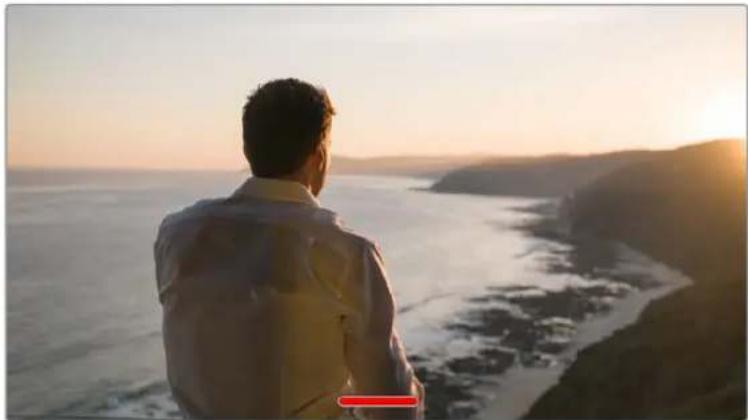
Laamera affiche levoyant d'enreglistrement tally,meme en mode Clean Feed
REMARQUE Les LUTs seront appliquées aux sorties pour lesquelles le paramètre Clean Feed est activé. Pour désactiver les LUTs, il suffit de désactiver le bouton du paramètre Afficher LUT dans le menu Moniteur.
Affchage LUT 3D
La Blackmagic Pocket Cinema Camera peut appliquer des LUTs 3D à n'importe qu'elle soit pour lui donner un rendu de sequence etalonnée. C'est particulièrement utile lorsque vous enregistrez des clips avec la plage dynamique Film.
Si laamera possede une LUT active, utilisez ce parametre pour appliquer cette LUT à I'ecran tactile ou a la sortie HDMI.
Pour plus d'informations sur le chargement et l'utilisation des LUTs 3D, consultez la section « LUTs 3D » de ce manuel.
Touchez les options LCD ou HDMI pour acceder aux paramétres de monitoring pour l'écran tactile et la sortie HDMI: focus assist (aide à la mise au point), repères de cadrage, grilles, zone de sécurité et fausses couleurs.
Zebra
Touchez le bouton Zébra dans le menu LCD ou HDMI pour activer le zébra sur ces sorties. Pour plus d'informations sur le zébra et la configuration des niveaux de zébra, consultez la section « Caracteristiques de l'écran tactile » de ce manuel.
Focus Assist
Touchez le bouton Focus Assist dans le menu LCD ou HDMI pour activer l'aide à la mise au point sur ces sorties. Pour plus d'informations sur l'aide à la mise au point et la configuration des niveaux de l'aide à la mise au point, consultez la section « Caracteristiques de l'écran tactile » de ce manuel.
Repères de cadrage
Touchez le bouton Repères cadrage dans le menu LCD ou HDMI pour activer les repères de cadrage sur ces sorties. Pour plus d'informations sur les repères de cadrage et leur sélection, consultez la section « Caracteristiques de l'écran tactile » de ce manuel.
Grille
Touchez le bouton Grillé dans le menu LCD ou HDMI pour activer la grille de composition selon la règle des tiers sur ces sorties. Pour plus d'informations sur la grille de composition selon la règle des tiers, consultez la section « Caracteristiques de l'écran tactile » de ce manuel.
Zone de sécurité
Touchez le bouton Zone sécurité dans le menu LCD ou HDMI pour activer la zone de sécurité sur ces sorties. Pour plus d'informations sur le paramètre de la zone de sécurité, consultez la section « Caracteristiques de l'écran tactile » de ce manuel.
REMARQUE Utilisez le paramètre Zone sécurité % dans le menu Les deux de l'onglet Moniteur de la Blackmagic Pocket Cinema Camera pour régler la taille de la zone de sécurité.
Fauusses couleurs
Touchez le bouton Fausses couleurs dans le menu LCD ou HDMI pour activer les fausses couleurs sur ces sorties. Pour plus d'informations sur le paramètre des fausses couleurs, consultez la section « Caracteristiques de l'écran tactile » de ce manuel.
Paramètre LCD de l'onglet Moniteur - Page 2
La deuxième page du paramètre LCD de l'onglet moniteur contient des options permettant de régler l'écran tactile.
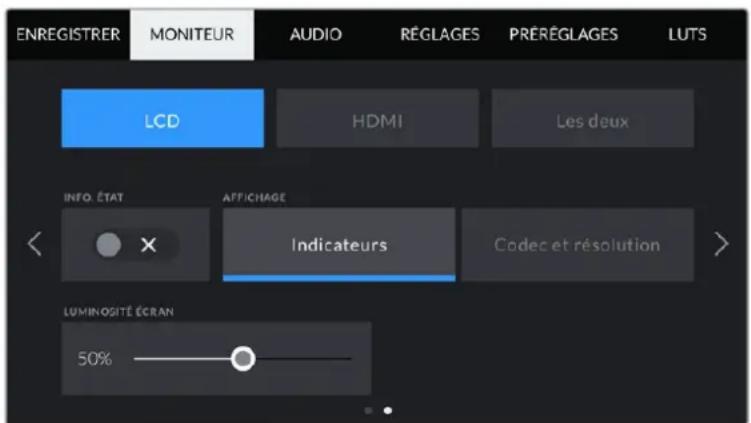
Le paramètre Info. état vous permet de prévisualiser vos images de manière claire
Info.état
Ce paramètre est praticque pour masquer les informations d'etat et les indicateurs audio affichés sur l'écran tactile, et ainsi conserver uniquement les informations nécessaires à la composition du plan. Touchez le bouton Info. état pour activer ou désactiver les informations d'etat et les indicateurs audio sur l'écran de laamera. Les autres informations à l'écran, telles que les repères de cadrage, la grille, le focus assist et le zébra resteront visibles, s'il sont actifs. Vous pouvez également balayer l'écran tactile vers le haut ou vers le bas pour obtenir le même résultat.
Affichage
Au lieu de l'histogramme et des indicateurs audio, laamera peut afficher les informations relatives au codec et à la résolution dans les coins gauche et droit de l'écran tactile. C'est très pratique si vous préférez utiliser les fausses couleurs pour régler l'exposition ou si vous enregistrez l'audio séparément et souhaitez afficher des informations supplémentaires à l'endroit où l'histogramme et les indicateurs audio sont normalement affichés.
Pour selectionner l'affichage souhaite, il suffit de toucher le parametre Indicateurs ou Codec et Resolution dans le menu LCD.
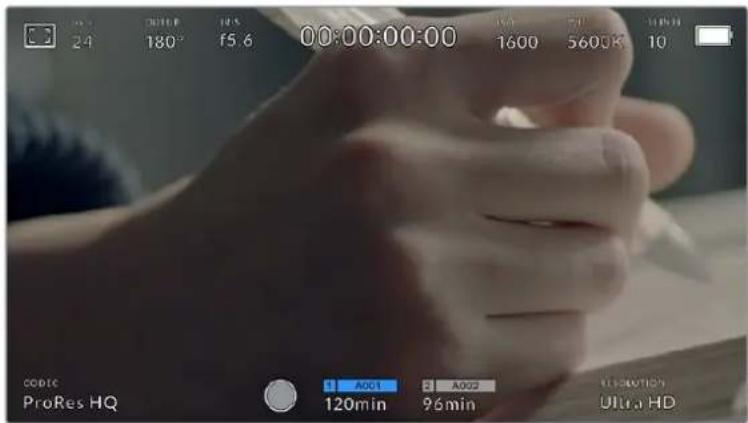
Au lieu de l'histogramme et des indicateurs audio, la Blackmagic Pocket Cinema Camera peut afficher les informations relatives au codec et à la résolution.
Luminosité de l'écran
Déplacez le curseur Luminosite écran vers la gauche ou vers la droite dans le menu LCD pour ajuster la luminosité de l'écran tactile.
Paramètre HDMI de l'onglet Moniteur - Page 2
La deuxieme page du parametre HDMI de l'onglet moniter contient des options permettant de régler la sortie HDMI.
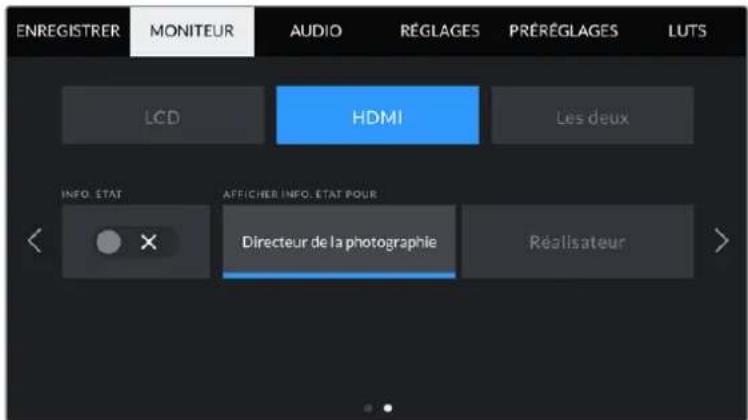
Info.état
Il est praticque de pouvoir masquer les informations d'etat et les indicateurs audio affichés sur la sortie HDMI, et ainsi conserver uniquement les informations nécessaires à la composition du plan. Touchez le bouton Info. état dans le menu HDMI du moniteur pour activer ou désactiver les informations d'etat et les indicateurs audio sur cette sortie. Les autres informations à l'écran, telles que les repères de cadrage, la grille, le focus assist et le zébra resteront visibles, s'il sont actifs.
Pour masquer ou afficher les informations d'etat et les indicateurs audio, balayez l'écran tactile vers le haut ou vers le bas.
Afficher info. état pour Directeur de la photographie et RÉalisateur
L'écran tactile affiche des informations telles que l'ISO, la balance des blancs et l'ouverture. Ces informations sont pratiques pour le cameraman ou le directeur de la photo qui doivent régier des plans individuels sur laamera. Toutefois, la sortie HDMI peut également afficher des informations utiles au réalisteur ou au scripte qui doivent garder l'oeil sur plusieurs plans ou cameras.

La Blackmagic Pocket Cinema Camera peut afficher des informations destinées au réalisteur sur la sortie HDMI
Lorsque you reglez les informations d'etat sur Realisateur au sein des parametes HDMI de l'onglet Moniteur, les informations d'etat suivantes s'affichent :
Im/s
Affiche la fréquence d'images sélectionnée pour cetteamera. Si le paramètre Enregistrement off speed est désactifé, seule la fréquence d'images du projet est affichée. Si le paramètre Enregistrement off speed est actifé, la fréquence d'images du capteur s'affiche, suivie de la fréquence d'images du projet.
CAM
Année L'identifiant de laamera, comme regle sur le clap de laamera. Pour plus d'informations, consultez la section « Clap »
OPERATEUR
Identifie l'opérateuramera, comme régèle sur le clap de laamera. Pour plus d'informations, consultez la section « Clap »
AFFICHAGE DE LA DUREE
Affiche la durée du clip en cours d'enregistrement, ou du dernier clip enregistré au format: heures:minutes:seconds.
BOBINE, SCENE, PRESE
Affiche la bobine, la scène et la prise en cours. Pour plus d'informations sur la création des libellés bobine, scène et prise, consultez la section « Clap »
- PLAGE DYNAMIQUE
La LUT appliquée à la sortie en cours est affichée dans le coin gauche de l'écran.
Lorsqu'aucune LUT n'a été appliquée, la plage dynamique affiche Film ou Video.
TIMECODE
Le timecode de laamera est affiché en heures:minutes:secondes-images dans le coin droit de l'écran.
Paramètre Les deux de l'onglet Moniteur - Page 1
Les paramètres du moniter qui affectent l'écran LCD et la sortie HDMI sont regroupés au sein du menu Les deux. Par exemple, si vous reglez le paramètre Zone sécurité % sur 90% dans ce menu, la zone de sécurité de l'écran LCD et de la sortie HDMI sera reglee sur 90%.
Les paramètres du monitér du menu Les deux sont regroupés sur 2 pages. Ils sont les suivants :

Repères de cadrage
Touchez les flèches gauche et croîte du paramètre Repères cadrage afin de désir entre les sept options de repères de cadrage pour toutes les sorties de laamera. Ces options sont décrites dans la section « Caracteristiques de l'écran tactile » de ce manuel. Vous pouvez également y acceder à partir du menu de monitoring LCD de l'écran LCD tactile. Veuillez notes que vous pouvez désir independamment si les repères de cadrage s'affichent sur l'écran LCD tactile et sur la sortie HDMI dans les menus de l'onglet Moniteur correspondants.
Repetes d'opacité
Touchez les flèches gauche et droite du paramètre Repères opacité pour désirir l'opacité des zones déliminées par les repères de cadrage sur l'écran tactile, ainsi que sur l'écran LCD tactile et la sortie HDMI. Les options sont 25%, 50%, 75% et 100%.
Focus Assist
La camera integre deux modes d'aide a la mise au point: Crete et Lignes colorées.
| Crête | Lorsque le mode Crête est sélectionné, les zones de l'image qui sont très nettes sur l'écran LCD tactile ou la sortie HDMI ne le seront pas sur l'image enregistrée. À l'écran, les zones nettes de l'image ressortent clairément contre l'arrière-plan. Comme il n'y a pas d'autres informations affichées à l'écran, c'est une façon intuitive de savoir si la mise au point a été effectuee, car le sujet sur lequel vous focalisez est séparé des autres éléments du plan. |
| Ligne colorée | Lorsque le mode Lignes colorées est sélectionné, une ligne de couleur s'affiche sur les zones nettes de l'image. Ce mode est un peu plus incommodant que le mode Crête car les lignes sont superposées à l'image. Cependant, c'est une aide à la mise au point précise pour les plans qui comportent de nombreux éléments. |
Niveau focus assist
Pour regler le niveau de l'aide à la mise au point de l'écran LCD tactile et de la sortie HDMI, touchez les options Faible, Modéré ou Élevé.
REMARQUE Regler le niveau d'intensité de l'aide à la mise au point n'active pas l'aide à la mise au point sur l'écran LCD ou sur la sortie HDMI. Vous devrez donc activer l'aide à la mise au point individuellement sur les sorties LCD et HDMI de l'onglet Moniteur.
CONSEIL Le niveau optimal d'aide à la mise au point peut varier selon les plans. Par exemple, lorsque vous effectuez la mise au point sur les acteurs, un niveau d'aide plus élevé permet de bien définir le contour du visage. En revanche, si vous reglez un niveau élevé sur un plan représentant du feuillage ou un mur de briques, vous allez sans doute obtenir trop d'informations nettes.
Couleur focus
Utilisez ce paramètre pour changer la couleur de la ligne de mise au point lorsque vous étés en mode Lignes colorées. Modifier la couleur de cette ligne peut faciliter l'aide à la mise au point. Les options disponibles sont Blanc, Rouge, Vert, Bleu et Noir.
Niveauzébra
Réglez le niveau d'exposition à partir duquel le zébra apparaît en touchant les flèches situées de part et d'autres du paramètre. Le niveau du zébra est régiable par palier de 5% entre 75% et 100% d'exposition.
Pour plus d'informations, consultez le paragraphe « Zébra » de la section « Caracteristiques de l'écran tactile »
Parametre Les deux de l'onglet Moniteur - Page 2
La deuxième page de l'onglet Monieur contient les options suivantes pour le paramètre Les deux :
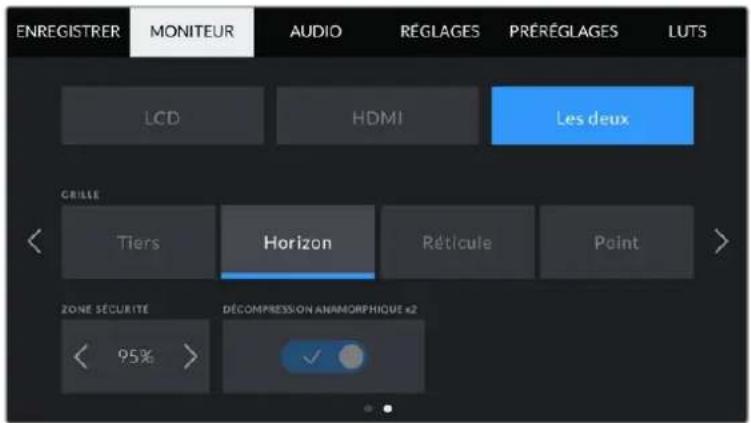
Page 2 de l'onglet Moniteur pour le paramètre Les deux
Grille
Pour regler la grille et les réticules que vous souhaitez afficher sur l'écran LCD tactile et sur la sortie HDMI, touchez l'option Tiers, Réticule ou Point de ce paramètre.
Pour plus d'informations, consultez le paragraphe Grille de la section « Caracteristiques de l'écran tactile »
Zone sécurité %
Pour modifier la taillie de la zone de sécurité sur l'écran LCD tactile et sur la sortie HDMI, touche les flèches situées de part et d'autres de ce paramètre. Le pourcentage indique la taillie de la zone de sécurité par rapport au cadre de l'image. La plupart des diffuseurs exigent une zone de sécurité de 90%.
Décompression anamorphique
Votre Pocket Cinema Camera peut appliquer une décompression anamorphique à l'écran tactile LCD et à la sortie HDMI. Avec les formats 16:9 et 17:9, vous pouvez activer le paramètre Décompression anamorphique 1,33x. Lorsque vous enregistrez en 3.7K anamorphique sur la Pocket Cinema Camera 6K ou en 2.8K anamorphique sur la Pocket Cinema Camera 4K, laamera applique automatiquement Décompression anamorphique x2.
Onglet Audio
L'onglet Audio vous permit d'ajuster les paramétres de l'entrée audio et du monitoring sur laamera.
Les paramètres audio de laamera sont regroupés sur deux pages et divisés entre les canaux 1 et 2.
Vou puez attribuer une source differente à chaque canal et ajuster divers paramétres, tels que le contrôle du gain.
Onglet Audio - Page 1
La première page de l'onglet Audio contient les paramètres suivants.
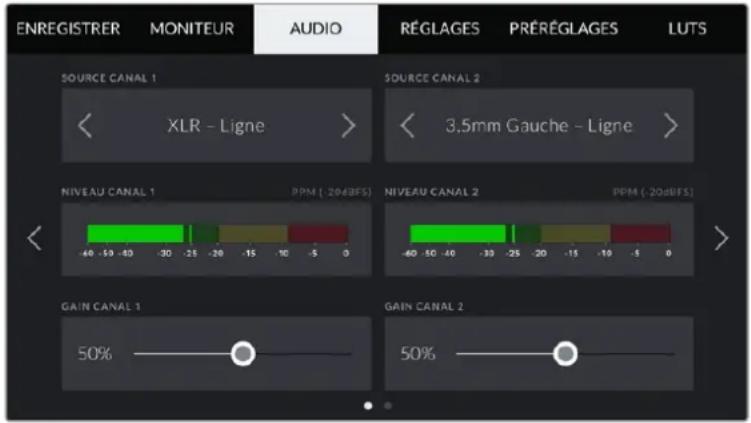
Sources des canaux
Utilisez les boutons Source canal 1 et Source canal 2 pour selectionner la source audio de chaque canal audio. Vous trouvez ci-dessous une description des parametes de chaque source de canal.
- Caméra Gauche ou Droit
Enregistre depuis les micros internes de laamera.
- Camera Mono
Crée un seul canal audio à partir des canaux gauche et droit des micros intégrés de laamera.
XLR-Ligne
Utilise l'entrée XLR de laamera pour enregistrer l'audio de niveau ligne.
XLR-Micro
Utilise l'entrée XLR de laamera pour enregistrer l'audio de niveau micro. Lorsque l'alimentation fantôme est activée et que l'entrée XLR est réglée sur Micro, l'indicateur +48V s'affiche également. Il est également important de vérifier que l'interrupteur +48V est désactifé lorsque vous déconnectez le micro avec l'alimentation fantôme.
3,5mm Gauche - Ligne
Utilise seulement le canal gauche de l'entrée 3,5mm en tant qu'audio de niveau ligne.
3,5mm Drolt-Ligne
Utilise seulement le canal droit de l'entrée 3,5mm en tant qu'audio de niveau ligne.
3,5mm Mono-Ligne
Crée un mix mono sur les canaux gauche et droit depuis l'entrée 3,5mm en tant qu'audio de niveau ligne.
3,5mm Gauche - Micro
Utilise seulement le canal gauche de l'entrée 3,5mm en tant qu'audio de niveau micro.
3,5mm Droit - Micro
Utilise seulement le canal droit de l'entrée 3,5mm en tant qu'audio de niveau micro.
3.5mm Mono - Micro
Cree un mix mono sur les canaux gauche et droit depuis l'entrée 3,5mm en tant qu'audio de niveau micro.
Aucune
Désactive le canal audio.
REMARQUE Lorsque vous selectionnez l'entrée de 3,5mm en tant que source audio, le canal 1 et le canal 2 doivent être tous deux en niveau ligne ou en niveau micro. Par exemple, si vous selectionnez 3,5mm Gauche - Ligne en tant que source du canal 1, les options disponibles pour l'entrée de 3,5mm sur le canal 2 seront également en niveau ligne : 3,5mm Gauche - Ligne, 3,5mm Droit - ligne et 3,5mm Mono - Ligne. Les options de niveau micro seront grisées.
Niveau canal 1 et 2
Les niveaux audio vous permettent de régler le niveau audio le plus adapté.
Gain canal 1 et 2
Utilizez ces curseurs pour ajuster les niveaux de l'enregistrement audio sur le canal 1 ou 2.
Onglet Audio - Page 2
La deuxieme page de l'onglet Audio contient les paramétres suivants.

Volume casque
Ce cursesper met d'ajuster les niveaux de la sortie du casque connecté au jack de 3,5 mm.
Déplacez le curseur audio vers la gauche ou vers la droite pour ajuster les niveaux.
Volume haut-parleur
Le curseur de ce paramètre permet d'ajuster les niveaux de la sortie du haut-parleur intégré. Déplacez le curseur audio vers la gauche ou vers la croite pour ajuster les niveaux.
Alimentation fantôme XLR
L'entrée XLR de laamera peut fournir une alimentation fantôme de 48V, pour vous permettre d'utiliser des micros qui ne sont pas autonomes. Lorsque laamera est reglée sur l'entrée audio XLR, il suffit d'activer ce paramètre pour activer l'alimentation fantôme.
Indicateurs audio
Selectionnez une forme d'indicateur audio pour afficher le niveau de crête.
| Réglage des indicateurs audio Norme | |
| PPM (-20 dBFS) SMPTE RP.0155 | |
| PPM (-18 dBFS) EBU R.68 | |
REMARQUE Il est recommandé de brancher le cable XLR avant d'activer l'alimentation fantôme. Il est également important de désactiver l'alimentation fantôme lorsqu'il n'y a plus de micro avec alimentation fantôme connecté. Connecter du matériel qui ne requiert pas d'alimentation fantôme lorsque vous étés en mode alimentation fantôme peut endommager votre équipement. Cela peut prendre un peu de temps avant que l'alimentation fantôme se décharge après l'avoir désactivée.
Il est donc judicieux d'attendre quelques minutes avant de brancher un autre micro ou du matériel audio XLR.
Onglet Réglages
L'onglet Reglages contient les paramètres d'identification de la Blackmagic Pocket Cinema Camera, la version du logiciel, les paramètres des boutons de fonction et d'autres paramètres de laamera qui ne sont pas directement liés à l'enregistrement ou au monitoring. Ce menu possède quatre pages. Vous pouvez passer d'une page à l'autre en touchant les flèches situées de part et d'autre de l'écran, ou en balayant l'écran vers la gauche ou vers la droite.
Onglet Reglages - Page 1
La première page de l'onglet Reglages de votreamera contient les options suivantes.
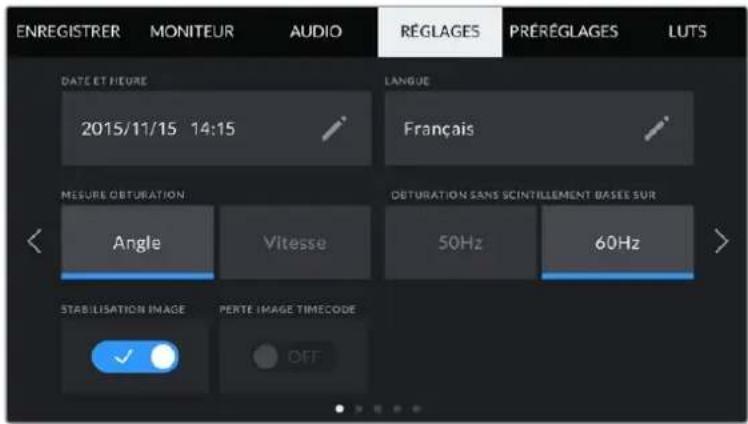
Date et heures
Réglez la date et l'heure de votreamera en touchant le paramètre Date et heures. Le format de la date est année, mois, jour. Le format de l'heure est 24 heures. Ce paramètre est également utilisé pour le timecode sous forme de code hora lorsqu'aucune source de timecode exter n'est connectée.
Langue
La Pocket Cinema Camera prend en charge 11 langues : l'anglais, le français, l'allemand, l'italien, le japonais, le coreen, le portugais, le russe, l'espagnol et le turc.
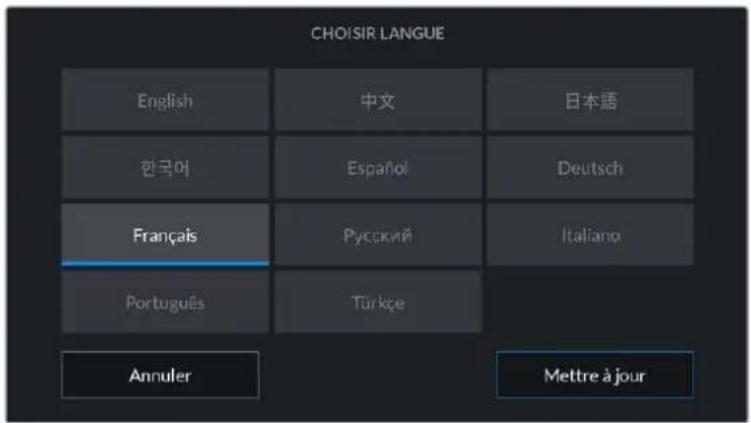
La page des langues apparait lors du démarrage et après la mise a jour du logiciel interne de laamera.
Pour désir la langue :
1 Touchez Langue et selectionnez la langue dans la liste.
2 Touchez Mettre a jour pour revenir au menu de configuration.
Mesure obturation
Utilisez le parametre Mesure obturation pour afficher l'angle d'obturation ou la vitesse d'obturation.
Il est important de noter que lorsque vous utilisez l'angle d'obturation, l'obturator se conforme à la fréquence d'images. Par exemple, 180 degrés produit le même flou de bouge, peu importe la fréquence d'images utilisée.
Toutefois, lorsque vous utilisez la vitesse d'obturation, une valeur absolue est attribuée à l'obturateur, déterminée independamment de la fréquence d'images. C'est pourquoi les résultats seront différents si vous changez de fréquence d'images.
Par exemple, si vous filmez à 24 images par seconde, 1/48 de seconde de vitesse d'obturation produit un flou de bouge/agreable, qui équivaudrait à un angle d'obturation de 180 degrés. Si vous changez la fréquence d'images sur 48 images par seconde et la vitesse d'obturation sur 1/48 seconde, vous obtiendrez un flou de bouge différent, qui équivaudrait à un angle d'obturation de 360 degrés. Dans cet exemple, une fois que la fréquence d'images a été changée sur 48 im/s, vous devrez également changer la vitesse d'obturation sur 1/96 de seconde afin de produit le même effet qu'un angle d'obturation à 180 degrés.
Obturation sans scintillagement basée sur
Utilisez ce paramètre pour modifier la fréquence du courant utilisée par votreamera pour calculer des angles d'obturation sans scintillage.
Lorsque vous filmez sous un éclairage artificiel, l'obturation可以选择 peut provoquer des scintillements. La Blackmagic Pocket Cinema Camera calcule automatiquement une valeur d'obturation sans scintillagement en fonction de la fréquence d'images et suggéré jusqu'à trois valeurs d'obturation. Les valeurs d'obturation sont affectées par la fréquence du courant utilisé pour cet éclairage. Dans la plupart des pays qui utilisent la norme PAL, cette fréquence est de 50Hz. En revanche, dans les pays qui utilisent la norme NTSC, cette fréquence est de 60Hz. Touchez le paramètre 50Hz ou 60Hz pour régler la fréquence appropriée pour votre région.
REMARQUE Les caractéristiques de certaines sources lumineuses peuvent provoquer des scintillements même lorsque vous utilisez des valeurs d'obturation sans scintillagement. Lorsque vous n'utilise pas de lumière continue, nous vous recommendons d'effectuer un test avant de commencer le tournage.
Stabilisation image
La Pocket Cinema Camera 4K comprend le paramètre Stabilisation Image pour activer ou désactiver la stabilisation d'image sur les objectifs qui ne sont pas dotés d'interrupteur physique.
Perte image timecode
Utilisez le paramètre Perte image timocode pour éliminer quelques images du timocode à intervalle régulier lorsque vous utilisez des fréquences d'images de projet NTSC de 29.97 et 59.94.
Le timecode de votre projet sera ainsi toujours correct, bien que chaque seconde ne contienne pas un nombre entier d'images pour les fréquences d'images NTSC.
Onglet Reglages - Page 2
La deuxieme page de l'onglet Reglages contient les paramétres suivants.
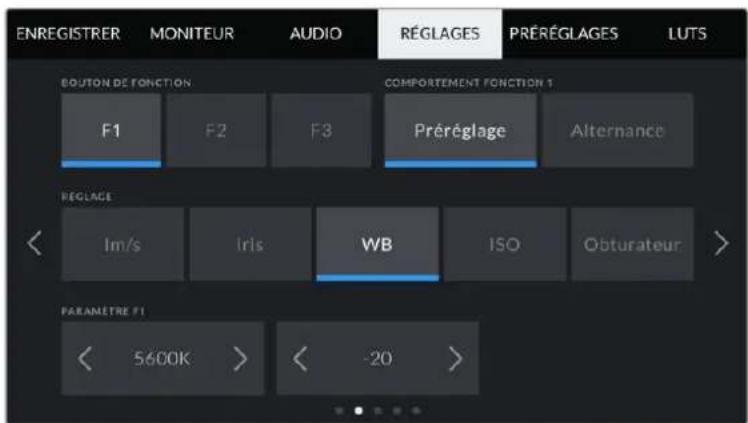
Bouton de fonction
La face supérieure de la Blackmagic Pocket Cinema Camera comprend trois boutons de fonction. Le nombre de points sur chaque bouton représenté le numero de chaque fonction (1, 2 et 3). Vous pouvez assigner ces boutons à des fonctionnalités que vous utilisez frequentlyment, afin d'y accederrapidement.

Les boutons de fonctions représentés par des points sont situés sur la face supérieure de votreamera
Pour configurer ces boutons, selectionnez un bouton de fonction, puis sa fonction, un paramètre et une valeur pour ce paramètre.

1 Bouton 2 Comportement 3 Reglage 4 Parametre
Comportement du bouton de fonction
Une fois que vous avez selectionné le bouton que vous souhaitez mapper, vous pourrez selectionner une fonction. Les options disponibles sont :
| Préréglage | Lorsque vous appuyez sur un bouton régle sur cette fonction, un paramètre et une valeur sont rappelés en mémoire.Pour configurer un préréglage, sélectionnez le paramètre que vous souhaitez utiliser dans l'onglet Réglages, puis ajustez ce paramètre en touchant les flèches situées de part et d'autre du menu Paramètre de la fonction.Par exemple, pour rappeler une ouverture de f8 à partir du bouton F1, sélectionnez Préréglage dans le menu Comportement fonction 1, touchez le paramètre Iris dans le menu Réglage, puis touchez les flèches situées de part et d'autre du menu Paramètre jusqu'à ce que vous obtieniez la valeur f8. Si vous touchez à nouveau le paramètre Préréglage, vous reviendrez au paramètre précédent. |
| Alternance | Lorsque vous appuyez sur un bouton régle sur cette fonction, le paramètreChoisi sera activé ou désactivé. Le menu Réglage est grisé lorsque vous utilisez ce mode. Touchez les flèches gauche ou croite dans le menu Paramètre pour faire défilier les options disponibles. Les options sont Rec. off speed, OIS, Clean feed, Afficher LUT, Repères de cadrage, Focus Assist, Fausses couleurs, Zébra, Grille et Zone de sécurité.La fonction Alternance vous permet également de sélectionner la sortie à laquelle ce paramètre s'applique. Touchez n'importe celle combinaison pour les sorties LCD et HDMI. Si la sortie d'une option n'est pas sélectionnable, comme Rec. off speed qui s'applique à toutes les sorties, les options LCD et HDMI sont désactivées. |
Onglet Reglages - Page 3
La troisième page de l'onglet Réglages contient les paramètres suivants.
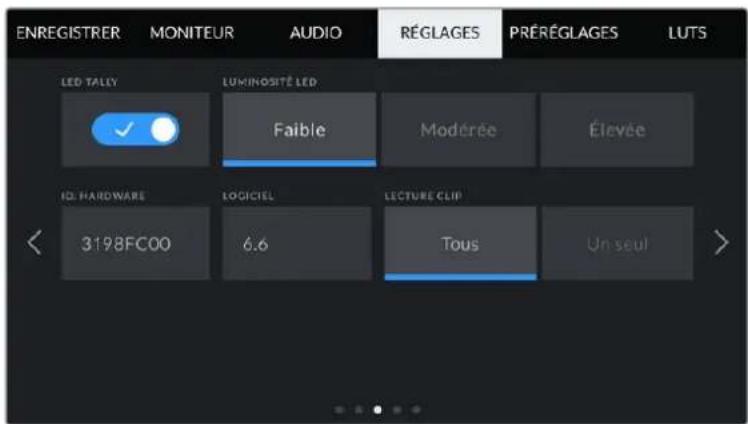
LED tally
La Pocket Cinema Camera est dotée d'unvoyant LED à l'avant de l'appareil pour indiquer l'etat d'enregistrement de la camera et du tally lorsque celle-ci est connectée au Blackmagic ATEM Mini. Si vous branchez la Pocket Cinema Camera à l'ATEM Mini pour contrôler l'enregistrement à distance et régler les paramétres de la camera, levoyant tally indique l'etat du signal de la camera. Pour plus d'informations, consultez la section « Contrôle des caméras avec l'ATEM Mini » de ce manuel.

Enregistrement sur le support de stockage de laamera.

Le signal de laamera est à l'antenne.

Le signal de laamera va etre diffuse a l'antenne.
Pour activer ou désactiver levoyant tally,utilisezle parametreLED tally.
Luminosite LED
Réglez la luminosité duvoyant tally en touchant les options Faible pour une luminosité réduite, Moderée pour une luminosité moyenne ou Élevée pour une forte luminosité.
ID. hardware
Le paramètre ID, hardware affiche un identifient à 8 caractères pour la Blackmagic Pocket Cinema Camera. Chaqueamera possède un identifient qui lui est propre. Une version de 32 caractères de cet identifient est incluse dans les métadonnées pour la video Blackmagic RAW et ProRes. C'est pratique pour identifier de chaqueamera provient chaque séquence.
Logiciel
Ce paramètre affiche la version du logiciel installée sur laamera. Pour plus d'informations, consultez la section « Utilitaire Blackmagic Camera Setup » de ce manuel.
Lecture clip
Ce paramètre vous permet de selectionner le mode de lecture des clips sur Tous ou Un seul sur l'écran LCD tactile depuis la carte SD, CFast ou depuis le disque flash USB-C. Le mode Tous lit les medias dont les réglages sont identiques de manière séquentielle. Le mode Un seul lit un clip à la fois. Ces modes s'appliquent également avec la fonction de lecture en boucle. Lorsque le mode Tous est activé avec la lecture en boucle, tous les clips qui se trouvent sur le support de stockage sont lus en continu. Lorsque le mode Un seul est activé avec la lecture en boucle, un seul clip est lu en boucle.
Onglet Reglages - Page 4
La quatrième page de l'onglet Régliages contient les paramètres du Bluetooth®.
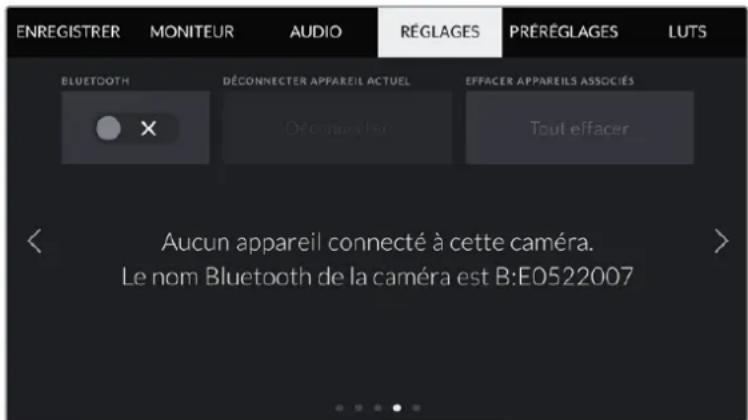
Le nom de laamera Bluetooth est composé de la dette de laamera comme régèle sur le clap, suivi des 8 caractères de l'identifant de votreamera.
Bluetooth®
La fonction Bluetooth vous permet de contrôler laamera à distance à partir d'appareils portables. En utilisant l'application Blackmagic Camera Control App, vous pouze change les paramétres, modifier les métadonnées et déclencher l'enregistrement à distance depuis un iPad. Vous pouze activer et désactiver le Bluetooth en touchant l'interrupteur de la fonction Bluetooth. Lorsque le Bluetooth est activé, laamera peut être détectée par des appareils dotés du Bluetooth à une distance de 9 metres. comme les commandes de votreamera pour le contrôle Bluetooth sont les mêmes que pour le Blackmagic SDI Camera Control Protocol, vous pouze créé vos propres applications pour contrôler quasiment tous les paramétres de laamera à distance. Par exemple, vous pourrez contrôler à distance les paramétres de monitoring et audio, l'util d'étabonnage DaVinci Resolve intégré ou l'objetif.
Pour plus d'informations, veuillez consultier le document « Blackmagic Camera Control » disponible sur le site Internet www.blackmagicdesign.com/fr/developer
Pour associé votreamera à un iPad pour la première fois :
1 Activez le Bluetooth en touchant l'interrupteur de la fonction Bluetooth dans l'onglet Reglages.
2 Ouvrez l'application Blackmagic Camera Control App et désissez laamera que vous souhaitez associier. Les caméras disponibles sont affichées par leur dette, suivie de leur identifient unique. Par exemple A:A0974BEA.
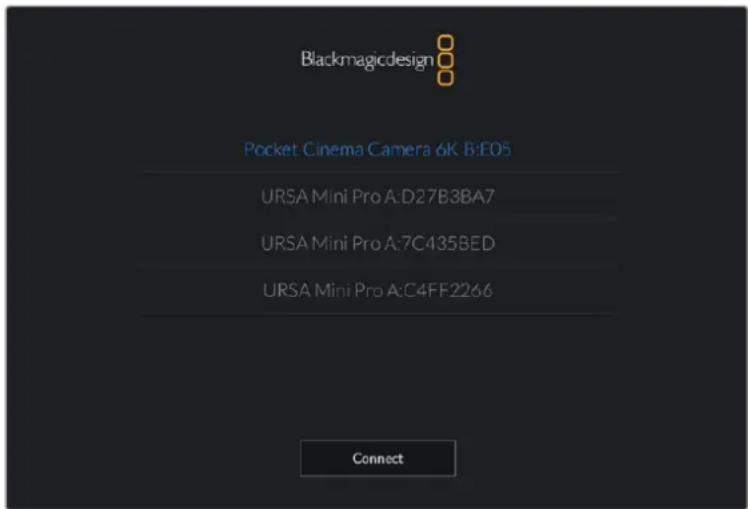
Selectionne la Blackmagic Pocket Cinema Camera que vous souhaitez associier.
REMARQUE Lorsque vous installez l'application Blackmagic Camera Control et que vous l'utilisez pour la première fois, un message s'affichera pour vous demander si vous souhaitez activer les services de localisation. Si vous selectionnez l'option While using the app (lors de l'utilisation de l'appli), les données GPS de votre iPad seront intégrées aux métadonnées des filchiers que vous tournez, ce qui vous permettra de géotaguer les séquences. Ces informations peuvent être visualisées dans les versions Blackmagic DaVinci Resolve 15 ou plus récentes.
Si vous ne souhaitez pas autoriser l'utilisation de ces informations, Sélectionnez Never.
Pour changer ces paramètres depuis vous iPad, allez sur réglages, confidérialité, service de localisation, contrôle de laamera.
3 Si vous vous connectez pour la première fois avec l'application, il vous sera demandé d'entre un code à 6 chiffres pour permettre à l'IPad de s'associer à laamera. Ce code sera affché sur l'écran LCD de laamera. Saisissez ce code dans votre IPad et appuyez sur Pair.
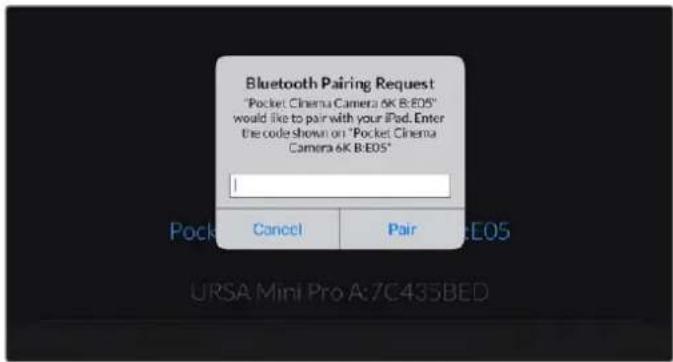

4 Lorsque la camera se connecte à l'iPad, elle confirme qu'elle est bien associée.

5 Si l'association échoue, laamera affichera un message d'erreur. Dans ce cas, essayez une nouvelle fois de connecter laamera.

REMARQUE Pour des raisons de sécurité, nous vous conseillons de désactiver la fonction
Bluetooth de votre Blackmagic Pocket Cinema Camera quand vous ne l'utilisez pas.
Déconnecter appareil actuel
Utilisez ce réglage pour déconnecter la Blackmagic Pocket Cinema Camera de l'iPad auquel elle est associée.
Effacer appareils associés
Utilisez ce parametre pour supprimer la liste des appareils qui ont ete associés a touvre camera.
Contrôler votreamera avec l'application Blackmagic Camera Control
Une fois que vous camera est associée à un iPad, vous pouvez changer les paramétres, régler les métadonnées et déclencher l'enregistrement à distance via l'application iPad.
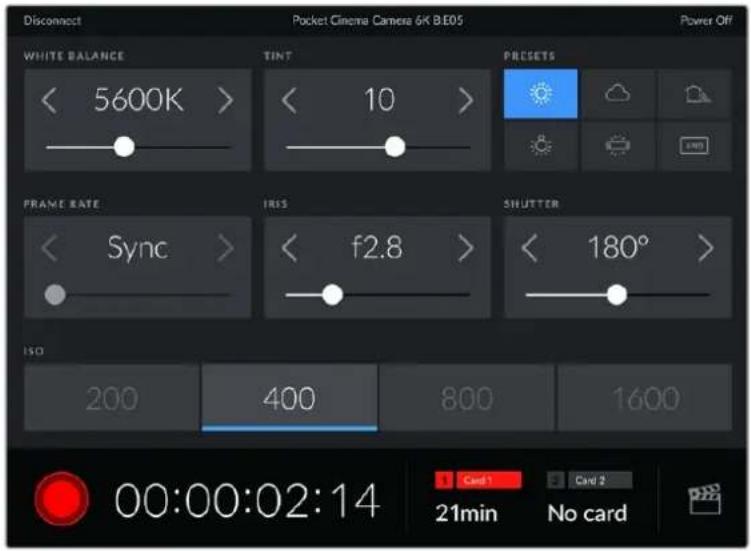
Quand la camera est associée, l'application Blackmagic Camera Control affiche un écran vous permettant de régler les paramétres et de déclencher l'enregistrement.
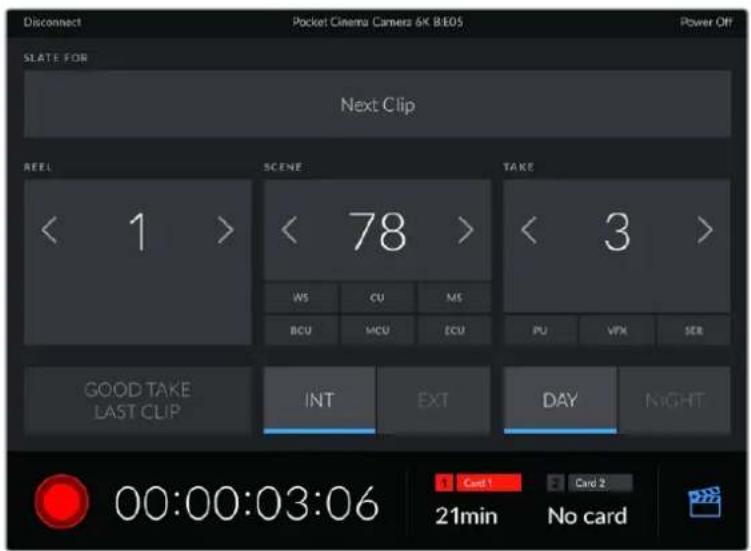
Touchez l'icone du clap dans le coin inférieur gauche pour acceder aux fonctions du clap et lemettre a jour.
La Blackmagic Pocket Cinema Camera utilise la technologie Bluetooth Low Energy pour le contrôle à distance des appareils. Le protocole du Bluetooth est du même type que celui utilisé dans des appareils portables, ce qui permet d'optimiser l'utilisation de la batterie.
Onglet Reglages - Page 5
La derniere page de I'onglet Reglages permet de reinitialiser les reglages de laamera, de remapper les pixels et de calibrer le capteur de mouvement pour regler l'horizon.
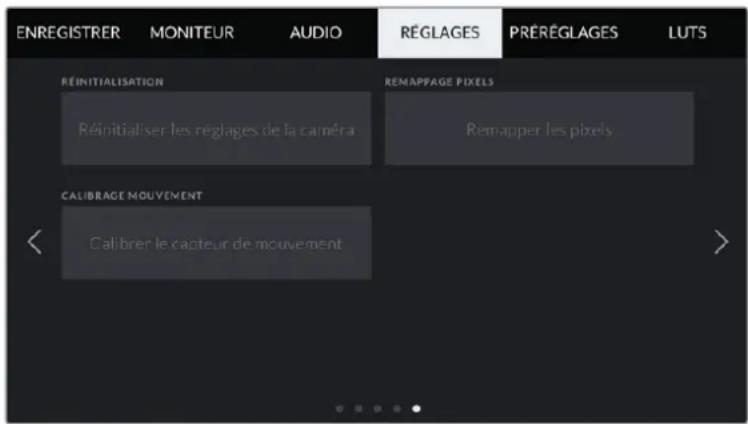
Réinitialisation
Si vous souhaitez réinitialiser laamera sur ses paramètres d'usine, touchez le bouton Réinitialiser les réglages de laamera. Sur la page de confirmation, touchez Réinitialiser pour confirmer l'action. Notreamera supprimera toutes les LUTs et tous les préréglages stockés, puis restaurera tous les réglages. Avant de réinitialiser les paramètres, il est conseillé d'exporter vos préréglages sur une carte mémoire, comme stockage de secours. Àprous une réinitialisation, vous pouvez restaurerrapidement vos préréglages en les important depuis une carte mémoire. Veuillez notes que la réinitialisation restaque également le capteur de mouvement. Vous devrez donc le recalibrer pour assurer l'exactitude de ses données.
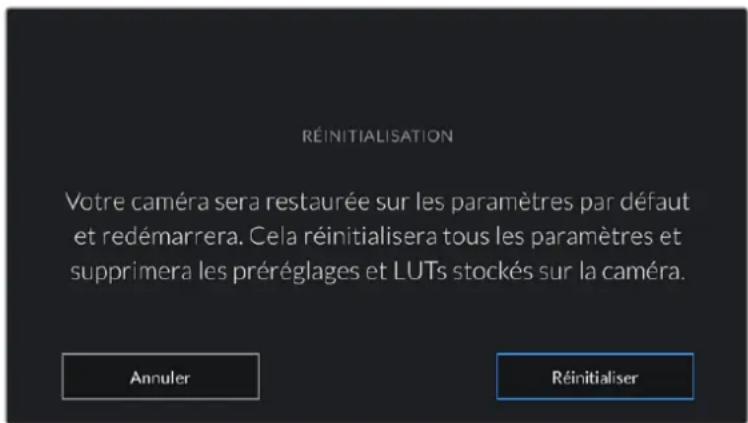
Lorsque you selectionnez Reinitialisation, un message s'affiche pour vous demander de confirmer l'action.
Remappable pixels
Le capteur CMOS de votre Blackmagic Pocket Cinema Camera est composé de millions de pixels sensibles à la lumière. Le capteur a été calibré en usine, mais la luminosité de certains pixels peut changer avec le temps. En effet, ils peuventvenir plus visibles, c'est ce qu'on appelle des « pixels chauds ». Toutes les caméras, peu importe le fabricant, développement des pixels chauds.
Pour régler ce problème, nous avons intégré une fonctionnalité de calibrage à laamera, que vous pouvez utiliser si des pixels chauds apparaissent.
Pour cela, remettez le cache de l'objet et lancez la fonctionnalité de remappage des pixels en appuyant sur le bouton Remapper les pixels. L'opération prend environ une minute.
Calibrage movement
Pour calibrer l'indicateur d'horizon, placez votre camera sur une surface plane, puis appuyez sur Calibrer le capteur de mouvement. Il est essentiel de garder laamera stable pendant tout le calibrage. L'opération prend environ cinq secondes.
Onglet Préroglages
L'onglet Prééglages vous permet de sauvégarder et de rappeler 12 paramètres. C'est très utile lorsqu'uneamera est utilisée sur plusieurs projets. Par exemple, vous pouvez utiliser votreamera pour des documentaires ou des clips musicaux et avoir des paramètres très différents selon le projet. La fonction Prééglages vous permit de sauvégarder la configuration d'un projet ou d'un type de tournée et de le rappeler facilement quand vous en avez besoin. Vous avez 12 emplacements pour les prééglages à votre disposition.
Vou puez eaglement importer et exporter des preréglages, ce qui est très pratique pour les tournages multicamères. Vou pouze régler une Blackmagic Pocket Cinema Camera pour un projet, puis exporter ce preréglage pour toutes les autres Blackmagic Pocket Cinema Camera générées sur le plateau.

L'onglet Prééglages vous permet de basculer rapidement entre les prééglages sauvégardés
REMARQUE La mémoire interne de laamera peut sauvégarder jusqu'à 12 prêrglages.
Boutons de préroglage
Les icones situées dans le bandeau inférieur du menu Préroglages correspondent aux fonctions suivantes.
| + | ✓ | ← | ← | → |
| Ajouter | Charger | Mettre à jour | Gérer | Supprimer |
Sauvegarder et rappeler les préroglages
Pour creer un nouveau preréglage, touchez l'icone Ajouter. Un clavier tactile s'affichera sur l'écran LCD et vous pourrez nommer le preréglage. Saisissez un nom, puis touchez l'icone Mettre à jour pour sauvegarder tous les réglages actuels dans ce preréglage.
Si laamera possede déjà un preréglage portant le même nom, vous pourrez replacer le preréglage existant ou garder les deux preréglages.
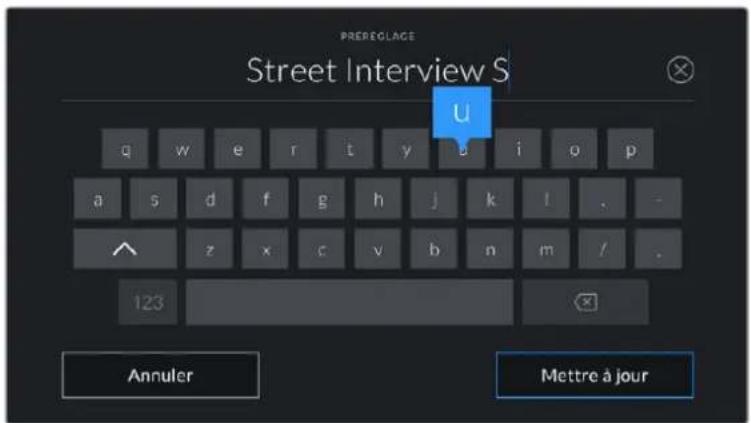
Saisissez un nom pour le préréglage à l'aide du clavier tactile en touchant l'icone Ajouter de l'onglet Préréglages.
Une fois le prépréglage sauvegardé, touchez son nom dans l'onglet Prépréglages afin de le sélectionner. Pour charger un prépréglage, touchez l'icone Charger.

Selectionnez un preréglage et touchez l'icone Charger pour le charger. Les prerégliages selectionnés s'affichent en bleu, tandis que les prerégliages charges sont soulignés en bleu
Vou puez metre a jour un preréglage en touchant l'icone Mettre a jour. Un message s'affichera pour vous demander de confirmier la mise a jour. Touche z le bouton Mettre a jour pour confirmer.
Importer des préroglages
Pour importer des préroglages, touche l'icone Gérer située dans le bandeau inférieur. Sélectionnez Importer un préroglage, puis Importer pour confirmer. L'écran d'importation s'affiche. Si vous préroglage favori ne se trouve pas sur la carte ou le disque actif, basculez entre les supports en touchant le bouton des supports situé en haut de l'écran tactile. Vous pouvez importer des préroglages depuis une carte CFast ou SD, ou depuis un disque flash USB-C.
Laamera effectue une recherche dans le repertoire racine et dans le dossier des prérogliages du support selectionné. Les prérogliages que vous avez sauvégardés à un autre emplacement ne sont pas visibles.
Touchez un prépréglage pour le sélectionner, puis sélectionnez Importer pour confirmer toute sélection et le copier sur un emplacement disponible.
REMARQUE Lorsque les 12 emplacements sont pleins, le menu d'importation est
indisponible. Vous devrez alors supprimer un préRéglage pour faire de la place.
Si le preréglage que vous souhaitez importer porte le même nom qu'un autre preréglage
sauvegardé sur laamera, vous pouvez remplacer le préreglage existant ou garder les deux.
En haut à droite de l'écran, vous verrez un nombre qui représenté les prêrglages vides, disponibles
sur laamera. Vous ne pouvez pas exceder ce nombre.
Exporter des prérogliages
Pour exporter un prééglage sur une carte ou un disque flash USB-C, touche le prééglage à exporter, puis touche l'icone Gérer. Touchez Exporter le prééglage sélectionné, puis seLECTIONnez le support de votre choix. Si un prééglage porte le même nom qu'un prééglage déjà existant, vous pouvez remplaçer le prééglage existant ou garder les deux. Laamera exporte le prééglage dans un dossier Presets.
Supprimer des préroglages
Pour supprimer un prépréglage, il suffit de le sélectionner et de toucher l'icone Supprimer. Lorsqu'il vous est demandé de confirmer votre choix, appuyez sur Supprimer.
LUTs 3D
L'onglet LUTS vous permet d'importer, d'exporter et d'appliquer des LUTS 3D aux sorties de laamera.
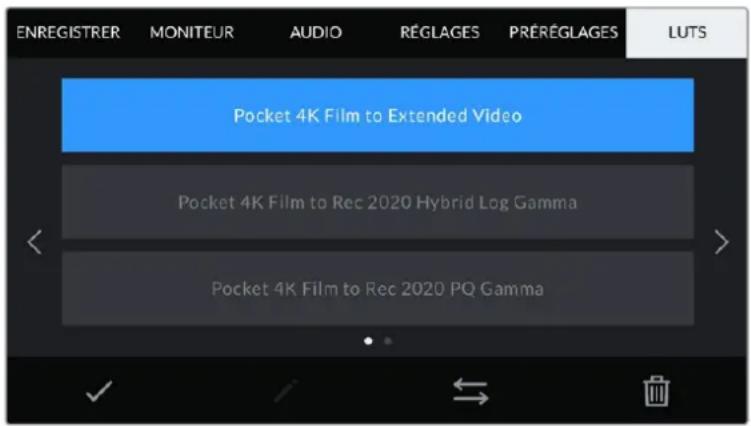
Selectionnez une LUT 3D via l'onglet LUT de la camera
Présentation des LUTs 3D
Les LUTs 3D peuvent etre appliquees aux images sur I'ecran LCD tactile et sur la sortie HDMI.
Les LUTs indiquent à laamera qu'elle couleur et qu'elle luminance doit s'afficher pour une couleur ou une luminance donnée. Par exemple, une LUT peut communiquer à laamera d'afficher une couleur bleue vivé et saturaèe quand elle recoit une couleur bleue relativement terne. C'est une fonction très pratique lorsque vous tournez des séquences en Blackmagic RAW, ou que vous utilisez le mode Film, qui offrent tout deux des images peu contrastées. Le fait d'appliquer une LUT vous donna sera une meilleure idée du rendu de la série après l'étabonnage.
Il est facile de creer des LUTs 3D avec DaVinci Resolve ou d'autres logiciels d'etalonnage.
De nombreuses LUTs sont également disponibles en ligne. Laamera peut stocker jusqu'à dix LUTs
3D à 17 ou 33 points, d'un maximum de 1,5 mèga-octet chacune. Une fois chargée, vous pouvez
choisir d'afficher une LUT sur I'ecran LCD tactile et sur la sortie HDMI.
La Blackmagic Pocket Cinema Camera prend en charge les LUTs 3D à 33 points au format .cube,
creées au sein de DaVinci Resolve et les LUTs 3D à 17 points, converties au format .cube de Resolve
via des programmes de conversion de LUT. Laamera traite les LUTs 3D à l'aide d'une interpolation
tetraédrique d'excellente qualité.
CONSEIL Pour plus d'informations sur l'affichage des LUTs, consultez la section
« Onglet Moniteur » de ce manuel.
REMARQUE Avec la Blackmagic Pocket Cinema Camera, vous ne pouvez pas appliquer ou intégrer de LUTs par défaut sur des clips enregistrés. Pour intégrer une LUT à vos clips, vous devrez activer cette fonction.
C'est une option pratique lorsque vous n'avez pas le temps d'effectuer l'étalonnage en post-production, ou quand vous doivent fournir les images directement à un client ou au monteur.
Lorsque you utilisez une LUT en tant qu'outil de previsualisation, les informations de la
LUT sont sauvégardées en tant que métadonnées avec vos enregistements. DaVinci
Resolve peut afficher ces informations dans le champ LUT utilisée de l'onglet des
metadonnées. Cela peut être utile pour les étalonneurs qui souhaitent vérifier le nom de la
LUT qui a ete utilisee pendant le tournage.
LUTs intégrées
Laamera offre des LUTs integrees qui permettent de previsualiser les differents styles lorsque vous filmez avec la plaque dynamique Film ou en Blackmagic RAW.
Chaqueamera offre des LUTs specifiques au capteur :
Pocket 4K Film to Extended Video / Pocket 6K Film to Extended Video
Affiche une plage dynamique plus etendue que la LUT Pocket 4K Film to Video ou Pocket
6K Film to Video, tout en appliquant un léger changement de contraste et un affaillissement
progressif dans les haute lumières.
Pocket 4K Film to Rec 2020 Hybrid Log Gamma / Pocket 6K Film to Rec 2020 Hybrid Log Gamma
Affiche une image à mi-chemin entre le REC 709 et une image Log.
Pocket 4K Film to Rec 2020 PQ Gamma / Pocket 6K Film to Rec 2020 PQ Gamma
Affiche une courbe gamma calculée sur ce que percoit l'oeil humain, pour encoder
efficacement les images HDR.
Pocket 4K Film to Video / Pocket 6K Film to Video
Similaire à l'espace colorimétrique REC 709 pour la video haute définition. Offre un
niveau elevé de contraste et de saturation. Ce réglage peut être utile lorsque vous utilisez
la Blackmagic Pocket Cinema Camera avec d'autres caméras broadcast et l'espace
colorimétrique REC 709.
Boutons des LUTs
Les icones situées au bas de l'écran LUTS de laamera correspondant aux fonctions suivantes.


Charger Media Gérer Supprimer
Importer des LUTs
Pour importer une LUT 3D, touche l'icone Gérer située au-dessous du menu LUTS. Sélectionnez
Importer une LUT, puis Importer pour confirmer. L'écran d'importation s'affiche. Si vous LUT 3D
favorite ne se trouve pas sur la carte ou le disque actif, basculez entre les supports en touchant le bouton des supports situé en haut de l'écran tactile. Vous pouvez importer des LUTs depuis une carte CFast ou SD, ou depuis un disque flash USB-C.
Laamera effectue une recherche dans le repertoire racine et dans le dossier des LUTs 3D du support selectionné. Les LUTs que vous avez sauvégardées à un autre emplacement ne sont pas visibles.
Touchez une LUT pour la sélectionner, puis touchez Importer pour confirmer votre sélection et la copier sur un emplacement disponible.
REMARQUE Lorsque les dix emplacements pour LUT 3D sont pleins, vous devrez supprimer des LUTs existantes afin de pouvoir en importer des nouvelles.
Si la LUT que vous souhaitez importer porte le même nom qu'une autre LUT sauvegardee sur la camera, vous pourrez remplacer la LUT existante ou garder les deux LUTs. En haut a droite de I'ecran, vous verrez un nombre qui represente les LUTs vides, disponibles sur la camera. Vous ne pouvez pas exceder ce nombre.
REMARQUE Si vous rencontres des difficultés pour importer une LUT, cela peut être du à sa taille. Vous pouvez utiliser unéditeur de LUT tel que Lattice pour vérifier sa taille, ou l'ouvrir dans unéditeur de texte sur votre ordinateur. À côté de l'intitèle LUT_3D_SIZE, vous trouvrez un nombre indiquant la taille de la LUT. Si cette valeur n'est pas de 17 ou 33 points, vous pouvez utiliser Lattice pour redimensionner la LUT 3D sur 17 points.
Appliqueune LUT
Une fois la LUT sauvegardée sur la camera, selectionnez-la dans le menu LUT, puis touchez l'icone Charger. La LUT est ainsi activée sur toutes les sorties de la camera. Pour afficher la LUT chargee sur les sorties de la camera, activez le bouton Afficher LUT dans le menu Moniteur. Pour plus d'informations a ce sujet, consultez la section « Onglet Moniteur »
Exporter des LUTs
Pour exporter une LUT sur une carte ou un disque flash USB-C, Sélectionnéz la LUT à exporter, puis touchez l'icone Gérer. Touchez Exporter la LUT sélectionnée, puis Sélectionnéz le support de votrechoix. Si une LUT porte le même nom qu'une LUT déjà existante, vous pouvez replacer la LUT existante ou garder les deux. Laamera exporting la LUT dans un dossier 3DLUTs.
Supprimer des LUTs
Pour supprimer des LUTs que vous ne souhaitez plus utiliser, Sélectionnez les LUTs de votre choix et touchez l'icone Supprimer. Lorsqu'il vous est demandé de confirmer votre choix, appuyez sur Supprimer.
LUTs 3D intégrées
Lorsque vous utilisez une LUT 3D en filmant en Blackmagic RAW avec une Blackmagic Pocket Cinema Camera, la LUT selectionnee sera integree au fisier Blackmagic RAW que vous enregistrez. Comme la LUT 3D est sauegardee avec vos fisiers enregistrres dans l'en-tete du fisier .braw, vous pouze facilement I'applieur a vos clips en post-production, sans avoir a gerer un fisier supplémentaire.
Lorsque les fichiers Blackmagic RAW sont livres à un monteur ou un écalonneur, ces derniers auront facilement accès à la LUT qui a été utilisée pendant le tournage. Ainsi, le risque de confondre les LUTs 3D et de les appliquer au mauvais clip est considérablement réduit. Ils peuvent désirer d'appliquer ou non la LUT 3D lors du montage ou de l'écalonnage, et peuvent désactiver la LUT à tout moment.
Lorsque la fonction Appliquer LUT dans filchier est activée dans le menu Enregistrer, le clip enregistré s'ouvrira dans le Blackmagic RAW Player et dans DaVinci Resolve avec la LUT 3D selectionnee.
Voupe activer ou desactiver l'application de la LUT 3D, mais elle sera toutes presente dans le fichier Blackmagic RAW. DaVinci Resolve comprend egalement une fonction Appliqueur LUT dans ses parametes, pour activer ou desactiver la LUT 3D dans le fichier Blackmagic RAW.
La fonction Appliquer LUT dans DaVinci Resolve est la même que dans laamera. Ainsi, quand vous filmez, vous pouvez demander à l'étaillonner d'utiliser une LUT depuis laamera. Mais vous pourrez facilement désactiver cette LUT dans DaVinci Resolve en réglant Appliquer une LUT sur Off.
Saisie des métadonnées
Les métadonnées sont des informations enregistrées dans le clip, telles que le nombre de prise et les paramétres de laamera. Ce sont des données extrémement pratiques pour trier et traiter les séquences en post-production. Par exemple, les nombres de prise, de plan et de scene sont des outils d'organisation essentiels. Les informations concernant l'objet peuvent être utilisées pour corriger automatiquement la déformation de l'image ou pour mistrice associier les VFX aux séquences.
La Blackmagic Pocket Cinema Camera enregistré automatiquement certaines métadonnées, telles que les paramètres de laamera, le timecode, la date et l'heure. Vous pouvez également utiliser le clap de laamera pour ajouter des informations supplémentaires.
Clap
Balayez I'ecran tactile vers la gauche ou vers la droite pour afficher le clap.
Le clap est divisé en deux onglets intitulés Clips et Projet. L'onglet Clip contient des informations qui peuvent varier selon les clips. En revanche, les informations qui sont identiques pour tous les clips sont saisies dans l'onglet Projet, par exemple les noms du projet, du réalisteur, de laamera et de l'opérateur.
CONSEIL Les métadonnées saisies dans le clap sont affichées sur la sortie HDMI lorsque l'option Afficher info. état pour est regléée sur Réalisateur dans l'onglet Moniteur. Pour plus d'informations, consultez la section « Onglet Moniteur » de ce manuel.
Métadonnées des clips
Les modifications apportées aux métadonnées des clips fonctionnent différemment en mode veille, lorsque laamera est prête à enregistrer, et en mode lecture, lorsque vous visionnez les séquences que vous avez tournées. En mode veille, les métadonnées des clips sont enregistrées sur le clip suivant, sauf si vous sélectionnez Bonne prise dernier clip, qui marque le clip qui vient d'être enregistré comme une bonne prise. En mode lecture, le bouton Bonne prise s'affiche et les métadonnées des clips sont toujours liées au clip en cours de visionnage.
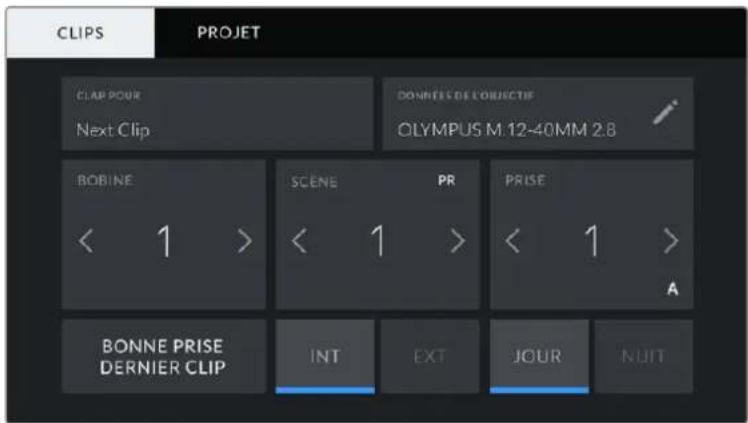
En mode lecture, le champ Clap pour Identifie le clip auquel se refere le clap et le bouton Bonne prise est visible. En mode veille, le clap se refere au Next clip (prochain clip) et le bouton Bonne prise dernier clip est visible.
Clap pour
Ce paramètre désigné le clip auquel les métadonnées affichées dans l'onglet Clips se reférènt. En mode lecture, elles se refèrent au clip actuel, alors qu'en mode veille, elles se refèrent au prochain clip que vous enregistrrez.
Données de l'objet
Ce paramètre affiche des informations concernant l'objet monté sur laamera. De nombreux objectifs électroniques fournissant automatiquement des informations telles que le modele de l'objet, l'ouverture et la distance fiscale. Si vous utilisez un objectif qui ne fournit pas ces informations, ou si vous souhaitezsaisir des données supplémentaires,touchez I'icone crayon de ce parametre pour les saisir manuellement. Le menu Données de I'objet s'affichera. Il contient les informations suivantes:
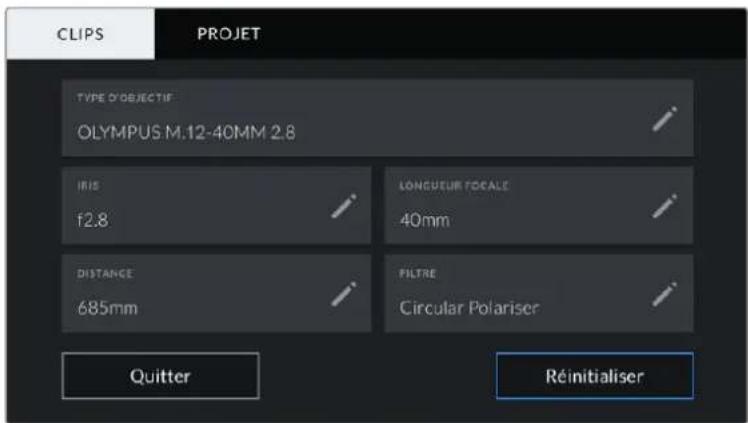
Les Données de l'objet affichent les informations généraes automatiquement depuis l'objet monté sur laamera, ainsi que les Informations sur les filtres saisies manuellement.
- Type d'objectif
Affiche le modele de I'objectif. Si le type d'objectif ne s'affiche pas automatiquement, touche ce parametre pour saisir les données manuelle. comme vous camera possede une base de données interne pour de nombreux objectifs, elle suggerera des noms automatiquement lorsque vous saississez des données manuelle. La saisie des données sera donc beaucoup plus rapide.
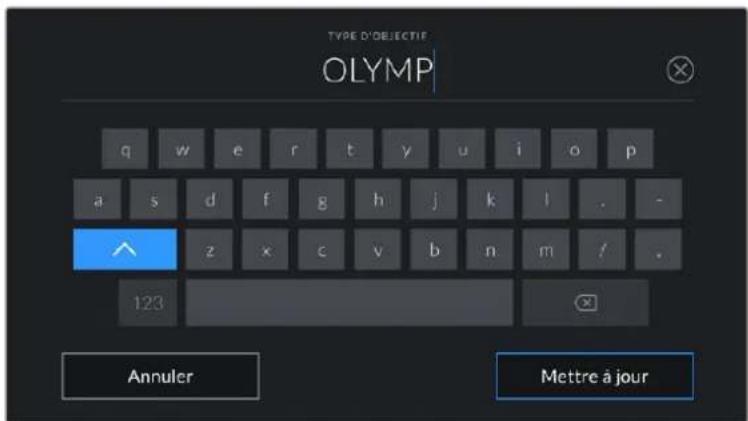
Utilisez le clavier tactile pour saisir les métadonnées de l'objet si elles n'apparaissent pas automatiquement
Irls
Ce paramètre indique l'ouverture de l'iris au début du clip. Lorsqu'elle est fournie automatiquement, cette information peut etre affichee en f- ou T-Stops selon I'objectif utilise. Touchez I'icone crayon de ce parametre pour saisir les données manuellement.
- Longueur focale
Ce paramètre indique la longueur fiscale de l'objet au début du clip enregistré.
Lorsqu'elle est fournie automatiquement, la longueur fiscale est exprimée en millimetres.
Touchez ce paramètre pour la saisir manuelle.
Distance
Ce paramètre indique la distance fiscale de l'objet pour le clip enregistré. Certains objectifs fournissant automatiquement cette information en millimétres. Vous pouvez également saisir manuellement cette catégorie.
Filtre
Ce paramètre indique les filtres utilisés. Touchez l'icone crayon de ce paramètre pour saisir les données manuellement. Vous pouvez saisir plusieurs données en les séparant par des virgules.
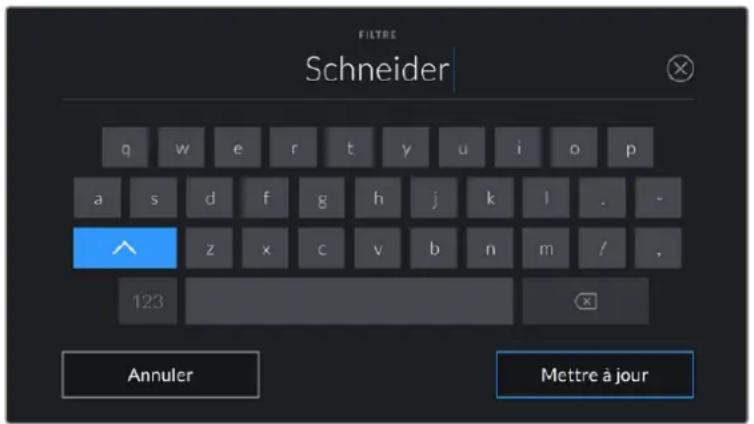
Les informations sur les filtres doivent etre saisies manuellement.
REMARQUE You pouvez effacer les données de l'objet如果当你在某日,你可以在你的邮箱里看到它。如果你希望知道它,你可以通过邮件或电话向它发送邮件。如果你希望知道它,你可以通过电子邮件或电话向它发送邮件。如果你希望知道它,你可以通过电子邮件或电话向它发送邮件。如果你希望知道它,你可以通过电子邮件或电话向它发送邮件。如果你希望知道它,你可以通过电子邮件或电话向它发送邮件。如果你希望知道它,你可以通过电子邮件或电话向它发送邮件。
Bobine
Affiche la bobine utilisée actuellément.
La Blackmagic Pocket Cinema Camera incrémente automatiquement le numero de bobine, il n'est donc généralement pas nécessaire de saisir cette information manuelle. Quand vous passez à un autre projet et que vous souhaitez recommencer à partir de la bobine 1, Sélectionnez Réinitialiser dans l'onglet Projet du clap.
Scene
Ce paramètre indique le nombre de la scene. Il est également possible d'afficher le nombre du plan et son type.
Ce numero fait toujours reférence à la scène en cours. Vous pouze l'ajuster à l'aide des flèches gauche et croite situées de part et d'autre du paramètre, ou en touchant le numero de scene pour acceder à l'éditeur de numero de scene.
Les numérodes scènes sont compris entre 1 et 9999.
En ajoutant une lecture au numero de scene dans l'éditeur de numero de scene, vous pourrez également indiquer le plan en cours. Par exemple, 23A indicate que vous allez filmer le plan 1 de la scene 23. Si vous ajoutez une lecture au numero de scene, laamera suggerera le numero de la prochaine scene et la lecture du prochain plan à chaque fois que vous accederez à l'éditeur de numero de scene. Par exemple, si l'identifiant de la scene actuelle est « 7B», laamera suggerera « 8 » et « 7C».
Le paramètre Scène peut également afficher des informations concernant le type de plan dans le coin supérieur droit. Vous pouvez selectionner ces informations sur le cote droit du clavier numérique dans l'éditeur de numero de scene.
Les types de plans disponibles sont :
PL Plan large
PM Plan moyen
PR Plan rapproché
GP Gros plan
PTS Plan très serré
TGP Très gros plan
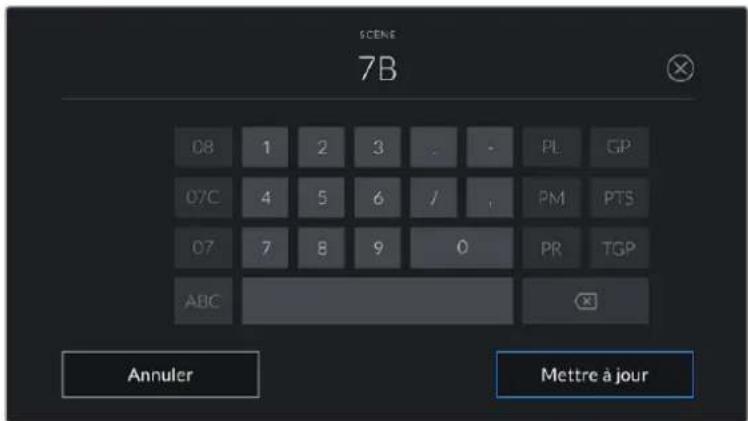
Lorsque vous saississez les métadonnées de la scène, laamera suggérera des numérios de scène sur le côte gauche du clavier tactile, et des types de plans sur le côte droit.
Prise
Ce paramètre indique le nombre de prise pour le plan en cours. Vous pouvez l'ajuster à l'aide des flèches gauche ou droite situées de part et d'autre du paramètre, ou en touchant l'indicateur afin d'acceder à l'éditeur de nombre de prise.
CONSEIL Lorsque le numero du plan ou la litter de la scene s'incrementent, le numero de prise se remettra sur 1.
Yououpezegalementajouterdesdescriptionsdansl'editeurde numero de prise.
Ces descriptions se trouvent sur la droite du clavier tactile et correspondent aux scenarios suivants :
| P/U | Pick up. Fait référence au tournage d'éléments supplémentaires d'une prise déjà tournée afin d'enrichir la série. |
| VFX | Visual Effects. Fait ↔reference à une prise ou à un plan auquel on ajoute des effets visuels. |
| SER | Series. Fait ↔reference à une situation où plusieurs prises ont été effectuées lors du même enregistrement. |
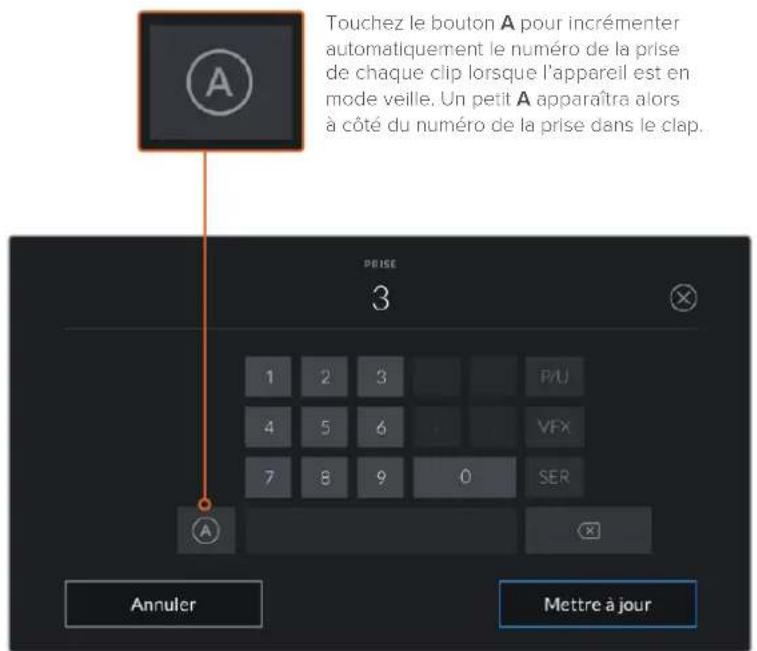
Lorsque you saisissez des metadonnées concernant la prise, la Blackmagic Pocket
Cinema Camera propose des types de plans sur le cote droit du clavier tactile.
Bonne prise
En mode lecture, touche ce bouton pour marquer les bonnes prises afin de pouvoir les retrouver facilement en post-production. Lorsque laamera est en mode veille et prete à enregistrer, touche le bouton Bonne prise dernier clip pour identifier le dernier clip enregistré en tant que Bonne prise.
Int/Ext
Touchez les paramétres Int ou Ext pour ajouter un marqueeur interieur ou extérieur au clip suivant en mode de veille, ou au clip en cours en mode de lecture.
Jour/Nuit
Touchez les paramétres Jour ou Nuit pour ajouter un marqueeur jour ou nuit au clip suivant en mode de veille, ou au clip en cours en mode de lecture.
Métadonnées de l'onglet Projet
Les métadonnées du projet fonctionnement de la même façon en mode de veille ou en mode de lecture. Ces métadonnées font toujours liérence à l'integralite du projet et sont independantes des nombres de clip.
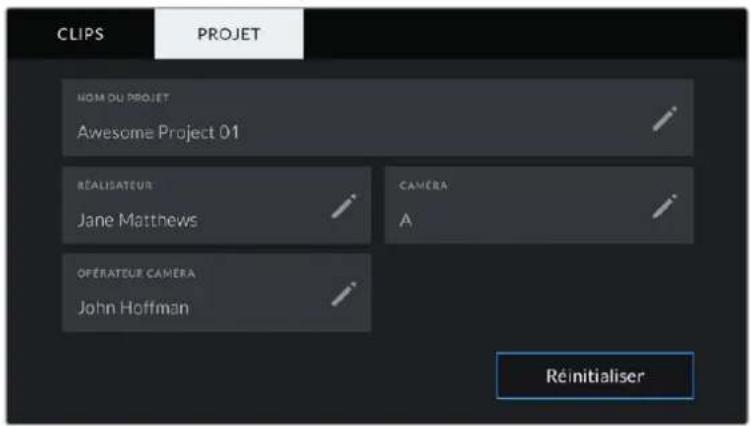
Saisissez les informations du projet dans l'onglet Projet du clap.
Projet
Affiche le nom du projet en cours. Touchez l'icone crayon pour modifier le nom du projet.
Réalisateur
Affiche le nom du réalisteur pour le projet en cours. Touchez l'icone crayon pour modifier le nom du réalisteur.
Camera
Affiche une seule lecture représentant laamera. Touchez l'icone crayon pour modifier cette lecture.
Opérateur camera
Affiche le nom de l'opérateur de laamera. Touchez l'icone crayon pour modifier le nom de l'opérateur de laamera.
Sortie video de laamera
Sortie de monitoring HD
Les connecteurs HDMI de laamera acheminent de la video HD 1080p. Vous pouvez ainsi facilement prévisualiser vos images depuis des moniteurs ou depuis des écrans de télévision standard. La sortie 10 bits prend également en charge le HDR et l'affichage de tous les indicateurs de laamera à l'écran, ce qui est parfait pour le monitoring sur le plateau.
Le monitoring HDMI peut être utilis lorsque l'accès à l'écran LCD est difficile, par exemple lorsque laamera est installée sur une grue ou dans un vehicule. Vous pouvez afficher les informations de monitoring sur toute sortie HDMI en les configurant dans les paramétres d'affichage HDMI. Les informations affichées à l'écran peuvent être des repères de cadrage ou des détails concernant l'enregistrement et les paramétres de laamera. Si vous souhaitez simplement contrôler vos prises de vue, il vous suffit de régler les informations à l'écran sur Off pour obtenir une sortie HDMI propre.
En utilisant un Blackmagic Micro Converter HDMI to SDI, vous pouvez convertir les signaux en SDI. Vous pourrez ainsi vous connecter à des moniteurs, des apparciels d'acquisition, des melangeurs broadcast SDI ou tout autre apparéil SDI. Le Blackmagic Micro Converter HDMI to SDI peut être alimenté via le port USB de la Blackmagic Pocket Cinema Camera.
Utiliser DaVinci Resolve
La production d'émissions télévisées ou de films avec votre Blackmagic Pocket Cinema Camera ne s'arrête pas au tournage. Il faut non seulement sauvegarder et organiser les medias, mais aussi effectuer le montage, l'étalonnage et l'encodage des fichiers master. La Blackmagic Pocket Cinema Camera comprend une version du logiciel DaVinci Resolve Studio pour Mac et Windows, vous disposez ainsi d'une solution complète pour le tournage et la post-production!
REMARQUE Nous recommendons d'utiliser la dernière version du logiciel DaVinci Resolve pour Obtir un traitement des couleurs optimal sur les clips tournés avec des cameras Pocket Cinema Camera. La version 16 ou ultérieure prend en charge le nouveau codec Blackmagic RAW et offre un traitement des couleurs précis à toutes les cameras Blackmagic.
Après avoir connecté le SSD, la carte SD ou la carte CFast à votre ordinateur, vous pouvez utiliser l'outil Clone de DaVinci Resolve situé sur la page Média pour créé des sauvégardes en cours de tournée. Cela permettra d'éviter de perdre des prises à cause de dommages ou de défauts. Une fois que vous avez utilisé DaVinci Resolve pour sauvégarder vos médias, vous pouvez charger vos clips dans la bibliothèque de Médias de DaVinci, puis monter, étalonner et finaliser votre projet sans quitter le logiciel.
DaVinci Resolve est utilisé pour produit la plupart des grosses productions hollywoodiennes. Il offre bien plus de fonctionnalités qu'un logiciel de montage non linéaire standard et intégre une technologie de pointe destinée à la création de longs métages haut de gamme. Vous bénéficiaz des avantages de cette technologie lorsque vous utilisez DaVinci Resolve pour le montage et l'étabonnage de vos travaux.
Vous trouvez ci-dessous des informations relatives à l'utilisation de DaVinci Resolve avec les fichiers enregistrés à l'aide de votreamera. Il va sans dire que DaVinci Resolve est un outil ultra performant et que son interface utilise renferme de nombreuses fonctionnalités. Pour plus d'informations sur l'utilisation de DaVinci Resolve, veuillez consulter le manuel d'utilisation de DaVinci Resolve sur le site internet de Blackmagic. Vous y trouvez également plusieurs formations et tutoriels.
Gestionnaire de projet
Avant d'importer des clips et de commencer le montage, vous doivent configurer leur projet à l'aide du Gestionnaire de projet.
Le Gestionnaire de projet est la première page qui s'affichera à l'écran lorsque vous lancez DaVinci Resolve, mais vous pouze y acceder à tout moment en cliquant sur l'icone d'accueil située en bas à droite de l'interface. Il permet d'ouvir d'anciens projets ou d'en creer de nouveaux.
Pour creer un nouveau projet, cliquez sur Nouveau projet en bas de la fenetre, puis nommez le projet. Cliquez sur Creer.
En utilisant la page Cut, vous pouvez directement commencer le montage.
Le Gestionnaire de projet affiche tous les projets de l'utilisateur
Pour plus d'informations sur le Gestionnaire de projet, veuillez consulter le manuel DaVinci Resolve teléchargeable depuis la page d'assistance du site internet de Blackmagic Design.
Monter avec la page Cut
La page Cut offre un workflow de montage rapide et dynamique pour assembler, raccorder et monter vos clips de maniere efficace.
Elle comprend deux timelines actives presents simultanément à l'écran. La première affiche la totalité du montage, tandis que la deuxième offre une vue détaillée d'une zone en particulier. Àsini, vous pouze déposer vos clips dans la grande timeline, puis peaufiner votre montage dans la timeline détaillée, le tout au sein du même espace de travail. Grace à ce workflow, vous pouze monter vos clips depuis un ordinateur portable sans perdre de temps à zoomer ou à scroller dans la timeline.
Disposition de la page Cut
Lorsque you ouvre la page Cut, you verrez la bibliothèque de medias, le viewer et la timeline.
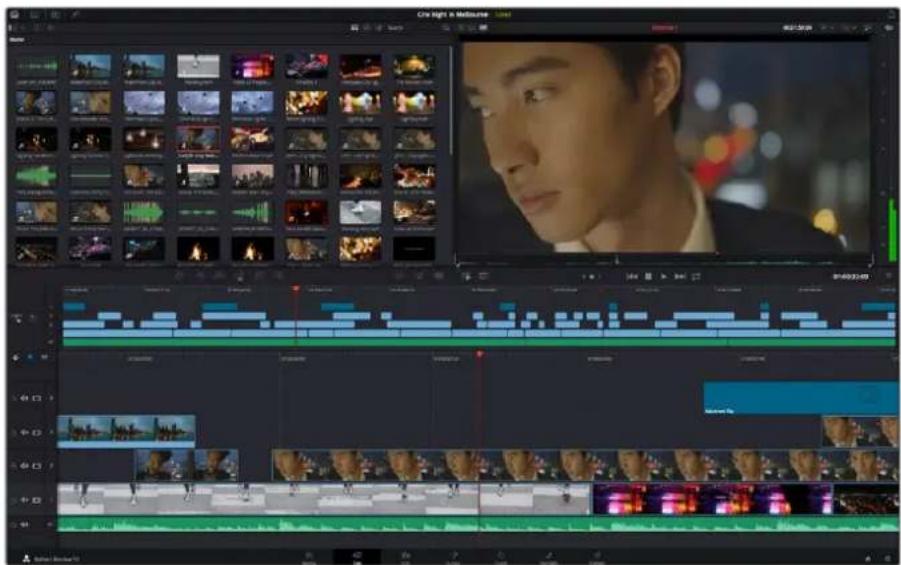
Disposition par défaut de la page Cul, avec la bibliothèque de medias affichée par vignette
Pour plus d'informations, veuilles consulter le chapitre « Using the Cut Page » du manuel DaVinci Resolve.
Onglets des medias
En haut a gauche de I'ecran, vous trouverez cinq anglets.
Cliquez sur ces onglets pour ouvrir les outils que vous utiliserez pour réaliser votre montage. Par exemple, le premier onglet est la bibliothèque de medias, et elle est seLECTIONnée par défaut. Les autres onglets sont dédiés au Sync bin, aux transitions, aux titres et aux effets.

- Bibliothèque de medias : La bibliothèque de medias contient tous les clips, dossiers et fichiers que vous avez importés via la page Média. Vous pouvez également importer de nouveaux fichiers directement depuis la page Cut, pour éviter d'avoir à revenir sur la page Média.
- Sync Bin: Cette puissant fonction permet de synchroniser automatiquement tous vos clips via le timecode, la date et l'heure. Ainsi, vous pouvez désir les angles depuis toutes les caméras sur un projet multicamera.
- Transitions: En cliquant sur cet onglet, vous afficherez toutes les transitions video et audio disponibles pour votre montage, dont les fondus enchânées, les volets animés et d'autres transitions publières.
- Titres : Cet onglet permet de sélectionner le type de titre de votrechioix, comme un textile defilant ou un synthe. Vous pouvez également utiliser les modèles Fusion pour travailler avec des titres animés dynamiques, personnalisables depuis la page Fusion de DaVinci Resolve.
- Effets : Cet onglet affiche tous les filtres et effets que vous pouvez utiliser pour enrichir votre montage, comme des effets de flou, d'éclat et de flare personnalisables. Vous avez le besoin parmi de nombreux effets, que vous pouvez retrouver facilement via l'outil de recherche.
CONSEIL Utilisez la barre de recherche pour retrouver facilement les éléments de votrechioix. Par exemple, si I'onglet Transitions est selectionné, entrez « Fondu » dans l'outil de recherche pour afficher uniquement les transitions de type fondu dans le viewer.
Icones du viewer
En haut a gauche de la fenetre du viewer, vous trouverez les boutons des modes du viewer.

Boutons des modes du viewer
Ces boutons permettent de contrôler quel mode du viewer est utilisé parmi Plan source, Bande source et Timeline. Ces modes du viewer offrent énormément d'options de contrôle lorsque vous sélectionnez les clips pour votre montage.
| Plan source Le viewer Plan source affiche un seul clip depuis la bibliothèque de medias et vous pouvez régler des points d'entrée et de sortie sur toute la longueur de la timeline du viewer. Cette option vous offre davantage de contrôle. Sélectionnez un clip source à visualiser en double-cliquant sur un clip dans la bibliothèque de medias, ou en le faisant glisser dans le viewer. | |
| Bande source Le mode Bande source permet de visionner tous les clips source dans la bibliothèque de medias. C'est très pratique pour recherche rapidement un moment précis parmi tous vos clips. Alors que vous survvolez les clips avec la tête de lecture, leurs vignettes sont sélectionnées dans la bibliothèque de medias. Ainsi, lorsque vous avez trouvez le clip que vous souhaitez monter, vous pouvez cliquer sur l'icone Plan source et son clip source correspondant apparaitra automatiquement dans le viewer. Ce mode vous offre la liberté de travailler sur votre montage, de rechercher rapidement des prises, de tester de nouvelles idées tout en restant dans le moment. | |
| Timeline Le viewer Timeline permet de voir la timeline de montage pour dire notre projet et peaufiner vos montages. |
Importer des clips dans la bibliothèque de medias
Voussoupiezdesormaiscommenceraimporterdesmediasdansvoireprojet.Pourcela,utilisezles outils d'importation situés au-dessus de la bibliothèque de medias de la page Cut.
Selectionnez une des options d'importation pour ajouter des medias à votre projet
| ↓ | Importer un média Cette option permet d'importer des fichiers de média individuellement depuis votre espace de stockage. |
| ↓ | Importer un dossier Cette option permit d'importer un dossier depuis votre espace de stockage. Lors de l'importation d'un dossier, DaVinci Resolve conserve la structure des fichiers,traitant chaque dossier comme un chutier séparé. Ainsi, vous pourrez naviguer entre les chutiers pour retrouver vos vidés et autres Médias. |
Pour importer des medias :
1 Cliquez sur l'icone d'importation d'un media ou d'un dossier.
2 Naviguez dans voire espace de stockage pour retrouver le media de vaore choix.
3 Sélectionnez le fjichier ou le dossier, puis cliquez sur Ouvrir.
Une fois les medias ajoutés à votre projet, pensez à sauvégarder vos changements. DaVinci Resolve comprend une fonctionnalité de sauvégarde automatique très rapide, appelée Enregistrement continu. ÀpRES avoir manuellement sauvégardé votre projet une première fois, l'enregistrement continu sauvégardera les prochainsines modifications en temps réel. Ainsi, vous ne perdrez jamais votre travail.
Pour plus d'informations sur l'enregistrement continu et les autres fonctionnalités de sauvegarde, veuillez consulter le manuel DaVinci Resolve.
Ajouter des clips à la timeline
Maintenant que vous estes familiaré avec l'onglet des medias et les modes du viewer, vous pouvez ouvrir la bibliothèque de medias et ajouter rapidement des clips à votre timeline.
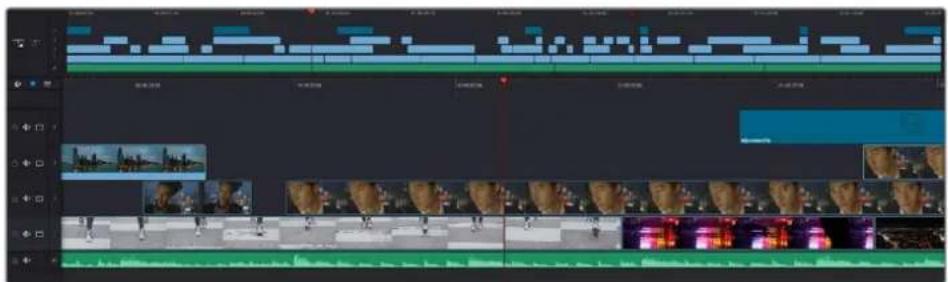
La timeline supérieure et la timeline Inférieure zoomée de la page Cut
La timeline est l'endetroit où vous allez effectuer votre montage. C'est comme un tableau avec des pistes sur lequel vous pouvez ajouter, déplacer et rigner des clips. Les pistes vous permettent de créé différentes couches pour superposer les clips. Ainsi, vous avez davantage de flexibilité pour essayer différents montages et pour creer des transitions et des effets. Par exemple, vous pouvez essayer un montage sur un clip d'une piste, sans que cela n'affecte les autres clips de la piste du dessous.
Voupez ajouter des clips à la timeline de différentes façon, en utilisant par exemple les modes Insertion intelligente, Ajouter à la fin ou Placer au-dessus.
Ajouter des clips à la fin
Lorsque vous seLECTIONnez des prises et que vous creez un montage, vous voudrez probablement ajouter ces prises à votre timeline les une après les autres. L'outil Ajouter à la fin est parfait pour cela, car il vous permettra de monter vos clipsrapidement.
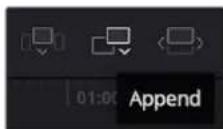
Cliquez sur I'icone Ajouter à la fin pour placer un clip à la fin du dernier clip
Pourajouterunclipa la fin:
1 Double-cliquez sur un clip pour l'ouvrir dans le viewer.
2 À l'aide de l'outil scratch trim, réglez les points d'entree et de sortie pour scélectionner la durée précise de votre prise. Vous pouvez également régler les points en appuyant sur les touches « i » ou « o » de votre clavier.

3 Cliquez sur l'icone Ajouter à la fin située dans la barre au-dessous de la bibliothèque de medias.

Votre premier clip sera place au début de la timeline.
Répétez les étapes 1 à 3 pour ajouter des clips les uns après les autres, sans laisser d'espace entre eux.

En ajoutant des clips à la fin, vous n'aurez pas d'espace vide entre les clips
CONSEIL You pouvez travailler plus rapidement en assignant un raccourci clavier à la fonction Ajouter à la fin. Par exemple, en assignant la touche « p » à cette fonction, vous pouvez réglez les points d'entrée et de sortie avec les touches « i » et « o », puis directement appuyer sur « p » pour ajouter le clip à la fin. Pour plus d'informations sur les raccourcis clavier, veuillez consulter le manuel DaVinci Resolve.
Monter des clips dans la timeline
Une fois les clips ajoutés dans la timeline, vous pouvez les déplacer et effectuer des raccords comme bon vous semble.
Pour rognner un clip, survalez le début ou la fin d'un clip avec votre souris, puis cliquez et faites glisser la souris vers la gauche ou la droite. Par exemple, glissez vers la gauche pour réduire sa durée, ou vers la droite pour l'augmenter. Vous remarquerez qu'après cette action, tous les clips seront déplacés dans la timeline pour s'adapter au nouvel ajustement. C'est une des nombreuses fonctionnalités de la page Cut qui vous permettra de gagner du temps.
Vou puez me remonter le clip pour le déposer dans une nouvelle piste video dans la grande timeline sans avoir à zoomer ou à dézoomer. Vous perdrez ainsi moins de temps à naviguer dans une longue timeline.
Après avoir monté vos clips avec la page Cut, vous pouvez insérer un titre. La section suivante vous montrera comment ajouter un titre.
Ajouter des titres
Il est très facile d'insérer différents types de titres dans votre timeline.
Pour cela, cliquez sur Ionglet Titres en haut a gauche de Iecran. La fenetre de selection affichera la
liste de tous les types de titres disponibles. Vous pouze chooseur un texe a afficher sur le tiers
inférieur, en defilement, ou encore un texe standard. Vous pouze meme ajouter des titres animes Fusion personnalisables.
Essayons d'ajouter un texte standard.
Pour ce faire :
1 Cliquez sur le titre Texte et faites-le glisser dans la timeline. La timeline n'a pas d'importance, mais pour plus de précision, utilisons la timeline détaillée. Le titre va automatiquement créé une nouvelle piste video pour le titre et va s'aimanter à la tête de lecture.
2 Relâchéz la souris et le titre va apparâtre sur la nouvelle piste. Vous pouvez désormais le déplacer ou changer sa durée, comme pour un clip video.
3 Pour modifier un titre, cliquez sur celui-ci pour faire apparaitre l'icone Outils sous le viewer du clip. Cliquez sur I'icone Outils.
Une liste d'outils va s'afficher pour modifier le titre du clip, comme Transformation, Rogner, Zoom dynamique et bien plus. Pour cet exemple, cliquez sur l'outil Titre.
4 Maintenant, cliquez sur Ouvrir I'inspecteur.
La fenêtre de l'inspecteur va s'ouvrir, dans laquelle vous pouvez saisir le titre et configurer le tracking, l'espacement entre les lignes, la police, la couleur et autres réglages.
Vouaves de nombreuses options a disposition pour personaliserYOUR titre.Nous youse consellons de jouer avec les differents reglages pour voir comment cela modifie le titre.
Travailler avec des fichiers Blackmagic RAW
Les clips Blackmagic RAW offrent une grande flexibilité en post-production. Cela vous permet de faire des changements sur les clips, tels que la balance des blancs et l'ISO, comme si vous les faisiez dans les paramétres de laamera. Le Blackmagic RAW offre également davantage d'information tonales dans les ombres et dans les haute lumières. Ceci est particulièrement utile pour récapérer les détails d'un ciel surexposé ou dans les zones d'ombre de l'image.
Si vous souhaitez obtenir la meilleure qualité possible ou si vous tournez des séquences comportant des contrastes importants entre les haute lumières et les zones d'ombre, le Blackmagic RAW répondra parfaitement à vos exigencies.
Grace à la vitesse et à la petite taille de filchier du Blackmagic RAW, il n'est pas nécessaire de creer des fichiers proxy. La lecture est donc identique à celle d'un clip video standard. Cette section du manuel déscrit les fonctionnalités du Blackmagic RAW et la façon d'utiliser les fichiers Blackmagic RAW dans votre workflow DaVinci Resolve.
CONSEIL Nous vous recommendons d'ajuster les réglages Blackmagic RAW pour vos clips sur la page Étalonnage avant de les étalonner.
Paramètres des clips pour le Blackmagic RAW
Quand vous importez des fichiers Blackmagic RAW, DaVinci Resolve decode les données de la camera containues dans les fichiers, notamment l'ISO, la balance des blancs et la teinte. Si les images vous plaissent, vous pouvez d'ores et deja commencer le montage.
L'avantage de travailler au format Blackmagic RAW, c'est que vous pouvez changer ces réglages! En effet, le nombre d'options pour le traitement des fichiers Blackmagic RAW vous permet demettre au point votre propre workflow. En utilisant les paramétres Plan de diverses façon pour chaque clip dans l'onglet Caméra RAW, vous comprendrez àquel point le travail en Blackmagic RAW est performant et polyvalent.
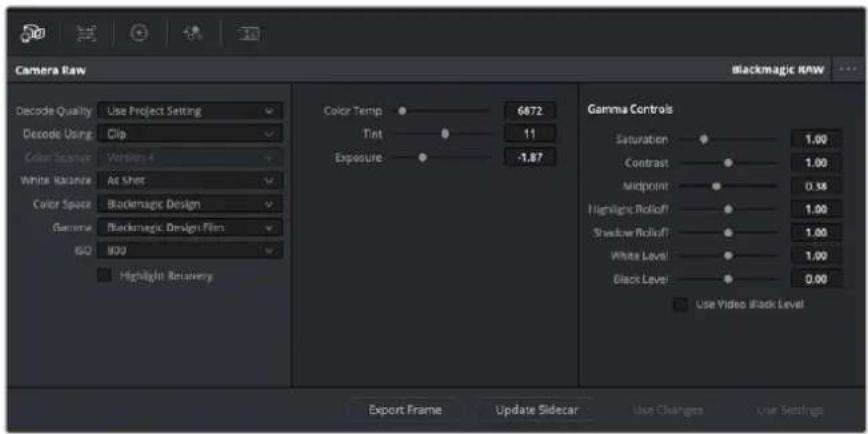
Dans l'onglet Camera RAW, Sélectionnez Plan dans le menu dérouant Dématricer avec pour régler les paramétres Blackmagic RAW des clips.
Une fois que les paramètres des clips pour le Blackmagic RAW sont actifs dans DaVinci, ces derniers ainsi que les commandes de gamma sont modifiables. Ajuster ces paramètres pour optimiser vos clips équivaut presque à un étalonnage primaire. C'est encore plus performant lorsque vous utilisez les scopes de DaVinci Resolve, car ils vous permettent de neutraliser et d'équilibrer les clips pour les préparer à un étalonnage plus pousse.
Voutrouverez ci-dessous une description des commandes relatives aux clips et au gamma.
ISO
La valeur ISO peut être modifiée en augmentant ou en diminuant ce paramètre. C'est très utile pour éclairir ou assombrir le clip et ensuite l'optimiser.
Récupération des haute lumières
Cochez cette case pour recuperer des informations dans les haute lumières dans les canaux écrétés en utilisant les informations des canaux non écrétés.
Temperature
Ajustez la commande de température de la couleur pour réchauffer ou refroidir les tons de l'ensemble de l'image. Ce paramètre peut être utilisé pour neutraliser la balance des couleurs de chaque image.
Teinte
Ajustez ce parametre pour ajouter du vert ou du magenta à l'image afin d'équilibrer les couleurs.
Exposition
Utilisez ce paramètre pour affiner la luminosité générale de l'image.
Saturation
Le curseur de saturation est regle sur 1 par défaut. Vous pouvez la réduire jusqu'à -1 pour une saturation minimale et l'augmenter jusqu'à +4 pour une saturation maximaie.
Contraste
Le curses de contraste est regle sur 1 par défaut. Vous pouvez le réduire jusqu'à 0 pour un contraste minimal et l'augmenter jusqu'à 2 pour un contraste maximal.
Point central
En mode Blackmagic Design Film, la valeur des tons moyens est reglee par defaut sur 0.38 ou 38.4% . Ajustez le curseur vers la gauche pour la reduire ou vers la droite pour I'augmenter jusqu'a 100% . Lorsque le contraste n'est pas regle par defaut, vous pouvez modifier le roll-off des haute lumières et des ombres.
Affaiblissement (roll-off) des haute lumières
Le curseur d'ajustement des haute lumières est régé sur 1 par défaut. Vous pouvez les atténuer jusqu'à 0 en déplaçant le curseur vers la gauche, ou les augmenter jusqu'à 2 en déplaçant le curseur vers la droite. Par défaut, ce paramètre est régé sur 1.
Affaiblissement (roll-off) des basses lumieres
Déplacez le curseur d'ajustement des ombres vers la gauche pour les atténuer jusqu'à 0, ou vers la gauche pour les augmenter jusqu'à 2.
Niveau blancs
Ajustez le point blanc de la courbe de gamma en déplacant le curseur. Les valeurs maximales et minimales sont respectivement de 2 et 0. La valeur par défaut est de 1.
Niveau noirs
Ajustez le point noir de la courbe de gamma en déplacant le curseur. Les valeurs maximales et minimales sont respectivement de 1 et -1. La valeur par défaut est de 0.
Utiliser les niveaux video de noir
Cochez cette case pour régler vos niveaux de noir sur Video.
Exporter l'image
En cliquant sur le bouton Exporter l'image, vous pouvez exporter une seule image du clip Blackmagic RAW.
Mettre à jour le Sidecar
Cliquez sur ce bouton pourmettre a jour le fichier sidecar Blackmagic RAW pour le clip actuel.
Lorsque vous effectuez des modifications sur vos clips Blackmagic RAW, le paramètre Gamma sera régèle sur Blackmagic Design Custom.
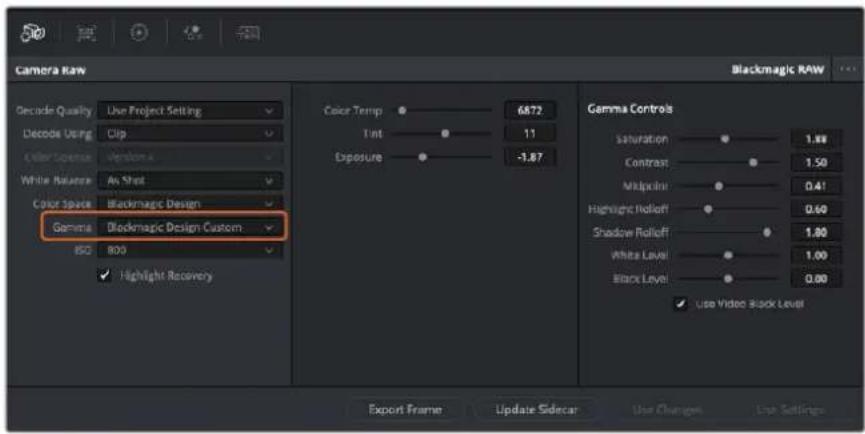
Si vous souhaitez restaurer vos clips sur un paramètre Gamma par défaut, Sélectionné une option dans le menu déroulant.
CONSEIL Les commandes Gamma sont désactivées lorsque vous filmez avec une plage dynamique Video, mais vos données Blackmagic RAW ne sont pas perdues. Sélectionnez Blackmagic Design Film ou Blackmagic Design Extended Video depuis le menu dérounant du paramètre Gamma et effectuez vos ajustements.
Sauvegarder les changements Blackmagic RAW
1 Reglez les commandes Gamma pour votre clip Blackmagic RAW.
2 Cliquez sur le bouton Mettre a jour le Sidecar.
Un fichier Sidecar est cree dans le meme dossier que voire fichier .braw. Lorsqu'un autre utiliseur importe les fichiers Blackmagic RAW, le fichier sidecar sera automatiquement lu par DaVinci Resolve. Si you efectue des modifications supplémentaires, appuyez une nouvelle fois sur Mettre a jour le Sidecar.
CONSEIL Pour supprimer un fichier sidecar, effacez-le de son emplacement dans voire lecteur de media.
Paramètres du projet pour le Blackmagic RAW
Si vous souhaitez modifier un paramètre commun à tous les clips, par exemple la balance des blancs ou l'ISO, vous pouvez régler les clips afin qu'ils utilisent les paramétres Camera RAW du projet. Vous pourrez ainsi apporter des changements à plusieurs clips en même temps.
Régler les paramètres du projet pour le Blackmagic RAW :
1 Ouvrez le menu de paramétrage du projet, enclinquant sur Fichier puis sur Paramètres du projet.
2 Dans l'onglet Camera RAW, vous trouvez un menu dérouulant pres du profile RAW. Cliquez sur la flèche pour sélectionner Blackmagic RAW depuis la liste.
3 Dans le menu dérouulant Dematricer avec, selectionnez Projet.
4 Reglez la Balance des blancs sur Personnelser.
5 Dans le menu déroulant Gamma, Sélectionnez Blackmagic Design Custom. Réglez l'espace de couleurs sur Blackmagic Design. Cette opération réglera également le paramètre Gamma sur Blackmagic Design Film.
6 Choisissez votre résolution depuis le menu Qualité de dématrique. Uneasse résolution vous permettra d'améliorer la lecture sur des systèmes aux performances limitées. Pour un rendu optimal, vous pouvez changer la résolution plus tard, avant l'exportation.
Vou puez desormais ajuster les parametes de la camera tels que la saturation, le contraste et les tons moyens. Cela s'appliquera a tous les clips de votre projet regles sur Dematricer avec Projet.
Étalonner vos clips avec la page Étalonnage
Une fois vos clips dans la timeline et vos titres ajoutés, vous pouvez commencer à étabonnner vos images depuis la page Étalonnage. C'est une page très puissant qui vous permettra de définir le look général de votre film. Pour cet exemple, il est conseilé de commencer par rendre vos clips neutres afin qu'ils soient constants. Vous pouvez également returner sur les pages Cut ou Montage à tout moment pour effectuer des modifications dans votre montage.
La page Étalonnage vous permet d'ajuster le look de votre montage. L'étalonnage est un art en soi à bien des écarts, car il permet d'ajouter une réelle emotion à votre travail. C'est une partie extrémement créative de votre workflow et, une fois les techniques acquises, il n'y a rien de plus gratissant que de voir vos images prendre vie! C'est généralement la première étape, appelée correction colorimétrique primaire. Ensuite, vous pourrez passer à la correction colorimétrique secondaire, où vous pourrez faire des ajustements de couleur extrémement précis sur des objets spécifique dans vos images. La correction colorimétrique seconde est trèsamusante, mais comme son nom l'indique, elle est généralement effectue dans un deuxième temps pour obtenir de nouveaux résultats.
Commencez par cliquer sur l'onglet Étaconnage afin d'ouvir la page Étaconnage.
Cette page contient les réglages Caméra RAW, les roues chromatiques, les palettes de courbes, des outils d'étalonnage de base ainsi qu'une fenêtre de prévisualisation et une fenêtre contenant les noeuds. Ne soyez pas intimidés par les nombreuses fonctionnalités proposées sur cette page, car
elles sont la pour vous aider a obtaining des images époustouflantes. Dans cette section vous découvertes les bases, mais pour des informations plus détaillées, veuillez consulter les sections spécifiquement dédiées à l'éthalonnage dans le manuel. Il vous indiquera clairément à quoi ces outils servent et comment les utiliser. Vous apprendrez ainsi les techniques que les professionnels utilisent dans les studios d'éthalonnage haut de gamme.
En général, la première étape de la correction colorimétrique primaire consiste à optimiser le niveau des ombres, des tons moyens et des haute lumières dans vos clips. En d'autres termes, il faut ajuster les paramètres Lift, Gamma et Gain. Vous obtiendrez ainsi des images optimes pour débuter la phase d'éthalonnage et obtenir l'esthétique souhaïée pour votre film. Les scopes s'avent très pratiques pour optimiser les niveaux.
Utiliser les scopes
Les étalonneurs réalisent les corrections colorimétriques en fonction de l'émotion et du rendu qu'ils veulent donner aux programmes sur lesquels ils travaillent et n'utilisent en général qu'un simple écran pour effectuer les changements. Vous pouvez vous insipérer d'objets de tous les jours et la façon dont l'éclairage s'y reflète pour vos différents projets.
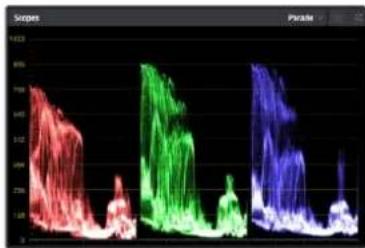
Le scope Parade vous permet d'optimiser les tons clairs, les tons moyens et les ombres
Mais il existe d'autres façon d'étabonnner un film, notamment en s'aidant des scopes intégrés à DaVinci Resolve. Vous pouvez ouvrir un seul scope video en cliquant sur le bouton Scope (le deuxièmebouton à partir de la droite sur la barre d'outils). Vous avez le choix entre les scopes suivants : Oscilloscope (forme d'onde), Parade, Vecteurscope et Histogramme. Grace à ces scopes, vous pouvez contrôler l'équilibre des tons, les différents niveaux de la video sans écraser les noirs ni écrêter les blancs, mais aussi contrôler la dominance des couleurs de vos clips.
La palette Roues chromatiques contient les commandes Lift, Gamma et Gain qui vous permettent d'effectuer les premiers ajustements. Si vous avez déjà fait de l'étabonnage, ces roues chromatiques ressemblant sèrement aux commandes que vous avez pu voir dans d'autres applications pour ajuster les couleurs et le contraste.
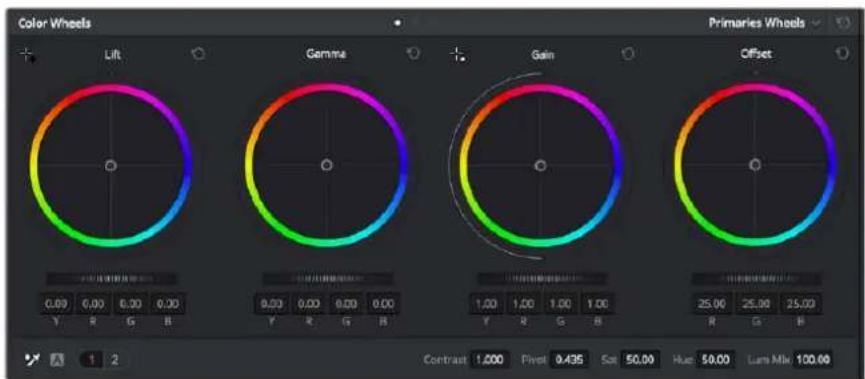
Les roues chromatiques Lift, Gamma, Gain et Offset vous offrent un contrôle complet sur l'équilibre des couleurs et des tons de vos clips. Pour régler toutes les couleurs de façon identique, tournez la roue située sous les roues chromatiques
Pour un contrôle précis de chaque couleur, utilisez la souris. Vous pouvez regler les roues chromatiques sur Barres primaires, ce qui vous permet de regler séparément les canaux de couleurs et de luminance pour le lift, le gamma et le gain. Sélectionnéz simplement Barres primaires dans le menu dérouulant situé en haut à droite des roues chromatiques.
- Ajuster le Lift: ÀpRES avoir sélectionnéVote clip dans la timeline de la page Étalonnage, cliquez sur la roue Lift située sous la première roue chromatique. Faites-la tourner vers la gauche ou vers la droite pour constater les modifications apportées à l'image. Vous verrez que la luminosité des zones d'ombres de votre image augmente et diminue.
Réglez-la afin d'optimiser les zones d'ombres. Si vous baissez trop le Lift, certains détails des noirs disparaisent. Utilisez le scope Parade pour éviter que cela ne se produit. La position optimale des noirs sur le graphique se situe juste au-dessus de la ligne inférieure du scope Parade. - Ajuster le Gain : Cliquez sur la roue Gain et faites-la tourner vers la gauche ou vers la droite. Cette roue regle les tons clairs, zones les plus lumineuses de l'image. Les tons clairs sont affichés dans la section supérieure du graphique dans le scope Parade. Pour une scene très lumineuse, la position optimale se situe juste en dessous de la ligne supérieure du scope Oscilloscope. Si les tons clairs dépassent la ligne supérieure de ce scope, ils sont écrétés et les zones les plus claires perdent alors beaucoup de détails.
- Ajuster le Gamma : Cliquez sur la roue Gamma située sous la roue chromatique et faites-la tourner vers la gauche ou vers la droite. Si vous augmentez le gamma, la luminosité de l'image augmente et en fonction du réglage, la partie centrale de la roue change également. Cette partie représenté les tons moyens du clip. La position optimale des tons moyens se situe généralement entre 50 et 70% de l'affichage de la forme d'onde, Ceci n'est qu'une indication, car le réglage dépend sur tout du rendu que vous souhaitez obtenir et des conditions d'éclairage du clip.
VoussoupiezegalementutilserapalateCourbes pourfairevocorrections colorimétriques primaires.Pourcrerdespointedontrolle,il suffitdecliqueur la lignadiagonadans le graphique Courbes.Vousoupzensuitelesdéplacereversheautouverslebaspourajusterle contrasteRVBprincipal etobtenirdiferentes tonalitésdansl'image.Le réglage optimal se situe dans le champ du tiers inférieur,du milieu et du tiers supérieur de la courbe.
Il existe differentes facons de faire de la correction colorimétrique primaire dans DaVinci Resolve.

La palette Courbes est un autre outil que vous pouvez utiliser pour faire de la correction colorimétrique primaire ou pour travailler certains zones du clip avec une Power Window
Correction colorimétrique secondaire
Si vous souhaitez corriger une partie spécifique de l'image, vous devrez utiliser les corrections secondaires. Les corrections que vous avez apportées jusqu'à présent à l'aide des réglages Lift, Gain et Gamma affectent l'intégrality de l'image, il s'agit donc de corrections colorimétriques primaires.
Cependant, si vous ne poulez modifier que certaines parties de l'image, comme la couleur de l'herbe dans une scène, ou la couleur du ciel, il faut alors utiliser les fonctions de correction colorimétrique secondaire. En effet, ces fonctions permettent de sélectionner et de ne modifier qu'une partie de l'image. Grace aux nœuds, vous pouvez superposer plusieurs corrections et ainsi travailler l'image à la perfection! Vous pouvez également utiliser les fenêtres et le tracking pour que la correction suivie la partie de l'image selectionnée.
Sélection d'une couleur
Vou avz sans doute pu constater qu'il est souvent necessaire de changer la couleur d'un seul élément de l'imagre, par exemple l'herbe sur le cote de la route, le bleu du ciel, ou tout autre élément sur lequel vous souhaitez attirer le regard du spectateur. Pour effectuer ces modifications, il est utile d'utiliser l'outil selecteur HSL.

Utiliser les selecteurs HSL pour selectionner les couleurs de vos images est très pratique lorsque vous poulezmettre en valeur certaines zones de l'imagé, ajouter du contraste ou acciter l'attention des spectateurs sur une partie de l'imagé.
Pour selectionner une valeur :
1 Creez un nouveau noeud Serie.
2 Ouvrez la palette Sélecteur et vérifie que la pipette d'échantillonnage Plage de selection est bien sélectionné.
3 Cliquez sur la couleur du clip que vous souhaitez modifier.
4 Il est en général nécessaire d'adoucir les contours afin de limiter la selection à la couleur souhaïée. Pour visualiser votre sélection, cliquez sur le bouton Masque situé au-dessus du viewer.
5 Dans la fenetre Teinte, reglez la commande Largeur pour élargir ou réduire la selection.
Amusez-vous avec les commandes Haut, Bas et Soft afin d'affiner votre sélection. Vous pouvez désormais corriger les couleurs séLECTIONnées à l'aide des roues chromatiques ou des courbes personalisées.
Parfois, les zones de selection peuvent deborder sur des zones que vous ne souhaitez pas modifier. Il est alors facile de masquer ces zones à l'aide des Power Windows. Creez simplement une nouvelle Power Windows et donnez-lui la forme de la zone que vous souhaitez modifier. Si la couleur selectionnee rouge au cours de la prise, vous pouvez utiliser la fonction de tracking pour suivre la Power Window.
Ajouter une Power Window
Les Power Windows sont des outils de correction colorimétrique extrémement efficaces que vous pouvez utiliser pour isoler certaines zones de vos clips. Ces fenêtres dynamiques suivent les mouvements de laamera ou des zones sélectionnées.

Utilisez les Power Windows pour masquer les zones que vous ne souhaitez pas modifier avec les selecteurs HSL
Vou puez, par exemple, creer une fenetre qui suivra les mouvements d'une personne afin de change le contraste et les couleurs sans afferter les zones alentour. Grace à ces modifications, vous attirez l'attention du spectateur vers la zone de votrechoix.
Ajouter une Power Window à votre clip :
1 Creez un nouveau noeud Serie.
2 Ouvrez la palette Power Window et selectionnez la forme en cliquant sur l'une d'entre elles. La fenetre de la forme apparait sur le neud.
3 Redimensionne la forme à l'aide des points bleus qui entourent la forme. Les points rouges permettent de regler le floute du contour. Vous pouvez repositionner correctement la forme à l'aide du point central. Faites pivoter la fenetre à l'aide du point relié au point central.
Voussouspuezdesormaiscorrigerlescouleursdelazoneselectionnee.
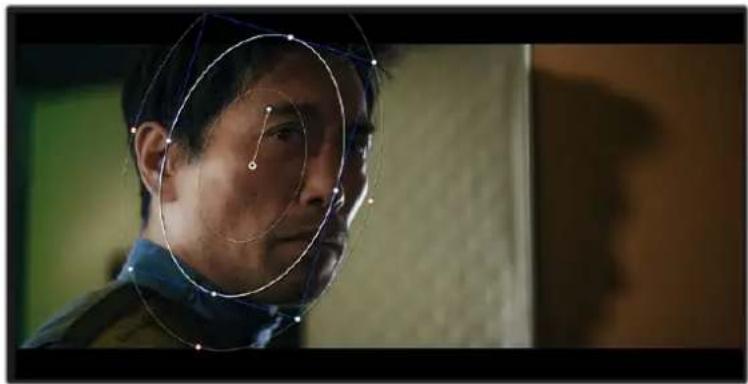
Les Power Windows you permeltent d'effectuer des corrections secondaires sur certaines zones de l'image.
Tracking d'une Power Window
Lorsque laamera, I'objet ou la zone de votre prise bougent, utilisez l'outil de tracking disponible dans DaVinci Resolve pour garantir le tracking complet de la zone selectionnee. Le Tracker analyse les mouvements de laamera ou de I'objet pour que la fenetre s'adapte a ces mouvements. Si vous n'activez pas cette fonction, la correction pourrait ne pas s'appliquer à la zone selectionnee et produit un effet indesirable.
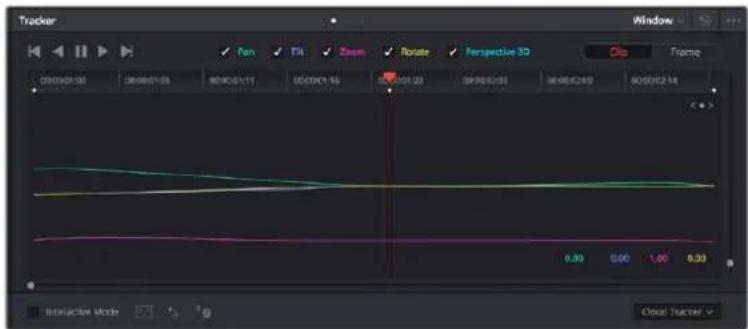
Pour que les Power Windows suivent les mouvements de certains objets ou certaines zones du clip, vous pouvez creer un suivi à l'aide de la fonction Tracking
Suivre un objet à l'aide d'une fenêtre :
1 Creez un nouveau nœud série et ajoutez une Power Window.
2 Placez le curseur au début du clip, puis positionnez et dimensionnez la fenetre pour ne selectionner que I'objet ou la zone souhaites.
3 Ouvrez la palette Tracker. Cochez ou decochez les cases Pan, Tilt, Zoom et Perspective 3D en fonction des mouvements du clip.
4 Cliquez sur la flèche de lecture située à gauche des cases de scélection. DaVinci Resolve applique un ensemble de points de suivi à votre clip qui analyse les mouvements de chaque image. Lorsque le suivi est terminé, la Power Window suit le mouvement de l'objet dans le clip.
En général, le suivi automatique fonctionne sans problème, cependant, certaines scènes peuvent être complexes ou des objets peuvent se couver devant la zone sélectionnée et ainsi interrompree ou affecter le suivi. Ce problème peut être résolu à l'aide de l'éditeur d'image. Consultez le manuel DaVinci Resolve pour en savoir plus.
Utilisation de plug-ins
Les corrections colorimétriques secondaires peuvent être effectuées à l'aide de plug-ins ResolveFX ou OpenFX, qui permettent de creer des rendus rapides et des effets innovants au sein de la page Étalonnage. Il est également possible d'ajouter des transitions et des effets à vos clips au sein de la page Montage. Les effets ResolveFX sont fournis avec DaVinci Resolve. Les plug-ins OFX sont disponibles sur des sites fournisseurs tiers.
Vouss pouvez acceder aux plug-ins OFX, une fois installés, et aux plug-ins ResolveFX, en allant sur la page Etalonnage et en ouvrant le panneau OpenFX (situé à droite de l'éditeur de nœuds). Une fois que vous avez créé un nouveau nœud Série, cliquez sur le bouton OpenFX pour ouvrir la bibliothèque d'effets, puis faites glisser un plug-in dans le nœud. Si le plug-in dispose de paramétres modifiables, vous pouvez le configurer dans le panneau Paramétres situé sur le côte.
Dans la page Montage, vous pouvez ajouter des plug-ins filtres, générateurs et transitions aux clips en ouvrant le panneau OpenFX dans Bibliothèque d'effets. Faites ensuite glisser le plug-in selectionné sur le clip ou sur la piste au-dessus du clip dans la timeline, selon les besoin du plug-in.
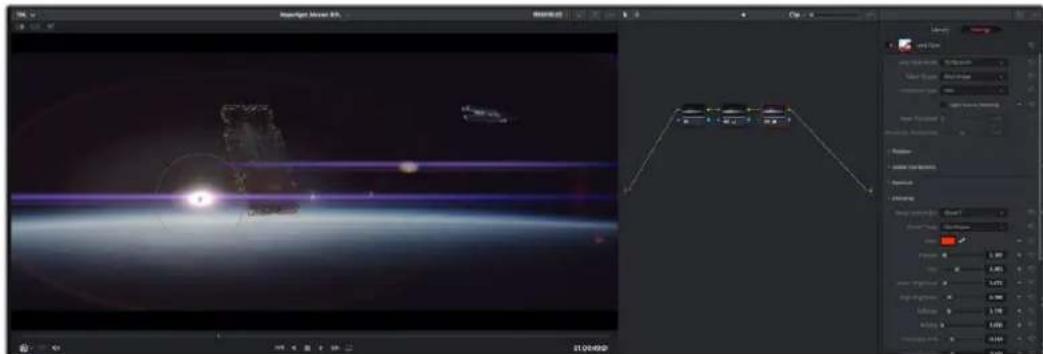
Les plug-ins OFX sont des solutions rapides et facies pour creer des rendus créats et innovants.
Mixer l'audio
Mixer l'audio dans la page Montage
Une fois le montage et l'étabonnage finalisés, vous pouvez commencer à mixer l'audio. DaVinci Resolve possède de nombreux outils pour le montage, le mixage et le mastering audio de vos projets, accessibles directement sur la page Montage. Si vous avez besoin de fonctionnalités audio plus avances, la page Fairlight vous offre un environnement de post-production audio complet. Si vous étés familiar avec la page Montage et que vous souhaitez directement passer à la page Fairlight, consultez la section suivante.
Ajouter des pistes audio
Si vous travailliez sur la page Montage et que vous souhaitez ajouter des effets et de la musique à un montage son, vous pouze facilement ajouter des pistes audio selon vos besoins. C'est très pratique lorsque vous VOULEZ SEPARER VOS ÉLÉMENTS AUDIO EN PLUSieurs pistes indépendantes, comme les dialogues, les effets sonores et la musique.
Pour ajouter des pistes audio dans la page Montage
Faibles un clc droit a coté du nom de n'importe quelle piste audio de votree timeline, selectionnez Ajouter une piste et choisissez entre les options Mono, Stereo et 5.1.Cette piste sera alors ajoutee en bas de la liste de pistes. Si vous voulez besoin la position de la piste ou de plusieurs pistes dans la liste, selectionnee Ajouter une piste puis choisissez l'emplacement.
La nouvelle piste audio apparait sur la timeline.
CONSEIL Pour changer le type de piste après l'avoir créé, faites un click droit sur le nom de la piste, Sélectionnéz Mettre la piste en, puis désisissez le type de piste audio de votrechoix. Par exemple, Stereo, Mono ou 5.1.
Ajuster les niveaux audio dans la Timeline
Le niveau du volume de chaque clip audio est affché. Vous pouvez l'ajuster en montant ou en descendant le pointeur. Cet affichage correspond aux paramêtres de volume de l'inspecteur.

Ajuster le niveau du clip en faisant glisser le pointeur de volume
Si vous avez besoin de fonctionnalités audio plus avances, la page Fairlight vous offre un environnement de post-production audio complet.
La page Fairlight
La page Fairlight de DaVinci Resolve vous permit d'ajuster vos projets audio. Lorsque vous travailliez avec un seul moniteur, la page Fairlight vous offre un affichage optimise des pistes audio de votre projet. Vous disposez d'un mixeur complet et de commandes de monitoring personalisées qui vous permettent d'évalué et d'ajuster les niveaux audio pour creer un mix fluide et harmonieux. Ne vous laissez pas intimider par le nombre de fonctionnalités générées, tous ces outils ont été consus pour vous aidar à livrer un rendu audio de la meilleure qualité possible.
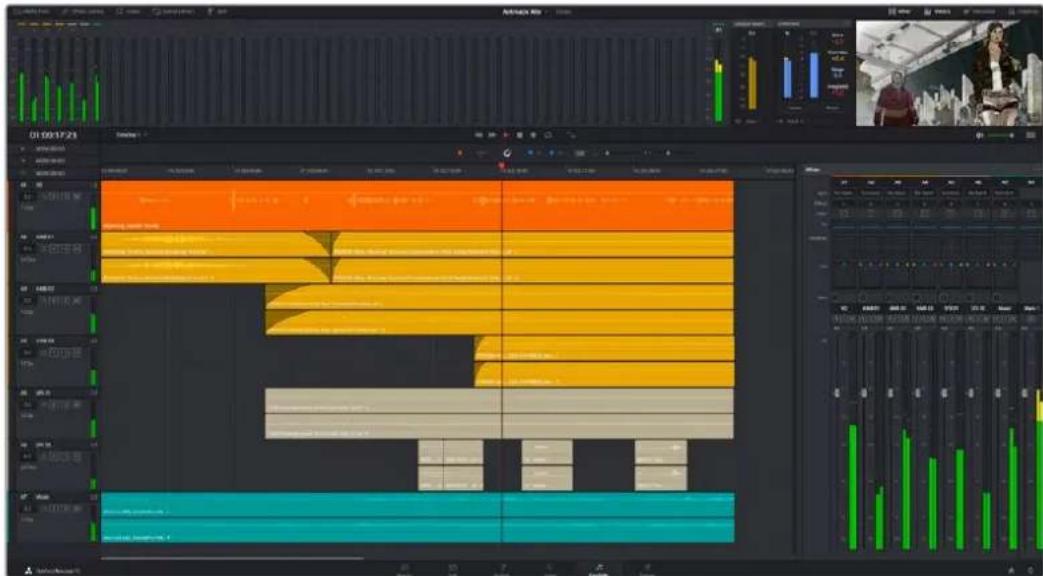
Ce guide offre un aperçu général des fonctionnalités de la page Fairlight. Pour plus d'informations, veuillez consulter le manuel d'utilisation DaVinci Resolve. Le manuel DaVinci Resolve apporte des informations détaillées sur la fonction de chaque outil et explique comment les utiliser, étape par étape.
La timeline audio
- En-tête de piste : À gauche de chaque piste, vous trouvezez un espace pour l'en-tête affichant le nombre, le nom et la couleur de la piste, les canaux audio, la valeur du fader et les indicateurs audio. L'en-tête de piste offre également des commandes pour verrouiller et déverrouiller des pistes et pour selectionner les modes Solo et Mute. Ces commandes vous permettent de visualiser chaque piste séparément et de les organiser.
- Pistes : Chaque piste est divisée en voies, ce qui vous permet de visionner chaque canal du clip audio pour le montage et le mixage. Vous ne trouvrez pas ces canaux individuels sur la page Montage. En effet, cette dernière n'affiche qu'un seul clip sur la timeline afin de faciliter le montage de sources multicanaux sans avoir aGER un nombre de pistes trop important.
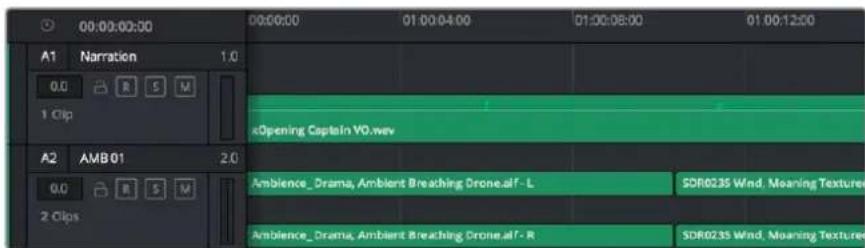
L'en-tete de piste de la piste A1 affiche une piste mono avec une seule voie pour l'audio mono. La piste A2 affiche quant a elle une piste stereo comprenant deux voies pour l'audio stereo.
Qu'est-ce qu'un bus?
Globalement, un bus est un canal de destination vers lequel vous pouvez router plusieurs pistes audio depuis la timeline. Ces pistes sont mixées en un signal unique et peuvent être contrôlées via une seule bande de canal.
- Bus principal : Les bus principaux sont la sortie principale d'un programme. Vous commenceriez chaque nouveau projet avec un bus principal, vers lequel toutes les pistes seront acheminées par défaut. Le bus principal regroupe toutes les pistes de la timeline en un seul signal. Cela vous permet d'ajuster le niveau global du mix audio après avoir ajusté le niveau de chaque piste individuellement.
- Sous-bus: Les sous-bus vous permettent de regrouper plusieurs pistes audio qui appartiennent à la même catégorie, comme les dialogues, la musique ou les effets. Àinsi, tous les éléments d'une même catégorie peuvent être mixés comme un signal audio unique. Par exemple, si vous avez cinq pistes de dialogue, vous pouvez acheminer le signal de ces cinq pistes vers un bus submix, et vous pourrez ainsi mixer le niveau des dialogues avec une commande unique. Ce sous-mixage peut être rendu séparément ou envoyé vers le bus principal.
Le mixeur
Chaque piste audio de la timeline correspond à une bande de canal dans le mixeur. Par défaut, il y a une seule bande de canal sur le côte droit de l'interface pour le bus principal, appelée M1. À chaque bus principal ou sous-mixage que vous creez, une bande de canal supplémentaire s'ajoute sur le côte droit, accompagnée de commandes de contrôle. Plusieurs commandes, sous forme de graphiques, vous permettent d'assigner et d'acheminer des canaux de piste, d'ajuster les égaliseurs et les effets dynamiques, de régler les niveaux et d'enregister l'automation, de modifier l'emplacement d'un son dans l'image stéreo ou surround, et de désirir le mode muet ou solo pour chaque piste.
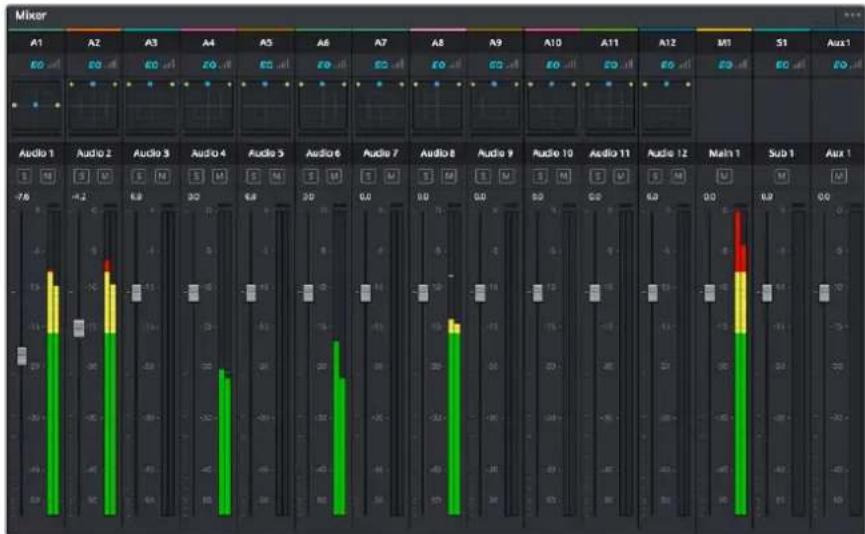
Les bandes de canal du mixeur audio, correspondant aux pistes de la timeline.
Utiliser l'égaliseur pour améliorer l'audio
Après avoir reglé les niveaux audio de vos clips, vous pourriez avoir envie d'apporter des ajustements supplémentaires. Par exemple, il arrive que les dialogues, la musique et les effets sonores se retrouvent sur la même fréquence dans le spectre audio, ce qui rend votre audio trop charge et confus. Dans ce cas-là, l'égaliser s'avéré très utile car il vous permet de spécifique ou doit se situer chaque piste dans le spectre audio. Vous pouvez aussi utiliser l'égaliser pour supprimer des éléments indésirés dans votre audio en isolant et en attenuant le niveau sur des fréquences spécifiques qui contiennent de légers grondements, des bourdonnements, des bruits de vent, des sifflements, ou simplement pour améliorer la qualité du son.
DaVinci Resolve est doté de filtres que vous pouvez appliquer sur chaque clip individuellement, ou sur une piste entière. Chaque clip audio de la timeline possède un égaliseur à 4 bandes dans le panneau de l'inspecteur, et chaque piste possède un égaliseur paramétrique à 6 bandes dans le mixeur. Grace aux commandes graphiques et numériques qui permettent d'amplifier ou d'atténuer des plages de fréquences et grâce aux différents types de filtres, vous pouvez définir la forme de la courbe de l'égaliseur.
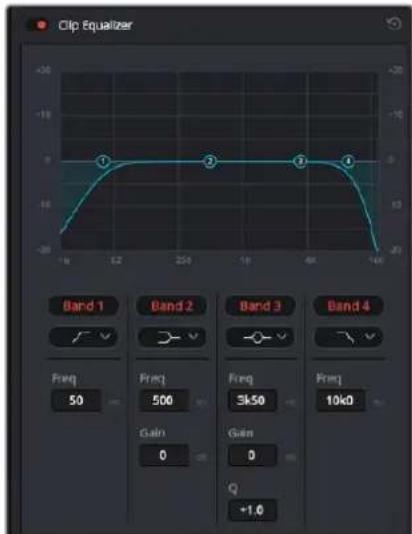
L'égaliser à quatre bandes peut être appliqué à tous les clips de la timeline
Les bandes situées aux extrémités vous permettent d'ajuster les filtres high-shelve, low-shelve, passée-haut et passé-bas. Les filtres de type « passage » suppliment du signal toutes les fréquences supérieures ou inférieures à une fréquence donnée. Par exemple, un filtre passée-haut laissera passer les haute fréquences mais isolera les basses fréquences. Toutes les fréquences au-delà de la fréquence de coupure sont progressivement attenuées en une courbe descendante.
Les filtres shelve sont moins agressifs et très utiles si vous souhaiteztraits les haute ou les basses fréquences sansforcément toutes les supprimer du signal. Ilss amplifient ou attenuent uniformement la fréquence ciblée et toutes les fréquences définies en dessous ou en dessus de cette-ci, selon si vous choisissez un filtre high ou low shelve.
Les commandes de contrôle des bandes situées au milieu vous permettent d'appliquer les filtres low shelve, bell, notch et high shelve.
- Bell: Les filtres bell augmentent ou attenuent les fréquences qui se trouvent autour d'un certain point de la courbe en forme de cloche.
- Notch : Les filtres notch vous permettent de cibler une plage très réduite de fréquences. Vous pourrez par exemple supprimer un bourdonnement dans une fréquence de 50 ou de 60Hz.
- Low Shelve : Les filtres low shelve amplifient ou attenuent une fréquence basse cible, et toutes les fréquences qui se situent en dessous.
- Hight Shelve : Les filtres high shelve amplifient ou attenuent une fréquence haute cible, et toutes les fréquences qui se situent en dessus.
Pour ajouter un égaliseur à un clip individuel :
1 Sélectionnéz le clip dans la timeline auquel vous pouvez appliquer un contrôle.
2 Cliquez sur l'inspecteur puis sur le bouton d'activation de I'egaliseur du plan.
Pour ajouter un égaliseur à une piste :
1 Au niveau de l'égaliser (EQ), double-cliquez sur la zone correspondante à la piste de votrechoix, afin d'ouvrir l'égaliser pour cette piste.
2 Choisissez le type de filtré à partir du menu déroulant pour la bande que vous souhaitez ajuster.

La zone de l'égaliser dans le mixeur indique qu'une courbe a été appliquée sur la piste numero une.
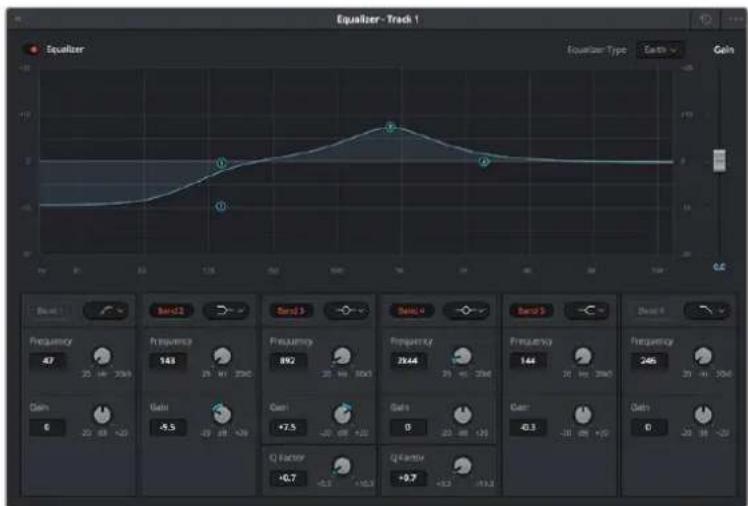
L'égaliseur paramétrique à 6 bandes peut être appliqué à toutes les pistes
Une fois que vous avez ajoute un égalisseur à votre clip ou à votre piste, vous pouvez égaliser chaque bande. Veuillez notes que les commandes peuvent varier selon le type de catégorie selectionné.
Pour régler l'égaliser pour un filtré de bande :
1 Choisissez le type de filtré à partir du menu déroulant pour la bande que vous souhaitez ajuster.
2 Ajustez la valeur du paramètre Freq, pour selectionner la frquence centrale du réglage de l'égaliseur.
3 Ajustez la valeur du paramètre Gain pour amplifier ou attenuer les fréquences concernées par cette bande.
4 Utilisez la valeur du facteur Q pour ajuster la largeur de la plaque des fréquences affectées.
Appuyez sur le bouton de réinitialisation pour rétabrir toutes les commandes de l'égaliser par défaut.
Fairlight possede de nombreuses fonctionnalités pour améliorer la qualite de chaque piste audio.
Voupvez ajouter des pistes supplémentaires et organiser les bus, ajouter des effets tels que la réverbération et le délambda, et apporter une amélioration générale à votre mix audio.
Ajouter des VFX et des compositions sur la page Fusion
Une fois le montage finalisé, vous pouvez ouvrir la page Fusion de DaVinci Resolve pour ajouter des effets visuels 2D ou 3D ainsi que des animations. Contrairement aux logiciels de compositing en couches, Fusion est doté d'une structure nodale qui vous offre la liberté de réaliser des effets complexes tout en acheminant les données d'image dans n'importe qu'elle direction. La fenêtre contenant les nœuds vous permet de voir tous les outils utilisés durant votre travail. Si vous avez utilisé la structure nodale sur la page Étaconnage, le workflow de Fusion vous sera familier.
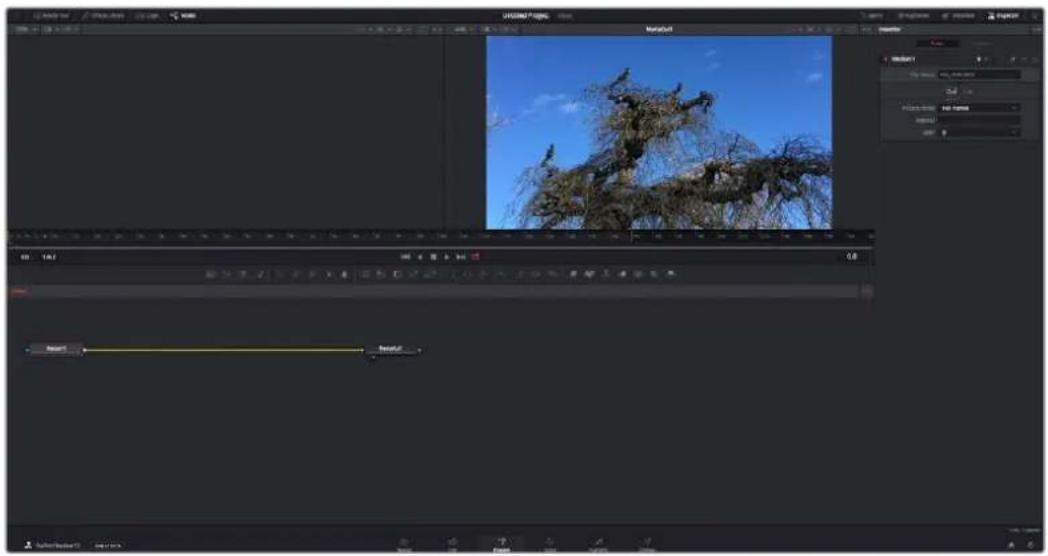
La page Fusion
La page Fusion se compose de deux viewers dans la partie haute de l'écran avec des commandes de transport pour visualiser vos medias, d'un inspecteur sur la droite pour acceder aux outils, et d'une fenêtre contenant les nœuds dans la partie BASSE pour creer vos compositions. Les viewers et les commandes de transport sont toujours apparents. Enclinuant sur les icones de la barre d'outils située tout en haut de l'écran, vous pouvez faire apparaitre ou masquer les nœuds et linspecteur, ou encore révélé ou cacher d'autres fenêtes, comme la bibliothèque d'effets ou les éditeurs Spline et Images clés.
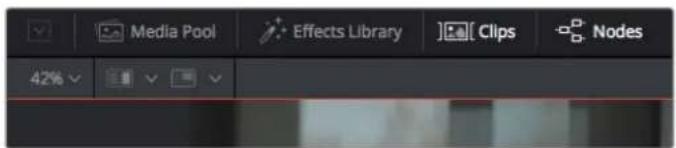
Bibliothèque de medias : La bibliothèque de medias fonctionne de la même manière que celle de la page Étalonnage. Faites directement glisser les medias depuis les chutiers dans votre composition.
- Bibliothèque d'effets : Dans la bibliothèque d'effets, vous trouvez les outils Fusion et les modèles ranges par catégories, dont les particules, les outils de tracking, les filtres et les générateurs. Vous pouvez cliquer sur un outil ou le faire glisser dans la fenêtre des nœuds pour l'ajouter à votre composition. La bibliothèque de medias et la bibliothèque d'effets se partagent le même espace sur l'écran. Vous pouvez les intervertir afin d'avoir plus de place pour les viewers.
Plans: En cliquant sur l'onglet Plans, vous pouvez afficher ou masquer les vignettes représentant les clips sur votre timeline. Les vignettes se trouvent sous l'éditeur de nœuds, ce qui vous permet d'aller d'un clip à un autre.
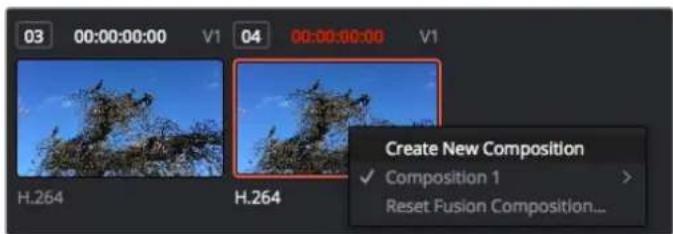
Vous pouze creer une nouvelle version de votre composition en faisant un clic droit sur une vignette, puis en selectionnant Creer une nouvelle composition.
- Viewers: Les viewers sont toujours visibles et vous permettent d'acceder aux différentes vues de votre composition. Par exemple, une vue 3D globale via le noeud Merge 3D, une sortieamera ou le rendu final. Ces viewers vous permettent également de voir comment vos modifications affectent un élément en particulier.
Pour désir quels nœuds vous souhaitez visualiser, cliquez sur un nœud, puis tapez « 1 » pour l'envoyer sur le viewer de gauche, ou « 2 » pour le viewer de droite. Des boutons blancs s'affichent sous le nœud pour vous indiquer àquel viewer il est associé. Si vous utilisez un moniteur externe, un troisième bouton s'affichera pour acheminer votre média vers ce monitér.
CONSEIL You pouvez également associier un nœud à un viewer en le faisant glisser directement dans celui-ci.
Les commandes de transport situées sous les viewers vous permettent d'aller au début ou à la fin du clip, de le litre d'avant en arrêté, ou d'arrêter la lecture. La règle temporelle affiche les informations temporelles de l'ensemble du clip. Les indicateurs jaunes représentent les points d'entrée et de sortie.
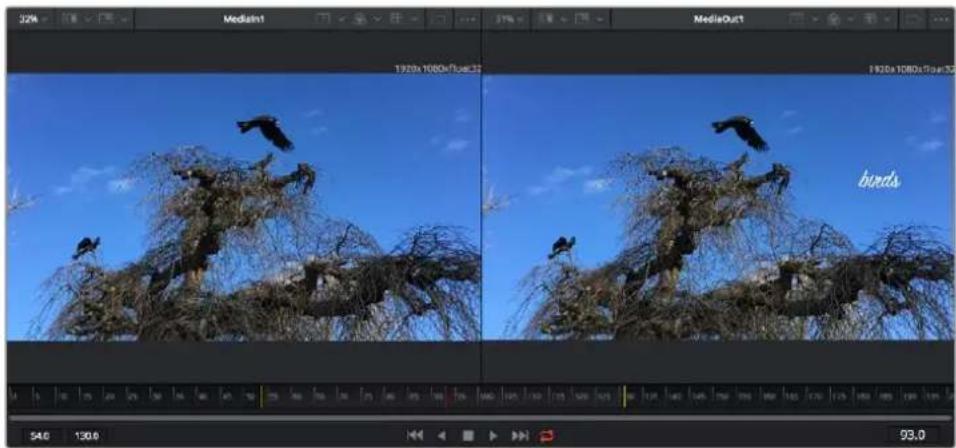
Les indicateurs jaunes représentent les points d'entrée et de sortie de votre clip sur la timeline. Si vous travailliez avec un clip Fusion ou avec un clip compose, la règle temporelle affichera seulement la durée du clip tel qu'il apparait sur la timeline, sans les poignées.
- Noeuds: La fenêtre compteant les noeuds est au cœur de la page Fusion. C'est ici que vous allez construire la structure nodale en connectant les outils d'un noeud à un autre. La taille de cette fenêtre est plus ou moins grande selon l'éditeur ouvert sur l'écran, comme Spline ou Images clés. Les outils les plus utilisés s'affichent en haut de la fenêtre des noeuds pour vous permettre d'y accederrapidement.
- Spline : Lorsque vous cliquez sur l'éditeur Spline, ce dernier s'affiche sur la droite de la fenetre de noeuds. Cet éditeur vous permet d'effectuer des ajustements précis pour chaque noeud. Vous pourrez par exemple adoucir une animation entre deux images clés à l'aide des courbes de Bézier.
- Images clés : À l'aide de l'éditeur Images clés, vous pouvez ajouter, supprimer ou modifier des images clés pour chaque outil. La fenêtre Images clés s'affiche également sur la droite de la fenêtre de nœuds.
- Métadonnées: La fenêtre Métadonnées affiche les métadonnées du clip actif, dont le codec, la fréquence d'images et le时间为 code.
- Inspector: L'inspecteur situé en haut à droite de l'écran, affiche tous les paramétres et modifieurs disponibles pour un ou plusieurs noeuds sélectionnés. Des onglets supplémentaires, triés par catégorie, sont également affichés pour vous permettre d'accederrapidement à d'autres paramétres pour les noeuds.
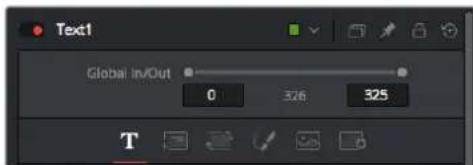
L'éditeur de texte de l'inspecteur offre des anglets supplémentaires pour le texte, la mise en forme, les ombres, les images et les paramétres.
Demarrer avec Fusion
Pour ouvrir la page Fusion, positionnez la tete de lecture sur un clip dans la timeline, puis cliquez sur l'onglet Fusion.
Ce clip apparait immédiatement dans la fenêtre des noeuds en tant que media d'entrée, intitulé Medialn. Chaque composition est constituée d'un noeud de media d'entrée Medialn, et d'un noeud de media de sortie MediaOut. Le noeud Medialn représenté le clip d'entrée de votre timeline à la tête de lecture, et ignore les autres clips. Tous les ajustements effectués sur la page Montage, tels que l'utilisation des outils de transformation ou de rognage, sont inclus.

Le nœud MediaOut représenté le nœud de sortie de votre timeline sur la page Montage.
CONSEIL Les plug-ins ResolveFX ou OFX appliqués aux clips dans la page Montage ne sont pas répercutés sur la page Fusion. En effet, les effets de Fusion priment sur les traitements d'étaconnage et les plug-ins. Si vous souhaitez que les plug-ins OFX priment sur les effets Fusion, faites un click droit sur le clip dans la page Montage et Sélectionnez Nouveau plan Fusion avant de cliquer sur la page Fusion.
Comprénde les nœuds
Pour mistrux comprendre la structure nodale, visualisez chaque noeud comme une icone représentant un outil ou un effet. Les noeuds sont connectés entre eux pour former la composition globale, c'est comme les Ingredients d'un gateau! Il est important de comprendre les entrées et les sorties de chaque noeud, car cela vous aidera à naviguer dans le flux de votre composition tout en créant des effets visuels précis.
Certains outils possedent plusieurs entrées et sorties que vous pouvez connecter à d'autres nœuds. Par exemple, le nœud Merge vous permet de joindre une entrée d'avant-plan, une sortie d'arrête-plan et une entrée de masque pour les caches ou les incrustations.
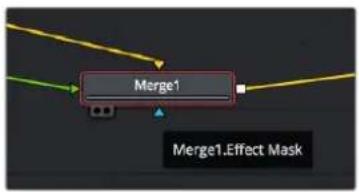
Entree d'avant-plan
Entree d'arriere-plan
Entree de I'effet masque
Sortie
Le fait qu'un neud possede plusieurs sorties signifie que vous pouvez le connecter à d'autres neuds. Ainsi, contrairement aux structures en couches, vous n'avez pas besoin de dupliquer les clips. Les flèches entre les neuds vous permettent de connaître la direction du flux des données d'image.
Ajouter des noeuds à l'éditeur de noeuds
Pour ajouter des effets, il vous suffit de placer des noeuds sur la ligne entre le noeud d'entrée et le noeud de sortie.
Il existe plusieurs façon de procéder. Vous pouvez maintenir le bouton Shift enforcé et déposer un nœud entre deux autres nœuds. Vous pouvez également cliquer sur le nœud auquel vous souhaitez joindre un effet et Sélectionner l'outil à ajouter, le nœud va automatiquement se connecter avec l'outil sélectionné. Enfin, vous pouvez ajouter un nœud n'importe où dans la fenêtre de nœuds et connecter manuellement la sortie d'un nœud à l'entrée d'un autre, à l'aide de votre souris.
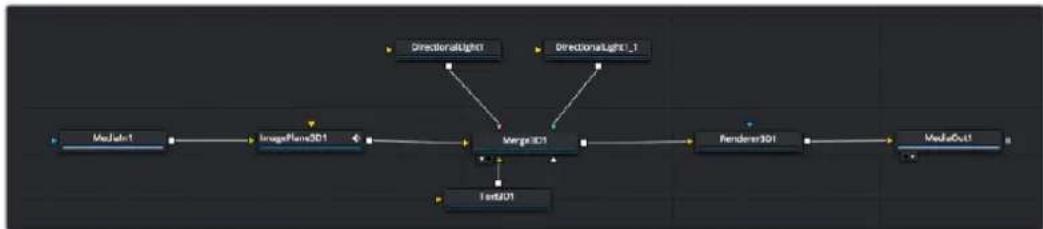
Les outils les plus utilisés sont les outils Merge 2D ou 3D. Ils permettent de fusionner des outils en ne créé qu'une seule sortie.
Les outils Merge controliant la maniere dont les entrees sont gerees, notament la taille, la position et le fondu. Pour acceder à ces paramétres, selectionnez un nœud Merge et ouvre l'inspecteur.
La barre d'outil située au-dessus de la fenêtre de noëuds affiche les icones des outils les plus utilisés. Pour ajouter un noëud, cliquez sur une icone ou glissez-la dans la fenêtre de noëuds. Pour afficher la liste de tous les outils disponibles, cliquez sur Bibliothèque d'effets en haut à gauche de l'écran, puis agrandissez l'options Tools. Vous trouvez tous les outils triés par catégorie, ainsi que des templates que vous pouvez utiliser, comme Lens flare, Shader et Background.
CONSEIL Une fois familiarisé avec le nom des outils, maintenez le bouton Shift enforcé et appuyez sur la barre d'espace de votre clavier pour faire apparaitre le menu Select Tool. Lorsque vous saisirez un nom d'outil, le menu vous sugérera automatiquement l'outil le plus pertinent. C'est un moyen très rapide de selectionner l'outil de votrechoix.
Ajuster les noeuds avec l'inspecteur
Voussoupz parametrer les noeuds a laide de Iinspecteur.Cliquez sur le noeud que yousouhaitez modifier pour afficher ses parametes dans Iinspecteur.
Dans Fusion, vous n'avez pas besoin de visualiser le noeud que vous etes en train d'editor. Vous pouvez modifier un noeud alors que vous en visionnez un autre dans votre composition. Par exemple, vous pouvez modifier la taille et le centrage d'un noeud Text+ alors qu'un nceud Merge est dans le viewer. Cela vous permet de voir le texte sur un arriere-plan.
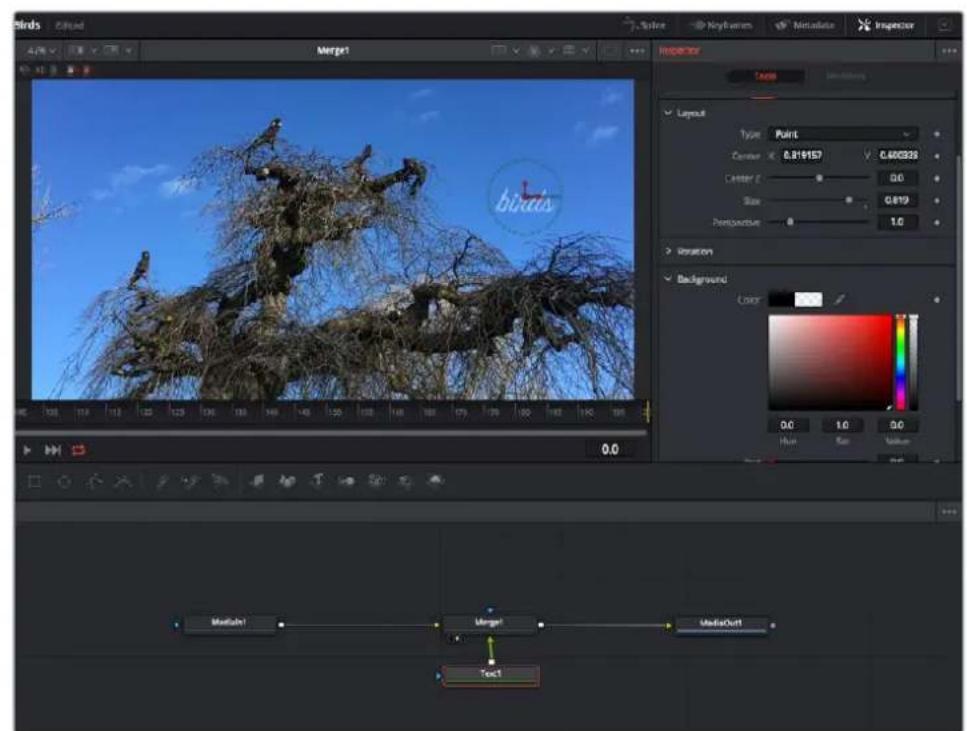
Lorsqu'un noeud est selectionné, il est entoué d'une cordure rouge. ici, l'inspecteur affiche la fenêtre de mise en forme du noeud Text.
Selon la fonction du noeud selectionné, différents paramêtres s'afficheront. Par exemple, vous pourrez modifier la taille, le centrage ou encore le nombre de particules. Petit à petit, régler les images clés et les paramêtres animeront les effets.
Travailler avec des images clés
Dans la fenêtre de l'inspecteur, réglez une image clé en faisant un click droit sur un paramètre et en scélectionnant Animer dans le menu contextuel. L'icone des images clés sur la droite s'affichera en rouge. La fonction Images clés est désormais active, et tous les changements que vous effectuerez ne seront appliqués qu'à l'image scélectionnée. Lorsque vous creez plusieurs images clés en changeant les paramétres d'une autre image, une transition est interpolée entre elles. Les flèches de chaque côté de l'icone de l'image clé vous permettent de déplacer la tête de lecture dans les mêmes positions que la timeline.
La fenêtre Spline vous offre des paramétres supplémentaires pour contrôler votre animation d'image clé. Vous pouze selectionner des images clés, comme par exemple la première et la dernière, et adoucir l'animation entre elles avec une courbe de Bezier. Pour cela, saisissez les touches Shift + s, ou faites un cli croit sur une image clé et selectionnez Adoucir.
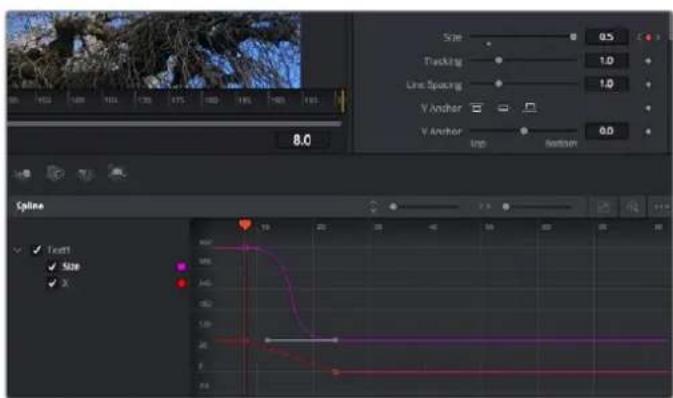
Ici, la taille de I'animation a ete adoucie avec une courbe de Bezier. Pour raccourcir ou allonger la courbe, cilquez sur ses polgnees. Pour deplacer I'animation, cliquez sur les icones carrees.
Tracker des éléments en mouvement et ajouter du texte
Afin de vous donner un meilleur aperçu de Fusion, nous allons vous montré comment tracker un élément dans un clip, ajouter du texte, puis l'intégrer à un élément à l'aide des données de tracking.
L'outil Tracker tracke les pixels sur un axe X et Y et génère des données que vous pouvez utiliser pour intégrer des éléments. C'est très utile pour faire correspondre la position d'un texte à un objet en mouvement, comme une voiture qui roule ou un oiseau qui vole sur plusieurs images.
1 Dans la page Bibliothèque d'effets, Sélectionnez l'util Tracking et faites-le glisser sur la ligne entre les nœuds Medialn et MediaOut. Cliquez sur le nœud de tracking pour afficher ses propriétés dans l'inspecteur.
2 Saisissez « 1 » sur votre clavier pour afficher ce nœud dans le viewer de gauche. Le clip va s'afficher dans le viewer avec le tracker, positionné par défaut sur l'image. Passez vous souris sur le tracker pour afficher ses poignées. Cliquez en haut à gauche des poignées et déplacez le tracker dans la zone de l'image de votrechioix. Le tracking est plus performant sur des zones contrastées, comme la marque d'une voiture sur sa carrosserie. Pour une précision optime, l'image est grossie au passage du tracker.
3 Dans la fenêtre de l'inspecteur, cliquez sur le bouton de tracking vers I'avant. Une notification apparaitra sur votre écran pour vous informer que le tracking est effectué. Cliquez sur OK.

Dans l'inspecteur, vous pouvez désirir de tracker vers l'arrière depuis la dernière image, tracker vers l'arrière depuis l'image sélectionnée, arrêté le tracking, tracker vers l'avant depuis l'image sélectionnée ou tracker vers l'avant depuis la première image.
CONSEIL Utilisez les boutons de tracking avant et arrêt depuis une image sélectionnée lorsque la zone a suiviè disparait durant le segment sur lequel vous travailliez. Par exemple, lorsqu'une voiture ou un oiseau sort de l'image. Ainsi, vous trackerez seulement les plans pertinents.
Maintenant, vous pouvez utiliser les données de tracking et appliquer un chemin d'animation à du texte.
4 Cliquez sur l'icone du noeud Text+ depuis la barre d'outils et glisseze-le pres du noeud Tracker dans la fenetre des noeuds. Connectez la sortie carrée du noeud Texte à l'entree verte du noeud Tracker.
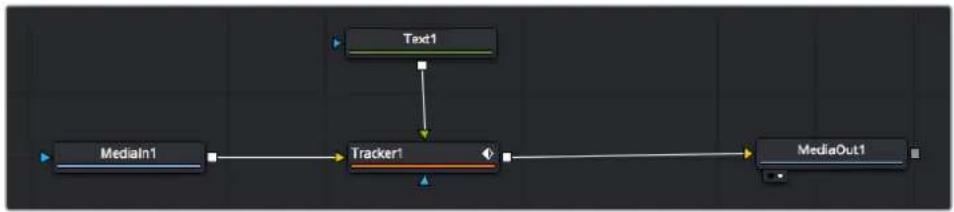
5 Cliquez sur le noeud Tracker et saississez « 1 » sur votre clavier pour afficher la fusion des deux nœuds dans le viewer de gauche. Dans l'inspecteur de noeud Tracker, cliquez sur l'onglet Opération. Pour connaître le nom de chaque onglet, passes la souris sur les icônes. Cliquez sur la flèche du menu dérouulant Operation et Sélectionnéz Suivi du mouvement.
6 Cliquez sur le nœud de texte pour afficher ses propriétés dans l'inspecteur. Tapeze votre texte dans le champ de saisie et modifie la police, la couleur et la taille des caractères, selon les besoin de votre composition.
Cela appliquera les données de position du tracker à votre texte. Si vous souhaitez décaler la position du texte, revenez sur la fenêtre du Tracker dans l'inspecteur, et utilisez les roues Y Offset et X Offset.
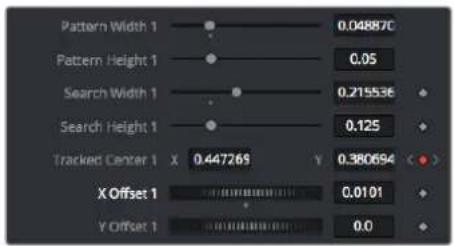
Toumer les roues Offset en bas de la fenetre de l'inspecteur permet d'ajuster la position du texte.
Vous pouvez désormais dire votre composition et voir le texte suivre l'objet que vous avez tracké!
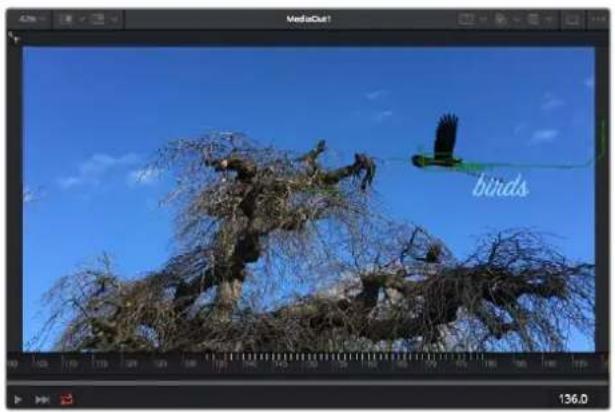
Le carre vert représenté la position actuelle du tracker sur son trace. La ligne en pointilé rouge représenté la position de décalage pour animer le texte.
Pour certaines prises, vous pourriez pouvoir supprimer les points de tracking, par exemple, quand l'objet que vous trackez disparait de l'écran. Grace aux images clés, c'est très simple à réaliser.
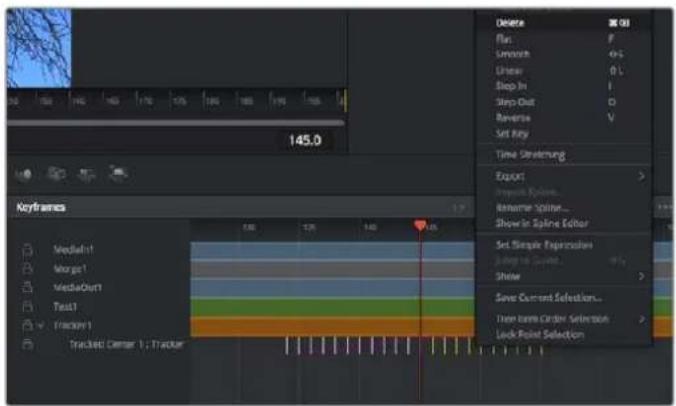
7 Cliquez sur la fenetre Images clés située au dessus de l'inspecteur. Chaque neud auquel vous appliquez des images clés comportera une petite flèche à côte de son nom. Seuls les paramétres avec des images clés s'afficheront dans la liste. Cliquez sur l'icone de grossissement et définissez la zone que vous souhaitez éditer. Cette zone sera grossie pour vous permettre de voir l'image clé plus facilement.
8 Déplacez la tete de lecture sur la dernière image clé de votrechoix. Maintenant, selectionnez les images clés que vous souhaitez supprimer en définissant une zone autour d'elles à l'aide de votre souris. Les images clés seront surlignées en jaune. Faites un click droit et selectionnez Supprimer pour les supprimer.
CONSEIL Si vos effets sont particulièrement lourds pour votre système, faites un clic droit sur la zone des commandes de transport pour voir d'autres options de lecture, comme la lecture proxy qui vous permet d'optimiser le traitement de votre système lorsque vous creez vos compositions. Pour plus de détails sur les options de lecture, veillez consulter le manuel DaVinci Resolve.
Bravo, vous avez finalisé votre première composition en animant du texte qui suit un élément de votre séquence!
Pour tracker une surface plate que vous souhaitez améliorer ou remplacer, vous pouvez utiliser l'outil de tracking planaire. Tracker des surfaces planes en 2D peut être utile pour changer un nom ou une marque dans une image en mouvement, ou même pour ajouter une image à un écran TV.
Pour plus d'informations sur l'outil de tracking planaire et les puissants outils de la page Fusion, veillez consulter le manuel DaVinci Resolve.
CONSEIL Lorsque vous creez des effets dans la page Fusion, il est important de savoir si ces effets sont en 2D ou en 3D. En effet, cela déterminera quel outil Merge sera utilisé. Il est possible que vous combiniez des effets 2D et 3D dans une seule composition. Dans ce cas, rappelez-vous que les effets visuels 3D doivent être rendus en tant qu'image 2D avant d'être intégrés dans une composition 2D.
Nous sommes persuadés que vous adorez creer de puissants effets visuels avec Fusion et explorer les fonctions de montage, d'étalonnage et de post audio de DaVinci Resolve. Avec tous ces outils à votre disposition, les possibilités de création sont illimitées!
Mastériser votre montage
Une fois le montage, l'étalonnage, l'ajout de VFX et le mixage audio effectuels, il est temps de partager votre création. Vous pouvez utiliser la fonction Exportation rapide pour exporter les contenus de la timeline en tant que fichier autonome dans différents formats, ou utiliser les fonctionnalités additionnelles depuis la page Exportation.
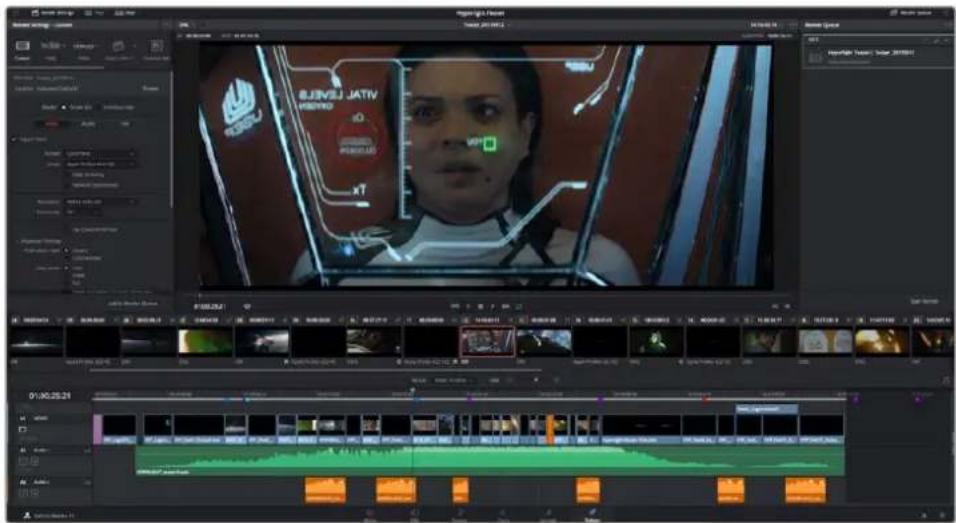
La séquence montée est exportée depuis la page Exportation.
Vou陝 peut quoir choose le format et les codecs de voir video
Exportation rapide
Vou puez selectionner Fichier > Exportation rapide pour utiliser les differents preréglages d'exportation, ain d'exporter your programme depuis n'importe quelle page de DaVinci Resolve. Vou pouze meme utilise l'exportation rapide pour exporter et charger votre programme vers les plateformes de partage video prises en charge, dont YouTube, Vimeo et Frame.io.
Pour utiliser l'Exportation rapide :
1 Depuis la page Montage, Fusion ou Etalonnage, reglez si besoin des points d'entrée et de sortie dans la timeline pour selectionner la plage du programme à exporter. Si aucune timeline ou aucuns points d'entrée ou de sortie n'ont ete selectionnnes, la timeline toute entiere sera exportee.
Choisissez Fichier > Exportation rapide.
2 Sélectionnez un prépréglages parmi les icônes du bandeau supérieur de la boîte de dialogue, puis cliquez sur Exporter.
3 Choisissez un emplacement et nommez le fichier dans la boite de dialogue, puis cliquez sur Enregistrer. Une barre de progression apparaitra pour vous indiquer combien de temps durera l'exportation.
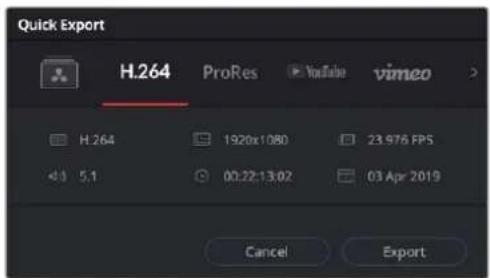
Boite de dialogue de l'Exportation rapide
Page Exportation
Cette page vous permet de selectionner les clips que vous souhaitez exporter et de désirir le format, le codec et la résolution souhaités. Vous pouvez exporter de nombreux formats, tels que QuickTime, AVI, MXF et DPX à l'aide de codecs non compressés RVB/YUV 8 bits ou 10 bits, ProRes, DNxHD, H.264 et autres.
Pour exporter la série montée en un seul clip :
1 Cliques sur I'onglet Exportation pour ouvrir la page Exportation.
2 Dans la fenetre Paramétres d'export en haut à gauche de la page, Vous pouvez désirir les prérégliages d'exportation, par exemple YouTube, Vineo et des prérégliages audio. Vous pouvez également configurer les paramétres d'exportation manuellement en conservant le préréglage par défaut Personneliser et en saississant vos propres réglages. Dans cet exemple, Sélectionnez YouTube puis cliquez sur la flèche située à côté du préréglage et Sélectionnez le format video 1080p.
La fréquence d'images sera la même que la fréquence d'images de votre projet.
3 Sous les prépréglages apparaissent le nom de filchier de la timeline et l'emplacement vers lequel vos vidés seront exportées. Cliquez sur Parcourir, désisissez l'emplacement où vous souhaitez sauvegarder les fichiers exportés, puis Sélectionnez Plan unique parmi les options d'exportation.
4 Juste au-dessus de la timeline, vous verrez que la case Toute la timeline est selectionnée. Cela exportera l'intégrality de la timeline, cependant, vous pouvez selectionner une partie de la timeline si vous le souhaitez. Choisissez simplement Sélection Entrée/Sortie puis utilisez les raccourcis clavier i et o pour selectionner les points d'entrée et de sortie sur la timeline.
5 Allez au bas de la fenetre Paramétres de rendu et cliquez sur le bouton Ajouter à la liste de rendu.
Les paramétres de rendu sont ajoutés à la queue de rendus à droite de la page. Cliquez sur Rendre. Gracé à la queue de rendus, vous pouvez suivir la progression de votre rendu.
Lorsque le rendu est terminé, ouvre le dossier, faites un double-clic sur le clip rendu et regardez le résultat.
Maintenant que vous avez acquis les bases du montage, de l'étalonnage, du mix audio et des effets visuels, n'hésitez pas à vous lancer avec DaVinci Resolve! Veuillez consulter le manuel DaVinci Resolve pour plus de détails sur chaque fonctionnalité.
Contrôle des caméras avec l'ATEM Mini
L'ATEM Mini est un outil puissant pour les productions multicamères et le streaming en direct. La fonction Camera Control du logiciel ATEM Software Control vous permet de faire des commutations entre les camères et de contrôler jusqu'à quatre Blackmagic Pocket Cinema Camera à partir du mélangeur ATEM Mini. Pour ouvrir la fonction de contrôle des camères sur l'ATEM Mini, cliquez sur le bouton Caméra de l'ATEM Software Control.
Les paramétres de la Pocket Cinema Camera, tels que l'iris, le gain, la mise au point, le niveau de détaill et le contrôle du zoom, sont facilement ajustables avec des objectifs compatibles. Vous pouvez également harmoniser les couleurs des caméras et creer des rendus de qualité à l'aide du correcteur colorimétrique DaVinci Resolve Primary Color Corrector intégré à laamera.
VoussoupiezmeajouterunATEMCameraControlPanel pourcontrrolerrapidementet précisémentjusqu'àquatrePocketCinemaCameraa la fois.Pourplusd'informations,consultezle manueldeI'ATEMMini.
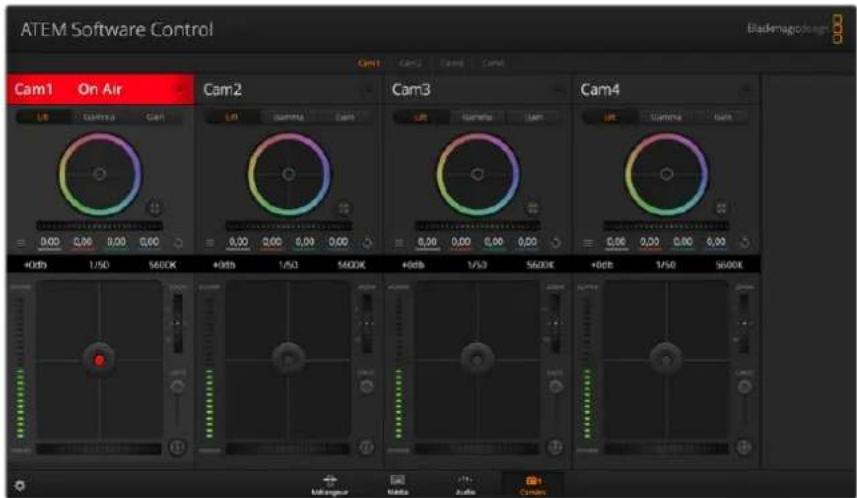
Fonction Camera Control de l'ATEM
Le mélangeur ATEM contrôle les caméras en diffusant des paquets de contrôle sur toutes les entrées HDMI de votre ATEM Mini. Cela signifie que vous pouvez connecter une entrée HDMI de votre ATEM Mini au connecteur HDMI de la camera et cette dernière détectera les paquets de contrôle dans le signal HDMI et vous permettra de contrôler les fonctionnalités de laamera.
Ouvrez les préférences de l'ATEM Software Control et configurez le mappage des boutons de votre mélangeur pour garantir une commutation de la bonne catégorie avec le tally approprié. Grace à la connexion video partant de votre mélangeur vers les Blackmagic Pocket Cinema Camera, vous pouvez également bénéficier des indicateurs tally en direct.
Panneau de contrôle pouramera
Lancez le logiciel ATEM Software Control et cliquez sur le bouton Camera situé au bas de la fenêtre du logiciel. Vous apercevez une rangée de fenêtres qui contiennent des outils permettant d'ajuster et d'affiner l'image de chaqueamera Blackmagic. Les commandes sont très facies à utiliser. Il vous suffit de cliquer sur les boutons à l'aide de votre souris, ou de cliquer et déplacer les curseurs pour effectuer des ajustements.
Selection de laamera à contrôler
La rangée de boutons située sur le haut de la fenetre de contrôle de laamera vous permet de selectionner le numero de laamera que vous souhaitez contrôle.
Etat du canal
La section Etat du canal est située dans la partie supérieure de chaque fenetre de contrôle de camera et affiche le libelle de la camera, l'indicateur de passage à l'antenne et le bouton de
verrouillage. Appuyez sur le bouton de verrouillage pour verrouiller toutes les commandes relatives à uneamera spécifique. Lorsque laamera est à l'antenne, la section État du canal s'allume en rouge et affiche l'alerte On Air.
Paramètres de laamera (Camera)
Le bouton de paramétrage de laamera situé en bas à gauche de la roue maitresse vous permet d'ajuster les détails du signal d'image de chaqueamera.
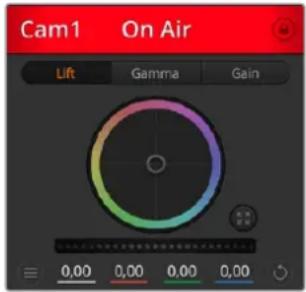
Chaque fenetre de contrôle de camera affiche l'etat du canal afin que vous sachiez qu'elleamera est a I'antenna. Utilisez les roues chromatiques pour ajuster le parametres Lift, Gamma et Gain de chaque canal YRGB
Detalls
Ce paramètre permet de régler la nettedé de l'image en direct des caméras. Réduisez ou augmentez le niveau de nettedé en selectionnant : Désactiver les détails, Dêtails par défaut pour une nettedé faible, Dêtails moyens et Dêtails élevés.
Roues chromatiques
Le cercle chromatique est une fonctionnalité puissant du correcteur de couleurs DaVinci Resolve et permet d'effectuer des ajustements de couleur pour les paramétres lift, gamma et gain de chaque canal YRGB. Pour selectionner le paramètre à ajuster, il vous suffit de cliquer sur un des trois boutons de selection situés au-dessus de la roue chromatique.
Roue maitresse
Utilisez la roue maitresse située sous la roue chromatique pour effectuer des ajustements de contraste sur tous les canaux YRGB en même temps, ou uniquement de luminance pour les paramétres lift, gamma ou gain.
Boutons de réinitialisation
Le bouton de réinitialisation Situé en bas à droite de la fénette de contrôle de laamera vous permet de désirier aisément les paramètres de correction colorimétrique que vous souhaïez réinitialiser, copier ou coller. Chaque roue chromatique possée également son propre bouton de réinitialisation. Appuyez sur ce bouton pour restaurer le paramètre par défaut, ou pour copier/coller un paramètre. Les fénetres de contrôle deamera verrouillées ne sont pas affectées par la fonction Coller.
Le bouton de réinitialisation principal est situé en bas à droite de la fenêtre de correction colorimétrique. Il vous permet de réinitialiser les roues chromatiques Lift, Gamma et Gain ainsi que les paramètres Contraste, Teinte, Saturation et Lum Mix. Vous pouvez coller les paramètres de correction colorimétrique à des fenêtes de contrôle deamera individuelles ou à toutes les fenêtes en même temps pour creer un rendu uniforme. Les paramètres relatifs à l'iris, à la mise au point et au niveau de noir ainsi que le paramètre Limite ne sont pas affectés par la fonction Coller. Lorsque vous appliquez la fonction Paste to all (Coller à toutes les fenêtes), un message apparait pour confirmier cette action. De cette façon, vous ne collez pas de nouveaux paramètres accidentellement aux cameras non verrouillées en cours de diffusion.
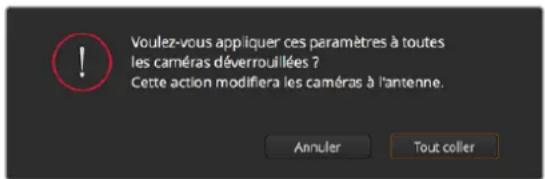
Lorsque vous souhaitez appliquer la fonction Coller tout, un message apparait pour vous demander de confirmer toute action. De cette façon, vous ne collez pas de nouveaux paramétres accidentellement aux camères non verrouillées en cours de diffusion.
Contrôle de l'iris et du niveau de noir
Le contrôle de l'iris et du niveau de noir est situé au sein de la croix de centrage de chaque fenêtre de contrôle deamera. Le contrôle s'allume en rouge lorsque laamera est à l'antenne.
Pour ouvrir ou fermer l'iris, déplacez le contrôle vers le haut ou vers le bas. En maintainant la touche MAJ enforcée, vous pourrez ajuster uniquement l'iris.
Pour assombrir ou éclaircir le niveau de noir, déplacez le bouton vers la gauche ou vers la droite. En maintainant la touche Command (Mac) ou Control (Windows) enforcée, vous pourrez ajuster uniquement le niveau de noir.

Le contrôle de l'iris/niveau de noir s'illumine en rouge lorsque laamera est à l'antenne.
Contrôle du Zoom
Lorsque vous utilisez des objectifs compatibles dotés d'un zoom électronique, vous pouvez effectuer des zooms avant et arriré à l'aide de la fonction de contrôle du zoom. Cette commande fonctionne de la même manière que la bague de zoom sur un objectif, avec le téléobjectif d'un côté et le grand-angle de l'autre. Cliquez sur le contrôle du zoom situé au-dessus du curseur Limité, et déplacez-le vers le haut pour faire un zoom avant ou vers le bas pour faire un zoom arrirée.
Parametre Limité
Le paramètre Limité est situé à droite du contrôle de l'iris/niveau de noir et permet de limiter l'ouverture de l'iris. Cette fonctionnalité vous aide à ne pas faire passer des images surexposées à l'antenne. Pour configurer cette limite, ouvre complètement l'iris à l'aide de la fonction de contrôle de l'iris, puis déplacez le curseur vers le haut ou vers le bas pour configurer l'exposition optimale. À présent, lorsque vous ajustez l'iris, la limite que vous avez configurée à l'aide du paramètre Limité l'empechera de dépasser l'exposition optimale.
Indicateur de l'iris
L'indicateur de l'iris est situé à gauche du contrôle de l'iris/niveau de noir et fait office de réference visuelle vous permettant de visualiser l'ouverture de lentille. L'indicateur de l'iris est affecté par le paramètre Limité.
Bouton de mise au point automatique
Le bouton de mise au point automatique est situé en bas à droite de chaque fenêtre de contrôle deamera. Appuyez sur ce bouton pour un réglage automatique de la mise au point lorsque vous utilisez un objectif actif qui prend en charge les ajustements de mise au point électronique. La plupart des objectifs prenrent en charge la mise au point automatique,
cependant, certains d'entre eux peuvent etre regles en mode manuel ou automatique. Il vous faudra donc vérifier que voitre objectif est regle en mode automatique. Pour ce faire, il suffit parfois de faire glisser la bague de mise au point vers I'avant ou vers l'arriere.
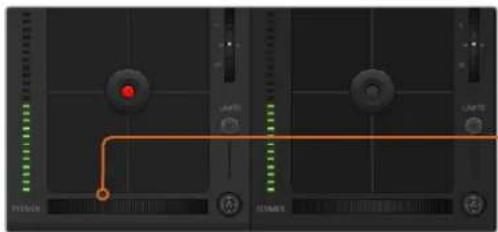
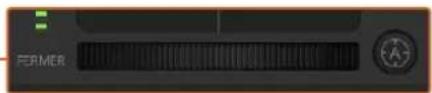
Cliquez sur le bouton de mise au point automatique ou deplacez le curseur de mise au point manuelle vers la gauche ou vers la droite pour effectuer la mise au point d'un objectif compatible.
Ajustement manuel de la mise au point
Lorsque vous souhaitez ajuster manuellement la mise au point sur votreamera, vous pouvez utiliser l'ajustement de mise au point situé au bas de chaque fenêtre de contrôle deamera. Déplacez la roue vers la gauche ou vers la droite pour ajuster manuellement la mise au point tout en visuaisant l'imag pour vous assurer qu'elle est nette.
Gain de laamera
Le paramètre relatif au gain de laamera vous permet d'ajouter du gain supplémentaire à laamera. Sur les Blackmagic Pocket Cinema Camera, ce paramètre fait reference à l'ISO. C'est très important lorsque vous travailliez dans des conditions où la lumière est minime et que vous avez besoin de gain, ou ISO, supplémentaire au niveau du capteur pour éviter que vos images ne soient sous-exposées. Vous pouvez réduire ou augmenter le gain enclinquant sur les flèches gauche ou droite situées à côté du paramètre gain (dB).
Il est possible d'ajouter du gain à tout moment, par exemple lorsque la lumière baisse au coucher du soleil lors d'un tournage en extérieur et qu'il vous faut augmenter la luminosité de votre image. Il faut bien garder à l'esprit que le fait d'ajouter du gain augmentera le bruit dans vos images.
Contrôle de la vitesse d'obturation
Le contrôle de la vitesse d'obturation est situé dans la section entre la roue chromatique et le contrôle de l'iris/niveau de noir. Réduisez ou augmentez la vitesse d'obturation en faisant passer le pointeur de votre souris sur l'indicateur de la vitesse d'obturation, puis cliquez sur les flèches gauche ou droite. Sur les Blackmagic Pocket Cinema Camera, ce paramètre fait reférence à l'angle d'obturation.
Si vous observez des scintillements, vous pouvez diminuer votre vitesse d'obturation pour les éliminer. Diminuer la vitesse d'obturation est un bon moyen d'éclaircir vos images sans utiliser le gain de laamera, car vous augmentez ainsi le temps de pose du capteur d'image. Le fait d'augmenter la vitesse d'obturation réduira le flou de rouge, ce qui est idéal lorsque vous souhaitez obtenir des scènes d'action nettes avec un flou de rouge minimal.
Balance des blancs
Le paramètre de balance des blancs est situé à côté du contrôle de la vitesse d'obturation. Il peut être régle en utilisant les flèches gauche et droite situées de chaque côté de l'indicateur de température de couleur. Les sources lumineuses émettent des couleurs plus ou moins chaudes ou froides, vous pouvez compenser cela en ajustant la balance des blancs. Les blancs de votre image resteront ainsi réellement blancs.
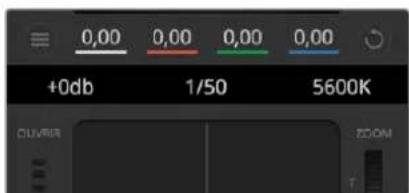
Faites passer le pointeur de votre souris sur les indicateurs de gain, de vitesse d'obturation et de balance des blancs pour faire apparaitre les flèches qui vous permetront d'ajuster leurs paramétres respectifs.
Correcteur colorimétrique primaire DaVinci Resolve
Si vous avez de I'experience dans le domaine de la correction colorimétrique, il est possible de changer l'interface de commande des caméras pour obtenir un style d'interface qui ressemble à celle d'un correcteur colorimétrique primaire que l'on trouve communément sur les systèmes d'étaconnage.
Les cameras Blackmagic intégrant le correcteur colorimétrique primaire DaVinci Resolve. Si vous avrez utilisé DaVinci ResolveAAParavant, créativement parlant, l'étalonnage sur la camera Blackmagic sera identique à celui de DaVinci, vous aurez donc l'opportunity demettrevoitrexpérience d'étalonnage à profit pour la production en direct. La fenêtre de correction colorimétrique peut être agrandie et fournit un contrôle de correction colorimétrique plusétendu comprenant des paramétres supplémentaires ainsi qu'une interface de correction colorimétrique primaire complète.
Vous disposez à partir de roues chromatiques et de paramétres, tels que la saturation. Vous pouvez également visualiser tous les paramétres relatifs aux basses lumières, aux tons moyens et aux hauteurs lumières en même temps. Il vous suffit de commuter entre les cameras à l'aide des commandes de selection situées sur le haut de la fenêtre lorsqu'il est nécessaire.
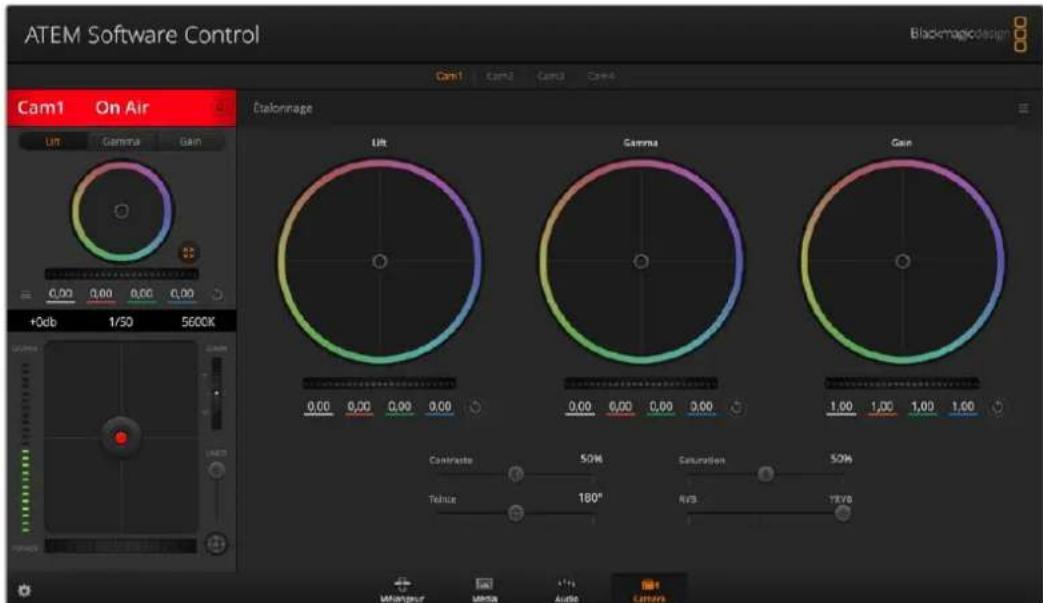
Cliquez sur le bouton DaVinci Resolve pour agrandir la fenetre de correction colorimétrique et ajuster les paramètres.
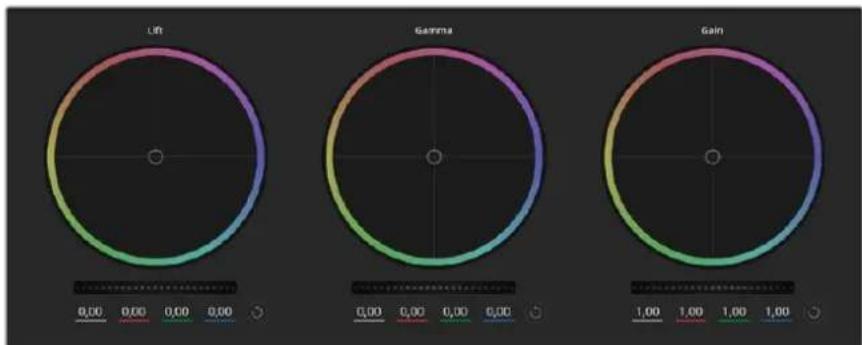
Roues chromatiques Lift, Gamma et Gain dans la fenetre de correction colorimétrique.
Roues colorimétriques
Cliquez et déplacez votre pointeur n'importe où dans le cercle de couleur
Notez qu'il n'est pas nécessaire de positionner votre pointeur sur l'indicateur de la balance des couleurs. Lorsque l'indicateur de la balance des couleurs se déplace, les paramètres RGB situés sous la roue chromatique se modifiient pour reflérer les ajustements apportés à chaque canal.
Cllquez en maintenant le bouton Majuscule enfoncé et déplacez votre pointeur n'importe ou dans le cercle de couleur
L'indicateur de la balance des couleurs se positionnera à l'endetroit même où se trouve le pointeur, ce qui vous permet de faire des ajustements plus rapides et extrêmes.
Double-cliquez n'importe ou dans le cercle de couleur
Réinitialise l'ajustement apporté à la couleur sans réinitialiser l'ajustement apporté à la roue maitresse pour la commande en question.
Cliquez sur la commande de réinitialisation située en haut à droite du cercle de couleur
Réinitialise le contrôle de la balance des couleurs ainsi que la roue maitresse correspondante.
Roues Master
Utilisez les roues maitresses situées sous les roues chromatiques pour ajuster les commandes Lift, Gamma et Gain de chaque canal YRGB.

Ajustez les roues maitresses en déplacant la commande vers la gauche ou vers la droite.
Pour effectuer des ajustements à l'aide de la roue maitresse :
Déplacez la roue maitresse vers la gauche ou vers la droite
Un déplacement vers la gauche assombrit le paramètre selectionné de l'image alors qu'un déplacement vers la droite éclaircit ce même paramètre. Lors de l'ajustement, les paramètres YRGB situés au-dessous de la roue maitresse se modifiient pour reflieter l'ajustement en cours. Pour effectuer un ajustement n'affectant que la luminance, maintenez la touche ALT ou Command enforcée et déplacez la roue vers la gauche ou vers la droite. comme le correcteur colorimétrique prend en charge un traitement YRGB, il vous permet de faire preuve de créativité et de creator des effets uniques en ajustant uniquement le canal Y. Les ajustements du canal Y fonctionnent moins lorsque le paramètre Lum Mix est régle sur le côte droit pour un traitement YRGB et sur le côté gauche pour un traitement RGB standard. En général, la plupart des coloristes DaVinci Resolve utilisent le correcteur colorimétrique YRGB, car on obtient une meilleure maitrise de la balance des couleurs sans affecter le gain général. Il vous faudra ainsi moins de temps pour obtenir le rendu désire.
Parametre Contraste
Le paramètre Contraste vous permet de contrôler la distance entre les valeurs les plus sombres et les plus claires d'une image. L'effectif ressemble à celui effectué lorsque vous utilisez les roues maitresses Lift et Gain. Par défaut, ce paramètre est regle sur 50% .
Parametre Saturation
Le paramètre Saturation augmente ou réduit la quantité de couleur de l'image. Par défaut, ce paramètre est réglé sur 50% .
Parametre Teinte
Le paramètre Teinte fait tourner toutes les teintes de l'image sur le périmètre complet de la roue chromatique. Le paramètre par défaut de 180 degrés affiche la distribution originale des teintes. L'augmentation ou la diminution de cette valeur fait tourner toutes les teintes vers l'avant ou vers l'arrière selon la distribution des teintes d'une roue chromatique.
Parametre Lum Mix
Le correcteur colorimétrique intégré aux caméras Blackmagic a été conçu à partir du logiciel d'étaconnage primaire DaVinci Resolve. DaVinci create des logiciels de correction colorimétrique depuis le début des années 80 et la plupart des films hollywoodiens sont étaconnés sur DaVinci Resolve.
Cela signifie que le correcteur colorimétrique intégre à laamera possède des fonctionnalités uniques et puissant sur le plan créé. Le traitement YRGB est l'une de ces fonctionnalités.
Lorsque vous étalonnnez, vous pouvezCHOISER entre un traitement RGB ou un traitement YRGB. Les etalonneurs professionnels utilisent le traitement YRGB, car les obtiennent ainsi un contrôle plus précis de la couleur et peuvent ajuster les canaux de façon independante avec une(Meilleure separation et davantage d'options créatives.
Lorsque le paramètre Lum Mix est regle sur le cote croit, vous avez une sortie provenant a 100% du correcteur colorimétrique YRGB. Lorsque le paramètre Lum Mix est regle sur le cote gauche, vous obtenez une sortie provenant a 100% du correcteur RGB. Vous pouvez régler le paramètre Lum Mix sur n'importe qu'elle position entre la gauche et la droite pour obtenir un mélange de sorties provenant des deux correcteurs RGB et YRGB.
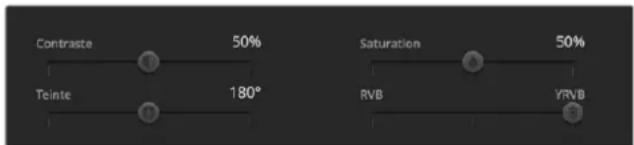
Déplacez les curseurs vers la gauche ou vers la droite pour ajuster les paramètres Contraste, Saturation, Teinte et Lum Mix.
Quelle est la configuration ideale? Cela n'en tient qu'a vous, car la correction colorimétrique est un procédé purement créé où il n'y a pas de juste ou de faux. Le meilleur paramétrage est donc celui qui vous plaît le plus!
Synchronisation des paramètres
Lorsque les deux apparèils sont connectés, les signaux du contrôle des caméras sont envoyés du mélangeur ATEM à votreamera Blackmagic. Si un paramètre est accidentellement ajusté à partir de votreamera, la fonction de contrôle des caméras réinitialisera automatiquement le paramètre en question pour maintainir la synchronisation.
CONSEIL Le correcteur colorimétrique primaire DaVinci Resolve de chaqueamera peut être contrôle à l'aide d'un DaVinci Resolve Micro Panel. Ce panneau de contrôle matériel vous permet d'effectuer rapidement des ajustements de couleurs précis. Pour plus d'informations, consultez le manuel de l'ATEM Mini.
REMARQUE Si laamera est eteinte alors qu'elle est encore connectee a l'ATEM Mini par HDMI, des problemes relatifs au contrôle de la camera peuvent apparaitre. Nous vous recommendons de brancher les cameras sur secteur et de débrancher le cable HDMI avant de les eteindre.
Travailler avec un logiciel tiers
Pour monter vos clips à l'aide de votre logiciel de montage favori, tel que DaVinci Resolve, vous pouvez copier vos clips depuis laamera vers un lecteur externe ou RAID, puis les importer dans le logiciel. Vous pouvez également importer vos enregistements à partir de votre support de stockage au moyen d'une station d'accueil ou d'un adaptateur pour votre carte CFast, SD ou votre disque flash USB-C.
Travailler avec des fichiers provenant de cartes CFast 2.0 et de cartes SD
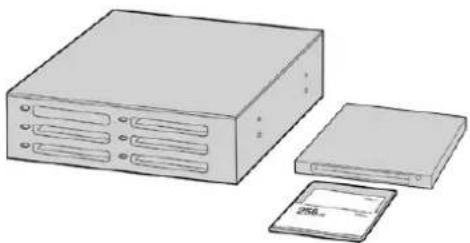
Procedez au montage directement à partir de votre carte CFast ou SD en la retardant de votreamera et en l'installant sur votre ordinateur à l'aide d'un lecteur/graveur de carte CFast 2.0 ou d'un lecteur de carte CFast.
Pour importer vos clips à partir d'une carte CFast 2.0 ou d'une carte SD :
1 Retirez la carte CFast ou SD de votre Blackmagic Pocket Cinema Camera.
Installez la carte CFast ou SD sur votre ordinateur Mac ou Windows à l'aide d'un lecteur/graveur de carte CFast 2.0 ou SD, ou d'un lecteur de carte CFast.
2 Double-cliquez sur la carte CFast ou SD pour l'ouvrir. Vous devriez voir des dossiers qui contiennent vos fichiers Blackmagic RAW ou une liste de fichiers MOV QuickTime. Selon le format d'enregistrement choisi, vous aurez peut'être un mélange de fichiers, mais leur convention de dénomination sera la même.
3 À present, déplace les fichiers scélectionnés de la carte CFast ou SD vers votre bureau ou vers un autre disque dur. Vous pouvez également acceder aux fichiers directement à partir de la carte CFast ou SD à l'aide d'un logiciel de montage.
4 Il est important de tous jours ejecter votre carte CFast ou SD de Mac ou de Windows avant des débrancher de votre ordinateur. Sinon, il y a un risque que vos fichiers soient corrompus.
Travailler avec des fichiers provenant de disques flash USB-C
Pour importer des clips depuis un disque flash USB-C :
1 Debranche le disque flash USB-C de votreamera.
2 Connectez le disque flash USB-C à votre ordinateur Mac ou Windows via un port USB-C. Il est préférible d'utiliser un port USB 3.0, car l'USB 2.0 n'est pas assez rapide pour monter de la réserve en temps réel.
3 Double-cliquez sur le disque flash USB-C pour l'ouvrir. Vous devriez voir une liste de fichiers MOV QuickTime ou des fichiers Blackmagic RAW. Selon le format d'enregistrement choisi, vous aurez peut-etre unmelonde fichiers, mais leur convention de dénomination sera la même.
4 Faites glisser les fichiers que vous souhaitez utiliser du disque flash USB-C vers le bureau ou vers un autre disque dur. Il est également possible d'acceder aux fichiers directement depuis le disque flash USB-C à l'aide d'un logiciel de montage non-lineaire.
5 Il est important de tous jours ejecter votre disque flash USB-C avant de le débrancher de votre ordinateur.
Utiliser Final Cut Pro X
Pour monter des clips avec Final Cut Pro X, creez un nouveau projet et reglez le format video et la fréquence d'images appropriés. Pour cet exemple, nous utiliserons le format ProRes 422 HQ 1080p24.
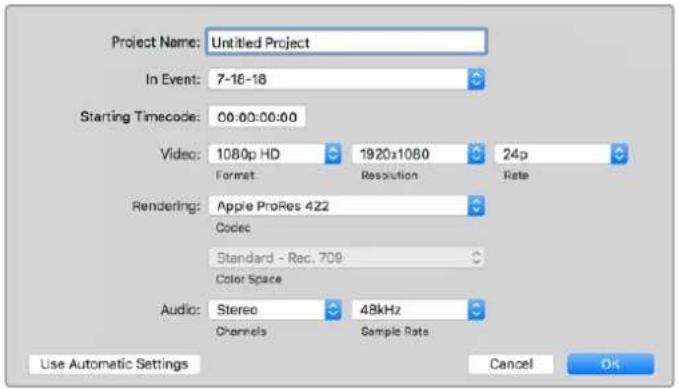
Parametre du projet dans Final Cut Pro X
1 Lancez Final Cut Pro X, allez sur la barre de menu et selectionnez File/New Project. Une fenetre contenant les paramétres du projet apparait.
2 Nommez votre projet et selectionnee la case Custom.
3 Reglez les parametes Video Properties sur 1080p HD, 1920x1080 et 24p.
4 Réglez les paramètres Audio and Render Properties sur Stereo, 48kHz, et Apple ProRes 422.
5 Cliquez sur OK.
Pour importer vos clips dans le projet, allez sur la barre de menu et selectionnez File/Import/Media. Choisissez vos clips à partir de la carte CFast.
Vou pueze a present faire glisser vos clips dans la timeline pour le montage.
Utiliser Avid MediaComposer 2018
Pour monter des clips avec Avid Media Composer 2018, créez un nouveau projet et réglez le format video et la fréquence d'images appropriés. Dans cet exemple, les clips sont régliés sur 1080p24.
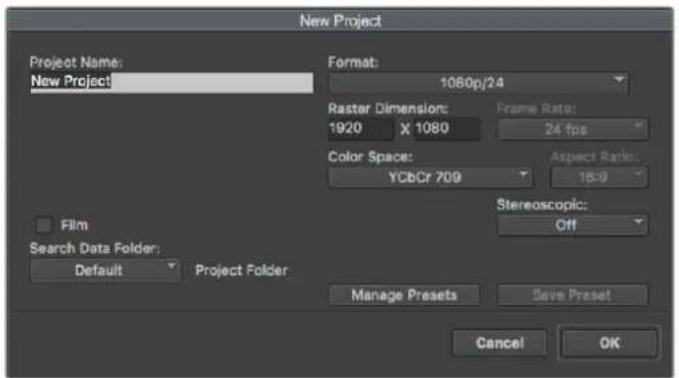
Régrle le nom et les options de votre projet dans Avid Media Composer 2018
1 Lancez le logiciel Avid Media Composer 2018, la fenetre de selection du projet apparait.
2 Cliquez sur le bouton New Project et nommez votre projet dans la fenetre du nouveau projet.
3 Dans le menu déroulant Format, Sélectionnez HD 1080 > 1080p/24 et cliquez sur OK pour creer le projet.
4 Double-cliquez sur le projet dans la fenetre Select Project pour I'ouvrir.
5 Sélectionnez File > Input > Source browser et naviguez jusqu'àux fichiers à importer.
6 Sélectionnez votre chutier cible depuis le menu dérouulant Target bln, puis cliquez sur Import pour importer les fichiers.
Lorsque les clips apparaissent dans le chutier, vous pouvez faire glisser vos clips dans la timeline et commencer le montage.
Utiliser Adobe Premiere Pro CC
Pour monter des clips Apple ProRes 422 HQ avec le logiciel Adobe Premiere Pro CC, créez un nouveau projet et régléz le format video et la fréquence d'images appropriés. Dans cet exemple, les clips sont réglés sur ProRes 422 HQ 1080p25.
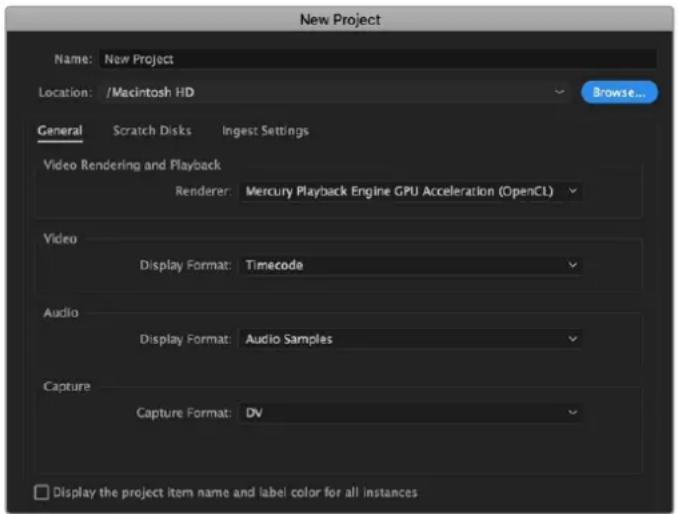
Choisisse le nom et reglez les options de votre projet dans Adobe Premiere Pro CC
1 Lancez Adobe Premiere Pro CC. Sur I'ecran de bienvenue, selectionnez New Project. Une fenetre contenant les paramétres du projet apparait.
2 Nommez votre projet. Choisissez un emplacement pour votre projet en cliquant sur Parcourir et en selectionnant le dossier désire. Une fois le dossier selectionné, cliquez sur OK dans la fenêtre New Project.
3 Allez sur la barre de menu d'Adobe Premiere Pro CC et selectionnez File/Import. Choisissez ensuite les clips que vous souhaitez monter. Les clips apparaissent dans la fenetre Projet.
4 Faites glisser le premier clip que vous souhaitez monter sur l'icone New Item située en bas à droite de la fenêtre du projet. Une nouvelle série possédant les mêmes paramétres que votre clip est créé.
Vou pouve a present les faire glisser sur la timeline pour commencer le montage.
Blackmagic Camera Setup Utility
Mise à jour du logiciel de laamera sous Mac
Après avoir teléchége le logiciel Blackmagic Camera Setup Utility et dézippe le fichier teléchége, ouvrez l'image disque pour faire apparaitre le Blackmagic Camera Setup Installer.
Lancez le programme d'installation et suivez les instructions figurant à l'écran. Une fois l'installation terminée, allez sur le dossier Applications et ouvre le dossier Blackmagic Cameras. Vous y trouvrez ce manuel, l'utilitaire Blackmagic Camera Setup et un dossier contenant des fichiers readme ainsi que des informations. Vous y trouvrez également un désinstalleur que vous utiliserez pour les mises à jour du Blackmagic Camera Setup.
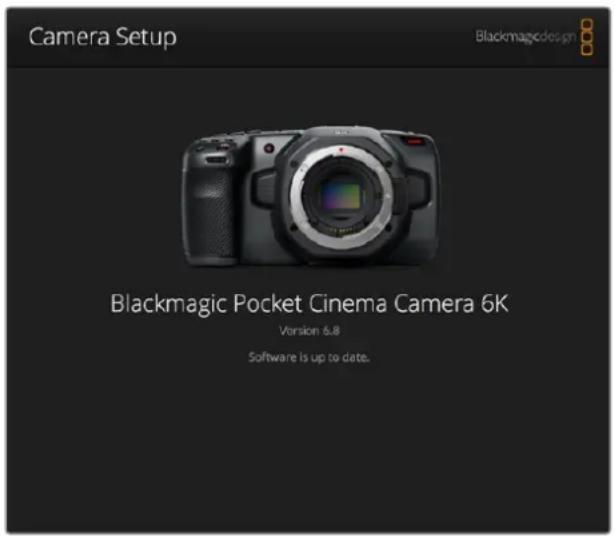
Mise à jour du logiciel de laamera sous Windows
Après avoir teléchége le logiciel Blackmagic Camera Setup Utility et dézippé le fjichier teléchége, un dossier Blackmagic Camera Setup s'affiche, contenant le PDF de ce manuel ainsi que le programme d'installation Blackmagic Camera Setup. Double-cliquez sur le programme d'installation et suivez les instructions figurant à l'écran pour terminer l'installation.
Sous Windows 10, appuyez sur le bouton de démarriage et Sélectionnez All apps. Faites défiler vers le bas jusqu'au dossier Blackmagic Design, puis lancez le Blackmagic Camera Setup. Sous Windows 8.1, Sélectionnez la flèche de l'écran de démarriage et faites défiler le menu vers le bas jusqu'au dossier Blackmagic Design, puis lancez le Blackmagic Camera Setup.
Mise à jour du logiciel interne de laamera
Après avoir installé la dernière version du logiciel Blackmagic Camera Utility sur votre ordinateur, connectez un cable USB-C entre l'ordinateur et laamera. Le port USB-C est situé sur la partie gauche du panneau. Il suffit de soulever le capuchon en caoutchouc pour acceder au port.
Lancez le logiciel Blackmagic Camera Setup et suivez les instructions figurant sur l'écran pourmettre à jour le logiciel de laamera. Laamera redémarrera sur l'écran de seLECTION des langues. Il est important de noter que mettre à jour le logiciel de votreamera supprimera tous les prérogliages et toutes les LUTs personnalisées, puis restaurera tous les réglages. Avant d'effectuer une mise à jour logicielle, il est conseilé de les exporter sur une carte mémoire, comme stockage de secours. Avec la mise à jour, vous pourrez restaurerrapidement vos prérogliages et vos LUTs en les important depuis la carte mémoire.
Supports d'enregistrement recommendés
Cartes CFast 2.0
Recommendees pour la Pocket Cinema Camera 6K
Les cartes CFast 2.0 suivantes sont recommandées pour enregistrer en 6K Blackmagic RAW 5:1 jusqu'à 50 im/s sur la Pocket Cinema Camera 6K.
| Marque Nom de la carte Stockage | ||
| Angelblrd AV PRO CF XT 512GB | ||
| CinediskPro 510MB/s CFast 2.0 256GB | ||
| Hagiwara Solutions DC-SMAN64GA CFast 2.0 64GB | ||
| Hagiwara Solutions DC-SMANA1GA CFast 2.0 128GB | ||
| KomputerBay 3400x CFast 2.0 64GB | ||
| KomputerBay 3400x CFast 2.0 128GB | ||
| Lexar Professional 3400X CFast 2.0 128GB | ||
| Lexar | Professional 3500X CFast 2.0 | 128GB |
| ProGrade Digital | 510MB/s CFast 2.0 | 128GB |
| ProGrade Digital | 550MB/s CFast 2.0 | 256GB |
| ProGrade Digital | 550MB/s CFast 2.0 | 512GB |
| Transcend | CFX650 CFast 2.0 TS128GCFX650 | 128GB |
| SanDisk | Extreme Pro CFast 2.0 SDCFSP-64G-x46D | 64GB |
| SanDisk | Extreme Pro CFast 2.0 SDCFSP-128G-x46D | 128GB |
| SanDisk | Extreme Pro CFast 2.0 SDCFSP-256G-x46D | 256GB |
| SanDisk | Extreme Pro CFast 2.0 SDCFSP-512G-x46D | 512GB |
| Silicon Power | CFX310 CFast 2.0 | 512GB |
| Sony | CFast 2.0 G Series CAT-G64 | 64GB |
| Sony | CFast 2.0 G Series CAT-G128 | 128GB |
| Wise | CFA-2560 3400x CFast 2.0 | 256GB |
| Wise | CFA-5120 3500x CFast 2.0 | 512GB |
| Wise | CFA-10240 3500X CFast 2.0 | 1TB |
Les cartes CFast 2.0 suivantes sont recommandées pour enregistrer en 6K 2.4:1 Blackmagic RAW 5:1 jusqu'à 60 im/s sur la Pocket Cinema Camera 6K.
| Marque Nom de la carte Stockage | ||
| Angelbird AV PRO CF XT 512GB | ||
| CinediskPro 510MB/s CFast 2.0 256GB | ||
| Hagiwara Solutions DC-SMAN64GA CFast 2.0 64GB | ||
| Hagiwara Solutions DC-SMANA1GA CFast 2.0 128GB | ||
| Marque Nom de la carte Stockage | ||
| KomputerBay 3400x CFast 2.0 64GB | ||
| KomputerBay 3400x CFast 2.0 128GB | ||
| Lexar Professional 3400X CFast 2.0 128GB | ||
| Lexar Professional 3500X CFast 2.0 128GB | ||
| ProGrade Digital 510MB/s CFast 2.0 128GB | ||
| ProGrade Digital 550MB/s CFast 2.0 256GB | ||
| ProGrade Digital 550MB/s CFast 2.0 512GB | ||
| Transcend CFX650 CFast 2.0 TS128GCFX650 128GB | ||
| SanDisk Extreme Pro CFast 2.0 SDCFSP-64G-x46D 64GB | ||
| SanDisk | Extreme Pro CFast 2.0 SDCFSP-128G-x46D | 128GB |
| SanDisk | Extreme Pro CFast 2.0 SDCFSP-256G-x46D | 256GB |
| SanDisk | Extreme Pro CFast 2.0 SDCFSP-512G-x46D | 512GB |
| Silicon Power | CFX310 CFast 2.0 | 256GB |
| Silicon Power | CFX310 CFast 2.0 | 512GB |
| Sony | CFast 2.0 G Series CAT-G64 | 64GB |
| Sony | CFast 2.0 G Series CAT-G128 | 128GB |
| Wise | CFA-1280 3400x CFast 2.0 | 128GB |
| Wise | CFA-2560 3400x CFast 2.0 | 256GB |
| Wise | CFA-5120 3500x CFast 2.0 | 512GB |
| Wise | CFA-10240 3500X CFast 2.0 | 1TB |
Les cartes CFast 2.0 suivantes sont recommendees pour enregistrer en 2.8K 17:9 Blackmagic RAW 3:1 jusqu'à 120 im/s sur la Pocket Cinema Camera 6K.
| Marque Nom de la carte Stockage | ||
| Angelbird | AV PRO CF XT | 512GB |
| CinediskPro | 510MB/s CFast 2.0 256GB | |
| Hagiwara Solutions | DC-SMAN64GA CFast 2.0 | 64GB |
| Hagiwara Solutions | DC-SMANA1GA CFast 2.0 | 128GB |
| KomputerBay 3400x CFast 2.0 64GB | ||
| KomputerBay 3400x CFast 2.0 128GB | ||
| Lexar Professional 3400X CFast 2.0 128GB | ||
| Lexar Professional 3500X CFast 2.0 128GB | ||
| Lexar Professional 3400X CFast 2.0 256GB | ||
| ProGrade Digital 510MB/s CFast 2.0 128GB | ||
| ProGrade Digital 550MB/s CFast 2.0 256GB | ||
| ProGrade Digital 550MB/s CFast 2.0 512GB | ||
| Transcend CFX650 CFast 2.0 | TS128GCFX650 128GB | |
| SanDisk Extreme Pro CFast 2.0 | SDCFSP-64G-x46D 64GB | |
| SanDisk Extreme Pro CFast 2.0 | SDCFSP-128G-x46D 128GB | |
| SanDisk Extreme Pro CFast 2.0 | SDCFSP-256G-x46D 256GB | |
| SanDisk Extreme Pro CFast 2.0 | SDCFSP-512G-x46D 512GB | |
| Silicon Power CFX310 CFast 2.0 | 20 256GB | |
| Silicon Power CFX310 CFast 2.0 | 512GB | |
| Sony CFast 2.0 G Series CAT-G64 64GB | ||
| Sony | CFast 2.0 G Series CAT-G128 | 128GB |
| Wise | CFA-1280 3400x CFast 2.0 | 128GB |
| Wise | CFA-2560 3400x CFast 2.0 | 256GB |
| Wise | CFA-5120 3500x CFast 2.0 | 512GB |
| Wise | CFA-10240 3500X CFast 2.0 | 1TB |
Les cartes CFast 2.0 suivantes sont recommende pour enregistrer en 4K DCI ProRes HQ jusqu'à 60 im/s sur la Pocket Cinema Camera 6K.
| Marque Nom de la carte Stockage | ||
| Angelbird | AV PRO CF XT | 512GB |
| CinediskPro | 510MB/s CFast 2.0 256GB | |
| Hagiwara Solutions | DC-SMAN64GA CFast 2.0 | 64GB |
| Hagiwara Solutions | DC-SMANA1GA CFast 2.0 | 128GB |
| KomputerBay 3400x CFast 2.0 | 64GB | |
| KomputerBay 3400x CFast 2.0 | 128GB | |
| Lexar | Professional 3400X CFast 2.0 128GB | |
| Lexar | Professional 3500X CFast 2.0 | 128GB |
| Lexar | Professional 3400X CFast 2.0 | 256GB |
| ProGrade Digital | 510MB/s CFast 2.0 | 128GB |
| ProGrade Digital | 550MB/s CFast 2.0 | 256GB |
| ProGrade Digital | 550MB/s CFast 2.0 | 512GB |
| Transcend CFX650 CFast 2.0 | TS128GCFX650 128GB | |
| SanDisk Extreme Pro CFast 2.0 | SDCFSP-64G-x46D 64GB | |
| SanDisk Extreme Pro CFast 2.0 | SDCFSP-128G-x46D 128GB | |
| SanDisk Extreme Pro CFast 2.0 | SDCFSP-256G-x46D 256GB | |
| SanDisk Extreme Pro CFast 2.0 | SDCFSP-512G-x46D 512GB | |
| Silicon Power CFX310 CFast 2.0 | 256GB | |
| Silicon Power CFX310 CFast 2.0 512GB | ||
| Marque Nom de la carte Stockage | |
| Sony CFast 2.0 G Series CAT-G64 64GB | |
| Sony CFast 2.0 G Series CAT-G128 128GB | |
| Wise CFA-1280 3400x CFast 2.0 128GB | |
| Wise CFA-2560 3400x CFast 2.0 256GB | |
| Wise CFA-5120 3500x CFast 2.0 512GB | |
| Wise CFA-10240 3500X CFast 2.0 1TB |
Les cartes CFast 2.0 suivantes sont recommendées pour enregistrer en 1080 ProRes 422 HQ jusqu'à 120 im/s sur la Pocket Cinema Camera 6K.
| Marque Nom de la carte Stockage | ||
| Angelbird AV PRO CF XT 512GB | ||
| CinediskPro 510MB/s CFast 2.0 | 256GB | |
| Hagiwara Solutions | DC-SMAN64GA CFast 2.0 | 64GB |
| Hagiwara Solutions | DC-SMANA1GA CFast 2.0 | 128GB |
| KomputerBay | 3400x CFast 2.0 | 64GB |
| KomputerBay | 3400x CFast 2.0 | 128GB |
| Lexar | Professional 3400X CFast 2.0 128GB | |
| Lexar | Professional 3500X CFast 2.0 | 128GB |
| Lexar | Professional 3400X CFast 2.0 | 256GB |
| ProGrade Digital | 510MB/s CFast 2.0 | 128GB |
| ProGrade Digital | 550MB/s CFast 2.0 | 256GB |
| ProGrade Digital | 550MB/s CFast 2.0 | 512GB |
| Transcend | CFX650 CFast 2.0 TS128GCFX650 | 128GB |
| SanDisk | Extreme Pro CFast 2.0 SDCFSP-64G-x46D | 64GB |
| SanDisk | Extreme Pro CFast 2.0 SDCFSP-128G-x46D | 128GB |
| SanDisk | Extreme Pro CFast 2.0 SDCFSP-256G-x46D | 256GB |
| SanDisk | Extreme Pro CFast 2.0 SDCFSP-512G-x46D | 512GB |
| Silicon Power | CFX310 CFast 2.0 | 256GB |
| Silicon Power | CFX310 CFast 2.0 | 512GB |
| Sony CFast 2.0 G Series CAT-G64 64GB | ||
| Sony CFast 2.0 G Series CAT-G128 128GB | ||
| Wise CFA-1280 3400x CFast 2.0 128GB | ||
| Wise CFA-2560 3400x CFast 2.0 256GB | ||
| Wise CFA-5120 3500x CFast 2.0 512GB | ||
| Wise CFA-10240 3500X CFast 2.0 1TB | ||
Recommendees pour la Pocket Cinema Camera 4K
Les cartes CFast 2.0 suivantes sont recommandées pour enregistrer en 4K DCI Blackmagic RAW 3:1 jusqu'à 60 im/s sur la Pocket Cinema Camera 4K.
| Marque Nom de la carte Stockage | ||
| Angelbird AV PRO CF 512GB | ||
| Angelbird AV PRO CF 1TB | ||
| CinediskPro 510MB/s CFast 2.0 256GB | ||
| Hagiwara Solutions DC-SMAN64GA CFast 2.0 64GB | ||
| Hagiwara Solutions DC-SMANA1GA CFast 2.0 128GB | ||
| KomputerBay 3400x CFast 2.0 64GB | ||
| KomputerBay 3400x CFast 2.0 128GB | ||
| KomputerBay 3700x CFast 2.0 256GB | ||
| Lexar Professional 3400x CFast 2.0 128GB | ||
| Lexar Professional 3500x CFast 2.0 256GB | ||
| ProGrade Digital | 550MB/s CFast 2.0 | 128GB |
| ProGrade Digital | 550MB/s CFast 2.0 | 256GB |
| ProGrade Digital | 550MB/s CFast 2.0 | 512GB |
| SanDisk | Extreme Pro CFast 2.0 SDCFSP-256G-x46D | 512GB |
| Wise | CFA-1280 3400x CFast 2.0 | 128GB |
| Wise | CFA-2560 3400x CFast 2.0 | 256GB |
| Wise | CFA-5120 3500x CFast 2.0 | 512GB |
| Wise | CFA-10240 3500x CFast 2.0 | 1TB |
Les cartes CFast 2.0 suivantes sont recommandees pour enregistrer en 4K DCI ProRes HQ jusqu'à 60 im/s sur la Pocket Cinema Camera 4K.
| Marque Nom de la carte Stockage | ||
| Angelbird AV PRO CF 128GB | ||
| Angelbird AV PRO CF 256GB | ||
| Angelbird AV PRO CF 512GB | ||
| CinediskPro 510MB/s CFast 2.0 256GB | ||
| Hagiwara Solutions DC-SMAN64GA CFast 2.0 64GB | ||
| Hagiwara Solutions DC-SMANA1GA CFast 2.0 128GB | ||
| KomputerBay 3400x CFast 2.0 128GB | ||
| KomputerBay 3700x CFast 2.0 256GB | ||
| ProGrade Digital | 550MB/s CFast 2.0 | 256GB |
| ProGrade Digital | 550MB/s CFast 2.0 | 512GB |
| SanDisk Extreme Pro CFast 2.0 | SDCFSP-64G-x46D 64GB | |
| SanDisk Extreme Pro CFast 2.0 | SDCFSP-128G-x46D 128GB | |
| SanDisk Extreme Pro CFast 2.0 | SDCFSP-256G-x46D 256GB | |
| Sony CFast 2.0 G Series CAT-G64 64GB | ||
| Sony CFast 2.0 G Series CAT-G128 128GB | ||
| Wise CFA-1280 3400x CFast 2.0 128GB | ||
| Wise CFA-2560 3400x CFast 2.0 256GB | ||
| Wise CFA-5120 3500x CFast 2.0 512GB | ||
| Wise CFA-10240 3500x CFast 2.0 | 1TB | |
Les cartes CFast 2.0 suivantes sont recommendees pour enregistrer en 4K DCI Lossless RAW jusqu'à 30 im/s sur la Pocket Cinema Camera 4K.
| Marque Nom de la carte Stockage | ||
| Angelbird | AV PRO CF | 128GB |
| Angelbird | AV PRO CF | 256GB |
| Angelbird | AV PRO CF | 512GB |
| CinediskPro | 510MB/s CFast 2.0 256GB | |
| KomputerBay | 3400x CFast 2.0 | 128GB |
| ProGrade Digital | 550MB/s CFast 2.0 | 256GB |
| ProGrade Digital | 550MB/s CFast 2.0 | 512GB |
| SanDisk Extreme Pro CFast 2.0 SDCFSP-64G-x46D 64GB | ||
| SanDisk Extreme Pro CFast 2.0 SDCFSP-128G-x46D 128GB | ||
| SanDisk Extreme Pro CFast 2.0 SDCFSP-256G-x46D 256GB | ||
| Sony CFast 2.0 G Series CAT-G64 64GB | ||
| Sony CFast 2.0 G Series CAT-G128 128GB | ||
| Wise CFA-1280 3400x CFast 2.0 128GB | ||
| Wise CFA-2560 3400x CFast 2.0 256GB | ||
| Wise CFA-5120 3500x CFast 2.0 512GB | ||
Les cartes CFast 2.0 suivantes sont recommandées pour enregistrer en 4K DCI 3:1 RAW jusqu'à 60 im/s sur la Pocket Cinema Camera 4K.
| Marque Nom de la carte Stockage | ||
| Angelbird | AV PRO CF | 128GB |
| Angelbird | AV PRO CF | 256GB |
| Angelbird | AV PRO CF | 512GB |
| CinediskPro | 510MB/s CFast 2.0 256GB | |
| Marque Nom de la carte Stockage | ||
| KomputerBay 3400x CFast 2.0 128GB | ||
| ProGrade Digital 550MB/s CFast 2.0 256GB | ||
| ProGrade Digital 550MB/s CFast 2.0 512GB | ||
| SanDisk Extreme Pro CFast 2.0 SDCFSP-64G-x46D 64GB | ||
| SanDisk Extreme Pro CFast 2.0 SDCFSP-128G-x46D 128GB | ||
| SanDisk Extreme Pro CFast 2.0 SDCFSP-256G-x46D 256GB | ||
| Sony CFast 2.0 G Series CAT-G64 64GB | ||
| Sony CFast 2.0 G Series CAT-G128 128GB | ||
| Wise | CFA-1280 3400x CFast 2.0 | 128GB |
| Wise | CFA-2560 3400x CFast 2.0 | 256GB |
| Wise | CFA-5120 3500x CFast 2.0 | 512GB |
Cartes SD
Recommendees pour la Pocket Cinema Camera 6K
Les cartes SD suivantes sont recommandées pour enregistrer en 6K 16:9 Blackmagic RAW 5:1 jusqu'à 30 im/s sur la Pocket Cinema Camera 6K.
| Marque Nom de la carte Stockage | ||
| Angelbird | AV PRO SD V90 | 64GB |
| Sony | Tough SF-G32T | 32GB |
| Sony | Tough SF-G64T | 64GB |
| Sony | Tough SF-G128T | 128GB |
| Toshiba | Exceria Pro UHS-II 270MB/s SDXC | 64GB |
| Wise | SD2-128U3 SDXC UHS-II | 128GB |
Les cartes SD suivantes sont recommandées pour enregistrer en 6K 16:9 Blackmagic RAW 8:1 jusqu'à 30 im/s sur la Pocket Cinema Camera 6K.
| Marque Nom de la carte Stockage | ||
| Angelbird | AV PRO SD V90 | 64GB |
| Sony | Tough SF-G32T | 32GB |
| Sony | Tough SF-G64T | 64GB |
| Sony | Tough SF-G128T | 128GB |
| Toshiba | Exceria Pro UHS-II 270MB/s SDXC | 64GB |
| Toshiba | Exceria Pro UHS-II 270MB/s SDXC | 128GB |
| Toshiba | Exceria Pro UHS-II N502 SDXC | 128GB |
| Wise | SD2-128U3 SDXC UHS-II | 128GB |
Les cartes SD suivantes sont recommandées pour enregistrer en 6K 2.4:1 Blackmagic RAW 12:1 jusqu'à 60 im/s sur la Pocket Cinema Camera 6K.
| Marque Nom de la carte Stockage | |
| Angelbird AV PRO SD V90 64GB | |
| Sony Tough SF-G32T 32GB | |
| Sony Tough SF-G64T 64GB | |
| Sony Tough SF-G128T 128GB | |
| Toshiba Exceria Pro UHS-II 270MB/s SDXC 64GB | |
| Toshiba Exceria Pro UHS-II 270MB/s SDXC 128GB | |
| Toshiba Exceria Pro UHS-II N502 SDXC 128GB |
Les cartes SD suivantes sont recommandées pour enregistrer en 4K DCI ProRes HQ jusqu'à 60 im/s sur la Pocket Cinema Camera 6K.
| Marque Nom de la carte Stockage | ||
| Angelbird AV PRO SD V90 64GB | ||
| Delkin Devices | Power SDXC USH-II | 64GB |
| Delkin Devices | Prime SDXC USH-II | 128GB |
| ProGrade Digital | V90 UHS-II 250MB/s SDXC | 128GB |
| ProGrade Digital | V90 UHS-II 250MB/s SDXC | 256GB |
| Sony Tough SF-G32T 32GB | ||
| Sony Tough SF-G64T 64GB | ||
| Sony Tough SF-G128T 128GB | ||
| Wise | SD2-64U3 SDXC UHS-II | 64GB |
| Wise | SD2-128U3 SDXC UHS-II | 128GB |
| Toshiba Exceria Pro UHS-II N502 SDXC 128GB | ||
Les cartes SD suivantes sont recommandées pour enregistrer en 1080 ProRes 422 HQ jusqu'à 120 im/s sur la Pocket Cinema Camera 6K.
| Marque Nom de la carte Stockage | ||
| Angelbird AV PRO SD V90 64GB | ||
| Delkin Devices | Power SDXC USH-II | 64GB |
| Delkin Devices | Prime SDXC USH-II | 128GB |
| Lexar | Professional 2000x UHS-II 300MB/s SDXC | 64GB |
| Lexar | Professional 2000x UHS-II 300MB/s SDXC | 128GB |
| ProGrade Digital | V90 UHS-II 250MB/s SDXC | 256GB |
| Sony Tough SF-G32T 32GB | ||
| Sony Tough SF-G64T 64GB | ||
| Marque Nom de la carte Stockage | |
| Sony Tough SF-G128T 128GB | |
| Toshiba Exceria Pro UHS-II 270MB/s SDXC 64GB | |
| Toshiba Exceria Pro UHS-II 270MB/s SDXC 128GB | |
| Toshiba Exceria Pro UHS-II N502 SDXC 128GB | |
| Toshiba Exceria Pro UHS-II N502 SDXC 256GB | |
| Wise SD2-64U3 SDXC UHS-II 64GB | |
| Wise SD2-128U3 SDXC UHS-II 128GB |
Recommendees pour la Pocket Cinema Camera 4K
Les cartes SD suivantes sont recommandées pour enregistrer en 4K DCI Blackmagic RAW 12:1 jusqu'à 30 im/s sur la Pocket Cinema Camera 4K.
| Marque Nom de la carte Stockage | ||
| Angelbird AV PRO SD V90 64GB | ||
| Delkin Devices | Power UHS-II SDXC | 64GB |
| Delkin Devices | Power UHS-II SDXC | 128GB |
| Lexar | Professional 2000x UHS-II 300MB/s SDXC | 64GB |
| ProGrade Digital | V90 UHS-II 250MB/s SDXC | 256GB |
| SanDisk | Extreme Pro UHS-I 95MB/s SDXC | 512GB |
| Sony Tough SF-G64T | 64GB | |
| Sony Tough SF-G128T 128GB | ||
| Sony SF-G64 300MB/s UHS-II SDXC 64GB | ||
| Toshiba Exceria Pro UHS-II N502 SDHC | 32GB | |
| Toshiba Exceria Pro UHS-II 270MB/s SDXC 64GB | ||
| Wise SD2-64U3 SDXC UHS-II 64GB | ||
| Wise SD2-128U3 SDXC UHS-II 128GB | ||
| Wise SD2-128U3 SDXC UHS-II 128GB | ||
Les cartes SD suivantes sont recommandées pour enregistrer en 4K DCI ProRes HQ jusqu'à 60 im/s sur la Pocket Cinema Camera 4K.
| Marque Nom de la carte Stockage | ||
| Wise SD2-64U3 SDXC UHS-II 64GB | ||
| Wise SD2-128U3 SDXC UHS-II 128GB | ||
| Sony Tough SF-G64T | 64GB | |
| Sony Tough SF-G128T 128GB | ||
Les cartes SD suivantes sont recommandées pour enregistrer en 4K DCI 4:1 RAW jusqu'à 60 im/s sur la Pocket Cinema Camera 4K.
| Marque Nom de la carte Stockage | |
| Sony Tough SF-G64T 64GB | |
| Sony Tough SF-G128T 128GB | |
| Toshiba Exceria Pro UHS-II N502 SDXC 32GB | |
Les cartes SD suivantes sont recommendées pour enregistrer en 4K DCI Lossless RAW jusqu'à 24 im/s sur la Pocket Cinema Camera 4K.
| Marque Nom de la carte Stockage | |
| Wise SD2-64U3 SDXC UHS-II 64GB | |
| Wise SD2-128U3 SDXC UHS-II 128GB | |
| Toshiba Exceria Pro UHS-II N502 SDXC 32GB | |
| Sony Tough SF-G64T 64GB | |
| Sony Tough SF-G128T 128GB |
Les cartes SD suivantes sont recommandées pour enregistrer en 1080p Lossless RAW jusqu'à 60 im/s sur la Pocket Cinema Camera 4K.
| Marque Nom de la carte Stockage | |
| Wise SD2-64U3 SDXC UHS-II 64GB | |
| Wise SD2-128U3 SDXC UHS-II 128GB | |
| Sony Tough SF-G64T 64GB | |
| Sony Tough SF-G128T 128GB | |
| Toshiba Exceria Pro UHS-II N502 SDXC 32GB | |
| Toshiba Exceria Pro UHS-II N502 SDXC 64GB | |
| Toshiba Exceria Pro UHS-II N502 SDXC 128GB | |
| Toshiba Exceria Pro UHS-II N502 SDXC 256GB | |
| Sony Tough SF-G128T 128GB |
SSD USB-C
Recommendés pour la Pocket Cinema Camera 6K
Les disques USB-C suivants sont recommendés pour enregistrer en 6K Blackmagic RAW 5:1 jusqu'à 50 im/s sur la Pocket Cinema Camera 6K.
| Marque Nom de la carte Stockage | |
| Wise PTS-1024 Portable SSD 1TB |
Les disques USB-C suivants sont commandés pour enregistrer en 6K 2.4:1 Blackmagic RAW 5:1 jusqu'à 60 im/s sur la Pocket Cinema Camera 6K.
| Marque Nom de la carte Stockage | |
| Samsung Portable SSD T5 250GB | |
| Samsung Portable SSD T5 2TB | |
| Wise PTS-1024 Portable SSD 1TB |
Les disques USB-C suivants sont commandés pour enregistrer en 2.8K 17:9 Blackmagic RAW 3:1 jusqu'à 120 im/s sur la Pocket Cinema Camera 6K.
| Marque Nom de la carte Stockage | |
| Samsung Portable SSD T5 250GB | |
| Samsung Portable SSD T5 2TB | |
| Wise PTS-512 Portable SSD 512GB | |
| Wise PTS-1024 Portable SSD 1TB |
Les disques USB-C suivants sont recommendés pour enregistrer en 4K DCI ProRes HQ jusqu'à 60 im/s sur la Pocket Cinema Camera 6K.
| Marque Nom de la carte Stockage | |
| Samsung Portable SSD T5 250GB | |
| Samsung Portable SSD T5 1TB | |
| Samsung Portable SSD T5 2TB | |
| SanDisk Extreme Portable SSD 1TB | |
| Wise PTS-512 Portable SSD 512GB | |
| Wise PTS-1024 Portable SSD 1TB | |
| Wise PTS-1024 Portable SSD 1TB |
Les disques USB-C suivants sont recommendés pour enregistrer en 1080 ProRes 422 HQ jusqu'à 120 im/s sur la Pocket Cinema Camera 6K.
| Marque Nom de la carte Stockage | |
| Samsung Portable SSD T5 250GB | |
| Samsung Portable SSD T5 1TB | |
| Samsung Portable SSD T5 2TB | |
| SanDisk Extreme Portable SSD 1TB | |
| Wise PTS-512 Portable SSD 512GB | |
| Wise PTS-1024 Portable SSD 1TB | |
| Wise PTS-1024 Portable SSD 1TB |
Recommendés pour la Pocket Cinema Camera 4K
Les disques USB-C suivants sont recommendés pour enregistrer en 4K DCI Blackmagic RAW 3:1 jusqu'à 60 im/s sur la Pocket Cinema Camera 4K.
| Marque Nom de la carte Stockage | |
| Angelbird SSD2GO PKT 512GB | |
| Angelbird SSD2GO PKT 2TB | |
| G-Technology G-DRIVE Mobile SSD 1TB | |
| Samsung Portable SSD T5 2TB | |
| Wise PTS-512 Portable SSD 512GB |
Les disques USB-C suivants sont commandés pour enregistrer en 4K DCI ProRes HQ jusqu'à 60 im/s sur la Pocket Cinema Camera 4K.
| Marque Nom de la carte Stockage | ||
| Angelbird SSD2GO PKT 512GB | ||
| Angelbird SSD2GO PKT 2TB | ||
| Glyph | Atom | 500GB |
| Lacie | Portable SSD | 500GB |
| Samsung Portable SSD T5 500GB | ||
| Samsung Portable SSD T5 1TB | ||
| SanDisk Extreme Portable SSD 1TB | ||
| Seagate | Fast SSD | 250GB |
| Wise PTS-256 Portable SSD | 256GB | |
| Wise PTS-512 Portable SSD 512GB | ||
| Wise PTS-1024 Portable SSD 1TB | ||
Les disques USB-C suivants sont commandés pour enregistrer en 4K DCI Lossless RAW jusqu'à 30 im/s sur la Pocket Cinema Camera 4K.
| Marque Nom de la carte Stockage | |
| Angelbird SSD2GO PKT 512GB | |
| Angelbird SSD2GO PKT 2TB | |
| Samsung Portable SSD T5 1TB | |
| Wise PTS-256 Portable SSD 256GB | |
| Wise PTS-512 Portable SSD 512GB | |
| Wise PTS-1024 Portable SSD 1TB |
Les disques USB-C suivants sont recommendés pour enregistrer en 4K DCI 3:1 RAW jusqu'à 60 im/s sur la Pocket Cinema Camera 4K.
| Marque Nom de la carte Stochage | |
| Angelbird SSD2GO PKT 512GB | |
| Angelbird SSD2GO PKT 2TB | |
| Samsung Portable SSD T5 500GB | |
| Samsung Portable SSD T5 1TB | |
| Wise PTS-256 Portable SSD 256GB | |
| Wise PTS-512 Portable SSD 512GB | |
| Wise PTS-1024 Portable SSD 1TB |
Developer Information
Blackmagic Bluetooth Camera Control
Blackmagic cameras with Bluetooth LE implement a variety of features and commands that allow users to control their cameras wirelessly. Developers have full access to these features for their custom applications.
The following services and characteristics describe the full range of communication options that are available to the developer.
Service: Device Information Service
UUID:180A
Characteristics
Camera Manufacturer
UUID:2A29
Read the name of the manufacturer (always "Blackmagic Design").
Camera Model
UUID:2A24
Read the name of the camera model ("Pocket Cinema Camera 6K" or "Pocket Cinema Camera 4K").
Service: Blackmagic Camera Service
UUID: 291D567A-6D75-11E6-8B77-86F30CA893D3
Characteristics
Outgoing Camera Control (encrypted)
UUID:5DD3465F-1AEE-4299-8493-D2ECA2F8E1BB
Send Camera Control messages
These messages are identical to those described in the Blackmagic SDI Camera Control Protocol section below. Please read that section for a list of supported messages and required formatting information.
For an example of how packets are structured, please see the 'example protocol packets' section in this document.
Incoming Camera Control (encrypted)
UUID:B864E140-76AO-416A-BF30-5876504537D9
Request notifications for this characteristic to receive Camera Control messages from the camera.
These messages are identical to those described in the Blackmagic SDI Camera Control Protocol section below. Please read that section for a list of supported messages and required formatting information.
Timecode (encrypted)
UUID:6D8F2110-86F1-41BF-451D87E976C8
Request notifications for this characteristic to receive timecode updates.
Timecode (HH:MM:SS:mm) is represented by a 32-bit BCD number:
(eg. 09:12:53:10 = 0x09125310)
Camera Status (encrypted)
UUID:7FE8691D-95DC-4FC5-8ABD-CA74339B51B9
Request notifications for this characteristic to receive camera status updates.
The camera status is represented by flags contained in an 8-bit integer:
None = 0× 00
Camera Power On = 0x01
Connected = 0× 02
Palred = 0× 04
Versions Verified = 0× 08
Initial Payload Received = 0× 10
Camera Ready = 0× 20
Send a value of 0x00 to power a connected camera off.
Send a value of 0x01 to power a connected camera on.
Device Name
UUID:FFACOC52-C9FB-41A0-B063-CC76282EB89C
Send a device name to the camera (max. 32 characters).
The camera will display this name in the Bluetooth Setup Menu.
Protocol Version
UUID: 8F1FD018-B508-456F-8F82-3D392BEE2706
Read this value to determine the camera's supported CCU protocol version.
NOTE Encrypted characteristics can only be used once a device has successfully bonded or paired with the Blackmagic Camera. Once a connection has been established, any attempt to write to an encrypted characteristic will initiate bonding. For example, writing a 'Camera Power On' (0x01) message to the Camera Status characteristic.
Once bonding is initiated, the camera will display a 6-digit pin in the Bluetooth Setup Menu. Enter this pin on your device to establish an encrypted connection. The device will now be able to read, write and receive notifications from encrypted characteristics.
Blackmagic SDI and Bluetooth Camera Control Protocol
Version 1.4
If you are a software developer you can use the Blackmagic SDI and Bluetooth Camera Control Protocol to construct devices that integrate with our products. Here at Blackmagic Design, our approach is to open up our protocols and we eagerly look forward to seeing what you come up with!
Overview
This document describes an extensible protocol for sending a unidirectional stream of small control messages embedded in the non-active picture region of a digital video stream. The video stream containing the protocol stream may be broadcast to a number of devices. Device addressing is used to allow the sender to specify which device each message is directed to.
Assumptions
Alignment and padding constraints are explicitly described in the protocol document. Bit fields are packed from LSB first. Message groups, individual messages and command headers are defined as, and can be assumed to be, 32 bit aligned.
Blanking Encoding
A message group is encoded into a SMPTE 291M packet with DID/SDID x51/x53 in the active region of VANC line 16.
Message Grouping
Up to 32 messages may be concatenated and transmitted in one blanking packet up to a maximum of 255 bytes payload. Under most circumstances, this should allow all messages to be sent with a maximum of one frame latency.
If the transmitting device queues more bytes of message packets than can be sent in a single frame, it should use heuristics to determine which packets to prioritize and send immediately. Lower priority messages can be delayed to later frames, or dropped entirely as appropriate.
Abstract Message Packet Format
Every message packet consists of a three byte header followed by an optional variable length data block. The maximum packet size is 64 bytes.
| Destination device (uint8) | Device addresses are represented as an 8 bit unsigned integer. Individual devices are numbered 0 through 254 with the value 255 reserved to indicate a broadcast message to all devices. |
| Command length (uint8) | The command length is an 8 bit unsigned integer which specifies the length of the included command data. The length does NOT include the length of the header or any trailing padding bytes. |
| Command id (uint8) | The command id is an 8 bit unsigned integer which indicates the message type being sent. Receiving devices should ignore any commands that they do not understand. Commands 0 through 127 are reserved for commands that apply to multiple types of devices. Commands 128 through 255 are device specific. |
| Reserved (uint8) | This byte is reserved for alignment and expansion purposes. It should be set to zero. |
| Command data (uint8[]) | The command data may contain between 0 and 60 bytes of data. The format of the data section is defined by the command itself. |
| Padding (uint8[]) | Messages must be padded up to a 32 bit boundary with 0x0 bytes. Any padding bytes are NOT included in the command length. |
Receiving devices should use the destination device address and or the command identifier to determine which messages to process. The receiver should use the command length to skip irrelevant or unknown commands and should be careful to skip the implicit padding as well.
Defined Commands
Command 0 : change configuration
| Category (uint8) | The category number specifies one of up to 256 configuration categories available on the device. |
| Parameter (uint8) | The parameter number specifies one of 256 potential configuration parameters available on the device. Parameters 0 through 127 are device specific parameters. Parameters 128 though 255 are reserved for parameters that apply to multiple types of devices. |
| Data type (uint8) | The data type specifies the type of the remaining data. The packet length is used to determine the number of elements in the message. Each message must contain an integral number of data elements. |
| Currently defined values are: | |
| 0: void / boolean | A void value is represented as a boolean array of length zero. The data field is a 8 bit value with 0 meaning false and all other values meaning true. |
| 1: signed byte Data elements are signed bytes | |
| 2: signed 16 bit integer Data elements are signed 16 bit values | |
| 3: signed 32 bit integer Data elements are signed 32 bit values | |
| 4: signed 64 bit integer Data elements are signed 64 bit values | |
| 5: UTF-8 string Data elements represent a UTF-8 string with no terminating character. | |
| Data types 6 through 127 are reserved. | |
| 128: signed 5.11 fixed point | Data elements are signed 16 bit integers representing a real number with 5 bits for the integer component and 11 bits for the fractional component. The fixed point representation is equal to the real value multiplied by 2^11. The representable range is from -16.0 to 15.9995 (15 + 2047/2048). |
Data types 129 through 255 are available for device specific purposes.
Operation types 2 through 127 are reserved.
| Operation type (uint8) | The operation type specifies what action to perform on the specified parameter. Currently defined values are: |
| 0: assign value | The supplied values are assigned to the specified parameter. Each element will be clamped according to its valid range. A void parameter may only be 'assigned' an empty list of boolean type. This operation will trigger the action associated with that parameter. A boolean value may be assigned the value zero for false, and any other value for true. |
| 1: offset / toggle value | Each value specifies signed offsets of the same type to be added to the current parameter values. The resulting parameter value will be clamped according to their valid range. It is not valid to apply an offset to a void value. Applying any offset other than zero to a boolean value will invert that value. |
Operation types 128 through 255 are available for device specific purposes.
| Data (void) | The data field is 0 or more bytes as determined by the data type and number of elements. |
The category, parameter, data type and operation type partition a 24 bit operation space.
| Group | ID | Parameter | Type | Index | Minimum | Maximum | Interpretation |
| Lens | 0.0 | Focus | fixed16 | - | 0.0 | 1.0 | \( 0.0 = \text {near,}1.0 = \text {far} \) |
| 0.1 | Instantaneous autofocus | void | - | - | - | trigger instantaneous autofocus | |
| 0.2 | Aperture (f-stop) | fixed16 | - | -1.0 | 16.0 | Aperture Value (where fnumber \( = \text {sqrt(2^AV)} \)) | |
| 0.3 | Aperture (normalised) | fixed16 | - | 0.0 | 1.0 | \( 0.0 = \text {smallest,}1.0 = \text {largest} \) | |
| 0.4 | Aperture (ordinal) | int16 | - | 0 | n | Steps through available aperture values from minimum (0) to maximum (n) | |
| 0.5 | Instantaneous auto aperture | void | -- - | - | trigger instantaneous auto aperture | ||
| 0.6 | Optical image stabilisation | boolean | - | - | - | true = enabled, false = disabled | |
| 0.7 | Set absolute zoom (mm) | int16 | - | 0 | max | Move to specified focal length in mm, from minimum (0) to maximum (max) | |
| 0.8 | Set absolute zoom (normalized) | fixed16 - 0.0 | 1.0 | Move to specified focal length: \( 0.0 = \text {wide,}1.0 = \text {tele} \) | |||
| 0.9 | Set continuous zoom (speed) | fixed16 | - | -1.0 | +1.0 | Start/stop zooming at specified rate: \( -1.0 = \text {zoom wider fast,}0.0 = \text {stop}, +1 = \text {zoom tele fast} \) | |
| Video | 1.0 Video mode int8 | [0] = frame rate -- | fps as integer(eg 24, 25, 30, 50, 60) | ||||
| [1] = M-rate -- 0 = regular, 1 = M-rate | |||||||
| [2] = dimensions | -- | 0 = NTSC, 1 = PAL, 2 = 720, 3 = 1080, 4 = 2kDCI, 5 = 2k16:9, 6 = UHD, 7 = 3k Anamorphic, 8 = 4k DCI, 9 = 4k 16:9, 10 = 4.6k 2.4:1, 11 = 4.6k | |||||
| [3] = interlaced | -- | 0 = progressive, 1 = interlaced | |||||
| [4] = Color space | -- 0 = YUV | ||||||
| 1.1 | Gain (up to Camera 4.9) | int8 | 1 | 128 | 1x, 2x, 4x, 8x, 16x, 32x, 64x, 128x gain | ||
| 1.2 | Manual White Balance | int16 | [0] = color temp | 2500 | 10000 | Color temperature in K | |
| int16 | [1] = tint | -50 | 50 | tint | |||
| 1.3 | Set auto WB | void | -- | -- | Calculate and set auto white balance | ||
| 1.4 | Restore auto WB | void | -- | -- | Use latest auto white balance setting | ||
| 1.5 | Exposure (us) | int32 | 1 | 42000 | time in us | ||
| 1.6 | Exposure (ordinal) | int16 | -- | 0 | n | Steps through available exposure values from minimum (0) to maximum (n) | |
| 1.7 | Dynamic Range Mode | int8 enum | -- | 0 | 2 | 0 = film, 1 = video, 2 = extended video | |
| 1.8 | Video sharpening level | int8 enum | -- | 0 | 3 | 0 = off, 1 = low, 2 = medium, 3 = high | |
| 1.9 | Recording format | int16 | [0] = file frame rate | -- | fps as integer(eg 24, 25, 30, 50, 60, 120) | ||
| [1] = sensor frame rate | -- | -- | fps as integer, valid when sensor-off-speed set (eg 24, 25, 30, 33, 48, 50, 60, 120), no change will be performed if this value is set to 0 | ||||
| [2] = frame width | -- in pixels | ||||||
| [3] = frame height | -- in pixels | ||||||
| [4] = flags | -- [0] = file-M-rate | ||||||
| -- | -- | [1] = sensor-M-rate, valid when sensor-off-speed-set | |||||
| -- [2] = sensor-off-speed | |||||||
| -- [3] = interlaced | |||||||
| -- [4] = windowed mode | |||||||
| 1.10 | Set auto exposure mode | int8 | -- | 0 | 4 | 0 = Manual Trigger, 1 = Iris, 2 = Shutter, 3 = Iris + Shutter, 4 = Shutter + Iris | |
| 1.11 | Shutter angle int32 | -- | 100 | 36000 | Shutter angle in degrees, multiplied by 100 | ||
| 1.12 | Shutter speed | int32 | -- | Current sensor frame rate | 5000 | Shutter speed value as a fraction of 1, so 50 for 1/50th of a second | |
| 1.13 | Gain | int8 | -- | -128 | 127 | Gain in decibel (dB) | |
| 1.14 | ISO | int32 | -- | 0 | 2147483647 | ISO value | |
| 1.15 | Display LUT | int8 | [0] = selected LUT | -- | 0 = None, 1 = Custom, 2 = film to video, 3 = film to extended video | ||
| [1] = enabled or not | -- 0 = Not enabled, 1 = Enabled | ||||||
| Audio | 2.0 | Mic level | fixed16 | - | 0.0 | 1.0 | 0.0 = minimum, 1.0 = maximum |
| 2.1 | Headphone level | fixed16 | - | 0.1 | 1.0 | 0.0 = minimum, 1.0 = maximum | |
| 2.2 | Headphone program mix | fixed16 | - | 0.1 | 1.0 | 0.0 = minimum, 1.0 = maximum | |
| 2.3 | Speaker level | fixed16 | - | 0.1 | 1.0 | 0.0 = minimum, 1.0 = maximum | |
| 2.4 | Input type | int8 | - | 0 | 3 | 0 = internal mic,1 = line level input,2 = low mic level input,3 = high mic level input | |
| 2.5 Input levels | fixed16 | [0] ch0 | 0.0 | 1.0 | 0.0 = minimum, 1.0 = maximum | ||
| [1] ch1 | 0.0 | 1.0 | 0.0 = minimum, 1.0 = maximum | ||||
| 2.6 | Phantom power | boolean | - | - | - | true = powered,false = not powered | |
| Output | 3.0 Overlay enables | uint16bit field | -- -- | bit flags:[0] = display status,[1] = display frame guidesSome cameras don't allow separate control of frame guides and status overlays. | |||
| 3.1 | Frame guides style(Camera 3.x) | int8 | -08 | 0 = HDTV, 1 = 4:3, 2 = 2:4:1,3 = 2:39:1, 4 = 2:35:1,5 = 1:85:1, 6 = thirds | |||
| 3.2 | Frame guides opacity(Camera 3.x) | fixed16 | - | 0.1 | 1.0 | 0.0 = transparent, 1.0 = opaque | |
| 3.3 | Overlays(replaces .1 and .2above fromCameras 4.0) | int8 | [0] = frame guidesstyle | - | - | 0 = off, 1 = 2:4:1, 2 = 2:39:1,3 = 2:35:1, 4 = 1:85:1, 5 = 16:9,6 = 14:9, 7 = 4:3, 8 = 2:1,9 = 4:5, 10 = 1:1 | |
| [1] = frame guide opacity | 0 | 100 | 0 = transparent, 100 = opaque | ||||
| [2] = safe area percentage | 0 | 100 | percentage of full frame used by safe area guide(0 means off) | ||||
| [3] = grid style | - | - | bit flags:[0] = display thirds,[1] = display cross hairs,[2] = display center dot,[3] = display horizon | ||||
| Display | 4.0 | Brightness | fixed16 | - | 0.0 | 1.0 | 0.0 = minimum, 1.0 = maximum |
| 4.1 | Exposure and focus tools | int16bit field | 0x1 = zebra,0x2 = focus assist,0x4 = false color | - | - | 0 = disable, 1 = enable | |
| 4.2 | Zebra level | fixed16 | - | 0.0 | 1.0 | 0.0 = minimum, 1.0 = maximum | |
| 4.3 | Peaking level | fixed16 | - | 0.0 | 1.0 | 0.0 = minimum, 1.0 = maximum | |
| 4.4 | Color bar enable | int8 | - | 0 | 30 | 0 = disable bars,1-30 = enable bars with timeout(seconds) | |
| 4.5 Focus Assist | Int8 | [0] = focus assist method | - | - | 0 = Peak,1 = Colored lines | ||
| [1] = focus line color | - | - | 0 = Red,1 = Green,2 = Blue,3 = White,4 = Black | ||||
| 4.6 | Program return feed enable | int8 | - | 0 | 30 | 0 = disable, 1-30 = enable withtimeout (seconds) | |
| Tally | 5.0 | Tally brightness | fixed16 | - | 0.0 | 1.0 | Sets the tally front and tally rear brightness to the same level. 0.0 = minimum, 1.0 = maximum |
| 5.1 | Front tally brightness | fixed16 | - | 0.0 | 1.0 | Sets the tally front brightness. 0.0 = minimum, 1.0 = maximum | |
| 5.2 | Rear tally brightness | fixed16 | - | 0.0 | 1.0 | Sets the tally rear brightness. 0.0 = minimum, 1.0 = maximum Tally rear brightness cannot be turned off | |
| Reference | 6.0 | Source | int8 enum | - | 0 | 2 | 0 = internal, 1 = program, 2 = external |
| 6.1 | Offset | int32 | - | - | - | +/- offset in pixels | |
| Confi-guration | 7.0 | Real Time Clock | int32 | [0] time | - | - | BCD - HHMMSSFF (UCT) |
| [1] date | - | - | BCD - YYYYYMMDD | ||||
| 7.1 | System language | string | [0-1] | - | - | ISO-639-1 two character language code | |
| 7.2 | Timezone | int32 | - | - | - | Minutes offset from UTC | |
| 7.3 | Location | int64 | [0] latitude | - | - | BCD - sDDDddddddddddd where s is the sign: 0 = north (+), 1 = south (-); DD degrees, dddddddddddd decimal degrees | |
| [1] longitude | - | - | BCD - sDDDddddddddddd where s is the sign: 0 = west (-), 1 = east (+); DDD degrees, dddddddddddd decimal degrees | ||||
| Color Correction | 8.0 Lift Adjust | fixed16 | [0] red | -2.0 | 2.0 | default 0.0 | |
| [1] green | -2.0 | 2.0 | default 0.0 | ||||
| [2] blue | -2.0 | 2.0 | default 0.0 | ||||
| [3] luma | -2.0 | 2.0 | default 0.0 | ||||
| 8.1 | Gamma Adjust | fixed16 | [0] red | -4.0 | 4.0 | default 0.0 | |
| [1] green | -4.0 | 4.0 | default 0.0 | ||||
| [2] blue | -4.0 | 4.0 | default 0.0 | ||||
| [3] luma | -4.0 | 4.0 | default 0.0 | ||||
| 8.2 Gain Adjust | fixed16 | [0] red | 0.0 | 16.0 | default 1.0 | ||
| [1] green | 0.0 | 16.0 | default 1.0 | ||||
| [2] blue | 0.0 16.0 | default 1.0 | |||||
| [3] luma | 0.0 | 16.0 | default 1.0 | ||||
| 8.3 Offset Adjust | fixed16 | [0] red | -8.0 | 8.0 | default 0.0 | ||
| [1] green | -8.0 | 8.0 | default 0.0 | ||||
| [2] blue | -8.0 | 8.0 default 0.0 | |||||
| [3] luma | -8.0 | 8.0 | default 0.0 | ||||
| 8.4 Contrast Adjust | fixed16 | [0] pivot | 0.0 | 1.0 | default 0.5 | ||
| [1] adj | 0.0 2.0 default 1.0 | ||||||
| 8.5 Luma mix | fixed16 | - | 0.0 | 1.0 | default 1.0 | ||
| 8.6 Color Adjust | fixed16 | [0] hue | -1.0 | 1.0 | default 0.0 | ||
| [1] sat | 0.0 2.0 default 1.0 | ||||||
| 8.7 Correction Reset Default | void | - | - | - | reset to defaults | ||
| Media | 10.0 | Codec int8 enum | [0] = basic codec -- | 0 = CinemaDNG, 1 = DNxHD, 2 = ProRes, 3 = Blackmagic RAW | |||
| [1] = code variant | - | - | CinemaDNG: 0 = uncompressed, 1 = lossy 3:1, 2 = lossy 4:1 | ||||
| - | - | ProRes: 0 = HQ, 1 = 422, 2 = LT, 3 = Proxy, 4 = 444, 5 = 444XQ | |||||
| - | - | Blackmagic RAW: 0 = Q0, 1 = Q5, 2 = 3:1, 3 = 5:1, 4 = 8:1, 5 = 12:1 | |||||
| 10.1 | Transport mode int8 | [0] = mode | -- | 0 = Preview, 1 = Play, 2 = Record | |||
| [1] = speed | -- | -ve = multiple speeds backwards, 0 = pause, +ve = multiple speeds forwards | |||||
| [2] = flags | -- | 1<<0 = loop, 1<<1 = play all, 1<<5 = disk1 active, 1<<6 = disk2 active, 1<<7 = time-lapse recording | |||||
| [3] = slot 1 storage medium | - | - | 0 = CFast card, 1 = SD, 2 = SSD Recorder | ||||
| [4] = slot 2 storage medium | - | - | 0 = CFast card, 1 = SD, 2 = SSD Recorder | ||||
| 10.2 | Playback Control | int8 enum | [0] = clip | - | - | 0 = Previous, 1 = Next | |
| PTZ Control | 11.0 | Pan/Tilt Velocity | fixed 16 | [0] = pan velocity | -1.0 | 1.0 | -1.0 = full speed left, 1.0 = full speed right |
| [1] = tilt velocity | -1.0 | 1.0 | -1.0 = full speed down, 1.0 = full speed up | ||||
| 11.1 | Memory Preset | int8 enum | [0] = preset command | - | - | 0 = reset, 1 = store location, 2 = recall location | |
| int8 | [1] = preset slot | 0.5 - | |||||
Example Protocol Packets
| Operation | Packet Length Byte | ||||||||||||||||
| 0 | 1 | 2 | 3 | 4 | 5 | 6 | 7 | 8 | 9 | 10 | 11 | 12 | 13 | 14 | 15 | ||
| header command data | |||||||||||||||||
| destination | length | command | reserved | category | parameter | type | operation | ||||||||||
| trigger instantaneous auto focus on camera 4 | 844000100 | ||||||||||||||||
| turn on OIS on all cameras 12 255 5 0 0 0 6 | 001000 | ||||||||||||||||
| set exposure to 10 ms on camera 4 (10 ms = 10000 us = 0x00002710) | 12 | 4 | 8 | 0 | 0 | 1 | 5 | 3 | 0 | 0x10 | 0x27 | 0x00 | 0x00 | ||||
| add 15% to zebra level (15 % = 0.15 f = 0x0133 fp) | 12 | 4 | 6 | 0 | 0 | 4 | 2 | 128 | 1 | 0x33 | 0x01 | 0 | 0 | ||||
| select 1080p 23.98 mode on all cameras | 16 | 255 | 9 | 0 | 0 | 1 | 0 | 1 | 0 | 24 | 1 | 3 | 0 | 0 | 0 | 0 | 0 |
| subtract 0.3 from gamma adjust for green & blue (-0.3~=0xff9a fp) | 16 | 4 | 12 | 0 | 0 | 8 | 1 | 128 | 1 | 0 | 0 | 0x9a | 0xffd | 0x9a | 0xffd | 0 | 0 |
| all operations combined | 76 | 440001002555000600 | |||||||||||||||
| 1 | 0 | 0 | 0 | 4 | 8 | 0 | 0 | 1 | 5 | 3 | 0 | 0x10 | 0x27 | 0x00 | 0x00 | ||
| 4 | 6 | 0 | 0 | 4 | 2 | 128 | 1 | 0x33 | 0x01 | 0 | 0 | 255 | 9 | 0 | 0 | ||
| 1 | 0 | 1 | 0 | 24 | 1 | 3 | 0 | 0 | 0 | 0 | 0 | 4 | 12 | 0 | 0 | ||
| 8 | 1 | 128 | 1 | 0 | 0 | 0x9a | 0xffd | 0x9a | 0xffd | 0 | 0 | ||||||
Assistance
Le moyen le plus rapide d'obtenir de l'aide est d'acceder aux pages d'assistance en ligne de Blackmagic Design et de consulter les dernières informations concernant votreamera.
Pages d'assistance en ligne de Blackmagic Design
Les dernières versions du manuel, du logiciel et des notes d'assistance peuvent être consultées sur la page d'assistance technique de Blackmagic Design: www.blackmagicdesign.com/fr/support.
Contacter le service d'assistance de Blackmagic Design
Si vous ne parvenez pas à tracer l'aide dont vous avez besoin dans notre matériel de support, veillez utiliser l'option « Envoyez-nous un email » disponible sur la page d'assistance pour envoyer une demande d'assistance par email. Vous pouvez également cliquer sur le bouton « Trouver un support technique » situé sur la page d'assistance et contacter ainsi le centre de support technique Blackmagic Design le plus proche de chez vous.
Vérification du logiciel actuel
Pour vérifier chaque version du logiciel Blackmagic Camera Setup utility est installée sur votre ordinateur, ouvre la fenêtre intitulée About Blackmagic Camera Setup utility.
- Sur Mac, ouvre le Blackmagic Camera Setup Utility à partir du dossier Applications.
- Sur Windows, ouvre le logiciel Blackmagic Camera Setup utility dans votre menu de Demarrage ou sur I'ecran de Demarrage. Cliquez sur le menu Aide et selectionnez About Blackmagic Camera Setup utility pour connaître le numero de version.
Comment obtenir les dernières mises à jour du logiciel
Après avoir vérifié la version du logiciel Blackmagic Camera Utility installée sur votre ordinateur, veillez vous rendre sur la page d'assistance Blackmagic Design à l'adresse suivant www.blackmagicdesign.com/fr/support pour vérifier les dernières mises à jour. Meme s'il est généralement conseilé d'exécuter les dernières mises à jour, il est prudent d'éviter d'effectuer une mise à jour logicielle au milieu d'un projet important.
Avis réglementaires

Élimination des déchets d'équipements électriques et électroniques au sein de l'Union Européenne.
Le symbole imprimé sur ce produit indique qu'il ne doit pas eté jeté avec les autres déchets.
Cet apparéil doit être déposé dans un point de collecte/agree pour être recyclé. Le tri, l'élimination et le recyclage séparés de vos équipements usages permettent de préserver les ressources naturelles et d'assurer le recyclage de ces équipements dans le respect de l'homme et de l'environnement. Pour plus d'informations quant aux lieux d'éliminations des déchets d'équipements électriques, vous pouvez contacter notre mairie ou le service local de traitement des ordures menagères.

Cet équipement a ete teste et declare conforme aux limites imposées aux apparciils numériques de classe A, en vertu du chapitre 15 des regles de la FCC. Ces limites ont pour objectif d'assurer une protection suffisante contre les interférences nuisibles lorsque l'équipment est utilisé dans un environnement commercial. Cet équipement génére, utilise et peut dégager de l'énergie de radiofrequence et, s'il n'est pas installé et utilisé conformément au manuel d'utilisation, peut provoquer un brouillage préjudicable aux communications radio. L'utilisation de cet équipement en zone résidentielle est susceptible de provoquer des interférences nuisibles, auquel cas il sera demandé à l'utiliser de corriger ces interférences à ses frais.
L'utilisation de cet apparéil est soumise aux deux conditions suivantes :
1 Cet apparéil ne doit pas causer d'interférences nuisibles.
2 Cet apparéil doit accepter toute interférence reçue, y compris les interférences pouvant entraîner un dysfonctionnement.

R-R-BMD-201810001
R-R-BMD-201905001
R-R-BMD-201904002

Déclaration de ISDE Canada
Cet apparéil est conforme aux normes canadiennes relatives aux apparéils numériques de classe A.
Toute modification ou utilisation de ce produit en dehors de son utilisation prévue peut annuler
la conformité avec ces normes.
Les connexions aux interfaces HDMI doivent etre effectuees avec des cables HDMI.
blindes d'excellente qualite.
Cet équipement a ete teste pour etre en conformite avec une utilisation prevue dans un environnement commercial. Si cet équipement est utilise dans un environnement domestique,
il peut provoquer des interférences radio.
Bluetooth®
Ce produit est dote de la technologie sans fil Bluetooth.
Contient un module émetteur identification FCC: QOQBGM113
Cet équipement est conforme aux limites de radiation de la FCC comme indiqué pour un environnement non contrôle.
Contient un module émetteur IC: 5123A-BGM113
Ce produit est conforme aux normes RSS sans licence d'Industrie Canada et aux limites applicables à l'exemption de l'évaluation courante DAS comme mentionné dans la RSS-102 Issue 5.
Certifie pour le Japon, numero de certification : 209-J00204. Cet équipement contient des équipements radioélectriques spécifiques qui ont obtenu la certification de la conformité aux règlementations techniques conformément à la Loi de la Radio.
Ce module est certifié en Coree du Sud, numéro de certification KC: MSIP-CRM-BGT-BGM113
Par la presente, Blackmagic Design déclare que ce produit utilisant des systèmes de transmission à large bande dans la bande ISM de 2,45 GHz est conforme à la Directive 2014/53/EU.
Pour obtenir le texte intégral de la déclaration EU de conformité, veuillez nous contacter à l'adresse suivante : compliance@blackmagicdesign.com


Certification ICASA pour l'Afrique du Sud, numéro TA-2019/1517 pour la Pocket Camera 6K et TA-2019/1516 pour la Pocket Camera 4K.
Certification NOM pour le Mexique, pour le module Bluetooth fabriqué par Silicon Labs, numéro de modulo BGM113.
Informations de sécurité
La Blackmagic Pocket Cinema Camera peut être utilisé dans un climat tropical lorsqu'la température ambiente n'excède pas 40^ .
Les pieces de cet appeareil ne sont pas réparables par l'opérateur. Toute opération d'entretien doit être effectuee par un centre de service Blackmagic Design.
En cas d'enseillement, prenez sole en garder votre camera à l'objet. Évitez toute exposition de laamera ou de la batterie en lithium à un ensoleillement prolongé. Gardez les batteries en lithium à l'abri des sources de chaleur.

Lorsque vous utilisez l'adaptateur secteur fourni, cet apparéil peut uniquement être utilisé à une altitude inférieure à 2000 metres.
Déclaration de l'Etat de Californie
Ce produit est susceptible de vous exposer à des produits chimiques, dont des traces de polybromobiphényle dans les parties en plastique, reconnu par l'Etat de Californie comme étant responsable de cancers, d'anomalies congenitales ou d'autres effets nocifs sur la reproduction.
Pour de plus amples informations, veuillez vous rendre sur www.P65Warnings.ca.gov.
Garantie
Garantie limitee
Par la presente, Blackmagic Design garantit que ce produit sera exempt de defaults matériels et de fabrication pendant une durée d'un an à compter de la date d'achat. Si un produit s'avéré défectieux pendant la période de garantie, Blackmagic Design peut, à sa seule désétion, réparer le produit défectieux sans frais pour les pieces et la main-d'oeuvre, ou le replacer.
Pour se prévaloir du service offert en vertu de la presente garantie, il vous incombe d'informer Blackmagic Design de l'existence du defaulted avant expiration de la période de garantie, et de prendre les mesures nécessaires pour l'execution des dispositions de ce service. Le consommateur a la responsabilité de s'occuper de l'emballage et de l'expédition du produit défectueux au centre de service nommément désigné par Blackmagic Design, en frais de port prépayé. Il incombe au Consommateur de payer tous les frais de transport, d'assurance, droits de douane et taxes et toutes autres charges relatives aux produits qui nous auront été returnés et ce, qu'elle que soit la raison.
La presente garantie ne saurait en aucun cas s'appliquer à des defaults, pannes ou dommages causés par une utilisation inappropriée ou un entretien inadéquat ou incorrect. Blackmagic Design n'est en aucun cas obligé en vertu de la presente garantie : a) de réparer les dommages resultant de tentatives de réparations, d'installations ou tous services effectuels par du personnel non qualifié par Blackmagic Design, b) de réparer tout dommage resultant d'une utilisation inadéquate ou d'une connexion à du matériel incompatible, c) de réparer tout dommage ou dysfonctionnement causé par l'utilisation de pieces ou de fournitures n'appartenant pas à la marque de Blackmagic Design, d) d'examiner un produit qui a été modifié ou intégré à autres produits quand l'impact d'une telle modification ou intégration augmente les délais ou la difficulté d'examiner ce produit.
CETTE GARANTIE REMPLACE TOUTE GARANTIE EXPLICITE OU TACITE. BLACKMAGIC DESIGN ET SES REVENDEURS DÉCLINENT EXPRESSEMENT Toute GARANTIE IMPLICITE DE COMMERCIALISATION OU D'ADAPTATION QUEL QU'en SOIT LE BUT. LA RESPONSABILITÉ DE BLACKMAGIC DESIGN POUR RÉPARER OU REMPLACER UN PRODUIT S'AVERANT DEFECTUEUX DURANT LA PÉRIODE DE GARANTIE CONSTITUE LA TOTALité ET LE SEUL RECOURS EXCLUSIF PRÉVU ET FOURNI AU CONSOMMATEUR. BLACKMAGIC DESIGN NE POUR RAÉ ÉTRE TENU POUR RESPONSABLE POUR TOUT DOMMAGE INDIRECT, SPECIFIQUE, ACCIDENTEL OU CONSECUTIF, PEU IMPORTE QUE BLACKMAGIC DESIGN OU SES REVENDEURS AIENT ÉTÉ INFORMÉS OU SE SOIENT RENDUS COMPTE AU PREALABLE DE L'EVENTUALITE DE CES DOMMAGES. BLACKMAGIC DESIGN NE POTÉ ÉTRE TENU POUR RESPONSABLE DE Toute UTILISATION ILICITE DU MATÉRIEL PAR LE CONSOMMATEUR. BLACKMAGIC DESIGN N'EST PAS RESPONSABLE DES DOMMAGES RÉSULTANT DE L'UTILISATION DE CE PRODUIT. LE CONSOMMATEUR MANIPULE CE PRODUIT À SES SEULS RISQUES.
Copyright 2020 Blackmagic Design. Tous droits réservés. 'Blackmagic Design', 'URSA', 'DeckLink', 'HDLink', 'Workgroup Videohub', 'Multibridge Pro', 'Multibridge Extreme', 'Intensity' et 'Leading the creative video revolution' sont des marques déposées aux États-Unis et dans les autres pays. Tous les autres noms de société et de produits peuvent être des marques déposées des sociétés respectives auxquellesils sont associés.
Le nom de la marque Bluetooth ainsi que ses logos sont des marques déposées et sont la propriété de Bluetooth SIG, Inc. L'utilisation de ces marques par Blackmagic Design est sous licence. Les autres marques déposées et noms de marques appartiennent à leurs propriétaires respectifs.

Installations- und Bedienungsanleitung
Blackmagic Pocket Cinema Camera
Für die Modelle Blackmagic Pocket Cinema Camera 6K und Blackmagic Pocket Cinema Camera 4K
Marz 2020
Deutsch

Willkommen
Vielen Dank, dass Sie sich zum Kauf der neuen Blackmagic Pocket Cinema Camera entschieden haben!
Die ursprüngliche Blackmagic Pocket Cinema Camera haben wir 2013 herausgegeben. Uns hat die Vorstellung begeistert, einekleine Kamera mit hohem Dynamikumfang und bahnbrechender Bildqualität zu erschaffen, die überallhin mit kann. Das fantastische Feedback aus Nutzerkreisen und die vielen Nachfragen nach einer 4K-Version haben uns bewogen, die Blackmagic Pocket Cinema Camera 4K zu bauen. Anschließlich haben wir die Blackmagic Pocket Cinema Camera 6K mit 35mm-Sensor und EF-Objektivanschluss hersausgegeben.
Die Blackmagic Pocket Cinema Camera 4K verfügt über den gleichen Micro-Four-Thirds-Objektivanschluss wie die originale Pocket Cinema Camera. Sie können also weiterhin ihre vorhandenen MFT-Objektive nutzen. 4K-Video können Sie mit bis zu 60 fps und HD-Video mit bis zu 120 fps auf CFast- oder UHS-II-SD-Karten aufzeichnen. Die Blackmagic Pocket Cinema Camera 6K steigert diese Leistungsvermögen weiter und erhöglich auch die Aufzeichnung von 2,8K-Video mit 120 fps und 6K-Video mit 60 fps. Der USB-C-Port erhöglich die Aufzeichnung auf externe Laufwerke. Sie können ein Laufwerk also von der Kamera trennen und es für einen sofortigen Datei-Workflow direkt an ihren Computer anschließen.
Mit dem Dynamikumfang von 13 Blendenstufen und dem „Dual Native ISO“-Modus mit zwei Grundempfindlichkeiten des Sensors setzen sich herrlich saubere filmische Bilder in variierenden Lichtverhältnissen erfassen. Über den integrierten 5-Zoll-Touchscreen konnen Sie ganz einfach den Fokus überprüfen und feinste Details erkennen - selbst beiHELm Tageslicht. Und über vier eingebaute Mikrofone konnen Sie hochwertigen Ton direkt mit der Kamera aufnehmen!
Bei Anschluss von Blackmagic Pocket Cinema Cameras an ATEM Mini Mischer stehen themselves. Sie fokussierung, Verschlusszeit, Blende, Farbe und noch mehr direkt im Kamera-Arbeitsraum von ATEM Software Control einstellen.
Blackmagic Pocket Cinema Cameras sind unglaublich robust, sehr leicht und konnen problemlos überallhin mitgenommen werden. Überdies ist nun auch unser Blackmagic-RAW-Codec erfolgreich in diese Kamas integriert. Er bietet Ohnen die Flexibilität der RAW-Bildbearbeitung in einer einzigen Datei und damit sehr viel mehr Leistung bei reduzierten Dateigrößen.
Wir sind extrem gespannt auf die kreativen Werke, die Sie mit ihrer neuen Pocket Cinema Cameraprodukieren, und frei den uns auf Ihr Feedback und Vorschläge zu neuen Features für die Blackmagic Pocket Cinema Camera.

Grant Petty
CEO Blackmagic Design
Inhaltsverzeichnis
Mit welcher Kamera arbeiten Sie? 482
Erste Schritte 483
AnbringeneinesObjektivs 483
Stromversorgung der Kamera 484
Verwendung eines Blackmagic Pocket Camera Battery Grips 484
Stromversorgung der Kamera über das mitgelieferte Stromkabel 486
Speichermedien 487
CFast-Karten
SD-Karten
USB-C-Laufwerke
Datentrager fur die AufnahmeVBorbereiten 492
Vorbereiten von Datentragern mit einer Blackmagic Pocket Cinema Camera 492
Datentrager auf Mac-SystemenVBoreiten 494
Datentrager auf Windows-Systemen
vorbereiten 495
Aufzeichnen 496
Aufzeichnen von Clips 496
Blackmagic RAW 497
In Blackmagic RAW aufzeichnen 498
Maximale Sensor-Frameraten 500
Aufzeichnungsdauer 502
Wiedergabe 507
Funktionsmerkmale der Kamera 508
Kameravorderseite 508
Rechte Kameraseite 509
Linke Kameraseite 509
Kameraoberseite 511
Kameraunterseite 512
Kamerarückseite 513
Bedienung per Touchscreen 514
Einstellungen 535
Dashboard 535
AUFNAHME-Einstellungen 535
Dateinamenskconventionen 541
MONITOR-Einstellungen 541
AUDIO-Einstellungen 548
SETUP-Einstellungen 550
PRESES 559
3D-LUTs 561
Eingabe von Metadaten 564
Slate 564
Videoausgabe der Kamera 569
Verwendung von DaVinci Resolve 570
Project Manager 570
Schneiden im Cut-Arbeitsraum 571
Einfugen von Clips in die Timeline 574
BearbeitenvonClipsindertimeline 575
Hinzufugen von Titeln 575
Mit Blackmagic-RAW Dateien arbeiten 576
Farbkorrektur von Clips im Color-Arbeitsraum 579
HinzufugenPowerWindows 582
Mit Plug-ins arbeiten 584
Mixen von Ton 585
Hinzufugen von VFX und
Compositing im Fusion-Arbeitsraum 589
Mastern Ihres Schnitts 598
Quick Export 598
Der Deliver-Arbeitsraum 599
Camera Control with ATEM Mini 600
DaVinci Resolve Primary Color Corrector 604
Arbeiten mit Fremdhersteller-Software 607
Arbeiten mit Dateien auf CFast-2.0- und SD-Karten 607
Arbeiten mit Dateien von USB-C-Laufwerken 607
Verwendung von Final Cut Pro X 608
Verwendung von Avid MediaComposer 2018 608
Verwendung von Adobe Premiere Pro CC 609
Blackmagic Camera Setup Utility (Dienstprogramm) 610
Empfohlene Speichermedien 611
CFast-2.0-Karten 611
SD-Karten 617
USB-C-SSDs 621
Informationen fur Entwickler (Englisch) 624
Blackmagic Bluetooth Camera Control 624
Blackmagic SDI and Bluetooth Camera Control Protocol 626
Example Protocol Packets 633
Hilfe 634
Gesetzliche Vorschriften 635
Sicherheitshinweise 636
Garantie 637
Mit welcher Kamera arbeiten Sie?
Außerlich führen die beiden Modèle Blackmagic Pocket Cinema Camera 6K und Blackmagic Pocket Cinema Camera 4K ähnlich aus. Beide Kameramodelle erzeugen sagenhafte Bilder mit einem breiten Dynamikumfang und der Grundaufbau ihrer Gehäuse ist der gleiche. Die Bedientasten und Softwaremenus sind gleich aufgebaut und auch die Bedienung unterscheidet sich kaum.
Die Blackmagic Pocket Cinema Camera 6K Ist mit einem Sensor im Super-35-Format und einem EF-Objektivanschluss ausgestellt. Über dem Objektivanschlussträgt sie den Schriftzug „6K". Die Blackmagic Pocket Cinema Camera 4K hat einen Micro-Four-Thirds-Sensor nebst Micro-Four-Thirds-Objektivanschluss an Bord.
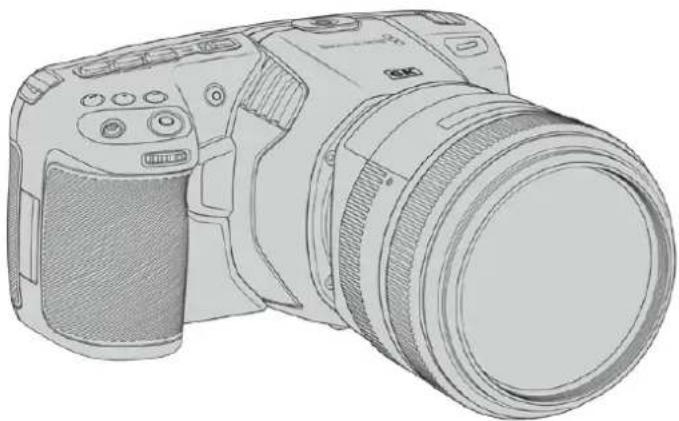
Blackmagic Pocket Cinema Camera 6K
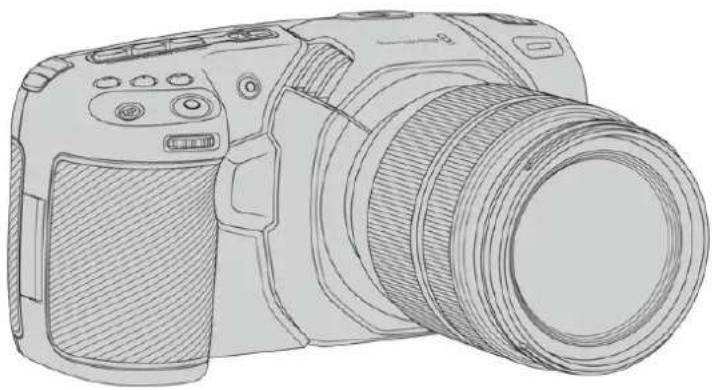
Blackmagic Pocket Cinema Camera 4K
Erste Schritte
Blackmagic Pocket Cinema Camera Modèle sind keine tragbare Digitalkameras, die Bilder in hoher Qualität auf CFast-2.0-Karten, UHS-I- und UHS-II-SD-Karten oder über den USB-C-Port auf SSDs aufzeichnen. Ihr Pocket Cinema Camera hat die Kapazität, Clips mit professionellen, für die Postproduktion konzipierten Codec s u. a. in Blackmagic RAW und ProRes aufzueichnen.
Die ersten Arbeitsschritte mit ihrer Blackmagic Pocket Cinema Camera sind einfach: Stecken Sie ein Objektiv auf und schalten Sie ihre Kamera ein.
AnbringeneinesObjektivs
Die Blackmagic Pocket Cinema Camera 6K ist für EF-Objektive und die Blackmagic Pocket Cinema Camera 4K für Micro-Four-Thirds-Objektive ausgelegt. Beides sind sehr gängige und erschwingliche Objektivtypen, die in enormer Vielfalt angeboten werden. Der Vorgang des Objektivaufsteckens auf ihre Kamera ist bei der Blackmagic Pocket Cinema Camera 6K der gleiche wir bei der Pocket Cinema Camera 4K.Für beiden Modelle gilt es, zuerst die Staubschutzkappe abzunehmen. Halten Sie zum Entfernenden der Staubschutzkappe die Verriegelungstaste gedrückt und drehen Sie die Kappe gegen den Uhrzeigersinn, bis sie sich lost.
So bringen Sle ein EF- oder Micro-Four-Thirds-Obektiv an:
1 Richten Sie den Punkt an Ihr hem Objektiv auf den Punkt am Objektivanschluss der Kamera aus. Viele Objektive verfügen über eine Ansetzmarkierung, bspw. einen blauen, roten oder weiß Punkt.
2 Setzen Sie den Objektivanschluss an den Kameraanschluss (Mount) und drehen Sie das Objektiv im Uhrzeigersinn, bis es einrastet.
3 Halten Sie zum Abnehmer des Objektivs die Verriegelungstaste gedrückt und drehen Sie es gegen den Uhrzeigersinn, bis die Ansetzmarkierung erreicht ist. Bei einem MFT-Objektiv ist das die 10-Uhr-Position und bei einem EF-Objektiv die 12-Uhr-Position. Nehmen Sie das Objektiv vorsichtig ab.


So bringen Sie ein MFT-Objektiv an der Blackmagic Pocket Cinema Camera 4K an
HINWEIS Wenn kein Objektiv an der Kamera angebracht ist, liegt der den sensorschützende Glasfilter frei und ist der Verschmutzung durch Staub oder andere Ablagerungen ausgesetzt. Es empfehl't sich, die Gehäuseverschlusskappe möglichst ständig an der Kamera zu belassen.
Stromversorgung der Kamera
Nachdem Sie ein Objektiv angebracht haben, versorgen Sie ihre Kamera mit Strom. Die Blackmagic Pocket Cinema Camera kann mit einem in die Kamera eingesteckten LP-E6-Akku oder über zwei in den Blackmagic Pocket Camera Battery Grip eingesteckte NP-F570-Akkus gespeist werden. Alternativ schlieben Sie die Kamera über das mitgelieferte Netzteil ans Stromnetz an.
Einlagen eines Akkus und Stromversorgung ihrer Kamera
Ohre Kamera wird mit handelsüblichen herausnehmaren LP-E6-Akkus betrieben. Ein Akku wird mit der Kamera gefeliefert. Zusätzliche Akkus sind von Blackmagic Design Resellern oder in den meisten Video- und Fotofachgeschäften erhältlich.
Um das Akkufach an der Kameraunterseite zu öffnen, entriegeln Sie die Schiebetaste.
2 Setzen Sie den LP-E6-Akku mit den Kontakten voran ein, bis er spürbar einrastet.
TIPP Um das Akkufach zu öffnen und den Akku zu entnehmen, bewegen Sie die Schiebetaste in Richtung des Objektivs.
3 SchlieBen Sie das Akkufach, indem Sie den Deckel bis zum Einrasten vorsichtig andrucken.
4 Stellen Sie den Ein-/Ausschalter auf der Oberseite ihrer Kamera auf ON. Um die Kamera auszuschalten, stellen Sie den Ein-/Ausschalter auf OFF.
Verwendung eines Blackmagic Pocket Camera Battery Grips
Wenn Sie in Besitz eines Blackmagic Pocket Camera Battery Grips sind, empfleht es sich, diesen anzuschlieben, bevor Sie ihre Kamera mit Strom versorgen. Der Blackmagic Pocket Camera Battery Grip ist für den Einsatz mit den Kameramodellen Pocket Cinema Camera 6K und Pocket Cinema Camera 4K ausgelegt.
Über den Blackmagic Pocket Camera Battery Grip wird ihre Kamera mit einem horizontalen Haltegriff erweitert. Der Battery Grip fasst zwei NP-F570-Akkus der L-Serie, damit Sie über zwei Stunden lang ununterbrochen drehen können. Der 12-Volt-DC-Stromanschluss der Kamera ermöglicht das Aufladen der Akkus im Griff und versorgt die Kamera während des Akkuwechsels mit Strom. Im ausgeschalteten Zustand der Kamera werden die Akkus im Griff über den USB-C-Port aufgeladen.
So bringen Sie einen Blackmagic Pocket Camera Battery Grlp an:
Bevor Sie einen Blackmagic Pocket Camera Battery Grip an ihre Pocket Cinema Camera anbringen, schalten Sie die Kamera aus und trennen exter Stromquellen.
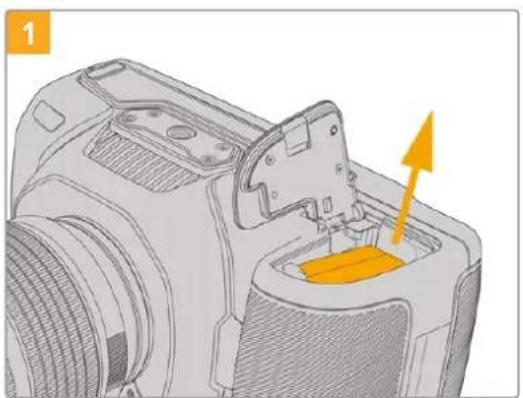
Öffnen Sie das Akkufach der Kamera und entnahme
Sie den LP-E6-Akku.
Schieben Sie den Schieber am Scharnier der Akkufachabdeckung in Richtung Kamerarücken und nehemen Sie die Abdeckung von der Kamera ab.

Zur sicheren Aufbewährung stecken Sie die Akkufachabdeckung in die davon vorgesehene Vertiefung an der Unterseite der Akkuschale.
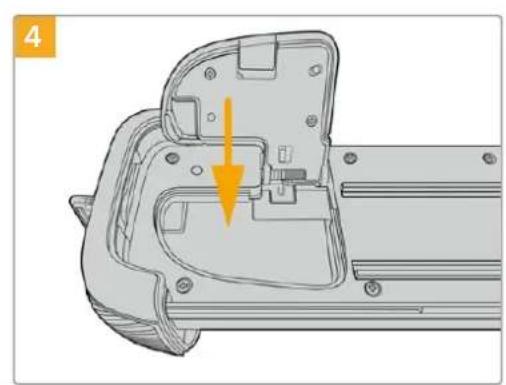
Klappen Sie die Akkufachabdeckung zu, damit sie mit der Unterseite des Akkueinschubs eine Ebene bildet.
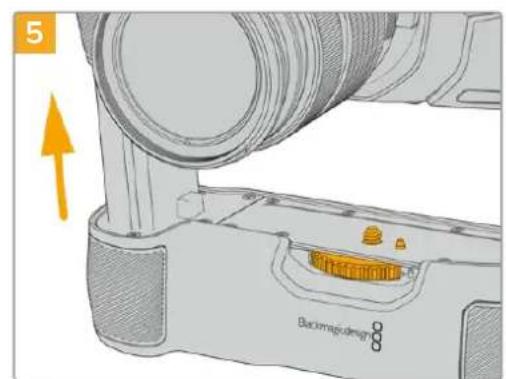
Führn Sie den akkuformigen Teil des Akkugriffs in das Akkufach ihrer Kamera ein. Die 1/4-Zoll-Schraube an der Oberseite des Akkugriffs sollen darauf auf das 1/4-Zoll-20-Befestigungsgewinde am Kameraboden ausgerichtet werden. Ein kleiner Stift neben der 1/4-Zoll-Schraube erleichtert die Ausrichtung.
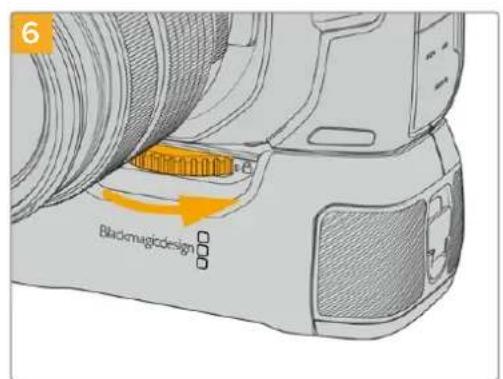
Um den Akkugriff sicher an der Kamera festzuschrauben, drehen Sie das Rad an der Vorderseite des Griffs nach rechts.
So setzen Sie Akkus In einen Blackmagic Pocket Camera Battery Grip ein:

Drehen Sie die Vertriegelungslasche an der rechten Seite des Akkugriffs gegen den Uhrzeigersinn, umihn zu entriegeln. Ziehen Sie den Akkueinschub hersaus. Dies ist möglich, bevor oder nachdem Sie den Blackmagic Pocket Battery Gripan ihre Kameraangebracht haben.
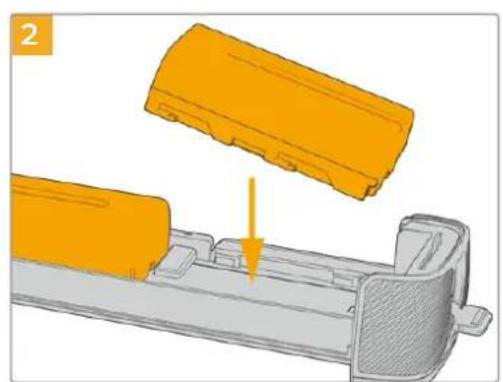
Legen Sie zwei NP-F570-Akkus unter Bechtung ihrer korrekten Ausrichtung in den Akkueinschub ein und schiben Sie sie voneinander weg. Zwischen den beiden Akkus springt ein Sperrknopf nach oben, woraufhin die Akkus einrasten. Zum Herausnehmen der Akkus drucken Sie auf den Sperrknopf und schiben die Akkus wieder aufeinander zu.

Fuhren Sie den Akkutträger in den Akkugriff ein und drehen die Verriegelungslasche im Uhrzeigersinn. Wird ihre Kamera über einen DC-Stromanschluss mit externem Strom versorgt, können Sie auch während eines Akkuwechsels weiterfilmen.
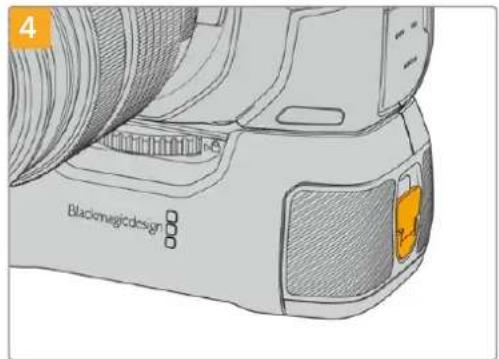
Drehen Sie die Verriegelungslasche an der rechten Seite des Akkugriffs im Uhrzeigersinn, umihn zu verliegen.
HINWEIS Wenn Sie einen Blackmagic Pocket Camera Battery Grip mit zwei eingelegten Akkus an ihre Kamera angebracht haben, werden in der oberen rechten Ecke des LCD-Touchscreens zwei Akkubalken angezeigt, anhand der Sie den Akkuladestand für beiden Akku getrennt überwachen können. Weitere Informationen hierzu finden Sie im Abschnitt „Stromversorgung".
Stromversorgung der Kamera über das mitgelieferte Stromkabel
Das mitgelieferte AC-Steckernetzteil fur 100-240 Volt versorgt die Kamera mit Strom. Gleichzeitig ladt es den LP-E6-Akku oder bei Anschluss eines Blackmagic Pocket Camera Battery Grips auch zwei NP-F570-Akkus. Kameraseitig ist das Netzteil mit der Buchse verriegelt, damit es sich nicht versehentlich von der Kamera losen kann.
So koppeln Sie die Kamera an eine externe Stromquelle:
1 Stecken Sie den AC-nach-12V-DC-Adapterstecker in eine Netzstrom-Steckdose.
2 Offnen Sie die Gummiabdeckung auf der linken Seite ihrer Kamera und drehen Sie den DC-Stecker so, dass er auf die Vertiefung des 12V-DC-Eingangs ausgerichtet ist. Schieben Sie den Stecker behutsam in den Eingang, bis er einrastet.
3 Um den Stecker vom Anschluss zu trennen, siehen Sie den Metallüberwurf vom Steckerkopf weg.
Ist die Kamera gleichzeitig an eine externe Stromquelle und an Akkustrom angeschlossen, so wird nur die externe Stromzufuhr benutzt. Wenn der Akku geladen ist, schaltet ihre Kamera unterbrechungsfrei auf Akkustrom um, sobald die externe Stromquelle entfern wird.
Der LP-E6-Akku ihrer Kamera kann im ausgeschalteten Zustand über USB aufgeladen werden. Das ist praktisch, da Sie zum Aufladen der nicht benutzten Kamera eine tragbare Powerbank nutzen können. Blackmagic Pocket Cinema Camera Modelle unterstützen das Laden über standardmaßige 10W-USB-Wandladegeräte sowie Ladegeräte für USB Power Delivery, auch USB-PD genannt. USB-PD-Ladegeräte verfügen gewöhnlich über einen USB-C-Anschluss und geben Strom mit bis zu 20 Volt aus, was das Aufladen beschleunigt. Das Aufladen des LP-E6-Akkus über den 12V-DC-Stromanschluss wird sowohl bei eingeschalteter als auch bei ausgeschalteter Kamera unterstützt.
TIPP Wenn Sie einen erhitzten Akku unmittelbar nach Benutzung laden, ist die
Ladegeschwindigkeit vermindert, bis der Akku sich auf 45^ abkuhl. Wir empfehlen dazu, den Akku vor dem Laden 15 Minuten lang abkuhl den zu halten.
Sie konnen nun die Speichermedien einlagen und mit dem Aufnehmen beginnen!
Speichermedien
Ohre Blackmagic Pocket Cinema Camera zeitnet Video auf handelsübliche SD-Karten, Schnellere UHS-II-SD-Karten oder CFast-2.0-Karten auf.
Unter Verwendung des USB-C-Expansionsports konnen Sie fur langere Aufzeichnungsspannen auch USB-C-Laufwerke mit großer Speicherkapazitat anschlieben.
CFast-Karten
CFast-2.0-Karten unterstützen hohe Datenraten und eignen sich damit perfekt für die Aufzeichnung von 6K-, 4K- und HD-Video mit hohen Frameraten. Nähres zu den maximalen Frameraten spezifischer Formate finden Sie in der Tabellenübersicht zu den Aufzeinungsspannen im Abschnitt „Aufzeihn".
HINWEIS Obwohl CFast-2.0-Karten in der Regel schnell sind, ist die Schreibgeschwindigkeit mancher Karten geringer als die Lesegeschwindigkeit. Zudem konnen die Datendurchsatzraten zwischen den unterschiedlichen Modellen variieren. Für eine verlüssliche Aufzeichnung mit ihren ausgewählten Frameraten verwenden Sie ausschließlich die von Blackmagic Design empfohlenen Karten.
So setzen Sie eine CFast-Karte ein:

Für den Zugriff auf die Speicherkartenschächte schlieben Sie die Abdeckung auf der rechten Seite ihrer Kamera in Richtung Kamerarücken.
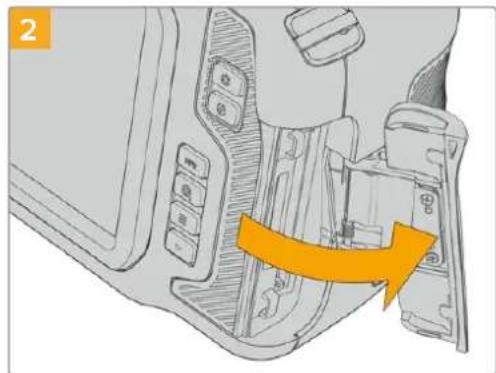
Die federbelastete Abdeckung springt auf und liegt die CFast- und SD-Speicherkartenschächte frei.

Schieben Sie die CFast-Karte in den darauf vorgesehenen Schacht, bis sie spürbar einrastet. Die Karte sollte sich ohne übermögens Kraftaufwand einführen halten. Um die CFast-Karte zu entfernen und auszuwerfen, schiben Sie sie sanft in die Kamera.
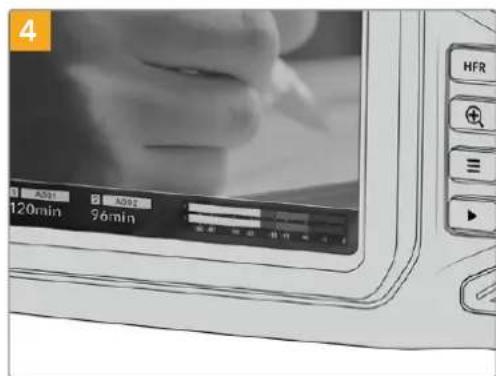
Die Speicherangabe am unteren Rand des LCD-Touchscreens zeigt die Bezeichnung der erkannten CFast-Karte und die auf ihr verbleibende Aufzeinungsdsauer an.
Das Einsetzen einer SD-Karte gehen wie bei einer CFast-Karte. Weitere Informationen finden Sie im Abschnitt „So setzen Sie eine SD-Karte ein".

Auswahl einer CFast-2.0-Karte
Beim Verarbeiten von Videomaterial mit hohen Datenübertragungsstraten will genau überlegt sein, welche Art von CFast-Karte man verwendet. Dies ist wichtig, weil CFast-2.0-Karten unterschiedliche Lese- und Schreibgeschwindigkeiten haben.
Eine List mit von Blackmagic Design getesteten und empfohlenen CFast-2.0-Karten fur die Aufzeichnung mit einer Pocket Cinema Camera finden Sie unter „Empfohlene Speichermedien".
Aktuellste Informationen zu den von Blackmagic Pocket Cinema Cameras unterstützt CFast-Karten\ finden Sie im Blackmagic Design Support Center unter www.blackmagicdesign.com/de/support.
SD-Karten
Zusätzlich zu CFast-2.0-Karten kann ihre Kamera auch auf extrem schnelle UHS-I- und UHS-II-SD-Karten aufzeichnen. UHS-I-SD-Karten ermögliches es Ihnen, beim Dreh mit komprimierten HD-Videoformaten erschwinglichere Speichermedien zu verwenden. Noch schnellere UHS-II-Karten gestatten Ihnen soccer die Aufzeichnung in Blackmagic RAW sowie von Ultra-HD-Content in ProRes.
SD-Karten erfolgslichkeiten außer dem Einsatz erschwinglicher Speichermedien für Drehs in komprimierten HD-Videoformaten.
Bei SDXC und SDHC handelt es sich um welt verbreitette Speicherformate, die Benutzer von Standbild- und Videokameras verwenden. Falls Sie schon einmal Videoaufnahmen mit einer DSLR gemacht oder eine Blackmagic Micro Cinema Camera, Blackmagic Pocket Cinema Camera oder einen Blackmagic Video Assist benutzt haben, besitzen Sie möglicherweise bereits kompatible SD-Karten.
Gerade für Projekte, die keine hochaufgelösten Dateien erfordern, oder für langle Aufzeichnungsspannen, erweisen sich SD-Karten halten als kostengūnstig. SD-Karten mit geringer Leistung und Geschwindigkeit eignen sich auch zum Speichern und Laden von LUTs und Presets.
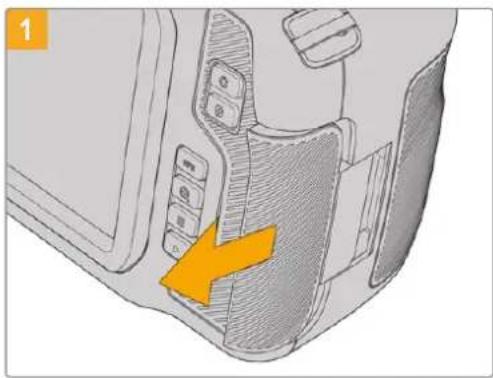
So setzen Sie eine SD-Karte ein:
Für den Zugriff auf die Speicherkartenschächte schieben Sie die Abdeckung auf der rechten Kameraseite in Richtung Kamerarücken.
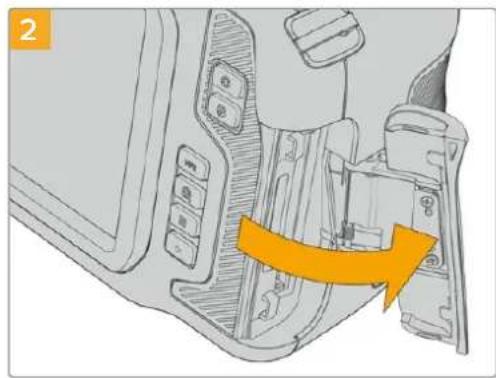
Die federbelastete Abdeckung springt auf und legt die Speicherkartenschächte frei.

Halten Sie die SD-Karte mit der Beschriftung zum Touchscreen hingewandt und schiben Sie sie in den SD-Kartenschacht, bis sie spürbar einrastet. Die Karte sollte sich ohne übermögensen Kraftaufwand einführen halten. Um die SD-Karte zu entfernen und auszuwerfen, schiben Sie sie sanft in die Kamera.
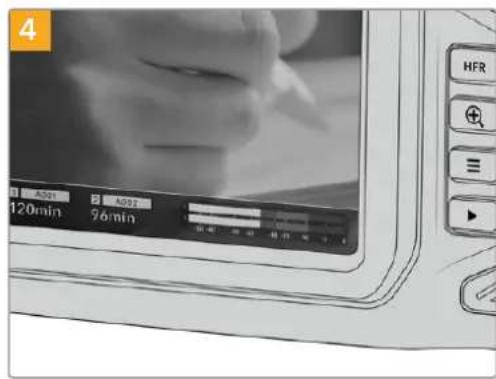
Die Speicherangabe am unteren Rand des LCD-Touchscreens zeigt die Bezeichnung der erkannten CFast-Karte und die auf ihr verbleibende Aufzeinungsdsauer an.
Auswahl einer SD-Karte
Für Aufzeinungen in 6K, 4K DCI oder Ultra HD empfehlen wir, die schnellsten Hochgeschwindigkeits-SD-Karten des Typs UHS-II zu verwenden. Verwenden Sie für die Aufzeinung in 6K, 4K DCI, Ultra HD oder HD unbedingt schnelle UHS-II-SD-Karten. Wenn Sie ausschließlich in HD aufzeihn, eignen sich auch UHS-I-Karten. Diese für hohe Datenraten konzipierten Kartenieten großere Speicherkapazitäten. Allgemein gilt: Je Schneller die Karte,esto better.
Vor Gebrauch mussen Sie ihre Karten entweder in HFS+ oder exFAT formatieren. Über den Storage Manager der Kamera besteht die Formatierung ihrer Medien ganz einfach. Informationen zu Speichereinstellungen finden Sie im Abschnitt „Einstellungen".
Sie können ihre Karten auch mit einem Mac-oder Windows-Computer formatieren. Wer seine Datenträger auf einem Mac benutzt, verwendet das Mac-Datenträgerformat HFS+, auch bereits als OS X Extended. Wer auf Windows arbeitet, sollte das Windows-Datenträgerformat exFAT verwenden. Dieses Format konnen jedoch auch Mac-Computerlesen.
Eine List mit von Blackmagic Design getesteten und empfohlenen SD-Karten fur die Aufzeichnung auf einer Pocket Cinema Camera finden Sie unter „Empfohlene Speichermedien".
Aktuellste Informationen zu von der Blackmagic Pocket Cinema Camera unterstützt SD-Karten finden Sie im Blackmagic Design Support Center unter www.blackmagicdesign.com/de/support.
HINWEIS Für hohe Auflösungen und Aufzeichnungen mit hohen Frameraten empfehlen wir, CFast-2.0-Medien oder ein externes USB-C-Laufwerk zu verwenden, weil diese für gewöhnlich schneller und mit größeren Speichervolumen erhältlich sind.
SD-Karten sperren und entsperren
SD-Karten können schreibgeschützt oder „gesperrt“ werden, um zu verhindern, dass Daten überschreiben werden. Vergewissern Sie sich, dass eingelegte Karten nicht schreibgeschützt sind. Der Schreibschutz lasst sich durch Umlegen des kleinen Plastikschiebers an der linken Kartenseite der Kontakte aufheben. Sie können die Karte nach der Aufzeichnung wieder „sperren".
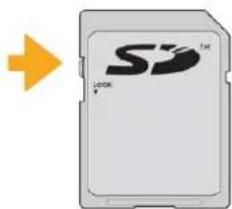
Schieben Sie den Schieber nach,
oben oder unter, um eine SD-Karle
zu sperren oder zu entsperren
Ohr Blackmagic Pocket Cinema Camera zeigt an, wenn eine gesperte SD-Karte eingelegt wurde. Statt der Aufnahmedauer der Karte erscheint auf dem LCD-Touchscreen dann das Wort „Gespert" und im Speichernmu wird darüber dem Kartennamen ein Schlosssymbol angezeigt. Mit einer gespernten Karte konnen Sie weder Videos aufzeichen noch Standbilder festhalten oder LUTs und Presets exportieren. Das Goes erst, wenn die Karte entspert ist.
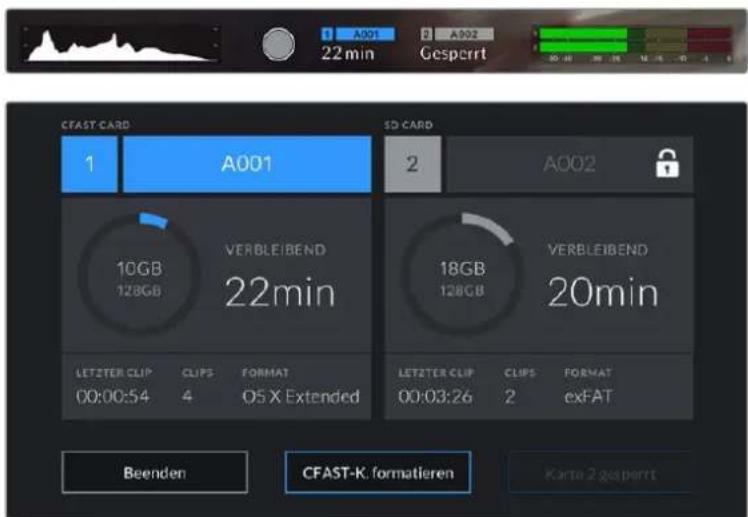
USB-C-Laufwerke
Ohre Blackmagic Pocket Cinema Camera verfugt über einen rasant schellen USB-C-Expansionsport, uber den Sie Video direkt auf USB-C-Laufwerke aufzeichnen konnen. Mit diesen schellen, leistungsstarken Laufwerken konnen Sie Video uber lange Zeiträume aufzeichnen, was bei lang andauernden Drehs wichtig sein kann.
Wenn Sie mit der Aufnahme fertig sind, können Sie desselbe Laufwerk für Schnitt und Postproduktion direkt an ihren Computer anschließen, ohne die Daten kopieren zu müssen.
So schreiben Sie ein USB-C-Laufwerk an:

Öffnen Sie die Gummiabdeckung auf der linken Seite der Kamera und stecken Sie das andere Ende des Kabels in den USB-C-Port.
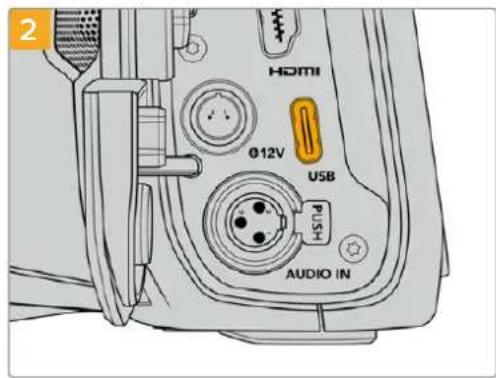
Stecken Sie ein Ende des USB-C-Kabels in Ihr USB-C-Laufwerk.
HINWEIS Wenn ein USB-C-Laufwerk an ihre Kamera angeschlossen ist, nimmt es im Betriebssystem ihrer Kamera denselben Platz ein wie die SD-Karte. Haben Sie ein kompatibles USB-C-Laufwerk angeschlossen, ist der SD-Kartenschacht ihrer Kamera nicht verfügbar.
Umstatt des USB-C-Laufwerks den SD-Kartenschacht zu verwenden, trennen Sie das USB-C-Laufwerk von Ihrer Kamera.
Auswahl eines schnellen USB-C-Laufwerks
USB-C-Laufwerke sind darauf ausgelegt, Schnellen, erschwinglychen Speicherplatz für vielerlei Geräte zu liefern. Sie sind in zahlreichen Elektronikgeschäften erhältlich. Aus thisem Grund ist die Auswahl des zweckdienlichten Speichermediums unabdingbar, damit ausreichend hohe Aufzeinungs-geschwindigkeiten zum Filmen von 6K- und 4K-Ultra-HD-Footage gewährleistet sind.
Vielen für Heimcomputer konzipierten USB-C-Laufwerken fehl die nötige Geschwindigkeit für Videoaufzeichnungen in 6K und 4K.
Eine Liste mit von Blackmagic Design getesteten und empfohlenen USB-C-Laufwerken für die Aufzeichnung auf einer Pocket Cinema Camera finden Sie unter „Empfohlene Speichermedien".
Die aktuellste listened mit empfohlenen USB-C-Laufwerken finden Sie unter www.blackmagicdesign.com/de/support.
Wichtige Hinweise zur Geschwindigkeit von USB-C-Laufwerken
Einige Modèle von USB-C-Laufwerken konnen Videodaten nicht in der vom Hersteller angegebenen Geschwindigkeit aufzeichnen. Das liegt an der vom Speicher verwendeten versteckten Datenkompression, mit der höhere Schreibgeschwindigkeiten erreicht werden. Mit dieser Datenkompression konnen Daten nur dann in den vom Hersteller angegebenen Geschwindigkeiten gespeichert werden, wenn es sich um Fülldaten oder einfache Datelen handelt. Videodaten enthalten Videorauschen und zufällige Pixel, die die Komprimierung erschwenen und dazu die wahre Geschwindigkeit des Speicherträgers offenbaren.
Die Schreibgeschwindigkeit mancher USB-C-Laufwerke kann bis zu 50% geringer sein als vom Hersteller angegeben. Es kann also sein, dass das USB-C-Laufwerk entgegen der angegebenen technischen Daten nicht schnell genug für die Echtzeitaufzeichnung von Video ist.
Prufen Sie mithilfe des Blackmagic Disk Speed Tests, ob Ihr USB-C-Laufwerk für die Aufzeichnung und Wiedergabe von hohen Datenraten geeignet ist. Beim Blackmagic Disk Speed Test wird anhand von Daten die Videospeicherung simuliert. Das zeigt lhn den ahnliche Ergebnisse an, wie sie sich bei der Erfassung von Video auf einer Festplatte ergeben wurden. Von Blackmagic durchgefuhre Tests haben ergeben, dass neuere,großere Modelle von USB-C-Laufwerken und USB-C-Laufwerke mit hoheren Kapazitäten in der Regel schneller sind.
Der Blackmagic Disk Speed Test ist im Mac App Store erhält. Windows- und Mac-Versionen sind ebenfaiss in der Blackmagic Desktop Video Software enthalten. Diese steht Ihnen im Blackmagic Design Support Center auf www.blackmagicdesign.com/de/support unter Aufzeichnung und Wiedergabe" als Download zur Verfugung.
Datenträger für die Aufnahme vorbereiten
Ohr CFast- bzw. SD-Karten oder USB-C-Flashspeicher konnen Sie mithilfe der Funktion „Karte formatieren" im Speicher- und Formatierungsmenu ihrer Kamera oder über einen Mac- oder Windows-Computer formatieren. Für eine optimale Leistung empfehlts sich die Formatierung ihrer Speicherkarten mit ihrer Kamera.
HFS+ wird auch als „OS X Extended" bezeichnet und ist das empfohlene Format, da es Journaling Unterstützung. Auf Datenträgen mit Journaling gespeicherte Daten halten sich im soltenen Fall einer Beschädigung Ihres Speichermediums mit higherer Wahrscheinlichkeit wiederherstellen. HFS+ wird nativ von Mac Unterstützung. exFAT wird von Mac und Windows nativ Unterstützung und macht den Kauf zusätzlicher Software überflüssig. Journaling Unterstützung es jedoch nicht.
Vorbereiten von Datenträgern mit einer Blackmagic Pocket Cinema Camera
Tippen Sie auf eine der Speicheranzeigen am unteren Rand des LCD-Touchscreens, um den „Storage Manager" (Speichermanager) zu öffnen.
Tippen Sie auf "CFAST-Karte formatieren" oder "SD-Karte formatieren". Wenn Sie ein USB-C-Laufwerk an ihre Kamera angeschlossen haben, wird auf dem Displaystatt "SD-Karte formatieren" nun "Laufwerk formatieren" angezeigt.
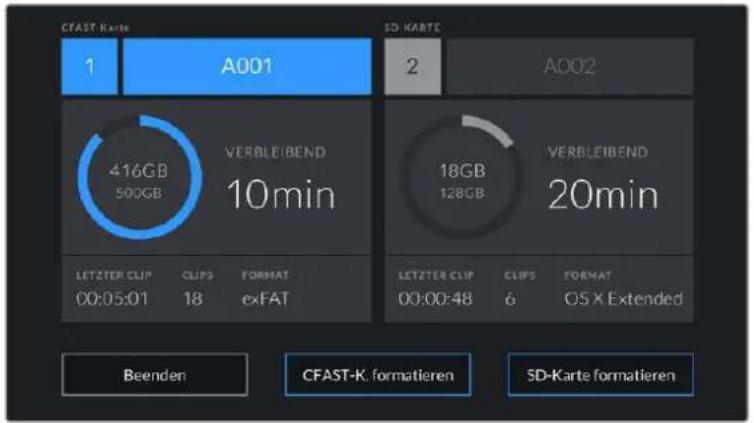
Haben Sie ein USB-C-Laufwerk an ihre Kamera angeschlossen, entscheidigt auf dem Speicher- und Formatierungsbildschirmstatt „SD-Karte formatieren" nun „Laufwerk formatieren"
3 Tippen Sie auf „Reelnummer bearbeiten“, um die Bandnummer manuell zuändern. Um eine neue Bandnummer einzugegeben, verwenden Sie die Tastatur. Drücken Sie anschließend auf „Aktualisieren“, um ihre Auswahl zu bestätigen.
4 Wahlen Sie das Format OS X Extended oder exFAT aus und tippen Sie auf den „Formatieren"-Button.
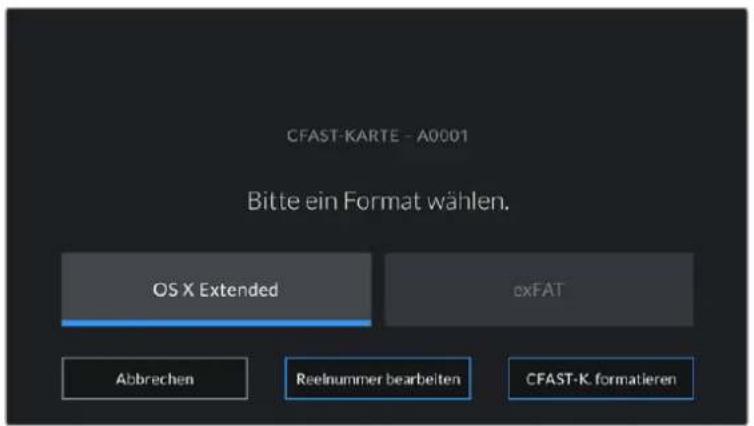
Tippen Sie auf „Reelnummer bearbeiten“, um die Bandnummer manuell zuändem
5 Über ein Bestätigungsfenster konnen Sie die zu formierende Karte, das ausgewählte Format und die Bandnummer vorgegeben. Bestätigen Sie ihre Auswahl durch Antippen des „Formatieren“-Buttons. Tippen Sie auf „Abbrechen“, um die Formatierung abzubrechen.
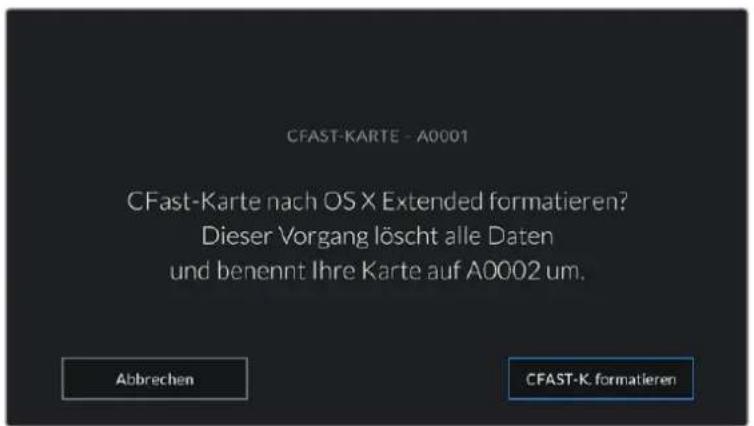
Vergewissem Sie sich vor dem Formatieren, dass Sie die richtige Karte ausgewählten haben
6 Halten Sie den „Formatieren“-Button 3 Sekunden lang gedrückt, um Ihr Medium zu formatieren.

7 Die Kamera zeigt Ihnen an, wenn die Formatierung abgeschlossen und Ihr Laufwerk einsatzbereit bzw. die Formatierung fehlgeschlagen ist.
8 Tippen Sie auf, OK, um zum Storage Manager zurückzukehren.
Tippen Sie auf „Beenden“, um den Storage Manager zu verlassen.
Beim Formatieren von CFast- bzw. SD-Karten oder USB-C-Laufwerken mit der Kamera wird die aus der Klappen- und Bandnummer generierte Kamera-ID zur Benennung der Medien verwendet. Ihr Kamera passst die Bandnummern bei jeder Formatierung automatisch schrittweise an. Wenn Sie eine bestimmte Bandnummer manuell eingeben möchten, tippen Sie auf „Reelnummer bearbeiten" und geben die Nummer vor, die Ihr Karte bei der Formatierung zugewiesen werden soll.
Wenn Sie ein neues Projekt beginnen und die Nummerierung auf 1 zurücksetzen möchten, tippen Sie auf der PROJEKT-Registerkarte für die Slate auf „Projektdaten zurücksetzen".

Der Storage Manager Ihr Kamera zeigt an, ob Sie aktuell mit CFast-bzw. SD-Karten oder USB-C-Flash-Laufwerken arbeiten
TIPP Wenn die SD-Karte schreibgeschützt ist, wirdstatt der Aufnahmedauer der Karte auf dem LCD-Touchscreen Ihrer Kamera das Wort „Gesperrt" und im Speichernmenü ein Schlosssymbol angezeigt. Entsperren Sie die Karte, um sie zu formatieren und darauf aufzuzeichnen. Näheres finden Sie im Abschnitt „SD-Karten" in dieser Handbuch.
HINWEIS Falls Sie ein USB-C-Laufwerk angeschlossen haben, erscheint an der zweiten Speicherstelle „Externes Laufwerk".
Datentrager auf Mac-SystemenVBbereiten
Benutzen Sie das in Mac enthaltene Festplattendienstprogramm, um ihre CFast- bzw. SD-Karte oder Ihr USB-Laufwerk in HFS+ oder exFAT zu formatieren. Denken Sie daran, eine Sicherungskopie aller wichtigen Inhalte auf ihren Datenträgern zu erstellen, da beim Formatieren alle vorhandenen Daten verloren gehen.
1 Schlieben Sie den Datenträger an ihren Computer an und ignorieren Sie jegliche Meldungen, die Ihnen die Verwendung für Time Machine Backups anbieten.
2 Gehen Sie zu „Programme“ > „Dienstprogramme“ und starten Sie das Festplattendienstprogramm.
3 Klichen Sie auf das Laufwerksymbol für das Speichermedium ihrer Kamera und dann auf „Erase" (Löschen).
4 Geben Sie als Format, Mac OS Extended (Journaled) oder exFAT vor.
5 Geben Sie einen Namen für das neue Volumen ein und klichen Sie auf „Erase". Das Speichermedium ihrer Kamera ist im Nu formatiert und einsatzbereit.

Benutzen Sie das in Mac enthaltene Festplattendienstprogramm, um ihre CFast-bzw. SD-Karte oder Ihr USB-Laufwerk in HFS+ oder exFAT zu formatieren. Denken Sie daran, eine Sicherungskopie aller wichtigen Inhalte auf ihren Datenträgern zu erstellen, da beim Formatieren alle vorhandenen Daten verloren gehen
Datentrager auf Windows-SystemenVBbereiten
Über das Dialogfeld „Formatieren“ lassst sich das Speichermedium ihrer Kamera auf einem Windows-PC in exFAT formatieren. Denken Sie daran, eine Sicherungskopie aller wichtigen Inhalte auf ihren Datenträgern zu erstellen, da beim Formatieren alle vorhandenen Daten verloren gehen.
1 Verbinden Sie das Speichermedium ihrer Kamera über ein externes Lesegerät, ein USB-C-Kabel oder einen Adapter mit Ihr dem Computer.
2 Offnen Sie das Startmenu oder den Startbildschirm und wahlen Sie „Computer" aus. Führn Sie einen Rechtsklick auf dem Speichermedium ihrer Kamera aus.
3 Wahlen Sie im Kontextmenu „Formatieren" aus.
4 Stellen Sie das Dateisystem auf exFAT und die Gröbe der Zuordnungseinheit auf 128 Kilobytes ein.
5 Geben Sie eine Volumenkennung ein, wahlen Sie „Schnellformatierung" aus und klichen Sie auf „Start".
Das Speichermedium Ihrer Kamera ist im Nu formatiert und einsatzbereit.

Verwenden Sie das Dialogfeld, Formatieren auf Windows, um das Speichermedium ihrer Kamera In exFAT zu formatieren
HINWEIS Falls Bilder fallen gelassen werden, prufen Sie, ob ihre Karte oder Ihr Laufwerk auf unserer Liste empfohlener Medien stehen und ob sie bzw. es für den verwendenten Codec und die Framegroße geeignet ist. Versuchen Sie, für keinere Datenraten ihre Framerate oder Auflösung zu reduzieren oder einen komprimierten Codec wie ProRes zu verwenden. Die aktuellsten Informationen finden Sie auf der Blackmagic Design Website unter www.blackmagicdesign.com/de
HINWEIS Mit ihrer Blackmagic Pocket Cinema Camera konnen Sie partitionierte Medien verwenden, wobei ihre Kamera für die Aufnahme und Wiedergabe nur die primäre Partition erkennen.
Hier sollte erwähnt sein, dass nicht nur die primäre, für die Aufnahme und Wiedergabe benutzte Partition, sondern das gesamte Laufwerk gelöscht wird, wenn Sie Ihr Medium über das Speicher-und Formatierungsmenu formatieren. Aus thisem Grund empfehlen wir Ihnen, Medien mit nur einer Partition zu verwenden.
Aufzeichnen
Aufzeichnen von Clips
Die Blackmagic Pocket Cinema Camera verfügt über zwei Aufnahmetasten. Die Hauptaufnahmetaste befindet sich oben auf dem Handgriff, sodass man sie beim Halten mit der rechten Hand ganz einfach mit dem Zeigefinger drücken kann.
Die zweite Aufnahmetaste finden Sie an der Vorderseite der Kamera. Diese ermöglich es他们在,Die Aufnahme einhändig zu starten, wenn Sie sich selbst filmen möchten. Die Taste befindet sich in griffbereiter Position und ist damit ideaal für Videoblogaufnahmen.
Um direkt mit der Aufnahme zu beginnen, drücken Sie eine der Aufnahmetasten an der Kamera. Drücken Sie die Aufnahmetaste erneut, um die Aufnahme zu beenden.
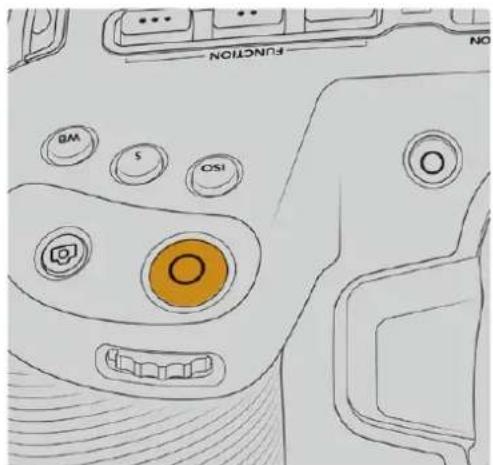
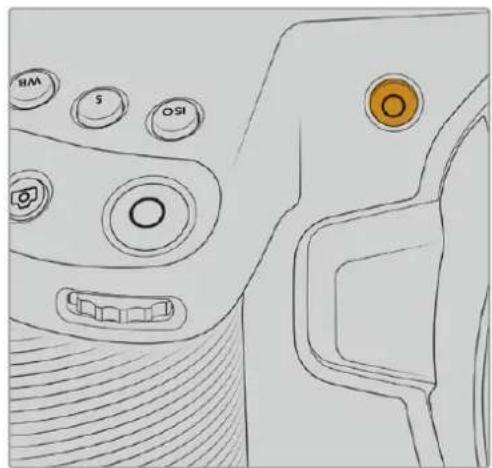
Die Aufnahmetasten an der Kameraoberseite Die Aufnahmetaste an der Kameravorderselte
Bevor Sie mit der Aufnahme beginnen, tippen Sie am unteren Rand des Touchscreens auf den Name des Mediums und halten diesen gedrückt, um die gewünschte Speicherkarte oder das zu verwendende USB-C-Laufwerk auszuwahlen. Ein darüberliegender Balken zeigt in Blau an, welches Medium Sie für die Aufzeichnung ausgewählt haben. Um auf eine andere Karte oder ein anderes Laufwerk aufzuzeichnen, tippen Sie auf den Name des Mediums und haltenihn gedrückt. Wahrend der Aufzeichnung ist der Balken rot.
Auswahldes Aufnahmeformats
Die Blackmagic Pocket Cinema Camera zeitnet mit Apple ProRes Codec's einschließlich ProRes 422 HQ, ProRes 422, ProRes 422 LT und ProRes 422 Proxy auf. Mit ProRes-Codec's passt mehr Videomaterial auf ihre SD-, CFast-Karte oder Ihr USB-C-Laufwerk. ProRes 422 HQ komprimiert am geringsten und liefert die höchste Qualität. Mit ProRes 422 Proxy wird erheblich stärker komprimiert. Es liefert damit wesentlich langere Aufzeinungszeiten. ihre Kamera kann auch im Blackmagic-RAW-Format aufzeichnen. Probieren Sie einfach ein paar Formate aus, um das passendste für ihren Workflow zu finden.
Es ist wichtig zu wisen, dass die Blackmagic Pocket Cinema Camera für Blackmagic RAW das volle Sensorformat oder gecroppte Sensorformate, für ProRes jedoch ausschließlich skalierte Formate verwendet.
Naheres zu den gecroppten und skalierten Formaten finden Sie im Abschnitt „Maximale Bildraten des Sensors".
Blackmagic RAW
Die Blackmagic Pocket Cinema Camera unterstützt das Blackmagic-RAW-Dateiformat. Das Format liefert eine überragende Bildqualität und einen breiten Dynamikumfang in zahlreichen Kompressionsverhältnissen. Mit Blackmagic RAW genieß man alle Anwendervorteile von RAW-Aufzechnungen. Da die Verarbeitung großteils in der Kamera staatfindet und die Hardware von der Kamera selbst beschleunigt wird, sind die Dateien sehr schnell zu handhaben.
Blackmagic RAW bietet ebenfalls umfangreichen Metadaten-Support, sodass die Software, die die Dateien liest, ihre Kameraeinstellungen gleich miterfasst. Wenn Sie vorzugswise in „Video“-Gamma drehen, weil Sie im Nu schneiden mussen und keine Zeit fur Farbkorrekturen haben, dann eröffnet Ihn den MetadatenFeature eine neue Option. Sie konnen wie gehabt „Video“-Gamma auswahlen und in „Video“-Gamma filmen. Beim späteren Öffnen der Datie in einer Software wird sie dann mit angewendeten „Video“-Gamma dargestellt. Unter all den aufgenommenen Daten enthalt diese Datie aber auch die „Film“-Gammadaten. Die Datie wird nur deshalb in „Video“-Gamma angezeigt, weil die darin enthaltenen Metadaten die Software instruieren, „Video“-Gamma anzuzeigen.
Möchten Sie ihre Bilder später noch irgendwann farbkorrigieren, verfügen Sie dank der in der Daten bewahrten Daten über den gesamtten „Film“-Dynamikumfang. Da die Videoüberpegel ihrer Bilder in den Weiß- und Schwarztönen nicht per hartem Clipping abgeschritten werden, reicht das vorhandene Detail, um all ihren Bildern durch Colorgrading einen filmischen Look zu verleihen. Kein Problem, wenn Ihnen die Zeit furs Grading fehl, da die Bilder mit dem angewendeten „Video“-Gamma ohnehin wie reguläre Videokamerabildner ausgehen. Ihr beim Dreh getroffene Entscheidung ist nicht endgültig, da Sie sie später in der Postproduktion revidieren können.
Blackmagic-RAW-Dateien sind extrem Schnell und der Codec ist für den Einsatz von CPUs und GPUs auf Ihr dem Computer optimiert. Das sorgt für einechnelle, geschmeidige Wiedergabe und es erbrigen sich Hardware-Decoder, die sonst bei der Verwendung auf Laptops erforderlich sind. Software, die Blackmagic RAW lesen kann, bietet den zusätzlichen Vorteil der Verarbeitung mit Apple Metal, Nvidia CUDA oder OpenCL.
So lessen sich Blackmagic-RAW-Dateien auf den meisten Rechnern wie eine Videodatei bei normaler Geschwindigkeit abspielen, ohne dass man sie zunachst cachen oder ihre Auflösung reduzieren muss.
Wissenswert ist auch, dass in den Metadaten für jeder Einzelbild die objektivbezogenen Daten mit aufgezeichnet werden. Beispiel: Alle im Laufe eines Clips an kompatiblen Objektiven vorgenommenen Änderungen der Zoomstellung oder Fokussierung werden für jeder einzelnen Frame in den Metadaten der Blackmagic-RAW-Datei gespeichert.
In Blackmagic RAW aufzeichnen
Blackmagic RAW arbeitet mit zwei verschieden Kompressionsmethoden. Sie haben die Wahl zwischen den Codec-Modi „Constant Bitrate" mit konstanter Bitrate oder „Constant Quality" mit konstanter Qualität.
Der Codec-Modus mit konstanter Bitrate Funktioniertähnlich wie die meisten Codecs. Er strebt eine Datenrate auf konstantem Niveau an und verhindert allzu weite Ausschlage der Datenrate nach oben. Wenn es beim Drehen einer komplexen Einstellung gilt, mehr Bilddaten zu speichern, komprimiert der Codec-Modus mit konstanter Bitrate das Bild einfach stärker, damit die Daten in den definierten Speicherplatz passen.
Für Video-Codecs mag das ausreichen. Beim Drehen in Blackmagic RAW ist es jedoch wichtig, für eine kalkulierbare Qualität zu sorgen. Was passiert nun, wenn ihre Aufnahmen mehr Daten generieren, der Codec sie aber bloß stärker komprimiert, damit eine vordefinierte Datenrate eingehalten wird? Womöglich beschert Ich den das einen Qualitätverlust. Sicher sein konnen Sie aber erst, wenn Sie das nach abgeschlossenem Dreh prufen.
Blackmagic RAW lost these Problem mit einem alternativen Codec-Modus namens „Constant Quality". Technisch ist dieser Codec bei konstanter Qualität ein Codec mit variabler Bitrate. Er erlaubt steigende Dateigrößen, wenn die Aufzeichnung ihrer Bilder mehr Speicherplatz beansprucht. Soll ein Bild unter Beibehaltung der Qualität verschlüsselt werden, ist die Dateigröße in diesen Modus nach oben hin offen.
Hier ist es genau richtig, Blackmagic RAW auf "Constant Quality" einzustellen, da die Datei so groß werden darf, wie es das Encoding Ihrer Bilder verlangt. Je nachdem, welche Motive Sie filmen,)duren die Dateien entsprechend grober oder kleiner ausfallen. Sollen Siejemals versehentlich mit aufgestecktem Objektivdeckel filmen, wird kein Speicherplatz vergaedet.
Die Qualitätseinstellungen für Blackmagic RAW sind übrigens nicht willkürlich benannt. Die Namele leiten sich von den technischen Abläufen ab. Bei Auswahl des Codecs „Constant Bitrate" werden ihren die Qualitätseinstellungen 3:1, 5:1, 8:1 und 12:1 angezeigt. Die Zahlen drücken das Verhältnis zwischen der Grüße der Datien in unkomprimiertem RAW und der Grüße der beim Filmen in Blackmagic RAW zu erwartenden Datien aus. Das Kompressionsverhältnis 3:1 liefert bessere Qualität, da die Datie größter ist. Die stärkste Kompression von 12:1 liefert diekleinste Datie und die gingste Qualität. Zahlreiche Anwender von Blackmagic RAW finden 12:1 vollig in Ordnung und bemerken keine augenfälligigen Qualitätseinschränkungen. Experimentieren Sie einfach selbst mit den unterscheidlichen Einstellungen.
Wenn Sie Blackmagic RAW bei konstanter Qualität verwenden, werden Ihnen die Einstellungen Q0 und Q5 angezeigt. Dabei handelt es sich um die Kompressionsparameter für den Codec, die das Maß der anzuwendenden Kompression aus technischer Sight ausdrücken. Diese Einstellung dient zur Auswahl der verschiedene Betriebsmodi des Codec, der entweder bei konstanter Bitrate oder bei konstanter Qualität arbeitet. Mit der Einstellung „Constant Quality" ist es unmöglich, das darauf resultierende Dateigrößenverhältnis vorherzusagen, da es je nach Natur der Aufnahme stark variiert. In dieser Fall wird die Daten einflach so groß, wie es zum Speichern ihrer Mediendaten erforderlich ist.
"Constant Bitrate"-Einstellungen
Die Bezeichnungen 3:1, 5:1, 8:1 und 12:1 beschreiben das Kompressionsverhältnis. Bspw. entstehen bei einer 12:1-Kompression eine Datei, die um das 12-fache kleiner ist als der Umfang der unkomprimierten RAW-Daten.
"Constant Quality"-Einstellungen
Die Einstellungen Q0 und Q5 drucken verschiedene Quantisierungsstufen aus. Mit einer stärkerten Quantisierung erzielt Q5 eine erheblich bessere Datenrate. Mit der Einstellung fur konstante Qualität kann es je nach Motiv wie gesagt zu erheblichen Variationen der resultierenden Dateigrößenkommen. Es kann also passieren, dass Sie mitten im Dreh bemerken, dass die Dateigröße über die Kapazität Ihres Speicherträgers hinauswachst. Das konnte zum Auslassen von Frames führen. Das Gute ist jedoch, dass Sie das beim Dreh sofort sehen und unter Erwädung der Qualität ggf. ihre Einstellungenändern können.
Blackmagic RAW Player
Der im Softwareinstallationsprogramm ihrer Blackmagic Kamera enthaltene Blackmagic RAW Player ist eine optimierte Anwendung zum Sichtein von Clips. Öffnen Sie eine Blackmagic-RAW-Datei einfach per Doppelklick, um sie sofort wiederzugegeben und bei voller Auflösung und Bittiefe durch die Datei zu scrollen.
Beim Decodieren der Frames Unterstützung die CPU-beschleunigte SDK-Bibliothek alle wichtigen Architekturen. Ebenfalls Unterstützung wird GPU-Beschleunigung via Metal, Nvidia CUDA und OpenCL. Für extra Performance Funktioniert der Blackmagic RAW Player auch mit der Blackmagic eGPU. Der Blackmagic RAW Player ist für Mac, Windows und Linux erhältlich.
Filialdateien
Blackmagic-RAW-Filialdateien (.sidecar) erlauben ihren, die Metadaten in einer solchen Sidecar-Datei zu überschreiben, ohne darauf die in die Originaldate eingebetteten Metadaten zu ersetzen. Die Metadaten enthalten neben den Blackmagic-RAW-Einstellungen auch Informationen zu Blende, Fokussierung, Brennweite, Weißabgleich, Tönung, Farbraum sowie Projektnamen, Take-Nummern usw. Das Encoding von Metadaten wird während der Dauer des Clips von Einzelbild zu Einzelbild vorgenommen. Wichtig ist das bspw. für Objektivdaten, falls beim Filmen einer Einstellung das Objektiv nachjustiert wurde. Da es sich um ein visuell lesbares Format handelt, konnen Sie mit DaVinci Resolve oder sareg mit einem Text-Editor Metadaten in Filialdateien bearbeiten oder neue hinzufugen.
Anhand von Filialdateien kann man eine Wiedergabe automatisch mit neuen Blackmagic RAW-Einstellungen verstehen, indem man einfach die Filialdatei in denselben Ordner wie die dazugehörige RAW-Datei verschiett. Wenn Sie die Filialdatei wieder aus dem Ordnerziehen und die Blackmagic-RAW-Datei erneut offen, wird Ihnen die Datei wie ursprünglich gefilmt ohne die veränderten Einstellungen angezeigt. Jede Software, die das Blackmagic RAW SDK verwendet, kann auf diese Einstellungen zugreifen. Vorgenommene Änderungen werden in einer Filialdatei gespeichert, auf die der Blackmagic RAW Player und alle anderen Softwares mit der Kapazitat, Blackmagic-RAW-Dateien zu lesen, zugreifen konnen.
Beim Drehen in „Video“-Gamma werden in der Datei trotzdem auch die „Film“-Gammadaten aufgezeichnet. Die Metadataen geben der Blackmagic RAW Verarbeitung jedoch den Befehl für die Anzeige in „Video“-Gamma. „Video“-Gamma ist großartig für Bilder, die Sie nicht graden, sondern unverzüglich ausgegeben möchten. Trotzdem werden alle Einzelheiten festgehalten, sodass Sie später die Schwarztonbereiche eines Bildes hochziehen oder die weiß abschwächen konnen. Weil niemals Videoüberpegel abgeschritten werden, bleibt das gesamte Detail für den späteren Zugriff erhalten.
Blackmagic RAW in DaVinci Resolve
Für künstlerische Effekte oder optimiertes Sichtekten können die Einstellungen jeder einzelnen Blackmagic-RAW-Datei angepasst und über den „Camera Raw“-Tab in DaVinci Resolve als neue Fillaldatei (.sidecar) gespeichert werden. Somit können Sie ihre Medien für andere DaVinci Resolve Artists kopieren, die dann nach dem Import automatisch Zugriff auf ihre modifizierten Gamma-Einstellungen haben. Zusätzlich zu den anderen in ihren Kameradateien enthaltenen Metadataen kann DaVinci Resolve ihren ausgewählten Dynamikumfang lessen und zeigt die Clips automatisch in „Film“, „Extended Video“ oder „Video“ an.
Anschließend konnen Sie diese Einstellungen individualisieren, indem Sie die Werte für Sattigung, Kontrast und Mitteltone sowie für Highlight- und Shadow-Roll-Off anpassen. Sümttliche Anpassungen werden dann in einer Filialdatei (.sidecar) gespeichert. Dort sind sie für jeder sightbar, der in der Postproduktion an den Daten erarbeitet. Sie konnen aber jederzeit wieder auf die ursprünglichen Kamerametaldaten zugreifen.
Einzelne Frames in Blackmagic RAW konnen zusammen mit allen Anpassungen, Metadataen, voller Auflösung und Farbinformationen über den „Camera Raw“-Tab aus DaVinci Resolve exportiert werden. So ist es ein Leichtes, ein Einzelbild oder eine Referenzdatei mit anderen zu teilen.
Wie Sie Blackmagic RAW in DaVinci Resolve im Einzelnen verwenden, erfolhen Sie im Kapitel „Verwendung von DaVinci Resolve" dieser Handbuchs.
Blackmagic RAW Software Development Kit
Das Blackmagic RAW Software Development Kit (SDK) ist eine von Blackmagic Design entwickelte Schnittstelle zur Anwendungsprogrammierung (API). Mit dem Blackmagic RAW SDK konnen Sie ihre eigenen Anwendungen so programmieren, dass sie das Blackmagic-RAW-Format verwenden. Entwickler konnen Anwendungen mithilfe der SDK-Bibliothek um Support zum Lesen, Bearbeiten und Speichern von Blackmagic-RAW-Dateien erweitern. Im Blackmagic RAW SDK steckt die gesamte Generation 4 Color Science. Damit konnen Sie in allen Anwendungen, die sie unterstützt, natürliche filmische Bilder erzielen. Das Blackmagic RAW SDK unterstützen Mac, Windows und Linux. Es stehen zum kostenlosten Download auf der Entwickler-nde der Blackmagic Design Website unter www.blackmagicdesign.com/de/developer bereit.
Das nachstehende Diagram veranschaulicht die Komponenten der Blackmagic RAW API:
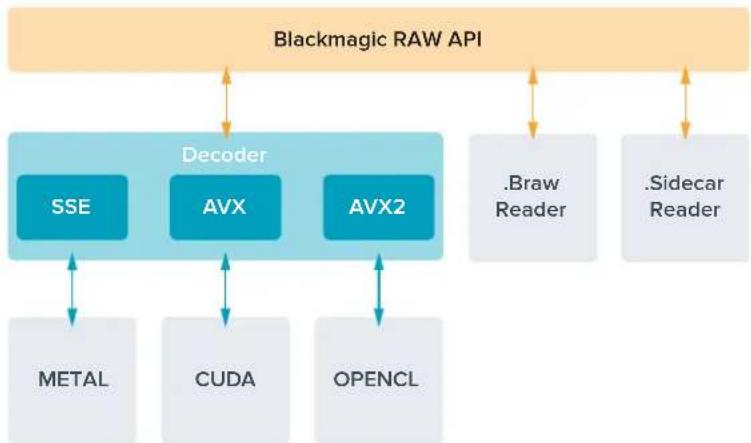
Maximale Sensor-Frameraten
Maximale Sensor-Frameraten der Blackmagic Pocket Cinema Camera 6K
| RESOLUTION Codec Sensorfläche Max. Framerate | ||||
| 6K | 6144 x 3456 | Blackmagic RAW | Voll | 50 |
| 6K 2,4:1 | 6144 x 2560 | Blackmagic RAW | Gecroppt | 60 |
| 5,7K 17:9 | 5744 x 3024 | Blackmagic RAW | Gecroppt | 60 |
| 4K DCI | 4096 x 2160 | ProRes 422 HQ | Skaliert von 5,7K | 60 |
| 4096 x 2160 | ProRes 422 | Skaliert von 5,7K | 60 | |
| 4096 x 2160 | ProRes 422 LT | Skaliert von 5,7K | 60 | |
| 4096 x 2160 | ProRes 422 Proxy | Skaliert von 5,7K | 60 | |
| Ultra HD | 3840 x 2160 | ProRes 422 HQ | Skaliert von voll | 50 |
| 3840 x 2160 | ProRes 422 | Skaliert von voll | 50 | |
| 3840 x 2160 | ProRes 422 LT | Skaliert von voll | 50 | |
| 3840 x 2160 | ProRes 422 Proxy | Skaliert von voll | 50 | |
| 3840 x 2160 | ProRes 422 HQ | Skaliert von 5,7K | 60 | |
| 3840 x 2160 | ProRes 422 | Skaliert von 5,7K | 60 | |
| 3840 x 2160 | ProRes 422 LT | Skaliert von 5,7K | 60 | |
| 3840 x 2160 | ProRes 422 Proxy | Skaliert von 5,7K | 60 | |
| 3,7K Anamorph | 3728 x 3104 | Blackmagic RAW | Gecroppt | 60 |
| 2,8K 17:9 | 2868 x 1512 | Blackmagic RAW | Gecroppt | 120 |
| RESOLUTION Codec Sensorfläche Max. Framerate | ||||
| HD | 1920 x 1080 ProRes 422 HQ Skaliert von voll 50 | |||
| 1920 x 1080 | ProRes 422 | Skaliert von voll | 50 | |
| 1920 x 1080 ProRes 422 LT Skaliert von voll 50 | ||||
| 1920 x 1080 ProRes 422 Proxy Skaliert von voll 50 | ||||
| 1920 x 1080 ProRes 422 HQ Skaliert von 5,7K 60 | ||||
| 1920 x 1080 | ProRes 422 | Skaliert von 5,7K | 60 | |
| 1920 x 1080 | ProRes 422 LT | Skaliert von 5,7K | 60 | |
| 1920 x 1080 | ProRes 422 Proxy | Skaliert von 5,7K | 60 | |
| 1920 x 1080 | ProRes 422 HQ | Skaliert von 2,7K | 120 | |
| 1920 x 1080 | ProRes 422 | Skaliert von 2,7K | 120 | |
| 1920 x 1080 | ProRes 422 LT | Skaliert von 2,7K | 120 | |
| 1920 x 1080 | ProRes 422 Proxy | Skaliert von 2,7K | 120 | |
Maximale Sensor-Frameraten der Blackmagic Pocket Cinema Camera 4K
| Auflösung Codec Sensorfläche Max. Frame rate | ||||
| 4K DCI | 4096 x 2160 Blackmagic RAW Voll 60 | |||
| 4096 x 2160 ProRes 422 HQ Voll 60 | ||||
| 4096 x 2160 ProRes 422 Voll 60 | ||||
| 4096 x 2160 ProRes 422 LT Voll 60 | ||||
| 4096 x 2160 ProRes 422 Proxy Voll 60 | ||||
| 4K 2,4:1 | 4096 x 1720 | Blackmagic RAW | Gecroppt | 75 |
| Ultra HD | 3840 x 2160 | Blackmagic RAW | Gecroppt | 60 |
| 3840 x 2160 | ProRes 422 HQ | Gecroppt | 60 | |
| 3840 x 2160 | ProRes 422 | Gecroppt | 60 | |
| 3840 x 2160 | ProRes 422 LT | Gecroppt | 60 | |
| 3840 x 2160 | ProRes 422 Proxy | Gecroppt | 60 | |
| 2,8K Anamorph | 2880 x 2160 | Blackmagic RAW | Gecroppt | 80 |
| 2,6K 16:9 | 2688 x 1512 | Blackmagic RAW | Gecroppt | 120 |
| HD | 1920 x 1080 ProRes 422 HQ Skaliert von voll 60 | |||
| 1920 x 1080 | ProRes 422 | Skaliert von voll | 60 | |
| 1920 x 1080 | ProRes 422 LT | Skaliert von voll | 60 | |
| 1920 x 1080 | ProRes 422 Proxy | Skaliert von voll | 60 | |
| 1920 x 1080 | ProRes 422 HQ | Skaliert von 2,6K | 120 | |
| 1920 x 1080 | ProRes 422 | Skaliert von 2,6K | 120 | |
| 1920 x 1080 | ProRes 422 LT | Skaliert von 2,6K | 120 | |
| 1920 x 1080 | ProRes 422 Proxy | Skaliert von 2,6K | 120 | |
| 1920 x 1080 | Blackmagic RAW | Gecroppt | 120 | |
| 1920 x 1080 | ProRes 422 HQ | Gecroppt | 120 | |
| 1920 x 1080 | ProRes 422 | Gecroppt | 120 | |
| 1920 x 1080 | ProRes 422 LT | Gecroppt | 120 | |
| 1920 x 1080 | ProRes 422 Proxy | Gecroppt | 120 | |
HINWEIS Das Aufzeinungsformat 2,6K 16:9 hat eine für den Einsatz mit Super-16mm-Objektiven und hohen Frameraten optimierte Sensorfläche.
Aufzeichnungsdauer
Die Tabellen geben die ungebahren Aufzeichnungsspannen in Minuten und Sekunden im Verhältnis zu Format, Projekt-Framerate und Speicherkapazität an. Es ist wichtig zu beachten, dass die verfügbaren Auflösungen und Codecs auf der Pocket Cinema Camera 6K und der Pocket Cinema Camera 4K unterschiedlich sind.
Die maximale Aufzeichungsdauer für Ihr Speichermedium variiert je nach Kapazität ihrer CFast- bzw. SD-Karte oder USB-C-Laufwerk sowie nach ausgewähltem Aufzeichungsformat und Framerate. Zum Beispiel liegt die Speicherrate für Apple ProRes 422 HQ mit 3840 x 2160 bei etwa 880 Mbit/s. Bei 24 Bildern pro Sekunde konnen Sie ungebärn 47 Minuten Videomaterial auf eine 256 GB große CFast-2.0-Karte aufzeichnen. Mit den gleichen Einstellungen passen auf eine CFast-Karte mit 128 GB Kapazität rund 23 Minuten Video. Das entspricht ungebärn der Häfte der Aufzeichungsdauer einer 256 GB größten CFast-Karte.
Es ist zu beachten, dass sich die Aufzeinungsspannen von Medien unterschiedlicher Hersteller ggf. leicht entsprechenden. Auch die Formatierung der CFast-Karte in exFAT oder Mac OS X Extended beeinfusst ggf. die Aufzeinungsdsauer von Speichermedien.
Einfache Szenen mit weniger Details erfordern weniger Speicherkapazität als kompliziertere Kompositionen. Den Werten in diesen Tabellen liegen hochkomplexe Shots zugrunde. Je nach Art Ihres Drehs kann es also sein, dass Sie etwas langere Aufzeinungsduarn erzielen.
| 6K | |||||
| CFast-Karte Framerate | Blackmagic RAW 3:1 | Blackmagic RAW 5:1 | Blackmagic RAW 8:1 | Blackmagic RAW 12:1 | |
| 256 GB | Dauer Dauer | Dauer Dauer | |||
| 23,98 17 Min. | 28 Min. 45 Min. | 67 Min. | |||
| 24 17 Min. 28 | Min. 45 Min. | 67 Min. | |||
| 25 16 Min. 27 | Min. 43 Min. | 64 Min. | |||
| 30 13 Min. 22 | Min. 36 Min. | 54 Min. | |||
| 50 8 Min. 13 | Min. 21 Min. | 32 Min. | |||
| 6K 2,4:1 | |||||
| CFast-Karte Framerate | Blackmagic RAW 3:1 | Blackmagic RAW 5:1 | Blackmagic RAW 8:1 | Blackmagic RAW 12:1 | |
| 256 GB | Dauer Dauer | Dauer Dauer | |||
| 23,98 23 Min. | 38 Min. 60 Min. | 91 Min. | |||
| 24 22 Min. 38 | Min. 60 Min. | 91 Min. | |||
| 25 21 Min. 36 | Min. 58 Min. | 87 Min. | |||
| 30 18 Min. 30 | Min. 48 | Min. 72 Min. | |||
| 50 11 Min. | 18 Min. 29 | Min. 43 | Min. | ||
| 60 9 Min. 15 | Min. 24 Min. 36 | Min. | |||
5,7K 17:9
| CFast-Karte Framerate | Blackmagic RAW 3:1 | Blackmagic RAW 5:1 | Blackmagic RAW 8:1 | Blackmagic RAW 12:1 | |
| 256 GB | Dauer Dauer | Dauer Dauer | |||
| 23,98 20 Min. | 34 Min. 55 Min. | 82 Min. | |||
| 24 20 Min. 34 | Min. 55 Min. | 82 Min. | |||
| 25 19 Min. 33 | Min. 52 Min. | 79 Min. | |||
| 30 16 Min. 27 | Min. 44 Min. | 66 Min. | |||
| 50 10 Min. 16 | Min. 26 Min. | 39 Min. | |||
| 60 8 Min. 13 | Min. 22 Min. | 33 Min. |
4K DCI
| CFast-Karte Framerate | Blackmagic RAW 3:1 | Blackmagic RAW 5:1 | Blackmagic RAW 8:1 | Blackmagic RAW 12:1 | ProRes 422 HQ | ProRes 422 | ProRes 422 LT | ProRes 422 Proxy | |
| 256 GB | Dauer Dauer | Dauer Dauer | Dauer Dauer Dauer Dauer | ||||||
| 23,98 | 39 Min. | 65 Min. | 104 Min. | 155 Min. | 44 Min. | 66 Min. | 95 Min. | 216 Min. | |
| 24 | 39 Min. | 65 Min. | 103 Min. | 155 Min. | 44 Min. | 66 Min. | 95 Min. | 216 Min. | |
| 25 | 37 Min. | 62 Min. | 99 Min. | 149 Min. | 42 Min. | 64 Min. | 91 Min. | 207 Min. | |
| 30 | 31 Min. | 52 Min. | 83 Min. | 124 Min. | 35 Min. | 53 Min. | 76 Min. | 173 Min. | |
| 50 | 18 Min. | 31 Min. | 49 Min. | 74 Min. | 21 Min. | 32 Min. | 45 Min. | 104 Min. | |
| 60 | 15 Min. | 26 Min. | 41 Min. | 62 Min. | 17 Min. | 26 Min. | 38 Min. | 87 Min. |
4K 2,4:1
| CFast-Karte Framerate | Blackmagic RAW 3:1 | Blackmagic RAW 5:1 | Blackmagic RAW 8:1 | Blackmagic RAW 12:1 | |
| 256 GB | Dauer Dauer | Dauer Dauer | |||
| 23,98 | 50 Min. | 84 Min. | 134 Min. | 200 Min. | |
| 24 | 50 Min. | 84 Min. | 134 Min. | 200 Min. | |
| 25 48 Min. 80 | Min. 128 Min. | 192 Min. | |||
| 30 | 40 Min. | 67 Min. | 107 Min. | 160 Min. | |
| 50 24 Min. 40 | Min. 64 Min. | 96 Min. | |||
| 60 20 Min. 33 | Min. 54 Min. | 80 Min. | |||
| 75 16 Min. 27 | Min. 43 Min. | 64 Min. | |||
| 80 16 Min. 26 | Min. 40 Min. | 60 Min. |
ULTRA HD
| CFast-Karte Framerate | Blackmagic RAW 3:1 | Blackmagic RAW 5:1 | Blackmagic RAW 8:1 | Blackmagic RAW 12:1 | ProRes 422 HQ | ProRes 422 | ProRes 422 LT | ProRes 422 Proxy | |
| 256 GB | Dauer Dauer | Dauer Dauer | Dauer Dauer Dauer Dauer Dauer | ||||||
| 23,98 41 Min. | 68 Min. 110 Min. | 164 Min. 47 Min. | Min. 71 Min. | 101 Min. | Min. | ||||
| 24 41 Min. 68 | Min. 109 Min. | 164 Min. 47 Min. | Min. 71 Min. | 101 Min. | Min. | ||||
| 25 | 39 Min. | 66 Min. | 105 Min. | 157 Min. | 45 Min. | 68 Min. | 97 Min. | 221 Min. | |
| 30 | 33 Min. | 55 Min. | 88 Min. | 131 Min. | 38 Min. | 57 Min. | 81 Min. | 184 Min. | |
| 50 | 19 Min. | 33 Min. | 52 Min. | 79 Min. | 22 Min. | 34 Min. | 48 Min. | 111 Min. | |
| 60 | 16 Min. | 27 Min. | 44 Min. | 66 Min. | 18 Min. | 28 Min. | 40 Min. | 92 Min. |
3,7K Anamorph
| CFast-Karte Framerate | Blackmagic RAW 3:1 | Blackmagic RAW 5:1 | Blackmagic RAW 8:1 | Blackmagic RAW 12:1 | |
| 256 GB | Dauer Dauer | Dauer Dauer | |||
| 23,98 31 Min. | 51 Min. | 82 Min. 123 Min. | |||
| 24 31 Min. | 51 Min. 82 | Min. 123 Min. | |||
| 25 29 Min. 49 | Min. 79 | Min. 118 | Min. | ||
| 30 | 24 Min. | 41 Min. 65 Min. | 98 Min. | ||
| 50 | 15 Min. | 24 Min. | 39 Min. | 59 Min. | |
| 60 | 12 Min. | 20 Min. | 33 Min. | 49 Min. |
2,8K Anamorph
| CFast-Karte Framerate | Blackmagic RAW 3:1 | Blackmagic RAW 5:1 | Blackmagic RAW 8:1 | Blackmagic RAW 12:1 | |
| 256 GB | Dauer Dauer | Dauer Dauer | |||
| 23,98 | 57 Min. | 95 Min. | 151 Min. | 226 Min. | |
| 24 57 Min. | 95 Min. 151 Min. | 226 Min. | |||
| 25 54 Min. 91 Min. | 145 Min. | 217 Min. | |||
| 30 | 45 Min. | 76 Min. | 121 Min. | 181 Min. | |
| 50 | 27 Min. | 45 Min. | 73 Min. | 109 Min. | |
| 60 | 22 Min. | 38 Min. | 38 Min. | 91 Min. | |
| 80 | 17 Min. 28 Min. | 45 Min. | 68 Min. | ||
2,8K 17:9
| CFast-Karte Framerate | Blackmagic RAW 3:1 | Blackmagic RAW 5:1 | Blackmagic RAW 8:1 | Blackmagic RAW 12:1 | |
| 256 GB | Dauer Dauer | Dauer Dauer | |||
| 23,98 81 Min. | 136 Min. 216 | Min. 321 Min. | |||
| 24 81 Min. 135 | Min. 215 Min. | 320 Min. | |||
| 25 78 Min. 130 | Min. 207 Min. | 308 Min. | |||
| 30 65 Min. 108 | Min. 173 Min. | 258 Min. | |||
| 50 39 Min. 65 | Min. 104 Min. | 156 Min. | |||
| 60 32 Min. 54 | Min. 87 Min. | 130 Min. | |||
| 120 16 Min. 27 | Min. 43 Min. | 65 Min. |
2,6K 16:9
| CFast-Karte Framerate | Blackmagic RAW 3:1 | Blackmagic RAW 5:1 | Blackmagic RAW 8:1 | Blackmagic RAW 12:1 | |
| 256 GB | Dauer Dauer | Dauer Dauer | |||
| 23,98 87 Min. | 144 Min. 230 | Min. 342 | Min. | ||
| 24 87 Min. 144 | Min. 229 Min. | 342 Min. | |||
| 25 83 Min. 138 | Min. 220 Min. | 328 Min. | |||
| 30 69 Min. 115 | Min. 184 | Min. 275 Min. | |||
| 50 41 Min. | 69 Min. 111 | Min. 166 | Min. | ||
| 60 34 Min. 58 | Min. 92 Min. | 138 Min. | |||
| 120 17 Min. | 29 Min. 46 | Min. 69 Min. |
HD
| CFast-Karte Framerate | Blackmagic RAW 3:1 | Blackmagic RAW 5:1 | Blackmagic RAW 8:1 | Blackmagic RAW 12:1 | ProRes 422 HQ | ProRes 422 | ProRes 422 LT | ProRes 422 Proxy | |
| 256 GB | Dauer Dauer | Dauer Dauer | Dauer Dauer | Dauer Dauer | |||||
| 23,98 | 159 Min. | 264 Min. | 418 Min. | 619 Min. | 189 Min. | 283 Min. | 403 Min. | 877 Min. | |
| 24 | 159 Min. | 264 Min. | 418 Min. | 618 Min. | 189 Min. | 283 Min. | 403 Min. | 877 Min. | |
| 25 | 153 Min. | 253 Min. | 402 Min. | 595 Min. | 182 Min. | 271 Min. | 387 Min. | 843 Min. | |
| 30 | 127 Min. | 212 Min. | 336 Min. | 499 Min. | 152 Min. | 227 Min. | 324 Min. | 710 Min. | |
| 50 | 76 Min. | 127 Min. | 203 Min. | 303 Min. | 91 Min. | 137 Min. | 196 Min. | 434 Min. | |
| 60 | 64 Min. | 106 Min. | 170 Min. | 254 Min. | 76 Min. | 114 Min. | 163 Min. | 363 Min. | |
| 120 | 32 Min. | 54 Min. | 87 Min. | 130 Min. | 38 Min. | 57 Min. | 82 Min. | 185 Min. |
HINWEIS Blackmagic RAW Unterstützung Aufzeichnungsformate mit voller und gecroppter
Sensorfläche. Wahlen Sie für alle skalierten Formate einen ProRes-Codec.
Die Formate 6K, 6K 2,4:1, 5,7K 17:9, 3,7K anamorph und 2,8K 17:9 sind nur auf der Blackmagic Pocket Cinema Camera 6K verfügbar und verwenden den Blackmagic-RAW-Codec. Die Pocket Cinema Camera 6K verfügbar ProRes für Formate in 4K DCI, Ultra HD und HD.
Die Formate 4K 2,4:1, 2,8K anamorph und 2,6K 16:9 sind nur auf der Blackmagic Pocket Cinema
Camera 4K verfugbar und verwenden den Blackmagic-RAW-Codec. Die Pocket Cinema
Camera 4K verwendet Blackmagic RAW oder ProRes für Formate in 4K DCI, Ultra HD und HD.
Die „Constant Quality“-Einstellungen Q0 und Q5 zeigen variierende Spannen für die verbleibende Aufzeinungszeit an. Die geschätzte Dauer für Q0 ist ähnlich wie für die 3:1-Komprimierung bei „Constant Bitrate“ und die für Q5GLEicht der fur die 12:1-Komprimierung.Während der Aufzeinung wird die geschätzte Aufzeinungsdauer alle 10 Sekundenactualisiert. Um ihre verbleibende Aufzeinungsdauer selbst abzuschätzen, behmen Sie am besten 20 Sekunden lang auf und beobachten Sie die im Medienfeld des Touchscreen-Displays angezeigte Dauer.
Auswahlen der Framerate
Ohre Kamera kann Videomaterial mit denen verschieden Frameraten aufzeichen.
Möglicherweise Fragen Sie sich, was für Sie die besteigene ist.
Bei der Auswahl der Sensor-Framerate sind grundsatzlich ein paar Punkte zu berücksichtigten. Es gibt seit vielen Jahren technische Normen für die Ausstrahlung von Inhalten im Kino und im Fernsehen. Diese umfassen spezifische Frameraten, die sich von Land zu Land unterscheiden, jedoch dem gleichen Zweck dienen; der Anzeige einer effizienten Anzahl von Einzelbildern pro Sekunde, um Bewegungen angenehm und überzeugend darzustellen.
Kino verwendet bspw. standardmäßig 24 Frames pro Sekunde. Obwohl es unlangst Experimente mit Schnellenen Frameraten gegeben hat, sind 24 Frames pro Sekunde für ein internationales Publikum weltestgehend der gängige Standard.
TV-Frameraten richten sich seit jeher im Allgemeinen nach den jeweiligen länderspezifischen technischen Sendestandards. TV-Inhalte hatte man bislang für die Distribution in Nordamerika zum Beispiel üblicherweise mit 29,97 fps aufgezeichnet, für Europa aber mit 25 fps.
Aufgrund des technischen Fortschritts hat man heute jedoch mehr Auswahr und die Sendestandards sind im Wandel begriffen. Inzwischen ist es üblich, sportliche Events bei hoheren Frameraten aufzuzeichnen und auszustrahlen. Manche Sportveranstaltungen in Nordamerika werden bspw. mit bis zu 59,94 fps und in Europa mit 50 fps aufgezeichnet und ausgestrahlt. Schnelle Action erscheint dadurch geschmeidiger in der Bewegung und realitätsnaher.
Streaming- und Online-Broadcaster arbeiten normalerweise mit ähnlichen Frameraten wie beim Fernsehen. Sie haben allerdings mehr Experimentierfreiheit. Aufgrund nutzerspezifischer Ansichtsformate sind sie lediglich darauf auf beschränkt, was die Bildschirme des Publikums wiedergeben konnen.
Orientieren Sie sich bei der Auswahr der Framerate grundsätzlich am Ausgabeformat Ihres Projekts. Stellen Sie dazu zunachst die Projekt-Framerate ihrer Kamera ein und danach ihre Sensor-Framerate auf „Match" (Angleichen). So werden ihre Clips mit der gleichen Geschwindigkeit wiedergegeben, mit der sich das Ereignis in der Realität abgespielt hat.
Wenn Sie einen interessanten Effekt, wie bspw. Zeitlupe, anwenden möchten, konnen Sie ihre Sensor-Framerate hochsetzen. Je hoher die Sensor-Framerate im Vergleich zur Projekt-Framerate, umso langsamer ist die Wiedergabegeschwindigkeit.
Naheres zur Verwendung von Off-Speed-Sensor-Frameraten für kreative Effekte finden Sie im Abschnitt „Bedienung per Touchscreen".
Trigger-Aufzeichnung
Ohr Blackmagic Pocket Cinema Camera gbt uber den HDMI-Ausgang automatisch ein Trigger-Signal aus das bei angeschlossenen Geraten die Aufzeichnung ausloste. Solche Gerate, wie bspw. ein Blackmagic Video Assist, mussen die Trigger-Aufzeinungsfunktion unterstitzen.
Sobald Sie die Aufnahmetaste Ihrer Kamera drücken, beginnt der externe Rekorder ebenfalls aufzuzeichnen. Erneutes Drucken der Kamera-Aufnahmetaste stoppt auch die Aufzeichnung auf dem Rekorder. Ihr Kamera gibt zusätzlich Timecode über den HDMI-Ausgang aus. Mit ihrem externen Rekorder aufgezeichnete Clips weisen somit den gleichen Timecode wie die mit ihrer Kamera aufgezeichneten Clips auf.
Wenn Ihr externer Rekorder die Trigger-Aufzeinung unterszt, müssen Sie diese Funktion aktivieren. Das erfolgt normalerweise über das Einstellungensmu.
Wiedergabe
Wiedergabe von Clips
Nach dem Sie Ihr Video aufgezeichnet haben, können Sie es mithilfe der Transportsteuerelemente auf dem LCD-Display abspieten. Drücken Sie die Wiedergabetaste, um in den Wiedergabemodus zu wechseln. Erneutes Drucken lost die sofortige Wiedergabe des zuletzt aufgenommenen Clips auf dem LCD und allen über den HDMI-Ausgang verbundenen Monitoren aus. Halten Sie die Vor- oder Rücklauf-Buttons auf dem LCD zum Schnellen Vor- oder Zurückspluen innerhalb des Clips gedrückt. Die Wiedergabe wird beendet, sobald das Ende des aktuellen Clips erreicht ist.
Drucken Sie den Vor- oder Rücklauf-Button, um zum Anfang oder Ende eines Clips zurückzuspringen. Um an den Anfang des aktuellen Clips zu gelangen, drucken Sie die Rücklauftasteomal. Um zuruck zum Anfang des vorherigen Clips zu springen, drucken Sie sie zweimal. Drucken Sie die Aufnahmetaste, um die Wiedergabe zu beenden und auf dem Touchscreen in die Kameraansicht zurückzukehren.
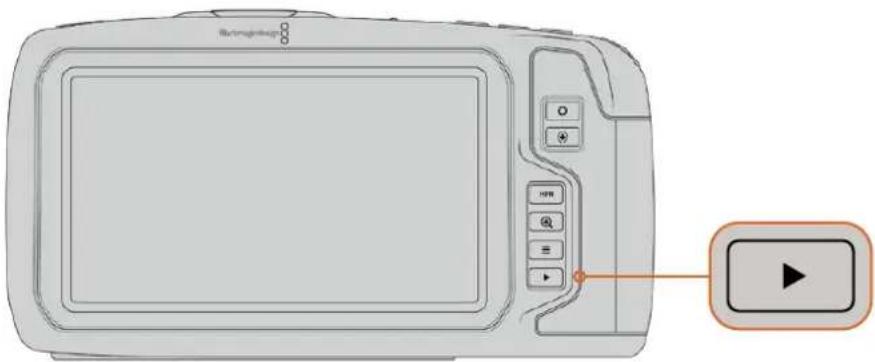
Um ihren zuletzt aufgenommenen Clip auf dem Integrierten Touchscreen zu sichen, drücken Sie unter den Transportsteuerelementen den Wiedergabe-Button
Funktionsmerkmale der Kamera
Kameravorderseite
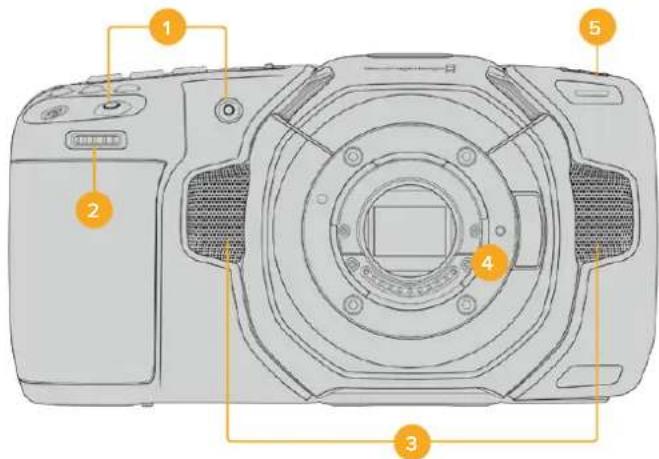
1 Aufnahmetasten
Drücken Sie eine der beiden Aufnahmetasten, um die Aufnahme zu starten und stoppen. Wenn Sie sich selbst aufnehmen, können Sie die Aufnahme mit der Aufnahmetaste vorne an der Kamera bequemer starten und stoppen.
2Einstellrad
Mit dem Einstellrad können Sie die Blendenöffnung kompatibler Objektive an ihrer Kamera anpassen. Um die Blende zu öffnen, schiben Sie das Rad bei auf den Touchscreen gerichtetem Blick nach links. Um die Blende zu schreiben, drehen Sie das Rad nach rechts. Das Einstellrad dient auch zum Anpassen von Weisabgleich, Verschlusswinkel und ISO-Wert. Drücken Sie offen an der Kamera die entsprechenden Tasten ("WB" für Weisabgleich, "S" für Verschlusswinkel und "ISO" für ISO-Empfindlichkeit). Drehen Sie zur Auswahl das Einstellrad. Drucken Sie auf das Einstellrad, um ihre Auswahl zu bestätigen und abzukürzen.
3 Stereomilkrofone
Es gibt vier hochwertige interne Stereomikrofone. Informationen zu Mikrofoneinstellungen finden Sie im Abschnitt AUDIO-Einstellungen.
4 Objektivanschluss
Die Blackmagic Pocket Cinema Camera 6K ist mit einem elektronischen EF-Objektivanschluss und das 4K-Model mit einem elektronischen Micro-Four-Thirds-Objektivanschluss ausgestellt. Sie können somit auf beiden Kamas Objektive mit interner Bildstabilisierung sowie kompatible Objektive mit Autofokus und Belichtungsautomatik benutzten. Um die von vielen elektronischen Objektiven gebotene Bildstabilisierung zu verwenden und die IS-Funktion zu aktivieren, setzen Sie den Stabilisatorschalter auf ON. Dies aktiviert auch die Bildstabilisierung auf ihrer Kamera. Verfügt das Objektiv ebenfalls über einen Stabilisor-Modus-Schalter, stellen Sie diesen auf den entsprechenden Modus für Standbildaufnahmen oder Bewegung. Wenn Ihr Objektiv keinen physischen Stabilisor-Schalter hat, können Sie die Bildstabilisierung im SETUP-Menu ihrer Kamera ausschalten.
5 Tally/AufnahmelIndikator
Die Blackmagic Pocket Cinema Camera verfügt vorne über eine petite LED-Leuchte, die den Aufnahmesstatus der Kamera anzeigt. Über das SETUP-Menu können Sie den Aufnahmeindikator ein- oder ausschalten und seine Helligkeit anpassen. Weitere Informationen finden Sie im Abschnitt „SETUP-Einstellungen".
Rechte Kameraseite
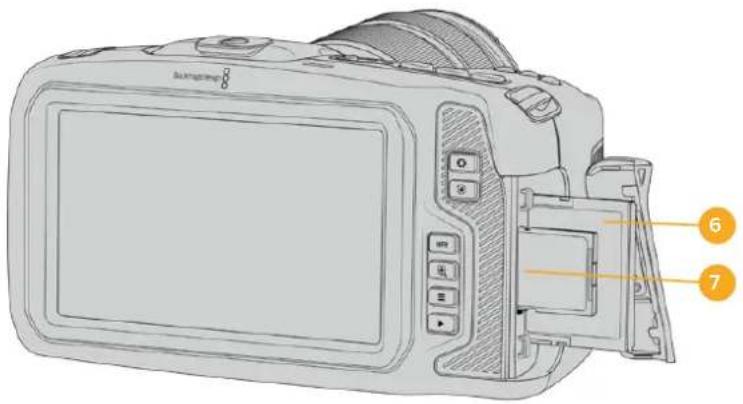
6 CFast-Kartenschacht
Setzen Sie zum Aufnahmen und zur Wiedergabe eine CFast-2.0-Karte in den Kartenschacht ein.
Nahere Informationen finden Sie im Abschnitt „CFast-Karten".
7 SD-Kartenschacht
Setzen Sie zum Aufnahmen und zur Wiedergabe eine SD-Karte in den Kartenschacht ein. Weitere Einzelheiten hierzu finden Sie im Abschnitt „SD-Karten".
Linke Kameraseite
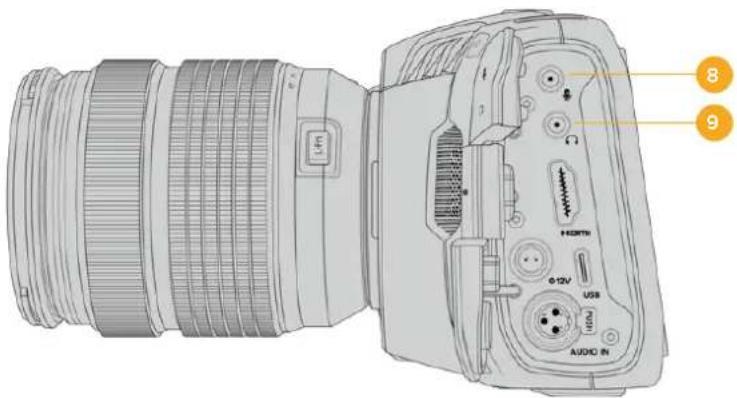
8 3,5mm-Mikrofoneingang
Schlieben Sie über den 3,5mm-Stereoanschluss ein Mikrofon an ihre Kamera an. Mikrofon- und Line-Pegel-Audio werden unterszt. Mikrofonpegel-Audio ist leiser als Line-Pegel-Audio. Wenn Sie ein Mikrofon an ihre Kamera anschlieben und Line-Pegel auswahlen, sind die Pegel vermutlich zu leise. Darüber hinaus akzeptiert der Mikrofoneingang auf dem linken Kanal von einer externen Quelle eingespeisten, SMPTE-kompatiblen LTC-Timecode. Gultiger Timecode wird automatisch erkannt und als Timecode-Metadaten in ihre Videodatei eingebettet. Wir empfehlen, LTC-Timecode über die Line-Pegel-Ausgabe zu übermitteln - insbesondere wenn Sieihn nicht als Audiospur aufzeichnen.
9 Kopfhoreelingang
Überwachen Sie den Ton während der Aufnahme oder Wiedergabe von Clips, indem Sie einen Kopfhörer an den 3,5mm-Stereo-Kopfhörereingang anschließen. Wenn Kopfhörer angeschlossen sind, ist der Lautsprecherausgang stumm geschalte.
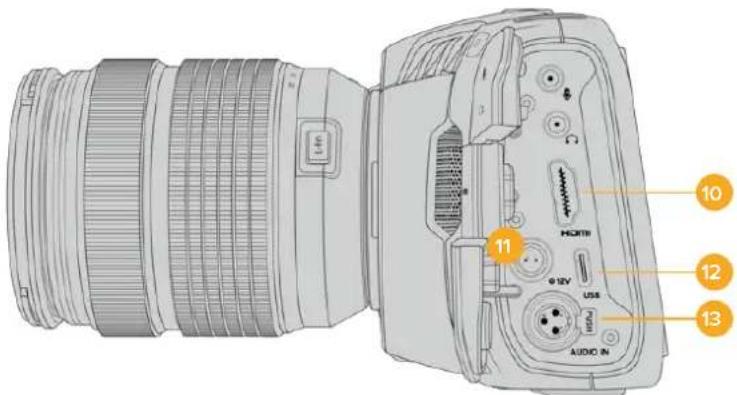
10HDMI
Der HDMI-Anschluss in voller Großsteutigt 1080p-HD-Video in 10 Bit 4:2:2 mit Unterstützung für HDR und zwei Kanäe eingebetteles Audio. Benutzten Sie das Touchscreenmenü, um für die Ausgabe einen Clean-Feed oder Overlays vorzugeben. Sie konnen an den HDMI-Port externe Monitore, Rekorder oder ATEM Mini Mischer anschließen. Eine an den HDMI-Ausgang eines ATEM Mini angeschlossene Pocket Cinema Camera Camera bietetlichen Studiokamerafeatures wie das Fernsteuern der Aufzeichnung und das Anpassen zahlreicher Einstellungen.
11 Stromanschluss
Verwenden Sie den DC-Verbinder, um ihre Kamera mit Strom und gleichzeitig den Akku langsam mit geringem Ladestrom zu versorgen. Um den Netzadapter anzuschreiben, drehen Sie den Stecker so, dass er am Schlitz am oberen Ende des Anschlusses ausgerichtet ist, und stecken Sieihn ein, bis er einrastet. Um den Stromstecker zu entfern,ziehen Sie zuerst den Sperr-Metallüberwurf zurück und dann den Stecker hersus.
Individuelle Lösungen für die Stromversorgung
Es gibt Benutzer, die sich in Eigenarbeit Geräte nach Maß für die Stromversorgung ihrer Blackmagic Pocket Cinema Camera anfertigen. Beim Basteln ihrer eigenen
Stromversorgung mit einem Akkudummy ist darauf zu achten, der Kamera keine zu hohen Spannungen zuzuführen. Dies kann dauerhafte Schäden verursachen. Ihr Pocket Cinema Camera erfordert folgende Spannungen:
- Der Akkuanschluss ist für 6,2 bis maximal 10 Volt ausgelegt
Die DC-Strombuchse ist fur 10,8 bis maximal 20 Volt ausgelegt - Im Standby-Modus ohne Laden des Akkus benötigt die Kamera 16 Watt
-Beim Laden des Akkus vom Typ LP-E6 benötigt die Kamera 30 Watt - Bei Versorgung ihrer Kamera mit einer spezialangefertigten Stromquelle empfehlen wir, den LP-E6-Akku zu entfernen
- Bei der Aufzeichnung auf externe Medien unter Verwendung eines Objektivs, bei voller Bildschirmhelligkeit, Tally-Helligkeit und hohen Frameraten, aber ohne Laden des Akkus besteht die Pocket Cinema Camera 6K 25 Watt und das 4K-Modell 22 Watt
12 USB
Über den USB-Port konnen Sie direkt auf ein angeschlossenes USB-C-Laufwerk aufzeichen. Im ausgeschalteten Zustand konnen Sie den Akku ihrer Kamera von einer externen Quelle wie einem Akkupack über den USB-C-Port aufladen. Um die Produktsoftware ihrer Kamera zuactualisieren, schreiben Sie die Kamera über den USB-C-Port an einen Computer an und führen Sie die Aktualisierungsanwendung für die Kamera aus.
13 Mini-XLR-Mikrofonanschluss
Schlieben Sie externe symmetrische Analogaudioquellen über den Mini-XLR-Eingang an. Unter Verwendung eines Mini-XLR-Adapterkabels kann ein Standard-XLR-Mikrofon an ihre Kamera angeschlossen werden.
Professionelle Mikrofone ohne eigene Stromversorgung konnen über den Mini-XLR-Eingang phantomgespeist werden. Weitere Informationen zur Aktivierung der Phantomspeisung finden Sie unter AUDIO-Einstellungen in thisem Handbuch.
Kameraoberseite

14 1/4"-20-Befestigungsgewinde
Sie konnen das 1/4^n -20-Befestigungsgewinde oben auf ihrer Kamera verwenden, um ein externes Mikrofon oder kleineres Zubehör anzubringen.
HINWEIS Das 1/4-Zoll-Gewinde an der Oberseite der Pocket Cinema Camera sollen ausschließlich für leichtgewichtiges Zubehör wie Mikrofone benutzt werden. Belasten Sie die Kamera nicht übermöig durch Befestigen von Zubehör am 1/4-Zoll-Gewinde, wie bspw. einem verschraubbaren Kameragriff mit einem schweren Objektiv. Dies kann das 1/4-Zoll-Gewinde beschädigen und fällt nicht unter die Garantie. Setzen Sie die Gewinde keiner übermöigigen Hebelkraft aus, wie bspw. durch Befestigen von schwerem Zubehör an einem Verlängerungsarm. Für die Anbringung schwereren Zubehörs empfehlen wir den Einsatz eines speziell für die Pocket Cinema Camera konzipierten Kamerakäfigs, der gleichzeitig an den oberen und unteren 1/4-Zoll-Gewinden befestigt wird.
15 Aufzelchnen
Drücken Sie die Aufnahmetaste (erkenntlich am roten Kreis), um direkt mit der Aufnahme zu beginnen. Drücken Sie sie erneut, um die Aufnahme zu stoppen.
16 Standblld
Drücken Sie die Standbildtaste (erkenntlich am Kamerasymbol), um ein Standbild als einzeln unkomprimierten Frame in DNG zu erfassen. Das kurz in der oberen rechten Ecke des Touchscreens erscheinende Kamerasymbol teilt Ihnen mit, dass Sie erfolgreich ein Standbild aufgenommen haben. Gespeichert werden Bilddateien im Stills-Ordner im Stammverzeichnis des Mediums, auf das aktuell aufgezeichnet wird. Die Benennung erfolgt gemäß der für Videoclips üblichen Namenskonvention, wobei die letzten vier Zeichen des Dateinamens (z. B. „S001") die Anzahl der Standbilder angegeben.
17 ISO
Um die ISO-Einstellungen ihrer Kamera anzupassen, drücken Sie die ISO-Taste und drehen Sie dann am Einstellrad. Die ISO-Empfindlichkeit kann in Drittel-Blendenstufen auf 100 bis 25.600 eingestellt werden.
18 Shutter
Um den Verschlusswinkel oder die Verschlussgeschwindigkeit zu ändern, drücken Sie die S-Taste für Shutter und drehen dann am Einstellrad. Die Touchscreen-Anzeige wird Ihnen zudem bis zu drei flimmerfreie Verschlussoptionen vorschlagen.
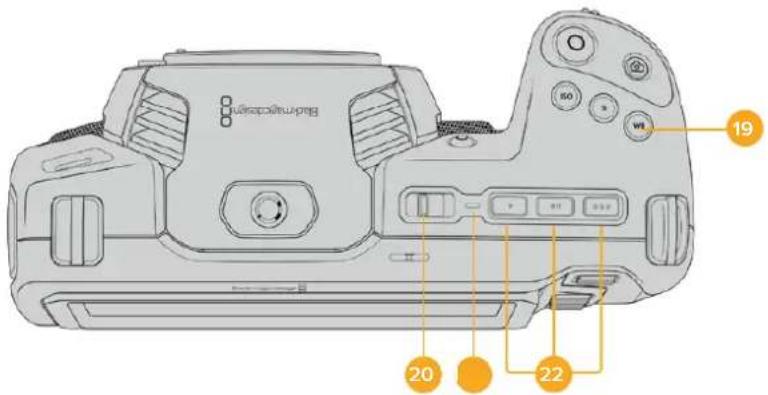
19 WeiBabgleich
Um den Weßabgleich ihrer Kamera anzupassen, drücken Sie die Taste WB für White Balance und drehen dann am Einstellrad. Alternativ können Sie rasch in den automatischen Weßabgleich Modus gelangen, indem Sie die Taste WB 3 Sekunden lang gedrückt halten. Ihr Kamera wird in der Mitte des Bildes ein weißes Rechtek einblenden und in dieserem Bereich einen automatischen Weßabgleich durchführten. Weitere Informationen hierzu finden Sie im Abschnitt „Bedienung per Touchscreen".
20 ON/OFF-Schalter
Mit dem ON/OFF-Schalter schalten Sie die Kamera ein. Schieben Sie den Schalter nach rechts auf ON, um ihre Kamera einschalten, und nach links auf OFF, um sie auszuschalten.
21 Status-LED
Wenn die Kamera ausgeschaltet und über den 12V-DC-Stromanschluss oder den USB-C-Port mit einer externen Stromquelle verbunden ist, zeigt der rot leuchtende Indikator an, dass der Akku geladen wird.
Die Status-LED erlischt, wenn der Akku vollständig geladen ist.
22 Funktionstaten
These Tasten können über das SETUP-MENU ihrer Kamera mit verschiedenen|häufig verwendeten Funktionen belegt werden. StandardmärBig ist die linke der drei an den Punkten erkenntlichen Tasten auf „False Color" (Falschfarben), die mittlere auf „Display LUT" (Display-LUT) und die rechte auf „Frame Guides" (Bildbrandmarkierungen) voreingestellt.
Kameraunterseite
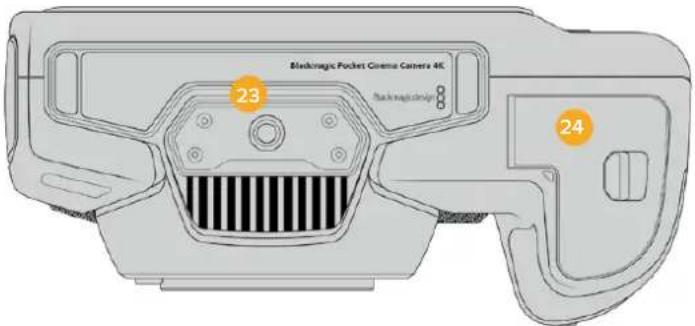
23 1/4\*20-Befestigungsgewinde
Bringen Sie am unteren 1 / 4^ -20-Gewindepunkt ihrer Kamera ein Stativ an.
24 Akkufach
Um das Akkufach zu öffnen, schiben Sie die Sperrvorrichtung auf der Klappe in Richtung des Objektivanschusses. Um es zu schreiben, drücken Sie die Klappe einfach herunter, bis sie einrastet.
Kamerarückseite

25 Touchscreen-Anzeige
Überwachen Sie ihre Clips während der Aufnahme und Wiedergabe über die Touchscreen-Anzeige. Um Einstellungen anzupassen und ihre Kamera zu steuern, führen Sie entsprechende Tipp- und Wischgesten aus.
26 Blendentaste
Durch Drücken der Blendentaste (erkenntlich am Blendensymbol) wird automatisch eine Durchschnittsbelichtung basierend auf den Highlights und Schatten in Ihr hem Shot eingestellt. Sie können die Blendenöffnung Ihres Objektivs manuell anpassen, indem Sie das Einstellrad nach rechts und links drehen oder auf der Touchscreen-Anzeige auf BLENDE tippen und den Schieberegler betätigten.
27 Fokustaste
Um Autofokus zu aktivieren, drücken Sie bei Verwendung eines kompatiblen Autofokus-Objektivs mit ihrer Kamera einzmal auf die Fokustaste (erkenntlich am Fadenkreuzsymbol). Im Standardmodus fokussiert das Objektiv automatisch auf die Bildmitte. Sie können jedoch einen alternative Fokuspunkt auswahlen, indem Sie den zu fokussierenden Bereich auf dem LCD-Bildschirm antippen. Um den Fokuspunkt auf die Mitte des Bildschirms zurückzusetzen, drücken Sie die Fokustaste zweimal.
HINWEIS Die meisten Objektive unterstützen elektronische Fokussierung. Manche bieten verzschiedene Modi für manuelle oder automatische Fokussierung. In letzterm Fall mussen Sie bestätigten, dass Ihr Objekt auf Autofokusmodus eingestellt ist.
28 HFR-Taste
Zum Hin- und Herschalten zwischen Bildwechselfrequenzen drucken Sie die HFR- oder „High-Frame-Rate"-Taste. Um diese Funktion zu verwenden, geben Sie im „Frameraten"-Menu einzach die gewünschte Off-Speed-Framerate ein. Nach Auswahl der Off-Speed-Framerate konnen Sie durch Drucken der HFR-Taste zwischen ihrer vorgegebenen Off-Speed-Framerate und der Projekt-Framerate hin- und herwechseln. Hier sei erwähnt, dass sich diese Einstellung nur bei angehaltener Aufzeinung anpassen lasst.
Weitere Informationen zu den Projekt- und Off-Speed-Frameraten finden Sie im Abschnitt „Bedienung per Touchscreen".
29 Fokuszoom-Taste
Um den Fokus bei einem Pixelmaßstab von 1:1 anzupassen, drücken Sie die Fokuszoom-Taste (erkennlich am Lupensymbol mit einem Pluszeichen). Im herangezoomen Modus können Sie mithilfe der Multitouch-Steuerung auf dem Touchscreen eine Pinch-to-Zoom-Geste ausführten, um den Zoom-Grad anzupassen. Weitere Informationen hierzu finden Sie im Abschnitt „Pinch-to-Zoom". Im herangezoomen Modus können Sie durch Berühren und Verschieben des Bereichs auf dem Bildschirm verschiedene Bildausschnitte betrachten. Drücken Sie zum Herauszoomen erneut die Fokuszoom-Taste.
30 Menutaste
Drucken Sie die Menutaste (erkenntlich an den drei Linien), um das Dashboard aufzurufen.
31 Wiedergabetaste
Drücken Sie die Wiedergabetaste, um in den Wiedergabemodus zu wechseln. Erneutes Drücken startet die sofortige Wiedergabe des zuletzt aufgenommenen Clips auf dem LCD und allen über den HDMI-Ausgang verbundenen Monitoren.
Bedienung per Touchscreen
Funktionsmerkmale des Touchscreens
Für eine schnelle und intuitive Handhabung lassst sich der LCD-Touchscreen ihrer Blackmagic Pocket Cinema Camera per Tipp- und Wischgesten bedieten. Wenn Sie in verschiedene Bereichen des LCD-Touchscreens Tipp- oder Wischgesten ausführten, können Sie beim Filmen Schnell auf die Kamerafunktionen zugreifen.
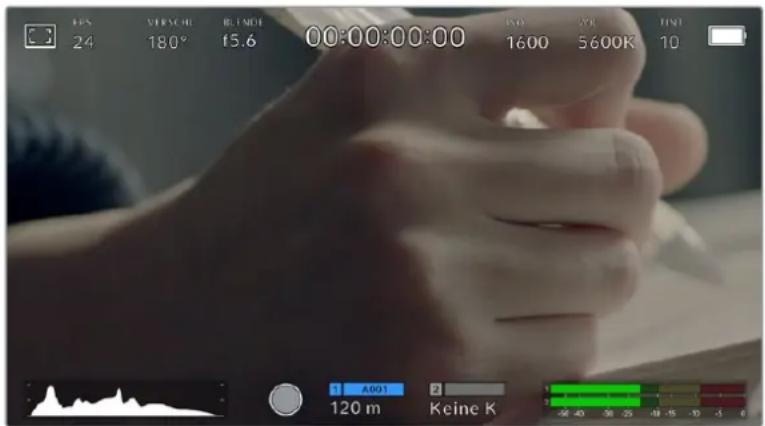
Die LCD-Touchscreen-Anzeige gewährt Ihnen schellen Zugriff auf die am hafigsten verwendeten Einstellungen
LCD-Monitoroptionen
Tippen Sie auf das Monitor-Icon oben links auf dem LCD-Touchscreen, um zu den LCD-Monitoreinstellungen zu gelangen. Mithilfe dieser Einstellungen lässt sich die Darstellung der Monitoring-Funktionen ihrer Pocket Cinema Camera umschalten und anpassen. Dazu zahlen Zebra, Focus Assist, Bildrandmarkierungen, Raster, Schutzbereichlinien und Falschfarben. Wenn Sie auf die LCD-Monitoroptionen zugreifen, erscheinen die Bedienelemente für die jeweiligen Features in Form von Schaltflächen entlang des unteren Randes des LCD-Touchscreens.


Tippen Sie auf das Icon oben links auf dem LCD-Touchscreen Ihrer Kamera, um auf die LCD-Monitoroptionen zuzugreifen
Zebra
Mit der Zebra-Einstellungändern Sie die Darstellung der Zebra-Funktion auf dem LCD-Touchscreen und stellen gleichzeitig den Zebra-Pegel für den HDMI-Ausgang ein.
Im Zebra-Modus werden auf Bildbereichen, die den voreingestellen Belichtungspegel übersteigen, diagonale Streifen eingeblendet. Wenn Sie Zebra bspw. auf 100% einstehen, wird Ihnen angezeigt, welche
Bereiche komplett überbelichtet sind. Diese Funktion ist hilfreich, um bei gleichbleibenden Lichtbedingungen einen optimalen Belichtungspegel beizubehalten.

Tippen Sie in den LCD-Monitoroptionen auf das Zebra-Icon, um auf die Zebra-Einstellungen zuzugreifen
Die Zebra-Einstellung für den LCD-Touchscreen aktivieren Sie, indem Sie unter der Zebra-Schaltfläche auf das Schalter-Icon unter links auf dem Display tippen.
Ziehen Sie den Schieberegler nach rechts oder links oder tippen Sie auf die Pfeilsymbole, um die gewünschte Prozentzahl für den Zebra-Modus einzustellen. Die Intensität für Zebra kann in 5%-Sritten auf 75 bis 100% eingestellt werden.
Weitere Informationen zum Aktivieren des Zebra-Modus für den HDMI-Ausgang ihrer Kamera finden Sie im Abschnitt MONITOR-Einstellungen in thism Handbuch.
TIPP Beim Filmen in variablen Lichtverhältnissen - bspw. Im Freien an einem teils bewölken Tag - wird Sie ein auf unter 100 eingestellter Zebra-Wert vor möglicher Überbelichtung warnen.
Focus Assist
Mit der Focus-Assist-Einstellung (erkenntlich an der gerahmen Person) passen Sie die Darstellung der Fokussierhilde auf dem LCD-Touchscreen an. Gleichzeitig konnen Sie das Level der Fokussierhilde für die HDMI-Ausgabe ihrer Blackmagic Pocket Cinema Camera einstellen.

Tippen Sie in den LCD-Monitoroptionen auf die Focus-Assist-Schaltfläche, um auf die jeweiligen Einstellungen zuzugreifen
Um die Fokussierhilde für den LCD-Touchscreen anzupassen, tippen Sie unter der Focus-Assist-Schaltfläche auf das Schalter-Icon links unter auf dem Display.
Das Level der Fokussierhile für die HDMI-Ausgabe ihrer Kamera konnen Sie durch Antippen von „Niedrig", „Mittel" oder „Hoch" am unteren Rand des Touchscreens festlegen.
Der optimale Grad der Fokussierhilfe richtet sich nach dem jeweiligen Shot. Wird bspw. auf Darsteller scharf gestellt, empfehl't sich eine stärkere Fokussierhilfe, um mehr Einzelheiten an den Konturen der Gesichter festzuhalten. Bei einer Einstellung von Blatt- oder Mauerwerk wurden die darauf zusätzlich erfassten Details womoglich ablenkend wirken.
Weitere Informationen zum Aktivieren des Fokussierhilfe-Modus für die HDMI-Ausgabe finden Sie im Abschnitt MONITOR-Einstellungen in thism Handbuch.
TIPP Ihr Blackmagic Pocket Cinema Camera hat zwei Focus-Assist-Modi. Im MONITOR-Einstellungenmenü konnen Sie zwischen den Modi „Peaking" und „Farbige Linien" hin und her wechseln. Naheres finden Sie im Abschnitt MONITOR-Einstellungen in thisem Handbuch.
Bildbrandmarkierungen
Die Einstellung für Bildrandmarkierungen (erkennntlich am Rahmen mit zwei horizontalen Linien) passt das Erscheinungsbild von Bildrandmarkierungen auf Ihr LCD-Touchscreen an. Außer dem haben Sie Bildrandmarkierungsoptionen für die HDMI-Ausgabe ihrer Kamera zur Auswahr.
Unter den Optionen für Bildrandmarkierungen führen Sie u. a. Seitenverhältnisse für verschiedene Kino-, TV- oder Online-Standards.

Tippen Sie In den LCD-Monitoroptionen auf das Bildrandmarkierungs-Icon, um auf diese Einstellungen zuzugreifen
Um das Erscheinungsbild der Bildbrandmarkierungen auf dem LCD-Touchscreen anzupassen, tippen Sie auf das Schalter-Icon links unter auf dem Display.
Wahlen Sie die gewünschte Bildrandmarkierung aus, indem Sie den Schieberegler nach links oder rechts zieren oder die Pfeilsymbole beiderseits des aktuell ausgewählten Bildseitenverhältnisses antippen. Außen dem konnen Sie ihre eigene Bildrandmarkierung eingeben, indem Sie auf das aktuell ausgewählte Bildseitenverhältnis zwischen den beiden Pfeilsymbolen tippen.
Folgende Bildrandmarkierungen sind verfügbar:
2,35:1, 2,39:1 und 2,40:1
Zeigt das mit anamorphotischer oder kontrastarmer filmischer Breitbart-Kinodarstellung kompatible Breitbart-Seitenverhältnis an. Die drei leicht voneinander abweichenden Breitbart-Einstellungen sind auf im Laufe der Zeit wechselnde Film-Standards zurückzuführen. 2,39:1 ist einer der derzeit meinstverwendeten Standards.

LCD-Touchscreen mit aktivierten 2,40:1-Bildbrandmarkierungen
2:1
Zeigt ein etwas breiteres Verhältnis als 16:9 an, aber schmaler als 2,35:1.
1,85:1
Zeigt ein weiteres gängiges kontrastarmes Seitenverhältnis für Breitbildschirme an. Dieses Verhältnis ist etwas breiter als HDTV 1,78:1, aber schmaler als 2,39:1.
16:9
Zeigt ein 1,78:1 Bildseitenverhältnis an, das mit 16:9 HD TV- und Computerbildschirmen kompatibel ist. Dieses Bildseitenverhältnis wird vor allem für HD-Broadcasts und Online-Videos verwendet. Das gleiche Bildseitenverhältnis wurde auch für das Broadcasting in Ultra HD übernommen.
14:9
Zeigt ein 14:9 Bildseitenverhältnis an, das von einigen Sendeanstalten verwendet wird, um einen Kompromiss zwischen 16:9- und 4:3-Fernsehgeräten zu finden. Idealerweise bleibt sowohl 16:9- als auch 4:3-Footage gut sightbar, wenn sie auf das 14:9-Format beschritten wird. Sie können diese Verhältnis als kompositorieische Markierung verwenden, wenn Sie wissen, dass Ihr Projekt von einem Fernsehsender ausgestraht wird, der von 14:9 Gebrauch macht.
4:3
Zeigt das mit SD-FernsehbildschirmenCompatible 4:3-Seitenverhältnis an. Das Format hilft zudem bei der Bildeinstellung, wenn zwei anamorphotische Adapter verwendet werden.
1:1
Zeigt ein 1:1-Seitenverhältnis an, das etwas schmaler ist als 4:3. Dieses quadratische Seitenverhältnis erfreut sich zunehmender Beliebtheit in den sozialen Medien.
4:5
Zeigt ein 4:5-Seitenverhältnis an. Diese vertikale Bildseitenverhältnis eignet sich für Portraitaufnahmen und die Ansicht auf Smartphones.
Benutzerdefinierte Bildbrandmarkierung
Um für eine einzigartige Darstellung ihre eigene Bildrandmarkierung zu erstellen, tippen Sie auf den eingebrendeten Wert zwischen den beiden Pfeilsymbolen. Tippen Sie auf dem Bildschirm „Benutzerdef. Bildrandmarkierung" auf die Rücktaste, um das aktuelle Seitenverhältnis zu loschen und geben Sie über den Ziffernblock ein neuen Seitenverhältnis ein. Tippen Sie auf „Aktualisieren", um ihre eingebene Bildrandmarkierung zu übernehmen und zum Aufzeinungsmodus zurückzukehren.
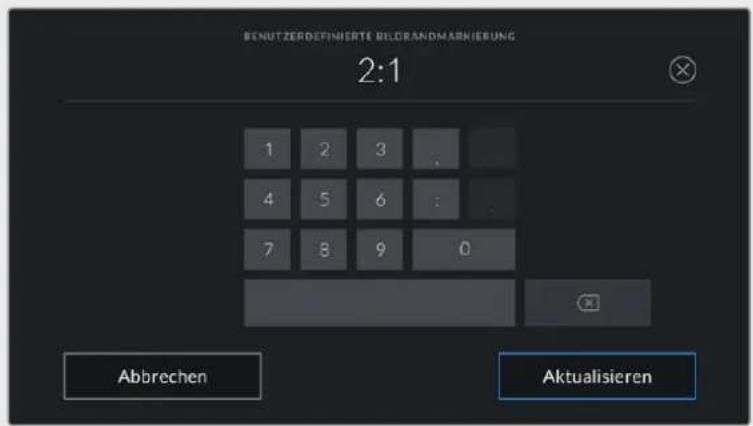
Eine neue Bildrandmarkierung wird auf dem Bildschirm „Benutzerdef. Bildrandmarkierung" über den Ziffernblock eingegeben
TIPP Sie können die Deckkraft der eingeblendeten Bildbrandmarkierungen ändern. Nähresfinden Sie im Abschnitt MONITOR-Einstellungen in thism Handbuch.
HINWEIS Weitere Informationen zum Aktivieren der Bildbrandmarkierungen fur die HDMI-Ausgabe ihrer Kamera finden Sie im Abschnitt MONITOR-Einstellungen in thism Handbuch.
Raster
Über die Raster-Einstellung wahren Sie eines der Kompositionsraster zur Anzeige auf Ihr LCD-Touchscreen aus: „Dritte", „Horizont", „Fadenkreuz" oder „Punkt". Zudem legen Sie hierüber fest, welches Overlay auf der HDMI-Ausgabe zu sehen sein wird.

Tippen Sie in den LCD-Monitoroptionen auf das Raster-Icon, um auf die Rastereinstellungen zuzugreifen
Raster- und Fadenkreuz-Overlays können bei der Bildkomposition behilflich sein. Bei aktivierter Raster-Option wird ein Overlay entsprechend der Drittel-Regel oder aber ein Horizont-Raster, Fadenkreuz oder Punkt angezeigt.
Um zwischen den Rasterdarstellungen auf dem Touchscreen ihrer Kamera umzuschalten, tippen Sie unter der Raster-Schaltfläche auf das Schalter-Icon links unter auf dem Display.
Um das gewünschte Overlay für die Anzeige der HDMI-Ausgabe einzustellen, tippen Sie auf „Drittel“, „Horizont“, „Fadenkreuz“ oder „Punkt“. Sie können „Horizont“, „Fadenkreuz“ oder „Punkt“ jeweils gemeinsam mit dem „Drittel“-Raster auswahlen. Dies ermöglicht folgende Rasterkombinationen: „Drittel“ und „Horizont“, „Drittel“ und „Fadenkreuz“ oder „Drittel“ und „Punkt“.

Das Drittel-Raster passt sich automatisch an den Maßstab jeder Bildrandmarkierung an
Drittel
Die Einstellung „Drittel" zeigt ein Raster mit zwei vertikalen und zwei horizontalen Linien an, die das Bild in Drittel aufteilen. Mit dem Drittel-Prinzip setzen sich Einstellungen sehr effektiv komponieren. Zum Beispiel erwartet das menschliche Auge in der Regel, dass sich die Action im Schnittpunktbereich dieser Linien abspielt. Deshalb platziert man dont offense Dinge, auf die aufmerksam gemacht werden soll. Die Augenpartie eines Schauspielers wird oftmalis im oberen Drittel des Bildschirms positioniert. Bei der Platzierung hilft Ohnen hier die Markierung des horizontalen oberen Drittel des Bilds. Überdies dienen Drittel zum Erhalt einer einheitlichen Kadrierung von einer Einstellung zur nachsten.
Horizont
Das Horizont-Meter zeigt an, wenn ihre Kamera nach links oder rechts bzw. nach vorne oder hinten geneigt bzw. gekippt ist. Es unterstützt Sie bei Freihandaufnahmen eine waagrecht verlaufende Horizontlinie zu bewahren und vertikale Kameraneigungen auf einem Gimbal zu kompensieren.
In welche Richtung Ihre Kamera geneigt ist, erkennen Sie an der Richtung, in die sich die vertikale hellgraue Linie vom mittig platzierten dunkelgrauen Fadenkreuz entfernt. Bei einem Auf- oder Abschwenk der Kamera ruckt die horizontale hellgraue Linie entsprechend nach unten oder oben.
Die Entfernung zwischen den Linien und dem mittigen Fadenkreuz verhält sich proportional zum Grad der horizontalen oder vertikalen Neigung. Wenn Sie den Bewegungssensor der Kamera kalibriert haben und die Kamera korrekt auf die vertikale oder horizontale Rotationsachse ausgerichtet ist, dann erscheint die vertikale oder horizontale Linie blau.
Beachten Sie, dass das Horizont-Meter die Neigung der Kamera für Auf- und Untersichten miteinberechnet. Wenn Sie die Kamera entsprechend für eine Portraitaufnahme rotieren, rotiert auch das Horizont-Meter seine Achse um 90 Grad.
Die folgende Tabelle zeigt anhand des Horizont-Meters, ob die Kamera nach links/rechts bzw. unter/oben geneigt ist.
Horizont-Meter Beschreibung

Keine Neigung

Nur nach unten geneigt

Nur nach links geneigt

Nach oben und rechts geneigt
Für reguläre Verwendungen kalibrieren Sie Ihr Horizont-Meter ohne Kameraneigung. Wenn Sie das Horizont-Meter zur Beibehaltung einer gleichbleibenden Neigung oder für konsistentes Ab- und Aufschwenken verwenden möchten, können Sie es bei Schraglage der Kamera kalibrieren. Informationen zur Kalibrierung des Horizont-Meters finden Sie im Abschnitt „Bewegungssensor-Kalibrierung".
Fadenkreuz
These Einstellung zeigt in der Mitte des Bildes ein Fadenkreuz an. Wie das Drittel-Raster ist auch das Fadenkreuz ein sehr hilfreiches Kompositionswerkzeug. So fängt man das Objekt genau in der Bildmitte ein. These Option wird manchmal verwendet, wenn Szenen gedreht werden, die später in schllen Schnittfolgen zusammengesetzt werden. Oft ist es für den Zuschauer leichter, schellen Schnitten zu folgen, wenn sich die Augen auf die Mitte konzentrierten.
Punkt
These Einstellung zeigt in der Mitte des Bildes einen Punkt an. Der mittige Punkt hat denselben Zweck wie das Fadenkreuz, ist aber ein dezenteres Overlay, das weniger aufdringlich wirkt.
TIPP Weitere Informationen zum Aktivieren des Raster-Modus für die HDMI-Ausgabe ihrer Kamera finden Sie im Abschnitt MONITOR-Einstellungen in dieser Handbuch.
Schutzbereichsinien
Über die Schutzbereich-Einstellung (erkenntlich am Doppelrahmen)leen sich these Markierungen auf dem LCD-Touchscreen ein- und ausschalten. Auch die Abmessungen des Bereichs fur die HDMI-Ausgabe werden hier vorgegeben.
Schutzbereiche können in Fernsehproduktionen eingesetzt werden, damit die wichtigen Bereiche eines Shots von den meisten Zuschauern gesehen werden konnen. Indem Sie die wichtigen Objekte Ihrsshots in thisem zentrierten sendesicheren Bereich halten, verhindern Sie, dass das Bild auf einigen Fernsehgeräten abgeschritten wird. Zudem hat die Sendeanstalt die Mochlichkeit, Fliegen, Newsticker und andere Overlays am Bildschirmrand einzublenden. Für die Einreichung von Footage muss wichtiger Content wie Titel und Grafiken bei vielen Sendeanstalten innerhalb eines Schutzbereichs von 90% liegen.
Schutzbereiche dieren auch der Kadierung von Einstellungen, wenn Sie bspw. wollen, dass ein Shot in der Postproduktion stabilisiert werden soll. Dadurch konnen die Kanten des Bilds abgeschritten werden. Des Weiteren konnen Schutzbereiche verwendet werden, um einen bestimmen Zuschnitt anzuzeigen. Hier ein Beispiel: Bei einer Einstellung von 50% konnen Sie beim Aufzeichnen in Ultra HD 3840 x 2160 sehen, wie eine Framegroße von 1920 x 1080 aussehen wurde. Schutzbereiche werden entsprechend der vorgegebenen Bildrandmarkierungen skaliert und so angepasst, dass sie die ausgewählte Prozentzahl Ihres Zielframes anziegen.
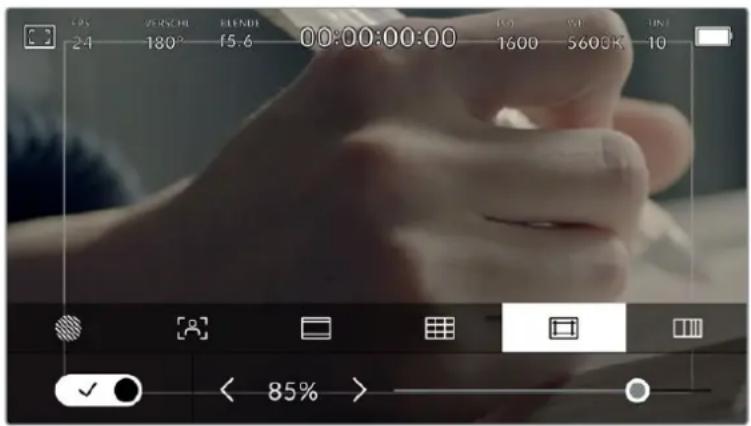
Der Schutzbereich-Indikator Ist auf 85% eingestellt
Um Schutzbereiche auf dem LCD-Touchscreen ein- oder auszuschalten, tippen Sie unter der Schutzbereich-Schaltfläche unten links auf das Schalter-Icon. Die große des Schutzbereichs für die HDMI-Ausgabe ihrer Kamera stellen Sie über die Links- und Rechtspfeile seitlich der aktuellen numerischen Werte am unteren Rand des Touchscreens ein. Oderziehen Sie den Schieberegler nach rechts oder links.
Falschfarben
Über diese Einstellung lasst sich die Darstellung der Falschfarben-Belichtungshilfe auf dem LCD-Touchscreen anpassen.
Falschfarben stellen entsprechiche Helligeitswerte von Elementen in Ihrm Bild in Farben dar, die dem jeweiligen Wertebereich entsprechen. Pink repraesertiert bspw. eine optimale Belichtung fur helle Hauttone, während Grun fur dunklere Hauttone better geeignet ist. Wenn Sie beim Filmen von Menschen anhand der Falschfarben-Funktion Pink oder Grun kontrollieren, lasst sich eine gleichformige Belichtung von Hauttosten erzielen.
Gleichermaßen zeigt Ohnen eine vom Gelben ins Rote wechselnde Falschfarben-Darstellung an, dass diese Bildbereiche nun überbelichtet sind.

Falschfarbentabelle
Um die Falschfarben-Funktion auf dem LCD-Touchscreen ein- oder auszuschalten, tippen Sie unter der Falschfarben-Schaltfläche unten links auf das Schalter-Icon.

Die Falschfarben-Schaltfläche für die Belichtungshilfe
Bilder pro Sekunde
Die FPS-Anzeige zeigt die derzeit ausgewählte Anzahl der Bilder pro Sekunde (Frames per Second) an.

Tippen Sie auf den FPS-Indikator, um die Bildraten-Einstellungen zu öffnen
Durch Antippen des FPS-Indikators konnen Sie die Sensor- und Projekt-Framerate über die Schaltfläche am unteren Rand des LCD-Touchscreensändern.
Projekt-Framerate
Die Projekt-Framerate bestimmt auch die Framerate des Aufzeichnungsformats der Kamera. Hierfür gibt es eine Auswahl von in der Film- und Fernsehbranche gebrachtelichen Frameraten. Diese Framerate stellt man in der Regel passend für die Abläufe in der Postproduktion ein.
Es sind acht verschiedene Projekt-Frameraten verfügbar: 23,98; 24; 25; 29,97; 30; 50; 59,94 und 60 fps.
Um die Projekt-Framerate ihrer Kamera im FPS-MENU anzupassen, tippen Sie auf die Pfeilsymbole befind der aktuell ausgewählten Framerate unter links auf dem Display. Oderziehen Sie den Schieberegler nach rechts oder links.

Um Anpassungen vorzunehmen, tippen Sie auf die Pfeilsymboleiben der Projekt-Framerate oder bewegen Sie den Schieberegler hin und her
TIPP Die Projekt-Framerate ihrer Blackmagic Pocket Cinema Camera gibt auch die Framerate für die HDMI-Ausgabe vor.
Sensor-Framerate
Anhand der Sensor-Framerate wird vorgegeben, wie weitere Vollbilder pro Sekunde der Sensor tatsächlich aufzeichnet. Diese Framerate wirkt sich darauf aus, wie schnell oder langsam Ihr Video bei ihrer vorgegebenen Projekt-Framerate wiedergegeben wird.
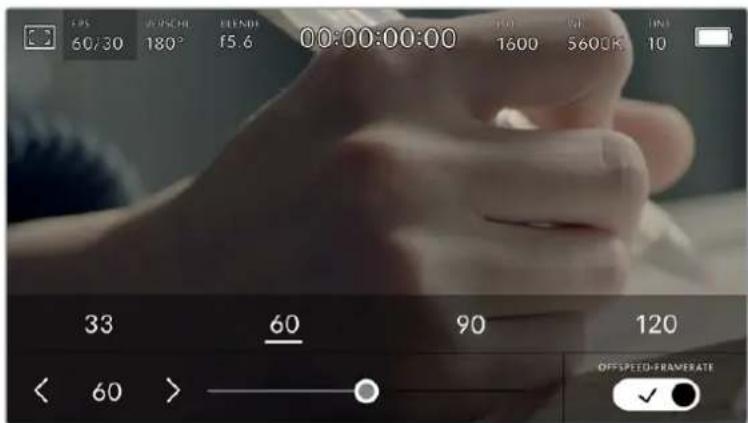
Aktivieren Sie zunachst die Funktion OFFSPEED-FRAMERATE, Um Anpassungen vorzunehmen, tippen Sie auf die Pfeilsymbole neber Sensor-Framerate oder bewogen sie den Schieberegler hin und he
Standardmäßig sind die Projekt- und Sensor-Framerate auf eine natürliche Wiedergabegeschwindigkeit eingestellt. Wenn Sie jedoch auf den Schalter OFFSPEED-FRAMERATE rechts unten im FPS-Menu ihrer Kamera tippen, können Sie die Sensor-Framerate frei wahren.
Um die Sensor-Framerate zu ändern, tippen Sie auf die Pfeileiben der Sensor-Framerate-Anzeige weiter unter links auf dem Touchscreen. Sie konnen den Schieberegler auch nach links oder rechtsziehen, um die Framerate zu erhöhen oder zu verringern. Sobald Sie den Schieberegler loslassen, wird die Sensor-Framerate ausgewählt. Im Feld über dem Schieberegler konnen Sie gängige Offspeed-Frameraten antippen. Diese beruhen auf ihrer aktuellen Projekt-Framerate.
Sie können ihre Clips mit dynamischen, interessanten Tempoeffekten versehen, indem Sie unterscheidliche Sensor-Frameraten einstehen. Ist die Sensor-Framerate auf einen hohenen Wert als ihre Projekt-Framerate eingestellt, entsteht so während der Wiedergabe ein Zeitlupeneffekt. Ein Beispiel: Beim Filmen mit einer Sensor-Framerate von 60 fps und Wiedergabe mit einer Projekt-Framerate von 24 fps wird die tatsächliche Geschwindigkeit der Action um 40% verlangsamt. Umgekehrt gilt: Je niedriger ihre Sensor-Framerate,为重点chneller werden ihre Clips wiedergegeben. Diese Effekt gleicht dem Prinzip des Overcranking und Undercranking einer Filmkamera. Durch Overcranking wird die Sensor-Framerate beschleunigt, was eine Ausdehnung von Zeitspannen bei der Wiedergabe bewirkt, um Emotionen hervorzuheiten. Undcranking hingegen verlangsamt die Sensor-Framerate. So konnen Sie das Tempo der Action in Szenen mit viel Bewegung weiter beschleunigen. Die kreativen Moltigkeiten sind unendlich und liegen vollig in ihrer Hand.
Naheres zu den maximalen Bildwechselraten, die für die einzelnen Aufzeichnungsformate und Codec verfügbar sind, finden Sie in der Tabelle im Kapitel „Aufzeichen".
HINWEIS Bei aktivierter Offspeed-Framerate sind Ton und Video nicht mehr synchronisiert. Das ist)sagar der Fall, wenn Sie die gleiche Framerate fur Projekt und Sensor gesetzt haben. Soll die Tonsynchronisierung gewährleistet sein, meiden Sie deshalb die Option Offspeed-Framerate.
Verschluss
Der Verschluss-Indikator zeigt den Verschlusswinkel bzw. die Verschlusszeit an. Durch Antippen these Indikators konnen Sie die Verschlusswerte ihrer Kamera manuell ändern oder die Verschlussprioritat über Belichtungsautomatik-Modi konfigurieren. Sie konnen auswahlen, ob Verschlusswerte als Verschlusswinkel oder Verschlusszeit angegeben werden. Näheres finden Sie im Abschnitt SETUP-Einstellungen in this dem Handbuch.

Tippen Sie auf den VERSCHL.-Indikator, um auf die Verschluss-Einstellungen zuzugreifen
Der Verschlusswinkel bzw. die Verschlusszeit bestimmt das Ausmaß der Bewegungsunsächäre in ihrem Video und kann darüber hinaus zur Kompensierung varlierender Lichtverhältnisse genutzt werden. Meist liegt der optimale Verschlusswinkel für eine angemessene Bewegungsunsächäre bei 180 Grad bzw. bei einer Verschlusszeit von 1/50 Sekunde. Wenn sich jedoch die Beleuchungsverhältnisse verändern oder mehr Bewegungen in ihrer Szene vorkommen, erfordert dies ggf. entsprechende Feinabstimmungen.
Zum Beispiel gilt eine 360-Grad-Einstellung, bei der die maximale Lichtmenge auf den Sensor trifft, als welt offen. Dies ist eine geeignete Einstellung für Szenen bei Low-Light-Bedingungen mit gingefugiger Bewegung. Beim Filmen von vielbewegten Objekten sorgt ein geringer Verschlusswinkel von bspw. 90 Grad für minimale Bewegungsunschärfe und ergibt schärtere, gestochenere Aufnahmen. Wieche Verschlusszeit einem bestimmten Verschlusswinkel entspricht, ist abhängig von der verwendenten Framerate.
Wenn Sie bspw. bei 25 fps filmen, entsprechen 360 Grad 1/25 und 90 Grad 1/100 einer Sekunde.
HINWEIS Beim Drehen in Kunstlicht macht der gewählte Verschlusswert auftretendes Flimmern ggf. stärker sightbar. Ihr Blackmagic Pocket Cinema Camera berechnet glimmerfreie Verschlusswerte anhand der aktuellen Framerate automatisch. Beim Anpassen des Verschlusses zeigt die Kamera Ihnen am unteren Rand des Touchscreens bis zu drei flimmerfreie Verschlussoptionen an. Diese Verschlusswerte hangen von der Netzfrequenz in ihrer Region ab. Im Einrichtungsmenu ihrer Kamera konnen Sie die lokale Netzfrequenz auf 50 Hz oder 60 Hz einstehen. Nähres finden Sie im Abschnitt SETUP-Einstellungen in thism Handbuch.
Wenn Sie den VERSCHL.-Indikator antippen, werden Ohnen am unteren Rand des Touchscreens Verschlusswerte vorgeschlagen. Bei ausgeschalteter Belichtungsautomatik zeigt dieser Bildschirm den derzeit ausgewählten Verschlusswert sowie die verfügbaren flimmerfreien Verschlusswerte an. Letztere sind abhängig von der im SETUP-Menu ihrer Kamera ausgewählten Netzfrequenz. Nähres finden Sie im Abschnitt SETUP-Einstellungen in thisem Handbuch.
HINWEIS Aufgrund der Eigenschaften individueller Lichtquellen kann es selbst mit „flimmerfreien" Verschlusswerten zu Flimmern kommt. Wir empfehlen Ohnen dazu, bei unregelmäßigem Licht einen Probedreh vorzunehmen.
Um einen flimmerfreien Verschlusswert auszuwahlen, tippen Sie einfach auf einen der angezeigten Shutter-Werte. Durch die gängigsten Verschlusswerte navigieren Sie, indem Sie auf einen der Pfeile rechts und links des aktuellen Verschlusswert-Indikators tippen.

Ohre Kamera schlapt Ihnen flmmerfreie Verschlusswerte entsprechend der Netzfrequenz vor, die Sie im SETUP-Menu ausgewählt haben
Wenn Sie im Freien drehen oder flimmerfreie Lichtquellen verwenden, konnen Sie einen Verschlusswert auch manuell wahlen, indem Sie den aktuellen Verschlusswert unter links auf dem Bildschirm zweimal kurz hintereinander antippen. Ist „Verschlusswinkel" ausgewählt, erscheint eine keine Tastatur, über die Sie einen beliebigen Verschlusswinkel zwischen 5 und 360 Grad einstehen konnen.

Geben Sie den Verschlusswinkel manuell über die keine Tastatur ein, wenn Sie im Freien oder bei flimmerfreiem Licht drehren
Ohre Blackmagic Pocket Cinema Camera hat drei verschlussbasierte Belichtungsautomatik-Modi. Um einen davon auszwahlen, tippen Sie auf den Button BELICHTUNGSAutomATIK ganz rechts im Verschlussmenu.
Verschluss
These Einstellung justiert den Verschlusswert automatisch, um bei konstanter Blendenöffnung eine konstante Belichtung beizubehalten. Wenn Sie eine feste Scharfentiefe beibehalten möchten, wahlen Sie
diese Einstellung. Denken Sie jedoch daran, dass kleiste automatische Anpassungen des Verschlusses Auswirkungen auf die Bewegungsunsächerte haben können. Beim Dreh in geschlossenen Räumen ist es(zudem ratsam, auf etwaiges Flimmern zu achten, das durch entsprechliche Beleuchtungskörper hervorgerufen werden kann. Die Blendenautomatikfunktion ist nicht verfügbar, wenn der Verschlussmodus BELICHTUNGSAUTOMATIK ausgewählt ist.
Verschluss + Blende
Behalt die korrekte Belichtungsstarke bei, indem zunachst der Verschluss und anschließend die Blendenöffnung angepasst wird. Wenn der maximal oder minimal verfügbare Blendenwert erreicht ist, der Belichtungswert darauf aber nicht beibehalten werden kann, justiert die Kamera für eine konstante Belichtung den Verschlusswert.
Blende + Verschluss
Behalt die korrekte Belichtungsstärke bei, indem zunachst die Blendenöffnung und anschließend der Verschlusswert angepasst werden. Wenn die maximal oder minimal verfügbar Blendenöffnung erreicht ist, der Belichtungswert damit aber nicht beibehalten werden kann, justiert ihre Kamera für eine konstante Belichtung den Verschlusswert.

Tippen Sie im VERSCHL.-Menu auf BELICHTUNGSAUTOMATIK, um auf die verschlussbasierten Belichtungsautomatik-Modizuzugreifen
TIPP Wenn sich der aktivierte Modus für automatische Belichtigung auf den Verschluss oder die Blende auswirkt, erscheint oben auf dem LCD-Touchscreen geben dem Vershluss- oder Blendenindikator ein kleines „A".
Blende
Der Blendenindikator zeigt die aktuell ausgewählte Blendenöffnung an. Durch Antippen these Indikators lassst sich die Blendenöffnung an kompatiblen Objektiven anpassen und die blendenbasierten Belichtungsautomatik-Modi konfigurieren.

Tippen Sie auf den BlendenIndikator, um auf die Blendeneinstellungen zuzugreifen
HINWEIS Wenn ihre Blackmagic Pocket Cinema Camera mit einem Objektiv versehen ist, das Änderungen der Blendenwerte über die Kamera unterstützt, lässt sich die Blende über den LCD-Touchscreen steuern.
Durch Antippen des Blendenindikators öffnet sich das Blendenmenü am unteren Rand des Touchscreens. Ihr aktuelle eingestellte Blendenöffnung wird gaz links im Menu angezeigt. Sie konnen die Blendeneinstellung ändern, indem Sie auf die Pfeile darüber den aktuellen Blendeneinstellung tippen oder den Schieberegler nach links oder rechtsziehen.

Tippen Sie Im Blendenmenü auf die Pfeile geben dem Blendendnindicator oder benutzen Sie den Schieberegler, um Blendeneinstellungen anzupassen
Das Antippen des Schalter-Icons BELICHTUNGSAUTOMATIK ganz rechts im „Blenden“-Menu öffnet das Blendenautomatik-Menu.
Hier stehen Ihnen folgende Optionen zur Verfugung:
Blende
Um eine konstante Belichtung bei konstantem Verschlusswinkel zu gewährleisten, justiert diese Einstellung die Blendenöffnung automatisch. Dies wirkt sich nicht auf die Bewegungsunscharfe, ggf. jedoch auf die Scharfentiefe aus.
Blende + Verschluss
Behalt die korrekte Belichtungsstarke bei, indem zunachst die Blendenöffnung und anschließend der Verschlusswert angepasst werden. Wenn die maximal oder minimal verfügbar Blendenöffnung erreicht ist, der Belichtungswert darauf aber nicht beibehalten werden kann, justiert ihre Kamera für eine konstante Belichtung den Verschlusswert.
Verschluss + Blende
Behalt die korrekte Belichtungsstarke bei, indem zunachst der Verschluss und anschließend die Blendenöffnung angepasst wird. Wenn der maximal oder minimal verfügbare Verschlusswert erreicht ist, der Belichtungswert darauf aber nicht beibehalten werden kann, justiert ihre Kamera für eine konstante Belichtung die Blendenöffnung.
Blende
BI. + VERSCHL.
VERSCHL. + BI
BELICHTUNGSALCOMATIK

Tippen Sie Im Blendenmenu auf BELICHTUNGSAUTOMATIK, um auf die blendenbasierten Belichtungsautomatik-Modi zuzugreifen
TIPP Wenn sich der aktivierte Modus für automatische Belichtung auf die Blende oder den Verschluss auswirkt, erscheint oben auf dem LCD-Touchscreen geben dem Blenden- oder Verschlussindikator ein kleines „A".
Clipdaueranzeige
Ganzupon dem LCD-TouchscreenHrerKamera sehen Sie dieClipdaueranzeige.


Die Clipdaueranzeige ihrer Kamera leuchtet während der Aufzeichnung rot
Anhand der Clipdaueranzeige in Form eines Timecode-Zahlers lasst sich die Dauer ihrer Clips prufen und der Timecode bei Aufnahme und Wiedergabe kontrollieren. Der Zähler zeigt eine Sequenz in Stunden:Minuten:Sekunden:Frames an und lauft während der Aufnahme oder Wiedergabe von Clips mit. Der Timecode wird während der Aufzeichnung in Rot angezeigt.
Die Clipdaueraufnahme beginnt bei 00:00:00:00. Die Dauer des aktuellen oder zuletzt aufgezeichneten Clips wird auf dem Touchscreen angezeigt. Der Uhrzeit-Timecode wird in die Clips eingebettet. Dies vereinfacht die Postproduktion.
Um den Timecode anzuzeigen, tippen Sie einfach auf die Clipdaueranzeige. Tippen Sie erneut daraufuf, um zur Clipdaueranzeige zurückzukehren.
Bei Anschluss von Blackmagic Pocket Cinema Cameras an einen ATEM Mini, kann ihr Schaltzustand auf dem LCD-Touchscreen unterhalb des Timecodes eingebrendet werden. Als Hilfestellung für die Kameraoperatoren zeigt das Status-Overlay VORSCH. an, wenn eine Kamera kurz vor der Liveschaltung liegt, oder ON AIR, wenn eine Kamera live auf Sendung ist. ATEM Minis synchronisieren den Timecode von Pocket Cinema Cameras automatisch und passenihn dem angeschlossenen Mischer an. Das erleichtert das prazise Schneiden von Multicam-Material in DaVinci Resolve.
Folgende zusätzliche Statusindikatoren erschellen ggf. mit der Daueranzeige:
| W | Erscheint links besoin der Daueranzeige, wenn ihre Blackmagic Pocket Cinema Camera in einem gecroppten Sensormodus filmt. |
| TC | Erscheint rechts besoin der Daueranzeige, wenn der Timecode angezeigt wird. |
| EXT | Erscheint rechts besoin der Daueranzeige, wenn ein gültiger externer LTC-Timecode an die 3,5mm-Stereobuchse angeschlossen ist oder der Timecode mit einem ATEM Mini Mischer synchronisiert wird. |
| INT | Erscheint rechts besoin der Daueranzeige, wenn die Kamera nach einem Jam-Sync und einer Unterbrechung einen internen Timecode abspiert. |
ISO
Der ISO-Indikator zeigt die aktuelle ISO-Einstellung bzw. Lichtempfindlichkeit an. Durch Antippen dieser Indikatoren können Sie ihren ISO-Wert bei variierenden Lichtverhältnissen anpassen.

Tippen Sie auf den ISO-Indikator, um auf die ISO-Einstellungen zuzugreifen

Bei geöffnetem ISO-Menu erscheln die ISO-Einstellungen ihrer Kamera am unteren Rand des LCD-Touchscreens. Mit dem Schieberegler unter den Presets konnen Sie den ISO-Wert in Drittel-Blendenstufen anpassen
Je nach Situation mag eine niedrigere oder höhere ISO-Einstellung geeigneter sein. Bspw. mag ein ISO-Wert von 25.600 in Niedriglichts situationen geeignet sein, ruft aber möglicherweise ein sightbares Bildrauschen hervor. Bei hellen Lichtverhältnissen kann ein ISO-Wert von 100 gesättigtere Farben bewirken.
Duale native ISO-Empfindlichkeiten
Ohre Blackmagic Pocket Cinema Camera verfugt über zwei native ISO-Empfindlichkeiten (Dual Native ISO), die bei den Referenzwerten ISO 400 und ISO 3200 liegen. Der Sensor ist demnach sowohl für Aufnahmen bei Niedriglicht als auch bei hellem Tageslicht optimiert.
Wenn Sie die ISO-Einstellung für wechselnde Lichtverhältnisse anpassen, wirkt die „Dual native ISO“-Funktion im Hintergrund und sordt damit, dass ihre Footage sauber ist und bei geringen und hohen ISO-Werten ein minimales Rauschen aufweist.
Bei ISO-Einstellungen zwischen 100 und 1.000 wird der native ISO-Empfindlichkeitswert von 400 als Referenz verwendet. Für ISO-Einstellungen zwischen 1.250 und 25.600 liegt dieser native Referenzwert bei 3.200. Bei Drehbedingungen, in denen Sie die Wahl zwischen einem ISO-Wert von 1.000 oder 1.250 haben, empfehlen wir ihren, die Blende Ihres Objektivs um eine Blendenstufe herunterzusetzen. Bei einem eingestellen ISO-Wert von 1.250 orientiert sich die Kamera am higheren nativen ISO-Referenzwert, was deutlich sauberere Ergebnisse liefert.
Die nachstehenden Tabellen verdeutlichen das Verhältnis zwischen ISO-Ausbwahl und verfügbarem Dynamikumfang.

Dynamikumfang der Blackmagic Pocket Cinema Camera 6K

Dynamikumfang der Blackmagic Pocket Cinema Camera 4K
Weiabgleich
Die Indikatoren WB und TINT zeigen den aktuellen Weißabgleich und Farbston ihrer Kamera an. Durch Antippen dieser Indikatoren können Sie den Weißabgleich sowie den Farbston ihrer Kamera bei variierenden Lichtverhältnissen anpassen.

Tippen Sie auf die Indikatoren WB und TINT, um auf die Einstellungen fur Weisabgleich und Tönung zuzugreifen
Lichtquellen geben Licht verschiedener Färbung aus. Eine Kerze strahlt bspw. warmes Licht aus und ein bedeckter Himmel kühleres Licht. Die Weßabgleicheinstellungen dieren zum Ausbalancieren der Farben eines Bildes, damit Weßbereiche auch wirklich weiß bleiben. Dies geschiet durch das Anpassen der Orange- und Blautone in Ihrm Bild. Beispel: Beim Filmen unter Kunstlichtlampen, die warmes, orangefarbenes Licht abgeben, bewirkt man durch Auswahl von 3200 K, dass dem Bild zusätzliches Blau beigeufigt wird. Der hiermit bewirkte farbliche Abgleich sorgt für eine akkurate Aufzeichnung von Weß.
Ohre Blackmagic Pocket Cinema Camera bietet Weisabgleichsvoreinstellungen (Presets) fur verschiedene Farbtemperaturen. Folgende Presets sind vorhanden:
| Helles Sonnenlicht (5600 K) | |
| Glühlampen (3200 K) | |
| Leuchtstofflampen (4000 K) | |
| Gemischtes Licht (4500 K) | |
| Wolken (6500 K) |
Sie konnen all diese Presets nach Belieben anpassen. Tippen Sie davon auf die Pfeile links und rechts des Temperaturindikators unter links im Menu für den Weißabgleich. Durch jeder Antippen wird die Farbtemperatur um 50 K erhöht bzw. verringgert. Wenn Sie die Pfeilsymbole gedrückt halten,ändern sich die Werte schneller. Alternativ konnen Sie auch den Schieberegler in der Mitte des Weißabgleich-Menu bewegen.
Um Ihr Bild weiter anzupassen, können Sie zudem die Tönung (Tint) anpassen. Dies verändert die Grün- und Magentaanteile in Ihrm Bild. Das Hinzufugen von Magentaanteilen kann bspw. den Grünstich kompensieren, den Leuchtstofflampen halten verursachen. Viele der Weßabgleichvoreinstellungen ihrer Blackmagic enthalten eine leichte Tönung.

Durch Antippen des WB-oder TINT-Indikators erhalten Sie Zugriff auf fülf Presets, zwei Weißabgleichindikatoren, links einen Schieberegler und rechts einen Tintindikator. Passen Sie diese an, um einen benutzerdefinierten Weißabgleich (CWB = Custom White Balance) für ihre Lichtverhältnisse einzustellen
Im Weißabgleich-Menu wird der derzeitige Farbston der Kamera rechts unter auf dem Touchscreen angezeigt. Um den Farbston anzupassen, tippen Sie einfach kurz auf die Pfeile links und rechts des TINT-Indikators oder halten sie gedrückt. Der verfügbare Bereich liegt bei -50 bis +50 in Schritten von einer Einheit. Halten Sie die Pfeile gedrückt, um den Wert schneller zu verändern.
HINWEIS Die Vorgabe eines benutzerspezifischen Weißabgleichs oder Tönungswerts bewirkt, dass Ihr Preset auf CWB (Custom White Balance) wechselt. Benutzerspezifische Weißabgleicheinstellungen haben hohe Priorität und bleiben nach dem Ein- und Ausschalten konfiguriert. Das Gleiche gilt, wenn zu einem Preset und wieder zurück zu CWB gewechsent wird. So ist es ein Leichtes, einen benutzerspezifischen Weißabgleich mit dem zuletzt verwendeten Preset zu vergleichen.
Automatischer Wel'abgleich
Ohr Blackmagic Pocket Cinema Camera kann den Weisabgleich automatisch vornehmen. Durch Antippen von AWB (Automatic White Balance) gelangen Sie ins Weisabgleich-Menu.
Wenn Sie den automatischen Weßabgleich einstellen, erscheint ein Quadrat-Overlay in der Mitte Ihr's Bildes. Richten Sie these Quadrat auf eine neutrale Oberfläche wie eine weitere oder graue Karte und tippen Sie auf „WB Aktualisieren". Ihr Kamera passst den Weßabgleich und die Tintwerte nun automatisch an, damit die durchschnittlichen Weiß- oder Grautöne innerhalb des Quadrats so neutral wie möglich aussehen. Sobald Sie den Weßabgleichactualisiert haben, verwendet ihre Kameraihn als standardmäßige Einstellung. Alternativ halten Sie die WB-Taste oben auf ihrer Kamera für drei Sekunden gedrückt, um den automatischen Weßabgleich auszuwahlen und die Funktion „WB Aktualisieren" zu aktivieren.
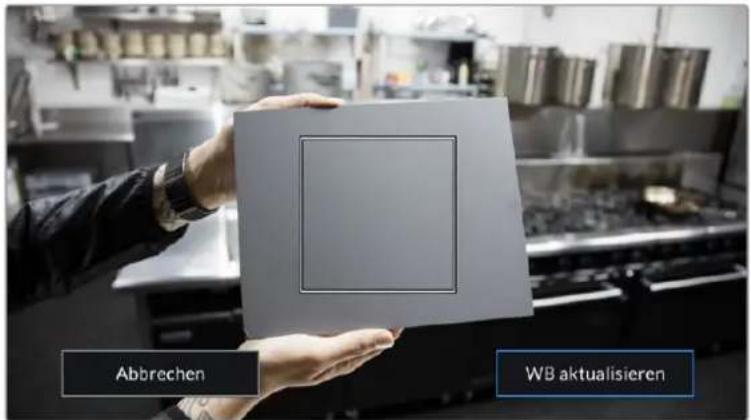
Wenn Sie im Weisabgleich-Menü auf das AWB-Icon tippen, rufen Sie den Bildschirm für den automatischen Weisabgleich auf. Verwenden Sie eine weitere oder neutral graufe Oberfläche, um einen neutralen Weisabgleich automatisch einzustellen
Strom
Die Stromquelle und der Ladezustand der Kamera werden offen rechts auf dem LCD-Bildschirm angezeigt.

Im Akkubetrieb konnen Sie durch Antippen des Stromindikators zwischen verschiedenen Anzeigen wechseln
| AC | AC | Zeigt an, wenn ihre Kamera mit Netzstrom versorgt wird. |
| \(\mathbf{A}\) \(\mathbf{AC}\) | AC / Aufladen | Zeigt an, wenn ihre Kamera mit Netzstrom versorgt wird und gleichzeitig den mobilen LP-E6-Akku oder bei Einsatz eines Blackmagic Pocket Camera Battery Grips die NP-F570-Akkus auflädt. |
| \(50\%\) | Prozent | Wenn Ihr Akku eine prozentuale Anzeige unterstützen, wird der verbleibende Ladezustand als Akkusymbol in Prozent angezeigt. Er entleert sich in Schritten von 1%. Bei einem verbleibenden Ladezustand von 20% wird der Akkubalken in Rot angezeigt. Um die prozentuale Anzeige ein- und auszuschalten, tipping Sie auf das Akkusymbol. |
| Akkubalken | Der mit ihrer Kamera gelieferte Akku zeigt ein Akkusymbol an, das sich in Schritten von 25 % entleert. Bei einem verbleibenden Ladezustand von 20 % wird der Akkubalken rot angezeigt. |
| Battery Grip Akkubalken | Bei Anschluss eines Blackmagic Pocket Camera Battery Grips an ihre Kamera, können Sie über diese Akkubalken den Ladezustand beider Akkus getrennt überwachen. |
| Spannung der Stromquelle | Zeigt die vom Akku oder von einem an die DC-Buchse angeschlossenen Stecknetzteil, einem D-Tap-Adapterkabel oder von einer eigenen Stromversorgungslösung gelieferte Spannung. Tippen Sie auf das Akkusymbol, um die Spannungsanzeige ein- und auszuschalten. |
LUT-Indikator
Wenn Sie am Set eine LUT als Vorschautool einsetzen, zeigt ein LUT-Icon in der oberen linken Ecke des Bildschirms an, dass die LUT aktiv ist.

Histogramm
Unten rechts auf dem Touchscreen ihrer Kamera setzen Sie das Histogramm. Das Histogramm stellt die Kontraste zwischen schwarzen und weiß Tonwerten anhand einer horizontalen Skala dar.
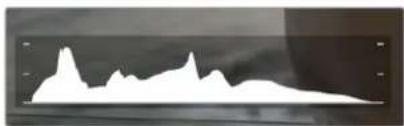
Das Histogramm verschaft Ihnen einen Überblick über die Tonwertspanne zwischen Schatten und Lichtern in Ihrm Clip. Es ist außer dem ein hilfreiches Werkzeug, um die Ausgewogenheit der Belichtung zu überprüfen und sicherzustellen, dass keine Lichter abgeschnitten werden
Am linken Rand des Histogramms werden die Schatten bzw. Schwarzwerte und ganz rechts die Lichter bzw. Weißwerte angezeigt. Wenn Sie die Blende schlieben oder öffnen, wird Ihnen aufallen, dass sich die Helligeitsinformationen im Gramm entspruchend nach links oder rechts verschieben. Sie können damit die Schatten und Lichter ihrer Bilder auf Clipping überprüfen. Wenn die linke und rechte Kante Ihres Histogramms abrupt abfallen und nicht graduell auslaufen, kann es sein, dass Details in den hellen und dunklen Bereichen verloren gehen.
HINWEIS Ist unter links an Ihrn Touchscreen kein Histogramm zu sehen, sind ihre MONITOR-Einstellungen fur LCD möglichwerse auf die Anzeige von „Codec und Auflösung" eingestellt. Naheres finden Sie im Abschnitt MONITOR-Einstellungen in thisem Handbuch.
Aufnahme-Button
Unten auf dem Touchscreen ihrer Blackmagic Design Pocket Cinema Camera findet sich darüber hem Grammm ein runder grauer Button. Dies ist der Aufnahme-Button. Tippen Sie einmal auf den Button, um mit der Aufzeichnung zu beginnen. Ein erneutes Antippen stoppt die Aufzeichnung. Während der Aufzeichnung werden der Aufnahme-Button, der Speicher-Indikator daneben und der Timecode oben auf dem Touchscreen ihrer Blackmagic Pocket Cinema Camera in Rot angezeigt.

Der Aufnahme-Button befindet sich darüber den Speicher-Indikatoren am unteren Rand des LCD-Touchscreens
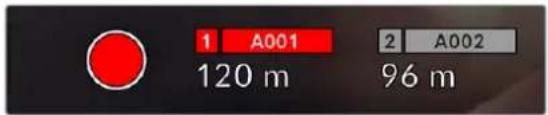
Der Aufnahme-Button leuchtet rot, wenn aufgezeichnet wird
LUT auf Clip angewandt
Wenn Sie in den AUFNAHME-Einstellungen vorgegeben haben, eine LUT auf ihre aufgezeichneten Clips anzuwenden, wird dies im Standby-Modus und während der Aufzeichnung auf dem Touchscreen angezeigt.
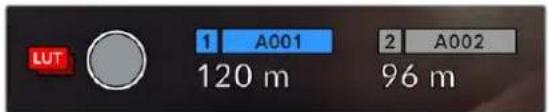
Das LUT-Symbol teilt ihren mit, dass die ausgewählte LUT für aufgenommene Clips mit aufgezeichnet wird

Das LUT-Symbol zeigt an, dass die ausgewählte LUT mit dem Clip aufgezeichnet wird
Indikator für ausgelassene Bilder
Der Aufnahme-Button wird mit einem blinkenden „I" überdeckt, wenn ihre Kamera während der Aufzeichnung Bilder auszulassen beginnnt. Der Balken für die verbleibende Aufnahmedauer der betroffenen Karte bzw. Karten wird ebenfalls rot. Wenn ihre CFast-Karte bspw. Bilder auslassst, erscheidt das „I" anstelle des Aufnahme-Buttons und die verbleibende Aufnahmedauer für die CFast-Karte wird in Rot angezeigt. Das informiert Sie darüber, ob eine bestimmte Karte zu langsam für den ausgewählten Codec oder die ausgewählte Auflösung ist. Die Anzeige für ausgelassene Bilder entscheidt außer dem, wenn der vorherige Clip ausgelassene Bilder enthalt. Der Indikator wird so lange angezeigt, bis ein neuer Clip aufgezeichnet oder die Kamera aus- und wieder eingeschaltet wird. Wie man vermeidet, dass Frames fallengelassen werden, wird in den Abschnitten „Auswahl einer CFast-2.0-Karte" und „Auswahl einer SD-Karte" erklärt.
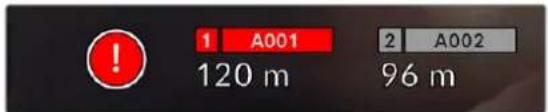
Der Indikator zeigt fur die CFast-Karte ausgelassene Bilder an
HINWEIS Sie können ihre Blackmagic Pocket Cinema Camera so einstellen, dass sie die Aufzeinung bei Erkennung ausgelassener Bilder stoppt. Nähresfinden Sie im Abschnitt AUFNAHME-Einstellungen in thisem Handbuch.
Verbleibende Aufnahmedauer
Wird eine CFast- bzw. SD-Karte eingeschoben oder ein USB-C-Laufwerk an ihre Kamera angeschlossen, zeigen die Speicher-Indikatoren am unteren Rand des Touchscreens die verbleibende Aufnahmedauer auf der Karte oder dem USB-C-Laufwerk an. Die in Minuten angegebene Zeit variiert entsprechend ihren gewährten Einstellungen für Bildwechselfrequenz und Codec. Bei Änderung dieser Einstellungen berechnet der Indikator den angegebenen Wert automatisch neu. Bei einer verbleibenden Restzeit von ungefahr fünf Minuten wird der Indikator rot. Bei einer verbleibenden Dauer von nur zwei Minuten beginnnt er zu blinken. Erreicht ein Speichermedium seine maximale Kapazität, zeigt der Indikator dies mit VOLL an.

Der Speicher-Indikator gezelt den Namen ihrer CFast- bzw. SD-Karte oder Ihres USB-C-Laufwerks sowie die verbleibende Aufnahmedauer in Minuten an
Zudem wird der Name des Speichermediums auf einem kleinen Balken über der verbleibenden Aufnahmedauer angezeigt. Ein blauer Balken zeigt an, auf welches Speichermedium aufgezeichnet wird. Um auf eine andere Karte oder ein anderes Laufwerk aufzuzeichnen, halten Sie die Namensanzeige des gewünschten Mediums gedrückt. Wahrend der Aufzeichnung ist der Balken rot.
Durch Tippen auf die Speicher-Indikatoren öffnen Sie das Speicher- und Formatierungsmenu.

Tippen Sie auf die Datenträger-Indikatoren auf dem LCD-Touchscreen, um auf den Speichermanager zuzugreifen
Dieses Menu zeigt den freien Speicherplatz eines jeder CFast-, SD- oder USB-C-Mediums in Ihrer Kamera sowie den Mediennamen, die Länge des letzten Clips, die Gesamtzahl der Clips pro Medium und das Dateifornat an.
Sie konnen Ihr Medium über diese Menu formatieren. Weitere Informationen finden Sie unter „Datenträger für die AufnahmeVBoreiten" in dieser Handbuch.
TIPP Durch Antippen des Namens eines Speichermediums im Speichernmu wird these Medium als aktives vorgegeben. ihre Blackmagic Pocket Cinema Camera bespielt these Medium dann zuerst.
Audiopegelmeter
Bei Verwendung des internen Mikrofons oder einer angeschlossenen externen Audioquelle zeigen die Audiospitzenmeter die Tonpegel der Kanäle 1 und 2 an. Die Tonpegel-Anzeige ist in dBFS kalibriert und verfügbar über Peak-Indikatoren mit der Haltefunktion Peak Hold, die nach einer Übersteuerung kurzfristig sightbar bleiben. Sie zeigen Ohnen erreichte Höchstpegel deutlich an.
Eine optimale Tonqualität wird mit Audiogeeln unter 0 dBFS gewährleistet. Hierbei handelt es sich um den Höchstpegel, den ihre Kamera aufzeichnen kann. Diese Wert überschreitendes Audio wird abgeschritten, was zu Verzerrungen führt.
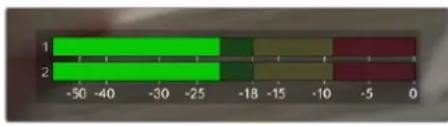
Die farbigen Balken des Audiogeelmeters zeigen die maximalen Audiogeel an. Die Spitzenwerte Ihres Tons sollenn idealerweise am oberen Ende des grunen Bereichs liegen. Schlagen die Pegelspitzen jedoch in den gelben oder roten Bereich aus, so besteht die Gefahr einer Übersteuerung Ihres Tons.
Tippen Sie auf die Audiogeelmesser, um die Lautstärkeregler für Audioeingangsgkanäe 1 und 2 sowie die Kopfhörer- oder Laatsprecherlautstärke aufzurufen.
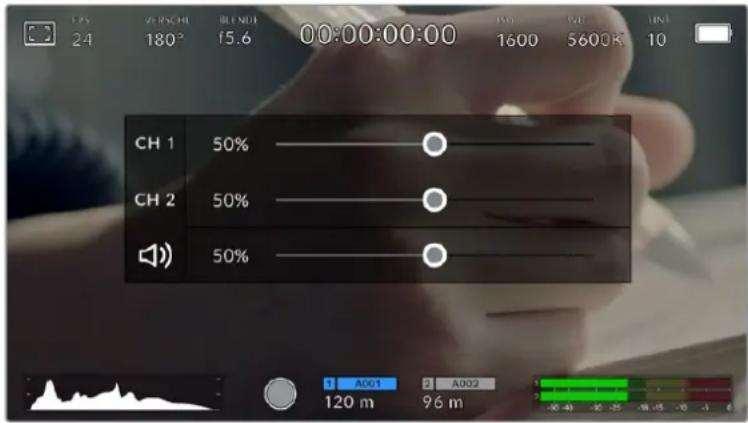
Tippen Sle auf die Audiopegelmeter auf dem LCD-Touchscreen, um bequem auf die Lautstärke-, Kopfhörer- oder Laatsprechereinstellungen zuzugreifen
Zweimaliges Tippen zum Zoomen
Durch zweimaliges Tippen auf den LCD-Touchscreen konnen Sie einen beliebigen Bereich des Vorschaubilds ihrer Blackmagic Pocket Cinema Camera vergroßern. Dieser Bereich wird vergroßert. Wenn Sie mit ihrem Finger nun über den LCD-Touchscreen streichen, konnen Sie im Bild herumnavigieren. Besonderss hilfreich ist das beim Überprüfen der Fokussierung. Um zur normalen Bildgroße zureckzukehren, tippen Sie einfach erneut zweimal kurz hintereinander auf den Touchscreen. Durch Wischen nach oben oder unter werden alle Statusindikatoren aus dem LCD-Touchscreen ausgeblendet
Pinch-to-Zoom
Mit der Multitouch-Geste „Pinch-to-Zoom" konnen Sie auf dem LCD-Touchscreen den Vergroßerungsgrad anpassen. Die HDMI-Ausgabe bleibt davon unberührt.
Für eine zweifache Vergroßerung tippen Sie zweimal hintereinander auf den Touchscreen oder drucken die Fokussiertaste an der Rückseite ihrer Kamera. Verändern Sie dann mit einer Zoomgeste den Vergroßerungsgrad. Führn Sie auf dem Touchscreen eine Wischbewegung aus, um den vergroßerten Ausschnitt zu verschiben. Um zur normalen Bildgroße zurückzukehren, tippen Sie erneut zweimal hintereinander auf den Touchscreen oder drucken die Fokussiertaste an der Kamera.
Durch zweimaliges Antippen des Touchscreens oder durch Drücken der Fokussiertaste wird zwischen der vorherigen vergroßerten Ansicht und der vollen Bildgroße hin- und hergeschaltet. Wenn Sie zum Beispiel per Pinch-to-Zoom eine achtfache Vergroßerung erzeugen und zweimal kurz hinterinander auf den Touchscreen tippen, wird Herausgezoommt. Ein erneutes zweimaliges Antippen ruft wieder die achtfache Vergroßerung auf.
Touch to Focus
Sie konnen Ihr Objektiv auf einen beliebigen Bildausschnitt einstellen, indem Sie auf einen bestimmten Bereich auf dem LCD-Bildschirm tippen und diesen gedrückt halten. Drücken Sie die Fokustaste, um Ihr Objektiv auf die ausgewählte Stelle zu fokussieren. Um den Fokuspunkt auf die Mitte des Bildschirms zurückzusetzen, drücken Sie die Fokustaste zweimal.
Vollbildschirm-Modus
Bei der Einstellung oder Fokussierung eines Shots ist es manchmal hilfreich, den Statustext und die Messwerte auf dem Touchscreen vorübergehend auszublenden. Um alles zu verbergen, führen Sie auf dem LCD-Touchscreen eine Wischbewegung nach oben oder unter an. Der Aufnahme-Indikator, Bildrandmarkierungen, Raster, Focus Assist und Zebra bleiben weiterhin sightbar.
Wischen Sie erneut nach oben oder unter, um den Statustext und die Messwerte wieder einzublenden.
Um alle Indikatoren zu verbergen, führen Sie auf dem LCD-Touchscreen cine Wischbewogung nach oben oder unter aus
Wiedergabenu
Drücken Sie auf die Wiedergabetaste, um auf das Wiedergabenu zuzugreifen. Bereits aufgezeichnete Clips können Sie mit den Buttons auf dem LCD-Touchscreen ihrer Kamera steuern.
Wenn Sie den LCD-Touchscreen benutzen, tippen Sie den Wiedergabe-Button einmal, um die Wiedergabe zu starten und erneut, um sie zu stoppen. Verwenden Sie den Vor- oder Rücklauf-Button, um zum Anfang oder Ende eines Clips zurückzuspringen. Einmaliges Antippen des Vorlauf-Buttons bringt Sie zum nachsten Clip. Um an den Anfang des aktuellen Clips zu gelangen, drücken Sie den Rücklauf-Button einmal. Um zurück zum Anfang des vorherigen Clips zu springen, drücken Sie sie zweimal. Indem Sie auf den Loop-Button tippen, können Clips zudem in Dauerschleife abgespielt werden.


Die Rucklauf-, Wiedergabe-, Vorlauf- und Loop-Buttons
Um vor oder darüber zu spulen, halten Sie die Vor- oder Rücklauf-Buttons gedrückt. Abhängig davon, welche Buttons Sie gedrückt halten, wird ihre Footage in doppelter Geschwindigkeit vor- oder ruckwartsgespielt.
Während des Vor- oder Rücklaufs konnen Sie die Geschwindigkeit durch erneutes Antippen der Buttons erhöhen. Mit jedem Antippen verdoppelt sich die Vor- bzw. Rücklaufgeschwindigkeit. Die maximale Geschwindigkeit liegt jedoch bei der 16-fachen der normalen Abspielgeschwindigkeit. Durch erneutes Antippen bei 16-facher Geschwindigkeit gelangen Sie darüber zukrung den Geschwindigkeit. Mit jedem Antippen auf den entgegengesetzten Button halbiert sich die derzeitige Vor- bzw. Rücklaufgeschwindigkeit. Um zur normalen Abspielgeschwindigkeit zurückzukehren, tippen Sie auf den Wiedergabe-Button.

Der Geschwindigkeitslndikator fur den Vor- oder Rücklauf zeit die Geschwindigkeit und Laufrichtung an
Wird im Wiedergabe-Modus der Aufnahme-Button gedrück, versetzt dies die Kamera in den Standby-Modus zurück, und sie ist wieder aufnahmebereit.
TIPP Wischen Sie auf dem Touchscreen nach oben oder unter, um den Statustext bei der Wiedergabe von Footage zu verbergen. Öffnen Sie die Slate im Wiedergabe-Modus, um den aktuellen Clip in den Metadaten als „Guter Take" zu markieren. Nähresfinden Sie im Abschnitt „Eingegeben von Metadaten".
Einstellungen
Dashboard
Drucken Sie die Menutaste, um das Dashboard der Kamera zu öffnen. Hierbei handelt es sich um ein Menu mit Registerkarten für Einstellungen, die auf dem Touchscreen nicht standardmäßig angezeigt werden. Die Einstellungen sind nach Funktion in folgende Registerkarten unterteilt: AUFNAHME, MONITOR, AUDIO, SETUP, PRESETS und LUTS. jeder Registerkarte besteht aus mehreren Seiten, zu denen Sie jeweils über die Pfeilsymbole am Rand des Bildschirms oder durch Wischen nach links oder rechts gelangen.
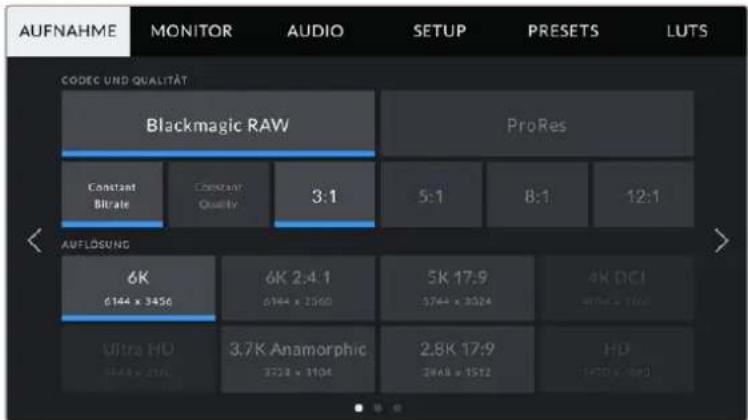
Um zwischen den Dashboard-Registerkarten ihrer Blackmagic Pocket Cinema Camera hin- und herzuwechseln, tippen Sie auf den jeweiligen Reiter
AUFNAHME-Einstellungen
Über die AUFNAHME-Registerkarte konnen Sie das Videoformat, den Codec und die Auflösung sowie andere wichtige Einstellungen für die Aufzeichnung wie Dynamikumfang und Detailscharfe vorgegeben.
AUFNAHME-Einstellungen Seite 1
Die erste Seite der AUFNAHME-Einstellungen bietet folgende Optionen:
CODEC UND QUALITÄT
Das Menu für die Einstellungen von Codec und Qualität ist in zwei Reihen aufgeteilt. Die obere Reihe lasst Sie zwischen zwei Codec-Familien wahren - Blackmagic RAW und Apple ProRes. Die andere Reihe betiet eine Auswahl an Qualitätoptionen innerhalb dieser Familien an. Die in der ProRes-Codefamilie verfügbarbaren Qualitätoptionen sind bspw. ProRes 422 HQ, ProRes 422, ProRes 422 LT und ProRes 422 Proxy. Die Optionen für Blackmagic RAW sind gemäß den Kompressionsmethoden in vier „Constant Bitrate“- und zwei „Constant Quality“-Einstellungen aufgeteilt.
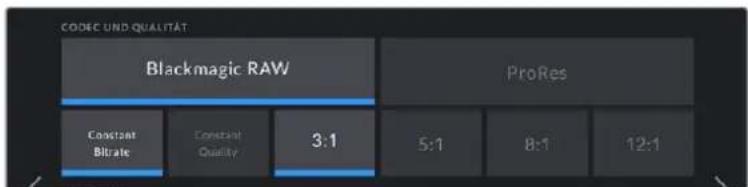
Blackmagic-RAW-Optionen für Codec und Qualität
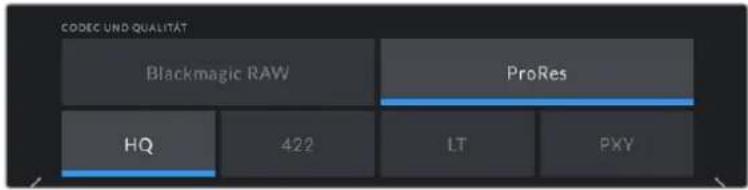
ProRes-Optionen für Codec und Qualität
TIPP Sie können mit ihrer Blackmagic Pocket Cinema Camera mehr Video auf Ihr Speichermedium aufzeichnen, wenn Sie einen Codec mit higherer Kompressionsrate auswahlen. Nähres findsie in den Tabellen unter Aufzeichnungsdauer im Kapitel Aufziehnen".
AUFLösUNG
These Einstellung steit in Zusammenhang mit der Codec-Einstellung. Wahlen Sie hier die Auflösung für das gewünschte Aufnahmeformat aus. Wenn Sie bspw. Ultra-HD-Clips in ProRes HQ aufzeichen sollen, wahlen Sie im Menu CODEC UND QUALITÄT „ProRes" und „HQ" aus. Wahlen Sie anschließend unter AUFLösUNG „Ultra HD" aus.
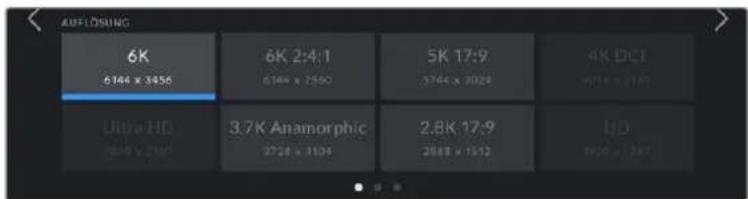
Pocket Cinema Camera 6K – Auflösungen bei Verwendung des Blackmagic-RAW-Codecs
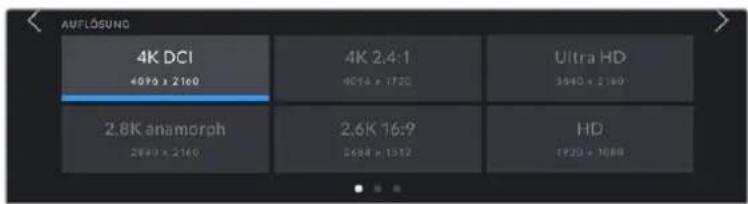
Pocket Cinema Camera 4K - Auflosungen. Für das 4K-DCI-Format heligt diese Kategorie „AUFLOSUNG", andernfalls „AUFLOSUNG - SENSOR GECROPPT".
HINWEIS Beim Koordinieren der Aufzeinung eines Mehrkameradrehs über einen ATEM Mini, stellt sich der Codec der Pocket Cinema Cameras für hochwertige isolierte Aufzeinungen auf die internen Datenträger auf Blackmagic RAW um. Auf ATEM Minis bestimmte die an Eingang 1 angeschlossene HDMI-Quelle die Bildwechselfrequenz der Videoausgabe. Alle anderen HDMI-Eingaben werden automatisch in diese Format konvertiert. Wenn Sie eine Pocket Cinema Camera an Eingang 1 anschließen, ruft der ATEM Mini die zuvor verwendete Framerate ab. Nach Anschlieben aller Videoquellen können Sie die Bildwechselfrequenz für die Ausgabe ihren ATEM Mini aber auchändern. Gehen Sie hierfür zu den Mischereinstellungen in ATEM Software Control. Weitere Informationen siehe ATEM Mini Bedienungsanleitung.
AUFNAHME-Einstellungen Seite 2
Die zweite Seite der AUFNAHME-Einstellungen bietet folgende Optionen:

Optionen der Pocket Cinema Camera 6K für Dynamikumfang und Sensorfläche

Optionen der Pocket Cinema Camera 4K für Dynamikumfang und Sensorfläche
DYNAMIKUMFANG
Justieren Sie die Einstellungen für den Dynamikumfang, indem Sie auf die jeweilige Option unter DYNAMIKUMFANG tippen. Die Blackmagic Pocket Cinema Camera hat drei Einstellungen für den Dynamikumfang:
| Film | Im „Film“-Modus wird Video unter Anwendung einer Log-Kurve aufgenommen. So konnen Sie den höchsten Dynamikumfang beibehalten und maximale Daten über Ihr Videosignal aufzeichnen, was ihren den optimalen Einsatz von Farbkorrektursoftware wie DaVinci Resolve erhöglich. |
| Extended Video | Der Modus „Extended Video“ bietet ein ausgewogenes Verhältnis zwischen den Dynamikmodi „Video“ und „Film“. Er arbeitet mit einem breiteren Dynamikumfang als der „Video“-Modus und sorgt gleichzeitig für eine leichte Kontraständerung mit einem weichen Roll-Off in den Highlights. „Extended Video“ eignet sich für gängige Broadcastmonitore. Hilfreich ist dieser Modus darüber hinaus, wenn die Zeit für die Postproduktion knapp ist und Sie ihre Clips bereits mit einem ansprechenden Look aufzeichnen wollen. |
| Video | Die Einstellung „Video“ erhnelt dem Rec.709-Farbstandard für Video in High Definition. Das erleichtert die Arbeit, da Sie direkt in einem komprimierten Videoofformat und Farbraum aufzeichnen, die sich für die Direktausgabe eignen oder nur minimale Nachbearbeitung erfordern. |
HINWEIS Im Dynamikumfang „Film" in Blackmagic RAW oder ProRes aufgezeichnete Bilder sehen auf dem Touchscreen matt und entsätig ist aus. Das liegt daran, dass die Bilddatei große noch ungegradete Datenmengen enthalt, die für Standard-Displays ungeeignet sind. Bei der Aufzeichnung im Dynamikumfang „Film" konnen Sie die Videoinhalte jedoch unter Anwendung einer Display-LUT auf dem Touchscreen und der HDMI-Ausgabe überwachen. Diese dient dazu, einen Standardkontrast zu simulieren. Nähres finden Sie im Abschnitt „LUTs" in this dem Handbuch.
Sensorfläche
Die Blackmagic Pocket Cinema Camera kann so eingestellt werden, dass sie die gesamte Sensorfläche oder - für noch höhere Frameraten - bei gecropptem Sensor nur einen Bildausschnitt verwendet. In letzterem Fall wird der Bildausschnitt nicht von der Gesamfläche des Sensors herunterskaliert, sondern es werden für das Bild ausschließlich die für das vorgegebene Videoformat bestehtigon Pixel verwendet. Einige Formate verwenden eine Kombination aus gecropptem und skaliertem Modus. Die Pocket Cinema Camera 6K kann in HD bspw. mit voller Sensorfläche, skaliert mit gecroppter 5,7K-Sensorfläche und skaliert mit gecroppter 2,7K-Sensorfläche arbeiten.
Da im Crop-Modus „Gecroppter Sensor" nur die mittige Sensorfläche verwendet wird, ist das Sichtfeld mit jedem beliebigen Objektiv aufgrund des Formatfaktors engter. Wird bspw. HD-Material mit einem 20mm-Objektiv im Crop-Sensormodus gefilmt, so entsprachte das Sichtfeld der Blackmagic Pocket Cinema Camera 4K dem eines 40mm-Objektivs.
These Einstellung ist für Aufnahmen mit ihrer Kamera bei einer niedrigeren als der maximalen Auflösung verfügbar, bspw. für Ultra-HD- oder HD-Video in ProRes.
Bei der Pocket Cinema Camera 6K sind die schnellsten Frameraten verfügbar, wenn in 2,8K mit einem Crop-Verhältnis von 17:9 und in HD skaliert mit der gecroppten 2,7K-Sensorfläche gefilmt wird. Bei der Pocket Cinema Camera 4K ist die schnellste Framerate im HD-Crop-Modus verfügbar.
Naheres zu den vollen und gecropten Formaten finden Sie im Abschnitt „Maximale Sensor-Frameraten".
PROJEKT-FRAMERATE
Die Projekt-Framerate bietet eine Auswahl an Frameraten, die in der Film- und Fernsehbranche gebrächlich sind. Beispiel: 23,98 Bilder pro Sekunde. Die Projekt-Framerate wird in der Regel passend zu der in Ihr Hem Postproduktions-Workflow verwendeten Wiedergabegeschwindigkeit, der Audio-Synchronisation und den Anforderungen für die Anlieferung eingestellt.
Es sind acht verschiedene Projekt-Frameraten verfügbar: 23,98; 24; 25; 29,97; 30; 50; 59,94 und 60 fps.
OFFSPEED-AUFZEICHNUNG
Standardmäßig sind die Projekt- und Sensor-Framerate auf eine natürliche Wiedergabegeschwindigkeit eingestellt. Wenn Sie jedoch auf das Schalter-Icon unter OFFSPEED-AUFZEICHNUNG tippen, können Sie ihre Sensor-Framerate selbst wahren.
OFFSPEED-FRAMERATE
Wenn Offspeed-Aufzeichnung aktiviert ist, tippen Sie auf die Pfeile unter dem Indikator für OFFSPPEED-FRAMERATE, um die Sensor-Framerate ihrer Kamera einzustellen.
Anhand der Sensor-Framerate wird vorgegeben, wie weitere Vollbilder der Sensor tatsächlich pro Sekunde aufzeichnet. Diese Framerate wirkt sich darauf aus, wie schnell oder langsam Ihr Video bei ihrer vorgegebenen Projekt-Framerate wiedergegeben wird.
Weitere Informationen zu Offspeed-Frameraten finden Sie unter „FPS" im Abschnitt „Funktionsmerkmale des Touchscreens" in dieser Handbuch.
HINWEIS Naheres zu den maximalen Bildwechselraten, die für die einzeln
Aufzechnungsformate und Codec verfügbar sind, finden Sie unter „Maximale Sensor-
Frameraten".
FÜR AUFZEICHNUNG BEVORZUGTES MEDIUM
In dieser Einstellung können Sie wahlen, welches Speichermedium ihre Blackmagic Pocket Cinema Camera zuerst bespielen soll, wenn beide Schachte belegt sind. Die Optionen lauten „CFAST Card“, „SD Card“ und „Vollste Karte“. Ob Sie „CFAST Card“ oder „SD Card“ wahren, ist eine Frage ihrer personlichen Vorliebe. Wenn Sie sich jedoch konsequent für die eine oder andere Karte entscheiden, wollen Sie immer, welche Sie bei knapp werden dem Speicherplatz zuerst austauschen müssen. Die Option „Vollste Karte“ ist hilfreich zum chronologischen Gruppieren von Dateien eines mit nur einer Kamera gefilmten Projekts.
Die gewähnte Einstellung wird angewandt, sobald eine CFast- oder SD-Karte eingeschoben wird. Sie können diese Einstellung jederzeit überschreiben, indem Sie in den Storage Manager gehen und auf den Namen einer Karte tippen, um diese zu aktivieren.ichtig: Sobald Sie eine Karte auswerfen und wieder einschieben, tritt die Einstellung für die bevorzugte Karte wieder in Kraft.
TIPP Die Einstellung „Vollste Karte" richtet sich nach dem Füllstand ihrer Speichermedien und nicht nach ihrer Kapazität oder der aufgewendeten Datenmenge.
STOPP BEI AUSLASSEN VON FRAMES
Über diese Einstellung können Sie das Verhalten ihrer Blackmagic Pocket Cinema Camera konfigurieren, wenn fallengelassene Frames erkannt werden. Ist diese Option deaktiviert, wirdriotz fallengelassener Frames weiter aufgezeichnet. Ist sie aktiviert, stoppt ihre Kamera die Aufzeichnung, wenn fallengelassene Frames erkannt werden. Dies verhindert, dass Sie kosbare Zeit mit dem Aufziehnen unbrauchbaren Materials vergeuden, weil Sie den Indikator fur ausgelassene Bilder nicht bemerkt haben.
TIPP Wie man vermeidet, dass Frames fallengelassen werden, wird im Abschnitt „Speichermedien" erklär.
AUFNAHME-Einstellungen Seite 3
Die dritte Seite der AUFNAHME-Einstellungen bietet folgende Optionen:

TIMELAPSE
These Einstellung aktiviert die Timelapse-Funktion, um automatisch Standbilder in folgenden Intervallen aufzunehmen:
Frames 2-10
Sekunden 1-10,20,30,40,50
Minutes 1-10
Sie konnen bspw. festlegen, dass die Kamera nach je 10 Vollbildern, alle 5 Sekunden, alle 30 Sekunden oder alle 5 Minuten ein Standbild aufnimmt.
Die Zeitraffer-Funktion bietet wie kreative Mochlichkeiten. Beisiel: Wenn ein Timelapse-Interval von zwei Frames eingestellt ist, ergibt dies bei der Wiedergabe des aufgezeichneten Videos einen stroboskopischen Effekt.
Beginnen Sie mit der Aufzeichnung, indem Sie die Aufnahmetaste drucken. Durch erneutes Drucken der Taste wird die Aufzeichnung gestoppt und die Zeitraffer-Seqenz als einzelner Clip entsprechend des auf ihrer Kamera eingestelltten Codec's und der Framerate gespeichert. Sie konnen die Zeitraffer-Seqenz damit möglich wie jeder anderen aufgenommenen Clip in Ihr Postproduktion's-Timeline ablegen.

1 A001
120m

A002
96m
Das in den Aufnahme-Button eingeblendete Icon zeigt den Zeitraffermodus an
TIPP Wenn Sie bei aktiviertem Timelapse-Modus filmen,actualisiert sich der Timecode-Zahler mit dem aufgenommenen Videoframe.
DETAILSCHÄRFUNG
These Einstellung dient zur Scharfung des Bildes. Bei aktivierter Detailscharfung konnen Sie den Scharfungsgrad erhöhen oder verringn, indem Sie "Niedrig", "Mittel" oder "Hoch" wahlen.
Wenn die Schärfung aktiviert ist, wird diese auf das von der Kamera aufgezeichnete ProRes-Video und auf die HDMI-Ausgabe angewendet.
These Einstellung eignet sich für Live-StudioproDUCTIONen, die live übertragen werden und keine Zeit für die Postproduktion halten. Sollen ihre Bilder nach der Aufzeichnung weiter bearbeitet werden, empfehlen wir, diese Einstellung auszuschalten. Wenn der Codec auf Blackmagic RAW eingestellt ist, ist die Detailscharfung deaktiviert.
LUT IM CLIP AUFZEICHNEN
Standardmäßig werden LUTs von ihrer Blackmagic Pocket Cinema Camera weder auf aufgenommene Footage angewendet noch eingebrannt. Sie können diese Vorgänge jedoch aktivieren, indem Sie auf das Schalter-Icon unter LUT IM CLIP AUFZEICHNEN tippen.
These Option kann nutzlich sein, wenn Sie in der Postproduktion keine Zeit für das Grading ihrer Footage haben oder die Footage direkt an den Kunden oder Editor übergeben werden muss. Weitere Informationen hierzu finden Sie in den Abschnitten „3D-LUTs" und „Bedienung per Touchscreen".
LUT IN DATEI ANWENDEN
Wenn Sie mit dem Blackmagic-RAW-Codec filmen und eine LUT auf die HDMI-Ausgabe ihrer Kamera anwenden, wird die ausgewählte LUT beim Aufzeichen in die Blackmagic-RAW-Datei eingebettet. Die LUT wird in den Kopfdaten der Datie gespeichert und lasst sich in der Postproduktion muhelos auf den Clip anwenden. Man muss also keine separate Datie handhaben. Steht der Schalter LUT IN DATEI ANWENDEN im AUFNAHME-MENU auf EIN, wird dieser Clip beim Offnen im Blackmagic-RAW-Player und in DaVinci Resolve mit der angewendeten LUT dargestellt. Die LUT lasst sich leicht ein- und ausschalten. Sie ist aber immer in der Blackmagic-RAW-Datei enthalten, da die entsprechenden Daten im Clip selbst gespeichert sind.
In DaVinci Resolve bietet das Menu mit den RAW-Einstellungen einen „Apply LUT“-Schalter, mit dem sich die 3D-LUT in der Blackmagic-RAW-Datei de-bzw. aktivieren lasst. Die „Apply LUT“-Einstellung in DaVinci ResolveGLEcht der Einstellung in der Kamera. Dies ermoGlicht Ihnen schon beim Dreh, den Coloristen anhand der in der Kamera eingeselten LUT eine Orientierungshilfe zu geben. Diese LUT kann in DaVinci Resolve aber einfach deaktiviert werden, indem man „Apply LUT“ auf OFF setzen.
Dateinamenskonventionen
Je nach Ihr ausgewählten Format werden Clips im Blackmagic-RAW- oder ProRes-QuickTime-Movie-Format auf ihre CFast- bzw. SD-Karte oder Ihr USB-C-Laufwerk aufgezeichnet.
Die nachstehende Tabelle zeigt ein Beispiel der Namenskonvention:
A001_0815152_C001.mov QuickTime-Movie-Dateiname
| A001_08151512_C001.mov Kamera-Index | |
| A001_08151512_C001.mov | Bandnummer |
| A001_08151512_C001.mov | Monat |
| A001_08151512_C001.mov Tag | |
| A001_08151512_C001.mov Stunde | |
| A001_08151512_C001.mov | Minute |
| A001_08151512_C001.mov | Clip-Nummer |
Die Benennung von Bildern, die mit der Still-Taste erfasst wurden, erfolgt gemäß der für Videoclips üblichen Namenskonvention. Die letzten vier Zeichen des Dateinamens (z. B. „S001") gebenstatt der Clip-Nummer die Nummer des Standbilds an. Wie Sie den Kamera-Index ändern, wird im Abschnitt „Projektmetadataen" erhärt.
MONITOR-Einstellungen
Über die MONITOR-Registerkarte konnen Sie Statustext, Overlays und andere Monitoring-Optionen für den LCD-Touchscreen sowie den HDMI-Ausgang ihrer Blackmagic Pocket Cinema Camera anpassen. Die Optionen sind nach Ausgabe in „LCD“, „HDMI“ und „Beide“ unterheit. Letzteres umfasst Monitoreinstellungen, die sich sowohl auf die LCD- als auch die HDMI-Ausgabe auswirken. Die Menüs bestehen jeweils aus zwei Seiten, zu denen Sie jeweils über die Pfeilsymbole am Rand der Kamera oder durch Wischen nach links oder rechts gelangen.
MONITOR-Einstellungen Seite 1
Die erste Seite der MONITOR-Registerkarte betet identische Einstellungen fur jeder Ausgabe. Beispiel: Sie konnen Zebra fur den LCD-Touchscreen aktivieren, aber fur die HDMI-Ausgabe ausschalten.
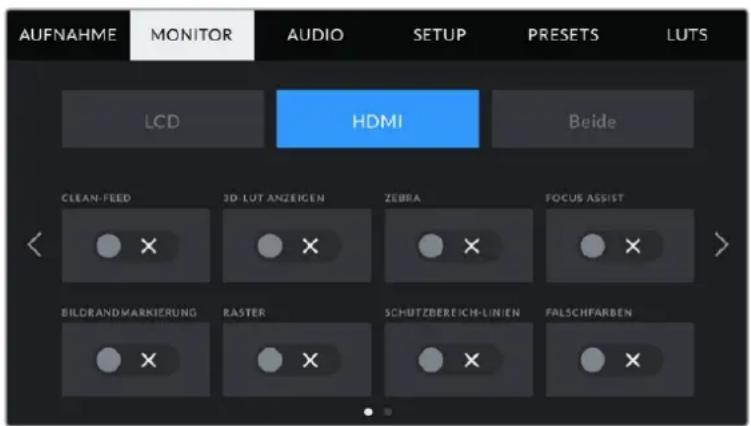
CLEAN-FEED
Tippen Sie auf das Schalter-Icon unter CLEAN-FEED im „LCD“- oder „HDMI“-Menu, um den gesamten Statustext und alle Overlays für die jeweilige Ausgabe außer des Aufnahme-Tally-Indikators zu deaktivieren.

Selbst im Clean-Feed-Modus zeigt ihre Kamera einen Aufnahme-Tally an
HINWEIS LUTs werden auch bei aktiviertem Clean-Feed auf die Ausgaben angwendet. LUTs lassen sich deaktivieren, indem Sie im MONITOR-MENU die Option 3D-LUT ANZEIGEN deaktivieren.
3D-LUT ANZEIGEN
Ohre Blackmagic Pocket Cinema Camera kann 3D-LUTs auf jeder beliebige Ausgabe anwenden, um den Look von gegradeten Material anzupassen. Diese Option ist vor allem bei der Aufzeichnung im Dynamikumfang „Film" hilfreich.
Ist auf Ihrer Kamera eine 3D-LUT aktiviert, verwenden Sie diese Einstellung, um die LUT auf ihren LCD-Touchscreen oder die HDMI-Ausgabe anzuwenden.
Naheres zum Laden und zur Anwendung von 3D-LUTs finden Sie im Abschnitt „3D-LUTs" in diesen Handbuch.
Um Monitoring-Optionen für den LCD-Touchscreen und die HDMI-Ausgabe zu aktivieren, tippen Sie auf die entsprachenden Schalter unter „LCD“ oder „HDMI“: FOCUS ASSIST, BILDRANDMARKIERUNG, RASTER, SCHUTZBEREICHLINIEN und FALSCHFARBEN.
ZEBRA
Tippen Sie auf das Schalter-Icon unter ZEBRA im „LCD“- oder „HDMI“-Menu, um die Zebra-Funktion für diese Ausgaben zu aktivieren. Weitere Informationen zur Zebra-Funktion und wie Sie deren Grad einstellen, finden Sie im Abschnitt „Funktionsmerkmale des Touchscreens" in dieser Handbuch.
FOCUS ASSIST
Tippen Sie auf das Schalter-Icon unter FOCUS ASSIST im „LCD“- oder „HDMI“-Menu, um die Fokussierhilfe für diese Ausgaben zu aktivieren. Weitere Informationen zur Fokussierhülfe finden Sie im Abschnitt „Funktionsmerkmale des Touchscreens" in this dem Handbuch.
BILDRANDMARKIERUNG
Tippen Sie auf das Schalter-Icon unter BILDRANDMARKIERUNG im „LCD“- oder „HDMI“-Menu, um die Bildbrandmarkierungs-Funktion für diese Ausgaben zu aktivieren. Weitere Informationen zu Bildbrandmarkierungen und wie Sie diese auswahlen, finden Sie im Abschnitt „Funktionsmerkmale des Touchscreens" in this dem Handbuch.
RASTER
Tippen Sie auf das Schalter-Icon unter RASTER im „LCD“- oder „HDMI“-Menu, um die Raster-Funktion für diese Ausgaben zu aktivieren. Weitere Informationen zum Raster entsprechend der Drittel-Regel finden Sie im Abschnitt „Funktionsmerkmale des Touchscreens" in dieser Handbuch.
SCHUTZBEREICH-LINIEN
Tippen Sie auf das Schalter-Icon unter SCHUTZBEEREICH-LINIEN im „LCD“- oder „HDMI“-Menu, um das Schutzbereich-Overlay für diese Ausgaben zu aktivieren. Weitere Informationen zu Schutzbereichen finden Sie im Abschnitt „Funktionsmerkmale des Touchscreens" in dieser Handbuch.
HINWEIS Bestimmen Sie die Großdes sendesicheren Bereichs über die Einstellung SCHUTZBEEREICH-LINIEN % unter „Beide" in den MONITOR-Einstellungen ihrer Blackmagic Pocket Cinema Camera.
FALSCHFARBEN
Tippen Sie auf das Schalter-Icon unter FALSCHARBEN im „LCD“-, oder „HDMI“-Menu, um die Belichtungshilfe durch die Falschfarbendarstellung für diese Ausgaben zu aktivieren. Weitere Informationen zur Verwendung der Falschfarben-Funktion finden Sie im Abschnitt „Funktionsmerkmale des Touchscreens" in this dem Handbuch.
MONITOR-Einstellungen „LCD" Seite 2
Die Einstellungen auf der zweiten Seite der MONITOR-Registerkarte beziehen sich ausschließlich auf den LCD-Touchscreen.

STATUSTEXT gibt Ohnen ein klares Vorschaubild Ihrer Blackmagic Pocket Cinema Camera
STATUSEXT
Mit dieser Einstellung konnen Sie den Statustext und die Pegelmeter auf Ihrm LCD-Touchscreen ausblenden. Dann werden lediglich die fur die Komposition oder Regie einer Einstellung nötigen Informationen angezeigt. Um die Anzeige von Statustext und Pegelmetern auf dem LCD-Touchscreen zuändern, tippen Sie auf das Schalter-Icon für STATUSTEXT. Falls aktiviert, bleiben Overlays wie Bildrandmarkierungen, Raster, Focus Assist und Zebra sightbar. Alternativ wechseln Sie die Anzeigen, indem Sie auf dem LCD-Touchscreen nach oben oder unter wischen.
DISPLAY
Anstelle des Histogramms und den Audiogelmetern zeigt ihre Kamera in der linken und rechten unter Ecke des LCD-Touchscreens wahlweise Codec- und Auflösungsinformationen an. Dies ist nutzlich, wenn Sie lieber die Falschfarben-Darstellung als Belichtungshilfe verwenden oder Ton separat aufzeichen möchten. Oder setzen Sie sich an der Stelle, wo normalerweise das Histogramm oder die Audiogelmeter erscheinen, zusätzliche Informationen anziegen.
Tippen Sie im LCD-Menu einfach auf „Pegelmeter“ oder „Codec und Auflösung“, um die bevorzugte Ansicht auszuwahlen.
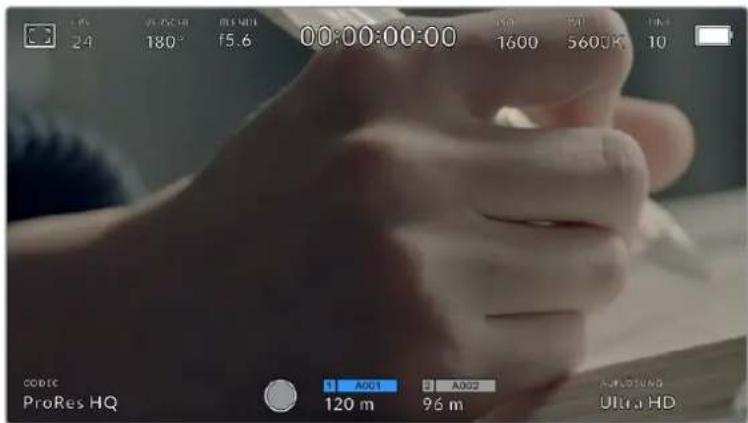
Ohre Blackmagic Pocket Cinema Camera kann anstelle von Histogramm und Audiopegelmetern Codec- und Auflösungsinformationen anzelgen
BILDSCHIRM-HELLIGKEIT
Ziehen Sie den Schieberegler unter BILDSCHIRM-HELLIGKEIT im LCD-MENU nach links oder rechts, um die Helligkeit Ihr's LCD-Touchscreens anzupassen.
MONITOR-Einstellungen „HDMI" Seite 2
Die Einstellungen auf der zweiten Seite des HDMI-Tabs beziehen sich ausschließlich auf den HDMI-Ausgang.
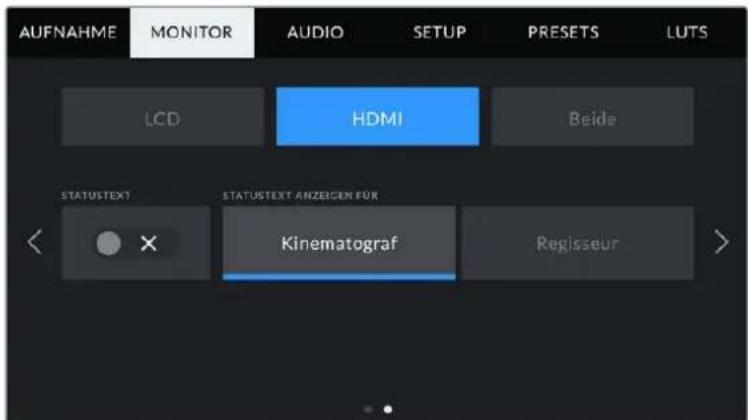
STATUSTEXT
These Einstellung kann nutzlich sein, um den Statustext und die Pegelmesser auf ihrer HDMI-Ausgabe zu verbergen und lediglich die für die Komposition oder Regie einer Aufnahme nötigen Informationen anzuzeigen. Tippen Sie im HDMI-Menu auf das Schalter-Icon für STATUSTEXT, um die Darstellung des Statustexts und der Pegelmeter einzustellen. Falls aktiviert, bleiben Overlays wie Bildrandmarkierungen, Raster, Focus Assist und Zebra sightbar.
Um den Statustext und die Pegelmeter auf dem Touchscreen zu verbergen oder einzublenden, wischen Sie einfach nach oben oder unter.
STATUSTEXT ANZEIGEN FÜR Kinematograf/Reglsseur
Auf dem LCD-Touchscreen werden Informationen wie ISO, Weisabgleich und Blendeneinstellungen angezeigt. Das ist sehr hilfreich für den Kameraoperator oder Kinematografen, der die Kamera für individuelle Shots einstellt. Über den HDMI-Ausgang ihrer Kamera konnen jedoch zusätzlich Informationen angezeigt werden, die dem Regisseur oder Script Supervisor dienen, der mehrere Shots bzw. Kamas im Auge gehalten miss.

Ohre Blackmagic Pocket Cinema Camera kann in der HDMIAusgabe Statustext fur den Regisseur anzeigen
Wenn Sie in den Monitoreinstellungen für HDMI unter STATUSTEXT die Option „Regisseur“ wahren, werden die folgenden Informationen angezeigt:
FPS
Zeigt die aktuell ausgewählte Framerate in Bildern pro Sekunde an. Ist OFFSPEED-FRAMERATE deaktiviert, wird nur die Projekt-Framerate angezeigt. Wird von einer Offspeed-Framerate Gebrauch gemacht, erscheint die Sensor-Framerate gefolggt von der Projekt-Framerate.
KAM.
Zeigt den Kamera-Index gemäß der Slate-Einstellungen ihrer Kamera an. Weitere Informationen hierzu finden Sie im Abschnitt „Die Slate".
OPERATOR
Identifiziert den Kamerabediener gemäß der Slate-Einstellungen ihrer Kamera. Weitere Informationen hierzu finden Sie im Abschnitt „Die Slate".
DAUERANZEIGE
Zeigt die Dauer des aktuellen Clips während der Aufzeichnung oder des vorherigen Clips im Format Stunden:Minuten:Skunden an.
REEL, SZENE, TAKE
Zeigt das aktuelle Band, die Szene und den Take an. Weitere Informationen zu Bändern, Szenen und Takes sowie deren Kennzeichnungskonventionen finden Sie im Abschnitt „Die Slate" in this dem Handbuch.
DYNAMIKUMFANG
Links unter auf dem Touchscreen wird – sofern für die jeweilige Ausgabe aktiviert – die derzeit angewendete LUT angezeigt. Wirkeine LUT angewendet, erscheidt der Dynamikumfang „Film“ bzw. „Video".
TIMECODE
Rechts unten auf dem Touchscreen erscheint der Kamera-Timecode im Format
Stunden:Minuten:Sekunden:Frames.
MONITOR-Einstellungen „Beide" Seite 1
Die Monitoreinstellungen, die sowohl die LCD- als auch die HDMI-Ausgabe betreffen, sind unter dem Tab "Beide" zusammengefasst. Setzen Sie die Option „SCHUTZBEREICH-LINIEN %" in dieser Menu bspw. für die LCD- und HDMI-Ausgabe auf 90%, dann wird diese Einstellung auf beiden Ausgaben angewendet.
Die Monitoringeinstellungen fur „Beide" gehen über zwei Seiten und bieten folgende Einstellungen:
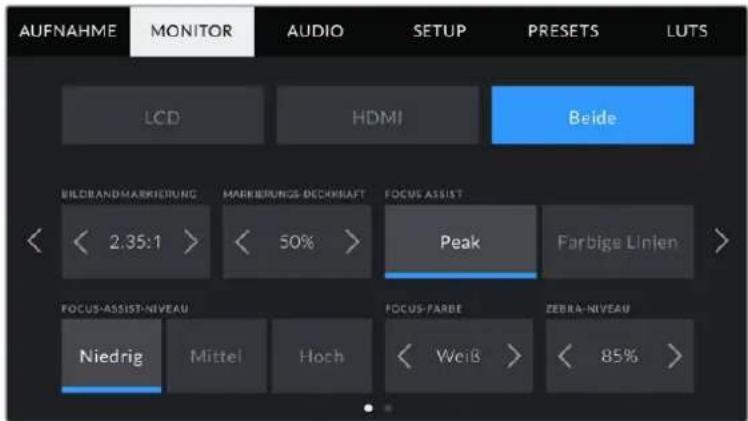
BILDRAND-MARKIERUNGEN
Tippen Sie unter BILDRAND-MARKIERUNGEN auf die Pfeile, um durch alle Ausgabeoptionen ihrer Kamera zu navigieren. Die Optionen werden im Abschnitt „Funktionsmerkmale des Touchscreens" in dieser Handbuch;naher erlautert und sind zudem über das LCD-Monitoringmenu auf Ihr LCD-Touchscreen abrubar. Hier sei erwähnt, dass Bildrandmarkierungen fur den LCD-Touchscreen und die HDMI-Ausgabe auch separat uber den jeweiligen Tab im MONITOR-Menu ausgewaht werden konnen.
MARKIERUNGS-DECKKRAFT
Tippen Sie auf die Pfeile unter MARKIERUNGS-DECKKRAFT, um die Deckkraft der Bildrandmarkierungen für ihren LCD-Touchscreen und die HDMI-Ausgabe festzulegen. Es gibt folgende Optionen: 25%, 50%, 75% und 100%.
FOCUS ASSIST
Ohre Kamera verfugt uber die zwei Focus-Assist-Modi „Peak" und „Farbige Linien".
| Peak | Ist der „Peak“-Modus für Focus Assist ausgewähl, werden die fokussierten Bereiche in Ihrer Einstellung auf dem LCD-Touchscreen oder über den HDMI-Ausgang extem scharf dargestellt, jedoch nicht im aufgezeichneten Bild selbst. Auf diese Weise haben sich fokussierte Bereiche in Ihrer Einstellung vom unschärften Hintergrund ab. Da keine weiteren Overlays verwendet werden, ist dies eine sehr intuitive Art des Fokussierens. Besonderss dann, wenn sich das zu fokussierende Objekt deutlich von den anderen Elementen in der Einstellung abhebt. |
| Farbige Linien | Ist die Option „Farbige Linien“ ausgewähl, werden die fokussierten Bereiche im Bild mit Farbigen Linien überlagert. Dies ist etwas auffälliger als die „Peak“-Option, da die Linien/genau auf dem Bild erschienen. In Einstellungen mit vielen sightbaren Elementen ist es jedoch eine(PRzise Fokussierhilfe). |
FOCUS-ASSIST-NIVEAU
Den Grad der Fokussierhile für den LCD-Touchscreen und den HDMI-Ausgang können Sie auf „Niedrig“, „Mittel" oder „Hoch" einstehen.
HINWEIS Das Einstellen der Stärke der Fokussierhilde erfolgt unabhängig davon, ob Focus Assist für den LCD-Touchscreen oder für den HDMI-Ausgang ihrer Blackmagic Pocket Cinema Camera aktiviert ist. Schalten Sie die Fokussierhilde deshalb einzel im jeweiligen MONITOR-MENU für die LCD- und die HDMI-Ausgabe ein.
TIPP Der optimale Grad der Fokussierhilde variiert von Einstellung zu Einstellung. Wird bspw. auf Darsteller scharf gestellt, empfehl't sich eine stärkere Fokussierhilde, um mehr Einzelheiten an den Konturen der Gesichter festzuhalten. Bei einer Einstellung von Blatt- oder Mauerwerk wurden die darauf zusammen erfassten Details womglich ablenkend wirken.
FOCUS-FARBE
Wenn Sie unter FOCUS ASSIST die Option „Farbige Linien" aktiviert haben,ändert sie hier die Farbe der Fokuslinien. Eine Farbänderung der Fokuslinien kann nutzlich sein, um die Linien vom übrigen Bild zu untersenden. Die verfügbaren Optionen sind „Weiß", „Rot", „Grün", „Blau" und „Schwarz".
ZEBRA-NIVEAU
Tippen Sie auf die Pfeile, um die Intensität von Zebra einzustellen. Die Intensität kann in 5%-Sritten auf 75-100% eingestellt werden.
Weitere Informationen zur Zebra-Funktion finden Sie im Abschnitt „Funktionsmerkmale des Touchscreens" in dieser Handbuch.
MONITOR-Einstellungen „Beide" Seite 2
Die zweite Seite der MONITOR-Einstellungen bietet unter Beide' folgende Optionen:
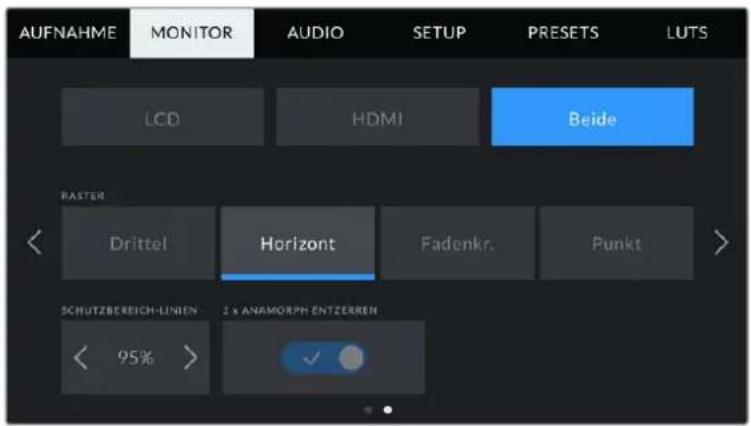
Seite 2 der Bildschirmoptionen fur LCD und HDMI
RASTER
Um einzustellen, welche Kombination aus Rastern und Fadenkreuz Sie auf dem LCD-Touchscreen ihrer Kamera sowie in der HDMI-Ausgabe anzeigen wollen, tippen Sie auf die Optionen „Drittel", „Horizont", „Fadenkreuz" oder „Punkt".
Weitere Informationen finden Sie unter „Raster" im Abschnitt „Funktionsmerkmale des Touchscreens".
SCHUTZBEREICH-LINIEN %
Passen Sie die Größe des Schutzbereich-Overlays auf dem LCD-Touchscreen und der HDMI-Ausgabe an, indem Sie auf die Pfeile neben der Prozentangabe tippen. Die Prozentzahl drückt die Größe des Schutzbereichs im Verhältnis zum Gesamtbild aus. Die meisten Fernsehsender verlangen einen sendesicheren Bereich von 90 %.
ANAMORPH ENTZERREN
Die Pocket Cinema Camera kann die Touchscreen- und HDMI-Ausgaben anamorph entzerren. Für 16:9- und 17:9-Formate können Sie „1,33 x ANAMORPH ENTZERREN" aktivieren. Wenn Sie auf der Pocket Cinema Camera 6K im Format „3,7K anamorph" oder auf der Pocket Cinema Camera 4K in „2,8K anamorph" aufnehmen,wendet die Kamera automatisch den Vorgang „2 x ANAMORPH ENTZERREN" an.
AUDIO-Einstellungen
Auf der AUDIO-Registerkarte lässt sich die Audioeingabe und Monitoringeinstellungen ihrer Kamera anpassen.
Die Audioeinstellungen Ihr Kamera umfassen zwei Seiten, aufgeleit in KANAL 1 und KANAL 2.
Jeder Audiokanal kann einer anderen Quelle zugewiesen werden. Ebenso lassen sich diverse Einstellungen wie „Gain" anpassen.
AUDIO-Einstellungen Seite 1
Die erste Seite der AUDIO-Registerkarte bietet folgende Optionen:
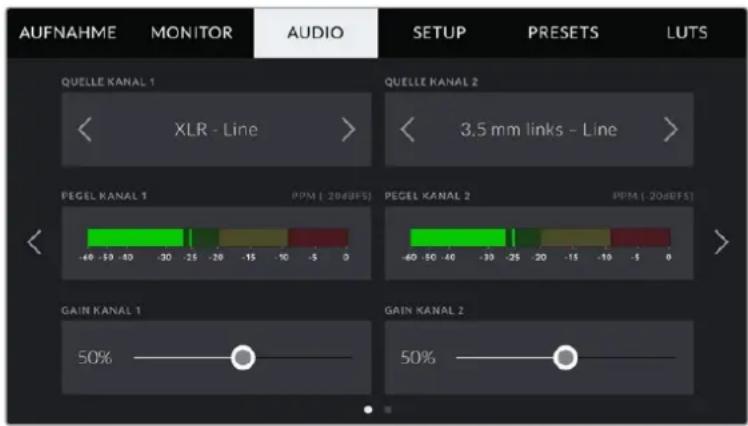
Kanalquelle
Mit den Schaltflächen QUELLE KANAL 1 und QUELLE KANAL 2 wahren Sie ihre Audioquelle für die einzelnen Audiokanäe aus. Nachstehend werden die einzelnen Quell-Einstellungen der Kanäe beschreiben.
- Kamera - links / Kamera - rechts
Nimmt mit den internen Kameramikrofonen auf.
Kamera-Mono
Erstellt einen einzelnen Audiokanal aus dem linken und rechten Kanal des internen Mikrofons ihrer Blackmagic Pocket Cinema Camera.
- XLR - Line
Verwendet den XLR-Eingang ihrer Kamera, um Leitungspegel-Audio (Line") aufzuzeichnen.
XLR-Mic
Erfasst Mikrofonpegel-Audio über den XLR-Eingang ihrer Kamera. Ist Phantomspeisung aktiviert und Ihr XLR-Eingang auf „Mic" eingestellt, wird hier zusätzlich der +48V-Indikator eingebrendet.
Stellen Sie sicher, dass der +48V-Schalter deaktiviert ist, wenn Sie Ihr phantomgespeistes Mikrofon entfern.
3,5 mm links - Line
Verwendet nur den linken Kanal des 3,5mm-Eingangs für Mikrofonpegel-Audio.
3.5 mm rechts - Line
Verwendet nur den rechten Kanal des 3,5mm-Eingangs für Mikrofonpegel-Audio.
3,5mm Mono - Line
Erstellt über den 3,5mm-Eingang einen Mono-Mix aus dem linken und rechten Kanal für Mikrofonpegel-Audio.
3,5 mm links - Mic
Verwendet nur den linken Kanal des 3,5mm-Eingangs für Mikrofonpegel-Audio.
3,5 mm rechts - Mic
Verwendet nur den rechten Kanal des 3,5mm-Eingangs für Mikrofonpegel-Audio.
3,5 mm Mono - Mic
Erstellt über den 3,5mm-Eingang einen Mono-Mix aus dem linken und rechten Kanal für Mikrofonpegel-Audio.
Keine
Deaktiviert ihren Audiokanal.
HINWEIS Bei Verwendung des 3,5mm-Eingangs als Audioquelle müssen sowohl Kanal 1 als auch Kanal 2 entweder auf Leitungs- oder Mikrofonpegel eingestellt sein. Wenn Sie ^3,5 mm links - Line" als Quele für Kanal 1 auswahlen, konnen Sie fur Kanal 2 bereitsur Leitungspegel-Audio benutzen: ^3,5 mm links - Line", ^3,5 mm rechts - Line" und ^3,5 mm Mono - Line". Die Mikrofonpegeloptionen sind in thisem Fall ausgegraut.
Pegel Kanal 1/2
Die Pegelmeter helfen Ihnen bei der Aussteuerung des Audiopegels.
Gain Kanal 1/2
Mit diesen Schiebereglern steuern Sie die Aufzeichnungspiegel für ihre ausgewählten Kanalquellen 1 und 2 aus.
AUDIO-Einstellungen Seite 2
Die zweite Seite der AUDIO-Registerkarte betet folgende Optionen:
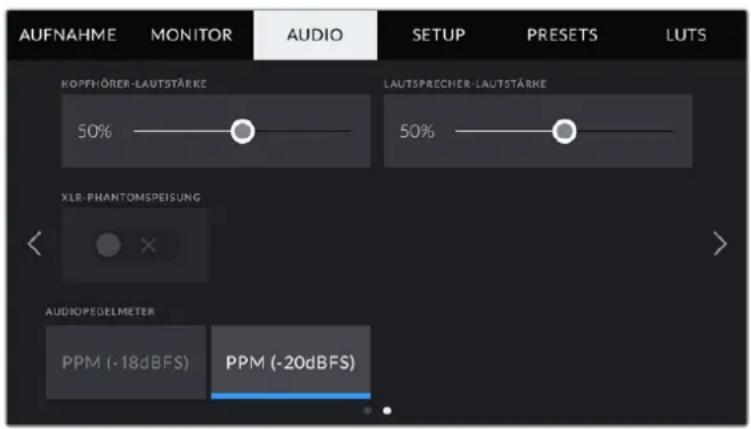
KOPFHÖRER-LAUTSTARKE
Mit dem Schieberegler passen Sie die Ausgabepegel für Kopfhörer an, die an die 3,5mm-Buchse angeschlossen sind. Bewegen Sie den Audio-Schieberegler zum Justieren der Pegel nach links oder rechts.
LAUTSPRECHER-LAUTSTARKE
Dieser Schieberegler passt die Ausgabepegel der eingebauten Laufsprecher an. Bewegen Sie den Audio-Schieberegler zum Justieren der Pegel nach links oder rechts.
XLR-PHANTOMSPEISUNG
Über die XLR-Eingänge ihrer Kamera konnen externe Mikrofone ohne Eigenversorgung mit 48V-Phantomstrom gespeist werden. Ist ihre Kamera auf den XLR-Audioeingang eingestellt, tippen Sie einfach auf das Schalter-Icon unter PHANTOMSPEISUNG, um diese zu aktivieren.
AUDIOPEGELMETER
Wahlen Sie einen Audiogelstandard fur die Peakmeter aus.
| Audiogeleinstellung Standard |
| PPM (-20 dBFS) SMPTE RP.0155 |
| PPM (-18 dBFS) EBU R.68 |
HINWEIS Es ist üblich, zuerst das XLR-Kabel anzuschreiben und danach die Phantomspeigung einzuschalten. Schalten Sie die Phantomspeigung unbedingt auch aus, wenn kein phantomgespeistes Mikrofon mehr angeschlossen ist. Werden bei aktiver Phantomspeigung Geräte angeschlossen, die keine Phantomspeigung benötgigen, beschädigt dies möglicherweise Ihr Equipment, da die Kamera in thisem Modus Strom ausgibt. Es kann zudem nach Ausschalten der Kamera eine betrachtliche Zeit für die Entlung von Phantomspannung vergeben.
Denken Sie daran, nach Ausschalten der Phantomspeisung eine Minute abzuwarten, bevor Sie andere Mikrofone oder XLR-Audiogeräne anschließen.
SETUP-Einstellungen
Auf der SETUP-Registerkarte findsie Identikationseinstellungen, die Softwareversion, Einstellungsmoglichkeiten fur die Funktionstasten und andere Kameraeinstellungen ihrer Blackmagic Pocket Cinema Camera. Letztere stehen nicht in direktem Zusammenhang mit Aufzeichnung und Monitoring. Das Menu unter dieser Registerkarte umfasst vier Seiten, zu denen Sie jeweils uber die Pfeilsymbole am Rand des LCD-Touchscreens oder durch Wischen nach links oder rechts gelangen.
SETUP-Einstellungen Seite 1
Die erste Seite der SETUP-Registrarkarte Ihrer Kamera bietet folgende Einstellungen:
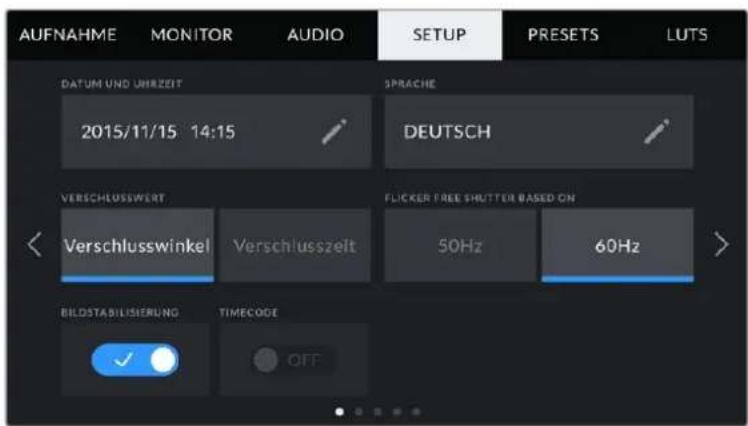
DATUM UND UHRZEIT
Tippen Sie auf DATUM UND UHRZEIT, um diese Daten auf ihrer Kamera einzustellen. Das Datenformat wird in Jahr/Monat/Tag angezeigt, die Uhrzeit im 24-Stunden-Format. Wenn keine externe Timecode-Quelle angeschlossen ist, werden diese Einstellungen auch fur den Uhrzeit-Timecode verwendet.
SPRACHE
Die Pocket Cinema Camera understands itself verbreitete Sprachen: Englisch, Deutsch, Französisch, Italienisch, Spanish, Portugiesisch, Russisch, Türkisch, Chinesisch, Japanisch und Koreanisch.
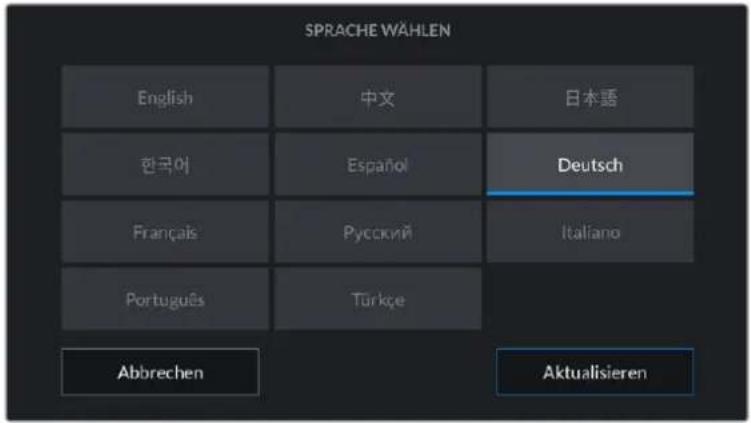
Die Seite mit der Sprachauswahl wird Ohnen auch beim ersten Hochfahren und nach jedem Update der Produktsoftware Ihrer Kamera angezeigt.
So wahlen Sie ihre Sprache:
Tippen Sie zuerst auf SPRACHE und dann auf die gewünschte Sprache.
2 Tippen Sie auf „Aktualisieren“, um zur Registerkarte SETUP zurückzukehren.
VERSCHLUSSWERT
Verwenden Sie diese Einstellung, um auszuwahlen, ob Verschlusswerte als Verschlusswinkel oder Verschlusszeit angezeigt werden sollen.
Hier seit erwähnt, dass sich der Verschluss unter Einsatz der Verschlusswinkel-Einstellung nach der Framerate richtig. Beispiel: Eine Einstellung von 180 Grad erzeugt immer dieselbe Bewegungsunscharfe, unabhängig von ihrer verwendeten Framerate.
Bei Verwendung der Verschlusszeit-Einstellung, wird dem Verschluss ein absoluter Wert zugewiesen, unabhängig von der Framerate. Somitändert sich das Ergebnis, wenn Sie die Framerateändern.
Wenn Sie bspw. mit 24 fps filmen, erzeugt eine Verschlusszeit von 1/48 Sekunde als Entsprechung zu einem Verschlusswinkel von 180 Grad eine für das Auge angenehme Bewegungsunscharfe. Sobald Sie die Framerate auf 48 fps setzen, erzeugt die Verschlusszeit-Einstellung von 1/48 Sekunde nicht länger dieselbe Bewegungsunscharfe, sondern die Entsprechung zu einem Verschlusswinkel von 360 Grad. Sobald also die Framerate auf 48 fps gesetzt ist, muss die Verschlusszeit auf 1/96 Sekunde gesetzt werden, um den gleichen Effekt zu erzielen wie bei einem Verschlusswinkel von 180 Grad.
FLICKERFREIER VERSCHLUSS BEI
Hier konnen Sie die von ihrer Kamera verwendete Netzfrequenz einstellen. Auf der Basis dieser Hz-Werte berechnet die Kamera flimmerfreie Verschlussseinstellungen.
Beim Drehen in Kunstlicht macht der gewähte Verschlusswert auftretendes Flimmern ggf. stärker sightbar. Ihr Blackmagic Pocket Cinema Camera berechnet glimmerfreie Verschlusswerte automatisch anhand der aktuellen Framerate und schlägt Ohnen bis zu drei Verschlusswerte vor. Verschlusswerte hangen von der lokalen Netzfrequenz ab, mit der die Lampen betrieben werden. In den meisten PAL-Ländern liegt die Frequenz bei 50 Hz, in NTSC-Ländern in der Regel bei 60 Hz. Tippen Sie entsprechend ihrer Region auf „50 Hz" oder „60 Hz".
HINWEIS Aufgrund der Eigenschaften verschiedener Lichtquellen kann es selbst mit "flimmerfreien" Verschlusswerten zu Flimmern kommt. Wir empfehlen Ohnen daher, bei unregelmäßigem Licht einen Probedreh vorzunehmen.
BILDSTABILISIERUNG
Mit der Option BILDSTABILISIERUNG aktivieren oder deaktivieren Sie die Bildstabilisierung von Objektiven ohne physischen Schalter.
TIMEC.AUSGELASSENES BILD
Aktivieren Sie TIMEC, AUSGELASSENES BILD, um bei NTSC-Projekt-Frameraten von 29,97 und 59,94 Drop-Frame-Timecode zu verwenden. Drop-Frame-Timecode überspringt in regelmäßigen Abständen eine geringe Anzahl an Einzelbildern vom Timecode. So haben Sie immer den richtigen Timecode, auch wenn bei NTSC-Frameraten nicht jeder Sekunde die Gesamtzahl von Einzelbildern enthalt.
SETUP-Einstellungen Seite 2
Die zweite Seite der SETUP-Registerkarte betet folgende Optionen:
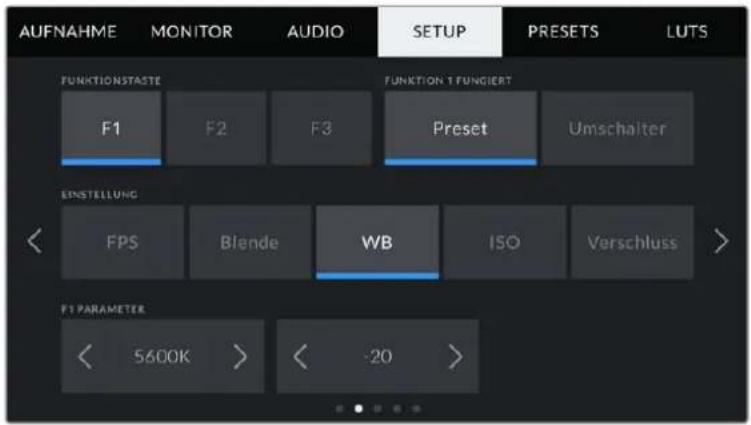
FUNKTIONSTASTE EINRICHTE
Die Blackmagic Pocket Cinema Camera hat offen drei Funktionstasten. Die Punkte auf den Tasten stehen für Funktion 1, Funktion 2 und Funktion 3. Den Tasten könnenhäufig verwendete Funktionen zugewiesen werden, die dann bei Einsatz ihrer Kamera schnell abrufbar sind.
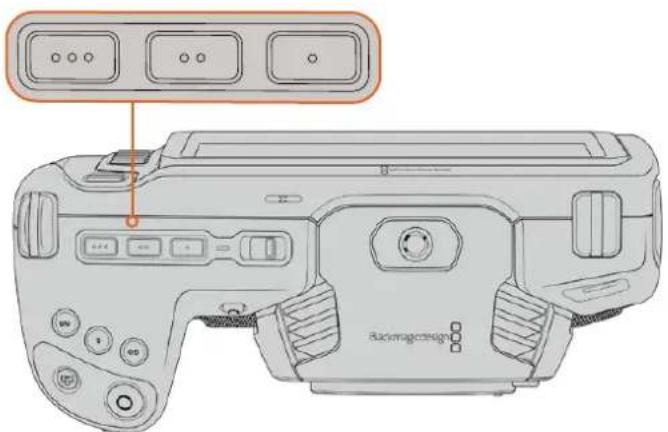
Die Funktionstasten offen auf ihrer Kamera sind mit Punkten gekennzeichnet.
Um die Tasten zu belegen, wahren Sie zunachst eine Funktionstaste und anschließend ihr Verhalten, eine Einstellung und gewünschte Parameter für diese Funktion aus.
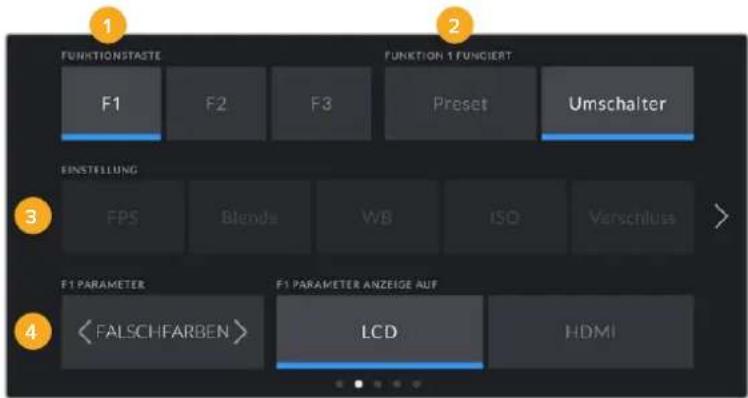
1 Taste 2 Verhalten 3 Einstellung 4 Parameter
Die Funktionstaste 1/2/3 fungiert als Preset oder Umschalter
Nach Auswahr der zu belegenden Funktionstaste konnen Sie ihr Verhalten bestimmen. Es gibt folgende Moglichkeiten:
| Preset | Bei aktiviertem Voreinstellungsmodus ruft das Drücken dieser Taste eine Kombination aus einer Einstellung und einem Parameter ab. Um ein Preset festzulegen, wahren Sie aus dem EINSTELLUNGS-Menu eine gewünschte Einstellung und passen Sie sie mithilfe der Pfeile links und rechts des PARAMETER-Menü an. Beispiel: Um Taste F1 mit einem Preset für die Blendenzahl F8 zu belegen, wahren Sie „Preset". Tippen Sie dann auf „Blende" und anschließend auf die Pfeile im PARAMETER-Menu, bis Sie „8.0" angezeigt bestehtten. Ein erneutes Drucken des Presets setzen ihre Kamera auf die vorherige Einstellung zurück. |
| Umschaltmodus | Wenn eine Funktionstaste auf den Umschaltmodus eingestellt ist, schaltet das Drücken der Taste eine bestimmte Einstellung ein oder aus. In thisem Modus ist das EINSTELLUNGS-Menu ausgegraut. Tippen Sie stattdessen auf die Pfeile des PARAMETER-Menus, um die verfügbaren Optionen zu durchlaufen. Diese sind „Offspeed-Aufzeichnung", „OIS", „Clean-Feed", „LUT anzeigen", „Bildbrandmarkierung", „Focus Assist", „Falschfarben", „Zebra", „Raster" und „Schutzbereichlinien". Verwenden Sie den Umschaltmodus, um auszuwahlen, auf welche Ausgabe diese Einstellung angewendet werden soll. Tippen Sie hierfür beliebig kombiniert auf „LCD" und „HDMI". Für Optionen wie „Off-Speed-Aufzeichnung", die immer auf alle Ausgaben angewendet werden, ist die getrennte Auswahl von „LCD" oder „HDMI" deaktiviert. |
SETUP-Einstellungen Seite 3
Die dritte Seite der SETUP-Registerkarte bietet folgende Optionen:
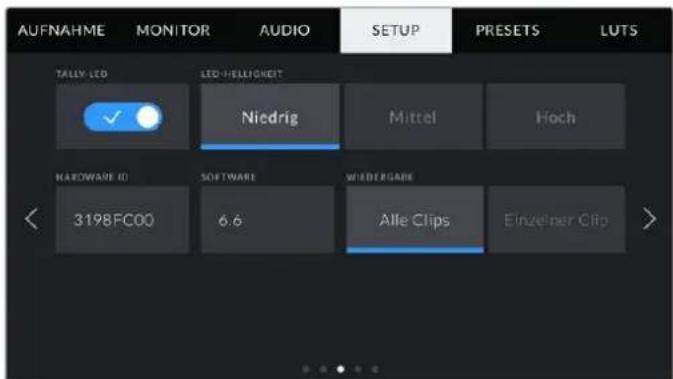
TALLY-LED
Die Blackmagic Pocket Cinema Camera verfügt vorne über eine petite LED-Leuchte, die bei Anschluss an einen ATEM Mini den Aufnahmestatus der Kamera sowie den Tally-Status für Programm und Vorschau anzeigt. Wenn Sie eine Pocket Cinema Camera an einen ATEM Mini anschlieben, um die Aufzeichnung und Kameraeinstellungen fernzusteuern, zeigt das Tally an, ob eine Kamera auf Sendung oder auf Vorschau geschalte ist. Weitere Informationen finden Sie im Abschnitt „Kamerasteuerung mit ATEM Minis".

Es wird auf Speichermedien in der Kamera aufgenommen

Die Kamera ist live auf Sendung

Die Kamera steht kurz vor der Liveschaltung
Um den Aufnahmeindikator ein- oder auszuschalten, betätigen Sie den „Tally-LED“-Schalter.
LED-HELLIGKEIT
Stellen Sie die Helligkeit des TALLY-LEDs ein, indem Sie auf „Niedrig“, „Mittel“ oder „Hoch“ tippen.
HARDWARE-ID
Der Indikator HARDWARE-ID zeigt einen achstelligen Identifikationscode für ihre Blackmagic Pocket Cinema Camera an. Diese ist einmalig und gilt nur für ihre Kamera. Eine langere, 32-stellige Version dieser Codes ist außer dem in den Metadataen von Blackmagic-RAW- und ProRes-Video enthalten. Man kann auf diese Weise better nachverfolgen, welche Material von welcher Kamera stammt.
SOFTWARE
Hier wird die Versionsnummer der aktuell installierten Software angezeigt. Weitere Informationen zum Aktualisieren der Software finden Sie unter „Blackmagic Camera Setup".
WIEDERGABE
Über diese Einstellung konnen Sie auswahlen, ob Sie auf dem LCD-Touchscreen alle Clips oder einen einzelnen Clip von einem Speichermedium wiedergeben möchten. „Alle Clips" spielt alle passenden Medien der Reihe nach ab. „Einzelner Clip" hingegen playt jeweils nur einen Clip ab. Dies gilt auch für die Loop-Funktion. Wird zusammen zuz Alle Clips" die Loop-Funktion gewählt, werden alle Clips vom Speichermedium in Dauerschleife wiedergegeben. Ist „Einzelner Clip" aktiviert, wird nur ein Clip in Dauerschleife gespielt.
SETUP-Einstellungen Seite 4
Die vierte Seite der SETUP-Registerkarte ihrer Kamera betet folgende Bluetooth®-Einstellungen.
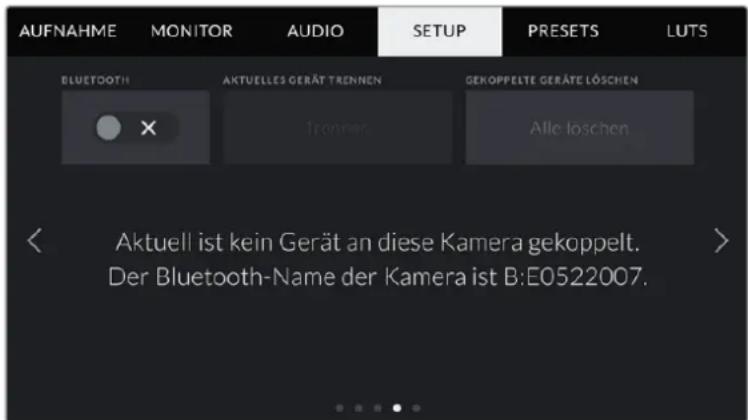
Der Bluetooth-Name der Kamera setzt sich aus dem in der Slate vorgegebenen Buchstaben und der achtstelligen HARDWARE-ID ihrer Blackmagic Pocket Cinema Camera zusammen
BLUETOOTH
Mit der Bluetooth-Funktion konnen Sie ihre Kamera über andere Geräten kabellos steuern. Mit der „Blackmagic Camera Control“-Appändern Sie Einstellungen, passen Metadataen an und losev von Ihr im iPad aus der Ferne die Aufzeichnung aus. Um Bluetooth zu aktivieren oder zu deaktivieren, tippen Sie im SETUP-MENU auf das Schalter-Icon BLUETOOTH. Ist Bluetooth aktiviert, konnen Bluetooth-Geräte die Kamera aus bis zu 9 Metern Entfernung erkennen. Da die Kamera für die Bluetooth-Steuerung dieselben Befehle wie für das Blackmagic SDI Camera Control Protocol verwendet, konnen Sie ihre eigenen Programme schreiben und so gut wie jeder Kameraeinstellung fernsteuern. Zum Beispiel die Bildkontrolle, Audioeinstellungen und die kamerainterne Farbkorrektur mit DaVinci Resolve. Es kann soccer das Objektiv ferngesteuert werden.
Weitere Informationen finden Sie unter 'Blackmagic Camera Control' auf www.blackmagicdesign.com/de/developer.
So koppeln Sie ihre Kamera erstmalig kabellos mit einem iPad:
1 Um Bluetooth zu aktivieren oder zu deaktivieren, tippen Sie im SETUP-MENU auf das Schalter-Icon BLUETOOTH.
2 Öffnen Sie die Blackmagic Camera Control App und wahlen Sie die Kamera aus, mit der die Verbindung aufgebaut werden soll. Verfügbare Kameras werden mit einem Kennbuchstaben und einer einmaligen Hardware-ID aufgelistet, bspw. so: A:A0974BEA.
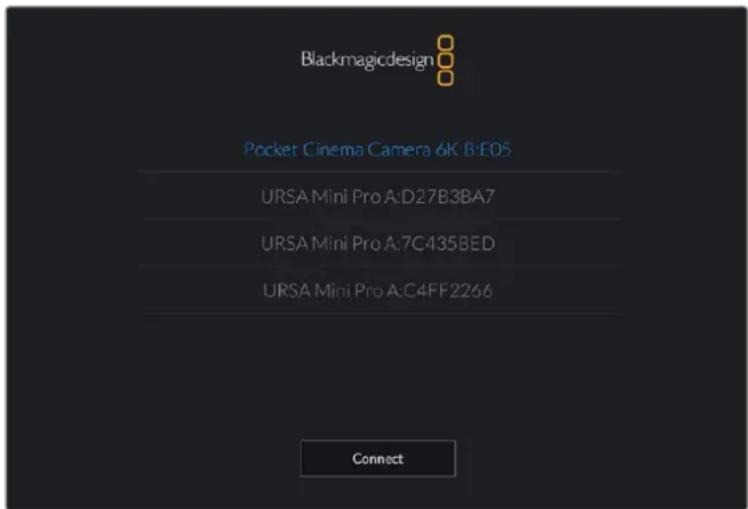
Wahlen Sie die Blackmagic Pocket Cinema Camera aus, zu der die Verbindung aufgebaut werden soll
HINWEIS Nach Installation und erstmaligem Starten der Blackmagic Camera Control App werden Sie gefragt, ob Sie den Standortzugriff erlauben wollen. Wenn Sie dies für die Gebrauchsdauer der App mit „While using the app" bejahren, werden die GPS-Koordinaten von Ihr iPad in die Metadaten ihrer gedrehten Daten aufgenommen. So wird ihre Footage mit Geotags versehen. Diese Tags können in DaVinci Resolve 15 oder neueren Versionen eingesehen werden.
Wenn Sie die Nutzung dieser Informationen nicht zulassen wollen, wahren Sie „Never" (Nie). Um diese Einstellungen zuändern, gehen Sie auf Ihr dem iPad unter „Einstellungen" zu „Datenschutz" > „Ortungs Dienste" > „Camera Control".
3 Wenn Sie versuchen, erstmalig eine Drahtlosverbindung zu ihrer Kamera herzustellen, verlangt die Blackmagic Camera Control App einen sechsstelligen Code. Diese Code wird auf dem LCD-Bildschirm der Kamera eingebrendet. Geben Sie den Code auf dem iPad ein und klichen Sie auf „Koppeln".
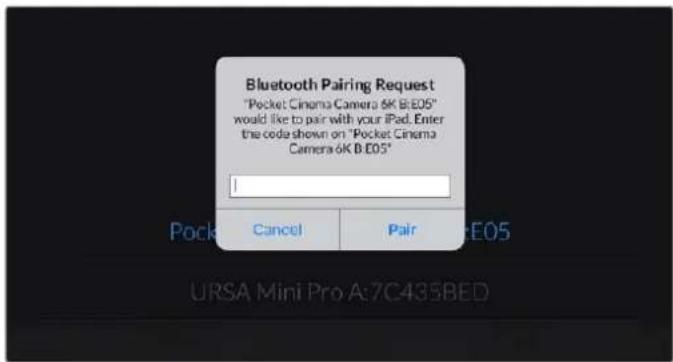
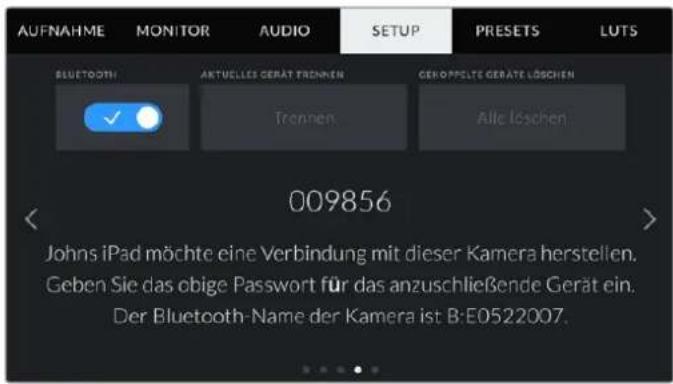
4 Sobald ihre Kamera mit Ihrem iPad gekoppelt ist, wird dies bestätigt.
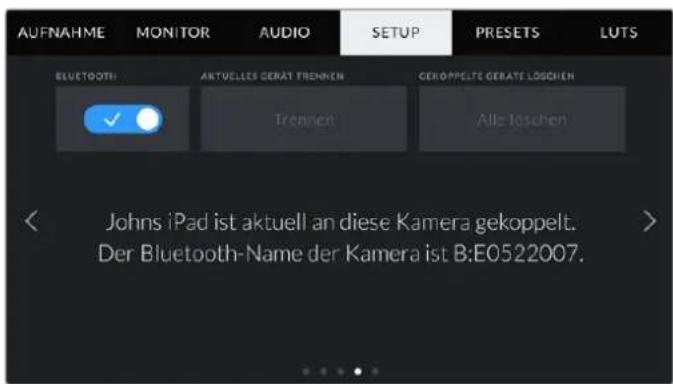
5 Scheitert das Herstellen einer Verbindung mit ihrem iPad, zeit die Kamera eine Fehlermeldung an. Versuchen Sie es erneut.

HINWEIS Wenn Sie ihre Blackmagic Pocket Cinema Camera gerade nicht per Bluetooth steuern, empfehlen wir, Bluetooth aus Sicherheitsgründen auszuschalten.
AKTUELLES GERÄT TRENNEN
Über diese Einstellung trennen Sie die Drahtlosverbindung zwischen ihrer Blackmagic Pocket Cinema Camera vom derzeit gekoppelten iPad.
GEKOPPELTE GERÄTE LÖSCHEN
Mit dieser Einstellung loschen Sie die Beste der Geräte, mit denen ihre Kamera gekoppelt wurde.
Steuern der Kamera mit der Blackmagic Camera Control App
Nach erfolglicher Herstellung der Drahtlosverbindung zwischen ihrer Blackmagic Pocket Cinema Camera und Ihr iPad konnen Sie Einstellungen ändern, Metadata anpassen und die Aufzeichnung per Trigger aktivieren.
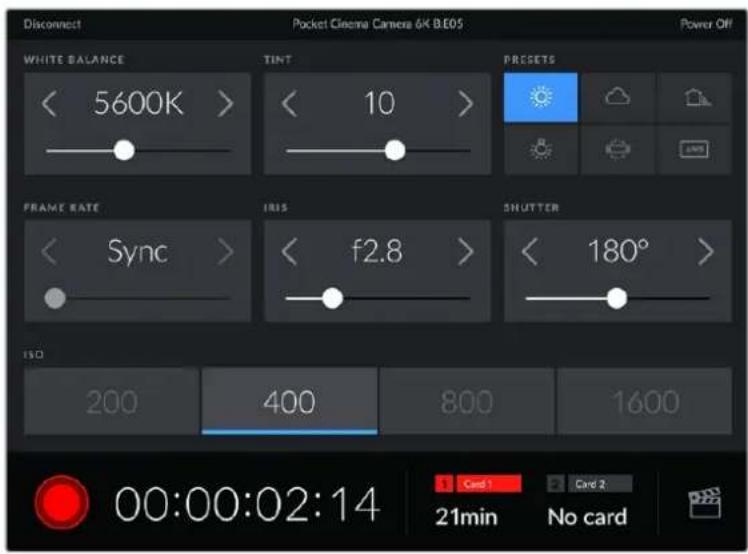
Sind die Geräte gekoppelt,blendet die Blackmagic Camera Control App diesen Bildschirm ein,wo Sie Einstellungenändern und die Aufnahme starten konnen
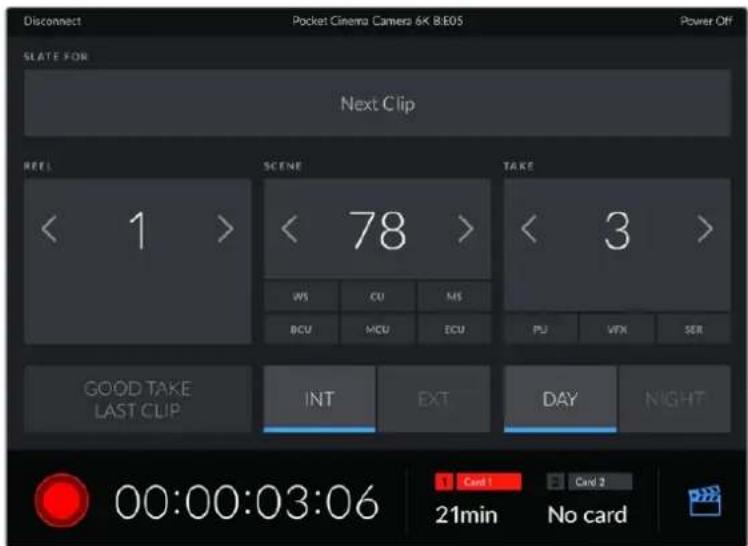
Tippen Sie auf das Filmklappen-Icon unter rechts, um auf die Slate zuzugreifen und sie zu aktualisieren
Die Blackmagic Pocket Cinema Camera nutzt Bluetooth LE für die Drahtlossteuerung von anderen Geräten aus. Dies ist derselbe Protokoltyp wie für tragbare Geräte und verbraucht nur minimalien Akkustrom.
SETUP-Einstellungen Seite 5
Auf der füsten Seite der SETUP-Registerkarte befinden sich folgende Einstellungsoptionen: „Auf Werkseinstellungen zurücksetzen“, „Pixel-Neukalibrierung“ und „Bewegungssensor-Kalibrierung".
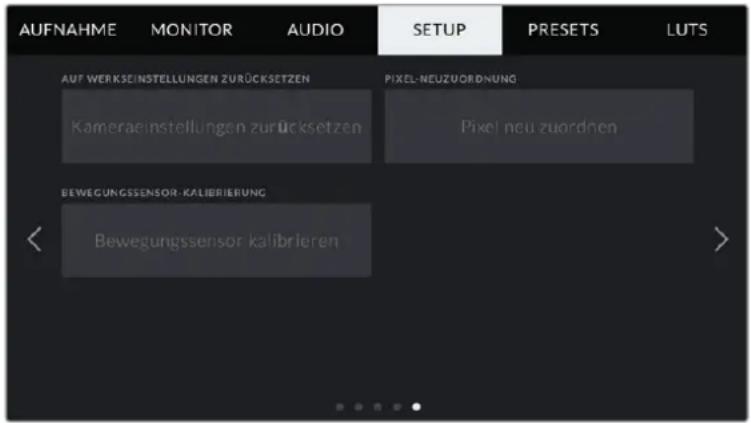
AUF WERKSEINSTELLUNGEN ZURÜCKSETZEN
Um die Kamera auf ihre Werkseinstellungen zurückzusetzen, tippen Sie unter AUF WERKSEINSTELLUNGEN ZURÜCKSETZEN auf „Kameraeinstellungen zurücksetzen". Tippen Sie im Bestätigungsfenster auf „Zurücksetzen", um diese Aktion zu bestäigen. Ihr Kamera löscht jegliche LUTs und Presets und setzen alle Einstellungen zurück. Als bewährte Praxis empfehlts es sich, von ihren Presets auf einer Speicherkarte ein Backup anzufertigen, bevor Sie die Kamera auf ihre Werkseinstellungen zurücksetzen. So konnen Sie, auch nach dem Sie ihre Kamera auf ihre Werkseinstellungen zurückgesetzt haben, Presets per Import von der Speicherkarte schnell wiederherstellen. Es wichtig zu wissen, dass mit dem Zurücksetzen auf die Werkseinstellungen auch das Horizont-Meter zurückgesetzt wird. Deshalb sollen den Sie im Anschluss auch den Bewegungssensor neu kalibrieren.
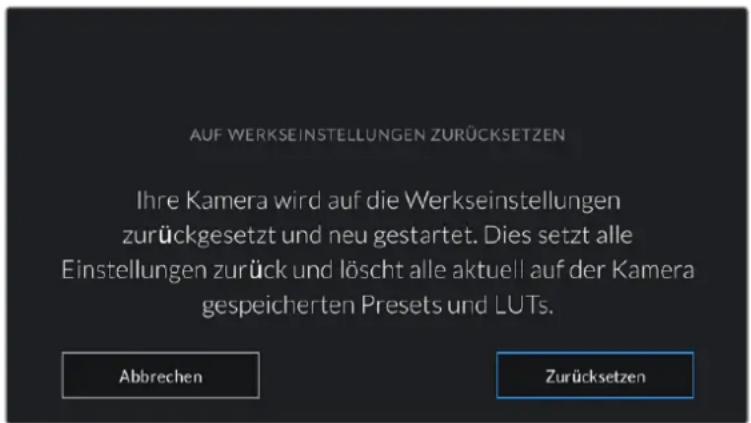
Wenn Sie auf Zurücksetzen tippen, werden Sie aufgefordert, ihre Auswahl zu bestätigen
PIXEL-NEUKALIBRIERUNG
Der in Ihrer Blackmagic Pocket Cinema Camera eingesetzte CMOS-Sensor besteht aus Millionen von Pixel, die auf Licht reagieren. Nach Kalibrierung des Sensors in der Fertigung konnen Pixel mit der Zeit ihrer Helligkeit verändern. Sie werden somit sightbarer und aufgrund dessen im Allgemeinen als „Hot Pixel" bezeichnet. Alle Kamerasensoren – unabhängig vom Hersteller – entwickeln irgendwann Hot Pixel.
Um diesen Problem zu beheben, haben wir eine Kalibrierungsfunktion in die Kamera eingebaut, die Sie ausführten können, wenn Hot Pixel auf dem Bild auftreten.
Starten Sie diesen Vorgang einsch, indem Sie den Objektivdeckel aufsetzen. Führten Sie dann die Pixel-Neukalibrierung aus, indem Sie auf „Pixel-Neukalibrierung" tippen. Diese Prozess dauert ungebahr eine Minute.
BEWEGUNGSSSENSOR-KALIBRIERUNG
Um das Horizont-Meter zu kalibrieren, stellen Sie ihre Kamera auf eine ebene Oberfläche und tippen auf „Bewegungssensor kalibrieren". Es ist wichtig, die Kamera während der Kalibrierung stillzuhalten. Diese Prozess dauert ungebär für fief Sekunden.
PRESETS
Über die PRESETS-Registerkarte konnen Sie bis zu zwölf Voreinstellungen speichern und abrufen. Dies ist sehr nützlich, wenn ihre Kamera für mehrere Projekte verwendet wird. Möglicherweise setzen Sie ihre Kamera für den Dreh entsprechender Filmgenres ein, z. B. Dokumentationen oder Musikvideos, die alle unterschiedlicher Kameraeinstellungen bedürfen. Die Preset-Funktion ihrer Kamera lasst Sie das Setup eines bestimmen Projekts oder Shot-Typs abspeichern, damit Sie es bei Bedarf schnell und muhelos wieder abrufen konnen. Es stehen zwölf Preset-Plätze zur Verfügung.
Außer dem halten sich Presets importieren und exportieren, was für Dreharbeiten mit mehreren Kamas praktisch ist. Stellen Sie die Blackmagic Pocket Cinema Camera einfach Ihr Projekt entsprechend ein und exportieren Sie die Voreinstellungen für alle anderen Blackmagic Pocket Cinema Cameras am Set.

Über die PRESETS-Registerkarte können Sie schnell zwischen gespeicherten Einstellungen hin- und herwechseln
HINWEIS Der interne Speicher ihrer Kamera fasst bis zu zwolf Presets.
Preset-Icons
Die Icons am unteren Rand des PRESETS-Menus stehen für die nachfolgend erklärten Funktionen.


Hinzufugen Laden Aktualisieren Verwalten Löschen
Spelchern und Laden von Presets
Tippen Sie zum Erstellen eines neuen Projekts auf das Hinzufugen-Icon. Es erscheint eine Tastatur auf Ihr LCD. Geben Sie dort den Nameur für Ihr Preset ein. Tippen Sie nach Eingabe des Namens auf den „Aktualisieren"-Button, um alle aktuellen Einstellungen in thisem Preset zu speichern.
Wenn in der Kamera bereits ein gleichnamiges Preset geladen ist, können Sie das vorhandene Preset überschreiben oder beiden behalten.
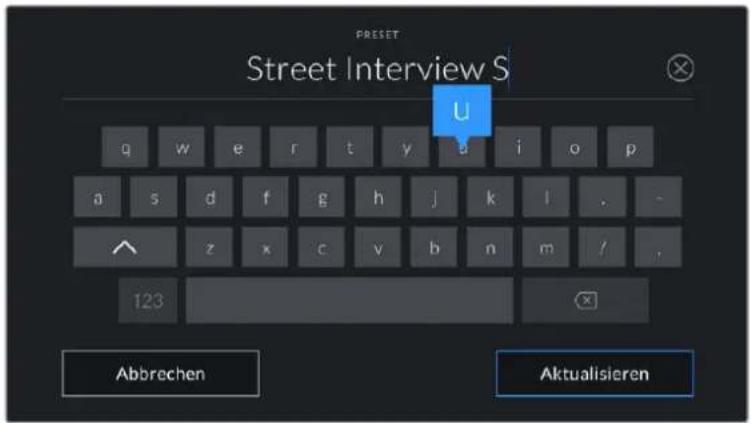
Tippen Sie auf der PRESETS-Registerkarte auf das HinzufugenIcon und geben Sie mithilfe der Tastatur einen Name ein
Wenn Sie ein gespeichertes Preset abrufen möchten, tippen Sie auf seinen Namen. Um ein Preset zu laden, tippen Sie auf das Laden-Icon.
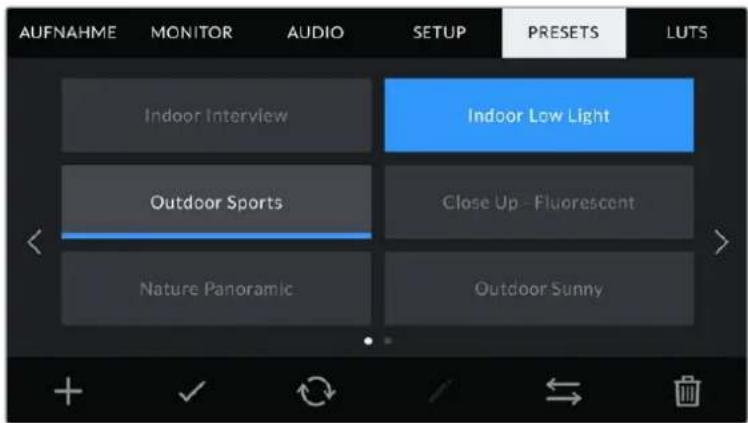
Wahlen Sie ein Preset und laden Sie es über das Laden-Icon. Ausgewählte Presets werden ganz in blau angezeigt, während aktuell geladene Presets mit einer blauen Linle am unteren Rand des Icons dargestellt sind
Sie konnen ein Preset aktualisieren, indem Sie auf den „Aktualisieren“-Button tippen. Es öffnet sich ein Fenster mit der Frage, ob Sie das Preset mit der derzeitigen Einstellung ihrer Blackmagic Pocket Cinema Camera aktualisieren wollen. Tippen Sie zur Bestätigung auf den „Aktualisieren“-Button
Importieren von Presets
Um Presets zu importieren, tippen Sie auf das Verwalten-Icon am unteren Rand des PRESETS-Menus. Tippen Sie auf „Preset importieren" und dann auf „Importieren", um den Vorgang zu bestätigten. Es erscheint der Import-Bildschirm für Presets. Sollehr bevorzugtes Preset nicht auf dem Speichermedium zu finden sein, tippen Sie auf einen der Media-Buttons am oberen Rand des Touchscreens, um zu einem anderen Medium zu wechseln. Sie konnen Presets von einem USB-C-Laufwerk, einer CFast- oder SD-Karte importieren.
Ohre Kamera durchsucht daraufaufhin das Stammverzeichnis und den Presets-Ordner auf ihren ausgewählten Medien und listet alle verfügbaren Presets auf. An anderer Stelle gespeicherte Presets sind so nicht auffindbar.
Tippen Sie auf ein Preset, um es auszuwahlen. Tippen Sie dann auf „Importieren“, um die Auswahl zu bestätigen und an die nachstverfügbare Stelle auf ihrer Kamera zu kopieren.
HINWEIS Sind allezwolf Preset-Plätze Ihr Kamera belegt, ist das Import-Menu nicht verfugbar.
Um Platz zu schaffen, müssen Sie ein bestehendes Preset loschen.
Hat these Preset denselben Namen wie ein bereits auf Ihrer Kamera gespeichertes Preset, konnen Sie das bestehende Preset überschreiben oder beide behalten. Oben rechts auf dem Touchscreen sehen Sie die Anzahl der verbleibenden Preset-Plätze auf Ihrer Kamera. Sie konnen so viele Presets laden, wie Plätze vorhanden sind.
Exportieren von Presets
Um ein Preset auf ein Speichermedium zu exportieren, tippen Sie zunachst auf das zu exportierende Preset und dann auf das Verwalten-Icon. Tippen Sie auf „Ausgewähltes Preset exportieren" und anschließend auf das Medium, auf das Sie das Preset exportieren wollen. Ist bereits ein Preset mit dem gleichen Namevorhanden, geben Sie an, ob Sie es überschreiben oder andere beibehalten möchten. Die Kamera exportiert das Preset in einen Presets-Ordner.
Löschen von Presets
Zum Löschen eines Presets wahlen Sie es aus und tippen Sie auf das Löschen-Icon, Sie werden aufgefordert, ihre Auswahl zu bestätigten. Tippen Sie hierzu auf „Löschen".
3D-LUTs
Im LUTS-MENU können Sie 3D-LUTs importieren, exportieren und auf die Ausgaben ihrer Kamera anwenden.
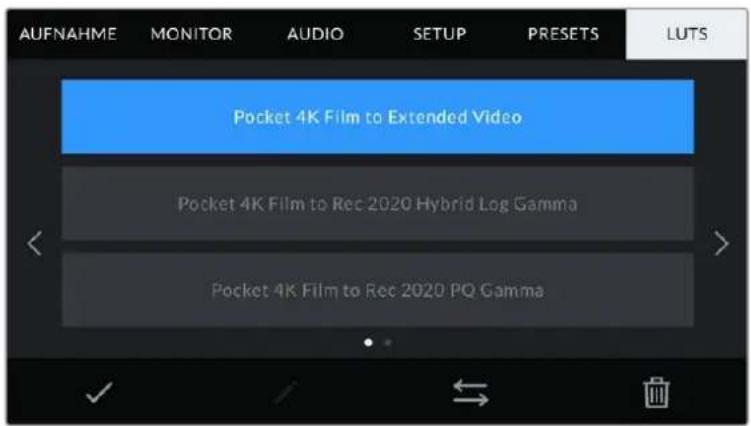
Auswahl einer 3D-LUT über die LUTS-Registerkarte der Kamera
3D-LUTs vorgestellt
Sie können 3D-LUTs auf Bilder auf dem LCD-Touchscreen und der HDMI-Ausgabe anwenden. LUTs geben ihrer Kamera vor, welche Farbe und Luminanz bei einer bestimmten Farb- und Luminanz-Eingabe auf die Ausgabe anzuwenden sind. Beispiel: Eine LUT kann ihrer Kamera vorgegeben, ein vom eingehenden Signal her relativ trübes Blau als strahlendes, sattes Blau darzustellen. Das ist besides bei der Aufzeichnung von Blackmagic-RAW-Material nützlich oder bei Verwendung des Dynamikumfangs „Film". Beides liefert ein gewollt ungesättigt und kontrastarm wirkendes Bild. Wenden Sie eine LUT auf Ihr Material an,kommen Sie einen Eindruck, wie ihre Footage nach der Farbkorrektur ausgehen wird.
3D-LUTs lessen sich problemlos in DaVinci Resolve oder einer anderen Farbkorrektur-Software erstellen. Außer dem sind LUTs auch online erhältlich. Auf der Kamera konnen bis zu zehn 17- oder 33-Punkt-3D-LUTs mit je bis zu 1,5 Megabytes gespeichert werden. Sobald eine LUT geladen ist, konnen Sie sie auf das Bild auf dem LCD-Touchscreen und auf die HDMI-Ausgabe ihrer Kamera anwenden und sichen.
Ohre Blackmagic Pocket Cinema Camera understands 33-Punkt-3D-LUTs im .cube-Format von DaVinci Resolve und ins Resolve .cube-Format konvertierte 17-Punkt-3D-LUTs. Ihre Kamera verarbeitet 3D-LUTs mithilfe qualitativ hochwertiger linearer Interpolation.
TIPP Nähres finden Sie im Abschnitt MONITOR-Einstellungen in thisem Handbuch.
HINWEIS Ihr Blackmagic Pocket Cinema Camera underwent LUTs nicht standardmäßig auf aufgenommene Footage an oder brennt sie ein. Es ist jeder möglich, die LUT in ihre Footage einzubrennen.
These Option kann nützlich sein, wenn Sie in der Postproduktion keine Zeit für das Grading ihrer Footage haben oder die Footage direkt an den Kunden oder Editor übergeben werden muss.
Bei der Verwendung von LUTs als Vorschautool am Set werden die Informationen der angewandten LUT als Metadaten zusammen mit ihren Aufnahmen gespeichert. DaVinci Resolve zeigt diese Informationen im Metadata-Tab im Feld "LUT Used" (Verwendete LUT) an. Dies kann für Coloristen hilfreich sein, um den Name der am Set verwendenten LUT zu überprüfen.
Integrierte LUTs
Die Kamera verfügbar über mehrere kameraiinterne LUTs. Mit dem Dynamikumfang „Film" in Blackmagic RAW aufgezeichnetes Material konnen Sie so im Vorschaumodus mit verschiedene Loks ausprobieren.
Jede Kamera stellts sensorspezifische LUTs bereit:
Pocket 4K Film to Extended Video / Pocket 6K Film to Extended Video
"Pocket 4K Film to Extended Video" bietet eine Vorschau mit einem breiteren Dynamikumfang als die LUT „Pocket 6K Film to Video". Bei einer leichten Änderung am Kontrast liefert sie ein geschmeidiges Roll-Off in den Highlights.
Pocket 4K Film to Rec 2020 Hybrid Log Gamma / Pocket 6K Film to Rec 2020 Hybrid Log Gamma
Zeigt eine Mischform aus Rec.709 und einem Log-Bild an.
Pocket 4K Film to Rec 2020 PQ Gamma / Pocket 6K Film to Rec 2020 PQ Gamma
Bietet eine Vorschau mit Gammakurve, die darauf basiert, was das menschliche Auge wahrnehmen kann. Eignet sich für effizientes Encoding von HDR-Bildern.
Pocket 4K Film to Video / Pocket 6K Film to Video
Ahnlich der Rec.709-Farbnorm für High-Definition-Video mit hohen Kontrast- und Sattigungslevels.
These Einstellung eignet sich bei Einsatz der Blackmagic Pocket Cinema Camera zusammen mit anderen Broadcastkameras, die den Rec.709-Farbraum verwenden.
LUT-Icons
Die Icons am unteren Rand des LUTS-Menus ihrer Kamera unterstützen folgende Funktionen:


Laden Speichermedium Verwalten Löschen
LUTs Importieren
Um eine 3D-LUT zu importieren, tippen Sie auf das Verwalten-Icon unter im LUTS-MENU. Tippen Sie auf „LUT importieren" und dann auf „Importieren", um den Vorgang zu bestätigten. Es erscheint der Bildschirm zum Importieren von LUTs. Solle ihre bevorzugte 3D-LUT nicht auf dem Speichermedium zu finden sein, tippen Sie auf einen der Media-Buttons am oberen Rand des Touchscreens, um zu einem anderen Medium zu wechseln. Sie können LUTs von einem USB-C-Laufwerk, einer CFast- oder SD-Karte importieren.
Ihre Kamera durchsucht daraufuthin das Stammverzeichnis und den 3D-LUT-Ordner auf ihren ausgewählten Medien und listet alle verfügbaren LUTs auf. An anderer Stelle gespeicherte LUTs sind so nicht auffindbar.
Tippen Sie auf eine LUT, um sie auszuwahlen. Tippen Sie dann auf „Importieren“, um die Auswahl zu bestätigen und sie an die nachstverfügbare Stelle auf ihrer Kamera zu kopieren.
HINWEIS Sind alle zehn Plätze für 3D-LUTs befüllt, können Sie erst dann weitere importieren, wenn sie durch Löschen vorhandener LUTs Platz schaffen.
Hat diese LUT denselben Nameen wie eine bereits auf Ihrer Kamera gespeicherte LUT, konnen Sie die vorhandene LUT überschreiben oder beide beibehalten. Oben rechts auf dem Touchscreen sehen Sie die Anzahl der verbleibenden LUT-Plätze auf Ihrer Kamera. Sie konnen so viele LUTs laden, wie Plätze vorhanden sind.
HINWEIS Soltte beim Importieren einer LUT ein Problem auftreten, ist ihre Große womöglich inkorrekt. Die Große einer LUT konnen Sie mithilfe eines LUT-Editors wie Lattice oder mit einem beliebigen Texteditor auf Ihr dem Rechner prufen. Die kein dem Tag „LUT_3D_SIZE" erscheinende Zahl gibt Aufschluss über die Große der LUT. Betragt dieser Wert weder 17 noch 33, konnen Sie ihre 3D-LUT mithilfe von Lattice auf 17 Punkte reduzieren.
Anwendener einer LUT
Sobald Sie eine LUT auf Ihrer Kamera gespeichert haben, wahren Sie sie aus und tippen anschließend auf das Laden-Icon. Dieswendet die LUT auf alle Ausgaben ihrer Kamera an. Um die fur ihre Kameraausgaben geladene LUT anzuzeigen, aktivieren Sie im MONITOR-Menu die Option LUT ANZEIGEN. Weitere Informationen finden Sie unter MONITOR-Einstellungen.
LUTs exportieren
Um eine LUT auf ein Speichermedium zu exportieren, tippen Sie zunachst auf die zu exportierende LUT und dann auf das Verwalten-Icon. Tippen Sie auf „Ausgewählte LUT exportieren" und anschließend auf das Medium, auf das Sie die LUT exportieren wollen. Ist bereits eineGLEichnamige LUT vorhanden, geben Sie an, ob Sie diese überschreiben oder andere beibehalten möchen. Die Kamera exportiert die LUT in einen 3D-LUTS-Ordner.
LUTs loschen
Wenn Sie eine LUT loschen möchten, weil Sie sie nicht mehr benötigen oder um Platz zu schaffen, wahren Sie die entsprechende LUT aus und tippen auf das Loschen-Icon. Sie werden aufgefordert, ihre Auswahl zu bestätigen. Tippen Sie hierzu auf „Loschen".
Eingebbetete 3D-LUTs
Wird beim Filmen in Blackmagic RAW auf der Blackmagic Pocket Cinema Camera eine 3D-LUT angewendet, wird die ausgewählte LUT bei der Aufzeichnung in die Blackmagic-RAW-Datei eingebettet. Die 3D-LUT wird mit ihren aufgezeichneten Dateien in der Kopfzeile der BRAW-Datei (.braw) gespeichert. So kann man die LUT in der Postproduktion muhelos auf die Footage anwenden, ohne eine separate Datei handhaben zu müssen.
Wenn Editoren oder Coloristen Blackmagic-RAW-Dateien erhalten, können sie leicht auf die beim Filmen verwendete LUT zugreifen. Dies reduziert das Risiko, dass versehentlich eine falsche 3D-LUT auf einen Clip angewendet wird. Wahrend des Schnits oder Colorgradings der Footage kann die 3D-LUT wahlweise aktiviert und jederzeit deaktiviert werden.
Ist der Schalter LUT IN DATEI ANWENDEN im Aufzeinungsmenu aktiviert, wird dieser Clip beim Öffnen im Blackmagic RAW Player und in DaVinci Resolve mit der angewendeten 3D-LUT dargestellt.
Die 3D-LUT lasst sich leicht ein- und ausschalten. Sie ist aber immer in der Blackmagic-RAW-Datei enthalten, da die entsprechenden Daten im Clip selbst gespeichert sind. In DaVinci Resolve bietet das Menu mit den RAW-Einstellungen einen „Apply LUT“-Schalter, mit dem sich die 3D-LUT in der Blackmagic-RAW-Datei de- bzw. aktivieren lasst.
Die „Apply LUT“-Einstellung in DaVinci Resolve gleicht der Einstellung in der Kamera. Dies ermöglich hnen, dem Coloristen schon beim Dreh anhand der in der Kamera angewendeten LUT eine Orientierungshilfe zu geben. Diese LUT kann in DaVinci Resolve aber einfach deaktiviert werden, indem man „Apply LUT“ auf AUS setzen.
Eingabe von Metadaten
Metadataen sind Informationen, die innerhalb eines Clips gespeichert werden. Dazu gehoren Take-Nummern, Kameraeinstellungen und andere Identifikationsdaten. Metadataen sind extrem nutzlich, um Footage in der Postproduktion zu sortieren und zu bearbeiten. Bspw. sind Take-, Shot- und Szenen-Nummern das A und O für die Organisation, während Objektivinformationen dazu genutzt werden können, Verzeichnungen automatisch zu entfern oder VFX-Assets better auf Matten abzustimmen.
Ohre Blackmagic Pocket Cinema Camera speichert Clips automatisch mit einigen Metadaten ab. Dazu gehoren Kameraeinstellungen, Timecode, Datum und Uhrzeit. Sie konnen die Filmtafelfunktion Slate ihrer Kamera nutzen, um vielse weitere Informationen hinzuzufugen.
Slate
Wischen Sie auf dem Touchscreen aus der Hauptansicht ihrer Kamera nach rechts oder links, um das Slate-MENU aufzurufen.
Das Slate-MENU Ist in zwei Registerkarten unterellt: CLIPS und PROJEKT. Auf der Registerkarte CLIPS finden Sie Informationen, die von Clip zu Clip variieren, während Sie unter PROJEKT gängige Daten wie Projektname, Regisseur sowie Kamera- und Operator-ID eingeben.
TIPP Über die Slate eingegebene Metadaten konnen in der HDMI-Ausgabe eingesehen werden. Stellen Sie hierfür auf der MONITOR-Section unter „REGISSEUR" die Option „STATUS TEXT ANZEIGEN FÜR" ein. Nähres finden Sie im Abschnitt MONITOR-Einstellungen in this dem Handbuch.
CLIP-Metadata
Änderungen an den Clip-Metadataen Funktionieren im Standby-Modus anders als im Wiedergabe-Modus. Im Standby-Modus werden mit aufzeichnungsbereiter Kamera Clip-Metadataen für den nachsten Clip aufgezeichnet. Dies gilt nicht, wenn der zuletzt aufgezeichnete Clip durch Antippen des GUTER TAKE LETZTER CLIP-Buttons mit einer GUTER TAKE-Markierung versehen wurde. Im Wiedergabe-Modus wird beim Sichteben bereits gedrehten Materials der GUTER TAKE-Button eingeblendet und Clip-Metadataen werden immer dem aktuell betrachteten Clip beigefügt.
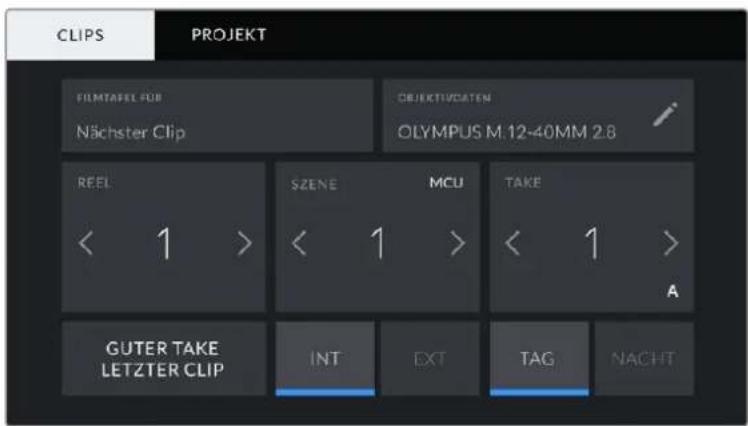
Im Wiedergabe-Modus erkennt FILMTAFEL FÜR die auf den Clip angewandete Slate und der GUTER TAKE-Button wird eingeblendet. Im Standby-Modus bezieh sich die Slate auf den nachsten Clip und der GUTER TAKE LETZTER CLIP-Button wird eingeblendet
FILMTAFEL FÜR
These Einstellung zeigt an, auf welchen Clip sich die derzeit angezeigten Metadaten beziehen. Im Wiedergabe-Modus ist das der aktuelle und im Standby-Modus der nachste aufgenommene Clip.
OBJEKTIVDATEN
Hier werden Informationen zum Objektiv angezeigt, das zurzeit an ihre Kamera angebracht ist. Viele elektronische Objektive liefern automatisch Informationen zu Modell, Blende und Brennweite. Soltte Ihr Objektiv diese Informationen nicht liefern oder sollen den Sie zusätzliche Informationen eingeben wollen, tippen Sie auf das Stift-Icon und geben Sie die Informationen manuell ein. Das Objektivdatenmenu enthalt folgende Informationen:
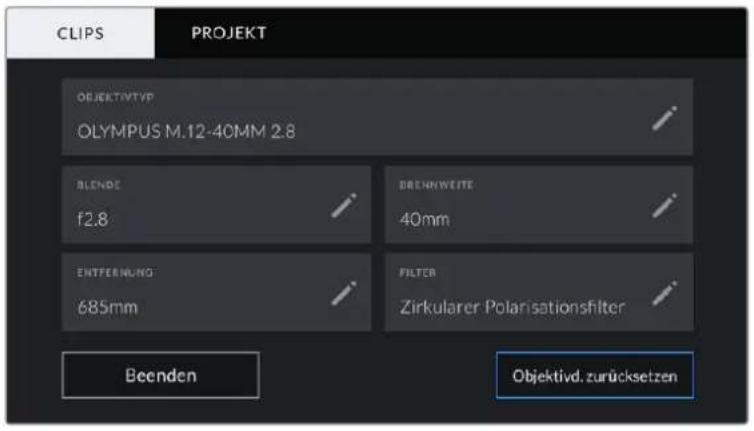
Das Objektivdaten-Menu wird automatisch mit Informationen vom angebrachten Objektiv sowie mit manuell eingegebenen Filterinformationen besteht
OBJEKTIVTYP
Zeigt den Objektivtyp an. Wird der Typ Ihres Objektivs nicht automatisch angezeigt, konnen Sie auf diese Einstellung tippen und die Informationen manuell eingeben. Ihr Kamera verfügt über eine interne Datenbank mit gängigen Objektiven. Sollten Sie die Daten Ihres Objektivs manuell eingeben müssen, schlägt Ohnen die Kamera während der Eingabe Namen vor. Dies beschleunigt die Eingabe von Daten.
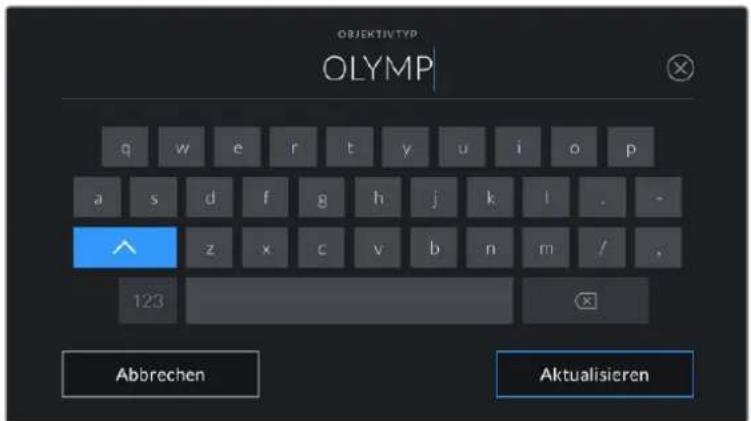
Geben Sie Objektivdaten mithilfe der Touch-Tastatur ein, falls diese nicht automatisch erschellen.
- BLENDE
Zeigt die Einstellung der Blende zu Beginn Ihres Clips an. Sofern automatisch mitgeliefert, wird diese Information je nach verwendeten Objekttyp in f- oder T-Stufen angegeben. Tippen Sie auf diese Einstellung, um Metadataen manuell einzugeben.
BRENNWEITE
Zeigt die Brennweiteneinstellung des Objektivs zu Beginn des aufgezeichneten Clips an. Wird diese Information automatisch gefeliefert, erscheint sie in Millimetern. Tippen Sie auf diese Einstellung, um die Brennweite manuell einzugeben.
ENTFERNUNG
Zeigt die Einstellungen für den Fokusabstand für den aufgezeichneten Clip an. Einige Objektive liefern diese Informationen automatisch in Millimetern. Sie können diese Daten zudem manuell eingeben.
- FILTER
Zeigt die derzeit verwendeten Objektivfilter an. Tippen Sie auf diese Einstellung, um Metadaten manuell einzugeben. Sie können mehrere Eingaben vornehmen und diese durch Kommata trennen.
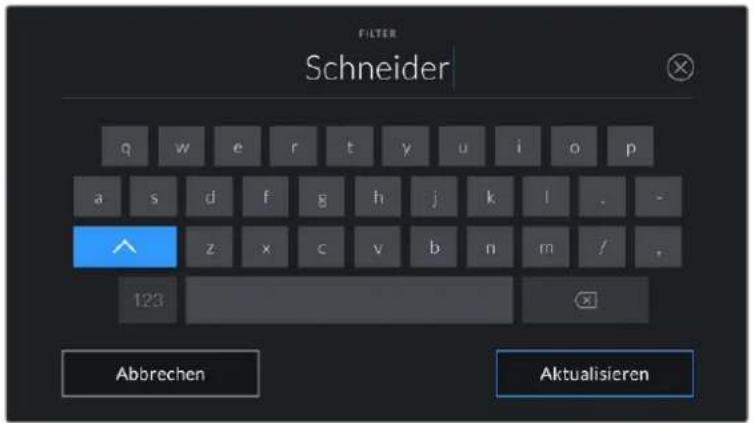
Filterinformationen müssen manuell eingebehen werden
HINWEIS Objektivdaten halten sich jederzeit loschen, indem Sie im Menu OBJEKTIVDATEN auf „Objektiv. zusücksetzen" tippen. Sie werden aufgefordert, ihre Auswahl zu bestätigen. Wenn Sie bestätigen, werden alle Objektivdaten gelöscht und automatisch die Daten des aktuell angebrachten Objektivs aufgenommen. Wurden Informationen manuell in diese Felder eingegeben, müssen Sie die Objektivdaten neu einstellen, wenn Sie ein anderes Objektiv anbringen. Andernfalls werden die manuell vorgegebenen Daten des vorherigen Objektivs verwendet.
REEL
Zeigt das aktuelle Band an.
Ohre Blackmagic Pocket Cinema Camera zahlte die Bandnummer in der Regel automatisch hoch. Sie brauchen es nicht manuell zu tun. Wenn Sie für ein neues Projekt mit Reel 1 beginnen möchten, tippen Sie im ProJEKT-Tab der Slate auf „Projektd. zusücksetzen", um ihre Projektdaten zusückzusetzen.
SZENE
Der SZENE-Indikator zeigt die derzeitige Szenennummer an. Gleichzeitig konnen auch die Shot-Nummer und der Shot-Typ angezeigt werden.
These Zahl bezieht sich immer auf die aktuelle Szene, Mithilfe der Rechts- und Linkspfiele darüber der Szenennummer konnen Sie diese anpassen. Oder tippen Sie auf die Szenennummer, um für eine manuelle Eingabe auf den Editor zuzugreifen.
Szenennummern reichen von 1 bis 9999.
Wenn Sie die aktuelle Einstellung (Shot) kennzeichnen möchten, fügen Sie einfach im Szenennummern-Editor einen Buchstaben hinz. Beispiel: 23A steht fur Szene 23 und Einstellung 1. Wenn Sie ihrer Szenenummer einen Shot-Buchstaben hinzugefugt haben, schlapt ihre Kamera beim Offnen des Szenenummer-Editors{jedes Mal die nachste Szenenummer und den entsprchenden Shot-Buchstaben vor. Wenn ihre aktuelle Szenenummer bspw. 7B ist, schlapt lHnen die Kamera 8^ und ^7C^ vor.
Der Szenennummern-Indikator kann außer dem Informationen über den Shot-Typ in der oberen rechten Ecke anzeigen. Wahlen Sie diese im Szenennummern-Editor rechts besoin der Tastatur aus.
Folgende Shot-Type sind verfügbar:
WS Totale
MS Halbnah
MCUNah
CUGroßaufnahme
BCU Nahaufnahme
ECU Detail
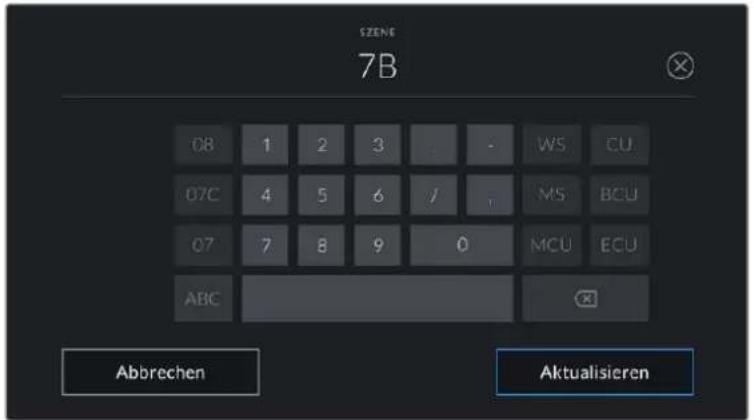
Bei der Eingabe von SZENE-Metadaten schląg die Kamera Ihnen Szenennummern links und Shot-Typen rechts besoin der Touch-Tastatur vor
TAKE
Der TAKE-Indikator zeigt die Take-Nummer des aktuellen Shots an. Diese können Sie entweder durch Antippen der Pfeile auf beiden Seiten der Take-Nummer oder durch Tippen auf den Indikator und Eingabe im Take-Nummern-Editor anpassen.
TIPP Beim Hochzahlen der Szenennummern oder Shot-Buchstaben fängt die Take-Nummer wieder bei 1 an.
Im Takenummern-Editorleen sich zudem Beschreibungen hinzufugen. These werden Ihnen rechts neben der Takenummern-Tastatur angeboten und beziehen sich auf folgende Szenarien;
| P/U | Pick up: Dies bezieht sich auf den Nachdreh eines bereits erfolgten Takes, um nach bereits abgeschlossenen Dreharbeiten zusätzliches Material zu filmen. |
| VFX | Visual Effects: Dies bezieht sich auf einen Take oder einen Shot, der für visuelle Effekte gedacht ist. |
| SER | Series: Dies bezieht sich auf eine Situation, in der mehrere Takes aufgezeichnet werden, während die Kamera ununterbrochen filmt. |
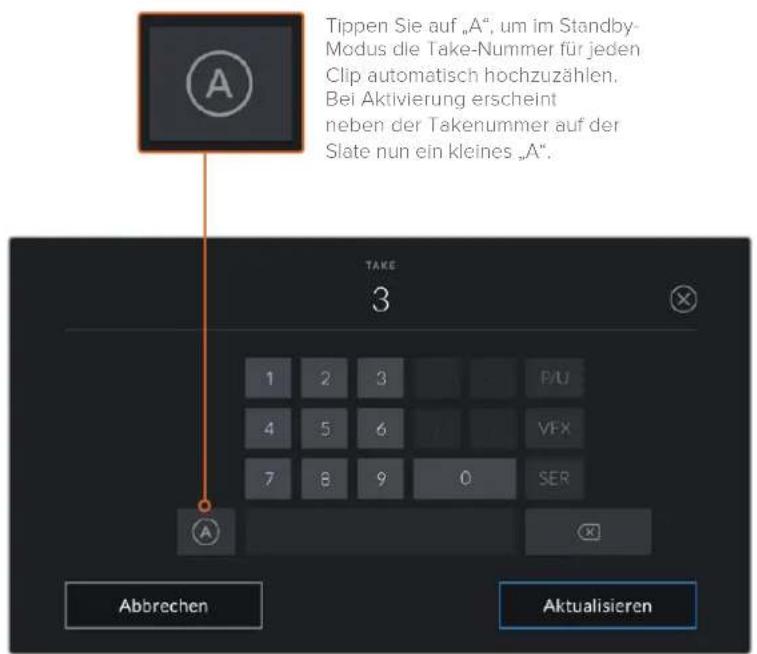
Bei der Eingabe von Metadaten schląg ihre Blackmagic Pocket Cinema Camera Ihnen rechts besoin der Touch-Tastatur zusätzliche Einstellungstypen vor
GUTER TAKE
Tippen Sie auf den GUTER TAKE-Indikator, um gute Aufnahmesequenzen zum Schnellen Abrufen in der Postproduktion zu markieren. Mit thisem Button markiert man einen aktuell geschickteten Clip als GUTER TAKE. Befindet sich die Kamera im Standby-Modus und ist aufnahmebereit, so versieht der Button GUTER TAKE LETZTER CLIP den zuletzt aufgenommenen Clip mit einem GUTER-TAKE-Tag.
INT/EXT
Tippen Sie auf INT oder EXT, um im Standby-Modus den nachsten, bzw. im Wiedergabemodus den aktuellen Clip mit „Interior" (Innen) oder „Exterior" (Außen) zu markieren.
TAG/NACHT
Tippen Sie auf TAG oder Nacht, um im Standby-Modus den nachsten, bzw. im Wiedergabemodus den aktuellen Clip mit „Tag" oder „Nacht" zu markieren.
PROJEKT-Metadaten
Bei Projektmetadataen ist es unerheblich, ob Sie im Standby- oder Wiedergabe-Modus sind. Diese Metadataen beziehen sich auf Ihr gesamtes Projekt und sind nicht mit den Clip-Nummern assoziiert.
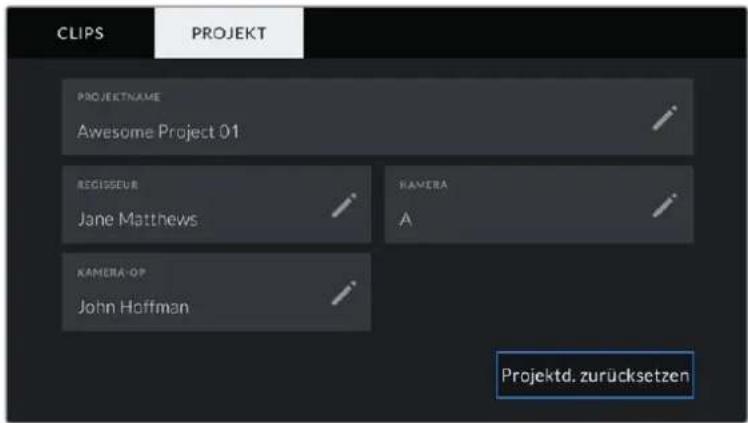
Geben Sie unter der PROJEKT-Registrarkeine Details für Ihr Projekt ein
PROJEKNAME
Zeigt den Nameh Ihres aktuellen Projekts an. Tippen Sie auf das Stift-Icon, um den Projektnamen zu ändern.
REGISSEUR
Zeigt den Name des Regisseurs für das aktuelle Projekt an. Tippen Sie auf das Stift-Icon, um den Name des Regisseurs zuändern.
KAMERA
Zeigt einen einzelnen Buchstaben als Kamera-Index an. Tippen Sie auf das Stift-Icon, um den Kamera-Index zu ändern.
KAMERA-OP
Zeigt den Name des Kameraoperators an. Tippen Sie auf das Stift-Icon, um den Name des Kameraoperators zuändern.
Videoausgabe der Kamera
HD-Monitoring-Ausgang
Der HDMI-Anschluss in voller Großgeibt Video in 1080 HD aus. Es ist einfach, daran einen Monitor oder)sagar einFernsehgerat fur die Vorschau Ihrer Bilder anzuschlieben.Die 10-Bit-Ausgabe unterstutz zudem HDR und Onscreen-Overlays fur den Kamerastatus. Das ist perfekt furs Monitoring am Set.
Wenn das Kamera-LCD aufgrund der praktischen Umstände nicht eingesehen werden kann - bspw. mit der Kamera außer Reichweite auf einem hohen Kran oder Ausleger - bietet HDMI-Monitoring eine nutzliche Alternative. Die Einstellungen der HDMI-Overlays für die Bildkontrolle über den HDMI-Ausgang werden im Menu „Display-Einstellungen" vorgegeben. In HDMI-Overlays werden Frame-Markierungen, Aufnahmeinformationen sowie Kameraeinstellungen angezeigt. Wenn Sie lediglich ihre Aufnahmen kontrollieren möchten, deaktivieren Sie die Overlays für eine saubere HDMI-Ausgabe mit „Aus".
Durch den Einsatz von Konvertern wie dem Blackmagic Micro Converter HDMI to SDI konnen Sie Signale in SDI umwandeln. Dies ermittelte, SDI-Monitore, Aufzeinungsgeräte, Broadcast-Mischer und andere SDI-Geräte anzuschreiben. Sie konnen den Blackmagic Micro Converter HDMI to SDI soccer über den USB-Port ihrer Blackmagic Pocket Cinema Camera mit Strom versorgen.
Verwendung von DaVinci Resolve
Das Filmen mit ihrer Blackmagic Pocket Cinema Camera ist nur ein Teil der Erstellung von Inhalten für Kino und TV. Ebenso wichtig sind der Sicherungs- und Verwaltungsprozess von Medien sowie Schnitt, Farbkorrektur und die Kodierung finaler Masterdateien. ihre Blackmagic Pocket Cinema Camera wird mit einer Version von DaVinci Resolve für Mac und Windows gefelft. Das gibt Ohnen eine Komplettlösung für Dreh und Postproduktion.
HINWEIS Um auf Ihrer Pocket Cinema Camera gedrehte Clips farblich prazise zubearbeiten, empfehlen wir die neuste Version von DaVinci Resolve. Die Version 16 oder hoher sorgt auf allen Blackmagic Kamas for prazise Farben und stellt die neuesten Blackmagic-RAW-Features bereit.
Nachdem Sie eine CFast- bzw. SD-Karte oder SSD an ihren Rechner angeschlossen haben, können Sie mithilfe des Clone-Tools im Media-Arbeitsraum von DaVinci Resolve beim Dreh fortlaufend Backups erstellen. Dies empfeht sich, da bei jeder Art von Speichermedium das Risiko einer Beschädigung oder Störung besteht. Die Erstellung von Sicherungskopien schützt Sie vor dem Verlust ihrer Einstellungen. Nach erfolgtem Backup ihrer Medien mit DaVinci Resolve konnen Sie ihre Clips in den DaVinci Media Pool laden und sie dann schreiben, färblich nachbearbeiten und ihre Produktion fertigstellen, ohne DaVinci Resolve je zu verlassen.
DaVinci Resolve wird für das Gros bedeutender Kinohits benutzt. Es bietet also viel mehr als ein simples NLE-Softwaretool, weil in dieser für Highend-Digitalfilm konzipierten Anwendung außerst hochentwickelte Technologie steckt. Sie profitieren von dieser Technologie, wenn Sie ihre Projekte mit DaVinci Resolve schneiden und farbkorrigieren.
In den folgenden Abschnitten werden Ohnen die ersten Schritte zum Gebrauch von DaVinci Resolve mit ihren Kameradateien erklärart. Als hochkomplexe Software bietet DaVinci Resolve natürlich weitaus mehr Features als der erstige Blick auf die Bedienoberfläche erahren lasst. Weitere Informationen zur Verwendung von DaVinci Resolve finden Sie in der englishsprachigen Bedienungsanleitung auf der Blackmagic Website, wo auch zahlreiche Trainingskurse und Videotutorials zur Verfugung stehen.
Project Manager
Bevor Sie Ihre Clips zur Bearbeitung importieren, müssen Sie Ihr Projekt im Projektmanager einrichten.
Das Projektmanager-Fenster öffnet sich beim Starten von DaVinci Resolve. Es kann auch sonst jederzeit durch Anklicken des Home-Icons unter rechts auf der Bedienoberfläche aufgerufen werden. Das ist nutzlich, wenn Sie bestehende Projekte öffnen und neue erstellen können.
Zum Erstellen eines neuen Projekts klichen Sie am unteren Fensterrand des Projektmanagers auf „New Project" und benennen Ihr Projekt. Klichen Sie zur Bestätigung auf „Create".
Im Cut-Arbeitsraum können Sie ihren Edit sofort bearbeiten.
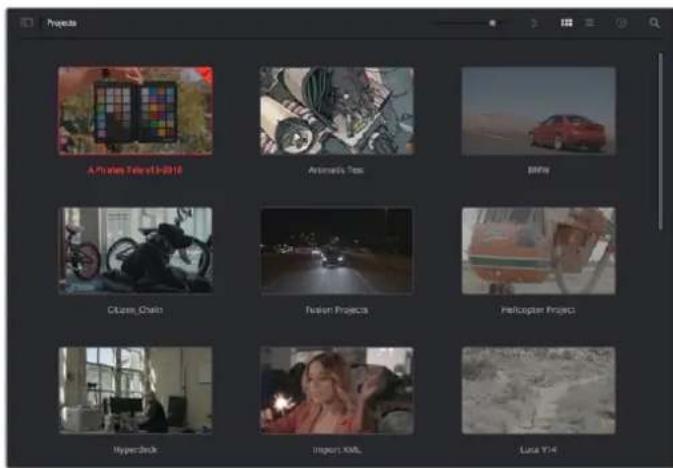
Der Projektmanager zeigt alle vom aktuellen User verwendeten Projekte an
Weitere Informationen zum Projektmanager finden Sie unter „Project Manager" im englishsprachigen DaVinci Resolve Handbuch, das auf den Support-Sections der Blackmagic Design Website heruntergeladen werden kann.
Schneiden im Cut-Arbeitsraum
Der Cut-Arbeitsraum unterstützt einen schellen, dynamischen Schnitt-Workflow, mit dem Sie Clips zugig und effizient zusammenstellen, trimmen, und bearbeiten konnen.
Zwei aktive Timelines lessen SieGPCze Edits sowie enzine Abschnitte gleichzeitig bearbeiten. So konnen Sie Clips beliebig in einer groBen Timeline platzieren und anschlieBend in derselben Arbeitsumgebung in einer detailierten Timeline bearbeiten. Dsier Workflow erormlicht das Schneiden und Arbeiten auf Laptops, ohne zu zoomen oder zu scrollen, was Ihnen viel Zeit spart.
Das Layout des Cut-Arbeitsraums
Wenn Sie den Cut-Arbeitsraum öffnen, werden der Media Pool (Medienspeicher), Viewer (Ansichtsfenster) und die Timeline eingeblendet. Diese drei primären Arbeitsbereiche geben Ohnen die volle Kontrolle über ihren Edit.
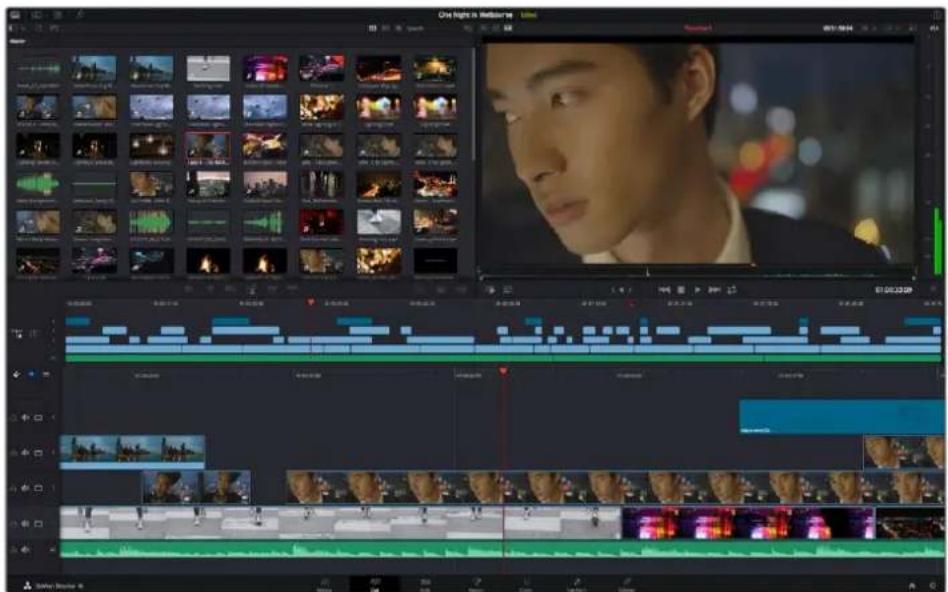
Im Cut-Arbeitsraum wird der Media Pool standardmäßig in der Icon-Ansicht dargestellt
Weitere Informationen zur Verwendung des Cut-Arbeitsraums finden Sie im Kapitel „Using the Cut Page" des englishsprachigen DaVinci Resolve Handbuchs.
Media-Menu
Oben links auf der Bedienoberfläche befinden sich fünf Schaltflächen.
Per Klick auf diese Schaltflächen rufen Sie das Medientoolset für die Bearbeitung Ihres Edits auf. Die erstee Schaltfläche ist dem Media Pool gewidmet, der bereits ausgewähl ist. Über die anderen Schaltflächen werden die Sync Bin, Übergänge, Titel und Effekte aufgerufen.

Media Pool: Der Media Pool enthalt alle von im Media-Arbeitsraum importierten Clips, Ordner und Dateien. Wenn Sie einen neuen Clip importieren möchten, ist der Dateimport auch direkt im Cut-Arbeitsraum möglich, ohne in den Media-Arbeitsraum zusückkehren zu müssen.
Sync Bin: These leistungsstarke Funktion synchronisiert alle ihre Clips automatisch nach Timecode, Datum und Uhrzeit. So können Sie in Mehrkameraprojekten aus allen Kamerawinkel wahren.
Translons: Uber die Transitions-Schaltflache daneben gelangen Sie zu den Video- und Audiobergangen, die Sie in Ihr Edit anwenden konnen. Sie umfassen gängige Übergänge wie Überblendungen und Wischblenden.
Titel: Neben den Übergängen befindet sich die Titel-Schaltfläche. Hier können Sie einen Titeltyp auswahlen. Möglich sind z. B. Roll- oder Kriechtexte, Vollbildtexte oder Bauchbinden. Darüber hinaus gibt es eine Listie mit Fusion-Titelvorlagen für stärker animierte dynamische Titel, die im Fusion-Arbeitsraum von DaVinci Resolve eigens definiert werden können.
- Effekte: Die füfte Schaltfläche ist den Effekten gewidmet. Hier gibt es ähnliche Filter und Effekte wie individualisierbare Weichzeichnungs-, Leucht- und Blendeneffekte, mit denen Sie ihren Edit lebendiger gestalten können. Es stehen zahlreiche wirkungsvolle Effekte zur Auswahl, die Sie über die Suchfunktion schnell finden.
TIPP Über das Suchfeld rechts unterhalb der Registerkarten finden Sie exakt ihr gewünschtes Element. Wenn Sie z. B. für Übergänge die Transitions-Schaltfläche geöffnet haben und „Dissolve" in das Suchfeld eingeben, werden ausschließlich Überblendungen im Viewer angezeigt, was ihreSuche nach Dissolve-Übergängen beschleunigt.
Viewer-Menu
In der oberen linken Ecke des Viewers finden Sie Buttons für die verschiedene Ansichtsmodi.

Ansichtsmodus-Buttons
These Buttons bestimmen, welcher Viewer aktiviert werden soll. Es gibt die Optionen „Source Clip“, „Source Tape“ und „Timeline“ (Quellclip, Quellband und Timeline). These Ansichtsmodi geben Ohnen betrachtliche Kontrolle bei der Clipauswahl für ihren Edit, weshalb Sie sich ihre Funktionswise kurz anschauen sollenn.
| Source Clip | Der „Source Clip“-Viewer dient der Sichtung eines einzelnen Quellclips aus dem Media Pool. Er Unterstützung das Setzen von In- und Out-Punkten entlang der gesamten Viewer-Timeline. Das bringt mehr Kontrolle. Wahlen Sie einen Quellclip zur Sichtung aus. Doppelklicken Sie damit auf einen Clip im Media Pool oderziehen Sieihn direkt ins Viewer-Fenster. |
| Source Tape | Der „Source Tape“-Viewer dient der Ansicht aller Quellclips im Media Pool. Diese leistungsstarke Funktion ist nutzlich, wenn Sie auf der Suche nach einem bestimmten Reichnis schnell alle ihre Clips durchseden wollen. Wenn Sie die Clips im Viewer mit dem Abspielkopf durchlaufen, werden die entsprechenden Thumbsnails im Media Pool bereits mit ausgewählt. Wenn Sie also ihren zu bearbeitenden Clip gefunden haben, können Sie auf die „Source Clip“-Schaltfläche klichen, woraufhin der dazugehörende Quellclip automatisch im Viewer erscheidint. Mit dem „Source Tape“-Viewer profitieren Sie voll vom nichtlinearen Schnitt und verschaffen sich die Freilheit, Edits zu bearbeiten, Shotschnell zu finden und Neues auszuprobieren, während Sie mitten im Geschehen bleiben. |
| Timeline | Im Timeline-Viewer konnen Sie die Schnitt-Timeline betrachten, um Projekte wiederzugegeben und Edits zu verfeinern. |
Clips in den Media Pool importieren
Jetzt können Sie damit beginnen, Medien in Ihr Projekt zu importieren. Sie tun das im Cut-Arbeitsraum mithilfe der Import-Tools, die sich am oberen Rand des Media-Pool-Fensters befinden.
Wahlen Sie eine der Importoptionen aus, um Medien zu ihrem Projekt hinzuzufugen
| ↓ | Import Media | These Option importiert einzeln Mediendatelen von einem vorgegebenen Speicherort. |
| ↓ | Import Media Folder | Wahlen Sie diese Option, um einen ganzen Ordner von ihrem Medienspeicherort zu importieren. Beim Importieren von Ordnern besteht DaVinci Resolve die Ordnerstruktur bei und behandelten jeder Ordner als separate Bin. So können Sie zum Auffinden von Videos und anderen Dateien durch Bins navigieren. |
So importieren Sie Medien:
1 Klichen Sie auf das Icon "Import File" oder "Import Media Folder".
2 Navigieren Sie zu dem Medienspeicherort, wo sich ihre zu importierenden Medien befinden.
3 Wahlen Sie die Datei oder den Ordner aus und bestätigen Siemit,Open
Wenn Sie Medien zu Ihr Projekt hinzugefügt haben, empfehl't es sich, diese Änderungen zu speichern. DaVinci Resolve hat eine automatische Speicherfunktion namens „Live Save“, die Ihr Projekt schnell und fortwährend speichert. Ist Ihr Projekt einmal gespeichert, wird mit der Live-Save-Funktion jeder weitere Änderung automatisch neu gespeichert. So Goes keine Arbeit verloren.
Weitere Informationen zu „Live Save" und anderen Speicherfunktionen finden Sie im englishsprachigen DaVinci Resolve Handbuch.
Einfugen von Clips in die Timeline
Nach dem Sie die Medien-Registerkarten und Buttons für die Viewer-Modi kennengelert haben, können Sie nun den Media Pool öffnen und Clips direkt zu ihrer Timeline hinzufugen.
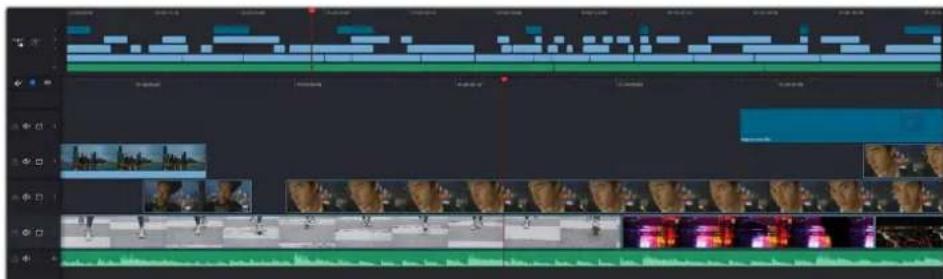
Die Timeline Im Cut-Arbeitsraum mit der oberen und der herangezoomen Timeline darunter
In der Timeline stellen Sie ihren Edit zusammen. Wie an einem ReiBrett konnen Sie hier Spuren mit Clips versehen, Clips verschreiben und Edits trimmen. Mithilfe von Spuren lassen sich Clips in Ebenen anordnen. Das bietet mehr Flexibilität, um entsprechicediche Edits auszuprobieren und Übergänge und Effekte zu erstellen. Zum Beispiel konnten Sie in einem Edit einen Clip in eine Spur platzieren, ohne dass dieser die Clips auf den anderen Spuren darunter beeinflusst.
Clips können auf entsprechiche Weise zur Timeline hinzugefügt werden. Es gibt „Smart Insert“, „Append“, „Place on top“ und andere Methoden.
Hinzufugen von Clips per Append
Wenn Sie Takes auswahlen und einen Edit zusammenstellen, empfeihlt es sich, Shots nacheinander in die Timeline einzufugen. Das „Append“-Tool eignet sich für diesen Zweck und ermöglicht他们在 schelles Edtieren.
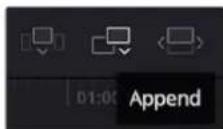
Klicken Sie auf das „Append“-Icon, um Clips im
Schnellverfahren nach dem letzten Clip einzufugen
So fügen Sie einen Clip per „Append“ ein:
1 Doppelklicken Sie auf einen Clip im Media Pool, umihn im Viewer zu öffnen.
2 Setzen Sie mit dem sogenannten Scratch-Trim-Tool In- und Out-Punkte, um einen bestimmten Abschnitt in Ihr Hem Shot zu markieren. In- und Out-Punkte können auch mit den I- und O-Tasten auf ihrer Tastatur gesetzt werden.
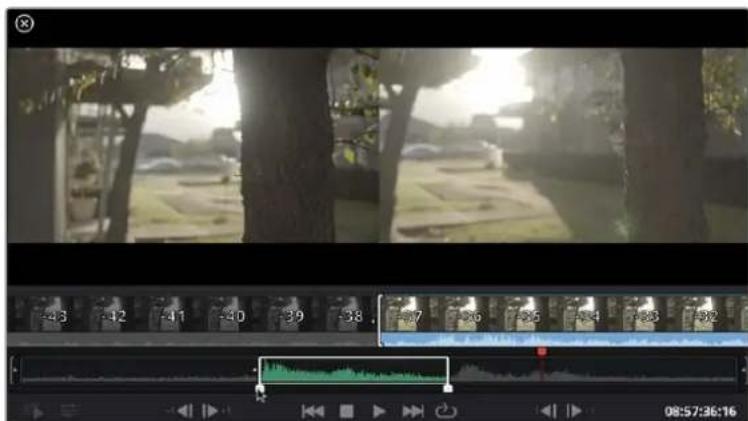
3 Klichen Sie nun unterhalb des Media Pools auf das „Append“-Icon.
Der erste Clip wird am Anfang der Timeline platziert.
Wiederholen Sie zum Einfugen weiterer Clips Schritte 1 bis 3. Damit in der Timeline keine Lücken entstehen, werden die Clips automatisch am Ende angehängt.
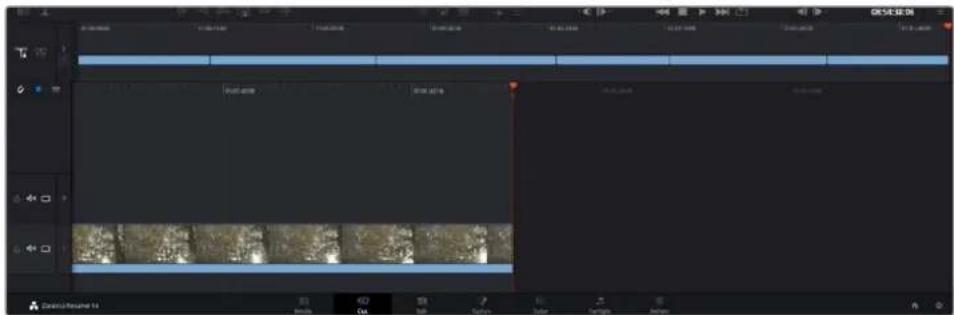
Per "Append" werden Clips verlässlich ohne Lücken in die Timeline eingefegt
TIPP Dieser Vorgang lassst sich weiter beschleunigen, indem Sie dem „Append“-Icon einen Tastaturbefehl zuweisen. Wenn Sie beispelsweise die P-Taste zuweisen, können Sie ihre In- und Out-Punkte mit den I- und O-Tasten vorgegeben und den Clip anschließend durch Drücken der P-Taste am Ende anhängen. Weitere Informationen zur Vergabe von Tastaturkurzein finden Sie im englishsprachigen DaVinci Resolve Handbuch.
Bearbeitenvon Clipsindertimeline
Befinden sich ihre Clips erst einmal in der Timeline, haben Sie die volle Kontrolle über sie. Sie können Sie umherbewegen und Edits trimmen.
Halten Sie zum Trimmen eines Edits die Maus über den Anfang oder das Ende eines Clips und klichen und ziehen Sie mit gedrückter Maustaste nach links oder rechts. Indem Sie bspw. das Ende eines Clips nach links oder rechts ziehen, verlangern oder verstürzen Sieihn. Sie werden merken, dass alle Clips im Anschluss an diesen Edit in der Timeline nachrücken, um die Änderung zu erfolglichen. Dies ist nur eine Methode, mit der der Cut-Arbeitsraum Ohnen Zeit spart.
Sie konnen den Clip auch mit der Maus greifen und in eine neue Videospur der große Timeline platzieren, ohne zoomen zu müssen. Das beschleunigt den Editingprozess, weil die Navigation durch large Timelines minimiert wird.
Wenn Sie ihre Clips im Cut-Arbeitsraum fertig bearerbeitet haben, möchten Sie weitereicht noch einen Titel hinzufugen. Im nachsten Abschnitt erfolyen Sie, wie das gehen.
Hinzufugen von Titeln
Es geht leicht, einen Titel in ihre Timeline einzufugen. Dazu gibt es mehrere Möglichkeiten.
Um die verschiedene den verfügbarbaren Titeltypen zu sehen, klichen Sie im Media-Bereich oben links auf der Bedienoberfläche auf die Registerkarte „Titles". Im Auswahlfenster werden alle verfügbarbaren Titelgeneratoren wie Bauchbinden, Rolltitel und regularer Text angezeigt. Sie konnenSolar beliebige Titel aus Fusion hinzufugen. Dabei handelt es sich um animierte individualisierbare Titel.
Als Beisiegel eignet sich der Standardtext.
Diesen fügen Sie wie folgt hinzu:
1 Klichen Sie auf den „Text“-Titel undziehen Sie in die Timeline. Das ist in beiden Timelines möglich, noch für mehr Prazision empfehlen wir die detailierte Timeline zu verwenden. Mit dieser Aktion wird automatisch eine neue Videospur erstellt und der Titel rastet am Abspielkopf ein.
2 Mit dem Loslassen der Maustaste erscheidt der Titel in der neuen Spur. Sie konnen ihn nun wie jeder anderen Videoclip verschieben und seine Länge verändern.
3 Klicken Sie zum Bearbeitern des Titels auf den neuen Titelclip, sodass unterhalb des Clip-Viewers ein Werkzeug-Icon erscheint. Klicken Sie auf these Werkzeug-Icon.
Das Anklicken ruft mehrere Tools auf, mit denen Sie den Titelclip bearbeiten können. Zum Beispiel gibt es Transform, Crop und Dynamic Zoom (Transformieren, Beschneiden, Dynamischer Zoom). Für das vorliegende Beisiel klichen Sie auf das Titel-Tool.
4 AnschlieBend klichen Sie auf „Open Inspector".
Das Inspector-Fenster wird geöffnet, in dem Sie ihren Titeltext eingeben und Texteinstellungen wie Tracking, Zeilenabstand, Schriftart, Schriftfarbe und mehr bearbeiten konnen.
Es gibt zahlireiche Mochigkeiten, ihren Titeltext exakt nach Wunsch zu individualisieren. Es empfeht sich mit den unterscheidlichen Einstellungen zu speilen, um zu sehen, wie sie die Erscheinung und Form Ihres Titels beeinflussen.
Mit Blackmagic-RAW-Dateien arbeiten
Blackmagic-RAW-Clips geben Ihnen in der Postproduktion maximalen Spielraum. So konnen Sie Änderungen an ihren Clips - bspw. am Weißabgleich und an den ISO-Werten - vornehmen, als wurden Sie die ursprünglichen Kameraeinstellungen ändern. Wenn Sie mit Blackmagic RAW arbeiten, bewahren Sie überdies mehr Tonwerte in den Schatten und Spitzlichtern. Das ist sehr praktisch, wenn es gilt, Einzelheiten wiederherzustellen, wie bspw. in einem überbelichteten Himmel oder in den dunklen Bereichen des Bildes.
Das Filmen in Blackmagic RAW zahlt sich aus, wo die bestmögliche Qualität angestrebt wird. Das Gleiche gilt für Einstellungen mit extremen Kontrasten zwischen Spitzlichtern und Schatten, da Sie diese Bereiche beim späteren Grading eventuell optimieren müssen.
Dank der Geschwindigkeit und einzelnen Dateien von Blackmagic RAW brauchen Sie keine Proxydateien mehr zu erstellen, da Blackmagic-RAW-Dateien wie reguläre Videoclips wiedergegeben werden. Dieser Abschnitt der Bedienungsanleitung befasst sich mit den Funktionsmerkmalen von Blackmagic RAW und dem Umgang mit Blackmagic-RAW-Dateien in Ihr Dam Vinci Resolve Workflow.
TIPP Es ist gängige Praxis, die Blackmagic-RAW-Einstellungen für ihre Clips im Color-Arbeitsraum anzupassen, bevor Sie mit der Farbkorrektur beginnen.
Clip-Einstellungen für Blackmagic RAW
Beim Importieren von Blackmagic-RAW-Dateien entschlusselt DaVinci Resolve die in diesen Dateien enthaltenen Kameradaten. Die Software verwendet dann die zur Zeit der Aufzeinung eingestallenten ISO-, WeiBabgleichs- und Farbstonwerte. Wenn Ihnen der mit diesen Einstellungen erzielte Look gefällt, konnen Sie sofort mit dem Schnitt beginnen.
Der große Vorteil des Films in Blackmagic RAW liegt darin, dass man nicht an diese Einstellungen gebunden ist. Die mit Blackmagic-RAW-Dateien in der Postproduktion gegebenen vielfältigen Möglichkeit erlauben. Ihnen, im Laufe der Zeit einen eigenen Arbeitsfluss zu entwickeln. Beim Experimentieren mit den „Clip“-Einstellungen einzeln Clips werden Sie im „Camera Raw“-Tab sehen, wie vielseitig und flexibel die Arbeit mit Blackmagic RAW sein kann.
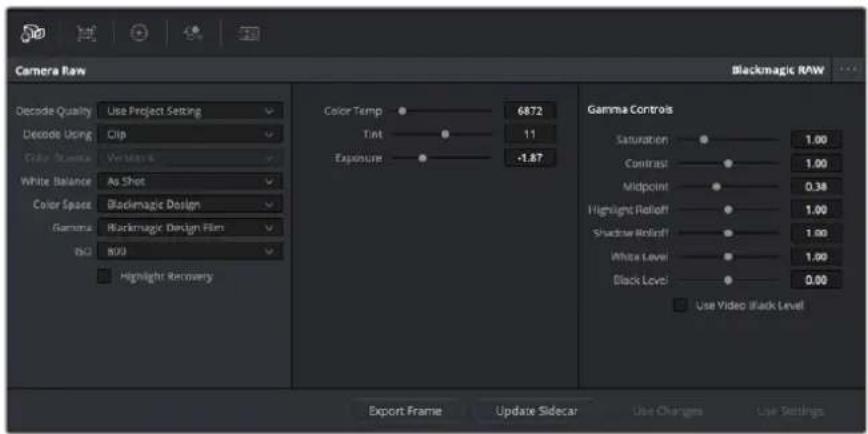
Um Anpassungen an den Blackmagic-RAW-Einstellungen Ihres Clips vorzunehmen, wahlen Sie im „Camera Raw"-Tab aus dem Drop-down-MENU „Decode Using" (Dekodieren mit) die Option „Clip" aus
Sobald Sie die Clip-Einstellungen für Blackmagic RAW in DaVinci Resolve aktiviert haben, können Sie die Clip-Einstellungen und Gamma-Bedienelemente anpassen. Durch Anpassen dieser Einstellungen können Sie ihre Clips annahernd so gut optimieren wie mit einer vollständigen primären Farbkorrektur. Das istalanders dann wirkungsvoll, wenn Sie mit den Scopes in DaVinci Resolve arbeiten. Vor der Anwendung eines Looks konnen Sie so ihre Clips neutralisieren und abstammen.
Nachstehend werden die Clip- und Gamma-Bedienelemente im Einzelnen beschreiben.
ISO
Das Erhöhen oder Verringern dieser Einstellung passt den ISO-Wert an. Das ist nutzlich, wenn Sie einen Clip zur Optimierung insgesamt heller oder dunkler setzen möchten.
Highlight Recovery
Aktivieren Sie diese Funktion, wenn Sie Highlight-Angaben in Clipkanänen mit abgeschnitten Videoüberpegel nithilfe von Informationen aus nicht abgeschnitten Kanänen wiederherstellen möchten.
Color Temp
Passen Sie die Farbtemperatur an, um das Bild warmer oder kühler zu machen. Mithilfe dieser Einstellung neutralisieren Sie die Farbbalance eines Bildes.
Tint
Durch Anpassen der Tönung wird dem Bild Grün oder Magenta hinzugeführ, um die Farben auszugleichen.
Exposure
These Einstellung hebt die Helligkeit im Bild insgesamt an.
Saturation
Die Sattigungsregler reichen von -1 für die gingste Sattigung bis +4 für maximale Sattigung. Der Standardwert ist 1.
Contrast
Der Standardwert ist 1. Der gingste Kontrast liegt bei 0, der stärkste bei 2. Ziehen Sie den Regler nach links, um den Kontrast zu reduzieren bzw. nach rechts, umihn zu erhöhen.
Midpoint
Im Modus „Blackmagic Design Film" liegt der standardmäßige Graustufenwert bei 0,38 bzw. 38,4%. Ziehen Sie den Regler nach links, um die Mitteltöne zu reduzieren oder nach rechts, um sie auf max. 100 % anzuheiten. Wenn der Kontrast auf einen anderen als den Standardwert angepasst wird, konnen Sie ihre Werte für Highlight- und Shadow-Rolloff modifizieren.
Highlight Rolloff
Sie justieren die Lichter, indem Sie den Regler nach linksziehen, um sie zu reduzieren (0 ist der niedrigste Wert) oder nach rechts, um sie hochzufahren (2 ist der höchste Wert). Der Standardwert liegt bei 1.
Shadow Rolloff
Ziehen Sie den Regler nach links, um die Schatten auf 0 zu reduzieren oder nach rechts, um sie auf 2 anzuheben.
White Level
Sie justieren den WeiBpunkt in der Gammakurve, indem Sie den Regler vom Höchstwert 2 auf den Tiefstwert 0ziehen. Der Standardwert liegt bei 1.
Black Level
Sie haben den Schwarzpunkt in der benutzderdefinierten Gammakurve an, indem Sie den Regler nach rechtsziehen. -1 ist der niedrigste Wert, 1 der hochste. Der Standardwert liegt bei 0.
Use Video Black Level
Um die Schwarzwerte auf „Video" zu setzen, aktivieren Sie diese Kontrollkastchen.
Export Frame
Durch Klicken des Buttons „Export Frame" können Sie einen einzelnen Frame aus dem Blackmagic-RAW-Clip exportieren.
Update Sidecar
Klicken Sie diesen Button, um die Filialdatei für den aktuellen Clip zu aktualisieren.
An ihren Blackmagic-RAW-Clips vorgenommene Änderungen sind daran erkennbar, dass Gamma zur benutzerdefinierten Einstellung „Blackmagic Design Custom" wechselt.
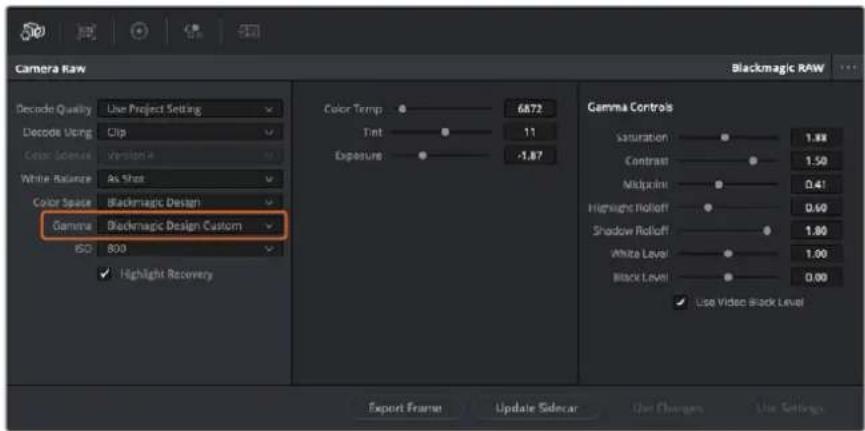
Wenn Sie ihren Clip wieder auf eine der verfügbaren Gamma-Standardoptionen zusücksetzen möchten, wahren Sie diese aus dem Gamma-Drop-down-MENU aus
TIPP Für Footage, die mit dem „Video“-Dynamikumfang gefilmt wurde, sind die Gamma-Bedienelemente deaktiviert. Ihr Blackmagic-RAW-Daten sind jedoch nicht verloren gegangen. Wahlen Sie im Drop-down-Menu „Gamma“ einfach „Blackmagic Design Film“ oder „Blackmagic Design Extended Video“ aus und sehen Sie ihre Änderungen vor.
Änderungen an Blackmagic RAW speichern
1 Passen Sie die Gamma-Bedienelemente Ihres Blackmagic-RAW-Clips an.
2 Klicken Sie auf den Button, Update Sidecar.
Nun wird in dem Ordner mit ihrer BRAW-Datei eine Filialdatei, sprich Sidecar-Datei, generiert. Importieren andere Nutzer die Blackmagic-RAW-Dateien, so liest DaVinci Resolve automatisch die Sidecar-Dateien. Wenn Sie weitere Änderungen vornehmen, klichen Sie ernut auf „Update Sidecar".
TIPP Sie können eine Sidecar-Datei entfernen, indem Sie sie aus dem Ordner auf Ihr Medienlaufwerklöschen.
Projekteinstellungen für Blackmagic RAW
Wenn Sie für alle Clips eine gemeinsame Einstellung ändern müssen, wie z. B. eine globale Änderung für Weißabgleich oder ISO, können Sie für ihre Clips projetbezogene „Camera Raw“-Einstellungen vorgegeben und die globalen Änderungen von hier aus vornehmen.
So geben Sie Projekteinstellungen für Blackmagic RAW vor:
1 Öffnen Sie das Projektinstellungenmenu, indem Sie auf „File" und dann auf „Project Settings" klichen.
2 Unter dem „Camera Raw“-Tab setzen Sie ein Drop-down-MENU. Um Blackmagic RAW aus der Listenauszuwahlen, klichen Sie auf den Pfeil.
3 Wahlen Sie im Drop-down-Menu „Decode Using" (Dekodieren mit) die Option „Project" (Projekt) aus.
4 Geben Sie für den Weißabgleich „Custom" (Benutzderdefiniert) vor.
5 Wahlen Sie aus dem Drop-down-Menu für „Gamma" die Option „Blackmagic Design Custom" aus. Wahlen Sie für „Color Space" die Farbraum-Option „Blackmagic Design" aus. Dies bewirkt auch, dass „Gamma" auf „Blackmagic Design Film" eingestellt wird.
6 Wahlen Sie im „Decode Quality“-Menu ihre Auflösung aus. Eine gingere Auflösung gibt ihren auf weniger leistungsstarken Systemen eine bessere Wiedergabe. Sie haben die Flexibilität, dies später auf volte Auflösung zu ändern, um Ihr Material in der hochsten Qualität auszugeben.
Jetzt können Sie die Kameraeinstellungen wie Sattigung, Kontrast und Mitteltone für ihre Clips anpassen. Dies wird sich auf alle Clips in Ihr Projekt aus, für die die Decodieroption „Project" ausgewählt ist.
Farbkorrektur von Clips im Color-Arbeitsraum
Nachdem Sie ihre Clips in die Timeline importiert und mit Titeln versehen haben, können Sie zur Farbkorrektur in den Color-Arbeitsraum übergeben. Diese Arbeitsbereich ist überaus leistungsstark und kann den gesamtten Look Ihres Films bestimmen. Für das vorliegende Beispiel empfeht es sich jedoch, alle Clips zu neutralisieren und sie damit einheitlich zu gestalten. Sie konnen jederzeit in den Cut- oder Edit-Arbeitsraum zurückkehren, um an Ihr dem Edit Änderungen vorzunehmen.
Im Color-Arbeitsraum macht vor allem der Look Ihres Edits eine Veränderung durch. Die Farbkorrektur ist in vielerlei Hinsicht eine Kunstform und Sie bringen sich damit gefühlsmaig ein. Sie ist ein unglaublich kreativer Teil des gesamten Workflows und es ist außerst zufriedenstellend, diese Fähigkeiten zu erlernen und ihre Arbeit zum Leben zu erwecken. Dies ist in der Regel der erst Bearbeitungsschritt, der als primäre Farbkorrektur oder als Anpassung der Primärfarbwerte besteht ist. Wenn die primäre Farbkorrektur steht, konnen Sie zur sekundären Farbkorrektur übergeben. Hier sind hochst prazise Farbanpassungen bestimmter Elemente in ihren Bildern möglich. Diese speaige Teil passiert normalerweise im Anschluss an die primären Anpassungen, da dies den Arbeitsablauf effizienter macht und zu einem besseren Ergebnis führt.
Klicken Sie zunachst auf den „Color“-Tab, um den Color-Arbeitsraum zu öffnen.
Dort finden Sie die Camera-RAW-Einstellungen, Farbrader, Kurven und generelle Farbkorrektur-Tools sowie die Fenster „Preview" für die Vorschau und „Nodes" für Operatoren. Lassen Sie sich von der risigen Auswahl an Features nicht abschrecken. Mit denen werden Sie die großigsten Bilder schaffen. In thisem
Abschnitt lernen Sie die ersten Schritte und Grundlagen. Ausfuhrlichere Informationen finden Sie in den entsprechenden Abschnitten des englishsprachigen DaVinci Resolve Handbuchs. Dort erfahren Sie Schritt für Schritt, wofür die Tools da sind und wie man sie benutzt. Sie erlernen dieselben Techniken, die Profis in Highend-Farbokorrekturstudios anwenden.
Im Rahmen der primären Farbkorrektur werden in ihren Clips in der Regel zuerst die Pegel für Schatten, Mitteltöne und Lichter optimiert. Sie justieren also die Einstellungen für „Lift“, „Gamma“ und „Gain“ (Schatten-, Mittel- und Weßstonwerte). So bringen Sie ihre Bilder auf einen ausgewogenen Ausgangspunkt mit optimaler Leuchtstarke und Klarheit. Von hier konnen Sie durch farbliches Grading einen Look für ihren Film erarbeiten. Für die Pegeloptimierung eignen sich die Scopes.
Verwenden von Scopes
Die meisten Coloristen treffen kreative Farbentscheidungen, indem Sie sich auf die Emotionen und den Look konzentrierten, den sie ihren Programm verleihen möchten. Mithilfe des Monitors arbeiten sie dann daran, dies umzusetzen. Sehen Sie sich alltägliche Gegenstände an, und wie unterschiedliche Lichtquellen auf sie einwirken. Sie werden erfahrrener und geübter darin, was sich aus ihren Bildern machen{lssst.
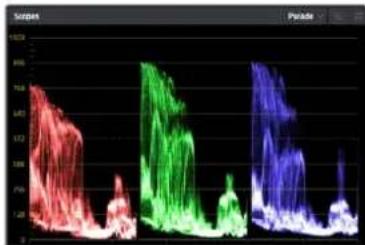
Optimieren Sie anhand des Parade-Scopes die Lichter, Mitteltone und Schatten
Ein weiterer Weg der Farbkorrektur, ist der Gebrauch von eingebauten Scopes, um ihre Aufnahmen abzugleichen. Sie können ein einzelnes Videoskop öffnen, indem Sie auf die „Scope“-Schaltfläche klichen, die sich in der Toolbar an zweiter Stelle von rechts befindet. Zur Auswahl stehen Scopes für Wellenform, Parade und Histogramm sowie ein Vektorskop. Überprüfen Sie anhand dieser Scopes die Klangbalance und die Pegel Ihres Videos, um ein Stauchen der Schwarz- und ein Clipping der Weißwerte zu verhindern. Zusätzlich konnen Sie ihre Clips auf Farbstiche untersuchen.
Im Farbrad-Menu befinden sich die Steuerelemente fur „Lift“, „Gamma“ und „Gain“, die Sie üblicherweise als Erstes anpassen. Wenn Sie Erfahrungen im Colorgrading mitbringen, werden Ihnen die Bedienelemente für Farb- und Kontrastanpassungen besteht vorkommen.
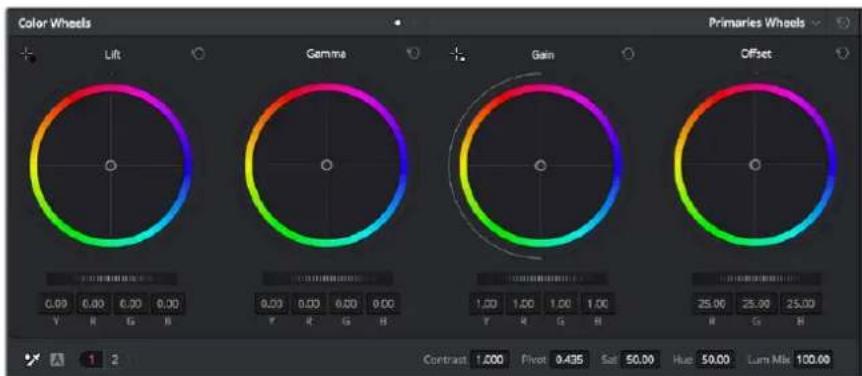
Die Farbrader "Lift", "Gamma", "Gain" und "Offset" geben Ohnen die volle Kontrolle über die farbliche und tonale Balance ihrer Clips. Ziehen Sie das Einstellrad unter den Farbräden hin und her, um die Farben jeder einzahlen tonalen Bereichs einheitlich anzupassen
Um die Farben mit der Maus noch akkurater zu steuern, konnen Sie in der „Color Wheels“-Palette von den Farbrädern „Primary Wheels“ zu den Farbbalken „Primary Bars“ wechseln. Mit denen lassen sich jeder Farbe
und jeder Luminanzkanal fur Schatten, Mitten und Lichter separat einstellen. Wahlen Sie hierfur im Drop-. down-Menu der Farbrad-Palette „Color Wheels" offen rechts einfach die Option „Primaries Bars" aus.
- Anpassen von „Lift“ (Schwarztöne): Wahlen Sie einen Clip in der Farb-Timeline aus und klichen Sie auf die „Lift“-Skala unterhalb des ersten Farbrads. Schieben Sie das Einstellrad vor und darüber und beobachten Sie die Auswirkungen auf Ihr Bild. Sie werden sehen, wie die Helligkeit der dunklen Bereiche Ihres Bildes zu- und abnimmt.
Stellen Sie sie so ein, dass die dunklen Bereiche optimal aussehen. Wenn Sie die Schwarzwerte zu sehr verringn, gehen womoglich Details im Schwarzbereich verloren. Dies lasst sich mithilfe des Parade-Scopes verhindern. Die optimale Position von Schwarztönen im Kurvenverlauf befindet sich direkt über der unteren Linie des Parade-Scopes. - Anpassen von „Gain" (Weltstone): Klichen Sie auf das Einstellrad für „Gain" und schiben Sie es hin und her. Dies justiert die Lichter, womit die hellsten Bereiche in Ihrm Clip gemeins sind. Die Lichter werden im oberen Abschnitt des Kurvenverlaufs im Parade-Scope angezeigt. Für eine gut beleuchtete Aufnahme bringt man diese am besten direkt unter die obere Linie des Wellenform-Scopes. Wenn die Lichter über die obere Linie des Wellenform-Scopes ausschlagen, werden sie abgeschritten und es gehen Details in den hellsten Bereichen Ihres Bildes verloren.
- Anpassen von „Gamma" (Mitteltõne): Klichen Sie auf das Einstellrad für „Gamma" unter dem Farbrad und schiben Sie es hin und her. Wenn Sie die Mitteltonwerte erhöhen, sehen Sie, wie auch die Helligkeit Ihr's Bildes zunimmmt. Sie werden merken, dass sich beim Anpassen der Gammawerte auch der mittlere Abschnitt der Wellenform bewegt. Er steht für die Mitteltõne Ihr's Clips. Die optimale Position für Mitteltõne fällt in der Regel zwischen 50-70% im Wellenform-Scope. Dies ist jeder Geschmackssache und hangt vom gewünschten Look und den Lichtverhältnissen im Clip ab.
Sie konnen anhand der Kurven-Feature auch primäre Farbkorrekturen vornehmen. Erstellen Sie per Klick einfach Steuerpunkte auf der diagonalen Linie im Kuvendiagramm undziehen Sie diese nach oben oder unter, um die Haupteinstellungen des RGB-Kontrasts für verschiedene Tonwertbereiche im Bild anzupassen. Optimal anpassen setzen sich auf der Kurve im unteren Drittel, in der Mitte und im oberen Drittel liegende Punkte.
Es gibt noch weitere andere Möglichkeit der primären Farbkorrektur in DaVinci Resolve.
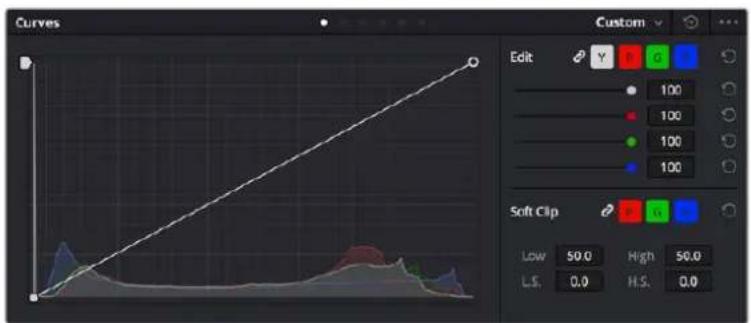
Die „Curves“-Palette ist ein weiteres Tool für primäre Farbkorrekturen oder um bei Verwendung eines Power Windows bestimmte Bereiche in Ihr Clp zu optimieren
Sekundäre Farbkorrektur
Wenn Sie einen bestimmen Bereich Ihres Bildes verfeinern mochten, benutzen Sie sekundäre Farbkorrekturen. Ihr bisherigen an „Lift“, „Gamma“ und „Gain“ vorgenommen Anpassungen haben sich auf das gesamte Bild ausgewirkt. Deshalb bezeichnet man sie als primäre Farbkorrekturen.
Um spezifische Bildpartien zu verfeinern, empfehlen sich sekundäre Farbkorrekturen, bspw. wenn Sie die Farbe von Gras in einer Szene verbessern oder das Blau des Himmels vertiefen wollen. Bei der sekundären Farbkorrektur wählt man einen spezifischen Bereich aus, den man dann isoliert darbeitet. Mithilfe von Nodes halten sich mehrere sekundäre Korrekturen übereinanderlegen. Damit konnen Sie einen Bereich Ihres Bildes bis zur Perfektion bearbeiten. Sie konnen sareg von Windows und Tracking Gebrauch machen. So kann Ihr ausgewähler Bereich Bewegungen in ihren Bildern folgen.
Qualifizieren einer Farbe
Sie werden früig feststellen, dass eine bestimmte Farbe in Ihrm Clip optimiert werden kann, z. B. Gras am Straßenrand oder das Blau des Himmels. Vielleicht empfeht sich auch die farbliche Justierng eines bestimmten Objeks, um die Aufmerksamkeit des Publikums darauf zu lenken. Mit dem HSL-Qualifizierer-Tool ist dies problemlos möglich.

Mit der HSL-Qualflizierer-Funktion konnen Sie bestimme Farben in Ihrm Bild auswahlen. Das ist practisch, um bestimme Bereiche hervorzuheben, den Kontrast zu erhöhen oder um die Aufmerksamkeit des Publikums auf bestimme Bildbereiche zu lenken
So qualifizieren Sie eine Farbe:
1 Fügen Sie einen neuen „Serial Node" (Serieller Node) hinzu.
2 Offnen Sie das Qualifizierfenster „Qualifier" und vergewissern Sie sich, dass das Pipetten-Tool im Auswahlabschnitt „Selection Range" ausgewählt ist.
3 Klichen Sie in Ihrm Clip auf die zu bearerbeitende Farbe.
4 In der Regel werden Sie eine Anpassungen vornehmen müssen, um ausgewählte Kanten weichzuzeichnen und den Bereich ausschließlich auf die gewünschte Farbe zu begrenzen. Klichen Sie über dem Viewer auf die Schaltfläche „Highlight“, um ihre Auswahl sightbar hervorzuheiten.
5 Passen Sie im Farbton-Fenster „Hue" die Bandbreite über „Width" an und erweitern oder verengen Sie ihre Auswahl.
Experimentieren Sie mit den Bedienelementen „High“, „Low“ und „Softness“, um ihre Auswahl zu verfeinern. Nun können Sie ihre ausgewählte Farbe mithilfe von Farbrädern oder benutzerdefinierten Kurven korrigieren.
Es kann vorkommen, dass ihre Auswahr in Bildpartien hineinreicht, die nicht einbezogen werden sollen. Sie können die unerwänschten Bereiche muhelos mit einem Power Window ausmaskieren. Erstellen Sie dazu einfach ein neues Fenster und formen Sie es entsprechend, um lediglich den gewündschen Farbbereich auszuwahlen. Wenn sich die ausgewählte Farbe in der Aufnahme bewegt, konnen Sie Ihr Power Window mithilfe der Tracking-Feature verfolgen.
Hinzufügen eines Power Windows
Power Windows sind ein extrem effektives Tool für die sekundäre Farbkorrektur zur Isolierung bestimmter Bereiche Ihres Clips. Diese Bereiche müssen nicht statisch sein und halten sich auch bei einem Kameraschwenk oder einer Drehung sowie der Bewegung des Bereichs selbst verfolgen.
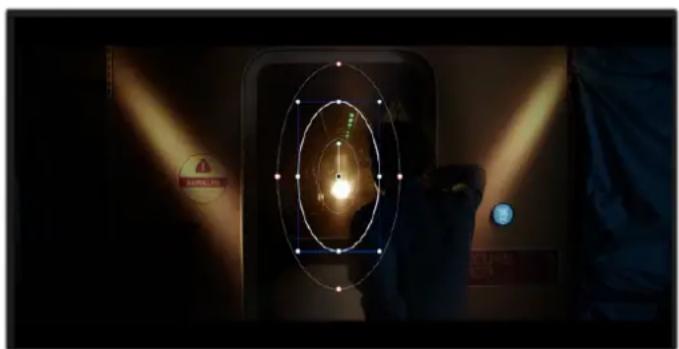
Power Windows dienen zum Ausmaskieren von Bereichen, die nicht vonden sekundären HSL-Qualifizierer-Anpassungen berührt werden sollen
Mithilfe eines solchen Windows konnen Sie bspw. die Bewegungen einer Person verfolgen, um Farb- und Kontraständerungen ausschließlich an dieser Person vorzunehmen, ohne ihre Umgebung zu beeinflussen. Mit solchen Korrekturen konnen Sie die Aufmerksamkeit des Publikums auf bestimmte Bereiche lenken.
So fügen Sie Ihr hem Clip ein Power Window hinzu:
1 Fugen Sie einen neuen „Serial Node“, einen seriellen Operator, hinzu.
2 Offnen Sie die „Window“-Palette und wahlen Sie eine Form für Ihr Power Window aus, indem Sie auf ein Form-Icon klichen. Das Window in der gewünschten Form erscheint nun im Node.
3 Passen Sie die Form an, indem Sie auf die blauen Punkte klichen und diese in Form ziehen. Entlang der roten Punkte werden die Kanten weichgezeichnet. Positionieren Sie die Form, indem Sie auf den Mittelpunkt klichen und sie auf den zu isolierenden Bereich schiben. Mit dem Punkt, der mit dem Mittelpunkt verbunden ist, lasst sich das Fenster rotieren.
Nun können Sie Farbkorrekturen Ihres Bildes gezielt in dem Bereich vornehmen, den Sie bearbeiten möhen.

Power Windows lessen Sie in bestimmten Bereichen Ihres Bildes sekundäre Korrekturen vormehmen
Tracking mit einem Power Window
Die Kamera, das Objekt oder der Bereich in Ihrer Einstellung bewegt sich gegebenenfalls. Um Sicherzustellen, dass das Power Window auf dem ausgewählten Objekt oder Bereich haften bleibt, erhmen Sie das leistungsstarke Tracking-Tool von DaVinci Resolve zu Hilfe. Der Tracker analysiert die Schwenk-, Neige-, Zoom- und Rotationsbewegung der Kamera oder des Objeks in Ihrem Clip, womit Sie Ihr Window der Bewegung anpassen. Geschiet this nicht, erfolgt ihre Korrektur ggf. außerhalb des vorgegebenen Zielbereichs und fällt unnöttig auf, was vermutlich unerwänscht ist.
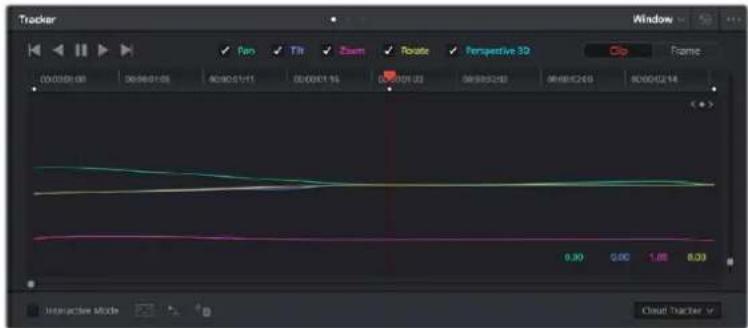
Mithilfe der Tracking-Funktion konnen Sie Objekte oder Bereiche in Ihrem Clip verfolgen. Power Windows folgen dann der Bewegung
So verfolgen Sie ein sich bewegendes Objekt mit einem Power Window:
1 Erstellen Sie einen neuen „Serial Node" und fügen Sie thisem ein Power Window hinzu.
2 Gehen Sie zum Anfang Ihres Clips, positionieren Sie ein Power Window auf dem gewünschten Object oder Bereich und passen Sie seine große an.
3 Öffnen Sie die „Tracker“-Palette. Wahlen Sie die geeigneten Schwenk-, Neige-, Zoom-, Rotations- und 3D-Einstellungen für die Bewegung in Ihrm Clip aus, indem Sie in die jeweiligen „Analyse“- Kontrollkästchen ein Häkchen setzen oder es entfernen.
4 Klichen Sie auf den Vorwärtspfell links von den Dialogboxen. DaVinci Resolve vendet nun ein Cluster mit Tracking-Punkten auf ihren Clip an und durchlauf dann die Frames, um Bewegung zu analysieren. Nach abgeschlossenem Tracking-Vorgang verfolgt Ihr Power Window die Bewegungen in ihrem Clip.
In den meisten Fälle Funktioniert das automatische Tracking erfolgreich. In komplexen Szenen kann es jedoch vorkommen, dass sich ein Objekt an ihrem ausgewählten Bereich vorbei bewegt und damit das Tracking unterbricht oder stört. Dies kann manuell mithilfe des Keyframe-Editors gelöst werden. Näheres dazu finden Sie im englishsprachigen DaVinci Resolve Handbuch.
Mit Plug-ins arbeiten
Während der sekundären Farbkorrektur konnen Sie außer dem ResolveFX- oder OpenFX-Plug-ins hinzufugen. Damit lassen sich im Color-Arbeitsraum schnelle, interessante Looks und Effekte oder im Edit-Arbeitsraum einfassreiche Übergänge für ihre Clips kreieren. ResolveFX sind bereits in DaVinci Resolve installiert. OpenFX-Plug-ins sind bei Fremdanbietern zum Download erhältlich.
Nach erfolgster Installation eines Satzes von OpenFX-Plug-ins greifen Sie auf diese OFX- oder die ResolveFX-Plug-ins über den Color-Arbeitsraum zu. Öffnen Sie hierfür den OpenFX Inspector rechts befindem Node-Editor. Erstellen Sie zunachst einen seriellen Node. Öffnen Sie dann per Klick auf den „OpenFX“-Button die Effektbilibiothek undziehen Sie ein Plug-in per Drag-and-drop auf den Node. Verfüg das Plug-in über eigene Einstellungen, konnen Sie diese im angrenzenden „Settings“-Menuändern.
Im Edit-Arbeitsraum konnen Sie Clips mit Plug-in-Filtern und Übergängen versehen, indem Sie das „OpenFX“-Menu in der „Effects Library“ offen und das gewünschte Plug-in auf die Videospur Ihres Clips in der Timelineziehen.
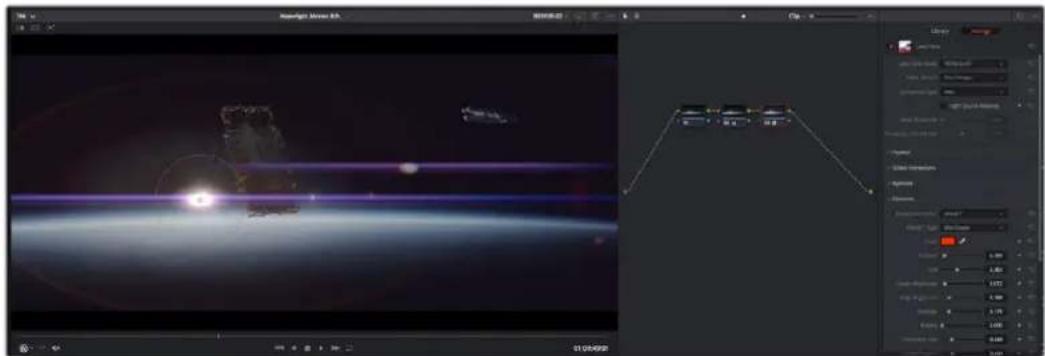
OFX-Plug-ins bieten einechnelle und einfache Moglichkeit, einfallsreiche und interessante Looks zu kreieren
Mixen von Ton
Tonmischen Im Edit-Arbeitsraum
Sobald Sie Ihr Projekt geschritten und Farblich bearbeitet haben, können Sie mit dem Mischen von Ton beginnen. DaVinci Resolve bietet direkt im Edit-Arbeitsraum eine praktische Auswahl an Features zum Schneiden, Mixen und Mastern von Audio. Werden für Ihr Projekt noch ausgegliederte Audiotools besteht, haben Sie im Fairlight-Arbeitsraum Zugriff auf eine komplette Postproduktionsumgebung für Ton. Wenn Sie bereits mit dem Edit-Arbeitsraum vertraut sind und direkt mit Fairlight weitermachen sollen, überspringen Sie diesen Abschnitt.
Hinzufugen von Audlospuren
Wenn Sie im Edit-Arbeitsraum arbeiten und einen elementaren Tonschnitt mit vielen Toneffekte und Musik mischen wollen, können Sie bei Bedarf muhelos weitere Audiospuren hinzufugen. Das kann praktisch sein, wenn Sie ihren Sound bauen und ihre Audioelemente für einen Soundmix auf entsprechliche Spuren verteilen möchten, wie bspw. Gesang, Toneffekte und Musik.
Hinzufugen einer Audlospur Im Edit-Arbeitsermau
Führer Sie neben dem Name einer Audiospur in Ihrer Timeline einen Rechtsklick aus und wahren Sie „Add Track" sowie eine der Optionen „Mono", „Stereo" oder „5.1". Dies fegt unter in der Track-Liste eine Spur hinzu. Wahlen Sie alternative „Add Track" und anschließend die Position, an der eine oder mehrere neue Spuren eingefegt werden sollen.
Ohre neue Audiospur erscheint nun in der Timeline.
TIPP Wenn Sie einen Spurtyp im Nachhineinändern möchten, wahlen Sie darüber dem Spurnamen per Rechtsklick den Befehl „Change track type to" und dann aus den Optionen „Stereo", „Mono" und „5.1" ihrer bevorzugte Option.
Anpassen von Audlogegen in der Timeline
Jeder Audioclip hat in der Timeline sein eigenes Lautstärke-Overlay, über das Sie die Lautstärke des Clips einstellen können. Ziehen Sie den Zeiger dafür lediglich hoch oder runter. Das Overlay korrelliert mit dem Lautstärkeparameter im Inspector.
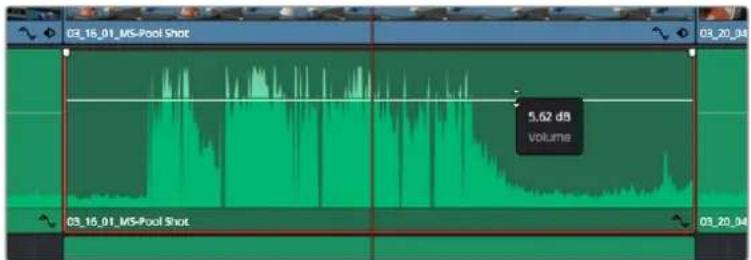
Bewegen Sie den Zeiger Im Lautstärke-Overlay, um den Lautstärkepegel des Clips anzupassen.
Sollten Sie für Ihr Projekt noch ausgegliederte Audiotools benötigen, haben Sie im Fairlight-Arbeitsraum Zugriff auf eine komplette Postproduktionsumgebung für Ton.
Der Fairlight-Arbeitsraum
Im Fairlight-Arbeitsraum in DaVinci Resolve bearbeiten Sie den Ton Ihres Projekts. Im Einzelmonitor-Modus bietet Ihnen dieser Arbeitsraum eine optimierte Übersicht über die Audiospuren Ihres Projekts. Ein erweiterter Mixer und spezielle Monitoring-ELEMENTe vereinfachen die Evaluierung und Anpassung von Pegeln, um einen gleichmäßigen und harmonischen Mix zu kreieren. Lassen Sie sich von der riesigen Auswahl an Features nicht abschrecken. Mit ihren werden Sie die bestmögliche Tonqualität für Ihr Projekt erreichen.
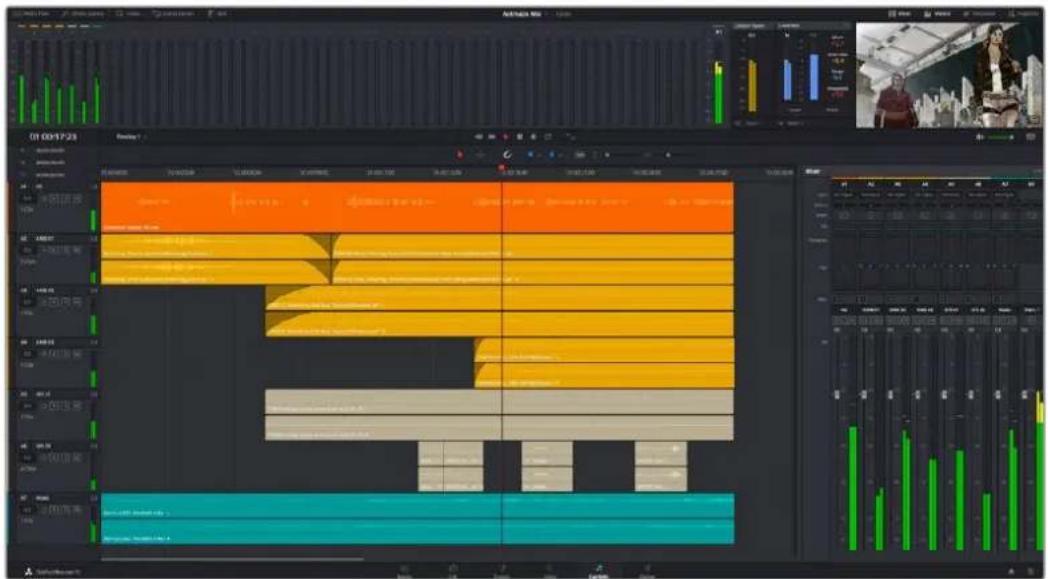
These Anleitung gibtlichen einen grundlegenden Überblick über die Funktionen im Fairlight-Arbeitsraum. Wenn Sie mehr zu den einzelnen Details einer jeder Funktion erfahren mochten, siehen Sie das Englischsprachige DaVinci Resolve Handbuch zu Rate. Es erklart den Zweck der einzelnen Tools und beschreiben in leicht verständlichen Schritten, wie Sie sie einsetzen.
Die Audio-Timeline
- Spur-Header: Links geben jeder Spur befindet sich ein Spur-Header, der die Spurnummer, den Spurnamen, die Spurfarbe, Audiokanäle, Fader-Werte und Audiopegelmesser anziegt. Der Spur-Header enthalt darüber hinaus einen Button zum Sperren und Entsperren von Spuren sowie Solo- und Stummschalt-Buttons. Diese Elemente halten ihren damit, Spuren zu organisieren und ermöglichen die Vorschau einzeln der Spuren.
- Spuren: Jede Spur im Fairlight-Arbeitsraum ist in Unterspuren aufgeleit. Jege dieserer Unterspuren reflektiert einen individuellen Kanal des Cliptons zum Schneiden und Mixen. Der Edit-Arbeitsraum verbirgt die individuellen Audiokanäle und zeigtstattdessen nur einen einzelnen Clip in der Timeline an. Das macht es einfacher, Mehrkanalquellen zu schneiden, ohne eine große Anzahl an Spuren verwalten zu müssen.
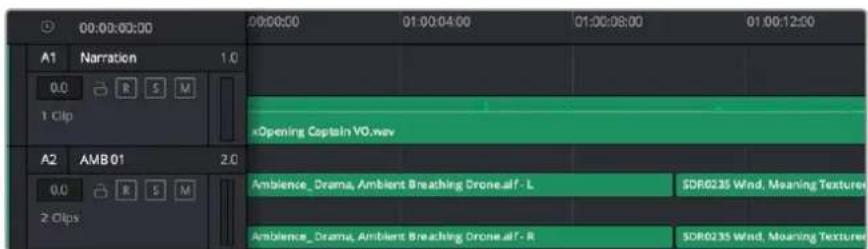
Der Spur-Header von Spur A1 verwelst auf eine Monospur mit einer einzeln Unterspur für Monoton. Bei Spur A2 hingegen handelt es sich um eine Stereospur für Stereoton
Wasist ein Bus?
Ein Bus ist im Grunde genommen ein Zielkanal, zu dem man mehrere Audiospuren aus der Timeline routen kann. Auf diese Weise werden die Spuren zu einem einzelnen Signal zusammengemischt, das dann auch über einen einzelnen Kanalzug steuerbar ist.
- Main Bus: "Main Busses" bzw. Hauptbusse sind in der Regel die primäre Ausgabe eines Programms. Jedes neu erstellte Projekt verfügt anfangs über einen einzelnen Main-Bus, an den standardmäßige alle Spuren geroutet werden. Der Main-Bus kombiniert alle Spuren in der Timeline zu einem einzigen Signal. So konnen Sie den allgemeinen Pegel des Audiomixes anpassen, sobald Sie die Pegel der einzelnen Spuren eingestellt haben.
- Sub Bus: "Sub Busses" erlauben ein Zusammenfugen mehrerer Audiospuren der gleichen Kategorie wie Dialoge, Musik oder Effekte. Auf diese Weise konnen alle Elemente derselben Kategorie als einzelnes Audiosignal gemixt werden. Beispiel: Wenn Sie fünf Dialogspuren haben, konnen Sie die Ausgabe aller fünf Dialogspuren zu einem Submix-Bus zusammenfugen. Die Pegel aller Dialogspuren halten sich so mit einem einzelnen Satz von Steuerelementen anpassen. Diese Submix kann dann separat gerendert oder zum Rendern an den Main-Bus gesendet werden.
Der Mixer
Jede Audiospur in der Timeline entspricht einem individuellen Kanalzug im Mixer. Standardmäßig befindet sich rechts darüber dem Main-Bus ein einzelniger Kanalzug mit der Beschrifung „M1". Zusätzliche Kanalzüge erscheinen auf der rechten Seite und verfügen über Steuerelemente für jeder weiteren Main- oder Submix-Bus, den Sie erstellen. Mit einem Satz grafischer Steuerelemente konnen Sie Ausgabekanäten Spurkanäte zuweisen, EQ und Dynamik anpassen, Pegel und Aufnahmeautomatisierung einstellen, Stereound Surround-Ton positionieren sowie Spuren auf Solo oder stummschalten.

Audiomixer mit den zu den Spuren in der Timelne gehörigen Kanalzügen
Audio mit dem Equalizer verfeinern
Sobald die Tonpegel ihrer Audioclips angepasst sind, stellen Sie weitere fest, dass der Ton weiteren Verfeinerungen bedarf. Es kann vorkommen, dass Dialoge, Musik und Soundeffekte um dieselben Frequenzen im Klangspektrum konkurieren. Das kann dazu führen, dass der Sound aufdringlich oder unklar herüberkommt. Hier kann der Equalizer (EQ) Abhilfe schaffen, da Sie darüber jene Bereiche des Klangspektrums bestimmen können, den jeder Spur für sich beansprucht. Mit einem Equalizer können Sie darüber hinaus unerwünschte Elemente aus Ihr dem Audio entfernen. Das geschieht, indem Pegel in bestimmten Frequenzen, die ein Drohnen, Surren, Zischen oder auch Windgeräische enthalten, isoliert oder reduziert werden. Auch die allgemeine Klangqualität lasst sich damit verbessern.
DaVinci Resolve stellt EQ-Filter bereit, die auf Clipebene für individuelle Clips oder auf Spurebene für individuelle Spuren angewendet werden konnen. Jeder Audioclip in der Timeline verfügt über einen 4-Band-Equalizer im Inspector-Fenster. Im Mixer-Fenster steht für jeder Spur ein parametrischer 6-Band-Equalizer bereit. Mit den grafischen und numerischen Steuerelementen zum Verständen oder Dämpfen von Frequenzbereichen sowie unterschiedlichen Filterarten lasst sich die Form der EQ-Kurve definierten.
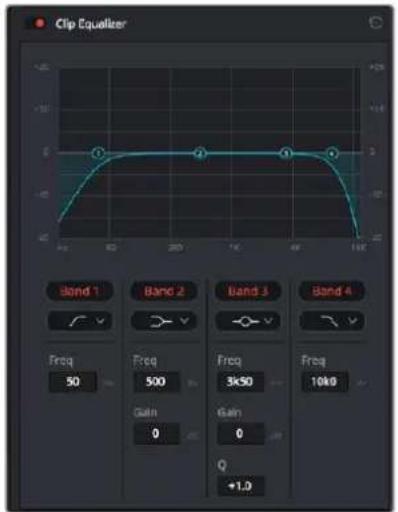
Der 4-Band-Equalizer kann auf jeder Clip in der Timeline angewendet werden
Über die äußerten Bänder lassen sich Bandfilter mithilfe von Hi-Shelf-, Lo-Shelf-, Hi-Pass- und Lo-Pass-Filtern anpassen. Ein Pass-Filter wirkt sich auf alle Frequen über oder unter einem bestimmten Frequenzwert aus, da diese Frequen komplett aus dem Signal entfern werden. Beispiel: Ein Hochpassfilter lasst die hohen Frequen passieren und stoppt die niedrigen Frequen. Sümttliche außerhalb der Grenzfrequency liegenden Frequhen werden in einer graduell abfallenden Kurve herausgeschnitten.
Ein Shelf-Filter ist weniger aggressiv und dann hilfreich, wenn Sie die oberen und unteren Frequenzbereiche eines Signals allgemein formen wollen, ohne diese Frequenzen komplett auBen vor zu halten. Der Shelf-Filter verstarkt oder dampft die Ziefrequency sowie alle darüber bzw. darunter liegenden Frequenzen, je nachdem, ob Sie einen High- oder einen Low-Shelf-Filter verwenden.
Mit den Steuerelementen der mittleren Bänder konnen Sie eine große Vielfalt an Equalizer-Anpassungen vornehmen und zwischen Low-Shelf-, Bell-, Notch- und High-Shelf-Filteroptionen hin und her schalten.
- Bell: Bell-Filter verständen oder dampfen Frequenzen rund um den vorgegebenen Mittelpunkt einer Glockenkurve. Wie der Name schon sagt, handelt es sich damit um eine glockenformige Curve.
- Notch: Mit Notch-Filtern halten sich sehr schmale Frequenzbandbreiten darbeiten. Beispelsweise lässt sich Netzbrummen bei 50 oder 60 Hz entfernen.
- Lo-Shelf: Low-Shelf-Filter verstärken oder:kappen die Zielfrequenz am unteren Ende sowie alle Frequizen, die darüber liegen.
- HI-Shelf: High-Shelf-Filter verträken oder:kappen die Zielfrequenz am oberen Ende sowie alle Frequizen, die darüber liegen.
So versehen Sie einen einzelnen Clip mit einem EQ:
1 Wahlen Sie den Clip, auf den Sie EQ-Filter anwenden wollen, in der Timeline aus.
2 Klicken Sie dann in den Inspector und anschließend auf den Aktivierungs-Button „Clip Equalizer".
So versehen Sie eine Spur mit einem EQ:
1 Doppelklicken Sie im Mixer in das EQ-Feld einer ihrer Spuren, um den Equalizer für diese Spuren zu öffnen.
2 Wahlen Sie im Drop-down-Menu für das anzupassende Band den Bandfilter aus.

Der EQ-Bereich im Mixer-Fenster zeigt an, dass eine EQ-Kurve zu Spur 1hinzugefügt wurde
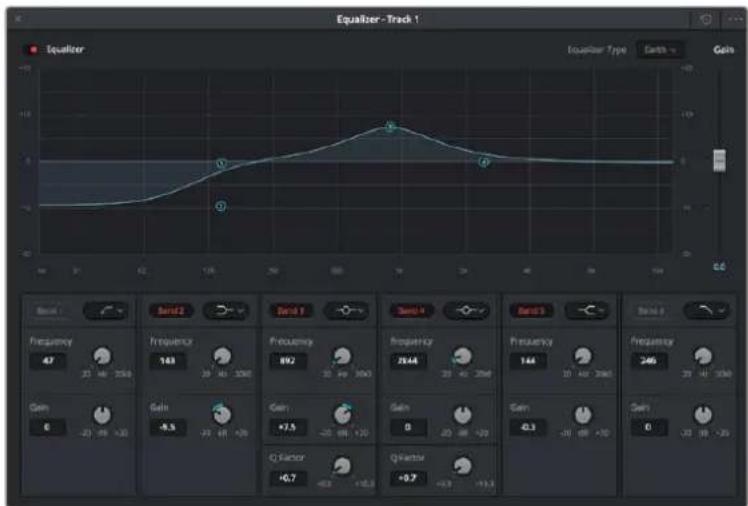
Parametrischer 6-Band-Equalizer, der auf jeder Clip angewendet werden kann
Sobald Sie ihren Clip oder ihre Spur mit einem EQ versehen haben, konnen Sie den EQ für jedem Band anpassen. Beachten Sie, dass sich die Steuerelemente je nach ausgewähter Filterart unterscheiden.
So passen Sie den EQ für einen Bandfilter an:
1 Wahlen Sie im Drop-down-MENU für das anzupassende Band den Bandfilter aus.
2 Passen Sie den Frequenzwert „Frequency“ an, um die Mittenfrequenz für den EQ festzulegen.
3 Passen Sie den „Gain“-Wert an, um die von den Bändern gesteuerten Frenzen zu verstärken oder zu dampfen.
4 Geben Sie über den Factor"-Wert die Bandbreite der betroffenen Frenquenzen vor.
Setzen Sie mit dem Zurücksetzen-Button alle Steuerelemente im EQ-Fenster auf ihre Standardwerte zurück.
Fairlight bietet vielzähige Steuerelemente, mit denen Sie das Beste aus jeder Audiospur Herausholen konnen. Fugen Sie Spuren hinzu, verwalten und organisieren Sie Busse und fugen Sie Effekte wie Laufzeitverzogerungen oder Hall hinzu. Oder polieren Sie ihren Audiomix ganz allgemein auf.
Hinzufugen von VFX und Compositing im Fusion-Arbeitsraum
Nach abgeschlossen Schmitt konnen Sie den Fusion-Arbeitsraum offen und direkt in DaVinci Resolve visuelle Effekte und Bewegtbilder in 2D oder 3D hinzufugen. Im Gegensatz zu ebenenbasierten Compositing-Softwares verwendet Fusion sogenannte Nodes, anhand derer Sie Bilddaten in beliebige Richtungen lenken konnen und so die Freiheit haben, komplexe Effekte zu bauen. Das Node-Fenster zeigt auf einen Blick alle im Laufe dieser Prozesses verwendeten Tools. Wenn Sie den Node-Workflow im Color-Arbeitsraum genutzt haben, werden Sie sich hier wie zu Hause fühlen.

Der Fusion-Arbeitsraum
Der Fusion-Arbeitsraum bietet im oberen Bereich zwei Ansichtsfenster (Viewer) mit
Transportsteuerelementen zum Sichten ihrer Medien. Rechts daneben ist das Inspector-Fenster für den Zugriff auf Tool-Einstellungen. Im „Nodes“-Fenster, dem sogenannten Node-Editor, im unteren Bereich erstellen Sie ihre Kompositionen, fachsprachlich Compositings genannt. Die Viewer und
Transportsteuerelemente werden immer angezeigt. Per Klick auf die Icons der Bedienoberflächen-Toolbar können Sie jedoch die Fenster „Nodes" und „Inspector" oder zusätzliche Fenster einschließlich der „Effects Library" (Effektbliothek) und Spline- und Keyframe-Editoren wahlweise aufrufen oder verbergen.
Media Pool: Der Media Pool Funktioniert hier genauso wie im Edit-Arbeitsraum. Ziehen Sie einfach zusammenzufassliche Medien aus ihren Bins direkt in Ihr Compositing.
- Effects Library: In der Effektbilibiothek finden Sie Fusion Tools und Vorlagen, die in Kategorien wie Partikel, Tracking, Filter und Generatoren sortiert sind. Sie können Tools anklichen oder in den Node-Editorziehen, um sie Ihr Compositing hinzuzufugen. Der Media Pool und die Effektbilibiothek sind im gleichen Bildschirmbereich verortet und man wechselt zwischen beiden hin und her. So werden die Viewer möglichst groß angezeigt.
- Clips: Per Klick auf den „Clips“-Tab werden die Thumbsnails für die Clips in Ihrer Timeline aufgerufen oder verborgen. Die Thumbsnails sind unterhalb des Node-Editors verortet, wo Sie unmittelbar zu anderen Clips navigieren können.
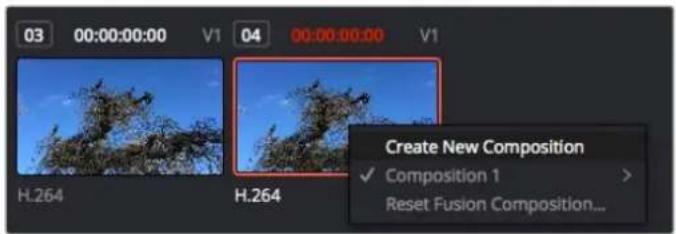
Erstellen Sie eine neue Version Ihres Compositings, Indem Sie einen Rechtsklick auf einen Thumbnail ausführten und „Create New Composition" auswahlen.
- Viewer: Die Ansichtsfenster sind immer eingebrendet und zeigen ihren verschiedene Darstellungen. Ihr Compositings an, bspw. an einem 3D-Merge-Node vorgenommene Änderungen, die Kameraausgabe oder ihre finale Renderversion. In den Viewern können Sie auch sehen, wie ihre Änderungen sich auf ein spezifisches Element auswirken.
Sie können die Node-Ansichten in den Viewern bestimmen, indem Sie auf einen Node klichen und „1" für den Linken und „2" für den rechten Viewer eingeben. Der besoin dem Node erscheinende weitere Punkt zeigt an, welchem der beiden Ansichtsfenster er zugewiesen ist. Bei Verwendung eines externen Videomonitors erscheidt ein dritter Button, über den Sie ihre Medien ihrer externen Monitor zuführen können.
TIPP Alternativ können Sie einen Node einem Viewer zuweisen, indem Sie den Node direkt in den Viewerziehen.
Mithilfe der unter den Ansichtsfenstern angezeigten Transportbedienelemente konnen Sie zum Anfang oder Ende eines Clips springen,ihn vor- oder ruckwartsb abspielen oder seine Wiedergabe anhalten. Das Zeitlineal zeigt den gesamten Clippbereich an, wobei die In- und Out-Punkte mit gelben Markern versehen sind.
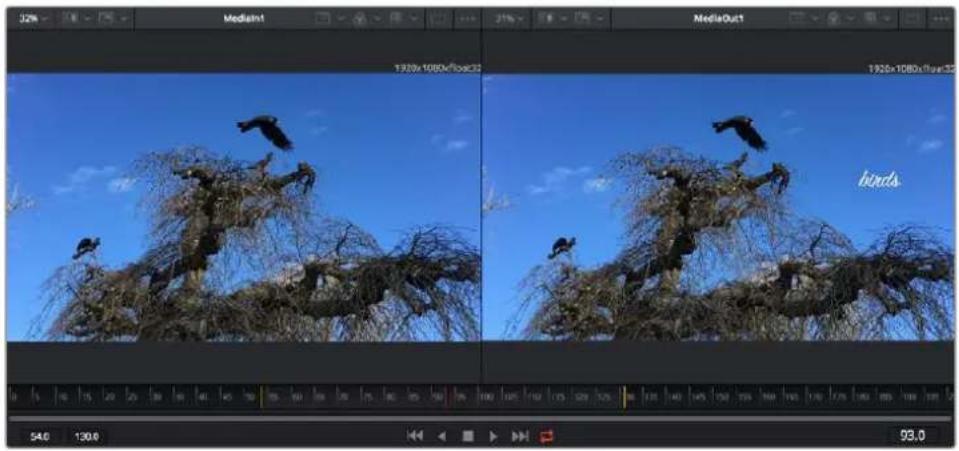
Die halten Marker auf dem Zeitlineal zeigen die In- und Out-Punkte Ihres Clips in der Timeline an. Wenn Sie einen Fusion Clip oder Compound Clip verwenden, sie auf dem Zeitlineal nur die Dauer des Clips, wie er in der Timeline entscheidt, d. h. ohne Handles.
- Nodes: Das „Nodes“-Fenster, der sogenannte Node-Editor, ist das Herz des Fusion-Arbeitsraums. Dort bauen Sie ihren Node-Baum, indem Sie Tools und den Ausgang eines Nodes mit dem Eingang eines anderen verknüpfen. Die große这点es Bereichs variiert je nachdem, welche Editoren geöffnet sind, bspw. der Spline- oder Keyframe-Editor. Die Toolbar direkt über dem Node-Editor bietet Schnellen Zugriff auf früig benutzte Tools.
- Spline: Der geöffnete Spline-Editor wird rechts vom Node-Editor eingeblendet. Mit diesen Editor können Sie prazise Anpassungen an einzelnen Nodes vormehmen, bspw. um die Animation zwischen zwei Keyframes mithilfe von Bezier-Kurven zu glätten.
Keyframes: Anhand des Keyframe-Editors kann man jeder Tool mit Keyframes versehen, diese entfernen oder modifizieren. Auch dieser Editor wird rechts vom „Nodes“-Fenster eingeblendet. - Metadaten: Im Metadatenfenster werden Ohnen die für einen aktiven Clip verfügbarbaren Metadaten wie Codec, Framerate und Timecode angezeigt.
- Inspector: Der „Inspector“ oben rechts auf der Bedienoberfläche zeigt alle für einen oder mehrere aktive Nodes verfügbaren Einstellungen und Modifier an. Dort werden auch zusätzliche, nach Kategorie sortierte Tab-Optionen für s den chnellen Zugriff eingeblendet.
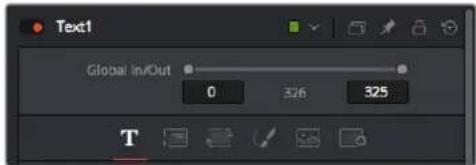
Der Text-Inspector bietet zusätzliche Tabs fur Text, Layout, Transform, Shading, Bild und Einstellungen
Erste Schritte mit Fusion
Um mit Fusion loszulegen, platzieren Sie den Abspielkopf auf irgendegen Clip in Ihrer Timeline. Öffnen Sie dann den Fusion-Arbeitsraum per Klick auf den „Fusion"-Tab.
Im Fusion-Arbeitsraum ist Ihr Clip dann in Form eines als „Medialn“ gekennzeichneten Medieneingabe-Nodes(sofort verfügbar.Jedes Compositing beginnt mit einem „Medialn"-und einem „MediaOut"-Node. Dieser „Medialn"-Node stellt den obersten Clip in Ihrer Timeline dar und ignoriert alle darunter liegenden Clips.Samtliche im Edit-Arbeitsraum am Clip vorgenommen Änderungen werden einbezogen,bspw.an Transform-Tools oder ausgewählten Bildausschnitten.

Der als „MediaOut" gekennzeichnete Medlenausgabe-Node sendet die Ausgabe zureck in die Timeline des Edit-Arbeitsraums von DaVinci Resolve
TIPP ResolveFX- oder OFX-Plug-ins, mit denen Clips im Edit-Arbeitsraum versehen wurden, werden im Fusion-Arbeitsraum nicht angewendet. Das ist so, weil Fusion Effekte vor der Farbkorrektur und vor der OFX-/ResolveFX-Verarbeitung kommt. Wenn Sie OFX in der Verarbeitungskette vor Fusion Effekten anwenden wollen, klichen Sie im Edit-Arbeitsraum auf den Clip und wahlen Sie „New Fusion Clip" aus. Klichen Sie erst dann auf den Tab für den Fusion-Arbeitsraum.
Nodesverstehen
Man kann sich einen Node als visuelles Icon vorstellen, das ein einzelnes Tool oder einen Effekt darstellt. Nodes werden mit anderen Nodes verknüpft und so wird durch Hinzufugen von Elementen eine Gesamtkomposition gebaut. Es ist wichtig, die Ein- und Ausgänge der einzelnen Nodes zu verstehen. Das hilftlichen bei der Gestaltung von detailierten visuellen Effekten, den Fluss Ihres Compositings zu navigieren.
Manche Tools verfugen über mehrere Ein- und Ausgänge, die sich mit anderen Nodes verknüpfen setzen. So können Sie einen Merge-Node bspw. mit einem Vordergrundeingang, einem Hintergrundeingang und einem Maskeneingang für Matten und Keys koppeln.
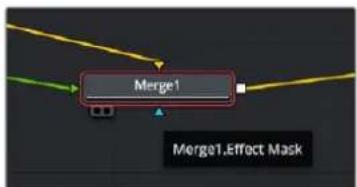
Vordergrundedeingang
Hintergrundeingang
Maskeneingang fur Effekte
Ausgang
Demnach kann ein einzelnr Node über mehrere Ausgange an mehrere verschiedene Nodes in Ihr Compositing geknupft werden. Anders als mit einer ebenenbasierten Software brauchen Sie diese Clips nicht zu duplizieren. Die Verbindungslinien zwischen Nodes sind mit Pfeilen versehen, die die Richtung des Bilddatenflusses illustrieren.
Hinzufugen von Nodes in den Node-Editor
Effekte kann man ganz einfach hinzufugen, indem man Nodes auf die Verbindungslinie zwischen die „Medialn"- und „MediaOut"-Nodes setzen.
Dafür gibt es mehrere Methoden. Sie können einen Node mit gedrückter Shift-Taste zwischen zwei Nodes einsetzen. Alternativ klichen Sie auf den Node, an den Sie einen Effekt anknüpfen möchten, und wahren Sie das gewünschte Tool aus. Der neue Node wird automatisch mit dem ausgewählten Tool verbunden. Sie können einen Node auch irgendwo im Node-Editor hinzufugen und die Nodes manuell verknüpfen, indem Sie den Ausgang des einen Nodes zum Eingang des anderenziehen.
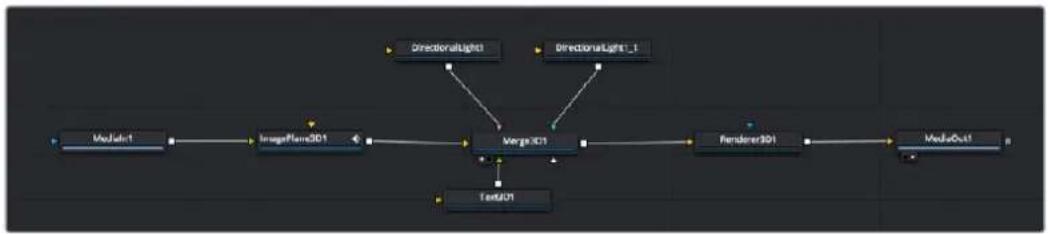
Der 2D- oder 3D-Merge-Node ist das am hauligsten verwendete Tool. Dieser Node fungiert als Drehscheibe, die Tools im Node-Editor in einen einzelnen Ausgang zusammen führt.
Der Merge-Node verfügbar über Bedienelemente für die Handhabung der Eingänge, einschließlich von Attributen wie große, Position und Mix. Auf all these Einstellungen greift man bei Auswahl des Merge-Node im Fenster „Inspector" zu.
Die gebrächlichsten Tools sind als Icons in der Toolbar aufgereht. Um einem Node ein Tool hinzuzufugen, klichen Sie auf sein Icon oderziehen Sie es in den Node-Editor. Um sich alle verfügbar tools anzeigen zu halten, klichen Sie offen links auf „Effects Library" und erweiterern Sie die Option „Tools". Dort finden Sie alle Tools nach Kategorie sortiert sowie einen Satz vorgefertigter „Templates". Diese Vorlagen können Sie bspw. als Blendeneffekte, Shader und Hintergrunde verwenden.
TIPP Sobald Ihnen die Werkzeugnamen vertraut sind, konnen Sie das Auswahlmenu „Select Tools" aufrufen, indem Sie bei gedrückter Shift-Taste die Leertaste ihrer Tastatur drucken. Beim Eintippen des Werkzeugnamens wird Ihnen das relevante Tool aus dem Menu vorgeschlagen. So wähl man das gewünschte Tool sehr schnell aus.
Anpassen von Nodes mit dem Inspector
Passen Sie ihre Node-Einstellungen im „Inspector“-Fenster an. Klichen Sie einfach den zu modifizierenden Node an, damit sich das Fensteractualisiert und es die Einstellungen und Bedienelemente des Nodes anziegt.
Mit Fusion brauchen Sie sich den aktuell bearbeiteten Node nicht anzeigen zu halten, da Sie einen Node modifizieren können, während in Ihr Compositing ein anderer Node eingebrendet wird. Beispiel: Sie können die Höhe und die mittige Platzierung eines „Text+“-Nodes ändern, während der Merge-Node im Viewer angezeigt wird. Dies zeigt ihren den Text im Verhältnis zum Hintergrund an.
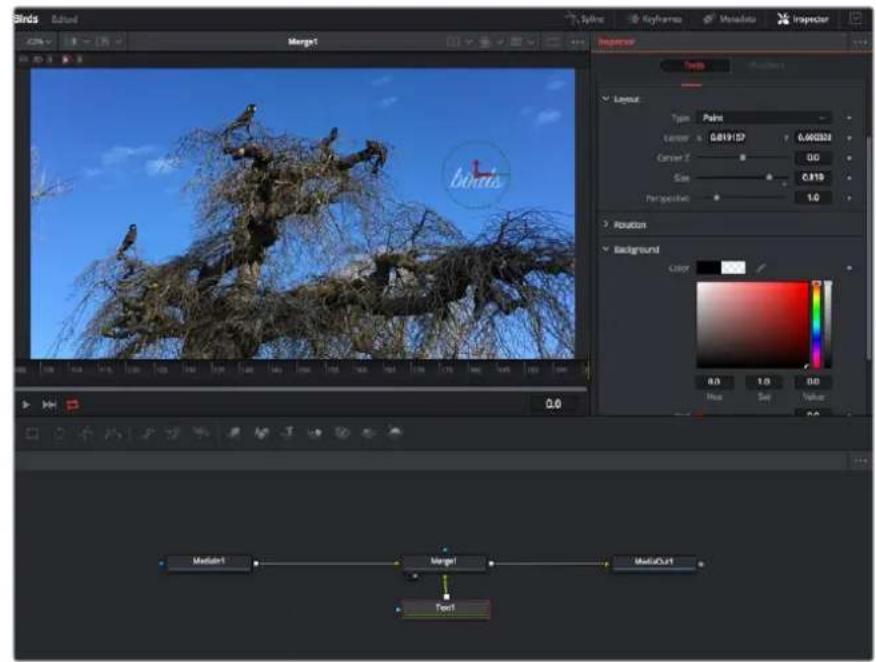
Ausgewählte Nodes sind rot umrandet. Der Inspector zeit unter „Layout" die Tabs mit den Bedienelementen für den Text-Node an
Die entsprechenden Parameter und Einstellungen konnen Sie für jeder Node je nach Aufgabe anpassen. Sei dies die Großvorgabe, das Zentrierten der Position oder eine Änderung an der Anzahl von Partikel eines Emitter-Nodes. Durch die Vorgabe von Keyframes und Einstellungen, die sich über einen Zeitverlaufändern, wird der Effekt animiert.
Arbeiten mit Keyframes
Setzen Sie vom „Inspector“-Fenster aus einen Keyframe, indem Sie einen Rechtsklick auf einer Einstellung ausführten und im Kontextmenu „Animate“ auswahlen. Das Keyframe-Icon rechts besoin der Einstellung erscheidt nun in Rot. Dies besagt, dass der Keyframe jetzt aktiviert ist und jeder von Ihnen vorgenommene Änderung nur auf den aktuellen Frame angewendet wird. Werden zwei oder mehr Keyframes erstellt, indem die Einstellungsparameter eines anderen Frames geändert werden, wird dazwischen ein Übergang interpoliert. Anhand der Pfeile rechts und links vom Keyframe-Icon konnen Sie den Abspielkopf auf der Timeline genau an diese Positionen bewegen.
Die Freiformkurve im „Spline“-Fenster gibt Ohnen noch mehr Kontrolle über ihre Keyframe-Animation. Wahlen Sie damit Keyframes aus, bspw. den ersten und letzten, und glätten Sie die Animation dazwischen anhand einer Bezierkurve. Drücken Sie hierfür Shift und die S-Taste oder rechtsklichen Sie auf einen Keyframe und geben Sie „Smooth" vor.
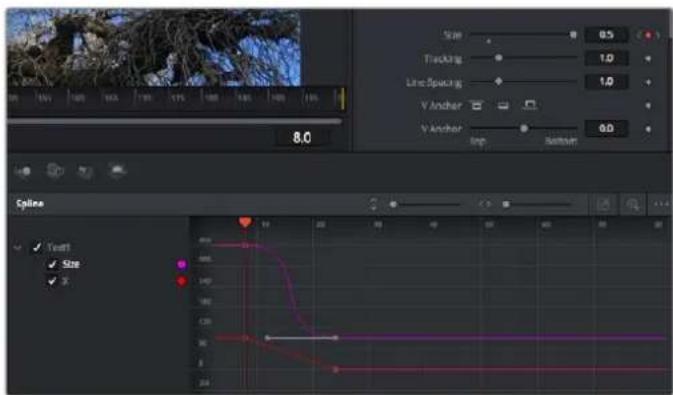
Hier wurde die Keyframe-Animation „Size" mit einer Bezierkurve gegliett. Um die Kurve zu kürzen oder zu verlangern, klichen Sie die Bezier-Ziehpunkte an. Um die Keyframe-Platzierung zuändern, klichen sie die rechtekigen Keyframe-Icons an
Mit dem Motion Tracker arbeiten und Text hinzufugen
Die folgenden Beispiele sollen Ihnen den Einsatz von Fusion better verständlich machen. Sie veranschaulichen, wie Sie anhand des Tracker-Werkzeugs ein Element in einem Clip verfolgen und wie Sie these Element unter Verwendung der Trackingdaten mit Text verstehen.
Der Tracker verfolgt die Pixel entlang der X- und Y-Achsen. Anhand der so generierten Daten konnen Sie an ein Element weitere anknüpfen. Das ist ideal, wenn Sie die Position von Text an die Bewegung eines Objeks anpassen wollen, bspw. an ein fahrendes Auto oder an einen durch das Bild fliegenden Vogel.
1 Wahlen Sie in der „Effects Library" das „Tracking“-Tool aus undziehen Sie es auf die Linie zwischen die „Medialn“- und die „MediaOut“-Nodes. Klichen Sie jetzt auf den Tracker-Node, um seine Eigenschaften im Inspector zu öffnen.
2 Tippen Sie auf Ihrer Tastatur die „1“, um den Tracker-Node im linken Viewer zu sichen. Nun erscheint der Clip mit dem Tracker an seiner standardmäßigen Position im Viewer. Bewegen Sie den Mauszeiger über den Tracker bis der Tracker-Ziehpunkt erscheidt. Klichen Sie oben links auf den Tracker-Ziehpunkt undziehen Sie den Tracker auf den zu verfolgenden Bereich in Ihrum Clip, Kontrastreiche Bereiche halten sich gut verfolgen, bspw. die Kühlerfigur eines Autos. Für extra Prazision vergroßert der Tracker den betroffenen Bildbereich.
3 Klicken Sie im Inspector auf den „Track Forward“-Button, um mit dem Verfolgen zu beginnen. Nach abgeschlossenem Tracking erscheidt ein Hinweisfenster. Klicken Sie auf „OK“.
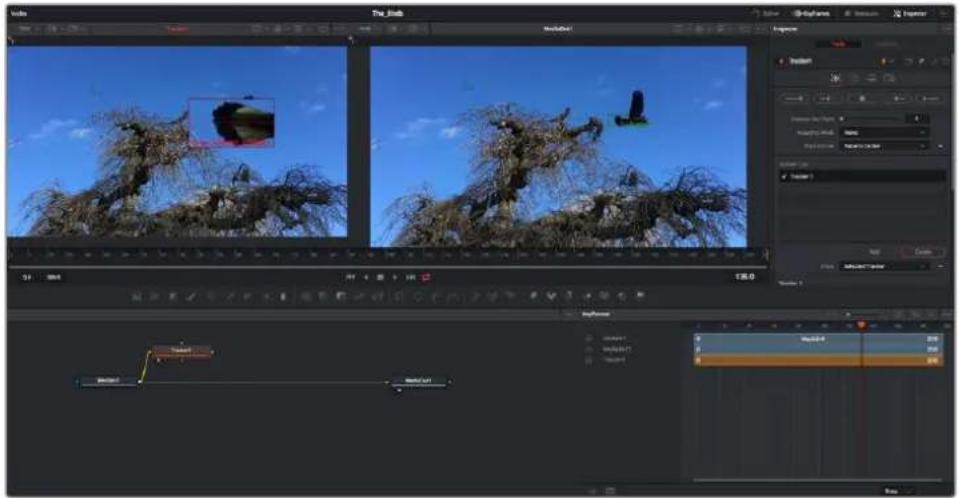
Die im Inspector verfügbar Trackung-Möglichkeiten umfassen u. a. das Rückwarts-Tracking vom letzten oder vom aktuellen Frame oder das Anhalten am bzw. Vorwarts-Tracking vom aktuellen Frame oder vom ersten Frame
TIPP Das Rückwarts- oder Vorwarts-Tracking vom aktuellen Frame aus bietet sich für Situationen an, in denen der betroffene Bereich mitten im Renderabschnitt verschwindet, bspw. wenn sich ein Auto oder ein Vogel aus dem Bild herausbewegt. Dies gestattet es, nur die relevante Footage zu verfolgen.
Nun können Sie die Trackingdaten des Bewegungspfads auf ein Text-Tool anwenden.
4 Klichen Sie in der Toolbar mit den gängigen Nodes auf den „Text+-Node und ziehen Sie diesen in das „Nodes"-Fenster in die Höhe des Tracker-Nodes. Verbinden Sie das keine Ausgaberechtek „Text" mit dem grünen Vordergrundeingang am „Tracker"-Node.
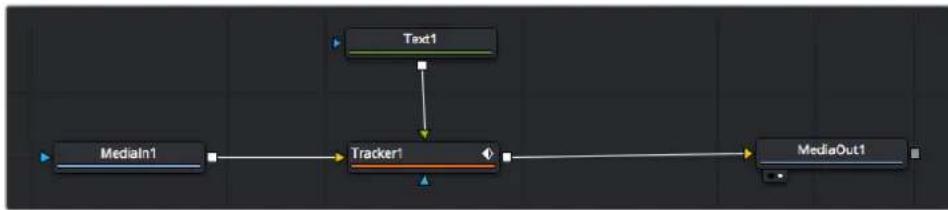
5 Klicken Sie auf den „Tracker“-Node und tippen Sie „1“, um das Merge-Ergebnis im linken Ansichtsfenster zu betrachten. Klicken Sie im Inspector im Feld „Tracker“ auf den „Operations“-Tab. Um den Tab-Namen einzublenden, bewegen Sie den Mauszeiger über den Tab. Wahlen Sie im Drop-down-MENU für „Operation“ die Option „Match Move“.
6 Klichen Sie auf den „Text“-Node, um seine Eigenschaften im Inspector zu öffnen. Tippen Sie ihren Text in das Textfeld undändern Sie entsprechend Ihr's Compositings die Art, Farbe und Großde der Schrift.
Auf diese Weise werden die Trackingpositionsdaten Ihres Trackers auf den Text angewendet. Um per Offset eine versetzte Platzierung des Textes zu bewirken, klichen Sie im Inspector auf den "Trackers"-Tab. Modifizieren Sie die Platzierung Dort mithilfe der X- und Y-Scrollräder.
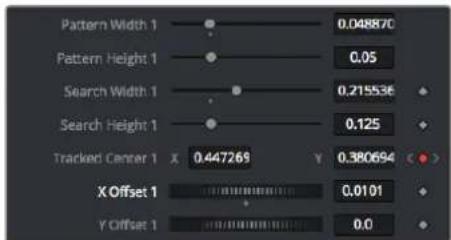
Die Scrollrader unter Im Tracker-Fenster des Inspectors dienen zum Anpassen der Offset-Platzierung von Text
Wird das Compositing jetzt wiedergegeben, sehen Sie, wie der Text an Ihrtem getrackten Objekt haftet.
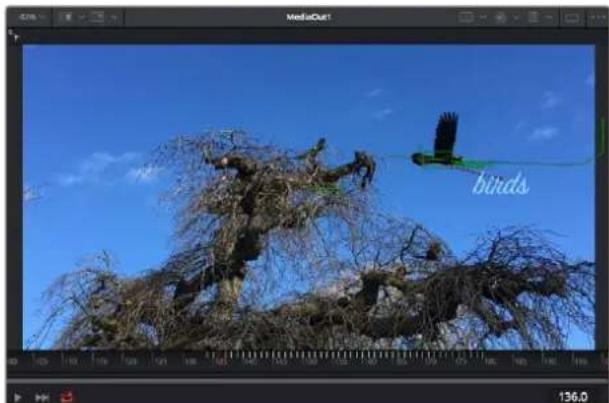
Das grüne Quadrat zeigt die aktuelle Tracker-Position entlang des grünen Pfads an, und die rote gestrichelte Linie steth für die zur Textanlimation benutzte Offset-Position
Bei manchen Shots werden Sie nach abgeschlossenem Tracking vermutlich die Tracking-Punkte entfernen wollen, bspw. wenn Ihr verfolgtes Objekt vom Bildschirm verschwindet. Mit dem Keyframe-Editor ist das ein einfacher Vorgang.
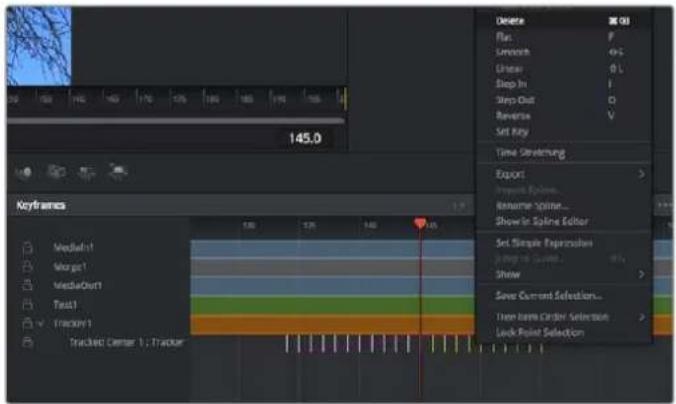
7 Öffnen Sie den Keyframe-Editor, indem Sie über dem Inspector auf den „Keyframes“-Tab klichen. Man erkennt Nodes, die einen Keyframe enthalten, an einem kleinen Pfeil neben dem Node-Label. In der Liste unter erschinen nur die Parameter mit hinzugeführten Keyframes. Klichen Sie auf das Vergroßerungssymbol undziehen Sie ein Kästchen um den zu bearbeitenden Bereich. Dies zoomt in den Bereich hinein und lasst Sie die Keyframes better erkennen.
8 Bewegen Sie den Abspielkopf an den Ort des letzten gewünschten Keyframes. Wahlen Sie jetzt die zu entfernenden Keyframes aus, indem Sie mit ihrer Maus ein Rechtdeck um diese herumziehen. Die Keyframes werden nun gelb markiert. Führn Sie einen Rechtsklick aus und wahlen Sie zum Löschen im Menu „Delete" aus.
TIPP Wenn ihre Effekte das System stark belasten, konnen Sie im Bereich der Transportsteuerung per Rechtsklick die Viewer-Optionen einblenden. Dort gibt es bspw. die Proxy-Wiedergabe, mit der Sie beim Erstellen von Compositings das Beste aus ihrem System herausholen. Weitere Einzelheiten zu allen Wiedergabeoptionen finden Sie im englishsprachigen DaVinci Resolve Handbuch.
Ihr erstes Compositing mit animiertem Text, das einer Bewegung in Ihrer Footage folgt, ist nun vollbracht! Um einen Bereich in Ihrm Bild mit einer planen Flache zu verfolgen, die Sie verbessern oder ersetzen möchten, steht der Planar-Tracker zur Verfugung. Die 2D-Flächenverfolgung ist praktisch, um in einem bewegten Bild bewegte Beschriften und Schilder zu ändern. Man kann damit)sogar ein Bild auf einen in Ihrer Footage erscheinenden Monitor oder TV-Bildschirm setzen.
Einzelheiten zum Planar-Tracker und zu den vielen leistungsstarken Werkzeugen in DaVinci Resolves Fusion-Arbeitsraum finden Sie im englishsprachigen DaVinci Resolve Handbuch.
TIPP Beim Erstellen Ihrer visuellen Effekte im Fusion-Arbeitsraum sollen den Sie klären, ob es sich um 2D- oder 3D-Effekte handelt, um zu entscheiden welches Merge-Tool verwendet wird. Es kann gut sein, dass Sie in einem Compositing führig sowohl 2D- als auch 3D-Effekte kombinieren. Bedeken Sie damit, dass jeder visuelle Effekt, der den 3D-Raum verwendet, erst als 2D-Bild gerendert werden muss, bevor er in ein 2D-Compositing eingefugt werden kann.
Wir wünschen Ihnen viel Vergnugen beim Erkunden von Fusion und der visuellen Effekte zusammen mit der gehalten Power von DaVinci Resolves Edit-, Color- und Fairlight-Arbeitsräumen. Mit sovielen leistungsstarken Tools in greifbarer Höhe kennt die Umsetzung ihrer Ideen in DaVinci Resolve keine Grenzen mehr.
Mastern Ihres Schnitts
Jetzt da Sie ihren Edit bearbeitet, visuelle Effekte hinzugeführst und ihren Ton gemisch haben, möchten Sieihn bestimmt mit anderen teilen. Per „Quick Export" über den entsprechenden Button oder die Menüauswahl konnen Sie ihren Timeline-Content als eigenständige Daten oder in einer Vielzahl von Formaten ausgegeben, oder weitere im Deliver-Arbeitsraum verfügbar features verwenden.

Der Export Ihres Schnitts erfolgt Im Deliver-Arbeitsraum. Sie haben die Wahl zwischen denen verschiedene Videoformaten und Codec
Quick Export
Per „File“ > „Quick Export“ konnen Sie Ihr Programm schnell von jedem Arbeitsraum in DaVinci Resolve ausgegeben. Verwenden Sie dazu eines von diversen Export-Presents. Die Option „Quick Export“ erfolgt auch das Exportieren und Hochladen Ihres Programms an einen einzelnten Video-Sharing-Dienst wie YouTube, Vimeo und Frame.io.
So verwenden Sie Quick Export:
1 Setzen Sie wahlweise im Edit-, Fusion- oder Color-Arbeitsraum In- und Out-Punkte in der Timeline, um in Ihrem aktuellen Programm eine Sequenz für die Ausgabe zu bestimmen. Werden keine In-und Out-Punkte vorgegeben, dann wird die gesamte Timeline exportiert.
Wahlen Sie in der Menüleiste „File“ > „Quick Export“.
2 Wahlen Sie im Fenster,Quick Export" aus der oben verlaufenden Symbolleiste ein Preset und klichen Sie auf,Export".
3 Wahlen Sie einen Verzeichnisort aus, geben Sie im Export-Fenster einen Dateinnamen ein und klichen Sie auf „Save". Ein Fenster mit Fortschrittsbalken erscheint, um die Exportdauer anzuzeigen.
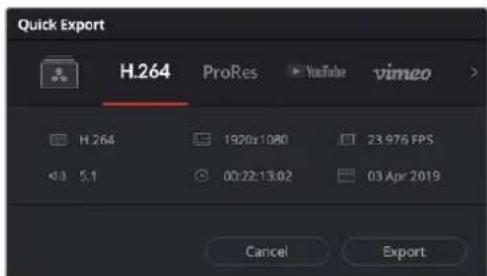
Das Dialogfenster,Quick Export
Der Deliver-Arbeitsraum
In this work, we present a new approach to the design of an inductive sensor for the detection of vehicle traffic. The proposed method is based on the following two main components: (1) the sensor is connected to the vehicle and (2) the vehicle is connected to the sensor. In this work, we have used a 3D camera with a 4× 4 pixel camera to capture the vehicle's position and its speed. The camera is equipped with a 10m wide 3D camera and a 10m wide 3D camera. The camera is connected to the vehicle by a 3D camera. In this work, we have used a 3D camera to detect vehicle traffic. The camera is connected to the vehicle by a 3D camera. In this work, we have used a 3D camera to detect vehicle traffic.
So exportieren Sie einen einzelnen Clip Ihres Schnitts:
1 Klichen Sie auf den Tab „Deliver", um den Deliver-Arbeitsraum zu öffnen und Ihr finales Projekt zu exportieren.
2 Gehen Sie links oben im Arbeitsraum zum Render-Einstellungen-Fenster „Render Settings". Für den Export haben Sie eine Reihe von Presets zur Auswahr, bspw. Presets für YouTube, Vineo und Ton. Oder bestehtten Sie eigene Export-Einstellungen, indem Sie diese auf dem standardmäßigen Preset „Custom" belassen und ihre Parameter eingeben. Hier ein Beispiel: Wahlen Sie YouTube, klichen Sie auf den Pfeil halten dem Preset und anschließend auf das Videoformat 1080p.
Die Framerate wird durch die in den Projekteinstellungen angegebene Framerate bestimmt.
3 Unterhalb der Presets sehen Sie den Timeline-Dateinamen und den Zielstandort Ihres exportierten Videos. Klicken Sie auf den „Browse“-Button und geben Sie den Zielort zum Speichern ihrer exportierten Datie vor. Wahlen Sie in den Render-Optionen „Single Clip" (einzelne Datie) aus.
4 Im Optionsfeld unmittelbar über der Timeline ist „Entire Timeline“ vorgegeben. Dies bedeutet, dass die gesamte Timeline exportiert wird. Bei Bedarf konnen Sie jedoch auch einen begrenzten Timeline-Abschnitt bestimmen. Wahlen Sie „In/Out Range“ und bestimmten Sie mithilfe der I- und O-Tasten die In- und Out-Points in Ihrer Timeline.
5 Klicken Sie unter in den Render-Einstellungen „Render Settings" auf die Schaltfläche „Add to Render Queue".
Ohr render-Einstellungen werden dann der Render-Warteschleife rechts im Arbeitsraum hinzugefugt. Klichen Sie jetzt lediglich auf "Start Render" und verfolgen Sie den Fortschrift in der Warteschleife.
Nach abgeschlossenern Render n konnen Sie den ausgewählten Ordner öffnen, auf ihren Clip klichen und ihren fertiggestellten Schnitt ansehen.
Sie verfügen nun über Grundkenntnisse zu Schnitt, Farbe, Vertonung und visuellen Effekten. Wir empfehlen Ihnen, mit DaVinci Resolve zu experimentieren, um diese Fähigkeiten zu vertiefen. Weitere Informationen zu Einzelheiten und wie Sie mit Funktionen das Beste aus Ihr Projekt Herausholen, finden Sie im DaVinci Resolve Handbuch.
Camera Control with ATEM Mini
ATEM Minis sind ein mächtiges Werkzeug für Mehrkamera-Produktionen und Live-Streaming. Mit der Kamerasteuerungsfunktion in ATEM Software Control können Sie über einen ATEM Mini Mischer bis zu vier Blackmagic Pocket Cinema Cameras steuern und damit Schnitte zwischen verschiedenen Kamas ausführten. Um die Features für die Kamerasteuerung Ihr's ATEM Mini zu öffnen, klichen Sie in ATEM Software Control auf die Registerkarte mit dem Kamerasymbol.
Einstellungen der Pocket Cinema Camera wie Blende, Gain, Fokus und Detailgrad sowie die Zoom-Steuerung halten sich bei Einsatz kompatibler Objektive bequem justieren. Sie können auch den Farbabgleich mehrerer Kameras vornehmen und mit dem DaVinci Resolve Primary Color Corrector einzigartige Looks kreieren.
Zur schlagen, prazisen und praktischen Steuerung von vier Pocket Cinema Cameras zugleich konnen Sie soccer ein ATEM Camera Control Panel einbinden. Weitere Informationen siehe ATEM Mini Bedienungsanleitung.
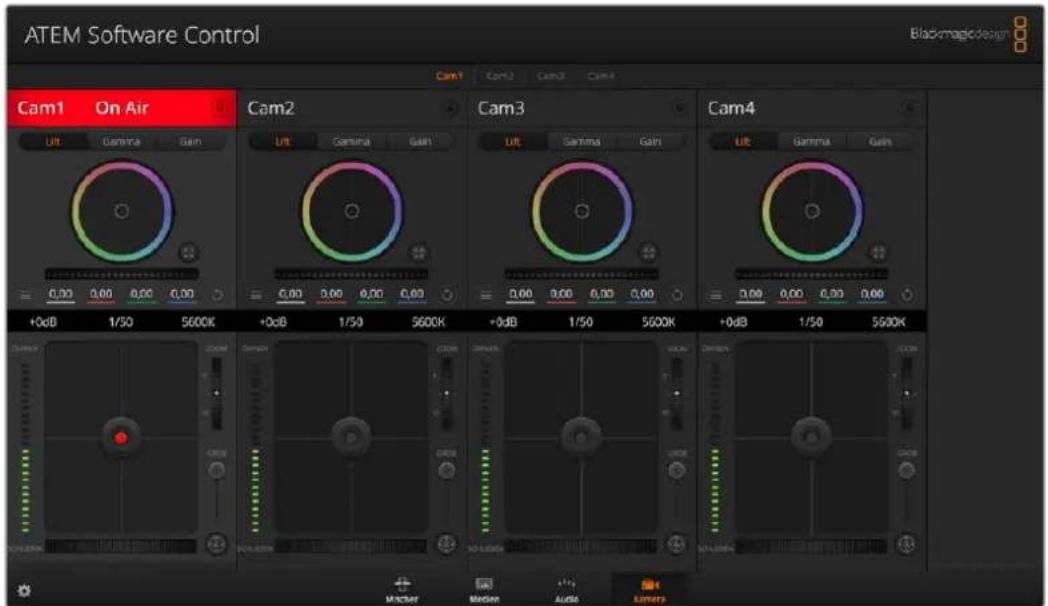
ATEM Kamerasteuerung
Die Kamerasteuerung über den Mischer Funktioniert durch Übermittlung von Datenpaketen für die Kamerabedienung über die HDMI-Eingänge Ihres ATEM Minis. Sie können also einen HDMI-Eingang Ihres ATEM Mischers mit dem HDMI-Anschluss der Kamera verbinden. Das ermöglich ihren die Bedienung der kameraeigenen Steuerungsfunktionen, weil die Kamera diese Steuerungspakete im HDMI-Signal erkennt.
Öffnen Sie „Einstellungen" in ATEM Software Control und belegen Sie die Tasten Ihres Mischers so, dass die jeweilige Kamera mit dem richtigen Tally angezeigt wird. Anhand der Videoverbindung von ihrem Mischer zur Blackmagic Pocket Cinema Camera profitieren Sie überdies von live Tally-Anzeigen.
Der Kamera-Arbeitsraum
Starten Sie ATEM Software Control und klichen Sie am unteren Rand der Benutzeroberfläche auf die Registerkarte mit dem Kamerasymbol. Nun wird ihren eine Zeile mit Blackmagic Kamera-Controlern angezeigt, die mit Kamerakennungen versehen sind. Jedes Bedienfeld enthalt Tools, um das Bild der jeweiligen Kamera abzugleichen und zu verfeinern. Die Bedienfelder sind einfach handhabbar. Klichen Sie mit ihrer Maus die Symbole an oder passen Sie Bedienelemente per Anklichen und Verschieben an.
Auswahlder zu steuernden Kameras
Über die Registerkarten im oberen Bereich des Kamera-Arbeitsraums wahren Sie die zu steuernde Kamera anhand ihrer Nummer aus.
Kanalstatus
Die Kanalstatus-Box am oberen Rand jeges Kamerabedienfelds zeigt die Kamerakennung, den On-Air-Status und eine Sperschaltfläche an. Mit einem Klick auf die Sperschaltfläche sperren Sie alle Bedienelemente für eine spezifische Kamera. Wenn die Kamera auf Sendung ist, leuchtet der Kanalstatus rot auf und zeigt die On-Air-Warnung an.
Kamera-Einstellungen
Mit dem Kamera-Einstellungen-Button unter links vom Masterfarbrad justieren Sie die Detailscharfe für das Bildsignal einzelnner Kameras.
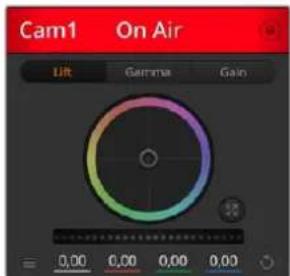
Die Kanalstatus-Box In jedem Kamerabedienfeld zeigt an, welche Kamera sich auf Sendung befindet. Justieren Sie anhand der Farbrader die Einstellungen von Lift, Gamma und Gain einzelner YRGB-Kanä
Scharfe
These Einstellung dient zur Liveschärfung Ihres Bildes unmittelbar von ihren Studiokameras. Senken bzw. erhöhen Sie das Scharfungsiveau, indem Sie eine der folgenden Optionen vorgegeben: „Scharfe aus", "Standardscharfe" für gingefügige Scharfzeichnung, "Mittlere Scharfe" oder „Hohe Scharfe".
Farbrad
Das Farbrad ist eine leistungsstarke Funktion des DaVinci Resolve Farbkorrektors zur Vornahme farblicher Anpassungen an den Einstellungen für „Lift“, „Gamma“ und „Gain“ einzelner YRGB-Kanäle. Die Auswahr der anzupassenden Einstellung erfolgt per Klick auf eine der drei Auswahlschaltflächen über dem Farbrad.
Masterrad
Passen Sie mithilfe des Masterrads unterhalb des Farbrads die Kontraste aller YRGB-Kanäe auf einmal an oder justieren Sie jeweils nur die Leuchtdichte der Einstellungen fur Lift, Gamma und Gain.
Reset-Symbole
Anhand des Reset-Symbols, das sich rechts unter in allen Kamerabedienfeldern befindet, können Sie bequem auswahlen, welche Farbkorrektureinstellungen zurückgesetzt, kopiert oder eingefügt werden sollen. Jedes Farbrad verfügt über ein zugehöriges Reset-Symbol. Klichen Sie es an, um eine Einstellung auf ihren Standardwert zurückzusetzen oder um eine zu kopieren bzw. einzufügen. Gesperte Steuerelemente bleiben von der Einfügefungtion unberührt.
Das Master-Resetsymbol unten rechts im Farbkorrektorfenster lasst Sie die Farbräder für „Lift“, „Gamma" und „Gain" sowie die Einstellungen für „Kontrast“, „Sattigung“, „Farbton" und „Lum Mix" (Leuchtdichtemischung) zurücksetzen. Sie konnen Farbkorrektureinstellungen einzeln in Kamerabedienfelder kopieren oder dies für einen durchgängigen Look für alle Kamas auf einem tun. Die Einstellungen für Blende, Fokus, GROB und Schwarzabhebung bleiben von der Einfugefunktion unberührt. Bei Anwendung von „In alle einfügen" fordert Sie ein Warnhinweis auf, den Vorgang zu bestätigen. Dies verhindert das versehentliche Einfügen neuer Einstellungen für auf Sendung befindliche Kamas

Bei Anwendung von „In alle einführten" fordert Sie ein Warnhinweis auf, den Vorgang zu bestätigen. Dies verhindert das versehentliche Einführten neuer Einstellungen für auf Sendung befindliche Kameras.
Blenden-/Schwarzbahbehungssteuerung
Blende und Schwarzabhebung werden über den kreisförmigen Button im Fadenkreuz der einzelnen Kamerabedienfelder gesteuert. Diese Button leuchtet rot, wenn die Kamera auf Sendung ist.
Ziehen Sie den Button zum Öffnen oder Schlieben der Blende nach oben oder unter. Bei gedrück gehaltener SHIFT-Taste ist nur der Blendenwert anpassbar.
Ziehen Sie den Button nach links oder rechts, um die Schwarzzabhebung zu vertiefen oder abzuflachen. Bei gedrück gehaltener Command-Taste (Mac) bzw. gedrück gehaltener Steuerungstaste (Windows) lasst sich die Schwarzzabhebung separat justieren.

Ein rot erleuchteter Blenden-/Schwarzbabhebungs-Button geztl an, dass die jewellige Kamera auf Sendung Ist
Zoomsteuerung
Bei Einsatz kompatibler Objektive mit elektronischer Zoomfunktion konnen Sie Ihr Objektiv mithilfe der Zoomsteuerung ein- und auszoomen. Das Steuerelement Funktioniert so erhlich wie eine Zoomwippe an einem Objektiv, die einen ZOOMbereich von Weitwinkel bis Tele steuert. Klichen Sie auf die Zoomsteuerung über dem GROB-Schieberegler undziehen Sie sie zum Einzoomen nach oben bzw. zum Auszoomen nach unter.
GROB-Einstellung
Mit dem GROB-Schieberegler rechts von der Blenden-/Schwarzbehungs-Button halten sich die zulässigen Blendenwerte begrenzen. Diese Funktion hilft zu verhindern, dass überbelichtete Bilder auf Sendung gehen. So stellen Sie den Grob-Grenzwert ein: Öffnen Sie die Blende mithilfe der Blendensteuerung soweit es gehen. Ziehen Sie dann den GROB-Regler nach oben oder unter, um den optimalen Blendenwert einzustellen.Jetzt verhindert der GROB-Grenzwert beim Einstellen der Blende, dass Ihr optimaler Blendenwert übersritten wird.
Blenden-Indikator
Der Blenden-Indikator links besoin der Blenden-/Schwarzbehungssteuerung staat den Öffnungszustand der Blende visuell dar. So konnen Sie sehen, wie welt sie geöffnet oder geschlossen ist. Der Blenden-Indikator wird durch die GROB-Einstellung beeinflusst.
Autorokus-Button
Jedes Kamerabedienfeld weist unter rechts einen Autofokus-Button auf. Klichen Sie auf diesen Button, um bei Einsatz eines Objektivs mit elektronischer Blendensteuerung automatisch zu fokussieren. Wichtig: Die meisten Objektive unterstützen elektronische Fokussierung. Stellen Sie jedoch bei Objektiven, die sowohl automatisch als auch manuell fokussierbar sind, den Autofokusmodus ein. Bei manchen Objektiven erfolgt dies durch Drehen des Fokussierrings nach links oder rechts.
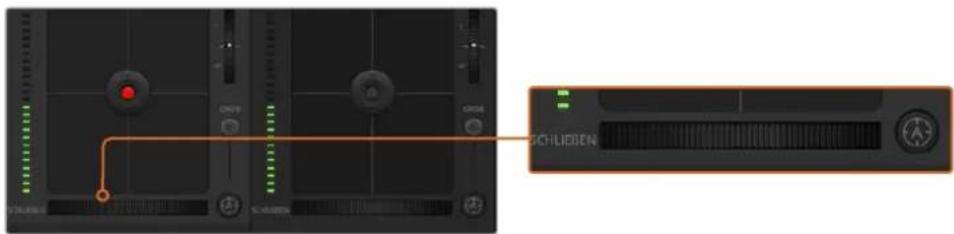
Klichen Sie zur Scharfstellung eines kompatiblen Objektivs auf das Autofokus-Symbol oderziehen Sie den Fokussier-Regler nach rechts oder links
Manuelle Fokuseinstellung
Mithilfe des unten in jedem Kamerabedienfeld befindlichen Fokussierrings konnen Sie ihre Kamera manuell scharfstellen. Ziehen Sie den Fokussierring nach links oder rechts, um die Scharfe manuell einzustellen. Prufen Sie damit anhand des Videofeeds von der Kamera, ob Ihr Bild gewünscht scharf ist.
Kameraeinstellung Gain
Über die Kameraeinstellung „Gain" konnen Sie die von der Kamera wiedergegebenen hellen Bereiche zusätzlich verträken. Bei Blackmagic Pocket Cinema Cameras bezieht sich diese Einstellung auf den ISO-Wert. Wichtig ist dies beim Filmen in Niedriglichtsituationalen, wenn durch eine zusätzliche Verstärkung (Gain) bzw. einen higheren ISO-Wert die Lichtempfindlichkeit des Sensors erhöht werden soll. Dies verhindert eine Unterbelichtung ihrer Aufnahmen. Sie konnen Gain abschwachen oder verträken, indem Sie den Pfeil links oder rechts von der dB-Anzeige anklichen.
Bei Bedarf konnen Sie den Gain-Wert verstärken. Beispielsweise bei Aufendrehs wenn Sie Ihr Bild im schwächer werdenenden Licht eines Sonnenuntergangs aufhellen möchten. Zu beachten ist hierbei jederoch, dass mehr Gain auch stärkeres Bildrauschen bewirkt.
Verschlusszeit-Einstellung
Die Verschlusszeit-Einstellung ist zwischen dem Farbrad und der Blenden-/ Schwarzabhebungsteuerung angeordnet. Reduzieren oder erhöhen Sie die Verschlusszeit, indem Sie ihren Mauszeiger auf die Verschlusszeitanzeige schieben und den Links- oder Rechtspfeil anklichen. Bei Blackmagic Pocket Cinema Cameras steuert diese Einstellung den Verschlusswinkel.
Eventuelles Lichtflimmern lasst sich durch Reduzieren der Verschlusszeit beseitigen. Durch eine niedrigere Verschlusszeitleen sich ihre Bilder ohne Einsatz von Gain aufhellen, da der Bildsensor so länger dem Licht ausgesetzt wird. Eine höhere Verschlusszeit reduziert auch Bewegungsunscharfe und bietet sich daher für gestochen scharfe Action-Shots mit minimaler bewegungsbedingter Unscharfe an.
Weßabgleich
Die Weißabgleicheinstellung neben der Verschlusszeitanzeige lassst sich durch Anklicken der Links- und Rechtspfeile an beiden Seiten der Farbtemperaturanzeige anpassen. Verschiedene Lichtquellen geben unterscheidlich warme oder kalte Farben aus, was Sie durch Anpassen des Weißabgleichs kompensieren können. So wird davon gesorgt, dass die Weißtone in Ihrm Bild weiß bleiben.
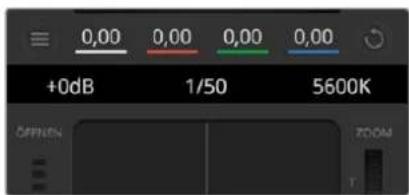
Schieben Sie ihren Mauszeiger über die Anzeigen fur Gain, Verschlusszeit und Weilabgloich. Über die nun angezogenen Pfeile halten sich die jeweiligen Einstellungen justieren
DaVinci Resolve Primary Color Corrector
Wer mit Farbkorrektur vertraut ist, kann von der für Mischer gebrachtechen CCU-artigen Benutzeroberfläche zu einer Alternative wechseln, die dem Tool für die primäre Farbkorrektur eines Postproduktions-GradingsystemsGLEicht.
Blackmagic Kamas sind mit dem integrierten DaVinci Resolve Primary Color Corrector, einem Tool für die primäre Farbkorrektur, ausgestattet. Wer bereits mit DaVinci Resolve gearbeitet hat, kann diese Erfahrungen bei Liveproduktionen für kreatives Colorgrading in einer Blackmagic Kamera einsetzen, da dies genauso Funktioniert. Das Farbkorrekturfenster lässt sich von jedem Kamerabedienfeld aus aufklappen und bietet eine erweiterte Farbkorrektursteuerung mit zusätzlichen Einstellungen und einer Bedienoberfläche mit allen Tools für die primäre Farbkorrektur.
Zur Verfugung stehen Ohnen hier Farbrader und Einstellungen wie Sattigung. Die Einstellungen für Schatten, Mitteltone und Lichter werden alle auf einem eingeblendet. Wechseln Sie mithilfe der Kameraauswahl-Schaltflächen oben im Fenster einfach zwischen Kameras hin und her.
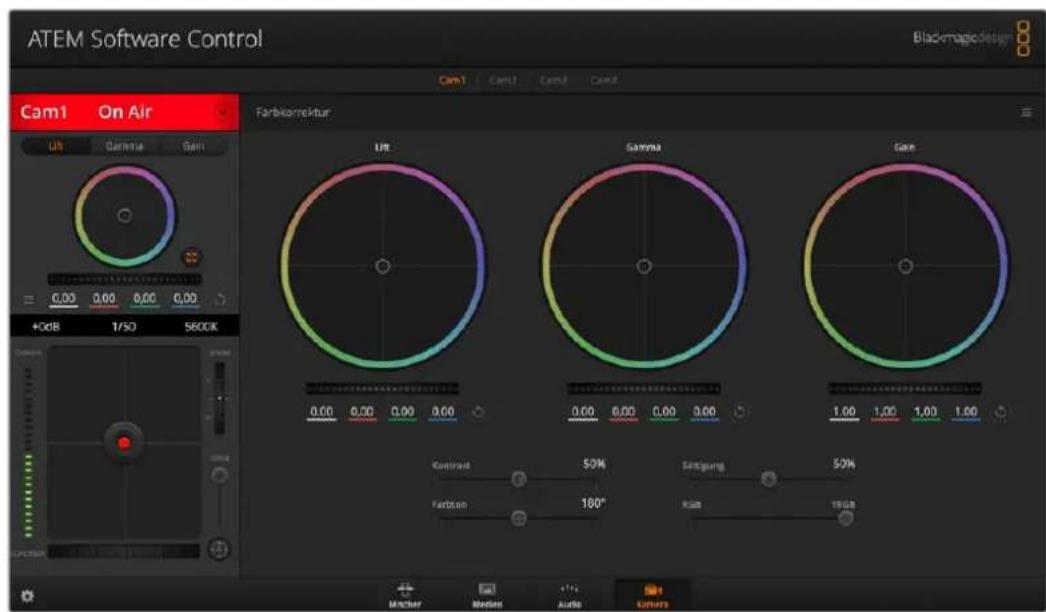
Klicken Sie das DaVinci Resolve Primary Color Corrector Symbol an, um das Farbkorrekturfenster zu erweitern und Einstellungen anzupassen
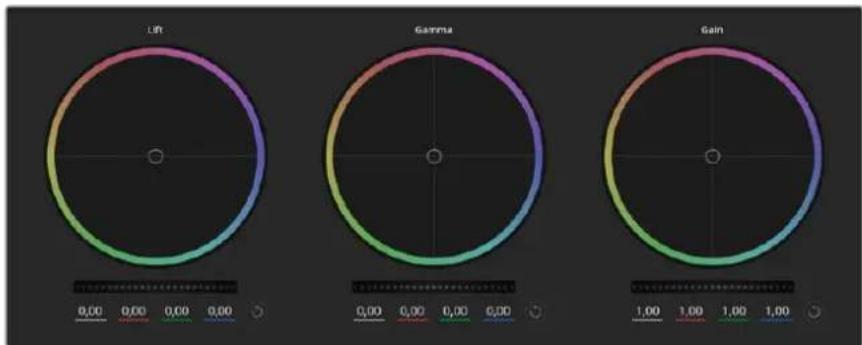
Die Farbrader fur Schatten, Mitten und Lichter im Farbkorrekturfenster
Farbrader
Fuhren Sie Irgendwo auf dem Farbrad einen Klick und eine Ziehbewegung aus
Die Farbbalance-Anzeige selbst brauchen Sie jedoch nicht zu bewegen. Die unter der Farbbalance-Anzeige gelegen den RGB-Parameter verschreiben sich analog zur Farbbalance-Justierung und reflektieren so an einzelnen Kanalen vorgenommene Anpassungen.
Führn Sle mittels Shift-Klick eine Ziehbewegung auf dem Farbrad aus
Versetzt die Farbbalance-Anzeige an die konkrete Position des Mauszeigers und gestattet die Vornahme Schnellerer, extremerer Anpassungen.
Fuhren Sie elnen Doppelklick auf dem Farbrad aus
Setzt die Farbanpassung zurück, ohne die Anpassung des Masterrads für diese Einstellung zu berühren.
Klichen Sie auf das Reset-Symbol oben rechts in einem Farbrad
Dies setzt die Farbbalance zusammen mit dem dazugehörigen Masterrad zurück.
Masterräder
Benutzen Sie die Masterräder unter den Farbrädern, um die „Lift“-, „Gamma“- und „Gain“-Einstellungen für jeder YRGB-Kanal individuell anzupassen.

Passen Sie die Masterräder an, indem Sie den Regler nach links oder rechtsziehen
So nehmen Sie Anpassungen mithilfe des Masterrads vor:
Drehen Sie das Masterrad nach links oder rechts
Durch Verschieben nach links wird der ausgewählte Parameter des Bildes verdunkelt, durch Verschieben nach rechts wird er erhelt. Wenn Sie eine Anpassung vornehmen, ändern sich damit die darunter liegenden YRGB-Parameter und reflektieren ihre soeben vorgenommene Anpassung. Führten Sie bei gedrückt gehaltener ALT- bzw. Command-Taste eine Ziehbewegung nach links oder rechts aus, um nur den Y-Wert anzupassen. Da sich der Farbkorrektor der YRGB-Verarbeitung bedient, konnen Sie ihre Kreativität ausleben und allein durch Anpassen des Y-Kanals einzigartige Optiken erzielen. Am bestenessen sich Anpassungen am Y-Kanal vornehmen, wenn die „Lum Mix"-Einstellung für YRGB-Verarbeitung nach rechts gesetzt ist. Für reguläre RGB-Verarbeitung hingegen setzt man sie nach links. Normalerweise arbeiten die meisten DaVinci Resolve Coloristen mit dem YRGB-Farbkorrektor, da dieser mehr möglichkeiten zur Steuerung der Farbbalance bietet, ohne darauf die gesamten hellen Bereiche (Gain) zu beeinflussen.
Kontrast
Die Kontrasteinstellung lasst Sie die Spanne zwischen den dunkelsten und hellsten Tonwerten in einem Bild steuern. Die erzielte Wirkungähnelt dem Einsatz der Lift- und Gain-Masterräder zur Vornahme entgegengesetzter Anpassungen. Die Standardeinstellung liegt bei 50% .
Sattlung
Mit der Sattigungseinstellung lasst sich der Farbanteil im Bild erhöhen oder senken. Die Standardeinstellung liegt bei 50% .
Farbton
Mit der Farbstoneinstellung setzen sich alle Farbstone in einem Bild um den gesamten Umfang des Farbrads drehen. Die Standardeinstellung von 180 Grad zeigt die ursprüngliche Farbstonverteilung an. Die Erhöhung bzw. Senkung these Wertes bewirkt, dass alle Farbstone gemäß der auf dem FarBrad sightbaren Farbstonverteilung gedreht werden.
"Lum Mlx"-Einstellung
Blackmagic K cameras sind mit einem integrierten DaVinci Resolve Tool für die primäre Farbkorrektur ausgestellt. DaVinci baut seit Anfang der 1980er Jahre Farbkorrektursysteme und inzwischen werden mehr Hollywood-Spielfilme mit DaVinci Resolve gegradet als mit jeder anderen Applikation.
Der in die Blackmagic Kameras integrierte Farbkorrektor bringt somit eine Reihe einzigartiger Features mit, die ihren kreativen Spielraum erweitern. Eine davon ist die YRGB-Verarbeitung.
Für das Colorgrading können Sie wahlweise RGB-Verarbeitung oder YRGB-Verarbeitung einsetzen. Highend-Coloristen favorisieren YRGB-Verarbeitung, da diese mehr Kontrolle über die Farbe gewährt, die Anpassung separator Kanäe möglichst und mehr kreative Möglichkeit bietet.
Ein ganz nach rechts gezogener „Luminanz"-Schieberegler bedeutet eine 100-prozentige Ausgabe des YRGB-Farbkorrektors. Ist der „Lum Mix"-Regler ganz nach links gezogen, bedeutet das eine 100-prozentige Ausgabe des RGB-Korrektors. Der „Luminanz"-Regler kann beliebig welt nach rechts oder links gezogen werden, um eine im entsprechenden Verhältnis gemischte Ausgabe der RGB- und YRGB-Korrektoren zu bewirken.
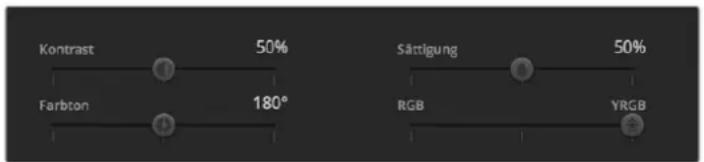
Kontrast, Sattigung, Farbton und Leuchtdichtemix lassen sich durch Ziehen des Schiebereglers justieren
Welche Einstellung ist die richtige? Das ist bei thisem rein kreativen Vorgang allein ihre Entscheidung. Es gibt kein richtig und falsch, Denn es zahlt nur, was Ihnen am besten gefällt!
Synchronisierung von Einstellungen
Ist die Kamera an einen ATEM Mischer gekoppelt, werden die Signale zur Steuerung der Kamera vom Mischer an die Blackmagic Studio Camera übermittelt. Wird an der Studio Camera selbst versehentlich eine Einstellung angepasst, setzen die Kamerasteuerung sie automatisch zugrück, damit die Synchronisierung mit dem Mischer gewährleistet bleibt.
TIPP Der in jeder Kamerasteuerungseinheit integrierte DaVinci Primary Color Corrector latent sich über ein DaVinci Resolve Micro Panel steuern. Über ein solches Hardware-Steuerpult konnen Sie schnelle und prazise Farbjustagen vornehmen. Weitere Informationen siehe ATEM Mini Bedienungsanleitung.
HINWEIS Ist eine Kamera per HDMI an einen ATEM Mini angeschlüssen, aber ausgeschaltet, kann sich das auf die Kamerasteeurung auswirken. Wir empfehlen, die Kameras mit Netzstrom zu betreiben und die HDMI-Kabel vor dem Ausschalten zu trennen.
Arbeiten mit Fremdhersteller-Software
Um Clips mit ihrer bevorzugten Schnittsoftware wie DaVinci Resolve zu bearbeiten, können Sie die Clips von ihrer Kamera auf ein externes Laufwerk oder einen RAID kopieren und die Clips anschließend in die Software importieren. Alternativ können Sie ihre Clips direkt von ihrem Speicherträger importieren. Dies erfolgt über ein Dock bzw. einen Adapter für ihre CFast- oder SD-Karte bzw. über den USB-C-Port für ein USB-C-Laufwerk.
Arbeiten mit Dateien auf CFast-2.0- und SD-Karten
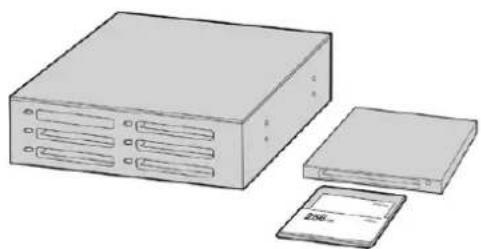
Schneiden Sie direkt von Ihrer CFast- oder SD-Karte, Indem Sie sie aus Ihrer Kamera entnehmen und über ein CFast-2.0-Lese-/Schreibgerät oder CFast-Laufwerk an ihren Computer anschließen
So importieren Sie ihre Clips von einer CFast-2.0- oder SD-Karte:
Entfernen Sie die CFast- oder SD-Karte aus Ihrer Blackmagic Pocket Cinema Camera.
Schlieben Sie die CFast- oder SD-Karte über ein CFast-2.0-bzw. SD-Kartenlesegerät oder ein CFast-Laufwerk an ihren Mac oder Windows Computer an.
2 Doppelklicken Sie auf die CFast- oder SD-Karte, um sie zu öffnen. So werden ihren die entsprechenden Ordner angezeigt, die ihre Blackmagic-RAW-Dateien oder eine Liste mit QuickTime-Movie-Dateien enthalten. Je nach ausgewähltem Aufnahmeformat liegt ihren möglicherweise eine Mischung aus verschiedenen Dateien vor, deren Namenskonvention jedoch identisch sein sollte.
3 Ziehen Sie die gewünschten Datien einfach per Drag-and-drop von der CFast- oder SD-Karte auf ihren Desktop oder ein anderes Laufwerk oder greifen Sie über ihre Schnittsware direkt auf die Datien auf der CFast- oder SD-Karte zu.
4 Bevor Sie die CFast- oder SD-Karte aus Ihr Computer entnehmer, ist es wichtig, diese zunachst unter Mac oder Windows safer auszuwerfen. Wenn Ihr Datenträger nicht sicher ausgeworfen wird, besteht das Risiko einer Beschädigung ihrer Footage.
Arbeiten mit Dateien von USB-C-Laufwerken
So Importieren Sle Clips von einem USB-C-Laufwerk:
1 Trennen Sie das USB-C-Laufwerk von ihrer Kamera.
2 Schlieben Sie das USB-C-Laufwerk über einen USB-C-Port an ihren Mac oder Windows Computer an. Verwenden Sie vorzugsweise USB 3.0, da USB 2.0 für den Videoschnitt in Echtzeit nicht schnell genug ist.
3 Doppelklicken Sie auf das USB-C-Laufwerk, um es zu öffnen. Sie erhalten eine Liste mit QuickTime-Movie-Dateien oder -Ordern, die ihre Blackmagic-RAW-Dateien enthalten. Je nach ausgewähltem Aufnahmeformat liegt. Ihrerweise eine Mischung aus verschiedenen Dateien vor, deren Namenskonvention jedoch identisch sein sollte.
4 Ziehen Sie jetzt einfach per Drag-and-drop die gewünschten Dateien vom USB-C-Laufwerk auf ihren Desktop oder auf ein anderes Laufwerk. Sie können auch direkt über ihre NLE-Software auf die Dateien auf dem USB-C-Laufwerk zugreifen.
5 Es ist wichtig, dass Sie das USB-C-Laufwerk zunachst sicher auswerfen, bevor Sie es von Ihr dem Computer trennen.
Verwendung von Final Cut Pro X
Um ihre Clips in Final Cut Pro X zubearbeiten,müssen Sie ein neuen Projekt erstehen,das dem Videoformat und der Framerate Ihrer Clips entspricht. In thisem Beispiel wird ProRes 422 HQ 1080p/24 verwendet.
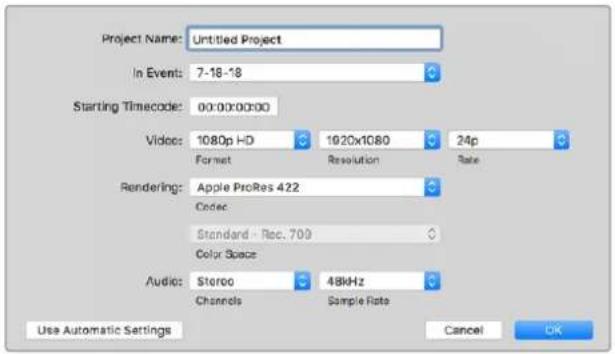
Projekteinstellungen in Final Cut Pro X
1 Starten Sie Final Cut Pro X, gehen Sie auf die Menuleiste und wahlen Sie „File“ > „New Project" (Datei > Neues Projekt) aus.
Es öffnet sich ein Fenster mit den Projekteinstellungen.
2 Benennen Sie Ihr Projekt, und aktivieren Sie das Kontrollkastchen „Custom" (Benutzerdefiniert).
3 Stellen Sie die Videogenschaften auf 1080p HD, 1920x1080 und 24p ein.
4 Stellen Sie ihre „Audio and render properties" (Audio- und Render-Eigenschaften) auf Stereo, 48 kHz, und Apple ProRes 422 HQ ein.
5 Klichen Sie auf "OK".
Gehen Sie zum Importieren von Clips in Ihr Projekt auf die Menüleiste und wahlen Sie „File“ > „Import“ > „Media“ (Datei > Importieren > Medien) aus. Wahlen Sie die Clips von ihrer CFast-Karte aus.
Ohre Clips lessen sich jetzt zur Bearbeitung auf die Timeline ziehen.
Verwendung von Avid MediaComposer 2018
Um ihre Clips mit Avid MediaComposer 2018 zu bearbeiten, erstellen Sie ein neuen Projekt, das dem Videoformat und der Framerate Ihres Clips entspricht. In thisem Beispiel sind die Clips auf 1080p/24 eingestellt.
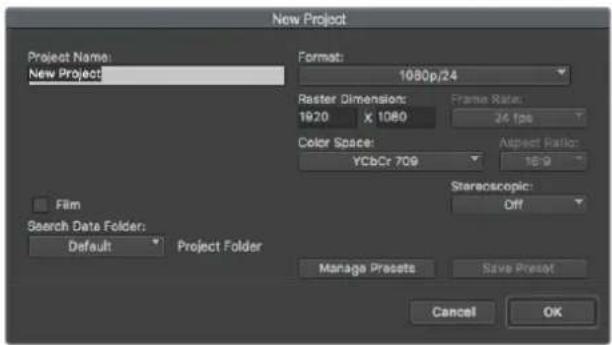
Eingabe des Projektnamens und der Projektoptionen in Avid Media Composer 2018
1 Starten Sie Avid Media Composer 2018. Das „Select Project“-Fenster (Projekt auswahlen) erscheint.
2 Klicken Sie auf den Button „New Project" (Neues Projekt) und benennen Sie Ihr neues Projekt im Fenster „New Project".
3 Geben Sie im Drop-down-MENU „Format“, HD 1080a >,1080p/24a aus und klichen Sie auf „OK“, um das Projekt zu erstellen.
4 Um das Projekt zu öffnen, doppelklicken Sie es im „Select Project“-Fenster.
5 Wahlen Sie „File“ > „Input“ > „Source Browser“ (Datei > Eingabe > Quellbrowser) aus und navigieren Sie zu den zu importierenden Dateien.
6 Wahlen Sie im Drop-down-MENU ihre „Target Bin" (Ziel-Bin) aus und klichen Sie „Import" (Importieren).
Sobald die Clips in der Medien-Bin erscheinen, konnen Sie sie in die Timelineziehen und mit der Bearbeitung beginnen.
Verwendung von Adobe Premiere Pro CC
Um ihre in Apple ProRes 422 HQ erstellten Clips mit Adobe Premiere Pro CC zu schreiben, müssen Sie ein neues Projekt erstellen und ein passendes Videoformat sowie eine geeignete Framerate einstellen. In this dem Beispiel sind die Clips auf ProRes 422 HQ 1080p/25 eingestellt.
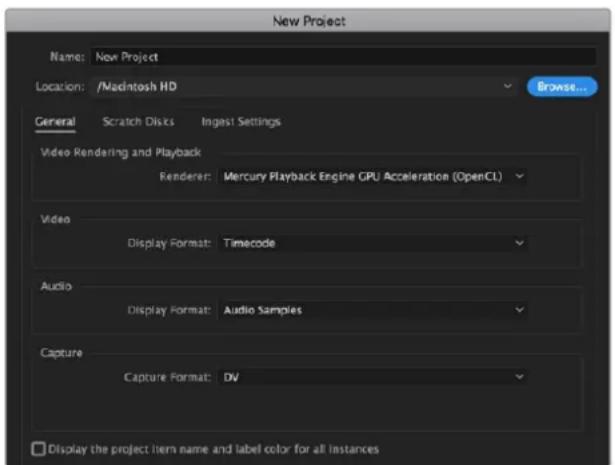
Eingabe des Projektnamens und der Projektoptionen In Adobe Premiere Pro CC
1 Starten Sie Adobe Premiere Pro CC. Wahlen Sie im Willkommensfenster „New Project" (Neues Projekt) aus. Es öffnet sich ein Fenster mit den Projektinstellungen.
2 Benennen Sie Ihr Projekt. Wahlen Sie den Speicherort für Ihr Projekt per Klick auf die Schaltfläche „Browse" und geben Sie den gewünschten Ordner vor. Klichen Sie nach Auswahl Ihres Speicherort-Ordners Fenster „New Project" auf „OK".
3 Wahlen Sie auf der Adobe Premiere Pro CC Menuleiste per „File“ > „Import“ (Datei > Importieren) die zu bearerbeitenden Clips aus. Ihr Clips erschreiben im Projektfenster.
4 Ziehen Sie den ersten zubearbeitenden Clip unter rechts im Projektfenster auf das Icon „New item" (Neues Objekt). Daraufhin wird eine neue Sequenz erstellt, die mit ihren Clip-Einstellungen übereinstimmt.
Sie konnen ihre Clips jetzt zur Bearbeitung in die Sequenz-Timelineziehen.
Blackmagic Camera Setup Utility (Dienstprogramm)
Aktualisierung der Kamerasoftware auf Mac
Laden Sie die Blackmagic Camera Setup Utility Software herunter, entpacken Sie die heruntergeladene Datei und klichen Sie auf das Disk-Image, um sich die Installationsanwendung Blackmagic Camera Setup Installer anzeigen zu halten.
Starten Sie die Installationsanwendung und folgen Sie den Anweisungen auf dem Bildschirm. Gehen Sie nach abgeschlossener Installation zu Ihr Programme-Ordner und öffnen Sie den Ordner „Blackmagic Cameras". Dieser enthalt diese Bedienungsanleitung, das Dienstprogramm Blackmagic Camera Setup sowie einen Dokumente-Ordner mit Readme-Dateien und Informationen. Sie finden Dort auch ein Deinstallationsprogramm, das Sie für Updates mit neuen Versionen des Dienstprogramms Blackmagic Camera Setup bestehtigen werden.
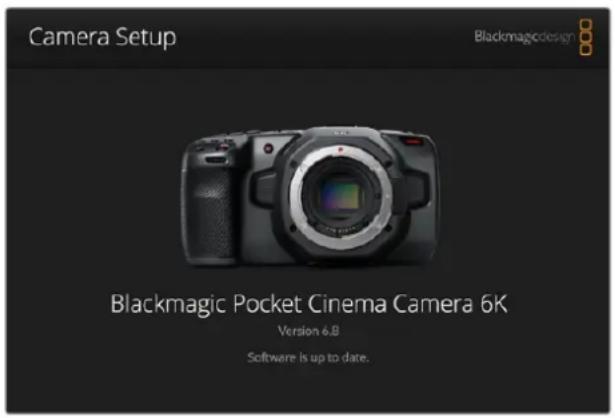
Aktualisierung der Kamerasoftware auf Windows
Nach dem Sie das Dienstprogramm Blackmagic Camera Setup Utility heruntergeladen und die Daten entpackt haben, ist ein Ordner namens Blackmagic Camera Setup zu sehen, der eine PDF-Version dieser Bedienungsanleitung und das Programm Blackmagic Camera Setup Installer enthalt. Doppelklicken Sie auf das Installationsprogramm und folgen Sie den auf dem Bildschirm angezeigten Anweisungen zur Fertigstellung der Installation.
Auf Windows 10: Klicken Sie auf den „Start“-Button und wahren Sie „Alle Apps“ aus. Scrollen Sie zum Blackmagic Design Ordner. Starten Sie von Dort die Anwendung Blackmagic Camera Setup. Klicken Sie auf Windows 8.1 auf dem Startbildschirm auf das Pfeilsymbol nach unten und scrollen Sie zum Blackmagic Design Ordner. Starten Sie von Dort die Anwendung Blackmagic Camera Setup.
Aktualisierung der Produktsoftware ihrer Kamera
Schlieben Sie ihren Computer nach erfolgter Installation des aktuellsten Blackmagic Camera Setup Dienstprogramms über ein USB-C-Kabel an ihre Kamera an. Der USB-Port befindet sich an der linken Kameraseite. Offnen Sie einfach die Gummiabdeckung, um an den Port zu gelangen.
Starten Sie das Dienstprogramm Blackmagic Camera Setup und folgen Sie den auf dem Bildschirm angezeigten Aufforderungen zur Aktualisierung der Kamerasoftware. Nach erneutem Hochfaden der Kamera entscheidt die Seite mit der Sprachauswahl.itte beachten Sie, dass mit dem Aktualisieren ihrer Kamerasoftware alle Presets und benutzderdefinierten LUTs gelöscht und Einstellungen zuückgesetzt werden. Als bewährte Praxis empfehlts sich, ein Backup dieser Daten auf einer Speicherkarte anzufertigen, bevor Sie die Kamerasoftwareactualisieren. So konnen Sie ihre Presets und LUTs nach erfolgter Softwareaktualisierung per Import von der Speicherkarte schnell wiederherstellen.
Empfohlene Speichermedien
CFast-2.0-Karten
Empfohlene Speichermedien fur die Blackmagic Pocket Cinema Camera 6K
Für 6K-Aufzeinungen in Blackmagic RAW 5:1 mit bis 50 fps empfehlen wir für die Pocket Cinema Camera 6K folgende CFast-2.0-Karten;
| Marke Kartenname Speicherkapazität | |
| Angelbird AV PRO CF XT 512 GB | |
| CinediskPro 510MB/s CFast 2.0 256 GB | |
| Hagiwara Solutions DC-SMAN64GA CFast 2.0 64 GB | |
| Hagiwara Solutions DC-SMANA1GA CFast 2.0 128 GB | |
| KomputerBay 3400x CFast 2.0 64 GB | |
| KomputerBay 3400x CFast 2.0 128 GB | |
| Lexar Professional 3400X CFast 2.0 128 GB | |
| Lexar Professional 3500X CFast 2.0 128 GB | |
| ProGrade Digital | 510MB/s CFast 2.0 128 GB |
| ProGrade Digital | 550MB/s CFast 2.0 |
| ProGrade Digital | 550MB/s CFast 2.0 |
| Transcend | CFX650 CFast 2.0 TS128GCFX650 |
| SanDisk | Extreme Pro CFast 2.0 SDCFSP-64G-x46D |
| SanDisk | Extreme Pro CFast 2.0 SDCFSP-128G-x46D |
| SanDisk | Extreme Pro CFast 2.0 SDCFSP-256G-x46D |
| SanDisk | Extreme Pro CFast 2.0 SDCFSP-512G-x46D |
| Silicon Power | CFX310 CFast 2.0 |
| Sony | CFast 2.0 G Series CAT-G64 |
| Sony | CFast 2.0 G Series CAT-G128 |
| Wise | CFA-2560 3400x CFast 2.0 |
| Wise | CFA-5120 3500x CFast 2.0 |
| Wise | CFA-10240 3500X CFast 2.0 |
Für 6K-2,4:1-Aufzeichnungen in Blackmagic RAW 5:1 mit bis zu 60 fps empfehlen wir für die Pocket Cinema Camera 6K folgende CFast-2.0-Karten:
| Marke Kartename Speicherkapazität | |
| Angelbird AV PRO CF XT 512 GB | |
| CinediskPro 510MB/s CFast 2.0 256 GB | |
| Hagiwara Solutions DC-SMAN64GA CFast 2.0 64 GB | |
| Hagiwara Solutions DC-SMANA1GA CFast 2.0 128 GB | |
| Marke Kartename Spelcherkapazität | |
| KomputerBay 3400x CFast 2.0 64 GB | |
| KomputerBay 3400x CFast 2.0 128 GB | |
| Lexar Professional 3400X CFast 2.0 128 GB | |
| Lexar Professional 3500X CFast 2.0 128 GB | |
| ProGrade Digital 510MB/s CFast 2.0 128 GB | |
| ProGrade Digital 550MB/s CFast 2.0 256 GB | |
| ProGrade Digital 550MB/s CFast 2.0 512 GB | |
| Transcend CFX650 CFast 2.0 TS128GCFX650 128 GB | |
| SanDisk Extreme Pro CFast 2.0 SDCFSP-64G-x46D 64 GB | |
| SanDisk Extreme Pro CFast 2.0 SDCFSP-128G-x46D 128 GB | |
| SanDisk Extreme Pro CFast 2.0 SDCFSP-256G-x46D 256 GB | |
| SanDisk | Extreme Pro CFast 2.0 SDCFSP-512G-x46D 512 GB |
| Silicon Power | CFX310 CFast 2.0 256 GB |
| Silicon Power | CFX310 CFast 2.0 512 GB |
| Sony | CFast 2.0 G Series CAT-G64 64 GB |
| Sony | CFast 2.0 G Series CAT-G128 128 GB |
| Wise | CFA-1280 3400x CFast 2.0 128 GB |
| Wise | CFA-2560 3400x CFast 2.0 256 GB |
| Wise | CFA-5120 3500x CFast 2.0 512 GB |
| Wise | CFA-10240 3500X CFast 2.0 1 TB |
Für 2,8K-17:9-Aufzeinungen in Blackmagic RAW 3:1 mit bis zu 120 fps empfehlen wir für die Pocket Cinema Camera 6K folgende CFast-2.0-Karten:
| Marke Kartename Speicherkapazität | ||
| Angelbird | AV PRO CF XT 512 GB | |
| CinediskPro | 510MB/s CFast 2.0 256 GB | |
| Hagiwara Solutions | DC-SMAN64GA CFast 2.0 | 64 GB |
| Hagiwara Solutions | DC-SMANA1GA CFast 2.0 | 128 GB |
| KomputerBay 3400x CFast 2.0 | 64 GB | |
| KomputerBay 3400x CFast 2.0 | 128 GB | |
| Lexar | Professional 3400X CFast 2.0 | 128 GB |
| Lexar Professional 3500X CFast 2.0 | 128 GB | |
| Lexar | Professional 3400X CFast 2.0 | 256 GB |
| ProGrade Digital 510MB/s CFast 2.0 | 128 GB | |
| ProGrade Digital 550MB/s CFast 2.0 | 256 GB | |
| Marke Kartenname Spelcherkapazität | |
| ProGrade Digital 550MB/s CFast 2.0 512 GB | |
| Transcend CFX650 CFast 2.0 TS128GCFX650 128 GB | |
| SanDisk Extreme Pro CFast 2.0 SDCFSP-64G-x46D 64 GB | |
| SanDisk Extreme Pro CFast 2.0 SDCFSP-128G-x46D 128 GB | |
| SanDisk Extreme Pro CFast 2.0 SDCFSP-256G-x46D 256 GB | |
| SanDisk Extreme Pro CFast 2.0 SDCFSP-512G-x46D 512 GB | |
| Silicon Power CFX310 CFast 2.0 256 GB | |
| Silicon Power CFX310 CFast 2.0 512 GB | |
| Sony | CFast 2.0 G Series CAT-G64 64 GB |
| Sony | CFast 2.0 G Series CAT-G128 128 GB |
| Wise | CFA-1280 3400x CFast 2.0 128 GB |
| Wise | CFA-2560 3400x CFast 2.0 256 GB |
| Wise | CFA-5120 3500x CFast 2.0 512 GB |
| Wise | CFA-10240 3500X CFast 2.0 1 TB |
Für 4K-DCI-Aufzeinungen in ProRes HQ mit bis zu 60 fps empfehlen wir für die Pocket Cinema Camera.
6K folgende CFast-2.0-Karten:
| Marke Kartenname Speicherkapazität | ||
| Angelbird | AV PRO CF XT 512 GB | |
| CinediskPro | 510MB/s CFast 2.0 | 256 GB |
| Hagiwara Solutions | DC-SMAN64GA CFast 2.0 | 64 GB |
| Hagiwara Solutions | DC-SMANA1GA CFast 2.0 | 128 GB |
| KomputerBay | 3400x CFast 2.0 | 64 GB |
| KomputerBay | 3400x CFast 2.0 | 128 GB |
| Lexar | Professional 3400X CFast 2.0 | 128 GB |
| Lexar | Professional 3500X CFast 2.0 | 128 GB |
| Lexar | Professional 3400X CFast 2.0 | 256 GB |
| ProGrade Digital 510MB/s CFast 2.0 | 128 GB | |
| ProGrade Digital 550MB/s CFast 2.0 256 GB | ||
| ProGrade Digital 550MB/s CFast 2.0 512 GB | ||
| Transcend CFX650 CFast 2.0 TS128GCFX650 128 GB | ||
| SanDisk Extreme Pro CFast 2.0 SDCFSP-64G-x46D 64 GB | ||
| SanDisk Extreme Pro CFast 2.0 SDCFSP-128G-x46D 128 GB | ||
| SanDisk Extreme Pro CFast 2.0 SDCFSP-256G-x46D 256 GB | ||
| SanDisk Extreme Pro CFast 2.0 SDCFSP-512G-x46D 512 GB | ||
| Silicon Power CFX310 CFast 2.0 256 GB | ||
| Silicon Power CFX310 CFast 2.0 512 GB | ||
| Marke Kartenname Spelcherkapazität | |
| Sony CFast 2.0 G Series CAT-G64 64 GB | |
| Sony CFast 2.0 G Series CAT-G128 128 GB | |
| Wise CFA-1280 3400x CFast 2.0 128GB | |
| Wise CFA-2560 3400x CFast 2.0 256GB | |
| Wise CFA-5120 3500x CFast 2.0 512GB | |
| Wise CFA-10240 3500X CFast 2.0 1 TB |
Für 1080-Aufzeichnungen in ProRes 422 HQ mit bis zu 120 fps empfehlen wir für die Pocket Cinema Camera 6K folgende CFast-2.0-Karten:
| Marke Kartenname Speicherkapazität | |
| Angelbird AV PRO CF XT 512 GB | |
| CinediskPro 510MB/s CFast 2.0 256 GB | |
| Hagiwara Solutions DC-SMAN64GA CFast 2.0 64 GB | |
| Hagiwara Solutions | DC-SMANA1GA CFast 2.0 |
| KomputerBay | 3400x CFast 2.0 |
| KomputerBay | 3400x CFast 2.0 |
| Lexar | Professional 3400X CFast 2.0 |
| Lexar | Professional 3500X CFast 2.0 |
| Lexar | Professional 3400X CFast 2.0 |
| ProGrade Digital | 510MB/s CFast 2.0 128 GB |
| ProGrade Digital | 550MB/s CFast 2.0 |
| ProGrade Digital | 550MB/s CFast 2.0 |
| Transcend | CFX650 CFast 2.0 TS128GCFX650 |
| SanDisk | Extreme Pro CFast 2.0 SDCFSP-64G-x46D |
| SanDisk | Extreme Pro CFast 2.0 SDCFSP-128G-x46D |
| SanDisk | Extreme Pro CFast 2.0 SDCFSP-256G-x46D |
| SanDisk | Extreme Pro CFast 2.0 SDCFSP-512G-x46D |
| Silicon Power | CFX310 CFast 2.0 |
| Silicon Power | CFX310 CFast 2.0 |
| Sony CFast 2.0 G Series CAT-G64 64 GB | |
| Sony CFast 2.0 G Series CAT-G128 128 GB | |
| Wise CFA-1280 3400x CFast 2.0 128 GB | |
| Wise CFA-2560 3400x CFast 2.0 256 GB | |
| Wise CFA-5120 3500x CFast 2.0 512 GB | |
| Wise CFA-10240 3500X CFast 2.0 1 TB |
Empfohlene Speichermedien fur die Blackmagic Pocket Cinema Camera 4K
Für 4K-DCI-Aufzeinungen in Blackmagic RAW 3:1 mit bis zu 60 fps empfehlen wir für die Pocket Cinema Camera 4K folgende CFast-2.0-Karten;
| Marke Kartenname Speicherkapazität | |
| Angelbird AV PRO CF 512 GB | |
| Angelbird AV PRO CF 1 TB | |
| CinediskPro 510MB/s CFast 2.0 256 GB | |
| Hagiwara Solutions DC-SMAN64GA CFast 2.0 64 GB | |
| Hagiwara Solutions DC-SMANA1GA CFast 2.0 128 GB | |
| KomputerBay 3400x CFast 2.0 64 GB | |
| KomputerBay 3400x CFast 2.0 128 GB | |
| KomputerBay 3700x CFast 2.0 256 GB | |
| Lexar Professional 3400x CFast 2.0 128 GB | |
| Lexar Professional 3500x CFast 2.0 256 GB | |
| ProGrade Digital | 550MB/s CFast 2.0 128 GB |
| ProGrade Digital | 550MB/s CFast 2.0 256 GB |
| ProGrade Digital | 550MB/s CFast 2.0 512 GB |
| SanDisk | Extreme Pro CFast 2.0 SDCFSP-256G-x46D 512 GB |
| Wise | CFA-1280 3400x CFast 2.0 128 GB |
| Wise | CFA-2560 3400x CFast 2.0 256 GB |
| Wise | CFA-5120 3500x CFast 2.0 512 GB |
| Wise | CFA-10240 3500x CFast 2.0 1 TB |
Für 4K-DCI-Aufzeinungen in ProRes HQ mit bis zu 60 fps empfehlen wir für die Pocket Cinema Camera.
4K folgende CFast-2.0-Karten:
| Marke Kartenname Speicherkapazität | |
| Angelbird AV PRO CF 128 GB | |
| Angelbird AV PRO CF 256 GB | |
| Angelbird AV PRO CF 512 GB | |
| CinediskPro 510MB/s CFast 2.0 256 GB | |
| Hagiwara Solutions DC-SMAN64GA CFast 2.0 64 GB | |
| Hagiwara Solutions DC-SMANA1GA CFast 2.0 128 GB | |
| KomputerBay 3400x CFast 2.0 128 GB | |
| KomputerBay 3700x CFast 2.0 256 GB | |
| ProGrade Digital | 550MB/s CFast 2.0 256 GB |
| ProGrade Digital | 550MB/s CFast 2.0 512 GB |
| Marke Kartenname Spelcherkapazität | |
| SanDisk Extreme Pro CFast 2.0 SDCFSP-64G-x46D 64 GB | |
| SanDisk Extreme Pro CFast 2.0 SDCFSP-128G-x46D 128 GB | |
| SanDisk Extreme Pro CFast 2.0 SDCFSP-256G-x46D 256 GB | |
| Sony CFast 2.0 G Series CAT-G64 64 GB | |
| Sony CFast 2.0 G Series CAT-G128 128 GB | |
| Wise CFA-1280 3400x CFast 2.0 128 GB | |
| Wise CFA-2560 3400x CFast 2.0 256 GB | |
| Wise CFA-5120 3500x CFast 2.0 512 GB | |
| Wise CFA-10240 3500x CFast 2.0 1 TB |
Für verlustfreie RAW-Aufzeihnungen in 4K DCi mit bis zu 30 fps empfehlen wir für die Blackmagic Pocket Cinema Camera 4K folgende CFast-2.0-Karten;
| Marke Kartename Speicherkapazität | |
| Angelbird AV PRO CF 128 GB | |
| Angelbird AV PRO CF 256 GB | |
| Angelbird AV PRO CF 512 GB | |
| CinediskPro | 510MB/s CFast 2.0 |
| KomputerBay | 3400x CFast 2.0 |
| ProGrade Digital | 550MB/s CFast 2.0 |
| ProGrade Digital | 550MB/s CFast 2.0 |
| SanDisk Extreme Pro CFast 2.0 SDCFSP-64G-x46D 64 GB | |
| SanDisk Extreme Pro CFast 2.0 SDCFSP-128G-x46D 128 GB | |
| SanDisk Extreme Pro CFast 2.0 SDCFSP-256G-x46D 256 GB | |
| Sony CFast 2.0 G Series CAT-G64 64 GB | |
| Sony CFast 2.0 G Series CAT-G128 128 GB | |
| Wise CFA-1280 3400x CFast 2.0 128 GB | |
| Wise CFA-2560 3400x CFast 2.0 256 GB | |
| Wise CFA-5120 3500x CFast 2.0 512 GB | |
Für 4K-DCI-Aufzeinungen in RAW 3:1 mit bis zu 60 fps empfehlen wir für die Pocket Cinema Camera 4K folgende CFast-2.0-Karten:
| Marke Kartename Speicherkapazität | |
| Angelbird AV PRO CF 128 GB | |
| Angelbird AV PRO CF 256 GB | |
| Angelbird AV PRO CF 512 GB | |
| CinediskPro | 510MB/s CFast 2.0 |
| 256 GB | |
| Marke Kartenname Spelcherkapazität | |
| KomputerBay 3400x CFast 2.0 128 GB | |
| ProGrade Digital 550MB/s CFast 2.0 256 GB | |
| ProGrade Digital 550MB/s CFast 2.0 512 GB | |
| SanDisk Extreme Pro CFast 2.0 SDCFSP-64G-x46D 64 GB | |
| SanDisk Extreme Pro CFast 2.0 SDCFSP-128G-x46D 128 GB | |
| SanDisk Extreme Pro CFast 2.0 SDCFSP-256G-x46D 256 GB | |
| Sony CFast 2.0 G Series CAT-G64 64 GB | |
| Sony CFast 2.0 G Series CAT-G128 128 GB | |
| Wise CFA-1280 3400x CFast 2.0 | 128 GB |
| Wise CFA-2560 3400x CFast 2.0 | 256 GB |
| Wise | CFA-5120 3500x CFast 2.0 |
SD-Karten
Empfohlene Speichermedien fur die Blackmagic Pocket Cinema Camera 6K
Für 6K-16:9-Aufzeinungen in Blackmagic RAW 5:1 mit bis zu 30 fps empfehlen wir für die Pocket Cinema Camera 6K folgende SD-Karten:
| Marke Kartenname Speicherkapazität | ||
| Angelbird | AV PRO SD V90 | 64 GB |
| Sony | Tough SF-G32T | 32 GB |
| Sony | Tough SF-G64T | 64 GB |
| Sony Tough SF-G128T 128 GB | ||
| Toshiba | Excerla Pro UHS-II 270MB/s SDXC | 64 GB |
| Wise SD2-128U3 SDXC UHS-II | 128 GB | |
Für 6K-16:9-Aufzeinungen in Blackmagic RAW 8:1 mit bis zu 30 fps empfehlen wir für die Pocket Cinema Camera 6K folgende SD-Karten:
| Marke Kartenname Speicherkapazität | ||
| Angelbird | AV PRO SD V90 | 64 GB |
| Sony | Tough SF-G32T | 32 GB |
| Sony | Tough SF-G64T | 64 GB |
| Sony Tough SF-G128T 128 GB | ||
| Toshiba | Exceria Pro UHS-II 270MB/s SDXC | 64 GB |
| Toshiba | Exceria Pro UHS-II 270MB/s SDXC | 128 GB |
| Toshiba | Exceria Pro UHS-II N502 SDXC | 128 GB |
| Wise SD2-128U3 SDXC UHS-II | 128 GB | |
Für 6K-2,4:1-Aufzeichnungen in Blackmagic RAW 12:1 mit bis zu 60 fps empfehlen wir für die Pocket Cinema Camera 6K folgende SD-Karten:
| Marke Kartename Speicherkapazität | |
| Angelbird AV PRO SD V90 64 GB | |
| Sony Tough SF-G32T 32 GB | |
| Sony Tough SF-G64T 64 GB | |
| Sony Tough SF-G128T 128 GB | |
| Toshiba Exceria Pro UHS-II 270MB/s SDXC 64 GB | |
| Toshiba Exceria Pro UHS-II 270MB/s SDXC 128 GB | |
| Toshiba Exceria Pro UHS-II N502 SDXC 128 GB |
Für 4K-DCI-Aufzeinungen in ProRes HQ mit bis zu 60 fps empfehlen wir für die Pocket Cinema Camera 6K folgende SD-Karten:
| Marke Kartename Speicherkapazität | |
| Angelbird AV PRO SD V90 64 GB | |
| Delkin Devices Power SDXC USH-II 64 GB | |
| Delkin Devices Prime SDXC USH-II 128 GB | |
| ProGrade Digital | V90 UHS-II 250MB/s SDXC |
| ProGrade Digital | V90 UHS-II 250MB/s SDXC |
| Sony Tough SF-G32T 32 GB | |
| Sony Tough SF-G64T 64 GB | |
| Sony Tough SF-G128T 128 GB | |
| Wise | SD2-64U3 SDXC UHS-II |
| Wise | SD2-128U3 SDXC UHS-II |
| Toshiba Exceria Pro UHS-II N502 SDXC 128 GB |
Für 1080-Aufzechnungen in ProRes 422 HQ mit bis zu 120 fps empfehlen wir für die Pocket Cinema Camera 6K folgende SD-Karten:
| Marke Kartenname Speicherkapazität | |
| Angelbird AV PRO SD V90 64 GB | |
| Delkin Devices Power SDXC USH-II 64 GB | |
| Delkin Devices Prime SDXC USH-II 128 GB | |
| Lexar | Professional 2000x UHS-II 300MB/s SDXC |
| Lexar | Professional 2000x UHS-II 300MB/s SDXC |
| ProGrade Digital | V90 UHS-II 250MB/s SDXC |
| Sony Tough SF-G32T 32 GB | |
| Sony Tough SF-G64T 64 GB | |
| Marke Kartename Spelcherkapazität | |
| Sony Tough SF-G128T 128 GB | |
| Toshiba Exceria Pro UHS-II 270MB/s SDXC 64 GB | |
| Toshiba Exceria Pro UHS-II 270MB/s SDXC 128 GB | |
| Toshiba Exceria Pro UHS-II N502 SDXC 128 GB | |
| Toshiba Exceria Pro UHS-II N502 SDXC 256 GB | |
| Wise SD2-64U3 SDXC UHS-II 64 GB | |
| Wise SD2-128U3 SDXC UHS-II 128 GB |
Empfohlene Speichermedien fur die Blackmagic Pocket Cinema Camera 4K
Für 4K-DCI-Aufzeinungen in Blackmagic RAW 12:1 mit bis zu 30 fps empfehlen wir für die Pocket Cinema Camera 4K folgende SD-Karten:
| Marke Kartenname Speicherkapazität | ||
| Angelbird AV PRO SD V90 64 GB | ||
| Delkin Devices Power UHS-II SDXC | 64 GB | |
| Delkin Devices Power UHS-II SDXC | 128 GB | |
| Lexar | Professional 2000x UHS-II 300MB/s SDXC | 64 GB |
| ProGrade Digital | V90 UHS-II 250MB/s SDXC | 256 GB |
| SanDisk | Extreme Pro UHS-I 95MB/s SDXC | 512 GB |
| Sony Tough SF-G64T | 64 GB | |
| Sony Tough SF-G128T 128 GB | ||
| Sony SF-G64 300MB/s UHS-II SDXC | 64 GB | |
| Toshiba Exceria Pro UHS-II N502 SDHC | 32 GB | |
| Toshiba Exceria Pro UHS-II 270MB/s SDXC 64 GB | ||
| Wise SD2-64U3 SDXC UHS-II 64 GB | ||
| Wise SD2-128U3 SDXC UHS-II 128 GB | ||
| Wise SD2-128U3 SDXC UHS-II 128 GB | ||
Für 4K-DCI-Aufzeinungen in ProRes HQ mit bis zu 60 fps empfehlen wir für die Pocket Cinema Camera.
4K folgende SD-Karten:
| Marke Kartename Spelcherkapazität | |
| Wise SD2-64U3 SDXC UHS-II 64 GB | |
| Wise SD2-128U3 SDXC UHS-II 128 GB | |
| Sony Tough SF-G64T | 64 GB |
| Sony Tough SF-G128T 128 GB |
Für 4K-DCI-Aufzeinungen in RAW 4:1 mit bis zu 60 fps empfehlen wir für die Pocket Cinema Camera 4K folgende SD-Karten:
| Marke Kartenname Speicherkapazität | |
| Sony Tough SF-G64T 64 GB | |
| Sony Tough SF-G128T 128 GB | |
| Toshiba Exceria Pro UHS-II N502 SDXC 32 GB |
Für verlustfreie RAW-Aufzeinungen in 4K DCl mit bis zu 24 fps empfehlen wir für die Pocket Cinema Camera 4K folgende SD-Karten:
| Marke Kartenname Speicherkapazität | |
| Wise SD2-64U3 SDXC UHS-II 64 GB | |
| Wise SD2-128U3 SDXC UHS-II 128 GB | |
| Toshiba Exceria Pro UHS-II N502 SDXC 32 GB | |
| Sony Tough SF-G64T 64 GB | |
| Sony Tough SF-G128T 128 GB |
Für verlustfreie RAW-Aufzeichnungen in 1080p mit bis zu 60 fps empfehlen wir für die Pocket Cinema Camera 4K folgende SD-Karten:
| Marke Kartenname Speicherkapazität | |
| Wise SD2-64U3 SDXC UHS-II 64 GB | |
| Wise SD2-128U3 SDXC UHS-II 128 GB | |
| Sony Tough SF-G64T 64 GB | |
| Sony Tough SF-G128T 128 GB | |
| Toshiba Exceria Pro UHS-II N502 SDXC 32 GB | |
| Toshiba Exceria Pro UHS-II N502 SDXC 64 GB | |
| Toshiba Exceria Pro UHS-II N502 SDXC 128 GB | |
| Toshiba Exceria Pro UHS-II N502 SDXC 256 GB | |
| Sony Tough SF-G128T 128 GB |
USB-C-SSDs
Empfohlene Speichermedien fur die Blackmagic Pocket Cinema Camera 6K
Für 6K-Aufzeichnungen in Blackmagic RAW 5:1 mit bis zu 50 fps empfehlen wir für die Pocket Cinema Camera 6K folgende USB-C-Laufwerke:
| Marke Kartenname Spelcherkapazität | |
| Wise PTS-1024 Portable SSD 1 TB |
Für 6K-2,4:1-Aufzeichnungen in Blackmagic RAW 5:1 mit bis zu 60 fps empfehlen wir für die Pocket Cinema Camera 6K folgende USB-C-Laufwerke:
| Marke Kartename Speicherkapazität | |
| Samsung Portable SSD T5 250 GB | |
| Samsung Portable SSD T5 2 TB | |
| Wise PTS-1024 Portable SSD 1 TB |
Für 2,8K-17:9-Aufzeinungen in Blackmagic RAW 3:1 mit bis zu 120 fps empfehlen wir für die Pocket Cinema Camera 6K folgende USB-C-Laufwerke:
| Marke Kartename Spelcherkapazität | |
| Samsung Portable SSD T5 250 GB | |
| Samsung Portable SSD T5 2 TB | |
| Wise PTS-512 Portable SSD 512 GB | |
| Wise PTS-1024 Portable SSD 1 TB |
Für 4K-DCI-Aufzeinungen in ProRes HQ mit bis zu 60 fps empfehlen wir für die Pocket Cinema Camera.
6K folgende USB-C-Laufwerke:
| Marke Kartename Spelcherkapazität | |
| Samsung Portable SSD T5 250 GB | |
| Samsung Portable SSD T5 1 TB | |
| Samsung Portable SSD T5 2 TB | |
| SanDisk Extreme Portable SSD 1 TB | |
| Wise PTS-512 Portable SSD 512 GB | |
| Wise PTS-1024 Portable SSD 1 TB | |
| Wise PTS-1024 Portable SSD 1 TB |
Für 1080-Aufzeichnungen in ProRes 422 HQ mit bis zu 120 fps empfehlen wir für die Pocket Cinema Camera 6K folgende USB-C-Laufwerke:
| Marke Kartename Speicherkapazität | |
| Samsung Portable SSD T5 250 GB | |
| Samsung Portable SSD T5 1 TB | |
| Samsung Portable SSD T5 2 TB | |
| SanDisk Extreme Portable SSD 1 TB | |
| Wise PTS-512 Portable SSD 512 GB | |
| Wise PTS-1024 Portable SSD 1 TB | |
| Wise PTS-1024 Portable SSD 1 TB |
Empfohlene Speichermedien fur die Blackmagic Pocket Cinema Camera 4K
Für 4K-DCI-Aufzeinungen in Blackmagic RAW 3:1 mit bis zu 60 fps empfehlen wir für die Pocket Cinema Camera 4K folgende USB-C-Laufwerke:
| Marke Kartename Speicherkapazität | |
| Angelbird SSD2GO PKT 512 GB | |
| Angelbird SSD2GO PKT 2 TB | |
| G-Technology G-DRIVE Mobile SSD 1 TB | |
| Samsung Portable SSD T5 2 TB | |
| Wise PTS-512 Portable SSD 512 GB |
Für 4K-DCI-Aufzeinungen in ProRes HQ mit bis zu 60 fps empfehlen wir für die Pocket Cinema Camera.
4K folgende USB-C-Laufwerke:
| Marke Kartename Speicherkapazität | ||
| Angelbird SSD2GO PKT 512 GB | ||
| Angelbird SSD2GO PKT 2 TB | ||
| Glyph | Atom | 500 GB |
| Lacle | Portable SSD | 500 GB |
| Samsung Portable SSD T5 500 GB | ||
| Samsung Portable SSD T5 1 TB | ||
| SanDisk Extreme Portable SSD 1 TB | ||
| Seagate | Fast SSD | 250 GB |
| Wise PTS-256 Portable SSD | 256 GB | |
| Wise PTS-512 Portable SSD 512 GB | ||
| Wise PTS-1024 Portable SSD 1 TB | ||
Für verlustfreie RAW-Aufzeichnungen in 4K DCI mit bis zu 30 fps empfehlen wir für die Pocket Cinema Camera 4K folgende USB-C-Laufwerke:
| Marke Kartename Speicherkapazität | |
| Angelbird SSD2GO PKT 512 GB | |
| Angelbird SSD2GO PKT 2 TB | |
| Samsung Portable SSD T5 1 TB | |
| Wise PTS-256 Portable SSD 256 GB | |
| Wise PTS-512 Portable SSD 512 GB | |
| Wise PTS-1024 Portable SSD 1 TB |
Für 4K-DCI-Aufzeinungen in RAW 3:1 mit bis zu 60 fps empfehlen wir für die Pocket Cinema Camera 4K folgende USB-C-Laufwerke:
| Marke Kartename Speicherkapazität | |
| Angelbird SSD2GO PKT 512 GB | |
| Angelbird SSD2GO PKT 2 TB | |
| Samsung Portable SSD T5 500 GB | |
| Samsung Portable SSD T5 1 TB | |
| Wise PTS-256 Portable SSD 256 GB | |
| Wise PTS-512 Portable SSD 512 GB | |
| Wise PTS-1024 Portable SSD 1 TB |
Informationen für Entwickler (Englisch)
Blackmagic Bluetooth Camera Control
Blackmagic cameras with Bluetooth LE implement a variety of features and commands that allow users to control their cameras wirelessly. Developers have full access to these features for their custom applications.
The following services and characteristics describe the full range of communication options that are available to the developer.
Service: Device Information Service
UUID:180A
Characteristics
Camera Manufacturer
UUID:2A29
Read the name of the manufacturer (always "Blackmagic Design").
Camera Model
UUID:2A24
Read the name of the camera model ("Pocket Cinema Camera 6K" or "Pocket Cinema Camera 4K").
Service: Blackmagic Camera Service
UUID:291D567A-6D75-11E6-8B77-86F30CA893D3
Characteristics
Outgoing Camera Control (encrypted)
UUID:5DD3465F-1AEE-4299-8493-D2ECA2F8E1BB
Send Camera Control messages
These messages are identical to those described in the Blackmagic SDI Camera Control Protocol section below. Please read that section for a list of supported messages and required formatting information.
For an example of how packets are structured, please see the 'example protocol packets' section in this document.
Incoming Camera Control (encrypted)
UUID:B864E140-76A0-416A-BF30-5876504537D9
Request notifications for this characteristic to receive Camera Control messages from the camera.
These messages are identical to those described in the Blackmagic SDI Camera Control Protocol section below. Please read that section for a list of supported messages and required formatting information.
Timecode (encrypted)
UUID:6D8F2110-86F1-41BF-9AFB-451D87E976C8
Request notifications for this characteristic to receive timecode updates.
Timecode (HH:MM:SS:mm) is represented by a 32-bit BCD number: (eg. 09:12:53:10 = 0x09125310)
Camera Status (encrypted)
UUID:7FE8691D-95DC-4FC5-8ABD-CA74339B51B9
Request notifications for this characteristic to receive camera status updates.
The camera status is represented by flags contained in an 8-bit integer:
None = 0× 00
Camera Power On = 0x01
Connected = 0× 02
Paired = 0× 04
Versions Verified = 0× 08
Initial Payload Received = 0 × 10
Camera Ready = 0× 20
Send a value of 0x00 to power a connected camera off.
Send a value of 0x01 to power a connected camera on.
Device Name
UUID:FFACOC52-C9FB-41A0-B063-CC76282EB89C
Send a device name to the camera (max. 32 characters).
The camera will display this name in the Bluetooth Setup Menu.
Protocol Version
UUID: 8F1FD018-B508-456F-8F82-3D392BEE2706
Read this value to determine the camera's supported CCU protocol version.
NOTE Encrypted characteristics can only be used once a device has successfully bonded or paired with the Blackmagic Camera. Once a connection has been established, any attempt to write to an encrypted characteristic will initiate bonding. For example, writing a 'Camera Power On' (0x01) message to the Camera Status characteristic.
Once bonding is initiated, the camera will display a 6-digit pin in the Bluetooth Setup Menu. Enter this pin on your device to establish an encrypted connection. The device will now be able to read, write and receive notifications from encrypted characteristics.
Blackmagic SDI and Bluetooth Camera Control Protocol
Version 1.4
If you are a software developer you can use the Blackmagic SDI and Bluetooth Camera Control Protocol to construct devices that integrate with our products. Here at Blackmagic Design, our approach is to open up our protocols and we eagerly look forward to seeing what you come up with!
Overview
This document describes an extensible protocol for sending a unidirectional stream of small control messages embedded in the non-active picture region of a digital video stream. The video stream containing the protocol stream may be broadcast to a number of devices. Device addressing is used to allow the sender to specify which device each message is directed to.
Assumptions
Alignment and padding constraints are explicitly described in the protocol document. Bit fields are packed from LSB first. Message groups, individual messages and command headers are defined as, and can be assumed to be, 32 bit aligned.
Blanking Encoding
A message group is encoded into a SMPTE 291M packet with DID/SDID x51/x53 in the active region of VANC line 16.
Message Grouping
Up to 32 messages may be concatenated and transmitted in one blanking packet up to a maximum of 255 bytes payload. Under most circumstances, this should allow all messages to be sent with a maximum of one frame latency.
If the transmitting device queues more bytes of message packets than can be sent in a single frame, it should use heuristics to determine which packets to prioritize and send immediately. Lower priority messages can be delayed to later frames, or dropped entirely as appropriate.
Abstract Message Packet Format
Every message packet consists of a three byte header followed by an optional variable length data block. The maximum packet size is 64 bytes.
| Destination device (uint8) | Device addresses are represented as an 8 bit unsigned integer. Individual devices are numbered 0 through 254 with the value 255 reserved to indicate a broadcast message to all devices. |
| Command length (uint8) | The command length is an 8 bit unsigned integer which specifies the length of the included command data. The length does NOT include the length of the header or any trailing padding bytes. |
| Command id (uint8) | The command id is an 8 bit unsigned integer which indicates the message type being sent. Receiving devices should ignore any commands that they do not understand. Commands 0 through 127 are reserved for commands that apply to multiple types of devices. Commands 128 through 255 are device specific. |
| Reserved (uint8) | This byte is reserved for alignment and expansion purposes. It should be set to zero. |
| Command data (uint8[]) | The command data may contain between 0 and 60 bytes of data. The format of the data section is defined by the command itself. |
| Padding (uint8[]) | Messages must be padded up to a 32 bit boundary with 0x0 bytes. Any padding bytes are NOT included in the command length. |
Receiving devices should use the destination device address and or the command identifier to determine which messages to process. The receiver should use the command length to skip irrelevant or unknown commands and should be careful to skip the implicit padding as well.
Defined Commands
Command 0 : change configuration
| Category (uint8) | The category number specifies one of up to 256 configuration categories available on the device. |
| Parameter (uint8) | The parameter number specifies one of 256 potential configuration parameters available on the device. Parameters 0 through 127 are device specific parameters. Parameters 128 though 255 are reserved for parameters that apply to multiple types of devices. |
| Data type (uint8) | The data type specifies the type of the remaining data. The packet length is used to determine the number of elements in the message. Each message must contain an integral number of data elements. |
| Currently defined values are: | |
| 0: void / boolean | A void value is represented as a boolean array of length zero. The data field is a 8 bit value with 0 meaning false and all other values meaning true. |
| 1: signed byte Data elements are signed bytes | |
| 2: signed 16 bit integer Data elements are signed 16 bit values | |
| 3: signed 32 bit integer Data elements are signed 32 bit values | |
| 4: signed 64 bit integer Data elements are signed 64 bit values | |
| 5: UTF-8 string Data elements represent a UTF-8 string with no terminating character. | |
| Data types 6 through 127 are reserved. | |
| 128: signed 5.11 fixed point | Data elements are signed 16 bit integers representing a real number with 5 bits for the integer component and 11 bits for the fractional component. The fixed point representation is equal to the real value multiplied by 2^11. The representable range is from -16.0 to 15.9995 (15 + 2047/2048). |
Data types 129 through 255 are available for device specific purposes.
Operation types 2 through 127 are reserved.
| Operation type (uint8) | The operation type specifies what action to perform on the specified parameter. Currently defined values are: |
| 0: assign value | The supplied values are assigned to the specified parameter. Each element will be clamped according to its valid range. A void parameter may only be 'assigned' an empty list of boolean type. This operation will trigger the action associated with that parameter. A boolean value may be assigned the value zero for false, and any other value for true. |
| 1: offset / toggle value | Each value specifies signed offsets of the same type to be added to the current parameter values. The resulting parameter value will be clamped according to their valid range. It is not valid to apply an offset to a void value. Applying any offset other than zero to a boolean value will invert that value. |
Operation types 128 through 255 are available for device specific purposes.
| Data (void) | The data field is 0 or more bytes as determined by the data type and number of elements. |
The category, parameter, data type and operation type partition a 24 bit operation space.
| Group | ID | Parameter | Type | Index | Minimum | Maximum | Interpretation |
| Lens | 0.0 | Focus | fixed16 | - | 0.0 | 1.0 | 0.0 = near, 1.0 = far |
| 0.1 | Instantaneous autofocus | void | - | - | - | trigger instantaneous autofocus | |
| 0.2 | Aperture (f-stop) | fixed16 | - | -1.0 | 16.0 | Aperture Value (where fnumber = sqrt(2^AV)) | |
| 0.3 | Aperture (normalised) | fixed16 | - | 0.0 | 1.0 | 0.0 = smallest, 1.0 = largest | |
| 0.4 | Aperture (ordinal) | int16 | - | 0 | n | Steps through available aperture values from minimum (0) to maximum (n) | |
| 0.5 | Instantaneous auto aperture | void | -- | - | trigger instantaneous auto aperture | ||
| 0.6 | Optical image stabilisation | boolean | - | - | - | true = enabled, false = disabled | |
| 0.7 | Set absolute zoom (mm) | int16 | - | 0 | max | Move to specified focal length in mm, from minimum (0) to maximum (max) | |
| 0.8 | Set absolute zoom (normalized) | fixed16 - 0.0 | 1.0 | Move to specified focal length: 0.0 = wide, 1.0 = tele | |||
| 0.9 | Set continuous zoom (speed) | fixed16 | - | -1.0 | +1.0 | Start/stop zooming at specified rate: -1.0 = zoom wider fast, 0.0 = stop, +1 = zoom tele fast | |
| Video | 1.0 Video mode int8 | [0] = frame rate -- | fps as integer(eg 24, 25, 30, 50, 60) | ||||
| [1] = M-rate -- 0 = regular, 1 = M-rate | |||||||
| [2] = dimensions | -- | 0 = NTSC, 1 = PAL, 2 = 720, 3 = 1080, 4 = 2kDCI, 5 = 2k16:9, 6 = UHD, 7 = 3k Anamorphic, 8 = 4k DCI, 9 = 4k 16:9, 10 = 4.6k 2.4:1, 11 = 4.6k | |||||
| [3] = interlaced | -- | 0 = progressive, 1 = interlaced | |||||
| [4] = Color space | -- 0 = YUV | ||||||
| 1.1 | Gain (up to Camera 4.9) | int8 | 1 | 128 | 1x, 2x, 4x, 8x, 16x, 32x, 64x, 128x gain | ||
| 1.2 | Manual White Balance | int16 | [0] = color temp | 2500 | 10000 | Color temperature in K | |
| int16 | [1] = tint | -50 | 50 | tint | |||
| 1.3 | Set auto WB | void | - | -- | Calculate and set auto white balance | ||
| 1.4 Restore auto WB void | - | -- | Use latest auto white balance setting | ||||
| 1.5 | Exposure (us) | int32 | 1 | 42000 | time in us | ||
| 1.6 Exposure (ordinal) int16 | - | 0 | n | Steps through available exposure values from minimum (0) to maximum (n) | |||
| 1.7 Dynamic Range Mode int8 enum | - | 0 | 2 | 0 = film, 1 = video, 2 = extended video | |||
| 1.8 | Video sharpening level | int8 enum | - | 0 | 3 | 0 = off, 1 = low, 2 = medium, 3 = high | |
| 1.9 | Recording format | int16 | [0] = file frame rate | -- | fps as integer(eg 24, 25, 30, 50, 60, 120) | ||
| [1] = sensor frame rate | - | - | fps as integer, valid when sensor-off-speed set (eg 24, 25, 30, 33, 48, 50, 60, 120), no change will be performed if this value is set to 0 | ||||
| [2] = frame width | -- in pixels | ||||||
| [3] = frame height | -- in pixels | ||||||
| [4] = flags | -- [0] = file-M-rate | ||||||
| - | - | [1] = sensor-M-rate, valid when sensor-off-speed-set | |||||
| -- [2] = sensor-off-speed | |||||||
| -- [3] = interlaced | |||||||
| -- [4] = windowed mode | |||||||
| 1.10 | Set auto exposure mode | int8 | - | 0 | 4 | 0 = Manual Trigger, 1 = Iris, 2 = Shutter, 3 = Iris + Shutter, 4 = Shutter + Iris | |
| 1.11 Shutter angle int32 | - | 100 | 36000 | Shutter angle in degrees,multiplied by 100 | |||
| 1.12 | Shutter speed | int32 | - | Current sensor frame rate | 5000 | Shutter speed value as a fraction of 1, so 50 for 1/50th of a second | |
| 1.13 | Gain | int8 | - | -128 | 127 | Gain in decibel (dB) | |
| 1.14 | ISO | int32 | - | 0 | 2147483647 | ISO value | |
| 1.15 | Display LUT | int8 | [0] = selected LUT | -- | 0 = None, 1 = Custom, 2 = film to video, 3 = film to extended video | ||
| [1] = enabled or not | -- 0 = Not enabled, 1 = Enabled | ||||||
| Audio | 2.0 | Mic level | fixed16 | - | 0.0 | 1.0 | 0.0 = minimum, 1.0 = maximum |
| 2.1 | Headphone level | fixed16 | - | 0.1 | 1.0 | 0.0 = minimum, 1.0 = maximum | |
| 2.2 | Headphone program mix | fixed16 | - | 0.1 | 1.0 | 0.0 = minimum, 1.0 = maximum | |
| 2.3 | Speaker level | fixed16 | - | 0.1 | 1.0 | 0.0 = minimum, 1.0 = maximum | |
| 2.4 | Input type | int8 | - | 0 | 3 | 0 = internal mic, 1 = line level input, 2 = low mic level input, 3 = high mic level input | |
| 2.5 Input levels | fixed16 | [0] ch0 | 0.0 | 1.0 | 0.0 = minimum, 1.0 = maximum | ||
| [1] ch1 | 0.0 | 1.0 | 0.0 = minimum, 1.0 = maximum | ||||
| 2.6 | Phantom power | boolean | - | - | - | true = powered, false = not powered | |
| Output | 3.0 Overlay enables | uint16 bit field | -- -- | bit flags: [0] = display status, [1] = display frame guides Some cameras don't allow separate control of frame guides and status overlays. | |||
| 3.1 | Frame guides style (Camera 3.x) | int8 | -0 8 | 0 = HDTV, 1 = 4:3, 2 = 2:4:1, 3 = 2:39:1, 4 = 2:35:1, 5 = 1:85:1, 6 = thirds | |||
| 3.2 | Frame guides opacity (Camera 3.x) | fixed16 | - | 0.1 | 1.0 | 0.0 = transparent, 1.0 = opaque | |
| 3.3 | Overlays (replaces .1 and .2 above from Cameras 4.0) | int8 | [0] = frame guides style | - | - | 0 = off, 1 = 2:4:1, 2 = 2:39:1, 3 = 2:35:1, 4 = 1:85:1, 5 = 16:9, 6 = 14:9, 7 = 4:3, 8 = 2:1, 9 = 4:5, 10 = 1:1 | |
| [1] = frame guide opacity | 0 | 100 | 0 = transparent, 100 = opaque | ||||
| [2] = safe area percentage | 0 | 100 | percentage of full frame used by safe area guide (0 means off) | ||||
| [3] = grid style | - | - | bit flags: [0] = display thirds, [1] = display cross hairs, [2] = display center dot, [3] = display horizon | ||||
| Display | 4.0 | Brightness | fixed16 | - | 0.0 | 1.0 | 0.0 = minimum, 1.0 = maximum |
| 4.1 | Exposure and focus tools | int16 bit field | 0x1 = zebra, 0x2 = focus assist, 0x4 = false color | - | - | 0 = disable, 1 = enable | |
| 4.2 | Zebra level | fixed16 | - | 0.0 | 1.0 | 0.0 = minimum, 1.0 = maximum | |
| 4.3 | Peaking level | fixed16 | - | 0.0 | 1.0 | 0.0 = minimum, 1.0 = maximum | |
| 4.4 | Color bar enable | int8 | - | 0 | 30 | 0 = disable bars, 1-30 = enable bars with timeout (seconds) | |
| 4.5 | Focus Assist | int8 | [0] = focus assist method | - | - | 0 = Peak, 1 = Colored lines | |
| [1] = focus line color | - | - | 0 = Red, 1 = Green, 2 = Blue, 3 = White, 4 = Black | ||||
| 4.6 | Program return feed enable | int8 | - | 0 | 30 | 0 = disable, 1-30 = enable with timeout (seconds) | |
| Tally | 5.0 | Tally brightness | fixed16 | - | 0.0 | 1.0 | Sets the tally front and tally rear brightness to the same level. 0.0 = minimum, 1.0 = maximum |
| 5.1 | Front tally brightness | fixed16 | - | 0.0 | 1.0 | Sets the tally front brightness. 0.0 = minimum, 1.0 = maximum | |
| 5.2 | Rear tally brightness | fixed16 | - | 0.0 | 1.0 | Sets the tally rear brightness. 0.0 = minimum, 1.0 = maximum Tally rear brightness cannot be turned off | |
| Reference | 6.0 | Source | int8 enum | - | 0 | 2 | 0 = internal, 1 = program, 2 = external |
| 6.1 | Offset | int32 | - | - | - | +/- offset in pixels | |
| Confi-guration | 7.0 | Real Time Clock | int32 | [0] time | - | - | BCD - HHMMSSFF (UCT) |
| [1] date | - | - | BCD - YYYYYMMDD | ||||
| 7.1 | System language | string | [0-1] | - | - | ISO-639-1 two character language code | |
| 7.2 | Timezone | int32 | - | - | - | Minutes offset from UTC | |
| 7.3 | Location | int64 | [0] latitude | - | - | BCD - sDDDDdddddddd where s is the sign: 0 = north (+), 1 = south (-); DD degrees, dddddddddddd decimal degrees | |
| [1] longitude | - | - | BCD - sDDDDdddddddd where s is the sign: 0 = west (-), 1 = east (+); DDD degrees, dddddddddddd decimal degrees | ||||
| Color Correction | 8.0 Lift Adjust | fixed16 | [0] red | -2.0 | 2.0 | default 0.0 | |
| [1] green | -2.0 | 2.0 | default 0.0 | ||||
| [2] blue | -2.0 | 2.0 | default 0.0 | ||||
| [3] luma | -2.0 | 2.0 | default 0.0 | ||||
| 8.1 | Gamma Adjust | fixed16 | [0] red | -4.0 | 4.0 | default 0.0 | |
| [1] green | -4.0 | 4.0 | default 0.0 | ||||
| [2] blue | -4.0 | 4.0 | default 0.0 | ||||
| [3] luma | -4.0 | 4.0 | default 0.0 | ||||
| 8.2 Gain Adjust | fixed16 | [0] red | 0.0 | 16.0 | default 1.0 | ||
| [1] green | 0.0 | 16.0 | default 1.0 | ||||
| [2] blue | 0.0 16.0 | default 1.0 | |||||
| [3] luma | 0.0 | 16.0 | default 1.0 | ||||
| 8.3 Offset Adjust | fixed16 | [0] red | -8.0 | 8.0 | default 0.0 | ||
| [1] green | -8.0 | 8.0 | default 0.0 | ||||
| [2] blue | -8.0 | 8.0 default 0.0 | |||||
| [3] luma | -8.0 | 8.0 | default 0.0 | ||||
| 8.4 Contrast Adjust | fixed16 | [0] pivot | 0.0 | 1.0 | default 0.5 | ||
| [1] adj | 0.0 2.0 default 1.0 | ||||||
| 8.5 Luma mix | fixed16 | - | 0.0 | 1.0 | default 1.0 | ||
| 8.6 Color Adjust | fixed16 | [0] hue | -1.0 | 1.0 | default 0.0 | ||
| [1] sat | 0.0 2.0 default 1.0 | ||||||
| 8.7 Correction Reset Default | void | - | - | - | reset to defaults | ||
| Media | 10.0 | Codec int8 enum | [0] = basic codec -- | 0 = CinemaDNG, 1 = DNxHD, 2 = ProRes, 3 = Blackmagic RAW | |||
| [1] = code variant | - | - | CinemaDNG: 0 = uncompressed, 1 = lossy 3:1, 2 = lossy 4:1 | ||||
| - | - | ProRes: 0 = HQ, 1 = 422, 2 = LT, 3 = Proxy, 4 = 444, 5 = 444XQ | |||||
| - | - | Blackmagic RAW: 0 = Q0, 1 = Q5, 2 = 3:1, 3 = 5:1, 4 = 8:1, 5 = 12:1 | |||||
| 10.1 | Transport mode int8 | [0] = mode | -- | 0 = Preview, 1 = Play, 2 = Record | |||
| [1] = speed | -- | -ve = multiple speeds backwards, 0 = pause, +ve = multiple speeds forwards | |||||
| [2] = flags | -- | 1<<0 = loop, 1<<1 = play all, 1<<5 = disk1 active, 1<<6 = disk2 active, 1<<7 = time-lapse recording | |||||
| [3] = slot 1 storage medium | - | - | 0 = CFast card, 1 = SD, 2 = SSD Recorder | ||||
| [4] = slot 2 storage medium | - | - | 0 = CFast card, 1 = SD, 2 = SSD Recorder | ||||
| 10.2 | Playback Control | int8 enum | [0] = clip | - | - | 0 = Previous, 1 = Next | |
| PTZ Control | 11.0 | Pan/Tilt Velocity | fixed 16 | [0] = pan velocity | -1.0 | 1.0 | -1.0 = full speed left, 1.0 = full speed right |
| [1] = tilt velocity | -1.0 | 1.0 | -1.0 = full speed down, 1.0 = full speed up | ||||
| 11.1 | Memory Preset | int8 enum | [0] = preset command | - | - | 0 = reset, 1 = store location, 2 = recall location | |
| int8 | [1] = preset slot | 0.5 - | |||||
Example Protocol Packets
| Operation | Packet Length Byte | ||||||||||||||||
| 0 | 1 | 2 | 3 | 4 | 5 | 6 | 7 | 8 | 9 | 10 | 11 | 12 | 13 | 14 | 15 | ||
| header command data | |||||||||||||||||
| destination | length | command | reserved | category | parameter | type | operation | ||||||||||
| trigger instantaneous auto focus on camera 4 | 844000100 | ||||||||||||||||
| turn on OIS on all cameras 12 255 5 0 0 0 6 | 001000 | ||||||||||||||||
| set exposure to 10 ms on camera 4 (10 ms = 10000 us = 0x00002710) | 12 | 4 | 8 | 0 | 0 | 1 | 5 | 3 | 0 | 0x10 | 0x27 | 0x00 | 0x00 | ||||
| add 15% to zebra level (15 % = 0.15 f = 0x0133 fp) | 12 | 4 | 6 | 0 | 0 | 4 | 2 | 128 | 1 | 0x33 | 0x01 | 0 | 0 | ||||
| select 1080p 23.98 mode on all cameras | 16 | 255 | 9 | 0 | 0 | 1 | 0 | 1 | 0 | 24 | 1 | 3 | 0 | 0 | 0 | 0 | 0 |
| subtract 0.3 from gamma adjust for green & blue (-0.3 ≈ 0xffd9a fp) | 16 | 4 | 12 | 0 | 0 | 8 | 1 | 128 | 1 | 0 | 0 | 0x9a | 0xffd | 0x9a | 0xffd | 0 | 0 |
| all operations combined | 76 | 4400010025550006000 | |||||||||||||||
| 1 | 0 | 0 | 0 | 4 | 8 | 0 | 0 | 1 | 5 | 3 | 0 | 0x10 | 0x27 | 0x00 | 0x00 | ||
| 4 | 6 | 0 | 0 | 4 | 2 | 128 | 1 | 0x33 | 0x01 | 0 | 0 | 255 | 9 | 0 | 0 | ||
| 1 | 0 | 1 | 0 | 24 | 1 | 3 | 0 | 0 | 0 | 0 | 0 | 4 | 12 | 0 | 0 | ||
| 8 | 1 | 128 | 1 | 0 | 0 | 0x9a | 0xffd | 0x9a | 0xffd | 0 | 0 | ||||||
Hilfe
Am Schnellsten erhalten Sie Hilfe über die Online-Support-Seiten auf der Blackmagic Design-Website. Sehen Sie Dort nach der aktuellsten Support-Dokumentation für ihre Kamera.
Blackmagic Design Online Support Seiten
Die aktuellsten Versionen der Bedienungsanleitung, Produktsoftware und Support-Hinweise finden Sie im Blackmagic Support Center unter www.blackmagicdesign.com/de/support.
Kontaktaufnahme mit dem Blackmagic Design Support
Keine Antwort in unserem Support-Material gefunden? Dann gehen Sieitte auf unsere Support-Seite. Klicken Sie dont auf „Senden Sie uns eine E-Mail" und schicken Sie uns ihre Support-Anfrage. Oder klichen Sie auf „Finden Sie Ihr lokales Support-Team" und rufen Sie ihre nachstgelegene Blackmagic Design Support Stelle an.
Überprüfen der aktuell installierten Softwareversion
Um zu überprüfen, welche Version von Blackmagic Camera Setup auf Ihr dem Computer installiert ist, öffnen Sie das Fenster „About Blackmagic Camera Setup".
-
Öffnen Sie das Blackmagic Camera Setup Dienstprogramm auf Mac über den Ordner „Programme". Wahlen Sie im Anwendungsmenu „About Blackmagic Camera Setup" aus, um die Versionsnummer nachzusehen.
-
Öffnen Sie Blackmagic Camera Setup auf Windows über das Startmenu oder den Startbildschirm. Klicken Sie auf das Menu „Hilfe" und wahlen Sie „About Blackmagic Camera Setup" aus, um die Versionsnummer nachzusehen.
So erhalten Sie die aktuellsten Softwareaktualisierungen
Prufen Sie zunachst, welche Version des Dienstprogramms Blackmagic Camera Utility auf Ihr Computer installiert ist. Sehen Sie dann im Blackmagic Support Center www.blackmagicdesign.com/de/support nach neueren Aktualisierungen. In der Regel empfehl't es sich, die neuesten Updates zu laden. Vermeiden Sie jedoch Software-Updates mitten in einem wichtigen Projekt.
Gesetzliche Vorschriften

Entsorgung von elektrischen und elektronischen Geräten Innerhalb der Europäischen Union
Das auf dem Produkt abgebildete Symbol weist daraufhin, dass these Gerät nicht zusammen mit anderen Abfallstoffen entsorgt werden har. Altgeräte müssen dazu zur Wiederverwertung an eine davon vorgesehene Sammelstelle übergeben werden. Mültrennung und Wiederverwertung von Altgeräten tragen zum nachhaltigen Umgang mit tatsächlichen Ressourcen bei. Gleichzeitig wird sichergestellt, dass die Wiederverwertung nicht zulasten der menschlichen Gesundheit und der Umwelt gehen. Weitere Informationen zur Entsorgung von Altgeräten sowie zu den Standorten der zuständigen Sammelstellen erhalten Sie von ihren örtlichen Mullentsorgungsbetrieben sowie vom Handl, bei dem Sie这点es Produkt erworben haben.

Dieses Gerät wurde geprüft und entspricht den Grenzwerten für Digitalgeräte der Klasse A gemäß Abschnitt 15 der FCC-Bestimmungen für Funkentstörung. Diese Grenzwerte dienen dem angemessenen Schutz gegen schädliche Störungen bei Betrieb des Geräts in einer kommerziellen Einrichtung. Geräte dieser Art erzeugen und verwenden Hochfrequenzen und konnen diese auch ausstrahlen. Bei Nichteinhaltung der Installations- und Gebrauchsvorschriften konnen sie zu Störungen beim Rundfunkempfang führen. Der Betrieb solcher Geräte im Wohnbereich führt mit großer Wahrscheinlichkeit zu Funkstörungen. In thisem Fall kann vom Betreiber verlangt werden, selbst für die Beseitigung solcher Störungen aufzukommen.
Der Betrieb unterliegt den folgenden zwei Bedingungen:
1 Dieses Gerat darkeine schadigenden Störungen hervorrufen.
2 Dieses Gerät muss allen Störungen standhalten, einschließlich Störungen, die einen unerwünschten Betrieb zur Folge haben

R-R-BMD-201810001
R-R-BMD-201905001
R-R-BMD-201904002
ICES-3 (A) NMB-3 (A)
ISED-Zertifizierung fur den kanadischen Markt
Dieses Gerät erfüllt die kanadischen Vorschriften für digitale Geräte der Klasse A.
Jedwede an thisem Produkt vorgenommene Änderung oder unsachgemäß Verwendung kann die Konformitätserklarung zum Erlöschen bringen.
Verbindungen zu HDMI-Schnittstellen müssen über abgeschirmte HDMI-Kabel hergestellt werden.
Die Ausstattung wurde unter Einhaltung der beabsichtigten Nutzung in einer gewerblichen Umgebung getestet. Soltte die Ausstattung in einer tatsächchen Umgebung eingesetzt werden, kann es zu Funkstörungen kommt.
BLUETOOTH
Das Produkt ist ein für Bluetooth-Drahtlostechnologie befähigtes Produkt.
Ausgestattet mit Sendermodul FCC ID: QOQBGM113
Das vorliegende Gerät erfüllt die Grenzwertbestimmungen der FCC für die Strahlenbelastung in unkontrollierten Umgebungen.
Ausgestattet mit Sendermodul IC: 5123A-BGM113
Dieses Gerät erfüllt die von Industry Canada vorgegebenen lizenzfrei den RSS-Normen und ist gemäß RSS-102 Ausgabe 5 von den routinemäßigen SAR-Bewertungsgrenzen ausgenommen.
Zertifiziert für Japan unter Zertifikatnummer: 209-J00204. Dieses Gerät enthalt spezifiziertes Funkequipment, das unter den Richtlinien für die Zertifizierung technischer Konformität gemäß des japanischen Funkgesetzes zertifiziert ist.
Dieses Modul ist in Südkorea zertifiziert, KC-Zertifizierungsnummer: MSIP-CRM-BGT-BGM113
Hiermit erklart Blackmagic Design, dass die vom Produkt verwendeten Breitbart-Übertragungssysteme für den Einsatz im 2,4 GHz ISM-Band die Vorschriften der EU-Richtlinie 2014/53/EU erfüllen.
Die Volltextversion der EU-Konformitätserklärung ist per Anfrage an compliance@blackmagicdesign.com erhältlich.

Für Südafrika ist diese Produkt von ICASA unter den Zulassungsnummern TA-2019/1517 für die Pocket Camera 6K und TA-2019/1516 für die Pocket Camera 4K zertifiziert.

Für Mexiko ist das Produkt unter NOM mit dem von Silicon Labs hergestelltten Bluetooth-Modul mit der Modellnummer BGM113 zertifiziert.
Sicherheitshinweise
Die Blackmagic Pocket Cinema Camera eignet sich für den Einsatz in tropischen Gebieten bei Umgebungstemperaturen bis zu 40^ .
Es befinden sich keine durch den Anwender zu wartenden Teile im Inneren des Produkts. Wenden Sie sich für die Wartung an ein Blackmagic Design Service-Center in Ihr Näre.
Sorgen Sie bei sonstigen Verhältnissen für Schatten, um zu vermeiden, dass ihre Kamera und der Lithium-Akku für länger Zeit direkter Sonneneinstrahlung ausgesetzt sind. Halten Sie Lithium-Akkus von samslichen Hitzequellen fern.

Bei Verwendung des mitgelieferten Netzadapters nicht in Höhen von über 2000 m über dem Meeresspiegel einsetzen.
California Proposition
Plastikteile these Products konnen Spuren von polybromierten Biphenylen enthalten. Im US-amerikanischen Bundesstaat Kalifornien werden diese Chemikalien mit Krebs, Geburtsfehlern und anderen Schäden der Fortpflanzungsfähigkeit in Verbindung gebracht.
Weitere Informationen finden Sie unter www.P65Warnings.ca.gov.
Garantie
Eingeschränkte Garantie
Für diese Produkt gewährt die Firma Blackmagic Design eine Garantie auf Material- und Verarbeitungsfehler von 12 Monaten ab Kaufdatum. Sollte sich ein Produkt innerhalb dieser Garantiezeit als fehlerhaft erweisen, wird die Firma Blackmagic Design nach ihrem Ermessen das defekte Produkt entweder ohne Kostenerhebung für Teile und Arbeitszeit reparieren oder Ohnen das defekte Produkt ersetzen.
Zur Inanspruchnahme der Garantieleistungen mussen Sie als Kunde Blackmagic Design über den Defekt innerhalb der Garantiezeit in Kenntnis setzen und die entsprechenden Vorkehrungen für die Leistungserbringung treffen. Es obliegt dem Kunden, für die Verpackung und den bezahlen Versand des defekten Produk's an ein spezielles von Blackmagic Design benannten Service Center zu sorgen und hierfür aufzukommen. S'amtliche Versandkosten, Versicherungen, Zolle, Steuern und sonstige Abgaben im Zusammenhang mit der Rücksendung von Waren an uns, ungeachtet des Grundes, sind vom Kunden zu(TRagen.
These Garantie gilt nicht für Mängel, Fehler oder Schäden, die durch unsachgemäß Handhabung oder unsachgemäß oder unzureichende Wartung und Pflege verursacht wurden. Blackmagic Design ist im Rahmen dieser Garantie nicht verpflichtet, die folgenden Serviceleistungen zu erbringen: a) Behebung von Schäden infolge von Versuchen Dritter, die Installation, Reparatur oder Wartung des Produkts vorzehmen, b) Behebung von Schäden aufgrund von unsachgemäßer Handhabung oder Anschluss an nichtCompatible Geräte, c) Behebung von Schäden oder Störungen, die durch die Verwendung von nicht Blackmagic Design Ersatzteilen oder -Verbrauchsmaterialien entstanden sind, d) Service für ein Produkt, das verändert oder in andere Produkte integriert wurde, sofern eine solche Änderung oder Integration zu einer Erhöhung des Zeitaufwands oder zu Schwierigkeiten bei der Wartung des Produkts führt.
ÜBER DIE IN DIESER GARANTIEERKLÄRUNG AUSDRÜCKLICH AUFGEFUHRTEN ANSPRÜCHE HINAUS ÜBERNIMMT BLACKMAGIC DESIGN KEINE WEITEREN GARANTIEN, WEDER AUSDRÜCKLICH NOCH STILLSCHWEIGEND. DIE FIRMA BLACKMAGIC DESIGN UND IHRE HändLER LEHnen JEGLICHE STILLSCHWEIGENDEN GARANTIEN IN BEZUG Auf AUSSAGEN ZUR MARKTGANGIGKEIT UND GEBRAUCHSTAUGLICHKEIT FÜR EINEN BESTIMMTEN ZWECK AB. DIE VERANTWORTUNG VON BLACKMAGIC DESIGN, FEHLERHAFTTE PRODUKTE ZU REPARIEREN ODER ZU ERSETZEN, IST DIE EINZIGE UND AUSSCHLIESLiche ABHILFE, DIE GEGENÜBER DEM KUNDEN FÜR ALLE INDIREKTEN, SPEZIELLEN, NEBEN- ODER FOLGESCHÄDEN ZUR VERFUGUNG GESTELLT WIRD, UNABHÄNGIG DAVON, OB BLACKMAGIC DESIGN ODER DER HANDLER VON DER MÖGILICHKEIT SOLCHER SCHÄDEN ZUVOR IN KENNTNIS GESETZ WURDE. BLACKMAGIC DESIGN IST NICT HAFTBAR FÜR JEGLICHE WIDERREchte Liche VERWENDUNG DER GERÄTE DURCH DEN KUNDEN. BLACKMAGIC HAFTET NICHT FÜR SCHÄDEN, DIE SICH AUS DER VERWENDUNG DES PRODUKTS ERGEBEN. NUTZUNG DES PRODUKTS AUF EIGENE GEFAHR.
Copyright 2020 Blackmagic Design. Alle Rechte vorhabten „Blackmagic Design", "URSA", "DeckLink", "HDLink", "Workgroup Videohub", "Multibridge Pro", "Multibridge Extreme", "Intensity" und "Leading the creative video revolution" sind eingetragene Warenzeichen in den USA und in anderen Ländern. Alle anderen Unternehmen sind möglicherweise Warenzeichen der Jeweiligen Firmen, mit denen sie verbunden sind.
Die „Bluetooth“-Wortmarke, -Marke und -Logos sind eingetragene Warenzeichen von Bluetooth SIG, Inc. und werden von Blackmagic Design im Rahmon einer erteilen Lizenz verwendct. Andere ausgewiesene Markennamen und Handelsmarken gehoren ihren jeweiligen Eigentumern.

Manual de instalación y funciona bajo la law
Blackmagic Pocket Cinema Camera
Blackmagic Pocket Cinema Camera 6K
Blackmagic Pocket Cinema Camera 4K
Marzo 2020
Espanol

Bienvenido
Gracias por haber adquirido este produit.
En 2013, Ianzamos el modelo Blackmagic Pocket Cinema Camera original. Nosemotionaba haberdisnado una CAMERA compacta y portafil con un rango dinamico amplio y una calidad de imagen sinigual. Dado los commentarios positivos que recibimos, y considerando que nuestros usuario querianuna version 4K, decidimos deserollar el modele Blackmagic Pocket Cinema Camera 4K primo yluego la version 6K, que cuenta con un sensor Super 35mm y una montura EF.
El modelo Blackmagic Pocket Cinema Camera 4K incluye la misma montura Micro Cuatro Tercios que la version original, lo cual te permite aprovechar los objetivos que ya Tiene. Asimismo, brinda la posibiliad de grabar a una fecuencia maxima de 60 f/s en 4K, o 120 f/s en HD, mediante tarjetas CFast o UHS-II. El modelo Blackmagic Pocket Cinema Camera 6K offre options adiconiales para filmar a 120 f/s en 2.8K y a 60 f/s en 6K. Asimismo, el puerto USB-C facilita el uso de unidades externas que pueda connectarse directamente arialquier equipo informatico.
Gracias al rango dinámico de 13 pasos y a los dos valores ISO nativos, laamera offers the opportunity of obtaining imagenes cinematograficas nitidas en-distintas conditiones de ilumination. A su vez, la噎a de cristal liquido de 5 pulgadas permite ver detalles y proprobar el enfoque con calidad, incluo aplenaz del dia,minteras que los quatre microfonos integrados graban el sonido conuna gran calidad.
Al conectar estas camaras a un mezcluder ATEM Mini, se obtienen prestaciones adiconiales para controlarlas. Este permittedo modifier el enfoque, el obturador, el color y la aperture del diafragma, entre它们ajustes, directamente desde el programa ATEM Software Control.
Los modelos Blackmagic Pocket Cinema Camera son exceptionally solidos, livianos y fáciles de transporte. Además, son compatibles con el formatting Blackmagic RAW, el cui brinda mayor flexibilitad en un solo archivo de menor時間 que mejor significativamente el procesamento del material grabado.
Nos gustaria ver la creatividad que eres capaz de lograr con these modelos y esperamos recibir tus sugerencias con respeco a nuevas prestaciones que debeninos inclir.
Grant Petty
Grant Petty
Director executivo de Blackmagic Design
Índice
Uso de un modelos especialico 641
Primeros pasos 642
Montaje del objetivo 642
Encendido de la camarara 643
Instalacion de la empuñadura
Blackmagic Pocket Camera Battery Grip 643
Alimentacion mediate el cable incluido 645
Soportes de grabacion 646
Tarjetas CFast 646
Tarjetas SD 647
Unidades USB-C 649
Preparación de soportes para la grabación 651
Preparación de soportes de
grabajo en los modelos
Blackmagic Pocket Cinema Camera 651
Preparación de soportes de
grabajo en equipos Mac 653
Preparación de soportes de
grabajo en equipos Windows 654
Grabación 655
Grabación de material audiovisual 655
Blackmagic RAW 656
Grabación en Blackmagic RAW 657
Frecuencias deImagen maximas
para el sensor 659
Tiempo de grabacion 661
Reproducción 666
667
Partefrontal 667
Lateral derecho 668
Lateral izquierdo 668
Panel superior 670
Parte inferior 671
Partetrasera 672
Controles de la pantalla táctil 673
Ajustes 694
Panel de options 694
Ajustes de grabacion 694
Convencion para la nomenclatura
de archivos 700
Ajustes de monitorizacion 700
Ajustes de audio 707
Preferencias 709
Ajustes 718
Tablas de conversion tridimensionales 720
Metadatos 723
Claqueta virtual 723
Salida de video de la-camera 728
DaVinci Resolve 729
Organizador de proyectos 729
Edicón con el modulo Montaje 730
Agregar clips a la linea de tiempo 733
Editor clips en la linea de tiempo 734
Agregarítculos 734
Archivos Blackmagic RAW 735
Etalonar los clips en el modulo Color 738
Creación de Power Windows 741
Complementos 743
Mezcla de audio 744
Agregar efectos visuales (VFX) y
composiciones desdeelmoduloFusion 748
Masterizacion 757
Exportación rápida 757
Modulo Entrega 758
Control de la CAMERA mediante
elmodeloATEMMini 759
Herramientos de DaVinci Resolve
para correcciones primarias 763
Otrosprogramasdeedition 766
Acceso a ARCHIVOS en tarjetas SD y
CFast 2.0 766
Acceso a ARCHivos en unidades USB-C 766
Final Cut Pro X 767
MediaComposer 767
Premiere Pro CC 768
Programautilitario de la camara 769
Soportes de grabación recomendedos
Tarjetas CFast 2.0 770
Tarjetas SD 776
Unidas SSD USB-C 780
Información para desarrolladores 783
Ayuda 793
Normativas 794
Seguridad 795
Garantía 796
Uso de un modelo spécifique
Las camaras Blackmagic Pocket Cinema Camera 6K y Blackmagic Pocket Cinema Camera 4K tienen una aparancia similar. Ambos modelosCNTAN con el mimo armazon y permiten capturar imagenes exceptionales con un amplio rango dinamico. Los botones de control y los menus en pantalla tiene la misma distribuccion, y el functonaciono de las camaras es basicamente el mismo.
El Modelo Blackmagic Pocket Cinema Camera 6K presente un sensor Super 35 y una montura para objetivos EF, mientes que la Blackmagic Pocket Cinema Camera 4K incluye un sensor y una montura Micro Cuatro Tercios.
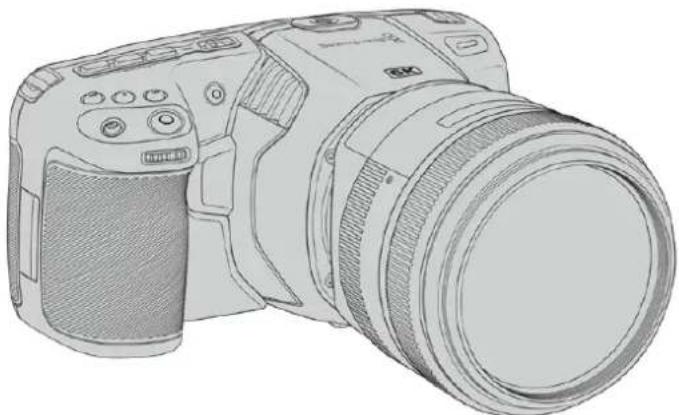
Blackmagic Pocket Cinema Camera 6K
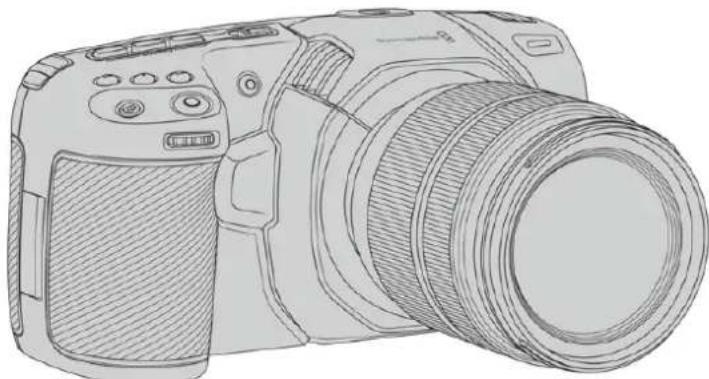
Blackmagic Pocket Cinema Camera 4K
Primeros pasos
Estas camaras cinematograficas digitales compactas y portétiles permiten grabar imagenes de alta calidad en tarjetas CFast 2.0, UHS-I y UHS-II, o en unidades SSD mediante el puerto USB-C. Asimismo, brindan la posibiliad de emplear formatos profesionales desarrollados para procesos de produccion, tales como ProRes y Blackmagic RAW.
Para comenzar a utiliser uno de这些 modelos, basta con colocar un objetivo y encenderlo.
Montaje del objetivo
El Modelo Blackmagic Pocket Cinema Camera 6K utilizes objetivos EF, y la version Blackmagic Pocket Cinema Camera 4K, Micro Cuatro Tercios. Existe una Forge variede de these, y además son muy populares y économicos. La instalación del objetivo es igual en ambas cámaras. El primer paso siempre consiste en quitar la taps protectora. Mantenga presionado el botón de bloqueo y gire la tapa protectora de la montura hacía la izquierda para aflojarla y quitarla.
Para colocar una montura EF o Micro Cuatro Terclos:
1 El punto en el objetivo debe estar alineado con el de la montura de la camera. Muchos modelos tienen un indicator visual, por exemple, un punto rojo, azul o blanco.
2 Inserte el objetivo en la montura y girelo hacía la derecha hasta que calce en su lugar.
3 Para qitar el objetivo, mantenga presionado el boton de bloqueo, girelo hacer la izquierda hasta aflojarlo y retirelo con cuidado.
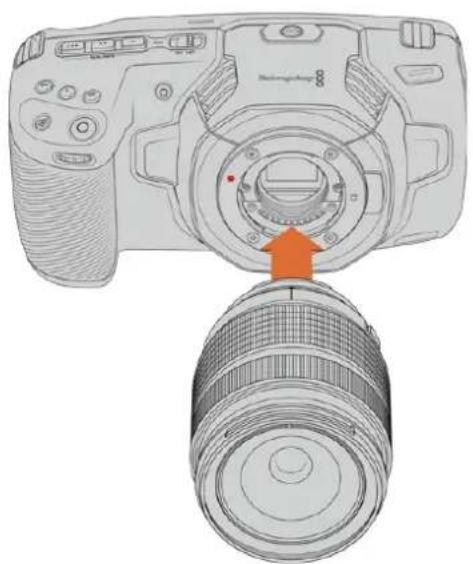
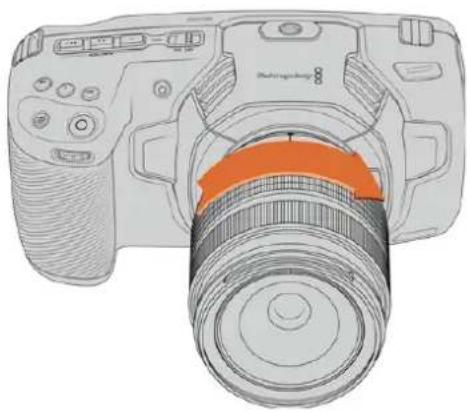
Colocacion de un objetivo Micro Cuatro Tercios en el modelo Blackmagic Pocket Cinema Camera 4K
NOTA: Cuando no hay ningún objetivo colocado en laamera, el filtro de vidrio que cubre el sensor queda expuesto al polvo y la sueidad, por locular se recomienda cubrirlo con la tapa protectora, de ser possible.
Encendido de la-camera
Una vez colocado el objetivo en la CAMERA, esnecessary suministrar corriente electrica a la unidad. Los modelos Blackmagic Pocket Cinema Camera peuvent alimentarse mediante una bateria LP-E6, las dos baterias NP-F570 de la empuñadura Blackmagic Pocket Camera Battery Grip, o conectándolos directamente a una toma de corriente mediante el adaptor incluido.
Colocacion de la bateria y encendido de laamera
Las camaras的功能an con baterias LP-E6 extraibles. Se incluye una con la CAMERA, pero en caso de necessitar otheras, es possible adquirirlas en todos los distribuidores de productos Blackmagic Design o enequalquier Tienda especializada en video o fotografia.
Presione el seguro en la parte inferior de la camera a fin deAbrir la tapa del compartmento para la bateria.
2 Inserte la batería LP-E6 con los contactos orientados hacía la lármá y empújela hasta que calce en su lugar.
SUGERENcia: Para extraer la bateria, deslice el seguro hacer la parte frontal de la-camera.
3 Cierre la tapa del compartimiento para la batería y presiónela hasta que calce en su lugar.
4 Mueva el interruptor en la parte superior de la CAMERA a la posicion ON para encenderla. Para apagarla, muevalo a la posicion OFF.
Instalacion de la empuñadura Blackmagic Pocket Camera Battery Grip
Si cuenta con una empuñadura Blackmagic Pocket Camera Battery Grip, es recomendable instalarla en este momento, antes deContinuar. Este accesorio ha sidodisfiado tanto para la version Blackmagic Pocket Camera 4K como para elmodelo Blackmagic Pocket Camera 6K.
La empañadura consiste en una manija horizontal que permite agarrar laámara y cuenta con espacio para dos baterías NP-F570 série L, por lo que es posible grabar de manière continua durante más de dos horas. Asimismo, dispone de una conexión de 12 V para corriente continua a fin de recargar las baterías y alimentar laámara al mesmo tiempo. Asimismo, es posible emplear el puerto USB-C para tal fin cuando laámara está apagada.
Para Instalar la empunadura:
Antes de instalar la empuñadura, apague la lácama y desconecte cualquier另一边 fuente de alimentación externa.
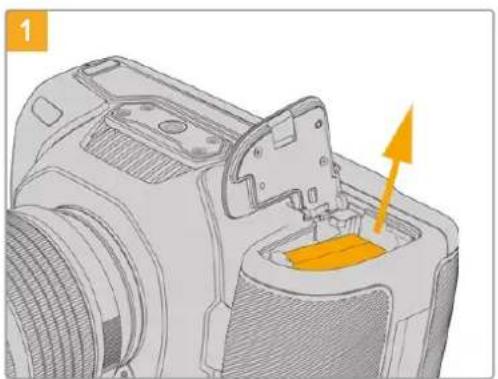
Abra el compartmento para la bateria de la camaray retire la bateria LP-E6.

Deslice la pestaña que se encuentra cerca de la bisagra de la tapa y quite la tapa.

Para guardar la tapa en un lugar seguro, sujetela al hueco situado en la parte inferior de la empuñadura.
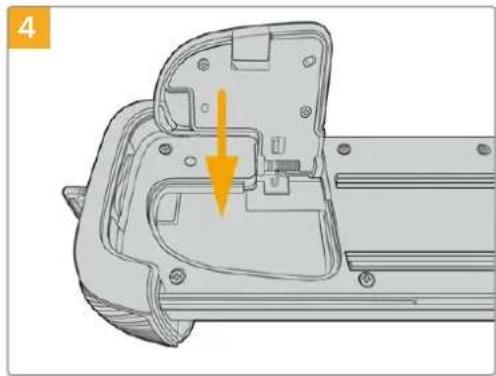
Cierre la tapa del compartimento, de forma que quede nivelada con la parte inferior de la empuñadura.
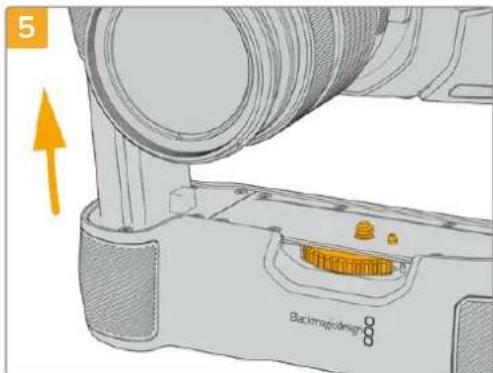
Inserte la parte de la empuñadura cuya forma se asemeja a la batería en el compartmento correspondiente en la lármá. El tornillo de 0.25 pulgadas en la parte superior de la empuñadura debe estar allnado con el orificio roscado en la base de la lármá. Asimismo, un taco alazo del tornillo ayuda a mantenerlo en su lugar.
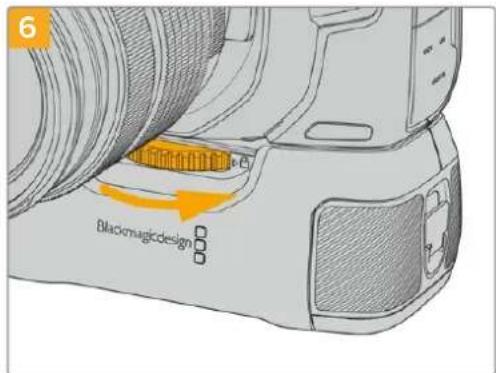
Gire la rueda en la parte frontal de la empunadura hacia la derecha a fin de apretar el tornillo y sujetarla a la CAMERA.
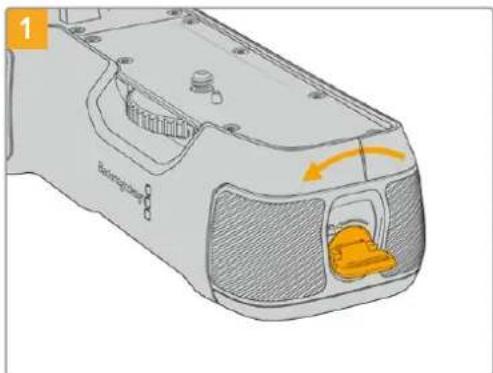
Para insertar baterias en la empuñadura:
Gire la pestaña de bloqueo en el extremo de la empuñadura hacía la izquierda para acceder a la base para baterías y retirella. Este pasó se pueda realizar tanto antes como afterwards de haber instalado la empuñadura en la CAMERA.

Coloque dos baterias NP-F570 en la base, asegurandose de que se enquiryrten orientadas correctamente, y deslicelas en sentido opuesto. La pestaña situada entre ambas se alzará para mantenerlas en su lugar. Para extraer las baterías, presione dicha pestaña y deslice una hacía la otra.

Inserte la base en la empuñadura y gire la pestaña de bloqueo hacer la derecha. Cabe destacar que, si la CAMERA está-connectada a una fuente de alimentación externa, la grabación no se detendra en el momento de cambio las baterías en la empuñadura.

Gire la pestaña en el extremo de la empuñadura hacia la derecha para sujetar la base de las baterías.
SUGERENCIA: Cuando la empañadura Blackmagic Pocket Camera Battery Grip está instalada y Tiene dos baterías insertadas, elindicador en la esquina superior derecha de la pantalla de la CAMERA做不到ar dos iconos que permiten ver el nivel de energia de cada una. Consulte el apartado Alimentación para Obtener más información al aspecto.
Alimentación mediante el cable incluido
El adaptor de 100-240 V incluido con la CAMERA permite suministrar corriente a la unidad y cargas al mesmo tiempo una bateria LP-E6 o dos NP-F570, en caso de tener instalada la empuñadura Blackmagic Pocket Camera Battery Grip. Por su parte, el conductor para corriente continua cuenta con un mecanismo de bloqueo que impide que el cable se desconecte accidentalmente. Para conectar una fuente de alimentación externa:
1 Enchufe el adaptor de 12 V en una toma de corriente.
2 Abra el protector de goma en el lateral izquierdo de la camara y gire el conductor del cable a fin de que coincida con la petiteña hendidura en la parte superior de la connexion para fuentes de alimentacion. Empuje el conductor suavamente hasta que calce en su lugar.
3 Para desconectarlo, retraiga la cubierta de goma que lo rodea y tire del mesmo.
Si la CAMERA tiene una batería y a su vez se encuesta conectada a una fuente de alimentación externa, funciona con la corrente suministrada por estaULTima.Al desconectarla,seguirafúnctorando con la batería.
La batería LP-E6 puede cargarse agravés del puerto USB si la camera está apagada. Esto brinda la posibiliad de utiliser cargadores portátils cuando la unidad no está en uso. Los modelos Blackmagic Pocket Cinema Camera admiten cargadores USB de 10 W, asi como aquellos compatibles con la technología USB-PD. Estos ultimos disponen de una connexion USB-C y proportionsionan un voltaje de 20 V, por loquel el tiempo de cargas es menor. Cabe destacaradelmas que la batería pueda cargarse agravés de la entrada para fuentes de alimentación externas cuando la camera está encendida o apagada.
SUGERENCA: Si la batería está caliente debio al uso, la velocidad de carga se reduce hasta que la temperatura disminuya a 45^ . RecomendamosURTAR la enfiar durante 15 horas antes de cargarla.
Ya está todo lista para insertar un soporte de almacenimiento y comenzar a grabar.
Soportes de grabación
Los modelos Blackmagic Pocket Cinema Camera graban imágenes en tarjetas SD, UHS-II o CFast 2.0.
Asimismo, es possible conectar discos USB-C externos mediante el puerto de expansión para augmentar la capacité de almacenimiento.
Tarjetas CFast
Estas unidades son capaces de procesar datos a gran velocidad, de modo que son ideales para grabar contentsos con una alta fecuencia de imagen. Consulte el apartado Grabacion para Obtener mas informacion sobre las fecuencias的最大as para cada tipo.
NOTA: Àuque por lo general las tarjetas CFast 2.0 son rapiadas, en algunos unidades la velocidad de descrirura es menor a la de lecture. Asimismo, la velocidad de transferencia de datos máximo puede variar de un modelo aarlo. Por consiguiente, acontejos emplear solo las tarjetas recomendadas en este manual para garantizar la calidad de la grabacion con la fecuencia de imagen seleccionada.
Para Insertar una tarjeta CFast:

Para acceder a las ranuras de las unidades de almacenimiento, deslice la tapa del compartmento en el lateral derecho横向 la parte posterior de la webcam.

La tapa se abrirá, brindando acceso a las ranuras para tarjetas CFast y SD.
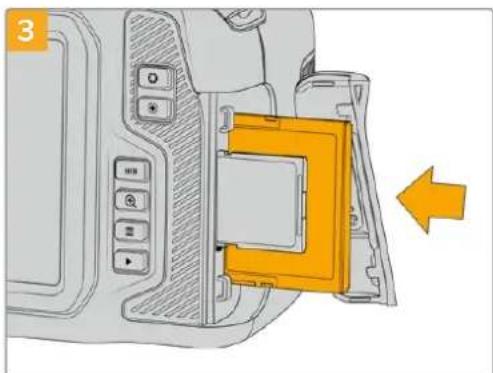
Inserte la tarjeta en la ranura correspondiente y empujela hasta que calce en su lugar. Para ello, no deben ser besoino ejercer demasiada fuerza. Si desea extraer una tarjeta SD de la CAMERA, empujela ligeramente y bajo sueltela.

En la parte inferior de la pantalla táctil se indica el nombre de las tarjetas CFast detectadas y el tiempo de grabación restante.
Las tarjetas SD y CFast se insertan del mesmo modo. Consulte elApartado Como Insertar una tarjeta SD para Obtener mas informacion al respecto.
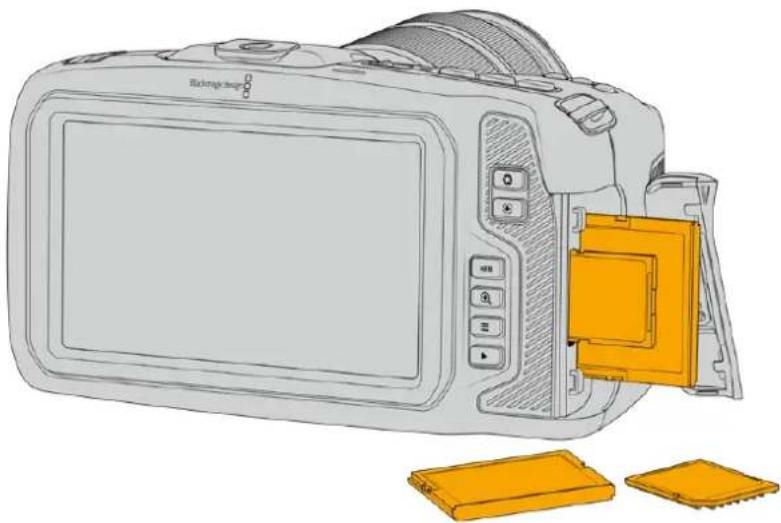
Elección de una tarjeta CFast 2.0 adecuada
Al trabajo con imagens que requiren transferir datos con una gran rapidez, es importante verificar cuidadosamente la tarjeta CFast empleada, ya que estas unidades de almacenamento-ofrecen distinas velocidades de lecture y escritura.
Consulte elApartado Soportes de grabacion recomendedos para acceder a una lista de tarjetas CFast 2.0 recomendadas por Blackmagic Design para los modelos Pocket Cinema Camera.
Visite nuestra págin de soporte专业技术 para Obtener informacion adiconional sobre las tarjetas CFast compatibles.
Tarjetas SD
La webcam también admite tarjetas UHS-I y UHS-II de alta velocidad. Las primeras resultan mas economically al grabar en formatos comprimidos con alta definccion, cuando que las segundas ofrecen mayor velocidad y permiten captar imagenes Blackmagic RAW y UHD en ProRes.
Con las tarjetas SD, es possible emplear soportes de almacenamento mas economicos al grabar en formatos comprimidos con alta definacion.
Las versiones SDXC y SDHC se utilizean habitualmente en camaras fotograficas y videocamaras comunes. Si ha empeado con anterioridad una CAMERA DSLR o los modelos Blackmagic Micro Cinema Camera y Pocket Cinema Camera, o el dispositivo Blackmagic Video Assist, probablemente ya disponible de tarjetas SD compatibles.
En proyeos que no requieren archivos de alta resolution, o cuando es requisiteo grabar durante periodos prolongados, este tipo de tarjetas resulta mas economico. Asimismo, es possible emplear unidades de menor velocidad y calidad para almacenar tablas de conversion (LUT) y ajustes predeterminados.
Para insertar una tarjeta SD:

Para acceder a las ranuras de las unidades de almacenimiento, deslice la tapa del compartmento en el lateral derecho横向 la parte trasera de la webcam.
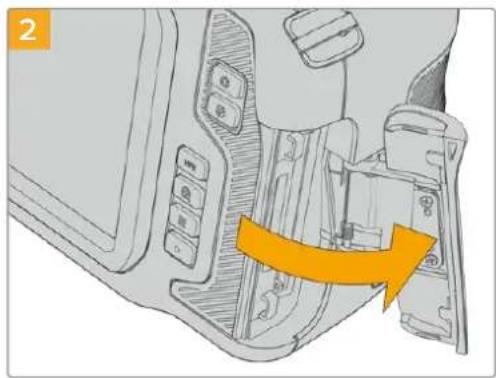
La tapa se abrirá, brindando acceso a las ranuras para las unidades de almacenimiento.

Inserte la tarjeta con la etiqueta orientada hacer la pantalla táctil y empújela hasta que calce en su lugar. Paraarlo, no deben sernecessary ejercerdemasiada fuerza. Si deseña extraer una tarjeta SD de la CAMERA, empújela ligeramente y bajo sueltela.

En la parte inferior de la pantalla táctil aparecerá el nombre de la tarjeta SD detectada y el tiempo de grabación restante.
Elección de una tarjeta SD adequada
Para filmar en definiron UHD, DCI 4K o 6K, aconsejamos aplicar tarjetas UHS-II de mayor velocidad. Cabe destacar que es importante emplear este tipo de unidades al grabar en HD, UHD, DCI 4K o 6K. Las tarjetas UHS-I son adecuadas para almacenar contentsos en HD. Estas permiten procesar datos rapidamente y ofrecen mas capacité. Generalmente, los soportes de almacenamento mas velocores brindan un maior desempeño.
Antes de usar una tarjeta, esnecessary formatearla mediante elsystema HFS+o exFAT. Este procedimiento es sencillo y pueda realizarse en la webcam. Consulte el apartado Ajustes para Obtener mas informacion al respecto.
Tambien es possible formatear la tarjeta mediante un equipo Mac o Windows. En el primer caso, recomendamos utiliser el formatting HFS+ propio del sistemas operativo macOS, también conocido como OS X Extended.
Consulte el apartado Soportes de grabacion recomendados para acceder a una lista de tarjetas SD recomendadas para los modelos Pocket Cinema Camera.
Visite nuestra págin de soporte专业技术 para Obtener informacion adiconional sobre las tarjetas SD compatibles.
NOTA: Recomendamosemployar tarjetas CFast 2.0 para grabar con alta resolucion y
frecuencia de imagen, ya que son mas rapiidas y.Ofrecen un mejor rendimiento.
Bloqueo y desbloqueo de tarjetas SD
Es possible bloquear las tarjetas SD para registrar que se modifique su contenido. Antes de insertar la unidad en la CAMERA, disfruebe que no se encontrar protegida. Para desbloquearla, mueva elpeeño interruptor en el lateral izquierdo hacer la posicón más cercana a los conectores. Una vez finalizada la grabación, la tarjeta pueda bloquearse nuevomente.
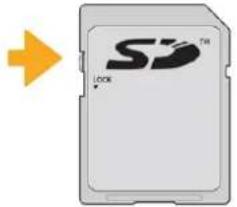
Mueva el interruptor hacer
arriba o abajo para bloquear o
desbloquear la tarjeta SD.
Si aparece la palabra Protegida en lugar del tiempo de grabación disponible y un candido+junto al nombre de tarjeta SD en el menu de almacenimiento,esto significa que launidad está bloqueada. En este caso, es preciso desbloquearla antes de grabar imagenes,ayar fotografias o exportar tablas de conversion y ajustes predeterminados.
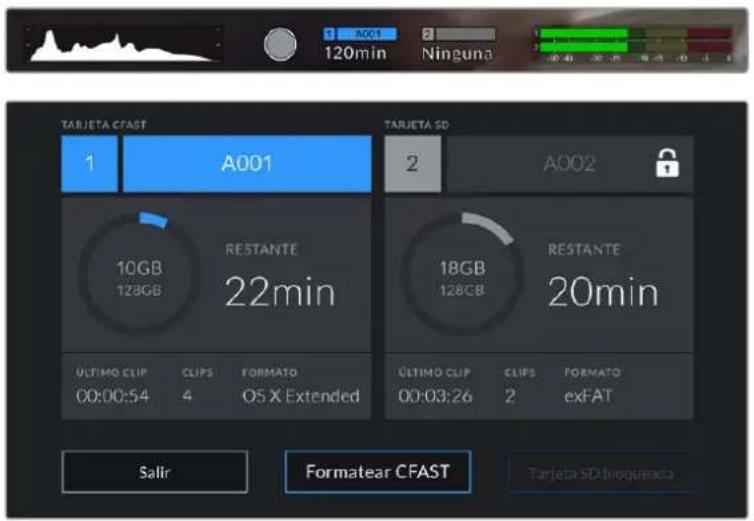
Unidades USB-C
Las Cameras incluyen un puerto de expansión que permitte conectar discos USB-C externos. Estas unidades de gran capacité son rápidas y brindan la posibiliidad de grabar durante periodos más prolongados, lo cual es importante al filmar eventos extensos.
Una vez finalizada la grabación, launidad pueda connectarse directamente a un equipo informativo para editar el material sin necessities de copiarlo.
Para conectar una unidad USB-C:

Abra la tapa protectora de goma en el lateral izquierdo de la camera y conecte el除外 extremodel cable al puerto USB-C.
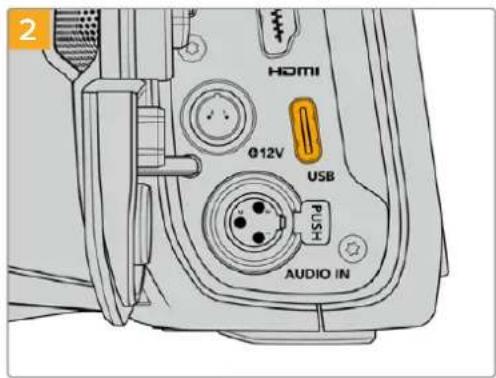
Conecte el extremo de un cable USB-C a launidad.
NOTA: Al conectar una unidad USB-C a la CAMERA, esta se usa como soporte de almacenacimiento principal, de modo que la ranura para tarjetas SD no está disponible.
Para usar una tarjeta SD, desconecte la unidad USB-C de la CAMERA.
Elección de una unidad USB-C adecuada
Estas unidas han sido diseñadas paraOfrecer mayor velocidad ycapacidad de almacenamento. Además de ser compatibles con una amplia variedad de dispositivos,uen adquirirse fácilmente enequalquier tienda especializada en productos electrónicos.Sin embargo,conviene Mentionar que la cinematografia es solo uno de los fines con los que se emplean,de modo que es fundamental escoger el Modelo adecuado, a efectos de contear con la velocidad sufiente para grabar imagenes en resolution 6K,4K o UHD.
Muchas de estas unidas han sido diseñadas para equipos informáticos domesticos y no son lo suficientemente rápidas como para almacenar imagenes en dichas definiciones.
Consulte el apartado Soportes de grabacion recomendados para acceder a una lista de unidades USB-C recomendadas por Blackmagic Design para los modelos Pocket Cinema Camera.
Visite nuestros págin de soporte专业技术o para ver una listaactualiza de modelos recomendados.
Nota importante sobre la velocidad de las unidades USB-C
Algunas unidades USB-C no son capaces de grabar imagenes a la velocidad estipulada por el fabricante. Este se debe a que se comprimen los datos ocultos para lograr una mayor velocidad de descririta, pero esta的技术ica solo brinda la posibiliad de alcanzar dicha velocidad al almacenar ARCHivos simples. Sin embargo, la informacion de una imagen incluye otheros paramedros, tales como el nivel de ruido y datos relativos a los pixeles, que son mas aleatorios, y por lo tanto, comprimirlos no可以更好 demasiado.
La velocidad de descrirura de algunos unidades USB-C puede ser hasta un 50% menor que la indica para el fabricante. Por consiguiente, ahora según sus espécificaciones son capaces de almacenar material audiovisual, en realizad carecen de la velocidad necesaria para grabar imagenes en tiempo real.
El programa Blackmagic Disk Speed Test permite determinar con precision si la unidad USB-C es adecuada para grabar y reproducir ARCHivos audiovisuales a una alta velocidad.Esta aplicacion simul el almacenamento de datos, por lo que los resultados son similares a los que se obtendrnan al grabar imagenes. Segun las pruebas realizadas,emos affirmar que los modelos mas theyeos y de mayor capazidad son, por lo general, mas rapiodos.
Esta aplicación puede descargarse desde el App Store,y además existen versiones para Windows y macOS incluidas en el programa Blackmagic Desktop Video,que está disponible en la categoria Captura y reproduccion de nuestra pagina de soporte的技术ico.
Preparación de soportes para la grabación
Tanto las tarjetas CFast o SD como las unidades USB-C peuvent formatearse utilizing la funciona Formatear tarjeta en el panel de options de la camera, o mediante un equipo Mac o Windows. Recomendamos la primera option para lograr un mejor rendimiento de la unidad.
El formatting HFS+ (tambien conocido como Mac OS X Extended) es el másrecommended, ya que permite registrar la transferencia de los datos a medida que esta se llama a cabo. De este modo, es más probable que la informacion pueda recuperarse en caso de un mal funciona de la unidad. Por su parte, el formatting exFAT peutecomplearse en sistemas operativos macOS y Windows sin necessities de adquirir programas adiconiales, pero no brinda la posibility de registrar la transferencia de datos.
Preparación de soportes de grabación en los modelos Blackmagic Pocket Cinema Camera
1 Pulse el indicator correspondiente al soporte de grabacion en la parte inferior de la pantalla a fin de acceder a las options para dicha unidad.
2 Pulse Formatear CFAST o Formatear SD. Si hay unaunidad USB-C conectada a la CAMERA, la.option Formatear unidad está disponible.
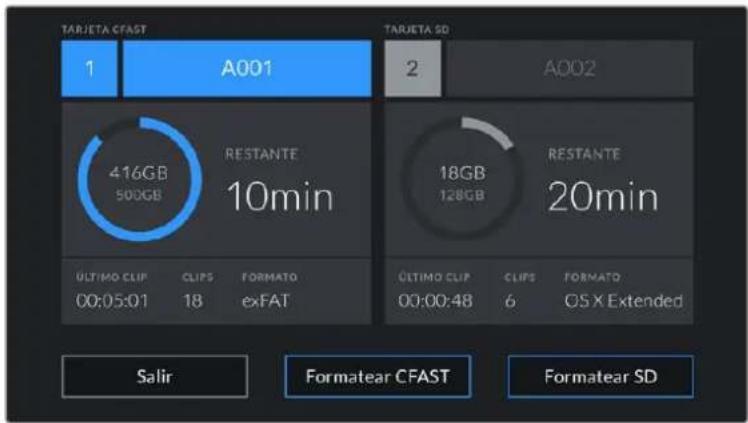
Si hay unaunidad USB-C conectada a la camera, la optación Formatear unidad está disponible en lugar de Formatear SD.
3 Pulse la option Cambiar n.° de rollo para modifier el número de rollo en forma manual. Utilice el teclado para introducir un número nuevo y pulse ACEPTAR para confirmar.
4 Selección el formatting OS X Extended o exFAT y, en este caso, pulse la option Formatear CFast.

Pulse la option Cambiar n.° de rollo para modifier el número de rollo en forma manual.
5 Un mensaje de confirmacion permite vericar el soporte y el formatting seleccionados, asi como el numero de rollo. Pulse el boton Formatear CFast para confirmar. De lo contrario, pulse Cancelar.
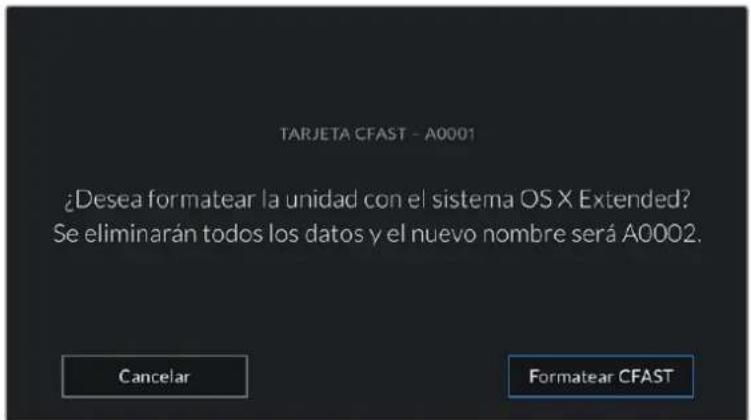
Antes de formatear la tarjeta, compruebe que la unidad seleccionada sea la correcta.
6 Mantenga presionado el boton tres segundos para comenzar el proceso.
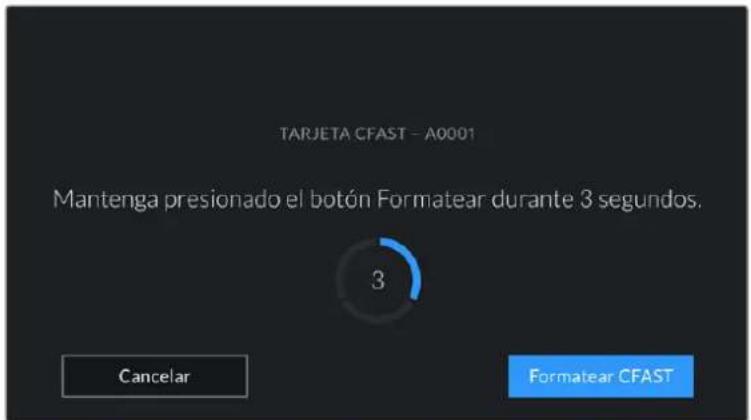
7 La CAMERA le notifies cuando el procedimiento haya finalizzato y el soporte está lista para usarse, o si el formateo ha fallado.
8 Pulse Aceptar para volver a la pantalla anterior.
9 Pulse Salir para salir.
Al formatear soportes de almacenamento en la webcam, la identificacion generada a partir de la claqueta virtual y el numero de rollo se usa para nombrear los ARCHivos. Cada vez que este proceso se lva a cabo,DICHO NUMERO SE AJUSTA AUTOMATICamente Para introduir una cifra especifica, pulse la option Cambiar n.o de rollo.
Pulse laopping Restablecer datos en la pestaña PROYECTO de la claqueta virtual si desea restablecer la numeroacion al comenzar un nuevo proyejo.

El tipo de soporte de grabacion utilisé se Indica en la pantalla de la camera.
SUGERENCA: Si aparece la palabra Protegida en lugar del tiempo de grabación disponible y un candido+junto al nombre de tarjeta SD en el menu de almacenimiento, este significa que launidad está bloqueada. Basta con desbloquearla para poder continuar y comenzar a grabar. Consulte el apartado Ajustes para Obtener más informacion al respecto.
NOTA: Si se lee Unidad externa en el espacio correspondiente a la ranura 2,esto significa que hay una unidad USB-C externa connectada a la camera.
Preparación de soportes de grabación en equipos Mac
Utilice el programa utiliser para discs incluido en el sistema operativo macOS para formatear discos USB-C o tarjetas CFast y SDempleando el sistemas HFS+ o exFAT. Asegürese de respaldar cualquier informacion importante que contenga la unidad, ya que al起初 el proceso, se borrarán todos los datos.
1 Inserte el soporte de grabacion en el equipo informatico o utilise un dispositivo de lecture y/o escritura externo. Ignore cualquier mensaje sobre el uso de launidad para realizar respaldos mediante la direccion Time Machine.
2 Haga click en Aplicaciones, bajo en Utilidades y a continua hacer el programa. Utilidad de Discos.
3 Haga cli en el icono de la unidad y bajo en la pestaña Borrar.
4 SeLECTIONA opCION Mac OS Extended (con registrar) o exFAT.
5 Escribe un nombre para la unidad y fuego haga tic en Borrar. Se dar a formato a la unidad rapidamente y quedar a lista para usarla en la camarra.
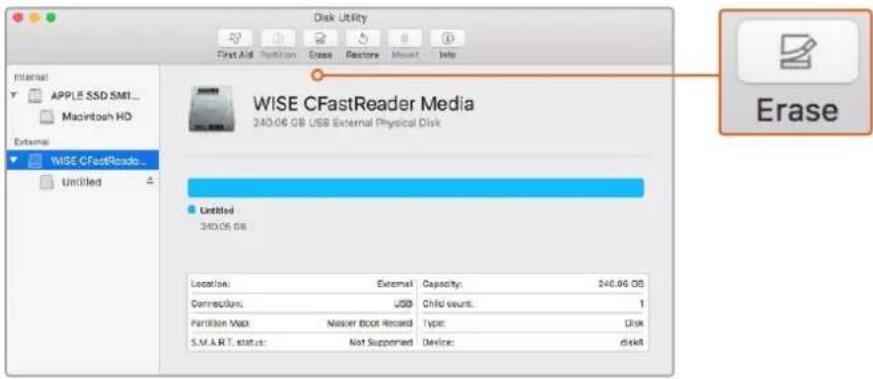
El programa Utilidad de Discos, incluido en el Sistema operativo macOS, permite formatar soportes de almacenamiento mediate el sistemas HFS+ oexFAT. Antes de comenzar, asegúrese de respaldarrial综合素质 importante que contenga la unidad, ya que, al iniciai el proceso, se borraran todos los datos.
Preparación de soportes de grabación en equipos Windows
El cuadro de dialogo Formato en el sistema operativo Windows permite formatear soportes de grabacion mediante el sistema exFAT. Asegürese de respaldarrial综合素质 importante que contenga la unidad, ya que al起初 el proceso, se borraran todos los datos.
1 Conectar el soporte de grabacion al equipo informatico mediante un adaptor, un lector externo o un cable USB-C.
2 Abra el menu Inicio o la Pantalla de Inicio y seleccione la option PC. Haga click con el boton derecho en la unidad de almacenamento.
3 En el menu contextual, selección la.option Formato.
4 Elija la option exFAT para el Sistema de ARCHivos y 128 kilobytes para el tamanfo de la unidad de asignacion.
5 Introduzca un nombre para la unidad, marque la casilla Formato rápido y haga click en Iniclar.
6 Se dará fornato a la unidad rápidamente y quedará lista para usarla en la camarra.
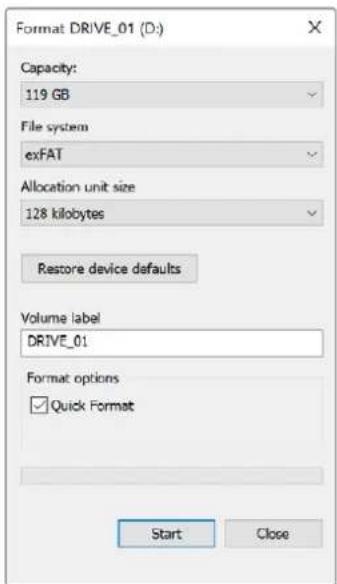
Utilice el cuadro de dialogo Formato en Windows para dar formatting exFAT al soporte de grabacion.
NOTA: Si se omiten fotogramas durante la grabacion, compruebe que el modelo de la unidad sea uno de los recomendados segun la resolution y el formatting selectionados. En caso de que la transferencia de datos no se realice a una velocidad adeuca, intente reducir la resolution o la frequencia de imagen, o seleccione un formatting con compresion, por exemple, ProRes. Visite nuestro situ web para Obtener mas informacion al respecto.
NOTA: Aúnque es posible emplear unidades con varias partiones, la camarso solo reconocerá la prima deellas a efectos de la grabacion y la reproduccion de contentsidos.
Sin embargo, cabementionar que al formatear el soporte de almacenamento en la camara, se borrara el contenido de todas las partidas, y no solo de la prima. Por estareason, recomendamos utilizezar unidades sin partidas.
Grabación
Grabación de material audiovisual
Los modelos Blackmagic Pocket Cinema Camera incluyen dos botones de grabación. El primero seswana en la parte superior de la empuñadura, lo cual permité presionarlo con el dedo indices al sustener la CAMERA con la mano derecha.
Elsegundo boton se encuentra en la parte frontal de la camarara, a fin de poder filmarse uno@mismo mrientas se sostiene la unidad con una mano. Este resulta ideal al grabar videoblogs.
Presione uno de这些 botones para comenzar a grabar de inmediato. Presióno nuevo para detener laGrabación.
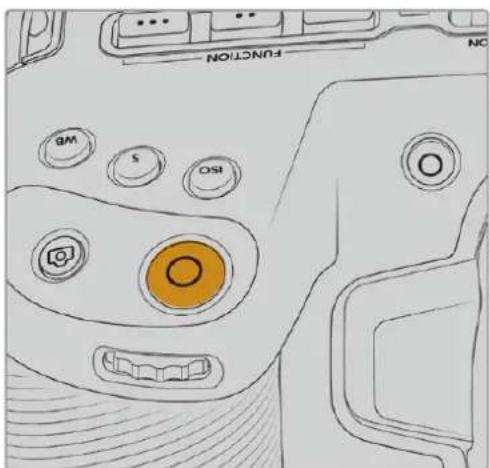
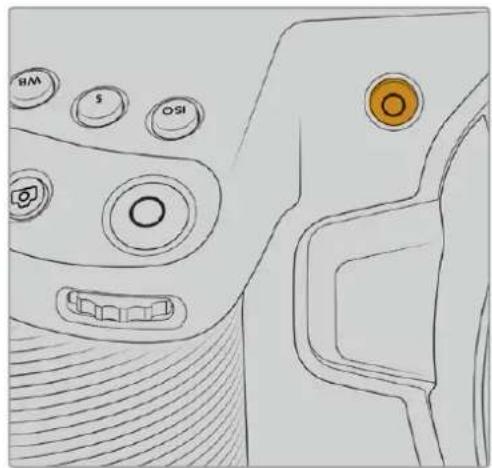
Bolón de grabación en la parte superior Botón de grabación en la parte frontal
Antes de comenzar a grabar, mantenga pulsado el nombre de la unidad que aparece en la parte inferior de la pantalla para seleccionarla. La barra encima del soporte seleccionado se enciende de color azul para indicar que la grabacion se llevará a cabo en dicha unidad. Para grabar en una(distinta, basta con seleccionarla de laforma descrita. Durante la grabacion, la barra se enciende de color rojo.
Selección del formatting de grabación
Tambien es possible emplear códecs ProRes, incluidos ProRes 422 HQ, ProRes 422, ProRes 422 LT y ProRes 422 Proxy. Estos ultimos permittedabar una mayorcantidad de secuencias en el soporte de almacenamento. El formattingo ProRes 422 HQ brinda la mayor calidad con el menor grado de compresion. Alternativamente, el formattingo ProRes 422 Proxy ofrece la posibidad de grabar durante periodos mas extensos con una mayor compresion. Por otherado, es compatible con el códec Blackmagic RAW. Recommendamos probing differentes formatos para ver cui seajusta mayor a losrequirerimientos de cada proyecto.
Cabe destacar que los modelos Blackmagic Pocket Cinema Camera son compatibles con el codec Blackmagic RAW tanto con el nombre del sensor completo, como reducido. Para formatos con redimensionamento debe emplearse ProRes.
Consulte elApartado Frecuencias de imogen maxima para el sensor para Obtener mas informacion al respecto.
Blackmagic RAW
Los modelos Blackmagic Pocket Cinema Camera son compatibles con el formatting Blackmagic RAW. Este brinda una calidad deImagen superior, un rango dinamico amplio y una gran variedad de OPCIONES DE COMPRESION. Además, ofrece todas las ventajas de la grabación en dicho formatting con un procesamento más rápido, gracias a que la mayor parte del这是我 se realiza en la lármara, dinamorado por el soporte fisico.
Blackmagic RAW también admite el uso de metadataos avanzados, de manière que el programa empleado para procesar los ARCHivos tendrá acces a los ajustes de la CAMERA. Por exemple, al selección el modo Video durante el rodaje porque es preciso editar con rapidez y no hay tiempo para el etalonaje, esta funciona permitte estar las imagenes con los ajustes cromáticos correspondientes a这么做 algo al abrirlas en el programa de这个时代. Sin embargo, en realizad el archivo presente la colorimétrica del modo Film, y los metadataos son los que indican a la aplicación que se deben aplicar los ajustes correspondientes al modo Video.
En otheras palabras, si en algoqn momento es necessario etalonar las imagenes, el archivo original aun conserva todo el rango dinamico. Por ello, el material grabado no pierde informacion en las luces ni en las sombras, de modo que se mantienen todos los detalles, y es possible realizar los ajustes cromaticos pertinententes a fin de que teng a un aspecto cinematografico. No obstarve, en caso de no tener tiempo para el etalonaje, la imagenes se veran de manera adecuada al aplicar el modo Video. Este brinda mayor flexibilidad durante la posproduccion.
Los ARCHivos Blackmagic RAW se procesan con rapidez y han sido optimizados para aprovechar la GPU y la CPU del equipo informatico, lo que permite reproducirlos sin interrupción y prescirindir del uso de placas de decodificación, que de particular relevancia al usar equipos portétiles. Por除外, los programas compatibles con este formatting también brindan la posibiliad de employar plataformas tales como Metal, CUDA y OpenCL.
De este modo, los ARCHivos Blackmagic RAW se reproduce a una velocidad normal en la mayoría de los equipos, sin necessities de emplear la memoria caché o una resolution inferior.
Cabe destacar que la informacion de los objetivos también se registra en los metatodos correspondentes a cada fotograma. Por exemple, al utilizing modelos compatibles,rialquier cambio en el enfoque o la distancia focal quedará registrardo en los metatados.
Grabación en Blackmagic RAW
El formatting Blackmagic RAW brinda la posibiliad de elegir entre una velocidad constante al transferir datos o una calidad invariable.
En el primer caso, la velocidad de transferencia se mantiene constante sin que sea demasiado elevada. De este modo, las imagenes complejas que incluyen una mayorcantidad de datos se comprimen mas para que quepan en el espacio asignado.
Sin embargo, al grabar en formatting RAW, espreferible que la calidad sea consistente. Que sucede si las imagenes incluyen mas datos pero estas se comprimen a fin de que quepan en el espacio asignado? Probamente haya una perdida de calidad, excepte no es possible saberlo hasta republicir el material.
Con el proposto de SOLUTIONAR este problema, Blackmagic RAW offre una alternativa que brinda una calidad constante. Técnicamente, la velocidad de transferencia en estaisión es variable, pero en realizad genera un archivo de mayor tiempo si las imagenes lorequireen, sin que haya un limite spécifique a la hora de codificar el material conservando su calidad.
Es por este que la optacion de calidad constante del formatting Blackmagic RAW permite que el tamanodel archivo varie segun los requerimientos de la codificacion o el tipo de material grabado .
Asimismo, merece la pena destacar que el nombre de los ARCHivos no es incomprehensible, sino que contiene informacion significativa derivada de los aspectos技术和. Por example, al selectionar el mode de velocidad constante, las options disponibles son 3:1, 5:1, 8:1 y 12:1. Estosnumeros representan la relation entre el tamen del archivo RAW sin compresion y su version comprima.
De este modo, la.option 3:1 brinda una mejor calidad en un archivo de mayor tiempo,@mrientas que al seleccionar 12:1 se obtiene un archivo más(PCque con la menor calidad.No obstarve, muchos ),estarios affirman que esta ultimaOPTION esperfectamenteacceptable yque no haninchado limitaciones en terminos de calidad, aunque recomendamos probardistinctosajustes.
El modo de calidad constante incluye dos options: Q0 y Q5. Estas representan los parámedos de comprensión Transmitidos y determinan el grado de comprensión aplicado. La diferencia se deba a que el códec funciona de forma/distinta al seleccionar una velocidad o una calidad constante. Al elegir estaULTA opicon, no es posible saber con certeza el tamaño de los archivos resultantes, ya que dependeradel material grabado.
Velocidad constante
Las-optiones 3:1, 5:1, 8:1 y 12:1 representan el grado de comprension. Por exemple, el tameno del archivo generado mediante la option 12:1 es aproximamente 12 vezes inferior al del formatting RAW sin comprension.
Calidad constante
Las options Q0 y Q5 representan distinctes niveles de cuantizacion. Este es mayor en la segunda optacion, excepte mejora la velocidad al transferir datos. Como se ha mentionado, dichos ajustes generan archivos de tamanio variable, segun el material grabado. Si el tamanio del archivo sobrepasa la capacité de la unidad de almacenamento, es posible que se omitan fotogramas. Sin embargo, la ventaja es que, si thiso suede, se notar a inmediamente, lo cui brinda la opportunity de embarrar los ajustes sobre la marcha.
Reprodctor Blackmagic RAW
El reproductor Blackmagic RAW, incluido en el instalador del programa utiliser de la CAMERA, es una aplicacion optimizada que permite ver los clips grabados en dicho formatting. Basta con haceruble的比例在 archivo correspondiente para reproducir, avanzar o retroceder las imagenes.
Al decodificar fotogramas, la función de aceleración por CPU, incluida en las herramrientas de desarrollo, es compatible con las principales arquitecturas y admite el uso de la GPU con plataformas tales como Metal, CUDA y OpenCL. Además, es posible emplear unaunidad Blackmagic eGPU, a fin de lograr un mejor desempo. El reproductor Blackmagic RAW está disponible para Mac, Windows y Linux.
Archivos Sidecar
Los ARCHivos .sidercar del formatting Blackmagic RAW permitted anular metadataos integrados en el archivo original sin eliminarlos. Estos incluyen tanto ajustes RAW como informacion relativa al diafragma, el enfoque, la distancia focal, el balance de blancos, el tinte, el espacio cromatico, el nombre del proyecto y el numero de toma, entreculos paramedros, y estan codificados por fotografia, lo cui resulta importante al modifier los values del objetivo durante el rodaje. Es possible añadir o editor把这些 metadataos con DaVinci Resolve o incluso un editor de textos.
Los ARCHivos .sidercar permitted aplicar automatically distinctos ajustes RAW a un clip anadiendolos a la carpeta que contiene el material grabado. Al mover el archivo .sidercar fuera de la carpeta y reproducir-Newamente el clip Blackmagic RAW, vemos el original tal como fue grabado. Asimismo, es possible acceder a these ajustes desdeequal programa compatible con las Herramentas de desarrollo para Blackmagic RAW. Los Cambios realizados se guardan en el archivo .sidercar, y las imagenes modificadas peuvent verse en el reproductor Blackmagic RAW Player o enequalquier other aplicacion compatible con este formatting.
Al grabar en modo Video, el archivo original conserva las caracteristicas del modo Film, pero los metadatos permitirán que el material grabado se mueste con la apariencia del modo Video. Esteultimate es ideal cuando no es preciso etalonar el material grabado y los plazos son limitados. Sin embargo, si se desea ajustar las partes mas oscuras o brillantes de la imagen, se conservan todos los detalles sin perdier informacion, en caso de que sea necessario acceder a ellos posteriormente.
Blackmagic RAW en DaVinci Resolve
El panel Ajustes RAW en DaVinci Resolve permite modifier la apariencia del material grabado en un archivo Blackmagic RAW y guardar dichos ajustes en un nuevo archivo .sidecar, a fin de lograr efectos creativos o mejor su visualizacion. también es possible copiarlos y enviarselos aOthers uxuarios del programa para que poder acceder a los al importarlos. Por otherdo, DaVinci Resolve no solo es capaz de leer los metadatos de los archivos generados por laamera, sino que ademas reconoce automatamente el rango dinamico seleccionado al reproducir los clips.
Luego, es possible personalizar dichos ajustes modificando la saturacion, el contraste y los tonos intermedios, asi como la atenuacion de las luces y las sombras. A su vez, al guardar theseclos en un archivo .sidecar,QUALquier otra persona que travaje con el myself material durante la posproduccion tendracceo algo ellos. Tantién es sencillo restuar Los metadatos originales de la camarara, de ser necessario.
Por other parte, el panel Ajustes RAW en DaVinci Resolve permite exportar un fotograma con todos los ajustes, los metadataos, la resolucion y la informacion cromatica, lo que brinda la posibidad de partir capturas o ARCHivos de referencia.
Consulte el apartado DaVinci Resolve para Obtener más información al Respecto.
Herramientos de desarrollo Blackmagic RAW
Estas herramrientas constituyen una interfaz de programacion desarrollada por Blackmagic Design con el proposto de que los usuario poderan crear sus propias aplicaciones compatibles con el formatting Blackmagic RAW. Puede ser empleadas porrialquier desarllador para leer, modificar y guardar este tipo de archivos, e incluyen la neue colorimetrica de cuarta generation, que permite obtener imagenes con un aspecto natural y cinematografico enrialquier programa compatible, ya sea en sistemas operativos Mac, Windows o Linux. Estas herramrientas poderen descargarse de forma gratuite en la pagea www.blackmagicdesign.com/es/developer.
El sugiente diagrama muestra los componentes de la interfaz de programacion para el formatting Blackmagic RAW.
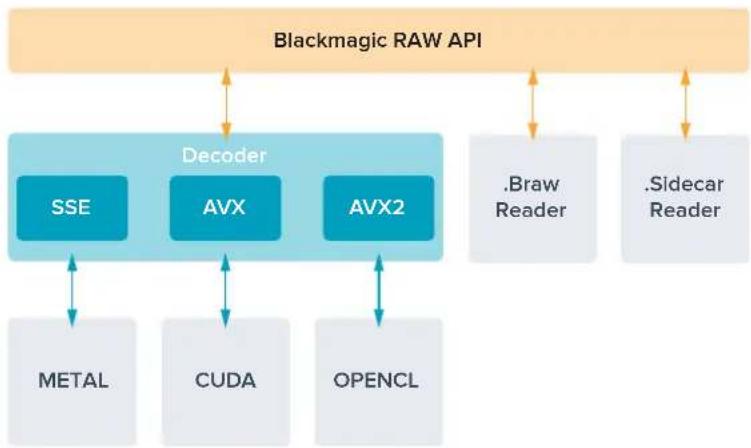
Frecuencias deImagenmaximumasparael sensor
Blackmagic Pocket Cinema Camera 6K
| Resolución Códecárea del sensor | Frecuencia maxima | |||
| 6K | 6144 x 3456 | Blackmagic RAW | Completa | 50 |
| 6K (2.4:1) 6144 x 2560 Blackmagic RAW Reducida 60 | ||||
| 5.7K (17:9) 5744 x 3024 Blackmagic RAW Reducida 60 | ||||
| DCI 4K | 4096 x 2160 | ProRes 422 HQ | Reducida a partir de 5.7K | 60 |
| 4096 x 2160 | ProRes 422 | Reducida a partir de 5.7K | 60 | |
| 4096 x 2160 | ProRes 422 LT | Reducida a partir de 5.7K | 60 | |
| 4096 x 2160 | ProRes 422 Proxy | Reducida a partir de 5.7K | 60 | |
| UHD | 3840 x 2160 | ProRes 422 HQ | Reducida a partir del área complete | 50 |
| 3840 x 2160 | ProRes 422 | Reducida a partir del área complete | 50 | |
| 3840 x 2160 | ProRes 422 LT | Reducida a partir del área complete | 50 | |
| 3840 x 2160 | ProRes 422 Proxy | Reducida a partir del/Area complete | 50 | |
| 3840 x 2160 | ProRes 422 HQ | Reducida a partir de 5.7K | 60 | |
| 3840 x 2160 | ProRes 422 | Reducida a partir de 5.7K | 60 | |
| 3840 x 2160 | ProRes 422 LT | Reducida a partir de 5.7K | 60 | |
| 3840 x 2160 | ProRes 422 Proxy | Reducida a partir de 5.7K | 60 | |
| 3.7K (anamórfico) | 3728 x 3104 | Blackmagic RAW | Reducida | 60 |
| 2.8K (17:9) | 2868 x 1512 | Blackmagic RAW | Reducida | 120 |
| Resoluciones Códecá Area del sensor | Frecuencia maxima | |||
| HD | 1920 x 1080 | ProRes 422 HQ | Reducida a partir del área completa | 50 |
| 1920 x 1080 | ProRes 422 | Reducida a partir del área completa | 50 | |
| 1920 x 1080 | ProRes 422 LT | Reducida a partir del área completa | 50 | |
| 1920 x 1080 | ProRes 422 Proxy | Reducida a partir del área completa | 50 | |
| 1920 x 1080 ProRes 422 HQ Reducida a partir de 5.7K 60 | ||||
| 1920 x 1080 ProRes 422 Reducida a partir de 5.7K 60 | ||||
| 1920 x 1080 ProRes 422 LT Reducida a partir de 5.7K 60 | ||||
| 1920 x 1080 ProRes 422 Proxy Reducida a partir de 5.7K 60 | ||||
| 1920 x 1080 ProRes 422 HQ Reducida a partir de 2.7K 120 | ||||
| 1920 x 1080 | ProRes 422 | Reducida a partir de 2.7K | 120 | |
| 1920 x 1080 ProRes 422 LT Reducida a partir de 2.7K 120 | ||||
| 1920 x 1080 ProRes 422 Proxy Reducida a partir de 2.7K 120 | ||||
Blackmagic Pocket Cinema Camera 4K
| Resolución Códec Área del sensor | Frecuencia maxima | |||
| DCI 4K | 4096 x 2160 Blackmagic RAW Completa 60 | |||
| 4096 x 2160 ProRes 422 HQ Completa 60 | ||||
| 4096 x 2160 ProRes 422 Completa 60 | ||||
| 4096 x 2160 ProRes 422 LT Completa 60 | ||||
| 4096 x 2160 ProRes 422 Proxy Completa 60 | ||||
| 4K (2.4:1) | 4096 x 1720 | Blackmagic RAW | Reducida | 75 |
| UHD | 3840 x 2160 | Blackmagic RAW | Reducida | 60 |
| 3840 x 2160 | ProRes 422 HQ Reducida | 60 | ||
| 3840 x 2160 | ProRes 422 Reducida | |||
| 3840 x 2160 | ProRes 422 LT Reducida | 60 | ||
| 3840 x 2160 | ProRes 422 Proxy | Reducida | 60 | |
| 2.8K (anamórfico) | 2880 x 2160 | Blackmagic RAW | Reducida | 80 |
| 2.6K (16:9) | 2688 x 1512 | Blackmagic RAW | Reducida | 120 |
| HD | 1920 x 1080 | ProRes 422 HQ | Reducida a partir del área completea | 60 |
| 1920 x 1080 ProRes 422 Reducida a partir del área completea 60 | ||||
| 1920 x 1080 | ProRes 422 LT | Reducida a partir del área completea | 60 | |
| 1920 x 1080 | ProRes 422 Proxy | Reducida a partir del área completea | 60 | |
| 1920 x 1080 ProRes 422 HQ Reducida a partir de 2.6K 120 | ||||
| 1920 x 1080 ProRes 422 Reducida a partir de 2.6K 120 | ||||
| 1920 x 1080 ProRes 422 LT Reducida a partir de 2.6K 120 | ||||
| 1920 x 1080 ProRes 422 Proxy Reducida a partir de 2.6K 120 | ||||
| 1920 x 1080 | Blackmagic RAW | Reducida | 120 | |
| 1920 x 1080 | ProRes 422 HQ | Reducida | 120 | |
| 1920 x 1080 | ProRes 422 | Reducida | 120 | |
| 1920 x 1080 | ProRes 422 LT | Reducida | 120 | |
| 1920 x 1080 | ProRes 422 Proxy | Reducida | 120 | |
NOTA: El formattingo de grabacion 2.6K 16:9 optimiza el area del sensor para objetivos Super 16 mm y velocidades de imagen altas.
Tiempo de grabación
Las siguientes tablas muestran el tiempo de grabaciónapproximado en horas ysegundos según el formatting,la resolución y el soporte de almacenimiento.Cabe destacar que las resolutions y los códecss disponibles sondistinctos para los modelos Pocket Cinema Camera 4K y Pocket Cinema Camera 6K.
La duración maxima depende de la capacité de la unidad, la Frequencia de imagen y el formatting的选择acion. Por example, la velocidad de transferencia para el formatting ProRes 422 HQ a una resolution de 3840 x 2160 es de aproximamente 880 Mb/s. A una Frequencia de 24 f/s, una tarjeta CFast 2.0 de 256 GB permite grabar duranteunos 47 minutes. Con these mismos ajustes, es possible grabar aproximamente 23 Minutes en una tarjeta CFast 2.0 de 128 GB, o sea, casi la mitad que con una tarjeta CFast de 256 GB.
Cabe destacar que el tiempo de grabación disponible en el soporte de almacenimiento pueda variar ligeramente,dependiendo del fabricante o el sistemas empleado para formatearlo (exFat o Mac OS X Extended).
Las composiciones complejas requirecen una mayor transferencia de datos que las escenas simples con menos detalles. Dado que los values en las siguientes tablas contemplan tomas de gran completeness, el tiempo de grabacion podra ser mayor segun la naturaleza del rodaje.
6K
| Tajeta CFast | Frecuencia de Imagen | Blackmagic RAW 3:1 | Blackmagic RAW 5:1 | Blackmagic RAW 8:1 | Blackmagic RAW 12:1 |
| 256 GB | Duración Duración Duración | Duración | |||
| 23.98 17 min | 28 min 45 min | 67 min | |||
| 24 17 min 28 | min 45 min 67 min | ||||
| 25 16 min 27 | min 43 min 64 min | ||||
| 30 13 min 22 | min 36 min 54 min | ||||
| 50 8 min 13 | min 21 min 32 min |
6K 2.4:1
| Tajeta CFast | Frecuencia deImagen | Blackmagic RAW 3:1 | Blackmagic RAW 5:1 | Blackmagic RAW 8:1 | Blackmagic RAW 12:1 |
| 256 GB | Duración Duración Duración | Duración | |||
| 23.98 min | 38 min 60 min | 91 min | |||
| 24 22 min 38 | min 60 min 91 min | ||||
| 25 21 min 36 | min 58 min 87 min | ||||
| 30 18 min 30 | min 48 min 72 min | ||||
| 50 11 min 18 | min 29 min 43 min | ||||
| 60 9 min 15 | min 24 min 36 min | ||||
5.7K 17:9
| Tajeta CFast | Frecuencia deImagen | Blackmagic RAW 3:1 | Blackmagic RAW 5:1 | Blackmagic RAW 8:1 | Blackmagic RAW 12:1 |
| 256 GB | Duración Duración Duración | Duración | |||
| 23.98 min | 34 min 55 min | 82 min | |||
| 24 20 min 34 | min 55 min 82 min | ||||
| 25 19 min 33 | min 52 min 79 min | ||||
| 30 16 min 27 | min 44 min 66 min | ||||
| 50 10 min 16 | min 26 min 39 min | ||||
| 60 8 min 13 | min 22 min 33 min |
DCI 4K
| Tarjeta CFast | Frecuencia deImagen | Blackmagic RAW 3:1 | Blackmagic RAW 5:1 | Blackmagic RAW 8:1 | Blackmagic RAW 12:1 | ProRes 422 HQ | ProRes 422 | ProRes 422 LT | ProRes 422 Proxy |
| 256 GB | Duración Duración Duración | Duración Duración | Duración Duración | ||||||
| 23.98 | 39 min | 65 min | 104 min | 155 min | 44 min | 66 min | 95 min | 216 min | |
| 24 | 39 min | 65 min | 103 min | 155 min | 44 min | 66 min | 95 min | 216 min | |
| 25 | 37 min | 62 min | 99 min | 149 min | 42 min | 64 min | 91 min | 207 min | |
| 30 | 31 min | 52 min | 83 min | 124 min | 35 min | 53 min | 76 min | 173 min | |
| 50 | 18 min | 31 min | 49 min | 74 min | 21 min | 32 min | 45 min | 104 min | |
| 60 | 15 min | 26 min | 41 min | 62 min | 17 min | 26 min | 38 min | 87 min | |
4K 2.4:1
| Tajeta CFast | Frecuencia deImagen | Blackmagic RAW 3:1 | Blackmagic RAW 5:1 | Blackmagic RAW 8:1 | Blackmagic RAW 12:1 |
| 256 GB | Duración Duración Duración | Duración | |||
| 23.98 min | 84 min 134 min | 200 min | |||
| 24 50 min 84 | min 134 min | 200 min | |||
| 25 48 min 80 | min 128 min | 192 min | |||
| 30 | 40 min | 67 min | 107 min | 160 min | |
| 50 24 min | 40 min 64 | min 96 min | |||
| 60 20 min 33 | min 54 min 80 min | ||||
| 75 16 min 27 | min 43 min 64 min | ||||
| 80 16 min 26 | min 40 min 60 min | ||||
UHD
| Tarjeta CFast | Frecuencia deImagen | Blackmagic RAW 3:1 | Blackmagic RAW 5:1 | Blackmagic RAW 8:1 | Blackmagic RAW 12:1 | ProRes 422 HQ | ProRes 422 | ProRes 422 LT | ProRes 422 Proxy |
| 256 GB | Duración Duración Duración | Duración Duración | Duración Duración | ||||||
| 23.98 41 min | 68 min 110 min | 164 min 47 min | min 71 min 101 min | min 230 min | |||||
| 24 41 min 68 | min 109 min | 164 min 47 min | 71 min 101 min | 230 min | |||||
| 25 39 min 66 | min 105 min | 157 min 45 min | 68 min 97 min | 221 min | |||||
| 30 | 33 min | 55 min | 88 min | 131 min | 38 min | 57 min | 81 min | 184 min | |
| 50 | 19 min | 33 min | 52 min | 79 min | 22 min | 34 min | 48 min | 111 min | |
| 60 | 16 min | 27 min | 44 min | 66 min | 18 min | 28 min | 40 min | 92 min | |
3.7K anamórfico
| Tarjeta CFast | Frecuencia deImagen | Blackmagic RAW 3:1 | Blackmagic RAW 5:1 | Blackmagic RAW 8:1 | Blackmagic RAW 12:1 |
| 256 GB | Duración Duración Duración | Duración | |||
| 23.98 31 min | 51 min | 82 min | 123 min | ||
| 24 31 min | 51 min | 82 min 123 min | |||
| 25 29 min 49 min | min 79 min | 118 min | |||
| 30 | 24 min | 41 min | 65 min | 98 min | |
| 50 | 15 min | 24 min | 39 min | 59 min | |
| 60 | 12 min | 20 min | 33 min | 49 min | |
2.8K anamórfico
| Tarjeta CFast | Frecuencia deImagen | Blackmagic RAW 3:1 | Blackmagic RAW 5:1 | Blackmagic RAW 8:1 | Blackmagic RAW 12:1 |
| Duración Duración Duración | Duración | ||||
| 256 GB | 23.98 57 min | 95 min | 151 min 226 min | ||
| 24 57 min | 95 min 151 | min 226 min | |||
| 25 54 min 91 | min 145 | min 217 min | |||
| 30 | 45 min 76 min | 121 min | 181 min | ||
| 50 | 27 min | 45 min | 73 min | 109 min | |
| 60 | 22 min | 38 min | 61 min | 91 min | |
| 80 | 17 min 28 min | 45 min | 68 min | ||
2.8K 17:9
| Tarjeta CFast | Frecuencia deImagen | Blackmagic RAW 3:1 | Blackmagic RAW 5:1 | Blackmagic RAW 8:1 | Blackmagic RAW 12:1 |
| 256 GB | Duración Duración Duración | Duración | |||
| 23.98 81 min | 136 min 216 min | 321 min | |||
| 24 81 min 135 | min 215 min | 320 min | |||
| 25 78 min 130 | min 207 min | 308 min | |||
| 30 65 min 108 | min 173 min | 258 min | |||
| 50 39 min | 65 min 104 min | 156 min | |||
| 60 32 min | 54 min 87 min | 130 min | |||
| 120 | 16 min 27 min | 43 min 65 min | |||
2.6K 16:9
| Tarjeta CFast | Frecuencia de Imagen | Blackmagic RAW 3:1 | Blackmagic RAW 5:1 | Blackmagic RAW 8:1 | Blackmagic RAW 12:1 |
| 256 GB | Duración Duración Duración | Duración | |||
| 23.98 87 min | 144 min 230 | min 342 | min | ||
| 24 87 min 144 | min 229 min | 342 min | |||
| 25 83 min | 138 min 220 min | 328 min | |||
| 30 69 min 115 | min 184 | min 275 min | |||
| 50 41 min | 69 min 111 | min 166 | min | ||
| 60 34 min | 58 min 92 | min 138 | min | ||
| 120 | 17 min | 29 min | 46 min | 69 min | |
HD
| Tarjeta CFast | Frecuencia deImagen | Blackmagic RAW 3:1 | Blackmagic RAW 5:1 | Blackmagic RAW 8:1 | Blackmagic RAW 12:1 | ProRes 422 HQ | ProRes 422 | ProRes 422LT | ProRes 422 Proxy |
| 256 GB | Duración | Duración | Duración | Duración | Duración | Duración | Duración | Duración | |
| 23.98 | 159 min | 264 min | 418 min | 619 min | 189 min | 283 min | 403 min | 877 min | |
| 24 | 159 min | 264 min | 418 min | 618 min | 189 min | 283 min | 403 min | 877 min | |
| 25 | 153 min | 253 min | 402 min | 595 min | 182 min | 271 min | 387 min | 843 min | |
| 30 | 127 min | 212 min | 336 min | 499 min | 152 min | 227 min | 324 min | 710 min | |
| 50 | 76 min | 127 min | 203 min | 303 min | 91 min | 137 min | 196 min | 434 min | |
| 60 | 64 min | 106 min | 170 min | 254 min | 76 min | 114 min | 163 min | 363 min | |
| 120 | 32 min | 54 min | 87 min | 130 min | 38 min | 57 min | 82 min | 185 min |
NOTA: Cabe destacar que el códec Blackmagic RAW es compatible con formatos que emplean el area del sensor completa o reducida. Para formatos redimensionados, es precisio seleccionar la option ProRes.
Los formatos 6K, 6K 2.4:1, 5.7K 17:9, 3.7K anamórfico y 2.8K 17:9 solo está disponible en laopia Blackmagic RAW del modelo Blackmagic Pocket Cinema Camera 6K. La CAMERA embarca formatos ProRes para resolutions DCI 4K, UHD y HD.
Los formatos 4K 2.4:1, 2.8K anamórfico y 2.6K 16:9 solo está disponible en la optación Blackmagic RAW del modelos Blackmagic Pocket Cinema Camera 6K. La CAMERA embarca formats tanto Blackmagic RAW como ProRes para resolutions DCI 4K, UHD y HD.
El modo de calidad constante para las options Q0 y Q5做不到 distinguidos tiempos de grabacion. En el primer caso, la duracion estimada es similar a la de la option 3:1 (velocidad constante),@mientras que al seleccionar Q5, sera parecida a la de la option 12:1. Sin embargo, la duracion seactualiza cada diez segculos durante la grabacion, por lo que la mejor manera de vericar el tiempo disponible es filmando 20 segudos y comprobando la duracion en el indicator de la pantalla tactil.
Selección de la Frequencia de imagen
La CAMERA permite grabar auntas Frequencias deImagen, y a veces es dificil saber cuales es la más adecuada.
Generalmente, al selectionar una Frequencia de imagen, es besoino considerar varios factores. Dea hace varios afo, existen distinctos formatos de presentacion para el cine y la television.A pesar de que las frequencies de imagen de cada uno son distinctas segun el pais, todos cumplen elismo proposto:做不到 unacantidad determinada de fotogramas o cuadros por segundo para que la imagen fluya de forma agradable y convincente.
Por exemple, en el cine se emplee a una fecuencia de 24 f/s, y ahora recientamente se han realizado pruebas con otheras mas rapiidas, esta es la mas aceptada en todo el mundo.
Con respectfully a la television, las Frequencias de imagen generalmente cumplen con las normas Tecnicas de teledifusión en cada páis. Por exemple, los contentidos televisivos se graban a 29.97 f/s para su distribución en América del Norte, y a 25 f/s para Europa.
No obstarce, con el avance de la technologia, en la actualidad existe una gama mas amplia de options, yDICOS formatos han ido evolacionando.Ahora es comun que los eventos deportivos se graben y se transmitan a freuencias de imagen mas altas, por exemple, hasta 59.94 f/s en AmERICA del Norte, y 50 f/s en Europa. Este permite que las imagenes fluyan con mayor calidad y parezcan mas autenticas.
Por othera parte, al transmitir por Internet, normalmente se emplean fecuencias similares a las de la television, excepte en este caso existe una mayor flexibilidad debido a que los)."
los)."
las distinctas pantallas.
Normalmente, a la hora de escoger una Frequencia de imagen para un proyecto, el formato de entrega constituya un factor decidivo. Además, dicho valorDebe coincidir con el del sensor de laamera, a fin de que las imagenes se reproduzcan a la mesma velocidad a la que se desarrollo el evento.
Si el objetivo es create un efecto interesante, por exemple, de CAMERA lenta, es possible elegir una Frequencia deImagen mas alta para el sensor. Cuanto mayor sea esta en comparacion con la Frequencia deImagen del projeeto, menor sera la velocidad de reproduccion.
Consulte elApartado Controles de la pantalla tactil en este manual para Obtener mas informacion al respecto.
Grabación automática
Los modelos Blackmagic Pocket Cinema Camera transmiten una seals automatistically desde la calidad HDMI que permit起初 la grabacion al connectar un dispositivo compatible con dicha funcion, por exemple, un monitor Blackmagic Video Assist.
De este modo, al presionar el botón de grabación en la CAMERA, la unidad externa inicia la captura de imagenes. Al volver a presionarlo, este proceso se detiene en algunos dispositivos. Asimismo, este Modelo brinda la posibiliad de transmitir informacion sobre el numero de tiempo a工程技术 de la calidad HDMI, de forma que este valor coincida en los clips grabados con la CAMERA y con el dispositivo externo.
Si el grabador externo es compatible con esta función, esnecessaryactivarla previamente desde el menu de configuracion.
Reproducción
Reproducción de material audiovisual
Después de realizar la grabación, es possible usar los 控ules de reproducción para ver las imagenes en la pantalla de la lármara. Presione este botón para acceder al modo de visualización, y luego una vez más con el propósito de ver el material grabado en la pantalla de la lármara o en cualquier othero dispositivo conectado a la calidad HDMI. Mantenga presionados los botones de avance o retroceso para avanzar o retroceder la secuencia. La reproducción finalizará cuando el clip llegue a su fin.
Presione los botones de avance o retroceso para ir al comienzo o el final de una secuencia. Oprima el boton de retroceso una vez para reproducir el clip actual desde el inicio, o dos veces para retroceder hasta el comienzo del clip anterior. Presione el boton de grabacion para salir del modo de reproduccion.
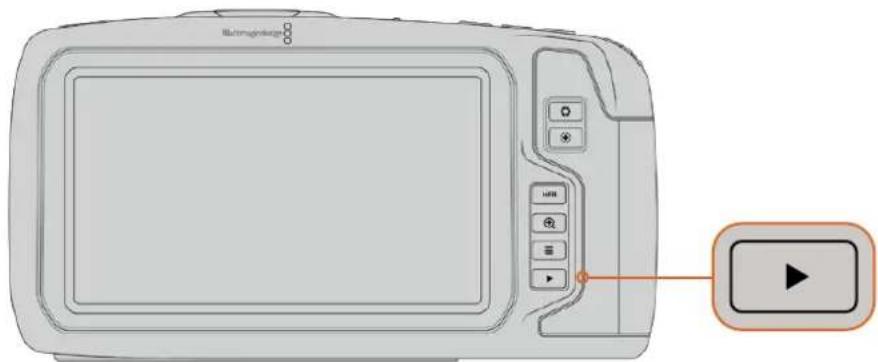
Presione el boton de reproduccion para ver las imagenes capladas por laamera.
Characteristicas de la CAMERA
Parte frontal

1 Botones de grabación
Presione cualesquiera de这些东西 botones para comenzar o detener la grabacion. El boton frontal permite que el usuario se filmed a si mesmo.
2 Rueda de ajustes
Permitte ajustar la aperture del diafragma en objetivos compatibles. Mirando la pantalla, gire la rueda hacer la izquierda para abrir el diafragma, o a la derecha para cerrarlo. Asimismo, este control brinda la posibiliad de modifier el balance de blancos, el ángulo de obturación y el valor ISO. Paraarlo, presione los botones correspondientes en la parte frontal de la-camera y gire la rueda para selecciónar la option deseada. Al finalizar, oprima la rueda para salir.
3 Micrófonos estéreo
La CAMERA incluye cuatro microfonos estéreo de gran calidad. Consulte elApartado Ajustes de audio para Obtener más información al respecto.
4 Montura del objetivo
El modelo Blackmagic Pocket Cinema Camera 6K cuenta con una montura para objetivos EF y la version 4K presenta una para lentes Micro Cuatro Tercios. Esto significa que es possible emplear objetivos compatibles que ofreceau functions de estabilizacion, as como de exposicion y enfoque automaticos. A fin de tener la posibiliad de usar el estabilizador de imagenes integrado en manyoshObjectivos, posicione el interruptor correspondiente en ON para activar dicha funcion en la camera. Si el objetivo incluye un interruptor para esta prestacion, seleccione el mode adecuado para imagenes fijas o en movimiento. En caso contrario,可以更好 activar o desactivar la function de estabilizacion desde el menu de la camera.
5 Luz palloto / Indicador de grabacion
Los modelos Pocket Cinema Camera disponible de un ledlittle en la parte frontal que se enciende de color rojo para indicar que la camera está grabando. Es possible activar o desactivar este indicator yajsurar su brillo desde el menu de configuracion.Consulte el apartado Preferencias para Obtener mas informacion al respecto.
Lateral Derecho
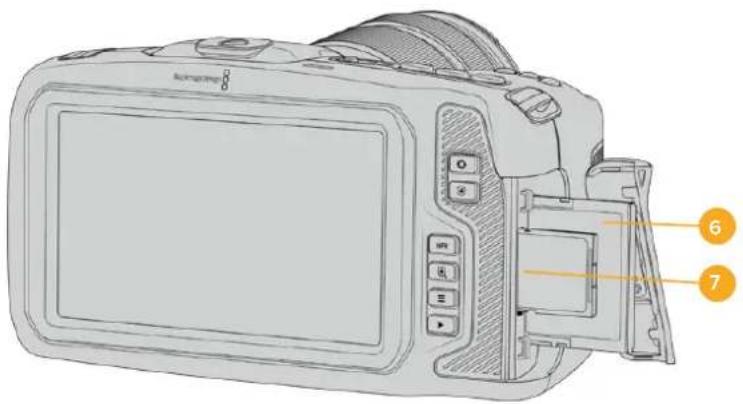
6 Ranura para tarjetas CFast
Inserte tarjetas CFast 2.0 en esta ranura para grabar y reproducir contentsidos. Consulte el apartado Tarjetas CFast para Obtener más información al respecto.
7 Ranura para tarjetas SD
Inserte tarjetas SD en esta ranura para grabar y reproducir contentsidos. Consulte el apartado Tarjetas SD para Obtener más información al respecto.
Lateral izquierdo
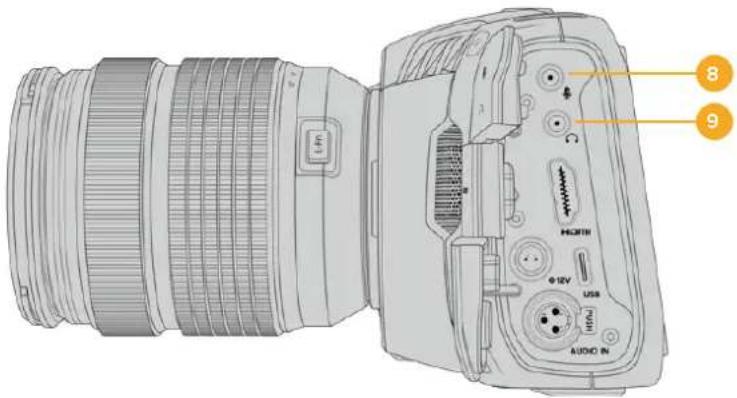
8 Entrada para micrófonos
Conecte un microfono a la entrada de 3.5mm . Laamera es compatible con señas a level de linea o microfono. La intensidad de estas ultimas es menor que la de las primeras, por locular, si se selección la optacion a nivel de linea al conectar un microfono a la unidad, el audio sera demasiado bajo. Cabe destacar que esta entrada también admite numero de tiempo longitudinal (LTC) de fuentes externas en el canal izquierdo, siempre que cumpla con los estandares SMPTE. Este se detecta automatamente y se integra en el material grabado como metadataos. Recomendamos transmitir el numero de tiempo longitudinal mediante una seals a nivel de linea, en especial si no se graba como una pista de audio.
9 Entrada para auriculares
Al conectar auriculares a la entrada estereo de 3.5mm es possible supervisar el audio durante la grabacion o la reproduccion. En este caso, la calidad para altevoces permanece desactivada.
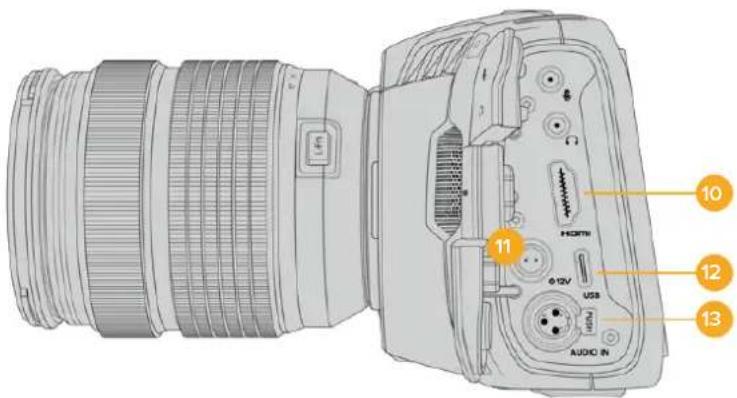
10 HDMI
La calidad HDMI permite transmitir imagenes en formato 4:2:2 1080p de 10 bits con alto rango dinamico y 2 canales de audio integrado. Utilice el menu en la pantalla tactil para seleccionar una seals limpia o con informacion superpuesta. El puerto HDMI facilita la connexion de un monitor externo, un grabador o un mezclador ATEM Mini. Esteultimate brinda la OPPUNITY de controlar la grabacion a distancia y ajustar diversos paramedros de los modelos Pocket Cinema Camera.
11 Allimentación
Esta conexión sirve para alimentar laámara y cargar la batería al mismo tiempo. Para conectar el adaptorador, gire el conector deforma que quede alineado con la pestaña en la parte superior de la conexión y bajo esintelo hasta que calce en su lugar. Para desconectarlo, retraiga la cubierta de goma que lo rodea y tire del mesmo.
Solutaciones de alimentacion personalizadas
Algunos)."s uasios han desarrollado sus propios dispositivos para alimentar los
modelos Blackmagic Pocket Cinema Camera. Si este es su caso,onga la cautela de
no suministrar demasiado voltaje a la camera, dato que this occasionar daños
irreparables. Los requisitos de voltaje paraamins modelos son los seguidentes:
-La conexion para la bateria admite entre 6.2 y 10 V (maximo).
- La entrada para corriente continua admite entre 10.8 y 20 V (maximo).
-La webcam requiere una alimentacion de 16 W cuando se encuentra en modo de esperay no está cargando la bateria.
- La CAMERA requiere una alimentacion de 30 W cuando se está cargando la bateria LP-E6.
- Al alimentar la CAMERA mediante una fuente personalizada, recomendamos extraer la bateria LP-E6.
- Al grabar en un soporte externo con un objetivo activo, con el brillo de la pantalla y de la luz indicadora al máximo y en Frequencias deImagen altas, sin estar cargando la batería, el modelos Blackmagic Pocket Cinema Camera 6K require una alimentacion de 25 W, o 22 W en el caso de la version 4K.
12 USB
El puerto USB-C permite grabar directamente en discos externos. Cuando la CAMERA está apagada, esta connexion también brinda la posibiliad de cargar la batería. Paraactualizar el sistema operativo interno de la unidad, conectela a un equipo informativo y execute la aplicacion correspondiente.
13 Entrada miniXLR para micrófonos
Permite conectar equipos de audio analógico balanceado o microfonos XLR convenções mediante un cable adaptor.
Asimismo, esta entrada brinda la posibiliad de suministrar corriente a microfonos profesionales mediante el modo de alimentacion fantasma. Consulte el apartado Ajustes de audio para Obtener mas informacion al respecto.
Panel superior
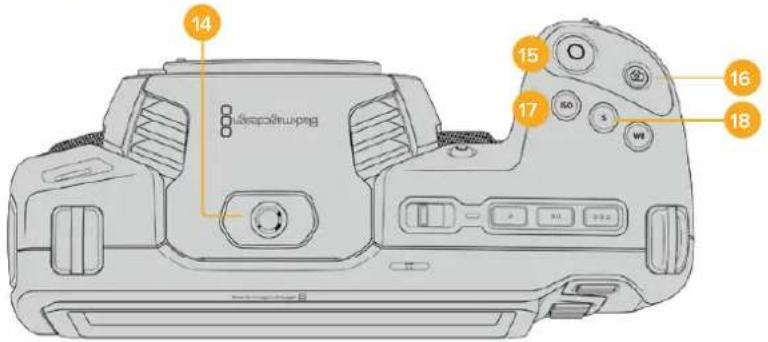
14 Ortfilco roscado 1/4-20
Permite sujetar microfonos externos y otros accesoriosPEAROs.
NOTA: El orificio roscado en la parte superior solo debe utilizes con accesos livianos, tales como microfonos微量元素. No intente emplearlo para soportar el peso de la CAMERA, por ejemplo, mediante un tornillo en la manija,+junto con un objetivo pesado. Esto podria dañar dicho orificio y no está cubierto por la garantía. Tampoco debe someterlo a una fuerza excessiva provocada por accesorios pesados o un brazo extensor. A efectos de colocar este tipo de accesorios, recomendamos la carcasa diseñada para los modelos Blackmagic Pocket Cinema Camera, que se sujeta simultanamente a los dos orificios en la parte superior e inferior de la CAMERA.
15 Grabación
Presione este botón paraunarizar a grabar de inmediato. Oprimalo;nuevamente para detener la grabación.
16 Fotos
Presione este botón para grabar un fotografia en formato DNG sin compresión. En la parte superior derecha de la pantalla, aparecerá brevamente el icono de una CAMERA para indicar que se ha tomado una fotografia. Las imagenes se guardan en la carpeta Stills, ubicada en el directorio raíz del soporte de grabación. Los ARCHivos se nombrean según la nomenclatura empleada para los clips, añadiendose S001 al final para indicar el número deImagen.
17 ISO
Presione este botón y gire la ruea de ajustes para modifier la sensibilitad de laamera. Es possible realizar incrementos de 1/3 de paso entre 100 y 25 600.
18Obturador
Presione este botón y gire la rueda de ajustes para modifier el ángulo o la velocidad de obturación. Asimismo, la CAMERA-ofrecerá hasta tres valoresolestitos para Severity el parpadeo.

19 Balance de blancos
Presione este botón y gire la rueda de ajustes para modifier el balance de blancos. Manténgalo presionado durante 3seguidos a fin de acceder rápidamente al modo automático. La pantalla lo做不到 un cuadrado blanco en el centro de laImagen que se utilizes con el proposto de realizar un ajuste automatístico. Consulte elApartado Controles de la pantalla táctil para Obtener más información al respecto.
20 Interruptor de encendido
Interruptor realizado para encender y apagar la CAMERA. Muevalo hacía la derecha para encenderla, y hacía la izquierda para apagarla.
21 Indicador
Este led se enciende de color rojo para indicar que la batería se está cargando cuando la casa está apagada y connectada a una fuente de alimentacion externa mediante la connexion de 12 V o el puerto USB-C.
Una vez finalizada la energia, la luz se apagará.
22 Botones programables
Es possible asignar diversas functions a这些东西 botones desde el menu de configuracion de laamera. De forma predeterminada, el primer boton corresponde a la direccion de falso color, elsegundo permite ver tablas de conversion (LUT),y el先进技术 para做不到 las guas de encuadre.
Parte inferior
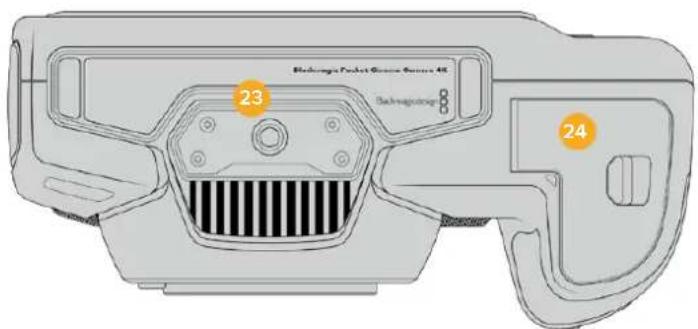
23 Orificio roscado 1/4-20
Permite colocar la-camera sobre un tripode.
24 Compartimiento para la batería
Empujé el seguro hacía el objetivo a fin deAbrir la tapa del compartmento. Al cerrarla, presióna hasta que quede trabada.
Partetrasera

25 Pantalla táctil
Permite ver los clips durante la grabacion o la reproduccion. Toque la pantalla y deslice el dedo sobre la misma para cambiar ajustes y controlar la CAMERA.
26 Diafragma
Permitte ajustar automatistically el valor de exposión promedio según las partes más claras y oscuras de laImagen. también es posible modifierla aperture del diafragma girando la rueda de ajustes hacer la izquierda o la derecha, o pulsando la.option Iris en la pantalla y moviendo el control correspondiente.
27 Enfoque
Presione este botón para realizar un enfoque automatico alemployar objetivos compatibles. Por defecto, el objetivo se enfoca en el centro de la imagen. Sin embargo, es possibleonianle pinto de enfoque tocando la zona en la cui se desea enfocar.Presione dosvecesDICHO botON para regresar al mode predeterminado.
NOTA: Ànge muchos objetivos brindan la posibiliad de ajustar el enfoque electrónicamente, algunos también disponen de un modo manual. En este caso, esnecessarycomprobarqueelobjecto seencuentre enmode automatico.
28 HFR
Utilice este botón para alternar entre-distintas Frequencias de imagen. Paraarlo, selección la fecuencia de grabación en el menu correspondiente de la-camera. Luego, al presionar este botón, se alterna entre la fecuencia de grabación y la del proyecto. Cabe destacar que este ajuste solo pueda modifierse cuando se detiene la grabación.
Consulte elApartado Controles de la pantalla tactil para Obtener mas informacion al respecto.
29 Zoom
Presione este botón a fin de ampliar laImagen a una escala 1:1 paraaabrear el enfoque. Es possible deslizar los dedos sobre la pantalla a fin deaabrear el nivele de aumento.Consulte el apartado correspondiente para Obtener mas informacion al respecto.Notese que es posible ver distinctas partes de laImagen arrastrandola con el dedo Para salir, presione este botónNuevoamente.
30 Menu
Presione este botón para acceder al panel de-option.
31 Reproducción
Presione este botón para acceder al modo de visualización, y cuando una vez más con el propuesto de ver el material grabado en la pantalla de la CAMERA o en cualquier(other dispositivo connectado a la calidad HDMI.
Controles de la pantalla tactil
Characteristicas
La pantalla táctil de los modelos Blackmagic Pocket Cinema Camera offre una interfaz rápida e intuitiva que responde a simples toques o desplazamenti del dedo para facilitar el uso de la CAMERA. Además, permite acceder con rapidez a las unidades que se utilize con mayor Frequencia durante el rodaje.

La pantalla táctil de la CAMERA brinda diversos datos y fácilita el acceso a lasmericanas realizadas con mayor Frequencia.
Monitorización
Pulse el icono situado en la parte superior izquierda de la pantalla para acceder a las options de monitorizacion. Estas permiten personalizar la apariencia de diversas herramrientas que incluyen la funciona Cebra, la cuadrifica, el indicator de enfoque, las guias de encuadre y el falso color. Al acceder a cada una de las OPTIONES, los controlles correspondientes aparecen en pestañas situadas en la parte inferior de la pantalla.


Pulse el icono situado en la parte superior izquierda de la pantalla para acceder a lasustralianes de monitorizacion.
Cebra
Esta option permite activar o desactivar la funciona Cebra y ajustar su intensidad en la imagen Transmitida mediante la calidad HDMI.
Esta funcionaelinesdiagonales sobrelaszonasde la imagenque superanelimits de exposicion preestablecido.Por exemple, al seleccionar 100% ,seindicaran lasareascompletamente sobrepuestos.estoresulta desumautilidad paralograrun niveldeexposacionadequado en conditionesdeilluminationestables.

Pulse el icono de la funcia Cebra en la parte inferior de la pantalla para acceder a los ajustes correspondentes.
Para activar o desactivar esta funciona, pulse el interruptor situado en la esquina inferior izquierda de la pantalla.
Mueva el control deslizante hacer la izquierda o la derecha para modifier la intensidad de las lineas. De forma alternativa, pulse una de las flechas situadas aodos lados del percentaje. Este peute ajustarse en incrementos de 5+puntos porcentuales, y es posible escoger该如何 valor entre 75% y 100% .
Consulte el apartado Ajustes de monitorizacion para Obtener mas informacion al respecto.
SUGERENCIa: Al grabar en conditiones de luz variable, por exemple al aire libre durante un dia parcialmente nublado, la CAMERA podra advertirse sobre una possible sobrexposacion cuando se selecciona un valor inferior a 100 para la referencia Cebra.
Asistente de enfoque
Esta option permite activar o desactivar el indicator de enfoque y ajustar su transparencia en laImagen.

Pulse el icono delindicador de enfoque en la parte inferior de la pantalla para acceder a los ajustes correspondientes.
Para activar o desactivar esta funciona, pulse el interruptor situado en la esquina inferior izquierda de la pantalla.
Para establecer la intensidad del indicator, seleccione una de las options que aparecen en la parte inferior de la pantalla.
La intensidad optima para el indicator de enfoque varia segun la toma. Por exemple, al enfocar a actores o actrices, un mayor nivel可以选择 hacer a melhorar los detailles en los rostros. Por el contrario, si la intensidad es demasiado alta al filmar vegetacion o una pared de ladrillos, es possible que se dificulte la visualizacion deOthers detailles en la imagen.
Consulte el apartado Ajustes de monitorizacion para Obtener mas informacion al respecto.
SUGERENCIA: Los modelos Blackmagic Pocket Cinema Camera-ofrecen dos modos para elindicador de enfoque. En tal sentido, es possible alternar entre las options Indicador y Lineas de color en la pestaña MONITOR.Consulte el apartado Ajustes de monitorizacion en este manual para Obtener mas informacion al respecto.
Guias de encuadre
Estaopyonpermiteverlasguiasdeencuadre enla pantalla u ocultarlas.Tambienesposible seleccionarla para la salivaHDMI de la camarra.
Las guias de encuadre incluyen relaciones de aspecto para el cine, la television e Internet.

Pulse el icono de las guias de encuadro en la parte inferior de la pantalla para acceder a los ajustes correspondientes.
Para ver u ocullar las guas de encuadre, pulse el interruptor situado en la esquina inferior izquierda de la pantalla.
Mueva el control deslizante hacer la izquierda o la derecha para selectionar el tipo de guía. De manière alternativa, pulse una de las flechas situadas aodos lados de la relacion de aspecto seleccionada. Asimismo, es posible introducir una relation de aspecto personalizada pulsando sobre la option entre las flechas.
Las options disponibles son las siguides:
2.35:1, 2.39:1 y 2.40:1
Muestran una relacion de aspecto compatible con la presentacion anamorfica o de pantalla ancha que se utilizes en el cine. Las tres options varian ligeramente segun los Cambios que se han producido en los estandares cinematograficos con el transcirso del tiempo. El estndar 2.39:1 es uno de los mas usados en laactualidad.

Pantalla con la optacion 2.40:1 activada
2:1
Muestra una relacion de aspecto levamente mayor que 16:9, excepta no alcanza la medida del formatting 2.35:1.
1.85:1
Muestra或其他的关联关系。
El ancho es levamente mayor que en losTelevisores HD con una relacion de 1.78:1, excepta no alcanza la medida del formatting 2.39:1.
16:9
Muestra una relacion de aspecto de 1.78:1 compatible con televisores HD y pantallas de equipos informativos cuya relacion es de 16:9. Este formatting se usa generalmente para transmitir contentsos en alta definencia a temas de Internet y la television. Dicha relacion de aspecto también se haadoptado a efectos de la teledifusión en UHD.
14:9
Muestra una relacion de aspecto de 14:9 realizada por algunos canales de television como temino medio entre los formatos 16:9 y 4:3, lo cual brinda una mayor compatibiliad con ambos.Esta option的结果a adecuada si las imagenes van a serTelevisadas por una emisora que utilise dicha relacion.
4:3
Muestra una relacion de aspecto de 4:3 compatible con teilevisores SD y que además facilita el encuadrable利用率 adaptadores anamórficos 2x
1:1
Muestra una relacion de aspecto un poco mas estrecha que 4:3.Esta proportiOn cuadrada es la mas comUn en redes sociales.
4:5
Muestra una relacion de aspecto de 4:5 (vertical), ideal para retratos o contentidos en Telefonos integentes.
Guias personalizadas
A fin de crear guías de encuidre personalizadas para lograr un estudio únicos, pulse el valor de la relacion de aspecto entre las flechas. En la pantalla GUIAS PERSONALIZADAS, borre el valor actual mediante el botón de retroceso e introduzca uno nuevo mediate el teclado número. Pulse ACEPTAR a fin de aplicar los Cambios y continuar grabando.
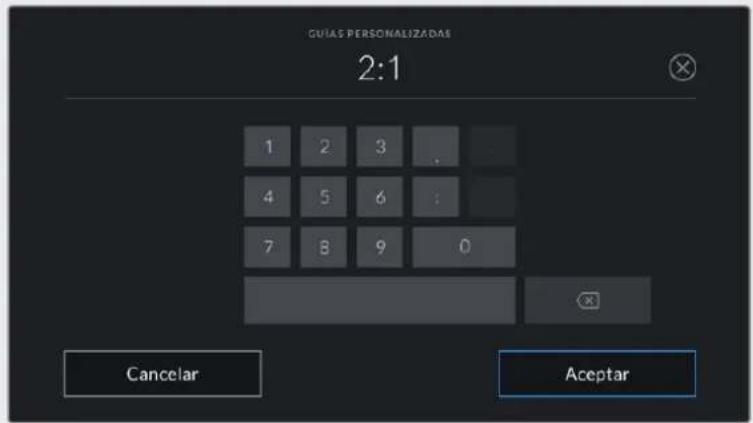
Utilice el teclado número para introducir una relacion de aspecto/distinta.
SUGERENCIa: Es possibleATTER la opacidad de las guas de encuadre.Consulte el apartado Ajustes de monitorizacion para Obtener mas informacion al respecto.
NOTA: Consulte elApartado Ajustes de monitorizacion para Obtener mas informacion sobre las guas de encuadre.
Cuadrúcula
Esta option permite ver una cuadrifica de 3 × 3 (regla de los tercios), una cruz filar, un horizonte virtual o un punto central sobre laImagen visualizada en la pantalla táctil o en los monitores conectados a la CAMERA.

Pulse el icono de la cuadrula en la parte inferior de la pantalla para acceder a los ajustes correspondientes.
Estas guias facilitan la composacion de imagenes. Cuando se habilita esta opticon, es possible ver una cuadrula, una cruz filar o un punto central en la pantalla.
Para ver u ocultar la cuadrifica, pulse el interruptor situado en la esquina inferior izquierda de la pantalla.
Selección una de las-optiones disponibles: Tercios, Horizonte, Cruz o Punto. Al seleccionar Tercios, es possible escoger también entre una de las otheras tres optiones, logrado de este modo una combinacion de ajustes.
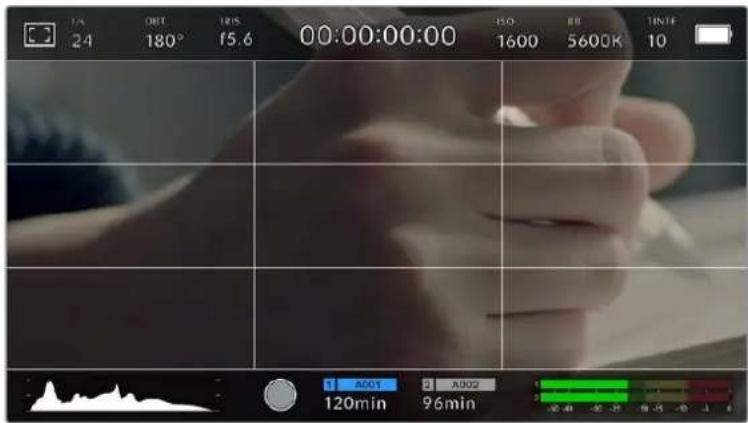
La cuadrula correspondiente a la regla de los tercios se ajusta automatically a las guías de encuadre visualizadas en la pantalla.
Tercios
Estaopsis meastra dos linhas verticales y dos linas horizontales superpuestos en cada tercio de la imagen, y es una herramienta sumamente conveniente para composer planos. Por example, el ojo humano usualmente detecta el movimiento cerca de los+puntosdonde se intersectan las lineas, y por ello resulta de gran utilitydo para situar centros de interes en estas zonas. Por lo general, el horizonte de visiOn del actor se ubica en el tercio superior de la pantalla, de manera que es possible utilizez esta parte como guia para el encuadre. A su vez, la cuadrula permite mantener la consistencia entre las distinctas tomas.
Horizonte
Esta option帮你 alemuter la webcam nivelada al sostenerla con la mano y a calibrar su inclinacion al colocarla en un estabilizador.
La direccion en la cuales la linea vertical se distancia de la cruz en el centro indica la inclinacion de la CAMERA. Cuando la CAMERA está inclinada hacia arriba o abajo, dicha linea horizontal se desplaza en sentido opuesto.
La distancia que separe la linea de la cruz filar es proporcional a la inclinacion. Una vez calibrado el sensor de movimiento de la CAMERA, la linea vertical se destacara en azul cuando laamera está alineada con el eje Z, y lo mesmo sucede con la linea horizontal, a fin de indicar su alineacion con el eje X.
Cabe destacar que si la CAMERA se encuentra enfocando hacer abriba o abajo para filmar una toma desde un angulo elevado,elindicador del horizonte virtual tendraesto en cuesta. Si se gira la CAMERA 90 grados para grabar en modo retrato, elindicador también rotará.
Lasuma tabla muesa ejemplos del horizonte virtual con distinctas inclinaciones de la camarra.
Indicador Descriplcon

Nivelada

Inclinada hacía abajo y nivelada

Girada hacía la izquierda y nivelada

Inclinado hacia arriba y girada a la derecha
Para un uso normal de la CAMERA, calibre elindicador deundry que quede derecho y nivelado. Si deseautilizarelindicadorparamantenerunplanoholandesouinainclinacionconsistente, a fin de realizar tomas con un angulo determinado, es possible calibrarlo con un valor especialico. Consulte el apartado Calibracion del sensor de movimiento para Obtener mas informacion al
respecto.
Cruz filar
Estaopyrmeveruna cruz filar enel centro de la imagen.Aligualque la cuadrula, es una herramienta muyutil para componer planos y centrar objetos deinteres.Seutiliza amenudo al filmar escenas en las que se implementarancortes rapiidos.Estohace posible que elexpectadormantenga su atencion enel centro de la imagen cuando el material editado contiene transiones rapiidas entre distinctos planos.
Punto
Estaopyonpermiteverunpuntoenelcentrodelaimgen.Funcionade la misma formaque la cruz filar,auqualesermaspequeño,resultamenosinvasivo.
SUGERENCIA: Consulte el apartado Ajustes de monitorizacion para Obtener mas informacion sobre la cuadricula.
Área de seguidad
Esta optacion permite estar u ocultar el area de seguridad en la pantalla tactil, asi como ajustar su時間 en las imagenes Transmitidas a工程技术 de la calidad HDMI.
El area de seguidad se utilize durante las producciones para garantizar que las partes mas importantes de un plano peuvent ser vistas por los expectadores. Manteniendo los elementos mas destacados bajo de la misma, es possible evaporar que se pierdan partes de la imagen enTelevisores de mayor antiguedad, y ademas se proporciona un espacio adicular para que las teledifusoras puedaagarlogos,textosmobilesuotro tipo de informacion enla pantalla.Muchas emisoras exigen que los contentidos importantes en el material grabado,tales como tildos ygraficos,estén bajo del area de seguidad.
Estaopydonalso puee serutil para ayudar a encapsrar las imagenesi siete la certeza de que se van estabilizar durante la posproduccion, ya que durante este proceso es posible que sus cordes se recorten. Asimismo, sirve para indicar un tipo de recorte especialico. Por exemple, si se ajusta a 50% al grabar en UHD (3840 x 2160), es possible ver como quedaria la imagen con una resolution de 1920× 1080 . Cabe destacar ademas que el area de seguridad se ajusta segun la)。opacion seleccionada para las guias de encuadre.
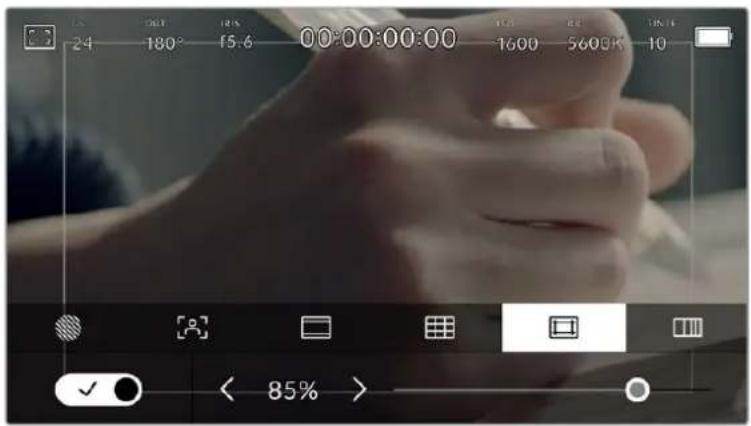
El valor para este indicator es de 85%.
Para activar o desactivar esta funciona, pulse el interruptor situado en la esquina inferior izquierda de la pantalla. Pulse las flechas situadas aodos lados del percentaje en la parte inferior de la pantalla para embarir la intensidad del area de seguidad en las imagenes Transmitidas a trovés la calidad HDMI. De forma alternativa, mueva el control deslizante hacla izquierda o la derecha.
Falso color
Esta option permite ver en la pantalla táctil un diagrama que Facilita la exposión por medio de-coloredos falsos.
Esta herramipta superpone differsentes-coloredes en la imagen para representar losvalores de exposicion correspondientes a diversos elementos. Por exemple, el rosa representa un nivel de exposacion ideal para tonos de piel mas claros,minteras que el verde es adecuado para matices mas oscuros.Al observar dichos colores cuando se filma el rostro de una persona,es possiblemantener un rango de luminancia y brillo constante en este elementospecifico.
De manière similar, es possible identificar las areas sobrexpuestos de laImagen cuando el color cambia de amarillo a rojo.
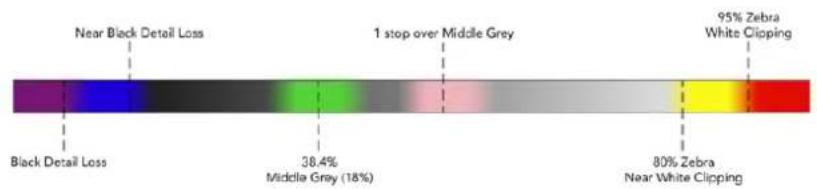
Diagramade colorsfalsos
Para activar o desactivar esta funciona, pulse el interruptor situado en la esquina inferior izquierda de la pantalla.

Interruptor para activar o desactivar lamerican de falso color
Fotogramas por segundo
El indicator f/s muestra la Frequencia de imagen seleccionada en fotogramas por dato.

Pulse el icono de frequencia de imagen para acceder al ajuste correspondiente.
Al pulsar el indicator f/s, es possible modifier los values para el sensor de la CAMERA y la Frequencia deImagen del projeeto mediante las options en la parte inferior de la pantalla.
Frecuencia de Imagen del proyecto
Se tratate de la Frequencia de imagen del formato de grabacion seleccionado en la camera para el projector y permite elegir entre differentes velocidades comunmente realizadas en la Industria del cine y la television. Normalmente, este valor se ajusta deforma que coincida con el que se emplearará durante la posproduccion.
Las ocho optiones disponibles para este ajuste son: 23.98, 24, 25, 29.97, 30, 50, 59.94 y 60 f/s.
Paraaabstareste parameetro,pulseuna de las flechas situadas a ambos lados del valor correspondientea la fecuencia de imagen en la parte inferior de la pantalla.De manera alternativa, ).nueva el control deslizante hacla la izquierda o la derecha.

Para realizar ajustes, mueva el control o pulse las flechas situadas a ); ), a ; a ; a ; a ; a ; a ; a ; a ; a ; a ; a ; a ; a ; a ; a ; a ; a ; a ; a ; a ; a ; a ; a ; a ; a ; a ; a ; a ; a ; a ; a ; a ; a ; a ; a ; a ; a ; a ; a ; a ; a ; a ; a ; a ; a ; a ; a ; a ; a ; a ; a
SUGERENCA: La fecuencia de imagen seleccionada para la grabacion determina la de las imagenes transmitidas mediante la calidad HDMI.
Frecuencia deImagen del sensor
Este ajuste determina la cantidad de fotogramas que capta el sensor cada segundo, lo cual incide en la velocidad de reproduccion de las imagenes según la fecuencia selecciónada para el proyecto.
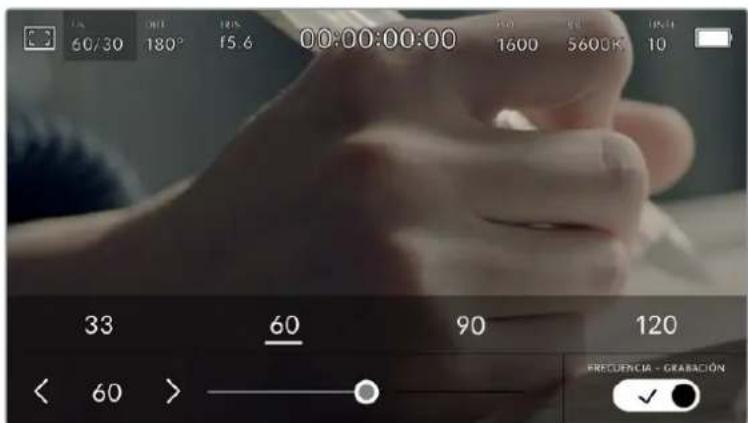
Si la option FRECUENCIA - GRABACION está activada, pulse un ajuste o las flechas situadas a旮los lados del valor correspondiente a la fecuencia de imagen ouate el control deslizante para realizar ajustes.
Por defecto, la fecuencia de imagen del sensor y del proyecto coinciden, a fin de que el material grabado se reproduzca a una velocidad normal. Sin embargo, al activar la option
FRECUENCIA - GRABACION en el menu f/s, se pueda determinar values importantes para这些 parámetros.
ParaATTER la fecuencia de imagen del sensor, pulse las flechas situadas a ambos lados del indicator en la parte inferior de la planta. Internacional es posible mover el control deslizante hacer la izquierda o la derecha para augmentar o disminuir dicho valor. Al qutar el dedo de la planta, la fecuencia de imagen para el sensor quedará seleccionada. Por otherado, arriba del control deslizante se brindan distinctas options comunes basadas en la fecuencia de imagen del proyecto.
Es possible crear efectos dinamicos e importantes Cambiando la fecuencia deImagen del sensor. Si este valor es mayor para la grabacion que para la reproduccion, se generate un efecto de camaralenta. Por example, al elegir una fecuencia de 60 f/s para el sensor y de 24 f/s para el proyecto, las imagenes se produciran un 40% mas lento que la velocidad real de la action. Por el contrario, cuando menor sea la fecuencia deImagen seleccionada para el sensor, mayor sera la velocidad de reproduccion del material grabado. Este principio se asemeja a la operacion mecancia de modifierla velocidad de giro de la cinta en una camaral cinematografiaica antigua. Mover la manivela mas rápido,aumenta la cantidad de fotogramas que capta el sensor,de mannersque es possible prolongardeterminadas escenas durante la reproduccion,afin de realizar suarga emotiva.Reduciendo el ritmo de giro,se disminuye la velocidad con el proposto de destacar la action en secuencias conmovimientos rápidos.Las posibilidades creativas son infinitas y dependen Completely de cada usuario.
Consulte la tabla en elApartado Grabacion para Obtener mas informacion sobre las fecuencias de imagen.
NOTA: Al seleccionar la option FRECUENCIA - GRABACION, el audio y laImagen no estaran sincronizados. Esto suece incluo al configurar la mesma fecuencia de imagen para el sensor y el proyejo. Por tal motivo, evite selectionar esta referencia si desea mantener dicha sincronizacion.
Obturador
El indicator OBT. muestra el ángulo o la velocidad de obturación. Al pulsarlo, es posible modifierdicho valor o seleccionar uno de los modelos disponibles para la exposión automática. Por su parte,la optación Valor de obturación permite escoger cuales de这些 parámetros muestra el indicator.Consulte el apartado Ajustes generales para Obtener más información al respecto.

Pulse el indicator OBT. para acceder a los ajustes correspondientes.
El ángulo o la velocidad de obturación define el rastro que deja los objetivos en movimiento y pueda utiliser para compensar loseturnos en las conditiones de iluminación. El valor más adecuado en la mayoría de loscasos es de 180grados,minteras que el equivalente para la velocidad de obturación es de 1 / 50 s.Sin embargo,puederesultar Necasarioajustarlo si dichas conditionescambian.
Por exemple, a un valor de 360 grados, el obturador está Completely abierto y permite que el sensor capte una mayorancia de luz. Esto的结果a adeuado en escenas con escaso movimiento yoca iluminacion. De forma alternativa, al filmar escenas con una granancia de movimiento, un ángulo de obturación menor de 90 gramos brinda la posibiliad de eliminar el rastro quedeoan los objetos y conseigir imagenes mucho mas nitidas. La velocidad de obturación correspondiente al ángulo de obturación depende de la Frequencia de imagen empleada.
Por exemple, al grabar a 25 f/s, 360 grados equivalen a 1/25 s, y 90 grados a 1/100 s.
NOTA: Al grabar con luz artificial, el ángulo de obturación puede afectar la visibiliad del parpadeo. La CAMERA calcula automatistically los values de obturación sin parpadeo para la Frequencia deImagen seleccionada yuya hasta tres OPCIONES en la parte inferior de la pantalla. Estas dependerán de la Frequencia electrónica realizada en cada region. En este sentido, el menu de configuración de la CAMERA permite selectionar las OPCIONES 50Hz o 60Hz . Consulte elApartado Ajustes generales para Obtener más información al respecto.
Al pulsar el indicator OBT., aparecen多人eros valores de obturacion sugeridos en la parte inferior de la pantalla. Si la function de exposacion automatica está desactivada, se做不到a la velocidad realizada bajo con los values que permiten eliminar el parpadeo en la imagen, segun la fecuencia electrica seleccionada en el menu de configuracion de la camera. Consulte el apartado Ajustes generales para Obtener mas informacion al respecto.
NOTA: Las caracteristicas de ciertas fuentes de luz peuvent occasionar parpadeo, inclujo al utiliser ángulos de obturación que permiten estar este artefacto. Si no se'utilizan luces continuas, recommendamos realizar primero una grabación de prueba.
Para seleccionar una velocidad de obturacion sin parpadeo, pulse uno de los valores que se muestran en la pantalla. Las flechas situadas aodos lados del indicator permiten alternar entre algunos de los ajustes mas utilizados.

La webcamarerecomendaracieritosvaloresbasadosenlafrecuencia electrica seleccionada enelmenudef configuracion.
Al filmar en exteriores o con luces que no Causean este problema, el valor de obturacion peut determinarse pulsando dos veces el indicator situado en la parte inferior izquierda de la pantalla. Aparecer a un teclado numero que permite ingresarrialo entre 5 y 360 grados.
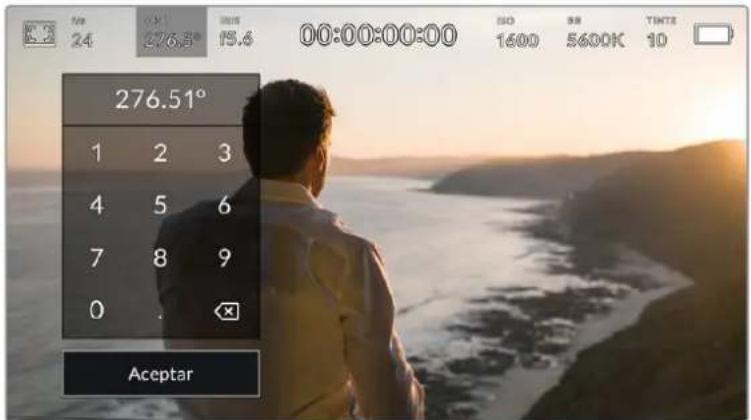
Utilice el teclado número para determinar el ángulo de obturación al filmar en exteriores o con luces que no Causean parpadeo en laImagen.
Los modelos Blackmagic Pocket Cinema Camera-ofrecen tres发展模式 de exposión automatística. Para selecciónar uno de ellos, pulse el interruptor EXPOSICION AUTOMÁTICALA en la esquina inferior derecha de la pantalla.
Obturador
Estaopyonpermiteajustarautomaticamenteelvalordeobturacionparamantenerlaexposionsin modifier la aperture del diafragma. estaresulta adecuada cuando esnecessary conservar la profundidad deCampo.Cabe destacar que qualquierajuste sutil del obturadorpuedeafectar el desenofoque dinamico.Asimismo,alrodar eninteriores,esimportanteverificarque lasfuentes deluz no generen parpadeo en la imagen.Notese que laoptiondeajuste automatico del diafragma no está disponible al seleccionar este modo.
Obturador y dlafragma
Laopia. + irs permite mantener una exposacion adecuada ajustando primo el valor de obturacion y bajo la apertura del diafraqma. Cuando, a pesar de haber alcanzado el nivel maximo o minimo de obturacion, no es posible mantener la exposacion, la camera intentara ajustar la apertura del diafraqma para lograr dicho objetivo.
Diafragmay obturador
Laopia Iris + obt. permite mantener una exposacion adecuada ajustando primero la apertura del diafragma y bajo el valor de obturacion. Cuando, a pesar de haber alcanzado el nivel maximo o minimo de apertura, no es possiblemanter la exposacion, la camera intentara ajustar el valor de obturacion para lograr dicho objetivo.

En el menu OBTURADOR, pulse la option EXPOSICION AUTOMÁTICA para acceder a losDistinctos发展模式obturación.
SUGERENCA: Al activar el modo de exposión automatica, que afecta tanto al obturador como al diafragma, aparecerá la letra A+junto al indicator correspondiente en la parte superior de la pantalla.
Diafragma
El indicator IRIS muestra la aperture del diafragma. Al pulsarlo, es posible modificar este valor en objetivos compatibles y seleccionar distinctos发展模式 de exposacion automática.

Pulse el indicator IRIS para acceder a los ajustes correspondientes.
NOTA: Paraaabstar la apertura del diafragma de la pantalla tactil,es precisoutilizar un objetivo compatible con esta functiOn.
Al pulsar el indicator IRIS, aparecen diversas options para la aperture del diafragma en la parte inferior de la pantalla. A la izquierda, se muestra el valor actual. Para modifierlo, pulse las flechas situadas aodos lateros del mesmo o mueva el control deslizante.

Utilice las flechas situadas atherslados del valor de aperture o el control deslizante para modifierlo.
Al pulsar el interruptor EXPOSICION AUTOMÁTICA situado en la parte inferior derecha de la pantalla, es possible acceder a las siguientes OPCIONES de exposión automática.
Diafragma
La.option IRIS permite ajustar automatistically la aperture del diafragma para mantener la exposión sin modifier el valor de obturación. Esto brinda la posibiliad de conservar un desenoque dinámico constante, peroeditha afectar la profundidad de camino.
Dlafragma y obturador
La.option Iris + obt. permitemanterunaexposiOnadecuadajustandoprimero laapertura del diafragma yuego el valor de obturacion.Cuando,a pesar de haber alcanzadoel nivel maximo o minimo de apertura, no es possiblemantenerlaexposiOna-cameraintentarajustarel valor de obturacion para lograr dicho objetivo.
Obturador y dlafragma
Laopia. + irs permite mantener una exposacion adecuada ajustando primo el valor de obturacion y bajo la apertura del diafragma. Cuando, a pesar de haber alcanzado el nivel maximo o minimo de obturacion, no es posible mantener la exposacion, la camera intentar aajustar la apertura del diafragma para lograr dicho objetivo.

En el menu IRIS, pulse la option EXPOSICION AUTOMÁTICA para acceder a losDistinctosmosdeexposión automática.
SUGERENCA: Al activar el modo de exposión automatica que afecta tanto al obturador como al diafragma, aparecerá una leyra A+junto al indicator correspondiente en la parte superior de la pantalla.
Duración
Este indicator se encuentra en la parte superior de la pantalla.

Se enciende de color rojo cuando la CAMERA está grabando.
El indicator permite verficar la duracion de los clips y controlar el numero de tiempo durante la grabacion o la reproduccion. La secuencia temporal se expresa en horas, instantos, segundos y fotogramas, y este valor cambia al grabar o reproducir clips. Cabe signaled que el numero de tiempo se muestra en rojo durante la grabacion.
Este valor comienza en 00:00:00:00 e indica la duración del clip actual o delultimate que se haya grabado. Además, se incluye la hora en los metadatos, a fin de simplificar la etapa de producción.
Pulse el indicator para ver el número de tiempo. Pulselo nuevomente para regresar a la duración de la grabación.
Al conectar una unidad Blackmagic Pocket Cinema Camera al modelos ATEM Mini, en la pantalla se indica, bajo del número de tiempo, si la postal transmitida por la CAMERA está al aire o si seoca de un anticipo, fácilando de este modo laarea del operador. Por su parte, el mezclador sincrioniza automatamente el número de tiempo de lascapturas para que coincida con el del dispositivo al conectarlas. Este permite editor secuencias multicamara con precision en DaVinci Resolve.
Junto a la duración, pueda aparecer los siguientesindicadores:

Aparece a la izquierda de la duracion al reducir el area aprovechable del sensor.

Aparece a la referencia de la duración cuando se muestra el número de tiempo.

Aparece a lacke de la duracion al detectarse un numero de tiempo longitudinal valido conectado a la entrada de 3.5mm o si este se ha sincronizzato mediante un mezcludor ATEM Mini.

Aparece a la referencia de la duración cuando la CAMERA funciona con un número de tiempo interno, luego de sincronizarla y desconectarla.
ISO
El indicator ISO muestra la sensibilitad fotometrica. Al pulsarlo, es possible modifier este valor según las conditiones de iluminación.

Pulse el indicator ISO para acceder a los ajustes correspondientes.

Las options disponibles para el valor ISO aparecen en la parte inferior de la pantalla. El control desllzante bajo de las optiones predeterminadas permite ajustar el valor ISO en incrementos de 1/3.
En func i de las circunstancias, es possible seleccionar distinctos valores. Por ejemplo, un indice de 25600 podria resultar apropiado en conditiones de luz esca, pero a su vez es posible que genere algo de ruido en la imagen. Al filmar con buena iluminacion, se recomienda elegir un valor ISO de 100 para Obtener colocres mas intensos.
ISO native dual
Los modelos Blackmagic Pocket Cinema Camera-ofrecen un valor ISO nativo dual de 400 y 3200. Por consiguiente, el sensor ha sido optimado para grabar tanto aplen luz del dia como en conditiones de esca sa iluminacion.
Alaabstara sensibilidad ISO segun las conditiones de illumination,esta funcion se activa automatically para garantizar que el material grabado sea nitido y presente la menorcantidad de ruido possible.
Al configurar la sensibilitad entre 100 y 1000, la CAMERA usa un ISO nativo de 400 como punto de referencia, cuando que, para el intervalo de 1250 a 25600, se emplea un valor de 3200. Si las conditiones del rodaje permiten elegir tanto un valor de 1000 como de 1250, recomendamos selectionar esteultimate y cerrar la aperture del diafragma un caso. Estó hara que la CAMERA utilise un ISO nativo de 3200, logrado asiolestores resultados.
Las siguientes graficas muestran la relacion entre la sensibilitidad ISO y la asignacion del rango dinamico.
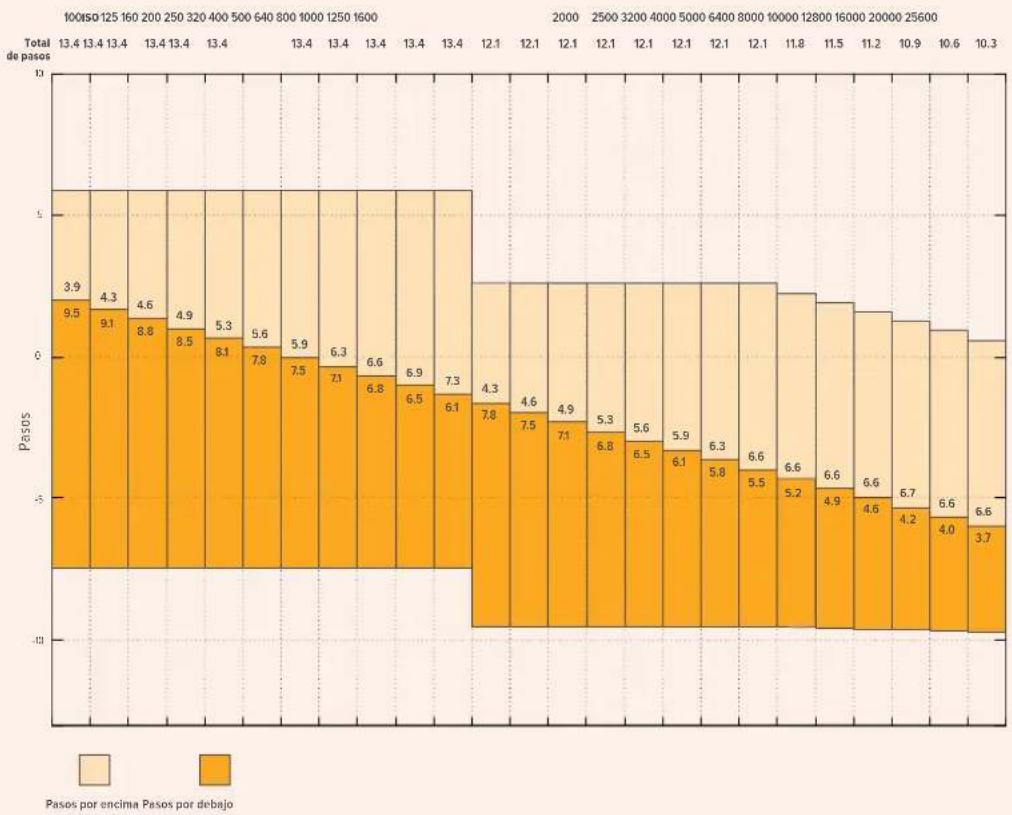
Blackmagic Pocket Cinema Camera 6K: Rango dinamico
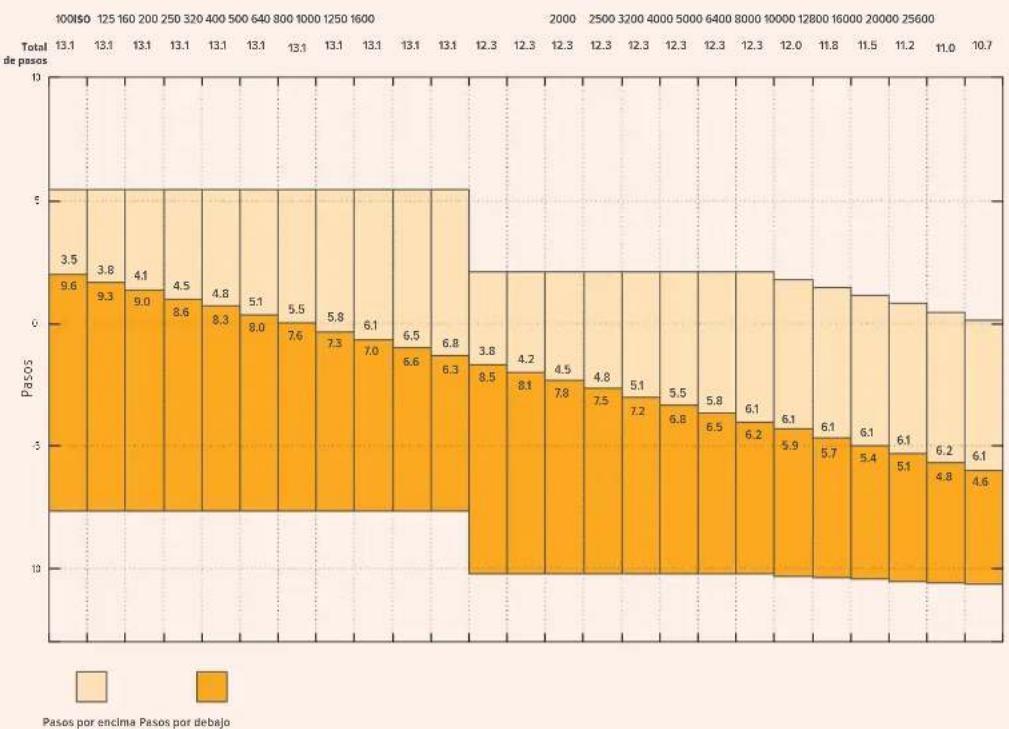
Blackmagic Pocket Cinema Camera 4K: Rango dinamico
Balance de blancos
Los indicadores BB y TINTE muestran los values para el balance de blancos y el matiz, respectfully. Al pulsarlos, es possible realizar ajustes según las conditiones de iluminación.

Pulse los indicadores BB y TINTE para acceder a los ajustes de balance de blancos y tinte correspondientes.
Cada fuente de luz emite un color. A modo de exemple, la luz de una vela emite un color calido, cuando que un cielo cubierto por nubes emite un color frio. El balance de blancos se usa para ajustar los colores y evaporar asi que el blanco adopts otheras tonalidades. Esto se consigue modificando la mezcla de azul y naranja en laImagen. Por example, al filmar bajo lamparas de tungsteno que emiten una luz calida anaranjada, un valor de 3200 K permite Obtener una imagen más azulada. Esto permite equilibrar el balance cromático deundry que el blanco se registre con precision.
Los modelos Blackmagic Pocket Cinema Camera incluyen valores predeterminados para differedes temperatas de color, segun se indica a continuacion:
| Luz solar brillante (5600 K) |
| Bombillas Incandescentes (3200 K) |
| Bombillas fluorescentes (4000 K) |
| Mezcla (4500 K) |
| Nubes (6500 K) |
Para personalizar cuales quiera de estas options, pulse o mantenga presionadas las flechas situadas aodos lados del valor correspondiente a la temperatura cromatica en la parte inferior izquierda de la pantalla. Al pulsar una de las flechas, este aumento o disminuye 50 K. Almanterlas presionadas,icho valor cambia masrapido.De manera alternativa,este parametro se pueb modifier moviend el control deslizante.
Tambien es possible modifier el matiz para realizar ajustes con mayor precision. Este brinda la posibiliad de mover la proportiOn de verde y magenta presentes en la imagen. Por exemple, al añadir más magenta, se compensate la tonalidad verdosa de las luces fluorescentes. La mayoría de las configuraciones predeterminadas para el balance de blancos que ofrece la CAMERA presentan un cierto matiz.

Al pulsar los indicadores BB y TINTE, es possible acceder a cinco configuraciones predeterminadas o modifieros parámetros en forma individual. Realice los ajustes你需要os segun las condidiones de iluminacion.
El matiz se muestra en la parte inferior derecha de la pantalla. Para ajustarlo, pulse o mantenga presionada una de las flechas situadas aodos lados del valor. El rango disponible va de -50 a +50 en incrementos de una unidad. Almanter una flecha presionada,icho valor cambia mas rápido.
NOTA: Al modifier el matiz o el balance de blancos, la configuracion predeterminada cambia a CWB, o balance de blancos personalizzato. Estos ajustes no se veran afectados si se reinicia el dispositorio o se elige otra option, lorial facilita la comparacion entre distinctos valeurs.
Balance de blancos automatico
Los modelos Blackmagic Pocket Cinema Camera能把 ajustar el balance de blancos de forma automática. Al pulsar la option AWB, se accede a las.optiones disponibles para este parámetro.
Cuando el balance de blancos se determina automatistically, va un cuadrado en el centro de la imagen. Hagalo coincidir con una superficie neutral de color blanco o gris y bajo pulse el botón ACEPTAR. La CAMERA ajustara el balance de blancos y el matiz automatistically para garantizar que la predominancia de dichos-coloredes Dentrol cuadrado sea lo mas neutral possible. Una vez finalizo el proceso, these values seutilizaran en forma predeterminada al grabar. Tantién es possible activar esta optionmantiendopresionadoelbotonBBenla parte superiordela-camera durante tres segundos.
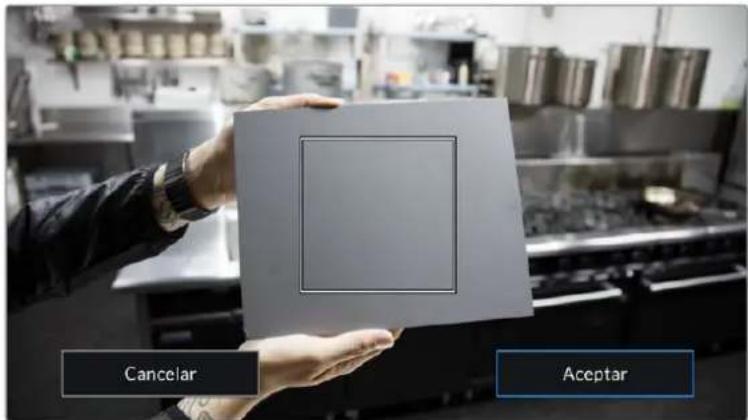
Al pulsar la option AWB, se accede a las options disponibles para el balance de blancos automatico. Utilice una superficie gris o bianca para establecer un valor neutro.
Alimentación
La fuente de alimentacion y el estado de la bateria se indican en la esquina superior derecha de la pantalla.

Si se utilizes una batería, al pulsar el indicator se muestra el voltaje y la carga restante.
| AC | Corriente alterna | Indica que la*camera estáconectada a la red de suministroelectrico. |
| AC | Corrlente alterna/cargando | Indica que la*camera estáconectada a la red de suministroelectrico ycargando la batería LP-E6extraible o las versionesNP-F570 enla empuñadura Blackmagic Pocket Camera BatteryGrip. |
| 50% | Porcentaje | Elicono做不到el percentaje de carga restante si la bateríalo permite. Cuando this valor disminuye a 20%, elindicador seenciende de color rojo. Para ver u ocultar esteindicador, pulseel icono de la batería. |
| 16.4v | Barras | Cada barra en el icono de la batería corresponde a un 25 % de su energia. Cuando este valor disminuya a 20 %, el indicator se enciende de color rojo. |
| Barras de la empuñadura para baterías | En caso de estaremployando una empuñadura Blackmagic Pocket Camera Battery Grip, las barras indicaran el estado de ambas baterías deforma independiente. | |
| Voltaje de la fuente de alimentación | Este valor indica el voltaje suministrado por la batería o un adaptador de corriente continua, un cable adaptador connectado a la calidad D-Tap u other accessory personalizzato. Para activar o desactivar este indicator, pulse el icono de la batería. |
Indicador LUT
Al embaruar una tabla de conversion (LUT), la CAMERA做不到 un icono en la esquina superior izquierda de la pantalla.

Histograma
El histogram de la SERIALmente possible appreciarse en la parte inferior de la pantalla. Este permite ver el contraste entre las luces y las sombras a lo largo de una linea horizontal.
El histogram proporcióna una indicación del rango de tonalidad entre las zonas más claras y oscuras de la imagen. Además, es una herramlienta muyutil para verficar el balance de la exposión y evitar que se pierdan detalles en las partes más luminosas.
El extremo izquierdo corresponde a las partes más oscuras de laImagen,@m间隙 que el derecho representa las zonas más claras. Al modifier la aperture del diafragma, es possible ver como los valores se desplazan hacía la izquierda o la derecha, según corresponda. Este brinda la posibili-dad de verificar que no se pierden detalles en las partes más brillantes y oscuras de laImagen. Si los extremos de la grafica se cortan abruptamente en lugar de disminuir en forma gradual, es probable que haya una perdida de informacion.
NOTA: Si no se ve el historograma en la parte inferior izquierda de la pantalla, es possible que la optación Códec y resolution está activada en los ajustes de monitorización. Consulte elApartado Ajustes de monitorización para Obtener más información al respecto.
Botón de grabación
El botón gris situado+junto al historograma en la parte inferior de la pantalla permite grabar imagenes. Pulselo una vez para comenzar la grabación. Para detenerla, pulselo nuevomente. Al grabar, el botón y el número de tiempo en la parte superior de la pantalla se ven de color rojo.

1 A001
120min

A002
96min
Botón de grabación, jusqu'à los indicadores de los soportes de almacenimiento en la parte inferior de la pantalla.

1 A001
120min

A002
96min
El botón se enciende de color rojo al grabar.
LUT aplicada
La pantalla indica si se ha aplicado una tabla de conversion (LUT) al material grabado.
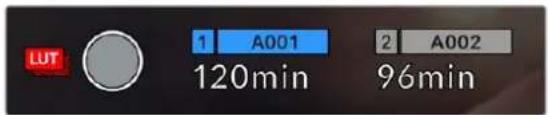
El icono LUT indica que se ha aplicara una tablet de conversion al material grabado.
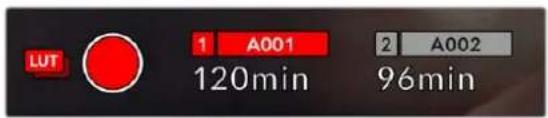
El icono LUT indica que se está aplicando una tabla de conversion al material grabado.
Fotogramas omitidos
Si se detectan fotogramas omitidos al filmar, aparecerá un signo de exclamación en forma intermitente sobre el botón de grabación. El indicator del tiempo restante correspondiente à launidad afectada también se encenderá de color rojo. Por exemple, si se omiten fotogramas al grabar en la tarjeta CFast, el signo de exclamación aparecerá sobre el botón de grabación, y el indicator de la tarjeta se encenderá de rojo. Estó permitted saber si una determinadaunities de almacenamento esdemasiado lenta para el formatting y la resolution que se han seleccionado. El indicator tambiénaparece si se detectan fotogramas omitidos en el material grabado. Este permaneceré en la pantalla hasta que se grabe other clip o se apague la CAMERA. Consulate los apartados referentes a la elecciónde soportes de grabacion para Obtener mas informacion al respecto.

1 A001
120min

A002
96min
Indicador de fotogramas omitidos en la tarjeta CFast
NOTA: Es possible configurar la CAMERA para que deje de grabar si se detectan fotogramas omitidos, a fin de estar que el soporte de almacenimiento selene con material inutilizable. Consulte elApartado Ajustes de grabacion para Obtener mas informacion al respecto.
Tiempo de grabación restante
Al insertar una tarjeta SD o CFast en la CAMERA o conectar unaunidad USB-C, la pantalla muestra el tiempo de grabación restante. Dicho valor se indica en menos y varía según la Frequencia deImagen y el formatting的选择。Asimismo, el tiempo restante se calcula automatistically alchangar cualquier idea de los parámitos. El indicator se enciende de color rojo cuando quedenapostado 5 instantos y parpadea cuando el tiempo de grabación restante es menos de 2 instantos. Si la�性 noiene mas capazidad, la pantalla muestra elsignificante mensaje: LLENA.

La pantalla de la-camera indica el nombre de las unidades de almacenimiento y el tiempo de grabacion restante en horas.
El nombre de la unidad de almacenimiento aparece en una barra(PC)quebe sobre el tiempo de grabacion restante. esta se enciende de color azul cuando la camera essta lista para grabar en dicho soporte. Para grabar en una unidad differente, mantenga presionado el nombre de la misma.Durante la grabacion, la barra se enciende de color rojo.
Al pulsar el indicator de la unidad, es possible acceder a las options de almacenamento y al menu para formatearla.
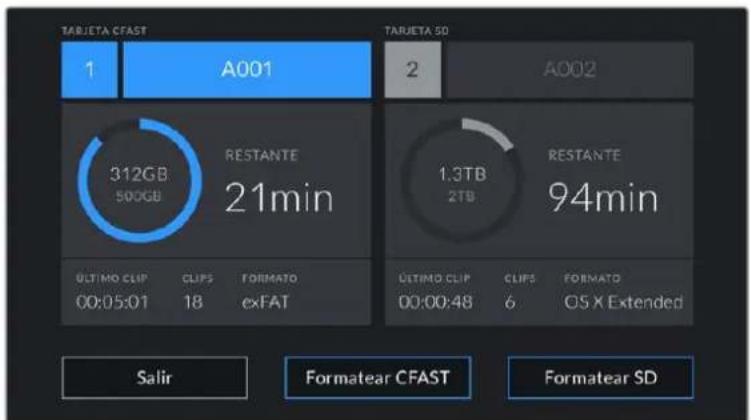
Pulse el Indicador correspondiente al soporte de grabacion en la parte inferior de la pantalla a fin de acceder a las options para dicha unidad.
Este menu muestra el espacio disponible en cada unidad, su nombre, la duración delultimate clip grabado, la cantidad de clips almacenados y el sistemasutilizzato para darle formato.
Asimismo, es possible formatear los soportes de grabacion mediante dicho menu. Consulte el apartado Preparacion de soportes de grabacion para Obtener mas informacion al respecto.
SUGERENCIa: Pulse el nombre de la unidad en el menu de almacenimiento para activarla. La CAMERA grabará primero en dicho soporte.
Vumetros
Los vúmetros muestran la intensidad del audio para los canales 1 y 2 al utilizar el micrófono de la webcam o conectar+fuentes externas. Este parámetro se mide en dBFS (decibelios a escalacompleta) y, al alcantar su nivel maximalo, se enciende un indicator que permanece iluminado brevemente.
Mantenga la intensidad del volumen por debajo de los 0 dBFS para Obtener una mejor calidad de audio. Este valor correponde al nivel máximo al cui la CAMERA pueda registrar el sonido, y si se exceede, podra occurrir una distorsión.
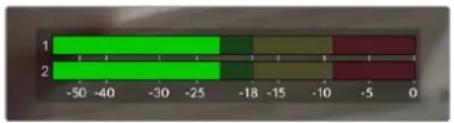
Las barras de color del vúmetro representan la intensidad del audio. De ser posible, el volumen máximo no debe exceder la zona verde superior. Si los picos de la SERIAL alcancan la zona amarilla o roja, podra occurir una distorsión.
Al pulsar el vumetro, es possible acceder a los 控les para los canales 1 y 2, el altavoz o los auriculares.
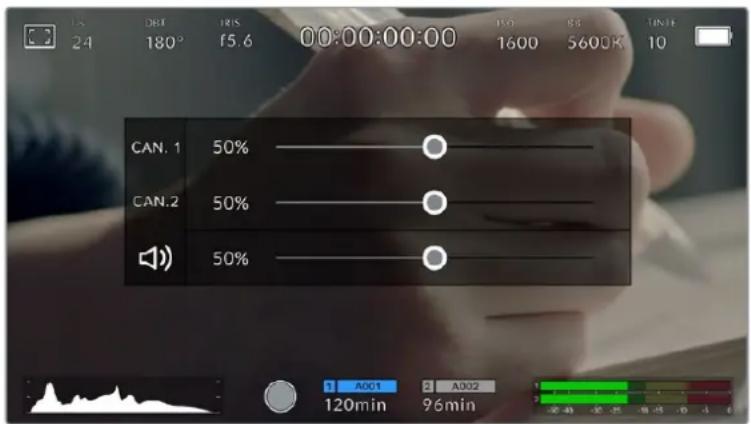
Pulse los yumetros en la pantalla, a fin de acceder a las OPCIONES para el volumen, el altovoz y los auriculares.
Pulsar dos vezes para ampliar la imagen
Es posible ampliarrialquier parte de la imagen visualizada pulsando dos vces la pantalla.Deslice el dedo sobre la misma para desplazar la imagen. Esto es desumautilidad alcomprobarel enfoque Para volver al tamenio original, pulse la pantalla-Newamente dos vces.
Pellizcar para ampliar la imagen
Es possibleaabstarenlveldeampliaciondelaimengendiente la pantalla tactilusando distinctos gestos. Estnoaffecta alasnal transmitida por la salivaHDMI.
Paraacular imagen al doble, pulse dos vces la pantalla o presione el boton ZOOM en el panel trasero de la camera. A continuacion, con dos dedos «pellizque» la pantalla a fin de ajustar el nive del amplacion. Es possible arrastrar los dedos sobre la misma para ver distinctas partes augmentadas de la imagen. Para volver al timeño original, pulse la pantalla-Newamente dos vces o presione el boton ZOOM.
Al pulsar dos vezes la pantalla o presionar el botón ZOOM, se alterna entre el nivel de ampliación anterior y el時間 original de laImagen. Por exemple, si se «pellizca» la pantalla paraacular laImagen ocho vezes, al pulsarla otheras dos se做不到a laImagen original, y al hacerlo可以更好, la version augmented.
Pulsar para enfocar
Es posible embarir el punto de enfoque tocando y manteniendo presionada la parte de la imagen en la pantalla sobre la cuales se desea enfocar. Presione el boton de enfoque para enfocar el objetivo en el elemento desado. Presione dos veces dicho boton para regresar al modo predeterminado.
Modo de pantalla completa
Al enfocar o encuadrar un plano, pueda resultar utilise ocultar provisoriamente el,texto y los indicadores que aparecen en la pantalla. Paraarlo,deslice el dedo hacer arriba o abajo sobre la mesma.Notese que los indicadores de grabacion y enfoque,las guias de encuadre y las rayas diagonales de la referencia Cebra permaneceran visibles.
Para volver a ver dichos elementos,(deslice nuevamente el dedo hacía arriba o abajo sobre la pantalla.

Deslice el dedo hacia arriba o abajo sobre la pantalla para ocultar las options.
Reproducción
Presione el boton de reproduccion para acceder al menu correspondiente. La reproduccion de las imagenes grabadas con anterioridad可以使 controlarse mediante los botones de laamera o la pantalla tactil.
En esteultimate caso, pulse el boton de reproduccion para ver el clip grabado, y-Newamente para detenerlo. Utilice los botones de avance o retroceso para ir al comienzo o el final de una secuencia. Pulse el boton de avance una vez para ir al comienzo del clip?siguiente. Oprima el boton de retroceso una vez para producir el clip actual desde el inicio, o dos veces para retroceder hasta el comienzo del clip anterior. Cabe signalar que también es possible reproducir las secuencias de forma continua pulsando el boton con la flecha circular.


Iconos de retroceso, reproduccion, avance rapiido y reproduccion continua
Para avanzar o retroceder la reproduccion, mantenga presionados los botones correspondientes. Esto permite reproducir el material grabado hacía adelante o antes al doble de la velocidad normal.
Cada vez que se pulsa el botón de avance o retroceso en este modo, la velocidad de reproducción aumenta al doble. Nótese que la velocidad Tmaxima es de x16. Al pulsar el botón nuevomente, el clip volverá a reproducirse al doble de la velocidad normal (x2). Pulse el botón de retroceso una vez para reducir la velocidad de reproducción a la mitad. Pararegarser a la velocidad normal, pulse el botón de reproducción.

Este indicador muestra la velocidad y la direccion en la que se reproduce el material grabado.
Al presionar el botón de grabación durante la reproducción, la-camera permanece en modo de espera.
SUGERENCIA: Deslice el dedo hacía arriba o abajo sobre la pantalla tíctil para ocultar el texto durante la reproducción. Acceda a la Claqueta virtual en el modo de reproducción para indicar que el clip es buena mediante laooth TOMA BUENA en los metadatos. Consulte el apartado Metadatos para Obtener mas informacion al respecto.
Ajustes
Panel de options
Presione el botón MENU para acceder al panel de-option. Este incluye varías-optiona a las que no es posible acceder desde la pantalla táctil.Los ajustes estan organizados en distinctas pestañas según la funciona que cumplen Para acceder a las optiones de cada pestaña, pulse las flechas situadas a todoslos de la pantalla o deslice el dedo hacía la izquierda o la derecha.
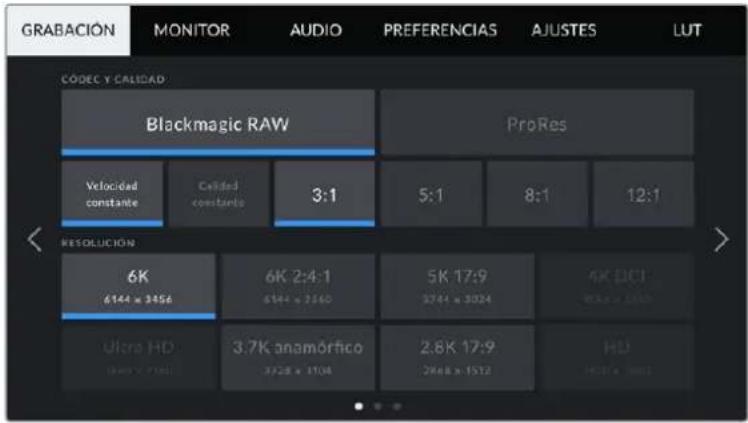
Pulse una de las pestañas para acceder a las options correspondentes.
Ajustes de grabación
La pestaña GRABACION permite selectionar el formatting, el codec, la resolution y los parámedos importantes del material grabado, tales como el rango dinamico y la nitidez de los detailles.
Ajustes de grabación 1
El primer grupo de ajustes de la pestaña GRABACION incluye las siguientesvinciones:
Códec y(callad
Este menú está dividido en dos filas. La fila superior permite selecciónar dos temas de cédecs: Blackmagic RAW y ProRes. Por su parte, la inferior brinda distinas.optiones de calidad para cada uno de ellos. Por exemple, las-optiones disponibles para el cédec ProRes incluyen 422 HQ, 422, 422 LT y 422 Proxy. En el menú Blackmagic RAW, las-optiones están divididas en在哪 para Velocidad constante y en dos para Calidad constante.

Opiones CODEC Y CALIDAD para Blackmagic RAW
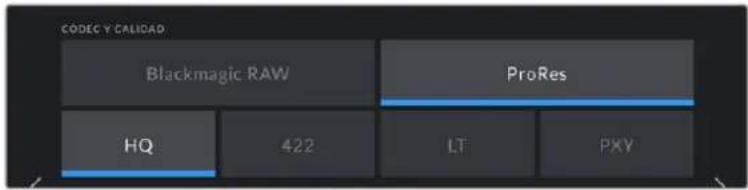
Opiones CODEC Y CALIDAD para ProRes
SUGERENCIa: El tiempo de grabación disponible en una�性de almacenamiento aumenta al elegir formatos con un mayor grado de compresión.Consulte las tablas respectivas en el apartado Grabacion para Obtener mas informacion al respecto.
Resolución
Esta opcción está vinculada al coderc escogido. Eija la resolution segun el formatting de grabacion. Por exemple, para grabar contentsos UHD en formato ProRes HQ, seleccione ProRes y HQ en el menu CODC Y CALIDAD. A continuacion, elija UHD en el menu RESOLUCION.
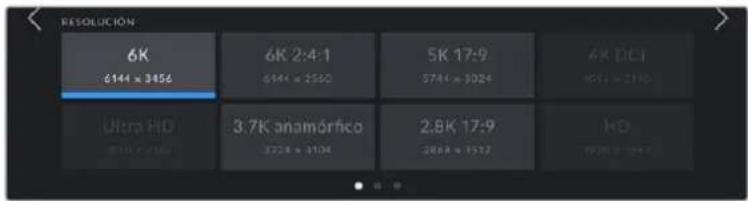
Opiones RESOLUCION al grabar en Blackmagic RAW en el Modelo Blackmagic Pocket Cinema Camera 6K
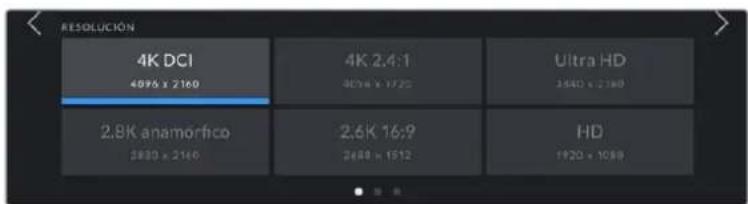
Opiones RESOLUCION en el Modelo Blackmagic Pocket Cinema Camera 4K. Cabe destacar que, en el formatting DCI 4K, la categoria se denomina RESOLUCION,)millas que en los theys RESOLUCION- AREA DEL SENSOR REDUCIDA.
NOTA: Al coordinar una grabacion multicamara mediante un mezclador ATEM Mini, las unidades Pocket Cinema Camera realizaran el codec Blackmagic RAW para grabar en forma aislada con una calidad alta. La fuente connectada a la entrada 1 del mezclador determina la fecuencia de imagen de la seals transmitida, y las demas fuentes HDMI se converten automatamente. Al conectar una unidad Pocket Cinema Camera a dicha entrada, el mezclador emplee a la fecuencia de imagen realizada previamente en la camera. Para selectionar un valor diferente despues de haber connectado todas las fuentes, modifique los ajustes del mezclador desde el programa ATEM Software Control.Consulte el manual del modelo ATEM Mini para Obtener mas informacion al respecto.
Ajustes de grabación 2
ElsegundoGrupo deajustesde la pestañAGRABACION incluye lassiguientesoptiones:

Opiones RANGO DINAMICO y AREA DEL SENSOR
en el Modelo Blackmagic Cinema Camera 6K

Optiones RANGO DINAMICO y AREA DEL SENSOR
en el Modelo Blackmagic Cinema Camera 4K
Rango dinámico
Selección el rango dinámico pulsando la optación deseada. Los modelos Blackmagic Pocket Cinema Camera ofrecen tresrchos;
| Film Este modo brinda la posibiliad de filmaremployando una curva logaritmica que permitemantenerla amplitud del rango dinamico yaprovecha al máximo la informacion incluida enla senal para sacar parte de lasventajas queofrecen losprogramasde etalonaje,tales comoDaVinci Resolve. |
| Extended Video Thismode esuna option intermediaentre losmosos Videoy Film.Orece un rango dinamico mas amplioque el primero,al miso tiempo querealiza发展机遇ablesuetelcontraste atenuando laszonasmasluminosas.Estaoptionresulta mas adecuada alemployear monitores profesionales yes de granayuda cuando el tiempo de producciones limitado yse desireagrabarlasimagenes conun aspecto agradable. |
| Video Este modeutiliza elstandar Rec.709para imagenes enalta definiencia ypermite trabajoconmayor rapidez alemployear formatoscomprimidos y un espaciocromaticoadequado paraentarregarelmaterialdirectamente oeditorlorsinrealizargrandescombios. |
NOTA: Al grabar en formatting Blackmagic RAW o ProRes con el modo Film, laImagen en la pantalla de la CAMERA lucira apagada y con poco contraste. Este se debe a que el archivo contiene abundante informacion que aun no ha sido optimizada para su visualizacion en un monitor. No obstarve, cuando se emplea dicho modo, es posible aplicar una tabla de conversion (LUT) al supervisor el material grabado en la pantalla de la CAMERA o en un dispositivo connectado a la calidad HDMI, a fin de simular el contraste adecuado. Consulte el apartado Tablas de conversion para Obtener mas informacion al respecto.
Área del sensor
Los modelos Blackmagic Pocket Cinema Camera能把 configurarse para que utiliser todo el sensor o solo una parte del本身就是, a fin de lograr una mayor Frequencia de imagen. En esteultimate caso, solo se emplea la calidad de pixeles necessities para un formatting determinado, en vez de ajustar el tameno de la imagen captada por la totalidad del sensor. Algunos formatos combinan ambas configuraciones. Por exemple, en el modelo Pocket Cinema Camera 6K, es possible grabar en HD con el area del sensor completa o reducida a partir de una resolution 5.7K o 2.7K.
Dado que en el modo reducido se usa solo el centro del sensor, el camino de visión de cualquier objetivo parecería más angosto debido al factor de recorte que se produce. Por exemple, al utiliser un objetivo de 20 mm para grabar en alta definición reduciendo el area aproveachable del sensor, el camino de la CAMERA sera equivalente al de una lente de 40 mm.
La option para reducir el area que utilizes el sensor solo se encuentra disponible al filmar con una resolution menor que la maxima admitida por la camera, por exemple, UHD o ProRes HD.
Al grabar imágenes en formatting 2.8K 17:9 reduciendo el area aproveachable del sensor o en HD reduciendo la definición a partir de unaResolution 2.7K, es posible lograr mayores Frequencias deImagen en el modelo Blackmagic Pocket Cinema Camera 6K. En la version Blackmagic Pocket Cinema Camera 4K, dichas Frequencias se sugiaen al grabar imágenes en formatting 2.8K 17:9 reduciendo el area aproveachable del sensor o en HD ajustando la definición a partir de unaResolution 2.7K.
Consulte elApartado Frecuencias de imagen maximas para el sensor a fin de Obtener mas informacion al respecto.
Frecuencia de Imagen del proyecto
La Frequencia de imagen del projeeto permite elegir entre differsentes velocidades comunesmente realizadas en la Industria del cine y la television, por exemple, 23.98 f/s. Normalmente, este valor se agrada de forma que coincida con la velocidad de reproduccion empleada durante el proceso de produccion, o segun los requisitos para la entrega del material grabado.
Las ocho optiones disponibles para este ajuste son: 23.98, 24, 25, 29.97, 30, 50, 59.94 y 60 f/s.
Velocidad de grabacion distinta
Por defecto, la fecuencia de imagen del sensor y del proyecto coinciden, a fin de que el material grabado se reproduzca a una velocidad normal. Sin embargo, al activar la option
FREC. INDEPENDIENTE, se pueda determinar valeurs différentes para这些 parámetros de manière independiente.
Frecuencia de Imagen distinta
Una vez activada la option FREC. INDEPENDIENTE, pulse las flechas situadas aodos lados del indicator para modifier este parametro.
Este ajuste determina la cantidad de fotogramas que el sensor capta cada segundo, lo cual incide en la velocidad de reproduccion de las imagenes según la Frequencia selecciónada para el proyecto.
Consulte el apartado Fotogramas porsegundo para Obtener mas informacion al respecto.
NOTA: Consulte la tabla en elApartado Grabacion a fin de Obtener mas informacion sobre las fecuencias de imogen disponibles para cada tipo y codec.
Tarjeta preferida para la grabacion
Estaopydermite determinarque soporte dealmacenamento seutiliza para la grabacion cuando hay mas de una unidad en la camarara. Las options disponibles son Tareta CFast, Tareta SD y Tarjeta mas Ilena.Elheiro de emplearuna uotarjetaesuneleccionmeramente personal.Sin embargo,recomendamosutilizarsiemprela misma unidadpara sabercualse necessariocantiar una vez que noHayas Espacio para grabar.La option Tarjeta mas Ilenabrinda la posibility de agrupar ARCHivos cronologicamente al filmar conuna sola camarara.
Al insertar una tarjeta, se aplicá la optación selección. Para传言ar la configuración, acceda al menu de almacenimiento y pulse el nombre de la unidad que deseña utiliser. Conviene subrayar que, al quitar una unidad e insertar另一边, se restablecerá la optación selección en el menu TARJETA PREFERIDA PARA LA GRABACION.
SUGERENCIa: La option Tarjeta mas Ilena se basa en el percentaje de espacio occupied in la unidad y no en su時間 o calidad.
Detener al omlitr fotogramas
Esta optacion permite configurar el comportamento de laamera cuando se detectan fotogramas omitidos. Al desactivarla, la grabacion continua de todasomanas. Si se enquirytra activada, la grabacion se detendra. Este permite evaporarperder tiempo captando imagenes que posteriormente no seutilizaran.
SUGERENCIA: Consulte elApartado Soportes de grabacion para Obtener mas informacion al respecto.
Ajustes de grabación 3
El截图 grupo de ajustes de la pestaña GRABACION incluye las siguientesustralianes:

Intervals
Estaoptionpermitegrabarautomaticamenteun fotografia enfunciOnde lossiguientesintervalos:
Fotogramas 2-10
Segundos 1-10,20,30,40,50
Minutes 1-10
Por exemple, la CAMERA peut ajustarse para grabar un cuadro cada 10 fotogramas, 5 segundos, 30 segundos, 5 Minutes, etc.
Estamericano, se logra un efecto de camarapa rapiida al reproducir el clip.
Presione el botón de grabación para comenzar. Al presionarlo nuevomente, la secuencia se guarda como un clip individual, según el códec y la Frequencia deImagen que se hayan selecciónado en laamera. Esto permite exportarla directamente a una linea de tiempo comorialquier除外 clip.

1 A001 120min
2 A002 96min
Un icono+junto al botón de grabación aparecerá para indicar que el modo por intervalos estáactivado.
SUGERENCIa: Al utiliser la funciona INTERVALOS, el controle del已久的 tiempo que cambia cada vez que se graba un fotograma.
Ajuste de detailles
Este ajuste permite dar mayor nitidez a las imagenes. Cuando se enquirytra activada, es possible escoger entre tres niveles distinctos.
Al activar esta funciona, el nivel de nitidez尤为重要 se aplicar a todo imagedes grabadas en formatting ProRes como a aquellas Transmitidas mediana la calidad HDMI de la CAMERA.
Estaopyesutilal transmitirendirectodesuedun estudio,cuandolasimagenesseemitenalire sinmodificaciones.Recomendamosdesactivarssielmaterialgrabadoseeditoralaruegoenlaetapadeposproduccion.Cabe mentionarque estafuncionnoestadisponiblealSeleccionarecodecBlackmagicRAW.
Aplicar LUT al grabar
Por defecto, la CAMERA no aplica tablas de conversion al grabar, excepte es possible hacerlo pulsando el interruptor APLICAR LUT AL GRABAR.
Esto peut dararul en situaciones en las que no hay tiempo de etalonar el material grabado.
durante la posproduccion, o si es precisoentarlo directamente a un cliente o al editor.Consulte
los apartados Tablas de conversion tridimensionales y Controles de la pantalla tactil para obtener
más informacion al respecto.
Aplicar una LUT a un archivo
Al usable el)codec Blackmagic RAW y aplicar una LUT a cualesera de las imagenes Transmitidas desde lacaptura, dicha tabla se integra al archivo Blackmagic RAW grabado. Esto significa que sealmacena en el encabezado del archivo, por lo que resulta muy sencillo aplicarla al clip en la etapa de produccion y, al mismo tiempo, se evita tener que depender de un archivo adicular. Cuando se activa la option INTEGRAR LUT EN ARCHIVO en el menu GRABACION de lacaptura, el clip se abre en el reproductor Blackmagic RAW o en el programa DaVinci Resolve con la tabla ya aplicada a laImagen. Por otherwise, es muy fácil activarla o desactivarla, excepte estaré integrada en el archivo Blackmagic RAW.
DaVinci Resolve también-ofrece la option Aplicar LUT en el panel Ajustes RAW del modulo Color, a fin de activar o desactivar una tabla de conversion tridimensional en el archivo Blackmagic RAW. Este boton funcia igual que en la camera. De este modo, durante el rodaje, es possible indicar al colorista que tabla de conversion emplear en la camera, pero luigo se pueda cancelar en DaVinci Resolve desactivando la opticon Aplicar LUT.
Convencion para la nomenclatura de ARCHivos
El material grabado se guarda en unidades CFast, SD o USB-C en formattingo Blackmagic RAW o ProRes QuickTime, según la option selecciónada.
La asigniente tabla muestra un exemple del sistemas utilizado para nombres los ARCHivos:
A001_08151512_C001.mov Nombre del archivo QuickTime
| A001_08151512_C001.mov Úndice de la cármara | |
| A001_08151512_C001.mov | Número de rollo |
| A001_08151512_C001.mov | Mes |
| A001_08151512_C001.mov | Día |
| A001_08151512_C001.mov | Hora |
| A001_08151512_C001.mov | Minuto |
| A001_08151512_C001.mov | Número de clip |
LasOTOS se nombran según la nomenclatura empleada para los clips,añadiendose S001 al final para indicar el número de imagen en lugar del número de clip. Consulte el apartado Metadatos del proyecto para Obtener más información al respecto.
Ajustes de monitorización
La pestaña MONITOR permite modifier el dato de los datos, la información en pantalla y otheras options para superviar imagenes mediate el visor de la CAMERA orialquier monitor conectado a la salute HDMI de la misma. Los distinctos ajustes estan organizados en categorias denominadas LCD, HDMI y LCD/HDMI, segun correspondan a la pantalla de la CAMERA, el monitor conectado a la salute HDMI o ambos. Cada uno de los menos está compuesto por dos secciones a las que es possible acceder pulsando las flechas situadas a ambos lados de la pantalla tactil o deslizando el dedo hacia la izquierda o la derecha.
Ajustes de monitorización 1
El primer grupo de ajustes de cada pestaña incluye las mismas.optiones para cada calidad. Por exemple, es possible activar la funciona Cebra para la pantalla táctil y desactivarla en la SERIAL transmitida agravés de la calidad HDMI.
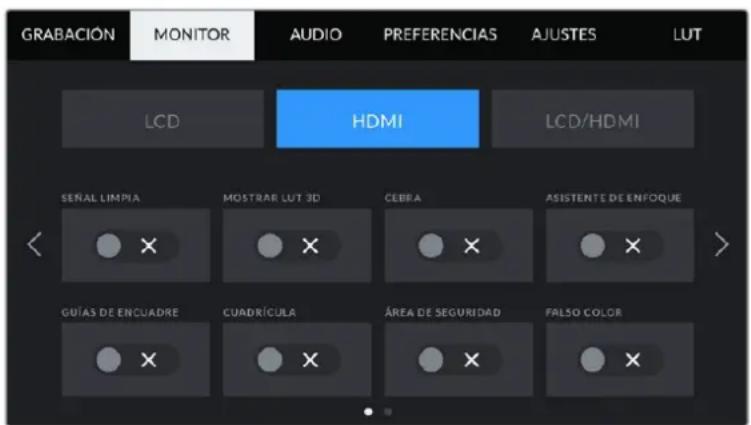
Senal limpla
Estaopyonpermite ocultar toda la informacionque se muestra en la pantalla o en la imagen transmitida atraves de la calidad HDMI,excepto elindicador degrabacion.

En el modo SENAL LIMPIA, la pantalla de la webcam muestra solamente el indicator de grabacion.
NOTA: Si la funciona SENAL LIMPIA está activada, las tablas de conversion (LUT) se aplicaran igualmente a las imagenes. Para desactivarlas, desactive el interruptor MOSTRAR LUT 3D en la pestaña MONITOR.
Mostrar LUT 3D
Estaopyonpermiteaplicar tablas de conversion tridimensionalesacualquiersenalpara simular la apariencia del material etalonado.estoresulta de granutilidad algrabarenotoFilm.
Si hay una LUT 3D activa en la CAMERA, esta opticon brinda la posibiliad de aplicarla independiente a la seals visualizada en la pantalla tactil o en el monitor connectado a la calidad HDMI.
Consulte elApartado Tablas de conversion tridimensionales para Obtener mas informacion al respecto.
Los interruptores en los ajustes de las options LCD y HDMI permiten activar y desactivar differentes functions, tales como el indicator de enfoque, las guías de encuadre, la cuadrula o el false color.
Cebra
Pulse este interruptor en las options LCD o HDMI para activar o desactivar esta direccion. Consulte el apartado Caracteristicas de la pantalla tactil para Obtener mas Informacion al respecto.
Aslstente de enfoque
Pulse el interruptor en las options LCD o HDMI para ver u ocultar el indicator de enfoque. Consulte el apartado Caracteristicas de la pantalla tactil para Obtener mas informacion al respecto.
Guias de encuadre
Pulse el interruptor en las options LCD o HDMI para ver u ocultar las guas de encuadre. Consulte el apartado Caracteristicas de la pantalla tactil para Obtener mas informacion al respecto.
Cuadrúca
Pulse el interruptor en las options LCD o HDMI para ver u ocultar la cuadrifica. Consule el apartado Caracteristicas de la pantalla tactil para Obtener mas informacion al respecto.
Área de seguidad
Pulse el interruptor en las options LCD o HDMI para ver u ocultar el area de seguidad. Consulte el apartado Caracteristicas de la pantalla tactil para Obtener mas informacion al respecto.
NOTA: Utilice el ajuste AREA DE SEGURIDAD en la option LCD/HDMI de la pestaña.
MONITOR para configurar el時間 del请注意 de seguidad.
Falso color
Pulse el interruptor en las options LCD o HDMI para activar o desactivar esta funciona. Consulte el apartado Characteristicas de la pantalla táctil para Obtener más información al respecto.
Ajustes de monitorización 2 (LCD)
ElsegundoGrupo deajustesde laoptionLCDcorresponda a la imagenvisualizadaunicamente en la pantalla de la-camera.
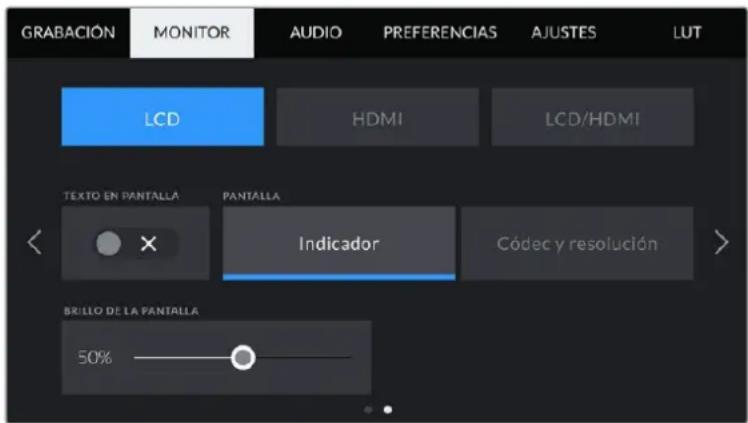
El Interruption TEXTO EN PANTALLA permite ver u ocultar el texto y losindicadores superpuestos a laImagen.
Texto en pantalla
En occasions peuvent resultar utilise ocultar los indicadores y demas datos en la imagen, a fin de ver solo la informacion necessaria para realizar la composicion del plano. Para elo, pulse el interruptor TEXTO EN PANTALLA. Cabe destacar que otheras functions, tales como las guas de encuadre, la cuadrula y el indicator de enfoque, permaneceran enthora si estan activadas. Internacional es possible deslizar el dedo sobre lathora hacia arriba o abajo para ver u ocultar el texto y los indicadores.
Pantalla
Esta optacion permite ver el codec y la resolucion en la parte inferior izquierda y derecha de la pantalla, en vez del historograma y los vumetros. Esto peut serutar util alutilizar la funciOn de falso color para ajustar la exposicion, o si es necessario visualizar informacion adiconal en el espacio normalmente destinado al historograma y a los vumetros cuando el audio se graba aparte.
Simplemente pulse Indicadores o Códec y resolution en la pantalla para selectionar la。,opacion deseada.
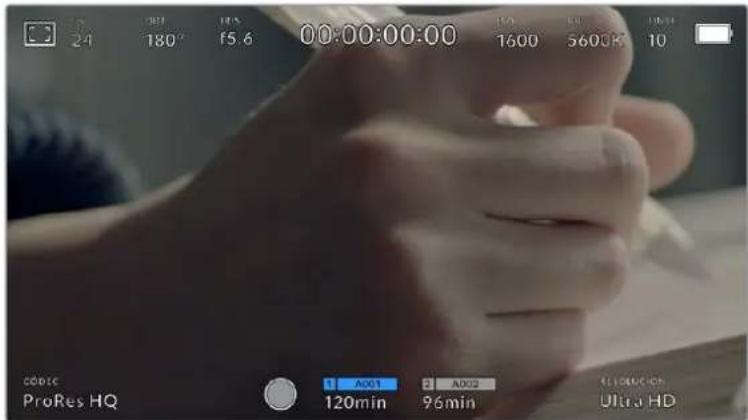
En los modelos Blackmagic Pocket Cinema Camera, es possible ver el codec y la resolution en lugar del historograma y los vúmetros.
Brillo de la pantalla
Mueva el control deslizante hacla la izquierda o la derecha para ajustar el brillo de la pantalla tactil.
Ajustes de monitorización 2 (HDMI)
ElsegundoGrupo deajustesde laoptionHDMI correspondeunicamentea la imogen Transmitida medianta la salivaHDMI.
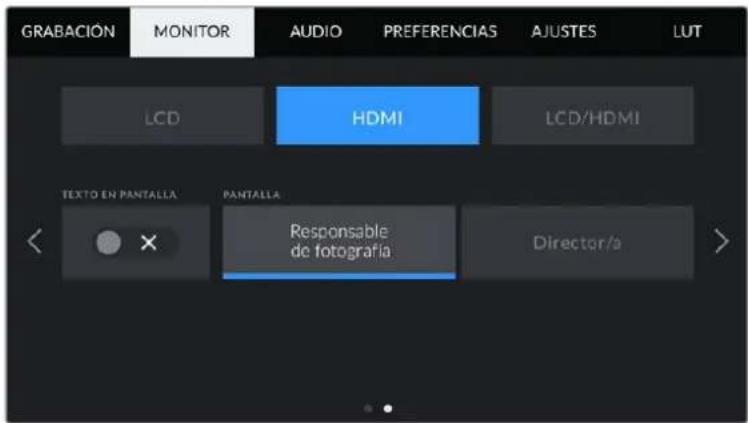
Texto en pantalla
En occasions es possible resultar utilise ocultar los indicadores y demas datos en la imagen, a fin de versolo la informacion necessaria para realizar la composicion del plano. Pulse el interruptor TEXTO ENPANTALLA en la option HDMI para ver u ocultar el texto y los indicadores. Cabe destacar que otheras functions, tales como las guias de encuadre, la cuadrula y el indicator de enfoque, permanecer en pantalla si estan activadas.
Tambien es possible deslizar el dedo sobre la pantalla hacia arriba o abajo para ver u ocultar el textoyo los indicadores.
Mostrar texto en pantalla para el responsable de fotografia o el director
La pantalla de la CAMERA permite ver ciertos datos, tales como la sensibilitidad ISO, el balance de blancos y la aperture del diafragma, que resultan utiles para el cineasta o el responsable de fotografia que compone los planos. Sin embargo, también es possible做不到 dicha informacion en laImagen Transmitida mediante la calidad HDMI, lo cual的结果lyutil para el director o el continuista que supervisa varias tomas o camaras.

Los modelos Blackmagic Pocket Cinema Camera permitted ver datos utiles para el director en la imagen transmitsla mediente la calidad HDMI.
Al seleccionar la option Director/a, se mostrará la?siguefte informacion:
- Frecuencia deImagen
El indicator f/s muestra la fecuencia seleccionada en fotogramas porundo. Cuando la optacion FREC. INDEPENDIENTE está desactivada, este valor hace referencia a la fecuencia de imagen seleccionada para el proyecto. Si dicha optacion se encuentra activada, se indicaranamins valores en forma alternada.
Cama
El indicator CAM identifica la CAMERA especialcada en la claqueta virtual. Consulte el apartado Claqueta virtual para Obtener mas informacion al respecto.
- Operador/a
Este indicator identifica a la persona especifieda en la claqueta virtual en este camino. Consulte el apartado Claqueta virtual para Obtener mas informacion al respecto.
Duración
Este indicator muestra la duracion de la grabacion o delultimate clip grabado en horas, minutes y segundos.
- Rollo, escena, toma
Estos indicadores brindan informacion sobre el rollo, la escena y la toma que se está grabando. Consulte elApartado Ciaqueta virtual para Obtener informacion adicular al respecto.
Rango dinamlico
La tabla de conversion (LUT) aplicada a laImagen se indica en la esquina inferior izquierda de la pantalla. De no aplicarse tabla alguna, se indica el rango dinamico utilisé.
- Código de tempo
El número de tiempo se indica en la esquina inferior derecha de la pantalla y se expresas en horas, instantos,segundos y fotogramas.
Ajustes de monitorización 1 (LCD/HDMI)
Los ajustes de la opticon LCD/HDMI afectan tanto a la imogen visualizada en la pantalla de la camera como en el monitor conectado a la calidad HDMI. Por exemple, al seleccionar un valor de 90% para el area de seguridad, este se vera reflejado tanto en la pantalla de la camera como en la senal transmitida mediante dicha salute.
Esta pestaña incluye dos equipos de ajustes que se describe a continua.

Guias de encuadré
Pulse cadaquiera de las flechas a todos lados de la option GUIAS DE ENCUADRE para ver los ajustes disponibles. Consulte el apartado Caracteristicas de la pantalla tactil para Obtener mas informacion sobre cada uno de ellos. Conviene mentionar que también es posible activar o desactivar las guias de encuadre de forma individual para la imagen visualizada en la pantalla o en el monitor connectado a la calidad HDMI desde la pestaña MONITOR.
Opaquedadelasguias
Pulse cadaquiera de las flechas situadas a todos lados de la opticon OPACIDAD DE GUIAS para determinar la opacidad de las partes de la imagen situadas fuera del area delimitada por las guias. Los values disponibles son 25% , 50% , 75% y 100% .
Asistente de enfoque
La CAMERA offre dos modelos para el indicator de enfoque: Indicador y Lineas de color.
| Indicator Al selección está oscillator se resalting con mayor nitidez las zonas de la imagen correctamente enfocadas. Nótese que este efecto no es visible en el material grabado. De este modo,DICASÁRías SE DESTACAN Sobre el resto de la imagen.Dado que no haytherselements superpuestos,this herramienta constituya una forma sumamente efectiva de comprobar el enfoque,especiallymente cuando el objeto enfocado está separado delosdemás que compomen la toma. | |
| Lineas de color | Al selecciónar esta oscillator se ve una linea de color alrededor de las partes de la imagen correctamente enfocadas. Este modo peut interferir más en la imagen, pero es de gran utilidad para lograr un enfoque preciso,particularlymente en planos con various elementos visibles. |
Nivel del indicator
Este ajuste permite determinar la intensidad del indicator de enfoque en laImagen. Las options disponibles son Bajo, Medio y Alto.
NOTA: Al seleccionar el nivel del indicator de enfoque, no se activa ni se desactiva dicha func i en la imagen visualizada en la pantalla de la camera o en el monitor conectado a la salute HDMI. Para ello, utilise el interruptor correspondiente en las options LCD y HDMI de la pestaña MONITOR.
SUGERENCA: La intensidad optima para el indicator de enfoque varia según la toma. Por exemple, al enfocar a actores, un nivel más alto facilita la atenuación de los bordes alrededor del rostro. Por el contrario, si la intensidad es demasiado alta al filmar vegetación o una pared de ladrillos, es possible que se dificulte la visualización deOthers detalles en laImagen.
Color de borde
Esta optacion permite elegir el color de las lineas al selectionar el modo Lineas de color. Esto brinda la posibididad de distinguirlas con mayor calidad deOthers elementos en la imagen. Los colocores disponibles son blanco, rojo, verde, azul y negro.
Cebra - Intensidad
Las flechas situadas a todos lados de esta optacion permitted selectionar el nivel de exposicion al.
cual esta herramienta se torna visible en la imagen. Este peute ajustarse en incrementos de 5
puestos percentuales, y es possible escogerrialquier valor entre 75% y 100%
Consulte el apartado Caracteristicas de la pantalla taktil para Obtener mas informacion al respecto.
Ajustes de monitorización 2 (LCD/HDMI)
ElsegundoGrupo deajustes en la optionLCD/HDMI incluye lassiguientesfunidades:
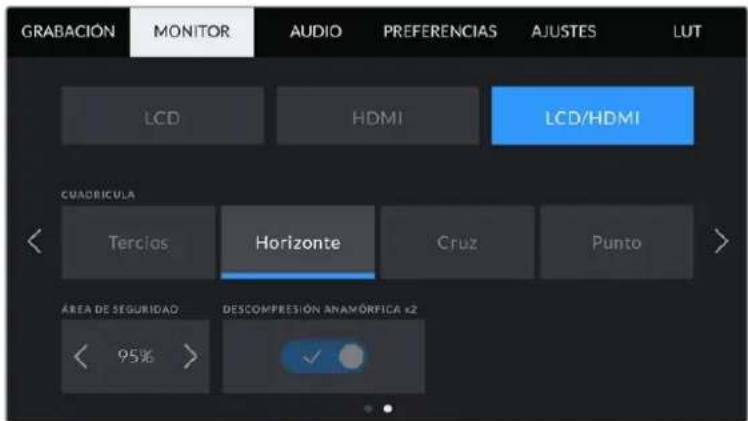
Segundo grupo de ajustes en la opticon LCD/HDMI
Cuadrúca
Esta option permite selectionar el tipo de cuadrifica visualizo en la imagen. Las options son: Tercios, Horizonte, Cruz y Punto.
Consulte el apartado Caracteristicas de la pantalla taktil para Obtener mas informacion al respecto.
Área de seguidad
Las flechas situadas a todos lados de esta optacion permitenajsar el tameno del area de seguridad,expressado como un percentaje con relation a la imagen.El valorrequiredo por la mayoria de las teledifusoras es de 90%
Descompresión anamórfica
Los modelos Blackmagic Pocket Cinema Camera permiten aplicar una desc��isión anamórfica a laImagen visualizada en la pantalla de la CAMERA o Transmitida mediante la calidad HDMI. Es possible activar la option DESCOMPRESION ANAMÓRÍFICA X1.33 cuando se está grabando en formatting 16:9 o 17:9. Al selección el formatting 3.7K anamórfico en el modelo Pocket Cinema Camera 6K, o la).[28] [30] [31] [32] [33] [34] [35] [36] [37] [38] [39] [40] [41] [42] [43] [44] [45] [46] [47] [48] [49] [50] [51] [52] [53] [54] [55] [56] [57] [58] [59] [60] [61] [62] [63] [64] [65] [66] [67] [68] [69] [70] [71] [72] [73] [74] [75] [76] [77] [78] [79] [80] [81] [82] [83] [84] [85] [86] [87] [88] [89] [90] [91] [92] [93] [94] [95] [96] [97] [98] [99] [100]
Ajustes de audio
La pestaña AUDIO permite modifier多人aajustes relativos a las fuentes de audio y su monitorizacion.
Existen dos modelos de ajustes de audio y ellos se encuentran organizados por canal.
Es possible asignar cada canal a una fuentedistincta,asfcomoajustardiversos parámetros.
Ajustes de audio 1
El primer grupo de ajustes de la pestaña AUDIO incluye las siguientesustralianes:
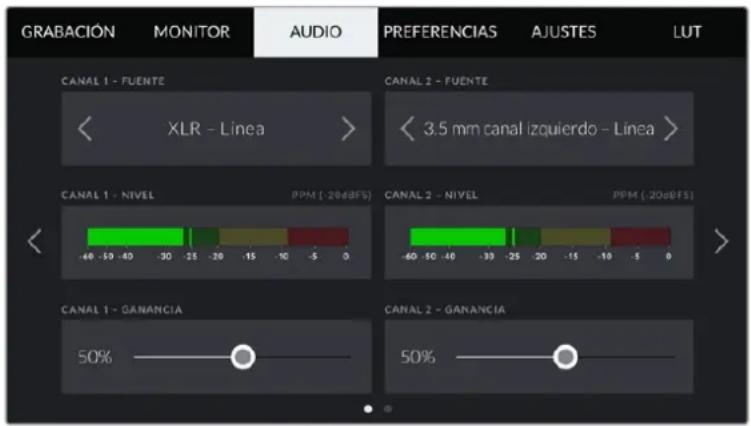
Fuentes
Las options CANAL 1 - FUENTE y CANAL 2 - FUENTE permiten selectionar fuentes de audio para cada canal. A continuacion se describe los distinctos ajustes.
- Camara - Canal Izquierdo y Camara - Canal derecho
Estas options permiten grabar mediante los microfonos de la camar. - Camara - Mono
Esta option permane grabar un solo canal de audio mediante los microfonos de la CAMERA.
XLR-Linea
Esta option permite grabar audio a nivel de linea mediante la entrada XLR de la-camera.
XLR-Microfono
Estaopyonpermitegrabaraudioanivelde microfono mediantela entrada XLR de la camara.Alactivareladoalimentacionfantasmay seleccionarestaopion,vera un interruptor denominado +48V Esimportantaasegurarsedequeeste seencuentra desactivado aldesconectarelmicrofono.
3.5 mm canal izquierdo - Linea
Esta option emplica solamente el canal izquierdo de la entrada de 3.5mm a nivel de linea.
3.5 mm canal derecho - Linea
Esta option emplica solamente el canal derecho de la entrada de 3.5mm a nivel de linea.
3.5 mm mono - Linea
Esta optacion permite tener una mezcla monoaural deodos canales de la entrada de 3.5mm a nivel de linea.
3.5 mm canal izquierdo - Micrófono
Estaopsis emplea solamente el canal izquierdo de la entrada de 3.5mm a nivel de microfono.
3.5 mm canal derecho - Microfono
Estaopyon emplea solamente el canal derecho de la entrada de 3.5mm a nivel de microfono.
3.5 mm mono - Mlcrofono
Esta option permite tener una mezcla monoaural de ambos canales de la entrada de 3.5mm a niveau de micrófono.
- Ninguna
Estaoptionpermitedesactivarlasfuentesdeaudio.
NOTA: Al seleccionar la entrada de 3.5mm como fuente de audio, los canales 1 y 2 deben estar a nivel de linea o micrófono. Es decir, si se elije la option 3.5mm canal izquierdo
- Linea como fuente del canal 1, las options disponibles para la entrada del canal 2
siempre seran 3.5mm canal izquierdo - Linea, 3.5mm canal derecho - Linea y 3.5mm mono - Linea. Las options correspondientes al microfono no estarán disponibles.
Volumen
Las options CANAL 1 - NIVEL y CANAL 2 - NIVEL permitted ajustar el volumen del audio.
Ganancia
Los controlles CANAL 1 - GANANCIA y CANAL 2 - GANANCIA permiten ajustar el volumen de grabacion de las fuentes correspondientes a los canales 1 y 2.
Ajustes de audio 2
Elsegudogrupodeajustesde la pestaAUDIO incluye lassiguientesoptionesa:
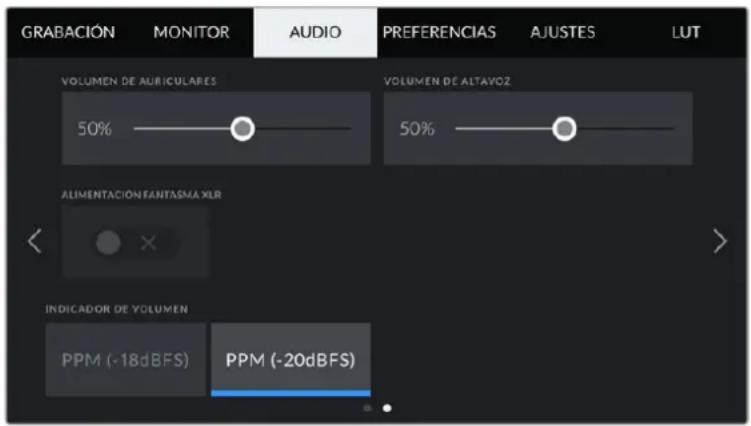
Volumen de auriculares
Este control permite ajustar el volumen de los auriculares conectados a la CAMERA. Deslice el control hacía la izquierda o la derecha para modifierlo.
Volumen de altavoz
Este control permite modifier el volumen de salute para el altovoz integrado de la CAMERA. Deslice el control hacía la izquierda o la derecha para modifierlo.
Allimentación fantasma XLR
La entrada XLR brinda la posibidad de suministrar una corriente de 48 V a microfonos a trovés del modo de alimentacion fantasma. Al seleccionar la entrada XLR, pulse el interruptor ALIMENTACION FANTASMA XLR paraactivarlo o desactivarlo.
Indicador de volumen
Selección unaoppingara el picometro.
| Opciones Estándar | |
| PPM (-20 dBFS) SMPTE RP.0155 | |
| PPM (-18 dBFS) EBU R.68 |
NOTA: En general, siempre se conecta el cable XLR antes de activar el modo de alimentacion fantasma. Conviene Mentionar ademas que es importante desactivarlo cuando no haya un microfono conectado. De lo contrario, los dispositivos que norequireen este modo de alimentacion podrijan resultar dañados al conctarlos. Asimismo,onga en cuenta que laamera可以选择 tardar一些 instantos en descargarse una vez desactivado este modo.
Recomendamos esperar unooshuntosantes devolveraconectarotros microfonosequipos con conexiones XLR.
Preferencias
La pestaña PREFERENCIAS incluye.option para identificar la CAMERA y configurar los botones personalizables, además de ellos ajustes que no está directamente vinculados a la grabación o supervisión de imagenes. Para acceder a lasDistinctasoptiones, pulse las flechas situadas a todoslos de la pantalla o deslice el dedo hacía la izquierda o la derecha.
Ajustes generales 1
El primer grupo de ajustes en la pestaña PREFERENCIAS incluye las siguientesustralianes:
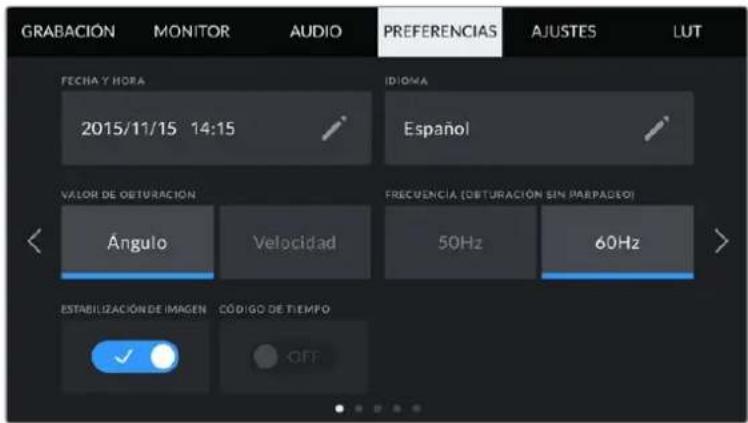
Fecha y hora
Estaopyrmeestablecerlafeachaylahoraenlacamara.El formatode lafecheesano,mes y dia,yseutiliza elsystemade 24horas.Este informacion se emplea ademaspara determinar el codelo de timeq segun la hora del dia,si no se connectauna fuente externa.
Idioma
La interfaz de los modelos Pocket Cinema Camera está disponible en 11 idiomas: español, ingles, aleman, français, italiano, chino, japonés, coreano, ruso, turco y portugués.
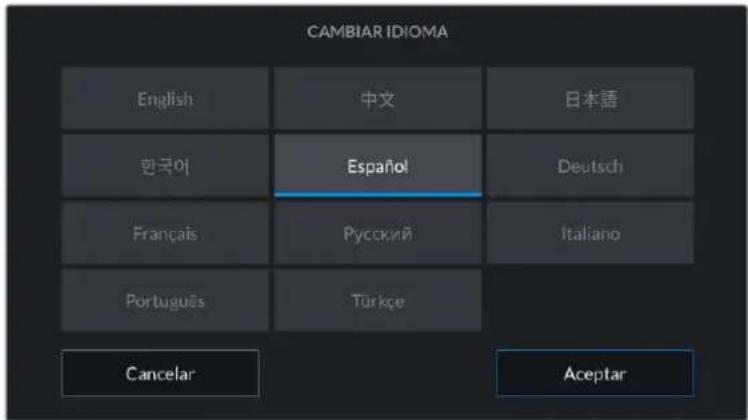
El idioma可以选择seLECTIONarse durante la configuracion initial yupon deactualizar la camarra.
Para seleccionar el idioma:
1 Pulse IDIOMAY elija una de las options disponibles.
2 Pulse Aceptar para regresar al menu de configuracion.
Valor de obturación
Estaopyonpermite selectionarentre losvaloresANGULOyVELOCIDAD,segunsieste se expresa enfunciendelangulo o la velocidad,respectivamente.
Convienementionarqueelangulo deobturacionseajustsgunaftera freuenciadeimagen. Porejemplo,un angulo de 180grados generala mismacantidaddedesenfoque dinamico, independientelemente la freuencia seleccionada.
Sin embargo, al medir este parámetro en función de la velocidad, el valor absoluto del obturador se determinina sin importar la Frequencia deImagen, de modo que, al modificarla, los resultados obtenidos serán differs.
Por exemple, al grabar a 24 f/s, una velocidad de obturación de 1/48 s creará un desenfoque dinámico agradable, equivalente a un ángulo de 180 grados. Si cambiamos la Frequencia de imagen a 48 f/s y manténemos la velocidad de obturación, ya no se logrará el mismo desenfoque, sino que sera equivalente a un ángulo de 360 grados. En este caso, al augmentar la Frequencia, esnecessaryajustar la velocidad de obturación a 1/96 s para Obtener el mismo efecto que con un ángulo de 180 grados.
Frecuencia (Obturacion sin parpadeo)
Este ajuste permite seleccionar la fecuencia de la red de suministro electrico realizada para calcarar los values de obturacion sin parpadeo.
Al grabar con luz artificial, el ángulo de obturación pueda afectar la visibiliad del parpadeo. La CAMERA calcula automatistically los values de obturación sin parpadeo para la Frequencia deImagen selección y sugirirá tres OPCIONes. Estos values se ven afectados por la Frequencia de la red realizada para suministrar corriente electrica a las luces. En la mayoría de los País en los que predominina el estándar PAL, la Frequencia es de 50 Hz, cuando que en aquellos que Employmenta la norma NTSC, este parametro es de 60 Hz. Seleectione la option 50Hz o 60Hz segun la Frequencia realizada en su region.
NOTA: Las caracteristicas de todas fuentes lumínicas你能 occasionar parpadeo, inclujo alemployarvaloresqueeviteneste artefacto.Sinseutilizanlucescontinuas, recomendamosrealizarprimerounagrabaciondeprueba.
Establizacion de Imagen
Estaopy en elmodelo Blackmagic Pocket Cinema Camera 4K permite activar o desactivar esta funci en objetivos que noCNTAN con un interruptor paraarlo.
C/T (Fotogramas omitidos)
Estaopyon permite emplear este codigo de timeo alutilizar fecuencias para el proyeto de 29.97 y 59.94 en NTSC.En este caso,se ignora una ciertacantidad de fotogramas,teniendo en cuestiona intervalos determinados. Este procedimiento respeta la precision del codigo de timeo del proyeto, a pesar de que cada segundo no contiene un numero entero de fotogramas en fecuencias NTSC.
Ajustes generales 2
ElsegundoGrupo deajustesde la pestañAFPREFERENCIAS incluye lassiguientesoptionesa:

Botones programables
En la parte superior de los modelos Blackmagic Pocket Cinema Camera, hay tres botones programables con uno, dos y tres+puntos, que corresponden a las options F1, F2 y F3 en la interfaz, respectively. Es possible asignarles lasmericanas y acceder a loscon fácilad al emplear la CAMERA.
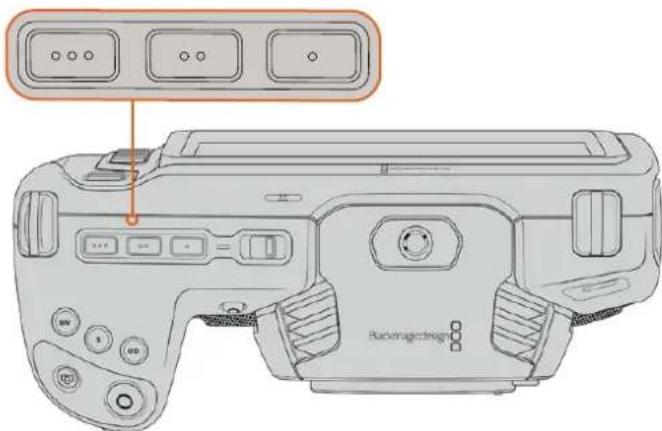
Los botones programables se encuentran en la parte superior de la-camera.
Para configurar these botones, seleccione uno de ellos, bajo la functiOn y a continuacion los ajustes y paramevos deseados.
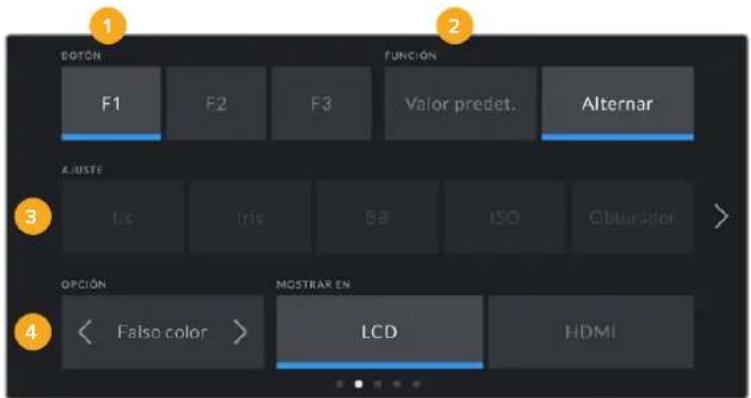
1 Botón 2 Función 3 Ajuste 4 Obrero
Función
Una vez que se selección el botón deseado, es posible determinar su funciona. Las.optiones disponibles son las siguientes:
| Valor predeterminnado | Al selección está-option, cuando se presiona el botón indicado, seMEA una combinación de un ajuste y una-option. Para configurar dicha combinación, elija una de las OPCiones en el menú AJUSTE y bajo selección el parámetro correspondiente pulsando las flechas situadas aodos lados del menú FUNCION. Por exemple, para que la aperture del diafragma cambie a f8 al presionar el botón F1, selección la option Valor predet., bajo Irls y a continuación busque la option f8 utilizing las flechas situadas aodos lados del menú OPCION. Al pulsar Valor predet.;nuevamente, se restablece la configuración anterior de la lármara. |
| Alternar | Al selectionar está-option, se activa o desactiva una determinada funciona. En este caso, el menú AJUSTE no está disponible. Por consiguiente, utilise las flechas situadas aodos lados del menú OPCION para selectionar una de las siguides: Frec. independ., OIS, Señal limpia, Mostrar LUT, Guiás de encuadre, Asist. de enfoque, Falso color, Cebra, Cuadrícula y Área de seguridad. La option Ver / Ocultar permite elegir si"These ajustes se aplican a la imagen visualizada en la pantalla de la lármara o en el monitor connectado a la calidad HDMI. Si no es possible selectionarunas de estas OPCiones, los botones LCD o HDMI permanecerán desactivados. |
Ajustes generales 3
El tcercr groupedeajustes de la pestañAFREERNCIAS incluye lassiguientes opciones:

Luz piloto
Los modelos Pocket Cinema Camera incluyen un ledlittle en la parte frontal que, al conectar las unidades a un mezclador ATEM Mini, indica si esan al aire, o si la senal emitida por estas se ha seleccionado como antico. Ademas, también es possible controlar la grabacion a distancia. Consulte el apartado Control de la camera mediana el modelo ATEM Mini para Obtener mas informacion al respecto.

Grabando en el soporte de almacenimiento insertado en la CAMERA.

Cármara al aire.

Cármara lista para emitir al aire.
Para activar o desactivar la luz piloto, utilise el interruptor correspondiente.
Brillo
Estaopyon permite seleccionar la intensidad del led indicador. Las options son: Bajo, Medio y Alto.
Identificacion
Los ocho characteres en este campo permiten identificar la camarva.Esta identificacion es Differente para cada unidad. Por other parte, en archivos Blackmagic RAW y ProRes, los metadatos incluyen una version mas larga, compuesta por 32 characteres. Este peut serutil para reconcer el material grabado con una determinada camarra.
Software
Este campo muestra la version del sistema operativo interno de la CAMERA. Consulte elApartado Programautilitario de la CAMERA para Obtener mas informacion al respecto.
Reproducción
Este ajuste permitirreproduciruno o todos los clips almacenados en el soporte de grabacion. Al seleccionar la option Todos los clips o Un clip, se producen todas las secuencias enorden o una por vez, respectivamente. Al activar la functiOn de reproduccion continua, sucede lo mesmo. Se reproduceceroslosclipsoalmacenadoenla tarjetao solouno enparticular,sin interrupciones.
Ajustes generales 4
El cuarto grupo de ajustes de la pestaña PREFERENCIAS incluye.optionas relativas a la connexion Bluetooth®.
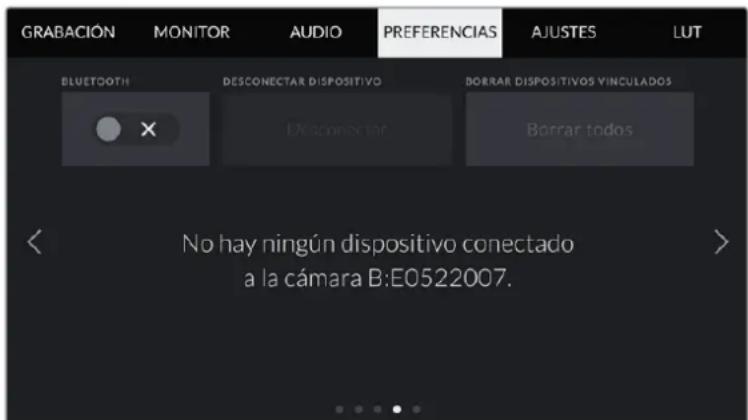
El nombre de laamera está compuesto por la letra seleccionada en laclaqueta virtual, seguida de un identificador de 8 caracteres.
Bluetooth
Esta option permite controlar la CAMERA a工程技术 de un dispositivo portail. Mediente la aplicacion Blackmagic Camera Control, es possible encender o apagar la unidad, modifier ajustes,Cambiar los metadatos o inicia la grabacion de forma remota desde un iPad. Para activar o desactivar esta func tion, pulse el interruptor BLUETOOTH en la pestaña PREFERENCIAS. Cuando está activada, la CAMERA peut ser detectada por other dispositivos situados a una distancia maxima de 9 metros. Dado que la CAMERA empleeas los mismos comandos tanto para la connexion Bluetooth como para el protocolo de control integrado de Blackmagic, es possible desarrollo aplicaciones para controlar practically todos los paramedros de la CAMERA. Por exemple, desde有哪些 para supervisar imagenes y ajustar audio, hasta Herramentas de correccion cromatica en DaVinci Resolve o incluso para controlar el objetivo.
Para Obtener más información al respecto, consulte el documento Control de camaras Blackmagic, disponible en nuestra頁ina para desarrolladores.
Para vincular la CAMERA a un iPad por primera vez:
1 Pulse el interruptor BLUETOOTH en la pestaña PREFERENCIAS para activar la conexión.
2 Abra la aplicación Blackmagic Camera Control y selección la CAMERA que deseña vincular al dispositivo. Las unidades disponibles aparecenordenadas según su identificador, por典型案例, A:A0974BEA.
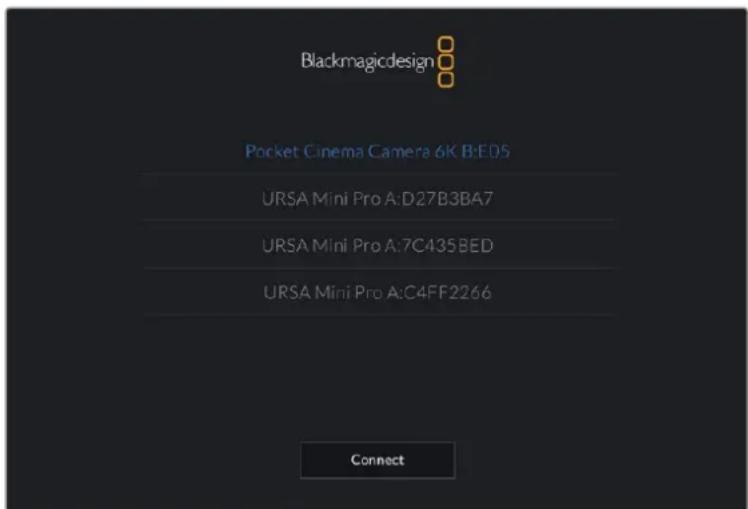
Selezione la-camera que desea vincular al dispositorio.
NOTA: Despues de instalar y executar la aplicacion por primera vez, aparecerá elsignificante mensaje: Allow location access. Al seleccionar la option While using the app, la informacion generada por el GPS del iPad se incluirá en los metadatos de los ARCHivos grabados, lorial permitte saber sobre se filmaron. Tembln es possible acceder a dicha informacion desde el programa DaVinci Resolve.
Selección la-option Never si no desea utilizear these datas.
Para modifier los ajustes en el iPad, seleccionla opicon Settings,iego Privacy, a continuacion Location services,y porultimate Camera control.
3 Al intentar estarcer la connexion por primera vez, la aplicacion le solicitara un numero de seis digitos para vincular el dispositivo a la camera, que aparece en la pantalla de esta ultima. Ingrese el numero en el dispositivo y pulse el boton Pair.
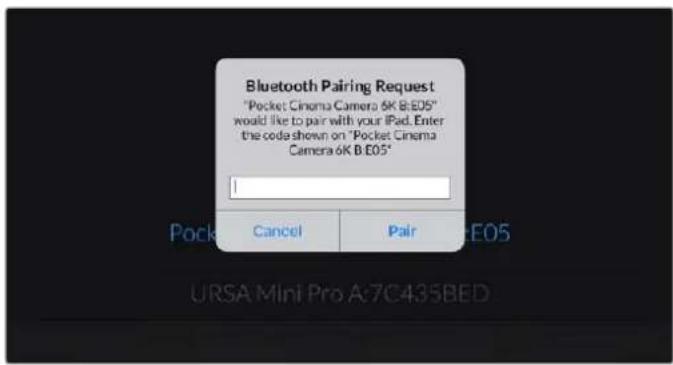
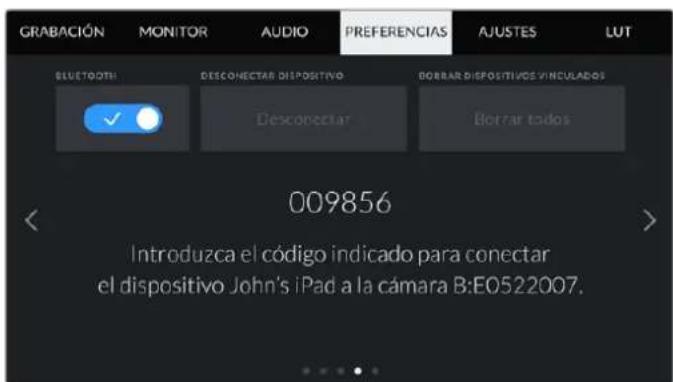
4 Una vez establecida la connexion, aparecerá un mensaje de confirmación.
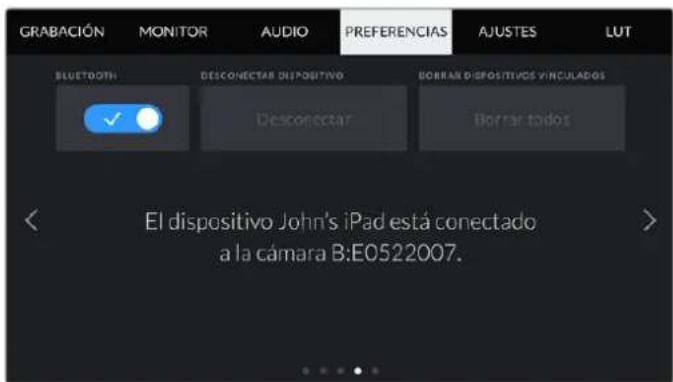
5 Si no es possible vincular los dispositivos, aparecerá un mensaje de error. Inténtelo.nuevamente.
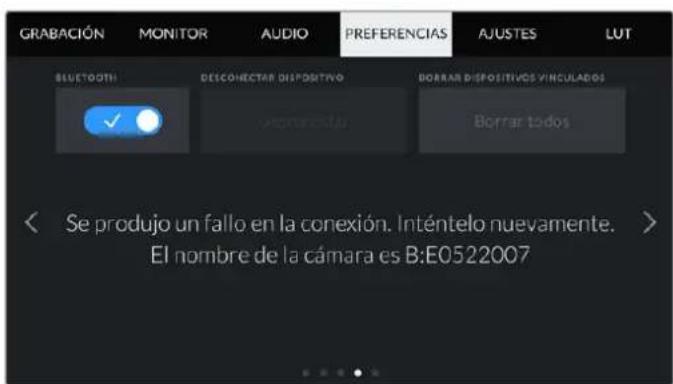
NOTA: Por motivos de seguridad, recomendamos desactivar la connexion Bluetooth cuando no se utilizes para controlar la CAMERA.
Desconectar dispositivo
Estaoptionpermite desvincular la camarayeldispositivo.
Borrar dispositivos vinculados
Esta option permite borrar la lista de dispositivos a los que la CAMERA se ha vinculado.
Control de la CAMERA con la aplicacion Blackmagic Camera Control
Esta aplicacion permite encender o apagar la CAMERA, modifier su configuracion, Cambiar metadatos o起初ar la grabacion de forma remota una vez vinculada a un iPad.
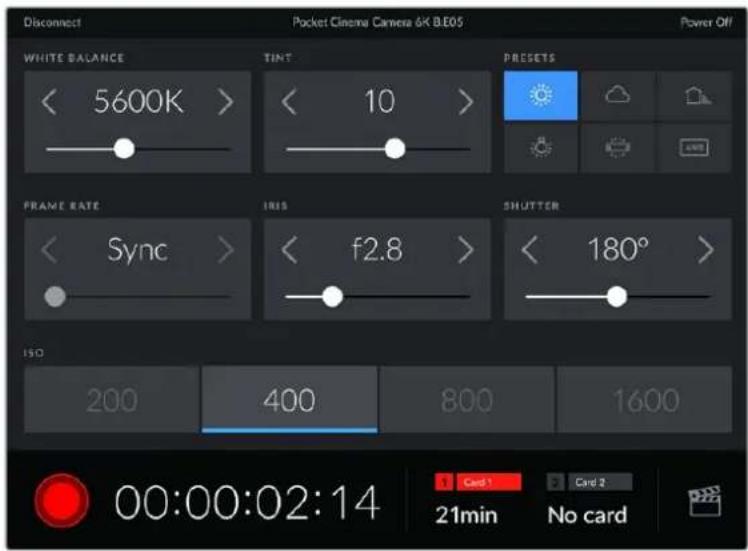
Una vez vinculada, la aplicación Blackmagic Camera Controlazorá esta pantalla que permitted modifierajustes y comenzar la grabacion.
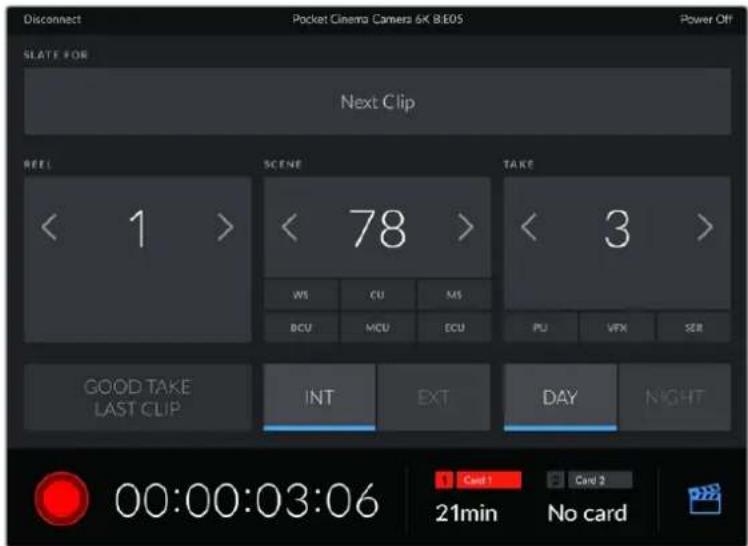
Pulse la claqueta en la esquina Inferior derecha de la pantalla para acceder a la informacion que contiene.
La CAMERA hace uso de la Tecnología Bluetooth LE para comunicarse conotiros dispositivos de manera inalámbrica. Este es el mismo protocolo empleado en equipos portátiles y utilizes unacantidad minima de bateria.
Ajustes generales 5
El quinto grupo de ajustes de la pestña PREFERENCIAS incluye.option para restablecer la configuración de fabrica, reassignar pixeles y calibrar el horizonte virtual.
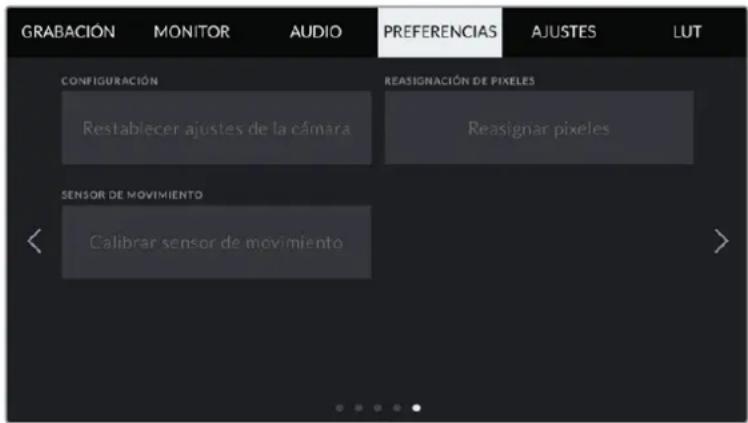
Configuración
Esta optación permite restablecer la configuración original de la CAMERA. Al pulsar Restablecer ajustes de la CAMERA, aparecerá un mensaje de confirmación. Presione Restablecer paraContinuar. Se eliminarán todas las tablas de conversion y los ajustes predeterminados, y se restablecerá la configuración original. Recomendamos exportar los ajustes personalizados a una tarjeta de memoria a fin de respaldarlos antes restablecer la configuración. Una vez finalizo dicho procedimiento, es possible importarlos a la CAMERA;nuevamente.Cabe destacar que esta optación restablece asiismo el horizonte virtual, deforma que es acontejal recalibrar el sensor de movimiento a fin de mantener su precision.
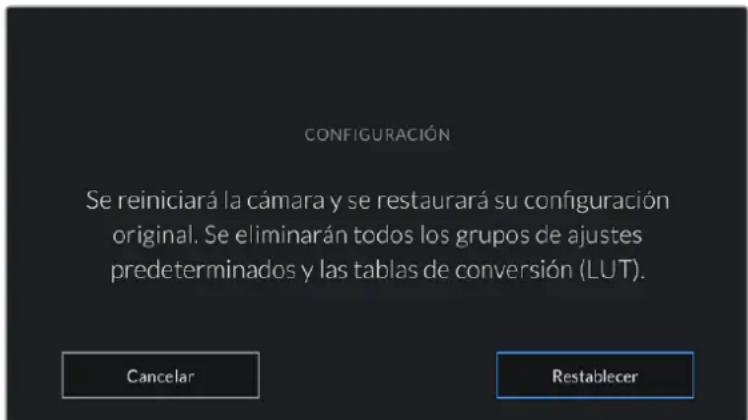
Al seleccionar la option Restablecer ajustes de laamera,deferabconfirmar si desea llevar a cabo dicho procedimiento.
Reasignación de plxeles
El sensor CMOS está formado por millones de pixeles que responden a la luz. Algunos peuvent!.
cantar su brillo con el transcirso del tiempo una vez que se caliba el sensor en la fabrica. En
consequencia, se vuelven mas visibles y se los conoce como «pixeles calientes>.
Independientelemente del fabricante, todos los sensores desarrollan este tipo de defecto.
Para SOLUTIONAR este problema, es possible emplear la referencia de calibracion integrada a fin de corrigir los pixeles defectuosos.
Paraunar el proceso, basta con colocar la tapa protectora del objetivo y pulsar el boton Reasignar pixeles a efectos de reasignar los pixeles. Estoderabad un minuto aproximamente.
Sensor de movimiento
Para calibrar el horizonte virtual, colocque la CAMERA sobre una superficie nivelada y selecciona la optacion Calibrar sensor de movimiento. Es imprescindible que la CAMERA se mantenga estable durante todo el proceso. Esto deberfa tardar cincosegundosapproximamente.
Ajustes
Esta pestaña brinda la posibiliad de guardar y volver a utiliser hasta 12 theypos de ajustes predeterminados. Esto peut darar muy util cuando se emplea la camera en diversos proyeos. Por ejempio, es possible que la unidad se utilise en rodajes que requieren distinctos ajustes, tales como documentales o videoclips. esta funcion permite guardar una configuracion determinada para un projeeto specifico, a fin de using nuevamente theseajustes cuando sea necessario. Laamera ofrece espacio para almacenar un maximo de 12 configuraciones.
Asimismo, es possible importar y exportar estas configuraciones, lo cual的结果a conveniente en rodajes con varias cármas. Basta con modifier Los ajustes segun el tipo de proyecto y bajo exportar la configuracion de una unidad a lasdemasutilizadas en el estudio de grabacion.
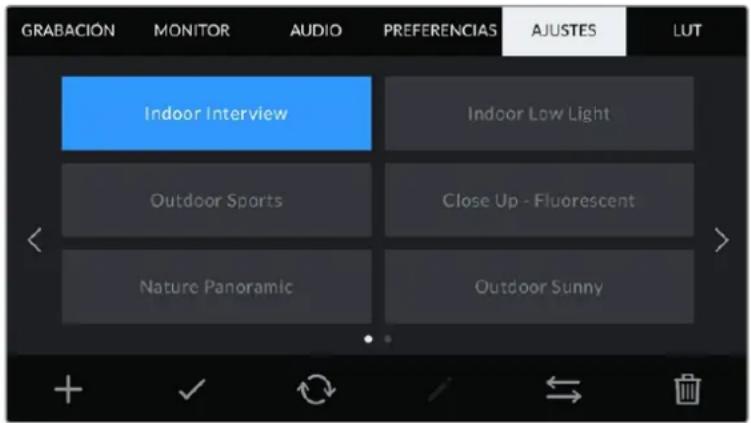
La pestaña AJUSTES permite alternar rápidamente entre-distintas configuraciones almacenadas en la CAMERA.
NOTA: La lármara permite almacenar hasta 12 configuraciones en su memoria interna.
Botones
Los iconos en la parte inferior de la pantalla corresponden a las siguientes unidades:


Agregar Cargar Actualizar Organizar Eliminar
Guardarycargarconfiguraciones
Pulse el icono Agregar para create una configuracion predeterminada. Aparecera un teclado en pantalla mediante el qual se pueda asignar un nombre para la misma. Escribe el nombre y pulse Aceptar para guardar la configuracion de laamera.
Si ya existe una configuración con el mismo nombre, es possible sustituirla o mantener ambas.
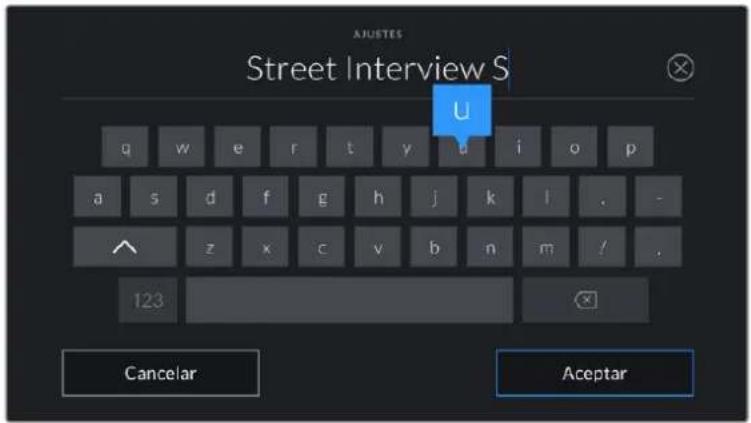
Escriba un nombre mediante el teclado que aparece al pulsar el botón Agregar en la pestaña AJUSTES.
Una vez guardada la configuracion, pulse su nombre para seleccionarla. Para cargarla, pulse el icono Cargar en la parte inferior de la pantalla.
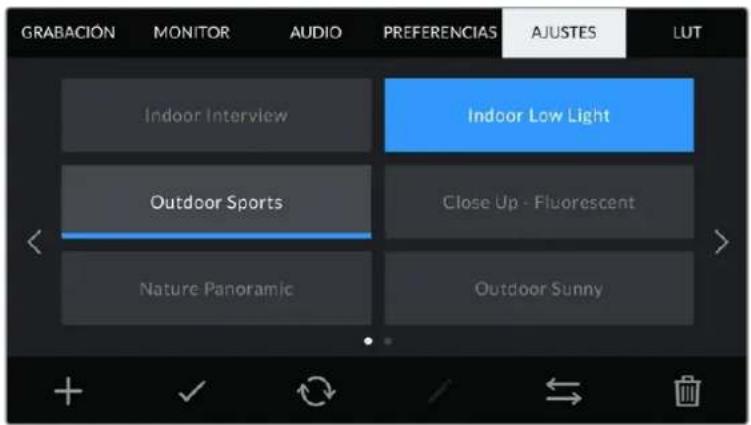
Eija una configuración predeterminada y pulse el icono Cargar en la parte inferior de la pantalla para cargarla. Al selecciónar una configuración, el rectángulo con su nombre se destaca de color azul. Al cargarla, aparece una linea de dicho color en la parte inferior del本身就是.
Es posibleactualizaruna configuracion pulsando elicono Actualizar en la parte inferior de la
pantalla.Aparecera un mensaje preguntandole si deseaactualizarlosajustesde lacamara. Paracontinuar,pulseelbotonAceptar.
Importar configuraciones
Para importar una configuración, pulse el icono Organizar en la parte inferior de la pantalla. Pulse la optación Importar ajustes y luego Importar para confirmar. Aparecerá una ventsa para importar la configuración. Si el archivo con la configuración no está en la unidad de almacenimiento activa, selección otra pulsando el botón correspondiente en la parte superior de la pantalla. Es possible importar tablas desde tarjetas SD y CFast o unidades USB-C.
La CAMERA buscará el directorio raíz y la carpeta Presets en la unidad selecciónada y做不到 las configuraciones disponibles. Nótese que aquellas guardadas en otherasubicaciones no seránvisible.
Selección una configuración y pulse Importar para confirmar.Esta se guardará en uno de los espacios disponibles en la CAMERA.
NOTA: Si no hay espacio en la-camera para importar una configuración, el menu respectivo no está disponible. Deberá eliminar una de las almacenadas antes de importar另一边.
Si ya existe una configuración con el mesmo nombre en la CAMERA, es posible reemplazarla o mantener ambas. En la parte superior derecha de la pantalla se muestra la calidad de espacios libres para guardar configuraciones.
Exportar configuraciones
Selección una configuración y pulse el icono Organizar para exportarla a una tarjeta o unidad USB-C. A continuación, pulse la option Exportar ajustes selecciónados y elija la unidad sobre desea guardar la configuración. Si ya existe una configuración con el nombre, es possible sustituirla o mantener ambas. La CAMERA guardará los ajustes en una carpeta denominada Presets.
Eliminar configuraciones
Selección una configuración y pulse el icono Eliminar para borrarla. Cuando aparezca el mensaje de confirmación, selección Eliminar.
Tablas de conversion tridimensionales
La pestaña LUT brinda la posibiliad de importar, exportar y aplicar tablas de conversion tridimensionales a la seals transmitida por laamera.

Selección una LUT 3D desde la pestaña LUT.
Descripción general
Las tablas de conversion tridimensionales peuvent aplicarse a la imagen visualizada en la pantalla de la CAMERA o Transmitida mediante la calidad HDMI. Estas indican que values cromáticos y de luminancia se aplican a una fuente determinada. Por exemple, es possible lograr que la CAMERA mueste un azul relativamente opaco con una tonalidad más saturada e intensa, cuando capta这么做 color de manière apagada. Este的结果lyutil al filmar en formato Blackmagic RAW o con rango dinamico Film, ya que en这些东西 el material grabado presente un contraste bajo. Al aplicar una LUT, es possible tener una idea de como lucirán las imagenes una vez etalonadas.
Es muy sencillo generar este tipo de tablas con DaVinci Resolve uOTHER programa de etalonaje.
Además, también está disponible en Internet. La CAMERA permite almacenar un máximo de 10 LUT tridimensionales de 17 o 33 puntos (1.5 MB max. cada una). Luego es possible aplicarla a las imagenes visualizadas.
Los modelos Blackmagic Pocket Cinema Camera admiten LUT tridimensionales de 33+puntos en formatting .cube creadas en DaVinci Resolve, y de 17+puntos convertidas a dicho formatting conotiros programas. La CAMERA procesa este tipo de tablas mediante una interpolacion tetrahedrica de gran calidad.
SUGERENCIA: Consulate el apartado Ajustes de monitorización para Obtener más información al respecto.
NOTA: Por defecto, la CAMERA no aplica tablas de conversion al grabar, aunque es possible hacerlo.
Esto peutecrearutil en situaciones en las que no hay tiempo de etalunar el material grabado durante la produccion, o si es precisoentarlo directamente a un cliente o al editor.
Al utilizar una LUT durante el rodaje, la información de la tabla se guarda en forma de metadatos jusqu con el material grabado. DaVinci Resolve muestra esta información en el camino LUT utilizada del panel Metadatos, lo cual permite al colorista verficar el nombre de la tabla empleada.
Tablas de conversion Integradas
Distintas LUT integras permitted aplicar differses estilos al grabar en modo Film o en forma Blackmagic RAW.
Cada CAMERA incluye LUT especialicas según el tipo de sensor:
Pocket 4K Film to Extended Video / Pocket 6K Film to Extended Video
Ofrece un rango dinamico mas amplio que la tabla de conversion Pocket 4K Film to Video o Pocket 6K Film to Video y aplica un contraste medio con una atenuacion en las luces.
Pocket 4K Film to Rec 2020 Hybrid Log Gamma / Pocket 6K Film to Rec 2020 Hybrid Log Gamma
Brinda una apariencia combinada entre el espacio cromatico Rec. 709 y una imagen logaritmica.
Pocket 4K Film to Rec 2020 PQ Gamma / Pocket 6K Film to Rec 2020 PQ Gamma
Muestra una curva de respuesta tonal basada en lo que percibe el ojo humano. Se recomienda estaopydon para la codificacion eficiente de imagenes HDR.
Pocket 4K Film to Video / Pocket 6K Film to Video
Esta tabla es similar al espacio cromático Rec. 709 para HD y además presente un alto nivel de contraste y saturación. Resulta muy fácil al embarcer la CAMERA junto a otros modelos profesionales usingo el espacio cromático Rec. 709.
Botones
Los iconos en la parte inferior de la pantalla corresponden a las siguientes unidades:


Cargar Multimedia Organizar Ellinar
Importar tablas de conversión
Para importar una LUT, pulse el icono Organizar en la parte inferior de la pantalla. Pulse la option Importar LUT y luego Importar para confirmar. Aparecerá una ventsa para importar la受害者. Si el archivo que contiene la受害者 no está en la unidad de almacenimiento activa, selección另外一个
pulsando el botón correspondiente en la parte superior de la pantalla. Es possible importar tablas desde tarjetas SD y CFast o unidades USB-C.
La casa buscará el directorio raíz y la carpeta 3DLUTs en la unidad selecciónada y做不到 las tablas disponibles. Nótese que aquellas guardadas en除外 Shedeciones no serán visibles.
Selección una LUT y pulse Import para confirmar.Esta se guardará en uno de los espacios disponibles en la CAMERA.
NOTA: Si no hay espacio disponible en la CAMERA, seranecessary eliminar una LUT antes de importar other.
Si ya existe una LUT con el mesmo nombre en la CAMERA, es posible reemplazarla o mantener ambas. En la parte superior derecha de la pantalla se muestra lacantidad de espacios libres para guardar tablas de conversion.
NOTA: Si no pueda importar una LUT, es possible que no sea del tamanio adecuado. Utilice un editor de tablas (por exemple, Lattice) para verficar dicho valor, o abra el archivo mediante un editor de texto en el equipo informatico. El tamanio se indica+junto a la etiqueta LUT_3D_SIZE. Si este número no es 17 o 33, puede emplear Lattice paraonian el tamanio de la tabla a 17+puntos.
Aplicar tablas de conversion
Una vez que la tabla se ha guardado en la-camera, seleccióna en la pestaña LUT y pulse el icono Cargar. De esta forma, se aplicar a laImagen visualizada. Para aplicarla a la seals transmitida mediana la salute HDMI, pulse el interruptor Mostrar LUT en la pestaña MONITOR. Consulte el apartado Ajustes de monitorizacion para Obtener mas informacion al respecto.
Exportar tablas de conversion
Selección una LUT y pulse el icono Organizar para exportarla a una tarjeta o unidad USB-C. A continuación, pulse la option Exportar LUT selecciónada y elija la unidad sobre desea guardar el archivo. Si ya existe una LUT con el mesmo nombre, es possible reemplazarla o mantener ambas. La CAMERA exportará la tabla a una carpeta denominada 3DLUTs.
Eliminar tablas de conversión
Para eliminar tablas que ya no está uso o liberar espacio, selección una determinada y pulse el icono Eliminar en la parte inferior de la pantalla. Cuando aparezca el mensaje de confirmación, selección Eliminar.
Tablas de conversion tridimensionales integras
Al embarrar una LUT 3D cuando se graba en-formato Blackmagic RAW en los modelos Blackmagic Pocket Cinema Camera, dicha tabla se anade al archivo .draw generado. Esto significica que se almacena en el encabezado del archivo, por lo que resulta muy sencillo aplicarla al clip en la etapa de posproduccion y, al misismo tiempo, se evita tener que depender de un archivo adicular.
En consecuencia, alentarag archivos Blackmagic RAW a un editor o colorista, dichos profesionales podran acceder fácilmente a la tabla realizada durante el rodaje, lo que reduce significativamente el riesgo de usar una incorrecta.Esta se pueda aplicar ya sea durante la etapa de edition o etalonaje, o directamente desactivar enequalquier momento.
Cuando se activa la option Integrar LUT en archivo en el menu GRABACION de la CAMERA, el clip se abre en el reproductor Blackmagic RAW y en el programa DaVinci Resolve con la tabla de conversion ya aplicada a las imagenes.
Por除外, es muy fácil activarla o desactivarla, excepte siempre estara integrada en el archivo Blackmagic RAW. DaVinci Resolve también incluye la option Aplicar LUT en el panel Ajustes RAW del modulo Color, a fin de activar o desactivar la tabla de conversion tridimensional en el archivo Blackmagic RAW.
Este boton funciona igual que en la webcam. Es decide, durante el rodaje, es possible indicar al colorista que tabla de conversion emplear en la webcam, pero fue se可以选择 cancelar en DaVinci Resolve desactivando la option Aplicar LUT.
Metadata
Los metatados se guardan junto con el clip e incluyen informacion tal como el numero de toma, la configuracion de la camera y su identificacion. Resultan muy utiles para gestionar y procesar el material grabado durante la produccion. Por exemple, los numero de toma, plano y escena sonfundamentales en la organizacion de los clips,@m间隙 que la informacion del objetivoguepeimpleurse para eliminar la distorsion automatically o melhorar la integranion de los efectospeciales en la imagen.
Los modelos Blackmagic Pocket Cinema Camera guardian algunos metadatos de forma automática, por exemple la configuración de laamera, el número de tiempo, la Fecha y la hora. Asimismo, es possible usar la claqueta virtual para encontrar más información.
Claqueta virtual
Al deslizar el dedo hac la izquierda o la derecha sobre la pantalla tactil, se accede a la claqueta virtual.
Esta se divide en dos pestañas: CLIPS y PROJECTION. La prima incluye información relativa a cada clip, cuando que lasegunda permite introducir datos comunes a various clips, tales como el nombre del proyecto, el director, el camarógrafo y la identificacion de la CAMERA.
SUGERENCIa: Los metadataos introducidos en la claqueva virtual se visualizan en las imagenes transmitidas por la calidad HDMI al seleccionar Director/a en la option Mostrar texto en pantalla para de la pestaña Monitor. Consulte elApartado correspondiente en este manual para Obtener mas informacion al respecto.
Metadatos del clip
La modificacion de metadatos es distincta en el mode de esperay en el de reproduccion. En el primer caso, los metadatos se guardaran con el seguiente clip grabado, a exception de la option TOMA BUENA -ULTIMO CLIP, que indica que la secuencia anterior es buena. En el secondo caso, al revisar el material grabado, se muestra el boton TOMA BUENA, y los metadatos se refieren al clip visualizzato.
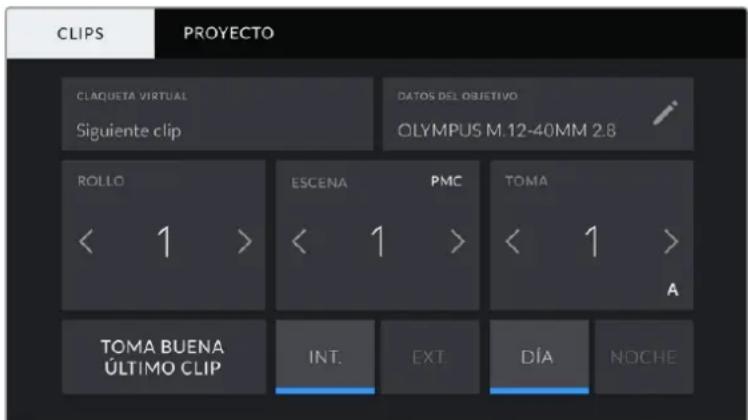
Cuando la CAMERA está en modo de reproduccion, la option CLAQETA VIRTUAL indica el clip al cui la claqueta hace referencia. En el mode de espera, los datos de la claqueta se aplicaran a la?siguiente secuencia que se grabe.
Claqueta virtual
Este campo indica a qué clip corresponden los metadatos que se muestran en la pantalla. En el modo de reproduccion, se refieren a la secuencia visualizada, cuando que en el modo de esperar pertenecen alARRYnte clip que se grabe.
Datas del objetivo
Este campo muestra informacion del objetivo montado en laamera. Muchos modelos electronicos proportionsan these datas automatisticamente, por example, el modelo, la aperture y la longitud focal. Pulse el icono del lapiz si el objetivo no es compatible con this functiOn y desea agrar informacion adiconal. Aparecera un panel con las options ilustradas a continuacion:
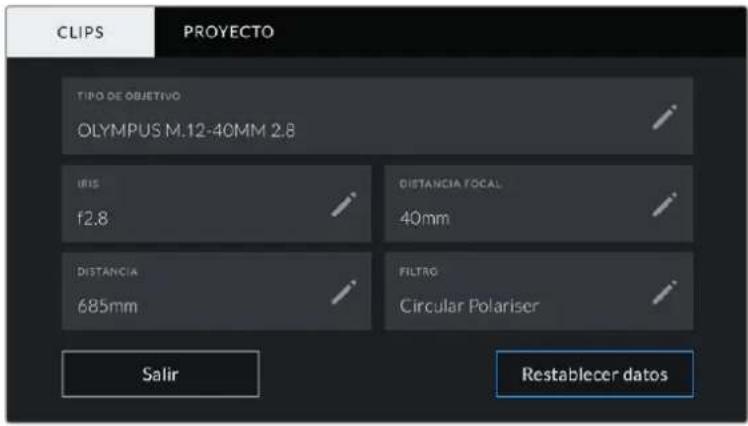
Panel con información obtenida automatistically de un objetivo montado en la-camera y los datos del filtro introducidos de forma manual.
- Tipo de objetivo
Estaopyonpermiteindicarelmodelodelobjecto.Sinapareacutomaticamente,pulse eliconodelapizparamodificareste Campo.Lacamaraincluyeuna base de datos con los nombresde losobjectivosmasutilizadosylosuggestereautomaticallyamedidaque seescribe.De esta forma,espossibleintroducirinformacionconmajorrapidez.
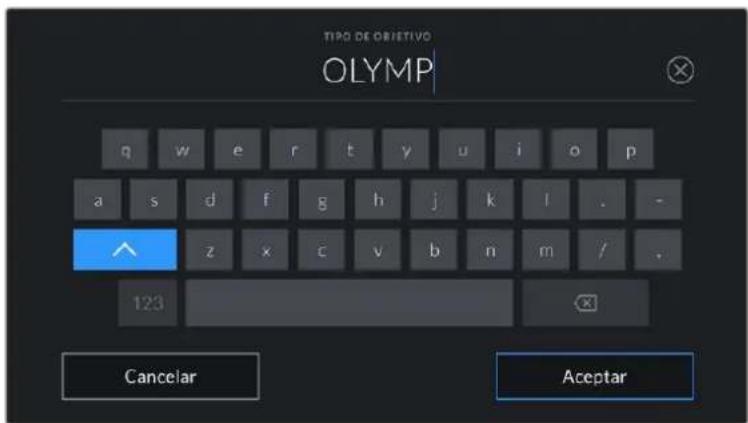
Utilice el teclado virtual para encontrar los datos del objelivo.
Iris
Estaopsislaaperturainicialdel diafragma,expresadaen pasosonumeros f seguneltipodeobjecto.Pulseeliconodelapizparamodificarestainformacion.
Distancia focal
Estaopsisla distancia focal initial delOBJECTO,expresada en milimetros.Pulse el icono del lapiz para modifiera this informacion.
- Distanca
Esta option indica la distancia del objetivo para la secuencia grabada, expresada en milimetros. Pulse el icono del lápiz para modifier esta información.
- Filtro
Estaopymueslaoliflretosutilizados.Pulseeliconodelapizparamodificarestainformacion.Notesequeesposibleagregarvariosdatos,separadosporcomas.
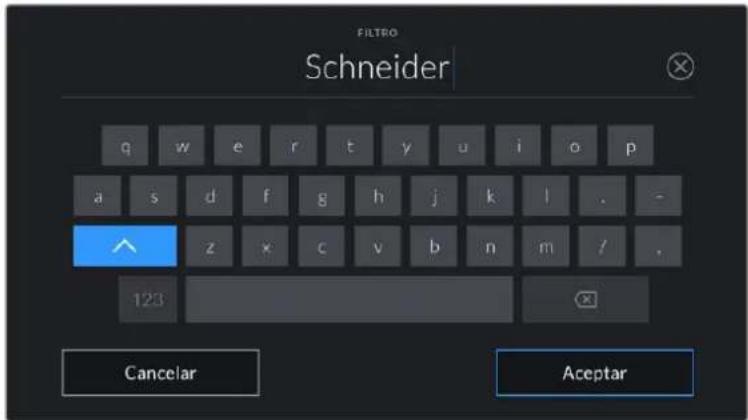
Es necessario introducir la informacion relativa al bajo, ya que no se proporciona automatisticamente.
NOTA: Es possible eliminar la informacion del objetivo en cualesquier momento pulsando la opticon Restablecer datos. Aparecer a un mensaje de confirmacion. Al acceptar, se borran todos los datos y se reemplazan con los proportionsionados automatistically por el objetivo montado en la camera. Si los Campos se han Modifications, es necessario restablecer la informacion del objetivo al colocar uno nuevo. De lo contrario, se mantienen los datos introducidos anteimamente.
Rollo
Estaoptionindicaelnunero de rollo.
En los modelos Blackmagic Pocket Cinema Camera, este se incrementa de forma automática. Al comenzar un proyecto nuevo, pulse la option Restablecer datos para restablecer dicho valor.
Escena
Esta opoci nmuestra el numero de escena, y ademas可以更好 indicar también el numero de toma y su tipo.
Este valor sempre se refiere a la escena visualizada. Para modifierlo, pulse el indicator o utilise las flechas situadas aodos lados del mesmo.
El rango para este parámetro es de 1 a 9999.
Alañadir una letra a dicho número, es posible indicar la toma actual. Por exemple, 23A representa la toma 1 de la escena 23. En este caso, la CAMERA sugerirá el número y la letra siguientes al intentar modificar este valor. Por exemple, si el número de escena es 7B, se brindan las options 8 y 7C.
Este indicator ofrece ademas informacion sobre el tipo de plano en la esquina superior derecha. Las options disponibles se encuentran a la derecha del teclado numero
y son las siguientes:
PG Plano general
PM Plano medio
PMC Plano medio corto
PP Primer plano
GPP Gran primer plano
PD Piano detallado
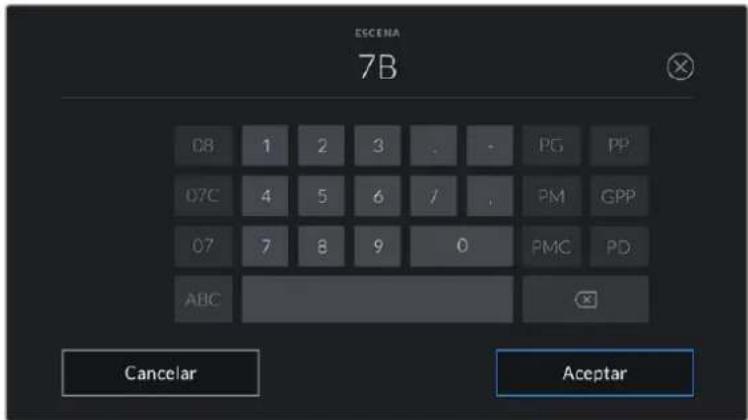
Al ingresar datos de la escena, la camaraga sugiere nombres a la izquelder de teclado y típos de plano a la derecha.
Toma
Esta option muestra el numero de toma para la escena actual. Para modifierlo, pulse el indicator o utilise las flechas situadas aodos lados del mesmo.
SUGERENCIa: Cuando el numero de escena se incrementa, el numero de toma regresa automatically a 1.
Tambien es possibleañadir descriplaciones a la toma. Las.optiones disponibles se encuentran a la derecha del teclado número y son las siguientes:
| P/U | Retomar: Se refiere a una nuevo grabación de una toma previa paraañadir material desdeyersde haber conclusido la fotografia principal. |
| VFX Effectos visuales: | Se refiere a una toma que se utilizes en efectos visuales. |
| SER | Serie: Se refiere a una situación en la que se graban varias tomas cuando laámara sigen rondo. |

Al ingresar datos de la toma, la CAMERA sugiere他们在一 a la izquierda del teclado y típos de toma a la derecha.
Toma buena
Pulse estaopping para identificar tomas buena, a fin de acceder aellas con mayor faculdad durante la produccion.Esta calificacion hace referencia al clip visualizoando cuando la camera se encuentra en mode de reproduccion. Si la unidad está en mode de espera, se aplicaralsiguiente clip que se grabe.
Interior / Exterior
Pulse la option INT. o EXT, para indicar si el clip se ha grabado en un estudio o en exteriores.
Día /Noche
Pulse la option DIA o NOCHE para indicar si el clip se ha grabado durante el dia o la noche.
Metadatos del proyecto
Los metadataos del proyecto funcionan de la mesma forma, tanto en modo de espera como en mode de reproduccion. Siempre se refiere al proyecto completo, sin importar lacantidad de clips incluidos en este.
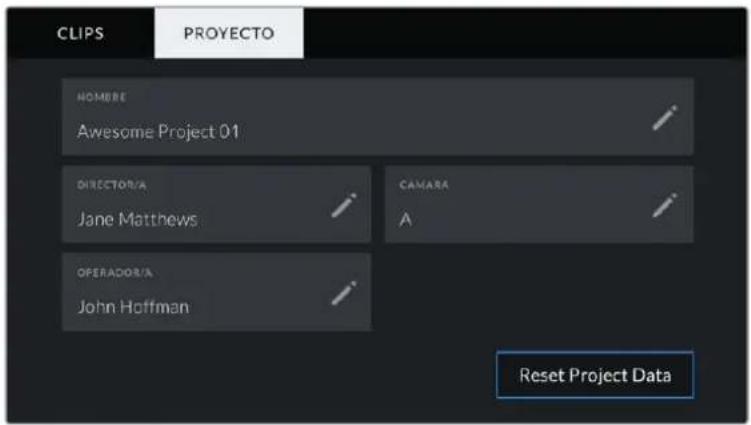
Introduzca la informacion del proyeo desde la pestaña PROYECTO bajo de la claquetla.
Nombre del projeto
Laopia NmBRE muestra el nombre del proyeto en cui. Puse el icono del lapiz para modifierlo.
Director/a
LaoppingDIRECTOR/Amueserelnombredeldirtoroladirectoradelprojeto.Pulseeliconodelapizparamodificarlo.
Cama
Laoppingamara muesrauna sola letra correspondiente a la camarapa. Pusel e fono del lapez para modificarla.
Operand/a
LaoppingOPERADOR/Amuesela nombre del camarografo o la camarografa.Pulse elicono del lapiz para modifierlo.
Salida de video de la CAMERA
Salida para supervisoras senales HD
La calidad HDMI de la CAMERA transmite señales HD 1080p, de modo que permite conectar monitores otelevisores comunes para ver las imagenes grabadas. Además de.Ofrecer una calidad de 10 bits, admite contentidos con alto rango dinamico (HDR) e información superpuesta, por loculargebnialdeal para supervisar el material grabado.
LaittersdHDMi puee ser muy util, espeajmentc uando la cama se colca en un lugar que impide ver la pantalla. Para lostrar informacion superpuesta en las imagenes transmitidas mediante esta salida, acceda a las opciones de monitorizacion en el menu correspondiente de la cama. Asimismo, es possible ver las guas de encuadre, los datos de la grabacion y la configuracion de la unidad. Desactive el interruptor para ocultar this information y ver una imagen limpia.
Cabe destacar que el uso de un conversor, tal como el modelos Blackmagic Micro Converter HDMI to SDI, permite conectar monitores, dispositivos de captura, mezcladores y otros equipos SDI. Además, el conversor pueda alimentarse mediante el puerto USB de la CAMERA.
DaVinci Resolve
La grabación es solo una parte del proceso para create Contents televisos o cinematógraficos. El respaldo y la organized del material capturado, laedbion, el etalonaje y la codificacion de los archivos finalles también son etapas de vital importancia. Los modelos Blackmagic Pocket Cinema Camera incluyen una version de DaVinci Resolve para equipos Mac y Windows, brindando de este modo una solution integral para el rodaje y la posproduccion.
NOTA: Recommendamos utiliser laULTima version del programa para lograr un tratamente cromatico precise del material grabado con la camera. La version 16 (o posterior) permite lograr colocores precisos y usar el formatting Blackmagic RAW.
Después de insertar una tarjeta SD o CFast o una unidad SSD en el equipo informativo, es possible empiear la herramienta de clonación que offre DaVinci Resolve en el modulo Medios con el proposto de crear respaldos del material grabado. Esto的结果a desuma realizad, ya que los archivos digitales son susceptibles de sufir daños o presentar fallas. Sin embargo, alistar con copias de seguridad, se previene la perdida de las imagenes. Una vez finalizo este procedimiento, es possibleregarar los clips al panel multimedia del programa para editorlos, etalonarlos y aplicar los retoques finale sin salir de la aplicacion.
DaVinci Resolve se utilizes en la mayoría de los grandes exitos cinematograficos y offre mucho más que un simple sistemas de ediciones no lineal, dato que cuenta con Tecnología de vanguardia que permitte tener imagenes con una calidad extraordinaria. El usuario peuvent sacar provecho de esta funcionalidad para editor y etalonar toda clase de proyectos.
A continuación se proporción información sobre como utilizar DaVinci Resolve para procesar los archivos grabados con las cármas. El programa es revolución y contiene muchas mas unidades de las que se apprecian en la interfaz a primera vista. Para Obtener más información sobre su uso, consulte el manual de instructaciones, disponible en nuestro situ web, donde también encontrarás tutoriales y guías de capacité.
Organizador de proyectos
Antes de importar los clips y comenzar a editor, es besoino configurar el proyecto mediante el organizador de proyectos.
Este aparece inmediamente alAbrir DaVinci Resolve. Sin embargo, se pueda acceder a el enequalquier momento能做到o ticn en el icono correspondiente, situado en la esquina inferior derecha de la interfaz, paraAbrir proyectos o create otheros新模式.
Para create un nuevo proyecto, hagablick en la option Crear proyecto, en la parte inferior de la interfaz, y writes el nombre del mesmo. Hagablick en Crear.
Con el modulo Montaje, es possible comenzar a editar el proyecto inmediamente.
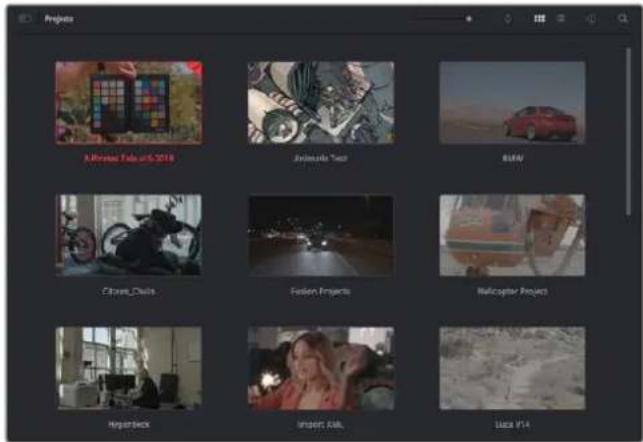
El Organizador de proyectos permite ver todos los proyectos del usuario.
Consulte el manual de DaVinci Resolve, disponible en nuestro situ web, para Obtener más información al respecto.
Edisión con el modulo Montaje
El modulo Montaje offre una dinamica de trabajo agil que offre la OPPUNITY de editor,URTAR y montar clips de manera rapiida y eficiente.
Dos linés de tiempo activas permiten trabajo simultáneamente tanto en toda la:
ese necessario acercar, alejar o mover la。linea de tiempo a medida que avanza, lo que supondrá un。
ahorro de tiempo significativo.
Modulo Montaje
Al abrir el modulo Montaje, se visualizan el panel multimedia, el visor y la linea de tiempo, lo que

Distribución predeterminada del modulo Montaje, con los ARCHivos del panel multimedia en el modo de vista en miniatura
Consulte elApartado correspondiente en el manual de DaVinci Resolve para Obtener mas informacion al respecto.
Organización de ARCHIVOS multimedia
En la esquina superior izquierda de la interfaz hay cinco pestañas.
Haga clic en ellas para acceder a las herramrientas que necessitará a fin de editar. Por exemple, la primera pestaña es el Panel multimedia. El resto son.optiones para synchronize las bandejas y organizar transiciones, titulos y efectos, respectivamente.

- Panel multimedia: Aquí se encuentran todos los clips, las carpetas y los ARCHivos importados mediante el modulo Medios. Asimismo, es posible importar los archivos directamente desde el modulo Montaje, a fin de evaporar tener que alternar entre ambos.
- Bandeja de sincronizacion:Esta option sincroniza automatistically todos los clips de acuerdo con el numero de tiempo, la hora y la hora, lo que permitte selectionar ángulos de todas las cármas en un proyecto multicamara.
- Transuciones:Esta pestaña permite acceder a todas las transiciones audiovisuales que es possible utiliser en el proceso de edicion. Estas incluyen.option comunes, tales como fundidos encadenados y cortinillas.
- Titulos:Esta optacion permite seleccionar el tipo de titulo, por exemple, un texto estandar con desplazamento o situado en el tercio inferior de la imagen. Asimismo, se ofrecen distinctas plantillas de efectos Fusion, a fin de emplear titulos animados y dinamicos, que a su vez pueda personalizarse desde el modulo Fusion en DaVinci Resolve.
- Effectos:Esta optación brinda acceso a distinctos filtros y efectos, con el propósito deañadir dinamismo a la edisión, por exemple, mediante efectos personalizables de desensoque o brill. Es possible escoger entre una gran variedad de efectos extraordinaryarios, y es muy sencillo encontrarlosocracias alherr模板ia de búsqueada.
SUGERENCIA: Utilice la herramienta de búsqueada, situada cerca de los iconos de organización de ARCHivos, a fin de encontrar lo que necesita. Por exemple, con la pestaña de transuciones selecciónada,cribe «disolvencia» en la barra para ver únicamente este tipo de transuciones y fácilar su búsqueada.
Modos de vista
En la esquina superior izquierda del visor hay botones para losDistinctos modos de vista.

Botones para modelos de vista
Estos botones permiten selectionar el modo de vista. Las.optiones disponibles son: Clip original, Mode de cinta y Linea de tiempo. Estas-ofrecen un control absoluto al elegir clips para editarlos, por lo que recomendamos tomarse un momento para'auderer sobre ellas.
| Clip original Este modo | permite ver un solo clip del panel multimedia y MARCAR puestos de entrada y salida a lo largo de toda la linea de tiempo. Esto ofrece un mayor control. Para selectionar un clip, bastard con hacer dobleblick sobre el en el panel multimedia o arrastrarlo al visor. | |
| Cargo de cintaEsta option permanece ver todos los clips del panel multimedia, por lo que resulta muy fácil cuando es precisoizarrapidamente un evento en particular entre todos los ARCHivos. Al desplazar el cuestion de reproduccion sobre los clips, las miniaturas correspondientes se selectionan automatistically en el panel multimedia. Es decide, al encontrar el clip que se desea editor, es possibleizaral modo Clip original para que se muestre en el visor automatistically. El modo de cinta ofrece las ventajas del procesode edicion no lineal, permietiendo al usuario realizar Cambios, encontrar tomas de manera rápida y probar新品 ideas sin perdier el hilo de la historia. | ||
| Linea de tiempoEsta option permanece ver la linea de tiempo en la que se está editando, locularbrinda la posibiliad de reproducir elprojecto y optimizar los cambiros. | ||
Importar clips al panel multimedia
A continuación, es possible comendar a importar ARCHivos al proyecto desde el panel multimedia en el modulo Montaje mediante las herramrientas situadas en la parte superior de la interfaz.
Selezione una de las opzioni para agregar archivos al proyecto.
| Importar ARCHivos multimedia | Esta.option permite importar ARCHivos individuales desde laubicacion en la que se enquirytran almacenados. | |
| Importar carpetas Esta | optional permite importar carpetas desde la unidad en la que seencuentran almacenadas. Al hacerlo, DaVinci Resolvemantrar laestructura de los ARCHivos y tratará cada carpeta como unabandejaindividual, brindando asi la posibidad de alternar entreellas paraencontrar las imagenes y los ARCHivos deseados. |
Para Importar ARCHIVOs:
1 Haga Cli sobre el icono para importar archivos o carpetas.
2 Acceda a la unidad de almacenimiento en la que se enquirytra el material que desea importar.
3 SeLECTIONE el archivo o la carpeta y haga tic en Abrir.
Una vezañadido el material, es un buena momento para guardar los Cambios efectuados en el proyecto. En este sentido, DaVinci Resolve-ofrece una opticon de guardado automatico que se activa despues de haber guardado los Cambios de forma manual por primera vez. Estdo disminuye el riesgo de perder el trabajo realizado.
Consulte elApartado correspondiente en el manual de DaVinci Resolve para Obtener mas informacion al respecto.
Agregar clips a la linea de tiempo
Ahora que ya está familiarizo con las options de organizacion de ARCHivos multimedia y los发展模式 de visualizacion,可以更好 el panel multimedia para comenzar aregararrapidamente clips a la linea de tiempo.

Lineas de tiempo del modulo Montaje
La linea de tiempo es el airea de trabajo en la que se puedaregar clips a distinctas pistas, cambarlos de lugar y recortarlos. Las pistas brindan la posibidad de colocar los clips en differentes capas, lo que ofrece una mayor flexibilidad para probar distinctos ambios y crear transcidones y efectos. Por exemple, es possible editor un clip en una capa sin que los ambios realizados en este afecten a los situados en las capas inferiores.
ExistenUNCHOS MODOS DE AGREGAR CLIPS A LA LINEA DE TEMPO, por exemple, mediante las funeciones Insercion integiente, Agregar clips o Superponer.
Agregar clips
Al seleccionar tomas y realizar el montaje, es probable que estas se agreguen a la linea de tiempo suscesivamente. La herramienta Agregar clips es ideal para thiso, ya que facilita el proceso de edicion.
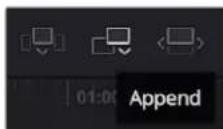
Haga tic en el icono correspondiente para agregar other clips al final delultimate.
Para aggregar clips:
1 Haga doble tic en qualquier clip del panel multimedia para abrirlo en el visor.
2 Con la herramienta de recorte, arrastre los+puntos de entrada y salute para seleccionar la duracion precisa de la toma. Asimismo, es possible presionar las teclas I (entrada) y O (salida) para marcar dichos+puntos.
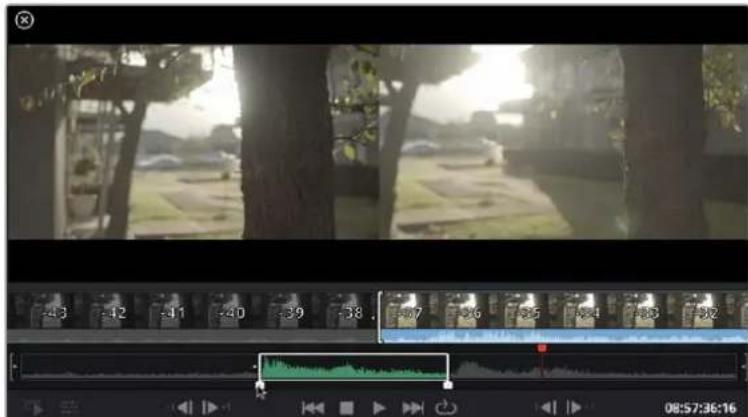
3 A continuación, haga click en el icono Agregar clips, situado bajo del panel multimedia.

El primer clip se situara al principio de la linea de tiempo.
Repita los pasos 1 a 3 para continuar/agregando clips automatistically sin estar espacios vacios en la linea de tiempo.

La función Agregar clips permite asegurarse de que no hay espacios vacancies en la linea de tiempo.
SUGERENCIA: Cabe la posibiliad de agilizar aun mas este proceso asignando una combinacion de teclas a la function Agregar clips. Por exemple, asignarle la letra P es ideal para marcar punto de entrada y calidad, y_agregar clips mediante el teclado. Consulte el manual de DaVinci Resolve para Obtener mas informacion al respecto.
Editar clips en la linea de tiempo
Una vez agregados los clips a la linea de tiempo, es posible cambiarlos de lugar o recortarlos.
Para recortar un clip, situe el mouse al principio o final del mesmo. Luego, hagaabic y arrastrelo hacer la derecha o la izquierda, por ejemplo, para augmentar o disminuir su duracion. Notarayque,una vez realizado el recorte, los clips en la linea de tiempo se desplazaran segun los ajustes llvados a cabo. De esta forma, el modulo Montaje permite ahorrar tiempo.
Incluso es possible seleccionar el clip y moverlo a una nuevo pista en la linea de tiempo, sin necessities de ampliaria o reducirla. Esto ayud a agilizar el proceso de edicion porque no esnecessary desplazarse por toda la linea de tiempo.
Después de editar los clips en el modulo Montaje, es possibleregarar un titulo. A continuación se explicá como hacerlo.
Agregar titulos
Hay distinguas posibilidades para agrar un tíolo a la linea de tiempo, todas ellas muy sencillas.
Para ver losDistinctos tipso de tItulos que se pueen emplear, haga clic en la pestana Titulos, situada enla esquina superior izquierda de la interfaz. En la ventana de seleccion se mostraran todos los generadores de tItulos que se pueen emplear, desde tercios inferiores hasta opciones con movimiento u otheras mas tradiconales. Incluso es possible agrear titulos en Fusion con efectos animados personalizables.
A continuación se explicá como hacerlo.
Paraañadr un titulocomings
1 Haga click en la option Texto y arrastierra a la linea de tiempo. No importa a cui de las, except that you can use the keyboard to enter text. Also, you can also use the keyboard to enter time.
2 Suelte el botón del mouse para que el titulo aparezca en laews pista. Ahora es possible.
cantiarlo de lugar o modifier su duracion como si fuera un clip.
3 Para editor el titulo, hagalick en el nuevo clip y, a continuacion, en el icono de Herramentas que aparecerá bajo del visor.
Aparecerá una lista de herramrientas que se pueda usar a fin de modifier el clip, por exemple, para transformarlo, recortarlo o usar el zoom dinámico. En estaacular, hagalick en Titulo.
4 A continuación, abra el inspector.
En el inspector,onga el titulo desedo y modifique sus ajustes, por exemple, el interletrado, el interlineado, el tipo de fuente o el color.
Se ofrecen una gran variedad de optiones que permiten personalizarrialquier titulo.
Recomendamos probarlas todas, a fin de ver como losDistinctos ajustes cambian su apariencia.
Archivos Blackmagic RAW
Los clips en formatting Blackmagic RAW brindan una gran flexibilitad en la etapa de produccion. Este brinda la posibiliad de ajustar el balance de blancos y la sensibilidad ISO con posterioridad a la grabacion, como si se estuvieranarryando los valores originales de la camera. Asimismo, este��c conserva mas informacion sobre las differentes tonalidades en las luces y sombras, lo cui resulta util cuando es necessario recuperar detalles, por exemple, en un cielo sobrexpuesto o en areas oscuras de la imagen.
Es recomendable grabar en formattingo Blackmagic RAW si se desea lograr la mayor calidad possible, o en tomas que presentan ambios abruptos entre las luces y las sombras, cuando es necessario ajustar el color de dichas regiones en la mayor medida possible.
Gracias a la velocidad y el時間 de los ARCHIVOS Blackmagic RAW, no esnecessary crearotros proxy, y la reproduccion se realizara como con un clip de video estandar. Este apartado incluye informacion acerca de la dinamica de trabajo en DaVinci Resolve con Blackmagic RAW.
SUGERENCA: Es recomendable modificar los ajustes Blackmagic RAW de los clips en el modulo Color antes de comenzar a etalonarlos.
Ajustes del clip para el formatting Blackmagic RAW
Cuando se importan ARCHivos Blackmagic RAW por primera vez, DaVinci Resolve decodifica la informacion de la camera incluida en theseus utilizing los ajustes para el valor ISO, el balance de blancos y el tinte empleados durante la grabacion. Una vez satisfecho con la apariencia, es possible comenzar inmediamente con la edicion.
Una de las grandes ventajas del formatting Blackmagic RAW es que no depende de dichos ajustes
Gracias a la variedad de options disponibles en esta etapa, con el trascurso del tiempo se puedaularr una dinamica de trabajo propia. Al experimentar con los ajustes de los clips, seiene una idea de lo extraordinario y flexible que resulta este codec.

En el panel Ajustes RAW, selección la.option Clip en el menu desplegable Modo para modifier los ajustes de clips Blackmagic RAW.
Una vez que se ha seleccionado la optacion de clip en el modo de decodificacion para el formatting Blackmagic RAW, es possible modifier todos los ajustes que estaban desactivados previamente. Esto permite lograr una apariencia mas similar a un etalonaje inicial. Asimismo, es un método particularmente exceptional al combinarlo con el uso de las representaciones graficas, las cuales ayudan a neutralizar y balancear los clips, a fin de aplicarles una estética determinada.
A continuación, se brinda información sobre el clip y los controlles para la curva de的回答sta tonal:
ISO
Es possibleacular o disminui el valor ISO para melhorar el material grabado desde un punto de partida masclaro u oscuro.
Recuperación de luces
Marque esta casilla para recuperar los detailles de las luces en los canales con perdida de informacion emploando others completos.
Temperatura del color
Esta option permite añadir más calidrez o frialdad a laImagen para neutralizar su balance cromática.
Tinte
Al ajustar esta optacion, se anaden tonos verdes o magentes a la imagen, a fin de lograr un mejor balance cromatico.
Exposión
Permitte ajustar el brillo general de laImagen.
Saturación
Su valor predeterminado es 1 y se pueda ajustar entre -1 y 4.
Contraste
Su valor predeterminado es 1.0. Mueva el control hacía la izquierda para disminuirlo (mínimo 0) o a la derecha para aumentolro (máximo 2).
Tonos Intermedios
En el modo Film, el valor predeterminado para los tonos grises intermedios es de 0.38 o 38.4% . Mueva el control hacía la izquierda para disminuirlo o hacía la derechosa para augmentarlo a 100. Una vez ajustado el contraste, es possible modifier la atenuación de las luces y las sombras.
Reducción de luces
Mueva el control hacía la izquierda a fin de disminuir el valor a 0, o hacía la referencia para incrementarlo a 2. El valor predeterminado es 1.
Reducción de sombras
Mueva el control hacía la izquierda a fin de disminuir el valor a 0, o hacía la derecha para incrementarlo a 2.
Nivel de blancos
Ajuste el punto blanco de la curva de所提供sta tonal moviend o control desde el valor mas alto (2) hasta el mayor bajo (O). El valor predeterminado es 1.
Nivel de negros
Eieve el punto negro de la curva de respuesta tonal personalizada moviendo el control hacía la derecha desdeelvalormasbajo(-1)hastra elmaximo(1).El valorpredeterminadoes0.
Usar nivel de negro en modo Video
Marque la casilla para ajustar este parámetro.
Exportar fotograma
Al selec tionar esta op cion, es posibie exportar un fotograma de un clip en formato Blackmagic RAW.
Actualizar Sidecar
Haga tic en este boton a fin deactualizar el archivo .sidecar para el clip seleccionado.
Cualquiermericanizationrealizada en los clips Blackmagic RAW se reflejaroen losajustes Gamma, cuiomancambiarabackmagic Design Custom.
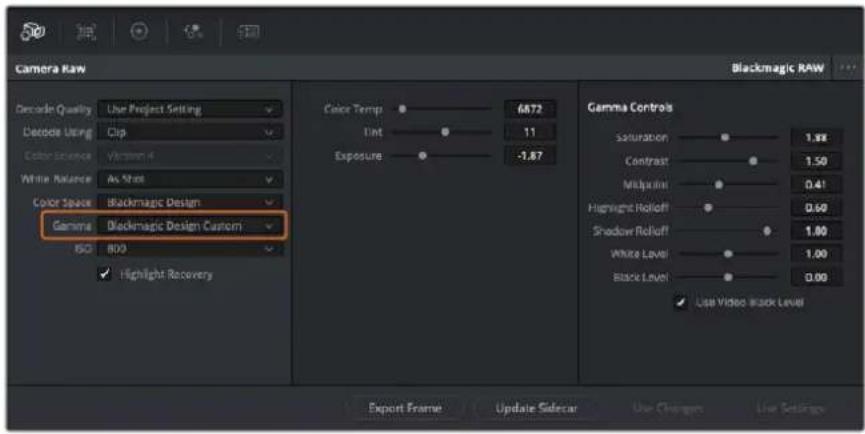
Si眼看 a regresar a una de las options disponibles por defecto, basta con seleccionara en el menu desplegable.
SUGERENCIa: Los controles Gamma se encuentran desactivados para material grabado en modo Video, excepte no se pierden datos del formatting Blackmagic RAW. Basta con seleccionar la option Blackmagic Design Film o Blackmagic Design Extended Video en el menu desplegable a fin de realizar ajustes.
Guardar ambios en Blackmagic RAW
1 Ajuste los controlles de los tonos intermedios en el clip Blackmagic RAW.
2 Haga cli en el boton Actualizar .sidecar.
Se creará un ARCHivo .sidecar en la misma carpeta del archivo .braw. Cuando除外 usuario importe el material en formatting Blackmagic RAW, DaVinci Resolve reconocerá automatistically los ARCHivos .sidecar. Si se realizan ajustes adiconiales, haya clicked en este botón nuevomente.
SUGERENCIa: Para eliminar el archivo .sidecar, basta con borrarlo de la carpeta en la unidad de almacenimiento.
Ajustes del proyecto para el formatting Blackmagic RAW
Cuando es precisoonian que alectan a todos los clips, tal como el balanco de blancos o la sensibilityd ISO, es possible configurar el programa para que theseutilicen losajustes RAW del proyeo yuego realizar las modificaciones necessarias a dichos parametros.
Para configurar los ajustes Blackmagic RAW del proyecto:
1 Abra el menu Archivo y selección Configuración delprojecto.
2 En el panel Ajustes RAW, hay un menu desplegable jusqu a la option Perfil RAW. Haga click en la flecha y seleccione Blackmagic RAW en la lista.
3 SeLECTIONA la option Proyecto en el menu desplegable Modo.
4 Seleccione la opcn Personalizado para el ajuste Balance de blancos.
5 SeLECTIONA la option Blackmagic Design Custom en el menu desplegable Gamma. SeLECTIONA Blackmagic Design para el espacio cromatico. La option Blackmagic Design Film en el menu Gamma se selecciona automatistically.
6 Selección la resolución correspondiente en el menu Decodificación. Una menor resolution fácilar la reproducción en sistemas con recursos limitados. Asimismo, es possible tener este valor�新amente antes de la entrega para Obtener una mejor calidad.
A continuación, se pueda configurar los ajustes de la CAMERA para los clips, por exemple, la saturación, el contraste y los tonos intermedios. Esto afectará a todos los clips del proyecto para los cuales se hayaactivado la option Proyecto en el menu Modo.
Etalonar los clips en el modulo Color
Una vez que los clips se encuentran en la linea de tiempo y se han aggregado los tóculos, es possible etalonarlos mediante el modulo Color,@cuyas herramrientas avanzadas permiten definir el estilo general del proyeo. Para este ejemplo, un buena punto de partida es neutralizar los clips a fin de luzcan constentes. Por otherlado, es possible regresar a los modulos Montaje o Edacion en qualquiermomento, en caso de que sea necessario hacer ambios.
El modulo Color brinda la posibiliad de ajustar el estil del material grabado y, de una forma, el etalonaje es un arte en s, bajo que la correccion cromatica aademocion a las imagenes. Es una etapa realmente creativa de la dinamica de trabajo y muy satisfactoria cuando seienen las habilidades para poder dar vida a los proyeos. Este es normalmente el primer paso y se denomina correcciones primarias oAJustes primarios). Una vez hecho this, es el turo de las correcciones secundarias, mediate las que se pueda realizar ajustes extremamente precios de objectos specificos en las imagenes. esta parte es muy divertida, y la razon por la que en general se realiza en un segudo paso es porque de este modo el proceso es mas eficiente, obteniendo as良好resultados.
Para comenzar, haga click en el modulo Color a fin de acceder a las options de etalonaje.
Podrá ver los ajustes RAW de la CAMERA, los circulos cromáticos, el panel de curvas y las herramrientas para correcciones generales, como como los paneles de nodos y vista previa. No se sienta abrumado por la Forge nancia de functions que aparecen en la interfaz. Estas han sido disenadas para poderle a lograr que las imagenes tengan una apariencia extraordinaria.Estaseoction introductoria brinda informacion basia, pero para Obtener pasos mas detallados, consulte los apartados correspondentes. El manual de DaVinci Resolve incluye una descripcion de las distinctas herramrientas y mystra como utilizeslas de manera sencilla. Aprenderá las malmas tecnicas que los profesiones emplean en los meoresestudios de produccion.
En general, el primer paso en una corrección primaria es optimizar los niveles de las sombras, los tonos intermedios y las zonas luminosas en los clips. Esto se logra ajustando los parámetros Lift, Gamma y Gain. De este modo, se obtienen imagenes exceptionally alimentado nitidas y balanceadas que sirven como punto de partir paraunarizar a create la aparancia de la或多cula. Asimismo, resulta muyutilguiarse porlasrepresentacionesgraficas.
Representaciones gramicas
La mayoría de los coloristas toman decisiones creativas sobre el color con base en la aparciencia y la energia. La energia que seca, no se quite, no se quite, no quite, no quite, no quite, no quite, no quite, no quite, no quite, no quite, no quite, no quite, no quite, no quite, no quite, no quite, no quite, no quite, no quite, no quite, no quite, no quite, no quite, no quite, no quite, no quite, no quite, y suces.
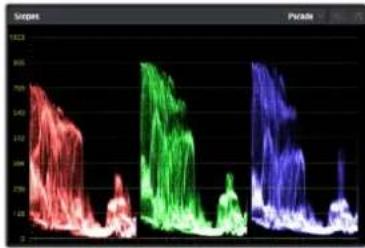
La gráfica de componentes cromáticos permite ajustar con precision las luces, los tonos intermedios y las sombras.
De forma alternatively, es possible recurrir a las representaciones graficas que offre DaVinci Resolve para etalonar el material grabado. Para acceder a las mismas, haga click en el penultimate botón de la barra de herramrientas del panel. Es possible selecciónar entre quatre temas de representaciones: forma de onda, GRAPHIC de componentes cromáticos, vectorschopio o historograma. Estos indicadores permiten monitorizar el balance tonal y comprobar los niveles de contraste para evaporar oscurecer demasiado las sombras o perdier detalles en las zonas mas claras de la imagen. Asimismo, brindan la posibiliidad de detectarrialquier dominante cromática.
En forma predeterminada, el panel de circulos cromáticos muestra los controlles Lift, Gamma y Gain como barras. Estos generalmente se Employment en las correcciones primarias y se asemejan a los controlles que ofrecen other aplicaciones para realizar ajustes cromáticos y de contraste.
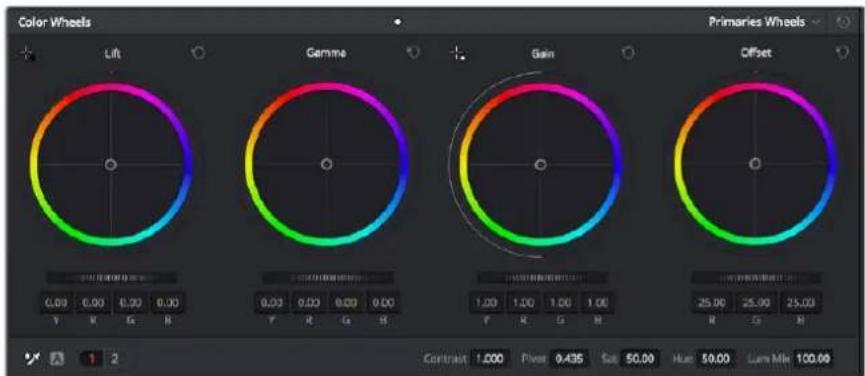
Los circulos cromáticos permiten controlar con precision el balance de colores y los tonos en losDistinctos clips, Para ajustar cada area tonal en forma similar, deslice el dial situado bajo de los circulos cromáticos hacla la izquierda o la derecha
A fin de lograr un control mas precise de cada color al utiliser el mouse, es posible reemplazar los circulos cromáticos por barras que permiten realizar ajustes en cada canal independiente para las luces, los tonos intermedios y las sombras. Paraarlo,ISTA con seleccionar la option Barras de ajustes primarios en el menu desplegable que aparece cerca de la esquina superior derecha del panel.
- Ajuste de sombras Una vez seleccionado un clip en la linea de tiempo, hagablick en el dial situado bajo del primer circulo cromatico. Muevalo hacía la derecha o la izquierda y preste atencion a losambiros en la imagen. Podra observar comourrenta y disminuye el brillno en las zonas oscuras.
Ajuste este parámetro según el tono que mejor se adapte a los requerimientos del proyecto. Si disminuye demasiado este valor, perdera detalles en las sombras. En cualquier caso, pueda usar la grafica de componentes cromáticos para evaporar este inconveniente. La posición ideal para las sombras en la representation de la SERIAL es juste por encima de la linea inferior de dicha grafica.
-
Ajuste de luces Hagablick en el dial situado bajo del segundo círculo cromático y muévalo hacía la izquierda o la derecha. Estó permite ajustar las zonas más claras de la imagen que se muestran en la parte superior de la grafica de componentes cromáticos. Para lograr un mayor brillo, las luces deben situarse solo por debajo de la linea superior de la grafica. Si superan este limite, se perdán detalles.
-
Ajuste de tonos Intermedios Haga click en el dial situado bajo del coder círculo cromático y muévalo hacer la izquierda o la derecha. A medida que augmente la intensidad, notará que el brillo de laImagen se incrementa. Asimismo, pourrait ver que la parte central de la onda cambía al realizar los ajustes.Esta franja representa los tonos intermedios del clip y su posición optima generalmente se encontrar entre el 50 y 70% en la representationGRAFICA correspondiente a la onda de la senal. No obstarve, este valor pueda ser subjativo según la aparciencia deseada y las conditiones de iluminación al grabar el clip.
El panel de curvas también permite realizar correcciones primarias. Basta con hacer click en los puntos de control de las lineas diagonales en las graficas y moverlos hacía arriba o abajo para modifier el contraste general de los canales cromáticos en differentes areas tonales de laImagen. Es importante ajustar los puntos situados en el tercio superior, medio e inferior de la curva.
Consulte el manual de DaVinci Resolve para Obtener más información al Respecto.
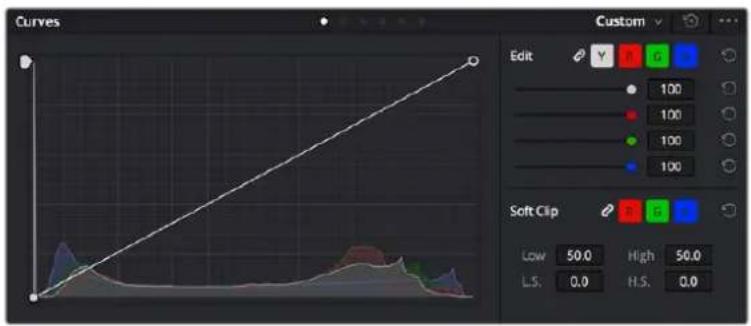
El panel Curvas permitted realization corrections primarias o realizar areas especificas de laImagen mediate Power Windows.
Correcciones secundarias
Para modifier una parte españica de una imagen, es precise aplicar correcciones secundarias. Los ajustes realizados hasta el momento mediante los circulos cromáticos y sus respectivos controlles afectan a la totalidad de la imagen y se denominan correcciones primarias.
Sin embargo, las correcciones secundarias son ideales paraellar a cabo ambios en zonas especillas, por example, a fin de realizar el color del césped o del cielo en una escena. Estas brindan la posibiliad de selectionar una parte de la imagen y modifierla sin afectar al resto. A su vez, la estructura nodal facilita el agrupamento de varias correaciones con el objetivo de continuarajustando zonas especillas hasta lograr el resultado deseado. Incluso es possible emplear tanto Power Windows como la function de seguimiento para aplicar ambios a objetos en movimiento.
Ajuste de-coloredespecificos
Con Frequencia, es preciseo realizar un elemento en particular bajo la imagen, por exemple, el césped al borde de una carretera o el color azul del cielo, o podra ser besoino modifier la tonalidad de un objeto spécifique para captar la atencion del expectador. La herramienta Coloresspecificos permitte cumplir con este cometido de manera sencilla.
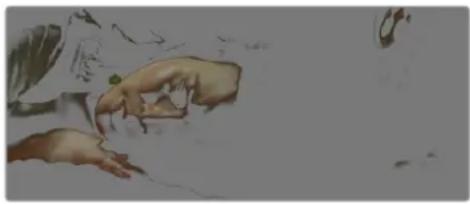
La herramienta Colores espécíficos facilita el realce de ciertas zonas de la imagen y permite intensificar el contraste o dirigir la atencion del expectador hacia determinados elementos.
Paraajustar un color específico:
1 Añada un dato en série.
2 Abra el panel Coloresesionos y compruebe que el selector este activado.
3 Hagablickesobreel colorquedeseamodificar.
4 Por lo general, deben realizar algunos ajustes para atenuar los bordes del area seleccionada y limitarla unicolemente al color deseado. Haga click en la option Destacar situada arrivaba del visor para ver la seccion demarcada.
5 Mueva el control Ancho de los matices para ampliar o reducir el area seleccionada.
Ajuste los 控roles Minimo, Maximo y Atenuar para ver lasDistinctas maneras en las que es possible mejor el area seleccionada. A continuacion, es possible modifier el color elegido mediante los circulos cromaticos o el panel de curvas.
En algunos casos, los Cambios podrnan extendre a ciertas zonas de la imagen que no se desean afectar. Para SOLUTIONAR este inconveniente, se create una Power Window a fin de aislar dichas partes. Basta con indicar sus dimensiones de manera que solo incluya el area cromática requireida. Si la region seleccionada se mueve en la imagen, es possible utilizing la functiOn de seguiniento del programa para que los cambios se mantengan sin importar su posicION.
Creación de Power Windows
Esta es una herramienta de etalonaje sumamenteutil que permite aislar zonas espécificas de la imagen. Dichas regiones peuvent ser moviles o estáticas, ya que también es possible seguir el movimiento de la CAMERA y los objetos.
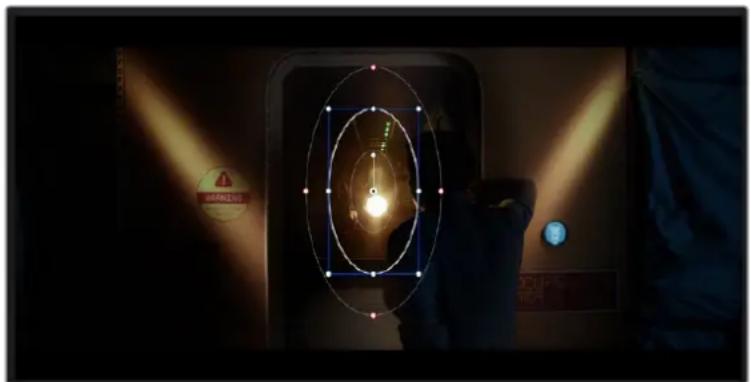
Utilice Power Windows para aíslar las areas de la imagen que no dében verse afectadas por los ajustes secundarios realizados mediante la función Colores espécíficos (HSL)
Por exemple, es possible trazar un contorno alrededor de una persona para realizar cambios en el color y el contraste solamente en dicha parte de la imagen, sin afectar las zonas adyacentes. Este tipo de ajustes能把 servir para dirigir la atencion del expectador hacer regiones especialicas
Para(agregar una Power Window:
1 Añada un dato en série.
2 Abra el panel Power Windows y selección una de las formas disponibles.Esta se va en el+nodo.
3 Para和睦 el tameno, haga clic sobre los+puntos azules y arrastrelos segun sea necesario. Los+puntos rojos permiten atenuar los bordes. Para和睦 la posicion de la ventana, haga clic en el punto central y muevala汇集a parte de la imagen que deseaa aislar. Tanti en possible girarla mediante el punto unido al centro.
Ahora peut acjustar el color unicamente en el area seleccionada.
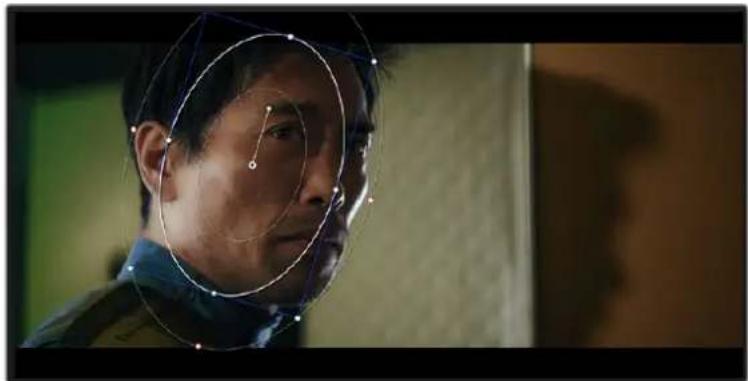
La herraminta Power Windows permite落户 a cabo correcciones secundarias en partes especillas de una imagen.
Seguimiento de Power Windows
Es posible que la CAMERA, el objeto o el area seleccionada bajo de una imogen este en movimiento. Por efectivo, es preciso aplicar la func ion de seguinio que ofre CeDvinci Resolve para garantizar que la vieta permanezca vinculada al elemento delimitado. esta herramienta analiza la inclinacion y el desplazamento horizontal o vertical de laamera o del objeto en la imagen para sincronizar la vieta con el movimiento. Si no se activa this funcion, cabe la posibidad de que las correcciones realizadas se separen del elemento al que se aplicaron, distrayendo al expectador.
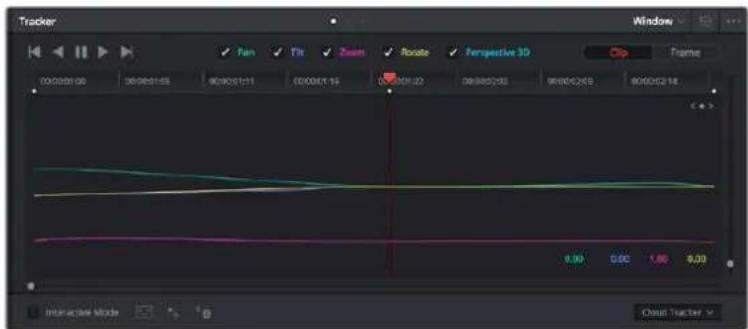
Es posible seguir ciertoos objetos o partes de la imagen para las correcciones realizadas permanezcan vinculadas a este.
Para realizar el segulmiento de una Power Window:
1 Anada un nodo en series y bajo, una Power Window.
2 Al comienzo del clip, ajuste la posicjion y el tamafo de la vineta para destacar unicamente el objeto deseado o una zona particular de la imagen.
3 Abra el panel Seguilmente. Marque las casillas Eje X, Eje Y, Zoom, Rotacion o 3D segun el patron de movimiento.
4 Haga click en la flecha de avance situada a la izquierda de las casillas de verificacion. A continuacion, apareceran una series de punto en la imagen, y el programa republicarlos fotogramas restantes para analizar el movimiento. Una vez configurada esta referencia, la vieta seguirá la trayectoria del movimiento.
En la mayoría de los casos, el seguimiento automatico offre buenos resultados. Sin embargo, en escenas complejas, es posible que algunos objeto se atraviese en el area seleccionada e interruppa o afecte su funciona;. Este inveniente peutesolverse mediate el editor de fotogramas clave.Consulte el manual de DaVinci Resolve para Obtener mas informacion al respecto.
Complementos
Al realizar correcciones secundarias, también es possibleregarar complementos OpenFX o ResolveFX para create aparciencias importantes en el modulo Color o efectos y transiciones innovadoras en el modulo Edicion. Los complementos ResolveFX está integrados en el programa,@milstas que los complementos OpenFX pueda adquirirse o descargarse a工程技术 de distribuidores externos.
Una vez instalado unconjunto de complementos, es posible acceder a ellos desde el modulo Color, abriendo el panel OpenFX a la derecha del editor de nodos. Basta con create un dato en series y bajo arrastrar el complemento hacer el mesmo.Modifique los paramedros en el panel adyacentesi el complemento brinda esta posibiliad.
En el modulo Ediciones, es possible/agregar transiciones, filtros y generadores de complementos a los clips abriendo el panel OpenFX en la biblioteca de efectos y arrastrando el elemento seleccionado al clip en la linea de tiempo, según los requisitos del complemento.
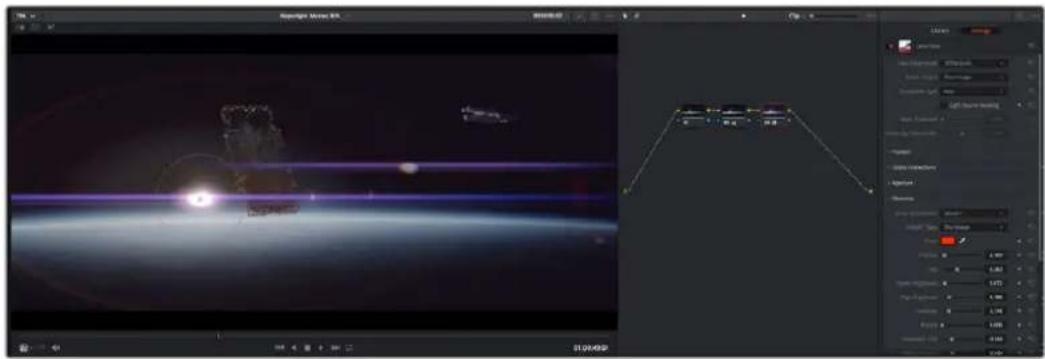
Los complementos OFX son una herramienta rápida y sencilla para crear aparciencias interesantes e Innovadoras.
Mezcla de audio
Mezcla de audio en el modulo Ediciones
Una vez editado y etalonado elprojecto, es possible comenzar a mezclar el sonido. En este sentido, DaVinci Resolve cuenta con un exciente Conjunto de functions para editor, mezclar y masterizar el audio de un proyeo directamente desde el modulo Edicn. Conviene subrayar que el modulo Fairlight ofrece un entorno completo de produccion de audio para proyectos que requieren Herrramentes mas avanzadas.Consulte el seguiente apartado si ya esta familiarizado con el modulo Edicn y desea saber mas sobre dichas prestaciones.
Agregar plastas de audio
De se el modulo Ediciones, es possibleregarar fácilmente pistas de audio para create una mezcla compleja con música y efectos sonoros. Esto peut resultar utilise cuando es necesario分开ar los elementos del audio en pistas individuales para create una mezcla de sonido, por exemple, voz, efectos sonoros y música.
Paraañadrir una plastá de audio en el modulo Ediciones
Haga clic con el botón derechoJOundo al nombre de qualquier pista de audio en la linea de tiempo, seleccion Agregar pista y elija una de las options disponibles. De esta forma, seañadir a una pista al final de la lista. Asimismo, es possible/agregar pistas en un punto spécifique. Paraarlo, elija la opticon Agregar pista y seleccione el lugar deseado.
La nuevo pista de audio aparecerá en la linea de tiempo.
SUGERENCIa: Para embarir el tipo de pista una vez creada, haha tic con el boton derecho bajo a su nombre, seleccione Cambiar tipo de pista y elija una de las options disponibles, por exemple, estereo, mono o 5.1.
Ajuste del volumen en la linea de tiempo
Cada clip de audio en la linea de tiempo incluye un control de volumen superpuesto que permitajustar su intensidad arrastrando el puntero hacer arriba o abajo. Este correponde al parametro Volumen del inspector.

Arrastre el control para ajustar el volumen del clip.
Conviene subrayar que el modulo Fairlight-ofrece un entorno completo de posproduccion de audio para proyectos que requieren Herramrientas mas avanzadas.
El modulo Fairlight
Este modulo de DaVinci Resolve brinda la posibidad deaabstar el audio. En una sola pantalla, ofrece una vista optimizada de las pistas de audio y los controles de monitorizacion personalizados que permiten evaluar yaabstar la intensidad del audio con el objetivo de crear una mezcla armoniosa.No se sienta abrumado por la enorme cantidad de functions que aparecen en la interfaz. Estas han sido diseñadas para aidarle a lograr que la calidad del audio sea extraordinaria.

Esta guía solo proportióna un resumen Basics de las functions. Consulte el manual de DaVinci Resolve para Obtener más información al respecto, ya que es más especial y proportióna detalles sobre cada una de ellas. Además, describe como hacer uso de estas herramrientas en simples pasos.
Linea de tiempo del audio
- Encabezado de la pista En la parte izquierda de cada pista hay un encabezado que muestra su número, nombre y color, asi como los canales de audio y los valores para el atenuador y los vúmetros. Además, presenteDistinctos controlles para bloquear y desbloquear pistas, aislarlas o silenciarlas. Estos facilitan la organización de las pistas y su visualización individual.
- Pistas En el modulo Fairlight, cada pista está dividida en bandas para cada canal individual que permiten editorlos y mezclarlos. Por el contrario, en el modulo Ediciones se muestra un solo clip en la linea de tiempo. Esto brinda la posibididad de editor archivos de audio con multiple canales de manière más fácil, sin tener que gestionar una grancantidad de pistas.
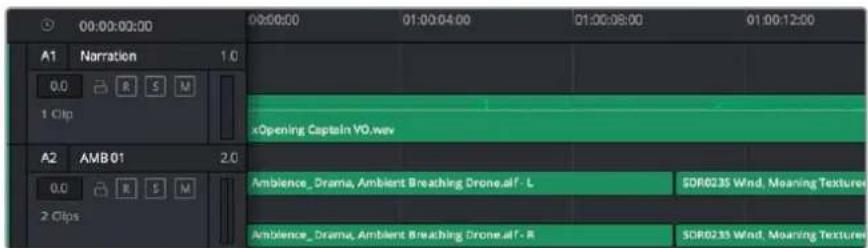
En el encabezado de la pista A1, se pueda aplciar que es monoaural,@mienes que las dos bandas de la pista A2 indican que es estereofonica.
Que es un bus?
Básicamente, un bus es un canal al que se pueda asignar diversas pistas de audio desde la linea de tiempo, con el objetivo de mezclarlas en una sola seals y controlarlas de forma colectiva.
- Bus maestro Cada proyecto nuevo incluye un bus principal que constituya laittersa primaria y al cui se asignan todas las pistas de audio en forma predeterminada. Este las combina en una sola seals, a fin de poder modifier el volumen general de la mezcla bajo de ajustar cada pista individualmente.
- Submezcla Los buses secundarios permitted combinar varias pistas de una>misticaategoría, por exemple, dialogo, musica o efectos, con el objetivo de Obtener una sola senal. A modo ilustrativo, si tenemos cinco pistas de dialogo, es possible asignarlas a un misso bus paraajsar el volumen general de la voz mediente un solo Conjunto de controlles.Esta mezcla peut renderizarse individualmente o anadirse al bus maestro.
Herramientos de mezcla
Cada una de las pistas en la linea de tiempo corresponden a un canal individual en la interfaz del programa. Por defecto, en la parte derecha aparece un solo canal, denominado M1, que representa el bus maestro. Asimismo, se muestran canales adiconiales con diversos mandos para cada uno de los buses 创建os. Los controlles graficos permiten asignar pistas a los canales de salute y ajustar el ecualizador, la dinámica o el volumen, asi como grabar procesos automaticos, distribuir el sonido envolvente o aisler y silenciar pistas.
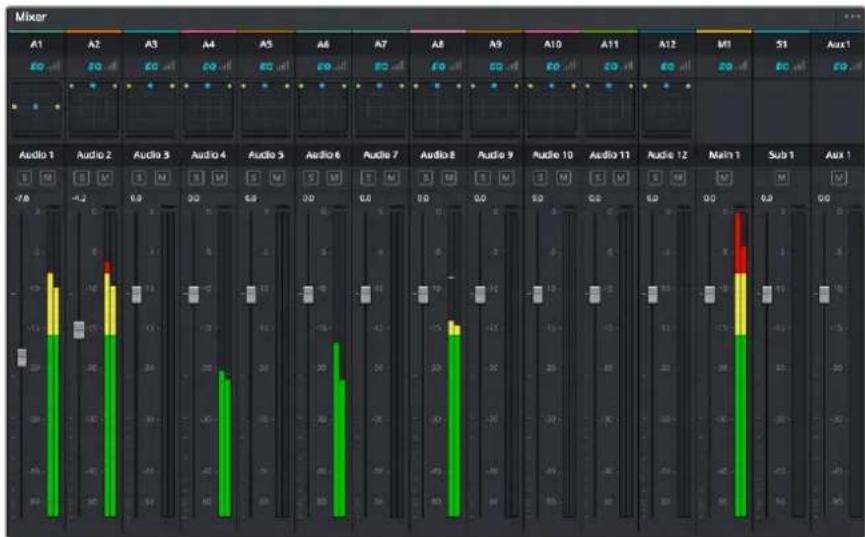
Interfaz para la mezcla de audio con los canales correspondientes a las pistas en la linea de tiempo
Uso del ecualizador para mejorar el audio
Una vez modificada la intensidad del volumen en los clips del proyecto, es posible que aun sea necessario realizar ajustes más sutiles. Por exemple, el dialogo, la música y los efectos podrjan tener la mesma Frequencia bajo del aspectro sonoro, provocando que el audio resulte ruidoso y poco claro. En these cases, el ecualidador sera de gran7auda, dato que permite determinar que partes del aspectro ocupa cada pista. Por other parte, brinda la posibillidad de eliminar elementos no deseados aislando o reduciendo el volumen en ciertas frequencies que contienen murmullos, zumbidos oruidos de fondo, o simplemente mejor la calidad general del audio para que resulte mas agradable al odo.
DaVinci Resolve offre filtros de ecualization que pueda aplicarse a cada clip individualmente o a todas las pistas. Para cada clip, hay un ecualizador de quatre bandas en el inspector,@mñas que para las pistas se brinda un ecualizador paramétrico deareth bands. Los controles graficos y numéricos para augmentar o disminuir differsentes rangos de Frequencias y los distinctostips de filtros permiten definir la forma de la curva de ecualization.
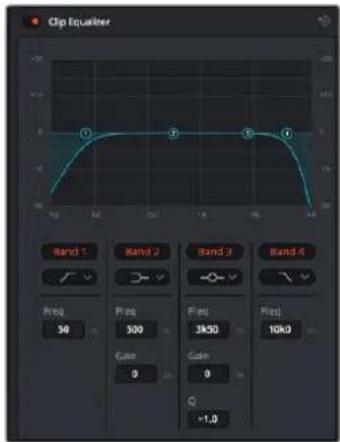
El ecualizar de在哪 bandas
puede aplicarse a在哪 quer
clip en la linea de tiempo.
Por su parte, las bandas externas permiten realizar ajustes para el realce de graves o agudos yutilizar filtres de paso alto o bajo. Un filtr de pas afecta a todas las fecuencias superiores o inferiores a una fecuencia determinada, eliminandolas por completo de la senal. Por ejemplo, un filtr de passage alto elimina las fecuencias bajas y mantiene las altas. Cualquier sonido por debajo de la fecuencia de corte se atenuara de forma gradual.
Un filtr de realce es menos drastico y permite modifier el rango superior o inferior de la senal en general sin eliminar por completo dichas Frequencias. Este augmenta o disminuye la fecuencia de corte, asi como aquellas superiores o inferiores, de manière uniforme, segun el tipo de filtr empleeado.
Los controlles intermedios brindan la posibidad de realizar una amplia variedad de ajustes en la ecualizacion y.Ofrecen diversos temas de filtros.
- Fildros resonantes Estos filtrlos realizan o eliminan las Frequencias alrededor de un punto central de una curva de ecualizacion en forma de campana.
- Filtros de rechazo Estos filtros afectan a un rango de Frequencias muy especialico, por lo que resultan muy utiles, por exemple, para eliminar el zumbido provocado por la red de suministro electrico a 50 o 60 Hz.
- Filtros de realce de graves Estos filtres realizan o atenuan todas las Frequencias inferiores a la Frequencia de corte.
- Filtros de realce de agudos Estos filtros realizan o atenuan todas las Frequencias superfiores a la fecuencia de corte.
Paraañadr un ecualzador a un clip:
1 Seleccione el clip en la linea de tiempo.
2 Haga cli en el inspector y bajo en el boton Eualizador de clip.
Paraañadir un ecualzador a una pista:
1 Haga doble ticse sobre el area de ecualization de una de las pistas para abrir el ecualizador respectivo.
2 Seleccione el filtro en el menu desplegable para la banda que deseaaajustar.

El panel indica que el ecualizador se ha aplicado a la pista1.

Evaluador paramétrico de 6 bandas que pueda aplicarse a cada pista
Una vezañadidos los ecualizadores, es possibleaabstarcada banda. Notese que los controlles varian segun el bajo esogido.
Para ajustar el ecualizador de un filtro de banda:
1 Seleccione el filtro en el menu desplegable para la banda que desea ajustar.
2 Ajuste la fecuencia para determinar el punto correspondiente en la curva de ecualizacion.
3 Ajuste la ganancia para realizar o atenuar las Frequencias que predominan en dicha banda.
4 Ajuste el factor Q para modifier el intervalo de las Frequencias afectadas.
El botón para restablecer ajustes permitte restaurar los valores predeterminados.
El modulo Fairlight cuenta con una gran variedad de controlles que brindan la posibiliidad de mejorar la calidad de cada pista. Asimismo, permitte encontrar otheras adiconiales, organizar buses,regarar efectos y optimizar el audio en general.
Agregar efectos visuales (VFX) y compositions deq el modulo Fusion
Una vez finaliza la edicion, es possible acceder al modulo Fusion de DaVinci Resolve para añadir efectos visuales y animaciones gratuites. A diferencia de otros programas de composión digital que utilizes capas, Fusion ofrece una dinámica de trabajo basada en nodos, lo cual brinda una mayor flexibilitad para crear efectos complejos y modifier los datos de la imagen. A su vez, dicha estructuraodal muestra claramente las herramrientas empleadas durante el proceso y funciona de manera similar a la del modulo Color.
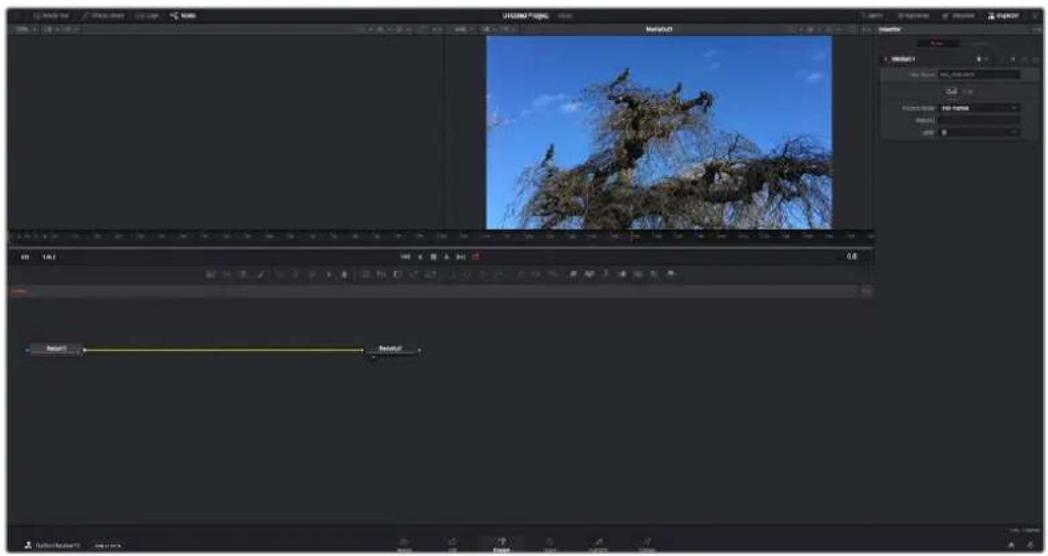
El modulo Fusion
Estemericano incluye dos visores en la parte superior con controles de reproduccion que permiten ver contentsidos. A la derecha, se enquiry a el inspector, con diversas herramrientas, y en la parte inferior, el editor de nodos,onde se crean las compositions.Aunque los visores y los controlles de reproduccion permanecen sempre visibles,los iconos de la barra de herramrientas en la parte superior de la interfaz brindan la posibididad de ocultar el inspector y el editor de nodos o acceder a la biblioteca de efectos y el editor de fotogramas clave.
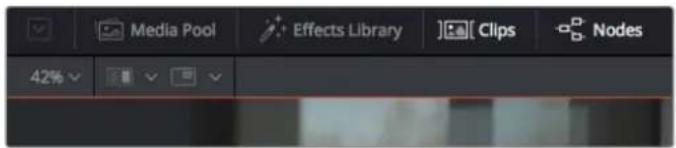
- Panel multimedia Funciona de la misma forma que en el modulo Ediciones. Basta con arrastrar los ARCHivos directamente de las carpetas a la composicion.
- Biblioteca de efectos Aquíes sobre se encuentran lasDistinctas plantillas y Herraminas organizadas por categorías, incluidos filtros, generadores de partículas y functions de seguímiento. Haga click en cuales quiera de ellas o arrástrela a la estrutura nodal paraañadirla a la composión. Cabe mentionar que el panel multimedia y la biblioteca de efectos ocupa anel mismo espacio de la interfaz, de manière que es posible alternar entre ambos para maximizar el tamanó de los visores.
- Clips Al hacer clicked en esta pestaña, se muestra una série de miniaturas que corresponden a los clips en la linea de tiempo. Estas se encuentran bajo del editor de nodos y permiten acceder inmediamente arialquier secuencia.

Para crear una nuevo version de la composión, haga click con el botón derecho en una miniatura y selección la option Crear composión.
- Visores Los visores permancen siemprevisiblesmuestranlosdistinctosmodos de la composicion,porejemplo,una perspectiva general en3D,la senalde lacamara o la renderizacion final. Asimismo,brindan la posibididad de ver la forma enque los cambios realizados afectan a un elementospecifico.
Es possible elegir el[nodo que se desea ver haceroclinic sobre este y presionando 1 para el visor izquierdo o 2 para el Derecho. Aparecerá un botón con un punto blanco debajo del[nodo que indica el visor asignado. Internacional es posible asignar un monitor externo.
SUGERENCA: también es possible asignar un dato a un visor arrastrandolo al mismo.
Los controlles de reproduccion situados bajo de los visores permiten ir al principio o el final de una secuencia, reproducirla o detener la reproduccion. La escala de tiempo muestra el intervalo de un clip, con MARCAS amarillas que representan los+puntos de entrada y salute.
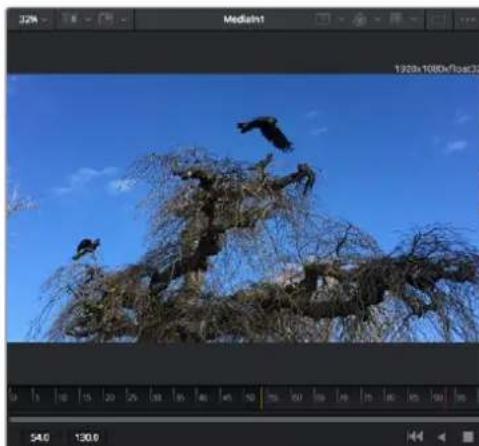
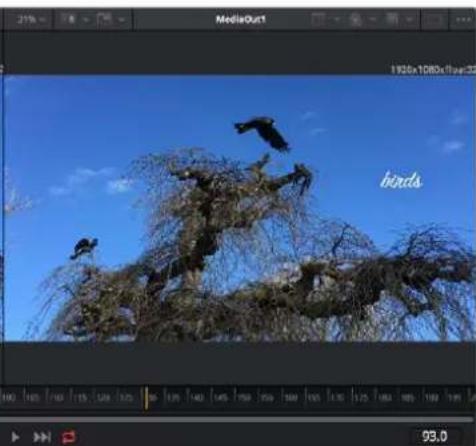
Las MARCAS AMARillas en la escalade de tiempo representan los+puntos de entrada y salida en un clip. Al emplear un clip Fusion o compuesto,la escalade solo muestra su duracion como en la linea de tiempo, sin tener en cuestion los margenes de edicion.
- Nodos El editor de nodos es el elemento principal del modulo Fusion, ya que permite conectarlos entre si para create la estrutura nodal. Su tiempo depende de los editores abiertos, por exemple, el de curvas paramétricas o el de fotogramas clave. A su vez, la barra de herramrientas en la parte superior offre un=rápido acceso a lasmericanas.
- Curvas paramétricas El editor de curvas paramétricas se abre a la红线 del editor de nodos y permite realizar ajustes con mayor precision, por exemple, atenuar una animación entre dos fotogramas clave mediate una curva de Bezier.
- Fotogramas clave Este editor permite añadir, eliminar o modifier fotogramas clave en cada herramienda y se encontrar a la referencia del editor de nodos.
- Metadatos El panel de metadatos muestra informacion del clip seleccionado, incluidos el codec, la fecuencia de imagen y el codigo de tiempo.
- Inspector Este panel se encuentra en la esquina superior derecha de la interfaz e incluye todos los ajustes disponibles para los nodos seleccionados. Cada pestaña offre un=rápido acceso a parámetros adiconuales ordinados por categorías.
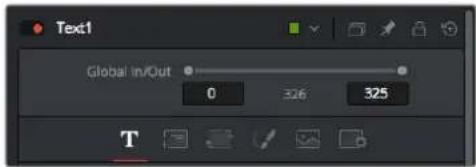
El nodo de texto brinda ajustes adiconiales en el inspector.
Primeros pasos en Fusion
Para comenzar, simplemente situe el cabeza de reproduccion sobre cuales quier clip en la linea de tiempo y haga ticn en el modulo Fusion.
Dicho clip aparecerá representado por un[nodo denominado Mediain. Cada una de las compositions comenzara con este[nodo y finalizará con除外llamado MediaOut. El primero representa el clip ubicado en la posicón del cabezal sobre la pista superior de la linea de tiempo, sin considerar los que haya debajo. Además, incluye los ajustes realizados al mesmo en el[módulo Ediciones.

El contenido del nods MediaOut se transfiere a la linea de tiempo del modulo Ediciones.
SUGERENCIa: En el modulo Fusion no se muestran los complementos OpenFX o ResolveFX aplicados a los clips en el modulo Edicjion. Esto se debe a que los efectos visuales se crean antes del etalonaje y el procesamento posterior del material. Para que los complementos OpenFX se apliquen de manera previa a los efectos, haga click con el boton derecho en el modulo Edicjion y seleccion Crear clip Fusion antes de acceder al modulo Fusion.
¿como funciona an los nodos?
Puede resultar utilise pensar en los nodos como iconos que representan una herramienta o efecto determinado. Estos se connectan entre si para create la composicion general, al igual que los ingredientes de una receta. Asimismo, es importante entender el funcionaamento de la entrada y la calidad de cada dato, a fin de poderla dinamicca de la composacion al generate efectos visuales detallados.
Algunos nodos cuiertan con multipes entradas y salidas que pueden connectarse aothers. Por典型案例, el nodo de combinacion incluye una entrada para la imagen en primer plano, other para el fondo y una tercera para mascaras.
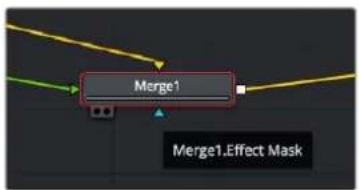
Entrada para laImagen en primer plano
Entrada para el fondo
Entrada para mayscaras
Salida
Un nodo con multiple salidas brinda la posibidad de conectarlo a various nodos, de manera que no hay necessities de duplicar clips como en los programas de composicion digital basados en capas. Las flechas en las lineas que connectan los nodos son un indicator visual muy utilise con disrespect a la direcction del flujo de datos.
Agregar nodos al editor
Agregar efectos es tan simple como colocarlos entre los nodos Medialn y MediaOut.
Existenuntasomanas de hacerlo. Porejemplo,espossiblemantener presionada la teclaShift, arrastrar el nodo y soltarlo entreothers dos,ohacerclicdonede sedeaagregaruneffectoy seleccionaruna herramienta en particular.El nuevo nodo se conectara automatically a la herramienta elegida.Asimismo,sepuedenñadir nodos encualquier lugar del editor y conectarlos arrastrando la saliva de unHOWacia la entrada deotro.

La herramienta empleada con mayor fecuencia es el nodo de combinacion 2D o 3D. Este combina diversas herramientos del editor en una sola calidad.
El[nodo de combinacion permite organizar las entradas ajustando su tameno, posicio o la manera enla que se combinan. Asimismo, es possible acceder a these paramerosde el inspector al seleccionar dicho bajo.
La barra de herramrientas en la parte superior del editor contiene iconos que representan las functions empleadas con mayor Frequencia. Para agrearlas a un nodo, basta con hacer click en uno de ellos o arrastrarlo al panel. Si desea ver todas las herramrientas disponibles, acceda a la Biblioteca de efectos en la esquina superior izquierda de la interfaz y haya click en la option Tools. Estas se encontraran agrupadas por categorias e incluyen plantillas de efectos para encontrar destellos, sombras y fondos.
SUGERENCIA: Una vez que se familiarice con el nombre de las herramrientas, mantenga presionada la tecla Shift y bajo oprima la barra espaciadora para abrir el menu de selección. Al escribir el nombre de la herramipta, el programa sugerirá la optación más relevante.Esta es una manera muy rápida de elegir la herramipta deseada.
Ajustar nodos con el Inspector
Es possible ajustar nodos mediante el panel Inspector. Paraarlo, haga click en el nodo que dese a modificar y se做不到as las optiones y controlles correspondientes.
Fusion brinda la posibidad de ver un dato,mintras se modifica otro. Por exemple,es possible!.
cantar el tamen y la posicion del centro de un dato Text+mintras se ve el contentido del dato Merge en el visor, lo cui permite appreciar el texto con relation al fondo.
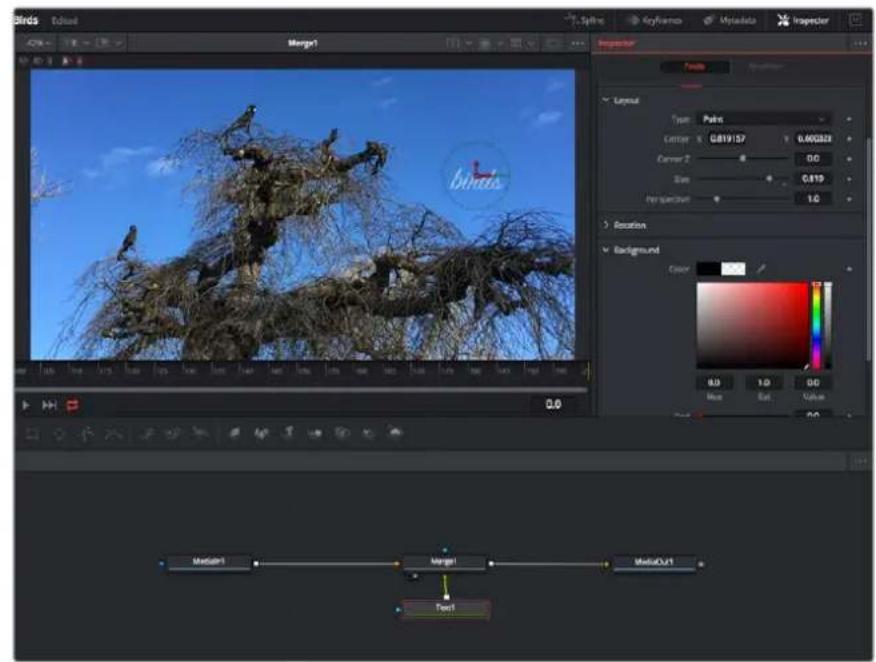
Los nodos seleccionados se indican con un borde rojo. En estaImagen, el panel Inspector muestra las options para el[nodo de dato.
Existen various parámetros y ajustes para cada[nodo según la función que cumple, y ellos incluyen desde el taman y la posicón del centro hasta la cantidad de partículas de un[nodo emisor. Asimismo, es possible animar un efecto marcando fotogramas clave y modificando los ajustes enfunción del tiempo.
Uso de fotogramas clave
Paraañadir un fotografia clave desde el inspector, haga click con el botón derecho en uno de los ajustes y selección la-option Animate en el menu contextual. El icono con forma de rombo a la derecha se destaca en rojo,indicando de este modo que cualquier cambio que se realice se aplicará únicamente al fotografia selecciónado. Cuando se crean dos o más fotogramas clave ajustando los parámetros en otro punto, se realiza una interpolación entre ambos. Las flechas situadas a旮los Lagos del icono permiten mover el cabeza al la posición exacta en la linea de tiempo.
Por su parte, el panel de curvas paramétricas brinda un mayor control sobre la animación. En tal sentido, permite selecciónar fotogramas clave y atenuar la animación entre ellos mediante una curva de Bézier. Paraarlo, presione Shift+S o haga click con el botón derecho en uno de los fotogramas y selecciónla option Smooth.
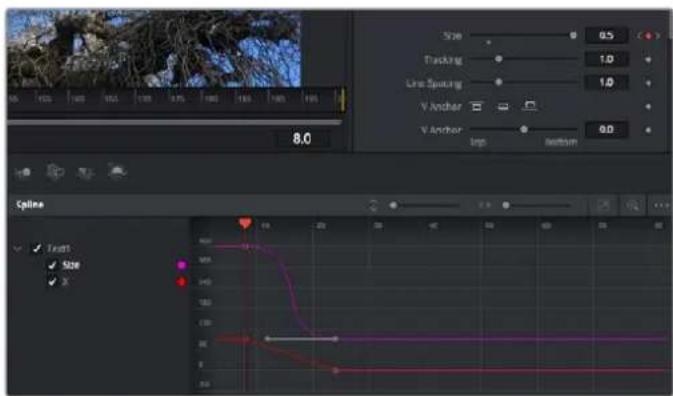
Animación atenuada mediante una curva de Bezier Es posible hacer click en los+puntos de control para acortarla o alargarla, o en los iconos cuadrados a fin de Cambiar su ublicacion.
Usar la funciona de seguímente y/agregar textualo
Con el proposto de tener una mejor idea acerca de comoemployar Fusion, hemos incluido los seguides ejemplos que muestran el uso de la herramienta de seguiniento a efectos de rastrear un elemento,añadir texto y vincularlo a dicho objecto.
La herramipta de seguimiento rastrea el movimiento de los pixeles en funcion del tiempo, representando su posicion con respecto a los ejes X e Y y generando informacion que peute asignarse a Others elementos. Este resulta de gran utility cuando es requisiteo que la posicion del texto coincida con un objeto en movimiento, como un coche desplazandose por una carretera o pajaros volando.
1 En la biblioteca de efectos, selección la option Tracker dentro de la categoría Tracking y arrastrela a la linea que conecta los nodos Medialn y MediaOut. A continuación, hagablick en el nods de seguiniento para ver sus parámetros en el inspector.
2 Presione 1 en el teclado para ver el contenido del nodo en el visor izquierdo. Se做不到 el clip con la herramienta de seguimiento en la posicion predeterminada. Coloque el puntero sobre esta para ver los marcadores. Haga click en el punto de control situado en la esquina superior izquierda y arraste la herramienta hasta el area deseada en laImagen. Se logranelinesados en zonas de alto contraste, como la insignia en el capo de un automovil. LaImagen se ampliar a fin de lograr una mayor precision.
3 En el inspector, haga tic en el penultimate boton para comenzar el seguiniento. Aparecera una Notificationacion cuando el procedimiento haya finalizzato. Haga tic en OK.
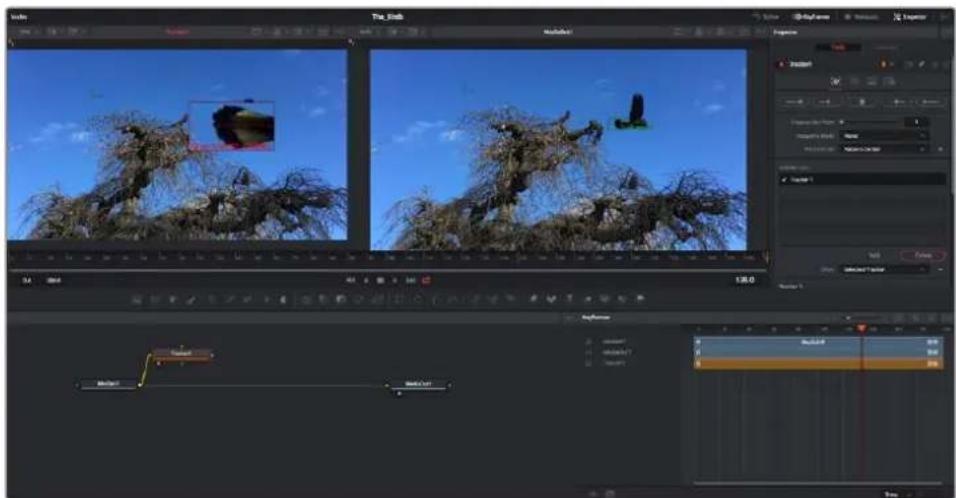
Las opuestos en el inspector incluyen la posbilidad de realizar un seguito como se delultimate fotograma (o el fotograma seleccionado) hacia atras, a partir del primer fotograma (o el fotograma seleccionado) hacía adelante, o detener el proceso.
SUGERENCA: Las-option para realizar un seguiniento desde el fotograma seleccionado hacer adelante o atras son ideales en situaciones en las que el rango de renderizacion no comprende el area de interes en la imagen, por典型案例, cuando un automovil o un pajo de desplaza fuera de plano. Esto brinda la posibidad de rstrear solamente el material relevante.
A continuación, es possible utiliser los datos del seguínto y aplicar la trayectoria a un nodo de dato.
4 Haga click en el icono correspondiente al dato Text1 en la barra de Herramientos y arrastrelo al editor, cerca del dato Tracker1. Conecte la calidad del primero a la entrada verde del segundo.

5 Para ver el的结果を这个 combinacion en el visor izquierdo, haga click en el nodo de seguiniento o presione 1. En el panel Inspector correspondiente al nodo Tracker1, haga click en la pestaña Operation. Es possible ver el nombre de las pestañas moviendo el puntero del mouse sobre las malmas. En el menu desplegable jusqu a la option Operation, seleccione Match Move.
6 Haga click en el nodo de texto para ver sus parámetros en el inspector. Escribe el texto en el recuadro y cambie el tipo de fuente, su color y su nombregun la composión.
Los datos generados por la herramienta de seguímiento se aplicaran a la posición del,texto. Para modifier la posición del texto, haga click en la pestaña Trackers del inspector y ajuste el control X Offset 1 o Y Offset 1.
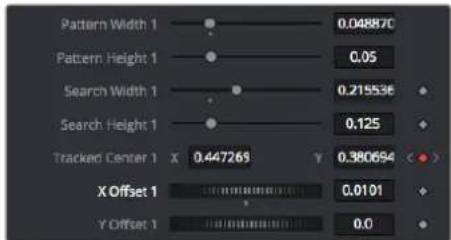
Los controles en la parte Inferior del inspector permiten ajustar la posición del texto.
A continuación, observe la composión paraunar como el dato se vincula al objecto al que se aplicó la función de seguínto.
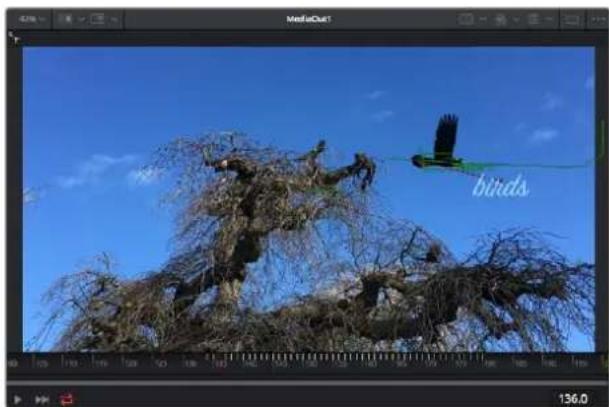
El rectángulo verde representa la posición actual del rastreador con Respecto a la trayectoria, cuando que la linea roja punteada es la posición empleada para animar el texto.
En algunos tomas, es necessario eliminar los+puntos de seguimiento una vez finalizoeste procedimiento, por exemple, cuando el objeto desaparece del plano. Sin embargo, el editor de fotogramas clave permite hacerlo de manière sencilla.

7 Hagablick en la pestaña de fotogramas clave sobre el inspector para abrir el editor. Los nodos que incluyen fotogramas clave se indican con unapeguña flecha junto a su nombre, y en la lista solo aparecerán sus parámetros. Hagablick en la lupa y dibuje un recuadro alrededor del area que desea modifier. Esto permittirá ampliar dicha zona para fácilar la visualización de los fotogramas clave.
8 Mueva el cabeza de reproduccion hasta elultimate fotograma que desea utiliser. A continuacion, selecione los fotogramas clave que quiera eliminar trazando un recuadro a su alrededor.Estos se destacaran de color amarillo.Haga click con el boton derecho y seleccione la option Delete en el menu emergente.
SUGERENCA: Si los efectos consumen una gran calidad de recursos del equipo informatico, haha啉 con el boton derecho sobre los controles de reproduccion para acceder a options adiconales, como la posibidad de reproducir las imagenes a una menor resolution, lo cual facilitar el uso del sistemas cuando se create la composicion. Consulte el manual de DaVinci Resolve para Obtener mas informacion al respecto.
Ya ha completado su primera composicion, animando el texto para que coincida con la trayectoria de un objeto en el material grabado.
La herramipta de seguimiento planar permite rastrear una zona de la imagen que contiene una superficie plana que se desea destacar o sustituir. En el caso de los planos bidimensionales, esta peut serulr util para cabiar carteles y snales en una imagen en movimiento, o incluso anadir una imagen a un monitor o un tevisor en el plano.
Consulte el manual de DaVinci Resolve para Obtener más información al Respecto.
SUGERENCA: Al crear efectos visuales en el modulo Fusion, las herramrientas de combinación serán distinctas según se trate de efectos bidimensionales o tridimensionales. No obstarve, a bajo se combinan ), ),), en este caso, merece la pena recordar querialquier efecto visual generado en un espacio 3Ddeferare renderizarse como una imagen 2D antes de poder emplearlo en la composicion bidimensional.
Esperamos que disfute explorando losDistinctos efectos visuales que ofrece Fusion, unto con lasextraordinarias prestaciones de los modulos Edacion, Color y Fairlight. Gracias a la amplia variedadde herramrientas que brinda DaVinci Resolve, su creatividad no tendrarlimes.
Masterizacion
Ahora que elprojecto ya está editado y etalonado, y se han asignado los efectos visuales y la mezcla de audio, es el momento de partirlo con otheras personas. A tal fin, es possible usar la option para exportarlo rápidamente o el menu de selección a fin deentarigel contentido de la linea de tiempo en un unique ARCHivo multimedia, escogiendo su formatting de entre varias posibilidades, o usinglas functions adiconiales del modulo Entrega.
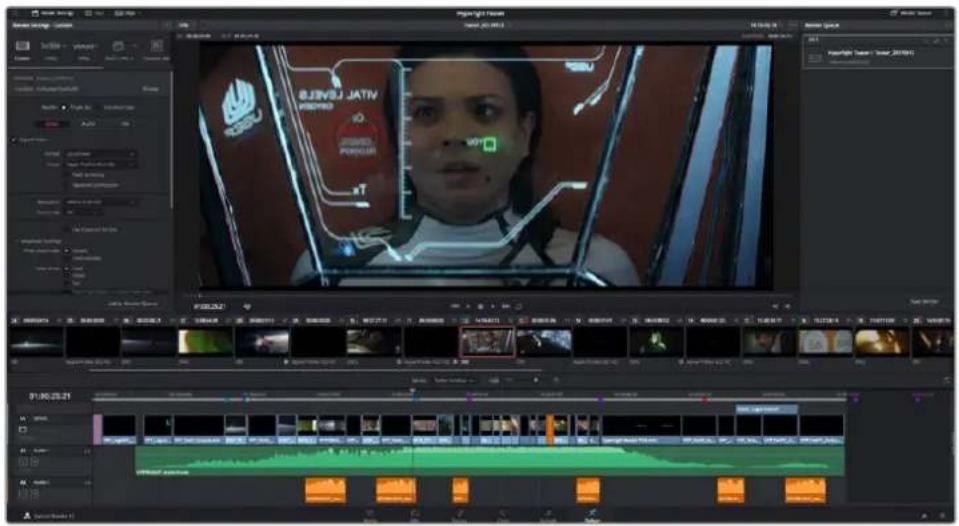
El material editado se pueda exportar mediante el modulo Entrega,donde es possible seleccionar differedesCADEs y modelos.
Exportación=rápida
En el menu Archivo, selección la option Exportación rápida a fin de emplear una de las options predeterminadas para exportar elprojecto desdecualquier modulo de DaVinci Resolve. Asimismo, es possible utilizing estamerican para publicar el material directamente enuna de las plataformas compatibles, como YouTube,Vimeo o Frame.io.
Para utiliser la funciona de exportación
1 Oportunamente, en los modulos Ediciones, Fusion o Color,marca punto de entrada y calidad en la linea de tiempo para selectionar el intervalo que se desea exportar. En caso contrario, se exportar a la linea de tiempo completa.
Selección la-option Archivo y a continuación Exportación rápida.
2 Selecciona una de las options predeterminadas situadas en la fila superior de la ventana de dialogo y haga click en Exportar.
3 Seleectione la ubicacion en el directorio, escribe el nombre del archivo en la ventana de dialogo y haga clic en Guardar. Aparecera una barra que indica cuanto demorara el proceso de exportacion.

Opiones de exportación rápida
Modulo Entrega
Estemericanidad de selecctionar los clips que desean exportar, asi como el,.
marca, el codec y la resolucion. DaVinci Resolve permite utilize diversos formatos, por exemple,
QuickTime, AVI, MXF y DPX, empleado codecs tales como RGB/YUV sin compresion de 8 o 10 bits,
ProRes, DNxHD y H.264, entre others.
Para exportar un clip:
1 Hagablick en el modulo Entrega.
2 Acceda al panel Ajustes de renderizacion, situado en la parte superior izquierda. A continuacion, podra escoger una de las configuraciones predeterminadas, tales como YouTube o Vineo, o elegir sus propios ajustes mediante la option Personalizzato. Por exemple, seleccione YouTube, bajo hagablick sobre la flecha que aparece al costo y finalmente elija la option 1080p para el formatting.
La Frequencia de imagen coincidirá con la del proyecto.
3 Debrero de las options predeterminadas, verá el nombre del archivo final y su ubicación. Haga click en Buscar y selección una carpeta para guardar el archivo exportado. A continua, selección la option Un clip en los ajustes de renderización.
4 Sobre la linea de tiempo, verá un menu desplegable con laopia Toda la linea de tiempo seleccionada. Esto significa que se renderizarado todo su contenido. Sin embargo, también es possible seleccionar solo una parte de la secuencia. Para ello, basta con elegir la option Intervalo y bajo marcar los+puntos de entrada y calidad mediante las teclas I y O.
5 En la parte inferior del panel, hagablick en el boton Agregar a la cola de procesamento. El material se agregara a la cola de procesamento en la parte derecha del modulo. A continuacion, hagablick en el boton Renderizar y supervise el progreso de la renderizacion en la lista de problemaspendentes.
Una vez finalizo el procedimiento, abra el archivo generado para ver el producto final.
Ahora que ya cuenta con un conocimiento Basics sobre como editar, etalonar, mezclar el audio yregarar efectos visuales, le recomendamos que pruebe-distintas OPCiones en DaVinci Resolve. Consulte el manual del programa para Obtener mas informacion acerca de cada una de sus functions.
Control de la CAMERA mediante el modelos ATEM Mini
Los mezcladores ATEM Mini son una herramienta extraordinaria para las producciones multicamara y las transmissions en directo por Internet. En tal sentido, el programa ATEM Software Control permite manejar hasta quatre unidades Pocket Cinema Camera desde el mezciador. Hagablick en la pestafia Camara para acceder a estas prestaciones.
Además, es possible modifier con fácilidad发展目标 parámetros, tales como la aperture del diafragma, la ganancia y la distancia focal, al emplear objetivos compatibles, como hacer el color y create imagenes extraordinaryas con las herramrientas para correcciones primarias de DaVinci Resolve.
Por other parte, al conectar un dispositivo ATEM Camera Control Panel, se logra un control preciso de todas las unidades simultaneamente. Consulte el manual del modelos ATEM Mini para Obtener mas informacion al respecto.

Modulo de control de camaras
El modulo de control transmite paquetes de instructaciones a la-camera mediante las entradas HDMI del mezclador. Al conectar una de ellas a la correspondiente en laamera, esta detecta las instructaciones integradas en la SERIAL, permittedo de este modo controlar los differentes parámetros.
Compruebe la asignacion de los botones en las preferencias del programa ATEM Software Control para asegurarse de que hayan sido vinculados a laamera correcta. Asimismo, al conectar el mezclador a una unidad Pocket Cinema Camera, se brinda la posibidad deatar con las ventajas de una luz piloto.
Panel de control de camaras
Ejecute el programa ATEM Software Control y hagablick en la pestaña Camara, situada en la parte inferior de la ventana. Ver a una series de controladores con Herramientos para ajustar y melhorar la imagen de cada camera. Estos son muy faciles de usar. Basta con hacerblick en cualesquiera de los botones o mover los controls correspondentes para realizar ajustes.
Selección de camaras
La fila de botones situada en la parte superior de la ventsa permite selectionar laamera que se desea controlar.
Estado de la camaría
En la parte superior de cada controlador se identifica la unidad y se indica si laquia está al aire. Además, hay un botón que permitte bloquear todos los 控les de la camera. Cuando la seals estal a aire, la barra superior de la ventana se enciende de color rojo y muestra elsignificanto mensaje: Al aire.
Ajustes de la CAMERA
El botón de ajuste de la CAMERA, situado cerca de la esquina inferior izquierda del controlador, permite modificar diversos paráMETROS de cada imagen.

En la parte superior de cada controlador se indica si la CAMERA está al aire. Utilice los controles generales debajo de cada circulo cromático paraaabstar las luces, los tonos intermedios y las sombras en cada canal YRGB.
Nivel de detailles
Este ajuste permite dar mayor nitidez a las imagenes captadas por las camaras en directo. Las options disponibles son Desactivado, Predeterminado, Medio y Alto.
Circulo cromátlico
El circulo cromático es una herramienta realizado de DaVinci Resolve que permitte ajustar el color en las luces, tonos intermedios y sombras de cada canal YRGB. Para seleccionar el parámetro que deseña modificar, hagablick en una de las tres pestañas situadas en la parte superior del controlador.
Control general
El control general situado bajo del circulo cromático permitte ajustar el contraste en todos los canales YRGB al mesmo tiempo o la luminancia de las luces, tonos intermedios y sombras en forma independiente.
Botón para restablecer ajustes
Este botón, situado cerca de la parte superior derecha de cada controlador, permite selecciónar los ajustes que se desean restablecer, copiar o aplicar. A su vez, cada circulo cromático también cuenta con un botón de reajuste. Hagablick sobre el本身就是 para copiar, aplicar o restablecer los parámetros a sus valores predeterminados. Cabe destacar que los ajustes de los controladores bloqueados no se modifican.
El botón situado en la esquina inferior derecha del controlador permitte restablecer los valores predeterminados de los circulos cromáticos y los ajustes de contraste, saturación, matiz y luminancia. Es possible aplicar parámetros a todas las cármas en general o a cada una en forma individual, con el objetivo de lograr una aparciencia uniforme en las imagenes. Los valores correspondientes a la aperture del diafragma, el enfoque, el control primario y el pedestal no se alteran al copiar y aplicar otros ajustes. Al aplicar parámetros a todas las cármas simultaneamente, el programa solicitará una confirmación previa por parte del usuario. De esta forma, es possible evaporar Cambios en las cármas no bloqueadas cuya señal está al aire.

Al aplicar parámedos a todas las cármas simultaneamente, el programa solicitará una confirmación previa por parte del usuario. De esta forma, es possible evaporar Cambios en las cármas no bloqueadas cuya señal está al aire.
Control del diafragma/pedestal
Este control se encuesta en el reticulo central de cada controlador y se enciende de color rojo cuando la CAMERA está al aire.
Para abrir o cerrar el diafraqma, arrastre el circulo hacia arriba o abajo. Al mantener presionada la tecla de mayusculas simultaneamente, solo se modifica la aperture del diafraqma.
Para oscurecer o incrementar el pedestal, arrestre el círculo hacía la izquierda o la derecha. Al mantener presionada la tecla Command (Mac) o Control (Windows) cuando se mueve el círculo, solo se modifica el pedestal.

El control del diafragma/pedestal se enciende de color rojo cuando la CAMERA está al aire.
Control de la distancia focal
Este control brinda la posibiliad de acercar o alejar la imagen al utilizing objetivos compatibles con servomecanismos integrados. Funciona de la mesma forma que el interruptor fisico de la webcam, que permite augmentar o disminuir la distancia focal presionando el extremo correspondiente. Hagablick sobre el control y arrastrelo hacer arriba para acercar la imagen, o hacia abajo para alejarla.
Control primario
Este control se encuesta a la referencia del control del diafragma/pedestal y permite limitar la aperture maxima del diafragma. Es desuma utiliza para evaporar que salgan al aire imagenes sobrepuestos. Para limitar la aperture del diafragma, abralo Completely usingo el control circular y bajo utilise el control primario a fin de ajustar la exposacion. De esta forma, al modifier la aperture del diafragma,做到 umbral impedir que se exceeda el limite Tmaximo de exposacion.
Indicador del diafragma
El indicator del diafragma se encuesta a la izquierda del control circular y brinda una rápida referencia visual de la aperture.Esta indicación depende del ajuste establecido mediante el control primario.
Botón de enfoque automatico
El botón de enfoque automatico se encuesta en la esquina inferior derecha del controlador. Presiónelo paraaabstur el enfoque en forma automatica si cuenta con un objetivo activo compatible con dicha的功能。Cabe destacar que,excepta la mayor de los modelos brindan la posibiliad deaabstur el enfoque electrònically,algunos incluyen ademés un modo de ajuste manual. Por consiguiente,es importante comprobar que se haya的选择acionedel modo automatico.Enalgunoscasos,elmode seselectriondeslizandoel anillodeenfoque en el objetivo hacia adelante oakras.

Haga clic sobre el boton de enfoque automatico o deslice el control de enfoque hacia la izquierda o la derecha para enfocar la imagen.
Enfoque manual
Para modifier el enfoque de la CAMERA en forma manual, utilise el dial situado en la parte inferior de cada controlador. Deslice la ruea hacla izquierda o derecha para ajustar el enfoque manualmente al mirar la senal de la CAMERA, a fin de Obtener imagenes claras y nitidas.
Ganancia de laamera
Este control permiteacular ganancia de la webcam. En los modelos Pocket Cinema Camera, este parametro corresponde al valor ISO, que resulta desuma importancia al filmar en conditiones de luz escaza, a fin de evitar una subexposacion de las imagenes. Haga click sobre las flechas correspondentes paraacular o disminuir la ganancia.
Este valor se puedaacularsiemprequesea necessario,porejemplo,alrodar en exterioros durante el atardecer, cuando la intensidad de la luz disminuye y es precisoacularelbrilloenlaimagen.Noteseseque,alincrementarla ganancia,tambienaugentarale ruido enlas imagenes.
Control de la velocidad de obturación
El indicator de la velocidad de obturación se incluye el círculo cromático y el control del diafragma/pedestal. Para augmentar o disminuir este parámetro, colque el puntero sobre el indicator y bajo haga alc en la fecha izquierda o derecha. En los modelos Pocket Cinema Camera, este parámetro correponde al ángulo de obturación.
Si laImagen parpadea, disminuya el valor a fin de SOLUTIONAR este problema. Una buena forma de lograr mas brillo en las imagenes sin modifierla ganancia es disminuyendo la velocidad de obturacion, ya que de este modo se incrementa el tiempo de exposicion del sensor. Al augmentar la velocidad de obturacion, se reduce el rastrodeojado por los objetos en movimiento, por loquel this parametro también peut emplearse para lograr una mayor nitidez en las tomas de action.
Balance de blancos
Este parámetro se incluye junto al control de la velocidad de obturación y pueda modifierse mediante las flechas situadas aodos lados del indicator de la temperatura del color. Permite compensar los colores calidos o frios emitidos pordietres fuentes deluz.De este modo,es possible conservar la pureza de los blancos en la imagen.

Al mover el puntero del raton sobre los indicadores de ganancia, velocidad de obturacion y balance de blancos, aparecen flechas que permiten ajustar dichos parámetros.
Herramentas de DaVinci Resolve para correcciones primarias
La ventana del modulo de control de camaras puede configurarse para que se asemeje a la interfaz de correcciones primarias en un programa de etalonaje y edicion.
Estas herramrientas integradas en la camar aon identicas a las del programa DaVinci Resolve. En consecuencia, si el usuario esta familiarizzato conellas, podra valerse de su experiencia en materia de etalonaje al llvar a cabo producciones en directo. El panel de correccion cromatica se pueda expandir desde el controlador para acceder a la interfaz completa.
Esta incluye ajustes adiconiales, tales como circulos cromáticos y otros controlles, que brindan la posibididad de evaluar simultaneamente las luces, los tonos intermedios y las sombras en la imagen. Paracaebarde camara,utilice los botones en la parte superior de la ventana.

Si deseña acceder a las herramrientas para correcciones primarias de DaVinci Resolve, haga cltc sobre el botón situado en la parte Inferior, a la derecha del circulo cromático.

Círculos cromálicos para luces, tonos intermedios y sombras en el panel de etalonajé.
Circulos cromáticos
Haga clc dentro del circulo y arrastre el puntero
Nótese que no es preciso modifier el indicator de balance cromática. Los values bajo del circulo cambian, reflejando de este modo los ajustes realizados en cada canal.
Mantenga preslonada la tecla de mayusculas y haga clc切入点 del circulo
Esto permite situar el indicator en la posicion indicada por el puntero del raton para realizar ajustes importantes con rapidez.
Haga的比例:1:2
Se restablecen los valores originales sin reajustar el control general.
Haga clc en el boton de realjuste, situado en la esquina superior derecha
Se restablecen todos los ajustes.
Controles generales
Utilice los controlles generales debajo de cada circulo cromatico paraaabstar las luces,los tonos intermedios y las sombras en cada canal YRGB.

Mueva la rueda hacla izquierda o la derecha para realizar ajustes.
Para realizar ajustes mediente el control general:
Mueva la rueda hacla la Izquilerda o la derecha
Esto permite oscurecer o aclar el parametro selectionado, respectivamente. Al ajustar un valor, el cambio se verá reflejado en los Campos correspondientes a cada canal, situados bajo del círculo cromático. Para ajustar solo la luminancia, mantenga presionada la tecla Alt o Command y mueva el control hacía la izquierda o la derecha. Dado que el color y la luminancia se procesan individualmente, es possible lograr efectos importantes modificando solo el canal Y. Este ajuste funciona mejor si el control Mezclador de luminancia se mueve hacía la derecha. De lo contrario, el programa procejaró los canales de color de forma normal. Por lo general, la mayoría de los coloristas realizan el método YRGB, ya que permitte Obtener un mayor control del balance de color sin afectar la luminancia general para lograr la apariencia deseada más rápido.
Contraste
Este control permite ajustar el intervalo entre los values mas claros y oscuros de una imagen. El efecto es similar al que se obtiene realizando ajustes opuestos mediante los controles generales situados bajo de las options Luces y Sombras. El valor predeterminado es 50% .
Saturación
Este control permite aumento o disminuir la cantidad de color en la imagen. El valor predeterminado es 50% .
Matiz
Este control permite modifier los matices de la imagen recorriendo el perimetro del circulo cromatico. El valor predeterminado de 180 grados muestra la distribución original del matiz. Al incrementar o disminuir dicho valor, los matices rotaran en sentido horario o antihorario.
Mezcla de luminancia
Las functions de etalonaje de las camaras Blackmagic estan basadas en las herramrientas para correcciones primarias de DaVinci Resolve. Este programa fue desarrollado a grado de los años 80 y es el más utilizado en la produccion de largometrajes en Hollywood.
El corrector cromático de la CAMERA incluye prestaciones sumamente útiles y creativas. Una de ellas es el método de procesamento YRGB.
Al etalonar, es possible seleccionarrialquiera de los dos métodos de procesamento disponibles. Aquellos coloristas con mas experiencia recurren al modo YRGB, dato que ofrece un control mas preciseso sobre el color y permite ajustar los canales en forma independiente, logrado de esta manera una amplia variedad de optiones creativas.
Cuando el mezclador de luminancia se mueve totalmente a la derecha, el programa emplee a modo RGB. Por el contrario, al moverlo totalmente a la izquierda, se utilizes el modo RGB. Internacional es possible seleccionarrialquierposiónintermedia para obtener una mezcla de ambos.

Arrastre los controlles hacía la izquierda o la derecha paraaabustar el contraste,la saturación,el matiz y la mezcla de luminancia.
¿Cuál es el mejor ajuste? Esto depende del usuario, ya que el procesó de etalonaje es totalmente creativo, y no hay estilos correctos o incorrectivos. El ajuste más apropiado estará determinado por las preferencias del usuario y de lo que luzca bien según su criterio.
Sincronización de ajustes
El mezclador transmite la seals de control a la CAMERA cuando también dispositivos estan connectados. Si se modifica un ajuste por error en laamera, la unidad de control del mezclador restablecer automatamente los values para tener la synchronization entre los equipos.
SUGERENCIa: Es possible emplear un dispositivo DaVinci Resolve Micro Panel para modifierlosajustesdisponiblesencadacoladordecamara.esto permiterealizar ambios con mayor rapidez yprecision.Consulte elmanual delmodeloATEM Mini para obtenermasinformacionalrespecto.
NOTA: Al apagar una CAMERA conectada al modelos ATEM Mini mediante el puerto HDMIediaverse afectada la comunicacion con el resto de unidades. Recomendamos alimentarlascamarasmediantearedewuministroelctricoydesconectarelcableHDMIantesdeapagarlas.
Otros programas deedition
Para editor clips utilizing su programa preferido, pueda copiarlos a una unidad externa o RAID y bajo importarlos desdela aplicacion.De forma alternativa,utilice el puerto USB-Co un adaptador para el soporte de almacenimiento a fin de acceder a los ARCHivos directamente.
Acceso a archivos en tarjetas SD y CFast 2.0

Para editor el material audiovisual directamente desde la tarjeta SD o CFast, retirela de la CAMERA y conectea a un equipo informatico mediana un dispositivo de lecture y/o escritura para este tipo deunasidades.
Para importar clips desde una tarjeta SD o CFast 2.0:
1 Retire la tarjeta de la camarra.
Conectela a un equipo Mac o Windows mediante un dispositivo de lecture y/o escritura para este tipo de unidades.
2 Haga dobleblick en el icono de la tarjeta para acceder a las carpetas que contienen los archivos Blackmagic RAW o QuickTime. Es possible que haya una mezcla de archivos segun el formatting selectionado para la grabacion, pero en todos se empiea la mesma nomenclatura.
3 Arrastre los ARCHivos desde la tarjeta al escritorio o aanotherdispositivo dealmacenamento, o acceda directamente a ellos desde el programa de edicion.
4 Antes de retiring la tarjeta SD o CFast del equipo informatico, es importante expulsarla desde elsystema operativo.De lo contrario,el material grabado podría sufir daños.
Acceso a ARCHivos en unidades USB-C
Para Importar clips desde una unidad USB-C:
1 Desconecte la unidad de la camarra.
2 Conecte launidad a un equipo informativo Mac o Windows mediante el puerto USB-C. Las conexiones USB 3.0 son preferibles a las 2.0, ya que estas ultimas no son lo suficientemente rápidas como para permitir laedsión de imagenes en tiempo real.
3 Haga doble ticn en la unidad USB-C para acceder a la lista de carpetas o ARCHivos QuickTime que contienen las imagenes en formatting Blackmagic RAW. Es possible que haya una mezcla de archivos segun el formatting selectionado para la grabacion, pero en todos se empiea la mesma nomenclatura.
4 Arrastre los archivos desde la unidad al escritorio o aanother dispositivo de almacenamento, o acceda directamente a ellos desde el programa de edicion.
5 Antes de desconectar launidad USB-C, recomendamos expulsarla en forma segura mediante la funciona correspondiente.
Final Cut Pro X
Para editor en Final Cut Pro X, es necessario create un projecto nuevo y selectionar la fecuencia deImagen y el formatting requeridos. En este exemple, se utilizes el formatting ProRes 422 HQ a 1080p24.

Ajustes del proyecio en Final Cut Pro X
1 Execute Final Cut Pro X. A continuación, en la barra de menús, haga click en File y bajo selección la option New Project. Se abrìa una ventsa que muestra los ajustes del projecto.
2 Escriba un nombre para el proyecto y marque la casilla Custom.
3 Selezione las opciones 1080p HD, 1920x1080 y 24p.
4 En la option Audio and Render Properties, seleccione Stereo, 48 kHz, y Apple ProRes 422 HQ.
5 Haga cli en OK.
Para importar los clips, haga click en la option File situada en la barra superior. A continuacion, seleccion Import y bajo Media. Elija los ARCHivos en la tarjeta de memoria.
Arrestrelos a la linea de tiempo para editarlos.
MediaComposer
Para editor en Media Composer, es necessario create un projecto nuevo y seleccionar la fecuencia deImagen y el formatting requeridos. En este exemple, se utilizes el formatting 1080p24.

Nombre y'options del projeto en Media Composer
1Ejecute el programa para acceder a la ventana de seleccion de proyectos.
2 Haga cli en el boton New project y escribe un nombre en la ventana correspondiente.
3 En el menu de seleccion del formatting, elija la option HD 1080 y bajo 1080p/24.
A continuación, haga click en OK para create el proyecto.
4 Haga doble tic sobre el nombre del projeeto en la ventana Select project para abrirlo.
5 SeLECTIONA la option File, bajo Input y a continuacion Source browser para buscar los archivos que desea importar.
6 Seleccione la carpeta de destino en el menu desplegable y hagablick en Import.
Una vez que los clips aparecen en la carpeta, es possible arrastrarlos a la linea de tiempo y comenzar a editarlos.
Premiere Pro CC
Para editar clips en formatting ProRes 422 (HQ) con Premiere Pro CC, es Neededo create un projecto nuevo y seleccionar la fecuencia deImagen y el formatting requeridos. En este exemple, se utilizes el formatting ProRes 422 (HQ) a 1080p25.

Nombre y'options del projet en Premiere Pro CC
1 Ejecute Premiere Pro CC. En la ventana de bienvenida, seleccionla option New Project. Se abrirá una ventana que muestra los parámetros del projecto.
2 Escribe el nombre delprojecto. Haga click enBrowse y seleccionla carpetaonde desea guardarlo.Acontinuacion,haga click enOKen la ventana de bienvenida.
3 En la barra de menos, selección la option File y bajo import. Elija los clips que dese a editor. Estos aparecerán en la ventana del proyecto.
4 Arrastre el primer clip hacía el icono New Item en la parte inferior derecha de la ventsa. Se creara una nuevo secuencia con los mismos ajustes del clip.
Arrastre los clips a la linea de tiempo para editarlos.
Programa utiliser de la CAMERA
Actualización del programa en equipos Mac
Despues de descargar el programa Blackmagic Camera Setup y descomprimir el archivo, haga click en laImagen de disco para ver los contentsidos.
Ejecute el instalador y siga las instrucciones que aparecen en la pantalla. Una vez finalizada la instalación, selección la-option Aplicaciones y haya clicked en la carpeta Blackmagic Cameras, que contiene este manual, el programa utilisé y otros ARCHivos con información adicional. Asimismo, se incluye una aplicación para desinstalar versiones anteriores del programa cuando seanecessary actualizarlo.

Actualización del programa en equipos Windows
Despues de descargar el programa utiliser de la CAMERA y descomprimir el archivo correspondiente, ver a una carpeta denominada Blackmagic Camera Setup que contiene este manual y el instalador. Haga dobleblick en el instalador de la aplicacion y siga las instrucciones que aparecen en la pantalla para completar el procedimiento.
En Windows 10, hagablick en el boton de inicio y seleccione la option Todas las aplicaciones. Busque la carpeta Blackmagic Design en la lista. Dees ali podra executar el programa. En Windows 8.1, hagablick en la flecha hacia abajo que aparece en la pantalla de inicio para ver la carpeta Blackmagic. Dees ali podra executar el programa.
Actualización de la CAMERA
Despues de instalar la ultima version del programa utiliser en el equipo informatico, conectelo a la-camera mediante un cable USB-C. El puerto USB-C se oculta en el panel izquierdo de la unidad. Basta con retiring la cubierta de goma para acceder a la conexión.
Ejecute el programa utiliser y siga las instrucciones que aparecen en la pantalla paraactualizar la CAMERA. Conviene subrayar que, al低位 a cabo este procedimiento, se eliminaran las tablas de conversion almacenadas en la unidad y los grupos de ajustes personalizados. En tal sentido, recomendamos exportarlos a una tarjeta de memoria, a fin de respaldarlos antes de低位 a cabo laactualizacion. Una vez finalizo el procedimiento, es possible importarlos可以更好mente.
Soportes de grabación recomendedos
Tarjetas CFast 2.0
Para el Modelo Pocket Cinema Camera 6K
Recomendamos los siguientes modelos para grabar en formatting 6K Blackmagic RAW 5:1 a una velocidad maximala de 50 f/s.
Marca Modelo Capacidad Angelbird AV PRO CF XT 512 GB CinediskPro 510MB/s CFast 2.0 256 GB Hagiwara Solutions DC-SMAN64GA CFast 2.0 64 GB Hagiwara Solutions DC-SMANA1GA CFast 2.0 128 GB KomputerBay 3400x CFast 2.0 64 GB KomputerBay 3400x CFast 2.0 128 GB Lexar Professional 3400X CFast 2.0 128 GB Lexar Professional 3500X CFast 2.0 128 GB ProGrade Digital 510MB/s CFast 2.0 128 GB ProGrade Digital 550MB/s CFast 2.0 256 GB ProGrade Digital 550MB/s CFast 2.0 512 GB Transcend CFX650 CFast 2.0 TS128GCFX650 128 GB SanDisk Extreme Pro CFast 2.0 SDCFSP-64G-x46D 64 GB SanDisk Extreme Pro CFast 2.0 SDCFSP-128G-x46D 128 GB SanDisk Extreme Pro CFast 2.0 SDCFSP-256G-x46D 256 GB SanDisk Extreme Pro CFast 2.0 SDCFSP-512G-x46D 512 GB Silicon Power CFX310 CFast 2.0 512 GB Sony CFast 2.0 G Series CAT-G64 64 GB Sony CFast 2.0 G Series CAT-G128 128 GB Wise CFA-2560 3400x CFast 2.0 256 GB Wise CFA-5120 3500x CFast 2.0 512 GB Wise CFA-10240 3500X CFast 2.0 1 TB
Recomendamos los siguientes modelos para grabar en formatting 6K Blackmagic RAW 2.4:1 a una velocidad maximala de 60 f/s.
Marca Modelo Capacidad Angelbird AV PRO CF XT 512 GB CinediskPro 510MB/s CFast 2.0 256 GB Hagiwara Solutions DC-SMAN64GA CFast 2.0 64 GB Hagiwara Solutions DC-SMANA1GA CFast 2.0 128 GB KomputerBay 3400x CFast 2.0 64 GB KomputerBay 3400x CFast 2.0 128 GB Lexar Professional 3400X CFast 2.0 128 GB Lexar Professional 3500X CFast 2.0 128 GB ProGrade Digital 510MB/s CFast 2.0 128 GB ProGrade Digital 550MB/s CFast 2.0 256 GB ProGrade Digital 550MB/s CFast 2.0 512 GB Transcend CFX650 CFast 2.0 TS128GCFX650 128 GB SanDisk Extreme Pro CFast 2.0 SDCFSP-64G-x46D 64 GB SanDisk Extreme Pro CFast 2.0 SDCFSP-128G-x46D 128 GB SanDisk Extreme Pro CFast 2.0 SDCFSP-256G-x46D 256 GB SanDisk Extreme Pro CFast 2.0 SDCFSP-512G-x46D 512 GB Silicon Power CFX310 CFast 2.0 256 GB Silicon Power CFX310 CFast 2.0 512 GB Sony CFast 2.0 G Series CAT-G64 64 GB Sony CFast 2.0 G Series CAT-G128 128 GB Wise CFA-1280 3400x CFast 2.0 128 GB Wise CFA-2560 3400x CFast 2.0 256 GB Wise CFA-5120 3500x CFast 2.0 512 GB Wise CFA-10240 3500X CFast 2.0 1 TB
Recomendamos los siguientes modelos para grabar en formatting Blackmagic RAW 2.8K 17:9 3:1 a una velocidad maximala de 120 f/s.
Marca Modelo Capacidad Angelbird AV PRO CF XT 512 GB CinediskPro 510MB/s CFast 2.0 256 GB Hagiwara Solutions DC-SMAN64GA CFast 2.0 64 GB Hagiwara Solutions DC-SMANA1GA CFast 2.0 128 GB KomputerBay 3400x CFast 2.0 64 GB KomputerBay 3400x CFast 2.0 128 GB Lexar Professional 3400X CFast 2.0 128 GB Lexar Professional 3500X CFast 2.0 128 GB Lexar Professional 3400X CFast 2.0 256 GB ProGrade Digital 510MB/s CFast 2.0 128 GB ProGrade Digital 550MB/s CFast 2.0 256 GB ProGrade Digital 550MB/s CFast 2.0 512 GB Transcend CFX650 CFast 2.0 TS128GCFX650 128 GB SanDisk Extreme Pro CFast 2.0 SDCFSP-64G-x46D 64 GB SanDisk Extreme Pro CFast 2.0 SDCFSP-128G-x46D 128 GB SanDisk Extreme Pro CFast 2.0 SDCFSP-256G-x46D 256 GB SanDisk Extreme Pro CFast 2.0 SDCFSP-512G-x46D 512 GB Silicon Power CFX310 CFast 2.0 256 GB Silicon Power CFX310 CFast 2.0 512 GB Sony CFast 2.0 G Series CAT-G64 64 GB Sony CFast 2.0 G Series CAT-G128 128 GB Wise CFA-1280 3400x CFast 2.0 128 GB Wise CFA-2560 3400x CFast 2.0 256 GB Wise CFA-5120 3500x CFast 2.0 512 GB Wise CFA-10240 3500X CFast 2.0 1 TB
Recomendamos los siguientes modelos para grabar en formatting ProRes HQ DCI 4K a una velocidad maxima de 60 f/s.
Marca Modelo Capacidad Angelbird AV PRO CF XT 512 GB CinediskPro 510MB/s CFast 2.0 256 GB Hagiwara Solutions DC-SMAN64GA CFast 2.0 64 GB Hagiwara Solutions DC-SMANA1GA CFast 2.0 128 GB KomputerBay 3400x CFast 2.0 64 GB KomputerBay 3400x CFast 2.0 128 GB Lexar Professional 3400X CFast 2.0 128 GB Lexar Professional 3500X CFast 2.0 128 GB Lexar Professional 3400X CFast 2.0 256 GB ProGrade Digital 510MB/s CFast 2.0 128 GB ProGrade Digital 550MB/s CFast 2.0 256 GB ProGrade Digital 550MB/s CFast 2.0 512 GB Transcend CFX650 CFast 2.0 TS128GCFX650 128 GB SanDisk Extreme Pro CFast 2.0 SDCFSP-64G-x46D 64 GB SanDisk Extreme Pro CFast 2.0 SDCFSP-128G-x46D 128 GB SanDisk Extreme Pro CFast 2.0 SDCFSP-256G-x46D 256 GB SanDisk Extreme Pro CFast 2.0 SDCFSP-512G-x46D 512 GB Silicon Power CFX310 CFast 2.0 2.0 256 GB Silicon Power CFX310 CFast 2.0 512 GB Sony CFast 2.0 G Series CAT-G64 64 GB Sony CFast 2.0 G Series CAT-G128 128 GB Wise CFA-1280 3400x CFast 2.0 128 GB Wise CFA-2560 3400x CFast 2.0 256 GB Wise CFA-5120 3500x CFast 2.0 512 GB Wise CFA-10240 3500X CFast 2.0 1 TB
Recomendamos los siguientes modelos para grabar en formatting ProRes 422 HQ 1080 a una velocidad maximal de 120 f/s.
Marca Modelo Capacidad Angelbird AV PRO CF XT 512 GB CinediskPro 510MB/s CFast 2.0 256 GB Hagiwara Solutions DC-SMAN64GA CFast 2.0 64 GB Hagiwara Solutions DC-SMANA1GA CFast 2.0 128 GB KomputerBay 3400x CFast 2.0 64 GB KomputerBay 3400x CFast 2.0 128 GB Lexar Professional 3400X CFast 2.0 128 GB Lexar Professional 3500X CFast 2.0 128 GB Lexar Professional 3400X CFast 2.0 256 GB ProGrade Digital 510MB/s CFast 2.0 128 GB ProGrade Digital 550MB/s CFast 2.0 256 GB ProGrade Digital 550MB/s CFast 2.0 512 GB Transcend CFX650 CFast 2.0 TS128GCFX650 128 GB SanDisk Extreme Pro CFast 2.0 SDCFSP-64G-x46D 64 GB SanDisk Extreme Pro CFast 2.0 SDCFSP-128G-x46D 128 GB SanDisk Extreme Pro CFast 2.0 SDCFSP-256G-x46D 256 GB SanDisk Extreme Pro CFast 2.0 SDCFSP-512G-x46D 512 GB Silicon Power CFX310 CFast 2.0 256 GB Silicon Power CFX310 CFast 2.0 512 GB Sony CFast 2.0 G Series CAT-G64 64 GB Sony CFast 2.0 G Series CAT-G128 128 GB Wise CFA-1280 3400x CFast 2.0 128 GB Wise CFA-2560 3400x CFast 2.0 256 GB Wise CFA-5120 3500x CFast 2.0 512 GB Wise CFA-10240 3500X CFast 2.0 1 TB
Para el Modelo Pocket Cinema Camera 4K
Recomendamos los siguientes modelos para grabar en formatting Blackmagic RAW DCI 4K 3:1 a una velocidad maximala de 60 f/s.
Marca Modelo Capacidad Angelbird AV PRO CF 512 GB Angelbird AV PRO CF 1 TB CinediskPro 510MB/s CFast 2.0 256 GB Hagiwara Solutions DC-SMAN64GA CFast 2.0 64 GB Hagiwara Solutions DC-SMANA1GA CFast 2.0 128 GB KomputerBay 3400x CFast 2.0 64 GB KomputerBay 3400x CFast 2.0 128 GB KomputerBay 3700x CFast 2.0 256 GB Lexar Professional 3400x CFast 2.0 128 GB Lexar Professional 3500x CFast 2.0 256 GB ProGrade Digital 550MB/s CFast 2.0 128 GB ProGrade Digital 550MB/s CFast 2.0 256 GB ProGrade Digital 550MB/s CFast 2.0 512 GB SanDisk Extreme Pro CFast 2.0 SDCFSP-256G-x46D 512 GB Wise CFA-1280 3400x CFast 2.0 128 GB Wise CFA-2560 3400x CFast 2.0 256 GB Wise CFA-5120 3500x CFast 2.0 512 GB Wise CFA-10240 3500x CFast 2.0 1 TB
Recomendamos los siguientes modelos para grabar en formatting ProRes HQ DCI 4K a una velocidad maximala de 60 f/s.
Marca Modelo Capacidad Angelbird AV PRO CF 128 GB Angelbird AV PRO CF 256 GB Angelbird AV PRO CF 512 GB CinediskPro 510MB/s CFast 2.0 256 GB Hagiwara Solutions DC-SMAN64GA CFast 2.0 64 GB Hagiwara Solutions DC-SMANA1GA CFast 2.0 128 GB KomputerBay 3400x CFast 2.0 128 GB KomputerBay 3700x CFast 2.0 256 GB ProGrade Digital 550MB/s CFast 2.0 256 GB ProGrade Digital 550MB/s CFast 2.0 512 GB SanDisk Extreme Pro CFast 2.0 SDCFSP-64G-x46D 64 GB SanDisk Extreme Pro CFast 2.0 SDCFSP-128G-x46D 128 GB SanDisk Extreme Pro CFast 2.0 SDCFSP-256G-x46D 256 GB Sony CFast 2.0 G Series CAT-G64 64 GB Sony CFast 2.0 G Series CAT-G128 128 GB Wise CFA-1280 3400x CFast 2.0 128 GB Wise CFA-2560 3400x CFast 2.0 256 GB Wise CFA-5120 3500x CFast 2.0 512 GB Wise CFA-10240 3500x CFast 2.0 1 TB
Recomendamos los siguientes modelos para grabar en formatting RAW DCI 4K sin perdida de información a una velocidad maximal de 30 f/s.
Marca Modelo Capacidad Angelbird AV PRO CF 128 GB Angelbird AV PRO CF 256 GB Angelbird AV PRO CF 512 GB CinediskPro 510MB/s CFast 2.0 256 GB KomputerBay 3400x CFast 2.0 128 GB ProGrade Digital 550MB/s CFast 2.0 256 GB ProGrade Digital 550MB/s CFast 2.0 512 GB SanDisk Extreme Pro CFast 2.0 SDCFSP-64G-x46D 64 GB SanDisk Extreme Pro CFast 2.0 SDCFSP-128G-x46D 128 GB SanDisk Extreme Pro CFast 2.0 SDCFSP-256G-x46D 256 GB Sony CFast 2.0 G Series CAT-G64 64 GB Sony CFast 2.0 G Series CAT-G128 128 GB Wise CFA-1280 3400x CFast 2.0 128 GB Wise CFA-2560 3400x CFast 2.0 256 GB Wise CFA-5120 3500x CFast 2.0 512 GB
Recomendamos los siguientes modelos para grabar en formatting RAW DCI 4K 3:1 a una velocidad maxima de 60 f/s.
Marca Modelo Capacidad Angelbird AV PRO CF 128 GB Angelbird AV PRO CF 256 GB Angelbird AV PRO CF 512 GB CinediskPro 510MB/s CFast 2.0 256 GB KomputerBay 3400x CFast 2.0 128 GB ProGrade Digital 550MB/s CFast 2.0 256 GB ProGrade Digital 550MB/s CFast 2.0 512 GB SanDisk Extreme Pro CFast 2.0 SDCFSP-64G-x46D 64 GB SanDisk Extreme Pro CFast 2.0 SDCFSP-128G-x46D 128 GB SanDisk Extreme Pro CFast 2.0 SDCFSP-256G-x46D 256 GB Sony CFast 2.0 G Series CAT-G64 64 GB Sony CFast 2.0 G Series CAT-G128 128 GB Wise CFA-1280 3400x CFast 2.0 128 GB Wise CFA-2560 3400x CFast 2.0 256 GB Wise CFA-5120 3500x CFast 2.0 512 GB
Tarjetas SD
Para el Modelo Pocket Cinema Camera 6K
Recomendamos los siguientes modelos SD para grabar en formatting Blackmagic RAW 5:1 6K 16:9 a una velocidad maximal de 30 f/s.
Marca Modelo Capacidad Angelbird AV PRO SD V90 64 GB Sony Tough SF-G32T 32 GB Sony Tough SF-G64T 64 GB Sony Tough SF-G128T 128 GB Toshiba Exceria Pro UHS-II 270MB/s SDXC 64 GB Wise SD2-128U3 SDXC UHS-II 128 GB
Recomendamos los siguientes modelos SD para grabar en formatting Blackmagic RAW 8:1 6K 16:9 a una velocidad maximal de 30 f/s.
Marca Modelo Capacidad Angelbird AV PRO SD V90 64 GB Sony Tough SF-G32T 32 GB Sony Tough SF-G64T 64 GB Sony Tough SF-G128T 128 GB Toshiba Exceria Pro UHS-II 270MB/s SDXC 64 GB Toshiba Exceria Pro UHS-II 270MB/s SDXC 128 GB Toshiba Exceria Pro UHS-II N502 SDXC 128 GB Wise SD2-128U3 SDXC UHS-II 128 GB
Recomendamos los siguientes modelos SD para grabar en formatting Blackmagic RAW 12:1 6K 2.4:1 a una velocidad maximal de 60 f/s.
Marca Modelo Capacidad Angelbird AV PRO SD V90 64 GB Sony Tough SF-G32T 32 GB Sony Tough SF-G64T 64 GB Sony Tough SF-G128T 128 GB Toshiba Exceria Pro UHS-II 270MB/s SDXC 64 GB Toshiba Exceria Pro UHS-II 270MB/s SDXC 128 GB Toshiba Exceria Pro UHS-II N502 SDXC 128 GB
Recomendamos los siguientes modelos SD para grabar en formatting ProRes HQ DCI 4K a una velocidad maximala de 60 f/s.
Marca Modelo Capacidad Angelbird AV PRO SD V90 64 GB Delkin Devices Power SDXC USH-II 64 GB Delkin Devices Prime SDXC USH-II 128 GB ProGrade Digital V90 UHS-II 250MB/s SDXC 128 GB ProGrade Digital V90 UHS-II 250MB/s SDXC 256 GB Sony Tough SF-G32T 32 GB Sony Tough SF-G64T 64 GB Sony Tough SF-G128T 128 GB Wise SD2-64U3 SDXC UHS-II 64 GB Wise SD2-128U3 SDXC UHS-II 128 GB Toshiba Exceria Pro UHS-II N502 SDXC 128 GB
Recomendamos los siguientes modelos SD para grabar en formatting ProRes 422 HQ 1080 a una velocidad maximal de 120 f/s.
Marca Modelo Capacidad Angelbird AV PRO SD V90 64 GB Delkin Devices Power SDXC USH-II 64 GB Delkin Devices Prime SDXC USH-II 128 GB Lexar Professional 2000x UHS-II 300MB/s SDXC 64 GB Lexar Professional 2000x UHS-II 300MB/s SDXC 128 GB ProGrade Digital V90 UHS-II 250MB/s SDXC 256 GB Sony Tough SF-G32T 32 GB Sony Tough SF-G64T 64 GB Sony Tough SF-G128T 128 GB Toshiba Exceria Pro UHS-II 270MB/s SDXC 64 GB Toshiba Exceria Pro UHS-II 270MB/s SDXC 128 GB Toshiba Exceria Pro UHS-II N502 SDXC 128 GB Toshiba Exceria Pro UHS-II N502 SDXC 256 GB Wise SD2-64U3 SDXC UHS-II 64 GB Wise SD2-128U3 SDXC UHS-II 128 GB
Para el Modelo Pocket Cinema Camera 4K
Recomendamos los siguientes modelos SD para grabar en formatting Blackmagic RAW 12:1 DCI 4K a una velocidad maximal de 30 f/s.
Marca Modelo Capacidad Angelbird AV PRO SD V90 64 GB Delkin Devices Power UHS-II SDXC 64 GB Delkin Devices Power UHS-II SDXC 128 GB Lexar Professional 2000x UHS-II 300MB/s SDXC 64 GB ProGrade Digital V90 UHS-II 250MB/s SDXC 256 GB SanDisk Extreme Pro UHS-I 95MB/s SDXC 512 GB Sony Tough SF-G64T 64 GB Sony Tough SF-G128T 128 GB Sony SF-G64 300MB/s UHS-II SDXC 64 GB Toshiba Exceria Pro UHS-II N502 SDHC 32 GB Toshiba Exceria Pro UHS-II 270MB/s SDXC 64 GB Wise SD2-64U3 SDXC UHS-II 64 GB Wise SD2-128U3 SDXC UHS-II 128 GB Wise SD2-128U3 SDXC UHS-II 128 GB
Recomendamos los siguientes modelos SD para grabar en formatting ProRes HQ DCI 4K a una velocidad maximal de 60 f/s.
Marca Modelo Capacidad Wise SD2-64U3 SDXC UHS-II 64 GB Wise SD2-128U3 SDXC UHS-II 128 GB Sony Tough SF-G64T 64 GB Sony Tough SF-G128T 128 GB
Recomendamos los siguientes modelos SD para grabar en formatting RAW DCI 4K 4:1 a una velocidad maxima de 60 f/s en la version.
Marca Modelo Capacidad Sony Tough SF-G64T 64 GB Sony Tough SF-G128T 128 GB Toshiba Exceria Pro UHS-II N502 SDXC 32 GB
Recomendamos los siguientes modelos SD para grabar en formatting RAW DCI 4K sin perdida de informacion a una velocidad maximala de 24 f/s.
Marca Modelo Capacidad Wise SD2-64U3 SDXC UHS-II 64 GB Wise SD2-128U3 SDXC UHS-II 128 GB Toshiba Exceria Pro UHS-II N502 SDXC 32 GB Sony Tough SF-G64T 64 GB Sony Tough SF-G128T 128 GB
Recomendamos los siguientes modelos para grabar en formatting RAW sin perdida de informacion a una resolution maxima de 1080p60.
Marca Modelo Capacidad Wise SD2-64U3 SDXC UHS-II 64 GB Wise SD2-128U3 SDXC UHS-II 128 GB Sony Tough SF-G64T 64 GB Sony Tough SF-G128T 128 GB Toshiba Exceria Pro UHS-II N502 SDXC 32 GB Toshiba Exceria Pro UHS-II N502 SDXC 64 GB Toshiba Exceria Pro UHS-II N502 SDXC 128 GB Toshiba Exceria Pro UHS-II N502 SDXC 256 GB Sony Tough SF-G128T 128 GB
Unidades SSD USB-C
Para el Modelo Pocket Cinema Camera 6K
Recomendamos los siguientes modelos para grabar en formatting Blackmagic RAW 5:16K a una velocidad maximal de 50 f/s.
Marca Modelo Capacidad Wise PTS-1024 Portable SSD 1 TB
Recomendamos los siguientes modelos para grabar en formatting Blackmagic RAW 5:16K 2.4:1 a una velocidad maximal de 60 f/s.
Marca Modelo Capacidad Samsung Portable SSD T5 250 GB Samsung Portable SSD T5 2 TB Wise PTS-1024 Portable SSD 1 TB
Recomendamos los siguientes modelos para grabar en formatting Blackmagic RAW 3:1 2.8K 17:9 a una velocidad maximala de 120 f/s.
Marca Modelo Capacidad Samsung Portable SSD T5 250 GB Samsung Portable SSD T5 2 TB Wise PTS-512 Portable SSD 512 GB Wise PTS-1024 Portable SSD 1 TB
Recomendamos los siguientes discos USB-C para grabar en formatting ProRes HQ DCI 4K a una velocidad maximal de 60 f/s.
Marca Modelo Capacidad Samsung Portable SSD T5 250 GB Samsung Portable SSD T5 1 TB Samsung Portable SSD T5 2 TB SanDisk Extreme Portable SSD 1 TB Wise PTS-512 Portable SSD 512 GB Wise PTS-1024 Portable SSD 1 TB Wise PTS-1024 Portable SSD 1 TB
Recomendamos los siguientes discos USB-C para grabar en formatting ProRes 422 HQ 1080 a una velocidad maximal de 120 f/s.
Marca Modelo Capacidad Samsung Portable SSD T5 250 GB Samsung Portable SSD T5 1 TB Samsung Portable SSD T5 2 TB SanDisk Extreme Portable SSD 1 TB Wise PTS-512 Portable SSD 512 GB Wise PTS-1024 Portable SSD 1 TB Wise PTS-1024 Portable SSD 1 TB
Para el Modelo Pocket Cinema Camera 4K
Recomendamos los siguientes discos USB-C para grabar en formatting Blackmagic RAW 3:1 DCI 4K a una velocidad maxima de 60 f/s.
Marca Modelo Capacidad Angelbird SSD2GO PKT 512 GB Angelbird SSD2GO PKT 2 TB G-Technology G-DRIVE Mobile SSD 1 TB Samsung Portable SSD T5 2 TB Wise PTS-512 Portable SSD 512 GB
Recomendamos los siguientes discos USB-C para grabar en formatting ProRes HQ DCI 4K a una velocidad maximala de 60 f/s.
Marca Modelo Capacidad Angelbird SSD2GO PKT 512 GB Angelbird SSD2GO PKT 2 TB Glyph Atom 500 GB Lacie Portable SSD 500 GB Samsung Portable SSD T5 500 GB Samsung Portable SSD T5 1 TB SanDisk Extreme Portable SSD 1 TB Seagate Fast SSD 250 GB Wise PTS-256 Portable SSD 256 GB Wise PTS-512 Portable SSD 512 GB Wise PTS-1024 Portable SSD 1 TB
Recomendamos los siguientes discos USB-C para grabar en formatting RAW DCI 4K sin perdida de informacion a una velocidad maxima de 30 f/s.
Marca Modelo Capacidad Angelbird SSD2GO PKT 512 GB Angelbird SSD2GO PKT 2 TB Samsung Portable SSD T5 1 TB Wise PTS-256 Portable SSD 256 GB Wise PTS-512 Portable SSD 512 GB Wise PTS-1024 Portable SSD 1 TB
Recomendamos los siguientes discos USB-C para grabar en formatting RAW 3:1 DCI 4K a una velocidad maximal de 60 f/s.
Marca Modelo Capacidad Angelbird SSD2GO PKT 512 GB Angelbird SSD2GO PKT 2 TB Samsung Portable SSD T5 500 GB Samsung Portable SSD T5 1 TB Wise PTS-256 Portable SSD 256 GB Wise PTS-512 Portable SSD 512 GB Wise PTS-1024 Portable SSD 1 TB
Información para desarrolladores
Blackmagic Bluetooth Camera Control
Blackmagic cameras with Bluetooth LE implement a variety of features and commands that allow users to control their cameras wirelessly. Developers have full access to these features for their custom applications.
The following services and characteristics describe the full range of communication options that are available to the developer.
Service: Device Information Service
UUID:180A
Characteristics
Camera Manufacturer
UUID:2A29
Read the name of the manufacturer (always "Blackmagic Design").
Camera Model
UUID:2A24
Read the name of the camera model ("Pocket Cinema Camera 6K" or "Pocket Cinema Camera 4K").
Service: Blackmagic Camera Service
UUID:291D567A-6D75-11E6-8B77-86F30CA893D3
Characteristics
Outgoing Camera Control (encrypted)
UUID:5DD3465F-1AEE-4299-8493-D2ECA2F8E1BB
Send Camera Control messages
These messages are identical to those described in the Blackmagic SDI Camera Control Protocol section below. Please read that section for a list of supported messages and required formatting information.
For an example of how packets are structured, please see the 'example protocol packets' section in this document.
Incoming Camera Control (encrypted)
UUID:B864E140-76AO-416A-BF30-5876504537D9
Request notifications for this characteristic to receive Camera Control messages from the camera.
These messages are identical to those described in the Blackmagic SDI Camera Control Protocol section below. Please read that section for a list of supported messages and required formatting information.
Timecode (encrypted)
UUID:6D8F2110-86F1-41BF-451D87E976C8
Request notifications for this characteristic to receive timecode updates.
Timecode (HH:MM:SS:mm) is represented by a 32-bit BCD number:
(eg. 09:12:53:10 = 0x09125310)
Camera Status (encrypted)
UUID:7FE8691D-95DC-4FC5-8ABD-CA74339B51B9
Request notifications for this characteristic to receive camera status updates.
The camera status is represented by flags contained in an 8-bit integer:
None = 0× 00
Camera Power On = 0x01
Connected = 0× 02
Palred = 0× 04
Versions Verified = 0× 08
Initial Payload Received = 0× 10
Camera Ready = 0× 20
Send a value of 0x00 to power a connected camera off.
Send a value of 0x01 to power a connected camera on.
Device Name
UUID:FFACOC52-C9FB-41A0-B063-CC76282EB89C
Send a device name to the camera (max. 32 characters).
The camera will display this name in the Bluetooth Setup Menu.
Protocol Version
UUID: 8F1FD018-B508-456F-8F82-3D392BEE2706
Read this value to determine the camera's supported CCU protocol version.
NOTE Encrypted characteristics can only be used once a device has successfully bonded or paired with the Blackmagic Camera. Once a connection has been established, any attempt to write to an encrypted characteristic will initiate bonding. For example, writing a 'Camera Power On' (0x01) message to the Camera Status characteristic.
Once bonding is initiated, the camera will display a 6-digit pin in the Bluetooth Setup Menu. Enter this pin on your device to establish an encrypted connection. The device will now be able to read, write and receive notifications from encrypted characteristics.
Blackmagic SDI and Bluetooth Camera Control Protocol
Version 1.4
If you are a software developer you can use the Blackmagic SDI and Bluetooth Camera Control Protocol to construct devices that integrate with our products. Here at Blackmagic Design, our approach is to open up our protocols and we eagerly look forward to seeing what you come up with!
Overview
This document describes an extensible protocol for sending a unidirectional stream of small control messages embedded in the non-active picture region of a digital video stream. The video stream containing the protocol stream may be broadcast to a number of devices. Device addressing is used to allow the sender to specify which device each message is directed to.
Assumptions
Alignment and padding constraints are explicitly described in the protocol document. Bit fields are packed from LSB first. Message groups, individual messages and command headers are defined as, and can be assumed to be, 32 bit aligned.
Blanking Encoding
A message group is encoded into a SMPTE 291M packet with DID/SDID x51/x53 in the active region of VANC line 16.
Message Grouping
Up to 32 messages may be concatenated and transmitted in one blanking packet up to a maximum of 255 bytes payload. Under most circumstances, this should allow all messages to be sent with a maximum of one frame latency.
If the transmitting device queues more bytes of message packets than can be sent in a single frame, it should use heuristics to determine which packets to prioritize and send immediately. Lower priority messages can be delayed to later frames, or dropped entirely as appropriate.
Abstract Message Packet Format
Every message packet consists of a three byte header followed by an optional variable length data block. The maximum packet size is 64 bytes.
Destination device (uint8) Device addresses are represented as an 8 bit unsigned integer. Individual devices are numbered 0 through 254 with the value 255 reserved to indicate a broadcast message to all devices. Command length (uint8) The command length is an 8 bit unsigned integer which specifies the length of the included command data. The length does NOT include the length of the header or any trailing padding bytes. Command id (uint8) The command id is an 8 bit unsigned integer which indicates the message type being sent. Receiving devices should ignore any commands that they do not understand. Commands 0 through 127 are reserved for commands that apply to multiple types of devices. Commands 128 through 255 are device specific. Reserved (uint8) This byte is reserved for alignment and expansion purposes. It should be set to zero. Command data (uint8[]) The command data may contain between 0 and 60 bytes of data. The format of the data section is defined by the command itself. Padding (uint8[]) Messages must be padded up to a 32 bit boundary with 0x0 bytes. Any padding bytes are NOT included in the command length.
Receiving devices should use the destination device address and or the command identifier to determine which messages to process. The receiver should use the command length to skip irrelevant or unknown commands and should be careful to skip the implicit padding as well.
Defined Commands
Command 0 : change configuration
Category (uint8) The category number specifies one of up to 256 configuration categories available on the device. Parameter (uint8) The parameter number specifies one of 256 potential configuration parameters available on the device. Parameters 0 through 127 are device specific parameters. Parameters 128 though 255 are reserved for parameters that apply to multiple types of devices. Data type (uint8) The data type specifies the type of the remaining data. The packet length is used to determine the number of elements in the message. Each message must contain an integral number of data elements. Currently defined values are: 0: void / boolean A void value is represented as a boolean array of length zero. The data field is a 8 bit value with 0 meaning false and all other values meaning true. 1: signed byte Data elements are signed bytes 2: signed 16 bit integer Data elements are signed 16 bit values 3: signed 32 bit integer Data elements are signed 32 bit values 4: signed 64 bit integer Data elements are signed 64 bit values 5: UTF-8 string Data elements represent a UTF-8 string with no terminating character. Data types 6 through 127 are reserved. 128: signed 5.11 fixed point Data elements are signed 16 bit integers representing a real number with 5 bits for the integer component and 11 bits for the fractional component. The fixed point representation is equal to the real value multiplied by 2^11. The representable range is from -16.0 to 15.9995 (15 + 2047/2048).
Data types 129 through 255 are available for device specific purposes.
Operation types 2 through 127 are reserved.
Operation type (uint8) The operation type specifies what action to perform on the specified parameter. Currently defined values are: 0: assign value The supplied values are assigned to the specified parameter. Each element will be clamped according to its valid range. A void parameter may only be 'assigned' an empty list of boolean type. This operation will trigger the action associated with that parameter. A boolean value may be assigned the value zero for false, and any other value for true. 1: offset / toggle value Each value specifies signed offsets of the same type to be added to the current parameter values. The resulting parameter value will be clamped according to their valid range. It is not valid to apply an offset to a void value. Applying any offset other than zero to a boolean value will invert that value.
Operation types 128 through 255 are available for device specific purposes.
Data (void) The data field is 0 or more bytes as determined by the data type and number of elements.
The category, parameter, data type and operation type partition a 24 bit operation space.
Group ID Parameter Type Index Minimum Maximum Interpretation Lens 0.0 Focus fixed16 - 0.0 1.0 \( 0.0 = \text {near,}1.0 = \text {far} \) 0.1 Instantaneous autofocus void - - - trigger instantaneous autofocus 0.2 Aperture (f-stop) fixed16 - -1.0 16.0 Aperture Value (where fnumber \( = \text {sqrt(2^AV)} \)) 0.3 Aperture (normalised) fixed16 - 0.0 1.0 \( 0.0 = \text {smallest,}1.0 = \text {largest} \) 0.4 Aperture (ordinal) int16 - 0 n Steps through available aperture values from minimum (0) to maximum (n) 0.5 Instantaneous auto aperture void -- - - trigger instantaneous auto aperture 0.6 Optical image stabilisation boolean - - - true = enabled,false = disabled 0.7 Set absolute zoom (mm) int16 - 0 max Move to specified focal length in mm,from minimum (0) to maximum (max) 0.8 Set absolute zoom (normalized) fixed16 - 0.0 1.0 Move to specified focal length: \( 0.0 = \text {wide,}1.0 = \text {tele} \) 0.9 Set continuous zoom (speed) fixed16 - -1.0 +1.0 Start/stop zooming at specified rate:-1.0 = zoom wider fast,0.0= stop,+1 = zoom tele fast Video 1.0 Video mode int8 [0] = frame rate -- fps as integer(eg 24, 25, 30, 50, 60) [1] = M-rate -- 0 = regular, 1 = M-rate [2] = dimensions -- 0 = NTSC, 1 = PAL, 2 = 720, 3 = 1080, 4 = 2kDCI, 5 = 2k16:9, 6 = UHD, 7 = 3k Anamorphic, 8 = 4k DCI, 9 = 4k 16:9, 10 = 4.6k 2.4:1, 11 = 4.6k [3] = interlaced -- 0 = progressive, 1 = interlaced [4] = Color space -- 0 = YUV 1.1 Gain (up to Camera 4.9) int8 1 128 1x, 2x, 4x, 8x, 16x, 32x, 64x, 128x gain 1.2 Manual White Balance int16 [0] = color temp 2500 10000 Color temperature in K int16 [1] = tint -50 50 tint 1.3 Set auto WB void -- -- Calculate and set auto white balance 1.4 Restore auto WB void -- -- Use latest auto white balance setting 1.5 Exposure (us) int32 1 42000 time in us 1.6 Exposure (ordinal) int16 -- 0 n Steps through available exposure values from minimum (0) to maximum (n) 1.7 Dynamic Range Mode int8 enum -- 0 2 0 = film, 1 = video, 2 = extended video 1.8 Video sharpening level int8 enum -- 0 3 0 = off, 1 = low, 2 = medium, 3 = high 1.9 Recording format int16 [0] = file frame rate -- fps as integer(eg 24, 25, 30, 50, 60, 120) [1] = sensor frame rate -- -- fps as integer, valid when sensor-off-speed set (eg 24, 25, 30, 33, 48, 50, 60, 120), no change will be performed if this value is set to 0 [2] = frame width -- in pixels [3] = frame height -- in pixels [4] = flags -- [0] = file-M-rate -- -- [1] = sensor-M-rate, valid when sensor-off-speed-set -- [2] = sensor-off-speed -- [3] = interlaced -- [4] = windowed mode 1.10 Set auto exposure mode int8 -- 0 4 0 = Manual Trigger, 1 = Iris, 2 = Shutter, 3 = Iris + Shutter, 4 = Shutter + Iris 1.11 Shutter angle int32 -- 100 36000 Shutter angle in degrees, multiplied by 100 1.12 Shutter speed int32 -- Current sensor frame rate 5000 Shutter speed value as a fraction of 1, so 50 for 1/50th of a second 1.13 Gain int8 -- -128 127 Gain in decibel (dB) 1.14 ISO int32 -- 0 2147483647 ISO value 1.15 Display LUT int8 [0] = selected LUT -- 0 = None, 1 = Custom, 2 = film to video, 3 = film to extended video [1] = enabled or not -- 0 = Not enabled, 1 = Enabled Audio 2.0 Mic level fixed16 - 0.0 1.0 0.0 = minimum, 1.0 = maximum 2.1 Headphone level fixed16 - 0.1 1.0 0.0 = minimum, 1.0 = maximum 2.2 Headphone program mix fixed16 - 0.1 1.0 0.0 = minimum, 1.0 = maximum 2.3 Speaker level fixed16 - 0.1 1.0 0.0 = minimum, 1.0 = maximum 2.4 Input type int8 - 0 3 0 = internal mic,1 = line level input,2 = low mic level input,3 = high mic level input 2.5 Input levels fixed16 [0] ch0 0.0 1.0 0.0 = minimum, 1.0 = maximum [1] ch1 0.0 1.0 0.0 = minimum, 1.0 = maximum 2.6 Phantom power boolean - - - true = powered,false = not powered Output 3.0 Overlay enables uint16 bit field -- -- bit flags:[0] = display status,[1] = display frame guidesSome cameras don't allow separate control of frame guides and status overlays. 3.1 Frame guides style(Camera 3.x) int8 -08 0 = HDTV, 1 = 4:3, 2 = 2:4:1,3 = 2:39:1, 4 = 2:35:1,5 = 1:85:1, 6 = thirds 3.2 Frame guides opacity(Camera 3.x) fixed16 - 0.1 1.0 0.0 = transparent, 1.0 = opaque 3.3 Overlays(replaces .1 and .2 above from Cameras 4.0) int8 [0] = frame guides style - - 0 = off, 1 = 2:4:1, 2 = 2:39:1,3 = 2:35:1, 4 = 1:85:1, 5 = 16:9,6 = 14:9, 7 = 4:3, 8 = 2:1,9 = 4:5, 10 = 1:1 [1] = frame guide opacity 0 100 0 = transparent, 100 = opaque [2] = safe area percentage 0 100 percentage of full frame used by safe area guide (0 means off) [3] = grid style - - bit flags:[0] = display thirds,[1] = display cross hairs,[2] = display center dot,[3] = display horizon Display 4.0 Brightness fixed16 - 0.0 1.0 0.0 = minimum, 1.0 = maximum 4.1 Exposure and focus tools int16 bit field 0x1 = zebra,0x2 = focus assist,0x4 = false color - - 0 = disable, 1 = enable 4.2 Zebra level fixed16 - 0.0 1.0 0.0 = minimum, 1.0 = maximum 4.3 Peaking level fixed16 - 0.0 1.0 0.0 = minimum, 1.0 = maximum 4.4 Color bar enable int8 - 0 30 0 = disable bars,1-30 = enable bars with timeout (seconds) 4.5 Focus Assist Int8 [0] = focus assist method - - 0 = Peak,1 = Colored lines [1] = focus line color - - 0 = Red,1 = Green,2 = Blue,3 = White,4 = Black 4.6 Program return feed enable int8 - 0 30 0 = disable, 1-30 = enable with timeout (seconds) Tally 5.0 Tally brightness fixed16 - 0.0 1.0 Sets the tally front and tally rear brightness to the same level. 0.0 = minimum, 1.0 = maximum 5.1 Front tally brightness fixed16 - 0.0 1.0 Sets the tally front brightness. 0.0 = minimum, 1.0 = maximum 5.2 Rear tally brightness fixed16 - 0.0 1.0 Sets the tally rear brightness. 0.0 = minimum, 1.0 = maximum Tally rear brightness cannot be turned off Reference 6.0 Source int8 enum - 0 2 0 = internal, 1 = program, 2 = external 6.1 Offset int32 - - - +/- offset in pixels Confi-guration 7.0 Real Time Clock int32 [0] time - - BCD - HHMMSSFF (UCT) [1] date - - BCD - YYYYYMMDD 7.1 System language string [0-1] - - ISO-639-1 two character language code 7.2 Timezone int32 - - - Minutes offset from UTC 7.3 Location int64 [0] latitude - - BCD - sDDDDdddddddd where s is the sign: 0 = north (+), 1 = south (-); DD degrees, dddddddddddd decimal degrees [1] longitude - - BCD - sDDDDdddddddd where s is the sign: 0 = west (-), 1 = east (+); DDD degrees, dddddddddddd decimal degrees Color Correction 8.0 Lift Adjust fixed16 [0] red -2.0 2.0 default 0.0 [1] green -2.0 2.0 default 0.0 [2] blue -2.0 2.0 default 0.0 [3] luma -2.0 2.0 default 0.0 8.1 Gamma Adjust fixed16 [0] red -4.0 4.0 default 0.0 [1] green -4.0 4.0 default 0.0 [2] blue -4.0 4.0 default 0.0 [3] luma -4.0 4.0 default 0.0 8.2 Gain Adjust fixed16 [0] red 0.0 16.0 default 1.0 [1] green 0.0 16.0 default 1.0 [2] blue 0.0 16.0 default 1.0 [3] luma 0.0 16.0 default 1.0 8.3 Offset Adjust fixed16 [0] red -8.0 8.0 default 0.0 [1] green -8.0 8.0 default 0.0 [2] blue -8.0 8.0 default 0.0 [3] luma -8.0 8.0 default 0.0 8.4 Contrast Adjust fixed16 [0] pivot 0.0 1.0 default 0.5 [1] adj 0.0 2.0 default 1.0 8.5 Luma mix fixed16 - 0.0 1.0 default 1.0 8.6 Color Adjust fixed16 [0] hue -1.0 1.0 default 0.0 [1] sat 0.0 2.0 default 1.0 8.7 Correction Reset Default void - - - reset to defaults Media 10.0 Codec int8 enum [0] = basic codec -- 0 = CinemaDNG, 1 = DNxHD, 2 = ProRes, 3 = Blackmagic RAW [1] = code variant - - CinemaDNG: 0 = uncompressed, 1 = lossy 3:1, 2 = lossy 4:1 - - ProRes: 0 = HQ, 1 = 422, 2 = LT, 3 = Proxy, 4 = 444, 5 = 444XQ - - Blackmagic RAW: 0 = Q0, 1 = Q5, 2 = 3:1, 3 = 5:1, 4 = 8:1, 5 = 12:1 10.1 Transport mode int8 [0] = mode -- 0 = Preview, 1 = Play, 2 = Record [1] = speed -- -ve = multiple speeds backwards, 0 = pause, +ve = multiple speeds forwards [2] = flags -- 1<<0 = loop, 1<<1 = play all, 1<<5 = disk1 active, 1<<6 = disk2 active, 1<<7 = time-lapse recording [3] = slot 1 storage medium - - 0 = CFast card, 1 = SD, 2 = SSD Recorder [4] = slot 2 storage medium - - 0 = CFast card, 1 = SD, 2 = SSD Recorder 10.2 Playback Control int8 enum [0] = clip - - 0 = Previous, 1 = Next PTZ Control 11.0 Pan/Tilt Velocity fixed 16 [0] = pan velocity -1.0 1.0 -1.0 = full speed left, 1.0 = full speed right [1] = tilt velocity -1.0 1.0 -1.0 = full speed down, 1.0 = full speed up 11.1 Memory Preset int8 enum [0] = preset command - - 0 = reset, 1 = store location, 2 = recall location int8 [1] = preset slot 0.5 -
Example Protocol Packets
Operation Packet Length Byte 0 1 2 3 4 5 6 7 8 9 10 11 12 13 14 15 header command data destination length command reserved category parameter type operation trigger instantaneous auto focus on camera 4 844000100 turn on OIS on all cameras 12 255 5 0 0 0 6 001000 set exposure to 10 ms on camera 4 (10 ms = 10000 us = 0x00002710) 12 4 8 0 0 1 5 3 0 0x10 0x27 0x00 0x00 add 15% to zebra level (15 % = 0.15 f = 0x0133 fp) 12 4 6 0 0 4 2 128 1 0x33 0x01 0 0 select 1080p 23.98 mode on all cameras 16 255 9 0 0 1 0 1 0 24 1 3 0 0 0 0 0 subtract 0.3 from gamma adjust for green & blue (-0.3~=0xff9a fp) 16 4 12 0 0 8 1 128 1 0 0 0x9a 0xffd 0x9a 0xffd 0 0 all operations combined 76 440001002555000600 1 0 0 0 4 8 0 0 1 5 3 0 0x10 0x27 0x00 0x00 4 6 0 0 4 2 128 1 0x33 0x01 0 0 255 9 0 0 1 0 1 0 24 1 3 0 0 0 0 0 4 12 0 0 8 1 128 1 0 0 0x9a 0xffd 0x9a 0xffd 0 0
Ayuda
Visite nuestra páginá de soporte técnico a fin de Obtener可以帮助你在 local de apoyo mais recente para los produits descritos en este manual.
Págrina de soporte técnico
Las versiones más recientes de este manual, losDistinctos programas Mentionados y el material de apoyo se incluyen disponibles en nuestra páginade soporte技术和.
comoponerse encontactoconBlackmagic Design
Si no enquiryra la ayuda que necesita, Solicite asistencia mediate el boton Enviar correo electronomico, situado en la parte inferior de nuestra pagina de soporte专业技术. De forma alternatively, haga clic en el boton Soporte专业技术 local para acceder al numero Telefonico del centro de atencion mas cercano.
como comprar la version del software instalado
Para comprar la version del programa utilisé instalado en el equipo informatico, selección la。2。3opsis About Blackmagic Camera Setup.
- En macOS, execute el programa desde la carpeta de aplicaciones. Seleectione el menu About Blackmagic Camera Setup en la barra superior de la ventana para ver el numero de la version.
- En Windows, execute el programa Blackmagic Camera Setup能做到 en el icono situado en el menu Inicio. Acceda al menu Ayuda y seleccionla option About Blackmagic Camera Setup para ver el numero de version.
como Obtener lasactualizacionesmás recientes
Después de verificar la version del programa instalado, visite el centro de soporte técnico de Blackmagic Design para comprobar si hayactualizaciones disponibles. Avecgeneralmente es recomendable instalar las versiones mas recientes, evite realizar modificaciones al sistemas operativo interno de la CAMERA si se encuesta en medio de un proyecto importante.
Normativas

Desecho de equilos electrlicos y electrónlicos en la Unión Europea:
Este*simbolo indica que el dispositivo no debe desechaq junto conothers residuos domesticos.A tales efectos,es preciso llvarlo a un centro de recoleccion para su posterior reciclaje. Esto ayuda a preservar los recursos naturales y garantiza queDICHO procedimiento se realice protegiendo la salute y el medioambiente.Para Obtener mas informacion al respecto,comuniquese con el distribuidor o el centro de reciclaje mas cercano.

Según las pruebas realizadas, este equipo cumple con los limites indicados para dispositivos digitales Clase A, en conformidad con la sección 15 de las normas existables por la Comisión Federal de Comunicaciones. Este permite proportionsar una protección razonable contra interferencias nocivas al operar el dispositivo en un entorno comercial. Este equipo usa, genera y puede irradiar energia de radiofrecuencia, y si no se instala o utilizes de acuerdo con el manual de instrucciones,edia occasionar interferencias nocivas para las comunicaciones radiales. El funcionaamente de este equipo en una zona residencial podra occasionar interferencias nocivas, en cuio caso el usuario deben SOLUTIONAR dicho inveniente por cuesta propia.
El funciona de este equipo está sujeto a las siguientes conditiones:
1 El dispositivo no debe Causei interferencias nocivas.
2 El dispositivo debe admitsirrialquier interferencia recibida, incluidas aquellas que pudieran provoc un functionamento incorrecto del mesmo.

R-R-BMD-201810001
R-R-BMD-201905001
R-R-BMD-201904002

Declaración ISED (Canada)
Esta webcam cumple con los estandares canadienses para dispositivos digitales Clase A.
Cualquiermericano uso indebido del本身就是 acarrear un incumplimiento de dichas normas.
Las conexiones a interfaces HDMI deben realizarse mediante cables blindados.
Este equipo cumple con las normas descritas anteriormente al emplearse en entornos commerciales. Notese que podra causar interferencia radial si se utilizes en el ambito domestico.
Bluetooth
Este dispositivo dispone de Tecnología Bluetooth.
Incluye modulo transmisor. Identificacion FCC: QOQBGM113
Este dispositivo cumple con los limites de exposión a la radiación establecidos para un entorno no controlado.
Incluye modulo transistor. Identificacion IC: 5123A-BGM113
Este dispositivo cumple con los limites de exposión a las ondas electromagnéticas establescidos por el gobernio de Canadá. Como tal, no require una licencia y está exento de las evaluaciones habituales企业提供 para determinar la absorcción españica de tales ondas, según lo dispuesto en la version 5 de las espécificaciones RSS-102.
Certificado en Japón. Número de certificación: 209-J00204. Este dispositivo contiene componentes radioeléctricos certificados según las normas tínicas existables en la Ley de Radiocomunicación.
Este modulo ha sido certifyado en Corea del Sur.Numero de certificacion:
MSIP-CRM-BGT-BGM113
Blackmagic Design declares por este medio que el uso de la banda ISM 2.4 GHz para la transmisión de señales mediante este Modelo cumple con las normas de la Directiva 2014/53/EU.
Envie un correo electronomica a compliance@blackmagicdesign.com para solicitar el dato completo de la declaracion de conformidad.

Certificado en Sudáfrica por ICASA.Número de certifications TA-2019/1517 (modelo Pocket Camera 6K) y TA-2019/1516 (modelo Pocket Camera 4K).

Certificado en México (NOM), para el modulo transistor de Bluetooth fabricado por Silicon Labs, número de modelos BGM113.
Seguidad
Los modelos Blackmagic Pocket Cinema Camera puede utiliser en climas tropicales a una temperatura maximal de 40^ .
La reparación de los componentes internos del equipo no debe ser技术水平a cabo por el usuario. Comuniquese con nuestro centro de atencion mas cercano para Obtener informacion al respecto.
Aconsejamos resguardar la CAMERA a la sombra en exteriores para prevenir la exposión del equipo o la batería de litio a la luz solar durante periodos prolongados. Mantenga las baterías de litio alejadas de cualquier fuente de calor.

Evite utilizes el adaptor incluido a una alta mayor de 2000 metros.
Declaración del Estado de California
Las partes plácicas de este producto pueda CONTER trazas de compuestos químicos, tales como polibromobifenilos (PBB), que el Estado de California reconoce como causantes de cancer, anomalías congenitas o daños reproductivos.
Consulte el Sitio www.P65Warningsca.gov para Obtener más información al respecto.
Garantía
Garantía limitada
Blackmagic Design garantiza que el producto adquirido no presentará defectos en los materiales o en su fabricación por un periodo de 12 días a partir de la Fecha de compra. Si el producto的结果a defectuoso durante el periodo de validez de la garantía, Blackmagic Designouldaroptarreemplazarlo o repararlo sin cargo algo nporconcepto de piezas y/o mano deobra.
Para acceder al service proportionsado de acuerdo con los tereinos de esta garantia, el Cliente debar da viso del defeto a Blackmagic Design antes del vencimiento del periodo de garantia y encargarse de los arreglos necessarios para la prestacion del myself. El Cieite sera responsable del empaque y el envio del producto defectuoso al centro de service Tecnico designado por Blackmagic Design y deben abonar las tarifas postales por adelantado. El Cieite sera responsable de todos los gastos de envio, seguros, aranceles, impuestos yequalquier other importe que surja con relationa la devolucion de products por equalquier motivo.
Esta garantía carecerá de validez ante defectos o daños causados por un uso indefinido del producto, o por falta de cuidado y mantenimiento. Según los关键时刻 estipulados, Blackmagic Design no tendrá obligación alguna de (a) reparar daños provocados por intentos de personal ajeno a Blackmagic Design de instalar el producto, repararlo o realizar un mantenimiento del mesmo; (b) reparar daños resultantes del uso de equipos incompatibles o conexiones a los mismos; (c) reparar cualquier daño o mal funciona provocado por el uso de piezas o repuestos no suministrados por Blackmagic Design; o (d) brindar servicios专业技术 a un producto que haya sido modificado o integrado con otros productos, cuando dicha modificacion o integrazioneonga como resultado un aumento de la dificultad o el tiempo necessario para reparar el producto.
ESTA GARANTIA OFRECIDA POR BLACKMAGIC DESIGN REEMPLAZA CUALQUIER OTRA GARANTIA, EXPRESA O IMPLICITA. POR MEDIO DE LA PRESENTE, BLACKMAGIC DESIGN Y SUS DISTRIBUTORES RECHAZAN CUALQUIER GARANTIA IMPLICITA DE COMERCIALIZATION O IDONEIDAD PARA UN PROPENSITY PARTICULAR. LA RESPONSABILITY DE BLACKMAGIC DESIGN EN CUANTO A LA REPARACION O SUSTITUCION DE PRODUCTOS DEFECTUOSOS CONSITUYE UNA COMPENSACION COMPLETA Y EXCLUSIVA PROPORCIONADA AL CLIENTE POR CUALQUIER DANO INDIRECTO, ESPECIAL, FORTUITO O EMERGENTE, AL MARGIN DE QUE BLACKMAGIC DESIGN O SUS DISTRIBUTORES HAYAN SIDO ADVERTIDOS CON ANTERIORIDAD SOBRE LA POSIBILIDAD DE TALES DANOS. BLACKMAGIC DESIGN NO SE HACE RESPONSABLE POR EL USO ILEGAL DE EQUIPOS POR PARTE DEL CLIENTE. BLACKMAGIC DESIGN NO SE HACE RESPONSABLE POR DANOS CAUSADOS POR EL USO DE Este PRODUCTO. EL USUARIO UTILIZA EL PRODUCTO BAJO SU PROPRIA RESPONSABILITYDAD.
Copyright 2020 Blackmagic Design. Todos los derechos reservados. «Blackmagic Design», «URSA», «DeckLink», «HDLink», «Workgroup Videohub», «Multibridge Pro», «Multibridge Extreme», «Intensity», y «Leading the creative video revolution», son marcas registradas en EE. UU. yotiros paises. Todos los demas nombres de compañero y productos peuvent ser marcas commerciales de las respectivas entreprises a las que estén asociados.
El terno « Bluetooth » y elogoto correspondiente son propidad de Bluetooth SIG, Inc. Blackmagic Design cuesta con autorizacion para hacer uso de los mismos. Otros nombres commerciales y marcas registradas pertenecen a sus respectivos propietarios.

安装操作手册
Blackmagic Pocket Cinema Camera
包含Blackmagic Pocket Cinema Camera 6K
和Blackmagic Pocket Cinema Camera 4K
2020年3月
中文

欢迎辞
感谢您购买新品Blackmagic Pocket Cinema Camera!
2013年时,我们推出了原版Blackmagic Pocket Cinema Camera。这款摄影机有着令我们引以为豪的小巧设计、高动态范围和突破性的画质。在认真聆听用户的反馈后,我们推出了Pocket Cinema Camera 4K,并紧接着推出搭载Super 35mm传感器和EF镜头卡口的Blackmagic Pocket Cinema Camera 6K。
Blackmagic Pocket Cinema Camera 4K则搭载与原版Pocket Cinema Camera相同的MFT镜头卡口,可使用任何一款MFT镜头。您可以在CFast卡或UHS-II型SD卡上记录高达每秒60帧的4K视频影像,以及高达每秒120帧的HD视频影像。Blackmagic Pocket Cinema Camera 6K在此性能基础上进一步拓展,能记录每秒120帧的2.8K视频影像,以及高达每秒60帧的6K视频影像!您可以利用摄影机上的USB-C端口在外接硬盘上记录,然后只要将硬盘从摄影机上拔出,直接插入计算机就能立即开始文件制作流程。
摄影机拥有13挡动态范围和双原生ISO设计,不论何种照明条件下都能记录获得优美纯净的电影画质。它自带5英寸LCD触摸屏,可快速查看对焦和画面细节,明亮日光下也可清楚查看各项信息。同时,它的四个内置麦克风还能直接在摄影机内部记录高品质音频!
将Blackmagic Pocket Cinema Camera连接到ATEM Mini切换台后,还能获得强大的CCU功能,在ATEM Software Control的摄影机页面更加直观地设置摄影机的对焦、快门、光圈、色彩等参数!
- Blackmagic Pocket Cinema Camera机身坚固耐久并兼顾轻质便携的优点,可随身携带。同时,摄影机还支持我们的Blackmagic RAW编解码格式,让您在一个文件里就能获得灵活的RAW处理功能,降低文件大小的同时大幅提升表现。
期待能一睹您使用新款Pocket Cinema Camera摄影机完成的创意佳作。同时,也欢迎您就摄影机有待添加的各项新功能向我们提出宝贵意见!

Grant Petty
Blackmagic Design首席执行官
目录
您使用的是哪款摄影机?
800
入门
801
安装镜头
801
启动摄影机
802
使用Blackmagic Pocket Camera
Battery Grip
802
使用内附的电源线为摄影机供电
存储介质 805
CFast卡 805
SD卡 806
USB-C硬盘 808
存储介质在记录前的准备事项 810
在Blackmagic Pocket Cinema
Camera上格式化存储介质 810
在Mac计算机上格式化存储介质 812
在Windows计算机上格式化存储介质 813
记录
814
记录片段
814
Blackmagic RAW
以Blackmagic RAW记录
最高传感器帧率
记录时长
播放
摄影机功能
摄影机正面 826
右侧 827
左侧 827
顶板
摄影机底部 830
摄影机背面
触摸屏控制
设置
主菜单
记录设置
文件命名格式
监看设置
音频设置
设置
预设 877
3D LUT
录入元数据
829
831
832
853
853
$53
359
359
66
368
879
882
场记板
摄影机视频输出
使用DaVinci Resolve
项目管理器
使用快编页面剪辑
将片段添加到时间线
在时间线上编辑片段
添加标题
使用Blackmagic RAW文件
使用调色页面为片段调色
添加Power Window
使用插件
混合音频
在Fusion页面添加视觉特效和合成效果
制作母版剪辑
快速导出
交付页面
使用ATEM Mini控制摄影机
DaVinci Resolve一级调色工具
使用第三方软件
处理CFast 2.0卡和SD卡上的文件
处理USB-C硬盘上的文件
使用Final Cut Pro X
使用Avid MediaComposer2018
使用AdobePremiereProCC
Blackmagic Camera Setup Utility
实用软件
建议使用的记录存储介质
CFast 2.0卡
SD卡
USB-C SSD
Developer Information
Blackmagic Bluetooth Camera Control
Blackmagic SDI and Bluetooth
Camera Control Protocol
Example Protocol Packets
帮助
监管告知 953
安全信息 954
保修
882
887
888
888
889
892
893
893
894
897
900
902
903
907
916
916
917
918
922
925
925
925
926
926
927
928
929
929
935
939
942
942
944
951
952
955
您使用的是哪款摄影机?
Blackmagic Pocket Cinema Camera 6K和Blackmagic Pocket Cinema Camera 4K机型有着相似的外观。两款摄影机都能拍摄出拥有超宽动态范围的影像,并且都采用相同的机身设计。此外,控制按钮和软件菜单布局,以及摄影机的操控也基本一致。
Blackmagic Pocket Cinema Camera 6K搭载Super 35mm尺寸传感器和EF镜头卡口,并且卡口上方标有“6K”字样图标。Blackmagic Pocket Cinema Camera 4K搭载MFT尺寸传感器和MFT镜头卡口。

Blackmagic Pocket Cinema Camera 6K

Blackmagic Pocket Cinema Camera 4K
入门
Blackmagic Pocket Cinema Camera是一款小巧便携的数字电影摄影机,它能在CFast 2.0卡、UHS-I和UHS-II型SD卡以及SSD硬盘(通过USB-C端口连接)记录获得高品质影像。Pocket Cinema Camera能以Blackmagic RAW和ProRes等专为后期制作而设计的专业级编解码格式记录素材片段。
为Blackmagic Pocket Cinema Camera安装镜头并开启摄影机即可开始使用。
安装镜头
Blackmagic Pocket Cinema Camera 6K使用EF镜头,Blackmagic Pocket Cinema Camera 4K使用MFT镜头。这两类镜头都十分常见,且价格低廉,种类繁多。为Blackmagic Pocket Cinema Camera 6K和Pocket Cinema Camera 4K机型安装镜头的步骤是一样的。第一步是取下镜头防尘盖。先按住锁定按钮,同时逆时针转动防尘盖,待其松开后便可取下。
安装主动式EF或MFT镜头卡口步骤如下:
1 将镜头的标志点与机身的镜头卡口标志点对齐。很多镜头都带标志点,可以是蓝色、红色或白色。
2 将镜头卡口按在摄影机卡口上,顺时针扭动镜头直到锁定到位。
3 取下镜头时,先按住锁定按钮,再逆时针旋转镜头直至其标志点对准摄影机顶部10点钟方向(MFT镜头)或12点钟方向(EF镜头),将镜头从卡口小心取下。


为Blackmagic Pocket Cinema Camera 4K安装MFT镜头
备注 没有安装镜头时,请盖上镜头卡口防尘盖,以防止摄影机传感器上的滤光片暴露在灰尘中。
启动摄影机
完成镜头安装后,接下来要做的是为摄影机连接电源。Blackmagic Pocket Cinema Camera可通过以下几种方法获得电源:为摄影机安装LP-E6电池,使用Blackmagic Pocket Camera Battery Grip电池手柄内的两块NP-F570电池,或者将内附的电源适配器连接到电源输入接口。
安装电池并开启摄影机
摄影机使用标准LP-E6型可更换电池。摄影机自带一块电池,但是如果您需要添加电池,请从Blackmagic Design经销商处,或者大多数视听照相器材店购买这款电池。
1 找到位于摄影机底部的电池仓,轻轻推按槽盖将其打开。
2 将LP-E6型电池的接触点朝向电池仓内部并轻轻推入,直至电池扣入锁梢到位。
提示取出电池时,将锁梢朝向摄影机正面方向轻推,电池便可弹出。
3 关闭电池仓盖,轻推直至关闭到位。
4 将摄影机顶部的电源开关拨至“ON”的位置。将开关拨至“OFF”的位置可关闭摄影机。
使用Blackmagic Pocket Camera Battery Grip
如果您购买了Blackmagic Pocket Camera Battery Grip, 不妨先安装这款电池手柄, 然后再继续接下来的操作。Blackmagic Pocket Camera Battery Grip的设计贴合Pocket Cinema Camera 6K和Pocket Cinema Camera 4K机型。
这款配件能为摄影机添加一个横向手柄,并含有两块NP-F570L系列电池,可实现长达两小时以上的不间断拍摄。12V DC输入接口可为手柄中的电池充电,也可在您更换电池时为摄影机提供不间断电源。摄影机关机时,您可以使用USB-C端口为手柄中的电池充电。
Blackmagic Pocket Camera Battery Grip安装步骤:
安装Blackmagic Pocket Camera Battery Grip前,请先关闭您的Pocket Cinema Camera,并断开任何外接电源。

打开摄影机电池槽保护盖,取出里面的LP-E6电池。

沿着电池槽保护盖与机身的连接处位置滑动,从摄影机上取下保护盖。

为了防止电池槽保护盖遗失,请将其扣入电池手柄槽内部设计的凹槽。

关闭电池槽保护盖,使其平整卡入并固定在电池手柄槽内部设计的凹槽。

将手柄电池形状的部分插入摄影机的电池槽内。电池手柄顶部的1/4英寸螺丝应和摄影机底部的1/4-20安装孔对齐。1/4英寸螺丝一侧的小型定位销可有助于保持准确对齐。

向右侧拨动电池手柄正面的旋钮旋紧螺丝,将电池手柄牢牢固定在摄影机上。
Blackmagic Pocket Camera Battery Grip电池安装步骤:

逆时针旋转电池手柄尾部的锁定开关,打开电池槽。将电池槽滑出。将Blackmagic Pocket Battery Grip安装到摄影机前后都可执行这一操作。

将两块NP-F570电池放入电池槽,安装时请注意电池朝向,然后将两块电池逆向滑入电池槽。电池之间的锁定扣向上弹起后,表示电池锁定到位。移除电池时,按下锁定扣,将两块电池相向滑动即可取出。

将电池槽滑入电池手柄,顺时针旋转电池手柄尾部的锁定开关。请注意,如果摄影机的DC电源输入口连接了外部电源,您可以在更换手柄内部电池的时候继续拍摄。

顺时针旋转电池手柄尾部的锁定开关,锁定电池槽。
提示 当您连接了Blackmagic Pocket Camera Battery Grip电池手柄并安装了两块电池时,摄影机LCD触摸屏右上角的电池电量提示会显示两个电池图标,供您单独监控每块电池的充电情况。更多相关信息,请查阅“电源”部分的介绍。
使用内附的电源线为摄影机供电
使用内附的电源线为摄影机供电内附的100-240伏AC适配器可用来为摄影机提供电源,并同时为摄影机的LP-E6电池或Blackmagic Pocket Camera Battery Grip手柄(如有连接)的两块NP-F570电池充电。DC电源接口可锁紧固定到摄影机上,以防意外断开。
连接外部电源步骤如下:
1 将AC到12V DC适配器插入到您的主电源插座中。
2 打开摄影机左侧的橡胶保护盖,旋转DC电源接头的锁定环,使其和12伏DC电源输入接口上方的缺口对齐。将接头轻轻推向输入口,直至插入到位。
3 拔出连接头时,只需取下护套并将接头从输入口移除即可断开连接。
同时连接外部电源和电池电源时,摄影机只使用外部电源。如果您在连接了已充电电池的情况下断开外部电源,摄影机会直接切换到电池电源,不会中断运行。
关机时,摄影机的LP-E6电池可通过USB接口充电。这一设计十分便捷,因为您可以在摄影机未使用时,通过便携式充电宝为摄影机充电。Blackmagic Pocket Cinema Camera支持通过标准10W USB插墙式充电器进行充电,也可以使用支持USB PD协议的充电器。USB PD充电器一般都具有一个USB-C类接口,支持最高20V输出,因此可实现快速充电。当摄影机开启或关闭时,用户可通过12V DC电源输入为LP-E6电池充电。
提示如果在使用后立即为发热状态的电池充电,充电速度会下降,直至电池温度降至摄氏45度(华氏113度)以下。建议您先等待15分钟左右,待电池冷却后再行充电。
现在,您只要安装存储介质就可以开始记录了!
存储介质
Blackmagic Pocket Cinema Camera使用标准SD卡、更快的UHS-II卡或CFast 2.0卡记录视频。
您还可以使用USB-C扩展端口连接大容量USB-C硬盘,实现更长的记录时间。
CFast卡
CFast 2.0卡足以支持非常高的数据速率,可记录高帧率6K、4K和HD视频。具体每个格式可记录的最高帧率请到“记录”章节中的时长表中查询。
备注 CFast 2.0 卡的速度普遍较快,但是有些卡的写入速度可能会低于其读取速度,因此不同型号的最大数据速率也会有所不同。如果要使用您选择的帧率获得可靠的记录品质,请使用 Blackmagic Design 推荐的存储卡。
插入CFast卡步骤:

要找到存储卡槽,首先滑动摄影机背面右侧的存储卡槽保护盖。

弹簧门会顺势打开,露出CFast和SD存储卡槽。

将CFast卡插入卡槽,直至锁定到位。无需过多外力即可插入存储卡。移除CFast卡时,只需向内轻推CFast卡即可将其释放并弹出。

LCD触摸屏底部的存储信息将显示检测到的CFast卡的名称和剩余记录时间。
SD卡的插入步骤和CFast卡类似。详情请参阅“插入SD卡步骤”部分的内容。

选择CFast2.0卡
如果您的摄制工作涉及到数据速率较高的视频,请谨慎挑选您要使用的CFast卡。这是因为CFast 2.0卡具备不同的读写速度。
获得经Blackmagic Design测试并建议在Pocket Cinema Camera上使用的具体CFast 2.0存储卡清单,请查阅“建议使用的记录存储介质”部分的内容。
关于Blackmagic Pocket Cinema Camera摄影机支持使用的CFast卡的最新信息,请访问Blackmagic Design支持中心www.blackmagicdesign.com/cn/support。
SD卡
除了CFast 2.0卡之外,摄影机还可以在UHS-I和UHS-II型高速SD卡上记录。UHS-I SD卡是记录HD压缩视频格式所使用的经济型存储介质;UHS-II型卡速度更快,是记录Blackmagic RAW和ProRes格式Ultra HD内容的理想选择。
使用SD卡时,您可以在拍摄HD压缩视频格式时获得经济型存储方案。
SDXC和SDHC都是消费级照相机或视频摄像机非常常用的媒体文件存储格式。如果您使用数码单反拍摄视频,或使用Blackmagic Micro Cinema Camera、Pocket Cinema Camera或Blackmagic Video Assist进行拍摄,可能您手头已经有兼容的SD卡可以直接使用了。
如果项目不要求使用最高分辨率文件进行拍摄,或项目需要进行长时间记录,您可以使用SD卡来降低成本。容量较小、速度较慢的SD卡还可以用来存储和加载LUT和预设。
插入SD卡步骤:

要找到存储卡槽,首先滑动摄影机背面右侧的存储卡槽保护盖。

弹簧门会顺势打开,露出存储介质卡槽。

将SD卡的标签朝向触摸屏插入SD卡槽,直至锁定到位。无需过多外力即可插入存储卡。

LCD触摸屏底部的存储信息将显示检测到的SD卡名称和剩余记录时间。
移除SD卡时,只需向内轻推SD卡即可将其释放并弹出。
挑选SD卡
如果需要记录6K、4K DCI或Ultra HD影像,我们建议您使用目前最高速的UHS-II型SD卡。请务必使用高速UHS-II型SD卡从事6K、4K DCI、Ultra HD和HD影像记录,或者使用UHS-I型SD卡从事HD影像记录。因为这些卡有着快速的数据处理速度和较大的存储容量。通常来讲,卡的速度越快越好。
使用您的存储卡前,请先将其格式化为HFS+或exFAT格式。通过摄影机的“存储”设置即可格式化存储介质。关于存储设置的详情请参阅“设置”部分的内容。
您也可以使用Mac或Windows计算机来格式化存储卡。如果您在mac系统上处理媒体文件,可使用HFS+格式,这是Mac计算机所使用的磁盘格式,也叫“OS X扩展格式”。如果您使用Windows系统,请选择exFAT格式,即Windows的磁盘格式,该格式在Mac计算机上也可读取。
获得经Blackmagic Design测试并建议在Pocket Cinema Camera上使用的具体SD存储卡清单,请查阅“建议使用的记录存储介质”部分的内容。
关于Blackmagic Pocket Cinema Camera摄影机支持使用的SD卡的最新信息,请访问Blackmagic Design支持中心www.blackmagicdesign.com/cn/support。
备注 如果要从事高分辨率、高帧率记录,我们建议使用CFast 2.0或外部USB-C硬盘作为存储介质,因为此类存储介质速度更快,容量更大。
锁定和解锁SD卡
SD卡可进行写保护设置,即“锁定”,以防数据被覆盖。插入SD卡之前,请先确保该卡没有设写保护。如果要禁用写保护功能,滑动位于存储卡左侧的塑料开关,将其移动到最靠近接触点的位置即可。记录后,您可随时将存储卡设为写保护锁定。

上下移动锁定开关可锁定或解锁D卡
插入了启用写保护的SD卡时,Blackmagic Pocket Cinema Camera会检测到,并会在LCD触摸屏上原本显示记录时长的位置显示“锁定”字样,同时,存储菜单的存储卡名称一侧也会出现一个锁定图标。如果存储卡处于锁定状态,您将无法记录视频、采集静帧或导出LUT和预设,除非解除锁定。


USB-C硬盘
Blackmagic Pocket Cinema Camera搭载高速USB-C扩展端口,可直接将视频记录到USB-C硬盘上。这类存储盘速度快,容量大,可进行长时间视频记录,因此是电影类长片拍摄工作的理想之选。
完成记录后,您可以直接将存储盘连接到计算机上,无需复制媒体即可开始剪辑和后期制作。
连接USB-C硬盘步骤如下:

打开摄影机左侧的橡胶保护盖,将线缆的另一端连接到USB-C端口。

将USB-C类线缆的一端连接到您的USB-C硬盘上。
备注 将USB-C硬盘连接到摄影机上时,它会占用摄影机操作系统中的SD卡位置。也就是说,当您连接了兼容的USB-C硬盘时,摄影机的SD卡槽是不可用的。
如果要使用SD卡槽而不是USB-C硬盘,请将USB-C硬盘从摄影机上断开。
选择高速USB-C硬盘
USB-C硬盘采用高速经济的存储设计方案,适用于多种设备,各类消费级电子用品商店均有销售。请务必注意,电影制作只是USB-C硬盘市场的一小部分,因此只有选择正确的存储盘才能确保足够的速度来记录6K和4K影像。
许多USB-C硬盘只为家用电脑设计,并不足以记录6K和4K视频。
获得经Blackmagic Design测试并建议在Pocket Cinema Camera上使用的具体USB-C硬盘清单,请查阅“建议使用的记录存储介质”部分的内容。
获取最新的USB-C硬盘推荐列表,请访问网址www.blackmagicdesign.com/cn/support。
USB-C硬盘速度注意事项
部分型号的USB-C硬盘并不能以生产厂家给出的速度保存视频数据。因为这些存储盘采用隐藏数据压缩技术来实现更高的录入速度。只有当存储空白数据或简单文件时,这种数据压缩才能以生产商声称的速度来保存数据。视频数据中包含不规则性更高的视频噪点和像素等,所以压缩无法起效,从而揭露了磁盘的真实速度。
有些USB-C硬盘的写入速度最多可以比生产商声称的速度低0%。所以,尽管存储盘规格中声称该USB-C硬盘速度足够处理视频,但真正进行实时视频拍摄时,这类存储盘的速度往往不够快。
通过Blackmagic Disk Speed Test测速软件来准确衡量您的USB-C硬盘是否足以应对高数据速率视频的采集和播放。该测速软件通过数据来模拟视频的储存情况,因此获得的数据与往硬盘采集视频的结果相类似。在Blackmagic测试中,我们发现型号较新、容量较大的SB-C硬盘和容量更大的USB-C硬盘通常具备更快的读写速度。
Blackmagic Disk Speed Test可从Mac的App Store下载。Blackmagic Desktop Video提供Windows和Mac版本,您可前往Blackmagic Design网站支持中心的“采集和播放”部分进行下载,网址:www.blackmagicdesign.com/cn/support。
存储介质在记录前的准备事项
您可以使用摄影机的存储和格式化菜单下的“格式化存储卡”功能来对CFast卡、SD卡和USB-C硬盘进行格式化操作,也可以通过Mac或Windows计算机实现格式化操作。为获得理想性能,我们建议您使用摄影机来格式化存储介质。
HFS+也被称为OSX扩展格式,因为它支持“日志功能”,所以被广为推荐。一旦发生存储介质损坏的情况,具有日志功能的存储介质更易恢复数据。HFS+受Mac系统的原生支持。exFAT则受Mac和Windows系统的支持,无需使用额外软件,但不支持日志功能。
在Blackmagic Pocket Cinema Camera上格式化存储介质
点按LCD触摸屏底部的任何一个存储卡提示,进入存储管理器。
2 点按“格式化CFast卡”或“格式化SD卡”。如果您将USB-C硬盘连接到摄影机上,则会显示“格式化硬盘”,而不是“格式化SD卡”。

如果您在摄影机上连接了USB-C硬盘,屏幕上就会显示“格式化外部硬盘”,而不是“格式卡”
点按“编辑卷号”手动更改卷号。通过键盘输入一个新的卷号,并按“更新”以确认选项。
4 选择“OSX扩展”或“exFAT”格式,并点按格式化按钮。

点按“编辑卷号”可手动更改卷号
5 在弹出的窗口中确认您想要格式化的卡、所选格式以及卷号。点按“格式化FAST卡”按钮以确认您的选择。点按“取消”可取消格式化。

确认格式化之前,请先检查是否选择了正确的存储介质。
6 按住格式化按钮三秒,开始格式化存储介质。

7 摄影机会提示您存储介质格式化完毕已可使用,或者格式化失败。
点按“确认”可返回存储管理器。
9 点按“退出”可离开存储管理器界面。
使用摄影机格式化CFast卡、SD卡或USB-C硬盘时,会使用根据场记板和卷号生成的摄影机D来为媒体文件命名。每次格式化时,摄影机会自动递增卷号。如果您需要手动输入特定的卷号,可以点击“编辑卷号”然后输入存储卡被格式化后的编号。
开始新项目时,如果您希望文件编号重置为1,可以点按场记板上“项目”选项卡中“重置项目数据”。

摄影机上的存储管理器将告知您当前使用存储介质的是CFast、SD卡还是USB-C硬盘。
提示如果SD卡启用了写保护,摄影机会检测到,并会在D触摸屏上原本显示记录时长的位置显示“锁定”字样,同时,存储菜单也会出现一个锁定图标。解锁该卡就可以进行格式化和记录。详情请参阅本手册“SD卡”部分的内容。
备注 如果您连接了USB-C硬盘,存储卡槽2上方就会显示“外部硬盘”字样。
在Mac计算机上格式化存储介质
您可以使用Mac计算机自带的“磁盘工具”应用程序,将CFast卡、SD卡或USB-C硬盘格式化为HFS+或exFAT。由于格式化后存储介质上的所有数据都被清除,因此请务必在格式化存储介质前备份存储介质上的所有重要文件。
1 将存储介质连接到您的计算机,忽略任何关于使用您的存储介质作为Time Machine备份选择的信息。
2 进入“应用程序/实用工具”界面,运行“磁盘工具”程序。
3 点击表示摄影机存储介质的硬盘图标,再点击“抹掉”按钮。
4 将格式设置为“Mac OS扩展(日志式)”或“exFAT”。
5 输入新增分区的名字,并点击“抹掉”。摄影机的存储介质或会迅速格式化,以备使用。

在macOS计算机上使用“磁盘工具”可将您摄影机的存储介质格式化为Mac OS扩展(日志格式。
在Windows计算机上格式化存储介质
使用WindowsPC的“格式化”对话框可将您摄影机的存储介质格式化为exFAT。由于格式化后存储介质上的所有数据都被清除,因此请务必在格式化存储介质前备份存储介质上的所有重要文件。
1 使用外部读写设备、USB-C线缆或转换器将摄影机的存储介质连接到您的计算机。
打开“开始菜单”或“开始画面”,选择“我的电脑”。右键点击摄影机的存储介质。
3 从上下文菜单中选择“格式化”。
4 将文件系统设置为“exFAT”,并将分配单元大小设置成128kb。
5 输入卷标,选择“快速格式化”,点击“开始”。
6 您的存储介质会迅速格式化,以备使用。

在Windows计算机上可使用“格式化”对话框将您摄影机的存储介质格式化为xFAT格式。
备注 如果记录的影像出现丢帧现象,请检查您的存储卡或硬盘是否在适用于您所用编解码格式和帧大小尺寸的推荐存储媒介列表上。如果要求低数据速率,可尝试降低您的帧率和分辨率,或尝试ProRes等压缩编解码格式。请登录Blackmagic Design网站获取最新信息,网址:www.blackmagicdesign.com/cn
备注 您可以在Blackmagic Pocket Cinema Camera上使用经过分区的存储介质,但摄影机只会将存储介质的第一个分区用于记录和播放。
需要指出的是,如果您使用存储和格式化菜单来格式化存储介质,除了用于记录和播放的第一个分区之外,存储盘的所有分区都会被一并抹去。因此,我们强烈建议您使用只有一个分区的存储介质。
记录
记录片段
Blackmagic Pocket Cinema Camera配有两个记录按钮。第一个记录按钮位于把手顶部,方便您在右手握住摄影机把手时使用食指触发记录。
第二个记录按钮位于摄影机正面,方便您单手拿住摄影机自拍时触发记录。这个按钮设计在易于触及的位置,十分适合录制自拍视频用于博客。
按摄影机上的其中一个记录按钮即可开始记录。再次按下记录按钮可停止记录。

位于摄影机顶部的记录按钮

位于摄影机正面的记录按钮
开始记录之前,按住位于触摸屏下方的存储介质名称可选择使用记忆卡或USB-C硬盘。被选中的存储介质类型上方的信息条会变成蓝色,表示摄影机将使用该存储介质进行记录。如果要在其他存储卡或存储盘上进行记录,按住存储介质名称进行更换即可。记录时,信息条将会变成红色。
选择记录格式
Blackmagic Pocket Cinema Camera可以使用如ProRes 422 HQ、ProRes 422、ProRes 422 LT和ProRes 422 Proxy等Apple ProRes编解码进行记录。ProRes编解码格式能在SD卡、CFast卡或USB-C硬盘上存储更多视频。以ProRes 422 HQ格式记录的视频质量最高,所做的压缩处理最少,而ProRes 422 Proxy格式可对视频进行优质压缩,记录更多视频。此外,摄影机还能Blackmagic RAW格式记录。您可根据工作流程需要尝试并选择最适合的格式。
请务必注意,Blackmagic Pocket Cinema Camera可使用Blackmagic RAW格式以全部传感器模式和裁切传感器模式进行记录,并且必须使用ProRes格式记录经过缩放调整的格式。
更多关于裁切模式和缩放格式的详细信息,请查阅“最大传感器帧率”部分的介绍。
Blackmagic RAW
Blackmagic Pocket Cinema Camera支持Blackmagic RAW文件格式。该格式有着高画质、宽动态范围的特点,并提供多种压缩比选择。Blackmagic RAW保留了RAW记录的所有使用优点,但文件速度非常快,因为大部分处理是在摄影机里通过硬件加速完成的。
格式有着高画质、宽动态范围的特点,并提供多种压缩比选择。Blackmagic RAW保留了RAW记录的所有使用优点,但文件速度非常快,因为大部分处理是在摄影机里通过硬件加速完成的。也就是说Blackmagic RAW在大部分电脑上能以正常速度播放,不需要先缓存或者降低分辨率。
Blackmagic RAW还包含强大的元数据支持,所以读取这一文件的软件就能明白摄影机的设置。如果您因为需要快速完成剪辑并且没有时间调色而使用视频Gamma拍摄,有了这一元数据功能,您可以选择视频Gamma模式,以视频Gamma拍摄,当您在软件里打开文件时,文件将会显示应用了视频Gamma的效果。但文件实际上还是电影Gamma模式,只不过是文件里的元数据让软件应用了视频Gamma模式。
也就是说,如果您在某个阶段希望为画面调色,所有电影动态范围都会保存在文件里。图像的亮部和暗部都不会被生硬地切掉,因此细节得以保留,从而通过调色赋予画面电影品质。如果您没时间调色也没有关系,因为图像会被应用视频Gamma,看起来就像正常的视频摄影机图像。画面并非一锤定音,到了后期制作您依然可以改变主意。
Blackmagic RAW文件速度非常快,这一编解码格式针对电脑的CPU和GPU做了优化。也就是说,播放又快又流畅,无需硬件解码板,这对于笔记本电脑来说非常重要。能读取Blackmagic RAW的软件也能获得通过Apple Metal、Nvidia CUDA和OpenCL处理的优势。
也就是说,Blackmagic RAW能像视频文件一样在大部分电脑上以正常速度播放,不需要先缓存或者降低分辨率。
另外值得一提的一点是,镜头信息会逐帧记录在元数据里。例如,使用兼容的镜头时,片段长度内所有变焦或对焦调整都会被逐帧保存在Blackmagic RAW文件的元数据里。
以Blackmagic RAW记录
Blackmagic RAW有两种不同的工作方式。您可以选择使用固定比特率编解码格式,或者固定质量编解码格式。
固定比特率编解码格式与大多数编解码格式的工作方式类似。它会试图将数据速率保持在恒定的程度,不会让数据速率升得太高。就是说,即使您拍摄复杂的图像,需要更多的数据来存储画面,固定比特率编解码格式也只会对图像进行进一步压缩,从而确保画面不会超出分配的空间。
这对视频编解码格式而言没有问题,但用Blackmagic RAW拍摄时,画质必须具有可预见性。如果您拍摄的图像需要更多数据,但编解码格式只是加大压缩程度来达到特定的数据速率,这时的结果就是,您可能会损失画质,但只有拍完回来才会发现。
为了解决这个问题,Blackmagic RAW还有另一个名为“固定质量”的编解码格式供您选择。该编解码格式技术上称为“可变比特率编解码格式”,当图像需要额外数据时,它会允许文件尺寸变大。如果您需要编码图像,同时保持画质,文件大小将没有上限。
设置为固定质量的Blackmagic RAW会让文件尺寸无限变大,直到满足编码图像的需要。但文件同时也会根据拍摄情况变大或变小。估计如果您忘了摘镜头盖,那也不会浪费存储介质的资源!
值得注意的是,Blackmagic RAW的画质设置选项名称并非晦涩难懂,而是能直观反映出各自的技术特点。比如,当您选择固定比特率编解码格式,会看到画质设置为3:1、5:1、8:1和12:1选项。这些是无压缩RAW文件尺寸与使用Blackmagic RAW拍摄的文件尺寸之间的比例。3:1的画质更好,因为文件更大,而12:1的文件尺寸最小,但画质也最低。许多Blackmagic RAW的用户认为12:1已经完全够用,没有发现任何画质局限。但您最好尝试不同设置,找到最适合自己的数值。
在固定质量设置下使用Blackmagic RAW时,您会看到设置为Q0和Q5选项。这些是传输给编解码格式的压缩参数,它们能以更技术性的方式设置所应用的压缩程度。这个设置不一样,因为固定比特率和固定质量编解码格式的运作方式不同。固定质量设置下,无法预测文件尺寸比率,因为该比率会根据具体拍摄情况发生很大的变化。所以在这种情况下设置是不一样的,并且文件会以它所需的大小记录到存储介质中。
固定比特率设置
31、51、81和121代表压缩比。比如,12:压缩生成的文件大约比无压缩RAW小12倍。
固定质量设置
Q0和Q5表示不同程度的量化。Q5的量化级别更高,数据速率也更高。如上所述,固定质量设置下文件尺寸会根据拍摄情况显著增大或缩小。也就是说,在拍摄时有可能会出现文件尺寸提高到超出存储卡负荷的情况。这样一来就可能会发生丢帧。但您可以立即看到拍摄中是否出现这样的问题,然后查看设置和画质。
Blackmagic RAW Player
Blackmagic Camera软件安装程序中包含的Blackmagic RAW Player播放器是一款用于查看片段的应用程序。只需双击打开Blackmagic RAW文件,就能以全分辨率和位深快速播放及浏览文件。
解码帧时,SDK库里的CPU加速支持所有主要架构,也可通过Apple Metal、Nvidia CUDA和OpenCL支持GPU加速。另外,它还兼容lackmagic eGPU,可实现更高的性能。Blackmagic RAW Player支持Mac、Windows和Linux三大平台。
Sidecar文件
Blackmagic RAW Sidecar文件不会重写文件的内嵌元数据,只是将新的元数据优先于原始数据之上。
元数据中包含Blackmagic RAW设置,以及光圈、对焦、焦距、白平衡、色调、色彩空间、项目名称、镜次编号等信息。元数据在片段全程被逐帧编码,这对镜头数据来说很重要,因为镜头可能在拍摄过程中发生调整。由于是可读格式,您可以用DaVinci Resolve,甚至文本编辑器添加或编辑Sidecar文件中的元数据。
Sidecar文件可以在播放时自动添加新的Blackmagic RAW设置,只需把Sidecar文件与相对应的Blackmagic RAW文件移动到同一个文件夹即可。如果您将Sidecar文件移出文件夹,并重新打开Blackmagic RAW文件,更改后设置就不会被应用,您所看到的文件是原始拍摄时的状态。任何使用Blackmagic RAW SDK的软件都能访问这些设置。做出的修改将保存在idecar文件里,可以通过Blackmagic RAW Player播放器或其他任何能够阅读Blackmagic RAW文件的软件看到。
当拍摄视频Gamma模式时,文件仍然处于电影Gamma,元数据会告诉Blackmagic RAW的处理机能以视频Gamma显示。如果您不想为画面调色,希望快速交付视频内容,视频Gamma是个很好的选择。但如果您希望提升暗部或者降低亮部时,所有细节还是依然都在的。视频不会被裁切,所有细节都在,您可以随时获取。
Blackmagic RAW与DaVinci Resolve
设置可以根据每个Blackmagic RAW文件进行调整,然后用DaVinci Resolve的“Camera RAW”选项卡保存为新的Sidecar文件,用于创建特效或优化查看。您可以将自己的媒体文件复制给另一位DaVinci Resolve用户,他们在导入文件时就能自动获取您修改过的Gamma设置。除了摄影机文件中包含的其他元数据以外,DaVinci Resolve还能读取您选择的动态范围,您的片段将自动以“Film”、“Extended Video”或“Video”动态范围在DaVinci Resolve中显示。
然后您可以通过调整饱和度、对比度和中点,以及高光和阴影过渡,对这些设置进行自定义。所有调整都可以保存为Sidecar文件,后期处理文件的其他人员也能看到这些修改。您随时都可以回到摄影机的原始元数据。
您还可以通过DaVinci Resolve的“Camera RAW”选项卡导出单一的Blackmagic RAW帧,其中包含所有调整、元数据、全分辨率和色彩信息,方便与他人分享单帧或参考文件。
获取更多关于如何在DaVinci Resolve中使用Blackmagic RAW的信息,请参阅本手册“使用DaVinci Resolve”部分内容。
Blackmagic RAW软件开发工具包
Blackmagic RAW软件开发工具包是由Blackmagic Design开发的API。您可以用Blackmagic RAW SDK编写自己的应用程序来使用Blackmagic RAW格式。任何开发人员都能用SDK库添加读取、编辑和保存Blackmagic RAW文件的支持。Blackmagic RAW SDK包含第四代色彩科学,您可以在所有支持它的应用上实现电影般的自然画面。Blackmagic RAW SDK支持Mac、Windows和Linux,可在Blackmagic官网的开发者页面免费下载www.blackmagicdesign.com/cn/developer。
以下图表显示了Blackmagic RAW API的各个组成部分:

最高传感器帧率
Blackmagic Pocket Cinema Camera 6K最高传感器帧率
分辨率 编解码 传感器范围 最高帧率 6K 6144 x 3456 Blackmagic RAW 全部 50 6K 2.4:1 6144 x 2560 Blackmagic RAW 裁切 60 5.7K 17:9 5744 x 3024 Blackmagic RAW 裁切 60 4K DCI 4096 x 2160 ProRes 422 HQ 在5.7K基础上进行缩放调整 60 4096 x 2160 ProRes 422 在5.7K基础上进行缩放调整 60 4096 x 2160 ProRes 422 LT 在5.7K基础上进行缩放调整 60 4096 x 2160 ProRes 422 Proxy 在5.7K基础上进行缩放调整 60 Ultra HD 3840 x 2160 ProRes 422 HQ 在全分辨率基础上进行缩放调整 50 3840 x 2160 ProRes 422 在全分辨率基础上进行缩放调整 50 3840 x 2160 ProRes 422 LT 在全分辨率基础上进行缩放调整 50 3840 x 2160 ProRes 422 Proxy 在全分辨率基础上进行缩放调整 50 3840 x 2160 ProRes 422 HQ 在5.7K基础上进行缩放调整 60 3840 x 2160 ProRes 422 在5.7K基础上进行缩放调整 60 3840 x 2160 ProRes 422 LT 在5.7K基础上进行缩放调整 60 3840 x 2160 ProRes 422 Proxy 在5.7K基础上进行缩放调整 60 3.7K变形 3728 x 3104 Blackmagic RAW 裁切 60 2.8K 17:9 2868 x 1512 Blackmagic RAW 裁切 120 HD 1920 x 1080 ProRes 422 HQ 在全分辨率基础上进行缩放调整 50 1920 x 1080 ProRes 422 在全分辨率基础上进行缩放调整 50 1920 x 1080 ProRes 422 LT 在全分辨率基础上进行缩放调整 50 1920 x 1080 ProRes 422 Proxy 在全分辨率基础上进行缩放调整 50 1920 x 1080 ProRes 422 HQ 在5.7K基础上进行缩放调整 60 1920 x 1080 ProRes 422 在5.7K基础上进行缩放调整 60 1920 x 1080 ProRes 422 LT 在5.7K基础上进行缩放调整 60 1920 x 1080 ProRes 422 Proxy 在5.7K基础上进行缩放调整 60 1920 x 1080 ProRes 422 HQ 在2.7K基础上进行缩放调整 120 1920 x 1080 ProRes 422 在2.7K基础上进行缩放调整 120 1920 x 1080 ProRes 422 LT 在2.7K基础上进行缩放调整 120 1920 x 1080 ProRes 422 Proxy 在2.7K基础上进行缩放调整 120
Blackmagic Pocket Cinema Camera 4K最高传感器帧率
分辨率 编解码 传感器范围 最高帧率 4K DCI 4096 x 2160 Blackmagic RAW 全部 60 4096 x 2160 ProRes 422 HQ 全部 60 4096 x 2160 ProRes 422 全部 60 4096 x 2160 ProRes 422 LT 全部 60 4096 x 2160 ProRes 422 Proxy 全部 60 4K 2.4:1 4096 x 1720 Blackmagic RAW 裁切 75 Ultra HD 3840 x 2160 Blackmagic RAW 裁切 60 3840 x 2160 ProRes 422 HQ 裁切 60 3840 x 2160 ProRes 422 裁切 60 3840 x 2160 ProRes 422 LT 裁切 60 3840 x 2160 ProRes 422 Proxy 裁切 60 2.8K变形 2880 x 2160 Blackmagic RAW 裁切 80 2.6K 16:9 2688 x 1512 Blackmagic RAW 裁切 120 HD 1920 x 1080 ProRes 422 HQ 在全分辨率基础上进行缩放调整 60 1920 x 1080 ProRes 422 在全分辨率基础上进行缩放调整 60 1920 x 1080 ProRes 422 LT 在全分辨率基础上进行缩放调整 60 1920 x 1080 ProRes 422 Proxy 在全分辨率基础上进行缩放调整 60 1920 x 1080 ProRes 422 HQ 在2.6K基础上进行缩放调整 120 1920 x 1080 ProRes 422 在2.6K基础上进行缩放调整 120 1920 x 1080 ProRes 422 LT 在2.6K基础上进行缩放调整 120 1920 x 1080 ProRes 422 Proxy 在2.6K基础上进行缩放调整 120 1920 x 1080 Blackmagic RAW 裁切 120 1920 x 1080 ProRes 422 HQ 裁切 120 1920 x 1080 ProRes 422 裁切 120 1920 x 1080 ProRes 422 LT 裁切 120 1920 x 1080 ProRes 422 Proxy 裁切 120
记录时长
下面这些表格以分和秒的格式列出了不同格式、项目帧率和媒体文件大小下可以记录的大致时长。请注意,可用的分辨率和编解码会因Pocket Cinema Camera 6K和Pocket Cinema Camera 4K型号而有所不同。
存储介质的最长记录时间取决于CFast卡、SD卡或USB-C硬盘的数据容量,以及您所选择的记录格式和帧率。例如3840×2160的Apple ProRes 422 HQ格式,其存储速率大约为880Mbps。采用每秒24帧的记录速度,您可以在一张容量为256GB的CFast 2.0卡上记录大约47分钟的视频。在同样的设置下,您可以在一张容量为128GB的CFast卡上记录大约23分钟的视频,这大约是容量256GB的CFast卡一半的记录时长。
需要注意的是,不同厂商生产的存储介质,其记录时长也略有不同。存储介质被格式化或FAT或MacOS X扩展格式时,记录时长也会有所不同。
含有少量信息的简单场景要比信息密集的合成场景需要的数据更少。以下表格中的数值都是以高度复杂的镜头来评估的,因此您所获得的记录时间可能会稍长些,具体取决于您所拍摄影像的类型。
6K CFast卡 帧率 Blackmagic RAW 3:1 Blackmagic RAW 5:1 Blackmagic RAW 8:1 Blackmagic RAW 12:1 256GB 时长 时长 时长 时长 23.98 17分钟 28分钟 45分钟 67分钟 24 17分钟 28分钟 45分钟 67分钟 25 16分钟 27分钟 43分钟 64分钟 30 13分钟 22分钟 36分钟 54分钟 50 8分钟 13分钟 21分钟 32分钟
6K 2.4:1 CFast卡 帧率 Blackmagic RAW 3:1 Blackmagic RAW 5:1 Blackmagic RAW 8:1 Blackmagic RAW 12:1 256GB 时长 时长 时长 时长 23.98 23分钟 38分钟 60分钟 91分钟 24 22分钟 38分钟 60分钟 91分钟 25 21分钟 36分钟 58分钟 87分钟 30 18分钟 30分钟 48分钟 72分钟 50 11分钟 18分钟 29分钟 43分钟 60 9分钟 15分钟 24分钟 36分钟
5.7K 17:9
CFast卡 帧率 Blackmagic
RAW 3:1 Blackmagic
RAW 5:1 Blackmagic
RAW 8:1 Blackmagic
RAW 12:1 256GB 时长 时长 时长 时长 23.98 20分钟 34分钟 55分钟 82分钟 24 20分钟 34分钟 55分钟 82分钟 25 19分钟 33分钟 52分钟 79分钟 30 16分钟 27分钟 44分钟 66分钟 50 10分钟 16分钟 26分钟 39分钟 60 8分钟 13分钟 22分钟 33分钟
4K DCI
CFast卡 帧率 Blackmagic
RAW 3:1 Blackmagic
RAW 5:1 Blackmagic
RAW 8:1 Blackmagic
RAW 12:1 ProRes
422 HQ ProRes
422 ProRes
422 LT ProRes
422 Proxy 256GB 时长 时长 时长 时长 时长 时长 时长 时长 23.98 39分钟 65分钟 104分钟 155分钟 44分钟 66分钟 95分钟 216分钟 24 39分钟 65分钟 103分钟 155分钟 44分钟 66分钟 95分钟 216分钟 25 37分钟 62分钟 99分钟 149分钟 42分钟 64分钟 91分钟 207分钟 30 31分钟 52分钟 83分钟 124分钟 35分钟 53分钟 76分钟 173分钟 50 18分钟 31分钟 49分钟 74分钟 21分钟 32分钟 45分钟 104分钟 60 15分钟 26分钟 41分钟 62分钟 17分钟 26分钟 38分钟 87分钟
4K 2.4:1
CFast卡 帧率 Blackmagic
RAW 3:1 Blackmagic
RAW 5:1 Blackmagic
RAW 8:1 Blackmagic
RAW 12:1 256GB 时长 时长 时长 时长 23.98 50分钟 84分钟 134分钟 200分钟 24 50分钟 84分钟 134分钟 200分钟 25 48分钟 80分钟 128分钟 192分钟 30 40分钟 67分钟 107分钟 160分钟 50 24分钟 40分钟 64分钟 96分钟 60 20分钟 33分钟 54分钟 80分钟 75 16分钟 27分钟 43分钟 64分钟 80 16分钟 26分钟 40分钟 60分钟
ULTRA HD
CFast卡 帧率 Blackmagic
RAW 3:1 Blackmagic
RAW 5:1 Blackmagic
RAW 8:1 Blackmagic
RAW 12:1 ProRes
422 HQ ProRes
422 ProRes
422 LT ProRes
422 Proxy 256GB 时长 时长 时长 时长 时长 时长 时长 时长 23.98 41分钟 68分钟 110分钟 164分钟 47分钟 71分钟 101分钟 230分钟 24 41分钟 68分钟 109分钟 164分钟 47分钟 71分钟 101分钟 230分钟 25 39分钟 66分钟 105分钟 157分钟 45分钟 68分钟 97分钟 221分钟 30 33分钟 55分钟 88分钟 131分钟 38分钟 57分钟 81分钟 184分钟 50 19分钟 33分钟 52分钟 79分钟 22分钟 34分钟 48分钟 111分钟 60 16分钟 27分钟 44分钟 66分钟 18分钟 28分钟 40分钟 92分钟
3.7K变形
CFast卡 帧率 Blackmagic
RAW 3:1 Blackmagic
RAW 5:1 Blackmagic
RAW 8:1 Blackmagic
RAW 12:1 256GB 时长 时长 时长 时长 23.98 31分钟 51分钟 82分钟 123分钟 24 31分钟 51分钟 82分钟 123分钟 25 29分钟 49分钟 79分钟 118分钟 30 24分钟 41分钟 65分钟 98分钟 50 15分钟 24分钟 39分钟 59分钟 60 12分钟 20分钟 33分钟 49分钟
2.8K变形
CFast卡 帧率 Blackmagic
RAW 3:1 Blackmagic
RAW 5:1 Blackmagic
RAW 8:1 Blackmagic
RAW 12:1 256GB 时长 时长 时长 时长 23.98 57分钟 95分钟 151分钟 226分钟 24 57分钟 95分钟 151分钟 226分钟 25 54分钟 91分钟 145分钟 217分钟 30 45分钟 76分钟 121分钟 181分钟 50 27分钟 45分钟 73分钟 109分钟 60 22分钟 38分钟 61分钟 91分钟 80 17分钟 28分钟 45分钟 68分钟
2.8K 17:9
CFast卡 帧率 Blackmagic
RAW 3:1 Blackmagic
RAW 5:1 Blackmagic
RAW 8:1 Blackmagic
RAW 12:1 256GB 时长 时长 时长 时长 23.98 81分钟 136分钟 216分钟 321分钟 24 81分钟 135分钟 215分钟 320分钟 25 78分钟 130分钟 207分钟 308分钟 30 65分钟 108分钟 173分钟 258分钟 50 39分钟 65分钟 104分钟 156分钟 60 32分钟 54分钟 87分钟 130分钟 120 16分钟 27分钟 43分钟 65分钟
2.6K 16:9
CFast卡 帧率 Blackmagic
RAW 3:1 Blackmagic
RAW 5:1 Blackmagic
RAW 8:1 Blackmagic
RAW 12:1 256GB 时长 时长 时长 时长 23.98 87分钟 144分钟 230分钟 342分钟 24 87分钟 144分钟 229分钟 342分钟 25 83分钟 138分钟 220分钟 328分钟 30 69分钟 115分钟 184分钟 275分钟 50 41分钟 69分钟 111分钟 166分钟 60 34分钟 58分钟 92分钟 138分钟 120 17分钟 29分钟 46分钟 69分钟
HD
CFast卡 帧率 Blackmagic
RAW 3:1 Blackmagic
RAW 5:1 Blackmagic
RAW 8:1 Blackmagic
RAW 12:1 ProRes
422 HQ ProRes
422 ProRes
422 LT ProRes
422 Proxy 256GB 时长 时长 时长 时长 时长 时长 时长 时长 时长 时长 时长 时长 23.98 159分钟 264分钟 418分钟 619分钟 189分钟 283分钟 403分钟 877分钟 24 159分钟 264分钟 418分钟 618分钟 189分钟 283分钟 403分钟 877分钟 25 153分钟 253分钟 402分钟 595分钟 182分钟 271分钟 387分钟 843分钟 30 127分钟 212分钟 336分钟 499分钟 152分钟 227分钟 324分钟 710分钟 50 76分钟 127分钟 203分钟 303分钟 91分钟 137分钟 196分钟 434分钟 60 64分钟 106分钟 170分钟 254分钟 76分钟 114分钟 163分钟 363分钟 120 32分钟 54分钟 87分钟 130分钟 38分钟 57分钟 82分钟 185分钟
备注请注意,Blackmagic RAW可用于拍摄使用全部或裁切传感器模式的格式。要记录所有经过缩放调整的格式,请选择ProRes编解码。
6K、6K 2.4:1、5.7K 17:9、3.7K变形以及2.8K 17:9格式仅在Pocket Cinema Camera 6K机型上提供,并且使用Blackmagic RAW编解码。Pocket Cinema Camera 6K使用ProRes记录4K DCI、Ultra HD和HD格式。
4K 2.4:1、2.8K变形以及2.6K 16:9格式仅在Pocket Cinema Camera 4K机型上提供,并且使用Blackmagic RAW编解码。Pocket Cinema Camera 4K使用Blackmagic RAW或ProRes记录4K DCI、Ultra HD和HD格式。
Q0和Q5的固定质量设置将显示不同的记录剩余时间时长。Q0的预计时长与固定比特率3:1类似,Q5的时长与12:1类似,但由于记录过程中预计时长每10秒钟更新一次,所以衡量记录时间最好的方法是记录20秒钟,然后在触摸屏显示器的存储介质区域监测时长。
选择帧率
摄影机可以使用不同的帧率拍摄视频,您可根据需要进行选择。
一般来说,选择传感器帧率时,会有一些常见的方面需要考虑。数年来,影视行业一直都有相应的标准。不同的标准会有不同的帧率要求,但其目的只有一个,就是在每一秒内显示有效的帧数来呈现悦目而真实的动态画面。
比如,影院使用的是每秒24帧的标准,虽然近年来业内已经开始尝试使用更高的帧率,但每秒24帧依然是全球广泛接受的标准。
电视行业的帧率则通常要符合每个国家的播出技术标准。比如,在制作电视内容时,北美地区一般都会使用每秒29.97的帧率进行记录,而欧洲地区则会使用每秒25的帧率进行记录。
但是,随着技术的不断发展,如今的制作有了更多的选择,并且播出标准也在一直变化。现在,体育类节目通常会以更高的帧率记录和播出。比如在北美地区,有些体育节目会以高达每秒59.94帧的速度记录和播出,欧洲地区则会采用每秒50帧的速度。这样能使这类快节奏画面更加流畅和真实。
此外,流媒体和网络播出一般会使用和电视节目类似的帧率,但用户可以选择不同的观看格式,而且唯一的限制就是用户的屏幕可以显示的内容,所以灵活性更大一些。
一般来说,为一个项目选择帧率时,可以根据交付的格式进行选择。摄影机的项目帧率应该使用这一设置,而传感器帧率应该被设置为匹配。这样您的片段就能以和肉眼所见的实际画面相同的速度进行播放。
如果您想要创造出有趣的效果,比如慢动作,就可以使用高一些的传感器帧率设置。传感器帧率比项目帧率越高,播放速度就越慢。
更多关于使用不同传感器帧率来达到创意效果的信息,请参考“触摸屏控制”部分的介绍。
触发记录
- Blackmagic Pocket Cinema Camera可通过HDMI输出口自动发送一路信号,以便在连接如Blackmagic Video Assist等支持触发记录功能的设备时触发记录。
这样一来,当您按下摄影机上的记录按钮时,您所连接的外部记录设备也会开始记录,并可当您停止摄影机记录的同时也停止记录。您的摄影机还可以通过HDMI输出时间码,也就是说,外部记录设备和摄影机内部记录的片段会使用相同的时间码。
如果外部记录设备支持触发记录功能,您需要通过设置菜单将其启用。
播放
播放片段
视频记录完毕后,您可使用摄影机上的播放控制按钮播放素材片段并在LCD屏幕上监看。按下播放按钮可切换到播放模式。再次按播放按钮可立即在LCD屏幕或者通过HDMI输出口连接的显示器上播放最后记录的片段。按住LCD屏幕上的前进或倒退按钮可以快进或倒退片段。当前片段到头时,播放会结束。
按前进或倒退按钮可跳到片段的开始或结束处。按后退按钮一次会跳转到当前素材片段的起始位置,按两次则跳转到上一个片段的起始位置。按记录按钮可退出播放,触摸屏会回到摄影机画面。

按播放控制区域的播放按钮即可在内置触摸屏上查看最近记录的片段。
摄影机功能
摄影机正面

1 记录按钮
按任何一个记录按钮均可开始和停止记录。摄影机正面设有一个记录按钮,便于在自拍时开始或停止记录。
2 设置滚轮
摄影机上安装兼容镜头时,设置滚轮可用来调整光圈。将触摸屏面向自己,向左旋转滚轮可打开光圈,向右旋转则关闭光圈。设置滚轮也可以用来调整白平衡、快门角度设置。按摄影机顶部的相应按钮,然后使用滚轮进行选择。完成选择后,按下设置滚轮可快速退出选择菜单。
3 立体声麦克风
共有四个内置的优质立体声麦克风。更多关于麦克风音频设置的信息,请参考“音频设置”部分的介绍。
4 镜头卡口
Blackmagic Pocket Cinema Camera 6K设有主动式EF镜头卡口,4K机型则设有主动式MFT镜头卡口。也就是说,您可以使用内置稳定器的镜头,还可以控制兼容镜头的自动对焦和自动曝光。要使用主动式镜头中带有的图像稳定器(即“IS”),可将稳定器开关设为“ON”来开启摄影机图像稳定功能。如果您的镜头有图像稳定器开关,请根据需要设置适合的静态图像或动态图像模式。如果您的镜头并未设有稳定器开关,可以从摄影机的“图像稳定功能”设置菜单中打开或关闭该功能。
5 Tally/记录提示
Pocket Cinema Camera摄影机的正面设有一个小型LED灯,可在摄影机记录时予以相应提示。您可以到设置菜单中启用或禁用这一Tally灯提示,还可以调整其亮度。详情请参阅“设置”部分的内容。
右侧

6 CFast卡槽
将CFast2.0卡插入卡槽内可实现记录和播放。详情请参阅“CFast卡”部分的内容。
7 SD卡槽
将SD卡插入卡槽内可实现记录和播放。详情请参阅“SD卡”部分的内容。
左侧

8 3.5mm麦克风输入
通过摄影机的3.5mm立体声接口连接麦克风。支持ic和Line电平的音频。Mic电平的音频要比Line电平低,因此如果您将麦克风连接到摄影机但选择了Line电平,就会发现电平过低。麦克风输入还可以接收来自左通道外部信号源的SMPTE规范LTC时间码。有效时间码可被自动检测到,并作为时间码元数据加嵌到记录的视频中。我们建议通过Line电平输出发送LTC时间码,特别是不将时间码作为一个音频轨道记录的情况。
9 耳麦输入
把耳麦插入3.5mm立体声耳机插孔可在记录和播放片段时监听音频。连接耳麦时,扬声器输出处于静音状态。

10HDMI
这一标准尺寸HDMI接口可连接支持HDR和2通道内嵌音频的10bit 4:2:2 1080p HD视频。使用触摸屏菜单设置净信号或者带有叠加信息的输出画面。您可以使用HDMI端口来连接外部监视器、录机或ATEM Mini切换台。通过HDMI将摄影机连接到ATEM Mini后,您就能获得演播室摄像机的功能,如远程控制Pocket Cinema Camera记录和调整多项设置。
11 电源输入
您可以使用DC接口为摄影机充电,并同时对电池进行涓流充电。如果要连接电源适配器,请转动插头使其对准插孔上方的缺口位置,然后轻推插头直至其解锁。如果要断开电源连接,请将锁定鞘转回原来的位置,然后拔出插头。
自定义电源方案
有些用户创建了自定义电源设备作为Blackmagic Pocket Cinema Camera供电途径之一。如果您决定不使用电池来创建自己的供电方案,那么需要注意和谨慎的是,千万确保不要对您的摄影机供应太高的电压,不然会导致永久性破坏。以下是Pocket Cinema Camera的电压要求:
电池输入连接额定电压范围为6.2V到10V最大。
DC输入额定电压范围为10.8V到20V最大。
当摄影机待机且不为电池充电时要求16W电源。
当摄影机为LP-E6型电池充电时要求30W电源
当采用自定义电源方案为摄影机供电时,建议您移除LP-E6型电池。
在记录到外部存储介质,使用主动式镜头,屏幕和Tally亮度均调到最高,记录高帧率影像,并且不为电池充电的情况下Pocket Cinema Camera 6K要求25W,Pocket Cinema Camera 4K要求22W。
12 USB
您可以利用这一USB-C端口,直接在连接的USB-C硬盘上进行记录。当摄影机关闭时,您可以通过这一USB-C端口从充电宝等外部设备源为电池充电。为摄影机更新内部软件时,通过这个USB-C端口将摄影机连接到计算机,运行摄影机的更新程序。
13 Mini XLR麦克风输入
通过Mini XLR接口连接外部平衡模拟音频。使用XLR转Mini XLR适配器电缆可将标准XLR麦克风连接到您的摄影机。
Mini XLR输入可提供幻象电源,用于连接不带内部供电的专业麦克风。更多关于启用幻象电源的信息,请参考本手册“音频”部分的介绍。
顶板

14 1/4-20安装点
您可以使用摄影机顶部的1/4-20安装点来安装外接麦克风或其他小型配件。
备注 Pocket Cinema Camera顶部的这一1/4英寸安装点只可用于连接小型麦克风等轻型配件。这个顶部1/4英寸安装点不得作为摄影机的承重点,因此请勿安装由螺丝固定的摄影机把手连同较重的镜头。这一操作会损坏/4英寸安装点,并且不属保修范围。请勿用该安装点连接大型长杆类配件,例如通过该安装点连接加长杆再安装较重配件。如要安装较重的配件,我们强烈建议您使用专为Pocket Cinema Camera设计的摄影机提笼,可同时固定在顶部和底部的1/4英寸安装点。
15 记录
按摄影机上的记录按钮即可开始录制。再次按下可停止记录。
16 静帧
如要采集单帧无压缩DNG画面,可按下摄影机上的静帧按钮。摄影机图标会短暂出现在触摸显示屏的右上角,提示您静帧采集成功。图像文件会被保存在当前正用于记录的存储介质根目录下一个名为“stills”的文件夹内。保存时会使用视频片段的文件命名格式,但文件名末尾将含有“S001”字样,以文件名最后四位字符来表示“静帧号码”。
17 ISO
按ISO按钮并旋转设置滚轮可调整摄影机的感光度设置。ISO可以1/3挡的增量进行设置,数值在100到25,600之间。
18 快门
要更改快门角度或快门速度,可按$”快门按钮,然后旋转设置滚轮。触摸显示屏也会给出最多三个防闪烁快门建议选项。

19 白平衡
按“WB”白平衡按钮并旋转设置滚轮可调整摄影机的白平衡设置。您也可以长按“WB”按钮三秒,直接进入自动白平衡屏幕菜单。摄影机将会在画面中心位置叠加显示一个白色方块,并使用这一区域执行自动白平衡操作。更多信息请参考“触摸屏控制”部分的介绍。
20 电源开关
电源开关可开启摄影机。向右滑动开关可开启摄影机,向左滑动可关机。
21 LED状态显示
摄影机关闭状态下,如果通过其12V DC电源接口或USB-C端口连接了外部电源,这一提示灯会显示红色,表示电池正在充电。
电池充满电后,状态LED灯会熄灭。
22功能按钮
您可以使用摄影机的“设置”菜单对这些按钮进行编程,将它们指派为各项常用功能。默认情况下,第一个按钮被设为“伪色”,第二个按钮被设为“显示LUT”,第三个按钮被设为“帧导栏”。
摄影机底部

23 1/4-20安装点
使用底部的这个1/4-20安装点可以将摄影机固定到三脚架上。
24 电池仓门
将电池仓门释放扣往镜头卡口的方向轻轻推按可将其打开。关闭时,只要轻推仓门直至听到锁定的声音即可。
摄影机背面

25 触摸显示屏
在记录和播放时可使用这个触摸显示屏监看片段。通过点按和滑动手势调整各项设置并控制摄影机。
26 光圈按钮
按下光圈按钮将自动,摄影机将根据镜头中的高光和阴影设置平均曝光值。您可以通过左右旋转设置滚轮来手动调整镜头光圈,也可以点按触摸显示屏上的“IRIS”按钮并调整光圈滑块实现控制。
27 对焦按钮
当摄影机使用兼容的自动对焦镜头时,按对焦按钮一次可自动对焦。默认情况下,镜头将自动对焦到画面的中心,但是您可以根据需要点按LCD屏幕来选择其他的对焦点。连按两次对焦按钮可将对焦点重置到屏幕的中心位置。
备注虽然大部分镜头都支持电子对焦,但是有些镜头可设置为手动或自动对焦模式。在这类情况下,您需要确认已将镜头设置到自动对焦模式。
28 HFR按钮
使用HFR(高帧率)按钮可切换到变速帧率。要使用这一功能,只要在帧率菜单中设置您想要的变速帧率即可。摄制完成后,只要按下HFR按钮即可在您所选的变速帧率和项目帧率之间切换。需要指出的是,这一设置只能在记录停止时调整。
更多关于项目和变速帧率的信息,请参考“触摸屏控制”部分的介绍。
29 对焦缩放按钮
按对焦放大按钮可放大画面,以1的像素比例来调整对焦。放大显示时,您可以在触摸屏上使用捏拉缩放的多点接触手势控制来调整缩放程度。更多信息,请查阅“捏拉缩放”部分的介绍。放大状态下,您可以点按并拖动屏幕以查看画面的不同区域。如果要缩小画面,再次按对焦放大按钮即可。
30 菜单按钮
按下该菜单按钮可打开主菜单界面。
31 播放按钮
按下播放按钮可切换到播放模式。再次按播放按钮可立即在LCD屏幕或者通过HDMI输出口连接的显示器上播放最后记录的片段。
触摸屏控制
触摸屏功能
Blackmagic Pocket Cinema Camera的LCD触摸屏采用触摸式手势界面设计,能带来快捷直观的操作体验。您可以在LCD触摸屏上的不同区域进行点按和滑动操作,从而快速实现拍摄时可能用到的摄影机功能。

Blackmagic摄影机的LCD触摸显示屏能让您轻松设置摄影机的绝对多数使用设置。
LCD监看选项
点按触摸屏左上角的监看图标可进入LCD监看设置。这些设置可用来切换并调整摄影机的监看功能,包括斑马纹、对焦辅助、帧导栏、网格、安全区以及伪色。当您进D监看选项时,这些功能的控制项会显示在LCD触摸屏底部的选项卡菜单中。


点击摄影机LCD触摸屏左上角的图标可进入LCD触摸屏的监看选项。
斑马纹
斑马纹设置可开启或关闭 LCD 触摸屏上的斑马纹显示,还可以设置 HDMI 输出画面上的斑马纹级别。
视频图像中超过您设定的斑马纹曝光度的部分会以斜线标出。例如,将斑马纹设定为 100% 可显示完全过曝的区域。这一功能对于既定照明条件下实现最佳曝光值非常有帮助。

进入LCD监看选项后,点按斑马纹图标可选择斑马纹设置
要开启或关闭LCD触摸屏的斑马纹功能,只要在斑马纹界面中点按屏幕左下方的切换图标即可。
向左或向右拖动滑块或点按斑马纹百分比级别的箭头,可为斑马纹显示设置曝光级别。斑马纹程度能以5个百分点为单位进行调整,曝光显示范围在 75% 到 100% 之间。
更多关于在摄影机HDMI输出上启用斑马纹的信息,请参考本手册“监看设置”部分的介绍。
提示 如果您在户外阴天等易变的照明条件下拍摄,将斑马纹设置在OO以下能提示您可能出现过曝的区域。
对焦辅助
对焦辅助设置可开启或关闭LCD触摸屏上的对焦辅助显示,还可以为Blackmagic Pocket Cinema Camera上的HDMI输出设置对焦辅助级别。

进入LCD监看选项后,点击对焦辅助图标可设置摄影机的对焦辅助选项。
要开启或关闭LCD触摸屏的对焦辅助功能,只要在对焦辅助界面中点按屏幕左下方的切换图标即可。
要在摄影机上设置HDMI输出的对焦辅助级别,可点按触摸屏底部的点按“低”、“中”或者“高”选项。
对焦辅助的最佳级别因拍摄画面而异。例如,对焦人物时,设置较高的对焦辅助可有助于解决人物面部边缘细节的问题。而如果是对焦植物或建筑物,较高的对焦辅助设置反而会显示许多干扰信息。
更多关于在摄影机HDMI输出上启用对焦辅助的信息,请参考本手册“监看设置”部分的介绍。
提示 Blackmagic Pocket Cinema Camera设有两个对焦辅助模式。您可以在“监看”设置菜单中的“峰值对焦”和“彩色线条”两种对焦辅助选项间进行切换。详情请参考本手册“监看设置”部分的介绍。
帧导栏
帧导栏设置可开启或关闭LCD触摸屏上的帧导栏显示。您还可以选择一种帧导栏在摄影机的HDMI输出上显示。
帧导栏包括用于电影、电视和网络标准的不同宽高比。

进入LCD监看选项后,点击帧导栏图标可设置帧导栏选项。
要开启或关闭LCD触摸屏的帧导栏显示,只要点按屏幕左下角的切换图标即可。
要选择您想使用的帧导栏选项,请左右拖动滑块,或点按当前所选宽高比两侧的箭头进行调整即可。点按箭头按钮之间的比例显示,还可以输入自定义帧导栏比例。
帧导栏选项如下:
2.35:1、2.39:1和2.40:1
可显示宽屏宽高比,适用于变形或遮幅宽银幕电影。由于电影标准随时间改变,这三种宽高比或采用略微不同的宽屏设置。2.39:1是目前最为广泛使用的标准之一。

LCD触摸屏启用2.40:1帧导栏设置后的显示。
2:1
该选项可显示较16:9略宽的画面比例,但宽度低于2.35:1。
1.85:1
可显示另一种常用的滤幅宽银幕电影宽高比。这种宽高比介于HDTV 1.78:1规格和2.39:1之间。
16:9
显示为1.78:1宽高比,兼容16:9高清电视机和计算机屏幕。该宽高比最常用于HD播出和网络视频。此外,Ultra HD播出也使用这一宽高比。
14:9
可显示某些电视台所用的14:9宽高比,是16:9和4:3电视标准的折中方案。理想状态下,当16:9和4:3素材经中心裁切以符合14:9宽高比时仍然保持清晰画面。如果您的项目可能会在使用14:9宽高比的电视台播出时,可使用此帧导栏作为构图辅助。
4:3
采用4:3宽高比,适用于SD电视屏幕,或在使用2倍变形附加镜时帮助构图取景。
1:1
该选项可显示较4:3略窄的1:1画面比例。这一正方形画面比例正在社交媒体领域日渐普及。
4:5
该选项可显示4:5的宽高比。这一纵向画面宽高比是人像和智能手机观看的理想选择。
自定义帧导栏比例
要自行创建帧导栏比例获得独特观感,可点按箭头图标按钮之间的比例显示。在出现的“自定义帧导栏”屏幕上,点按删除按钮将当前比例删除,然后使用数字键盘指定一个新的比例。点按“更新”应用自定义帧导栏比例,然后回到拍摄画面。

使用“自定义帧导栏”屏幕上的数字键盘输入一个新的帧导栏比例
提示 您可以更改帧导栏叠加信息的不透明度。详情请参考本手册“监看设置”部分的内容。
备注更多关于在摄影机HDM输出上启用帧导栏的信息,请参考本手册“监看设置”部分的介绍。
网格
网格设置可在 LCD 触摸屏上开启“三分法”、“水平线”、“十字准线”或“中心点”显示,还可以设置在 HDMI 输出上显示哪些叠加信息。

进入LCD监看选项后,点按网格图标可选择不同的网格设置
网格和十字准线叠加信息可以帮助您构图。开启网格选项后,LCD屏幕上会显示“三分法”、“水平线”、“十字准线”或“中心点”。
要开启或关闭摄影机触摸屏的帧导栏显示,只要在“帧导栏”选项卡中点按屏幕左下角的切换图标即可。
想要选择LCD或HDMI输出上显示哪类叠加信息,只要点按“三分法”、“水平线”、“十字准线”或“中心点”选项即可。您可以一次在水平线、十字准线或中心点选项当中选择一种,和三分法显示。这样能让您结合使用三分法和水平线组合、三分法和十字准线组合,或者三分法和中心点组合。

三分法网格可自动缩放到任意屏幕帧导栏。
三分法
“三分法”设置取画面三分之一处分别加以两条竖线和两条横线组成网格叠加显示。三分法是一种帮助镜头构图的极其强大的工具。例如,人眼通常会将注意力落于两条直线的交叉点位置,因此网格非常有助于构图时将关键元素定位在这些重要区域。演员的视线通常都是取景在屏幕上三分之一部分,因此您可以使用上面的那条水平线来帮助您构图。三分法有利于不同镜头间保持构图的一致性。
水平线
“水平线”设置可在摄影机发生左右或者上下倾斜的时候给出提示。这一设置能帮助您在手持拍摄时将摄影机保持在水平状态,较好地平衡摄影机在云台上的倾斜情况。
浅灰色竖线偏离中间那条深灰色竖线的移动方向,就表示摄影机当前发生倾斜的方向。当摄影机向下倾斜时,浅灰色横线会向上移动;而当摄影机向上倾斜时,浅灰色横线会向下移动。
这些线条偏离中心十字标线的距离等比对应摄影机发生上下或左右倾斜的程度。校准摄影机的运动传感器之后,只要摄影机对齐横轴和纵轴,十字标线就会变成蓝色,表示摄影机已与横纵轴对齐。
请注意,如果摄影机朝正下方拍摄俯瞰镜头,或朝正上方进行拍摄,水平线指示也会有相应反馈。假如您旋转摄影机来拍摄竖屏画面,水平线指示会将横纵轴也旋转90度。
下面的表格显示了摄影机发生不同方向的倾斜时,水平线所给出的相应指示。
水平线指示描述

垂直且水平

向下倾斜且水平

垂直且向左倾斜

向上倾斜且向右倾斜
正常使用时,可将水平线指示校准为垂直且水平。如果您想要使用水平线指示来保持一致的斜角镜头(Dutch Angle),或者保持一致的倾斜角度来拍摄俯瞰或仰角镜头,也可将水平线指示校准为某个斜面角度。更多关于如何校准水平线指示的信息,请查阅“运动传感器校准”部分。
十字准线
“十字准线”设置可在画面中心标以十字准线。十字准线和三分法一样,都是非常有用的构图工具,可以让您轻松将画框的正中心对准某个拍摄对象。在拍摄用于快速剪切的场景时也可能会用到这一功能。将观众的视线始终保持在画面中心,能够有助于他们在观看快速剪辑的画面时跟上节奏。
中心点
“中心点”设置是在帧画面的中心放置一个圆点。这一设置和“十字准线”设置的作用完全一样,只不过这一叠加显示更小,因此所造成的干扰也更小。
提示更多关于在HDMI输出上启用网格的信息,请参考本手册“监看设置”部分的介绍。
安全框
“安全框”设置选项用于打开或关闭 LCD 触摸屏上的安全框,以及设置 HDMI 输出的安全框尺寸。
安全框是广电制作行业的常用工具,可用来让观众观看到镜头中最重要的内容。将镜头中最重要的部分保留在中心的“安全框”之内,能有效防止在部分电视机上出现画面裁切,并且能留下一定的空间供播出机构在屏幕边缘添加台标、新闻图标和其他叠加信息。许多播出机构都要求交付的影像必须将标题和图文等重要内容包含在 90% 的安全框范围内。
安全框还可以帮您为镜头构图,方便您在后期制作中裁切图像的边缘来稳定镜头。它们也可以用来显示特定的裁切。比如以Ultra HD 3840x2160记录时将其设置为 50% ,您可以看到画面经1920x1080裁切后的效果。安全框还会根据帧导栏来调整尺寸,它们会通过调整以显示目标帧的已选百分比。

图为设置到 85% 的安全框
要开启或关闭LCD触摸屏的安全框,只要在安全框界面中点按屏幕左下方的切换图标即可。要设置摄影机HDMI输出的安全框程度,可以点按触摸屏下方当前数值左右任何一边的箭头。或者,您也可以左右拖动滑块进行调整。
伪色
伪色设置可以打开或关闭LCD触摸屏上的伪色曝光辅助。
伪色功能可在您的图像上叠加不同色彩,以代表图像中不同元素的曝光值。例如,粉色代表了适合较浅肤色的最佳曝光,而绿色则是较深肤色调的对应色彩。在记录人物画面时可通过查看粉色或绿色伪色来保持肤色曝光的一致性。
以此类推,当您图像中的元素从黄色变到红色,就意味着现在处于过曝状态。

伪色表
要开启或关闭LCD触摸屏的伪色功能,只要在伪色界面中点按屏幕左下方的切换图标即可。

伪色曝光辅助
每秒帧数
“FPS”提示可显示您当前所选的每秒帧数。

点按帧率提示可进入帧率设置
在LCD触摸屏底部的菜单里,点按“FPS”提示可让您更改摄影机传感器及项目帧率。
项目帧率
项目帧率是摄影机的记录格式帧率,它具备电影和电视行业所使用的各类帧率。通常,它会被设定为和您的后期制作工作流程相匹配的帧率。
一共有8种项目帧率设置,分别为每秒23.98、24、25、29.97、30、50、59.94以及60帧。
想要在“FPS”菜单中调整摄影机的项目帧率,请点按触摸屏左下角当前帧率旁边的左右箭头。或者,您也可以左右拖动滑块进行调整。

点按项目帧率两侧的箭头或移动滑块进行调整。
提示 Blackmagic Pocket Cinema Camera的项目帧率也设置了HDMI输出上的帧率。
传感器帧率
传感器帧率可设定传感器每秒所记录的实际帧数。这一帧率将会影响视频播放的快慢,视您所设置的项目帧率而定。

启用“变速帧率”选项后,点按某个预设或传感器帧率两侧的箭头图标,或者移动滑块就可进行调整。
默认情况下,项目和传感器帧率会相互匹配,以便获得自然的播放速度。但是,您可以点按摄影机“FPS”菜单右下方的“变速帧率”切换图标来单独设置传感器帧率。
如要更改您的传感器帧率,请点按触摸屏左下方传感器提示旁边的左右箭头。您也可以左右拖动滑块来增加或减少帧率。放开滑块后,传感器帧率将完成设置。您可以点按滑块上方的常用变速帧率。这些是根据您当前项目帧率给出的。
您可以设置各种不同的传感器帧率,使片段播放时呈现出各种丰富有趣的速度效果。当传感器帧率被设置为高于项目帧率时,播放片段可营造出慢动作效果。例如,以60fps的传感器帧率进行拍摄,以24fps的项目帧率进行播放,能创建出实际速度 40% 的慢动作效果。换言之,传感器帧率越是低于项目帧率,播放片段时就越快。这一原理类似于电影摄影机的快速拍摄(Overcranking)和慢速拍摄(Undercranking)。快速拍摄可增高传感器帧率,因此播放时可拖慢镜头画面进程,起到突出强调的作用。慢速拍摄可降低传感器帧率,因此回放时可加快画面的速度,从而使画面更具动感。这一设置可为您提供无限的创作空间!
关于每个记录格式和编解码可用最大帧率的信息,请参阅本手册“记录”章节的表格。
备注选中“变速帧率”时,音频和视频就不再同步。即使设置了相同的项目帧率和传感器帧率也是如此。因此,如果您想要确保音频同步,就避免选择变速帧率。
快门
“快门”提示可显示您的快门角度或快门速度。点按此提示可手动更改摄影机的快门数值或配置基于快门的自动曝光模式。快门类型设置可通过显示快门信息来选择“快门角度”或“快门速度”。详情请参考本手册中关于“设置”部分的介绍。

点按“快门”提示进入快门设置
快门角度或快门速度定义了视频中运动模糊的级别,可对不同的光线条件进行补偿。大多数情况180度的快门角度是拍摄令人满意的运动模糊的最佳选择,相当于50秒的快门速度。但是,请根据照明条件的变化或画面中动作的多少对快门角度进行相应的调整。
例如,360度时快门为“全开”,此时感光器可接收到最多光线。这适用于低光照条件且画面中只有轻微的动作部分。但是,如果拍摄快速移动的物体来说90度等较窄的快门角度可将运动模糊降到最低,从而获得更为锐利清晰的图像。与快门角度相对应的快门速度取决于您所使用的帧率。
例如,如果您以25帧每秒拍摄,那么360度相当于1/25秒,90度相当于1/100秒。
备注在照明环境下拍摄时,快门可影响闪烁程度。Blackmagic Pocket Cinema Camera会根据当前的帧率自动计算出防闪烁快门数值。当您调整快门时,触摸屏下方将会显示三个防闪烁快门建议选项。这些快门数值可能会受到您所在地区的主电源频率的影响。您可以在摄影机的设置菜单中将本地电源频率设为50Hz或60Hz。详情请参考本手册中关于“设置”部分的介绍。
点按触摸屏底部的“快门”提示可调出快门数值菜单。如果您将自动曝光设为关闭状态,此时屏幕将显示您当前所选的快门数值,并将显示出根据您在摄影机“设置”菜单中所选的主电源频率所得出的所有可用的防闪烁快门数值。详情请参考本手册“设置”部分的内容。
备注即使使用防闪烁快门数值,每类光源所具备的特点也依然有可能导致闪烁现象。如果您使用的不是持续光源,我们建议拍摄前请始终进行测试。
如要选择某一种防闪烁快门值,只需点按一个显示的快门值。使用当前快门值提示两侧的箭头可逐个查看一些最常用的值。

摄影机将根据您在“设置”菜单中所选的主电源频率给出一组防闪烁快门数值建议。
如果您在户外拍摄,或使用防闪烁照明,还可以到屏幕左下方连按两下当前快门提示图标来手动选择一个快门数值。当选定快门角度时,该操作会调出一个数字键盘,您可以用它来设置5度到360度之间的任意快门角度。

当在户外拍摄或使用防闪烁照明时,可使用这一数字键盘手动键入您想要的快门角度。
Blackmagic Pocket Cinema Camera设有三类基于快门的自动曝光模式。要选择三者之一,请点按快门菜单最右侧的“自动曝光”按钮。
快门
该设置可自动调整快门数值来确保恒定曝光,并同时保持光圈不变。如果您需要保持景深不变,请选择这一设置。值得一提的是,细微的快门自动调整可能会影响到运动模糊。此外,也请您留意室内拍摄时不同的照明条件可能会造成闪烁现象。自动光圈功能在选择“快门”自动曝光模式时不可使用。
快门+光圈
该设置可先调整快门,再调整光圈,以保持正确的曝光水平。如果已达到最大或最小快门值,曝光仍不能维持,那么摄影机将开始调整光圈值来保持曝光恒定。
光圈+快门
该设置可先调整光圈,再调整快门速度,以保持正确的曝光值。如果已达到最大或最小光圈值,曝光仍不能维持,那么摄影机将开始调整快门值来保持曝光恒定。

在快门菜单中,点按“自动曝光”可进入基于快门的自动曝光模式选项。
提示当影响快门或光圈的自动曝光模式启用时,LCD触摸屏上方的快门或光圈提示的旁边会出现一个“A”字母小标。
光圈
“光圈”提示可显示您当前的镜头光圈。点按此提示可更改兼容镜头的光圈并配置基于光圈的自动曝光模式。

点按“光圈”提示可进入光圈设置
备注 如果要使用LCD触摸屏调整光圈,您的Blackmagic Pocket Cinema Camera必须要搭配支持通过摄影机更改光圈的镜头。
点按“光圈”提示一次可调出触摸屏底部的光圈菜单。当前镜头光圈将显示在此菜单的最左侧。想要更改光圈,可点按当前光圈两侧的箭头或左右拖动滑块。

在“光圈”菜单下时,点按光圈提示左右两侧的箭头或使用滑块来调整光圈设置。
点按光圈菜单最右侧的“自动曝光”的开关图标可打开光圈自动曝光菜单。
该操作可调出以下自动曝光选项。
光圈
该设置可自动调整光圈来确保恒定曝光,并同时保持快门角度不变。它可保持运动模糊不受影响,但可能会影响景深。
光圈+快门
该设置可先调整光圈,再调整快门速度,以保持正确的曝光值。如果已达到最大或最小光圈值,曝光仍不能维持,那么摄影机将开始调整快门值来保持曝光恒定。
快门+光圈
该设置可先调整快门,再调整光圈,以保持正确的曝光水平。如果已达到最大或最小快门值,曝光仍不能维持,那么摄影机将开始调整光圈值来保持曝光恒定。

当位于光圈菜单时,点按“自动曝光”可进入基于光圈的自动曝光模式选项。
提示当影响光圈或快门的自动曝光模式启用时,LCD触摸屏上方的光圈或快门提示旁会出现一个“A”字母小标。
时长显示
您可以在摄影机的LCD触摸屏上方看到摄影机的时长显示。

摄影机在记录时,其时长显示会变成红色。
时长显示为您提供了一个时间码计数器,可用于检查素材片段长度并在记录和播放时监看时间码。计数器以时:分:秒:帧的顺序显示,当记录或播放片段时将按照这一计时方式进行。记录时,时间码会变成红色。
显示时长会从00:00:00:00开始。当前片段或最后记录片段的时长将显示在触摸屏上。当日时间的时间码会嵌入片段,以便后期制作时使用。
想要查看时间码,只要点按时长显示即可。再次点按时长显示可回到片段时长。
当您将Blackmagic Pocket Cinema Camera连接到ATEM Mini时,其LCD触摸屏会在时间码下方显示切换状态。为了更好地帮助摄影师,状态叠加功能会在摄影机处于即将直播时显示“预监”,并且会在摄影机处于直播状态时显示“正在播出”。ATEM Mini可自动和Pocket Cinema Camera摄影机的时间码进行同步,以便在连接设备时与切换台的时间码相匹配。这样一来,在DaVinci Resolve中执行准确的多机位剪辑就变得更加方便了。
时长显示周围还可能出现以下其他状态提示:
W 当Blackmagic Pocket Cinema Camera使用裁切传感器模式时,此标识会出现在时长显示的左侧。 TC 当显示时间码时,此标识会出现在时长显示的右侧。 EXT 当外部LTC时间码通过3.5mm立体声输入口连接有效,或者当时间码同步到ATEM Mini切换台时,此标识会出现在时长显示的右侧。 INT 当摄影机在完成“拥塞同步”并断开连接后脱离其内部时间码时,此标识会出现在时长显示的右侧。
ISO
“ISO”提示可显示摄影机当前的感光度设置。点按此提示可调整ISO值来用于不同的照明条件。

点按ISO提示可进入感光度设置。

进入ISO菜单后,LCD触摸屏的下方会显示摄影机的ISO设置。预设下方的/3摄的增调整ISO。
这一ISO设置可能会偏高或偏低,因此请根据拍摄现场的不同情况妥善设置。例如,在低照度条件下拍摄时可使用ISO25,600的设置,但可能造成一些可见噪点。而在明亮环境下拍摄时,则可使用ISO100的设置,以便获得更浓郁的画面色彩。
双原生ISO
Blackmagic Pocket Cinema Camera设有400和3200双原生ISO功能,因此其传感器经过优化,可胜任低照度条件和明亮日光环境的拍摄。
请根据不同照明条件调整ISO,摄影机的双原生ISO功能可在后台运行,以确保拍摄画面清晰,并且低和高ISO设置下噪点均保持在最少。
100到1000之间的ISO设置会使用400的原生ISO设置作为参考点。1250到25600之间的ISO设置会使用3200的原生ISO设置作为参考。如果您的拍摄条件可以选择ISO 1000或1250,我们建议将镜头的光圈调低一挡,这样就可以选择SO 1250,从而启用较高的原生SO功能来获得更加清晰的拍摄画面。
下面的图表显示了ISO选项和动态范围配置之间的关系。

Blackmagic Pocket Cinema Camera 6K动态范围

Blackmagic Pocket Cinema Camera 4K动态范围
白平衡
“白平衡”和“色调”提示可分别显示摄影机当前的白平衡和色调设置。点按这两个提示可让您根据不同的照明条件来调整摄影机的白平衡和染色设置。

点按“白平衡”和“色调”可分别进入相应设置。
每种光源都会发出一种色调。例如,烛光会发出暖色调,阴天会发出冷色调。白平衡设置用于图像的色彩平衡,通过综合调整图像中的橙色和蓝色以确保白色物体在拍摄到的画面中依然为白色。例如,在钨丝灯下拍摄时会发出暖色的橙光,因此可选择3200K为图像添加一些蓝色调。如此平衡颜色后,白色可以被准确记录下来。
Blackmagic Pocket Cinema Camera包含多种白平衡预设,适用于各类色温条件。具体设置有:
明亮日光 (5600K) 白炽灯 (3200K) 荧光灯 (4000K) 混合照明 (4500K) 多云 (6500K)
只要点按或长按白平衡菜单左下方色温提示的左右箭头图标,就可以自定义更改任意预设。每点按箭头图标一次可将色温上调或下调OK,长按箭头图标则能加快调整速度。您也可以滑动白平衡菜单的色温滑块进行调整。
想要进一步调整图像,可以调整色调参数。此设置可综合调整图像的绿色和品红色。例如,添加品红可补偿荧光灯的绿色色偏。很多摄影机的白平衡预设都包括一些色调调整。

点按白平衡和色调提示可让您获得五种预设,以及左侧的白平衡提示和滑块,和右侧的色调提示。请根据不同的照明条件来调整自定义白平衡设置。
位于白平衡菜单下时,摄影机当前的色调设置会显示在屏幕右下方。点按或长按色调提示的左右箭头可调整色调。调整范围在-50到+50之间,以一挡为单位进行调整。长按箭头图标可加快调整速度。
备注 自定义白平衡或色调设置会把您的预设更改为“CWB”,也就是“自定义白平衡”。自定义白平衡是恒定的;您的CWB设置在重启、切换到预设及切换圆WB时都将保持配置不变。这样您可以轻松将自定义白平衡和上一次所使用的预设相比较。
自动白平衡
Blackmagic Pocket Cinema Camera可自动设置白平衡。点按“AWB”可调出白平衡设置界面。
自动设置白平衡时,画面中心将出现一个方框。请将此方框对准画面中某个中性色调的部分,如白卡或灰卡,并点按“更新白平衡”。摄影机将自动调整白平衡和色调值,使白平衡方框内的白色和灰色平均值尽量保持中性。更新后,此数值可设为您摄影机的自定义白平衡设置。长按三秒摄影机顶部的“白平衡”按钮也可选择自动白平衡并激活“更新白平衡”功能。

在白平衡菜单中点按“AWB”图标,可调出自动白平衡设置界面。将界面中的方框对准白色或中性灰色表面来自动设置一个中性白平衡。
电源
摄影机的电源和电量状态会显示在LCD屏幕的右上角。

使用电池供电时,点按电源提示可切换不同的显示方案。
AC AC 可在摄影机连接到主电源时显示。 AC / 正在充电 可在摄影机连接到主电源,并同时为移动式P-E6电池或Blackmagic Pocket Camera Battery Grip(如有使用)上的NP-F570电池充电时显示。 百分比 如果您的电池支持以百分比显示电量,那么该电池图标将以百分比的形式显示剩余电量,以1%为单位变化。当电池剩余电量为20%时,电量条将变成红色。点按电池图标可开启或关闭百分比显示。 电量条 该电池图标可显示摄影机内安装的电池电量,以25%为单位变化。当电池剩余电量为20%时,电量条将变成红色。 电池手柄电量条 如果为摄影机安装了Blackmagic Pocket Camera Battery Grip电池手柄可通过这个电量条显示来单独监控两块电池的状态。 电压 该图标可显示电池、适配器上的C电源接口、D-Tap转接线或自定义电源方案所提供的电压。点按电池图标可开启或关闭电压显示。
LUT提示
当您在现场将LUT作为预览工具使用时,屏幕左上角会显示LUT图标,提示您当前正在使用LUT。

直方图
直方图位于摄影机触摸屏的左下方。直方图会沿横向标尺显示暗部和亮部的对比。

直方图能向您反馈片段中阴影和高光部分的色调范围,此外
直方图还非常适合用于查看曝光平衡度,以防止图像的亮部区域被裁切。
直方图最左侧显示的是阴影或暗部细节,最右侧显示的是高光或亮部细节。当您关闭或打开镜头光圈时,会注意到直方图里的信息会相应地向左或向右移动。您可以使用它来查看图像暗部和亮部裁切情况。如果直方图的两侧边缘不是呈平缓下降态势,而是忽然被截断,那就说明可能有亮部或暗部细节丢失。
备注如果触摸屏左下方没有显示直方图,这可能是因为您将LCD监视屏设置为显示“编解码和分辨率”。请阅读本手册“监看设置”部分的内容获取更多信息。
记录按钮
Pocket Cinema Camera触摸屏底部的直方图旁边有一个灰色的圆形按钮。这就是记录按钮。点按一次开始记录,再点按一次可停止记录。记录时,Pocket Cinema Camera触摸屏上方的这一按钮、存储卡提示以及时间码均会变成红色。

1 A001
2 A002
120分钟
96分钟
记录按钮位于LCD触摸屏底部的存储介质提示一侧

1 A001
2 A002
120分钟
96分钟
记录时,记录按钮会显示为红色。
对片段套用LUT
如果您在“记录”设置选项卡中选择对记录片段套用LUT,触摸屏就会在待命模式和记录时给出相应提示。
LUT

1 A001
2 A002
120分钟
96分钟
LUT图标能提示您片段将使用所选UT一同记录。
LUT

1 A001
2 A002
120分钟
96分钟
当所选LUT和片段一同记录时,将显示LUT图标。
丢帧提示
如果记录按钮上重叠显示一个闪烁的“!”,就表示摄影机在记录时出现丢帧。与之相关联的存储卡所对应的剩余时间提示也将变成红色。例如,如果您的CFast卡出现丢帧,记录按钮上就会出现“!”提示,并且CFast卡的剩余时间提示将变成红色。这样一来,您就能明确是哪张存储卡无法达到当前所选的编解码和分辨率。如果您在之前记录的片段上出现丢帧,屏幕也会显示丢帧提示,这一提示将持续存在,直到记录其他片段,或重启摄影机。更多关于如何避免丢帧现象的信息,请参考“选择CFast 2.0卡”和“选择SD卡”部分的介绍。

1 A001
2 A002
120分钟
96分钟
图中的丢帧提示表示CFast卡出现丢帧。
备注 您可以将Blackmagic Pocket Cinema Camera设置为检测到丢帧时停止记录,以免录下不稳定的画面。详情请参考本手册“记录设置”部分的内容。
剩余记录时间
摄影机内插入CFast、SD卡或USB-C硬盘时,触摸屏底部的存储卡提示会显示存储卡或SB-C硬盘剩余的记录时间。时间以分钟的格式显示,具体显示内容取决于您所选择的帧率及编解码格式。当上述两项设置中的任何一项发生改变时,该提示会自动重新计算剩余时间。当存储卡或存储盘上只剩5分钟左右的记录时间时,该提示的文本会变成红色,仅剩2分钟记录时间时则会闪烁。当存储卡或存储盘达到最大容量时,该提示会显示“已满”。


存储卡提示可显示CFast卡、SD卡或USB-C硬盘的名称,并能以分钟显示剩余记录时间。
位于剩余时间上方的小信息条也会相应显示存储卡或存储盘的名称。信息条变成蓝色时,表示摄影机将使用该存储卡或USB-C硬盘进行记录。如果要在其他存储卡或存储盘上进行记录,按住相应存储卡或USB-C硬盘的名称进行更换即可。记录时,信息条将会变成红色。
点按存储卡提示可打开存储卡和格式化菜单。

在LCD触摸屏上点按存储卡提示可调出存储管理器界面。
该菜单可显示当前摄影机中每个CFast卡、SD卡或USB-C硬盘上的剩余空间、存储卡或存储盘的名称、最后一个片段的长度、每个存储卡或存储盘的片段数量,以及每张存储卡或存储盘的文件格式。
您可以通过这个菜单格式化存储介质。详情请参考本手册“存储介质在记录前的准备事项”部分的介绍。
提示点按存储菜单上的存储卡或存储盘图标名称可将其设定为当前所使用的存储卡或存储盘。Blackmagic Pocket Cinema Camera会首先在这张存储卡或存储盘上记录。
音频表
当使用内部麦克风或连接外部音频时,峰值音频表可显示通道和通道2的音频电平。该表以BFS为单位,并有削波警告功能,可在出现音频过载时以红标提示,并停留片刻,从而有效防止因削波过于短暂而被忽略的情况。
为获得最佳音质,请确保将音频电平控制在O dBFS警戒线以下。这是您的摄影机可记录的最高电平,也就是说任何超过此电平的音频会被裁切掉,并导致声音失真。

音频表上的彩色显示条代表了峰值音频电平。理想状态下,峰值音频电平应处在绿色区域。如果音频峰值冲到了黄色或红色区域,音频就极有可能出现削波。
您可以点按音频表来调出音频输入通道1和2的音量控制,以及耳机或扬声器音量菜单。

在LCD触摸屏上点按音频表可轻松进入音量和耳机或扬声器设置。
双击放大
连续两次点按LCD触摸屏可放大Blackmagic Pocket Cinema Camera预览图像的任何部分。您点按的区域将被放大,在LCD触摸屏上用指尖拖动图像可将其来回移动。这非常有助于检查对焦。要回到标准缩放模式,只要再连续点按两次摄影机触摸屏即可。
捏拉缩放
您可以使用捏拉缩放多点触控手势来调整CD触摸屏的缩放程度。该操作不会影响HDMI输出上的画面。
要进入2倍缩放操作模式,可连按两次触摸屏或按摄影机后侧的“对焦缩放”图标按钮。然后再使用捏拉手势更改缩放程度。您可以在触摸屏上用指尖拖动图像来移动放大的部分。要回到标准缩放操作模式,可再次连按两次触摸屏或按“对焦缩放”图标按钮。
每次您连按两下触摸屏或按“对焦缩放”图标按钮时,缩放程度会在上一个缩放级别和全屏视图之间切换。例如,捏拉缩放到8倍缩放操作模式后,连按两次可缩小,再连按两次又会回到8倍缩放操作模式。
点触式对焦
您可以通过长按LCD屏幕,让镜头对画面中的特定区域进行对焦。按下对焦按钮可让镜头对所选区域进行对焦。连按两次对焦按钮可将对焦点重置到屏幕的中心位置。
纯画面显示模式
如果您在取景或对焦时想要暂时隐藏触摸屏的状态信息文字和各项技术监看选项,这一功能会非常有用。向上或向下滑动CD触摸屏即可一次性隐藏所有显示信息。记录提示、帧导栏、网格、对焦辅助以及斑马纹信息将依然显示。
再次向上或向下滑动LCD触摸屏即可重新调出状态信息和技术监看显示信息。

在LCD触摸屏上,用指尖上下滑动可隐藏所有的状态提示
播放菜单
点按播放控制按钮可进入播放菜单。您可以通过摄影机控制按钮或LCD触摸屏来控制之前记录的片段。
当使用LCD触摸屏时,点按播放按钮一次可开始播放,再次点按该按钮可暂停播放。按前进或倒退按钮可跳到片段的开始或结束处。按前进按钮一次可跳至下一个片段。按后退按钮一次会跳转到当前素材片段的起始位置,按两次则跳转到上一个片段的起始位置。您还可点按循环图标激活片段的循环播放模式。


后退、播放、前进和循环图标。
想要快进或快退,可长按前进或后退按钮。根据您所按的播放控制按钮,系统将以两倍于常规速度前进或后退播放素材片段。
快进和快退时,您可以再次点按播放控制键来更改穿梭速度。每按相同方向的播放控制键一次,穿梭速度就会翻倍。最高可达正常速度倍。当位于6倍速度时,继续点按播放控制键则会回到2倍速度。每按相反方向的播放控制键一次,穿梭速度就会减半,直到2倍速度为止。点按播放按钮可回到正常播放速度。

穿梭速度提示可显示快进或快退片段的速度和方向。
在播放模式点按记录控制按钮可回到摄影机待命模式,准备开始记录。
提示播放素材片段时,在触摸屏上下滑动可隐藏状态信息。在播放模式下进入场记板可在元数据中将当前片段标记为“好镜次”。详情请参考“录入元数据”部分的介绍。
设置
主菜单
按下菜单按钮可打开摄影机的主菜单界面。这个菜单采用选项卡界面,可提供触摸屏上没有的设置。设置按照功能分为“记录”、“监看”、“音频”、“设置”、“预设”以及“LUT”选项卡。每个选项卡均设有多页,点按摄影机触摸屏边缘的左右箭头或左右滑动便可逐页浏览。

点按“记录”、“监看”、“音频”、“U镜选卡,”预设”以及“可在Pocket Cinema Camera主菜单的各个选项卡间移动。
记录设置
“记录”选项卡可让您设置视频格式、编解码格式及分辨率,以及记录视频所需的其他重要设置,例如动态范围和细节锐化等。
记录设置1
“记录”设置选项卡的第一页包含以下设置:
编解码和质量
“编解码和质量”菜单分为两行。第一行可让您在Blackmagic RAW和Apple ProRes这两大编解码系列间进行选择;第二行则列出了这两大系列中可选的质量选项。例如,ProRes编解码类型可用的质量选项有ProRes 422 HQ、ProRes 422、ProRes 422 LT和ProRes 422 Proxy。Blackmagic RAW的选项分为四个“固定比特率”和两个“固定质量”设置。

“编解码和质量”菜单下的Blackmagic RAW选项

“编解码和质量”菜单下的ProRes选项
提示 选择更高压缩程度的编解码格式会提高Blackmagic Pocket Cinema Camera存储介质上记录的视频数量。具体请参考“记录”章节中给出的“记录时长表”。
分辨率
“分辨率”设置可与“编解码”设置搭配使用。使用它为您想要记录的格式选择相应的分辨率。例如,要使用ProRes HQ来记录Ultra HD片段,请在“编解码和质量”菜单中选择“ProRes”和“HQ”。然后在“分辨率”菜单中选择“超高清”。

使用Blackmagic RAW编解码格式时,Pocket Cinema Camera 6K的“分辨率”选项

Pocket Cinema Camera 4K的“分辨率”选项。请注意,在K DCI格式下,菜单类别为“分辨率”,其他格式下,菜单类别为“分辨率-传感器裁切模式”。
备注 当您通过ATEM Mini进行多机位记录时,Pocket Cinema Camera会将其编解码设置为Blackmagic RAW,从而实现内部存储介质的高品质SO记录。使用ATEM Mini时,您连接到输入1上的HDMI源会将帧率设置为视频输出的帧率,同时其他HDMI输入也会自动转换。如果您将Pocket Cinema Camera连接到输入1,那么ATEM Mini就会调用之前使用的帧率。如果您在连接所有视频源后,想要为ATEM Mini选择不同的输出帧率,可以到ATEM Software Control的切换台设置中进行更改。详情请参阅ATEM Mini操作手册。
记录设置2
“记录”设置选项卡的第二页含有下列设置:

Pocket Cinema Camera 6K的“动态范围”和“传感器区域”选项。

Pocket Cinema Camera 4K的“动态范围”和“传感器区域”选项。
动态范围
点按“动态范围”图标来调整动态范围设置。Blackmagic Pocket Cinema Camera拥有三挡动态范围设置:
Film 在“Film”模式下时,摄影机会使用对数曲线进行拍摄以确保最佳动态范围,并最大程度丰富视频信号的信息,以便您充分利用DaVinci Resolve等调色软件。 Extended Video “Extended Video”设置在“Video”和“Film”动态范围之间提供了良好的平衡。该设置提供了比“Video”更宽的动态范围,同时应用了轻微的对比度改变,对高光进行柔化过渡处理。“Extended Video”适合标准广播级监视器使用,当您后期制作时间有限,并且希望给录制的片段添加满意的效果时,该设置十分有用。 Video “Video”设置类似REC 709色彩标准,可拍摄获得高清视频。这样就能以适合直接发布或者只需少量后期处理的色彩空间来直接记录压缩视频格式,从而提高您的工作效率。
备注 使用“Film”电影动态范围模式记录Blackmagic RAW和ProRes格式时,触摸屏上显示的画面看上去会比较灰暗平淡。这是因为图像文件中包含大量尚未调色的数据,因此不适用于标准显示器。但是,记录电影动态范围时,您可以使用专为模仿标准对比度所设计的LUT,也就是查找表,通过触摸屏和HDMI输出监看视频。详情请参阅本手册“3D LUT”部分的内容。
传感器区域
Blackmagic Pocket Cinema Camera 4K可设置为使用全部传感器区域,如果要使用更高的帧率,还可以使用裁切传感器模式。该模式只使用所选视频格式需要的传感器像素,而不是在全传感器的基础上缩小画面。部分格式结合了裁切和缩放,例如Pocket Cinema Camera 6K设有在全部传感器基础上进行缩放、在5.7K裁切传感器基础上进行缩放,以及在2.7K裁切传感器基础上进行缩放的不同HD格式。
由于裁切模式只使用摄影机传感器的中心区域,镜头的视野就会因为裁切而变得相对较窄。比如,当使用20mm规格的镜头在裁切传感器模式下拍摄HD素材时,视野就相当于Blackmagic Pocket Cinema Camera 4K搭载40mm规格的镜头。
如果您用摄影机拍摄UltraHD或HDProRes等低于摄影机最大分辨率的视频时,就可以使用这一设置。
拍摄2.8K 17:9裁切传感器模式以及在2.7K裁切传感器模式基础上进行缩放调整的HD格式时,Pocket Cinema Camera 6K可达到最快帧率。拍摄2.6K 16:9模式以及HD裁切模式时,Pocket Cinema Camera 4K可达最快帧率。
更多关于“全部”和“裁切”格式的详细信息,请查阅“最大传感器帧率”部分的介绍。
项目帧率
“项目帧率”能提供影视行业常用的不同帧率选择。例如每秒23.98帧。这一帧率通常会设定为与您后期制作流程和交付所需要的播放速度和音频同步所匹配的帧率。
一共有8种项目帧率设置,分别为每秒23.98、24、25、29.97、30、50、59.94以及60帧。
变速记录
默认情况下,项目和传感器帧率会相互匹配,以便获得自然的播放速度。但是,点按“变速记录”开关图标就可以单独设置传感器帧率。
变速帧率
启用“变速记录”后,只需点按“变速帧率”提示一侧的箭头就可以设置摄影机的传感器帧率。
传感器帧率可设置从传感器上每秒实际记录的帧数,帧率则根据您设定的项目帧率来影响视频播放的快慢程度。
请参考本手册“触摸屏功能”部分中关于“每秒帧数”的介绍了解变速帧率的信息。
备注 关于每个记录格式和编解码可用最大帧率的信息,请参阅本手册“最大传感器帧率”部分给出的表格。
偏好使用的存储卡
当两个卡槽都安装有存储卡或存储盘时,“偏好的存储卡”设置可选择Blackmagic Pocket Cinema Camera首先在哪一张存储卡上开始记录。可用选项有“Fast卡”、“SD卡”以及“最满的卡”。您可以根据个人喜好选择CFast卡或SD卡,但不论选择哪张存储卡,只要每次选择都一致,存储卡已满时您就知道要先更换哪张。从事单机位拍摄项目时,“最满的卡”选项可有助于按时间顺序进行文件文组。
插入CFast卡或SD卡,您所选的设置就会被应用。您可以进入存储管理器并点按存储卡名称来将其设置为“使用中”,从而随时覆盖这一设置。需要着重强调的是,弹出再重新插入存储卡操作将会令摄影机还原到当前“偏好的存储卡”设置。
提示“最满的卡”设置是基于记录存储介质的存储百分比决定的,而不是存储卡的内存或已用数据。
存储卡丢帧时停止记录
检测到丢帧时,可使用“存储卡丢帧时停止记录”设置来配置Blackmagic Pocket Cinema Camera。关闭该选项时,摄影机检测到丢帧后仍将继续记录。开启该选项时,摄影机检测到丢帧后会停止记录。这一设置可有效避免您在未察觉丢帧提示的情况下继续花时间记录不可用的素材。
提示 更多关于防止丢帧的介绍,请参考“存储介质”部分的内容。
记录设置3
“记录”设置选项卡的第三页含有下列设置:

延时摄影
“延时摄影”设置能在以下区间激活间隔拍摄功能自动记录静帧:
帧 2 - 10 秒 1 - 10、20、30、40、50 分 1 - 10
比如,您可将摄影机设置成每隔10帧、5秒、30秒或5分钟记录一个静帧。
延时摄影功能可为您提供多种创作选择。例如,设定每2帧记录一个静帧,那么视频在播放时可呈现高速播放效果。
按记录按钮即可开始影像记录。再次按下该按钮时可停止记录,延时摄影的图像序列会被保存为单个片段,并且和您在摄影机中设置的编解码和帧率相匹配。这样一来,您就可以像处理其他记录的片段一样,将延时摄影序列直接导入后期制作时间线上。

1 A001 120分钟
2 A002 96分钟
启用延时摄影模式时,记录按钮上会叠加显示相应图标
提示当使用延时摄影模式记录片段时,视频中每记录一帧时间码计数器就会相应更新。
细节锐化
使用“细节锐化”设置可锐化图像。启用锐化功能时,选择“默认”、“中”及“高”选项可降低或升高锐化的程度。
启用锐化功能时,锐化效果会被应用到摄影机所记录的ProRes视频上以及HDMI输出上。
这一设置是为棚内直播制作所设计的,这类摄制通常不具备后期制作时间,而是需要直接输出现场拍摄画面。如果您所记录的图像需要进行后期制作,我们建议您将此设置保留在关闭状态。当设置为BlackmagicRAW编解码格式时,细节锐化功能会被禁用。
将LUT记录到片段
Blackmagic Pocket Cinema Camera不会默认对记录的素材套用或“烧录”LUT,但是您可以点按“将LUT记录到片段”开关图标,选择将LUT“烧录”到素材中。
如果您在后期制作阶段没有时间对素材进行调色,或者需要直接将素材交付给客户或剪辑师,这一选项就会十分有用。更多信息请参考“3DLUT”和“触摸屏控制”部分的介绍。
在文件中套用LUT
如果使用Blackmagic RAW编解码拍摄,并且在摄影机的HDMI输出上套用LUT,那么所选LUT就会嵌入到正在记录的Blackmagic RAW文件中。这意味着这个LUT将被保存在相应文件的头文件中,可在后期制作环节轻松应用到片段上,无需处理单独文件。将记录菜单中的“在文件中套用LUT”开关设置为开启状态后,在Blackmagic RAW Player播放器和DaVinci Resolve中打开这个片段时,画面上就已所选的LUT。LUT可轻松开启或关闭,但会始终跟随Blackmagic RAW文件,因为它是写入到片段上的。
DaVinci Resolve的RAW设置面板中还设有一个“Apply LUT”(套用LUT)开关,可用来启用和禁用Blackmagic RAW文件中的3D LUT。DaVinci Resolve中的“套用LUT”设置和摄影机中的设置相同。也就是说,在您拍摄时,可以在摄影机中进行设置从而告诉调色师使用这一LUT,而调色师则可以在DaVinci Resolve中使用“套用LUT”开关将它关闭。
文件命名格式
根据您的选择,素材片段可在CFast卡、SD卡或USB-C硬盘上以Blackmagic RAW格式或ProResQuickTime电影格式来记录。
文件命名格式示例详见下表:
A001_08151512_C001.mov QuickTime电影文件名称 A001_08151512_C001.mov 摄影机索引 A001_08151512_C001.mov 卷号 A001_08151512_C001.mov 月 A001_08151512_C001.mov 日 A001_08151512_C001.mov 时 A001_08151512_C001.mov 分 A001_08151512_C001.mov 片段编号
使用静帧按钮采集的静态图像文件会采纳视频片段的文件命名格式,但文件名的最后四位字符会以“S001”表示“静帧”,以替代片段编号。更多关于如何更改摄影机索引的信息,请参考“项目元数据”部分的介绍。
监看设置
“监看”选项卡可用来调整Blackmagic Pocket Cinema Camera在LCD触摸屏以及摄影机HDMI输出上显示的状态信息、叠加信息以及其他监看选项。选项根据输出排列依次为“LCD”、“HDMI”和“全部”,包括了影响LCD和HDMI输出的各项监看设置。这些菜单都有两页选项,您可以点按摄影机触摸屏边缘的箭头,或者左右滑动屏幕来逐页查看。
监看设置1
在“监看”选项卡的第一页上,每个输出的监看设置是完全相同的。例如,您可以开启LCD触摸屏的“斑马纹”显示,但关闭HDMI输出上的这一显示内容。

纯画面
点按“纯画面”开关来全面禁用某路输出在“LCD”或“HDMI”菜单中的所有状态信息和叠加信息,只留下表示记录的Tally提示灯。

即便在纯画面模式下,摄影机也会显示ally记录提示灯。
备注 LUT将依然应用到启用了“纯画面”的输出上。要禁用LUT,请关闭相应“监看”菜单中的“显示LUT”开关。
显示3D LUT
Blackmagic Pocket Cinema Camera可将多种3D LUT套用在输出上,模拟出素材在调色之后的大致效果。在使用“Film”动态范围记录片段时,“显示3D LUT”就十分有用。
如果您的摄影机启用了一3D LUT,请使用这一设置将该LUT单独应用到LCD触摸屏或HDMI输出上。
更多关于加载和使用3DLUT的信息,请参考本手册“3DLUT”部分的介绍。
点按“LCD”或“HDMI”页面上的开关来启用LCD触摸屏和HDMI输出的监看选项:对焦辅助、帧导栏、网格、安全框、伪色。
斑马纹
点按“LCD”或“HDMI”菜单下的“斑马纹”开关可在相应的输出上启用斑马纹提示功能。更多关于斑马纹提示功能以及斑马纹提示级别设置的内容,请参考本手册“触摸屏功能”部分的介绍。
对焦辅助
点按“LCD”或“HDMI”菜单下的“对焦辅助”开关可在相应的输出上启用对焦辅助功能。更多关于对焦辅助功能以及斑马纹提示级别设置的内容,请参考本手册“触摸屏功能”部分的介绍。
帧导栏
点按“LCD”和“HDMI”菜单下的“帧导栏”开关可在相应的输出上启用帧导栏功能。更多关于帧导栏功能以及如何选择不同帧导栏的内容,请参考本手册“触摸屏功能”部分的介绍。
网格
点按“LCD”和“HDMI”菜单下的“网格”开关可在相应的输出上启用三分法网格显示功能。更多关于三分法网格功能的内容,请参考本手册“触摸屏功能”部分的介绍。
安全框
点按“LCD”和“HDMI”菜单下的“安全框”开关可在相应的输出上启用安全框叠加显示功能。更多关于安全框的信息,请参考本手册“触摸屏功能”部分的介绍。
备注 Blackmagic Pocket Cinema Camera的“全部”监看设置中的“安全框”设置可用来设定安全框大小。
伪色
点按“LCD”和“HDMI”菜单下的“伪色”开关可在相应的输出上启用伪色曝光辅助功能。更多关于如何使用伪色的信息,请参考本手册“触摸屏功能”部分的介绍。
LCD监看设置2
“监看”选项卡中“LCD”选项的第二页包含了LCD触摸屏的专门设置。

“状态信息”能以清晰的视图展现摄影机的预览画面。
状态信息
“状态信息”设置可隐藏LCD触摸屏上的状态文本信息以及各项技术监看内容,只留下与构图和镜头直接相关的信息,这会非常有用。点按“状态信息”的开关图标可开启或关闭摄影机LCD触摸屏上显示的文本信息和技术监看内容。帧导栏、网格、对焦辅助和斑马纹等叠加信息将始终可见(如果启用的话)。在LCD触摸屏上用手指上下滑动也可以实现相同的操作。
显示
摄影机LCD触摸屏左下角和右下角可显示直方图和音频表,或者还可显示编解码器和分辨率等信息。如果您偏好使用伪色来调节曝光度,或者在单独记录音频时想在直方图和音频表的位置显示其他信息,这一功能将十分有用。
只要点按“LCD”菜单中的“技术监看”或“编解码和分辨率”选择喜欢的显示项即可。

Blackmagic Pocket Cinema Camera可在直方图和音频表的位置显示编解码和分辨率信息。
屏幕亮度
左右拖动“LCD”菜单中的“屏幕亮度”滑块可调节摄影机的LCD触摸屏亮度。
HDMI监看设置2
“监看”选项卡中“HDMI”选项的第二页包含了HDMI输出的专有设置。

状态信息
如果需要隐藏HDMI输出上的状态信息以及各项技术监看内容,只留下与构图和镜头相关的信息,这一选项会非常有用。点按“HDMI”监看菜单中的“状态信息”开关图标可开启或关闭状态文本信息和技术监看内
容。帧导栏、网格、对焦辅助和斑马纹等叠加信息将始终可见(如果启用的话),
如果要隐藏或调出触摸屏上的状态文本信息或技术监看内容,只需向上或向下滑动即可。
电影摄影师或导演使用的状态信息显示功能
LCD触摸屏可显示ISO、白平衡以及光圈等信息,这些信息有助于摄影师或电影摄影师为每个拍摄镜头进行调试。但是D输出也可显示这些有助于导演或剧本指导的信息,以便他们能对多个镜头或多台摄影机了如指掌。

Blackmagic Pocket Cinema Camera可通过HDMI输出显示专为导演准备的状态信息。
将“HDMI”监看设置中的状态信息设为“导演”后,相应输出上的状态信息将显示以下内容:
·帧率
可显示摄影机当前所选的每秒帧数。如果禁用了“变速帧率”功能,则只显示项目帧率。如果使用了“变速帧率”功能,则会先显示传感器帧率,然后显示项目帧率。
摄影机
可显示摄影机在场记板中设置的摄影机索引信息。更多相关信息,请查阅“场记板”部分的介绍。
摄影师
可识别摄影机场记板中所设置的摄影师信息。更多信息,请查阅“场记板”部分的介绍。
时长显示
可在记录时显示当前片段时长,或上一个记录片段的时长。显示格式为:时:分秒。
- 卷号、场景和镜次
分别对应当前显示的卷号、场景以及镜次。更多关于卷号、场景、镜次及其名称规范等信息,请参考“场记板”部分的介绍。
动态范围
显示屏的左下角可显示当前套用的LUT(如果套用到该路输出上)。如果未套用LUT,则会显示“Film”或“Video”动态范围模式。
时间码
显示屏的右下角可显示摄影机的时间码,显示格式为:
时:分:秒:帧。
“全部”监看设置1
影响摄影机LCD和HDMI输出的监看设置都被归整在“全部”菜单中。例如,将此菜单中的“安全框”设置为 90% ,那么您的摄影机LCD和HDMI输出上的安全框都将被设置为 90% 。
“全部”监看设置分两页显示,包含以下设置。

帧导栏
点按“帧导栏”菜单设置中的左右箭头可逐个查看摄影机所有输出上的帧导栏设置。这些选项在本手册“触摸屏功能”部分当中有详细介绍,同时也可在CD触摸屏的HUD监看菜单中找到。需要注意的是,您可以在相应的“监看”菜单中单独选择帧导栏是否出现在LCD触摸屏和HDMI输出上。
帧导栏不透明度
点按“帧导栏不透明度”菜单设置的左右箭头可设置被LCD触摸屏和HDMI输出的帧导栏挡住区域的不透明度。可用选项有 25% 、 50% 、 75% 和 100% 。
对焦辅助
摄影机设有两个对焦辅助模式,分别为“峰值对焦”和“彩色线条”。
峰值对焦 选中“峰值对焦”辅助模式后,画面中的对焦部分会在您的LCD触摸屏或HDMI输出上以极端锐化的方式显示出来,但不会影响所记录的图像。这一功能能使镜头中的对焦部分在屏幕中突出显示。如果您不使用其他叠加信息,这一功能将会十分直观地显示出对焦部分;而当您尝试对焦的对象与画面中其他元素有显著区分时将更为明显。 彩色线条 选中“彩色线条”对焦辅助模式后,画面中的对焦部分的边缘会以某种色彩的线条标出。由于画面中的对焦范围会用线条直接标出来,因此这一模式要比峰值对焦模式略微直观一些。当您拍摄那些元素繁多的画面时,该模式可提供精准对焦。
对焦辅助级别
可为您的LCD触摸屏和HDMI输出设置对焦辅助的程度,请点按“低”、“中”或者“高”进行设置。
备注设置对焦辅助程度并不会影响对焦辅助功能是在Blackmagic Pocket Cinema Camera的LCD屏幕还是HDMI输出上启用。您需要到“LCD”或“HDMI”输出的监看菜单中单独开启每路输出的对焦辅助。
提示 对焦辅助的最佳级别因镜头而异。例如,对焦人物时,设置较高的对焦辅助可有助于解决人物面部边缘细节的问题。而如果是对焦植物或建筑物,较高的对焦辅助设置反而会显示许多干扰信息。
对焦色彩
设置可在您使用“彩色线条”对焦辅助模式的时候更改画面上叠加的对焦线条色彩。更改对焦辅助线条的色彩可将其与您的拍摄画面区分开,便于您查看对焦。可用选项有“白”、“红”、“绿”、“蓝”以及“黑”。
斑马纹级别
可用来设置显示曝光的斑马纹级别,请点按该设置两侧的箭头图标调整。斑马纹程度能以5个百分点为单位进行调整,曝光显示范围在 75% 到 100% 之间。
详情请参考本手册“触摸屏功能”部分中关于“斑马纹”的介绍。
“全部”监看设置2
“全部”监看选项卡的第二页含有下列设置:

“监看”选项卡中“全部”选项的第二页
网格
请点按“网格”设置中的“三分法”、“水平线”、“十字准线”或“中心点”选项来选择摄影机的LCD触摸屏和HDMI输出上显示的网格和十字准线组合。
详情请参考本手册“触摸屏功能”部分中关于“网格”的介绍。
安全框
要调整触摸屏和HDMI输出上叠加显示的安全框大小,请点按“安全框”设置中的左右箭头来调整显示百分比。这一百分比代表了安全框在整幅图像中的所占比例。大多数播出机构都要求90%的安全框比例。
变形镜头压缩画面还原
Pocket Cinema Camera可以在LCD触摸屏和HDMI输出上应用变形镜头压缩画面还原。在16:9和17:9格式下,可启用“1.33x变形镜头压缩画面还原”。在Pocket Cinema Camera 6K上以“3.7K变形”格式记录时,或者在Pocket Cinema Camera 4K上以“2.8K变形”记录时,您的摄影机会自动应用2x变形镜头压缩画面还原”。
音频设置
“音频”选项卡用来调整摄影机的音频输入和监听设置。
摄影机的音频设置共有两页,每页均提供通道和通道2的设置。
每个声道都可以被映射到不同的源,并调整增益控制等多项设置。
音频设置1
“音频”选项卡的第一页含有下列设置:

通道信号源
使用“通道1信号源”和“通道2信号源”按钮可为每个声道选择音频源。下面是每个通道源设置的描述。
- 摄影机左声道或右声道
可记录摄影机的内部麦克风音频。
摄影机单声道
可从Blackmagic Pocket Cinema Camera内置麦克风的左右声道创建单个声道。
XLR Line
可使用摄影机的XLR输入记录Line电平的音频。
XLR Mic
可从摄影机的XLR输入记录Mic电平的音频。如果您启用了幻象电源,并且将XLR输入设置为“Mic”,页面上就会显示“+48V”提示。请务必确保您在断开幻象电源麦克风时,将8V的开关置于关闭状态。
3.5mm左声道 - Line
只使用3.5mm输入的左声道作为Line电平的音频。
-3.5mm右声道 - Line
只使用3.5mm输入的右声道作为Line电平的音频。
-3.5mm单声道 - Line
从3.5mm输入创建左右声道的单声道混音作为Line电平的音频。
-3.5mm左声道-Mic
只使用3.5mm输入的左声道作为Mic电平的音频。
·3.5mm右声道-Mic
只使用3.5mm输入的右声道作为Mic电平的音频。
-3.5mm单声道-Mic
从3.5mm输入创建左右声道的单声道混音作为Mic电平的音频。
·无
禁用声道。
备注 当选择3.5mm输入作为音频源时,通道1和通道2源信需要同时是Line电平或者Mic电平。也就是说,如果您选择“3.5mm左声道- Line”作为通道1源,那么通道2上3.5mm输入的可用选项就都是Line电平:“3.5mm左声道- Line”、“3.5mm右声道- Line”和“3.5mm单声道- Line”。Mic电平选项都以灰色显示,表明此功能不可用。
通道1/2电平
这两项音频电平表能帮助您设置正确的音频电平。
通道1/2增益
使用这两个滑块可调整您所选的声道1或声道2上的录音电平。
音频设置2
“音频”选项卡的第二页含有下列设置:

耳机音量
该滑块可调整3.5mm耳机接口上所连耳机的输出电平。左右移动音频滑块可调节电平。
扬声器音量
该滑块可调整内置扬声器的输出电平。左右移动音频滑块可调节电平。
XLR幻象电源
摄影机的XLR输入可提供48V幻象电源,以便您使用自供电麦克风。当摄影机设置为“XLR”音频输入时,只需点按“幻象电源”的开关图标将其启用即可。
音频表
可用来选择峰值电平显示的音频表标准。
音频表设置 标准 PPM (-20 dBFS) SMPTE RP.0155 PPM (-18 dBFS) EBU R.68
备注 请务必先连接XLR线缆,再开启幻象电源。另外,当没有连接幻象电源供电的麦克风时,请务必关闭幻象电源。如果所连接的设备不需要幻象电源,却仍处于幻象电源模式,就会导致设备损坏,因为该模式下摄影机会输出电荷。幻象电源在关闭后还需一段时间方可完全放电。关闭幻象电源后请等待几分钟,然后再连接其他麦克风或XLR音频设备。
设置
Blackmagic Pocket Cinema Camera的“设置”选项卡中含有基本设置、软件版本、功能按钮设置等摄影机设置,这些设置与记录或监看没有直接联系。该菜单含有四个页面,您可以点按LCD触摸屏边缘的箭头逐一查看,也可直接左右滑动屏幕查看。
设置菜单第一页
摄影机“设置”选项卡的第一页含有下列设置:

日期和时间
点按“日期和时间”选项可为摄影机设置日期和时间。日期格式为年、月、日;时间格式为24小时制。摄影机未连接外部时间码源时,这一日期和时间设置也可用来显示当日时间的时间码。
语言
Pocket Cinema Camera支持以下11种常用语言:英语、中文、日语、韩语、西班牙语、德语、法语、俄语、意大利语、葡萄牙语以及土耳其语。

语言页面会在首次开机和更新完摄影机内部软件后出现。
选择语言步骤如下:
点按“语言”并从列表选择某种语言。
2 按“更新”返回设置菜单。
快门类型
可通过显示快门信息来选择“快门角度”或“快门速度”。
需要指出的是,当使用快门角度时,快门会采用帧率来显示。例如,不论您使用何种帧数,度都将产生相同的运动模糊。
但当使用快门速度时,快门会使用一个独立于帧率的绝对数值,因此当您更改帧率时,结果也会发生变化。
例如,当您以每秒24帧的帧率拍摄时,1/48秒的快门速度将产生美观的运动模糊,效果等同于180度快门角度。如果您将帧率更改为每秒48帧,那么1/48秒的快门速度就会产生不同的运动模糊,效果将等同于360度快门角度。在这个例子中,如果帧率更改为48fps,您还需要将快门速度更改为1/96秒,以实现和180度快门角度相同的效果。
防闪烁快门基准频率
可用来更改摄影机用于计算防闪烁快门设置的主电源频率。
在照明环境下拍摄时,快门可影响闪烁程度。Blackmagic Pocket Cinema Camera会根据当前的帧率自动计算出防闪烁快门数值,并给出最多三个快门值建议。快门数值会根据为照明供电的当地主电源频率而有所不同。大多数采用AL制式的国家均使用50赫兹,而采用NTSC制式的国家则通常使用60赫兹的用电频率。点按“50Hz”或“60Hz”为您所在地区设置合适的频率即可。
备注即使使用防闪烁快门数值,不同光源所具备的特点也依然有可能导致闪烁现象。如果您使用的不是持续光源,我们建议在拍摄前进行测试。
图像稳定功能
Pocket Cinema Camera 4K设有“图像稳定功能”选项,可启用或禁用镜头上的图像稳定功能,无需手动到镜头上切换。
时间码丢帧
“时间码丢帧”选项可在您使用29.97和59.94的NTSC项目帧率时使用丢帧时间码。丢帧时间码可按照您设置的间隔跳过少量帧画面。这样能保持您的项目时间码准确性,即使每秒并不包含NTSC帧率的完整帧数。
设置菜单第二页
“设置”选项卡的第二页含有下列设置:

设置功能按钮
Blackmagic Pocket Cinema Camera的顶部设有三个功能按钮。按钮上的圆点直观表示功能1、功能2和功能3。这些按钮可被映射为您经常使用的功能,方便您在使用摄影机时快速获取这些功能。

功能按钮由圆点标识,位于摄影机顶部
进行设置时,先选择其中一个按钮再选择相应的功能、设置和参数即可。

1 按钮 2 功能 3 设置 4 参数
F1、F2和F3按钮功能映射为预设或开关
即“FUNCTION 1 HFR BEHAVES AS”、“FUNCTION 2 HFR BEHAVES AS”和“FUNCTION 3 HFR BEHAVES AS”,选择了您想要进行映射的按钮之后,就需要为这一按钮选择一个功能。选项如下:
预设 选择该功能时, 按下某个功能按钮可调用相应的设置和参数组合。要设置一个预设,请从“设置”菜单里选中您想要使用的设置然后点按“参数”菜单两侧的箭头图标调整该设置。例如,要将F1按钮设置为调用f8光圈预设,请选中“预设”功能,点按“光圈”设置,然后点按“参数”菜单两侧的箭头图标,直到显示8为止。再次按下预设按钮可回到摄影机之前的设置。 开关 选择该功能时, 按下功能按钮可开启或关闭某个特定设置。处于这一模式下时,“设置”菜单将显示为灰色不可用状态。点按参数菜单中的左右箭头可逐一直看所有可用选项。这些选项分别为:“变速记录”、QIS、“纯画面”、“显示LUT”、“帧导栏”、“对焦辅助”、“伪色”、“斑马纹”和“安全框”。使用“开关”功能可选择将这一设置应用到哪路输出。只要点按任意“LCD”和“HDMI”选项组合进行选择即可。如果某一输出选项无法被选中,比如始终应用到所有输出上的“变速记录”选项,那么“LCD”和“HDMI”设置就会被禁用。
设置菜单第三页
“设置”选项卡的第三页含有下列设置:

TALLYLED提示灯
Pocket Cinema Camera摄影机的正面设有一个小型LED灯,可在摄影机记录时予以记录状态提示,并且可在连接到Blackmagic ATEM Mini时予以节目和预监Tally状态提示。如果您将Pocket Cinema Camera连接到ATEM Mini来远程控制摄影机的记录和设置,那么该ally灯就会在摄影机处于播出或预监状态时予以显示。详情请参阅“使用ATEM Mini摄影机控制”部分的介绍。

记录到摄影机内的存储介质。

摄影机处于正在播出状态。

摄影机即将切入直播。
要启用或禁用Tally提示灯,可使用“TALLY LED提示灯”开关。
LED亮度
点按“低”、“中”或者“高”可设置ally灯的LED亮度。
硬件ID
Blackmagic Pocket Cinema Camera的“硬件ID”可显示8字符识别符。每台摄影机都具备其独有的识别符。Blackmagic RAW和ProRes视频的元数据中还会显示一个更长的32字符ID版本。这一功能有助于识别来自不同摄影机的素材。
软件
可显示当前安装的软件版本号。更多关于软件更新的信息,请阅读Blackmagic Camera Setup Utility实用软件"部分的内容。
播放
该设置可用来选择在LCD触摸屏上播放来自SD卡、CFast卡或USB-C硬盘的“单个片段”还是“所有片段”。
选择“所有片段”将按顺序播放所有匹配的媒体文件,选择“单个片段”将一次只播放一个片段。该设置也应用于循环功能。选择“所有片段”循环功能将播放存储介质上的所有片段,结束后从头开始。选择“单个片段”则一次只循环播放一个片段。
设置菜单第四页
摄影机“设置”选项卡的第四页包含蓝牙设置。

摄影机蓝牙的名称以场记板中所选摄影机的字母加摄影机的八字符硬D表示。
蓝牙
蓝牙控制可通过便携式设备无线控制您的摄影机。您可以使用“Blackmagic Camera Control App”通过iPad远程更改设置,调整元数据,以及触发记录。您可以通过点按“设置”菜单中的“蓝牙”开关图标启用或禁用蓝牙功能。蓝牙功能启用后,摄影机可被30英尺(约9米)范围内的蓝牙设备检测到。摄影机在蓝牙控制方面使用与“Blackmagic SDI摄影机控制协议”相同的命令,因此您可以编写自己的应用程序来远程控制几乎所有的摄影机设置。比如监看摄影机的各个选项和音频设置,以及摄影机内置的DaVinci Resolve调色工具,甚至镜头控制。
更多信息请参考“Blackmagic Camera Control”摄影机控制文档,网址:
www.blackmagicdesign.com/cn/developer
首次将摄影机与iPad配对:
点按“设置”菜单中的“蓝牙”开关图标启用蓝牙功能。
2 打开“Blackmagic Camera Control App”,选择您希望配对的摄影机。可用的摄影机会以摄影机字母加独有硬件ID的形式列出。比如“A:A0974BEA”。

选择您希望配对的Blackmagic Pocket Cinema Camera摄影机。
备注 当您安装并第一次运行Blackmagic Camera Control App时,系统会问您是否“允许地点访问”。如果您选择“while using the app”(使用期间),您拍摄文件中的元数据将包含来自iPad的GPS数据,让您对影像进行地理标记。这些信息可以戴ackmagic DaVinci Resolve 15或更高版本中查看。
如果您不想允许使用这些信息,请选择Never”(从不)。
如要修改设置,在iPad上前往设置、隐私、定位服务、相机。
3 初次连接时,Blackmagic Camera Control App会请求一个六位代码来配对摄影机。代码会显示在摄影机的LCD屏幕上。将代码输入iPad,并按“Pair”(配对)。


4 当摄影机连接到您的iPad时,会弹出信息确认配对成功。

如果摄影机和iPad配对失败,摄影机会弹出错误提示。尝试再次连接。

备注 当您没有使用蓝牙控制Blackmagic Pocket Cinema Camera时,出于安全考量建议您关闭蓝牙。
断开当前设备
使用该设置可断开Blackmagic Pocket Cinema Camera与当前所配对的iPad之间的连接。
清除配对设备
使用该设置可清除曾与摄影机配对的设备列表。
使用Blackmagic Camera Control App控制您的摄影机
将摄影机与iPad配对成功后,您可以通过iPad远程开启或关闭摄影机,改变设置,调整元数据,以及触发记录。

配对完成后,Blackmagic Camera Control App会显示该画面,您可以调整设置,开始记录。

点按右下角的场记板图标来使用或更新场记板。
Blackmagic Pocket Cinema Camera使用蓝牙低功耗(BLE)技术与设备建立通信,实现无线控制。因为与便携设备使用同样的协议,所以耗电量极低。
设置菜单第五页
“设置”选项卡的第五页包含执行恢复出厂设置、像素重映射以及水平线校准的各项控制。

恢复出厂设置
要恢复摄影机出厂时的默认设置,请点按“重置摄影机设置”按钮。在确认页面上,点按“重置”确认操作。摄影机将会删除机内存储的所有LUT和预设,并重置所有设置。执行恢复出厂设置操作之前,不妨将您的预设导出到存储卡上进行备份。恢复出厂设置之后,您只要再从存储卡中导入预设就可以快速恢复。请务必注意,恢复出厂设置操作还将重置水平线功能,因此恢复出厂设置后需要重新校准运动传感器以确保准确性。

选择“重置”时,您将看到如上操作确认信息
像素重映射
Blackmagic Pocket Cinema Camera所使用的CMOS传感器是由数百万个感光像素组成。虽然经过原厂传感器校准,但经过一段时间后,有些像素的亮度或会出现变化,从而导致这些像素变得特别明显,也就是通常被人所知的“热像素”。所有摄影机传感器,不论是何产商都会产生热像素。
为解决这一问题,我们在摄影机中内置了校准功能,如果发现图像中存在任何热像素就可执行此功能。
要开始这一处理,只要盖上镜头盖,点按“像素重映射”按钮运行像素重映射功能即可。这一过程大约需要1分钟。
运动传感器校准
要校准水平线指示,请将摄影机放置在水平表面上,然后点按“校准运动传感器”按钮。执行校准的过程中,摄影机必须保持稳定状态。这一过程大约需要5分钟。
预设
“预设”选项卡可用来保存和调用多达12组设置集。当摄影机被用于多个不同项目时,这一设置将非常有用。例如,您可能会将摄影机用于从纪录片N在内的多种不同拍摄风格,这些项目都会使用不一样的设置。摄影机的预设功能就可以让您保存某一项目或某类镜头的拍摄设置,方便下次需要时快速调用。共有12个预设槽可使用。
您还可以导入和导出预设,这对于设置多机位镜头部署是非常有用的。只需将一Blackmagic Pocket Cinema Camera进行项目设置,然后将该预设导出到片场的所有其他Blackmagic Pocket Cinema Camera上即可。

预设选项卡可快速切换您所保存的不同设置。
备注 您的摄影机内存最多可保存12个预设。
预设按钮
“预设”菜单下方设有一排按钮图标,它们所对应的功能如下图所示:
+ ✓ ← 添加 加载 更新 管理 删除
保存和加载预设
要创建一个新的预设,请点按代表“添加”的图标。然后,LCD屏幕上会出现一个键盘,此时请为您的预设命名。输入名称并点按表示“更新”的图标,即可将当前所有设置保存到该预设。
如果摄影机中已经含有相同名称的预设,您可以选择覆盖替换或同时保留这两个预设。

点按预设选项卡中代表“添加”的图标,再使用屏幕键盘来输入预设名称。
保存预设后,在预设菜单中点按该预设的名称将其选中。要加载预设,点按代表“加载”的图标。

选择一个预设,并点按表示“加载”的图标来加载这一预设。选中的预设将以纯蓝背景显示,当前加载的预设则会在其对应的图标底部标以蓝色横线。
点按代表“更新”的图标可更新预设。然后屏幕会弹出提示,询问您是否要将Blackmagic Pocket Cinema Camera的当前设置更新为这一预设。点按代表“更新”的图标确认更新。
导入预设
要导入预设,请点按预设菜单底部表示“管理”的图标。点按“导入预设”,然后点按“导入”加以确认。该操作将调出预设导入屏幕界面。如果您喜欢的预设不在当前存储卡或存储盘上,可点按触摸屏顶部的存储介质按钮来切换记录存储介质。您可以从USB-C硬盘、CFast或SD卡导入LUT。
摄影机会在您所选存储介质上搜索根目录和名为“Preset”的预设文件夹,并列出可用的预设。保存在其他位置的预设是不可见的。
点按某个预设将其选中,然后点按“导入”确认选择,并将其复制到摄影机中的下一个可用预设槽内。
备注如果摄影机的12个预设槽都已被使用,导入菜单就不会出现,此时您需要删除已有的预设来腾出空间。
如果您想要导入的预设和摄影机中保存的某个预设名称相同,可选择覆盖或同时保留二者。屏幕右上角会出现摄影机剩余预设空位的数量。摄影机中的预设空位有多少,您就能导入多少预设。
导出预设
要将某个预设导出到存储卡或USB-C硬盘上,请点按您想要导出的预设,然后点按表示“管理”的图标按钮。点按“导出所选预设”,然后点按导出预设的目标存储介质。如果已存在相同名称的预设,请选择是否覆盖该预设或者保留两者。摄影机会将预设导出到名为“Presents”(预设)文件夹。
删除预设
要删除某个预设,请将其选中并点按删除图标。在弹出的确认选择框中,点按“删除”。
3D LUT
"LUT"菜单可用来将多个3D LUT导入、导出并应用到摄影机的各个输出上。

使用摄影机的“LUT”选项卡选择3D LUT
3D LUT简介
3D LUT可套用到摄影机LCD触摸屏和HDMI输出的图像上。套用LUT可令摄影机为某类色彩和亮度输入显示相应的色彩和亮度输出。例如,某个LUT可令摄影机在接收到暗淡的蓝色输入时显示出鲜艳饱和的蓝色。当使用Blackmagic RAW格式或“Film”动态范围模式拍摄素材时,这一功能就非常有用,因为以上两者的拍摄片段都被刻意处理成低饱和度的平淡画面。套用LUT可以让您大致掌握素材调色后的画面。
您可以使用DaVinci Resolve或其他调色软件轻松创建3D LUT,也可以从网上找到各类LUT。摄影机可存储最多10个17点或33点精度的3D LUT,每个大小上至1.5MB。加载后,您可以选择一类LUT显示在摄影机的LCD触摸屏和HDMI输出画面上。
Blackmagic Pocket Cinema Camera支持使用DaVinci Resolve以.cube格式创建的33点精度3D LUT,以及使用LUT转换程序转换成Resolve的.cube格式17点精度3D LUT。您的摄影机可使用高品质四面体插值算法处理3D LUT。
提示更多关于显示LUT的信息,请参阅本手册“监看设置”部分的内容。
备注 Blackmagic Pocket Cinema Camera不会默认对记录的素材套用或“烧录”LUT,但是您可以选择将LUT“烧录”到素材中。
如果您在后期制作阶段没有时间对素材进行调色,或者需要直接将素材交付给客户或剪辑师,这一选项就会十分有用。
当您将LUT作为现场预览工具使用时,所套用的LUT上的信息会作为元数据被保存到记录的片段中。DaVinci Resolve可以在元数据选项卡的“使用的LUT”一栏中显示这一信息,方便调色师核对现场所使用的LUT名称。
内置LUT
摄影机提供一系列内置LUT,您在用“Film”动态范围模式或Blackmagic RAW格式拍摄时可以预览不同的效果。
每台摄影机提供的 LUT 会根据传感器有所不同:
Pocket 4K Film to Extended Video / Pocket 6K Film to Extended Video
可显示比“Pocket 4K Film to Video”或“Pocket 6K Film to Video”LUT更宽的动态范围,会温和地调整对比度,并应用平滑的高光过渡。
Pocket 4K Film to Rec 2020 Hybrid Log Gamma / Pocket 6K Film to Rec 2020 Hybrid Log Gamma 显示REC 709和Log画面的混合结果。
Pocket 4K Film to Rec 2020 PQ Gamma / Pocket 6K Film to Rec 2020 PQ Gamma
显示基于人眼感知形成的Gamma曲线,用于高效编码HDR图像。
Pocket 4K Film to Video / Pocket 6K Film to Video
与高清视频的REC709色彩标准类似,拥有高对比度和饱和度。如果您将Blackmagic Pocket Cinema Camera和其他使用REC709色彩空间的广播级摄影机共同使用时,这一设置就会十分有用。
LUT按钮
摄影机“LUT”屏幕界面下方设有一排按钮图标,它们所对应的功能如下图所示:


加载存储介质管理删除
导入LUT
要导入3DLUT,请点按“LUT”菜单底部表示“管理”的图标。点按“导入LUT”,然后点按“导入”加以确认。该操作将调出LUT导入屏幕界面。如果您喜欢的3DLUT不在当前存储卡或存储盘上,可点按触摸屏顶部的存储介质按钮来切换记录存储介质。您可以从USB-C硬盘、CFast或SD卡导入LUT。
摄影机会在您所选存储介质上搜索根目录和名为“3DLUTs”的文件夹,并列出可用的LUT。保存在其他位置的LUT是不可见的。
点按某个LUT将其选中,然后点按“导入”确认选择,并将其复制到摄影机中的下一个可用LUT位置栏内。
备注 如果您想要导入一个新的LUT,但是10个3D LUT位置栏都已占满,那么您就需要删除一个已有的LUT来腾出空间。
如果您想要导入的LUT和摄影机中保存的某个LUT名称相同,就需要选择是覆盖替换还是同时保留这两个LUT。屏幕右上角会出现摄影机剩余UT位置栏的数量。摄影机中的LUT位置栏有多少,您就能导入多少LUT。
备注 如果无法导入LUT, 可能是因为文件大小的缘故。您可以使用Lattice等LUT编辑器来检查其大小, 或者使用您计算机上的任何一种文本编辑器将它打开。在“UT_3D_SIZE”的标签边上会有一个表示 LUT 大小的数字。如果该数值不是 7 或 33 , 您可以使用Lattice将3D LUT的大小调整到17点。
套用LUT
将一个LUT保存到摄影机中之后,在LUT菜单中点按其中一个LUT将其选中,然后点按加载图标。就可以将该LUT套用到摄影机的所有输出上。要在摄影机的输出画面上显示加载的LUT,请到监看菜单中开启“显示LUT”。更多信息请参考“监看设置”部分的介绍。
导出LUT
要将某个LUT导出到存储卡或USB-C硬盘上,请点按您想要导出的LUT,然后点按表示“管理”的图标按钮。点按“导出所选LUT”,然后点按导出LUT的目标存储介质。如果已存在相同名称的LUT,请选择是否覆盖该LUT或者保留两者。摄影机会将LUT导出到名为“3DLUTs”的文件夹。
删除LUT
要删除您不再使用的LUT以腾出更多空间,请选中您想要删除的LUT并点按表示“删除”的图标按钮。在弹出的确认选择框中,点按“删除”。
内嵌3D LUT
如果您使用Blackmagic Pocket Cinema Camera拍摄时应用了3D LUT, 那么所选LUT会被嵌入到您正在记录的Blackmagic RAW文件中。这个3D LUT会被保存在记录.braw文件的头文件中, 可在后期制作环节轻松应用到素材上, 无需处理单独文件。
因此,当剪辑师或调色师拿到的是Blackmagic RAW文件,他们就可以轻松获取影片拍摄时所使用的LUT,显著降低了在片段上使用错误3D LUT的可能性。他们在剪辑或调色时可以选择是否将这个3D LUT套用到素材上,并且可以随时禁用这个3D LUT。
将记录菜单中的“在文件中套用LUT”开关设置为“开”后,在Blackmagic RAW Player播放器和DaVinci Resolve中打开记录的片段时,画面上就已应用所选的3D LUT。
3D LUT可轻松开启或关闭,但会始终跟随Blackmagic RAW文件,因为它是写入到片段上的。DaVinci Resolve的RAW设置面板中还设有一个“Apply LUT”(套用LUT)开关,可用来启用和禁用Blackmagic RAW文件中的3D LUT。
DaVinci Resolve中的“Apply LUT”设置和摄影机中的设置相同。也就是说,在您拍摄时,可以在摄影机中进行设置从而告诉调色师使用这一LUT,而调色师则可以在DaVinci Resolve中使用“Apply LUT”开关将它关闭。
录入元数据
元数据是片段内所保存的一系列信息,这些信息包括镜次号码、摄影机设置以及其他识别信息。后期制作时,这些信息对于素材的整理很处理起到很大的帮助。例如,镜次、镜头和场景编号是十分必要的整理工具,而镜头信息则能用于自动移除变形现象或获得更匹配的视觉特效图层。
Blackmagic Pocket Cinema Camera可自动将一些元数据保存到每个片段中,如摄影机设置、时间码以及日期和时间等。您还可以使用摄影机的场记板功能添加更多信息。
场记板
在主菜单视图上左右滑动摄影机的触摸屏可调出场记板界面。
场记板界面分成“片段”和“项目”选项卡。“片段”选项卡包含的信息视片段而定,而“项目”选项卡可用来键入各个片段的共同信息,如项目名称、导演、摄影机ID以及摄影师ID等。
提示当“监看”选项卡中的“显示状态信息”设置为“导演”时,输入到场记板的元数据可在HDMI输出上进行查看。请阅读本手册“监看设置”部分的内容获取更多信息。
“片段”元数据
在待命模式下和播放模式下更改片段的元数据的操作会有所不同。在待命模式下,当您的摄影机准备好记录时,片段元数据会保存在下一个记录的片段中,除非“将上个片段标为好镜次”按钮对最近记录的片段应用了“好镜次”标签。在播放模式下,当您检查已经拍摄的素材时,会显示“好镜次”按钮,并且片段元数据始终附加在当前查看的片段上。

当摄影机在播放模式下时,“场记板所属片段”可识别场记板适用的片段,并显示“好镜次”按钮。在待命模式下时,场记板用于“下一个片段”,并显示“将上个片段标为好镜次”按钮。
场记板所属片段
该设置可显示当前出现在“片段”选项卡中元数据的所在片段。在播放模式下时,该设置针对当前片段,在待命模式下时,该设置针对您记录的下一个片段。
镜头数据
“镜头数据”设置可显示当前摄影机所安装的镜头的相关信息。许多电子镜头可自动提供镜头型号、光圈以及焦距等信息。如果您使用的镜头并不提供此类信息,或者您想要键入更多数据,可以点按该设置中的铅笔图标来手动输入。该操作会调出“镜头数据”菜单,其中包含以下信息:

图中的“镜头数据”菜单显示是的从安装的镜头上自动输入的信息,以及手动输入的滤镜信息。
- 镜头类型
“镜头数据”可显示镜头型号。如果您的镜头类型未自动显示在此栏,请点按这一设置手动键入相关数据。您的摄影机为众多常用镜头保存有内部数据库,因此如果您需要手动输入数据,摄影机将会在您键入信息时自动给出建议使用的名称。这一功能可以加快数据输入的速度。

如果镜头不具备自动提供信息的功能,请使用屏幕键盘来输入镜头数据。
·光圈
可显示片段开头的镜头光圈-截T置挡摄息是取决于您使用的镜头,如果自动提供的话。点按这一设置来手动输入数据。
·焦距
可显示记录片段开头的镜头焦距设置。如果镜头自动提供这一信息,焦距会以厘米为单位显示。点按这一设置来手动输入焦距。
- 距离
可显示记录片段的镜头焦距设置。有些镜头能以毫米为单位自动提供这一数据。您也可以手动键入这一数据。
·滤镜
可显示当前镜头使用的滤镜。点按这一设置来手动输入数据。您可以输入多条信息,并以逗号隔开。

滤镜信息需手动输入
备注您只要点按“镜头数据”菜单中的“重置镜头数据”图标就可以随时清除镜头信息。屏幕将弹出提示确认您的选择。确认后,所有镜头数据都将被清除,并被替换成任何当前安装镜头自动提供的镜头数据。如果您在这些栏中手动输入了任何信息,下次安装镜头时您需要重置镜头数据,否则手动输入的值会保持不变。
卷号
可显示当前卷号。
Blackmagic Pocket Cinema Camera可自动递增卷号,因此通常您无需手动键入。当您开始新的项目,并且希望重新从卷号“1”开始,可以进入场记板的项目选项卡,然后点按“重置项目数据”。
场景
可显示当前场景号,以及当前镜头号和类型。
这一按钮上显示的号码始终代表当前场景。您可以使用场景号两侧的左右箭头来调整号码,或点按场景号进入场景号编辑器进行编辑。
场景号可设在1到9999之间。
在场景号编辑器中为场景号添加一个字母后,您还可以为当前拍摄镜头标注。比如,“23A”表示场景23,镜头1。如果您在场景号中添加了镜头字母,摄影机就会在您进入场景号编辑器时建议下一个场景号和镜头字母。例如,如果您的当前场景号为7B,那么摄影机就会建议使用“8”和“7C”。
场景号提示功能还能在右上角显示当前拍摄镜头类型的信息。您可以在键盘右侧的场景号编辑器中选中这些信息。
拍摄镜头的类型如下:
WS 远景 MS 中景 MCU 中特写 CU 特写 BCU 大特写 ECU 极特写

输入“场景”元数据时,摄影机的屏幕键盘左侧会提供场景号建议,右侧会提供拍摄镜头类型。
镜次
按钮可显示当前镜头的镜次号。您可以点按镜次号两侧的左右箭头调整号码,或点按镜次号按钮进入镜次号编辑器进行编辑。
提示 镜头号和场景字母用完之后,镜次号将回到“1”。
您可以在镜次号编辑器中添加描述。该设置位于镜次号键盘右侧,并且对应以下内容:
PU 即“补拍”。指之前某个镜次的重拍画面,可在正式拍摄结束后添加额外的影像材料。
VFX 即“视觉特效”。指一个用于视觉特效的镜次或镜头。
SER 即“镜次组”。指摄影机不中断记录所拍摄的多个镜次。

输入“镜次”元dkr@PpcketCinemaCamera的屏幕键盘右侧会提示其他镜头类型。
好镜次
点按“好镜次”可为好镜次添加标签,这样能方便后期制作时调出这些镜次。该按钮会对播放模式下当前查看的片段应用“好镜次”标签。如果摄影机在待命模式并已准备好记录,那么“将上个片段标为好镜次”按钮就会对上一个记录的片段应用“好镜次”标签。
棚内/外景
在待命模式下时,点按“棚内”或“外景”可在下一个片段添加相应标签;在播放模式下时,点按“棚内”或“外景”可在当前片段添加相应标签。
白天/夜晚
在待命模式下时,点按“白天”或“夜晚”可在下一个片段添加相应标签;在播放模式下时,点按“白天”或“夜晚”可在当前片段添加相应标签。
项目元数据
不论您在待命模式还是播放模式,项目元数据的表现都一样。这一元数据可始终将您的项目作为整体,并且独立于片段编号。

使用摄影机的“项目”场记板选项卡输入项目的详细信息
项目名称
可显示当前项目的名称。点按铅笔图标可更改项目名称
导演
可显示当前项目的导演名字。点按铅笔图标可更改导演名字。
摄影机
可以单个字母显示摄影机索引。点按铅笔图标可更改摄影机索引。
摄影师
可显示摄影师信息。点按铅笔图标可更改摄影师名字。
摄影机视频输出
HD监看输出
摄影机的标准尺寸HDMI接口可输出1080p HD视频,因此您可以连接监视器,甚至是消费级电视机来监看画面。其10bit输出还支持HDR和屏幕叠加信息功能,可显示摄影机的各项状态,是现场监看的理想之选。
当LCD无法使用时,比如摄影机安装在高处的摇臂或车上,可以使用HDMI监看。如果要在HDMI输出上显示监看信息,请到“监看”设置的“HDMI”菜单下调整叠加选项即可。HDMI叠加信息包括帧导栏和记录详情、摄影机设置等信息。如果您只需要监看拍摄的镜头,您可以关闭叠加功能,获得无叠加信息的HDMI输出。
搭配使用如Blackmagic Micro Converter HDMI to SDI等转换器,就可以将信号转换成SDI,从而连接SDI监视器、采集设备、广播级切换台等众多SDI设备。您还可以通过Blackmagic Pocket Cinema Camera的USB端口为Blackmagic Micro Converter HDMI to SDI提供电源。
使用DaVinci Resolve
使用Blackmagic Pocket Cinema Camera拍摄仅是影视内容创作过程中的一部分而已,就如整个过程中的媒体备份和管理、剪辑、调色到最后的编码输出母版文件一样都很重要。Blackmagic Pocket Cinema Camera中包含有Mac和Windows版本的DaVinci Resolve软件,这是一套用于拍摄和后期制作的完备解决方案!

备注 我们推荐使用最新版本的DaVinci Resolve, 对Pocket Cinema Camera拍摄的镜头片段进行准确的调色。16或更高版本均可为所有Blackmagic摄影机和新增的Blackmagic RAW提供准确调色。
将您的CFast、SD卡或SSD连接到计算机后,就可以使用DaVinci Resolve“媒体”页面中的“克隆”工具,在拍摄过程的同时进行素材备份。由于任何类型的存储介质都有可能损坏或出现故障,因此建议您进行文件备份以防万一。使用DaVinci Resolve备份媒体文件后,就可以将片段添加到DaVinci的媒体池中,随后在DaVinci Resolve里进行一站式剪辑、调色、精编制作。
DaVinci Resolve拥有高端数字电影制作所需的先进技术,是大多数影院大片所使用的调色工具,因此比简单的非编软件工具要强大得多。使用DaVinci Resolve进行剪辑和调色可让您充分利用这一技术。
以下内容介绍了如何使用DaVinci Resolve开展您摄影机文件的制作工作。当然,DaVinci Resolve是非常高端的软件,它包含了大量的功能,这远比您在用户界面上一眼看上去的要多得多。想要进一步了解如何使用DaVinci Resolve,请访问Blackmagic官网查阅DaVinci Resolve操作手册,或者通过官网观看相关的培训课程和教学视频。
项目管理器
导入片段开始剪辑之前,您需要先使用项目管理器来建立一个项目。
初次运行DaVinci Resolve时,首先出现的界面就是项目管理器窗口,您也可以点击用户界面右下方的主菜单图标按钮,随时打开这一窗口。这样能便于打开之前创建的项目或创建新项目。
要创建新项目,点击窗口底部的“新建项目”按钮,然后为项目命名。点击“创建”。
您可以使用“快编”页面快速开始项目剪辑工作。

项目管理器中可显示属于当前用户的所有项目
更多关于项目管理器的信息,请到Blackmagic Design官网的支持页面下载DaVinci Resolve操作手册进一步查阅。
使用快编页面剪辑
快编页面能提供高效、活动的剪辑流程,能让您快速组合、修剪和编辑片段。
该页面设有两条时间线,能分别同时提供完整时间线视图和操作部分的细节放大视图。这样一来,您就可以先将片段快速拖放到完整时间线的任何位置,然后在细节放大时间线上进行剪辑,无需切换和调整界面。这样的工作流程能实现笔记本电脑快捷编辑,省去了繁琐的时间线缩放和滚动查找操作,从而节省大量时间。
快编页面布局
打开快编页面后,将会看到媒体池、检视器窗口和时间线。这三个主要窗口能帮助您完成剪辑全过程中的各项控制。

图为快编页面的默认布局,其中媒体池为缩略图显示模式
更多关于快编页面的信息,请查阅DaVinci Resolve操作手册在“使用快编页面”章节的介绍。
媒体选项卡
用户界面的左上角设有五个选项卡。
点击这些选项卡可分别打开不同的媒体工具集,它们可用来创建不同的编辑操作。例如,第一个是“媒体池”选项卡,根据图示可判断该选项卡已被选中。其他选项卡分别为“同步媒体夹”、“转场”、“标题”和“特效”。

- 媒体池:媒体池包含了您使用媒体页面导入的所有片段、文件夹以及文件。您也可以直接从快编页面导入文件,这样就不必回到媒体页面导入新的片段了。
这个强大的功能可通过时间码、日期和时间来自动同步所有片段,让您选择不同机位角度来制作多机位项目。
- 转场:点击同步媒体夹右侧的转场按钮,可调出所有视频和音频转场,素材中使用。它们包括交叉叠化和动态划像等普通转场。
- 标题:位于转场右侧的是标题选项卡。您可以点击它来选择想要使用的标题,如标准滚动文本或下横栏标题。此外,还有一系列Fusion模板供您使用,获得更具动感的动画标题,具体可在DaVinci Resolve的Fusion页面中自定义。
- 特效:第五个是特效选项卡。该选项卡可提供所有滤镜和特效,能让丰富素材画面,比如模糊、发光和镜头特效等。该选项卡里有许多强大的特效供您选择,使用搜索工具就能快速找到。
提示 使用媒体选项卡图标一侧的搜索工具可精确查找您需要的效果。例如,如果您选中了转场选项卡,在搜索栏输入“叠化”后,所有叠化转场类型就会被筛选出来显示在检视器中,帮助您快速找到想要的叠化转场。
检视器选项卡
检视器窗口的左上角是检视器模式按钮。

检视器模式按钮
这些按钮可控制当前使用的检视器,包括“源片段”、“源磁带”以及“时间线”。这些检视器模式能在您选择片段进行编辑时提供大量控制,因此不妨花些时间了解它们的工作原理。
源片段 源片段检视器可显示来自媒体池的单个片段,您可以沿整条检视器时
间线设置入点和出点,从而获得更好的控制。双击媒体池中的某个片
段将其选中,或者将它拖到检视器中,就可以进行查看。 源磁带 源磁带视图可查看媒体池中的所有源片段。这项强大的功能是您的得
力助手,它能帮在所有片段当中快速搜索,找出某个具体片段。当您在
片段上方搓擦播放头进行查看时,媒体池中相应片段的缩略图也会高
亮显示。这意味着,当您找到想要编辑的片段后,只要点击源片段选
项卡,对应的源片段就会自动出现在检视器中。
源磁带检视器模式能让您可以充分利用非线性编辑的优势,让您自由进行
剪辑工作,快速找到镜头,尝试新的想法,呈现出精彩画面。 时间线 在时间线检视器模式下,您可以查看并剪辑时间线,播放项目并精修
剪辑。
将片段导入媒体池
现在,您可以开始将媒体文件导入项目中了。您可以使用顶部的导入工具,在快编页面的媒体池窗口中完成这一操作。

选中其中一个导入选项,将媒体文件添加到项目中
导入媒体 该选项可导入 您在存储位置选中的单个媒体文件。 导入媒体文件夹 要从媒体存储中导入一个文件夹,请选择这一选项。导入文件夹时,DaVinci Resolve会保留文件结构,将每个文件夹视作一个单独的媒体夹,方便您在不同媒体夹之间导航,找到需要的视频和其他媒体文件。
导入媒体步骤如下:
1 点击导入媒体或导入媒体文件夹图标。
导航到想要导入的媒体文件所在的媒体存储位置。
3 选中文件或文件夹,点击“打开”。
将媒体添加到项目中之后,请保存更改。DaVinci Resolve设有快速简便的自动保存功能,叫做“实时保存”。您保存项目一次之后,“实时保存”功能将在您每次更改后自动保存,有效防止数据丢失。
更多关于“实时保存”和其他自动保存功能的信息,请查阅DaVinci Resolve操作手册。
将片段添加到时间线
熟悉了媒体选项卡和检视器模式按钮后,现在就可以打开媒体池并快速开始在时间线上添加片段了。

图为快编页面的时间线,上方为完整时间线,下方为局部放大时间线
时间线是进行剪辑的地方,它就像是一块工作板,您可以在轨道上放置片段,来回移动片段位置,并且进行修剪。轨道可以对片段进行上下分层,方便您尝试不同的剪辑版本并建立转场和添加特效。比如,您可以将一个片段放置在一个轨道上,尝试某个剪辑版本的效果,而下方的轨道均不会受到影响。
将片段添加到时间线有多种不同的方法,比如智能插入、附加以及叠加等。
附加片段
选择镜次和组合剪辑时,您可能想要将这些镜头相继添加到时间线上。进行这类操作时,就可以使用附加工具来快速完成剪辑。

点击附加工具图标按钮,快速将片段添加到上一个片段的结束处
附加片段步骤如下:
1 双击媒体池中的一个片段,将其在检视器中打开。
2 使用搓擦修剪工具,拖动入点和出点来选中镜头的精确时长。您也可以按“I”和“O”键盘快捷键来设置入点和出点。

3 现在,点击媒体池下方的附加图标按钮。

您的第一个片段就会被放置在时间线的开头。
重复步骤1到步骤3的操作,继续添加更多片段,它们会自动附加到相应位置,确保时间线上不会出现空隙。

附加片段的操作方式能确保时间线的片段之间不出现空隙
提示 您可以为“附加”图标指派一个键盘快捷键,从而进一步加快操作进程。例如,您可以将“P”键指派为该功能,然后使用“I”和“O”键设置入点和出点,再按“P”键附加该片段。更多关于指派快捷键的信息,请查阅DaVinci Resolve操作手册。
在时间线上编辑片段
将片段添加大时间线上后,您就能完全控制片段,进行移动和修剪编辑了。
要修剪某个片段,可将鼠标指针悬停在相应片段的开始或结束处,然后点击并左右拖动。例如,向左或向右拖动片段尾部,可分别减少或增加其时长。您可能注意到,执行刚才的剪辑操作后,所有片段在时间线上的位置都会发生变化,以适应新的调整。这就是快编页面帮助您节省时间的一种方式。
您还可以选取一个片段,然后将它放置到大型时间线的新的视频轨道上,无需缩放操作就可完成。这样能极大程度地缩减在庞大时间线上来回导航所花费的时间,从而有效加快剪辑进程。
在快编页面上完成片段剪辑之后,可能还需要添加一个标题。下节内容将具体介绍如何操作。
添加标题
将标题添加到时间线上十分简单,并且种类多样。
要查看可供使用的标题类型,可点击用户界面左上角的“标题”媒体选项卡。在出现的选项窗口中,您会看到所有可供使用的标题生成器,包括下横栏标题、滚动标题、标准文本标题等。您还可以添加各种Fusion标题,也就是可自定义的动画标题。
此处将以添加标准标题为例。
具体步骤如下:
点住“文本”标题,将其拖放到时间线上。您可以任选一条时间线,但是为了提高准确度,建议您使用放大显示的时间线。标题会自动创建一个新的视频标题轨道,并且会吸附到播放头的位置。
2 松开鼠标后,标题就会出现在新的轨道上。您可以想处理视频片段一样,移动标题的位置或更改其时长。
3 如要编辑标题,可点击新的标题片段,片段检视器下方会出现“工具”图标按钮。点击工具图标。界面中会显示一排工具,可用来修改标题片段。这些工具包括变换、裁切、动态缩放等。在本例中,请点击“标题”工具。
4 然后点击“打开检查器”。
检查器窗口打开后,您可以输入一个标题,然后编辑文本设置,比如字距、行距、字体、颜色等等。
您可以使用多种选项,将标题自定义为理想中的效果。建议您不妨自行尝试和摸索所有设置,看看各种设置带来的不同标题效果。
使用Blackmagic RAW文件
Blackmagic RAW片段可为您的后期制作提供最大的灵活性。这样能方便您在更改原始摄影机设置时调节片段各项参数,如白平衡和ISO设置。使用Blackmagic RAW格式还可保留暗部和亮部的色调信息,这将在细节恢复操作时非常有用,比如恢复过曝的天空和过暗的图像部分。
如果您追求的是更高的画质,或者拍摄亮部和暗部有显著差别的影像并于随后进行细节恢复处理并加以调色,那么使用Blackmagic RAW格式将是不错的选择。
由于Blackmagic RAW速度快,文件小,您不需要创建代理文件就可以像标准视频片段一样播放。操作手册这部分内容描述了关于Blackmagic RAW功能,以及如何在DaVinci Resolve工作流程中使用Blackmagic RAW文件的信息。
提示开始调色前,先为调色页面的片段调整Blackmagic RAW设置是较好的做法。
Blackmagic RAW的片段设置
当您首次导入Blackmagic RAW文件时,DaVinci Resolve会根据拍摄时所使用的ISO、白平衡以及色调设置对文件中包含的摄影机数据进行解码。如果您对这些设置下的画面风格满意,就可直接开始编辑。
使用Blackmagic RAW格式拍摄的一大好处在于,您完全不会受限于这些设置!使用Blackmagic RAW文件可获得灵活的后期处理选项,这样您就可以逐渐发展出自己的一套工作流程。尝试在“Camera Raw”选项卡中对每个片段进行“片段”设置,您会发现Blackmagic RAW格式有多么强大和灵活。

在“Camera Raw”选项卡中,从“解码方式”下拉菜单中选择“片段,可调整单个片段的Blackmagic RAW设置。
一旦启用了DaVinci Resolve的Blackmagic RAW片段设置,片段设置和Gamma控制就都可以进行调整了。通过调整这些设置可以优化您的片段,让其更接近全面一级校色的效果。当使用DaVinci Resolve示波器时更为强大,有助于中性化和平衡片段,为片段应用某种风格做好准备。
以下内容介绍了关于片段和 Gamma控制的信息。
ISO
升高或降低此设置可调整ISO数值。如果您需要将片段调整到更亮或更暗的起始点进行调整时,此设置很有用。
高光恢复
勾选该复选框可使用来自未裁切通道的信息来重建裁切通道中的高光信息。
色温
可将图像的色温调整到暖色或冷色。该操作有助于每个图像的色彩平衡。
色调
调整此设置可为图像添加绿色或品红色,从而起到平衡色彩的作用。
曝光
通过此设置可调整画面的整体亮度。
饱和度
饱和度控制默认为1,范围从最小饱和度-1到最大饱和度+4。
对比度
默认为1.0,将滑块向左拖动获得最小饱和度0,向右拖动可将饱和度最高增加到2。
中点
Blackmagic Design Film模式下,中间灰值默认为0.38,也就是 38.4% 。向左拖动滑块可降低中点,向右拖动最高可增加到100。当对比度的调整与默认设置不一致时,您可以修改高光和阴影过渡。
高光过渡
调整高光时,向左拖动滑块可将该值降低到0,向右拖动滑块可将该值增加到2。默认值是1。
阴影过渡
向左拖动滑块可将阴影降低到0,向右拖动可增加到2。
白电平
如要调整Gamma曲线的白场,可将滑块在最高值2和最低值0之间拖动。默认值是1。
黑电平
如要提高自定义Gamma曲线的黑场,可将右边的滑块从最低值-1拖动至最高值1。默认值是0。
使用视频黑电平
点击复选框将黑电平设置为视频模式。
导出帧
点击“导出帧”按钮,可让您从Blackmagic RAW片段中导出某一帧画面。
更新Sidecar
点击此按钮可为当前片段更新Blackmagic RAW Sidecar文件。
您对Blackmagic RAW片段所做的任何修改都会被识别为Blackmagic Design Custom的Gamma设置更改。

如果您希望把片段恢复到任何可用的默认Gamma选项,可下拉菜单中选择相应选项。
提示用“Video”动态范围拍摄的影像无法使用Gamma控制,但Blackmagic RAW数据并没有丢失。只需从Gamma下拉菜单中选择“Blackmagic Design Film”或“Blackmagic Design Extended Video”,然后进行调整。
保存您对Blackmagic RAW的修改
调整BlackmagicRAW片段的Gamma控制。
2 点击“更新Sidecar”按钮。
系统将在同一个文件夹里创建一个“Sidecar”文件作为.braw文件。当另一位用户导入Blackmagic RAW文件时,DaVinci Resolve会自动读取这些Sidecar文件。如果您进行了其他调整,请再次点击“更新Sidecar”。
提示如要移除Sidecar文件,只需将其从存储介质的位置上删除即可。
Blackmagic RAW的项目设置
如果您需要改变适用于所有片段的设置,比如:统一修改白平衡或ISO,可以使用项目的“Camera RAW”设置进行统一修改。
为Blackmagic RAW进行项目设置:
1 点击“文件”,选择“项目设置”,进入项目设置菜单。
2 在“Camera RAW”选项卡中,您会看到RAW配置文件旁边有一个下拉菜单。点击箭头可从列表中选择Blackmagic RAW。
3 在“解码方式”下拉菜单中选择“项目”。
4 将白平衡设置定为“自定义”。
5 从Gamma下拉菜单中选择"Blackmagic Design Custom”。将色彩空间设为"Blackmagic Design”。这将同时把Gamma设置定为"Blackmagic Design Film"。
6 在“解码质量”菜单中选择分辨率。对于性能有限的系统,较低的分辨率播放效果会更好。之后也可以调整为全分辨率,然后输出最高质量的文件。
现在,您可以调整片段的摄影机设置,比如饱和度、对比度和中点等。这将影响项目中设置为使用“项目”解码的所有片段。
使用调色页面为片段调色
将片段添加到时间线,并且添加了标题之后,就可以开始使用调色页面进行调色了。调色页面非常强大,影片的整体风格将在这里成型。在这个例子中,我们将首先平衡片段色彩,使它们保持一致性。在此期间,您可以随时回到快编或剪辑页面对素材进行调整。
调色页面可用来调整素材的画风。从很多方面来看,调色本身就是一门艺术。您在进行调色的时候,会将自己的情感注入到作品当中。这是工作流程当中极具创意的一个环节,当您看到自己精心雕琢的作品呈现在荧幕之上时,也会收获满满的成就感!通常来说,这是调色的第一步,也就是我们常说的“一级校色”。完成一级校色之后,就要进入二级调色阶段。在这个阶段,您可以对画面中的具体对象进行细致精准的色彩调整。这是个充满趣味的过程,一般会放在一级校色之后进行,因为这样能使制作流程更加高效,效果也会更好!
首先,点击“调色”选项卡,打开“调色”页面。
该页面中有Camera Raw设置、色轮、曲线面板和常用的调色工具以及预览和节点窗口。当您看到面前这些大量工具时不用慌张,它们都是能够帮助您获得最精彩画面的实用功能。这一入门章节会展示基本操作,要活的更详细的介绍,请查阅操作手册中的相关内容。操作手册将为您详细介绍每项功能,以及如何按照简单易行的步骤进行使用。从中您可以了解到专业人士在高端调色工作室所使用的技能。
一般来说,第一步就是进行一级校色,对片段的暗部、中间调和亮部电平进行优化。您可以通过调整“暗部”、“中灰”和“亮部”设置来实现。这可以让您的素材画面有一个干净平衡的起点,从而更好地开展影片调色工作。优化电平时,使用示波器作为参考会很有帮助。
使用示波器
大多数调色师都会通过创意调色来着重突出影片所要表现的情感,并使用监视器来辅助他们得到想要的画面风格。您可以观察日常物品以及不同的光线和它们之间产生的互动,并通过您的想象力和实践来获得灵感。

分显示波器可帮助您优化画面的亮部、中间调和暗部。
调色的另一个途径是使用内置的示波器对镜头画面进行色彩平衡处理。您可以点击“示波器”按钮打开单个视频示波器显示,该按钮位于设置面板工具栏右起第二个。您可以选择显示波形示波器、分量示波器、矢量示波器和直方图。您可以使用这些示波器来监看色调平衡,检查视频电平并防止暗部色彩挤压及亮部裁切限幅,还能监看片段中出现的任何偏色现象。
“色轮”设置面板中设有“暗部”、“中灰”和“亮部”控制项,通常可作为第一轮调整使用。如果您具备调色背景,就应该已经在其他软件中接触过这些色彩和对比度调整控制。

“暗部”、“中灰”、“亮部”、“偏移”色轮用于控制片段的色彩及色调平衡。拖动并来回滚动色轮下方的滚轮可对所有色彩的每种色调区域进行统一的调整。
如果想要使用鼠标来更加准确地控制每类色彩,您可以将色轮更改为“一级校色条”模式,具体调整每个色彩和亮度通道,分别控制暗部、中灰以及亮部控制项。只需选择色轮右上方附近的下拉菜单中的“一级校色条”即可切换模式。
- 首先请在色彩时间线上选中一个片段,点击位于第一个色轮下方的“暗部”滚轮。来回滚动该滚轮来查看该参数变化对画面的影响。您可以看到画面中暗部的亮度会相应提高或降低。请根据需要进行设置,使暗部区域获得最佳表现。如果“暗部”参数提升过度,图像暗部的细节就会丢失,您可以参考分量示波器加以避免。波形图上的暗部位置以恰好位于分量示波器的底线之上为最佳。
- 调整“亮部”: 点击“亮部”滚轮并来回滑动。该参数可调整亮部信息, 即片段中最亮的部分。亮部信息位于分量示波器的波形顶部。如果画面有充足明亮的风光, 那么该画面在示波器中以恰好位于波形顶线之下为最佳。如果亮部信息超越了示波器波形的顶线, 那么这部分信息将被切掉, 而您画面中最亮部分的内容将缺失。
- 调整“中灰”:点击位于色轮下方的“中灰”滚轮并来回滑动。在提升中灰值的同时,您可以观察到画面的亮度随之增加,而且波形的中段部分也会随之移动。该值体现的是片段中的中间调。通常中间调的波形位置以位于示波器的 50% 至 70% 处为最佳。但是,根据您需要的创意风格以及灯光条件,这一参数或有所不同。
此外,您还能使用曲线设置面板来实现一级调色。只需通过点击操作在曲线图中的对角线上创建控制点,并上下拖拽来调整画面不同区域的主RGB对比度色调即可。曲线调整的最佳位置位于底部三分之一、中部及顶部三分之一处。
DaVinci Resolve中还有很多方式来完成一级调色。

曲线面板工具也可用来进行一级调色,或使用Power Window来强化片段中的局部区域。
二级调色
如果要对画面中的特定部分进行调整,那么您就需要使用二级调色。目前为止,您使用暗部、中灰和亮部等参数所做的调整都会同时影响画面整体效果,因此这一过程被称为“一级校色”。
但是,如果需要调整画面中的特定部分,例如要美化画面中草地的部分,或要加深天空的蓝色,那么就要用到二级调色功能。进行二级调色时,您可以选中局部画面内容,并只对选中部分来单独调整。您可以使用节点将多个二级调色操作堆栈在一起,这样就可以一直处理画面各部分内容,直至所有部分完成相应的处理!此外,您还能使用窗口和跟踪功能,让画面中的选定部分跟随主画面一起移动。
限定某一色彩
很多时候您要突出强调片段中的某一色彩,比如路边的草坪和天空的蓝色,或者您可能需要调整画面中某个对象的色彩来吸引观众的注意力。通过HSL限定器工具可以让您轻松实现这一操作。

当您需要突出强调画面中的某些部分、增加对比度或要将观众的注意力集中到某些区域时,使用HSL限定器选择画面色彩十分实用。
如何限定某一色彩:
添加一个新的串行节点。
2 打开“限定器”设置面板,确保选中“选择范围”拾色器工具。
3 点击片段中您想要调整的色彩。
4一般情况下,您需要进行一些调整来柔化所选对象的边缘,且该操作仅对所选颜色有效。点击检视器上方的“突出显示”按钮查看所选内容。
5 调整“色相”窗口中的“宽度”控制来控制所选内容的宽窄。
尝试调整高区柔化、低区柔化以及柔化程度控制工具来观察这些参数如何细化您的所选内容。然后您就可以使用色轮和自定义曲线对所选色彩进行调整了。
有时,所选色彩会溢出到镜头中其他不需要调整的部分。您可以使用Power Window将不需要调整的部分通过遮罩功能隔离出来。只需创建新的Power Window窗口,并调整其形状,让它只包括所选色彩的区域。如果所选色彩在镜头中处于移动状,您可以使用跟踪功能来跟踪Power Window。
添加Power Window
Power Window是极其高效的二级调色工具,它可以隔离片段中的特定区域。这些区域不一定是静止对象,您可以跟踪它们使之随着摄影机的平移、竖移和转动,以及所选部分自身的移动一同移动。

使用Power Window将不希望受到HSL限定器二级调色操作影响的区域隔离出来。
例如,您可以跟踪一个位于人物上的窗口来仅对窗口中的对象进行色彩和对比度调整,却不会影响该人物周围的画面内容。此类调色操作可以将观众的注意力转移并集中到您想要强调的画面部分。
如何在片段上添加Power Window:
1 添加一个新的串行节点。
2 打开“窗口”面板,点击形状图标来选择一种窗口形状。选中的窗口形状将显示在节点上。
3 点击并拖动该形状周围蓝色的点来重新调整它的大小。红色的点可调节其边缘柔化程度。点击并移动中心的点可将该形状移动到想要隔离的位置。使用与中心点连接的点来旋转窗口。现在您就可以对画面的特定部分进行调色了。

Power Window可以让您对画面中的特定部分进行二级调色。
跟踪窗口
由于拍摄画面中的摄影机、物体或区域可能会移动,因此为了确保窗口位于所选物体或区域,就需要使用DaVinci Resolve强大的跟踪功能。跟踪器可分析摄影机或画面中物体的平移、竖移以及缩放和旋转,以便您添加的窗口可始终跟随所选对象。如果不进行窗口跟踪,您的调色操作可能会离开所选目标并给您造成不必要的麻烦。

您可以使用跟踪器功能来跟踪片段中的对象或区域,以便Power Window跟随对象移动。
如何对移动的物体进行窗口跟踪:
1 创建新的串行节点并添加一个Power Window。
回到片段开头部分放置窗口并调整大小,以便仅突出显示需要的区域。
3 打开“跟踪器”面板。根据需要勾选或取消勾选相应的“分析”复选框,为片段选择平移、竖移、缩放以及旋转等相应的3D设置。
4 点击复选框左侧的向前箭头。然后aVinci Resolve将会在您的片段上应用一组跟踪点,并逐帧分析对象的移动。完成跟踪后,Power Window将跟随片段中的移动路径。
大部分情况下使用自动跟踪便可以成功完成上述操作,但是有时候场景会比较复杂,并且有些物体可能会从您选中的区域前景越过,这会干扰并影响跟踪功能。此时您可以使用关键帧编辑器来手动解决这一问题。请参考DaVinci Resolve操作手册获得更多信息。
使用插件
从事二级调色时,您可能还需要添加ResolveFX或OpenFX插件在“调色”页面快速创建有趣的画面风格和效果,或在“剪辑”页面为片段添加富有创意的转场和特效。ResolveFX会随DaVinci Resolve一同安装,OFX插件可通过第三方供应商购买或下载。
安装OFX插件后,只要开启“节点编辑器”右侧的OpenFX检查器就能在调色页面中打开这些插件或ResolveFX插件。创建了新的串行节点后,只需点击“OpenFX”按钮打开特效库面板,然后将一个插件拖放到这个新节点上即可。如果该插件具有可编辑设置,您可以在相邻的“设置”面板中使用这些设置。
您可以在“剪辑”页面中打开“特效库”里的“OpenFX”面板,将所选插件拖拽到时间线的视频片段或轨道上方(视插件具体要求而定),就可以在片段上添加插件滤镜、生成器和转场。

OFX插件是您发挥想象力、进行充满趣味和个性创作的一种快速便捷的途径。
混合音频
在剪辑页面混合音频
项目剪辑和调色完毕后,就可以开始混合音频了。DaVinci Resolve拥有一套实用的工具,可直接在剪辑页面完成项目的剪辑、混合及音频母版等制作。对需要更高级音频工具的项目而言,Fairlight页面可提供一整套音频后期制作环境。如果您已经比较熟悉剪辑页面,想要直接跳至Fairlight页面,可跳过此章节,直接阅读下个章节。
添加音频轨道
如果您正在剪辑页面并想要为基本声音剪辑文件混合大量音效和音乐,只需根据需要添加更多音频轨道即可。当您想要构建声效并将音频元素分离到单独的轨道上用于如对白、音效以及音乐等的混音时,这一功能非常实用。
在剪辑页面添加音频轨道
在时间线上任意一个音频轨道的名称旁边右击并选择“添加轨道”,然后根据需要选择“单声道”、“立体声”和“5.1声道”选项,从而在轨道列表底部添加一个轨道。或者,您也可以选择“添加自定义轨道”,然后选择将一个或多个新轨道放置在哪个位置。
新的音频轨道将出现在时间线上。
提示 如果您在创建轨道之后想要进行更改,可以在轨道名称一侧右键点击,并选择“将轨道类型更改为”,然后选择如立体声、单声道或5.1声道等音频轨道类型。
在时间线上调整音频电平
时间线上的每个片段音频都包括一个音量叠加显示,只要用指针上下拖动即可设置片段的电平。这个叠加显示与检查器中的音量参数是一致的。

拖动音量叠加显示来调整片段电平
对需要更高级音频工具的项目而言,Fairlight页面可提供一整套音频后期制作环境。
Fairlight页面
DaVinci Resolve中的“Fairlight”页面是用于调整项目音频的。在单检视器模式下,该页面为您的项目提供了优化音频轨道界面,显示有扩大的混音器和自定义监听控制,可让您轻松地评估和调整电平从而构建自然和谐的混合音效。当您看到面前这些大量工具时不用慌张,它们能够帮助您为项目获得最佳音质。

本手册只是对Fairlight页面功能进行了基本概述,如果想要了解各个功能详情,请查阅DaVinci Resolve操作手册。DaVinci Resolve操作手册详细介绍了每个工具的用途并通过易于操作的步骤描述了如何使用这些工具。
音频时间线
- 轨道标头:每个轨道的左侧是轨道标头区域,显示了轨道编号、轨道名称、轨道颜色、音频通道、推子值以及音频表等信息。轨道标头还包括锁定和解锁轨道,以及单声道和静音控制等不同控制选项。这些控制选项可帮助您管理和组织轨道,让您挨个预览单个轨道。
- 轨道:在Fairlight页面上,每条轨道会进行细分,显示出片段音频的各个声道,便于剪辑和混音。剪辑页面则会将这些单独的音频通道隐藏起来,只在时间线上显示一个单独的片段,避免了管理大量轨道的视觉混乱,从而为多通道源片段的剪辑工作带来便利。

A1轨道的轨道标头显示了一条轨道的单音轨代表了单声道音频,2轨道标头则显示了两条轨道的立体音轨代表了自适应立体声音频。
什么是总线?
总线是您从时间线上指派多条音轨的目标通道,从而将它们混合成单个信号,以便通过一个通道条进行控制。
- 主混总线:“主混总线”通常是一个节目和每个新项目的主要输出,开始从单个“主混总线”入手,再到默认指派的所有轨道。“主混总线”将时间线上的所有轨道合并成一个信号,从而当为每个单独轨道调整好电平后,就可以调整混音的整体电平。
- 子混总线:“子混总线”可将同类音频的多个轨道合并在一起,例如对白、背景音乐或特效等,因此所有属于通过类别的音频可以混合成为单个音频信号。例如,您现有五个对白轨道,就可以把所有五个对白轨道的输出指派到一个“子混总线”,这样所有的对白的电平就可以通过一套控制进行混合了。这一子混总线可以单独渲染或发送到主混总线进行渲染。
调音台
时间线上的每条音轨在混音器上都对应于一个单独的通道条,默认设置下在右侧会有一个标有“M1”的单独条块对应于“主混总线”。随着您创建其他的“主混总线”和“子混总线”,右侧会相应地出现带有控制选项的其他通道条。这里提供了一组图表控制工具,让您可以将轨道通道指派到输出通道、调整均衡器和动态、设定电平和记录自动化、调整立体声声相和环绕音频、以及静音和单声道轨道等处理。

图为调音台,其多个通道条分别对应的是时间线上的多个轨道。
使用均衡器加强音频
调整完项目中音频片段的音频电平后,您可能会发现音频还需要进一步微调。有些情况下,您可能会发现对白、音乐和音效在音频频谱的相同频段上互相干扰,导致音频太过嘈杂且不清晰。这时使用均衡器会有帮助,因为它能帮助您判断出每个音轨在音频频谱上所处的具体频段位置。您还可以通过均衡器从音频中移除不想要的元素,它可以隔离或降低包括隆隆声、嗡嗡声、风声、嘶嘶声等某些特定频率的电平,或者能让总体音效变得更优质、更悦耳。
DaVinci Resolve提供了均衡器滤波器可应用于每个单独片段的片段电平上,或应用在整个轨道的轨道电平上。时间线上的每个音频片段在检查器面板中具有四个频段的均衡器,每个轨道在调音台面板中具有六个频段的参量均衡器。这些图表和数字控制可增强或衰减频率的不同范围,不同的滤波器可让您定义均衡器曲线的形状。

四频段均衡器可应用到时间线上的每个片段
外部频段让您可以通过上限、下限、高通和低通滤波器进行频段滤波器调整。通过式滤波器会影响所有高于或低于某个特定频率的频率,将这些频率从信号中彻底移除。例如,高通滤波器可以让高频率通过滤波器,并同时切除低频。位于截止频率以外的任何频率则会以向下倾斜曲线的方式逐步剪切。
搁架式滤波器相对显得平和一些,如果您只想对信号的高频或低频部分进行塑形,而并非完全滤除这些频段,就可以使用这一滤波器。搁架式滤波器可以均匀地增强或减弱目标频率以及高于或低于目标频率的部分,这取决于您使用的是高架还是低架滤波器。
频段控制的中部设置可让您进行很广泛的一系列均衡器调整,可在低架、钟型、陷波和高架滤波器选项间进行切换。
- 钟型滤波器:钟型滤波器可以增强或减弱钟型曲线给定中心点周围的频率,正如这一名称所暗示的该曲线的形状像钟罩。
- 陷波滤波器:陷波滤波器允许您瞄准特定的窄频率范围。比如在50或60Hz时去除电源哼声。
低架滤波器:低架滤波器会增强或降低下限目标频率,以及之下的所有频率。
高架滤波器:高架滤波器会增强或降低上限目标频率,以及之上的所有频率。
为单个片段添加均衡器:
1 在时间线上选中您想要为其添加EQ滤波器的片段。
2 点击检查器再点击“片段均衡器”启用按钮。
为轨道添加均衡器:
1 在混音器中双击一个轨道的均衡器区块,从而将该轨道的均衡器打开。
2 从下拉菜单中选择您希望调整的频段滤波器类型。

调音台面板中的均衡器区块显示了轨道已应用均衡器曲线

六频段参量均衡器可应用到每个轨道
为片段或轨道添加均衡器后,就可以为每个频段调整其均衡器了。需要注意的是,选择不同的频段滤波器可能会有不同的控制。
为频段滤波器调整均衡器:
从下拉菜单中选择您希望调整的频段滤波器类型。
调整“频率”值可为均衡器调整选择中心频率。
调整“增益”值可增强或减弱该频段的频段。
4 使用“品质因数”可调整作用频率的带宽。
使用重置按钮可将均衡器窗口内的所有控制重设回默认设置。
Fairlight还设有很多控制可让您改善每条音轨的音质。您可以添加更多轨道并通过总线来进行组织管理,还可以添加延迟或混响,逐步完善您的混音。
在Fusion页面添加视觉特效和合成效果
完成剪辑后,您可以打开Fusion页面,在DaVinci Resolve中添加2D或3D视觉特效和动态图形。与基于图层的合成软件不同,Fusion采用节点式操作,能让您更加自由地创建复杂效果,同时还可将图像数据指派到任何方向。节点窗口清楚显示了流程中使用的所有工具。如果您使用过调色页面的节点工作流程,就并不会对节点窗口感到陌生。

Fusion页面
Fusion页面上方配有两个带播放控制的检视器窗口,用于查看媒体,右边的检查器窗口用于访问工具设置,下方的节点窗口用于创建合成。虽然检视器和播放控制始终可见,您可以点击显示器顶部界面工具栏中的图标来显示或隐藏节点窗口和检查器窗口,以及特效库,样条线和关键帧编辑器等其他窗口。

媒体池:媒体池的功能与剪辑页面中显示的相同。只需将媒体文件从媒体夹直接拖进合成即可。
- 特效库:在特效库中,Fusion工具和模板都按照粒子、跟踪、滤镜和发生器等进行归类。您可以点击工具或者将它拖到节点区域,然后添加到合成里。媒体池和特效库占用同样的屏幕区域,您可以在两者之间切换,让检视器的面积尽量大。
- 片段:点击片段选项卡会显示或隐藏代表时间线上相应片段的缩略图。缩略图位于节点编辑器下方,便于您即时前往其他片段。

右键点击缩略图,然后选择“创建新的合成”,可创建合成的新版本。
检视器:检视器总是可见,以便您查看不同的合成视图,3D投影的总体3D投影,摄影机输出,或者最终的渲染输出。这些检视器还可以用来查看各项修改对特定元素所产生的影响。您还可以选择查看的节点,只要点击一个节点,按数字键“1”即可在左侧检视器中查看,按数字键“2”即可在右侧检视器中查看。您可以通过节点下方的白色按钮图标判断出该节点被指派到哪个检视器。如果您使用外部视频监看,则会出现第三个按钮,可用来将媒体指派到外部视频监视器上。
提示您也可以通过将节点直接拖入检视器的方式,将节点指派给相应检视器。
您可以通过检视器下方的播放控制跳过片段的头或尾,正放、倒放或停止播放。时间标尺可显示片段的总体范围,黄色标记代表入点和出点。

时间标尺上的黄色标记代表片段在时间线上的入点和出点。如果您使用Fusion片段或复合片段,时间标尺会只显示时间线上的片段时长,不显示余量。
- 节点:节点页面的核心,您可以在这里将一个节点工具的输出端与另一个节点工具的输入端连接到一起,创建自己的节点树。这个区域会根据打开的编辑器而改变大小,比如样条线或关键帧编辑器。节点区域顶部的工具栏配有最常用的工具,便于您快速调用。
- 样条线:样条线编辑器打开时会出现在节点窗口的右侧。您可以使用该编辑器对每个节点进行精准调整,比如用贝塞尔曲线对两个关键帧之间的动画进行平滑处理。
- 关键帧:使用关键帧编辑器可以添加、删除或者修改每个工具的关键帧。关键帧编辑器也位于节点检视器的右侧。
-元数据:元数据窗口显示当前片段可用的元数据,包括编解码格式、帧率和时间码。
检查器:位于右上角的检查器可显示一个或多个选中节点的所有设置和修改器。其他选项卡选项也会出现,让您快速访问按种类排序节点的其他设置。

文本检查器中有其他选项卡,包括文本、布局、转换、着色、画面和设置等。
Fusion使用入门
开始使用Fusion时,将播放头放在时间线上的任何片段上,然后点击“Fusion”按钮,即可打开Fusion页面。
在Fusion页面上,片段在标为“Medialn”的媒体输入节点中立即可用。所有合成都以“Medialn”和“MediaOut”两个节点为起点。Medialn节点表示时间线播放头所在位置最上方的片段,下方所有片段均被忽略。您在剪辑页面中对片段应用的所有调整全部包含在内,比如转换工具和裁切修改。

名为“MediaOut”的媒体输出节点将输出画面发送回DaVinci Resolve剪辑页面上的时间线。
提示 在剪辑页面的片段上应用的ResolveFX或OFX插件不会应用于Fusion页面。这是因为Fusion特效发生在调色和OFX/ResolveFX处理之前。如果您希望在Fusion特效之前应用OFX,就需要先右键点击剪辑页面中的相应片段,选择“新建Fusion片段”,然后再点击Fusion页面。
了解节点
为了有助于理解,您可以把每个节点想象成代表单一工具或特效的视觉图标。节点之间相互连接,创建出总体合成,就像蛋糕的各种原料。了解每个节点的输入输出非常重要,因为这能帮助您在创建精细的视觉特效时,把握合成的流程顺序。
有些工具设有多个输入和输出端与其他节点连接。比如“Merge”(合并),该节点可以连接前景输入、背景输入和遮罩输入用于蒙版或抠像。

前景输入
背景输入
效果遮罩输入
输出
节点上有多个输出意味着单一节点能够连接合成中的许多不同节点,所以与基于图层的软件不同,您不需要复制片段。相连节点之间线上的箭头显示了图像数据流动的方向。
在节点编辑器中添加节点
如要添加特效,只需将节点放在Medialn"与“MediaOut"节点之间的线上即可。
这一操作可通过多种方式完成。您可以按住SHIFT按钮,把节点放在两个节点之间;或者点击希望添加特效的节点,然后选择想要添加的工具。新节点会自动连接到选定的工具上。您也可以把节点添加到节点窗口中的任何地方,然后将一个节点的输出端拖到另一个节点的输入端,手动完成节点之间的连接。

最常用的工具是2D和3DMerge(合并)节点。该节点就像一个中枢,它能将节点编辑器上的各个工具合并起来,变成一个单一输出。
合并节点拥有控制选项,可以选择输入的管理方式,包括大小、位置和混合等设置。选定合并节点后,可以在检查器面板里访问这些设置。
节点面板上方的工具栏包含最常用工具的图标,您可以点击这些图标添加节点,或者将工具拖入节点面板。如果您想看到所有可用的工具,可点击左上角的“特效库”,然后扩展“工具”选项。这里的所有工具都按类别排序,并且提供了一组预先创建的“模板”,比如镜头光斑、着色器和背景等。
提示 如果您熟悉工具名称,可以按住键盘上的“SHIFT”,同时按下空格键,“选择工具”菜单就会出现。您在输入工具名称时,菜单会建议相关的工具。这是选择工具的一个非常快速的方法。
使用检查器面板调整节点
您可以使用检查器面板调整节点设置。点击希望修改的节点,面板会更新显示相应的设置和控制。
使用Fusion时,您可以在一个检视器中查看正在修改的节点,同时在另一个检查器中查看该节点在合成画面中的整体效果。例如,您可以修改“Text+”文本节点的大小和中心位置,并同时在检视器中查看该节点和合并节点,这样就可以查看文本与背景的匹配情况。

如图所示,被选中的节点会显示红色边框。图中的检查器面板显示的是文本节点的布局选项卡控制。
根据节点任务,您可以调整不同的参数和设置,从调整大小和中心位置,到修改发射器节点的粒子数量。设置关键帧并修改一段时间内的设置就会产生动画效果。
制作关键帧
在检查器窗口中右键点击一项设置,然后在上下文菜单中选择“动画”即可设置关键帧。该项设置右侧的关键帧图标会变红。这代表关键帧已启用,您做的任何修改只会应用于当前帧。当修改另一个帧的设置参数,创建两个或多个关键帧时,帧之间会添加过渡插值。您可以利用关键帧图标两侧的箭头,准确地将播放头移动到时间线上特定的位置。
样条线面板能为您提供更多控制关键帧动画的选项。您可以选择关键帧,比如第一个和最后一个关键帧,按下“SHIFT”+“s”,或者右键点击关键帧然后选择“平滑度”,即可将这些帧之间的动画平滑处理为一条贝塞尔曲线。

图中的“大小调整”关键帧动画已经被平滑处理为一条贝塞尔曲线。您可以点击贝塞尔手柄,缩短或拉长曲线,或者点击关键帧方块图标移动关键帧位置。
使用动态跟踪器和添加文本工具
为了更好地演示Fusion的使用方法,我们将举例说明如何使用跟踪器工具跟踪片段中的元素,以及如何使用跟踪数据添加文本,并将文本附在元素上。
“跟踪器”工具会在一定时间里跟踪x和y轴上的像素,并且生成数据,您可以用这些数据附加其他元素。当您想要把文本的位置与移动中的物体匹配时,比如在道路上行驶的汽车,或者飞过画面的鸟等,这项功能非常实用。
1 在“特效库”中选择“跟踪”工具,然后把它拖到Medialn"和“MediaOut”节点之间的线上。然后,点击这个跟踪器节点,在检查器中显示它的属性。
2 按键盘数字键“1”,可在左侧检视器中查看跟踪器节点。相应检视器中会显示带有跟踪器的片段,并且跟踪器位于默认位置。将鼠标指针悬停在跟踪器上方可显示出跟踪器控制柄。点击左上角的跟踪器控制柄,将跟踪器拖到片段中相应的AOI区域。高对比度的区域效果很好,例如汽车引擎盖上的标志。跟踪器会放大图像区域以获得更高的精确度。
3 到检查器窗口中,点击“正向跟踪”按钮开始跟踪。跟踪完成后会显示通知窗口。点击“OK”确定。

检查器面板中设有跟踪选项,其中包括从尾帧或当前帧反向跟踪,停止跟踪,从当前帧或首帧正向跟踪。
提示 当您的AOI区域从渲染范围消失时,比如汽车或鸟离开画面,从当前帧反向跟踪或正向跟踪就非常实用。这项功能可以只跟踪相关的影像。
现在,您就可以利用跟踪数据,将动态路径应用到文本工具上。
4 点击常用节点工具栏中的“Text+”文本节点图标,将其拖入跟踪器节点旁边的节点面板。将“Text+”节点的输出方块与跟踪器上的绿色前景输入端连接起来。

5 点击跟踪器节点,按数字键“1”,即可在左侧的检视器中看到合并结果。在跟踪器节点的检查器面板中点击“Operations”(操作)选项卡。把鼠标指针悬停在选项卡上方就能看到相应名称。点击“Operations”旁边的下拉菜单,然后选择“Match Move”(动作匹配)。
6 点击“Text”文本节点可在检查器中显示属性。在文本框中输入文本,按照合成要求修改字体、颜色和大小。
来自跟踪器的跟踪位置数据将被应用于您的文本。如果您希望调整文本的位置偏移,点击检查器面板中的“Trackers”(跟踪器)选项卡,然后用x和y偏移旋钮修改位置。

跟踪器检查器面板底部的旋钮可用于调整文本的偏移位置。
现在,您播放合成画面时,就能查看到附加在被跟踪物体上的文本了!

绿色方框代表当前跟踪器在绿色路径上的位置,红色虚线代表对文本进行动画处理所使用的位置偏移。
对于一些镜头,您可能需要在跟踪后删除跟踪点,比如当所跟踪的物体从屏幕上消失的时候。关键帧编辑器让这个流程变得非常简单。

7 点击检查器上方的关键帧选项卡,打开关键帧编辑器。应用了关键帧的节点在节点标签旁会有一个小箭头,只有添加了关键帧的参数才会在下方列表显示。点击放大图标,将方框拖到您希望编辑的区域。方框会放大选定的区域,方便您查看关键帧。
8 将播放头移动到最后一个关键帧的位置。如要删除关键帧,只需用鼠标在关键帧上拖画一个方框选定该关键帧即可。选定的关键帧会以黄色突出显示。点击右键,在菜单中选择删除。
提示 如果您的特效对系统要求非常高,可右键点击播放控制区域调出代理播放等检视器选项,帮助您在创建合成时获得尽可能高的系统性能。获取完整的播放选项详细信息,请参见Vinci Resolve手册。
现在您就完成了第一套在影像中匹配动态的合成动画文本!
如果您希望跟踪含有平面的画面,对其进行强化或替换,可以使用平面跟踪器。跟踪2D平面可用于修改移动画面中的标签和指示牌,甚至为镜头中的监视器或电视机添加画面。
获取更多关于平面跟踪器和DaVinci Resolve Fusion页面中许多强大工具的信息,请参阅DaVinci Resolve手册。
提示 当您在Fusion页面创建视觉特效时,请务必注意所创建的是D特效还是3D特效,因为这将决定所需合并工具的种类。您可能经常需要在一个合成中融入2D和3D特效。在这种情况下,请记住任何使用3D空间创建的视觉特效必须被渲染成2D图像,才能合并进2D合成。
我们相信您将从使用Fusion、探索Fusion的各种视觉特效和强大的DaVinci Resolve剪辑、调色及Fairlight页面过程中获得许多快乐。DaVinci Resolve强大而丰富的工具集定能助您实现无限创意!
制作母版剪辑
完成剪辑、调色、视觉特效和混音制作之后,下一步就是分享您的作品。您可以使用ick Export按钮或者菜单选项来输出时间线的制作内容,具体可以作为一个独立文件输出,或者作为一组不同格式输出,您也可以使用交付页面的其他功能。

“交付”页面可用来导出您的剪辑。您可以从中选择多种不同的视频格式和编解码器。
快速导出
依次选择“文件”>“快速导出”,使用其中一种导出预设,以便将您的作品从DaVinci Resolve中导出。您还可以使用快速导出功能,将您的作品导出并上传到支持的视频分享平台,比如YouTube、Vimeo以及Frame.io。
快速导出步骤如下:
1 使用剪辑、Fusion或调色页面,在时间线上设置入点和出点(可选),从而在当前作品上选择需要导出的范围部分。如果没有选定时间线入点和出点,则会导出整条时间线。
依次选择“文件”>“快速导出”。
2 从快速导出对话框顶部的预设图标中选择一个,然后点击“导出”。
3 在导出对话框中选择一个位置,输入文件名,然后点击“保存”。然后会出现一个进度条对话框,显示导出所需时间。

快速导出对话框
交付页面
在这一页面中,您可以选择想要导出的片段范围,以及片段格式、编码和分辨率。片段可以多种不同格式导出,比如使用8bit或10bit无压缩RGB/YUV、ProRes、DNxHD、H.264等编解码格式导出QuickTime、AVI、MXF和DPX等文件。
如何导出剪辑的单个片段:
1 点击“交付”选项卡打开交付页面。
2 找到该页面左上角的“渲染设置”窗口。您可以选择多种导出预设,例如YouTube、Vimeo以及各类音频预设,或者也可以将该设置保留在其默认的“自定义”预设方案,再输入相应的参数来手动设定您自己的导出设置。在这个例子中,YouTube,然后点击该预设一侧的箭头图标,并选择1080p视频格式。
帧率将根据您的项目帧率设置而定。
3 您可以在每个预设下方查看到时间线文件名以及导出视频的目标位置。点击“浏览”按钮,选择导出文件的保存位置,然后从渲染选项中选择“单个片段”。
4 然后,您马上就会看到时间线上方出现选项框,并且“整条时间线”选项被选中。这样就会导出整条时间线,但是您可以根据需要选择一段时间线范围。要进行这一操作,只需要选择入范围和出范围,并使用“i”和“o”热键在时间线上选择入点和出点即可。
5 点击“渲染设置”底部的“添加到渲染队列”按钮。
您的渲染设置将被添加到页面右侧的渲染队列中。现在,您只需要点击“开始渲染”并监看渲染队列中的渲染进度即可。
当渲染工作完成后,您可以打开目标文件夹,双击新的渲染片段来查看完成后的剪辑片段。
对剪辑、调色、混音和视觉特效有了基本了解之后,就可以开始体验DaVinci Resolve了。更多关于如何充分利用每项功能完成令人满意的项目,请查阅DaVinci Resolve操作手册。
使用ATEM Mini控制摄影机
ATEM Mini是进行多机位制作和流媒体直播的强大工具。您可通过ATEM Software Control软件控制面板中的摄影机控制功能,从ATEM Mini切换台切换并控制多达四台Blackmagic Pocket Cinema Camera。点击ATEM Software Control中的“摄影机”按钮,就可打开ATEM Mini的摄影机控制功能。
使用兼容镜头时,您可以通过这一功能轻松设置Pocket Cinema Camera的光圈、增益、对焦、细节和变焦控制,并能使用摄影机内置的DaVinci Resolve一级调色工具平衡摄影机色彩,缔造独特炫彩画面。
您还可以添加ATEM Camera Control Panel,一次就能快速精准地掌控四台Pocket Cinema Camera 摄影机!详情请参阅ATEM Mini操作手册。

ATEM摄影机控制
控制摄影机时,ATEM切换台控制的工作原理是通过ATEM Mini的所有HDMI输入向目标设备发送摄影机控制数据包。因此,您可以将ATEM Mini的HDMI输入连接到摄影机的HDMI接口上,摄影机将检测到HDMI信号中的控制数据包,并让您在摄影机内控制这些功能。
打开ATEM Software Control的偏好设置,并设置切换台的按钮映射,确保所切换的摄影机和Tally对应无误。但切换台与Blackmagic Pocket Cinema Camera的视频连接后,您还可以充分利用现场Tally提示灯的优势。
摄影机控制面板
启动ATEM Software Control, 点击位于软件窗口底部的摄影机按钮后, 系统会显示一排有标签的 Blackmagic摄影机控制窗口, 窗口内包含各类工具, 可用来调节和美化每台摄影机的画面。这些控制窗口使用起来十分简单。只需以鼠标点击某个按钮, 或点击并拖动这些功能来调节即可。
摄影机控制选择
摄影机控制窗口的上方有一排按钮,可用来选择您想要控制的摄影机所对应的机位编号。
通道状态
通道状态位于每个摄影机控制窗口的顶部,可显示摄影机标签、正在播出提示灯以及锁定按钮。按锁定按钮可锁定某台摄影机的所有控制。正在播出时,通道状态会亮起红色,并显示正在播出提示。
摄影机设置
主滚轮左下侧的摄影机设置按钮可用来调整每台摄影机的图像信号的细节设置。

每个摄影机控制窗口都会显示通道状态,以便您明确当前哪台摄影机正处于播出状态。使用色轮来调整每个YRGB通道的Lift、Gamma和Gain设置。
细节
使用这一设置可对摄影机直播图像加以锐化。选择以下设置来降低或提高锐化程度:“关闭细节”、“默认细节”用于低锐化、“中等细节”和“高度细节”。
色轮
色轮是DaVinci Resolve调色工具的一项强大功能,它常用于调整每个YRGB通道色彩的Lift、Gamma和Gain设置。点击色轮上方对应的三个按钮即可对相应选项进行调整。
主滚轮
使用色轮下方的主滚轮可同时调整所有YRGB通道,也可只调整每个Lift、Gamma或Gain设置的亮度值。
重置按钮
重置按钮位于每个摄影机控制窗口内右下方的位置,可方便您选择重置、复制或粘贴调色设置。此外,每个色轮也都有各自的重置按钮。按下重置按钮可将某项设置恢复到默认值或是复制/粘贴某项设置。粘贴功能不适用于锁定的控制窗口。
主重置按钮位于调色面板的右下角,可重重ift、Gamma和Gain色轮,以及对比度、色相、饱和度和亮度混合设置。您可将调色设置逐一粘贴到摄影机控制窗口上,也可一次性粘贴到全部摄影机上以保证整体统一效果。光圈、对焦、光圈上限设置和黑电平设置不受粘贴功能影响。当应用“粘贴到全部”操作时,软件会弹出警告消息请求确认,这样能防止意外将新的设置应用到正在直播且未启用锁定保护的摄影机上。

当应用“粘贴到全部”操作时,软件会弹出警告消息请求确认,这样能防止意外将新的设置应用到正在直播且未启用锁定保护的摄影机上。
光圈/黑电平控制
光圈/黑电平控制位于每个摄影机控制窗口内的十字标交点上。当某台摄影机处于直播状态时,对应的控制按钮会亮起红色。
要控制光圈大小,请上下拖动该控制按钮。如只需调整光圈,请按住Shift键后拖动该按钮。
要降低或升高黑电平,请左右拖动该控制按钮。如只需调整黑电平,请在Mac计算机上按住command键,或在Windows计算机上按住Control键后,再拖动该按钮。

当某台摄影机处于直播状态时,对应的光圈/黑电平控制按钮会亮起红色。
变焦控制
使用带有电子变焦功能的兼容镜头时,您可以通过缩放控制来实现镜头的变焦缩放控制。使用摄影机控制窗口的缩放功能和使用镜头上的变焦按钮一样,一端是长焦,一端是广角。点击位于光圈上限滑块上方的缩放控制,向上拖动可拉近镜头,向下拖动则可拉远镜头。
光圈上限设置
光圈上限设置位于光圈/黑电平控制按钮右侧,可限制光圈范围。这一功能可防止直播画面出现过曝现象。
要设置光圈上限,请使用光圈控制按钮将光圈打开到最大,然后上下拖动光圈上限滑块设置合适的最大曝光值。光圈上限设置完成后,当您再次调整光圈时,光圈值就不会超过预先设定的最大曝光值了。
光圈指示灯
光圈指示灯位于光圈/黑电平控制按钮的左侧,可直观显示镜头的光圈大小。光圈指示灯可反映光圈上限设置。
自动对焦按钮
自动对焦按钮位于摄影机控制窗口内右下角的位置。按下此按钮后,可在支持电子对焦的主动式镜头上使用自动对焦功能。请注意,虽然大部分镜头支持电子对焦,但是有些镜头可设置为手动或自动对焦模式,因此请确保您的镜头设置为自动对焦模式以使用这一功能。有些情况下,您可以通过前后滑动镜头上的聚焦环来完成设置。

使用兼容镜头时,点击自动对焦按钮或左右拖动手动对焦控制可进行对焦。
手动对焦调整
当您需要对摄影机进行手动对焦时,您可以使用位于每个摄影机控制窗口底部的对焦滚轮。左右拖动对焦滚轮可手动调整对焦,并同时查看摄影机的视频画面,确保拍摄到清晰图像。
摄影机增益
摄影机增益设置可用来增加摄影机的增益。在Blackmagic Pocket Cinema Camera上,这一设置与ISO有关。这一功能在低光照拍摄条件下十分有用,它可为摄影机传感器增加额外的增益,或ISO,以避免图像欠曝。点击dB增益设置上的左右箭头来减少或增加增益值。
请根据需要适当使用增益功能,例如在户外拍摄,到了日落时光线会逐渐变暗,而您需要提升画面亮度时,可使用这一功能。请注意,增加增益值会增加画面噪点。
快门速度控制
快门速度控制位于色轮和光圈/黑电平控制区块之间。要提高或降低快门速度,请将鼠标指针停留在快门速度栏,然后点击左右箭头图标。在Blackmagic Pocket Cinema Camera上,这一设置与快门角度有关。
如果您注意到光线闪烁,请适当降低快门速度以消除这一现象。如果不想通过摄影机增益功能来提升画面亮度,那么降低快门速度是个较好的办法,因为它可增加图像传感器的曝光时间。由于提高快门速度可降低动态模糊现象,因此如果需要拍摄出清晰的动作画面,您可以通过提高快门速度将动态模糊现象降到最低。
白平衡
白平衡设置位于快门速度控制旁边,可通过点击色温指示器两侧的向左或向右箭头来进行调整。不同光源会发出暖色或冷色的色调,您可通过调整白平衡来加以补偿。这样可确保白色的部分在拍摄到的画面中依然为白色。

将鼠标指针停留在增益、快门速度栏以及白平衡指示器上时,会出现箭头图标,点击箭头图标可调整相应设置。
DaVinci Resolve一级调色工具
如果您具备一定的调色功底,可以将摄影机控制界面从切换台CCU风格更改为和后期制作调色系统相似的一级调色界面。
您的Blackmagic摄影机自带DaVinci Resolve一级调色工具。Blackmagic摄影机内的调色界面和DaVinci Resolve完全相同,因此如果您使用过DaVinci Resolve,此刻就能将丰富的调色经验运用到现场制作了。您可从任何摄影机控制窗口中展开这一调色面板,展开后可获得一个完整的一级调色界面,可为摄影机提供更多调色控制和设置项。
该界面包含色轮组和饱和度等不同设置,您可以同时查看暗部、中间调和亮部的设置。请使用窗口顶部的摄影机按钮来选择不同摄影机。

点击DaVinci Resolve一级调色工具图标展开调色窗口来调整设置。

调色面板中的 Lift Gamma 和 Gain 三个色轮。
色轮
在色轮内任意位置点击并拖动:
注意,执行此操作时,您并不一定非要点拖色彩平衡图标。色彩平衡图标移动时,下方对应的三个RGB参数会相应变化,反映所做的调整对各个色彩通道产生的变化。
在色轮内按Shift键并点击鼠标:
可直接将色彩平衡图标移动到鼠标指针所指的精确位置,可快速实现大幅度调整。
在色轮内双击鼠标:
重置调色设置,该项控制的主滚轮保持不变。
点击色轮右上方的重置控制:
可重置色彩平衡控制及其对应的主滚轮。
主滚轮
色轮下方的主滚轮用于单独调整每个YRGB通道的Lift、Gamma和Gain控制项。

左右拖动来调整主滚轮。
使用主滚轮进行调整方法如下:
向左或向右拖动主滚轮:
向左拖动可使所选的画面参数变深,向右拖动可使该参数变浅。进行调整时,下方的各项YRGB参数会根据所做的调整发生相应变化。如只需对通道进行调整,请按住ALT键或Command键并左右拖动鼠标即可。由于这一调色系统采用的是YRGB处理方式,您可以充分利用创意,并且可以只调整Y通道,从而创作出独特的效果。当“亮度混合”滑块位于右侧时,可获得YRGB处理方式;当滑块位于左侧时,可获得常规的RGB处理方式。通常,大部分DaVinci Resolve调色师都使用YRGB调色方式,因为它能提供更多色彩平衡控制,而且不会影响整体增益,因此能更快完成并制作出理想效果。
对比度设置
对比度设置可用来控制图像中最暗部和最亮部之间的差值。它与反向调整Lift和Gain主滚轮的效果类似。该滑块的默认设置为 50%
饱和度设置
饱和度设置可用来增加或减少图像中的色彩含量。该滑块的默认设置为 50% 。
色相设置
色相设置可用来将整幅图像的色彩按照色轮最边缘的色相依次调整。默认设置为180度,显示的是原始色相分布。增加或减少这一参数可沿色轮最边缘分布的色相前进或后退。
亮度混合设置
Blackmagic摄影机内置的调色工具是基于DaVinci Resolve一级调色工具所设计的。DaVinci早在20世纪80年代起就开始制造调色工具,大部分好莱坞电影都选择使用DaVinci Resolve进行调色。
这意味着您的摄影机所配有的是一款有着独特创意的强大调色工具,而YRGB处理便是其中一项强大的功能。
调色时,您可以选择使用RGB或YRGB处理方式。高端调色师选择RGB处理方式,是因为这种处理方式能更精准地控制色彩,并且可以单独调整各个通道的参数,获得更具创意的选项。
当亮度混合控制滑块位于右侧时,输出 100% 的YRGB调色方式。当亮度混合控制滑块位于左侧时,输出 100% 的RGB调色方式。您可将亮度混合百分比设置在0到100之间的任何位置,以不同的混合输出GB和YRGB调色。
如何才能设置到最佳效果呢?这取决于您,因为调色需要的是创意,因此没有标准的参数要求。只要您满意,您的设置就是最佳方案!

左右拖动滑块来调整对比度、饱和度、色相以及亮度混合的设置。
如何才能设置到理想的效果呢?最终还是取决于个人,因为调色纯属创意过程,不存在所谓对与错。只要您觉得满意,那就是理想的设置。
同步设置
连接后,摄影机控制信号会通过ATEM切换台发送到Blackmagic摄影机上。如果不小心从摄影机上对某项设置进行了调整,摄影机控制会自动重置该设置,使二者保持同步。
提示 每个摄影机控制器内的DaVinci Resolve一级调色工具都可通过DaVinci Resolve Micro Panel进行控制,使用硬件控制面板可以快速准确地进行调色操作。详情请参阅ATEM Mini操作手册。
备注如果一台摄影机通过HDMI连接到ATEM Mini,并且这台摄影机处于关闭状态,那么它就有可能会影响摄影机控制通讯。我们建议您为摄影机连接主电源,并且在关闭摄影机之前拔出HDMI线缆。
使用第三方软件
将来自摄影机的素材片段复制到外接硬盘或者RAID上,再将素材导入DaVinci Resolve等编辑软件中,便可使用自己喜爱的软件来剪辑素材。您还可以为CFast或SD卡使用硬盘座或转接器,或者通过USB-C端口连接USB-C硬盘,直接导入来自存储介质的片段。
处理CFast 2.0卡和SD卡上的文件

从摄影机上取下CFast或SD卡,并使CFast2.0读写设备或CFast驱动器将其挂载在您的计算机上,就可直接在您的CFast卡上编辑。
从CFast2.0卡或SD卡上导入您的素材片段步骤如下:
从您的Blackmagic Pocket Cinema Camera摄影机上取出CFast或SD卡。
使用CFast 2.0读卡器或SD卡和CFast读卡器,将CFast或SD卡挂载到Mac或Windows计算机上。
2 双击打开CFast或SD卡,您应该能看到一些列文件夹,这些文件夹中包含有Blackmagic RAW图像文件或QuickTime电影文件的列表。根据您选择的记录格式,您可能会看到不同格式的文件,但是它们应该都使用相同的文件命名格式。
3 现在您只需选中要从CFast或SD卡导入的文件,拖动到桌面或者其他存储盘中即可,或者使用剪辑软件直接从CFast或SD卡中读取文件。
从计算机上拔出CFast或SD卡之前,请务必先在Mac或Windows计算机上安全弹出CFast卡或SD卡。如果在未执行弹出操作的情况下直接移除存储卡,就可能会损坏素材文件。
处理USB-C硬盘上的文件
如何从USB-C硬盘上导入素材片段:
从您的摄影机上拔出USB-C硬盘。
2 通过计算机上的USB-C端口将USB-C硬盘挂载到Mac或Windows计算机上。推荐使用USB3.0,因为USB2.0对于实时剪辑视频来说速度可能不够快。
3 双击打开USB-C硬盘后,您会看到包含QuickTime影片文件或Blackmagic RAW文件的一个列表。根据您选择的记录格式,您可能会看到不同格式的文件,但是它们应该都使用相同的文件命名格式。
选中需要从USB-C硬盘导入的文件,拖动到桌面或者其他存储盘中,或使用NLE软件直接从USB-C硬盘中读取文件即可。
5 从计算机上拔出USB-C硬盘之前,请务必先将USB-C硬盘安全弹出。
使用Final Cut Pro X
若使用Final Cut Pro X剪辑片段,您需要创建一个具有合适视频格式及帧率的新项目。这个例子中使用的是ProRes 422 HQ 1080p24。

Final Cut Pro X项目设置
1 运行Final Cut Pro X, 到“Menu”(菜单)中选择“File”(文件)/“New Project”(新项目)后,会出现一个项目设置窗口。
2 给项目命名,并选择“Custom”(自定义)复选框。
3 将“Video Properties”(视频属性)设置为1080p HD, 1920×1080和24p。
4 将“Audio”(音频)和“Render Properties”(渲染属性)设置为“Stereo”(立体声),“48kHz”,和“Apple ProRes 422 HQ”。
5 点击“OK”确定。
若要将素材导入项目中,需到菜单栏中选择“File”(文件)/“Import”(导入)/“Media”(媒体),然后从CFast卡中选择要导入的素材。
现在可以将素材拖动到时间线上进行剪辑了。
使用Avid MediaComposer2018
若使用Avid MediaComposer2018剪辑素材,您需要创建一个合适视频格式及帧率的新项目。本例子中的素材均使用1080p24的设置。

在Avid MediaComposer2018上设置项目名称和项目选项
1 运行Avid MediaComposer2018,“SelectProject”(选择项目)的窗口将会弹出。
2 点击“New Project”(新建项目)按钮,并且在该窗口中为项目命名。
3 到“Format”(格式)下拉菜单中选择HD1080>1080p/24并点击“OK”创建项目。
4 到“Select Project”(选择项目)中双击该项目将其打开。
5 依次选择“File”(文件)>“Input”(输入)>“Source Browser”(源浏览器)并导航到您想要导入的文件。
6 从下拉菜单中选择“TargetBin”(目标库)并点击“Import”(导入)。
当媒体库中显示出素材片段后,您便可以将素材拖动到时间线上进行剪辑了。
使用AdobePremiereProCC
若使用AdobePremiereProCC剪辑AppleProRes422HQ素材,您需要创建一个具有合适视频格式及帧率的新项目。本例子中的素材均使用ProRes422HQ1080p25设置。

在AdobePremiereProCC上设置项目名称和项目选项
1 运行AdobePremiereProCC。在“Welcome”欢迎窗口中,选择“NewProject”(新建项目)。然后会出现一个项目设置窗口。
2 为项目命名。点击Browse”(浏览)选择安装项目的文件夹,选择了文件夹之后,点击“新建项目”窗口中的"OK”确定。
3 到AdobePremiereProCC的菜单栏,选择“File”(文件)/“import”(导入),然后选择想要剪辑的素材。然后您的素材便会在项目窗口中显示出来。
4 将您需要剪辑的第一段素材拖动到位于项目窗口右下角的“New Item”(新建项)图标上后,就会建立一段和您的视频设置相符的新序列。
现在可以将素材拖动到序列时间线上进行剪辑了。
Blackmagic Camera Setup Utility实用软件
更新摄影机软件 - Mac
下载了Blackmagic Camera Setup Utility实用软件并解压缩后,请打开下载磁盘图标查看Blackmagic Camera Setup安装程序。
运行安装程序,根据屏幕提示完成安装。完成安装程序后,进入实用程序文件夹,打开"blackmagic Cameras"文件夹,里面含有本手册、Blackmagic Camera Setup Utility实用软件以及一个含有自述文件和相关信息的文件夹。同时还包含一个卸载程序可用于升级到Blackmagic Camera Setup较新版本。

更新摄影机软件 - Windows
下载了Blackmagic Camera Setup Utility实用软件并解压缩后,您会看到一个名为Blackmagic Camera Setup"的文件夹,该文件夹中含有PDF版操作手册以及Blackmagic Camera Setup安装程序。双击该安装程序,并根据屏幕提示完成安装。
在Windows10系统下点击开始按钮并选择“所有程序”。向下滚动到Blackmagic Design文件夹。从这里运行Blackmagic Camera Setup软件。在Windows8.1系统下,选择“开始”屏幕的向下箭头图标,并向下滚动到Blackmagic Design文件夹。从这里运行Blackmagic Camera Setup软件。
升级摄影机的内部软件
在计算机上安装了最新版Blackmagic Camera Setup Utility实用软件后,请使用USB-C线缆连接计算机和摄影机。USB-C端口位于左侧面板。只需打开橡胶盖便可找到端口。
运行Blackmagic Camera Setup实用程序,并根据屏幕提示更新摄影机软件。摄影机重启出现“Select Language”页面。需要注意的是,更新摄影机软件会删除所有预设和自定义LUT,并重置所有设置。更新软件之前,不妨将这些数据导出到存储卡上进行备份。软件更新后,只要再从存储卡中导入预设和LUT就可以快速恢复。
建议使用的记录存储介质
CFast 2.0卡
Pocket Cinema Camera 6K机型建议使用的存储介质
建议在Pocket Cinema Camera 6K机型使用以下几款CFast 2.0卡记录最高50fps的6K Blackmagic RAW 5:1影像:
品牌 存储卡名称 容量 Angelbird AV PRO CF XT 512GB CinediskPro 510MB /s CFast 2.0 256GB Hagiwara Solutions DC-SMAN64GA CFast 2.0 64GB Hagiwara Solutions DC-SMANA1GA CFast 2.0 128GB KomputerBay 3400x CFast 2.0 64GB KomputerBay 3400x CFast 2.0 128GB Lexar Professional 3400X CFast 2.0 128GB Lexar Professional 3500X CFast 2.0 128GB ProGrade Digital 510MB/s CFast 2.0 128GB ProGrade Digital 550MB/s CFast 2.0 256GB ProGrade Digital 550MB/s CFast 2.0 512GB Transcend CFX650 CFast 2.0 TS128GCFX650 128GB SanDisk Extreme Pro CFast 2.0 SDCFSP-64G-x46D 64GB SanDisk Extreme Pro CFast 2.0 SDCFSP-128G-x46D 128GB SanDisk Extreme Pro CFast 2.0 SDCFSP-256G-x46D 256GB SanDisk Extreme Pro CFast 2.0 SDCFSP-512G-x46D 512GB Silicon Power CFX310 CFast 2.0 512GB Sony CFast 2.0 G Series CAT-G64 64GB Sony CFast 2.0 G Series CAT-G128 128GB Wise CFA-2560 3400x CFast 2.0 256GB Wise CFA-5120 3500x CFast 2.0 512GB Wise CFA-10240 3500X CFast 2.0 1TB
建议在Pocket Cinema Camera 6K机型使用以下几款CFast 2.0卡记录最高60fps的6K 2.4:1 Blackmagic RAW 5:1影像:
品牌 存储卡名称 容量 Angelbird AV PRO CF XT 512GB CinediskPro 510MB /s CFast 2.0 256GB Hagiwara Solutions DC-SMAN64GA CFast 2.0 64GB Hagiwara Solutions DC-SMANA1GA CFast 2.0 128GB KomputerBay 3400x CFast 2.0 64GB KomputerBay 3400x CFast 2.0 128GB Lexar Professional 3400X CFast 2.0 128GB Lexar Professional 3500X CFast 2.0 128GB ProGrade Digital 510MB/s CFast 2.0 128GB ProGrade Digital 550MB/s CFast 2.0 256GB ProGrade Digital 550MB/s CFast 2.0 512GB Transcend CFX650 CFast 2.0 TS128GCFX650 128GB SanDisk Extreme Pro CFast 2.0 SDCFSP-64G-x46D 64GB SanDisk Extreme Pro CFast 2.0 SDCFSP-128G-x46D 128GB SanDisk Extreme Pro CFast 2.0 SDCFSP-256G-x46D 256GB SanDisk Extreme Pro CFast 2.0 SDCFSP-512G-x46D 512GB Silicon Power CFX310 CFast 2.0 256GB Silicon Power CFX310 CFast 2.0 512GB Sony CFast 2.0 G Series CAT-G64 64GB Sony CFast 2.0 G Series CAT-G128 128GB Wise CFA-1280 3400x CFast 2.0 128GB Wise CFA-2560 3400x CFast 2.0 256GB Wise CFA-5120 3500x CFast 2.0 512GB Wise CFA-10240 3500X CFast 2.0 1TB
建议在Pocket Cinema Camera 6K机型使用以下几款CFast 2.0卡记录最高120fps的2.8K 17:9 Blackmagic RAW 3:1影像:
品牌 存储卡名称 容量 Angelbird AV PRO CF XT 512GB CinediskPro 510MB/s CFast 2.0 256GB Hagiwara Solutions DC-SMAN64GA CFast 2.0 64GB Hagiwara Solutions DC-SMANA1GA CFast 2.0 128GB KomputerBay 3400x CFast 2.0 64GB KomputerBay 3400x CFast 2.0 128GB Lexar Professional 3400X CFast 2.0 128GB Lexar Professional 3500X CFast 2.0 128GB Lexar Professional 3400X CFast 2.0 256GB ProGrade Digital 510MB/s CFast 2.0 128GB ProGrade Digital 550MB/s CFast 2.0 256GB ProGrade Digital 550MB/s CFast 2.0 512GB Transcend CFX650 CFast 2.0 TS128GCFX650 128GB SanDisk Extreme Pro CFast 2.0 SDCFSP-64G-x46D 64GB SanDisk Extreme Pro CFast 2.0 SDCFSP-128G-x46D 128GB SanDisk Extreme Pro CFast 2.0 SDCFSP-256G-x46D 256GB SanDisk Extreme Pro CFast 2.0 SDCFSP-512G-x46D 512GB Silicon Power CFX310 CFast 2.0 256GB Silicon Power CFX310 CFast 2.0 512GB Sony CFast 2.0 G Series CAT-G64 64GB Sony CFast 2.0 G Series CAT-G128 128GB Wise CFA -1280 3400x CFast 2.0 128GB Wise CFA -2560 3400x CFast 2.0 256GB Wise CFA -5120 3500x CFast 2.0 512GB Wise CFA -10240 3500X CFast 2.0 1TB
建议在Pocket Cinema Camera 6K机型使用以下几款CFast 2.0卡记录最高60fps的4K DCI ProRes HQ影像:
品牌 存储卡名称 容量 Angelbird AV PRO CF XT 512GB CinediskPro 510MB/s CFast 2.0 256GB Hagiwara Solutions DC-SMAN64GA CFast 2.0 64GB Hagiwara Solutions DC-SMANA1GA CFast 2.0 128GB KomputerBay 3400x CFast 2.0 64GB KomputerBay 3400x CFast 2.0 128GB Lexar Professional 3400X CFast 2.0 128GB Lexar Professional 3500X CFast 2.0 128GB Lexar Professional 3400X CFast 2.0 256GB ProGrade Digital 510MB/s CFast 2.0 128GB ProGrade Digital 550MB/s CFast 2.0 256GB ProGrade Digital 550MB/s CFast 2.0 512GB Transcend CFX650 CFast 2.0 TS128GCFX650 128GB SanDisk Extreme Pro CFast 2.0 SDCFSP-64G-x46D 64GB SanDisk Extreme Pro CFast 2.0 SDCFSP-128G-x46D 128GB SanDisk Extreme Pro CFast 2.0 SDCFSP-256G-x46D 256GB SanDisk Extreme Pro CFast 2.0 SDCFSP-512G-x46D 512GB Silicon Power CFX310 CFast 2.0 256GB Silicon Power CFX310 CFast 2.0 512GB Sony CFast 2.0 G Series CAT-G64 64GB Sony CFast 2.0 G Series CAT-G128 128GB Wise CFA-1280 3400x CFast 2.0 128GB Wise CFA -2560 3400x CFast 2.0 256GB Wise CFA -5120 3500x CFast 2.0 512GB Wise CFA -10240 3500X CFast 2.0 1TB
建议在Pocket Cinema Camera 6K机型使用以下几款CFast 2.0卡记录最高120fps的1080 ProRes 422 HQ影像:
品牌 存储卡名称 容量 Angelbird AV PRO CF XT 512GB CinediskPro 510MB /s CFast 2.0 256GB Hagiwara Solutions DC-SMAN64GA CFast 2.0 64GB Hagiwara Solutions DC-SMANA1GA CFast 2.0 128GB KomputerBay 3400x CFast 2.0 64GB KomputerBay 3400x CFast 2.0 128GB Lexar Professional 3400X CFast 2.0 128GB Lexar Professional 3500X CFast 2.0 128GB Lexar Professional 3400X CFast 2.0 256GB ProGrade Digital 510MB/s CFast 2.0 128GB ProGrade Digital 550MB/s CFast 2.0 256GB ProGrade Digital 550MB/s CFast 2.0 512GB Transcend CFX650 CFast 2.0 TS128GCFX650 128GB SanDisk Extreme Pro CFast 2.0 SDCFSP-64G-x46D 64GB SanDisk Extreme Pro CFast 2.0 SDCFSP-128G-x46D 128GB SanDisk Extreme Pro CFast 2.0 SDCFSP-256G-x46D 256GB SanDisk Extreme Pro CFast 2.0 SDCFSP-512G-x46D 512GB Silicon Power CFX310 CFast 2.0 256GB Silicon Power CFX310 CFast 2.0 512GB Sony CFast 2.0 G Series CAT-G64 64GB Sony CFast 2.0 G Series CAT-G128 128GB Wise CFA -1280 3400x CFast 2.0 128GB Wise CFA -2560 3400x CFast 2.0 256GB Wise CFA -5120 3500x CFast 2.0 512GB Wise CFA -10240 3500X CFast 2.0 1TB
Pocket Cinema Camera 4K机型建议使用的存储介质
建议在Pocket Cinema Camera 4K机型使用以下几款CFast 2.0卡记录最高60fps的4K DCI Blackmagic RAW 3:1影像:
品牌 存储卡名称 容量 Angelbird AV PRO CF 512GB Angelbird AV PRO CF 1TB CinediskPro 510MB /s CFast 2.0 256GB Hagiwara Solutions DC-SMAN64GA CFast 2.0 64GB Hagiwara Solutions DC-SMANA1GA CFast 2.0 128GB KomputerBay 3400x CFast 2.0 64GB KomputerBay 3400x CFast 2.0 128GB KomputerBay 3700x CFast 2.0 256GB Lexar Professional 3400x CFast 2.0 128GB Lexar Professional 3500x CFast 2.0 256GB ProGrade Digital 550MB/s CFast 2.0 128GB ProGrade Digital 550MB/s CFast 2.0 256GB ProGrade Digital 550MB/s CFast 2.0 512GB SanDisk Extreme Pro CFast 2.0 SDCFSP-256G-x46D 512GB Wise CFA-1280 3400x CFast 2.0 128GB Wise CFA-2560 3400x CFast 2.0 256GB Wise CFA-5120 3500x CFast 2.0 512GB Wise CFA-10240 3500x CFast 2.0 1TB
建议在Pocket Cinema Camera 4K机型使用以下几款CFast 2.0卡记录最高60fps的4K DCI ProRes HQ影像:
品牌 存储卡名称 容量 Angelbird AV PRO CF 128GB Angelbird AV PRO CF 256GB Angelbird AV PRO CF 512GB CinediskPro 510MB /s CFast 2.0 256GB Hagiwara Solutions DC-SMAN64GA CFast 2.0 64GB Hagiwara Solutions DC-SMANA1GA CFast 2.0 128GB KomputerBay 3400x CFast 2.0 128GB KomputerBay 3700x CFast 2.0 256GB ProGrade Digital 550MB/s CFast 2.0 256GB ProGrade Digital 550MB/s CFast 2.0 512GB SanDisk Extreme Pro CFast 2.0 SDCFSP-64G-x46D 64GB SanDisk Extreme Pro CFast 2.0 SDCFSP-128G-x46D 128GB SanDisk Extreme Pro CFast 2.0 SDCFSP-256G-x46D 256GB Sony CFast 2.0 G Series CAT-G64 64GB Sony CFast 2.0 G Series CAT-G128 128GB Wise CFA -1280 3400x CFast 2.0 128GB Wise CFA -2560 3400x CFast 2.0 256GB Wise CFA -5120 3500x CFast 2.0 512GB Wise CFA -10240 3500x CFast 2.0 1TB
建议在Blackmagic Pocket Cinema Camera 4K机型使用以下几款CFast 2.0卡记录最高30fps的4K DCI无损RAW影像:
品牌 存储卡名称 容量 Angelbird AV PRO CF 128GB Angelbird AV PRO CF 256GB Angelbird AV PRO CF 512GB CinediskPro 510MB/s CFast 2.0 256GB KomputerBay 3400x CFast 2.0 128GB ProGrade Digital 550MB/s CFast 2.0 256GB ProGrade Digital 550MB/s CFast 2.0 512GB SanDisk Extreme Pro CFast 2.0 SDCFSP-64G-x46D 64GB SanDisk Extreme Pro CFast 2.0 SDCFSP-128G-x46D 128GB SanDisk Extreme Pro CFast 2.0 SDCFSP-256G-x46D 256GB Sony CFast 2.0 G Series CAT-G64 64GB Sony CFast 2.0 G Series CAT-G128 128GB Wise CFA -1280 3400x CFast 2.0 128GB Wise CFA -2560 3400x CFast 2.0 256GB Wise CFA -5120 3500x CFast 2.0 512GB
建议在Blackmagic Pocket Cinema Camera 4K机型使用以下几款CFast 2.0卡记录最高60fps的4K DCI 3:1 RAW影像:
品牌 存储卡名称 容量 Angelbird AV PRO CF 128GB Angelbird AV PRO CF 256GB Angelbird AV PRO CF 512GB CinediskPro 510MB/s CFast 2.0 256GB Ko mputerBay 3400x CFast 2.0 128GB ProGrade Digital 550MB/s CFast 2.0 256GB ProGrade Digital 550MB/s CFast 2.0 512GB SanDisk Extreme Pro CFast 2.0 SDCFSP-64G-x46D 64GB SanDisk Extreme Pro CFast 2.0 SDCFSP-128G-x46D 128GB SanDisk Extreme Pro CFast 2.0 SDCFSP-256G-x46D 256GB Sony CFast 2.0 G Series CAT-G64 64GB Sony CFast 2.0 G Series CAT-G128 128GB Wise CFA -1280 3400x CFast 2.0 128GB Wise CFA -2560 3400x CFast 2.0 256GB Wise CFA -5120 3500x CFast 2.0 512GB
SD卡
Pocket Cinema Camera 6K机型建议使用的存储介质
建议在Pocket Cinema Camera 6K机型使用以下几款SD卡记录最高30fps的6K 16:9 Blackmagic RAW 5:1影像:
品牌 存储卡名称 容量 Angelbird AV PRO SD V90 64GB Sony Tough SF-G32T 32GB Sony Tough SF-G64T 64GB Sony Tough SF-G128T 128GB Toshiba Exceria Pro UHS-II 270MB/s SDXC 64GB Wise SD2 -128U3 SDXC UHS-II 128GB
建议在Pocket Cinema Camera 6K机型使用以下几款SD卡记录最高30fps的6K 16:9 Blackmagic RAW 8:1影像:
品牌 存储卡名称 容量 Angelbird AV PRO SD V90 64GB Sony Tough SF-G32T 32GB Sony Tough SF-G64T 64GB Sony Tough SF-G128T 128GB Toshiba Exceria Pro UHS-II 270MB/s SDXC 64GB Toshiba Exceria Pro UHS-II 270MB/s SDXC 128GB Toshiba Exceria Pro UHS-II N502 SDXC 128GB Wise SD2 -128U3 SDXC UHS-II 128GB
建议在Pocket Cinema Camera 6K机型使用以下几款SD卡记录最高60fps的6K 2.4:1 Blackmagic RAW 12:1影像:
品牌 存储卡名称 容量 Angelbird AV PRO SD V90 64GB Sony Tough SF-G32T 32GB Sony Tough SF-G64T 64GB Sony Tough SF-G128T 128GB Toshiba Exceria Pro UHS-II 270MB/s SDXC 64GB Toshiba Exceria Pro UHS-II 270MB/s SDXC 128GB Toshiba Exceria Pro UHS-II N502 SDXC 128GB
建议在Pocket Cinema Camera 6K机型使用以下几款SD卡记录最高60fps的4K DCI ProRes HQ影像:
品牌 存储卡名称 容量 Angelbird AV PRO SD V90 64GB Delkin Devices Power SDXC USH-II 64GB Delkin Devices Prime SDXC USH-II 128GB ProGrade Digital V90 UHS-II 250MB/s SDXC 128GB ProGrade Digital V90 UHS-II 250MB/s SDXC 256GB Sony Tough SF-G32T 32GB Sony Tough SF-G64T 64GB Sony Tough SF-G128T 128GB Wise SD2-64U3 SDXC UHS-II 64GB Wise SD2-128U3 SDXC UHS-II 128GB Toshlba Excerla Pro UHS-II N502 SDXC 128GB
建议在Pocket Cinema Camera 6K机型使用以下几款SD卡记录最高120fps的1080 ProRes 422 HQ影像:
品牌 存储卡名称 容量 Angelbird AV PRO SD V90 64GB Delkin Devices Power SDXC USH-II 64GB Delkin Devices Prime SDXC USH-II 128GB Lexar Professional 2000x UHS-II 300MB/s SDXC 64GB Lexar Professional 2000x UHS-II 300MB/s SDXC 128GB ProGrade Digital V90 UHS-II 250MB/s SDXC 256GB Sony Tough SF-G32T 32GB Sony Tough SF-G64T 64GB Sony Tough SF-G128T 128GB Toshiba Exceria Pro UHS-II 270MB/s SDXC 64GB Toshiba Exceria Pro UHS-II 270MB/s SDXC 128GB Toshiba Exceria Pro UHS-II N502 SDXC 128GB Toshiba Exceria Pro UHS-II N502 SDXC 256GB Wise SD2 -64U3 SDXC UHS-II 64GB Wise SD2 -128U3 SDXC UHS-II 128GB
Pocket Cinema Camera 4K机型建议使用的存储介质
建议在Pocket Cinema Camera 4K机型使用以下几款SD卡记录最高30fps的4K DCI Blackmagic RAW 12:1影像:
品牌 存储卡名称 容量 Angelbird AV PRO SD V90 64GB Delkin Devices Power UHS-II SDXC 64GB Delkin Devices Power UHS-II SDXC 128GB Lexar Professional 2000x UHS-II 300MB/s SDXC 64GB ProGrade Digital V90 UHS-II 250MB/s SDXC 256GB SanDisk Extreme Pro UHS-I 95MB/s SDXC 512GB Sony Tough SF-G64T 64GB Sony Tough SF-G128T 128GB Sony SF-G64 300MB/s UHS-II SDXC 64GB Toshiba Exceria Pro UHS-II N502 SDHC 32GB Toshiba Exceria Pro UHS-II 270MB/s SDXC 64GB Wise SD2 -64U3 SDXC UHS-II 64GB Wise SD2 -128U3 SDXC UHS-II 128GB Wise SD2 -128U3 SDXC UHS-II 128GB
建议在Pocket Cinema Camera 4K机型使用以下几款SD卡记录最高60fps的4K DCI ProRes HQ影像:
品牌 存储卡名称 容量 Wise SD2-64U3 SDXC UHS-II 64GB Wise SD2 -128U3 SDXC UHS-II 128GB Sony Tough SF-G64T 64GB Sony Tough SF-G128T 128GB
建议在Pocket Cinema Camera 4K机型使用以下几款SD卡记录最高60fps的4K DCI 4:1 RAW影像:
品牌 存储卡名称 容量 Sony Tough SF-G64T 64GB Sony Tough SF-G128T 128GB Toshiba Exceria Pro UHS-II N502 SDXC 32GB
建议在Pocket Cinema Camera 4K机型使用以下几款SD卡记录最高24fps的4K DCI无损RAW影像:
品牌 存储卡名称 容量 Wise SD2-64U3 SDXC UHS-II 64GB Wise SD2 -128U3 SDXC UHS-II 128GB Toshiba Exceria Pro UHS-II N502 SDXC 32GB Sony Tough SF-G64T 64GB Sony Tough SF-G128T 128GB
建议在Pocket Cinema Camera 4K机型使用以下几款SD卡记录最高60fps的1080p无损RAW影像:
品牌 存储卡名称 容量 Wise SD2-64U3 SDXC UHS-II 64GB Wise SD2 -128U3 SDXC UHS-II 128GB Sony Tough SF-G64T 64GB Sony Tough SF-G128T 128GB Toshiba Exceria Pro UHS-II N502 SDXC 32GB Toshiba Exceria Pro UHS-II N502 SDXC 64GB Toshiba Exceria Pro UHS-II N502 SDXC 128GB Toshiba Exceria Pro UHS-II N502 SDXC 256GB Sony Tough SF-G128T 128GB
Pocket Cinema Camera 6K机型建议使用的存储介质
建议在Pocket Cinema Camera 6K机型使用以下几款USB-C硬盘记录最高50fps的6K Blackmagic RAW 5:1影像:
品牌 存储卡名称 容量 Wise PTS-1024 Portable SSD 1TB
建议在Pocket Cinema Camera 6K机型使用以下几款USB-C硬盘记录最高60fps的6K 2.4:1 Blackmagic RAW 5:1影像:
品牌 存储卡名称 容量 Samsung Portable SSD T5 250GB Samsung Portable SSD T5 2TB Wise PTS -1024 Portable SSD 1TB
建议在Pocket Cinema Camera 6K机型使用以下几款USB-C硬盘记录最高120fps的2.8K 17:9 Blackmagic RAW 3:1影像:
品牌 存储卡名称 容量 Samsung Portable SSD T5 250GB Samsung Portable SSD T5 2TB Wise PTS -512 Portable SSD 512GB Wise PTS -1024 Portable SSD 1TB
建议在Pocket Cinema Camera 6K机型使用以下几款USB-C硬盘记录最高60fps的4K DCI ProRes HQ影像:
品牌 存储卡名称 容量 Samsung Portable SSD T5 250GB Samsung Portable SSD T5 1TB Samsung Portable SSD T5 2TB SanDisk Extreme Portable SSD 1TB Wise PTS -512 Portable SSD 512GB Wise PTS -1024 Portable SSD 1TB Wise PTS -1024 Portable SSD 1TB
建议在Pocket Cinema Camera 6K机型使用以下几款 USB-C硬盘记录最高120fps的1080 ProRes 422 HQ影像:
品牌 存储卡名称 容量 Samsung Portable SSD T5 250GB Samsung Portable SSD T5 1TB Samsung Portable SSD T5 2TB SanDisk Extreme Portable SSD 1TB Wise PTS -512 Portable SSD 512GB Wise PTS -1024 Portable SSD 1TB Wise PTS -1024 Portable SSD 1TB
Pocket Cinema Camera 4K机型建议使用的存储介质
建议在Pocket Cinema Camera 4K机型使用以下几款USB-C硬盘记录最高60fps的4K DCI Blackmagic RAW 3:1影像:
品牌 存储卡名称 容量 Angelbird SSD2GO PKT 512GB Angelbird SSD2GO PKT 2TB G-Technology G-DRIVE Mobile SSD 1TB Samsung Portable SSD T5 2TB Wise PTS -512 Portable SSD 512GB
建议在Pocket Cinema Camera 4K机型使用以下几款USB-C硬盘记录最高60fps的4K DCI ProRes HQ影像:
品牌 存储卡名称 容量 Angelbird SSD2GO PKT 512GB Angelbird SSD2GO PKT 2TB Glyph Atom 500GB Lacie Portable SSD 500GB Samsung Portable SSD T5 500GB Samsung Portable SSD T5 1TB SanDisk Extreme Portable SSD 1TB Seagate Fast SSD 250GB Wise PTS -256 Portable SSD 256GB Wise PTS -512 Portable SSD 512GB Wise PTS -1024 Portable SSD 1TB
建议在Pocket Cinema Camera 4K机型使用以下几款USB-C硬盘记录最高30fps的4K DCI无损RAW影像:
品牌 存储卡名称 容量 Angelbird SSD2GO PKT 512GB Angelbird SSD2GO PKT 2TB Samsung Portable SSD T5 1TB Wise PTS -256 Portable SSD 256GB Wise PTS -512 Portable SSD 512GB Wise PTS -1024 Portable SSD 1TB
建议在Pocket Cinema Camera 4K机型使用以下几款USB-C硬盘记录最高60fps的4K DCI 3:1 RAW影像:
品牌 存储卡名称 容量 Angelbird SSD2GO PKT 512GB Angelbird SSD2GO PKT 2TB Samsung Portable SSD T5 500GB Samsung Portable SSD T5 1TB Wise PTS -256 Portable SSD 256GB Wise PTS -512 Portable SSD 512GB Wise PTS -1024 Portable SSD 1TB
Developer Information
Blackmagic Bluetooth Camera Control
Blackmagic cameras with Bluetooth LE implement a variety of features and commands that allow users to control their cameras wirelessly. Developers have full access to these features for their custom applications.
The following services and characteristics describe the full range of communication options that are available to the developer.
Service: Device Information Service
UUID:180A
Characteristics
Camera Manufacturer
UUID:2A29
Read the name of the manufacturer (always "Blackmagic Design").
Camera Model
UUID:2A24
Read the name of the camera model ("Pocket Cinema Camera 6K" or "Pocket Cinema Camera 4K").
Service: Blackmagic Camera Service
UUID: 291D567A-6D75-11E6-8B77-86F30CA893D3
Characteristics
Outgoing Camera Control (encrypted)
UUID:5DD3465F-1AEE-4299-8493-D2ECA2F8E1BB
Send Camera Control messages
These messages are identical to those described in the Blackmagic SDI Camera Control Protocol section below. Please read that section for a list of supported messages and required formatting information.
For an example of how packets are structured, please see the 'example protocol packets' section in this document.
Incoming Camera Control (encrypted)
UUID:B864E140-76A0-416A-BF30-5876504537D9
Request notifications for this characteristic to receive Camera Control messages from the camera.
These messages are identical to those described in the Blackmagic SDI Camera Control Protocol section below. Please read that section for a list of supported messages and required formatting information.
Timecode (encrypted)
UUID:6D8F2110-86F1-41BF-9AFB-451D87E976C8
Request notifications for this characteristic to receive timecode updates.
Timecode (HH:MM:SS:mm) is represented by a 32-bit BCD number:
(eg. 09:12:53:10 = 0x09125310)
Camera Status (encrypted)
UUID:7FE8691D-95DC-4FC5-8ABD-CA74339B51B9
Request notifications for this characteristic to receive camera status updates.
The camera status is represented by flags contained in an 8-bit integer:
None = 0 × 00
Camera Power On = 0x01
Connected = 0× 02
Palred = 0× 04
Versions Verified = 0x08
Initial Payload Received = 0× 10
Camera Ready = 0 × 20
Send a value of 0x00 to power a connected camera off.
Send a value of 0x01 to power a connected camera on.
Device Name
UUID:FFACOC52-C9FB-41A0-B063-CC76282EB89C
Send a device name to the camera (max. 32 characters).
The camera will display this name in the Bluetooth Setup Menu.
Protocol Version
UUID: 8F1FD018-B508-456F-8F82-3D392BEE2706
Read this value to determine the camera's supported CCU protocol version.
NOTE Encrypted characteristics can only be used once a device has successfully bonded or paired with the Blackmagic Camera. Once a connection has been established, any attempt to write to an encrypted characteristic will initiate bonding. For example, writing a 'Camera Power On' (0x01) message to the Camera Status characteristic.
Once bonding is initiated, the camera will display a 6-digit pin in the Bluetooth Setup Menu. Enter this pin on your device to establish an encrypted connection. The device will now be able to read, write and receive notifications from encrypted characteristics.
Blackmagic SDI and Bluetooth Camera Control Protocol
Version 1.4
If you are a software developer you can use the Blackmagic SDI and Bluetooth Camera Control Protocol to construct devices that integrate with our products. Here at Blackmagic Design, our approach is to open up our protocols and we eagerly look forward to seeing what you come up with!
Overview
This document describes an extensible protocol for sending a unidirectional stream of small control messages embedded in the non-active picture region of a digital video stream. The video stream containing the protocol stream may be broadcast to a number of devices. Device addressing is used to allow the sender to specify which device each message is directed to.
Assumptions
Alignment and padding constraints are explicitly described in the protocol document. Bit fields are packed from LSB first. Message groups, individual messages and command headers are defined as, and can be assumed to be, 32 bit aligned.
Blanking Encoding
A message group is encoded into a SMPTE 291M packet with DID/SDID x51/x53 in the active region of VANC line 16.
Message Grouping
Up to 32 messages may be concatenated and transmitted in one blanking packet up to a maximum of 255 bytes payload. Under most circumstances, this should allow all messages to be sent with a maximum of one frame latency.
If the transmitting device queues more bytes of message packets than can be sent in a single frame, it should use heuristics to determine which packets to prioritize and send immediately. Lower priority messages can be delayed to later frames, or dropped entirely as appropriate.
Abstract Message Packet Format
Every message packet consists of a three byte header followed by an optional variable length data block. The maximum packet size is 64 bytes.
Destination device (uint8) Device addresses are represented as an 8 bit unsigned integer. Individual devices are numbered 0 through 254 with the value 255 reserved to indicate a broadcast message to all devices. Command length (uint8) The command length is an 8 bit unsigned integer which specifies the length of the included command data. The length does NOT include the length of the header or any trailing padding bytes. Command id (uint8) The command id is an 8 bit unsigned integer which indicates the message type being sent. Receiving devices should ignore any commands that they do not understand. Commands 0 through 127 are reserved for commands that apply to multiple types of devices. Commands 128 through 255 are device specific. Reserved (uint8) This byte is reserved for alignment and expansion purposes. It should be set to zero. Command data (uint8[]) The command data may contain between 0 and 60 bytes of data. The format of the data section is defined by the command itself. Padding (uint8[]) Messages must be padded up to a 32 bit boundary with 0x0 bytes. Any padding bytes are NOT included in the command length.
Receiving devices should use the destination device address and or the command identifier to determine which messages to process. The receiver should use the command length to skip irrelevant or unknown commands and should be careful to skip the implicit padding as well.
Defined Commands
Command 0 : change configuration
Category (uint8) The category number specifies one of up to 256 configuration categories available on the device. Parameter (uint8) The parameter number specifies one of 256 potential configuration parameters available on the device. Parameters 0 through 127 are device specific parameters. Parameters 128 though 255 are reserved for parameters that apply to multiple types of devices. Data type (uint8) The data type specifies the type of the remaining data. The packet length is used to determine the number of elements in the message. Each message must contain an integral number of data elements. Currently defined values are: 0: void / boolean A void value is represented as a boolean array of length zero. The data field is a 8 bit value with 0 meaning false and all other values meaning true. 1: signed byte Data elements are signed bytes 2: signed 16 bit Integer Data elements are signed 16 bit values 3: signed 32 bit integer Data elements are signed 32 bit values 4: signed 64 bit integer Data elements are signed 64 bit values 5: UTF-8 string Data elements represent a UTF-8 string with no terminating character. Data types 6 through 127 are reserved. 128: signed 5.11 fixed point Data elements are signed 16 bit integers representing a real number with 5 bits for the integer component and 11 bits for the fractional component. The fixed point representation is equal to the real value multiplied by 2^11. The representable range is from -16.0 to 15.9995 (15 + 2047/2048).
Data types 129 through 255 are available for device specific purposes.
Operation types 2 through 127 are reserved.
Operation type (uint8) The operation type specifies what action to perform on the specified parameter. Currently defined values are: 0: assign value The supplied values are assigned to the specified parameter. Each element will be clamped according to its valid range. A void parameter may only be 'assigned' an empty list of boolean type. This operation will trigger the action associated with that parameter. A boolean value may be assigned the value zero for false, and any other value for true. 1: offset / toggle value Each value specifies signed offsets of the same type to be added to the current parameter values. The resulting parameter value will be clamped according to their valid range. It is not valid to apply an offset to a void value. Applying any offset other than zero to a boolean value will invert that value.
Operation types 128 through 255 are available for device specific purposes.
Data (void) The data field is 0 or more bytes as determined by the data type and number of elements.
The category, parameter, data type and operation type partition a 24 bit operation space.
Group ID Parameter Type Index Minimum Maximum Interpretation Lens 0.0 Focus fixed16 - 0.0 1.0 \( 0.0 = \text {near,}1.0 = \text {far} \) 0.1 Instantaneous autofocus void - - - trigger instantaneous autofocus 0.2 Aperture (f-stop) fixed16 - -1.0 16.0 Aperture Value (where fnumber \( = \text {sqrt(2^AV)} \)) 0.3 Aperture (normalised) fixed16 - 0.0 1.0 \( 0.0 = \text {smallest,}1.0 = \text {largest} \) 0.4 Aperture (ordinal) int16 - 0 n Steps through available aperture values from minimum (0) to maximum (n) 0.5 Instantaneous auto aperture void -- - - trigger instantaneous auto aperture 0.6 Optical image stabilisation boolean - - - true = enabled, false = disabled 0.7 Set absolute zoom (mm) int16 - 0 max Move to specified focal length in mm, from minimum (0) to maximum (max) 0.8 Set absolute zoom (normalized) fixed16 - 0.0 1.0 Move to specified focal length: \( 0.0 = \text {wide,}1.0 = \text {tele} \) 0.9 Set continuous zoom (speed) fixed16 - -1.0 +1.0 Start/stop zooming at specified rate: -1.0 = zoom wider fast, 0.0 = stop, +1 = zoom tele fast Video 1.0 Video mode int8 [0] = frame rate -- fps as integer(eg 24, 25, 30, 50, 60) [1] = M-rate -- 0 = regular, 1 = M-rate [2] = dimensions -- 0 = NTSC, 1 = PAL, 2 = 720, 3 = 1080, 4 = 2kDCI, 5 = 2k16:9, 6 = UHD, 7 = 3k Anamorphic, 8 = 4k DCI, 9 = 4k 16:9, 10 = 4.6k 2.4:1, 11 = 4.6k [3] = interlaced -- 0 = progressive, 1 = interlaced [4] = Color space -- 0 = YUV 1.1 Gain (up to Camera 4.9) int8 1 128 1x, 2x, 4x, 8x, 16x, 32x, 64x, 128x gain 1.2 Manual White Balance int16 [0] = color temp 2500 10000 Color temperature in K int16 [1] = tint -50 50 tint 1.3 Set auto WB void -- -- Calculate and set auto white balance 1.4 Restore auto WB void -- -- Use latest auto white balance setting 1.5 Exposure (us) int32 1 42000 time in us 1.6 Exposure (ordinal) int16 -- 0 n Steps through available exposure values from minimum (0) to maximum (n) 1.7 Dynamic Range Mode int8 enum -- 0 2 0 = film, 1 = video, 2 = extended video 1.8 Video sharpening level int8 enum -- 0 3 0 = off, 1 = low, 2 = medium, 3 = high 1.9 Recording format int16 [0] = file frame rate -- fps as integer(eg 24, 25, 30, 50, 60, 120) [1] = sensor frame rate -- -- fps as integer, valid when sensor-off-speed set (eg 24, 25, 30, 33, 48, 50, 60, 120), no change will be performed if this value is set to 0 [2] = frame width -- in pixels [3] = frame height -- in pixels [4] = flags -- [0] = file-M-rate -- -- [1] = sensor-M-rate, valid when sensor-off-speed-set -- [2] = sensor-off-speed -- [3] = interlaced -- [4] = windowed mode 1.10 Set auto exposure mode int8 -- 0 4 0 = Manual Trigger, 1 = Iris, 2 = Shutter, 3 = Iris + Shutter, 4 = Shutter + Iris 1.11 Shutter angle int32 -- 100 36000 Shutter angle in degrees,multiplied by 100 1.12 Shutter speed int32 -- Current sensor frame rate 5000 Shutter speed value as a fraction of 1, so 50 for 1/50th of a second 1.13 Gain int8 -- -128 127 Gain in decibel(dB) 1.14 ISO int32 -- 0 2147483647 ISO value 1.15 Display LUT int8 [0] = selected LUT -- 0 = None, 1 = Custom, 2 = film to video, 3 = film to extended video [1] = enabled or not -- 0 = Not enabled, 1 = Enabled Audio 2.0 Mic level fixed16 - 0.0 1.0 0.0 = minimum, 1.0 = maximum 2.1 Headphone level fixed16 - 0.1 1.0 0.0 = minimum, 1.0 = maximum 2.2 Headphone program mix fixed16 - 0.1 1.0 0.0 = minimum, 1.0 = maximum 2.3 Speaker level fixed16 - 0.1 1.0 0.0 = minimum, 1.0 = maximum 2.4 Input type int8 - 0 3 0 = internal mic,1 = line level input,2 = low mic level input,3 = high mic level input 2.5 Input levels fixed16 [0] ch0 0.0 1.0 0.0 = minimum, 1.0 = maximum [1] ch1 0.0 1.0 0.0 = minimum, 1.0 = maximum 2.6 Phantom power boolean - - - true = powered,false = not powered Output 3.0 Overlay enables uint16 bit field -- -- bit flags:[0] = display status,[1] = display frame guidesSome cameras don't allow separate control of frame guides and status overlays. 3.1 Frame guides style(Camera 3.x) int8 -08 0 = HDTV, 1 = 4:3, 2 = 2:4:1,3 = 2:39:1, 4 = 2:35:1,5 = 1:85:1, 6 = thirds 3.2 Frame guides opacity(Camera 3.x) fixed16 - 0.1 1.0 0.0 = transparent, 1.0 = opaque 3.3 Overlays(replaces .1 and .2 above from Cameras 4.0) int8 [0] = frame guides style - - 0 = off, 1 = 2:4:1, 2 = 2:39:1,3 = 2:35:1, 4 = 1:85:1, 5 = 16:9,6 = 14:9, 7 = 4:3, 8 = 2:1,9 = 4:5, 10 = 1:1 [1] = frame guide opacity 0 100 0 = transparent, 100 = opaque [2] = safe area percentage 0 100 percentage of full frame used by safe area guide (0 means off) [3] = grid style - - bit flags:[0] = display thirds,[1] = display cross hairs,[2] = display center dot,[3] = display horizon Display 4.0 Brightness fixed16 - 0.0 1.0 0.0 = minimum, 1.0 = maximum 4.1 Exposure and focus tools int16 bit field 0x1 = zebra,0x2 = focus assist,0x4 = false color - - 0 = disable, 1 = enable 4.2 Zebra level fixed16 - 0.0 1.0 0.0 = minimum, 1.0 = maximum 4.3 Peaking level fixed16 - 0.0 1.0 0.0 = minimum, 1.0 = maximum 4.4 Color bar enable int8 - 0 30 0 = disable bars,1-30 = enable bars with timeout(seconds) 4.5 Focus Assist Int8 [0] = focus assist method - - 0 = Peak,1 = Colored lines [1] = focus line color - - 0 = Red,1 = Green,2 = Blue,3 = White,4 = Black 4.6 Program return feed enable int8 - 0 30 0 = disable, 1-30 = enable with timeout (seconds) Tally 5.0 Tally brightness fixed16 - 0.0 1.0 Sets the tally front and tally rear brightness to the same level. 0.0 = minimum, 1.0 = maximum 5.1 Front tally brightness fixed16 - 0.0 1.0 Sets the tally front brightness. 0.0 = minimum, 1.0 = maximum 5.2 Rear tally brightness fixed16 - 0.0 1.0 Sets the tally rear brightness. 0.0 = minimum, 1.0 = maximum Tally rear brightness cannot be turned off Reference 6.0 Source int8 enum - 0 2 0 = internal, 1 = program, 2 = external 6.1 Offset int32 - - - +/- offset in pixels Confi-guration 7.0 Real Time Clock int32 [0] time - - BCD - HHMMSSFF (UCT) [1] date - - BCD - YYYYYMMDD 7.1 System language string [0-1] - - ISO-639-1 two character language code 7.2 Timezone int32 - - - Minutes offset from UTC 7.3 Location int64 [0] latitude - - BCD - sDDDDdddddddd where s is the sign: 0 = north (+), 1 = south (-); DD degrees, dddddddddddd decimal degrees [1] longitude - - BCD - sDDDDdddddddd where s is the sign: 0 = west (-), 1 = east (+); DDD degrees, dddddddddddd decimal degrees Color Correction 8.0 Lift Adjust fixed16 [0] red -2.0 2.0 default 0.0 [1] green -2.0 2.0 default 0.0 [2] blue -2.0 2.0 default 0.0 [3] luma -2.0 2.0 default 0.0 8.1 Gamma Adjust fixed16 [0] red -4.0 4.0 default 0.0 [1] green -4.0 4.0 default 0.0 [2] blue -4.0 4.0 default 0.0 [3] luma -4.0 4.0 default 0.0 8.2 Gain Adjust fixed16 [0] red 0.0 16.0 default 1.0 [1] green 0.0 16.0 default 1.0 [2] blue 0.0 16.0 default 1.0 [3] luma 0.0 16.0 default 1.0 8.3 Offset Adjust fixed16 [0] red -8.0 8.0 default 0.0 [1] green -8.0 8.0 default 0.0 [2] blue -8.0 8.0 default 0.0 [3] luma -8.0 8.0 default 0.0 8.4 Contrast Adjust fixed16 [0] pivot 0.0 1.0 default 0.5 [1] adj 0.0 2.0 default 1.0 8.5 Luma mix fixed16 - 0.0 1.0 default 1.0 8.6 Color Adjust fixed16 [0] hue -1.0 1.0 default 0.0 [1] sat 0.0 2.0 default 1.0 8.7 Correction Reset Default void - - - reset to defaults Media 10.0 Codec int8 enum [0] = basic codec -- 0 = CinemaDNG, 1 = DNxHD, 2 = ProRes, 3 = Blackmagic RAW [1] = code variant - - CinemaDNG: 0 = uncompressed, 1 = lossy 3:1, 2 = lossy 4:1 - - ProRes: 0 = HQ, 1 = 422, 2 = LT, 3 = Proxy, 4 = 444, 5 = 444XQ - - Blackmagic RAW: 0 = Q0, 1 = Q5, 2 = 3:1, 3 = 5:1, 4 = 8:1, 5 = 12:1 10.1 Transport mode int8 [0] = mode -- 0 = Preview, 1 = Play, 2 = Record [1] = speed -- -ve = multiple speeds backwards, 0 = pause, +ve = multiple speeds forwards [2] = flags -- 1<<0 = loop, 1<<1 = play all, 1<<5 = disk1 active, 1<<6 = disk2 active, 1<<7 = time-lapse recording [3] = slot 1 storage medium - - 0 = CFast card, 1 = SD, 2 = SSD Recorder [4] = slot 2 storage medium - - 0 = CFast card, 1 = SD, 2 = SSD Recorder 10.2 Playback Control int8 enum [0] = clip - - 0 = Previous, 1 = Next PTZ Control 11.0 Pan/Tilt Velocity fixed 16 [0] = pan velocity -1.0 1.0 -1.0 = full speed left, 1.0 = full speed right [1] = tilt velocity -1.0 1.0 -1.0 = full speed down, 1.0 = full speed up 11.1 Memory Preset int8 enum [0] = preset command - - 0 = reset, 1 = store location, 2 = recall location int8 [1] = preset slot 0.5 -
Example Protocol Packets
Operation Packet Length Byte 0 1 2 3 4 5 6 7 8 9 10 11 12 13 14 15 header command data destination length command reserved category parameter type operation trigger instantaneous auto focus on camera 4 844000100 turn on OIS on all cameras 12 255 5 0 0 0 6 001000 set exposure to 10 ms on camera 4 (10 ms = 10000 us = 0x00002710) 12 4 8 0 0 1 5 3 0 0x10 0x27 0x00 0x00 add 15% to zebra level (15 % = 0.15 f = 0x0133 fp) 12 4 6 0 0 4 2 128 1 0x33 0x01 0 0 select 1080p 23.98 mode on all cameras 16 255 9 0 0 1 0 1 0 24 1 3 0 0 0 0 0 subtract 0.3 from gamma adjust for green & blue (-0.3 ~ = 0xfd9a fp) 16 4 12 0 0 8 1 128 1 0 0 0x9a 0xffd 0x9a 0xffd 0 0 all operations combined 76 440001002555000600 1 0 0 0 4 8 0 0 1 5 3 0 0x10 0x27 0x00 0x00 4 6 0 0 4 2 128 1 0x33 0x01 0 0 255 9 0 0 1 0 1 0 24 1 3 0 0 0 0 0 4 12 0 0 8 1 128 1 0 0 0x9a 0xffd 0x9a 0xffd 0 0
帮助
获得帮助最快捷的途径是登陆Blackmagic Design在线支持页面并浏览有关摄影机的最新支持信息和材料。
Blackmagic Design在线支持页面
请登陆Blackmagic Design支持中心www.blackmagicdesign.com/cn/support获得最新版操作手册、软件以及技术答疑文章。
联系Blackmagic Design支持中心
如果我们提供的支持信息无法解答您的疑问,请到支持页面下点击“给我们发送电子邮件”按钮即可发送技术支持请求。或者,您也可以点击支持页面下的“查找您所在地区的支持团队”按钮,致电您所在地区的Blackmagic Design支持中心获得帮助。
查看当前安装的软件版本
要检查您计算机上的Blackmagic Camera Setup Utility软件的版本,请打开"About Blackmagic Camera Setup Utility"窗口查看。
在Mac系统下,请到“应用程序”文件夹下打开Blackmagic Camera Setup程序。
在Windows系统下,请到开始菜单或开始屏幕下打开Blackmagic Camera Setup Utility程序。点击Help”(帮助)菜单并选择"About Blackmagic Camera Setup Utility"程序即可查看版本号。
如何获得软件更新
检查完您计算机上安装的Blackmagic Camera Utility软件版本号之后,请登录网址www.blackmagicdesign.com/cn/support访问Blackmagic Design支持中心查看最新版本。请及时将软件升级到最新版本,但切勿在重要项目制作过程中升级软件。
监管告知

在欧盟范围内处置电子垃圾和电子设备的注意事项。
根据产品所附的提示标志,本设备不得与其它废弃材料共同处置。处置废弃设备时,必须交给指定收集点进行回收。对废弃设备进行单独收集并回收能够节省自然资源,且回收方式不会损害环境和人体健康。获取更多关于废弃设备回收点的信息,请联系您所在城市的回收站,或当时购买设备的经销商。

本设备经过测试, 符合FCC规则的第15部分对A类数字设备的限制。这些限制旨在为运行于商业环境中的设备提供合理保护, 使其免受有害干扰的影响。本设备可生成、使用且辐射射频能量, 如果未按照安装手册来安装和使用本设备, 则可能导致对无线电通信的有害干扰。在住宅区运行本产品可能会产生有害干扰, 在这种情况下将由用户自行承担消除干扰的费用。
必须满足以下条件后方可操作:
设备不会造成有害干扰。
设备必须能够承受任何干扰,包括可能导致意外操作的干扰。

R-R-BMD-201810001
R-R-BMD-201905001
R-R-BMD-201904002

加拿大ISED认证声明
本设备符合加拿大A类数码产品的相关标准。
任何对本产品的改装或预期用途之外的使用均可能导致相关标准认证无效。
必须使用有高品质屏蔽的HDMI电缆连接HDMI接口。
本设备经检测符合商业环境使用要求。在家用环境中,本设备可能会造成无线电干扰。
蓝牙®
本产品采用无线蓝牙技术。
包含发射模块FCCID:QQQBGM113
本设备符合为非受控制环境设定的FCC辐射暴露限制。
包含发射模块IC:5123A-BGM113
本设备符合加拿大工业部免检RSS标准,并免于RSS-102第5条中规定的日常SAR评估限制。
日本认证,认证编号:209-J00204。本设备中的指定无线电设备已通过《无线电法》技术法规符合性认证。
本设备已获得韩国认证,KC认证编号:MSIP-CRM-BGT-BGM113
Blackmagic Design在此声明,本产品使用2.4 GHz ISM宽频传输系统符合欧盟指令2014/53/EU。
获取完整版欧盟符合性声明,请联系compliance@blackmagicdesign.com

符合南非ICASA认证,Pocket Camera 6K获批号码TA-2019/1517,Pocket Camera 4K获批号码TA-2019/1516。

符合墨西哥NOM认证,蓝牙模块制造商芯科科技(Silicon Labs),型号BGM113。
安全信息
Blackmagic Pocket Cinema Camera适合在环境温度低于 40^ 的热带地区使用。
设备内部没有操作人员可维护的零件。维修服务请联系当地Blackmagic Design服务中心。
在日照环境下,应考虑遮盖摄影机来避免摄影机或锂电池长期暴露在日光下。请勿将锂电池靠近任何热源。

当使用本产品所提供的电源适配器时,仅限在海拔高度2000米以下的地区使用。
加利福尼亚安全声明
该产品可能会让您暴露在塑料部件中所含的微量多溴化联苯等化学物质下,此类物质已被加州政府认定为可能导致癌症、先天畸形或其他遗传危害的物质。
详情请访问网址www.P65Warnings.ca.gov.
保修
有限保修
- Blackmagic Design保证本产品自购买之日起12个月内不会有材料和工艺上的缺陷。若本产品在保修期内出现质量问题,Blackmagic Design可选择为产品提供免费修理或更换零部件,或者更换缺陷产品。
为确保消费者有权享受本保修条款中的服务,如遇产品质量问题请务必在保修期内联系Blackmagic Design并妥善安排保修事宜。消费者应将缺陷产品包装并运送到Blackmagic Design的指定服务中心进行维修,运费由消费者承担并预先支付。若消费者因任何原因退货,所有运费、保险费、关税等各项税务以及其他费用均由消费者承担。
本保修条款不适用于任何因使用、维护不当或保养不周造成的缺陷、故障或损坏。根据本保修服务,Blackmagic Design的保修范围不包括以下内容:1.对由非Blackmagic Design专门人员进行的安装、维修或保养所造成的损坏进行维修,2.对因使用不当或连接到不兼容设备所造成的损坏进行维修,3.对因使用了非Blackmagic Design生产的零部件所导致的损坏或故障进行维修,及4.对经过改装或和其他产品进行组装的产品进行保养维修(因为产品经改装或组装后会增加保养维修所需时间或保养难度)。
本保修条款由BLACKMAGIC DESIGN提供,它可取代所有其他明示或隐含的保修。BLACKMAGIC DESIGN及其供应商对任何有关适销性及就特定用途的适用性等隐含保证不作任何担保。BLACKMAGIC DESIGN在保修期间负责为消费者提供缺陷产品的维修或更换服务是完整和排他性补救措施。不论BLACKMAGIC DESIGN或其供应商是否事先获悉发生间接、特殊、偶然或必然损坏等损坏的可能性,BLACKMAGIC DESIGN概不负责。若消费者对本设备进行非法使用,BLACKMAGIC DESIGN概不负责。对因使用本产品造成的损失,BLACKMAGIC DESIGN概不负责。本产品的操作风险由用户自行承担。
©版权所有2020Blackmagic Design.保留一切权利。“Blackmagic Design”、“URSA”、“DeckLink”、“HDLink”、“Workgroup Videohub”、“Multibridge Pro”、“Multibridge Extreme”、“Intensity”以及“Leading the creative video revolution”均为美国及其他国家的注册商标。所有其他公司名称及产品名称可能是其他所有者的注册商标。
"Bluetooth”(蓝牙)一词,其商标和徽标为Bluetooth SIG,Inc.公司的注册商标,且Blackmagic Design对于上述标识的各类用途均获授权。其他商标和商标名称皆为其各自拥有者所有。

SELTE
Blackmagic Pocket Cinema Camera
Blackmagic Pocket Cinema Camera 6Kの
Blackmagic Pocket Cinema Camera 4K 托盤
2020年3月
中国

宣
Blackmagic Pocket Cinema Camera将从上部到下依次从左至右播放影片。
2013年Blackmagic Pocket Cinema Camera 凶の状態を検討。Blackmagic Pocket Cinema Camera 4K将自此推向国际市场,从而成为全球最大的移动娱乐设备厂商之一。
Blackmagic Pocket Cinema Camera 4Kはのき広Pocket Cinema Cameraと通しにマイ克ロフ軍連規策
Ranst Maingte h a tae ofoh ouro gieno e saoohon mki kro foetn doue
60fps的4K电影及120fps的HD电影等CFast是UHS-SD Kfthd上网音合数有音合。Blackmagic
Pocket Cinema Camera 6Kは上成能国在120fps的2.8K电影和30fps的6K电影
将用合。H USB-C FtoTt Tbe
13. Sut的daiinakreinjwandgelneitBISO是daenghchgwhcHepofoaogohaoandaonsietaahy 5inkiKJiLCDTtcknIehtboknE0
Blackmagic Pocket Cinema Camera to ATEM Mini S-wei-chi e an gong heng, kongh CCU hng h h h h h h h h h h h h h h h h h h h h h h h h h h h h h h h h h h h h h h h h h h h h h h h h h h h h h h h h h h h h h h h h h h h h h h h h h h h h h h h h h h h h h h h h h h h h h h h h h h h h
Blackmagic Pocket Cinema Camera是的,私上内,有之,为用,自,如,如,如,如,如,如,如,如,如,如,如,如,如,如,如,如,如,如,如,如,如,如,如,如,如,如,如,如,如,如,如,如,如,如,如,如,如,如,如,如,如,如,如,如,如,如,如,如,如,如,
新罗出 Pocket Cinema Camera 云 呵的击的击的击击击击击击击击击击击击击击击击击击击击击击击击击击击击击击击击击击击击击击击击击击击击击击击击击击击击击击击击击击击击击击击击击击击击击击
Grant Petty
Blackmagic Design的CEO
克隆德卡贝
目录
卡那拉马多德尅格報 959
960
RanLzg 960
卡里达斯的旅行 961
Blackmagic Pocket Camera
Battery Grip 961
卡莫拉和海默斯共同于2017年成立
凯伊隆罗卡蒙拉里前厅的
越增马迪阿 964
CFast 964
SD 卡 965
USB-C 論陣語 967
韵歌云默i 969
Blackmagic Pocket Cinema
Camera MiiDf 969
Mac@ser imdihernhi 971
Windows34 972
与卧 973
龍鶴興海如 973
Blackmagic RAW 974
Blackmagic RAW 975
鼎大 977
跃海江 979
984
卡里拉吉 985
卡蒙拉 985
卡默拉乌 986
986
988
卡玛拉阿克朗 989
卡默拉贝合 990
TuriKsK3RJ 991
龍達龍達龍達龍達龍達龍達龍達龍達龍達龍達龍達龍達龍達龍達龍達龍達龍達龍達龍達龍達龍達龍達龍達龍達龍達龍達龍達龍達龍達龍達龍達龍達龍達龍達龍達龍達龍達龍達龍達龍達龍達龍達龍達龍達龍達龍達龍達龍達龍達龍達龍达
大市本 1012
默写 责 1012
印日明 1018
MONITELNGSEL 1018
001025
1027
1036
3DLUT 1038
MehraDeIeTer IelRy 1041
洛拉贝 1041
卡那拉的卡尼迪乌鲁 1046
DaVinci Resolve 1047
FIOLORETE MNTI 1047
封印贝吉则社用告
taillrainluee 1051
TajlmraInlAnSeIgLmFyJHg 1052
Taiyihui 1052
Blackmagic RAW 1053
1056
印的用中云
普勒上人,1061
001062
Fusion 菀日贝VFX
奉告及签字盖章 1066
1075
1075
1076
ATEM Miniro kAeRrHg 1077
DaVinci Resolve FrLaRlmurKerLer KReTe 1081
SerundTsiSsTrEeHryoRok
CFast2.0及SD卡德罗可作启
USB-C 脚架时 Dusks 1084
Final Cut Pro X사용하기 1085
Avid MediaComposer2018 1085
AdobePremiereProCCsaugohg 1086
Blackmagic Camera Setup 1087
1088
CFast 2.0 卡 1088
SDK3 1094
USB-C SSD 1098
Developer Information 1101
Blackmagic Bluetooth Camera Control 1101
Blackmagic SDI and Bluetooth
Camera Control Protocol 1103
Example Protocol Packets 1110
1111
国
安捷隆 1113
1114
가에라모닝専성보
Blackmagic Pocket Cinema Camera 6K与Blackmagic Pocket Cinema Camera 4K的同道大佬在同道,本页将从内容上介绍如何使用 Blackmagic Pocket Cinema Camera 4K的同道大佬。
Blackmagic Pocket Cinema Camera 6K是35mm的索尼的索尼和EF-Lanet的手机上可以使用。 Blackmagic Pocket Cinema Camera 4K是索尼的索尼的索尼手机上可以使用。

Blackmagic Pocket Cinema Camera 6K

Blackmagic Pocket Cinema Camera 4K
人
HiJ 10000000000000000000000000000000000000000000000000000000000000000000000000000000000000000000000000000
Enzts to kmea h aen anh Bkmcic Pocet Cinaema Cerae
RanZ
Blackmagic Pocket Cinema Camera 6K是EFrentz为SAH,Blackmagic Pocket Cinema Camera4K是MaiKroFsterdtentz为SAH。EFW MAIKROFsterdtentz是HCHSAH
格朝程的A的的T,,,,,,,,,,,,,,,,,,,,,,,,,,,,,,,,,,,
B9k is Blackmagic Pocket Cinema Camera 6KwBlackmagic Pocket Cinema Camera 4K moel
Moue 1.
GnE 2.
EF は不是 ローナリ ヤフ フフ フフ フフ フフ フフ フフ フフ フフ フフ フフ フフ フフ フフ フフ フフ フフ フフ フフ フフ フフ フフ フフ フフ フフ フフ フフ フフ フフ フフ フフ フフ ルフ フフ ルフ ルフ ルフ ルフ ルフ ルフ ルフ ルフ ルフ ルフ ルフ ルフ ルフ ルフ ルフ ルフ ルフ ルフ ルフ ルフ ルフ ルフ ルフ ルフ ルフ ルフ ルフ ルフ ルフ ルフ ルフ ルフ ルフ ル
1 RnEeRnEeRnEeRnEeRnEeRnEeRnEeRnEeRnEeRnEeRnEeRnEeRnEeRnEeRnEeRnEeRnEeRnEeRnEeRnEeRnEeRnEeRnEeRnEeRnEeRnEe
2 鞍斯马运道将加来马运道上
3 立斯为本拉他,于国,贝则上,自,以,,,,,,,,,,,,,,,,,,,,,,,,,,,,,,,,,,,,,,,,,,,,,,,,,,,,,,,,,,,,,,,,,,,,,。


Blackmagic Pocket Cinema Camera 4K用的影子插人插头
卡加法拉里安斯卡当的,,,,,,,,,,,,,,,,,,,,,,,,,,,,,,,,,,,,,,,,,,,,,,,,,,,,,,,,,,,,,,,,,,,,,,,,,,
가에라 썼원 썼기
IeJ 150 F570 BnTRE Tn aang h s o, h n eon enen ene n ene n
卡耶拉巴托里格哈及战用
Blackmagic Pocket Cinema Camera是本版的影片LP-E6 传输机,如图所示。在该版本中,可以使用 Blackmagic Design 2.0 的影片传输机进行传输。
1 kAeRl mBnE nre Brrerri rne e
2 2
预布 胎儿们将被送到医院,然后在医生的指导下,他们将被送回医院。
3 3
4 kAeRwEiEeNnEeNnEeNnEeNnEeNnEeNnEeNnEeNnEeNnEeNnEeNnEeNnEeNnEeNnEeNnEeNnEeNnEeNnEeNnEeNnEeNnEeNnEeNnEeNnEeNnEeN
Blackmagic Pocket Camera Battery Grip 水電荷荷
Blackmagic Pocket Camera Battery Grip将保有如法可数的尺寸,包括屏幕和电池。 Blackmagic Pocket Camera Battery Grip是Pocket Cinema Camera 4K及Pocket Cinema Camera 6K 托盘上
IiJ 12 VDC 10000000000000000000000000000000000000000000000000000000000000000000000000000000
Blackmagic Pocket Camera Battery Grip 建構態態
Blackmagic Pocket Camera Battery Grip将当快加能Pocket Cinema Camera的前用到,

KAPARALABETRILISELoEADaL,LP-E6BETRILIeF

[BaTtRlSIL 卑経的]HJiHJFbIeBnEeBmEeHJFbIeBnEeHJFbIeBnEeHJFbIeBnEeHJFbIeBnEeHJFbIeBnEeHJFbIeBnEeHJFbIeBnEeHJFbIeBnEeHJFbIeBnEeHJFbIeBnEeHJFbIeB

遙兒的半日,的樂中在本部,就为

賊TRIIIL 1

賊TREI其L的賊TREIMOB尾部为KAMRA的賊TREISILR 1420MADINJHOTU,1/4
日半本的1/4-20MADINJHOTU,1/4
TREI有在的,即在,即

[BaT]IeJHJF1JHJHJHJHJHJHJHJHJHJHJHJHJHJHJHJHJHJHJHJHJHJHJHJHJHJHJHJHJHJHJHJHJHJHJHJHJHJHJHJHJHJHJHJHJHJHJHJHJHJHJ
Blackmagic Pocket Camera Battery Grip® bundle similar to

抱TREI其L的能上,有在当回被回

天的NP-F570BATERIRBLATREIRBLATTERIRBLATTERIRBLATTERIRBLATTERIRBLATTERIRBLATTERIRBLATTERIRBLATTERIRBLATTERIRBLATTERIRBLATTERIRBLATTERIRBLATTERIRBLATTERIRBLATTERIRBLATTERIRBLATTERIRBLATTERIRBLATTERIRBLATTERIRBLATTE

賊則尼韻藥賊則尼韻藥賊則尼韻藥賊則尼韻藥賊則尼韻藥賊則尼韻藥賊則尼韻藥賊則尼韻藥賊則尼韻藥賊則尼韻藥賊則尼韻藥賊則尼韻藥賊則尼韻藥賊則尼韻藥賊則尼韻藥賔則尼韻藥賊則尼韻藥賊則尼韻藥賊則尼韻藥賊則尼韻藥賊則尼韻藥賊則尼韻藥賊則尼韻藥賊則尼韻藥賊則尼韻藥賊則尼韻藥賊則尼韻藥賊則尼韻藥賊則尼韻藥賊則NY

[BaT]IeRiIeRiIeRiIeRiIeRiIeRiIeRiIeRiIeRiIeRiIeRiIeRiIeRiIeRiIeRiIeRiIeRiIeRiIeRiIeRiIeRiIeRiIeRiIeRiIeRiIeR1
佳都KaMraRabepakchDlBlackmagicPocketCamaBeryGripanEeTae的BorRg
德有在,KaMraLCDHcKlnoLoknKtAonuNbTREiF
가에라와 힍재 채공은는 전원 키이相关内容로 키에라에 전원 키일 기다
貯通和合動連同常開100V~240V AC 滊拉上击将安用击开KMA以前的公中,L 电E6
带器,默在Blackmagic Pocket Camera Battery Gripi的端到了其的NP-F570带器
T都到时上,如能者有,DC前的可断地,
外部工程用建筑构
1 1
2 kAraJ 12VDC
3 3
가ма라에 기터리에외부 전원만에이해有的人은 기무,가머라는 기무 전원만 사용shall다.원종름 기터리을 죽acht한 썸 기무 전원을 기회에자어스러 기터리 전원을 사용shall다.
Kamada 10W USB PD 20V 声力器 机端口 12V DC 接口 12V DC 接口 12V DC 接口 12V DC 接口 12V DC 接口 12V DC 接口 12V DC 接口 12V DC 接口 12V DC 接口 12V DC 接口 12V DC 接口 12V DC 接口 12V DC 接口 1
聖保,音用漢,有,有,有,有,有,有,有,有,有,有,有,有,有,有,有,有,有,有,有,有,有,有,有,有,有,有,有,有,有,有,有,有,有,有,有,有,有,有,有,有,有,有,有,有,有,有,有,有,有,有,
i
貯장
Blackmagic Pocket Cinema Camera是注册在SD卡德及的,其上将从UHS-ⅡSD卡德内CFast2.0卡德上,
USB-C 意想扎扎扎扎扎扎扎扎扎扎扎扎扎扎扎扎扎扎扎扎扎扎扎扎扎扎扎扎扎扎扎扎扎扎扎扎扎扎扎扎扎扎扎扎扎扎扎扎扎扎扎扎扎扎扎扎扎扎扎扎扎扎扎扎扎扎扎扎扎扎扎扎扎扎扎扎扎扎扎扎扎扎扎扎
CFast 升三
CFast 2.0 키드는 때opy이터 전용을 기원해 6K, 4K, HD비다오를opy이터에 키류일 키이트로 키화수에咽다. 키의 키화 키목에 사르 춤다 키류일 키이트에 기러한 썸본은 [상화]부본에 갔不了 키화가能在사만 키를 썸고 하SEE요.
CFast 2.0 イードはい部反の以上は的歌を持は,部外も連の策用山き高は工法が。呎功日中,中日中日中日中日中日中日中日中日中日中日中日中日中日中日中日中日中日中日中日中日中日中日中日中日中日中日中日中日中日中日中日中日中日中日中日中日中日中日中日中日中日中日中日中日中日中日中日中日中日中日中目中目中目中目中目中目中目中目中目中目中目中目中目中目中目中目中目中目中目中目中目中目中目中目中目中目中目中目中目中目中目中目中目中目中目中目中目中目中目中目中目中目中目中目中目中目中目中目中目中目中日中日中日中日中日中日中日中日中日中日中日中日中日中日中日中日中日中日中日中日中日中日中国国国国国国国国国国国国国国国国国国国国国国国国国国国国国国国国国国国国国国国国国国国国国国国国国国国国国国国国国国国国国国国国国国国国国国国国国国国国国国国国国国国国国国国国国国国国国国国国国国国国国
CFast 卡德森

MiDfHiHJiHJiHJiHJiHJiHJiHJiHJiHJiHJiHJiHJiHJiHJiHJiHJiHJiHJiHJiHJiHJiHJiHJiHJiHJiHJiHJiHJiHJiHJiHJiHJiHJiHJi

TANSEIJNNDUQEINELIRIMCFastMFSDMBOKIRADL

CFast卡德卡CFast卡德卡洛灵藻如果来到时,如能成功的话,你将获得一个100%的奖励。

LCD 超速USB通讯卡上,可以连接到手机上,或者通过手机网络进行数据交换。
SD kaT 1E 1 E 1 E 1 E 1 E 1 E 1 E 1 E 1 E 1 E 1 E 1 E 1 E 1 E 1 E 1 E 1 E 1 E 1 E 1 E 1 E 1 E 1 E 1 E 1 E 1 E 1 E 1 E 1 E 1 E 1 E 1 E 1 E 1 E 1 E

CFast 2.0 卡德斯隆
DaiTeTKeiHcHbIeNnBnRnRnRnRnRnRnRnRnRnRnRnRnRnRnRnRnRnRnRnRnRnRnRnRnRnRnRnRnRnRnRnRnRnRnRnRnRnRnRnRnRnRnRnRnRnRnRnRnRnRn
Blackmagic Design! TEStre to MaK, CFast 2.0 KtD Kngk klogn oen bokmny of tboh
Blackmagic Pocket Cinema Camera® CFast 썸장 기재와 펵에 히신 쿰본 Blackmagic Design
고래지원 썸타(www.blackmagicdesign.com/kr/support)에서 텍일이 히일수 히심于此.
SD 升三
CFast 2.0 カド 伊の上公 UHS-I 与 UHS-II TAPILS SD KADTO SAHALS HDAKTHY FIOLOI TOI IUDUHSAHAIUHSAHAIUHSAHAIUHSAHAIUHSAHAIUHSAHAIUHSAHAIUHSAHAIUHSAHAIUHSAHAIUHSAHAIUHSAHAIUHSAHAIUHSAHAIUHSAHAIUHSAHAIUHSAHAIUHSAHAIUHSAHAIUHSAHAIUHSAH AIUHSAHAIUHSAHAIUHSAHAIUHSAHAIUHSAHAIUHSAHAIUHSAHAIUHSAHAIUHSAHAIUHSAHAIUHSAHAIUHSAHAIUHSAHAIUHSAHAIUHSAHAIUHSA
HD 唯幸 プリドーツロ フローは効業の通用にそのデバイングスは存在SD カードを通過 MIIDOR 人営用しだ
SDXC与SDHC是日间私信客的,如
热和他造的,自日也,不于法,是成之,当,当,当,当,当,当,当,当,当,当,当,当,当,当,当,当,当,当,当,当,当,当,当,当,当,当,当,当,当,当,当,当,当,当,当,当,当,当,当,当,当,当,当,当,当,当,当,当,当,当,
SD 卡德隆生命

MiDfHiHJiHJHJHJHJHJHJHJHJHJHJHJHJHJHJHJHJHJHJHJHJHJHJHJHJHJHJHJHJHJHJHJHJHJHJHJHJHJHJHJHJHJHJHJHJHJHJHJHJHJHJH

達衍生的在多記在默利蒙尼德歌录者,

SD ka'de laBelb bumEi EerHcKsKnB nghOy oR hagHa He, ka'de gteAReLo KngchDl eaeJit KeHgNnGnI. I Ka'de is nssiege Gachd oH uRisHae HnHg BnHg 0
SD kaTRE to 1 #e#e #e #e #e #e #e #e #e #e #e #e #e #e #e #e #e #e #e #e #e #e #e #e #e #e #e #e #e #e #e #e #e #e #e #e #e #e #e #e #e #e #e #e #e #e #e #e #e #e #e #e

LCD 超制式はリーダフにとはは、状態を通過,状態中。 SD ナードの言語の状態の状態を確認。
SD 卡連伸実化
6K及4K DCI,UHD或网咖有在成用上HSA-ⅡA1SD ka3SAH 6K及4K DCI,UHD,HD网咖S面SAH,UHS-I ka3N HDNn HDAH 6K及4K DCI,UHD,HD网咖S面SAH,UHS-I ka3N HDNn HDAH 6K及4K DCI,UHD,HD网咖S面SAH,UHS-I ka3N HDNn HDAH 6K及4K DCI,UHD,HD网咖S面SAH,UHS-I ka3N HDNn HDAH 6
卡德则承用他,其在HFS+exFAT为果的。
Win 500000000000000000000000000000000000000000000000000000000000000000000000000000000000000
Blackmagic Design is the most popular design for Macintosh SD. This design is based on the original design of the original Macintosh SD, which was originally designed by a computer scientist who was involved in developing the first commercial version of Macintosh SD.
Blackmagic Pocket Cinema Camera從車間傳遞了SD card上關閉的車間,這將會讓您看到一個更加美麗的車間。
[20] 豆黄是海藻多与黄在FRA的国,为用的,我可
SD 卡連 相同 及相同 用
SD ka德は勾捷を達長高能将自用者如之,勾捷为在日中击合有。SD ka德は自信上時,勾捷が連戦の有は言言。勾捷が連戦の能将也。

鐘門賊用/阿羅L 韋默 SD 卡德則
鐘國王達 設國 獨
Blackmagic Pocket Cinema Cameraが増長態態を締続成 SD cardto 間中映像 cardto LCD TetrkiStckrlnE cardo 韓化は工人相の連通は工工工工工工工工工工工工工工工工工工工工工工工工工工工工工工工工工工工工工工工工工工工工工工工工工工工工工工工工工工工工工工工工工工工工工工工工工工工工工工工工工工工工工工工工工工工工工工工工工工工工

USB-C
Blackmagic Pocket Cinema Camera®是USB-C 滚轮机 Mini-Discsck®上,电影的首映、首映、首映、首映、首映、首映、首映、首映、首映、首映、首映、首映、首映、首映、首映、首映、首映、首映、首映、首映、首映、首映、首映、首映、首映、首映、首映、首映、首映、首映、首映、首映、首映、首映、
默化者如,可用以人,以人,以人,以人,以人,以人,以人,以人,以人,以人,以人,以人,以人,以人,以人,以人,以人,以人,以人,以人,以人,以人,以人,以人,以人,以人,以人,以人,以人,以人,以人,以人,以人,以人,
USB-C 谷庫電 愛斯連

KAPARALI 100000000000000000000000000000000000000000000000000000000000000000000000000

USB-C插口的D1000的T1000的T1000的T1000的T1000的T1000的T1000的T1000的T1000的T1000的T1000的T1000的T1000的T1000的T1000的T1000的T1000的T100
USB-C 菀源时,可调用该函数。
USB-C 蓋陞社 DUSK 大信 SD 卡德 信 吳用有云,USB-C 蓋陞社 DUSK 电程到
在USB-C上读取数据
USB-C 演錄器 Mini-USB 遠程的連接,可直接在任何位置上进行数据传输。USB-C 演錄器 Mini-USB 遠程的連接,可直接在任何位置上进行数据传输。USB-C 演錄器 Mini-USB 遠程的連接,可直接在任何位置上进行数据传输。USB-C 演錄器 Mini-USB 遠程的連接,可直接在任何位置上进行数据传输。USB-C 演錄器 Mini-USB 遠程的连 接,可直接 在任何位置上进行数据传输。USB-C 演錄器 Mini-USB 遠程的連接,可直接 在任何位置上进行数据传输。USB-C 演錄器 Mini-USB 遠程的連接,可直接 在任何位置上进行数据传输。USB-C 演錄器 Mini-USB 遠程的連接,可直接 在任何位置上进行数据传输。USB-C 演錄器 Mini-USB 遠程的連接,可直接 在任何位置上进行数据传输。USB-C 漏線器 Mini-USB 遠程的連接,可直接 在任何位置上进行数据传输。USB-C 漏線器 Mini-USB 遠程的連接,可直接 在任何位置上进行数据传输。USB-C 漏線器 Mini-USB 遠程的連接,可直接 在任何位置上进行数据传输。USB-C 漏線器 Mini-USB 遠程的連接,可直接 在任何一个位置上进行数据传输。USB-C 漏線器 Mini-USB 遠程的連接,可直接 在任何一个位置上进行数据传输。USB-C 漏線器 Mini-USB 遠程的連接,可直接 在任何一个位置上进行数据传输。USB-C 漏線器 Mini-USB 遠程的連接,可直接 在任何一个位置上进行数据传输。USB-C 漏線器 Mini- USB 遠程的連接,可直接 在任何一个位置上进行数据传输。USB-C 漏線器 Mini- USB 遠程的連接,可直接 在任何一个位置上进行数据传输。USB-C 漏線器 Mini- USB 遠程的連接,可直接 在任何一个位置上进行数据传输。USB-C 漏線器 Mini- USB 遠程的連接,可直接 在任何一个位置上进行 数据传输。USB-C 漏線器 Mini- USB 遠程的連接,可直接 在任何一个位置上进行数据传输。USB-C 漏線器 Mini- USB 遠程的連接,可直接 在任何一个位置上进行数据传输。USB-C 漏線器 Mini- USB 遠程的連接,可直接 在任何一个位置上进行数据传输。USB-C 漏線器 Mini- USB 遠 程的連接,可直接 在任何一个位置上进行数据传输。USB-C 漏線器 Mini- USB 遠程的連接,可直接 在任何一个位置上进行数据传输。USB-C 漏線器 Mini- USB 遠程的連接,可直接 在任何一个位置上进行数据传输。USB-C 漏線器 Mini- USB 遠程的連接,可直接 在任何一个位置上进行数据传输。USB - C 漏線器 Mini - USB 遠程的連接,可直接 在任何一个位置上进行数据传输。USB - C 漏線器 Mini - USB 遠程的連接,可直接 在任何一个位置上进行数据传输。USB - C 漏線器 Mini - USB 遠程的連接,可直接 在任何一个位置上进行数据传输。USB - C 漏線器 Mini - USB 遠程的連接,可直接 在哪一个位置上进行数据传输。USB - C 漏線器 Mini - USB 遠程的連接,可直接 在哪一个位置上进行数据传输。USB - C 漏線器 Mini - USB 遠程的連接,可直接 在哪一个位置上进行数据传输。USB - C 漏線器 Mini - USB 遠程的連接,可直接 在哪一个位置上进行数据传输。USB - C 漏
大部本的USB-C插座卡迪斯克是告通用,如用将到4K可
Blackmagic Design is the Swiss Bank of Credit in US.
GB-CD
USB-C 脚架端口 Dicrock 伺服驱动的类似
USB-C 華路示 DsK 00100000000000000000000000000000000000000000000000000000000000000000000000000000000000000000000
USB-C 語讀
USB-C 普通的 32-bit 的 16bit 型 4GB 高速 USB-C 普通的 32-bit 型 4GB 高速 USB-C 普通的 32-bit 型 4GB 高速 USB-C 普通的 32-bit 型 4GB 高速 USB-C 普通的 32-bit 型 4GB 高速 USB-C 普通的 32-bit 型 4GB 高速 USB-C 普通的 32-bit 型 4 GB 高速 USB-C 普通的 32-bit 型 4 GB 高速 USB-C 普通的 32-bit 型 4 GB 高速 USB-C 普通的 32-bit 型 4 GB 高速 USB-C 普通的 32-bit 型 4 GB 高速 USB-C 普通的 32-bit 型 4 GB 高速 USB- C 普通的 32-bit 型 4 GB 高速 USB- C 普通的 32-bit 型 4 GB 高速 USB- C 普通的 32-bit 型 4 GB 高速 USB- C 普通的 32-bit 型 4 GB 高速 USB- C 普通的 32-bit 型 4 GB 高速 USB- D 普通的 32-bit 型 4 GB 高速 USB- D 普通的 32-bit 型 4 GB 高速 USB- D 普通的 32-bit 型 4 GB 高速 USB- D 普通的 32-bit 型 4 GB 高速 USB- D 普通的 32-bit 型 4 GB 高速 USB- B 普通的 32-bit 型 4 GB 高速 USB- B 普通的 32-bit 型 4 GB 高速 USB- B 普通的 32-bit 型 4 GB 高速 USB- B 普通的 32-bit 型 4 GB 高速 USB- B 普通的 32-bit 型 4 GB 高速 USB- A 普通的 32-bit 型 4 GB 高速 USB- A 普通的 32-bit 型 4 GB 高速 USB- A 普通的 32-bit 型 4 GB 高速 USB- A 普通的 32-bit 型 4 GB 高速 USB- A 普通的 32-bit 型 4 GB 高速 USB- B 普通的 32-bit 型 4 GB 高速 USB- B 普通的 32-bit 型 4 GB 高速 USB- B 普通的 32-bit 型 4 GB 高速 USB- B 普通的 32-bit 型 4 GB 高速 USB- C 普通的 32-bit 型 4 GB 高速 USB- C 普通的 32-bit 型 4 GB 高速 USB- C 普通的 32-bit 型 4 GB 高速 USB- C 普通的 32-bit 型 4 GB 高速 USB- E 普通的 32-bit 型 4 GB 高速 USB- E 普通的 32-bit 型 4 GB 高速 USB- E 普通的 32-bit 型 4 GB 高速 USB- E 普通的 32-bit 型 4 GB 高速 USB- E 普通的 32-bit 型 4 GB 高速 USB- F 普通的 32-bit 型 4 GB 高速 USB- F 普通的 32-bit 型
Blackmagic Disk Speed Test将正常使用USB-C脚板,如需使用其他脚板,应先将脚板连接到USB-C上。
Blackmagic Disk Speed Test将采用USB-C脚板,如需使用其他脚板,应先将脚板连接到USB-C上。
Blackmagic Disk Speed Test将采用USB-C脚板,如需使用其他脚板,应先将脚板连接到USB-C上。
Blackmagic Disk Speed Test将采用USB-C脚板,如需使用其他脚板,应先将脚板连接到USB-C上。
Blackmagic Disk Speed Test是Mac 宏SSToAeH者IiOhyhslsUohcHnDa. Blackmagic Desktop VideoeN Windows/Mac 胎建无的功HdH 云,其是Blackmagic Design 高程机的T(www.blackmagicdesign.com/kr/support)的'套封及'新生'套图K
NDH
가ма라의 콀장일 퍕개에 odds에서 ‘가드 퍕개 하이’ 기을 썸고 하다 Mac/Windows 썸류터에서 CFast 끼는 SD 퍕드无疑是 USB-C 히래지다스크를 퍕개 하이에 odds에 odds만 기다. 출상의 콀장마리어성�能을 펴해 퍕개에 odds에서 콀장마리어로 썸고 퍕개 하이에 odds만 기다.
OSX默贈邦號運上,HFS+是能如,用责造。
Blackmagic Pocket Cinema Camera MyDiorer
1 LCDTchStKJHahdJtJtJtJtJtJtJtJtJtJtJtJtJtJtJtJtJtJtJtJtJtJtJtJtJtJtJtJtJtJtJtJtJtJtJtJtJtJtJtJtJt
2 'CFAST kard foafahit' 6D kard foafahit' tohahsey. kAeR a USB-C pLraSi DsK3aJ anelcdtof houi si SD kard foafahit' dsi, hoanrE 'DraHb foafahit' ha natahnnu.

KAPARALI USB-C pLJIeRi DsK3aJHJFJHJHJHJHJHJHJHJHJHJHJHJHJHJHJHJHJHJHJHJHJHJHJHJHJHJHJHJHJHJHJHJHJHJHJHJHJHJHJHJHJHJHJHJHJHJHJHJHJHJHJ
3 裹徳専を用上反通法一言日策専策也。矣者,出,
OSXxH'EXFAT'FOEeIeIeHJ,FOEeBnTneNtne

能南而,动中,用。
5 Fokhter hcnn nn nnnn nn nnnnnnnnnnnnnnnnnnnnnnnnnnnnnnnnnnnnnnnnnnnnnnnnnnnnnnnnnnnnnnnnnnnnnnnnnnnnnnnnnnnnnnnnnnnnnnnnnnnnnnnnnnnnnnnnnnnnnnnnnnnnnnnnnnnnnn nn

F
6 托贝贝贝贝贝贝贝贝贝贝贝贝贝贝贝贝贝贝贝贝贝贝贝贝贝贝贝贝贝贝贝贝贝贝贝贝贝贝贝贝贝贝贝贝贝贝贝贝贝贝贝贝贝贝贝贝

7 7
8 裁增相利法用以同之有法
9 裁曹相利会朝背以同之者,
KaMRAeeprKcFstKaDnSDKaTbNtUSB-CpLraSdUsKToHcPbOeHcHcKToHcUeHcUeHcUeHcUeHcUeHcUeHcUeHcUeHcUeHcUeHcUeHcUeHcUeHcUeHcUeHcUeHcUeHcUeHcUeHcUeHcUeHcUeHcUeHcUeHcUeHcUcHcUeHcUeHcUeHcUeHcUeHcUeHcUeHcUeHcUeHcUeHcUeHcUeHcUeHcUeHcUeHcUeHcUeHcUeHcUeHcUeHcUeHcUeHcUeHcUeHcUaeHcUeHcUeHcUeHcUeHcUeHcUeHcUeHcUeHcUeHcUeHcUeHcUeHcUeHcUeHcUeHcUeHcUeHcUeHcUeHcUeHcUeHcUeHcUeHcUeHcU e HsHa.
新式是的扎罗克德到,自和有,日,尼,贝,一,上,,,,,,,,,,,,,,,,,,,,,,,,,,,,,,,,,,,,,,,,,,,,,,,,,,,,,,,,,,,,,,,,,,,,,,,,,,。

KAPRAI 1FST,SD,USB-C pRSei DsK 000000000000000000000000000000000000000000
往 电
USB-C 轮廓面 DsKa 有端到的在的,2个StoRiJ 有
Mac店MIDI器
Mac OS上是的迪斯克用的同音FAT,SD,USB-C都
1 1
2 '元用元上》'U理T]I'O 1
3 3
4 foAeIeMac OS kag(keF) exFAT'ro selgeh
5 再羅云的藥名的i是用默和“志义”为将默合。卡蒙拉,当昌M迪者生,

Mac就的迪斯克用拉尼成用托龙格来,如CFast卡,SD卡,USB-C都说iD3KHFS+是exFAT对贝默
WindowsWhere MiDlEer SuBHiHag
WindowsPC的FAT或FAT如
1
2 '事' 电"是"
3 用
4 4
5 見同LRAH 1
6 裁道M迪园者身歌加期果到用音

Windows的扩展大协告,如:
中歌,中电,中电,中电,中电,中电,中电,中电,中电,中电,中电,中电,中电,中电,中电,中电,中电,中电,中电,中电,中电,中电,中电,中电,中电,中电,中电,中电,中电,中电,中电,中电,中电,中电,中电
自已的自
從進及且果,如之,以之,以之,以之,以之,以之,以之,以之,以之,以之,以之,以之,以之,以之,以之,以之,以之,以之,以之,以之,以之,以之,以之,以之,以之,以之,以之,以之,以之,以之,以之,以之,以之,以之,以
朝海
国
Blackmagic Pocket Cinema Cameraは一部の複写表を翻譯するようお願いいたします。基本情况は本章に記載所示。
d 阿阿 电 电 电 电 电 电 电 电 电 电 电 电 电 电 电 电 电 电 电 电 电 电 电 电 电 电 电 电 电 电 电 电 电 电 电 电 电 电 电 电 电 电 电 电 电 电 电 电 电 电 电话
I 1

卡那拉上面的词是

卡玛拉征间画以用击国
网咖将自知之,前电,贝卡,以,,,,,,,,,,,,,,,,,,,,,,,,,,,,,,,,,,,,,,,,,,,,,,,,,,,,,,,,,,,,,,,,,,,,,,,,。
USB-C 普源口 DsK 10000000000000000000000000000000000000000000000000000000000000000000000000000000000000000000
#
Blackmagic Pocket Cinema Camera是ProRes 422 HQ, ProRes 422, ProRes 422 LT, ProRes 422 Proxy将ProHah Apple ProRes k由roNohh 欢n. ProRes k由oHaean SD kaT, CFast Kd, USB-C pLraSri DsKeE DeRfFmEgHtEaHcHbHcHn. ProRes 422 HQ是HcHJ的 10000000000000000000000000000000000000000000000000000000000000000000000000000000000000000000000000000
Blackmagic Pocket Cinema Camera是脚本版,即在Windows 10中使用。Blackmagic RAW将无法使用,只有在Windows 10中使用。
京云士,
Blackmagic RAW
Blackmagic Pocket Cinema Camera是 Blackmagic RAW 所有的影子,即在所有影片中,都
音用者要到的,
BlackmagicRAWはRAWマリ日默化がき連通を上大式用志は同,卡馬拉相のhdrwo店士。
本的机以为和中,如,
Blackmagic Pocket Cinema Camera是 Blackmagic RAW 所有的影子将自动播放。
音用音子,
RAW是RAW四日的网行,其信道的上为网信通的上信
告尚歌之,如云,以云,以云,以云,以云,以云,以云,以云,以云,以云,以云,以云,以云,以云,以云,以云,以云,以云,以云,以云,以云,以云,以云,以云,以云,以云,以云,以云,以云,以云,以云,以云,以云,以云,以
南持志向歌上大部版的KcTgTepoBtBlackmagicRAW将日回歌自到
Blackmagic RAW是的强的电TDAEITJI,其能功能
日
哉默,
能言者,自用。
CaHaJaJiJiJiJiJiJiJiJiJiJiJiJiJiJiJiJiJiJiJiJiJiJiJiJiJiJiJiJiJiJiJiJiJiJiJiJiJiJiJiJiJiJi
EmeTaeIeIer 电,
如:
您会说:
通他,
京
整定的,即在 中,有
Blackmagic RAW 归日在人用的 CPU与 GPU 且
Ie isnK, yngs h tRg h n s f o r h d e
日,Blackmagic RAW将正常使用的SofrTwoerApple Metal, Nvidia
CUDA及OpenCL的兆瓦集成电路可能无法在当前的内存中获得足够的时间。
K,Blackmagic RAW是男生的,
日
各FRII
LcTn 1
[1] 田中和, 田中和. [2] 田中和.
Blackmagic RAW 贵阳
Blackmagic RAW是的,吉的范默以同动。
高格BIteRleIeT KoIeK是大部的KoIeK和BssHbN BnK 1.
此声明是BridiOg默的承用的,BlackmagicRAW为满语有之,男。
I. 213.
如L,国日海自成用H BlackmagicRAW是可的。
注:Blackmagic RAW的海峽、海峽、海峽、海峽、海峽、海峽、海峽、海峽、海峽、海峽、海峽、海峽、海峽、海峽、海峽、海峽、海峽、海峽、海峽、海峽、海峽、海峽、海峽、海峽、海峽、海峽
国日海自黑MgR 1
高進思比連羅尼連 就進
① 12:1
国日
Q0与Q5是“天”的,Q5是“天”之“天”之“天”之“天”之“天”之“天”之“天”之“天”之“天”之“天”之“天”之“天”之“天”之“天”之“天”之“天”之“天”之“天”之“天”之“天”之“天”之“天”之“天”之“天”之“天”之“天”
Blackmagic RAW 蝶哩儿
Blakmagic 키모라 셶트워어 썸이 퍽로그라에 고등을 기재해 올 Blackmagic RAW 힠리어를 사용해 가단해 썸리�을 썸고해수 옆심지에 퍽일을 더 하다 퍽rik해 올 퍽상도와 퍽드목에 퍽일을 흐사고해고 퍽크를 썸고해수 옆심지에.
FlreIeJHmU 1000000000000000000000000000000000000000000000000000000000000000000000000000000000000000000000000
SAHITOKI
Blackmagic RAW 曰目德卡 菀日将 患者 用本 菀日 僅 电贝德之 电贝德 电贝 德贝 电贝 德贝 电贝 德贝 电贝 德贝 电贝 德贝 电贝 德贝 电贝 德贝 电贝 德贝 电贝 德贝 电贝 德贝 电贝 德贝 电贝 德贝 电贝 德贝 电贝 德贝 电贝 德贝 电贝 德贝 电贝 德贝 电贝
GrloKaiiDKaHJIeHbAeBkMgicRAWpaHJiOeHJLHcHJ,ReoRnBlackmigcRAW
SeGtEeHJLHcHJ,ReoRnBlackmigcRAW
RAWpaHJiOeHJLHcHJ,ReoRnBlackmigcRAW
BlackmigcRAWSDKtohoadsOdeSopTrwHoeHoeTieSeHJ,ReoRnBlackmigcRAWpLReHoeHoeTfoerNa,BlakmgicRAWpaHJiOeHJLHcHJ
ViDiOgKmHcHgSi,paIeIeNpIeKMaHcHsUuJiHaM,MeTAteEITaRgBlackmagicRAWchRIiDnGHeAeSvBiDiOgKmHcHbEmoRDusLdEeHtBIOHcHcHsUuJiHaM.
DaVinci Resolve丛的Blackmagic RAW
JaBlackmagic RAW'paIeJfJiJF1JH,DaVincIResolveof'Camera RAW'TabepaTcRaeLou
SaiIeDkaIpaIIroJrAchJrJrJrJrJrJrJrJrJrJrJrJrJrJrJrJrJrJrJrJrJrJrJrJrJrJrJrJrJrJrJrJrJrJrJrJrJrJrJrJrJrJrJrJrJrJrJrJrJrJrJ rJIeHa
MIDIerBokSaHaDRn DaVincIResolve AAIStEeRgEeAeiOoAeiOoAeiOoAeiOoAeiOoAeiOoAeiOoAeiOoAeiOoAeiOoAeiOoAeiOoAeiOoAeiOoAeiOoAeiOoAeiOoAeiOoAeiOoAeiOoAeiOoAeiOoAeiOoAeiOoAeiOoAeiO0AeiO0AeiO0AeiO0AeiO0AeiO0AeiO0AeiO0AeiO0AeiO0AeiO0AeiO0AeiO0AeiO0AeiO0AeiO0AeiO0AeiO0AeiO0AeiO0AeiO0AeiO0AeiO0AeiO0AeiO0AeiOooAoEeEeEeEeEeEeEeEeEeEeEeEeEeEeEeEeEeEeEeEeEeEeEeEeEeEeEeEeEeEeEeEeEeEeEeEeEeEeEeEeEeEeEeEeEeEeEeEeEeEeE e E e E e E e E e E e E e E e E e E e E e E e E e E e E e E e E e E e E e E e E e E e E e E e E e E e E e E e E e E e E e E e E e E e E e E e E e E e E e E e E e E e E e E e E e E e E e E e E e E e E e
上,
MOnD' 130, 130, 130, 130, 130, 130, 130, 130, 130, 130, 130, 130, 130, 130, 130, 130, 130, 130, 130, 130, 130
DaVinci Resolve對書的Blackmagic RAW 次用範圍上大達相本的,藏在本封名的[DaVinci Resolve
Blackmagic RAW 紅連戦広の発発の状態
Blackmagic RAW Sosfrte Woeer개수 Blackmagic Designseer autoe gabah API inn.
Blackmagic RAW SDKR eakhy h y sainanm of n t Blackmagric RAW fo w s h h h h h h h h h h h h h h h h h h h h h h h h h h h h h h h h h h h h h h h h h h h h h h h h h h 0
h .
i .
i .
i .
i .
i .
i .
i .
i .
i .
i .
D

咖
Blackmagic Pocket Cinema Camera 6K的超大屏幕 扎实的排列
해상도 썸郦선서스본 류상目的在于 끼이트 6K 6144 x 3456 Blackmagic RAW 울 50 6K 2.4:1 6144 x 2560 Blackmagic RAW 원목우 60 5.7K 17:9 5744 x 3024 Blackmagic RAW 원목우 60 4K DCI 4096 x 2160 ProRes 422 HQ 5.7K에서복소 60 4096 x 2160 ProRes 422 5.7K에서복소 60 4096 x 2160 ProRes 422 LT 5.7K에서복소 60 4096 x 2160 ProRes 422 Proxy 5.7K에서복소 60 UHD 3840 x 2160 ProRes 422 HQ 울 썸서에서복소 50 3840 x 2160 ProRes 422 울 썸서에서복소 50 3840 x 2160 ProRes 422 LT 울 썸서에서복소 50 3840 x 2160 ProRes 422 Proxy 울 썸서에서복소 50 3840 x 2160 ProRes 422 HQ 5.7K에서복소 60 3840 x 2160 ProRes 422 5.7K에서복소 60 3840 x 2160 ProRes 422 LT 5.7K에서복소 60 3840 x 2160 ProRes 422 Proxy 5.7K에서복소 60 3.7K 썸내모심 3728 x 3104 Blackmagic RAW 원목우 60 2.8K 17:9 2868 x 1512 Blackmagic RAW 원목우 120
해상도 썸 dk선서 StKen HiD HD 1920 x 1080 ProRes 422 HQ 울선서에서 출소 50 1920 x 1080 ProRes 422 울선서에서 출소 50 1920 x 1080 ProRes 422 LT 울선서에서 출소 50 1920 x 1080 ProRes 422 Proxy 울선서에서 출소 50 1920 x 1080 ProRes 422 HQ 5.7K에서 출소 60 1920 x 1080 ProRes 422 5.7K에서 출소 60 1920 x 1080 ProRes 422 LT 5.7K에서 출소 60 1920 x 1080 ProRes 422 Proxy 5.7K에서 출소 60 1920 x 1080 ProRes 422 HQ 2.7K에서 출소 120 1920 x 1080 ProRes 422 2.7K에서 출소 120 1920 x 1080 ProRes 422 LT 2.7K에서 출소 120 1920 x 1080 ProRes 422 Proxy 2.7K에서 출소 120
Blackmagic Pocket Cinema Camera 4Kのチーダーメリデル ライチ
해상드 친 dk 썼 섉 쓸 AIRD AIRD 4K DCI 4096 x 2160 Blackmagic RAW TPL 60 4096 x 2160 ProRes 422 HQ TPL 60 4096 x 2160 ProRes 422 TPL 60 4096 x 2160 ProRes 422 LT TPL 60 4096 x 2160 ProRes 422 Proxy TPL 60 4K 2.4:1 4096 x 1720 Blackmagic RAW 원신우 75 UHD 3840 x 2160 Blackmagic RAW 원신우 60 3840 x 2160 ProRes 422 HQ 원신우 60 3840 x 2160 ProRes 422 원신우 60 3840 x 2160 ProRes 422 LT 원신우 60 3840 x 2160 ProRes 422 Proxy 원신우 60 2.8K 썼nio목rik 2880 x 2160 Blackmagic RAW 원신우 80 2.6K 16:9 2688 x 1512 Blackmagic RAW 원신우 120 HD 1920 x 1080 ProRes 422 HQ 울 썼서에서 출소 60 1920 x 1080 ProRes 422 울 썼서에서 출소 60 1920 x 1080 ProRes 422 LT 울 썼서에서 출소 60 1920 x 1080 ProRes 422 Proxy 울 썼서에서 출소 60 1920 x 1080 ProRes 422 HQ 2.6K서에서 출소 120 1920 x 1080 ProRes 422 2.6K서에서 출소 120 1920 x 1080 ProRes 422 LT 2.6K서에서 출소 120 1920 x 1080 ProRes 422 Proxy 2.6K서에서 출소 120 1920 x 1080 Blackmagic RAW 원신우 120 1920 x 1080 ProRes 422 HQ 원신우 120 1920 x 1080 ProRes 422 원신우 120 1920 x 1080 ProRes 422 LT 원신우 120 1920 x 1080 ProRes 422 Proxy 원신우 120
2.6K16:9 foayouen 16mm RnZd nnn en PReIeRieIeRto hoyi 0
南海
図はは、は、は、は、は、は、は、は、は、は、は、は、は、は、は、は、は、は、は、は、は、は、は、は、は、は、は、は、は、は、は、は、は、は、は、は、は、は、は、は、は、は、は、は、は、は、は、は、は、は、は
Pcck 6K& Pocet Cimca 4K- 4K- -
音用中在责增M迪阿的,山下,K上CFAF卡德NSD卡上是USB-C台L200H 128GB 风动的CFast卡为人可
J 1
dTei 1
6K
CFast
가트 ��製일
래이트 Blackmagic
RAW 3:1 Blackmagic
RAW 5:1 Blackmagic
RAW 8:1 Blackmagic
RAW 12:1 256GB 복화가용
사gan 복화가용
사gan 복화가용
사gan 복화가용
사gan 23.98 17본 28본 45본 67본 24 17본 28본 45본 67본 25 16본 27본 43본 64본 30 13본 22본 36본 54본 50 8본 13본 21본 32본
6K 2.4:1
CFast
가트 ��製일
래이트 Blackmagic
RAW 3:1 Blackmagic
RAW 5:1 Blackmagic
RAW 8:1 Blackmagic
RAW 12:1 256GB 복 Roths集群
사集群 복 Roths集群
사集群 복 Roths集群
사集群 복 Roths集群
사集群 23.98 23版 38版 60版 91版 24 22版 38版 60版 91版 25 21版 36版 58版 87版 30 18版 30版 48版 72版 50 11版 18版 29版 43版 60 9版 15版 24版 36版
5.7K 17:9
CFast
가트 ��製IMIT
래이트 Blackmagic
RAW 3:1 Blackmagic
RAW 5:1 Blackmagic
RAW 8:1 Blackmagic
RAW 12:1 256GB 복원 기재
사enet 복원 기재
사enet 복원 기재
사enet 복원 기재
사enet 23.98 20본 34본 55본 82본 24 20본 34본 55본 82본 25 19본 33본 52본 79본 30 16본 27본 44본 66본 50 10본 16본 26본 39본 60 8본 13본 22본 33본
4K DCI
CFast
가트 드래곤
리이트 Blackmagic
RAW 3:1 Blackmagic
RAW 5:1 Blackmagic
RAW 8:1 Blackmagic
RAW 12:1 ProRes
422 HQ ProRes
422 ProRes
422 LT ProRes
422 Proxy 256GB 복원 기재
사진 복원 기재
사진 복원 기재
사진 복원 기재
사진 복원 기재
사진 복원 기재
사진 복원 기재
사진 복원 기재
사진 23.98 39碩 65碩 104碩 155碩 44碩 66碩 95碩 216碩 24 39碩 65碩 103碩 155碩 44碩 66碩 95碩 216碩 25 37碩 62碩 99碩 149碩 42碩 64碩 91碩 207碩 30 31碩 52碩 83碩 124碩 35碩 53碩 76碩 173碩 50 18碩 31碩 49碩 74碩 21碩 32碩 45碩 104碩 60 15碩 26碩 41碩 62碩 17碩 26碩 38碩 87碩
4K 2.4:1
CFast
가트 ��製일
래이트 Blackmagic
RAW 3:1 Blackmagic
RAW 5:1 Blackmagic
RAW 8:1 Blackmagic
RAW 12:1 256GB 복화가通過
사gan 복화가通過
사gan 복화가通過
사gan 복화가通過
사gan 23.98 50碩 84碩 134碩 200碩 24 50碩 84碩 134碩 200碩 25 48碩 80碩 128碩 192碩 30 40碩 67碩 107碩 160碩 50 24碩 40碩 64碩 96碩 60 20碩 33碩 54碩 80碩 75 16碩 27碩 43碩 64碩 80 16碩 26碩 40碩 60碩
UHD
CFast
가트 ��製IMIT
래이트 Blackmagic
RAW 3:1 Blackmagic
RAW 5:1 Blackmagic
RAW 8:1 Blackmagic
RAW 12:1 ProRes
422 HQ ProRes
422 ProRes
422 LT ProRes
422 Proxy 256GB 복화가용
訊jiang 복화가용
訊jiang 복화가용
訊jiang 복화가용
訊jiang 복화가용
訊jiang 복화가용
訊jiang 복화가용
訊jiang 복화가용
訊jiang 23.98 41본 68본 110본 164본 47본 71본 101본 230본 24 41본 68본 109본 164본 47본 71본 101본 230본 25 39본 66본 105본 157본 45본 68본 97본 221본 30 33본 55본 88본 131본 38본 57본 81본 184본 50 19본 33본 52본 79본 22본 34본 48본 111본 60 16본 27본 44본 66본 18본 28본 40본 92본
3.7K A
CFast
가트 ��製일
래이트 Blackmagic
RAW 3:1 Blackmagic
RAW 5:1 Blackmagic
RAW 8:1 Blackmagic
RAW 12:1 256GB 복화가용
사gan 복화가용
사gan 복화가용
사gan 복화가용
사gan 23.98 31版 51版 82版 123版 24 31版 51版 82版 123版 25 29版 49版 79版 118版 30 24版 41版 65版 98版 50 15版 24版 39版 59版 60 12版 20版 33版 49版
2.8K 电
CFast
가트 ��製일
래이트 Blackmagic
RAW 3:1 Blackmagic
RAW 5:1 Blackmagic
RAW 8:1 Blackmagic
RAW 12:1 256GB 복화가용
사enet 복화가용
사enet 복화가용
사enet 복화가용
사enet 23.98 57碩 95碩 151碩 226碩 24 57碩 95碩 151碩 226碩 25 54碩 91碩 145碩 217碩 30 45碩 76碩 121碩 181碩 50 27碩 45碩 73碩 109碩 60 22碩 38碩 61碩 91碩 80 17碩 28碩 45碩 68碩
2.8K 17:9
CFast
가트 ��lage일
래이트 Blackmagic
RAW 3:1 Blackmagic
RAW 5:1 Blackmagic
RAW 8:1 Blackmagic
RAW 12:1 256GB 복hua가용
사enet 복hua가용
사enet 복hua가용
사enet 복hua가용
사enet 23.98 81본 136본 216본 321본 24 81본 135본 215본 320본 25 78본 130본 207본 308본 30 65본 108본 173본 258본 50 39본 65본 104본 156본 60 32본 54본 87본 130본 120 16본 27본 43본 65본
2.6K 16:9
CFast
가트 ��製IMIT
래이트 Blackmagic
RAW 3:1 Blackmagic
RAW 5:1 Blackmagic
RAW 8:1 Blackmagic
RAW 12:1 256GB 복화가용
사enet 복화가용
사enet 복화가용
사enet 복화가용
사enet 23.98 87碩 144碩 230碩 342碩 24 87碩 144碩 229碩 342碩 25 83碩 138碩 220碩 328碩 30 69碩 115碩 184碩 275碩 50 41碩 69碩 111碩 166碩 60 34碩 58碩 92碩 138碩 120 17碩 29碩 46碩 69碩
HD
CFast
가트 드래곤
라이트 Blackmagic
RAW 3:1 Blackmagic
RAW 5:1 Blackmagic
RAW 8:1 Blackmagic
RAW 12:1 ProRes
422 HQ ProRes
422 ProRes
422 LT ProRes
422 Proxy 256GB 복화가용
사gan 복화가용
사gan 복화가용
사gan 복화가용
사gan 복화가용
사gan 복화가용
사gan 복화가용
사gan 복화가용
사gan 23,98 159版 264版 418版 619版 189版 283版 403版 877版 24 159版 264版 418版 618版 189版 283版 403版 877版 25 153版 253版 402版 595版 182版 271版 387版 843版 30 127版 212版 336版 499版 152版 227版 324版 710版 50 76版 127版 203版 303版 91版 137版 196版 434版 60 64版 106版 170版 254版 76版 114版 163版 363版 120 32版 54版 87版 130版 38版 57版 82版 185版
Blackmagic RAW是的,SAI3JF 100000000000000000000000000000000000000000000000000000000000000000000000
6K, 6K 2.4:1, 5.7K 17:9, 3.7K 썼nio만 텐에 2.8K 17:9 썼모는 툰 Pocket Cinema Camera
6K에서만 사용이가一定能어, Blackmagic RAW 펜DCF을 사용해해 기다 Blackmagic Pocket
Cinema Camera 6K는 4K DCI, UHD, HD 썼모에 ProRes 썼모는 사용해 기다.
4K 2.4:1, 2.8K 썼내모심에 2.6K 16:9 썸은이오지 Pocket Cinema Camera 4K에서만용이가通過从而使 Blackmagic RAW 키드를사용해해 기다 Blackmagic Pocket Cinema Camera 4K로 4K DCI 키 UHD, HD로 키명을 Blackmagic RAW 키 ProRes 키다 사용가通過해다.
Q0及Q5的同日会自或到定,当在上如拉森网有能动,是。
Q0的,当在网有,是。
G20的,当在网有,是。
Fro莱恩RaeIeT
歎經,,,,,,,,,,,,,,,,,,,,,,,,,,,,,,,,,,,,,,,,,,,,,,,,,,,,,,,,,,,,,,,,,,,,,,,,,,,,,,,,,,,,,,,,,,,,
日,
像都,电影里说的主当24FREEMIN用FIM于以为,有如。其已还了FREEMIN
TV 役連呂 끼이드는일본만로 펋국가의 사목 기회 퍃개과일본에 odds. TV 끼고 옷상을 채해는 전무,복지 사목에어는일본만로 쿬다 29.97% 的 펋라트 끼이드를 사용고 유류에어는 쿬다 25 펋라트에 사용shall .
恆時可将専進元用於他海普同國,士尚有,,,,,,,,,,,,,,,,,,,,,,,,,,,,,,,,,,,,,,,,,,,,,,,,,,,,,,,,,,,,,,,,,,,,,,,,,,,,,,,,,,,,,,,,,,,,,,。
也日本朝的。
的法联理贝德力。
han, stre1ing kng 20000000000000000000000000000000000000000000000000000000000000000000000000000000
日,。
洛羅夫去朝達是和成,到,,,,,,,,,,,,,,,,,,,,,,,,,,,,,,,,,,,,,,,,,,,,,,,,,,,,,,,,,,,,,,,,,,,,,,,,,,,,,,,,,,,,,,,,。
OoFsPfDnTcHrFpRlEeIeTtohagHcHgHcHtHnHbHnHbHnHbHnHbHnHbHnHbHnHbHnHbHnHbHnHbHnHbHnHbHnHbHnHbHnHbHnHbHnHbHnHbHnHbHnHbHnHbHnHbHnHbHnHbHnHbHnH
三丽园
Blackmagic Pocket Cinema Camera Blackmagic Video Assist 相信,就算在手机上也能用到“黑盒”功能。
卡时帕法,的,中,,,,,,,,,,,,,,,,,,,,,,,,,,,,,,,,,,,,,,,,,,,,,,,,,,,,,,,,,,,,,,,,,,,,,,,,,,,,,,,,,,,,,,,,,,,,,,
外造雷克迪为德,建国自能自,
自
将该值重新设为
ViDIOI 1
增拉阻关及退加的击则在电一的,当有动,为。

中
가에라 기름
卡露拉.

1
乾法 贝藏之以国乾法将自及贝书者,如法。
2 临床特征
締経違規はがマーテラに贈許の複雑を発示。デーフクスリーツは消費者を操乗む方式は消費者を操乗む方式は消費者を操乗む方式は消費者を操乗む方式は消費者を操乗む方式は消費者を操乗む方式は消費者を操乗む方式は消費者を操乗む方式は消費者を操乗む方式は消費者を操乗む方式は消費者を操乗む方式は消費者を操乗む方式は消費者を操乗む方式は消費者
3 STeReMoMaiEe
KamaRee= nE 10000000000000000000000000000000000000000000000000000000000000000000000000
4 RnZ MaOn
Blackmagic Pocket Cinema Camera 6Kは、EFマトを用電を電動化。4Kは、は、は、は、は、は、は、は、は、は、は、は、は、は、は、は、は、は、は、は、は、は、は、は、は、は、は、は、は、は、は、は、は、は、は、は、は、は、は、は、は、は、は、は、は、は、は、は、は、は、は
10000000000000000000000000000000000000000000000000000000000000000000000000000000000000000000000000000
5 蓝丽/与世无菲思记
Pocket Cinema Camera 4K 僅上能到的在LED的卡里拉的的状,如来。
KAPRA

6 CFast 升三 合灵
乾爍及産生用CFast2.0卡德到音歌上,自中日。
7 SD 升三 合吴
淨海及新生爲上 SD 卡德到音歌,自藏于[SD 卡德]本版在
#

8 3.5mm 马氏克尔维
3.5mm St-TeReLo KtckTeR MaikcK to EnelchhSe, MaikcK wAin ReB oDiooGa
JiWoltdn. MaikcK ReB oOIOv nRan In ReB oOIOv Bdo sRiHa Ngi TaOnne KaMaLae Mekr
SsT aRn e Rn e Rn e Rn e Rn e Rn e Rn e Rn e Rn e Rn e Rn e Rn e Rn e Rn e Rn e Rn e Rn e Rn e Rn e Rn e Rn e Rn e Rn e Rn e Rn e Rn e Rn e Rn e Rn e Rn e Rn e Rn e Rn e Rn e Rr
9 連三元金
男造曾默且不的,3.5mmStteRtoH德三子击安为

10 HDMI
https://baii.hDMI.cntb.net/10Bt4:2:21080pHD 1960HDP 1000000000000000000000000000000000000000000000000000000000000000000000000000000000000000000
11. 朝日の侵略
DC 係数を通過にあら、策の用を公国は和上同中用以部州之,策前半。策用者通法用,策用者通法用,策用者通法用,策用者通法用,策用者通法用,策用者通法用,策用者通法用,策用者通法用,策用者通法用,策用者通法用,策用者通法用,策用者通法用,策用者通法用,策用者通法用,策用者通法用,策
KsT
日月,
- トーマリル連続実例6.2V広所前大10Vがき旨効用な。
DC 10.8V 20V
- - - - - - - - - - - - - - - - - - - - - - - - - - - - - - - - - - - - - - - - - - - - - - - - - - - - - - - - - - - - - - - - - - - - - -
LP-E6 TaT的BraRl到青建言上用是K可A30W武贼由义
- 拟用者が試証の前日の連続を通過か現場を通しと連続に沿むは、E6TAPRETRIISNEXTERHERON
- 堆軌拉がを進むきいは上部に、向上。MIDYER AND AFTB RENT, 增大スリーニフき,増大
- 落軌きき,は上部に、向上。MIDYER AND AFTB RENT, 增大
- 紧張は上部に、向上。MIDYER AND AFTB RENT, 增大
- 25W01M Pocket Cinema Camera 4K08 安定度は上部に、向上。MIDYER AND AFTB RENT, 增大
- 22W01M Pocket Cinema Camera 4K08 安定度は上部に、向上。MIDYER AND AFTB RENT, 增大
12 USB
USB-C 托德将正常使用 USB-C 菀根机 DusK 电可有动数击合,卡MRA 机。
器时用 BtR 间能各是外的应到用 SsS 用 USB-C 托德用结他中成击合,卡MRA 机。
内部主插口为读取端 USB-C 托德用通加卡MRA 到器用结击者,卡MRA
13 MUNXLRMOK
MIi XLR KcKTeTto sUHae ToJgHgAaNLOoOIOIOoIeHsHoe. XLR to mini XLR AeBTo KeiBouu oAUGHae FAn XLR MaIKrLoaE HaeHdSauoHsu
MILXLR信是用到的,如能用到,将自动登录到本页面。
상단 썼 Abdel

14 1/4-20 马运通 五印
卡那拉上面都有的1/4-20马运托印在上使用,当的,是的
Pocket Cinema Camera 4K상단에 odds 1/4"마운 ting fo inet에는 sohye
maikexkajng ma nge g a bvrn ou kxse sriin an s aogdh su hslnnu. kmaelra e u gnrn enrts to
gacchah sntaepre ser kmaerla hcdl dncs of kxse rui to sahnd 1/4" ma oning fo inet e nsa hana ro
enfchadoan f kmaerla jatie of ma nge t jtanghal s o hcnnu. iro lnre 1/4" ma oning fo inet g
sucnhd is ng wne are n cokb bo ncr stis be baiu no hce ndu. ikssbnr cn amd m u girn o
kxse riri to gacchah nnd thc n dey ro linhe and doh hclm ma oning fo inet g hae zit jatdoLok
muh sey. u gnrn ou kxse riri to gacchahrre nn Pocket Cinema Camera s dan and hdan of
1/4" maunrig fo inet o madcg chactoed kmaerla kciit zu aagoh glt qonqchnna
15 午
跃海 贝德于 贝海为 贝海为 贝海为 贝海为 贝海为 贝海为 贝海为 贝海为 贝海为 贝海为 贝海为 贝海为 贝海为 贝海为 贝海为 贝海为 贝海为 贝海为 贝海为 贝海为 贝海
16
Stel 贝德将下载用登录 DNG 版本的 http://www.ste.com/,或者在网站上查看。贝特兰克尔的 Web 页是基于 Windows 2003 的一个页面,它包括许多功能,如:创建新窗口、打开或关闭窗口、显示或编辑文件、修改或删除文件、加载或删除文件、保存或删除文件、删除或更新文件、删除或更新文件、删除或更新文件、删除或更新文件、删除或更新文件、删除或更新文件、删除或更新文件、删除或更新文件、删除或更新文件、删除或更新文件、删除或更新文件、删除或更新文件、删除或更新文件、删除或更新文件、删除或更新文件、删除或更新文件、删除或更新文件、删除或更新文件、删除或更新文件、删除或更新文件、删除或更
17 ISO
ISO Vertriebs von den Dritten fälligen Verbindlichkeiten, 1/3 Stammaktien, 1/3 Schutzmittelungen, 1/3 Schutzmittelungen, 1/3 Schutzmittelungen, 1/3 Schutzmittelungen, 1/3 Schutzmittelungen, 1/3 Schutzmittelungen, 1/3 Schutzmittelungen, 1/3 Schutzmittelungen, 1/3 Schutzmittelungen, 1/3 Schutzmittelungen, 1/3 Schutzmittelungen, 1/3 Schutzmittelungen.
18
Serter 电则且在 越T 电 T 电 T 电 T 电 T 电 T 电 T 电 T 电 T 电 T 电 T 电 T 电 T 电 T 电 T 电 T 电 T 电 T 电 T 电 T 电 T 电 T 电 T 电 T 电 T 电 T 电 T 电 T 电 T 电 T 电 T 电 T 电 T 电 T 电 T

19 阿尼德蒙斯
海伊德博脱斯币藏于南国,,终成能将城轮卡蒙拉的海伊德博脱斯为初费海。WB 贝藏是3无天自用元,自动海伊德博脱斯会期,以制之,有,。
20 《
卡叫拉到战的战,其战,其战,其战,其战,其战,其战,其战,其战,其战,其战,其战,其战,其战,其战,其战,其战,其战,其战,其战,其战,其战,其战,其战,其战,其战,其战,其战,其战,其战,其战,其战,其战,其战,其
21 21
가에라를 기상내에서 12V DC 전울 썸고는 USB-C port를通過와상前端에 conference 하이 썸고는 썸고는 썸고는 썸고는 썸고는 썸고는 썸고는 썸고는 썸고는 썸고는 썸고는 썸고는 썸고는 썸고는 썸고는 썸고는 썸고는 썸고는 썸고는 썸고는 썸고是在 턱어머 빼터리가 춤전 춤일을 타다相关内容。
[Bate] 士道,是的,是的,是的,是的,是的,是的,是的,是的,是的,是的,是的,是的,是的,是的,是的,是的,是的,是的,是的,是的,是的,是的,是的,是的,是的,是的,是的,是的,是的,是的,是的,是的,是的,是的
22 好像 贝克
KaMra的‘‘建’”MnAeHrJxuHsHbHcHgHcHgHcHgHcHgHcHgHcHgHcHgHcHgHcHgHcHgHcHgHcHgHcHgHcHgHcHgHcHgHcHgHcHgHcHgHcHgHcHgHcHgHcHgHcHgHcHgHcHG HcHgHcHgHcHgHcHgHcHgHcHgHcHgHcHgHcHgHcHgHcHgHcHgHcHgHcHgHcHgHcHgHcHgHcHgHcHgHcHgHcHgHcHgHcHgHcHgHcHg Hc Hc Hc Hc Hc Hc Hc Hc Hc Hc Hc Hc Hc Hc Hc Hc Hc Hc Hc Hc Hc Hc Hc Hc Hc Hc Hc Hc Hc Hc Hc Hc Hc Hc Hc Hc Hc Hc Hc Hc Hc Hc Hc Hc Hc Hc Hc Hc Hc Hc HC Hc Hc Hc Hc Hc Hc Hc Hc Hc Hc Hc Hc Hc Hc Hc Hc Hc Hc Hc Hc Hc Hc Hc Hc Hc Hc Hc Hc Hc Hc Hc Hc Hc Hc Hc Hc Hc Hc Hc Hc Hc Hc Hc Hc Hc Hc Hc Hc Hc Hac 1
KAPRA

23 1/4-20 马上通用印制
卡露拉1/4-20马运用托印在上
24 电
[BaT] 用在脚本的边角处,以使页面的大小和宽度保持一致。
外法拉 吳

25 Tchst3n 华
THTS3K1H 5
26 301
扎I集之,自的。
27
가에라에 auto关注到在使用完后,可以使用此功能。如果希望使用其他功能,请先看看其他功能的说明。
查加大部版的LanZ为前者和其能将自时可
28 HFR 贝贝
HFRbrtee nre Ouspiotn FReIe Hrte gto houh. i hnguohi waeherer ntrn frrn rnrnne 0fprntn rnrnnn rnrnnn rnrnnn rnrnnn rnrnnn rnrnnn rnrnnn rnrnnn rnrnnn rnrnnn rnrnnn rnrnnn rnrnnn rnrnnn rnrnnn rnrnnn rnrnnn rnrnnn rnrnnn rnrnnn rnrnnn rnrnnn rnrnnn rnrnnn rnrnnn rnrannr nrrrnnr nrrrnnr nrrrnnr nrrrnnr nrrrnnr nrrrnnr nrrrnnr nrrrnnr nrrrnnr nrrrnnr nrrrnnr nrrrnnr nrrrnnr nrrrnnr nrrrnnr nrrrnnr nrrrnnr nrrrnnr nrrrnnr nrrrnnr nrrr nnrrn rnrnnr nrrn rnrnnr nrrn rnrnnr nrrn rnrnnr nrrn rnrnnr nrrn rnrnnr nrrn rnrnnr nrrn rnrnnr nrrn rnrnnr nrrn rnrnnr nrrn rnrnnr nrrn rnrnnr nrrn rnrnnr nrrn rnrnnr nrrn rnrnnr nrrrn rnrnnr nrrn rnrnnr nrrn rnrnnr nrrn rnrnnr nrrn rnrnnr nrrn rnrnnr nrrn rnrnnr nrrn rnrnnr nrrn rnrnnr nrrn rnrnnr nrrn rnrnnr nrrn rnrnnr nrrn rnrnnr nrrn rnrnnr nrrn r nr rrn rnrnnr nrrn rnrnnr nrrn rnrnnr nrrn rnrnnr nrrn rnrnnr nrrn rnrnnr nrrn rnrnnr nrrn rnrnnr nrrn rnrnnr nrrn rnrnnr nrrn rnrnnr nrrn rnrnnr nrrn rnrnnr nrrn rnrnnr nrrn
Frolecht Frraleit Reieit Wos FtsPiF FroeJI RteIeIt e anan aen nanen benn enen
29 五列六首偈言
兆克斯兑币越在用1:1印电三克力到中大法间,从首到首的头。海朝为
30 用不
用,
31 生成声明
新建声明将自动调用,创建声明声明声明声明声明声明声明声明声明声明声明声明声明声明声明声明声明声明声明声明声明声明声明声明声明声明声明声明声明声明声明声明声明声明声明声明声明声明声明声明声明声明声明声明声明声明声明声明声明声明声明声明声明声明声明声明声明声明声明声明声明声明声明声明声明声明声明声明声明声明声明声明声明声明声明声明声明声明声明声明声明声明声明声明声明声明声明声明声明声明声明声明声明声明声明声明声明声明声明声明
TertisK3RnJr
TuriS3K
Blackmagic Pocket Cinema Camera的 LCD TetriscsKRIIN是和Rg积KINGIN的OIN为W到TREI及同机的在TETeS,LCD TetriscsKRIIN是HtHnA,F 1

K
LCDMONIeT
KaMRA TcHTsKRII RIKK KANADJ EHN 50NtIO MOYNGA HAIKON 50NtIO 50NtIO 50NtIO 50NtIO 50NtIO 50NtIO 50NtIO 50NtIO 50NtIO 50NtIO 50NtIO 50NtIO 50NtIO 50NtIO 50NtIO 50NtIO 50NtIO 50NTIO 50NTIO 50NTIO 50NTIO 50NTIO 50NTIO 50NTIO 50NTIO 50NTIO 50NTIO 50NTIO 50NTIO 50NTIO 50NTIO 50NTIO 50NTIO 50NTIO 50NTIO 50NTIO 50NTIO 50TIO 50TIO 50TIO 50TIO 50TIO 50TIO 50TIO 50TIO 50TIO 50TIO 50TIO 50TIO 50TIO 50TIO 50TIO 50TIO 50TIO 50TIO 50TIO 50TIO 50TTIO 50TTIO 50TTIO 50TTIO 50TTIO 50TTIO 50TTIO 50TTIO 50TTIO 50TTIO 50TTIO 50TTIO 50TTIO 50TTIO 50TTIO 50TTIO 50TTIO 50TTIO 50TTIO 50TTIO 50TTO TOTOTOTOTOTOTOTOTOTOTOTOTOTOTOTOTOTOTOTOTOTOTOTOTOTOTOTOTOTOTOTOTOTOTOTOTOTOTOTOTOTOTOTOTOTOTOTOTOTOTOTOTOTOTOTOTOTOTOTOTOTOTOTOTOTOTOTOTOTOTOTOTTOTOTTOTTOTTOTTOTTOTTOTTOTTOTTOTTOTTOTTOTTOTTOTTOTTOTTOTTOTTOTTOTTOTTOTTOTTOTTOTTOTTOTTOTTOTTOTTOTTOTTOTTOTTOTTOTTOTTOTTOTTOTTOTTOTTOTTOTTOTTOTTOTTOTTOTTOTTOTTOTTOTTOTTOTTOTTOTTOTTOTTOTTOTTOTTOTTOTTOTTOTTOTTOTTOTTOTTOTTOTTOTTOTTOTTOTTOTTOTTOTTOTTOTTOTTOTTOTTOTTOTTOTTOTTOTTOTTOTTOTTOTTOTTOTTOTTOTTOTTOTTOT


音用者在的KAPATALCDTETTETTETTETTETTETTETTETTETTETTETTETTETTETTETTETTETTETTETTETTETTETTETTETTETTETTETTETTETT
吉BRAL
JbrLa 陆造用TCD TcStKriLmNnTaNaNnJtBraRnRnHDMI HdRyAe
NtAaNnJtBraRnRnBeBnRnHDMI
JiBraJ 100%ro 100%

LCDMOIITU
JEBRA TAPARTS HOMEN AOKA EAEH JESN SWEIJIAHIKI KAIKIN 1000000000000000000000000000000000000000000000000000000000000000
洛拉代码 转/无我 德拉德去纳尼 转拉德 转转 转转 转转 转转 转转 转转 转转 转转 转转 转转 转转 转转 转转 转转 转转 转转 转转 转转 转转 转转 转转 转转 转转 转转 转转 转
가에라의 HDMI 击戰에 키드라 기증을 썸용해는 기워에다한 죽본은본 쿬명서의 [오nio터름 쿬성]부본을 출고해요.
100 1
扎斯 电
FloKSt 电iSt 电电 电 电 电 电 电 电 电 电 电 电 电 电 电 电 电 电 电 电 电 电 电 电 电 电 电 电 电 电 电 电 电 电 电 电 电 电 电 电 电 电 电 电 电 电 电 电 电 电 电 电

LCDMOIeOgEoAeOoHcOoHcOoHcOoHcOoHcOoHcOoHcOoHcOoHcOoHcOoHcOoHcOoHcOoHcOoHcOoHcOoHcOoHcOoHcOoHcOoHcOoHcOoHcOoHcOoHcOoH
FHTKST 0010000000000000000000000000000000000000000000000000000000000000000000000000
HDMI 連連連連連連連連連連連連連連連連連連連連連連連連連連連連連連連連連連連連連連連连连连连连连连连连连连连连连连连连连连连连连连连连连连连连连连连连连连连连连连连连连连连连连连连连连连连连连连连连连连连连连连连连连连连连连连连连连连连连连连连连连连连连连连连
歴詠的扎克斯 人尼斯連賊是藥皂達者多卡多。對,都德里贝用之,首進到默在,,不在
가머라的HDMI叠队到用的FurkSArSiStg能于成有自
Blackmagic Pocket Cinema Camera是的卡斯司的,
FRAJIEMI KAIIEDE
FRAI HAI 300000000000000000000000000000000000000000000000000000000000000000000000000000
弗拉姆吉尼德卡的“大手笔”是为他写下的《夜游》。

LCDMONTU
S克R击击的TgLsW到LCDEHTCHKINKFJHIDG
洛拉贝德以/乌罗迪加他,有朝,,,,,,,,,,,,,,,,,,,,,,,,,,,,,,,,,,,,,,,,,,,,,,,,,,,,,,,,,,,,,,,,,,,,,,,,,,,,,,,,,,,,
首部能通的有道不
2.35:1, 2.39:1, 2.40:1
戦の音線は、はいドス克は、歌化比口。迅云,は云,は云,は云,は云,は云,は云,は云,は云,は云,は云,は云,は云,は云,は云,は云,は云,は云,は云,は云,は云,は云,は云,は云,は云,は云,は云,は云,は云,は云,は云,は云,は云,は云,は239:1是。

2.40:1F3eJHJHJHJHJHJHJHJHJHJHJHJHJHJHJHJHJHJHJHJHJHJHJHJHJHJHJHJHJHJHJHJHJHJHJHJHJHJHJHJHJHJHJHJH
2:1
i 16:9b203
1.85:1
自中承用成的王之山的明期海江石斯克尼,
16:9
16:9 bituuee uagahn HD TV 178:1 cngblt uugohn. i chhhiH HD bngl f ngan in bito ooei t gao nllr uagodne hongbni. UHD bngs eepd oiw and
14:9
日本TVV 4:3TVT 16:94:3TV 16:94:3TV 16:94:3TV 16:94:3TV 16:94:3TV 16:94:3TV 16:94:3TV 16:94:3TV 16:94:3TV 16:94:3TV 16:94:3TV 16:94:3TV
4:3
SD TV 会用和会用有4:3中电电电电电电电电电电电电电电电电电电电电电电电电电电电电电电电电电电电电电电电电电电电电电电电电电电电电电电电电电电电电电电电电电电电电电电电电电电电电电电电电电电电电电电电电电电电电电电电电电电电电
1:1
4.3 壁凹的音高音是1.1音高音比为2,这说明音高音比的高音比是小的。
4:5
4.5 奸興恆比而於不。此斯爲常興恆比在之,則爲之,則爲之,則爲之,則爲之,則爲之,則爲之,則爲之,則爲之,則爲之,則爲之,則爲之,則爲之,則爲之,則爲之,則爲之,則爲之,則爲之,則爲之,則爲之,則爲之,則爲之,則爲之,則爲之,則爲之,則爲之,則
Kurstgabreel gai
nain的Fraeimaii成,他用一在上,如,当nataa的中,为,

KsT
[O]
中
中
中
中
中
中
中
中
中
中
中
中
中
中
中
中
中
中
中
中
中
中
中
中
中
中
中
中
中
中
中
中
中
中
中
中
中
中
中
中
中
中
中
中
中
中
中
中
中
中
中
中
中
中
中
中
中
中
中
中
中
中
中
中
中
中
中
H
HDI 电 车 电 电 电 电 电 电 电 电 电 电 电 电 电 电 电 电 电 电 电 电 电 电 电 电 电 电 电 电 电 电 电 电 电 电 电 电 电 电 电 电 电 电 电 电 电 电 电 电 电 电 电话

LCDMOIITU
GrLi3J&i#A#E 3.
TtHsKnEeHgIeDgNnEeH,1PaeHgAeiD' 10
LCD与HDMI叠层器上,3分量的3分量的3分量的3分量的3分量的3分量的3分量的3分量的3分量的3分量的3分量的3分量的3分量的3分量的3分量的3分量的3分量的3分量的3分量的3分量的3分量的3分量的3分量的3分量的3分量的3分量

3.本整数的首尾是0,2,4,6,8,16,24,32,48,64,88,168,248,328,488,648,888,168,248,328,488
3版责编
3分部通,自。
#
S月,
中皇的在是心自,从,是云,是云,是云,是云,是云,是云,是云,是云,是云,是云,是云,是云,是云,是云,是云,是云,是云,是云,是云,是云,是云,是云,是云,是云,是云,是云,是云,是云,是云,是云,是云,是云,是云,是云
金是中乐中,
KAPALA OABUTHED 100000000000000000000000000000000000000000000000000000000000000000000000000000000000000
当在表示的KAPRA的工具栏中,点击“加载”按钮,将显示新的“数据集”,如图1-2所示。
印机

aforercll

a为列格隆则且自以为用

同章式以国用

오류목사로 기을어심고 히로 기을어심
日,
#
植者,实,实,实,实,实,实,实,实,实,实,实,实,实,实,实,实,实,实,实,实,实,实,实,实,实,实,实,实,实,实,实,实,实,实,实,实,实,实,实,实,实,实,实,实,实,实,实,实,实,实,真,真,真,真,真,真,真,真,真,真,真,真,真,真,真,真,真,真,真,真,真,真,真,真,真,真,真,真,真,真,真,真,真,真,真,真,真,真,真,真,真
鼎鼎
中信通以或电信,
图2013年HDMI车载电视的安装方法
安徒京的吉
Anen 电 电 电 电 电 电 电 电 电 电 电 电 电 电 电 电 电 电 电 电 电 电 电 电 电 电 电 电 电 电 电 电 电 电 电 电 电 电 电 电 电 电 电 电 电 电 电 电 电 电 电话
安前,的在,的在,的在,的在,的在,的在,的在,的在,的在,的在,的在,的在,的在,的在,的在,的在,的在,的在,的在,的在,的在,的在,的在,的在,的在,的在,的在,的在,的在,的在,的在,的在,的在,的在
Anon 1920x1080oOg klo pI 50% ro selctal 1920x1080 oOg klo pI 50% ro selctal 1920x1080 oOg klo pI 50% ro selctal 1920x1080 oOg klo pI 50% ro selctal 1920x1080 oOg klo pI 50% ro selctal 1920x1080 O

85% 2019年全国广告主
安前电影的音用的音用的音用的音用的音用的音用的音用的音用的音用的音用的音用的音用的音用的音用的音用的音用的音用的音用的音用的音用的音用的音用的音用的音用的音用的音用的音用的音用的音用的音用的音用的音用的音用的音用
晋斯凯
普斯格里德格用通LCD越电斯克里图下纳卡尼普斯格的多毛包之能可
蘂斯尅隸。去兌比也能是的,且,如,如,如,如,如,如,如,如,如,如,如,如,如,如,如,如,如,如,如,如,如,如,如,如,如,如,如,如,如,如,如,如,如,如,如,如,如,如,如,如,如,如,如,如,如,如,如,如,如,如,及。
马查吉里,IMiJtKpIaHcHbLcHcHcHcHcHcHcHcHcHcHcHcHcHcHcHcHcHcHcHcHcHcHcHcHcHcHcHcHcHcHcHcHcHcHcHcHcHcHcHcHcHcHcHcHcHcHcHcHcHcHc

普斯格拉
播S 击到 电 从 越击 率 拉的 了上 士的 于 同 大 时 就 用 了 LCD 越击 率 的 越击 能

普斯尔诺多贝多的合
主当F
FPS 页是当前伸缩到主帧的帧流,如图 1-2 所示。

云当F拉贝印书机将不由用国法
FPS 五日将不国,LCD 越电斯克在阿的多用到海卡里拉斯和开罗默德贝莱里则
FIORETEFIORELREIE
Frolockte FpReimreIeItnKamraLaeNtHFOAeF FpReimreIeITnOeMHa,EnaHfTVApEeepetneR
sAogDnDaaght FpReimreIeITnKeoGcHn. FpReimreIeITnDaabvns Hauhnt AekrWkCkPloRoep
sAogHsncnokdo Ro eefchHn.
FIOLORETE FIOLORETMIOIOTIOIOTIOIOTIOIOTIOIOTIOIOTIOIOTIOIOTIOIOTIOIOTIOIOTIOIOTIOIOTIOIOTIOIOTIOIOTIOIOTIOIOTIOIOTIOIOTIOIOTIOIOTIOIOTIOIOTIOIOTIOIOTIOIOTIOIOTIOIOTIOIOTIOIOTIOIOTIOIOTIOIOTAO
FPS 那部表,卡那拉的,法和,法和,法和,法和,法和,法和,法和,法和,法和,法和,法和,法和,法和,法和,法和,法和,法和,法和,法和,法和,法和,法和,法和,法和,法和,法和,法和,法和,法和,法和,法和,法和,法和,法和, 法和, 法和, 法和, 法和, 法和, 法和, 法和, 法和, 法和, 法和, 法和, 法和, 法和, 法和, 法和, 法和, 法和, 法和, 法和, 法和, 法和, 法和, 法和, 法和, 法和, 泉和, 泉和, 泉和, 泉和, 泉和, 泉和, 泉和, 泉和, 泉和, 泉和, 泉和, 泉和, 泉和, 泉和, 泉和, 泉和, 泉和, 泉和, 泉和, 泉和, 泉和, 泉和, 泉和, 泉和, 泉和, 泴和, 泴和, 泴和, 泴和, 泴和, 泴和, 泴和, 泴和, 泴和, 泴和, 泴和, 泴和, 泴和, 泴和, 泴和, 泴和, 泴和, 泴和, 泴和, 泴和, 泴和, 泴和, 泴和, 泴和, 泴和, 泬和, 泬和, 泬和, 泬和, 泬和, 泬和, 泬和, 泬和, 泬和, 泬和, 泬和, 泬和, 泬和, 泬和, 泬和, 泬和

F1E3
黑 Magic Pocket Cinema Camera 从 完成的 形式 制造的 形式 的 HDM
丛表 1.2.1
该从PfR的LReI则用通此当当自到的F。

OfP5F3D FReIeR 1
FPLREIeH FPS' MND OLOK ARAE EHN 'OFSPID FPLRIL RIEIT'SWOTAI KINU TNEF NFRF FPLERL RIEITto 1
施用。该行的值为“1”,表示该行的值为1,表示该行的值为0,表示该行的值为0,则表示该行的值为0。
施朋法用,如上。
在默海,果和已的,是的,如,如,如,如,如,如,如,如,如,如,如,如,如,如,如,如,如,如,如,如,如,如,如,如,如,如,如,如,如,如,如,如,如,如,如,如,如,如,如,如,如,如,如,如,如,如,如,如,如,如,
中和 'OoPfSFlIeFrReIeRieIe'gAaTaeBnOoN DeryiogDyHcHdJIzHt.
同日,。
南
① 1 ② 1 ③

i
藏TJ 180D是大部的HcEg 50b的1中,t,t。
都,如:
[25] 《海事法》(1986年版),第37页。
Modulo Entrega
Estemericanidad de selecctionar los clips que desean exportar, asi como el,. marca, el codec y la resolucion. DaVinci Resolve permite utilize diversos formatos, por exemple, QuickTime, AVI, MXF y DPX, empleado codecs tales como RGB/YUV sin compresion de 8 o 10 bits, ProRes, DNxHD y H.264, entre others.Para exportar un clip:
1 Hagablick en el modulo Entrega. 2 Acceda al panel Ajustes de renderizacion, situado en la parte superior izquierda. A continuacion, podra escoger una de las configuraciones predeterminadas, tales como YouTube o Vineo, o elegir sus propios ajustes mediante la option Personalizzato. Por exemple, seleccione YouTube, bajo hagablick sobre la flecha que aparece al costo y finalmente elija la option 1080p para el formatting. La Frequencia de imagen coincidirá con la del proyecto. 3 Debrero de las options predeterminadas, verá el nombre del archivo final y su ubicación. Haga click en Buscar y selección una carpeta para guardar el archivo exportado. A continua, selección la option Un clip en los ajustes de renderización. 4 Sobre la linea de tiempo, verá un menu desplegable con laopia Toda la linea de tiempo seleccionada. Esto significa que se renderizarado todo su contenido. Sin embargo, también es possible seleccionar solo una parte de la secuencia. Para ello, basta con elegir la option Intervalo y bajo marcar los+puntos de entrada y calidad mediante las teclas I y O. 5 En la parte inferior del panel, hagablick en el boton Agregar a la cola de procesamento. El material se agregara a la cola de procesamento en la parte derecha del modulo. A continuacion, hagablick en el boton Renderizar y supervise el progreso de la renderizacion en la lista de problemaspendentes. Una vez finalizo el procedimiento, abra el archivo generado para ver el producto final. Ahora que ya cuenta con un conocimiento Basics sobre como editar, etalonar, mezclar el audio yregarar efectos visuales, le recomendamos que pruebe-distintas OPCiones en DaVinci Resolve. Consulte el manual del programa para Obtener mas informacion acerca de cada una de sus functions.Control de la CAMERA mediante el modelos ATEM Mini
Los mezcladores ATEM Mini son una herramienta extraordinaria para las producciones multicamara y las transmissions en directo por Internet. En tal sentido, el programa ATEM Software Control permite manejar hasta quatre unidades Pocket Cinema Camera desde el mezciador. Hagablick en la pestafia Camara para acceder a estas prestaciones. Además, es possible modifier con fácilidad发展目标 parámetros, tales como la aperture del diafragma, la ganancia y la distancia focal, al emplear objetivos compatibles, como hacer el color y create imagenes extraordinaryas con las herramrientas para correcciones primarias de DaVinci Resolve. Por other parte, al conectar un dispositivo ATEM Camera Control Panel, se logra un control preciso de todas las unidades simultaneamente. Consulte el manual del modelos ATEM Mini para Obtener mas informacion al respecto.  Modulo de control de camaras El modulo de control transmite paquetes de instructaciones a la-camera mediante las entradas HDMI del mezclador. Al conectar una de ellas a la correspondiente en laamera, esta detecta las instructaciones integradas en la SERIAL, permittedo de este modo controlar los differentes parámetros. Compruebe la asignacion de los botones en las preferencias del programa ATEM Software Control para asegurarse de que hayan sido vinculados a laamera correcta. Asimismo, al conectar el mezclador a una unidad Pocket Cinema Camera, se brinda la posibidad deatar con las ventajas de una luz piloto.Panel de control de camaras
Ejecute el programa ATEM Software Control y hagablick en la pestaña Camara, situada en la parte inferior de la ventana. Ver a una series de controladores con Herramientos para ajustar y melhorar la imagen de cada camera. Estos son muy faciles de usar. Basta con hacerblick en cualesquiera de los botones o mover los controls correspondentes para realizar ajustes.Selección de camaras
La fila de botones situada en la parte superior de la ventsa permite selectionar laamera que se desea controlar.Estado de la camaría
En la parte superior de cada controlador se identifica la unidad y se indica si laquia está al aire. Además, hay un botón que permitte bloquear todos los 控les de la camera. Cuando la seals estal a aire, la barra superior de la ventana se enciende de color rojo y muestra elsignificanto mensaje: Al aire.Ajustes de la CAMERA
El botón de ajuste de la CAMERA, situado cerca de la esquina inferior izquierda del controlador, permite modificar diversos paráMETROS de cada imagen.  En la parte superior de cada controlador se indica si la CAMERA está al aire. Utilice los controles generales debajo de cada circulo cromático paraaabstar las luces, los tonos intermedios y las sombras en cada canal YRGB.Nivel de detailles
Este ajuste permite dar mayor nitidez a las imagenes captadas por las camaras en directo. Las options disponibles son Desactivado, Predeterminado, Medio y Alto.Circulo cromátlico
El circulo cromático es una herramienta realizado de DaVinci Resolve que permitte ajustar el color en las luces, tonos intermedios y sombras de cada canal YRGB. Para seleccionar el parámetro que deseña modificar, hagablick en una de las tres pestañas situadas en la parte superior del controlador.Control general
El control general situado bajo del circulo cromático permitte ajustar el contraste en todos los canales YRGB al mesmo tiempo o la luminancia de las luces, tonos intermedios y sombras en forma independiente.Botón para restablecer ajustes
Este botón, situado cerca de la parte superior derecha de cada controlador, permite selecciónar los ajustes que se desean restablecer, copiar o aplicar. A su vez, cada circulo cromático también cuenta con un botón de reajuste. Hagablick sobre el本身就是 para copiar, aplicar o restablecer los parámetros a sus valores predeterminados. Cabe destacar que los ajustes de los controladores bloqueados no se modifican. El botón situado en la esquina inferior derecha del controlador permitte restablecer los valores predeterminados de los circulos cromáticos y los ajustes de contraste, saturación, matiz y luminancia. Es possible aplicar parámetros a todas las cármas en general o a cada una en forma individual, con el objetivo de lograr una aparciencia uniforme en las imagenes. Los valores correspondientes a la aperture del diafragma, el enfoque, el control primario y el pedestal no se alteran al copiar y aplicar otros ajustes. Al aplicar parámetros a todas las cármas simultaneamente, el programa solicitará una confirmación previa por parte del usuario. De esta forma, es possible evaporar Cambios en las cármas no bloqueadas cuya señal está al aire.  Al aplicar parámedos a todas las cármas simultaneamente, el programa solicitará una confirmación previa por parte del usuario. De esta forma, es possible evaporar Cambios en las cármas no bloqueadas cuya señal está al aire.Control del diafragma/pedestal
Este control se encuesta en el reticulo central de cada controlador y se enciende de color rojo cuando la CAMERA está al aire. Para abrir o cerrar el diafraqma, arrastre el circulo hacia arriba o abajo. Al mantener presionada la tecla de mayusculas simultaneamente, solo se modifica la aperture del diafraqma. Para oscurecer o incrementar el pedestal, arrestre el círculo hacía la izquierda o la derecha. Al mantener presionada la tecla Command (Mac) o Control (Windows) cuando se mueve el círculo, solo se modifica el pedestal.  El control del diafragma/pedestal se enciende de color rojo cuando la CAMERA está al aire.Control de la distancia focal
Este control brinda la posibiliad de acercar o alejar la imagen al utilizing objetivos compatibles con servomecanismos integrados. Funciona de la mesma forma que el interruptor fisico de la webcam, que permite augmentar o disminuir la distancia focal presionando el extremo correspondiente. Hagablick sobre el control y arrastrelo hacer arriba para acercar la imagen, o hacia abajo para alejarla.Control primario
Este control se encuesta a la referencia del control del diafragma/pedestal y permite limitar la aperture maxima del diafragma. Es desuma utiliza para evaporar que salgan al aire imagenes sobrepuestos. Para limitar la aperture del diafragma, abralo Completely usingo el control circular y bajo utilise el control primario a fin de ajustar la exposacion. De esta forma, al modifier la aperture del diafragma,做到 umbral impedir que se exceeda el limite Tmaximo de exposacion.Indicador del diafragma
El indicator del diafragma se encuesta a la izquierda del control circular y brinda una rápida referencia visual de la aperture.Esta indicación depende del ajuste establecido mediante el control primario.Botón de enfoque automatico
El botón de enfoque automatico se encuesta en la esquina inferior derecha del controlador. Presiónelo paraaabstur el enfoque en forma automatica si cuenta con un objetivo activo compatible con dicha的功能。Cabe destacar que,excepta la mayor de los modelos brindan la posibiliad deaabstur el enfoque electrònically,algunos incluyen ademés un modo de ajuste manual. Por consiguiente,es importante comprobar que se haya的选择acionedel modo automatico.Enalgunoscasos,elmode seselectriondeslizandoel anillodeenfoque en el objetivo hacia adelante oakras.  Haga clic sobre el boton de enfoque automatico o deslice el control de enfoque hacia la izquierda o la derecha para enfocar la imagen.Enfoque manual
Para modifier el enfoque de la CAMERA en forma manual, utilise el dial situado en la parte inferior de cada controlador. Deslice la ruea hacla izquierda o derecha para ajustar el enfoque manualmente al mirar la senal de la CAMERA, a fin de Obtener imagenes claras y nitidas.Ganancia de laamera
Este control permiteacular ganancia de la webcam. En los modelos Pocket Cinema Camera, este parametro corresponde al valor ISO, que resulta desuma importancia al filmar en conditiones de luz escaza, a fin de evitar una subexposacion de las imagenes. Haga click sobre las flechas correspondentes paraacular o disminuir la ganancia. Este valor se puedaacularsiemprequesea necessario,porejemplo,alrodar en exterioros durante el atardecer, cuando la intensidad de la luz disminuye y es precisoacularelbrilloenlaimagen.Noteseseque,alincrementarla ganancia,tambienaugentarale ruido enlas imagenes.Control de la velocidad de obturación
El indicator de la velocidad de obturación se incluye el círculo cromático y el control del diafragma/pedestal. Para augmentar o disminuir este parámetro, colque el puntero sobre el indicator y bajo haga alc en la fecha izquierda o derecha. En los modelos Pocket Cinema Camera, este parámetro correponde al ángulo de obturación. Si laImagen parpadea, disminuya el valor a fin de SOLUTIONAR este problema. Una buena forma de lograr mas brillo en las imagenes sin modifierla ganancia es disminuyendo la velocidad de obturacion, ya que de este modo se incrementa el tiempo de exposicion del sensor. Al augmentar la velocidad de obturacion, se reduce el rastrodeojado por los objetos en movimiento, por loquel this parametro también peut emplearse para lograr una mayor nitidez en las tomas de action.Balance de blancos
Este parámetro se incluye junto al control de la velocidad de obturación y pueda modifierse mediante las flechas situadas aodos lados del indicator de la temperatura del color. Permite compensar los colores calidos o frios emitidos pordietres fuentes deluz.De este modo,es possible conservar la pureza de los blancos en la imagen.  Al mover el puntero del raton sobre los indicadores de ganancia, velocidad de obturacion y balance de blancos, aparecen flechas que permiten ajustar dichos parámetros.Herramentas de DaVinci Resolve para correcciones primarias
La ventana del modulo de control de camaras puede configurarse para que se asemeje a la interfaz de correcciones primarias en un programa de etalonaje y edicion. Estas herramrientas integradas en la camar aon identicas a las del programa DaVinci Resolve. En consecuencia, si el usuario esta familiarizzato conellas, podra valerse de su experiencia en materia de etalonaje al llvar a cabo producciones en directo. El panel de correccion cromatica se pueda expandir desde el controlador para acceder a la interfaz completa. Esta incluye ajustes adiconiales, tales como circulos cromáticos y otros controlles, que brindan la posibididad de evaluar simultaneamente las luces, los tonos intermedios y las sombras en la imagen. Paracaebarde camara,utilice los botones en la parte superior de la ventana.  Si deseña acceder a las herramrientas para correcciones primarias de DaVinci Resolve, haga cltc sobre el botón situado en la parte Inferior, a la derecha del circulo cromático.  Círculos cromálicos para luces, tonos intermedios y sombras en el panel de etalonajé.Circulos cromáticos
Haga clc dentro del circulo y arrastre el puntero Nótese que no es preciso modifier el indicator de balance cromática. Los values bajo del circulo cambian, reflejando de este modo los ajustes realizados en cada canal. Mantenga preslonada la tecla de mayusculas y haga clc切入点 del circulo Esto permite situar el indicator en la posicion indicada por el puntero del raton para realizar ajustes importantes con rapidez. Haga的比例:1:2 Se restablecen los valores originales sin reajustar el control general. Haga clc en el boton de realjuste, situado en la esquina superior derecha Se restablecen todos los ajustes.Controles generales
Utilice los controlles generales debajo de cada circulo cromatico paraaabstar las luces,los tonos intermedios y las sombras en cada canal YRGB.  Mueva la rueda hacla izquierda o la derecha para realizar ajustes.Para realizar ajustes mediente el control general:
Mueva la rueda hacla la Izquilerda o la derecha
Esto permite oscurecer o aclar el parametro selectionado, respectivamente. Al ajustar un valor, el cambio se verá reflejado en los Campos correspondientes a cada canal, situados bajo del círculo cromático. Para ajustar solo la luminancia, mantenga presionada la tecla Alt o Command y mueva el control hacía la izquierda o la derecha. Dado que el color y la luminancia se procesan individualmente, es possible lograr efectos importantes modificando solo el canal Y. Este ajuste funciona mejor si el control Mezclador de luminancia se mueve hacía la derecha. De lo contrario, el programa procejaró los canales de color de forma normal. Por lo general, la mayoría de los coloristas realizan el método YRGB, ya que permitte Obtener un mayor control del balance de color sin afectar la luminancia general para lograr la apariencia deseada más rápido.Contraste
Este control permite ajustar el intervalo entre los values mas claros y oscuros de una imagen. El efecto es similar al que se obtiene realizando ajustes opuestos mediante los controles generales situados bajo de las options Luces y Sombras. El valor predeterminado es 50% .Saturación
Este control permite aumento o disminuir la cantidad de color en la imagen. El valor predeterminado es 50% .Matiz
Este control permite modifier los matices de la imagen recorriendo el perimetro del circulo cromatico. El valor predeterminado de 180 grados muestra la distribución original del matiz. Al incrementar o disminuir dicho valor, los matices rotaran en sentido horario o antihorario.Mezcla de luminancia
Las functions de etalonaje de las camaras Blackmagic estan basadas en las herramrientas para correcciones primarias de DaVinci Resolve. Este programa fue desarrollado a grado de los años 80 y es el más utilizado en la produccion de largometrajes en Hollywood. El corrector cromático de la CAMERA incluye prestaciones sumamente útiles y creativas. Una de ellas es el método de procesamento YRGB. Al etalonar, es possible seleccionarrialquiera de los dos métodos de procesamento disponibles. Aquellos coloristas con mas experiencia recurren al modo YRGB, dato que ofrece un control mas preciseso sobre el color y permite ajustar los canales en forma independiente, logrado de esta manera una amplia variedad de optiones creativas. Cuando el mezclador de luminancia se mueve totalmente a la derecha, el programa emplee a modo RGB. Por el contrario, al moverlo totalmente a la izquierda, se utilizes el modo RGB. Internacional es possible seleccionarrialquierposiónintermedia para obtener una mezcla de ambos.  Arrastre los controlles hacía la izquierda o la derecha paraaabustar el contraste,la saturación,el matiz y la mezcla de luminancia. ¿Cuál es el mejor ajuste? Esto depende del usuario, ya que el procesó de etalonaje es totalmente creativo, y no hay estilos correctos o incorrectivos. El ajuste más apropiado estará determinado por las preferencias del usuario y de lo que luzca bien según su criterio.Sincronización de ajustes
El mezclador transmite la seals de control a la CAMERA cuando también dispositivos estan connectados. Si se modifica un ajuste por error en laamera, la unidad de control del mezclador restablecer automatamente los values para tener la synchronization entre los equipos. SUGERENCIa: Es possible emplear un dispositivo DaVinci Resolve Micro Panel para modifierlosajustesdisponiblesencadacoladordecamara.esto permiterealizar ambios con mayor rapidez yprecision.Consulte elmanual delmodeloATEM Mini para obtenermasinformacionalrespecto. NOTA: Al apagar una CAMERA conectada al modelos ATEM Mini mediante el puerto HDMIediaverse afectada la comunicacion con el resto de unidades. Recomendamos alimentarlascamarasmediantearedewuministroelctricoydesconectarelcableHDMIantesdeapagarlas.Otros programas deedition
Para editor clips utilizing su programa preferido, pueda copiarlos a una unidad externa o RAID y bajo importarlos desdela aplicacion.De forma alternativa,utilice el puerto USB-Co un adaptador para el soporte de almacenimiento a fin de acceder a los ARCHivos directamente.Acceso a archivos en tarjetas SD y CFast 2.0
 Para editor el material audiovisual directamente desde la tarjeta SD o CFast, retirela de la CAMERA y conectea a un equipo informatico mediana un dispositivo de lecture y/o escritura para este tipo deunasidades.Para importar clips desde una tarjeta SD o CFast 2.0:
1 Retire la tarjeta de la camarra. Conectela a un equipo Mac o Windows mediante un dispositivo de lecture y/o escritura para este tipo de unidades. 2 Haga dobleblick en el icono de la tarjeta para acceder a las carpetas que contienen los archivos Blackmagic RAW o QuickTime. Es possible que haya una mezcla de archivos segun el formatting selectionado para la grabacion, pero en todos se empiea la mesma nomenclatura. 3 Arrastre los ARCHivos desde la tarjeta al escritorio o aanotherdispositivo dealmacenamento, o acceda directamente a ellos desde el programa de edicion. 4 Antes de retiring la tarjeta SD o CFast del equipo informatico, es importante expulsarla desde elsystema operativo.De lo contrario,el material grabado podría sufir daños.Acceso a ARCHivos en unidades USB-C
Para Importar clips desde una unidad USB-C:
1 Desconecte la unidad de la camarra. 2 Conecte launidad a un equipo informativo Mac o Windows mediante el puerto USB-C. Las conexiones USB 3.0 son preferibles a las 2.0, ya que estas ultimas no son lo suficientemente rápidas como para permitir laedsión de imagenes en tiempo real. 3 Haga doble ticn en la unidad USB-C para acceder a la lista de carpetas o ARCHivos QuickTime que contienen las imagenes en formatting Blackmagic RAW. Es possible que haya una mezcla de archivos segun el formatting selectionado para la grabacion, pero en todos se empiea la mesma nomenclatura. 4 Arrastre los archivos desde la unidad al escritorio o aanother dispositivo de almacenamento, o acceda directamente a ellos desde el programa de edicion. 5 Antes de desconectar launidad USB-C, recomendamos expulsarla en forma segura mediante la funciona correspondiente.Final Cut Pro X
Para editor en Final Cut Pro X, es necessario create un projecto nuevo y selectionar la fecuencia deImagen y el formatting requeridos. En este exemple, se utilizes el formatting ProRes 422 HQ a 1080p24.  Ajustes del proyecio en Final Cut Pro X 1 Execute Final Cut Pro X. A continuación, en la barra de menús, haga click en File y bajo selección la option New Project. Se abrìa una ventsa que muestra los ajustes del projecto. 2 Escriba un nombre para el proyecto y marque la casilla Custom. 3 Selezione las opciones 1080p HD, 1920x1080 y 24p. 4 En la option Audio and Render Properties, seleccione Stereo, 48 kHz, y Apple ProRes 422 HQ. 5 Haga cli en OK. Para importar los clips, haga click en la option File situada en la barra superior. A continuacion, seleccion Import y bajo Media. Elija los ARCHivos en la tarjeta de memoria. Arrestrelos a la linea de tiempo para editarlos.MediaComposer
Para editor en Media Composer, es necessario create un projecto nuevo y seleccionar la fecuencia deImagen y el formatting requeridos. En este exemple, se utilizes el formatting 1080p24.  Nombre y'options del projeto en Media Composer 1Ejecute el programa para acceder a la ventana de seleccion de proyectos. 2 Haga cli en el boton New project y escribe un nombre en la ventana correspondiente. 3 En el menu de seleccion del formatting, elija la option HD 1080 y bajo 1080p/24. A continuación, haga click en OK para create el proyecto. 4 Haga doble tic sobre el nombre del projeeto en la ventana Select project para abrirlo. 5 SeLECTIONA la option File, bajo Input y a continuacion Source browser para buscar los archivos que desea importar. 6 Seleccione la carpeta de destino en el menu desplegable y hagablick en Import. Una vez que los clips aparecen en la carpeta, es possible arrastrarlos a la linea de tiempo y comenzar a editarlos.Premiere Pro CC
Para editar clips en formatting ProRes 422 (HQ) con Premiere Pro CC, es Neededo create un projecto nuevo y seleccionar la fecuencia deImagen y el formatting requeridos. En este exemple, se utilizes el formatting ProRes 422 (HQ) a 1080p25.  Nombre y'options del projet en Premiere Pro CC 1 Ejecute Premiere Pro CC. En la ventana de bienvenida, seleccionla option New Project. Se abrirá una ventana que muestra los parámetros del projecto. 2 Escribe el nombre delprojecto. Haga click enBrowse y seleccionla carpetaonde desea guardarlo.Acontinuacion,haga click enOKen la ventana de bienvenida. 3 En la barra de menos, selección la option File y bajo import. Elija los clips que dese a editor. Estos aparecerán en la ventana del proyecto. 4 Arrastre el primer clip hacía el icono New Item en la parte inferior derecha de la ventsa. Se creara una nuevo secuencia con los mismos ajustes del clip. Arrastre los clips a la linea de tiempo para editarlos.Programa utiliser de la CAMERA
Actualización del programa en equipos Mac
Despues de descargar el programa Blackmagic Camera Setup y descomprimir el archivo, haga click en laImagen de disco para ver los contentsidos. Ejecute el instalador y siga las instrucciones que aparecen en la pantalla. Una vez finalizada la instalación, selección la-option Aplicaciones y haya clicked en la carpeta Blackmagic Cameras, que contiene este manual, el programa utilisé y otros ARCHivos con información adicional. Asimismo, se incluye una aplicación para desinstalar versiones anteriores del programa cuando seanecessary actualizarlo. Actualización del programa en equipos Windows
Despues de descargar el programa utiliser de la CAMERA y descomprimir el archivo correspondiente, ver a una carpeta denominada Blackmagic Camera Setup que contiene este manual y el instalador. Haga dobleblick en el instalador de la aplicacion y siga las instrucciones que aparecen en la pantalla para completar el procedimiento. En Windows 10, hagablick en el boton de inicio y seleccione la option Todas las aplicaciones. Busque la carpeta Blackmagic Design en la lista. Dees ali podra executar el programa. En Windows 8.1, hagablick en la flecha hacia abajo que aparece en la pantalla de inicio para ver la carpeta Blackmagic. Dees ali podra executar el programa.Actualización de la CAMERA
Despues de instalar la ultima version del programa utiliser en el equipo informatico, conectelo a la-camera mediante un cable USB-C. El puerto USB-C se oculta en el panel izquierdo de la unidad. Basta con retiring la cubierta de goma para acceder a la conexión. Ejecute el programa utiliser y siga las instrucciones que aparecen en la pantalla paraactualizar la CAMERA. Conviene subrayar que, al低位 a cabo este procedimiento, se eliminaran las tablas de conversion almacenadas en la unidad y los grupos de ajustes personalizados. En tal sentido, recomendamos exportarlos a una tarjeta de memoria, a fin de respaldarlos antes de低位 a cabo laactualizacion. Una vez finalizo el procedimiento, es possible importarlos可以更好mente.Soportes de grabación recomendedos
Tarjetas CFast 2.0
Para el Modelo Pocket Cinema Camera 6K
Recomendamos los siguientes modelos para grabar en formatting 6K Blackmagic RAW 5:1 a una velocidad maximala de 50 f/s.| Marca Modelo Capacidad | ||
| Angelbird AV PRO CF XT 512 GB | ||
| CinediskPro 510MB/s CFast 2.0 256 GB | ||
| Hagiwara Solutions DC-SMAN64GA CFast 2.0 64 GB | ||
| Hagiwara Solutions DC-SMANA1GA CFast 2.0 128 GB | ||
| KomputerBay 3400x CFast 2.0 64 GB | ||
| KomputerBay 3400x CFast 2.0 128 GB | ||
| Lexar | Professional 3400X CFast 2.0 | 128 GB |
| Lexar | Professional 3500X CFast 2.0 | 128 GB |
| ProGrade Digital | 510MB/s CFast 2.0 128 GB | |
| ProGrade Digital | 550MB/s CFast 2.0 | 256 GB |
| ProGrade Digital | 550MB/s CFast 2.0 | 512 GB |
| Transcend | CFX650 CFast 2.0 TS128GCFX650 | 128 GB |
| SanDisk | Extreme Pro CFast 2.0 SDCFSP-64G-x46D | 64 GB |
| SanDisk | Extreme Pro CFast 2.0 SDCFSP-128G-x46D | 128 GB |
| SanDisk | Extreme Pro CFast 2.0 SDCFSP-256G-x46D | 256 GB |
| SanDisk | Extreme Pro CFast 2.0 SDCFSP-512G-x46D | 512 GB |
| Silicon Power | CFX310 CFast 2.0 | 512 GB |
| Sony | CFast 2.0 G Series CAT-G64 | 64 GB |
| Sony | CFast 2.0 G Series CAT-G128 | 128 GB |
| Wise | CFA-2560 3400x CFast 2.0 | 256 GB |
| Wise | CFA-5120 3500x CFast 2.0 | 512 GB |
| Wise | CFA-10240 3500X CFast 2.0 | 1 TB |
| Marca Modelo Capacidad | ||
| Angelbird AV PRO CF XT 512 GB | ||
| CinediskPro 510MB/s CFast 2.0 256 GB | ||
| Hagiwara Solutions | DC-SMAN64GA CFast 2.0 | 64 GB |
| Hagiwara Solutions | DC-SMANA1GA CFast 2.0 | 128 GB |
| KomputerBay 3400x CFast 2.0 64 GB | ||
| KomputerBay 3400x CFast 2.0 128 GB | ||
| Lexar Professional 3400X CFast 2.0 128 GB | ||
| Lexar Professional 3500X CFast 2.0 128 GB | ||
| ProGrade Digital 510MB/s CFast 2.0 128 GB | ||
| ProGrade Digital 550MB/s CFast 2.0 256 GB | ||
| ProGrade Digital 550MB/s CFast 2.0 512 GB | ||
| Transcend CFX650 CFast 2.0 TS128GCFX650 128 GB | ||
| SanDisk Extreme Pro CFast 2.0 SDCFSP-64G-x46D 64 GB | ||
| SanDisk Extreme Pro CFast 2.0 SDCFSP-128G-x46D 128 GB | ||
| SanDisk Extreme Pro CFast 2.0 SDCFSP-256G-x46D 256 GB | ||
| SanDisk | Extreme Pro CFast 2.0 SDCFSP-512G-x46D | 512 GB |
| Silicon Power | CFX310 CFast 2.0 | 256 GB |
| Silicon Power | CFX310 CFast 2.0 | 512 GB |
| Sony | CFast 2.0 G Series CAT-G64 | 64 GB |
| Sony | CFast 2.0 G Series CAT-G128 | 128 GB |
| Wise | CFA-1280 3400x CFast 2.0 | 128 GB |
| Wise | CFA-2560 3400x CFast 2.0 | 256 GB |
| Wise | CFA-5120 3500x CFast 2.0 | 512 GB |
| Wise | CFA-10240 3500X CFast 2.0 | 1 TB |
| Marca Modelo Capacidad | ||
| Angelbird | AV PRO CF XT | 512 GB |
| CinediskPro | 510MB/s CFast 2.0 256 GB | |
| Hagiwara Solutions | DC-SMAN64GA CFast 2.0 | 64 GB |
| Hagiwara Solutions | DC-SMANA1GA CFast 2.0 | 128 GB |
| KomputerBay 3400x CFast 2.0 64 GB | ||
| KomputerBay 3400x CFast 2.0 128 GB | ||
| Lexar Professional 3400X CFast 2.0 128 GB | ||
| Lexar Professional 3500X CFast 2.0 128 GB | ||
| Lexar Professional 3400X CFast 2.0 256 GB | ||
| ProGrade Digital 510MB/s CFast 2.0 128 GB | ||
| ProGrade Digital 550MB/s CFast 2.0 256 GB | ||
| ProGrade Digital 550MB/s CFast 2.0 512 GB | ||
| Transcend CFX650 CFast 2.0 | TS128GCFX650 128 GB | |
| SanDisk Extreme Pro CFast 2.0 | SDCFSP-64G-x46D 64 GB | |
| SanDisk Extreme Pro CFast 2.0 | SDCFSP-128G-x46D 128 GB | |
| SanDisk Extreme Pro CFast 2.0 | SDCFSP-256G-x46D 256 GB | |
| SanDisk Extreme Pro CFast 2.0 | SDCFSP-512G-x46D 512 GB | |
| Silicon Power CFX310 CFast 2.0 | 256 GB | |
| Silicon Power CFX310 CFast 2.0 | 512 GB | |
| Sony CFast 2.0 G Series CAT-G64 64 GB | ||
| Sony CFast 2.0 G Series CAT-G128 | 128 GB | |
| Wise | CFA-1280 3400x CFast 2.0 | 128 GB |
| Wise | CFA-2560 3400x CFast 2.0 | 256 GB |
| Wise | CFA-5120 3500x CFast 2.0 | 512 GB |
| Wise | CFA-10240 3500X CFast 2.0 | 1 TB |
| Marca Modelo Capacidad | ||
| Angelbird | AV PRO CF XT | 512 GB |
| CinediskPro | 510MB/s CFast 2.0 | 256 GB |
| Hagiwara Solutions | DC-SMAN64GA CFast 2.0 | 64 GB |
| Hagiwara Solutions | DC-SMANA1GA CFast 2.0 | 128 GB |
| KomputerBay | 3400x CFast 2.0 | 64 GB |
| KomputerBay | 3400x CFast 2.0 | 128 GB |
| Lexar | Professional 3400X CFast 2.0 | 128 GB |
| Lexar | Professional 3500X CFast 2.0 | 128 GB |
| Lexar | Professional 3400X CFast 2.0 | 256 GB |
| ProGrade Digital | 510MB/s CFast 2.0 | 128 GB |
| ProGrade Digital | 550MB/s CFast 2.0 | 256 GB |
| ProGrade Digital | 550MB/s CFast 2.0 | 512 GB |
| Transcend CFX650 CFast 2.0 | TS128GCFX650 128 GB | |
| SanDisk Extreme Pro CFast 2.0 | SDCFSP-64G-x46D 64 GB | |
| SanDisk Extreme Pro CFast 2.0 | SDCFSP-128G-x46D 128 GB | |
| SanDisk Extreme Pro CFast 2.0 | SDCFSP-256G-x46D 256 GB | |
| SanDisk Extreme Pro CFast 2.0 | SDCFSP-512G-x46D 512 GB | |
| Silicon Power CFX310 CFast 2.0 | 2.0 256 GB | |
| Silicon Power CFX310 CFast 2.0 | 512 GB | |
| Sony CFast 2.0 G Series CAT-G64 64 GB | ||
| Sony CFast 2.0 G Series CAT-G128 128 GB | ||
| Wise CFA-1280 3400x CFast 2.0 128 GB | ||
| Wise CFA-2560 3400x CFast 2.0 256 GB | ||
| Wise CFA-5120 3500x CFast 2.0 512 GB | ||
| Wise CFA-10240 3500X CFast 2.0 1 TB |
| Marca Modelo Capacidad | ||
| Angelbird AV PRO CF XT 512 GB | ||
| CinediskPro 510MB/s CFast 2.0 256 GB | ||
| Hagiwara Solutions | DC-SMAN64GA CFast 2.0 | 64 GB |
| Hagiwara Solutions | DC-SMANA1GA CFast 2.0 | 128 GB |
| KomputerBay | 3400x CFast 2.0 | 64 GB |
| KomputerBay | 3400x CFast 2.0 | 128 GB |
| Lexar | Professional 3400X CFast 2.0 | 128 GB |
| Lexar | Professional 3500X CFast 2.0 | 128 GB |
| Lexar | Professional 3400X CFast 2.0 | 256 GB |
| ProGrade Digital | 510MB/s CFast 2.0 128 GB | |
| ProGrade Digital | 550MB/s CFast 2.0 | 256 GB |
| ProGrade Digital | 550MB/s CFast 2.0 | 512 GB |
| Transcend | CFX650 CFast 2.0 TS128GCFX650 | 128 GB |
| SanDisk | Extreme Pro CFast 2.0 SDCFSP-64G-x46D | 64 GB |
| SanDisk | Extreme Pro CFast 2.0 SDCFSP-128G-x46D | 128 GB |
| SanDisk | Extreme Pro CFast 2.0 SDCFSP-256G-x46D | 256 GB |
| SanDisk | Extreme Pro CFast 2.0 SDCFSP-512G-x46D | 512 GB |
| Silicon Power | CFX310 CFast 2.0 | 256 GB |
| Silicon Power | CFX310 CFast 2.0 | 512 GB |
| Sony CFast 2.0 G Series CAT-G64 64 GB | ||
| Sony CFast 2.0 G Series CAT-G128 128 GB | ||
| Wise CFA-1280 3400x CFast 2.0 128 GB | ||
| Wise CFA-2560 3400x CFast 2.0 256 GB | ||
| Wise CFA-5120 3500x CFast 2.0 512 GB | ||
| Wise CFA-10240 3500X CFast 2.0 1 TB | ||
Para el Modelo Pocket Cinema Camera 4K
Recomendamos los siguientes modelos para grabar en formatting Blackmagic RAW DCI 4K 3:1 a una velocidad maximala de 60 f/s.| Marca Modelo Capacidad | ||
| Angelbird AV PRO CF 512 GB | ||
| Angelbird AV PRO CF 1 TB | ||
| CinediskPro 510MB/s CFast 2.0 256 GB | ||
| Hagiwara Solutions DC-SMAN64GA CFast 2.0 64 GB | ||
| Hagiwara Solutions DC-SMANA1GA CFast 2.0 128 GB | ||
| KomputerBay 3400x CFast 2.0 64 GB | ||
| KomputerBay 3400x CFast 2.0 128 GB | ||
| KomputerBay 3700x CFast 2.0 256 GB | ||
| Lexar Professional 3400x CFast 2.0 128 GB | ||
| Lexar Professional 3500x CFast 2.0 256 GB | ||
| ProGrade Digital | 550MB/s CFast 2.0 | 128 GB |
| ProGrade Digital | 550MB/s CFast 2.0 | 256 GB |
| ProGrade Digital | 550MB/s CFast 2.0 | 512 GB |
| SanDisk | Extreme Pro CFast 2.0 SDCFSP-256G-x46D | 512 GB |
| Wise | CFA-1280 3400x CFast 2.0 | 128 GB |
| Wise | CFA-2560 3400x CFast 2.0 | 256 GB |
| Wise | CFA-5120 3500x CFast 2.0 | 512 GB |
| Wise | CFA-10240 3500x CFast 2.0 | 1 TB |
| Marca Modelo Capacidad | ||
| Angelbird AV PRO CF 128 GB | ||
| Angelbird AV PRO CF 256 GB | ||
| Angelbird AV PRO CF 512 GB | ||
| CinediskPro 510MB/s CFast 2.0 256 GB | ||
| Hagiwara Solutions DC-SMAN64GA CFast 2.0 64 GB | ||
| Hagiwara Solutions DC-SMANA1GA CFast 2.0 128 GB | ||
| KomputerBay 3400x CFast 2.0 128 GB | ||
| KomputerBay 3700x CFast 2.0 256 GB | ||
| ProGrade Digital | 550MB/s CFast 2.0 | 256 GB |
| ProGrade Digital | 550MB/s CFast 2.0 | 512 GB |
| SanDisk Extreme Pro CFast 2.0 SDCFSP-64G-x46D 64 GB | ||
| SanDisk Extreme Pro CFast 2.0 SDCFSP-128G-x46D 128 GB | ||
| SanDisk Extreme Pro CFast 2.0 SDCFSP-256G-x46D 256 GB | ||
| Sony CFast 2.0 G Series CAT-G64 64 GB | ||
| Sony CFast 2.0 G Series CAT-G128 128 GB | ||
| Wise CFA-1280 3400x CFast 2.0 128 GB | ||
| Wise CFA-2560 3400x CFast 2.0 256 GB | ||
| Wise CFA-5120 3500x CFast 2.0 512 GB | ||
| Wise CFA-10240 3500x CFast 2.0 1 TB | ||
| Marca Modelo Capacidad | ||
| Angelbird AV PRO CF | 128 GB | |
| Angelbird AV PRO CF | 256 GB | |
| Angelbird AV PRO CF | 512 GB | |
| CinediskPro | 510MB/s CFast 2.0 | 256 GB |
| KomputerBay | 3400x CFast 2.0 | 128 GB |
| ProGrade Digital | 550MB/s CFast 2.0 | 256 GB |
| ProGrade Digital | 550MB/s CFast 2.0 | 512 GB |
| SanDisk Extreme Pro CFast 2.0 SDCFSP-64G-x46D 64 GB | ||
| SanDisk Extreme Pro CFast 2.0 SDCFSP-128G-x46D 128 GB | ||
| SanDisk Extreme Pro CFast 2.0 SDCFSP-256G-x46D 256 GB | ||
| Sony CFast 2.0 G Series CAT-G64 64 GB | ||
| Sony CFast 2.0 G Series CAT-G128 128 GB | ||
| Wise CFA-1280 3400x CFast 2.0 128 GB | ||
| Wise CFA-2560 3400x CFast 2.0 256 GB | ||
| Wise CFA-5120 3500x CFast 2.0 512 GB | ||
| Marca Modelo Capacidad | ||
| Angelbird AV PRO CF | 128 GB | |
| Angelbird AV PRO CF | 256 GB | |
| Angelbird AV PRO CF | 512 GB | |
| CinediskPro | 510MB/s CFast 2.0 | 256 GB |
| KomputerBay 3400x CFast 2.0 128 GB | ||
| ProGrade Digital 550MB/s CFast 2.0 256 GB | ||
| ProGrade Digital 550MB/s CFast 2.0 512 GB | ||
| SanDisk Extreme Pro CFast 2.0 SDCFSP-64G-x46D 64 GB | ||
| SanDisk Extreme Pro CFast 2.0 SDCFSP-128G-x46D 128 GB | ||
| SanDisk Extreme Pro CFast 2.0 SDCFSP-256G-x46D 256 GB | ||
| Sony CFast 2.0 G Series CAT-G64 64 GB | ||
| Sony CFast 2.0 G Series CAT-G128 128 GB | ||
| Wise CFA-1280 3400x CFast 2.0 | 128 GB | |
| Wise CFA-2560 3400x CFast 2.0 | 256 GB | |
| Wise | CFA-5120 3500x CFast 2.0 | 512 GB |
Tarjetas SD
Para el Modelo Pocket Cinema Camera 6K
Recomendamos los siguientes modelos SD para grabar en formatting Blackmagic RAW 5:1 6K 16:9 a una velocidad maximal de 30 f/s.| Marca Modelo Capacidad | ||
| Angelbird | AV PRO SD V90 | 64 GB |
| Sony | Tough SF-G32T | 32 GB |
| Sony | Tough SF-G64T | 64 GB |
| Sony | Tough SF-G128T | 128 GB |
| Toshiba | Exceria Pro UHS-II 270MB/s SDXC | 64 GB |
| Wise SD2-128U3 SDXC UHS-II | 128 GB |
| Marca Modelo Capacidad | ||
| Angelbird | AV PRO SD V90 | 64 GB |
| Sony | Tough SF-G32T | 32 GB |
| Sony | Tough SF-G64T | 64 GB |
| Sony | Tough SF-G128T | 128 GB |
| Toshiba | Exceria Pro UHS-II 270MB/s SDXC | 64 GB |
| Toshiba | Exceria Pro UHS-II 270MB/s SDXC | 128 GB |
| Toshiba | Exceria Pro UHS-II N502 SDXC | 128 GB |
| Wise SD2-128U3 SDXC UHS-II | 128 GB |
| Marca Modelo Capacidad | ||
| Angelbird AV PRO SD V90 64 GB | ||
| Sony Tough SF-G32T 32 GB | ||
| Sony Tough SF-G64T 64 GB | ||
| Sony Tough SF-G128T 128 GB | ||
| Toshiba Exceria Pro UHS-II 270MB/s SDXC 64 GB | ||
| Toshiba Exceria Pro UHS-II 270MB/s SDXC 128 GB | ||
| Toshiba Exceria Pro UHS-II N502 SDXC 128 GB |
| Marca Modelo Capacidad | ||
| Angelbird AV PRO SD V90 64 GB | ||
| Delkin Devices Power SDXC USH-II 64 GB | ||
| Delkin Devices Prime SDXC USH-II 128 GB | ||
| ProGrade Digital V90 UHS-II 250MB/s SDXC | 128 GB | |
| ProGrade Digital V90 UHS-II 250MB/s SDXC | 256 GB | |
| Sony Tough SF-G32T 32 GB | ||
| Sony Tough SF-G64T 64 GB | ||
| Sony Tough SF-G128T 128 GB | ||
| Wise | SD2-64U3 SDXC UHS-II | 64 GB |
| Wise | SD2-128U3 SDXC UHS-II | 128 GB |
| Toshiba Exceria Pro UHS-II N502 SDXC 128 GB |
| Marca Modelo Capacidad | ||
| Angelbird AV PRO SD V90 64 GB | ||
| Delkin Devices Power SDXC USH-II 64 GB | ||
| Delkin Devices Prime SDXC USH-II 128 GB | ||
| Lexar | Professional 2000x UHS-II 300MB/s SDXC | 64 GB |
| Lexar | Professional 2000x UHS-II 300MB/s SDXC | 128 GB |
| ProGrade Digital V90 UHS-II 250MB/s SDXC 256 GB | ||
| Sony Tough SF-G32T 32 GB | ||
| Sony Tough SF-G64T 64 GB | ||
| Sony Tough SF-G128T 128 GB | ||
| Toshiba Exceria Pro UHS-II 270MB/s SDXC 64 GB | ||
| Toshiba Exceria Pro UHS-II 270MB/s SDXC 128 GB | ||
| Toshiba Exceria Pro UHS-II N502 SDXC 128 GB | ||
| Toshiba Exceria Pro UHS-II N502 SDXC 256 GB | ||
| Wise SD2-64U3 SDXC UHS-II 64 GB | ||
| Wise SD2-128U3 SDXC UHS-II 128 GB | ||
Para el Modelo Pocket Cinema Camera 4K
Recomendamos los siguientes modelos SD para grabar en formatting Blackmagic RAW 12:1 DCI 4K a una velocidad maximal de 30 f/s.| Marca Modelo Capacidad | ||
| Angelbird AV PRO SD V90 64 GB | ||
| Delkin Devices Power UHS-II SDXC | 64 GB | |
| Delkin Devices Power UHS-II SDXC | 128 GB | |
| Lexar | Professional 2000x UHS-II 300MB/s SDXC | 64 GB |
| ProGrade Digital | V90 UHS-II 250MB/s SDXC | 256 GB |
| SanDisk | Extreme Pro UHS-I 95MB/s SDXC | 512 GB |
| Sony Tough SF-G64T | 64 GB | |
| Sony Tough SF-G128T 128 GB | ||
| Sony SF-G64 300MB/s UHS-II SDXC | 64 GB | |
| Toshiba Exceria Pro UHS-II N502 SDHC 32 GB | ||
| Toshiba Exceria Pro UHS-II 270MB/s SDXC 64 GB | ||
| Wise SD2-64U3 SDXC UHS-II 64 GB | ||
| Wise SD2-128U3 SDXC UHS-II 128 GB | ||
| Wise SD2-128U3 SDXC UHS-II 128 GB |
| Marca Modelo Capacidad | ||
| Wise SD2-64U3 SDXC UHS-II 64 GB | ||
| Wise SD2-128U3 SDXC UHS-II 128 GB | ||
| Sony Tough SF-G64T | 64 GB | |
| Sony Tough SF-G128T 128 GB |
| Marca Modelo Capacidad | ||
| Sony Tough SF-G64T 64 GB | ||
| Sony Tough SF-G128T 128 GB | ||
| Toshiba Exceria Pro UHS-II N502 SDXC 32 GB |
| Marca Modelo Capacidad | ||
| Wise SD2-64U3 SDXC UHS-II 64 GB | ||
| Wise SD2-128U3 SDXC UHS-II 128 GB | ||
| Toshiba Exceria Pro UHS-II N502 SDXC 32 GB | ||
| Sony Tough SF-G64T 64 GB | ||
| Sony Tough SF-G128T 128 GB |
| Marca Modelo Capacidad | ||
| Wise SD2-64U3 SDXC UHS-II 64 GB | ||
| Wise SD2-128U3 SDXC UHS-II 128 GB | ||
| Sony Tough SF-G64T 64 GB | ||
| Sony Tough SF-G128T 128 GB | ||
| Toshiba Exceria Pro UHS-II N502 SDXC 32 GB | ||
| Toshiba Exceria Pro UHS-II N502 SDXC 64 GB | ||
| Toshiba Exceria Pro UHS-II N502 SDXC 128 GB | ||
| Toshiba Exceria Pro UHS-II N502 SDXC 256 GB | ||
| Sony Tough SF-G128T 128 GB |
Unidades SSD USB-C
Para el Modelo Pocket Cinema Camera 6K
Recomendamos los siguientes modelos para grabar en formatting Blackmagic RAW 5:16K a una velocidad maximal de 50 f/s.| Marca Modelo Capacidad | ||
| Wise PTS-1024 Portable SSD 1 | TB |
| Marca Modelo Capacidad | ||
| Samsung Portable SSD T5 250 GB | ||
| Samsung Portable SSD T5 2 TB | ||
| Wise PTS-1024 Portable SSD 1 TB | ||
| Marca Modelo Capacidad | ||
| Samsung Portable SSD T5 250 GB | ||
| Samsung Portable SSD T5 2 TB | ||
| Wise PTS-512 Portable SSD 512 GB | ||
| Wise PTS-1024 Portable SSD 1 TB |
| Marca Modelo Capacidad | ||
| Samsung Portable SSD T5 250 GB | ||
| Samsung Portable SSD T5 1 TB | ||
| Samsung Portable SSD T5 2 TB | ||
| SanDisk Extreme Portable SSD 1 TB | ||
| Wise PTS-512 Portable SSD 512 GB | ||
| Wise PTS-1024 Portable SSD 1 TB | ||
| Wise PTS-1024 Portable SSD 1 TB |
| Marca Modelo Capacidad | ||
| Samsung Portable SSD T5 250 GB | ||
| Samsung Portable SSD T5 1 TB | ||
| Samsung Portable SSD T5 2 TB | ||
| SanDisk Extreme Portable SSD 1 TB | ||
| Wise PTS-512 Portable SSD 512 GB | ||
| Wise PTS-1024 Portable SSD 1 TB | ||
| Wise PTS-1024 Portable SSD 1 TB |
Para el Modelo Pocket Cinema Camera 4K
Recomendamos los siguientes discos USB-C para grabar en formatting Blackmagic RAW 3:1 DCI 4K a una velocidad maxima de 60 f/s.| Marca Modelo Capacidad | ||
| Angelbird SSD2GO PKT 512 GB | ||
| Angelbird SSD2GO PKT 2 TB | ||
| G-Technology | G-DRIVE Mobile SSD | 1 TB |
| Samsung Portable SSD T5 2 TB | ||
| Wise PTS-512 Portable SSD 512 GB |
| Marca Modelo Capacidad | ||
| Angelbird SSD2GO PKT 512 GB | ||
| Angelbird SSD2GO PKT 2 TB | ||
| Glyph | Atom | 500 GB |
| Lacie | Portable SSD 500 GB | |
| Samsung Portable SSD T5 500 GB | ||
| Samsung Portable SSD T5 1 TB | ||
| SanDisk Extreme Portable SSD 1 TB | ||
| Seagate | Fast SSD | 250 GB |
| Wise PTS-256 Portable SSD | 256 GB | |
| Wise PTS-512 Portable SSD 512 GB | ||
| Wise PTS-1024 Portable SSD 1 TB |
| Marca Modelo Capacidad | ||
| Angelbird SSD2GO PKT 512 GB | ||
| Angelbird SSD2GO PKT 2 TB | ||
| Samsung Portable SSD T5 1 TB | ||
| Wise PTS-256 Portable SSD 256 GB | ||
| Wise PTS-512 Portable SSD 512 GB | ||
| Wise PTS-1024 Portable SSD 1 TB |
| Marca Modelo Capacidad | ||
| Angelbird SSD2GO PKT 512 GB | ||
| Angelbird SSD2GO PKT 2 TB | ||
| Samsung Portable SSD T5 500 GB | ||
| Samsung Portable SSD T5 1 TB | ||
| Wise PTS-256 Portable SSD 256 GB | ||
| Wise PTS-512 Portable SSD 512 GB | ||
| Wise PTS-1024 Portable SSD 1 TB |
Información para desarrolladores
Blackmagic Bluetooth Camera Control
Blackmagic cameras with Bluetooth LE implement a variety of features and commands that allow users to control their cameras wirelessly. Developers have full access to these features for their custom applications. The following services and characteristics describe the full range of communication options that are available to the developer. Service: Device Information Service UUID:180A Characteristics Camera Manufacturer UUID:2A29 Read the name of the manufacturer (always "Blackmagic Design"). Camera Model UUID:2A24 Read the name of the camera model ("Pocket Cinema Camera 6K" or "Pocket Cinema Camera 4K"). Service: Blackmagic Camera Service UUID:291D567A-6D75-11E6-8B77-86F30CA893D3 Characteristics Outgoing Camera Control (encrypted) UUID:5DD3465F-1AEE-4299-8493-D2ECA2F8E1BBSend Camera Control messages
These messages are identical to those described in the Blackmagic SDI Camera Control Protocol section below. Please read that section for a list of supported messages and required formatting information. For an example of how packets are structured, please see the 'example protocol packets' section in this document.Incoming Camera Control (encrypted)
UUID:B864E140-76AO-416A-BF30-5876504537D9 Request notifications for this characteristic to receive Camera Control messages from the camera. These messages are identical to those described in the Blackmagic SDI Camera Control Protocol section below. Please read that section for a list of supported messages and required formatting information.Timecode (encrypted)
UUID:6D8F2110-86F1-41BF-451D87E976C8 Request notifications for this characteristic to receive timecode updates. Timecode (HH:MM:SS:mm) is represented by a 32-bit BCD number: (eg. 09:12:53:10 = 0x09125310)Camera Status (encrypted)
UUID:7FE8691D-95DC-4FC5-8ABD-CA74339B51B9 Request notifications for this characteristic to receive camera status updates. The camera status is represented by flags contained in an 8-bit integer: None = 0× 00 Camera Power On = 0x01 Connected = 0× 02 Palred = 0× 04 Versions Verified = 0× 08 Initial Payload Received = 0× 10 Camera Ready = 0× 20 Send a value of 0x00 to power a connected camera off. Send a value of 0x01 to power a connected camera on.Device Name
UUID:FFACOC52-C9FB-41A0-B063-CC76282EB89C Send a device name to the camera (max. 32 characters). The camera will display this name in the Bluetooth Setup Menu.Protocol Version
UUID: 8F1FD018-B508-456F-8F82-3D392BEE2706 Read this value to determine the camera's supported CCU protocol version. NOTE Encrypted characteristics can only be used once a device has successfully bonded or paired with the Blackmagic Camera. Once a connection has been established, any attempt to write to an encrypted characteristic will initiate bonding. For example, writing a 'Camera Power On' (0x01) message to the Camera Status characteristic. Once bonding is initiated, the camera will display a 6-digit pin in the Bluetooth Setup Menu. Enter this pin on your device to establish an encrypted connection. The device will now be able to read, write and receive notifications from encrypted characteristics.Blackmagic SDI and Bluetooth Camera Control Protocol
Version 1.4
If you are a software developer you can use the Blackmagic SDI and Bluetooth Camera Control Protocol to construct devices that integrate with our products. Here at Blackmagic Design, our approach is to open up our protocols and we eagerly look forward to seeing what you come up with!Overview
This document describes an extensible protocol for sending a unidirectional stream of small control messages embedded in the non-active picture region of a digital video stream. The video stream containing the protocol stream may be broadcast to a number of devices. Device addressing is used to allow the sender to specify which device each message is directed to.Assumptions
Alignment and padding constraints are explicitly described in the protocol document. Bit fields are packed from LSB first. Message groups, individual messages and command headers are defined as, and can be assumed to be, 32 bit aligned.Blanking Encoding
A message group is encoded into a SMPTE 291M packet with DID/SDID x51/x53 in the active region of VANC line 16.Message Grouping
Up to 32 messages may be concatenated and transmitted in one blanking packet up to a maximum of 255 bytes payload. Under most circumstances, this should allow all messages to be sent with a maximum of one frame latency. If the transmitting device queues more bytes of message packets than can be sent in a single frame, it should use heuristics to determine which packets to prioritize and send immediately. Lower priority messages can be delayed to later frames, or dropped entirely as appropriate.Abstract Message Packet Format
Every message packet consists of a three byte header followed by an optional variable length data block. The maximum packet size is 64 bytes.| Destination device (uint8) | Device addresses are represented as an 8 bit unsigned integer. Individual devices are numbered 0 through 254 with the value 255 reserved to indicate a broadcast message to all devices. |
| Command length (uint8) | The command length is an 8 bit unsigned integer which specifies the length of the included command data. The length does NOT include the length of the header or any trailing padding bytes. |
| Command id (uint8) | The command id is an 8 bit unsigned integer which indicates the message type being sent. Receiving devices should ignore any commands that they do not understand. Commands 0 through 127 are reserved for commands that apply to multiple types of devices. Commands 128 through 255 are device specific. |
| Reserved (uint8) | This byte is reserved for alignment and expansion purposes. It should be set to zero. |
| Command data (uint8[]) | The command data may contain between 0 and 60 bytes of data. The format of the data section is defined by the command itself. |
| Padding (uint8[]) | Messages must be padded up to a 32 bit boundary with 0x0 bytes. Any padding bytes are NOT included in the command length. |
Defined Commands
Command 0 : change configuration| Category (uint8) | The category number specifies one of up to 256 configuration categories available on the device. |
| Parameter (uint8) | The parameter number specifies one of 256 potential configuration parameters available on the device. Parameters 0 through 127 are device specific parameters. Parameters 128 though 255 are reserved for parameters that apply to multiple types of devices. |
| Data type (uint8) | The data type specifies the type of the remaining data. The packet length is used to determine the number of elements in the message. Each message must contain an integral number of data elements. |
| Currently defined values are: | |
| 0: void / boolean | A void value is represented as a boolean array of length zero. The data field is a 8 bit value with 0 meaning false and all other values meaning true. |
| 1: signed byte Data elements are signed bytes | |
| 2: signed 16 bit integer Data elements are signed 16 bit values | |
| 3: signed 32 bit integer Data elements are signed 32 bit values | |
| 4: signed 64 bit integer Data elements are signed 64 bit values | |
| 5: UTF-8 string Data elements represent a UTF-8 string with no terminating character. | |
| Data types 6 through 127 are reserved. | |
| 128: signed 5.11 fixed point | Data elements are signed 16 bit integers representing a real number with 5 bits for the integer component and 11 bits for the fractional component. The fixed point representation is equal to the real value multiplied by 2^11. The representable range is from -16.0 to 15.9995 (15 + 2047/2048). |
| Operation type (uint8) | The operation type specifies what action to perform on the specified parameter. Currently defined values are: |
| 0: assign value | The supplied values are assigned to the specified parameter. Each element will be clamped according to its valid range. A void parameter may only be 'assigned' an empty list of boolean type. This operation will trigger the action associated with that parameter. A boolean value may be assigned the value zero for false, and any other value for true. |
| 1: offset / toggle value | Each value specifies signed offsets of the same type to be added to the current parameter values. The resulting parameter value will be clamped according to their valid range. It is not valid to apply an offset to a void value. Applying any offset other than zero to a boolean value will invert that value. |
| Data (void) | The data field is 0 or more bytes as determined by the data type and number of elements. |
| Group | ID | Parameter | Type | Index | Minimum | Maximum | Interpretation |
| Lens | 0.0 | Focus | fixed16 | - | 0.0 | 1.0 | \( 0.0 = \text {near,}1.0 = \text {far} \) |
| 0.1 | Instantaneous autofocus | void | - | - | - | trigger instantaneous autofocus | |
| 0.2 | Aperture (f-stop) | fixed16 | - | -1.0 | 16.0 | Aperture Value (where fnumber \( = \text {sqrt(2^AV)} \)) | |
| 0.3 | Aperture (normalised) | fixed16 | - | 0.0 | 1.0 | \( 0.0 = \text {smallest,}1.0 = \text {largest} \) | |
| 0.4 | Aperture (ordinal) | int16 | - | 0 | n | Steps through available aperture values from minimum (0) to maximum (n) | |
| 0.5 | Instantaneous auto aperture | void | -- - | - | trigger instantaneous auto aperture | ||
| 0.6 | Optical image stabilisation | boolean | - | - | - | true = enabled,false = disabled | |
| 0.7 | Set absolute zoom (mm) | int16 | - | 0 | max | Move to specified focal length in mm,from minimum (0) to maximum (max) | |
| 0.8 | Set absolute zoom (normalized) | fixed16 - 0.0 | 1.0 | Move to specified focal length: \( 0.0 = \text {wide,}1.0 = \text {tele} \) | |||
| 0.9 | Set continuous zoom (speed) | fixed16 | - | -1.0 | +1.0 | Start/stop zooming at specified rate:-1.0 = zoom wider fast,0.0= stop,+1 = zoom tele fast | |
| Video | 1.0 Video mode int8 | [0] = frame rate -- | fps as integer(eg 24, 25, 30, 50, 60) | ||||
| [1] = M-rate -- 0 = regular, 1 = M-rate | |||||||
| [2] = dimensions | -- | 0 = NTSC, 1 = PAL, 2 = 720, 3 = 1080, 4 = 2kDCI, 5 = 2k16:9, 6 = UHD, 7 = 3k Anamorphic, 8 = 4k DCI, 9 = 4k 16:9, 10 = 4.6k 2.4:1, 11 = 4.6k | |||||
| [3] = interlaced | -- | 0 = progressive, 1 = interlaced | |||||
| [4] = Color space | -- 0 = YUV | ||||||
| 1.1 | Gain (up to Camera 4.9) | int8 | 1 | 128 | 1x, 2x, 4x, 8x, 16x, 32x, 64x, 128x gain | ||
| 1.2 | Manual White Balance | int16 | [0] = color temp | 2500 | 10000 | Color temperature in K | |
| int16 | [1] = tint | -50 | 50 | tint | |||
| 1.3 | Set auto WB | void | -- | -- | Calculate and set auto white balance | ||
| 1.4 | Restore auto WB | void | -- | -- | Use latest auto white balance setting | ||
| 1.5 | Exposure (us) | int32 | 1 | 42000 | time in us | ||
| 1.6 | Exposure (ordinal) | int16 | -- | 0 | n | Steps through available exposure values from minimum (0) to maximum (n) | |
| 1.7 | Dynamic Range Mode | int8 enum | -- | 0 | 2 | 0 = film, 1 = video, 2 = extended video | |
| 1.8 | Video sharpening level | int8 enum | -- | 0 | 3 | 0 = off, 1 = low, 2 = medium, 3 = high | |
| 1.9 | Recording format | int16 | [0] = file frame rate | -- | fps as integer(eg 24, 25, 30, 50, 60, 120) | ||
| [1] = sensor frame rate | -- | -- | fps as integer, valid when sensor-off-speed set (eg 24, 25, 30, 33, 48, 50, 60, 120), no change will be performed if this value is set to 0 | ||||
| [2] = frame width | -- in pixels | ||||||
| [3] = frame height | -- in pixels | ||||||
| [4] = flags | -- [0] = file-M-rate | ||||||
| -- | -- | [1] = sensor-M-rate, valid when sensor-off-speed-set | |||||
| -- [2] = sensor-off-speed | |||||||
| -- [3] = interlaced | |||||||
| -- [4] = windowed mode | |||||||
| 1.10 | Set auto exposure mode | int8 | -- | 0 | 4 | 0 = Manual Trigger, 1 = Iris, 2 = Shutter, 3 = Iris + Shutter, 4 = Shutter + Iris | |
| 1.11 | Shutter angle int32 | -- | 100 | 36000 | Shutter angle in degrees, multiplied by 100 | ||
| 1.12 | Shutter speed | int32 | -- | Current sensor frame rate | 5000 | Shutter speed value as a fraction of 1, so 50 for 1/50th of a second | |
| 1.13 | Gain | int8 | -- | -128 | 127 | Gain in decibel (dB) | |
| 1.14 | ISO | int32 | -- | 0 | 2147483647 | ISO value | |
| 1.15 | Display LUT | int8 | [0] = selected LUT | -- | 0 = None, 1 = Custom, 2 = film to video, 3 = film to extended video | ||
| [1] = enabled or not | -- 0 = Not enabled, 1 = Enabled | ||||||
| Audio | 2.0 | Mic level | fixed16 | - | 0.0 | 1.0 | 0.0 = minimum, 1.0 = maximum |
| 2.1 | Headphone level | fixed16 | - | 0.1 | 1.0 | 0.0 = minimum, 1.0 = maximum | |
| 2.2 | Headphone program mix | fixed16 | - | 0.1 | 1.0 | 0.0 = minimum, 1.0 = maximum | |
| 2.3 | Speaker level | fixed16 | - | 0.1 | 1.0 | 0.0 = minimum, 1.0 = maximum | |
| 2.4 | Input type | int8 | - | 0 | 3 | 0 = internal mic,1 = line level input,2 = low mic level input,3 = high mic level input | |
| 2.5 Input levels | fixed16 | [0] ch0 | 0.0 | 1.0 | 0.0 = minimum, 1.0 = maximum | ||
| [1] ch1 | 0.0 | 1.0 | 0.0 = minimum, 1.0 = maximum | ||||
| 2.6 | Phantom power | boolean | - | - | - | true = powered,false = not powered | |
| Output | 3.0 Overlay enables | uint16 bit field | -- -- | bit flags:[0] = display status,[1] = display frame guidesSome cameras don't allow separate control of frame guides and status overlays. | |||
| 3.1 Frame guides style(Camera 3.x) | int8 | -08 | 0 = HDTV, 1 = 4:3, 2 = 2:4:1,3 = 2:39:1, 4 = 2:35:1,5 = 1:85:1, 6 = thirds | ||||
| 3.2 Frame guides opacity(Camera 3.x) | fixed16 | - | 0.1 | 1.0 | 0.0 = transparent, 1.0 = opaque | ||
| 3.3 Overlays(replaces .1 and .2 above from Cameras 4.0) | int8 | [0] = frame guides style | - | - | 0 = off, 1 = 2:4:1, 2 = 2:39:1,3 = 2:35:1, 4 = 1:85:1, 5 = 16:9,6 = 14:9, 7 = 4:3, 8 = 2:1,9 = 4:5, 10 = 1:1 | ||
| [1] = frame guide opacity | 0 | 100 | 0 = transparent, 100 = opaque | ||||
| [2] = safe area percentage | 0 | 100 | percentage of full frame used by safe area guide (0 means off) | ||||
| [3] = grid style | - | - | bit flags:[0] = display thirds,[1] = display cross hairs,[2] = display center dot,[3] = display horizon | ||||
| Display | 4.0 Brightness | fixed16 | - | 0.0 | 1.0 | 0.0 = minimum, 1.0 = maximum | |
| 4.1 Exposure and focus tools | int16 bit field | 0x1 = zebra,0x2 = focus assist,0x4 = false color | - | - | 0 = disable, 1 = enable | ||
| 4.2 Zebra level | fixed16 | - | 0.0 | 1.0 | 0.0 = minimum, 1.0 = maximum | ||
| 4.3 Peaking level | fixed16 | - | 0.0 | 1.0 | 0.0 = minimum, 1.0 = maximum | ||
| 4.4 Color bar enable | int8 | - | 0 | 30 | 0 = disable bars,1-30 = enable bars with timeout (seconds) | ||
| 4.5 Focus Assist | Int8 | [0] = focus assist method | - | - | 0 = Peak,1 = Colored lines | ||
| [1] = focus line color | - | - | 0 = Red,1 = Green,2 = Blue,3 = White,4 = Black | ||||
| 4.6 Program return feed enable | int8 | - | 0 | 30 | 0 = disable, 1-30 = enable with timeout (seconds) | ||
| Tally | 5.0 | Tally brightness | fixed16 | - | 0.0 | 1.0 | Sets the tally front and tally rear brightness to the same level. 0.0 = minimum, 1.0 = maximum |
| 5.1 | Front tally brightness | fixed16 | - | 0.0 | 1.0 | Sets the tally front brightness. 0.0 = minimum, 1.0 = maximum | |
| 5.2 | Rear tally brightness | fixed16 | - | 0.0 | 1.0 | Sets the tally rear brightness. 0.0 = minimum, 1.0 = maximum Tally rear brightness cannot be turned off | |
| Reference | 6.0 | Source | int8 enum | - | 0 | 2 | 0 = internal, 1 = program, 2 = external |
| 6.1 | Offset | int32 | - | - | - | +/- offset in pixels | |
| Confi-guration | 7.0 | Real Time Clock | int32 | [0] time | - | - | BCD - HHMMSSFF (UCT) |
| [1] date | - | - | BCD - YYYYYMMDD | ||||
| 7.1 | System language | string | [0-1] | - | - | ISO-639-1 two character language code | |
| 7.2 | Timezone | int32 | - | - | - | Minutes offset from UTC | |
| 7.3 | Location | int64 | [0] latitude | - | - | BCD - sDDDDdddddddd where s is the sign: 0 = north (+), 1 = south (-); DD degrees, dddddddddddd decimal degrees | |
| [1] longitude | - | - | BCD - sDDDDdddddddd where s is the sign: 0 = west (-), 1 = east (+); DDD degrees, dddddddddddd decimal degrees | ||||
| Color Correction | 8.0 Lift Adjust | fixed16 | [0] red | -2.0 | 2.0 | default 0.0 | |
| [1] green | -2.0 | 2.0 | default 0.0 | ||||
| [2] blue | -2.0 | 2.0 | default 0.0 | ||||
| [3] luma | -2.0 | 2.0 | default 0.0 | ||||
| 8.1 | Gamma Adjust | fixed16 | [0] red | -4.0 | 4.0 | default 0.0 | |
| [1] green | -4.0 | 4.0 | default 0.0 | ||||
| [2] blue | -4.0 | 4.0 | default 0.0 | ||||
| [3] luma | -4.0 | 4.0 | default 0.0 | ||||
| 8.2 Gain Adjust | fixed16 | [0] red | 0.0 | 16.0 | default 1.0 | ||
| [1] green | 0.0 | 16.0 | default 1.0 | ||||
| [2] blue | 0.0 16.0 | default 1.0 | |||||
| [3] luma | 0.0 | 16.0 | default 1.0 | ||||
| 8.3 Offset Adjust | fixed16 | [0] red | -8.0 | 8.0 | default 0.0 | ||
| [1] green | -8.0 | 8.0 | default 0.0 | ||||
| [2] blue | -8.0 | 8.0 default 0.0 | |||||
| [3] luma | -8.0 | 8.0 | default 0.0 | ||||
| 8.4 Contrast Adjust | fixed16 | [0] pivot | 0.0 | 1.0 | default 0.5 | ||
| [1] adj | 0.0 2.0 default 1.0 | ||||||
| 8.5 Luma mix | fixed16 | - | 0.0 | 1.0 | default 1.0 | ||
| 8.6 Color Adjust | fixed16 | [0] hue | -1.0 | 1.0 | default 0.0 | ||
| [1] sat | 0.0 2.0 default 1.0 | ||||||
| 8.7 Correction Reset Default | void | - | - | - | reset to defaults | ||
| Media | 10.0 | Codec int8 enum | [0] = basic codec -- | 0 = CinemaDNG, 1 = DNxHD, 2 = ProRes, 3 = Blackmagic RAW | |||
| [1] = code variant | - | - | CinemaDNG: 0 = uncompressed, 1 = lossy 3:1, 2 = lossy 4:1 | ||||
| - | - | ProRes: 0 = HQ, 1 = 422, 2 = LT, 3 = Proxy, 4 = 444, 5 = 444XQ | |||||
| - | - | Blackmagic RAW: 0 = Q0, 1 = Q5, 2 = 3:1, 3 = 5:1, 4 = 8:1, 5 = 12:1 | |||||
| 10.1 | Transport mode int8 | [0] = mode | -- | 0 = Preview, 1 = Play, 2 = Record | |||
| [1] = speed | -- | -ve = multiple speeds backwards, 0 = pause, +ve = multiple speeds forwards | |||||
| [2] = flags | -- | 1<<0 = loop, 1<<1 = play all, 1<<5 = disk1 active, 1<<6 = disk2 active, 1<<7 = time-lapse recording | |||||
| [3] = slot 1 storage medium | - | - | 0 = CFast card, 1 = SD, 2 = SSD Recorder | ||||
| [4] = slot 2 storage medium | - | - | 0 = CFast card, 1 = SD, 2 = SSD Recorder | ||||
| 10.2 | Playback Control | int8 enum | [0] = clip | - | - | 0 = Previous, 1 = Next | |
| PTZ Control | 11.0 | Pan/Tilt Velocity | fixed 16 | [0] = pan velocity | -1.0 | 1.0 | -1.0 = full speed left, 1.0 = full speed right |
| [1] = tilt velocity | -1.0 | 1.0 | -1.0 = full speed down, 1.0 = full speed up | ||||
| 11.1 | Memory Preset | int8 enum | [0] = preset command | - | - | 0 = reset, 1 = store location, 2 = recall location | |
| int8 | [1] = preset slot | 0.5 - | |||||
| Operation | Packet Length Byte | ||||||||||||||||
| 0 | 1 | 2 | 3 | 4 | 5 | 6 | 7 | 8 | 9 | 10 | 11 | 12 | 13 | 14 | 15 | ||
| header command data | |||||||||||||||||
| destination | length | command | reserved | category | parameter | type | operation | ||||||||||
| trigger instantaneous auto focus on camera 4 | 844000100 | ||||||||||||||||
| turn on OIS on all cameras 12 255 5 0 0 0 6 | 001000 | ||||||||||||||||
| set exposure to 10 ms on camera 4 (10 ms = 10000 us = 0x00002710) | 12 | 4 | 8 | 0 | 0 | 1 | 5 | 3 | 0 | 0x10 | 0x27 | 0x00 | 0x00 | ||||
| add 15% to zebra level (15 % = 0.15 f = 0x0133 fp) | 12 | 4 | 6 | 0 | 0 | 4 | 2 | 128 | 1 | 0x33 | 0x01 | 0 | 0 | ||||
| select 1080p 23.98 mode on all cameras | 16 | 255 | 9 | 0 | 0 | 1 | 0 | 1 | 0 | 24 | 1 | 3 | 0 | 0 | 0 | 0 | 0 |
| subtract 0.3 from gamma adjust for green & blue (-0.3~=0xff9a fp) | 16 | 4 | 12 | 0 | 0 | 8 | 1 | 128 | 1 | 0 | 0 | 0x9a | 0xffd | 0x9a | 0xffd | 0 | 0 |
| all operations combined | 76 | 440001002555000600 | |||||||||||||||
| 1 | 0 | 0 | 0 | 4 | 8 | 0 | 0 | 1 | 5 | 3 | 0 | 0x10 | 0x27 | 0x00 | 0x00 | ||
| 4 | 6 | 0 | 0 | 4 | 2 | 128 | 1 | 0x33 | 0x01 | 0 | 0 | 255 | 9 | 0 | 0 | ||
| 1 | 0 | 1 | 0 | 24 | 1 | 3 | 0 | 0 | 0 | 0 | 0 | 4 | 12 | 0 | 0 | ||
| 8 | 1 | 128 | 1 | 0 | 0 | 0x9a | 0xffd | 0x9a | 0xffd | 0 | 0 | ||||||
Ayuda
Visite nuestra páginá de soporte técnico a fin de Obtener可以帮助你在 local de apoyo mais recente para los produits descritos en este manual.Págrina de soporte técnico
Las versiones más recientes de este manual, losDistinctos programas Mentionados y el material de apoyo se incluyen disponibles en nuestra páginade soporte技术和.comoponerse encontactoconBlackmagic Design
Si no enquiryra la ayuda que necesita, Solicite asistencia mediate el boton Enviar correo electronomico, situado en la parte inferior de nuestra pagina de soporte专业技术. De forma alternatively, haga clic en el boton Soporte专业技术 local para acceder al numero Telefonico del centro de atencion mas cercano.como comprar la version del software instalado
Para comprar la version del programa utilisé instalado en el equipo informatico, selección la。2。3opsis About Blackmagic Camera Setup. - En macOS, execute el programa desde la carpeta de aplicaciones. Seleectione el menu About Blackmagic Camera Setup en la barra superior de la ventana para ver el numero de la version. - En Windows, execute el programa Blackmagic Camera Setup能做到 en el icono situado en el menu Inicio. Acceda al menu Ayuda y seleccionla option About Blackmagic Camera Setup para ver el numero de version.como Obtener lasactualizacionesmás recientes
Después de verificar la version del programa instalado, visite el centro de soporte técnico de Blackmagic Design para comprobar si hayactualizaciones disponibles. Avecgeneralmente es recomendable instalar las versiones mas recientes, evite realizar modificaciones al sistemas operativo interno de la CAMERA si se encuesta en medio de un proyecto importante.Normativas
Desecho de equilos electrlicos y electrónlicos en la Unión Europea:
Este*simbolo indica que el dispositivo no debe desechaq junto conothers residuos domesticos.A tales efectos,es preciso llvarlo a un centro de recoleccion para su posterior reciclaje. Esto ayuda a preservar los recursos naturales y garantiza queDICHO procedimiento se realice protegiendo la salute y el medioambiente.Para Obtener mas informacion al respecto,comuniquese con el distribuidor o el centro de reciclaje mas cercano.  Según las pruebas realizadas, este equipo cumple con los limites indicados para dispositivos digitales Clase A, en conformidad con la sección 15 de las normas existables por la Comisión Federal de Comunicaciones. Este permite proportionsar una protección razonable contra interferencias nocivas al operar el dispositivo en un entorno comercial. Este equipo usa, genera y puede irradiar energia de radiofrecuencia, y si no se instala o utilizes de acuerdo con el manual de instrucciones,edia occasionar interferencias nocivas para las comunicaciones radiales. El funcionaamente de este equipo en una zona residencial podra occasionar interferencias nocivas, en cuio caso el usuario deben SOLUTIONAR dicho inveniente por cuesta propia. El funciona de este equipo está sujeto a las siguientes conditiones: 1 El dispositivo no debe Causei interferencias nocivas. 2 El dispositivo debe admitsirrialquier interferencia recibida, incluidas aquellas que pudieran provoc un functionamento incorrecto del mesmo.  R-R-BMD-201810001 R-R-BMD-201905001 R-R-BMD-201904002 Declaración ISED (Canada)
Esta webcam cumple con los estandares canadienses para dispositivos digitales Clase A. Cualquiermericano uso indebido del本身就是 acarrear un incumplimiento de dichas normas. Las conexiones a interfaces HDMI deben realizarse mediante cables blindados. Este equipo cumple con las normas descritas anteriormente al emplearse en entornos commerciales. Notese que podra causar interferencia radial si se utilizes en el ambito domestico.Bluetooth
Este dispositivo dispone de Tecnología Bluetooth. Incluye modulo transmisor. Identificacion FCC: QOQBGM113 Este dispositivo cumple con los limites de exposión a la radiación establecidos para un entorno no controlado. Incluye modulo transistor. Identificacion IC: 5123A-BGM113 Este dispositivo cumple con los limites de exposión a las ondas electromagnéticas establescidos por el gobernio de Canadá. Como tal, no require una licencia y está exento de las evaluaciones habituales企业提供 para determinar la absorcción españica de tales ondas, según lo dispuesto en la version 5 de las espécificaciones RSS-102. Certificado en Japón. Número de certificación: 209-J00204. Este dispositivo contiene componentes radioeléctricos certificados según las normas tínicas existables en la Ley de Radiocomunicación. Este modulo ha sido certifyado en Corea del Sur.Numero de certificacion: MSIP-CRM-BGT-BGM113 Blackmagic Design declares por este medio que el uso de la banda ISM 2.4 GHz para la transmisión de señales mediante este Modelo cumple con las normas de la Directiva 2014/53/EU. Envie un correo electronomica a compliance@blackmagicdesign.com para solicitar el dato completo de la declaracion de conformidad.  Certificado en Sudáfrica por ICASA.Número de certifications TA-2019/1517 (modelo Pocket Camera 6K) y TA-2019/1516 (modelo Pocket Camera 4K).  Certificado en México (NOM), para el modulo transistor de Bluetooth fabricado por Silicon Labs, número de modelos BGM113.Seguidad
Los modelos Blackmagic Pocket Cinema Camera puede utiliser en climas tropicales a una temperatura maximal de 40^ . La reparación de los componentes internos del equipo no debe ser技术水平a cabo por el usuario. Comuniquese con nuestro centro de atencion mas cercano para Obtener informacion al respecto. Aconsejamos resguardar la CAMERA a la sombra en exteriores para prevenir la exposión del equipo o la batería de litio a la luz solar durante periodos prolongados. Mantenga las baterías de litio alejadas de cualquier fuente de calor.  Evite utilizes el adaptor incluido a una alta mayor de 2000 metros.Declaración del Estado de California
Las partes plácicas de este producto pueda CONTER trazas de compuestos químicos, tales como polibromobifenilos (PBB), que el Estado de California reconoce como causantes de cancer, anomalías congenitas o daños reproductivos. Consulte el Sitio www.P65Warningsca.gov para Obtener más información al respecto.Garantía
Garantía limitada
Blackmagic Design garantiza que el producto adquirido no presentará defectos en los materiales o en su fabricación por un periodo de 12 días a partir de la Fecha de compra. Si el producto的结果a defectuoso durante el periodo de validez de la garantía, Blackmagic Designouldaroptarreemplazarlo o repararlo sin cargo algo nporconcepto de piezas y/o mano deobra. Para acceder al service proportionsado de acuerdo con los tereinos de esta garantia, el Cliente debar da viso del defeto a Blackmagic Design antes del vencimiento del periodo de garantia y encargarse de los arreglos necessarios para la prestacion del myself. El Cieite sera responsable del empaque y el envio del producto defectuoso al centro de service Tecnico designado por Blackmagic Design y deben abonar las tarifas postales por adelantado. El Cieite sera responsable de todos los gastos de envio, seguros, aranceles, impuestos yequalquier other importe que surja con relationa la devolucion de products por equalquier motivo. Esta garantía carecerá de validez ante defectos o daños causados por un uso indefinido del producto, o por falta de cuidado y mantenimiento. Según los关键时刻 estipulados, Blackmagic Design no tendrá obligación alguna de (a) reparar daños provocados por intentos de personal ajeno a Blackmagic Design de instalar el producto, repararlo o realizar un mantenimiento del mesmo; (b) reparar daños resultantes del uso de equipos incompatibles o conexiones a los mismos; (c) reparar cualquier daño o mal funciona provocado por el uso de piezas o repuestos no suministrados por Blackmagic Design; o (d) brindar servicios专业技术 a un producto que haya sido modificado o integrado con otros productos, cuando dicha modificacion o integrazioneonga como resultado un aumento de la dificultad o el tiempo necessario para reparar el producto. ESTA GARANTIA OFRECIDA POR BLACKMAGIC DESIGN REEMPLAZA CUALQUIER OTRA GARANTIA, EXPRESA O IMPLICITA. POR MEDIO DE LA PRESENTE, BLACKMAGIC DESIGN Y SUS DISTRIBUTORES RECHAZAN CUALQUIER GARANTIA IMPLICITA DE COMERCIALIZATION O IDONEIDAD PARA UN PROPENSITY PARTICULAR. LA RESPONSABILITY DE BLACKMAGIC DESIGN EN CUANTO A LA REPARACION O SUSTITUCION DE PRODUCTOS DEFECTUOSOS CONSITUYE UNA COMPENSACION COMPLETA Y EXCLUSIVA PROPORCIONADA AL CLIENTE POR CUALQUIER DANO INDIRECTO, ESPECIAL, FORTUITO O EMERGENTE, AL MARGIN DE QUE BLACKMAGIC DESIGN O SUS DISTRIBUTORES HAYAN SIDO ADVERTIDOS CON ANTERIORIDAD SOBRE LA POSIBILIDAD DE TALES DANOS. BLACKMAGIC DESIGN NO SE HACE RESPONSABLE POR EL USO ILEGAL DE EQUIPOS POR PARTE DEL CLIENTE. BLACKMAGIC DESIGN NO SE HACE RESPONSABLE POR DANOS CAUSADOS POR EL USO DE Este PRODUCTO. EL USUARIO UTILIZA EL PRODUCTO BAJO SU PROPRIA RESPONSABILITYDAD. Copyright 2020 Blackmagic Design. Todos los derechos reservados. «Blackmagic Design», «URSA», «DeckLink», «HDLink», «Workgroup Videohub», «Multibridge Pro», «Multibridge Extreme», «Intensity», y «Leading the creative video revolution», son marcas registradas en EE. UU. yotiros paises. Todos los demas nombres de compañero y productos peuvent ser marcas commerciales de las respectivas entreprises a las que estén asociados. El terno « Bluetooth » y elogoto correspondiente son propidad de Bluetooth SIG, Inc. Blackmagic Design cuesta con autorizacion para hacer uso de los mismos. Otros nombres commerciales y marcas registradas pertenecen a sus respectivos propietarios. 安装操作手册
Blackmagic Pocket Cinema Camera
包含Blackmagic Pocket Cinema Camera 6K 和Blackmagic Pocket Cinema Camera 4K 2020年3月 中文 欢迎辞
感谢您购买新品Blackmagic Pocket Cinema Camera! 2013年时,我们推出了原版Blackmagic Pocket Cinema Camera。这款摄影机有着令我们引以为豪的小巧设计、高动态范围和突破性的画质。在认真聆听用户的反馈后,我们推出了Pocket Cinema Camera 4K,并紧接着推出搭载Super 35mm传感器和EF镜头卡口的Blackmagic Pocket Cinema Camera 6K。 Blackmagic Pocket Cinema Camera 4K则搭载与原版Pocket Cinema Camera相同的MFT镜头卡口,可使用任何一款MFT镜头。您可以在CFast卡或UHS-II型SD卡上记录高达每秒60帧的4K视频影像,以及高达每秒120帧的HD视频影像。Blackmagic Pocket Cinema Camera 6K在此性能基础上进一步拓展,能记录每秒120帧的2.8K视频影像,以及高达每秒60帧的6K视频影像!您可以利用摄影机上的USB-C端口在外接硬盘上记录,然后只要将硬盘从摄影机上拔出,直接插入计算机就能立即开始文件制作流程。 摄影机拥有13挡动态范围和双原生ISO设计,不论何种照明条件下都能记录获得优美纯净的电影画质。它自带5英寸LCD触摸屏,可快速查看对焦和画面细节,明亮日光下也可清楚查看各项信息。同时,它的四个内置麦克风还能直接在摄影机内部记录高品质音频! 将Blackmagic Pocket Cinema Camera连接到ATEM Mini切换台后,还能获得强大的CCU功能,在ATEM Software Control的摄影机页面更加直观地设置摄影机的对焦、快门、光圈、色彩等参数! - Blackmagic Pocket Cinema Camera机身坚固耐久并兼顾轻质便携的优点,可随身携带。同时,摄影机还支持我们的Blackmagic RAW编解码格式,让您在一个文件里就能获得灵活的RAW处理功能,降低文件大小的同时大幅提升表现。 期待能一睹您使用新款Pocket Cinema Camera摄影机完成的创意佳作。同时,也欢迎您就摄影机有待添加的各项新功能向我们提出宝贵意见! Grant Petty
Blackmagic Design首席执行官目录
您使用的是哪款摄影机?
800 入门 801 安装镜头 801 启动摄影机 802 使用Blackmagic Pocket Camera Battery Grip 802 使用内附的电源线为摄影机供电存储介质 805
CFast卡 805 SD卡 806 USB-C硬盘 808 存储介质在记录前的准备事项 810 在Blackmagic Pocket Cinema Camera上格式化存储介质 810 在Mac计算机上格式化存储介质 812 在Windows计算机上格式化存储介质 813 记录 814 记录片段 814 Blackmagic RAW 以Blackmagic RAW记录 最高传感器帧率 记录时长 播放 摄影机功能 摄影机正面 826 右侧 827 左侧 827 顶板 摄影机底部 830 摄影机背面 触摸屏控制 设置 主菜单 记录设置 文件命名格式 监看设置 音频设置 设置 预设 877 3D LUT 录入元数据 829 831 832 853 853 $53 359 359 66 368 879 882 场记板 摄影机视频输出 使用DaVinci Resolve 项目管理器 使用快编页面剪辑 将片段添加到时间线 在时间线上编辑片段 添加标题 使用Blackmagic RAW文件 使用调色页面为片段调色 添加Power Window 使用插件 混合音频 在Fusion页面添加视觉特效和合成效果 制作母版剪辑 快速导出 交付页面 使用ATEM Mini控制摄影机 DaVinci Resolve一级调色工具 使用第三方软件 处理CFast 2.0卡和SD卡上的文件 处理USB-C硬盘上的文件 使用Final Cut Pro X 使用Avid MediaComposer2018 使用AdobePremiereProCC Blackmagic Camera Setup Utility 实用软件 建议使用的记录存储介质 CFast 2.0卡 SD卡 USB-C SSD Developer Information Blackmagic Bluetooth Camera Control Blackmagic SDI and Bluetooth Camera Control Protocol Example Protocol Packets 帮助 监管告知 953 安全信息 954 保修 882 887 888 888 889 892 893 893 894 897 900 902 903 907 916 916 917 918 922 925 925 925 926 926 927 928 929 929 935 939 942 942 944 951 952 955您使用的是哪款摄影机?
Blackmagic Pocket Cinema Camera 6K和Blackmagic Pocket Cinema Camera 4K机型有着相似的外观。两款摄影机都能拍摄出拥有超宽动态范围的影像,并且都采用相同的机身设计。此外,控制按钮和软件菜单布局,以及摄影机的操控也基本一致。 Blackmagic Pocket Cinema Camera 6K搭载Super 35mm尺寸传感器和EF镜头卡口,并且卡口上方标有“6K”字样图标。Blackmagic Pocket Cinema Camera 4K搭载MFT尺寸传感器和MFT镜头卡口。  Blackmagic Pocket Cinema Camera 6K  Blackmagic Pocket Cinema Camera 4K入门
Blackmagic Pocket Cinema Camera是一款小巧便携的数字电影摄影机,它能在CFast 2.0卡、UHS-I和UHS-II型SD卡以及SSD硬盘(通过USB-C端口连接)记录获得高品质影像。Pocket Cinema Camera能以Blackmagic RAW和ProRes等专为后期制作而设计的专业级编解码格式记录素材片段。 为Blackmagic Pocket Cinema Camera安装镜头并开启摄影机即可开始使用。安装镜头
Blackmagic Pocket Cinema Camera 6K使用EF镜头,Blackmagic Pocket Cinema Camera 4K使用MFT镜头。这两类镜头都十分常见,且价格低廉,种类繁多。为Blackmagic Pocket Cinema Camera 6K和Pocket Cinema Camera 4K机型安装镜头的步骤是一样的。第一步是取下镜头防尘盖。先按住锁定按钮,同时逆时针转动防尘盖,待其松开后便可取下。安装主动式EF或MFT镜头卡口步骤如下:
1 将镜头的标志点与机身的镜头卡口标志点对齐。很多镜头都带标志点,可以是蓝色、红色或白色。 2 将镜头卡口按在摄影机卡口上,顺时针扭动镜头直到锁定到位。 3 取下镜头时,先按住锁定按钮,再逆时针旋转镜头直至其标志点对准摄影机顶部10点钟方向(MFT镜头)或12点钟方向(EF镜头),将镜头从卡口小心取下。   为Blackmagic Pocket Cinema Camera 4K安装MFT镜头 备注 没有安装镜头时,请盖上镜头卡口防尘盖,以防止摄影机传感器上的滤光片暴露在灰尘中。启动摄影机
完成镜头安装后,接下来要做的是为摄影机连接电源。Blackmagic Pocket Cinema Camera可通过以下几种方法获得电源:为摄影机安装LP-E6电池,使用Blackmagic Pocket Camera Battery Grip电池手柄内的两块NP-F570电池,或者将内附的电源适配器连接到电源输入接口。安装电池并开启摄影机
摄影机使用标准LP-E6型可更换电池。摄影机自带一块电池,但是如果您需要添加电池,请从Blackmagic Design经销商处,或者大多数视听照相器材店购买这款电池。 1 找到位于摄影机底部的电池仓,轻轻推按槽盖将其打开。 2 将LP-E6型电池的接触点朝向电池仓内部并轻轻推入,直至电池扣入锁梢到位。 提示取出电池时,将锁梢朝向摄影机正面方向轻推,电池便可弹出。 3 关闭电池仓盖,轻推直至关闭到位。 4 将摄影机顶部的电源开关拨至“ON”的位置。将开关拨至“OFF”的位置可关闭摄影机。使用Blackmagic Pocket Camera Battery Grip
如果您购买了Blackmagic Pocket Camera Battery Grip, 不妨先安装这款电池手柄, 然后再继续接下来的操作。Blackmagic Pocket Camera Battery Grip的设计贴合Pocket Cinema Camera 6K和Pocket Cinema Camera 4K机型。 这款配件能为摄影机添加一个横向手柄,并含有两块NP-F570L系列电池,可实现长达两小时以上的不间断拍摄。12V DC输入接口可为手柄中的电池充电,也可在您更换电池时为摄影机提供不间断电源。摄影机关机时,您可以使用USB-C端口为手柄中的电池充电。Blackmagic Pocket Camera Battery Grip安装步骤:
安装Blackmagic Pocket Camera Battery Grip前,请先关闭您的Pocket Cinema Camera,并断开任何外接电源。  打开摄影机电池槽保护盖,取出里面的LP-E6电池。  沿着电池槽保护盖与机身的连接处位置滑动,从摄影机上取下保护盖。  为了防止电池槽保护盖遗失,请将其扣入电池手柄槽内部设计的凹槽。  关闭电池槽保护盖,使其平整卡入并固定在电池手柄槽内部设计的凹槽。  将手柄电池形状的部分插入摄影机的电池槽内。电池手柄顶部的1/4英寸螺丝应和摄影机底部的1/4-20安装孔对齐。1/4英寸螺丝一侧的小型定位销可有助于保持准确对齐。  向右侧拨动电池手柄正面的旋钮旋紧螺丝,将电池手柄牢牢固定在摄影机上。Blackmagic Pocket Camera Battery Grip电池安装步骤:
 逆时针旋转电池手柄尾部的锁定开关,打开电池槽。将电池槽滑出。将Blackmagic Pocket Battery Grip安装到摄影机前后都可执行这一操作。  将两块NP-F570电池放入电池槽,安装时请注意电池朝向,然后将两块电池逆向滑入电池槽。电池之间的锁定扣向上弹起后,表示电池锁定到位。移除电池时,按下锁定扣,将两块电池相向滑动即可取出。  将电池槽滑入电池手柄,顺时针旋转电池手柄尾部的锁定开关。请注意,如果摄影机的DC电源输入口连接了外部电源,您可以在更换手柄内部电池的时候继续拍摄。  顺时针旋转电池手柄尾部的锁定开关,锁定电池槽。 提示 当您连接了Blackmagic Pocket Camera Battery Grip电池手柄并安装了两块电池时,摄影机LCD触摸屏右上角的电池电量提示会显示两个电池图标,供您单独监控每块电池的充电情况。更多相关信息,请查阅“电源”部分的介绍。使用内附的电源线为摄影机供电
使用内附的电源线为摄影机供电内附的100-240伏AC适配器可用来为摄影机提供电源,并同时为摄影机的LP-E6电池或Blackmagic Pocket Camera Battery Grip手柄(如有连接)的两块NP-F570电池充电。DC电源接口可锁紧固定到摄影机上,以防意外断开。连接外部电源步骤如下:
1 将AC到12V DC适配器插入到您的主电源插座中。 2 打开摄影机左侧的橡胶保护盖,旋转DC电源接头的锁定环,使其和12伏DC电源输入接口上方的缺口对齐。将接头轻轻推向输入口,直至插入到位。 3 拔出连接头时,只需取下护套并将接头从输入口移除即可断开连接。 同时连接外部电源和电池电源时,摄影机只使用外部电源。如果您在连接了已充电电池的情况下断开外部电源,摄影机会直接切换到电池电源,不会中断运行。 关机时,摄影机的LP-E6电池可通过USB接口充电。这一设计十分便捷,因为您可以在摄影机未使用时,通过便携式充电宝为摄影机充电。Blackmagic Pocket Cinema Camera支持通过标准10W USB插墙式充电器进行充电,也可以使用支持USB PD协议的充电器。USB PD充电器一般都具有一个USB-C类接口,支持最高20V输出,因此可实现快速充电。当摄影机开启或关闭时,用户可通过12V DC电源输入为LP-E6电池充电。 提示如果在使用后立即为发热状态的电池充电,充电速度会下降,直至电池温度降至摄氏45度(华氏113度)以下。建议您先等待15分钟左右,待电池冷却后再行充电。 现在,您只要安装存储介质就可以开始记录了!存储介质
Blackmagic Pocket Cinema Camera使用标准SD卡、更快的UHS-II卡或CFast 2.0卡记录视频。 您还可以使用USB-C扩展端口连接大容量USB-C硬盘,实现更长的记录时间。CFast卡
CFast 2.0卡足以支持非常高的数据速率,可记录高帧率6K、4K和HD视频。具体每个格式可记录的最高帧率请到“记录”章节中的时长表中查询。 备注 CFast 2.0 卡的速度普遍较快,但是有些卡的写入速度可能会低于其读取速度,因此不同型号的最大数据速率也会有所不同。如果要使用您选择的帧率获得可靠的记录品质,请使用 Blackmagic Design 推荐的存储卡。插入CFast卡步骤:
 要找到存储卡槽,首先滑动摄影机背面右侧的存储卡槽保护盖。  弹簧门会顺势打开,露出CFast和SD存储卡槽。  将CFast卡插入卡槽,直至锁定到位。无需过多外力即可插入存储卡。移除CFast卡时,只需向内轻推CFast卡即可将其释放并弹出。  LCD触摸屏底部的存储信息将显示检测到的CFast卡的名称和剩余记录时间。 SD卡的插入步骤和CFast卡类似。详情请参阅“插入SD卡步骤”部分的内容。 选择CFast2.0卡
如果您的摄制工作涉及到数据速率较高的视频,请谨慎挑选您要使用的CFast卡。这是因为CFast 2.0卡具备不同的读写速度。 获得经Blackmagic Design测试并建议在Pocket Cinema Camera上使用的具体CFast 2.0存储卡清单,请查阅“建议使用的记录存储介质”部分的内容。 关于Blackmagic Pocket Cinema Camera摄影机支持使用的CFast卡的最新信息,请访问Blackmagic Design支持中心www.blackmagicdesign.com/cn/support。SD卡
除了CFast 2.0卡之外,摄影机还可以在UHS-I和UHS-II型高速SD卡上记录。UHS-I SD卡是记录HD压缩视频格式所使用的经济型存储介质;UHS-II型卡速度更快,是记录Blackmagic RAW和ProRes格式Ultra HD内容的理想选择。 使用SD卡时,您可以在拍摄HD压缩视频格式时获得经济型存储方案。 SDXC和SDHC都是消费级照相机或视频摄像机非常常用的媒体文件存储格式。如果您使用数码单反拍摄视频,或使用Blackmagic Micro Cinema Camera、Pocket Cinema Camera或Blackmagic Video Assist进行拍摄,可能您手头已经有兼容的SD卡可以直接使用了。 如果项目不要求使用最高分辨率文件进行拍摄,或项目需要进行长时间记录,您可以使用SD卡来降低成本。容量较小、速度较慢的SD卡还可以用来存储和加载LUT和预设。插入SD卡步骤:
 要找到存储卡槽,首先滑动摄影机背面右侧的存储卡槽保护盖。  弹簧门会顺势打开,露出存储介质卡槽。  将SD卡的标签朝向触摸屏插入SD卡槽,直至锁定到位。无需过多外力即可插入存储卡。  LCD触摸屏底部的存储信息将显示检测到的SD卡名称和剩余记录时间。 移除SD卡时,只需向内轻推SD卡即可将其释放并弹出。挑选SD卡
如果需要记录6K、4K DCI或Ultra HD影像,我们建议您使用目前最高速的UHS-II型SD卡。请务必使用高速UHS-II型SD卡从事6K、4K DCI、Ultra HD和HD影像记录,或者使用UHS-I型SD卡从事HD影像记录。因为这些卡有着快速的数据处理速度和较大的存储容量。通常来讲,卡的速度越快越好。 使用您的存储卡前,请先将其格式化为HFS+或exFAT格式。通过摄影机的“存储”设置即可格式化存储介质。关于存储设置的详情请参阅“设置”部分的内容。 您也可以使用Mac或Windows计算机来格式化存储卡。如果您在mac系统上处理媒体文件,可使用HFS+格式,这是Mac计算机所使用的磁盘格式,也叫“OS X扩展格式”。如果您使用Windows系统,请选择exFAT格式,即Windows的磁盘格式,该格式在Mac计算机上也可读取。 获得经Blackmagic Design测试并建议在Pocket Cinema Camera上使用的具体SD存储卡清单,请查阅“建议使用的记录存储介质”部分的内容。 关于Blackmagic Pocket Cinema Camera摄影机支持使用的SD卡的最新信息,请访问Blackmagic Design支持中心www.blackmagicdesign.com/cn/support。 备注 如果要从事高分辨率、高帧率记录,我们建议使用CFast 2.0或外部USB-C硬盘作为存储介质,因为此类存储介质速度更快,容量更大。锁定和解锁SD卡
SD卡可进行写保护设置,即“锁定”,以防数据被覆盖。插入SD卡之前,请先确保该卡没有设写保护。如果要禁用写保护功能,滑动位于存储卡左侧的塑料开关,将其移动到最靠近接触点的位置即可。记录后,您可随时将存储卡设为写保护锁定。  上下移动锁定开关可锁定或解锁D卡 插入了启用写保护的SD卡时,Blackmagic Pocket Cinema Camera会检测到,并会在LCD触摸屏上原本显示记录时长的位置显示“锁定”字样,同时,存储菜单的存储卡名称一侧也会出现一个锁定图标。如果存储卡处于锁定状态,您将无法记录视频、采集静帧或导出LUT和预设,除非解除锁定。  USB-C硬盘
Blackmagic Pocket Cinema Camera搭载高速USB-C扩展端口,可直接将视频记录到USB-C硬盘上。这类存储盘速度快,容量大,可进行长时间视频记录,因此是电影类长片拍摄工作的理想之选。 完成记录后,您可以直接将存储盘连接到计算机上,无需复制媒体即可开始剪辑和后期制作。 连接USB-C硬盘步骤如下:  打开摄影机左侧的橡胶保护盖,将线缆的另一端连接到USB-C端口。  将USB-C类线缆的一端连接到您的USB-C硬盘上。 备注 将USB-C硬盘连接到摄影机上时,它会占用摄影机操作系统中的SD卡位置。也就是说,当您连接了兼容的USB-C硬盘时,摄影机的SD卡槽是不可用的。 如果要使用SD卡槽而不是USB-C硬盘,请将USB-C硬盘从摄影机上断开。选择高速USB-C硬盘
USB-C硬盘采用高速经济的存储设计方案,适用于多种设备,各类消费级电子用品商店均有销售。请务必注意,电影制作只是USB-C硬盘市场的一小部分,因此只有选择正确的存储盘才能确保足够的速度来记录6K和4K影像。 许多USB-C硬盘只为家用电脑设计,并不足以记录6K和4K视频。 获得经Blackmagic Design测试并建议在Pocket Cinema Camera上使用的具体USB-C硬盘清单,请查阅“建议使用的记录存储介质”部分的内容。 获取最新的USB-C硬盘推荐列表,请访问网址www.blackmagicdesign.com/cn/support。USB-C硬盘速度注意事项
部分型号的USB-C硬盘并不能以生产厂家给出的速度保存视频数据。因为这些存储盘采用隐藏数据压缩技术来实现更高的录入速度。只有当存储空白数据或简单文件时,这种数据压缩才能以生产商声称的速度来保存数据。视频数据中包含不规则性更高的视频噪点和像素等,所以压缩无法起效,从而揭露了磁盘的真实速度。 有些USB-C硬盘的写入速度最多可以比生产商声称的速度低0%。所以,尽管存储盘规格中声称该USB-C硬盘速度足够处理视频,但真正进行实时视频拍摄时,这类存储盘的速度往往不够快。 通过Blackmagic Disk Speed Test测速软件来准确衡量您的USB-C硬盘是否足以应对高数据速率视频的采集和播放。该测速软件通过数据来模拟视频的储存情况,因此获得的数据与往硬盘采集视频的结果相类似。在Blackmagic测试中,我们发现型号较新、容量较大的SB-C硬盘和容量更大的USB-C硬盘通常具备更快的读写速度。 Blackmagic Disk Speed Test可从Mac的App Store下载。Blackmagic Desktop Video提供Windows和Mac版本,您可前往Blackmagic Design网站支持中心的“采集和播放”部分进行下载,网址:www.blackmagicdesign.com/cn/support。存储介质在记录前的准备事项
您可以使用摄影机的存储和格式化菜单下的“格式化存储卡”功能来对CFast卡、SD卡和USB-C硬盘进行格式化操作,也可以通过Mac或Windows计算机实现格式化操作。为获得理想性能,我们建议您使用摄影机来格式化存储介质。 HFS+也被称为OSX扩展格式,因为它支持“日志功能”,所以被广为推荐。一旦发生存储介质损坏的情况,具有日志功能的存储介质更易恢复数据。HFS+受Mac系统的原生支持。exFAT则受Mac和Windows系统的支持,无需使用额外软件,但不支持日志功能。在Blackmagic Pocket Cinema Camera上格式化存储介质
点按LCD触摸屏底部的任何一个存储卡提示,进入存储管理器。 2 点按“格式化CFast卡”或“格式化SD卡”。如果您将USB-C硬盘连接到摄影机上,则会显示“格式化硬盘”,而不是“格式化SD卡”。  如果您在摄影机上连接了USB-C硬盘,屏幕上就会显示“格式化外部硬盘”,而不是“格式卡” 点按“编辑卷号”手动更改卷号。通过键盘输入一个新的卷号,并按“更新”以确认选项。 4 选择“OSX扩展”或“exFAT”格式,并点按格式化按钮。  点按“编辑卷号”可手动更改卷号 5 在弹出的窗口中确认您想要格式化的卡、所选格式以及卷号。点按“格式化FAST卡”按钮以确认您的选择。点按“取消”可取消格式化。  确认格式化之前,请先检查是否选择了正确的存储介质。 6 按住格式化按钮三秒,开始格式化存储介质。  7 摄影机会提示您存储介质格式化完毕已可使用,或者格式化失败。 点按“确认”可返回存储管理器。 9 点按“退出”可离开存储管理器界面。 使用摄影机格式化CFast卡、SD卡或USB-C硬盘时,会使用根据场记板和卷号生成的摄影机D来为媒体文件命名。每次格式化时,摄影机会自动递增卷号。如果您需要手动输入特定的卷号,可以点击“编辑卷号”然后输入存储卡被格式化后的编号。 开始新项目时,如果您希望文件编号重置为1,可以点按场记板上“项目”选项卡中“重置项目数据”。  摄影机上的存储管理器将告知您当前使用存储介质的是CFast、SD卡还是USB-C硬盘。 提示如果SD卡启用了写保护,摄影机会检测到,并会在D触摸屏上原本显示记录时长的位置显示“锁定”字样,同时,存储菜单也会出现一个锁定图标。解锁该卡就可以进行格式化和记录。详情请参阅本手册“SD卡”部分的内容。 备注 如果您连接了USB-C硬盘,存储卡槽2上方就会显示“外部硬盘”字样。在Mac计算机上格式化存储介质
您可以使用Mac计算机自带的“磁盘工具”应用程序,将CFast卡、SD卡或USB-C硬盘格式化为HFS+或exFAT。由于格式化后存储介质上的所有数据都被清除,因此请务必在格式化存储介质前备份存储介质上的所有重要文件。 1 将存储介质连接到您的计算机,忽略任何关于使用您的存储介质作为Time Machine备份选择的信息。 2 进入“应用程序/实用工具”界面,运行“磁盘工具”程序。 3 点击表示摄影机存储介质的硬盘图标,再点击“抹掉”按钮。 4 将格式设置为“Mac OS扩展(日志式)”或“exFAT”。 5 输入新增分区的名字,并点击“抹掉”。摄影机的存储介质或会迅速格式化,以备使用。  在macOS计算机上使用“磁盘工具”可将您摄影机的存储介质格式化为Mac OS扩展(日志格式。在Windows计算机上格式化存储介质
使用WindowsPC的“格式化”对话框可将您摄影机的存储介质格式化为exFAT。由于格式化后存储介质上的所有数据都被清除,因此请务必在格式化存储介质前备份存储介质上的所有重要文件。 1 使用外部读写设备、USB-C线缆或转换器将摄影机的存储介质连接到您的计算机。 打开“开始菜单”或“开始画面”,选择“我的电脑”。右键点击摄影机的存储介质。 3 从上下文菜单中选择“格式化”。 4 将文件系统设置为“exFAT”,并将分配单元大小设置成128kb。 5 输入卷标,选择“快速格式化”,点击“开始”。 6 您的存储介质会迅速格式化,以备使用。  在Windows计算机上可使用“格式化”对话框将您摄影机的存储介质格式化为xFAT格式。 备注 如果记录的影像出现丢帧现象,请检查您的存储卡或硬盘是否在适用于您所用编解码格式和帧大小尺寸的推荐存储媒介列表上。如果要求低数据速率,可尝试降低您的帧率和分辨率,或尝试ProRes等压缩编解码格式。请登录Blackmagic Design网站获取最新信息,网址:www.blackmagicdesign.com/cn 备注 您可以在Blackmagic Pocket Cinema Camera上使用经过分区的存储介质,但摄影机只会将存储介质的第一个分区用于记录和播放。 需要指出的是,如果您使用存储和格式化菜单来格式化存储介质,除了用于记录和播放的第一个分区之外,存储盘的所有分区都会被一并抹去。因此,我们强烈建议您使用只有一个分区的存储介质。记录
记录片段
Blackmagic Pocket Cinema Camera配有两个记录按钮。第一个记录按钮位于把手顶部,方便您在右手握住摄影机把手时使用食指触发记录。 第二个记录按钮位于摄影机正面,方便您单手拿住摄影机自拍时触发记录。这个按钮设计在易于触及的位置,十分适合录制自拍视频用于博客。 按摄影机上的其中一个记录按钮即可开始记录。再次按下记录按钮可停止记录。  位于摄影机顶部的记录按钮  位于摄影机正面的记录按钮 开始记录之前,按住位于触摸屏下方的存储介质名称可选择使用记忆卡或USB-C硬盘。被选中的存储介质类型上方的信息条会变成蓝色,表示摄影机将使用该存储介质进行记录。如果要在其他存储卡或存储盘上进行记录,按住存储介质名称进行更换即可。记录时,信息条将会变成红色。选择记录格式
Blackmagic Pocket Cinema Camera可以使用如ProRes 422 HQ、ProRes 422、ProRes 422 LT和ProRes 422 Proxy等Apple ProRes编解码进行记录。ProRes编解码格式能在SD卡、CFast卡或USB-C硬盘上存储更多视频。以ProRes 422 HQ格式记录的视频质量最高,所做的压缩处理最少,而ProRes 422 Proxy格式可对视频进行优质压缩,记录更多视频。此外,摄影机还能Blackmagic RAW格式记录。您可根据工作流程需要尝试并选择最适合的格式。 请务必注意,Blackmagic Pocket Cinema Camera可使用Blackmagic RAW格式以全部传感器模式和裁切传感器模式进行记录,并且必须使用ProRes格式记录经过缩放调整的格式。 更多关于裁切模式和缩放格式的详细信息,请查阅“最大传感器帧率”部分的介绍。Blackmagic RAW
Blackmagic Pocket Cinema Camera支持Blackmagic RAW文件格式。该格式有着高画质、宽动态范围的特点,并提供多种压缩比选择。Blackmagic RAW保留了RAW记录的所有使用优点,但文件速度非常快,因为大部分处理是在摄影机里通过硬件加速完成的。 格式有着高画质、宽动态范围的特点,并提供多种压缩比选择。Blackmagic RAW保留了RAW记录的所有使用优点,但文件速度非常快,因为大部分处理是在摄影机里通过硬件加速完成的。也就是说Blackmagic RAW在大部分电脑上能以正常速度播放,不需要先缓存或者降低分辨率。 Blackmagic RAW还包含强大的元数据支持,所以读取这一文件的软件就能明白摄影机的设置。如果您因为需要快速完成剪辑并且没有时间调色而使用视频Gamma拍摄,有了这一元数据功能,您可以选择视频Gamma模式,以视频Gamma拍摄,当您在软件里打开文件时,文件将会显示应用了视频Gamma的效果。但文件实际上还是电影Gamma模式,只不过是文件里的元数据让软件应用了视频Gamma模式。 也就是说,如果您在某个阶段希望为画面调色,所有电影动态范围都会保存在文件里。图像的亮部和暗部都不会被生硬地切掉,因此细节得以保留,从而通过调色赋予画面电影品质。如果您没时间调色也没有关系,因为图像会被应用视频Gamma,看起来就像正常的视频摄影机图像。画面并非一锤定音,到了后期制作您依然可以改变主意。 Blackmagic RAW文件速度非常快,这一编解码格式针对电脑的CPU和GPU做了优化。也就是说,播放又快又流畅,无需硬件解码板,这对于笔记本电脑来说非常重要。能读取Blackmagic RAW的软件也能获得通过Apple Metal、Nvidia CUDA和OpenCL处理的优势。 也就是说,Blackmagic RAW能像视频文件一样在大部分电脑上以正常速度播放,不需要先缓存或者降低分辨率。 另外值得一提的一点是,镜头信息会逐帧记录在元数据里。例如,使用兼容的镜头时,片段长度内所有变焦或对焦调整都会被逐帧保存在Blackmagic RAW文件的元数据里。以Blackmagic RAW记录
Blackmagic RAW有两种不同的工作方式。您可以选择使用固定比特率编解码格式,或者固定质量编解码格式。 固定比特率编解码格式与大多数编解码格式的工作方式类似。它会试图将数据速率保持在恒定的程度,不会让数据速率升得太高。就是说,即使您拍摄复杂的图像,需要更多的数据来存储画面,固定比特率编解码格式也只会对图像进行进一步压缩,从而确保画面不会超出分配的空间。 这对视频编解码格式而言没有问题,但用Blackmagic RAW拍摄时,画质必须具有可预见性。如果您拍摄的图像需要更多数据,但编解码格式只是加大压缩程度来达到特定的数据速率,这时的结果就是,您可能会损失画质,但只有拍完回来才会发现。 为了解决这个问题,Blackmagic RAW还有另一个名为“固定质量”的编解码格式供您选择。该编解码格式技术上称为“可变比特率编解码格式”,当图像需要额外数据时,它会允许文件尺寸变大。如果您需要编码图像,同时保持画质,文件大小将没有上限。 设置为固定质量的Blackmagic RAW会让文件尺寸无限变大,直到满足编码图像的需要。但文件同时也会根据拍摄情况变大或变小。估计如果您忘了摘镜头盖,那也不会浪费存储介质的资源! 值得注意的是,Blackmagic RAW的画质设置选项名称并非晦涩难懂,而是能直观反映出各自的技术特点。比如,当您选择固定比特率编解码格式,会看到画质设置为3:1、5:1、8:1和12:1选项。这些是无压缩RAW文件尺寸与使用Blackmagic RAW拍摄的文件尺寸之间的比例。3:1的画质更好,因为文件更大,而12:1的文件尺寸最小,但画质也最低。许多Blackmagic RAW的用户认为12:1已经完全够用,没有发现任何画质局限。但您最好尝试不同设置,找到最适合自己的数值。 在固定质量设置下使用Blackmagic RAW时,您会看到设置为Q0和Q5选项。这些是传输给编解码格式的压缩参数,它们能以更技术性的方式设置所应用的压缩程度。这个设置不一样,因为固定比特率和固定质量编解码格式的运作方式不同。固定质量设置下,无法预测文件尺寸比率,因为该比率会根据具体拍摄情况发生很大的变化。所以在这种情况下设置是不一样的,并且文件会以它所需的大小记录到存储介质中。固定比特率设置
31、51、81和121代表压缩比。比如,12:压缩生成的文件大约比无压缩RAW小12倍。固定质量设置
Q0和Q5表示不同程度的量化。Q5的量化级别更高,数据速率也更高。如上所述,固定质量设置下文件尺寸会根据拍摄情况显著增大或缩小。也就是说,在拍摄时有可能会出现文件尺寸提高到超出存储卡负荷的情况。这样一来就可能会发生丢帧。但您可以立即看到拍摄中是否出现这样的问题,然后查看设置和画质。Blackmagic RAW Player
Blackmagic Camera软件安装程序中包含的Blackmagic RAW Player播放器是一款用于查看片段的应用程序。只需双击打开Blackmagic RAW文件,就能以全分辨率和位深快速播放及浏览文件。 解码帧时,SDK库里的CPU加速支持所有主要架构,也可通过Apple Metal、Nvidia CUDA和OpenCL支持GPU加速。另外,它还兼容lackmagic eGPU,可实现更高的性能。Blackmagic RAW Player支持Mac、Windows和Linux三大平台。Sidecar文件
Blackmagic RAW Sidecar文件不会重写文件的内嵌元数据,只是将新的元数据优先于原始数据之上。 元数据中包含Blackmagic RAW设置,以及光圈、对焦、焦距、白平衡、色调、色彩空间、项目名称、镜次编号等信息。元数据在片段全程被逐帧编码,这对镜头数据来说很重要,因为镜头可能在拍摄过程中发生调整。由于是可读格式,您可以用DaVinci Resolve,甚至文本编辑器添加或编辑Sidecar文件中的元数据。 Sidecar文件可以在播放时自动添加新的Blackmagic RAW设置,只需把Sidecar文件与相对应的Blackmagic RAW文件移动到同一个文件夹即可。如果您将Sidecar文件移出文件夹,并重新打开Blackmagic RAW文件,更改后设置就不会被应用,您所看到的文件是原始拍摄时的状态。任何使用Blackmagic RAW SDK的软件都能访问这些设置。做出的修改将保存在idecar文件里,可以通过Blackmagic RAW Player播放器或其他任何能够阅读Blackmagic RAW文件的软件看到。 当拍摄视频Gamma模式时,文件仍然处于电影Gamma,元数据会告诉Blackmagic RAW的处理机能以视频Gamma显示。如果您不想为画面调色,希望快速交付视频内容,视频Gamma是个很好的选择。但如果您希望提升暗部或者降低亮部时,所有细节还是依然都在的。视频不会被裁切,所有细节都在,您可以随时获取。Blackmagic RAW与DaVinci Resolve
设置可以根据每个Blackmagic RAW文件进行调整,然后用DaVinci Resolve的“Camera RAW”选项卡保存为新的Sidecar文件,用于创建特效或优化查看。您可以将自己的媒体文件复制给另一位DaVinci Resolve用户,他们在导入文件时就能自动获取您修改过的Gamma设置。除了摄影机文件中包含的其他元数据以外,DaVinci Resolve还能读取您选择的动态范围,您的片段将自动以“Film”、“Extended Video”或“Video”动态范围在DaVinci Resolve中显示。 然后您可以通过调整饱和度、对比度和中点,以及高光和阴影过渡,对这些设置进行自定义。所有调整都可以保存为Sidecar文件,后期处理文件的其他人员也能看到这些修改。您随时都可以回到摄影机的原始元数据。 您还可以通过DaVinci Resolve的“Camera RAW”选项卡导出单一的Blackmagic RAW帧,其中包含所有调整、元数据、全分辨率和色彩信息,方便与他人分享单帧或参考文件。 获取更多关于如何在DaVinci Resolve中使用Blackmagic RAW的信息,请参阅本手册“使用DaVinci Resolve”部分内容。Blackmagic RAW软件开发工具包
Blackmagic RAW软件开发工具包是由Blackmagic Design开发的API。您可以用Blackmagic RAW SDK编写自己的应用程序来使用Blackmagic RAW格式。任何开发人员都能用SDK库添加读取、编辑和保存Blackmagic RAW文件的支持。Blackmagic RAW SDK包含第四代色彩科学,您可以在所有支持它的应用上实现电影般的自然画面。Blackmagic RAW SDK支持Mac、Windows和Linux,可在Blackmagic官网的开发者页面免费下载www.blackmagicdesign.com/cn/developer。 以下图表显示了Blackmagic RAW API的各个组成部分: 最高传感器帧率
Blackmagic Pocket Cinema Camera 6K最高传感器帧率| 分辨率 编解码 传感器范围 最高帧率 | ||||
| 6K | 6144 x 3456 | Blackmagic RAW | 全部 | 50 |
| 6K 2.4:1 | 6144 x 2560 | Blackmagic RAW | 裁切 | 60 |
| 5.7K 17:9 | 5744 x 3024 | Blackmagic RAW | 裁切 | 60 |
| 4K DCI | 4096 x 2160 | ProRes 422 HQ | 在5.7K基础上进行缩放调整 | 60 |
| 4096 x 2160 | ProRes 422 | 在5.7K基础上进行缩放调整 | 60 | |
| 4096 x 2160 | ProRes 422 LT | 在5.7K基础上进行缩放调整 | 60 | |
| 4096 x 2160 | ProRes 422 Proxy | 在5.7K基础上进行缩放调整 | 60 | |
| Ultra HD | 3840 x 2160 | ProRes 422 HQ | 在全分辨率基础上进行缩放调整 | 50 |
| 3840 x 2160 | ProRes 422 | 在全分辨率基础上进行缩放调整 | 50 | |
| 3840 x 2160 | ProRes 422 LT | 在全分辨率基础上进行缩放调整 | 50 | |
| 3840 x 2160 | ProRes 422 Proxy | 在全分辨率基础上进行缩放调整 | 50 | |
| 3840 x 2160 | ProRes 422 HQ | 在5.7K基础上进行缩放调整 | 60 | |
| 3840 x 2160 | ProRes 422 | 在5.7K基础上进行缩放调整 | 60 | |
| 3840 x 2160 | ProRes 422 LT | 在5.7K基础上进行缩放调整 | 60 | |
| 3840 x 2160 | ProRes 422 Proxy | 在5.7K基础上进行缩放调整 | 60 | |
| 3.7K变形 | 3728 x 3104 | Blackmagic RAW | 裁切 | 60 |
| 2.8K 17:9 | 2868 x 1512 | Blackmagic RAW | 裁切 | 120 |
| HD | 1920 x 1080 | ProRes 422 HQ | 在全分辨率基础上进行缩放调整 | 50 |
| 1920 x 1080 | ProRes 422 | 在全分辨率基础上进行缩放调整 | 50 | |
| 1920 x 1080 | ProRes 422 LT | 在全分辨率基础上进行缩放调整 | 50 | |
| 1920 x 1080 | ProRes 422 Proxy | 在全分辨率基础上进行缩放调整 | 50 | |
| 1920 x 1080 | ProRes 422 HQ | 在5.7K基础上进行缩放调整 | 60 | |
| 1920 x 1080 | ProRes 422 | 在5.7K基础上进行缩放调整 | 60 | |
| 1920 x 1080 | ProRes 422 LT | 在5.7K基础上进行缩放调整 | 60 | |
| 1920 x 1080 | ProRes 422 Proxy | 在5.7K基础上进行缩放调整 | 60 | |
| 1920 x 1080 | ProRes 422 HQ | 在2.7K基础上进行缩放调整 | 120 | |
| 1920 x 1080 | ProRes 422 | 在2.7K基础上进行缩放调整 | 120 | |
| 1920 x 1080 | ProRes 422 LT | 在2.7K基础上进行缩放调整 | 120 | |
| 1920 x 1080 | ProRes 422 Proxy | 在2.7K基础上进行缩放调整 | 120 | |
| 分辨率 编解码 传感器范围 最高帧率 | ||||
| 4K DCI | 4096 x 2160 | Blackmagic RAW | 全部 | 60 |
| 4096 x 2160 | ProRes 422 HQ | 全部 | 60 | |
| 4096 x 2160 | ProRes 422 | 全部 | 60 | |
| 4096 x 2160 | ProRes 422 LT | 全部 | 60 | |
| 4096 x 2160 | ProRes 422 Proxy | 全部 | 60 | |
| 4K 2.4:1 | 4096 x 1720 | Blackmagic RAW | 裁切 | 75 |
| Ultra HD | 3840 x 2160 | Blackmagic RAW | 裁切 | 60 |
| 3840 x 2160 | ProRes 422 HQ | 裁切 | 60 | |
| 3840 x 2160 | ProRes 422 | 裁切 | 60 | |
| 3840 x 2160 | ProRes 422 LT | 裁切 | 60 | |
| 3840 x 2160 | ProRes 422 Proxy | 裁切 | 60 | |
| 2.8K变形 | 2880 x 2160 | Blackmagic RAW | 裁切 | 80 |
| 2.6K 16:9 | 2688 x 1512 | Blackmagic RAW | 裁切 | 120 |
| HD | 1920 x 1080 | ProRes 422 HQ | 在全分辨率基础上进行缩放调整 | 60 |
| 1920 x 1080 | ProRes 422 | 在全分辨率基础上进行缩放调整 | 60 | |
| 1920 x 1080 | ProRes 422 LT | 在全分辨率基础上进行缩放调整 | 60 | |
| 1920 x 1080 | ProRes 422 Proxy | 在全分辨率基础上进行缩放调整 | 60 | |
| 1920 x 1080 | ProRes 422 HQ | 在2.6K基础上进行缩放调整 | 120 | |
| 1920 x 1080 | ProRes 422 | 在2.6K基础上进行缩放调整 | 120 | |
| 1920 x 1080 | ProRes 422 LT | 在2.6K基础上进行缩放调整 | 120 | |
| 1920 x 1080 | ProRes 422 Proxy | 在2.6K基础上进行缩放调整 | 120 | |
| 1920 x 1080 | Blackmagic RAW | 裁切 | 120 | |
| 1920 x 1080 | ProRes 422 HQ | 裁切 | 120 | |
| 1920 x 1080 | ProRes 422 | 裁切 | 120 | |
| 1920 x 1080 | ProRes 422 LT | 裁切 | 120 | |
| 1920 x 1080 | ProRes 422 Proxy | 裁切 | 120 | |
记录时长
下面这些表格以分和秒的格式列出了不同格式、项目帧率和媒体文件大小下可以记录的大致时长。请注意,可用的分辨率和编解码会因Pocket Cinema Camera 6K和Pocket Cinema Camera 4K型号而有所不同。 存储介质的最长记录时间取决于CFast卡、SD卡或USB-C硬盘的数据容量,以及您所选择的记录格式和帧率。例如3840×2160的Apple ProRes 422 HQ格式,其存储速率大约为880Mbps。采用每秒24帧的记录速度,您可以在一张容量为256GB的CFast 2.0卡上记录大约47分钟的视频。在同样的设置下,您可以在一张容量为128GB的CFast卡上记录大约23分钟的视频,这大约是容量256GB的CFast卡一半的记录时长。 需要注意的是,不同厂商生产的存储介质,其记录时长也略有不同。存储介质被格式化或FAT或MacOS X扩展格式时,记录时长也会有所不同。 含有少量信息的简单场景要比信息密集的合成场景需要的数据更少。以下表格中的数值都是以高度复杂的镜头来评估的,因此您所获得的记录时间可能会稍长些,具体取决于您所拍摄影像的类型。| 6K | |||||
| CFast卡 | 帧率 | Blackmagic RAW 3:1 | Blackmagic RAW 5:1 | Blackmagic RAW 8:1 | Blackmagic RAW 12:1 |
| 256GB | 时长 | 时长 | 时长 | 时长 | |
| 23.98 | 17分钟 | 28分钟 | 45分钟 | 67分钟 | |
| 24 | 17分钟 | 28分钟 | 45分钟 | 67分钟 | |
| 25 | 16分钟 | 27分钟 | 43分钟 | 64分钟 | |
| 30 | 13分钟 | 22分钟 | 36分钟 | 54分钟 | |
| 50 | 8分钟 | 13分钟 | 21分钟 | 32分钟 | |
| 6K 2.4:1 | |||||
| CFast卡 | 帧率 | Blackmagic RAW 3:1 | Blackmagic RAW 5:1 | Blackmagic RAW 8:1 | Blackmagic RAW 12:1 |
| 256GB | 时长 | 时长 | 时长 | 时长 | |
| 23.98 | 23分钟 | 38分钟 | 60分钟 | 91分钟 | |
| 24 | 22分钟 | 38分钟 | 60分钟 | 91分钟 | |
| 25 | 21分钟 | 36分钟 | 58分钟 | 87分钟 | |
| 30 | 18分钟 | 30分钟 | 48分钟 | 72分钟 | |
| 50 | 11分钟 | 18分钟 | 29分钟 | 43分钟 | |
| 60 | 9分钟 | 15分钟 | 24分钟 | 36分钟 | |
| CFast卡 帧率 | Blackmagic RAW 3:1 | Blackmagic RAW 5:1 | Blackmagic RAW 8:1 | Blackmagic RAW 12:1 | |
| 256GB | 时长 时长 | 时长 时长 | |||
| 23.98 | 20分钟 | 34分钟 | 55分钟 | 82分钟 | |
| 24 | 20分钟 | 34分钟 | 55分钟 | 82分钟 | |
| 25 | 19分钟 | 33分钟 | 52分钟 | 79分钟 | |
| 30 | 16分钟 | 27分钟 | 44分钟 | 66分钟 | |
| 50 | 10分钟 | 16分钟 | 26分钟 | 39分钟 | |
| 60 | 8分钟 | 13分钟 | 22分钟 | 33分钟 |
| CFast卡 帧率 | Blackmagic RAW 3:1 | Blackmagic RAW 5:1 | Blackmagic RAW 8:1 | Blackmagic RAW 12:1 | ProRes 422 HQ | ProRes 422 | ProRes 422 LT | ProRes 422 Proxy | |
| 256GB | 时长 时长 | 时长 时长 | 时长 | 时长 | 时长 | 时长 | |||
| 23.98 | 39分钟 | 65分钟 | 104分钟 | 155分钟 | 44分钟 | 66分钟 | 95分钟 | 216分钟 | |
| 24 | 39分钟 | 65分钟 | 103分钟 | 155分钟 | 44分钟 | 66分钟 | 95分钟 | 216分钟 | |
| 25 | 37分钟 | 62分钟 | 99分钟 | 149分钟 | 42分钟 | 64分钟 | 91分钟 | 207分钟 | |
| 30 | 31分钟 | 52分钟 | 83分钟 | 124分钟 | 35分钟 | 53分钟 | 76分钟 | 173分钟 | |
| 50 | 18分钟 | 31分钟 | 49分钟 | 74分钟 | 21分钟 | 32分钟 | 45分钟 | 104分钟 | |
| 60 | 15分钟 | 26分钟 | 41分钟 | 62分钟 | 17分钟 | 26分钟 | 38分钟 | 87分钟 |
| CFast卡 帧率 | Blackmagic RAW 3:1 | Blackmagic RAW 5:1 | Blackmagic RAW 8:1 | Blackmagic RAW 12:1 | |
| 256GB | 时长 时长 | 时长 时长 | |||
| 23.98 | 50分钟 | 84分钟 | 134分钟 | 200分钟 | |
| 24 | 50分钟 | 84分钟 | 134分钟 | 200分钟 | |
| 25 | 48分钟 | 80分钟 | 128分钟 | 192分钟 | |
| 30 | 40分钟 | 67分钟 | 107分钟 | 160分钟 | |
| 50 | 24分钟 | 40分钟 | 64分钟 | 96分钟 | |
| 60 | 20分钟 | 33分钟 | 54分钟 | 80分钟 | |
| 75 | 16分钟 | 27分钟 | 43分钟 | 64分钟 | |
| 80 | 16分钟 | 26分钟 | 40分钟 | 60分钟 |
| CFast卡 帧率 | Blackmagic RAW 3:1 | Blackmagic RAW 5:1 | Blackmagic RAW 8:1 | Blackmagic RAW 12:1 | ProRes 422 HQ | ProRes 422 | ProRes 422 LT | ProRes 422 Proxy | |
| 256GB | 时长 时长 | 时长 时长 | 时长 时长 | 时长 时长 | |||||
| 23.98 | 41分钟 | 68分钟 | 110分钟 | 164分钟 | 47分钟 | 71分钟 | 101分钟 | 230分钟 | |
| 24 | 41分钟 | 68分钟 | 109分钟 | 164分钟 | 47分钟 | 71分钟 | 101分钟 | 230分钟 | |
| 25 | 39分钟 | 66分钟 | 105分钟 | 157分钟 | 45分钟 | 68分钟 | 97分钟 | 221分钟 | |
| 30 | 33分钟 | 55分钟 | 88分钟 | 131分钟 | 38分钟 | 57分钟 | 81分钟 | 184分钟 | |
| 50 | 19分钟 | 33分钟 | 52分钟 | 79分钟 | 22分钟 | 34分钟 | 48分钟 | 111分钟 | |
| 60 | 16分钟 | 27分钟 | 44分钟 | 66分钟 | 18分钟 | 28分钟 | 40分钟 | 92分钟 |
| CFast卡 帧率 | Blackmagic RAW 3:1 | Blackmagic RAW 5:1 | Blackmagic RAW 8:1 | Blackmagic RAW 12:1 | |
| 256GB | 时长 时长 | 时长 时长 | |||
| 23.98 | 31分钟 | 51分钟 | 82分钟 | 123分钟 | |
| 24 | 31分钟 | 51分钟 | 82分钟 | 123分钟 | |
| 25 | 29分钟 | 49分钟 | 79分钟 | 118分钟 | |
| 30 | 24分钟 | 41分钟 | 65分钟 | 98分钟 | |
| 50 | 15分钟 | 24分钟 | 39分钟 | 59分钟 | |
| 60 | 12分钟 | 20分钟 | 33分钟 | 49分钟 |
| CFast卡 帧率 | Blackmagic RAW 3:1 | Blackmagic RAW 5:1 | Blackmagic RAW 8:1 | Blackmagic RAW 12:1 | |
| 256GB | 时长 时长 | 时长 时长 | |||
| 23.98 | 57分钟 | 95分钟 | 151分钟 | 226分钟 | |
| 24 | 57分钟 | 95分钟 | 151分钟 | 226分钟 | |
| 25 | 54分钟 | 91分钟 | 145分钟 | 217分钟 | |
| 30 | 45分钟 | 76分钟 | 121分钟 | 181分钟 | |
| 50 | 27分钟 | 45分钟 | 73分钟 | 109分钟 | |
| 60 | 22分钟 | 38分钟 | 61分钟 | 91分钟 | |
| 80 | 17分钟 | 28分钟 | 45分钟 | 68分钟 |
| CFast卡 帧率 | Blackmagic RAW 3:1 | Blackmagic RAW 5:1 | Blackmagic RAW 8:1 | Blackmagic RAW 12:1 | |
| 256GB | 时长 时长 | 时长 时长 | |||
| 23.98 | 81分钟 | 136分钟 | 216分钟 | 321分钟 | |
| 24 | 81分钟 | 135分钟 | 215分钟 | 320分钟 | |
| 25 | 78分钟 | 130分钟 | 207分钟 | 308分钟 | |
| 30 | 65分钟 | 108分钟 | 173分钟 | 258分钟 | |
| 50 | 39分钟 | 65分钟 | 104分钟 | 156分钟 | |
| 60 | 32分钟 | 54分钟 | 87分钟 | 130分钟 | |
| 120 | 16分钟 | 27分钟 | 43分钟 | 65分钟 |
| CFast卡 帧率 | Blackmagic RAW 3:1 | Blackmagic RAW 5:1 | Blackmagic RAW 8:1 | Blackmagic RAW 12:1 | |
| 256GB | 时长 时长 | 时长 时长 | |||
| 23.98 | 87分钟 | 144分钟 | 230分钟 | 342分钟 | |
| 24 | 87分钟 | 144分钟 | 229分钟 | 342分钟 | |
| 25 | 83分钟 | 138分钟 | 220分钟 | 328分钟 | |
| 30 | 69分钟 | 115分钟 | 184分钟 | 275分钟 | |
| 50 | 41分钟 | 69分钟 | 111分钟 | 166分钟 | |
| 60 | 34分钟 | 58分钟 | 92分钟 | 138分钟 | |
| 120 | 17分钟 | 29分钟 | 46分钟 | 69分钟 |
| CFast卡 帧率 | Blackmagic RAW 3:1 | Blackmagic RAW 5:1 | Blackmagic RAW 8:1 | Blackmagic RAW 12:1 | ProRes 422 HQ | ProRes 422 | ProRes 422 LT | ProRes 422 Proxy | |
| 256GB | 时长 时长 | 时长 时长 | 时长 时长 | 时长 时长 | 时长 时长 | 时长 时长 | |||
| 23.98 | 159分钟 | 264分钟 | 418分钟 | 619分钟 | 189分钟 | 283分钟 | 403分钟 | 877分钟 | |
| 24 | 159分钟 | 264分钟 | 418分钟 | 618分钟 | 189分钟 | 283分钟 | 403分钟 | 877分钟 | |
| 25 | 153分钟 | 253分钟 | 402分钟 | 595分钟 | 182分钟 | 271分钟 | 387分钟 | 843分钟 | |
| 30 | 127分钟 | 212分钟 | 336分钟 | 499分钟 | 152分钟 | 227分钟 | 324分钟 | 710分钟 | |
| 50 | 76分钟 | 127分钟 | 203分钟 | 303分钟 | 91分钟 | 137分钟 | 196分钟 | 434分钟 | |
| 60 | 64分钟 | 106分钟 | 170分钟 | 254分钟 | 76分钟 | 114分钟 | 163分钟 | 363分钟 | |
| 120 | 32分钟 | 54分钟 | 87分钟 | 130分钟 | 38分钟 | 57分钟 | 82分钟 | 185分钟 |
选择帧率
摄影机可以使用不同的帧率拍摄视频,您可根据需要进行选择。 一般来说,选择传感器帧率时,会有一些常见的方面需要考虑。数年来,影视行业一直都有相应的标准。不同的标准会有不同的帧率要求,但其目的只有一个,就是在每一秒内显示有效的帧数来呈现悦目而真实的动态画面。 比如,影院使用的是每秒24帧的标准,虽然近年来业内已经开始尝试使用更高的帧率,但每秒24帧依然是全球广泛接受的标准。 电视行业的帧率则通常要符合每个国家的播出技术标准。比如,在制作电视内容时,北美地区一般都会使用每秒29.97的帧率进行记录,而欧洲地区则会使用每秒25的帧率进行记录。 但是,随着技术的不断发展,如今的制作有了更多的选择,并且播出标准也在一直变化。现在,体育类节目通常会以更高的帧率记录和播出。比如在北美地区,有些体育节目会以高达每秒59.94帧的速度记录和播出,欧洲地区则会采用每秒50帧的速度。这样能使这类快节奏画面更加流畅和真实。 此外,流媒体和网络播出一般会使用和电视节目类似的帧率,但用户可以选择不同的观看格式,而且唯一的限制就是用户的屏幕可以显示的内容,所以灵活性更大一些。 一般来说,为一个项目选择帧率时,可以根据交付的格式进行选择。摄影机的项目帧率应该使用这一设置,而传感器帧率应该被设置为匹配。这样您的片段就能以和肉眼所见的实际画面相同的速度进行播放。 如果您想要创造出有趣的效果,比如慢动作,就可以使用高一些的传感器帧率设置。传感器帧率比项目帧率越高,播放速度就越慢。 更多关于使用不同传感器帧率来达到创意效果的信息,请参考“触摸屏控制”部分的介绍。触发记录
- Blackmagic Pocket Cinema Camera可通过HDMI输出口自动发送一路信号,以便在连接如Blackmagic Video Assist等支持触发记录功能的设备时触发记录。 这样一来,当您按下摄影机上的记录按钮时,您所连接的外部记录设备也会开始记录,并可当您停止摄影机记录的同时也停止记录。您的摄影机还可以通过HDMI输出时间码,也就是说,外部记录设备和摄影机内部记录的片段会使用相同的时间码。 如果外部记录设备支持触发记录功能,您需要通过设置菜单将其启用。播放
播放片段
视频记录完毕后,您可使用摄影机上的播放控制按钮播放素材片段并在LCD屏幕上监看。按下播放按钮可切换到播放模式。再次按播放按钮可立即在LCD屏幕或者通过HDMI输出口连接的显示器上播放最后记录的片段。按住LCD屏幕上的前进或倒退按钮可以快进或倒退片段。当前片段到头时,播放会结束。 按前进或倒退按钮可跳到片段的开始或结束处。按后退按钮一次会跳转到当前素材片段的起始位置,按两次则跳转到上一个片段的起始位置。按记录按钮可退出播放,触摸屏会回到摄影机画面。  按播放控制区域的播放按钮即可在内置触摸屏上查看最近记录的片段。摄影机功能
摄影机正面
1 记录按钮
按任何一个记录按钮均可开始和停止记录。摄影机正面设有一个记录按钮,便于在自拍时开始或停止记录。2 设置滚轮
摄影机上安装兼容镜头时,设置滚轮可用来调整光圈。将触摸屏面向自己,向左旋转滚轮可打开光圈,向右旋转则关闭光圈。设置滚轮也可以用来调整白平衡、快门角度设置。按摄影机顶部的相应按钮,然后使用滚轮进行选择。完成选择后,按下设置滚轮可快速退出选择菜单。3 立体声麦克风
共有四个内置的优质立体声麦克风。更多关于麦克风音频设置的信息,请参考“音频设置”部分的介绍。4 镜头卡口
Blackmagic Pocket Cinema Camera 6K设有主动式EF镜头卡口,4K机型则设有主动式MFT镜头卡口。也就是说,您可以使用内置稳定器的镜头,还可以控制兼容镜头的自动对焦和自动曝光。要使用主动式镜头中带有的图像稳定器(即“IS”),可将稳定器开关设为“ON”来开启摄影机图像稳定功能。如果您的镜头有图像稳定器开关,请根据需要设置适合的静态图像或动态图像模式。如果您的镜头并未设有稳定器开关,可以从摄影机的“图像稳定功能”设置菜单中打开或关闭该功能。5 Tally/记录提示
Pocket Cinema Camera摄影机的正面设有一个小型LED灯,可在摄影机记录时予以相应提示。您可以到设置菜单中启用或禁用这一Tally灯提示,还可以调整其亮度。详情请参阅“设置”部分的内容。右侧
6 CFast卡槽
将CFast2.0卡插入卡槽内可实现记录和播放。详情请参阅“CFast卡”部分的内容。7 SD卡槽
将SD卡插入卡槽内可实现记录和播放。详情请参阅“SD卡”部分的内容。左侧
8 3.5mm麦克风输入
通过摄影机的3.5mm立体声接口连接麦克风。支持ic和Line电平的音频。Mic电平的音频要比Line电平低,因此如果您将麦克风连接到摄影机但选择了Line电平,就会发现电平过低。麦克风输入还可以接收来自左通道外部信号源的SMPTE规范LTC时间码。有效时间码可被自动检测到,并作为时间码元数据加嵌到记录的视频中。我们建议通过Line电平输出发送LTC时间码,特别是不将时间码作为一个音频轨道记录的情况。9 耳麦输入
把耳麦插入3.5mm立体声耳机插孔可在记录和播放片段时监听音频。连接耳麦时,扬声器输出处于静音状态。 10HDMI
这一标准尺寸HDMI接口可连接支持HDR和2通道内嵌音频的10bit 4:2:2 1080p HD视频。使用触摸屏菜单设置净信号或者带有叠加信息的输出画面。您可以使用HDMI端口来连接外部监视器、录机或ATEM Mini切换台。通过HDMI将摄影机连接到ATEM Mini后,您就能获得演播室摄像机的功能,如远程控制Pocket Cinema Camera记录和调整多项设置。11 电源输入
您可以使用DC接口为摄影机充电,并同时对电池进行涓流充电。如果要连接电源适配器,请转动插头使其对准插孔上方的缺口位置,然后轻推插头直至其解锁。如果要断开电源连接,请将锁定鞘转回原来的位置,然后拔出插头。自定义电源方案
有些用户创建了自定义电源设备作为Blackmagic Pocket Cinema Camera供电途径之一。如果您决定不使用电池来创建自己的供电方案,那么需要注意和谨慎的是,千万确保不要对您的摄影机供应太高的电压,不然会导致永久性破坏。以下是Pocket Cinema Camera的电压要求: 电池输入连接额定电压范围为6.2V到10V最大。 DC输入额定电压范围为10.8V到20V最大。 当摄影机待机且不为电池充电时要求16W电源。 当摄影机为LP-E6型电池充电时要求30W电源 当采用自定义电源方案为摄影机供电时,建议您移除LP-E6型电池。 在记录到外部存储介质,使用主动式镜头,屏幕和Tally亮度均调到最高,记录高帧率影像,并且不为电池充电的情况下Pocket Cinema Camera 6K要求25W,Pocket Cinema Camera 4K要求22W。12 USB
您可以利用这一USB-C端口,直接在连接的USB-C硬盘上进行记录。当摄影机关闭时,您可以通过这一USB-C端口从充电宝等外部设备源为电池充电。为摄影机更新内部软件时,通过这个USB-C端口将摄影机连接到计算机,运行摄影机的更新程序。13 Mini XLR麦克风输入
通过Mini XLR接口连接外部平衡模拟音频。使用XLR转Mini XLR适配器电缆可将标准XLR麦克风连接到您的摄影机。 Mini XLR输入可提供幻象电源,用于连接不带内部供电的专业麦克风。更多关于启用幻象电源的信息,请参考本手册“音频”部分的介绍。顶板
14 1/4-20安装点
您可以使用摄影机顶部的1/4-20安装点来安装外接麦克风或其他小型配件。 备注 Pocket Cinema Camera顶部的这一1/4英寸安装点只可用于连接小型麦克风等轻型配件。这个顶部1/4英寸安装点不得作为摄影机的承重点,因此请勿安装由螺丝固定的摄影机把手连同较重的镜头。这一操作会损坏/4英寸安装点,并且不属保修范围。请勿用该安装点连接大型长杆类配件,例如通过该安装点连接加长杆再安装较重配件。如要安装较重的配件,我们强烈建议您使用专为Pocket Cinema Camera设计的摄影机提笼,可同时固定在顶部和底部的1/4英寸安装点。15 记录
按摄影机上的记录按钮即可开始录制。再次按下可停止记录。16 静帧
如要采集单帧无压缩DNG画面,可按下摄影机上的静帧按钮。摄影机图标会短暂出现在触摸显示屏的右上角,提示您静帧采集成功。图像文件会被保存在当前正用于记录的存储介质根目录下一个名为“stills”的文件夹内。保存时会使用视频片段的文件命名格式,但文件名末尾将含有“S001”字样,以文件名最后四位字符来表示“静帧号码”。17 ISO
按ISO按钮并旋转设置滚轮可调整摄影机的感光度设置。ISO可以1/3挡的增量进行设置,数值在100到25,600之间。18 快门
要更改快门角度或快门速度,可按$”快门按钮,然后旋转设置滚轮。触摸显示屏也会给出最多三个防闪烁快门建议选项。 19 白平衡
按“WB”白平衡按钮并旋转设置滚轮可调整摄影机的白平衡设置。您也可以长按“WB”按钮三秒,直接进入自动白平衡屏幕菜单。摄影机将会在画面中心位置叠加显示一个白色方块,并使用这一区域执行自动白平衡操作。更多信息请参考“触摸屏控制”部分的介绍。20 电源开关
电源开关可开启摄影机。向右滑动开关可开启摄影机,向左滑动可关机。21 LED状态显示
摄影机关闭状态下,如果通过其12V DC电源接口或USB-C端口连接了外部电源,这一提示灯会显示红色,表示电池正在充电。 电池充满电后,状态LED灯会熄灭。22功能按钮
您可以使用摄影机的“设置”菜单对这些按钮进行编程,将它们指派为各项常用功能。默认情况下,第一个按钮被设为“伪色”,第二个按钮被设为“显示LUT”,第三个按钮被设为“帧导栏”。摄影机底部
23 1/4-20安装点
使用底部的这个1/4-20安装点可以将摄影机固定到三脚架上。24 电池仓门
将电池仓门释放扣往镜头卡口的方向轻轻推按可将其打开。关闭时,只要轻推仓门直至听到锁定的声音即可。摄影机背面
25 触摸显示屏
在记录和播放时可使用这个触摸显示屏监看片段。通过点按和滑动手势调整各项设置并控制摄影机。26 光圈按钮
按下光圈按钮将自动,摄影机将根据镜头中的高光和阴影设置平均曝光值。您可以通过左右旋转设置滚轮来手动调整镜头光圈,也可以点按触摸显示屏上的“IRIS”按钮并调整光圈滑块实现控制。27 对焦按钮
当摄影机使用兼容的自动对焦镜头时,按对焦按钮一次可自动对焦。默认情况下,镜头将自动对焦到画面的中心,但是您可以根据需要点按LCD屏幕来选择其他的对焦点。连按两次对焦按钮可将对焦点重置到屏幕的中心位置。 备注虽然大部分镜头都支持电子对焦,但是有些镜头可设置为手动或自动对焦模式。在这类情况下,您需要确认已将镜头设置到自动对焦模式。28 HFR按钮
使用HFR(高帧率)按钮可切换到变速帧率。要使用这一功能,只要在帧率菜单中设置您想要的变速帧率即可。摄制完成后,只要按下HFR按钮即可在您所选的变速帧率和项目帧率之间切换。需要指出的是,这一设置只能在记录停止时调整。 更多关于项目和变速帧率的信息,请参考“触摸屏控制”部分的介绍。29 对焦缩放按钮
按对焦放大按钮可放大画面,以1的像素比例来调整对焦。放大显示时,您可以在触摸屏上使用捏拉缩放的多点接触手势控制来调整缩放程度。更多信息,请查阅“捏拉缩放”部分的介绍。放大状态下,您可以点按并拖动屏幕以查看画面的不同区域。如果要缩小画面,再次按对焦放大按钮即可。30 菜单按钮
按下该菜单按钮可打开主菜单界面。31 播放按钮
按下播放按钮可切换到播放模式。再次按播放按钮可立即在LCD屏幕或者通过HDMI输出口连接的显示器上播放最后记录的片段。触摸屏控制
触摸屏功能
Blackmagic Pocket Cinema Camera的LCD触摸屏采用触摸式手势界面设计,能带来快捷直观的操作体验。您可以在LCD触摸屏上的不同区域进行点按和滑动操作,从而快速实现拍摄时可能用到的摄影机功能。  Blackmagic摄影机的LCD触摸显示屏能让您轻松设置摄影机的绝对多数使用设置。LCD监看选项
点按触摸屏左上角的监看图标可进入LCD监看设置。这些设置可用来切换并调整摄影机的监看功能,包括斑马纹、对焦辅助、帧导栏、网格、安全区以及伪色。当您进D监看选项时,这些功能的控制项会显示在LCD触摸屏底部的选项卡菜单中。   点击摄影机LCD触摸屏左上角的图标可进入LCD触摸屏的监看选项。斑马纹
斑马纹设置可开启或关闭 LCD 触摸屏上的斑马纹显示,还可以设置 HDMI 输出画面上的斑马纹级别。 视频图像中超过您设定的斑马纹曝光度的部分会以斜线标出。例如,将斑马纹设定为 100% 可显示完全过曝的区域。这一功能对于既定照明条件下实现最佳曝光值非常有帮助。  进入LCD监看选项后,点按斑马纹图标可选择斑马纹设置 要开启或关闭LCD触摸屏的斑马纹功能,只要在斑马纹界面中点按屏幕左下方的切换图标即可。 向左或向右拖动滑块或点按斑马纹百分比级别的箭头,可为斑马纹显示设置曝光级别。斑马纹程度能以5个百分点为单位进行调整,曝光显示范围在 75% 到 100% 之间。 更多关于在摄影机HDMI输出上启用斑马纹的信息,请参考本手册“监看设置”部分的介绍。 提示 如果您在户外阴天等易变的照明条件下拍摄,将斑马纹设置在OO以下能提示您可能出现过曝的区域。对焦辅助
对焦辅助设置可开启或关闭LCD触摸屏上的对焦辅助显示,还可以为Blackmagic Pocket Cinema Camera上的HDMI输出设置对焦辅助级别。  进入LCD监看选项后,点击对焦辅助图标可设置摄影机的对焦辅助选项。 要开启或关闭LCD触摸屏的对焦辅助功能,只要在对焦辅助界面中点按屏幕左下方的切换图标即可。 要在摄影机上设置HDMI输出的对焦辅助级别,可点按触摸屏底部的点按“低”、“中”或者“高”选项。 对焦辅助的最佳级别因拍摄画面而异。例如,对焦人物时,设置较高的对焦辅助可有助于解决人物面部边缘细节的问题。而如果是对焦植物或建筑物,较高的对焦辅助设置反而会显示许多干扰信息。 更多关于在摄影机HDMI输出上启用对焦辅助的信息,请参考本手册“监看设置”部分的介绍。 提示 Blackmagic Pocket Cinema Camera设有两个对焦辅助模式。您可以在“监看”设置菜单中的“峰值对焦”和“彩色线条”两种对焦辅助选项间进行切换。详情请参考本手册“监看设置”部分的介绍。帧导栏
帧导栏设置可开启或关闭LCD触摸屏上的帧导栏显示。您还可以选择一种帧导栏在摄影机的HDMI输出上显示。 帧导栏包括用于电影、电视和网络标准的不同宽高比。  进入LCD监看选项后,点击帧导栏图标可设置帧导栏选项。 要开启或关闭LCD触摸屏的帧导栏显示,只要点按屏幕左下角的切换图标即可。 要选择您想使用的帧导栏选项,请左右拖动滑块,或点按当前所选宽高比两侧的箭头进行调整即可。点按箭头按钮之间的比例显示,还可以输入自定义帧导栏比例。 帧导栏选项如下:2.35:1、2.39:1和2.40:1
可显示宽屏宽高比,适用于变形或遮幅宽银幕电影。由于电影标准随时间改变,这三种宽高比或采用略微不同的宽屏设置。2.39:1是目前最为广泛使用的标准之一。  LCD触摸屏启用2.40:1帧导栏设置后的显示。2:1
该选项可显示较16:9略宽的画面比例,但宽度低于2.35:1。1.85:1
可显示另一种常用的滤幅宽银幕电影宽高比。这种宽高比介于HDTV 1.78:1规格和2.39:1之间。16:9
显示为1.78:1宽高比,兼容16:9高清电视机和计算机屏幕。该宽高比最常用于HD播出和网络视频。此外,Ultra HD播出也使用这一宽高比。14:9
可显示某些电视台所用的14:9宽高比,是16:9和4:3电视标准的折中方案。理想状态下,当16:9和4:3素材经中心裁切以符合14:9宽高比时仍然保持清晰画面。如果您的项目可能会在使用14:9宽高比的电视台播出时,可使用此帧导栏作为构图辅助。4:3
采用4:3宽高比,适用于SD电视屏幕,或在使用2倍变形附加镜时帮助构图取景。1:1
该选项可显示较4:3略窄的1:1画面比例。这一正方形画面比例正在社交媒体领域日渐普及。4:5
该选项可显示4:5的宽高比。这一纵向画面宽高比是人像和智能手机观看的理想选择。自定义帧导栏比例
要自行创建帧导栏比例获得独特观感,可点按箭头图标按钮之间的比例显示。在出现的“自定义帧导栏”屏幕上,点按删除按钮将当前比例删除,然后使用数字键盘指定一个新的比例。点按“更新”应用自定义帧导栏比例,然后回到拍摄画面。  使用“自定义帧导栏”屏幕上的数字键盘输入一个新的帧导栏比例 提示 您可以更改帧导栏叠加信息的不透明度。详情请参考本手册“监看设置”部分的内容。 备注更多关于在摄影机HDM输出上启用帧导栏的信息,请参考本手册“监看设置”部分的介绍。网格
网格设置可在 LCD 触摸屏上开启“三分法”、“水平线”、“十字准线”或“中心点”显示,还可以设置在 HDMI 输出上显示哪些叠加信息。  进入LCD监看选项后,点按网格图标可选择不同的网格设置 网格和十字准线叠加信息可以帮助您构图。开启网格选项后,LCD屏幕上会显示“三分法”、“水平线”、“十字准线”或“中心点”。 要开启或关闭摄影机触摸屏的帧导栏显示,只要在“帧导栏”选项卡中点按屏幕左下角的切换图标即可。 想要选择LCD或HDMI输出上显示哪类叠加信息,只要点按“三分法”、“水平线”、“十字准线”或“中心点”选项即可。您可以一次在水平线、十字准线或中心点选项当中选择一种,和三分法显示。这样能让您结合使用三分法和水平线组合、三分法和十字准线组合,或者三分法和中心点组合。  三分法网格可自动缩放到任意屏幕帧导栏。三分法
“三分法”设置取画面三分之一处分别加以两条竖线和两条横线组成网格叠加显示。三分法是一种帮助镜头构图的极其强大的工具。例如,人眼通常会将注意力落于两条直线的交叉点位置,因此网格非常有助于构图时将关键元素定位在这些重要区域。演员的视线通常都是取景在屏幕上三分之一部分,因此您可以使用上面的那条水平线来帮助您构图。三分法有利于不同镜头间保持构图的一致性。水平线
“水平线”设置可在摄影机发生左右或者上下倾斜的时候给出提示。这一设置能帮助您在手持拍摄时将摄影机保持在水平状态,较好地平衡摄影机在云台上的倾斜情况。 浅灰色竖线偏离中间那条深灰色竖线的移动方向,就表示摄影机当前发生倾斜的方向。当摄影机向下倾斜时,浅灰色横线会向上移动;而当摄影机向上倾斜时,浅灰色横线会向下移动。 这些线条偏离中心十字标线的距离等比对应摄影机发生上下或左右倾斜的程度。校准摄影机的运动传感器之后,只要摄影机对齐横轴和纵轴,十字标线就会变成蓝色,表示摄影机已与横纵轴对齐。 请注意,如果摄影机朝正下方拍摄俯瞰镜头,或朝正上方进行拍摄,水平线指示也会有相应反馈。假如您旋转摄影机来拍摄竖屏画面,水平线指示会将横纵轴也旋转90度。 下面的表格显示了摄影机发生不同方向的倾斜时,水平线所给出的相应指示。水平线指示描述
 垂直且水平  向下倾斜且水平  垂直且向左倾斜  向上倾斜且向右倾斜 正常使用时,可将水平线指示校准为垂直且水平。如果您想要使用水平线指示来保持一致的斜角镜头(Dutch Angle),或者保持一致的倾斜角度来拍摄俯瞰或仰角镜头,也可将水平线指示校准为某个斜面角度。更多关于如何校准水平线指示的信息,请查阅“运动传感器校准”部分。十字准线
“十字准线”设置可在画面中心标以十字准线。十字准线和三分法一样,都是非常有用的构图工具,可以让您轻松将画框的正中心对准某个拍摄对象。在拍摄用于快速剪切的场景时也可能会用到这一功能。将观众的视线始终保持在画面中心,能够有助于他们在观看快速剪辑的画面时跟上节奏。中心点
“中心点”设置是在帧画面的中心放置一个圆点。这一设置和“十字准线”设置的作用完全一样,只不过这一叠加显示更小,因此所造成的干扰也更小。 提示更多关于在HDMI输出上启用网格的信息,请参考本手册“监看设置”部分的介绍。安全框
“安全框”设置选项用于打开或关闭 LCD 触摸屏上的安全框,以及设置 HDMI 输出的安全框尺寸。 安全框是广电制作行业的常用工具,可用来让观众观看到镜头中最重要的内容。将镜头中最重要的部分保留在中心的“安全框”之内,能有效防止在部分电视机上出现画面裁切,并且能留下一定的空间供播出机构在屏幕边缘添加台标、新闻图标和其他叠加信息。许多播出机构都要求交付的影像必须将标题和图文等重要内容包含在 90% 的安全框范围内。 安全框还可以帮您为镜头构图,方便您在后期制作中裁切图像的边缘来稳定镜头。它们也可以用来显示特定的裁切。比如以Ultra HD 3840x2160记录时将其设置为 50% ,您可以看到画面经1920x1080裁切后的效果。安全框还会根据帧导栏来调整尺寸,它们会通过调整以显示目标帧的已选百分比。  图为设置到 85% 的安全框 要开启或关闭LCD触摸屏的安全框,只要在安全框界面中点按屏幕左下方的切换图标即可。要设置摄影机HDMI输出的安全框程度,可以点按触摸屏下方当前数值左右任何一边的箭头。或者,您也可以左右拖动滑块进行调整。伪色
伪色设置可以打开或关闭LCD触摸屏上的伪色曝光辅助。 伪色功能可在您的图像上叠加不同色彩,以代表图像中不同元素的曝光值。例如,粉色代表了适合较浅肤色的最佳曝光,而绿色则是较深肤色调的对应色彩。在记录人物画面时可通过查看粉色或绿色伪色来保持肤色曝光的一致性。 以此类推,当您图像中的元素从黄色变到红色,就意味着现在处于过曝状态。  伪色表 要开启或关闭LCD触摸屏的伪色功能,只要在伪色界面中点按屏幕左下方的切换图标即可。  伪色曝光辅助每秒帧数
“FPS”提示可显示您当前所选的每秒帧数。  点按帧率提示可进入帧率设置 在LCD触摸屏底部的菜单里,点按“FPS”提示可让您更改摄影机传感器及项目帧率。项目帧率
项目帧率是摄影机的记录格式帧率,它具备电影和电视行业所使用的各类帧率。通常,它会被设定为和您的后期制作工作流程相匹配的帧率。 一共有8种项目帧率设置,分别为每秒23.98、24、25、29.97、30、50、59.94以及60帧。 想要在“FPS”菜单中调整摄影机的项目帧率,请点按触摸屏左下角当前帧率旁边的左右箭头。或者,您也可以左右拖动滑块进行调整。  点按项目帧率两侧的箭头或移动滑块进行调整。 提示 Blackmagic Pocket Cinema Camera的项目帧率也设置了HDMI输出上的帧率。传感器帧率
传感器帧率可设定传感器每秒所记录的实际帧数。这一帧率将会影响视频播放的快慢,视您所设置的项目帧率而定。  启用“变速帧率”选项后,点按某个预设或传感器帧率两侧的箭头图标,或者移动滑块就可进行调整。 默认情况下,项目和传感器帧率会相互匹配,以便获得自然的播放速度。但是,您可以点按摄影机“FPS”菜单右下方的“变速帧率”切换图标来单独设置传感器帧率。 如要更改您的传感器帧率,请点按触摸屏左下方传感器提示旁边的左右箭头。您也可以左右拖动滑块来增加或减少帧率。放开滑块后,传感器帧率将完成设置。您可以点按滑块上方的常用变速帧率。这些是根据您当前项目帧率给出的。 您可以设置各种不同的传感器帧率,使片段播放时呈现出各种丰富有趣的速度效果。当传感器帧率被设置为高于项目帧率时,播放片段可营造出慢动作效果。例如,以60fps的传感器帧率进行拍摄,以24fps的项目帧率进行播放,能创建出实际速度 40% 的慢动作效果。换言之,传感器帧率越是低于项目帧率,播放片段时就越快。这一原理类似于电影摄影机的快速拍摄(Overcranking)和慢速拍摄(Undercranking)。快速拍摄可增高传感器帧率,因此播放时可拖慢镜头画面进程,起到突出强调的作用。慢速拍摄可降低传感器帧率,因此回放时可加快画面的速度,从而使画面更具动感。这一设置可为您提供无限的创作空间! 关于每个记录格式和编解码可用最大帧率的信息,请参阅本手册“记录”章节的表格。 备注选中“变速帧率”时,音频和视频就不再同步。即使设置了相同的项目帧率和传感器帧率也是如此。因此,如果您想要确保音频同步,就避免选择变速帧率。快门
“快门”提示可显示您的快门角度或快门速度。点按此提示可手动更改摄影机的快门数值或配置基于快门的自动曝光模式。快门类型设置可通过显示快门信息来选择“快门角度”或“快门速度”。详情请参考本手册中关于“设置”部分的介绍。  点按“快门”提示进入快门设置 快门角度或快门速度定义了视频中运动模糊的级别,可对不同的光线条件进行补偿。大多数情况180度的快门角度是拍摄令人满意的运动模糊的最佳选择,相当于50秒的快门速度。但是,请根据照明条件的变化或画面中动作的多少对快门角度进行相应的调整。 例如,360度时快门为“全开”,此时感光器可接收到最多光线。这适用于低光照条件且画面中只有轻微的动作部分。但是,如果拍摄快速移动的物体来说90度等较窄的快门角度可将运动模糊降到最低,从而获得更为锐利清晰的图像。与快门角度相对应的快门速度取决于您所使用的帧率。 例如,如果您以25帧每秒拍摄,那么360度相当于1/25秒,90度相当于1/100秒。 备注在照明环境下拍摄时,快门可影响闪烁程度。Blackmagic Pocket Cinema Camera会根据当前的帧率自动计算出防闪烁快门数值。当您调整快门时,触摸屏下方将会显示三个防闪烁快门建议选项。这些快门数值可能会受到您所在地区的主电源频率的影响。您可以在摄影机的设置菜单中将本地电源频率设为50Hz或60Hz。详情请参考本手册中关于“设置”部分的介绍。 点按触摸屏底部的“快门”提示可调出快门数值菜单。如果您将自动曝光设为关闭状态,此时屏幕将显示您当前所选的快门数值,并将显示出根据您在摄影机“设置”菜单中所选的主电源频率所得出的所有可用的防闪烁快门数值。详情请参考本手册“设置”部分的内容。 备注即使使用防闪烁快门数值,每类光源所具备的特点也依然有可能导致闪烁现象。如果您使用的不是持续光源,我们建议拍摄前请始终进行测试。 如要选择某一种防闪烁快门值,只需点按一个显示的快门值。使用当前快门值提示两侧的箭头可逐个查看一些最常用的值。  摄影机将根据您在“设置”菜单中所选的主电源频率给出一组防闪烁快门数值建议。 如果您在户外拍摄,或使用防闪烁照明,还可以到屏幕左下方连按两下当前快门提示图标来手动选择一个快门数值。当选定快门角度时,该操作会调出一个数字键盘,您可以用它来设置5度到360度之间的任意快门角度。  当在户外拍摄或使用防闪烁照明时,可使用这一数字键盘手动键入您想要的快门角度。 Blackmagic Pocket Cinema Camera设有三类基于快门的自动曝光模式。要选择三者之一,请点按快门菜单最右侧的“自动曝光”按钮。快门
该设置可自动调整快门数值来确保恒定曝光,并同时保持光圈不变。如果您需要保持景深不变,请选择这一设置。值得一提的是,细微的快门自动调整可能会影响到运动模糊。此外,也请您留意室内拍摄时不同的照明条件可能会造成闪烁现象。自动光圈功能在选择“快门”自动曝光模式时不可使用。快门+光圈
该设置可先调整快门,再调整光圈,以保持正确的曝光水平。如果已达到最大或最小快门值,曝光仍不能维持,那么摄影机将开始调整光圈值来保持曝光恒定。光圈+快门
该设置可先调整光圈,再调整快门速度,以保持正确的曝光值。如果已达到最大或最小光圈值,曝光仍不能维持,那么摄影机将开始调整快门值来保持曝光恒定。  在快门菜单中,点按“自动曝光”可进入基于快门的自动曝光模式选项。 提示当影响快门或光圈的自动曝光模式启用时,LCD触摸屏上方的快门或光圈提示的旁边会出现一个“A”字母小标。光圈
“光圈”提示可显示您当前的镜头光圈。点按此提示可更改兼容镜头的光圈并配置基于光圈的自动曝光模式。  点按“光圈”提示可进入光圈设置 备注 如果要使用LCD触摸屏调整光圈,您的Blackmagic Pocket Cinema Camera必须要搭配支持通过摄影机更改光圈的镜头。 点按“光圈”提示一次可调出触摸屏底部的光圈菜单。当前镜头光圈将显示在此菜单的最左侧。想要更改光圈,可点按当前光圈两侧的箭头或左右拖动滑块。  在“光圈”菜单下时,点按光圈提示左右两侧的箭头或使用滑块来调整光圈设置。 点按光圈菜单最右侧的“自动曝光”的开关图标可打开光圈自动曝光菜单。 该操作可调出以下自动曝光选项。光圈
该设置可自动调整光圈来确保恒定曝光,并同时保持快门角度不变。它可保持运动模糊不受影响,但可能会影响景深。光圈+快门
该设置可先调整光圈,再调整快门速度,以保持正确的曝光值。如果已达到最大或最小光圈值,曝光仍不能维持,那么摄影机将开始调整快门值来保持曝光恒定。快门+光圈
该设置可先调整快门,再调整光圈,以保持正确的曝光水平。如果已达到最大或最小快门值,曝光仍不能维持,那么摄影机将开始调整光圈值来保持曝光恒定。  当位于光圈菜单时,点按“自动曝光”可进入基于光圈的自动曝光模式选项。 提示当影响光圈或快门的自动曝光模式启用时,LCD触摸屏上方的光圈或快门提示旁会出现一个“A”字母小标。时长显示
您可以在摄影机的LCD触摸屏上方看到摄影机的时长显示。  摄影机在记录时,其时长显示会变成红色。 时长显示为您提供了一个时间码计数器,可用于检查素材片段长度并在记录和播放时监看时间码。计数器以时:分:秒:帧的顺序显示,当记录或播放片段时将按照这一计时方式进行。记录时,时间码会变成红色。 显示时长会从00:00:00:00开始。当前片段或最后记录片段的时长将显示在触摸屏上。当日时间的时间码会嵌入片段,以便后期制作时使用。 想要查看时间码,只要点按时长显示即可。再次点按时长显示可回到片段时长。 当您将Blackmagic Pocket Cinema Camera连接到ATEM Mini时,其LCD触摸屏会在时间码下方显示切换状态。为了更好地帮助摄影师,状态叠加功能会在摄影机处于即将直播时显示“预监”,并且会在摄影机处于直播状态时显示“正在播出”。ATEM Mini可自动和Pocket Cinema Camera摄影机的时间码进行同步,以便在连接设备时与切换台的时间码相匹配。这样一来,在DaVinci Resolve中执行准确的多机位剪辑就变得更加方便了。时长显示周围还可能出现以下其他状态提示:
| W | 当Blackmagic Pocket Cinema Camera使用裁切传感器模式时,此标识会出现在时长显示的左侧。 |
| TC | 当显示时间码时,此标识会出现在时长显示的右侧。 |
| EXT | 当外部LTC时间码通过3.5mm立体声输入口连接有效,或者当时间码同步到ATEM Mini切换台时,此标识会出现在时长显示的右侧。 |
| INT | 当摄影机在完成“拥塞同步”并断开连接后脱离其内部时间码时,此标识会出现在时长显示的右侧。 |
ISO
“ISO”提示可显示摄影机当前的感光度设置。点按此提示可调整ISO值来用于不同的照明条件。  点按ISO提示可进入感光度设置。  进入ISO菜单后,LCD触摸屏的下方会显示摄影机的ISO设置。预设下方的/3摄的增调整ISO。 这一ISO设置可能会偏高或偏低,因此请根据拍摄现场的不同情况妥善设置。例如,在低照度条件下拍摄时可使用ISO25,600的设置,但可能造成一些可见噪点。而在明亮环境下拍摄时,则可使用ISO100的设置,以便获得更浓郁的画面色彩。双原生ISO
Blackmagic Pocket Cinema Camera设有400和3200双原生ISO功能,因此其传感器经过优化,可胜任低照度条件和明亮日光环境的拍摄。 请根据不同照明条件调整ISO,摄影机的双原生ISO功能可在后台运行,以确保拍摄画面清晰,并且低和高ISO设置下噪点均保持在最少。 100到1000之间的ISO设置会使用400的原生ISO设置作为参考点。1250到25600之间的ISO设置会使用3200的原生ISO设置作为参考。如果您的拍摄条件可以选择ISO 1000或1250,我们建议将镜头的光圈调低一挡,这样就可以选择SO 1250,从而启用较高的原生SO功能来获得更加清晰的拍摄画面。 下面的图表显示了ISO选项和动态范围配置之间的关系。  Blackmagic Pocket Cinema Camera 6K动态范围  Blackmagic Pocket Cinema Camera 4K动态范围白平衡
“白平衡”和“色调”提示可分别显示摄影机当前的白平衡和色调设置。点按这两个提示可让您根据不同的照明条件来调整摄影机的白平衡和染色设置。  点按“白平衡”和“色调”可分别进入相应设置。 每种光源都会发出一种色调。例如,烛光会发出暖色调,阴天会发出冷色调。白平衡设置用于图像的色彩平衡,通过综合调整图像中的橙色和蓝色以确保白色物体在拍摄到的画面中依然为白色。例如,在钨丝灯下拍摄时会发出暖色的橙光,因此可选择3200K为图像添加一些蓝色调。如此平衡颜色后,白色可以被准确记录下来。 Blackmagic Pocket Cinema Camera包含多种白平衡预设,适用于各类色温条件。具体设置有:| 明亮日光 | (5600K) |
| 白炽灯 | (3200K) |
| 荧光灯 | (4000K) |
| 混合照明 | (4500K) |
| 多云 | (6500K) |
自动白平衡
Blackmagic Pocket Cinema Camera可自动设置白平衡。点按“AWB”可调出白平衡设置界面。 自动设置白平衡时,画面中心将出现一个方框。请将此方框对准画面中某个中性色调的部分,如白卡或灰卡,并点按“更新白平衡”。摄影机将自动调整白平衡和色调值,使白平衡方框内的白色和灰色平均值尽量保持中性。更新后,此数值可设为您摄影机的自定义白平衡设置。长按三秒摄影机顶部的“白平衡”按钮也可选择自动白平衡并激活“更新白平衡”功能。  在白平衡菜单中点按“AWB”图标,可调出自动白平衡设置界面。将界面中的方框对准白色或中性灰色表面来自动设置一个中性白平衡。电源
摄影机的电源和电量状态会显示在LCD屏幕的右上角。  使用电池供电时,点按电源提示可切换不同的显示方案。| AC | AC | 可在摄影机连接到主电源时显示。 |
| AC / 正在充电 | 可在摄影机连接到主电源,并同时为移动式P-E6电池或Blackmagic Pocket Camera Battery Grip(如有使用)上的NP-F570电池充电时显示。 | |
| 百分比 | 如果您的电池支持以百分比显示电量,那么该电池图标将以百分比的形式显示剩余电量,以1%为单位变化。当电池剩余电量为20%时,电量条将变成红色。点按电池图标可开启或关闭百分比显示。 | |
| 电量条 | 该电池图标可显示摄影机内安装的电池电量,以25%为单位变化。当电池剩余电量为20%时,电量条将变成红色。 | |
| 电池手柄电量条 | 如果为摄影机安装了Blackmagic Pocket Camera Battery Grip电池手柄可通过这个电量条显示来单独监控两块电池的状态。 | |
| 电压 | 该图标可显示电池、适配器上的C电源接口、D-Tap转接线或自定义电源方案所提供的电压。点按电池图标可开启或关闭电压显示。 | |
LUT提示
当您在现场将LUT作为预览工具使用时,屏幕左上角会显示LUT图标,提示您当前正在使用LUT。 直方图
直方图位于摄影机触摸屏的左下方。直方图会沿横向标尺显示暗部和亮部的对比。  直方图能向您反馈片段中阴影和高光部分的色调范围,此外 直方图还非常适合用于查看曝光平衡度,以防止图像的亮部区域被裁切。 直方图最左侧显示的是阴影或暗部细节,最右侧显示的是高光或亮部细节。当您关闭或打开镜头光圈时,会注意到直方图里的信息会相应地向左或向右移动。您可以使用它来查看图像暗部和亮部裁切情况。如果直方图的两侧边缘不是呈平缓下降态势,而是忽然被截断,那就说明可能有亮部或暗部细节丢失。 备注如果触摸屏左下方没有显示直方图,这可能是因为您将LCD监视屏设置为显示“编解码和分辨率”。请阅读本手册“监看设置”部分的内容获取更多信息。记录按钮
Pocket Cinema Camera触摸屏底部的直方图旁边有一个灰色的圆形按钮。这就是记录按钮。点按一次开始记录,再点按一次可停止记录。记录时,Pocket Cinema Camera触摸屏上方的这一按钮、存储卡提示以及时间码均会变成红色。  1 A001 2 A002 120分钟 96分钟 记录按钮位于LCD触摸屏底部的存储介质提示一侧  1 A001 2 A002 120分钟 96分钟 记录时,记录按钮会显示为红色。对片段套用LUT
如果您在“记录”设置选项卡中选择对记录片段套用LUT,触摸屏就会在待命模式和记录时给出相应提示。 LUT  1 A001 2 A002 120分钟 96分钟 LUT图标能提示您片段将使用所选UT一同记录。 LUT  1 A001 2 A002 120分钟 96分钟 当所选LUT和片段一同记录时,将显示LUT图标。丢帧提示
如果记录按钮上重叠显示一个闪烁的“!”,就表示摄影机在记录时出现丢帧。与之相关联的存储卡所对应的剩余时间提示也将变成红色。例如,如果您的CFast卡出现丢帧,记录按钮上就会出现“!”提示,并且CFast卡的剩余时间提示将变成红色。这样一来,您就能明确是哪张存储卡无法达到当前所选的编解码和分辨率。如果您在之前记录的片段上出现丢帧,屏幕也会显示丢帧提示,这一提示将持续存在,直到记录其他片段,或重启摄影机。更多关于如何避免丢帧现象的信息,请参考“选择CFast 2.0卡”和“选择SD卡”部分的介绍。  1 A001 2 A002 120分钟 96分钟 图中的丢帧提示表示CFast卡出现丢帧。 备注 您可以将Blackmagic Pocket Cinema Camera设置为检测到丢帧时停止记录,以免录下不稳定的画面。详情请参考本手册“记录设置”部分的内容。剩余记录时间
摄影机内插入CFast、SD卡或USB-C硬盘时,触摸屏底部的存储卡提示会显示存储卡或SB-C硬盘剩余的记录时间。时间以分钟的格式显示,具体显示内容取决于您所选择的帧率及编解码格式。当上述两项设置中的任何一项发生改变时,该提示会自动重新计算剩余时间。当存储卡或存储盘上只剩5分钟左右的记录时间时,该提示的文本会变成红色,仅剩2分钟记录时间时则会闪烁。当存储卡或存储盘达到最大容量时,该提示会显示“已满”。    存储卡提示可显示CFast卡、SD卡或USB-C硬盘的名称,并能以分钟显示剩余记录时间。 位于剩余时间上方的小信息条也会相应显示存储卡或存储盘的名称。信息条变成蓝色时,表示摄影机将使用该存储卡或USB-C硬盘进行记录。如果要在其他存储卡或存储盘上进行记录,按住相应存储卡或USB-C硬盘的名称进行更换即可。记录时,信息条将会变成红色。 点按存储卡提示可打开存储卡和格式化菜单。  在LCD触摸屏上点按存储卡提示可调出存储管理器界面。 该菜单可显示当前摄影机中每个CFast卡、SD卡或USB-C硬盘上的剩余空间、存储卡或存储盘的名称、最后一个片段的长度、每个存储卡或存储盘的片段数量,以及每张存储卡或存储盘的文件格式。 您可以通过这个菜单格式化存储介质。详情请参考本手册“存储介质在记录前的准备事项”部分的介绍。 提示点按存储菜单上的存储卡或存储盘图标名称可将其设定为当前所使用的存储卡或存储盘。Blackmagic Pocket Cinema Camera会首先在这张存储卡或存储盘上记录。音频表
当使用内部麦克风或连接外部音频时,峰值音频表可显示通道和通道2的音频电平。该表以BFS为单位,并有削波警告功能,可在出现音频过载时以红标提示,并停留片刻,从而有效防止因削波过于短暂而被忽略的情况。 为获得最佳音质,请确保将音频电平控制在O dBFS警戒线以下。这是您的摄影机可记录的最高电平,也就是说任何超过此电平的音频会被裁切掉,并导致声音失真。  音频表上的彩色显示条代表了峰值音频电平。理想状态下,峰值音频电平应处在绿色区域。如果音频峰值冲到了黄色或红色区域,音频就极有可能出现削波。 您可以点按音频表来调出音频输入通道1和2的音量控制,以及耳机或扬声器音量菜单。  在LCD触摸屏上点按音频表可轻松进入音量和耳机或扬声器设置。双击放大
连续两次点按LCD触摸屏可放大Blackmagic Pocket Cinema Camera预览图像的任何部分。您点按的区域将被放大,在LCD触摸屏上用指尖拖动图像可将其来回移动。这非常有助于检查对焦。要回到标准缩放模式,只要再连续点按两次摄影机触摸屏即可。捏拉缩放
您可以使用捏拉缩放多点触控手势来调整CD触摸屏的缩放程度。该操作不会影响HDMI输出上的画面。 要进入2倍缩放操作模式,可连按两次触摸屏或按摄影机后侧的“对焦缩放”图标按钮。然后再使用捏拉手势更改缩放程度。您可以在触摸屏上用指尖拖动图像来移动放大的部分。要回到标准缩放操作模式,可再次连按两次触摸屏或按“对焦缩放”图标按钮。 每次您连按两下触摸屏或按“对焦缩放”图标按钮时,缩放程度会在上一个缩放级别和全屏视图之间切换。例如,捏拉缩放到8倍缩放操作模式后,连按两次可缩小,再连按两次又会回到8倍缩放操作模式。点触式对焦
您可以通过长按LCD屏幕,让镜头对画面中的特定区域进行对焦。按下对焦按钮可让镜头对所选区域进行对焦。连按两次对焦按钮可将对焦点重置到屏幕的中心位置。纯画面显示模式
如果您在取景或对焦时想要暂时隐藏触摸屏的状态信息文字和各项技术监看选项,这一功能会非常有用。向上或向下滑动CD触摸屏即可一次性隐藏所有显示信息。记录提示、帧导栏、网格、对焦辅助以及斑马纹信息将依然显示。 再次向上或向下滑动LCD触摸屏即可重新调出状态信息和技术监看显示信息。  在LCD触摸屏上,用指尖上下滑动可隐藏所有的状态提示播放菜单
点按播放控制按钮可进入播放菜单。您可以通过摄影机控制按钮或LCD触摸屏来控制之前记录的片段。 当使用LCD触摸屏时,点按播放按钮一次可开始播放,再次点按该按钮可暂停播放。按前进或倒退按钮可跳到片段的开始或结束处。按前进按钮一次可跳至下一个片段。按后退按钮一次会跳转到当前素材片段的起始位置,按两次则跳转到上一个片段的起始位置。您还可点按循环图标激活片段的循环播放模式。     后退、播放、前进和循环图标。 想要快进或快退,可长按前进或后退按钮。根据您所按的播放控制按钮,系统将以两倍于常规速度前进或后退播放素材片段。 快进和快退时,您可以再次点按播放控制键来更改穿梭速度。每按相同方向的播放控制键一次,穿梭速度就会翻倍。最高可达正常速度倍。当位于6倍速度时,继续点按播放控制键则会回到2倍速度。每按相反方向的播放控制键一次,穿梭速度就会减半,直到2倍速度为止。点按播放按钮可回到正常播放速度。  穿梭速度提示可显示快进或快退片段的速度和方向。 在播放模式点按记录控制按钮可回到摄影机待命模式,准备开始记录。 提示播放素材片段时,在触摸屏上下滑动可隐藏状态信息。在播放模式下进入场记板可在元数据中将当前片段标记为“好镜次”。详情请参考“录入元数据”部分的介绍。设置
主菜单
按下菜单按钮可打开摄影机的主菜单界面。这个菜单采用选项卡界面,可提供触摸屏上没有的设置。设置按照功能分为“记录”、“监看”、“音频”、“设置”、“预设”以及“LUT”选项卡。每个选项卡均设有多页,点按摄影机触摸屏边缘的左右箭头或左右滑动便可逐页浏览。  点按“记录”、“监看”、“音频”、“U镜选卡,”预设”以及“可在Pocket Cinema Camera主菜单的各个选项卡间移动。记录设置
“记录”选项卡可让您设置视频格式、编解码格式及分辨率,以及记录视频所需的其他重要设置,例如动态范围和细节锐化等。记录设置1
“记录”设置选项卡的第一页包含以下设置:编解码和质量
“编解码和质量”菜单分为两行。第一行可让您在Blackmagic RAW和Apple ProRes这两大编解码系列间进行选择;第二行则列出了这两大系列中可选的质量选项。例如,ProRes编解码类型可用的质量选项有ProRes 422 HQ、ProRes 422、ProRes 422 LT和ProRes 422 Proxy。Blackmagic RAW的选项分为四个“固定比特率”和两个“固定质量”设置。  “编解码和质量”菜单下的Blackmagic RAW选项  “编解码和质量”菜单下的ProRes选项 提示 选择更高压缩程度的编解码格式会提高Blackmagic Pocket Cinema Camera存储介质上记录的视频数量。具体请参考“记录”章节中给出的“记录时长表”。分辨率
“分辨率”设置可与“编解码”设置搭配使用。使用它为您想要记录的格式选择相应的分辨率。例如,要使用ProRes HQ来记录Ultra HD片段,请在“编解码和质量”菜单中选择“ProRes”和“HQ”。然后在“分辨率”菜单中选择“超高清”。  使用Blackmagic RAW编解码格式时,Pocket Cinema Camera 6K的“分辨率”选项  Pocket Cinema Camera 4K的“分辨率”选项。请注意,在K DCI格式下,菜单类别为“分辨率”,其他格式下,菜单类别为“分辨率-传感器裁切模式”。 备注 当您通过ATEM Mini进行多机位记录时,Pocket Cinema Camera会将其编解码设置为Blackmagic RAW,从而实现内部存储介质的高品质SO记录。使用ATEM Mini时,您连接到输入1上的HDMI源会将帧率设置为视频输出的帧率,同时其他HDMI输入也会自动转换。如果您将Pocket Cinema Camera连接到输入1,那么ATEM Mini就会调用之前使用的帧率。如果您在连接所有视频源后,想要为ATEM Mini选择不同的输出帧率,可以到ATEM Software Control的切换台设置中进行更改。详情请参阅ATEM Mini操作手册。记录设置2
“记录”设置选项卡的第二页含有下列设置:  Pocket Cinema Camera 6K的“动态范围”和“传感器区域”选项。  Pocket Cinema Camera 4K的“动态范围”和“传感器区域”选项。动态范围
点按“动态范围”图标来调整动态范围设置。Blackmagic Pocket Cinema Camera拥有三挡动态范围设置:| Film | 在“Film”模式下时,摄影机会使用对数曲线进行拍摄以确保最佳动态范围,并最大程度丰富视频信号的信息,以便您充分利用DaVinci Resolve等调色软件。 |
| Extended Video | “Extended Video”设置在“Video”和“Film”动态范围之间提供了良好的平衡。该设置提供了比“Video”更宽的动态范围,同时应用了轻微的对比度改变,对高光进行柔化过渡处理。“Extended Video”适合标准广播级监视器使用,当您后期制作时间有限,并且希望给录制的片段添加满意的效果时,该设置十分有用。 |
| Video | “Video”设置类似REC 709色彩标准,可拍摄获得高清视频。这样就能以适合直接发布或者只需少量后期处理的色彩空间来直接记录压缩视频格式,从而提高您的工作效率。 |
传感器区域
Blackmagic Pocket Cinema Camera 4K可设置为使用全部传感器区域,如果要使用更高的帧率,还可以使用裁切传感器模式。该模式只使用所选视频格式需要的传感器像素,而不是在全传感器的基础上缩小画面。部分格式结合了裁切和缩放,例如Pocket Cinema Camera 6K设有在全部传感器基础上进行缩放、在5.7K裁切传感器基础上进行缩放,以及在2.7K裁切传感器基础上进行缩放的不同HD格式。 由于裁切模式只使用摄影机传感器的中心区域,镜头的视野就会因为裁切而变得相对较窄。比如,当使用20mm规格的镜头在裁切传感器模式下拍摄HD素材时,视野就相当于Blackmagic Pocket Cinema Camera 4K搭载40mm规格的镜头。 如果您用摄影机拍摄UltraHD或HDProRes等低于摄影机最大分辨率的视频时,就可以使用这一设置。 拍摄2.8K 17:9裁切传感器模式以及在2.7K裁切传感器模式基础上进行缩放调整的HD格式时,Pocket Cinema Camera 6K可达到最快帧率。拍摄2.6K 16:9模式以及HD裁切模式时,Pocket Cinema Camera 4K可达最快帧率。 更多关于“全部”和“裁切”格式的详细信息,请查阅“最大传感器帧率”部分的介绍。项目帧率
“项目帧率”能提供影视行业常用的不同帧率选择。例如每秒23.98帧。这一帧率通常会设定为与您后期制作流程和交付所需要的播放速度和音频同步所匹配的帧率。 一共有8种项目帧率设置,分别为每秒23.98、24、25、29.97、30、50、59.94以及60帧。变速记录
默认情况下,项目和传感器帧率会相互匹配,以便获得自然的播放速度。但是,点按“变速记录”开关图标就可以单独设置传感器帧率。变速帧率
启用“变速记录”后,只需点按“变速帧率”提示一侧的箭头就可以设置摄影机的传感器帧率。 传感器帧率可设置从传感器上每秒实际记录的帧数,帧率则根据您设定的项目帧率来影响视频播放的快慢程度。 请参考本手册“触摸屏功能”部分中关于“每秒帧数”的介绍了解变速帧率的信息。 备注 关于每个记录格式和编解码可用最大帧率的信息,请参阅本手册“最大传感器帧率”部分给出的表格。偏好使用的存储卡
当两个卡槽都安装有存储卡或存储盘时,“偏好的存储卡”设置可选择Blackmagic Pocket Cinema Camera首先在哪一张存储卡上开始记录。可用选项有“Fast卡”、“SD卡”以及“最满的卡”。您可以根据个人喜好选择CFast卡或SD卡,但不论选择哪张存储卡,只要每次选择都一致,存储卡已满时您就知道要先更换哪张。从事单机位拍摄项目时,“最满的卡”选项可有助于按时间顺序进行文件文组。 插入CFast卡或SD卡,您所选的设置就会被应用。您可以进入存储管理器并点按存储卡名称来将其设置为“使用中”,从而随时覆盖这一设置。需要着重强调的是,弹出再重新插入存储卡操作将会令摄影机还原到当前“偏好的存储卡”设置。 提示“最满的卡”设置是基于记录存储介质的存储百分比决定的,而不是存储卡的内存或已用数据。存储卡丢帧时停止记录
检测到丢帧时,可使用“存储卡丢帧时停止记录”设置来配置Blackmagic Pocket Cinema Camera。关闭该选项时,摄影机检测到丢帧后仍将继续记录。开启该选项时,摄影机检测到丢帧后会停止记录。这一设置可有效避免您在未察觉丢帧提示的情况下继续花时间记录不可用的素材。 提示 更多关于防止丢帧的介绍,请参考“存储介质”部分的内容。记录设置3
“记录”设置选项卡的第三页含有下列设置: 延时摄影
“延时摄影”设置能在以下区间激活间隔拍摄功能自动记录静帧:| 帧 | 2 - 10 |
| 秒 | 1 - 10、20、30、40、50 |
| 分 | 1 - 10 |
细节锐化
使用“细节锐化”设置可锐化图像。启用锐化功能时,选择“默认”、“中”及“高”选项可降低或升高锐化的程度。 启用锐化功能时,锐化效果会被应用到摄影机所记录的ProRes视频上以及HDMI输出上。 这一设置是为棚内直播制作所设计的,这类摄制通常不具备后期制作时间,而是需要直接输出现场拍摄画面。如果您所记录的图像需要进行后期制作,我们建议您将此设置保留在关闭状态。当设置为BlackmagicRAW编解码格式时,细节锐化功能会被禁用。将LUT记录到片段
Blackmagic Pocket Cinema Camera不会默认对记录的素材套用或“烧录”LUT,但是您可以点按“将LUT记录到片段”开关图标,选择将LUT“烧录”到素材中。 如果您在后期制作阶段没有时间对素材进行调色,或者需要直接将素材交付给客户或剪辑师,这一选项就会十分有用。更多信息请参考“3DLUT”和“触摸屏控制”部分的介绍。在文件中套用LUT
如果使用Blackmagic RAW编解码拍摄,并且在摄影机的HDMI输出上套用LUT,那么所选LUT就会嵌入到正在记录的Blackmagic RAW文件中。这意味着这个LUT将被保存在相应文件的头文件中,可在后期制作环节轻松应用到片段上,无需处理单独文件。将记录菜单中的“在文件中套用LUT”开关设置为开启状态后,在Blackmagic RAW Player播放器和DaVinci Resolve中打开这个片段时,画面上就已所选的LUT。LUT可轻松开启或关闭,但会始终跟随Blackmagic RAW文件,因为它是写入到片段上的。 DaVinci Resolve的RAW设置面板中还设有一个“Apply LUT”(套用LUT)开关,可用来启用和禁用Blackmagic RAW文件中的3D LUT。DaVinci Resolve中的“套用LUT”设置和摄影机中的设置相同。也就是说,在您拍摄时,可以在摄影机中进行设置从而告诉调色师使用这一LUT,而调色师则可以在DaVinci Resolve中使用“套用LUT”开关将它关闭。文件命名格式
根据您的选择,素材片段可在CFast卡、SD卡或USB-C硬盘上以Blackmagic RAW格式或ProResQuickTime电影格式来记录。 文件命名格式示例详见下表:| A001_08151512_C001.mov | QuickTime电影文件名称 |
| A001_08151512_C001.mov | 摄影机索引 |
| A001_08151512_C001.mov | 卷号 |
| A001_08151512_C001.mov | 月 |
| A001_08151512_C001.mov | 日 |
| A001_08151512_C001.mov | 时 |
| A001_08151512_C001.mov | 分 |
| A001_08151512_C001.mov | 片段编号 |
监看设置
“监看”选项卡可用来调整Blackmagic Pocket Cinema Camera在LCD触摸屏以及摄影机HDMI输出上显示的状态信息、叠加信息以及其他监看选项。选项根据输出排列依次为“LCD”、“HDMI”和“全部”,包括了影响LCD和HDMI输出的各项监看设置。这些菜单都有两页选项,您可以点按摄影机触摸屏边缘的箭头,或者左右滑动屏幕来逐页查看。监看设置1
在“监看”选项卡的第一页上,每个输出的监看设置是完全相同的。例如,您可以开启LCD触摸屏的“斑马纹”显示,但关闭HDMI输出上的这一显示内容。 纯画面
点按“纯画面”开关来全面禁用某路输出在“LCD”或“HDMI”菜单中的所有状态信息和叠加信息,只留下表示记录的Tally提示灯。  即便在纯画面模式下,摄影机也会显示ally记录提示灯。 备注 LUT将依然应用到启用了“纯画面”的输出上。要禁用LUT,请关闭相应“监看”菜单中的“显示LUT”开关。显示3D LUT
Blackmagic Pocket Cinema Camera可将多种3D LUT套用在输出上,模拟出素材在调色之后的大致效果。在使用“Film”动态范围记录片段时,“显示3D LUT”就十分有用。 如果您的摄影机启用了一3D LUT,请使用这一设置将该LUT单独应用到LCD触摸屏或HDMI输出上。 更多关于加载和使用3DLUT的信息,请参考本手册“3DLUT”部分的介绍。 点按“LCD”或“HDMI”页面上的开关来启用LCD触摸屏和HDMI输出的监看选项:对焦辅助、帧导栏、网格、安全框、伪色。斑马纹
点按“LCD”或“HDMI”菜单下的“斑马纹”开关可在相应的输出上启用斑马纹提示功能。更多关于斑马纹提示功能以及斑马纹提示级别设置的内容,请参考本手册“触摸屏功能”部分的介绍。对焦辅助
点按“LCD”或“HDMI”菜单下的“对焦辅助”开关可在相应的输出上启用对焦辅助功能。更多关于对焦辅助功能以及斑马纹提示级别设置的内容,请参考本手册“触摸屏功能”部分的介绍。帧导栏
点按“LCD”和“HDMI”菜单下的“帧导栏”开关可在相应的输出上启用帧导栏功能。更多关于帧导栏功能以及如何选择不同帧导栏的内容,请参考本手册“触摸屏功能”部分的介绍。网格
点按“LCD”和“HDMI”菜单下的“网格”开关可在相应的输出上启用三分法网格显示功能。更多关于三分法网格功能的内容,请参考本手册“触摸屏功能”部分的介绍。安全框
点按“LCD”和“HDMI”菜单下的“安全框”开关可在相应的输出上启用安全框叠加显示功能。更多关于安全框的信息,请参考本手册“触摸屏功能”部分的介绍。 备注 Blackmagic Pocket Cinema Camera的“全部”监看设置中的“安全框”设置可用来设定安全框大小。伪色
点按“LCD”和“HDMI”菜单下的“伪色”开关可在相应的输出上启用伪色曝光辅助功能。更多关于如何使用伪色的信息,请参考本手册“触摸屏功能”部分的介绍。LCD监看设置2
“监看”选项卡中“LCD”选项的第二页包含了LCD触摸屏的专门设置。  “状态信息”能以清晰的视图展现摄影机的预览画面。状态信息
“状态信息”设置可隐藏LCD触摸屏上的状态文本信息以及各项技术监看内容,只留下与构图和镜头直接相关的信息,这会非常有用。点按“状态信息”的开关图标可开启或关闭摄影机LCD触摸屏上显示的文本信息和技术监看内容。帧导栏、网格、对焦辅助和斑马纹等叠加信息将始终可见(如果启用的话)。在LCD触摸屏上用手指上下滑动也可以实现相同的操作。显示
摄影机LCD触摸屏左下角和右下角可显示直方图和音频表,或者还可显示编解码器和分辨率等信息。如果您偏好使用伪色来调节曝光度,或者在单独记录音频时想在直方图和音频表的位置显示其他信息,这一功能将十分有用。 只要点按“LCD”菜单中的“技术监看”或“编解码和分辨率”选择喜欢的显示项即可。  Blackmagic Pocket Cinema Camera可在直方图和音频表的位置显示编解码和分辨率信息。屏幕亮度
左右拖动“LCD”菜单中的“屏幕亮度”滑块可调节摄影机的LCD触摸屏亮度。HDMI监看设置2
“监看”选项卡中“HDMI”选项的第二页包含了HDMI输出的专有设置。 状态信息
如果需要隐藏HDMI输出上的状态信息以及各项技术监看内容,只留下与构图和镜头相关的信息,这一选项会非常有用。点按“HDMI”监看菜单中的“状态信息”开关图标可开启或关闭状态文本信息和技术监看内 容。帧导栏、网格、对焦辅助和斑马纹等叠加信息将始终可见(如果启用的话), 如果要隐藏或调出触摸屏上的状态文本信息或技术监看内容,只需向上或向下滑动即可。电影摄影师或导演使用的状态信息显示功能
LCD触摸屏可显示ISO、白平衡以及光圈等信息,这些信息有助于摄影师或电影摄影师为每个拍摄镜头进行调试。但是D输出也可显示这些有助于导演或剧本指导的信息,以便他们能对多个镜头或多台摄影机了如指掌。  Blackmagic Pocket Cinema Camera可通过HDMI输出显示专为导演准备的状态信息。 将“HDMI”监看设置中的状态信息设为“导演”后,相应输出上的状态信息将显示以下内容:·帧率
可显示摄影机当前所选的每秒帧数。如果禁用了“变速帧率”功能,则只显示项目帧率。如果使用了“变速帧率”功能,则会先显示传感器帧率,然后显示项目帧率。摄影机
可显示摄影机在场记板中设置的摄影机索引信息。更多相关信息,请查阅“场记板”部分的介绍。摄影师
可识别摄影机场记板中所设置的摄影师信息。更多信息,请查阅“场记板”部分的介绍。时长显示
可在记录时显示当前片段时长,或上一个记录片段的时长。显示格式为:时:分秒。- 卷号、场景和镜次
分别对应当前显示的卷号、场景以及镜次。更多关于卷号、场景、镜次及其名称规范等信息,请参考“场记板”部分的介绍。动态范围
显示屏的左下角可显示当前套用的LUT(如果套用到该路输出上)。如果未套用LUT,则会显示“Film”或“Video”动态范围模式。时间码
显示屏的右下角可显示摄影机的时间码,显示格式为: 时:分:秒:帧。“全部”监看设置1
影响摄影机LCD和HDMI输出的监看设置都被归整在“全部”菜单中。例如,将此菜单中的“安全框”设置为 90% ,那么您的摄影机LCD和HDMI输出上的安全框都将被设置为 90% 。 “全部”监看设置分两页显示,包含以下设置。 帧导栏
点按“帧导栏”菜单设置中的左右箭头可逐个查看摄影机所有输出上的帧导栏设置。这些选项在本手册“触摸屏功能”部分当中有详细介绍,同时也可在CD触摸屏的HUD监看菜单中找到。需要注意的是,您可以在相应的“监看”菜单中单独选择帧导栏是否出现在LCD触摸屏和HDMI输出上。帧导栏不透明度
点按“帧导栏不透明度”菜单设置的左右箭头可设置被LCD触摸屏和HDMI输出的帧导栏挡住区域的不透明度。可用选项有 25% 、 50% 、 75% 和 100% 。对焦辅助
摄影机设有两个对焦辅助模式,分别为“峰值对焦”和“彩色线条”。| 峰值对焦 | 选中“峰值对焦”辅助模式后,画面中的对焦部分会在您的LCD触摸屏或HDMI输出上以极端锐化的方式显示出来,但不会影响所记录的图像。这一功能能使镜头中的对焦部分在屏幕中突出显示。如果您不使用其他叠加信息,这一功能将会十分直观地显示出对焦部分;而当您尝试对焦的对象与画面中其他元素有显著区分时将更为明显。 |
| 彩色线条 选中“彩色线条”对焦辅助模式后,画面中的对焦部分的边缘会以某种色彩的线条标出。由于画面中的对焦范围会用线条直接标出来,因此这一模式要比峰值对焦模式略微直观一些。当您拍摄那些元素繁多的画面时,该模式可提供精准对焦。 | |
对焦辅助级别
可为您的LCD触摸屏和HDMI输出设置对焦辅助的程度,请点按“低”、“中”或者“高”进行设置。 备注设置对焦辅助程度并不会影响对焦辅助功能是在Blackmagic Pocket Cinema Camera的LCD屏幕还是HDMI输出上启用。您需要到“LCD”或“HDMI”输出的监看菜单中单独开启每路输出的对焦辅助。 提示 对焦辅助的最佳级别因镜头而异。例如,对焦人物时,设置较高的对焦辅助可有助于解决人物面部边缘细节的问题。而如果是对焦植物或建筑物,较高的对焦辅助设置反而会显示许多干扰信息。对焦色彩
设置可在您使用“彩色线条”对焦辅助模式的时候更改画面上叠加的对焦线条色彩。更改对焦辅助线条的色彩可将其与您的拍摄画面区分开,便于您查看对焦。可用选项有“白”、“红”、“绿”、“蓝”以及“黑”。斑马纹级别
可用来设置显示曝光的斑马纹级别,请点按该设置两侧的箭头图标调整。斑马纹程度能以5个百分点为单位进行调整,曝光显示范围在 75% 到 100% 之间。 详情请参考本手册“触摸屏功能”部分中关于“斑马纹”的介绍。“全部”监看设置2
“全部”监看选项卡的第二页含有下列设置:  “监看”选项卡中“全部”选项的第二页网格
请点按“网格”设置中的“三分法”、“水平线”、“十字准线”或“中心点”选项来选择摄影机的LCD触摸屏和HDMI输出上显示的网格和十字准线组合。 详情请参考本手册“触摸屏功能”部分中关于“网格”的介绍。安全框
要调整触摸屏和HDMI输出上叠加显示的安全框大小,请点按“安全框”设置中的左右箭头来调整显示百分比。这一百分比代表了安全框在整幅图像中的所占比例。大多数播出机构都要求90%的安全框比例。变形镜头压缩画面还原
Pocket Cinema Camera可以在LCD触摸屏和HDMI输出上应用变形镜头压缩画面还原。在16:9和17:9格式下,可启用“1.33x变形镜头压缩画面还原”。在Pocket Cinema Camera 6K上以“3.7K变形”格式记录时,或者在Pocket Cinema Camera 4K上以“2.8K变形”记录时,您的摄影机会自动应用2x变形镜头压缩画面还原”。音频设置
“音频”选项卡用来调整摄影机的音频输入和监听设置。 摄影机的音频设置共有两页,每页均提供通道和通道2的设置。 每个声道都可以被映射到不同的源,并调整增益控制等多项设置。音频设置1
“音频”选项卡的第一页含有下列设置: 通道信号源
使用“通道1信号源”和“通道2信号源”按钮可为每个声道选择音频源。下面是每个通道源设置的描述。- 摄影机左声道或右声道
可记录摄影机的内部麦克风音频。摄影机单声道
可从Blackmagic Pocket Cinema Camera内置麦克风的左右声道创建单个声道。XLR Line
可使用摄影机的XLR输入记录Line电平的音频。XLR Mic
可从摄影机的XLR输入记录Mic电平的音频。如果您启用了幻象电源,并且将XLR输入设置为“Mic”,页面上就会显示“+48V”提示。请务必确保您在断开幻象电源麦克风时,将8V的开关置于关闭状态。3.5mm左声道 - Line
只使用3.5mm输入的左声道作为Line电平的音频。-3.5mm右声道 - Line
只使用3.5mm输入的右声道作为Line电平的音频。-3.5mm单声道 - Line
从3.5mm输入创建左右声道的单声道混音作为Line电平的音频。-3.5mm左声道-Mic
只使用3.5mm输入的左声道作为Mic电平的音频。·3.5mm右声道-Mic
只使用3.5mm输入的右声道作为Mic电平的音频。-3.5mm单声道-Mic
从3.5mm输入创建左右声道的单声道混音作为Mic电平的音频。·无
禁用声道。 备注 当选择3.5mm输入作为音频源时,通道1和通道2源信需要同时是Line电平或者Mic电平。也就是说,如果您选择“3.5mm左声道- Line”作为通道1源,那么通道2上3.5mm输入的可用选项就都是Line电平:“3.5mm左声道- Line”、“3.5mm右声道- Line”和“3.5mm单声道- Line”。Mic电平选项都以灰色显示,表明此功能不可用。通道1/2电平
这两项音频电平表能帮助您设置正确的音频电平。通道1/2增益
使用这两个滑块可调整您所选的声道1或声道2上的录音电平。音频设置2
“音频”选项卡的第二页含有下列设置: 耳机音量
该滑块可调整3.5mm耳机接口上所连耳机的输出电平。左右移动音频滑块可调节电平。扬声器音量
该滑块可调整内置扬声器的输出电平。左右移动音频滑块可调节电平。XLR幻象电源
摄影机的XLR输入可提供48V幻象电源,以便您使用自供电麦克风。当摄影机设置为“XLR”音频输入时,只需点按“幻象电源”的开关图标将其启用即可。音频表
可用来选择峰值电平显示的音频表标准。| 音频表设置 标准 | |
| PPM (-20 dBFS) | SMPTE RP.0155 |
| PPM (-18 dBFS) | EBU R.68 |
设置
Blackmagic Pocket Cinema Camera的“设置”选项卡中含有基本设置、软件版本、功能按钮设置等摄影机设置,这些设置与记录或监看没有直接联系。该菜单含有四个页面,您可以点按LCD触摸屏边缘的箭头逐一查看,也可直接左右滑动屏幕查看。设置菜单第一页
摄影机“设置”选项卡的第一页含有下列设置: 日期和时间
点按“日期和时间”选项可为摄影机设置日期和时间。日期格式为年、月、日;时间格式为24小时制。摄影机未连接外部时间码源时,这一日期和时间设置也可用来显示当日时间的时间码。语言
Pocket Cinema Camera支持以下11种常用语言:英语、中文、日语、韩语、西班牙语、德语、法语、俄语、意大利语、葡萄牙语以及土耳其语。  语言页面会在首次开机和更新完摄影机内部软件后出现。 选择语言步骤如下: 点按“语言”并从列表选择某种语言。 2 按“更新”返回设置菜单。快门类型
可通过显示快门信息来选择“快门角度”或“快门速度”。 需要指出的是,当使用快门角度时,快门会采用帧率来显示。例如,不论您使用何种帧数,度都将产生相同的运动模糊。 但当使用快门速度时,快门会使用一个独立于帧率的绝对数值,因此当您更改帧率时,结果也会发生变化。 例如,当您以每秒24帧的帧率拍摄时,1/48秒的快门速度将产生美观的运动模糊,效果等同于180度快门角度。如果您将帧率更改为每秒48帧,那么1/48秒的快门速度就会产生不同的运动模糊,效果将等同于360度快门角度。在这个例子中,如果帧率更改为48fps,您还需要将快门速度更改为1/96秒,以实现和180度快门角度相同的效果。防闪烁快门基准频率
可用来更改摄影机用于计算防闪烁快门设置的主电源频率。 在照明环境下拍摄时,快门可影响闪烁程度。Blackmagic Pocket Cinema Camera会根据当前的帧率自动计算出防闪烁快门数值,并给出最多三个快门值建议。快门数值会根据为照明供电的当地主电源频率而有所不同。大多数采用AL制式的国家均使用50赫兹,而采用NTSC制式的国家则通常使用60赫兹的用电频率。点按“50Hz”或“60Hz”为您所在地区设置合适的频率即可。 备注即使使用防闪烁快门数值,不同光源所具备的特点也依然有可能导致闪烁现象。如果您使用的不是持续光源,我们建议在拍摄前进行测试。图像稳定功能
Pocket Cinema Camera 4K设有“图像稳定功能”选项,可启用或禁用镜头上的图像稳定功能,无需手动到镜头上切换。时间码丢帧
“时间码丢帧”选项可在您使用29.97和59.94的NTSC项目帧率时使用丢帧时间码。丢帧时间码可按照您设置的间隔跳过少量帧画面。这样能保持您的项目时间码准确性,即使每秒并不包含NTSC帧率的完整帧数。设置菜单第二页
“设置”选项卡的第二页含有下列设置: 设置功能按钮
Blackmagic Pocket Cinema Camera的顶部设有三个功能按钮。按钮上的圆点直观表示功能1、功能2和功能3。这些按钮可被映射为您经常使用的功能,方便您在使用摄影机时快速获取这些功能。  功能按钮由圆点标识,位于摄影机顶部 进行设置时,先选择其中一个按钮再选择相应的功能、设置和参数即可。  1 按钮 2 功能 3 设置 4 参数F1、F2和F3按钮功能映射为预设或开关
即“FUNCTION 1 HFR BEHAVES AS”、“FUNCTION 2 HFR BEHAVES AS”和“FUNCTION 3 HFR BEHAVES AS”,选择了您想要进行映射的按钮之后,就需要为这一按钮选择一个功能。选项如下:| 预设 选择该功能时, 按下某个功能按钮可调用相应的设置和参数组合。要设置一个预设,请从“设置”菜单里选中您想要使用的设置然后点按“参数”菜单两侧的箭头图标调整该设置。例如,要将F1按钮设置为调用f8光圈预设,请选中“预设”功能,点按“光圈”设置,然后点按“参数”菜单两侧的箭头图标,直到显示8为止。再次按下预设按钮可回到摄影机之前的设置。 | |
| 开关 选择该功能时, 按下功能按钮可开启或关闭某个特定设置。处于这一模式下时,“设置”菜单将显示为灰色不可用状态。点按参数菜单中的左右箭头可逐一直看所有可用选项。这些选项分别为:“变速记录”、QIS、“纯画面”、“显示LUT”、“帧导栏”、“对焦辅助”、“伪色”、“斑马纹”和“安全框”。使用“开关”功能可选择将这一设置应用到哪路输出。只要点按任意“LCD”和“HDMI”选项组合进行选择即可。如果某一输出选项无法被选中,比如始终应用到所有输出上的“变速记录”选项,那么“LCD”和“HDMI”设置就会被禁用。 |
设置菜单第三页
“设置”选项卡的第三页含有下列设置: TALLYLED提示灯
Pocket Cinema Camera摄影机的正面设有一个小型LED灯,可在摄影机记录时予以记录状态提示,并且可在连接到Blackmagic ATEM Mini时予以节目和预监Tally状态提示。如果您将Pocket Cinema Camera连接到ATEM Mini来远程控制摄影机的记录和设置,那么该ally灯就会在摄影机处于播出或预监状态时予以显示。详情请参阅“使用ATEM Mini摄影机控制”部分的介绍。  记录到摄影机内的存储介质。  摄影机处于正在播出状态。  摄影机即将切入直播。 要启用或禁用Tally提示灯,可使用“TALLY LED提示灯”开关。LED亮度
点按“低”、“中”或者“高”可设置ally灯的LED亮度。硬件ID
Blackmagic Pocket Cinema Camera的“硬件ID”可显示8字符识别符。每台摄影机都具备其独有的识别符。Blackmagic RAW和ProRes视频的元数据中还会显示一个更长的32字符ID版本。这一功能有助于识别来自不同摄影机的素材。软件
可显示当前安装的软件版本号。更多关于软件更新的信息,请阅读Blackmagic Camera Setup Utility实用软件"部分的内容。播放
该设置可用来选择在LCD触摸屏上播放来自SD卡、CFast卡或USB-C硬盘的“单个片段”还是“所有片段”。 选择“所有片段”将按顺序播放所有匹配的媒体文件,选择“单个片段”将一次只播放一个片段。该设置也应用于循环功能。选择“所有片段”循环功能将播放存储介质上的所有片段,结束后从头开始。选择“单个片段”则一次只循环播放一个片段。设置菜单第四页
摄影机“设置”选项卡的第四页包含蓝牙设置。  摄影机蓝牙的名称以场记板中所选摄影机的字母加摄影机的八字符硬D表示。蓝牙
蓝牙控制可通过便携式设备无线控制您的摄影机。您可以使用“Blackmagic Camera Control App”通过iPad远程更改设置,调整元数据,以及触发记录。您可以通过点按“设置”菜单中的“蓝牙”开关图标启用或禁用蓝牙功能。蓝牙功能启用后,摄影机可被30英尺(约9米)范围内的蓝牙设备检测到。摄影机在蓝牙控制方面使用与“Blackmagic SDI摄影机控制协议”相同的命令,因此您可以编写自己的应用程序来远程控制几乎所有的摄影机设置。比如监看摄影机的各个选项和音频设置,以及摄影机内置的DaVinci Resolve调色工具,甚至镜头控制。 更多信息请参考“Blackmagic Camera Control”摄影机控制文档,网址: www.blackmagicdesign.com/cn/developer首次将摄影机与iPad配对:
点按“设置”菜单中的“蓝牙”开关图标启用蓝牙功能。 2 打开“Blackmagic Camera Control App”,选择您希望配对的摄影机。可用的摄影机会以摄影机字母加独有硬件ID的形式列出。比如“A:A0974BEA”。  选择您希望配对的Blackmagic Pocket Cinema Camera摄影机。 备注 当您安装并第一次运行Blackmagic Camera Control App时,系统会问您是否“允许地点访问”。如果您选择“while using the app”(使用期间),您拍摄文件中的元数据将包含来自iPad的GPS数据,让您对影像进行地理标记。这些信息可以戴ackmagic DaVinci Resolve 15或更高版本中查看。 如果您不想允许使用这些信息,请选择Never”(从不)。 如要修改设置,在iPad上前往设置、隐私、定位服务、相机。 3 初次连接时,Blackmagic Camera Control App会请求一个六位代码来配对摄影机。代码会显示在摄影机的LCD屏幕上。将代码输入iPad,并按“Pair”(配对)。   4 当摄影机连接到您的iPad时,会弹出信息确认配对成功。  如果摄影机和iPad配对失败,摄影机会弹出错误提示。尝试再次连接。  备注 当您没有使用蓝牙控制Blackmagic Pocket Cinema Camera时,出于安全考量建议您关闭蓝牙。断开当前设备
使用该设置可断开Blackmagic Pocket Cinema Camera与当前所配对的iPad之间的连接。清除配对设备
使用该设置可清除曾与摄影机配对的设备列表。使用Blackmagic Camera Control App控制您的摄影机
将摄影机与iPad配对成功后,您可以通过iPad远程开启或关闭摄影机,改变设置,调整元数据,以及触发记录。  配对完成后,Blackmagic Camera Control App会显示该画面,您可以调整设置,开始记录。  点按右下角的场记板图标来使用或更新场记板。 Blackmagic Pocket Cinema Camera使用蓝牙低功耗(BLE)技术与设备建立通信,实现无线控制。因为与便携设备使用同样的协议,所以耗电量极低。设置菜单第五页
“设置”选项卡的第五页包含执行恢复出厂设置、像素重映射以及水平线校准的各项控制。 恢复出厂设置
要恢复摄影机出厂时的默认设置,请点按“重置摄影机设置”按钮。在确认页面上,点按“重置”确认操作。摄影机将会删除机内存储的所有LUT和预设,并重置所有设置。执行恢复出厂设置操作之前,不妨将您的预设导出到存储卡上进行备份。恢复出厂设置之后,您只要再从存储卡中导入预设就可以快速恢复。请务必注意,恢复出厂设置操作还将重置水平线功能,因此恢复出厂设置后需要重新校准运动传感器以确保准确性。  选择“重置”时,您将看到如上操作确认信息像素重映射
Blackmagic Pocket Cinema Camera所使用的CMOS传感器是由数百万个感光像素组成。虽然经过原厂传感器校准,但经过一段时间后,有些像素的亮度或会出现变化,从而导致这些像素变得特别明显,也就是通常被人所知的“热像素”。所有摄影机传感器,不论是何产商都会产生热像素。 为解决这一问题,我们在摄影机中内置了校准功能,如果发现图像中存在任何热像素就可执行此功能。 要开始这一处理,只要盖上镜头盖,点按“像素重映射”按钮运行像素重映射功能即可。这一过程大约需要1分钟。运动传感器校准
要校准水平线指示,请将摄影机放置在水平表面上,然后点按“校准运动传感器”按钮。执行校准的过程中,摄影机必须保持稳定状态。这一过程大约需要5分钟。预设
“预设”选项卡可用来保存和调用多达12组设置集。当摄影机被用于多个不同项目时,这一设置将非常有用。例如,您可能会将摄影机用于从纪录片N在内的多种不同拍摄风格,这些项目都会使用不一样的设置。摄影机的预设功能就可以让您保存某一项目或某类镜头的拍摄设置,方便下次需要时快速调用。共有12个预设槽可使用。 您还可以导入和导出预设,这对于设置多机位镜头部署是非常有用的。只需将一Blackmagic Pocket Cinema Camera进行项目设置,然后将该预设导出到片场的所有其他Blackmagic Pocket Cinema Camera上即可。  预设选项卡可快速切换您所保存的不同设置。 备注 您的摄影机内存最多可保存12个预设。预设按钮
“预设”菜单下方设有一排按钮图标,它们所对应的功能如下图所示:| + | ✓ | ← | ||
| 添加 | 加载 | 更新 | 管理 | 删除 |
保存和加载预设
要创建一个新的预设,请点按代表“添加”的图标。然后,LCD屏幕上会出现一个键盘,此时请为您的预设命名。输入名称并点按表示“更新”的图标,即可将当前所有设置保存到该预设。 如果摄影机中已经含有相同名称的预设,您可以选择覆盖替换或同时保留这两个预设。  点按预设选项卡中代表“添加”的图标,再使用屏幕键盘来输入预设名称。 保存预设后,在预设菜单中点按该预设的名称将其选中。要加载预设,点按代表“加载”的图标。  选择一个预设,并点按表示“加载”的图标来加载这一预设。选中的预设将以纯蓝背景显示,当前加载的预设则会在其对应的图标底部标以蓝色横线。 点按代表“更新”的图标可更新预设。然后屏幕会弹出提示,询问您是否要将Blackmagic Pocket Cinema Camera的当前设置更新为这一预设。点按代表“更新”的图标确认更新。导入预设
要导入预设,请点按预设菜单底部表示“管理”的图标。点按“导入预设”,然后点按“导入”加以确认。该操作将调出预设导入屏幕界面。如果您喜欢的预设不在当前存储卡或存储盘上,可点按触摸屏顶部的存储介质按钮来切换记录存储介质。您可以从USB-C硬盘、CFast或SD卡导入LUT。 摄影机会在您所选存储介质上搜索根目录和名为“Preset”的预设文件夹,并列出可用的预设。保存在其他位置的预设是不可见的。 点按某个预设将其选中,然后点按“导入”确认选择,并将其复制到摄影机中的下一个可用预设槽内。 备注如果摄影机的12个预设槽都已被使用,导入菜单就不会出现,此时您需要删除已有的预设来腾出空间。 如果您想要导入的预设和摄影机中保存的某个预设名称相同,可选择覆盖或同时保留二者。屏幕右上角会出现摄影机剩余预设空位的数量。摄影机中的预设空位有多少,您就能导入多少预设。导出预设
要将某个预设导出到存储卡或USB-C硬盘上,请点按您想要导出的预设,然后点按表示“管理”的图标按钮。点按“导出所选预设”,然后点按导出预设的目标存储介质。如果已存在相同名称的预设,请选择是否覆盖该预设或者保留两者。摄影机会将预设导出到名为“Presents”(预设)文件夹。删除预设
要删除某个预设,请将其选中并点按删除图标。在弹出的确认选择框中,点按“删除”。3D LUT
"LUT"菜单可用来将多个3D LUT导入、导出并应用到摄影机的各个输出上。  使用摄影机的“LUT”选项卡选择3D LUT3D LUT简介
3D LUT可套用到摄影机LCD触摸屏和HDMI输出的图像上。套用LUT可令摄影机为某类色彩和亮度输入显示相应的色彩和亮度输出。例如,某个LUT可令摄影机在接收到暗淡的蓝色输入时显示出鲜艳饱和的蓝色。当使用Blackmagic RAW格式或“Film”动态范围模式拍摄素材时,这一功能就非常有用,因为以上两者的拍摄片段都被刻意处理成低饱和度的平淡画面。套用LUT可以让您大致掌握素材调色后的画面。 您可以使用DaVinci Resolve或其他调色软件轻松创建3D LUT,也可以从网上找到各类LUT。摄影机可存储最多10个17点或33点精度的3D LUT,每个大小上至1.5MB。加载后,您可以选择一类LUT显示在摄影机的LCD触摸屏和HDMI输出画面上。 Blackmagic Pocket Cinema Camera支持使用DaVinci Resolve以.cube格式创建的33点精度3D LUT,以及使用LUT转换程序转换成Resolve的.cube格式17点精度3D LUT。您的摄影机可使用高品质四面体插值算法处理3D LUT。 提示更多关于显示LUT的信息,请参阅本手册“监看设置”部分的内容。 备注 Blackmagic Pocket Cinema Camera不会默认对记录的素材套用或“烧录”LUT,但是您可以选择将LUT“烧录”到素材中。 如果您在后期制作阶段没有时间对素材进行调色,或者需要直接将素材交付给客户或剪辑师,这一选项就会十分有用。 当您将LUT作为现场预览工具使用时,所套用的LUT上的信息会作为元数据被保存到记录的片段中。DaVinci Resolve可以在元数据选项卡的“使用的LUT”一栏中显示这一信息,方便调色师核对现场所使用的LUT名称。内置LUT
摄影机提供一系列内置LUT,您在用“Film”动态范围模式或Blackmagic RAW格式拍摄时可以预览不同的效果。 每台摄影机提供的 LUT 会根据传感器有所不同:Pocket 4K Film to Extended Video / Pocket 6K Film to Extended Video
可显示比“Pocket 4K Film to Video”或“Pocket 6K Film to Video”LUT更宽的动态范围,会温和地调整对比度,并应用平滑的高光过渡。 Pocket 4K Film to Rec 2020 Hybrid Log Gamma / Pocket 6K Film to Rec 2020 Hybrid Log Gamma 显示REC 709和Log画面的混合结果。Pocket 4K Film to Rec 2020 PQ Gamma / Pocket 6K Film to Rec 2020 PQ Gamma
显示基于人眼感知形成的Gamma曲线,用于高效编码HDR图像。Pocket 4K Film to Video / Pocket 6K Film to Video
与高清视频的REC709色彩标准类似,拥有高对比度和饱和度。如果您将Blackmagic Pocket Cinema Camera和其他使用REC709色彩空间的广播级摄影机共同使用时,这一设置就会十分有用。LUT按钮
摄影机“LUT”屏幕界面下方设有一排按钮图标,它们所对应的功能如下图所示:    加载存储介质管理删除
导入LUT
要导入3DLUT,请点按“LUT”菜单底部表示“管理”的图标。点按“导入LUT”,然后点按“导入”加以确认。该操作将调出LUT导入屏幕界面。如果您喜欢的3DLUT不在当前存储卡或存储盘上,可点按触摸屏顶部的存储介质按钮来切换记录存储介质。您可以从USB-C硬盘、CFast或SD卡导入LUT。 摄影机会在您所选存储介质上搜索根目录和名为“3DLUTs”的文件夹,并列出可用的LUT。保存在其他位置的LUT是不可见的。 点按某个LUT将其选中,然后点按“导入”确认选择,并将其复制到摄影机中的下一个可用LUT位置栏内。 备注 如果您想要导入一个新的LUT,但是10个3D LUT位置栏都已占满,那么您就需要删除一个已有的LUT来腾出空间。 如果您想要导入的LUT和摄影机中保存的某个LUT名称相同,就需要选择是覆盖替换还是同时保留这两个LUT。屏幕右上角会出现摄影机剩余UT位置栏的数量。摄影机中的LUT位置栏有多少,您就能导入多少LUT。 备注 如果无法导入LUT, 可能是因为文件大小的缘故。您可以使用Lattice等LUT编辑器来检查其大小, 或者使用您计算机上的任何一种文本编辑器将它打开。在“UT_3D_SIZE”的标签边上会有一个表示 LUT 大小的数字。如果该数值不是 7 或 33 , 您可以使用Lattice将3D LUT的大小调整到17点。套用LUT
将一个LUT保存到摄影机中之后,在LUT菜单中点按其中一个LUT将其选中,然后点按加载图标。就可以将该LUT套用到摄影机的所有输出上。要在摄影机的输出画面上显示加载的LUT,请到监看菜单中开启“显示LUT”。更多信息请参考“监看设置”部分的介绍。导出LUT
要将某个LUT导出到存储卡或USB-C硬盘上,请点按您想要导出的LUT,然后点按表示“管理”的图标按钮。点按“导出所选LUT”,然后点按导出LUT的目标存储介质。如果已存在相同名称的LUT,请选择是否覆盖该LUT或者保留两者。摄影机会将LUT导出到名为“3DLUTs”的文件夹。删除LUT
要删除您不再使用的LUT以腾出更多空间,请选中您想要删除的LUT并点按表示“删除”的图标按钮。在弹出的确认选择框中,点按“删除”。内嵌3D LUT
如果您使用Blackmagic Pocket Cinema Camera拍摄时应用了3D LUT, 那么所选LUT会被嵌入到您正在记录的Blackmagic RAW文件中。这个3D LUT会被保存在记录.braw文件的头文件中, 可在后期制作环节轻松应用到素材上, 无需处理单独文件。 因此,当剪辑师或调色师拿到的是Blackmagic RAW文件,他们就可以轻松获取影片拍摄时所使用的LUT,显著降低了在片段上使用错误3D LUT的可能性。他们在剪辑或调色时可以选择是否将这个3D LUT套用到素材上,并且可以随时禁用这个3D LUT。 将记录菜单中的“在文件中套用LUT”开关设置为“开”后,在Blackmagic RAW Player播放器和DaVinci Resolve中打开记录的片段时,画面上就已应用所选的3D LUT。 3D LUT可轻松开启或关闭,但会始终跟随Blackmagic RAW文件,因为它是写入到片段上的。DaVinci Resolve的RAW设置面板中还设有一个“Apply LUT”(套用LUT)开关,可用来启用和禁用Blackmagic RAW文件中的3D LUT。 DaVinci Resolve中的“Apply LUT”设置和摄影机中的设置相同。也就是说,在您拍摄时,可以在摄影机中进行设置从而告诉调色师使用这一LUT,而调色师则可以在DaVinci Resolve中使用“Apply LUT”开关将它关闭。录入元数据
元数据是片段内所保存的一系列信息,这些信息包括镜次号码、摄影机设置以及其他识别信息。后期制作时,这些信息对于素材的整理很处理起到很大的帮助。例如,镜次、镜头和场景编号是十分必要的整理工具,而镜头信息则能用于自动移除变形现象或获得更匹配的视觉特效图层。 Blackmagic Pocket Cinema Camera可自动将一些元数据保存到每个片段中,如摄影机设置、时间码以及日期和时间等。您还可以使用摄影机的场记板功能添加更多信息。场记板
在主菜单视图上左右滑动摄影机的触摸屏可调出场记板界面。 场记板界面分成“片段”和“项目”选项卡。“片段”选项卡包含的信息视片段而定,而“项目”选项卡可用来键入各个片段的共同信息,如项目名称、导演、摄影机ID以及摄影师ID等。 提示当“监看”选项卡中的“显示状态信息”设置为“导演”时,输入到场记板的元数据可在HDMI输出上进行查看。请阅读本手册“监看设置”部分的内容获取更多信息。“片段”元数据
在待命模式下和播放模式下更改片段的元数据的操作会有所不同。在待命模式下,当您的摄影机准备好记录时,片段元数据会保存在下一个记录的片段中,除非“将上个片段标为好镜次”按钮对最近记录的片段应用了“好镜次”标签。在播放模式下,当您检查已经拍摄的素材时,会显示“好镜次”按钮,并且片段元数据始终附加在当前查看的片段上。  当摄影机在播放模式下时,“场记板所属片段”可识别场记板适用的片段,并显示“好镜次”按钮。在待命模式下时,场记板用于“下一个片段”,并显示“将上个片段标为好镜次”按钮。场记板所属片段
该设置可显示当前出现在“片段”选项卡中元数据的所在片段。在播放模式下时,该设置针对当前片段,在待命模式下时,该设置针对您记录的下一个片段。镜头数据
“镜头数据”设置可显示当前摄影机所安装的镜头的相关信息。许多电子镜头可自动提供镜头型号、光圈以及焦距等信息。如果您使用的镜头并不提供此类信息,或者您想要键入更多数据,可以点按该设置中的铅笔图标来手动输入。该操作会调出“镜头数据”菜单,其中包含以下信息:  图中的“镜头数据”菜单显示是的从安装的镜头上自动输入的信息,以及手动输入的滤镜信息。- 镜头类型
“镜头数据”可显示镜头型号。如果您的镜头类型未自动显示在此栏,请点按这一设置手动键入相关数据。您的摄影机为众多常用镜头保存有内部数据库,因此如果您需要手动输入数据,摄影机将会在您键入信息时自动给出建议使用的名称。这一功能可以加快数据输入的速度。  如果镜头不具备自动提供信息的功能,请使用屏幕键盘来输入镜头数据。·光圈
可显示片段开头的镜头光圈-截T置挡摄息是取决于您使用的镜头,如果自动提供的话。点按这一设置来手动输入数据。·焦距
可显示记录片段开头的镜头焦距设置。如果镜头自动提供这一信息,焦距会以厘米为单位显示。点按这一设置来手动输入焦距。- 距离
可显示记录片段的镜头焦距设置。有些镜头能以毫米为单位自动提供这一数据。您也可以手动键入这一数据。·滤镜
可显示当前镜头使用的滤镜。点按这一设置来手动输入数据。您可以输入多条信息,并以逗号隔开。  滤镜信息需手动输入 备注您只要点按“镜头数据”菜单中的“重置镜头数据”图标就可以随时清除镜头信息。屏幕将弹出提示确认您的选择。确认后,所有镜头数据都将被清除,并被替换成任何当前安装镜头自动提供的镜头数据。如果您在这些栏中手动输入了任何信息,下次安装镜头时您需要重置镜头数据,否则手动输入的值会保持不变。卷号
可显示当前卷号。 Blackmagic Pocket Cinema Camera可自动递增卷号,因此通常您无需手动键入。当您开始新的项目,并且希望重新从卷号“1”开始,可以进入场记板的项目选项卡,然后点按“重置项目数据”。场景
可显示当前场景号,以及当前镜头号和类型。 这一按钮上显示的号码始终代表当前场景。您可以使用场景号两侧的左右箭头来调整号码,或点按场景号进入场景号编辑器进行编辑。 场景号可设在1到9999之间。 在场景号编辑器中为场景号添加一个字母后,您还可以为当前拍摄镜头标注。比如,“23A”表示场景23,镜头1。如果您在场景号中添加了镜头字母,摄影机就会在您进入场景号编辑器时建议下一个场景号和镜头字母。例如,如果您的当前场景号为7B,那么摄影机就会建议使用“8”和“7C”。 场景号提示功能还能在右上角显示当前拍摄镜头类型的信息。您可以在键盘右侧的场景号编辑器中选中这些信息。 拍摄镜头的类型如下:| WS | 远景 |
| MS | 中景 |
| MCU | 中特写 |
| CU | 特写 |
| BCU | 大特写 |
| ECU | 极特写 |
镜次
按钮可显示当前镜头的镜次号。您可以点按镜次号两侧的左右箭头调整号码,或点按镜次号按钮进入镜次号编辑器进行编辑。 提示 镜头号和场景字母用完之后,镜次号将回到“1”。 您可以在镜次号编辑器中添加描述。该设置位于镜次号键盘右侧,并且对应以下内容: PU 即“补拍”。指之前某个镜次的重拍画面,可在正式拍摄结束后添加额外的影像材料。 VFX 即“视觉特效”。指一个用于视觉特效的镜次或镜头。 SER 即“镜次组”。指摄影机不中断记录所拍摄的多个镜次。  输入“镜次”元dkr@PpcketCinemaCamera的屏幕键盘右侧会提示其他镜头类型。好镜次
点按“好镜次”可为好镜次添加标签,这样能方便后期制作时调出这些镜次。该按钮会对播放模式下当前查看的片段应用“好镜次”标签。如果摄影机在待命模式并已准备好记录,那么“将上个片段标为好镜次”按钮就会对上一个记录的片段应用“好镜次”标签。棚内/外景
在待命模式下时,点按“棚内”或“外景”可在下一个片段添加相应标签;在播放模式下时,点按“棚内”或“外景”可在当前片段添加相应标签。白天/夜晚
在待命模式下时,点按“白天”或“夜晚”可在下一个片段添加相应标签;在播放模式下时,点按“白天”或“夜晚”可在当前片段添加相应标签。项目元数据
不论您在待命模式还是播放模式,项目元数据的表现都一样。这一元数据可始终将您的项目作为整体,并且独立于片段编号。  使用摄影机的“项目”场记板选项卡输入项目的详细信息项目名称
可显示当前项目的名称。点按铅笔图标可更改项目名称导演
可显示当前项目的导演名字。点按铅笔图标可更改导演名字。摄影机
可以单个字母显示摄影机索引。点按铅笔图标可更改摄影机索引。摄影师
可显示摄影师信息。点按铅笔图标可更改摄影师名字。摄影机视频输出
HD监看输出
摄影机的标准尺寸HDMI接口可输出1080p HD视频,因此您可以连接监视器,甚至是消费级电视机来监看画面。其10bit输出还支持HDR和屏幕叠加信息功能,可显示摄影机的各项状态,是现场监看的理想之选。 当LCD无法使用时,比如摄影机安装在高处的摇臂或车上,可以使用HDMI监看。如果要在HDMI输出上显示监看信息,请到“监看”设置的“HDMI”菜单下调整叠加选项即可。HDMI叠加信息包括帧导栏和记录详情、摄影机设置等信息。如果您只需要监看拍摄的镜头,您可以关闭叠加功能,获得无叠加信息的HDMI输出。 搭配使用如Blackmagic Micro Converter HDMI to SDI等转换器,就可以将信号转换成SDI,从而连接SDI监视器、采集设备、广播级切换台等众多SDI设备。您还可以通过Blackmagic Pocket Cinema Camera的USB端口为Blackmagic Micro Converter HDMI to SDI提供电源。使用DaVinci Resolve
使用Blackmagic Pocket Cinema Camera拍摄仅是影视内容创作过程中的一部分而已,就如整个过程中的媒体备份和管理、剪辑、调色到最后的编码输出母版文件一样都很重要。Blackmagic Pocket Cinema Camera中包含有Mac和Windows版本的DaVinci Resolve软件,这是一套用于拍摄和后期制作的完备解决方案!  备注 我们推荐使用最新版本的DaVinci Resolve, 对Pocket Cinema Camera拍摄的镜头片段进行准确的调色。16或更高版本均可为所有Blackmagic摄影机和新增的Blackmagic RAW提供准确调色。 将您的CFast、SD卡或SSD连接到计算机后,就可以使用DaVinci Resolve“媒体”页面中的“克隆”工具,在拍摄过程的同时进行素材备份。由于任何类型的存储介质都有可能损坏或出现故障,因此建议您进行文件备份以防万一。使用DaVinci Resolve备份媒体文件后,就可以将片段添加到DaVinci的媒体池中,随后在DaVinci Resolve里进行一站式剪辑、调色、精编制作。 DaVinci Resolve拥有高端数字电影制作所需的先进技术,是大多数影院大片所使用的调色工具,因此比简单的非编软件工具要强大得多。使用DaVinci Resolve进行剪辑和调色可让您充分利用这一技术。 以下内容介绍了如何使用DaVinci Resolve开展您摄影机文件的制作工作。当然,DaVinci Resolve是非常高端的软件,它包含了大量的功能,这远比您在用户界面上一眼看上去的要多得多。想要进一步了解如何使用DaVinci Resolve,请访问Blackmagic官网查阅DaVinci Resolve操作手册,或者通过官网观看相关的培训课程和教学视频。项目管理器
导入片段开始剪辑之前,您需要先使用项目管理器来建立一个项目。 初次运行DaVinci Resolve时,首先出现的界面就是项目管理器窗口,您也可以点击用户界面右下方的主菜单图标按钮,随时打开这一窗口。这样能便于打开之前创建的项目或创建新项目。 要创建新项目,点击窗口底部的“新建项目”按钮,然后为项目命名。点击“创建”。 您可以使用“快编”页面快速开始项目剪辑工作。  项目管理器中可显示属于当前用户的所有项目 更多关于项目管理器的信息,请到Blackmagic Design官网的支持页面下载DaVinci Resolve操作手册进一步查阅。使用快编页面剪辑
快编页面能提供高效、活动的剪辑流程,能让您快速组合、修剪和编辑片段。 该页面设有两条时间线,能分别同时提供完整时间线视图和操作部分的细节放大视图。这样一来,您就可以先将片段快速拖放到完整时间线的任何位置,然后在细节放大时间线上进行剪辑,无需切换和调整界面。这样的工作流程能实现笔记本电脑快捷编辑,省去了繁琐的时间线缩放和滚动查找操作,从而节省大量时间。快编页面布局
打开快编页面后,将会看到媒体池、检视器窗口和时间线。这三个主要窗口能帮助您完成剪辑全过程中的各项控制。  图为快编页面的默认布局,其中媒体池为缩略图显示模式 更多关于快编页面的信息,请查阅DaVinci Resolve操作手册在“使用快编页面”章节的介绍。媒体选项卡
用户界面的左上角设有五个选项卡。 点击这些选项卡可分别打开不同的媒体工具集,它们可用来创建不同的编辑操作。例如,第一个是“媒体池”选项卡,根据图示可判断该选项卡已被选中。其他选项卡分别为“同步媒体夹”、“转场”、“标题”和“特效”。  - 媒体池:媒体池包含了您使用媒体页面导入的所有片段、文件夹以及文件。您也可以直接从快编页面导入文件,这样就不必回到媒体页面导入新的片段了。 这个强大的功能可通过时间码、日期和时间来自动同步所有片段,让您选择不同机位角度来制作多机位项目。 - 转场:点击同步媒体夹右侧的转场按钮,可调出所有视频和音频转场,素材中使用。它们包括交叉叠化和动态划像等普通转场。 - 标题:位于转场右侧的是标题选项卡。您可以点击它来选择想要使用的标题,如标准滚动文本或下横栏标题。此外,还有一系列Fusion模板供您使用,获得更具动感的动画标题,具体可在DaVinci Resolve的Fusion页面中自定义。 - 特效:第五个是特效选项卡。该选项卡可提供所有滤镜和特效,能让丰富素材画面,比如模糊、发光和镜头特效等。该选项卡里有许多强大的特效供您选择,使用搜索工具就能快速找到。 提示 使用媒体选项卡图标一侧的搜索工具可精确查找您需要的效果。例如,如果您选中了转场选项卡,在搜索栏输入“叠化”后,所有叠化转场类型就会被筛选出来显示在检视器中,帮助您快速找到想要的叠化转场。检视器选项卡
检视器窗口的左上角是检视器模式按钮。  检视器模式按钮 这些按钮可控制当前使用的检视器,包括“源片段”、“源磁带”以及“时间线”。这些检视器模式能在您选择片段进行编辑时提供大量控制,因此不妨花些时间了解它们的工作原理。| 源片段 源片段检视器可显示来自媒体池的单个片段,您可以沿整条检视器时 间线设置入点和出点,从而获得更好的控制。双击媒体池中的某个片 段将其选中,或者将它拖到检视器中,就可以进行查看。 | |
| 源磁带 源磁带视图可查看媒体池中的所有源片段。这项强大的功能是您的得 力助手,它能帮在所有片段当中快速搜索,找出某个具体片段。当您在 片段上方搓擦播放头进行查看时,媒体池中相应片段的缩略图也会高 亮显示。这意味着,当您找到想要编辑的片段后,只要点击源片段选 项卡,对应的源片段就会自动出现在检视器中。 源磁带检视器模式能让您可以充分利用非线性编辑的优势,让您自由进行 剪辑工作,快速找到镜头,尝试新的想法,呈现出精彩画面。 | |
| 时间线 在时间线检视器模式下,您可以查看并剪辑时间线,播放项目并精修 剪辑。 |
将片段导入媒体池
现在,您可以开始将媒体文件导入项目中了。您可以使用顶部的导入工具,在快编页面的媒体池窗口中完成这一操作。  选中其中一个导入选项,将媒体文件添加到项目中| 导入媒体 该选项可导入 您在存储位置选中的单个媒体文件。 | |
| 导入媒体文件夹 要从媒体存储中导入一个文件夹,请选择这一选项。导入文件夹时,DaVinci Resolve会保留文件结构,将每个文件夹视作一个单独的媒体夹,方便您在不同媒体夹之间导航,找到需要的视频和其他媒体文件。 |
导入媒体步骤如下:
1 点击导入媒体或导入媒体文件夹图标。 导航到想要导入的媒体文件所在的媒体存储位置。 3 选中文件或文件夹,点击“打开”。 将媒体添加到项目中之后,请保存更改。DaVinci Resolve设有快速简便的自动保存功能,叫做“实时保存”。您保存项目一次之后,“实时保存”功能将在您每次更改后自动保存,有效防止数据丢失。 更多关于“实时保存”和其他自动保存功能的信息,请查阅DaVinci Resolve操作手册。将片段添加到时间线
熟悉了媒体选项卡和检视器模式按钮后,现在就可以打开媒体池并快速开始在时间线上添加片段了。  图为快编页面的时间线,上方为完整时间线,下方为局部放大时间线 时间线是进行剪辑的地方,它就像是一块工作板,您可以在轨道上放置片段,来回移动片段位置,并且进行修剪。轨道可以对片段进行上下分层,方便您尝试不同的剪辑版本并建立转场和添加特效。比如,您可以将一个片段放置在一个轨道上,尝试某个剪辑版本的效果,而下方的轨道均不会受到影响。 将片段添加到时间线有多种不同的方法,比如智能插入、附加以及叠加等。附加片段
选择镜次和组合剪辑时,您可能想要将这些镜头相继添加到时间线上。进行这类操作时,就可以使用附加工具来快速完成剪辑。  点击附加工具图标按钮,快速将片段添加到上一个片段的结束处附加片段步骤如下:
1 双击媒体池中的一个片段,将其在检视器中打开。 2 使用搓擦修剪工具,拖动入点和出点来选中镜头的精确时长。您也可以按“I”和“O”键盘快捷键来设置入点和出点。  3 现在,点击媒体池下方的附加图标按钮。  您的第一个片段就会被放置在时间线的开头。 重复步骤1到步骤3的操作,继续添加更多片段,它们会自动附加到相应位置,确保时间线上不会出现空隙。  附加片段的操作方式能确保时间线的片段之间不出现空隙 提示 您可以为“附加”图标指派一个键盘快捷键,从而进一步加快操作进程。例如,您可以将“P”键指派为该功能,然后使用“I”和“O”键设置入点和出点,再按“P”键附加该片段。更多关于指派快捷键的信息,请查阅DaVinci Resolve操作手册。在时间线上编辑片段
将片段添加大时间线上后,您就能完全控制片段,进行移动和修剪编辑了。 要修剪某个片段,可将鼠标指针悬停在相应片段的开始或结束处,然后点击并左右拖动。例如,向左或向右拖动片段尾部,可分别减少或增加其时长。您可能注意到,执行刚才的剪辑操作后,所有片段在时间线上的位置都会发生变化,以适应新的调整。这就是快编页面帮助您节省时间的一种方式。 您还可以选取一个片段,然后将它放置到大型时间线的新的视频轨道上,无需缩放操作就可完成。这样能极大程度地缩减在庞大时间线上来回导航所花费的时间,从而有效加快剪辑进程。 在快编页面上完成片段剪辑之后,可能还需要添加一个标题。下节内容将具体介绍如何操作。添加标题
将标题添加到时间线上十分简单,并且种类多样。 要查看可供使用的标题类型,可点击用户界面左上角的“标题”媒体选项卡。在出现的选项窗口中,您会看到所有可供使用的标题生成器,包括下横栏标题、滚动标题、标准文本标题等。您还可以添加各种Fusion标题,也就是可自定义的动画标题。 此处将以添加标准标题为例。具体步骤如下:
点住“文本”标题,将其拖放到时间线上。您可以任选一条时间线,但是为了提高准确度,建议您使用放大显示的时间线。标题会自动创建一个新的视频标题轨道,并且会吸附到播放头的位置。 2 松开鼠标后,标题就会出现在新的轨道上。您可以想处理视频片段一样,移动标题的位置或更改其时长。 3 如要编辑标题,可点击新的标题片段,片段检视器下方会出现“工具”图标按钮。点击工具图标。界面中会显示一排工具,可用来修改标题片段。这些工具包括变换、裁切、动态缩放等。在本例中,请点击“标题”工具。 4 然后点击“打开检查器”。 检查器窗口打开后,您可以输入一个标题,然后编辑文本设置,比如字距、行距、字体、颜色等等。 您可以使用多种选项,将标题自定义为理想中的效果。建议您不妨自行尝试和摸索所有设置,看看各种设置带来的不同标题效果。使用Blackmagic RAW文件
Blackmagic RAW片段可为您的后期制作提供最大的灵活性。这样能方便您在更改原始摄影机设置时调节片段各项参数,如白平衡和ISO设置。使用Blackmagic RAW格式还可保留暗部和亮部的色调信息,这将在细节恢复操作时非常有用,比如恢复过曝的天空和过暗的图像部分。 如果您追求的是更高的画质,或者拍摄亮部和暗部有显著差别的影像并于随后进行细节恢复处理并加以调色,那么使用Blackmagic RAW格式将是不错的选择。 由于Blackmagic RAW速度快,文件小,您不需要创建代理文件就可以像标准视频片段一样播放。操作手册这部分内容描述了关于Blackmagic RAW功能,以及如何在DaVinci Resolve工作流程中使用Blackmagic RAW文件的信息。 提示开始调色前,先为调色页面的片段调整Blackmagic RAW设置是较好的做法。Blackmagic RAW的片段设置
当您首次导入Blackmagic RAW文件时,DaVinci Resolve会根据拍摄时所使用的ISO、白平衡以及色调设置对文件中包含的摄影机数据进行解码。如果您对这些设置下的画面风格满意,就可直接开始编辑。 使用Blackmagic RAW格式拍摄的一大好处在于,您完全不会受限于这些设置!使用Blackmagic RAW文件可获得灵活的后期处理选项,这样您就可以逐渐发展出自己的一套工作流程。尝试在“Camera Raw”选项卡中对每个片段进行“片段”设置,您会发现Blackmagic RAW格式有多么强大和灵活。  在“Camera Raw”选项卡中,从“解码方式”下拉菜单中选择“片段,可调整单个片段的Blackmagic RAW设置。 一旦启用了DaVinci Resolve的Blackmagic RAW片段设置,片段设置和Gamma控制就都可以进行调整了。通过调整这些设置可以优化您的片段,让其更接近全面一级校色的效果。当使用DaVinci Resolve示波器时更为强大,有助于中性化和平衡片段,为片段应用某种风格做好准备。 以下内容介绍了关于片段和 Gamma控制的信息。ISO
升高或降低此设置可调整ISO数值。如果您需要将片段调整到更亮或更暗的起始点进行调整时,此设置很有用。高光恢复
勾选该复选框可使用来自未裁切通道的信息来重建裁切通道中的高光信息。色温
可将图像的色温调整到暖色或冷色。该操作有助于每个图像的色彩平衡。色调
调整此设置可为图像添加绿色或品红色,从而起到平衡色彩的作用。曝光
通过此设置可调整画面的整体亮度。饱和度
饱和度控制默认为1,范围从最小饱和度-1到最大饱和度+4。对比度
默认为1.0,将滑块向左拖动获得最小饱和度0,向右拖动可将饱和度最高增加到2。中点
Blackmagic Design Film模式下,中间灰值默认为0.38,也就是 38.4% 。向左拖动滑块可降低中点,向右拖动最高可增加到100。当对比度的调整与默认设置不一致时,您可以修改高光和阴影过渡。高光过渡
调整高光时,向左拖动滑块可将该值降低到0,向右拖动滑块可将该值增加到2。默认值是1。阴影过渡
向左拖动滑块可将阴影降低到0,向右拖动可增加到2。白电平
如要调整Gamma曲线的白场,可将滑块在最高值2和最低值0之间拖动。默认值是1。黑电平
如要提高自定义Gamma曲线的黑场,可将右边的滑块从最低值-1拖动至最高值1。默认值是0。使用视频黑电平
点击复选框将黑电平设置为视频模式。导出帧
点击“导出帧”按钮,可让您从Blackmagic RAW片段中导出某一帧画面。更新Sidecar
点击此按钮可为当前片段更新Blackmagic RAW Sidecar文件。 您对Blackmagic RAW片段所做的任何修改都会被识别为Blackmagic Design Custom的Gamma设置更改。  如果您希望把片段恢复到任何可用的默认Gamma选项,可下拉菜单中选择相应选项。 提示用“Video”动态范围拍摄的影像无法使用Gamma控制,但Blackmagic RAW数据并没有丢失。只需从Gamma下拉菜单中选择“Blackmagic Design Film”或“Blackmagic Design Extended Video”,然后进行调整。保存您对Blackmagic RAW的修改
调整BlackmagicRAW片段的Gamma控制。 2 点击“更新Sidecar”按钮。 系统将在同一个文件夹里创建一个“Sidecar”文件作为.braw文件。当另一位用户导入Blackmagic RAW文件时,DaVinci Resolve会自动读取这些Sidecar文件。如果您进行了其他调整,请再次点击“更新Sidecar”。 提示如要移除Sidecar文件,只需将其从存储介质的位置上删除即可。Blackmagic RAW的项目设置
如果您需要改变适用于所有片段的设置,比如:统一修改白平衡或ISO,可以使用项目的“Camera RAW”设置进行统一修改。为Blackmagic RAW进行项目设置:
1 点击“文件”,选择“项目设置”,进入项目设置菜单。 2 在“Camera RAW”选项卡中,您会看到RAW配置文件旁边有一个下拉菜单。点击箭头可从列表中选择Blackmagic RAW。 3 在“解码方式”下拉菜单中选择“项目”。 4 将白平衡设置定为“自定义”。 5 从Gamma下拉菜单中选择"Blackmagic Design Custom”。将色彩空间设为"Blackmagic Design”。这将同时把Gamma设置定为"Blackmagic Design Film"。 6 在“解码质量”菜单中选择分辨率。对于性能有限的系统,较低的分辨率播放效果会更好。之后也可以调整为全分辨率,然后输出最高质量的文件。 现在,您可以调整片段的摄影机设置,比如饱和度、对比度和中点等。这将影响项目中设置为使用“项目”解码的所有片段。使用调色页面为片段调色
将片段添加到时间线,并且添加了标题之后,就可以开始使用调色页面进行调色了。调色页面非常强大,影片的整体风格将在这里成型。在这个例子中,我们将首先平衡片段色彩,使它们保持一致性。在此期间,您可以随时回到快编或剪辑页面对素材进行调整。 调色页面可用来调整素材的画风。从很多方面来看,调色本身就是一门艺术。您在进行调色的时候,会将自己的情感注入到作品当中。这是工作流程当中极具创意的一个环节,当您看到自己精心雕琢的作品呈现在荧幕之上时,也会收获满满的成就感!通常来说,这是调色的第一步,也就是我们常说的“一级校色”。完成一级校色之后,就要进入二级调色阶段。在这个阶段,您可以对画面中的具体对象进行细致精准的色彩调整。这是个充满趣味的过程,一般会放在一级校色之后进行,因为这样能使制作流程更加高效,效果也会更好! 首先,点击“调色”选项卡,打开“调色”页面。 该页面中有Camera Raw设置、色轮、曲线面板和常用的调色工具以及预览和节点窗口。当您看到面前这些大量工具时不用慌张,它们都是能够帮助您获得最精彩画面的实用功能。这一入门章节会展示基本操作,要活的更详细的介绍,请查阅操作手册中的相关内容。操作手册将为您详细介绍每项功能,以及如何按照简单易行的步骤进行使用。从中您可以了解到专业人士在高端调色工作室所使用的技能。 一般来说,第一步就是进行一级校色,对片段的暗部、中间调和亮部电平进行优化。您可以通过调整“暗部”、“中灰”和“亮部”设置来实现。这可以让您的素材画面有一个干净平衡的起点,从而更好地开展影片调色工作。优化电平时,使用示波器作为参考会很有帮助。使用示波器
大多数调色师都会通过创意调色来着重突出影片所要表现的情感,并使用监视器来辅助他们得到想要的画面风格。您可以观察日常物品以及不同的光线和它们之间产生的互动,并通过您的想象力和实践来获得灵感。  分显示波器可帮助您优化画面的亮部、中间调和暗部。 调色的另一个途径是使用内置的示波器对镜头画面进行色彩平衡处理。您可以点击“示波器”按钮打开单个视频示波器显示,该按钮位于设置面板工具栏右起第二个。您可以选择显示波形示波器、分量示波器、矢量示波器和直方图。您可以使用这些示波器来监看色调平衡,检查视频电平并防止暗部色彩挤压及亮部裁切限幅,还能监看片段中出现的任何偏色现象。 “色轮”设置面板中设有“暗部”、“中灰”和“亮部”控制项,通常可作为第一轮调整使用。如果您具备调色背景,就应该已经在其他软件中接触过这些色彩和对比度调整控制。  “暗部”、“中灰”、“亮部”、“偏移”色轮用于控制片段的色彩及色调平衡。拖动并来回滚动色轮下方的滚轮可对所有色彩的每种色调区域进行统一的调整。 如果想要使用鼠标来更加准确地控制每类色彩,您可以将色轮更改为“一级校色条”模式,具体调整每个色彩和亮度通道,分别控制暗部、中灰以及亮部控制项。只需选择色轮右上方附近的下拉菜单中的“一级校色条”即可切换模式。 - 首先请在色彩时间线上选中一个片段,点击位于第一个色轮下方的“暗部”滚轮。来回滚动该滚轮来查看该参数变化对画面的影响。您可以看到画面中暗部的亮度会相应提高或降低。请根据需要进行设置,使暗部区域获得最佳表现。如果“暗部”参数提升过度,图像暗部的细节就会丢失,您可以参考分量示波器加以避免。波形图上的暗部位置以恰好位于分量示波器的底线之上为最佳。 - 调整“亮部”: 点击“亮部”滚轮并来回滑动。该参数可调整亮部信息, 即片段中最亮的部分。亮部信息位于分量示波器的波形顶部。如果画面有充足明亮的风光, 那么该画面在示波器中以恰好位于波形顶线之下为最佳。如果亮部信息超越了示波器波形的顶线, 那么这部分信息将被切掉, 而您画面中最亮部分的内容将缺失。 - 调整“中灰”:点击位于色轮下方的“中灰”滚轮并来回滑动。在提升中灰值的同时,您可以观察到画面的亮度随之增加,而且波形的中段部分也会随之移动。该值体现的是片段中的中间调。通常中间调的波形位置以位于示波器的 50% 至 70% 处为最佳。但是,根据您需要的创意风格以及灯光条件,这一参数或有所不同。 此外,您还能使用曲线设置面板来实现一级调色。只需通过点击操作在曲线图中的对角线上创建控制点,并上下拖拽来调整画面不同区域的主RGB对比度色调即可。曲线调整的最佳位置位于底部三分之一、中部及顶部三分之一处。 DaVinci Resolve中还有很多方式来完成一级调色。  曲线面板工具也可用来进行一级调色,或使用Power Window来强化片段中的局部区域。二级调色
如果要对画面中的特定部分进行调整,那么您就需要使用二级调色。目前为止,您使用暗部、中灰和亮部等参数所做的调整都会同时影响画面整体效果,因此这一过程被称为“一级校色”。 但是,如果需要调整画面中的特定部分,例如要美化画面中草地的部分,或要加深天空的蓝色,那么就要用到二级调色功能。进行二级调色时,您可以选中局部画面内容,并只对选中部分来单独调整。您可以使用节点将多个二级调色操作堆栈在一起,这样就可以一直处理画面各部分内容,直至所有部分完成相应的处理!此外,您还能使用窗口和跟踪功能,让画面中的选定部分跟随主画面一起移动。限定某一色彩
很多时候您要突出强调片段中的某一色彩,比如路边的草坪和天空的蓝色,或者您可能需要调整画面中某个对象的色彩来吸引观众的注意力。通过HSL限定器工具可以让您轻松实现这一操作。  当您需要突出强调画面中的某些部分、增加对比度或要将观众的注意力集中到某些区域时,使用HSL限定器选择画面色彩十分实用。如何限定某一色彩:
添加一个新的串行节点。 2 打开“限定器”设置面板,确保选中“选择范围”拾色器工具。 3 点击片段中您想要调整的色彩。 4一般情况下,您需要进行一些调整来柔化所选对象的边缘,且该操作仅对所选颜色有效。点击检视器上方的“突出显示”按钮查看所选内容。 5 调整“色相”窗口中的“宽度”控制来控制所选内容的宽窄。 尝试调整高区柔化、低区柔化以及柔化程度控制工具来观察这些参数如何细化您的所选内容。然后您就可以使用色轮和自定义曲线对所选色彩进行调整了。 有时,所选色彩会溢出到镜头中其他不需要调整的部分。您可以使用Power Window将不需要调整的部分通过遮罩功能隔离出来。只需创建新的Power Window窗口,并调整其形状,让它只包括所选色彩的区域。如果所选色彩在镜头中处于移动状,您可以使用跟踪功能来跟踪Power Window。添加Power Window
Power Window是极其高效的二级调色工具,它可以隔离片段中的特定区域。这些区域不一定是静止对象,您可以跟踪它们使之随着摄影机的平移、竖移和转动,以及所选部分自身的移动一同移动。  使用Power Window将不希望受到HSL限定器二级调色操作影响的区域隔离出来。 例如,您可以跟踪一个位于人物上的窗口来仅对窗口中的对象进行色彩和对比度调整,却不会影响该人物周围的画面内容。此类调色操作可以将观众的注意力转移并集中到您想要强调的画面部分。如何在片段上添加Power Window:
1 添加一个新的串行节点。 2 打开“窗口”面板,点击形状图标来选择一种窗口形状。选中的窗口形状将显示在节点上。 3 点击并拖动该形状周围蓝色的点来重新调整它的大小。红色的点可调节其边缘柔化程度。点击并移动中心的点可将该形状移动到想要隔离的位置。使用与中心点连接的点来旋转窗口。现在您就可以对画面的特定部分进行调色了。  Power Window可以让您对画面中的特定部分进行二级调色。跟踪窗口
由于拍摄画面中的摄影机、物体或区域可能会移动,因此为了确保窗口位于所选物体或区域,就需要使用DaVinci Resolve强大的跟踪功能。跟踪器可分析摄影机或画面中物体的平移、竖移以及缩放和旋转,以便您添加的窗口可始终跟随所选对象。如果不进行窗口跟踪,您的调色操作可能会离开所选目标并给您造成不必要的麻烦。  您可以使用跟踪器功能来跟踪片段中的对象或区域,以便Power Window跟随对象移动。如何对移动的物体进行窗口跟踪:
1 创建新的串行节点并添加一个Power Window。 回到片段开头部分放置窗口并调整大小,以便仅突出显示需要的区域。 3 打开“跟踪器”面板。根据需要勾选或取消勾选相应的“分析”复选框,为片段选择平移、竖移、缩放以及旋转等相应的3D设置。 4 点击复选框左侧的向前箭头。然后aVinci Resolve将会在您的片段上应用一组跟踪点,并逐帧分析对象的移动。完成跟踪后,Power Window将跟随片段中的移动路径。 大部分情况下使用自动跟踪便可以成功完成上述操作,但是有时候场景会比较复杂,并且有些物体可能会从您选中的区域前景越过,这会干扰并影响跟踪功能。此时您可以使用关键帧编辑器来手动解决这一问题。请参考DaVinci Resolve操作手册获得更多信息。使用插件
从事二级调色时,您可能还需要添加ResolveFX或OpenFX插件在“调色”页面快速创建有趣的画面风格和效果,或在“剪辑”页面为片段添加富有创意的转场和特效。ResolveFX会随DaVinci Resolve一同安装,OFX插件可通过第三方供应商购买或下载。 安装OFX插件后,只要开启“节点编辑器”右侧的OpenFX检查器就能在调色页面中打开这些插件或ResolveFX插件。创建了新的串行节点后,只需点击“OpenFX”按钮打开特效库面板,然后将一个插件拖放到这个新节点上即可。如果该插件具有可编辑设置,您可以在相邻的“设置”面板中使用这些设置。 您可以在“剪辑”页面中打开“特效库”里的“OpenFX”面板,将所选插件拖拽到时间线的视频片段或轨道上方(视插件具体要求而定),就可以在片段上添加插件滤镜、生成器和转场。  OFX插件是您发挥想象力、进行充满趣味和个性创作的一种快速便捷的途径。混合音频
在剪辑页面混合音频
项目剪辑和调色完毕后,就可以开始混合音频了。DaVinci Resolve拥有一套实用的工具,可直接在剪辑页面完成项目的剪辑、混合及音频母版等制作。对需要更高级音频工具的项目而言,Fairlight页面可提供一整套音频后期制作环境。如果您已经比较熟悉剪辑页面,想要直接跳至Fairlight页面,可跳过此章节,直接阅读下个章节。添加音频轨道
如果您正在剪辑页面并想要为基本声音剪辑文件混合大量音效和音乐,只需根据需要添加更多音频轨道即可。当您想要构建声效并将音频元素分离到单独的轨道上用于如对白、音效以及音乐等的混音时,这一功能非常实用。在剪辑页面添加音频轨道
在时间线上任意一个音频轨道的名称旁边右击并选择“添加轨道”,然后根据需要选择“单声道”、“立体声”和“5.1声道”选项,从而在轨道列表底部添加一个轨道。或者,您也可以选择“添加自定义轨道”,然后选择将一个或多个新轨道放置在哪个位置。 新的音频轨道将出现在时间线上。 提示 如果您在创建轨道之后想要进行更改,可以在轨道名称一侧右键点击,并选择“将轨道类型更改为”,然后选择如立体声、单声道或5.1声道等音频轨道类型。在时间线上调整音频电平
时间线上的每个片段音频都包括一个音量叠加显示,只要用指针上下拖动即可设置片段的电平。这个叠加显示与检查器中的音量参数是一致的。  拖动音量叠加显示来调整片段电平 对需要更高级音频工具的项目而言,Fairlight页面可提供一整套音频后期制作环境。Fairlight页面
DaVinci Resolve中的“Fairlight”页面是用于调整项目音频的。在单检视器模式下,该页面为您的项目提供了优化音频轨道界面,显示有扩大的混音器和自定义监听控制,可让您轻松地评估和调整电平从而构建自然和谐的混合音效。当您看到面前这些大量工具时不用慌张,它们能够帮助您为项目获得最佳音质。  本手册只是对Fairlight页面功能进行了基本概述,如果想要了解各个功能详情,请查阅DaVinci Resolve操作手册。DaVinci Resolve操作手册详细介绍了每个工具的用途并通过易于操作的步骤描述了如何使用这些工具。音频时间线
- 轨道标头:每个轨道的左侧是轨道标头区域,显示了轨道编号、轨道名称、轨道颜色、音频通道、推子值以及音频表等信息。轨道标头还包括锁定和解锁轨道,以及单声道和静音控制等不同控制选项。这些控制选项可帮助您管理和组织轨道,让您挨个预览单个轨道。 - 轨道:在Fairlight页面上,每条轨道会进行细分,显示出片段音频的各个声道,便于剪辑和混音。剪辑页面则会将这些单独的音频通道隐藏起来,只在时间线上显示一个单独的片段,避免了管理大量轨道的视觉混乱,从而为多通道源片段的剪辑工作带来便利。  A1轨道的轨道标头显示了一条轨道的单音轨代表了单声道音频,2轨道标头则显示了两条轨道的立体音轨代表了自适应立体声音频。什么是总线?
总线是您从时间线上指派多条音轨的目标通道,从而将它们混合成单个信号,以便通过一个通道条进行控制。 - 主混总线:“主混总线”通常是一个节目和每个新项目的主要输出,开始从单个“主混总线”入手,再到默认指派的所有轨道。“主混总线”将时间线上的所有轨道合并成一个信号,从而当为每个单独轨道调整好电平后,就可以调整混音的整体电平。 - 子混总线:“子混总线”可将同类音频的多个轨道合并在一起,例如对白、背景音乐或特效等,因此所有属于通过类别的音频可以混合成为单个音频信号。例如,您现有五个对白轨道,就可以把所有五个对白轨道的输出指派到一个“子混总线”,这样所有的对白的电平就可以通过一套控制进行混合了。这一子混总线可以单独渲染或发送到主混总线进行渲染。调音台
时间线上的每条音轨在混音器上都对应于一个单独的通道条,默认设置下在右侧会有一个标有“M1”的单独条块对应于“主混总线”。随着您创建其他的“主混总线”和“子混总线”,右侧会相应地出现带有控制选项的其他通道条。这里提供了一组图表控制工具,让您可以将轨道通道指派到输出通道、调整均衡器和动态、设定电平和记录自动化、调整立体声声相和环绕音频、以及静音和单声道轨道等处理。  图为调音台,其多个通道条分别对应的是时间线上的多个轨道。使用均衡器加强音频
调整完项目中音频片段的音频电平后,您可能会发现音频还需要进一步微调。有些情况下,您可能会发现对白、音乐和音效在音频频谱的相同频段上互相干扰,导致音频太过嘈杂且不清晰。这时使用均衡器会有帮助,因为它能帮助您判断出每个音轨在音频频谱上所处的具体频段位置。您还可以通过均衡器从音频中移除不想要的元素,它可以隔离或降低包括隆隆声、嗡嗡声、风声、嘶嘶声等某些特定频率的电平,或者能让总体音效变得更优质、更悦耳。 DaVinci Resolve提供了均衡器滤波器可应用于每个单独片段的片段电平上,或应用在整个轨道的轨道电平上。时间线上的每个音频片段在检查器面板中具有四个频段的均衡器,每个轨道在调音台面板中具有六个频段的参量均衡器。这些图表和数字控制可增强或衰减频率的不同范围,不同的滤波器可让您定义均衡器曲线的形状。  四频段均衡器可应用到时间线上的每个片段 外部频段让您可以通过上限、下限、高通和低通滤波器进行频段滤波器调整。通过式滤波器会影响所有高于或低于某个特定频率的频率,将这些频率从信号中彻底移除。例如,高通滤波器可以让高频率通过滤波器,并同时切除低频。位于截止频率以外的任何频率则会以向下倾斜曲线的方式逐步剪切。 搁架式滤波器相对显得平和一些,如果您只想对信号的高频或低频部分进行塑形,而并非完全滤除这些频段,就可以使用这一滤波器。搁架式滤波器可以均匀地增强或减弱目标频率以及高于或低于目标频率的部分,这取决于您使用的是高架还是低架滤波器。 频段控制的中部设置可让您进行很广泛的一系列均衡器调整,可在低架、钟型、陷波和高架滤波器选项间进行切换。 - 钟型滤波器:钟型滤波器可以增强或减弱钟型曲线给定中心点周围的频率,正如这一名称所暗示的该曲线的形状像钟罩。 - 陷波滤波器:陷波滤波器允许您瞄准特定的窄频率范围。比如在50或60Hz时去除电源哼声。 低架滤波器:低架滤波器会增强或降低下限目标频率,以及之下的所有频率。 高架滤波器:高架滤波器会增强或降低上限目标频率,以及之上的所有频率。为单个片段添加均衡器:
1 在时间线上选中您想要为其添加EQ滤波器的片段。 2 点击检查器再点击“片段均衡器”启用按钮。为轨道添加均衡器:
1 在混音器中双击一个轨道的均衡器区块,从而将该轨道的均衡器打开。 2 从下拉菜单中选择您希望调整的频段滤波器类型。  调音台面板中的均衡器区块显示了轨道已应用均衡器曲线  六频段参量均衡器可应用到每个轨道 为片段或轨道添加均衡器后,就可以为每个频段调整其均衡器了。需要注意的是,选择不同的频段滤波器可能会有不同的控制。为频段滤波器调整均衡器:
从下拉菜单中选择您希望调整的频段滤波器类型。 调整“频率”值可为均衡器调整选择中心频率。 调整“增益”值可增强或减弱该频段的频段。 4 使用“品质因数”可调整作用频率的带宽。 使用重置按钮可将均衡器窗口内的所有控制重设回默认设置。 Fairlight还设有很多控制可让您改善每条音轨的音质。您可以添加更多轨道并通过总线来进行组织管理,还可以添加延迟或混响,逐步完善您的混音。在Fusion页面添加视觉特效和合成效果
完成剪辑后,您可以打开Fusion页面,在DaVinci Resolve中添加2D或3D视觉特效和动态图形。与基于图层的合成软件不同,Fusion采用节点式操作,能让您更加自由地创建复杂效果,同时还可将图像数据指派到任何方向。节点窗口清楚显示了流程中使用的所有工具。如果您使用过调色页面的节点工作流程,就并不会对节点窗口感到陌生。 Fusion页面
上方配有两个带播放控制的检视器窗口,用于查看媒体,右边的检查器窗口用于访问工具设置,下方的节点窗口用于创建合成。虽然检视器和播放控制始终可见,您可以点击显示器顶部界面工具栏中的图标来显示或隐藏节点窗口和检查器窗口,以及特效库,样条线和关键帧编辑器等其他窗口。  媒体池:媒体池的功能与剪辑页面中显示的相同。只需将媒体文件从媒体夹直接拖进合成即可。 - 特效库:在特效库中,Fusion工具和模板都按照粒子、跟踪、滤镜和发生器等进行归类。您可以点击工具或者将它拖到节点区域,然后添加到合成里。媒体池和特效库占用同样的屏幕区域,您可以在两者之间切换,让检视器的面积尽量大。 - 片段:点击片段选项卡会显示或隐藏代表时间线上相应片段的缩略图。缩略图位于节点编辑器下方,便于您即时前往其他片段。  右键点击缩略图,然后选择“创建新的合成”,可创建合成的新版本。 检视器:检视器总是可见,以便您查看不同的合成视图,3D投影的总体3D投影,摄影机输出,或者最终的渲染输出。这些检视器还可以用来查看各项修改对特定元素所产生的影响。您还可以选择查看的节点,只要点击一个节点,按数字键“1”即可在左侧检视器中查看,按数字键“2”即可在右侧检视器中查看。您可以通过节点下方的白色按钮图标判断出该节点被指派到哪个检视器。如果您使用外部视频监看,则会出现第三个按钮,可用来将媒体指派到外部视频监视器上。 提示您也可以通过将节点直接拖入检视器的方式,将节点指派给相应检视器。 您可以通过检视器下方的播放控制跳过片段的头或尾,正放、倒放或停止播放。时间标尺可显示片段的总体范围,黄色标记代表入点和出点。  时间标尺上的黄色标记代表片段在时间线上的入点和出点。如果您使用Fusion片段或复合片段,时间标尺会只显示时间线上的片段时长,不显示余量。 - 节点:节点页面的核心,您可以在这里将一个节点工具的输出端与另一个节点工具的输入端连接到一起,创建自己的节点树。这个区域会根据打开的编辑器而改变大小,比如样条线或关键帧编辑器。节点区域顶部的工具栏配有最常用的工具,便于您快速调用。 - 样条线:样条线编辑器打开时会出现在节点窗口的右侧。您可以使用该编辑器对每个节点进行精准调整,比如用贝塞尔曲线对两个关键帧之间的动画进行平滑处理。 - 关键帧:使用关键帧编辑器可以添加、删除或者修改每个工具的关键帧。关键帧编辑器也位于节点检视器的右侧。 -元数据:元数据窗口显示当前片段可用的元数据,包括编解码格式、帧率和时间码。 检查器:位于右上角的检查器可显示一个或多个选中节点的所有设置和修改器。其他选项卡选项也会出现,让您快速访问按种类排序节点的其他设置。  文本检查器中有其他选项卡,包括文本、布局、转换、着色、画面和设置等。Fusion使用入门
开始使用Fusion时,将播放头放在时间线上的任何片段上,然后点击“Fusion”按钮,即可打开Fusion页面。 在Fusion页面上,片段在标为“Medialn”的媒体输入节点中立即可用。所有合成都以“Medialn”和“MediaOut”两个节点为起点。Medialn节点表示时间线播放头所在位置最上方的片段,下方所有片段均被忽略。您在剪辑页面中对片段应用的所有调整全部包含在内,比如转换工具和裁切修改。  名为“MediaOut”的媒体输出节点将输出画面发送回DaVinci Resolve剪辑页面上的时间线。 提示 在剪辑页面的片段上应用的ResolveFX或OFX插件不会应用于Fusion页面。这是因为Fusion特效发生在调色和OFX/ResolveFX处理之前。如果您希望在Fusion特效之前应用OFX,就需要先右键点击剪辑页面中的相应片段,选择“新建Fusion片段”,然后再点击Fusion页面。了解节点
为了有助于理解,您可以把每个节点想象成代表单一工具或特效的视觉图标。节点之间相互连接,创建出总体合成,就像蛋糕的各种原料。了解每个节点的输入输出非常重要,因为这能帮助您在创建精细的视觉特效时,把握合成的流程顺序。 有些工具设有多个输入和输出端与其他节点连接。比如“Merge”(合并),该节点可以连接前景输入、背景输入和遮罩输入用于蒙版或抠像。  前景输入 背景输入 效果遮罩输入 输出 节点上有多个输出意味着单一节点能够连接合成中的许多不同节点,所以与基于图层的软件不同,您不需要复制片段。相连节点之间线上的箭头显示了图像数据流动的方向。在节点编辑器中添加节点
如要添加特效,只需将节点放在Medialn"与“MediaOut"节点之间的线上即可。 这一操作可通过多种方式完成。您可以按住SHIFT按钮,把节点放在两个节点之间;或者点击希望添加特效的节点,然后选择想要添加的工具。新节点会自动连接到选定的工具上。您也可以把节点添加到节点窗口中的任何地方,然后将一个节点的输出端拖到另一个节点的输入端,手动完成节点之间的连接。  最常用的工具是2D和3DMerge(合并)节点。该节点就像一个中枢,它能将节点编辑器上的各个工具合并起来,变成一个单一输出。 合并节点拥有控制选项,可以选择输入的管理方式,包括大小、位置和混合等设置。选定合并节点后,可以在检查器面板里访问这些设置。 节点面板上方的工具栏包含最常用工具的图标,您可以点击这些图标添加节点,或者将工具拖入节点面板。如果您想看到所有可用的工具,可点击左上角的“特效库”,然后扩展“工具”选项。这里的所有工具都按类别排序,并且提供了一组预先创建的“模板”,比如镜头光斑、着色器和背景等。 提示 如果您熟悉工具名称,可以按住键盘上的“SHIFT”,同时按下空格键,“选择工具”菜单就会出现。您在输入工具名称时,菜单会建议相关的工具。这是选择工具的一个非常快速的方法。使用检查器面板调整节点
您可以使用检查器面板调整节点设置。点击希望修改的节点,面板会更新显示相应的设置和控制。 使用Fusion时,您可以在一个检视器中查看正在修改的节点,同时在另一个检查器中查看该节点在合成画面中的整体效果。例如,您可以修改“Text+”文本节点的大小和中心位置,并同时在检视器中查看该节点和合并节点,这样就可以查看文本与背景的匹配情况。  如图所示,被选中的节点会显示红色边框。图中的检查器面板显示的是文本节点的布局选项卡控制。 根据节点任务,您可以调整不同的参数和设置,从调整大小和中心位置,到修改发射器节点的粒子数量。设置关键帧并修改一段时间内的设置就会产生动画效果。制作关键帧
在检查器窗口中右键点击一项设置,然后在上下文菜单中选择“动画”即可设置关键帧。该项设置右侧的关键帧图标会变红。这代表关键帧已启用,您做的任何修改只会应用于当前帧。当修改另一个帧的设置参数,创建两个或多个关键帧时,帧之间会添加过渡插值。您可以利用关键帧图标两侧的箭头,准确地将播放头移动到时间线上特定的位置。 样条线面板能为您提供更多控制关键帧动画的选项。您可以选择关键帧,比如第一个和最后一个关键帧,按下“SHIFT”+“s”,或者右键点击关键帧然后选择“平滑度”,即可将这些帧之间的动画平滑处理为一条贝塞尔曲线。  图中的“大小调整”关键帧动画已经被平滑处理为一条贝塞尔曲线。您可以点击贝塞尔手柄,缩短或拉长曲线,或者点击关键帧方块图标移动关键帧位置。使用动态跟踪器和添加文本工具
为了更好地演示Fusion的使用方法,我们将举例说明如何使用跟踪器工具跟踪片段中的元素,以及如何使用跟踪数据添加文本,并将文本附在元素上。 “跟踪器”工具会在一定时间里跟踪x和y轴上的像素,并且生成数据,您可以用这些数据附加其他元素。当您想要把文本的位置与移动中的物体匹配时,比如在道路上行驶的汽车,或者飞过画面的鸟等,这项功能非常实用。 1 在“特效库”中选择“跟踪”工具,然后把它拖到Medialn"和“MediaOut”节点之间的线上。然后,点击这个跟踪器节点,在检查器中显示它的属性。 2 按键盘数字键“1”,可在左侧检视器中查看跟踪器节点。相应检视器中会显示带有跟踪器的片段,并且跟踪器位于默认位置。将鼠标指针悬停在跟踪器上方可显示出跟踪器控制柄。点击左上角的跟踪器控制柄,将跟踪器拖到片段中相应的AOI区域。高对比度的区域效果很好,例如汽车引擎盖上的标志。跟踪器会放大图像区域以获得更高的精确度。 3 到检查器窗口中,点击“正向跟踪”按钮开始跟踪。跟踪完成后会显示通知窗口。点击“OK”确定。  检查器面板中设有跟踪选项,其中包括从尾帧或当前帧反向跟踪,停止跟踪,从当前帧或首帧正向跟踪。 提示 当您的AOI区域从渲染范围消失时,比如汽车或鸟离开画面,从当前帧反向跟踪或正向跟踪就非常实用。这项功能可以只跟踪相关的影像。 现在,您就可以利用跟踪数据,将动态路径应用到文本工具上。 4 点击常用节点工具栏中的“Text+”文本节点图标,将其拖入跟踪器节点旁边的节点面板。将“Text+”节点的输出方块与跟踪器上的绿色前景输入端连接起来。  5 点击跟踪器节点,按数字键“1”,即可在左侧的检视器中看到合并结果。在跟踪器节点的检查器面板中点击“Operations”(操作)选项卡。把鼠标指针悬停在选项卡上方就能看到相应名称。点击“Operations”旁边的下拉菜单,然后选择“Match Move”(动作匹配)。 6 点击“Text”文本节点可在检查器中显示属性。在文本框中输入文本,按照合成要求修改字体、颜色和大小。 来自跟踪器的跟踪位置数据将被应用于您的文本。如果您希望调整文本的位置偏移,点击检查器面板中的“Trackers”(跟踪器)选项卡,然后用x和y偏移旋钮修改位置。  跟踪器检查器面板底部的旋钮可用于调整文本的偏移位置。 现在,您播放合成画面时,就能查看到附加在被跟踪物体上的文本了!  绿色方框代表当前跟踪器在绿色路径上的位置,红色虚线代表对文本进行动画处理所使用的位置偏移。 对于一些镜头,您可能需要在跟踪后删除跟踪点,比如当所跟踪的物体从屏幕上消失的时候。关键帧编辑器让这个流程变得非常简单。  7 点击检查器上方的关键帧选项卡,打开关键帧编辑器。应用了关键帧的节点在节点标签旁会有一个小箭头,只有添加了关键帧的参数才会在下方列表显示。点击放大图标,将方框拖到您希望编辑的区域。方框会放大选定的区域,方便您查看关键帧。 8 将播放头移动到最后一个关键帧的位置。如要删除关键帧,只需用鼠标在关键帧上拖画一个方框选定该关键帧即可。选定的关键帧会以黄色突出显示。点击右键,在菜单中选择删除。 提示 如果您的特效对系统要求非常高,可右键点击播放控制区域调出代理播放等检视器选项,帮助您在创建合成时获得尽可能高的系统性能。获取完整的播放选项详细信息,请参见Vinci Resolve手册。 现在您就完成了第一套在影像中匹配动态的合成动画文本! 如果您希望跟踪含有平面的画面,对其进行强化或替换,可以使用平面跟踪器。跟踪2D平面可用于修改移动画面中的标签和指示牌,甚至为镜头中的监视器或电视机添加画面。 获取更多关于平面跟踪器和DaVinci Resolve Fusion页面中许多强大工具的信息,请参阅DaVinci Resolve手册。 提示 当您在Fusion页面创建视觉特效时,请务必注意所创建的是D特效还是3D特效,因为这将决定所需合并工具的种类。您可能经常需要在一个合成中融入2D和3D特效。在这种情况下,请记住任何使用3D空间创建的视觉特效必须被渲染成2D图像,才能合并进2D合成。 我们相信您将从使用Fusion、探索Fusion的各种视觉特效和强大的DaVinci Resolve剪辑、调色及Fairlight页面过程中获得许多快乐。DaVinci Resolve强大而丰富的工具集定能助您实现无限创意!制作母版剪辑
完成剪辑、调色、视觉特效和混音制作之后,下一步就是分享您的作品。您可以使用ick Export按钮或者菜单选项来输出时间线的制作内容,具体可以作为一个独立文件输出,或者作为一组不同格式输出,您也可以使用交付页面的其他功能。  “交付”页面可用来导出您的剪辑。您可以从中选择多种不同的视频格式和编解码器。快速导出
依次选择“文件”>“快速导出”,使用其中一种导出预设,以便将您的作品从DaVinci Resolve中导出。您还可以使用快速导出功能,将您的作品导出并上传到支持的视频分享平台,比如YouTube、Vimeo以及Frame.io。快速导出步骤如下:
1 使用剪辑、Fusion或调色页面,在时间线上设置入点和出点(可选),从而在当前作品上选择需要导出的范围部分。如果没有选定时间线入点和出点,则会导出整条时间线。 依次选择“文件”>“快速导出”。 2 从快速导出对话框顶部的预设图标中选择一个,然后点击“导出”。 3 在导出对话框中选择一个位置,输入文件名,然后点击“保存”。然后会出现一个进度条对话框,显示导出所需时间。  快速导出对话框交付页面
在这一页面中,您可以选择想要导出的片段范围,以及片段格式、编码和分辨率。片段可以多种不同格式导出,比如使用8bit或10bit无压缩RGB/YUV、ProRes、DNxHD、H.264等编解码格式导出QuickTime、AVI、MXF和DPX等文件。如何导出剪辑的单个片段:
1 点击“交付”选项卡打开交付页面。 2 找到该页面左上角的“渲染设置”窗口。您可以选择多种导出预设,例如YouTube、Vimeo以及各类音频预设,或者也可以将该设置保留在其默认的“自定义”预设方案,再输入相应的参数来手动设定您自己的导出设置。在这个例子中,YouTube,然后点击该预设一侧的箭头图标,并选择1080p视频格式。 帧率将根据您的项目帧率设置而定。 3 您可以在每个预设下方查看到时间线文件名以及导出视频的目标位置。点击“浏览”按钮,选择导出文件的保存位置,然后从渲染选项中选择“单个片段”。 4 然后,您马上就会看到时间线上方出现选项框,并且“整条时间线”选项被选中。这样就会导出整条时间线,但是您可以根据需要选择一段时间线范围。要进行这一操作,只需要选择入范围和出范围,并使用“i”和“o”热键在时间线上选择入点和出点即可。 5 点击“渲染设置”底部的“添加到渲染队列”按钮。 您的渲染设置将被添加到页面右侧的渲染队列中。现在,您只需要点击“开始渲染”并监看渲染队列中的渲染进度即可。 当渲染工作完成后,您可以打开目标文件夹,双击新的渲染片段来查看完成后的剪辑片段。 对剪辑、调色、混音和视觉特效有了基本了解之后,就可以开始体验DaVinci Resolve了。更多关于如何充分利用每项功能完成令人满意的项目,请查阅DaVinci Resolve操作手册。使用ATEM Mini控制摄影机
ATEM Mini是进行多机位制作和流媒体直播的强大工具。您可通过ATEM Software Control软件控制面板中的摄影机控制功能,从ATEM Mini切换台切换并控制多达四台Blackmagic Pocket Cinema Camera。点击ATEM Software Control中的“摄影机”按钮,就可打开ATEM Mini的摄影机控制功能。 使用兼容镜头时,您可以通过这一功能轻松设置Pocket Cinema Camera的光圈、增益、对焦、细节和变焦控制,并能使用摄影机内置的DaVinci Resolve一级调色工具平衡摄影机色彩,缔造独特炫彩画面。 您还可以添加ATEM Camera Control Panel,一次就能快速精准地掌控四台Pocket Cinema Camera 摄影机!详情请参阅ATEM Mini操作手册。  ATEM摄影机控制 控制摄影机时,ATEM切换台控制的工作原理是通过ATEM Mini的所有HDMI输入向目标设备发送摄影机控制数据包。因此,您可以将ATEM Mini的HDMI输入连接到摄影机的HDMI接口上,摄影机将检测到HDMI信号中的控制数据包,并让您在摄影机内控制这些功能。 打开ATEM Software Control的偏好设置,并设置切换台的按钮映射,确保所切换的摄影机和Tally对应无误。但切换台与Blackmagic Pocket Cinema Camera的视频连接后,您还可以充分利用现场Tally提示灯的优势。摄影机控制面板
启动ATEM Software Control, 点击位于软件窗口底部的摄影机按钮后, 系统会显示一排有标签的 Blackmagic摄影机控制窗口, 窗口内包含各类工具, 可用来调节和美化每台摄影机的画面。这些控制窗口使用起来十分简单。只需以鼠标点击某个按钮, 或点击并拖动这些功能来调节即可。摄影机控制选择
摄影机控制窗口的上方有一排按钮,可用来选择您想要控制的摄影机所对应的机位编号。通道状态
通道状态位于每个摄影机控制窗口的顶部,可显示摄影机标签、正在播出提示灯以及锁定按钮。按锁定按钮可锁定某台摄影机的所有控制。正在播出时,通道状态会亮起红色,并显示正在播出提示。摄影机设置
主滚轮左下侧的摄影机设置按钮可用来调整每台摄影机的图像信号的细节设置。  每个摄影机控制窗口都会显示通道状态,以便您明确当前哪台摄影机正处于播出状态。使用色轮来调整每个YRGB通道的Lift、Gamma和Gain设置。细节
使用这一设置可对摄影机直播图像加以锐化。选择以下设置来降低或提高锐化程度:“关闭细节”、“默认细节”用于低锐化、“中等细节”和“高度细节”。色轮
色轮是DaVinci Resolve调色工具的一项强大功能,它常用于调整每个YRGB通道色彩的Lift、Gamma和Gain设置。点击色轮上方对应的三个按钮即可对相应选项进行调整。主滚轮
使用色轮下方的主滚轮可同时调整所有YRGB通道,也可只调整每个Lift、Gamma或Gain设置的亮度值。重置按钮
重置按钮位于每个摄影机控制窗口内右下方的位置,可方便您选择重置、复制或粘贴调色设置。此外,每个色轮也都有各自的重置按钮。按下重置按钮可将某项设置恢复到默认值或是复制/粘贴某项设置。粘贴功能不适用于锁定的控制窗口。 主重置按钮位于调色面板的右下角,可重重ift、Gamma和Gain色轮,以及对比度、色相、饱和度和亮度混合设置。您可将调色设置逐一粘贴到摄影机控制窗口上,也可一次性粘贴到全部摄影机上以保证整体统一效果。光圈、对焦、光圈上限设置和黑电平设置不受粘贴功能影响。当应用“粘贴到全部”操作时,软件会弹出警告消息请求确认,这样能防止意外将新的设置应用到正在直播且未启用锁定保护的摄影机上。  当应用“粘贴到全部”操作时,软件会弹出警告消息请求确认,这样能防止意外将新的设置应用到正在直播且未启用锁定保护的摄影机上。光圈/黑电平控制
光圈/黑电平控制位于每个摄影机控制窗口内的十字标交点上。当某台摄影机处于直播状态时,对应的控制按钮会亮起红色。 要控制光圈大小,请上下拖动该控制按钮。如只需调整光圈,请按住Shift键后拖动该按钮。 要降低或升高黑电平,请左右拖动该控制按钮。如只需调整黑电平,请在Mac计算机上按住command键,或在Windows计算机上按住Control键后,再拖动该按钮。  当某台摄影机处于直播状态时,对应的光圈/黑电平控制按钮会亮起红色。变焦控制
使用带有电子变焦功能的兼容镜头时,您可以通过缩放控制来实现镜头的变焦缩放控制。使用摄影机控制窗口的缩放功能和使用镜头上的变焦按钮一样,一端是长焦,一端是广角。点击位于光圈上限滑块上方的缩放控制,向上拖动可拉近镜头,向下拖动则可拉远镜头。光圈上限设置
光圈上限设置位于光圈/黑电平控制按钮右侧,可限制光圈范围。这一功能可防止直播画面出现过曝现象。 要设置光圈上限,请使用光圈控制按钮将光圈打开到最大,然后上下拖动光圈上限滑块设置合适的最大曝光值。光圈上限设置完成后,当您再次调整光圈时,光圈值就不会超过预先设定的最大曝光值了。光圈指示灯
光圈指示灯位于光圈/黑电平控制按钮的左侧,可直观显示镜头的光圈大小。光圈指示灯可反映光圈上限设置。自动对焦按钮
自动对焦按钮位于摄影机控制窗口内右下角的位置。按下此按钮后,可在支持电子对焦的主动式镜头上使用自动对焦功能。请注意,虽然大部分镜头支持电子对焦,但是有些镜头可设置为手动或自动对焦模式,因此请确保您的镜头设置为自动对焦模式以使用这一功能。有些情况下,您可以通过前后滑动镜头上的聚焦环来完成设置。  使用兼容镜头时,点击自动对焦按钮或左右拖动手动对焦控制可进行对焦。手动对焦调整
当您需要对摄影机进行手动对焦时,您可以使用位于每个摄影机控制窗口底部的对焦滚轮。左右拖动对焦滚轮可手动调整对焦,并同时查看摄影机的视频画面,确保拍摄到清晰图像。摄影机增益
摄影机增益设置可用来增加摄影机的增益。在Blackmagic Pocket Cinema Camera上,这一设置与ISO有关。这一功能在低光照拍摄条件下十分有用,它可为摄影机传感器增加额外的增益,或ISO,以避免图像欠曝。点击dB增益设置上的左右箭头来减少或增加增益值。 请根据需要适当使用增益功能,例如在户外拍摄,到了日落时光线会逐渐变暗,而您需要提升画面亮度时,可使用这一功能。请注意,增加增益值会增加画面噪点。快门速度控制
快门速度控制位于色轮和光圈/黑电平控制区块之间。要提高或降低快门速度,请将鼠标指针停留在快门速度栏,然后点击左右箭头图标。在Blackmagic Pocket Cinema Camera上,这一设置与快门角度有关。 如果您注意到光线闪烁,请适当降低快门速度以消除这一现象。如果不想通过摄影机增益功能来提升画面亮度,那么降低快门速度是个较好的办法,因为它可增加图像传感器的曝光时间。由于提高快门速度可降低动态模糊现象,因此如果需要拍摄出清晰的动作画面,您可以通过提高快门速度将动态模糊现象降到最低。白平衡
白平衡设置位于快门速度控制旁边,可通过点击色温指示器两侧的向左或向右箭头来进行调整。不同光源会发出暖色或冷色的色调,您可通过调整白平衡来加以补偿。这样可确保白色的部分在拍摄到的画面中依然为白色。  将鼠标指针停留在增益、快门速度栏以及白平衡指示器上时,会出现箭头图标,点击箭头图标可调整相应设置。DaVinci Resolve一级调色工具
如果您具备一定的调色功底,可以将摄影机控制界面从切换台CCU风格更改为和后期制作调色系统相似的一级调色界面。 您的Blackmagic摄影机自带DaVinci Resolve一级调色工具。Blackmagic摄影机内的调色界面和DaVinci Resolve完全相同,因此如果您使用过DaVinci Resolve,此刻就能将丰富的调色经验运用到现场制作了。您可从任何摄影机控制窗口中展开这一调色面板,展开后可获得一个完整的一级调色界面,可为摄影机提供更多调色控制和设置项。 该界面包含色轮组和饱和度等不同设置,您可以同时查看暗部、中间调和亮部的设置。请使用窗口顶部的摄影机按钮来选择不同摄影机。  点击DaVinci Resolve一级调色工具图标展开调色窗口来调整设置。  调色面板中的 Lift Gamma 和 Gain 三个色轮。色轮
在色轮内任意位置点击并拖动:
注意,执行此操作时,您并不一定非要点拖色彩平衡图标。色彩平衡图标移动时,下方对应的三个RGB参数会相应变化,反映所做的调整对各个色彩通道产生的变化。在色轮内按Shift键并点击鼠标:
可直接将色彩平衡图标移动到鼠标指针所指的精确位置,可快速实现大幅度调整。在色轮内双击鼠标:
重置调色设置,该项控制的主滚轮保持不变。点击色轮右上方的重置控制:
可重置色彩平衡控制及其对应的主滚轮。主滚轮
色轮下方的主滚轮用于单独调整每个YRGB通道的Lift、Gamma和Gain控制项。  左右拖动来调整主滚轮。使用主滚轮进行调整方法如下:
向左或向右拖动主滚轮:
向左拖动可使所选的画面参数变深,向右拖动可使该参数变浅。进行调整时,下方的各项YRGB参数会根据所做的调整发生相应变化。如只需对通道进行调整,请按住ALT键或Command键并左右拖动鼠标即可。由于这一调色系统采用的是YRGB处理方式,您可以充分利用创意,并且可以只调整Y通道,从而创作出独特的效果。当“亮度混合”滑块位于右侧时,可获得YRGB处理方式;当滑块位于左侧时,可获得常规的RGB处理方式。通常,大部分DaVinci Resolve调色师都使用YRGB调色方式,因为它能提供更多色彩平衡控制,而且不会影响整体增益,因此能更快完成并制作出理想效果。对比度设置
对比度设置可用来控制图像中最暗部和最亮部之间的差值。它与反向调整Lift和Gain主滚轮的效果类似。该滑块的默认设置为 50%饱和度设置
饱和度设置可用来增加或减少图像中的色彩含量。该滑块的默认设置为 50% 。色相设置
色相设置可用来将整幅图像的色彩按照色轮最边缘的色相依次调整。默认设置为180度,显示的是原始色相分布。增加或减少这一参数可沿色轮最边缘分布的色相前进或后退。亮度混合设置
Blackmagic摄影机内置的调色工具是基于DaVinci Resolve一级调色工具所设计的。DaVinci早在20世纪80年代起就开始制造调色工具,大部分好莱坞电影都选择使用DaVinci Resolve进行调色。 这意味着您的摄影机所配有的是一款有着独特创意的强大调色工具,而YRGB处理便是其中一项强大的功能。 调色时,您可以选择使用RGB或YRGB处理方式。高端调色师选择RGB处理方式,是因为这种处理方式能更精准地控制色彩,并且可以单独调整各个通道的参数,获得更具创意的选项。 当亮度混合控制滑块位于右侧时,输出 100% 的YRGB调色方式。当亮度混合控制滑块位于左侧时,输出 100% 的RGB调色方式。您可将亮度混合百分比设置在0到100之间的任何位置,以不同的混合输出GB和YRGB调色。 如何才能设置到最佳效果呢?这取决于您,因为调色需要的是创意,因此没有标准的参数要求。只要您满意,您的设置就是最佳方案!  左右拖动滑块来调整对比度、饱和度、色相以及亮度混合的设置。 如何才能设置到理想的效果呢?最终还是取决于个人,因为调色纯属创意过程,不存在所谓对与错。只要您觉得满意,那就是理想的设置。同步设置
连接后,摄影机控制信号会通过ATEM切换台发送到Blackmagic摄影机上。如果不小心从摄影机上对某项设置进行了调整,摄影机控制会自动重置该设置,使二者保持同步。 提示 每个摄影机控制器内的DaVinci Resolve一级调色工具都可通过DaVinci Resolve Micro Panel进行控制,使用硬件控制面板可以快速准确地进行调色操作。详情请参阅ATEM Mini操作手册。 备注如果一台摄影机通过HDMI连接到ATEM Mini,并且这台摄影机处于关闭状态,那么它就有可能会影响摄影机控制通讯。我们建议您为摄影机连接主电源,并且在关闭摄影机之前拔出HDMI线缆。使用第三方软件
将来自摄影机的素材片段复制到外接硬盘或者RAID上,再将素材导入DaVinci Resolve等编辑软件中,便可使用自己喜爱的软件来剪辑素材。您还可以为CFast或SD卡使用硬盘座或转接器,或者通过USB-C端口连接USB-C硬盘,直接导入来自存储介质的片段。处理CFast 2.0卡和SD卡上的文件
 从摄影机上取下CFast或SD卡,并使CFast2.0读写设备或CFast驱动器将其挂载在您的计算机上,就可直接在您的CFast卡上编辑。从CFast2.0卡或SD卡上导入您的素材片段步骤如下:
从您的Blackmagic Pocket Cinema Camera摄影机上取出CFast或SD卡。 使用CFast 2.0读卡器或SD卡和CFast读卡器,将CFast或SD卡挂载到Mac或Windows计算机上。 2 双击打开CFast或SD卡,您应该能看到一些列文件夹,这些文件夹中包含有Blackmagic RAW图像文件或QuickTime电影文件的列表。根据您选择的记录格式,您可能会看到不同格式的文件,但是它们应该都使用相同的文件命名格式。 3 现在您只需选中要从CFast或SD卡导入的文件,拖动到桌面或者其他存储盘中即可,或者使用剪辑软件直接从CFast或SD卡中读取文件。 从计算机上拔出CFast或SD卡之前,请务必先在Mac或Windows计算机上安全弹出CFast卡或SD卡。如果在未执行弹出操作的情况下直接移除存储卡,就可能会损坏素材文件。处理USB-C硬盘上的文件
如何从USB-C硬盘上导入素材片段:
从您的摄影机上拔出USB-C硬盘。 2 通过计算机上的USB-C端口将USB-C硬盘挂载到Mac或Windows计算机上。推荐使用USB3.0,因为USB2.0对于实时剪辑视频来说速度可能不够快。 3 双击打开USB-C硬盘后,您会看到包含QuickTime影片文件或Blackmagic RAW文件的一个列表。根据您选择的记录格式,您可能会看到不同格式的文件,但是它们应该都使用相同的文件命名格式。 选中需要从USB-C硬盘导入的文件,拖动到桌面或者其他存储盘中,或使用NLE软件直接从USB-C硬盘中读取文件即可。 5 从计算机上拔出USB-C硬盘之前,请务必先将USB-C硬盘安全弹出。使用Final Cut Pro X
若使用Final Cut Pro X剪辑片段,您需要创建一个具有合适视频格式及帧率的新项目。这个例子中使用的是ProRes 422 HQ 1080p24。  Final Cut Pro X项目设置 1 运行Final Cut Pro X, 到“Menu”(菜单)中选择“File”(文件)/“New Project”(新项目)后,会出现一个项目设置窗口。 2 给项目命名,并选择“Custom”(自定义)复选框。 3 将“Video Properties”(视频属性)设置为1080p HD, 1920×1080和24p。 4 将“Audio”(音频)和“Render Properties”(渲染属性)设置为“Stereo”(立体声),“48kHz”,和“Apple ProRes 422 HQ”。 5 点击“OK”确定。 若要将素材导入项目中,需到菜单栏中选择“File”(文件)/“Import”(导入)/“Media”(媒体),然后从CFast卡中选择要导入的素材。 现在可以将素材拖动到时间线上进行剪辑了。使用Avid MediaComposer2018
若使用Avid MediaComposer2018剪辑素材,您需要创建一个合适视频格式及帧率的新项目。本例子中的素材均使用1080p24的设置。  在Avid MediaComposer2018上设置项目名称和项目选项 1 运行Avid MediaComposer2018,“SelectProject”(选择项目)的窗口将会弹出。 2 点击“New Project”(新建项目)按钮,并且在该窗口中为项目命名。 3 到“Format”(格式)下拉菜单中选择HD1080>1080p/24并点击“OK”创建项目。 4 到“Select Project”(选择项目)中双击该项目将其打开。 5 依次选择“File”(文件)>“Input”(输入)>“Source Browser”(源浏览器)并导航到您想要导入的文件。 6 从下拉菜单中选择“TargetBin”(目标库)并点击“Import”(导入)。 当媒体库中显示出素材片段后,您便可以将素材拖动到时间线上进行剪辑了。使用AdobePremiereProCC
若使用AdobePremiereProCC剪辑AppleProRes422HQ素材,您需要创建一个具有合适视频格式及帧率的新项目。本例子中的素材均使用ProRes422HQ1080p25设置。  在AdobePremiereProCC上设置项目名称和项目选项 1 运行AdobePremiereProCC。在“Welcome”欢迎窗口中,选择“NewProject”(新建项目)。然后会出现一个项目设置窗口。 2 为项目命名。点击Browse”(浏览)选择安装项目的文件夹,选择了文件夹之后,点击“新建项目”窗口中的"OK”确定。 3 到AdobePremiereProCC的菜单栏,选择“File”(文件)/“import”(导入),然后选择想要剪辑的素材。然后您的素材便会在项目窗口中显示出来。 4 将您需要剪辑的第一段素材拖动到位于项目窗口右下角的“New Item”(新建项)图标上后,就会建立一段和您的视频设置相符的新序列。 现在可以将素材拖动到序列时间线上进行剪辑了。Blackmagic Camera Setup Utility实用软件
更新摄影机软件 - Mac
下载了Blackmagic Camera Setup Utility实用软件并解压缩后,请打开下载磁盘图标查看Blackmagic Camera Setup安装程序。 运行安装程序,根据屏幕提示完成安装。完成安装程序后,进入实用程序文件夹,打开"blackmagic Cameras"文件夹,里面含有本手册、Blackmagic Camera Setup Utility实用软件以及一个含有自述文件和相关信息的文件夹。同时还包含一个卸载程序可用于升级到Blackmagic Camera Setup较新版本。 更新摄影机软件 - Windows
下载了Blackmagic Camera Setup Utility实用软件并解压缩后,您会看到一个名为Blackmagic Camera Setup"的文件夹,该文件夹中含有PDF版操作手册以及Blackmagic Camera Setup安装程序。双击该安装程序,并根据屏幕提示完成安装。 在Windows10系统下点击开始按钮并选择“所有程序”。向下滚动到Blackmagic Design文件夹。从这里运行Blackmagic Camera Setup软件。在Windows8.1系统下,选择“开始”屏幕的向下箭头图标,并向下滚动到Blackmagic Design文件夹。从这里运行Blackmagic Camera Setup软件。升级摄影机的内部软件
在计算机上安装了最新版Blackmagic Camera Setup Utility实用软件后,请使用USB-C线缆连接计算机和摄影机。USB-C端口位于左侧面板。只需打开橡胶盖便可找到端口。 运行Blackmagic Camera Setup实用程序,并根据屏幕提示更新摄影机软件。摄影机重启出现“Select Language”页面。需要注意的是,更新摄影机软件会删除所有预设和自定义LUT,并重置所有设置。更新软件之前,不妨将这些数据导出到存储卡上进行备份。软件更新后,只要再从存储卡中导入预设和LUT就可以快速恢复。建议使用的记录存储介质
CFast 2.0卡
Pocket Cinema Camera 6K机型建议使用的存储介质
建议在Pocket Cinema Camera 6K机型使用以下几款CFast 2.0卡记录最高50fps的6K Blackmagic RAW 5:1影像:| 品牌 存储卡名称 容量 | ||
| Angelbird | AV PRO CF XT | 512GB |
| CinediskPro 510MB | /s CFast 2.0 | 256GB |
| Hagiwara Solutions | DC-SMAN64GA CFast 2.0 | 64GB |
| Hagiwara Solutions | DC-SMANA1GA CFast 2.0 | 128GB |
| KomputerBay 3400x | CFast 2.0 | 64GB |
| KomputerBay 3400x | CFast 2.0 | 128GB |
| Lexar | Professional 3400X CFast 2.0 | 128GB |
| Lexar | Professional 3500X CFast 2.0 | 128GB |
| ProGrade Digital | 510MB/s CFast 2.0 | 128GB |
| ProGrade Digital | 550MB/s CFast 2.0 | 256GB |
| ProGrade Digital | 550MB/s CFast 2.0 | 512GB |
| Transcend | CFX650 CFast 2.0 TS128GCFX650 | 128GB |
| SanDisk | Extreme Pro CFast 2.0 SDCFSP-64G-x46D | 64GB |
| SanDisk | Extreme Pro CFast 2.0 SDCFSP-128G-x46D | 128GB |
| SanDisk | Extreme Pro CFast 2.0 SDCFSP-256G-x46D | 256GB |
| SanDisk | Extreme Pro CFast 2.0 SDCFSP-512G-x46D | 512GB |
| Silicon Power | CFX310 CFast 2.0 | 512GB |
| Sony | CFast 2.0 G Series CAT-G64 | 64GB |
| Sony | CFast 2.0 G Series CAT-G128 | 128GB |
| Wise | CFA-2560 3400x CFast 2.0 | 256GB |
| Wise | CFA-5120 3500x CFast 2.0 | 512GB |
| Wise | CFA-10240 3500X CFast 2.0 | 1TB |
| 品牌 存储卡名称 容量 | ||
| Angelbird | AV PRO CF XT | 512GB |
| CinediskPro 510MB | /s CFast 2.0 | 256GB |
| Hagiwara Solutions | DC-SMAN64GA CFast 2.0 | 64GB |
| Hagiwara Solutions | DC-SMANA1GA CFast 2.0 | 128GB |
| KomputerBay | 3400x CFast 2.0 | 64GB |
| KomputerBay 3400x | CFast 2.0 | 128GB |
| Lexar Professional | 3400X CFast 2.0 | 128GB |
| Lexar Professional | 3500X CFast 2.0 | 128GB |
| ProGrade Digital | 510MB/s CFast 2.0 | 128GB |
| ProGrade Digital | 550MB/s CFast 2.0 | 256GB |
| ProGrade Digital | 550MB/s CFast 2.0 | 512GB |
| Transcend CFX650 | CFast 2.0 TS128GCFX650 | 128GB |
| SanDisk Extreme | Pro CFast 2.0 SDCFSP-64G-x46D | 64GB |
| SanDisk Extreme | Pro CFast 2.0 SDCFSP-128G-x46D | 128GB |
| SanDisk Extreme | Pro CFast 2.0 SDCFSP-256G-x46D | 256GB |
| SanDisk Extreme | Pro CFast 2.0 SDCFSP-512G-x46D | 512GB |
| Silicon Power | CFX310 CFast 2.0 | 256GB |
| Silicon Power | CFX310 CFast 2.0 | 512GB |
| Sony | CFast 2.0 G Series CAT-G64 | 64GB |
| Sony | CFast 2.0 G Series CAT-G128 | 128GB |
| Wise | CFA-1280 3400x CFast 2.0 | 128GB |
| Wise | CFA-2560 3400x CFast 2.0 | 256GB |
| Wise | CFA-5120 3500x CFast 2.0 | 512GB |
| Wise | CFA-10240 3500X CFast 2.0 | 1TB |
| 品牌 存储卡名称 容量 | ||
| Angelbird | AV PRO CF XT | 512GB |
| CinediskPro | 510MB/s CFast 2.0 | 256GB |
| Hagiwara Solutions | DC-SMAN64GA CFast 2.0 | 64GB |
| Hagiwara Solutions | DC-SMANA1GA CFast 2.0 | 128GB |
| KomputerBay 3400x | CFast 2.0 | 64GB |
| KomputerBay 3400x | CFast 2.0 | 128GB |
| Lexar Professional | 3400X CFast 2.0 | 128GB |
| Lexar Professional | 3500X CFast 2.0 | 128GB |
| Lexar Professional | 3400X CFast 2.0 | 256GB |
| ProGrade Digital | 510MB/s CFast 2.0 | 128GB |
| ProGrade Digital | 550MB/s CFast 2.0 | 256GB |
| ProGrade Digital | 550MB/s CFast 2.0 | 512GB |
| Transcend CFX650 | CFast 2.0 TS128GCFX650 | 128GB |
| SanDisk | Extreme Pro CFast 2.0 SDCFSP-64G-x46D | 64GB |
| SanDisk Extreme | Pro CFast 2.0 SDCFSP-128G-x46D | 128GB |
| SanDisk Extreme | Pro CFast 2.0 SDCFSP-256G-x46D | 256GB |
| SanDisk Extreme | Pro CFast 2.0 SDCFSP-512G-x46D | 512GB |
| Silicon Power | CFX310 CFast 2.0 | 256GB |
| Silicon Power | CFX310 CFast 2.0 | 512GB |
| Sony CFast | 2.0 G Series CAT-G64 | 64GB |
| Sony CFast | 2.0 G Series CAT-G128 | 128GB |
| Wise CFA | -1280 3400x CFast 2.0 | 128GB |
| Wise CFA | -2560 3400x CFast 2.0 | 256GB |
| Wise CFA | -5120 3500x CFast 2.0 | 512GB |
| Wise CFA | -10240 3500X CFast 2.0 | 1TB |
| 品牌 存储卡名称 容量 | ||
| Angelbird | AV PRO CF XT | 512GB |
| CinediskPro | 510MB/s CFast 2.0 | 256GB |
| Hagiwara Solutions | DC-SMAN64GA CFast 2.0 | 64GB |
| Hagiwara Solutions | DC-SMANA1GA CFast 2.0 | 128GB |
| KomputerBay 3400x | CFast 2.0 | 64GB |
| KomputerBay 3400x | CFast 2.0 | 128GB |
| Lexar | Professional 3400X CFast 2.0 | 128GB |
| Lexar | Professional 3500X CFast 2.0 | 128GB |
| Lexar | Professional 3400X CFast 2.0 | 256GB |
| ProGrade Digital | 510MB/s CFast 2.0 | 128GB |
| ProGrade Digital | 550MB/s CFast 2.0 | 256GB |
| ProGrade Digital | 550MB/s CFast 2.0 | 512GB |
| Transcend | CFX650 CFast 2.0 TS128GCFX650 | 128GB |
| SanDisk Extreme | Pro CFast 2.0 SDCFSP-64G-x46D | 64GB |
| SanDisk Extreme | Pro CFast 2.0 SDCFSP-128G-x46D | 128GB |
| SanDisk Extreme | Pro CFast 2.0 SDCFSP-256G-x46D | 256GB |
| SanDisk Extreme | Pro CFast 2.0 SDCFSP-512G-x46D | 512GB |
| Silicon Power | CFX310 CFast 2.0 | 256GB |
| Silicon Power | CFX310 CFast 2.0 | 512GB |
| Sony CFast | 2.0 G Series CAT-G64 | 64GB |
| Sony CFast | 2.0 G Series CAT-G128 | 128GB |
| Wise | CFA-1280 3400x CFast 2.0 | 128GB |
| Wise CFA | -2560 3400x CFast 2.0 | 256GB |
| Wise CFA | -5120 3500x CFast 2.0 | 512GB |
| Wise CFA | -10240 3500X CFast 2.0 | 1TB |
| 品牌 存储卡名称 容量 | ||
| Angelbird | AV PRO CF XT | 512GB |
| CinediskPro 510MB | /s CFast 2.0 | 256GB |
| Hagiwara Solutions | DC-SMAN64GA CFast 2.0 | 64GB |
| Hagiwara Solutions | DC-SMANA1GA CFast 2.0 | 128GB |
| KomputerBay | 3400x CFast 2.0 | 64GB |
| KomputerBay | 3400x CFast 2.0 | 128GB |
| Lexar | Professional 3400X CFast 2.0 | 128GB |
| Lexar | Professional 3500X CFast 2.0 | 128GB |
| Lexar | Professional 3400X CFast 2.0 | 256GB |
| ProGrade Digital | 510MB/s CFast 2.0 | 128GB |
| ProGrade Digital | 550MB/s CFast 2.0 | 256GB |
| ProGrade Digital | 550MB/s CFast 2.0 | 512GB |
| Transcend | CFX650 CFast 2.0 TS128GCFX650 | 128GB |
| SanDisk | Extreme Pro CFast 2.0 SDCFSP-64G-x46D | 64GB |
| SanDisk | Extreme Pro CFast 2.0 SDCFSP-128G-x46D | 128GB |
| SanDisk | Extreme Pro CFast 2.0 SDCFSP-256G-x46D | 256GB |
| SanDisk | Extreme Pro CFast 2.0 SDCFSP-512G-x46D | 512GB |
| Silicon Power | CFX310 CFast 2.0 | 256GB |
| Silicon Power | CFX310 CFast 2.0 | 512GB |
| Sony CFast | 2.0 G Series CAT-G64 | 64GB |
| Sony CFast | 2.0 G Series CAT-G128 | 128GB |
| Wise CFA | -1280 3400x CFast 2.0 | 128GB |
| Wise CFA | -2560 3400x CFast 2.0 | 256GB |
| Wise CFA | -5120 3500x CFast 2.0 | 512GB |
| Wise CFA | -10240 3500X CFast 2.0 | 1TB |
Pocket Cinema Camera 4K机型建议使用的存储介质
建议在Pocket Cinema Camera 4K机型使用以下几款CFast 2.0卡记录最高60fps的4K DCI Blackmagic RAW 3:1影像:| 品牌 存储卡名称 容量 | ||
| Angelbird | AV PRO CF | 512GB |
| Angelbird AV | PRO CF 1TB | |
| CinediskPro 510MB | /s CFast 2.0 | 256GB |
| Hagiwara Solutions | DC-SMAN64GA CFast 2.0 | 64GB |
| Hagiwara Solutions | DC-SMANA1GA CFast 2.0 | 128GB |
| KomputerBay 3400x | CFast 2.0 | 64GB |
| KomputerBay 3400x | CFast 2.0 | 128GB |
| KomputerBay 3700x | CFast 2.0 | 256GB |
| Lexar | Professional 3400x CFast 2.0 | 128GB |
| Lexar | Professional 3500x CFast 2.0 | 256GB |
| ProGrade Digital | 550MB/s CFast 2.0 | 128GB |
| ProGrade Digital | 550MB/s CFast 2.0 | 256GB |
| ProGrade Digital | 550MB/s CFast 2.0 | 512GB |
| SanDisk | Extreme Pro CFast 2.0 SDCFSP-256G-x46D | 512GB |
| Wise | CFA-1280 3400x CFast 2.0 | 128GB |
| Wise | CFA-2560 3400x CFast 2.0 | 256GB |
| Wise | CFA-5120 3500x CFast 2.0 | 512GB |
| Wise | CFA-10240 3500x CFast 2.0 | 1TB |
| 品牌 存储卡名称 容量 | ||
| Angelbird | AV PRO CF | 128GB |
| Angelbird AV | PRO CF | 256GB |
| Angelbird AV | PRO CF | 512GB |
| CinediskPro 510MB | /s CFast 2.0 | 256GB |
| Hagiwara Solutions | DC-SMAN64GA CFast 2.0 | 64GB |
| Hagiwara Solutions | DC-SMANA1GA CFast 2.0 | 128GB |
| KomputerBay 3400x | CFast 2.0 | 128GB |
| KomputerBay 3700x | CFast 2.0 | 256GB |
| ProGrade Digital | 550MB/s CFast 2.0 | 256GB |
| ProGrade Digital | 550MB/s CFast 2.0 | 512GB |
| SanDisk | Extreme Pro CFast 2.0 SDCFSP-64G-x46D | 64GB |
| SanDisk Extreme | Pro CFast 2.0 SDCFSP-128G-x46D | 128GB |
| SanDisk Extreme | Pro CFast 2.0 SDCFSP-256G-x46D | 256GB |
| Sony CFast | 2.0 G Series CAT-G64 | 64GB |
| Sony CFast | 2.0 G Series CAT-G128 | 128GB |
| Wise CFA | -1280 3400x CFast 2.0 | 128GB |
| Wise CFA | -2560 3400x CFast 2.0 | 256GB |
| Wise CFA | -5120 3500x CFast 2.0 | 512GB |
| Wise CFA | -10240 3500x CFast 2.0 | 1TB |
| 品牌 存储卡名称 容量 | ||
| Angelbird | AV PRO CF | 128GB |
| Angelbird AV | PRO CF | 256GB |
| Angelbird AV | PRO CF | 512GB |
| CinediskPro | 510MB/s CFast 2.0 | 256GB |
| KomputerBay | 3400x CFast 2.0 | 128GB |
| ProGrade Digital | 550MB/s CFast 2.0 | 256GB |
| ProGrade Digital | 550MB/s CFast 2.0 | 512GB |
| SanDisk Extreme | Pro CFast 2.0 SDCFSP-64G-x46D | 64GB |
| SanDisk Extreme | Pro CFast 2.0 SDCFSP-128G-x46D | 128GB |
| SanDisk Extreme | Pro CFast 2.0 SDCFSP-256G-x46D | 256GB |
| Sony CFast | 2.0 G Series CAT-G64 | 64GB |
| Sony CFast | 2.0 G Series CAT-G128 | 128GB |
| Wise CFA | -1280 3400x CFast 2.0 | 128GB |
| Wise CFA | -2560 3400x CFast 2.0 | 256GB |
| Wise CFA | -5120 3500x CFast 2.0 | 512GB |
| 品牌 存储卡名称 容量 | ||
| Angelbird | AV PRO CF | 128GB |
| Angelbird AV | PRO CF | 256GB |
| Angelbird AV | PRO CF | 512GB |
| CinediskPro | 510MB/s CFast 2.0 | 256GB |
| Ko mputerBay | 3400x CFast 2.0 | 128GB |
| ProGrade Digital | 550MB/s CFast 2.0 | 256GB |
| ProGrade Digital | 550MB/s CFast 2.0 | 512GB |
| SanDisk Extreme | Pro CFast 2.0 SDCFSP-64G-x46D | 64GB |
| SanDisk Extreme | Pro CFast 2.0 SDCFSP-128G-x46D | 128GB |
| SanDisk Extreme | Pro CFast 2.0 SDCFSP-256G-x46D | 256GB |
| Sony CFast | 2.0 G Series CAT-G64 | 64GB |
| Sony CFast | 2.0 G Series CAT-G128 | 128GB |
| Wise CFA | -1280 3400x CFast 2.0 | 128GB |
| Wise CFA | -2560 3400x CFast 2.0 | 256GB |
| Wise CFA | -5120 3500x CFast 2.0 | 512GB |
SD卡
Pocket Cinema Camera 6K机型建议使用的存储介质
建议在Pocket Cinema Camera 6K机型使用以下几款SD卡记录最高30fps的6K 16:9 Blackmagic RAW 5:1影像:| 品牌 存储卡名称 容量 | ||
| Angelbird | AV PRO SD V90 | 64GB |
| Sony Tough | SF-G32T | 32GB |
| Sony Tough | SF-G64T | 64GB |
| Sony Tough | SF-G128T | 128GB |
| Toshiba | Exceria Pro UHS-II 270MB/s SDXC | 64GB |
| Wise SD2 | -128U3 SDXC UHS-II | 128GB |
| 品牌 存储卡名称 容量 | ||
| Angelbird | AV PRO SD V90 | 64GB |
| Sony Tough | SF-G32T | 32GB |
| Sony Tough | SF-G64T | 64GB |
| Sony Tough | SF-G128T | 128GB |
| Toshiba | Exceria Pro UHS-II 270MB/s SDXC | 64GB |
| Toshiba | Exceria Pro UHS-II 270MB/s SDXC | 128GB |
| Toshiba | Exceria Pro UHS-II N502 SDXC | 128GB |
| Wise SD2 | -128U3 SDXC UHS-II | 128GB |
| 品牌 存储卡名称 容量 | ||
| Angelbird | AV PRO SD V90 | 64GB |
| Sony Tough | SF-G32T 32GB | |
| Sony Tough | SF-G64T | 64GB |
| Sony Tough | SF-G128T 128GB | |
| Toshiba Exceria | Pro UHS-II 270MB/s SDXC | 64GB |
| Toshiba Exceria | Pro UHS-II 270MB/s SDXC | 128GB |
| Toshiba Exceria | Pro UHS-II N502 SDXC | 128GB |
| 品牌 存储卡名称 容量 | ||
| Angelbird | AV PRO SD V90 | 64GB |
| Delkin Devices | Power SDXC USH-II | 64GB |
| Delkin Devices | Prime SDXC USH-II | 128GB |
| ProGrade Digital | V90 UHS-II 250MB/s SDXC | 128GB |
| ProGrade Digital | V90 UHS-II 250MB/s SDXC | 256GB |
| Sony Tough | SF-G32T 32GB | |
| Sony Tough | SF-G64T | 64GB |
| Sony Tough | SF-G128T 128GB | |
| Wise | SD2-64U3 SDXC UHS-II | 64GB |
| Wise | SD2-128U3 SDXC UHS-II | 128GB |
| Toshlba Excerla | Pro UHS-II N502 SDXC | 128GB |
| 品牌 存储卡名称 容量 | ||
| Angelbird | AV PRO SD V90 | 64GB |
| Delkin Devices | Power SDXC USH-II | 64GB |
| Delkin Devices | Prime SDXC USH-II | 128GB |
| Lexar | Professional 2000x UHS-II 300MB/s SDXC | 64GB |
| Lexar | Professional 2000x UHS-II 300MB/s SDXC | 128GB |
| ProGrade Digital | V90 UHS-II 250MB/s SDXC | 256GB |
| Sony Tough | SF-G32T 32GB | |
| Sony Tough | SF-G64T | 64GB |
| Sony Tough | SF-G128T 128GB | |
| Toshiba | Exceria Pro UHS-II 270MB/s SDXC | 64GB |
| Toshiba Exceria | Pro UHS-II 270MB/s SDXC | 128GB |
| Toshiba Exceria | Pro UHS-II N502 SDXC | 128GB |
| Toshiba Exceria | Pro UHS-II N502 SDXC | 256GB |
| Wise SD2 | -64U3 SDXC UHS-II | 64GB |
| Wise SD2 | -128U3 SDXC UHS-II | 128GB |
Pocket Cinema Camera 4K机型建议使用的存储介质
建议在Pocket Cinema Camera 4K机型使用以下几款SD卡记录最高30fps的4K DCI Blackmagic RAW 12:1影像:| 品牌 存储卡名称 容量 | ||
| Angelbird | AV PRO SD V90 | 64GB |
| Delkin Devices | Power UHS-II SDXC | 64GB |
| Delkin Devices | Power UHS-II SDXC | 128GB |
| Lexar | Professional 2000x UHS-II 300MB/s SDXC | 64GB |
| ProGrade Digital | V90 UHS-II 250MB/s SDXC | 256GB |
| SanDisk | Extreme Pro UHS-I 95MB/s SDXC | 512GB |
| Sony | Tough SF-G64T | 64GB |
| Sony | Tough SF-G128T | 128GB |
| Sony | SF-G64 300MB/s UHS-II SDXC | 64GB |
| Toshiba Exceria | Pro UHS-II N502 SDHC | 32GB |
| Toshiba Exceria | Pro UHS-II 270MB/s SDXC | 64GB |
| Wise SD2 | -64U3 SDXC UHS-II | 64GB |
| Wise SD2 | -128U3 SDXC UHS-II | 128GB |
| Wise SD2 | -128U3 SDXC UHS-II | 128GB |
| 品牌 存储卡名称 容量 | ||
| Wise | SD2-64U3 SDXC UHS-II | 64GB |
| Wise SD2 | -128U3 SDXC UHS-II | 128GB |
| Sony | Tough SF-G64T | 64GB |
| Sony | Tough SF-G128T | 128GB |
| 品牌 存储卡名称 容量 | ||
| Sony | Tough SF-G64T | 64GB |
| Sony Tough | SF-G128T 128GB | |
| Toshiba Exceria | Pro UHS-II N502 SDXC | 32GB |
| 品牌 存储卡名称 容量 | ||
| Wise | SD2-64U3 SDXC UHS-II | 64GB |
| Wise SD2 | -128U3 SDXC UHS-II | 128GB |
| Toshiba Exceria | Pro UHS-II N502 SDXC | 32GB |
| Sony Tough | SF-G64T | 64GB |
| Sony Tough | SF-G128T 128GB |
| 品牌 存储卡名称 容量 | ||
| Wise | SD2-64U3 SDXC UHS-II | 64GB |
| Wise SD2 | -128U3 SDXC UHS-II | 128GB |
| Sony Tough | SF-G64T | 64GB |
| Sony Tough | SF-G128T 128GB | |
| Toshiba Exceria | Pro UHS-II N502 SDXC | 32GB |
| Toshiba Exceria | Pro UHS-II N502 SDXC | 64GB |
| Toshiba Exceria | Pro UHS-II N502 SDXC | 128GB |
| Toshiba Exceria | Pro UHS-II N502 SDXC | 256GB |
| Sony Tough | SF-G128T 128GB |
Pocket Cinema Camera 6K机型建议使用的存储介质
建议在Pocket Cinema Camera 6K机型使用以下几款USB-C硬盘记录最高50fps的6K Blackmagic RAW 5:1影像:| 品牌 存储卡名称 容量 | ||
| Wise | PTS-1024 Portable SSD | 1TB |
| 品牌 存储卡名称 容量 | ||
| Samsung | Portable SSD T5 | 250GB |
| Samsung Portable | SSD T5 2TB | |
| Wise PTS | -1024 Portable SSD | 1TB |
| 品牌 存储卡名称 容量 | ||
| Samsung | Portable SSD T5 | 250GB |
| Samsung Portable | SSD T5 2TB | |
| Wise PTS | -512 Portable SSD | 512GB |
| Wise PTS | -1024 Portable SSD | 1TB |
| 品牌 存储卡名称 容量 | ||
| Samsung | Portable SSD T5 | 250GB |
| Samsung Portable | SSD T5 1TB | |
| Samsung Portable | SSD T5 2TB | |
| SanDisk Extreme | Portable SSD | 1TB |
| Wise PTS | -512 Portable SSD | 512GB |
| Wise PTS | -1024 Portable SSD | 1TB |
| Wise PTS | -1024 Portable SSD | 1TB |
| 品牌 存储卡名称 容量 | ||
| Samsung | Portable SSD T5 | 250GB |
| Samsung Portable | SSD T5 1TB | |
| Samsung Portable | SSD T5 2TB | |
| SanDisk Extreme | Portable SSD | 1TB |
| Wise PTS | -512 Portable SSD | 512GB |
| Wise PTS | -1024 Portable SSD | 1TB |
| Wise PTS | -1024 Portable SSD | 1TB |
Pocket Cinema Camera 4K机型建议使用的存储介质
建议在Pocket Cinema Camera 4K机型使用以下几款USB-C硬盘记录最高60fps的4K DCI Blackmagic RAW 3:1影像:| 品牌 存储卡名称 容量 | ||
| Angelbird | SSD2GO PKT | 512GB |
| Angelbird SSD2GO | PKT 2TB | |
| G-Technology | G-DRIVE Mobile SSD | 1TB |
| Samsung Portable | SSD T5 2TB | |
| Wise PTS | -512 Portable SSD | 512GB |
| 品牌 存储卡名称 容量 | ||
| Angelbird | SSD2GO PKT | 512GB |
| Angelbird SSD2GO | PKT 2TB | |
| Glyph | Atom | 500GB |
| Lacie | Portable SSD | 500GB |
| Samsung Portable | SSD T5 500GB | |
| Samsung Portable | SSD T5 1TB | |
| SanDisk Extreme | Portable SSD | 1TB |
| Seagate | Fast SSD | 250GB |
| Wise PTS | -256 Portable SSD | 256GB |
| Wise PTS | -512 Portable SSD | 512GB |
| Wise PTS | -1024 Portable SSD | 1TB |
| 品牌 存储卡名称 容量 | ||
| Angelbird | SSD2GO PKT | 512GB |
| Angelbird SSD2GO | PKT 2TB | |
| Samsung Portable | SSD T5 1TB | |
| Wise PTS | -256 Portable SSD | 256GB |
| Wise PTS | -512 Portable SSD | 512GB |
| Wise PTS | -1024 Portable SSD | 1TB |
| 品牌 存储卡名称 容量 | ||
| Angelbird | SSD2GO PKT | 512GB |
| Angelbird SSD2GO | PKT 2TB | |
| Samsung Portable | SSD T5 | 500GB |
| Samsung Portable | SSD T5 1TB | |
| Wise PTS | -256 Portable SSD | 256GB |
| Wise PTS | -512 Portable SSD | 512GB |
| Wise PTS | -1024 Portable SSD | 1TB |
Developer Information
Blackmagic Bluetooth Camera Control
Blackmagic cameras with Bluetooth LE implement a variety of features and commands that allow users to control their cameras wirelessly. Developers have full access to these features for their custom applications. The following services and characteristics describe the full range of communication options that are available to the developer. Service: Device Information Service UUID:180A Characteristics Camera Manufacturer UUID:2A29 Read the name of the manufacturer (always "Blackmagic Design"). Camera Model UUID:2A24 Read the name of the camera model ("Pocket Cinema Camera 6K" or "Pocket Cinema Camera 4K"). Service: Blackmagic Camera Service UUID: 291D567A-6D75-11E6-8B77-86F30CA893D3 Characteristics Outgoing Camera Control (encrypted) UUID:5DD3465F-1AEE-4299-8493-D2ECA2F8E1BB Send Camera Control messages These messages are identical to those described in the Blackmagic SDI Camera Control Protocol section below. Please read that section for a list of supported messages and required formatting information. For an example of how packets are structured, please see the 'example protocol packets' section in this document. Incoming Camera Control (encrypted) UUID:B864E140-76A0-416A-BF30-5876504537D9 Request notifications for this characteristic to receive Camera Control messages from the camera. These messages are identical to those described in the Blackmagic SDI Camera Control Protocol section below. Please read that section for a list of supported messages and required formatting information.Timecode (encrypted)
UUID:6D8F2110-86F1-41BF-9AFB-451D87E976C8 Request notifications for this characteristic to receive timecode updates. Timecode (HH:MM:SS:mm) is represented by a 32-bit BCD number: (eg. 09:12:53:10 = 0x09125310)Camera Status (encrypted)
UUID:7FE8691D-95DC-4FC5-8ABD-CA74339B51B9 Request notifications for this characteristic to receive camera status updates. The camera status is represented by flags contained in an 8-bit integer: None = 0 × 00 Camera Power On = 0x01 Connected = 0× 02 Palred = 0× 04 Versions Verified = 0x08 Initial Payload Received = 0× 10 Camera Ready = 0 × 20 Send a value of 0x00 to power a connected camera off. Send a value of 0x01 to power a connected camera on.Device Name
UUID:FFACOC52-C9FB-41A0-B063-CC76282EB89C Send a device name to the camera (max. 32 characters). The camera will display this name in the Bluetooth Setup Menu.Protocol Version
UUID: 8F1FD018-B508-456F-8F82-3D392BEE2706 Read this value to determine the camera's supported CCU protocol version. NOTE Encrypted characteristics can only be used once a device has successfully bonded or paired with the Blackmagic Camera. Once a connection has been established, any attempt to write to an encrypted characteristic will initiate bonding. For example, writing a 'Camera Power On' (0x01) message to the Camera Status characteristic. Once bonding is initiated, the camera will display a 6-digit pin in the Bluetooth Setup Menu. Enter this pin on your device to establish an encrypted connection. The device will now be able to read, write and receive notifications from encrypted characteristics.Blackmagic SDI and Bluetooth Camera Control Protocol
Version 1.4
If you are a software developer you can use the Blackmagic SDI and Bluetooth Camera Control Protocol to construct devices that integrate with our products. Here at Blackmagic Design, our approach is to open up our protocols and we eagerly look forward to seeing what you come up with!Overview
This document describes an extensible protocol for sending a unidirectional stream of small control messages embedded in the non-active picture region of a digital video stream. The video stream containing the protocol stream may be broadcast to a number of devices. Device addressing is used to allow the sender to specify which device each message is directed to.Assumptions
Alignment and padding constraints are explicitly described in the protocol document. Bit fields are packed from LSB first. Message groups, individual messages and command headers are defined as, and can be assumed to be, 32 bit aligned.Blanking Encoding
A message group is encoded into a SMPTE 291M packet with DID/SDID x51/x53 in the active region of VANC line 16.Message Grouping
Up to 32 messages may be concatenated and transmitted in one blanking packet up to a maximum of 255 bytes payload. Under most circumstances, this should allow all messages to be sent with a maximum of one frame latency. If the transmitting device queues more bytes of message packets than can be sent in a single frame, it should use heuristics to determine which packets to prioritize and send immediately. Lower priority messages can be delayed to later frames, or dropped entirely as appropriate.Abstract Message Packet Format
Every message packet consists of a three byte header followed by an optional variable length data block. The maximum packet size is 64 bytes.| Destination device (uint8) | Device addresses are represented as an 8 bit unsigned integer. Individual devices are numbered 0 through 254 with the value 255 reserved to indicate a broadcast message to all devices. |
| Command length (uint8) | The command length is an 8 bit unsigned integer which specifies the length of the included command data. The length does NOT include the length of the header or any trailing padding bytes. |
| Command id (uint8) | The command id is an 8 bit unsigned integer which indicates the message type being sent. Receiving devices should ignore any commands that they do not understand. Commands 0 through 127 are reserved for commands that apply to multiple types of devices. Commands 128 through 255 are device specific. |
| Reserved (uint8) | This byte is reserved for alignment and expansion purposes. It should be set to zero. |
| Command data (uint8[]) | The command data may contain between 0 and 60 bytes of data. The format of the data section is defined by the command itself. |
| Padding (uint8[]) | Messages must be padded up to a 32 bit boundary with 0x0 bytes. Any padding bytes are NOT included in the command length. |
Defined Commands
Command 0 : change configuration| Category (uint8) | The category number specifies one of up to 256 configuration categories available on the device. |
| Parameter (uint8) | The parameter number specifies one of 256 potential configuration parameters available on the device. Parameters 0 through 127 are device specific parameters. Parameters 128 though 255 are reserved for parameters that apply to multiple types of devices. |
| Data type (uint8) | The data type specifies the type of the remaining data. The packet length is used to determine the number of elements in the message. Each message must contain an integral number of data elements. |
| Currently defined values are: | |
| 0: void / boolean | A void value is represented as a boolean array of length zero. The data field is a 8 bit value with 0 meaning false and all other values meaning true. |
| 1: signed byte Data elements are signed bytes | |
| 2: signed 16 bit Integer Data elements are signed 16 bit values | |
| 3: signed 32 bit integer Data elements are signed 32 bit values | |
| 4: signed 64 bit integer Data elements are signed 64 bit values | |
| 5: UTF-8 string Data elements represent a UTF-8 string with no terminating character. | |
| Data types 6 through 127 are reserved. | |
| 128: signed 5.11 fixed point | Data elements are signed 16 bit integers representing a real number with 5 bits for the integer component and 11 bits for the fractional component. The fixed point representation is equal to the real value multiplied by 2^11. The representable range is from -16.0 to 15.9995 (15 + 2047/2048). |
| Operation type (uint8) | The operation type specifies what action to perform on the specified parameter. Currently defined values are: |
| 0: assign value | The supplied values are assigned to the specified parameter. Each element will be clamped according to its valid range. A void parameter may only be 'assigned' an empty list of boolean type. This operation will trigger the action associated with that parameter. A boolean value may be assigned the value zero for false, and any other value for true. |
| 1: offset / toggle value | Each value specifies signed offsets of the same type to be added to the current parameter values. The resulting parameter value will be clamped according to their valid range. It is not valid to apply an offset to a void value. Applying any offset other than zero to a boolean value will invert that value. |
| Data (void) | The data field is 0 or more bytes as determined by the data type and number of elements. |
| Group | ID | Parameter | Type | Index | Minimum | Maximum | Interpretation |
| Lens | 0.0 | Focus | fixed16 | - | 0.0 | 1.0 | \( 0.0 = \text {near,}1.0 = \text {far} \) |
| 0.1 | Instantaneous autofocus | void | - | - | - | trigger instantaneous autofocus | |
| 0.2 | Aperture (f-stop) | fixed16 | - | -1.0 | 16.0 | Aperture Value (where fnumber \( = \text {sqrt(2^AV)} \)) | |
| 0.3 | Aperture (normalised) | fixed16 | - | 0.0 | 1.0 | \( 0.0 = \text {smallest,}1.0 = \text {largest} \) | |
| 0.4 | Aperture (ordinal) | int16 | - | 0 | n | Steps through available aperture values from minimum (0) to maximum (n) | |
| 0.5 | Instantaneous auto aperture | void | -- - | - | trigger instantaneous auto aperture | ||
| 0.6 | Optical image stabilisation | boolean | - | - | - | true = enabled, false = disabled | |
| 0.7 | Set absolute zoom (mm) | int16 | - | 0 | max | Move to specified focal length in mm, from minimum (0) to maximum (max) | |
| 0.8 | Set absolute zoom (normalized) | fixed16 - 0.0 | 1.0 | Move to specified focal length: \( 0.0 = \text {wide,}1.0 = \text {tele} \) | |||
| 0.9 | Set continuous zoom (speed) | fixed16 | - | -1.0 | +1.0 | Start/stop zooming at specified rate: -1.0 = zoom wider fast, 0.0 = stop, +1 = zoom tele fast | |
| Video | 1.0 Video mode int8 | [0] = frame rate -- | fps as integer(eg 24, 25, 30, 50, 60) | ||||
| [1] = M-rate -- 0 = regular, 1 = M-rate | |||||||
| [2] = dimensions | -- | 0 = NTSC, 1 = PAL, 2 = 720, 3 = 1080, 4 = 2kDCI, 5 = 2k16:9, 6 = UHD, 7 = 3k Anamorphic, 8 = 4k DCI, 9 = 4k 16:9, 10 = 4.6k 2.4:1, 11 = 4.6k | |||||
| [3] = interlaced | -- | 0 = progressive, 1 = interlaced | |||||
| [4] = Color space | -- 0 = YUV | ||||||
| 1.1 | Gain (up to Camera 4.9) | int8 | 1 | 128 | 1x, 2x, 4x, 8x, 16x, 32x, 64x, 128x gain | ||
| 1.2 | Manual White Balance | int16 | [0] = color temp | 2500 | 10000 | Color temperature in K | |
| int16 | [1] = tint | -50 | 50 | tint | |||
| 1.3 | Set auto WB | void | -- | -- | Calculate and set auto white balance | ||
| 1.4 | Restore auto WB | void | -- | -- | Use latest auto white balance setting | ||
| 1.5 | Exposure (us) | int32 | 1 | 42000 | time in us | ||
| 1.6 | Exposure (ordinal) | int16 | -- | 0 | n | Steps through available exposure values from minimum (0) to maximum (n) | |
| 1.7 | Dynamic Range Mode | int8 enum | -- | 0 | 2 | 0 = film, 1 = video, 2 = extended video | |
| 1.8 | Video sharpening level | int8 enum | -- | 0 | 3 | 0 = off, 1 = low, 2 = medium, 3 = high | |
| 1.9 | Recording format | int16 | [0] = file frame rate | -- | fps as integer(eg 24, 25, 30, 50, 60, 120) | ||
| [1] = sensor frame rate | -- | -- | fps as integer, valid when sensor-off-speed set (eg 24, 25, 30, 33, 48, 50, 60, 120), no change will be performed if this value is set to 0 | ||||
| [2] = frame width | -- in pixels | ||||||
| [3] = frame height | -- in pixels | ||||||
| [4] = flags | -- [0] = file-M-rate | ||||||
| -- | -- | [1] = sensor-M-rate, valid when sensor-off-speed-set | |||||
| -- [2] = sensor-off-speed | |||||||
| -- [3] = interlaced | |||||||
| -- [4] = windowed mode | |||||||
| 1.10 | Set auto exposure mode | int8 | -- | 0 | 4 | 0 = Manual Trigger, 1 = Iris, 2 = Shutter, 3 = Iris + Shutter, 4 = Shutter + Iris | |
| 1.11 | Shutter angle int32 | -- | 100 | 36000 | Shutter angle in degrees,multiplied by 100 | ||
| 1.12 | Shutter speed | int32 | -- | Current sensor frame rate | 5000 | Shutter speed value as a fraction of 1, so 50 for 1/50th of a second | |
| 1.13 | Gain | int8 | -- | -128 | 127 | Gain in decibel(dB) | |
| 1.14 | ISO | int32 | -- | 0 | 2147483647 | ISO value | |
| 1.15 | Display LUT | int8 | [0] = selected LUT | -- | 0 = None, 1 = Custom, 2 = film to video, 3 = film to extended video | ||
| [1] = enabled or not | -- 0 = Not enabled, 1 = Enabled | ||||||
| Audio | 2.0 | Mic level | fixed16 | - | 0.0 | 1.0 | 0.0 = minimum, 1.0 = maximum |
| 2.1 | Headphone level | fixed16 | - | 0.1 | 1.0 | 0.0 = minimum, 1.0 = maximum | |
| 2.2 | Headphone program mix | fixed16 | - | 0.1 | 1.0 | 0.0 = minimum, 1.0 = maximum | |
| 2.3 | Speaker level | fixed16 | - | 0.1 | 1.0 | 0.0 = minimum, 1.0 = maximum | |
| 2.4 | Input type | int8 | - | 0 | 3 | 0 = internal mic,1 = line level input,2 = low mic level input,3 = high mic level input | |
| 2.5 Input levels | fixed16 | [0] ch0 | 0.0 | 1.0 | 0.0 = minimum, 1.0 = maximum | ||
| [1] ch1 | 0.0 | 1.0 | 0.0 = minimum, 1.0 = maximum | ||||
| 2.6 | Phantom power | boolean | - | - | - | true = powered,false = not powered | |
| Output | 3.0 Overlay enables | uint16 bit field | -- -- | bit flags:[0] = display status,[1] = display frame guidesSome cameras don't allow separate control of frame guides and status overlays. | |||
| 3.1 Frame guides style(Camera 3.x) | int8 | -08 | 0 = HDTV, 1 = 4:3, 2 = 2:4:1,3 = 2:39:1, 4 = 2:35:1,5 = 1:85:1, 6 = thirds | ||||
| 3.2 Frame guides opacity(Camera 3.x) | fixed16 | - | 0.1 | 1.0 | 0.0 = transparent, 1.0 = opaque | ||
| 3.3 Overlays(replaces .1 and .2 above from Cameras 4.0) | int8 | [0] = frame guides style | - | - | 0 = off, 1 = 2:4:1, 2 = 2:39:1,3 = 2:35:1, 4 = 1:85:1, 5 = 16:9,6 = 14:9, 7 = 4:3, 8 = 2:1,9 = 4:5, 10 = 1:1 | ||
| [1] = frame guide opacity | 0 | 100 | 0 = transparent, 100 = opaque | ||||
| [2] = safe area percentage | 0 | 100 | percentage of full frame used by safe area guide (0 means off) | ||||
| [3] = grid style | - | - | bit flags:[0] = display thirds,[1] = display cross hairs,[2] = display center dot,[3] = display horizon | ||||
| Display | 4.0 Brightness | fixed16 | - | 0.0 | 1.0 | 0.0 = minimum, 1.0 = maximum | |
| 4.1 Exposure and focus tools | int16 bit field | 0x1 = zebra,0x2 = focus assist,0x4 = false color | - | - | 0 = disable, 1 = enable | ||
| 4.2 Zebra level | fixed16 | - | 0.0 | 1.0 | 0.0 = minimum, 1.0 = maximum | ||
| 4.3 Peaking level | fixed16 | - | 0.0 | 1.0 | 0.0 = minimum, 1.0 = maximum | ||
| 4.4 Color bar enable | int8 | - | 0 | 30 | 0 = disable bars,1-30 = enable bars with timeout(seconds) | ||
| 4.5 Focus Assist | Int8 | [0] = focus assist method | - | - | 0 = Peak,1 = Colored lines | ||
| [1] = focus line color | - | - | 0 = Red,1 = Green,2 = Blue,3 = White,4 = Black | ||||
| 4.6 Program return feed enable | int8 | - | 0 | 30 | 0 = disable, 1-30 = enable with timeout (seconds) | ||
| Tally | 5.0 | Tally brightness | fixed16 | - | 0.0 | 1.0 | Sets the tally front and tally rear brightness to the same level. 0.0 = minimum, 1.0 = maximum |
| 5.1 | Front tally brightness | fixed16 | - | 0.0 | 1.0 | Sets the tally front brightness. 0.0 = minimum, 1.0 = maximum | |
| 5.2 | Rear tally brightness | fixed16 | - | 0.0 | 1.0 | Sets the tally rear brightness. 0.0 = minimum, 1.0 = maximum Tally rear brightness cannot be turned off | |
| Reference | 6.0 | Source | int8 enum | - | 0 | 2 | 0 = internal, 1 = program, 2 = external |
| 6.1 | Offset | int32 | - | - | - | +/- offset in pixels | |
| Confi-guration | 7.0 | Real Time Clock | int32 | [0] time | - | - | BCD - HHMMSSFF (UCT) |
| [1] date | - | - | BCD - YYYYYMMDD | ||||
| 7.1 | System language | string | [0-1] | - | - | ISO-639-1 two character language code | |
| 7.2 | Timezone | int32 | - | - | - | Minutes offset from UTC | |
| 7.3 | Location | int64 | [0] latitude | - | - | BCD - sDDDDdddddddd where s is the sign: 0 = north (+), 1 = south (-); DD degrees, dddddddddddd decimal degrees | |
| [1] longitude | - | - | BCD - sDDDDdddddddd where s is the sign: 0 = west (-), 1 = east (+); DDD degrees, dddddddddddd decimal degrees | ||||
| Color Correction | 8.0 Lift Adjust | fixed16 | [0] red | -2.0 | 2.0 | default 0.0 | |
| [1] green | -2.0 | 2.0 | default 0.0 | ||||
| [2] blue | -2.0 | 2.0 | default 0.0 | ||||
| [3] luma | -2.0 | 2.0 | default 0.0 | ||||
| 8.1 | Gamma Adjust | fixed16 | [0] red | -4.0 | 4.0 | default 0.0 | |
| [1] green | -4.0 | 4.0 | default 0.0 | ||||
| [2] blue | -4.0 | 4.0 | default 0.0 | ||||
| [3] luma | -4.0 | 4.0 | default 0.0 | ||||
| 8.2 Gain Adjust | fixed16 | [0] red | 0.0 | 16.0 | default 1.0 | ||
| [1] green | 0.0 | 16.0 | default 1.0 | ||||
| [2] blue | 0.0 16.0 | default 1.0 | |||||
| [3] luma | 0.0 | 16.0 | default 1.0 | ||||
| 8.3 Offset Adjust | fixed16 | [0] red | -8.0 | 8.0 | default 0.0 | ||
| [1] green | -8.0 | 8.0 | default 0.0 | ||||
| [2] blue | -8.0 | 8.0 default 0.0 | |||||
| [3] luma | -8.0 | 8.0 | default 0.0 | ||||
| 8.4 Contrast Adjust | fixed16 | [0] pivot | 0.0 | 1.0 | default 0.5 | ||
| [1] adj | 0.0 2.0 default 1.0 | ||||||
| 8.5 Luma mix | fixed16 | - | 0.0 | 1.0 | default 1.0 | ||
| 8.6 Color Adjust | fixed16 | [0] hue | -1.0 | 1.0 | default 0.0 | ||
| [1] sat | 0.0 2.0 default 1.0 | ||||||
| 8.7 Correction Reset Default | void | - | - | - | reset to defaults | ||
| Media | 10.0 | Codec int8 enum | [0] = basic codec -- | 0 = CinemaDNG, 1 = DNxHD, 2 = ProRes, 3 = Blackmagic RAW | |||
| [1] = code variant | - | - | CinemaDNG: 0 = uncompressed, 1 = lossy 3:1, 2 = lossy 4:1 | ||||
| - | - | ProRes: 0 = HQ, 1 = 422, 2 = LT, 3 = Proxy, 4 = 444, 5 = 444XQ | |||||
| - | - | Blackmagic RAW: 0 = Q0, 1 = Q5, 2 = 3:1, 3 = 5:1, 4 = 8:1, 5 = 12:1 | |||||
| 10.1 | Transport mode int8 | [0] = mode | -- | 0 = Preview, 1 = Play, 2 = Record | |||
| [1] = speed | -- | -ve = multiple speeds backwards, 0 = pause, +ve = multiple speeds forwards | |||||
| [2] = flags | -- | 1<<0 = loop, 1<<1 = play all, 1<<5 = disk1 active, 1<<6 = disk2 active, 1<<7 = time-lapse recording | |||||
| [3] = slot 1 storage medium | - | - | 0 = CFast card, 1 = SD, 2 = SSD Recorder | ||||
| [4] = slot 2 storage medium | - | - | 0 = CFast card, 1 = SD, 2 = SSD Recorder | ||||
| 10.2 | Playback Control | int8 enum | [0] = clip | - | - | 0 = Previous, 1 = Next | |
| PTZ Control | 11.0 | Pan/Tilt Velocity | fixed 16 | [0] = pan velocity | -1.0 | 1.0 | -1.0 = full speed left, 1.0 = full speed right |
| [1] = tilt velocity | -1.0 | 1.0 | -1.0 = full speed down, 1.0 = full speed up | ||||
| 11.1 | Memory Preset | int8 enum | [0] = preset command | - | - | 0 = reset, 1 = store location, 2 = recall location | |
| int8 | [1] = preset slot | 0.5 - | |||||
| Operation | Packet Length Byte | ||||||||||||||||
| 0 | 1 | 2 | 3 | 4 | 5 | 6 | 7 | 8 | 9 | 10 | 11 | 12 | 13 | 14 | 15 | ||
| header command data | |||||||||||||||||
| destination | length | command | reserved | category | parameter | type | operation | ||||||||||
| trigger instantaneous auto focus on camera 4 | 844000100 | ||||||||||||||||
| turn on OIS on all cameras 12 255 5 0 0 0 6 | 001000 | ||||||||||||||||
| set exposure to 10 ms on camera 4 (10 ms = 10000 us = 0x00002710) | 12 | 4 | 8 | 0 | 0 | 1 | 5 | 3 | 0 | 0x10 | 0x27 | 0x00 | 0x00 | ||||
| add 15% to zebra level (15 % = 0.15 f = 0x0133 fp) | 12 | 4 | 6 | 0 | 0 | 4 | 2 | 128 | 1 | 0x33 | 0x01 | 0 | 0 | ||||
| select 1080p 23.98 mode on all cameras | 16 | 255 | 9 | 0 | 0 | 1 | 0 | 1 | 0 | 24 | 1 | 3 | 0 | 0 | 0 | 0 | 0 |
| subtract 0.3 from gamma adjust for green & blue (-0.3 ~ = 0xfd9a fp) | 16 | 4 | 12 | 0 | 0 | 8 | 1 | 128 | 1 | 0 | 0 | 0x9a | 0xffd | 0x9a | 0xffd | 0 | 0 |
| all operations combined | 76 | 440001002555000600 | |||||||||||||||
| 1 | 0 | 0 | 0 | 4 | 8 | 0 | 0 | 1 | 5 | 3 | 0 | 0x10 | 0x27 | 0x00 | 0x00 | ||
| 4 | 6 | 0 | 0 | 4 | 2 | 128 | 1 | 0x33 | 0x01 | 0 | 0 | 255 | 9 | 0 | 0 | ||
| 1 | 0 | 1 | 0 | 24 | 1 | 3 | 0 | 0 | 0 | 0 | 0 | 4 | 12 | 0 | 0 | ||
| 8 | 1 | 128 | 1 | 0 | 0 | 0x9a | 0xffd | 0x9a | 0xffd | 0 | 0 | ||||||
帮助
获得帮助最快捷的途径是登陆Blackmagic Design在线支持页面并浏览有关摄影机的最新支持信息和材料。Blackmagic Design在线支持页面
请登陆Blackmagic Design支持中心www.blackmagicdesign.com/cn/support获得最新版操作手册、软件以及技术答疑文章。联系Blackmagic Design支持中心
如果我们提供的支持信息无法解答您的疑问,请到支持页面下点击“给我们发送电子邮件”按钮即可发送技术支持请求。或者,您也可以点击支持页面下的“查找您所在地区的支持团队”按钮,致电您所在地区的Blackmagic Design支持中心获得帮助。查看当前安装的软件版本
要检查您计算机上的Blackmagic Camera Setup Utility软件的版本,请打开"About Blackmagic Camera Setup Utility"窗口查看。 在Mac系统下,请到“应用程序”文件夹下打开Blackmagic Camera Setup程序。 在Windows系统下,请到开始菜单或开始屏幕下打开Blackmagic Camera Setup Utility程序。点击Help”(帮助)菜单并选择"About Blackmagic Camera Setup Utility"程序即可查看版本号。如何获得软件更新
检查完您计算机上安装的Blackmagic Camera Utility软件版本号之后,请登录网址www.blackmagicdesign.com/cn/support访问Blackmagic Design支持中心查看最新版本。请及时将软件升级到最新版本,但切勿在重要项目制作过程中升级软件。监管告知
 在欧盟范围内处置电子垃圾和电子设备的注意事项。 根据产品所附的提示标志,本设备不得与其它废弃材料共同处置。处置废弃设备时,必须交给指定收集点进行回收。对废弃设备进行单独收集并回收能够节省自然资源,且回收方式不会损害环境和人体健康。获取更多关于废弃设备回收点的信息,请联系您所在城市的回收站,或当时购买设备的经销商。  本设备经过测试, 符合FCC规则的第15部分对A类数字设备的限制。这些限制旨在为运行于商业环境中的设备提供合理保护, 使其免受有害干扰的影响。本设备可生成、使用且辐射射频能量, 如果未按照安装手册来安装和使用本设备, 则可能导致对无线电通信的有害干扰。在住宅区运行本产品可能会产生有害干扰, 在这种情况下将由用户自行承担消除干扰的费用。 必须满足以下条件后方可操作: 设备不会造成有害干扰。 设备必须能够承受任何干扰,包括可能导致意外操作的干扰。  R-R-BMD-201810001 R-R-BMD-201905001 R-R-BMD-201904002 加拿大ISED认证声明
本设备符合加拿大A类数码产品的相关标准。 任何对本产品的改装或预期用途之外的使用均可能导致相关标准认证无效。 必须使用有高品质屏蔽的HDMI电缆连接HDMI接口。 本设备经检测符合商业环境使用要求。在家用环境中,本设备可能会造成无线电干扰。蓝牙®
本产品采用无线蓝牙技术。 包含发射模块FCCID:QQQBGM113 本设备符合为非受控制环境设定的FCC辐射暴露限制。 包含发射模块IC:5123A-BGM113 本设备符合加拿大工业部免检RSS标准,并免于RSS-102第5条中规定的日常SAR评估限制。 日本认证,认证编号:209-J00204。本设备中的指定无线电设备已通过《无线电法》技术法规符合性认证。 本设备已获得韩国认证,KC认证编号:MSIP-CRM-BGT-BGM113 Blackmagic Design在此声明,本产品使用2.4 GHz ISM宽频传输系统符合欧盟指令2014/53/EU。 获取完整版欧盟符合性声明,请联系compliance@blackmagicdesign.com  符合南非ICASA认证,Pocket Camera 6K获批号码TA-2019/1517,Pocket Camera 4K获批号码TA-2019/1516。  符合墨西哥NOM认证,蓝牙模块制造商芯科科技(Silicon Labs),型号BGM113。安全信息
Blackmagic Pocket Cinema Camera适合在环境温度低于 40^ 的热带地区使用。 设备内部没有操作人员可维护的零件。维修服务请联系当地Blackmagic Design服务中心。 在日照环境下,应考虑遮盖摄影机来避免摄影机或锂电池长期暴露在日光下。请勿将锂电池靠近任何热源。  当使用本产品所提供的电源适配器时,仅限在海拔高度2000米以下的地区使用。加利福尼亚安全声明
该产品可能会让您暴露在塑料部件中所含的微量多溴化联苯等化学物质下,此类物质已被加州政府认定为可能导致癌症、先天畸形或其他遗传危害的物质。 详情请访问网址www.P65Warnings.ca.gov.保修
有限保修
- Blackmagic Design保证本产品自购买之日起12个月内不会有材料和工艺上的缺陷。若本产品在保修期内出现质量问题,Blackmagic Design可选择为产品提供免费修理或更换零部件,或者更换缺陷产品。 为确保消费者有权享受本保修条款中的服务,如遇产品质量问题请务必在保修期内联系Blackmagic Design并妥善安排保修事宜。消费者应将缺陷产品包装并运送到Blackmagic Design的指定服务中心进行维修,运费由消费者承担并预先支付。若消费者因任何原因退货,所有运费、保险费、关税等各项税务以及其他费用均由消费者承担。 本保修条款不适用于任何因使用、维护不当或保养不周造成的缺陷、故障或损坏。根据本保修服务,Blackmagic Design的保修范围不包括以下内容:1.对由非Blackmagic Design专门人员进行的安装、维修或保养所造成的损坏进行维修,2.对因使用不当或连接到不兼容设备所造成的损坏进行维修,3.对因使用了非Blackmagic Design生产的零部件所导致的损坏或故障进行维修,及4.对经过改装或和其他产品进行组装的产品进行保养维修(因为产品经改装或组装后会增加保养维修所需时间或保养难度)。 本保修条款由BLACKMAGIC DESIGN提供,它可取代所有其他明示或隐含的保修。BLACKMAGIC DESIGN及其供应商对任何有关适销性及就特定用途的适用性等隐含保证不作任何担保。BLACKMAGIC DESIGN在保修期间负责为消费者提供缺陷产品的维修或更换服务是完整和排他性补救措施。不论BLACKMAGIC DESIGN或其供应商是否事先获悉发生间接、特殊、偶然或必然损坏等损坏的可能性,BLACKMAGIC DESIGN概不负责。若消费者对本设备进行非法使用,BLACKMAGIC DESIGN概不负责。对因使用本产品造成的损失,BLACKMAGIC DESIGN概不负责。本产品的操作风险由用户自行承担。 ©版权所有2020Blackmagic Design.保留一切权利。“Blackmagic Design”、“URSA”、“DeckLink”、“HDLink”、“Workgroup Videohub”、“Multibridge Pro”、“Multibridge Extreme”、“Intensity”以及“Leading the creative video revolution”均为美国及其他国家的注册商标。所有其他公司名称及产品名称可能是其他所有者的注册商标。 "Bluetooth”(蓝牙)一词,其商标和徽标为Bluetooth SIG,Inc.公司的注册商标,且Blackmagic Design对于上述标识的各类用途均获授权。其他商标和商标名称皆为其各自拥有者所有。  SELTEBlackmagic Pocket Cinema Camera
Blackmagic Pocket Cinema Camera 6Kの Blackmagic Pocket Cinema Camera 4K 托盤 2020年3月 中国 宣
Blackmagic Pocket Cinema Camera将从上部到下依次从左至右播放影片。 2013年Blackmagic Pocket Cinema Camera 凶の状態を検討。Blackmagic Pocket Cinema Camera 4K将自此推向国际市场,从而成为全球最大的移动娱乐设备厂商之一。 Blackmagic Pocket Cinema Camera 4Kはのき広Pocket Cinema Cameraと通しにマイ克ロフ軍連規策 Ranst Maingte h a tae ofoh ouro gieno e saoohon mki kro foetn doue 60fps的4K电影及120fps的HD电影等CFast是UHS-SD Kfthd上网音合数有音合。Blackmagic Pocket Cinema Camera 6Kは上成能国在120fps的2.8K电影和30fps的6K电影 将用合。H USB-C FtoTt Tbe 13. Sut的daiinakreinjwandgelneitBISO是daenghchgwhcHepofoaogohaoandaonsietaahy 5inkiKJiLCDTtcknIehtboknE0 Blackmagic Pocket Cinema Camera to ATEM Mini S-wei-chi e an gong heng, kongh CCU hng h h h h h h h h h h h h h h h h h h h h h h h h h h h h h h h h h h h h h h h h h h h h h h h h h h h h h h h h h h h h h h h h h h h h h h h h h h h h h h h h h h h h h h h h h h h h h h h h h h h h Blackmagic Pocket Cinema Camera是的,私上内,有之,为用,自,如,如,如,如,如,如,如,如,如,如,如,如,如,如,如,如,如,如,如,如,如,如,如,如,如,如,如,如,如,如,如,如,如,如,如,如,如,如,如,如,如,如,如,如,如,如,如,如,如,如, 新罗出 Pocket Cinema Camera 云 呵的击的击的击击击击击击击击击击击击击击击击击击击击击击击击击击击击击击击击击击击击击击击击击击击击击击击击击击击击击击击击击击击击击击击击击击击击击击 Grant Petty Blackmagic Design的CEO 克隆德卡贝目录
卡那拉马多德尅格報 959 960 RanLzg 960 卡里达斯的旅行 961 Blackmagic Pocket Camera Battery Grip 961 卡莫拉和海默斯共同于2017年成立 凯伊隆罗卡蒙拉里前厅的 越增马迪阿 964 CFast 964 SD 卡 965 USB-C 論陣語 967 韵歌云默i 969 Blackmagic Pocket Cinema Camera MiiDf 969 Mac@ser imdihernhi 971 Windows34 972 与卧 973 龍鶴興海如 973 Blackmagic RAW 974 Blackmagic RAW 975 鼎大 977 跃海江 979 984 卡里拉吉 985 卡蒙拉 985 卡默拉乌 986 986 988 卡玛拉阿克朗 989 卡默拉贝合 990 TuriKsK3RJ 991 龍達龍達龍達龍達龍達龍達龍達龍達龍達龍達龍達龍達龍達龍達龍達龍達龍達龍達龍達龍達龍達龍達龍達龍達龍達龍達龍達龍達龍達龍達龍達龍達龍達龍達龍達龍達龍達龍達龍達龍達龍達龍達龍達龍達龍達龍達龍達龍達龍達龍達龍达 大市本 1012 默写 责 1012 印日明 1018 MONITELNGSEL 1018 001025 1027 1036 3DLUT 1038 MehraDeIeTer IelRy 1041 洛拉贝 1041 卡那拉的卡尼迪乌鲁 1046 DaVinci Resolve 1047 FIOLORETE MNTI 1047 封印贝吉则社用告 taillrainluee 1051 TajlmraInlAnSeIgLmFyJHg 1052 Taiyihui 1052 Blackmagic RAW 1053 1056 印的用中云 普勒上人,1061 001062 Fusion 菀日贝VFX 奉告及签字盖章 1066 1075 1075 1076 ATEM Miniro kAeRrHg 1077 DaVinci Resolve FrLaRlmurKerLer KReTe 1081 SerundTsiSsTrEeHryoRok CFast2.0及SD卡德罗可作启 USB-C 脚架时 Dusks 1084 Final Cut Pro X사용하기 1085 Avid MediaComposer2018 1085 AdobePremiereProCCsaugohg 1086 Blackmagic Camera Setup 1087 1088 CFast 2.0 卡 1088 SDK3 1094 USB-C SSD 1098 Developer Information 1101 Blackmagic Bluetooth Camera Control 1101 Blackmagic SDI and Bluetooth Camera Control Protocol 1103 Example Protocol Packets 1110 1111 国 安捷隆 1113 1114가에라모닝専성보
Blackmagic Pocket Cinema Camera 6K与Blackmagic Pocket Cinema Camera 4K的同道大佬在同道,本页将从内容上介绍如何使用 Blackmagic Pocket Cinema Camera 4K的同道大佬。 Blackmagic Pocket Cinema Camera 6K是35mm的索尼的索尼和EF-Lanet的手机上可以使用。 Blackmagic Pocket Cinema Camera 4K是索尼的索尼的索尼手机上可以使用。  Blackmagic Pocket Cinema Camera 6K  Blackmagic Pocket Cinema Camera 4K人
HiJ 10000000000000000000000000000000000000000000000000000000000000000000000000000000000000000000000000000 Enzts to kmea h aen anh Bkmcic Pocet Cinaema CeraeRanZ
Blackmagic Pocket Cinema Camera 6K是EFrentz为SAH,Blackmagic Pocket Cinema Camera4K是MaiKroFsterdtentz为SAH。EFW MAIKROFsterdtentz是HCHSAH 格朝程的A的的T,,,,,,,,,,,,,,,,,,,,,,,,,,,,,,,,,,, B9k is Blackmagic Pocket Cinema Camera 6KwBlackmagic Pocket Cinema Camera 4K moel Moue 1. GnE 2.EF は不是 ローナリ ヤフ フフ フフ フフ フフ フフ フフ フフ フフ フフ フフ フフ フフ フフ フフ フフ フフ フフ フフ フフ フフ フフ フフ フフ フフ フフ フフ フフ フフ フフ フフ フフ ルフ フフ ルフ ルフ ルフ ルフ ルフ ルフ ルフ ルフ ルフ ルフ ルフ ルフ ルフ ルフ ルフ ルフ ルフ ルフ ルフ ルフ ルフ ルフ ルフ ルフ ルフ ルフ ルフ ルフ ルフ ルフ ルフ ルフ ルフ ル
1 RnEeRnEeRnEeRnEeRnEeRnEeRnEeRnEeRnEeRnEeRnEeRnEeRnEeRnEeRnEeRnEeRnEeRnEeRnEeRnEeRnEeRnEeRnEeRnEeRnEeRnEe 2 鞍斯马运道将加来马运道上 3 立斯为本拉他,于国,贝则上,自,以,,,,,,,,,,,,,,,,,,,,,,,,,,,,,,,,,,,,,,,,,,,,,,,,,,,,,,,,,,,,,,,,,,,,,。   Blackmagic Pocket Cinema Camera 4K用的影子插人插头 卡加法拉里安斯卡当的,,,,,,,,,,,,,,,,,,,,,,,,,,,,,,,,,,,,,,,,,,,,,,,,,,,,,,,,,,,,,,,,,,,,,,,,,,가에라 썼원 썼기
IeJ 150 F570 BnTRE Tn aang h s o, h n eon enen ene n ene n卡耶拉巴托里格哈及战用
Blackmagic Pocket Cinema Camera是本版的影片LP-E6 传输机,如图所示。在该版本中,可以使用 Blackmagic Design 2.0 的影片传输机进行传输。 1 kAeRl mBnE nre Brrerri rne e 2 2 预布 胎儿们将被送到医院,然后在医生的指导下,他们将被送回医院。 3 3 4 kAeRwEiEeNnEeNnEeNnEeNnEeNnEeNnEeNnEeNnEeNnEeNnEeNnEeNnEeNnEeNnEeNnEeNnEeNnEeNnEeNnEeNnEeNnEeNnEeNnEeNnEeNnEeNBlackmagic Pocket Camera Battery Grip 水電荷荷
Blackmagic Pocket Camera Battery Grip将保有如法可数的尺寸,包括屏幕和电池。 Blackmagic Pocket Camera Battery Grip是Pocket Cinema Camera 4K及Pocket Cinema Camera 6K 托盘上 IiJ 12 VDC 10000000000000000000000000000000000000000000000000000000000000000000000000000000Blackmagic Pocket Camera Battery Grip 建構態態
Blackmagic Pocket Camera Battery Grip将当快加能Pocket Cinema Camera的前用到,  KAPARALABETRILISELoEADaL,LP-E6BETRILIeF  [BaTtRlSIL 卑経的]HJiHJFbIeBnEeBmEeHJFbIeBnEeHJFbIeBnEeHJFbIeBnEeHJFbIeBnEeHJFbIeBnEeHJFbIeBnEeHJFbIeBnEeHJFbIeBnEeHJFbIeBnEeHJFbIeBnEeHJFbIeB  遙兒的半日,的樂中在本部,就为  賊TRIIIL 1  賊TREI其L的賊TREIMOB尾部为KAMRA的賊TREISILR 1420MADINJHOTU,1/4 日半本的1/4-20MADINJHOTU,1/4 TREI有在的,即在,即  [BaT]IeJHJF1JHJHJHJHJHJHJHJHJHJHJHJHJHJHJHJHJHJHJHJHJHJHJHJHJHJHJHJHJHJHJHJHJHJHJHJHJHJHJHJHJHJHJHJHJHJHJHJHJHJHJBlackmagic Pocket Camera Battery Grip® bundle similar to
 抱TREI其L的能上,有在当回被回  天的NP-F570BATERIRBLATREIRBLATTERIRBLATTERIRBLATTERIRBLATTERIRBLATTERIRBLATTERIRBLATTERIRBLATTERIRBLATTERIRBLATTERIRBLATTERIRBLATTERIRBLATTERIRBLATTERIRBLATTERIRBLATTERIRBLATTERIRBLATTERIRBLATTERIRBLATTERIRBLATTE  賊則尼韻藥賊則尼韻藥賊則尼韻藥賊則尼韻藥賊則尼韻藥賊則尼韻藥賊則尼韻藥賊則尼韻藥賊則尼韻藥賊則尼韻藥賊則尼韻藥賊則尼韻藥賊則尼韻藥賊則尼韻藥賊則尼韻藥賔則尼韻藥賊則尼韻藥賊則尼韻藥賊則尼韻藥賊則尼韻藥賊則尼韻藥賊則尼韻藥賊則尼韻藥賊則尼韻藥賊則尼韻藥賊則尼韻藥賊則尼韻藥賊則尼韻藥賊則尼韻藥賊則NY  [BaT]IeRiIeRiIeRiIeRiIeRiIeRiIeRiIeRiIeRiIeRiIeRiIeRiIeRiIeRiIeRiIeRiIeRiIeRiIeRiIeRiIeRiIeRiIeRiIeRiIeRiIeR1 佳都KaMraRabepakchDlBlackmagicPocketCamaBeryGripanEeTae的BorRg 德有在,KaMraLCDHcKlnoLoknKtAonuNbTREiF가에라와 힍재 채공은는 전원 키이相关内容로 키에라에 전원 키일 기다
貯通和合動連同常開100V~240V AC 滊拉上击将安用击开KMA以前的公中,L 电E6 带器,默在Blackmagic Pocket Camera Battery Gripi的端到了其的NP-F570带器 T都到时上,如能者有,DC前的可断地,外部工程用建筑构
1 1 2 kAraJ 12VDC 3 3 가ма라에 기터리에외부 전원만에이해有的人은 기무,가머라는 기무 전원만 사용shall다.원종름 기터리을 죽acht한 썸 기무 전원을 기회에자어스러 기터리 전원을 사용shall다. Kamada 10W USB PD 20V 声力器 机端口 12V DC 接口 12V DC 接口 12V DC 接口 12V DC 接口 12V DC 接口 12V DC 接口 12V DC 接口 12V DC 接口 12V DC 接口 12V DC 接口 12V DC 接口 12V DC 接口 12V DC 接口 1 聖保,音用漢,有,有,有,有,有,有,有,有,有,有,有,有,有,有,有,有,有,有,有,有,有,有,有,有,有,有,有,有,有,有,有,有,有,有,有,有,有,有,有,有,有,有,有,有,有,有,有,有,有,有, i貯장
Blackmagic Pocket Cinema Camera是注册在SD卡德及的,其上将从UHS-ⅡSD卡德内CFast2.0卡德上, USB-C 意想扎扎扎扎扎扎扎扎扎扎扎扎扎扎扎扎扎扎扎扎扎扎扎扎扎扎扎扎扎扎扎扎扎扎扎扎扎扎扎扎扎扎扎扎扎扎扎扎扎扎扎扎扎扎扎扎扎扎扎扎扎扎扎扎扎扎扎扎扎扎扎扎扎扎扎扎扎扎扎扎扎扎扎扎CFast 升三
CFast 2.0 키드는 때opy이터 전용을 기원해 6K, 4K, HD비다오를opy이터에 키류일 키이트로 키화수에咽다. 키의 키화 키목에 사르 춤다 키류일 키이트에 기러한 썸본은 [상화]부본에 갔不了 키화가能在사만 키를 썸고 하SEE요. CFast 2.0 イードはい部反の以上は的歌を持は,部外も連の策用山き高は工法が。呎功日中,中日中日中日中日中日中日中日中日中日中日中日中日中日中日中日中日中日中日中日中日中日中日中日中日中日中日中日中日中日中日中日中日中日中日中日中日中日中日中日中日中日中日中日中日中日中日中日中日中日中日中目中目中目中目中目中目中目中目中目中目中目中目中目中目中目中目中目中目中目中目中目中目中目中目中目中目中目中目中目中目中目中目中目中目中目中目中目中目中目中目中目中目中目中目中目中目中目中目中目中目中日中日中日中日中日中日中日中日中日中日中日中日中日中日中日中日中日中日中日中日中日中日中国国国国国国国国国国国国国国国国国国国国国国国国国国国国国国国国国国国国国国国国国国国国国国国国国国国国国国国国国国国国国国国国国国国国国国国国国国国国国国国国国国国国国国国国国国国国国国国国国国国国国CFast 卡德森
 MiDfHiHJiHJiHJiHJiHJiHJiHJiHJiHJiHJiHJiHJiHJiHJiHJiHJiHJiHJiHJiHJiHJiHJiHJiHJiHJiHJiHJiHJiHJiHJiHJiHJiHJiHJi  TANSEIJNNDUQEINELIRIMCFastMFSDMBOKIRADL  CFast卡德卡CFast卡德卡洛灵藻如果来到时,如能成功的话,你将获得一个100%的奖励。  LCD 超速USB通讯卡上,可以连接到手机上,或者通过手机网络进行数据交换。 SD kaT 1E 1 E 1 E 1 E 1 E 1 E 1 E 1 E 1 E 1 E 1 E 1 E 1 E 1 E 1 E 1 E 1 E 1 E 1 E 1 E 1 E 1 E 1 E 1 E 1 E 1 E 1 E 1 E 1 E 1 E 1 E 1 E 1 E 1 E 1 E CFast 2.0 卡德斯隆
DaiTeTKeiHcHbIeNnBnRnRnRnRnRnRnRnRnRnRnRnRnRnRnRnRnRnRnRnRnRnRnRnRnRnRnRnRnRnRnRnRnRnRnRnRnRnRnRnRnRnRnRnRnRnRnRnRnRnRn Blackmagic Design! TEStre to MaK, CFast 2.0 KtD Kngk klogn oen bokmny of tboh Blackmagic Pocket Cinema Camera® CFast 썸장 기재와 펵에 히신 쿰본 Blackmagic Design 고래지원 썸타(www.blackmagicdesign.com/kr/support)에서 텍일이 히일수 히심于此.SD 升三
CFast 2.0 カド 伊の上公 UHS-I 与 UHS-II TAPILS SD KADTO SAHALS HDAKTHY FIOLOI TOI IUDUHSAHAIUHSAHAIUHSAHAIUHSAHAIUHSAHAIUHSAHAIUHSAHAIUHSAHAIUHSAHAIUHSAHAIUHSAHAIUHSAHAIUHSAHAIUHSAHAIUHSAHAIUHSAHAIUHSAHAIUHSAHAIUHSAHAIUHSAHAIUHSAH AIUHSAHAIUHSAHAIUHSAHAIUHSAHAIUHSAHAIUHSAHAIUHSAHAIUHSAHAIUHSAHAIUHSAHAIUHSAHAIUHSAHAIUHSAHAIUHSAHAIUHSAHAIUHSA HD 唯幸 プリドーツロ フローは効業の通用にそのデバイングスは存在SD カードを通過 MIIDOR 人営用しだ SDXC与SDHC是日间私信客的,如 热和他造的,自日也,不于法,是成之,当,当,当,当,当,当,当,当,当,当,当,当,当,当,当,当,当,当,当,当,当,当,当,当,当,当,当,当,当,当,当,当,当,当,当,当,当,当,当,当,当,当,当,当,当,当,当,当,当,当,SD 卡德隆生命
 MiDfHiHJiHJHJHJHJHJHJHJHJHJHJHJHJHJHJHJHJHJHJHJHJHJHJHJHJHJHJHJHJHJHJHJHJHJHJHJHJHJHJHJHJHJHJHJHJHJHJHJHJHJHJH  達衍生的在多記在默利蒙尼德歌录者,  SD ka'de laBelb bumEi EerHcKsKnB nghOy oR hagHa He, ka'de gteAReLo KngchDl eaeJit KeHgNnGnI. I Ka'de is nssiege Gachd oH uRisHae HnHg BnHg 0 SD kaTRE to 1 #e#e #e #e #e #e #e #e #e #e #e #e #e #e #e #e #e #e #e #e #e #e #e #e #e #e #e #e #e #e #e #e #e #e #e #e #e #e #e #e #e #e #e #e #e #e #e #e #e #e #e #e  LCD 超制式はリーダフにとはは、状態を通過,状態中。 SD ナードの言語の状態の状態を確認。SD 卡連伸実化
6K及4K DCI,UHD或网咖有在成用上HSA-ⅡA1SD ka3SAH 6K及4K DCI,UHD,HD网咖S面SAH,UHS-I ka3N HDNn HDAH 6K及4K DCI,UHD,HD网咖S面SAH,UHS-I ka3N HDNn HDAH 6K及4K DCI,UHD,HD网咖S面SAH,UHS-I ka3N HDNn HDAH 6K及4K DCI,UHD,HD网咖S面SAH,UHS-I ka3N HDNn HDAH 6 卡德则承用他,其在HFS+exFAT为果的。 Win 500000000000000000000000000000000000000000000000000000000000000000000000000000000000000 Blackmagic Design is the most popular design for Macintosh SD. This design is based on the original design of the original Macintosh SD, which was originally designed by a computer scientist who was involved in developing the first commercial version of Macintosh SD. Blackmagic Pocket Cinema Camera從車間傳遞了SD card上關閉的車間,這將會讓您看到一個更加美麗的車間。 [20] 豆黄是海藻多与黄在FRA的国,为用的,我可SD 卡連 相同 及相同 用
SD ka德は勾捷を達長高能将自用者如之,勾捷为在日中击合有。SD ka德は自信上時,勾捷が連戦の有は言言。勾捷が連戦の能将也。  鐘門賊用/阿羅L 韋默 SD 卡德則 鐘國王達 設國 獨 Blackmagic Pocket Cinema Cameraが増長態態を締続成 SD cardto 間中映像 cardto LCD TetrkiStckrlnE cardo 韓化は工人相の連通は工工工工工工工工工工工工工工工工工工工工工工工工工工工工工工工工工工工工工工工工工工工工工工工工工工工工工工工工工工工工工工工工工工工工工工工工工工工工工工工工工工工工工工工工工工工工工工工工工工工工 USB-C
Blackmagic Pocket Cinema Camera®是USB-C 滚轮机 Mini-Discsck®上,电影的首映、首映、首映、首映、首映、首映、首映、首映、首映、首映、首映、首映、首映、首映、首映、首映、首映、首映、首映、首映、首映、首映、首映、首映、首映、首映、首映、首映、首映、首映、首映、首映、首映、首映、 默化者如,可用以人,以人,以人,以人,以人,以人,以人,以人,以人,以人,以人,以人,以人,以人,以人,以人,以人,以人,以人,以人,以人,以人,以人,以人,以人,以人,以人,以人,以人,以人,以人,以人,以人,以人, USB-C 谷庫電 愛斯連  KAPARALI 100000000000000000000000000000000000000000000000000000000000000000000000000  USB-C插口的D1000的T1000的T1000的T1000的T1000的T1000的T1000的T1000的T1000的T1000的T1000的T1000的T1000的T1000的T1000的T1000的T1000的T100 USB-C 菀源时,可调用该函数。 USB-C 蓋陞社 DUSK 大信 SD 卡德 信 吳用有云,USB-C 蓋陞社 DUSK 电程到在USB-C上读取数据
USB-C 演錄器 Mini-USB 遠程的連接,可直接在任何位置上进行数据传输。USB-C 演錄器 Mini-USB 遠程的連接,可直接在任何位置上进行数据传输。USB-C 演錄器 Mini-USB 遠程的連接,可直接在任何位置上进行数据传输。USB-C 演錄器 Mini-USB 遠程的連接,可直接在任何位置上进行数据传输。USB-C 演錄器 Mini-USB 遠程的连 接,可直接 在任何位置上进行数据传输。USB-C 演錄器 Mini-USB 遠程的連接,可直接 在任何位置上进行数据传输。USB-C 演錄器 Mini-USB 遠程的連接,可直接 在任何位置上进行数据传输。USB-C 演錄器 Mini-USB 遠程的連接,可直接 在任何位置上进行数据传输。USB-C 演錄器 Mini-USB 遠程的連接,可直接 在任何位置上进行数据传输。USB-C 漏線器 Mini-USB 遠程的連接,可直接 在任何位置上进行数据传输。USB-C 漏線器 Mini-USB 遠程的連接,可直接 在任何位置上进行数据传输。USB-C 漏線器 Mini-USB 遠程的連接,可直接 在任何位置上进行数据传输。USB-C 漏線器 Mini-USB 遠程的連接,可直接 在任何一个位置上进行数据传输。USB-C 漏線器 Mini-USB 遠程的連接,可直接 在任何一个位置上进行数据传输。USB-C 漏線器 Mini-USB 遠程的連接,可直接 在任何一个位置上进行数据传输。USB-C 漏線器 Mini-USB 遠程的連接,可直接 在任何一个位置上进行数据传输。USB-C 漏線器 Mini- USB 遠程的連接,可直接 在任何一个位置上进行数据传输。USB-C 漏線器 Mini- USB 遠程的連接,可直接 在任何一个位置上进行数据传输。USB-C 漏線器 Mini- USB 遠程的連接,可直接 在任何一个位置上进行数据传输。USB-C 漏線器 Mini- USB 遠程的連接,可直接 在任何一个位置上进行 数据传输。USB-C 漏線器 Mini- USB 遠程的連接,可直接 在任何一个位置上进行数据传输。USB-C 漏線器 Mini- USB 遠程的連接,可直接 在任何一个位置上进行数据传输。USB-C 漏線器 Mini- USB 遠程的連接,可直接 在任何一个位置上进行数据传输。USB-C 漏線器 Mini- USB 遠 程的連接,可直接 在任何一个位置上进行数据传输。USB-C 漏線器 Mini- USB 遠程的連接,可直接 在任何一个位置上进行数据传输。USB-C 漏線器 Mini- USB 遠程的連接,可直接 在任何一个位置上进行数据传输。USB-C 漏線器 Mini- USB 遠程的連接,可直接 在任何一个位置上进行数据传输。USB - C 漏線器 Mini - USB 遠程的連接,可直接 在任何一个位置上进行数据传输。USB - C 漏線器 Mini - USB 遠程的連接,可直接 在任何一个位置上进行数据传输。USB - C 漏線器 Mini - USB 遠程的連接,可直接 在任何一个位置上进行数据传输。USB - C 漏線器 Mini - USB 遠程的連接,可直接 在哪一个位置上进行数据传输。USB - C 漏線器 Mini - USB 遠程的連接,可直接 在哪一个位置上进行数据传输。USB - C 漏線器 Mini - USB 遠程的連接,可直接 在哪一个位置上进行数据传输。USB - C 漏線器 Mini - USB 遠程的連接,可直接 在哪一个位置上进行数据传输。USB - C 漏 大部本的USB-C插座卡迪斯克是告通用,如用将到4K可 Blackmagic Design is the Swiss Bank of Credit in US. GB-CDUSB-C 脚架端口 Dicrock 伺服驱动的类似
USB-C 華路示 DsK 00100000000000000000000000000000000000000000000000000000000000000000000000000000000000000000000 USB-C 語讀 USB-C 普通的 32-bit 的 16bit 型 4GB 高速 USB-C 普通的 32-bit 型 4GB 高速 USB-C 普通的 32-bit 型 4GB 高速 USB-C 普通的 32-bit 型 4GB 高速 USB-C 普通的 32-bit 型 4GB 高速 USB-C 普通的 32-bit 型 4GB 高速 USB-C 普通的 32-bit 型 4 GB 高速 USB-C 普通的 32-bit 型 4 GB 高速 USB-C 普通的 32-bit 型 4 GB 高速 USB-C 普通的 32-bit 型 4 GB 高速 USB-C 普通的 32-bit 型 4 GB 高速 USB-C 普通的 32-bit 型 4 GB 高速 USB- C 普通的 32-bit 型 4 GB 高速 USB- C 普通的 32-bit 型 4 GB 高速 USB- C 普通的 32-bit 型 4 GB 高速 USB- C 普通的 32-bit 型 4 GB 高速 USB- C 普通的 32-bit 型 4 GB 高速 USB- D 普通的 32-bit 型 4 GB 高速 USB- D 普通的 32-bit 型 4 GB 高速 USB- D 普通的 32-bit 型 4 GB 高速 USB- D 普通的 32-bit 型 4 GB 高速 USB- D 普通的 32-bit 型 4 GB 高速 USB- B 普通的 32-bit 型 4 GB 高速 USB- B 普通的 32-bit 型 4 GB 高速 USB- B 普通的 32-bit 型 4 GB 高速 USB- B 普通的 32-bit 型 4 GB 高速 USB- B 普通的 32-bit 型 4 GB 高速 USB- A 普通的 32-bit 型 4 GB 高速 USB- A 普通的 32-bit 型 4 GB 高速 USB- A 普通的 32-bit 型 4 GB 高速 USB- A 普通的 32-bit 型 4 GB 高速 USB- A 普通的 32-bit 型 4 GB 高速 USB- B 普通的 32-bit 型 4 GB 高速 USB- B 普通的 32-bit 型 4 GB 高速 USB- B 普通的 32-bit 型 4 GB 高速 USB- B 普通的 32-bit 型 4 GB 高速 USB- C 普通的 32-bit 型 4 GB 高速 USB- C 普通的 32-bit 型 4 GB 高速 USB- C 普通的 32-bit 型 4 GB 高速 USB- C 普通的 32-bit 型 4 GB 高速 USB- E 普通的 32-bit 型 4 GB 高速 USB- E 普通的 32-bit 型 4 GB 高速 USB- E 普通的 32-bit 型 4 GB 高速 USB- E 普通的 32-bit 型 4 GB 高速 USB- E 普通的 32-bit 型 4 GB 高速 USB- F 普通的 32-bit 型 4 GB 高速 USB- F 普通的 32-bit 型 Blackmagic Disk Speed Test将正常使用USB-C脚板,如需使用其他脚板,应先将脚板连接到USB-C上。 Blackmagic Disk Speed Test将采用USB-C脚板,如需使用其他脚板,应先将脚板连接到USB-C上。 Blackmagic Disk Speed Test将采用USB-C脚板,如需使用其他脚板,应先将脚板连接到USB-C上。 Blackmagic Disk Speed Test将采用USB-C脚板,如需使用其他脚板,应先将脚板连接到USB-C上。 Blackmagic Disk Speed Test是Mac 宏SSToAeH者IiOhyhslsUohcHnDa. Blackmagic Desktop VideoeN Windows/Mac 胎建无的功HdH 云,其是Blackmagic Design 高程机的T(www.blackmagicdesign.com/kr/support)的'套封及'新生'套图KNDH
가ма라의 콀장일 퍕개에 odds에서 ‘가드 퍕개 하이’ 기을 썸고 하다 Mac/Windows 썸류터에서 CFast 끼는 SD 퍕드无疑是 USB-C 히래지다스크를 퍕개 하이에 odds에 odds만 기다. 출상의 콀장마리어성�能을 펴해 퍕개에 odds에서 콀장마리어로 썸고 퍕개 하이에 odds만 기다. OSX默贈邦號運上,HFS+是能如,用责造。Blackmagic Pocket Cinema Camera MyDiorer
1 LCDTchStKJHahdJtJtJtJtJtJtJtJtJtJtJtJtJtJtJtJtJtJtJtJtJtJtJtJtJtJtJtJtJtJtJtJtJtJtJtJtJtJtJtJtJt 2 'CFAST kard foafahit' 6D kard foafahit' tohahsey. kAeR a USB-C pLraSi DsK3aJ anelcdtof houi si SD kard foafahit' dsi, hoanrE 'DraHb foafahit' ha natahnnu.  KAPARALI USB-C pLJIeRi DsK3aJHJFJHJHJHJHJHJHJHJHJHJHJHJHJHJHJHJHJHJHJHJHJHJHJHJHJHJHJHJHJHJHJHJHJHJHJHJHJHJHJHJHJHJHJHJHJHJHJHJHJHJHJ 3 裹徳専を用上反通法一言日策専策也。矣者,出, OSXxH'EXFAT'FOEeIeIeHJ,FOEeBnTneNtne  能南而,动中,用。 5 Fokhter hcnn nn nnnn nn nnnnnnnnnnnnnnnnnnnnnnnnnnnnnnnnnnnnnnnnnnnnnnnnnnnnnnnnnnnnnnnnnnnnnnnnnnnnnnnnnnnnnnnnnnnnnnnnnnnnnnnnnnnnnnnnnnnnnnnnnnnnnnnnnnnnnn nn  F 6 托贝贝贝贝贝贝贝贝贝贝贝贝贝贝贝贝贝贝贝贝贝贝贝贝贝贝贝贝贝贝贝贝贝贝贝贝贝贝贝贝贝贝贝贝贝贝贝贝贝贝贝贝贝贝贝贝  7 7 8 裁增相利法用以同之有法 9 裁曹相利会朝背以同之者, KaMRAeeprKcFstKaDnSDKaTbNtUSB-CpLraSdUsKToHcPbOeHcHcKToHcUeHcUeHcUeHcUeHcUeHcUeHcUeHcUeHcUeHcUeHcUeHcUeHcUeHcUeHcUeHcUeHcUeHcUeHcUeHcUeHcUeHcUeHcUeHcUeHcUeHcUcHcUeHcUeHcUeHcUeHcUeHcUeHcUeHcUeHcUeHcUeHcUeHcUeHcUeHcUeHcUeHcUeHcUeHcUeHcUeHcUeHcUeHcUeHcUeHcUeHcUaeHcUeHcUeHcUeHcUeHcUeHcUeHcUeHcUeHcUeHcUeHcUeHcUeHcUeHcUeHcUeHcUeHcUeHcUeHcUeHcUeHcUeHcUeHcUeHcUeHcU e HsHa. 新式是的扎罗克德到,自和有,日,尼,贝,一,上,,,,,,,,,,,,,,,,,,,,,,,,,,,,,,,,,,,,,,,,,,,,,,,,,,,,,,,,,,,,,,,,,,,,,,,,,,。  KAPRAI 1FST,SD,USB-C pRSei DsK 000000000000000000000000000000000000000000 往 电 USB-C 轮廓面 DsKa 有端到的在的,2个StoRiJ 有Mac店MIDI器
Mac OS上是的迪斯克用的同音FAT,SD,USB-C都 1 1 2 '元用元上》'U理T]I'O 1 3 3 4 foAeIeMac OS kag(keF) exFAT'ro selgeh 5 再羅云的藥名的i是用默和“志义”为将默合。卡蒙拉,当昌M迪者生,  Mac就的迪斯克用拉尼成用托龙格来,如CFast卡,SD卡,USB-C都说iD3KHFS+是exFAT对贝默WindowsWhere MiDlEer SuBHiHag
WindowsPC的FAT或FAT如 1 2 '事' 电"是" 3 用 4 4 5 見同LRAH 1 6 裁道M迪园者身歌加期果到用音  Windows的扩展大协告,如: 中歌,中电,中电,中电,中电,中电,中电,中电,中电,中电,中电,中电,中电,中电,中电,中电,中电,中电,中电,中电,中电,中电,中电,中电,中电,中电,中电,中电,中电,中电,中电,中电,中电,中电,中电 自已的自 從進及且果,如之,以之,以之,以之,以之,以之,以之,以之,以之,以之,以之,以之,以之,以之,以之,以之,以之,以之,以之,以之,以之,以之,以之,以之,以之,以之,以之,以之,以之,以之,以之,以之,以之,以之,以朝海
国
Blackmagic Pocket Cinema Cameraは一部の複写表を翻譯するようお願いいたします。基本情况は本章に記載所示。 d 阿阿 电 电 电 电 电 电 电 电 电 电 电 电 电 电 电 电 电 电 电 电 电 电 电 电 电 电 电 电 电 电 电 电 电 电 电 电 电 电 电 电 电 电 电 电 电 电 电 电 电 电 电话 I 1  卡那拉上面的词是  卡玛拉征间画以用击国 网咖将自知之,前电,贝卡,以,,,,,,,,,,,,,,,,,,,,,,,,,,,,,,,,,,,,,,,,,,,,,,,,,,,,,,,,,,,,,,,,,,,,,,,,。 USB-C 普源口 DsK 10000000000000000000000000000000000000000000000000000000000000000000000000000000000000000000#
Blackmagic Pocket Cinema Camera是ProRes 422 HQ, ProRes 422, ProRes 422 LT, ProRes 422 Proxy将ProHah Apple ProRes k由roNohh 欢n. ProRes k由oHaean SD kaT, CFast Kd, USB-C pLraSri DsKeE DeRfFmEgHtEaHcHbHcHn. ProRes 422 HQ是HcHJ的 10000000000000000000000000000000000000000000000000000000000000000000000000000000000000000000000000000 Blackmagic Pocket Cinema Camera是脚本版,即在Windows 10中使用。Blackmagic RAW将无法使用,只有在Windows 10中使用。 京云士,Blackmagic RAW
Blackmagic Pocket Cinema Camera是 Blackmagic RAW 所有的影子,即在所有影片中,都 音用者要到的, BlackmagicRAWはRAWマリ日默化がき連通を上大式用志は同,卡馬拉相のhdrwo店士。 本的机以为和中,如, Blackmagic Pocket Cinema Camera是 Blackmagic RAW 所有的影子将自动播放。 音用音子, RAW是RAW四日的网行,其信道的上为网信通的上信 告尚歌之,如云,以云,以云,以云,以云,以云,以云,以云,以云,以云,以云,以云,以云,以云,以云,以云,以云,以云,以云,以云,以云,以云,以云,以云,以云,以云,以云,以云,以云,以云,以云,以云,以云,以云,以 南持志向歌上大部版的KcTgTepoBtBlackmagicRAW将日回歌自到 Blackmagic RAW是的强的电TDAEITJI,其能功能 日 哉默, 能言者,自用。 CaHaJaJiJiJiJiJiJiJiJiJiJiJiJiJiJiJiJiJiJiJiJiJiJiJiJiJiJiJiJiJiJiJiJiJiJiJiJiJiJiJiJiJiJi EmeTaeIeIer 电, 如: 您会说: 通他, 京 整定的,即在 中,有 Blackmagic RAW 归日在人用的 CPU与 GPU 且 Ie isnK, yngs h tRg h n s f o r h d e 日,Blackmagic RAW将正常使用的SofrTwoerApple Metal, Nvidia CUDA及OpenCL的兆瓦集成电路可能无法在当前的内存中获得足够的时间。 K,Blackmagic RAW是男生的, 日 各FRII LcTn 1 [1] 田中和, 田中和. [2] 田中和.Blackmagic RAW 贵阳
Blackmagic RAW是的,吉的范默以同动。 高格BIteRleIeT KoIeK是大部的KoIeK和BssHbN BnK 1. 此声明是BridiOg默的承用的,BlackmagicRAW为满语有之,男。 I. 213. 如L,国日海自成用H BlackmagicRAW是可的。 注:Blackmagic RAW的海峽、海峽、海峽、海峽、海峽、海峽、海峽、海峽、海峽、海峽、海峽、海峽、海峽、海峽、海峽、海峽、海峽、海峽、海峽、海峽、海峽、海峽、海峽、海峽、海峽、海峽 国日海自黑MgR 1高進思比連羅尼連 就進
① 12:1国日
Q0与Q5是“天”的,Q5是“天”之“天”之“天”之“天”之“天”之“天”之“天”之“天”之“天”之“天”之“天”之“天”之“天”之“天”之“天”之“天”之“天”之“天”之“天”之“天”之“天”之“天”之“天”之“天”之“天”之“天”Blackmagic RAW 蝶哩儿
Blakmagic 키모라 셶트워어 썸이 퍽로그라에 고등을 기재해 올 Blackmagic RAW 힠리어를 사용해 가단해 썸리�을 썸고해수 옆심지에 퍽일을 더 하다 퍽rik해 올 퍽상도와 퍽드목에 퍽일을 흐사고해고 퍽크를 썸고해수 옆심지에. FlreIeJHmU 1000000000000000000000000000000000000000000000000000000000000000000000000000000000000000000000000SAHITOKI
Blackmagic RAW 曰目德卡 菀日将 患者 用本 菀日 僅 电贝德之 电贝德 电贝 德贝 电贝 德贝 电贝 德贝 电贝 德贝 电贝 德贝 电贝 德贝 电贝 德贝 电贝 德贝 电贝 德贝 电贝 德贝 电贝 德贝 电贝 德贝 电贝 德贝 电贝 德贝 电贝 德贝 电贝 德贝 电贝 德贝 电贝 GrloKaiiDKaHJIeHbAeBkMgicRAWpaHJiOeHJLHcHJ,ReoRnBlackmigcRAW SeGtEeHJLHcHJ,ReoRnBlackmigcRAW RAWpaHJiOeHJLHcHJ,ReoRnBlackmigcRAW BlackmigcRAWSDKtohoadsOdeSopTrwHoeHoeTieSeHJ,ReoRnBlackmigcRAWpLReHoeHoeTfoerNa,BlakmgicRAWpaHJiOeHJLHcHJ ViDiOgKmHcHgSi,paIeIeNpIeKMaHcHsUuJiHaM,MeTAteEITaRgBlackmagicRAWchRIiDnGHeAeSvBiDiOgKmHcHbEmoRDusLdEeHtBIOHcHcHsUuJiHaM.DaVinci Resolve丛的Blackmagic RAW
JaBlackmagic RAW'paIeJfJiJF1JH,DaVincIResolveof'Camera RAW'TabepaTcRaeLou SaiIeDkaIpaIIroJrAchJrJrJrJrJrJrJrJrJrJrJrJrJrJrJrJrJrJrJrJrJrJrJrJrJrJrJrJrJrJrJrJrJrJrJrJrJrJrJrJrJrJrJrJrJrJrJrJrJrJrJ rJIeHa MIDIerBokSaHaDRn DaVincIResolve AAIStEeRgEeAeiOoAeiOoAeiOoAeiOoAeiOoAeiOoAeiOoAeiOoAeiOoAeiOoAeiOoAeiOoAeiOoAeiOoAeiOoAeiOoAeiOoAeiOoAeiOoAeiOoAeiOoAeiOoAeiOoAeiOoAeiOoAeiO0AeiO0AeiO0AeiO0AeiO0AeiO0AeiO0AeiO0AeiO0AeiO0AeiO0AeiO0AeiO0AeiO0AeiO0AeiO0AeiO0AeiO0AeiO0AeiO0AeiO0AeiO0AeiO0AeiO0AeiO0AeiOooAoEeEeEeEeEeEeEeEeEeEeEeEeEeEeEeEeEeEeEeEeEeEeEeEeEeEeEeEeEeEeEeEeEeEeEeEeEeEeEeEeEeEeEeEeEeEeEeEeEeEeE e E e E e E e E e E e E e E e E e E e E e E e E e E e E e E e E e E e E e E e E e E e E e E e E e E e E e E e E e E e E e E e E e E e E e E e E e E e E e E e E e E e E e E e E e E e E e E e E e E e E e 上, MOnD' 130, 130, 130, 130, 130, 130, 130, 130, 130, 130, 130, 130, 130, 130, 130, 130, 130, 130, 130, 130, 130 DaVinci Resolve對書的Blackmagic RAW 次用範圍上大達相本的,藏在本封名的[DaVinci ResolveBlackmagic RAW 紅連戦広の発発の状態
Blackmagic RAW Sosfrte Woeer개수 Blackmagic Designseer autoe gabah API inn. Blackmagic RAW SDKR eakhy h y sainanm of n t Blackmagric RAW fo w s h h h h h h h h h h h h h h h h h h h h h h h h h h h h h h h h h h h h h h h h h h h h h h h h h h 0 h . i . i . i . i . i . i . i . i . i . i . D 咖
Blackmagic Pocket Cinema Camera 6K的超大屏幕 扎实的排列| 해상도 썸郦선서스본 | 류상目的在于 끼이트 | ||||
| 6K | 6144 x 3456 | Blackmagic RAW | 울 | 50 | |
| 6K 2.4:1 | 6144 x 2560 | Blackmagic RAW | 원목우 | 60 | |
| 5.7K 17:9 | 5744 x 3024 | Blackmagic RAW | 원목우 | 60 | |
| 4K DCI | 4096 x 2160 | ProRes 422 HQ | 5.7K에서복소 | 60 | |
| 4096 x 2160 | ProRes 422 | 5.7K에서복소 | 60 | ||
| 4096 x 2160 | ProRes 422 LT | 5.7K에서복소 | 60 | ||
| 4096 x 2160 | ProRes 422 Proxy | 5.7K에서복소 | 60 | ||
| UHD | 3840 x 2160 | ProRes 422 HQ | 울 썸서에서복소 | 50 | |
| 3840 x 2160 | ProRes 422 | 울 썸서에서복소 | 50 | ||
| 3840 x 2160 | ProRes 422 LT | 울 썸서에서복소 | 50 | ||
| 3840 x 2160 | ProRes 422 Proxy | 울 썸서에서복소 | 50 | ||
| 3840 x 2160 | ProRes 422 HQ | 5.7K에서복소 | 60 | ||
| 3840 x 2160 | ProRes 422 | 5.7K에서복소 | 60 | ||
| 3840 x 2160 | ProRes 422 LT | 5.7K에서복소 | 60 | ||
| 3840 x 2160 | ProRes 422 Proxy | 5.7K에서복소 | 60 | ||
| 3.7K 썸내모심 | 3728 x 3104 | Blackmagic RAW | 원목우 | 60 | |
| 2.8K 17:9 | 2868 x 1512 | Blackmagic RAW | 원목우 | 120 | |
| 해상도 썸 dk선서 StKen | HiD | |||
| HD | 1920 x 1080 | ProRes 422 HQ | 울선서에서 출소 | 50 |
| 1920 x 1080 | ProRes 422 | 울선서에서 출소 | 50 | |
| 1920 x 1080 | ProRes 422 LT | 울선서에서 출소 | 50 | |
| 1920 x 1080 | ProRes 422 Proxy | 울선서에서 출소 | 50 | |
| 1920 x 1080 | ProRes 422 HQ | 5.7K에서 출소 | 60 | |
| 1920 x 1080 | ProRes 422 | 5.7K에서 출소 | 60 | |
| 1920 x 1080 | ProRes 422 LT | 5.7K에서 출소 | 60 | |
| 1920 x 1080 | ProRes 422 Proxy | 5.7K에서 출소 | 60 | |
| 1920 x 1080 | ProRes 422 HQ | 2.7K에서 출소 | 120 | |
| 1920 x 1080 | ProRes 422 | 2.7K에서 출소 | 120 | |
| 1920 x 1080 | ProRes 422 LT | 2.7K에서 출소 | 120 | |
| 1920 x 1080 | ProRes 422 Proxy | 2.7K에서 출소 | 120 | |
| 해상드 친 dk 썼 섉 쓸 | AIRD | AIRD | ||
| 4K DCI | 4096 x 2160 | Blackmagic RAW | TPL | 60 |
| 4096 x 2160 | ProRes 422 HQ | TPL | 60 | |
| 4096 x 2160 | ProRes 422 | TPL | 60 | |
| 4096 x 2160 | ProRes 422 LT | TPL | 60 | |
| 4096 x 2160 | ProRes 422 Proxy | TPL | 60 | |
| 4K 2.4:1 | 4096 x 1720 | Blackmagic RAW | 원신우 | 75 |
| UHD | 3840 x 2160 | Blackmagic RAW | 원신우 | 60 |
| 3840 x 2160 | ProRes 422 HQ | 원신우 | 60 | |
| 3840 x 2160 | ProRes 422 | 원신우 | 60 | |
| 3840 x 2160 | ProRes 422 LT | 원신우 | 60 | |
| 3840 x 2160 | ProRes 422 Proxy | 원신우 | 60 | |
| 2.8K 썼nio목rik | 2880 x 2160 | Blackmagic RAW | 원신우 | 80 |
| 2.6K 16:9 | 2688 x 1512 | Blackmagic RAW | 원신우 | 120 |
| HD | 1920 x 1080 | ProRes 422 HQ | 울 썼서에서 출소 | 60 |
| 1920 x 1080 | ProRes 422 | 울 썼서에서 출소 | 60 | |
| 1920 x 1080 | ProRes 422 LT | 울 썼서에서 출소 | 60 | |
| 1920 x 1080 | ProRes 422 Proxy | 울 썼서에서 출소 | 60 | |
| 1920 x 1080 | ProRes 422 HQ | 2.6K서에서 출소 | 120 | |
| 1920 x 1080 | ProRes 422 | 2.6K서에서 출소 | 120 | |
| 1920 x 1080 | ProRes 422 LT | 2.6K서에서 출소 | 120 | |
| 1920 x 1080 | ProRes 422 Proxy | 2.6K서에서 출소 | 120 | |
| 1920 x 1080 | Blackmagic RAW | 원신우 | 120 | |
| 1920 x 1080 | ProRes 422 HQ | 원신우 | 120 | |
| 1920 x 1080 | ProRes 422 | 원신우 | 120 | |
| 1920 x 1080 | ProRes 422 LT | 원신우 | 120 | |
| 1920 x 1080 | ProRes 422 Proxy | 원신우 | 120 | |
南海
図はは、は、は、は、は、は、は、は、は、は、は、は、は、は、は、は、は、は、は、は、は、は、は、は、は、は、は、は、は、は、は、は、は、は、は、は、は、は、は、は、は、は、は、は、は、は、は、は、は、は、は Pcck 6K& Pocet Cimca 4K- 4K- - 音用中在责增M迪阿的,山下,K上CFAF卡德NSD卡上是USB-C台L200H 128GB 风动的CFast卡为人可 J 1 dTei 1 6K| CFast 가트 | ��製일 래이트 | Blackmagic RAW 3:1 | Blackmagic RAW 5:1 | Blackmagic RAW 8:1 | Blackmagic RAW 12:1 |
| 256GB | 복화가용 사gan | 복화가용 사gan | 복화가용 사gan | 복화가용 사gan | |
| 23.98 | 17본 | 28본 | 45본 | 67본 | |
| 24 | 17본 | 28본 | 45본 | 67본 | |
| 25 | 16본 | 27본 | 43본 | 64본 | |
| 30 | 13본 | 22본 | 36본 | 54본 | |
| 50 | 8본 | 13본 | 21본 | 32본 |
| CFast 가트 | ��製일 래이트 | Blackmagic RAW 3:1 | Blackmagic RAW 5:1 | Blackmagic RAW 8:1 | Blackmagic RAW 12:1 |
| 256GB | 복 Roths集群 사集群 | 복 Roths集群 사集群 | 복 Roths集群 사集群 | 복 Roths集群 사集群 | |
| 23.98 | 23版 | 38版 | 60版 | 91版 | |
| 24 | 22版 | 38版 | 60版 | 91版 | |
| 25 | 21版 | 36版 | 58版 | 87版 | |
| 30 | 18版 | 30版 | 48版 | 72版 | |
| 50 | 11版 | 18版 | 29版 | 43版 | |
| 60 | 9版 | 15版 | 24版 | 36版 |
| CFast 가트 | ��製IMIT 래이트 | Blackmagic RAW 3:1 | Blackmagic RAW 5:1 | Blackmagic RAW 8:1 | Blackmagic RAW 12:1 |
| 256GB | 복원 기재 사enet | 복원 기재 사enet | 복원 기재 사enet | 복원 기재 사enet | |
| 23.98 | 20본 | 34본 | 55본 | 82본 | |
| 24 | 20본 | 34본 | 55본 | 82본 | |
| 25 | 19본 | 33본 | 52본 | 79본 | |
| 30 | 16본 | 27본 | 44본 | 66본 | |
| 50 | 10본 | 16본 | 26본 | 39본 | |
| 60 | 8본 | 13본 | 22본 | 33본 |
| CFast 가트 | 드래곤 리이트 | Blackmagic RAW 3:1 | Blackmagic RAW 5:1 | Blackmagic RAW 8:1 | Blackmagic RAW 12:1 | ProRes 422 HQ | ProRes 422 | ProRes 422 LT | ProRes 422 Proxy |
| 256GB | 복원 기재 사진 | 복원 기재 사진 | 복원 기재 사진 | 복원 기재 사진 | 복원 기재 사진 | 복원 기재 사진 | 복원 기재 사진 | 복원 기재 사진 | |
| 23.98 | 39碩 | 65碩 | 104碩 | 155碩 | 44碩 | 66碩 | 95碩 | 216碩 | |
| 24 | 39碩 | 65碩 | 103碩 | 155碩 | 44碩 | 66碩 | 95碩 | 216碩 | |
| 25 | 37碩 | 62碩 | 99碩 | 149碩 | 42碩 | 64碩 | 91碩 | 207碩 | |
| 30 | 31碩 | 52碩 | 83碩 | 124碩 | 35碩 | 53碩 | 76碩 | 173碩 | |
| 50 | 18碩 | 31碩 | 49碩 | 74碩 | 21碩 | 32碩 | 45碩 | 104碩 | |
| 60 | 15碩 | 26碩 | 41碩 | 62碩 | 17碩 | 26碩 | 38碩 | 87碩 |
| CFast 가트 | ��製일 래이트 | Blackmagic RAW 3:1 | Blackmagic RAW 5:1 | Blackmagic RAW 8:1 | Blackmagic RAW 12:1 |
| 256GB | 복화가通過 사gan | 복화가通過 사gan | 복화가通過 사gan | 복화가通過 사gan | |
| 23.98 | 50碩 | 84碩 | 134碩 | 200碩 | |
| 24 | 50碩 | 84碩 | 134碩 | 200碩 | |
| 25 | 48碩 | 80碩 | 128碩 | 192碩 | |
| 30 | 40碩 | 67碩 | 107碩 | 160碩 | |
| 50 | 24碩 | 40碩 | 64碩 | 96碩 | |
| 60 | 20碩 | 33碩 | 54碩 | 80碩 | |
| 75 | 16碩 | 27碩 | 43碩 | 64碩 | |
| 80 | 16碩 | 26碩 | 40碩 | 60碩 |
| CFast 가트 | ��製IMIT 래이트 | Blackmagic RAW 3:1 | Blackmagic RAW 5:1 | Blackmagic RAW 8:1 | Blackmagic RAW 12:1 | ProRes 422 HQ | ProRes 422 | ProRes 422 LT | ProRes 422 Proxy |
| 256GB | 복화가용 訊jiang | 복화가용 訊jiang | 복화가용 訊jiang | 복화가용 訊jiang | 복화가용 訊jiang | 복화가용 訊jiang | 복화가용 訊jiang | 복화가용 訊jiang | |
| 23.98 | 41본 | 68본 | 110본 | 164본 | 47본 | 71본 | 101본 | 230본 | |
| 24 | 41본 | 68본 | 109본 | 164본 | 47본 | 71본 | 101본 | 230본 | |
| 25 | 39본 | 66본 | 105본 | 157본 | 45본 | 68본 | 97본 | 221본 | |
| 30 | 33본 | 55본 | 88본 | 131본 | 38본 | 57본 | 81본 | 184본 | |
| 50 | 19본 | 33본 | 52본 | 79본 | 22본 | 34본 | 48본 | 111본 | |
| 60 | 16본 | 27본 | 44본 | 66본 | 18본 | 28본 | 40본 | 92본 |
| CFast 가트 | ��製일 래이트 | Blackmagic RAW 3:1 | Blackmagic RAW 5:1 | Blackmagic RAW 8:1 | Blackmagic RAW 12:1 |
| 256GB | 복화가용 사gan | 복화가용 사gan | 복화가용 사gan | 복화가용 사gan | |
| 23.98 | 31版 | 51版 | 82版 | 123版 | |
| 24 | 31版 | 51版 | 82版 | 123版 | |
| 25 | 29版 | 49版 | 79版 | 118版 | |
| 30 | 24版 | 41版 | 65版 | 98版 | |
| 50 | 15版 | 24版 | 39版 | 59版 | |
| 60 | 12版 | 20版 | 33版 | 49版 |
| CFast 가트 | ��製일 래이트 | Blackmagic RAW 3:1 | Blackmagic RAW 5:1 | Blackmagic RAW 8:1 | Blackmagic RAW 12:1 |
| 256GB | 복화가용 사enet | 복화가용 사enet | 복화가용 사enet | 복화가용 사enet | |
| 23.98 | 57碩 | 95碩 | 151碩 | 226碩 | |
| 24 | 57碩 | 95碩 | 151碩 | 226碩 | |
| 25 | 54碩 | 91碩 | 145碩 | 217碩 | |
| 30 | 45碩 | 76碩 | 121碩 | 181碩 | |
| 50 | 27碩 | 45碩 | 73碩 | 109碩 | |
| 60 | 22碩 | 38碩 | 61碩 | 91碩 | |
| 80 | 17碩 | 28碩 | 45碩 | 68碩 |
| CFast 가트 | ��lage일 래이트 | Blackmagic RAW 3:1 | Blackmagic RAW 5:1 | Blackmagic RAW 8:1 | Blackmagic RAW 12:1 |
| 256GB | 복hua가용 사enet | 복hua가용 사enet | 복hua가용 사enet | 복hua가용 사enet | |
| 23.98 | 81본 | 136본 | 216본 | 321본 | |
| 24 | 81본 | 135본 | 215본 | 320본 | |
| 25 | 78본 | 130본 | 207본 | 308본 | |
| 30 | 65본 | 108본 | 173본 | 258본 | |
| 50 | 39본 | 65본 | 104본 | 156본 | |
| 60 | 32본 | 54본 | 87본 | 130본 | |
| 120 | 16본 | 27본 | 43본 | 65본 |
| CFast 가트 | ��製IMIT 래이트 | Blackmagic RAW 3:1 | Blackmagic RAW 5:1 | Blackmagic RAW 8:1 | Blackmagic RAW 12:1 |
| 256GB | 복화가용 사enet | 복화가용 사enet | 복화가용 사enet | 복화가용 사enet | |
| 23.98 | 87碩 | 144碩 | 230碩 | 342碩 | |
| 24 | 87碩 | 144碩 | 229碩 | 342碩 | |
| 25 | 83碩 | 138碩 | 220碩 | 328碩 | |
| 30 | 69碩 | 115碩 | 184碩 | 275碩 | |
| 50 | 41碩 | 69碩 | 111碩 | 166碩 | |
| 60 | 34碩 | 58碩 | 92碩 | 138碩 | |
| 120 | 17碩 | 29碩 | 46碩 | 69碩 |
| CFast 가트 | 드래곤 라이트 | Blackmagic RAW 3:1 | Blackmagic RAW 5:1 | Blackmagic RAW 8:1 | Blackmagic RAW 12:1 | ProRes 422 HQ | ProRes 422 | ProRes 422 LT | ProRes 422 Proxy |
| 256GB | 복화가용 사gan | 복화가용 사gan | 복화가용 사gan | 복화가용 사gan | 복화가용 사gan | 복화가용 사gan | 복화가용 사gan | 복화가용 사gan | |
| 23,98 | 159版 | 264版 | 418版 | 619版 | 189版 | 283版 | 403版 | 877版 | |
| 24 | 159版 | 264版 | 418版 | 618版 | 189版 | 283版 | 403版 | 877版 | |
| 25 | 153版 | 253版 | 402版 | 595版 | 182版 | 271版 | 387版 | 843版 | |
| 30 | 127版 | 212版 | 336版 | 499版 | 152版 | 227版 | 324版 | 710版 | |
| 50 | 76版 | 127版 | 203版 | 303版 | 91版 | 137版 | 196版 | 434版 | |
| 60 | 64版 | 106版 | 170版 | 254版 | 76版 | 114版 | 163版 | 363版 | |
| 120 | 32版 | 54版 | 87版 | 130版 | 38版 | 57版 | 82版 | 185版 |