
KM 408-1 GRIL - Plaque de cuisson MIELE - Notice d'utilisation et mode d'emploi gratuit
Retrouvez gratuitement la notice de l'appareil KM 408-1 GRIL MIELE au format PDF.

| Type de produit | Plaque de cuisson (gril de contact) |
| Marque | MIELE |
| Modèle | KM 408-1 GRIL |
| Dimensions (L x P x H) | 514 x 288 x 52 mm |
| Dimensions de découpe (L x P) | 500 x 274 mm |
| Alimentation électrique | 240 V / 208 V, 60 Hz, 15 A |
| Câble d'alimentation | 3 conducteurs (noir, rouge, vert) |
| Fonctions | Gril de contact |
| Utilisation prévue | Installation sur plan de travail |
| Distance de sécurité (au-dessus) | 760 mm (30 pouces) minimum |
| Distance de sécurité (murs latéraux) | 50 mm (2 pouces) minimum |
| Distance de sécurité (entre appareils) | 50 mm (2 pouces) entre KM 408-1 et autres |
| Matériau du plan de travail requis | Résistant à la chaleur (100°C) avec adhésif adapté |
| Installation électrique | Par un électricien qualifié selon normes locales |
| Normes applicables | ANSI/NFPA 70 (USA) / CSA C22.1 (Canada) |
| Accessoires inclus | Barres de support, pinces à ressort, joint silicone |
| Entretien | Nettoyer régulièrement, ne pas sceller l'appareil |
| Sécurité | Mise à la terre obligatoire, ne pas installer près d'une friteuse à gaz |
| Service client (USA) | 800-999-1360 |
| Service client (Canada) | 800-565-6435 |
FOIRE AUX QUESTIONS - KM 408-1 GRIL MIELE
Questions des utilisateurs sur KM 408-1 GRIL MIELE
0 question sur cet appareil. Repondez a celles que vous connaissez ou posez la votre.
Poser une nouvelle question sur cet appareil
Téléchargez la notice de votre Plaque de cuisson au format PDF gratuitement ! Retrouvez votre notice KM 408-1 GRIL - MIELE et reprennez votre appareil électronique en main. Sur cette page sont publiés tous les documents nécessaires à l'utilisation de votre appareil KM 408-1 GRIL de la marque MIELE.
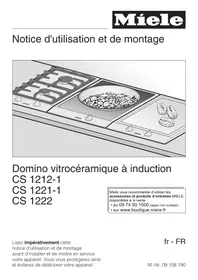
MODE D'EMPLOI KM 408-1 GRIL MIELE
Installation Instructions
natural_image
Illustration of a screw and a mechanical component with motion arrows indicating movement (no text or symbols)KM 400 Electric Cooktop
KM 402 / KM 403 Fryer
KM 408-1 Contact Grill
KM 410 / KM 411 Electric Barbecue
To prevent accidents and
machine damage,
read these instructions
before installation or use.
IMPORTANT SAFETY INSTRUCTIONS 4
Installation 4
Safety distance above the appliances 5
Safety distance between the KM 410 / KM 411 and a venting hood . . . . . . . . 6
Appliance dimensions....7
KM 400 / KM 408-1 7
KM 402 / KM 403....8
KM 410 / KM 411....9
Installation 10
Cutting out the countertop....10
Laying out the support bars and clamps. 11
Securing the support bars....12
Wood or Corian countertops. 12
Granite countertops 12
Securing the spring clamps....12
Wood or Corian countertops....12
Granite countertops 12
Locking the appliance into place 13
Electrical connection....15
Note to the installer:
Please leave this instruction book with the consumer for the local electrical inspector's use.
Installation
The minimum distances given in these Installation Instructions must be observed in order to ensure safe operation. Failure to do so increases the risk of fire.
To prevent appliance damage, the cabinetry and venting hood should be installed first.
The countertop must be bonded with heat resistant (212 °F/100 °C) adhesive to prevent distortion.
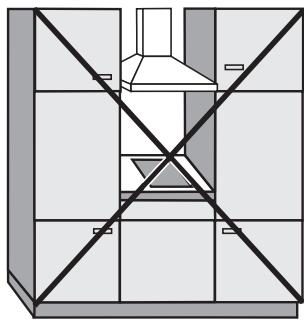
The cooktops should only be installed with the required safety distances shown. Do not install the cooktop between 2 tall cabinets as this is a fire hazard.
① = Minimum safety distances:
$$ \mathrm{KM} 4 0 0 = 2 ^ {\prime \prime} (5 0 \mathrm{mm}) $$
$$ \mathrm{KM} 4 0 2 / 4 0 3 = 2 ^ {\prime \prime} (5 0 \mathrm{mm}) $$
$$ \mathrm{KM} 4 0 8 - 1 = 2 ^ {\prime \prime} (5 0 \mathrm{mm}) $$
$$ \mathrm{KM} 4 1 0 / 4 1 1 = 1 0 ^ {\prime \prime} (2 5 0 \mathrm{mm}) $$
Deep fryers must not be installed next to gas cooktops. Gas flames can ignite splattering oil. A distance of at least 12" (305 mm) should be maintained between these two appliances.
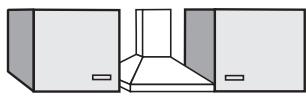
natural_image
Simple line drawing of a kitchen cabinet with front and side panels (no text or symbols)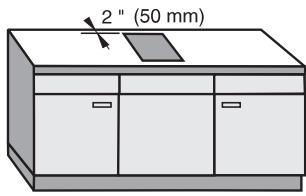
recommended
not recommended
natural_image
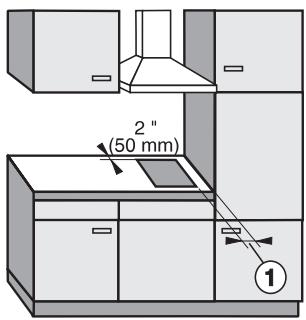
Architectural diagram of a kitchen with no visible text, numbers, or symbolsnot allowed
Cooktops should not be installed above a dishwasher, washer, dryer, freezer or refrigerator. Heat generated by cooktops could damage these appliances.
This equipment has not been designed for maritime use or for use in mobile installations such as aircraft or recreational vehicles. However, under certain circumstances it may be possible for an installation in these applications. Please contact the nearest Miele Dealer or the Miele Technical Service Department with specific requirements.
Safety distance above the appliances
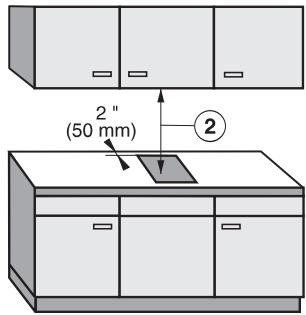
There must be a minimum safety distance of at least 30 inches (760 mm) between the top of the appliance and any cabinet above it, ②. If the cabinet manufacturer recommends a different distance, follow that manufacturer's recommendation.
When installing the cooktops under an exhaust hood, always observe the minimum safety distances recommended by the hood manufacturer.
Safety distance between the KM 410 / KM 411 and a venting hood
The minimum safety distance between the KM 410 / KM 411 and the bottom of a venting hood should be no less than 26" (650 mm).
The filters of the venting hood should be cleaned regularly.
Never leave the grill unattended when in use.
If more than one appliance is installed beneath a hood and they have different minimum safety distances, the greater distance should be followed.
Keep this instruction book in a safe place and pass it on to any future owner.
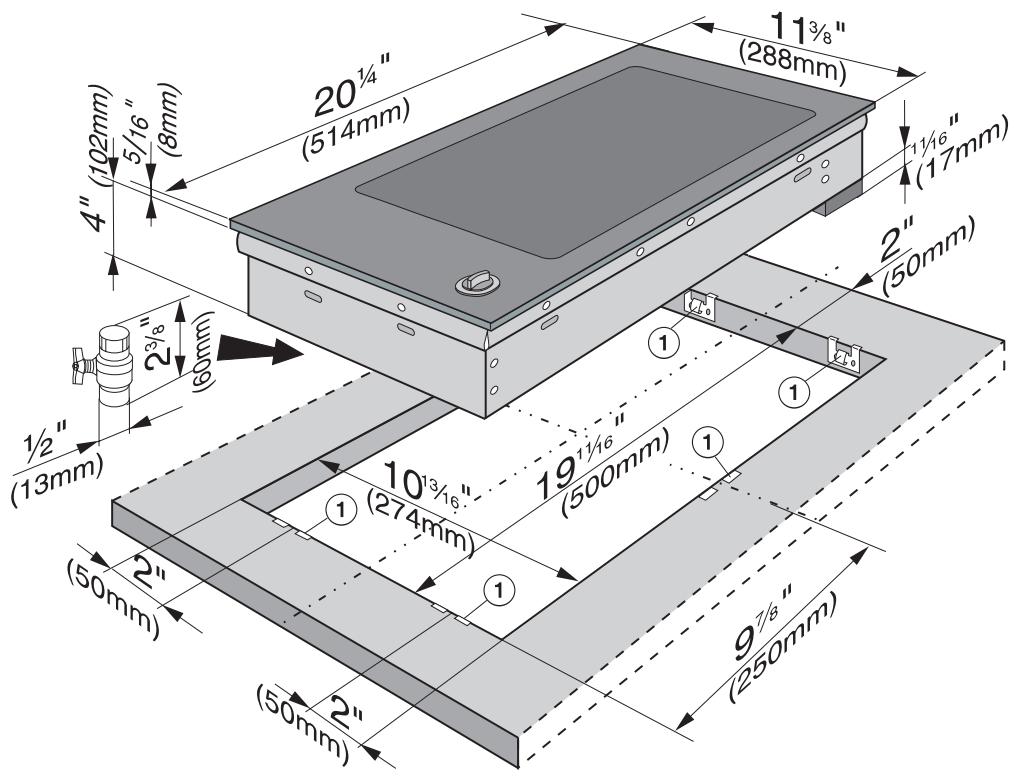
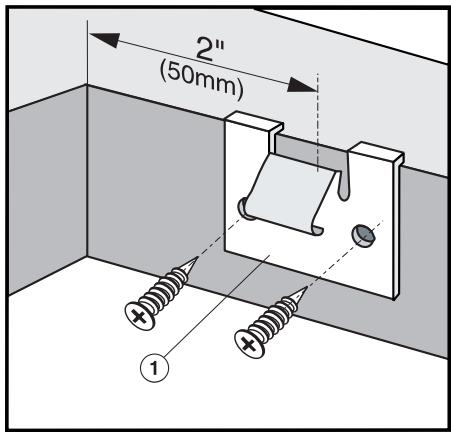
KM 400 / KM 408-1
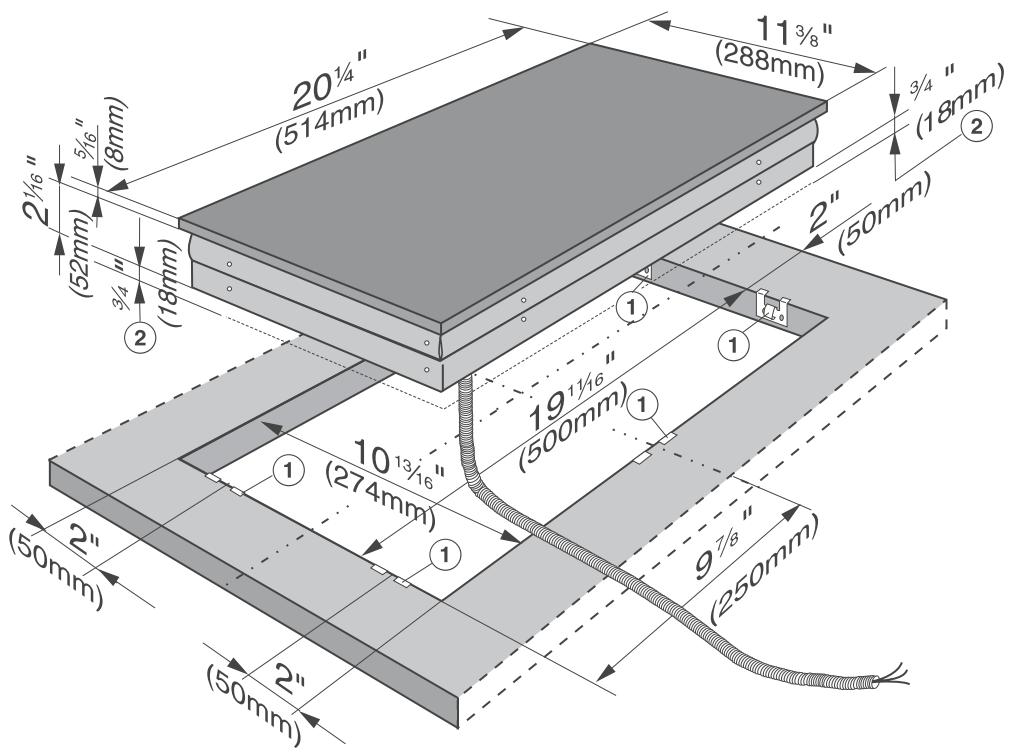
① Clamps
② Please allow an additional ^3/_4 " (18 mm) depth below the cooktop for clearance of the power cord.
KM 402 / KM 403
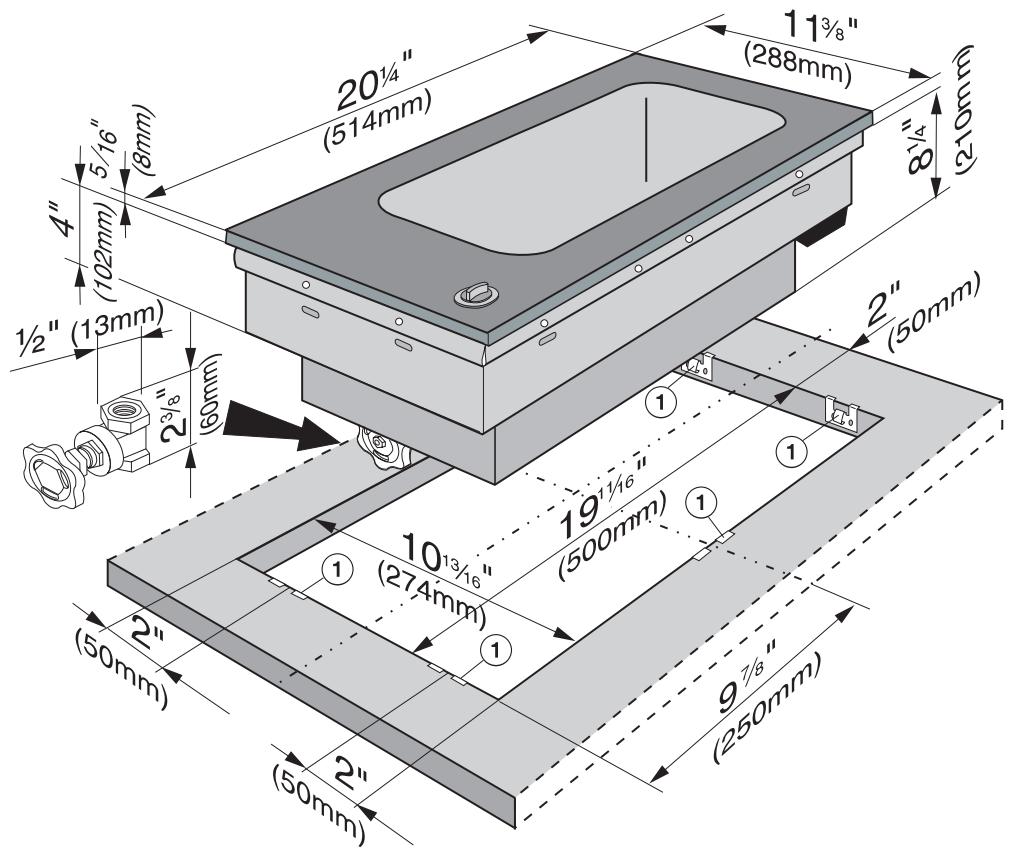
① Clamps
KM 410 / KM 411
① Clamps
Cutting out the countertop
All Miele combisets have the same length and width. Make sure that there is enough room beneath the countertop to allow for the depth of the various appliances. When installing a KM 402 / KM 403 or KM 410 / KM 411 remember to allow clearance for the drain valve that will be located in the cabinet beneath the appliances.
The following safety distances must be maintained:
- Between the cooktop and rear wall: 2" (50 mm).
- Between the cooktop and side wall or cabinet:
$$ \mathrm{KM} 4 0 0 = 2 ^ {\prime \prime} (5 0 \mathrm{mm}) $$
$$ \mathrm{KM} 4 0 2 / 4 0 3 = 2 ^ {\prime \prime} (5 0 \mathrm{mm}) $$
$$ \mathrm{KM} 4 0 8 - 1 = 2 ^ {\prime \prime} (5 0 \mathrm{mm}) $$
$$ \mathrm{KM} 4 1 0 / 4 1 1 = 1 0 ^ {\prime \prime} (2 5 0 \mathrm{mm} $$
Refer to section "Important Safety Instructions" for further information.
Installing one or multiple appliances:
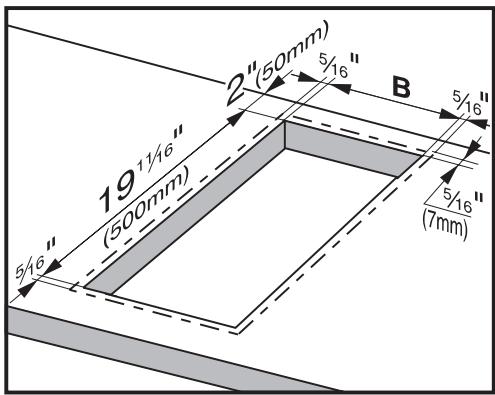
Cut out the countertop using the dimensions listed in the following table.
| Number of cooktops | Cut out width Dimension "B" |
| 1 | 10^13/_16" (274 mm) |
| 2 | 22^1/_8" (562 mm) |
| 3 | 33^1/_2" (850 mm) |
| 4 | 44^13/_16 (1138 mm) |
| 5 | 56^1/_8" (1426 mm) |
| 6 | 67^1/_2" (1714 mm) |
| 7 | 78^13/_16" (2002 mm) |
The tolerance for each dimension is ^1/_16 " (1 mm).
When installing more than one combiset cooktop, a support bar must be installed between the appliances. Install the support bars as shown on the following page before setting the appliances into the countertop.
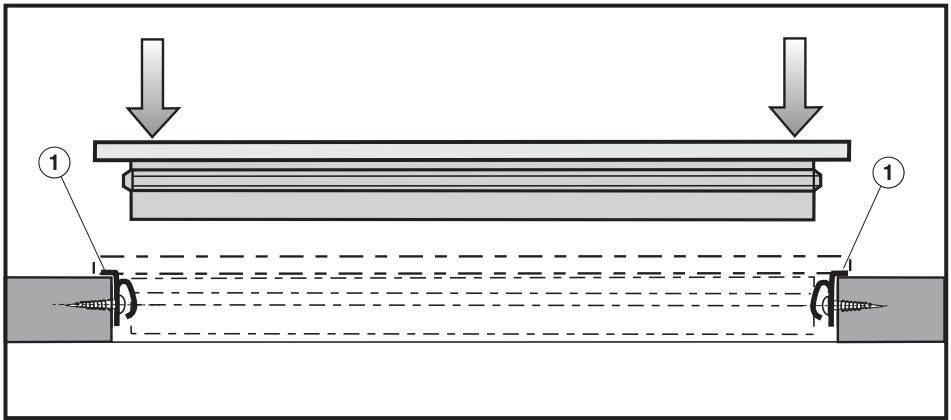
Laying out the support bars and clamps
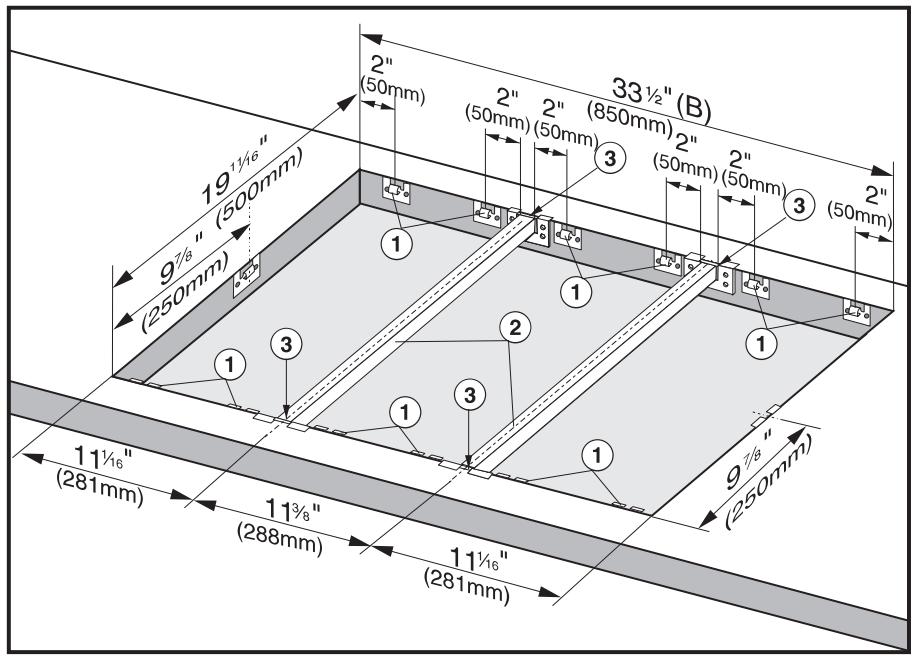
① Clamps
② Support bars
This illustration shows the layout for 3 combisets, their respective support bars, ②, and the 14 spring clamps, ①, required for correct installation.
If more than 3 combisets are being installed, add an additional 11^3/8 (288 mm) to the overall width of the cut out for each extra combiset, or use the table on the preceding page.
③ Slight gap between support bar and countertop.
Securing the support bars
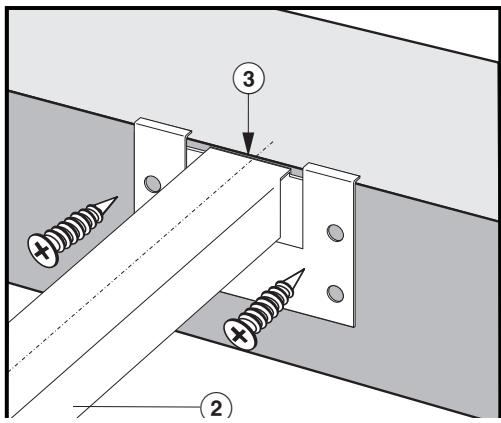
Wood or Corian countertops
■ Arrange the bars, ②, as shown in the illustration
■ Drill ^1/_16 " (1.5 mm) pilot holes through the brackets and secure them using the supplied screws.
■ Fill the gap, ③, between the bars and the countertop using the supplied silicon sealant.
Granite countertops
For granite countertops, the support bars, ②, can be secured using double-sided construction tape. Do not allow the bars to "float", they must be securely fastened. Fill the gap, ③, between the bars and the countertop using the supplied silicon sealant.
The screws are not necessary for granite countertops.
Securing the spring clamps
Wood or Corian countertops
■ Place the spring clamps, ①, as shown in the illustration.
- Drill two ^1/_16 " (1.5 mm) pilot holes for each clamp and secure using the supplied screws.
Granite countertops
For granite countertops, the spring clamps can be secured using doublesided construction adhesive. Do not allow the spring clamps to "float", they must be securely fastened.
The screws are not necessary for granite countertops.
Locking the appliance into place
Make sure the cooktops are aligned correctly before setting them into the countertop. Once the spring clamps are engaged, a special tool is required to release the cooktop from the clamps.
■ Guide the power cord through the cut out and connect the appliance to the electrical supply.
■ Position the cooktop over the cut out. With a hand on each side, above the clamps, ①, press the cooktop down, locking it into the spring clamps. Make sure that the cooktop rim lies flat against the countertop on all sides.
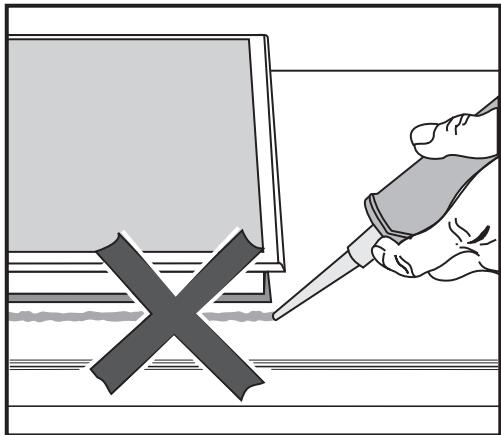
Important
natural_image
Illustration of a hand using a pipette to mark a cross symbol on a screen (no text or symbols present)The cooktop must not be permanently sealed into the countertop when installed.
If the cooktop is sealed into position, the countertop or appliance may be damaged if the cooktop needs to be removed for maintenance or service. The sealing strip under the edge of the cooktop provides a sufficient seal for the countertop.
WARNING:
Disconnect the appliance from the main power supply before servicing. To reduce the risk of electric shock, make sure that the appliance is properly grounded after installation.
To guarantee the electrical safety of this appliance; continuity must exist between the appliance and an effective grounding system. It is imperative that this basic safety requirement be met. If there is any doubt, have the electrical system of the house checked by a qualified electrician. The manufacturer cannot be held responsible for damages caused by the lack, or inadequacy of, an effective grounding system.
All electrical work should be performed by a qualified electrician in accordance with local codes and with the
- National Electrical code ANSI / NFPA No. 70-1481 for USA
or
- Canadian Electrical Code Part I (CSA Standard C 22.1) for Canada
Note to the installer:
Please leave these instructions with the consumer.
Power supply:
- 240 V, 60 Hz, 15 A fuse rating or
- 208 V, 60 Hz, 15 A fuse rating
The oven is equipped with a power cord consisting of 3 leads. They must be connected to a dedicated line through the use of an approved junction box
Black : connect to L1 (hot)
Red: connect to L2 (hot)
Green: connect to GND (ground):
For further information, see the wiring diagram provided with the appliance.
WARNING:
THIS APPLIANCE MUST BE GROUNDED
Miele, Inc. USA
National Headquarters
9 Independence Way
Princeton, NJ 08540
Phone: 800-843-7231
609-419-9898
Fax: 609-419-4298
www.mieleusa.com
Technical Service & Support
Nationwide
Phone: 800-999-1360
Fax: 888-586-8056
Mid-West Region
Phone: 800-666-6740
Fax: 847-714-9434
South-East Region
Phone: 561-995-8030
Fax: 561-995-8083
West-Coast Region
Phone: 800-245-8215
Fax: 415-241-6822
Miele Limited
CDN
National Headquarters
55G East Beaver Creek Road
Richmond Hill, ON L4B 1E5
Phone: 800-565-6435
905-707-1171
Fax: 905-707-0177
www.miele.ca
info@miele.ca (general enquiries)
service@miele.ca (tech. service)
Technical Service & Support
Ontario Region
Phone: 905-707-1171
Fax: 905-707-0177
Quebec Region
Phone: 877-636-4353
Fax: 514-277-1838
British Columbia Region
Phone: 604-434-1300
Fax: 604-434-1309
- Installation Instructions
- IMPORTANT SAFETY INSTRUCTIONS 4
- Appliance dimensions....7
- Installation 10
- Electrical connection....15
- Note to the installer:
- Installation
- Safety distance between the KM 410 / KM 411 and a venting hood
- Keep this instruction book in a safe place and pass it on to any future owner.
- Cutting out the countertop
- Installing one or multiple appliances:
- Laying out the support bars and clamps
- Securing the support bars
- Wood or Corian countertops
- Granite countertops
- Securing the spring clamps
- Locking the appliance into place
- WARNING:
- Power supply:
- THIS APPLIANCE MUST BE GROUNDED
- National Headquarters
- Technical Service & Support
- Nationwide
- Mid-West Region
- South-East Region
- West-Coast Region
- Ontario Region
- Quebec Region
- British Columbia Region
Marque : MIELE
Modèle : KM 408-1 GRIL
Catégorie : Plaque de cuisson