
VN-712PC, VN-711PC, VN-713PC - Enregistreurs vocaux OLYMPUS - Notice d'utilisation et mode d'emploi gratuit
Retrouvez gratuitement la notice de l'appareil VN-712PC, VN-711PC, VN-713PC OLYMPUS au format PDF.


| Type de produit | Enregistreur vocal numérique |
| Marque | OLYMPUS |
| Modèles compatibles | VN-713PC, VN-712PC, VN-711PC |
| Mémoire interne | VN-713PC : 4 Go ; VN-712PC et VN-711PC : 2 Go |
| Support mémoire externe | Carte microSD/microSDHC jusqu'à 32 Go (VN-713PC et VN-712PC uniquement) |
| Formats d'enregistrement | MP3 (192, 128, 48 kbps) sur VN-713PC/712PC ; WMA (32, 16, 5 kbps) sur tous les modèles |
| Formats de lecture | MP3, WMA |
| Haut-parleur intégré | Haut-parleur dynamique rond de 28 mm |
| Prise microphone | Mini-jack 3,5 mm, impédance 2 kΩ |
| Prise écouteur | Mini-jack 3,5 mm, impédance ≥ 8 Ω |
| Alimentation | 2 piles AAA (LR03) alcalines |
| Dimensions (L x l x H) | 108 x 39 x 16,8 mm (sans parties saillantes) |
| Poids | 71 g (avec piles) |
| Fonctionnalités d'enregistrement | VCVA (enregistrement par détection de voix), filtre coupe-bas, scènes d'enregistrement (Mémos, Réunion, Conférence, DNS) |
| Fonctionnalités de lecture | Annulation du bruit (VN-713PC), filtre vocal (VN-713PC/712PC), vitesse variable (x0.5 à x2.0), répétition de segment, marques de repère et temporaires |
| Recherche de fichiers | Recherche par calendrier (VN-713PC/712PC), navigation par dossier (A à E) |
| Connectivité | USB 2.0 pour transfert de données vers PC |
| Autonomie des piles (approximative) | Enregistrement : jusqu'à 72 h (WMA 5 kbps) ; lecture via haut-parleur : jusqu'à 21 h ; lecture via écouteurs : jusqu'à 68 h |
| Température de fonctionnement | 0 °C à 42 °C |
| Nettoyage et entretien | Nettoyer avec un chiffon sec et doux. Ne pas utiliser de solvants organiques. |
| Sécurité | Ne pas exposer à des températures extrêmes, à l'humidité, à la poussière. Tenir hors de portée des jeunes enfants. Ne pas démonter. |
| Accessoires en option | Microphones externes (ME51S, ME32, ME52W, ME15), adaptateur téléphonique TP8, câble de liaison KA333, étui CS131 |
FOIRE AUX QUESTIONS - VN-712PC, VN-711PC, VN-713PC OLYMPUS
Questions des utilisateurs sur VN-712PC, VN-711PC, VN-713PC OLYMPUS
0 question sur cet appareil. Repondez a celles que vous connaissez ou posez la votre.
Poser une nouvelle question sur cet appareil
Téléchargez la notice de votre Enregistreurs vocaux au format PDF gratuitement ! Retrouvez votre notice VN-712PC, VN-711PC, VN-713PC - OLYMPUS et reprennez votre appareil électronique en main. Sur cette page sont publiés tous les documents nécessaires à l'utilisation de votre appareil VN-712PC, VN-711PC, VN-713PC de la marque OLYMPUS.
MODE D'EMPLOI VN-712PC, VN-711PC, VN-713PC OLYMPUS
DIGITAL VOICE RECORDER
VN-713PC VN-712PC VN-711PC
DETAILED INSTRUCTIONS
Thank you for purchasing an Olympus Digital Voice Recorder. Please read these instructions for information about using the product correctly and safely. Keep the instructions handy for future reference.
To ensure successful recordings, we recommend that you test the record function and volume before use.

EN
Introduction
- The contents of this document may be changed in the future without advanced notice. Contact our Customer Support Center for the latest information relating to product names and model numbers.
- The illustration of the screen and the recorder shown in this manual may differ from the actual product. The utmost care has been taken to ensure the integrity of this document but if you find a questionable item, error or omission, please contact our Customer Support Center.
- Any liability for passive damages or damage of any kind occurred due to data loss incurred by a defect of the product, repair performed by the third party other than Olympus or an Olympus authorized service station, or any other reason is excluded.
Trademarks and registered trademarks
- IBM and PC/AT are the trademarks or registered trademarks of International Business Machines Corporation.
- Microsoft, Windows and Windows Media are registered trademarks of Microsoft Corporation.
• Macintosh and iTunes are the trademarks of Apple Inc. - microSD and microSDHC are the trademarks of SD Card Association.
- MPEG Layer-3 audio coding technology is licensed from Fraunhofer IIS and Thomson.
- The product was developed based on noise-canceling technology under license from NEC Corporation.
Other product and brand names mentioned herein may be the trademarks or registered trademarks of their respective owners.


Introduction
Table of contents 3
Safety precautions...... 4
Caution for usage environment 4
Handling the recorder 5
Battery handling precautions 6
1 Getting started
Main features 7
Identification of parts......8
Display (LCD panel) 9
Power supply 10
Inserting batteries 10
Turning on/off the power....11
HOLD 11
Setting time and date
[Time & Date]......12
Inserting and ejecting a
microSD card....13
Inserting a microSD card 13
Ejecting a microSD card....14
Selecting the folders and files .....15
Searching for a file 15
2 About recording
Recording....16
Changing the recording scene
[Rec Scene]......17
Recording from external microphone or
other devices....18
3 About playback
Playback....19
Changing the playback speed 21
Setting an index mark or a temp mark ..... 22
How to begin segment repeat playback ..... 23
Erasing 25
4 Menu setting
Menu setting method 26
File Menu 28
Rec Menu 29
Play Menu.... 33
LCD/Sound Menu 34
Device Menu 35
5 Using the recorder on your PC
Operating environment 38
Connecting to your PC 38
Disconnecting from your PC.... 39
6 Other information
Troubleshooting 40
Accessories (optional)...... 40
Specifications 41
Technical assistance and support..... 45
Before using your new recorder, read this manual carefully to ensure that you know how to operate it safely and correctly. Keep this manual in an easily accessible location for future reference.
- The warning symbols indicate important safety related information. To protect yourself and others from personal injury or damage to property, it is essential that you always read the warnings and information provided.

Danger
If the product is used without observing the information given under this symbol, serious injury or death may result.

Warning
If the product is used without observing the information given under this symbol, injury or death may result.

Caution
If the product is used without observing the information given under this symbol, minor personal injury, damage to the equipment, or loss of valuable data may result.
Caution for usage environment
- To protect the high-precision technology contained in this product, never leave the recorder in the places listed below, no matter if in use or storage:
- Places where temperatures and/or humidity are high or go through extreme changes. Direct sunlight, beaches, locked cars, or near other heat sources (stove, radiator, etc.) or humidifiers.
• In sandy or dusty environments.
• Near flammable items or explosives. -
In wet places, such as bathrooms or in the rain.
• In places prone to strong vibrations. -
Never drop the recorder or subject it to severe shocks or vibrations.
- The recorder may malfunction if it is used in a location where it is subject to a magnetic/electromagnetic field, radio waves, or high voltage, such as near a TV set, microwave, video game, loud speakers, large monitor unit, TV/radio tower, or transmission towers. In such cases, turn the recorder off and on again before further operation.
- Avoid recording or playing back near cellular phones or other wireless equipment, as they may cause interference and noise. If you experience noise, move to another place, or move the recorder further away from such equipment.
- Do not use organic solvents such as alcohol and lacquer thinner to clean the unit.
Warning regarding data loss:
- Recorded content in memory may be destroyed or erased by operating mistakes, unit malfunction, or during repair work. It is recommended to back up and save important content to other media such as a computer hard disk.
- Any liability for passive damages or damage of any kind occurred due to data loss incurred by a defect of the product, repair performed by the third party other than Olympus or an Olympus authorized service station, or any other reasons is excluded from the Olympus's liability.
Handling the recorder

Warning:
- Do not use the recorder near flammable or explosive gases.
- Keep young children and infants away from the recorder.
Always use and store the recorder out of the reach of young children and infants to prevent the following dangerous situations which could cause serious injury:
① Becoming entangled in the recorder strap, causing strangulation.
② Accidentally swallowing the battery, cards or other small parts.
③ Accidentally being injured by the moving parts of the recorder.
- Do not use or store the recorder in dusty or humid places.
- Do not disassemble, repair or modify the unit yourself.
- Use microSD/microSDHC memory cards only. Never use other types of cards.
If you accidentally insert another type of card into the recorder, contact an authorized distributor or service center. Do not try to remove the card by force.
- Do not operate the unit while operating a vehicle (such as a bicycle, motorcycle, or car).

Caution:
- Stop using the recorder immediately if you notice any unusual odors, noise, or smoke around it.
Never remove the batteries with bare hands, which may cause a fire or burn your hands.
- Be careful with the strap.
Be careful with the strap when you carry the recorder. It could easily catch on stray objects and cause serious damage.
- Do not leave the recorder in places where it may be subject to extremely high temperatures.
Doing so may cause parts to deteriorate and, in some circumstances, cause the recorder to catch fire. Do not use the charger or AC adapter if it is covered (such as a blanket). This could cause overheating, resulting in fire.
- Handle the recorder with care to avoid getting a low-temperature burn.
- When the recorder contains metal parts, overheating can result in a low-temperature burn. Pay attention to the following:
- When used for a long period, the recorder will get hot. If you hold on to the recorder in this state, a low-temperature burn may be caused.
- In places subject to extremely cold temperatures, the temperature of the recorder's body may be lower than the environmental temperature. If possible, wear gloves when handling the recorder in cold temperatures.
Battery handling precautions
Follow these important guidelines to prevent batteries from leaking, overheating, burning, exploding, or causing electrical shocks or burns.

Danger:
- Batteries should never be exposed to flame, heated, short-circuited or disassembled.
- Never heat or incinerate batteries.
- Take precautions when carrying or storing batteries to prevent them from coming into contact with any metal objects such as jewelry, pins, fasteners, etc.
- Never store batteries where they will be exposed to direct sunlight, or subjected to high temperatures in a hot vehicle, near a heat source, etc.
- To prevent causing battery leaks or damaging their terminals, carefully follow all instructions regarding the use of batteries. Never attempt to disassemble a battery or modify it in any way, solder, etc.
- Do not connect the battery directly to a power outlet or a cigarette lighter of an automobile.
- If a battery fluid gets into your eyes, flush your eyes immediately with clear, cold running water and seek medical attention immediately.

Warning:
- Keep batteries dry at all times.
- Do not use a battery if it is cracked or broken.
- Never subject batteries to strong shocks or continuous vibration.
- If a battery leaks, becomes discolored or deformed, or becomes abnormal in any other way during operation, stop using the recorder.
- If a battery leaks fluid onto your clothing or skin, remove the clothing and flush the affected area with clean, running cold water immediately. If the fluid burns your skin, seek medical attention immediately.
- Keep battery out of the reach of children.
- If you notice anything unusual when using this product such as abnormal noise, heat, smoke, or a burning odor:
① remove the battery immediately while being careful not to burn yourself, and;
② call your dealer or local Olympus representative for service.

Caution:
- Please recycle batteries to help save our planet's resources. When you throw away dead batteries, be sure to cover their terminals and always observe local laws and regulations.
Main features
● Supports a wide range of recording formats. Can handle the MP3 format* (MPEG-1/ MPEG-2 Audio Layer 3) and the Windows Media Audio (WMA) format (P.29).
* VN-713PC, VN-712PC only.
● Supports high capacity recording media. Besides the internal memory, you can also record into a microSD card (VN-713PC, VN-712PC only) (P.13).
- It has a built-in Variable Control Voice Actuator (VCVA) function (P.30).
● The Low Cut Filter minimizes air conditioner noise and other similar noises while recording (P.29).
● A Noise Cancel function*1 (P.33) and a Voice Filter function*2 (P.33) cut noise and enable clear audio playback.
*1 VN-713PC only.
*2 VN-713PC, VN-712PC only.
- It has recording scene setting function to register the best setting according to different usages (P.32).
● Equipped with a calendar search function, convenient for searching for files (VN-713PC, VN-712PC only) (P.15).
- It features various repeat functions (P.23, P.33).
- You can divide a file (MP3) that has been recorded with this recorder into two files* (P.28). * VN-713PC, VN-712PC only.
- Index mark and temp mark features allow you to quickly find desired locations (P.22).
● The playback speed can be controlled as preferred (P.21).
● Display text is larger to make it easier to read. You can also reduce the text size as you like.
● This recorder is compatible with USB 2.0, enabling fast data transfer to a computer.
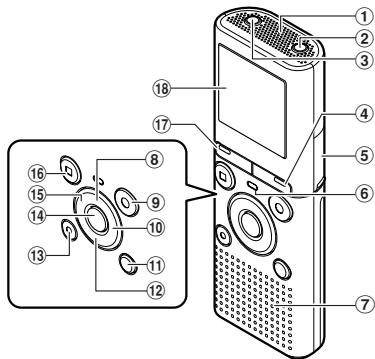
① Built-in microphone
② MIC (Microphone) jack
③ EAR (Earphone) jack
④ CALENDAR/SCENE button*1
SCENE button*2
⑤ Card cover*1
⑥ LED indicator light
⑦ Built-in speaker
⑧ + button
⑨ REC (●) (Record) button
⑩▶▶lbutton
⑪ FOLDER/INDEX button
⑫ - button
natural_image
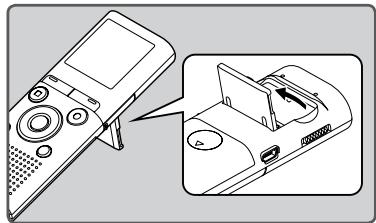
Illustration of a remote control device with an open lid and a close-up view of its internal components (no text or symbols)• Use the stand as needed.
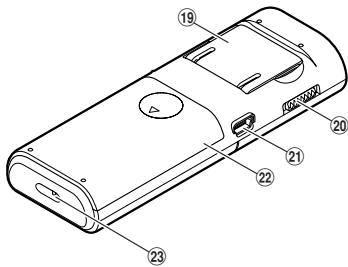
⑬ ERASE button
⑭▶OK button
⑮ ◀◀ button
⑯ STOP (■) button
⑰ MENU button
⑱ Display (LCD panel)
⑲ Stand
⑳ POWER/HOLD switch
②1 USB connector
⑳ Battery cover
⑳ Strap hole
*1 VN-713PC, VN-712PC only.
*2 VN-711PC only.
natural_image
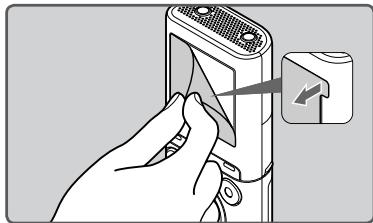
Illustration of a hand inserting a device into a device with an arrow pointing to it (no text or symbols present)- Remove the screen protector on the display.
Display (LCD panel)
The displayed character size on the screen can be changed. See "[Font Size]" (P.34).
When the [Font Size] is set to [Large]
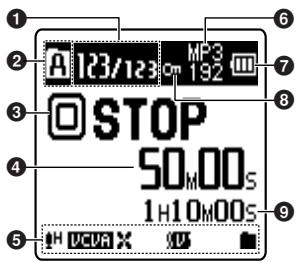
① Current file number/ Total number of recorded files in the folder
② Recording media indicator*1
[ICON]: Built-in flash memory
[▶]: microSD card
Folder indicator
③ Recorder status indicator
[○] (●): Record indicator
[○○] (○○): Pause indicator
[☐] (☐): Stop indicator
[▶] (▶): Play indicator
(▶F): F. Play indicator
(▶s): S. Play indicator
[▶] (▶): Forwarding indicator
[◀] (◀): Rewinding indicator
④ Elapsed recording time, Elapsed playback time
When the [Font Size] is set to [Small]
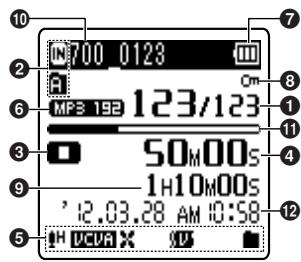
⑤ Icon display
[H]: Rec Level
[Sync]: Voice sync*2
[X]: Low Cut Filter
[1N]: Noise Cancel*2
[10]: Voice Filter*1
[■] [□]: Playback mode
⑥ Recording mode indicator
⑦ Battery indicator
⑧ File Lock indicator
⑨ Remaining recording time, File length
10 Current file name*3
1 Remaining memory bar indicator*3, Playback position bar indicator*3
⑫ Recording date and time*3
*1 VN-713PC, VN-712PC only.
*2 VN-713PC only.
*3 These items will be displayed only when the [Font Size] is set to [Small].
Inserting batteries
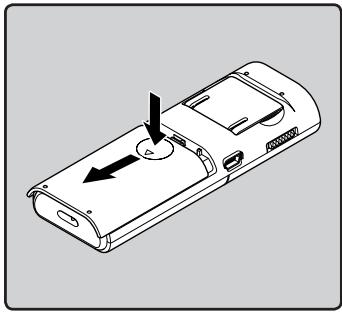
1 Lightly press down on the arrow and slide the battery cover open.
natural_image
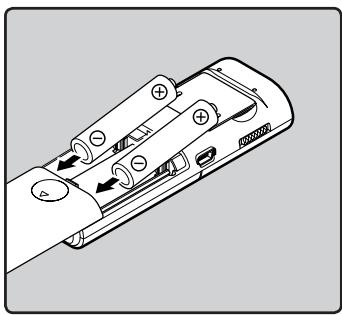
Line drawing of a mobile phone casing with an arrow indicating left-hand rule (no text or symbols)2 Insert the batteries, observing the correct ⊕ and ⊖ polarities.
natural_image
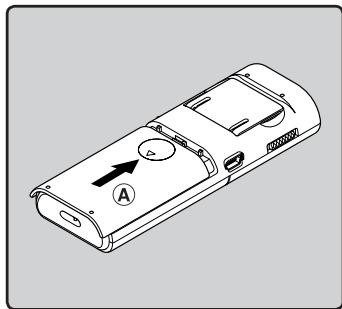
Diagram of a remote control device with multiple ports and directional arrows indicating movement (no text or symbols)3 Close the battery cover completely by sliding to the direction Ⓐ.
natural_image
Line drawing of a mobile phone casing with labeled ports and an arrow indicator (no text or symbols beyond basic labels)Battery indicator

flowchart
graph LR
    A[" "] --> B[" "]
    B --> C[" "]
When [☐] appears on the display, replace the batteries as soon as possible.
When the batteries are too weak, [☐] and [Battery low] will appear on the display and the recorder will shut down.
Notes
- When changing the batteries, use only AAA alkaline batteries.
- Remove the batteries if you are not going to use the recorder for an extended period of time.
Turning on/off the power
Turning on the power
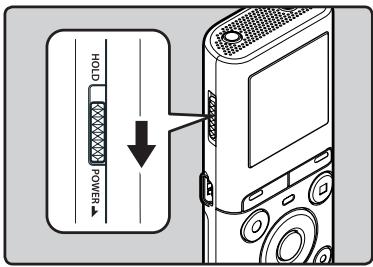
While the recorder is turned off, slide the POWER/HOLD switch to the direction of the arrow.
Turning off the power
Slide the POWER/HOLD switch to the direction of the arrow, and hold it for 0.5 seconds or longer.
- The resume function remembers the stop position before the power is turned off.
Power save mode
If the recorder is on and stops for 5 minutes or longer, the display shuts off and it goes into power save mode.
- To exit power save mode, press any button.
Set the recorder to HOLD mode (A)
Slide the POWER/HOLD switch to the [HOLD] position.
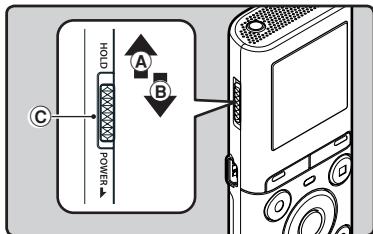
- After [Hold] appears on the display, the recorder is set to HOLD mode.
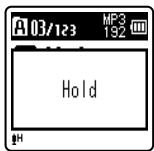
Exit HOLD mode (B)
Slide the POWER/HOLD switch to the ⓒ position.
Notes
- If you press any button in HOLD mode, the clock display lights for 2 seconds, but the recorder will not operate.
- If HOLD is applied during playback (recording), operation is disabled with the playback (recording) state unchanged (When playback has ended or the recording has ended due to the remaining memory being used up, it will stop).
Setting time and date [Time & Date]
If you set the time and date beforehand, the information when the file is recorded is automatically stored for each file. Setting the time and date beforehand enables easier file management.
When you install batteries for the first time or each time you replace the batteries, the "Hour" indication will flash.
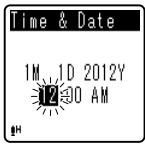
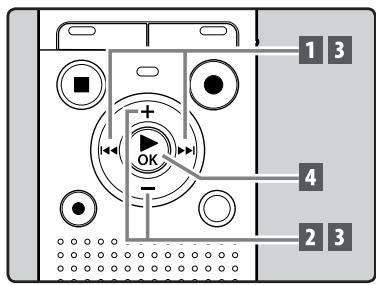
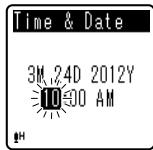
1 Press the ▶▶| or |◀◀ button to select the item to set.
- Select the item from the "Hour", "Minute", "Year", "Month" and "Day" with a flashing point.
2 Press the + or - button to set.
3 Repeat steps 1 and 2 to set the other items.
▶▶| or |◀◀ button:
Move to the previous/next item.
+ or - button:
Change the value.
- You can select between 12 and 24 hour display by pressing the FOLDER/INDEX button while setting the hour and minute.
- You can select the order of the "Month", "Day" and "Year" by pressing the FOLDER/INDEX button while setting them.
4 Press the ▶ OK button to complete the setting.
- The clock will start from the set date and time. Press the ▶ OK button according to the time signal.
Notes
- If you press the ▶OK button during the setup operation, the recorder will save the items that were set to that point.
- While the recorder is in stop mode, press and hold the STOP (■) button to display [Time & date] and [Remain].
Changing the time and date
Select [Time & Date] from the menu on the [Device Menu].
- See "[Menu setting method]" (P.26)
Inserting and ejecting a microSD card

For VN-713PC, VN-712PC:
The “microSD” indicated in the instruction manual refers to both microSD and microSDHC. With this recorder, besides the internal memory, you can store the data into commercially available microSD card.
Inserting a microSD card
1 While the recorder is in stop mode, open the card cover.
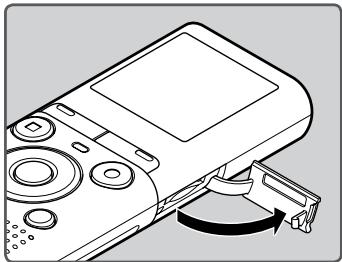
natural_image
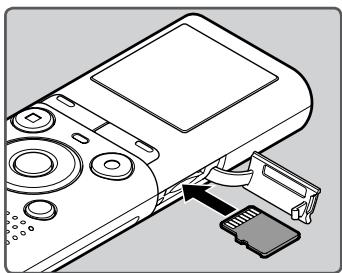
Line drawing of a handheld electronic device with a scroll wheel and control knob (no text or symbols)2 Face the microSD card in the correct way and insert it into the card slot as shown in the diagram.
- Insert the microSD card keeping it straight.
natural_image
Diagram of a handheld electronic device with a USB flash drive inserted (no text or symbols visible)- Inserting the microSD card in the wrong way or at an angle could damage the contact area or cause the microSD card to jam. - If the microSD card is not inserted all the way until it clicks, data may not be recorded to the microSD card.
3 Close the card cover securely.
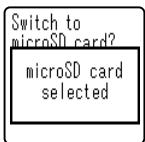
- When you insert the microSD card, the recording media changeover display will appear.
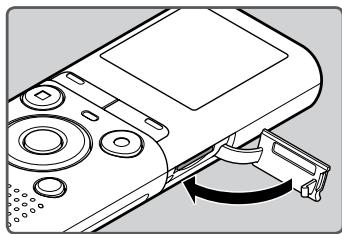
natural_image
Line drawing of a handheld electronic device with a scroll wheel and control knob (no text or symbols)4 To record on a microSD card, press the + or - button and select [Yes].
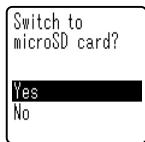
5 Press the ▶ OK button to complete the setting.
Notes
- It is possible to switch the recording media over to the internal memory (P.35).
- In some cases microSD cards that have been formatted (initialized) by another device, such as a computer, may not be recognized. Be sure to format microSD cards with this recorder before using them (P.36).
Ejecting a microSD card
1 While the recorder is in stop mode, open the card cover.
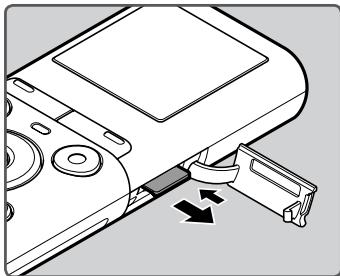
2 Push the microSD card inward to unlock it, and let it eject partially.
natural_image
Diagram of a device with a scroll wheel and directional arrows indicating movement or force (no text or symbols present)- The microSD card is visibly out of the slot and can be removed safely.
- If you eject the microSD card when [Memory Select] is set to [microSD card], it will be automatically changed to [Internal memory selected].
Internal memory selected
3 Close the card cover securely.
Notes
- Releasing your finger quickly after pushing the microSD card inward may cause it to eject forcefully out of the slot.
- Some microSD cards or microSDHC cards may not be recognized correctly depending on the manufacturer or type of card due to compatibility issues with this recorder.
-
See the Olympus website for a list of microSD cards that have been confirmed to operate with this recorder in conditions prescribed by Olympus. The website http://olympus-imaging.jp/introduces manufacturers and types of microSD cards confirmed to be compatible. Please note, however, this is not meant to guarantee that microSD cards will operate. Some microSD cards may not be recognized correctly due to circumstances such as changes in manufacturer specifications.
-
In the case when the microSD card cannot be recognized, remove the microSD card then put it in again to see if this recorder recognizes the microSD card.
• Always read the instructions that come with your microSD card before using. - Processing speed may be slower with some types of microSD cards. Processing performance may also be reduced due to repeated writing and deleting. If that happens, reformat the microSD card (P.36).
- Not all operations are guaranteed for microSD cards that have been confirmed to operate.
Selecting the folders and files
The recorder provides five folders, [A], [B], [C], [D] and [E]. Each folder can store up to 200 files.
1 While the recorder is in stop mode, press the FOLDER/INDEX button.
- The folder changes each time you press the FOLDER/INDEX button.
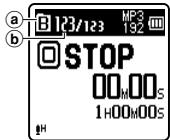
a Folder indicator
⑥ Current file number
2 Press the ▶▶| or |◀◀ button to select a file.
Searching for a file

For VN-713PC, VN-712PC:
You can search for voice files by the date they were recorded. As long as you know the date, you can quickly find a file even if you forgot what folder it is in.
1 While the recorder is in stop mode, press the CALENDAR/SCENE button.
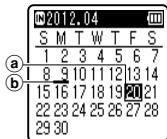
a Current date
(b) Date when a file was recorded
2 Press the +, -, ►► | or |◄◄ button to select the date.
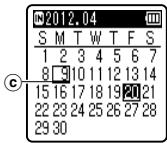
© Selected date
▶▶, ◀◀ buttons:
Move to the previous/next day.
+, - buttons:
Move to the previous/next week.
- Dates with recorded files are shown with underbars.
3 Press the ▶ OK button.
- Files recorded on the date selected are displayed in a list.
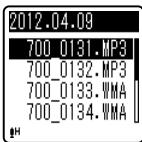
4 Press the + or - button to select a file.
5 Press the ▶ OK button to start playback.
Note
- Does not support display of national holidays.
About recording
Recording
Before starting recording, select a folder among [E] to [E]. These five folders can be selectively used to distinguish the kind of recording; for example, Folder [E] might be used to store private information, while Folder [E] might be dedicated to holding business information.
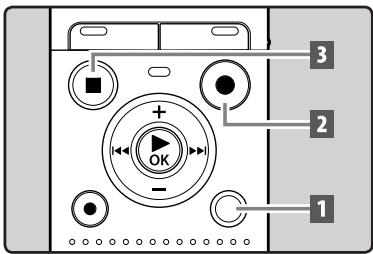
1 Select the recording folder (P.15).
2 Press the REC (●) button to start recording.
- Turn the microphone in the direction of the source to be recorded.
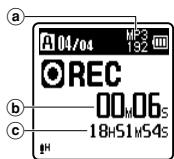
Ⓐ Recording mode indicator
⑥ Elapsed recording time
© Remaining recording time
- [Rec Mode] cannot be changed in the recording standby mode or while recording. Configure this while the recorder is stopped (P.29).
3 Press the STOP (■) button to stop recording.
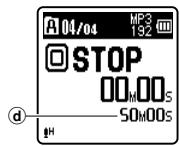
(d) File length
Notes
- To ensure recording from the beginning, start recording after you see the display and the LED indicator light on.
- When remaining recording time is less than 60 seconds, the LED indicator light starts flashing. When the recording time is decreasing to 30 or 10 seconds, the light flashes faster.
- [Folder full] will appear when the recording cannot be made any further. Select other folder or delete unnecessary files before recording (P.25).
- [Memory full] will appear when the memory is full. Delete unnecessary files before recording any further (P.25).
For VN-713PC, VN-712PC:
- When a microSD card is inserted in the recorder, be sure to confirm the recording media as either [Internal memory] or [microSD card] so that there is no mistake (P.35).
- If a recording is made in stereo modes ([192 kbps] or [128 kbps]), it will be a monaural recording through the built-in microphone, and the same audio will be recorded to both Left channel (Lch) and Right channel (Rch).
Pause
While the recorder is in recording mode, press the REC (●) button.
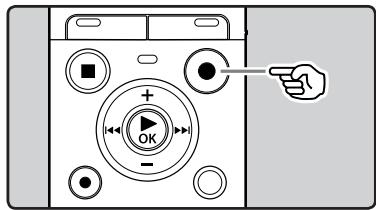
- The recorder will stop if left on pause for more than 60 minutes.
■ Resume Recording:
Press the REC (●) button again.
- Recording will resume at the point of interruption.
To quickly check on the recorded contents
While the recorder is in recording mode, press the ▶ OK button.
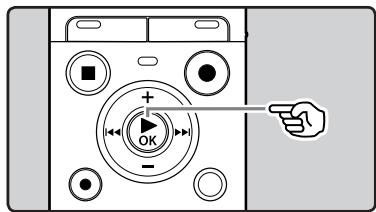
- Recording will stop, and the file that was just recorded will be played back.
Changing the recording scene [Rec Scene]
You can easily change the recording settings by selecting the scene which best matches your usage (P.32).
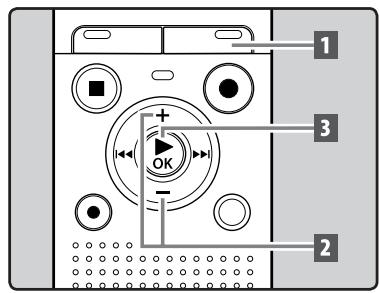
1 While the recorder is in stop mode, press and hold the CALENDAR/SCENE button.
For VN-711PC:
While the recorder is in stop mode, press the SCENE button.
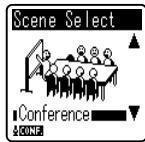
2 Press the + or – button to select the recording scene.
3 Press the ▶ OK button.
Recording from external microphone or other devices
The external microphone and other devices can be connected and the sound can be recorded.
- Do not plug and unplug devices into the recorder's jack while it is recording.
Connect an external microphone to the MIC jack of the recorder.
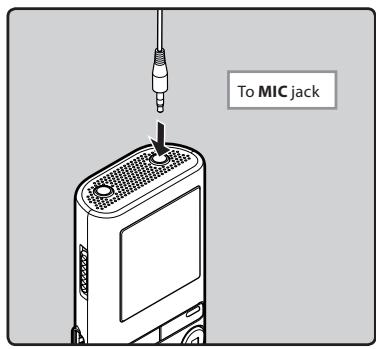
Notes
- The built-in microphone will become inoperable when an external microphone is plugged into the recorder's MIC jack.
- Microphones supported by plug-in power can also be used.
- When external devices are connected, perform a test recording and then adjust the output level for the external devices.
- When recording using external microphones, the microphone's cord may cause noise if placed close to the recorder's display.
- When the external stereo microphone is used while [Rec Mode] is set to a monaural recording mode, it enables recording only with the L channel microphone (P.29).
For VN-713PC, VN-712PC:
- When an external monaural microphone is used while [Rec Mode] is set to a stereo recording mode, audio will be recorded to the L channel only (P.29).
About playback
Playback
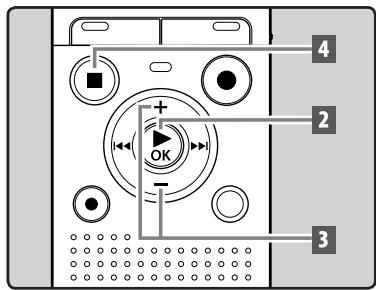
1 Select the file to be played back from the folder that contains it (P.15).
2 Press the ▶ OK button to start playback.
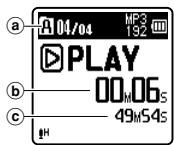
a Folder indicator
⑥ Elapsed playback time
© File length
3 Press the + or – button to adjust to a comfortable listening volume.
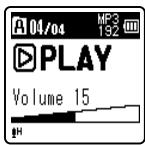
- The volume can be adjusted within a range from [00] to [30].
4 Press the STOP (■) button at any point you want to stop playback.
- This will stop the file being played back midway. When the resume function is activated the stopped location will be registered, even if the power is turned off. The next time the power is turned on, playback may be resumed from the registered stopped location.
Playback through earphones
The earphones can be connected to the EAR jack of the recorder for listening.
- When the earphones are used, the recorder speaker will be switched-off.
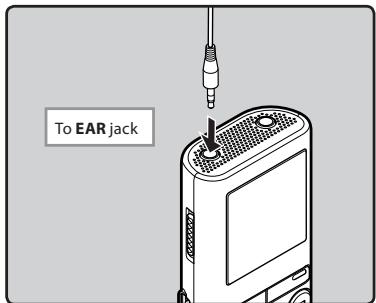
Notes
- To avoid irritation to the ear, insert the earphones after turning down the volume level.
- When you listen with the earphones during playback, do not raise the volume too much. It may cause hearing impairment and decrease in hearing ability.
Forwarding and Rewinding
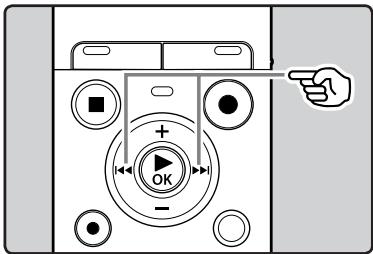
While the recorder is in stop mode, press and hold the ▶▶▶l or l◀◀ button.
- If you release the ▶▶▶ I or I◀◀ button, it will stop. Press the ▶OK button to start playback from where it was stopped.
While the recorder is in playback mode, press and hold the ▶▶l or ◀◀◀ button.
- When you release the ▶▶▶ or ◀◀◀ button the recorder will resume normal playback.
- If there is an index mark or temp mark in the middle of the file, the recorder will stop at that location (P.22).
- ▶▶▶I: Keeping the ▶▶▶I button pressed will make the recorder fast forward the next file.
◀◀: Keeping the ◀◀ button pressed will make the recorder rewind the previous file.
Locating the beginning of a file
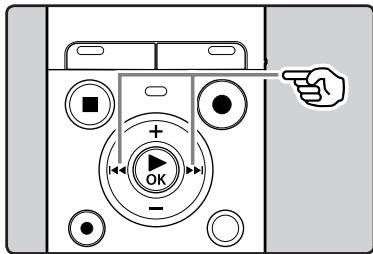
While the recorder is in stop mode or playback mode, press the ▶▶▶ button.
- The recorder skips to the beginning of the next file.
While the recorder is in playback mode, press the ◀◀ button.
- The recorder skips to the beginning of the current file.
While the recorder is in stop mode, press the ◀◀◀ button.
- The recorder skips to the beginning of the previous file. If the recorder is in the middle of a file, it will return to the beginning of the file.
While the recorder is in playback mode, press the ◀◀ button twice.
- The recorder skips to the beginning of the previous file.
Notes
- When you attempt to skip to the beginning of a file during playback, the recorder will start playback from the index mark or temp mark if those are recorded. You will skip to the beginning of the file, if you perform the operation while in stop mode (E5P.22).
- When [Skip Space] is set to other than [File Skip], the recorder will skip forward/reverse the specified time, then will start playback (P.34).
About music file
In cases where the recorder is unable to playback music files that have been transferred to it, check to make sure that the sampling rate and bit rate are in the range where playback is possible. Combinations of sampling rates and bit rates for music files which the recorder can playback are given below.
| File format | Sampling frequency | Bit rate |
| MP3 format | MPEG1 Layer3: 32 kHz, 44.1 kHz, 48 kHzMPEG2 Layer3: 16 kHz, 22.05 kHz, 24 kHz | From 8 kbps up to 320 kbps |
| WMA format | 8 kHz, 11 kHz, 16 kHz, 22 kHz, 32 kHz, 44.1 kHz, 48 kHz | From 5 kbps up to 320 kbps |
- Variable bitrate MP3 files (in which conversion bitrates can vary) may not be played back properly.
- Even if the file format is compatible for playback on this recorder, the recorder does not support every encoder.
Changing the playback speed
Change the speed according to need such as listening to meeting content at a fast speed or reviewing spots that you couldn't catch in a language lesson at a slow speed.
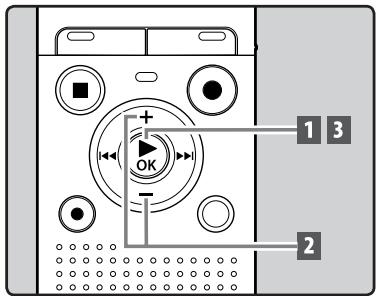
1 While the recorder is in playback mode, press the ▶ OK button.
2 Press the + or – button to select playback speed.
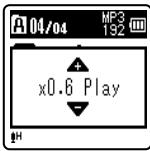
[x1.0 Play] (Normal playback): Playback at normal speed.
[x0.5 Play] – [x0.9 Play] (Slow playback): Playback speed slows down.
[x1.1 Play] – [x2.0 Play] (Fast playback): Playback speed becomes faster.
3 Press the ▶ OK button.
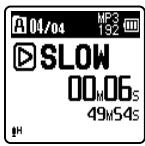
- Even if playback is stopped, the changed playback speed will be retained. The next playback will be at that speed.
About the limits of fast playback
Normal operation may not be available depending on the sampling frequency and the bit rate of the file to be played back. In such a case, reduce the speed of the fast playback.
Notes
- As in normal playback mode, you can stop playback, cue a file, or insert an index or temp mark in slow playback and fast playback modes as well.
- The slow playback or fast playback is available even if [Voice Filter] is set (P.33).
- When using the slow playback or fast playback function, the following functions are not available.
• [Noise Cancel] (P.33) (VN-713PC only)
Setting an index mark or a temp mark
If index marks and temp marks are placed, you can quickly find a location you want to listen to in fast forward and fast rewind and when cuing a file. Index marks cannot be placed on files created on machines other than this recorder, but temp marks can be placed instead to temporarily remember desired locations.
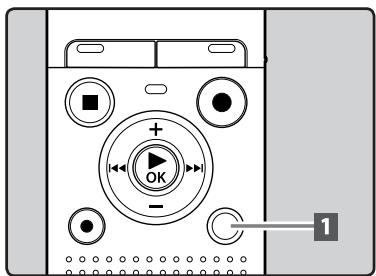
1 While the recorder is in recording mode or playback mode, press the FOLDER/INDEX button.
- Even after an index or temp mark is placed, recording or playback will continue so you can place index or temp marks in other locations in a similar manner.
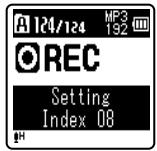
Clearing an index mark or a temp mark
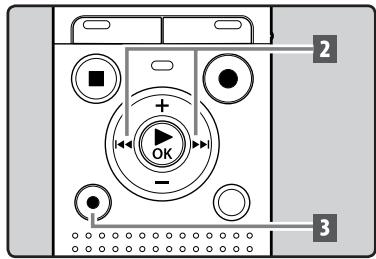
1 Select a file in which index or temp marks you wish to erase are contained.
2 Press the ▶▶l or l◀◀ button to select the index or temp mark to erase.
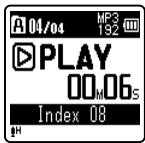
3 While the index or temp number is displayed for approximately 2 seconds on the display, press the ERASE button.
• The index or temp mark is erased.
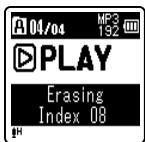
- Index or temp numbers after the erased index or temp number will be automatically decreased by 1.
Notes
- Temp marks are temporary markings. They will be automatically erased if you move to another file or connect the recorder to a computer.
- Up to 99 index and temp marks can be set in a file. If you try to place more than 99 index or temp marks, the [No more can be set] message will appear for index marks, and [No more can be set] for temp marks.
- Index or temp marks cannot be set or erased in a locked file (P.28).
How to begin segment repeat playback
This function enables repeated playback of part of the file being played.
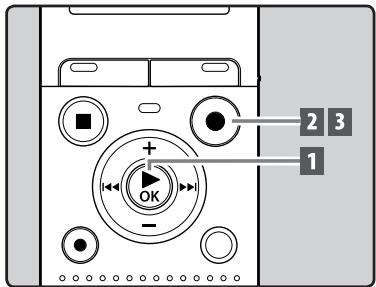
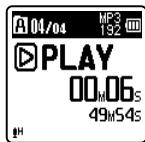
1 Select a file that has a segment you would like to play back repeatedly, and start playback.
2 Press the REC (●) button at the point you want to start segment repeat playback.
- [A] will flash on the display.
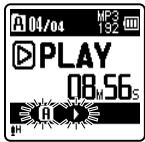
- You can fast forward, rewind, or change playback speed as you can operate in normal mode while [A] is flashing to find the end position (P.21).
- When it reaches the end of the file while [A] is flashing, point [B] becomes the end of the file, and repeat playback will start.
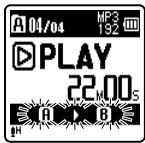
3 Press the REC (●) button again at the position where you want to end segment repeat playback.
- The recorder continuously plays back the segment until the segment repeat playback is canceled.
Note
- As in normal playback mode, playback speed can be changed during segment repeat playback as well (P.21). If an index mark and temp mark are placed or cleared during segment repeat playback, segment repeat playback will be canceled and it will return to normal playback mode (P.22).
Canceling the segment repeat playback function
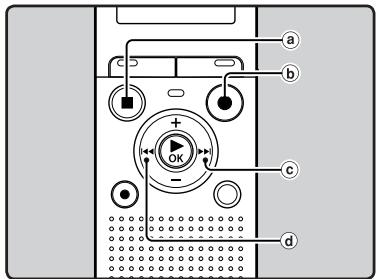
Pressing any of the following buttons will release the segment repeat playback.
a Press the STOP (■) button
⑥ Press the REC (●) button
© Press the ▶▶l button
(d) Press the ◀◀ button
A selected file can be erased from a folder. Also, all files in a folder can be erased simultaneously.
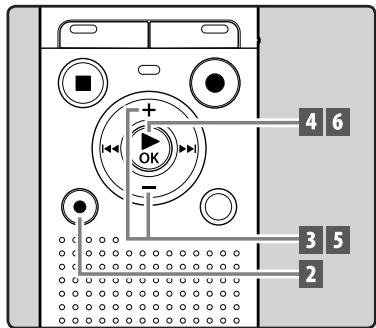
1 Select the file you want to erase (P.15).
2 While the recorder is in stop mode, press the ERASE button.
3 Press the + or – button to select [All in folder] or [One file].
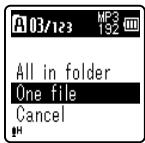
- If an action is not selected within 8 seconds, the recorder will return to stop mode.
4 Press the ▶ OK button.
5 Press the + button to select [Start].
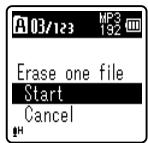
6 Press the ▶ OK button.
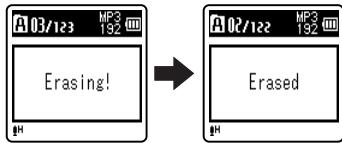
flowchart
graph LR
    A["Erasing!"] --> B["Erased"]
- The display changes to [Erasing!] and erasing will start.
- [Erased] is displayed when the file is erased.
Notes
- The locked files and files set as read-only cannot be erased (P.28).
- You cannot delete folders through the recorder.
- Replace the battery with a new one in order to ensure that the battery will not run out while processing. In addition, it may take over 10 seconds to complete processing. Never perform operations such as the following while processing, as they may damage the data.
① Removing the battery while processing.
② Remove the microSD card during processing when [microSD card] is being used as the recording media (VN-713PC, VN-712PC only).
For VN-713PC, VN-712PC:
- When a microSD card is inserted in the recorder, be sure to confirm the recording media as either [Internal memory] or [microSD card] so that there is no mistake (P.35).
Menu setting
Menu setting method
Items in menus are categorized so that you can quickly set a desired item. You can set each menu item as follows.
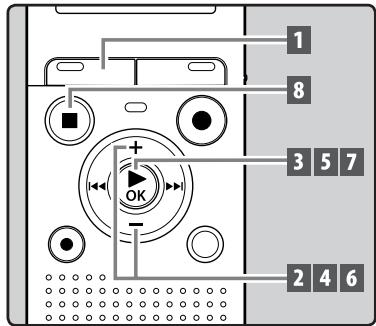
1 Press the MENU button.
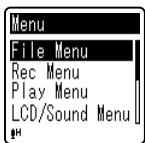
2 Press the + or – button to move to the item you want to set.

3 Press the ▶ OK button to move the cursor to the item to set.
4 Press the + or – button to move to the item you want to set.
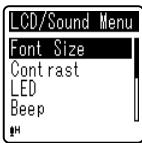
5 Press the ▶ OK button.
- Moves to the setting of the selected item.
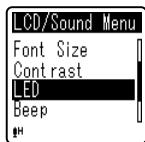
6 Press the + or – button to change the setting.
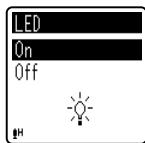
7 Press the ▶ OK button to complete the setting.
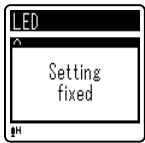
- Pressing the ◀◀◀ button without pressing the ▶OK button will cancel the settings and return you to the previous screen.
8 Press the STOP (■) button to close the menu screen.
- When in the menu screen during recording or playback, pressing the ◀◀◀ button will allow you to return to the recording or playback screen without interrupting recording or playback.
Notes
- The recorder will stop if you leave it idle for 3 minutes during a menu setup operation, when a selected item is not applied.
- When entering menu settings during recording or playback, the menu settings will be canceled if 8 seconds elapse with no buttons being pressed.
| Menu list | |
| [File Menu] | [File Lock] |
| [File Divide]*1 | |
| [Property] | |
| [Rec Menu] | [Rec Level] |
| [Rec Mode] | |
| [Low Cut Filter] | |
| [VCVA] | |
| [V-Sync. Rec]*2 | |
| [Rec Scene] | |
| [Play Menu] | [Noise Cancel]*2 |
| [Voice Filter]*1 | |
| [Play Mode] | |
| [Skip Space] | |
| [LCD/Sound Menu] | [Font Size] |
| [Contrast] | |
| [LED] | |
| [Beep] | |
| [Language(Lang)] | |
| [Device Menu] | [Memory Select]*1 |
| [Time & Date] | |
| [Reset Settings] | |
| [Format] | |
| [Memory Info.]*1 | |
| [System Info.] | |
*1 VN-713PC, VN-712PC only.
*2 VN-713PC only.
File Menu
File Lock
Locking a file keeps important data from being accidentally erased. Locked files are not erased when you select to erase all files from a folder (P.25).
1 Select the file you want to lock.
2 Select [File Lock] from the menu on the [File Menu].
[Lock]:
Locks the file and prevents it from being erased.
[Unlock]:
Unlocks the file and allows it to be erased.
File Divide

For VN-713PC, VN-712PC:
- Only MP3 files recorded with this recorder can be divided.
Files with large capacities and long recording times can be divided so that they are easier to manage and edit.
1 Stop playback at the divide position.
2 Select [File Divide] from the menu on the [File Menu].
3 Press the + button to select [Start], and then press the ▶ OK button.
• [Dividing!] will appear and file dividing will start.
- File dividing is completed when [File divide completed] appears.
Notes
- The recorder cannot divide files when the number of files in the folder exceeds 199.
- If a file has an extremely short recording time, it may not be divided even if it is a MP3 file.
- Locked files cannot be divided.
- After splitting the file, the front part of the file will be renamed as [File name_1.MP3] and the latter part of the file will be named as [File name_2.MP3].
- Do not remove the battery while dividing a file. This may damage the data.
Property
Select the files for which you would like to confirm information in advance before operating the menu.
1 Select [Property] from the menu on the [File Menu].
- [Name] (File name), [Date] (Time stamp), [Size] (File size) and [Bit Rate] (File format) will appear on the display.
Rec Menu
Rec Level
Recording sensitivity is adjustable to meet recording needs.
1 Select [Rec Level] from the menu on the [Rec Menu].
[High]:
High recording sensitivity suitable for conferences with many participants and recording audio at a distance or low volume.
[Low]:
Standard recording sensitivity suitable for dictation.
Note
- When you would like to clearly record a speaker's voice, set [Rec Level] to [Low] and hold recorder's built-in microphone close to the speaker's mouth (5-10 cm).
Rec Mode
Besides stereo* and monaural recording, you can also select recording with priority to sound quality, and recording with priority to recording time. Select the recording mode appropriate to your needs.
* VN-713PC, VN-712PC only
1 Select [Rec Mode] from the menu on the [Rec Menu].
When [MP3]* is selected:
Stereo recording
[192kbps], [128kbps]
Monaural recording
[48kbps]
* VN-713PC, VN-712PC only
When [WMA] is selected:
Monaural recording
[32kbps], [16kbps], [5kbps]
Notes
- If a recording is made in stereo modes ([192 kbps] or [128 kbps]), it will be a monaural recording through the built-in microphone, and the same audio will be recorded to both Left channel (Lch) and Right channel (Rch).
- To record a meeting and lecture clearly, set other than [5kbps] in [Rec Mode].
For VN-713PC, VN-712PC:
- When an external monaural microphone is used while [Rec Mode] is set to a stereo recording mode, audio will be recorded to the L channel only.
Low Cut Filter
The recorder has a Low Cut Filter function to minimize low-frequency sounds and record voices more clearly.
1 Select [Low Cut Filter] from the menu on the [Rec Menu].
[On]:
Enables the Low Cut Filter function.
[Off]:
Disables this function.
VCVA
When the microphone senses that sounds have reached a preset threshold volume level, the built-in Variable Control Voice Actuator (VCVA) starts recording automatically, and stops when the volume drops below the threshold level. The VCVA feature extends recording time and conserves memory by stopping recording during silent periods, which helps the playback to be more efficient.
1 Select [VCVA] from the menu on the [Rec Menu].
[On]:
Enables the VCVA function.
[Off]:
Disables this function. Will resume recording in normal mode.
■ Adjust the start/stop actuation level:
1 Press the REC (●) button to start recording.
- When the sound volume is lower than the preset threshold sound level, recording automatically stops after 1 sec approximately, and [Standby] flashes on the display. The LED indicator light turns on when recording starts and flashes when recording pauses.
2 Press the ▶▶▶ or ◀◀◀ button to adjust the start/stop actuation level.
- The VCVA level can be set to any of 15 different values.
- The higher the value, the more sensitive the recorder will be to sounds. At the highest value, even the faintest sound will activate recording.
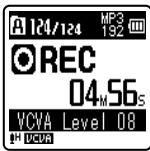
Notes
- If the start/stop actuation level is not adjusted within 2 seconds, the display will return to the previous one.
- To ensure successful recordings, prior testing and adjustment of the start/stop actuation level is recommended.
- When using the VCVA function, the following functions are not available.
• [V-Sync. Rec] (P.31) (VN-713PC only)
V-Sync. Rec

For VN-713PC:
Voice sync recording starts when a voice louder than the voice sync level (detection level) is detected. When the voice becomes low, recording will automatically stop. When voice sync recording is on and the input level is equal to or below the voice sync level (detection level) for a period of at least the specified detection time, the recorder will return to the standby mode or stop mode.
1 Select [V-Sync. Rec] from the menu on the [Rec Menu].
2 Select the setting.
When [On/Off] is selected:
[On]:
Enables the Voice sync recording function.
[Off]:
Disables this function.
When [V-sync time] is selected:
[1 sec.] [2 sec.] [3 sec.] [5 sec.] [10 sec.]: If the input (recording level) is equal to or below the specified level for longer than the specified detection time, the recorder will return to the standby mode or stop mode.
When [Mode] is selected:
[One Time]:
Closes the file after recording and returns to stop mode.
[Continuous]:
Closes the file after recording and returns to recording standby mode. If sound is subsequently detected, recording will start with a new file.
■ Adjust the voice sync level:
1 Press the REC (●) button to start recording.
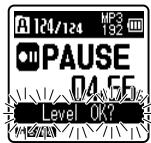
2 Press the ▶▶| or |◀◀ button to adjust the voice sync level.
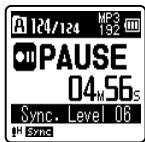
- The voice sync level can be set to any of 15 different values. - The higher the value, the more sensitive the recorder will be to sounds. At the highest value, even the faintest sound will activate recording.
3 Press the REC (●) button again.
- The recorder will go into standby. [Standby] will flash on the display and the LED indicator light will flash. - When the input is at or above the voice sync level, recording will start automatically.
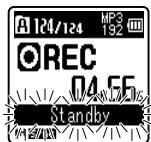
- If sound at a volume equal to or below the voice sync level continues for the specified time, voice sync recording will end automatically, and the recorder will return to the recording standby mode or stop mode. Every time the recorder enters standby mode, the file will be closed and recording will continue in a new file.
- To stop the recorder during voice sync recording, press the STOP (■) button.
Note
- When using the [V-Sync. Rec] function, the following functions are not available.
• VCVA (P.30)
Rec Scene
A recording setting can be selected from among the [Memo], [Meeting], [Conference] or [DNS] templates to suit the recording scene or situation. You can also save a recording setting of your choice.
1 Select [Rec Scene] from the menu on the [Rec Menu].
2 Press the + or – button to select the item to set, and press the ▶OK button.
When [Select] is selected:
Press the + or - button to select the recording scene you want to set, and then press the ▶OK button.
[Off]: Disables this function.
[Memo]: Suitable for dictation.
[Meeting]: Suitable for recording meetings.
[Conference]: Suitable for seminars with a small number of people.
[DNS]: Suitable for voice recognition software (Dragon NaturallySpeaking) compliant recording.
[User Setting]: Recording with menu settings saved using [Register].
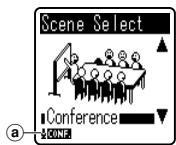
a Rec Scene
When [Register] is selected:
- You can save the current [Rec Menu] menu settings in [User Setting].
Note
- When a recording scene is selected, recording-related menu settings cannot be changed. If you wish to use these functions, set [Rec Scene] to [Off].
Play Menu
Noise Cancel

For VN-713PC:
If recorded audio is difficult to understand because of noisy surroundings, adjust the Noise Cancel setting level.
1 Select [Noise Cancel] from the menu on the [Play Menu].
[High] [Low]: Enables the Noise Cancel function. Noise will be reduced in the file when it's played back for better sound quality.
[Off]: Disables this function.
Note
- When using the [Noise Cancel] function, the following functions are not available.
• Slow/Fast speed playback (P.21)
• [Voice Filter] (VN-713PC, VN-712PC only)
Voice Filter

For VN-713PC, VN-712PC:
The recorder has a Voice Filter Function to cut low and high frequency tones during normal, fast, or slow playback, and enable clear audio playback.
1 Select [Voice Filter] from the menu on the [Play Menu].
[On]:
Enables the Voice Filter function.
[Off]:
Disables this function.
Note
- When using the [Voice Filter] function, the following functions are not available.
• [Noise Cancel] (VN-713PC only)
Play Mode
You can select the playback mode that fits your preference.
1 Select [Play Mode] from the menu on the [Play Menu].
When [Playback range] is selected:
[File]:
Selects the current file.
[Folder]
Selects the current folder.
When [Repeat] is selected:
[On]:
Sets to repeat playback mode.
[Off]:
Disables this function.
Notes
- In [File] mode, when the recorder comes to the end of the last file in the folder, [End] flashes for two seconds on the display and the recorder stops at the start of the last file.
- In [Folder] mode, when the recorder comes to the end of the last file in the folder, [End] flashes for two seconds on the display and the recorder stops at the start of the first file in the folder.
Skip Space
This function enables you to skip (forward) or reverse skip (rewind) a file being played for a set period. This function is convenient for quickly skipping to another playback position or repeatedly playing back short phrases.
1 Select [Skip Space] from the menu on the [Play Menu]. When [Forward Skip] is selected: [File Skip] [10 sec. Skip] [30 sec. Skip] [1 min. Skip] [5 min. Skip] [10 min. Skip] When [Reverse Skip] is selected: [File Skip] [1 sec. Skip] – [5 sec. Skip] [10 sec. Skip] [30 sec. Skip] [1 min. Skip] [5 min. Skip] [10 min. Skip]
Note
- If there is an index mark/temp mark or a cue closer than the skip space, the recorder will forward skip/reverse skip to that position.
■ Forward/Reverse Skip Playback:
1 Press the ▶ OK button to start playback.
2 Press the ▶▶| or |◀◀ button.
- The recorder will skip (forward) or reverse skip (rewind) a set space and start playing back.
LCD/Sound Menu
Font Size
Changing the displayed character size on the display.
1 Select [Font Size] from the menu on the [LCD/Sound Menu].
[Large]: Text is displayed in large characters. [Small]: Text is displayed in small characters.
Note
- When the [Font Size] is set to [Small], the layout of the display will change so that more information is displayed (P.9).
Contrast
Display contrast can be adjusted in 12 levels.
1 Select [Contrast] from the menu on the [LCD/Sound Menu].
- You can adjust the LCD display contrast level from [01] to [12].
LED
You can set it so the LED indicator light does not turn on.
1 Select [LED] from the menu on the [LCD/Sound Menu].
[On]: LED light will be set. [Off]: LED light will be canceled.
Beep
The recorder beeps to alert you to button operations or warn you of errors. System sounds may be turned off.
1 Select [Beep] from the menu on the [LCD/Sound Menu].
[On]: Enables the Beep function. [Off]: Disables this function.
Language(Lang)
You can select the display language for this recorder.
1 Select [Language(Lang)] from the menu on the [LCD/Sound Menu].
[English] [Français] [Deutsch] [Italiano] [Espanol] [Русский]
- The selectable languages differ depending on the region.
Device Menu
Memory Select

For VN-713PC, VN-712PC:
When a microSD card is inserted you can select to record to either the internal memory or to the microSD card (P.13).
1 Select [Memory Select] from the menu on the [Device Menu].
[Internal memory]: Internal memory. [microSD card]: microSD card.
Time & Date
If the current time and date is not correct, set it.
1 Select [Time & Date] from the menu on the [Device Menu].
• See "Setting time and date [Time & Date]" (P.12).
Reset Settings
This returns the functions back to their initial settings (factory default).
1 Select [Reset Settings] from the menu on the [Device Menu].
Menu settings after resetting (initial settings):
Rec Menu:
[Rec Level] [High]
[Rec Mode]*1
[MP3] [192 kbps]
[Rec Mode]*2 [32 kbps]
[Low Cut Filter] [Off]
VCVA [Off]
[V-Sync. Rec]*3
[On/Off] [Off]
[V-sync time] [1 sec.]
[Mode] [Continuous]
[Rec Scene] [Off]
Play Menu:
[Noise Cancel]*3 [Off]
[Voice Filter]*1 [Off]
[Play Mode]
[Playback range] [File]
[Repeat] [Off]
[Skip Space]
[Forward Skip] [File Skip]
[Reverse Skip] [File Skip]
LCD/Sound Menu:
[Font Size] [Large]
[Contrast] [Level 06]
[LED] [On]
[Beep] [On]
[Language(Lang)] [English]
■ Device Menu:
[Memory Select]*1 [Internal memory]
*1 VN-713PC, VN-712PC only.
*2 VN-711PC only.
*3 VN-713PC only.
Format
If you format the recorder, all files will be removed and all function settings will return to defaults except date and time settings. Transfer any important files to a computer before formatting the recorder.
1 Select [Format] from the menu on the [Device Menu].
For VN-711PC:
Proceed to the operation of step 3.
2 Press the + or – button to select the recording media to format, and press the ▶ OK button.
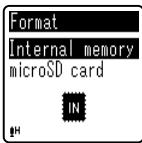
3 Press the + button to select [Start], and press the ▶ OK button.
![OLYMPUS VN-712PC, VN-711PC, VN-713PC - Press the + button to select [Start], and press the ▶ OK button. - 1](/content/2025/01/84124/images/41d18fbf1a11063be3fd4728fb4fcbc6b8eb0cad5afefcf19996386088dd5f6b.jpg)
flowchart
graph LR
    A["Start"] --> B["Cancel"]
    C["Format"] --> D["All data will be erased"]
• After [All data will be erased] message is on for two seconds, [Start] and [Cancel] will turn on.
4 Press the + button again to select [Start], and press the ▶ OK button.
- Formatting begins and [Formatting!] flashes on the display.
- [Format done] appears when formatting ends.
![OLYMPUS VN-712PC, VN-711PC, VN-713PC - Press the + button again to select [Start], and press the ▶ OK button. - 1](/content/2025/01/84124/images/04f59ed926e496465be8ce3ea3f5afba7ee2e1fc0eca1236170a4b179c0385fe.jpg)
flowchart
graph LR
    A["Start"] --> B["Cancel"]
    C["Start"] --> D["Format"]
    E["Start"] --> F["Formatting!"]
Notes
• Never format the recorder from a PC.
- When the recorder is formatted, all the saved data, including locked files and read-only files, are erased.
- Replace the battery with a new one in order to ensure that the battery will not run out while processing. In addition, it may take over 10 seconds to complete processing. Never perform operations such as the following while processing, as they may damage the data.
① Removing the battery while processing.
② Remove the microSD card during processing when [microSD card] is being used as the recording media (VN-713PC, VN-712PC only).
For VN-713PC, VN-712PC:
- When a microSD card is inserted in the recorder, be sure to confirm the recording media as either [Internal memory] or [microSD card] so that there is no mistake (P.35).
- Formatting on the recorder will be Quick Format. If you format the microSD card, information of file management is refreshed and the data inside the microSD card is not deleted completely. When handing over and disposing the microSD card, be careful about the data leakage from the microSD card. We recommend the microSD card to be destroyed when you dispose the microSD card.
Memory Info.

For VN-713PC, VN-712PC:
The recordable capacity remaining and overall capacity of the recording media can be seen from the menu.
1 Select [Memory Info.] from the menu on the [Device Menu].
- The recorder will use some capacity of the memory to keep the management file. For microSD card, the remaining capacity will be shown less than the total capacity of the card due to characteristic of the microSD card, but this is not a malfunction.
System Info.
You can check the recorder's information on the menu screen.
1 Select [System Info.] from the menu on the [Device Menu].
- [Model] (Model Name), [Version] (System version) and [Serial No.] (Serial Number) appear on the display.
Using the recorder on your PC
Apart from using this unit as a recorder, you can use it as an external memory for your computer, as a storage device.
- The files recorded by this recorder can be played back on your computer using Windows Media Player. You can also transfer the WMA files downloaded with Windows Media Player to your recorder and listen to them (excluding files with copyright protection).
Operating environment
Windows
Operating System:
Microsoft Windows XP/Vista/7 (Standard Installation)
Compatible PC's:
Windows PC's equipped with more than one free USB port
Macintosh
Operating System:
Mac OS X 10.4.11 - 10.7 (Standard Installation)
Compatible PC's:
Apple Macintosh series equipped with more than one free USB port
Notes
- This is an operational environment for saving the files recorded by this recorder to your PC with USB connection.
- The support service will not cover if your PC has been updated from Windows 95/98/Me/2000 to Windows XP/Vista/7.
- Any failure on a self-modified PC will not be covered under the operational warranty.
Connecting to your PC
1 Boot the PC.
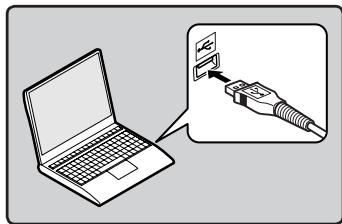
2 Connect the USB cable to the USB port of the PC.
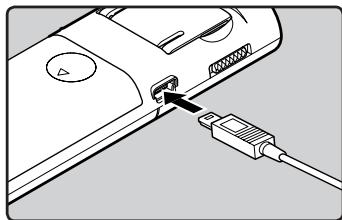
3 Make sure that the recorder is stopped, and then connect the USB cable to the connecting port on this recorder.
natural_image
Diagram of a device with an attached cable showing a port and connector (no text or symbols present)- [Remote] is displayed on the recorder if the USB cable is connected.
Windows:
When you connect the recorder to Windows and open [My Computer], it will be recognized by the drive name of the product name. Inserting a microSD card will allow you to use it as [Removable Disk].
Macintosh:
When you connect the recorder to Mac OS, it will be recognized by the drive name of the product name on the desktop. If a microSD card is inserted, [Untitled] will be displayed.
Notes
- Refer to the user's manual for your PC regarding the USB port on your PC.
- Be sure to push the cable connector all the way in. Otherwise, the recorder may not operate properly.
- When connecting the recorder through an USB hub the operation may become unstable. In such cases, refrain from using a USB hub.
- Be sure to use the included dedicated USB cable. If any other company's cable is used, it may lead to malfunction of the recorder. Also, never use this dedicated cable with any other company's products.
Disconnecting from your PC
Windows
1 Click [✗] on the task bar located at the lower-right corner of the screen. Click [Safely remove USB Mass Storage Device].
Safely remove USB Mass Storage Device - Drives(F:, G:)
5:17 PM
- The drive letter will differ depending on the PC being used.
- When the window indicating that it is safe to remove hardware window appears, close the window.
2 Confirm that the recorder LED indicator light is gone before disconnecting the USB cable.
Macintosh
1 Drag and drop the recorder's drive icon for this recorder displayed on the desktop to the Recycle Bin icon.
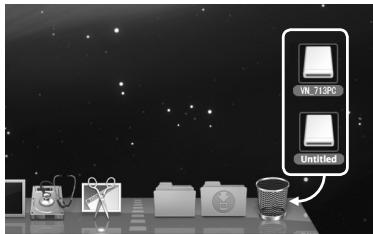
2 Confirm that the recorder LED indicator light is gone before disconnecting the USB cable.
Notes
- NEVER disconnect the USB cable while the LED indicator light is flashing. If you do, the data may be destroyed.
- In the Mac OS operational environment, WMA format files cannot be played back.
Other information
Troubleshooting
Q-1 Nothing happens when a button is pressed.
A-1 • The POWER/HOLD switch may be set to [HOLD] position.
• The batteries may be depleted.
- The batteries may be inserted incorrectly.
Q-2 No sound or quiet sound is heard from the speaker while playing back.
A-2 • The earphone plug may be plugged into the recorder.
- The volume may be set to the minimum level.
Q-3 Recording is not possible.
A-3 • By pressing the STOP (■) button repeatedly while the recorder stops, check if the display shows:
- The remaining recording time may have reached [00:00].
- Check if the display shows [Memory full] by pressing the REC (●) button.
- Check if the display shows [Folder full] by pressing the REC (●) button.
Q-4 The playback speed is too fast (slow).
A-4 • The recorder may be set to fast (slow) Playback.
Accessories (optional)
Accessories exclusive to the Olympus voice recorder can be purchased directly from Online Shop on our company's website. Sales of accessories are different according to the country.
- Stereo microphone: ME51S
● Compact zoom microphone (unidirectional): ME32
● Highly sensitive noise-cancellation monaural microphone (unidirectional): ME52W
● Tie clip microphone (omni-directional): ME15
● Telephone pickup: TP8
● Connecting cord: KA333
● Carrying case: CS131
General points
■ Recording format:
MP3 (MPEG-1 Audio Layer3)*
WMA (Windows Media Audio)
* VN-713PC, VN-712PC only
■ Sampling frequency: MP3 format\*
| 192 kbps | 44.1 kHz |
| 128 kbps | 44.1 kHz |
| 48 kbps | 44.1 kHz |
WMA format
| 32 kbps | 44.1 kHz |
| 16 kbps | 22 kHz |
| 5 kbps | 8 kHz |
* VN-713PC, VN-712PC only
■ Maximum working output:
250 mW (8 Ω speaker)
■ Maximum headphone output:
≤ 150 mV (according to EN 50332-2)
■ Wide band characteristic headphone output:
75 mV ≤ (according to EN 50332-2)
■ Recording medium:
Internal memory:
VN-713 PC : 4 GB
VN-712 PC, VN-711 PC: 2 GB
microSD card*:
2 GB to 32 GB
* VN-713PC, VN-712PC only
Speaker:
Built-in ø 28 mm round dynamic speaker
MIC jack:
ø 3.5 mm mini-jack, impedance 2 kΩ
EAR jack:
∅ 3.5 mm mini-jack, impedance 8 Ω or more
■ Input power requirement:
AAA battery (LR03)
■ External dimensions:
108 mm × 39 mm × 16.8 mm (without protrusions)
Weight:
71 g (including batteries)
■ Operating temperature:
0^-42^/32^-107.6^
Frequency response
■ During recording mode (Microphone jack):
MP3 format*
| 192 kbps | 70 Hz to 19 kHz |
| 128 kbps | 70 Hz to 17 kHz |
| 48 kbps | 70 Hz to 10 kHz |
WMA format
| 32 kbps | 70 Hz to 13 kHz |
| 16 kbps | 70 Hz to 7 kHz |
| 5 kbps | 70 Hz to 3 kHz |
* VN-713PC, VN-712PC only
■ During recording mode (Built-in microphone):
70 Hz to 16 kHz (However, when recording in the MP3 format or the WMA format, the upper limit value of the frequency response depends on each recording mode)
■ During playback mode:
70 Hz to 19 kHz
Guide to battery life
The following values are strictly references.
■ Alkaline batteries:
| Recording mode | Built-in microphone (During recording mode) | Built-in speakers (During playback mode) | Earphone (During playback mode) | |
| MP3 format* | 192 kbps | 53 h. | 20 h. | 60 h. |
| WMA format | 5 kbps | 72 h. | 21 h. | 68 h. |
* VN-713PC, VN-712PC only
Note
- Battery life is measured by Olympus. It varies greatly according to the type of batteries used and the conditions of use.
Guide to recording times
The following values are strictly references.
■ MP3 format*1:
| Recording mode | Internal memory | microSD card*1 | ||||
| VN-713PC (4 GB) | VN-712PC (2 GB) | 2 GB | 4 GB | 8 GB | 16 GB | |
| 192 kbps | 44 h. | 22 h. | 22 h. | 44 h. | 89 h. | 178 h. |
| 128 kbps | 66 h. 30 min. | 33 h. 30 min. | 33 h. | 66 h. | 133 h. | 268 h. |
| 48 kbps | 177 h. | 89 h. 30 min. | 88 h. 30 min. | 177 h. | 356 h. | 715 h. |
WMA format:
| Recording mode | Internal memory | microSD card*1 | ||||
| VN-713PC (4 GB) | VN-712PC, VN-711PC (2 GB) | 2 GB | 4 GB | 8 GB | 16 GB | |
| 32 kbps | 259 h. | 131 h. | 130 h. | 259 h. | 522 h. | 1047 h. |
| 16 kbps | 511 h. | 258 h. | 255 h. | 510 h. | 1027 h. | 2061 h. |
| 5 kbps | 1626 h. | 823 h. | 813 h. | 1623 h. | 3268 h. | 6556 h. |
| DNS*2 | 65 h. | 32 h. 30 min. | 32 h. 30 min. | 64 h. 30 min. | 130 h. | 262 h. |
*1 VN-713PC, VN-712PC only
*2 Rec Scene
Notes
• Available recording time may be shorter if many short recordings are made (The displayed available recording time and recorded time are approximate indications).
- Variations in the available recording time will arise as there may be differences in the available memory depending on the microSD card.
Maximum recording time per file
- The maximum capacity for a single file is limited to approx. 4 GB for WMA and MP3.
- Regardless of the memory remaining amount, the longest sound recording time per file is restricted to the following value.
■ MP3 format*:
| 192 kbps | approx. 49 h. 40 min. |
| 128 kbps | approx. 74 h. 30 min. |
| 48 kbps | approx. 198 h. 40 min. |
* VN-713PC, VN-712PC only
■ WMA format:
| 32 kbps | approx. 26 h. 40 min. |
| 16 kbps | approx. 53 h. 40 min. |
| 5 kbps | approx. 148 h. 40 min. |
| DNS* | approx. 26 h. 40 min. |
* Rec Scene
Technical assistance and support
The following are contact information for technical support for Olympus recorders and software only.
● Technical Hotline Number in the U.S. and Canada
1-888-553-4448
● User Support E-mail address in the U.S. and Canada
distec@olympus.com
● Technical Hotline Number in Europe
Toll free number: 00800 67 10 83 00
available for Austria, Belgium, Denmark, Finland, France, Germany, Italy, Luxembourg,
Netherlands, Norway, Portugal, Spain, Sweden, Switzerland, United Kingdom
Charged numbers for the Rest of Europe
+49 180 567 1083
+49 40 23773 4899
- User Support E-mail address in Europe
dss.support@olympus-europa.com
For customers in Europe:

"CE" mark indicates that this product complies with the European requirements for safety, health, environment and customer protection.

This symbol [crossed-out wheeled bin WEEE Annex IV] indicates separate collection of waste electrical and electronic equipment in the EU countries. Please do not throw the equipment into the domestic refuse. Please use the return and collection systems available in your country for the disposal of this product.

Applicable Product: VN-713PC/VN-712PC/VN-711PC

This symbol [crossed-out wheeled bin Directive 2006/66/EC Annex II] indicates separate collection of waste batteries in the EU countries.
Please do not throw the batteries into the domestic refuse. Please use the return and collection systems available in your country for the disposal of the waste batteries.
OLYMPUS®
OLYMPUS IMAGING CORP.
Shinjuku Monolith, 3-1 Nishi-Shinjuku 2-chome, Shinjuku-ku, Tokyo 163-0914, Japan.
Tel. +81 (0)3-3340-2111
http://www.olympus.com
OLYMPUS EUROPA HOLDING GMBH
(Premises/Goods delivery) Wendenstrasse 14-18, 20097 Hamburg, Germany.
Tel. +49 (0)40-237730
(Letters) Postfach 10 49 08. 20034 Hamburg, Germany.
http://www.olympus-europa.com
- DIGITAL VOICE RECORDER
- VN-713PC VN-712PC VN-711PC
- DETAILED INSTRUCTIONS
- Introduction
- Trademarks and registered trademarks
- Getting started
- About recording
- About playback
- Menu setting
- Using the recorder on your PC
- Other information
- Danger
- Warning
- Caution
- Caution for usage environment
- Warning regarding data loss:
- Handling the recorder
- Warning:
- Caution:
- Battery handling precautions
- Danger:
- Main features
- Display (LCD panel)
- Folder indicator
- Inserting batteries
- Battery indicator
- Notes
- Turning on/off the power
- Turning on the power
- Turning off the power
- Power save mode
- Set the recorder to HOLD mode (A)
- Exit HOLD mode (B)
- Setting time and date [Time & Date]
- Press the ▶▶| or |◀◀ button to select the item to set.
- Press the + or - button to set.
- Repeat steps 1 and 2 to set the other items.
- ▶▶| or |◀◀ button:
- + or - button:
- Press the ▶ OK button to complete the setting.
- Changing the time and date
- Inserting and ejecting a microSD card
- For VN-713PC, VN-712PC:
- Inserting a microSD card
- Ejecting a microSD card
- Close the card cover securely.
- Selecting the folders and files
- While the recorder is in stop mode, press the FOLDER/INDEX button.
- Press the ▶▶| or |◀◀ button to select a file.
- Searching for a file
- While the recorder is in stop mode, press the CALENDAR/SCENE button.
- Press the +, -, ►► | or |◄◄ button to select the date.
- ▶▶, ◀◀ buttons:
- Press the ▶ OK button.
- Press the + or - button to select a file.
- Press the ▶ OK button to start playback.
- Note
- About recording
- Recording
- Pause
- ■ Resume Recording:
- To quickly check on the recorded contents
- Changing the recording scene [Rec Scene]
- While the recorder is in stop mode, press and hold the CALENDAR/SCENE button.
- Press the + or – button to select the recording scene.
- Recording from external microphone or other devices
- About playback
- Playback
- Playback through earphones
- Forwarding and Rewinding
- While the recorder is in stop mode, press and hold the ▶▶▶l or l◀◀ button.
- While the recorder is in playback mode, press and hold the ▶▶l or ◀◀◀ button.
- Locating the beginning of a file
- While the recorder is in stop mode or playback mode, press the ▶▶▶ button.
- While the recorder is in playback mode, press the ◀◀ button.
- While the recorder is in stop mode, press the ◀◀◀ button.
- While the recorder is in playback mode, press the ◀◀ button twice.
- About music file
- Changing the playback speed
- About the limits of fast playback
- Setting an index mark or a temp mark
- While the recorder is in recording mode or playback mode, press the FOLDER/INDEX button.
- Clearing an index mark or a temp mark
- How to begin segment repeat playback
- Press the REC (●) button at the point you want to start segment repeat playback.
- Press the REC (●) button again at the position where you want to end segment repeat playback.
- Menu setting
- Menu setting method
- Press the ▶ OK button to complete the setting.
- Press the STOP (■) button to close the menu screen.
- File Menu
- File Lock
- File Divide
- Property
- Rec Menu
- Rec Level
- Select [Rec Level] from the menu on the [Rec Menu].
- Rec Mode
- Select [Rec Mode] from the menu on the [Rec Menu].
- Low Cut Filter
- Select [Low Cut Filter] from the menu on the [Rec Menu].
- VCVA
- Select [VCVA] from the menu on the [Rec Menu].
- ■ Adjust the start/stop actuation level:
- Press the REC (●) button to start recording.
- Press the ▶▶▶ or ◀◀◀ button to adjust the start/stop actuation level.
- V-Sync. Rec
- For VN-713PC:
- Rec Scene
- When [Register] is selected:
- Play Menu
- Noise Cancel
- Select [Noise Cancel] from the menu on the [Play Menu].
- Voice Filter
- Select [Voice Filter] from the menu on the [Play Menu].
- Play Mode
- Select [Play Mode] from the menu on the [Play Menu].
- Skip Space
- ■ Forward/Reverse Skip Playback:
- Press the ▶ OK button to start playback.
- Press the ▶▶| or |◀◀ button.
- LCD/Sound Menu
- Font Size
- Select [Font Size] from the menu on the [LCD/Sound Menu].
- Contrast
- Select [Contrast] from the menu on the [LCD/Sound Menu].
- LED
- Select [LED] from the menu on the [LCD/Sound Menu].
- Beep
- Language(Lang)
- Device Menu
- Memory Select
- Time & Date
- Reset Settings
- Menu settings after resetting (initial settings):
- Rec Menu:
- Play Menu:
- LCD/Sound Menu:
- ■ Device Menu:
- Format
- Select [Format] from the menu on the [Device Menu].
- Press the + or – button to select the recording media to format, and press the ▶ OK button.
- Press the + button to select [Start], and press the ▶ OK button.
- Press the + button again to select [Start], and press the ▶ OK button.
- Memory Info.
- Select [Memory Info.] from the menu on the [Device Menu].
- System Info.
- Select [System Info.] from the menu on the [Device Menu].
- Using the recorder on your PC
- Operating environment
- Windows
- Macintosh
- Connecting to your PC
- Windows:
- Macintosh:
- Disconnecting from your PC
- Other information
- Troubleshooting
- Q-1 Nothing happens when a button is pressed.
- Q-2 No sound or quiet sound is heard from the speaker while playing back.
- Q-3 Recording is not possible.
- Q-4 The playback speed is too fast (slow).
- Accessories (optional)
- General points
- ■ Recording format:
- ■ Sampling frequency: MP3 format\*
- ■ Maximum working output:
- ■ Maximum headphone output:
- ■ Wide band characteristic headphone output:
- ■ Recording medium:
- Speaker:
- MIC jack:
- EAR jack:
- ■ Input power requirement:
- ■ External dimensions:
- Weight:
- ■ Operating temperature:
- Frequency response
- ■ During recording mode (Microphone jack):
- ■ During recording mode (Built-in microphone):
- ■ During playback mode:
- Guide to battery life
- Guide to recording times
- Maximum recording time per file
- Technical assistance and support
- For customers in Europe:
- OLYMPUS®
- OLYMPUS IMAGING CORP.
- OLYMPUS EUROPA HOLDING GMBH
Marque : OLYMPUS
Modèle : VN-712PC, VN-711PC, VN-713PC
Catégorie : Enregistreurs vocaux