
HL-L9200CDWT - Imprimante couleur laser BROTHER - Notice d'utilisation et mode d'emploi gratuit
Retrouvez gratuitement la notice de l'appareil HL-L9200CDWT BROTHER au format PDF.

| Type de produit | Imprimante couleur laser |
| Marque | Brother |
| Modèle | HL-L9200CDWT |
| Dimensions (L × P × H) | 313 × 445 × 486 mm (12,3 × 17,5 × 19,1 po) |
| Poids (avec consommables) | 27,9 kg (61,6 lb) |
| Source d'alimentation | 110-120 V CA, 50/60 Hz |
| Consommation électrique (impression moyenne) | 555 W à 25 °C |
| Vitesse d'impression (A4, simple face) | Jusqu'à 30 ppm (noir et couleur) |
| Vitesse d'impression (A4, recto-verso auto.) | Jusqu'à 14 pages/min (7 feuilles/min) |
| Première page (couleur/noir) | Moins de 15 secondes (mode Prêt) |
| Résolution d'impression | 600 × 600 ppp (mode Normal) ; 2400 ppp classe (mode Fin) |
| Capacité papier (entrée) | 800 feuilles (bac standard 250 + bac inférieur 500 + bac multifonction 50) |
| Capacité papier (sortie) | 150 feuilles (face vers le bas) ; 1 feuille (face vers le haut) |
| Types de support | Papier ordinaire, fin, épais, cartonné, recyclé, étiquettes, enveloppes, brillant |
| Impression recto-verso automatique | Oui (papier ordinaire, fin, recyclé, brillant) |
| Mémoire | 128 Mo standard, extensible à 256 Mo (1 slot SO-DIMM DDR2) |
| Connectivité | USB 2.0 Hi-Speed, Ethernet 10/100BASE-TX, Wi-Fi 802.11b/g/n, USB direct |
| Écran | Écran tactile couleur TFT 1,8 po (diagonale) |
| Impression directe | Depuis une clé USB ou un appareil photo (PDF, JPEG, TIFF, XPS, PRN) |
| Entretien | Nettoyage de l'intérieur, des fils corona, du tambour et du rouleau de préhension |
| Pièces consommables (références) | Toners TN-339BK/C/M/Y (6 000 pages), tambour DR-331CL (25 000 pages), courroie BU-320CL (50 000 pages), bac à déchet WT-320CL (50 000 pages) |
| Langues de la notice | Français, anglais, et autres sur demande |
FOIRE AUX QUESTIONS - HL-L9200CDWT BROTHER
Questions des utilisateurs sur HL-L9200CDWT BROTHER
0 question sur cet appareil. Repondez a celles que vous connaissez ou posez la votre.
Poser une nouvelle question sur cet appareil
Téléchargez la notice de votre Imprimante couleur laser au format PDF gratuitement ! Retrouvez votre notice HL-L9200CDWT - BROTHER et reprennez votre appareil électronique en main. Sur cette page sont publiés tous les documents nécessaires à l'utilisation de votre appareil HL-L9200CDWT de la marque BROTHER.
MODE D'EMPLOI HL-L9200CDWT BROTHER
User's Guide
Brother Laser Printer
HL-L9200CDW
HL-L9200CDWT
HL-L9300CDW
HL-L9300CDWT
HL-L9300CDWTT
For visually-impaired users
You can read this manual with Screen Reader 'text-to-speech' software.
You must set up the hardware and install the driver before you can use the machine.
Please use the Quick Setup Guide to set up the machine. You can find a printed copy in the box.
Please read this User's Guide thoroughly before you use the machine.
Please visit http://solutions.brother.com/ where you can get product support, the latest driver updates and utilities, and answers to frequently asked questions (FAQs) and technical questions.
Note: Not all models are available in all countries.
In USA: Visit the Brother Solutions Center at http://solutions.brother.com/ and click Manuals on your model's page to download other manuals.
HL-L9300 series only
The instructions in this guide apply to both the HL-L9200 series and the HL-L9300 series. However, there are differences for the HL-L9300 series:
■ Optional lower paper tray (see instructions below)
Machine specifications (see tables on next page)
Loading paper in the optional lower tray (if equipped)

Slowly pull out the paper tray until it stops.
Slightly lift the front of the tray and pull the tray completely out of the machine.

For Legal or Folio size paper, press the release button (1) in the bottom of the paper tray and then extend the back of the paper tray.
NOTE
Legal and Folio size paper are available only in some regions.
Optional lower trays
| Model | HL-L9200CDW | HL-L9200CDWT | HL-L9300CDW | HL-L9300CDWT | HL-L9300CDWTT |
| Model Name | LT-325CL | LT-328CL1 | |||
| Number of lower trays | - | 1 | - | 1 | 2 |
| Paper Source | - | Tray 2 | - | Tray 2 | Tray 2 and Tray 32 |
| Maximum Paper Capacity3 | 300 | 800 | 300 | 800 | 1300 |
1 LT-328CL is functionally equivalent to LT-325CL.
For setup, see the User's Guide supplied with the lower tray unit.
2 For Tray 3 users, please read the descriptions for Tray 2.
3 20 lb (80 g/m²) paper
Machine specifications
General
| Model | HL-L9300CDW | HL-L9300CDWT | HL-L9300CDWTT | |
| Power Consumption1(Average) | Peak | Approx. 1180 W | ||
| Printing | Approx. 555 W at 77 °F (25 °C) | |||
| Printing (Quiet Mode) | Approx. 375 W at 77 °F (25 °C) | |||
| Ready | Approx. 65 W at 77 °F (25 °C) | |||
| Sleep | Approx. 10 W | |||
| Deep Sleep | Approx. 1.3 W | |||
| Power Off23 | Approx. 0.02 W | |||
| Dimensions | 12.3(313)*17.5(445)**22.8(580)***19.1(486)19.1(486) * : HL-L9300CDW** : HL-L9300CDWT*** : HL-L9300CDWTT | |||
| Weights (with supplies) | 47.7 lb (21.6 kg) | 62.2 lb (28.2 kg) | 76.7 lb (34.8 kg) | |
Using USB connection to computer.
2 Measured according to IEC 62301 Edition 2.0.
3 Power consumption varies slightly depending on the usage environment or part wear.
User's Guides and where do I find them?
| Which Guide? | What's in it? | Where is it? |
| Product Safety Guide | Read this Guide first. Read the Safety Instructions before you set up your machine. See this Guide for trademarks and legal limitations. | Printed / In the Box |
| Quick Setup Guide | Follow the instructions for setting up your machine and installing the drivers and software for the operating system and connection type you are using. | Printed / In the Box |
| User's Guide | Learn the print operations and how to replace supplies and perform routine maintenance. See troubleshooting tips. | For USA:PDF file / Brother Solutions Center at http://solutions.brother.com/For Other Countries: (Windows®)PDF file / CD-ROM / In the Box (Macintosh)PDF file / Brother Solutions Center at http://solutions.brother.com/ |
| Network User's Guide | This Guide provides useful information about wired and wireless network settings and security settings using the Brother machine. You can also find supported protocol information for your machine and detailed troubleshooting tips. | For USA:HTML file / Brother Solutions Center at http://solutions.brother.com/For Other Countries: (Windows®)HTML file / CD-ROM / In the Box (Macintosh)HTML file / Brother Solutions Center at http://solutions.brother.com/ |
| Google Cloud Print Guide | This Guide provides information about how to configure your Brother machine to a Google account and use Google Cloud Print services for printing over the Internet. | PDF file / Brother Solutions Center at http://solutions.brother.com/ |
| Mobile Print/Scan Guide for Brother iPrint&Scan | This Guide provides useful information about printing from your mobile device and scanning from your Brother machine to your mobile device when connected on a Wi-Fi network. | PDF file / Brother Solutions Center at http://solutions.brother.com/ |
| Web Connect Guide | This Guide provides information about how to configure and use your Brother machine to load and view images and files on certain websites that provide these services. | PDF file / Brother Solutions Center at http://solutions.brother.com/ |
Using the documentation
Thank you for buying a Brother machine! Reading the documentation will help you make the most of your machine.
Symbols and conventions used in the documentation
The following symbols and conventions are used throughout the documentation:
WARNING
WARNING indicates a potentially hazardous situation which, if not avoided, could result in death or serious injuries.
IMPORTANT
IMPORTANT indicates a potentially hazardous situation which, if not avoided, may result in damage to property or loss of product functionality.
NOTE
Notes tell you how to respond to a situation that may arise or give tips about how the operation works with other features.
4
Electrical Hazard icons alert you to possible electrical shocks.
Fire Hazard icons alert you to the possibility of a fire.
Hot Surface icons warn you not to touch machine parts that are hot.
Prohibition icons indicate actions that must not be performed.
Bold
Bold style identifies buttons on the machine's Touchpanel or computer screen. Italicized style emphasizes an important point or refers you to a related topic.
Italics
Courier New font identifies the messages shown on the Touchscreen of the machine.
Courier New
Accessing Brother Utilities (Windows®)
Brother Utilities is an application launcher that offers convenient access to all Brother applications installed on your device.
1 (Windows XP, Windows Vista and Windows 7, Windows Server 2003, Windows Server 2008 and Windows Server 2008 R2)
Click (Start) > All Programs > Brother > Brother Utilities.
(Windows® 8 and Windows Server® 2012)
Tap or click (Brother Utilities) either on the Start screen or the desktop.
(Windows® 8.1 and Windows Server® 2012 R2)
Move your mouse to the lower left corner of the Start screen and click (if you are using a touch-based device, swipe up from the bottom of the Start screen to display the Apps screen). When the Apps screen appears, tap or click (Brother Utilities).
2 Select your machine.
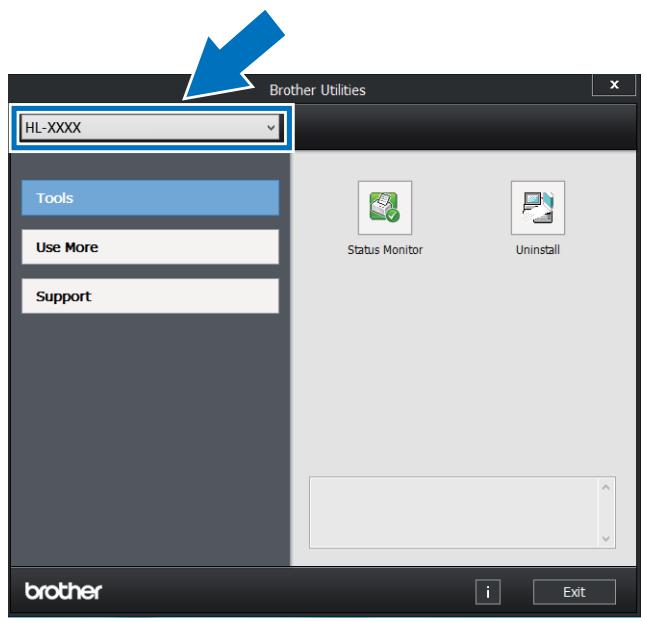
Choose the operation you want to use.
Table of Contents
1 Printing Methods
1
About this Machine 1
Front view and Back view 1
Acceptable paper and other print media. 2
Recommended paper and print media 2
Paper type and size 2
Handling and using special paper 4
Unprintable area when printing from a computer 7
Loading paper. 8
Loading paper and print media 8
Loading paper in the standard paper tray and the optional lower tray 8
Loading paper in the multi-purpose tray (MP tray) 12
2-sided printing 20
Guidelines for printing on both sides of the paper 20
Automatic 2-sided printing 21
Manual 2-sided printing 23
Printing from a USB flash drive or digital camera supporting mass storage. 24
Creating a PRN file for direct printing 25
Printing directly from the USB flash drive or digital camera supporting mass storage 26
2 Driver and Software
29
Printer driver 29
Printing a document. 30
Printer driver settings 31
Windows 32
Accessing the printer driver settings 32
Features in the Windows® printer driver 33
Basic tab 33
Advanced tab. 41
Print Profiles tab 50
Device Settings tab. 52
Support 53
BR-Script 3 printer driver features (PostScript® 3™ language emulation) .....55
Uninstalling the printer driver 63
Status Monitor 64
Macintosh 66
Features in the printer driver (Macintosh) 66
Choosing page setup options 66
Features in the BR-Script3 printer driver (PostScript® 3™ language emulation) 76
Removing the printer driver 81
Status Monitor 82
Software 84
Software for networks 84
3 General Information
85
Control panel overview 85
Touchscreen LCD 86
Basic Operations 88
Settings and features tables 90
Using the Settings Tables 90
Settings Tables 90
Features Table 105
Entering Text 108
Inserting spaces 108
Making corrections 108
Repeating letters 108
Printing Secure documents. 109
Secure documents 109
How to print Secure documents 109
Security features 110
Setting Lock. 110
Secure Function Lock 3.0 111
Active Directory Authentication 112
IPSec 112
Ecology features 113
Toner Save 113
Sleep Time 113
Deep Sleep mode 113
Auto Power Off 114
Quiet mode feature 115
Turning Quiet mode on/off 115
Color Correction 116
Color Calibration 116
Color Registration 117
Auto Correction 117
4 Options
118
Lower tray (LT-325CL). 119
SO-DIMM 120
SO-DIMM types 120
Installing extra memory 121
5 Routine Maintenance 123
Replacing supplies 123
Replacing the toner cartridges 127
Replacing the drum unit 133
Replacing the belt unit 140
Replacing the waste toner box 146
Cleaning and Checking the machine 153
Cleaning the outside of the machine 154
Cleaning the inside of the machine 156
Cleaning the corona wires 160
Cleaning the drum unit 163
Cleaning the paper pick-up roller 169
Replacing periodic maintenance parts 170
Packing and shipping the machine 171
6 Troubleshooting 175
Identifying the problem 175
Error and maintenance messages 176
Paper jams 182
If you are having difficulty with your machine 194
Improving the print quality 198
Machine Information 206
Checking the Serial Number 206
Default settings 206
A Appendix 207
Machine specifications. 207
General 207
Print media 209
Printer 210
Interface 210
Network (LAN) 211
Direct Print feature. 211
Computer requirements 212
Important information for choosing your paper 213
Supplies 214
Important information for the toner cartridge life 215
Brother numbers 217
B Index 220
1 Printing Methods
About this Machine
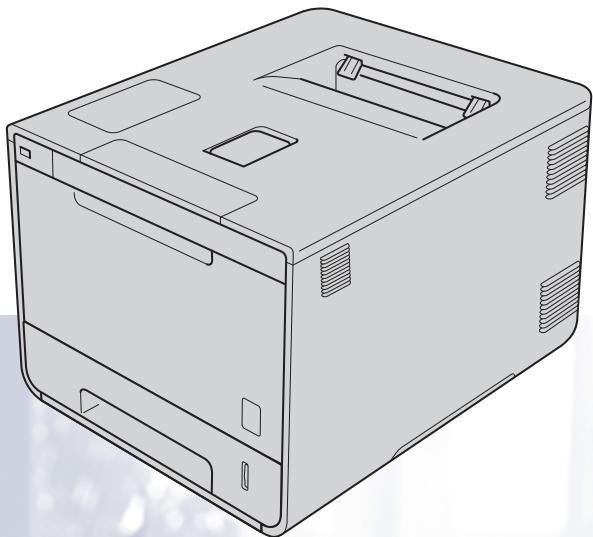
Front view and Back view
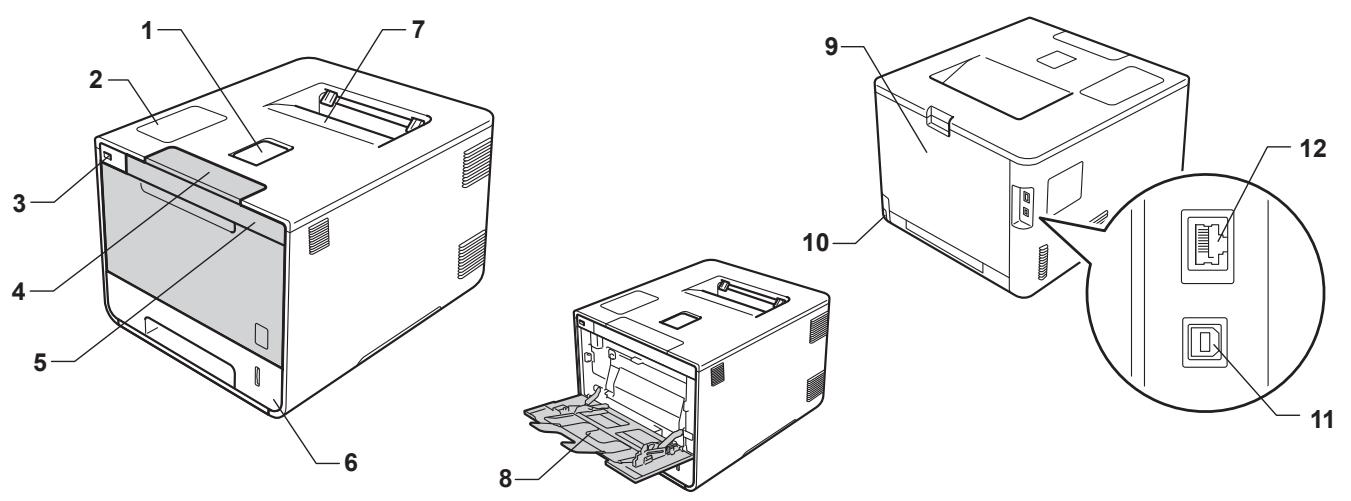
1 Face-down output tray support flap (support flap)
2 Touch panel with a tiltable Touchscreen LCD (Liquid Crystal Display)
3 USB direct print interface
4 Front cover release button
5 Front cover
6 Paper tray
7 Face-down output tray
8 Multi-purpose tray (MP tray)
9 Back cover (Face-up output tray when open)
10 AC power connector
11 USB connector
12 10BASE-T/100BASE-TX port
Acceptable paper and other print media
Print quality may vary according to the type of paper you are using.
You can use the following types of print media: plain paper, thin paper, thick paper, thicker paper, bond paper, recycled paper, labels, envelopes or glossy paper (see Print media on page 209).
For best results, follow the instructions below:
- DO NOT load different types of paper in the paper tray at the same time because it may cause paper jams or misfeeds.
For correct printing, you must choose the same paper size in your software application as the paper in the tray. - Avoid touching the printed surface of the paper immediately after printing.
Before you buy a lot of paper, test a small quantity to make sure that the paper is appropriate for the machine.
Use labels that are designed for use in laser machines.
Recommended paper and print media
| Paper Type | Item |
| Plain Paper | Xerox 4200 20 lb Hammermill Laser Print 24 lb (90 g/m2) |
| Recycled Paper | (No specific brand recommended) |
| Labels | Avery laser labels white #5160 |
| Envelopes | (No specific brand recommended) |
| Glossy Paper | NewPage Futura Laser Gloss 80 lb Text/32 lb Bond (118 g/m2) Xerox Digital Color Elite Gloss |
Paper type and size
The machine feeds paper from the installed standard paper tray, multi-purpose tray or optional lower tray. The names for the paper trays in the printer driver and this Guide are as follows:
| Tray | Name |
| Paper Tray | Tray 1 |
| Optional Lower Tray Unit (Standard equipment for HL-L9200CDWT) | Tray 2 |
| Multi-purpose Tray | MP Tray |
Paper Tray Capacity
| Paper size | Paper types | No. of sheets | |
| Paper Tray (Tray 1) | Letter, A4, Legal, B5 (JIS), Executive, A5, A5 (Long Edge), A6, Folio 1 | Plain Paper, Thin Paper and Recycled Paper | up to 250 sheets 20 lb (80 g/m2) |
| Multi-purpose Tray (MP Tray) | Width: 3.0 to 8.5 in. (76.2 to 215.9 mm) Length: 5 to 14 in. (127 to 355.6 mm) | Plain Paper, Thin Paper, Thick Paper, Thicker Paper, Recycled Paper, Bond Paper, Labels, Envelopes, Env. Thin, Env.Thick and Glossy Paper 2 | up to 50 sheets 20 lb (80 g/m2) 3 Envelopes 1 Glossy paper |
| Optional Lower Tray (Tray 2) 3 | Letter, A4, Legal, B5(JIS), Executive, A5, Folio 1 | Plain Paper, Thin Paper and Recycled Paper | up to 500 sheets 20 lb (80 g/m2) |
1 Folio size is 8.5 in. × 13 in. (215.9 mm x 330.2 mm).
2 Load only one sheet of Glossy in the MP tray.
3 Tray 2 is standard on HL-L9200CDWT.
Recommended paper specifications
The following paper specifications are appropriate for this machine:
| Basis Weight | 20-24 lb (75-90 g/m2) |
| Thickness | 80-110 μm |
| Roughness | Higher than 20 sec. |
| Stiffness | 90-150 cm3/100 |
| Grain Direction | Long Grain |
| Volume Resistivity | 10e9-10e11 ohm |
| Surface Resistivity | 10e9-10e12 ohm-cm |
| Filler | CaCO3(Neutral) |
| Ash Content | Below 23 wt% |
| Brightness | Higher than 80% |
| Opacity | Higher than 85% |
Use plain paper that is appropriate for laser machines to make copies.
Use paper that is 20 to 24 lb (75 to 90g / m^2
Use long grain paper with a neutral Ph value, and a moisture content of approx. 5% .
This machine can use recycled paper that meets DIN 19309 specifications.
(Before you load paper in this machine, see Important information for choosing your paper on page 213.)
Handling and using special paper
The machine is designed to work well with most types of xerographic and bond paper. However, some paper variables may have an effect on print quality or handling reliability. Always test samples of paper before purchasing to ensure desirable performance. Store paper in its original packaging and keep it sealed. Keep the paper flat and away from moisture, direct sunlight and heat.
Some important guidelines when selecting paper are:
■ DO NOT use inkjet paper because it may cause a paper jam or damage your machine.
■ Preprinted paper must use ink that can withstand the temperature of the machine's fusing process 392 °F (200 °C).
If you use bond paper, paper having a rough surface, or paper that is wrinkled or creased, the paper may exhibit degraded performance.
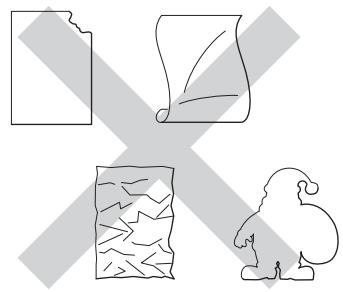
Types of paper to avoid
IMPORTANT
Some types of paper may not perform well or may cause damage to your machine.
DO NOT use paper:
- that is highly textured
- that is extremely smooth or shiny
- that is curled or warped
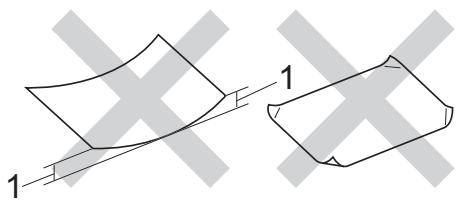
1 A curl of 0.08 in. (2 mm) or greater may cause jams to occur.
- that is coated or has a chemical finish
- that is damaged, creased or folded
- that exceeds the recommended weight specification in this guide
with tabs and staples - with letterheads using low temperature dyes or thermography
- that is multipart or carbonless
- that is designed for inkjet printing
If you use any of the types of paper listed above, they may damage your machine. This damage is not covered under any Brother warranty or service agreement.
Envelopes
Most envelopes can be used with your machine. However, some envelopes may have feed and print-quality problems because of the way they have been made. Envelopes should have edges with straight, well-creased folds. Envelopes should lie flat and not be of baggy or flimsy construction. Use only quality envelopes from a supplier who understands that you will be using the envelopes in a laser machine.
We recommend printing a test envelope to make sure the print results are what you want.
Types of envelopes to avoid
IMPORTANT
DO NOT use envelopes:
- that are damaged, curled, wrinkled or an unusual shape
- that are extremely shiny or textured
- with clasps, staples, snaps or tie strings
with self-adhesive closures - that are of a baggy construction
- that are not sharply creased
- that are embossed (have raised writing on them)
- that were previously printed by a laser printer or LED machine
- that are pre-printed on the inside
- that cannot be arranged neatly when stacked
- that are made of paper that weighs more than the paper weight specifications for the machine
- with edges that are not straight or consistently square
- with windows, holes, cut-outs or perforations
- with glue on the surface as shown in the figure below
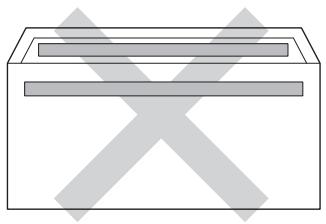
with double flaps as shown in the figure below
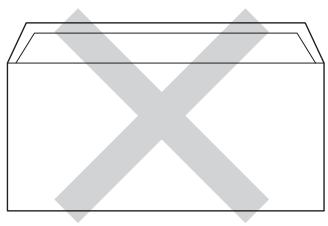
- with sealing flaps that are not folded down when purchased
- with each side folded as shown in the figure below
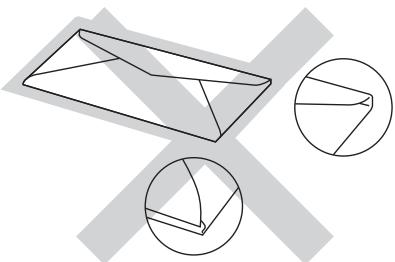
If you use any of the types of envelopes listed above, they may damage your machine. This damage may not be covered under any Brother warranty or service agreement.
Occasionally you may experience paper feed problems caused by the thickness, size and flap shape of the envelopes you are using.
Labels
Most labels can be used with your machine. Labels should have an adhesive that is acrylic-based since this material is more stable at the high temperatures in the fuser unit. Adhesives should not come in contact with any part of the machine, because the label stock may stick to the drum unit or rollers and cause jams and print quality problems. No adhesive should be exposed between the labels. Labels should be arranged so that they cover the entire length and width of the sheet. Using labels with spaces may result in labels peeling off and causing serious jams or print problems.
All labels used in this machine must be able to withstand a temperature of 392^ (200^) for a period of 0.1 seconds.
Types of labels to avoid
Do not use labels that are damaged, curled, wrinkled or an unusual shape.
IMPORTANT
- DO NOT feed partially used label sheets or labels with the carrier sheet exposed because your machine will be damaged.
- DO NOT reuse or insert labels that have been used previously or are missing a few labels on the sheet.
- Label sheets should not exceed the paper weight specifications described in this User's Guide. Labels exceeding this specification may not feed or print correctly and may cause damage to your machine.
Unprintable area when printing from a computer
The figures below show maximum unprintable areas. The unprintable areas may vary depending on the paper size or settings in the application you are using.
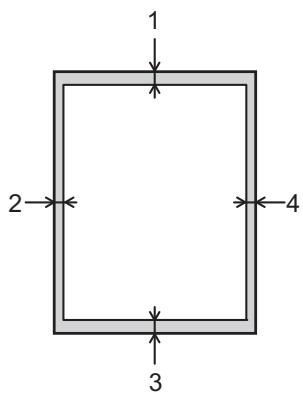
| Usage | Document Size | Top (1) Bottom (3) | Left (2) Right (4) |
| Letter | 0.16 in. (4.23 mm) | 0.16 in. (4.23 mm) | |
| A4 | 0.16 in. (4.23 mm) | 0.16 in. (4.23 mm) | |
| Legal | 0.16 in. (4.23 mm) | 0.16 in. (4.23 mm) |
Loading paper
Loading paper and print media
The machine can feed paper from the standard paper tray, multi-purpose tray or optional lower tray.
When you load paper into the paper tray, note the following:
If your application software supports paper size selection on the print menu, you can select it through the software. If your application software does not support it, you can set the paper size in the printer driver or by pressing the buttons on the Touchscreen.
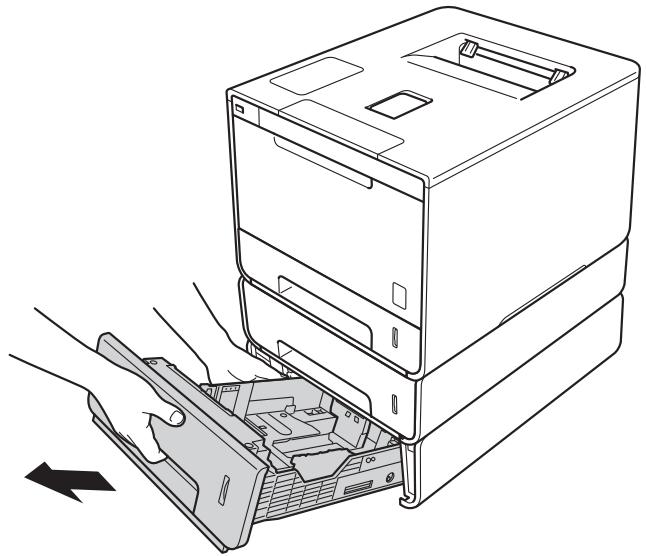
Loading paper in the standard paper tray and the optional lower tray
Load up to 250 sheets of paper in the standard paper tray (Tray 1). You can also load up to 500 sheets in the optional lower tray (Tray 2) ^1 . Paper can be loaded up to the maximum paper mark ( ) on the right side of the paper tray. (For the recommended paper to use, see Acceptable paper and other print media on page 2.)
1 Tray 2 is standard on HL-L9200CDWT.
Printing on plain paper, thin paper, or recycled paper from Tray 1 and Tray 2
Pull the paper tray completely out of the machine.
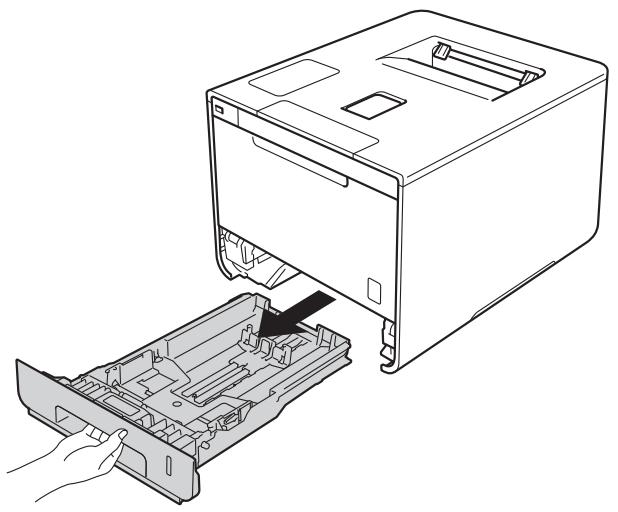
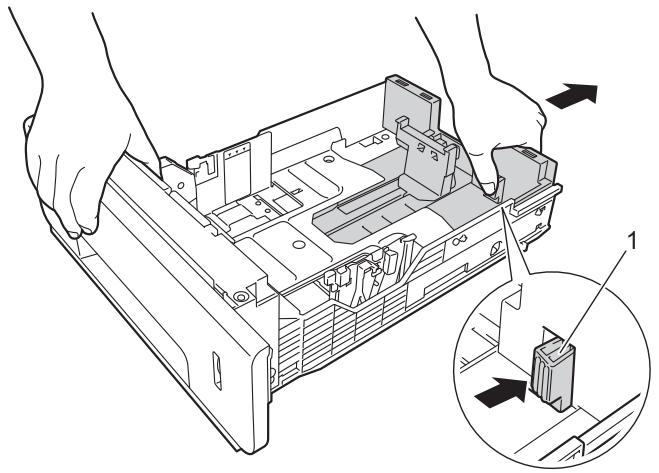
While pressing the blue paper-guide release levers (1), slide the paper guides to fit the size of paper you are loading in the tray. Make sure that the guides are firmly in the slots.
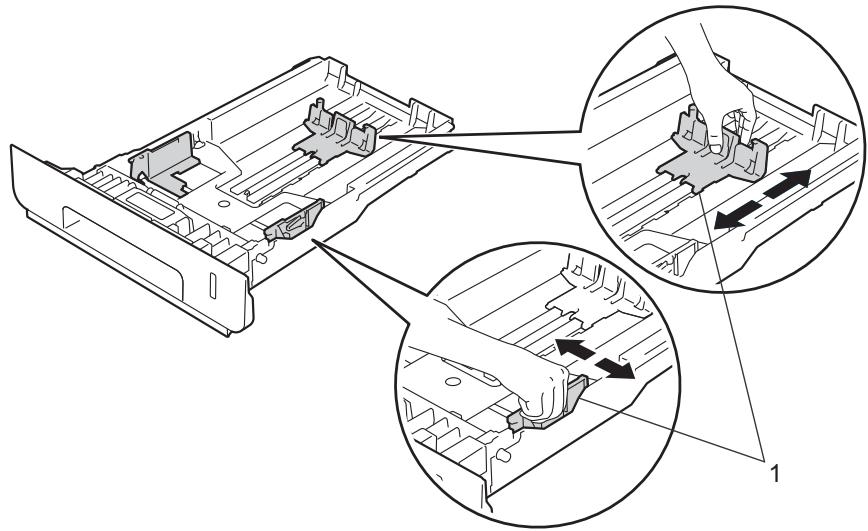
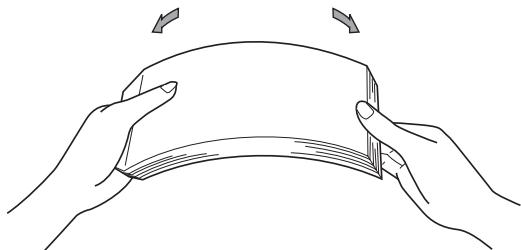
Fan the stack of paper well to avoid paper jams and misfeeds.
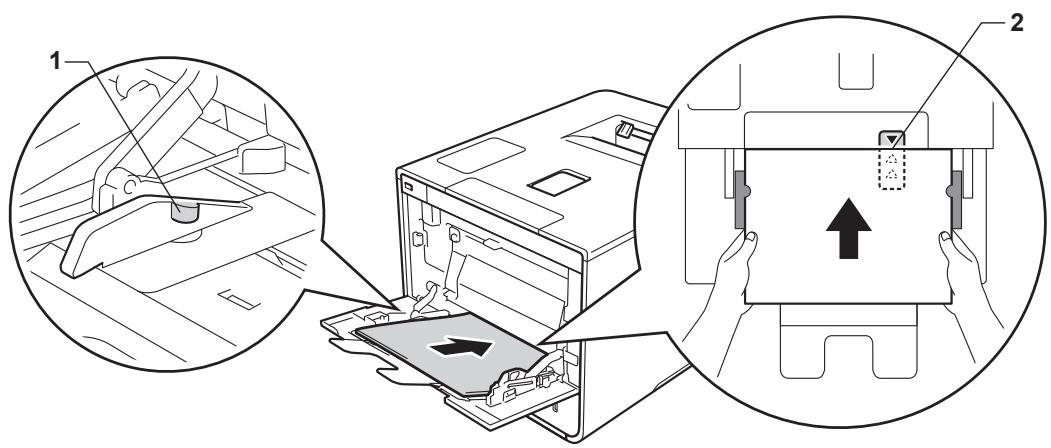
4 Load paper in the tray and make sure:
The paper is below the maximum paper mark ( ) (1).
Over filling the paper tray will cause paper jams.
The side to be printed on is face down.
The paper guides touch the sides of the paper so it will feed correctly.
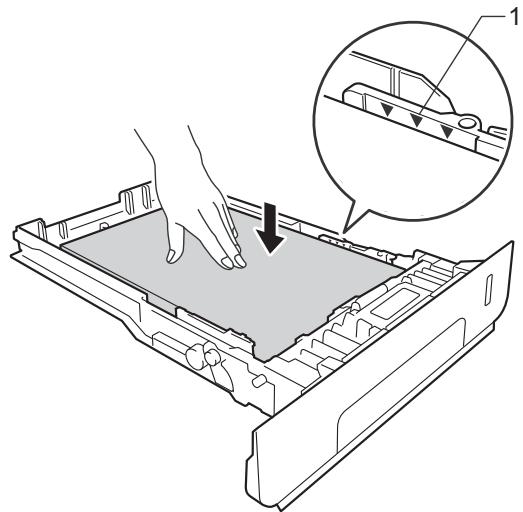
Put the paper tray firmly back in the machine. Make sure that it is completely inserted into the machine.
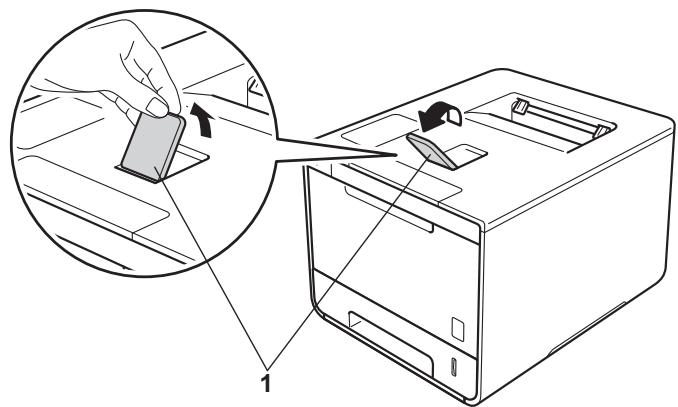
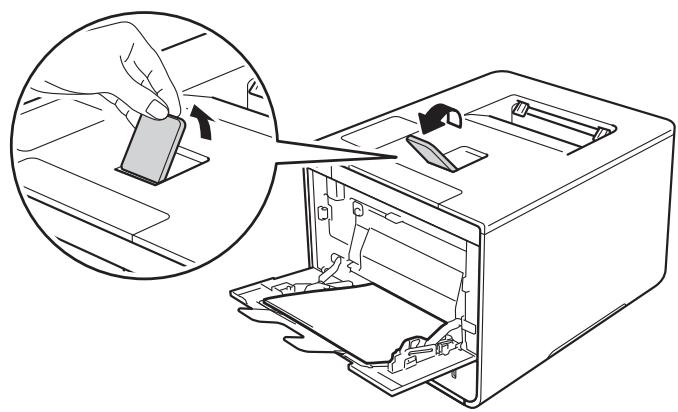
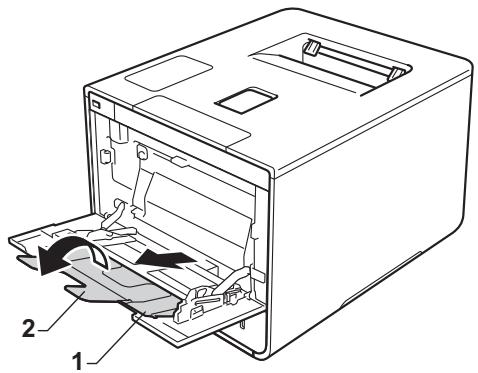
6 Lift up the support flap (1) to prevent paper from sliding off the face-down output tray, or remove each page as soon as it comes out of the machine.

Change the printer driver settings for your operating system (for details, see Chapter 2: Driver and Software).
Choose the option you want from each of the following drop-down lists (for more information on acceptable paper sizes and types, see Paper type and size on page 2.):
Paper Size
A4
Letter
Legal
Executive
A5
JIS B5
Folio
A5 Long Edge
A6
For the acceptable paper sizes, see Paper type and size on page 2.
Media Type
Plain Paper
Thin Paper
Recycled Paper
Paper Source
Tray1
Tray2 (if available)
For other settings, see Chapter 2: Driver and Software.
NOTE
The name of options in the drop-down lists may vary depending on your operating system and its version.

Send the print job to the machine.
Loading paper in the multi-purpose tray (MP tray)
You can load up to three envelopes, one sheet of glossy paper, other special print media, or up to 50 sheets of plain paper in the MP tray. Use this tray to print on thick paper, bond paper, labels, envelopes or glossy paper. (For the recommended paper to use, see Acceptable paper and other print media on page 2.)
Printing on plain paper, thin paper, recycled paper, bond paper, or glossy paper from the MP tray
1 Open the MP tray and lower it gently.

Pull out the MP tray support (1) and unfold the flap (2).
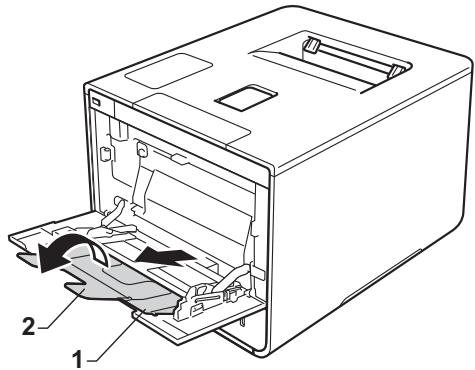
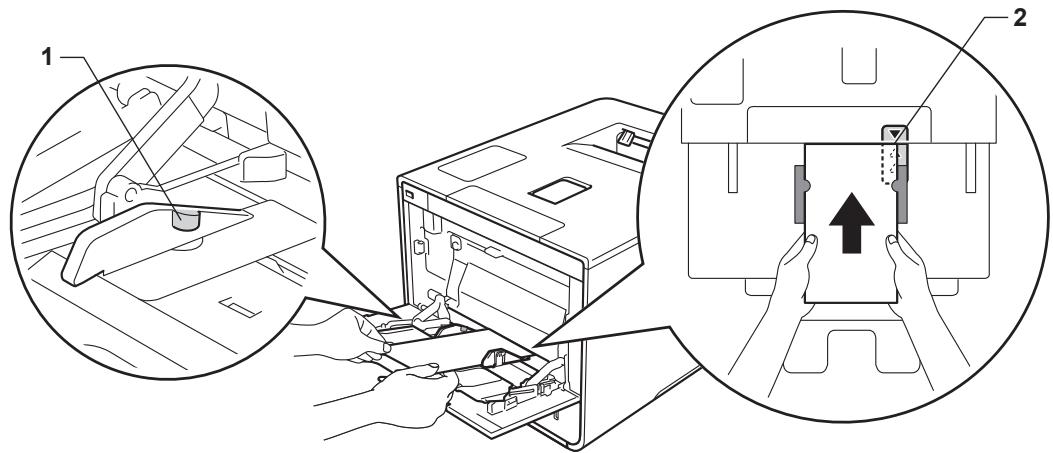
3 Load paper in the MP tray, making sure:
The paper stays under the maximum paper tab (1).
The paper's leading edge (top of paper) is positioned between the and arrows (2).
The side to be printed on must be face up with the leading edge in first.
The paper guides touch the sides of the paper so it will feed properly.
NOTE
When you are using glossy paper, load only one sheet at a time in the MP tray to avoid a paper jam.
4 Lift up the support flap to prevent paper from sliding off the face-down output tray, or remove each page as soon as it comes out of the machine.
Change the printer driver settings for your operating system (for details, see Chapter 2: Driver and Software).
Choose the option you want from each of the following drop-down lists (for more information on acceptable paper sizes and types, see Paper type and size on page 2.):
Paper Size
A4
Letter
Legal
Executive
A5
A5 Long Edge
A6
B5
JIS B5
3x5
Folio
Customized paper size
1 You can define your original paper size by choosing User Defined... in Windows® printer driver, PostScript Custom Page Size in BR-Script printer driver for Windows®, or Manage Custom Sizes... in Macintosh printer drivers.
For the acceptable paper sizes, see Paper type and size on page 2.
Media Type
Plain Paper
Thin Paper
Recycled Paper
Bond Paper
Glossy Paper
Paper Source
MP Tray
For other settings, see Chapter 2: Driver and Software.
NOTE
The names of options in the drop-down lists may vary depending on your operating system and its version.

Send the print job to the machine.
Printing on thick paper, labels and envelopes from the MP tray
When the back cover (face-up output tray) is pulled down, the machine has a straight paper path from the MP tray through to the back of the machine. Use this paper feed and output method when you print on thick paper, labels, or envelopes. (For the recommended paper to use, see Acceptable paper and other print media on page 2 and Envelopes on page 5.)
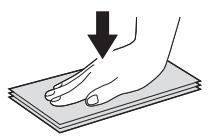
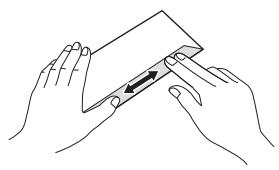
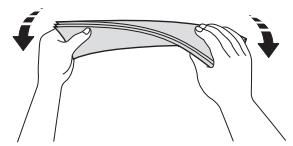
Before loading, press the corners and sides of the envelopes to make them as flat as possible.
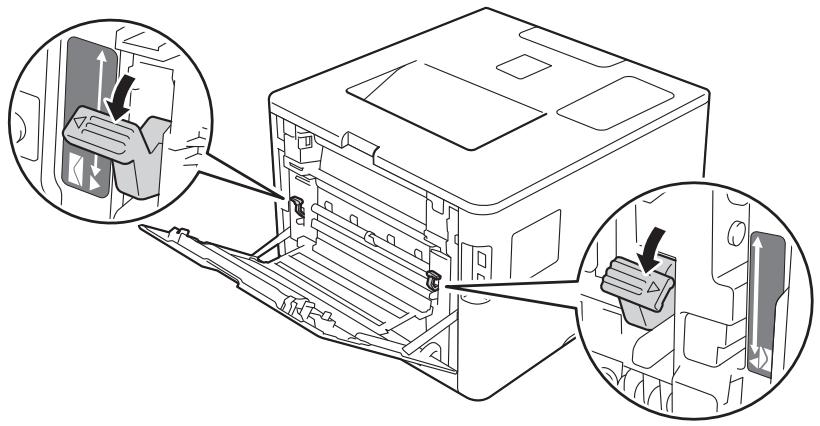
1 Open the back cover (face-up output tray).
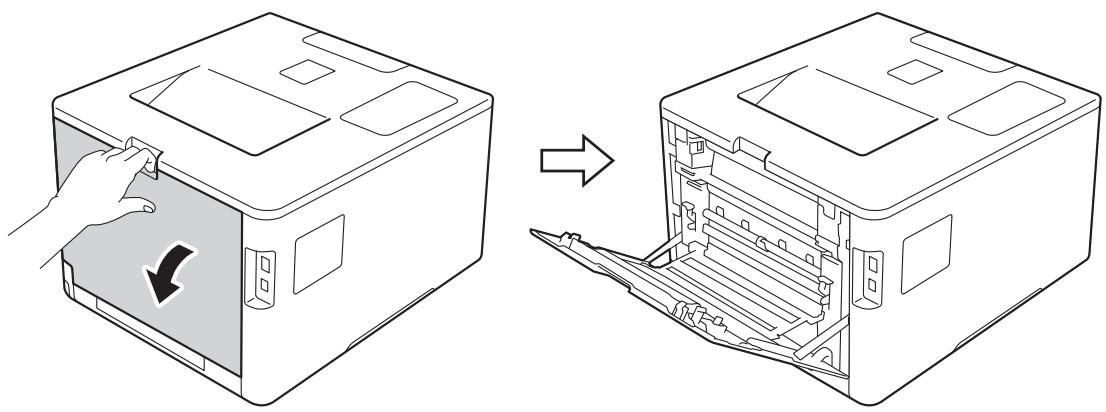
(For printing envelopes only)
Pull down the two gray levers, one on the left side and one on the right side, toward you as shown in the illustration.
3 Open the MP tray and lower it gently.

Pull out the MP tray support (1) and unfold the flap (2).
Load paper, labels, or envelopes in the MP tray, making sure:
The number of envelopes in the MP tray does not exceed three.
The paper, labels or envelopes stay under the maximum paper tab (1).
The paper's leading edge (top of paper) is positioned between the and arrows (2).
The side to be printed on is face up.

Change the printer driver settings for your operating system (for details, see Chapter 2: Driver and Software).
Choose the option you want from each of the following drop-down lists (for more information on acceptable paper sizes and types, see Paper type and size on page 2.):
Paper Size
For printing thick paper or labels
A4
Letter
Legal
Executive
A5
A5 Long Edge
A6
B5
JIS B5
3x5
Folio
Customized paper size
For printing envelopes
Com-10
DL
C5
Monarch
Customized paper size
You can define your original paper size by choosing User Defined... in Windows® printer driver, PostScript Custom Page Size in BR-Script printer driver for Windows®, or Manage Custom Sizes... in Macintosh printer drivers.
For the acceptable paper sizes, see Paper type and size on page 2.
Media Type
For printing thick paper
Thick Paper
Thicker Paper
For printing labels
Label
For printing envelopes
Envelopes
Env. Thin
Env. Thick
Paper Source
MP Tray
For other settings, see Chapter 2: Driver and Software.
NOTE
- The name of options in the drop-down lists may vary depending on your operating system and its version.
- When you use Envelope #10, choose Com-10 (for Windows®) or Envelope #10 (for Macintosh) from the Paper Size drop-down list.
- For other envelopes that are not listed in the printer driver, such as Envelope #9 or Envelope C6, choose User Defined... (for Windows® printer driver), PostScript Custom Page Size (for BR-Script printer driver for Windows®), or Manage Custom Sizes... (for Macintosh printer driver).
7 Send the print job to the machine.
NOTE
- Remove each envelope as soon as it has been printed. Stacking the envelopes may cause them to jam or curl.
- If envelopes or thick paper get smudged during printing, set the Media Type to Env. Thick or Thicker Paper to increase the fixing temperature.
- If the envelopes are creased after they are printed, see Improving the print quality on page 198.
- If your thick paper curls during printing, load only one sheet at a time in the MP tray.
- Envelope joints that are sealed by the manufacturer should be secure.
- All sides of the envelope should be properly folded without wrinkles or creases.
Printing Methods
(For printing envelopes only)
When you have finished printing, reset the two gray levers that you pulled down in step ② back to their original positions.
9 Close the back cover (face-up output tray).
2-sided printing
The supplied printer drivers all enable 2-sided printing.
Guidelines for printing on both sides of the paper
If the paper is thin, it may wrinkle.
If paper is curled, straighten it and put it back in the paper tray. If the paper continues to curl, replace the paper.
If the paper is not feeding correctly, it may be curled. Remove the paper and straighten it. If the paper continues to curl, replace the paper.
■ When you use the manual 2-sided setting, it is possible that there may be paper jams or poor print quality. (If the paper jams, see Paper jams on page 182. If you have a print quality problem, see Improving the print quality on page 198.)
NOTE
Make sure that the paper tray is completely inserted in the machine.
Automatic 2-sided printing
If you are using the Macintosh Printer Driver, see 2-sided Printing on page 75.
Automatic 2-sided printing using the Windows® printer driver
1 Change the printer driver settings for your operating system (for details, see Chapter 2: Driver and Software).
Choose the option you want from each of the following drop-down lists (for more information on acceptable paper sizes and types, see Paper type and size on page 2.):
Paper Size
Letter
Legal
Folio
Media Type
Plain Paper
Recycled Paper
Thin Paper
Glossy Paper (MP Tray only)
Paper Source
Tray1
MP Tray
Tray2 (if available)
2-sided / Booklet
2-sided
2-sided Type in 2-sided Settings
There are four options for each orientation (see 2-sided / Booklet on page 38).
■ Binding Offset in 2-sided Settings
Specify the offset for binding (see 2-sided / Booklet on page 38).
NOTE
- Do not use bond paper.
- The name of options in the drop-down lists may vary depending on your operating system and its version.
For other settings, see Chapter 2: Driver and Software.
2 Send the print job to the machine. The machine will print on both sides of the paper automatically.
Automatic 2-sided printing using the BR-Script printer driver for Windows®

Change the printer driver settings for your operating system (for details, see Chapter 2: Driver and Software).
Choose the option you want from each of the following drop-down lists (for more information on acceptable paper sizes and types, see Paper type and size on page 2.):
Paper Size
Letter
Legal
Folio
Media Type
Plain Paper
Recycled Paper
Thin Paper
Glossy Paper (MP Tray only)
■ Paper Source
Tray1
MP Tray
Tray2 (if available)
■ Print on Both Sides
Flip on Short Edge
Flip on Long Edge
Page Order
Front to Back
Back to Front
NOTE
- Do not use bond paper.
- The name of options in the drop-down lists may vary depending on your operating system and its version.
For other settings, see Chapter 2: Driver and Software.

Send the print job to the machine. The machine will print on both sides of the paper automatically.
Manual 2-sided printing
The BR-Script printer driver for Windows® does not support manual 2-sided printing. If you are using the Macintosh Printer Driver, see Manual 2-sided Printing on page 75.
Manual 2-sided printing using the Windows® printer driver
1 Change the printer driver settings for your operating system (for details, see Chapter 2: Driver and Software).
Choose the option you want from each of the following drop-down lists (for more information on acceptable paper sizes and types, see Paper type and size on page 2.):
Paper Size
You can use all the paper sizes specified for the tray you are using.
Media Type
You can use all the media types that are specified for the tray you are using, except envelopes and labels, which have only one print side.
Paper Source
Tray1
MP Tray
Tray2 (if available)
2-sided / Booklet
2-sided (Manual)
2-sided Type in 2-sided Settings
There are four options for each orientation (see 2-sided / Booklet on page 38).
■ Binding Offset in 2-sided Settings
Specify the offset for binding (see 2-sided / Booklet on page 38).
For other settings, see Chapter 2: Driver and Software.
2 Send the print job to the machine. The machine will print all the even-numbered pages on one side of the paper first. Then, the Windows® driver instructs you (with a pop-up message) to reinsert the paper to print the odd-numbered pages.
NOTE
Before reinserting the paper, straighten it well, or you may get a paper jam. Very thin or thick paper is not recommended.
Printing from a USB flash drive or digital camera supporting mass storage
With the Direct Print feature, you do not need a computer for printing. You can print by just plugging your USB flash drive into the machine's USB direct interface. You can also connect and print directly from a camera set to USB mass storage mode.
You can use a USB flash drive that has the following specifications:
| USB Class | USB Mass Storage Class |
| USB Mass Storage Sub Class | SCSI or SFF-8070i |
| Transfer protocol | Bulk transfer Only |
| Format1 | FAT12/FAT16/FAT32 |
| Sector size | Max. 4096 Byte |
| Encryption | Encrypted devices are not supported. |
1 NTFS format is not supported.
NOTE
- Some USB flash drives may not work with the machine.
- If your camera is in PictBridge mode, you cannot print from it. See the documentation supplied with your camera to switch from PictBridge mode to mass storage mode.
Creating a PRN file for direct printing
NOTE
The screens in this section may vary depending on your application and operating system.
From the menu bar of an application, click File, then Print.
Choose Brother HL-XXXX Printer (1) and check the Print to file box (2). Click Print.
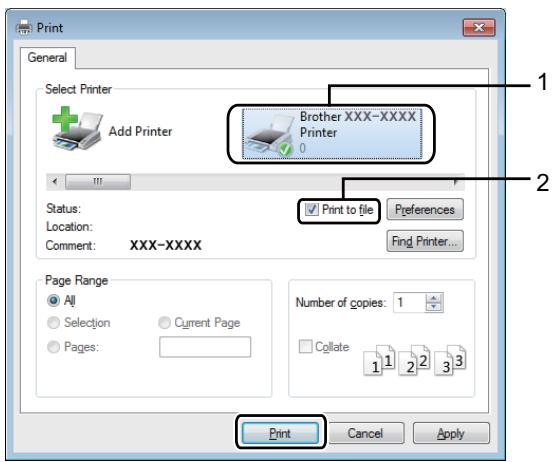
3 Choose the folder you want to save the file to and type the file name if prompted.
If you are prompted for a file name only, you can also specify the folder you want to save the file in by typing the directory name. For example: C:\Temp\FileName.prn
If a USB flash drive is connected to your computer, you can save the file directly to the USB flash drive.
Printing directly from the USB flash drive or digital camera supporting mass storage
NOTE
- Make sure your digital camera is turned on.
- Your digital camera must be switched from PictBridge mode to mass storage mode.
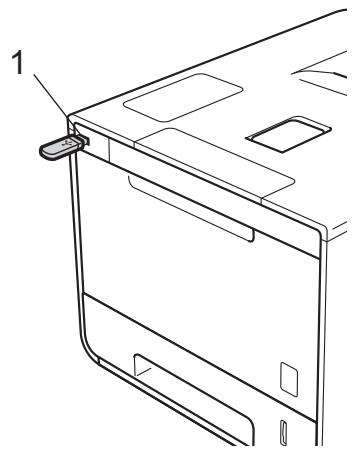
1 Connect your USB flash drive or digital camera to the USB direct interface (1) on the front of the machine. The Touchscreen displays the Checking Device message.
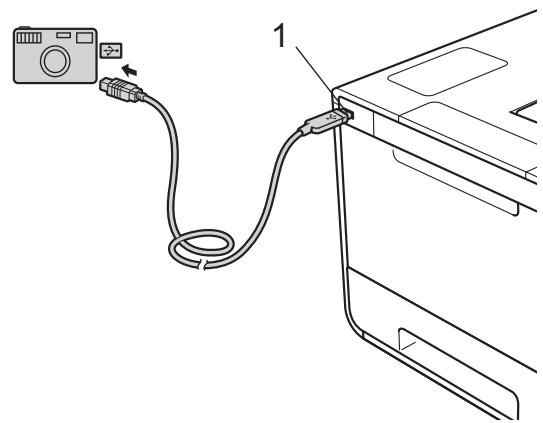
IMPORTANT
- To prevent damage to your machine, DO NOT connect any device other than a digital camera or USB flash drive to the USB direct interface.
NOTE
- If an error occurs, the USB memory menu will not appear on the Touchscreen.
- When the machine is in Deep Sleep mode, the Touchscreen will not display any information even if you connect a USB flash drive to the USB direct interface. Press the Touchscreen to wake up the machine.
- If your machine has been set to Secure Function Lock On, you may not be able to access Direct Print (see the Network User's Guide).
Press or to choose the folder name and file name you want.
If you have selected the folder name, press it. Press or to choose the file name, and then press it.
NOTE
To print an index of the files, press on the Touchscreen. Press Start to start printing.
3 Do one of the following:
To change the current settings, press Options. Go to step 4.
If you do not want to change the current settings, go to step 6.
Press or to display the setting you want to change, and then press it. Press or to select the option you want, and then press it.
NOTE
- You can choose the following settings:
Paper Type
Paper Size
Multiple Page
Orientation
2-sided
Collate
Print Quality
Tray Use
PDF Option
Output Color
- Depending on the file type, some of these settings may not appear.
5 Do one of the following:
To change another setting, repeat step 4.
If you do not want to change other settings, press and go to step 6.
6 Enter the number of copies you want.

Press Start to start printing.
IMPORTANT
- DO NOT remove the USB flash drive or digital camera from the USB direct interface until the machine has finished printing.
NOTE
You can change the default settings for Direct Print by using the Touchscreen when the machine is not in the Direct Print mode. Press Settings, and then Direct Print. (See Direct Print on page 104.)
2 Driver and Software
Printer driver
A printer driver is software that translates data from the format used by a computer to the format that a particular printer needs. Typically, this format is page description language (PDL).
The printer drivers for the supported versions of Windows® and Macintosh are on the CD-ROM we have supplied (Windows® only) or on the Brother Solutions Center website at http://solutions.brother.com/. Install the drivers by following the steps in the Quick Setup Guide. The latest printer drivers can be downloaded from the Brother Solutions Center website at:
http://solutions.brother.com/
For Windows®
Windows® printer driver (the recommended printer driver for this product)
■ BR-Script printer driver (PostScript® 3™ language emulation)
1 Install the driver using the Custom Install from the CD-ROM.
For Macintosh1
Macintosh printer driver (the recommended printer driver for this product)
■ BR-Script printer driver (PostScript® 3™ language emulation) 2
To download the printer driver for Macintosh, please visit your model page at http://solutions.brother.com/.
2 For the installation instruction of the driver, please visit http://solutions.brother.com/.
For Linux® 12
LPR printer driver
CUPS printer driver
For more information and to download the printer driver for Linux, please visit your model page at http://solutions.brother.com/ or use the link on the CD-ROM we have supplied.
2 Depending on Linux distributions, the driver may not be available or it may be released after the initial release of your model.
Printing a document
When the machine receives data from your computer, it begins printing by picking up paper from the paper tray, multi-purpose tray or optional lower tray. The multi-purpose tray can feed many types of paper and envelopes (see Paper Tray Capacity on page 3).
1 From your application, choose the Print command.
If other printer drivers are installed on your computer, choose Brother HL-XXXX series (where XXXX is your model name) as your printer driver from the Print or Print Settings menu in your software application, and then click OK or Print to begin printing.
2 Your computer sends the print job to the machine. The Touchscreen will display Printing.
3 When the machine finishes printing all the jobs, the Touchscreen return to the Home screen.
NOTE
- Select the paper size and orientation in your application software.
- If your application software does not support your custom paper size, choose the next largest paper size.
- Then adjust the print area by changing the right and left margins in your application software.
Printer driver settings
You can change the following printer settings when printing from your computer:
| Windows® printer driver | BR-Script printer driver for Windows® | Macintosh Printer Driver | BR-Script printer driver for Macintosh | |
| Paper Size | ✓ | ✓ | ✓ | ✓ |
| Orientation | ✓ | ✓ | ✓ | ✓ |
| Copies | ✓ | ✓ | ✓ | ✓ |
| Media Type | ✓ | ✓ | ✓ | ✓ |
| Print Quality | ✓ | ✓ | ✓ | ✓ |
| Document Type | ✓ | |||
| Color/Mono | ✓ | ✓ | ✓ | ✓ |
| Multiple Page | ✓ | ✓ | ✓ | ✓ |
| 2-sided1/Booklet2 | ✓ | ✓ | ✓ | ✓ |
| Paper Source | ✓ | ✓ | ✓ | ✓ |
| Scaling | ✓ | ✓ | ✓ | ✓ |
| Reverse Print | ✓ | ✓ | ✓ | |
| Use Watermark | ✓ | |||
| Header-Footer Print | ✓ | |||
| Toner Save Mode | ✓ | ✓ | ✓ | ✓ |
| Secure Print | ✓ | ✓ | ✓ | ✓ |
| Administrator | ✓ | |||
| User Authentication | ✓ | |||
| Color Calibration | ✓ | |||
| Sleep Time | ✓ | ✓ | ✓ | ✓ |
| Improve Print Output | ✓ | ✓ | ✓ | ✓ |
| Skip Blank Page | ✓ | ✓ | ||
| Print Text in Black | ✓ | |||
| Print Archive | ✓ | |||
| Print Profile | ✓ |
1 Manual 2-sided printing is not available with the BR-Script printer driver for Windows®.
2 Booklet is not available with the Macintosh printer driver and the BR-Script printer driver for Macintosh.
Windows®
Accessing the printer driver settings
1 (For Windows® XP and Windows Server® 2003)
Click Start > Printers and Faxes.
(For Windows Vista® and Windows Server® 2008)
Click the (Start) button > Control Panel > Hardware and Sound > Printers.
(For Windows® 7 and Windows Server® 2008 R2)
Click the (Start) button > Devices and Printers.
(For Windows® 8 and Windows Server® 2012)
Move your mouse to the lower right corner of your desktop. When the menu bar appears, click Settings > Control Panel. In the Hardware and Sound (Hardware) group, click View devices and printers.
(For Windows Server® 2012 R2)
Click Control Panel on the Start screen. In the Hardware group, click View devices and printers.
Right-click the Brother HL-XXXX series icon (where XXXX is your model name) and select Printer properties (Properties), and Brother HL-XXXX series if needed. The printer properties dialog box appears.
3 Click the General tab, and then click Preferences... (Printing Preferences...). To configure the tray settings, click the Device Settings tab.
Features in the Windows® printer driver
For more information, see the Help text in the printer driver.
NOTE
- The screens in this section are from Windows® 7. The screens on your computer will vary depending on your operating system.
To access the printer driver settings, see Accessing the printer driver settings on page 32. - For HL-L9200CDWT users, please read HL-L9200CDW as HL-L9200CDWT.
Basic tab
Chanme Layout settings by clicking the illustration on the left side of the Basic tab.
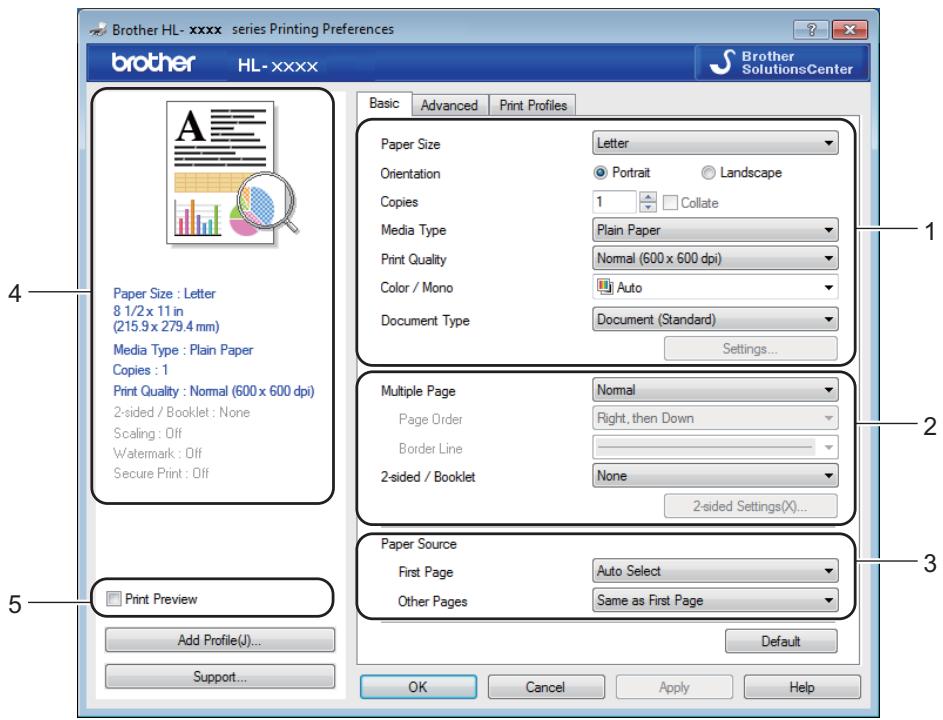
Choose the Paper Size, Orientation, Copies, Media Type, Print Quality, Color / Mono and Document Type (1).
Choose Multiple Page and 2-sided / Booklet (2).
Choose the Paper Source (3).
4 Review the displayed list of settings (4).
5 Click OK to confirm the settings. To return to the default settings, click Default, then OK.
NOTE
To preview your document before printing, select the Print Preview check box (5).
Paper Size
From the drop-down list choose the Paper Size you are using.
Orientation
Orientation selects the position of how your document will be printed (Portrait or Landscape).
| Portrait (Vertical) | Landscape (Horizontal) |
| A | A |
Copies
Click or to enter the number of copies to be printed.
Collate
With the Collate check box selected, one complete copy of your document will be printed and then repeated for the number of copies you selected. If the Collate check box is not selected, then each page will be printed for all the copies before the next page of the document is printed.

Collate selected
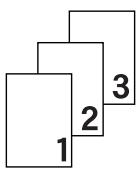
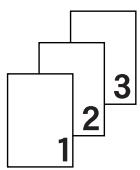
Collate cleared
Media Type
You can use the following types of media in your machine. For the best print quality, select the type of media that matches the paper you are using.
Plain Paper
Thin Paper
Thick Paper
Thicker Paper
Bond Paper
Envelopes
Env. Thick
Env. Thin
Recycled Paper
Label
Glossy Paper
NOTE
- When using ordinary plain paper 16 to 28 lb (60 to 105g / m^2 ) choose Plain Paper. When using heavier weight paper or rough paper choose Thick Paper or Thicker Paper. For bond paper, choose Bond Paper.
- When using envelopes, choose Envelopes. If the toner is not fixed to the envelope correctly when Envelopes is selected, choose Env. Thick. If the envelope is crumpled when Envelopes is selected, choose Env. Thin. For more information, see Paper Tray Capacity on page 3.
- When Label is selected in the printer driver, the machine will feed the paper from the MP tray, even if MP Tray is not selected as the paper source.
Print Quality
Choose one of the following print quality settings:
Normal (600 x 600 dpi)
600 × 600 dpi. Recommended for ordinary printing. Use this mode for good print quality with reasonable print speeds.
Fine (2400 dpi class)
2400 dpi class. The finest print mode. Use this mode to print precise images such as photographs. Since the print data is much larger than in Normal mode, processing time / data transfer time and print time will be longer.
NOTE
The print speed will change depending on the print quality setting you choose. Higher print quality takes longer to print, while lower print quality takes less time to print.
Color / Mono
You can change the Color/Mono settings in the printer driver as follows:
Auto
The machine checks the content of the document for color. If color is detected anywhere in the document, it will print the whole of the document using all the colors. In other words, it will mix some of the toners to help achieve every shade detected in the document, increasing the density of toner applied to the page. If no color content is detected, it will print the document in monochrome. The default setting on your machine is Auto.
Color
Whether the document contains color or just monochrome, your machine will print the document using all the colors.
Mono
Select Mono if the document has only black and grayscale text and objects. If your document contains color, then selecting Mono means it will print the document in 256 levels of gray using only the black toner.
NOTE
- The machine's color sensor is very sensitive and may perceive faded black text or an off-white background as color. If you know that your document is black and white and you want to conserve color toner, select Mono mode.
- If either the Cyan, Magenta or Yellow toner reaches the end of its life while printing a color document, the print job cannot be completed. You can cancel your print job and choose to start the print job again in Mono mode, as long as Black toner is available.
Document Type
Use Document Type to select the optimal settings for printing the relevant type of data.
Document (Standard)
Use this mode for printing a combination of graphics and text.
Photo / Image
Use this mode for printing photos or images.
Document (Mixed)
Use this mode for printing combinations of graphics/text and photos/images.
NOTE
Choosing Document (Mixed) may take longer to print the document.
Manual
Choosing Manual allows you to select the settings manually by clicking the Settings button.
Settings dialog box
To change the following settings, click Settings... in the Basic tab.
Color Mode
The following options are available in color Matching mode:
Normal
This is the default color mode.
Vivid
The color of all elements are adjusted to become a brighter color.
- Auto
The printer driver selects the Color Mode type.
NOTE
Choosing Auto may take longer to print the data.
- None
Import...
To adjust the print configuration of a particular image, click Settings. When you have finished adjusting the image parameters, such as brightness and contrast, import those settings as a print configuration file. Use the Export... option to create a print configuration file from the current settings.
Export...
To adjust the print configuration of a particular image, click Settings. When you have finished adjusting the image parameters, such as brightness and contrast, export those settings as a print configuration file. Use the Import... option to load a previously exported configuration file.
Improve Gray Color
You can improve the image quality of a shaded area.
Enhance Black Printing
If a black graphic does not print correctly, choose this setting.
Improve Thin Line
You can improve the image quality of thin lines.
Improve Pattern Printing
Select this option if printed fills and patterns are different from the patterns and fills you see on your computer.
Multiple Page
The Multiple Page selection can reduce the image size of a page to allow multiple pages to be printed on one sheet of paper or to enlarge the image size for printing one page on multiple sheets of paper.
Page Order
When the N in 1 option is selected, the page order can be selected from the drop-down list.
Border Line
When using the Multiple Page feature to print multiple pages on one sheet, you can choose to have a solid border, dash border or no border around each page on the sheet.
Print cut-out line
When the 1 in NxN pages option is selected, the Print cut-out line option can be selected. This option allows you to print a faint cut-out line around the printable area.
2-sided / Booklet
To print a booklet or do 2-sided printing, use this option.
None
Disable 2-sided printing.
2-sided / 2-sided (Manual)
To do 2-sided printing, use these options.
2-sided
The machine prints on both sides of the paper automatically.
2-sided (Manual)
The machine prints all the even numbered pages first. Then the printer driver will stop and display the instructions required to reload the paper. When you click OK the odd numbered pages will be printed.
When you choose 2-sided or 2-sided (Manual), the 2-sided Settings... button becomes available to choose. You can choose from the following options in the 2-sided Settings dialog box:
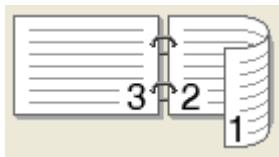
2-sided Type
There are four types of 2-sided binding directions available for each orientation.
Portrait
Long Edge (Left)
Long Edge (Right)
Short Edge (Top)
Short Edge (Bottom)
Landscape
Long Edge (Top)
Long Edge (Bottom)
Short Edge (Right)
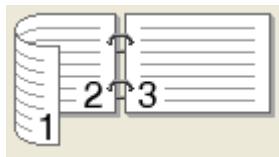
Short Edge (Left)
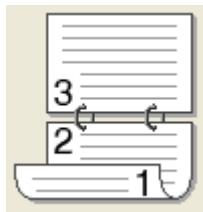
- Binding Offset
When you check Binding Offset, you can also specify the offset for binding in inches or millimeters.
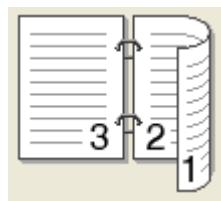
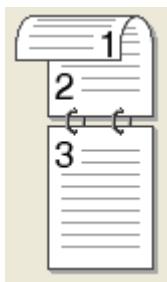
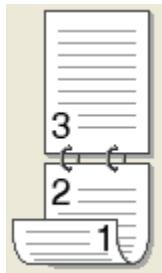
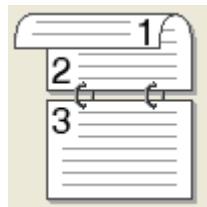
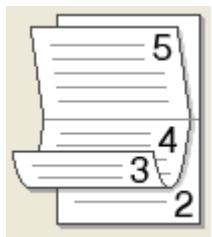
■ Booklet / Booklet (Manual)
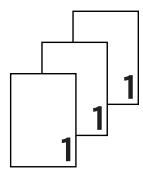
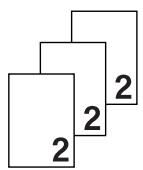
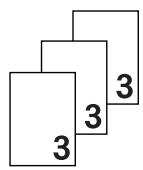
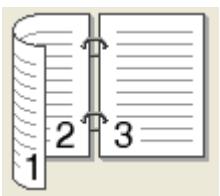
Use this option to print a document in booklet format using 2-sided printing; it will arrange the document according to the correct page number and allow you to fold at the center of the print output without having to change the order of the page numbers.
- Booklet
The machine prints on both sides of the paper automatically.
- Booklet (Manual)
The machine prints all the even numbered sides first. Then the printer driver will stop and display the instructions required to reload the paper. When you click OK the odd numbered sides will be printed.
When you choose Booklet or Booklet (Manual), the 2-sided Settings... button becomes available to choose. You can choose the following settings in the 2-sided Settings dialog box.
2-sided Type
There are two types of 2-sided binding directions available for each orientation.
Portrait
Left Binding
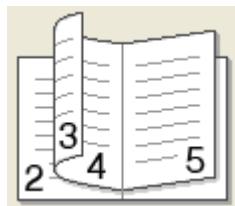
Right Binding
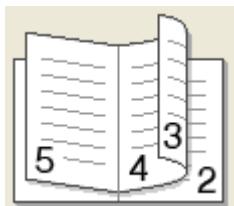
Landscape
Top Binding

Bottom Binding
- Booklet Printing Method
When Divide into Sets is selected:
This option allows you to print the whole booklet in smaller individual booklet sets, and it still allows you to fold at the center of the smaller individual booklet sets without having to change the order of the page numbers. You can specify the number of sheets in each smaller booklet, from 1 to 15. This option is helpful for folding a printed booklet that has a large number of pages.
- Binding Offset
Check Binding Offset to specify the offset for binding in inches or millimeters.
Paper Source
You can choose Auto Select, Tray1, Tray2, ^12 or MP Tray and specify separate trays for printing the first page and for printing from the second page onward.
Available if the optional tray is installed.
2 Tray 2 is standard on HL-L9200CDWT.
Print Preview
Preview a document before it is printed. If you check the Print Preview check box the Print Preview Viewer window will open before printing starts.
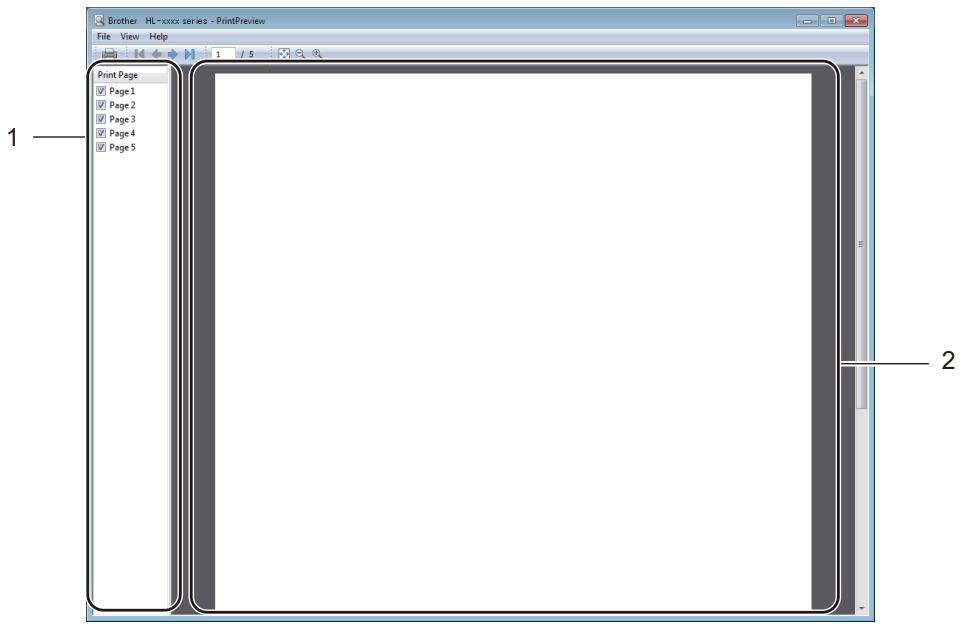
(1) Page List Area
The Page List Area displays the page numbers for the actual pages that will be printed. If you choose a page in this list, a preview of the print results for the page will be displayed in the Preview Area. If you do not want to print a page, clear the check box.
(2) Preview Area
The Preview Area displays a preview of the print results for the pages chosen in the Page List Area.
NOTE
- If the Booklet setting was selected in the Printer driver settings, you cannot use the Print Preview option.
- If the 2-sided setting was selected in the Printer driver settings, you cannot delete pages using the Page List Area.
Advanced tab

Change the tab settings by clicking the following settings:
(1) Scaling
(2) Reverse Print
(3) Use Watermark
(4)Header-Footer Print
(5) Toner Save Mode
(6) Secure Print
(7) Administrator
(8)User Authentication
(9) Other Print Options
Scaling
Select an option to change the scale of the printed image.
Reverse Print
Select Reverse Print to rotate the page 180 degrees.
Use Watermark
Add a logo or text to your document as a watermark. Choose one of the preset Watermarks, or use an image file that you have created. Check Use Watermark, and then click the Settings... button.
Watermark Settings
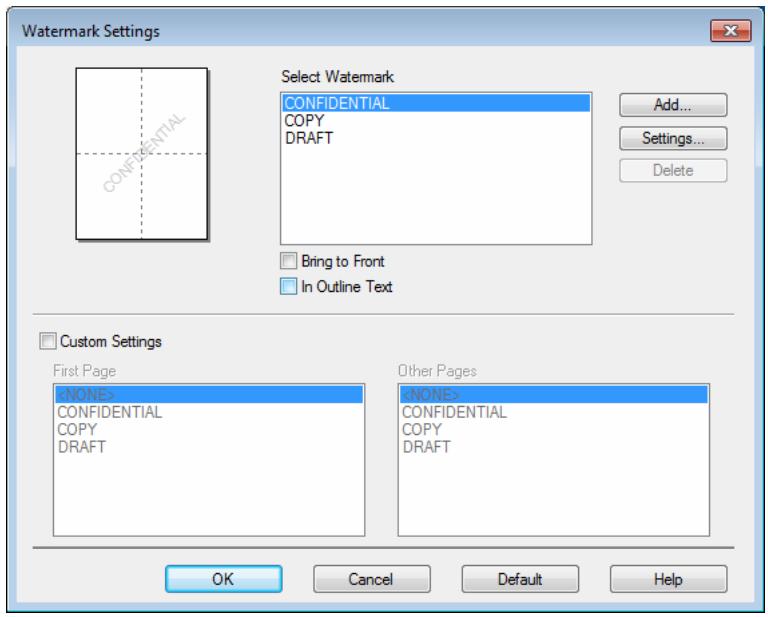
Bring To Front
Select this check box to overlay the selected characters or image onto your printed document.
In Outline Text
Select this check box if you want to print only an an outline of a text watermark.
Custom Settings
Select this check box if you want to print one watermark on the first page and a different watermark on the following pages.
Edit Watermark
Click the Add button to add the watermark settings, and then choose Use Text or Use Image File in Watermark Style.
Title
Type an appropriate title for the watermark.
Text
Type your Watermark Text into the Text box, and then choose the Font, Style, Size and Choose Color....
- Image File
Type the file name and location of the Image File you want to use as the Watermark in File, or click Browse to search for the file. Bitmap, JPEG and PNG file formats are supported. The scaling of the image can be adjusted from 25 - 999%.
- Position
Use this setting to control the position of the watermark on the page.
Header-Footer Print
When this feature is enabled, it will print the date and time on your document from your computer's system clock and the computer login user name or the text you typed. Click Settings to customize.
ID Print
Select Login User Name to print your computer login user name. To print a different name, select Custom and type a name in the Custom text box.
Toner Save Mode
Conserve toner use with this feature. When you set Toner Save Mode to On, print appears lighter. The default setting is Off (unchecked).
NOTE
We do not recommend Toner Save Mode for printing photo or grayscale images.
Secure Print
Secure documents are documents that are password-protected when they are sent to the machine. Only the people who know the password will be able to print them. Since the documents are secured at the machine, you must enter the password using the Touchscreen of the machine to print them.
To send a secured document:
1 Click Settings... from Secure Print and check Secure Print.
2 Enter your password and click OK.
To print a secured document, you must enter your password using the Touchscreen of the machine (see Printing Secure documents on page 109).
To delete a secured document:
You must use the Touchpanel of the machine to delete a secured document (see Printing Secure documents on page 109).
Administrator
Administrators have the authority to limit access to settings such as scaling and watermark.
■ Password
Type the password in this box.
NOTE
Click Set Password... to change the password.
Copies Lock
Select this check box to lock the Copies selection in the Basic tab to prevent users from printing multiple copies.
Multiple Page & Scaling Lock
Select this check box to lock the multiple page and scaling settings.
Color / Mono Lock
Select this check box to lock the Color/Mono settings as Mono to prevent color printing.
Watermark Lock
Select this check box to lock the settings of the Watermark option to prevent changes being made.
Header-Footer Print Lock
Select this check box to lock the settings of the Header-Footer Print option to prevent changes being made.
User Authentication
If you are restricted from using computer to print by the Secure Function Lock feature, you can check your current print status. Click Check Print Status to see your computer login name information, such as the restricted features and the remaining number of pages you are allowed to print when you are using the machine on a network. The Authentication result dialog box appears.
To cause the Authentication result dialog box to open each time you print, select the Show print status before printing check box.
For more information about Secure Function Lock, see the Network User's Guide
Other Print Options
You can set the following in Printer Function:
Color Calibration
Sleep Time
Improve Print Output
Skip Blank Page
■ Print Text in Black
■ Print Archive
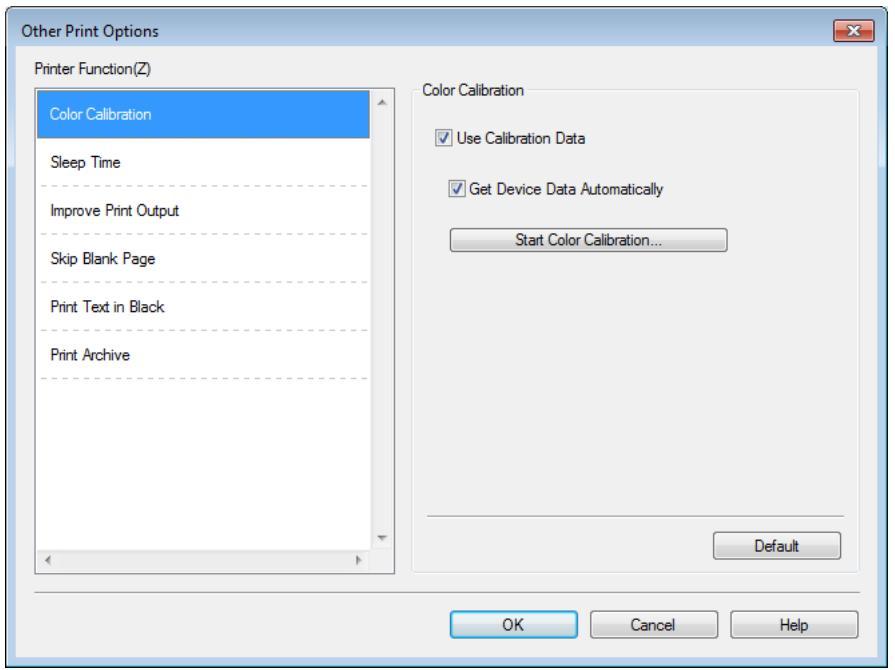
Color Calibration
The output density of each color may vary depending on the temperature and humidity of the machine's environment. This setting helps you improve color density by letting the printer driver use the color calibration data stored in your machine.
Use Calibration Data
If you select this check box, the printer driver will use the calibration data retrieved from the machine to set color matching in the printer driver. This will ensure consistent print quality.
Get Device Data Automatically
If you select this check box, the printer driver will use the color calibration data from your machine.
Start Color Calibration
If you click this button, your machine will start the color calibration process, and then the printer driver will use the calibration data from your machine.
Sleep Time
When the machine does not receive data for a certain period of time, it enters Sleep mode. In Sleep mode, the machine acts as though it were turned off. When you choose Printer Default, the timeout setting will be reset to the specific time set at the factory; this can be altered in the driver. Intelligent Sleep mode adjusts to the most appropriate timeout setting depending on the frequency of your machine use.
While the machine is in Sleep mode, the Touchscreen's backlight turns off, but the machine can still receive data. Receiving a print job will wake up the machine to start printing.
Improve Print Output
This feature allows you to improve a print quality problem.
Reduce Paper Curl
Select this setting to reduce paper curl.
If you are printing only a few pages, you do not have to choose this setting. We recommend changing the printer driver setting in Media Type to a thin setting.
NOTE
This operation will decrease the temperature of the machine's fusing process.
Improve Toner Fixing
Select this setting to improve the toner fixing capabilities. If this selection does not provide enough improvement, change the printer driver setting in Media Type to a thick setting.
NOTE
This operation will increase the temperature of the machine's fusing process.
Skip Blank Page
If Skip Blank Page is selected, the printer driver detects blank pages and excludes them from printing.
NOTE
This option does not work with the following options:
- Use Watermark
- Header-Footer Print
- N in 1 and 1 in NxN Pages in Multiple Page
- 2-sided (Manual), Booklet, Booklet (Manual) and 2-sided with Binding Offset in 2-sided / Booklet
Print Text in Black
Select this option to print all text in Black only.
NOTE
It may not work with certain characters.
Print Archive
A copy of your printout can be saved as a PDF file to your computer. To change the file size, move the File Size slider to the right or left. The resolution is set according to the file size.
NOTE
By enabling this feature, there may be a longer wait before your machine begins printing.
Print Profiles tab
Print Profiles are editable presets designed to give you quick access to frequently used printing configurations.
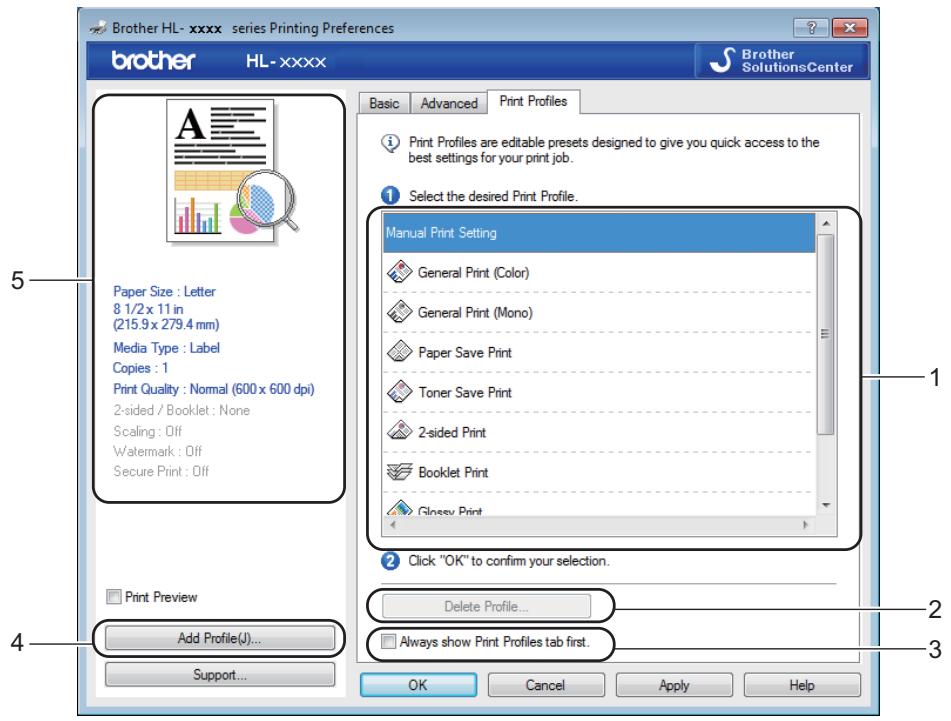
(1) Print profile list box
(2) Delete Profile
(3) Always show Print Profiles tab first
(4) Add Profile
(5) Current print profile view
Choose your profile from the print profile list box.
To display the Print Profiles tab at the front of the window every time you print, click Always show Print Profiles tab first.
3 Click OK to apply your chosen profile.
Add Profile
Click the Add Profile button to display the Add Profile dialog box. Add up to 20 new profiles with your preferred settings.
1 Type a title in Name.
Choose an icon you want to use from the Icon list, then click OK.
The settings shown on the left side of the printer driver window will be saved.
Delete Profile
Click Delete Profile to display the Delete Profile dialog box. You can delete any of the profiles you have added.
Choose your profile from the print profile list box.
2 Click Delete.
The selected profile will be deleted.
Device Settings tab
NOTE
To access the Device Settings tab, see Accessing the printer driver settings on page 32.
You can define the paper size for each paper tray and auto detect the serial number in the Device Settings tab as follows.
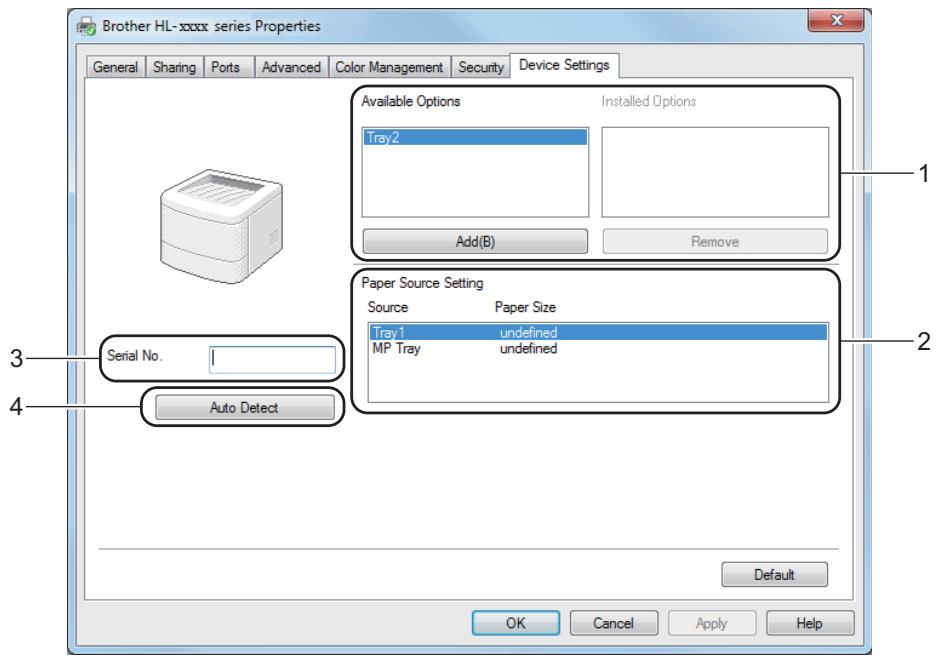
(1) Available Options / Installed Options
You can manually add and remove the options that are installed on the machine. Tray settings will match the installed options.
(2) Paper Source Setting
Click the Auto Detect (4) button to detect and display the machine's serial number and paper size setting for the paper trays.
(3) Serial No.
By clicking Auto Detect (4), the printer driver will probe the machine and display its serial number. If it fails to receive the information, the screen displays "--------".
(4) Auto Detect
The Auto Detect setting finds the currently installed optional devices and displays the available options in the printer driver. When you click Auto Detect, options that are installed on the machine will be listed in Available Options (1). Manually add or remove the options by choosing an optional device you want to add or remove, and then clicking Add or Remove.
NOTE
The Auto Detect (4) setting is not available under the following machine conditions:
- The machine is turned off.
- The machine is in an error state.
- The machine is connected to the print server using a USB cable in a shared network environment.
- The cable is not connected to the machine correctly.
Support
Click Support... in the Printing Preferences dialog box.
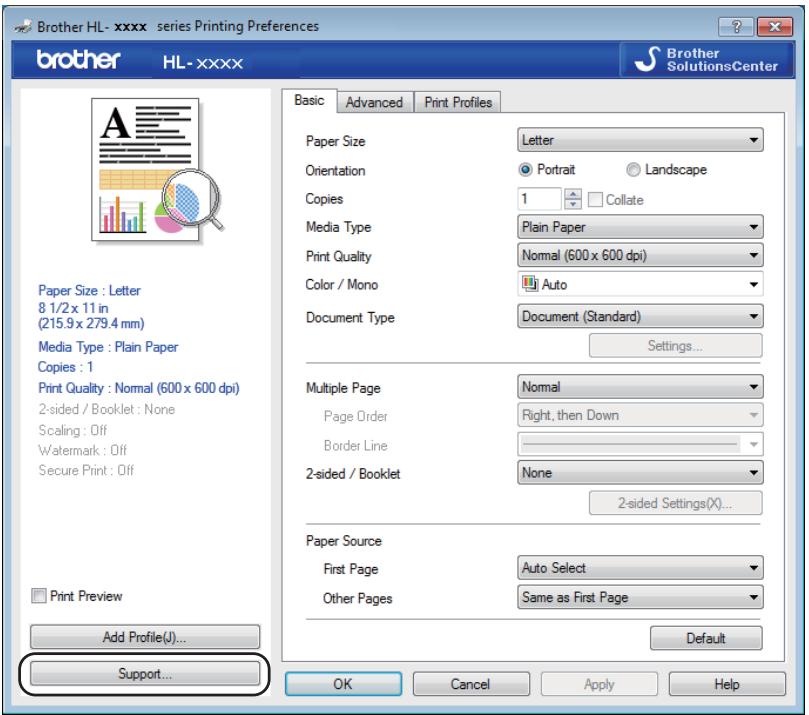
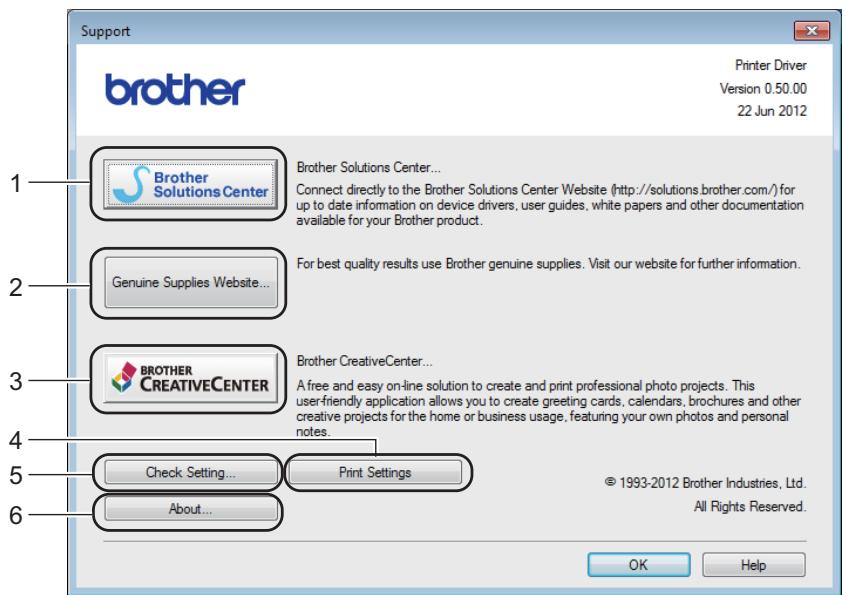
(1) Brother Solutions Center
Click this button to visit the Brother Solutions Center website (http://solutions.brother.com/) for information about your Brother product including FAQs (Frequently Asked Questions), User's Guides, driver updates and tips for using your machine.
(2) Genuine Supplies website
Click this button to visit our website for genuine Brother supplies.
(3) Brother CreativeCenter
Click this button to visit our website for free online solutions for business and home users.
(4) Print Settings
Click this button to print pages that show how the internal settings of the machine have been configured.
(5) Check Setting...
Click this button to check the printer driver settings.
(6) About...
Click this button to view a list of the printer driver files and version information.
BR-Script 3 printer driver features (PostScript® 3™ language emulation)
NOTE
The screens in this section are from Windows® 7. The screens on your computer may vary depending on your operating system.
Printing Preferences
NOTE
To access the Printing Preferences dialog box, click Preferences... in the General tab of the Brother HL-XXXX BR-Script3 Properties dialog box.
■ Layout tab
Change the layout by choosing the settings for Orientation, Print on Both Sides (2-sided), Page Order and Pages per Sheet.

- Orientation
Orientation selects the position of your document on the printed page.
Portrait
Landscape
Rotated Landscape
- Print on Both Sides
To do 2-sided printing, choose Flip on Short Edge or Flip on Long Edge.
Page Order
Specify the order in which the pages of your document will be printed. Front to Back prints the document so that page 1 is on top of the stack. Back to Front prints the document so that page 1 is on the bottom of the stack.
Pages per Sheet
Click Pages per Sheet to reduce the image size of a page by allowing multiple pages to be printed on one sheet of paper. Select Booklet to print a document in the booklet style.
Draw Borders
Select this check box to add a border.
Paper/Quality tab
Choose the Paper Source.
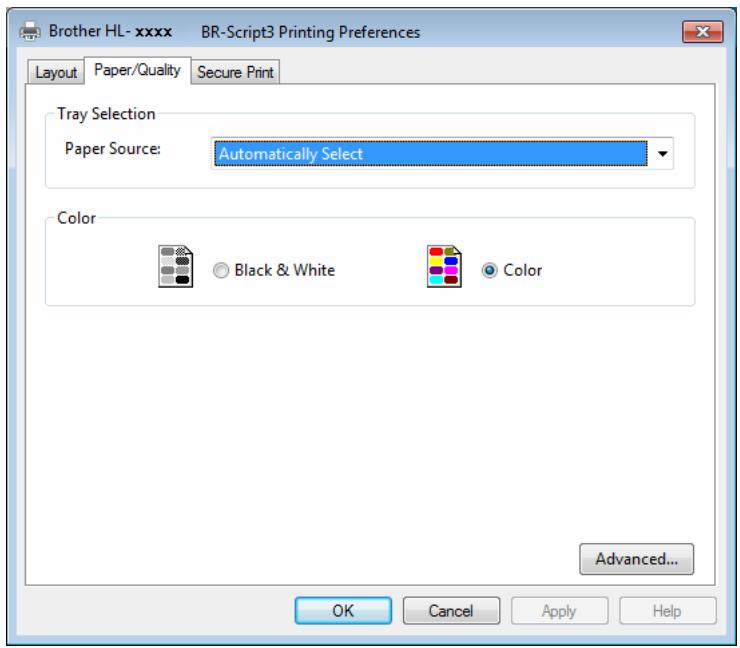
- Paper Source
Automatically Select
Auto Select by Printer
Tray1
Tray2 12
MP Tray
Automatically Select
Select this option to pull paper from any paper source that has a paper size defined in the printer driver that matches your document.
Auto Select by Printer
Select this option to pull paper from any paper source that has a paper size defined in the machine that matches your document.
Tray1
Select this option to pull paper from Tray 1.
Tray2
Select this option to pull paper from Tray 2. (Available if the optional tray is installed.)2
MP Tray
Select this option to pull paper from the multi-purpose tray. The paper size in the multi-purpose tray must match the size defined in the printer driver.
1 Available if the optional tray is installed.
2 Tray 2 is standard on HL-L9200CDWT.
Color
Select either Black & White or Color.
Secure Print tab
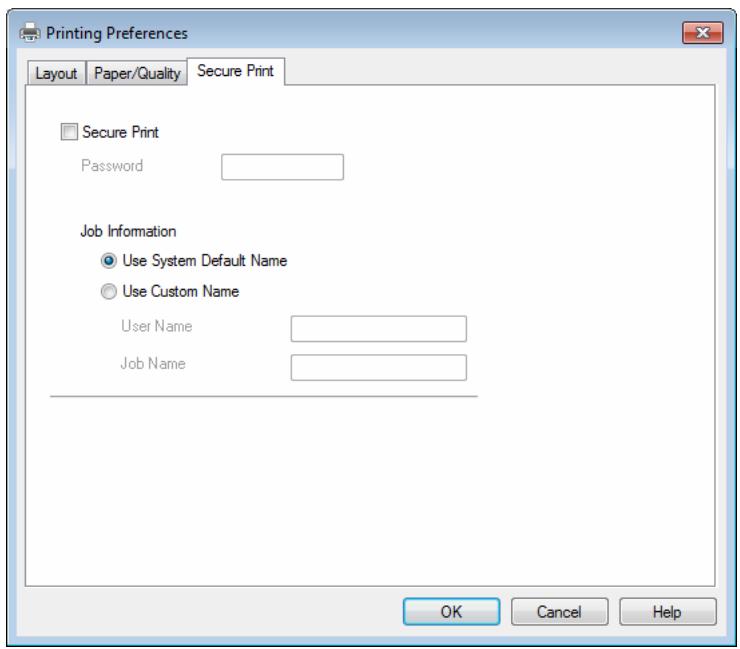
Secure documents are documents that are password protected when they are sent to the machine. Only the people who know the password will be able to print them. Since the documents are secured at the machine, you must enter the password using the Touchscreen of the machine to print them.
To send a secured document:
1 Check Secure Print.
2 Type your password and click OK.
To print the secured document, you must enter your password using the Touchscreen of the machine (see Printing Secure documents on page 109).
To delete a secured document:
You must use the Touchpanel of the machine to delete a secured document (see Printing Secure documents on page 109).
Advanced options
Access the Advanced options by clicking the Advanced... button on the Layout tab or Paper/Quality tab.
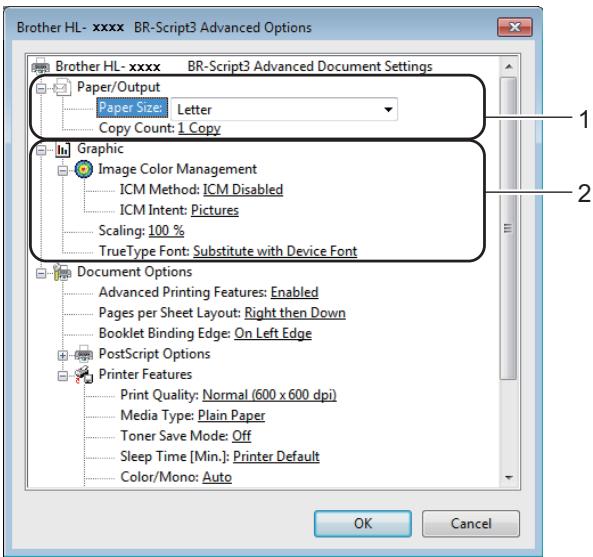
1 Choose the Paper Size and Copy Count (1).
Paper Size
From the drop-down list choose the size of paper you are using.
Copy Count
The copy selection sets the number of copies that will be printed.
2 Set the Image Color Management, Scaling and TrueType Font settings (2).
Image Color Management
Specify how to print your color graphics:
- If you don't want to enable Image Color Management, click ICM Disabled.
- If you want the calculations for color matching to be performed on the host computer before it sends the document to the machine, click ICM Handled by Host System.
- If you want the calculations for color matching to be performed on your machine, click ICM Handled by Printer using printer calibration.
Scaling
Specify whether to reduce or enlarge documents, and by what percentage.
TrueType Font
Specify the TrueType font options. Click Substitute with Device Font (the default) to use equivalent printer fonts for printing documents that contain TrueType fonts. This will permit faster printing; however, you might lose special characters not supported by the printer font. Click Download as Softfont to download TrueType fonts for printing instead of using printer fonts.
Change settings by choosing a setting in the Printer Features list (3):

■ Print Quality
Choose one of the following print quality settings:
Normal (600 x 600 dpi)
600 dpi class. Recommended for ordinary printing. Use this mode for good print quality with reasonable print speeds.
- Fine (2400 dpi class)
2400 dpi class. The finest print mode. Use this mode to print precise images such as photographs. Since the print data is much larger than in Normal mode, processing time, data transfer time, and print time will be longer.
Media Type
You can use the following types of media in your machine. For the best print quality, select the type of media you are using.
- Plain Paper
Thin Paper
Thick Paper - Thicker Paper
Bond Paper - Envelopes
Env. Thick
Env. Thin
Recycled Paper
Label
Glossy Paper
Toner Save Mode
Conserve toner use with this feature. When you set Toner Save Mode to On, print appears lighter. The default setting is Off.
NOTE
We do not recommend Toner Save Mode for printing Photo or grayscale images.
Sleep Time [Min.]
When the machine does not receive data for a certain period of time, it enters Sleep mode. In Sleep mode, the machine acts as though it were turned off. When you choose Printer Default, the timeout setting will be reset to the specific time set at the factory; this can be altered in the driver.
While the machine is in Sleep mode, the Touchscreen's backlight turns off, but the machine can still receive data. Receiving a print job will wake up the machine to start printing.
Color / Mono
You can change the Color/Mono settings in the printer driver as follows:
- Auto
The machine checks the content of the document for color. If color is detected anywhere in the document, it will print the whole of the document using all the colors. In other words, it will mix some of the toners to help achieve every shade detected in the document, increasing the density of toner applied to the page. If no color content is detected, it will print the document in monochrome. The default setting on your machine is Auto.
Color
Whether the document contains color or just monochrome, your machine will print the document using all the colors.
- Mono
Select this mode if the document has only black and grayscale text and objects. If your document contains color, then selecting Mono means it will print the document in 256 levels of gray using only the black toner.
NOTE
- The machine's color sensor is very sensitive and may perceive faded black text or an off-white background as color. If you know that your document is black and white and you want to conserve color toner, select Mono mode.
- If either the Cyan, Magenta or Yellow toner reaches the end of its life while printing a color document, the print job cannot be completed. You can cancel your print job and choose to start the print job again in Mono mode, as long as Black toner is available.
Color Mode
The following options are available in Color Matching mode:
Normal
This is the Default color mode.
Vivid
The color of all elements are adjusted to become a more vivid color.
- None
Improve Gray Color
You can improve the image of a shaded area.
Enhance Black Printing
If a black graphic does not print correctly, choose this setting.
Halftone Screen Lock
This lock stops other applications from modifying the Halftone settings. The default setting is On.
High Quality Image Printing
You can get high quality image printing. If you set High Quality Image Printing to On, the print speed will be slower.
Improve Print Output
This feature allows you to improve a print quality problem.
- Reduce Paper Curl
If you choose this setting, the paper curl may be reduced. If you are printing only a few pages, you do not have to choose this setting. We recommend changing the printer driver setting in Media Type to a thin setting.
NOTE
This operation will decrease the temperature of the machine's fusing process.
- Improve Toner Fixing
If you choose this setting, the toner fixing capabilities may be improved. If this selection does not provide enough improvement, change the printer driver setting in Media Type to a thick setting.
NOTE
This operation will increase the temperature of the machine's fusing process.
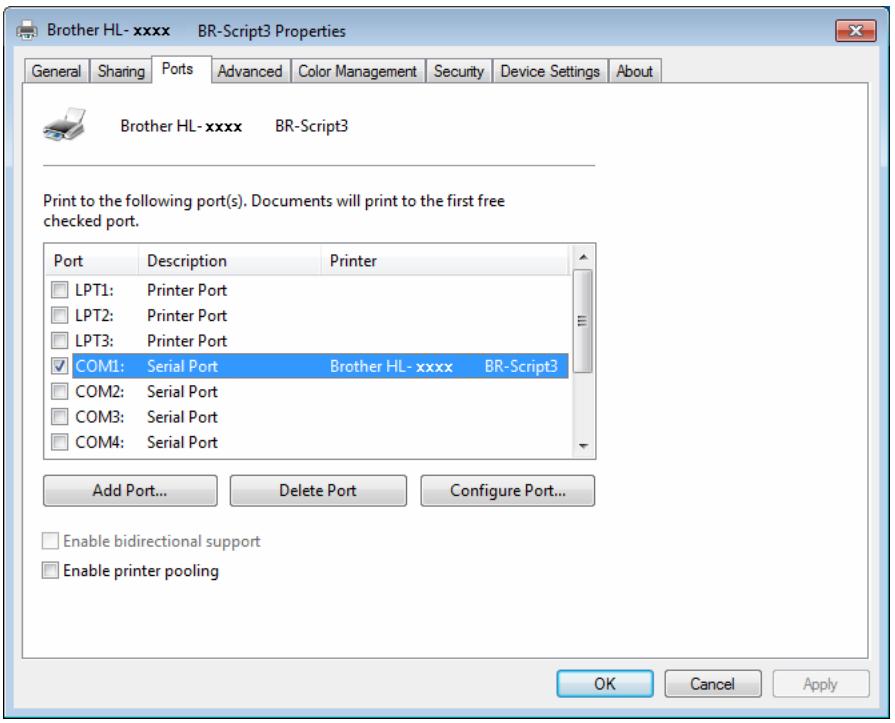
Ports tab
To change the port where your machine is connected or the path to the network machine you are using, choose or add the port you want to use.
Uninstalling the printer driver
Uninstall the printer driver that you have installed with the following steps.
NOTE
- Uninstall is not available if you originally installed the printer driver from the Windows Add a printer setting.
- After uninstalling, we recommend restarting your computer to remove files that were in use during the uninstall.
(Windows® XP, Windows Vista® and Windows® 7)
1 Click the Start button, point to All Programs, Brother, Brother Utilities and then click the drop-down list and select your model name (if not already selected).
Click Uninstall.
3 Follow the instructions on the screen.
(Windows® 8)
1 Click (Brother Utilities). Brother Utilities screen appears.
2 Click the drop-down list and select your model name (if not already selected).
3 Click Tools in the left navigation bar.
4 Click Uninstall.
Status Monitor
The Status Monitor utility is a configurable software tool for monitoring the status of one or more devices, allowing you to get immediate notification of errors.
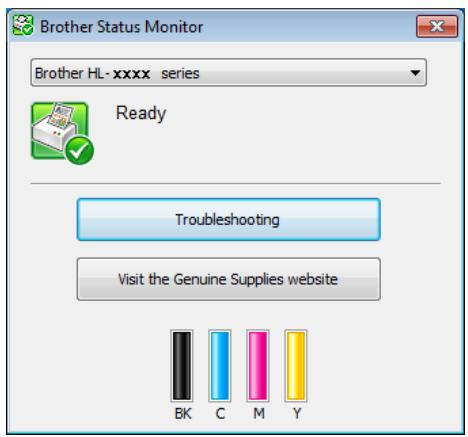
If you selected the Enable Status Monitor on startup check box during installation, you will find the button or the Status Monitor icon on the taskbar.
- To show the Status Monitor icon on your taskbar, click the button. The Status Monitor icon appears in the small window. Drag the icon to the taskbar.
Do one of the following:
Double-click the icon in the task tray.
(Windows® XP, Windows Vista® and Windows® 7)
1 Click Start > All Programs > Brother > Brother Utilities. The Brother Utilities screen appears.
2 Click the drop-down list and select your model name (if not already selected).
3 Click Tools in the left navigation bar.
4 Click Status Monitor.
(Windows® 8)
1 Click (Brother Utilities). The Brother Utilities screen appears.
2 Click the drop-down list and select your model name (if not already selected).
3 Click Tools in the left navigation bar.
4 Click Status Monitor.
Troubleshooting
Click the Troubleshooting button to access the Brother Solutions Center at http://solutions.brother.com/ and visit FAQs on your model page for instructions.
Visit the Genuine Supplies website
Click the Visit the Genuine Supplies website button for more information on Brother genuine supplies.
NOTE
The automatic firmware update is active when the status monitor feature is enabled.
Monitoring the machine's status
When you start up your computer, the Brother Status Monitor icon appears on the tasktray.
| A green icon indicates the normal stand-by condition. | |
| A yellow icon indicates a warning. | |
| A red icon indicates an error has occurred. | |
| A gray icon indicates the offline condition. |
The Status Monitor can be displayed in the tasktray or on the desktop of your computer.
Macintosh
Features in the printer driver (Macintosh)
This machine supports Mac OS X 10.7.5, 10.8.x, 10.9.x.
NOTE
The screens in this section are from OS X v10.7.x. The screens on your Macintosh will vary depending on your operating system version.
Choosing page setup options
Select the Paper Size, Orientation and Scale.
From an application such as TextEdit, click File, then Page Setup. Make sure Brother HL-XXXX (where XXXX is your model name.) is chosen in the Format For pop-up menu. Select the settings for Paper Size, Orientation and Scale, then click OK.
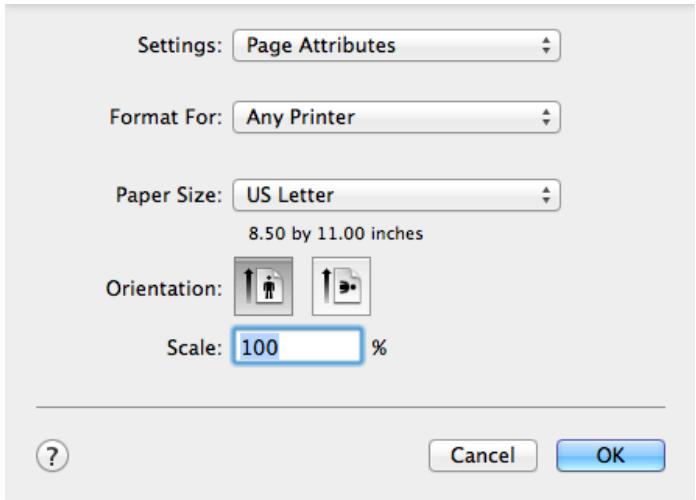

From an application such as TextEdit, click File, then Print to start printing. For more page setup options, click the Show Details button.
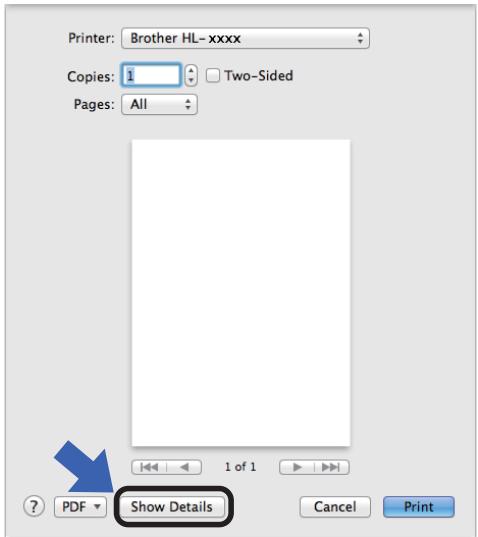
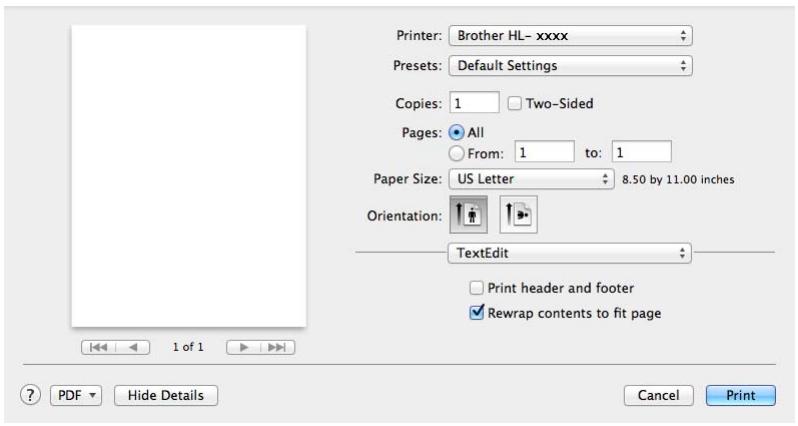
NOTE
Save the current settings as a preset by choosing Save Current Settings as Preset... from the Presets pop-up menu.
Choosing printing options
To control special printing features, choose Print Settings from the Print dialog box. For more information about the available options, see the following descriptions:
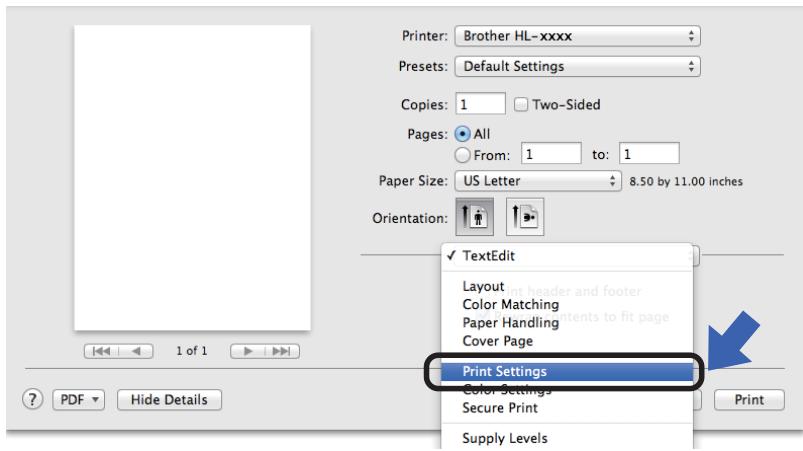
Cover Page
You can choose the following cover page settings:
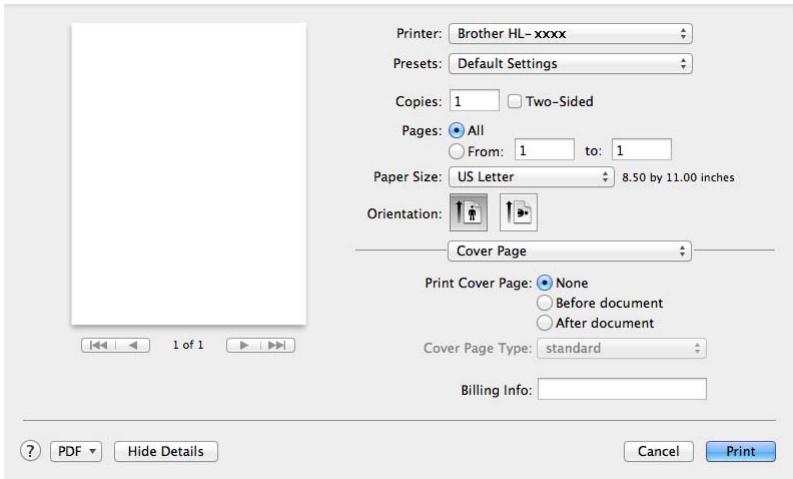
■ Print Cover Page
To add a cover page to your document, use this setting.
Cover Page Type
Choose a template for the cover page.
Billing Info
To add the billing information to the cover page, type text in the Billing Info text box.
Layout
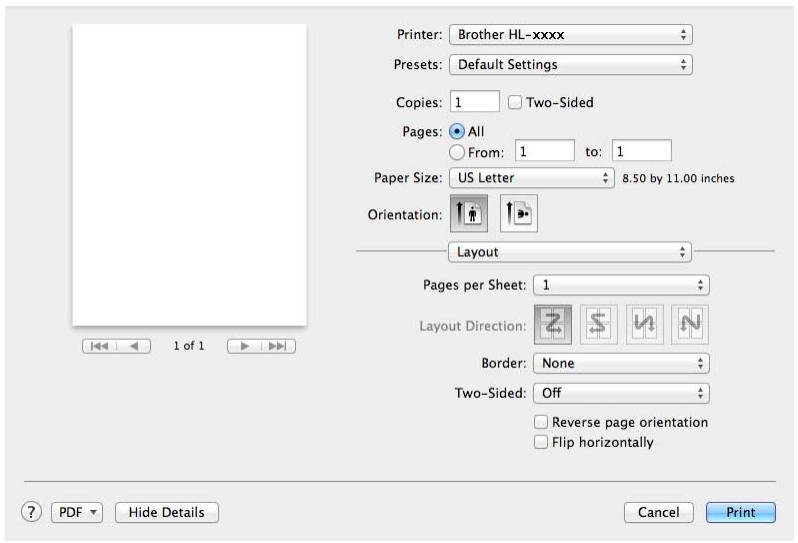
Pages per Sheet
The Pages per Sheet selection can reduce the image size of a page by allowing multiple pages to be printed on one sheet of paper.
■ Layout Direction
When you specify the pages per sheet, you can also specify the direction of the layout.
Border
To add a border, use this setting.
Two-Sided
See 2-sided Printing on page 75.
■ Reverse page orientation
Select Reverse page orientation to rotate the page 180 degrees.
Flip horizontally
Select Flip horizontally to print the page as a reflection flipped left-to-right.
Secure Print
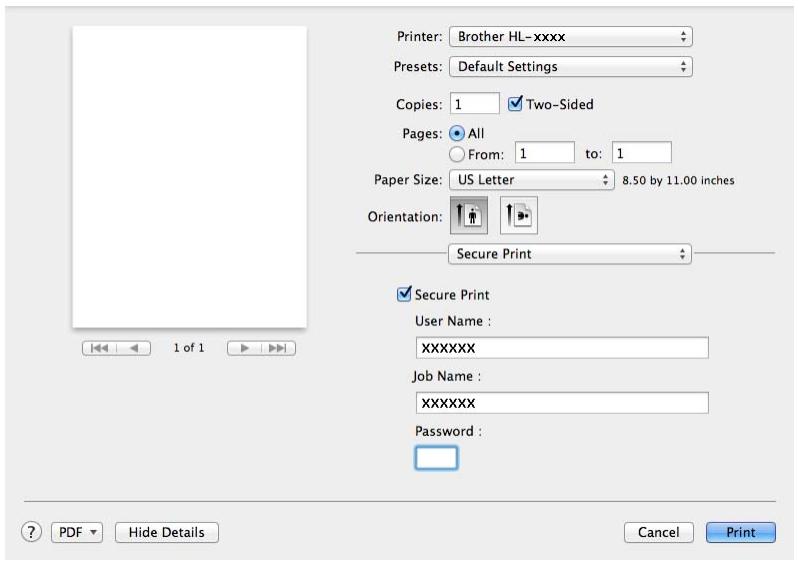
Secure Print:
Secure documents are documents that are password protected when they are sent to the machine. Only the people who know the password will be able to print them. Since the documents are secured at the machine, you must enter the password using the Touchscreen of the machine to print them.
To send a secured document:
1 Select Secure Print.
Type your password, user name and job name, and then click Print.
To print a secured document, you must enter your password using the Touchscreen of the machine (see Printing Secure documents on page 109).
To delete a secured document, you must use the Touchscreen of the machine to delete it (see Printing Secure documents on page 109).
Print Settings
Choose your settings in the Print Settings list:
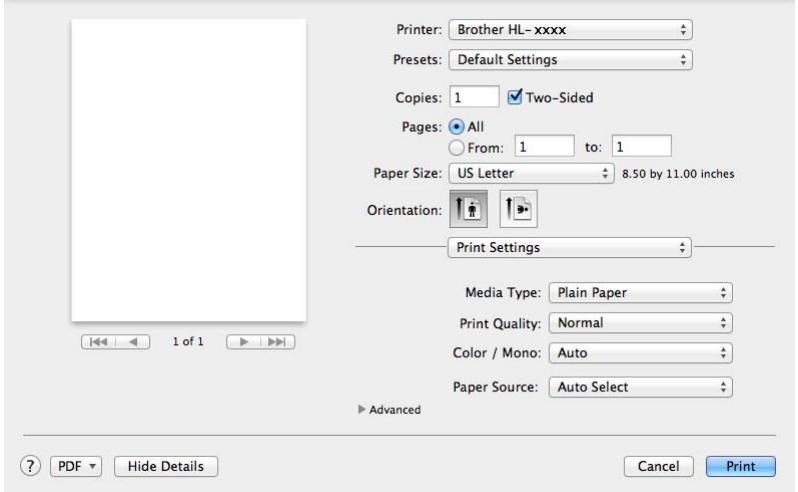
Media Type
Select one of the following media types:
- Plain Paper
Thin Paper
Thick Paper
Thicker Paper
Bond Paper - Envelopes
Env. Thick
Env. Thin
Recycled Paper
Label
Glossy Paper
NOTE
When Label is selected in the printer driver, the machine will feed the paper from the MP tray, even if MP Tray is not selected as the paper source.
■ Print Quality
Choose one of the following print quality settings:
Normal
600 dpi class. Recommended for ordinary printing. Use this mode for good print quality with reasonable print speeds.
Fine
2400 dpi class. The finest print mode. Use this mode to print precise images such as photographs. Since the print data is much larger than in Normal mode, processing time, data transfer time, and printing time will be longer.
NOTE
The print speed will change depending on the print quality setting you choose. Higher print quality takes longer to print, while lower print quality takes less time to print.
Color / Mono
You can change the Color/Mono settings in the printer driver as follows:
- Auto
The machine checks the content of the document for color. If color is detected anywhere in the document, it will print the whole of the document using all the colors. In other words, it will mix some of the toners to help achieve every shade detected in the document, increasing the density of toner applied to the page. If no color content is detected, it will print the document in monochrome. The default setting on your machine is Auto.
Color
Whether the document contains color or just monochrome, your machine will print the document using all the colors.
- Mono
Select this mode if the document has only black and grayscale text and objects. If your document contains color, then selecting Mono means it will print the document in 256 levels of gray using only the black toner.
NOTE
- The machine's color sensor is very sensitive and may perceive faded black text or an off-white background as color. If you know that your document is black and white and you want to conserve color toner, select Mono mode.
- If either the Cyan, Magenta or Yellow toner reaches the end of its life while printing a color document, the print job cannot be completed. You can cancel your print job and choose to start the print job again in Mono mode, as long as Black toner is available.
Paper Source
Choose Auto Select, Tray1, Tray2, ^12 or MP Tray.
Available if the optional tray is installed.
2 Tray 2 is standard on HL-L9200CDWT.
Advanced print settings
When you click the triangle mark (▶) beside Advanced, the advanced print settings appear.
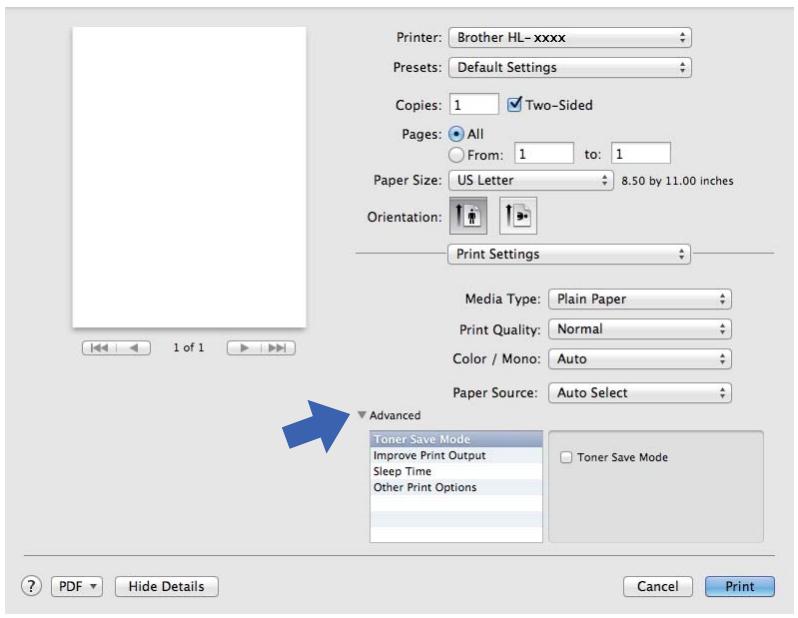
Toner Save Mode
Conserve toner use with this feature. When you select the Toner Save Mode check box, print appears lighter. The default setting is off (unchecked).
NOTE
We do not recommend Toner Save Mode for printing Photo or grayscale images.
Improve Print Output
This feature allows you to improve a print quality problem.
- Reduce Paper Curl
If you choose this setting, the paper curl may be reduced.
If you are printing only a few pages, you do not have to choose this setting. We recommend changing the printer driver setting in Media Type to a thin setting.
NOTE
This operation will decrease the temperature of the machine's fusing process.
- Improve Toner Fixing
If you choose this setting, the toner fixing capabilities may be improved. If this selection does not provide enough improvement, change the printer driver setting in Media Type to a thick setting.
NOTE
This operation will increase the temperature of the machine's fusing process.
Sleep Time
When the machine does not receive data for a certain period of time, it enters Sleep mode. In Sleep mode, the machine acts as though it were turned off. If you choose Printer Default, the timeout setting will be reset to the specific time set at the factory; this can be altered in the driver. To change the Sleep Time, select Manual, and then type the time in the text box.
While the machine is in Sleep mode, the Touchscreen's backlight turns off, but the machine can still receive data. Receiving a print job will wake up the machine to start printing.
Other Print Options
- Skip Blank Page
If Skip Blank Page is selected, the printer driver detects blank pages and excludes them from printing.
Color Settings
Color Mode
The following options are available in Color Matching mode:
Normal
This is the Default color mode.
Vivid
The color of all elements are adjusted to become a more vivid color.
- None
Improve Gray Color
You can improve the image of a shaded area.
Enhance Black Printing
If a black graphic does not print correctly, choose this setting.
2-sided Printing
Automatic 2-sided Printing
Select Layout.
Choose Long-Edge binding or Short-Edge binding in Two-Sided.
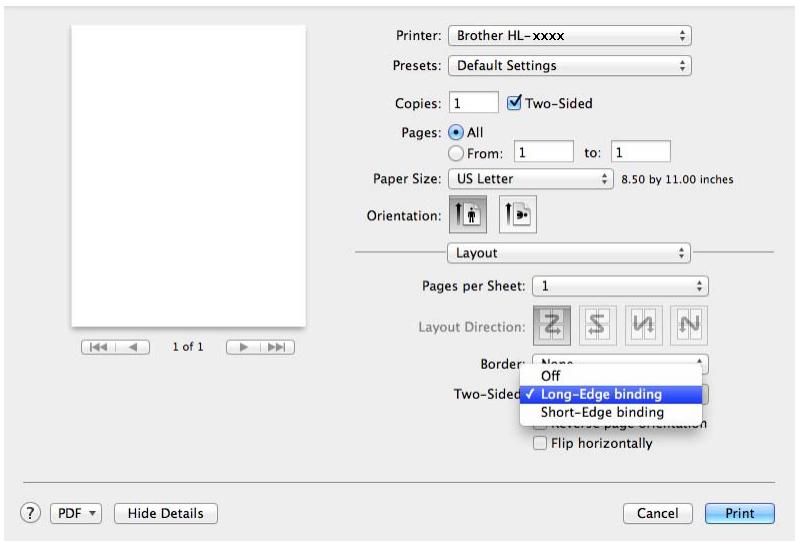
Manual 2-sided Printing
Select Paper Handling.
- Choose Even Only and Print. Reload the printed paper into the tray (blank side face down in Tray 1, Tray 2, or blank side face up in the MP tray). Choose Odd Only and Print.
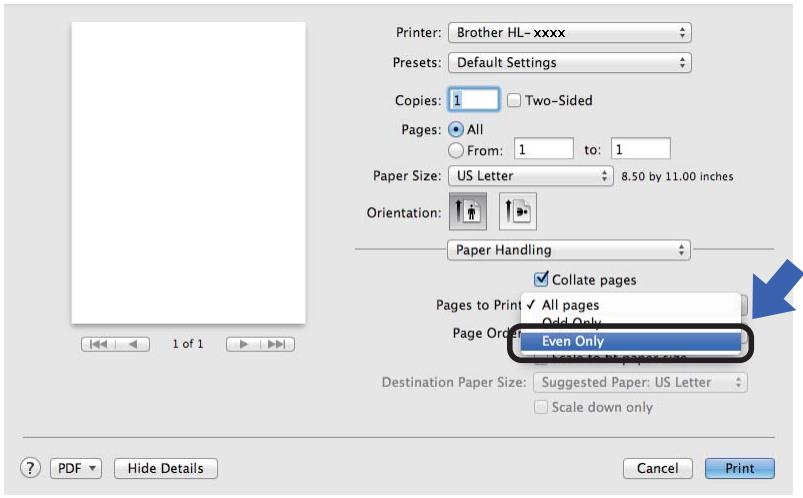
Features in the BR-Script3 printer driver (PostScript® 3™ language emulation)
This section introduces the distinctive operations of the BR-Script3 printer driver. For the basic operations of the BR-Script3 printer driver, see Features in the printer driver (Macintosh) on page 66 for Page Setup, Cover Page, Paper Source and Layout.
Choosing printing options
To control special print features, choose Printer Features in the Print dialog box.

Printer Features
Feature Sets: General 1
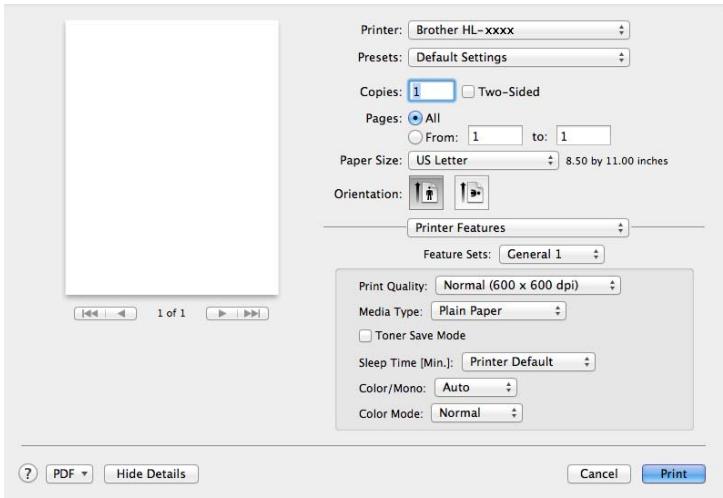
Print Quality
Select one of the following resolutions from the Print Quality pop-up menu:
Normal
600 × 600 dpi. Recommended for ordinary printing. Use this mode for good print quality with reasonable print speeds.
Fine
2400 dpi class. The finest print mode. Use this mode to print precise images such as photographs. Since the print data is much larger than in Normal mode, processing time / data transfer time and print time will be longer.
Media Type
Select the media type that matches the type of paper you loaded in the machine.
- Plain Paper
Thin Paper
Thick Paper
Thicker Paper
Bond Paper - Envelopes
Env. Thick
Env. Thin
Recycled Paper
Label
Glossy Paper
Hagaki
1 Postcard with the size specified by Japan Post Service Co., LTD
Toner Save Mode
When you select the Toner Save Mode check box, print appears lighter. The default setting is Off (unchecked).
NOTE
We do not recommend Toner Save Mode for printing Photo or grayscale images.
Sleep Time [Min.]
When the machine does not receive data for a certain period of time, it enters Sleep mode. In Sleep mode, the machine acts as though it were turned off. If you choose Printer Default, the timeout setting will be reset to the specific time set at the factory; this can be altered in the driver. To change the Sleep Time, choose 2, 10 or 30.
While the machine is in Sleep mode, the Touchscreen's backlight turns off, but the machine can still receive data. Receiving a print job will wake up the machine to start printing.
Color / Mono
You can change the Color/Mono settings in the printer driver as follows:
- Auto
The machine checks the content of the document for color. If color is detected anywhere in the document, it will print the whole of the document using all the colors. In other words, it will mix some of the toners to help achieve every shade detected in the document, increasing the density of toner applied to the page. If no color content is detected, it will print the document in monochrome. The default setting on your machine is Auto.
Color
Whether the document contains color or just monochrome, your machine will print the document using all the colors.
- Mono
Select this mode if the document has only black and grayscale text and objects. If your document contains color, then selecting Mono means it will print the document in 256 levels of gray using only the black toner.
NOTE
- The machine's color sensor is very sensitive and may perceive faded black text or an off-white background as color. If you know that your document is black and white and you want to conserve color toner, select Mono mode.
- If either the Cyan, Magenta or Yellow toner reaches the end of its life while printing a color document, the print job cannot be completed. You can cancel your print job and choose to start the print job again in Mono mode, as long as Black toner is available.
Color Mode
The following options are available in Color Matching mode:
Normal
This is the Default color mode.
Vivid
The color of all elements are adjusted to become a more vivid color.
- None
Feature Sets: General 2
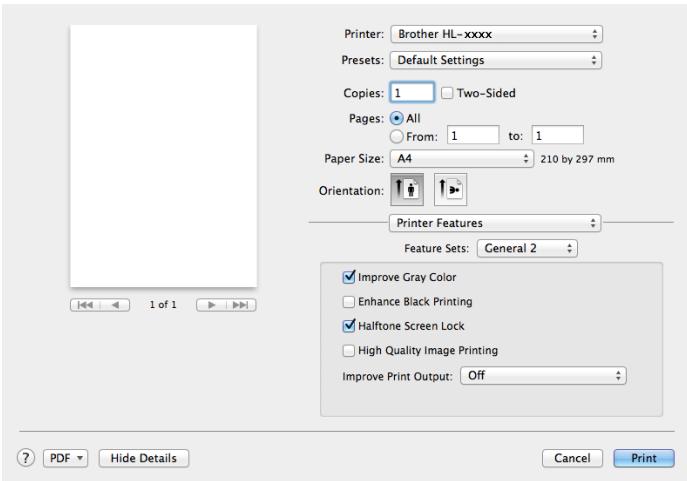
Improve Gray Color
You can improve the image of a shaded area.
Enhance Black Printing
If a black graphic does not print correctly, choose this setting.
Halftone Screen Lock
This lock stops other applications from modifying the Halftone settings. The Default setting is On (checked).
High Quality Image Printing
You can increase the quality of the printed image. If you set High Quality Image Printing to On (checked), the print speed will be slower.
Improve Print Output
This feature allows you to improve a print quality problem.
- Reduce Paper Curl
If you choose this setting, the paper curl may be reduced.
If you are printing only a few pages, you do not have to choose this setting. We recommend changing the printer driver setting in Media Type to a thin setting.
NOTE
This operation will decrease the temperature of the machine's fusing process.
- Improve Toner Fixing
If you choose this setting, the toner fixing capabilities may be improved. If this selection does not provide enough improvement, change the printer driver setting in Media Type to a thick setting.
NOTE
This operation will increase the temperature of the machine's fusing process.
Secure Print
Secure documents are documents that are password protected when they are sent to the machine. Only the people who know the password will be able to print them. Since the documents are secured at the machine, you must enter the password using the Touchscreen of the machine to print them.
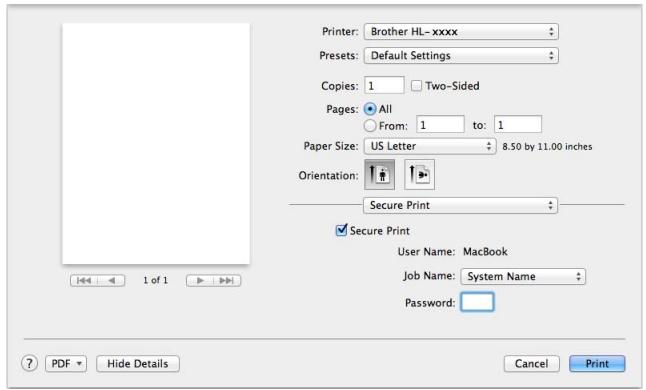
To create a secure print job, select Secure Print and select the Secure Print check box. Type a password in the Password text box and click Print.
(For more information about Secure Print, see Printing Secure documents on page 109.)
Removing the printer driver
1 Log on as an 'Administrator'.
From the Apple menu, choose System Preferences. Click Print & Scan or Printers & Scanners 1, then select the printer you want to remove and remove it by clicking the - button.
3 Click Delete Printer.
1 Printers & Scanners for OS X v10.9.x users
Status Monitor
The Status Monitor utility is a configurable software tool for monitoring the status of the machine; it lets you see error messages such as paper empty or paper jam at pre-set update intervals and access the Web Based Management utility. Check the device status by following these steps to Launch the Brother Status Monitor:
For OS X v10.7.5 and 10.8.x
1 Run System Preferences, select Print & Scan, and then choose the machine.
2 Click Options & Supplies.... Click the Utility tab, and then click Open Printer Utility. The Status Monitor will start up.
For OS X v10.9.x
1 Run System Preferences, select Printers & Scanners, and then choose the machine.
2 Click Options & Supplies.... Click the Utility tab, and then click Open Printer Utility. The Status Monitor will start up.
Updating the machine's status
If you want the latest machine status while the Status Monitor window is open, click the Refresh icon.
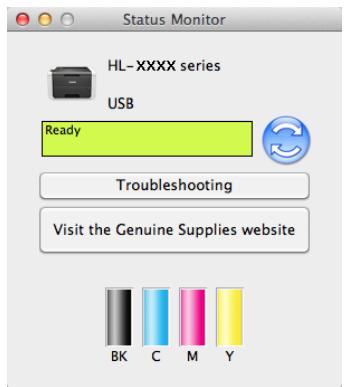
If the toner level is low or there is a problem with the toner cartridge, the following icons appear:
| The toner level is low. |
| The toner cartridge is empty. |
You can set the interval at which the software will update the machine's status information. Go to the menu bar, Brother Status Monitor and select Preferences.
Hiding or showing the window
After starting the Status Monitor, you can hide or show the window. To hide the window, go to the menu bar, click Brother Status Monitor and select Hide Status Monitor. To show the window, click the Brother Status Monitor icon in the dock.
Quitting the window
Click Brother Status Monitor in the menu bar, and then select Quit Status Monitor from the pop-up menu.
Web Based Management (Network Connection only)
Access the Web Based Management System by clicking the machine icon on the Status Monitor screen. A standard web browser can be used to manage your machine using HTTP (Hyper Text Transfer Protocol). For information about the Web Based Management System, see the Network User's Guide.
Software
Software for networks
For information about network utility software, see the Network User's Guide.
3 General Information
Control panel overview
This is a Touchscreen LCD with an electrostatic Touchpanel that only displays the LEDs when they can be used.
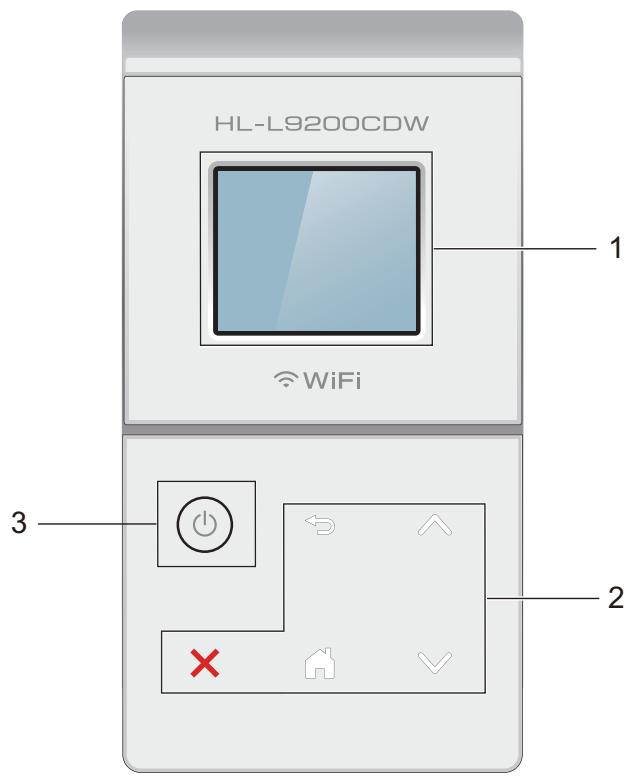
1 1.8 in. Touchscreen LCD (Liquid Crystal Display)
This is a Touchscreen LCD. You can access the menus and options by pressing them when they are displayed on the screen.
2 Touchpanel:
The LEDs on the Touchpanel only light up when they are available for use.

Press to go back to the previous menu level.

Press to return to the Home screen.

Press to cancel an operation when illuminated red.

Press to display the previous or next page. The Up and Down Arrows do not light up when there is only one page.
3 Power On/Off
Press to turn on the machine. Press and hold down to turn off the machine.
The Touchscreen LCD displays Shutting Down and stays on for a few seconds before going off.
Touchscreen LCD
The Touchscreen LCD displays the machine's status when the machine is idle.
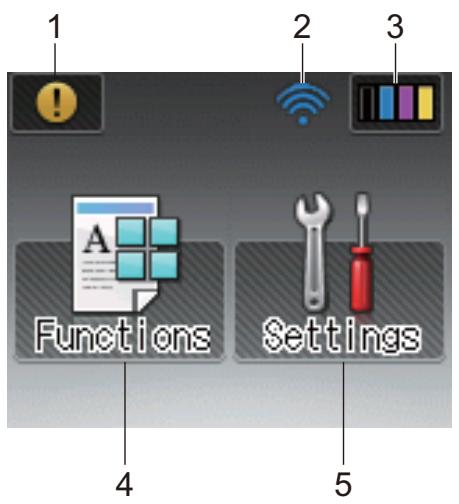
1 Warning icon
The warning icon ! appears when there is an error or maintenance message; press ! to view it, and then press × to return to Ready mode.
For details, see Error and maintenance messages on page 176.
2 Wireless Status
A four-level indicator on the Ready mode screen displays the current wireless signal strength if you are using a wireless connection.

If you see WiFi at the top on the screen, you can easily configure the wireless settings by pressing it (for more information, see the Network User's Guide).
3 (Toner)
Lets you see the remaining toner life and also lets you access the Toner menu.
NOTE
The indication of the remaining toner life will vary depending on the types of documents printed and customer's usage.
4 Functions
The Touchscreen displays the machine's settings when you pre
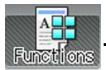
You can access the machine's settings from the following screen:
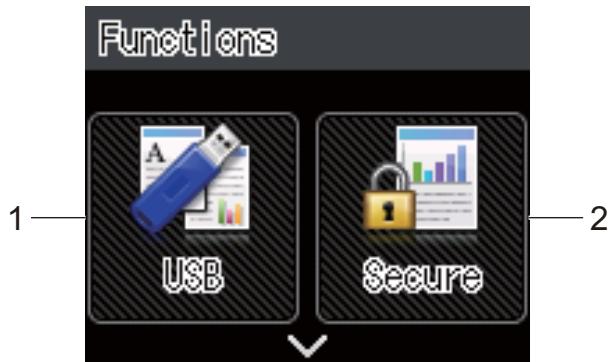
1 USB
Press to access the Direct Print menu.
2 Secure
Lets you access the Secure Print menu.
3 Web
Press to connect the Brother machine to an Internet service (for more information, see the Web Connect Guide).
5 (Settings)
Lets you access the full Settings menu.
Basic Operations
Press your finger on the Touchscreen LCD to operate it. To display and access all the settings and features tables and the available options, press or on the Touchpanel to scroll through them.
NOTE
DO NOT touch the Touchscreen immediately after plugging in the power cord or turning on the machine. Doing this may cause an error.
The following steps explain how to change a setting in the machine. In this example, the Touchscreen's Backlight setting is changed from Light to Med.
1 Pr
Press
Press or on the Touchpanel to display General Setup.
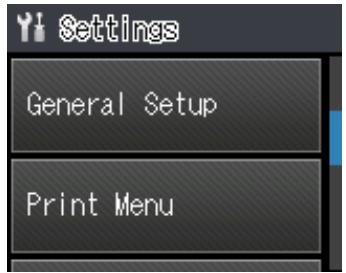
Press General Setup.
4 Press or to display Panel Control.
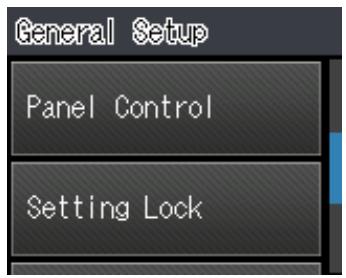
Press Panel Control.
Press LCD Settings.
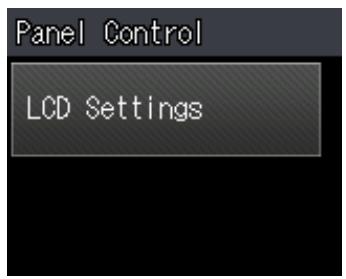
7 Press Backlight.
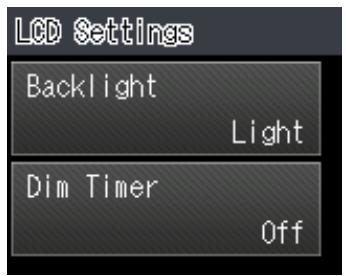
Press Med.
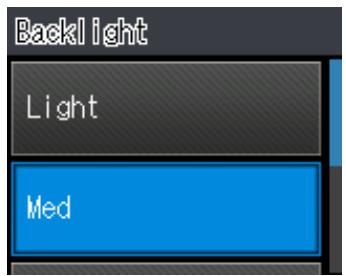
NOTE
Press to go back to the previous level.
Press
Settings and features tables
Using the Settings Tables
Your machine's Touchscreen LCD is easy to set up and operate. All you have to do is press the settings and options you want as they are displayed on the screen. We created step-by-step Settings Tables and Features Tables so you can see at-a-glance all the available choices for each setting and feature. You can use these tables to quickly set up your preferred settings in the machine.
Settings Tables
The Settings tables will help you understand the menu settings and options that are found in the machine's programs. The factory settings are shown in Bold with an asterisk.
NOTE
The Touchscreen displays the tray names as follows:
- Standard paper tray: Tray1
- Multi-purpose tray: MP Tray
- Optional lower tray1: Tray2 and T2
| Level 1 | Level 2 | Level 3 | Level 4 | Options | Descriptions |
| Machine Information | Print Settings | - | - | - | Prints the Printer Settings page. |
| Print NetSetting | - | - | - | Prints the Network Configuration Report. | |
| Print WLANReport | - | - | - | The WLAN Report shows the wireless LAN connectivity diagnosis. | |
| Test Print | - | - | - | Prints the test page. | |
| Drum Dot Print | - | - | - | Prints the drum dot check sheet. | |
| Print Font | HP LaserJet | - | - | Prints the font list and samples of HP LaserJet. | |
| BR-Script 3 | - | - | Prints the font list and samples of BR-Script. | ||
| Serial No. | - | - | - | Displays the machine's serial number. | |
| Version | Main Version | - | - | Displays the main firmware version. | |
| Sub1 Version | - | - | Displays the sub firmware version. | ||
| The factory settings are shown in Bold with an asterisk. | |||||
| Machine Information (Continued) | Version (Continued) | Sub2 Version | - | - | Displays the sub firmware version. |
| Sub4 Version | - | - | Displays the sub firmware version. | ||
| RAM Size | - | - | Displays the size of memory in this machine. | ||
| Page Count | Total | - | - | Displays the total printed pages. | |
| Color | - | - | Displays the total color printed pages. | ||
| Monochrome | - | - | Displays the total monochrome printed pages. | ||
| Parts Life | Toner Life | - | - | Displays the remaining life for each toner cartridge. | |
| Drum Life | - | - | Displays the remaining life for the drum unit. | ||
| Belt Life | - | - | Displays the remaining life for the belt unit. | ||
| PF KitMP Life | - | - | Displays the pages left to print with the PF kit MP. | ||
| PF Kit1 Life | - | - | Displays the pages left to print with the PF kit 1. | ||
| PF Kit2 Life | - | - | Displays the pages left to print with the PF kit 2. | ||
| Fuser Life | - | - | Displays the pages left to print with the fuser unit. | ||
| Laser Life | - | - | Displays the pages left to print with the laser unit. | ||
| Reset Parts Life (Appears only when the drum unit or belt unit has exceeded its rated life.) | Drum Unit | - | Yes / No | Reset the drum unit life. Appears when you replace the drum unit. | |
| Belt Unit | - | Yes / No | Reset the belt unit life. Appears when you replace the belt unit. | ||
| Level 1 | Level 2 | Options | Descriptions | ||
| Paper Tray | Tray Use | Auto*/MP Only/Tray1 Only/Tray2 Only1 | Select the tray that will be used. | ||
| Priority | (Without Tray2 installed)MP>T1*/T1>MP(With Tray2 installed)MP>T1>T2*/MP>T2>T1/T1>T2>MP/T2>T1>MP | When Auto is chosen in Tray Use, the machine chooses the order in which it uses the paper trays that contain paper of the same size. | |||
| 2-sided | On(Long Bind)/On(Short Bind)/Off* | Select whether to print on both sides of the paper. | |||
| MP Size | A4 / Letter*/B5 (JIS) / B5 (ISO) / A5 / A5 (Long Edge) / A6/Executive/Legal/Folio/Com-10/Monarch/C5/DL/3"x5" | Select the size of paper you are loading in the MP tray. | |||
| Tray1 Size | A4 / Letter*/B5 (JIS) / A5 / A5 (Long Edge) / A6/Executive/Legal/Folio | Choose the size of paper you loaded in the standard paper tray. | |||
| Tray2 Size1 | A4 / Letter*/B5 (JIS) / A5/Executive/Legal/Folio | Choose the size of paper you loaded in the optional lower tray (Tray 2)2. | |||
| Check Size | On*/Off | Select whether to display the message telling you to check that the size of the paper in the machine and the machine's Paper Size setting match. | |||
| The factory settings are shown in Bold with an asterisk. | |||||
1 When Tray 2 is installed.
2 Tray 2 is standard on HL-L9200CDWT.
| Level 1 | Level 2 | Level 3 | Level 4 | Options | Descriptions |
| General Setup | Local Language | - | - | English*/ français... | Select the Touchscreen language for your country. |
| Ecology | Toner Save | - | On / off* | Increases the page yield of the toner cartridge. | |
| Sleep Time | - | 0/1/2/3*/4/5/...50 min | Set the time to return to Power Save mode. | ||
| Quiet Mode | - | On / off* | Decreases printing noise. | ||
| Auto Power Off | - | Off*/1hour/2hours/4hours/8hours | Sets the number of hours that the machine will remain in Deep Sleep mode before going into Power Off mode. Choose Off if you do not want the machine to go into Power Off mode. | ||
| Panel Control | LCD Settings | Backlight | Light*/Med/Dark | Adjust the brightness of the Touchscreen's backlight. | |
| Dim Timer | Off*/10sec/20sec/30sec | Set how long the Touchscreen's backlight stays on after the last button press. | |||
| Setting Lock | Set Password | - | - | Stop unauthorized users from changing the machine's settings. | |
| Lock Off⇒On | - | - | |||
| Interface | Select | - | Auto*/USB/Network | Choose the interface to use.If you select Auto, the machine changes the interface to USB or Ethernet depending on which interface is receiving data. | |
| Auto IF Time | - | 1/2/3/4/5*/.../99sec | You must set the time-out period for the auto interface selection. | ||
| Input Buffer | - | Level 1/2/3/4*/.../7 | Increases or decreases the input buffer capacity. |

The factory settings are shown in Bold with an asterisk.
| Level 1 | Level 2 | Level 3 | Options | Descriptions |
| Print Menu | Emulation | - | Auto*/HP LaserJet/BR-Script 3 | Chooses the emulation mode you use. |
| Auto Continue | - | On*/Off | Select this setting if you want the machine to clear paper size errors. | |
| Output Color | - | Auto*/Color/Monochrome | Sets the output color. | |
| Paper Type | - | Plain Paper*/Thick Paper/Thicker Paper/Thin Paper/Recycled Paper/Bond Paper/Label Paper/Envelope/Env.Thick/Env.Thin/Glossy Paper | Sets the type of paper. | |
| Paper Size | - | A4 /Letter*/B5(JIS)/B5(ISO)/A5/A5(Long Edge)/A6/Executive/Legal/Folio/Com-10/Monarch/C5/DL/3"x5" | Sets the size of paper. | |
| Copies | - | 1*/2/.../999 | Sets the number of printed pages. | |
| Orientation | - | Portrait*/Landscape | This machine can print pages in portrait or landscape orientation. | |
| Print Position | X Offset | -500/-499/.../-1/0*/1/.../499/500dot(s) | Moves the print start position (at the top-left corner of pages) horizontally up to -500 (left) to +500 (right) dots in 300 dpi. | |
| Y Offset | -500/-499/.../-1/0*/1/.../499/500dot(s) | Moves the print start position (at the top-left corner of pages) vertically up to -500 (up) to +500 (down) dots in 300 dpi. | ||
| Auto FF | - | On/Off* | Allows the machine to print any remaining data automatically. | |
| The factory settings are shown in Bold with an asterisk. | ||||
| Print Menu(Continued) | HP LaserJet | Font No. | I000 / ... / I059* / ... / I071 | Sets the font number. |
| Font Pitch | 0.44 / ... / 10.00* / ... / 99.99 | Sets the font pitch.The Font Pitch menu will appear when you choose I059 to I071 in Font No. setting. | ||
| Font Point | 4.00 / ... / 12.00* / ... / 999.75 | Sets the font size.The Font Point menu will appear when you choose I000 to I058 in Font No. setting. | ||
| Symbol Set | PC-8* / PC-8 D/N / ... | Sets the symbol set or the character set. | ||
| Table Print | - | Prints the code table.If Change Emulation appears on the Touchscreen, select Auto or HP LaserJet in Emulation of the Print Menu (see page 95). | ||
| Auto LF | On / Off* | ON: CR → CR+LF, OFF: CR → CR | ||
| Auto CR | On / Off* | ON: LF → LF+CR, FF → FF+CR, or VT → VT+CROFF: LF → LF, FF → FF, or VT → VT | ||
| Auto WRAP | On / Off* | Chooses whether a line feed and carriage return will happen when the machine reaches the right margin. | ||
| The factory settings are shown in Bold with an asterisk. | ||||
| Print Menu(Continued) | HP LaserJet(Continued) | Auto SKIP | On*/Off | Chooses whether a line feed and carriage return will happen when the carriage position reaches the bottom margin. |
| Left Margin | ## | Sets the left margin at column 0 to 70 columns at 1 cpi. The default setting is 0 cpi. | ||
| Right Margin | ## | Sets the right margin at column 10 to 80 columns at 1 cpi. The default setting is 80 cpi (Letter). | ||
| Top Margin | #.## | Sets the top margin at a distance from the top edge of the paper: 0.00, 0.33, 0.50, 1.00, 1.50 or 2.00 inches. The default setting is 0.50 inches. | ||
| Bottom Margin | #.## | Sets the bottom margin at a distance from the bottom edge of the paper: 0.00, 0.33, 0.50, 1.00, 1.50 or 2.00 inches. The default setting is 0.50 inches. | ||
| Lines | ##### | Sets the number of lines on each page from 5 to 128 lines. The default setting is 60 lines (Letter). | ||
| BR-Script 3 | Error Print | On*/Off | Choose whether the machine prints the error information when errors occur. | |
| CAPT | On / Off* | Use CAPT (Color Advanced Printing Technology) for optimal print quality when printing a PS file created by a non-Brother PS driver.Colors and photos appear clearer and more accurate.Print speed will be slower. | ||

The factory settings are shown in Bold with an asterisk.
| Level 1 | Level 2 | Level 3 | Level 4 | Options | Descriptions |
| Network | Wired LAN | TCP/IP | Boot Method | Auto*/Static/RARP/BOOTP/DHCP | Chooses the IP method that best suits your needs. |
| IP Address | #########.#####.########(000.000.000.000)*1 | Enter the IP address. | |||
| Subnet Mask | #########.#####.#####.(000.000.000.000)*1 | Enter the Subnet mask. | |||
| Gateway | #########.#####.#####.(000.000.000.000)*1 | Enter the Gateway address. | |||
| IP Boot Tries | 0/1/2/3*/.../32767 | Specifies the number of attempts the machine will try to obtain an IP address when the Boot Method is set to any setting except Static. | |||
| APIPA | On*/Off | Automatically allocates the IP address from the link-local address range.1 | |||
| IPv6 | On/Off* | Enables or disables the IPv6 protocol. | |||
| Ethernet | - | Auto*/100B-FD/100B-HD/10B-FD/10B-HD | Chooses Ethernet link mode. | ||
| Wired Status | - | Active 100B-FD/Active 100B-HD/Active 10B-FD/Active 10B-HD/Inactive/Wired OFF | Displays Ethernet link status. | ||
| MAC Address | - | - | Displays MAC address of the machine. | ||
| Set to Default | Restores wired network settings of the internal print server to the factory settings. | ||||
| Wired Enable | - | On*/Off | Chooses Ethernet link mode. | ||
| Network(Continued) | WLAN | TCP/IP | Boot Method | Auto*/Static/RARP/BOOTP/DHCP | Chooses the IP method that best suits your needs. |
| IP Address | #####.#####.#####.########(000.000.000.000)*1 | Enter the IP address. | |||
| Subnet Mask | #####.#####.#####.#####(000.000.000.000)*1 | Enter the Subnet mask. | |||
| Gateway | #####.#####.#####.#####(000.000.000.000)*1 | Enter the Gateway address. | |||
| IP BootTries | 0 / 1 / 2 / 3*/... / 32767 | Specifies the number of attempts the machine will try to obtain an IP address when the Boot Method is set to any setting except Static. | |||
| APIPA | On*/Off | Automatically allocates the IP address from the link-local address range.1 | |||
| IPv6 | On / Off* | Enables or Disables the IPv6 protocol. | |||
| WLAN Assistant | - | - | (Windows® only)You can configure your wireless network settings using the Brother CD-ROM. | ||
| Setup Wizard | - | - | Configs the wireless network settings using the setup wizard. | ||
| WPS/AOSS | - | - | Configs the wireless network settings using WPS or AOSSTM method. | ||
| The factory settings are shown in Bold with an asterisk. | |||||
| Network(Continued) | WLAN(Continued) | WPS w/ PIN Code | - | - | Configures the wireless network settings using WPS with a PIN code. |
| WLAN Status | Status | Active (11n) / Active (11b) / Active (11g) / Wired LAN Active / WLAN OFF/AOSS Active / Connection Failed | Displays wireless Ethernet link status. | ||
| Signal | - | Displays the signal condition. | |||
| SSID | - | DisplaysSSID [uses a maximum of 32 digits and characters 0-9, a-z and A-Z in ASCII values] | |||
| Comm. Mode | Ad-hoc / Infrastructure | Displays the current Communication Mode. | |||
| MAC Address | - | - | Displays MAC address of the machine. | ||
| Set to Default | Restores wireless network settings of the internal print server to the factory settings. | ||||
| WLAN Enable | - | On / Off* | Turns the wireless interface on or off. | ||
| The factory settings are shown in Bold with an asterisk. | |||||
| Network(Continued) | Wi-Fi Direct | Push Button | - | - | You can easily configure your Wi-Fi DirectTMnetwork settings using the one-button push method. |
| PIN Code | - | - | You can easily configure your Wi-Fi DirectTMnetwork settings using WPS with a PIN code. | ||
| Manual | - | - | You can manually configure your Wi-Fi DirectTMnetwork settings. | ||
| Group Owner | - | On/Off | Sets your machine as the Group Owner. | ||
| Device Info. | Device Name | - | You can see the device name of your machine. | ||
| SSID | - | DisplaysSSID of Group Owner.When the machine is not connected, the Touchscreen displays Not Connected. | |||
| IP Address | - | Displays the IP Address of your machine. | |||
| Status Info. | Status | G/O Active(**)/Client Active/Not Connected/Off/Wired LAN Active** = the number of devices | Displays the Wi-Fi DirectTMnetwork status. | ||
| Network(Continued) | Wi-Fi Direct(Continued) | Status Info.(Continued) | Signal | - | Displays the Wi-FiDirectTM network signal strength.When your machine acts as the Group Owner, the Touchscreen always displays Strong. |
| I/F Enable | - | On / Off* | Enables or disables the Wi-FiDirectTMconnection. | ||
| Web Connect Settings | Proxy Settings | Proxy Connection | On / Off* | You can change the web connection settings. | |
| Address | - | ||||
| Port | 8080* | ||||
| User Name | - | ||||
| Password | - | ||||
| Security | IPsec | - | On / Off* | IPsec is an optional security feature of the IP protocol that provides authentication and encryption services. We recommend contacting your network administrator before changing this setting. | |
| Network Reset | Restores all network settings of the internal print server to the factory settings. | ||||
| The factory settings are shown in Bold with an asterisk. | |||||
1
means a number within the range of 000 to 255. On connection to the network, if the machine's 'Boot Method' is 'Auto' the machine will attempt to set the IP address and Subnet Mask from a boot server such as DHCP or BOOTP. If a boot server cannot be found, an APIA IP address will be allocated, such as 169.254. [001-254]. [000-255]. If the 'Boot Method' of the machine is set to 'Static' you must manually enter an IP address from the machine's Touchscreen.
| Level 1 | Level 2 | Description |
| Reset Menu | Network | Restores all network settings of the internal print server to the factory settings. |
| Factory Reset | This operation resets all the machine's setting back to the defaults set at the factory. Brother strongly recommends you perform this operation when you dispose of the machine. | |
| The factory settings are shown in Bold with an asterisk. | ||
| Level 1 | Level 2 | Level 3 | Options | Descriptions |
| Color Correction | Calibration | Calibrate | Yes / No | Performs a calibration to check and correct the colors. |
| Reset | Yes / No | Set the calibration parameters back to the default settings. | ||
| Registration | - | Yes / No | Aligns the print position of each color. | |
| Auto Correction | - | On* / Off | Sets the machine to perform Color Calibration and Registration automatically. | |
| The factory settings are shown in Bold with an asterisk. | ||||
| Level 1 | Level 2 | Options | Descriptions |
| Direct Print | Paper Type | Plain Paper*/Thick Paper/ Thicker Paper/Thin Paper/ Recycled Paper/Bond Paper/ Label Paper/Envelope/Env. Thick/Env. Thin/Glossy Paper | Set the print media type when printing directly from the USB flash drive. |
| Paper Size | A4 /Letter*/B5 (JIS) /B5 (ISO) / A5 /A5 (Long Edge) /A6 / Executive /Legal /Folio / Com-10 /Monarch /C5 /DL / 3"x5" | Set the paper size when printing directly from the USB flash drive. | |
| Multiple Page | 1in1*/2in1/4in1/9in1/ 16in1/25in1/1 in 2x2 pages/ 1 in 3x3 pages/1 in 4x4 pages/1 in 5x5 pages | Set the page layout when printing multiple pages directly from the USB flash drive. | |
| Orientation | Portrait*/Landscape | Set the page orientation when printing directly from the USB flash drive. | |
| Collate | On*/Off | Enable or disable page collation when printing directly from the USB flash drive. | |
| Print Quality | Normal*/Fine | Set the print quality option when printing directly from the USB flash drive. | |
| PDF Option | Document*/Document&Stamps/ Document&Markup | Set the USB direct print setting to print either comments (Markup) or stamps in the PDF file along with the text. | |
| Index Print | Simple*/Details | Print a thumbnail page. | |
| The factory settings are shown in Bold with an asterisk. | |||

Functions
| Level 1 | Level 2 | Level 3 | Options | Descriptions |
| USB | See USB (Direct Print) on page 106. | Access the USB Direct Print menu. | ||
| Secure | See Printing Secure documents on page 109. | Print secure data. | ||
| Web | See Web on page 107. | Connect the Brother machine to an Internet service. | ||
| The factory settings are shown in Bold with an asterisk. | ||||
Features Table

Toner
| Level 1 | Level 2 | Level 3 | Options | Descriptions |
| Toner Life | - | - | Displays the remaining life for each toner cartridge | |
| Test Print | - | - | Print the Test Print page. | |
| Calibration | Calibrate | Yes / No | Performs a calibration to revise the colors. | |
| Reset | Yes / No | Set the calibration parameters back to the default settings. | ||
| Registration | - | Yes / No | Aligns the print position of each color. | |
| The factory settings are shown in Bold with an asterisk. | ||||
WiFi
Wi-Fi Setup
| Level 1 | Level 2 | Level 3 | Options | Descriptions |
| WiFi | WLAN Assistant | - | - | (Windows® only) You can configure your wireless network settings using the Brother CD-ROM. |
| Setup Wizard | - | - | Configs the wireless network settings using the setup wizard. | |
| WPS/AOSS | - | - | Configs the wireless network settings using WPS or AOSS™ method. | |
| The factory settings are shown in Bold with an asterisk. | ||||

USB (Direct Print)
| Level 1 | Level 2 | Level 3 | Level 4 | Options | Descriptions |
| USB | Index Print | - | - | - | Print a thumbnail page. |
| (Select File) | Number of Print (01-99) | Paper Type | Plain Paper*/Thick Paper/Thicker Paper/Thin Paper/Recycled Paper/Bond Paper/Label Paper/Envelope/Env. Thick/Env. Thin/Glossy Paper | Set the print media type when printing directly from the USB flash drive. | |
| Paper Size | A4 / Letter*/B5 (JIS) / B5 (ISO) / A5 / A5 (Long Edge) / A6 / Executive / Legal / Folio / Com-10 / Monarch /C5 / DL / 3"x5" | Set the paper size when printing directly from the USB flash drive. | |||
| Multiple Page | 1in1*/2in1/4in1/9in1/16in1/25in1/1 in 2x2 pages/1 in 3x3 pages/1 in 4x4 pages/1 in 5x5 pages | Set the page layout when printing multiple pages directly from the USB flash drive. | |||
| Orientation | Portrait*/Landscape | Set the page orientation when printing directly from the USB flash drive. | |||
| 2-sided | On (Long Bind) / On (Short Bind) / Off* | Choose the 2-sided print format when printing directly from the USB flash drive. |

The factory settings are shown in Bold with an asterisk.
USB (Direct Print) menu is displayed after pressing

USB (Direct Print) (continued)
| Level 1 | Level 2 | Level 3 | Level 4 | Options | Descriptions |
| USB(Continued) | (Select File)(Continued) | Number of Print (01-99)(Continued) | Collate | On*/Off | Enable or disable page collation when printing directly from the USB flash drive. |
| PrintQuality | Normal*/Fine | Set the print quality option when printing directly from the USB flash drive. | |||
| Tray Use | (Without Tray2 installed)Auto*/MP Only / Tray1 Only(With Tray2 installed)Auto*/MP Only / Tray1 Only / Tray2 Only | Chooses the tray that will be used when printing directly from the USB flash drive. | |||
| PDF Option | Document*/Document&Stamps / Document&Markup | Set the USB direct print setting whether to print comments (Markup) or stamps in the PDF file along with the text. | |||
| OutputColor | Auto*/Color/ Monochrome | Choose color or black & white when printing directly from the USB flash drive. |

The factory settings are shown in Bold with an asterisk.
USB (Direct Print) menu is displayed after pressing

Web
| Level 1 | Level 2 | Level 3 | Options | Descriptions |
| SkyDrive® | - | - | - | Connect the Brother machine to an Internet service. |
| Box | - | - | - | Visit the Brother Solutions Center to download the Web Connect Guide at http://solutions.brother.com/. |
| Google Drive™ | - | - | - | |
| Dropbox | - | - | - | |
| The factory settings are shown in Bold with an asterisk. The Web menu is displayed after pressing | ||||
Entering Text
When you must enter text into the machine the keyboard will appear on the Touchscreen.
Press to cycle among letters, numbers, and special characters.
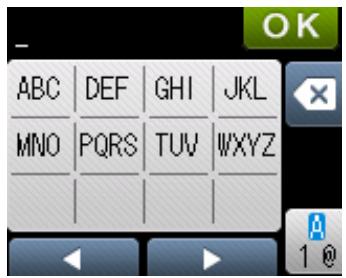
Inserting spaces
To enter a space, press twice to choose special characters, then press the space button
NOTE
The characters that are available may differ depending on your country.
Making corrections
If you entered an incorrect character and want to change it, press to move the cursor under the incorrect character. Press × , and then enter the correct character. You can also back up and insert letters.
If the Touchscreen does not display , press × for each character you want to erase, or press and hold × to erase all the characters.
Repeating letters
If you must enter a letter that is on the same button as the letter before it, press to move the cursor to the right before you press the same button again.
Printing Secure documents
Secure documents
Secure documents are protected by a password and only those people who know the password will be able to print the document. The machine will not print the document when you send it for printing. To print the document, you must enter the password at the Touchscreen of the machine. Secure documents will be deleted after they are printed once.
When the area to spool documents is full, the Touchscreen displays Print Data Full. Press × to return to the Home screen.
To delete the spooled print job, you must delete it at the Touchpanel.
NOTE
- Secure documents will be deleted when the machine is turned off.
- If you wait 60 seconds to continue the Touchscreen operation, the Secure Print setting will close and the Touchscreen will return to the Home screen.
- For more information about the settings in the printer driver and how to create secure documents, see Secure Print on page 45 (for Windows® printer driver), Secure Print tab on page 57 (for Windows® BR-Script printer driver), Secure Print on page 70 (for Macintosh printer driver) or Secure Print on page 80 (for Macintosh BR-Script printer driver).
How to print Secure documents
1 Press

2 Press Secure.
Press or to choose the user name, and then press it.
Press or to choose the job, and then press it.
5 Enter the registered four-digit password. To enter each digit, use the keyboard on the machine's Touchscreen, and then press OK, (see Entering Text on page 108).
Press + or - to enter the number of copies you want.
7 Press Start.
NOTE
To delete the secure document from the memory, replace steps 6 - 7 with the following step:
- Press Delete, and then press Yes.
The Touchscreen displays Deleted and returns to the Home screen.
Security features
Setting Lock
Setting Lock lets you set a password to stop other people from accidentally changing your machine's settings. Make a careful note of your password. If you forget it, you must reset the passwords stored in the machine. Call your administrator or Brother Customer Service. While Setting Lock is On, you cannot access the machine settings.
Setting up the password
1 Press Settling
Press General Setup > Setting Lock.
3 Enter a four-digit password using the keyboard on the machine's Touchscreen. Press OK.
4 Re-enter the password when the Touchscreen displays Verify:.. Press OK.
Press
Changing your Setting Lock password
Turn Setting Lock off before you change the password (see Turning Setting Lock on/off on page 111).
1 Press Settings
Press General Setup > Setting Lock > Set Password.
3 Enter the old four-digit password using the keyboard on the machine's Touchscreen. Press OK.
4 Enter a four-digit number for the new password using the keyboard on the machine's Touchscreen. Press OK.
5 Re-enter the new password when the Touchscreen displays Verify:. Press OK.
6 Press
Turning Setting Lock on/off
If you enter the wrong password when following the instructions below, the Touchscreen displays Wrong Password. Enter the correct password.
Turning Setting Lock on
1 Press

Press General Setup > Setting Lock > Lock Off On.
3 Enter the registered four-digit password using the keyboard on the machine's Touchscreen, and then press OK.
Turning Setting Lock off
1 Press

on the Touchscreen.
Enter the registered four-digit administrator password using the keyboard on the machine's Touchscreen.
Press OK.
Secure Function Lock 3.0
Use Secure Function Lock to configure passwords, set specific user page limits, and grant access to some or all of the operations listed here. You can configure and change the following Secure Function Lock 3.0 settings using Web Based Management or BRAdmin Professional 3 (Windows®):
Print 1
USB Direct Print
Web Connect (Download) 2
Color Print 12
Page Limit
1 Print and Color Print include print jobs via Google Cloud Print and Brother iPrint&Scan.
2 Available for Print, USB Direct Print and Web Connect (Download).
NOTE
- Make a careful note of your password. If you forget it, you must reset the password stored in the machine. For information about how to reset the password contact Brother Customer Service.
- Only administrators can set limitations and make changes for each user.
Active Directory Authentication
Active Directory Authentication restricts the use of the Brother machine. If Active Directory Authentication is enabled, the machine's Touchscreen will be locked. You cannot change the machine's settings until the user enters the user ID, domain name and password.
You can change the Active Directory Authentication setting using Web Based Management or BRAdmin Professional 3 (Windows®).
For more information about Active Directory Authentication, see the Network User's Guide.
IPSec
IPsec (Internet Protocol Security) is a security protocol that uses an optional Internet Protocol function to prevent manipulation and ensure the confidentiality of data transmitted as IP packets. IPsec encrypts data carried over the network, such as print data sent from computers to a printer. Because the data is encrypted at the network layer, applications that use a higher-level protocol use IPsec even if the user is not aware of its use.
IPsec supports the following operations:
IPsec transmissions
IPsec settings
For more information about IPsec, see the Network User's Guide.
Ecology features
Toner Save
Save toner by using this feature. When you set Toner Save to On, print appears lighter. The default setting is Off.
1 Press Settling
Press General Setup > Ecology > Toner Save.
Press On or Off.
4 Press
NOTE
If your machine has been set to Quiet mode On, you cannot set Toner Save to On.
Sleep Time
The Sleep mode setting can reduce power consumption. When the machine is in Sleep mode (Power Save mode) it acts as though it were turned off. The machine will wake up and start printing when it receives a print job.
Choose how long the machine must be idle before it goes into Sleep mode. When the machine receives a print file or document, the timer will be reset. The default setting is 3 minutes. While the machine is in Sleep mode the Touchscreen's backlight turns off.
1 Press Settling.
Press General Setup > Ecology > Sleep Time.
3 Enter the length of time (0-50 minutes) the machine will remain idle before entering Sleep mode, and then press OK.
4 Press
Deep Sleep mode
If the machine is in Sleep mode and does not receive any jobs for a certain length of time, the machine will go into Deep Sleep mode and the Touchscreen's backlight turns off and blinks. Deep Sleep mode uses less power than Sleep mode. The machine will wake up, when the machine receives a print job.
Auto Power Off
If the machine is in Deep Sleep mode for a certain length of time, it will go into Power Off mode. To start printing, press on the Touchpanel, and then send the print job.
You can choose how long the machine must be in Deep Sleep mode before it goes into Auto Power Off mode, by following these steps:
1 Press
Press General Setup > Ecology > Auto Power Off.
Choose the length of time (Off, 1hour, 2hours, 4hours or 8hours) the machine will remain idle before entering Auto Power Off mode, and then press it.
4 Press
NOTE
The machine does not go into Power Off mode when the machine is connected to a wired or wireless network or has secure documents in the memory.
Quiet mode feature
The Quiet mode setting can reduce printing noise. When Quiet Mode is turned on, the print speed becomes slower. The default setting is Off.
Turning Quiet mode on/off
1 Press
Press General Setup > Ecology > Quiet Mode.
Press On or Off.
4 Press
NOTE
If your machine has been set to Toner Save On, you cannot set Quiet mode to On.
Color Correction
The output density and print position for each color may vary depending on the machine's environment, such as temperature and humidity.
Color Calibration
Calibration helps you improve the color density.
NOTE
- If you are using the Windows® printer driver, the driver will get the calibration data automatically if both the Use Calibration Data and Get Device Data Automatically check boxes are selected. The default settings are On. See Color Calibration on page 48.
- If you are using the Macintosh printer driver, you must perform the calibration using the Status Monitor. Turn on the Status Monitor, and then select Color Calibration from the Control menu. See Status Monitor on page 82 for how to turn on the Status Monitor.
Calibrate
1 Press

2 Press Calibration > Calibrate.
Press Yes to confirm.
4 The Touchscreen displays Completed.
Press
Reset
Reset the calibration parameters back to those set at the factory.
1 Press

Press Calibration > Reset.
Press Yes to confirm.
4 The Touchscreen displays Completed.
Press
Color Registration
Registration helps you improve the print position for each color.
1 Pr

Press Registration.
Press Yes to confirm.
4 The Touchscreen displays Completed.
Press
Auto Correction
Select Auto Correction if you want the machine to perform Color Calibration and Registration automatically. The factory setting is On. The color correction process consumes some toner.
1 Pr

Press Color Correction > Auto Correction.
Press On or Off.
4 Press
4 Options
This machine has the following optional accessories. You can increase the capabilities of the machine with these items.
| Lower tray1 | SO-DIMM memory |
| LT-325CL | |
| See Lower tray (LT-325CL) on page 119. | See SO-DIMM on page 120. |
1 HL-L9200CDWT is equipped with the lower tray as standard equipment.
Lower tray (LT-325CL)
One optional lower tray (Tray 2) can be installed on HL-L9200CDW ^1 , and the lower tray can hold up to 500 sheets of 20 lb ( 80g / m^2 ) paper. When the optional lower tray is installed, the machine can hold up to 800 sheets of plain 20 lb ( 80g / m^2 ) paper. If you want to buy the optional lower tray unit, call the dealer you bought the machine from or Brother Customer Service.
1 Tray 2 is standard on HL-L9200CDWT.
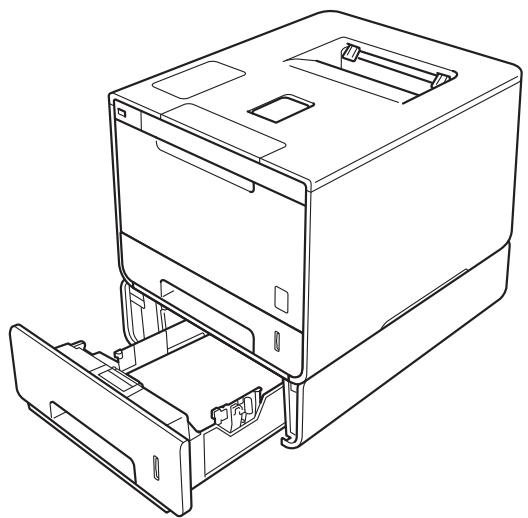
For setup, see the instructions that we have supplied with the lower tray unit.
WARNING
If you use a Lower Tray, DO NOT carry the machine with the Lower Tray. You may injure yourself or cause damage to the machine because the Lower Tray is not securely attached to the machine.
SO-DIMM
The machine has 128 MB of standard memory and one slot for optional memory expansion. You can increase the memory up to a maximum of 384 MB by installing one SO-DIMM (Small Outline Dual In-line Memory Module).
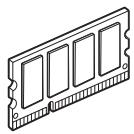
SO-DIMM types
For information about memory for your Brother machine, please visit: http://www.brother-usa.com/support/memory/
In general, the SO-DIMM must have the following specifications:
Type: 144-pin and 16-bit output
CAS latency: 4
Clock frequency: 267 MHz (533 Mb/S/Pin) or more
Capacity: 256 MB
Height: 1.18 in. (30.0 mm)
DRAM type: DDR2 SDRAM
NOTE
- There might be some SO-DIMMs that will not work with the machine.
For more information, call the dealer you bought the machine from or Brother Customer Service.
Installing extra memory
1 Turn off the machine's power switch.
2 Disconnect the interface cables from the machine, and then unplug the power cord from the AC power outlet.
NOTE
Always unplug the power cord from the AC power outlet before installing or removing the SO-DIMM.
3 Remove the plastic (1) and then the metal (2) SO-DIMM covers.

4 Unpack the SO-DIMM and hold it by its edges.
IMPORTANT
To prevent damage to the machine from static electricity, DO NOT touch the memory chips or the board's surface.
Hold the SO-DIMM by the edges and align the notches in the SO-DIMM with the protrusions in the slot. Insert the SO-DIMM diagonally (1), then tilt it toward the interface board until it locks into place (2).
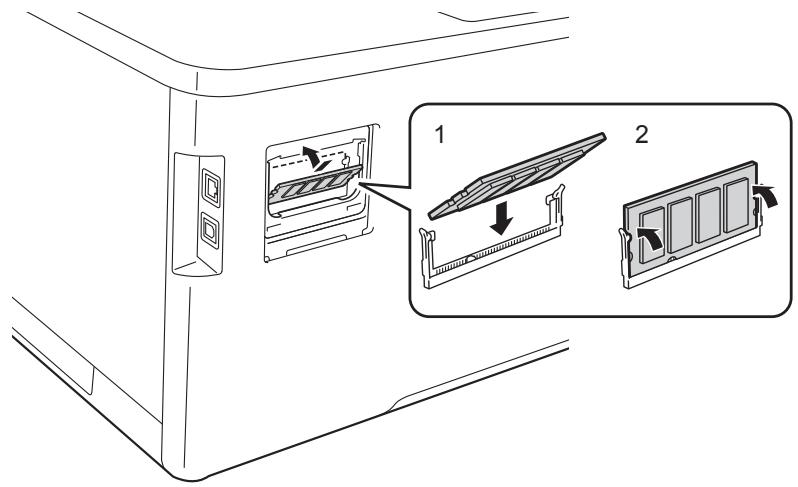
Put the metal (2) and then the plastic (1) SO-DIMM covers back on.
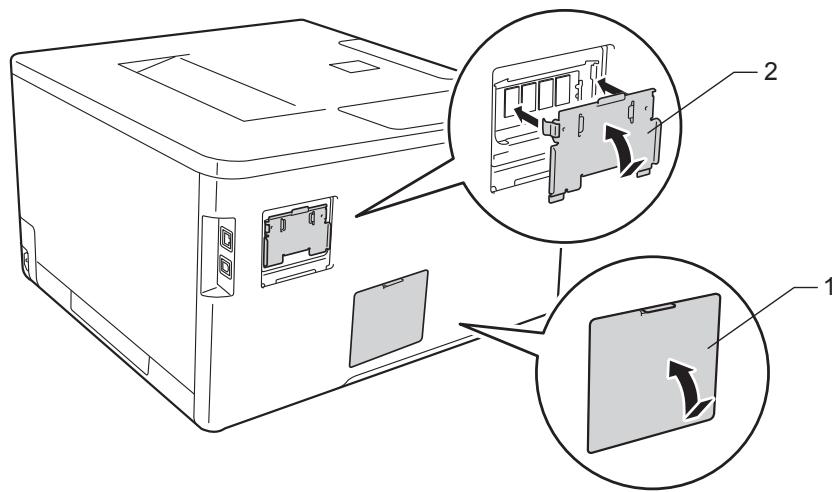
Plug the machine's power cord back into the AC power outlet first, and then connect the interface cables.
Turn on the machine's power switch.
NOTE
To make sure that you have installed the SO-DIMM properly, you can print the Printer Settings page that shows the current memory size, (see Machine Information on page 91.)
5 Routine Maintenance
Replacing supplies
You must replace supplies when the machine indicates that the life of the supply is over. You can replace the following supplies yourself.
Using non-Brother supplies may affect the print quality, hardware performance, and machine reliability.
NOTE
The drum unit and toner cartridge are two separate parts.
| Toner cartridge | Drum unit |
| See Replacing the toner cartridges on page 127. Order No. TN-339BK, TN-339C, TN-339M, TN-339Y | See Replacing the drum unit on page 133. Order No. DR-331CL |
| Belt unit | Waste toner box |
| See Replacing the belt unit on page 140. Order No. BU-320CL | See Replacing the waste toner box on page 146. Order No. WT-320CL |
The following messages appear on the Touchscreen in Ready mode. These messages provide advanced warnings to replace supplies before they reach their end of life. To avoid any inconvenience, you may want to buy spare supplies before the machine stops printing.
| Touchscreen messages | Supply to get ready | Approximate life | How to replace | Order No. |
| Toner Low: X | Toner cartridge X = C, M, Y, BK C = Cyan M = Magenta Y = Yellow BK = Black | 6,000 pages 1 2 | See page 128 | TN-339BK TN-339C TN-339M TN-339Y |
| Drum End Soon | Drum unit | 25,000 pages 1 3 | See page 134 | DR-331CL |
| Belt End Soon | Belt unit | 50,000 pages (5 pages per job) 1 3 20,000 pages (1 page per job) 1 3 | See page 140 | BU-320CL |
| WT Box End Soon | Waste toner box | 50,000 pages 1 3 | See page 146 | WT-320CL |
Letter or A4 size single-sided pages
2 Approximate cartridge yield is declared in accordance with ISO/IEC 19798.
3 Life of supply is approximate and may vary by type of use.
You must clean the machine regularly and replace supplies when the following messages are displayed on the Touchscreen:
| Touchscreen messages | Supply to replace | Approximate life | How to replace | Order No. |
| Replace Toner | Toner cartridge The Touchscreen displays the toner cartridge color that you must replace. BK = Black C = Cyan M = Magenta Y = Yellow | 6,000 pages 1 2 | See page 128 | TN-339BK TN-339C TN-339M TN-339Y |
| Replace Drum | Drum unit | 25,000 pages 1 3 | See page 134 | DR-331CL |
| Drum Stop | Drum unit | 25,000 pages 1 3 | See page 134 | DR-331CL |
| Replace Belt | Belt unit | 50,000 pages (5 pages per job) 1 3 20,000 pages (1 page per job) 1 3 | See page 140 | BU-320CL |
| Replace WT Box | Waste toner box | 50,000 pages 1 3 | See page 146 | WT-320CL |
| Replace Fuser | Fuser unit | 100,000 pages 1 3 | Contact Brother Customer Service for a replacement fuser unit. | |
| Replace PF Kit MP | Paper feeding kit | 50,000 pages 1 3 | Contact Brother Customer Service for a replacement PF kit MP. | |
| Replace PF Kit 1 | Paper feeding kit | 100,000 pages 1 3 | Contact Brother Customer Service for a replacement PF kit 1. | |
| Replace PF Kit 2 | Paper feeding kit | 100,000 pages 1 3 | Contact Brother Customer Service for a replacement PF kit 2. | |
| Replace Laser | Laser unit | 100,000 pages 1 3 | Contact Brother Customer Service for a replacement laser unit. | |
Letter or A4 size single-sided pages
2 Approximate cartridge yield is declared in accordance with ISO/IEC 19798.
3 Life of supply is approximate and may vary by type of use.
NOTE
- Visit to http://www.brother.com/original/index.html for instructions about how to return the used toner cartridge to the brother collection program. If you choose not to return your used toner cartridge, please discard the used toner cartridge according to local regulations, keeping it separate from domestic waste. If you have questions, contact your local waste disposal office.
- We recommend placing used supplies on a piece of paper to prevent accidentally spilling or scattering the material inside.
- If you use paper that is not a direct equivalent of the recommended paper, the life of supplies and machine parts may be reduced.
- The projected life for each of the toner cartridges is based on ISO/ICE 19798. Frequency of replacement will vary depending on the print volume, percentage of coverage, types of media used, and powering on/off of the machine.
- Frequency of replacement supplies except toner cartridges will vary depending on the print volume, types of media used, and powering on/off of the machine.
Replacing the toner cartridges
Order No. For the item number of the toner cartridges, see Replacing supplies on page 123
The toner cartridge can print approximately 6,000 pages (black, cyan, magenta, yellow) ^1 . Actual page count will vary depending on your average type of document. When a toner cartridge is running low, the Touchscreen displays Toner Low.
The toner cartridge that comes supplied with the machine must be replaced after printing approximately 6,000 pages (black, cyan, magenta, yellow) ^1 .
1 Approximate cartridge yield is declared in accordance with ISO/IEC 19798.
NOTE
- The indication of remaining toner life will vary depending on the types of documents printed and your usage.
- It is a good idea to keep a new toner cartridge ready for use when you see the Toner Low warning.
- To ensure high quality printing, we recommend using only Genuine Brother Brand toner cartridges. When you want to buy toner cartridges, contact your local Brother retailer or Brother Customer Service.
- We recommend cleaning the machine when you replace the toner cartridge. See Cleaning and Checking the machine on page 153.
- DO NOT unpack the new toner cartridge until you are ready to install it.
Toner Low: X
If the Touchscreen displays Toner Low: X, buy a new toner cartridge for the color indicated on the Touchscreen and have it ready before you get a Replace Toner message.
Replace Toner
When the Touchscreen displays Replace Toner the machine will stop printing until you replace the toner cartridge.
The Touchscreen indicates the toner cartridge color that you must replace. (BK=Black, C=Cyan, M=Magenta, Y=Yellow).
A new genuine Brother toner cartridge will reset the Replace Toner message.
NOTE
For more information about how toner cartridge life is calculated, see Important information for the toner cartridge life on page 215.
Replacing the toner cartridges
1 Make sure that the machine is turned on.
Press the front cover release button and pull open the front cover.
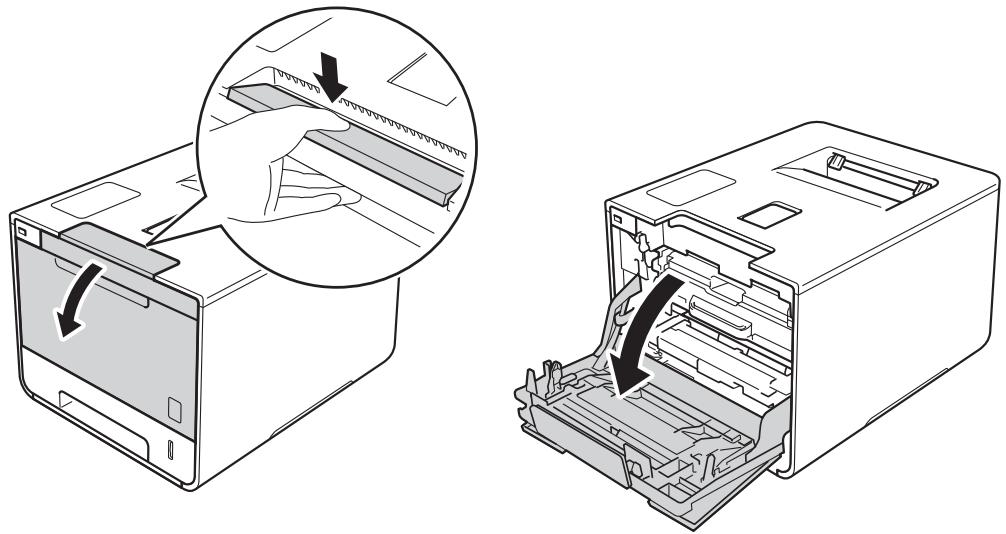
Hold the blue handle of the drum unit. Pull the drum unit out until it stops.
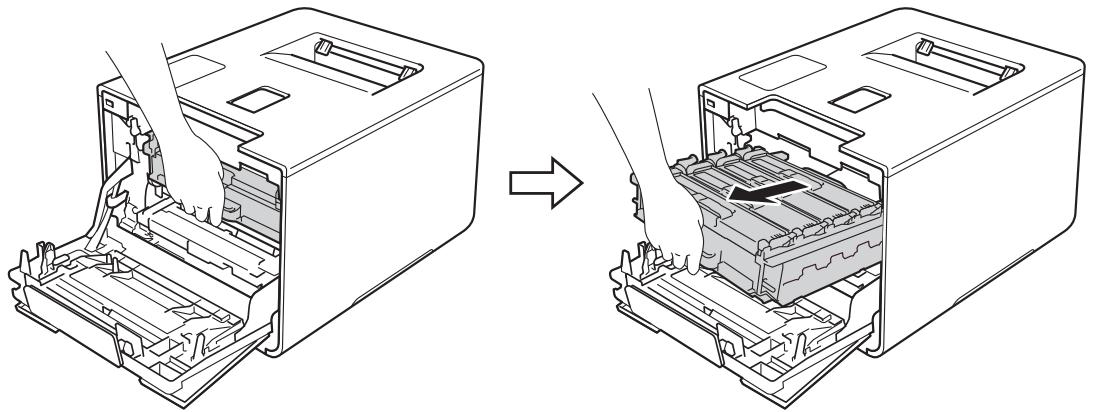
Hold the handle of the toner cartridge and gently push it forward to unlock it. Then pull it out of the drum unit. Repeat this for all the toner cartridges.

WARNING
#
- DO NOT put a toner cartridge into a fire. It could explode, resulting in injuries.
- DO NOT use flammable substances, any type of spray, or an organic solvent/liquid containing alcohol or ammonia to clean the inside or outside of the machine. Doing so could cause a fire or electrical shock. Instead, use only a dry, soft, lint-free cloth.
(See the Product Safety Guide.)


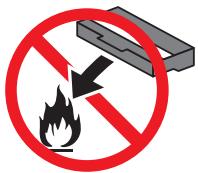
IMPORTANT
- Handle the toner cartridge carefully. If toner scatters on your hands or clothes, immediately wipe or wash it off with cold water.
- To avoid print quality problems, DO NOT touch the shaded parts shown in the illustration.
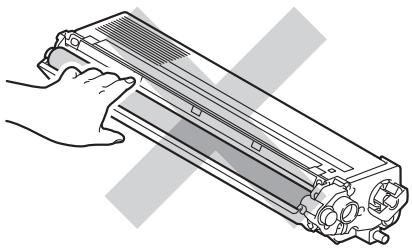
- We recommend placing the toner cartridge on a clean, flat, level, stable surface with a sheet of disposable paper or cloth underneath it in case you accidentally spill or scatter toner.
NOTE
- Be sure to seal up the used toner cartridge tightly in a bag so that toner powder does not spill out of the cartridge.
- Visit to http://www.brother.com/original/index.html for instructions about how to return your used supplies to the Brother collection program. If you choose not to return your used supply, please discard the used supply according to local regulations, keeping it separate from domestic waste. If you have questions, contact your local waste disposal office.
Clean the corona wire inside the drum unit by gently sliding the blue tab from left to right and right to left several times.
IMPORTANT
Be sure to return the tab to the home position (1). If you do not, printed pages may have a vertical stripe.
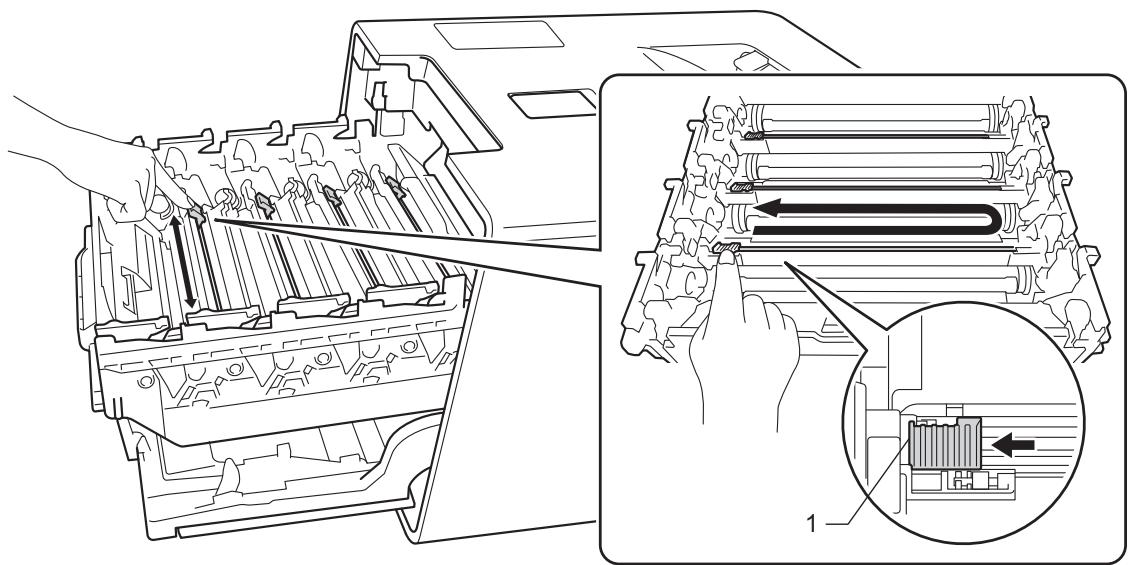
6 Repeat step 5 to clean each of three remaining corona wires.
7 Unpack the new toner cartridge, then pull off the protective cover.
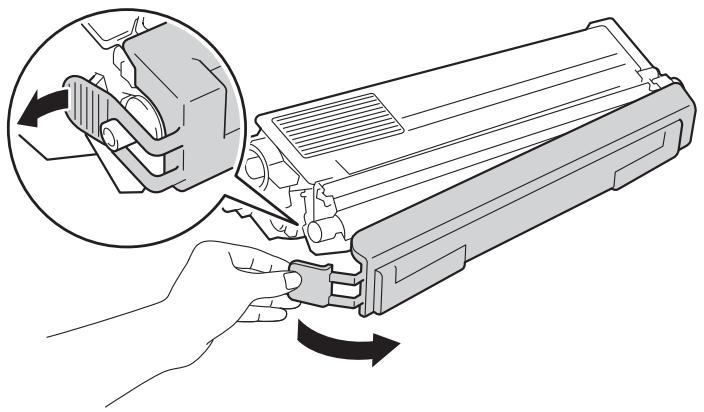
IMPORTANT
- DO NOT unpack the new toner cartridge until you are ready to install it. If a toner cartridge is left unpacked for a long time, the toner life will be shortened.
- If an unpacked drum unit is exposed to direct sunlight (or room light for long periods of time), the unit may be damaged.
- Brother strongly recommends that you DO NOT refill the toner cartridge provided with your machine. We also strongly recommend that you continue to use only Genuine Brother Brand replacement toner cartridges. Use or attempted use of potentially incompatible toner and/or cartridges in the Brother machine may cause damage to the machine and/or may result in unsatisfactory print quality. Our limited warranty coverage does not apply to any problem that is caused by the use of unauthorized third party toner and/or cartridges. To protect your investment and obtain premium performance from the Brother machine, we strongly recommend the use of Genuine Brother Supplies.
- Put the toner cartridge in the drum unit immediately after you have removed the protective cover. To prevent degradation to the print quality, DO NOT touch the shaded parts shown in the illustration.

Hold the handle of the toner cartridge and slide the toner cartridge into the drum unit then gently pull it toward you until you hear it lock into place. Make sure that you match the toner cartridge color to the same color label on the drum unit. Repeat this for all the toner cartridges.

NOTE
Make sure you installed the toner cartridge correctly or it may separate from the drum unit.
9 Push the drum unit in until it stops.

10 Close the front cover of the machine.
NOTE
After replacing the toner cartridge, DO NOT turn off the machine's power switch or open the front cover until the Touchscreen returns to the Home screen.
Replacing the drum unit
Order No. DR-331CL
A new drum unit can print approximately 25,000 pages. ^12
Letter or A4 size single-sided pages.
2 Drum life is approximate and may vary by type of use.
NOTE
- There are many factors that determine the actual drum life, such as the temperature, humidity, type of paper, type of toner used and so on. Under ideal conditions, the average drum life is estimated at approximately 25,000 pages. The actual number of pages that your drum will print may be significantly less than this estimate. Because we have no control over the many factors that determine the actual drum life, we cannot guarantee a minimum number of pages that will be printed by your drum.
- For best performance, use only genuine Brother toner. The machine should be used only in a clean, dust-free environment with adequate ventilation.
- Printing with a non-Brother drum unit may reduce not only the print quality but also the quality and life of the machine itself. Warranty coverage does not apply to problems caused by the use of a non-Brother drum unit.
Drum!
The corona wires are coated with paper dust or toner. Clean the corona wires in the drum unit (see Cleaning the corona wires on page 160).
Drum End Soon
The drum unit is nearing the end of its rated life and will require replacement. We recommend you keep a genuine Brother drum unit ready for installation. Buy a new drum unit (DR-331CL) and have it ready before you get a Replace Drum message.
Replace Drum
The drum unit has exceeded its rated life. Please replace the drum unit with a new one. We recommend a genuine Brother drum unit be installed at this time.
After replacement, reset the drum counter by following the instructions included with the new drum unit.
Drum Stop
We cannot guarantee the print quality. Please replace the drum unit with a new one. We recommend a genuine Brother drum unit be installed at this time.
After replacement, reset the drum counter by following the instructions included with the new drum unit.
Replacing the drum unit
IMPORTANT
- While removing the drum unit, handle it carefully because it may contain toner. If toner scatters on your hands or clothes, immediately wipe or wash it off with cold water.
- Every time you replace the drum unit, clean the inside of the machine (see Cleaning and Checking the machine on page 153).
When you replace the drum unit with a new one, follow these steps, and then reset the drum counter by following the steps on page 139.
1 Make sure that the machine is turned on.
Press the front cover release button and pull open the front cover.

Hold the blue handle of the drum unit. Pull the drum unit out until it stops.


Turn the blue lock lever (1) at the left of the machine counterclockwise to the release position. Holding the blue handles of the drum unit, lift the front of the drum unit and remove it from the machine.

IMPORTANT
- Hold the blue handles of the drum unit when you carry it. DO NOT hold the sides of the drum unit.
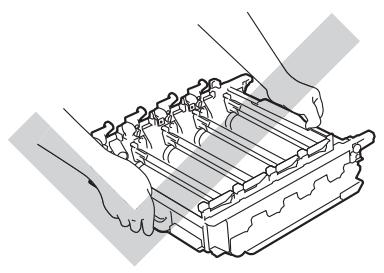

- We recommend placing the drum unit on a clean, flat, level, stable surface with a sheet of disposable paper or cloth underneath it in case you accidentally spill or scatter toner.
- To prevent damage to the machine from static electricity, DO NOT touch the electrodes shown in the illustration.

Hold the handle of the toner cartridge and gently push it forward to unlock it. Then pull it out of the drum unit. Repeat this for all the toner cartridges.
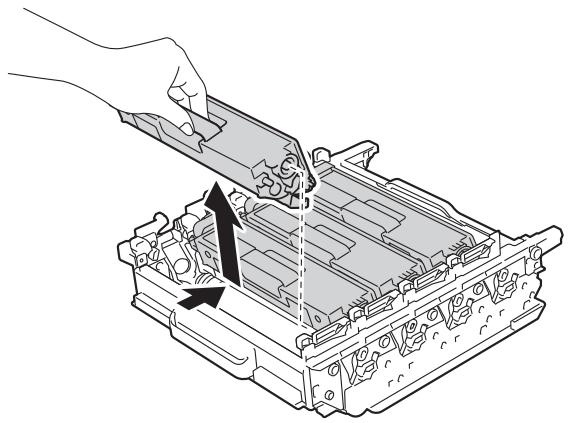
WARNING

- DO NOT put a toner cartridge into a fire. It could explode, resulting in injuries.
- DO NOT use flammable substances, any type of spray, or an organic solvent/liquid containing alcohol or ammonia to clean the inside or outside of the machine. Doing so could cause a fire or electrical shock. Instead, use only a dry, soft, lint-free cloth.
(See the Product Safety Guide.)


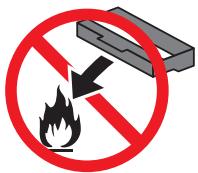
IMPORTANT
- Handle the toner cartridge carefully. If toner scatters on your hands or clothes, immediately wipe or wash it off with cold water.
- To avoid print quality problems, DO NOT touch the shaded parts shown in the illustrations.
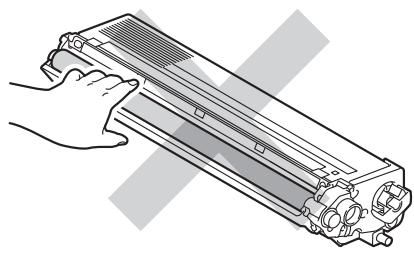
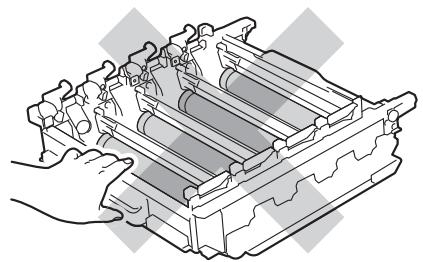

- We recommend placing the toner cartridge on a clean, flat, level, stable surface with a sheet of disposable paper or cloth underneath it in case you accidentally spill or scatter toner.
NOTE
- Be sure to seal up the used drum unit tightly in a bag so that toner powder does not spill out of the drum unit.
- Visit to http://www.brother.com/original/index.html for instructions about how to return your used supplies to the Brother collection program. If you choose not to return your used supply, please discard the used supply according to local regulations, keeping it separate from domestic waste. If you have questions, contact your local waste disposal office.
Unpack the new drum unit and remove the protective cover.
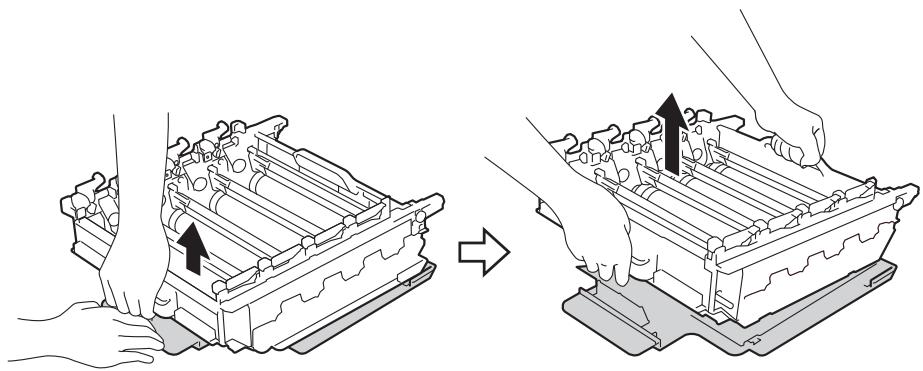
Hold the handle of the toner cartridge and slide it into the appropriate colored section of the drum unit until you hear it lock into place.
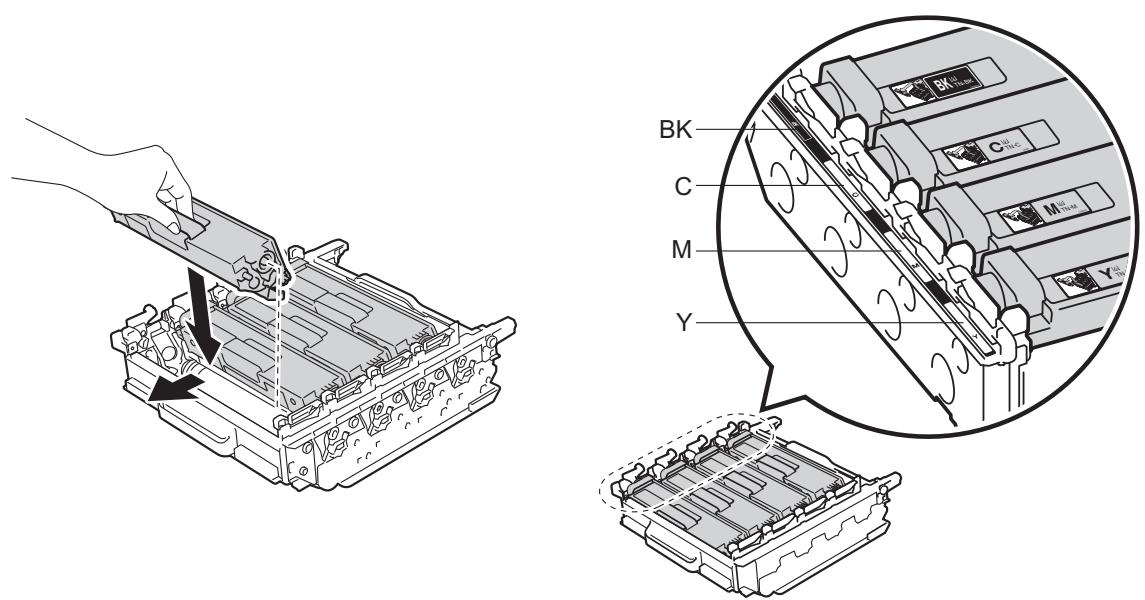
BK - Black
C-Cyan
M - Magenta
Y - Yellow
NOTE
Make sure you install the toner cartridge correctly or it may separate from the drum unit.
Make sure the blue lock lever (1) is in the release position as shown in the illustration.
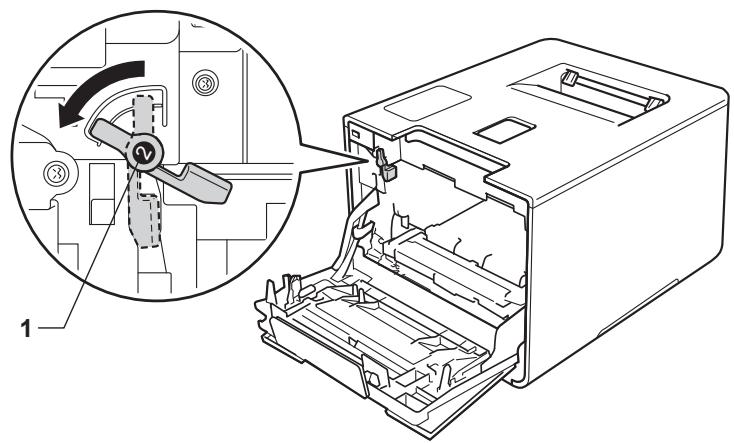
Gently slide the drum unit into the machine until it stops at the blue lock lever.

10 Turn the blue lock lever (1) clockwise to the lock position.
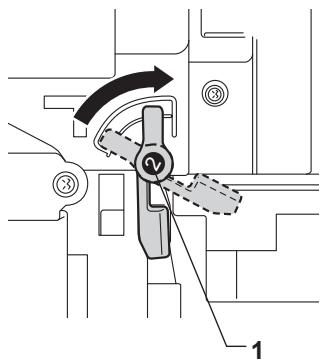
Push the drum unit in until it stops.

12 Close the front cover of the machine.
Resetting the drum counter
When you replace a drum unit with a new one, you must reset the drum counter by completing the following steps:
Press to interrupt the error.
Press Settles
Press Machine Information > Parts Life.
Press X until the Touchscreen message changes.
Press Drum.
Press Yes.
7 Press
Replacing the belt unit
Order No. BU-320CL
A new belt unit can print approximately 50,000 pages (5 pages per job), ^12 or 20,000 pages (1 page per job) ^12
Letter or A4 size single-sided pages.
2 Belt unit life is approximate and may vary by type of use.
Belt End Soon
If the Touchscreen displays Belt End Soon, it means the belt unit is near the end of its life. Buy a new belt unit and have it ready before you get a Replace Belt message. To replace the belt unit, see Replacing the belt unit on page 140.
Replace Belt
When the Replace Belt message appears on the Touchscreen, you must replace the belt unit.
After replacement, reset the belt unit by following the instructions included with the new belt unit.
IMPORTANT
- DO NOT touch the surface of the belt unit. If you touch it, it could degrade print quality.
- Damage caused by incorrect handling of the belt unit may void your warranty.
Replacing the belt unit
1 Make sure that the machine is turned on.
Press the front cover release button and pull open the front cover.

Hold the blue handle of the drum unit. Pull the drum unit out until it stops.

4 Turn the blue lock lever (1) at the left of the machine counterclockwise to the release position. Holding the blue handles of the drum unit, lift the front of the drum unit and remove it from the machine.

IMPORTANT
- Hold the blue handles of the drum unit when you carry it. DO NOT hold the sides of the drum unit.
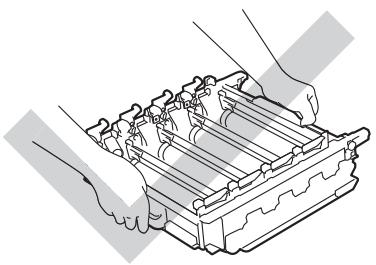
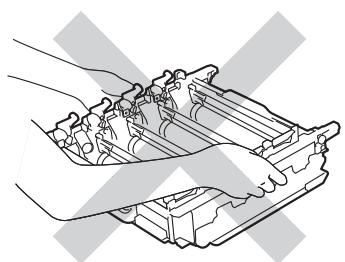
- We recommend placing the drum unit on a clean, flat, level, stable surface with a sheet of disposable paper or cloth underneath it in case you accidentally spill or scatter toner.
- To prevent damage to the machine from static electricity, DO NOT touch the electrodes shown in the illustration.
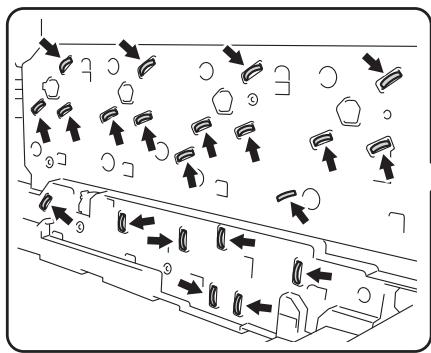

Hold the blue handle of the belt unit with both hands and lift the belt unit up, and then pull it out.

IMPORTANT
To avoid print quality problems, DO NOT touch the shaded parts shown in the illustrations.
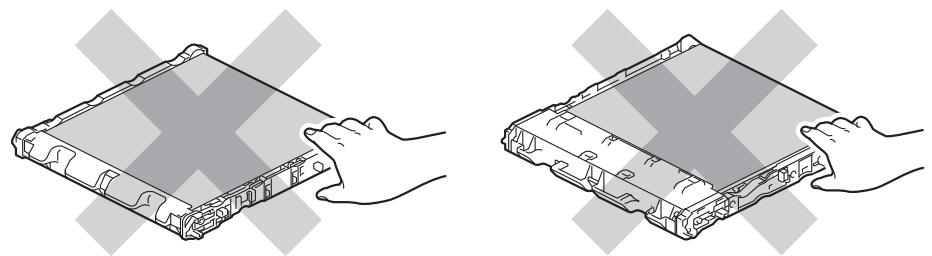
Unpack the new belt unit and install it in the machine. Make sure the belt unit is level and fits firmly into place.
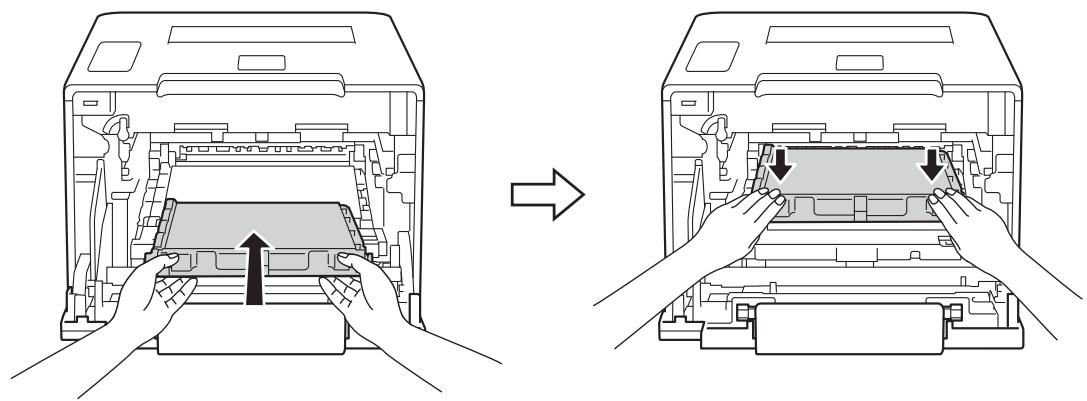
Make sure the blue lock lever (1) is in the release position as shown in the illustration.

Gently slide the drum unit into the machine until it stops at the blue lock lever.
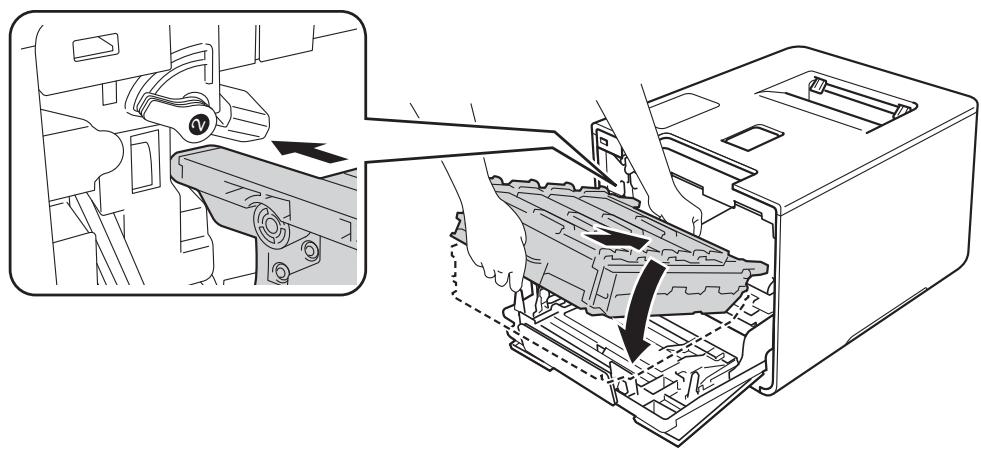
9 Turn the blue lock lever (1) clockwise to the lock position.

Push the drum unit in until it stops.

11 Close the front cover of the machine.
Resetting the belt counter
When you replace the belt unit with a new one, you must reset the belt unit counter by completing the following steps:
Press to interrupt the error.
2 Press Settings
Press Machine Information > Parts Life.
Press × until the Touchscreen message changes.
Press Belt Unit.
Press Yes.
7 Press
Replacing the waste toner box
Order No. WT-320CL
The life of a waste toner box is approximately 50,000 pages. ^12
1 Letter or A4 size single-sided pages.
2 Waste toner box life is approximate and may vary by type of use.
WT Box End Soon
If the Touchscreen displays WT Box End Soon, it means the waste toner box is near the end of its life. Buy a new waste toner box and have it ready before you get a Replace WT Box message. To replace the waste toner box, see Replacing the waste toner box on page 146.
Replace WT Box
When the Replace WT Box message appears on the Touchscreen, you must replace the waste toner box.
Replacing the waste toner box
1 Make sure that the machine is turned on.
Press the front cover release button and pull open the front cover.

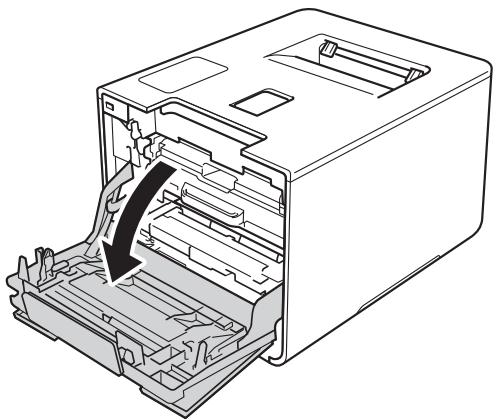
Hold the blue handle of the drum unit. Pull the drum unit out until it stops.

4 Turn the blue lock lever (1) at the left of the machine counterclockwise to the release position. Holding the blue handles of the drum unit, lift the front of the drum unit and remove it from the machine.
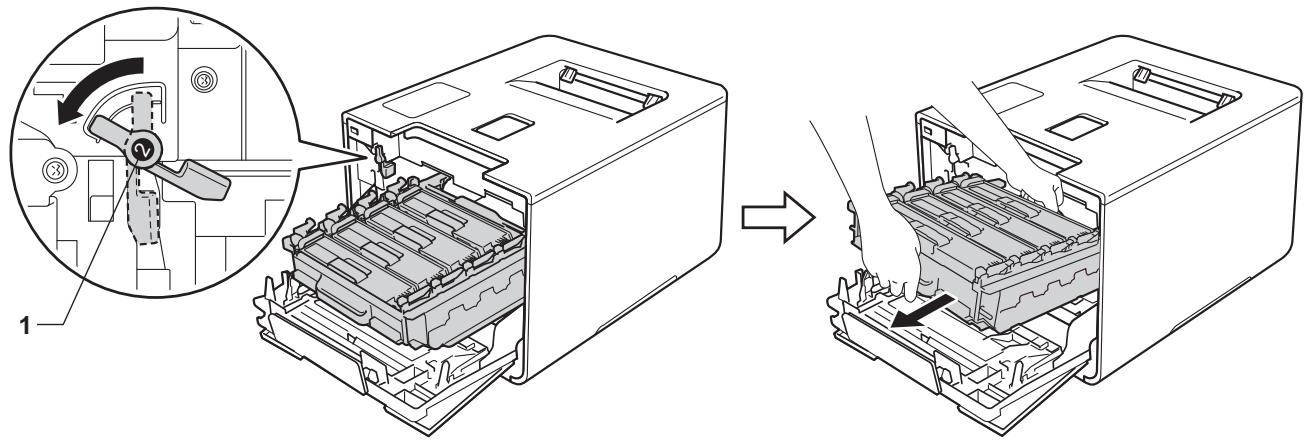
IMPORTANT
- Hold the blue handles of the drum unit when you carry it. DO NOT hold the sides of the drum unit.
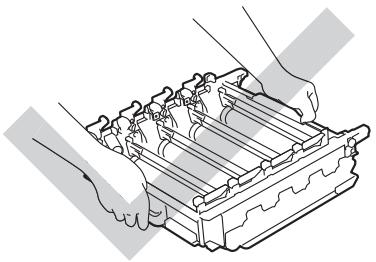
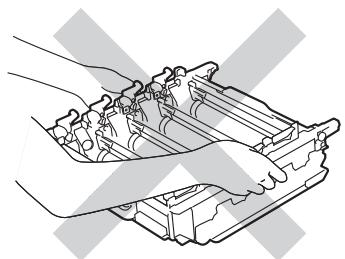
- We recommend placing the drum unit on a clean, flat, level, stable surface with a sheet of disposable paper or cloth underneath it in case you accidentally spill or scatter toner.
- To prevent damage to the machine from static electricity, DO NOT touch the electrodes shown in the illustration.

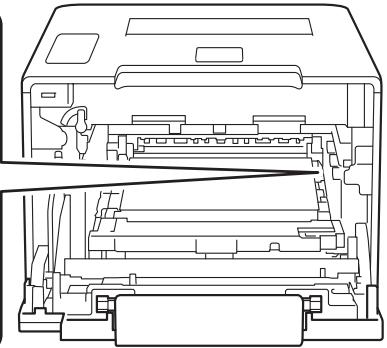
Hold the blue handle of the belt unit with both hands and lift the belt unit up, and then pull it out.
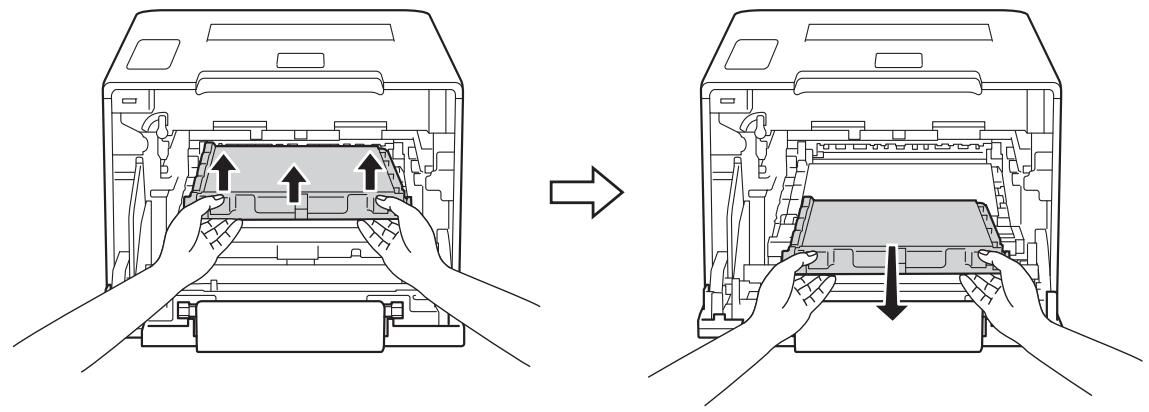
IMPORTANT
To avoid print quality problems, DO NOT touch the shaded parts shown in the illustrations.
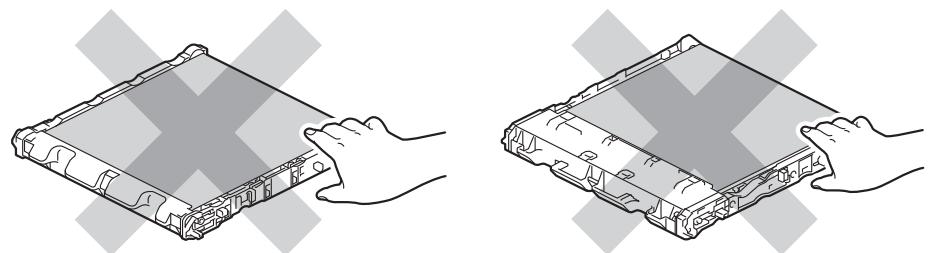
6 Remove the two pieces of orange packing material and discard them.

NOTE
This step is only necessary when you are replacing the waste toner box for the first time, and is not required for the replacement waste toner box. The orange packing pieces are installed at the factory to protect your machine during shipment.
Hold the blue handle of the waste toner box and remove the waste toner box from the machine.
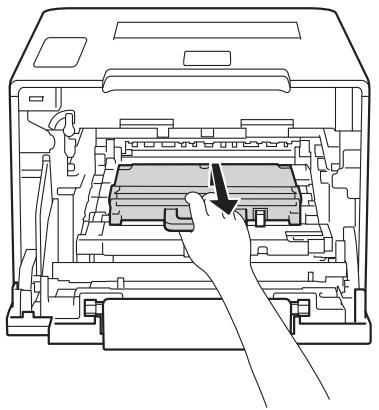
IMPORTANT
DO NOT reuse the waste toner box.

WARNING

- DO NOT put the waste toner box into a fire. It could explode, resulting in injuries.
- DO NOT use flammable substances, any type of spray, or an organic solvent/liquid containing alcohol or ammonia to clean the inside or outside of the machine. Doing so could cause a fire or electrical shock. Instead, use only a dry, soft, lint-free cloth.
(See the Product Safety Guide.)


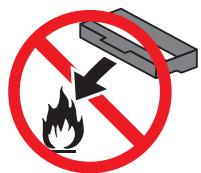
NOTE
- Be sure to seal up the waste toner box tightly in an appropriate bag so that toner powder does not spill out of the waste toner box.
- Discard the used waste toner box according to local regulations, keeping it separate from domestic waste. If you have questions, contact your local waste disposal office.
Unpack the new waste toner box and install it in the machine using the blue handle. Make sure the waste toner box is level and fits firmly into place.
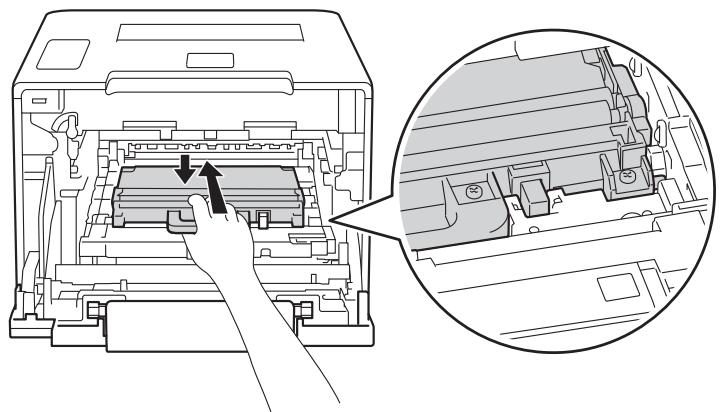
9 Slide the belt unit back into the machine. Make sure the belt unit is level and fits firmly into place.
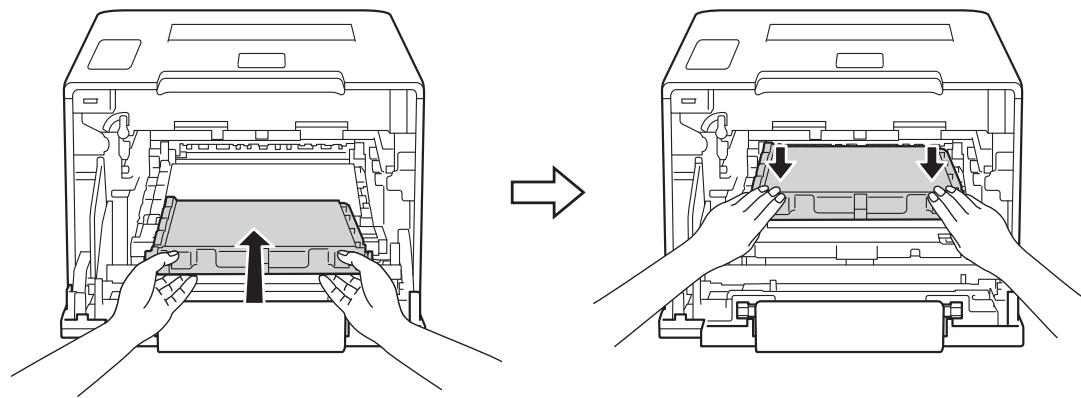
10 Make sure the blue lock lever (1) is in the release position as shown in the illustration.

Gently slide the drum unit into the machine until it stops at the blue lock lever.

12 Turn the blue lock lever (1) clockwise to the lock position.

Push the drum unit in until it stops.
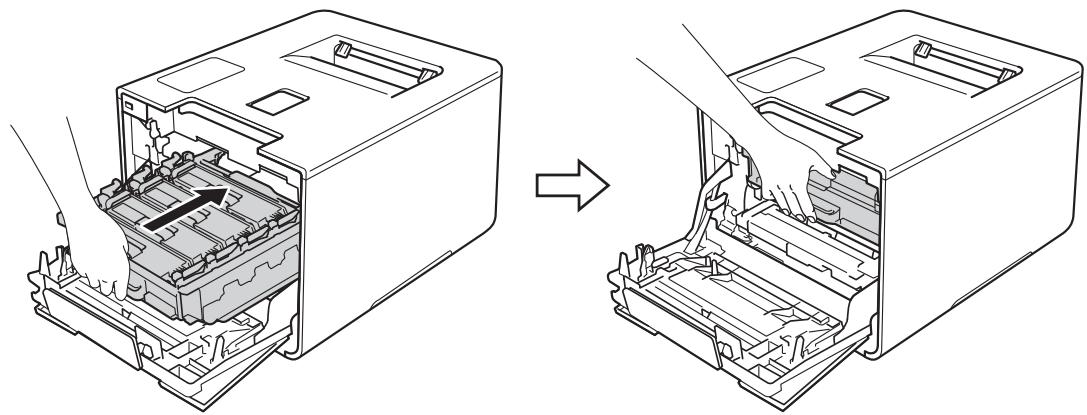
14 Close the front cover of the machine.
Cleaning and Checking the machine
Clean the outside and inside of the machine regularly with a dry, soft, lint-free cloth. When you replace the toner cartridge or the drum unit, make sure that you clean the inside of the machine. If printed pages are stained with toner, clean the inside of the machine with a dry, soft, lint-free cloth.
WARNING
- DO NOT put a toner cartridge into a fire. It could explode, resulting in injuries.
- DO NOT use flammable substances, any type of spray, or an organic solvent/liquid containing alcohol or ammonia to clean the inside or outside of the machine. Doing so could cause a fire or electrical shock. Instead, use only a dry, soft, lint-free cloth.
(See the Product Safety Guide.)


IMPORTANT
Use neutral detergents. Cleaning with volatile liquids such as thinner or benzine will damage the surface of the machine.
Cleaning the outside of the machine
Clean the Touchscreen as follows:
Press and hold down to turn off the machine.
2 Clean the Touchscreen with a dry, soft lint-free cloth.
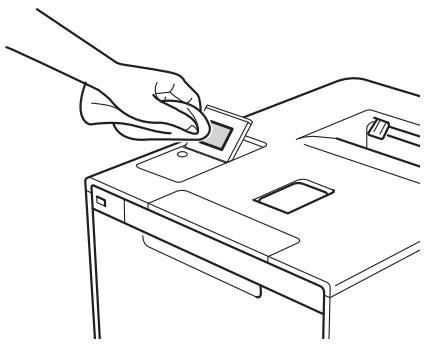
Press to turn on the machine.
Clean the outside of the machine as follows:
Press and hold down to turn the machine off.
Wipe the outside of the machine with a dry, soft, lint-free cloth to remove dust.
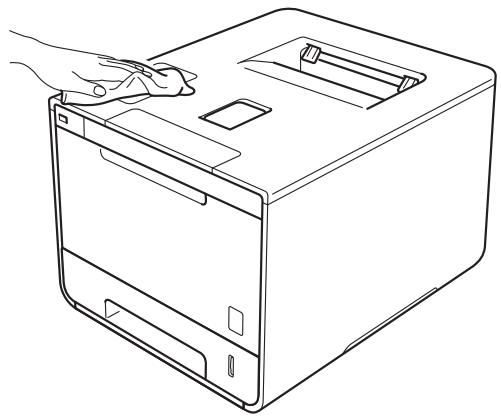
Pull the paper tray completely out of the machine.

If paper is loaded in the paper tray, remove it.
5 Remove anything that is stuck inside the paper tray.
Wipe the inside and the outside of the paper tray with a dry, soft, lint-free cloth to remove dust.
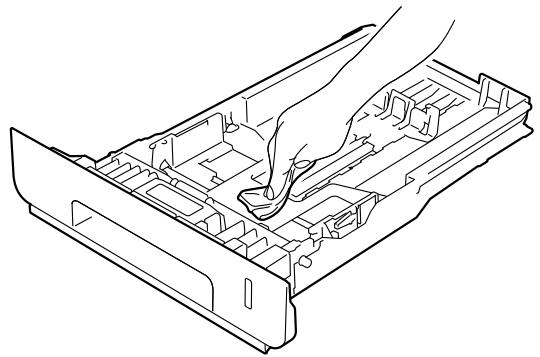
7 Re-load the paper and put the paper tray firmly back in the machine.
8 Turn on the machine.
Cleaning the inside of the machine
Press and hold down to turn the machine off.
Press the front cover release button and pull open the front cover.

Hold the blue handle of the drum unit. Pull the drum unit out until it stops.
Turn the blue lock lever (1) at the left of the machine counterclockwise to the release position. Holding the blue handles of the drum unit, lift the front of the drum unit and remove it from the machine.

IMPORTANT
- Hold the blue handles of the drum unit when you carry it. DO NOT hold the sides of the drum unit.

- We recommend placing the drum unit on a clean, flat, level, stable surface with a sheet of disposable paper or cloth underneath it in case you accidentally spill or scatter toner.
- To prevent damage to the machine from static electricity, DO NOT touch the electrodes shown in the illustration.

Wipe the four scanner windows (1) with a dry, soft, lint-free cloth.
Make sure the blue lock lever (1) is in the release position as shown in the illustration.

Gently slide the drum unit into the machine until it stops at the blue lock lever.

8 Turn the blue lock lever (1) clockwise to the lock position.
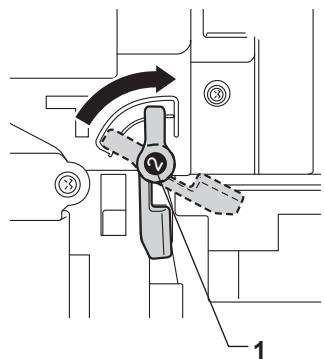
9 Push the drum unit in until it stops.
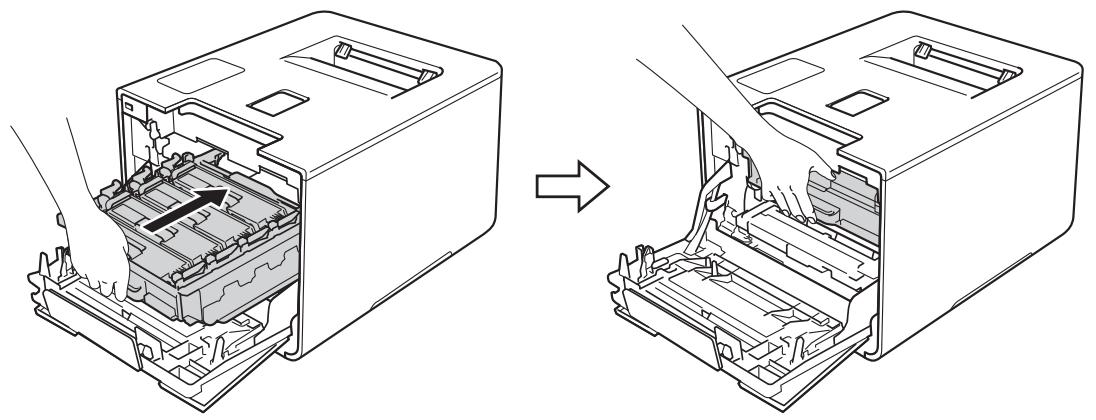
10 Close the front cover of the machine.
11 Turn on the power switch.
Cleaning the corona wires
If you have print quality problems, clean the corona wires as follows:
1 Make sure that the machine is turned on.
Press the front cover release button and pull open the front cover.

Hold the blue handle of the drum unit. Pull the drum unit out until it stops.
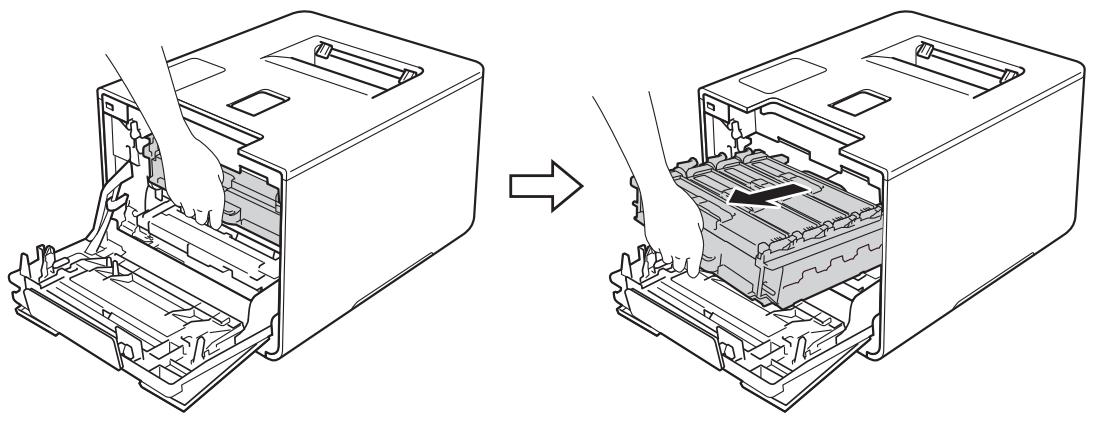
Hold the handle of the toner cartridge and gently push it forward to unlock it. Then pull it out of the drum unit. Repeat this for all the toner cartridges.
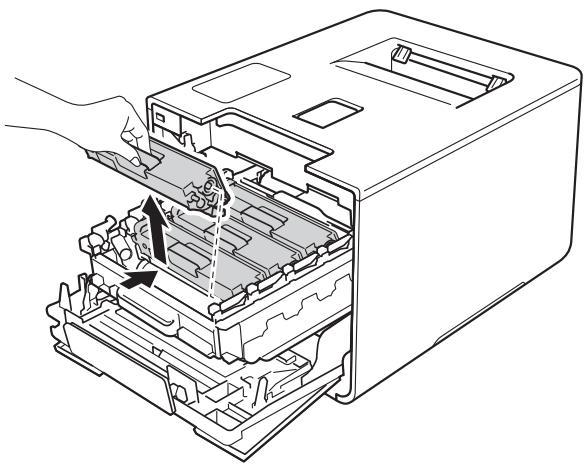
IMPORTANT
- We recommend placing the toner cartridges on a piece of disposable paper or cloth in case you accidentally spill or scatter toner.
- Handle the toner cartridges carefully. If toner scatters on your hands or clothes, immediately wipe or wash it off with cold water.
Clean the corona wire inside the drum unit by gently sliding the blue tab from left to right and right to left several times.
IMPORTANT
Be sure to return the tab to the home position (1). If you do not, printed pages may have a vertical stripe.
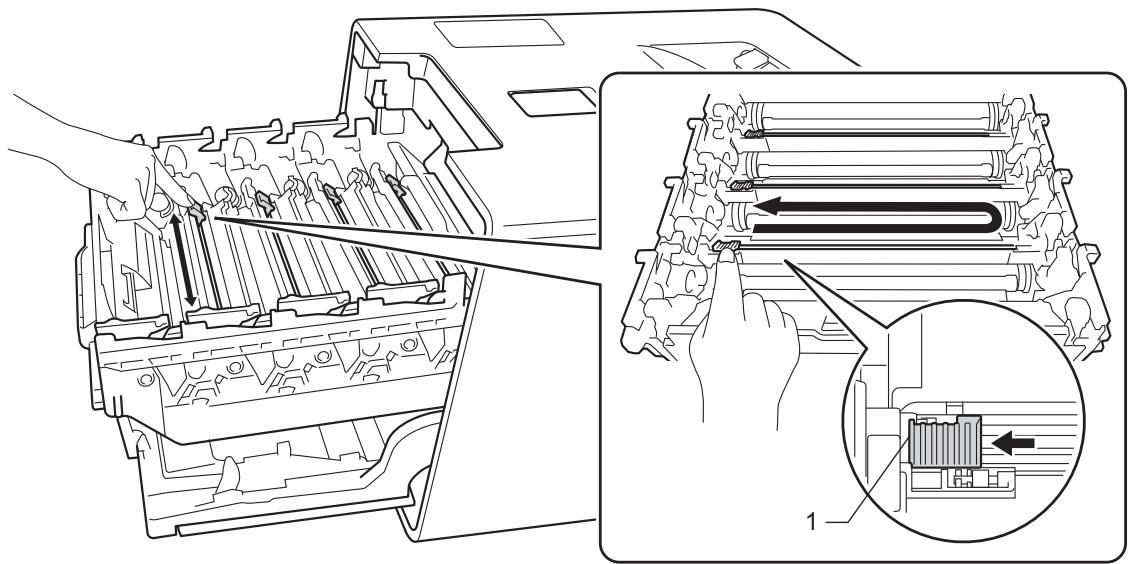
Repeat step 5 to clean each of three remaining corona wires.
Hold the handle of the toner cartridge and slide the toner cartridge into the drum unit then gently pull it toward you until you hear it lock into place. Make sure that you match the toner cartridge color to the same color label on the drum unit. Repeat this for all the toner cartridges.
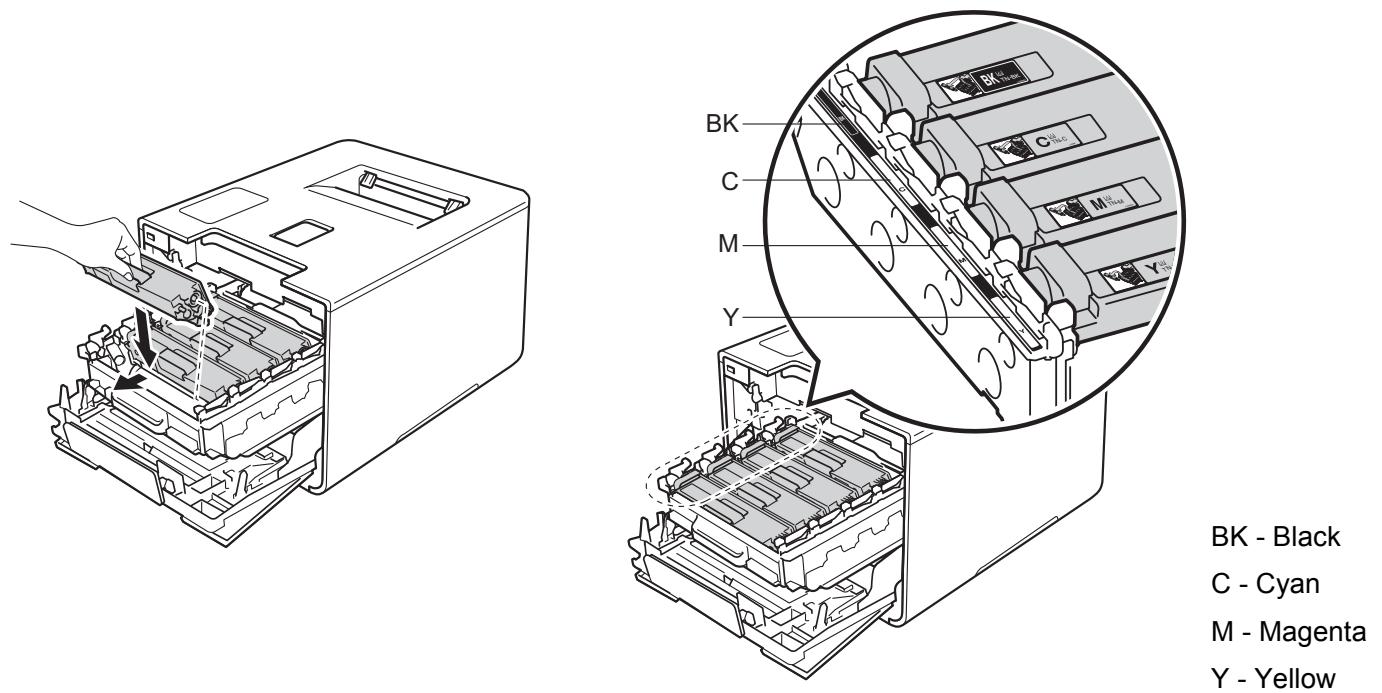
Push the drum unit in until it stops.
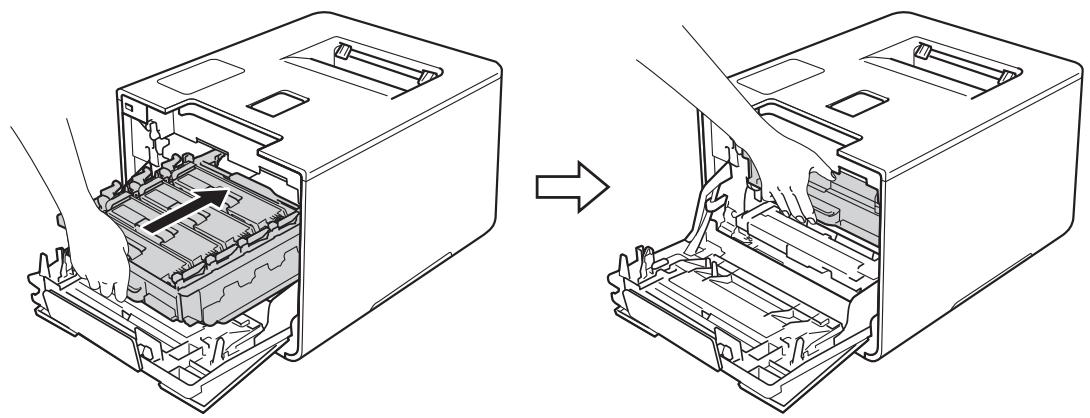
9 Close the front cover of the machine.
Cleaning the drum unit
If your printout has colored, white, or black dots at 3.7 in. (94 mm) intervals, the drum may have foreign material, such as glue from a label stuck on the drum surface. Follow the steps below to solve the problem:
1 Make sure the machine is in Ready mode.
Press Settings
Press Machine Information > Drum Dot Print.
4 Press OK to print the drum dot check sheet.
Press and hold down to turn the machine off.
Press the front cover release button and pull open the front cover.
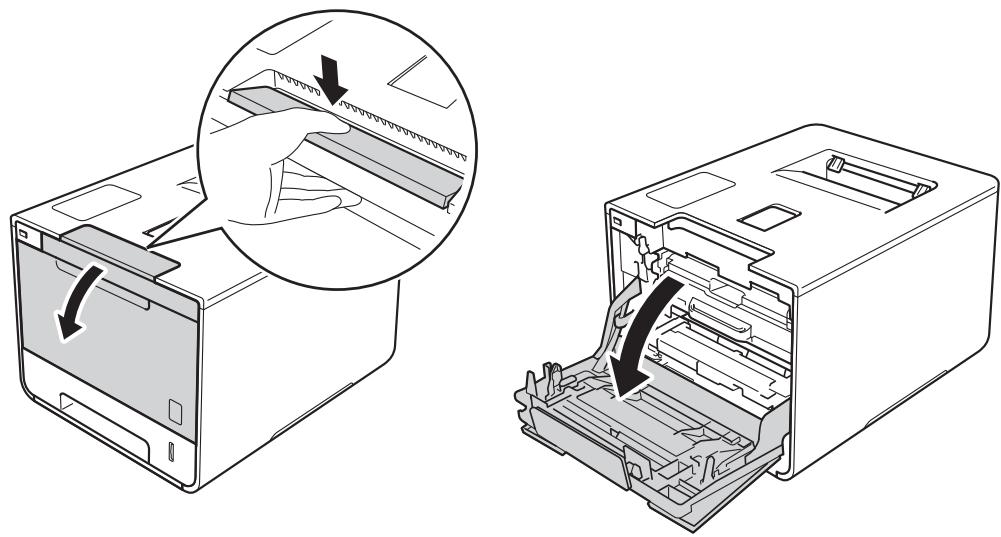
Hold the blue handle of the drum unit. Pull the drum unit out until it stops.
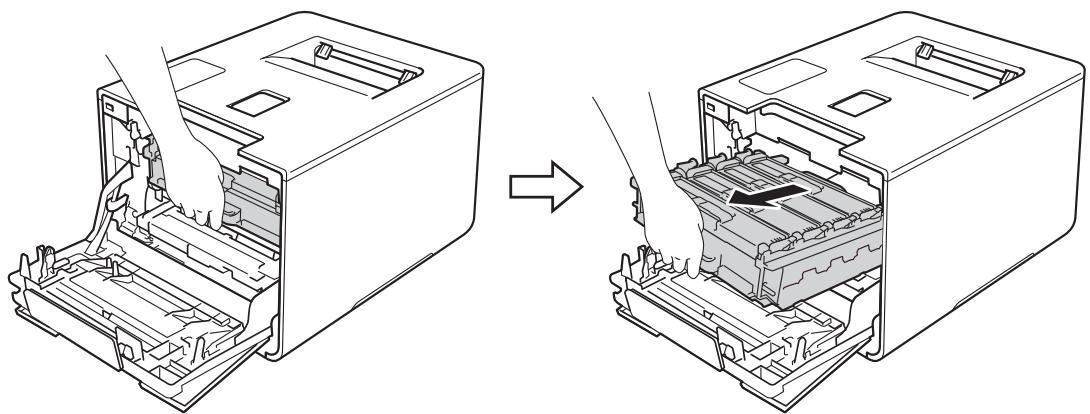
Turn the blue lock lever (1) at the left of the machine counterclockwise to the release position. Holding the blue handles of the drum unit, lift the front of the drum unit and remove it from the machine.
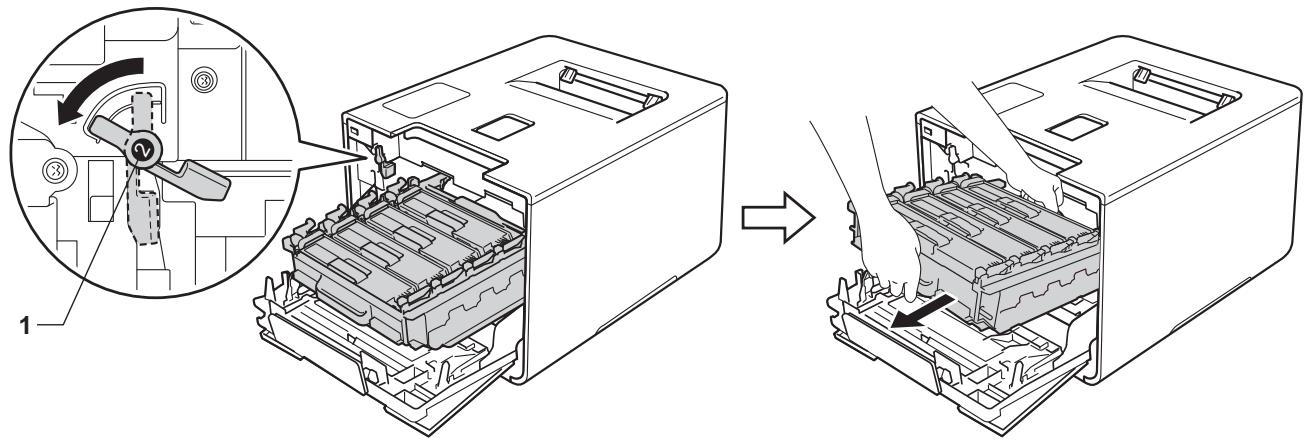
IMPORTANT
- Hold the blue handles of the drum unit when you carry it. DO NOT hold the sides of the drum unit.


- We recommend placing the drum unit on a clean, flat, level, stable surface with a sheet of disposable paper or cloth underneath it in case you accidentally spill or scatter toner.
- To prevent damage to the machine from static electricity, DO NOT touch the electrodes shown in the illustration.

Hold the handle of the toner cartridge and gently push it forward to unlock it. Then pull it out of the drum unit.
Repeat this for all the toner cartridges.

IMPORTANT
Handle the toner cartridges carefully. If toner scatters on your hands or clothes, immediately wipe or wash it off with cold water.
10 Turn the drum unit over by holding the blue handles. Make sure that the drum unit gears (1) are on the left side.
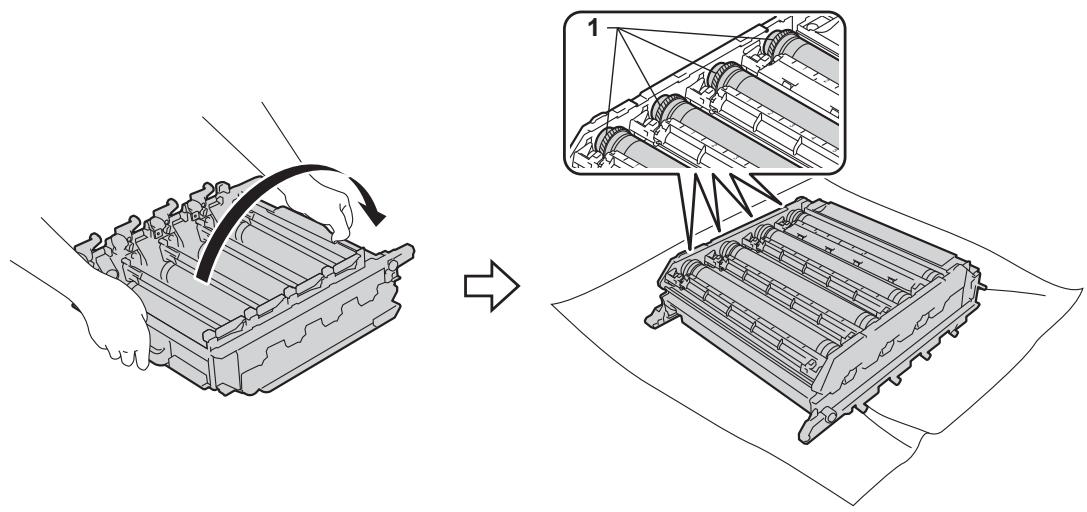
11 Read the following information from the drum dot check sheet:
Dot Color problem: The color of printed dots is the color of the drum you will clean.
- Dot location: The sheet has eight numbered columns. The number of the column with the printed dot in it is used to find the dot position on the drum.
Use the numbered markers next to the drum roller to find the mark. For example, a cyan dot in column 2 on the check sheet would mean that there is a mark in the "2" region of the cyan drum.
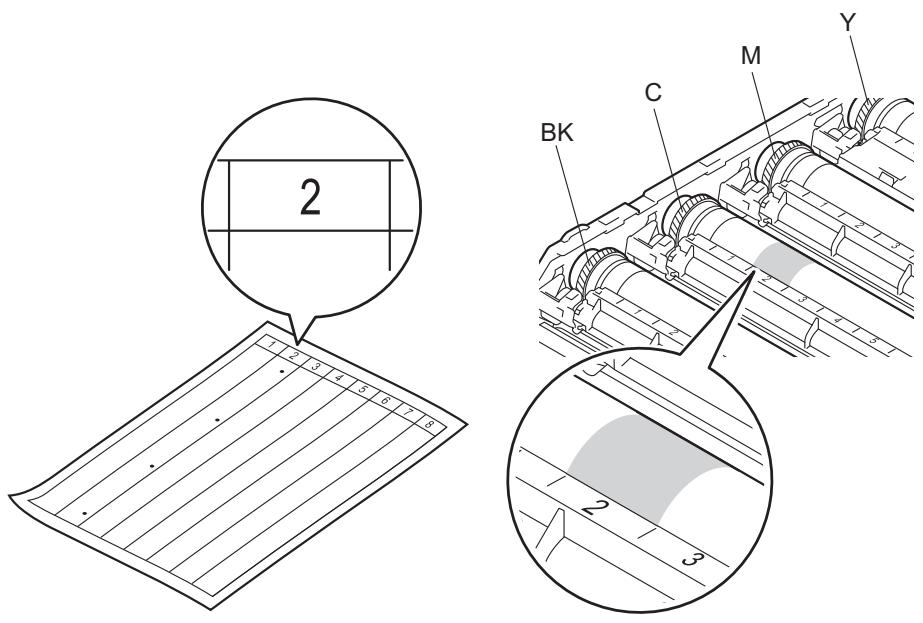
BK - Black
C-Cyan
M - Magenta
Y - Yellow
13 Identify the drum indicated by the colored dot in step 12. Hold the drum unit frame with both hands, place your left thumb on the drum unit gear, and roll the drum toward you, as illustrated in the drawing below. Look in the numbered area identified in step 12 for any marks or scratches.
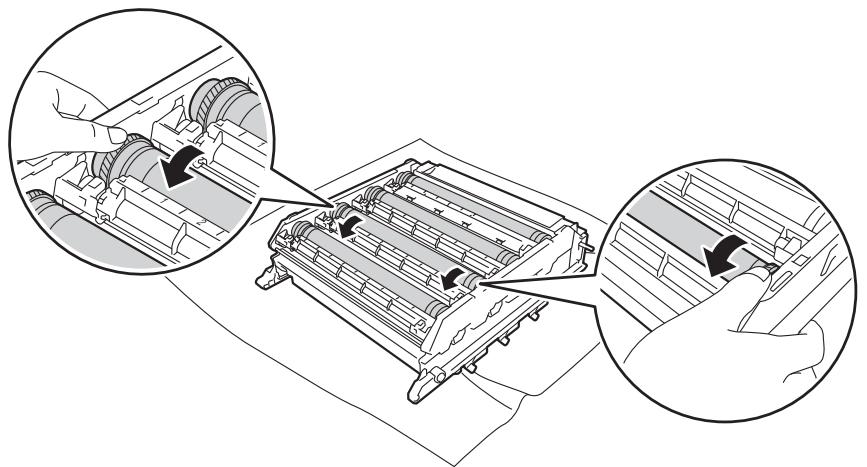
IMPORTANT
- To avoid print quality problems, DO NOT touch the surface of the drum unit with your bare hands.
- Handle the drum unit gear carefully.
- DO NOT clean the surface of the photosensitive drum with a sharp object or any liquids.
When you have found the mark on the drum that matches the drum dot check sheet, wipe the surface of the drum gently with a cotton swab until the mark on the surface comes off.
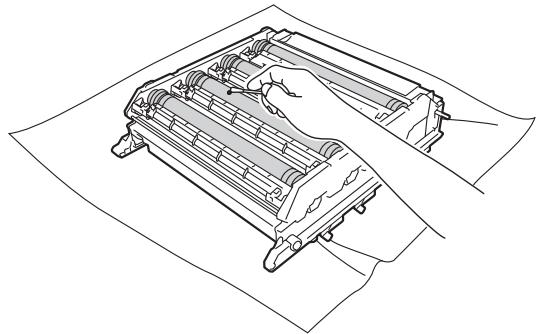
Hold the handle of the toner cartridge and slide it into the appropriate colored section of the drum unit until you hear it lock into place.
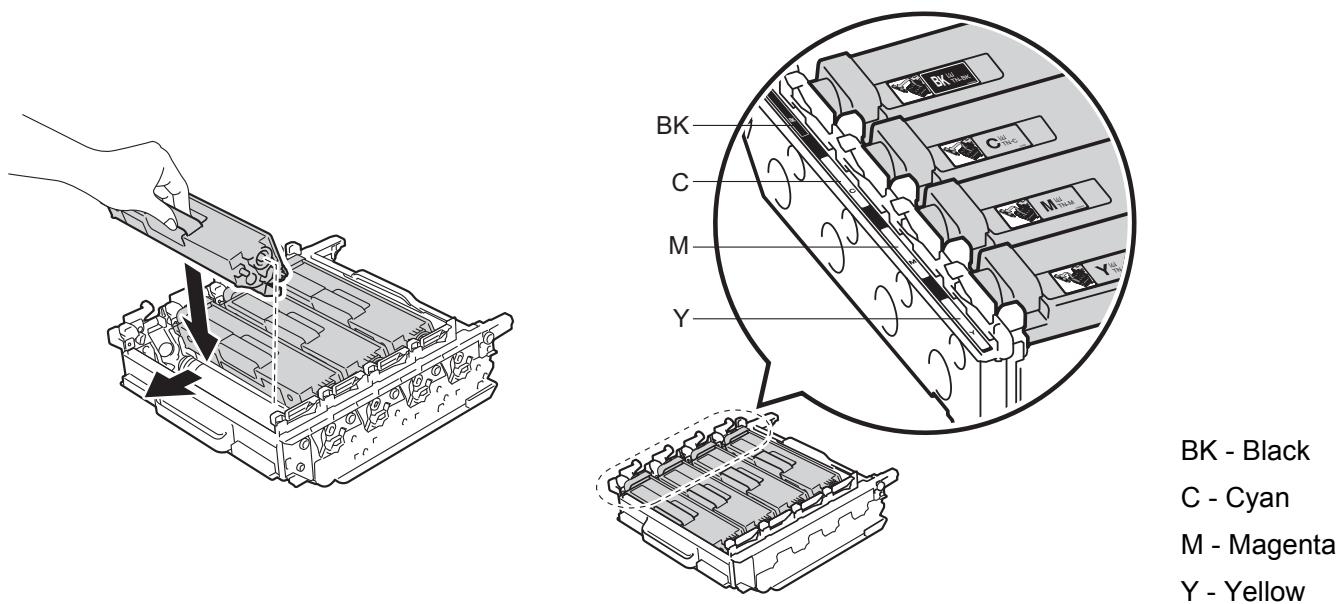
16 Make sure the blue lock lever (1) is in the release position as shown in the illustration.
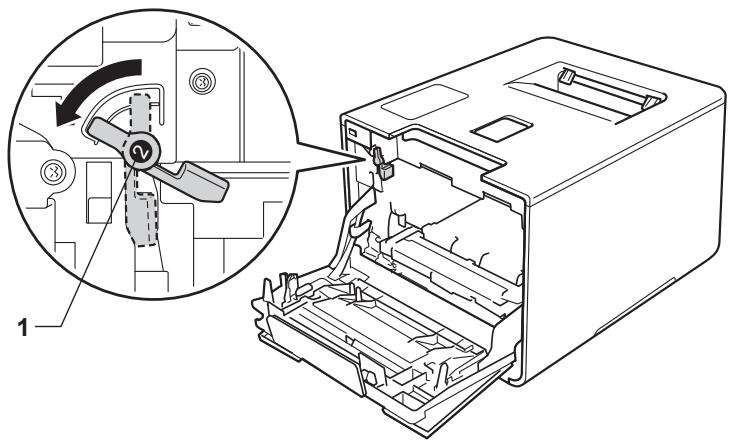
Gently slide the drum unit into the machine until it stops at the blue lock lever.

18 Turn the blue lock lever (1) clockwise to the lock position.

Push the drum unit in until it stops.

20 Close the front cover of the machine.
21 Turn on the power switch.
Cleaning the paper pick-up roller
Cleaning the paper pick-up roller periodically may prevent paper jams by insuring the proper feeding of paper.
Press and hold down to turn the machine off.
Pull the paper tray completely out of the machine.
3 If paper is loaded in the paper tray, remove it.
4 Remove anything that is stuck inside the paper tray.
Tightly wring out a soft, lint-free cloth soaked in lukewarm water, and then wipe the separator pad (1) of the paper tray with it to remove dust.
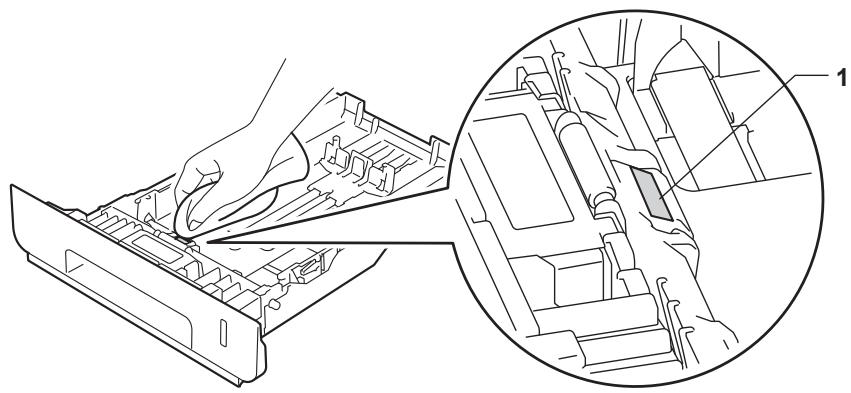
6 Wipe the two pick-up rollers (1) inside of the machine to remove dust.
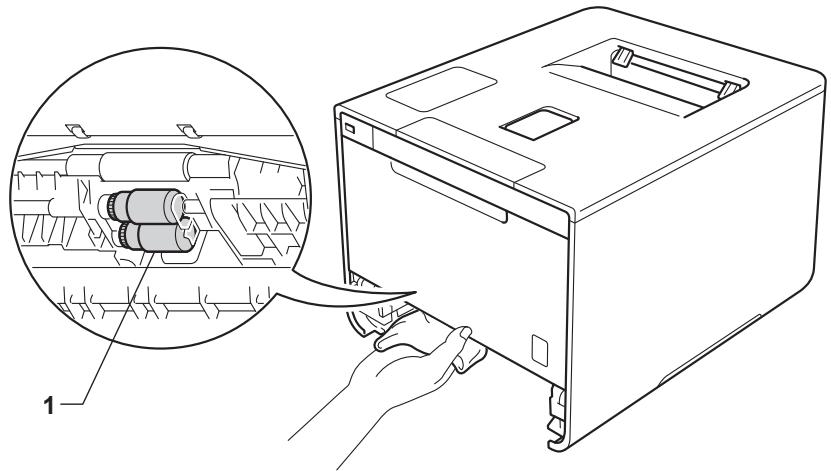
7 Reload the paper, and then put the paper tray firmly back in the machine.
8 Turn on the machine.
Replacing periodic maintenance parts
The periodic maintenance parts must be replaced regularly to maintain print quality. The parts listed below must be replaced after printing approximately 50,000 pages ^1 for PF Kit MP and 100,000 pages ^1 for PF Kit 1, PF Kit 2, Fuser and Laser.
Please contact Brother Customer Service or a Brother Authorized Service Center when the following messages appear on the Touchscreen:
| Touchscreen message | Description |
| Replace Fuser2 | Replace the fuser unit. |
| Replace Laser2 | Replace the laser unit. |
| Replace PF Kit 12 | Replace the paper feeding kit for the paper tray. |
| Replace PF Kit 223 | Replace the paper feeding kit for the lower tray (option). |
| Replace PF Kit MP2 | Replace the paper feeding kit for the multi-purpose tray. |
Letter or A4 size single-sided pages.
2 Life of part is approximate and may vary by type of use.
3 If the optional lower tray is installed on HL-L9200CDW.
Packing and shipping the machine
WARNING
- This machine is heavy and weighs more than 47.7lb ( 21.6kg ). To prevent possible injuries at least two people should lift the machine. One person should hold the front of the machine, and one person should hold the back, as shown in the illustration. Be careful not to pinch your fingers when you put the machine down.
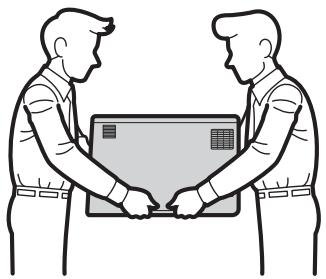
- If you use a Lower Tray, DO NOT carry the machine with the Lower Tray. Since the Lower Tray is not attached, you may be injured or cause damage to the machine.
If for any reason you must ship your machine, carefully repack the machine in the original packaging to avoid damage during transit. The machine should be adequately insured with the carrier.
For HL-L9200CDWT users, pack the lower tray and the machine separately into each original packing box, and then pack them both into the largest original box.
Unless you are returning the machine as part of the Brother Exchange Service, leave the toner cartridges and drum unit inside the machine when you pack and ship it.
Press and hold down to turn the machine off. Leave the machine turned off for at least 10 minutes to cool down.
2 Disconnect all the cables, and then unplug the power cord from the AC power outlet.
Put the packing material (1) into the carton.

4 Wrap the machine in a plastic bag. Put the machine on the bottom packing material (1) and the packing material (2) on the top of the machine. Match the front side of the machine to the “FRONT” mark on each packing material.
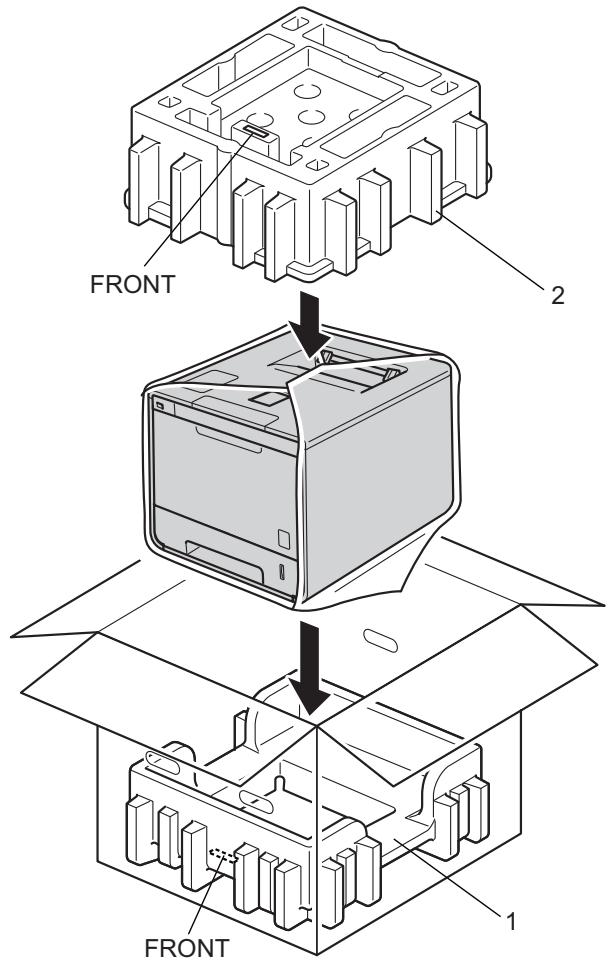
NOTE
If you are returning your machine to Brother as part of the Exchange Service, pack only the machine. Keep all separate parts, including the drum unit, toner cartridges, belt unit, waste toner box and printed materials, to use with your 'Exchange' machine.
Put the AC power cord in the original carton as shown in the illustration.
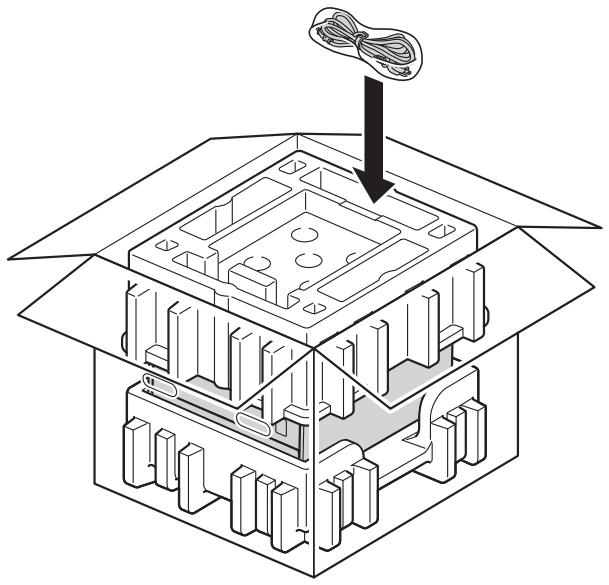
6 Close the carton and tape it shut.
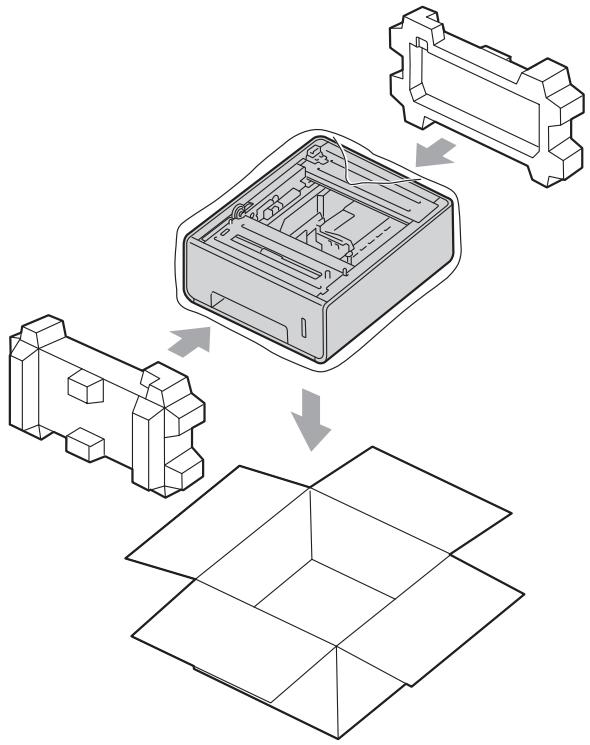
6
Troubleshooting
If you think there is a problem with your machine, check each item below first and follow the troubleshooting tips. You can solve most problems yourself.
In USA: Visit the Brother Solutions Center at http://solutions.brother.com/ and click Manuals on your model's page to download the other manuals.
Identifying the problem
First, check that
The machine's power cord is connected correctly and the machine is turned on. If the machine does not turn on after connecting the power cord, see Other difficulties on page 197.
All of the protective parts have been removed.
■ Paper is inserted correctly in the paper tray.
- The interface cables are securely connected to the machine and the computer, or the wireless connection is set up on both the machine and your computer.
Touchscreen Messages
(See Error and maintenance messages on page 176.)
If you did not solve the problem with the above checks, identify the problem, and then go to the page suggested below.
Machine does not print.
Paper handling
(See Paper handling difficulties on page 195.)
Pages are printed, but there are still problems.
■ Print quality
(See Improving the print quality on page 198.)
■ Printout is incorrect
(See Printing difficulties on page 194.)
Network and other problems:
Network difficulties on page 196
Other difficulties on page 197
Error and maintenance messages
As with any sophisticated office product, errors may occur and supplies must be replaced. If this happens, your machine identifies the error or required routine maintenance and displays the appropriate message. The most common error and maintenance messages are shown below.
You can correct most errors and perform routine maintenance yourself. If you need more help, the Brother Solutions Center offers the latest FAQs and troubleshooting tips:
Visit http://solutions.brother.com/.
Using non-Brother supplies may affect the print quality, hardware performance, and machine reliability.
NOTE
The Touchscreen displays the tray names as follows.
- Standard paper tray: Tray1
- Multi-purpose tray: MP Tray
- Optional lower tray ^1 : Tray2 and T2
1 Tray 2 is standard on HL-L9200CDWT.
| Error message | Cause | Action |
| 2-sided Disabled | The back cover of the machine is not closed completely. | Close the back cover of the machine. |
| Access Denied | The operation you want to use is restricted by Secure Function Lock. | Contact your administrator to check your Secure Function Lock settings. |
| Access Error | The device was removed from the USB direct interface while data was processing. | Press ✦.Reinsert the device and try to print with Direct Print. |
| Belt End Soon | The belt unit is near the end of its life. | Buy a new belt unit before you get a Replace Belt message. |
| Calibration | Calibration failed. | ■ Press and hold down Ⓒ to turn the machine off. Wait a few seconds, and then turn it on again. Perform the color calibration again using the Touchscreen or the printer driver (see Color Calibration on page 48).■ Install a new belt unit (see Replacing the belt unit on page 140).■ If the problem continues, contact Brother Customer Service. |
| Cartridge Error | The toner cartridge is not installed correctly. | Pull out the drum unit, remove the toner cartridge for the color that is indicated on the Touchscreen, and put it back into the drum unit again. Install the drum unit in the machine again. If the problem continues, contact Brother Customer Service. |
| Condensation | Condensation may have formed inside the machine after a room temperature change. | Leave the machine turned on. Wait for 30 minutes with the front cover in the open position. Then turn off the machine and close the cover. Turn it on again. |
| Cover is Open | The front cover is not closed completely. | Close the front cover of the machine. |
| The fuser cover is not closed completely. | Close the fuser cover located inside the back cover of the machine. | |
| DIMM Error | ■ The DIMM is not installed correctly. ■ The DIMM is broken. ■ The DIMM does not meet the required specifications. | ■ Turn off the machine and unplug the power cord. Remove the DIMM. (See Installing extra memory on page 121.) ■ Confirm that the DIMM meets the required specifications. (For details, see SO-DIMM types on page 120.) ■ Reinstall the DIMM correctly. Wait a few seconds. Plug in the power cord, and then turn the machine on again. ■ If this error message appears again, replace the DIMM with a new one. (See Installing extra memory on page 121.) |
| Drum End Soon | The drum unit is near the end of its life. | Order a new drum unit now so a replacement drum unit will be available when the Touchscreen displays Replace Drum (see Drum End Soon on page 133). |
| Drum ! | The corona wire on the drum unit needs to be cleaned. | Clean all four corona wires inside the drum unit by sliding the blue tabs (see Cleaning the corona wires on page 160). |
| The drum unit is not installed correctly. | Remove the drum unit, remove the toner cartridges from the drum unit, and put the toner cartridges back into the drum unit. Reinstall the drum unit in the machine. | |
| Drum Stop | It is time to replace the drum unit. | Replace the drum unit (see Replacing the drum unit on page 133). |
| Jam 2-sided | The paper is jammed underneath the paper tray or the fuser unit. | See Paper is jammed underneath the Paper Tray on page 184. |
| Jam Inside | The paper is jammed inside the machine. | See Paper is jammed inside the machine on page 190. |
| Jam MP Tray | The paper is jammed in the multi-purpose tray of the machine. | See Paper is jammed in the multi-purpose tray on page 182. |
| Jam Rear | The paper is jammed in the back of the machine. | See Paper is jammed at the back of the machine on page 187. |
| Jam Tray Jam Tray1 Jam Tray2 | The paper is jammed in the paper tray of the machine. | See Paper is jammed in Paper Tray 1 or Tray 2 on page 182. |
| Limit Exceeded | The print limit set in Secure Function Lock was reached. | Contact your administrator to check your Secure Function Lock settings. |
| Log Access Error | The machine could not access the print log file in the server. | Contact your administrator to check the Store Print Log to Network settings. (For detailed information, see the Network User's Guide) |
| No Belt Unit | The belt unit is not installed correctly. | Reinstall the belt unit (see the steps in Replacing the belt unit on page 140). |
| No Drum Unit | The drum unit is not installed correctly. | Reinstall the drum unit. (See Replacing the drum unit on page 133.) |
| No HUB Support | A USB hub device is connected to the USB direct interface. | Disconnect the USB hub device from the USB direct interface. |
| No Paper | The machine is out of paper or paper is not correctly loaded in the specified paper tray. | Load paper in the indicated paper tray. Make sure the paper guides are set to the correct size. |
| No Permission | Printing color documents is restricted. | Contact your administrator to check your Secure Function Lock settings. |
| No Toner | The toner cartridge for the color indicated on the Touchscreen is not installed correctly. | Remove the drum unit, remove the toner cartridge for the color indicated on the Touchscreen from the drum unit, and put the toner cartridge back into the drum unit. Reinstall the drum unit in the machine. If the problem continues, replace the toner cartridge (see Replacing the toner cartridges on page 128). |
| No Tray | The paper tray that is indicated on the Touchscreen is not installed or not installed correctly. | Reinstall the paper tray that is indicated on the Touchscreen. |
| No Waste Toner | The waste toner box is not installed correctly. | Reinstall the Waste Toner Box (see the steps in Replacing the waste toner box on page 146). |
| Not Registerd | The requested operation is not permitted to all User IDs by Secure Function Lock. | Contact your administrator to check your Secure Function Lock settings. |
| Out of Memory | The machine's memory is full. | Reduce the complexity of your document or reduce the print resolution. Add more memory. (see Installing extra memory on page 121.) |
| Print Data Full | The machine's memory is full. | Press × and delete the previously stored secure print jobs. Add more memory. (see Installing extra memory on page 121.) |
| Print Unable ## | The machine has a mechanical problem. | Press and hold down Ⓞ to turn the machine off. Wait a few seconds, then turn it on again. If the problem continues, contact Brother Customer Service. |
| Registration | Registration failed. | ■ Press and hold down Ⓒ to turn the machine off. Wait a few seconds, and then turn it on again. Perform the color registration again using the Touchscreen (see Color Registration on page 117).■ Install a new belt unit (see Replacing the belt unit on page 140).■ If the problem continues, contact Brother Customer Service. |
| Replace Belt | It is time to replace the belt unit. | Replace the belt unit (see Replacing the belt unit on page 140). |
| Replace Drum | It is time to replace the drum unit. | Replace the drum unit (see Replacing the drum unit on page 133). |
| The drum unit counter was not reset when a new drum was installed. | Reset the drum unit counter (see Resetting the drum counter on page 139). | |
| Replace Fuser | It is time to replace the fuser unit. | Contact Brother Customer Service or a Brother Authorized Service Center to replace the fuser unit. To replace the Fuser Unit contact Brother Customer Service at:1-877-BROTHER (1-877-276-8437) (in USA)www.brother.ca/support (in Canada)or to locate a Brother Authorized Service Center, visit:http://www.brother-usa.com/service/ |
| Replace Laser | It is time to replace the laser unit. | Contact Brother Customer Service or a Brother Authorized Service Center to replace the laser unit. To replace the Laser Unit contact Brother Customer Service at:1-877-BROTHER (1-877-276-8437) (in USA)www.brother.ca/support (in Canada)or to locate a Brother Authorized Service Center, visit:http://www.brother-usa.com/service/ |
| Replace PF Kit 1Replace PF Kit 2Replace PF Kit MP | It is time to replace the paper feeding kit. | Contact Brother Customer Service or a Brother Authorized Service Center to replace the PF kit. To replace the PF Kit contact Brother Customer Service at:1-877-BROTHER (1-877-276-8437) (in USA)www.brother.ca/support (in Canada)or to locate a Brother Authorized Service Center, visit:http://www.brother-usa.com/service/ |
| Replace Toner | The toner cartridge is at the end of its life. The machine will stop all print operations. | Replace the toner cartridge for the color indicated on the Touchscreen (see Replacing the toner cartridges on page 128). |
| Replace WT Box | It is time to replace the waste toner box. | Replace the waste toner box (see Replacing the waste toner box on page 146). |
| Screen Init. Fail | The Touchscreen was pressed before the power on initialization was completed. | Make sure nothing is touching or resting on the Touchscreen. |
| Debris may be stuck between the lower part of the Touchscreen and its frame. | Insert a piece of stiff paper between the lower part of the Touchscreen and its frame and slide it back and forth to push out the debris. | |
| Self-Diagnostic | The temperature of the fuser unit does not rise to a specified temperature within the specified time. | Turn the machine off, wait a few seconds, and then turn it on again. Leave the machine for 15 minutes with the power on. |
| The fuser unit is too hot. | ||
| Short paper | The length of the paper in the tray is too short for the machine to deliver it to the Face-down output tray. | Open the back cover (face-up output tray) to let the printed page exit onto the face-up output tray. Remove the printed pages, and then press Retry. |
| Size Error | The paper size specified in the printer driver is not supported by the specified tray. | Choose a paper size that is supported for each tray. (see Paper type and size on page 2.) |
| Size Error 2-sided | The paper size specified in the printer driver and the Touchscreen menu is not available for automatic 2-sided printing. | Press Choose a paper size that is supported by 2-sided printing. The paper sizes for automatic 2-sided printing are Letter, Legal or Folio. |
| The paper in the tray is not the correct size and is not available for automatic 2-sided printing. | Load the correct size of paper in the tray and set the size of paper for the tray (see Paper Tray on page 93). The paper sizes for automatic 2-sided printing are Letter, Legal or Folio. | |
| Size Mismatch | The paper in the indicated tray is not the correct size. | Do one of the following: Load the same size of paper in the paper tray that is selected in the printer driver, and then press Retry. In the printer driver select the size of paper that you loaded in the indicated paper tray. |
| Small paper | The paper size specified in the printer driver is too small for the machine to deliver it to the Face-down output tray. | Open the back cover (face-up output tray) to let the printed paper exit onto the face-up output tray, and then press Retry. |
| Toner Error | One or more toner cartridges are not installed correctly. | Pull out the drum unit. Remove all the toner cartridges, and then put them back into the drum unit. |
| Toner Low: X (X indicates the toner cartridge or drum unit color that is near the end of its life. BK=Black, C=Cyan, M=Magenta, Y=Yellow.) | If the Touchscreen displays Toner Low you can still print; however, the machine is telling you that the toner cartridge is near the end of its life. | Order a new toner cartridge now so a replacement toner cartridge will be available when the Touchscreen displays Replace Toner. |
| Tray 2 Error | The optional lower tray is not installed correctly. | Reinstall the lower tray. |
| Unusable Device | An incompatible or defective device has been connected to the USB direct interface. | Remove the USB flash drive from the USB Direct Interface. |
| WT Box End Soon | The waste toner box is almost full. | Order a new waste toner box before you get a Replace WT Box message. |
Paper jams
When you are adding new paper, always remove all the paper from the paper tray and straighten the stack. This helps prevent multiple sheets of paper from feeding through the machine at one time and prevents paper jams.
Paper is jammed in the multi-purpose tray
If the Touchscreen displays Jam MP Tray, follow these steps:
1 Remove the paper from the MP tray.
2 Remove any jammed paper from in and around the MP tray.
3 Fan the paper stack, and then put it back in the MP tray.

When loading paper in the MP tray, make sure that the paper stays under the maximum paper height guides on both sides of the tray.
Press Retry to resume printing.
Paper is jammed in Paper Tray 1 or Tray 2
If the Touchscreen displays Jam Tray, Jam Tray1 or Jam Tray2, follow these steps:
Pull the paper tray completely out of the machine.
For Jam Tray or Jam Tray1:
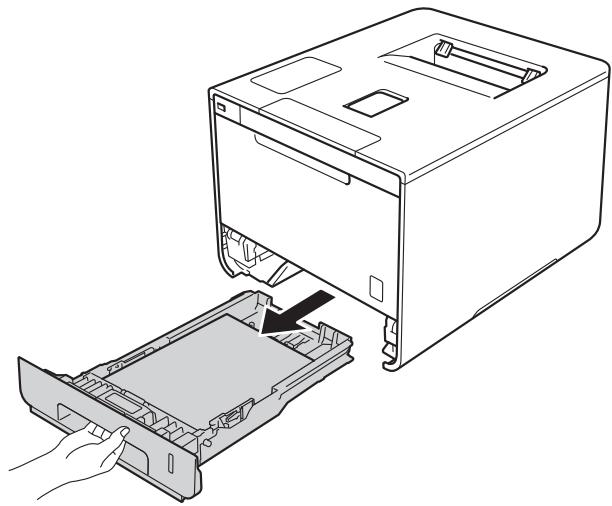
Troubleshooting
For Jam Tray2:

Use both hands to slowly pull out the jammed paper.
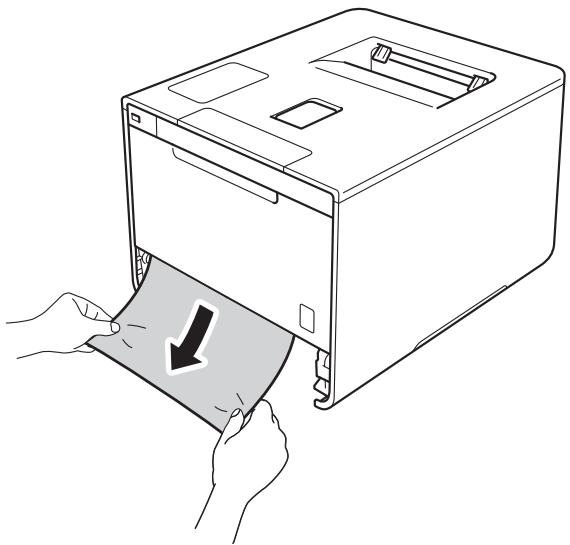
NOTE
Pulling the jammed paper downward allows you to remove the paper more easily.
3 Make sure that the paper is below the maximum paper mark ( ) in the paper tray. While pressing the blue paper-guide release lever, slide the paper guides to fit the paper size. Make sure that the guides are firmly in the slots.
Put the paper tray firmly back in the machine.
Paper is jammed underneath the Paper Tray
If the Touchscreen displays Jam 2-sided, follow these steps:
1 Leave the machine turned on for 10 minutes for the internal fan to cool the extremely hot parts inside the machine.
Pull the paper tray completely out of the machine.
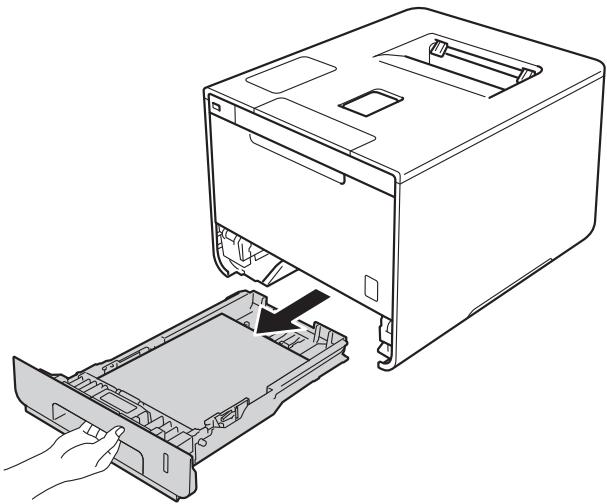
3 Make sure that the jammed paper does not remain inside the machine.
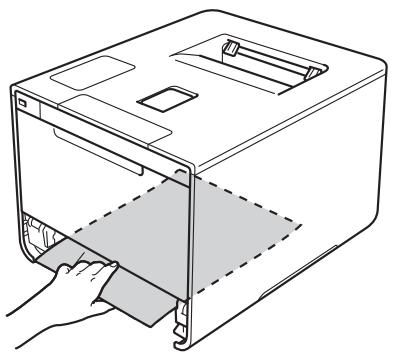
If paper is not caught inside the machine, check underneath the paper tray.
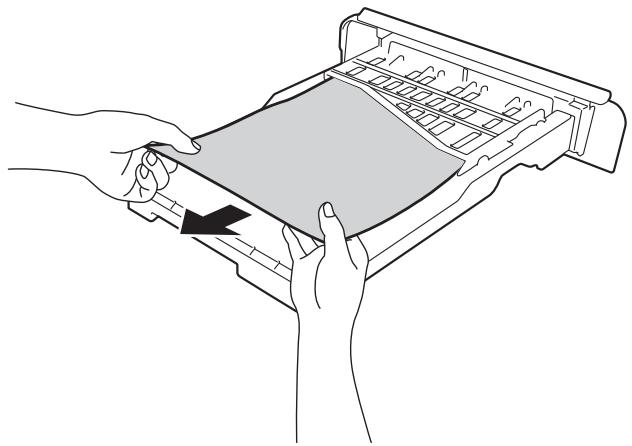
5 If the paper is not caught in the paper tray, open the back cover.
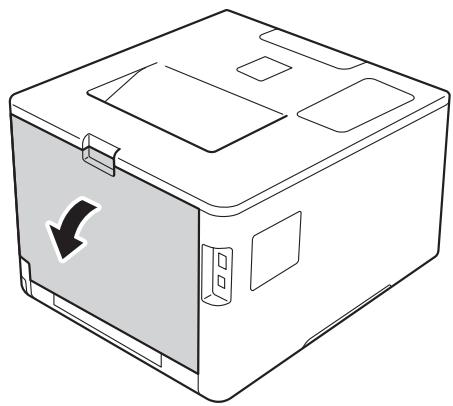
WARNING

HOT SURFACE
After you have just used the machine, some internal parts of the machine will be extremely hot. Wait for the machine to cool down before you touch the internal parts of the machine.
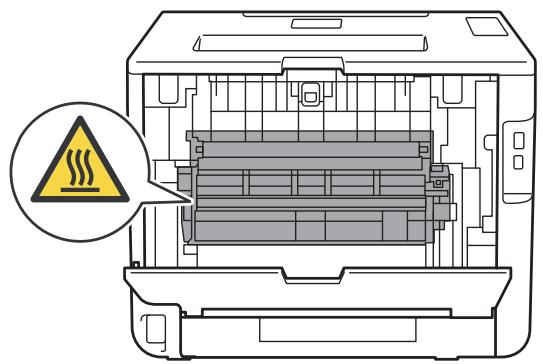
Troubleshooting
Use both hands to pull out the jammed paper slowly.
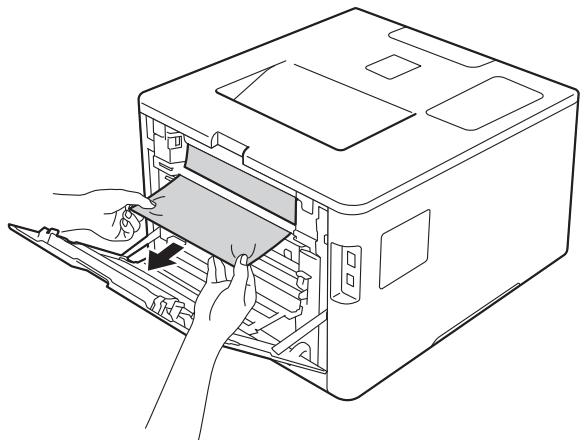
7 Close the back cover until it locks in the closed position.
Put the paper tray back in the machine.
Paper is jammed at the back of the machine
If the Touchscreen displays Jam Rear, a paper jam occurred behind the back cover. Follow these steps:
1 Leave the machine turned on for 10 minutes for the internal fan to cool the extremely hot parts inside the machine.
2 Open the back cover.
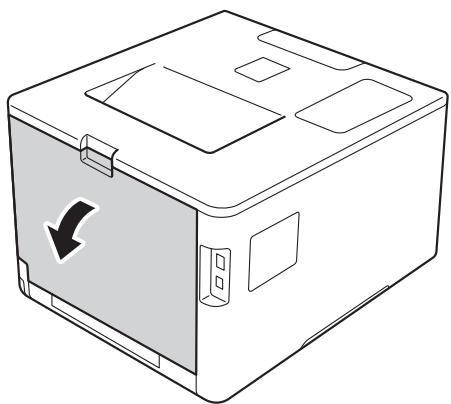
WARNING

HOT SURFACE
After you have just used the machine, some internal parts of the machine are extremely hot. Wait for the machine to cool down before you touch the internal parts of the machine.
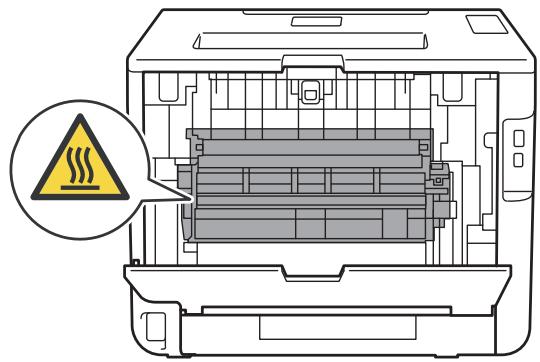
Pull the blue tabs (2) at the left and right sides toward you to release the fuser cover (1).

NOTE
If the envelope levers (3) inside the back cover are pulled down to the envelope position, lift these levers to the original position before pulling the blue tabs (2) down.
Use both hands to gently pull the jammed paper out of the fuser unit.
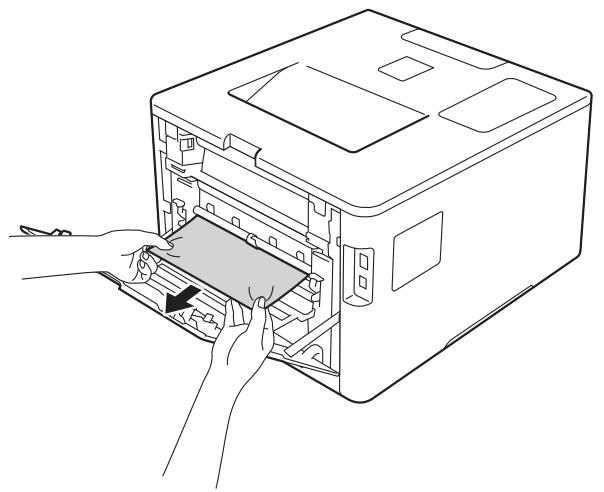
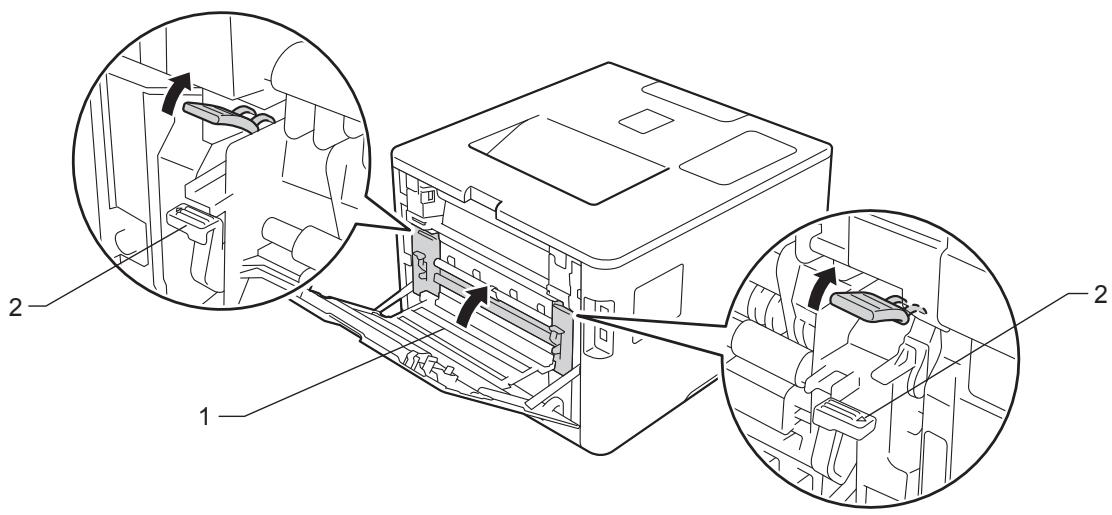
Close the fuser cover (1).
NOTE
If you print on envelopes, pull down the envelope levers (2) to the envelope position again before closing the back cover.
6 Close the back cover.
Paper is jammed inside the machine
If the Touchscreen displays Jam Inside, follow these steps:
Press the front cover release button and pull open the front cover.

Hold the blue handle of the drum unit. Pull the drum unit out until it stops.
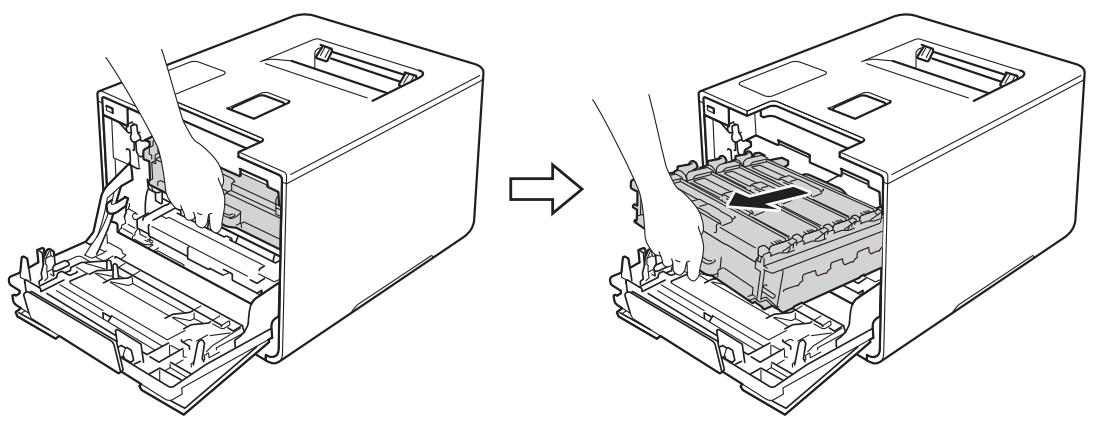

Turn the blue lock lever (1) at the left of the machine counterclockwise to the release position. Holding the blue handles of the drum unit, lift the front of the drum unit and remove it from the machine.

IMPORTANT
- Hold the blue handles of the drum unit when you carry it. DO NOT hold the sides of the drum unit.

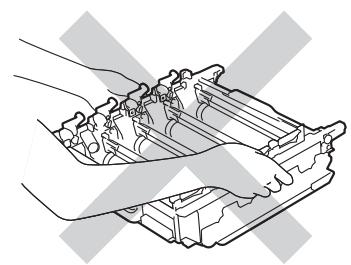
- We recommend placing the drum unit on a clean, flat, level, stable surface with a sheet of disposable paper or cloth underneath it in case you accidentally spill or scatter toner.
- To prevent damage to the machine from static electricity, DO NOT touch the electrodes shown in the illustration.
Pull out the jammed paper slowly.
IMPORTANT
To avoid print quality problems, DO NOT touch the shaded parts shown in the illustration.
Make sure the blue lock lever (1) is in the release position as shown in the illustration.
Gently slide the drum unit into the machine until it stops at the blue lock lever.

7 Turn the blue lock lever (1) clockwise to the lock position.

Push the drum unit in until it stops.

9 Close the front cover of the machine.
NOTE
If you turn off the machine during Jam Inside, the machine will print incomplete data from your computer when it is turned back on. Before you turn on the machine, delete the print spooler job on your computer.
If you are having difficulty with your machine
IMPORTANT
- For technical help, you must call the country where you bought the machine. Calls must be made from within that country.
- If you think there is a problem with your machine, check the chart below and follow the troubleshooting tips. You can solve most problems yourself.
- If you need additional help, the Brother Solutions Center offers the latest FAQs and troubleshooting tips. Visit http://solutions.brother.com/.
- Using non-Brother supplies may affect the print quality, hardware performance, and machine reliability.
Printing difficulties
| Difficulties | Suggestions |
| No printout. | Check that the correct printer driver has been installed and chosen. |
| Check to see if the Touchscreen is showing an error message.(See Error and maintenance messages on page 176.) | |
| Check that the machine is online:(Windows® 7 and Windows Server® 2008 R2)Click the Start button > Devices and Printers. Right-click Brother HL-XXXX series and click See what's printing. Click Printer. Make sure you clear the check mark before Use Printer Offline.(Windows Vista® and Windows Server® 2008)Click the Start button > Control Panel > Hardware and Sound > Printers. Right-click Brother HL-XXXX series. Make sure you clear the check mark before Use Printer Offline.(Windows® XP and Windows Server® 2003)Click the Start button > Printers and Faxes. Right-click Brother HL-XXXX series. Make sure you clear the check mark before Use Printer Offline.(Windows® 8 and Windows Server® 2012)Move your mouse to the lower right corner of your desktop. When the menu bar appears, click Settings > Control Panel. In the Hardware and Sound (Hardware) group, click View devices and printers. Right-click the Brother HL-XXXX Printer > See what's printing. If printer driver options appear, select your printer driver. Click Printer in the menu bar. Make sure you clear the check mark before Use Printer Offline.(For Windows Server® 2012 R2) Click Control Panel on the Start screen. In the Hardware group, click View devices and printers. Right-click the Brother HL-XXXX Printer >See what's printing. If printer driver options appear, select your printer driver. Click Printer in the menu bar. Make sure you clear the check mark before Use Printer Offline. | |
| Contact your administrator to check your Secure Function Lock settings. | |
| Make sure the interface is set to Auto on the machine (see how to change the interface on page 94). | |
| No printout.(continued) | Check that the machine is not in Power Off mode.If the machine is in Power Off mode, press on the Touchpanel, and then re-send the print job.(See Auto Power Off on page 114.) |
| The machine is not printing or has stopped printing. | Press The machine will cancel the print job and clear it from the memory. The printout may be incomplete. |
| The headers or footers appear when the document is displayed on the screen but they are not on the printed page. | There is an unprintable area on the top and bottom of the page. Adjust the top and bottom margins in your document to allow for this.(See Unprintable area when printing from a computer on page 7.) |
| The machine prints unexpectedly or it prints garbage. | Press to cancel the print jobs. |
| Check the settings in your application to make sure they are set to work with your machine. | |
| The machine prints the first couple of pages correctly, then some pages have text missing. | Check the settings in your application to make sure that they are set to work with your machine. |
| Your computer is not recognizing the machine's input buffer's full signal. Make sure the interface cable is connected correctly. | |
| Cannot perform 'Page Layout' printing. | Check that the paper size settings in the application and in the printer driver are the same. |
| Print speed is too slow. | Try changing the printer driver setting. The highest quality takes longer data processing, sending and printing time. |
| If the machine is in Quiet mode, print speed is slower. Check the Quiet mode setting.(See Turning Quiet mode on/off on page 115.) | |
| The machine does not print from Adobe ® Illustrator ®. | Reduce the print quality.(For Windows, see Basic tab on page 33.)(For Macintosh, see Print Settings on page 71.) |
| Poor print quality | See Improving the print quality on page 198. |
Paper handling difficulties
| Difficulties | Suggestions |
| The machine does not feed paper. | If the paper tray is empty, load a new stack of paper in the paper tray. |
| If there is paper in the paper tray, make sure it is straight. If the paper is curled, straighten it. Sometimes it is helpful to remove the paper, turn the stack over and put it back in the paper tray. | |
| Reduce the amount of paper in the paper tray, and then try again. | |
| Make sure that MP Tray mode is not selected in the printer driver. | |
| Clean the paper pick-up roller.(See Cleaning the paper pick-up roller on page 169.) | |
| The machine does not feed paper from the MP tray. | Make sure that MP Tray is selected in the printer driver. |
| Fan the paper well and put the paper tray back in the machine. | |
| How do I print on envelopes? | 1 Open the back cover.2 Pull down the two gray levers to the envelope position.3 When you have finished printing envelopes, reset the two gray levers to their original positions and close the back cover.(See Printing on thick paper, labels and envelopes from the MP tray on page 15.)Load up to three envelopes at a time in the MP tray. Your application must be set to print the envelope size you are using. This is usually done in the Page Setup or Document Setup menu of your application.(See your application's manual for more information.) |
Network difficulties
| Difficulties | Suggestions |
| Cannot print over a network after completing the software installation. | When the Cannot print to the networked printer. screen appears, follow the on-screen instructions. If the problem is not solved, see the Network User's Guide. |
| Make sure the interface is set to Auto on the machine (see how to change the interface on page 94). | |
| The Brother software cannot be installed. | (Windows®) If the Security Software warning appears on the computer screen during the installation, change the Security Software settings to permit the Brother product setup program or other program to run. (Macintosh) If you are using a firewall function of anti-spyware or antivirus security software, temporarily disable it, and then install the Brother software. |
| Cannot connect to wireless network. | Investigate the problem using the WLAN report. Print the WLAN report. 1 Press Settings. 2 Press Machine Information > Print WLANReport. 3 Press OK. For more details, see the Network User's Guide. |
| For other problems concerning using your machine on a Network,see the Network User's Guide. | |
Other difficulties
| Difficulties | Suggestions |
| The machine will not turn on. | Adverse conditions on the power connection (such as lightning or a power surge) may have triggered the machine's internal safety mechanisms. Turn the machine off and unplug the power cord. Wait for ten minutes, then plug in the power cord and turn the machine on. If you still cannot turn on the machine, plug the power cord directly into a different known working wall outlet (do not plug it into a surge suppressor or backup battery type of device), and then turn on the machine. If this works, then the wall outlet, battery backup device, or surge suppressor device is the cause of the problem. |
| The machine cannot print EPS data that includes binary with the BR-Script3 printer driver. | (Windows®) To print EPS data, do the following: 1 For Windows® 7 and Windows Server® 2008 R2: Click the Start button > Devices and Printers. For Windows Vista® and Windows Server® 2008: Click the Start button > Control Panel, Hardware and Sound > Printers. For Windows XP and Windows Server® 2003: Click the Start button > Printers and Faxes. For Windows 8 and Windows Server® 2012: Move your mouse to the lower right corner of your desktop. When the menu bar appears, click Settings > Control Panel. In the Hardware and Sound group, click View devices and printers. For Windows Server® 2012 R2: Click Control Panel on the Start screen. In the Hardware group, click View devices and printers. 2 For Windows® 7, Windows XP, Windows Vista®, Windows Server® 2003, Windows Server® 2008 and Windows Server® 2008 R2: Right-click the Brother HL-XXXX BR-Script3 icon and select Printer properties (Properties), and Brother HL-XXXX BR-Script3 if needed. For Windows® 8, Windows Server® 2012 and Windows Server® 2012 R2: Right-click the Brother HL-XXXX BR-Script3 icon, select Printer properties. 3 From the Device Settings tab, choose TBCP (Tagged binary communication protocol) in Output Protocol. (Macintosh) If your machine is connected to a computer with a USB interface, you cannot print EPS data that includes binary. You can print the EPS data at the machine through a network. For installing the BR-Script3 printer driver through the network, visit the Brother Solutions Center at http://solutions.brother.com/. |
Improving the print quality
If you have a print quality problem, print a test page first (see Machine Information on page 91). If the printout looks good, the problem is probably not the machine. Check the interface cable or try the machine on another computer. If the printout has a quality problem, check the following steps first. And then, if you still have a print quality problem, check the chart below and follow the recommendations.
NOTE
Using non-Brother supplies may affect the print quality, hardware performance, and machine reliability.
To get the best print quality, we suggest using the recommended paper. Check that you are using paper that meets our specifications (see Acceptable paper and other print media on page 2).
Check that the drum unit and toner cartridges are installed correctly.
| Examples of poor print quality | Recommendation |
| Printed pages are compressed, horizontal stripes appear, or characters in the top, bottom, left and right margins are cut off | Adjust the print margins on your application and reprint the job. |
| Colors are light or faint on the whole page | Perform the color calibration using the Touchscreen or the printer driver (see Color Calibration on page 116).Make sure toner save mode is off in the Touchscreen or the printer driver.Make sure that the media type setting in the driver matches the type of paper you are using (see Acceptable paper and other print media on page 2).Shake all four toner cartridges gently.Wipe the scanner windows with a dry, soft, lint-free cloth. (See Cleaning the inside of the machine on page 156.) |
| B B White streaks or bands down the page | ■ Wipe the scanner windows with a dry, soft, lint-free cloth (see Cleaning the inside of the machine on page 156.) ■ Make sure that foreign material such as a torn piece of paper, sticky note or dust is not inside the machine and around the drum unit and toner cartridge. |
| Colored streaks or bands down the page | ■ Clean all four corona wires inside the drum unit by sliding the blue tabs (see Cleaning the corona wires on page 160). IMPORTANT Make sure the blue tabs of the corona wires are at the home position (1). ■ Replace the toner cartridge that matches the color of the streak or band (see Replacing the toner cartridges on page 128). To identify the color of the toner cartridge, visit http://solutions.brother.com/ to view our FAQs and troubleshooting tips. ■ Install a new drum unit (see Replacing the drum unit on page 133). |
| Colored lines across the page | ■ Identify the color causing the problem and replace the toner cartridge that matches the color of the line (see Replacing the toner cartridges on page 127).To identify the color of the toner cartridge, visit http://solutions.brother.com/ to view our FAQs and troubleshooting tips.■ Install a new drum unit (see Replacing the drum unit on page 133). |
| White spots or hollow print | ■ Make sure that the media type setting in the printer driver matches the type of paper you are using (see Acceptable paper and other print media on page 2).■ Check the machine's environment. Conditions such as high humidity can cause hollow print (See the Product Safety Guide).■ If the problem is not solved after printing a few pages, the drum may have foreign material, such as glue from a label, stuck on the drum surface. Clean the drum unit (see Cleaning the drum unit on page 163).■ Install a new drum unit (see Replacing the drum unit on page 133). |
| Blank page or some colors are missing | ■ Identify the color causing the problem and put in a new toner cartridge (see Replacing the toner cartridges on page 128). To identify the color of the toner cartridge, visit http://solutions.brother.com/ to view our FAQs and troubleshooting tips.■ Install a new drum unit (see Replacing the drum unit on page 133). |
| Colored spots at 3.7 in. (94mm) | ■ If the problem is not solved after printing a few pages, the drum may have foreign material, such as glue from a label, stuck on the drum surface. Clean the drum unit (see Cleaning the drum unit on page 163).■ Install a new drum unit (see Replacing the drum unit on page 133). |
| 1.2 in. (30 mm) 1.2 in. (30 mm) Colored spots at 1.2 in. (30mm) | ■ Identify the color causing the problem and put in a new toner cartridge (see Replacing the toner cartridges on page 128). To identify the color of the toner cartridge, visit http://solutions.brother.com/ to view our FAQs and troubleshooting tips. |
| B Toner scatter or toner stain | ■ Check the machine's environment. Conditions such as high humidity and high temperatures may cause this print quality problem. ■ Identify the color causing the problem and put in a new toner cartridge (see Replacing the toner cartridges on page 128). To identify the color of the toner cartridge, visit http://solutions.brother.com/ to view our FAQs and troubleshooting tips. ■ Install a new drum unit (see Replacing the drum unit on page 133). |
| The color of your printouts is not what you expected | ■ To improve the color density, calibrate the colors using first the Touchscreen and then the printer driver (see Color Calibration on page 116).■ To adjust the print position of colors for sharper edges, perform the color registration using the Touchscreen (see Color Registration on page 117).■ Make sure toner save mode is off in the Touchscreen or the printer driver. See Toner Save Mode in Advanced tab on page 41 (For Windows® printer driver), Advanced options on page 58 (For Windows® BR-Script printer driver), Advanced print settings on page 73 (For Macintosh printer driver), Printer Features on page 77 (For Macintosh BR-Script printer driver).■ If the print quality is poor, clear the Improve Gray Color check box of the printer driver. See Improve Gray Color in Settings dialog box on page 36 (for Windows® printer driver), Advanced options on page 58 (for Windows® BR-Script printer driver), Advanced print settings on page 73 (for Macintosh printer driver), or Printer Features on page 77 (for Macintosh BR-Script printer driver).If the print quality of the black portion is not what you expected, select the Enhance Black Printing check box of the printer driver. See Enhance Black Printing in Settings dialog box on page 36 (for Windows® printer driver), Advanced options on page 58 (for Windows® BR-Script printer driver), Advanced print settings on page 73 (for Macintosh printer driver), or Printer Features on page 77 (for Macintosh BR-Script printer driver).■ Identify the color causing the problem and put in a new toner cartridge (see Replacing the toner cartridges on page 128). To identify the color of the toner cartridge, visit http://solutions.brother.com/ to view our FAQs and troubleshooting tips.■ Install a new drum unit (see Replacing the drum unit on page 133). |
| Color misregistration | ■ Make sure that the machine is on a solid level surface.■ Perform the color registration using the Touchscreen(see Color Registration on page 117).■ Install a new drum unit (see Replacing the drum unit on page 133).■ Install a new belt unit (see Replacing the belt unit on page 140). |
| Uneven density appears periodically across the page | Perform the calibration using the Touchscreen or the printer driver (see Color Calibration on page 116).Clear the Improve Gray Color check box of the printer driver.Identify the color causing the problem and put in a new toner cartridge (see Replacing the toner cartridges on page 127). To identify the color of the toner cartridge, visit http://solutions.brother.com/ to view our FAQs and troubleshooting tips.Install a new drum unit (see Replacing the drum unit on page 133). |
| Missing image at thin line | Make sure toner save mode is off in the Touchscreen or the printer driver.See Toner Save Mode in Advanced tab on page 41 (for Windows® printer driver), Advanced options on page 58 (for Windows® BR-Script printer driver), Advanced print settings on page 73 (for Macintosh printer driver), or Printer Features on page 77 (for Macintosh BR-Script printer driver).Change the print resolution.If you use a Windows printer driver, choose Improve Pattern Printing in Print Setting of the Basic tab (see Settings dialog box on page 36). |
| Wrinkled | Check the paper type and quality (see Acceptable paper and other print media on page 2).Make sure that the back cover is closed completely.Make sure that the two gray levers inside the back cover are in the up positions.Make sure that the media type setting in the driver matches the type of paper you are using (see Acceptable paper and other print media on page 2). |
| Ghost | Check the machine's environment. Conditions such as low humidity and low temperatures may cause this print quality problem (see the Product Safety Guide).Make sure that the media type setting in the printer driver matches the type of paper you are using (see Acceptable paper and other print media on page 2).Make sure you lift up the two gray levers inside the back cover until they stop in the up position.Install a new drum unit (see Replacing the drum unit on page 133). |
| Poor fixing | Make sure you lift up the two gray levers inside the back cover until they stop in the up position. Make sure that the media type setting in the printer driver matches the type of paper you are using (see Acceptable paper and other print media on page 2). Choose Improve Toner Fixing mode in the printer driver. (For Windows, see Other Print Options on page 47.) (For Macintosh, see Print Settings on page 71.) If this selection does not provide enough improvement, change the printer driver setting in Media Type to a thick setting. If you are printing an envelope, choose Env. Thick in the media type setting. |
| Curled or wavy | Choose Reduce Paper Curl mode in the printer driver. (For Windows, see Other Print Options on page 47.) (For Macintosh, see Print Settings on page 71.) If the problem is not solved, choose Plain Paper in the media type setting. If you are printing an envelope, choose Env. Thin in the media type setting. If you do not use the machine often, the paper may have been in the paper tray too long. Turn over the stack of paper in the paper tray. Also, fan the paper stack, and then rotate the paper 180° in the paper tray. Store the paper where it will not be exposed to high temperatures and high humidity. Open the back cover (face-up output tray) to let the printed pages exit onto the face-up output tray. |
| Envelope Creases | ■ Make sure that the envelope levers inside the back cover are pulled down to the envelope position when you print envelopes. See Loading paper in the multi-purpose tray (MP tray) on page 12. NOTE · When you have finished printing, open the back cover and reset the two gray levers back to their original positions (1) by lifting them up until they stop. 1 · If creases occur with the envelope levers in the envelope position, print with the back cover open and feed one envelope at a time from the MP tray. |
Machine Information
Checking the Serial Number
You can see the machine's Serial Number on the Touchscreen.
1 Press

Press Machine Information > Serial No..
Default settings
The machine has two levels of default settings; the default settings have been set at the factory before shipment (see Basic Operations on page 88).
Network
Factory Reset
NOTE
- Changing the default settings does not modify the preset factory defaults.
- Page counters can never be changed.
Network default settings
To reset only the print server back to its default settings (by resetting all network information such as the password and IP address), follow these steps:
1 Press
Press Network > Network Reset.
Press Yes after Reset Network? appears.
Press Yes for more than 2 seconds after Reboot OK? appears. The machine will restart automatically.
Factory Reset
This operation will reset all the machine's settings back to the defaults that were set at the factory.
1 Press

Press Reset Menu >Factory Reset.
3 Press Yes after Factory Reset? appears.
Press Yes for more than 2 seconds after Reboot OK? appears. The machine will restart automatically.
Machine specifications
General
| Model | HL-L9200CDW | HL-L9200CDWT | |
| Printer Type | Laser | ||
| Print Method | Electrophotographic Laser Printer (single-pass) | ||
| Memory Capacity | Standard | 128 MB | |
| Optional | 1 slot: DDR2 SO-DIMM (144-pin) up to 256 MB | ||
| LCD (liquid crystal display) | 1.8 in. TFT Color Touchscreen LCD 1 and Touchpanel | ||
| Power Source | 110 - 120 VAC 50/60 Hz | ||
| Power Consumption 2(Average) | Peak | Approx. 1170 W | |
| Printing | Approx. 555 W at 77 °F (25 °C) | ||
| Printing(Quiet Mode) | Approx. 375 W | ||
| Ready | Approx. 65 W at 77 °F (25 °C) | ||
| Sleep | Approx. 9.0 W | ||
| Deep Sleep | Approx. 1.1 W | ||
| Power Off 3 4 | Approx. 0.02 W | ||
| Dimensions | 12.3 (313)*17.5 (445)**16.1(410)19.1(486)** : HL-L9200CDW** : HL-L9200CDWT | ||
| Weights (with supplies) | 47.7 lb (21.6 kg) | 61.6 lb (27.9 kg) | |
1 Measured diagonally
2 USB connections to computer.
3 Measured according to IEC 62301 Edition 2.0.
4 Power consumption varies slightly depending on the usage environment or part wear.
| Model | HL-L9200CDW | HL-L9200CDWT | ||
| Noise Level | Sound Pressure | Printing | LpAm = 53.5 dB (A) | LpAm = 55.1 dB (A) |
| Ready | LpAm = 27.9 dB (A) | LpAm = 27.3 dB (A) | ||
| Printing (Quiet Mode) | LpAm = 50.6 dB (A) | LpAm = 50.8 dB (A) | ||
| Sound Power1 | Printing | LwAd = 6.78 B (A) | ||
| Ready | LwAd = 4.06 B (A) | |||
| Printing (Quiet Mode) | (Color) LwAd = 6.33 B (A) (Mono) LwAd = 6.35 B (A) | (Color) LwAd = 6.39 B (A) (Mono) LwAd = 6.41 B (A) | ||
| Temperature | Operating | 50 °F to 90 °F (10 to 32 °C) | ||
| Storage | 32 °F to 104 °F (0 to 40 °C) | |||
| Humidity | Operating | 20 - 80% (without condensation) | ||
| Storage | 10 - 90% (without condensation) | |||
1 Measured in accordance with the method described in RAL-UZ171.
Print media
| Model | HL-L9200CDW | HL-L9200CDWT | ||
| Paper Input1 | Paper Tray (Standard) | Paper Type | Plain Paper, Thin Paper, Recycled Paper | |
| Paper Size | Letter, A4, B5 (JIS), A5, A5 (Long Edge), A6, Executive, Legal, Folio | |||
| Paper Weight | 16 to 28 lb (60 to 105 g/m2) | |||
| Maximum Paper Capacity | Up to 250 sheets of 20 lb (80 g/m2) Plain paper | |||
| Multi-purpose tray (MP tray) | Paper Type | Plain Paper, Thin Paper, Thick Paper, Thicker Paper, Recycled Paper, Bond Paper, Label, Envelope, Env.Thin, Env.Thick, Glossy Paper2 | ||
| Paper Size | Width: 3 to 8.5 in (76.2 to 215.9 mm) Length: 5 to 14 in (127 to 355.6 mm) | |||
| Paper Weight | 16 to 43 lb (60 to 163 g/m2) | |||
| Maximum Paper Capacity | Up to 50 sheets of 20 lb (80 g/m2) Plain paper | |||
| Paper Tray 2 (Optional)3 | Paper Type | Plain Paper, Thin Paper, Recycled Paper | ||
| Paper Size | Letter, A4, B5 (JIS), A5, Executive, Legal, Folio | |||
| Paper Weight | 16 to 28 lb (60 to 105 g/m2) | |||
| Maximum Paper Capacity | Up to 500 sheets of 20 lb (80 g/m2) Plain paper | |||
| Paper Output1 | Face-Down Output Tray | Up to 150 sheets of 20 lb (80 g/m2) Plain paper (face-down delivery to the face-down output paper tray) | ||
| Face-Up Output Tray | One sheet (face-up delivery to the face-up output tray) | |||
| 2-sided | Automatic 2-sided Printing | Paper Type | Plain Paper, Thin Paper, Recycled Paper, Glossy Paper | |
| Paper Size | Letter, Legal, Folio | |||
| Paper Weight | 16 to 28 lb (60 to 105 g/m2) | |||
1 For labels, we recommend removing the printed sheets from the output paper tray immediately after they exit the machine to avoid the possibility of smudging.
2 For glossy paper, place only one sheet in the MP Tray.
3 Tray 2 is standard on HL-L9200CDWT.
Printer
| Model | HL-L9200CDW | HL-L9200CDWT | ||
| Automatic 2-sided Print | Yes | |||
| Emulation | PCL6, BR-Script3 (PostScript® 3™) | |||
| Resolution | 600 × 600 dpi2400dpi (2400 × 600) quality | |||
| Print Speed1 2 | Single side print | Monochrome | Up to 32 ppm (Letter size)Up to 30 ppm (A4 size) | |
| Full color | Up to 32 ppm (Letter size)Up to 30 ppm (A4 size) | |||
| 2-sided Print | Monochrome | Up to 14 sides per minute (7 sheets per minute) (Letter or A4 size) | ||
| Full color | Up to 14 sides per minute (7 sheets per minute) (Letter or A4 size) | |||
| First Print Time3 | (Color)Less than 15 seconds at 73.4 °F (23 °C) / 115 V(Mono)Less than 15 seconds at 73.4 °F (23 °C) / 115 V | |||
1 The print speed may change depending on the type of document you print.
2 Print speed may be slower when the machine is connected by wireless LAN.
3 From Ready mode and standard tray
Interface
| Model | HL-L9200CDW | HL-L9200CDWT |
| USB | Hi-Speed USB 2.012 We recommend using a USB 2.0 cable (Type A/B) that is no more than 6 feet (2 meters) long. | |
| Ethernet3 | 10BASE-T / 100BASE-TX Use a straight-through Category 5 (or greater) twisted-pair cable. | |
| Wireless LAN3 | IEEE 802.11b/g/n (Infrastructure Mode/Ad-hoc Mode) IEEE 802.11g (Wi-Fi Direct) | |
1 Your machine has a Hi-Speed USB 2.0 interface. The machine can also be connected to a computer that has a USB 1.1 interface.
2 Third party USB ports are not supported.
3 For detailed network specifications, see Network (LAN) on page 211 and see the Network User's Guide.
Network (LAN)
| Model | HL-L9200CDW | HL-L9200CDWT | |
| LAN | You can connect your machine to a network for Network Printing. Also included is Brother BRAdmin Light 1 2 Network Management software. | ||
| Protocols | IPv4 | ARP, RARP, BOOTP, DHCP, APIPA(Auto IP), WINS/NetBIOS name resolution, DNS Resolver, mDNS, LLMNR responder, LPR/LPD, Custom Raw Port/Port9100, IPP/IPPS, FTP Server, TELNET Server, HTTP/HTTPS server, TFTP client and server, SMTP Client, SNMPv1/v2c/v3, ICMP, Web Services (Print), CIFS client, SNMP client, LDAP client | |
| IPv6 | NDP, RA, DNS resolver, mDNS, LLMNR responder, LPR/LPD, Custom Raw Port/Port9100, IPP/IPPS, FTP Server, TELNET Server, HTTP/HTTPS server, TFTP client and server, SMTP Client, SNMPv1/v2c, ICMPv6, Web Services (Print), CIFS Client, SNMP client, LDAP client | ||
| Security Protocols | Wired | SMTP-AUTH, SSL/TLS (IPPS, HTTPS, SMTP), SNMP v3 802.1x (EAP-MD5, EAP-FAST, PEAP, EAP-TLS, EAP-TTLS), Kerberos, IPSec | |
| Wireless | SMTP-AUTH, SSL/TLS (IPPS, HTTPS, SMTP), SNMP v3 802.1x (LEAP, EAP-FAST, PEAP, EAP-TLS, EAP-TTLS), Kerberos, IPSec | ||
| Wireless Network Security | WEP 64/128 bit, WPA-PSK (TKIP/AES), WPA2-PSK (AES) | ||
| Wireless Network Setup Support Utility | \(AOSS^{TM}\) | Yes | |
| WPS | Yes | ||
1 (For Windows® users) Brother BRAdmin Light is available from the CD-ROM provided with the machine. (For Macintosh users) Brother BRAdmin Light is available as a download from http://solutions.brother.com/.
2 (For Windows® users) If you want more advanced printer management, use the latest Brother BRAdmin Professional utility version that is available as a download from http://solutions.brother.com/.
Direct Print feature
| Model | HL-L9200CDW | HL-L9200CDWT |
| Compatibility | PDF version 1.7¹, JPEG, Exif+JPEG, PRN (created by Brother printer driver), TIFF (scanned by all Brother MFC or DCP models), XPS version 1.0 | |
| Interface | USB direct interface | |
PDF data including a JBIG2 image file, a JPEG2000 image file or a transparency file is not supported.
Computer requirements
| Computer Platform & Operating System Version | PC Interface | Processor | Hard Disk Space to install | |||
| USB1 | 10/100 Base-TX (Ethernet) | Wireless 802.11b/g/n | ||||
| Windows® Operating System | Windows® XP Home Windows® XP Professional | Printing | 32bit (x86) or 64bit (x64) processor | 80 MB | ||
| Windows® XP Professional x64 Edition | 64bit (x64) processor | |||||
| Windows Vista® | 32bit (x86) or 64bit (x64) processor | |||||
| Windows® 7 | ||||||
| Windows® 8 | ||||||
| Windows® 8.1 | ||||||
| Windows Server® 2003 | Printing | 32bit (x86) or 64bit (x64) processor | ||||
| Windows Server® 2003 x64 Edition | 64bit (x64) processor | |||||
| Windows Server® 2008 | 32bit (x86) or 64bit (x64) processor | |||||
| Windows Server® 2008 R2 | 64bit (x64) processor | |||||
| Windows Server® 2012 | 64bit (x64) processor | |||||
| Windows Server® 2012 R2 | 64bit (x64) processor | |||||
| Macintosh Operating System | OS X v10.7.5 | Printing | Intel® Processor | 80 MB | ||
| OS X v10.8.x | ||||||
| OS X v10.9.x | ||||||
Third party USB ports are not supported.
For the latest driver updates, visit http://solutions.brother.com/.
All trademarks, brand and product names are property of their respective companies.
Important information for choosing your paper
The information in this section will help you choose paper to use with this machine.
NOTE
If you use paper that is not recommended, a paper jam or misfeed may occur in the machine.
Before you buy a large quantity of paper
Make sure that the paper is appropriate for the machine.
Paper for plain paper copies
Paper is divided by usage, such as paper for printing and paper for copying. The usage is usually written on the paper's package. Check the package to see whether it is appropriate for laser printers. Use paper that is appropriate for laser printers.
Basis weight
The basis weight of the paper for general use varies in different countries. We recommend using paper that weighs 20 to 24 lb (75 to 90g / m^2 ), although this machine is able to cope with thinner or thicker paper than these weights.
Long grain and short grain
The pulp fiber of the paper is aligned during paper manufacturing. Paper can be classified into two types, long grain and short grain.
Long grain paper fibers run in the same direction as the long edge of the paper. Short grain paper fibers run perpendicular to the long edge of the paper. Though most plain paper for copying is long grain, some is short grain. We recommend using long grain paper for this machine. Short grain paper is too weak for the paper transport of the machine.
Acid paper and neutralized paper
Paper can be classified as either acid paper or neutralized paper.
Though modern paper manufacture methods started with acid paper, neutralized paper is recently taking the place of acid paper because of environmental issues.
However, many forms of acid paper can be found in recycled paper. We recommend using neutralized paper for this machine.
Use an acid paper check pen to distinguish acid paper from neutral paper.
Print surface
The characteristics of the face side and reverse side of a sheet of paper may vary a little.
Usually, the opening side of the paper ream package is the print side. Follow the instructions on the paper package. Typically, the print side is indicated by an arrow.
Supplies
| Model | HL-L9200CDW | HL-L9200CDWT | Order No. | ||
| Toner Cartridge | Inbox | Black, Cyan, Magenta, Yellow | Approx. 6,000 pages Letter or A4 page1 | - | |
| Supply | Black, Cyan, Magenta, Yellow | Approx. 6,000 pages Letter or A4 page1 | TN-339BK, TN-339C, TN-339M, TN-339Y | ||
| Drum Unit | Approx. 25,000 pages Letter or A4 pages2 | DR-331CL | |||
| Belt Unit | 50,000 pages (5 pages per job)2 | BU-320CL | |||
| 20,000 pages (1 page per job)2 | |||||
| Waste Toner Box | Approx. 50,000 pages Letter or A4 pages2 | WT-320CL | |||
1 Approximate cartridge yield is declared in accordance with ISO/IEC 19798.
2 Life of supply is approximate and may vary by type of use.
Important information for the toner cartridge life
Color/Mono setting in the printer driver
Users can change the Color/Mono settings on the printer driver as follows:
Auto
The machine checks the content of the document for color. If color is detected anywhere in the document, it will print the whole of the document using all the colors. In other words, it will mix some of the toners to help achieve every shade detected in the document, increasing the density of toner applied to the page. If no color content is detected, it will print the document in monochrome.
The default setting on your machine is Auto.
NOTE
The machine's color sensor is very sensitive and may perceive faded black text or an off-white background as color. If you know that your document is black and white and you want to conserve color toner, select Mono mode.
Color
Whether the document contains color or just monochrome, your machine will print the document using all the colors.
Mono
Select this mode if the document has only black and grayscale text and/or objects. If your document contains color, this mode prints the document in 256 levels of gray using the black toner.
NOTE
If either the Cyan, Magenta or Yellow toner reaches the end of its life while printing a color document, the print job cannot be completed. You can cancel your print job and choose to start the print job again in Mono mode, as long as Black toner is available.
For more information about the settings in the printer driver, see Chapter 2: Driver and Software.
Toner Cartridge Life
This product detects the life of the toner cartridges using the following two methods:
Detection by counting the dots of each color that are necessary to create an image
Detection by counting the rotations of the developer roller
This product counts the dots of each color used to print every document and the rotations of each toner cartridge's developer roller. The print operation will stop when either one of the upper limits are reached. The upper limit is set above the number of dots or rotations required for the cartridge to perform consistently with its advertised page yield (for more information on page yield, please visit http://www.brother.com/pageyield). This feature is intended to reduce the risk of poor print quality and damage to the machine.
There are two messages that indicate when the toner nears or reaches its life end: Toner Low and Replace Toner.
Appendix
Toner Low is displayed on the LCD when the number of dots or rotations of the developer roller nears its maximum count: Replace Toner is displayed on the LCD when the number of dots or rotations of the developer roller reaches its maximum count.
Color Correction
The number of developer roller rotations that are counted may not only be for normal operations such as printing, but also for machine adjustments, such as Color Calibration and Color Registration.
Color Calibration (Adjustment of Color Density)
To obtain stable print quality, the density of each toner cartridge needs to be maintained at a fixed value. If the density balance between the colors cannot be kept, the tint becomes unstable, and accurate color reproduction becomes unavailable. The toner density can change due to chemical changes to the toner that affect its electrical charge, deterioration of the developer unit, and temperature and humidity levels in the device. When calibration occurs, the density level adjustment test patterns are printed on the belt unit.
Calibration is mainly performed at the following times:
- When the user manually selects calibration from the operation panel or the printer driver. (Please perform calibration if color density needs to be improved.)
- When a used toner cartridge is replaced with a new one.
- When the printer senses that the ambient temperature and humidity have changed.
- When a specified number of printed pages is reached.
Color Registration (Correction of Color Position)
In this device, the drum unit and developer unit are prepared for black (K), yellow (Y), magenta (M), and cyan (C), respectively. Four color images are combined into one image, and therefore color registration errors (i.e., how the four color images align) might occur. When registration errors occur, registration correction test patterns are printed on the belt unit.
Registration is mainly performed at the following times:
- When the user manually selects registration from the operation panel.
(Pleases perform registration if a color registration error needs to be corrected.) - When a specified number of printed pages is reached.
Brother numbers
IMPORTANT
For technical and operational help, you must call the country where you bought the machine. Calls must be made from within that country.
Register your product
By registering your product with Brother International Corporation, you will be recorded as the original owner of the product.
Your registration with Brother:
may serve as a confirmation of the purchase date of your product should you lose your receipt;
may support an insurance claim by you in the event of product loss covered by insurance; and,
■ will help us notify you of enhancements to your product and special offers.
Complete the Brother Warranty Registration or, for your convenience and most efficient way to register your new product, register on-line at
http://www.brother.com/registration/
FAQs (frequently asked questions)
The Brother Solutions Center is our one-stop resource for all your machine needs. Download the latest software and utilities and read FAQs and troubleshooting tips to learn how to get the most from your Brother product.
http://solutions.brother.com/
Check here for Brother driver updates.
Customer Service
In USA: http://www.brother-usa.com/support (Self-Service/Email/Chat) 1-877-BROOTHER (1-877-276-8437)
In Canada: www.brother.ca/support (Self-Service, Videos, Email, Chat, Facebook and Twitter Help)
If you have comments or suggestions, write us at:
In USA: Printer Customer Support
Brother International Corporation
7905 North Brother Boulevard
Bartlett, TN 38133
In Canada: Brother International Corporation (Canada), Ltd. Customer Experience Team 1, rue Hotel de Ville Dollard-des-Ormeaux, PQ, Canada H9B 3H6
Service center locator (USA only)
For the location of a Brother authorized service center, call 1-877-BROTHER (1-877-276-8437), or visit http://www.brother-usa.com/service/.
Service center locations (Canada only)
For the location of a Brother authorized service center, visit www.brother.ca/support
Internet addresses
Brother Global Website: http://www.brother.com/
For Frequently Asked Questions (FAQs), Product Support and Technical Questions, and Driver Updates and Utilities: http://solutions.brother.com/
For Brother Accessories & Supplies:
In USA: http://www.brothermall.com/
In Canada: http://www.brother.ca/
Ordering supplies
For best quality results use only genuine Brother supplies, which are available at most Brother retailers. If you cannot find the supply you need and have a Visa, MasterCard, Discover, or American Express credit card, or PayPal account, you can order directly from Brother. Visit us online for a complete selection of the Brother accessories and supplies that are available for purchase.
NOTE
In Canada, only Visa and MasterCard are accepted.
In USA: 1-877-552-MALL (1-877-552-6255)
1-800-947-1445 (fax)
http://www.brothermall.com/
In Canada: http://www.brother.ca/
| Description | Item |
| Toner Cartridge <Black> | TN-339BK (Approx. 6,000 pages) 12 |
| Toner Cartridge <Cyan> | TN-339C (Approx. 6,000 pages) 12 |
| Toner Cartridge <Magenta> | TN-339M (Approx. 6,000 pages) 12 |
| Toner Cartridge <Yellow> | TN-339Y (Approx. 6,000 pages) 12 |
| Drum Unit | DR-331CL (Approx. 25,000 pages) 13 |
| Waste Toner Box | WT-320CL (Approx. 50,000 pages) 13 |
| Belt Unit | BU-320CL 50,000 pages (5 pages per job) 13 20,000 pages (1 page per job) 13 |
| Paper Tray #2 (option) 4 | LT-325CL |
Letter or A4 size single-sided pages.
2 Approximate cartridge yield is declared in accordance with ISO/IEC 19798.
3 Life of supply is approximate and may vary by type of use.
4 Tray 2 is standard on HL-L9200CDWT.
B
Index
Numerics
2-sided printing 20
A
Apple Macintosh 29,66
Auto Power Off 114
B
Brother Numbers (USA/Canada) 217, 218, 219
BR-Script3 55,76
C
Cleaning 153
Color Correction 116
Computer requirements 212
Control panel buttons 85
Corona wires 160
D
Deep Sleep mode 113
Default settings 206
Device Settings tab 52
Dimensions 207
Drum unit 133
E
Emulation 210
Envelopes 3,5,15
Error messages 176
F
FAQs (Frequently Asked Questions) 217
Folio 3
1
Interface 210
J
Jam 2-sided 184
Jam Inside 190
Jam MP Tray 182
Jam Rear 187
Jam Tray 1 182
Jam Tray 2 182
L
Labels 3,6,15
Linux 29
M
Machine information 206
Macintosh 29,66
Maintenance messages 124, 125
Manual 2-sided printing 23
Media specifications 209
Memory 207
N
Network connectivity 210
Network software 84
P
Packing and shipping the machine 171
Paper 2, 213
loading 8, 12
recommended 2,3
size 2
tray capacity 3
type 2
Paper jams 182
Plain Paper 2
difficulties 194
Macintosh
BR-Script3 printer driver 76
Printer driver 66
Windows®
2-sided printing 38
Booklet printing 39
BR-Script3 printer driver 55
Printer driver 33
Print quality 198
Printer driver 29,63,81
Q
Quiet mode 115
R
Register your product 217
S
Secure documents 109
Service centers (USA/Canada) 218
Sleep mode 113
Specifications 207
Status Monitor
Macintosh 82
Windows 64
Supplies 123, 124, 125, 214
Supplies (USA/Canada) 219
T
TCP/IP 98,99
Thick paper 15
Toner cartridge 127, 128
Toner cartridge life 215
Troubleshooting 175, 194
Error messages on Touchscreen 176
if you are having difficulty
network 196
paper handling 195
paper jams 182
printing 194
Maintenance messages on Touchscreen 176
U
Unprintable area 7
USB direct interface 24
USB flash drive 24
Utilities 217
W
Watermark 41, 46
Weights 207
Windows 29
WLAN 99,100
World Wide Web 217
- User's Guide
- For visually-impaired users
- HL-L9300 series only
- Loading paper in the optional lower tray (if equipped)
- NOTE
- Optional lower trays
- Machine specifications
- General
- User's Guides and where do I find them?
- Using the documentation
- Symbols and conventions used in the documentation
- Accessing Brother Utilities (Windows®)
- Table of Contents
- Printing Methods
- Driver and Software
- General Information
- Options
- Routine Maintenance 123
- Troubleshooting 175
- A Appendix 207
- B Index 220
- About this Machine
- Front view and Back view
- Acceptable paper and other print media
- Recommended paper and print media
- Paper type and size
- Recommended paper specifications
- Handling and using special paper
- Types of paper to avoid
- IMPORTANT
- A curl of 0.08 in. (2 mm) or greater may cause jams to occur.
- Envelopes
- Types of envelopes to avoid
- Labels
- Types of labels to avoid
- Unprintable area when printing from a computer
- Loading paper
- Loading paper and print media
- Loading paper in the standard paper tray and the optional lower tray
- Printing on plain paper, thin paper, or recycled paper from Tray 1 and Tray 2
- Loading paper in the multi-purpose tray (MP tray)
- Printing on plain paper, thin paper, recycled paper, bond paper, or glossy paper from the MP tray
- Printing on thick paper, labels and envelopes from the MP tray
- Paper Size
- Media Type
- Paper Source
- Send the print job to the machine.
- Printing Methods
- 2-sided printing
- Guidelines for printing on both sides of the paper
- Automatic 2-sided printing
- Automatic 2-sided printing using the Windows® printer driver
- Automatic 2-sided printing using the BR-Script printer driver for Windows®
- Manual 2-sided printing
- Manual 2-sided printing using the Windows® printer driver
- Printing from a USB flash drive or digital camera supporting mass storage
- Creating a PRN file for direct printing
- Printing directly from the USB flash drive or digital camera supporting mass storage
- Printer driver
- For Windows®
- For Macintosh1
- For Linux® 12
- Printing a document
- Printer driver settings
- Windows®
- Accessing the printer driver settings
- Features in the Windows® printer driver
- Basic tab
- Orientation
- Copies
- Collate
- Print Quality
- Color / Mono
- Document Type
- Settings dialog box
- Import...
- Export...
- Improve Gray Color
- Enhance Black Printing
- Improve Thin Line
- Improve Pattern Printing
- Multiple Page
- Page Order
- Border Line
- Print cut-out line
- 2-sided / Booklet
- None
- 2-sided / 2-sided (Manual)
- 2-sided Type
- Portrait
- Landscape
- - Binding Offset
- ■ Booklet / Booklet (Manual)
- - Booklet
- - Booklet (Manual)
- Left Binding
- Right Binding
- Top Binding
- Bottom Binding
- - Booklet Printing Method
- Print Preview
- Page List Area
- Preview Area
- Advanced tab
- Scaling
- Reverse Print
- Use Watermark
- Watermark Settings
- Bring To Front
- In Outline Text
- Custom Settings
- Edit Watermark
- Header-Footer Print
- ID Print
- Toner Save Mode
- Secure Print
- Administrator
- ■ Password
- Copies Lock
- Multiple Page & Scaling Lock
- Color / Mono Lock
- Watermark Lock
- Header-Footer Print Lock
- User Authentication
- Other Print Options
- Color Calibration
- Use Calibration Data
- Get Device Data Automatically
- Start Color Calibration
- Sleep Time
- Improve Print Output
- Reduce Paper Curl
- Improve Toner Fixing
- Skip Blank Page
- Print Text in Black
- Print Archive
- Print Profiles tab
- Add Profile
- Delete Profile
- Device Settings tab
- Available Options / Installed Options
- Paper Source Setting
- Serial No.
- Auto Detect
- Support
- Brother Solutions Center
- BR-Script 3 printer driver features (PostScript® 3™ language emulation)
- Printing Preferences
- ■ Layout tab
- Pages per Sheet
- Draw Borders
- Paper/Quality tab
- - Paper Source
- Automatically Select
- Auto Select by Printer
- Tray1
- Tray2
- MP Tray
- Color
- Secure Print tab
- Advanced options
- ■ Print Quality
- Sleep Time [Min.]
- - Auto
- - Mono
- Color Mode
- Halftone Screen Lock
- High Quality Image Printing
- Ports tab
- Uninstalling the printer driver
- Status Monitor
- Troubleshooting
- Visit the Genuine Supplies website
- Monitoring the machine's status
- Macintosh
- Features in the printer driver (Macintosh)
- Choosing page setup options
- Choosing printing options
- Cover Page
- ■ Print Cover Page
- Cover Page Type
- Billing Info
- Layout
- ■ Layout Direction
- Border
- Two-Sided
- ■ Reverse page orientation
- Flip horizontally
- Secure Print:
- Print Settings
- Normal
- Fine
- Advanced print settings
- Color Settings
- Features in the BR-Script3 printer driver (PostScript® 3™ language emulation)
- Printer Features
- Feature Sets: General 1
- Feature Sets: General 2
- - Reduce Paper Curl
- - Improve Toner Fixing
- Removing the printer driver
- Updating the machine's status
- Hiding or showing the window
- Quitting the window
- Web Based Management (Network Connection only)
- Software
- Software for networks
- Control panel overview
- 1.8 in. Touchscreen LCD (Liquid Crystal Display)
- Touchpanel:
- Power On/Off
- Touchscreen LCD
- Warning icon
- Wireless Status
- (Toner)
- Functions
- (Settings)
- Basic Operations
- Settings and features tables
- Using the Settings Tables
- Settings Tables
- Features Table
- Toner
- WiFi
- Wi-Fi Setup
- USB (Direct Print) (continued)
- Web
- Entering Text
- Inserting spaces
- Making corrections
- Repeating letters
- Printing Secure documents
- Secure documents
- How to print Secure documents
- Security features
- Setting Lock
- Setting up the password
- Changing your Setting Lock password
- Turning Setting Lock on/off
- Turning Setting Lock on
- Turning Setting Lock off
- Secure Function Lock 3.0
- Active Directory Authentication
- IPSec
- Ecology features
- Toner Save
- Deep Sleep mode
- Auto Power Off
- Quiet mode feature
- Turning Quiet mode on/off
- Color Correction
- Calibrate
- Reset
- Color Registration
- Auto Correction
- Lower tray (LT-325CL)
- WARNING
- SO-DIMM
- SO-DIMM types
- Installing extra memory
- Routine Maintenance
- Replacing supplies
- Replacing the toner cartridges
- Toner Low: X
- Replace Toner
- #
- Replacing the drum unit
- Drum!
- Drum End Soon
- Replace Drum
- Drum Stop
- Resetting the drum counter
- Replacing the belt unit
- Belt End Soon
- Replace Belt
- Resetting the belt counter
- Replacing the waste toner box
- WT Box End Soon
- Replace WT Box
- Cleaning and Checking the machine
- Cleaning the outside of the machine
- Clean the Touchscreen as follows:
- Clean the outside of the machine as follows:
- Cleaning the inside of the machine
- Cleaning the corona wires
- Cleaning the drum unit
- Cleaning the paper pick-up roller
- Replacing periodic maintenance parts
- Packing and shipping the machine
- 6
- Identifying the problem
- First, check that
- Error and maintenance messages
- Paper jams
- Paper is jammed in the multi-purpose tray
- Paper is jammed in Paper Tray 1 or Tray 2
- Paper is jammed underneath the Paper Tray
- HOT SURFACE
- Paper is jammed at the back of the machine
- Paper is jammed inside the machine
- If you are having difficulty with your machine
- Improving the print quality
- Machine Information
- Checking the Serial Number
- Default settings
- Network default settings
- Factory Reset
- Print media
- Printer
- Interface
- Network (LAN)
- Direct Print feature
- Computer requirements
- Important information for choosing your paper
- Before you buy a large quantity of paper
- Paper for plain paper copies
- Basis weight
- Long grain and short grain
- Acid paper and neutralized paper
- Print surface
- Supplies
- Important information for the toner cartridge life
- Color/Mono setting in the printer driver
- Auto
- Mono
- Toner Cartridge Life
- Appendix
- Color Calibration (Adjustment of Color Density)
- Color Registration (Correction of Color Position)
- Brother numbers
- Register your product
- FAQs (frequently asked questions)
- Customer Service
- Service center locator (USA only)
- Service center locations (Canada only)
- Internet addresses
- Ordering supplies
- B
- Index
- Numerics
- A
- C
- D
- E
- F
- 1
- J
- L
- M
- N
- P
- Q
- R
- S
- T
- U
- W
Marque : BROTHER
Modèle : HL-L9200CDWT
Catégorie : Imprimante couleur laser