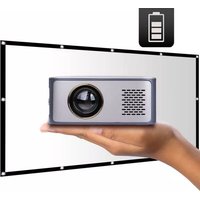
LV-HD400 - Projecteur LA VAGUE - Notice d'utilisation et mode d'emploi gratuit
Retrouvez gratuitement la notice de l'appareil LV-HD400 LA VAGUE au format PDF.

| Type de produit | Projecteur LED |
| Marque | LA VAGUE |
| Modèle | LV-HD400 |
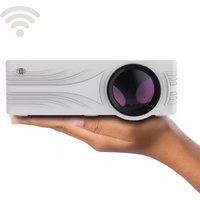
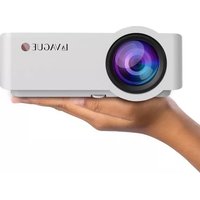
| Résolution native | 1920 x 1080 pixels (Full HD) |
| Luminosité | 3 200 lumens |
| Contraste | 2000:1 |
| Correction trapézoïdale | ±15° manuelle |
| Température de couleur | 7500-8500K |
| Source lumineuse | LED |
| Dimensions (L x l x H) | 305 x 225 x 115 mm |
| Poids | Environ 2,5 kg |
| Alimentation | Secteur AC 100-240 V, 50/60 Hz |
| Interfaces | 2x HDMI, 2x USB, 1x AV, 1x VGA, sortie audio, entrée audio |
| Formats vidéo supportés | AVI, MP4, MKV, FLV, WMV, MOV, RMVB, MPEG1, MPEG2, MPEG-4, H.264, XVID, H.263, JPEG |
| Formats audio supportés | AAC, MP2, MP3, PCM, FLAC, WMA |
| Formats image supportés | BMP, JPEG, PNG |
| Fonctionnalités principales | Lecture USB directe (photos, musique, vidéos, texte), correction trapézoïdale, réglage de l'angle d'inclinaison |
| Entretien et nettoyage | Nettoyer le filtre à poussière toutes les 8 semaines |
| Sécurité | Ne pas regarder dans l'objectif, garder à l'écart des liquides, ne pas ouvrir le boîtier |
| Pièces détachées et réparabilité | Aucune pièce réparable par l'utilisateur ; contacter le fournisseur en cas de problème |
| Informations générales | Fabricant : VEHNS GROUP GmbH, Theatinerstraße 40-42, 80333 Munich, Allemagne ; Fabriqué en Chine |
FOIRE AUX QUESTIONS - LV-HD400 LA VAGUE
Questions des utilisateurs sur LV-HD400 LA VAGUE
0 question sur cet appareil. Repondez a celles que vous connaissez ou posez la votre.
Poser une nouvelle question sur cet appareil
Téléchargez la notice de votre Projecteur au format PDF gratuitement ! Retrouvez votre notice LV-HD400 - LA VAGUE et reprennez votre appareil électronique en main. Sur cette page sont publiés tous les documents nécessaires à l'utilisation de votre appareil LV-HD400 de la marque LA VAGUE.
MODE D'EMPLOI LV-HD400 LA VAGUE

La VAGUE
LED Projector
LV-HD400
Benutzerhandbuch
Instruction Manual
Mode d'emploi
Manuale di istruzioni
Manual de uso
TABLE OF CONTENTS
DEUTSCH 3
ENGLISH 14
FRANÇAIS 25
ITALIANO.... 36
ESPAÑOL 47
DEUTSCH
BITTE BEACHTEN:
- Bitte lesen Sie das gesamte Benutzerhandbuch sorgfältig durch, bevor Sie den Projektor verwenden.
- Um die Stabilität der Stromversorgung zu gewährleisten, verwenden Sie bitte eine Standard-Stromversorgung und geerdete Steckdosen.
- Verwenden Sie nur die auf dem Projektor angegebene Stromquelle.
- Bitte öffnen Sie den Projektor nicht. Es befinden sich keine vom Benutzer zu wartenden Teile im Projektor. Das Öffnen des Projektors führt zum Erlöschen der Garantie. Wenn Sie ein Problem mit Ihrem Projektor haben, wenden Sie sich an Ihren Lieferanten.
- Bitte schauen Sie nicht in die Linse des Projektors. Das helle Licht könnte Ihren Augen schaden.
- Stellen Sie den Projektor nicht auf eine Fläche, die den Luftstrom aus den Lüftungsschlitzen blockieren könnte. Weiches Gewebe könnte den Luftstrom behindern. Auf stabilem, hartem Untergrund aufstellen.
- Halten Sie den Projektor von Flüssigkeiten fern. Der Projektor ist nicht wasserdicht und darf nicht im Freien verwendet werden.
- Um einen elektrischen Schlag zu vermeiden, halten Sie den Projektor von Feuchtigkeit fern.
- Bitte schalten Sie den Projektor aus und trennen Sie ihn vom Stromnetz, wenn er nicht benutzt wird.
- Bitte verwenden Sie für die Aufbewahrung Ihres Projektors Originalverpackungen.
PRODUKTÜBERSICHT
Front

text_image
Technical diagram of a projector with labeled components and directional arrows indicating orientation1 Infrarotempfänger
2 Lautsprecher
3 Stellschraube für Neigungswinkel
Oben

text_image
Diagram of a device control panel with labeled buttons and a scroll-like diagram showing internal structure.1 Objektiv Fokus
2 Keystone-Korrektur
3 Bedienfeld
Rückseite

text_image
Diagram of a rear panel with labeled ports and indicators, including a control panel and display elements.1 Netzschalter
2 Anschlussfeld
3 Infrarotempfänger
Unterseite

text_image
Technical diagram of a device casing with numbered components and labeled parts1 Stellschraube für Neigungswinkel
2 Gewinde (M4x8mm) für Projektorhalterungen befinden sich unter den Pads
3 Staubfilter
Dieser sollte bei regelmäßiger Verwendung des Projektors alle 8 Wochen gereinigt werden
Bedienfeld

flowchart
graph TD
    1["1"] --> O(( ))
    2["2"] --> Power["Power"]
    3["3"] --> Menu["Menu"]
    4["4"] --> Return["Return"]
    5["5"] --> Return
    6["6"] --> Source["Source"]
    O --> OK((OK))
    Power --> OK
    Menu --> OK
    Return --> OK
    Source --> OK
1 LED Rot: Projektor befindet sich im Standby-Modus Grün: Der Projektor befindet sich in Betrieb
2 Ein- und Ausschalten des Projektors
3 Menü aufrufen
4 Tasten zur Navigation im Menü
5 Zurück
6 Auswahl der Videoquelle
Anschlussfeld

text_image
HDMI1 Audio-out HDMI2 Audio-in Video PC-RGB 1 2| HDMI1 | HDMI Eingang 1 |
| HDMI2 | HDMI Eingang 2 |
| Audio-out | Audio Ausgang |
| Audio-in | Audio Eingang |
| Video | AV-Video Eingang |
| PC-RGB | VGA Eingang |
| 1 | USB Eingang 1 |
| 2 | USB Eingang 2 |
Den jeweiligen Eingang können Sie auf dem Bedienfeld über die Taste „Source“ und den Pfeiltasten auswählen. Bitte bestätigen Sie die Auswahl über die „OK“ Taste.
Alternativ kann die Auswahl des Eingangsignals auch über die Fernbedienung erfolgen.
FERNBEDIENUNG

text_image
Ein-/ Ausschalten Bild spiegeln Steuerungstasten wenn als Eingang ein USB Anschluss ausgewählt ist Navigation Eingangssignal wählen Menü aufrufen Zurück Lautstärke verringern - + - Laustärke erhöhenMENÜ
Durch drücken der Taste „Menu“ auf dem Bedienfeld oder durch Drücken der Taste „M“ auf der Fernbedienung wird das Menü eingeblendet.
Über die „Return“ oder „Menu“ Taste auf dem Bedienfeld oder über die Tasten „M“ und „zurück“ auf der Fernbedienung wird das Menü verlassen.
Über die Tasten zur Navigation auf dem Bedienfeld und der Fernbedienung können die entsprechenden Einstellungen im Menü vorgenommen werden.
Menüstruktur

text_image
text_image
Clock-- Off Time On Time Sleep Timer Auto Sleeptext_image
OSD Language English Restore Factory Default Blending HDMI CEC Osd Duration Software UpdateBESONDERHEITEN BEI DER EINGANGSQUELLE „USB“
Es können USB-Sticks als auch externe Festplatten direkt an die USB Ports angeschlossen werden. Bei Auswahl des Eingangsignals „USB1“ oder „USB2“ erscheint folgender Bildschirm: text_image
USB DRIVE PHOTO MUSIC MOVIE TEXTnatural_image
Circular diagram with concentric rings and directional arrows, no text or symbols presenttext_image
OK| Abmessungen | 305 x 225 x 115 mm |
| Schnittstellen | 2x HDMI |
| 2x USB | |
| 1x AV | |
| 1x VGA | |
| Native Auflösung | 1920 x 1080 |
| Helligkeit | 3.200 Lumen |
| Farbtemperatur | 7500-8500K |
| Kontrast | 2000:1 |
| Keystone | ±15° Manuell |
| Lichtquelle | LED |
| Video Formate | AVI, MP4, MKV, FLV, WMV, MOV, RMVB, MPEG1, MPEG2, MPEG-4, H.264, XVID, H.263, JPEG |
| Audio Formate | AAC, MP2, MP3, PCM, FLAC, WMA |
| Bild Formate | bmp, jpg, png |
ENTSORGUNG
natural_image
Symbol of a trash bin with crossed lines indicating no waste or discharge (no text or labels)Hersteller:
VEHNSGROUP
VEHNS GROUP GmbH Theatinerstraße 40-42 80333 München Deutschland www.vehnsgroup.com service@vehnsgroup.com www.lavague.deMADE IN CHINA
   Änderungen und Irrtümer vorbehalten Der Hersteller übernimmt keine Haftung für Schäden, die durch fehlerhafte, unsachgemäße oder unvereinbare Verwendung des Produkts entstehen. © VEHNS GROUP GmbH Version 1.0 - Dec 2019ENGLISH
PLEASE NOTE
1. Please read the entire user manual carefully before using the projector. 2. To ensure the stability of the power supply, use standard grounded power sockets. 3. Only use a power source as indicated on the projector. 4. Please do not open projector. There are no user-serviceable parts in the projector. Opening the projector will void warranty. If there is a problem with your projector contact your supplier. 5. Please do not directly look into the projector lens. The bright light could damage your eyes. 6. Please do not place projector on a surface that may block air flow from the vents. A soft fabric could prevent air flow. Place the projector on stable hard surface. 7. Please keep projector away from any liquids. The projector is not water proof or water resistant and is not for use outside. 8. To prevent electrical shock please keep projector away from moisture. 9. Please turn off and unplug projector when not in use. 10. Please use original packaging material when storing your projector.PRODUCT OVERVIEW
Front
text_image
Technical diagram of a projector with labeled components and directional arrows indicating assembly or positioning.Top
text_image
Diagram of a device control panel with labeled buttons and a grid of strips, showing ports like Press, Mena, Source, and Hafar.Back
text_image
Diagram of a computer monitor rear panel with labeled ports and indicators, showing front, back, and top views.Bottom
text_image
Technical diagram of a device casing with numbered components for identificationControl panel
flowchart
graph TD
    1["1"] --> O(( ))
    2["2"] --> Power["Power"]
    3["3"] --> Menu["Menu"]
    4["4"] --> Return["Return"]
    5["5"] --> Return
    6["6"] --> Source["Source"]
    O --> OK((OK))
    Power --> OK
    Menu --> OK
    Return --> OK
    Source --> OK
Anschlussfeld
text_image
HDMI1 Audio-out Audio-in HDMI2 Video PC-RGB 1 2REMOTE CONTROL
text_image
Switching on / off Mirror image Switching on / off Control keys when a USB port is selected as input navigation OK Select input signal Call up the menu Decrease volume Back Increase volumeMENU
Pressing the „Menu“ button on the control panel or pressing the „M“ button on the remote control will display the menu. The „Return“ or „Menu“ button on the control panel or the „M“ and „Back“ buttons on the remote control exit the menu. The navigation buttons on the control panel and the remote control can be used to make the corresponding settings in the menu.Structure
text_image
Picture Mode Standard Color Temperature Aspect Ratio X _Zoom Y _Zoom Noise Reduction Middle PC Setting Color Range Flip Horizon Flip Verticaltext_image
Sound Mode Standard Balance Auto Volume Surround Sound EQ Sound Sourcetext_image
Clock-- Off Time On Time Sleep Timer Auto Sleeptext_image
OSD Language English Restore Factory Default Blending HDMI CEC Osd Duration Software UpdateSPECIAL FEATURES OF THE „USB“ INPUT SOURCE
USB sticks as well as external hard disks can be connected directly to the USB ports. When the input signal „USB1“ or „USB2“ is selected, the following screen appears: text_image
USB DRIVE PHOTO MUSIC MOVIE TEXTflowchart
graph TD
    A["Start"] --> B{Decision}
    B -->|Yes| C["OK"]
    B -->|No| D["End"]
text_image
OK| Dimensions (mm) | 305 x 225 x 115 mm |
| Interfaces | 2x HDMI |
| 2x USB | |
| 1x AV | |
| 1x VGA | |
| Native resolution | 1920 x 1080 |
| Brightness | 3,200 Lumen |
| Colour temperature | 7500-8500K |
| Contrast | 2000:1 |
| Keystone | ±15° manual |
| Light source | LED |
| Video Formats | AVI, MP4, MKV, FLV, WMV, MOV, RMVB, MPEG1, MPEG2, MPEG-4, H.264, XVID, H.263, JPEG |
| Audio Formats | AAC, MP2, MP3, PCM, FLAC, WMA |
| Image Formats | bmp, jpg, png |
DISPOSAL
natural_image
Symbol of a trash bin with crossed lines indicating no waste or discharge, and a solid black rectangle below (no text or labels)Manufacturer:
VEHNSGROUP
VEHNS GROUP GmbH Theatinerstraße 40-42 80333 Munich Germany www.vehnsgroup.com service@vehnsgroup.com www.lavague.deMADE IN CHINA
    Changes and errors excepted. The manufacturer accepts no liability for damage resulting from incorrect, improper or incompatible use of the product. © VEHNS GROUP GmbH Version 1.0 - Dec 2019FRANÇAIS
ATTENTION
1. Veuillez lire attentivement l'intégralité du manuel d'utilisation avant d'utiliser le projecteur. 2. Pour assurer la stabilité de l'alimentation électrique, utilisez une alimentation électrique standard et des prises de terre. 3. Utilisez uniquement la source d'alimentation indiquée sur le projecteur. 4. N'ouvrez pas le projecteur. Le projecteur ne contient aucune pièce réparable par l'utilisateur. L'ouverture du projecteur annule la garantie. Si vous avez un problème avec votre projecteur, contactez votre fournisseur. 5. Ne regardez pas dans l'objectif du projecteur. La lumière vive pourrait endommager vos yeux. 6. Ne placez pas le projecteur sur une surface qui pourrait bloquer le flux d'air des fentes de ventilation. Les tissus mous peuvent obstruer le flux d'air. Placer sur une surface stable et dure. 7. Tenez le projecteur à l'écart des liquides et de l'humidité. Le projecteur n'est pas étanche et ne doit pas être utilisé à l'extérieur. 8. Pour éviter tout choc électrique, tenez le projecteur à l'écart de l'humidité. 9. Veuillez éteindre le projecteur et le débrancher du secteur lorsqu'il n'est pas utilisé. 10. Veuillez utiliser l'emballage d'origine pour ranger votre projecteur.APERÇU DU PRODUIT
Devant
text_image
Technical diagram of a projector with labeled components and directional arrows indicating orientationDessus
text_image
Diagram of a device control panel with labeled buttons and a scroll inside, showing three numbered components.Côté
text_image
Diagram of a rear panel with labeled ports and indicators, including a control panel and display elements.Dessous
text_image
Technical diagram of a device casing with numbered components for identificationTableau de commande
flowchart
graph TD
    1["1"] --> O(( ))
    2["2"] --> Power["Power"]
    3["3"] --> Menu["Menu"]
    4["4"] --> Return["Return"]
    5["5"] --> Return
    6["6"] --> Source["Source"]
    Power --> OK((OK))
    Return --> OK
    Menu --> OK
    Source --> OK
Panneau du connecteur
text_image
HDMI1 Audio-out Audio-in HDMI2 Video PC-RGB 1 2TÉLÉCOMMANDE
text_image
Mise en marche / arrêt Image miroir Navigation Sélection du signal d'entrée Touche menu Baisse du volume Activer/Désactiver le son Touches de contrôle lorsqu'un port USB est sélectionné comme entrée OK M S Retour - + Augmentation du volumeMENU
Appuyez sur la touche „Menu“ du panneau de commande ou sur la touche „M“ de la télécommande pour afficher le menu. La touche „Return“ ou „Menu“ du panneau de commande ou les touches „M“ et „Retour“ de la télécommande permettent de quitter le menu. Les touches de navigation du panneau de commande et de la télécommande permettent d'effectuer les réglages correspondants dans le menu.Configuration du menu
text_image
Picture Mode Standard Color Temperature Aspect Ratio X _Zoom Y _Zoom Noise Reduction Middle PC Setting Color Range Flip Horizon Flip Verticaltext_image
Sound Mode Standard Balance Auto Volume Surround Sound EQ Sound Sourcetext_image
Clock-- Off Time On Time Sleep Timer Auto Sleeptext_image
OSD Language English Restore Factory Default Blending HDMI CEC Osd Duration Software UpdatePARTICULARITÉS DE LA SOURCE D'ENTRÉE „USB“
Les clés USB ainsi que les disques durs externes peuvent être connectés directement aux ports USB. Lorsque le signal d'entrée „USB1“ ou „USB2“ est sélectionné, l'écran suivant apparaît: text_image
USB DRIVE PHOTO MUSIC MOVIE TEXTflowchart
graph TD
    A["Start"] --> B{Decision}
    B -->|Yes| C["OK"]
    B -->|No| D["End"]
text_image
OK| Dimensions (mm) | 305 x 225 x 115 mm |
| Interfaces | 2x HDMI |
| 2x USB | |
| 1x AV | |
| 1x VGA | |
| Résolution native | 1920 x 1080 |
| Luminosité | 3.200 Lumen |
| Température de couleur | 7500-8500K |
| Contraste | 2000:1 |
| Correction trapézoïdale | ±15° manuelle |
| Source d'éclairage | LED |
| Formats vidéo | AVI, MP4, MKV, FLV, WMV, MOV, RMVB, MPEG1, MPEG2, MPEG-4, H.264, XVID, H.263, JPEG |
| Formats audio | AAC, MP2, MP3, PCM, FLAC, WMA |
| Formats d'image | bmp, jpg, png |
TRAITEMENT DES APPAREILS USAGÉS
natural_image
Symbol of a trash bin with crossed lines indicating no waste or discharge, and a solid black rectangle below (no text or labels)Fabricant:
VEHNSGROUP
VEHNS GROUP GmbH Theatinerstraße 40-42 80333 Munich Allemagne www.vehnsgroup.com service@vehnsgroup.com www.lavague.deMADE IN CHINA
    Sous réserve de modifications et d'erreurs. Le fabricant décline toute responsabilité pour les dommages résultant d'une utilisation incorrecte, inappropriée ou incompatible de l'appareil. © VEHNS GROUP GmbH Version 1.0 - Dec 2019ITALIANO
SI PREGA DI NOTARE:
1. Si prega di leggere attentamente l'intero manuale utente prima di utilizzare il proiettore. 2. Per garantire la stabilità dell'alimentazione elettrica, utilizzare un alimentatore standard e prese con messa a terra. 3. Utilizzare solo la fonte di alimentazione indicata sul proiettore. 4. Si prega di non aprire il proiettore. Non ci sono parti riparabili dall'utente nel proiettore. L'apertura del proiettore annulla la garanzia. Se avete un problema con il proiettore, contattate il vostro fornitore. 5. Non guardare nell'obiettivo del proiettore. La luce intensa potrebbe danneggiare gli occhi. 6. Non posizionare il proiettore su una superficie che potrebbe bloccare il flusso d'aria dalle fessure di ventilazione. I tessuti molli possono ostruire il flusso d'aria. Collocare su una superficie dura e stabile. 7. Tenere il proiettore lontano da liquidi e umidità. Il proiettore non è impermeabile e non deve essere utilizzato all'esterno. 8. Per evitare scosse elettriche, tenete il proiettore lontano dall'umidità. 9. Spegnere il proiettore e scollegare l'alimentazione CA quando non è in uso. 10. Si prega di utilizzare l'imballaggio originale per la conservazione del proiettore.DESCRIZIONE DEL PRODOTTO
Parte anteriore
text_image
Technical diagram of a projector with labeled components and directional arrows indicating orientationTop
text_image
Diagram of a device control panel with labeled buttons and a grid preview showing two components.Dorso
text_image
Diagram of a rear panel with labeled ports and indicators, showing numbered labels 1, 2, and 3 pointing to different electronic devices.Lato basso
text_image
Technical diagram of a device casing with numbered components for identificationPannello di controllo
flowchart
graph TD
    A["1"] --> B(( ))
    C["2"] --> D["Power"]
    E["3"] --> F["Menu"]
    G["OK"] --> H["Return"]
    I["Source"] --> J["4"]
    K["5"] --> L["6"]
Pannello connettori
text_image
HDMI1 Audio-out Audio-in HDMI2 Video PC-RGB 1 2text_image
Accensione / spegnimento Immagine speculare Tasti di controllo quando viene selezionata una porta USB come ingresso Indietro navigazione Selezionare il segnale di ingresso Richiamare il menu Diminuire il volume M S Aumentare il volume Aumentare il volumeMENÜ
Premendo il tasto „Menu“ sul pannello di controllo o premendo il tasto „M“ sul telecomando viene visualizzato il menu. Il tasto „Return“ o „Menu“ sul pannello di controllo o i tasti „M“ e „Back“ sul telecomando escono dal menu. Con i tasti di navigazione del pannello di controllo e del telecomando è possibile effettuare le impostazioni corrispondenti nel menu.Struttura del menu
text_image
Picture Mode Standard Color Temperature Aspect Ratio X _Zoom Y _Zoom Noise Reduction Middle PC Setting Color Range Flip Horizon Flip Verticaltext_image
Sound Mode Standard Balance Auto Volume Surround Sound EQ Sound Sourcetext_image
OSD Language English Restore Factory Default Blending HDMI CEC Osd Duration Software Updatetext_image
Clock-- Off Time On Time Sleep Timer Auto SleepCARATTERISTICHE SPECIALI DELLA SORGENTE DI INPUT „USB
Le chiavi USB e i dischi rigidi esterni possono essere collegati direttamente alle porte USB. Quando si seleziona il segnale di ingresso „USB1“ o „USB2“, appare la seguente schermata: text_image
USB DRIVE PHOTO MUSIC MOVIE TEXTflowchart
graph TD
    A["Start"] --> B{Decision}
    B -->|Yes| C["OK"]
    B -->|No| D["End"]
text_image
OK| Dimensioni (mm) | 305 x 225 x 115 mm |
| interfacce | 2x HDMI |
| 2x USB | |
| 1x AV | |
| 1x VGA | |
| Risoluzione nativa | 1920 x 1080 |
| brillantezza | 3.200 Lumen |
| temperatura di colore | 7500-8500K |
| contrapposizione | 2000:1 |
| cardine | ±15° Manuell |
| sorgente luminosa | LED |
| Formati video | AVI, MP4, MKV, FLV, WMV, MOV, RMVB, MPEG1, MPEG2, MPEG-4, H.264, XVID, H.263, JPEG |
| Formati audio | AAC, MP2, MP3, PCM, FLAC, WMA |
| Formati immagine | bmp, jpg, png |
ESPOSIZIONE
natural_image
Simple line drawing of a trash bin with crossed lines indicating no waste or restriction (no text or symbols)Produttore:
VEHNSGROUP
VEHNS GROUP GmbH Theatinerstraße 40-42 80333 Monaco Germania www.vehnsgroup.com service@vehnsgroup.com www.lavague.deMADE IN CHINA
    Salvo modificaciones y errores. El fabricante no se hace responsable de los daños derivados de un uso incorrecto, inadecuado o incompatible del producto. © VEHNS GROUP GmbH Versión 1.0 - Nov 2019ESPAÑOL
TENGA EN CUENTA:
1. Lea atentamente todo el manual del usuario antes de utilizar el proyector. 2. Para garantizar la estabilidad de la fuente de alimentación, utilice una fuente de alimentación estándar y tomas de corriente con conexión a tierra. 3. Utilice únicamente la fuente de alimentación indicada en el proyector. 4. Por favor, no abra el proyector. No hay piezas que el usuario pueda reparar en el proyector. La apertura del proyector anula la garantía. Si tiene algún problema con el proyector, póngase en contacto con su proveedor. 5. Por favor, no mire a la lente del proyector. La luz brillante podría dañar sus ojos. 6. No coloque el proyector sobre una superficie que pueda bloquear el flujo de aire de las ranuras de ventilación. Los tejidos blandos pueden obstruir el flujo de aire. Colóquelo sobre una superficie estable y dura. 7. Mantenga el proyector alejado de líquidos y humedad. El proyector no es impermeable y no debe utilizarse al aire libre. 8. Para evitar descargas eléctricas, mantenga el proyector alejado de la humedad. 9. Apague el proyector y desenchúfelo de la alimentación de CA cuando no esté en uso. 10. Por favor, utilice el embalaje original cuando guarde el proyector.DESCRIPCIÓN DEL PRODUCTO
Fachada
text_image
Technical diagram of a projector with labeled components and directional arrows indicating orientationArriba
text_image
Diagram of a device control panel with labeled buttons and a scroll wheel, showing three numbered components.Reverso
text_image
Diagram of a computer rear panel with labeled ports and indicators, showing front, back, and top views with numbered annotations.Base
text_image
Technical diagram of a device casing with numbered components for identificationTablero de mando
flowchart
graph TD
    1["1"] --> A["Circle"]
    2["2"] --> B["Power"]
    3["3"] --> C["Menu"]
    4["4"] --> D["OK"]
    5["5"] --> E["Return"]
    6["6"] --> F["Source"]
    B --> D
    C --> F
    D --> E
    E --> F
Panel de conexión
text_image
HDMI1 Audio-out Audio-in HDMI2 Video PC-RGB 1 2FERNBEDIENE
text_image
Encendido y apagado Imagen espejo Navegación Seleccionar la señal de entrada Llamar el menú Disminuir el volumen Encendido y apagado Teclas de control cuando se selecciona un puerto USB como entrada OK Espalda Aumentar el volumenMENÚ
Al pulsar el botón „Menú“ en el panel de control o al pulsar el botón „M“ en el mando a distancia se mostrará el menú. Los botones „Return“ o „Menu“ del panel de control o los botones „M“ y „Back“ del mando a distancia salen del menú. Con los botones de navegación del panel de control y del mando a distancia se pueden realizar los ajustes correspondientes en el menú.Estructura del menú
text_image
Picture Mode Standard Color Temperature Aspect Ratio X _Zoom Y _Zoom Noise Reduction Middle PC Setting Color Range Flip Horizon Flip Verticaltext_image
Sound Mode Standard Balance Auto Volume Surround Sound EQ Sound Sourcetext_image
Clock-- Off Time On Time Sleep Timer Auto Sleeptext_image
OSD Language English Restore Factory Default Blending HDMI CEC Osd Duration Software UpdateCARACTERÍSTICAS ESPECIALES DE LA FUENTE DE ENTRADA „USB“
Los lápices USB y los discos duros externos se pueden conectar directamente a los puertos USB. Cuando se selecciona la señal de entrada „USB1“ o „USB2“, aparece la siguiente pantalla: text_image
USB DRIVE PHOTO MUSIC MOVIE TEXTflowchart
graph TD
    A["Start"] --> B{Decision}
    B -->|Yes| C["OK"]
    B -->|No| D["End"]
text_image
OK| Dimensiones (mm) | 305 x 225 x 115 mm |
| interrelaciones | 2x HDMI |
| 2x USB | |
| 1x AV | |
| 1x VGA | |
| Resolución nativa | 1920 x 1080 |
| Resplandor | 3.200 Lumen |
| Temperatura del color | 7500-8500K |
| Contraposición | 2000:1 |
| Clave | ±15° Manuell |
| Fuente luminosa | LED |
| Formatos de vídeo | AVI, MP4, MKV, FLV, WMV, MOV, RMVB, MPEG1, MPEG2, MPEG-4, H.264, XVID, H.263, JPEG |
| Formatos de audio | AAC, MP2, MP3, PCM, FLAC, WMA |
| Formatos de imagen | bmp, jpg, png |