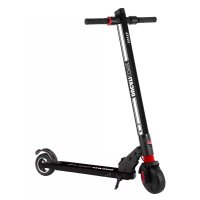
PROI EVO - Scooter DUCATI - Notice d'utilisation et mode d'emploi gratuit
Retrouvez gratuitement la notice de l'appareil PROI EVO DUCATI au format PDF.

| Type de produit | Trottinette électrique (scooter) |
| Marque | Ducati |
| Modèle | PROI EVO |
| Poids maximal supporté | 100 kg |
| Poids minimal du conducteur | 30 kg |
| Taille recommandée | De 120 cm à 200 cm |
| Âge minimal | 14 ans (vérifier réglementation locale) |
| Batterie | Lithium-ion, rechargeable |
| Chargeur | 42V / 1.5A |
| Temps de charge | 4 heures |
| Moteur | Électrique, dans la roue motrice |
| Vitesse maximale | Limitée par le mode choisi (jusqu'à 25 km/h selon réglementation) |
| Modes de conduite | Piéton (6 km/h), Eco, Confort, Sport |
| Freins | Frein à disque arrière et frein électrique avant |
| Éclairage | Phare avant, feux arrière, clignotants (selon version) |
| Display | Écran LCD avec indicateur de vitesse, batterie, mode, Bluetooth |
| Connectivité | Bluetooth pour application Ducati Urban E‑Mobility |
| Pliage | Guidon et colonne de direction pliables |
| Entretien courant | Vérifier pression des pneus, freins, batterie ; nettoyer avec un chiffon humide |
| Accessoires fournis | Chargeur, clés Allen, chambre à air de rechange, adaptateur de gonflage |
| Garantie | Consulter les conditions générales sur le site du fabricant |
FOIRE AUX QUESTIONS - PROI EVO DUCATI
Questions des utilisateurs sur PROI EVO DUCATI
0 question sur cet appareil. Repondez a celles que vous connaissez ou posez la votre.
Poser une nouvelle question sur cet appareil
Téléchargez la notice de votre Scooter au format PDF gratuitement ! Retrouvez votre notice PROI EVO - DUCATI et reprennez votre appareil électronique en main. Sur cette page sont publiés tous les documents nécessaires à l'utilisation de votre appareil PROI EVO de la marque DUCATI.
MODE D'EMPLOI PROI EVO DUCATI
e-scooters
user manual
English....02
Italiano....46
Español....89
Français....133
Deutsch 176
Nederlands 220
Polski....224
Čeština.... 267
Slovenčina.... 310
Ελληνικά......353
Slovenščina.... 394
Srpski...... 437
Български 478
عوي....521
Türkçe....564
Hrvatski 607
Românesc 650
Português....693
This manual is valid for the following electric scooters:
Pro-I Evo (Black Edition / White Edition), Pro-I Evo AS, Pro-I Evo SR (Black Edition/White Edition), Pro-I
Pro-I Evo Max SR, Pro-I Evo Max AS, Pro-I Max
Pro-II Plus, Pro-II Plus AS, Pro-II Evo, Pro-II Evo AS
Pro-III, Pro-III AS, Pro-III R, Pro-III R AS
User manual
DU-MO-000002
Instructions translated from the original Italian
Thank you for choosing this product.
For information, technical support, assistance and for consulting the warranty general terms, please consult your dealer or visit www.platum.com/en/ducati-urban-e-mobility/
Contents
- Safety instructions
- Package contents and assembly
- Product overview
- Battery charging and activation
- Command information / Control panel
- Quick guide
- Folding and carrying
- Range and performance
- Storage, maintenance and cleaning
- App configuration
- Technical data sheet
- Troubleshooting
- Liability and general terms of warranty
1. Safety instructions
IMPORTANT! Read and follow the following instructions carefully before using the product. Keep this manual for future reference or new users.
Take the time to learn the basics to avoid any serious accidents that may occur in the first few months. Contact your dealer for appropriate support on the correct way to use the product or to be directed to an appropriate training organisation.
The company disclaims all direct or indirect liability arising from the c active use of the product, non-compliance with both road traffic regulations and the instructions in this manual, accidents and disputes caused by non-compliance with regulations and illegal actions.
This product is intended to be used for recreational purposes, to be used by one person only and not for transporting passengers, therefore it cannot be used by more than one person at the same time.
Do not change the purpose of use in any way, this product is not suitable for stunts, competitions, transporting objects, towing other vehicles or appendages.
The electric scooter must be used with caution, always respecting the rules imposed by the Highway Code of the country in which it is used, in order to avoid danger and to take maximum care of yourself and others.

CAUTION
Indicative vehicle design requirements:
| Scooter model | Pro-I Evo Black and White edition | Pro-I Evo SR Black and White edition | Pro-I Evo AS Pro-I | |
| Product code without indicators | DU-MO-210001DU-MO-210004 | --- | ||
| Product code with indicators included | DU-MO-210011DU-MO-220004 | --- | ||
| Product code with two brake controls | - | DU-MO-220019DU-MO-220023DU-MO-220025 | DU-MO-230003 DU-MO-250002 | |
| MIN weight (Kg) 30 30 30 30 | ||||
| MAX weight (Kg) 100 100 100 100 | ||||
| MIN age * | 14 14 14 14 | |||
| MAX age * | 65 65 65 65 | |||
| MIN height (cm) 120 120 120 120 | ||||
| MAX height (cm) 200 200 200 200 | ||||
| Scooter model Pro-I Evo Max SR Pro-I Evo Max AS Pro-I Max | ||||
| Product code without indicators | - | - | ||
| Product code with indicators included | - | - | ||
| Product code with two brake controls | DU-MO-220009DU-MO-220002 | DU-MO-240001 DU-MO-250001 | ||
| MIN weight (Kg) 30 30 30 | ||||
| MAX weight (Kg) 100 100 100 | ||||
| MIN age * | 14 14 14 | |||
| MAX age * | 65 65 65 | |||
| MIN height (cm) 120 120 120 | ||||
| MAX height (cm) 200 200 200 | ||||
| Scooter model Pro-II Plus Pro-II Plus AS | Pro-II Evo | Pro-II Evo AS | ||
| Product code without indicators | DU-MO-210005 | - | DU-MO-210009 | - |
| Product code with indicators included | DU-MO-210010DU-MO-220008 | - | DU-MO-210012DU-MO-220005 | - |
| Product code with two brake controls | DU-MO-220026 | DU-MO-220020DU-MO-240006 | - | DU-MO-220012DU-MO-220013DU-MO-220022DU-MO-240009 |
| MIN weight (Kg) | 30 | 30 | 30 | 30 |
| MAX weight (Kg) | 100 | 100 | 100 | 100 |
| MIN age * | 14 | 14 | 14 | 14 |
| MAX age * | 65 | 65 | 65 | 65 |
| MIN height (cm) | 120 | 120 | 120 | 120 |
| MAX height (cm) | 200 | 200 | 200 | 200 |
| Scooter model Pro-III Pro-III AS Pro-III R Pro-III R AS | ||||
| Product code without indicators | - - - - | |||
| Product code with indicators included | - - - - | |||
| Product code with two brake controls | MN-DUC-PRO3DU-MO-210013DU-MO-220006DU-MO-220024 | DU-MO-220021 DU-MO-220003 DU-MO-220016 | ||
| MIN weight (Kg) 30 30 30 30 | ||||
| MAX weight (Kg) 100 100 100 100 | ||||
| MIN age * | 14 14 14 14 | |||
| MAX age * | 65 65 65 65 | |||
| MIN height (cm) 120 120 120 120 | ||||
| MAX height (cm) | 200 | 200 | 200 | 200 |
* Before using the product, check and follow the local regulations in force regarding the minimum age of the driver.
The A-weighted emission sound pressure level (noise) at the rider's ear is less than 70 dB(A).
Visual representation of the safety warnings
To identify the safety messages in this manual, the following graphic symbols will be used. They draw the focus of attention of the reader/user to the proper, safe use of the item.

CAUTION
Pay attention
Highlights the rules to follow to prevent damage to the item and/or prevent hazardous situations from arising.

DANGER
Residual risks
Highlights the presence of hazards causing residual risks, which the user must be aware of to prevent injury or damage to property.
General warnings

CAUTION
It is important to bear in mind that when out in a public space or on the road, even when the instructions in the manual are observed down to the letter, the rider is not immune to injury caused by infractions or inappropriate actions taken towards other vehicles, obstacles or persons. Misuse of the item or non-compliance with the instructions provided in this manual may cause severe injury.
This product is an electric vehicle. The faster you ride, the longer the braking distance. Emergency braking on slippery, muddy, wet or icy roads may result in wheel spin and loss of balance. Adequate speeds and safety distances from other vehicles or pedestrians must be adhered to. Take extra care when riding on unfamiliar roads. Do not open the kickstand when using the item, risk of severe personal injury and damage to item.
On wet roads, the braking distance increases and the grip decreases compared to dry roads!
Drive more carefully, keep a safe distance!
For personal safety, wear a helmet, and knee and elbow pads to protect against falls and injuries while riding the item. When allowing others to use the item, ensure that the rider wears the safety equipment and explain the operation of the vehicle. To avoid injury, do not allow other persons to use the item if they do not know how to use it. Wear shoes before using the item.
Children must not play with the scooter or its parts, nor should they be allowed to clean it or perform maintenance operations.
When riding, take special care to not frighten children or pedestrians. When passing behind them, warn them by sounding the horn and slow down using the minimum speed of 6km/h.

CAUTION
Frequency information:
The frequency hopping data transmission equipment Bluetooth® is operating between the band 2,4000 GHz and 2,4835 GHz. The maximum transmitted radio frequency power is 100mW.
Instructions and warnings on rider behaviour
| Conditions Appropriate/intended use Improper use | ||
| Riders One | More than one person, with children or animals | |
| Safety equipment | Helmet, knee pads, elbow pads, reflective vest | No safety equipment |
| Pre-riding check | Prior to each use, check brakes and any wear, check tyre pressure (see side of tyre for recommended value), wheel wear, accelerator, indicators, lights and charge status of battery.If any unusual noises or faults are detected, do not use the item and contact your dealer or the Authorised Technical Support Department | Never checking the item prior to useUsing the item when noise or faults are present |
| Walking while pushing the item | Not accelerating Press the acceleratorPushing while walking across pedestrian crossingsIn pedestrian areas when not in pedestrian mode (6 km/h)In overcrowded areas | Riding the vehicle on pedestrian crossingsRiding the vehicle in pedestrian areas when not in pedestrian mode (6 km/h)Riding the vehicle in overcrowded areas |
| Stationary | The person riding the item must be able to easily place both feet on the ground while holding the handlebars at the correct height | Not being able to keep the item stationary and balanced.Sitting on the item while it is running or stationary |
| Riding under normal conditions | No objects hanging from handlebars | Objects hanging from handlebars result in instability and may impede manoeuvring |
| Riding with both hands on handlebars. One-handed or hand-free ridingNot using devices such as phones, smartwatches, music players, or headphones | Using devices such as phones, smartwatches, music players, or headphones | |
| Riding with both feet on the footrest comfortably and safely | Riding with one or both feet outside the footrestIt is prohibited to place or amass weight on the rear mudguard. | |
| Riding with helmet and protective equipment | Riding without helmet and protective equipment | |
| Riding under normal conditions | Riding on easily accessible, smooth and compact roads, avoiding areas with intense traffic or overcrowded areas:e.g. dedicated cycle path, smooth paved surfacesComplying with local regulations and the highway code | Riding on motorways, long-distance roadsRiding on busy roadsRiding on pavementsRiding in overcrowded areasRiding on very rough roadsRiding near: ravines, escarpments, harbours, sea, lakes or riversFailure to comply with regulations and the highway code |
| Looking ahead and watching out for obstacles, vehicles or nearby pedestrians | Becoming distracted while riding | |
| Changing direction, making sure to be seen, moderating speedAnticipating the route and moderating speed while observing the highway code and those that are the most vulnerableUsing direction indicators, if included on the item | Changing direction abruptly at high speed without making sure that you have been seenBraking and cornering at the same time makes the vehicle unstableNot using direction indicators | |
| Slowing down when pedestrians are presentUsing pedestrian mode in pedestrian areas (6 km/h)Warning others of your presence by using the bell | Accelerating or maintaining a constant speed when pedestrians are presentRiding without using pedestrian mode in pedestrian areas (6 km/h)Not warning others of your presence by using the bell | |
| Uneven road conditions: speed bumps/steps/rough road surfaces | Riding at moderate speeds High-speed ridingBend knees slightly for better shock absorption when traversing uneven surfaces. | Accelerating over bumps or ditches, going down steps, jumping over obstacles, climbing pavements, riding harshly. |
| Behaviour:around bends, down slopes,in the presence of nearbyobstacles, vehicles andpedestrians | Keeping at a safe distance Not observing safety distancesStop accelerating/Brake and slow down AcceleratingRiding at moderate speed and braking safelyPaying attention to doors and other highobstacles | Riding at high speed, brakingsuddenlyTraversing beneath high obstacles |
| Visibility conditions | Only ride if there is enough light to ridesafely. When riding in unfavourable lightingconditions (from half an hour followingsunset, throughout the entire periodof darkness and even during the day, ifweather conditions preclude road visibility,when driving through tunnels), rememberto switch on the item's lights and wear areflective vest, belts or bands. | Riding in unfavourable lightingconditions with lights off and withoutusing a reflective vest, belts or bands. |
| Weather conditions Driving in optimal conditions (no rain) | Driving in adverse conditions:in the rain, in case of snowfall, in thepresence of ice or mud on the road, incase of strong wind and fog. | |
| Parking | In designated areas without impedingmovement of vehicles or pedestriansOn smooth surfaces, ensuring stability ismaintainedSwitching off the item and using an anti-theft device. Using the kickstand provided | Everywhere, impeding movement ofvehicles or pedestriansOn uneven surfaces and withoutensuring stabilityLeaving the item switched on,unattended with no anti-theft device |
| Engaging in extreme sports/acrobatics | NO | YESRiding near: ravines, escarpments,harbours, sea, lakes or riversRiding through puddlesRacing with other vehicles |
| Subjecting the item to forceful impact | NO | YESjumping over object or persons,jumping off steps or from high places |
What to do after a fall:
Check that the accelerator lever works properly. To do this, accelerate and decelerate several times.
Check that the brakes work properly. To do this, get off the item, push it forward and brake to ensure it responds to the controls.
Check that all vehicle components are in place and securely fastened.
Check tyre wear and pressure (see side of tyre for recommended value).
Check the wear of the brakes and cables.

DANGER
The brakes may become hot during use. Do not touch after use.
Assembled item, the handlebar must be installed using the special screws contained in the package.
2. Package contents and assembly
| Model Reference picture In the package Handlebar assembly | |||
| Pro-I Evo (Black & White edition)DU-MO-210001DU-MO-210004DU-MO-210011DU-MO-220004Pro-I Evo SR(Black & White edition)DU-MO-220019DU-MO-220023DU-MO-220025Pro-I Evo ASDU-MO-230003Pro-IDU-MO-250002 | 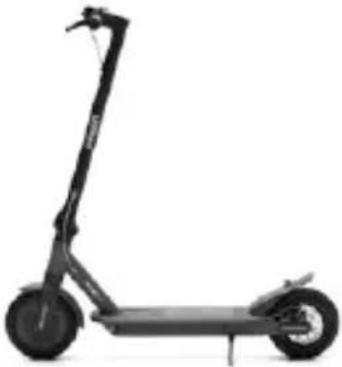 | Accessories:- Allen keys- 4 screws for handlebars- Spare inner tube(not available formodel DU-MO-230003/250002)- Inflator adapter- Battery charger | 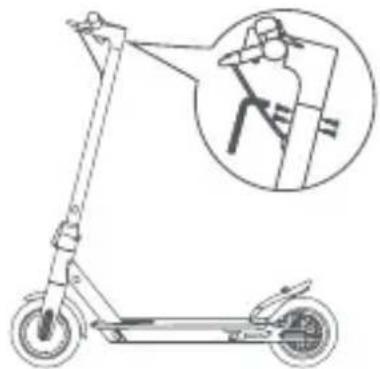 Insert the 4 screws manually without tightening them, then use the hex wrench supplied to tighten them and secure the handlebars. Insert the 4 screws manually without tightening them, then use the hex wrench supplied to tighten them and secure the handlebars. |
| Pro-I Evo Max SRDU-MO-220009DU-MO-220002Pro-I Evo Max ASDU-MO-240001Pro-I MaxDU-MO-250001 |  | Accessories:- Allen keys- 4 screws for handlebars- Spare inner tube(not available for theDU-MO-240001 /250001model)- Inflator adapter- Battery charger | 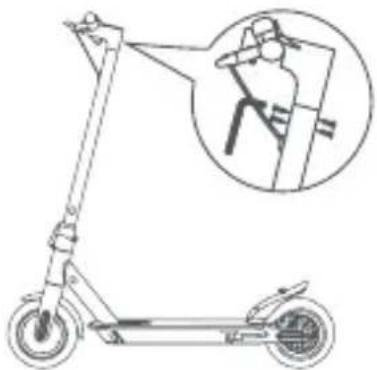 Insert the 4 screws manually without tightening them, then use the hex wrench supplied to tighten them and secure the handlebars. Insert the 4 screws manually without tightening them, then use the hex wrench supplied to tighten them and secure the handlebars. |
| Pro-II PlusDU-MO-210005DU-MO-210010DU-MO-220008DU-MO-220026 |  | Accessories:- Allen keys- Components for assembly handlebars (hook, plastic parts, 4 screws)- Tyre inflation adapter- Charger- Electronic horn(DU-MO-220012DU-MO-220020DU-MO-220026)* | 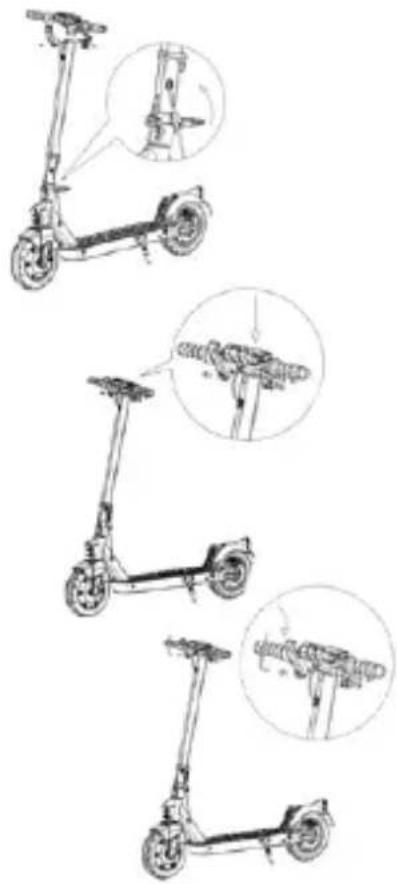 Method:1. Open the kickstand2. Lift and secure the steering column by bending the lever of the folding mechanism and lower the safety ring (if present)3. Install the handlebar on the shaft4. Install the hook (see photo) by approaching it to the rod, making sure that it is aligned with the holes, then insert the screws.5. Insert the screw on the outside into the hole located under the control panel.6. Tighten the screws.7. Align the plastic plate (see photo) with the second hole/ profile of the control panel, then insert and tighten the screw. Method:1. Open the kickstand2. Lift and secure the steering column by bending the lever of the folding mechanism and lower the safety ring (if present)3. Install the handlebar on the shaft4. Install the hook (see photo) by approaching it to the rod, making sure that it is aligned with the holes, then insert the screws.5. Insert the screw on the outside into the hole located under the control panel.6. Tighten the screws.7. Align the plastic plate (see photo) with the second hole/ profile of the control panel, then insert and tighten the screw. |
| Pro-II Plus ASDU-MO-220020DU-MO-240006 |  | ||
| Pro-II EvoDU-MO-210009DU-MO-210012DU-MO-220005 |  | ||
| Pro-II Evo ASDU-MO-220012 | |||
| Pro-II Evo ASDU-MO-220013DU-MO-220022DU-MO-240009 | 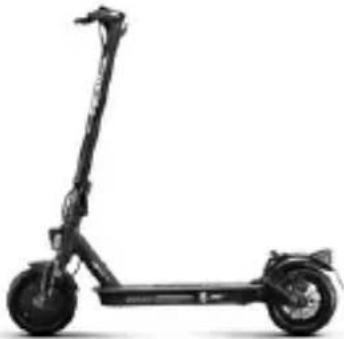 | Accessories:- Allen keys- Components for assembly handlebars (hook, plastic parts, 4 screws)- Tyre inflation adapter-Charger | Method: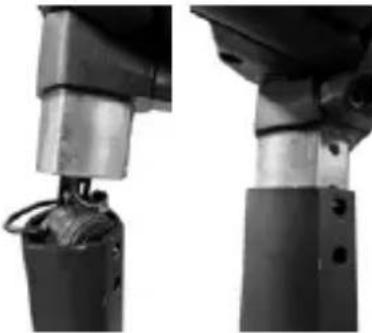 1. Lift the steering column and insert the handlebars taking care not to damage the electronic horn or crush the cables.2. Lift and secure the steering column by bending the lever of the folding mechanism and lower the safety ring (if present)3. Install the handlebar on the shaft4. Install the hook (see photo) by approaching it to the rod, making sure that it is aligned with the holes, then insert the screws.5. Insert the screw on the outside into the hole located under the control panel.6. Tighten the screws.7. Align the plastic plate (see photo) with the second hole/ profile of the control panel, then insert and tighten the screw. 1. Lift the steering column and insert the handlebars taking care not to damage the electronic horn or crush the cables.2. Lift and secure the steering column by bending the lever of the folding mechanism and lower the safety ring (if present)3. Install the handlebar on the shaft4. Install the hook (see photo) by approaching it to the rod, making sure that it is aligned with the holes, then insert the screws.5. Insert the screw on the outside into the hole located under the control panel.6. Tighten the screws.7. Align the plastic plate (see photo) with the second hole/ profile of the control panel, then insert and tighten the screw.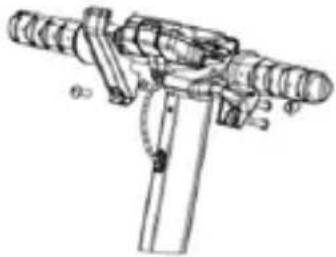 |
| Pro-IIIMN-DUC-PRO3DU-MO-210013DU-MO-220006DU-MO-220024Pro-III ASDU-MO-220021Pro-III RDU-MO-220003Pro-III R ASDU-MO-220016 | 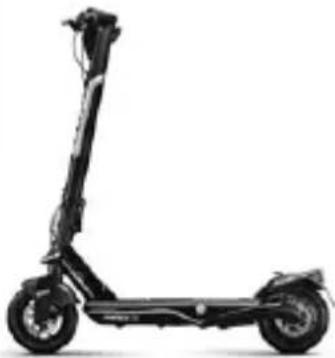 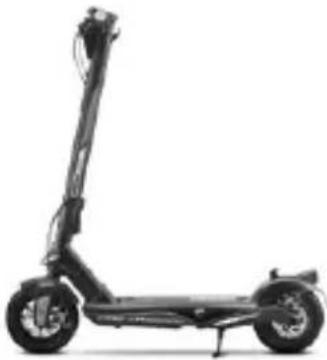 | Accessories:- Allen keys- Components for handlebar assembly (hook, plastic parts, screws)- Tyre inflation adapter- Charger- 2 RF keys for scooter ignition | 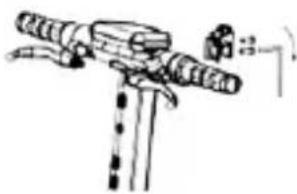 Method:1. Open the kickstand2. Pick up the handlebar, place the lever in the closed position and lower the safety ring.3. Connect the light cable to the display wiring and insert the handlebars into the column.4. Install the hook on the column, making sure that it is aligned with the holes, and insert the 2 M6 screws.5. Insert the M6 screw on the outside into the hole located under the control panel and tighten all three M6 screws. Method:1. Open the kickstand2. Pick up the handlebar, place the lever in the closed position and lower the safety ring.3. Connect the light cable to the display wiring and insert the handlebars into the column.4. Install the hook on the column, making sure that it is aligned with the holes, and insert the 2 M6 screws.5. Insert the M6 screw on the outside into the hole located under the control panel and tighten all three M6 screws. |
*Pro-II Plus AS (DU-MO-220020 - DU-MO-220026) / Pro-II EVO AS (DU-MO-220012)
| Electronic horn. | ||
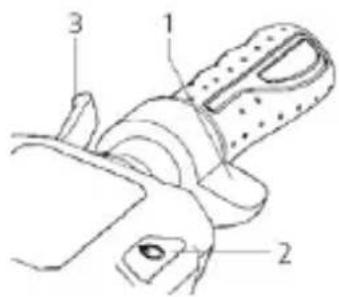
| USB charging port(lower side, under the rubber protection) | 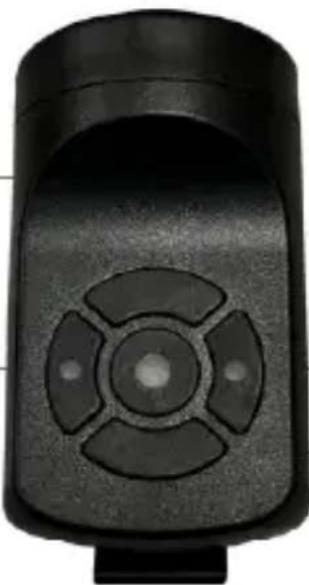 | Right button:Press and hold to deactivate anti-theft mode.Central button (Horn):Press to sound the horn.Press twice quickly to change the sound. |
| Left button:Press and hold to activate anti-theft mode. | ||
| Charging the device: Insert the USB cable into the charging port (lower side). | ||
| *Instructions for installing the headlamp | ||
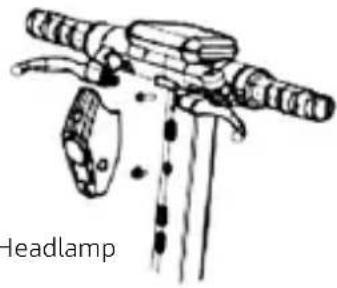 | 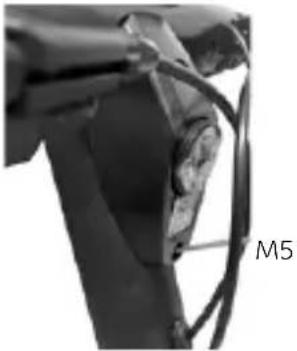 | Washer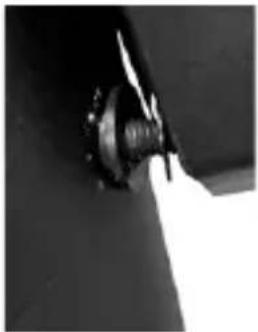 |
| 1. Insert the M5 screw (without washer) into the lower hole of the light, then insert the washer between the screw and the column and tighten it just enough to avoid damaging the light dashboard. | ||
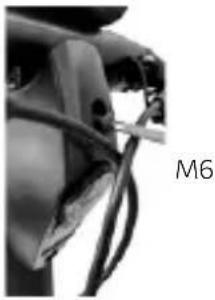 | 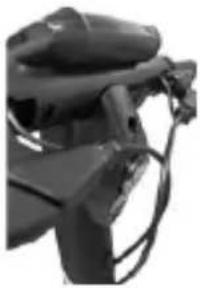 | |
| 2. Insert the M6 screw into the upper hole of the light and tighten it. | ||
Method:
• Take the item out of the packaging
- Open the kickstand and check that the item is stable
- Open the handlebar stem and secure it by closing the lever of the closing mechanism
- Connect the display power cable to the main wiring (if necessary)
- Connect the front light to the 2-pin cable coming from the display (if necessary).
• Install the handlebar on the stem (do not crush the cables)
- Tighten the screws on the stem using the wrench supplied
- Adjust the column closing mechanism
- Check the tyre pressure (see the side of the tyre for the recommended value).
| Model Reference picture * Adjustment | ||
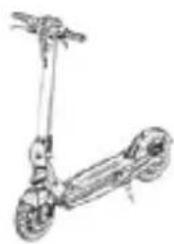
| Pro-I Evo(Black and White edition) | 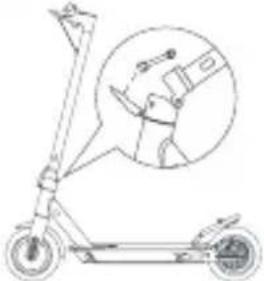 | Adjusting the handlebar stem:If the handlebar stem is not very stable after closing, adjust the screw in the mechanism, by tightening or loosening it as required to increase the stability of the steering column. |
| Pro-I Evo SR(Black and White Edition) | 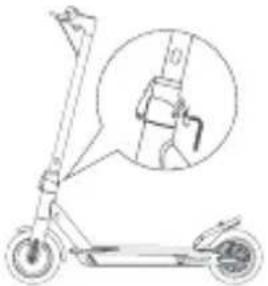 | |
| Pro-I Evo Max SR | ||
| Pro-I Evo AS | 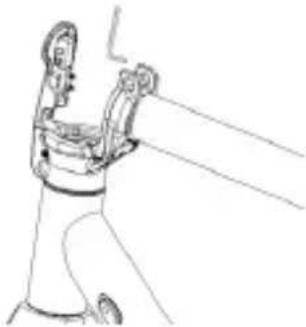 | Inside the lever of the folding mechanism is located a hexagonal pin. If the steering column feels unstable after folding, you can adjust the pin of the mechanism by screwing or unscrewing it slightly until the desired stability is achieved. |
| Pro-I Evo Max AS | ||
| Pro-I | 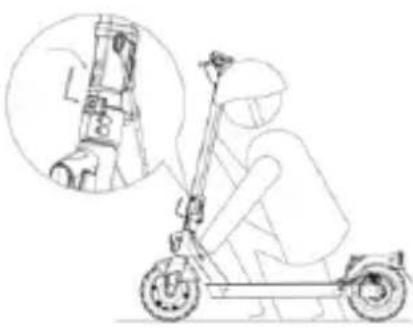 | Adjusting the handlebar stem:As shown in the figure, if the steering column vibrates during use, adjust the screw (if present) using the hexagon wrench. |
| Pro-II Plus | ||
| Pro-II Plus AS | ||
| Pro-II Evo | ||
| Pro-II Evo AS | ||
| Pro-IIIPro-III ASPro-III RPro-III R AS | 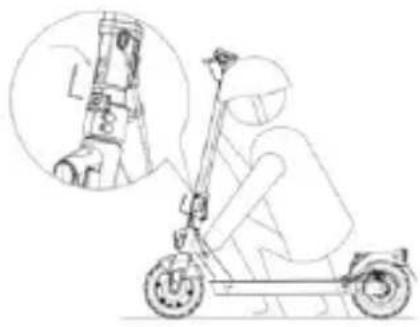 | Adjust the handlebar:If the handlebar stem vibrates during use, adjust the screw by means of the hexagon wrench as illustrated in the figure. |

CAUTION
Assemble the item correctly. If, during assembly, any factory defects are detected, certain steps are unclear or issues with assembly or adjustments occur, do not ride the vehicle and contact your dealer or visit www.platum.com/en/ducati-urban-e-mobility/ for technical support.
Keep children away from plastic items (including packaging materials) and small parts that may result in suffocation.
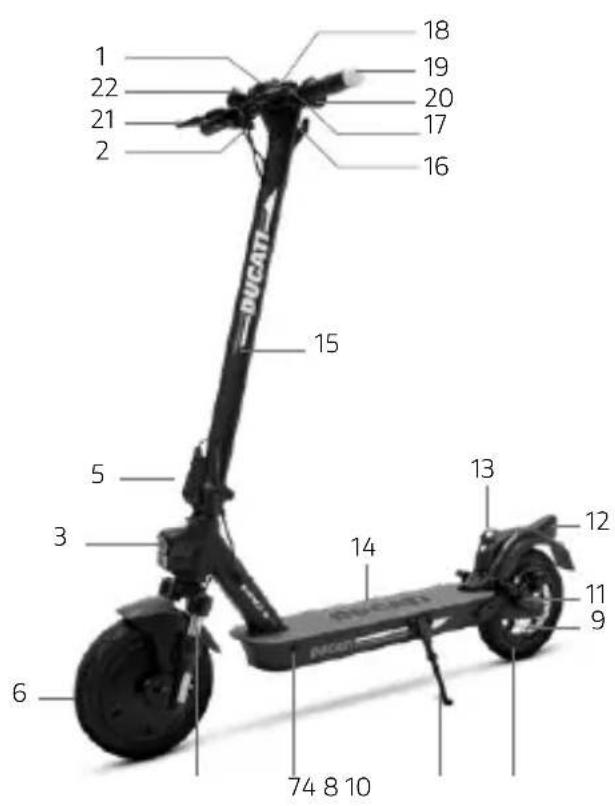
3. Product overview
It is forbidden to modify or transform the item or any its parts in any way, as this may impair efficiency, reduce structural integrity and cause damage. In the interest of technological development, the manufacturer reserves the right to modify the item with no prior notice and this manual will not be automatically updated.
For further information and to consult different versions of the manual, www.platum.com/en/ducati-urban-e-mobility/
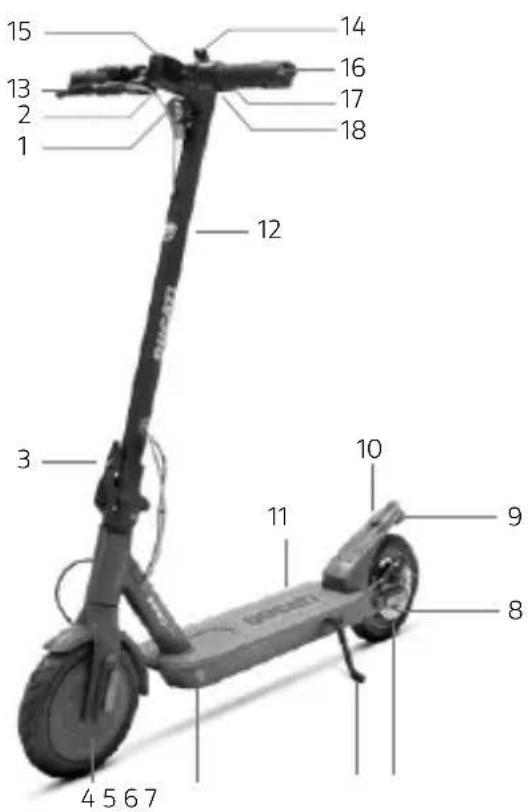
Pro-I Evo (Black and White edition)
Pro-I Evo SR (Black and White edition)
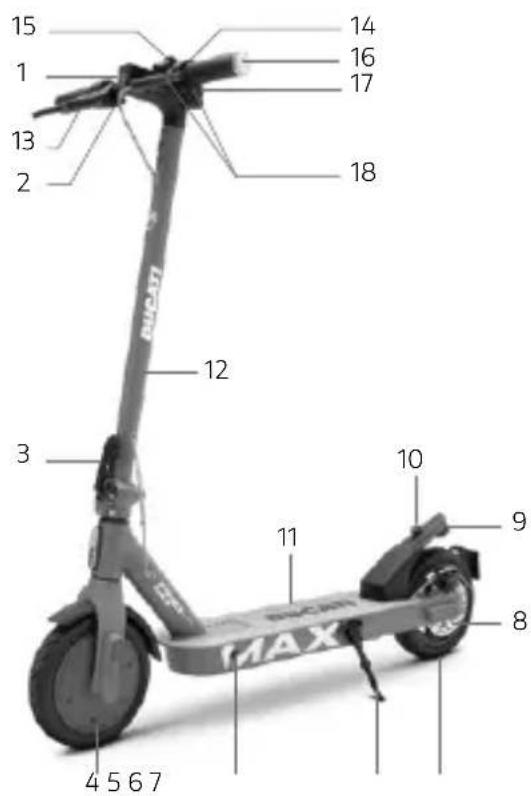
Pro-I Evo AS / Pro-I
- Headlamp
- Accelerator
- Folding mechanism
- Drive sprocket
- Charging port
- Stand
- Free wheel
- Disc brake
- Light
- Locking catch
- Footrest
- Steering column
- Brake lever
- Bell
- Display
-
Indicator lights
-
Controls of the indicators (if present)
-
Electric brake lever (Pro-I Evo SR only)
Pro-I Evo Max SR / Pro-I Evo Max AS / Pro-I Max
- Headlamp
- Accelerator
- Folding mechanism
- Drive sprocket
- Charging port
- Stand
- Free wheel
- Disc brake
- Light
- Locking catch
- Footrest
- Steering column
- Brake lever
(model SR: controls the rear disc brake; model AS: controls the front electric brake) - Bell (SR model only)
- Display
- Indicator lights
- Command of the turn signals (the AS model includes the horn button)
- Left lever/brake control (model SR: control for front electric brake; model AS: lever for disc brake posteriore)
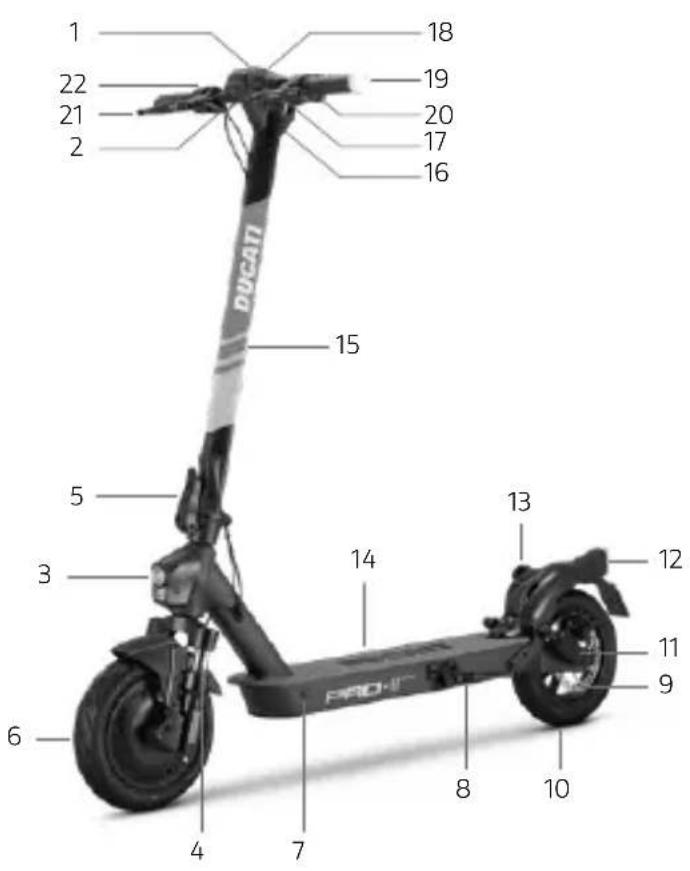
Pro-II Plus / Pro-II Plus AS / Pro-II Evo
- Display
- Accelerator
- Headlamp
- Suspension fork (Pro-II Evo)
- Folding mechanism
- Drive sprocket
- Charging port
- Stand
- Disc brake
- Free wheel
- Suspension (Pro-II Evo)
- Light
- Fastening clip
- Footrest
- Safety ring (if present)
- Steering column
- Locking catch
- Brake lever
- Bell
- Indicator lights
- Controls of the indicators (if present)
Pro-II Evo AS
- Display
- Accelerator
- Headlamp
- Suspension fork
- Folding mechanism
- Drive sprocket
- Charging port
- Stand
- Disc brake
- Free wheel
- Suspension fork
- Light
- Fastening clip
- Footrest
- Steering column
- Locking catch
- Brake lever
- Bell
- Indicator lights
- Command of the turn signals
- Brake lever
- Electronic horn (except DU-MO-220012)
Pro-II Evo AS (DU-MO-240009)
- Display
- Accelerator
- Headlamp
- Suspension fork
- Folding mechanism
- Drive sprocket
- Charging port
- Stand
- Disc brake
- Free wheel
- Suspension fork
- Light
- Fastening clip
- Footrest
- Steering column
- Locking catch
- Brake lever
- Bell
- Indicator lights
- Command of the turn signals
- Brake lever
- Electronic horn
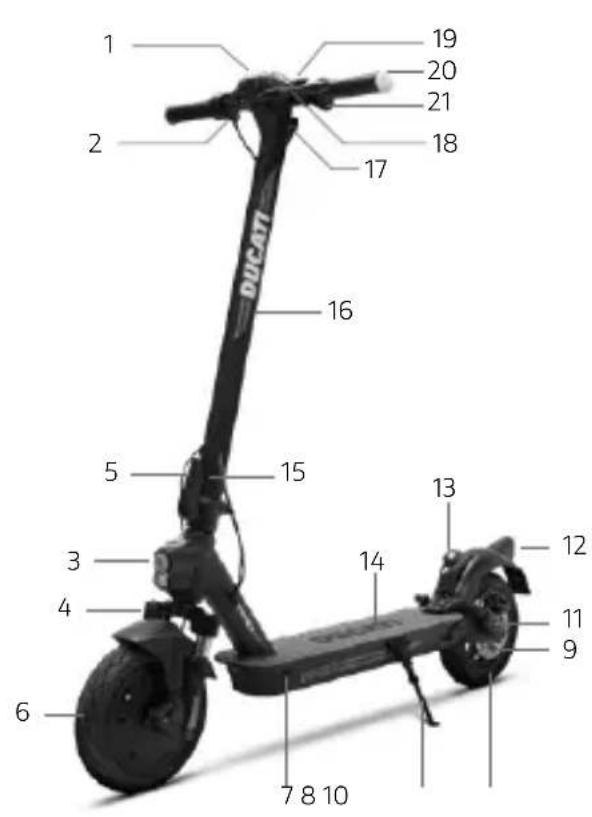
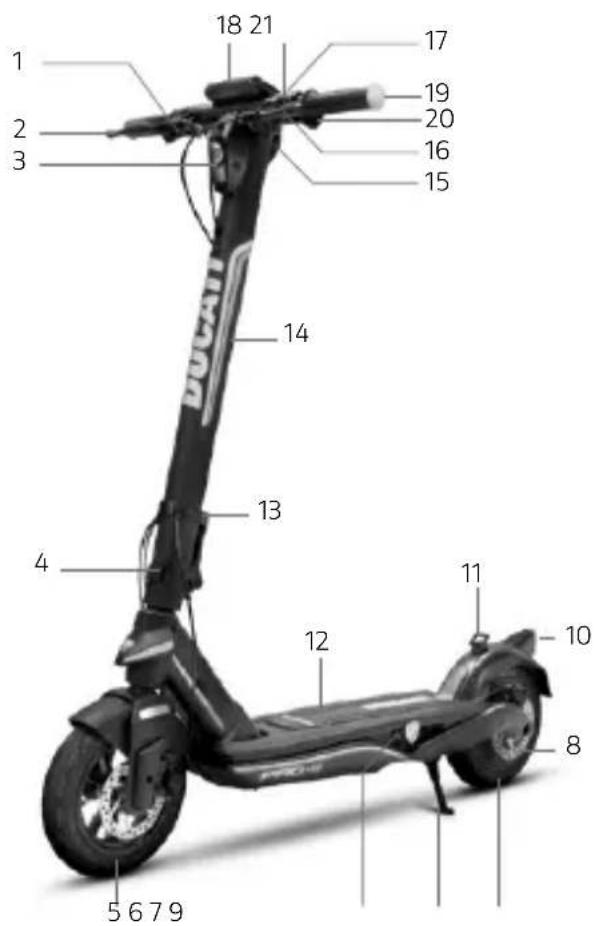
Pro-III / Pro-III AS
- Accelerator
- Brake lever
- Headlamp
- Folding mechanism
- Free wheel
- Charging port
- Stand
- Disc brake
- Drive sprocket
- Light
- Fastening clip
- Footrest
- Safety ring (if present)
- Steering column
- Fastening clip
- Brake lever
- Bell
- Display
- Indicator lights
- Controls of the indicators (if present; AS model includes horn button)
- USB port
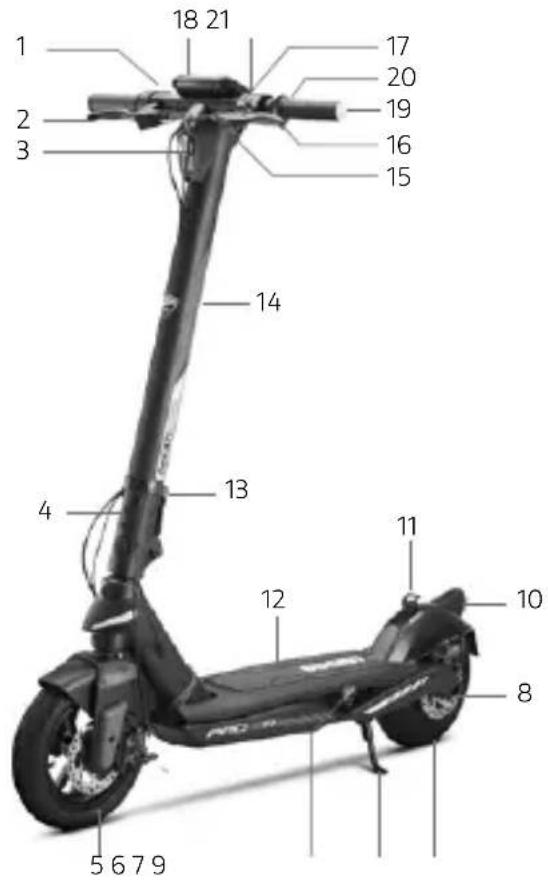
Pro-III R / Pro-III R AS
- Accelerator
- Brake lever
- Headlamp
- Folding mechanism
- Free wheel
- Charging port
- Stand
- Disc brake
- Drive sprocket
- Light
- Fastening clip
- Footrest
- Safety ring (if present)
- Steering column
- Fastening clip
- Brake lever
- Bell
- Display
- Indicator lights
- Controls of the indicators (if present; AS model includes horn button)
- USB port
4. Battery charging

CAUTION
Prior to using the item for the first time, charge to 100%. Make sure that the item, the battery charger and the charging port are dry.
Instructions:
- Open the kickstand
- Switch off the item
Battery charging

CAUTION
Charge the device before the first use. We also recommend charging it after each use and before storing it. Do not allow the vehicle to discharge completely to prevent damage to the battery.
The red light on the charger will turn green when charging is complete.
| Model Reference picture Instructions | ||||
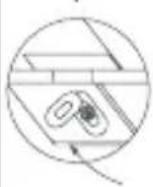
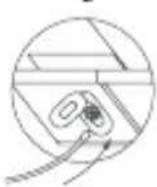
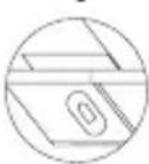
| Pro-I Evo(Black and White edition)Pro-I Evo SR(Black and White edition)Pro-I Evo ASPro-IPro-I Evo Max SRPro-I Evo Max ASPro-I MaxPro-II PlusPro-II Plus ASPro-II EvoPro-II Evo AS | 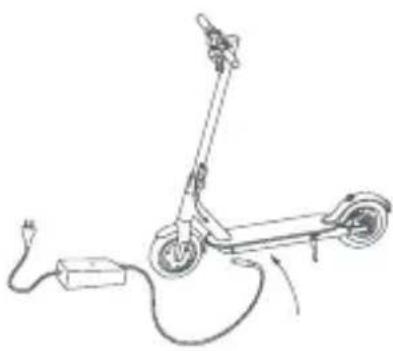 | 1. Remove the rubber cover from the charging socket.2. Connect the battery charger to the electrical outlet and then to the charging socket. When the item is fully charged, the light on the charger changes from red (charging) to green (charging complete).3. After charging, disconnect the battery charger from the vehicle and reinsert the rubber cover. Unplug the battery charger from the electrical outlet.Do not switch the scooter on while it is charging.CAUTIONThe red light on the charger will turn green when charging is complete. | ||
| 1 | 2 | 3 | ||
 |  |  | ||
| Pro-IIIPro-III ASPro-III RPro-III R AS | 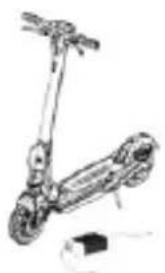 | 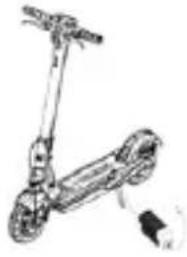 | 1. Switch off the electric scooter and open the kickstand.2. Turn the Ducati logo, open the waterproof cover, then connect the battery charger to the electrical outlet, connect the connector to the charging port.3. After charging, disconnect the connector from the charging port, close the waterproof cover. | |
 | 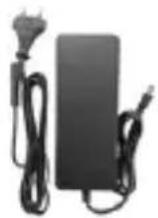 | |||
To recharge this product, use the battery charger supplied ONLY.
| Model Product code Battery charger model Output voltage | Charging time | |||
| Pro-I Evo(Black and White edition)Pro-I Evo SR(Black and White edition) | DU-MO-210001DU-MO-210004DU-MO-210011DU-MO-220004DU-MO-220019DU-MO-220023DU-MO-220025 | XHK-916-42015 42V - 1.5A 4 h | ||
| Pro-I Evo AS DU-MO-230003 G | S150-4200150 42V - 1.5A 4 h | |||
| Pro-I DU-MO-250002 FCA133-42 | 105 42V - 1.5A 5 h | |||
| Pro-I Evo Max SR | DU-MO-220009DU-MO-220002 | FY-4202000 42V - 1.5A 5 h | ||
| Pro-I Evo Max AS DU-MO-240001 | GJS150-4200150 42V - 1.5A 5 h | |||
| Pro-I Max | DU-MO-250001 | FCA133-42105 | 42V - 1.5A | 7 h |
| Pro-II PlusPro-II Plus AS | DU-MO-210005DU-MO-210010DU-MO-220008DU-MO-220020DU-MO-220026DU-MO-240006 | CP4215XVE063-4200150 | 42V - 1.5A 4 h | |
| Pro-II Evo | DU-MO-210009DU-MO-210012DU-MO-220005 | CP4215XVE063-4200150 | 42V - 1.5A 7 h | |
| Pro-II Evo AS | DU-MO-220012DU-MO-220013DU-MO-220022DU-MO-240009 | CP4215 | 42V - 1.5A 7 h | |
| Pro-III | MN-DUC-PRO3DU-MO-210013DU-MO-220006DU-MO-220024 | CP4215XVE063-4200150 | 42V - 1.5A 8 h | |
| Pro-III AS | DU-MO-220021 | CP4215XVE063-4200150 | 42V - 1.5A 8 h | |
| Pro-III R | DU-MO-220003 | CP546200 | 54.6V - 2A | 6 h |
| Pro-III R AS | DU-MO-220016 | CP546200 | 54.6V - 2A | 6 h |
Using another type of charger may damage the scooter or entail other potential risks.
Never leave the item unsupervised while it is charging. Do not switch the product on while it is charging.
After each use, fully recharge the battery to extend its useful life. Do not recharge the item immediately after use. Allow the scooter to cool for an hour before recharging.
The item should not be charging for extended periods. Overcharging reduces battery life and poses additional potential hazards.
Allow the vehicle to discharge completely to prevent damage to the battery.
Damage caused by the battery being left uncharged for a long period is irreversible and is not covered by the limited warranty. Once the damage has occurred, the battery cannot be recharged (the battery must not be dismantled by unqualified personnel, as this could lead to electric shocks, short circuits or even major safety incidents). If the owner is away, e.g. on holiday, and the device is entrusted to a third party, leave it in a partial charge state (20-50% charge), not fully charged.
Carry out regular visual inspection of the charger and charger cables. If the battery charger cable is clearly damaged, do not use it to avoid further damage and/or risks; please contact us for a replacement.
The battery charger can be used by children of at least 8 years of age and by people with reduced physical, sensory or mental abilities or lack of experience and knowledge if they have been supervised or have received instructions on how to use the appliance safely and understand the risks involved. Children must not play with the battery charger. Cleaning and maintenance operations must not be performed by children without supervision.
Battery warnings
The battery consists of lithium-ion cells and chemical elements that are hazardous to health and the environment. Do not use the item if it emits odours, substances or excessive amounts of heat. Do not dispose of the item or the battery with household waste. The end user is responsible for the disposal of electrical and electronic equipment and batteries in compliance with all applicable regulations.

DANGER
Avoid used, defective and/or non-original batteries of other models or brands.
Do not leave the battery near fire or heat sources. Fire and explosion hazard.
Do not open the battery or take it apart. Do not strike, throw, or puncture the battery or attach objects onto it.
Do not touch any substances leaking from the battery, as they are deemed hazardous. Do not allow children or pets to touch the battery.
Do not overcharge or short-circuit the battery. Fire and explosion hazard.
Do not immerse or expose the battery to water, rain or other liquids. Do not expose the battery to direct sunlight, excessive heat or cold (for example, do not leave the item or battery in a car in direct sunlight for extended periods of time), or environments containing explosive gases or flames.
Do not carry or store the battery with metal objects such as hairpins, necklaces, etc. Contact between metal objects and battery contacts may cause a short circuit resulting in physical injury or death.
5. Command information / Control panel
| Model | |
| Pro-I Evo(Black and White edition)Pro-I Evo SR(Black and White Edition)Pro-I Evo Max SR | 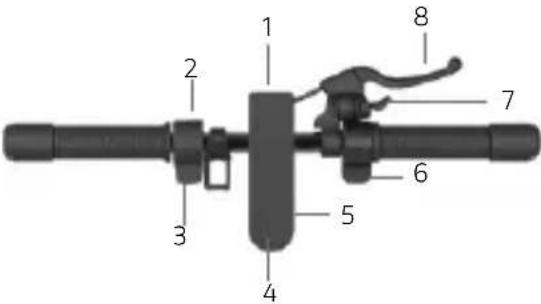 Multifunction button (4):• Switching on and off: press and hold for a few seconds to switch the electric scooter on and off.• Lights: press the button once to switch the lights on and off.• Speed mode: press the button twice to select the speed mode. Multifunction button (4):• Switching on and off: press and hold for a few seconds to switch the electric scooter on and off.• Lights: press the button once to switch the lights on and off.• Speed mode: press the button twice to select the speed mode. |
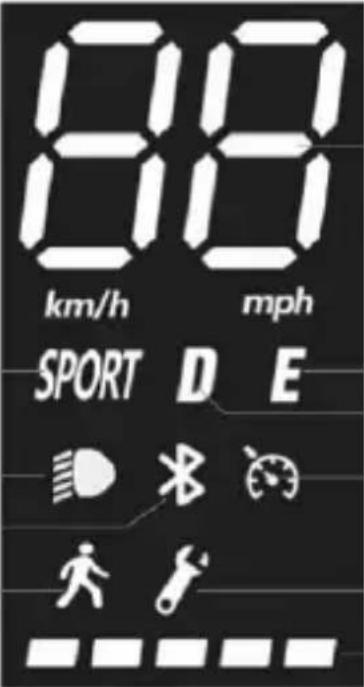 1 1. Speedometer: Displays the current speed of the scooter.2. Battery level: indicates the remaining battery level.3. Lights: lights indicator light4. Bluetooth: Bluetooth indicator light5. SPORT mode: the display will show SPORT6. COMFORT mode: the display will show D7. ECO mode: the display will show E8. Cruise control: speed control. It is activated after the same speed has been maintained for a few seconds.9. Pedestrian mode10. Fault: if on, check for a possible solution by consulting the error code table 1 1. Speedometer: Displays the current speed of the scooter.2. Battery level: indicates the remaining battery level.3. Lights: lights indicator light4. Bluetooth: Bluetooth indicator light5. SPORT mode: the display will show SPORT6. COMFORT mode: the display will show D7. ECO mode: the display will show E8. Cruise control: speed control. It is activated after the same speed has been maintained for a few seconds.9. Pedestrian mode10. Fault: if on, check for a possible solution by consulting the error code table | |
 CAUTIONThe accelerator is activated once the speed of travel exceeds 3 km/h.Cruise control is deactivated when the brake or accelerator is pressed for the first time. CAUTIONThe accelerator is activated once the speed of travel exceeds 3 km/h.Cruise control is deactivated when the brake or accelerator is pressed for the first time. | |
| Pro-I Evo ASPro-IPro-I Evo Max ASPro-I Max | 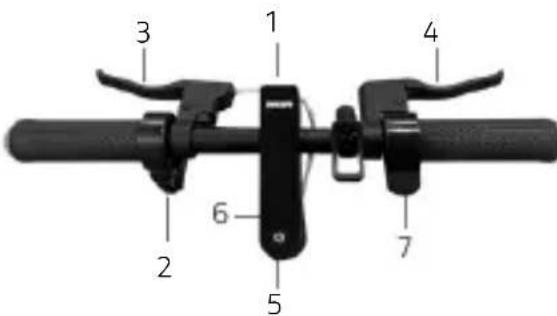 1. Projector2. Control unit3. Brake lever4. Brake lever5. Multifunction button6. Display7. AcceleratorMultifunction button (4):Switching on and off: press and hold for a few seconds to switch the electric scooter on and off.Lights: press the button once to switch the lights on and off.Speed mode: press the button twice to select the speed mode.Change units: Press the button three times to change from miles to kilometers and vice versa. 1. Projector2. Control unit3. Brake lever4. Brake lever5. Multifunction button6. Display7. AcceleratorMultifunction button (4):Switching on and off: press and hold for a few seconds to switch the electric scooter on and off.Lights: press the button once to switch the lights on and off.Speed mode: press the button twice to select the speed mode.Change units: Press the button three times to change from miles to kilometers and vice versa. |
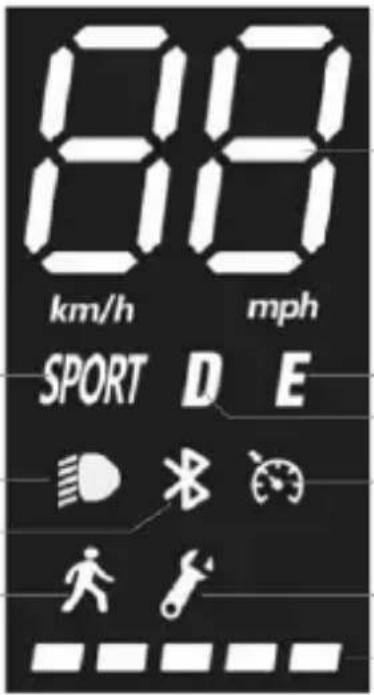 1. Speedometer: Displays the current speed of the scooter.Battery level: indicates the remaining battery level.Lights: lights indicator lightBluetooth: Bluetooth indicator lightSPORT mode: the display will show SPORTCOMFORT mode: the display will show DECO mode: the display will show ECruise control: speed control. It is activated after the same speed has been maintained for a few seconds.Pedestrian modeFault: if on, check for a possible solution by consulting the error code table 1. Speedometer: Displays the current speed of the scooter.Battery level: indicates the remaining battery level.Lights: lights indicator lightBluetooth: Bluetooth indicator lightSPORT mode: the display will show SPORTCOMFORT mode: the display will show DECO mode: the display will show ECruise control: speed control. It is activated after the same speed has been maintained for a few seconds.Pedestrian modeFault: if on, check for a possible solution by consulting the error code table | |
 CAUTIONThe accelerator is activated once the speed of travel exceeds 3 km/h.Cruise control is deactivated when the brake or accelerator is pressed for the first time. CAUTIONThe accelerator is activated once the speed of travel exceeds 3 km/h.Cruise control is deactivated when the brake or accelerator is pressed for the first time. | |
 1. Accelerator2. Multifunction button3. Brake lever 1. Accelerator2. Multifunction button3. Brake lever | |
| Multifunction button (2):• Switching on and off: press and hold for a few seconds to switch the electric scooter on and off.• Lights: press the button twice quickly to switch the lights on and off.• Speed mode: press the button once to select the speed mode. | |
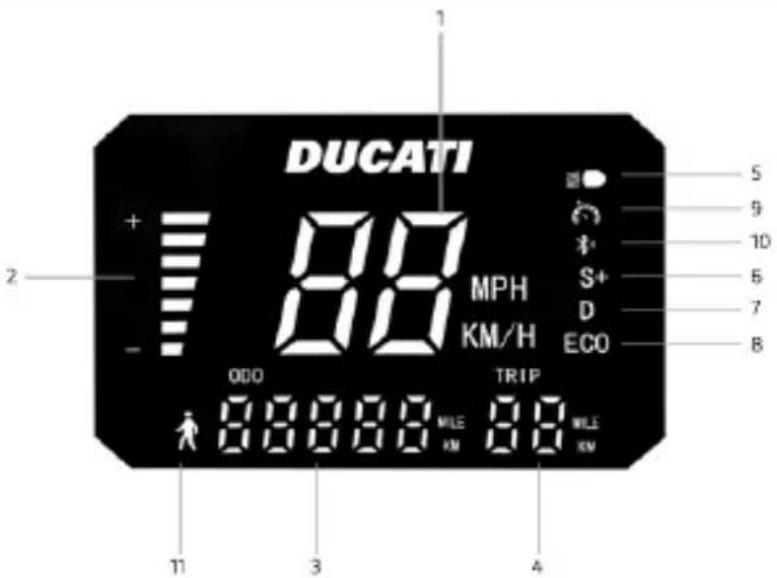 | |
| 1. Speedometer: Displays the current speed of the scooter.2. Battery level: indicates the remaining battery level.3. ODO: total distance travelled.4. TRIP: distance of single session.5. Lights: lights indicator light.6. SPORT mode: The display will show S+.7. COMFORT mode: The display will show D.8. ECO mode: The display will show ECO.9. Cruise control: speed control. It is activated after the same speed has been maintained for a few seconds.10. Bluetooth: Bluetooth indicator light11. PEDESTRIAN mode[GTBW]CAUTIONThe accelerator is activated once the speed of travel exceeds 3 km/h.Cruise control is deactivated when the brake or accelerator is pressed for the first time. |
CAUTION
| Model Indications on RF KEY | |
| Pro-IIIPro-III ASPro-III RPro-III R AS | When the scooter is started, there is a motor block integrated into the system that needs to be unblocked in one of the following ways*:RF KEY: Approach the RF key (supplied) to the display to activate the electric scooter. Smart-phone: Use the Ducati Urban E-Mobility application via the lock/unlock button in the settings menu. Smart-phone: Use the Ducati Urban E-Mobility application via the lock/unlock button in the settings menu. |
Direction indicators (if present)
| Models * | |
| Pro-I Evo(Black and White edition) |  |
| Pro-I Evo SR(Black and White edition) | |
| Pro-I Evo AS | On models where they are fitted, the direction indicators are placed at the ends of the handlebars (left and right side).The direction indicators are required to provide early warning of any change in direction while riding. |
| Pro-I | |
| Pro-I Evo Max SR | |
| Pro-I Max | Drive: |
| Pro-II Plus | |
| Pro-II Plus AS | 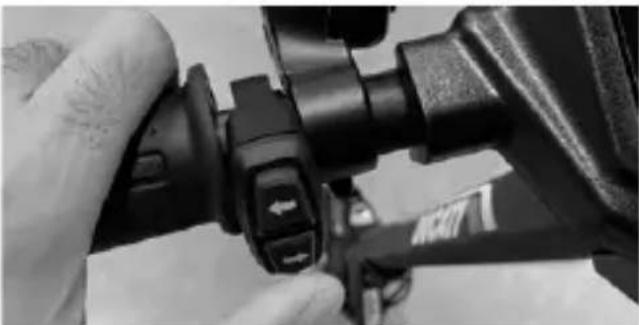 |
| Pro-II Evo | |
| Pro-II Evo AS | |
| Pro-III | |
| Pro-III R | |
| [DD26] CAUTIONBefore each use of the product, check the correct operation of the direction indicators. |
6. Quick guide
- Prior to using the item for the first time, charge to 100% .
- Check tyre pressure (see side of tyre for recommended value). If the item does not reach at least 60% of the declared kms, or the maximum speed within the first 3 months of use, it is likely that the wheels have deflated once more. In this case, restore pressure as indicated.
- Check and adjust the brakes.
- Turn on the display.
- Place the item on a flat surface.
- Hold the handlebar firmly using both hands. Step onto the footrest with one foot and use the other to give yourself a gentle push and accelerate.

CAUTION
Zero Start Function: the accelerator is activated once the forward speed exceeds 3 km/h.
For safety reasons, the item is initially set up to avoid standing starts.
- When riding the item, tilt body in the riding direction during a turn and slowly turn the handlebars.
• To stop the item, release the accelerator, pull the brake lever
• To get off, first stop the item completely. Getting off the moving item can cause injury. - Prior to each use, check brakes and any wear, check tyre pressure (see side of tyre for recommended value), wheel wear, accelerator and charge status of battery.
Brake lever adjustment
Brake levers
Refer to point A (see photo) to adjust the position of the brake lever, if necessary.
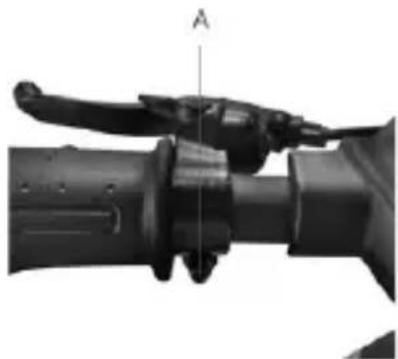
natural_image
Close-up of a mechanical lever handle assembly with labeled point A (no text or symbols beyond label)Adjusting the brake calliper
If the brake is too tight or too loose, use the hex wrench to loosen the nut (A), then adjust the brake cable, (shorten the brake cable at the top if it is too tight; if it is too loose, pull the brake cable downwards) and then, retighten the nut (A). If the wire is too loose or too tight even after following the first step, it may be necessary to adjust the (fixed) brake pad by means of the wheel located on the opposite side; use the hex wrench to move the brake pad (B) closer or further away (see picture).
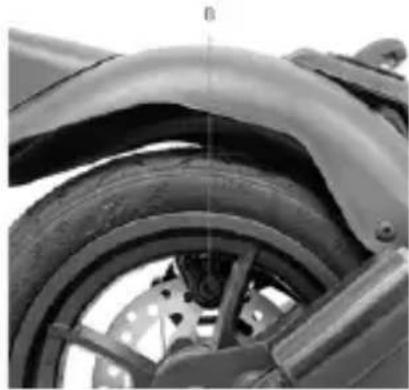
Check the correct alignment between the brake caliper and the disc. Use screws C and D to adjust the position / alignment on the disc, if necessary.
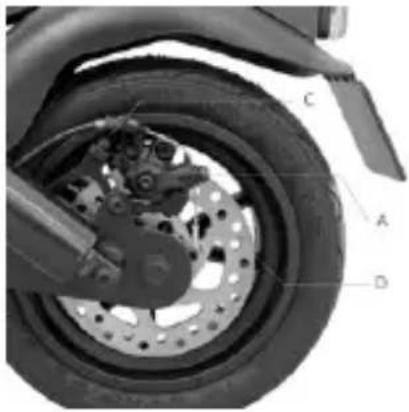
natural_image
Close-up of a motorcycle wheel and disc assembly with labeled parts (A, B, C, D), no readable text or symbols beyond labels.