WM-GX410 - Lecteur de cassette portable SONY - Notice d'utilisation et mode d'emploi gratuit
Retrouvez gratuitement la notice de l'appareil WM-GX410 SONY au format PDF.

| Type de produit | Lecteur de cassette portable avec radio FM/AM |
| Marque | Sony |
| Modèle | WM-GX410 |
| Dimensions (L x H x P) | Environ 112,0 x 82,5 x 35,0 mm (sans parties saillantes) |
| Poids | Environ 200 g (unité principale) |
| Alimentation | 3 V CC : 2 piles R6 (AA) ou adaptateur secteur AC-E30HG (non fourni) |
| Autonomie des piles (écouteurs) | Lecture : 24 h (alcaline), 6 h (standard) ; Radio : 48 h (alcaline), 15 h (standard) |
| Autonomie des piles (haut-parleurs) | Lecture : 10 h (alcaline), 2,5 h (standard) ; Radio : 17,5 h (alcaline), 5 h (standard) |
| Gammes de fréquences radio | FM : 87,5 – 108 MHz (Eur/USA), 76 – 90 MHz (Japon) ; AM : 531 – 1710 kHz |
| Réponse en fréquence (lecture) | 40 – 15 000 Hz |
| Réponse en fréquence (enregistrement) | 100 – 8 000 Hz |
| Entrée micro | Prise MIC (PLUG IN POWER) pour micro externe |
| Sortie casque | Prise casque stéréo, impédance de charge 8 – 300 Ω |
| Puissance de sortie (haut-parleurs) | 500 mW + 500 mW (JEITA) |
| Fonctions principales | Lecture/Enregistrement cassette, Radio FM/AM, AVLS, Sound Boost, Présélection stations, Enregistrement micro/radio |
| Vitesses de bande | Normale (4,8 cm/s) ou Double (2,4 cm/s) pour enregistrement longue durée |
| Entretien et nettoyage | Nettoyer la tête et le chemin de bande toutes les 10 heures avec un coton-tige et du solvant. Extérieur : chiffon doux légèrement humide. |
| Sécurité | Verrouillage des touches (HOLD), protection auditive AVLS, ne pas utiliser en conduisant, retirer les piles en cas d'inutilisation prolongée. |
| Pièces détachées et réparabilité | Adaptateur secteur AC-E30HG, micro externe ECM-DS70P (non fournis). Réparation par professionnel recommandée. |
| Accessoires fournis | Casque stéréo ou écouteurs (1), piles Sony R6P(SR) (2) (modèle mondial seulement) |
FOIRE AUX QUESTIONS - WM-GX410 SONY
Questions des utilisateurs sur WM-GX410 SONY
0 question sur cet appareil. Repondez a celles que vous connaissez ou posez la votre.
Poser une nouvelle question sur cet appareil
Téléchargez la notice de votre Lecteur de cassette portable au format PDF gratuitement ! Retrouvez votre notice WM-GX410 - SONY et reprennez votre appareil électronique en main. Sur cette page sont publiés tous les documents nécessaires à l'utilisation de votre appareil WM-GX410 de la marque SONY.
MODE D'EMPLOI WM-GX410 SONY
Radio Cassette-Corder
Operating Instructions
使用说明书
사용설명서

WALKMAN
WM-GX410
©2004 Sony Corporation Printed in China
http://www.sony.net/
"WALKMAN" is a registered trademark of Sony Corporation to represent Headphone Stereo products.
WALKMAN is a trademark of Sony Corporation.
The validity of the CE marking is restricted to only those countries where it is legally enforced, mainly in the countries EEA (European Economic Area).
CE标志的有效性,仅限于那些有法律限制的国家,主要在EEA(欧洲经济区)国家。
CE 표시 유효성은 주로 EEA 제국(유럽 경제 지역)에 있는 법적으로 강제된 나라에서만으로 한정됩니다.


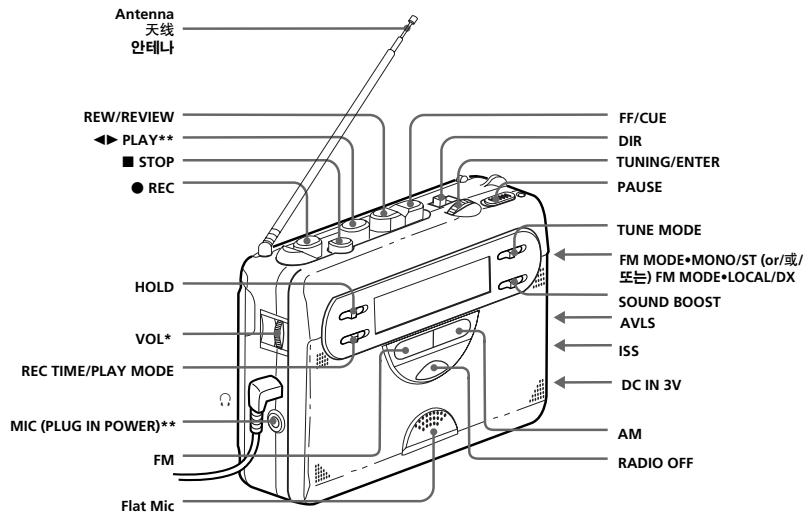
* There is a tactile dot beside VOL on the main unit to show the direction to turn up the volume.
up the volume.
**The button or jack has a tactile dot.
* 主机上的VOL 画边有穿起圆点用工表示调高产量的方向
* 主机上的VOL旁边有突起圆点用于表示调高音量的方向。
**按钮或插孔带有突起圆点
*, 브기의 VOI, 연에 도층된 점이 요량, 도적 방향을 앉건?!
“본기의 VOL 뜄에 돌 Coral된 점이 금당 소
**버튼 또는 책에 돌출된 점이 있습니다.

Preparations
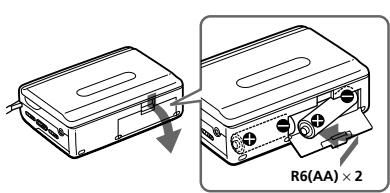
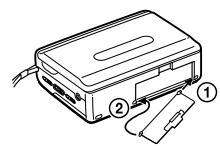
To insert batteries A-®
Slide open the battery compartment lid, and insert two R6 (size AA) dry batteries (supplied with "Sony World Model" only) with correct polarity.
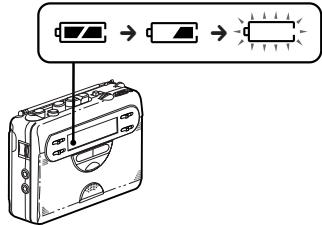
Replace the batteries with new ones when “☐” flashes in the display. A-B
Notes
- For maximum performance we recommend that you use Sony alkaline batteries.
- Be sure to replace both batteries within 2 minutes.
Otherwise, the preset radio stations will be cancelled
To attach the battery compartment lid, if it is accidentally detached
Attach it as illustrated. A-©
To use external power
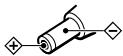
- Connect the AC power adaptor AC-E30HG (not supplied) to the DC IN 3V jack and to the wall outlet. Do not use any other AC power adaptor. - Specifications for AC-E30HG vary for each area. Check your local voltage and the shape of plug before purchasing.
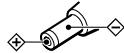
Polarity of the
pluc
- Connect the AC power adaptor to an easily accessible AC outlet. Should you notice an abnormality in the AC power adaptor, disconnect it from the AC outlet immediately.
- Do not touch the AC power adaptor with wet hands.
Recording
Notes
- If the record-protect tab is broken, you cannot record on that side.
- Tapes recorded with the REC TIME/PLAY MODE switch in the DOUBLE position cannot be played properly on a cassette player/tape recorder without the REC TIME/PLAY MODE switch function.
- Use new batteries when recording.
- If a howling occurs, turn down the volume
- If a flowing occurs, turn down the volume. - When recording with the microphone, the sound to be recorded cannot be heard through the speakers.
1 Insert a normal (TYPE I) tape. B
To record on both sides:
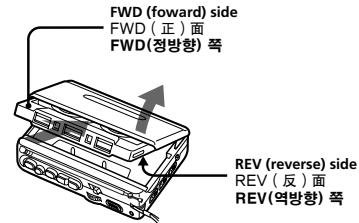
Insert the cassette with the side to be first recorded on as the FWD side, and set DIR to FWD.
To record on one side only:
Insert the cassette with the side to be recorded on as the REV side, and set DIR to REV.
2 Set REC TIME/PLAY MODE to the desired position.
NORMAL (4.8 cm/s): for optimum sound.
Recommended for normal recordings.
RECOMMENDED FOR NORMAL RECORDINGS. DOUBLE (2.4 cm/s): for double recording
DOUBLE (2.4 cm/s). for double recording
time (for example, 120 minutes using both
sides of a 60-minute cassette). Suitable for
recording conferences, dictations, etc. Not recommended to record music.
3 Select a recording source.
To record with the built-in microphone
(Flat Mic):
Place the unit on a hard surface (such as a desk) with the cassette holder side down, so that the microphone can record effectively. To record from the radio:
Tune in to the station you want to record (see "Listening to the Radio").
4. Press ● REC ◀▶ PLAY is pressed
simultaneously and recording starts. The recording level is automatically adjusted.
If you have started recording from the FWD side, recording will switch to the REV side automatically at the end of the FWD side.
| To | Press/switch |
| Pause recording | PAUSE in the direction of the arrow |
| Stop recording | ■ STOP |
| Start recording during playback | ● REC during playback |
| Review the portion just recorded | Press and hold REW/ REVIEW during recording. Release to listen. |
To reduce noise while recording AM
programs
Set the ISS (Interference Suppress Switch) to the position that reduces noise the most.
To monitor the recording sound
You can monitor the recording sound through headphones/earphones. Adjust monitoring level using VOL.
Notes on recording
• The recording level is fixed.
- Adjusting the volume or setting AVLS (see "Using
Other Functions") will not affect the recording level.
These controls only change the sound level you hear
• Actual recording will start about 2 seconds after you
Press ● REC Press ● REC about 2 seconds before the
press ● RLE. Press ● RLE about 2 seconds before the moment you want to start recording, or you will miss
moment you want to start recording, or you will miss the beginning of your recording.
- When recording on both sides, recording will not be
made for about 10 seconds while the tape is switching
sides.
- Do not use a high-position (TYPE II) or metal (TYPE
IV) tape. If you do, the sound may be distorted when
you play back the tape, or the previous recording may
not be erased completely.
- Do not connect or disconnect the headphones/
earphones to/from the ⏰ jack while recording from th
radio. The recording condition may change abruptly,
or noise may be recorded.
- When recording with the microphone, do not place it
near a lamp cord or a fluorescent lamp as this may
cause interference noise.
- For other operations, stop recording first
- DIR will not work while recording. Do not force
- Will not work while restringing. Do not have changing the setting, as the unit may malfunction
- The frequency will change if you switch TUNE MODE
The frequency will change if your own Taylor MODE while recording the radio.
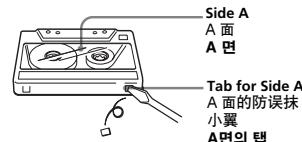
To prevent a tape from being accidentally recorded over ©
Break off the tabs from side A and/or B. To reuse the tape for recording, cover the tab hole with adhesive
tape.
Recording from various sound
sources
To record with an external microphone
Connect an external microphone to the MIC (PLUG
Connect an external microphone to the M2C (P2C) IN POWER) jack.
IN POWER) Jack.
Use a microphone such as the ECM-DS70P (not
supplied).
When using a plug-in-power system microphone, the power to the microphone is supplied from this unit.
Playing a Tape
1 Insert a normal (TYPE I) tape. B
- Press RADIO OFF to turn off the radio
2 Press RADIO OFF to turn on the radio.
3 Set REC TIME/PLAY MODE to the same
position as that used for recording. To
playback commercially available music
playback commercially available music tape, etc. select NORMAL
4 Press ◀▶ PLAY.
| To | Press/switch |
| Stop playback | ■ STOP |
| Pause playback | PAUSE in the direction of the arrow |
| Fast-forward or rewind* | FF/CUE or REW/REVIEW during stop |
| Search forward/backward during playback (CUE/REVIEW) | Press and hold FF/CUE or REW/REVIEW during playback and release it at the point you want |
Switch playback to the other side** DIR to FWD or REV
* If you leave the unit after the tape has been wound
or rewound, the batteries will be consumed.
rapidly. Be sure to press ■ STOP
** Playback will switch to the REV side automatically
At the end of the FWD side.
Note
Do not open the cassette holder while the tape is running.
Using Other functions
Protecting Your Hearing—AVLS
(Automatic Volume Limiter System)
(Only when using headphones/earphones)
Set AVLS to LIMIT. The maximum volume is kept
down to protect your ears.
Listening with Powerful Sound
(Only when using headphones/earphones)
Set SOUND BOOST to ON to obtain the Sound Boost
effect which emphasizes both treble and bass.
Note
When you set AVLS to LIMIT, the SOUND BOOST effect is reduced.
To use the speakers
Disconnect the headphones/earphones from the Ⓞ
jack. The sound will play from the speakers.
When the speakers are in use, the AVLS and SOUND
BOOST function will not operate
Locking the Controls
Slide the HOLD switch in the direction of the arrow to
lock the controls. The HOLD function only locks the
radio operation buttons and TUNING/ENTER.
(turn over)

The Ground Truth image displays a single, solid horizontal line. According to Rule 2 (UNDERSCORE & LINE RULES), if the GT contains lines used for stylistic emphasis or as background (like ruled paper), the OCR result must ignore them. The provided OCR content is "\_\_\_\_", which consists of four underscores. This is incorrect because underscores are not equivalent to a solid line and are not permitted under the “Stylistic/Background Lines (Ignore)” rule. Outputting underscores for a stylistic line violates the rule and constitutes an error. Therefore, the OCR result is inconsistent with the Ground Truth.
准备工作
安装电池 A-⑨
滑开电池室盖,按正确极性插入两节 R6(AA)干电池(仅随“Sony 世界型号”提供)。
“☐”在显示窗中闪烁时,即请更换电池。A-⑧
2
- 为获得最佳效果,建议您使用 Sony 牌碱电池
- 一定要在2分钟内换装好两个电池。否则,预约电台都将被解除掉。
如果电池室盖意外脱落,要安装电池室盖
如图所示,安装电池室盖。A-©
要用外部电源时
- 将 AC-E30HG 交流电源转接器(未附带)连接到电池盒的 DC IN 3V 插孔和墙上插座。请勿使用任何其他的交流电源转接器。
- AC-E30HG 的规格根据地区而异,在购买之前请核
查您所在地区的电压和插头的电极开

插头的电极
- 将交流电源适配器连接至易于拔插的交流插座。如果发现交流电源适配器出现异常,则立即将其从交流插座上拔下。
- 切勿在手湿时接触交流电源适配器
录音
江
- 如果防误抹小翼已被折断,则无法在该面录音
- 使 REC TIME/PLAY MODE 开关置于 DOUBLE 位置时录制的录音带可能无法在没有 REC TIME/PLAY
MODE 开关功能的磁带 / 录音带播放器上正常播放。 - 录音时,请使用新的电池。
- 如果声音太大,请调低音量
- 当用麦克风录音时,所录的声音是不能通过扬声器听到的。
1 插入一盒标准型(TYPE I)录音带。B 要在两面录音时:
将要先录音的面作为 FWD 面插入盒带并把 DIR 设定于 FWD。
只要录一面时
将要录音的面作为REV面插入食带并把
将要求音的曲作为REV曲插入盘币并把DIR设定于REV。
2 把 REC TIME/PLAY MODE 设定于所要位置。
NORMAL (4.8cm/s): 用于为获得最佳音响,最好请用正常模式进行录音。
DOUBLE (2.4cm/s): 用于双倍录音时间
(例如,使用60分食带的双面可录120分
(例如,使用60万盎司的双面可求120分钟),适用于会议。口授记录等的录音,但
钟)。适用于会议,口技记录等的录音。但不适用于录音乐。
三
要用内装麦克风录音时(Flat Mic)
使盒带架一面朝下,将本机放置在坚硬的表面
(如桌面)上,从而使麦克风录音更加有效。
要从收音机录音时
请调入您想录音的电台(参见“听收音机”)。
- 按 ● PEC 、 1. PLAY 也同时被控至不开始
4 按 ● REC。◀▶ PLAY 也同时被按下而开始
录音。录音电平能自动调整
如果从 FWD 面开始录音,则当 FWD 面录音
结束时,将自动切换至 REV 面进行录音。
要防止录音带被误录时 C
请折断 A 面和/或 B 面的防误抹小翼。要重新用该录音带录音,用胶带盖住折断防误抹小翼后的缺口。
使用不同音源录音
使用外置麦克风录音
将外置麦克风连接至 MIC(PLUG IN POWER) 插
孔。
使用 ECM-DS70P 等麦克风(未附带)
使用插上电源系统麦克风时,麦克风电源由本机提
供。
播放录音带
1 插入一盒标准型(TYPE I)录音带。B
2 按 RADIO OFF 以关掉收音机。
3 将 REC TIME/PLAY MODE 的位置设置为与录音时所用的相同的位置。要播放商用音乐录音带等格式磁带,请选择 NORMAL。
4 按 ◀▶ PLAY。
要 请按/切换
| 停止播放 | ■ STOP |
停止播放 ■ STOP
| 暂停播放 | 按箭头方向 PAUSE |
(暂停)
| 快进绕或重绕* | 停止中按FF/CUE或 |
REW/REVIEW
| 播放时向前/向后搜索 | 播放时按住 FF/CUE |
(CUE/ REVIEW) 或 REW/REVIEW,
| 在要播放的地方将其松 |
开
| 换播放另一面** | 把DIR切换为FWD或 |
REV
* 当磁带已绕完或重绕完时,如果仍放置机器不管,将
迅速消耗电池。请即按 ■ STOP。
**当 FWD 面播放结束时,将自动切换至 REW 面进行播放。
| 2017 | 2016 | |
| Cost of sales | 3.4 | 3.5 |
| Gross margin | 1.9% | 1.8% |
i
在磁带运转中,不可打开盒带座。
· = 0
使用其它功能
保护听觉-AVLS
(自动音量限制系统
(当使用头戴耳机/耳机时为限)
把 AVLS 设定于 LIMIT。便可限制最大的音量以保护您的耳朵。
聆听震撼音效
(当使用头戴耳机/耳机时为限)
将SOUNDBOOST设置为ON,以获得SoundBoost(增强音效)效果,使高音和低音同时得到增强。
i
如果将 AVLS 设置为 LIMIT,SOUND BOOST(增强音效)效果将会减弱。
要用扬声器时
从 插孔拔下头戴耳机/耳机。本机将从扬声器
放音。
当使用扬声器时,AVLS 和 SOUND BOOST 功能是不起作用的。
锁住控制器
按箭头方向滑动 HOLD 开关锁住控制器。HOLD 功能只能锁住收音机操作按钮和 TUNING/ENTER。

준비
배터리를 넣으려면 A-⑨
배터리실 커버를 밀어서 연 후에 R6 (AA 사이즈) 건전지 2 개(“Sony World Model” 만 제공)를 바른 방향으로 넣습니다.
표시창에서 “☐” 점멸하면 배터리를 새 것으로 교환하여 주십시오. A-⑧
주의점
- 본기의 성능을 최대한으로 즐기시려면 Sony 알카라인 배터리를 사용하실 것을 권합니다.
-배터리는 반드시 2분 이내에 양쪽 모두 교환하여 주십시오.그렇지 않으면 프리세트해 놓은 라디오 방송국이 지원지요.
배터리실 커버가 실수로 분리된 경우 다시 부착하려면 다음 그림을 참조하여 주십시오. A-©
외부 전원을 사용하려면
- 배터리 케이스 DC IN 3V 단자와 콘센트에 AC 전원 어DBTTER AC-E30HG (별매품)를 접속합니다. 그 밖의 전원 어DBTTER는 사용하지 마십시오.
- AC-E30HG의 주요 제원은 지역에 따라 다릅니다. 사용 지역의 전압과 플러그의 극성을 확인하신 후에 구입하여 주십시오.
플러그의 극성
- 가까운 AC 콘센트에 AC 전원 어댑터를 접속합니다. AC 전원 어댑터에서 이상을 발견하면 AC 콘센트에서 바로 분리하여 주십시오.
• 젖은 손으로 AC 전원 어댑터를 만지지 마십시오.
논은하기
주의점
- 녹음 보호 탱을 제거했을 때에는 그 면에는 녹음을 할 수 없습니다.
- REC TIME/PLAY MODE 스위치를 DOUBLE 위치로 해서 녹음한 테이프는 REC TIME/PLAY MODE 전환 기능에 대응하지 않는 카세트 플레이어/테이프 레코더에서 정상으로 재생되지 않습니다.
• 녹음할 때에는 새 배터리를 사용하여 주십시오.
-소리가 올릴 때에는 음략을 낮 Cub니다.
-마이크로폰을 사용해서 녹음할 때에는 녹음하는 사운드는 스피커에서 출력되지 않습니다.
1 통상(TYPE I) 테이프를 넣습니다. B
양면에 독음하려면:
먼저 녹음하고 싶은 면을 FWD 쪽으로 해서 카세 트를 넣고 DIR 을 FWD 로 설정합니다.
한쪽 면에만 녹음하려면:
녹음하고 싶은 면을 REV 쪽으로 해서 카세트를 넣고 DIR 을 REV 로 설정합니다.
2 REC TIME/PLAY MODE 을 원하는 위치로 설정합니다.
NORMAL(4.8 cm/s): 고음질로 녹음할 수 있습니다. 일반적인 녹음에 사용하실 것을 권합니다
DOUBLE(2.4 cm/s) : 녹음 시간이 2배로 됩니다(예를 들면 60 분용 카세트 양면을 사용해서 120분). 회의, 구술 등의 녹음에 적합합니다. 음악 녹음에는 적합하지 않습니다.
3 녹음원을 선택합니다.
내장 마이크로폰을 사용해서 녹음하려면
(Flat Mic)
마이크로폰을 사용해서 효과적으로 녹음을 하기 위해서는 본기를 카세트 홀더 측이 아래가 되도록 해서 딱딱한 면(책상 등) 위해 올려 놓으십시오.
라디오 방송을 녹음하려면:
녹음하고 싶은 방송국에 맞춤니다(라디오를 듣기 참조).
4 ● REC 을 누릅니다. ◀▶ PLAY 가 동시에 놀려지고 녹음이 시작됩니다. 녹음 레벨은 자동 조절됩니다.
FWD 쪽에서 녹음을 시작했을 때에는 테이프가 그 면의 마지막이 되면 자동으로 REV 쪽으로 전환되고 녹음이 계속됩니다.
| 목적 | 누르거나 전환할 버튼 |
| 녹음 일시 정지 | PAUSE를 화살표 방향으로 논륙다 |
노요전
| 속임 중에 | ■ STOP 떨 수 Tanzania |
| 재생 중에 녹음을 시작 | 재생 중에 ● REC 을 누른다 |
Specifications
Frequency range
| Area* | FM (MHz) | AM(kHz) |
| Eur | 87.5 - 108 | 531 - 1602 |
| USA | 87.5 - 108 | 530 - 1710 |
| JPn | 76 - 90 | 531 - 1710 |
* Eur: European and other countries, USA:USA, Canada, and Central and South America. JPn:Japan
en
| Frequency response | Playback: 40 - 15 000 HzRecording: 100 - 8 000 Hz |
| Input | Microphone (MIC) jack |
| Output | Headphones (7) jackLoad impedance 8 - 300 Ω |
| Power requirements | 3 V DC: batteries R6 (size AA) × 2External DC 3V power sources |
| Power output | Speakers 500 mW + 500 mW (JEITA*) |
| Dimensions (w/h/d) | Approx. 112.0 × 82.5 × 35.0 mm (4^1/2 × 3^1/4 × 1^7/16 inches) , excl. projecting parts and controls |
| Mass | Approx. 200 g (7.1oz) (main unit only) |
| Supplied accessories | Stereo headphones or earphones (1)Sony dry battery R6P(SR) (2) (“Sony World Model” only) |
Design and specifications are subject to change without notice.
Battery life* (Approx. hours)
| Sony alkaline LR6(SG)** | Sony R6P(SR) | |
| (using headphones/earphones) | ||
| playback | 24 | 6 |
| radio | 48 | 15 |
| mic recording | 20 | 4.5 |
| radio recording | 12 | 3 |
| (using the speakers) | ||
| playback | 10 | 2.5 |
| radio | 17.5 | 5 |
| radio recording | 6.5 | 1 |
* Measured value by the standard of JEITA (Japan Electronics and Information Technology Industries Association. (Using a Sony HF series cassette tape)
**When using Sony LR6(SG) alkaline dry batteries (produced in Japan).
Note
| The battery life may be shorter depending on the operating condition, the surrounding temperature and battery type. |
Design and specifications are subject to change without notice.
--
规格
频率范围
| 地区* | FM (MHz) | AM(kHz) |
| Eur | 87.5 - 108 | 531 - 1602 |
| USA | 87.5 - 108 | 530 - 1710 |
| JPn | 76 - 90 | 531 - 1710 |
* Eur:欧洲和其它国家,USA:美国、加拿大和中南美,JPn:日本
频率范围
| 录音:100-8000Hz | |
| 输入 | 麦克风(MIC)插孔 |
| 输出 | 头戴耳机(Ω)插孔负载阻抗8-300Ω |
| 电源 | 3V DC:电池R6(3号,AA)×2外部DC 3V电源 |
| 电源输出 | 扬声器500mW+500mW(JEITA*) |
| 尺寸(宽/高/纵深) | 大约112.0×82.5×35.0mm,不含突起部分和控制器 |
| 质量 | 大约200g(只包括主机) |
| 附件 | 立体声头戴耳机或耳机(1)Sony干电池R6P(SR)(2)("Sony世界型号"为限) |
设计和规格有所变更时,恕不另行通知。
电池寿命 ^* (大约时数)
| Sony 碱电池 LR6(SG)** | Sony R6P(SR) | |
| (使用头带耳机/耳机时) | ||
| 播放 | 24 | 6 |
| 听收音机 | 48 | 15 |
| 麦克风录音 | 20 | 4.5 |
| 收音机录音 | 12 | 3 |
| (使用扬声器时) | ||
| 播放 | 10 | 2.5 |
| 听收音机 | 17.5 | 5 |
| 收音机录音 | 6.5 | 1 |
| * JEITA (Japan Electronics and Information Technology Industries Association) 标准的测定值。(使用 Sony HF 系列盒带) | ||
| **使用 LR6 (SG) 型 Sony 碱电池(日本制)时。 | ||
注
| 电池寿命,可能因操作条件,环境温度和电池型式而缩短些。 |
---
주요 제원
라디오 부분
| 지역* | FM (MHz) | AM(kHz) |
| Eur | 87.5 - 108 | 531 - 1602 |
| USA | 87.5 - 108 | 530 - 1710 |
| JPn | 76 - 90 | 531 - 1710 |
| * Eur: 유럽 및 기타 국가, USA : 미국, 카나다, 중미 및 남미, JPn :일본 | ||
주파수 응답
| 녹음 : 100 - 8 000 Hz | |
| 입력 | 마이크로폰 (MIC) 책 |
| 출력 | 헤드폰(☐) 책부하 입피던스 8 - 300 Ω |
| 전원 요구사항 | 3V DC: 배터리 R6(AA 사이즈) × 2외부 DC 3V 전원 |
| 출력 | 스피커 500 mW + 500 mW (JEITA |
| 규격 (w/h/d) | 약 112.0 × 82.5 × 35.0 mm돌기 부분 및 건트롤 스위지류는 제외 |
| 중량 | 약 200 g (본체만) |
| 부속품 | 스테레오 헤드폰 또는 이어폰 (1)Sony 전전지 R6P(SR) (2)(“Sony World Model” 전용) |
디자인 및 주요 제원은 에고 없이 변경하는 경우가 있습니다.
배터리의 지속 시간*(약 시간)
| Sony 알카라인 LR6(SG)•• | Sony R6P(SR) | |
| (헤드폰/이어폰 사용) | ||
| 제생 | 24 | 6 |
| 라디오 | 48 | 15 |
| MIC(마이크로폰)녹음 | 20 | 4.5 |
| 라디오 녹음 | 12 | 3 |
| (스피커 사용) | ||
| 계생 | 10 | 2.5 |
| 라디오 | 17.5 | 5 |
| 라디오 녹읍 | 6.5 | 1 |
* JEITA(일본전자정보기술산업협회) 표준에 따라 측정한 값입니다 (Sony HF 시리얼 카세트 테이프 사용)
**LR6(SG) Sony 알카라인 건전지(일본산)를 사용할 경우
조이전
| 사용상태,주위의 온도나 배터리의 종류에 따라서 배터리의 지속시간이 짧아지는 경우가 있습니다. |
[Non-Text]
| 2017 | 2016 | |
| Cost of sales | 3.4 | 3.5 |
| Gross margin | 1.9% | 1.8% |
English
Listening to the Radio
Note
| For customers who purchased the “Sony World Model” Switch the area to “Eur” or “USA” when you use this Walkman outside of Japan. For operations, refer to “Receiving Stations Outside Your Country.” |
1 Press FM or AM to select the band and to turn on the radio.
2 For manual tuning
| 1 Set TUNE MODE to MANUAL. |
| 2 Rotate TUNING/ENTER to tune in to the desired station. |
For preset tuning
| 1 Set TUNE MODE to PRESET. |
② Rotate TUNING/ENTER to recall the
desired preset station.
To use preset tuning, store the stations first (see "Presetting Radio Stations").
To turn off the radio
Press RADIO OFF.
To improve the broadcast reception D
| For AM: Reorient the unit itself.For FM: When using the headphones/earphones, extend the headphones/earphones cord (antenna).When using the speakers, lift up and adjust the angle of antenna or connect the headphones/ earphones to MIC jack for best reception. If the reception is still not good, adjust FM MODE. |
Note
| The antenna can be damaged when you move the antenna with excessive force. |
Presetting Radio Stations
You can preset up to 30 stations —20 for FM and 10 for AM (for the JPn area*, up to 16 stations —8 for FM and 8 for AM).
* Only if available. See "Receiving Stations Outside Your Country".
Presetting Automatically Scanned Stations
1 Set TUNE MODE to PRESET.
2 Press FM or AM.
3 Press TUNING/ENTER for more than 2 seconds
Current preset number and frequency digits will flash for 3 times.
Preset number 1 will flash in the display and the Walkman starts scanning for stations from the lowest frequency, and stops for
4 If you wish to preset the received station, press TUNING/ENTER while the preset number is flashing.
The received station is preset on preset number 1 and the unit starts scanning for the next receivable station.
5 Repeat step 4 until all receivable stations are preset.
To stop scanning
Press RADIO OFF. The radio is turned off at the same time.
Notes
| If stations are already stored, the newly preset stations replace the old ones when the above procedure is completed. |
- If stations cannot be presented automatically, preset them manually.
Presetting Stations Manually
1 Set TUNE MODE to PRESET
2 Press FM or AM.
3 Rotate TUNING/ENTER to select the desired preset number.
4 Press TUNING/ENTER and the preset number will flash in the display.
5 Rotate TUNING/ENTER to tune in to the station.
6 Press TUNING/ENTER while the display is flashing.
•
If a station is already stored on that number, the newly preset station will replace the old one.
Scanning the Preset Radio Stations — DAPS (Digital Auto Preset Scanning)
1 Set TUNE MODE to PRESET.
2 Press FM or AM.
3 Press and hold FM or AM pressed in step 2 for 2 seconds or more.
The preset stations of the selected band will be played for about 5 seconds each. (During DAPS the indicators in the display flash.)
4 Press FM or AM again to select the station while the desired preset station is being played.
Notes
| Notes |
| In step 3 or 4, if you select a band which you did not select in step 2 by pressing FM or AM, the newly selected band will be played normally. |
| Until a station is selected in step 4, the DAPS function turned on in step 3 will continue. |
Receiving Stations Outside Your Coun
(excluding European, Saudi Arabian, and Chinese models)
1 Press RADIO OFF and turn off the radio.
2 Press and hold FM until "Eur", "USA", or "JPn" flashes in the display.
3 Rotate TUNING/ENTER to select "Eur", "USA", or "JPn" and press TUNING/ENTER.
4 Tune in to stations and store as necessary following the procedure of "Listening to the Radio" and "Presetting Radio Stations."
Note
| If no area are preset, the preset numbers retain their former setting. |
Precautions
On batteries
- Do not carry the dry batteries with coins or other metallic objects. It can generate heat if the positive and negative terminals of the batteries are accidentally contacted by a metallic object.
- When you are not going to use your Walkman for a long time, remove the batteries to prevent damage from battery leakage and corrosion.
On handling
- Do not leave the unit in a location near heat sources, or in a place subject to direct sunlight, excessive dust or sand, moisture, rain, mechanical shock, or leave it in a car with its windows closed.
- We do not recommend the use of tape longer than 90 minutes. They are very thin and tend to be stretched easily. This may cause malfunction of the unit or sound deterioration.
- The LCD display may become hard to see or slow down when using the unit at high temperatures (above 40^ / 104^ ) or at low temperatures (below 0^ / 32^ ). At room temperature, the display will return to its normal operating condition.
- If the unit has not been used for a long time, set it in the
playback mode to warm up for a few minutes before you start using again. - Keep personal credit cards using magnetic coding or spring-wound watches, etc., away from the unit to prevent possible damage from the magnet used in the speaker.
On headphones/earphones
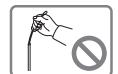
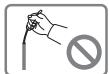
Road safety
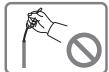
Do not use headphones/earphones while driving, cycling, or operating any motorized vehicle. It may create a traffic hazard and is illegal in some areas. It can also be potentially dangerous to play your headphones/earphones at high volume while walking, especially at pedestrian crossings.
You should exercise extreme caution or discontinue use in potentially hazardous situations.
Preventing hearing damage
Do not use headphones/earphones at high volume. Hearin
experts advise against continuous, loud and extended play experience a ringing in your ears, reduce volume or discon
use.
Caring for others
Keep the volume to a moderate level. This will allow you to hear outside sounds and to be considerate to the people around you.
On maintenance
- Clean the tape head and path using a cotton swab and
commercially available cleaning solvent after every 10 hours of
• To clean the exterior, use a soft cloth slightly moistened in
water. Do not use alcohol, benzine or thinner. - Clean the headphone/earphone plugs periodically.
[Non-Text]
Troubleshooting
The playback speed is too fast/slow
The playback sound is distorted.
- Set REC TIME/PLAY MODE at the same position as when the tape was recorded.
The display and operation are not normal.
- Remove the batteries and leave the unit without batteries for 10 minutes or more, and then insert them again. Preset the stations again, since the preset stations are erased from the memory.
Playback may not start automatically even if you release FF/CUE or REW/REVIEW at the end of the tape. - To start playback again, press ■ STOP, then press ◀▶ PLAY.
[Non-Text]
[Non-Text]
| 2017 | 2016 | |
| Cost of sales | 3.4 | 3.5 |
| Gross margin | 1.9% | 1.8% |
[Non-Text]
[Non-Text]
[Non-Text]
[Non-Text]
[Non-Text]
[Non-Text]
[Non-Text]
[Non-Text]
中文
听收音机
2
| 购买“Sony 世界型号”的顾客:当在日本以外使用本“Walkman”时,请把地区切换到“Eur”或“USA”。操作方法,请参见“接收国外电台”。 |
1 按 FM 或 AM 选择波段并打开收音机。
2 要手动调谐时
| 1把TUNE MODE设定于MANUAL。 |
| 2旋转TUNING/ENTER以调入所要的电台。 |
要预约电台时
① 把 TUNE MODE 设定于 PRESET
② 旋转 TUNING/ENTER 以选出所要的预约电台。
要使用预约调谐时,请先预约好电台(参见“预约电台”)。
要关掉收音机时
请按 RADIO OFF。
要改善广播接收效果时D
- 收听 AM 节目时:请调转机器本身的方位。 - 收听 FM 节目时:若使用头戴耳机/耳机,请展开头戴耳机/耳机线(天线)。若使用扬声器,请拉出天线并调整其角度,或将头戴耳机/耳机连接到 MIC 插孔以获得最佳的接收效果。如果接收效果仍然很差,则调节 FM MODE。
注
注
| 如果转动时用力过大,可能会使天线受到损坏。 |
预约电台
您最多可以预调 30 个电台-FM 20 个,AM 10 个(在 JPn 地区 ^* ,最多 16 个电台-FM 和 AM 各 8 个)。
* 若有所限,请参见“接收国外电台”。
自动预约存储所扫描的电台
1 把 TUNE MODE 设定于 PRESET。
2 按 FM 或 AM。
3 按 TUNING/ENTER 2 秒以上。
当前预约号及频段数字将闪烁3次。
预约号 1 将在显示屏上闪烁。Walkman 开始从低频段扫描电台,在接收到电台时停止约 5 秒钟。
4 如果您要预约接收到的电台,在预约号闪烁时按 TUNING/ENTER 键。
接收到的电台被预约于预约号 1,本机开始扫描下一个可接收的电台。
5 重复步骤 4 直至所有可接收电台均被预约。
要停止扫描时
请按 RADIO OFF。收音机将同时关掉电源
2
| ·如果已储存有电台,则当做完上面程序时,新预约电台将取代旧存有的电台。 |
- 如果电台不能自动预约,请用手动预约电台
手动储存广播电台
1 把 TUNE MODE 设定于 PRESET。
2 按 EM 或 AM
按PM或HM
3 旋转 TUNING/ENTER 以选择所要的预约号。
4 按 TUNING/ENTER,预约号将在显示屏上闪烁。
5 转动 TUNING/ENTER 调入想要收听的电台。
6. 显示展闪烁时按 TUNING/ENTER
- 显示听网源时按 TUNING/ENTER
注
| 如果该预约号上已储存有电台,则新的预约电台将取代旧存的电台。 |
扫描预约电台 - DAPS (Digital Auto Preset Scanning)
1 将 TUNE MODE 设置为 PRESET。
2 按 FM 或 AM。
3 按在步骤 2 里按住 FM 或 AM 两秒或以上。
所选波段的预约电台即各播放大约 5 秒。(在 DAPS 当中,显示窗中将闪烁着指示灯。)
4 当播放着所要预约电台时,再按一次 FM 或 AM 以选择电台。
注
| ·在步骤3或4里,如果您选择了在步骤2中并没有利用按FM或AM选择过的波段,新选波段即将以正常模式播放。 |
- 步骤3里的DAPS功能将继续打开着一直到在步骤4里已选择了电台为止。
接收国外电台
(欧洲、沙地阿拉伯和中国型号除外)
1 按 RADIO OFF 关掉收音机。
2 按住 FM 直到 “Eur”、“USA” 或 “JPn” 在显示屏上闪烁为止。
3 转动 TUNING/ENTER 以选择 “Eur”、“USA” 或 “JPn”,然后按 TUNING/ENTER。
4 如有必要,请按照 “收听音机” 和 “预约电台” 中所述的步骤,调入并储存要收听的电台。
i
| 如果未预约任何区域,预约号仍将保留以前的设置 |
使用前须注意
关于电池
- 干电池不要同钱币或其它金属物件放在一起。如果金属物件偶尔接触电池的正极与负极,就会发热。
- 如果 Walkman(本机)长期不用,请取出电池以免本机因电池漏液、腐蚀而受损。
:
| 不要将本机放在靠近热源或受阳光直射、多尘、多沙、潮湿、雨淋、机械振动的地方,也不要留在车窗关闭的车内。 |
- 请不要使用90分钟以上长度的磁带,这些磁带很薄,容易被拉伸。这可能导致本机故障或音质变差。
- 本机在高温(40℃以上)或低温(0℃以下)条件下使用,液晶显示窗很难看清楚或者显示速度放慢。在室温下,显示窗可恢复到正常操作状况。
- 如果本机长期未用,在重新开始使用前,请将其设于播放模式加温几分钟。
- 请将使用磁编码的个人信用卡或发条式钟表等远离本机放置,以防被扬声器中使用的磁铁损坏。
关于头戴耳机/耳机
路上安全
驾车、骑自行车、摩托车辆时不要使用头戴耳机/耳机,这可能导致交通事故且在有些地区是违法的。走路特别是穿越马路时用头戴耳机/耳机大音量听也是有潜在危险的。
在有潜在危险的场合应格外小心,或者停止使用本机
防止听力受损
不要大音量使用头戴耳机/耳机。听力专家反对持续、大音量收听。如果有耳鸣经验,请降低音量或不连续使用。
关心他人
| 请用适当音量收听。这样则既可同时听到外面声音,也不骚扰您周围人们的安宁。 |
关于维护
- 每使用 10 个小时,即用棉棒和商用清洁液清洁一下磁头和磁带通道。
- 清洁外壳用稍蘸些水的软布。不要用酒精、汽油或稀释剂
- 定期清洁头戴耳机/耳机的插头。
-
故障探寻
播放速度太快/太慢
播放声失真。
- 把 REC TIME/PLAY MODE 设定于与该磁带录音时的相同位置。
显示和操作不正常
- 取出电池,让本机10分钟或更长时间处于没有电池的状态,然后再插入电池。此时,都须重新预约电台,因为预约电台已从存储器中抹除。
即便在录音带尾端松开FF/CUE或REW/REVIEW键,播放也无法自动开始。
- 要重新开始播放,按 ■ S
[Non-Text]
| 2017 | 2016 | |
| Cost of sales | 3.4 | 3.5 |
| Gross margin | 1.9% | 1.8% |
[Non-Text]
| 2017 | 2016 | |
| Cost of sales | 3.4 | 3.5 |
| Gross margin | 1.9% | 1.8% |
[Non-Text]
[Non-Text]
[Non-Text]
| 2017 | 2016 | |
| Cost of sales | 3.4 | 3.5 |
| Gross margin | 1.9% | 1.8% |
[Non-Text]
| Year Ended December 31, | ||
| 2018 | 2017 | |
| Revenues | 1,465 | 1,394 |
| Costs and expenses | (1,028) | (1,028) |
[Non-Text]
| 2017 | 2016 | |
| Cost of sales | 3.4 | 3.5 |
| Gross margin | 1.9% | 1.8% |
[Non-Text]
| 2017 | 2016 | |
| Costs per share: | ||
| Cost of sales | 0.45 | 0.43 |
| Rate of sales | 3.9% | 3.8% |
[Non-Text]
| 2017 | 2016 | |
| Cost of sales | 3.4 | 3.5 |
| Gross margin | 1.9% | 1.8% |
[Non-Text]
| 2017 | 2016 | |
| Costs per share: | ||
| Cost of sales | 0.45 | 0.43 |
| Rate of sales | 3.9% | 3.8% |
[Non-Text]
| 2017 | 2016 | |
| Cost of sales | 3.4 | 3.5 |
| Gross margin | 1.9% | 1.8% |
[Non-Text]
| Year Ended December 31, | ||
| 2018 | 2017 | |
| Revenues | 1,465 | 1,394 |
| Costs and expenses | (1,028) | (1,008) |
| Net income | 1,465 | 1,394 |