
WM-FX653 - Radio cassette portable SONY - Notice d'utilisation et mode d'emploi gratuit
Retrouvez gratuitement la notice de l'appareil WM-FX653 SONY au format PDF.

| Type de produit | Radio cassette portable |
| Marque | Sony |
| Modèle | WM-FX653 |
| Dimensions (L x H x P) | Environ 109 x 83 x 25,9 mm |
| Poids (sans piles ni cassette) | Environ 145 g |
| Alimentation | 1 pile R6 (AA) ou batterie rechargeable Ni-Cd NC-6WM |
| Autonomie (lecture cassette, pile alcaline) | Environ 29 heures |
| Autonomie (radio FM, pile alcaline) | Environ 30 heures |
| Gammes radio | FM 87,5-108 MHz / AM 531-1602 kHz |
| Mémoire radio | 16 stations FM + 8 stations AM (Auto Memory Scanning) |
| Fonctions cassette | Lecture automatique, AMS (détection de plage), répétition, BL SKIP, arrêt automatique |
| Égaliseur | MEGA BASS (MB) et GROOVE (GRV), réglable via menu LCD |
| Réduction de bruit | Dolby NR (activé via menu) |
| Télécommande | Oui, avec micro-prise (pour FX653) |
| Affichage | LCD avec menu (fréquence, mode, etc.) |
| Protection auditive | AVLS (limiteur de volume automatique) |
| Verrouillage | Fonction HOLD sur l'appareil et la télécommande |
| Nettoyage des têtes | Utiliser une cassette de nettoyage CHK-1 toutes les 10 heures |
| Nettoyage extérieur | Chiffon doux légèrement humide, pas d'alcool ni solvant |
| Accessoires fournis | Pile alcaline? (non fournie), chargeur, batterie rechargeable, étui, pince, télécommande avec écouteurs |
| Réparabilité | Pièces détachées non spécifiées ; entretien par professionnel recommandé |
FOIRE AUX QUESTIONS - WM-FX653 SONY
Questions des utilisateurs sur WM-FX653 SONY
0 question sur cet appareil. Repondez a celles que vous connaissez ou posez la votre.
Poser une nouvelle question sur cet appareil
Téléchargez la notice de votre Radio cassette portable au format PDF gratuitement ! Retrouvez votre notice WM-FX653 - SONY et reprennez votre appareil électronique en main. Sur cette page sont publiés tous les documents nécessaires à l'utilisation de votre appareil WM-FX653 de la marque SONY.
MODE D'EMPLOI WM-FX653 SONY
Radio Cassette Player
Operating Instructions
Istruzioni per I'uso
WM-FX655/FX653/FX651

WALKMAN is a registered trademark of Sony Corporation .WALKMAN é un marcho registrato della Sony Corporation
Sony Corporation © 1997 Printed in Japan

(This mark is valid for Russian version of WM-EX655 only.)
(Questo marchio é valido solo per la versione russa del WM-FX655.
WARNING
To prevent fire or shock hazard, do not expose the unit to rain or moisture.
ATTENZIONE
Per evitare incendi o scosse elettriche, non esporre l'apparecchio alla pioggia o all'umidita.
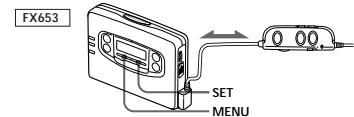
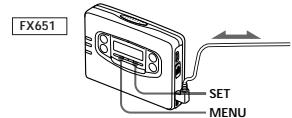
The instructions in this manual are for WM-FX655, WM-FX653 and WM-FX651. Before you start reading, check your model number. WM-FX655 is the model used for illustration purposes. Any differences in operation are clearly indicated in the text, for example, "FX655 only".
Le struzioni inizio房贷 sono per il WM-FX655, il WM-FX653 e il WM-FX651. Prima di建立起 la detrolla controllable il numero del modello acquistato. Il WM-FX655 e il modello usato per le illustrazioni. Eventuali differenze nel funzionamento sono indicate chiaramente nel testo, ad esempio con "solo FX655".


FX653
FX651


Other models
Modellperi I Regno Unito e l'Australia


a

《


FX655/FX65

1
Welcome!
Thank you for purchasing the Sony WM-FX655/FX653/FX651 Radio Cassette Player
Some features are:
-
You can enjoy low bass sounds by the powerful headphone.
-
You can choose from 2 different emphasizing tones: MB (MEGA BASS) and GRV (GROOVE) to adjust to your favorite sound.
-
LCD Menu function that lets you select and switch functions in the display window of the main unit.
-
Auto Memory Scanning function that lets you store and recall up to 16 stations for FM and 8 stations for AM automatically.
-
AMS (Automatic Music Sensor) function that searches the beginning of the current and 2 previous tracks, and succeeding 3 tracks at high speed.
-
Useful remote control (FX655/ FX653 only).
Getting Started
Preparing a Power Source
Choose one of the three power sources below: dry battery, rechargeable battery, and mains.
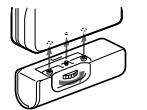
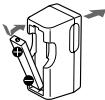
Dry Battery (see Fig. A-⑧)
1 Attach the supplied battery case.
- Use the Sony NC-6WM rechargeable battery only with the supplied battery; otherwise, with the separately sold battery charger for Sony NC-6WM.
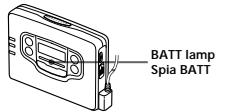
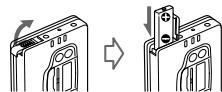
When to replace the battery (see Fig. A-9) Replace the battery with a new one
when the BATT lamp dims. The battery charger and the Battery life (Approx. hours) rechargeable battery may become warm during charging, but it is not a problem.
Tape playback 29 8 Radio reception 30 8 Note
depe unit
For maximum performance we recommend that you use an alkaline battery.
Notes
-
Do not charge a dry battery.
-
When you are not going to use your Walkman for a long time, remove the battery to prevent damage from battery leakage and corrosion.
2 Plug in the charger to the mains.
UK and Australia model: Full charging takes about 3.5 hours, European Continent, Russia, and Arabian models: Full charging takes about 2.5 hours. Korean model: The full charging time depends on the
voltage of your mains.
110 V: 10 hours
220 V: 2.5 hours
Other models: The full
charging time depends on the voltage of your mains.
120 V: 10 hours
220-240 V: 2.5 hours
If the plug does not fit your mains, attach the supplied AC plug adaptor.
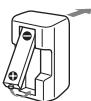
3 Insert the fully charged battery into the rechargeable battery compartment (see Fig. A ⑥).
When to charge the battery (see Fig. A-⑥)
Charge the battery when the BATT lamp dims. You can charge the battery about 300 times.
Battery life (Approx. hours) Rechargeable battery (NC-6WM) Tape playback 8
36 (with Sony)
alkaline LR6 (SG)
Radio reception 9
37 (with Sony)
alkaline LR6 (SG)
Notes
-
Do not tear off the film on the rechargeable battery.
-
Use the Sony NC-6WM rechargeable battery only with the supplied battery charger or with the sold in-line battery charger for the Sony NC-6WM.
-
Remove the charger unit from the wall outlet as soon as possible after the rechargeable battery has been charged. This may damage the rechargeable battery.
-
The battery charger and the rechargeable battery may become warm during charging, but it is not problem.
-
Be sure not to short-circuit the battery. When you carry it with you, use the supplied carrying case. If you do not use the carrying case, do not carry with other metallic objects such as keys in your pocket.
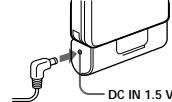
House Current (mains) (see Fig. A-0)
Remove the rechargeable battery if inserted and attach the battery case. Connect the AC power adaptor AC E15HG (not supplied) to the DC IN 1.5V of the battery case and to the mains. Do not use any other AC power adaptor.

Polarity of
the plug.
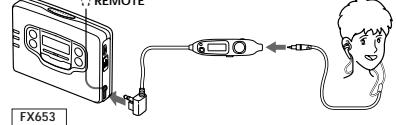
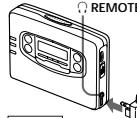
Connecting the
Headphones
(see Fig. B-α)
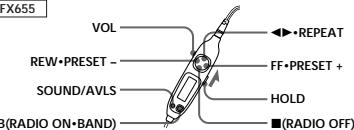
1 Connect the micro plug firmly to the remote control. (FX655 only)
2 Connect the remote control to REMOTE (FX655/FX653 only).
Connect the headphones to REMOTE (FX651 only).
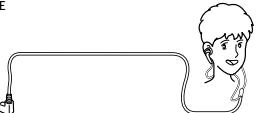
You can put the longer.
headphone cord behind you. neck.
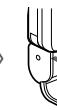
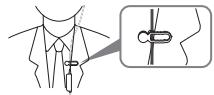
To use the supplied clip (FX655/FX653 only) (see F B-0)
Position the headphones cord
through the guides on the supplies and equipment . Fasten the clip to your clothes .
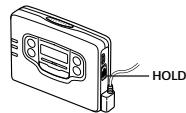
Releasing HOLD
(see Fig. 6)
The HOLD function locks the Walkman to prevent from operatin-
button. If the Walkman is locked, unlock it before operating.
1 Slide HOLLOW to the opposite direction of the arrow.
To lock the Walkman
Slide HOLD in the direction of the arrow.
To lock and unlock the remote control (FX655/FX65 only)
See "Using the remote control".
Operating the Walkman
Playing a Tape
(see Fig. D-⑧)
The Auto Tape Selector automatically selects the tape (normal (TYPE I), CrO_2 (TYPE II) or metal (TYPE IV) for playback.
1 Insert a cassette.
2 Press REPEAT to start playing then adjust the volume If the headphones do not fit to your ears or the sound is unbalanced, turn round the headphones a little to fit to your ears firmly.
When adjusting the volume on the Walkman (FX655/FX653 only) Set the VOL control on the remote control at maximum.
When adjusting the volume on the remote control (FX655/FX653 only)
Set the VOLUME control on the Walkman to around 6.
| To | Press (see Fig. D-⑧) |
play the other side REPEAT
during playback stop playback ■ (stop)
fast forward FF-AMS during stewind REW+AN during st
repeat the track REPEAT you are listening to for two second (Repeat Single or more during Track function) playback
18 step 3 single repeat, press it again.
find the beginning FF*AMS once, of the next track/ repeatedly succeeding 3 tracks during (AMS') playback
find the beginning of the current track/ previous 2 tracks (AMS) during
playback
from the beginning for two (Rewind Auto seconds or Play function) more during
stop play the other side FF-AMS for two from the beginning seconds or more during stop (Skip Reverse function)
- Automatic Music Sensor
Note on Beeps during AMS operations
- The beeps differ in relation to the track number being searched. When the track number is 0, the beeps are
tracks during AMS operations, beeps * - - - (beep followed by three long beeps) are emitted repeatedly. Likewise, when finding
the beginning of the previous 2 tracks,beeps"·--"are emitted repeatedly. While the remaining
long beeps are reduced accordingly.
To skip a long blank space between musics. (BL SKIP* function) (see Fig. D-⑤)
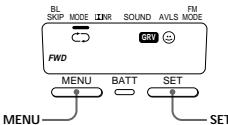
Press MENU repeatedly to set the cursor to BL SKIP in the display. Then press SET to show "ON".
- The Walkman fast forwards the tape to the next track if there is a blank space longer than 12 seconds.
To select playback mode (see Fig. D.
Press MENU repeatedly to set the cursor to MODE in the display. Then press SET to select the desired mode.
| To play | Select |
| Both sides repeatedly | → |
| Both sides once | → |
from the side facing the cassette holder
Note on AMS, REPEAT Single Track and BL SKIP
- To operate the AMS and the REPEAT Single Track functions, you need a blank of 4 seconds or longer between the tracks. For the BL Skype function, you need a blank of 12 seconds or longer. Therefore, if there is noise between the tracks, these functions will not detect the blank and will not operate. Likewise, if the recording level is moderately low within a track, these functions may inaccurately operate.
To play a tape recorded with Dolby* NR system
(see Fig. D-⑥)
Press MENU repeatedly to set the cursor to NR (Dolby noise
reduction) in the display. Then press SET to show "ON".
- Dolby noise reduction manufactured under license from Dolby Inc.
Laboratories Licensing Corporation, "DOLBY" and the double-D symbol
Laboratories Licensing Corporation.
Si dlichiera che l'appreciere e s ètà fabricato in conformità all'art. 2
Comma I de D.M. 28.08.1995 n. 548.
Benvenuti!
Grazie per ave acquistato il teletore di nasti con radio Sony.
WM-FX655/FX653/FX651
Alcune caratteristica son
-
Possibilità di ascottare i suihi dei bassi profondi grazie alle cuffe potenti.
-
E possile scegliare tra 2 diversei toni di enfatizzazione: MB (MEGA BASS) e GRV (GROOVE), per
regolare il suo come preferito.
- Funzione di menu LCD che permette di selezione e commutare funzioni sul display dell'apprecchio.
-
Funzione di scorrimento automatico memoriale cheffi di memorizzare e richiamare forn a 16 stazioni FM e 8 stationsi AM automaticamente.
-
Funzione AMS (sensore musica automatico) che cera l'inizio del brano attuale e di 2 precedenti o dei 3 brani successivi ad alta velocità.
-
Utile telecomando (solo FX655/ FX653).
Preparativi
Preparazione della
fonte di
alimentazione
Scegliere una delle segmentei font di alimentazione: pila a seco, pila ricariable e corrente domestica.
Pila a secco
(vedere la fig. A-@)
1 Applicare il portapila in dotazione.
2 Aprire il coperchio del compato pila e inserire una pila tipo R6 (formato AA) (non in dotazione) come miglior'ell'illustrazione di quello manuale.
Quando sostituire lapla (vede la fig. A-⑤)
Sostitutire la pila con unaltra nuovawhen la spia BATT si affelevisce.
Dunipale du pila si a
Durata della pila (oro circa) Alcalina Sony SRL&SG (SR)
| Riproduzione di nastri | 29 | 8 |
| Ricezione radio | 30 | 8 |
Nota
- La durata delle pile può essere minore a seconda del modo di impiego dell'apparecchio.
Per il massimo delle prestazioni consigliamo l'impeggo di una pila alcalina.
Note
Non caricare la pila a secco.
- Quando n si usa I Walkman per un lungo periodo estrange la pila para evitare danni cosepati da perdite di flusce e la pila a risultante corrosionie.
Pila ricaricabile
(vedere la fig. A-
1 Inserire la pila ricaricable (NC 6WM) nel caricapile con la corretta polarita.
2 Collegei the caricapile alla presa di corrente.
Modello per il Regno Unito e l'Australia: La carica completa richiede circa 3,5 ore.
Modelli per il continente europeo, la Russia e l'Arabia La carica completingiche circa 2,5 ore.
Modellopara the Core: Il tempo per la carica completing dipende alla tensione della rete di alimentazione.
110 V: 10 ore
220 V: 2,5 ore
Altri modelli: Il tempo di caro
completa dipende alla
tensione della rete elettrica.
120 V: 10 ore
220-240 V: 2.5 ore
Se la spina del caricatore non
corresponds to a protein, such as 1,4-diolester per spinala CA in dotazone.
3 Insertre la pila completeness carica nel compasto pila ricaricabile (vedere la fig. A@).
Quando caricare la pila (vedere la fig. A-b)
Caricare la pila quando la spi BATT si affievolisce. E possible caricare la pila circa 300 volta.
Duralla della pila (ore circa) Pila ricaricabile (NC-6WM)
Riproduzione di
36 (con pila)
alcalina Son
LR6 (SG))
Ricejone radio
37 (con pila)
alcalina Son
LR6 (SG))
Note
- Non rimuovere la pellicola di plastica della pila ricarcabile.
- Usare la pila ricarcabile Sony NC-6WM solo con il caricapire in
dotation o con il caricaple in vengi a partamento per la Sory NC-6WM.
Rimuovere il caricapie alla presa di corrente il prima possibile dopo che la pila ricaricabile è stata caricata. Una carica excessiva po danneggiate la pila ricaricabile.
-
Il caricapile e la pila ricarcabile possono riscaldarsi durante la carica ma quello non è indic di problemi
-
Assicurarsi di non corticulare la pila. Quando la si porta se,
inserlora nella custodia di trasporto in dotazione. Se non si usa la custodia, e lo non ha l'ore nene la piola insieme ad和其他 oggetti metallici come le chilvi in tasca.
Corrente domestica
(vedere la fig. A-⑥)
Estrarre la pila ricariable se inserte e applice el portapila. Collegare il trasformatore CA AC-E15HG (non in Dotazione) alla pres DC IN 1.5V del portapila e alla presa di corrente. Non usare alcun altra trasformatore CA.

Collegamento delle cuffie
(vedere la fig. B-@)
1 Collegare saldamente la microspina al telecomando. (solo FX655)
2 Collegare il telecomando a REMOTE. (solo FX655/ FX653).
Collegare le cuffe a © REMOTE. (solo FX651)
É possible far passée filo cuffe pù lungo dietro il collo.
Uso del gancio in dotazione (solo FX655/FX653) (vedere la fig. 8-9b)
Far passare il filo delle cuffine nelle guide sul gancio in dotazione come illustrato. Fissare il gancio agli abiti

La funzione HOLD blocka il Walkman per etivating che si attivato quando si preme accidentamente un taso. Se il Walkman è blocatto, sblocarla prima di farne uso.
1 Spostare HOLD in direzione opposata alla franca.
Per bloccare il Walkman
Spostare HOLD in direzione della freccia.
Per bloccare e sbloccare il telecomando (solo FX655/ FX653)
Vedere "Uso del telecomando"
>Uso del Walkman
Riproduzione di nastri
(vedere la fig. D-8)
Il selettore del tipo di nastro sceglie automaticamente il nastro (normale (ippo I), al cromo (nome II) o al metallo (chio IV)) per la riproduzione.
2 Premen
avviare la riproduzione e\ quindi regolar il volume. Se gli auricolari delle cuffe non\ s adattano bene alla orecchio e\ se lo suono e sbilanciato, girare\ leggermente gli auricolari in\ como che entrino bene nelle orecchio.
Quando si regola il volume su Walkman (solo FK655/FX653) Regolare il dato VOLU del telecomando sul massimo.
Quando s regola il volume sul telecomando (solo FX655/FX653) Regolare i comando VOLUME del Walkman su circa 6.
| Per | Premiere (vedere la fig. D. B) |
| riproduire l'altra | → REPEAT |
facciata durante la
riproduzione
interrompere la (arresto)
riproduzione
avanzare FF*AMS durante il modulo di arresto
ravilgore REV*AMS durante il modulo di arresto
ripeITEIbrano REPEAT per che sta due secondi o più durante la (funzione di ripetizione Per interrampere la ripetizione di un singolo brano, premere di nuove il
travore l'initio FF-AMSuna del brano volta/ trancamente brani successivi duringa la riproduzione (AMS*)
trocire l'initio REW*AMSuna de Ibral attitude/ volta/ (AMS) ripidamente ririduesa la copertura de la stessaREW*AMS per faccata dl'initio que secondi o più
(unizibile di imodo di arresto)
riproduzione automatica con riavolmente (oggetto)
riproduzione l'altra faccata dl'innizio (funzione di salute con Inversione) FF*AMS per due secondi o più in modo di arresto
- Sensore musicale automatico
Note sui segnali acustici durante le operazioni AMS
- I segnali acustici differiscono a seconda numero di brani cercato. Mentre viene localizzato I'nizio del
3 brani successivi con le operazioni AMS, sono emessi ripetutamente segnali acustici - - - (un bilp seguito da tre bis luigi). In modo analogolo, quando viene localizzato I inizio del 2 brani precedenti sono emessi ripetutamente segnali acustici - - - . Via via che il numero di brani riamentati cala, il numero di bis luigi cala in modo correspondiente.
Per saltare gli spazi vuoti tra
i brani (funzione BL SKIP*) (vedera la fig. ②)
Premiere ripetutamente MENU per spostare il cursor se BL SKIP sul display e quando premente SET per visualizzare "ON".
- Il Walkman fa vanzare\ rapidamente il nastro flato al brano\ successivo se e uno spazio vuoto di\ duratura superiore a 12 secondi.
Selezione del modo di coproduzione
(vedere la fig. ①)
Premiere ripetutamente MENU per spostare il cursor su MODE sul
display. Quindi premiere SET per selezione il modo desiderato.
| Per riproduire | Selezionare |
| Entrambe le facciate ripetutamente | © |
Entrambe le facciate una volta a partir della faccata rivolta alla compatto cassetta
Note sull AMs, la ripetizione di un singnozano br e SL KIP
Per usare les fonctions AMs e di reripetizione di un singolo brano, sono necessari spazi vuoti di 4 secondi o più tra i brani. Para la funzione BL SKIP sono necessari spazi vuoti di 12 secondi o più. Se quand ci eurre morno lo spazio tra i brani queste fioni non individuo lo spazio vuoti e non si attivano. In modo analogo, se il livello di registrazione è
relativamente basso all' Interno di un brano, queste funzioni possoattovii erroneamente.
Per riproduire nastri registati con il sister
Dabry* NR (vedere la fig. 1-9)
Premiere ripetutamente MENU per spostare il Curseiore sU NR (riduzione del rumore Dolby) sul display. Quindi premere SET per visualizzare "ON".
- Dispositivo Dolby di riduzione del rumore fabbricato su licenza della Dolby Laboratories Licensing Corporation.
DOLBY e il sbimento della doppiia DDI, Italy
Laboratories Licensing Corporation.
(turn over)

Listening to the
Radio (see Fig. E-8)
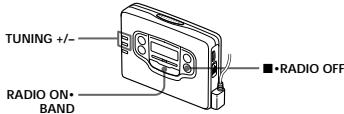
1 Press RADIO ON·BAND to turn on the radio.
2 Press RADIO ON + BAND repeatedly to select AM or FM
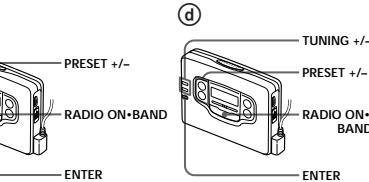
3 Press TUNING + / - to tune in to the desired station. If you keep pressing TUNING + / - for a few seconds, the Walkman will start tuning to the stations automatically.
To turn off the radio Press · RADIO OFF.
To improve the broadcast reception
- For AM: The Walkman has built-in antenna. Reorient the Walkman horizontally to obtain optimum AM reception. For FM (see Fig. 1b): Extend the cord of the remote control, the aerial (FX855/FX853 only). Extend the headphones cord, the aerial (FX851 only). If the reception is still not good, press MENU repeatedly to set the cursor to FM MODE in the display. Then press SET to choose from MONO (monaural), LOCAL or none (stereo) mode for best reception.
Note
- Do not remove the power sources while listening to the radio, or the radio is turned off.
12x - 1 = 32x + 5
Presetting Radio Stations
Once you store your favorite stations in memory, you can tune them easily. You can preset up to 16 stations for FM and 8 stations for AM.
Tuning in to and Storing Radio Stations
Automatically (AutoMemory Scanning
function) (see Fig. E-
1 Press RADIO ON·BAND to turn on the radio.
2 Press RADIO ON+BAND repeatedly to select AM or FM.
3 Press ENTER until "A" appears in the display.
The Walkman starts searching and storing stations.
4 After the preset number appears, tune in to a stationary using PRESET + / -
Storing Radio Stations
Manually (Manual-)
Memory function) (see Fig. 8-9)
You can preset the stations in any order.
1 Turn on the radio and select the desired band.
2 Press ENTER. The frequency digits and a preset number flash in the display.
3 While the frequency digits and the preset number are flashing, tune in to a station you wish to store using TUNING + / - ,and select a preset number using PRESET + / -
4 While the frequency digits and the preset number are flashing, press ENTER.
5 Tune in to a station using PRESET +/-
Note
- If you cannot complete step 3 or 4 when the indications are flashing, please use the
- If you present a new station to the same preset number, the previously presented station will be replaced.
To cancel the stored station Follow the procedure above and in step 3, instead of tuning in to a station, press and hold TUNING + until - - - - is displayed. Press ENTER while is flashing.
Using Other
Functions (see Fig. F)
Emphasizing Bass
each process, the indications To unlock, slide HOLD so that change as follows. the yellow HOLD indicator is MB (MEGA BASS):emphasizes hidden.
1 Press MENU repeatedly to set the cursor to SOUND in the display. Then press SET to the image.
GRV(GROOVE)emphasizesdeeper bass sound No message: off (normal)
For FX655
When using the remote control, see "Using the remote control".
Note
- If the sound is distorted with the mode "GRV", select the mode "MB" or no message.
Protecting Your Hearing (AVLS)
When you set the AVLS (Automatic Volume Limiter System) function to on, the maximum volume is kept down to protect your ears.
1 Press MENU repeatedly to set the cursor to AVLS in the display. Then press SET to show " "
For FX655
When using the remote control, see "Using the remote control". Notes
- If the sound is distorted when you listen to the bass-boosted sound with the AVLS function, turn down the volume.
- The setting is stored as long as the battery is not replaced. Using the Remote
(20
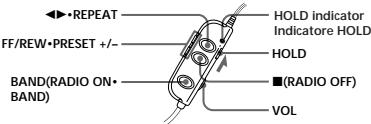
(FA655/FA653 only) (see Fig. 6)
All buttons on the remote control unless otherwise noted below function identically to those corresponding on the main unit. Read the direction for your model.
To lock the buttons For FX655
1 Slide HOLD in the direction of the arrow.
When you press any button "Hold" appears in the display.
To unlock, slide HOLD in the opposite direction of the arrow.
For FX653
1 Slide HOLD so that the HOLD indicator turns yellow.
To unlock, slide HOLD so that the yellow HOLD indicator is hidden.
Using SOUND (FX655 only) Press SOUND/AVLS to select the
desired mode. With each press, the indications in the display changes as follows:
MB:emphasizes bass sound GRV:emphasizes deeper bas sound No message:off (normal)
Using AVLS (FX655 only)
Press and hold SOUND/AVLS for two seconds or more. "⑥" appears in the display.
To cancel, press and hold SOUND/ AVLS for two seconds or more again.
Additional Information
Precautions
On rechargeable battery and charger
- If the rechargeable battery is new or has not been used for a long time, it may not be charged completely until you use it several times.
- The nameplate indicating the operating voltage, power consumption, etc. is located on the bottom exterior of the battery charger.
18 × 20
On batteries
Do not carry the dry or rechargeable batteries with coins or other metallic objects. It can generate heat if the positive and negative terminals of the batteries are accidentally contacted by a metallic object.
On the unit
- Do not drop the unit or give a shock to the unit, or it may cause a malfunction.
Do not leave the unit in a location near heat sources, or in a place subject to direct sunlight, excessive dust or sand, moisture, rain, mechanical shock, or in a car with its windows closed.
- If the unit has not been used for long, set it in the playback mode and warm it up for a few minutes before inserting a tape.
On tapes longer than 90 minutes
We do not recommend the use of tapes longer than 90 minutes except for a long continuous playback. They are very thin and tend to be stretched easily.
On the remote control (FX655/FX653 only)
Use the supplied remote control only for each unit.
On headphones
Road safety
Do not use headphones while
driving, cycling, or operating any motorized vehicle. It may create a traffic hazard and is illegal in some areas. It can also be potentially dangerous to play your headsets at a high volume while walking.
especially at pedestrian crossings. You should exercise extreme caution or discontinue use in potentially hazardous situations.
Preventing hearing damage Do not use headphones at high volume. Hearing experts advi against continuous, loud and extended play. If you experience ringing in your ears, reduce v or discontinue use.
Caring for others
Keep the volume at a moderate level. This will allow you to hear outside sounds and to be considerate to the people around you.
Maintenance
To clean the tape head and path
Use the cleaning cassette CHK-1 (not supplied) every 10 hours of
use.
- Use only the recommended cleanig cassette.
To clean the exterior
Use a soft cloth slightly moistened with water. Do not use alcohol, benzine or thinner.
Note
- Clean the headphones plug periodically.
12 =
Troubleshooting
The cassette holder does not open.
-
If the tape is playing, stop and then slide OPEN.
-
This condition may occur when you remove the power sources during playback, or when you exhausted dry or rechargeable battery. Set the power sources again or replace the exhausted battery with new one.
The volume is not turned up.
If ^ appears for AVLS display, press SET so that ^ disappears
The tape fast forwards by itse during playback.
If "ON" appears for BL SKIP display, press SET so that "ON" disappears.
The display on the remote control is not normal (FX655 only).
Disconnect the remote control from the Walkman, then connect it again.
Specifications
Radio section
Frequency range
FM:87.5-108MHz
AM:531-1,602kHz
Tape section
Frequency response (Dolby NR off)
Playback: 20 - 18,000 F Output
Headphones (f, REMOTE jack) Load impedance 8 - 300 ohms Power output 4mW + 4mW (16 ohms).
General
Power requirement
Rechargeable battery One R6 (size AA) battery
Dimensions (W/H)
Approx. 109x / 830x≥ 25.9mm (Fig. 1). The CO_2 was measured by projecting parts and controls
Mass Approx. 145g FX655:Approx rechargeable
headphones with remote control
FX651: Approx. 235 g (8.3 oz) incl. rechargeable battery, headphones with remote control and cassette
Fx651: Approx
rechargeable
Rechargeable
Supplied accessor
Battery case (1)
Stereo headphones with remote control. (1) (FY655/ FY653).
Stereo headphones (1) FX651)
Clip. (1) FX655/FX653).
Battery charger (1) Rechargeable battery (NC-6WM)
1.2 V, 600 mAh, Ni-Cd) (1)
Rechargeable battery carrying case (1)
Carrying pouch
Design and specifications are subject to change without notice.
m - 1 0 ;
A
1
MELX71=HIX113
A. 2011 1.11
1
111
(1)
1
m - 1 0 ;
18
m - 1 0 ;
当 m = 32 且 m 1 时方程有两个实数根;
2018年1月
1
(2)
2.1.1
(二)现场会议召开时间
( xt^2 - x) a + bt^2 = 4| 8y|
(20
- 61
- 61
- 61
A
(1)
10.2018年1月1日
1
( xt^2 - x) t + xy^2 = - ( x) f^
(1)
AD = AC = 1 = x,y,h,z
2023年1月16日
6.2019年3月5日
.
(1)
A
1 + u7 = 4.8
A
…
A.
1. 3.5mm
(1)
AD = AC = 1 = x( 0 < x < 1)
(1)
AD = AC = 1 = x,y,h,z
2023年1月16日
(1)
(1)
(1)
B. b 管的结果