
DVS 673 - Hotte aspirante TEKA - Notice d'utilisation et mode d'emploi gratuit
Retrouvez gratuitement la notice de l'appareil DVS 673 TEKA au format PDF.

| Intitulé | Valeur / Description |
|---|---|
| Type de produit | Hotte de cuisine |
| Dimensions approximatives | 60 cm de largeur |
| Poids | Environ 10 kg |
| Alimentation électrique | 220-240 V, 50 Hz |
| Puissance | 200 W |
| Débit d'air | 450 m³/h |
| Niveaux de vitesse | 3 niveaux de vitesse |
| Fonctions principales | Extraction et filtration des odeurs, éclairage LED |
| Entretien et nettoyage | Filtres lavables au lave-vaisselle, nettoyage régulier recommandé |
| Pièces détachées et réparabilité | Disponibilité de pièces de rechange via le service client TEKA |
| Normes de sécurité | Conforme aux normes CE, protection contre les surcharges électriques |
| Compatibilités | Compatible avec les cuisines modernes et traditionnelles |
| Garantie | 2 ans |
FOIRE AUX QUESTIONS - DVS 673 TEKA
Questions des utilisateurs sur DVS 673 TEKA
0 question sur cet appareil. Repondez a celles que vous connaissez ou posez la votre.
Poser une nouvelle question sur cet appareil
Téléchargez la notice de votre Hotte aspirante au format PDF gratuitement ! Retrouvez votre notice DVS 673 - TEKA et reprennez votre appareil électronique en main. Sur cette page sont publiés tous les documents nécessaires à l'utilisation de votre appareil DVS 673 de la marque TEKA.
MODE D'EMPLOI DVS 673 TEKA
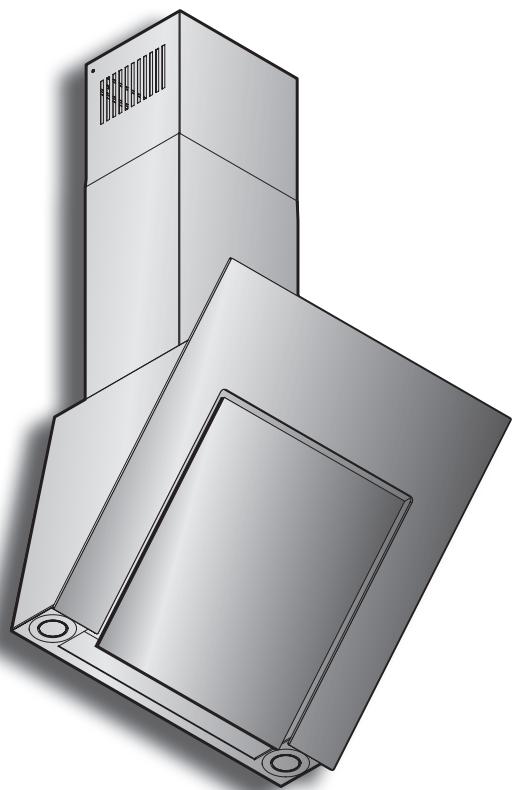
DVS 983 BK/WH
DVS 673 BK/WH


INSTRUKCJA OBSLUGI
Przy przyprzejowadzaniu instalacji urzadzenia na-lezy postepować wedlug wskazówek podanych w niniejszej instrukcji. Producent uchyla sie od wzelskiej odpowedzialnosci za uszkodzenia winikte na skutek instalacji niedgodnej z informacjami podanymi w niniejszej instrukcji. Okap zostal zaprojektowy wyłacznie do uzytku domowego. OkapMZo roznic sie pod wzgludem wygladu od okapu przyzdawionego na rysunkach niniejszej instrukcji, ale zalecenia dotyczace obligu konserwaczij montaizu pozostaja niezmienione.
! Naleź zachować instrukcję obstrugi aby moc znej skorzystaec wkażdej chwili. W przypadku sprezaźury urzadzenia lub przypegowadzki, naleź upewnić sie, ze dołączono do noego instrukcję obstrugi.
! Uważnia zapoźnać są ztreścia instruktcj obłowigi, któ rostarcza dokladne informacja dotyczace instalacji, uzytkowania i pielegnacje urzadzenia.
! Nie dokonywac zmian elektrycznychczy mechanicznych w urzadzeniu lub na przewodach odpwadzajczych.
Uwaga: Elementy oznaczone symbolem “(*)” wchodź wylącznia w skład wybranych modeli, w pozostalych przypadkach powinny byc zakupione osobno.Nie podlaczać urzadzenia do sieci elektrycznej przyzed ukońceniem montaź.
OSTRZEŽENIA
! Przed wykonaniem jakiejkolwiek czynnosci czyszczenia lub konserwacci naleź odlączyc okap od zasilania, wyjmujac wtyczkre z gniażdka lub wyłuczaj glówny wyłȩcznik zasilania.
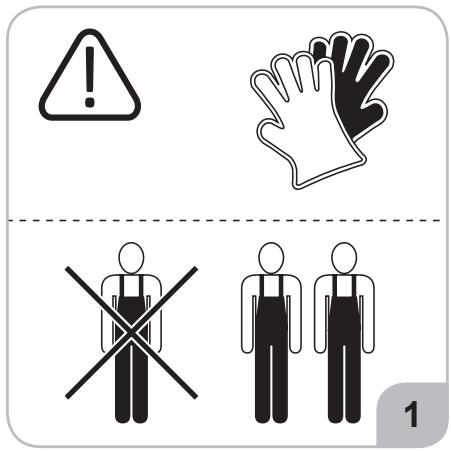
! Wszelkie czynnosci montażowe i konserwacyjne wykonywać w rekawicach ochronnych.
! Niniejszy sprzętMZebyc uzytkowynpzewdzieci w wieku co najmniej 8 lat przez osoby o obniżonych moziwościach fizycznych, umysłowychi osoby o braku dozwiedzenia i znajomość sprzetu, jejeli zapewniony zostanie nadźór lub instruktaż odnosnie do uzytkowania sprzetu w bezpieczny sposob, tak aby zwiazane z tym zagrożenia byly zrozumiale.
! Dzieci nie powinny bawić sie sprzętem.
! Dzieci bez nadzoru nie powinny wykonywaczyszczenia i konserwacje sprzetu.
! Nie naleźny nigdy uzywać okapu bez prawidłowo zamontowanych filtrów!
! Okap nie powinien byc NIGDY uzywany jako plaszczyzna oparcia, chyba ze taka mozliwość zostafa wyrażnie wskazana. Pomieszczenie, w ktorym okap jest uzywany sączne z innymi urzadzeniami spelajacymi gaz lub innate paliwo, powinno posiadać odpowiednia wentylacja.
! Zasysanegowietrne Nie powinno byc odpwadzane do kanalu wykorzystwyanego do odpwadzania spalin wytwarzanych przyez urzadzenia gazowe lub na innepaliwo. Surowo zabrania sie przygotowywania pod okapem potraw zuzyciem otwartego ognia (flambirowanie).
! Użycie otwartego ognia jest groźne dla filtrów i stwarza ryzyko pożaru, a zatem nie wolno togo robie pod zadnym pozorem. Podczas smażenia naleź zachownikostrożnosć, aby nie dopuścić do przyegrzanía oleju, aby nie ulegt samozapaleniu. Dosteptné czȩci moga ulec znacznemu nagrzaniu, jeźeli;będą uzywane razem z urzędeniami przyeznaczonymi do gotowania.
! W zakresie koniecznych do zastosowania srodków technicznych i bezpieczność wodysta dotycznych odpradowaziania spalin naleź scisle przystręgac przyepam yWDyanych przy bez kompetente wędze lokalne.
! Okap powinien byc czesto czyszczony zaröwno na zewnatrix jak i od wewnatrix (PRZYNAJMIEJ RAZ W MIESIACU, z zachowaniem wskazówek dotycznych konserwacci podanych w niniejszej instrukcj).
! Nieprzestrzeganie zasad dotyczych czyszczenia okapu oraz wymiani i czyszczenia filtrów powoduje powstanie zagrożenia poźarem.
! Celem uniknięcia porażenia pradem nie naleź y uzywać lub pozostawiać okapu bez prawidlowo zamontowanych zarówek. Producent nie ponosiźadnej odpowiedzialnosci za ewentualne szkody lub poźary spowodOWane przyżędzenia a winikajace z nieprzejstręgania zalecen podanych w niniejszej instrukcj.
! Niniejsze urzadzenie posiada oznaczenia zgodnie z Dyrektywa Unijna 2012/19/UE w sprawie zuzytego spreztu elektrycznégo i elektroniczngo (WEEE).
! Zapewniajac prawidowe złomowanie niniejszego urzadzenia, przyczynia sie Państwo do ograniczenia ryzyka wystapienia negatywnego wplywu produktu naŚrodowisko i zdrowie ludzi, ktoré mogłowby zaistnieć w przypadku niewlasci-wej utylizacja urzadzenia.

Symbol na urzadzeniu lub opakowaniu oznacza, ze tego produktu nie:noza traktować jak innych odpadów komunalnych. Naleź y oddać go do wlasciwo go punktu zbiórkì i recycl Klingu spreţów elektrycznych
i elektronicznych.
Własciwa uty Lizacja i złomawanie pomaga w eliminacji niedrzejnego wplywu zlokowanych urzadzen na srodowisko oraz zdrowie. Aby uzyskać szczegolowe dane dotyczze是不可能 sczy recykingu niniejskiego urzadzenia,NSEZY skontaktowej sie z lokalmnym urzedom miasta, sLUzbami oczyszczania miasta lub sklearnpem, w ktorym produkt zostar zakupiony.
OBSLUGA
Urzadzenie möglich uzywać jako wyciag (odpwadzanie oparów na zewnatrz) daßťo jako pochłaniacz (opary sa filtrwane i odpwadzane z powrotem do pomieszczenia). Modele okapów, któ nie posiadaj wentylatora wyciagowego, funkcionuja wyplażciejne;)不同程度 wyciagówym (nie zawartym w wyposzażeniu).
Wskazówki dotyczę podlączenia są dostarczane razem z zewétrznym urzadzeniem wymiagowym.
OKAP PRACUACY JAKO WYCIAG
Opary sa usuwane na zewnatrz ruradoprowadzajaca zamocowan do kolnierza laczeniowego.
Srednica rury odpradowazajacej musi
byc rowna srednicy kolnierza laccenio
wego.
Uwaga! Rura odpwadzajca nie jest dostarczona w komplecie z urzadzeniem i nalezy ja zakupic.
W częsci poziomej, rura musi miec lekka inklinacja do góry (około 10^ ), tak aby ułatwoć przyȩpyw powietrza na zew)natrz. Jesli okap jest zaopatrzony w filtrny wegrłowe, to musza one zostac zdjete.
Podlączyć okap do przywodu wencyjnego rur odpwadzajac o srednicy odpwiadajcej rozmiarowiy wylotu z okapu (koŋnierz ląceniowy).
Užycie przewodów o mniejszym przykroju powoduje zmniejszenie zdolnosci zasysania oraz drastyczne zwiekszenie hałasliwość okapu.
Producent, zatem, nie ponosiźadnej odpowiedzialnosci za ten stan.
Uzywacjaknajkrotszego przewodu.
! Uzywać przyzewodu o jak najmniejszej liczbie zagieć (maksymalny kát zagiecia: 90^ ).
! Unikać radykalnych zmian przykroju przyzewodu.
! Uzywać przyzwodu o jak sągladszej powierzchni wewétrznej.
! Material przewodu musi byc zgodny z obwiązujacymi normami.
OKAP PRACUACY JAKO POCHLANIACZ
Aby uzywac okapu w tej wersji, nalezy zainstalowa filtr weglowy.
Mozna go kucić u sprezdawcy.
Zasysanegowietrzejestoczyszczane
z tuszczu i zapachów zanim zestanie zwrócone do pomieszczenia przyez katki w górnej oslonie komina.
INSTALACJA OKAPU
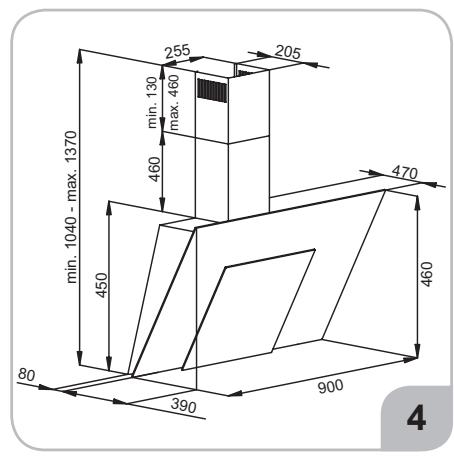
Minimalna odlegość między powierzchnia, na kto-) rej znajduja sie naczyna na urzadzeniu grzejnym, a najnizsza czȩcią okapu kuchenego powinna wynosić nie mnej niz 55 cm w przypadku kuchenek elektrycznych i nie mnej niz 65 cm w przypadku kuchenek gazowych lub typu mieszanean.
Ježeli w instrukcji zainstalowania kuchni gazowej podana jest wieksza odlegostoć, naleź dostosstawcie do takich wskazań.
PODLACZENIE ELEKTRYCZNE

Napięcie sieciowe musi odpowiadc napieciu wskazanemu na tabliczce umieszczonej w wewétrzniej czȩcki okapu. Okap wyposzaźny jest we
wtyczke, ktora nalezy podlączyc do gniazdka zgodnego z obowiazujacymi normami i umieszczonego w latwo dostepnym.), rawniez po zakoningzonej instalacji.
Uwaga! Przed ponownym podlączeniem obwodu okapu do zasilania i sprawdzeniem poprawnosci seinen dzialaniaNSEZWSE UPewnico,czy przywod zasilajacy jest prawidlowo zamontowany. Okap jest wyposaźony w spezialny przywod zasilajacy.
W razieuszkodzeniarego przewodu,nalezygukupicw serwisie producenta lub u dostawcy okapu.
INSTALACJA OKAPU
Urzadzenie jest噤kie. Przenoszenia oraz instalaccta okapu powinny byc wykonywane przyez co najmiej dwie osoby. Przed przystapieniem do instalacci:
Sprawdzić,czy wymiary zakupionego produktu są stosowne do wybranego.), moja sca montaź.
Zdemontowac filtr węgłowy (^) , jejeli zznajduje sie na wyposażeniu (patrz odpowiedni rozdziel). Filtr naleź tonownik zagmontowac tylko wtedy, gdy okap;będzie uzywany wersji filtrujuść.
- Sprawdzic,czy wewnatrz okapu nie pozostawiono (z powodow zwiazanych z transporteim) dodatkowergo materialu dostarczanego wraz z urzadzeniem (na przykriad woreczków z wkrétami (), karty gwarancyjnej (*) itp), ewentualnie wyjac je i zachować.
- Ježeli toMZLIwe, nalezy odlaczyc/usunac meble,znajdujace w obszarze instalacji okapu,po to aby uzyskać latwy dostep do sufitu/sciany, na ktoiRej ma byc zamontowany okap. W przeciwnym wypadku nalezy jak najlepiej zabepezycyce meble oraz wszystkie czeci przypadykowym uszkodzeniem. Wybrac plaska powierzchnie,na ktoiRej bedzie oparty okap i elementy wyposazenia,ora zprzykryc ja folia ochronna.
- Ponadto naleź sprawdzić,czy w oblizu strefy montaź okapu (w.),兩一
- zę po zamontowaniu okapu) jest dostepné gniażdko wtykowe,czy nożna podłuczyc okap do urzędzenia odpradowazącego na zewnatrix opary (tylko w), wersji filtrujuej).
Wykona wsystkie niezbędne prace murarskie (np.: montaż gniazdka wtykowego i/lub otwor do przyejścia przyzewodu odpradowazȩcoma opary).
Okap jest zaopatrzony w kolki mocujace odpowiednie do Większość scian i sufitów. Konieczne jest JDBC zasięgniecie porady wykalifikowanego technika, aby upewnić sie co do odpowiedniość materialów wazoleńosci od typu sciany lub sufitu. Sciana lub sufit musza być odpowiednio mocne, aby utrzyzmac czar okapu.
DZIAŁANIE OKAPU
W przypadku gdy powietrze w pomieszczeniu kuchennym jest szczególnie zanieczyszczone,NSEzy uzywać okapu ustawionego na najwyźsa prędkość. Zaleca sie uruchomienie okapu 5 minut przy数据分析em do gotowania jakichkolwiek potraw i pozostawieuie go wączonym sąszcie przyez ok. 15 minut po zakończemu gotowania.
Aby wybrać funkcjé okapu, wystarczy lekko dotknąc kontrolek.

- Węłaczenia urzadzenia / zmiejszenia prędkosci
Przycisk sLUzy do zmniejszania prędkosci silnik. Aby wyłaczyc silnik, nacinij i przytrzymaj.
- Wlaczenia urzadzenia / zwiekszenie prędkosci
Gdy urzadzenie jest w trybie wyłaczenia, naci-snij ten przycisk, aby uruchomic silnik.
Gdy urzadzenie pracje, nacinij ten przycisk, aby zwiekszyć prędkość o jeder bieg wyzej.
Aktualny bieg jestPokazany na wyświetlaczu LCD.Cyfra na wyświetlaczu odpowiada aktualsej prędkosci silnika.
- Wyswietlacz LCD
Pokazuje aktualne funkcje / tryb pracy okapu.
- Timer
Umozliwia zaprogramowanie automatycznego wyłaczenia okapu.
- Wączenia / wymiędzie oświetlenia
Timer
Istnieje möliwość zaprogramwomania automatycznego wyłaczenia sie wentylatora okapu w czasiedowolnie wybranym z przydzialu od 10 do 90 minut w 10-minutowych odstepach czasowych.
- Aby uruchomic fungcje programwomania, nalezy wączyc silnik okapu przyciskiem 4 na zędany bieg, a nastepnie nacisnac przycisk programwomania czasu wyłaczenia okapu. Na wyświetlaczu pojawi są pulsujacja dioda, informujac nas o wejsciu sterownik a tryb programwomania czasu. Wybrać czas automatycznego wyłaczenia silnika za pomoczą przyciscu "1,2,3", pamietyjadz, ze wskazana przyez wyświetlacz cyfra, pomnożona przyez 10-minutowy interwal czasowy,
odpwiada czasow opóznionego wyłaczenia silnika okapu (np. cyfra 1=10 min., cyfra 2=20 min., cyfra 3=30 min., itd.).
- Majac ustawiona wartosć opóznionego wylączenia zatwierdzamy są ponownie przyciskiem programowania czasu wylączenia okapu, nastepnie wyświetlacz przystanie mrugac i wskaźne namwczesnej ustawiony bieg, a pulsujacja kropka przy biegu zasygnalizuJE odmierzanie czasu wylączenia silnika okapu.
- ZrezygnOWanie z funkci automatycznego wyIaczenia sie silnika okapumonaryoprzekolejne naciSiNcie przycisku programOWania czasu wyIaczenia okapu w trakcie odmierzania czasu.
Uwaga: Właczenia fungcji automatycznégo wyłaczenia (Timer) musimy wykonac w czasie do 20 sekund, w przyciwnym razie, kiedyNie zostanie wykonanażadna czynnosć, okap przyjdzie automatycznie wtryb normalnej pracy.
KONSERWACJA
Uwaga! Przed wykonaniem jakiejkolwiec czynnosci czyszczenia lub konserwacci nalezy odłuczyc okap od zasilania wyjmujac wyczke z gniaźdka lub wylaczajac glówny wyłacznik zasilania.
CZYSZCZENIE OKAPU
Okap nalezy czesto czyscić, tak wewnatrz jak i na zewnatrz (przynajmiej z ta sama czestotliwość, z ktora wykonuje sie czyszczenie filtrów tuszczowych), przy uzyciu szmatki nawilzonej lagodnymi srodkami. Nie nalezy uzywać srodkówSciernych.
NIE STOSOWAC ALKOHOLU!
Uwaga: Nieprzestrzeganie przyepam odycznych czyszczenia urzadzenia i wymiany filtrów powoduje powstanie zagrozenia poźarem. Zaleca są zatem przyestrzeganie podanych wskazowej.
Producent nie ponosiźadnej odpwiedzialnosci za ewentualne uszkodzenia silnika lub pożary wynikacja zNieprzestręgania zasad konserwacje oraz wzmiankowych wyjej instrukcj.
FILTR PRZECIWTŁUSZCZOWY
Zatrzymuje czastki tuszczu pochodzace z gotowania.
Musi byc czyszczony co najmnej raz w miesiacu (lub gdy wskaznik zanieczyszczenia filtrów - jeźeli wasz model okapu posiada wskaznik - informuje o koniecznosci和他的 wymiany), za pomocna nieagresynego srodka czyszcząrego, recznia lub w zmywarce w niskiej temperaturze i krótkim cyklu mycia. Podczas mycia w zmywarce metalowy filtr tuszczowy sącie odbarwić, ale sie zmienia są不同程度 charakterystyczne cechy filtrujuace.
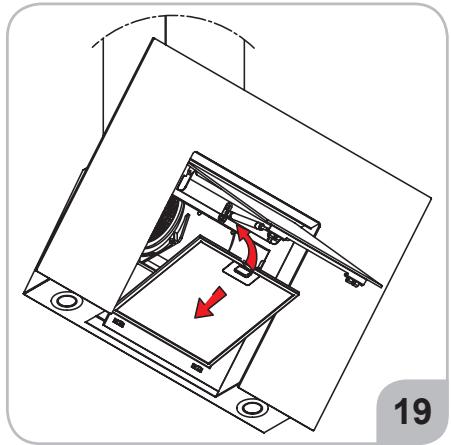
Aby wyjac filtr tuszczowy, nalezy pociagnac za klamke spreźynowa.
FILTR WEGLOWY
Filtr wegrlowy stosuje sie wyłaczenia wtedy, kiedy okap nie jest podlączony do przywodu wentylacyjngo. Filtr z wegrlem aktywnym posiada zdolnosc pochtliania zapachów az do swego nasycenia. Nie nadaje sie do mycia ani do regenerazioni i powinien byc wymieniany, co najmiej raz na 4 miesiacne lub czesciej w wypadku wyjalkowo intensywnego uzycia.
WYMIANA OSWIETLENIA
Instalacja oświetleniowa składa sie z dwóch LED-ów w oprawie halogenowej o mocy 2 W kaźdy. Wymianę oświetlenia przystawiono na rys. 22. W przypadku gdy oświetlenie nie działa, sąȩzy najpierwu sprawdzić,czy lampki zostymi prawidlowo zamontowane. Jeźeli po przyseprowadzeniu takiej kontrli oświetlenie nadal nie działa, sąȩzy zwrócić sie do serwisu.
UWAGA: Nalezy uwazać, aby nie dotykać demontowanego halogenu bezposrednio gołymi rekami.
USER MANUAL
Closely follow the instructions set out in this manual. All responsibility, for any eventual inconveniences, damages or fires caused by not complying with the instructions in this manual, is declined. The hood is conceived for the suction of cooking fumes and steam and is destined only for domestic use.
The hood can look different to that illustrated in the drawings in this booklet. The instructions for use, maintenance and installation, however, remain the same.
It is important to conserve this booklet for consultation at any moment. In the case of sale, cession or move, make sure it is together with the product.
! Read the instructions carefully: there is important information about installation, use and safety.
! Do not carry out electrical or mechanical variations on the product or on the discharge conduits.
! Before proceeding with the installation of the appliance verify that there are no damaged all components. Otherwise contact your dealer and do not proceed with the installation.
Note: the elements marked with the symbol (^*) are optional accessories supplied only with some models or elements to purchase, not supplied.
CAUTION
! Do not connect the appliance to the mains until the installation is fully complete.
! Before any cleaning or maintenance operation, disconnect hood from the mains by removing the plug or disconnecting the mains electrical supply.
! Always wear work gloves for all installation and maintenance operations.
! The appliance is not intended for use by children or persons with impaired physical, sensorial or mental faculties, or if lacking in experience or knowledge, unless they are under supervision or have been trained in the use of the appliance by a person responsible for their safety.
This appliance is designed to be operated by adults, children should be monitored to ensure that they do not play with the appliance.
This appliance is designed to be operated by adults. Children should not be allowed to tamper with the controls or play with the appliance.
! Never use the hood without effectively mounted grating!
! The hood must NEVER be used as a support surface unless specifically indicated.
! The premises where the appliance is installed must be sufficiently ventilated, when the kitchen hood is used together with other gas combustion devices or other fuels.
! The ducting system for this appliance must not be connected to any existing ventilation system which is being used for any other purpose such as discharging exhaust fumes from appliances burning gas or other fuels.
! The flaming of foods beneath the hood itself is severely prohibited.
! The use of exposed flames is detrimental to the filters and may cause a fire risk, and must therefore be avoided in all circumstances.
! Any frying must be done with care in order to make sure that the oil does not overheat and ignite. Accessible parts of the hood may became hot when used with cooking appliance.
With regards to the technical and safety measures to be adopted for fume discharging it is important to closely follow the regulations provided by the local authorities.
! The hood must be regularly cleaned on both the inside and outside (AT LEAST ONCE A MONTH).
! This must be completed in accordance with the maintenance instructions provided in this manual). Failure to follow the instructions provided in this user guide regarding the cleaning of the hood and filters will lead to the risk of fires.
! Do not use or leave the hood without the lamp correctly mounted due to the possible risk of electric shocks.
! We will not accept any responsibility for any faults, damage or fires caused to the appliance as a result of the non-observation of the instructions included in this manual.
This appliance is marked according to the European directive 2012/19/EC on Waste Electrical and Electronic Equipment (WEEE). By ensuring this product is disposed of correctly, you will help prevent potential negative consequences for the environment and human health, which could otherwise be caused by inappropriate waste handling of this product.
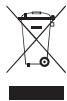
The symbol on the product, or on the documents accompanying the product, indicates that this appliance may not be treated as household waste. Instead it should be taken to the appropriate collection point for
the recycling of electrical and electronic equipment. Disposal must be carried out in accordance with local environmental regulations for waste disposal.
For further detailed information regarding the process, collection and recycling of this product, please contact the appropriate department of your local authorities or the local department for household waste or the shop where you purchased this product.
Suggestions for a correct use in order to reduce the environmental impact: Switch ON the hood at minimum speed when you start cooking and kept it running for few minutes after cooking is finished. Increase the speed only in case of large amount of smoke and vapour and use boost speed(s) only in extreme situations. Replace the charcoal filter(s) when necessary to maintain a good odour reduction efficiency. Clean the grease filter(s) when necessary to maintain a good grease filter efficiency. Use the maximum diameter of the ducting system indicated in this manual to optimize efficiency and minimize noise.
Additional Installation Specifications:
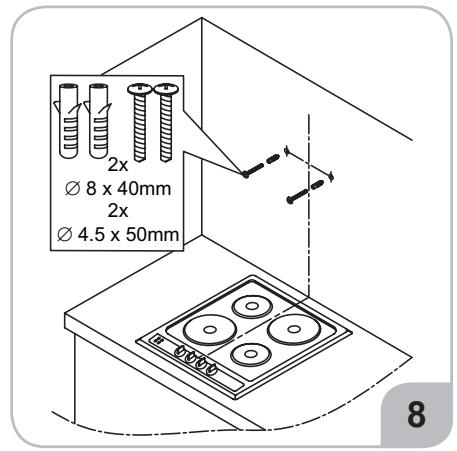
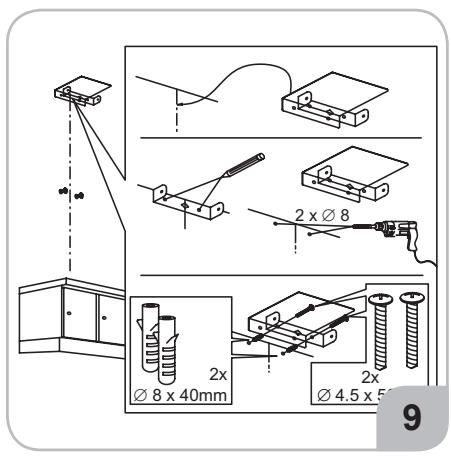
Use only the fixing screws supplied with the product for installation or, if not supplied, purchase the correct screws type. Use the correct length for the screws which are identified in the Installation Guide. In case of doubt, consult an authorised service assistance centre or similar qualified person.
WARNING! Failure to install the screws or fixing device in accordance with these instructions may result in electrical hazards.
USE
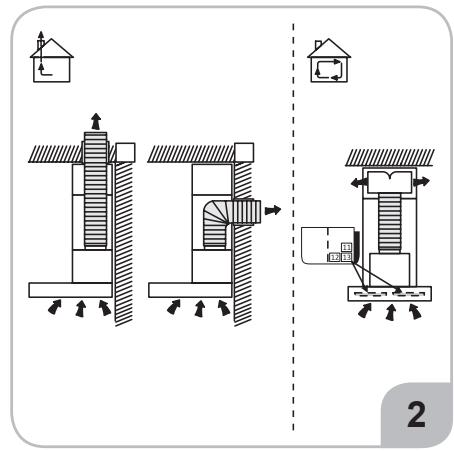
The hood is designed to be used either for exhausting or filter version.
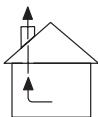
DUCTING VERSION
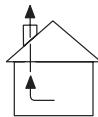
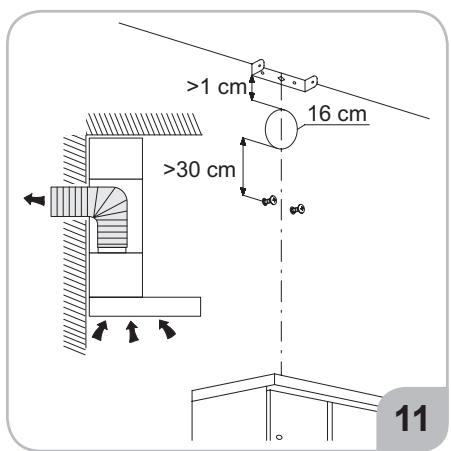
In this case the fumes are conveyed outside of the building by means of a special pipe connected with the connection ring located on top of the hood.
Attention! The exhausting pipe is not
supplied and must be purchased apart. Diameter of the exhausting pipe must be equal to that of the connection ring.
In the horizontal runs the exhausting pipe must be slightly slanted (about 10^ ) and directed upwards to vent the air easily from the room to the outside.
Attention! If the hood is supplied with active charcoal filter, then it must be removed.
Connect the hood and discharge holes on the walls with a diameter equivalent to the air outlet (connection flange).
Using the tubes and discharge holes on walls with smaller dimensions will cause a diminution of the suction performance and a drastic increase in noise.
Any responsibility in the matter is therefore declined.
Use a duct of the minimum indispensable length.
! Use a duct with as few elbows as possible (maximumpelbowangle: 90^
! Avoid drastic changes in the duct cross-section.
Use a duct as smooth as possible inside.
The duct must be made of certified material.
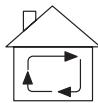
FILTER VERSION
One active charcoal filter is needed for this and can be obtained from your usual retailer.
The filter removes the grease and smells from the extracted air before sending it back into the room through the upper outlet grid.
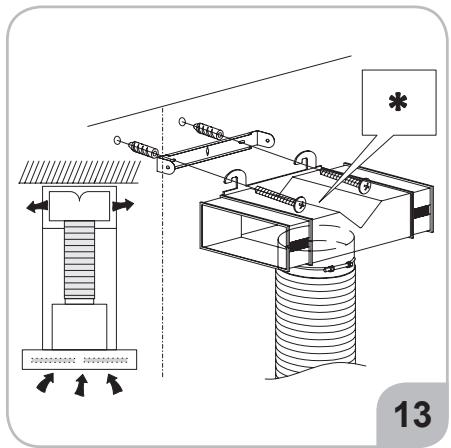
INSTALLATION
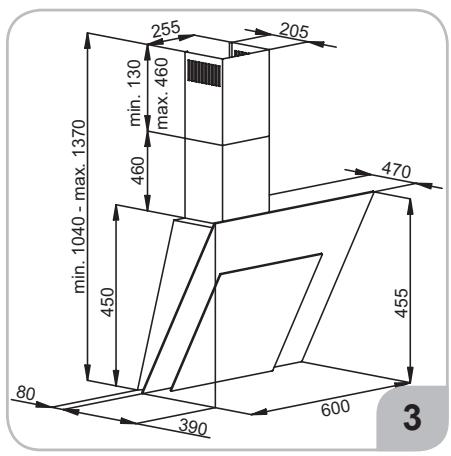
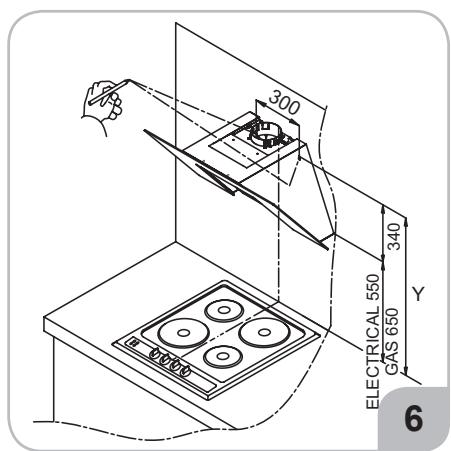
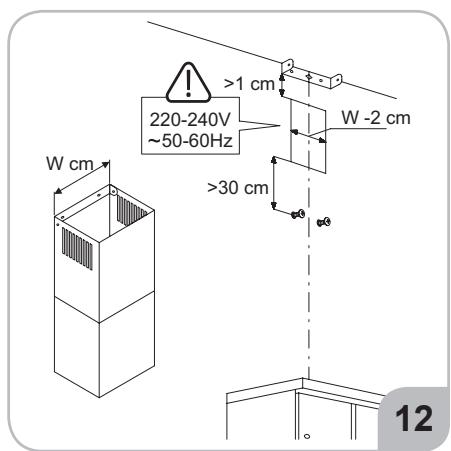
The minimum distance between the supporting surface for the cooking equipment on the hob and the lowest part of the range hood must be not less than 50cm from electric cookers and 65cm from gas or mixed cookers.
If the instructions for installation for the gas hob specify a greater distance, this must be adhered to.
ELECTRICAL CONNECTION

The mains power supply must correspond to the rating indicated on the plate situated inside the hood. If provided with a plug connect the hood to a socket
in compliance with current regulations and positioned in an accessible area, after installation. If it not fitted with a plug (direct mains connection) or if the plug is not located in an accessible area, after installation, apply a double pole switch in accordance with standards which assures the complete disconnection of the mains under conditions relating to over-current category III, in accordance with installation instructions.
Warning! Before re-connecting the hood circuit to the mains supply and checking the efficient function, always check that the mains cable is correctly assembled.
The hood is provided with a special power cable; if the cable is damaged, request a new one from Technical Service.
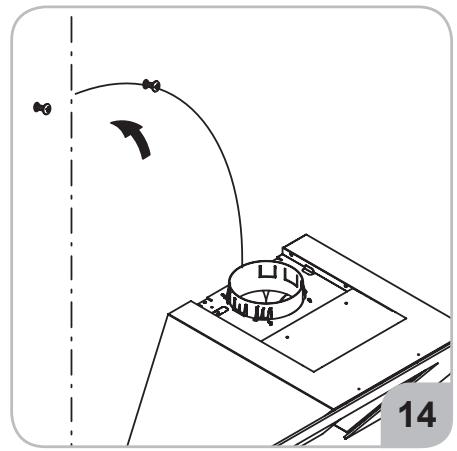
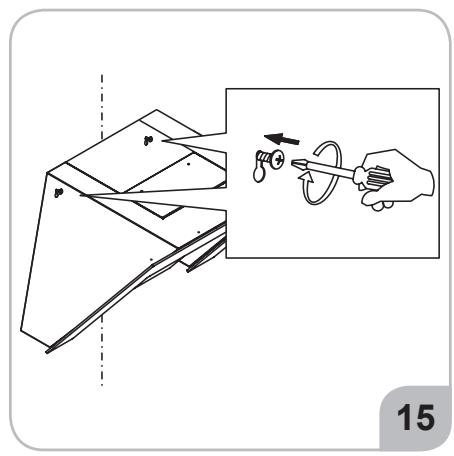
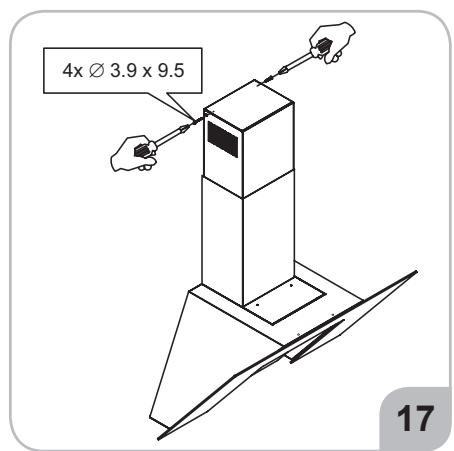
MOUNTING
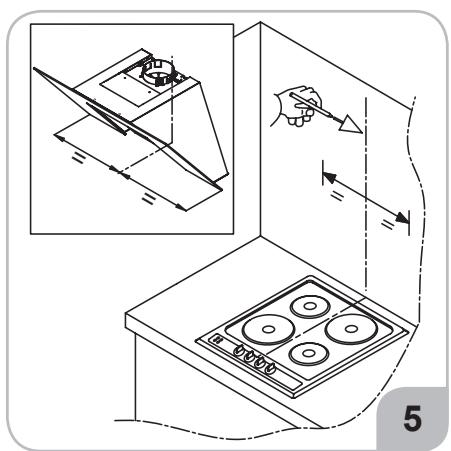
Very heavy product; hood handling and installation must be carried out by at least two persons. Before beginning installation:
- Check that the product purchased is of a suitable size for the chosen installation area.
- Remove the charcoal (*) filter/s if supplied (see also relative paragraph). This/these is/are to be mounted only if you want to use the hood in the filtering version.
- Check (for transport reasons) that there is no other supplied material inside the hood (e.g. packets with screws (^) , guarantees (^) , etc.), eventually removing them and keeping them.
- If possible, disconnect and move freestanding or slide-in range from cabinet opening to provide easier access to rear wall/ceiling. Otherwise put a thick, protective covering over countertop, cooktop or range to protect from damage and debris. Select a flat surface for assembling the unit. Cover that surface with a protective covering and place all canopy hood parts and hardware in it.
- In addition check whether near the installation area of the hood (in the area accessible also with the hood mounted) an electric socket is available and it is possible to connect a fumes
discharge device to the outside (only suction version).
- Carry out all the masonry work necessary (e.g. installation of an electric socket and/or a hole for the passage of the discharge tube).
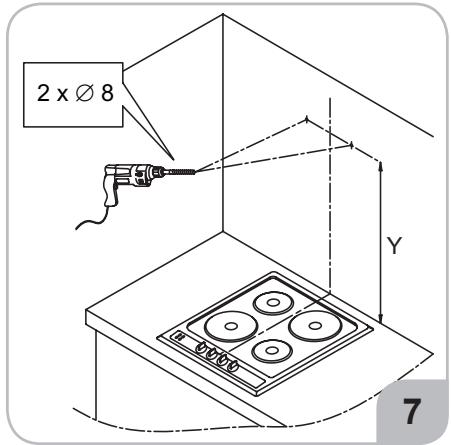
Expansion wall plugs are provided to secure the hood to most types of walls/ceilings. However, a qualified technician must verify suitability of the materials in accordance with the type of wall/ceiling. The wall/ceiling must be strong enough to take the weight of the hood. Do not tile, grout or silicone this appliance to the wall. Surface mounting only.
OPERATION
Use the high suction speed in cases of concentrated kitchen vapours. It is recommended that the cooker hood suction is switched on for 5 minutes prior to cooking and to leave in operation during cooking and for another 15 minutes approximately after terminating cooking.
To select the functions of the hood, simply touch the controls.

1. Speed decrease / switching off
This button is used to decrease the speed of the motor. Press and hold this button to switch off the appliance.
2. Speed increase / switching on
In the off - mode press this button to switch on the motor in speed one.
Pressing this button while the appliance is in operation will increase the speed one step higher.
The speed of the motor is shown on the LED display. The digit on the display corresponds to the speed of the motor (i.e. "1" indicates first speed, "2" indicates second speed etc.)
3. LED display
Indicates the current function / mode of the hood
4. Timer
Enables to set automatic switch off of the hood
5. Lights on/off
Timer: to enable programming automatic switch off at any given time between 10 and 90 minutes, with 10-minute increments.
- To enable programming function, turn the engine on using the "+" button to the level you want, and then press the button to program the switch-off time. The display will show a blinking 0, which means, that the time programming mode was entered.
- Select the automatic switch-off time using the "+" button, keeping in mind, that the number on the display, multiplied by the 10-minut interval, means the time of automatic switch-off (e.g. 1 = 10min , 2 = 20min , 3 = 30min , etc.)
- With the auto switch-off timer set, confirm the setting using the timer button, the display will stop blinking and will show the previously selected speed, and the blinking dot next to the speed will show the switch-off time. You can cancel the automatic switchoff function by pressing the timer button again while the time is counted down.
Caution: Timer programming should be completed within 20 seconds, otherwise no action will be taken, and the hood will resume operation in normal mode.
MAINTENANCE
ATTENTION! Before performing any maintenance operation, isolate the hood from the electrical supply by switching off at the connector and removing the connector fuse.
Or if the appliance has been connected through a plug and socket, then the plug must be removed from the socket.
CLEANING
The cooker hood should be cleaned regularly (at least with the same frequency with which you carry out maintenance of the fat filters) internally and externally. Clean using the cloth dampened with neutral liquid detergent. Do not use abrasive products. DO NOT USE ALCOHOL!
WARNING: Failure to carry out the basic cleaning recommendations of the cooker hood and replacement of the filters may cause fire risks. Therefore, we recommend observing these instructions. The manufacturer declines all responsibility for any damage to the motor or any fire damage linked to inappropriate maintenance or failure to observe the above safety recommendations.
GREASE FILTER
Traps cooking grease particles. The grease filter must be cleaned once a month using non aggressive detergents, either by hand or in the dishwasher, which must be set to a low temperature and a short cycle. When washed in a dishwasher, the grease filter may discolour slightly, but this does not affect its filtering capacity. To remove the grease filter, pull the spring release handle.
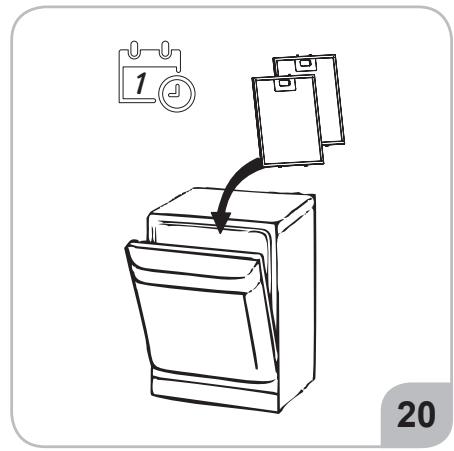
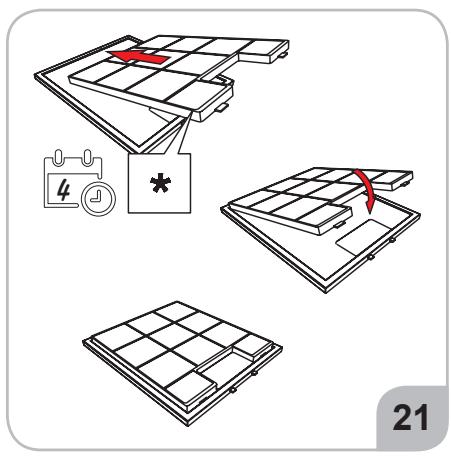
CHARCOAL FILTER (filter version only)
It absorbs unpleasant odours caused by cooking. The saturation of the charcoal filter occurs after more or less prolonged use, depending on the type of cooking and the regularity of cleaning of the grease filter. In any case it is necessary to replace the cartridge at least every four months. The charcoal filter may NOT be washed or regenerated.
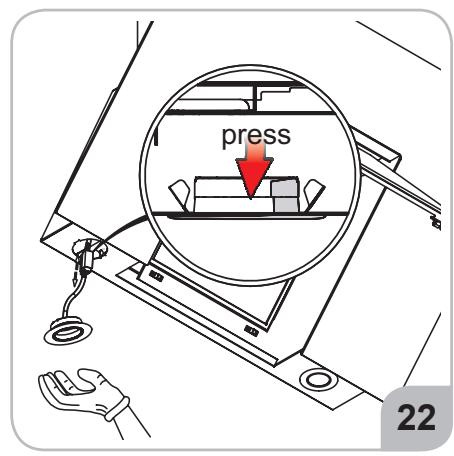
REPLACING LAMPS
The hood is equipped with a lighting system based on LED technology. The LEDs guarantee an optimum lighting, a duration up to 10 times as long as the traditional lamps and allow to save 90% electrical energy.
For replacement, contact the technical service.

TEKA POLSKA SP. Z O.O.
ul. 3-go Maja 8
05-800 PRUSZKÖW
tel.227383270
www.teka.com