
MQ927GNE - Mixeur plongeant ELECTROLUX - Notice d'utilisation et mode d'emploi gratuit
Retrouvez gratuitement la notice de l'appareil MQ927GNE ELECTROLUX au format PDF.
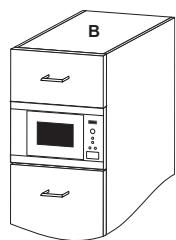
| Type de produit | Four à micro-ondes encastrable |
| Marque | Electrolux |
| Modèle | MQ927GNE |
| Dimensions extérieures (L x H x P) | 596 x 459 x 404 mm |
| Dimensions de la cavité (L x H x P) | 342 x 207 x 368 mm |
| Capacité | 26 litres |
| Diamètre du plateau tournant | 325 mm |
| Poids net | 19,5 kg |
| Tension d'alimentation | 220-240 V ~ 50 Hz, monophasé |
| Fusible recommandé | 16 A minimum |
| Puissance micro-ondes | 900 W (IEC 60705) |
| Puissance gril | 800 W |
| Puissance maximale combinée | 2,20 kW |
| Fréquence micro-ondes | 2450 MHz (Groupe 2 / Classe B) |
| Fonctions de cuisson | Micro-ondes, Gril, Gril combiné, Décongélation automatique, Recettes favorites, Minuterie, Démarrage rapide |
| Accessoires fournis | Plateau tournant en verre, Support de plateau, Grille haute, Grille basse |
| Sécurité enfants | Verrouillage du panneau de commande |
| Nettoyage | Surface extérieure : eau savonneuse, intérieur : éponge humide, plateau et support lavables au lave-vaisselle |
| Consommation en veille | Mode économie d'énergie après 5 min d'inactivité |
| Réparabilité | Pièces détachées originales recommandées, ampoule intérieure remplaçable uniquement par un service agréé |
FOIRE AUX QUESTIONS - MQ927GNE ELECTROLUX
Questions des utilisateurs sur MQ927GNE ELECTROLUX
0 question sur cet appareil. Repondez a celles que vous connaissez ou posez la votre.
Poser une nouvelle question sur cet appareil
Téléchargez la notice de votre Mixeur plongeant au format PDF gratuitement ! Retrouvez votre notice MQ927GNE - ELECTROLUX et reprennez votre appareil électronique en main. Sur cette page sont publiés tous les documents nécessaires à l'utilisation de votre appareil MQ927GNE de la marque ELECTROLUX.
MODE D'EMPLOI MQ927GNE ELECTROLUX
EN Microwave Oven
IT Forno a Microonde
User Manual 2
Manuale per L'utente 26

CONTENTS
- SAFETY INFORMATION 3
- INSTALLATION 7
3.PRODUCT DESCRIPTION 11 - BEFORE FIRST USE 12
- OPERATION 13
- COOKING CHARTS 16
- HINTS AND TIPS 22
- TROUBLESHOOTING 24
- TECHNICAL INFORMATION 25
- ENVIRONMENT CONCERNS 25
WE'RE THINKING OF YOU
Thank you for purchasing an Electrolux appliance. You've chosen a product that brings with it decades of professional experience and innovation. Ingenious and stylish, it has been designed with you in mind. So whenever you use it, you can be safe in the knowledge that you'll get great results every time. Welcome to Electrolux.
Visit our website for:

Get usage advice, brochures, trouble shooter, service information:
www.electrolux.com

Register your product for better service:
www.electrolux.com/productregistration

Buy Accessories, Consumables and Original spare parts for your appliance:
www.electrolux.com/shop
CUSTOMER CARE AND SERVICE
We recommend the use of original spare parts.
When contacting Service, ensure that you have the following data available.
The information can be found on the rating plate. Model, PNC, Serial Number.

Warning/Caution-Safety information

General information and tips

Environmental information
Subject to change without notice.
1. SAFETY INFORMATION
This appliance can be used by children aged from 8 years and above and persons with reduced physical, sensory or mental capabilities or lack of experience and knowledge if they have been given supervision or instruction concerning use of the appliance in a safe way and understand the hazards involved. Children should be supervised to ensure that they do not play with the appliance. Cleaning and user maintenance shall not be made by children unless they are aged from 8 years and above and supervised.
This appliance is not intended for use at altitudes above 2000m.

IMPORTANT! IMPORTANT SAFETY
INSTRUCTIONS: READ CAREFULLY AND KEEP FOR FUTURE REFERENCE.

WARNING!
If the door or door seals are damaged, the oven must not be operated until it has been repaired by a competent person.

WARNING!
It is hazardous for anyone other than a competent person to carry out any service or repair operation that involves the removal of a cover which gives protection against exposure to microwave energy.

WARNING!
Liquids and other foods must not be heated in sealed containers since they are liable to explode.
This appliance is intended to be used in household and similar applications such as: staff kitchen areas in shops, offices and other working environments; farm houses; by clients in hotels, motels and other residential environments; bed and breakfast type environments.
Only use microwave-safe containers and utensils.
Metallic containers for food and beverages are not allowed during microwave cooking.
Do not leave the oven unattended when using disposable plastic, paper or other combustible food containers.
The microwave oven is intended for heating food and beverages. Drying of food or clothing and heating of warming pads, slippers, sponges, damp cloth and similar may lead to risk of injury, ignition or fire.
If food being heated begins to smoke, DO NOT OPEN THE DOOR. Turn off and unplug the oven and wait until the food has stopped smoking. Opening the door while food is smoking may cause a fire.
Microwave heating of beverages can result in delayed eruptive boiling, therefore care has to be taken when handling the container.
The contents of feeding bottles and baby food jars shall be stirred or shaken and the temperature checked before consumption, in order to avoid burns.
Do not cook eggs in their shells and whole hard boiled eggs should not be heated in microwave ovens since they may explode even after microwave cooking has ended.
1.1 Care and cleaning
Door:
To remove all trace of dirt, regularly clean both sides of the door, the door seals and sealing surfaces with a soft, damp cloth. Do not use harsh abrasive cleaners or sharp metal scrapers to clean the oven door glass since they can scratch the surface, which may result in shattering of the glass.
Oven interior:
For cleaning, wipe any splatters or spills with a soft damp cloth or sponge after each use while the oven is still warm. For heavier spills, use a mild soap and wipe several times with a damp cloth until all residues are removed. Do not remove the waveguide cover. Make sure that mild soap or water does not penetrate the small vents in the walls which may cause damage to the oven. Do not use spray type cleaners on the oven interior. Heat up your oven regularly by using the grill. Remaining food or fat splashed can cause smoke or a bad smell. Clean the waveguide cover, the oven cavity, the turntable and turntable support after use. These must be dry and free from grease. Built-up grease may overheat and begin to smoke or catch fire.
Oven exterior:
The outside of your oven can be cleaned easily with mild soap and water. Make sure the soap is wiped off with a moist cloth, and dry the exterior with a soft towel.
Control panel:
Open the door before cleaning to de-activate the control panel. Care should be taken when cleaning the control panel. Using a cloth dampened with water only, gently wipe the panel until it becomes clean. Avoid using excessive amounts of water. Do not use any sort of chemical or abrasive cleaner.
Turntable and turntable support:
Remove the turntable and turntable support from the oven. Wash the turntable and turntable support in mild soapy water. Dry with a soft cloth. Both the turntable and the turntable support are dishwasher safe.
Racks:
This should be washed in a mild washing up liquid solution and dried. The racks are dishwasher safe.

IMPORTANT!
Clean the oven at regular intervals and remove any food deposits. Failure to maintain the oven in a clean condition could lead to a deterioration of the surface that could adversely affect the life of the appliance and possibly result in a hazardous situation.
Care should be taken not to displace the turntable when removing containers from the appliance.

IMPORTANT!
A steam cleaner should not be used.
The microwave oven is intended to be used built-in.
The appliance and its accessible parts become hot during use. Care should be taken to avoid touching heating elements.

WARNING!
Keep children away from the door and accessible parts that may become hot when the grill is in use. Children should be kept away to prevent them burning themselves.

IMPORTANT!
Do not use commercial oven cleaners, steam cleaners, abrasive, harsh cleaners, any that contain sodium hydroxide or scouring pads on any part of your microwave oven.
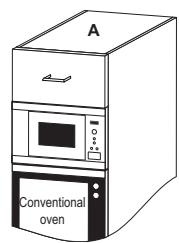
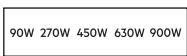
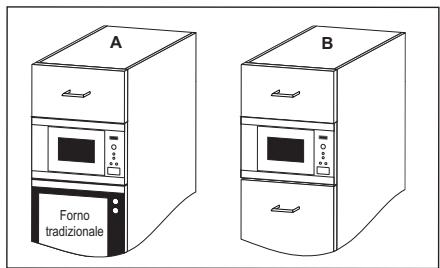
2. INSTALLATION
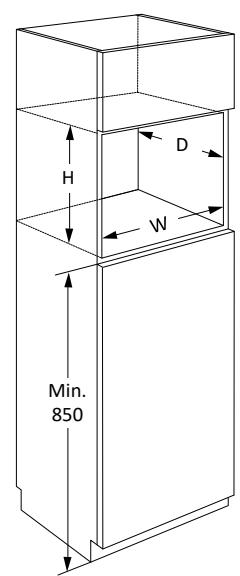
The microwave can be fitted in position
A or B:
| Position | Niche size | |
| W | D H | |
| A | 562 x 550 x 450 | |
| B | 562 x 500 x 450 | |
Measurements in (mm)
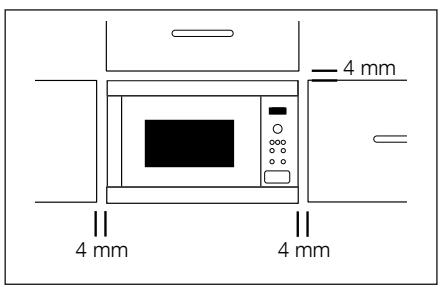
2.1 Installing the appliance
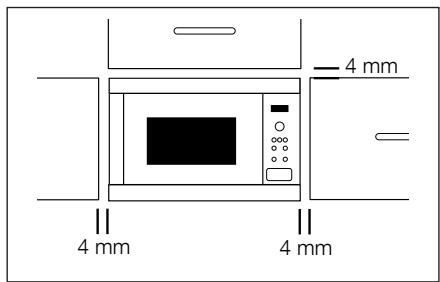
- Remove all packaging and check carefully for any signs of damage.
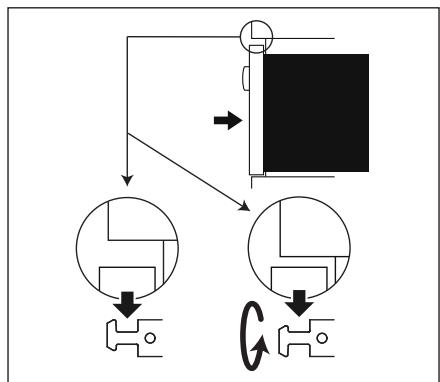
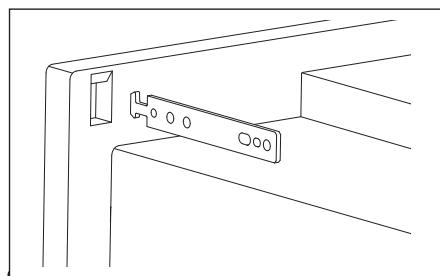
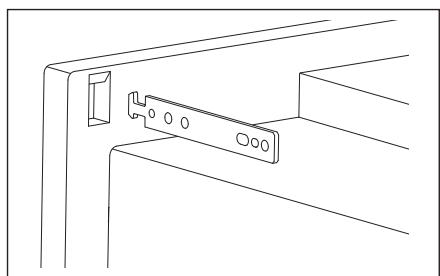
- Fit the fixing hooks to the kitchen cupboard using the instruction sheet and template supplied.
- Fit the appliance into the kitchen cupboard slowly, and without force. The appliance should be lifted onto the fixing hooks and then lowered into place. In the case of interference during fitting, this hook is reversible. The front frame of the oven should seal against the front opening of the cupboard.
- Ensure the appliance is stable and not leaning. Ensure that a 4 mm gap is kept between the cupboard door above and the top of the frame (see diagram).
2.2 Connecting the appliance to the power supply
- The electrical outlet should be readily accessible so that the unit can be unplugged easily in an emergency. Or it should be possible to isolate the oven from the supply by incorporating a switch in the fixed wiring in accordance with the wiring rules.
- The power supply cord may only be replaced by an electrician.
- If the supply cord is damaged it must be replaced by the manufacturer, its service agent or similarly qualified persons in order to avoid a hazard.
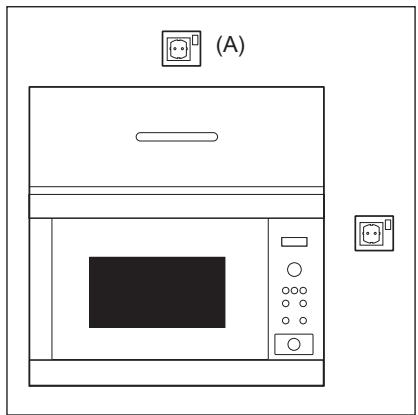
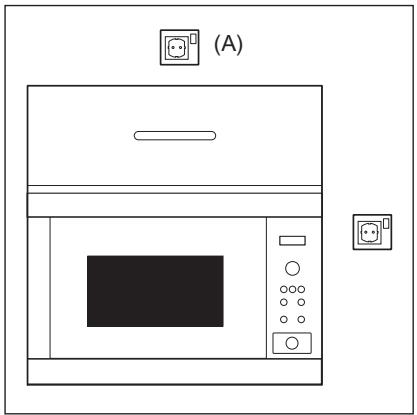
- The socket should not be positioned behind the cupboard.
- The best position is above the cupboard, see (A).
- Connect the appliance to a single phase 220-240 V/50 Hz alternating current via a correctly installed earth socket. The socket must be fused with a 16 A fuse.
- Before installing, tie a piece of string to the power supply cord to facilitate connection to point (A) when the appliance is being installed.
- When inserting the appliance into the high-sided cupboard, DO NOT crush the power supply cord.
- Do not immerse the power supply cord or plug in water or any other liquid.
- Do not allow the power supply cord to run over any hot or sharp surfaces, such as the hot air vent area at the top rear of the oven.
2.3 Additional advice
Do not use the microwave oven to heat oil for deep frying. The temperature cannot be controlled and the oil may catch fire. To make popcorn, only use special microwave popcorn makers.
Individuals with PACEMAKERS should check with their doctor or the manufacturer of the pacemaker for precautions regarding microwave ovens.
Never spill or insert any objects into the door lock openings or ventilation openings. In the event of a spill, turn off and unplug the oven immediately and call an authorised ELECTROLUX service agent.
Never modify the oven in any way.
Only use the turntable and the turntable support designed for this oven. Do not operate the oven without the turntable.
To prevent the turntable from breaking:
- Before cleaning the turntable with water, leave the turntable to cool.
- Do not put hot foods or hot utensils on a cold turntable.
- Do not put cold foods or cold utensils on a hot turntable.
Do not use plastic containers for microwaving if the oven is still hot from using the GRILL mode and DUAL GRILL mode because they may melt. Plastic containers must not be used during above modes unless the container manufacturer says they are suitable.
Neither the manufacturer nor the dealer can accept any liability for damage to the oven or personal injury resulting from failure to observe the correct electrical connection procedure. Water vapour or drops may occasionally form on the oven walls or around the door seals and sealing surfaces. This is a normal occurrence and is not an indication of microwave leakage or a malfunction.
Concerning the lamp(s) inside this product and spare part lamps sold separately: These lamps are intended to withstand extreme physical conditions in household appliances, such as temperature, vibration, humidity, or are intended to signal information about the operational status of the appliance. They are not intended to be used in other applications and are not suitable for household room illumination.
3. PRODUCT DESCRIPTION
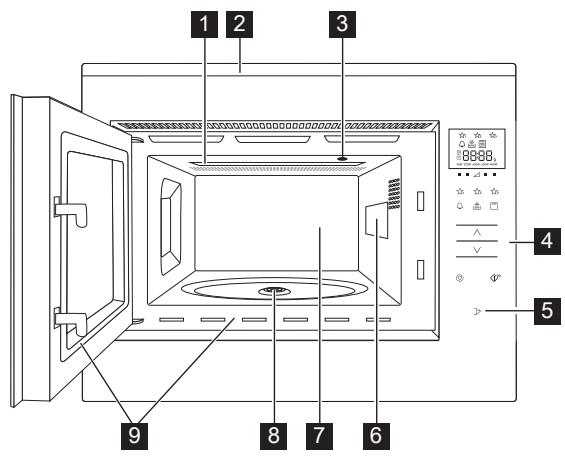
3.1 Microwave oven
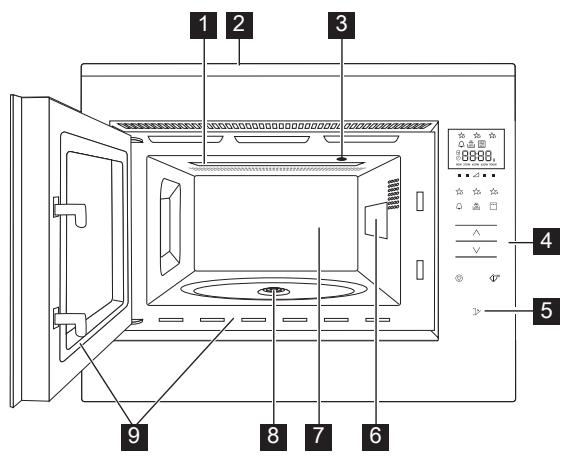
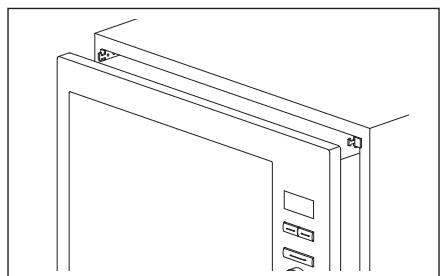
1 Grill heating element
2 Front trim
3 Oven light
4 Control panel
5 Door open key
6 Waveguide cover
7 Oven cavity
8 Seal packing
9 Door seals and sealing surfaces
3.2 Accessories

Check to make sure the following accessories are provided:
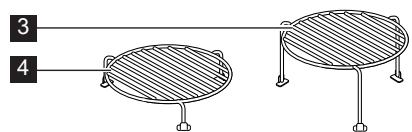
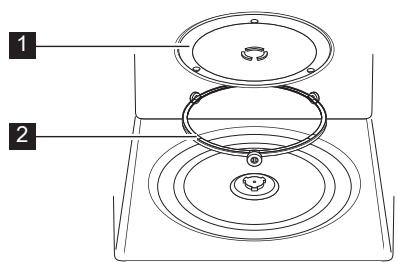
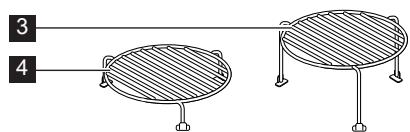
1 Turntable
2 Turntable support
3 High rack
4 Low rack
- Place the turntable support on the floor of the cavity.
- Then place the turntable on the turntable support.
- To avoid turntable damage, ensure dishes or containers are lifted clear of the turntable rim when removing them from the oven.
When you order accessories, please mention two items: part name and model name to your dealer or an authorised ELECTROLUX service agent.
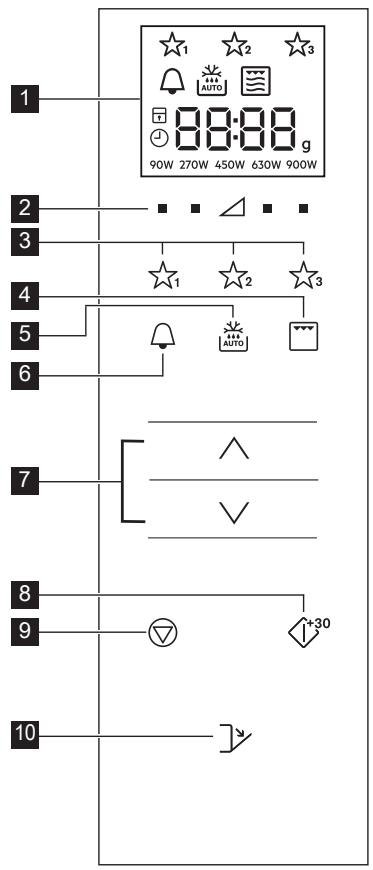
3.3 Control panel
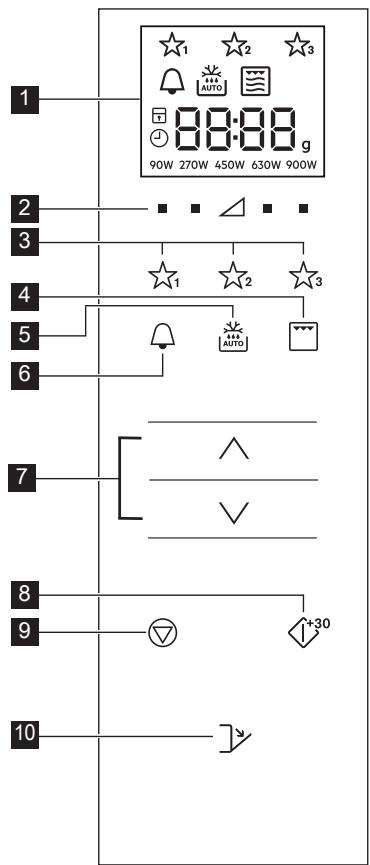

1 Digital display indicators:
Favourites

Kitchen timer

Auto defrost

Grill

Dual grill

Microwave

Stop/Cancel

Child safety lock

Set clock

Display segments

Weight
Power levels
2 Power level keys
3 Favourites keys
4 Grill key
5 Auto defrost key
6 Kitchen timer key
7 More/Less keys
8 Start/Confirm/ Quick start key
9 Stop key
10 Door open key
4. BEFORE FIRST USE
4.1 Plug in
When the oven is plugged in for the first time you have the option of setting the clock. The oven has a 24hr clock.
- The oven will beep and all of the display icons will be switched on for half a second. Press the MORE/LESS keys until 'on' or 'OFF' is displayed.
2a. To turn the clock off, press the MORE/LESS keys until 'oFF' is displayed then press the START key. The oven is ready to use.
If you have turned the clock off and want to turn it back on, press the KITCHEN TIMER key twice and follow 2b.
2b. To turn the clock on, press the MORE/LESS keys until 'on' is displayed then press the START key. Example: To set the clock to 18:45.
- Press the MORE/LESS keys to adjust the hour.
- Press the START key to confirm.
- Press the MORE/LESS keys to adjust the minutes.
- Press the START key to confirm.

When the clock is set, the time of day will not be shown in the display.
4.2 Standby (Economy mode)
The oven will automatically enter standby mode if it is not used within a 5 min period.
Example: If the clock has not been set: The display will switch off.
Open the door or press any key to exit standby mode.
Example: If the clock has been set:
After the 5 minute period, the time will be displayed.
4.3 Adjusting the clock when set
You can adjust the clock after the time has been set.
Example: To change from 18.45 to 19.50.
- Press the KITCHEN TIMER key twice.
- Press the START key.
- Press the MORE/LESS keys until '19' is displayed.
- Press the START key.
- Press the MORE/LESS keys until '50' is displayed.
- Press the START key.
4.4 To cancel the clock and set standby (Economy mode)
- Press the KITCHEN TIMER key twice.
- Press the MORE/LESS keys until 'oFF' is displayed.
- Press the START key to confirm.
4.5 Child safety lock
The oven has a safety feature which prevents the accidental running of the oven by a child. When the lock has been set, no part of the microwave will operate until the lock feature has been turned off.
Switching the lock on or off is only possible when the oven is not running.
Example: To switch the lock on.
Press and hold the STOP key until the 'child lock' symbol switches on.
Example: To switch the lock off.
Press and hold the STOP key until the 'child lock' symbol switches off.

When child lock is switched on, all keys are disabled except the STOP key.
5. OPERATION
5.1 Microwave cooking
Example: To heat soup for 2 minutes and 30 seconds on 630 W microwave power.
- Press the POWER LEVEL key to the right of the triangle until '630 W' is displayed.
- Press the MORE/LESS keys to enter the time.
- Press the START key.

In microwave cooking mode, you can adjust the power level of the oven by pressing the key directly below the required setting.
You can set the power level when the oven is running by pressing and holding the required POWER LEVEL key until the new power setting is highlighted on the display. Power levels that are too high or cooking times that are too long may overheat foods resulting in a fire.
If 900 W is selected then the maximum microwave time that can be input is 15 minutes.
If the oven runs in any mode for 3 minutes or longer, the fan will stay on for 2 minutes after the cooking ends. Open the door and it will stop, close the door it will start again until 2 minutes is finished (including door open time). If the oven runs for less than 3 minutes the fan will not come on.
After cooking the turntable will continue to rotate until the cooking vessel returns to its initial start position. The cavity light will remain on until completion of the rotation, or for 5 seconds (whichever is greater). The oven will beep when complete. If the door is opened during this process, the rotation will stop.
5.2 Power levels
| Power setting | Suggested use |
| 900 W/HIGH | Used for fast cooking or reheating (e.g. soup, casseroles, canned food, hot beverages, vegetables, fish). |
| 630 W | Used for longer cooking of dense foods such as roast joints, meat loaf and plated meals, also for sensitive dishes such as cheese sauce and sponge cakes. At this reduced setting, the sauce will not boil over and food will cook evenly without over cooking at the sides. |
| 450 W | For dense foods which require a long cooking time when cooked conventionally (e.g. beef dishes) it is advisable to use this power setting to ensure the meat will be tender. |
| 270 W/ DEFROST | To defrost, select this power setting, to ensure that the dish defrosts evenly. This setting is also ideal for simmering rice, pasta, dumplings and cooking egg custard. |
| 90 W | For gentle defrosting (e.g. cream gateaux or pastry). |
| 0 W | For standing/kitchen timer. |
W = WATT
5.3 Reduced power level
| Cooking mode | Standard time | Reduced power level |
| Microwave 900 W | 15 minutes | Microwave 630 W |
| Grill | 10 minutes | Grill 500 W |
| Dual Grill | 10 minutes | Grill 500 W |
5.4 Adjusting the cooking time during cooking
You can adjust the cooking time during cooking.
Example: To add 2 minutes (120 seconds) using the START key.
- Press the START key four times. The cooking time will increase by 120 seconds.
5.5 Using the stop key
Press the STOP key once to enter Pause mode.
Press the STOP key again to cancel the cooking time.
5.6 Kitchen timer
To set the kitchen timer.
- Press the KITCHEN TIMER key.
- Press the MORE/LESS keys to enter the time.
- Press the START key. The timer will automatically start.
The time can be extended when the timer is running by pressing the START key.
The timer function can only be used when the oven is not running.
5.7 Quick start
You can directly start cooking on 900 W/HIGH for 30 seconds by pressing the START key.
To add more time press the START key.
5.8 Mute
To turn the sound off.
- Press the KITCHEN TIMER key 3 times until 'Soun' is displayed.
- Press the MORE/LESS keys until 'off' is displayed.
- Press the START key.
To turn the sound on.
-
Press the KITCHEN TIMER key 3 times until 'Soun' is displayed.
-
Press the MORE/LESS keys until 'on' is displayed.
- Press the START key.
5.9 Pause
To pause whilst the microwave is running.
- Press the STOP key or open the door.
- The oven will pause for up to 5 minutes.
- Press START to continue cooking.
5.10 Grill and dual grill
This microwave oven has two grill cooking modes:
Grill only
Dual grill (grill with microwave)

IMPORTANT! The high or the low rack is recommended for grilling.
You may detect smoke or a burning smell when using the grill for the first time, this is normal and does not indicate a fault with the oven. To avoid this problem, when using the grill for the first time, operate the grill without food for 20 minutes.
- Press the MORE/LESS keys to enter the time.
- Press the GRILL key once for Dual Grill mode (Grill + Microwave) and press the START key. Press the GRILL key again to select Grill only mode.
- Press the START key.

In Dual Grill mode the 90 W and 900 W microwave power levels are not available.
To exit Dual Grill or Grill mode press the GRILL key until the microwave only symbol is illuminated on the display.
5.11 Favourites
The oven has 3 Favourite recipes.

Soften Butter

Melt Chocolate

Mug Cake
Example: To soften butter.
- Press the FAVOURITE 1 key once.
- Press the MORE/LESS keys to select the weight.
- Press the START key.

If display segments exhibit a rotating pattern this indicates that the food needs to be stirred or turned over. To continue cooking, press the START key. At the end of the auto defrost time, the programme will automatically stop. The power levels for the pre-set Favourite recipes cannot be adjusted. 1-4 Mug cakes can be cooked.

WARNING! Chocolate may become very hot! If the chocolate needs longer cooking time then add 10 seconds. Take care with chocolate as it may overheat and burn.
To overwrite Favourites for your own recipes.
- Press the POWER level key to select the power.
- Press the MORE/LESS keys to enter the time.
- Press and hold the FAVOURITE key you want to set until you hear a single beep and the favourite star is visible.
To re-set Favourites to the factory settings.
- Press the STOP key.
- Press and hold POWER LEVEL 450 W for 3 seconds. The oven will reset Favourites to the factory settings.
5.12 Auto defrost
Auto defrost automatically works out the correct cooking mode and cooking time based on the weight of the food.
You can choose from 2 auto defrost menus.
- Auto Defrost: Meat/Fish/Poultry
- Auto Defrost: Bread
Example: To defrost 0.2kg steak.
- Select the auto defrost menu by pressing the AUTO DEFROST key once.
- Press the MORE/LESS keys to select the weight.
- Press the START key.

If display segments exhibit a rotating pattern this indicates that the food needs to be stirred or turned over. To continue cooking, press the START key. At the end of the auto defrost time, the programme will automatically stop. Time/Power adjustment is not available in auto defrost.
6. COOKING CHARTS
6.1 Favourites
| Favourites | Weight | Key | Procedure |
| Soften Butter | 0.05-0.25 kg | ☆1 | · Place the butter into a pyrex dish. Stir well after cooking. |
| Melt Chocolate | 0.1-0.2 kg | ☆2 | · Break up the chocolate into small pieces. Place the chocolate into a pyrex dish. Stir when audible bell sounds. Stir well after cooking. 温馨提示: Chocolate may become very hot! If the chocolate needs longer then add 10 seconds cooking time. Take care with chocolate as it may overheat and burn. |
| Mug Cake | 1-4 mugs | ☆3 | · Make the cake as the recipe. Place the mug towards the edge of the turntable. Stand for 30 seconds after cooking. |
6.2 Mug cake recipes
| Rich Chocolate Mug Cake | |
| Ingredients for 1 Mug: | |
| 2½ tbsp (25 g) | Plain Flour |
| 2 tbsp (12 g) | Cocoa Powder |
| 2½ tbsp (30 g) | Castor Sugar |
| ¼ tsp | Baking Powder |
| 1½ tbsp (15 g) | Vegetable Oil |
| ¼ tsp | Vanilla Extract |
| 1 | Medium Egg |
Method:
- Put all of the dry ingredients into a mug, mix well with a fork.
- Add the vegetable oil, vanilla extract and egg, mix well.
- Place the mug off centre on the turntable.
- Cook using ^3 . The cake will rise out of the mug during cooking.
After cooking, stand for 30 seconds.
Decoratewithaswirlofchocolate buttercream.
Tip: To make Chocolate Orange Mug Cake replace the vanilla extract with 12 tsp orange extract.
| Raspberry Ripple Mug Cake | |
| Ingredients for 1 Mug: | |
| 2½ tbsp (25 g) | Plain Flour |
| 2½ tbsp (30 g) | Castor Sugar |
| ¼ tsp | Baking Powder |
| 1½ tbsp (15 g) | Vegetable Oil |
| ½ tsp | Vanilla Extract |
| 1 | Medium Egg |
| 1½ tsp | Seedless Raspberry Jam |
| Apple Crumble Mug Cake | |
| Ingredients for 1 Mug: | |
| 2½ tbsp (25 g) | Plain Flour |
| 2 tbsp (30 g) | Soft Brown Sugar |
| ¼ tsp | Baking Powder |
| ¼ tsp | Ground Cinnamon |
| 1½ tbsp (15 g) | Vegetable Oil |
| 1 | Medium Egg |
| 1½ tbsp (30 g) | Apple Sauce |
| half (7 g) | Digestive Biscuit, crushed |
Method:
- Put all of the dry ingredients into a mug, mix well with a fork.
- Add the vegetable oil, vanilla extract and egg, mix well.
- Fold in the jam using a spoon so that it streaks the mixture.
- Place the mug off centre on the turntable.
- Cook using 3 . The cake will rise out of the mug during cooking. After cooking, stand for 30 seconds.
Decorate with a swirl of vanilla buttercream.
Method:
- Put all of the dry ingredients (except for the biscuit) into a mug, mix well with a fork.
- Add the vegetable oil and egg, mix well.
- Gently fold in the apple sauce using a spoon so that it streaks the mixture.
- Top with the crushed digestive biscuit.
- Place the mug off centre on the turntable.
- Cook using _3 . The cake will rise out of the mug during cooking. After cooking, stand for 30 seconds.
Top with a scoop of vanilla ice cream.

WARNING! The apple sauce will be hot.
| Peanut Butter Mug Cake | |
| Ingredients for 1 Mug: | |
| 2½ tbsp (25 g) | Plain Flour |
| 2 tbsp (30 g) | Soft Brown Sugar |
| ¼ tsp | Baking Powder |
| 1½ tbsp (15 g) | Vegetable Oil |
| ¼ tsp | Vanilla Extract |
| 2 tbsp (30 g) | Smooth Peanut Butter |
| 1 | Medium Egg |
Method:
- Put all of the dry ingredients into a mug, mix well with a fork.
- Add the vegetable oil, vanilla extract, peanut butter, and egg mix well.
- Place the mug off centre on the turntable.
- Cook using 3 . The cake will rise out of the mug during cooking.
After cooking, stand for 30 seconds.
Top with chocolate spread.
Tip: Use crunchy peanut butter if you prefer.
| Lemon Drizzle Mug Cake | |
| Ingredients for 1 Mug: | |
| 2½ tbsp (25 g) | Plain Flour |
| 2½ tbsp (30 g) | Castor Sugar |
| ¼ tsp | Baking Powder |
| 1½ tbsp (15 g) | Vegetable Oil |
| 1 tsp | Lemon Zest |
| 1 | Medium Egg |
| Topping: | 1 tbsp Lemon Juice mixed with 2 tbsp Castor Sugar |
Method:
- Put all of the dry ingredients into a mug, mix well with a fork.
- Add the vegetable oil, lemon zest and egg, mix well.
- Place the mug off centre on the turntable.
- Cook using 3 . The cake will rise out of the mug during cooking.
- Make the drizzle topping by mixing the lemon juice with the castor sugar.
- After cooking, loosen the cake, pierce the top all over with a skewer, then drizzle the topping over the cake, stand for 30 seconds.
| Carrot Mug Cake | |
| Ingredients for 1 | Mug: |
| 2 tbsp (20 g) | Plain Flour |
| 2½ tbsp (30 g) | Light Brown Sugar |
| ¼ tsp | Baking Powder |
| ¼ tsp | Ground Cinnamon |
| ¼ tsp | Ground Nutmeg |
| 1 tbsp | Ground Almonds |
| 1½ tbsp (15 g) | Sunflower Oil |
| zest from ½ Orange | |
| 30 g | Grated Carrot |
| 1 | Medium Egg |
| Cream Topping: | 15 g Butter, Softened |
| 40 g Icing Sugar | |
| 40 g Full-fat Cream Cheese | |
| ½ tsp Orange Juice | |
Method:
- Put all of the dry ingredients into a mug, mix well with a fork.
- Add the sunflower oil, orange zest, grated carrot and egg, mix well.
- Place the mug off centre on the turntable.
- Cook using 12 . The cake will rise out of the mug during cooking.
- Make the topping by mixing the butter, icing sugar, cream cheese and orange juice together.
After cooking, stand for 30 seconds.
Allow the cake to cool, then add the topping.
6.3 Auto defrost
| Auto defrost | Weight | Key | Procedure |
| Meat/fish/poultry | 0.2-1.0 kg | AUTO x1 | · Place the food in a flan dish in the centre of the turntable. · When the audible bell sounds, turn the food over, rearrange and separate. Shield thin parts and warm spots with aluminium foil. · After defrosting, wrap in aluminium foil for 15-45 min, until thoroughly defrosted. · Minced meat: When the audible bell sounds, turn the food over. Remove the defrosted parts if possible. Not suitable for whole poultry. |
| (Whole fish, fish steaks, fish fillets, chicken legs, chicken breast, minced meat, steak, chops, burgers, sausages) | |||
| Bread | 0.1-1.0 kg | AUTO x2 | · Distribute in a flan dish in the centre of the turntable. For 1.0 kg, distribute directly on the turntable. · When the audible bell sounds, turn over, rearrange and remove defrosted slices. · After defrosting cover in aluminium foil and stand for 5-15 min until thoroughly defrosted. |
Enter the weight of the food only. Do not include the weight of the container. For food weighing more or less than weights/quantities given in the chart, use manual operation. The final temperature will vary according to the initial temperature. Steaks and chops should be frozen in one layer. Minced meat should be frozen in a thin shape.
6.4 Heating food and drink
| Food/drink | Quantity -g/ml- | Setting | Power Level | Time -Min- | Method | |
| Milk, | 1 cup | 150 | Micro | 900 W | 1 | do not cover |
| Water, | 1 cup | 150 | Micro | 900 W | 2 | do not cover |
| 6 cups | 900 | Micro | 900 W | 8-10 | do not cover | |
| 1 bowl | 1000 | Micro | 900 W | 9-11 | do not cover | |
| One plate meal | 400 | Micro | 900 W | 4-6 | cover, stir halfway through cooking | |
| Soup/stew | 200 | Micro | 900 W | 1-2 | cover, stir after heating | |
| Vegetables | 500 | Micro | 900 W | 3-5 | cover, stir halfway through cooking | |
| Meat, 1 slice1) | 200 | Micro | 900 W | 3 | thinly spread sauce over the top, cover | |
| Fish fillet1) | 200 | Micro | 900 W | 3-5 | cover | |
| Cake, 1 slice | 150 | Micro | 450 W | 1½-1 | place in a flan dish | |
| Baby food, 1 jar | 190 | Micro | 450 W | 1½-1 | transfer into a suitable microwaveable container, after heating stir well and test the temperature | |
| Melting margarine or butter1) | 50 | Micro | 900 W | 1½ | cover | |
| Melting chocolate | 100 | Micro | 450 W | 3-4 | stir occasionally | |
1)from chilled
6.5 Defrosting
| Food | Quantity -g- | Setting | Power Level | Time -Min- | Method | Standing time -Min- |
| Goulash | 500 | Micro | 270 W | 8-9 | stir halfway through defrosting | 10-30 |
| Cake, 1 slice | 150 | Micro | 90 W | 1-3 | place in a flan dish | 5 |
| Fruit | 250 | Micro | 270 W | 3-5 | spread out evenly, turn over halfway through defrosting | 5 |
6.6 Cooking from frozen
| Food | Quantity -g- | Setting | Power Level | Time -Min- | Method | Standing time -Min- |
| Fish fillet | 300 | Micro | 900 W | 9-11 | cover | 2 |
| One plate meal | 400 | Micro | 900 W | 8-10 | cover, stir after 6 minutes | 2 |
6.7 Cooking and grilling
| Food | Quantity -g- | Setting | Power Level | Time -Min- | Method | Standing time -Min- |
| Broccoli/ Peas | 500 | Micro | 900 W | 6-8 | add 4-5 tbsps water, cover, stir halfway through cooking | - |
| Carrots | 500 | Micro | 900 W | 9-11 | cut into rings, add 4-5 tbsps water, cover, stir halfway through cooking | - |
| Roasts | 1000 | Micro | 450 W | 16-17 | season to taste, place on the low rack, turn over after1) | 10 |
| Dual Grill | 450 W | 9-101) | ||||
| Micro | 450 W | 9-10 | ||||
| Grill | 9-10 | |||||
| Rump steaks | 400 | Grill | 10-111) | place on the high rack, turn over after1), season after grilling | ||
| 2 pieces | Grill | 10-11 | ||||
| Browning of gratin dishes | Grill | 11-15 | place dish on the low rack | |||
| Cheese | 1 piece | Grill | 450 W | 4-51) | place 2 slices of bread on the high rack, cover one slice with cheese, cook1), place toasted slice on top of the cheese on toast, turnover and cook2) | |
| toastie | Grill | 3-42) | ||||
| Frozen pizza | 400 | Micro | 450 W | 4-5 | place on the low rack | |
| Dual Grill | 450 W | 5-6 |
If the oven runs in any mode for 3 minutes or longer, the fan will stay on for 2 minutes after the cooking ends. Open the door and it will stop, close the door it will start again until 2 minutes is finished (including door open time). If the oven runs for less than 3 minutes the fan will not come on.
7. HINTS AND TIPS
7.1 Microwave safe cookware
| Cookware | Microwave safe | Comments |
| Aluminium foil/containers | ✓ / X | Small pieces of aluminium foil can be used to shield food from overheating. Keep foil at least 2 cm from the oven walls, as arcing may occur. Foil containers are not recommended unless specified by the manufacturer. Follow instructions carefully. |
| China and ceramics | ✓ / X | Porcelain, pottery, glazed earthenware and bone china are usually suitable, except for those with metallic decoration. |
| Glassware e.g. Pyrex® | ✓ | Care should be taken if using fine glassware as it can break or crack if heated suddenly. |
| Metal | X | It is not recommended to use metal cookware when using microwave power as it will arc, which can lead to fire. |
| Plastic/polystyrene e.g. fast food containers | ✓ | Care must be taken as some containers warp, melt or discolour at high temperatures. |
| Freezer/roasting bags | ✓ | Must be pierced to let steam escape. Ensure bags are suitable for microwave use. Do not use plastic or metal ties, as they may melt or catch fire due to the metal arcing. |
| Paper-plates, cups and kitchen paper | ✓ | Only use for warming or to absorb moisture. Care must be taken as overheating may cause fire. |
| Straw and wooden containers | ✓ | Always attend the oven when using these materials as overheating may cause fire. |
| Recycled paper and newspaper | X | May contain extracts of metal which will cause arcing and may lead to fire. |
7.2 Microwave cooking advice
| Microwave cooking advice | |
| Composition | Foods high in fat or sugar (e.g. Christmas pudding, mince pies) require less heating time. Care should be taken as overheating can lead to fire. |
| Size | For even cooking make all the pieces the same size. |
| Temperature of food | The initial temperature of food affects the amount of cooking time needed. Cut into foods with fillings (e.g. jam doughnuts) to release heat or steam. |
| Arrange | Place the thickest parts of food towards the outside of the dish (e.g. chicken drumsticks). |
| Cover | Use vented microwave cling film or a suitable lid. |
| Pierce | Foods with a shell, skin or membrane must be pierced in several places before cooking or reheating as steam will build up and may cause food to explode (e.g. potatoes, fish, chicken, sausages). IMPORTANT! Eggs should not be heated using microwave power as they may explode, even after cooking has ended (e.g. poached, hard boiled). |
| Stir, turn and rearrange | For even cooking it is essential to stir, turn and rearrange food during cooking. Always stir and rearrange from the outside towards the centre. |
| Stand | Standing time is necessary after cooking to enable the heat to disperse equally throughout the food. |
| Shield | Warm areas can be shielded with small pieces of foil, which reflect microwaves (e.g. legs and wings on a chicken). |
Use pot holders or oven gloves when removing food from the oven to prevent burns. Always open containers, popcorn makers, oven cooking bags, etc., away from the face and hands to avoid steam burns. Always stand back from the oven door when opening to avoid burns from escaping steam and heat. Slice stuffed baked foods after heating to release steam and avoid burns.
8. TROUBLESHOOTING
| Problem | Check if ... |
| The microwave appliance is not working properly? | · The fuses in the fuse box are working. · There has not been a power outage. · If the fuses continue to blow, please contact a qualified electrician. |
| The microwave mode is not working? | · The door is properly closed. · The door seals and their surfaces are clean. · The START key has been pressed. |
| The turntable is not turning? | · The turntable support is correctly connected to the drive. · The ovenware does not extend beyond the turntable. · Food does not extend beyond the edge of the turntable preventing it from rotating. · There is nothing in the well beneath the turntable. |
| The microwave will not switch off? | · Isolate the appliance from the fuse box. · Call an authorised ELECTROLUX service agent. |
| The interior light is not working? | · Call your authorised ELECTROLUX service agent. The interior light can be exchanged only by a trained authorised ELECTROLUX service agent. |
| The food is taking longer to heat through and cook than before? | · Set a longer cooking time (double quantity = nearly double time) or · If the food is colder than usual, rotate or turn from time to time or · Set a higher power setting. |
| The door will not open due to power cut? | · Open the door carefully by pulling outward at the bottom right hand corner of the door glass. |
9. TECHNICAL INFORMATION
| AC Line Voltage | 220-240 V, 50 Hz, single phase | |
| Distribution line fuse/circuit breaker | Minimum 16 A | |
| AC Power required: | Microwave | 1.4 kW |
| Grill | 0.85 kW | |
| Microwave/Grill | 2.20 kW | |
| Output power: | Microwave | 900 W (IEC 60705) |
| Grill | 800 W | |
| Microwave Frequency | 2450 MHz1) (Group 2/Class B) | |
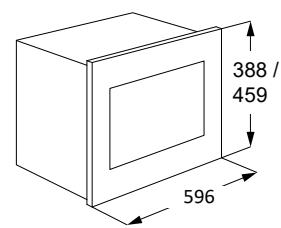
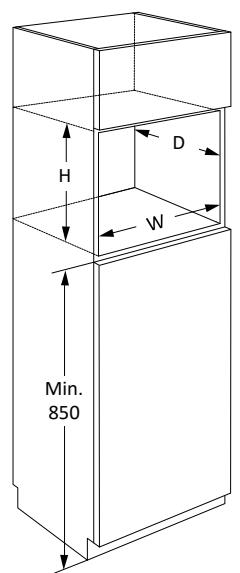
| Outside Dimensions: | MQ927GNE | 596 mm (W) x 459 mm (H) x 404 mm (D) |
| Cavity Dimensions | 342 mm (W) x 207 mm (H) x 368 mm (D)2) | |
| Oven Capacity | 26 litres2) | |
| Turntable | ø 325 mm, glass | |
| Weight | approx. 19.5 kg | |
1) This Product fulfils the requirement of the European standard EN55011. In conformity with this standard, this product is classified as group 2 class B equipment. Group 2 means that the equipment intentionally generates radio-frequency energy in the form of electromagnetic radiation for the heat treatment of food. Class B equipment means that the equipment is suitable to be used in domestic establishments.
2) Internal capacity is calculated by measuring maximum width, depth and height. Actual capacity for holding food is less.
10. ENVIRONMENT CONCERNS
Recycle materials with the symbol . Put the packaging in applicable containers to recycle it.
Help protect the environment and human health and recycle waste electrical and electronic appliances.
Do not dispose of appliances marked with the symbol with household waste. Return the product to your local recycling facility or contact your municipal office.
INDICE
- NORME DI SICUREZZA 27
- INSTALLAZIONE 32
- DESCrizIONE DEL PRODOTTO 36
- PRIMA DELL'USO 37
- FUNZIONAMENTO 38
- TABELLE PER LA COTTURA 42
- SUGGERIMENTI E CONSIGLI 49
- COSA FARE SE 51
- DATI TECHNICI 52
- INFORMAZIONI AMBIENTALI 52
PENSATI PER VOI
Grazie per aver acquistato un'apparecchiatura Electrolux. Avete scelto un prodotto che ha alle spalle decenni di esperienza professionale e innovazione. Ingegnoso ed elegante, è stato progettato pensando a voi. Quindi, in qualsiasi momento desiderate utilizzato, potete esser certi di ottenerere sempre i migliorori risultati. Benvenuti in Electrolux.
Visitate il nostro site web per:

Ricevere consigli, scaricare i nostri opuscoli, eliminare eventuali anomalie, ottener informazioni sull'assistenza:
www.electrolux.com

Registrarilevisto prodottoereceiveunservizioagliore:
www.electrolux.com/productregistration

Acquistare accessori, materiali di consumo e ricambi originali per la vostra apparecchiatura:
www.electrolux.com/shop
SERVIZIO CLIENTI E MANUTENZIONE
Consiglio sempre l'impiego di ricambi originali.
Quando si contatta l'Assistenza, accertarsi di disporre dei seguenti dati.
Le informazioni si trovano sulla targhetto di identificazione. Modelo, numero dell'apparecchio (PNC), numero di serie.

Avverenza/Attenzione - Importanti Informazioni di Sicurezza

Informazioni e suggerimenti generali

Informazioni sull'ambiente
Con riserva di modifiche.
1. NORME DI SICUREZZA
Questa apparecchiatura può essere utilizzata da bambini di età superiore a 8 anni e da persone con ridotte capacità mentali, sensoriali o fisiche oppure con poca esperienza o conoscenza se sorvegliate o precedentamente istruite in merito all'utilizzo sicuro dell'apparecchiatura e se hanno compreso i rischi che comporta. I bambini devono usare il forno soltanto in presenza di un adulto. La pulizia e la manutenzione non devono essere eseguite dai bambini a meno che questi non abbiano almeno 8 anni e siano sorvegliati.
L'elettrodomestico non è idoneo all'uso ad altitudini superiore ai 2.000 m.

IMPORTANT! ISTRUZIONI PER LA SICUREZZA PERSONALE DA LEGGERE ATTENTAMENTE E CONSERVARE PER OGNI RIFERIMENTO FUTURO.

ATTENZIONE!
Lo sportello o le relative guarnizioni si danneggiano, non usate ilorno sino all'avvenuta riparazione da parte di personale competente.

ATTENZIONE!
Eseguire interventi di assistenza o riparazione che coinvolgono la rimozione del coperchio che protege dall'esposizione all'energia a microonde è rischioso per chiunque non sia una persona competente.

ATTENZIONE!
Non riscaldare liquidi o altri cibi in contentitori sigillati, perché potrebbero esplodere.
Questo prodotto è destinato all'utilizzo domestico e in ambienti simili quali: cucine riservate allo staff in negoti,
uffici e altri ambienti di lavoro; fattorie; clienti di hotel, motel e altri ambienti legati all'ospitalità; ambienti tipo "bed and breakfast".
Usate esclusivamente recipienti e utensili adatti per fornì a microonde.
Non è consentita la presenza di contentitori metallici per alimenti e bevande durante la cottura al microonde.
Non lasciate ilorno incustodito usingo plastica, carta od alto recipiente infiammabile a perdere.
Il forno a microonde è destinato al riscaldamento di pietanze e bevande. L'utilizzo per l'essiccazione di cibo o l'asciugatura di abiti oppure per il riscaldamento di cuscini, asciugamani, spugne, panni bagnati e altri articoli simili cui poso comportare il rischio di lezione, combustione o incendio.
Se il cibo che si riscalda nel forno comincia a sprigionare fumo, NON APRITE LO SPORTELLO. Spegnete il forno, staccate il cavo di alimentazione. Prima di riaprirre lo sportello accertatevi che non ci sia più fumo all'interno del forno Se si apre lo sportello quando il cibo sta alla cora fumando c'è il pericolo d'incendio.
Il riscaldamento delle bevande nel microonde cui provocare un'ebollizione ridardata, si consiglia la massima attenzione quando si toglie il recipiente dalorno.
Controllare i contentuti delle bottiglie di alimentazone e dei vasi con gli alimenti per il bamino da agitare o scuotere e la temperatura prima del consumo per evitare scottature.
Non usare il forno a microonde per cuocere le uova con il guscio né per riscaldare le uova sode intere, perché potrebbero esplodere dopo la fase di riscaldamento.
1.1 Manutenzione e pulizia
Sportello:
Pulire spesso la porta da entrambi i lati, la guarnizione della porta e le superfici della guarnizione, utilizzare un panno umido pertogliere lo sporco. Non utilizzato detergenti abrasivi o raschietti di metallo appuntiti per pulire il vetro del forno in quanto possono graffiare la superficie e, di conseguenza, danneggiare il vetro.
Internodelforno:
Per la pulizia: togliete agli tipo di sporco con un panno morbido o spugna subito dopo l'uso a forno alla caldo. Per lo sporco più difficoltà, usate un detergente dolce e pulite più volte con un panno umido finché tutto lo sporco non sare rimosso. Non rimuovere la copertina della guida. Controllate che sapone ed acqua non penetrinoattraverso i fori nelle pareti, perché possono causaredanni al forno. Non usate detergenti spray all'interno delforno. Ad intervalli regolari, riscaldare il forno usingo ilgrill, poiché gli schizzi di cibi o di olio possono causare la formazione di fumo e cattivi odori. Dopo l'uso, pulite sempre il coperchio guida onde, la cavity del forno, il piatto girevole e il sostegno rotante. Essi devono essere asciuttied esenti da grasso. Gli accumuli di grasso possono surriscaldarsi, fumare o infiammarsi.
Esterno delorno a microonde:
L'esterno del forno può essere facilemente pulito con acqua saponata. Non mancate di togliere il sapone ed asciugare il forno a microonde con un panno morbido ed asciutto.
Pannello di contollo:
Apire innanzittutto lo sportello in modo da disattivare il pannello di controllo. Eseguire le operazioni di pulizia del pannello di controllo con attenzione. Usando un panno,
inumidito sostanto con acqua, strofinate delicatamente il pannello finché non diventa pulito. Evitate di usare troppa acqua. Non usate detergenti corrosivi.
Piatto rotante e supporto:
Togliete dal forno il piatto rotante e il supporto e lavateli. Con acqua leggermente saponata. Asciugateli con un panno morbido. Sia il piatto rotante sua il supporto possono essere lavati nella lavapiatti.
Griglie:
Si consiglia di lavare le griglie con detersivo per piatti diluito e di asciugarle. Le griglie possonoanche essere lavate nella lavastoviglie.

IMPORTANT!
Pulisca il forno a intervalli normali e rimuova tutti i residui di alimenti. Se il forno non viene mantenuto pulito, la superficie potrebbe deteriorarsi compromettendo la durata dell'apparecchio e comportando possibili situazioni di rischio.
Fare attenzione a non spostare il ravolo durante la rimozione dei contentitori dall'apparecchiatura.

IMPORTANT!
Nonutilizzare getti a vapore.
Il forno a microonde è progettato per essere usato in modo integrato.
L'apparecchiatura e le parti accessibili divertano calde durante l'utilizzo. É necessario prestare attenzione a non toccare gli elementi riscaldanti.

ATTENZIONE!
Tenere i bambini lontani dallo sportello e dalle altre parti accessibili che possono surriscaldarsi durante l'utilizzo del grill. I bambini devono essere tenuti lontani per evitare che possano bruciarsi.

IMPORTANT!
Non utilizzato su nessuna parte del fornodetergenti per fornì commerciali, getti a vapore, abrasivi, detergenti ruvidi o che contengono idrossido di sodio né spugne abrasive.
2. INSTALLAZIONE
Il forno a microonde cui èssere inserto nella posizione A o B:
| Posizione | Dimensioni nicchia |
| L P A | |
| A | 562 x 550 x 450 |
| B | 562 x 500 x 450 |
Misure in (mm)
2.1 Installazione dell'elettrodomestico
- Rimuovere l'imballo e verificare l'eventuale presenza di danni sull'apparechio.
- Fermare i ganci di fissaggio al mobile della cucina facendo riferimento al foglio di istruzioni e allo schema forniti.
- Inserire l'elettrodomestico nel mobile della cucina lentamente eenza forzare. L'elettrodomestico dovrebbe essere sollevato sopra i ganci di fissaggio e quindi abbassato sono a raggiungere la posizione corretta. In caso di interferenza durante l'inserimento, il gancio è reversible. Il telaio anteriore del forno dovrebbe poggiare contro l'apertura anteriore del mobile penza lasciare spazi.
- Accertarsi che l'apparecchio si trovi in posizione stabile e non inclinata. Verificare che tra lo sportello superiore della colonna forno e la parte alta della struttura del forno vi sia uno spazio di 4 mm. (vedi diagramma.)
2.2 Collegare l'apparecchio alla rete
- La presa elettrica deve essere facilemente accessibile per consentire il rapido scollegamento dell'unità in caso di emergenza. Oppure deve essere possibile isolare il fornodall'alimentazione inserendoinserendoun interruptore nell'implanto in conformità con le norme impiantistiche.
Il cavo di alimentazione può essere sostituito escludivamente da un elettricista.
Se il cavo di alimentazione è danneggiato, deve essere sostituito dal produttore, il suo agente di servizio o da persona delle qualifiche simili per evitare rischi.
La presa non deve essere posizionata dietro la colonna forno.
La posizione migliorie è sulla colonna fornò, vedi (A). - Collegare l'elettrodomestico a corrente alternata monofase 220-240 V/50 Hz mediante una presa di terra correttamente installata. La presa deve essere fusa con un fusibile 16 A.
- Prima dell'installazione legare un pezzo di corda al cavo di alimentazione per agevolare il collegamento al punto (A) durante l'installazione dell'apparecchio.
- Durante l'insertimento dell'apparecchio all'interno della colonna forno a bianchi alto NON schiacciare il cavo di alimentazione.
Non immershere il cavo di alimentazione o la spina in acqua o in alto liquido. - Tenete il cavo di alimentazione lontano da superfici riscaldate, compresa la parte posteriore delorno.
2.3 Raccomandazioni addizzionali
Non usate il forno a microonde per friggere o riscaldare l'olio di frittura. La temperatura in tal caso non cui quesserere controllata e cui causare un incendio. Per fare il granoturco soffiato (popcorn), usate esclusivamente le confezioni apposite per microonde.
Chi porta uno STIMOLATORE
CARDIACO delve rivolgersi al medico o al fabbricante dello stimolatore cardiaco riguardo alle precauzioni da prendere per l'uso delorno a microonde.
Non inserte alcun oggettone nelle aperture di ventilazione del forno. In caso di versamenti, spagnere e staccare immediatamente il forno e contattare un agente di servizio autorizzato ELECTROLUX.
Non modificate il alcun modo ilorno.
Usate sostanto il piatto rotante e il sostegno rotante progettati per quelloorno. Non utilizzato il fornso alla il piatto girevole.
Per evitare che il pietto rotante si rompa:
- Prima di pulire il piatto rotante con acqua, lasciatelo raffreddare.
Non mettete cibi o utensili caldi sul piatto rotante freddo.
Non mettete cibi o utensili freddi sul piatto rotante caldo.
Non usare contentitori in plastica per microonde se il forno è ancora caldo dopo l'uso della modalità GRILL o COTTURA COMBINATA perché potrebbero fondersi. I contentitori di plastica non devono essere usati con le funzioni sopra indicate, a meno che il loro fabbricante non assicuri che sono adatti allo scopo.
Il fabbricante e il rivenditore non possono
essere ritenuti responsabili per i danni al
forno e/o alle persone causati da un non
correcto collegamento elettrico. Sulle pareti
del forn, o intorno alle guarnizioni e
superfici di tenuta dello sportello,
potrebbero formarsi vapore o gocce
d'acqua. Ciò è normale e non indica una
perdita o un difetto del forn.
Per quanto riguarda la lampada o le lampade all'interno di quello prodotto e le lampade di ricambio vendute separamente: Queste lampade sono destinate a resistere a condizioni fisiche estreme negli elettrodomestici, come temperatura, vibrazioni, umidità, o sono destinate a segnalare informazioni sullo stato operativo dell'apparecchio. Non sono destinate ad essere utilizzate in altre applicazioni e non sono adatte per l'illuminazione di ambienti domestici.
3. DESCrizIONE DEL PRODOTTO
3.1 Forno a microonde
1 Resistenza del grill
2 Cornice
3 Illuminazione forn
4 Pannello di controlo
5 Tasto per aprire lo sportello
6 Coperchio guida onde
7 Cavity del fomo
8 Perno del pietto rotante
Guarnizioni e superfici di tenuta sportello
3.2 Accessori
Accertarsi che la confazione contenga i seguenti accessori:
1 Piatto rotante
Supporto per piatto rotante
3 Griglia alta
4 Griglia bassa
- Collocare il supporto del piatto sul pavimento della cavity.
- Inserirvi quindi il piatto rotante.
- Onde evitare di danneggiare il piatto rotante, accertarsi di sollevare perfettamente i piatti o i contentitori dal bordo del piatto rotante quando li si toglie dalorno.
i Se si insertisce degli accessori, indicate due elementi: nome parte e nome modello al proprio rivenditore o a un agente di servizio autorizzato ELECTROLUX.
3.3 Pannello di controllo
1 Display digitale indicatori:

Preferiti

Timer cucina

Scongelamento automatico

Grill

Cottura combinata

Microonde

Stop/annulla

Blocco di sicurezza bambino

Impostare orologio

Segment del display

Peso
90W 270W 450W 630W 900W
Livelli potenza
2 Pulsanti livelli potenza
3 Pulsanti preferiti
4 Pulsante grill
5 Pulsante scongelamento automatico
6 Pulsante timer cucina
7 Pulsanti Piu/Meno
8 Pulsante di start/ conferma/ avvio rapido
9 Pulsante di stop
10 Tasto per aprire lo sportello
4. PRIMA DELL'USO
4.1 Insertimento
Quando la spina delorno viene collegata per la prima volta, si ha la possibilità di impostare l'orologio. Il fornò è dotato di un orologio di 24 ore.
- Ilorno emette un segnale acustico e tutte le icone del display si illuminano per mezzo secondo. Premere i pulsanti PIU/MENO finché non appeare 'on' oppure "oFF".
2a. Per disattivare l'orologio, premere i pulsanti PIU/MENO finché non appeare "oFF" sul display, quando premere il pulsante START. Ilorno è pronto all'uso.
i Se si desidera riattivare l'orologio dopo averlo disattivato, premere due volte il pulsante TIMER CUCINA e seguire 2b.
2b. Per accendere l'orologio, premei pulsanti PIU/MENO finché non appeare "on" sul display, quando premere il pulsante START.
Esempio: Per impostare l'orologio sulle ore 18:45.
- Premere i pulsanti PIU/MENO per regolare l'ora.
- Premere il pulsante START per confermare.
-
Premere i pulsanti PIU/MENO per regolare i minuti.
-
Premere il pulsante START per confermare.
i Una volta impostato I'orologio, I'orario verrà molto sullo schermo.
4.2 Standby (modalita Economia)
Il forno passa automaticamente in modalità standby se non è usato per un periodo di 5 minuti.
Esempio: Se l'orologio non è stato impostato:
Lo schermo si disattivera.
Aprière lo sportello oppure premere un pulsante qualsiasi per uscire alla modalità stand-by.
Esembio: Se l'orologio è stato impostato:
Dopo 5 minuti, l'orario verrà molto.
4.3 Regolazione dell'orologio una volta impostato.
É possible regolare l'orologio après che l'ora è stata impostata.
Esempio: Per passare dalle ore 18.45 alle 19.50.
- Premere due volte il pulsante TIMER CUCINA.
- Premere il pulsante START.
- Premere i pulsanti PIU/MENO finché non appeare "19".
- Premere il pulsante START.
- Premere i pulsanti PIU/MENO finché non appeare "50".
- Premere il pulsante START.
4.4 Per cancellare l'orologio e impostare lo standby (modalità Economia)
- Premere due volte il pulsante TIMER CUCINA.
- Premere i pulsanti PIU/MENO finché non appeare "oFF".
- Premere il pulsante START per confermare.
4.5 Blocco di sicurezza bambino
I fornò è dotato di una funzionalità di sicurezza che impedisce l'uso accidentale del fornò da parte dei bambini. Se il blocco è stato impostato, nessuna componente del microonde funzionera fino alla disattivazione della funzionalità di blocco.
L'attivazione/disattivazione del blocco è possibile solo se il fornò non è in funzione.
Esempio: Per attivare il blocco.
Tenere premuto il pulsante STOP fino alla visualizzazione del symbolo "blocco bambini".
Esemblio: Per disattivare il blocco.
Tenere premuto il pulsante STOP sono alla commutazione del significato "blocco bambini".
i Quando il blocco bambini è attivato, tutti i pulsanti sono disattivati tranne il pulsante STOP.
5. FUNZIONAMENTO
5.1 Livello di potenza delle microonde
Esempio: Voler scaldare una minestra per 2 minuti e 30 secondi ad una potenza di 630 W.
- Premere il pulsante LIVELLO POTENZA a destra del triangolo fino a visualizzare "630 W".
- Premere i pulsanti PIU/MENO per indicare il tempo.
- Premere il pulsante START.
i Nella modalità di cottura a microonde, è possibile regolare il livello di potenza sul forn o premendo il pulsante direttamente al di fatto delle impostazioni richieste.
È possibile impostare il livello di potenza quando i fornò è in esecuzione tenendo premuto il pulsante LIVELLO POTENZA sino a che la nuova impostazioni di potenza non verrà visualizzata sullo schermo. I livelli di potenza troppo alto o i tempi di cottura troppo lunghi possono surriscaldare il cibo e causare un incendio.
Se è selezionato 900 W l'orario massimo per il microonde che è possibile insere è circa 15 minuti.
Se il forno è in funzione in una modalità qualsiasi per 3 minuti o più, la ventola resta accesa per 2 minuti fino al termine della cottura. Aprire lo sportello ne causa l'arresto, chiudere lo sportello ne causa il riavvio fino al termine dei due minuti (incluso il tempo di aperture dello sportello). Se il forno è in funzione per meno di due minuti la ventola non si attiva.
Dopo la cottura, il piatto rotante
continuera a girare fino a quando il
recipiente da cottura non sare
ritornato alla sua posizione iniziale. La
luce interna restera accesa fino al
completamento della rotazione,
oppure per 5 secondi (a seconda di
quale dei due tempi risulta più lungo). Il forno emetterà un segnale acustico
al completamento. Se lo sportello
viene aperto durante quello
procedimento, la rotazione si
interromperà.
5.2 Livelli potenza
| Impostazione della potenza | Utilizzato consigliato |
| 900 W/ALTA | Utilizzato per una cottura rapida o per riscaldare le vivande (ad esempio minestre, casseruole, cibi in scatola, bevande calde, verdure, pesce, ecc.). |
| 630 W | Utilizzato per la cottura più prolongata di alimenti densi, quali arrosti, polpettoni di carne, pasti preconfezionati e per pietanze delicate quali salse al formaggio e dolci tipo pan di Spagna. Grazie a esta impostazione ridotta, le salse bollendo non fuoriescono dal loro contentatore e il cibo viene cucinato in maniera uniforme, evitando di cuocereccessivamente le estremità. |
| 450 W | Per cibi densi che richiedono una cottura prolongata quando cucinati in modo tradizionale (ad esempio la carne di manzo). Si raccomanda di utilizzato但这a potenza per ottenere una carne tenera. |
| 270 W/ SCONGE-LARE | Scongelare, selezionare但这a potenza. L'alimento viene scongelato in maniera uniforme. Questo livello di potenza è idealeanche per cuocere lentamente riso, pasta, dolcetti di frutta e crème pasticcere. |
| 90 W | Per scongelare lentamente (ad esempio torte alla crema o altre pasticceria). |
| 0 W | Perorno inattivo/timer. |
W = WATT
5.3 Potenza ridotta
| Funzione di cottura | Tempo standard | Potenza ridotta |
| Microonde 900 W | 15 minuti | Microonde 630 W |
| Grill | 10 minuti | Grill 500 W |
| Cottura combinata | 10 minuti | Grill 500 W |
5.4 Regolazione del tempo di cottura durante la cottura
É possible regolare il tempo di cottura durante la cottura.
Esembio: Per aggiungere due minuti (120 secondi) usando il pulsante START.
- Premere il pulsante START quattro volte.
Il tempo di cottura aumenta di 120 secondi.
5.5 Uso del pulsante stop
Premere il pulsante STOP una volta per passare alla modalità Pausa.
Premere nuovamente il pulsante STOP per annullare il tempo di cottura.
5.6 Timer cucina
Per impostare l'orario della cucina.
Il tempo può essere esteso quando il timer è in funzione premendo il pulsante START.
- Premere il pulsante TIMER CUCINA.
- Premere i pulsanti PIU/MENO per indicare il tempo.
- Premere il pulsante START. Il timer si avvia automaticamente.
La funzione timer più essere usata solo quando il fornò non è in funzione.
5.7 Avvio rapido
É possible iniziare la cottura direttamente su 900 W/ALTA per 30 secondi premendo il pulsante START.
i Per aggiuengere tempo premere il pulsante START.
5.8 Disatt. audio
Per disattivare l'audio.
- Premere il pulsante TIMER CUCINA tre volte fino a che viene visualizzato "Soun".
- Premere i pulsanti PIU/MENO finché non appeare "oFF".
- Premere il pulsante START.
Per attivare l'audio.
-
Premere il pulsante TIMER CUCINA tre volte fino a che viene visualizzato "Soun".
-
Premere i pulsanti PIU/MENO finché non appeare "on".
- Premere il pulsante START.
5.9 Pausa
Per mettere in pausa durante l'uso del microonde.
- Premere il pulsante STOP per aprire lo sportello.
- Il forn otra in pausa per 5 minuti.
- Premere il pulsante START per continuare la cottura.
5.10 Griglia e cottura combinata
Questo foro a microonde prevede due modalità per la cottura con il grill:
Solo grill
Dual Grill (Grill e microonde)

IMPORTANT! Per cuocere con il grill si consiglia l'uso della griglia alla o bassa. Quando si mette in funzione per la prima volta il grill è possibile che si produca fumo o cattivo odore, ma cui non significiva che ilorno sia guasto. Per eliminare la causa di tale fenomeno, prima di usare il fornso per la prima volta, metterlo in funzione vuoto per 20 minuti, selezionando la funzione di cottura grill.
- Premere i pulsanti PIU/MENO per indicare il tempo.
- Premere il pulsante GRILL una volta per la modalità Cottura combinata (Griglia + Microonde) e premere il pulsante START.
Premere nuovamente il pulsante GRILL per selezionare la modalità Solo grill.
- Premere il pulsante START.

Nella modalità Cottura combinata i livelli di potenza da 90 W e 900 W non sono disponibili.
Per uscire alla modalità Cottura combinata o Grill premere il pulsante GRILL sino a che è illuminato solo il symbolo del microonde sullo schermo.
5.11 Preferiti
Il fromo è dotato di tre ricette preferite.
Burro morbido
Cioccolato fuso
Mug Cake
Esempio: Per ammonidire il burro.
- Premere una volta il pulsante PREFERITA 1.
- Premere i pulsanti PIU/MENO per selezionare il peso.
- Premere il pulsante START.
i Se i segmenti dello schermo mostrano uno schema a rotazione, cui indica che gli alimenti devono essere agitati o rovesciati. Per continuare la cottura, premere il pulsante START. Al terme del periodo di scongelamento automatico, il programma si arresta automaticamente.
I livelli di potenza per le ricette preferite pre-impostate non possono essere regolati. É possibile preparare 1-4 Mug cake.
ATTENZIONE! Il ciocolato può diventare bolliente! Se il ciocolato necessita di un tempo di cottura superiore aggiungere 10 secondi. Fare attenzione al ciocolato perché potrebbe surriscaldarsi e bruciarsi.
Per sovrascrivere i Preferiti con le proprie ricette.
- Premere il PULSANTE livello id potenza per selezionare la potenza.
- Premere i pulsanti PIU/MENO per indicare il tempo.
- Tenere premuto il pulsante PREFERITI che si desidera impostare fino a che non verra emesso un segnale acustico, quando la stellina dei preferiti è visible.
Per reimpostare i Preferiti alle impostazioni di fabbrica.
- Premere il pulsante STOP.
- Premere etenere premuto LIVELLI POTENZA 450 W per tre secondi. Ilorno reimposta i Preferiti alle impostazioni di fabbrica.
5.12 Scongelamento automatico
Lo scongelamento automatico attiva automaticamente la modalità e il tempo di cottura corretti in base al peso degli alimenti.
É possible selezionare da due menu di scongelamento automatico.
- Scongelamento automatico: Carne/pesce/pollame
- Scongelamento automatico: Pane
Esembio:Per scongelare una bistecca da 0,2kg
- Selezionare il menu di scongelamento automatico premendo una volta il pulsante SCONGELAMENTO AUTOMATICO.
- Premere i pulsanti PIU/MENO per selezionare il peso.
- Premere il pulsante START.
i Se i segmenti dello schermo
mostrano uno schema a rotazione,
cchio indica che gli alimenti devono
essere agitati o rovesciati. Per
continuire la cottura, premere il pulsante START. Al termine del
periodo di scongelamento automatico, il programma si arresta automaticamente. La regolazione Tempo/Potenza non è disponibile con lo scongelamento automatico.
6. TABELLE PER LA COTTURA
6.1 Preferiti
| Preferiti | Peso | Pulsante | Procedimento |
| Burro morbido | 0,05-0,25 kg | ☆1 | Collocare il burro su un piatto in pirex. Agitare dopo la cottura. |
| Ciocolato fuso | 0,1-0,2 kg | ☆2 | Rompere la ciocolata in piccoli pezzi. Collocare la ciocolata in un piatto in pirex. Agitare quando la campanella émette un suono. Agitare dopo la cottura.ATTENZIONE: Il ciocolato può diventare ballente! Se il ciocolato necessita di un tempo di cottura superiore aggiungere 10 secondi. Fare attenzione al ciocolato perché potrebbe surriscaldarsi e bruciari si. |
| Mug cake | 1-4 tazze | ☆3 | Preparare la torta come nella ricetta. Collocare la tazza sui bordi del piatto. Lasciare rimosare 30 secondi dopo la cottura. |
6.2 Ricette per mug cake
| Mug Cake al ciocolato | |
| Ingredienti per una tazza: | |
| 2 1/2 cucchiaio (25 g) | di farina semplice |
| 2 cucchiaio (12 g) | di polvere di cocco |
| 2 cucchiaini e mezzo (30 g) | circa di zucchini |
| ¼ di cucchiaino | di lieviti artificiale |
| un cucchiaino e mezzo (15 g) | di olio vegetale |
| un quarto di cucchiaino | di estratto di vaniglia |
| 1 | uovo medio |
Metodo:
- Collocare tutti gli ingredienti asciutti in una tazza, agitare bene con una forchetta.
- Aggiungere l'olio vegetale, l'estratto di vaniglia e le uova, agitare bene.
- Collocare la tazza sui bordi del pietto.
- Cucinare using _3 . La torta lievita alla tazza durante la cottura.
Dopo la cottura, lasciare riposare per 30 secondi.
Decorare con un ricciolo di crema al burro di cioccolato.
Suggerimento: Per preparare una Mug Cake con ciocolato all'arancia sostituire l'estratto di vaniglia con mezzo cucchiaino di estratto di arancia.
| Mug Cake al lampone | |
| Ingredienti per una tazza: | |
| 2 1/2 cucchiaio (25 g) | di farina semplice |
| 2 cucchiaini e mezzo (30 g) | circa di zucchini |
| ¼ di cucchiaino | di lieviti artificiale |
| un cucchiaio e mezzo (15 g) | di olio vegetale |
| ½ tsp | di estratto di vaniglia |
| 1 | uovo medio |
| un cucchiaio e mezzo | di marmellata di lampone sensa semi |
Metodo:
- Collocare tutti gli ingredienti asciutti in una tazza, agitare bene con una forchetta.
- Aggiungere l'olio vegetale, l'estratto di vaniglia e le uova, agitare bene.
- Girare la marmellata usando un cucchioioosi che il composto assume delle striature.
- Collocare la tazza sui bordi del piatto.
- Cucinare using _3 . La torta livita alla tazza durante la cottura.
Dopo la cottura, lasciare riposare per 30 secondi.
Decorare con un ricciolo di crema al burro di cioccolato.
| Mug Cake alla mela con bricchio | |
| Ingredienti per una tazza: | |
| 2 cucchiaio (25 g) | di farina semplice |
| 2 cucchiai (30 g) | di zucchero di canna morbido |
| ¼ di cucchiaino | di lieviti artificiale |
| un quarto di cucchiaino | di cannella |
| un cucchiaino e mezzo (15 g) | di olio vegetale |
| 1 | uovo medio |
| un cucchiaio e mezzo (30 g) | di salsa di melà |
| (7 g) sbriciolato | mezzo biscotto digestivo |
Metodo:
- Collocare tutti gli ingredienti asciutti (tranne il biscotto) in una tazza, agitare bene con una forchetta.
- Aggiungere l'olio vegetale e l'uovo, mescolare bene.
- Versare la salsa di mela usando un cucchioio per creare striature.
- Decorare con biscotti digestivi sbriciolati.
- Collocare la tazza sui bordi del pietto.
- Cucinare using _3 . La torta livita alla tazza durante la cottura.
Dopo la cottura, lasciare riposare per 30 secondi.
Decorare con un ricciolo di gelato alla vaniglia.

ATTENZIONE! La salsa di mela è boliente.
| Mug Cake al burro di noccioline | |
| Ingredienti per una tazza: | |
| 2 cucchiaio (25 g) | di farina semplice |
| 2 cucchiai (30 g) | di zucchero di canna morbido |
| ¼ di cucchiaino | di lieviti artificiale |
| un cucchiaino e mezzo (15 g) | di olio vegetale |
| un quarto di cucchiaino | di estratto di vaniglia |
| 2 cucchiai (30 g) | di burro di noccioline liscio |
| 1 | uovo medio |
Metodo:
- Collocare tutti gli ingredienti asciutti in una tazza, agitare bene con una forchetta.
- Aggiungere l'olio vegetale, l'estratto di vaniglia, il burro di nocciolino e agitare bene le uova.
- Collocare la tazza sui bordi del pietto.
- Cucinare using _3 . La torta lievita alla tazza durante la cottura.
Dopo la cottura, lasciare riposare per 30 secondi.
Decorare con un ricciolo di cioccolato.
Suggerimento: Usare burro di noccioline croccante se si desidera.
| Mug Cake con decorazione al limone | |
| Ingredienti per una tazza: | |
| 2 cucchiaio (25 g) | di farina semplice |
| 2 cucchiaini e mezzo (30 g) | circa di zucchero |
| ¼ di cucchiaio | di lieviti artificiale |
| un cucchiaio e mezzo (15 g) | di olio vegetale |
| un cucchiaio | di scorza di limone |
| 1 | uovo medio |
| Decorazione: | 1 cucchiaio di succo di limone con un cucchiaio di zucchini di castagna |
Metodo:
- Collocare tutti gli ingredienti asciutti in una tazza, agitare bene con una forchetta.
- Aggiungere l'olio vegetale, la scorza di limone e l'uvolo e agitare bene.
- Collocare la tazza sui bordi del pietto.
- Cucinare usingo3 . La torta lievita alla tazza durante la cottura.
- Applicare la decorazione a pioggia escolando il succo di limone con lo zucchero di castagna.
- Dopo la cottura, lasciare riposare la torta, bucare la cima con uno spiedo, quando spargere la decorazione sulla torta, lasciare riposare per 30 secondi.
| Mug cake alle carote | |
| Ingredienti per una tazza: | |
| 2 cucchiaio (20 g) | di farina semplice |
| 2½ cucchiaio (30 g) | di zucchero di canna bianro |
| ¼ di cucchiaino | di lieviti artificiale |
| un quarto di cucchiaino | di cannella |
| un quarto di cucchiaino | di noce moscata |
| un cucchiaino | di mandorle |
| un cucchiaio e mezzo (15 g) | di olio di semi di girasole |
| la scorza di una arancia | |
| 30 g | di carote gratinate |
| 1 | uovo medio |
| Decorazione alla crema: | 15 g di burro morbido |
| 40 g di zucchero ghiacciato | |
| 40 g di formaggio cremoso | |
| un mezzo di cucchiaino di succo d'arancia | |
Metodo:
- Collocare tutti gli ingredienti asciutti in una tazza, agitare bene con una forchetta.
- Aggiungere l'olio di semi di girasole, la carota grigliata e l'uovo e agitare bene.
- Collocare la tazza sui bordi del pietto.
- Cucinare usando 3 . La torta lievita alla tazza durante la cottura.
- Appicare la decorazione mescolando il burro, lo zucchero ghiacciato, la crema al formaggio e il succo d'arancia insieme.
Dopo la cottura, lasciare riposare per 30 secondi.
Lasciare raffreddare la torta, quando aggungere la decorazione.
6.3 Scongelamento automatico
| Scongelamento automatico | Peso | Pulsante | Procedimento |
| Carne/pisce/pollame | 0,2-1,0 kg | x1 | • Disporre il tutto su un piatto al centro del piatto rotante. |
| • Quando ilorno si blocca e viene emesso un segnale acustico, girare la carne, quand risistemare e分开are. | |||
| (Pesci interi, trancidi pesce, filetti di pesce, cosce di pollo, petti di pollo, carne macinata, bistecche, braciole, hamburger, salsicce) | Proteggete le parti sottili e i punti caldi con fogli d'alluminio. | ||
| • Terminata l'operazione, avvolgere nella stagnola e lasciare ricosare per 15-45 minuti, fino al completo scongelamento. | |||
| • Carne macinata: quando ilorno si arresta e viene emesso il segnale acustico, rigirate il cibo. Se possibile, rimuovete le parti scongelate. | |||
| Non idoneo per polli interi. | |||
| Pane | 0,1-1,0 kg | x2 | • Distribuire in una pirofila al centro del piatto girevole. Fino a 1,0 kg distribuire direttamente sul piatto girevole. |
| • Al segnale acustico, girare, ridisporre e togliere le fette scongelate. | |||
| • Dopo lo scongelamento, copire con la pellicola di alluminio e lasciar ricosare per 5 -15 min, fino a scongelamento ultimato. |
Indicare il peso del cibo, escludendo il peso del contentatore.
Per alimenti dal peso superiore o inferiore al peso/quantità indicato nella tabella, usare il funzionamento manuale.
La temperatura finale dipende dalla temperatura iniziale.
Bistecche e braciale dovrebbero essere congelati in uno strato.
La carne macinata delve essere congelata in spessori sottili.
6.4 Riscaldamento di cibi e bevande
| Bevanda/Cibo | Quantità -g/ml- | Regol- azione | Potenza Livello | Durata -Min- | Suggerimenti | |
| Latte, | 1 tazza | 150 | Micro | 900 W | 1 | non copire |
| Acqua, | 1 tazza | 150 | Micro | 900 W | 2 | non copire |
| 6 tazze | 900 | Micro | 900 W | 8-10 | non copire | |
| 1 zuppiera | 1000 | Micro | 900 W | 9-11 | non copire | |
| Piatto pronto | 400 | Micro | 900 W | 4-6 | aggiungere una spruzzata d'acqua all'intingolo, copire e mescolare di tantoin tanto | |
| Stufato/zuppe | 200 | Micro | 900 W | 1-2 | copire, mescolare dopo il riscaldamento | |
| Verdure | 500 | Micro | 900 W | 3-5 | aggiungere eventualmente un po' d'acqua a metà riscaldamento mescolare | |
| Carne, 1 fetta 1) | 200 | Micro | 900 W | 3 | copire, cospargere con un po' di intingolo | |
| Filetto di pesce 1) | 200 | Micro | 900 W | 3-5 | copire | |
| Dolce (torta), 1 fetta | 150 | Micro | 450 W | ½-1 | adagiare su una gratella per dolci | |
| Omogeneizzati, 1 vasetto | 190 | Micro | 450 W | ½-1 | togliere il coperchio, a riscaldamento ultimato mescolare e controllare la temperatura | |
| Per scogiagliere il burro o la margarina 1) | 50 | Micro | 900 W | ½ | copire | |
| Per scogiagliere il ciocolato | 100 | Micro | 450 W | 3-4 | mescolare di tanto in tanto | |
1)temperatura di frigorifero
6.5 Scongelamento
| Alimenti | Quantità -g- | Regol- azione | Potenza Livello | Durata -Min- | Suggerimenti | Tempo di attesa -Min- |
| Spezzatino | 500 | Micro | 270 W | 8-9 | a metà scongelamento mescolare e分开ere i pezzi di carne | 10-30 |
| Torta, 1 fetta | 150 | Micro | 90 W | 1-3 | adagiare su un piatto per dolci | 5 |
| Frutta | 250 | Micro | 270 W | 3-5 | collocarle l'une di fianco all'altra e a metà scongelamento voltarle | 5 |
6.6 Cucinare alimenti congelati
| Alimenti | Quantità -g- | Regol- azione | Potenza Livello | Durata -Min- | Suggerimenti | Tempo di attesa -Min- |
| Filetto di pesce | 300 | Micro | 900 W | 9-11 | copire | 2 |
| Piatto pronto | 400 | Micro | 900 W | 8-10 | copire, mescolare dopo 6 minuti | 2 |
6.7 Cucinare e grigliare
| Alimenti | Quantità -g- | Regol-azione | Potenza Livello | Durata -Min- | Suggerimenti | Tempo di attesa -Min- |
| Broccoli/Piselli | 500 | Micro | 900 W | 6-8 | aggiungere 4-5 cucchiasi d'accu, copire, girare di tanto in tanto durante la cottura | - |
| Carote | 500 | Micro | 900 W | 9-11 | tagliare a rondelle, copire,aggiungere 4-5 cucchiasi d'accu, copire, girare di tanto in tanto durante la cottura | - |
| Arrosti | 1000 | MicroCottura combinata | 450 W450 W | 16-179-101) | insaporire a piacere,adagiare sulla griglia più Bassa e voltare dopo 1) | 10 |
| MicroGrill | 450 W | 9-109-10 | ||||
| Bistecca2 pezzi | 400 | GrillGrill | 10-111) | disporre sulla griglia alta, girare dopo 1), insaporire dopo la cottura | ||
| Cottura di sformati | Grill | 11-15 | collocare il piatto sulla griglia in basso | |||
| CroqueMonsieur | 1 porzioni | GrillGrill | 450 W | 4-51)3-42) | collocare due fette di pane sul vassoio superiore, copire la fetta con formaggio, cucinare 1), collocare la fetta tostata sopra il formaggio sul toast, girare e cucinare 2) | |
| Pizzacongelata | 400 | MicroCottura combinata | 450 W450 W | 4-55-6 | adagiare sulla griglia bassa |
i Se il forno è in funzione in una modalità qualsiasi per 3 minuti o più, la ventola restaa accesa per 2 minuti fino al termine della cottura. Aprire lo sportello ne causa l'arresto, chiudere lo sportello ne causa il riavvio fino al termine dei minuti (incluso il tempo di apertura dello sportello). Se il forno è in funzione per meno di due minuti la ventola non si attiva.
7. SUGGERIMENTI E CONSIGLI
7.1 Recipients per una cottura a microonde sicura
| Recipients di cottura | Sicurezza con le microonde | Commenti |
| Carta stagnola/ Contenitori in carta stagnola | ✓ / X | Per proteggere gli alimenti dal surriscaldamento, è possibile utilizzare fogli di carta stagnola. Mantenere la carta stagnola a una distanza minima di 2 cm delle pareti del forno poiché, in caso contrario, potrebbero formarsi archi elettrici. Si sconsiglia l'utilizzo di contentitori in carta stagnola, se non specificati dal produttore e seguire attendamente le istruzioni. |
| Porcellana e ceramica | ✓ / X | Di norma, è possible utilizzato i contentitori in porcellana, in ceramica, in vetro e in porcellana fine, se non presentano decorazioni metalliche. |
| Recipienti in vetro, ad esempio Pyrex® | ✓ | Se si utilizzato recipienti in vetro sottile occorre fare molto attenzione, perché, se riscaldati in modo improviso, possono rompersi o scheggiarsi. |
| Metallo | X | Nella cottura a microonde si sconsiglia l'utilizzo di recipienti in metallo, poché causano la formazione di archi elettrici e possono essere causa di un principio di incendio. |
| Plastica/Polistirene, ad esempio, contentitori da Fast Food | ✓ | Occorre prestare molta attenzione, perché ad elevate temperature alcuni contentori possono deformarsi, fondersi o scolorirsi. |
| Sacchetti per congelamento/ rosolatura | ✓ | Devono essere forati per consentire la fuoruscita del vapore. Verificare che i sacchetti siano adatti per l'utilizzo in forno a microonde. Non utilizzato legacci in plastica o in metallo, perché possono fondersi o provocare incendi a causa della formazione di archi elettrici. |
| Carta - sottocoppe e carta da cucina | ✓ | Utilizzato solo per il riscaldamento o per assorbire l'umido. Occorre prestare molta attenzione, perché il surriscaldamento può portare al sviluppo di incendi. |
| Contenitori in paglia e legno | ✓ | Quando si utilizzato quosti materiali, è necessario sempre sorvegliare il forno, perché il surriscaldamento può portare allvo sviluppo di incendi. |
| Carta riciclata e carta di giomale | X | Possocono contentere estratti di metallo, i quali possono provocare la formazione di archi elettrici e causare incendi. |
7.2 Consigli e suggerimenti
| Consigli e suggerimenti | |
| Composizione | Gli alimenti con un elevato contento di grassi o zuccheri (ad esempio, un dolce natalizio o una torta ripiena di frutta secca) richiedono un tempo di cottura inferiore. Occorre prestare molta attenzione perché il surriscaldamento può costituire un grado di incendio. |
| Dimensioni | Per una cottura uniforme, ottenere pezzi delle stesse dimensioni. |
| Temperatura | La temperature iniziade degli alimenti influisce sul tempo di cottura necessario. Nel caso di alimenti con ripiano, (ad esempio, bomboloni alla marmellata), occorre praticare in essi piccoli tagli, per consentire la fuoriuscita di calore o vapore. |
| Disposizione | Posizionare le parti più spesse dell'alimento verso la parte esterna del vassoio di cottura. (Ad esempio, nel caso di cosce di pollo.) |
| Copertura | Utilizzare pellicola protettiva, forandola per la ventilazione, o un coperchio adatto. |
| Foratura | Prima della cottura o del riscaldamento, gli alimenti con guscio, pelle o membrana devono essere forati in diversi punti, poiché la formazione interna di vapore potrebbe causare l'esplosione dell'alimento stesso. (Ad esempio, nel caso di patate, pesce, pollo, salsicce.)IMPORTANT! Non utilizzato il fornso a microonde per cuocere uova poiché QUESTe potrebbero esplodere,anche dopo la cottura.(Ad esempio, nel caso di uova in camacia, fritte o sode.) |
| Rimescolare, girare e ridisperre gli alimenti | Per una cottura uniforme, è necessario rimescolare, girare o ridisperre gli alimenti. Rimescolare e ridisperre sempre gli alimenti alla parte esterna verso il centro. |
| Tempo di riposo | Dopo la cottura, è necessario lasciare risosare brevamente gli alimenti per consentire al calore di diffondersi uniformmenteattraverso gli alimenti stessi. |
| Schematura | È possibile schermare le aree calde con pezzetti di carta stagnola, che riflettono le microonde, (ad esempio nel caso di cosce e ai di pollo). |
Mai toccare o alzare la resistenza quando è calda. Usare presine o guanti da cucina per togliere il cibo dalorno. Per evitare le usioni causate dal vapore, après sempre contentitori, recipienti per pop-corn, sacchetti da fornso, ecc. tenendoli lontani dal viso e dalle mani.
Per evitare le scottature causate da la fuoriuscita del vapore e del calore, allontanarsi dallo sportello del fornso durante l'apertura. Per far uscire il vapore ed evitare uszioni, praticare alcune incisioni sui cibi ripieni riscaldi.
8. COSA FARE SE
| Sintomo | Controlli/suggerimenti . . . |
| Ilorno a microonde non funziona correttamente? | I fusibili all'interno del portafusibili funzionino correttamente. Non sua avvenuta un'interruzione di corrente. Se i fusibili continuano a saltare, contattere un elettricista qualificato. |
| La funzione microonde non funziona? | Lo sportello sia chiuso correttamente. Le guarnizioni e la superficie dello sportello siano pulite. Il pulsante START è stato premuto. |
| Il piatto rotante non gira? | Il supporto del piatto rotante sia correttamente collegato alla trasmission. Il vasellame non si estenda altre il piatto rotante. Gli alimenti inserti non si estendano altre il bordo del piatto rotante impedendone la rotazione. Non sua presente nulla nel vano sottostante il piatto rotante. |
| Ilorno a microonde non si spegne? | Isolare l'apparecchio dal portafusibili. Contattere un agente di servizio autorizzato ELECTROLUX. |
| La luce interna non funziona? | Contattere il proprio agente di servizio autorizzato ELECTROLUX. La lampadina interna deeva essere sostituita solo da un agente di servizio autorizzato ELECTROLUX. |
| Occorre più tempo per gli alimenti? | Impostare un tempo di cottura più lungo (quantità doppia = quasi tempo doppio) oppure. Se il cibo risulta più freddo del solito, farlo ruotare di tanto in tanto, oppure. Impostare un livello di potenza superiore. |
| Lo sportello non si apree a causa di un'interruzione di corrente? | Aprire lo sportello conattenzione tirando verso l'esterno l'angolo in basso a destra dello sportello di vetro. |
9. DATI TECHNICI
| Tensione della linea CA | 220-240 V, 50 Hz, monofase | |
| Fusibile/interruttore linea di distribuzione | Minimo 16 A | |
| Potenza CA richiesta: | Microonde | 1.4 kW |
| Grill | 0.85 kW | |
| Microonde/Grill | 2.20 kW | |
| Potenza sviluppata: | Microonde | 900 W (IEC 60705) |
| Grill | 800 W | |
| Frequenza microonde | 2450 MHz 1) (Gruppo 2/Classe B) | |
| Dimensioni esterne: | MQ927GNE | 596 mm (L) x 459 mm (A) x 404 mm (P) |
| Dimensioni interne | 342 mm (L) x 207 mm (A) x 368 mm (P) 2) | |
| Capacità del fosso | 26 litres 2) | |
| Piatto rotante | ø 325 mm, vetro | |
| Peso | circa. 19,5 kg | |
1) Il Prodotto soddisfa i requisiti della norma europea EN55011. In conformità a tale norma, quello prodotto è classificato come apparecchiatura appartenente al gruppo 2 classe B. Gruppo 2 significhe che l'apparecchiatura genera energia in frequenza radio sotto forma di radiazioni elettromagnetiche per il riscaldamento dei cibi. Apparecchiatura di Classe B significata che l'apparecchiatura può essere utilizzata in ambienti domestici.
2) La capacité interna è calculata misurando larghezza, profondità è altezza massima. Lo spazio a disposizione per gli alimenti è inferiore e dipende dagli accessori inserti.
10. INFORMAZIONI AMBIENTALI
Riciclare i materiali con il symbolo. Buttare l'imballaggio negli appositi contentitori per il riciclaggio.
Aiutare a proteggere l'ambiente e la salute umana e a riciclare rifuti derivanti da apparecchiature elettriche ed elettroniche.
Non smaltire le appearecchiature che riportano il symbolo insieme ai normali rifiuti domestici. Portare il prodotto al punto di riciclaggio più vicino o contattare il comune di residenza.
electrolux.com/shop


- CONTENTS
- WE'RE THINKING OF YOU
- CUSTOMER CARE AND SERVICE
- SAFETY INFORMATION
- Care and cleaning
- Door:
- Oven interior:
- Oven exterior:
- Control panel:
- Turntable and turntable support:
- Racks:
- IMPORTANT!
- WARNING!
- INSTALLATION
- Installing the appliance
- Connecting the appliance to the power supply
- Additional advice
- PRODUCT DESCRIPTION
- Microwave oven
- Accessories
- Control panel
- BEFORE FIRST USE
- Plug in
- Standby (Economy mode)
- Adjusting the clock when set
- To cancel the clock and set standby (Economy mode)
- Child safety lock
- OPERATION
- Microwave cooking
- Power levels
- Reduced power level
- Adjusting the cooking time during cooking
- Using the stop key
- Kitchen timer
- Quick start
- Mute
- Pause
- Grill and dual grill
- Favourites
- Auto defrost
- COOKING CHARTS
- Favourites
- Mug cake recipes
- Method:
- Auto defrost
- Cooking from frozen
- Cooking and grilling
- HINTS AND TIPS
- Microwave cooking advice
- TROUBLESHOOTING
- TECHNICAL INFORMATION
- ENVIRONMENT CONCERNS
- INDICE
- PENSATI PER VOI
- Visitate il nostro site web per:
- SERVIZIO CLIENTI E MANUTENZIONE
- NORME DI SICUREZZA
- ATTENZIONE!
- Manutenzione e pulizia
- Sportello:
- INSTALLAZIONE
- Installazione dell'elettrodomestico
- Collegare l'apparecchio alla rete
- Raccomandazioni addizzionali
- DESCrizIONE DEL PRODOTTO
- Forno a microonde
- Accessori
- Pannello di controllo
- PRIMA DELL'USO
- Insertimento
- Standby (modalita Economia)
- Regolazione dell'orologio una volta impostato.
- Per cancellare l'orologio e impostare lo standby (modalità Economia)
- Blocco di sicurezza bambino
- FUNZIONAMENTO
- Livello di potenza delle microonde
- Livelli potenza
- Potenza ridotta
- Regolazione del tempo di cottura durante la cottura
- Uso del pulsante stop
- Timer cucina
- Avvio rapido
- Disatt. audio
- Pausa
- Griglia e cottura combinata
- Preferiti
- Scongelamento automatico
- TABELLE PER LA COTTURA
- Metodo:
- Scongelamento automatico
- Riscaldamento di cibi e bevande
- Scongelamento
- Cucinare alimenti congelati
- Cucinare e grigliare
- SUGGERIMENTI E CONSIGLI
- Consigli e suggerimenti
- COSA FARE SE
- DATI TECHNICI
- INFORMAZIONI AMBIENTALI
- electrolux.com/shop
Marque : ELECTROLUX
Modèle : MQ927GNE
Catégorie : Mixeur plongeant