
MQC326GXE - Mixeur plongeant ELECTROLUX - Notice d'utilisation et mode d'emploi gratuit
Retrouvez gratuitement la notice de l'appareil MQC326GXE ELECTROLUX au format PDF.

| Type d'appareil | Micro-ondes |
| Capacité | Non précisé |
| Puissance | Non précisé |
| Nombre de niveaux de puissance | Non précisé |
| Fonction décongélation | Oui |
| Type de commande | Non précisé |
| Affichage | Non précisé |
| Type d'ouverture | Non précisé |
| Dimensions (L x H x P) | Non précisé |
| Poids | Non précisé |
| Couleur | Non précisé |
| Fonction cuisson rapide | Oui |
| Type d'installation | Pose libre |
| Accessoires inclus | Non précisé |
| Garantie | Non précisé |
| Consommation électrique | Non précisé |
| Marque | Non précisé |
FOIRE AUX QUESTIONS - MQC326GXE ELECTROLUX
Questions des utilisateurs sur MQC326GXE ELECTROLUX
0 question sur cet appareil. Repondez a celles que vous connaissez ou posez la votre.
Poser une nouvelle question sur cet appareil
Téléchargez la notice de votre Mixeur plongeant au format PDF gratuitement ! Retrouvez votre notice MQC326GXE - ELECTROLUX et reprennez votre appareil électronique en main. Sur cette page sont publiés tous les documents nécessaires à l'utilisation de votre appareil MQC326GXE de la marque ELECTROLUX.
MODE D'EMPLOI MQC326GXE ELECTROLUX
EN Microwave Oven
IT Forno a Microonde
User Manual 2
Manuale per L'utente 21

CONTENTS
- SAFETY INFORMATION 3
- INSTALLATION 7
3.PRODUCT DESCRIPTION 11 - OPERATION 13
- HINTS AND TIPS 17
- TROUBLESHOOTING 19
- TECHNICAL INFORMATION 20
- ENVIRONMENT CONCERNS 20
WE'RE THINKING OF YOU
Thank you for purchasing an Electrolux appliance. You've chosen a product that brings with it decades of professional experience and innovation. Ingenious and stylish, it has been designed with you in mind. So whenever you use it, you can be safe in the knowledge that you'll get great results every time. Welcome to Electrolux.
Visit our website for:

Get usage advice, brochures, trouble shooter, service information: www.electrolux.com

Register your product for better service: www.electrolux.com/productregistration

Buy Accessories, Consumables and Original spare parts for your appliance: www.electrolux.com/shop
CUSTOMER CARE AND SERVICE
We recommend the use of original spare parts.
When contacting Service, ensure that you have the following data available.
The information can be found on the rating plate. Model, PNC, Serial Number.

Warning/Caution-Safety information

General information and tips

Environmental information
Subject to change without notice.
1. SAFETY INFORMATION
This appliance can be used by children aged from 8 years and above and persons with reduced physical, sensory or mental capabilities or lack of experience and knowledge if they have been given supervision or instruction concerning use of the appliance in a safe way and understand the hazards involved. Children should be supervised to ensure that they do not play with the appliance. Cleaning and user maintenance shall not be made by children unless they are aged from 8 years and above and supervised.
This appliance is not intended for use at altitudes above 2000m.

IMPORTANT! IMPORTANT SAFETY
INSTRUCTIONS: READ CAREFULLY AND KEEP FOR FUTURE REFERENCE.

WARNING!
If the door or door seals are damaged, the oven must not be operated until it has been repaired by a competent person.

WARNING!
It is hazardous for anyone other than a competent person to carry out any service or repair operation that involves the removal of a cover which gives protection against exposure to microwave energy.

WARNING!
Liquids and other foods must not be heated in sealed containers since they are liable to explode.
This appliance is intended to be used in household and similar applications such as: staff kitchen areas in shops, offices and other working environments; farm houses; by clients in hotels, motels and other residential environments; bed and breakfast type environments.
Only use microwave-safe containers and utensils.
Metallic containers for food and beverages are not allowed during microwave cooking.
Do not leave the oven unattended when using disposable plastic, paper or other combustible food containers.
The microwave oven is intended for heating food and beverages. Drying of food or clothing and heating of warming pads, slippers, sponges, damp cloth and similar may lead to risk of injury, ignition or fire.
If food being heated begins to smoke, DO NOT OPEN THE DOOR. Turn off and unplug the oven and wait until the food has stopped smoking. Opening the door while food is smoking may cause a fire.
Microwave heating of beverages can result in delayed eruptive boiling, therefore care has to be taken when handling the container.
The contents of feeding bottles and baby food jars shall be stirred or shaken and the temperature checked before consumption, in order to avoid burns.
Do not cook eggs in their shells and whole hard boiled eggs should not be heated in microwave ovens since they may explode even after microwave cooking has ended.
1.1 Care and cleaning
Door:
To remove all trace of dirt, regularly clean both sides of the door, the door seals and sealing surfaces with a soft, damp cloth. Do not use harsh abrasive cleaners or sharp metal scrapers to clean the oven door glass since they can scratch the surface, which may result in shattering of the glass.
Oven interior:
For cleaning, wipe any splatters or spills with a soft damp cloth or sponge after each use while the oven is still warm. For heavier spills, use a mild soap and wipe several times with a damp cloth until all residues are removed. Do not remove the waveguide cover. Make sure that mild soap or water does not penetrate the small vents in the walls which may cause damage to the oven. Do not use spray type cleaners on the oven interior. Heat up your oven regularly by using the grill. Remaining food or fat splashed can cause smoke or a bad smell. Clean the waveguide cover, the oven cavity, the turntable and turntable support after use. These must be dry and free from grease. Built-up grease may overheat and begin to smoke or catch fire.
Oven exterior:
The outside of your oven can be cleaned easily with mild soap and water. Make sure the soap is wiped off with a moist cloth, and dry the exterior with a soft towel.
Control panel:
Open the door before cleaning to de-activate the control panel. Care should be taken when cleaning the control panel. Using a cloth dampened with water only, gently wipe the panel until it becomes clean. Avoid using excessive amounts of water. Do not use any sort of chemical or abrasive cleaner.
Turntable and turntable support:
Remove the turntable and turntable support from the oven. Wash the turntable and turntable support in mild soapy water. Dry with a soft cloth. Both the turntable and the turntable support are dishwasher safe.
Racks / Baking Plate:
These should be washed in a mild washing up liquid
solution and dried. They are dishwasher safe.

IMPORTANT!
Clean the oven at regular intervals and remove any food deposits. Failure to maintain the oven in a clean condition could lead to a deterioration of the surface that could adversely affect the life of the appliance and possibly result in a hazardous situation.
Care should be taken not to displace the turntable when removing containers from the appliance.

IMPORTANT!
A steam cleaner should not be used.
The microwave oven is intended to be used built-in.
The appliance and its accessible parts become hot during use. Care should be taken to avoid touching heating elements.

WARNING!
Keep children away from the door and accessible parts that may become hot when the grill & convection is in use. Children should be kept away to prevent them burning themselves.

IMPORTANT!
Do not use commercial oven cleaners, steam cleaners, abrasive, harsh cleaners, any that contain sodium hydroxide or scouring pads on any part of your microwave oven.
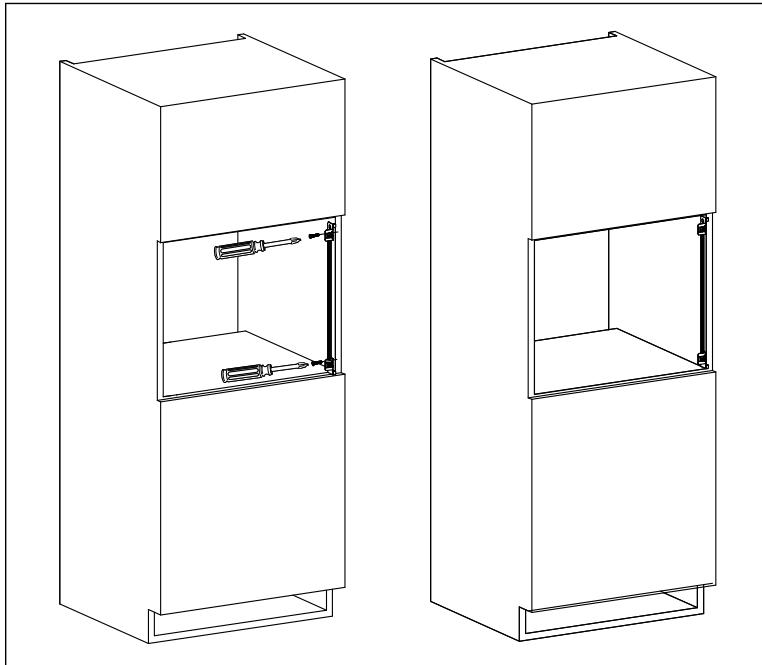
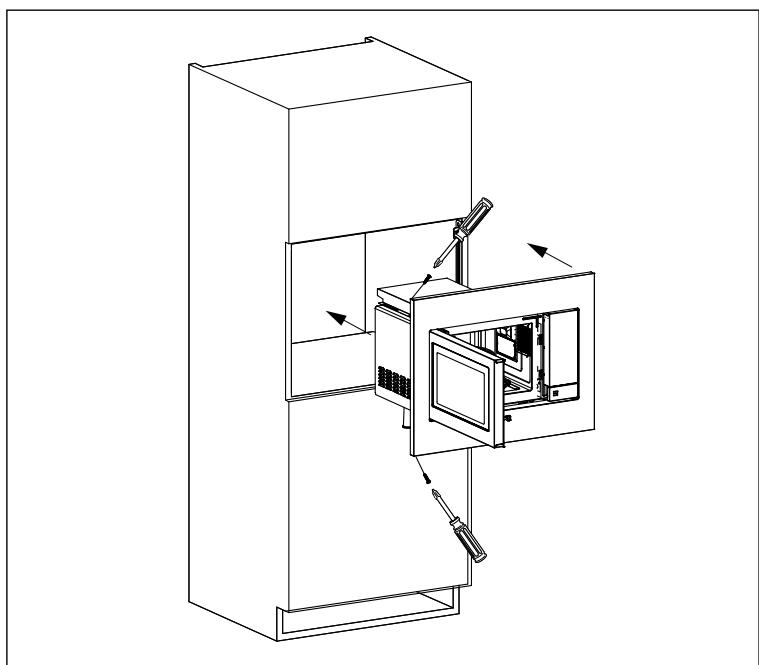
2. INSTALLATION
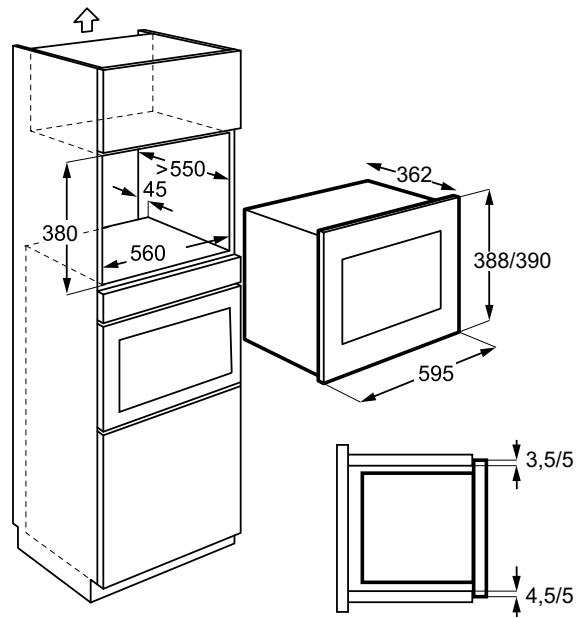
2.1 Installing the appliance
- Remove all packaging and check carefully for any signs of damage.
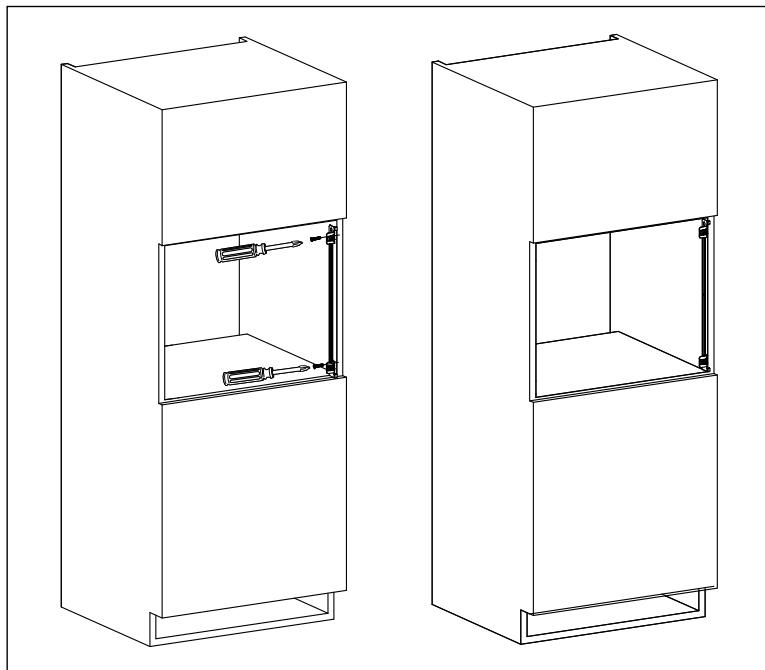
- Fit the fixing bracket to the right hand side of the kitchen cupboard using the installation sheet and two screws supplied.
- Fit the appliance into the kitchen cupboard slowly and without force until it clips into the brackets. Ensure the appliance is stable and centralised.
- Fix the oven on the left hand side using the two screws supplied.
- The front frame of the appliance should seal against the front opening of the cupboard.

IMPORTANT!
Do not install this appliance in kitchen cupboards without the specified 45mm rear chimney. Inadequate ventilation could adversely affect the performance and life of the appliance.

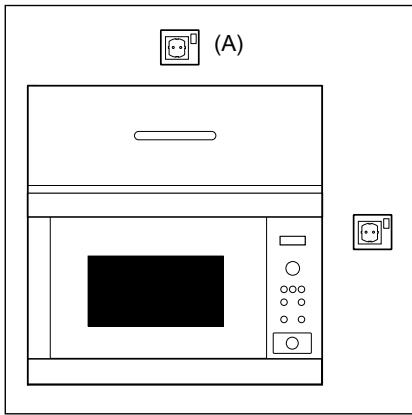
2.2 Connecting the appliance to the power supply
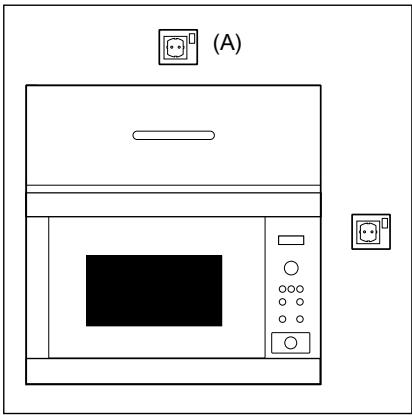
- The electrical outlet should be readily accessible so that the unit can be unplugged easily in an emergency. Or it should be possible to isolate the oven from the supply by incorporating a switch in the fixed wiring in accordance with the wiring rules.
- The power supply cord may only be replaced by an electrician.
- If the supply cord is damaged it must be replaced by the manufacturer, its service agent or similarly qualified persons in order to avoid a hazard.
- The socket should not be positioned behind the cupboard.
- The best position is above the cupboard, see (A).
- Connect the appliance to a single phase 230V / 50Hz alternating current via a correctly installed earth socket. The socket must be fused with a 16 A fuse.
- Before installing, tie a piece of string to the power supply cord to facilitate connection to point (A) when the appliance is being installed.
- When inserting the appliance into the high-sided cupboard, DO NOT crush the power supply cord.
- Do not immerse the power supply cord or plug in water or any other liquid.
- Do not allow the power supply cord to run over any hot or sharp surfaces, such as the hot air vent area at the top rear of the oven.
2.3 Additional advice
Do not use the microwave oven to heat oil for deep frying. The temperature cannot be controlled and the oil may catch fire. To make popcorn, only use special microwave popcorn makers.
Individuals with PACEMAKERS should check with their doctor or the manufacturer of the pacemaker for precautions regarding microwave ovens.
Never spill or insert any objects into the door lock openings or ventilation openings. In the event of a spill, turn off and unplug the oven immediately and call an authorised ELECTROLUX service agent.
Never modify the oven in any way.
Only use the turntable and the turntable support designed for this oven. Do not operate the oven without the turntable.
To prevent the turntable from breaking:
- Before cleaning the turntable with water, leave the turntable to cool.
- Do not put hot foods or hot utensils on a cold turntable.
- Do not put cold foods or cold utensils on a hot turntable.
Do not use plastic containers for microwaving if the oven is still hot from using the GRILL & CONVECTION modes because they may melt. Plastic containers must not be used during above modes unless the container manufacturer says they are suitable.
Neither the manufacturer nor the dealer can accept any liability for damage to the oven or personal injury resulting from failure to observe the correct electrical connection procedure. Water vapour or drops may occasionally form on the oven walls or around the door seals and sealing surfaces. This is a normal occurrence and is not an indication of microwave leakage or a malfunction.

WARNING!
After GRILL & CONVECTION modes the oven cavity, door, oven cabinet and accessories will become very hot. Before cleaning, make sure they are completely cool.
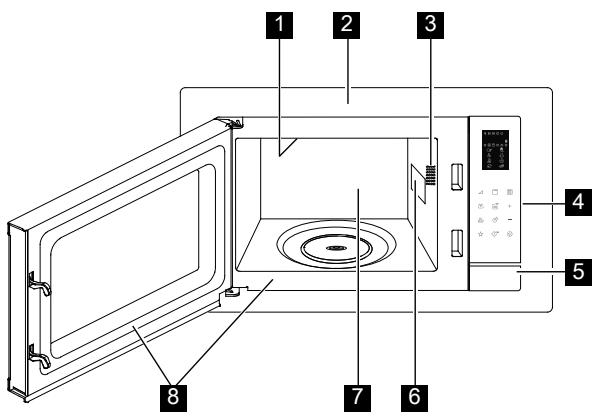
3. PRODUCT DESCRIPTION
3.1 Microwave oven

1 Grill heating element
2 Front trim
3 Oven light
4 Control panel
5 Door open button
6 Waveguide cover
7 Oven cavity
8 Door seals and sealing surfaces
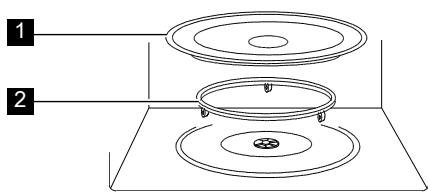
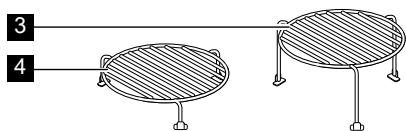
3.2 Accessories
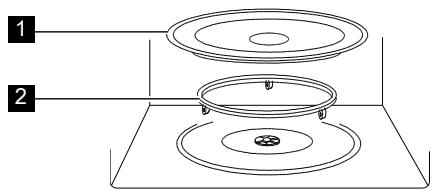
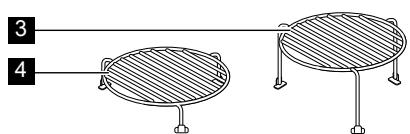
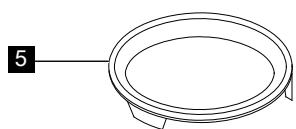
Check to make sure the following accessories are provided:
1 Tumtable
2 Turntable support
3 High rack
4 Low rack
5 Baking plate
- Place the turntable support on the floor of the cavity.
- Then place the turntable on the turntable support.
- To avoid turntable damage, ensure dishes or containers are lifted clear of the turntable rim when removing them from the oven.

When you order accessories, please mention two items: part name and model name to your dealer or an authorised ELECTROLUX service agent.
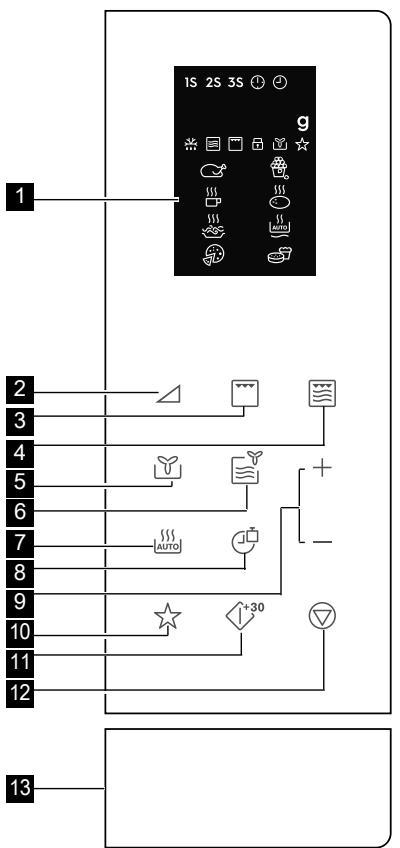
3.3 Control panel
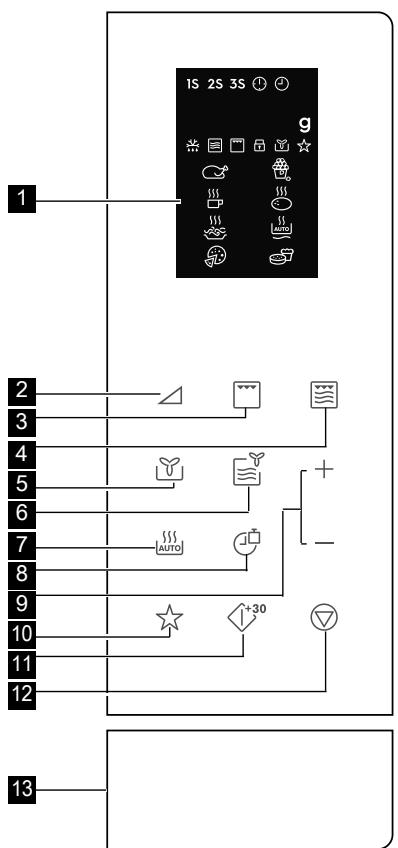
1 Digital display indicators:

Multi stage cooking

Clock set

Clock setting

Weight

Auto Defrost

Microwave

Grill

Child safety lock

Convection

Preset

Chicken

Beverages

Spaghetti

Pizza

Popcorn

Potato

Auto Reheat

Cake
2 Power level key
3 Grill key
4 Micro. + grill key
5 Convection key
6 Micro. + convection key
7 Auto cook key
8 Clock/weight key
9 Time + / - key
10 Preset key
11 Start/quick start key
12 Pause/cancel key
13 Door open button
4. OPERATION
4.1 Setting the clock
When the oven is plugged in for the first time you can have the option of setting the clock. The oven has a 12 and 24 hour clock.
Example: To set the clock.
- In standby mode, press the CLOCK/WEIGHT key once to set 12 hour clock, if you want to set 24 hour clock, press it again.
- Press the TIME +/- key to adjust the hour.
- Press the CLOCK/WEIGHT key to confirm.
- Press the TIME +/- key to adjust the minutes.
- Press the CLOCK/WEIGHT key to confirm.
During cooking, you can press the CLOCK/WEIGHT key to check the time of day.
4.2 Microwave cooking
Microwave cooking allows you to customize the cooking power and time. First, you select a power level by pressing the POWER LEVEL key (see the table below). Press the TIME +/- key to enter the cooking time. Maximum cooking time is 95 minutes.
Example: To cook for 5 minutes at 60% power level.
- Open the oven door and place the food inside. Close the door.
- Press the POWER LEVEL key 5 times.
- Press the TIME +/- key to enter the cooking time.
- Press the START/QUICK START key.
To check the microwave power level during cooking press the POWER LEVEL key. The power level default is 100% .
At the end of cooking, the system will beep and End is displayed. Before starting another cooking session, press any key to clear the display and reset the system. Power levels that
are too high or cooking times that are too long may overheat foods resulting in a fire.
| Power Level Key | Power Level |
| x 1 | 100 % (P100) |
| x 2 | 90 % (P-90) |
| x 3 | 80 % (P-80) |
| x 4 | 70 % (P-70) |
| x 5 | 60 % (P-60) |
| x 6 | 50 % (P-50) |
| x 7 | 40 % (P-40) |
| x 8 | 30 % (P-30) |
| x 9 | 20 % (P-20) |
| x 10 | 10 % (P-10) |
| x 11 | 0 % (P-00) |
4.3 Grill
Grill cooking is particularly useful for thin slices of meat, steaks, chops, kebabs, sausages and pieces of chicken. It is also suitable for hot sandwiches and au gratin dishes. Maximum cooking time is 95 minutes.
Example: To grill for 12 minutes.
- Open the oven door and place the food inside. Close the door.
- Press the GRILL key.
- Press the TIME +/- key to enter cooking time.
- Press the START/QUICK START key.
IMPORTANT! The high rack is recommended for grilling.
4.4 Micro. + Grill
Combi Micro/Grill mode combines the microwave and the grill functions at different time periods during cooking.
Maximum cooking time is 95 minutes.
Example: To set Combi cooking for 25 minutes.
- Open the oven door and place the food inside. Close the door.
- Press the MICRO. + GRILL key once or twice.
- Press the TIME +/- key to enter the cooking time.
- Press the START/QUICK START key.
| Micro. + Grill Key | Microwave | Grill | Use |
| x 1 Co - 1 | 30 % | 70 % | fish, potatoes, au gratin |
| x 2 Co - 2 | 55 % | 45 % | pudding, omelette, baked potatoes, poultry |
4.5 Convection cooking
During convection cooking, hot air is circulated throughout the oven cavity to brown and make crisp foods quickly and evenly. This oven can be programmed for ten different cooking temperatures. Maximum cooking time is 95 minutes.
To cook with convection:
Example: To cook at 180^ for 40 minutes.
- Open the oven door and place the food inside. Close the door.
- Press the CONVECTION key 8 times.
- Press the TIME +/- key to enter the cooking time.
- Press the START/QUICK START key.

To cook with convection, press CONVECTION key repeatedly to enter the desired convection temperature. To check the temperature during cooking pres CONVECTION key.
| Convection Key | Temperature (℃) |
| x 1 | 110 |
| x 2 | 120 |
| x 3 | 130 |
| x 4 | 140 |
| x 5 | 150 |
| x 6 | 160 |
| x 7 | 170 |
| x 8 | 180 |
| x 9 | 190 |
| x 10 | 200 |
To preheat and cook with convection: Your oven can be programmed to combine preheating and convection cooking operations.
Example: To preheat to 170^ and then cook 35 minutes.
- Press CONVECTION key 7 times.
- Press the START/QUICK START key. The oven will beep when the designated temperature is reached.
- Open the oven door and place the food inside. Close the door.
- Press the TIME +/- key to enter the cooking time.
- Press the START/QUICK START key.

The maximum preheat time is 30 minutes. The oven will count down from 30'00 until preheat temperature is reached. When the temperature reaches the preheat temperature, the countdown stops and beeps every 5 seconds for 30 minutes. If you don't open the oven door within the 30 minutes, the system will stop automatically with END in display.
4.6 Micro. + convection
This oven has one pre-programmed setting that makes it easy to cook with 200^ convection and microwave. Example: To cook for 24 minutes on Micro. + Convection.
- Open the oven door and place the food inside. Close the door.
- Press the MICRO. + CONVECTION key.
- Press the TIME +/− key to enter the cooking time.
- Press the START/QUICK START key.

To check the microwave power level during cooking press the MICRO. + CONVECTION key. Press MICRO. + CONVECTION key repeatedly to program convection temperature. Maximum cooking time is 95 minutes.
4.7 Preset
This function allows you to set the oven to start a cooking program at a later time.
- Open the oven door and place the food inside. Close the door.
- Enter the desired cooking program.
- Press the PRESET key once.
- Press the TIME +/- key to adjust the hour.
- Press the PRESET key once.
- Press the TIME +/- key to adjust the minutes.
- Press the START/QUICK START key.

Before using preset, check the oven clock time is correct. In preset mode the preset time can be seen by pressing the PRESET key. If you press the PAUSE/CANCEL key when the display shows the time, the function is cancelled. Preset cannot be used for Quick Start & Auto Defrost.
4.8 Quick start
You can directly start cooking on 100 % for 30 seconds by pressing the START/QUICK START key.

To add more time press the START/QUICK START key.
4.9 Auto cook
Auto cook automatically works out the correct cooking mode and cooking time. You can choose from 9 menus.
| Auto Cook Food | Cooking Mode | |
| A - 01 | Chicken 800 - 1400 g | Micro. + Convection |
| A - 02 | Popcorn 99 g | Micro. |
| A - 03 | Milk/Coffee 1 - 3 cups | Micro. |
| A - 04 | Baked Potato 1 - 3 pcs | Micro. |
| A - 05 | Spaghetti 100 - 300 g | Micro. |
| A - 06 | Auto Reheat 200 - 800 g | Micro. |
| A - 07 | Pizza 150 - 450 g | Convection |
| A - 08 | Cake | Convection |
| A - 09 | Auto Defrost | Micro. |
- Open the oven door and place the food inside. Close the door.
- Press the AUTO COOK key to select the food.
- Press the CLOCK/WEIGHT key to select amount or weight.
- Press the START/QUICK START key.

Turn the chicken 2 to 3 times during cooking, close the oven door and press the START/QUICK START key to resume cooking.
4.10 Auto defrost
Auto defrost automatically works out the correct cooking mode for defrosting food. Example: To defrost frozen food for 10 minutes.
- Open the oven door and place the food inside. Close the door.
- Press the AUTO COOK key 9 times until it shows A-09.
- Press the TIME +/- key to set 10 minutes.
- Press the START/QUICK START key.

Turn the chicken 2 to 3 times during defrosting, close the oven door and press the START/QUICK START key to resume cooking.
4.11 Multi-stage cooking
A sequence of 3 stages (maximum) can be programmed.
Example: To cook:
Stage 1: 2 minutes 30 seconds at 70% Stage 2: 5 minutes grill
- Open the oven door and place the food inside. Close the door.
- Press the POWER LEVEL key 4 times.
- Press the TIME +/- key to enter the cooking time.
- Press the GRILL key once.
- Press the TIME +/- key to enter the cooking time.
- Press the START/QUICK START key.
Auto Cook, Auto Defrost, and Quick Start cannot be set as a multi-stage cooking program.
4.12 Child safety lock
The child proof lock prevents unsupervised operation by children. The child safety lock is automatically enabled after 1 minute of no operation by the user. To cancel open the door.
4.13 Pause
To pause whilst the microwave is running.
- Press the PAUSE/CANCEL key once to enter pause mode during cooking.
- Press the START/QUICK START key to continue cooking.
The oven will stop operating when the door is opened.
4.14 Oven protection features
This oven has 3 automatic systems to protect against abnormal cooking temperatures. In normal operation no user input is needed.
If one of the systems is triggered then the display shows an indication below and beeps continuously.
E01: Over temperature
E02: Under temperature
E03: Sensor
Press the PAUSE/CANCEL key to return the system to normal standby mode.
5. HINTS AND TIPS
5.1 Microwave safe cookware
| Cookware | Microwave safe | Comments |
| Aluminium foil/containers | ✓ / X | Small pieces of aluminium foil can be used to shield food from overheating. Keep foil at least 2 cm from the oven walls, as arcing may occur. Foil containers are not recommended unless specified by the manufacturer. Follow instructions carefully. |
| China and ceramics | ✓ / X | Porcelain, pottery, glazed earthenware and bone china are usually suitable, except for those with metallic decoration. |
| Glassware e.g. Pyrex® | ✓ | Care should be taken if using fine glassware as it can break or crack if heated suddenly. |
| Metal | X | It is not recommended to use metal cookware when using microwave power as it will arc, which can lead to fire. |
| Plastic/polystyrene e.g. fast food containers | ✓ | Care must be taken as some containers warp, melt or discolour at high temperatures. |
| Freezer/roasting bags | ✓ | Must be pierced to let steam escape. Ensure bags are suitable for microwave use. Do not use plastic or metal ties, as they may melt or catch fire due to the metal arcing. |
| Paper-plates, cups and kitchen paper | ✓ | Only use for warming or to absorb moisture. Care must be taken as overheating may cause fire. |
| Straw and wooden containers | ✓ | Always attend the oven when using these materials as overheating may cause fire. |
| Recycled paper and newspaper | X | May contain extracts of metal which will cause arcing and may lead to fire. |
| Cookware | Microwave | Grill | Convection | Combination* |
| Heat - resistant glass | ✓ | ✓ | ✓ | ✓ |
| Non Heat - resistant glass | X | X | X | X |
| Heat - resistant ceramics | ✓ | ✓ | ✓ | ✓ |
| Microwave - safe plastic dish | ✓ | X | X | X |
| Kitchen paper | ✓ | X | X | X |
| Baking plate | X | ✓ | ✓ | X |
| Racks | X | ✓ | ✓ | X |
| Aluminum foil & foil container | X | ✓ | ✓ | X |
- Combination: applicable for both micro. grill and micro. convection cooking.
5.2 Microwave cooking advice
| Microwave cooking advice | |
| Composition | Foods high in fat or sugar (e.g. Christmas pudding, mince pies) require less heating time. Care should be taken as overheating can lead to fire. |
| Size | For even cooking make all the pieces the same size. |
| Temperature of food | The initial temperature of food affects the amount of cooking time needed. Cut into foods with fillings (e.g. jam doughnuts) to release heat or steam. |
| Arrange | Place the thickest parts of food towards the outside of the dish (e.g. chicken drumsticks). |
| Cover | Use vented microwave cling film or a suitable lid. |
| Pierce | Foods with a shell, skin or membrane must be pierced in several places before cooking or reheating as steam will build up and may cause food to explode (e.g. potatoes, fish, chicken, sausages). IMPORTANT! Eggs should not be heated using microwave power as they may explode, even after cooking has ended (e.g. poached, hard boiled). |
| Stir, turn and rearrange | For even cooking it is essential to stir, turn and rearrange food during cooking. Always stir and rearrange from the outside towards the centre. |
| Stand | Standing time is necessary after cooking to enable the heat to disperse equally throughout the food. |
| Shield | Warm areas can be shielded with small pieces of foil, which reflect microwaves (e.g. legs and wings on a chicken). |
Use pot holders or oven gloves when removing food from the oven to prevent burns. Always open containers, popcorn makers, oven cooking bags, etc., away from the face and hands to avoid steam burns.
Always stand back from the oven door when opening to avoid burns from escaping steam and heat. Slice stuffed baked foods after heating to release steam and avoid burns.
6. TROUBLESHOOTING
| Problem | Check if ... |
| The microwave appliance is not working properly? | · The fuses in the fuse box are working. · There has not been a power outage. · If the fuses continue to blow, please contact a qualified electrician. |
| The microwave mode is not working? | · The door is properly closed. · The door seals and their surfaces are clean. · The START key has been pressed. |
| The turntable is not turning? | · The turntable support is correctly connected to the drive. · The ovenware does not extend beyond the turntable. · Food does not extend beyond the edge of the turntable preventing it from rotating. · There is nothing in the well beneath the turntable. |
| The microwave will not switch off? | · Isolate the appliance from the fuse box. · Call an authorised ELECTROLUX service agent. |
| The interior light is not working? | · Call your authorised ELECTROLUX service agent. The interior light can be exchanged only by a trained authorised ELECTROLUX service agent. |
| The food is taking longer to heat through and cook than before? | · Set a longer cooking time (double quantity = nearly double time) or · If the food is colder than usual, rotate or turn from time to time or · Set a higher power setting. |

If the oven operates in any mode for 2 minutes or longer, the fan will stay on for 3 minutes after the cooking ends.
7. TECHNICAL INFORMATION
| AC Line Voltage | 230 V, 50 Hz, single phase | |
| Distribution line fuse/circuit breaker | Minimum 16 A | |
| AC Power required: | Microwave | 1.400 kW |
| Grill | 1.000 kW | |
| Convection | 1.950 kW | |
| Output power: | Microwave | 900 W (IEC 60705) |
| Grill | 1000 W | |
| Convection | 1950 W | |
| Microwave Frequency | 2450 MHz1) (Group 2/Class B) | |
| Outside Dimensions: | LMS6253TM | 595 mm (W) x 388 mm (H) x 382 mm (D) |
| MQC326GXE | 595 mm (W) x 390 mm (H) x 382 mm (D) | |
| Cavity Dimensions | 340 mm (W) x 210 mm (H) x 344 mm (D)2) | |
| Oven Capacity | 25 litres2) | |
| Turntable | ø 270 mm, glass | |
| Weight | approx. 16.7 kg | |
1) This Product fulfils the requirement of the European standard EN55011. In conformity with this standard, this product is classified as group 2 class B equipment. Group 2 means that the equipment intentionally generates radio-frequency energy in the form of electromagnetic radiation for the heat treatment of food. Class B equipment means that the equipment is suitable to be used in domestic establishments.
2) Internal capacity is calculated by measuring maximum width, depth and height. Actual capacity for holding food is less.
8. ENVIRONMENT CONCERNS
Recycle materials with the symbol . Put the packaging in applicable containers to recycle it.
Help protect the environment and human health and recycle waste electrical and electronic appliances.
Do not dispose of appliances marked with the symbol with household waste. Return the product to your local recycling facility or contact your municipal office.
INDICE
- NORME DI SICUREZZA 22
- INSTALLAZIONE 27
- DESCrizIONE DEL PRODOTTO 31
- FUNZIONAMENTO 33
- SUGGERIMENTI E CONSIGLI 37
- COSA FARE SE 39
- DATI TECHNICI 40
- INFORMAZIONI AMBIENTALI 40
PENSATI PER VOI
Grazie per aver acquistato un'apparecchiatura Electrolux. Avete scelto un prodotto che ha alle spalle decenni di esperienza professionale e innovazione. Ingegnoso ed elegante, è stato progettato pensando a voi. Quindi, in qualsiasi momento desiderate utilizzato, potete esser certi di ottenerere sempre i migliorori risultati. Benvenuti in Electrolux.
Visitate il nostro site web per:

Ricevere consigli, scaricare i nostri opuscoli, eliminare eventuali anomalie, ottener
informazioni sull'assistenza:
www.electrolux.com

Registrar il vosto prodotto e ricevere un servizio migliorare: www.electrolux.com/productregistration

Acquistare accessori, materiali di consumo e ricambi originali per la vostra apparecchiatura: www.electrolux.com/shop
SERVIZIO CLIENTI E MANUTENZIONE
Consiglio sempre l'impiego di ricambi originali.
Quando si contatta l'Assistenza, accertarsi di disporre dei seguenti dati.
Le informazioni si trovano sulla targhetta di identificazione. Modello, numero dell'apparecchio (PNC), numero di serie.

Avverenza/Attenzione - Importanti Informazioni di Sicurezza

Informazioni e suggerimenti generali

Informazioni sull'ambiente
Con riserva di modifiche.
1. NORMEDISICUREZZA
Questa apparecchiatura può essere utilizzata da bambini di età superiore a 8 anni e da persone con ridotte capacità mentali, sensoriali o fisiche oppure con poca esperienza o conoscenza se sorvegliate o precedentemente istruite in merito all'utilizzo sicuro dell'apparecchiatura e se hanno compreso i rischi che comporta. I bambini devono usare ilorno soltanto in presenza di un adulto. La pulizia e la manutenzione non devono essere eseguite dai bambini a meno che questi non abbiano almeno 8 anni e siano sorvegliati.
L'elettrodomestico non è idoneo all'uso ad altitudini superiore ai 2.000 m.

IMPORTANT! ISTRUZIONI PER LA SICUREZZA PERSONALE DA LEGGERE ATTENTAMENTE E CONSERVARE PER OGNI RIFERIMENTO FUTURO.

ATTENZIONE!
Lo sportello o le relative guarnizioni si danneggiano, non usate ilorno sino all'avvenuta riparazione da parte di personale competente.

ATTENZIONE!
Eseguire interventi di assistenza o riparazione che coinvolgono la rimozione del coperchio che protege dall'esposizione all'energia a microonde è rischioso per chiunque non sia una persona competente.

ATTENZIONE!
Non riscaldare liquidi o altri cibi in contentitori sigillati, perché potrebbero esplodere.
Questo prodotto è destinato all'utilizzo domestico e in ambienti simili quali: cucine riservate allo staff in negoti,
uffici e altri ambienti di lavoro; fattorie; clienti di hotel, motel e altri ambienti legati all'ospitalità; ambienti tipo "bed and breakfast".
Usate esclusivamente recipienti e utensili adatti per fornì a microonde.
Non è consentita la presenza di contentitori metallici per alimenti e bevande durante la cottura al microonde.
Non lasciate ilorno incustodito usingo plastica, carta od altri recipiente inflammabile a perdere.
Il forno a microonde è destinato al riscaldamento di pietanze e bevande. L'utilizzo per l'essiccazione di cibo o l'asciugatura di abiti oppure per il riscaldamento di cuscini, asciugamani, spugne, panni bagnati e altri articoli simili cui poè comportare il rischio di lezione, combustione o incendio.
Se il cibo che si riscalda nel forno comincia a sprigionare fumo, NON APRITE LO SPORTELLO. Spegnete il forno, staccate il cavo di alimentazione. Prima di riaprirre lo sportello accertatevi che non ci sa più fumo all'interno del forno Se si aprre lo sportello quando il cibo sta alla fumando c'è il pericolo d'incendio.
Il riscaldamento delle bevande nel microonde cui provocare un'ebollizione ritardata, si consiglia la massima attenzione quando si toglie il recipiente dalorno.
Controllare i contentuti delle bottiglie di alimentazone e dei vasi con gli alimenti per il bamino da agitare o scuotere e la temperatura prima del consumo per evitare scottature.
Non usare ilorno a microonde per cuocere le uova con il guscio né per riscaldare le uova sode intere, perché potrebbero esplodere dopo la fase di riscaldamento.
1.1 Manutenzione e pulizia
Sportello:
Pulire spesso la porta da entrambi i lati, la guarnizione della porta e le superfici della guarnizione, utilizzare un panno umido pertogliere lo sporco. Non utilizzato detergenti abrasivi o raschietti di metallo appuntiti per pulire il vetro del forno in quanto possono graffiare la superficie e, di conseguenza, danneggiare il vetro.
Internodelforno:
Per la pulizia: togliete agli tipo di sporco con un panno morbido o spugna subito dopo l'uso a forno alla caldo. Per lo sporco più dificile, usate un detergente dolce e pulite più volte con un panno umido finché tutto lo sporco non sare rimosso. Non rimuovere la copertina della guida. Controllate che sapone ed acqua non penetrinoattraverso i fori nelle pareti, perché possono causaredanni al forno. Non usate detergenti spray all'interno delforno. Ad intervalli regolari, riscaldare il forno usingo ilgrill, poiché gli schizzi di cibi o di olio possono causare laformazione di fumo e cattivi odori. Dopo l'uso, pulite sempre il coperchio guida onde, la cavity del forno, il piatto girevole e il sostegno rotante. Essi devono essere asciuttied esenti da grasso. Gli accumuli di grasso possonsurriscaldarsi, fumare o infiammarsi.
Esterno delorno a microonde:
L'esterno del forno può essere facilemente pulito con acqua saponata. Non mancate di togliere il sapone ed asciugare il forno a microonde con un panno morbido ed asciutto.
Pannello di contollo:
Apire innanzittutto lo sportello in modo da disattivare il pannello di controllo. Eseguire le operazioni di pulizia del pannello di controllo con attenzione. Usando un panno,
inumidito sostanto con acqua, strofinate delicatamente il pannello finché non diventa pulito. Evitate di usare troppa acqua. Non usate detergenti corrosivi.
Piatto rotante e supporto:
Togliete dalorno il piatto rotante e il supporto e lavateli. Con acqua leggermente saponata. Asciugateli con un panno morbido. Sia il piatto rotante sia il supporto possono essere lavati nella lavapiatti.
Griglie / vassoi:
Si consiglia di lavare le griglia con detersivo per piatti diluito e di asciugarle. Possono essere lavati in lavastoviglie.

IMPORTANT!
Pulisca il forno a intervalli normali e rimuova tutti i residui di alimenti. Se il forno non viene mantenuto pulito, la superficie potrebbe deteriorarsi compromettendo la durata dell'apparecchio e comportando possibili situazioni di rischio.
Fare attenzione a non spostare il ravolo durante la rimozione dei contentitori dall'apparecchiatura.

IMPORTANT!
Nonutilizzare getti a vapore.
Il forn o a microonde è progettato per essere usato in modo integrato.
L'apparecchiatura e le parti accessibili divertano calde durante l'utilizzo. è necessario prestare attenzione a non toccare gli elementi riscaldanti.

ATTENZIONE!
Tenere i bambini lontani dallo sportello e da altre parti accessibili che potrebbero riscaldarsi quando il grill e la convenzione sono in uso. I bambini devono essere tenuti lontani per evitare che possano bruciarsi.

IMPORTANT!
Non utilizzato su nessuna parte del fornodetergenti per fornì commerciali, getti a vapore, abrasivi, detergenti ruvidi o che contengono idrossido di sodio né spugne abrasive.
2. INSTALLAZIONE
2.1 Installazione dell'elettrodomestico
- Rimuovere l'imballo e verificare l'eventuale presenza di danni sull'apparechio.
- Inserire il supporto di fissaggio sul lato destro della credenza della cucina utilizzando il foglio di installmente e due viti fornite.
- Inserire l'apparecchio nella credenza lentamente e perché forzare finché non si incastra nel supporto. Assicurarsi che l'apparecchio sia stabile e centrato.
- Fissare ilorno sul lato sinistro utilizzato due viti fornite.
- Il telaio anteriore delorno dovrebbe poggiare contro l'apertura anterio del mobile alla lasciare spazi.

IMPORTANT!
Non installare quello apparecchio in credenze in cucina perché lo spazio di ventilazione posteriori di 45 mm specificato. Una ventilazione inadeguata può influenzare negativamente le prestazioni e la vita dell'appareccchio.
2.2 Collegare l'apparecchio alla rete
- La presa elettrica deve essere facilemente accessibile per consentire il rapido scollegamento dell'unità in caso di emergenza. Oppure deve essere possibile isolare il fornodall'alimentazione inserendoinserendoun interruptore nell'impliano in conformità con le norme impiantistiche.
Il cavo di alimentazione può essere sostituito escludamente da un elettricista.
Se il cavo di alimentazione è danneggiato, deve essere sostituito dal produttore, il suo agente di servizio o da persona delle qualifiche simili per evitare rischi.
La presa non deve essere posizionata dietro la colonna forno.
La posizione miglioré è sulla colonna fornò, vedi (A). - Collegare l'elettrodomestico a corrente alternata monofase 230 V/50 Hz mediante una presa di terra correttamente installata. La presa devesse sere fusa con un fusible 16 A.
- Prima dell'installazione legare un pezzo di corda al cavo di alimentazione per agevolare il collegamento al punto (A) durante l'installazione dell'apparecchio.
- Durante l'inserimento dell'apparecchio all'interno della colonna forno a bianchi alto NON schiacciare il cavo di alimentazione.
Non immershere il cavo di alimentazione o la spina in acqua o in altri liquido. - Tenete il cavo di alimentazione lontano da superfici riscaldate, compresa la parte posteriore delorno.
2.3 Raccomandazioni addizzionali
Non usate il forno a microonde per friggere o riscaldare l'olio di frittura. La temperatura in tal caso non cui quesseresse controllata e cui causare un incendio. Per fare il granoturco soffiato (popcorn), usate esclusivamente le confezioni apposite per microonde.
Chi porta uno STIMOLATORE
CARDIACO delve rivolgersi al medico o al fabbricante dello stimolatore cardiaco riguardo alle precauzioni da prendere per l'uso delorno a microonde.
Non inserte alcun oggettone nelle aperture di ventilazione del forno. In caso di versamenti, speggere e staccare immediamente il forno e contattare un agente di servizio autorizzato ELECTROLUX.
Non modificate il alcun modo il forno.
Usate soltanto il pietto rotante e il sostegno rotante progettati per quello forn. Non utilizzato il fornso alla il pietto girevole.
Per evitare che il pietto rotante si rompa:
- Prima di pulire il piatto rotante con acqua, lasciatelo raffreddare.
Non mettete cibi o utensili caldi sul piatto rotante freddo.
Non mettete cibi o utensili freddi sul piatto rotante caldo.
Non utilizzato contentori di plastica con il microonde se il forno è ancora caldo durante l'utilizzo delle modalità GRILL E CONVEZIONE perché potrebbero scigligiersi. I contentitori di plastica non devono essere usati con le funzioni sopra indicate, a meno che il loro fabbricante non assicuri che sono adatti allo scopo.
Il fabbricante e il rivenditore non possono
essere ritenuti responsabili per i danni al
forno e/o alle persone causati da un non
correcto collegamento elettrico. Sulle pareti
del forn, o intorno alle guarnizioni e
superfici di tenuta dello sportello,
potrebbero formarsi vapore o gocce
d'acqua. Ciò è normale e non indica una
perdita o un difetto del forn.

ATTENZIONE!
Dopo l'uso nelle modalità GRILL E CONVEZIONE l'interno, l'esterno e lo sportello del forno e gli accessori diventeranno molto caldi. Prima di pulire, assicurarsi che si siano raffreddati.
3. DESCrizIONE DEL PRODOTTO
3.1 Forno a microonde

Resistenza del grill

Cornice

Illuminazione forno

Pannello di controlo

Pulsante aperture sportello

Coperchio guida onde

Cavità del forno

Guamizioni e superfici di tenuta sportello
3.2 Accessori

Accertarsi che la confezione contenga i seguenti accessori:

Patto rotante

Supporto per piatto rotante

Griglia alta

Griglia bassa

Vassoio
Collocare il supporto del piatto sul pavimento della cavity.
- Inserirvi quindi il pietto rotante.
- Onde evitare di danneggiare il piatto rotante, accertarsi di sollevare perfettamente i piatti o i contentitori dal bordo del piatto rotante quando li si toglie dalorno.

Se si insertiscecono degli accessori, indicate due elementi: nome parte e nome modello al proprio rivenditore o a un agente di servizio autorizzato ELECTROLUX.
3.3 Pannello di controllo
1 Display digitale indicatori:

Cottura multifase

Orologio configurato

Configurazione orologio

Peso

Scongelamento automatico

Microonde

Grill

Blocco di sicurezza bambino

Convezione

Preset

Pollo

Bevande

Spaghetti

Pizza

Popcorn

Patata

Riscaldamento automatico

Torta
Pulsanti livllo di potenza
3 Pulsante grill
4 Pulsante micro. + grill
5 Pulsante convenzione
6 Pulsante micro. + convezione
7 Pulsante cottura automatica
8 Pulsante orologio/peso
9 Pulsante tempo +/-
10 Pulsante preset
11 Pulsante start/quick start
12 Pulsante
pausa/annulla
13 Pulsante aperture sportello
4. FUNZIONAMENTO
4.1 Impostazione dell'orologio
Quando il forno è collegato per la prima volta all'alimentazione, è possibile impostare l'orologio. L'orologio del forno utilizes cici di 12 e da 24 ore.
Esempio: Per impostare l'orologio.
- In modalità stand-by, premere una volta il pulsante OROLOGIO/PESO per impostare l'orologio su cicli da 12 ore; se si desidera impostarlo su cicli da 24 ore, premerlo alla.
- Premere il pulsante TEMPO +/- per regolare l'ora.
- Premere il pulsante OROLOGIO/PESO per confermare.
- Premere il pulsante TEMPO +/- per regolare i minuti.
- Premere il pulsante OROLOGIO/PESO per confermare.
i Durante la cottura, è possible premere il pulsante OROLOGIO/ PESO per controllare l'ora del giorno.
4.2 Livello di potenza delle microonde
La cottura a microonde permette di personalizzare la potenza e il tempo di cottura. Per prima casa, selezionare un livello di potenza premendo il pulsante LIVELLO DI POTENZA (vedere la tabella riportata di seguito). Premere il pulsante TEMPO +/- per regolare il tempo di cottura. Il tempo di cottura massimo è 95 minuti.
Esempio: Per cuocere per 5 minuti a un livello di potenza del 60% .
- Aprire lo sportello del forno e collocare il cibo all'interno. Chiudere lo sportello.
- Premere il pulsante LIVELLO DI POTENZA per cinque volte.
- Premere il pulsante TEMPO +/- per regolare il tempo di cottura.
- Premere il pulsante START/QUICK START.
i Per controllare il livello di potenza del microonde durante la cottura, premere il pulsante LIVELLO DI POTENZA. Il livello di potenza predefinito è 100% .
Al termine della cottura, ilsystema emetterà dei segnali acustici e sul display apparirà "End".Prima di iniziare un'altra sessione di cottura, premere un pulsante qualsiasi per azzerare il display e ilsystema. Livelli di potenza troppo alto o tempi di cottura troppo lunghi potrebbero riscaldare eccessivamente il cibo originando fiamme.
| Pulsanti Livello di Potenza | Livello di Potenza |
| x 1 | 100 % (P100) |
| x 2 | 90 % (P-90) |
| x 3 | 80 % (P-80) |
| x 4 | 70 % (P-70) |
| x 5 | 60 % (P-60) |
| x 6 | 50 % (P-50) |
| x 7 | 40 % (P-40) |
| x 8 | 30 % (P-30) |
| x 9 | 20 % (P-20) |
| x 10 | 10 % (P-10) |
| x 11 | 0 % (P-00) |
4.3 Grill
La cottura col grill è particolaremente utile per fette di carne sottili, bistecche, braciole, kebab, salsicce e pezzi di pollo. Éanche utile per panini caldi e piatti al gratin. Il tempo di cottura massimo è 95 minuti.
Esembio: Per cuocere tramite grill per 12 minuti.
- Aprirlo sportello del fomo e collocare il cibo all'interno. Chiudere lo sportello.
- Premere il pulsante GRILL.
- Premere il pulsante TEMPO +/- per regolare il tempo di cottura.
- Premere il pulsante START/QUICK START.
IMPORTANT! Per cuocere con il grill si consiglia l'uso della griglia alla o bassa.
4.4 Micro. + Grill
La modalità Combi Micro/Grill combina le funzioni microonde e grill per diverse durate durante la cottura.
Il tempo di cottura massimo è 95 minuti.
Esempio: Per impostare la cottura combinata per 25 minuti.
- Apire lo sportello del forno e collocare il cibo all'interno. Chiudere lo sportello.
- Premere il pulsante MICRO. + GRILL una o due volte.
- Premere il pulsante TEMPO +/- per regolare il tempo di cottura.
- Premere il pulsante START/QUICK START.
| Pulsante Micro. + Grill | Microonde | Grill | Uso |
| x 1 Co - 1 | 30 % | 70 % | pesce, patate, al gratin |
| x 2 Co - 2 | 55 % | 45 % | pudding, omelette, patate al forno farcite, pollame |
4.5 Cottura con convenzione
Durante la cottura con convenzione, l'aria calda circola attraverso l'interno del forno per dorare il cibo e renderlo croccante rapidamente e uniformamente. Questo forno cui quod assere programmato per dieci diverse temperature di cottura.
Il tempo di cottura massimo è 95 minuti.
Per cuocere con convenzione:
Esempio: Per cuocere a 180^ per 40 minuti.
- Aprirlo sportello del forone e collocare il cibo all'interno. Chiudere lo sportello.
- Premere il pulsante CONVEZIONE per 8 volte.
- Premere il pulsante TEMPO +/- per regolare il tempo di cottura.
- Premere il pulsante START/QUICK START.
i Per cuocere con convenzione, premere il pulsante CONVEZIONE ripetutamente perindicare latemperatura di convenzione desiderata. Per controllare la temperatura
durante la cottura, pre mere il pulsante CONVEZIONE.
| Pulsante Convezione | Temperatura (°C) |
| x 1 | 110 |
| x 2 | 120 |
| x 3 | 130 |
| x 4 | 140 |
| x 5 | 150 |
| x 6 | 160 |
| x 7 | 170 |
| x 8 | 180 |
| x 9 | 190 |
| x 10 | 200 |
Per preriscaldare e cuocere con convenzione:
Ilorno più essere programmatico per combinare le operazioni di cottura di preriscaldamento e convenzione.
Esembio: Per preriscaldare a 170^ e poi cuocere per 35 minuti.
- Premere il pulsante CONVEZIONE 7 volte.
- Premere il pulsante START/QUICK START. Ilorno émetterà un segnale acustico quando verrà raggiunta la temperaturaindicata.
- Aprire lo sportello del forno e collocare il cibo all'interno. Chiudere lo sportello.
- Premere il pulsante TEMPO +/- per regolare il tempo di cottura.
- Premere il pulsante START/QUICK START.
Il tempo massimo di preriscaldamento è 30 minuti. Ilorno conterà alla rovescia da 30'00 finché la temperature di preriscaldamento sera raggiunta. Quando la temperature raggiunge la temperature di preriscaldamento, il conto alla rovescia si fermerà e si udiranno segnali acustici agli 5 secondi per 30 minuti. Se lo sportello del fornò non viene aperto entro i 30 minuti, ilsystema si interromperà automaticamente con la scritta END sul display.
4.6 Micro. + convezione
Il forno ha una impostazione preprogrammata che rende facile cuocere conconvezione e microonde a 200^
Esempio: Per cuocere per 24 minuti su Micro. + Convezione.
- Aprire lo sportello del forno e collocare il cibo all'interno. Chiudere lo sportello.
- Premere il pulsante MICRO.+ CONVEZIONE.
- Premere il pulsante TEMPO +/- per regolare il tempo di cottura.
- Premere il pulsante START/QUICK START.

Per controllare il livello di potenza delle microonde durante la cottura, premere il pulsante MICRO.+ CONVEZIONE.Premere il pulsante MICRO.+CONVEZIONE
ripeturamente per programmare la temperatura di convenzione. Il tempo di cottura mas simo è 95 minuti.
4.7 Preset
Questa funzione ti permette di impostare il forno per iniziare il programma di cottura in un momento successivo.
- Aprire lo sportello del forno e collocare il cibo all'interno. Chiudere lo sportello.
- Selezionare il programma di cottura desiderato.
- Premere il pulsante PRESET una volta.
- Premere il pulsante TEMPO +/- per regolare l'ora.
- Premere il pulsante PRESET una volta.
- Premere il pulsante TEMPO +/- per regolare i minuti.
- Premere il pulsante START/QUICK START.

Prima di usare il preset, controllare che l'orologio del forno segni l'ora esatta. In modalità preset, l'ora del preset può essere impostata premendo il pulsante PRESET. Premendo il pulsante PAUSA/ ANNULLA quando il display della rona, la funzione viene annullata. Preset non può essere usato per l'avvio rapido o lo scongelamento automatico.
4.8 Avvio rapido
Épossible iniziare la cottura al 100% per 30 secondi premendo il pulsante START/QUICK START.

Peraggiungere ulteriore tempo, premere il pulsante START/QUICK START.
4.9 Cottura automatica
La cottura automatica adopera autonomamente la modalità di cottura e il tempo adeguati. É possibile scegliere tra 9 menu.
| Cottura automatica | Alimenti | Funzione di cottura |
| A - 01 | Pollo 800 - 1400 g | Micro. + Convezione |
| A - 02 | Popcorn 99 g | Micro. |
| A - 03 | Latte/caffè 1 - 3 tazze | Micro. |
| A - 04 | Patata alorno farcita 1 - 3 pezzi | Micro. |
| A - 05 | Spaghetti 100 - 300 g | Micro. |
| A - 06 | Riscaldamento automatico 200 - 800 g | Micro. |
| A - 07 | Pizza 150 - 450 g | Convezione |
| A - 08 | Torta | Convezione |
| A - 09 | Scongelamento automatico | Micro. |
- Aprire lo sportello del forno e collocare il cibo all'interno. Chiudere lo sportello.
- Premere il pulsante COTTURA AUTOMATICA per selezionare il cibo.
- Premere il pulsante OROLOGIO/PESO per selezionare il peso.
- Premere il pulsante START/QUICK START.

Capovolgere il pollo da 2 a 3 volte durante la cottura, chiudere lo sportello del forno e premere il pulsante START/QUICK START per riprendere la cottura.
4.10 Scongelamento automatico
Lo scongelamento automatico adopera autonomamente la modalità di cottura per scongelare il cibo.
Esembio: Per scongelare il cibo congelato per 10 minuti.
- Aprire lo sportello del forno e collocare il cibo all'interno. Chiudere lo sportello.
- Premere il pulsante COTTURA AUTOMATICA per 9 volte finché non appeare A-09.
- Premere il pulsante TEMPO +/- per impostare 10 minuti.
- Premere il pulsante START/QUICK START.
Capovolgere il pollo due o tre volte durante lo scongelamento, chiudere lo sportello delorno e premere il pulsante START/QUICK START per riprendere la cottura.
4.11 Cottura multifase
Può essere programmata una sequenza di (massimo) 3 fasi.
Esembio: Per cuocere:
Fase 1: 2 minuté 30 secondi al 70 %
Fase 2: 5 minuti in modalità grill
- Aprire lo sportello del forno e collocare il cibo all'interno. Chiudere lo sportello.
- Premere il pulsante LIVELLO DI POTENZA per 4 volte.
- Premere il pulsante TEMPO +/- per regolare il tempo di cottura.
- Premere una volta il pulsante GRILL.
- Premere il pulsante TEMPO +/- per regolare il tempo di cottura.
- Premere il pulsante START/QUICK START.
Cottura automatica, Scongelamento automatico e Quick start non pos sono essere impostati comeprogrammi di cottura multi-fase.
4.12 Blocco di sicurezza bambino
Il blocco a prova di bambino previene l'utilizzo da parte di bambini non supervisionati. Il blocco per bambini si attiva automaticamente dopo 1 minuto di mancato utilizzato da parte dell'utente. Per annullare, après lo sportello.
4.13 Pausa
Per mettere in pausa durante l'uso del microonde.
- Premere una volta il pulsante PAUSA/ANNULLA per entrare in modalità pausa durante la cottura.
- Premere il pulsante START/QUICK START per continuare la cottura.
Il forn o smette di funzionare quando lo sportello viene aperto.
4.14 Funzioni di protezione delorno
Questo forn ha 3 sistemi automatici per prevenir temperature di cottura anomali. Nel normale utilizzato, non è necessario una indicazione dall'utente.
Se uno dei sistemi viene attivato, il display alla sua proietta avviati ed emette segnali acustici continu.
E01: Temperatura eccessamente alta
E02: Temperatura eccessamente Bassa
E03: Sensore
Premere il pulsante PAUSA/ANNULLA per far tornare il systema nella normale modalità di stand-by.
5. SUGGERIMENTI E CONSIGLI
5.1 Recipients per una cottura a microonde sicura
| Recipients di cottura | Sicurezza con le microonde | Commenti |
| Carta stagnola/ Contenitori in carta stagnola | ✓ / X | Per proteggere gli alimenti dal surriscaldamento, è possibile utilizzato fogli di carta stagnola. Mantenere la carta stagnola a una distanza minima di 2 cm delle pareti del forno poiché, in caso contrario, potrebbero formarsi archi elettrici. Si sconsiglia l'utilizzo di contentitori in carta stagnola, se non specificati dal produttore e seguire attendamente le istruzioni. |
| Porcellana e ceramica | ✓ / X | Di norma, è possible utilizzato i contentitori in porcellana, in ceramica, in vetro e in porcellana fine, se non presentano decorazioni metalliche. |
| Recipients in vetro, ad esempio Pyrex® | ✓ | Se si utilizzato recipienti in vetro sottile occorre fare molto attenzione, perché, se riscaldati in modo improvviso, possono rompersi o scheggiarsi. |
| Metallo | X | Nella cottaura a microonde si sconsiglia l'utilizzo di recipienti in metallo, poché causano la formazione di archi elettrici e possono essere causa di un grado di incendio. |
| Plastica/Polistirene, ad esempio, contentori da Fast Food | ✓ | Occorre prestare molta attenzione, perché ad elevate temperature alcuni contentori sono deformarsi, fondersi o scolorirsi. |
| Sacchetti per congelamento/ rosolatura | ✓ | Devono essere forati per consentire la fuoriuscita del vapore. Verificare che i sacchetti siano adatti per l'utilizzo in forno a microonde. Non utilizzato legacci in plastica o in metallo, perché possono fondersi o provocare incendi a causa della formazione di archi elettrici. |
| Carta - sottocoppe e carta da cucina | ✓ | Utilizzato solo per il riscaldamento o per assorbire l'umido. Occorre prestare molta attenzione, perché il surriscaldamento può portare allo sviluppo di incendi. |
| Contenitori in paglia e legno | ✓ | Quando si utilizzato quosti materiali, è necessario sempre sorvegliare il forno, perché il surriscaldamento può portare allo sviluppo di incendi. |
| Carta riciclata e carta di giornale | X | Possocono contentere estratti di metallo, i quali possono provocare la formazione di archi elettrici e causare incendi. |
| Recipienti di cottura | Microonde | Grill | Convezione | Combinazione* |
| Vetro termoresistente | ✓ | ✓ | ✓ | ✓ |
| Vetro non termoresistente | X | X | X | X |
| Ceramica termoresistente | ✓ | ✓ | ✓ | ✓ |
| Stoviglie di plastica utilizzabili nel microonde | ✓ | X | X | X |
| Carta da cucina | ✓ | X | X | X |
| Vassoio | X | ✓ | ✓ | X |
| Griglie | X | ✓ | ✓ | X |
| Fogli di alluminio e contentitore di alluminio | X | ✓ | ✓ | X |
*Combinazione: applicabile sua per la cottura micro. grill sua per la cottura micro. convenzione.
5.2 Consigli e suggerimenti
| Consiglio e suggerimenti | |
| Composizione | Gli alimenti con un elevato contento di grassi o zuccheri (ad esempio, un dolce natalizio o una torta ripiena di frutta secca) richiedono un tempo di cottura inferiore. Occorre prestare moltoattenzione perché il surriscaldamento può costituire un principio di incendio. |
| Dimensioni | Per una cottura uniforme,OTTENERE pezzi delle stesse dimensioni. |
| Temperatura | La temperature iniziale degli alimenti influisce sul tempo di cottura necessario. Nel caso di alimenti con ripieno,(ad esempio,bomboloni alla marmellata),occorre praticare in essi piccoli tagli,per consentire la fuoriuscita di calore ovapore. |
| Disposizione | Posizonare le parti più spesse dell'alimento verso la parte esterna del vassoio di cottura.(Ad esempio,nel caso di cosce di pollo.) |
| Copertura | Utilizzare pellicola protettiva,forandola per la ventilazione,o un coperchio adatto. |
| Foratura | Prima della cottura o del riscaldamento,gli alimenti con guscio,pelle o membrana devono essere forati in diversi punti,poiché la formazione interna di vapore potrebbe causare l'esplosione dell'alimento stesso.(Ad esempio,nel caso di patate, pesce,pollo,salsicce.)IMPORTANT!Nonutilizzare ilorno a microonde per cuocere uova poiché queste potrebbero esplodere,anche dello la cottura.(Ad esempio,nel caso di uova in camacia,fritte o sode.) |
| Rimescolare,girare ere ridisporre gli alimenti | Per una cottura uniforme,è necessario rimescolare,girare oridisperroglialimenti.Rimescolare eridisperro sempre gli alimenti alla parte esterna verso il centro. |
| Tempo di riposo | Dopo la cottura,è necessario lasciare risosare brevamente gli alimenti per consentire al calorie di diffondersi uniformamenteattraverso gli alimenti stessi. |
| Schematura | È possibile schermare le aree calde con pezzetti di carta stagnola,che riflettonto le microonde,(ad esempio nel caso di cosce e ai di pollo). |
i Mai toccare o alzare la resistenza quando è calda. Usare presine o quanti da cucina per togliere il cibo dal forno. Per evitare le ustioni causate dal vapore, après sempre contentitori, recipienti per pop-corn, sacchetti da forno, ecc. tenendoli lontani dal viso e delle mani. Per evitare le scottature causate alla fuoriuscita del vapore e del calorie, allontanarsi dallo sportello del forno durante l'apertura. Per far uscire il vapore ed evitare ustioni, praticare alcune incisioni sui cibi ripieni riscaldati.
6. COSA FARE SE
| Sintomo | Controlli/suggerimenti . . . |
| Ilorno a microonde non funziona correttamente? | I fusibili all'interno del portafusibili funzionino correttamente. Non sia avvenuta un'interruzione di corrente. Se i fusibili continuano a salute, contattare un elettricista qualificato. |
| La funzione microonde non funziona? | Lo sportello sia chiuso correttamente. Le guarnizioni e la superficie dello sportello siano pulite. Il pulsante START è stato premuto. |
| Il piatto rotante non gira? | Il supporto del piatto rotante sia correttamente collegato alla trasmission. Il vasellame non si estenda altre il piatto rotante. Gli alimenti inserti non si estendano及其他 il bordo del piatto rotante impedendone la rotazione. Non si presente nulla nel vano sottostante il piatto rotante. |
| Ilorno a microonde non si spegne? | Isolare l'apparecchio dal portafusibili. Contattare un agente di servizio autorizzato ELECTROLUX. |
| La luce interna non funziona? | Contattare il proprio agente di servizio autorizzato ELECTROLUX. La lampadina interna devese essere sostituita solo da un agente di servizio autorizzato ELECTROLUX. |
| Occorre più tempo per gli alimenti? | Impostare un tempo di cottura più lungo (quantità doppiia = quasi tempo doppio) oppure. Se il cibo risulta più freddo del solito, farlo ruotare di tanto in tanto, oppure. Impostare un livello di potenza superiore. |
Se ilorno resta in funzione in qualsiasi modalità per 2 minuti o più, la ventola di raffreddamento restera attiva per 3 minuti dopo il termine della cottura.
7. DATI TECHNICI
| Tensione della linea CA | 230 V, 50 Hz, monofase | |
| Fusibile/interruttore linea di distribuzione | Minimo 16 A | |
| Potenza CA richiesta: | Microonde | 1.400 kW |
| Grill | 1.000 kW | |
| Convezione | 1.950 kW | |
| Potenza sviluppata: | Microonde | 900 W (IEC 60705) |
| Grill | 1000 W | |
| Convezione | 1950 W | |
| Frequenza microonde | 2450 MHz 1) (Gruppo 2/Classe B) | |
| Dimensioni esterne: | LMS6253TM | 595 mm (L) x 388 mm (A) x 382 mm (P) |
| MQC326GXE | 595 mm (L) x 390 mm (A) x 382 mm (P) | |
| Dimensioni interne | 340 mm (L) x 210 mm (A) x 344 mm (P)2) | |
| Capacità delorno | 25 litres2) | |
| Piatto rotante | ø 270 mm, vetro | |
| Peso | circa. 16.7 kg | |
1) Il Prodotto soddisfa i requisiti della norma europea EN55011.
In conformità a tale norma, quello prodotto è classificato come apparecchiatura appartenente al gruppo 2 classe B.
Gruppo 2 significa che l'apparecchiatura genera energia in frequenza radio除去 forma di radiazioni elettromagnetiche per il riscaldamento dei cibi.
Apparecchiatura di Classe B significata che l'apparecchiatura può essere utilizzata in ambienti domestici.
2) La capacité interna è calculata misurando larghezza, profondità e altezza massima.
Lo spazio a disposizione per gli alimenti è inferiore e dipende dagli accessori inserti.
8. INFORMAZIONI AMBIENTALI
Riciclare i materiali con il symbolo. Buttare l'imballaggio negli apposti contentitori per il riciclaggio.
Aiutare a proteggere l'ambiente e la salute umana e a riciclare rifuti derivanti da apparecchiature elettriche ed elettroniche.
Non smaltire le apparecchiature che riportano il symbolo insieme ai normali rifiuti domestici. Portare il prodotto al punto di riciclaggio più vicino o contattare il comune di residenza.


Type Approved
Safety
Regular Production
Surveillance
www.tuv.com
ID 1419074178
- CONTENTS
- WE'RE THINKING OF YOU
- Visit our website for:
- CUSTOMER CARE AND SERVICE
- SAFETY INFORMATION
- IMPORTANT! IMPORTANT SAFETY
- WARNING!
- Care and cleaning
- Door:
- IMPORTANT!
- INSTALLATION
- Installing the appliance
- Connecting the appliance to the power supply
- Additional advice
- PRODUCT DESCRIPTION
- Microwave oven
- Accessories
- Control panel
- Digital display indicators:
- OPERATION
- Setting the clock
- Microwave cooking
- Grill
- Micro. + Grill
- Convection cooking
- Micro. + convection
- Preset
- Quick start
- Auto cook
- Auto defrost
- Multi-stage cooking
- Child safety lock
- Pause
- Oven protection features
- HINTS AND TIPS
- Microwave cooking advice
- TROUBLESHOOTING
- TECHNICAL INFORMATION
- ENVIRONMENT CONCERNS
- INDICE
- PENSATI PER VOI
- Visitate il nostro site web per:
- SERVIZIO CLIENTI E MANUTENZIONE
- NORMEDISICUREZZA
- Manutenzione e pulizia
- Sportello:
- Internodelforno:
- Esterno delorno a microonde:
- Pannello di contollo:
- ATTENZIONE!
- INSTALLAZIONE
- Installazione dell'elettrodomestico
- Collegare l'apparecchio alla rete
- Raccomandazioni addizzionali
- DESCrizIONE DEL PRODOTTO
- Forno a microonde
- Accessori
- Pannello di controllo
- FUNZIONAMENTO
- Impostazione dell'orologio
- Livello di potenza delle microonde
- Cottura con convenzione
- Micro. + convezione
- Avvio rapido
- Cottura automatica
- Scongelamento automatico
- Cottura multifase
- Blocco di sicurezza bambino
- Pausa
- Funzioni di protezione delorno
- SUGGERIMENTI E CONSIGLI
- Consigli e suggerimenti
- COSA FARE SE
- DATI TECHNICI
- INFORMAZIONI AMBIENTALI
Marque : ELECTROLUX
Modèle : MQC326GXE
Catégorie : Mixeur plongeant