NEXT 9 LITE UNO - Caméscope NEXT BASE - Notice d'utilisation et mode d'emploi gratuit
Retrouvez gratuitement la notice de l'appareil NEXT 9 LITE UNO NEXT BASE au format PDF.

| Type de produit | Caméscope DVD portable |
| Marque | NEXT BASE |
| Modèle | NEXT 9 LITE UNO |
| Taille de l'écran | 9 pouces (diagonale) |
| Dimensions (appareil principal) | 268 x 183 x 44 mm |
| Poids (appareil principal) | 920 g |
| Alimentation | 12V / 1,5A (adaptateur secteur ou câble voiture) |
| Formats de lecture | JPEG, MP3, WMA, DAT, VOB, MPEG2, MPEG4 (AVI, DIVX) |
| Connectique | USB (clé), entrée/sortie vidéo, entrée/sortie audio, casque, DC IN 12V |
| Batterie intégrée | Non (batterie externe optionnelle) |
| Télécommande | Oui, avec pile CR2025 |
| Fonctions spéciales | Zoom, répétition A-B, programmation, angle (selon disque) |
| Verrouillage parental | Oui, avec mot de passe |
| Nettoyage | Chiffon doux sec ; éviter alcool, solvants |
| Accessoires inclus | Adaptateur AC/DC, télécommande, câble AV, câble voiture, support montage, sac de transport, écouteurs |
| Options | Batterie externe |
FOIRE AUX QUESTIONS - NEXT 9 LITE UNO NEXT BASE
Questions des utilisateurs sur NEXT 9 LITE UNO NEXT BASE
0 question sur cet appareil. Repondez a celles que vous connaissez ou posez la votre.
Poser une nouvelle question sur cet appareil
Téléchargez la notice de votre Caméscope au format PDF gratuitement ! Retrouvez votre notice NEXT 9 LITE UNO - NEXT BASE et reprennez votre appareil électronique en main. Sur cette page sont publiés tous les documents nécessaires à l'utilisation de votre appareil NEXT 9 LITE UNO de la marque NEXT BASE.
MODE D'EMPLOI NEXT 9 LITE UNO NEXT BASE
Click Lite Series
7” & 9” Portable DVD Player
with Stanchion Mount
Instruction Manual
Click&Go
English
Deutsch
François
Italiano
Espanol
Nederlandsl
Svenska
Norsk
Dansk
Suomi
TABLE OF CONTENTS
PRECAUTIONS 02
CAUTIONS ON USING THIS PLAYER 03
PACKAGE CONTENTS 04
DIMENSION AND PARAMETERS 04
PLAYABLEFORMATS 04
PLAYER FUNCTIONS 05
MONITOR FUNCTIONS 06
REMOTE CONTROL FUNCTIONS 07
TURING ON THE PLAYER 08
TURING OFF THE PLAYER. 08
LOADING AND PLAYING DISC 08
SHARING SCREENS (Duo and Duo Deluxe only) 08
SYSTEM SETTINGS 09
INPUT SETTINGS. 10
CONNECTING TV SCREEN / CAMCORDER 10
MULTIMEDIAFILEPLAYBACK 11
SPECIAL FUNCTIONS ON REMOTE CONTROL 11
TROUBLESHOOTING 12
PRECAUTIONS
Thank you for purchasing the NEXTBASE product. Please read this manual carefully before operation and reserve it for future reference. It will be helpful to you when you encounter any operational problem.
CAUTION:
These servicing instructions are for use by qualified service personnel only. To reduce the risk of electric shock, do not perform any servicing other than that contained in the instruction manual unless you are qualified to do so.
WARNING:
To reduce the risk of fire or electric shock, do not expose this device to rain, moisture, dripping or splashing. No object filled with liquids (such as vase) shall be placed on the device. High voltages are present inside the unit. Under no circumstances should you try to repair the unit yourself. Refer servicing to qualified personnel.
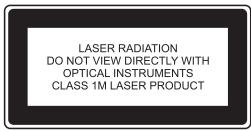
LASER:
This unit employs a laser. Due to possible eye injury, only qualified service personnel should remove the cover or attempt to service this device.
Use of controls or adjustments or performance of procedures other than those specified herein may result in hazardous radiation exposure.
Visible and invisible laser radiation will be exposed when open and interlocks defeated.
DO NOT STARE INTO BEAM!
LASER
Type
Semiconductor laser GaAlAs
Wave Length
650 nm/780 nm
Output Power
5mW
Beam Divergence
60degree
LCD:
A Liquid Crystal Display (LCD) screen is a multilayer complex component.
Have the unit serviced by a qualified service technician if:
The unit has been exposed to rain or water.
The unit does not seem to operate normally.
The unit exhibits a marked change in performance.
ROVI:
This product incorporates copyright protection technology that is protected by U.S. patents and other intellectual property rights. Use of this copyright protection technology must be authorized by Rovi. If not, the use of this technology if only permitted for domestic use and other limited playback uses. Reverse engineering or disassembly is prohibited.
DOLBY:
Dolby and the double-D symbol are registered trademarks of Dolby Laboratories.
DivX:
DivX and the associated DivX logos are trademarks of DivX, LLC, a subsidiary of Rovi Corporation.
WEEE:
Please do not throw electronic devices into household waste. Separate them for correct recycling.
DO NOT ATTEMPT TO SERVICE THE UNIT BY YOURSELF!
CAUTIONS ON USING THIS PLAYER
1. DO NOT MOVE THE PLAYER DURING PLAYBACK
During playback, the disc spins at high speed. So do not lift or move player. Doing so may damage the disc.
2. TRANSPORT THE PLAYER
Before transporting the player, please remove the disc, turn off the power, and unplug the power cord.
3. PLACE OF INSTALLATION
Select a stable place near TV or stereo system to which you are going to connect the player.
Do not place the player on top of a TV or color monitor.
Install the player away from cassette decks or other devices which are easily affected by magnetic forces.
4. TURN OFF THE POWER WHEN NOT USING THE PLAYER
If the player is connected to your TV but not in use, switch the power off. It can avoid interference with your normal TV picture.
Noise problems may also be experienced if the player is used near a radio.
5. STORAGE TEMPERATURE OF THE PLAYER
Do not leave the player in places where the temperature is extremely low (about -10^ or lower) or extremely high (about 60^ or higher), such as inside passenger cabin or trunk in midsummer. Doing so may warp the outer case or reduce the performance or quality of the battery pack.
6. WHEN USING WITH CAR POWER CABLE IN CARS
Please turn the engine on and then connect the car power cable for use.
7. CLEANING THE PLAYER
Normally clean the player with a soft dry cloth. For tough dirt, apply some neutral detergent diluted in 5 to 6 parts water to a soft cloth, and wring out thoroughly. Wipe off the dirt, then clean the player with a dry cloth. Note that alcohol, thinner, benzene, insecticides, etc., may cause the paint or coating to peel off. Also avoid leaving rubber or plastic products in contact with the player for long periods of time, as this may damage the cabinet.
When using chemically treated cloths, read the cloth's instructions carefully. Always unplug the power cord from the power outlet before cleaning the player.
8. NEVER TOUCH THE LASER PICKUP LENS
Do not touch the laser pickup lens. Doing so may cause damages to the player. Refer servicing to qualified personnel.
9. COPYRIGHTS
Unauthorized duplication, broadcast, public performance or rental of discs is prohibited by law.
10. MODEL NUMBER
To see the model no. of the player, you can turn it over to see it printed on the backplate.
PACKAGE CONTENTS
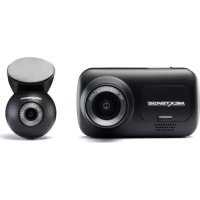
Please check the contents of your Click Lite product package. The actual products might appear slightly different from the pictures shown below.
| Player (x2 for Click Lite Duo Deluxe) | Monitor (for Click Lite Duo only) | AC/DC Adaptor (x2 for Click Lite Duo Deluxe) | Remote Control |
| Earphones (x2 for Click Lite Duo/Duo Deluxe) | Quick Start & Instruction Manual | Stanchion Mount (x2 for Click Lite Duo/Duo Deluxe) | Carrying Bag |
| Cable Yo Yo (for Click Lite Duo/Duo Deluxe) | Car Power Cable (for Uno version only) | AV Cable | External Battery (optional) |
Note: The external battery is an optional accessory for use on a train, plane, coach, etc. It occupies the Click&Go fitting, therefore prevents connection to any mount or other screen. Batteries are available from your NEXTBASE dealer and multiple batteries can be used for longer journeys.
DIMENSION AND PARAMETERS
| Product name | Click 7 Lite / Duo / Duo Deluxe Click 9 Lite / Duo / Duo Deluxe |
| Power | 12V / 1.5A |
| Audio out | Line L/R |
| Video out | CVBS |
| Player size | (7") 222 x 160 x 44mm (9") 268 x 183 x 44mm |
| Monitor size | (7") 222 x 160 x 31mm (9") 268 x 183 x 30mm |
| Player weight | (7") 728g (9") 920g |
| Monitor weight | (7") 381g (9") 482g |
| Remote Control Battery type | CR2025 |
Note: Do NOT connect to a 24V DC supply, or damage will result.
PLAYABLE FORMATS
The unit is able to play most audio/video files such as:
PICTURE: JPEG
AUDIO: MP3, WMA
VIDEO: DAT, VOB, MPEG2, MPEG4 (AVI, DIVX)
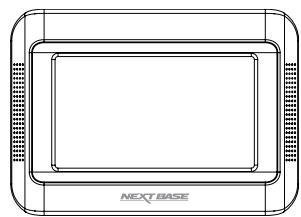
PLAYER FUNCTIONS
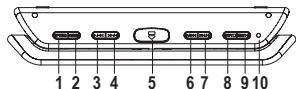
1. OPTION
Press it to pop up the OPTION menu for system settings.
2. MODE
Press it to pop up the MODE menu for input settings.
The default mode is DVD.
3. /
Press it to fast backward playback.
Press it to move to the left.
4.
Press it to fast forward playback.
Press it to move to the right.
5.
Press it to open the cover.
6. ↑/↓
Press it to skip to the previous track / chapter.
Press it to move upwards.
7. 11
Press it to skip to the next track / chapter.
Press it to move downwards.
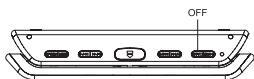
8. OFF/
Press it for about 2 seconds to turn off the player.
Press it to stop the playback.
Press it to exit the current operation.
9. ON/II
Press it for about 2 seconds to turn on the player. Press it to start / pause the playback.
Press it to confirm the selection.
10. LED indicator
Green light when the player is on.
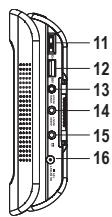
11. Volume wheel
Adjust volume up and down.
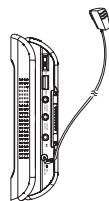
12. USB port
Insert a USB memory stick here.
Note: Do NOT use a USB hub, extension etc. Do not connect other devices such as PC's, HDD's Digital camera or PSP etc.
13. Video in/out
Connect a video cable for video in/out here.
14. Audio in/out
Connect an audio cable for audio in/out here.
15. Earphone jack
Connect earphones or amplifier here.
16. DC IN 12V
Connect the included AC/DC adaptor here.
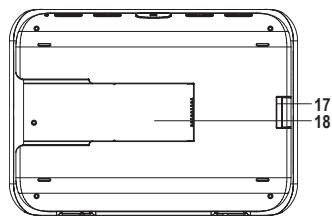
17. Lock
Lock/unlock the Click&Go Stanchion Mount.
18. Slot
Connect to the backplate ridge of Click&Go Stanchion Mount.
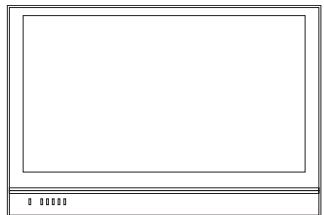
MONITOR FUNCTIONS
Supplied with Click Lite Duo only, to show the same movie as the main DVD player.


- LED indicator
Green light when the player is on.
- ON/OFF switch
Turn on/off the unit.
- Brightness wheel
Adjust screen brighter or dimmer.
- Volume wheel
Adjust volume up and down.
- Earphone jack
Connect earphones or amplifier here.
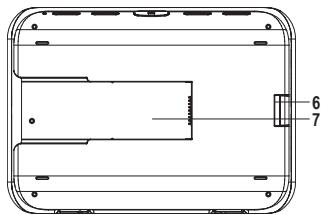
- Lock
Lock/unlock the Click&Go Stanchion Mount.
- Slot
Connect to the backplate ridge of Click&Go Stanchion Mount.
Note: The Monitor will not work unless it connects to the Player by the Stanchion Mount and Cable Yo Yo correctly.
REMOTE CONTROL FUNCTIONS
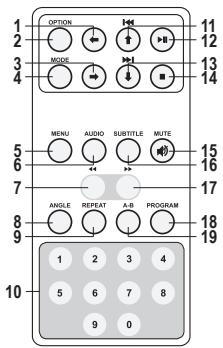
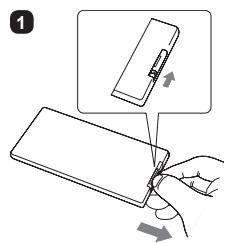
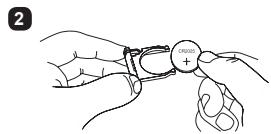
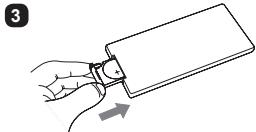
Replacing the battery (CR2025)
Press it to move to the left.
2. OPTION
Press it to pop up the OPTION menu for system settings.
- →
Press it to move to the right.
4. MODE
Press it to pop up the MODE menu for input settings.
5. MENU
Press it to display DVD menu.
6. AUDIO
Press it to change the audio language.
7.
Press it to fast backward playback.
8. ANGLE
Press it to switch angle.
9. REPEAT
Press it to repeat the playback.
10. NUMBER KEY 0-9
Press it to play particular track or for program setting.
- ↑
Press it to skip to the previous track / chapter.
Press it to move upwards.
- II
Press it to start / pause the playback.
Press it to confirm the selection.
- /
Press it to skip to the next track / chapter.
Press it to move downwards.
14.
Press it to stop the playback.
Press it to exit the current operation.
15. MUTE
Press it to turn on/off the volume.
16. SUBTITLE
Press it to change the subtitle.
17.
Press it to fast forward playback.
18.PROGRAM
Press it to arrange the playing order of tracks.
19. A-B
During the playback, press it to set two points, and repeatedly play the section between them.
Note: Do not drop or step on the remote control or subject it to shocks. Note that the remote control may not work if there is any obstacle between the remote control sensor and itself. Do not expose the remote sensor to strong light. Doing so may make operation impossible. Use the remote control within the specified operating range.
Caution: The battery may present a risk of fire if not being handled properly. Do not recharge, disassemble, or heat it above 100^ .
TURING ON THE PLAYER
Home Use
- Connect the included AC/DC adaptor to the main outlet.
-
Connect the DC output plug of the adaptor to the DC input jack of the unit.
In-Car Use -
Slide the DVD player on to the Stanchion Mount, make sure that power is being supplied from the car cigarette lighter connection.
Once the DVD player is connected to power, the DVD player will turn ON automatically.
Note: The included AC/DC adaptor is compatible with voltage from 100V to 240V. You can use it overseas, and a converter plug may be used to fit into the region in which you are traveling.
TURING OFF THE PLAYER
- Press OFF / ■ on the unit for about 2 seconds.
- Unplug the adaptor from a socket.
- Disconnect the DC output plug from the DC input jack.
Note: When the player or monitor is not used for around 5 minutes, the player or monitor will turn off automatically.
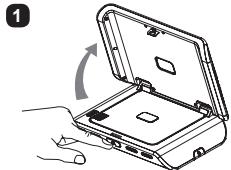
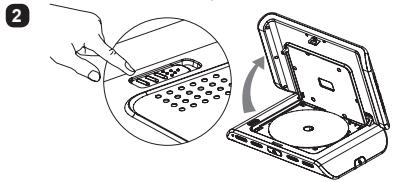
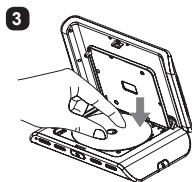
LOADING AND PLAYING DISC
- Press the OPEN button on the Player to open the display panel.
- Open the disc cover.
- Insert a disc. You can hear a distinctive click as the disc locates correctly.
- Close the disc cover. The playback will start automatically.
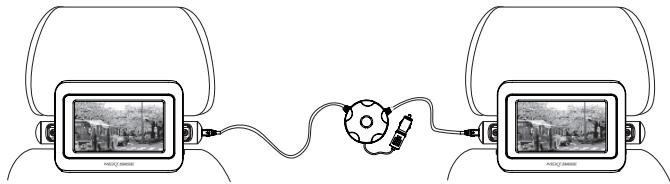
SHARING SCREENS (Duo and Duo Deluxe only)
Install the 2 screens on the Stanchion Mounts as this transfers the picture and sound also. For the Duo model, the picture and sound of player transfer to the monitor automatically.
For the Duo Deluxe model, select "MODE" and "AV Click&Go INPUT" on the designated Slave screen, whilst the movie is already playing in the Master unit.
SYSTEM SETTINGS
When the OPTION button either on the player or remote control is pressed, an option list will pop up. Use / or / to navigate or adjust setting and press ON / to confirm or press OFF / to back to the previous menu or exist.
| IR Headphone | If optional IR headphone is used, select the same channel as the setting of IR headphone. Default is Off. | ||
| Display | To adjust Brightness \(\text{, Color} \)\( \) and Screen Ratio\(\text{,}\) | ||
| Setup | A window of sub-menu will pop up for System, Language and Digital Setup. | ||
| System Setup | TV System | To select TV mode. Default is Auto. | |
| Screen Saver | To set screen saver. Default is On. | ||
| TV Type | To adjust DVD aspect ratio. | ||
| Password | For parents to give DVD access to their kids selectively. For the first time use, enter 0000 or the assigned password to unlock the parental control. Go to the Rating menu and set the rating for a program. Assign a new 4-digit password to lock the rating. If you forget the password, enter 0000 to unlock the rating again. | ||
| Rating | This setting works with those DVDs which a rating has been assigned to. It helps you to give DVD access to others selectively. Note: When the Password function is locked, the Rating function is disable. | ||
| Default | To restore all the settings to the factory default settings. | ||
| Language Setup | Display | To select display language. Default is English. | |
| Subtitle | To set subtitle. Default is Off. | ||
| Digital Setup | Sound Effect | To select sound effect. | |
| Dynamic Range | To adjust the line out compressing ratio and get different effects. The audio signal peak value will be compressed to its minimum when Off is selected. | ||
| DivX(R) VOD | A 8-digit VOD registration code will appear and allow you to rent and purchase videos using the DivX VOD service. For the details, please visit www.divx.com/vod. | ||
| Disc Menu | To display the disc's menu if applicable. | ||
| Information | To display the disc's information if applicable. | ||
| Mute | To mute the sound. Re-select to recover the sound. | ||
| Audio | To set audio language if multi-languages are available. | ||
| Subtitle | To display the subtitle. | ||
| Repeat | To repeat a track or the entire disc. The mode will be changed each time ON / ▷II is pressed. | ||
| Zoom | To zoom the picture. The zooming rate will be changed each time ON / ▷II is pressed. Note: If the option Zoom is selected during the playback, the movie may be automatically paused. Press ON / ▷II to resume the playback if it happens. | ||
INPUT SETTINGS
When the MODE button either on the player or remote control is pressed, a mode list will pop up. Use I / or / to navigate and press ON / to confirm. Default is DVD.
| DVD VIDEO | To play the disc inside the player and press ON / ▶II to start the playback. |
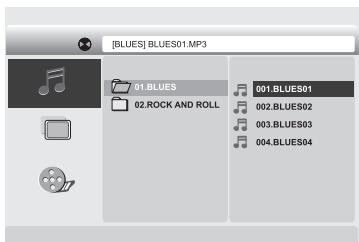
| USB | To watch or listen the contents from USB stick and press ON / ▶II to load the contents. A menu window as the right picture will pop up. See the next page for playback of multimedia file. Note: The USB socket is for playback of media files from USB stick but NOT for connection to any hard drive, PC or other external device. Quality branded USB sticks of size up to 4Gb are preferred for high speed access and reliable video playback. Format in FAT or FAT32. Re-format the USB stick prior to loading the movies to reduce error and discontinuous file problems. |
| AV Click&Go INPUT (For Duo Deluxe only) | To view the same movie from the next player. Before doing so, connect two players with the Stanchion Mount and Cable YoYo provided in the package. Note: For Duo model, the monitor will play the same movie from the player automatically when it is switched on and connected with the player with the Stanchion Mount and Cable YoYo provided in the package. |
| AVI INPUT | To view the output from an external device such as games controller which is connected to the AV IN sockets already. |
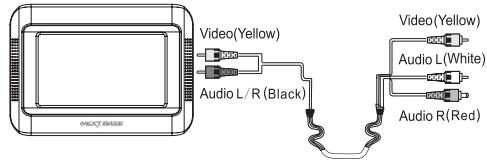
CONNECTING TV SCREEN / CAMCORDER
MULTIMEDIA FILE PLAYBACK
When a disc or USB stick containing multimedia file, if it has MP3 file, the player will play it automatically. Press OFF / ■ to exist the auto playback and a window of folder as the right picture will pop up.
Content files are categorized into three kinds of media, Music 品 Picture 品 , Movie 品 .
Use I / or /1 to navigate and press ON/ to confirm and play or press OFF / to stop and go back to the folder list.
SPECIAL FUNCTIONS ON REMOTE CONTROL
| ANGLE | This button is only valid while a scene was recorded with multiple angles. Press this button to change the angle. | ANGLE | A-B |
| A-B | To repeat a section of video between these two points A and B. During a playback, press the button to set the start point A, press the button again to set the end point B, the section is then set and played repeatedly. Press the button again to resume the normal playback. | ||
| PROGRAM | To arrange the chapters or tracks in your preferred order. Press the button, a menu will pop up. Use ↑, ↓, ←, → and the number keys to enter the chapter or track number to the order field, use ↑, ↓, ←, → to move the cursor to Play and press ON / ▶II to start the programmed playback. Press the button again to cancel the program. Note: This function may be invalid in some discs. | PROGRAM | PROGRAM |
TROUBLESHOOTING
| Symptoms | Possible causes | Remedies |
| No power | Check that the red LED light illuminates on the cigarette plug. | If no LED is lit, check the fuses within the body of the cigarette plug by removing the tip. Fuse is within. Replace a blown fuse, with same rating. |
| Check that the stanchion mount is connected correctly, as there is no internal battery in the player. | Clean the contacts on the rear of the screen(s) and also the mount. Use a cotton bud and alcohol based fluid to clean the contacts. | |
| No image on second screen | Check that the stanchion mount is connected correctly, with the Cable Yo Yo is in place. This cable is required for image and sound display on the second screen. | Clean the contacts on the rear of the screen(s) and also the mount. Use a cotton bud and alcohol based fluid to clean the contacts. |
| Unable to play the disc | Disc is not loaded correctly. | Load the disc with the label side up and firmly press it on to the rotating spindle. |
| Disc is scratched or not clean. | Make sure there is no scratch or fingerprint on it. | |
| Wrong regional disc. | Use the right regional disc. | |
| Unable to play the USB files | Incompatible file format or USB has errors upon. | Re-format the USB with FAT32 and verify media files are correct type as described in this manual. |
| No display | AV cable is disconnected. | Connect the cable firmly. |
| Wrong setting or connection to the player. | Check settings and connections are all correct. | |
| Wrong input mode setting. | Set the input mode correctly. | |
| No sound | Volume set too low. | Turn the volume wheel on DVD player and / or monitor up. |
| Wrong setting or connection to the player. | Check settings and connections are all correct. | |
| Remote control doesn't work | Battery exhausted. | Replace the battery. |
| Display has lines upon | Any diagonal lines indicate that the screen has been smashed. | Contact your NEXTBASE repair agent for details of the LCD panel replacement cost. |
| Unable to charge the player | This is normal as there is no internal battery in the Click Lite DVD player or monitor. | Connect the car power, mains power or an external battery (optional) to operate the player. |
Note: Clean and maintain the product only as recommended earlier in this instruction manual.
NEXTBASE
www.next-base.com