
DISPLAYIT MICRO - Accessoire informatique DAXTEN - Notice d'utilisation et mode d'emploi gratuit
Retrouvez gratuitement la notice de l'appareil DISPLAYIT MICRO DAXTEN au format PDF.
| Type de produit | Extendeur VGA par câble RJ45 (KVM extender) |
| Marque | DAXTEN |
| Modèle | DISPLAYIT MICRO |
| Dimensions (émetteur/récepteur) | 89 × 46 × 25,3 mm |
| Poids (émetteur/récepteur) | 552 g |
| Alimentation émetteur | Via port USB (5V DC) |
| Alimentation récepteur | Adaptateur secteur externe 5V DC ou via séparateur Micro |
| Connecteurs émetteur | 1x RJ45, 1x VGA HD15 mâle, 1x USB power |
| Connecteurs récepteur simple | 1x RJ45, 1x VGA HD15 femelle |
| Connecteurs récepteur double | 1x RJ45, 2x VGA HD15 femelle |
| Résolution maximale | 1600 x 1200 à 75 Hz |
| Distance maximale | 125 m (avec câble CAT5/6/7) |
| Type de câble recommandé | CAT5, CAT6 ou CAT7 UTP/STP solide, câblage EIA/TIA 568B |
| Nombre d'affichages max. avec séparateur | Jusqu'à 128 |
| Température de fonctionnement | 0 °C à 40 °C |
| Température de stockage | -40 °C à 70 °C |
| Humidité | 80 % sans condensation |
| Indicateurs LED | Vert (alimentation), Jaune clignotant (connexion) |
| Contenu du pack 1025-101K | 1 émetteur, 1 récepteur simple, 1 adaptateur secteur, 1 tournevis mini |
| Contenu du pack 1025-102K | 1 émetteur, 1 récepteur double, 1 adaptateur secteur, 1 tournevis mini |
| Installation | Plug and play, aucun logiciel requis |
| Garantie | 24 mois |
| Fonctions principales | Duplication de l'écran PC jusqu'à 125 m, compatible avec séparateurs pour multi-affichage |
FOIRE AUX QUESTIONS - DISPLAYIT MICRO DAXTEN
Questions des utilisateurs sur DISPLAYIT MICRO DAXTEN
0 question sur cet appareil. Repondez a celles que vous connaissez ou posez la votre.
Poser une nouvelle question sur cet appareil
Téléchargez la notice de votre Accessoire informatique au format PDF gratuitement ! Retrouvez votre notice DISPLAYIT MICRO - DAXTEN et reprennez votre appareil électronique en main. Sur cette page sont publiés tous les documents nécessaires à l'utilisation de votre appareil DISPLAYIT MICRO de la marque DAXTEN.
MODE D'EMPLOI DISPLAYIT MICRO DAXTEN

DAXTEN
THE BRAINS BEHIND KVM SWITCHING & SHARING
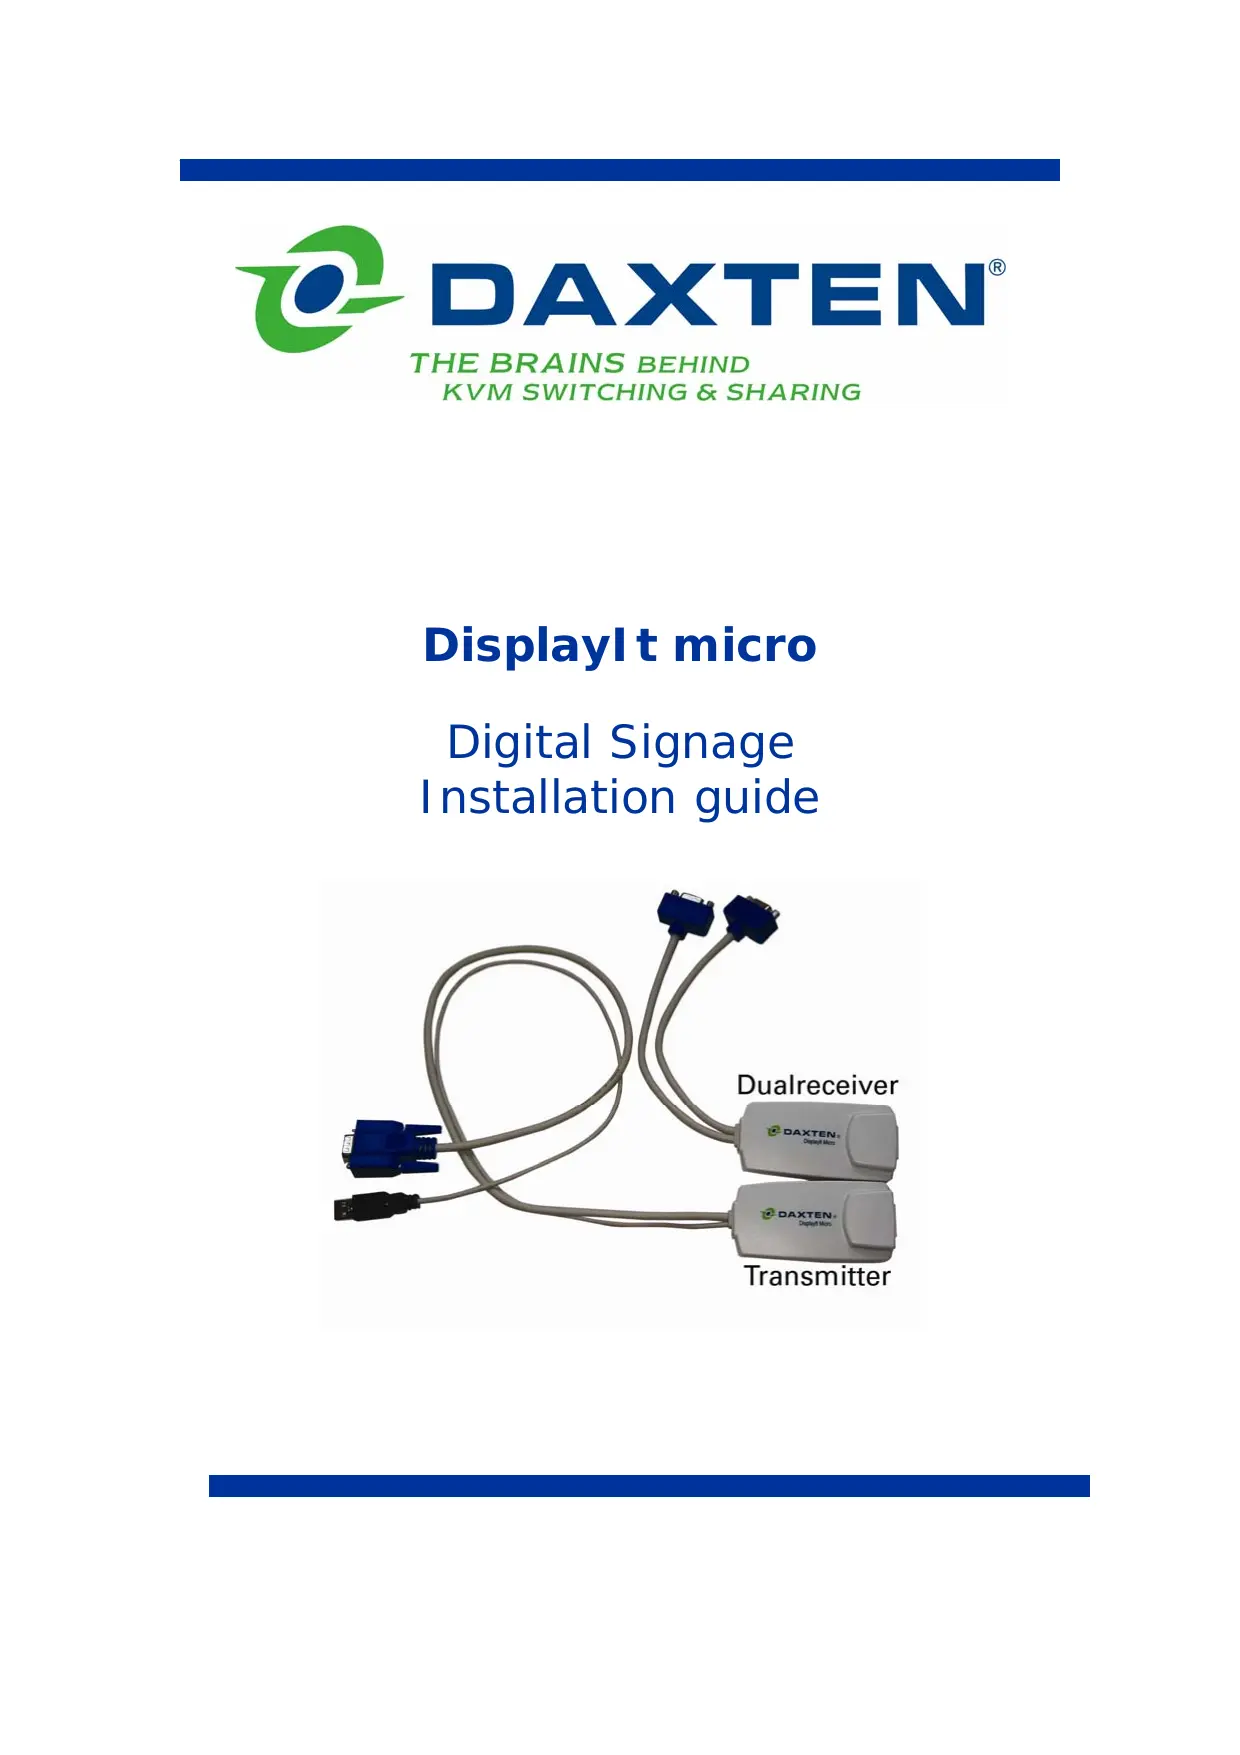
DisplayIt micro
Digital Signage Installation guide
Specifications
Package Contents: 1025-101K
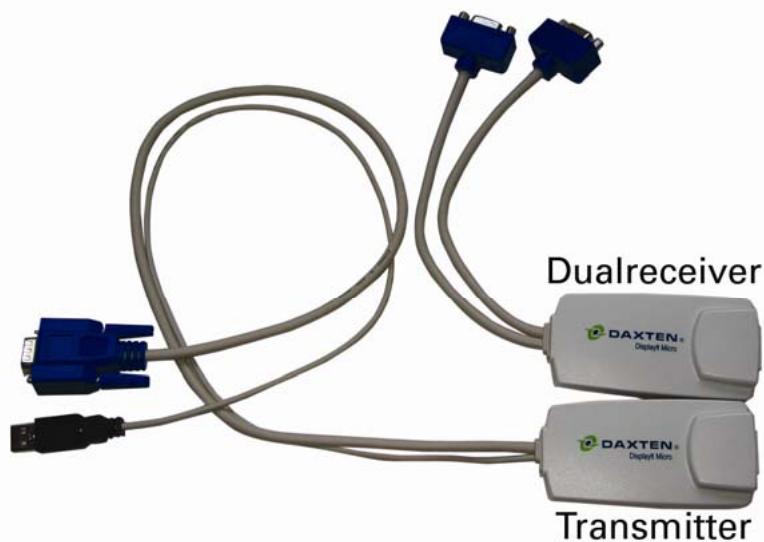
1 x DisplayIt micro Transmitter Unit
1 x DisplayIt micro Receiver Unit
1 x Power Adaptor
1 x Mini Screwdriver
Package Contents: 1025-102K
1 x DisplayIt micro Transmitter Unit
1 x DisplayIt micro Dual Receiver Unit
1 x Power Adaptor
1 x Mini Screwdriver
Specifications
Cables &
Connectors
Transmitter Unit
System RJ45
Monitor HD15M
Power USB Plug
Receiver Unit
System RJ45
Monitor HD15F
Dual Receiver Unit
System RJ45
2xMonitor HD15F
Power
Dimensions
From connected computer via USB port
89 × 46 × 25.3 ~mm
3.5 × 1.8 × 0.9
5V DC 110/240
External power adaptor
89 × 46 × 25.3 ~mm
3.5 × 1.8 × 0.9
552g / 1.21lb
5V DC 110/240
External power adaptor
89 × 46 × 25.3 ~mm
3.5 × 1.8 × 0.9
552g / 1.21lb
Specifications
Cables &
Connectors
Power
Micro Splitter
System In RJ45
8 x System Out
12V DC 110/240
External power adaptor
118× 96× 42mm
3.5 × 1.8 × 0.9
552g / 1.21lb
System
System cable
Maximum distance
Screen resolution
Operating temp.
Storage temp.
Humidity
CAT5/6/7 cable 2x4x24 AWG Solid Wire (Not supplied)
125m/400ft
Up to 1600X1200 @ 75Hz (depending on cable length)
0^ to 40^ / 32^ to 104^
-40°C to 70°C/-40°F to 158°F
80% non condensing relative humidity
Copyright 2006. All rights reserved.
Daxten, the Daxten logo, Displaylt and The Brains Behind KVM Switching and Sharing are trademarks of Daxten Industries. All other trademarks acknowledged.
Revision 1.0

Displaylt micro
Introduction
Thank you for purchasing the DisplayIt Micro. This product will allow you to duplicate your computers video image on up to 128 displays up to 125 meters away from you computer.
There are two types of DisplayIt Receivers available, single screen version and dual screen version.
Features
Allows you to display a PC's screen up to 110 meters away from a PC, using a single CAT 5, 6 or 7 cable.
Up to 1600 x 1200 @ 75Hz (depending on distance).
Advanced CAT5 technology.
Plug-and-play installation.
No additional software is required for operation.
Optional Micro Splitters powers receiver units.
With optional DisplayIt Micro Splitters, allows up to 128 displays
Operation
The DisplayIt Micro is simple to install, no software is required. Just connect the units up as described in quick setup system guide and you're ready to work.
Installation
Before connecting your computer to the DisplayIt Micro Transmitter unit, please ensure that your computer is powered off.
Note: The DisplayIt Micro Receiver requires power, if it is not connected to a Micro Splitter. Use only the power supply unit supplied with the DisplayIt Micro units.
Cable Requirements
The DisplayIt Micro Transmitter unit will connect to your PCs system monitor port.
The UTP / STP interconnect cable to connect the DisplayIt Micro's Transmitter and Receiver unit is not supplied with the DisplayIt Micro. If you do not have suitable CAT 5, 6 or 7 UTP or STP cable available, please consult your dealer.
The Transmitter and Receiver units are connected by industry standard structured cabling (Category 5, 6 or 7 UTP/STP, 4-pair) terminated with RJ45 connectors.
The cable used should be solid trunk cable. Stranded patch cable will give poor results over longer distances. The connector wiring must meet the EIA/TIA 568 standard.
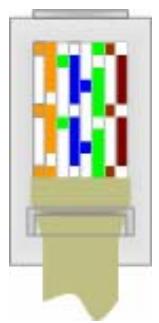
CAT5 Wiring Scheme
The Transmitter Receiver interconnection cable is terminated in RJ45 connectors and should be wired according to the EIA/TIA 568 (Scheme B preferred) industry standard. The DisplayIt may function with other wiring schemes, but the video quality may be impaired.
Note: Failure to wire the twisted pairs correctly will impair the video quality dramatically and / or prevent correct operation.
| Pin | Wire Colour | Wire | Pair |
| 1 | White/Orange | T2 | 2 |
| 2 | Orange/White | R2 | 2 |
| 3 | White/Green | T3 | 3 |
| 4 | Blue/White | R1 | 1 |
| 5 | White/Blue | T1 | 1 |
| 6 | Green/White | R3 | 3 |
| 7 | White/Brown | T4 | 4 |
| 8 | Brown/White | R4 | 4 |
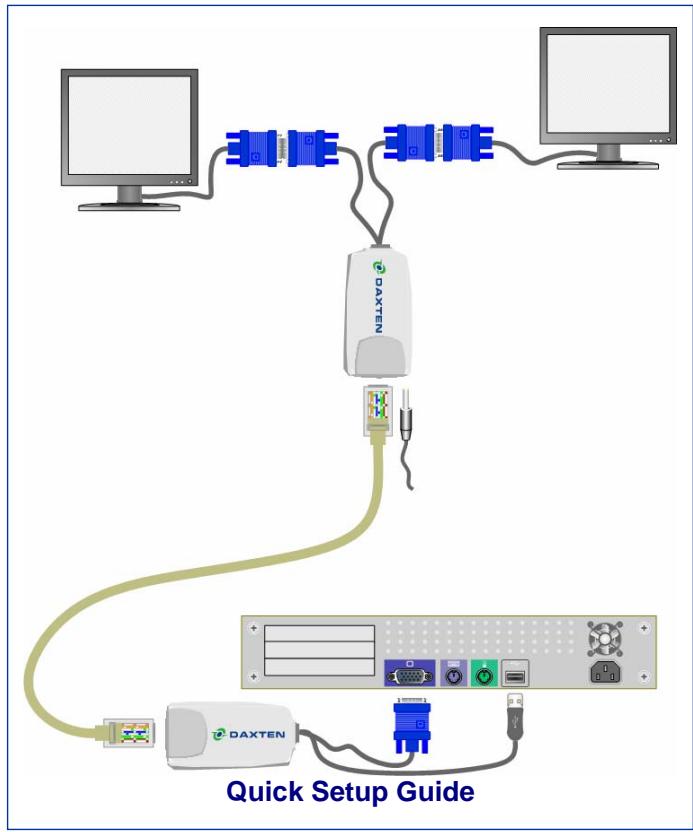
Connecting up without a DisplayIt Micro Splitter
- Switch off your computer.
- Connect the DisplayIt Micro Transmitter unit to your computer's monitor port. Connect the USB power adaptor into your computers USB port.
- Connect your UTP cable to the DisplayIt Micro's Transmitter and Receiver units.
- Connect the DisplayIt Receiver to your remote monitor
- Connect the power supply unit to the DisplayIt Receiver unit.
- Adjust the picture tuner with the screwdriver on the DisplayIt Micro Receiver unit if required.
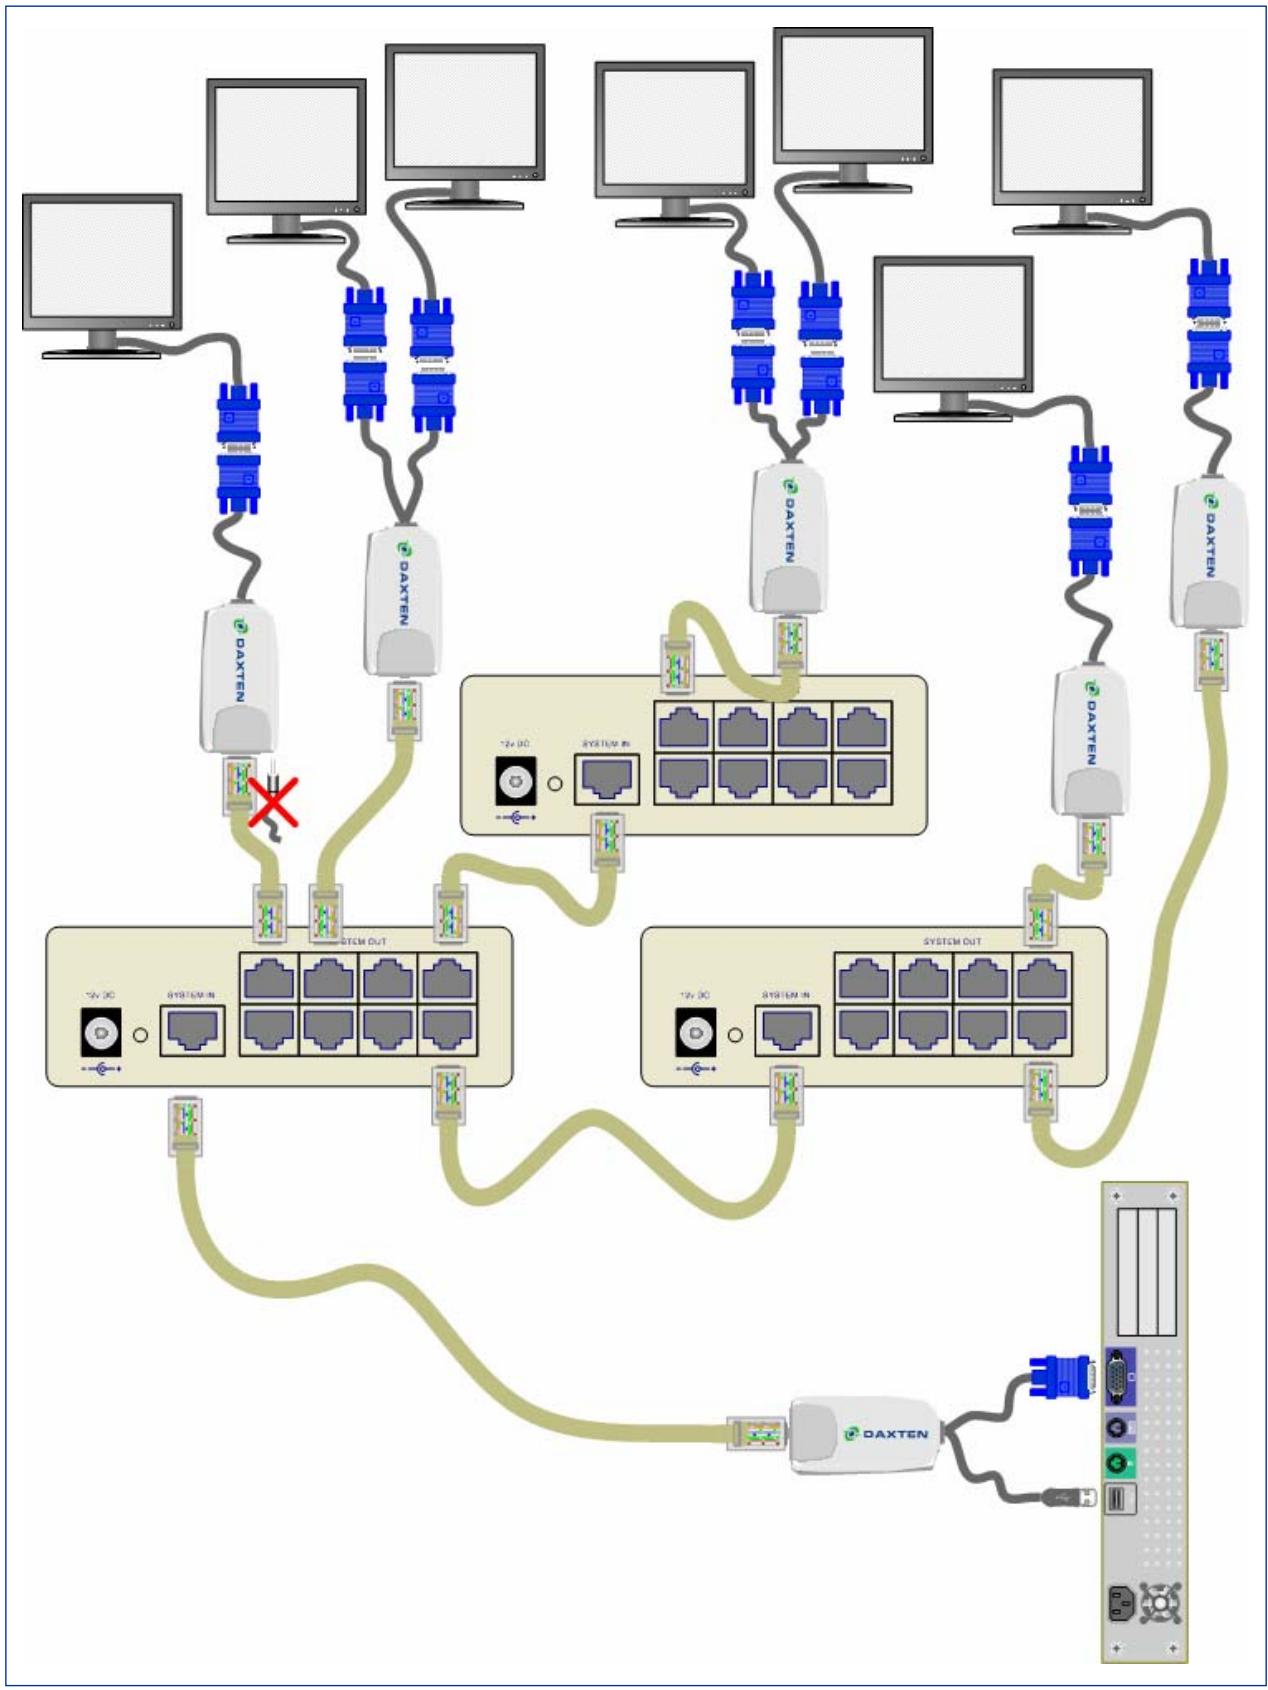
Note: When using a DisplayIt micro Splitter, the Splitter will supply power over the UTP cable to the DisplayIt micro receivers.
Do not connect the cable to any other device.
Connecting up with a DisplayIt Micro Splitter
- Switch off your computer.
- Connect the DisplayIt Micro Transmitter unit to your computer's monitor port. Connect the USB power adaptor into your computers USB port.
- Connect your UTP cable to the DisplayIt micro Splitter.
- Connect the DisplayIt Micro Receivers with the remote monitors and the micro Splitters.
- Adjust the picture tuner with the screwdriver on the DisplayIt Micro Receiver unit if required.
You can daisy chain the Micro Splitter by connecting a UTP cable to the RJ45 out and the RJ45 in port on another Micro Splitter Unit.
Place cables away from fluorescent lights, air conditioners, and machines that are likely to generate electrical noise
LED indicators
The DisplayIt Micro Transmitter and Receiver units both have 2 LEDs above the RJ45 port. The green LED indicates power is on. The flashing yellow LED indicates the system is connected.
Technical Support
If you cannot determine the nature of a problem, please call Daxten and ask for Technical Support. If possible, call from a phone located near the unit, as we may be able to solve your problem directly over the phone. If we cannot solve your problem, and determine that the fault is in the unit, we will issue a Return Material Authorisation (RMA) number that must appear on the outside of all returned products. The unit should be double-packed in the original container, insured, and shipped to the address given to you by our Technical Support representative. The Technical Support offices are found on the back of this manual.
Limited Warranty
Daxten warrants to the end user that this product is and will be free from defects in materials and workmanship for a period of 24 months from the date of purchase. If during the warranty period the product should fail, the purchaser must promptly call Daxten for a RETURN MATERIALS AUTHORIZATION (RMA) number. Make sure that the RMA number appears on the packing slip, proof of purchase, AND ON THE OUTSIDE OF EACH SHIPPING CARTON. Unauthorized returns or collect shipments will be refused.
Ship prepaid to the Daxten office (see back page) where you purchased your product. The above limited warranty is voided by occurrence of any of the following events, upon which the product is provided as is, with all faults, and with all disclaimers of warranty identified below:
- If non-Daxten approved power supply or cabling is attached to the product.
- If defect or malfunction was caused by abuse, mishandling, unauthorized repair, or use other than intended.
- If unauthorized modifications were made to product.
- If unreported damages occurred in any shipment of the product.
- If damages were due to or caused by equipment or software not provided by Daxten.
- If the product is used with non-grounded or incorrectly polarized AC power.
- If the product is used in contradiction to any instruction provided by any User Guide or Instruction Sheet provided to you or with the product.
EXCEPT AS SPECIFICALLY PROVIDED ABOVE AND TO THE MAXIMUM EXTENT ALLOWED BY LAW, DAXTEN DISCLAIMS ALL WARRANTYES AND CONDITIONS WHETHER EXPRESS, IMPLIED, OR STATUTORY AS TO ANY MATTER WHATSOEVER INCLUDING, WITHOUT LIMITATION, TITLE, NON-INFRINGEMENT, CONDITION, MERCHANTABILITY OR FITNESS FOR ANY PARTICULAR OR INTENDED PURPOSE.
EXCEPT AS EXPRESSLY PROVIDED ABOVE AND TO THE MAXIMUM EXTENT ALLOWED BY LAW, DAXTEN SHALL NOT BE LIABLE FOR ANY SPECIAL, INDIRECT OR CONSEQUENTIAL DAMAGES (INCLUDING WITHOUT LIMITATION, LOSS OF PROFIT, LOSS OF BUSINESS, LOSS OF INFORMATION, FINANCIAL LOSS, PERSONAL INJURY, LOSS OF PRIVACY OR NEGLIGENCE) WHICH MAY BE CAUSED BY OR RELATED TO, DIRECTLY OR INDIRECTLY, THE USE OF A PRODUCT OR SERVICE, THE INABILITY TO USE A PRODUCT OR SERVICE, INADEQUACY OF A PRODUCT OR SERVICE FOR ANY PURPOSE OR USE THEREOF OR BY ANY DEFECT OR DEFICIENCY THEREIN EVEN IF DAXTEN OR AN AUTHORIZED DAXTEN DEALER HAS BEEN ADVISED OF THE POSSIBILITY OF SUCH DAMAGES OR LOSSES.
Waste Electrical and Electronic Equipment (WEEE)

Within the European this symbol indicates that this product should not be disposed in household waste. It should be deposited at an appropriate facility to enable recovery and recycling. For information on how to recycle this product, please check with the reseller of the product that replaces this product "Take Back" or the original seller of this product.


DAXTEN®
THE BRAINS BEHIND
KVM SWITCHING & SHARING
www.daxten.com
Ireland
Bay 21
Free Zone West
Shannon, Co. Clare
info.ie@daxten.com
www.daxten.ie
Tel: +353 (0) 61 23 4000
Fax: +353 (0) 61 23 4099
Österreich
Kunstlergasse 11/4
A-1150 Wien
info.at@daxten.com
www.daxten.at
Tel: +43 (0)1 879 77 65
Fax: +43 (0)1 879 77 65 30

Espana
C/Florian Rey, 8
50002 Zaragoza
info.es@daxten.com
www.daxten.com.es
Tel: +34 902 197 662
Fax: +34 976 201 633
USA
811 W. Evergreen Ave
Suite 302A
Chicago, IL 60622
info.us@daxten.com
www.daxten.us
Tel: +1 312 475 0795
Fax: +1 312 475 0797
Deutschland
Salzufer 16, Geb. B
10587 Berlin
info.de@daxten.com
www.daxten.de
Tel: +49 (0) 30 8595 37-0
Fax: +49 (0) 30 8595 37-99

Sweden
info.se@daxten.com
www.daxten.se

Denmark
info.dk@daxten.com
www.daxten.dk

United Kingdom
5 Manhattan Business Park
Westgate
London W5 1UP
info.uk@daxten.com
www.daxten.co.uk
Tel: +44 (0) 20 8991 6200
Fax: +44 (0) 20 8991 6299
Schweiz
Seebahnstr. 231
8004 Zurich
info.ch@daxten.com
www.daxten.ch
Tel: +41 (0) 43243 32 11
Fax: +41 (0) 432433216

France
B.P 04-77
Route de Cheptainville
91630 Marolles-en-Hurepoix
info.fr@daxten.com
www.daxten.fr
Tel: +33 (0)1 64 56 09 33
Fax: +33 (0)1 69 14 88 34
