TECH - Transfert de données LAPLINK - Notice d'utilisation et mode d'emploi gratuit
Retrouvez gratuitement la notice de l'appareil TECH LAPLINK au format PDF.


| Intitulé | Détails |
|---|---|
| Type de produit | Logiciel de transfert de données |
| Compatibilités | Windows, MacOS |
| Fonctions principales | Transfert de fichiers, migration de données, sauvegarde |
| Caractéristiques techniques principales | Transfert de données à haute vitesse, interface utilisateur intuitive |
| Alimentation électrique | Non applicable (logiciel) |
| Dimensions approximatives | Non applicable (logiciel) |
| Poids | Non applicable (logiciel) |
| Type de licence | Licence unique, licence multi-utilisateur disponible |
| Maintenance et mise à jour | Mises à jour régulières disponibles, support technique inclus |
| Sécurité | Chiffrement des données pendant le transfert, protection par mot de passe |
| Informations générales | Compatible avec les dernières versions des systèmes d'exploitation, interface multilingue |
FOIRE AUX QUESTIONS - TECH LAPLINK
Questions des utilisateurs sur TECH LAPLINK
0 question sur cet appareil. Repondez a celles que vous connaissez ou posez la votre.
Poser une nouvelle question sur cet appareil
Téléchargez la notice de votre Transfert de données au format PDF gratuitement ! Retrouvez votre notice TECH - LAPLINK et reprennez votre appareil électronique en main. Sur cette page sont publiés tous les documents nécessaires à l'utilisation de votre appareil TECH de la marque LAPLINK.
MODE D'EMPLOI TECH LAPLINK
LAPLINK
tech
Copyright Notice
No part of this publication may be reproduced, transmitted, transcribed, stored in a retrieval system, or translated into any human or computer language, in any form or by any means, without the express written permission of Traveling Software, Inc., 18702 North Creek Parkway, Bothell, Washington, 98011, U.S.A.
Trademarks
Traveling Software, the Traveling Software logo, LapLink, DeskLink, SpeedSync and SmartXchange are trademarks or registered trademarks of Traveling Software, Inc.
Acrobat and the Acrobat logo are trademarks of Adobe Systems Incorporated or its subsidiaries and may be registered in certain jurisdictions.
Other brand and product names are trademarks or registered trademarks of their respective holders.
Patents
SpeedSync® U.S. Patent Number 5,446,888
This product contains the RSA Data Security, Inc. MD5 Message-Digest Algorithm. Copyright © 1991-2, RSA Data Security, Inc. Created 1991. All rights reserved
LapLink® Tech
© 1986-1998 by Traveling Software, Inc. All rights reserved
18702 North Creek Parkway
Bothell, WA 98011 U.S.A.
LapLink® Technical User's Guide
© 1998 Traveling Software, Inc.
Printed in U.S.A.
Contents
1 Introducing LapLink Technical
What is LapLink Technical? 8
What you can do in LapLink Technical 10
Getting help 12
2 Installing LapLink Technical
Requirements for using LapLink Technical 16
Installing LapLink Technical 18
Customizing the installation 20
3 Connecting to Other Computers
Connecting to other computers—Overview 24
Connecting by modem—Overview 26
Making a LapLink-to-LapLink connection by modem 28
Connecting to a network by modem: Dial-Up Networking 30
Using Address Book for modem connections 32
Connecting over the Internet 34
Determining an Internet address 36
Using the Traveling Software WINS server for Internet names 38
Internet security and firewalls 40
Connecting by network 42
Connecting to computers outside of your TCP/IP subnetwork 44
Using Address Book for network connections 46
Connecting by cable 48
Connecting by wireless 50
Connecting over CAPI 2.0/ISDN 52
Understanding CAPI configuration 54
Changing the security setup 56
Setting up password protection 58
Securing your computer and encrypting the data you transfer 60
Connecting automatically 62
4 Using Remote Control
Using Remote Control—Overview 66
Viewing the host 68
Customizing keyboard control 70
Disabling the host keyboard and mouse and blanking its screen 72
Rebooting and logging on to the host 74
Hosting a Remote Control session 76
Sharing clipboard information with remote computers 78
Customizing Remote Control performance 80
5 Using File Transfer
Using File Transfer—Overview 84
Navigating through drives and folders 86
Selecting files and folders 88
Copying or moving files and folders 90
Setting File Transfer options for the results you want 92
Synchronizing folders with SmartXchange 94
Replacing one folder with another: Clone Folder 96
Speeding file transfers with SpeedSync and compression 98
Resuming an interrupted file transfer 100
6 Automating File Synchronization with Xchange Agent
Introduction to Xchange Agent 104
Creating an Xchange Agent 106
Previewing and running an Xchange Agent 108
Dealing with conflicts 110
Customizing an Xchange Agent 112
Using filters to include or exclude files 114
Scheduling an Xchange Agent to run automatically 116
7 Using Print Redirection
Printing over LapLink—Overview 120
Printing a document 122
Setting up printers for Print Redirection 124
8 Using Text Chat and Voice Chat
Using Text Chat 128
Talking to someone using Voice Chat 130
Improving Voice Chat performance 132
Using Manual conversation mode 134
9 Troubleshooting Tips
Introduction to troubleshooting 138
Checklist for Setup 139
Checklist for cable connections 140
Checklist for modem connections 142
Checklist for network connections 144
Checklist for Dial-Up Networking connections 146
Checklist for wireless connections 147
Checklist for CAPI 2.0/ISDN 149
Checklist for File Transfer 150
Checklist for Xchange Agent 153
Checklist for Remote Control 155
Checklist for Print Redirection 157
Checklist for Text Chat 158
Checklist for Voice Chat 159
Index 161
Traveling Software License Agreement 170
1
Introducing LapLink Technical
In this chapter
What is LapLink Technical? 8
What you can do in LapLink Technical 10
Getting help 12
What is LapLink Technical?
LapLink Technical provides the services for communicating with one computer or several computers at the same time. Whether you're using a modem, network, wireless device, or cable, you can connect to other computers that are also running LapLink. Once you are connected, you can transfer files between the computers. When you're at home or on the road, you can use files and programs on your office computer—as well as other computers on your office network. You can even "chat" (through Text Chat or Voice Chat) with someone sitting at your office computer while you transfer or work on office files from a remote location.
Go to illustration
Connect as you want
Using a modem, network, wireless device, or cable, you can connect to other computers using the same device. In one session, you can connect to several computers, using a variety of these devices, limited mainly by the number of devices and resources on your computer.
You can also take advantage of the Dial-Up Networking feature of Windows to connect by modem to other network computers running LapLink. Using this modem-to-network connection provides full access to the network; it's like being connected to the network directly.
Different situations call for specific devices. Cables and wireless devices work well when connecting your laptop to your desktop computer from a short distance. Networks make it easier to connect to many different computers in your local company network, a wide-area network, or the Internet. Modems work well at any time when you can use a phone line to connect—whether you're at home or on the road or communicating with someone in another company.
Use the services you want
LapLink services—File Transfer, Remote Control, Print Redirection, Text Chat, and Voice Chat—offer five ways to communicate with other computers, no matter what device you're using. You can select one or more services as you connect and add other services as you need them. In the same session, you can use different services simultaneously or at different times, on one or more computers.
- With File Transfer, you can move or copy files between computers. Customizing any of the several File Transfer settings simplifies complicated transfers. And using Xchange Agent automates the repetitive process of keeping two computers in sync.
Traveling Software's patented SpeedSync technology makes updating files faster by comparing files so that only changes—not entire files—are transferred. A comprehensive security system, including encryption, protects your valuable data at all times.
The Ultimate Remote Access And Support Tools For The PC Expert. Guaranteed.
LAPLINK®

- With Remote Control, you control another computer as though you were sitting at that computer, using its keyboard, mouse, and programs while looking at its screen. Whether your computer is controlling or being controlled, you have the same setup and startup procedures.
- With Print Redirect, you can work on a document at one end of a LapLink connection and print it at the other end. For example, you can prepare a document at home, make a LapLink connection to your office computer, then print the document on an office printer.
- You can set up Print Redirection any time after setup by starting LapLink and clicking Print Redirection from the Options menu.
- With Text Chat, you "talk" with someone at another computer by exchanging messages. When you have only one phone line, you can use your modem to connect to the remote computer for File Transfer or Remote Control, and then use Text Chat to talk to the person at the other end.
- With Voice Chat, you can speak with another user over the line you are using to transmit data. You speak into a microphone attached to your computer and listen through a headset or speakers.

Go to topic summary
What you can do in LapLink Technical
LapLink Technical gives you five services for working with other computers: File Transfer, Remote Control, Print Redirection, Text Chat, and Voice Chat. Features like Xchange Agent and Address Book save time and simplify your work.
Go to illustration
Choosing the right service for the job you need to do is simple when you're using LapLink. You have five services to choose from: File Transfer, Remote Control, Print Redirection, Text Chat, and Voice Chat. Being familiar with their distinctions makes choosing the right service easier.
LapLink is versatile, designed specifically so you can use services when you want, as you want. Use one service at a time or all services at once. Use one service when connecting to the first remote computer; use a different service when connecting to another computer.
Working on a remote computer?
You can copy information on one computer and paste it on another computer.
Using the Remote Control service, you can operate a remote computer using your computer's keyboard and mouse. You can use the remote computer's applications and network connections.
Since all the work you do is actually performed on the remote computer, Remote Control is especially helpful to laptop owners who can't use their office computer's programs on their laptop. Remote Control is also helpful when you're telecommuting or troubleshooting a remote computer.
To protect the confidentiality of files you send over the Internet, you can have LapLink encrypt them beforehand.
Transferring files between computers?
Whether you're hundreds of miles away or in the same room, use the File Transfer service to exchange files between computers.
Use Xchange Agent to automate the process of keeping files on two computers synchronized. You can even set up Xchange Agent to run automatically, when you are away from your computer.
Printing to the other end of a LapLink connection?
Using the Print Redirector service, you can prepare a document at home, make a LapLink connection to your office computer, and then print the document on an office printer.
Sending and receiving messages?
Use the Text Chat service to hold a two-way conversation with someone at another computer by exchanging written messages. You can use your modem to connect to the remote computer for File Transfer, for example, and then use Text Chat to talk to the person at the other end.
Or you can use the Voice Chat service to talk to another person over the same line while using other LapLink services.
Choose the LapLink services for the needs at hand

Use File Transfer for a fast and efficient way of exchanging files.

Use Xchange Agent to automate file synchronizations.
Use Remote Control to run programs and access files on a remote computer.

Use Print Redirection to work on a document at one end of a LapLink connection and print it at the other end.

Use Text Chat to communicate with remote users, consult with coworkers, and answer users' questions.

Use Voice Chat to talk to another user over the same line that is being used to transmit data while using other LapLink services.
Connecting to a network?
Go to topic summary
Over a modem, you can connect to a network from home or on the road and use the same network resources you enjoy in the office. You can combine this "remote-node" connectivity with LapLink services, such as file Transfer and Remote Control.
As a remote node, for example, you can direct a document you've prepared away from the office to a network printer, read and answer your e-mail, and browse the network. In the same session, you can use LapLink to run a database program on your office computer and work on large, shared files on the network—or connect to another network computer and review a presentation in preparation on that computer.
Saving time and protecting your computer
Simplify connections by storing telephone numbers, passwords, and other information in Address Book entries. Then select an Address Book entry, and the connection will be opened for you.
Use SpeedSync when updating files, especially over slower devices like modems. Instead of sending entire files, SpeedSync sends only the parts that have changed since the last update. Overall times for transferring files can be cut drastically.
Set up your security system to define who has access to your computer and what services they can use while connected. Use encryption to protect information you transfer over the Internet or wide-area networks.
Getting help
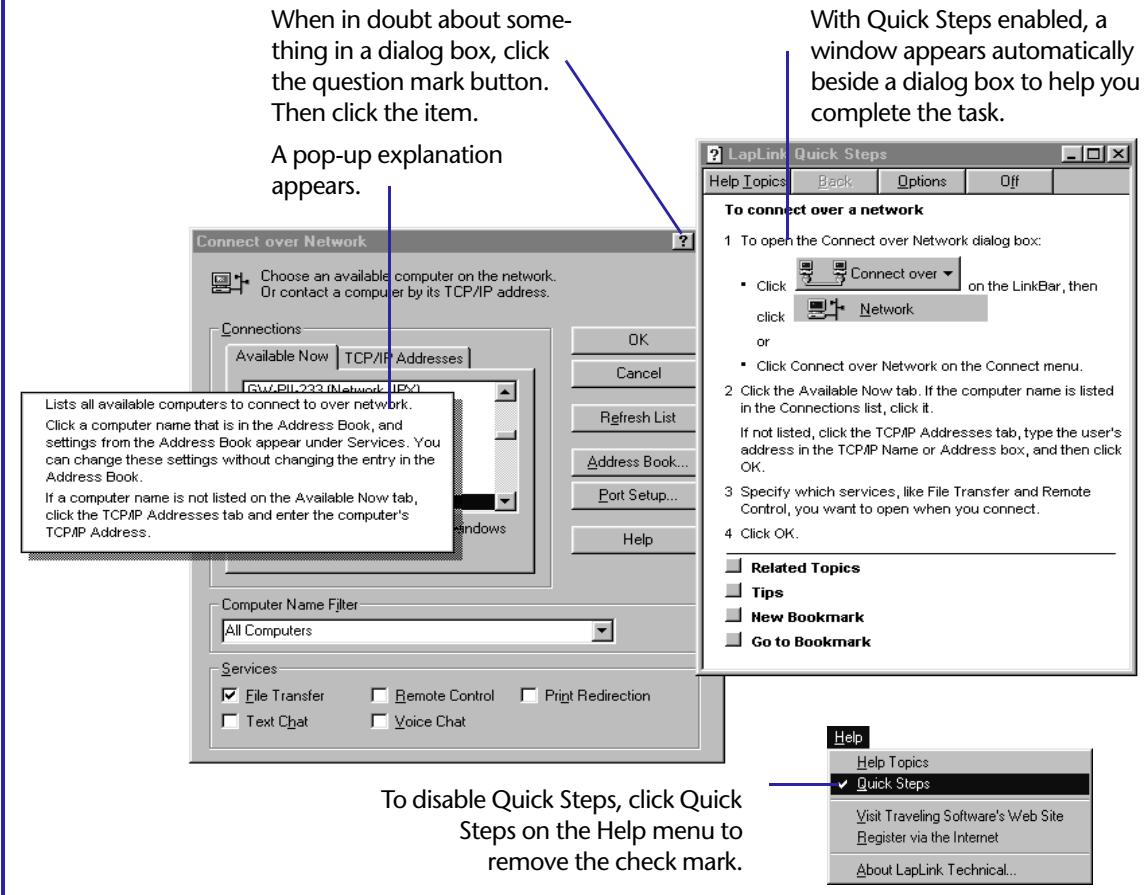
When you need help getting your work done, use the LapLink online Help system. For instructions on working in a dialog box, simply open the dialog box. A Quick Steps window appears automatically. (To disable Quick Steps, click Quick Steps on the Help menu.) For detailed instructions on identifying and solving problems you may encounter, consult a troubleshooter: click Help Topics on the Help menu and open the Troubleshooting book. Through Help, you can also get explanations of items in a dialog box and buttons on a toolbar.
Go to illustration
To get Help for a command without opening its dialog box, open the menu, point to the command, and press F1.
Refer to Quick Steps for step-by-step instructions
When you click a button to make a connection or choose a command from one of the menus, a Help window appears beside the dialog box. Refer to the window for a concise, step-by-step guide though the dialog box.
You can also use Quick Steps to:
Find related topics, including one with detailed information about all the items in the current dialog box.
View tips for finishing the task.
- Display the complete list of topics in the LapLink Help system. (Click Help Topics.)
You can prevent Quick Steps windows from appearing by disabling the feature.
Even after dis- abling Quick Steps, you can get Help for a particular dialog box by clicking the Help button in the dialog box.
To disable Quick Steps:
On the Help menu, click Quick Steps to clear the check mark.
To enable Quick Steps again, click Quick Steps to place a check mark.
Use Troubleshooting topics when you get stuck
Answers to questions most commonly asked by users appear in the Troubleshooting topics. In many cases, a Troubleshooting topic takes you directly to the dialog box where you can find the solution to your problem.
To use Troubleshooting:
1 On the Help menu, click Help Topics. (If you have a Help window open, click the Help Topics button in the window instead.)
2 Click the Contents tab.
3 Click the Troubleshooting book, and then click Open.
4 Click a topic under Troubleshooting, and then click Display.
Getting help in a dialog box
In the Help Topics window, you can also browse through topics listed alphabetically (click the Index tab) and find topics containing a certain word or phrase (click the Find tab).
Determine what's what on the screen
When you're not sure about something on the screen, you can display a brief explanation of what it is or does.
To find out about an item on the screen:
In a dialog box, click the question mark button, and then click the item. Or use the right mouse button to click the item, and then click the What's This? command.
On a toolbar, place the mouse pointer over a button for a second or two.
Go to topic summary
- Click anywhere to make a pop-up explanation disappear.
2
Installing LapLink Technical
In this chapter
Requirements for using LapLink Technical 16
Installing LapLink Technical 18
Customizing the installation 20
Requirements for using LapLink Technical
Before you begin setting up LapLink, make sure you have the hardware and software you need to use the program.
To determine the amount of installed memory, double-click System in the Windows Control Panel. Then click the Performance tab.
To determine the amount of free disk space, right-click the drive in My Computer. Then click the Properties tab.
General requirements for each computer
Microsoft Windows 95 or Microsoft Windows NT 4.0
Intel or Intel-compatible 486/100 processor
16 MB of memory (24 MB recommended)
- 9 MB of available hard disk space (for a complete installation)
VGA monitor (or better recommended)
Microsoft mouse or compatible pointing device
CD-ROM drive or access to one over a network
Requirements for modem communication
In Windows 95, either of these:
A Windows-compatible modem
- A Hayes-compatible 2400 bps modem or better (9600 bps or higher recommended)
In Windows NT:
A modem set up in Windows NT (including TAPI functionality)
Requirements for network communication
- For IPX connections: Client for Microsoft Networks or Client for NetWare Networks (both included in Windows).
For TCP/IP connections: Windows Sockets (included in Windows).
Requirements for Dial-Up Networking communication
- The guest computer must have the Dial-Up Networking feature of Windows installed, with a Dial-Up Networking connection to the appropriate dial-up server.
- The host computer must be running a dial-up server program, or must be accessible via a dedicated dial-up server that supports incoming Dial-Up Networking connections.
Dedicated remote access servers include Novell NetWare Connect and Shiva NetModem.
Dial-up server programs include the Dial-Up Networking server included with the Microsoft PLUS! Pack for Windows 95, and Windows NT Remote Access Server.
Requirements for cable communication
- For serial connections: a LapLink serial cable and an RS-232 serial (COM) port on each computer.
- For parallel connections: A LapLink parallel cable and a parallel (printer) port on each computer, or a DirectParallel Universal cable and an Extended Capabilities Port (ECP) on each computer.
To purchase cables, contact Traveling Software or a LapLink reseller.
Requirements for wireless communication (Windows 95 only)
Any of the following:
- Infrared ports and devices supported by the Windows Infrared communications driver (IrDA), version 1.0 or 2.0. The driver must be installed on both computers.
- Infrared devices such as the Extended Systems JetEye Infrared PC Interface (baud-switchable only). These devices must be configured in Windows in order to work in LapLink.
Built-in infrared devices such as the ones found on some models of laptops (such as recent versions of the Gateway 2000, Dell Latitude, and IBM ThinkPad), and on some computers (such as the NEC PowerMate series). Check your hardware documentation for details.
AirShare Radio Modules.
Requirements for CAPI 2.0/ISDN communication
CAPI 2.0/ISDN is a standard popular in Europe. It is not typically used in the United States.
- An ISDN adapter with a CAPI 2.0 compliant driver on both ends of the connection
An ISDN line
Requirements for using Voice Chat
A sound card in each computer
- Speakers or headphones on each computer
A microphone on each computer
Parallel cable connections are not available in Windows NT.
Wireless connections are not available in Windows NT.
To connect over any wireless devices except those supported by the Windows Infrared communications driver, you must edit a setting in the LLW.INI file. For more information, see the online user's guide.
For additional information, see the section on Voice Chat.
Installing LapLink Technical
Before you can connect to another computer, LapLink must be installed and running on both computers. When you install LapLink, you choose between two types of installation: Express and Custom. Choose Custom to determine exactly which ports and devices are enabled during installation. To begin installing from a CD-ROM, insert the CD-ROM, click Install Software, and click Install LapLink. To begin installing from floppy disks, double-click Add/Remove Programs in Control Panel.
Go to illustration
- You cannot install LapLink Technical in Windows NT unless you have sufficient rights in Windows NT. For more information see page139.
Types of installation
Setup asks you which type of installation you want. There are two types:
- Express Installs all LapLink files, with a minimum of prompting.
- Custom Installs all LapLink files, and allows you to specify the types of communications you want available to you in LapLink.
By default, Setup automatically enables any connections by network (both IPX and TCP/IP), modem, and Dial-Up Networking which are installed on your computer. In a Custom installation, you can disable any network or modem connections you do not intend to use in LapLink (and still leave them enabled for use in other programs). You can also ensure that ports are enabled for cable and wireless connections.
Other Setup questions
Regardless of the type of installation, Setup wants to know:
Where to install LapLink? Setup asks where you want LapLink installed. Any location on a hard disk with sufficient free space will do.
The name of your computer? The name you give your computer will be seen by others when you connect to their computers and when they connect to yours. Remember that you can change the name by running LapLink anytime after installation.
Whether to register? After installing LapLink, Setup asks whether you want to fill out a registration form on the Web. If you don't have a Web browser, or access to the Internet, fill out your LapLink registration card and mail it to Traveling Software. Remember you can register on the after installation by selecting Web Registration in the LapLink program group.
Installing the software
To install LapLink from a CD-ROM:
1 Insert the LapLink Tech CD-ROM in a CD-ROM drive.
2 Click Install Software, and then click Install LapLink, and follow the instructions on your screen.
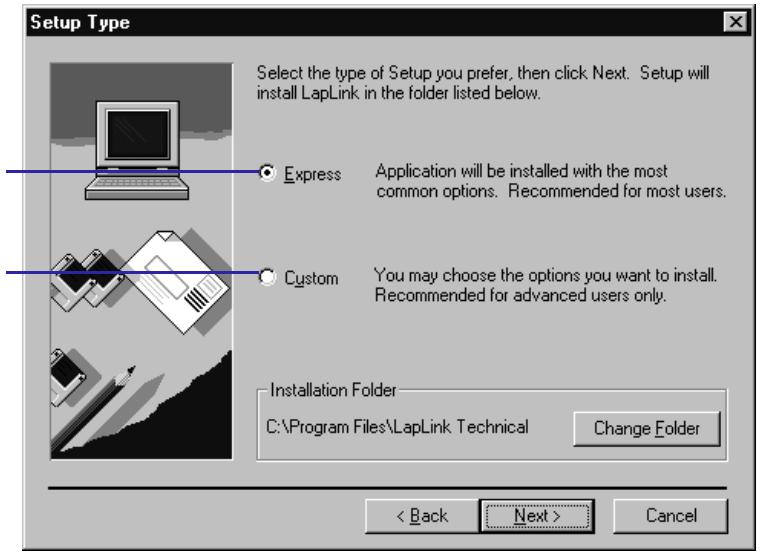
Choosing the type of installation
You can choose between two types of installation:
Express installs all LapLink files with a minimum of prompting.
Custom gives you control over the kinds of connections enabled for use in LapLink.
To install LapLink from floppy disks:
1 Insert the first LapLink floppy disk in a floppy disk drive.
2 Click the Start button, and click Run.
3 Type a:setup, where a: is the letter for your floppy drive, and click OK.
4 Follow the instructions on your screen.
When the installation is done, restart Windows before starting LapLink.
Starting the program
The Setup program creates a new program folder for LapLink Tech, which includes the LapLink Technical program.
To start LapLink Technical:
1 Click the Start button. Point to Programs and then point to the LapLink Tech folder.
2 Click LapLink Technical to start the program.

Go to topic summary
To remove
LapLink, click Uninstall LapLink in the LapLink Tech program group.
Once you run
LapLink, you can connect to other computers running LapLink.
installing LapLink Technical Customizing the installation
The main reason for using Custom installation is to specify exactly the types of communications you want available to you in LapLink. By default, Setup automatically enables any connections by network (both IPX and TCP/IP), modem, and Dial-Up Networking which are installed on your computer. You can disable any network or modem connections you do not intend to use in LapLink (while retaining their use in other programs). You can also ensure that serial and parallel ports are available for cable or wireless.
Go to illustration
If you intend to use AirShare Radio Modules or infrared devices without the support of Windows Infrared driver (IrDA), you must edit the LapLink configuration file after installation.
Configuring your LapLink connections
Cable and wireless Depending on a variety of factors, Setup may not enable cable or wireless ports for you. With Custom installation, however, you can enable ports for the type of communication you want.
To enable cable or wireless communication during installation:
- In the Port Configuration dialog box, click the Cable or Wireless button, and then click the appropriate port so that it is checked.
If a port is grayed, it was not detected or has been configured for use by some other device.
Modems LapLink will communicate over any modem installed in Windows, using the Windows settings.
If you have Windows 95, you can choose whether to use Windows modems or you can choose to configure one of your COM ports for a modem. Giving Windows control of modems simplifies their use in different communications programs; you do not have to configure a modem separately for each program. Giving Windows control of ports makes it easier to switch a port between modem and cable communications; you do not have to disable one communication device and enable the other.
By default, Setup makes Windows modems available to LapLink and gives control to Windows. With Custom installation, however, you can make your Windows modems unavailable to LapLink.
To make Windows modems unavailable to LapLink:
- In the Port Configuration dialog box, click the Modems button. Then click Enable Windows Modems so that it is cleared.
You can use network and Dial-Up Networking connections in LapLink only if they have been installed in Windows.
Networks Setup automatically enables communications over any IPX and TCP/IP networks installed on your computer under Windows. With Custom installation, however, you can make a network connection unavailable to LapLink.
Configuring LapLink connections during Custom installation
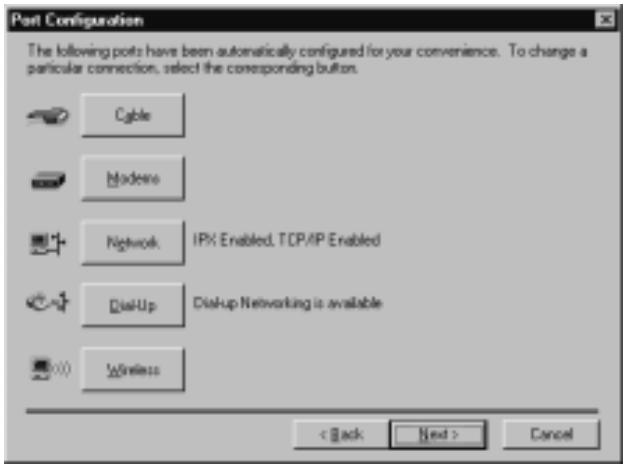
When you perform a Custom installation, you can change the types of connections that will be available when you run LapLink. The connections that appear vary based on what
In the Port Configuration dialog box, you see the connections Setup has enabled for you.
To enable or disable a connection, click the appropriate button.
To make a network connection unavailable to LapLink:
Go to topic summary
- In the Port Configuration dialog box, click the Network button, and then click the appropriate network connection so that it is cleared.
Dial-Up Networking If you have Dial-Up Networking installed on your computer, Setup automatically enables this feature for use in LapLink. Custom installation tells you whether Dial-Up Networking is available on your computer but does not let you change its status.
Performing a Custom installation
To perform a Custom installation from a CD-ROM:
1 Insert the LapLink Tech CD-ROM in a CD-ROM drive.
2 Click Install Software, and then Install LapLink, and follow the instructions on your screen.
3 When asked for the Setup type, click Custom.
To perform a Custom installation from floppy disks:
1 Start Windows and insert the first LapLink disk in a floppy disk drive.
2 Click the Start button, point to Settings, and then click Control Panel.
3 Double-click Add/Remove Programs.
4 In the Install/Uninstall tab, click Install, and follow the instructions on your screen.
When asked for the Setup type, click Custom.
To remove LapLink, click Uninstall LapLink in the LapLink Tech program group.
3
Connecting to Other Computers
In this chapter
Connecting to other computers—Overview 24
Connecting by modem—Overview 26
Making a LapLink-to-LapLink connection by modem 28
Connecting to a network by modem: Dial-Up Networking 30
Using Address Book for modem connections 32
Connecting over the Internet 34
Determining an Internet address 36
Using the Traveling Software WINS server for Internet names 38
Internet security and firewalls 40
Connecting by network 42
Connecting to computers outside of your TCP/IP subnetwork 44
Using Address Book for network connections 46
Connecting by cable 48
Connecting by wireless 50
Connecting over CAPI 2.0/ISDN 52
Understanding CAPI configuration 54
Changing the security setup 56
Setting up password protection 58
Securing your computer and encrypting the data you transfer 60
Connecting automatically 62
Connecting to other computers—Overview
Using LapLink, you can connect to one or more computers using a variety of connection methods. All computers must be running LapLink before they can connect. After you've connected, you can use any combination of the LapLink services such as File Transfer and Remote Control. You can open services while you connect to another computer or after you've connected.
Go to illustration
When you connect to another computer, you're making an outgoing connection. To complete the connection, the other computer accepts your incoming connection. The computer you are working at is the local computer. The computer accepting your connection is the remote computer.
To connect two computers, LapLink must be running on both.
Before you can connect two computers, both must be running LapLink. You can then connect by modem, network, cable, wireless, or CAPI 2.0/ ISDN. Which type of connection you choose depends on where the remote computer is.
Connections by wireless and parallel cable are not available in Windows NT.
If the two computers are close together, you might use cable or wireless. If you're in the same company, you might use a network. If you're in separate locations, not connected by network, modems work best. You can connect in different ways at different times or even in the same session.
Cable and wireless connections are not protected initially by security; you can secure these in the Security dialog box. See the online help for information.
Relaxing security to allow incoming connections
Security settings must be relaxed to allow an incoming connection by network or modem. Initially, LapLink allows you to make outgoing calls, but nobody can connect to your computer. Likewise, you can connect only with those remote computers that allow incoming connections.
To change the security settings:
1 Start LapLink.
2 Click the Security button on the LinkBar.
3 On the General tab, click Anybody (Public System).
! Selecting Anybody (Public System) makes your computer and its files completely open to anyone who can connect to your computer. For more information about securing your computer, see page 60.
4 Click the services you want, such as File Transfer and Remote Control.
5 Click OK.
Making outgoing connections
When you make an outgoing connection, you follow the same basic steps regardless of how you're connecting or the services you intend to use.
Relaxing security and opening connections
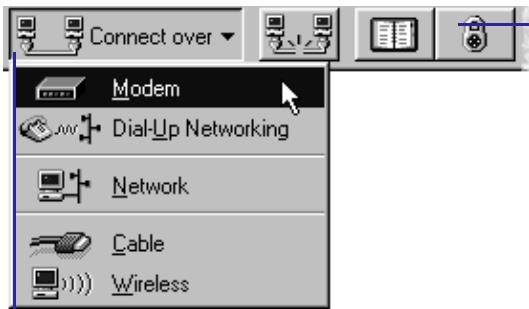
To open a connection, click the Connect button on the LinkBar. Then click the type of connection you want.
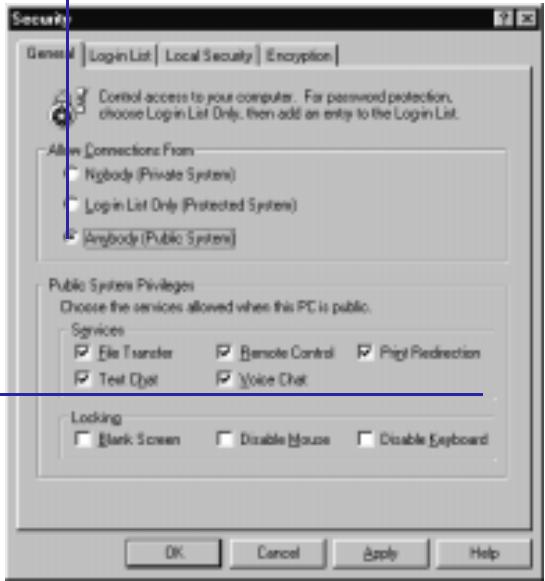
Be sure the services you want to make available to other users are checked.
To relax security, click the Security button on the LinkBar.
Then click Anybody (Public System) to allow access to your computer without password protection.
To make an outgoing connection:
Go to topic summary
1 Click the button on the LinkBar for the type of connection you're using.
2 Click the name of the computer you want to connect to, or type the remote computer's phone number if connecting by modem.
3 Click the service, or combination of services, you want to use.
4 Click OK or Dial.
Disconnecting
When you disconnect, you end communication with the remote computer. You can disconnect your connections individually, or all at the same time.
To disconnect from the remote computer:
1 Click the Disconnect button on the LinkBar.
2 In the Connection list, click the name of the remote computer.
3 Click OK.
Connecting by modem—Overview
With LapLink Technical, you have a choice of connections over a modem: the "traditional" connection between two computers running LapLink or a LapLink connection combined with the Dial-Up Networking feature of Windows.
Go to illustration
Direct LapLink-to-LapLink connections
A LapLink-to-LapLink connection requires only that both computers run LapLink and be connected by modem. When you dial directly in to another LapLink computer, you have access to all the programs and files available to that computer, including any network resources. You can:
- Transfer files between the computers. Using LapLink's patented Speed-Sync technology, you can transfer data faster than is possible with Dial-Up Networking.
- Control the remote computer to run its programs and access its files. Through Remote Control, you can efficiently run large programs on the remote computer and access large files (including multiuser files such as order entry systems or accounting systems).
If the remote computer is attached to a network, you can use its copy of LapLink to exchange files indirectly with other network computers running LapLink.
Using Dial-Up Networking by itself
A server can be a specialized server available from many manufacturers. Or it can be a Windows computer running dial-up server software. For more information, see chapter 2.
When away from the office, you can connect to your office computer and network using a modem to dial in to a remote access server on the network. You can then use programs, files, printers, and other resources on the server or network. With proper configuration at both ends of the connection, Dial-Up Networking lets you:
- Make small file transfers using Windows Explorer.
- Run programs on your local computer and edit smaller files on the network. (Running a large program or editing large files on the remote computer might prove unacceptably slow.)
- Send documents on your local computer to network-based printers.
Read and send e-mail messages.
Combining LapLink with Dial-Up Networking
Using LapLink with Dial-Up Networking, you enjoy all the advantages of both kinds of connections, with these additional benefits:
- You can establish a connection to another LapLink computer on the network, and open services such as File Transfer and Remote Control.
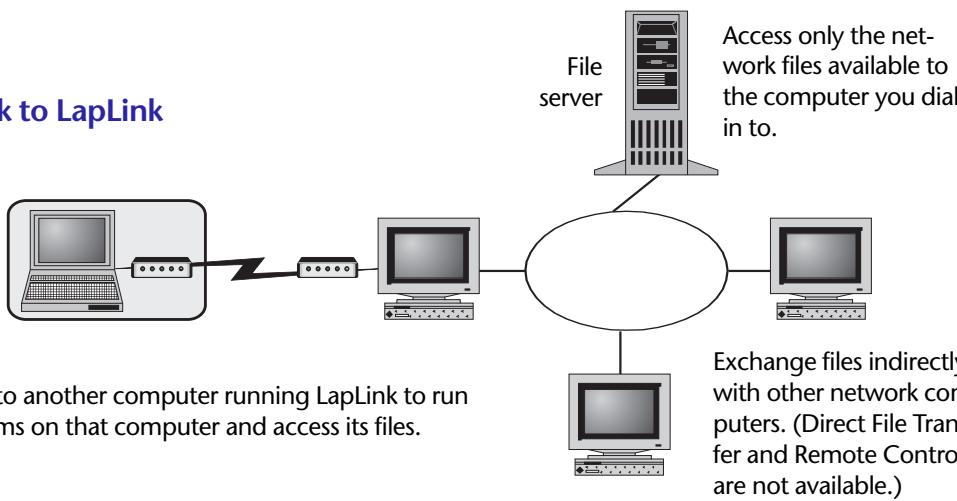
LapLink to LapLink
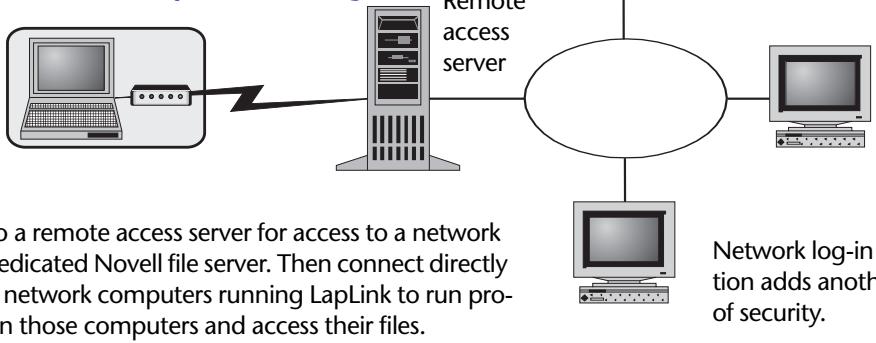
LapLink with Dial-Up Networking
Exchange files indirectly with other network computers. (Direct File Transfer and Remote Control are not available.)
Network log-in protection adds another level of security.
Security is enhanced by combining LapLink password protection with network security. When you dial in to a server, you must provide a network log-in name and password. When you connect to another LapLink computer, you must also provide the log-in name and password required by that computer.
Go to topic summary
You can open Dial-Up Networking connections to other network computers only on a network with a dedicated Novell file server.
Connecting by modem
Making a LapLink-to-LapLink connection by modem
If you're connecting to another computer using a modem, you must first attach the modem correctly to your computer and phone line. To connect to the other computer, start LapLink, and click the Connect button on the LinkBar, then click Modem. Then choose among the modem connections you have entered in Address Book.
Go to illustration
You can make a LapLink-to-LapLink connection to any other computer in the world when both computers have modems and are attached to phone lines. Using the manufacturer's guidelines, connect the modem to a serial (COM) port on your computer and to a phone line.
To connect two computers by modem, both must be running LapLink, and their modem ports must be enabled.
Dialing from an Address Book entry
Before dialing a computer, it's a good idea to create an entry for that connection in Address Book. Though you do not dial from Address Book, you can choose among its entries when you connect to a remote computer. For information about using Address Book for modem connections, see page 32.
Dialing Properties replaces the Suffixes and Prefixes feature of earlier versions of LapLink.
When you dial a connection you have entered in Address Book, you use the Dialing Properties feature of Windows. Through the settings you specify in Dialing Properties, you determine how your calls are dialed in LapLink. Use these settings to charge a call to a calling card, use your computer while traveling, reach an outside line, and place long-distance and international calls.
To connect to another computer by modem:
1 Click the Connect button on the LinkBar, and then click Modem.
2 In the Connection list, click the connection you want to open.
To review or change any of the settings for your dialing location, click Dial Properties. If you travel, it's important to keep your dialing location up to date.
The connections listed under Manual Dial are your Address Book entries for modem connections. To create a new entry, click Address Book.
3 In the Dialing Location list, click the location you're dialing from.
4 Under Services, click the services you want, such as File Transfer and Remote Control.
5 Click Dial.
Connecting by modem to another computer running LapLink

On the LinkBar, click the Connect button.
Then click Modem.
Click the connection you want to open.
Click the services you want to use.
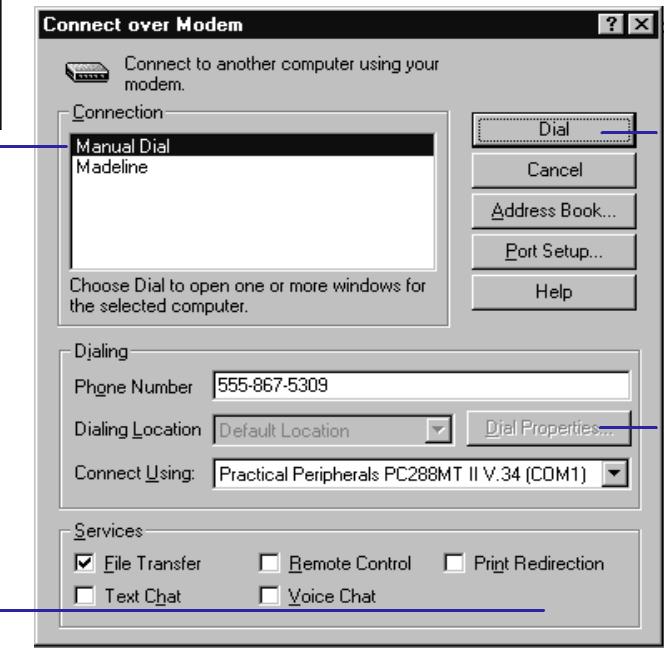
Click Dial when you are ready to open the connection.
Click Dial Properties to change Windows settings that determine how the number is dialed.
Dialing manually

Go to topic summary
To dial a connection that is not complicated by such considerations as calling cards, outside lines, and country codes, you can type the phone number without creating an Address Book entry beforehand. LapLink dials the number exactly as you type it, regardless of how you have set up Dialing Properties.
To dial manually:
1 Click the Connect button on the LinkBar, and then click Modem.
2 Click Manual Dial.
3 In Phone Number, type the number to dial.
4 Click Dial.
To allow incoming modem connections, you must relax your computer's security setup. See page 56.
Connecting by modem
Connecting to a network by modem: Dial-Up Networking
Connecting to a network using Dial-Up Networking provides the most versatile kind of modem connection. You can access network resources as a "remote node" and then open LapLink connections with any other network computers running LapLink. The computers at both ends of this connection must be configured for remote access.
Go to illustration
LapLink lets you dial in to a remote access server on your office network. You can then access network resources and open LapLink connections to other computers on the network as you would from your office computer.
To make a LapLink connection to another computer over Dial-Up Networking, both computers must be running LapLink. In addition:
For help in configuring computers for Dial-Up Networking, consult Help in Windows.
- The computer you dial from must be configured with the Dial-Up Networking feature of Windows.
- The computer you dial in to may be a dedicated server (such as Novell NetWare Connect, Windows Remote Access Server, or Shiva NetModem) or a computer running dial-up server software.
To connect to a network by modem:
You can make a LapLink connection anytime during a Dial-Up Networking session by clicking the Connect button on the LinkBar, and then clicking Network.
1 Click the Connect button on the LinkBar, and then click Dial-Up Networking.
2 In the Dial-Up Networking Connection list, click the server you want to connect to.
3 In the Dialing From list, click the location you're dialing from.
To review or change any of the settings for your dialing location, click Dial Properties.
4 If you do not want to open a LapLink connection as soon as the Dial-Up Networking connection is established, clear this option: After connecting to the network, choose a LapLink connection.
5 Click Dial.
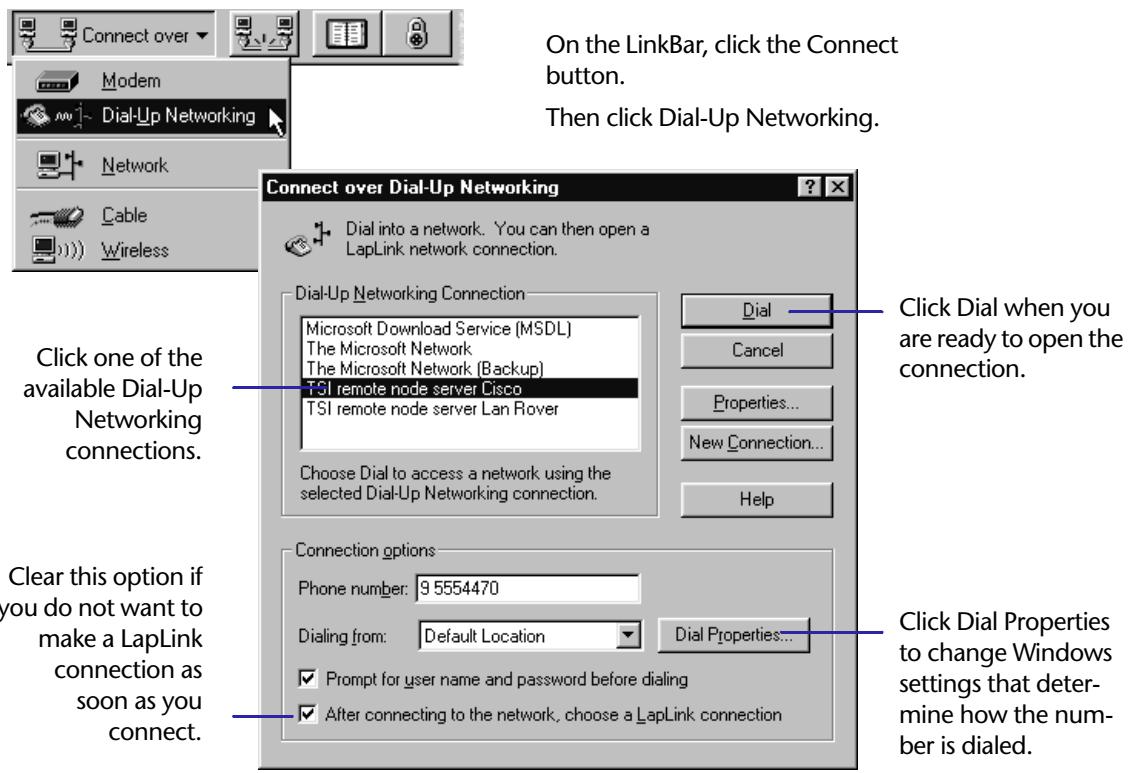
Connecting over Dial-Up Networking
The list of dial-up servers available in LapLink is identical to the one available through Dial-Up Networking (in My Computer on your desktop) and is controlled through Windows. To learn more about a server or to change the phone number or select a different modem, click Properties. To set up a new connection, click New Connection and follow the instructions on your screen.
When you make a Dial-Up Networking connection in LapLink, you use the Dialing Properties feature of Windows. Through the settings you specify in Dialing Properties, you determine how your calls are dialed. Use these settings to charge a call to a calling card, use your computer while traveling, reach an outside line, and place long-distance and international calls. Dialing Properties replaces the Suffixes and Prefixes feature of earlier LapLink versions.

Go to topic summary
Connecting by modem
Using Address Book for modem connections
Making entries in Address Book simplifies the process of making modem connections and opening service windows. Use Address Book entries to store phone numbers, requests for services (such as File Transfer and Remote Control), and passwords. When you dial a connection, this information is passed on to the remote computer for you. In addition, Address Book entries work in combination with Dialing Properties, the Windows feature you can use for dialing outside lines, using calling cards, and placing long-distance and international calls.
Go to illustration
Address Book is a convenient way of storing all the information you need to make a modem connection. Enter the information once, and it will be there whenever you need it again. Your Address Book entries will be available when you connect using Connect over Modem.
The information you store in Address Book will be sent automatically to a remote computer when you dial. You do not open a connection from Address Book itself.
By creating Address Book entries, you can also take advantage of Dialing Properties, the Windows feature that lets you determine how your numbers will be dialed. Set up your Dialing Properties to charge a call to a calling card, use your computer from various locations, reach an outside line, and place long-distance and international calls. For more information about Dialing Properties, see the Windows documentation.
To create an entry in Address Book for a modem connection:
1 Click the Address Book button on the LinkBar.
If you have set up password protection for your security system, you are now asked to type the password.
To change an Address Book entry, click the entry, and then click Edit. To copy an entry for revision as a new entry, click Copy.
2 Click Add.
3 In Description, type a brief description of the remote computer for your own reference.
4 In Computer Name, type the exact name assigned to the remote computer in LapLink.
5 In the Connection Type list, click Modem.
6 Under Phone Number, type the area code and phone number, and identify the location of the remote computer.
7 Under Services, click the services you want to use when you connect to the remote computer, such as File Transfer and Remote Control.
You will be able to change your selections later, as part of the connection process. You will also be able to request new services after you connect.
Creating a modem entry in Address Book


On the LinkBar, click the Address Book button.
Type a description for your own reference.
Type the exact name assigned to the remote computer.
Click modem as the connection type.
Click the kinds of services you want to use.
Type the log-in name and password required by the remote computer.
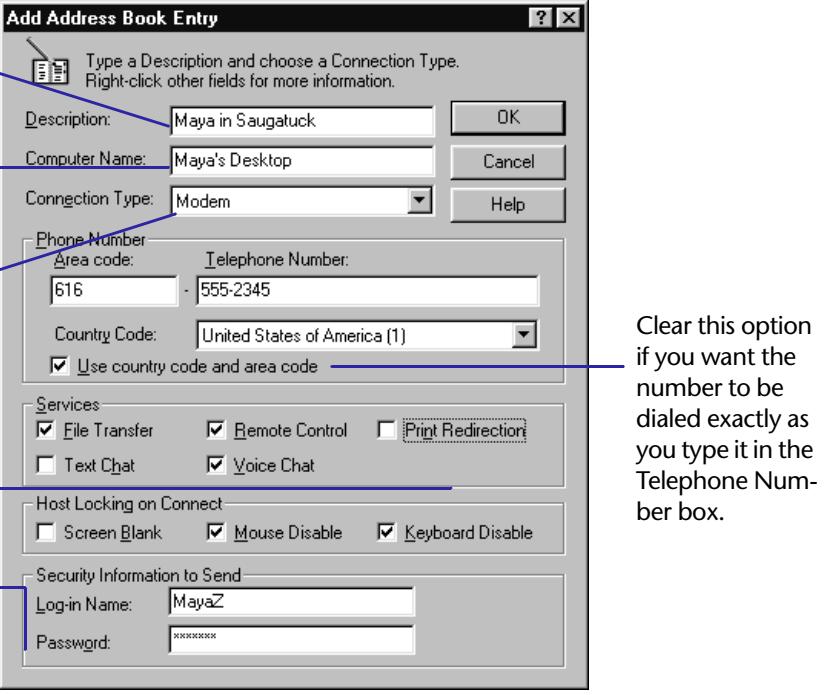
Clear this option if you want the number to be dialed exactly as you type it in the Telephone Number box.
8 Under Host Locking on Connect, click the kind of locking, if any, you want to take effect on the remote computer when you connect for Remote Control.
Go to topic summary
You can lock a host (blank its screen or disable its mouse or keyboard) only if it has been configured to allow locking.
9 Under Security Information to Send, type the log-in name and the password you must provide in order to gain access to the remote computer. Reenter the password to confirm.
When you have finished the entry, you see Address Book and the description of the new entry. If you want to create another entry, click Add again and complete the entry. Otherwise, click Close.
If you want to have a phone number dialed exactly as you type it in an Address Book entry, clear this option: Use country code and area code.
Case is irrelevant in LapLink passwords: A capital D is treated the same as a lowercase, for example.
Connecting over the Internet
The Internet is a worldwide collection of networks running the TCP/IP protocol. Since LapLink Technical supports TCP/IP networks, you can connect any two computers that have dialed in to the Internet. That means you can use the LapLink services (such as File Transfer and Remote Control) anywhere in the world, all for the cost of a connection to a local Internet provider.
Go to illustration
Requirements for using LapLink over the Internet
Before you connect over the Internet, both Windows NT and LapLink must be properly configured:
- In Windows, the Microsoft TCP/IP protocol stack must be installed. Do not install any other TCP/IP stack.
- In LapLink, the TCP/IP port must be enabled in Port Setup.
Making a LapLink connection over the Internet
How you make a LapLink connection over the Internet depends on how you access the Internet. There are two common ways of accessing the Internet:
Over a modem connection to an Internet provider.
Over a direct connection from a corporate network.
To open a LapLink connection by modem over the Internet:
1 In LapLink, dial in to your Internet provider: click the Connect button on the LinkBar, and then click Dial-Up Networking.
The Connect over Network dialog box appears when you connect.
To prepare a computer to receive incoming Internet connections by modem, start LapLink and dial in to your Internet provider using Dial-Up Networking.
2 On the TCP/IP Addresses tab of the Connect over Network dialog box, type the remote computer's Internet (IP) name or address in the TCP/IP Name or Address box. (For information about Internet names and addresses, see the next section.)
3 Specify the services you want to open at the start of the connection, such as File Transfer and Remote Control.
4 Click OK.
To open a LapLink connection over the Internet from a corporate network:
1 Start LapLink.
2 On the LinkBar, click the Connect button. Then click Network.
3 Click the TCP/IP Addresses tab.
4 Type the remote computer's Internet (IP) name or address in the TCP/IP Name or Address box.
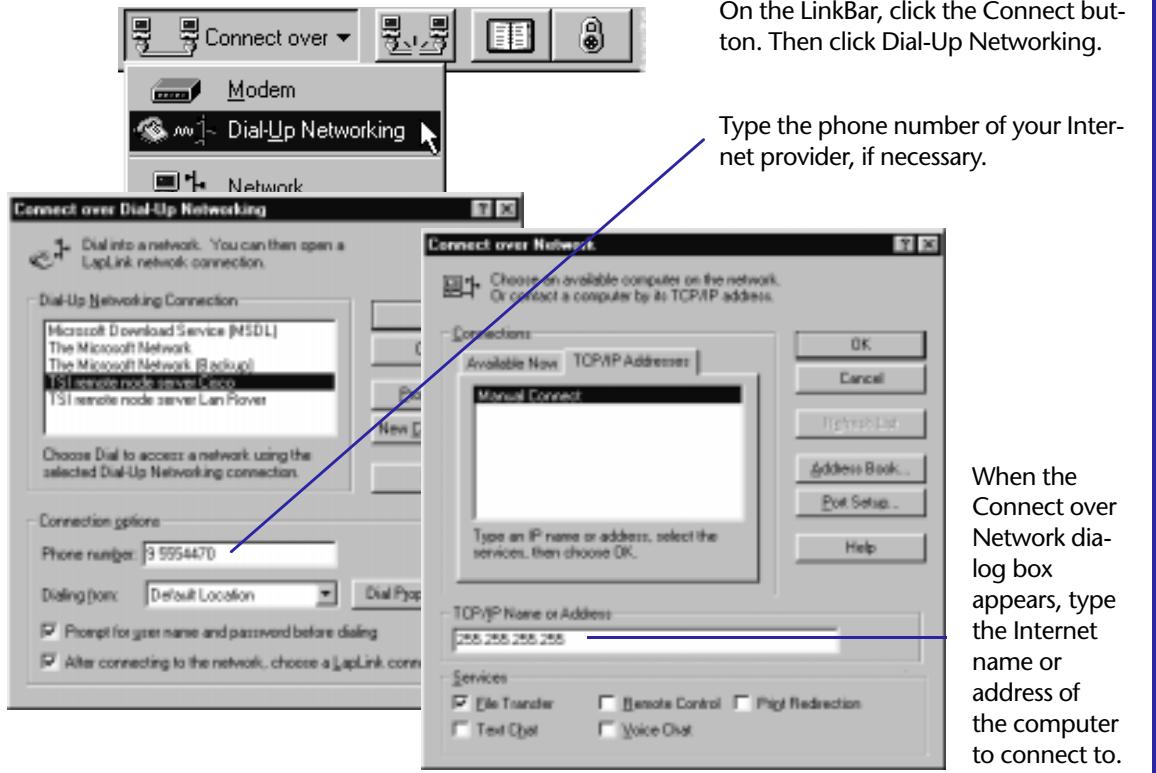
Making a LapLink connection by modem over the Internet
For information about Internet names and addresses, see the next section.
Go to topic summary
5 Specify the services you want to open at the start of the connection, such as File Transfer and Remote Control.
6 Click OK.
To prepare a computer to receive incoming Internet connections over a corporate network, enable the TCP/IP port in LapLink Port Setup. Then leave LapLink running.
To simplify repeat connections to a computer with a permanent Internet address, create an entry in Address Book. Identify the connection type as TCP/IP.
To use your network for LapLink connections over the Internet, the network must have Internet access, your computer must be configured with Microsoft TCP/IP software, and the network's security system must allow LapLink connections. Consult your system administrator if in doubt.
Connecting over the Internet Determining an Internet address
To connect to another computer over the Internet, you must know the computer's Internet name or address. Conversely, anyone wanting to connect to your computer, must know its Internet name or address. A computer's address on the Internet can vary from session to session, or it can remain constant, depending in large part on how the Internet is accessed. With access to the proper software, however, names can be used instead of addresses; names do not change from session to session and thus simplify the process of connecting.
Go to illustration
When you connect to another computer on your local network, you choose from a list of connections available to you. When you connect over the Internet, however, you must provide the computer's Internet (IP) address or name; there is no list of computers to choose from.
Internet addresses consist of a series of numbers, with periods as separators: for example, 255.255.255.255.
Connecting to a computer with a temporary Internet address
If you connect to an Internet provider by modem, it's likely that your Internet address is assigned dynamically; that is, it's different every time you connect. (Check with your Internet provider if in doubt.)
To open a connection to a computer having a temporary address, you have a choice:
- Someone determines that computer's address after connecting to the Internet, and e-mails you the information. You then type that address in the Connect over Network dialog box. (If someone wants to connect to your computer, you must determine your own address and e-mail the other party.)
- A better solution is available through "name-resolution" software, which lets you maintain a permanent Internet name even though your address changes every time you connect to the Internet. For information about the free WINS service offered by Traveling Software, see page 38.
Connecting to a computer with a permanent Internet address
If you connect to the Internet directly from your corporate network, your Internet address is probably permanent. Some Internet providers also offer permanent addresses; even if you dial in to such providers, your address is the same from session to session.
Connecting to a computer with a permanent address simplifies the connection process, since you always know what to type as the address in the Connect over Network dialog box.
Some networks include a name-resolution service called DNS (Domain Name System), which converts permanent addresses to names. A DNS
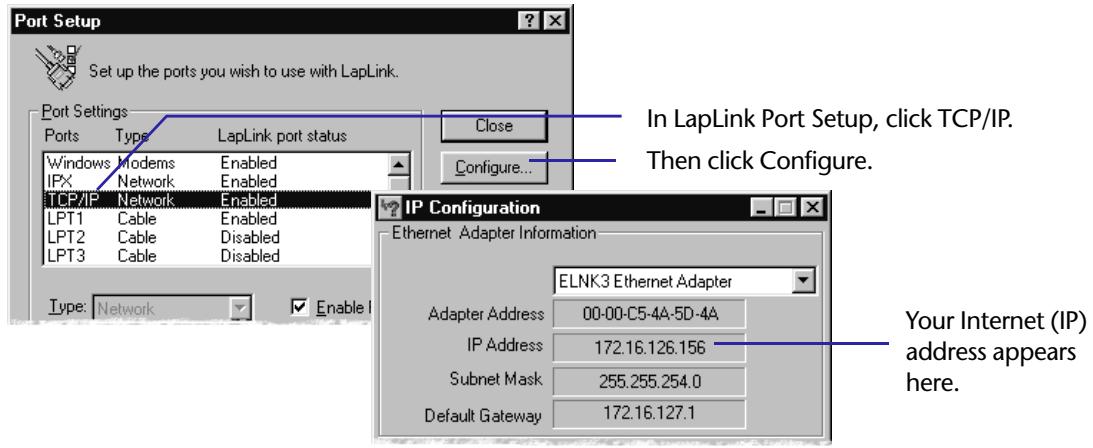
Determining your Internet address in Windows 95
name looks like an e-mail address (for example, janed.acme.com), but never includes @. If your network uses DNS, other users can connect to your computer using the DNS name.

Go to topic summary
Determining an Internet address
To determine your Internet address in Windows 95:
1 Do one of the following:
If you access the Internet by modem through an Internet provider, start LapLink and connect using Dial-Up Networking. (See the previous section for details.)
If you access the Internet directly from your corporate network, start LapLink.
2 Click Port Setup on the Options menu.
3 Click TCP/IP Network in the Ports list, and then click Configure.
4 Your Internet address appears in the IP Address box.
To determine your Internet address in Windows NT:
1 If you access the Internet by modem through an Internet provider, start LapLink and connect using Dial-Up Networking. (See the previous section for details.)
2 Click the Windows Start button, point to Programs, and click Command Prompt.
3 Type IPCONFIG and press ENTER.
The TCP/IP address for that computer appears in the IP Address line.
Connecting over the Internet
Using the Traveling Software WINS server for Internet names
A WINS server allows computers with temporary Internet addresses to connect using permanent names. Even though your address is different every time you connect to the Internet, other computers will be able to locate your computer by specifying your WINS name. As a free service to its registered users, Traveling Software, Inc., offers a WINS server to facilitate LapLink connections over the Internet.
Go to illustration
Most users who dial in to an Internet provider are assigned temporary addresses. With only temporary addresses to go by, LapLink users must rely on e-mail to pass on their current addresses once they have connected to the Internet.
To connect to a computer using its WINS name, type the name in the IP Name or Address box in the Connect over Network dialog box.
Users who want to open LapLink connections over the Internet can overcome the issue of temporary addresses by using a WINS (Windows Internet Naming Service) server. A WINS server matches a Windows computer name to the computer's current Internet address. Once users have configured their computers for the same WINS server, they can locate each other using their WINS names (that is, their Windows computer names).
Traveling Software offers a WINS server as a free service to its registered users.
If you are already using a WINS server, you do not have to switch to the one offered by Traveling Software. If you do switch, however, be sure to record the address of the original server; other programs may rely on that server.
To configure your computer for the Traveling Software WINS server:
1 In Windows, click the Start button and then point to Settings.
2 Click Control Panel and then double-click Network.
3 On the Identification tab, make note of your computer name. This is your WINS name (other users will use this to connect to your computer).
If necessary, edit the name to avoid duplicating the name of any computer you plan to connect to.
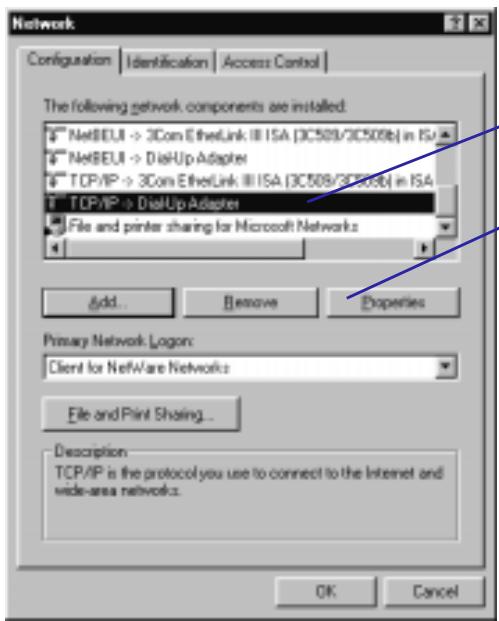
4 In Windows 95, click the Configuration tab, click TCP/IP -> Dial-Up Adapter, and then click Properties. Then, click the WINS Configuration tab. On that tab, click Enable WINS Resolution.
In Windows NT, click the Protocols tab, click TCP/IP Protocol, and then click Properties. Then, click the WINS Address tab.
5 In the Primary WINS Server box, type this address: 198.102.198.10
6 In the Scope ID box, type an identifier to be used by you and the other LapLink users you want to connect to.
Setting up the Traveling Software WINS server in Windows 95
On the WINS Configuration tab, type the address of the Traveling Software WINS server.
Type a Scope ID. Share this Scope ID with the other LapLink users you want to connect to using the Traveling Software WINS server.
After opening the Network option in the Windows 95 Control Panel, click the TCP/IP -> Dial-Up Adapter line.
Then click Properties.
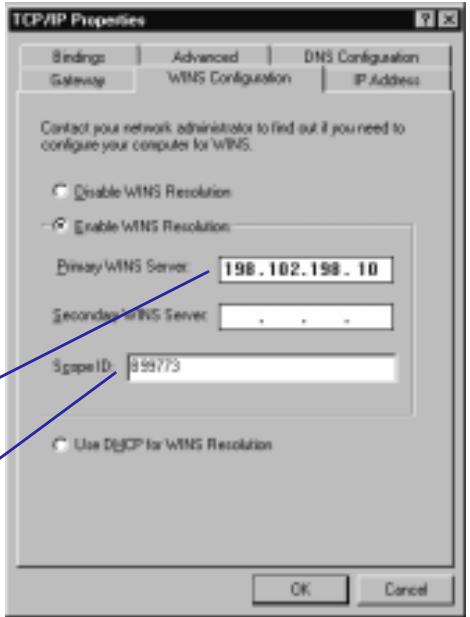
Begin a scope ID with a letter and follow it with any combination of letters and numbers (avoiding signs and symbols). Uppercase and lowercase letters are treated the same way.
Go to topic summary
7 Click OK and restart Windows.
8 Ask other LapLink users to configure their computers for the Traveling Software WINS server. Inform them of your WINS name (step 3) and your scope ID (step 6).
By using a scope ID, you speed up service and minimize the possibility of duplicating the name of another computer (duplicate names are allowed in different scope IDs but not in the same one). You also restrict your access to other computers configured with the same scope ID. (If you do not provide a scope ID, the other users should do the same.)
Connecting over the Internet Internet security and firewalls
LapLink connections over the Internet may require special configuration if either of the computers has a direct connection to the Internet over a corporate network. Before connecting over the Internet, LapLink users should ensure that their data is being encrypted before being transferred.
Firewalls and LapLink
The Internet has grown immensely because it is unregulated. It is also inherently unsecured. To protect their data from authorized access, corporations commonly insulate their corporate networks from the Internet with firewalls, which selectively allow data to pass between the two.
Without the proper configuration, LapLink connections over the Internet will probably be prevented if either of the computers is on a private or corporate TCP/IP network.
LapLink requires the use of two TCP/IP ports: one for the host (the computer receiving the incoming connection) and another for the guest (the computer opening the connection).
To facilitate LapLink connections over the Internet, Traveling Software, Inc., has registered port 1547 with the Internet Assigned Numbers Authority. This port is used by the host computer.
To allow LapLink connections through a firewall, a network administrator should open port 1547.
With most networks, this is the only configuration required. With other networks, however, it may be necessary to specify a port for use by the guest computer.
In many cases, the TCP/IP stack assigns guest computers the next available TCP port number above port 1024, and the firewall automatically allows the connection.
If the firewall does not allow automatic port assignment, however, LapLink must be configured on the guest computer to request a specific port. Consult your network administrator before making this change.
To request a specific port on a guest computer, add the following section to the computer's LLW.INI file (the file is located in the \TSI32\LLW folder under the Windows folder):
[TCPIP]
ClientPort=xxxxxxxxx
For xxxxx type any number between 1025 and 65535, except 1547. Using a large number—for example, one above 30000—reduces the chance of
conflicts with another TCP/IP application. (For a complete list of registered ports, see RFC 1700.)
Securing your data on the Internet
The Internet is a large, unregulated network. When transferring data, keep in mind that the data can be intercepted. To keep any intercepted data from being interpreted, set LapLink to encrypt the data beforehand.
To encrypt all data exchanged in a LapLink connection:
1 On the Options menu, click Security. Or click the Security button on the LinkBar.
2 On the Encryption tab, check this option: Encrypt all information exchanged with a remote computer.
3 Click OK.
- Be sure to enable encryption before you open a connection to another computer. Changing the setting during a connection won't have any effect until you connect again.
Connecting by network
If you're connecting to another computer over an IPX or TCP/IP network, make sure that the other computer's security settings have been changed to allow you to connect. Then click the Connect over Network button on the LinkBar to connect to the other computer.
Go to illustration
Networks offer users (and the companies that maintain them) features for sharing files, exchanging files, sharing peripherals, and exchanging electronic mail between computers. A network can link two computers across a room or thousands of computers and a wide variety of peripherals in several buildings.
To connect two computers over a network, both must be running LapLink, and the network ports must be enabled.
If you're using a network, you can use LapLink to connect with other computers on your network. In the same LapLink session, you can also connect to other computers using a cable or modems.
Connecting to another computer by network
Before you can connect to another computer on the network, security settings on that computer must be relaxed. If you are going to accept incoming LapLink connections, your computer's security settings must be relaxed. See page 56.
To connect to another computer by network:
If your network port is not yet enabled, the Port Setup dialog box appears when you connect.
1 Click the Connect button on the LinkBar, and then click Network.
2 In the Available Now list, click the name of the computer you want to connect to.
If the computer is not listed and you are attempting to connect over a TCP/IP network, you can access it though its IP name or address. See the next section for more information.
3 Under Services, click the services you want to use, such as File Transfer and Remote Control.
4 Click OK.
Filtering the list of available network computers
You can display the name of a particular computer in the Connect over Network dialog box by typing all or part of the name in the Computer Name Filter box; then click Refresh List.
Specifying the name of a particular computer can speed up the process of opening a LapLink connection when you are connecting to a network by modem, using Dial-Up Networking.
Connecting by network
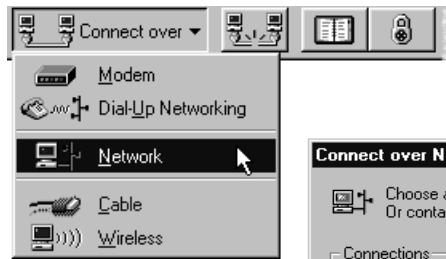
Click the Connect button on the LinkBar.
Then click Network.
Click the name of the computer to connect to.
Click the services you want to use.

Click OK when you are ready to open the connection.
Click Refresh List to update the list of connections.
To locate a particular computer, type its name—or part of its name—here. Then click Refresh List.
To display the names of all available computers again, click the arrow next to the Computer Name Filter box, click All Computers, and then click Refresh List.
^+ Before you can connect over your network, you must have your network drivers loaded, though you don't have to be logged on to the network.
After connecting to a network using Dial-Up Networking, use the Connect over Network command to connect to other network computers. Note that you can open such connections only over a network with a dedicated Novell file server.
On a network, each computer name used in LapLink should be unique. To avoid conflicts, use your network log-in name.
^+ Use Address Book in LapLink to make connecting easier. If you regularly connect to the same computers, add those computer names to Address Book. For more information, see page 46.
Go to topic summary
Connecting by network
Connecting to computers outside of your TCP/IP subnetwork
Only computers on your local TCP/IP subnetwork appear as available connections when you attempt to connect by network. To connect to a computer beyond your subnetwork, click the TCP/IP Addresses tab in the Connect over Network dialog box and type the IP name or address.
Go to illustration
TCP/IP is the protocol used to connect to wide-area networks and the Internet. Each computer on a TCP/IP network has a unique address. You don't need to know this address to connect to other computers on your subnetwork; the names of these computers appear in the list of available connections when you connect.
For information on making a LapLink connection over the Internet, see page 34.
You can connect to a computer outside of your subnetwork (on your wide-area network or the Internet) by specifying its IP address or name. An IP address consists of numbers (such as 255.255.255.255). A name consists of a string of characters (such as janedoe.acme.com). It is often similar to an e-mail address but never includes the @ symbol.
To connect to a computer outside of your TCP/IP subnetwork:
1 Click the Connect button on the LinkBar, and then click Network.
2 Click the TCP/IP Addresses tab.
3 Under IP Name or Address, type the name or address.
4 Under Services, click the services you want, such as File Transfer and Remote Control.
5 Click OK.
- You can use an IP name only if there is a server available to resolve (translate) the name into its real IP address.
Use Address Book to make connecting easier. If you regularly connect to the same computers over TCP/IP, add their IP names or addresses to Address Book; you can then click a connection instead of typing its name or address. For more information, see the next section.
Finding a TCP/IP address
To find out your TCP/IP address in Windows 95:
1 Click Port Setup on the Options menu.
2 Click TCP/IP Network in the Ports list, and then click Configure.
3 Your Internet address appears in the IP Address box.
Connecting to a computer by specifying its IP address
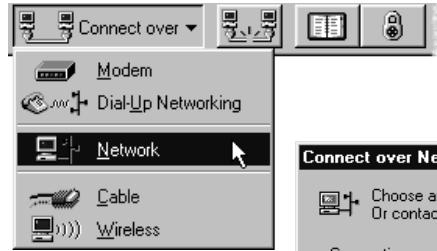
Click the Connect button on the LinkBar.
Then click Network.
Click the TCP/IP Addresses tab.
Type the IP name or address of the computer to connect to.
Click the services you want to use.
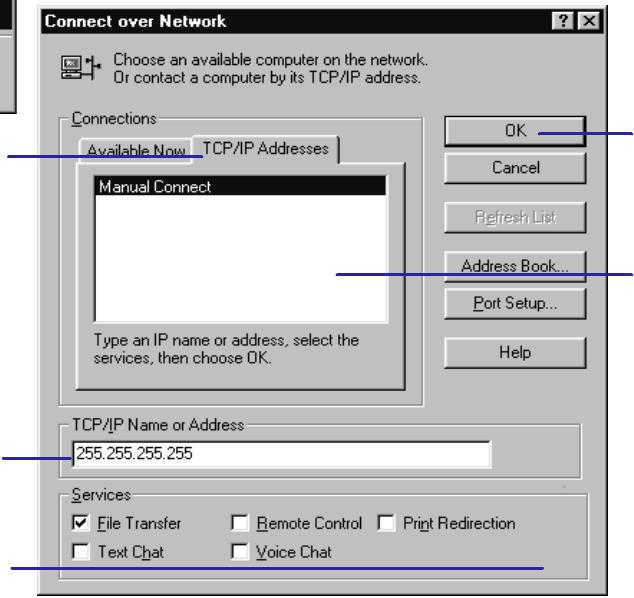
Click OK when you are ready to connect.
TCP/IP connections appear here once you add them to Address Book.
To determine your Internet address in Windows NT:

Go to topic summary
1 Click the Windows Start button, point to Programs, and click Command Prompt.
2 Type IPCONFIG and press ENTER.
The TCP/IP address for that computer appears in the IP Address line.
Connecting by network
Using Address Book for network connections
Making entries in Address Book for network computers you frequently connect to simplifies the process of making the connections and opening services. For each Address Book entry, you can specify the type of network (Novell IPX or TCP/IP), the kinds of services (such as File Transfer and Remote Control) to be opened automatically, and any security information required by the remote computer. For TCP/IP connections, you can also store the IP address. The information you save in Address Book is used when you open a connection using the Connect over Network command.
Go to illustration
Address Book stores information and requests that will be sent automatically to a remote computer when you open a connection over a network. You do not open a connection from Address Book itself.
In addition to network connections, Address Book can be used to store information for connections by cable and modem.
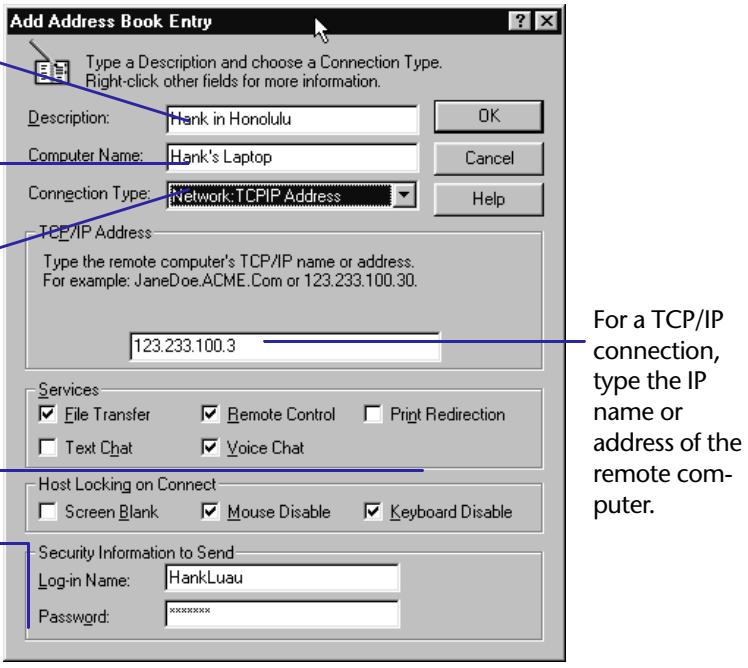
To create an entry in Address Book for a network connection:
1 Click the Address Book button on the LinkBar.
If you have set up password protection for your security system, you are now asked to type the password.
2 Click Add.
3 In Description, type a brief description of the remote computer for your own reference.
4 In Computer Name, type the exact name assigned to the remote computer.
Type the computer name assigned in LapLink, not the IP name.
5 In the Connection Type list, click Network IPX or Network TCP/IP.
6 If you selected Network TCP/IP, type the IP name or address of the remote computer under TCP/IP Address.
7 Under Services, click the services you want to open when you connect to the remote computer, such as File Transfer and Remote Control.
8 Under Host Locking on Connect, click the kind of locking, if any, you want to take effect on the remote computer when you connect for Remote Control.
You can lock a host (that is, blank its screen or disable its mouse or keyboard) only if it has been configured to allow locking.
9 Under Security Information to Send, type the log-in name and the password you must provide in order to gain access to the remote computer. Reenter the password to confirm.
- Your requests for services in Address Book will be honored only if the security setup of the remote computer permits.
Creating a network entry in Address Book

On the LinkBar, click the Address Book button.
Type a description for your own reference.
Type the exact name assigned in LapLink to the remote computer.
Click a type of network connection.
Click the kinds of services you want to use.
Type the log-in name and password required by the remote computer.

Go to topic summary
When you have finished the entry, you see Address Book and the description of the new entry. If you want to create another entry, click Add again and complete the entry. Otherwise, click Close.
The log-in name and password you type in Address Book must match a log-in name and password entered in the security system on the remote computer. (Case is irrelevant in LapLink passwords: A capital D is treated the same as a lowercase d , for example.)
^+ To edit an entry in Address Book, click the entry, and then click Edit. To copy an entry for revision as a new entry, click Copy. To delete an entry, click Delete.
Connecting by cable
If you're connecting to another computer using a cable, you must first decide which kind of cable you'll use—serial or parallel—and plug the cable into both computers. Start LapLink on both computers. Autoconnect, the standard setting for cable connections, connects the computers automatically when you run LapLink. To manually connect, click the Connect button on the LinkBar, and then click Cable.
Go to illustration
At times, you must choose the type of cable—serial or parallel—that you are going to use based on the ports you have available. Ports are the connectors that you attach cables and peripherals like printers and external modems.
Parallel cable connections are not available on Windows NT.
To find out which types of ports are available, look at the back or side of each computer. If you have both types of ports, remember that parallel cables transfer data faster than serial cables. Choosing parallel over serial will save you time when transferring files.
To connect two computers over a cable, both must be running LapLink, and the appropriate ports must be enabled on both.
Once you decide which port and cable you'll use, plug each end of a LapLink cable into the appropriate port on each computer. If you're using a LapLink cable with three connectors (one connector at each end, two at the other end), you only have to connect one of the connectors to each computer. One connector will not be used.
If in doubt about the ports on your computer, proceed carefully. Attaching the LapLink cable to a monitor (video) port, in particular, can damage the computer. (A monitor port is sometimes labeled RGB and typically has 9 holes.) Consult the documentation for your system, or contact your dealer or manufacturer.
Cables you can use for LapLink connections
In addition to the LapLink cables, you can open connections over a DirectParallel Universal cable (available separately). This cable allows faster transfers than a LapLink cable. You can connect a DirectParallel Universal cable to standard parallel ports, but for the fastest possible transfers, connect it to two Extended Capabilities Ports (ECPs).
Connecting to another computer by cable
When you start LapLink on two computers connected by cable, they will automatically connect. Autoconnect, the default setting for cable connections, causes the computers to connect automatically. If you change this setting, you can connect to the other computer manually.
If the connection does not open automatically, click Port Setup on the Options menu and verify that the appropriate port (either COM or LPT) is enabled for cable.
Connecting by cable manually
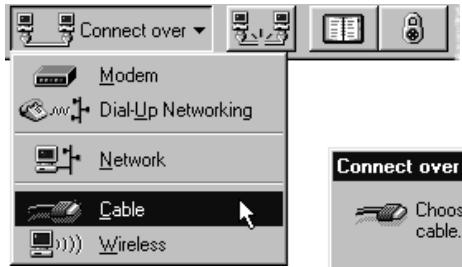
Click the Connect button on the LinkBar, and then click Cable.
Click the name of the computer to connect to.
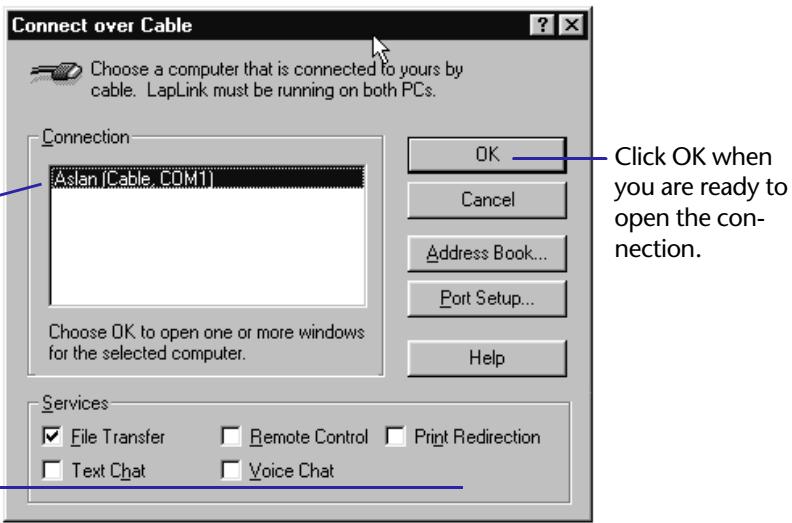
Click OK when you are ready to open the connection.
To manually connect to another computer by cable:
1 Click the Connect button on the LinkBar, and then click Cable.
2 In the Connection list, click the name of the computer you want to connect to.
3 Under Services, click the services you want to use, such as File Transfer and Remote Control.
4 Click OK.
To turn Autoconnect off, click Connect Options on the Options menu. On the Connect tab, click Enable Autoconnect so that it is cleared.

Go to topic summary
If your cable port is not yet enabled, the Port Setup dialog box appears when you try to connect.
Connecting by wireless
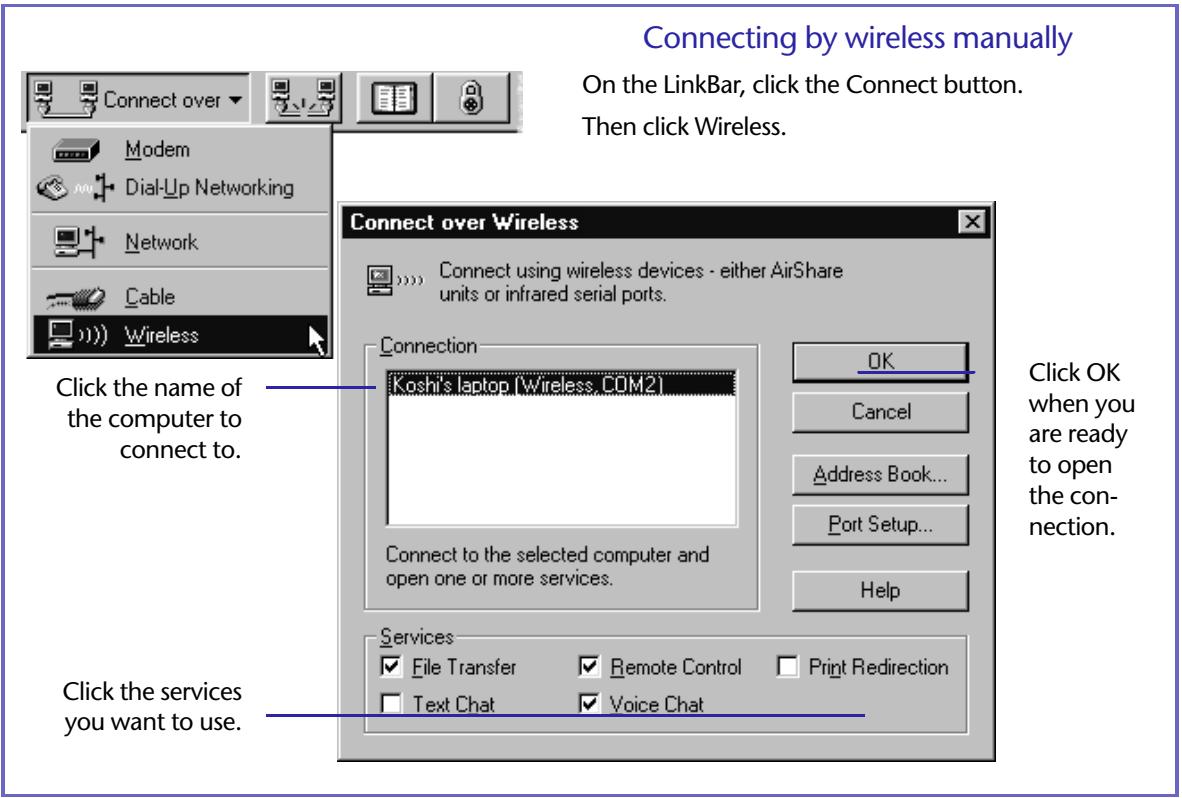
IF YOU'RE CONNECTING to another computer using wireless, simply start LapLink, and the connection is opened for you. Autoconnect, the standard setting for wireless connections, lets computers connect automatically when you run LapLink. To connect manually, click the Connect button on the LinkBar, and then click Wireless.
Go to illustration
Wireless connections are not available in Windows NT.
Connecting to another computer by wireless
When you start LapLink on both computers, they will automatically connect by wireless. Autoconnect, the default setting for wireless connections, forces the computers to connect automatically. If you change this setting, you can connect to the other computer manually.
To connect two computers by wireless, both must be running LapLink, and the appropriate wireless port must be enabled on both.
If the connection does not open automatically, click Port Setup on the Options menu and verify that the appropriate COM is enabled for wireless.
If your wireless port is not yet enabled, the Port Setup dialog box appears when you click Connect over Wireless.
To manually connect to another computer by wireless:
1 Click the Connect over Wireless button on the LinkBar.
2 In the Connection list, click the name of the computer you want to connect to.
3 Under Services, click the services you want to use, such as File Transfer, and Remote Control.
4 Click OK.
To connect with a cellular modem, connect over a modem. To connect with a wireless LAN adapter, connect over a network.
To turn Autoconnect off, click Connect Options on the Options menu. On the Connect tab, click Enable Autoconnect so that it is cleared.
Using infrared devices
You can connect over infrared ports and devices supported by the Windows 95 Infrared communications driver (IrDA), version 1.0 or 2.0. Without the IrDA driver, you can connect over other infrared devices by editing the LapLink initialization file, as explained on the following page.
Windows 95 infrared (IrDA) devices The Windows 95 Infrared driver supports a variety of built-in ports as well as adapters connected to serial ports. If the driver is not installed on your computer, you can download it from the Microsoft site on the Internet.
When you install the driver, specify any one of the COM ports from COM1 to COM9 as the redirected port. In LapLink Port Setup (Options menu), enable the redirected port for wireless communications.
Go to topic summary
Infrared devices without IrDA If you have a wireless device that does not use the IrDA driver, you can still connect, but you need to change a setting in the LLW.INI file. (The file is located in the TSI32\LLW subfolder within your Windows folder.) Open LLW.INI in Notepad and locate the section corresponding to your wireless port: [COM1], [COM2], and so on. Edit the section so that it includes this line: UseIRDADriver=No. Restart LapLink; in Port Setup (Options menu), ensure that the port is enabled for wireless communications.
Using AirShare Radio Modules
You can connect over AirShare Radio Modules once you have enabled the port in LapLink and added the UseIRDADriver=No line to the LLW.INI file, as described in the previous paragraph.
Connecting over CAPI 2.0/ISDN
CAPI 2.0 is a widely-used ISDN (Integrated System Digital Network) implementation in Europe. When CAPI 2.0 is installed with LapLink, CAPI 2.0/ISDN commands are available in LapLink.
Go to illustration
United States users note: CAPI 2.0 is not generally used in the U.S. If you have ISDN, you should probably use the Connect over Modem command to make connections. You might also use the Connect over Network command if your ISDN device establishes a network connection for you.
■ Be sure to include any required country or area codes. These aren't added automatically to the number.
Requirements for using LapLink over CAPI 2.0/ISDN
Each computer must have a CAPI 2.0 adapter and driver installed.
- The computer you're connecting to must be running a version of LapLink that is CAPI compatible.
Connecting to another computer over CAPI 2.0/ISDN
Before you can connect to another computer, security settings on that computer must be relaxed. To accept incoming LapLink connections, a computer's security setting must be relaxed. See page 56.
To connect to a computer over CAPI 2.0:
1 Click the Connect button on the LinkBar, and then click CAPI 2.0/ISDN.
2 Click the name of the computer you want to connect to in the Connection list or enter a phone number under Dialing.
The connections listed under Manual Dial are your Address Book entries for CAPI connections. To create a new entry, click Address Book.
3 Under Services, click the services you want, such as File Transfer and Remote Control. You can select any combination of these services.
4 Click Dial.
Dialing from an Address Book entry
Before dialing a computer, it's a good idea to create an entry for that connection in Address Book. Though you do not dial from Address Book, you can choose among its entries when you connect to a remote computer. For information about using Address Book for modem connections, see page 32.
To create an entry in Address Book for a CAPI 2.0 connection:
1 Click the Address Book button on the LinkBar.
2 If you have set up password protection for your security system, type the password.
3 Click Add.
Connecting over CAPI 2.0/ISDN

On the LinkBar, click the Connect button.
Then click CAPI 2.0/ISDN.
Click the computer to connect to. Or type the phone number.
Click the kinds of services you want to use.
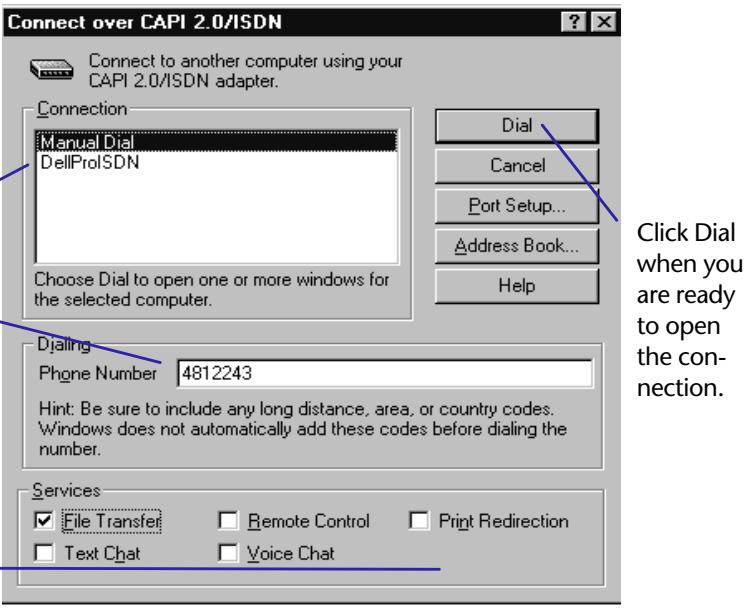
Go to topic summary
4 In Description, type a brief description of the remote computer for your own reference.
5 In Computer Name, type the exact name assigned to the remote computer in LapLink.
6 In the Connection Type list, click CAPI 2.0/ISDN.
7 Under Phone Number, type the full phone number.
8 Under Services, click the services you want to use when you connect to the remote computer (such as File Transfer and Remote Control).
You can change your selections later, as part of the connection process. You can also request new services after you connect.
9 Under Security Information to Send, type the log-in name and the password you must provide in order to gain access to the remote computer. Reenter the password to confirm.
Requests for services in Address Book will be honored only if the security setup permits.
LapLink passwords are not case sensitive. For example, a capital D is the same as a lowercased.
Connecting by CAPI 2.0/ISDN Understanding CAPI configuration
Before using LapLink with CAPI, you may need to customize LapLink to answer calls. You also need to decide if you want to use channel bonding, which allows LapLink to transmit at speeds of up to 128 Kbps.
Go to illustration
LapLink is initially set up to answer calls from both telephone numbers and to transmit at 64 Kbps. You may want to change these defaults in some circumstances.
Answering Calls
Auto Answer specifies the incoming calls that LapLink should answer, if any. Accept calls only on the following numbers specifies the telephone number that LapLink should answer if you want LapLink to answer only one number.
When Auto Answer is Enabled and Accept calls only on the following numbers is blank (the default state), LapLink answers all incoming calls.
If you don't want LapLink to answer any incoming calls, clear Enable under Auto Answer and make sure that Accept calls only on the following numbers is blank.
If you want LapLink to answer only one number, type that phone number at Accept calls only on the following numbers. Notice that typing a number automatically enables Auto Answer.
Channel Bonding
CAPI (COMMON-ISDN-API) supports two B channels that can be used for data and/or voice. Each channel has a telephone number and a line speed of 64 Kbps. Channel bonding allows LapLink to use both channels, when they are available, to transmit at speeds of up to 128 Kbps.
When channel bonding is not enabled (the default state), LapLink transmits over only one channel at 64 Kbps, even when both channels are available. This setting keeps transmissions costs to a minimum, if you pay additional fees for each channel connection.
If you want faster transmissions and don't mind paying higher transmission costs, you can enable channel bonding. Then, when both channels are available, LapLink can transmit at speeds of up to 128 Kbps.
When only one channel is available—because the other channel is being used for voice or fax—LapLink transmits at 64 Kbps, regardless of whether channel bonding is enabled or disabled.
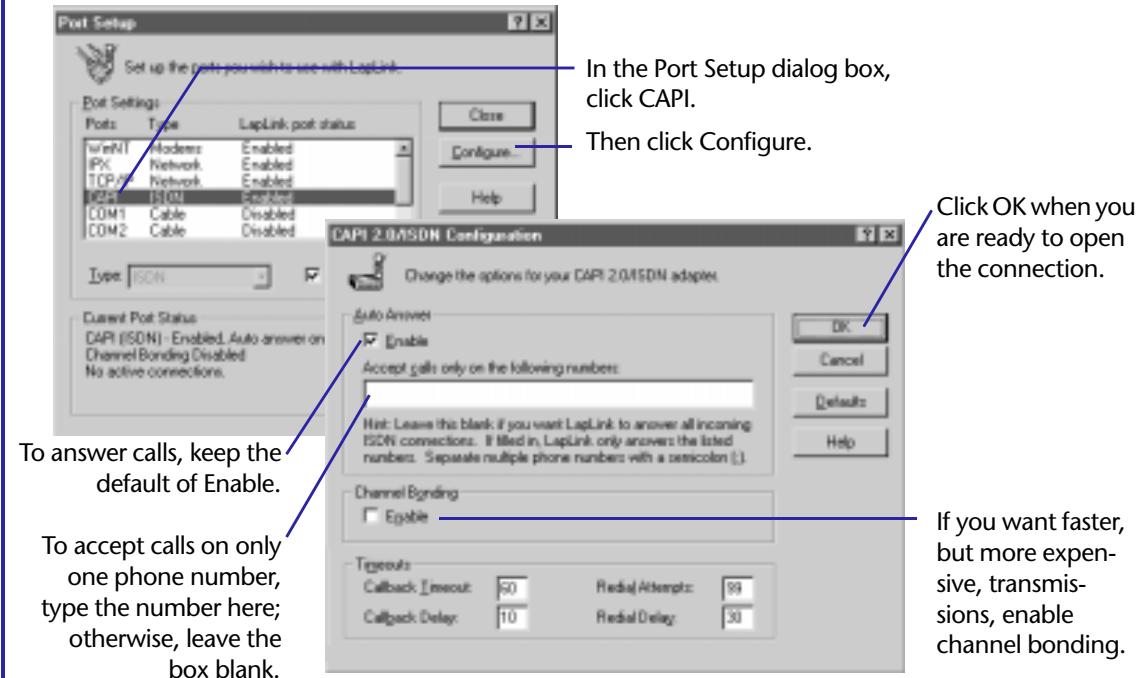
CAPI 2.0/ISDN Configuration
To configure a computer for CAPI 2.0/ISDN:

Go to topic summary
1 Click Port Setup on the Options menu.
2 Under Port Settings, click CAPI.
3 Click the Configure button.
4 Configure Auto Answer for the computer.
5 Enable Channel Bonding if you want to use it.
6 Customize the Timeout options if needed.
When you change the Callback Timeout, Callback Delay, and Redial Delay options, you are specifying seconds.
7 Click OK.
You can set options back to defaults by clicking the Defaults button.
To enable CAPI 2.0/ISDN on a computer:
1 Click Port Setup on the Options menu.
2 Under Port Settings, click CAPI.
3 Click the Enable Port option on the Port Setup dialog box.
Changing the security setup
After you install LapLink, you can make outgoing connections to other computers, but other users cannot open incoming connections to yours until you change the security setup. Click the Security button on the LinkBar, and open the system to any remote user.
Go to illustration
There are two ways of changing the security setup so that others can connect to your computer by modem or network:
- By giving any remote user access to your computer.
- By requiring that a user provide a password before gaining access.
In both cases, you can limit the kinds of services and locking privileges available to others. By setting up password protection, you can also set up callbacks over modem connections.
Opening up the security system
By opening your computer to anyone, you are, in effect, disabling the security system. Use this option with caution! For information about setting up password protection, see the next section.
To open your computer to any modem or network connection:
1 Click the Security button on the LinkBar.
2 On the General tab, click Anybody (Public System).
3 Under Services, click any of the services you want to use, such as File Transfer and Remote Control.
4 Click OK.
Consult the following sections for ways to refine your security setup.
Allowing any remote user to connect to your computer

On the LinkBar, click Security.
To allow any incoming connections by modem or network, click Anybody (Public System).
Click the kinds of services you want to allow remote users to use.
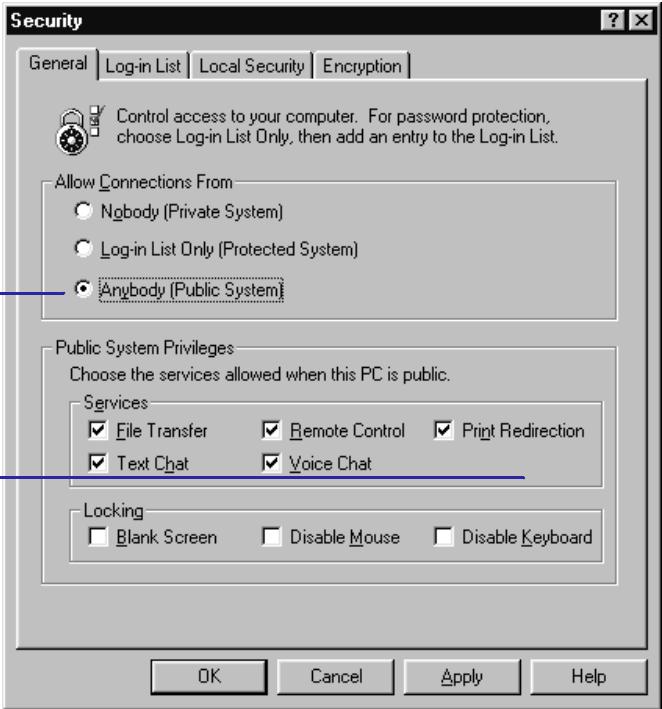

Go to topic summary
Using the security system
Setting up password protection
To set up password protection, create one or more entries in the Log-in List. In each entry, specify the password and the log-in name the user must provide to gain access to your computer. Then grant privileges to use services and other features. Any LapLink user who can provide the password and log-in name can connect to your computer and operate within the restrictions you impose.
Go to illustration
The number of entries you make in your Log-in List will be determined by the number of special cases you have in mind. If you want to allow one user to use only File Transfer, for example, and another to use only Remote Control, create two entries, with different log-in names and passwords.
When you set up password protection, it's a good idea to protect the security system itself. See page 60 for more information.
On the other hand, a single entry would be enough if you intend only to connect to the computer from your home, using both File Transfer and Remote Control. A single entry will also suffice if you want to grant a group of users the same privileges.
To create an entry in the Log-in List:
1 Click the Security button on the LinkBar.
2 On the General tab, click Log-in List Only (Protected System).
3 Click the Log-in List tab, and then click Add.
4 Under Guest Information, type the log-in name and the password the user must provide in order to make a connection to your computer. Reenter the password and click OK to confirm.
5 Under Services, click the services you want to make available to the user, such as File Transfer and Remote Control.
6 Under Locking Permissions, click options to determine whether the user can blank the screen of your computer and disable its mouse and keyboard. You can grant locking permissions only if you select Remote Control as one of the available services.
7 Under Modem Callback, click an option to determine whether, or how, the user will be called back when opening a modem connection. If you click an option requiring a callback to a certain number, type the number in Phone Number. For details see the next page.
8 Click OK.
Creating an entry in the Log-in List
On the LinkBar, click Security.
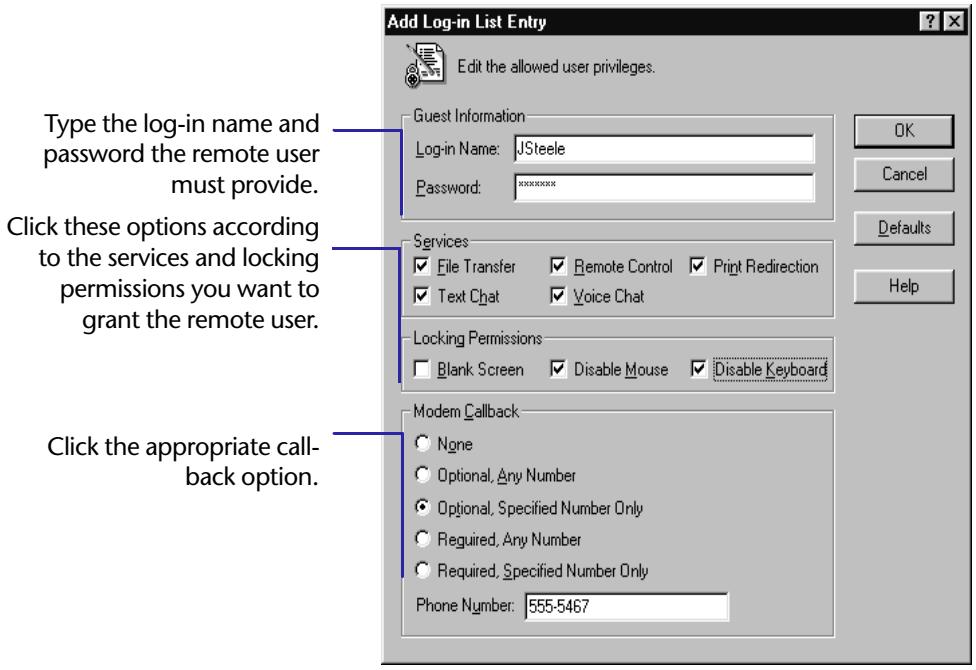
Setting callback options for incoming modem connections

Go to topic summary
None Prevents callbacks.
Optional, Any Number Lets the remote user decide whether to be called back; users who choose to be called back can specify the number to dial. This is the most flexible of all the options.
Optional, Specified Number Only Let's the remote user decide whether to be called back to the number you specify or to open the connection without any callback. Only the number you specify in Phone Number can be dialed for the callback.
Required, Any Number Requires remote users to be called back but allows them to specify the number to be dialed. The number can vary from session to session.
Required, Specified Number Only Requires the remote user to be called back to the number you specify in Phone Number. Click this option if you always want the remote user to be called back to the same number.
- You can use callbacks to save money, as when you call from a hotel room. Requiring a callback to a particular number adds an additional level of security.
Changing the security setup
Securing your computer and encrypting the data you transfer
Protecting your computer with a password prevents unauthorized users from compromising your security system; it also keeps them from viewing your Address Book entries and using them to open modem connections. Protecting your security system is a particularly good idea if you allow others to remote control your computer. Another security measure, data encryption, is recommended if you connect to other computers over the Internet or WANs (wide-area networks).
Go to illustration
Setting up password protection for your security system is important if your computer is serves as a host to other users in Remote Control sessions. Without password protection, a remote user could read your security information.
In LapLink, passwords are not case-sensitive: capitals and lowercase letters are treated the same way.
Securing your computer
Setting a security password ensures that the protections you set up for your computer cannot be changed—either by someone using your computer in your absence or by remote users.
Without knowledge of your password, users cannot view or change any of this information:
- Log-in names, passwords, and other Security settings.
- Telephone numbers, passwords, and other information stored in your Address Book entries.
- Privileges you have granted to guest computers and other settings in Remote Control Options.
In addition, the same password is required for access to Connect over Modem and certain Logging features.
To set a password for your security system:
1 Click the Security button on the LinkBar.
2 On the Local Security tab, check this option: Protect local security with a password.
3 In the Change Password dialog box, type the password in the New Password box. In the Confirm New Password box, type it again.
4 Click OK.
To remove password protection, click this option to remove the check mark: Protect local security with a password. To change the password currently in effect, click the Set Password button.
By default, security is not imposed on incoming connections by cable. If you set up password protection for modem and network connections, however, you can extend that protection to cable connections as well. On the Local Security tab, check this option: Enforce security for connections.
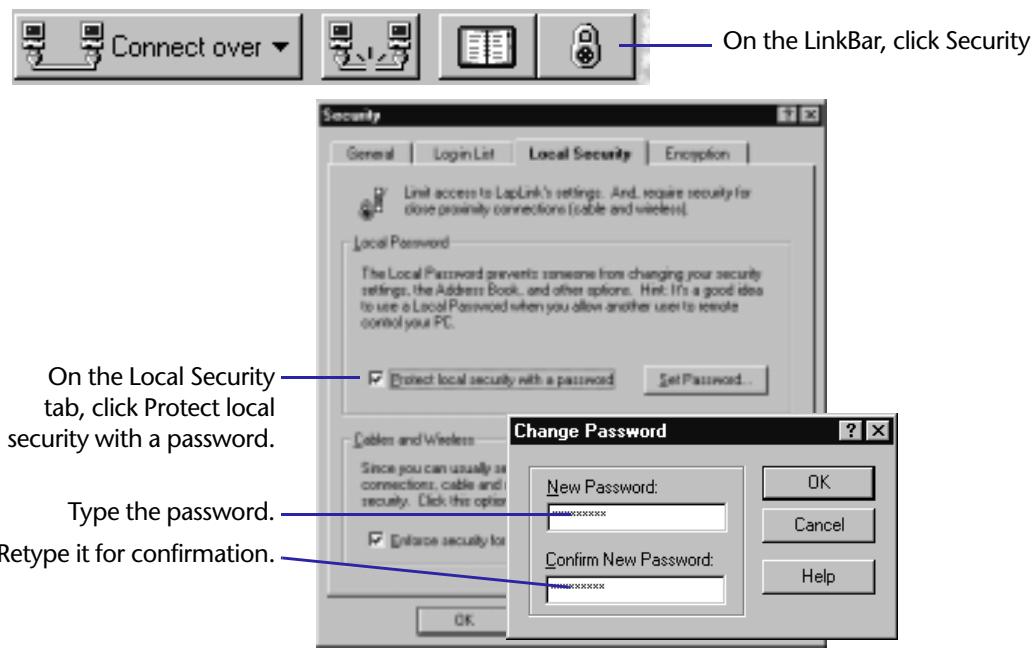
Setting a password for your security system
Encrypting information
LapLink always encrypts (encodes) log-in names and passwords. Unless you specify otherwise, nothing else is encrypted. Encryption is usually not necessary over LAN connections or other types of connections where security is not an issue.
On the Internet or a WAN, however, security is definitely an issue; the information you exchange with another computer can be intercepted. Before connecting over the Internet or a WAN, enable the encryption feature in LapLink.
To encrypt all information exchanged during a LapLink connection:
1 Click the Security button on the LinkBar.
2 On the Encryption tab, check this option: Encrypt all information exchanged with a remote computer.
3 Click OK.
! Be sure to enable encryption before you open a connection to another computer. Changing the setting during a connection won't have any effect until you connect again.

Go to topic summary
Encryption is determined entirely by the setting on the guest computer (the one opening the connection); the setting on the host computer has no effect.
Connecting automatically
Once you have established a connection, you can save it for easy restoration later. You can restore a saved connection by double-clicking a shortcut icon, setting LapLink to restore the connection automatically at startup, or restoring the connection while running LapLink. When LapLink restores a connection, it connects to the same computer or computers and opens the same services.
Go to illustration
Instead of spending time connecting to the same computer and opening the same service windows time after time, you can save the connection and used the saved connection as a convenient way to reconnect later.
To connect automatically to several computers at once, open connections to those computers before saving connections. All connections that are open when you save will be restored automatically.
Saving a connection is like taking a snapshot of the way things appear on your screen at the moment. The snapshot records such details as the number and types of connections (modem, network, the Internet, or cable), the names of computers, and the kinds of services in use. Each connection is saved as a file.
Restoring a saved connection opens the same connections and services and arranges windows to appear much as they did when the snapshot was taken.
Saving a connection
To save a connection:
1 Open one or more connections as usual.
2 On the Connect menu, click Save Connections.
3 In the File Name box, type a name to identify the connection file.
4 If you want to create a shortcut icon for restoring the connection, check this option: Create a shortcut to this file on the desktop.
5 Click Save.
To completely automate the connection process, create entries in Address Book for saved connections. Include the log-in name and password required to open each connection.
Restoring a saved connection
Once you have saved a connection, you can restore it three ways:
- Double-click the shortcut icon you created when you saved the connection. (The icon appears on the desktop, the large area you see when you start Windows.)
- Set up LapLink to restore the connection when you run LapLink again.
- Open the connection file while running LapLink.
To set up LapLink to restore a saved connection at startup:
1 On the Options menu, click Connect Options.
Three ways to restore a saved connection
Double-click the shortcut icon on the desktop.

Connect to Office
While running LapLink, use Restore Connections (Connect menu) to open the connection file.
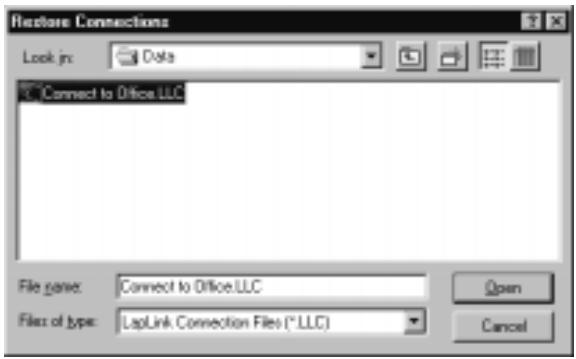
Set Connect Options (Options menu) to restore the connection when LapLink is run in the future.
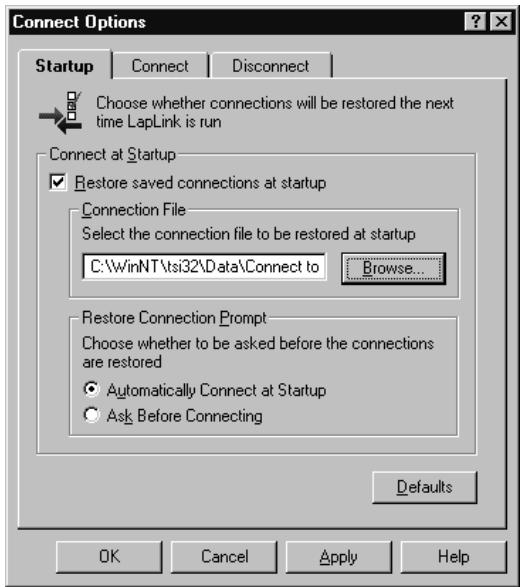
2 On the Startup tab, check this option: Restore saved connections at startup.
3 Click the name of the connection file you want to open, or type it in the Connection File box.
If the file does not appear in the list of files, click the Browse button and locate the drive and folder that contain the file.
4 If you want the connection restored without confirmation, click Automatically Connect at Startup. Otherwise, click Ask Before Connecting.
5 Click OK.
To open a saved connection while running LapLink:
1 On the Connect menu, click Restore Connections.
2 Click the name of the connection file you want to open, or type it in the File Name box.
If the file does not appear in the list of files, locate the appropriate drive in the Look In box; then double-click the folder containing the file.
3 Click Open.

Go to topic summary
By default, connection files are assigned.LLC extensions and stored in the \TSI32\DATA subfolder within the Windows folder.
4
Using Remote Control
In this chapter
Using Remote Control—Overview 66
Viewing the host 68
Customizing keyboard control 70
Disabling the host keyboard and mouse and blanking its screen 72
Rebooting and logging on to the host 74
Hosting a Remote Control session 76
Sharing clipboard information with remote computers 78
Customizing Remote Control performance 80
Using Remote Control—Overview
When you open a Remote Control window on your computer, you become the guest, and the remote computer displayed on your screen becomes the host. As a guest, you can view and operate the host computer as if you were sitting in front of it. The host images appear on your screen in a Remote Control window within the LapLink workplace.
Go to illustration
Remote Control provides a way to operate another computer at a distance. You begin Remote Control as soon as you open a Remote Control window. While you are working in this window, your mouse moves the mouse pointer on the remote computer, your keyboard types characters on the remote computer, and your Remote Control window shows the remote computer's screen.
Remote Control terminology
You cannot open a connection to a remote computer by modem or network unless the default security setup on that computer has been changed to grant you access. For more information, see page 56.
A Remote Control session creates two kinds of LapLink users:
Guest The Remote Control window and your mouse and keyboard are your links to the host computer. Working in the Remote Control window, you use your mouse and keyboard to operate the host. Your work is processed on the host computer.
Host There is no special procedure associated with becoming a host. Your computer need only be running LapLink and set up to allow incoming connections and serve as a host. You do not need to be at your computer. On the other hand, you may want to join the guest as an observer or as an active participant.
No one else can control your computer while you are using Remote Control. Nor can a computer be controlled by anyone else while you are controlling it.
Opening a Remote Control window
As a guest, you can open a Remote Control window at the same time you connect to the host or after the connection is made. Because LapLink supports multiple connections, you can maintain several Remote Control windows, one for each host computer.
To open a Remote Control window while connecting:
- Click the Connect button on the LinkBar and then click Modem, Network, or some other means of connecting. Under Services, click Remote Control. (For complete information about connecting to other computers, see chapter 3.)
To open a Remote Control window after opening a connection:
- Click the Open Remote Control button on the LinkBar. Or click Open Remote Control on the Window menu.
If you have more than one connection, select a window for the desired connection before clicking the Open Remote Control button.
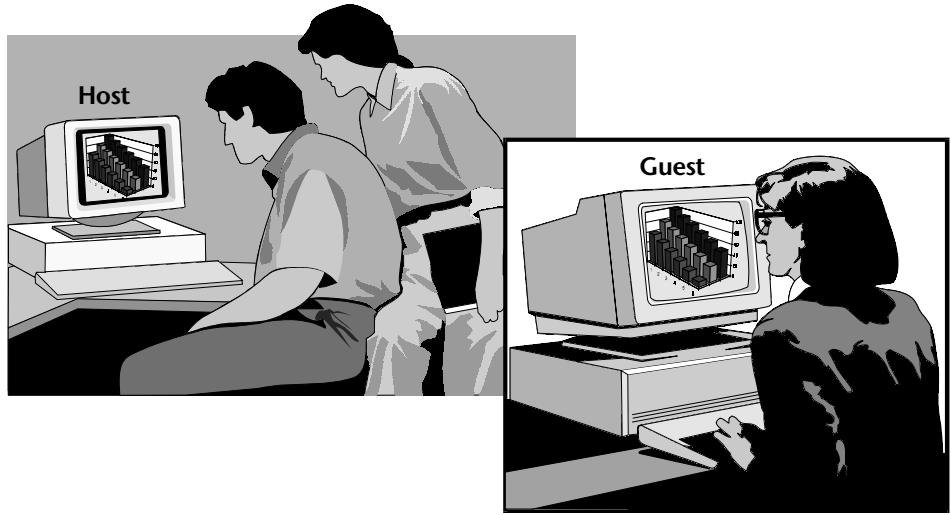
Operating the host computer from the guest computer
What you see

Go to topic summary
The host screen appears on your screen as a window within LapLink. The name of the host computer appears in the window's title bar. You can move, resize, minimize, or maximize the window as you would any other window. Use the scrollbars to view other parts of the host screen.
If you prefer to display the host screen across your entire screen instead of a window, press CTRL+SHIFT+F. Press CTRL+SHIFT+F again to return to the window view. For more information about changing your view of the host, see the next section.
A host screen can be made to display full screen by default. To set this option, click Remote Control Options on the Options menu. On the Guest tab, click Always Use Full-Screen so that it is checked. The Remote Control window then alternates between full screen and icon; the window view is not available.
There are several ways to customize Remote Control performance—whether you want to enhance your view of the host or speed up performance. For more information see page 80.
Viewing the host
As a guest, you can alternate between two views of the host screen. Your first view appears in a window within LapLink. Inside the window, you control the host; outside the window, you perform other tasks, in LapLink or in other applications on your computer. Switch to a full-screen view when you want to maximize your view of the host and use Remote Control exclusively. If you cannot see the entire host screen even in full screen, you can change the resolution of the host screen or scale its image to fit within your view.
Go to illustration
Devoting your entire screen to a view of the host
You can view the host screen in two ways:
In a window within LapLink (the default)
As a full-screen display, hiding LapLink and the rest of your Windows workspace
In a window view, you have quick access to File Transfer, Text Chat, and other LapLink features. You can also switch to other applications on your computer.
To maximize the area in which you view and control the host, switch to a full-screen view. Your entire screen is now devoted to controlling the host; you do not have access to your own applications. When you want to do something other than control the host, switch back to the window view.
To switch between window and full-screen view:
You can substitute another key combination for CTRL+SHIFT+F. For more information, see the next section.
Press CTRL+SHIFT+F.
In full screen, you can also switch to a window from the copy of LapLink running on the host: If LapLink is an icon, click it to restore it to a window. Then click the icon representing your Remote Control window, and click Guest Full Screen to remove the check mark.
^+ To make Remote Control alternate between full screen and icon, bypassing the window view, click Remote Control Options on the Options menu. On the Guest tab, click Always Use Full-Screen.
Viewing the entire host screen at once
There are two ways to fit the host screen into your view:
- From your computer, lower the resolution of a higher-resolution host screen to match that of your screen.
Scale the image of the host screen to fit within your view.
Temporarily changing the resolution of the host screen When using a laptop to control a desktop, you normally can't view the entire host screen at once, since a desktop typically operates at a higher screen reso
Alternating between a window and a full-screen view of the host
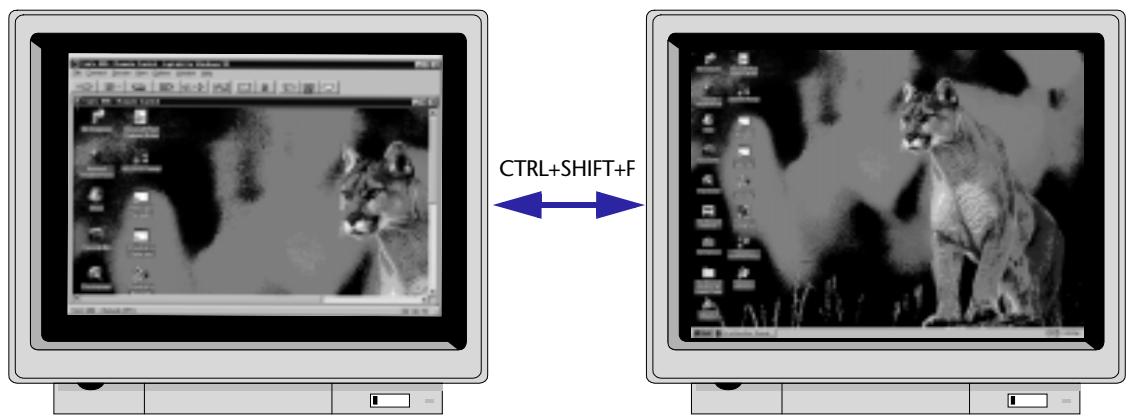
By default, your view of the host screen appears in a window within LapLink.
When you switch to full-screen view, the host screen occupies your entire screen, hiding your local Windows workspace.
lution. From your laptop, you can lower the desktop's screen resolution to match your laptop's.
You can then view all of the host screen in full-screen view. The original resolution is restored automatically on disconnect or at your direction.
To lower the resolution of the host screen to match that of your screen:
1 On the Options menu, click Remote Control Options.
2 On the Guest tab, click this option: Match Host to Guest.
Clicking the option again restores the host to its original resolution.
3 Click OK.
Scaling the image of the host screen to fit You can also view the entire host screen at once by scaling the image to fit your view of it. You always see all of the host's screen, whether you are working in full screen or window, though the image may be distorted.
To scale the image of the host screen to fit within your view:
Press CTRL+SHIFT+S.
Pressing CTRL+SHIFT+S again restores the image to normal.

Go to topic summary
- You cannot lower the resolution of a host computer unless its monitor and display adapter allow the change without restarting Windows. In addition, the host must be running LapLink 7.5 or later.
In full-screen view, you can also scale the image of the host screen by clicking the icon in the host's LapLink workplace which represents your connection. Then click Guest Scale to Fit.
Customizing keyboard control
By default, Windows system keys pressed on the guest computer take effect on the host. If you want the system keys to operate on the guest while working in a Remote Control window, click Remote Control Options on the Options menu. Then on the Guest tab, click Execute on Guest. Through Remote Control Options, you can also change the key combinations that control your view of the host.
Go to illustration
Windows system keys are keys that take effect in Windows; other key combinations, like CTRL+C or CTRL+BREAK, which affect DOS sessions, are not affected by LapLink settings.
If you intend to control a remote computer using the keyboard exclusively (without a mouse), set the Windows system keys to execute on your computer (the guest). When you want the keys to execute on the remote computer (the host), switch to the full-screen view.
Windows system keys
Windows system keys are key combinations that perform a variety of tasks. Pressing ALT+TAB, for example, switches to the program you used last. By default, LapLink sends most system keys to the host during Remote Control: pressing ALT+TAB on the guest, therefore, switches to the program last used on the host.
You can make system keys work on your own computer (the guest) when you are working in a Remote Control window.
Windows system keys (except CTRL+ALT+DELETE) always take effect on the host when you are using Remote Control in the full-screen view.
To execute Windows system keys on the guest:
1 Click Remote Control Options on the Options menu, and then click the Guest tab.
2 Click Execute on Guest.
3 Click OK.
Remote Control shortcut keys
LapLink offers two shortcut keys to change your view of a host screen. Pressing CTRL+SHIFT+F switches between full-screen and window view of the host. Pressing CTRL+SHIFT+S switches between scaled-to-fit and normal view. (See the previous section for more information.)
You can change these default key combinations to certain other combinations. (To avoid interference with other LapLink and Windows shortcut keys, you are limited in your choice of replacements.)
To change the LapLink shortcut key combinations:
1 Click Remote Control Options on the Options menu.
2 On the Guest tab, click in one of these boxes:
Full-screen Toggle Changes the shortcut key that alternates between full-screen and window view.
- Scaling Toggle Changes the shortcut key that alternates between scaled-to-fit and normal view.
Customizing keyboard options in Remote Control Options
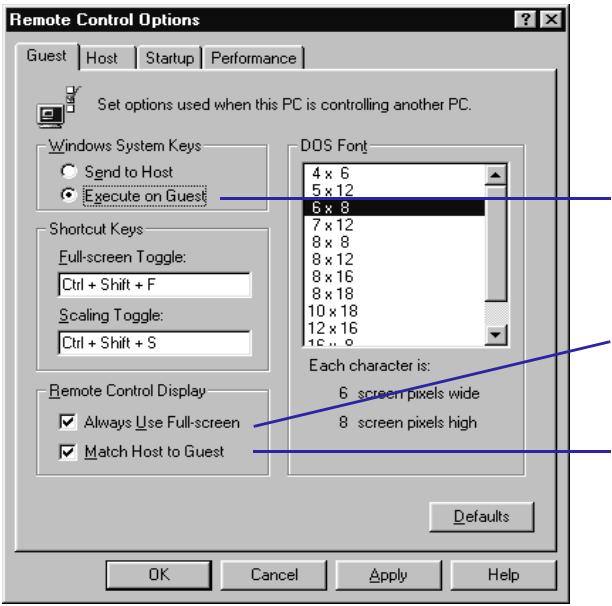
When you are working in a Remote Control window, the Windows system keys you press on your computer (the guest) take effect on the remote computer.
If you prefer to have system keys take effect on your computer, click Execute on Guest.
With this option, you can change the shortcut key that alternates between full-screen and window view.
With this option, you can change the shortcut key that alternates between scaled to fit and normal view.
3 Press any of the following key combinations:

Go to topic summary
SHIFT+ALT+N (where N is a number or letter)
CTRL+SHIFT+N (where N is a number or letter)
CTRL+ALT+N (where N is a number or letter)
CTRL+SHIFT+ALT+N (where N is a number or letter)
Disabling the host keyboard and mouse and blanking its screen
From a guest computer, you can ensure privacy and prevent interruptions by disabling the host keyboard and its mouse and by blanking its screen. To perform any of these "locking" operations from the guest, click the appropriate command on the Session menu. On the host, you can allow locking by changing the default security setup.
Go to illustration
Locking the host from the guest
With the permission of the host computer, you can:
- Blank the host screen The host's screen is darkened, preventing your work from being viewed at the host.
- Disable the host keyboard The host's keyboard is locked, preventing anyone at the host from using the keyboard to interrupt your work.
- Disable the host mouse The host's mouse is locked, preventing anyone at the host from using the mouse to interrupt your work.
To lock the host during a Remote Control session:
On the Session menu, click one of these commands so that it is checked: Blank Host Screen, Lock Host Mouse, or Lock Host Keyboard.
To disable locking, click the command again to remove the check mark.
If a command is dimmed, it is not available: Either the host cannot perform the action, or the security setup of the host computer does not allow it.
Through Address Book, you can request the kinds of locking you want to take effect as soon as you open a Remote Control session. Your requests will be honored as long as they are allowed by the host. For information on using Address Book to make connections, see chapter 3.
As a host, you can keep guests from changing your locking and rebooting settings during Remote Control sessions by setting up password protection for your security system. For more information, see page 54.
Configuring a host for locking
You can configure a host to determine who can lock it and how it will be locked. Guests cannot lock the host without your permission, and locking privileges you grant cannot be changed during a Remote Control session.
Whether you permit any kind of locking depends on how you intend to use LapLink. If you want to use Text Chat, for example, there should be no locking.
You grant locking permission by changing the security setup on the host computer: click the Security button on the LinkBar.
Locking the host from the guest



Session
Blank Host Screen
Lock Host Mouse
Lock Host Keyboard
Reboot Host
To ensure privacy and prevent interruptions at the host, blank the host screen and lock its mouse and keyboard.
A check mark beside a command on the guest means the protection is in effect on the host. Clicking the command again removes the check mark—and the protection.
If commands appear dimmed on your Session menu, the security setup on the host computer must be changed to allow their use.
You then have a choice:

Go to topic summary
- Open the system to any user by clicking Anybody (Public System). Click Remote Control so that it is checked, and then click any of the three options under Locking. The permissions will apply to all guests.
- Set up a Log-in List by clicking Log-in List (Protected System) and adding one or more entries. In each entry, click any of the three options under Locking Permissions. The permissions will apply only to guests whom you provide with the appropriate log-in name and password.
For more information about setting up a Log-in List, see page 58.
Rebooting and logging on to the host
From a guest computer, you can reboot a host computer and restart Windows. To reboot a host from the guest during Remote Control, click the Reboot Host command on the Session menu. To configure a host for rebooting and restarting Windows, click Remote Control Options on the Options menu.
Go to illustration
Rebooting the host from the guest
From a guest computer you may want to restart a host to put into effect changes you have made on that computer. Or you may want to restart a host computer to ensure that no one else can call in after you disconnect.
If Reboot Host is dimmed on the Session menu, the host has not set the option to allow rebooting by a guest.
To reboot the host from the guest during Remote Control:
On the Session menu, click Reboot Host.
You are then asked for confirmation. If you have not saved your work, you are asked if you want to do so before rebooting.
Logging onto Windows NT from the guest
Depending on how your computer is set up, you may or may not be prompted to log on to Windows. On every Windows NT computer, however, you must always press CTRL+ALT+DEL before you can log on to Windows.
To send CTRL+ALT+DEL to a Windows NT host, do one of these:
Press the key combination specified for this purpose on the host. (For more information, see the next page.)
On the host's Session menu, click Send CTRL+ALT+DEL to the Host.
- Click the Remote Control icon at the bottom of the host's LapLink workplace, and then click Feed CTRL+ALT+DEL.
Configuring the host for rebooting
You must configure a host to allow any guest to restart it during a Remote Control session. You can also require that the host be restarted whenever a Remote Control connection is broken.
To configure a host computer for rebooting:
-
On the Host tab of Remote Control Options (Options menu), check either or both of these options:
-
Allow Guest to Reboot on Command Click this option to allow guests to restart the host using the Reboot Host command on their computers.
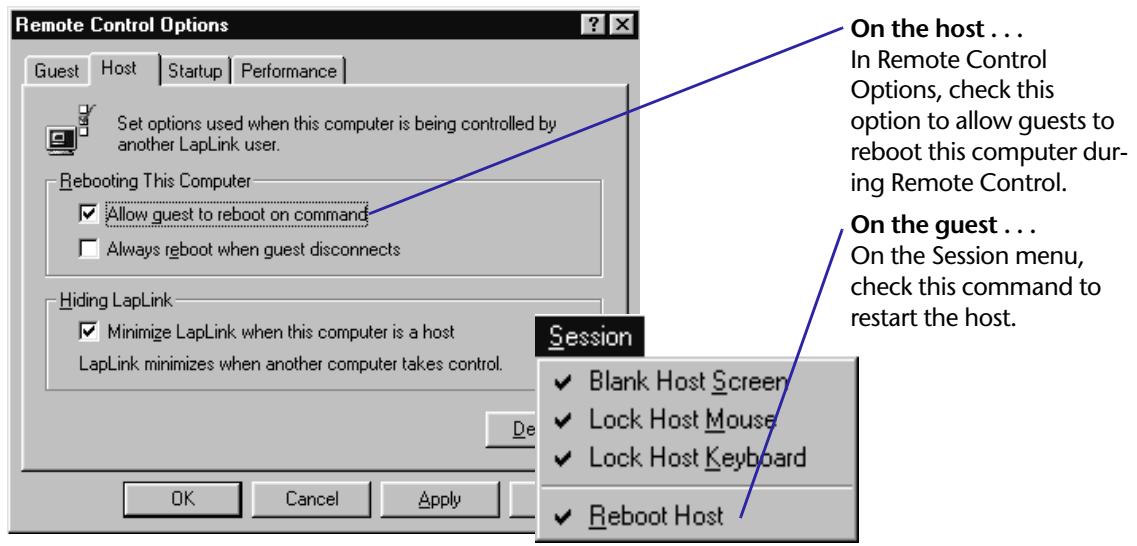
Rebooting the host from the guest in LapLink
- Always Reboot When Guest disconnects Click this option to require that the host be restarted whenever any guest breaks a connection or the connection is broken accidentally.
Go to topic summary
Ensuring access to the host after a reboot
At the same time you are configuring a host for rebooting, you can configure it so that a guest can resume a LapLink connection after the host is rebooted. You can do this by setting up LapLink to run whenever Windows is started.
To configure a host to so that it automatically runs LapLink each time Windows is started:
- On the Host tab of Remote Control Options (Options menu), check this option: Always Start LapLink before Windows Logon Prompt.
Logging on to Windows NT When a Windows NT host requires the user to press CTRL+ALT+DEL at logon, a guest can press a special key combination specified on the host.
To specify the key combination for CTRL+ALT+DEL:
1 On the Host tab of Remote Control Options (Options menu), click in this box: Send CTRL+ALT+DEL to This Computer When a Guest Presses This Key Combination.
2 Press one of these key combinations (where N is a number or letter): SHIFT+ALT+N, CTRL+SHIFT+N, CTRL+ALT+N, or CTRL+SHIFT+ALT+N.
Hosting a Remote Control session
When you allow your computer to be controlled from a remote computer, you become the host to a guest computer. For Remote Control to take place you need only be running LapLink—you do not need to be at your computer. Sensitive information is protected by the conditions of the connection. You can grant greater access, or limit these conditions, through the LapLink security system.
Go to illustration
As a host, you have control over who can connect to your computer and the kinds of services the guests can use. For example, you can limit a guest to Remote Control only, or you can allow access to Text Chat and File Transfer as well. You can even allow a guest to blank your computer's screen or disable the mouse and keyboard. All of these options are set in the LapLink security system.
To allow other computers to control your computer by modem or network, you must relax the security setup established during installation. (See page 56.) The only other action needed in order to become a host is to run LapLink.
You can leave the host computer unattended, giving an authorized user exclusive control. Or you can stay at the computer and interact with the guest by trading off control. For example, the two of you could edit a document together, participate in a training session, or explore a new program.
A computer can serve as a host to only one other computer at a time. In the meantime, other computers can open services like File Transfer and Text Chat connections to the host.
- You can make the LapLink workplace remain a window when a guest connects: click Remote Control Options on the Options menu, and then click the Host tab. Clear this option: Minimize When This Computer Is a Host.
What you see as a host
When a guest connects to your computer and begins Remote Control, your LapLink workplace is minimized. When you double-click the icon, the LapLink workplace is restored to a window.
At the bottom of the restored LapLink workplace, you see an icon for the Remote Control connection. The icon is identified by the name of the remote computer. Clicking this icon displays a Windows menu with standard commands. Clicking Close closes the Remote Control connection.
Reversing a Remote Control session
There may be times when the guest and you want to switch roles so that you become the guest controlling the remote computer.
To reverse the direction of Remote Control, the current Remote Control connection must be broken on either computer. Then, as the prospective guest, you open a Remote Control window and begin controlling the other computer.
Hosting a Remote Control session
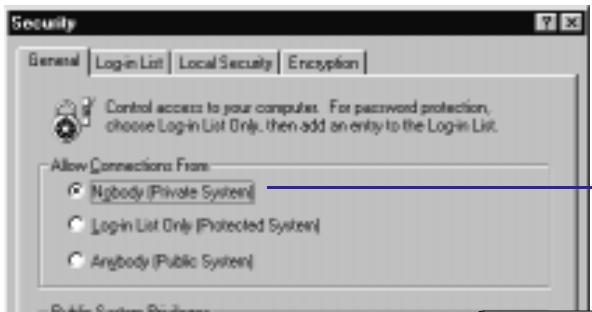
To allow a computer to serve as a host for the first time, you must change the security setup.
The default setup prevents incoming connections by modem or network.
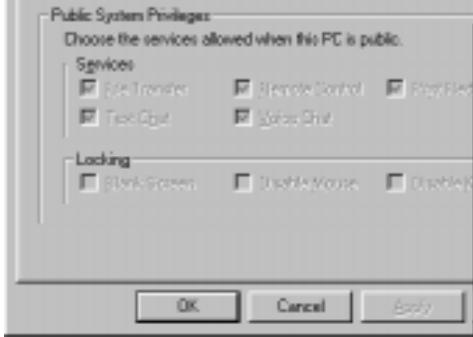
To prepare a computer to host a Remote Control session, start LapLink and leave it running. There is no special host setup procedure.
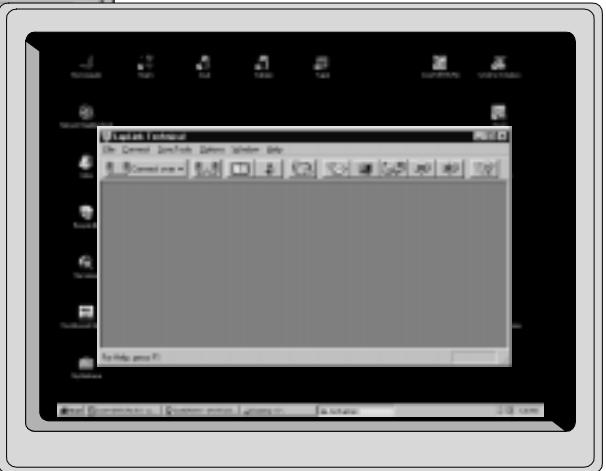

To avoid breaking the connection when a Remote Control connection is closed, make sure that there is at least one other service window open, such as File Transfer. If Remote Control is the only service in use, open another service window before closing Remote Control.
Go to topic summary
Sharing clipboard information with remote computers
Computers in a Remote Control connection share a common clipboard: You can copy or cut information to the clipboard on one computer and paste this information on another. Only information put in the clipboard during a Remote Control session is available to other computers.
Go to illustration
When you cut or copy information for pasting in another document, the information is stored temporarily in the clipboard. Normally, clipboard information is transferred between documents on the same computer. When you use Remote Control, however, you can use the clipboard to transfer information from one computer to another. You can copy text or graphics on the host computer, for example, and paste it on the guest.
Clipboard information can be shared only in connections between computers running LapLink version 7.5 or later.
If you are controlling several computers at the same time, information you cut or copy on any of the linked computers can be made available for pasting on any of the others.
Only information placed in the clipboard during Remote Control can be pasted on other computers. You cannot share any information copied or cut to a clipboard before a Remote Control connection is opened.
When you clear the contents of the clipboard on one computer, you clear the contents of all the other keyboards as well.
Pasting from the clipboard during Remote Control
When you copy or cut information to the clipboard during Remote Control, only a small part of the information is transferred to the other computer immediately. The rest of the information is transferred when you paste.
To prevent the loss of information added to the clipboard during Remote Control, paste the information before disconnecting.
If you are controlling several remote computers, information in the clipboard on your computer is available to any of the remote computers. If you want to transfer clipboard information from one remote computer to another, however, you must first paste the information into a document on your computer; then paste it on another remote computer.
Disabling clipboard sharing
Clipboard sharing is available during Remote Control sessions unless you disable it.
To disable clipboard sharing:
1 Open a Remote Control connection to another computer.
2 On the Edit menu, click Link Clipboards to remove the check mark.
Sharing clipboard information during Remote Control
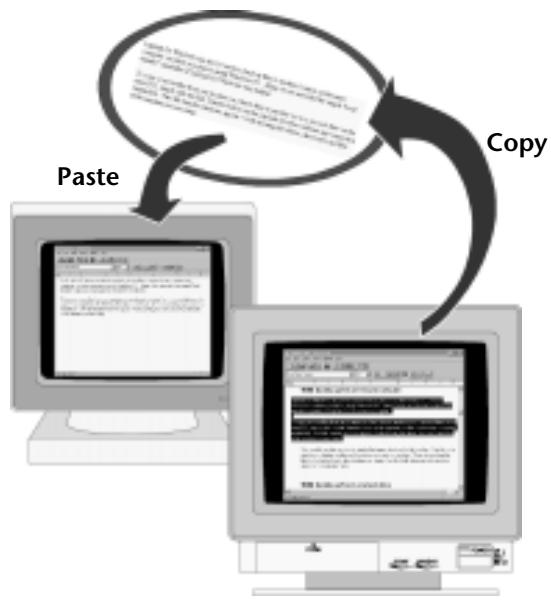
When you are controlling another computer, the two computers share a common clipboard.
You can cut or copy text or graphics on either computer and paste it on the other.
Only information placed in the clipboard during a Remote Control session is available to other computers.
If there is data in the common clipboard that hasn't been transferred completely, you are asked whether to complete the transfer.
Go to topic summary
To enable clipboard sharing again, repeat the procedure to restore the check mark to Link ClIPboards. Only data placed in the clipboard after you enable this option can be shared with other computers.
Customizing Remote Control performance
As a guest, you can change several Remote Control settings either to speed up performance or to enhance your view of the host screen. When speed is your priority, change the settings to enhance performance. When you want the best view of the host screen, turn off the performance enhancements. To change performance settings, click Remote Control Options on the Options menu, and then click the Performance tab.
Go to illustration
To improve Remote Control performance, LapLink temporarily alters the host screen by removing its wallpaper, screen saver, and other visual enhancements. You can restore any of these enhancements. Or you can improve performance even more by minimizing the number of bitmaps and bitmap colors transferred over a connection.
To change the default Remote Control performance settings:
1 On the Options menu, click Remote Control Options.
2 On the Performance tab, click one of these options:
By default, Remote Control performance is configured for the Typical option. To restore the original settings, click Typical.
- Best Quality (improves the appearance of fonts and does not change the appearance of the host screen except to disable its screen saver)
- Best Performance (displays smaller bitmaps in black and white and does not show larger bitmaps at all; also changes the appearance of the host screen to maximize performance)
- User Customized
3 To customize the settings for any of these options, click the Settings button and change the settings on the Guest Display and Host Display tabs as described below.
To alter your view of the host screen, click the Settings button in Remote Control Options.
Changing your view of the host screen
On the Guest Display tab, you can change the quality of your view of the host screen without affecting the host screen itself. Three of the settings change the amount of information transferred to your computer and therefore affect the speed of the connection.
Send Font information Displays text and symbols on the guest computer. Checking this option speeds display performance but may not present the most accurate representation of text and symbols.
Use Solid Colors Displays solid colors instead of dithered, or patterned, colors. Performance is not affected.
Prevent Display of Large Bitmaps Determines the size of the largest bitmap to be displayed in your view, ranging from 32 by 32 to 512 by 512 pixels. Choosing a smaller size improves performance but may cause bitmaps not to appear in some dialog boxes, wizards, and buttons. (Experi
Customizing Remote Control performance
On a guest computer, you can choose between enhancing your view of the host and improving Remote Control performance.
On the Performance tab of Remote Control Options, choose one of the preset options.
Or click the Settings button and tailor the settings to your requirements.
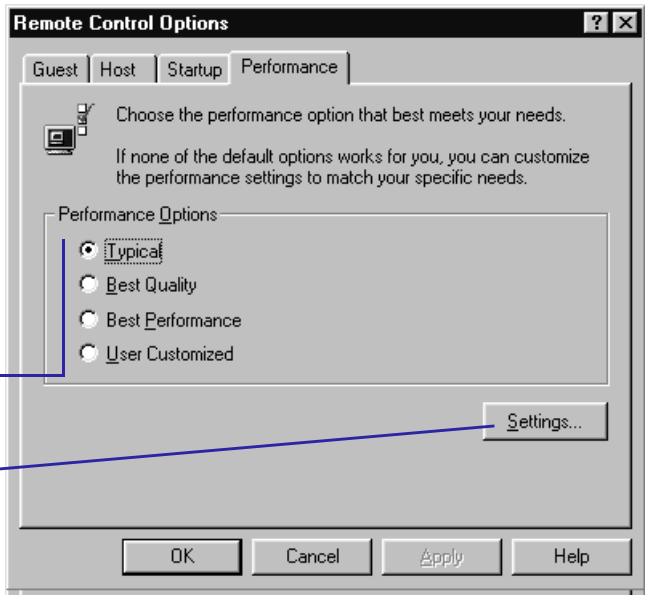
ment with the setting, increasing it as necessary to display larger bitmaps.) Clear this option when you work in a paint program on the host.
Go to topic summary
Bitmap Color Selects the palette used to display bitmaps. The values range from Monochrome to True Color (24 bit). Choose a palette with fewer colors to improve performance.
Changing the host screen
On the Host Display tab, you can alter your view of the host by changing the appearance of the host screen itself. When you disconnect, the host screen is restored to its original appearance.
Checking any of the Host Display options may reduce performance.
Show Background Wallpaper and Patterns Displays the wallpaper and pattern that normally decorate the desktop of the host.
Show Window Contents When Dragging or Sizing Displays the contents of windows as you move and resize them on the host.
Show Visible Zoom When Minimizing and Restoring Windows Shows the movement associated with dragging and resizing on the host.
Keep Screen Saver Running Keeps the screen saver running on the host.
The monitor and screen adapter on both the guest and host determine the maximum number of colors that can be viewed on the guest.
5
Using File Transfer
In this chapter
Using File Transfer—Overview 84
Navigating through drives and folders 86
Selecting files and folders 88
Copying or moving files and folders 90
Setting File Transfer options for the results you want 92
Synchronizing folders with SmartXchange 94
Replacing one folder with another: Clone Folder 96
Speeding file transfers with SpeedSync and compression 98
Resuming an interrupted file transfer 100
Using File Transfer—Overview
Once you have connected to another computer and opened File Transfer windows, you are ready to transfer files between the computers. First, display your target, and then select the files you want to transfer. If you want the files on both computers, copy them. If you want to transfer the files to one computer and delete them from the other, move the files.
Go to illustration
When you connected to the remote computer, you may have opened File Transfer windows. If not, you can open the windows now.
To open File Transfer windows:
In Windows, folder and subfolder are used in place of directory and subdirectory.
- Click the Open File Transfer button on the LinkBar. Or click Open File Transfer on the Window menu.
Two File Transfer windows appear: one for the remote computer, one for your computer. Using these windows, you can view all the files on any drive on both computers.
Step one: Display the target
Since you will be using the drag-and-drop method of copying and moving files, first find your target so it's visible on your screen. A target is the drive or folder you want to transfer the files to.
To determine which File Transfer window is which, look for the computer name in the title bar, at the top of each window.
To display the target:
1 Identify the target window: it may be the window for your computer or the remote computer—whichever you want to receive the files.
2 On the left side of the target window, double-click the target drive.
3 Click the target folder. Its contents now appear on the right.
4 If you are looking for a subfolder, click the plus sign (+) beside the folder containing the subfolder. Then click the subfolder.
Step two: Select the files
In the opposite File Transfer window, select the files you'll be transferring to the target you just displayed.
You can also select a group of files or folders by clicking at a right corner of the group and dragging to the opposite corner to form a selection box.
To select the folders and files you want to transfer:
On the right side of the window, click the folder or file you want to transfer.
To select more than one item, do either of the following:
Hold down CTRL as you click each item.
- To select two or more items listed next to each other, click the first item and press SHIFT while you click the last item.
Transferring files using drag and drop
Open File Transfer
Step one:
Display the target drive or folder.
Step two:
Select the files you want to transfer.
Step three:
Drag the selected files and drop them onto the target.

Step three: Drag and drop

Go to topic summary
Using the drag-and-drop method simplifies file transfers. Keep in mind the difference between copying and moving. Copying puts a copy of the files on the other computer, leaving the originals where they were. Moving puts the files on the other computer, deleting the originals.
To drag and drop the selected files:
To copy the files, hold down CTRL and your left mouse button as you drag them to the target folder.
To move the files, hold down SHIFT and your left mouse button as you drag them to the target folder.
If you drag without using CTRL or SHIFT, files are copied when you drag to a different drive or computer and moved when you drag to another location on the same drive.
Navigating through drives and folders
A File Transfer window is split into a left and a right side. The left side is designed for navigating through drives and folders: click or double-click a drive or folder to open it and display its contents. On the right side, you see the contents of the open drive and folder. Commands on the View menu let you change the appearance and the order of the contents.
Go to illustration
Follow these guidelines to navigate through the left side of a File Transfer window:
Want to locate a particular folder or file? Type the first letter of its name. The highlight moves to the next item beginning with that letter. Typing the letter again finds the next occurrence.
- Double-click a drive or folder Opens and expands the drive or folder, displaying its sub folders immediately below. (Double-clicking is the fastest way to navigate downward in a hierarchy of folders.)
- Click a drive or folder Opens the drive or folder without expanding it.
- Click a plus sign (+) Expands the drive or folder, displaying its subfolders immediately below. The drive or folder is not opened.
- Click a minus sign (-) Collapses the drive or folder, hiding its sub folders.
Changing the view
When you open a drive or folder, you see its contents—sub folders and files—on the right side of the File Transfer window.
By default, the contents appear in Detail view: file name, size, type (based on the MS-DOS name extension), modification date, and attributes.
To change the appearance of the items displayed on the right side of a File Transfer window:
- On the View menu, click one of these commands: Large Icons, Small Icons, or List.
Try the different views to find your preference. To return to the original view, click Detail.
Sorting files and folders
Regardless of the view, you can rearrange the folders and files on the right side of a File Transfer window according to name, size, date, and so on.
To change the order of files and folders:
■ On the View menu, point to Arrange Icons; then click one of these commands: By Name, By Type, By Size, By Date, or By Attributes.
As an additional navigational aid, you can filter files and folders according to names and dates. Only the items that match your filter criteria are displayed. On the View menu, click Filter.
Navigating through a drive
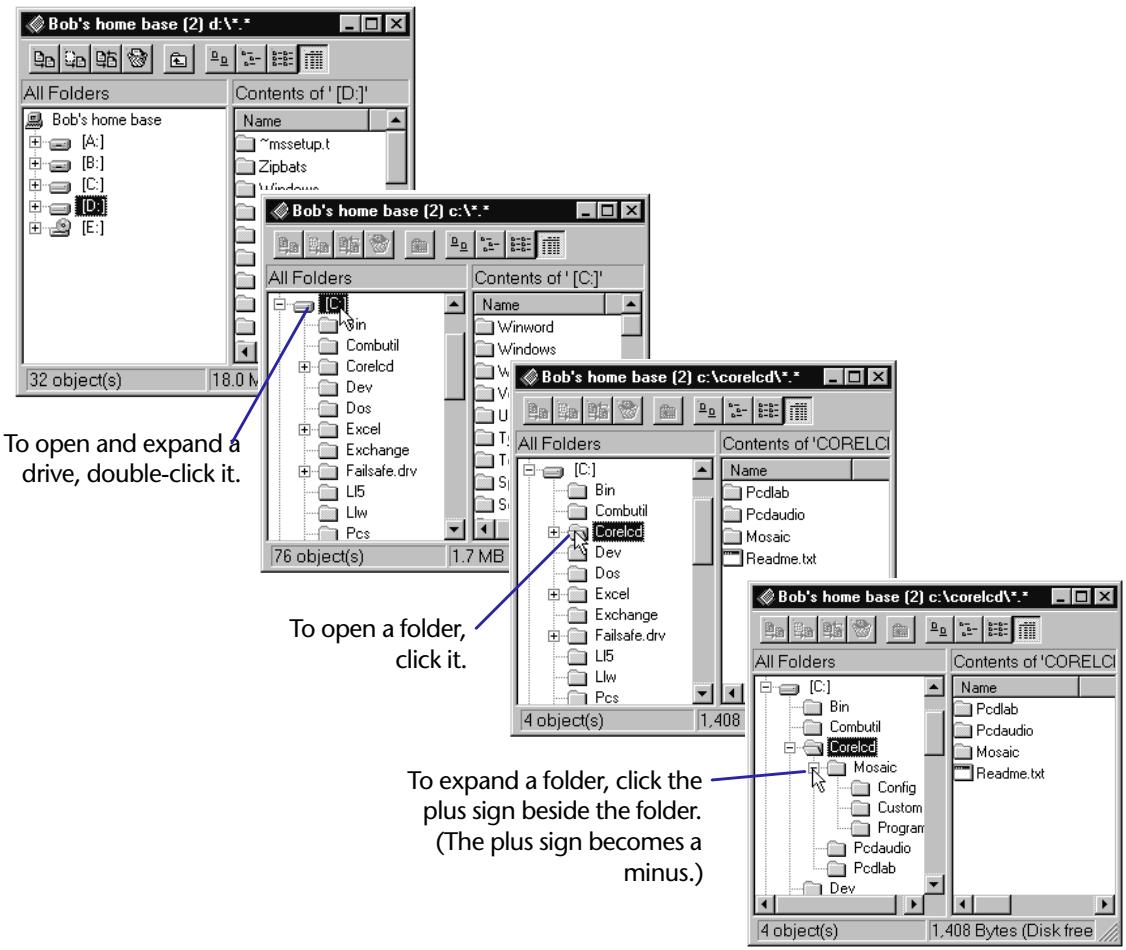
If you are displaying files in Detail view, you can sort them by name, size, type (file name extension), modification date, or attribute: click the corresponding button at the top of a column. Clicking the same button again reverses the order.

Go to topic summary
Selecting files and folders
On the left side of a File Transfer window, you can select only one folder at a time. On the right side, you can select multiple folders and files. To select a single item, point to it and click the left mouse button. To select several items in sequence, click the first item; then hold down SHIFT while you click the last item. To select items out of sequence, hold down CTRL while you click each one. You can also click Select All or Select By on the File menu. To cancel an individual selection, hold down CTRL, and click the item.
Go to illustration
You must select a folder or file before you can copy or move it. When you select an item, its name and icon are highlighted.
You can select a single folder on either side of a File Transfer window. You can select files and multiple folders only on the right side.
By default, selecting a folder selects all of its files and its sub folders. To change the default, click File Transfer Options (Options menu). On the Filter tab, clear this option: Include Sub folders in Copies. (You can always override this setting when you are asked to confirm a copy or move operation.)
To select a single file or folder:
- Place the mouse pointer on its name or icon, and click the left mouse button.
If you want information about your selections—such as the number of files and the total size—click Size of Selections on the File menu.
To select a group of items, do either of the following:
- Click the first item, and press SHIFT while you click the last item.
- Click at a right corner of the group and drag to the opposite corner to form a selection box.
To select two or more items out of sequence:
Press CTRL while you click the items.
To select all folders and files in the current folder:
- Click Select All on the File menu.
To select everything on a drive, select the drive before clicking Select All.
To select folders and files using the Select By command:
1 Click Select By on the File menu.
2 In the Filter box, type the name of a file or folder. Or use wildcards to specify items with similar names.
For example, typing .DOC selects all files with the .DOC extension. The default (^,^*) selects all files and folders.
Selecting several folders and files
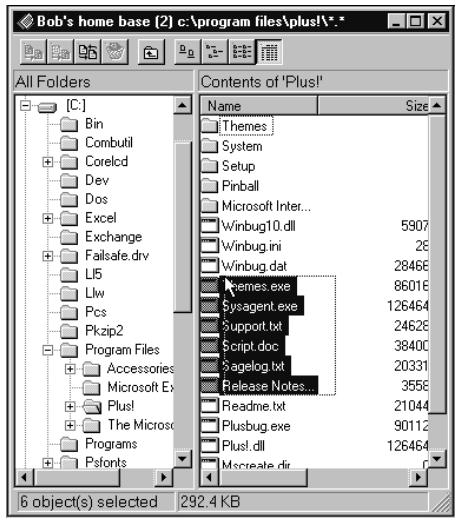
Select a group of items by dragging a selection box around them, from right to left.
Or click the first item and then press SHIFT while you click the last one.
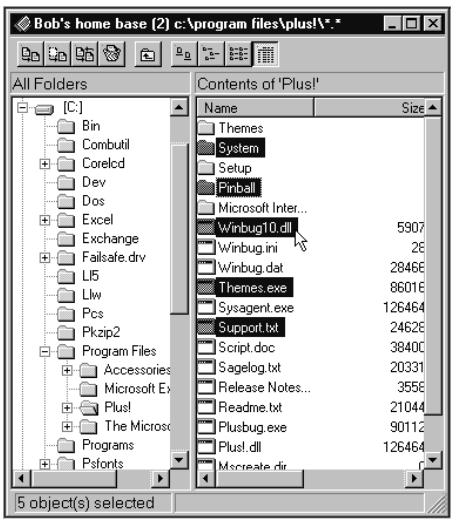
Select several items not listed together by pressing CTRL while you click the items.
You can specify several criteria at once by typing them one after another and inserting a space or a comma between them. For example, typing .DOC,.TXT displays all files with these extensions.
3 If you want to select according to date, check Enable Date/Time Range. Then type the dates and times under Oldest File and Newest File.
4 Click OK.
Clearing selections
To clear an individual selection:
Hold down CTRL while you click the item.
To clear all selections:
■ Click Clear Selection on the File menu.
Go to topic summary
Copying or moving files and folders
Once you have displayed the target and selected the items to be transferred, you are ready to use the Copy or Move command. Or you can use the mouse to drag the items and drop them onto the target. Before the transfer is completed in either case, you see a confirmation dialog box showing details of the operation you are about to perform. You can then proceed immediately, change certain conditions, or cancel the operation entirely.
Go to illustration
When you copy or move, you transfer items from one location—the source—to another—the target. You can transfer items using the Copy or Move commands or by dragging them with the mouse.
Before attempting to transfer between computers, open a File Transfer window for each of them.
To prepare for a copy or move operation:
1 Navigate through the left side of the target window to display the folder where you want to put the selections. Click the folder. (For more information, see page 86.)
2 In the source window, select the items you intend to transfer. Make sure that the source and the target are still showing. (For more information, see page 88.)
To copy or move using drag and drop:
1 Place the mouse pointer over a single item or one of several items you have selected on the source.
2 Do either of the following:
- To copy, press CTRL and your left mouse button as you move the pointer over to the target folder.
- To move, press SHIFT and your left mouse button as you move the pointer over to the target.
3 Once the target is highlighted, release the mouse button and the CTRL or SHIFT key.
You now see the File Copy or File Move dialog, as described on the opposite page.
Copy and Move also appear as buttons on the Drive Bar, near the top of each File Transfer window.
To copy or move using a command:
■ With the source still window active, click Copy or Move on the File menu.
You now see the File Copy or File Move dialog, as described next.
To complete the copy or move:
1 In the File Copy or File Move dialog box, you can verify the source and the target, change the target, and set options. Do any of the following:
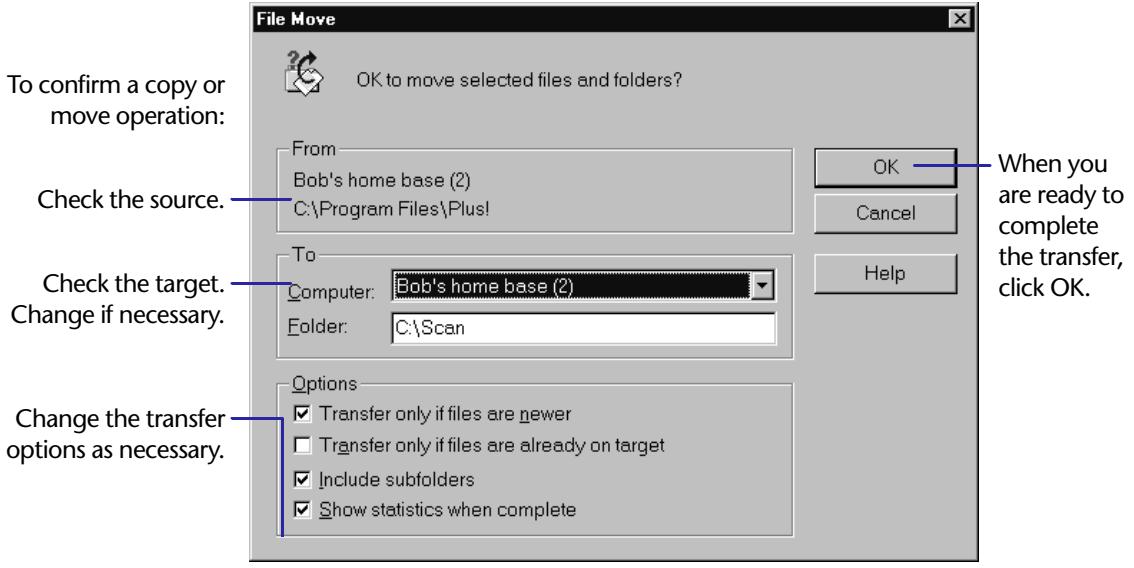
Confirming a copy or move operation
Tips for drag and drop

Copy by pressing CTRL as you drag.

Move by pressing SHIFT as you drag.
- Under To, verify the target. You can choose a different computer from the Computer drop-down list; in the Folder box, you can type any drive and folder already on the target.
- Under Options, check or clear the options as you wish. For more information, see the next section.
2 Click OK to complete the operation or Cancel to halt it.
You now see a dialog box reporting on the operation as it proceeds. Click Cancel to halt the operation. If the Protected Files dialog box appears, select the files you want to transfer, and click OK.
- Dropping onto a drive puts the selections at the highest level of the hierarchy of folders.
Dropping onto a folder puts the selections inside the folder. - Dropping onto a file puts the selections on the same level as the file.

Go to topic summary
When you transfer folders that are not on the target already, the folders are created for you. You do not have to create them yourself.
Setting File Transfer options for the results you want
Certain File Transfer options play a crucial role when you are copying or moving files. Depending on how you set them, you can include or exclude sub folders, prevent the overwriting of files except by newer copies, or copy only files you have backed up before. To specify global preferences for these options, click File Transfer Options on the Options menu; then click the Filter tab. Whenever you confirm a copy or move operation, you can change the settings for that operation.
Go to illustration
There are three File Transfer options that determine which files are transferred and which are overwritten:
Transfer Only If Files Are Newer
- Include Sub folders in Copies
Transfer Only If Files Are Already on Target
The first two options are in effect until you change them.
To change your global preferences for File Transfer options:
- Click File Transfer Options on the Options menu. Click the Filter tab, and then click the appropriate options.
When you transfer files, you can tailor these options for that operation before giving your confirmation.
Protecting newer copies of files
When transferring files between computers, ensure that their clocks are reasonably in sync. If they are not, files that appear to be older may actually be newer, and you could lose your most recent work.
One of the options—Transfer Only If Files Are Newer—is designed to preserve files that represent your most recent work. It is also useful for speeding up file transfers; files that do not need to be updated are excluded from the operation.
When checked, this option ensures that files are not overwritten by older copies of those files. (Files not already on the target will be copied anyway.) When this option is cleared, files are overwritten without regard to their dates and times.
Including or excluding sub folders
One of the options—Include Sub folders in Copies—is designed for copying a hierarchy of folders and sub folders and is potentially the most powerful of the File Transfer options. It can make the difference between copying hundreds of files or only a few.
Sub folders are always included when you move a folder.
When checked, this option extends your selection to include any sub folders within the folders you have selected. When this option is cleared, your selection is limited to the selected files and folders (including the files in those folders); sub folders within folders are excluded.
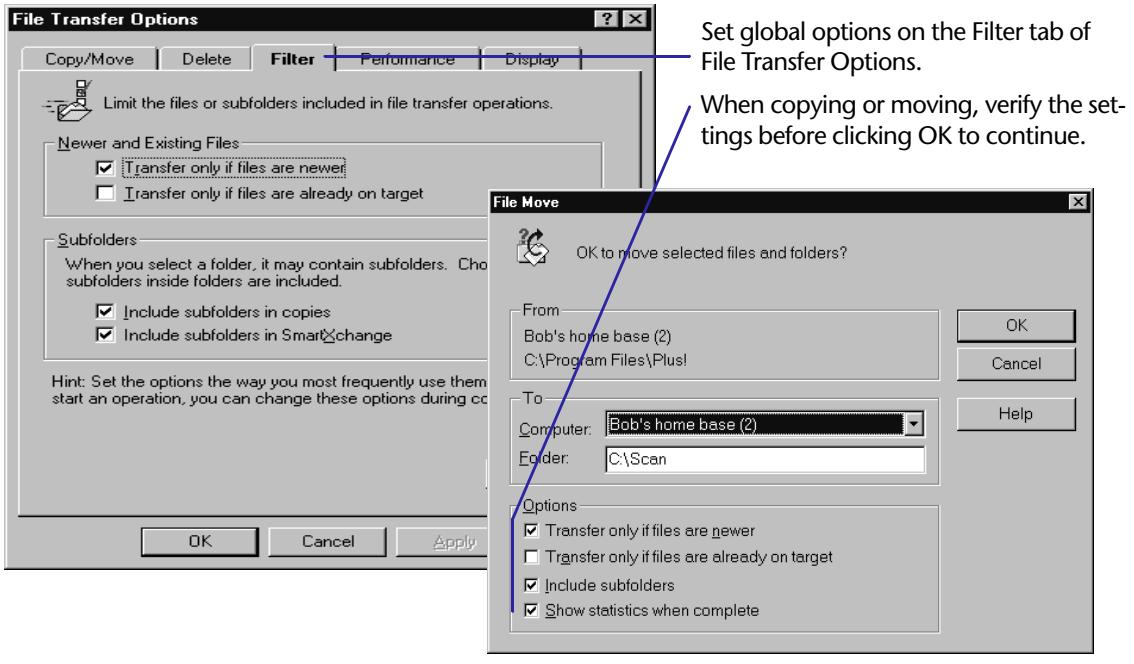
Setting options for your copy and move operations
Updating older copies of files
One of the options—Transfer Only If Files Are Already on Target—simplifies the task of updating older copies of files without adding new ones. It is designed for anyone who regularly updates the same set of files.
No matter how many files you select on the source, only those already on the target will be copied; those not on the target will be ignored.
In preparation for using this option the first time, copy the files to the target with the option cleared. When you are ready to update the files, check the option.
Deleting to the Recycle Bin
By default, any files you delete in LapLink are "recycled," that is, moved to the Windows Recycle Bin, where they can be retrieved later. (The Recycle Bin must be enabled for this feature to work.) You can change this setting so that files are permanently removed as soon as you delete them.
To permanently remove files when you delete them in LapLink:
1 On the Options menu, click File Transfer Options.
2 On the Delete tab, click this option to remove the check mark: Move Deleted Files and Folders to the Recycle Bin.

Go to topic summary
- Whether files are recycled or permanently removed is determined solely by the setting on the computer that opens the connection.
Synchronizing folders with SmartXchange
You can use SmartXchange to synchronize two folders in a two-way exchange of files. You can limit the scope of the operation by including only the files already in both folders. You can also use SmartXchange to update an archive folder quickly. In either case, older files are overwritten, but no files are deleted.
Go to illustration
Synchronizing folders
If you have ever copied files back and forth between computers so that they share the latest files, you have synchronized. Unlike the usual copy operation, synchronization works in two directions: from one folder to the other and back again.
- With SmartX-change, you determine the items to be copied by selecting the folder containing the items, not by selecting the items themselves. Select the folder on the left side of each File Transfer window.
With SmartXchange, you can accomplish this in one operation, one folder at a time. You can increase the scope of the operation by including sub folders within the folder. You can limit its scope by exchanging only the files that are on both folders already.
SmartXchange is a tool for exchanging files between folders. It does not merge the contents of files. If you need to merge databases, schedules, or other shared files, see the documentation for the program in which they were created.
If you synchronize the same folders on a routine basis, consider using Xchange Agent instead of SmartXchange. Xchange Agent automates the process of opening connections, selecting the pairs of folders to be synchronized, setting the appropriate options, initiating the exchange, and disconnecting. For more information, see page 104.
To double-check which folder is open, look at the title bar, at the top of the File Transfer window.
To use SmartXchange to synchronize folders:
1 On the left side of each File Transfer window, click the folder (not an entire drive) containing the files you want to exchange.
2 On the SyncTools menu, click SmartXchange. Or click the Sync button on the Drive Bar, near the top of the File Transfer window.
3 Verify that the source and target are correct. If necessary, change the target.
If you want to include sub folders in the exchange, check this option: Include Sub folders.
If you merely want to update files—and not add new ones—check this option: Transfer Only If Files Are Already on Target. If you want the two folders to be identical, the option must be cleared.
4 Make sure that this option is cleared: One-way Transfer Only.
5 Click OK.
Synchronizing folders
The folders you opened in the File Transfer windows appear under Source and Target.
To update only the files that are already in both folders, check this option. Clear the option to copy all files and make the folders identical.
To ensure that files are copied in both directions, clear this option. It should be checked only if you want a one-way transfer from source to target, as when you update an archive folder.
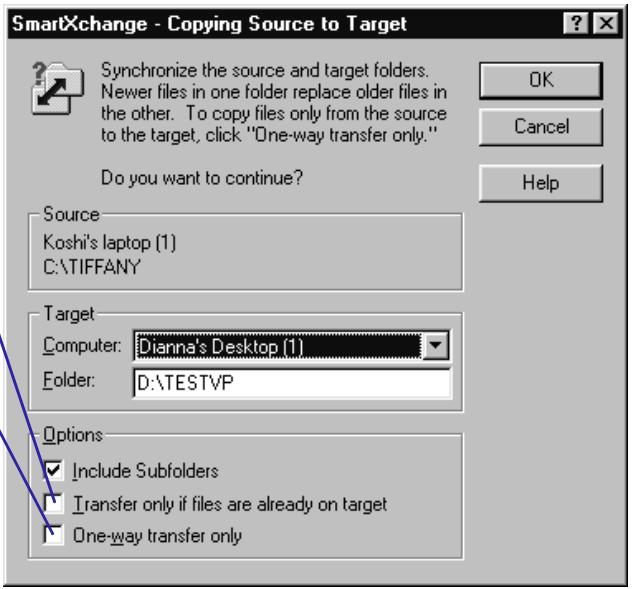
Updating folders

Go to topic summary
You can also use SmartXchange to simplify the process of updating a set of files you have archived already.
To use SmartXchange to update an archive folder:
1 On the left side of the target (archive) window, click the folder you want to update.
2 On the left side of the source window, click the folder containing the files you want to archive.
3 On the SyncTools menu, click SmartXchange.
4 Verify that the source and target are correct. Change the target if necessary.
If you want to include sub folders in the exchange, check this option: Include Sub folders.
If you want to update files—and not add new ones—check this option: Transfer Only If Files Are Already on Target. If you want the folders to be identical, the option must be cleared.
5 Make sure that this option is checked: One-way Transfer Only.
6 Click OK.
Replacing one folder with another: Clone Folder
Clone Folder replicates one folder onto another by adding, deleting, and updating files on the target until they match those on the source. After opening the target and the source folders, click Clone Folder on the SyncTools menu. Then choose whether to include or exclude subFolders.
Go to illustration
Clone Folder replaces one folder (the target) with another (the source). The effect is the same as deleting everything on the target and copying everything from the source.
- With Clone Folder, you determine the items to be copied by selecting the folder containing the items, not by selecting the items themselves. Select the folder on the left side of each File Transfer window.
Cloning a folder adds and updates target files until they are identical to those on the source. In addition, it deletes any target file that has no counterpart on the source.
It's the deletion of files that makes Clone Folder useful, particularly when you are maintaining a backup folder. With the usual copy operation, the backup folder over time accumulates all the files you have deleted from the source. With Clone Folder, those unwanted files are removed with each backup.
Use this command with caution. Any subfolder or file not on the source will be deleted from the target.
To replace one folder with another:
1 On the left side of the target window, click the folder whose contents you want to replace.
2 On the left side of the source window, select the folder whose contents you want to reproduce.
3 With the source window still active, click Clone Folder on the Sync-Tools menu.
4 Verify that the source and target are correct. Change the target if necessary.
5 If you want to reproduce sub folders, check this option: Include Sub folders.
6 Click OK.
Using Clone Folder to replace one folder with another

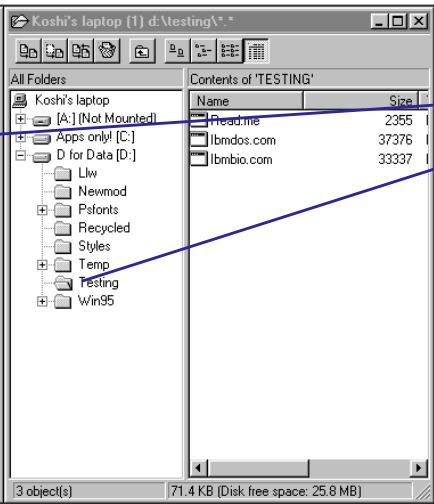
With Clone Folder—
This folder in the source window... ...will replace this folder in the target window.
Clone Folder deletes any files in the target folder that are not included in the source folder. It then updates older files on the target.

Go to topic summary
Speeding file transfers with SpeedSync and compression
When you are updating files, SpeedSync can shorten transfer times by sending only the parts of the files that have changed since the last update. SpeedSync is most effective when you update files that have not been changed extensively since the last update. Compression speeds file transfers by "shrinking" files before they are sent and restoring them to their original sizes afterward. Compression is most effective with large files that have not been compressed already. Though both features are in effect by default, there may be circumstances in which you might improve transfer times by disabling them.
Go to illustration
Using SpeedSync
SpeedSync is designed to cut transfer times when you are updating files. It has no effect when you are copying files that were not on the target before you started copying.
- Whether Speed-Sync and Compression are used in file transfers depends entirely on the settings of the guest (the computer that opens the connection).
Before a file is copied, SpeedSync searches the target for a file with the same name. If none is found, the entire file is copied. Otherwise, the two files are compared to locate changes in the source file. Only the changes located in the source file are copied.
The time necessary to locate changes is usually more than offset by the smaller amount of data that has to be transferred. The reverse may be true in a few circumstances, particularly when you are updating files over a fast network connection.
! SpeedSync is a tool for decreasing transfer times. It does not merge the contents of two files. The contents of one file will always replace the contents of the other. If you need to merge databases, schedules, or other shared files, see the documentation for the program in which they were created.
To disable SpeedSync:
1 On the Options menu, click File Transfer Options.
2 On the Performance tab, click this option to remove the check mark: Use SpeedSync on all file transfers.
To review the effect of SpeedSync on your past file transfers, open at least one File Transfer window. Then click SpeedSync Statistics on the SyncTools menu. You see the statistics for your most recent transfer as well as combined statistics for earlier transfers.
Using compression
Because compression usually results in the transfer of less data, it is particularly useful when you transfer large files by modem: the larger the files, the greater the savings.
How SpeedSync works



With SpeedSync
Source and target files are compared to locate changes in the source file.
Only changes are copied. The result is often shorter transfer times.
Without SpeedSync
Source and target files are not compared for changes.
Entire files are copied, often resulting in longer transfer times.
Since compression would actually slow the transfer of files that have already been compressed (by PKZIP or another file-compression program), LapLink automatically turns this feature off while it is transferring such files.
If you find a situation in which compression does not speed up file transfer, you can disable it: On the Options menu, click File Transfer Options. On the Performance tab, click this option to remove the check mark: Use Compression When Transferring Files.
Go to topic summary
Resuming an interrupted file transfer
If you lose your connection to another computer while transferring files, File Transfer Recovery lets you connect again and continue the transfer where it left off. Any file—or portion of a file—copied before the interruption is skipped; only the untransmitted data is copied.
Go to illustration
File Transfer Recovery lets you continue a file transfer even when you have lost a connection. Instead of starting the transfer at the beginning, File Transfer Recovery resumes at the point where the connection was lost:
Only the missing part of the interrupted file is copied.
- Files successfully copied before the interruption are not copied again.
File Transfer Recovery is particularly useful when you copy large files over an unreliable modem connection.
To resume an interrupted file transfer:
If you were running an Xchange Agent when the interruption occurred, run the agent again.
If you were transferring from File Transfer windows:
1 Re-establish the connection.
2 Select the same files and folders.
3 Begin the transfer again.
File Transfer Recovery and other options
Three options must be enabled for File Transfer Recovery to work effectively. All three appear in File Transfer Options (Options menu) and are enabled by default.
Enable File Transfer Recovery Located on the Copy/Move tab, this option must be checked for File Transfer Recovery to occur at all.
Use SpeedSync on All File Transfers Located on the Performance tab, this option must be checked to allow the transfer to resume with the missing part of a file. When it is cleared, the entire file must be sent again.
Transfer Only If Files Are Newer Located on the Filter tab, this option must be checked so that files successfully copied before the interruption are not copied again.
How File Transfer Recovery works
If you lose a connection while transferring a file, the data transferred at the point of interruption is stored on the tar-
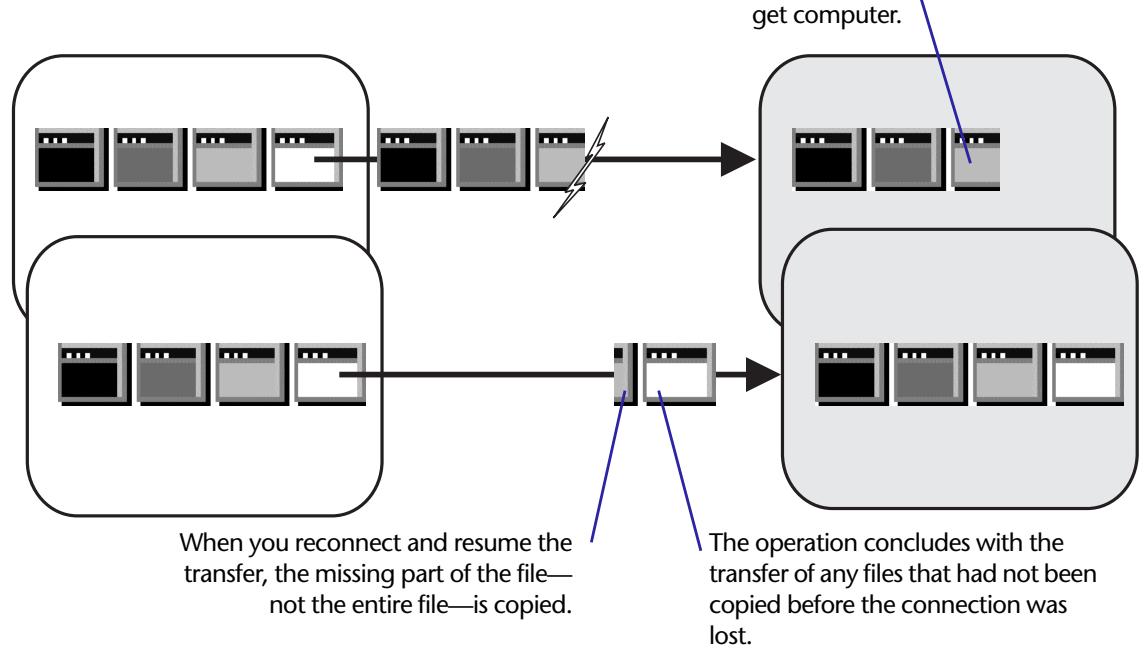
When a transfer is interrupted, File Transfer Recovery creates a file in the target folder containing whatever part of the file has been transferred successfully. The file is named!LAPLINK.TSI.
When File Transfer Recovery resumes a transfer, this file is compared with the source file to determine what's missing. Once the file is complete, !LAPLINK.TSI is given its original name. (If you do not use File Transfer Recovery to resume the transfer, the file remains in the folder and can be deleted.)
Go to topic summary
6
Automating File Synchronization with Xchange Agent
In this chapter
Introduction to Xchange Agent 104
Creating an Xchange Agent 106
Previewing and running an Xchange Agent 108
Dealing with conflicts 110
Customizing an Xchange Agent 112
Using filters to include or exclude files 114
Scheduling an Xchange Agent to run automatically 116
Introduction to Xchange Agent
Xchange Agent automates synchronization—the process of keeping your files updated when you use two computers. To set up an Xchange Agent, open a connection to another computer, choose the pairs of folders to be synchronized, preview, and then perform the synchronization. After working on the files on either or both of the computers, run the agent to reconnect and update the older copies of the files automatically. You can run an agent by double-clicking its shortcut icon or schedule it to run unattended.
Go to illustration
Xchange Agent simplifies the repetitive process of keeping two computers—often a laptop and a desktop—in sync.
Xchange Agent automatically picks the newer copies of all the files regardless of which computer they are on. File that have no match are copied onto the computer that lacks them.
Whether your most recent work appears on one or both of the computers, Xchange Agent transfers files so that both have only the newer copies of your files.
Xchange Agent automates the process of opening connections, selecting the pairs of folders to be synchronized, setting the appropriate options, initiating the exchange, and disconnecting. To prevent unwanted results, you can preview before running.
Creating an Xchange Agent
Open a LapLink connection—by modem, cable, network, or Internet—to the computer with which you want to exchange files.
Xchange Agent is also useful for local synchronizations, as when you want to keep files on your desktop in sync with files on your corporate network.
Then use the Xchange Agent wizard to create your own Xchange Agent:
- From the hierarchy of folders displayed for each computer, choose the pair of folders—one folder on each computer—you want to synchronize. Choose as many pairs as you want.
Name your Xchange Agent file and save it.
Preview the agent you just created, making sure that you set it up as intended.
Then run the agent to make the files in each pair of folders identical.
Previewing an Xchange Agent
To prevent unintended consequences, you can preview an agent before synchronizing. The preview screen shows pairs of folders and files, with arrows to indicate the direction in which files will be copied when the agent is run.
In a preview, you can customize the agent by excluding pairs of files (and entire folders) from the current synchronization, leaving the files as they are on each computer.
Using Xchange Agent
Choose folders to synchronize
Select a pair of folders to synchronize:
Cassin in the Office
D:\AdLib Project
C:AdLib Project
Create an agent by connecting to another computer and selecting the pairs of folders to be synchronized.
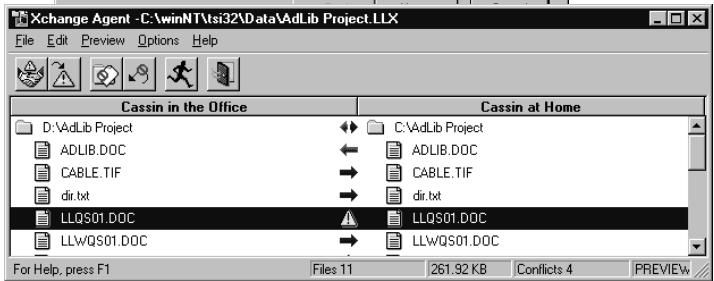
Preview the agent and customize it as necessary. Then run the agent.

AdLib Project
You can also run an agent from the desktop or by scheduling it.
By default, agents are previewed before being run. To bypass preview, click Properties on the File menu and choose an option on the Run Options tab. For more information see page 113.
Running an Xchange Agent
There are several ways to run an Xchange Agent:
Double-click its shortcut icon on the desktop.
Schedule the agent to run unattended.
Start LapLink and run the agent.
Double-click the agent file in Windows Explorer.
Beyond the basics
Xchange Agent offers various options for customizing each synchronization. For example, you can—
- Change the direction of copy: instead of a two-way change of files, files are copied in one direction only, from one computer to the other.
- Include or exclude (filter) files according to type or name.
- Include or exclude sub folders within synchronized folders.

Go to topic summary
Xchange Agent exchanges files between folders. It does not merge the contents of files. To merge databases and other shared files, use the program in which the files were created.
Creating an Xchange Agent
Once you connect to another computer, you create an Xchange Agent by selecting the pairs of folders—one folder on each computer—which you want to keep synchronized. You can select the pairs from a window displaying the folders on both computers, or you can drag folders from File Transfer windows onto the Xchange Agent window. In either case, you can preview the agent to ensure that you have set up the synchronizations as intended.
Go to illustration
To create an Xchange Agent:
1 Start LapLink and open a connection with the computer with which you want to synchronize files. (For a local synchronization, simply start LapLink.)
2 On the SyncTools menu, click either of these:
Xchange Agent Wizard
New Xchange Agent
Using the Xchange Agent wizard
The wizard guides you through the process of selecting pairs of folders to be synchronized. After naming and saving the agent file, you can preview the agent or change its settings.
To make the files in each folder pair identical, click the Run button on the toolbar.
Using New Xchange Agent
After choosing New Xchange Agent from the SyncTools menu, you can select the pairs of folders to be synchronized in two ways:
- On the Edit menu, click Add Folder Pair. After specifying whether the synchronization is Local-Local or Local-Remote, click a folder on each side of the window. Repeat the procedure to add other folder pairs.
- Drag folders from File Transfer windows onto the Xchange Agent window. From either File Transfer window, drag a folder onto the Xchange Agent window; from the other File Transfer window, drag a folder onto the Xchange Agent window.
Once you have selected the pairs to be synchronized, you can do any of the following:
Preview the agent: Click the Preview button on the toolbar.
- Name and save the agent file: On the File menu, click Save. In the File Name box, type a name, and click OK.
There are two "modes" in Xchange Agent: edit and preview. Certain operations are available in one mode and not the other. To save an agent, for example, you must be in edit. To change to edit from preview, click the Close Preview button on the toolbar.
Selecting folder pairs for synchronization
While using the Xchange Agent wizard or Add Folder Pair, you see the hierarchy of folders on both computers.
Create a folder pair by clicking one folder for each computer.
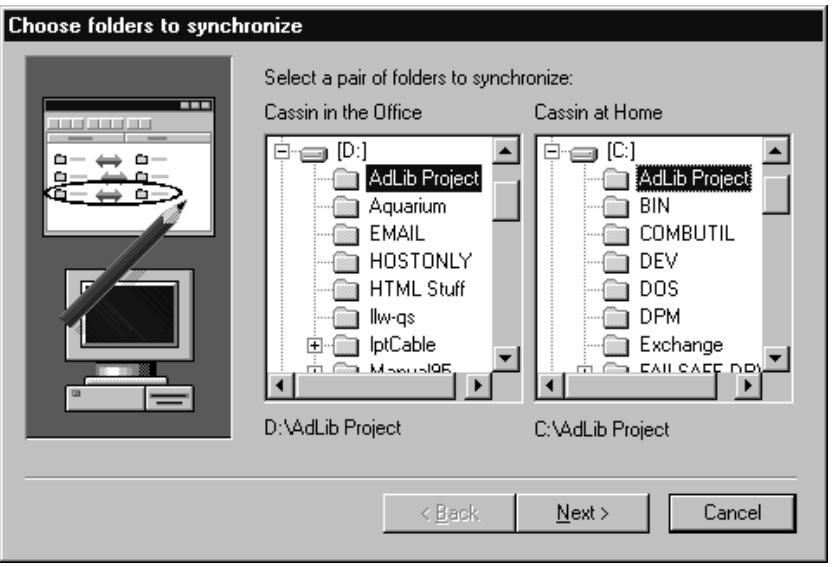
- Run the agent to make the files in each folder pair identical: Click the Run button on the toolbar.
^+ Xchange Agent files are given the .LLX extension. By default, they are stored in the \TSI32\DATA subfolder within your Windows folder, though you can store them elsewhere.
Go to topic summary
Previewing and running an Xchange Agent
Previewing an Xchange Agent lets you see exactly which folders will be synchronized and which files will be overwritten. It also lets you skip pairs of folders and files and resolve conflicts. Unless you specify otherwise, you preview each agent before you run it. You can run an agent from the desktop, from within LapLink, or you can schedule it to run in your absence.
Go to illustration
Only agents that you schedule to run unattended will proceed without a preview. To set up other agents to run without a preview, see page 113.
In a preview, arrows indicate the direction in which files will be copied, and thus which files will be overwritten. Special icons indicate conflicts between files.
Previewing
By default, a preview appears whenever you run most Xchange Agents. You can also open an agent and preview it.
To open and preview an Xchange Agent:
1 In LapLink, click Open Xchange Agent on the SyncTools menu. (In Xchange Agent, click Open Xchange Agent on the File menu.) Then click the agent file and click Open.
2 Click the Preview button on the toolbar.
While previewing an agent you can do any of the following:
- Select files or folders to be omitted from the current synchronization only—Click a pair and click the Skip Pair button on the toolbar. Skipping a folder skips all the files and sub folders it contains.
- Put skipped pairs back into a synchronization—Click a skipped pair and then click the Undo Skip button on the toolbar.
- Resolve conflicts—Click a pair showing a conflict icon, click the Resolve Conflict button on the toolbar, and specify how you want the conflict resolved. For more information about resolving conflicts, see the next section.
! Once you have resolved conflicts or marked pairs to be skipped, run the agent before closing preview. Your modifications will be lost otherwise. - Select every pair of folders and files in the agent—Click Select All on the Edit menu.
- Locate a pair with a conflict—Click the Next Conflict button on the toolbar.
To close a preview:
- Click the Close Preview button on the toolbar. You are now in edit.
While in edit you can customize an agent in several ways. For more information see page 112.
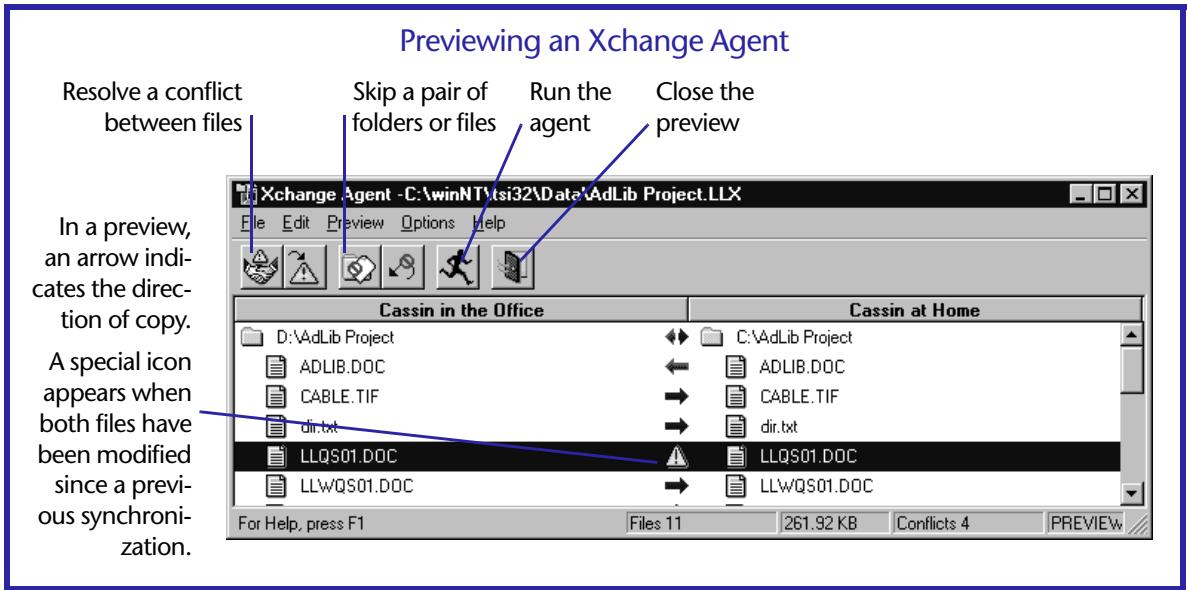
Running an Xchange Agent
Go to topic summary
There are several ways to run an Xchange Agent:
- Double-click the agent's shortcut icon on the desktop. To create a shortcut icon for an open agent, click Create Desktop Shortcut on the File menu.
- Schedule the agent to run at an appointed time. For more information see page 116.
- Run the agent from within LapLink—Click Run Xchange Agent on the SyncTools menu. Then click the name of the agent file and click Open.
- Run an agent you have opened in Xchange Agent—Click the Run button on the toolbar.
In Windows Explorer, double-click the agent file.
Once an agent finishes synchronizing files, the connection with the remote computer is closed. If LapLink was not running to begin with, it is started and shut down automatically.
For a record of your latest synchronizations, refer to the LapLink log files: On the Options menu, click Logging.
Previewing and running an Xchange Agent Dealing with conflicts
When you are keeping folders on two computers in sync, the most common kind of conflict occurs when a file has been modified on both computers since the last time you synchronized. You can handle these conflicts when you preview or run the agent. Or you can set options to handle them automatically.
Go to illustration
Conflicts between files
Conflicts occur when you modify a file on both of your computers. Since both files are new, you need to decide how to handle them. These are the choices you can make while previewing or running an Xchange Agent:
- Copy either the older or newer file over the other.
- Copy either the older or newer file and give the copy a new name.
- Skip the conflict, without copying either file.
When you skip a conflict, you carry it over to future synchronizations. You now have two categories of conflicts:
- New conflicts: Files have been changed on both computers since the previous synchronization.
- Old conflicts: Conflicts were left unresolved in earlier synchronizations. The two computers now have different versions of the same file, and both are dated prior to the latest synchronization. You can treat these conflicts like new conflicts, or ignore them and let both versions remain.
Changing how all conflicts are handled By default, each conflict is presented for resolution when you run an Xchange Agent. You can change this so that conflicts are handled automatically.
To change how conflicts are handled by an Xchange Agent:
1 Open the Xchange Agent.
2 On the File menu, click Properties.
3 On the Run Options tab, click this option: Run Unattended, without Preview or Confirmation. Then click either of these options:
- Copy the Newer File over the Older
- Do Not Copy Either; Keep Both Files
Ignoring old conflicts By default, old and new conflicts are treated alike, according to the settings on the Run Options tab in Properties. For example, if you specify that conflicts are to be displayed every time you run an agent, old conflicts will appear time after time. The alternative is to exclude old conflicts, regardless of how other conflicts are handled.
Resolving a conflict between files
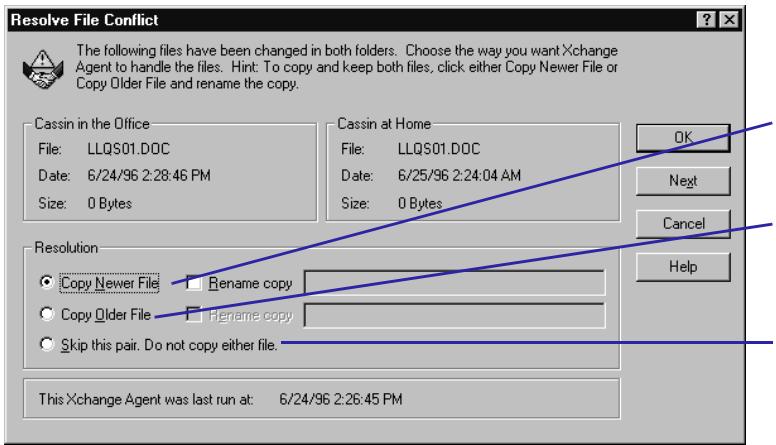
When you are asked to resolve a conflict between files, you can do any of the following:
Copy the newer file over the older, with the option of giving the copy a new name.
Copy the older file over the newer, with the option of giving the copy a new name.
Skip the conflict, without copying either. You will then retain two versions of the file, one on each computer.
To exclude old conflicts from synchronizations:

Go to topic summary
1 Open the Xchange Agent.
2 On the File menu, click Properties.
3 On the Advanced tab, click this option: Exclude Previously Skipped Files.
Other conflicts
You will encounter other kinds of conflicts in these situations:
- When you attempt to copy a file or folder with a long name to a drive that does not accept long names.
- When you attempt to synchronize a file with a folder; this happens only when a file and a folder have exactly the same name.
Long name conflicts If you do not shorten long names, you are given this choice when you run an agent: Copy the file and give the copy a short name, or skip the conflict without copying the file.
Conflicts between files and folders If you do not rename the file to avoid the conflict, you are given this choice when you run an agent: Copy both the file and folder and give the copies new names, or skip the conflict without copying either.
The best way to handle either of these conflicts is to rename files: Shorten the long names or rename the file so that it does not conflict with the name of the folder. True synchronization cannot occur otherwise. If you set an agent to run unattended, for example, neither file in a conflict is copied.
To retain both versions of files in old conflicts, click this option on the Advanced tab in Properties: Exclude Previously Skipped Files.
Customizing an Xchange Agent
Instead of a two-way synchronization, you can customize an agent so that files within folder pairs are copied in one direction only, from one computer to the other. Among other modifications, you can create a shortcut icon to run an agent directly from the desktop, run an agent without preview, and limit synchronizations just to the files that already appear on both computers.
Go to illustration
To customize an agent, you must open it from within LapLink or Xchange Agent.
To open an agent:
In LapLink, click Open Xchange Agent on the SyncTools menu. Click the agent file and then click Open.
In Xchange Agent, click Open Xchange Agent on the File menu. Click the agent file and then click Open.
To customize an agent, you must be in edit. If you are previewing, click the Close Preview button on the toolbar.
Changing the direction of copy
When you create an Xchange Agent, all folder pairs are set for a two-way exchange of files. Files are copied in both directions, until the folders on both computers are identical.
You can modify this by specifying that files in a folder pair be copied in one direction only, so that only one folder updates the other.
To change the direction in which files are copied in a folder pair:
1 Click the folder pair.
To change the direction of copy for all folder pairs, click Select All on the Edit menu.
2 Click an arrow button on the toolbar to change the direction of the copy.
Adding folder pairs
To add a pair of folders to an Xchange Agent:
1 Open a connection with the computer with which you are synchronizing.
2 On the Edit menu, click Add Folder Pair.
3 Click one folder for each computer and then click OK.
Changing how an Xchange Agent is run
There are several ways to customize how an agent is run:
- Create a shortcut icon for running an agent from the desktop: On the File menu, click Create Desktop Shortcut.
To delete a pair of folders, click the pair and click Delete Pair(s) on the Edit menu. Then click Yes. The folders are deleted from the agent, not from the computers.
Changing the direction of copy
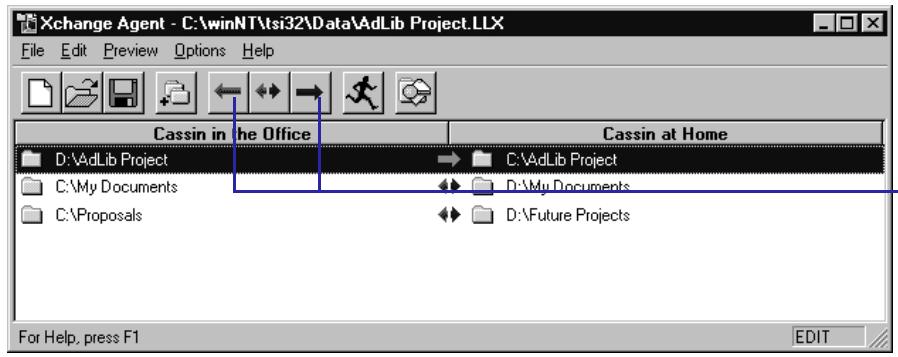
To change the direction of copy, click one or more of the folders.
Then click either the left or right arrow button to specify the direction.
- Schedule the agent to run at the time you want: On the File menu, click Schedule. For more information see page 116.
- Set up the agent to run without a preview: On the File menu, click Properties. On the Run Options tab, click this option: Run without Previewing First.
- Set up the agent to run unattended: On the File menu, click Properties. On the Run Options tab, click this option: Run Unattended, without Preview or Confirmations. Then determine how conflicts will be handled by clicking either of these options: Copy the Newer File over the Older or Do Not Copy Either; Keep Both Files.

Go to topic summary
For more information about handling conflicts, see the previous section.
Changing which files are included in synchronizations
By default, sub folders within folder pairs are included in synchronizations. Read-only files are also included, but hidden files and system files are not. To change these settings, click Properties on the File menu. Then click the File Options tab and change the settings as necessary.
Also on the File Options tab, you can set an option to limit synchronizations by exchanging only files that already appear on both computers. To exclude files that have been added to one computer and not the other, click to place a check mark next to this option: Include Files Only If They Are Present in BothFolders.
Instead of changing the various options every time you create a new agent, you can set default options to apply to any agents you create in the future. These defaults will take effect in new agents unless you specify otherwise in Properties. To change the defaults, click Properties for New Agents on the Options menu.
- Filters offer another way of determining which files are to be included in synchronizations. For more information, see the next section.
Customizing an Xchange Agent
Using filters to include or exclude files
Using preset filters or filters you create yourself, you can limit synchronizations by including only certain files or types of files. Or you can use the same filters to exclude certain files and file types.
Go to illustration
Xchange Agent is shipped with filters for some of the most common types of files, including Microsoft Word, Lotus 1-2-3, and dBase. File types are defined by one or more extensions. Word files, for example, are defined by the extensions .DOC and .DOT.
You can use
Xchange Agent to synchronize a single file: First, create an agent to include only the folder pair containing the file. Then create a filter to specify the name of the file.
You can also create your own filters for different file types—or for specific files.
You can use filters to synchronize only the files matching the filters. Or you can exclude the files matching the filters and synchronize the rest of the files.
To filter files by type using the preset filters:
1 Click a folder pair, and then click Set Filter on the Edit menu. To filter all folder pairs, click Select All on the Edit menu.
2 In the list of available filters, click a filter and then click the Add button. Repeat the process to add other filters.
3 To use the filters to exclude—not include—file types, click this option: Exclude Files That Match These Filters.
4 Click OK.
To create and apply your own filter:
1 Click a folder pair and then click Set Filter on the Edit menu.
2 Under the list of available filters, click the New button.
3 In the Filter Name box, type a description for the filter.
4 In the Pattern(s) box, type one or more file extensions or file names, using a semicolon (·) to separate them.
To specify file types, use extensions preceded by asterisks: .chp;.sty and so on. To specify certain files, type their entire names: annual.xls;march.xls;april.xls and so on.
5 Click OK.
Your filter now appears in the list of available filters.
6 Click the filter and then click the Add button.
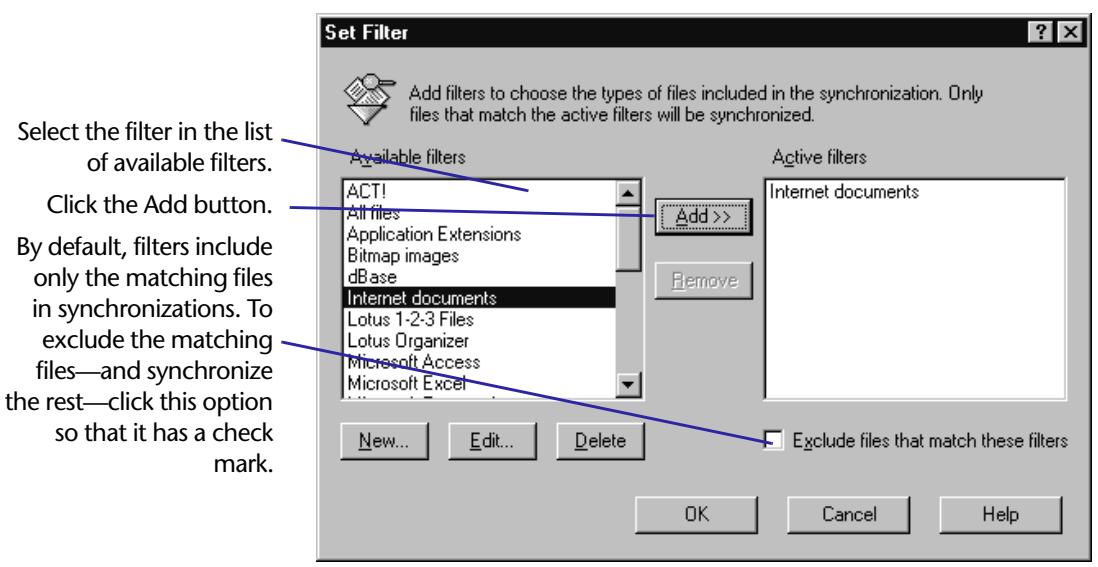
Adding a filter to include or exclude files
7 To use the filters to exclude—not include—file types, click this option: Exclude Files That Match These Filters.
Go to topic summary
To remove the effects of a filter:
1 Click the filter in the list of active filters.
2 Click the Remove button.
Modifying a filter
You can modify any of the filters appearing in the list of available filters. To apply the modifications, you must add the filter to the list of active filters, even if the filter already appears in that list.
To edit and apply a filter:
1 Click the filter in the list of available filters.
2 Click the Edit button.
3 Change the Filter Name or Pattern(s) as necessary and then click OK.
4 In the list of available filters, click the filter then click the Add button.
To delete an available filter, click it and then click the Delete button.
Customizing an Xchange Agent
Scheduling an Xchange Agent to run automatically
You can schedule an Xchange Agent to run at a certain time on the days you specify. Scheduled agents run unattended: There is no preview, and conflicts are handled automatically. To schedule an agent, open it from within LapLink or Xchange Agent.
Go to illustration
You can set up an Xchange Agent to run at a particular time on one of these schedules:
- Just once, on a particular date (such as June 27, 1998)
Every day - On certain days of the week (such as Monday and Friday)
- Once a month on a particular day (such as the first day of each month)
LapLink does not have to be running for an agent to run as scheduled. When the scheduled time comes, LapLink starts, the connection is opened, files are synchronized, the connection is closed, and LapLink is shut down.
To schedule Xchange Agent in Windows 95, you will need to have the Microsoft System Agent installed and running on your computer (included with the Microsoft Plus! Pack for Windows 95.) In Windows NT, a scheduler for LapLink is automatically installed during LapLink Setup.
To schedule an Xchange Agent:
1 From within LapLink or Xchange Agent, open the agent.
2 On the File menu, click Schedule.
3 In the Run Xchange Agent At boxes, specify the time.
Type values in the boxes, or click the arrows to set the values.
4 Do one of the following:
- Click Once On and specify the date.
- Click Every Day.
- Click Weekly On. Then click to remove check marks from the days on which you do not want the agent to run.
- Click Monthly On and specify which day of the month you want the agent to run.
5 Click OK.
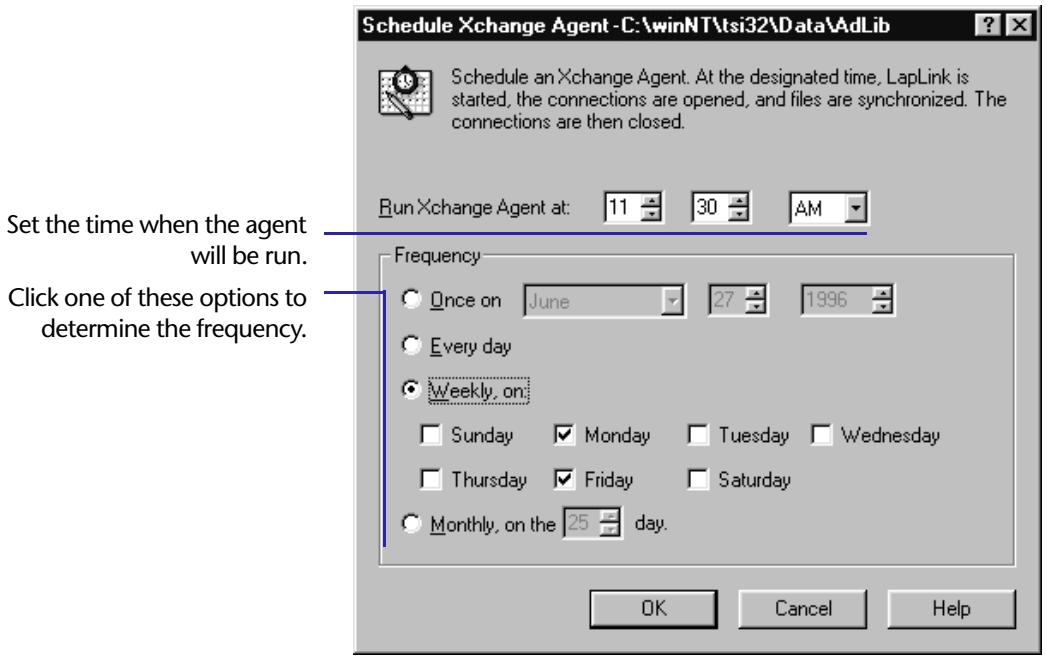
Scheduling an Xchange Agent
To run a scheduled agent in Windows 95:

Go to topic summary
- Leave your computer and Microsoft System Agent running.
System Agent can be installed during the setup for Microsoft Plus! If System Agent is not installed, run the Microsoft Plus! setup again.
To run a scheduled agent in Windows NT:
Leave your computer running.
Running an agent unattended
A scheduled agent runs without preview, even if you have specified preview on the Run Options tab of Properties.
When conflicts are encountered, they are ignored; neither file is copied. If you prefer to have the newer file in each conflict copied over the older one, click Properties on the File menu. On the Run Options tab, click this option: Run Unattended, without Preview or Confirmations. Then click this option: Copy the Newer File Over the Older.
To ensure that an agent will run and synchronize as scheduled, create an entry in Address Book. Include the log-in name and password required by the remote computer to open the connection.
For more information about resolving conflicts, see page 110.
7
Using Print Redirection
In this chapter
Printing over LapLink—Overview 120
Printing a document 122
Setting up printers for Print Redirection 124
Printing over LapLink—Overview
You can print a document you're working on during a Remote Control session to your local printer, or you can print a document over LapLink to a printer on another computer; this is known as Print Redirection. Print Redirection is just like printing a document on a local printer, but the document is sent over LapLink to another printer, instead.
Go to illustration
Print Redirect lets you print a document located on one computer to a printer on another computer by sending the document you want to print over LapLink.
There are two types of printing you can do using Print Direction:
- Print locally during a Remote Control session
While using Remote Control to view another computer, you can print a document you're viewing on that computer to a printer at your location. For example, you can remote control your office computer from your home and print office documents on your home printer.
Print directly over LapLink
When you're connected to another LapLink computer, you can print a document from your computer to a printer at the remote location. For example, after working on a report at home or on the road, you could connect to your office computer and print the report to a high-end laser printer at your office.
Normally, you'd have to first transfer the document to the other computer, and then use Remote Control to control a remote program and print the document.
Print Redirection works the same way regardless of which type of printing you're doing.
How Print Redirection works
To learn how to set up a printer, see "Setting up printers for Print Redirection" later in this guide.
Printing using Print Redirection is exactly like printing to a printer attached to your computer--you use the Print command in your program and choose the printer you want to print to from a list of printers. Instead of choosing a printer attached to your computer, however, you choose a special printer that has been set up to use Print Redirection.
Your document is then sent over the current LapLink connection, to be printed on the printer at the other end of the connection.
Print Redirection works in two different ways
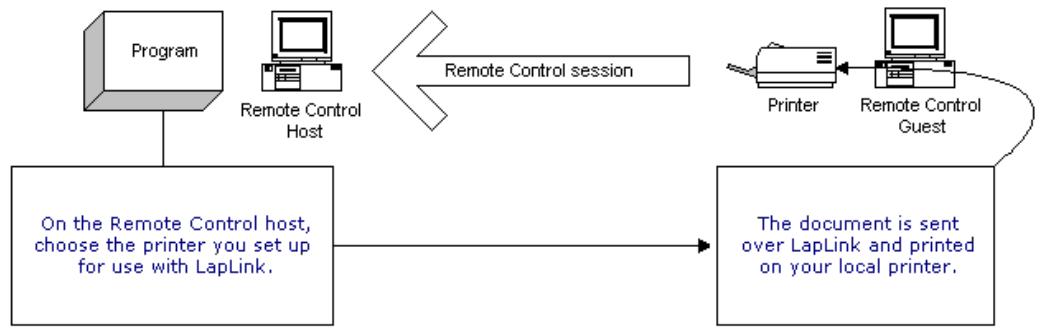
While controlling a remote computer...
... print to your local printer
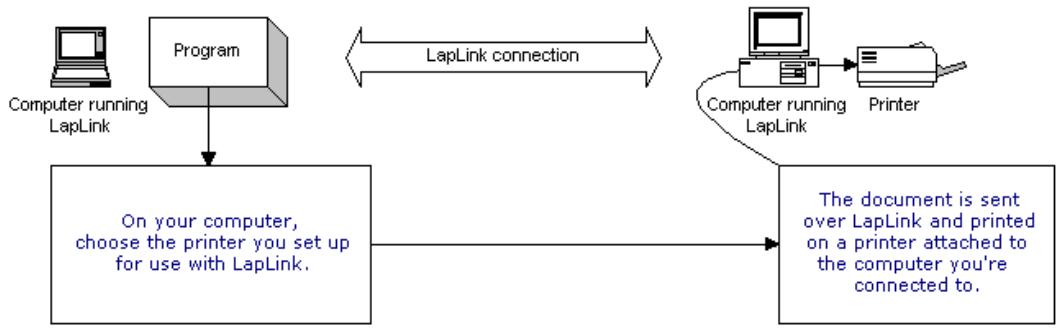
Or print to a remote printer...
... over a LapLink connection

Go to topic summary
Printing a document
To print over LapLink, you print from your Windows programs just as you normally would, but choose a printer that has been set up to print over LapLink instead of a local printer. Your document is then sent over LapLink to another printer, where it is printed.
Go to illustration
In order to print a document on one computer to a printer attached to another computer, you must first set up the destination printer on the computer containing the document. To learn how to set up a printer, see the next section.
To print over LapLink:
1 Make sure that LapLink is running and the computer containing the document you want to print is connected to the computer that has the printer attached.
For more information on starting services, see chapter 3.
2 Make sure you have the Print Redirector service open over that connection. If you didn't start Print Redirector while opening the connection, click the Print Redirector button on the LinkBar.
If you have opened more than one LapLink connection, click a window for the desired connection before starting Print Redirection.
3 Use the standard print command for your program, and select the printer on the other computer from the list of printers that appears.
See the next section to learn how to set up a printer for Print Redirection.
This is a printer you set up just for Print Direction. It is typically a printer with [LapLink] at the end of its name.
4 The Print Redirection icon on the LapLink status bar animates as the document is sent over LapLink to the destination printer.
If there is more than one printer on the other computer, the document is sent to the default printer on that computer.
When the animation completes, the document as been sent to the other computer. You can then close LapLink, if you want.
You can monitor the status of the printing document after it's been sent over LapLink. On the computer which has the printer attached, click the Windows Start Menu, point to Control Panel, and then click Printers. Then double-click the printer icon.
Printing to a computer with more than one connected printer
Normally, Print Redirector prints to the default printer on the connected computer. If there is only one printer on that computer, that printer will always be used.
Printing over LapLink
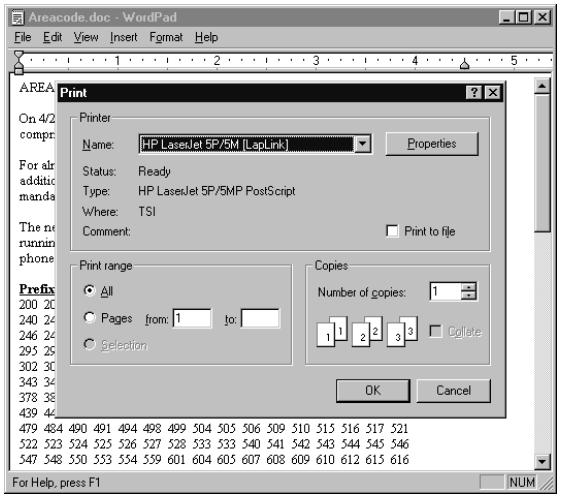
Print from a Windows program as you normally would, but choose the printer you set up for LapLink.

The Print Redirection icon on the status bar animates until the document is sent to the other computer. The document is then printed on the other computer.
However, you can set Print Redirection to prompt you with a list of printers whenever you print. You change this setting on the computer which has the printers attached, not the computer you're printing from. You only have to set this once.
Go to topic summary
If you're not in front of that computer, you can still change this setting by remote controlling the computer.
To be prompted with a list of printers:
1 On the computer the printers are attached to, click Print Redirect Options on the Options menu.
2 Click Display a List of Available Printers.
3 Click OK.
Now, whenever you print a document to that computer, you'll be prompted with a list of all the printers set up on that computer.
Setting up printers for Print Redirection
In order to use Print Redirect, you need to set up each printer you'll be printing to over LapLink on the computer you will print from. You can do this within LapLink, or manually using the Windows Add Printer Wizard. The printer you create should match the printer at the other end of the connection.
Go to illustration
Before you can use Print Redirect, you need to add a printer for Print Redirect to the computer you'll be printing from (the location where your documents are kept.)
You might have already added a printer when you installed LapLink.
For example, if you're remote controlling your office computer, and want to print a document on that computer to your printer at home, you'll need to set up your home printer on the office computer.
If you want to print a document on your home computer to a high-powered printer at your office, you'll need to set up that printer on your home computer.
The printer you set up for Print Redirection should match the printer you'll be printing to at the other end of the connection. Although it is possible to use a compatible printer, the results you get when printing might not be as good.
Setting up a printer
You can set up a printer from within LapLink. You will probably need your Windows CD-ROM in order to set up the printer, as you are likely not to already have the correct printer drivers for that printer on your computer.
To set up a printer:
1 Click Print Redirection Options on the Options menu.
2 Click the Setup button to start the Print Redirection Setup Wizard.
3 Follow the instructions in the wizard.
If your printer is not listed, you might need to set up the printer manually; see below.
Once the printer is set up, you can print to it, and your document will be sent over your LapLink connection. In order to print, LapLink must be running and connected to the computer you want to print to.
Setting up a printer manually
If the printer you want is not found in the list of printers in the Print Redirection Setup Wizard, you need to add your printer manually.
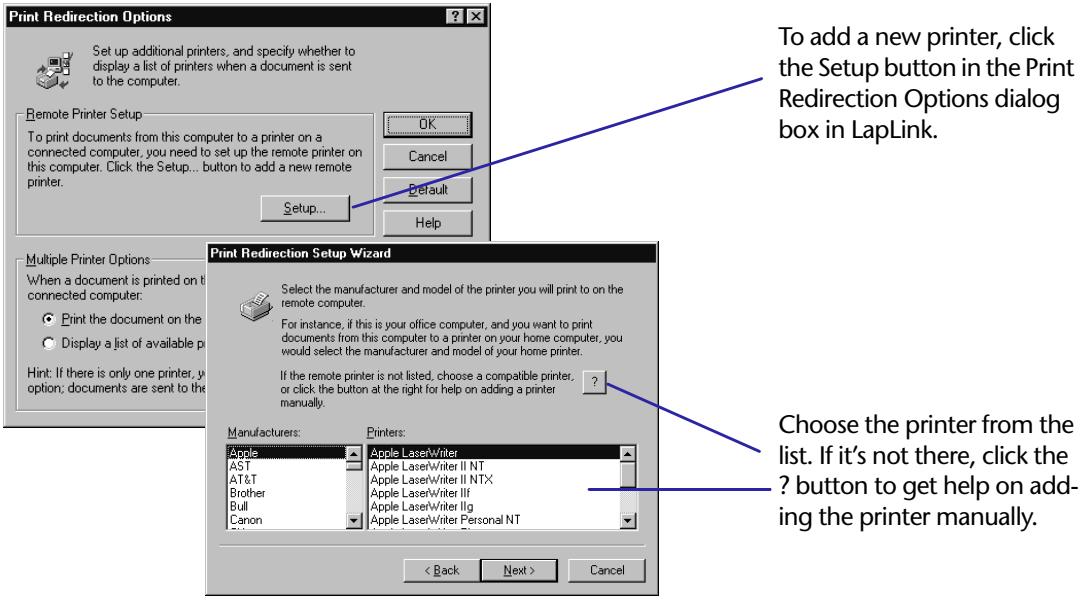
Setting up a printer for Print Redirection
To set up a printer manually:

Go to topic summary
1 On the Windows Start menu, click Start, point to Settings, and click Printers. Then double-click Add Printer.
2 In Windows 95, when you're asked how the printer is attached, click Local Printer.
In Windows NT, when you're asked how you want to manage printers, click My Computer.
3 When you see a list of printers, click the Have Disk button, and specify the location of the printer files for that printer. This is often a floppy disk from your printer manufacturer.
4 When you're asked to specify the printer port, choose the TSI Print Redirector port. This is important!
5 When you're asked to specify a name for the printer, use a name that will help you recognize this printer. Adding [LapLink] to the end of the printer name is suggested.
When you complete the wizard, the printer will be added as one of your Windows printers, and you can print to it just like any Windows printer.
8
Using Text Chat and Voice Chat
In this chapter
Using Text Chat 128
Talking to someone using Voice Chat 130
Improving Voice Chat performance 132
Using Manual conversation mode 134
Using Text Chat
Text Chat lets you exchange typed messages with a person sitting at a remote computer. Used with a service like Remote Control or File Transfer or by itself, Text Chat is useful for exchanging brief messages and sending instructions. However, if you have a microphone, sound card, and speakers, you can use Voice Chat instead.
Go to illustration
Opening a Text Chat window
When you connected to the remote computer, you may have opened a Text Chat window. If not, you can open one after you open the connection.
To open a Text Chat window:
- Click the Open Text Chat button on the LinkBar. Or click Open Text Chat on the Window menu.
If you have opened more than one connection, click a window for the desired connection before opening Text Chat.
A Text Chat window pops to the foreground on your screen whenever the remote user sends a message. To keep the Text Chat window from activating automatically, click Text Chat Options on the Options menu. Then clear this option: Restore Text Chat Window Automatically.
Sending messages
A Text Chat window consists of two parts:
- The upper part displays the messages you have sent to the remote user as well as those the remote user has sent to you. Each message is identified by the name of the computer from which it was sent.
- The lower part serves as a note pad on which you write your messages. It clears each time you send a message.
To send a message to the remote user:
1 Click the Text Chat window.
2 Type your message.
Avoid pressing ENTER until your message is complete. To start a new paragraph, press CTRL+ENTER.
3 Press ENTER to send the message.
Pasting text into your Text Chat window
Instead of typing messages while connected, you can prepare them ahead of time and paste them into the Text Chat window as necessary.
To paste text into a Text Chat window:
1 In Notepad or another Windows text editor, select the text and copy it.
2 In LapLink, click the lower part of the Text Chat window.

Using Text Chat
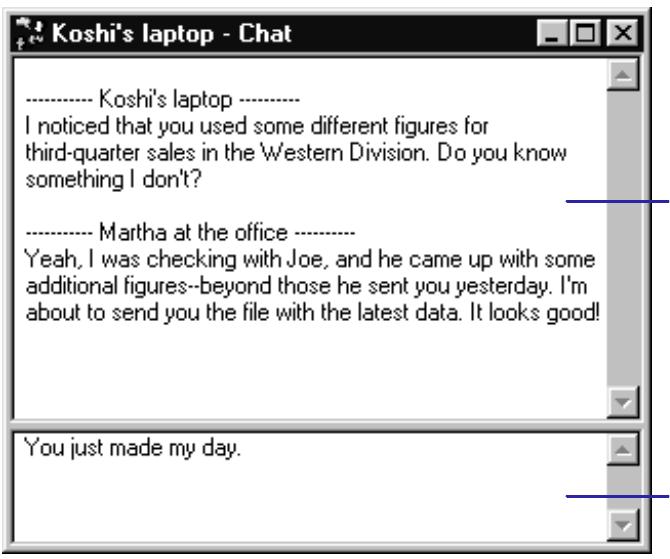
Read the messages from the remote computer—as well as your own—in the upper part of the Text Chat window.
Type your messages in the lower part. Press ENTER to send.
3 Click Paste on the Edit menu.
Copying text from your Text Chat window
You can copy part or all of a Text Chat conversation and paste it into another Windows program.
To copy your Text Chat conversation:
1 In the upper part of the Text Chat window, highlight part of the text, or select the entire conversation by clicking Select All on the Edit menu.
2 Click Copy on the Edit menu.
3 Switch to another Windows program, and paste the text into that program.
As a guest during Remote Control, you can carry on a Text Chat conversation with the host only by viewing the host screen in a window. (In full-screen view, you cannot see your own Text Chat window.) To arrange the Text Chat window beside the Remote Control window, click Tile Side by Side on the Window menu.

Go to topic summary
To reverse your latest editing action in the lower part of a Text Chat window, click Undo on the Edit menu.
Talking to someone using Voice Chat
Voice Chat lets you speak with a person at the other end of a LapLink connection, using the same line that transfers data between the two computers. Both computers must be configured for full duplex if you are to talk as you would on the telephone. If either computer is configured for half duplex, you must wait for the other person to stop talking before you begin.
Go to illustration
Use Voice Chat to talk to someone you're connected to over LapLink while using other LapLink services like File Transfer and Remote Control. To use Voice Chat, you must have a computer that is capable of recording and playing sound.
^+ Before you use Voice Chat, you might want to configure Voice Chat for the best performance. For more information, see the next section.
Starting Voice Chat
You may have started Voice Chat when you connected to the remote computer. If not, you can start it after you open the connection.
To start Voice Chat:
For more information on starting services, see Chapter 3.
- You can minimize the window or prevent it from opening. For more information, see the online help.
Although there are other volume/ level controls in Windows, it is recommended that you use the ones in LapLink for best results.
Over slower connections, you might not be able to use full duplex, due to the lower bandwidth of the connection.
1 Click the Open Voice Chat button on the LinkBar. Or Click Open Voice Chat on the Window menu.
2 The person on the other end of the connection is "called" and asked whether he or she wants to talk with you.
If the Voice Chat connection is accepted, a Voice Chat window opens, and you can begin talking to the other person.
If you have opened more than one connection, click a window for the desired connection before starting Voice Chat.
Talking in Voice Chat
To use Voice Chat, you speak into the microphone and listen through headphones or speakers. If the other person can't hear you very well, increase the microphone level in the Voice Chat window. If the other person's voice is too loud or too soft, change the speaker level.
Depending on the configuration of the sound card in both computers, you may be able to talk as you would on a telephone; that is, your voice and the voice of the other user can be transmitted simultaneously. This is known as full duplex.
If you and the other user are not using full duplex, you must talk as you would on a walkie-talkie; that is, you must wait for the other person to finish before you begin. The transmission of just one voice at a time is known as half duplex.
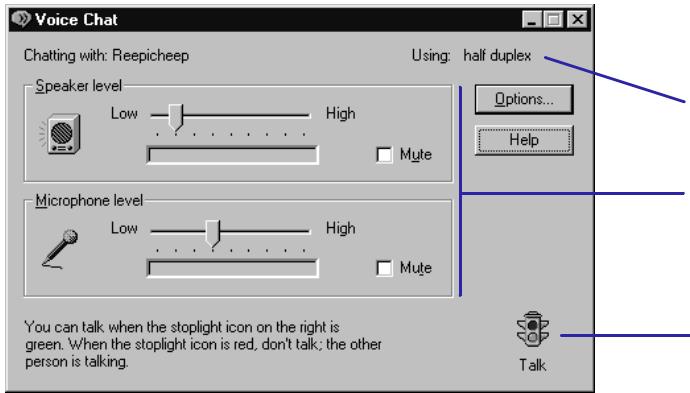
Using Voice Chat
The Voice Chat window appears while you're connected.
How you talk depends on whether the current conversation is using half duplex or full duplex.
During a conversation, you can adjust your speaker and microphone and mute them, if necessary.
When you're using half duplex, watch the icon to determine when to talk. If you minimize the Voice Chat window, use the icon in the LapLink status bar instead.
Voice Chat conversations are always half duplex unless both sound cards are configured for full duplex. The indicator at the top of the Voice Chat window shows whether your current conversation is half duplex or full duplex.
Voice Chat provides an alternate method you can use to talk using Voice Chat, known as Manual mode; see the "Using Manual conversation mode" section for information.
Go to topic summary
Talking using half duplex
When you are having a half duplex conversation, refer to the stoplight icon in the lower right corner of the Voice Chat window to know when you can talk. When the light is green, or the text says "Talk," you can talk; when the light is red, or the text says "Don't Talk," you should wait until the other person has finished talking.
Saying "over" when you are finished talking may help facilitate conversation.
Notice that the stoplight icon is also available on the LapLink status bar, so you can minimize the Voice Chat window and continue talking.
Configuring your sound card for full duplex
Some sound cards can be reconfigured for full duplex merely by adding new sound card driver software to your computer. Contact your sound card manufacturer to find out whether your sound card is capable of full duplex, and to obtain sound card driver software. Sound card drivers can often be found on the manufacturer's Web site.
Remember that the sound card of the person you're talking to also has to be configured as full duplex in order for you to talk in full duplex.
Talking to someone using Voice Chat Improving Voice Chat performance
To improve Voice Chat performance, click the Levels tab in the Voice Chat Options dialog box, and then configure the microphone and speaker levels and specify information about your environment.
Go to illustration
If you have already used a program that records and plays sound in Windows, you might not need to change anything in order to have Voice Chat work correctly.
Voice Chat automatically detects any speaker and microphone devices that are set up in Windows. In most cases, you won't need to change these devices. For more information, see the online help.
However, Voice Chat lets you change settings for your speaker, microphone, and environment to improve performance in Voice Chat. It is recommended that you do this once, preferably before you start using Voice Chat.
Setting levels in Voice Chat
The Levels tab on the Voice Chat Options dialog box lets you perform recording and playback tests and measure other speech qualities. Use the Levels tab when you're not using Voice Chat.
To configure levels in Voice Chat:
1 On the Options menu, click Voice Chat Options.
2 Click the Levels tab.
3 Under Set Speaker Level, click the Play Speech button.
4 While listening to the speech, move the Speaker Level slider to a comfortable level.
If you cannot hear the speech, move the slider towards High. If the speech is too loud, move the slider towards Low.
5 Under Set Microphone Level, click the Record button. The Windows Sound Recorder opens.
Some sound cards might not allow these settings to be changed using software; in this case, the sliders won't be available.
6 Use the Sound Recorder to record and play back a few seconds of speech.
7 If you could not hear what you recorded, move the Microphone Level slider towards High, and try using the Sound Recorder again.
8 Under Set Environment Level, click the Setup button. The Environment Setup wizard begins, and you're asked to record a few seconds of background noise and a few seconds of speech.
Setting the environment level helps avoid transmitting sound that is not speech. It is recommended that you use the Setup button, and not the slider, to adjust this level.
If the Sound Recorder is not available, adjust this option when you are using Voice Chat, instead.
Improving Voice Chat performance
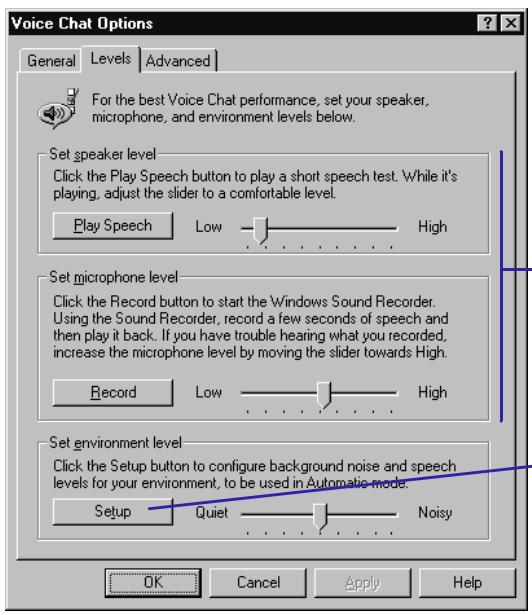
Use the Levels tab of the Voice Chat Options dialog box to configure your speaker, microphone, and environment levels.
For the speaker and microphone levels, click the button, and then adjust the sliders to the desired level.
To set the environment level, click the Setup button and follow the instructions.
Improving quality over a fast connection
Go to topic summary
Voice Chat works best over a fast connection. If you use Voice Chat over a network or other fast connection, you might be able to improve the Voice Chat sound quality.
To improve Voice Chat performance over a fast connection:
1 On the Options menu, click Voice Chat Options.
2 On the Advanced tab, change Transmission Quality to Medium or High.
Be sure to reset this option to Low when you use a modem or other slow connection.
When you have a slow connection, using Medium or High might cause problems with your connection.
It is recommended that you set up your environment level every time you change the transmission quality.
This option can not be changed during a Voice Chat session.
Talking to someone using Voice Chat Using Manual conversation mode
Use Voice Chat's Manual conversation mode if you're having problems using Voice Chat or if you want additional control over when speech is sent over the connection. Manual mode requires you to press a button in order to talk.
Go to illustration
You don't have to use the same conversation mode as the person you're talking to. However, if you do, you both will use different methods to talk.
Voice Chat has two conversation modes: Automatic and Manual.
Automatic is the normal conversation mode, and allows hands-free operation of Voice Chat. Automatic mode sends speech whenever you talk.
- Manual mode requires you to click a button in order to talk.
In most cases, Automatic mode is recommended.
Use Manual mode if you're having problems using Automatic mode, or if your sound card does not support Automatic mode. If your work environment is very noisy, you might have problems using Automatic mode. You can also use Manual mode to control exactly when speech is sent to the other person.
To change to Manual conversation mode:
1 Click Voice Chat Options on the Options menu.
2 On the Advanced tab, click Manual Mode.
3 Click OK.
The next time you use Voice Chat, the window includes a walkie-talkie button that you use to talk.
Talking in Manual mode
Manual mode works differently depending on whether your conversation is full duplex or half duplex.
- When using half duplex, you click the walkie-talkie button once in order to talk. While you're talking, the other person cannot talk to you (he or she sees a "Don't Talk" icon) until you click the button again to release it. The other person can then talk.
- When using full duplex, you also click the walkie-talkie button once in order to talk, but you don't need to release it to allow the other person to talk, since in full duplex, you can both talk at the same time.
Therefore, you can just leave the button down until you and the other person are finished talking, since the other person will be able to talk to you when your button is pressed.
Conversation modes in Voice Chat
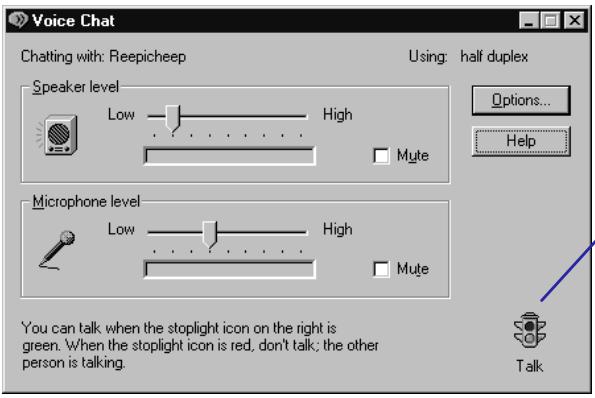
In Automatic mode, Voice Chat transmits speech automatically when you talk.
When using half duplex, wait for the stoplight icon to change to Talk before talking.
When using full duplex, talk whenever you want to.
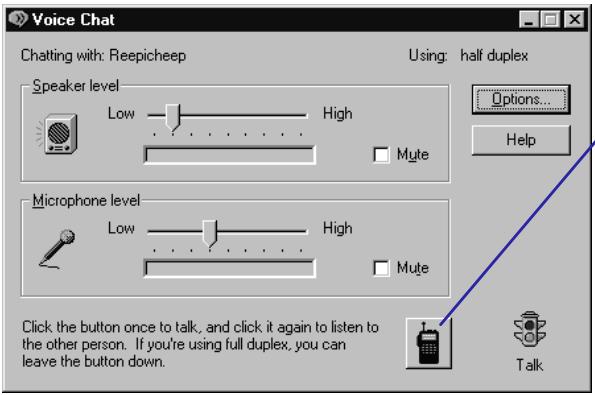
In Manual mode, you need to click the walkie-talkie button in order to talk.
When using half duplex, click the button again to release it when you finish talking.
When using full duplex, you can click the button and leave it down.

Go to topic summary
9
Troubleshooting Tips
In this chapter
Introduction to troubleshooting 138
Checklist for Setup 139
Checklist for cable connections 140
Checklist for modem connections 142
Checklist for network connections 144
Checklist for Dial-Up Networking connections 146
Checklist for wireless connections 147
Checklist for CAPI 2.0/ISDN 149
Checklist for File Transfer 150
Checklist for Xchange Agent 153
Checklist for Remote Control 155
Checklist for Print Redirection 157
Checklist for Text Chat 158
Checklist for Voice Chat 159
Introduction to troubleshooting
This chapter provides checklists for solving problems and improving performance. These checklists are designed as a quick overview of possible solutions, with enough information to guide experienced users to solutions.
For detailed, step-by-step information, consult the troubleshootingers in online Help. The troubleshootingers are designed to solve problems you may encounter in opening connections and using the services once you have opened connections.
To use a Troubleshooter, open the Troubleshooting book in Help Topics and display one of the topics. Then answer the questions about your problem and try the suggested remedies. In some cases you will find shortcut buttons to dialog boxes; use these buttons to resolve the problem faster.
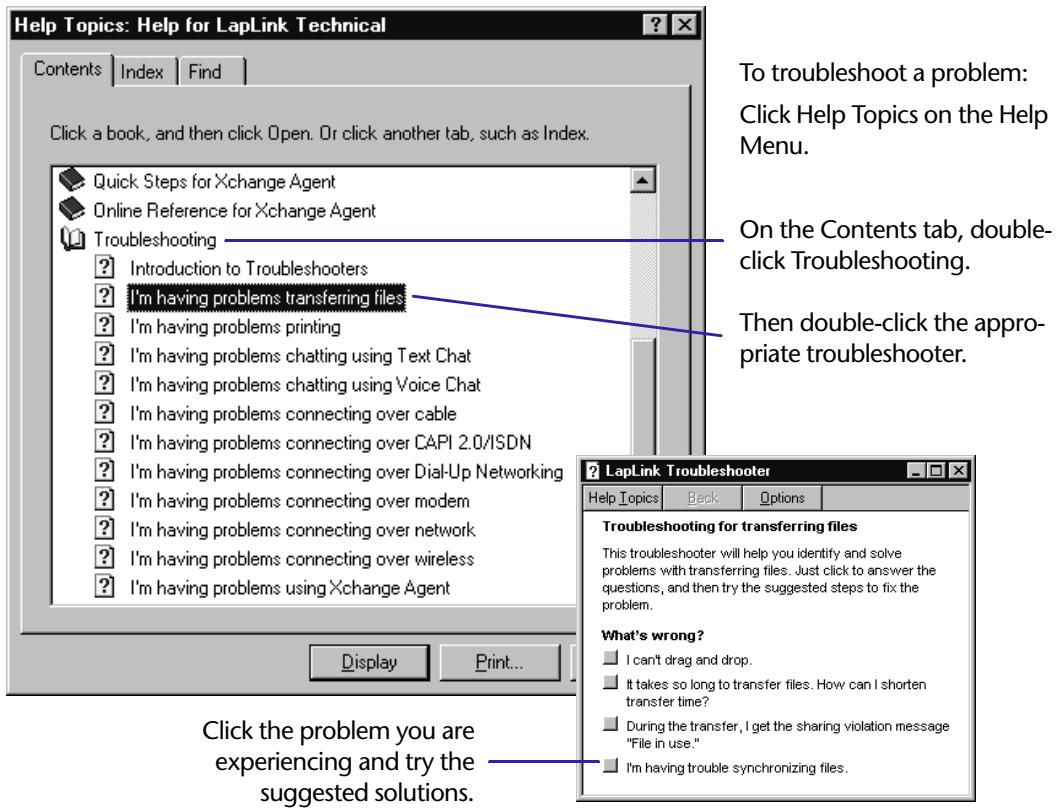
Using Help to troubleshoot a problem
Checklist for Setup
- You need Administrator rights to install LapLink on Windows NT. If you're setting up LapLink on Windows NT, you won't be able to perform the installation unless you are logged on to Windows NT with sufficient rights. This means that your user account should include the Administrator rights built into the operating system. Your rights are assigned in User Manager: Click the Start button, point to Programs and then Administrative Tools (Common); click User Manager. You may be able to add Administrator rights to your user account. Otherwise, contact your system administrator.
You can configure printers and ports after Setup
During Setup, you are asked if you want to set up printers for Print Redirection. If you did not do this during Setup, you can do it at any time using the Setup option in the Print Redirection Options dialog box.
To configure ports for all the different types of LapLink connections during Setup, choose Custom Setup. After Setup, you can configure ports by clicking Port Setup on the Options menu in LapLink.
Checklist for cable connections
If you have trouble maintaining a cable connection, try disabling Autoconnect on one or both of the computers.
Ensure that Autoconnect is turned on
Autoconnect opens cable connections for you automatically. To ensure that Autoconnect is in effect, click Connect Options (Options menu). On the Connect tab, verify that this option is checked: Enable Autoconnect. Below the option, verify that the services you want to use are also checked.
Run LapLink on both computers
No connections are possible by cable or any other means unless LapLink is running on both computers. You can connect to a computer running LapLink Technical, or earlier versions of LapLink for Windows 3.1, 95, or NT.
Check the cable
Make sure that each end of the cable is securely attached to the proper port; check the port labels for proper identification. Check a parallel cable for damaged pins. Try reconnecting the cable to each port or even reversing the cable ends.
Attach the yellow LapLink cable or a DirectParallel Universal cable to Parallel/LPT (printer) ports. Attach the blue LapLink cable to Serial/COM (modem or mouse) ports; connect only one end to each computer. LapLink does not work over most other serial cables or any printer cables.
Enable the port
You cannot connect by cable until a port is enabled—that is, made available specifically to LapLink. To enable a port for cable, click Port Setup (Options menu). Click the port you want to enable. Then check Enable Port.
If a port is listed as unavailable, quit any program that may be using the port, or enable a different port. Make sure that the cable is attached to an available port.
Use a serial cable when connecting to a Windows NT computer
When you want to connect by cable to a computer running LapLink on Windows NT, parallel connections are not available. Use a serial cable instead.
Serial cable connections: lower the speed of a serial port
In Port Setup (Options menu), click the COM port to which the cable is attached. Click Configure. In the Port Speed box, click 57600. Repeat this procedure on the other computer. If you still can't connect, repeat the procedure, lowering the speed one step at a time until you can connect.
Serial cable connections: check for an internal modem
In Port Setup (Options menu), look for an internal modem that is enabled for the serial port to which the cable is attached. Change the port setup so that the modem is enabled for a different serial port.
Restart the computer
If all else fails, remove the cable from both computers, and restart the computers. Reattach the cable, and try the connection again.
Checklist for modem connections
Run LapLink on both computers
Contact the user whose computer you want to connect to, and ensure that LapLink is running on that computer. You can connect to a computer running LapLink Technical, or earlier versions of LapLink for Windows 3.1, 95, or NT.
Enable the modem port for LapLink
Installing a modem in Windows does not automatically provide access to the modem in LapLink. To connect by modem in LapLink, your modem port must be enabled—that is, made available for use in LapLink. In Port Setup (Options menu), click Windows Modems, and then check Enable Port.
Ensure that the modem can answer a call
A modem cannot answer an incoming call unless the Auto Answer option is on. In Port Setup (Options menu), click Windows Modems. Click Configure, and then verify that Auto Answer Enabled is checked.
Make sure the modem port is not already in use
LapLink cannot use a modem as long as the modem port is being used by another program. Either close the program or wait until it releases the port.
Check the settings for a Windows modem
If your modem does not answer calls or dial after you have enabled it as a Windows modem in LapLink, exit LapLink, and make sure the modem is turned on. In the Windows Control Panel, double-click Modems, click the Diagnostics tab, and click the appropriate port. Click More Info. If the test fails, click the General tab, and remove the modem. Shut down the computer and then restart it. Return to Modems in the Control Panel and reinstall the modem.
Disable error control and data compression on both computers
Some modems communicate better if error control and data compression are disabled on both computers. In Port Setup (Options menu), click Windows Modems, Configure, and then Properties. On the Connection tab, click Advanced. Then clear Use Error Control. Repeat this procedure on the other computer.
Set a longer timeout value
If the computer you are dialing takes a long time to answer and complete the connection, try increasing its modem timeout. In Port Setup (Options menu), click Windows Modems. Click Configure and then Properties. On the Connection tab, type a larger number in this box: Cancel the Call if Not Connected Within.
Lower the modem speed on the computer opening the connection
In Port Setup (Options menu), click Windows Modems. Click Configure and then Properties. On the General tab, click a lower speed in the Maximum Speed box.
Check the security setup on the remote computer
If you are denied use of Remote Control or one of the other services while connected to another computer, contact the user at that computer, and request permission to use the service. The user can give you access to services through Security (Options menu).
Disable call waiting
Ensure that the call waiting feature is disabled on the telephone systems at both ends of the connection. Call waiting interferes with modem connections when incoming calls are detected.
Use Dialing Properties for calling cards and outside lines
When you use a Windows modem, use the Dialing Properties feature in connection with Address Book to dial an outside line and use a calling card.
To let other computers connect to your computer by modem, you must change the security setup established during installation.
Checklist for network connections
Enable the network port for LapLink
Access to a network by e-mail and other programs does not automatically provide network access in LapLink. To connect by network in LapLink, your network port must be enabled—that is, made available for use in LapLink. To enable a network port in LapLink, click Port Setup (Options menu). Click the type of network—either IPX or TCP/IP—in the Ports list. Then check Enable Port. If the network is IPX, click Configure, and ensure that Internet Network Name Broadcast is checked.
Run LapLink on both computers
Contact the user whose computer you want to connect to and ensure that LapLink is running on that computer. You can connect to a computer running LapLink Technical, or earlier versions of LapLink for Windows 3.1, 95, or NT. (LapLink for Windows 3.1 allows connections over IPX networks but not over TCP/IP networks.) Verify that the computer has a network port enabled for the same kind of network connection as your network port.
Refresh the list of connections
If LapLink was started on the other computer after you started connecting, you may need to refresh the list of available connections in order to include the computer in the list. Click the Refresh List button, and wait while the list of LapLink computers is updated.
Ensure that the network is installed
LapLink cannot connect by network unless a network protocol—either IPX or TCP/IP—is installed. Network protocols are installed using the Networks option in the Windows Control Panel. See your Windows help and documentation for information on adding network protocols.
Type the TCP/IP name or address
If you do not see a computer listed as an available connection over a TCP/IP network, you may have to type the computer's IP name or address. Click the Connect button on the LinkBar, and then click Network. On the TCP/IP Addresses tab, type the IP address or the Windows computer name under TCP/IP Name or Address. (Do not type the name assigned to the computer in LapLink.)
To determine the TCP/IP address for a Windows 95 computer, click Port Setup (Options menu); click TCP/IP in the ports list; and then click Configure. The computer's address appears in the IP Address box.
To determine the TCP/IP address for a Windows NT computer, click the Start button, point to Programs, and click Command Prompt. Then type IPCONFIG and press ENTER. The address appears on the IP Address line.
If you cannot connect after typing a TCP/IP address, click the Start button, point to Programs, and click Command Prompt. Then type PING followed by a space and the address you are trying to reach. Press ENTER. If you do not receive a positive reply, the address is not available, and you cannot connect.
Check the security setup of the remote computer
If you are denied use of Remote Control or one of the other services while connected to another computer, contact the user at that computer and request permission to use the service. The user can give you access to services through Security (Options menu).
IPX connections: change the type of frame on both computers
Some IPX connections work better if the frame type for the IPX connection is preset rather than selected automatically; try setting the frame type to Ethernet 802.2 or Ethernet 802.3. This setting should be changed on both computers making a LapLink connection. Network protocols are installed using the Networks option in the Windows Control Panel. See your Windows help and documentation for information on changing the frame type.
To let other computers connect to your computer by network, you must change the security setup established during installation.
Checklist for Dial-Up Networking connections
For more information about Microsoft Dial-Up Networking, consult Windows Help.
Ensure that Dial-Up Networking is installed
You can connect over Dial-Up Networking only if Microsoft Dial-Up Networking has been installed. Dial-Up Networking should already be installed in Windows NT. In Windows 95, you can install this feature from your Windows CD-ROM as follows: In the Windows Control Panel, double-click Add/Remove Programs. Click the Windows Setup tab, and double-click the Communications line. If Dial-Up Networking is checked, it is installed. If it is not checked, click Dial-Up Networking, and then click OK to begin installation.
Once connected using Dial-Up Networking, connect to the network
When you connect over Dial-Up Networking in LapLink, you dial in to a remote access server and connect to a network. Then you make LapLink connections in the Connect over Network dialog box. Unless you specify otherwise, the list of available LapLink connections appears automatically as soon as you are connected to the network. If the list of connections does not appear automatically, click the Connect button on the LinkBar and click Connect over Network.
To connect to another LapLink computer as soon as a Dial-Up Networking connection is established, make sure that the following option is checked in the Connect over Dial-Up Networking dialog box: After connecting to the network, choose a LapLink connection.
Ensure that your computer is set up for network connections
Making connections to other LapLink computers through Dial-Up Networking requires that your computer meet the requirements for network connections in LapLink: a network protocol must be installed, your network ports must be enabled in LapLink, and so on. For more information about network connections, see the previous section.
Run LapLink on both computers
Contact the user whose computer you want to connect to and ensure that LapLink is running on that computer. You can connect to a computer running LapLink Technical, or earlier versions of LapLink for Windows 3.1, 95, or NT. Verify that the computer has a network port enabled for the same kind of network connection as your network port.
To let other computers connect to your computer through Dial-Up Networking, you must change the security setup established during installation.
Checklist for wireless connections
Make sure you're not trying to connect to a Windows NT computer. Wireless connections are not supported for LapLink in Windows NT.
Install the Windows Infrared driver (IrDA)
The Windows Infrared driver supports a variety of built-in ports and devices attached to serial ports. If the driver is not installed on your computer, you can download it from the Microsoft Web site. When you install the driver, specify any serial port, from COM1 to COM9, as the redirected port. In LapLink Port Setup (Options menu), enable the redirected port for wireless communications.
Edit the LapLink initialization file
A setting in the LLW.INI file must be changed in order to connect to computers not running the Windows Infrared driver. This might include computers using AirShare Radio Modules, Extended Systems JetEye Infrared PC Interface, and wireless devices on some laptops.
Open LLW.INI in Notepad; the file is located in the TSI32\LLW subfolder within your Windows folder. Locate the section corresponding to your wireless port: [COM1], [COM2], and so on. Edit the section so that it includes this line: UseIRDADriver=No. Restart LapLink. In Port Setup (Options menu), ensure that the port is enabled for wireless communications.
Enable the wireless port
You cannot connect by wireless until a serial port is enabled for wireless connections in LapLink. In Port Setup (Options menu), click the COM port to which the wireless device is attached. Click Wireless in the Type box, and then click Enable Port so that it is checked.
Ensure that Autoconnect is turned on
Autoconnect opens wireless connections for you automatically. To ensure that Autoconnect is in effect, click Connect Options (Options menu), and verify that this option is checked: Enable Autoconnect. Below the option, verify that the services you want to use are also checked.
Run LapLink on both computers
No connections are possible by wireless or any other means unless LapLink is running on both computers. You can connect to a computer running LapLink Technical, or earlier versions of LapLink for Windows 3.1 or Windows 95.
In LapLink, wireless refers to short-range connections over infrared or radio devices. Other "wireless" connections are available over wireless LAN adapters (by connecting over a network) and cellular modems (by connecting over a modem).
Check the cable, if any
If you have an external wireless device, make sure that its cable is securely attached to the proper port.
Lower the speed of the ports
If you are using wireless devices without the Windows Infrared driver, try lowering the port speeds on both computers. In Port Setup (Options menu), click the COM port to which the wireless device is attached. Click Configure, and then click 57600 in the Port Speed box. Repeat this procedure on the other computer. If you still can't connect, repeat the procedure, lowering the speed one step at a time until you can connect.
Tips for AirShare Radio Modules
Check the LED lights; both the red and the green lights should be lit.
On one computer at a time, try connecting the module to a different serial (COM) port.
Switch to a different channel; be sure that the same channel is set on both modules.
Move the modules closer together and away from metal surfaces, laptop screens, desktop monitors, and electrical transformers.
Swap the modules between the computers.
Replace the batteries.
Checklist for CAPI 2.0/ISDN
Run CAPI-compatible versions of LapLink on both computers
Contact the user whose computer you want to connect to, and ensure that the version of LapLink running on that computer is compatible with CAPI 2.0/ISDN. Currently, only LapLink Technical and LapLink for Windows NT support CAPI 2.0/ISDN.
Check the security setup on the remote computer
If you are denied use of Remote Control or one of the other services while connected to another computer, contact the user at that computer, and request permission to use the service. The user can give you access to services through Security (Options menu).
Ensure that LapLink is set up to answer calls over CAPI 2.0/ISDN
CAPI cannot answer an incoming call unless the Auto Answer option in LapLink is enabled. In Port Setup (Options menu), click CAPI. Click Configure, and then verify that Enable under Auto Answer is checked.
When using ISDN in the United States, make sure you are using CAPI 2.0
In the United States, ISDN doesn't necessarily mean CAPI 2.0. If you are using ISDN but not CAPI 2.0, configure your ISDN device as a Windows (TAPI) modem, or configure it using the Dial-Up Networking feature in Windows. You can also use the Connect over Network dialog box to connect if you routinely use your ISDN device to provide a network connection first.
Checklist for File Transfer
To ensure that files are copied, press CTRL while dragging. To ensure that files are moved, press SHIFT while dragging.
Drop files directly on target folder
The most common mistake when using drag and drop is dropping files on the wrong target folder (the folder to receive the files). To help prevent this mistake, open the target folder first; the name of the folder now appears in the title bar. Then open the source folder and select and drag the files until the mouse pointer rests on the open folder and the folder is highlighted. As soon as you release the mouse button, you receive a confirmation dialog box showing, among other things, the target you just dropped on. Check the target, and change it if necessary.
If you want to copy a folder (rather than the files within the folder), drop the folder on the target one level higher than where you want the files to appear; this may be another folder or a drive letter. Assume that you want to update your Letters folder on your desktop computer with your Letters folder from your laptop, and the Letters folder appears at the highest level of folders on drive C. Drag the folder from the laptop to the desktop and drop it on drive letter C.
Use the Copy or Move command
Instead of using drag and drop, use the Copy or Move command. First, click the target folder. After selecting the files to be transferred, click Copy or Move on the File menu. Then verify that the source and target are correct.
Make File Transfer available to other computers
If you are denied use of File Transfer while connected to another computer, contact the user at that computer, and request permission to use the service. The user can give you access to File Transfer and other services through Security (Options menu).
General tips for faster transfers
Follow these suggestions to improve transfer speeds:
Check the folders and files you have selected for transfer, making sure that you are not including more than necessary. For example, have you selected an entire folder when you want to transfer only a few files within the folder?
Use SpeedSync to improve file transfer times when updating files, particularly over modems: On the Performance tab of File Transfer Options, select Use SpeedSync on All File Transfers. When you transfer files directly over a network (without using a modem), you may improve transfer times by clicking the same option to remove the check mark.
Disable any ports that are not in use: in Port Setup (Options menu), click an unused port, and then clear Enable Port.
Close other service windows and any connections to other computers you have opened in LapLink.
On laptop computers, disable power management functions. Attach the AC adapter to the computer to ensure steady voltage throughout the transfer.
Disable screen savers, and close other programs.
Tips for transfers over a serial cable
Ensure that the serial port is configured for maximum speed: in Port Setup (Options menu), click the appropriate COM port; click Configure; and ensure that Port Speed is set at 115200.
Change the transfer mode to standard: in Port Setup (Options menu), click the appropriate COM port; click Configure; and click Standard under Transfer Mode.
Tips for transfers over modems
Consult the documentation for your modem and verify that the port speed is set for optimum performance: in Port Setup (Options menu), click Windows Modems. Click Configure, and click the modem you are using. Click Properties. In the Maximum Speed list on the General tab, click the maximum speed your modem can use.
Tips for transfers over a network
For faster transfers, try turning SpeedSync off: On the Performance tab of File Transfer Options, click Use SpeedSync on All File Transfers to remove the check mark.
Transfer your files when there is less traffic on the network.
Ask your system administrator to verify that the network drivers are current.
Tips for SmartXchange
Use SmartXchange to update files in two folders so that the folders share the latest files. Since SmartXchange always overwrites older files, do not use it if you want to merge the contents of two files. Use SmartXchange by opening the two folders you want to update; do not select the individual files. After clicking SmartXchange (Sync-Tools menu), verify that you have opened the right folders. If you do not want to add new files to either folder, check this option: Transfer only if files are already on target.
Because long file names are not supported in Windows 3.1, SmartXchange may not work as expected when you are synchronizing with a computer running LapLink for Windows 3.1
Ensure that you have read access rights to network files you want to copy
If you can locate the files you want to copy but then are denied access when you attempt to copy them, contact the network administrator. You can copy only files to which you have been assigned read access.
Checklist for Xchange Agent
Ensure that LapLink is running on the remote computer
LapLink must be running on the remote computer before an agent can connect to it and synchronize files. Windows needs to be running on the local computer. (LapLink starts automatically when the agent runs.)
Make sure that a scheduler program is running
To schedule Xchange Agents—and have them run on schedule—you must have a scheduler program running.
In Windows 95, the Microsoft System Agent program must be running. To install System Agent, run the Microsoft Plus! Setup.
In Windows NT, the LapLink Scheduler program must be running. This utility is installed during LapLink Setup; its icon appears at the right end of the Windows taskbar. (If the icon does not appear on the taskbar, you may have to put the program file TSISCHED.EXE back into your Windows StartUp folder.)
Close an Xchange Agent before it is scheduled to run
An agent cannot run on schedule while it remains open in Xchange Agent.
Create an Address Book entry to meet the security requirements of the remote computer
If the remote computer requires a name and password before connecting, create an Address Book entry and include the name and password required by that computer. LapLink can then send this information and connect automatically.
Turn off the LapLink callback feature
If the remote computer requires or requests a callback before opening a modem connection, the agent cannot run. On the remote computer, turn off the callback feature: Click the Security button on the LinkBar. On the Log-in List tab, click the name of the guest computer and then click Edit. Under Modem Callback, click None.
- Avoid moving or deleting agent files for which you have created shortcut icons
If you have moved or deleted the Xchange Agent file, the shortcut can no longer run the agent. Create the agent again. You can reuse the shortcut icon by saving the new file in the same location, with the same name, as the original file. Or you can create a shortcut icon for the new agent file.
Because long file names are not supported in Windows 3.1, Xchange Agent may not work as expected when you attempt to synchronize with a computer running LapLink for Windows 3.1
Create a filter to synchronize a single file
Xchange Agent always synchronizes by folder pairs, but you can create a filter so that only one file within a folder pair is synchronized. Open the agent in Xchange Agent and click the folder pair. On the Edit menu, click Set Filter and then click New. After typing a description for the filter, type the complete name of the file, including its extension. (To add more than one file name, type a semicolon and then the next file name.) Click OK. Click the filter's name in the Available Filters list, and then click Add.
Try previewing the agent to see if the correct files are included in the synchronization.
Use Preview to limit the files to be copied in the current synchronization
While previewing an agent, you can specify that certain pairs of files and folders will be omitted from the current synchronization: Click a pair of files or folders and then click the Skip Pair button on the toolbar. When the correct files are shown, run the agent. Your changes will be lost when you close Preview or quit Xchange Agent.
- You can omit file and folder pairs only from the current synchronization. To remove them from a future synchronization, you must use Preview again.
Use Xchange Agent to overwrite, not merge, files
Xchange Agent overwrites files. Unless you specify otherwise, it copies the newer file to the other computer. It does not merge files. To merge databases and other shared files, use the program in which the files were created.
Checklist for Remote Control
□ Improve performance from the guest
As a guest, you may be able to speed up Remote Control connections by changing settings in Remote Control Options (Options menu) on your computer. On the Performance tab, click the Best Performance option. (To further customize settings, click the Settings button.) Your view of the host should be updated faster, though you will now be viewing the host screen in black and white, and larger bitmaps will not be displayed.
Control the display properties of the host from the guest
By default, LapLink is configured to speed up Remote Control connections: any wallpaper or screen saver on the host is temporarily disabled, along with certain other visual enhancements. As a guest, you can restore these enhancements to the guest screen through settings on your computer. On the Performance tab of Remote Control Options (Options menu), click Best Quality. (To further customize settings, click the Settings button.) Keep in mind that changing these settings may slow Remote Control connections.
Make Remote Control available to other computers
If you are denied use of Remote Control while connected to another computer, contact the user at that computer, and request permission to use the service. The user can give you access to Remote Control and other services through Security (Options menu).
Use the keyboard to view the host screen
If the window in which you are viewing the host screen does not show all of the host screen, you can use your keyboard to view areas beyond the borders of the window: press CTRL+ALT+SHIFT and any of the arrow keys, PAGE UP, PAGE DOWN, HOME, or END.
Use the latest driver for your display adapter
Contact the vendor, on its Web site or elsewhere, to verify that you are using the latest driver available.
Try changing the Windows Display Properties on the host
Remote Control may improve if you lower the screen resolution and the number of colors displayed on the host. In the Windows Control Panel, double-click Display. On the Settings tab, click a setting with fewer colors in the Color Palette box. Use the Desktop Area slider to choose a lower resolution. (Your monitor and display adapter may not allow you to change this setting.) Another solution may be to switch the host to a standard VGA driver.
- Use a special key combination to log on to a Windows NT host When you restart a Windows NT host, you must press CTRL+ALT+DEL to log on to Windows again. You can accomplish this from the guest by pressing a special key combination specified on the host. (Pressing CTRL+ALT+DEL on the guest affects the guest, not the host.) To specify a key combination for use on the guest, start LapLink on the host and click Remote Control Options on the Options menu. On the Host tab, type the key combination in this box: Send CTRL+ALT+DEL to This Computer When a Guest Presses This Key Combination.
Instead of pressing a special key combination for CTRL+ALT+DEL, you can click the Remote Control icon at the bottom of the host's LapLink workplace, and then click Feed CTRL+ALT+DEL.
Checklist for Print Redirect
The Print Redirection service needs to be running before you print.
Be sure to open the Print Redirection service before you print. When you print to a printer that is set up for Print Redirection, the Print Redirection must be opened before the document prints. Click the Print Redirection icon on the LinkBar, or click Open Printer Redirection (Window menu).
Use the same printer driver on both ends of a connection
If possible, set up the computer containing the documents with exactly the same printer driver that is used on the computer that has the printer attached. This gives you the best print results.
To do this, you usually need the Windows CD or the printer manufacturer's printer driver disk.
Use the Windows Control Panel to get additional information
If the document you printed is sent over LapLink correctly but does not print, examine the printer in the Windows Control Panel to get additional information about why the document didn't print.
Make sure the printer is connected correctly and has enough paper, and the printer cartridge is not empty.
If there are several printers available, set Print Direction to prompt you to select a printer
Print Redirecton lets you choose to always print to the default printer on a computer, or to be prompted for a list of printers to choose from every time you print.
To have Print Redirection prompt you with a list of printers, select Display a List of Available Printers (Print Redirection Options) on the computer to which the printers are attached.
Checklist for Text Chat
Press ENTER to send your message
Type your message in the lower part of the Text Chat window. (In some cases, you may have to click in the lower part of the window before you can begin typing.) To send your message to the remote computer, press ENTER.
To begin a new paragraph in a message, press CTRL+ENTER.
Open a Text Chat window after connecting
If you are connected to more than one computer, be sure to specify which computer you want to use Text Chat with: click the name of the computer on the Window menu. Then click the Open Text Chat button on the LinkBar or Open Text Chat on the Window menu.
Make Text Chat available to other computers
If you are denied use of Text Chat while connected to another computer, contact the user at that computer, and request permission to use the service. The user can give you access to Text Chat and other services through Security (Options menu).
Save your Text Chat conversation from time to time
As a Text Chat conversation grows in length, the most recent messages begin to replace the earliest messages. This starts to happen when the conversation exceeds 32,000 characters. If you intend to save a lengthy conversation, begin saving before this limit is reached. To save a conversation, click in the upper part of the Text Chat window. Click Select All (Edit menu), and then click Copy (Edit menu). You can then switch to another Windows program such as Notepad, paste the text, and save it as a file.
Shorten connection time by preparing messages beforehand
Instead of typing text while connected, you can prepare it ahead of time in Notepad or a similar Windows program and send it to a remote computer through Text Chat. In the other application, select the text, and press CTRL+C to copy. In the lower part of the Text Chat window, press CTRL+V to paste. Then press ENTER to send.
Use File Transfer for long messages
Text Chat can send as many as 2,048 characters at one time. When you attempt to send a message that exceeds that limit, part of the message will not be transmitted to the other computer. Try sending the message in parts. Or save the message as a file, and send the file using File Transfer. You can still use the Text Chat window to let the remote user know what you're sending and to pass along additional notes.
Checklist for Voice Chat
Use full duplex sound card drivers on both ends of the connection
Voice Chat is easiest to use over a full duplex connection; full duplex allows both people to talk at the same time.
For full duplex, both ends of the connection must have sound cards with drivers that support full duplex. Contact your sound card manufacturer to determine whether your sound card supports full duplex and find out whether drivers are available.
When using half duplex, wait for the other person to finish talking
A common problem in half duplex conversations is learning to take turns talking. Use the stoplight icon in LapLink as a guideline for when you can talk and when you can't. In some cases, a verbal signal that you are finished speaking (saying "Over," for instance) might be helpful, or it might help to simply pause a few seconds when you are done speaking.
If you're using Manual mode, be sure to release the walkie-talkie button; you might not be able to hear the other person otherwise.
Adjust your microphone to a comfortable level
Many microphones require adjustment in order to send clear speech. Make sure your microphone is placed at a good distance from your mouth—not too far and not too close—and then adjust the microphone level using the Levels tab (Voice Chat Options).
Adjust your speakers or headphones to a comfortable level
Most speakers, and some headphones, have a manual control that you can use to adjust volume. It is recommended that you leave the manual controls at a medium level, and adjust the volume of speakers and headphones in LapLink (or in Windows).
Minimize background noise, if possible
Try moving your microphone away from ringing telephones, loud computer power supplies, radios, and so on. Also, moving your speaker and microphones apart is recommended.
If the person you're talking to hears a lot of noise in your background or doesn't hear your voice, you might want to reset your environment level using the Levels tab (Voice Chat Options).
Tips for improving Voice Chat performance
- If you haven't already done so, perform the tests in the Levels tab (Voice Chat Options) to get the best performance.
^+ If you are talking over a fast connection, set the transmission quality option (Advanced tab, Voice Chat Options) to High; if you're talking over a slow connection, set it to Low.
Index
A
Accept calls only on the following numbers command 54
Adapter, CAPI 2.0/ISDN 52
Add Folder Pair command 106, 112
Adding
Address Book entries 32,46
Log-in List entries 58
Address Book
adding entries 32,46
andDialingProperties 32-33
for CAPI 2.0/ISDN 52
formodemconnections 32
for network connections 46
log-in name 32,46
with Remote Control 72
security for 58, 60
using 32,46
Address Book command 32,46,56,60
Addresses on the Internet 36, 38
AirShare Radio Modules
enabling 51
troubleshooting 147-148
Allowing incoming connections
modem 56
network 56
Answering calls CAPI 2.0/ISDN 54
Arrange Icons command 87
Arranging
Remote Control windows 67
Text Chat window 129
Auto Answer command 54, 149
Auto Answer option 142
Autoconnect
in cable connections 48, 140
in wireless connections 50
Automatic mode in Voice Chat 134
Automating connections 62
B
Bitmaps displayed in Remote Control
setting number of colors for 81
setting size limit for 81
Blank Host Screen command 72
Blanking screen 72
By Attributes command 87
By Date command 87
By Name command 87
By Size command 87
By Type command 87
C
Cable
connecting over 48
connections, requirements for 17
enabling security for 60
port, enabling after installation 140
port, enabling during installation 18
requirements for connecting over 16
tips for transfers over 152
troubleshooting 140-141
Call waiting 143
Callback, allowing or requiring 59, 153
Canceling selections 89
CAPI 2.0/ISDN
adapter 52
Address Book 52
answering calls 54
channel bonding 54
configuring 54-55
connecting over 52
requirements 52
requirements for 17
timeout options 55
transmissions 54
troubleshooting 149
using in United States 52
Channel Bonding command for CAPI 2.0/ ISDN 54
Clear Selection command 89
Clipboard information, sharing between computers 78
Clone Folder command 96
Cloning folders and files 96
Colors, switching between solid and patterned in Remote Control 81
Commands
Accept calls only on the following numbers 54
Add Folder Pair 106, 112
Address Book 32,46,56,60
Arrange Icons 87
Auto Answer 54,149
Blank Host Screen 72
By Attributes 87
By Date 87
By Name 87
By Size 87
By Type 87
Channel Bonding 54
Clear Selection 89
Clone Folder 96
Compression 99
Connect over Cable 49
Connect over Dial-Up Networking 30, 52, 146
Connect over Modem 28, 52
Connect over Network 30, 42, 44, 52
Connect over Wireless 50
Copy 90, 92, 125, 129, 131
Create Desktop Shortcut 112
Delete Pair(s) (see note) 112
Detail 86
Disconnect 25
Enable Port 55
File Transfer Options 88,92,100
LargeIcons 86
LinkClIPboards 78
List 86
Lock Host Keyboard 72
Lock Host Mouse 72
Move 90, 92
New Xchange Agent 106
Open Print Redirection 122
Open Remote Control 66
Open Text Chat 128
Open Xchange Agent 108
PrintRedirectionOptions 123-124
Properties 110, 113, 117
Properties for New Agents 113
Quick Steps 12
Reboot Host 74
Remote Control Options 67, 70, 74, 76, 80
Restore Connections 63
Run Xchange Agent 109
Save Connections 62
Schedule 116
Security 56, 58, 60
Select All 88,112,125,129,131
Select By 88
SetFilter 114
Size of Selections (see note) 88
SmallIcons 86
SmartXchange 94
SpeedSync 98
SpeedSync Statistics 98
Tile Side by Side 129
Transmission Quality 133
Voice Chat Levels 132
Voice Chat Options 132
What's This? 13
Xchange Agent Wizard 106
ompressing files 99
compression command 99
Computer names on network
filtering 42
requirements for 43
confirmation messages, turning off and on (see note) 93
connect over Cable command 491
connect over Dial-Up Networking command 30,146
Connect over Dial-Up Networking connections
and ISDN 149
connct over Modem command 281
and ISDN 52
connect over Network command 30,42,44
and ISDN 52
connect over Wireless command 501
onnections
cable 48
CAPI 2.0/ISDN 52
disconnecting 25
incoming 24
Internet 34
modem 26, 28, 30
network 42, 44
outgoing 24
overview 24
restoring automatically 62
wireless 50
Controlling a host computer 66
Conversation mode in Voice Chat 134
Copy command 90, 92, 125, 129, 131
Copying
in Remote Control 78
in Text Chat 129
Copying files
already on target 92
drag and drop 84, 90, 120, 122
existing files only 92
including subfolders 92
newer files only 92
using Copy command 90
Create Desktop Shortcut command 112
Creating an Xchange Agent 104, 106
Custom installation 18
Cutting in Remote Control 78
D
Delete Pair(s) command (see note) 112
Deleting files permanently 93
Deselecting files 89
Detail command 86
Dialing Properties 28, 31-33
Dial-Up Networking connections and ISDN 149
LapLink connections, opening 30, 146
opening 30
overview 26
requirements for 16
troubleshooting 146
DirectParallel Universal cable, requirements for 17
Disabling
keyboard 72
mouse 72
Disconnect command 25
Disconnecting from a remote computer 25
Drag and drop 84, 90, 120, 122
tips 91, 150
Drives
cloning 96
copying 92
expanding 86
opening 86
selecting 86
viewing contents of 86
Dropping files on target 90
Duplicating folders 96
E
Enable Autoconnect option 49-50
Enable File Transfer Recovery option 100
Enable Port command 55
Enabling
File Transfer Recovery 100
modem port 142
network port 144
rebooting 74
serial port 140
wireless devices 50
wireless port 147
Encrypting data 41,61
Existing files only, copying 92
Expanding drives and folders 86
F
File names, long 97, 152
File Transfer
Copy command 90
drag and drop 84, 90, 120, 122
Move command 90
navigating in window 86
opening 84,120,122
optimizing 98
permitting through security setup 56, 58
requesting through Address Book 32,46
resuming after an interruption 100
selecting items 84, 88, 120, 122
with SpeedSync 98
tips 150, 152
troubleshooting 150, 152
File Transfer Options command
Enable File Transfer Recovery option 100
Include Sub folders in Copies option 92
Transfer Only If Files Are Already on Target option 92
Transfer Only If Files Are Newer option 92, 100
File Transfer Recovery 100
Files
compressing 99
copying and moving 84, 90, 92, 120, 122
deleting to Recycle Bin 93
encrypting 61
finding (see note) 86
merging 98
selecting 84, 88, 120, 122
sorting 86
synchronizing 94,104
updating older copies 92
Filtering
computer names on network 42
files and folders (see note) 86
files in Xchange Agent 114, 154
Finding folders and files (see note) 86
Firewalls 40
Folders
cloning 96
copying 90
defined (see note) 84, 120, 122
expanding 86
finding (see note) 86
moving 90
opening 86
replacing one with another 96
selecting 84, 88, 120, 122
sorting 86
synchronizing 94
updating 94
Fonts, changing appearance in Remote
Control 80
Full duplex, 130-131
Full screen mode 67-68, 70
G
Guest computer
blanking host screen from 72
changing appearance of host screen from 80
defined 66
locking host keyboard from 72
locking host mouse from 72
opening Remote Control window on 66
viewing host computer on 68
H
Half duplex, 130-131
Help
online index 13
pop-up explanations 13
Quick Steps 12
for troubleshooting 138
What's This? command 13
Host computer
defined 66
locking 33,46,72
preparing 74, 76
rebooting 74
viewing 67-69
Host screen
blanking 33,46
changing appearance of 81
changing guest view of 68, 80
scaling image to fit 69
temporarily lowering resolution of 69
viewing full screen 68
Hosting a Remote Control session 76
1
Icons on host computer 76
Include Sub folders in Copies option 88,92, 94
Infrared devices
Hewlett Packard OmniBook infrared devices 51
IBM ThinkPad infrared devices 51
IrDA devices 50
JetEye infrared devices 51
non-IrDA devices 51, 148
troubleshooting 147-148
Installing LapLink Technical 18-21
Integrated System Digital Network. See
ISDN 52
Internet 34-41, 45
addresses 36, 38
encryptingdatafor 41,61
LAN security, configuring for LapLink 40
making a LapLink connection on 34
names 36, 38
requirements for using LapLink on 34
using a WINS server for connections 38
IP name or address 34-36, 38, 44, 144
IrDA connections, requirements for 17
ISDN
and Address Book 52
channel bonding 54
configuring 54-55
Connect over Dial-Up Networking
command 52,149
Connect over Modem command 52
Connect over Network command 52
connecting over 52
implementing 52
requirements 52
timeout options 55
transmissions 54
troubleshooting 149
using in United States 52
Items,selecting 84,88,120,122
K
Keyboard control, customizing 70
Keyboard, disabling on host 33, 46, 72
Keys, system and shortcut 70
L
LapLink for Windows 3.1 and long file names, 151
LapLink Technical
connecting to 50
custom installation 18
installing 18-19
overview 8,10
registering 18
removing (see note) 19
starting 19
starting before Windows NT logon 75
!LAPLINK.TSI file 101
LargeIconscommand 86
Levels in Voice Chat 132
LinkClIPboardscommand 78
LinkBar 25
List command 86
.LLC extension 63
LLW.INI file 51, 147
.LLX extension 107
Local security password 58, 60
Lock Host Keyboard command 72
Lock Host Mouse command 72
Locking host computer 72
enabling and disabling on guest 72
Locking host computer, requesting in Address
Book 33,46
Log-in List
adding entries 58
enforcing 56
Log-in name 33,47,58
Long file names 97, 111, 152
M
Manual mode in Voice Chat 134
Merging files 94, 98
Messages in Text Chat 128
Microphone, configuring for Voice Chat 132
Minus sign in folder icons 86
Modem connections
Address Book entries for 32
dialing from Address Book entries 28
dialingmanually 29,33
Dial-Up Networking connections 26,30
over the Internet 34
LapLink-to-LapLink connections 26, 28
overview 26
requirements for 16
tips for transfers over 152
troubleshooting 142-143
types of 26
Mouse
disabling on host 33,46,72
using in drag and drop 90
Move command 90, 92
Moving files
drag and drop 84, 90, 120, 122
using Move command 90
N
Names on the Internet 36, 38
Navigating in File Transfer windows 86
Network connections
using Address Book for 46
filtering list of available computers 42
opening 42
requirements for 16
tips for transfers over 152
troubleshooting 144-145
See also CAPI 2.0/ISDN 52
Network, connecting to Internet over 35
New Xchange Agent command 106
0
One-Way Transfer Only option 94
Open Print Redirection command 122
Open Remote Control command 66
Open Text Chat command 128
Open Xchange Agent command 108
Optimizing transfers with SpeedSync 98
P
Parallel cable connections, requirements for 17
Password
local security 58, 60
setting 58,60
Pasting
in Remote Control 78
in Text Chat 128
Plus signs in folder icons 86
Ports
enabling 140, 142, 144, 147
modem 142
network 144
serial 140
speed, changing 140
wireless 147
Previewing an Xchange Agent 104, 108, 154
Print Redirection
overview 120
printing 122
setting up printers 124
setting up printers manually 125
starting 122
troubleshooting 157
understanding 120
Private system 56
Privileges
granting to remote users 56, 58
rebooting the host 74
Properties command 110, 113, 117
Properties for New Agents command 113
Protect Local Security with a Password option 60
Protected system 56, 58
Public system 56
Q
Quick Steps command 12
R
Reboot Host command 74
Rebooting the host in Remote Control 74
configuring the host 74
Recycle Bin, deleting to 93
Remote access servers 26, 30
Remote Control
bitmaps displayed in 81
clipboard information, sharing 78
colors displayed in 81
controlling the host 66
font displayed in 80
improving performance 80
locking the host computer 72
minimized window on host 76
opening 66
overview 66
permitting through security setup 58
rebooting the host computer 74
requesting through Address Book 32,46, 72
reversing 76
serving as a host 76
shortcut keys, changing 70
troubleshooting 155
using Print Redirection in 120
using Windows system keys 70
viewing the host computer 67-68, 80, 155
Remote Control Options command
Allow Guest to Reboot on Command option 74-75
Always Reboot when Guest Disconnects option 74
Always Start LapLink before Windows NT Logon option 75
Always Use Full-Screen option 67
Best Performance option 80
Best Quality option 80
Execute on Guest option 70-71
Full-Screen Toggle option 71
Minimize When This Computer Is a Host option 76
Scaling Toggle option 71
User Customized option 80
Replacing folders 96
Resolution of host screen, changing from guest 69
Restarting the host in Remote Control 74
Restore Connections command 63
Restore Text Chat Automatically option 128
Restricting access to a computer 56, 58, 60
Resuming an interrupted file transfer 100
Reversing Remote Control 76
Run Xchange Agent command 109
Running an Xchange Agent 109
S
Save Connections command 62
Scaling Remote Control windows 70
Schedule command 116
Scope ID 39
Screen blanking 72
Screen blanking, requesting in Address Book 33, 46
Screen saver, allowing to run on host screen 81
Security changing for cable connections 56
changing for modem connections 56
changing for network connections 56
changing LAN security for Internet connections 40
encrypting data 41,61
Log-in List, adding entries 58
password for the security system 60
password protection, setting up 58, 60
Security command 56, 58, 60
Select All command 88,112,125,129,131
Select By command 88
Selecting files and folders 84, 88, 120, 122
clearingselections 89
Selecting text in Text Chat window 125, 129, 131
Serial cable connections, requirements for 17
Serial ports
enabling 140
speed, changing 140
Services
allowing 56, 58
File Transfer 84,120,122
overview 8
PrintRedirection 122
Remote Control 66
requesting in Address Book 32,46
Text Chat 128
Voice Chat 130
SetFiltercommand 114
Setup, troubleshooting 139
Shortcut icon
creating 62,112
opening connections with 62
running an Xchange Agent with 109, 154
Shortcut keys in Remote Control 70
Size of Selections command (see note) 88
SmallIconscommand 86
SmartXchange
tips 152
using 94
SmartXchange command 94
Sorting files and folders 86
Sound card, configuring 131
Source
with Copy or Move command 90
in drag and drop 84, 90, 120, 122
Speaker, configuring for Voice Chat 132
SpeedSync 98
and File Transfer Recovery 100
reviewing effect of 98
SpeedSync command 98
SpeedSync Statistics command 98
Starting
File Transfer 84,120,122
LapLink Technical 19
PrintRedirection 122
Remote Control 66
Text Chat 128
Voice Chat 130
Xchange Agent 106, 108
Statistics for SpeedSync 98
Subfolders
defined (see note) 84, 120, 122
including in transfers 92, 94, 96
navigating through 86
Synchronizing folders 94
System keys 70
T
Tailoring copy and move operations 92
Talking using Voice Chat 130
Target
with Copy or Move command 90
in drag and drop 84, 90, 120, 122
TCP/IP connections
defined 44
IP name or address, finding 44
IP name or address, specifying 34-36, 44
opening 44
troubleshooting 144-145
Text Chat
copying text in 129
hints and tips 128-129
opening window 128
pasting text in 128
permitting through security setup 58
requesting through Address Book 32,46
selecting text in 125, 129, 131
sending messages 128
troubleshooting 158-159
Tile Side by Side command 129
Transfer Only If Files Are Already on Target option 92, 94
Transfer Only If Files Are Newer option 92, 100
Troubleshooting
cable connections 140-141
CAPI 2.0/ISDN 149
File Transfer 150, 152
infrared devices 147-148
ISDN 149
modem connections 142-143
network connections 144-145
PrintRedirection 157
Remote Control 155
Setup 139
TCP/IP connections 144-145
Text Chat 158-159
using online Help for 12, 138
wireless connections 147-148
Xchange Agent 153-154
Two-way file exchange 94
U
United States, using CAPI 2.0/ISDN in 52
V
Voice Chat
Automatic mode 134
full duplex 130
half duplex 130-131
improving quality 133
Manual mode 134
overview 130
performance 132
permitting through security setup 58
requesting through Address Book 32,46
requirements for 17
starting 130
talking 130
using 130
W
Wallpaper, showing on host screen 81
What's This? command 13
Window
File Transfer 84, 120, 122
Remote Control 66
Text Chat 128
Windows NT
connecting to 50
wireless connections to 50
Windows system keys 70
Windows Modems setting 28, 32-33, 142
WINS server, using for Internet
connections 38
Wireless
connecting over 50
connections, requirements for 17
devices supported 50
port, enabling after installation 50, 147
troubleshooting 147-148
X
Xchange Agent 104-117
adding folder pairs to an agent 112
closing preview 108
conflicts defined 110
copying in one direction 112
creating an agent 104, 106
excluding files by type or name 114
filtering files 114
including files by type or name 114
overview 104
reviewing an agent 104, 108
resolving conflicts 108, 110
running an agent 109
running unattended 113, 117
running without preview 113, 117
scheduling to run unattended 116, 153
skipping folder pairs 108
troubleshooting 153-154
Xchange Agent Wizard command 106
TRAVELING SOFTWARE LICENSE AGREEMENT
IF YOU BREAK THE SEAL OR OTHERWISE OPEN THE PACKAGE CONTAINING THE SOFTWARE PROGRAM MEDIA, YOU ARE BY THAT ACT AGREEING TO BE BOUND BY THE TERMS AND CONDITIONS OF THIS LICENSE AGREEMENT.
Ownership of Software. You acknowledge and agree that all of the computer programs and associated documentation contained in this package (collectively, the "Software") are owned exclusively by Traveling Software and/or its licensors. The Software is protected under copyright and other intellectual property laws of the United States and international copyright treaties. You acknowledge and agree that the price paid by you for the Software is a license fee granting you only the rights set forth in this License Agreement.
License. Traveling Software grants to you, and you accept, a limited, non-exclusive and revocable license to use the Software, in machine-readable, object code form only. You agree to use the Software only as authorized in this License Agreement. This License Agreement does not convey to you any ownership rights or any other interest in the Software.
Scope of License. This is a single-user, multiple computer license, which means you are authorized to use the Software on up to a total of three personal computers that are used exclusively by you (e.g., office, laptop and home). A valid license must be purchased for each person who will use the Software. You may only use the Software to link with a computer not used solely by you if the user of that computer has a valid license.
If this software is to be installed on a network server, or more than one user can run the Software, you must purchase an additional license for each user or work station. Please contact the location where your purchased the Software and this license, or contact Traveling Software, to obtain additional licenses.
You may not copy or make any changes or modifications to the Software, and you may not translate, decompile, disassemble, or otherwise reverse engineer the computer program(s). You may not loan, rent, lease or sublicense the Software or any copy to others for any purpose. You agree to use all reasonable efforts to protect the Software from unauthorized use, modification, reproduction, distribution or publication. You are not permitted to make any uses or copies of the Software that are not specifically authorized by the terms of this License Agreement, and Traveling Software reserves all rights that are not expressly granted to you. Your adherence to this License Agreement will allow Traveling Software to continue developing innovative and useful products and providing a high level of customer service and support.
Term. This license will become effective on the date you acquire the Software and will remain in force until terminated. You may terminate this license at any time by removing the Software from your computer and destroying the original Software and all copies. This license will automatically terminate if you breach any of the terms or conditions set out in this License Agreement. You agree to remove the Software from your computer, and either to destroy the original Software and all copies of the Software and documentation or to return them to Traveling Software, upon termination of this license for any reason.
Transfer. You may transfer your license of the Software to another party by transferring the original program media and all applicable documentation, including the original of this License Agreement, to the recipient, who agrees to the terms of this Agreement. All other copies of the Software must be deleted and/or destroyed. Any transfer of possession of the Software terminates your license and all associated benefits under this License Agreement. You must notify Traveling Software in writing of such a transfer.
Archival Copy. You may make one copy of this Software and associated documentation solely for backup or archival purposes. Alternatively, you may transfer this Software to a single hard disk drive, provided that you keep the original program media and accompanying documentation in your possession for backup or archival purposes. Any such copies of the Software or documentation shall include Traveling Software's copyright and other ownership notices. No other copies of Software or documentation may be made by you or any person under your authority or control.
Limited Warranty. Traveling Software warrants the physical program media, cable(s) and physical documen
tation to be free from defects in materials and workmanship for a period of 90 days from the date of your purchase. If you notify Traveling Software of defects in materials or workmanship during the warranty period, Traveling Software will replace the defective program media or documentation or, at its option, refund the purchase price. Your remedy for breach of this warranty shall be limited to replacement or refund and shall not encompass any other damages. No dealer, distributor, agent or employee of Traveling Software is authorized to make any modification or addition to the warranty and remedies stated above.
TRAVELING SOFTWARE SPECIFICALLY DISCLAIMS ALL OTHER WARRANTYES, EXPRESS OR IMPLIED, INCLUDING BUT NOT LIMITED TO IMPLIED WARRANTYES OF MERCHANTABILITY AND FITNESS FOR A PARTICULAR PURPOSE. TRAVELING SOFTWARE DOES NOT WARRANTY THE PHYSICAL PROGRAM MEDIA, CABLE, PHYSICAL DOCUMENTATION OR COMPUTER PROGRAM(S) OTHER THAN AS EXPRESSLY STATED ABOVE, NOR DOES TRAVELING SOFTWARE PROVIDE ANY WARRANTY AS TO THE OPERATION OF THE SOFTWARE OR ITS FITNESS FOR ANY PARTICULAR APPLICATION, USE, OR PURPOSE.
Limitations of Liability and Remedies. IN NO EVENT SHALL TRAVELING SOFTWARE OR ITS LICENSORS BE LIABLE FOR ANY LOSS OF PROFIT OR ANY OTHER COMMERCIAL DAMAGE, INCLUDING BUT NOT LIMITED TO SPECIAL, INCIDENTAL, CONSEQUENTIAL, PUNITIVE OR OTHER DAMAGES, EVEN IF TRAVELING SOFTWARE OR ITS LICENSORS ARE ADVISED, IN ADVANCE, OF THE POSSIBILITY OF SUCH DAMAGES. IN NO EVENT SHALL THE LIABILITY OF TRAVELING SOFTWARE OR ITS LICENSORS EXCEED THE PURCHASE PRICE PAID FOR THE SOFTWARE, LESS ALL APPLICABLE TAXES AND DUTIES. SOME STATES DO NOT ALLOW THE EXCLUSION OR LIMITATION OF LIABILITY FOR INCIDENTAL OR CONSEQUENTIAL DAMAGES, SO THE AFOREMENTioned LIMITATION OR EXCLUSION MAY NOT APPLY TO YOU.
U.S. Government Restricted Rights. The Software is provided with Restricted Rights. Use, duplication, or disclosure by the United States Government is subject to restrictions set forth in subparagraph (c)(1)(ii) of The Rights in Technical Data and Computer Software clause at DFARS 252.227-7013 or subparagraphs (c)(1) and (2) of the Commercial Computer Software—Restricted Rights at 48 CFR 52.227-19, as applicable. Contractor/Manufacturer is Traveling Software, Inc., 18702 North Creek Parkway, Bothell, Washington 98011 U.S.A.
Updates. To receive notification of future Software updates, please complete and return the registration card. Also, please locate the serial number of your copy of the Software on the program media. You will need this number to receive updates and technical support from Traveling Software.
Trademarks. TRAVELING SOFTWARE, LAPLINK and the associated logo(s) are registered trademarks of Traveling Software, Inc. No right or license to any trademarks owned by Traveling Software or others appearing in the Software or packaging is granted to you by this License Agreement.
Miscellaneous. Unless otherwise restricted by law, you agree that this License Agreement shall be construed, interpreted and governed by the laws of the State of Washington of the United States of America, without regard to the laws governing conflicts of law. If any action is brought by either party against the other regarding any subject matter of this License Agreement, the prevailing party shall be entitled to recover, in addition to any other relief granted, reasonable attorney fees and expenses of litigation. You further agree that any claim relating to this License Agreement shall be brought in the courts of competent jurisdiction in the State of Washington. If any term of this License Agreement is declared void or unenforceable by any court of competent jurisdiction, enforcement of the remaining terms shall not be affected. No waiver of any right under this License Agreement shall be effective unless in writing and signed by both parties. No waiver of any past or present right arising from any breach or failure to perform shall be deemed to be a waiver of any future right arising under this License Agreement. This License Agreement sets forth the entire agreement between Traveling Software and you with respect to all matters covered herein.
IF YOU HAVE ANY QUESTIONS CONCERNING THIS LICENSE AGREEMENT, PLEASE CONTACT TRAVELING SOFTWARE AT 18702 NORTH CREEK PARKWAY, BOTHELL, WASHINGTON 98011 U.S.A. (425.483.8088), OR CONTACT YOUR REGIONAL TRAVELING SOFTWARE OFFICE.