
POWERSUITE 2010 - Logiciel d'optimisation système UNIBLUE - Notice d'utilisation et mode d'emploi gratuit
Retrouvez gratuitement la notice de l'appareil POWERSUITE 2010 UNIBLUE au format PDF.


| Type de produit | Logiciel d'optimisation système |
| Marque | UNIBLUE |
| Modèle | POWERSUITE 2010 |
| Systèmes d'exploitation compatibles | Windows XP, Vista, 7 (32 et 64 bits) |
| Processeur minimal | Intel Pentium III 500 MHz ou équivalent |
| Mémoire vive (RAM) minimale | 256 Mo |
| Espace disque dur requis | 350 Mo (plus espace pour pilotes) |
| Résolution d'écran minimale | 1024 x 768, couleurs 16 bits |
| Connexion Internet requise | Oui (pour téléchargement et mises à jour) |
| Fonctions principales | Nettoyage du registre, défragmentation du registre, mise à jour des pilotes, optimisation de la vitesse, suppression des fichiers indésirables |
| Outils supplémentaires | Gestionnaire de CPU, générateur proactif de vignettes, lanceur rapide de logiciels |
| Planification des analyses | Oui (scans automatiques programmables) |
| Langues disponibles | Multiples (modifiable dans les paramètres) |
| Activation | Nécessite une clé de série (format PS-XXXXX-XXXXX-XXXXX-XXXXX-XXXXX-XXXXX) |
| Support technique | Premium et FAQ en ligne sur support.uniblue.com |
| Sécurité | Sauvegarde automatique du registre avant nettoyage, points de restauration pour les pilotes |
| Format de livraison | Téléchargement de fichier exécutable |
| Version du manuel | 1ère édition (13 pages) |
| Entretien et nettoyage | Analyses périodiques recommandées, suppression automatique des fichiers indésirables |
FOIRE AUX QUESTIONS - POWERSUITE 2010 UNIBLUE
Questions des utilisateurs sur POWERSUITE 2010 UNIBLUE
0 question sur cet appareil. Repondez a celles que vous connaissez ou posez la votre.
Poser une nouvelle question sur cet appareil
Téléchargez la notice de votre Logiciel d'optimisation système au format PDF gratuitement ! Retrouvez votre notice POWERSUITE 2010 - UNIBLUE et reprennez votre appareil électronique en main. Sur cette page sont publiés tous les documents nécessaires à l'utilisation de votre appareil POWERSUITE 2010 de la marque UNIBLUE.
MODE D'EMPLOI POWERSUITE 2010 UNIBLUE

PowerSuite 2010
PRODUCT MANUAL - 1ST EDITION
About PowerSuite
Your computer is a complex assemblage of technologies that need management and maintenance to run smoothly. Without the right care and expertise, vulnerable technical areas can suffer wear and tear, resulting in degraded performance, conflicts and slow-down.
PowerSuite is the comprehensive performance solution for your PC. Compounding the powers of RegistryBooster, DriverScanner and SpeedUpMyPC under a unified interface, PowerSuite boosts and protects critical system elements tied to speed and stability. Through its unified three-in-one scan, PowerSuite cleans and defragments your registry, updates your drivers and optimizes system and resource management, giving your PC the ultimate performance step-up. Once your system is fully optimized, a convenient scan-scheduling function provides professional and ongoing maintenance to keep you running smooth, fast and efficient.
With PowerSuite you can:
- Remove harmful registry entries to reduce errors and conflicts
- Defragment registry data to improve data processing efficiency
- Update old drivers for better hardware function
- Boost system resource management to avoid computer slowdowns
- Remove junk files to recover hard drive space
- Optimize system settings for maximum speed
Contents
Chapter 1 Getting started 4
1.1 Minimum requirements
1.2 Installing PowerSuite
Chapter 2 Program overview 5
Chapter 3 Scanning and fixing 6
3.1 RegistryBooster 6
3.1.1 Fixing registry errors
3.1.2 Defragmenting registry
3.1.3 Registry restore
3.2 DriverScanner 7
3.2.1 Downloading new drivers
3.2.2 Installing new drivers
3.2.3 Ignoring drivers
3.2.4 Rolling back to a previous driver
3.3 SpeedUpMyPC 8
3.3.1 Speeding up your PC
3.3.2 Conducting a selective speed up
3.3.3 Managing improvements
3.3.4 SpeedUpMyPC optimization explained
3.3.5 What are speed tools?
3.3.6 What are system tweaks?
3.3.7 What are junk files?
Chapter 4 Configuring PowerSuite 11
4.1 Changing display language
4.2 Removing auto launch
4.3 Using a proxy
4.3 Using the PowerSuite scheduler
Chapter 5 Online resources and support 12
1. Getting Started
PowerSuite can be installed on any version of Windows XP, Windows Vista, or Windows 7. It is compatible with 32 and 64-bit systems.
1.1 Minimum requirements
Intel Pentium 3 500MHz or equivalent processor
- 256 MB RAM
350MB free hard disk space
Additional space for driver backups and new drivers
- Graphics mode 1024x768 high color 16-bit
Internet Explorer 6
- Internet connection
1.2 Installing PowerSuite
Shortly after purchasing PowerSuite, you will receive an email with your order details, a link to download your product and a serial number for activation.
To download PowerSuite, click on the Download link and, if prompted, select Save and then choose a download location where to save your file. The next step is to locate the .exe file and double click on its icon to start the installation wizard.
Follow the wizard by clicking on the Next button. You will be asked to read and accept the End User License Agreement and then to specify a location where to install PowerSuite. We recommend you choose the default location unless you have a specific reason not to.
You will also be prompted to enter your serial number to activate your product. This can be found in the order details email that was sent to you shortly after purchasing the product.
This number should start with the letters PS and be in the following format, where X represents a character: PS-XXXXX-XXXXX-XXXXX-XXXXX-XXXXX-XXXXX.
2. Program overview
This section will describe some features within the PowerSuite interface. To learn how to scan and fix your PC, you may choose to move straight to section 3.
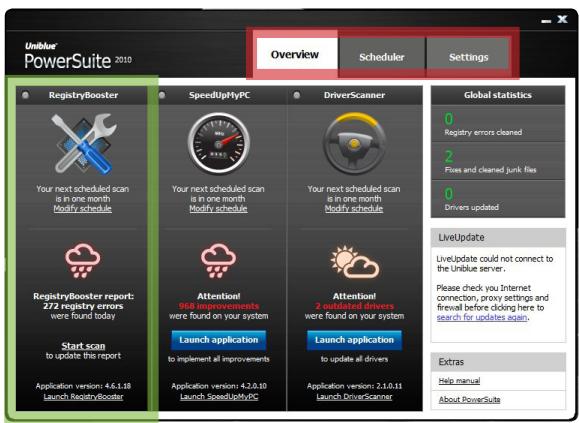
figure 1
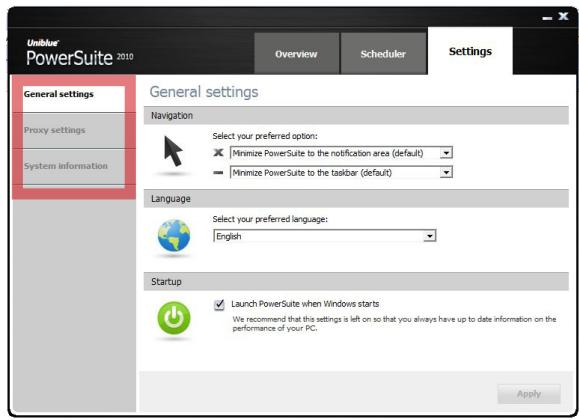
figure 2
Overview:
- PowerSuite merges RegistryBooster, SpeedUpMyPC and DriverScanner under a single interface. Figure 1 shows, boxed in green, the RegistryBooster panel.
- Use the Navigation Panel (figure 1, boxed in red) to shift through the different pages of the application. Each tab links to a particular page. The term 'navigation panel' will be used throughout this manual to refer to the row of four tabs labeled in figure 1.
Figure 2 shows the PowerSuite Settings screen. The menu on the left hand side (boxed in red) offers different screens within the chosen tab. The term 'left hand side menu' will be used to refer to this menu. - The overview page (figure 1) shows three weather pictorial, each associated with one of the three integrated application. These weather images provide a quick idea of your computer's performance status where rainy weather indicates a computer under-performing in the area scanned by the application (go to section 3 for scan details).
- The LiveUpdate box provides registered users access to PowerSuite updates and upgrades. Any update to RegistryBooster, DriverScanner or SpeedUpMyPC is conducted through PowerSuite.
3. Scanning and fixing
PowerSuite offers three scans that target different areas tied to your PC's performance and stability:
- Registry scan
Scans registry for errors
- Speed scan
Scans system and resource allocation settings for issues slowing down your computer
- Driver scan
Scans system for outdated drivers
Upon launching for the first time, PowerSuite will conduct all three scans and display, as results, the number of registry errors, slow-down issues, and outdated drives affecting the performance of your PC. To view more detailed scan results, you will need to summon the standalone application by clicking on the relevant Launch application button.
The next section deals with the functionality of the individual standalone applications.
3.1 RegistryBooster
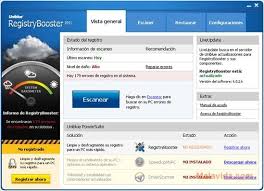
RegistryBooster repairs or removes harmful registry entries to optimize your PC for better performance. It also includes a registry defragmentation function to improve your computer's efficiency in executing instructions.
3.1.1 Fixing registry errors
After scanning through PowerSuite, click on the Launch application button associated with RegistryBooster and the application will launch directly on the Latest Scan results from within the Registry Scan tab.
Click on the Fix errors button to start the registry cleaning process. Before cleaning, RegistryBooster will, as a precaution, automatically backup your registry.
3.1.2 Defragmenting your registry
Registry defragmentation can improve system performance by reordering instructions scattered in different locations. To defragment your registry, click on the Registry Scan tab and, from the left hand side menu, select Registry defrag, then click on the Defrag registry button at the bottom right of your screen.
Registry changes will take effect once you restart your computer.
Note:The registry defragmentation process can take up to a few minutes. Do not quit RegistryBooster during defragmentation as this may harm your system.
3.1.3 Registry restore
To restore a backup copy of your registry, access the Restore tab from the navigation panel. The last registry backups will be listed one beneath the other, most recent first. Select the backup version you want to resort to then click the Restore button at the bottom right of the screen. Registry changes will be implemented upon restarting your computer.
3.2 DriverScanner
DriverScanner scans your computer to provide a list of drivers that need to be updated. With single click convenience, DriverScanner will then install each driver update on your PC.
3.2.1 Downloading new drivers
To update a driver, DriverScanner must be guided through a three part process:
- System scan
- Driver download
- Driver installation
After scanning through PowerSuite, click on the DriverScanner Launch Application button and the program will launch straight in the Scan results page within the Driver scan tab.
To start the download process, click on the Download all button at the bottom right of the screen. During this process, DriverScanner will contact the Uniblue database and download the necessary data. A progress bar will approximate download completion until the words "Download complete" appear with a 'very good' tick.
At this stage, drivers will be listed one beneath the other. Clicking on the Install button will start a driver's installation process.
Note: A single driver can cater for more than one device. For example, DriverScanner may identify five outdated devices but offer only three drivers. This is normal and technically sound.
3.2.2 How to install new drivers
To install a downloaded driver, click on the word Install displayed in the middle column of the Update drivers page. Note that drivers need to be installed one by one.
Before clicking, check for the driver's safety rating, displayed to the right of the install button. System drivers are labeled risky as their installation is particularly delicate. We recommend that you do not install risky drivers unless you are an advanced user taking a considered decision.
Once you click on Install, DriverScanner launches an automatic restore point which will allow you to roll back to previous drivers on demand. DriverScanner will then install the new driver automatically and silently. A pop-up will confirm a driver's successful installation.
3.2.3 Ignoring drivers
If you decide not to install a driver for safety reasons, you might want to omit this driver from subsequent scan results. To do this, go to the Driver Scan page from the navigation panel. From the left hand side menu, select Update drivers. You will find a list of downloaded drivers. To omit a driver from the next search results, click on the Ignore option from the right hand side.
Ignored drivers can be retrieved. To unignore a driver, select the Manage tab from the navigation panel and then Ignored drivers from the left hand side menu. Select the appropriate driver by clicking the tickbox on the left hand side. An Unignore selected button should turn blue. Click on the Unignore selected button and the driver will be offered once again in subsequent scan results.
3.2.4 Rolling back to a previous driver
Every time you install a new driver, DriverScanner keeps a restore point. This is a snapshot of your system that you can resort to in case of system problems.
To roll back to a restore point, click on the Manage tab from the navigation panel. Select Restore from the left hand side menu. Any restore points will be listed together with the date and time that they were set. To rollback to your computer at a previous state, select the appropriate restore point by clicking on the left hand side tickbox.
Once selected, a Restore selected button should change color from grey to blue. Click on the Restore selected button. To complete the rollback you will need to restart your computer.
Note: Rolling back to a restore point will undo any changes made to your computer since the restore point was set.
3.3 SpeedUpMyPC
DriverScanner scans your computer to provide a list of drivers that need to be updated. With single click convenience, DriverScanner will then install each driver update on your PC.
To update a driver, DriverScanner must be guided through a three part process:
- System scan
- Driver download
- Driver installation
3.31 Speeding up your PC
After scanning through PowerSuite, click the SpeedUpMyPC Launch Application and the program will launch straight in the Scan results page within the Speed scan tab.
By default, if you click on the Speed up now button, SpeedUpMyPC will conduct a full system speed up, implementing speed tools and system tweaks as well as cleaning junk files (for information on system optimization go to section 3.4).
3.3.2 Conducting a selective speed up
You can choose to omit certain fixes from the speed up process, either by excluding a major category from the scan process or by deselecting individual fixes from the scan results. To omit a major category from the scan
process, go to the Speed scan tab and select Speed scan from the left hand side menu. From this screen you can deselect one or more categories from speed tools, system tweaks and junk files. Note that SpeedUpMyPC cannot offer fixes for categories excluded from the scan process.
To deselect individual fixes from the scan results, select the Speed scan tab from the navigation panel and choose Scan results from the left hand side menu. If you click on the issue category link, shown in blue and underlined, an itemized list of fixes recommended for your PC will be revealed.
To omit a particular fix, untick the corresponding selection box on the left hand side. Once you click the Speed up now button, unticked fixes will not be implemented.
3.3.3 Managing optimizations
Once set, some optimizations can be deactivated or undone. To manage optimizations in this manner, select the Manage tab from the navigation panel and choose between Speed tools or System Tweaks from the left hand side menu. This brings up a list of optimizations together with the option to activate or deactivate.
3.3.4 System optimization explained
SpeedUpMyPC increases your computer's speed through optimizations grouped into three categories:
. Speed tools
. System tweaks
Junk file deletion
3.3.5 What are speed tools?
Speed tools are optimizations that remain actively available for deployment as long as SpeedUpMyPC is left running. Each speed tool has a specific purpose.
CPU manager
A process may cause problems by manipulating an unreasonably large chunk of system resources. The CPU manager guards against the possibility of such an event by adjusting the priority of a process before it spirals out of control.
Proactive thumbnail generator
Under some settings, every time you open a picture folder, Windows generates the picture thumbnails that are used for preview. This is a system resource intensive task that can slow down your PC. With the Proactive thumbnail generator on, upon folder access, your PC will conduct a one-time thumbnail generation process and save the relevant data to a Windows system folder. From then onwards thumbnails will be quickly retrieved instead of generated.
Software quick starter
The software quick starter increases program launch speed by anticipating the user and pre-loading data into the memory.
3.3.6 What are system tweaks?
System tweaks are one-time changes that take place upon clicking the Speed up now button. Although there are many different types of system tweaks, we group them under three categories:
System resource tweaks free up system resources by cutting off unused services or improving system resource allocation.
Internet or network tweaks optimize network and browser settings for better speed and efficiency.
Visual effects tweaks optimize Windows visual effects for speed.
3.3.7 What are junk files?
Junk files accumulate on your computer through use, occupying hard drive space and slowing down your PC. After scanning you will be able to identify which files SpeedUpMyPC has identified for cleaning.
4. Configuring PowerSuite
PowerSuite can be configured through a number of options from the Settings tab. Any changes applied through the PowerSuite interface will be automatically extended to the standalone programs.
4.1 Change display language
To change display language, click on the Settings tab from the navigation panel. In the General settings screen, the first in the left hand side menu, you will see a drop down menu for language. Click on the downward arrow and select your language of choice. A pop up will inform you that PowerSuite needs to be re-launched for the change to take effect. Click on the Relaunch now button and PowerSuite will launch in the new language.
4.2 Remove auto launch
By default, PowerSuite will launch automatically with Windows start up. We recommend you preserve this setting to ensure you have up to date information on the performance of your PC. Furthermore, SpeedUpMyPC's speed tools will only operate when the program is running. To remove this setting, select Settings from the navigation panel. You should see a green power sign toward the bottom of the screen. Untick the box to the left hand side of the 'Launch PowerSuite when Windows starts' option to remove auto launch.
4.3 Using a Proxy
To run PowerSuite through a proxy, go to the Settings tab from the navigation panel. Choose Proxy settings from the left hand side menu and follow the form to enter your proxy details before ticking the Enable proxy option at the bottom. For the changes to be implemented, click on the Apply button.
4.4 Using the PowerSuite scheduler
The PowerSuite scheduler will launch automatic and periodic background scans to ensure that PowerSuite shows a performance status that is recent and relevant. By default, PowerSuite will scan with RegistryBooster every week, with SpeedUpMyPC every two weeks, and with DriverScanner every month. These settings can be changed but the default configuration is generally sufficient to maintain optimum PC performance.
5. Online resources and support
In addition to this help manual the following support and services are also available:
Premium support
Our premium support service is provided by dedicated customer care and technical support professionals. For more information visit our support centre.
FAQs
The support website also includes a useful FAQ section.
Address:
Uniblue Systems Ltd
Orange Point
Dun Karm Street
Birkirkara
BKR 9037
Malta, Europe
Support:
http://www.unibblue.com/support/
- POWERSUITE 2010
- ABOUT POWERSUITE
- WITH POWERSUITE YOU CAN
- CONTENTS
- GETTING STARTED
- 1.1 MINIMUM REQUIREMENTS
- 1.2 INSTALLING POWERSUITE
- PROGRAM OVERVIEW
- OVERVIEW
- SCANNING AND FIXING
- 3.1 REGISTRYBOOSTER
- 3.1.1 FIXING REGISTRY ERRORS
- 3.1.2 DEFRAGMENTING YOUR REGISTRY
- 3.1.3 REGISTRY RESTORE
- 3.2 DRIVERSCANNER
- 3.2.1 DOWNLOADING NEW DRIVERS
- 3.2.2 HOW TO INSTALL NEW DRIVERS
- 3.2.3 IGNORING DRIVERS
- 3.2.4 ROLLING BACK TO A PREVIOUS DRIVER
- 3.3 SPEEDUPMYPC
- 3.31 SPEEDING UP YOUR PC
- 3.3.2 CONDUCTING A SELECTIVE SPEED UP
- 3.3.3 MANAGING OPTIMIZATIONS
- 3.3.4 SYSTEM OPTIMIZATION EXPLAINED
- 3.3.5 WHAT ARE SPEED TOOLS
- CPU MANAGER
- PROACTIVE THUMBNAIL GENERATOR
- SOFTWARE QUICK STARTER
- 3.3.6 WHAT ARE SYSTEM TWEAKS
- 3.3.7 WHAT ARE JUNK FILES
- CONFIGURING POWERSUITE
- 4.1 CHANGE DISPLAY LANGUAGE
- 4.2 REMOVE AUTO LAUNCH
- 4.3 USING A PROXY
- 4.4 USING THE POWERSUITE SCHEDULER
- ONLINE RESOURCES AND SUPPORT
- PREMIUM SUPPORT
- FAQS
- ADDRESS
- SUPPORT
Marque : UNIBLUE
Modèle : POWERSUITE 2010
Catégorie : Logiciel d'optimisation système