HB-M988 - Moyeu de roue SHIMANO - Notice d'utilisation et mode d'emploi gratuit
Retrouvez gratuitement la notice de l'appareil HB-M988 SHIMANO au format PDF.

| Type de produit | Moyeu de roue avant |
| Marque | SHIMANO |
| Modèle | HB-M988 |
| Série | XTR |
| Nombre de trous de rayons | 32 |
| Type de roulement | Billes libres |
| Nombre de billes (côté gauche) | 15 |
| Nombre de billes (côté droit) | 17 |
| Taille des billes | 5/32" |
| Graisse recommandée | DURA-ACE grease |
| Compatibilité frein | Disque |
| Étrier recommandé | BR-M985 |
| Rotor recommandé | SM-RT98 |
| Utilisation prévue | VTT, cross-country |
| Interdictions | Descente, freeride |
| Fixation axe | E-Thru + fourche spéciale |
| Outils spéciaux | TL-FC36, TL-HB16 |
| Entretien | Démontable côté droit, graissage périodique |
| Matériau | Aluminium / acier |
| Pays de fabrication | Japon |
FOIRE AUX QUESTIONS - HB-M988 SHIMANO
Questions des utilisateurs sur HB-M988 SHIMANO
0 question sur cet appareil. Repondez a celles que vous connaissez ou posez la votre.
Poser une nouvelle question sur cet appareil
Téléchargez la notice de votre Moyeu de roue au format PDF gratuitement ! Retrouvez votre notice HB-M988 - SHIMANO et reprennez votre appareil électronique en main. Sur cette page sont publiés tous les documents nécessaires à l'utilisation de votre appareil HB-M988 de la marque SHIMANO.
MODE D'EMPLOI HB-M988 SHIMANO
General Safety Information

WARNING
- The HB-M988 front hub is not designed for downhill bicycle riding and freeriding. However, depending on the riding condition, The hub axle could develop a crack, which may result in failure of the hub axle. This can lead to an accident that could result in serious injury or even death. Before riding, you should carefully check your hubs to make sure that there are no cracks in the axles, and if you find any sign of a crack or any other unusual condition, do NOT use the bicycle.
- The HB-M988 can be used in combination with a special front fork and the E-Thru. If it is used in combination with any other front fork or fixed axle, it may cause the wheel to become detached from the bicycle while you are riding and result in serious bodily injury.
- The securing method and tightening torque for the front wheel both vary depending on the type of front suspension fork being used. When installing the front wheel to the front suspension fork, always be sure to follow the directions given in the Service Instructions for the front suspension fork. If the directions are not followed, the front wheel may fall out of the front suspension fork and serious injury may result.
- Please use extra caution to keep your fingers away from the rotating disc brake rotor during installing or servicing the wheel. The rotor is sharp enough to inflict severe injury to your fingers if caught within the openings of moving rotor.
- The calipers and rotor will become hot when the brakes are operated, so do not touch them while riding or immediately after dismounting from the bicycle, otherwise you may get burned. Check that the brake components have cooled down sufficiently before attempting to adjust the brakes.
- Always make sure that the front and rear brakes are working correctly before you ride the bicycle.
- Be careful not to allow any oil or grease to get onto the rotor and brake pads; otherwise the brakes may not work correctly.
- If any oil or grease do get on the pads, you should replace the pads. If any oil or grease gets on the rotor, you should clean the rotor. If this is not done, the brakes may not work correctly.
- If the E-Thru lever is on the same side as the rotor, there is the danger that it may interfere with the rotor, so check that it does not interfere.
- Check that the wheels are fastened securely before riding the bicycle. If the wheels are loose in any way, they may come off the bicycle and serious injury may result.
- Obtain and read the service instructions carefully prior to installing the parts. Loose, worn or damaged parts may cause the bicycle to fall over and serious injury may occur as a result. We strongly recommend only using genuine Shimano replacement parts.
- Read these Technical Service Instructions carefully, and keep them in a safe place for later reference.
- Be sure to carefully read the Service Instructions for the disc brakes also.

NOTICE
- When using the special tool (TL-FC36) to remove and install the rotor mounting ring, be careful not to touch the outside of the rotor with your hands. Wear gloves to protect your hands from getting cut.
■ Burn-in period
- Disc brakes have a burn-in period, and the braking force will gradually increase as the burn-in period progresses. Make sure that you are aware of any such increases in braking force when using the brakes during the burn-in period. The same thing will happen when the brake pads or rotor are replaced.
Note
- If the brake caliper mounting boss and the dropout are not parallel, the rotor and caliper may touch.
- If the rotor is worn, cracked or warped, it should be replaced.
- Parts are not guaranteed against natural wear or deterioration resulting from normal use.
- For maximum performance we highly recommend Shimano lubricants and maintenance products.
Technical Service Instructions
SI-27X0A-002
HB-M988
Front hub
In order to realize the best performance, we recommend that the following combination be used.
| Series | XTR |
| Caliper | BR-M985 |
| Brake Lever | BL-M985 |
| Rotor | SM-RT98 |
Specifications
Front hub
| Model No. | HB-M988 |
| No. of spoke holes | 32 |
Maintenance
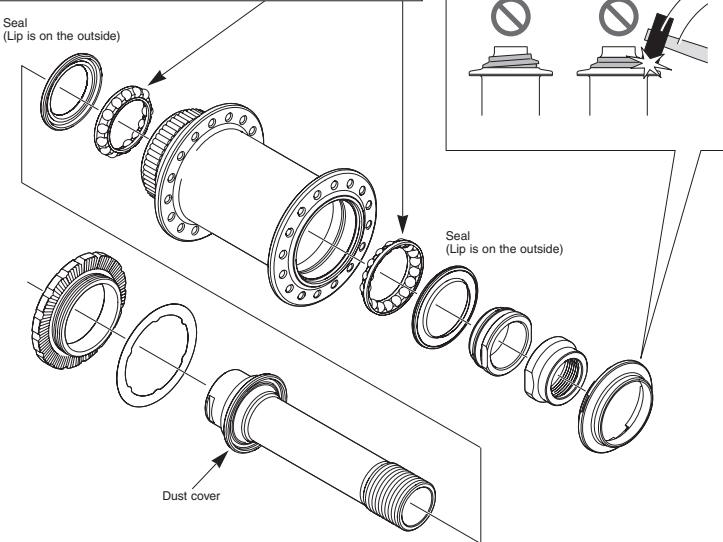
These units can be disassembled as shown in the illustrations. Grease should be applied to each part at periodic intervals.
Applying grease
DURA-ACE grease
- Left
No.of balls:15
Ball size: 5/32"
Right
No.of balls:17
Ball size: 5/32"
Note:
- It cannot be disassembled from the left side of the hub (the side with the fixed rotor serrations).
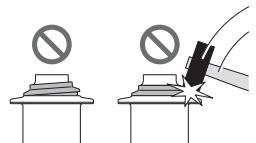
- When removing and installing the seal, do it very carefully so that the seal does not become bent. When reinstalling the seal, make sure that it is facing the right way, and insert it as far as it will go.
- Do not disassemble the dust cover which is crimped onto the Left hand axle cap.
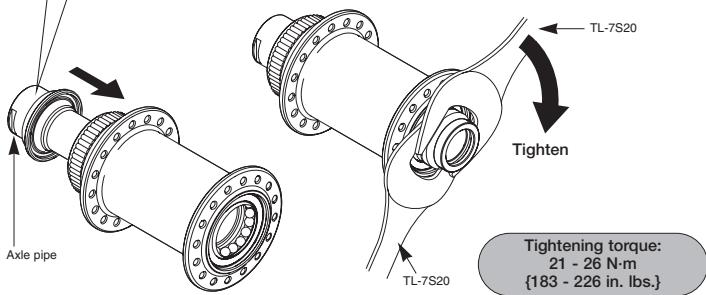
Install the axle pipe, and then use the special tools to tighten the lock nut so as to double-lock the mechanism as shown in the illustration.
If using a hub spanner on the beveled parts of the left-hand axle cap, be careful not to apply excessive torque, otherwise damage may occur.
Rotating direction
Front left
Front right
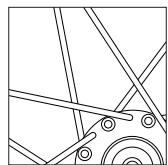
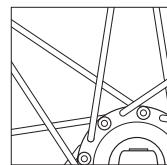
Wheel spoke lacing
Check that the spokes have been laced as shown in the illustration.
A radial assembly cannot be used.
Use the TL-HB16 assembly tool when assembling the wheel.
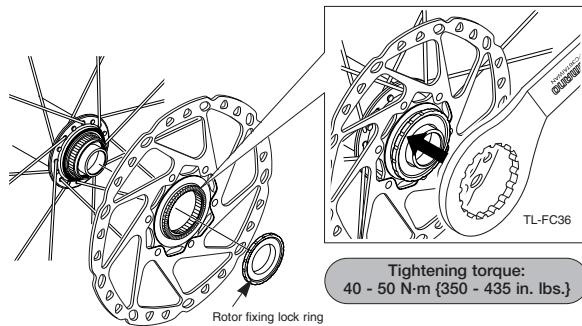
Installation of the rotor
A NOTICE
When using the special tool (TL-FC36) to remove and install the rotor mounting ring, be careful not to touch the outside of the rotor with your hands. Wear gloves to protect your hands from getting cut.
SHIMANO
SHIMANO AMERICAN CORPORATION
One Holland, Irvine, California 92618, U.S.A. Phone: +1-949-951-5003
SHIMANO EUROPE B.V.
Industriebweg 24,8071 CT Nunspeet, The Netherlands Phone: +31-341-27222
SHIMANO INC.
3-77 Oimitsu-cho, Sakai-ku, Sakai-shi, Osaka 590-8577, Japan
- Service Instructions in further languages are available at: http://techdocs.shimano.com
Please note: specifications are subject to change for improvement without notice. (English) © Nov. 2010 by Shimano Inc. XBC SZK Printed in Japan.