
INFOTOOL - Logiciel informatique NERO - Notice d'utilisation et mode d'emploi gratuit
Retrouvez gratuitement la notice de l'appareil INFOTOOL NERO au format PDF.
| Type d'appareil | Ordinateur portable |
| Système d'exploitation | Windows (général) |
| Processeur | Non précisé |
| Mémoire RAM | Non précisé |
| Stockage | Non précisé |
| Écran | Écran LCD couleur |
| Résolution d'écran | Non précisé |
| Carte graphique | Non précisé |
| Connectivité | Wi-Fi, Ethernet (général) |
| Ports | USB, audio, vidéo (général) |
| Clavier | Clavier intégré |
| Autonomie batterie | Non précisé |
| Dimensions | Non précisé |
| Poids | Non précisé |
| Logiciel inclus | Nero InfoTool |
| Langue du manuel | Anglais |
FOIRE AUX QUESTIONS - INFOTOOL NERO
Questions des utilisateurs sur INFOTOOL NERO
0 question sur cet appareil. Repondez a celles que vous connaissez ou posez la votre.
Poser une nouvelle question sur cet appareil
Téléchargez la notice de votre Logiciel informatique au format PDF gratuitement ! Retrouvez votre notice INFOTOOL - NERO et reprennez votre appareil électronique en main. Sur cette page sont publiés tous les documents nécessaires à l'utilisation de votre appareil INFOTOOL de la marque NERO.
MODE D'EMPLOI INFOTOOL NERO
Info Tool
Nero InfoTool Manual
Nero AG
Copyright and Trademark Information
The Nero InfoTool manual and all its contents are protected by copyright and are the property of Nero AG. All rights reserved. This manual contains material that is protected by internationally valid copyright. No part of this manual may be reproduced, transmitted or transcribed without the express written permission of Nero AG.
Nero AG rejects any claims that transcend the clauses of the guarantee rights. Nero AG does not undertake any liability for the correctness of the content of the Nero InfoTool manual. The contents of the software supplied, as well as of the Nero InfoTool manual, may be changed without prior warning.
All trade names and trademarks are the property of their respective owners.
The trademarks mentioned here are named for information purposes only.
Copyright © 2008 Nero AG and its licensors. All rights reserved.
SW 4.99.6.0
Contents
1 General information 4
1.1 About the manual 4
1.2 About Nero InfoTool 4
2 Technical information 5
2.1 System requirements 5
3 Launching the Program 6
3.1 Starting Nero InfoTool via Nero StartSmart 6
4 Nero InfoTool 7
4.1 Saving and printing the log 10
4.1.1 Saving the log 10
4.1.2 Printing the log 10
4.2 Refreshing the log 11
4.3 Changing the language 11
4.4 Verifying system requirements for Blue-ray and HD DVD 11
5 List of figures 12
6 Index 13
7 Contact 14
1 General information
1.1 About the manual
This manual is intended for all users who want to find out how to use Nero InfoTool. It is task-based and explains how to achieve a particular objective on a step-by-basis.
In order to make best use of this manual, please note the following conventions:
| Symbol | Meaning |
| ○ | Indicates warnings, preconditions or instructions that have to be followed strictly. |
| ○ | Indicates additional information or advice. |
| 1. Start ... | A number at the beginning of a line indicates a request for action. Carry out these actions in the order specified. |
| → | Indicates an intermediate result. |
| → | Indicates a result. |
| OK | Indicates text passages or buttons that appear in the program interface. They are shown in bold face. |
| Chapter | Indicates references to other chapters. They are executed as links and are shown in red and underlined. |
| [...] | Indicates keyboard shortcuts for entering commands. |
1.2 About Nero InfoTool
Nero InfoTool allows you to call up information about the most important features of installed drives, inserted discs, installed software, and much more. You obtain detailed data on drive properties such as firmware, buffer size, serial number, production date, and, for DVD drives, the current DVD region code. Furthermore, Nero InfoTool tells you the name and version number of the operating system, the ASPI manager, and the installed burning applications and also tells you about the hardware configuration of the computer.
2 Technical information
2.1 System requirements
Nero InfoTool is installed together with the Nero Suite and its system requirements are the same. You can find more detailed information on the system requirements in the Nero QuickStart Guide.
3 Launching the Program
3.1 Starting Nero InfoTool via Nero StartSmart
To start Nero InfoTool via Nero StartSmart, proceed as follows:
- Click on the Nero StartSmart icon.
The Nero StartSmart window opens.
- Click the button.
The list of Nero applications is displayed.
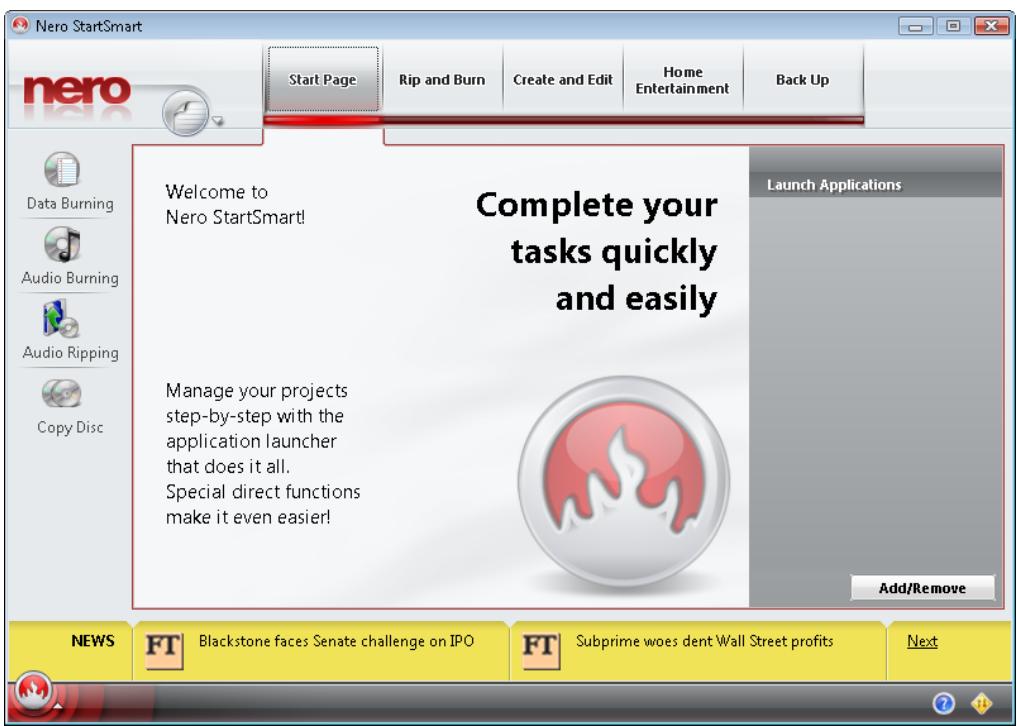
Abb. 1: Nero StartSmart
- Select the Nero InfoTool entry in the Tools list box.
The Nero InfoTool window opens.
You have launched Nero InfoTool via Nero StartSmart.
4 Nero InfoTool
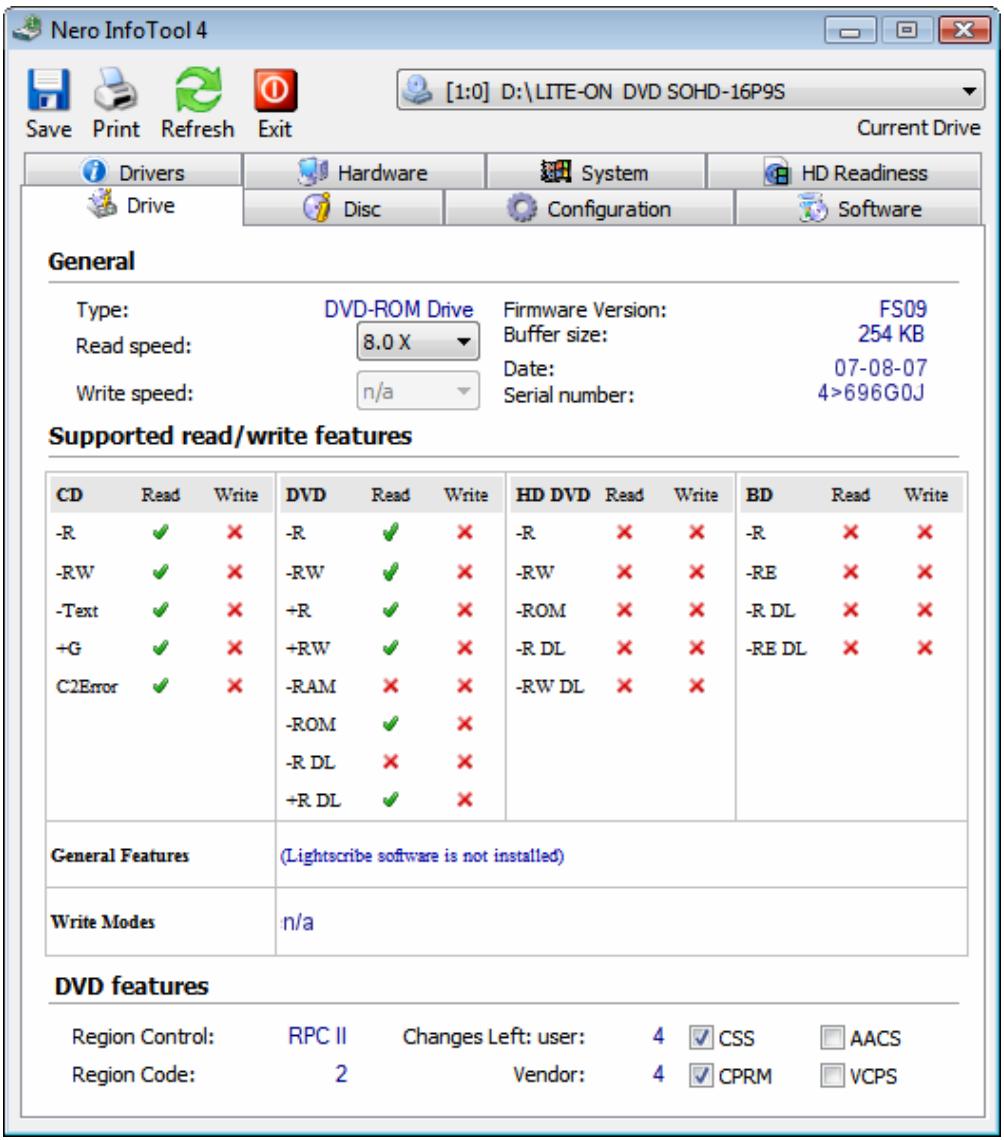
Fig. 2: Nero InfoTool window; Drive tab
The following setting options are available in the Nero InfoTool window:
| Drive list box | Displays all connected recorders for selection. |
| Save button | Opens the Nero InfoTool – Save/Print window and saves the log generated by Nero InfoTool. |
| Print button | Opens the Nero InfoTool – Save/Print window and prints the log generated by Nero InfoTool. |
| Refresh button | Refreshes the log generated by Nero InfoTool. |
| Options button | Sets the language of the program and the log. |
| Exit button | Closes Nero InfoTool. |
| Drive tab | |
| General area | Displays general information about the installed recorder. |
| Supported read features area | Displays the formats that the installed recorder can read. |
| Supported write features area | Displays the formats that the installed recorder can write. |
| DVD features area | Displays any additional DVD burning features of the recorder. |
| Disc tab | |
| General area | Displays general information about the inserted disc, such as the type or capacity. |
| Extended Information area | Displays extended information about the inserted disc, such as the number of tracks and sessions on the CD. |
| Content area | Displays information about the contents of the inserted disc, such as the name or creation date of the disc. |
| Configuration tab | |
| Selection tree | Displays the driver(s) of the selected main entry when it is expanded. |
| Driver information area | Displays information about the driver selected in the tree. |
| Software tab | |
| Software list | Displays the version numbers of the installed Nero applications. |
| Drivers tab | |
| Drivers area | Displays all of the software drivers installed on the computer. |
| Video Codecs area | Displays all of the video codecs installed on the computer. |
| Audio Codecs area | Displays all of the audio codecs installed on the computer. |
| Hardware tab | |
| System area | Displays information about the computer hardware. |
| Peripherals area | Displays information about the computer's peripherals, such as audio output devices. |
| System tab | |
| System information area | Displays information about the installed operating system, DirectX version, and browser. |
| HD Readiness tab | |
| Verify the system requirements drop-down menu | Displays the tasks for which the system requirements are verified. |
| Your system display area | Displays a table that lists the tested components, information about whether an upgrade is required, and the details of the tested components. |
| Link display area | Displays whether system upgrades are required and provides a link to the system requirements list. |
| Your Nero version display area | Displays whether the current Nero configuration supports the task that you selected in the drop-down menu. |
4.1 Saving and printing the log
When you open Nero InfoTool as described in the chapter 'Launching the Program', a log is automatically generated. You can save or print this log.
4.1.1 Saving the log
To save the log, proceed as follows:
- To save the log, click on the Save button.
The Nero InfoTool - Save/Print window is opened. - If you do not wish to include information from certain areas:
- Uncheck the boxes for the areas that you wish to exclude in the check box area of the Nero InfoTool - Save/Print window.
- To see what the log will look like without the unchecked areas, click on the Preview button.
The log preview is refreshed. - Click on the Save button.
The Save As window is opened. - Select the folder where you want to save the log.
- Enter the name to save the log with in the File name text box.
You have saved the log as a text file.
4.1.2 Printing the log
To print the log, proceed as follows:
- To print the log, click on the Print button.
The Nero InfoTool - Save/Print window is opened.
-
If you do not wish to include information from certain areas:
-
Uncheck the boxes for the areas that you wish to exclude in the check box area of the Nero InfoTool - Save/Print window.
-
To see what the log will look like without the unchecked areas, click on the Preview button.
The log preview is refreshed.
- Click on the Print button.
The Print window is opened.
- Apply the desired print settings and then click on the Print button.
You have printed the log.
4.2 Refreshing the log
To refresh the log, proceed as follows:
- Click the Refresh log button.
The Nero InfoTool - Retrieving Information window is opened. You have refreshed the log.
4.3 Changing the language
To change the language of Nero InfoTool and the log, proceed as follows:
- Click on the Options button.
The Options window is opened. - Select the desired Language from the drop-down menu and confirm your selection.
- Restart Nero InfoTool to apply the language change.
You have changed the language.
4.4 Verifying system requirements for Blue-ray and HD DVD
With Nero InfoTool you can check your system to see if it supports Blu-ray Discs and HD DVDs.
To display any necessary upgrades for Blu-ray Disc support, proceed as follows:
-
Click the HD Readiness tab.
-
Select the desired task from the Verify the system requirements drop-down menu.
Depending on the selected entry, the tested components, information about any required upgrades, and the details of the tested components are displayed in the area below the Verify the system requirements list box.
The display area on the left indicates whether your system needs to be upgraded for the selected task. A link to the system requirements for the selected task is provided here. The Your Nero version display area provides information about whether the current Nero configuration supports the selected task.
5 List of figures
Abb. 1: Nero StartSmart 6
Fig. 2: Nero InfoTool window; Drive tab
6 Index
B
Browser 8
C
Codec audio. 8 video. 8
Contact 14
Conventions. 4
D
DirectX version. 8
Driver software. 8
Drivers hardware 8
L
Language change. 11
Launching the program 6 Log
print 10
refresh. 11
save. 10
P
Peripheral 8 Preview 10
R
Read features 8
S
Settings options 7
Starting Nero PhotoSnap via Nero StartSmart.6
System requirements. 5
T
Target group 4
V
Version number 8
W
Write features 8
7 Contact
Nero InfoTool is a Nero AG product.
Nero AG
Im Stoeckmaedle 13-15
76307 Karlsbad
Germany
Web: www.nero.com
Help: http://support.nero.com
Fax: +49 724 892 8499