
ATS 404 - Radio portable SANGEAN - Notice d'utilisation et mode d'emploi gratuit
Retrouvez gratuitement la notice de l'appareil ATS 404 SANGEAN au format PDF.


| Type de produit | Récepteur radio numérique portable |
| Caractéristiques techniques principales | Réception AM/FM, DAB/DAB+, affichage LCD rétroéclairé, tuner numérique |
| Alimentation électrique | Adaptateur secteur et batterie rechargeable |
| Dimensions approximatives | 240 x 160 x 70 mm |
| Poids | 1,2 kg |
| Compatibilités | Compatible avec les stations DAB/DAB+ et FM |
| Type de batterie | Batterie lithium-ion rechargeable |
| Tension | 5V DC |
| Puissance | 2W RMS |
| Fonctions principales | Préréglage de stations, minuterie, alarme, fonction snooze |
| Entretien et nettoyage | Nettoyer avec un chiffon doux, éviter l'eau et les produits chimiques |
| Pièces détachées et réparabilité | Disponibilité limitée des pièces détachées, consulter le service après-vente |
| Sécurité | Ne pas exposer à l'humidité, utiliser uniquement l'adaptateur fourni |
| Informations générales utiles | Vérifier la compatibilité DAB/DAB+ dans votre région avant l'achat |
FOIRE AUX QUESTIONS - ATS 404 SANGEAN
Questions des utilisateurs sur ATS 404 SANGEAN
0 question sur cet appareil. Repondez a celles que vous connaissez ou posez la votre.
Poser une nouvelle question sur cet appareil
Téléchargez la notice de votre Radio portable au format PDF gratuitement ! Retrouvez votre notice ATS 404 - SANGEAN et reprennez votre appareil électronique en main. Sur cette page sont publiés tous les documents nécessaires à l'utilisation de votre appareil ATS 404 de la marque SANGEAN.
MODE D'EMPLOI ATS 404 SANGEAN
SANGEAN
ATS-404

SANGEAN
ATS 404
POWER


DISPLAY

ALARM

中

45
stations memory
- 10 Key pad direct Frequency tuning
Full Short Wave 14 meter bands
FM/MW/14 SW METER BAND
SYNTHESIZED RECEIVER
BAND

SW SELECT

1224H
MEMO SCAN

DUAL TIME
1)


2


0SET


TUNING
FREQ
TIME
ENTER

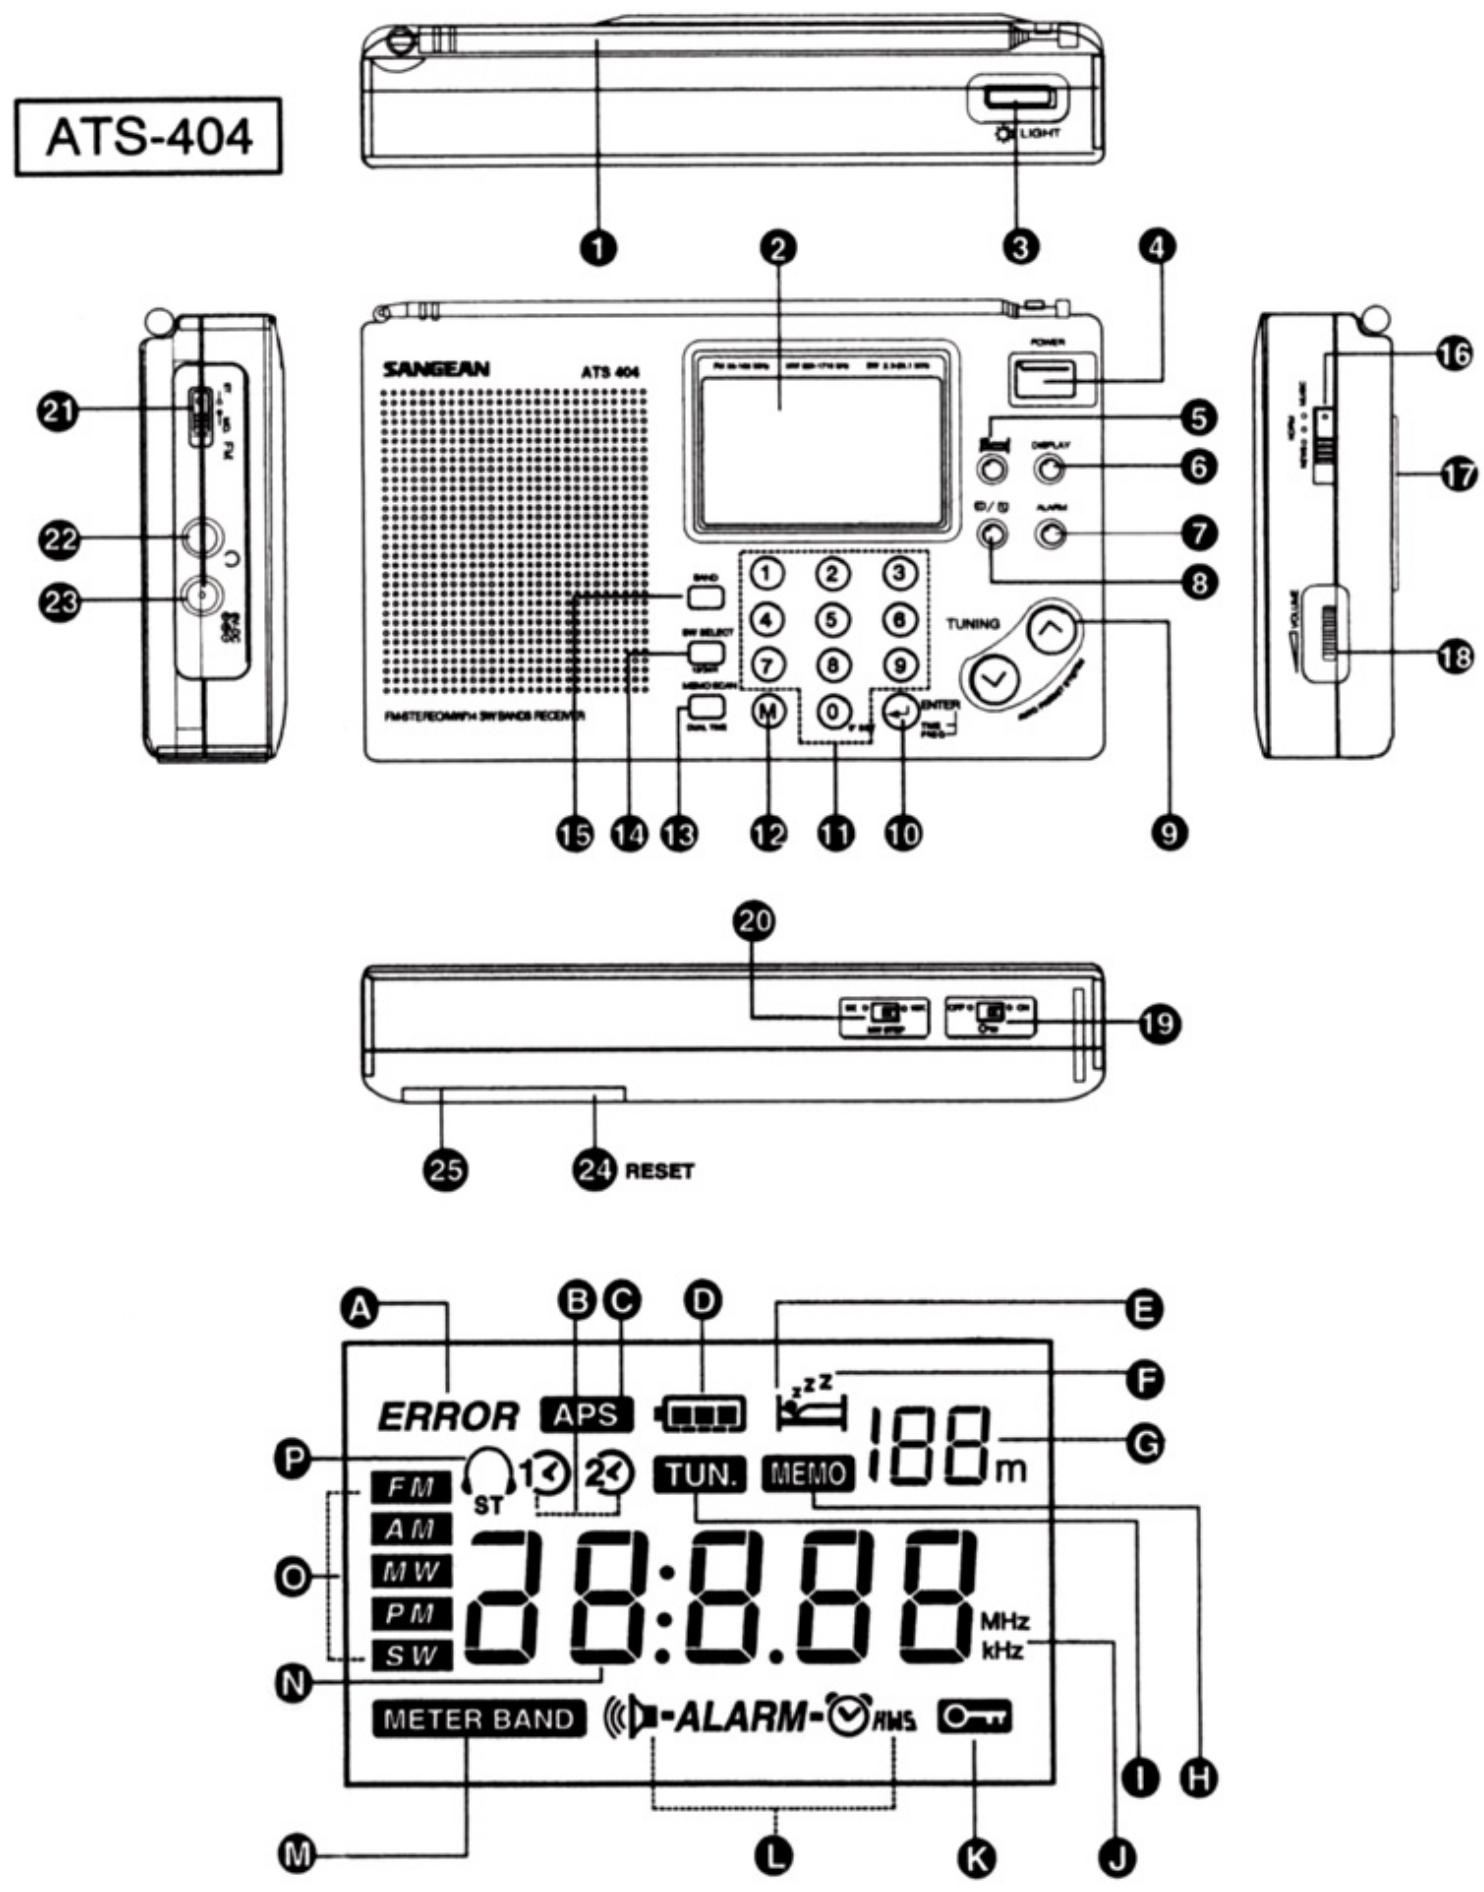
Control Locations
- Telescopic Antenna
- Display(L.C.D)
- Display illuminated button (LIGHT)
- Poweron/off button
- Sleep (auto shut off) button
- Display button
- Standby button (ALARM)
- Alarm by radio or buzzer selection
- Manual/auto scan tuning buttons
- Enter command button for frequency and time.
- Numbered buttons for frequency and time.
- Memory set button
- Memory scan and dual time.
- SW meter band also 12/24 Hour select button
- Radio band selection
- Music/norm/News selector
- Folding stand
- Volume Control
- Lock switch
- 9/10kHz MW step switch
- FM Stereo/mono switch
- Earphones socket
- DC input socket
- RESET button (in the battery compartment)
- Battery compartment
Display information
A. Operation error
B. Time area 1 or 2
C. APS (auto preset system) status
D. Battery status
E. Sleep (auto shut off) status
F. Snooze status
G. Time second/short wave meter band/Memory indicator
H. Memory set
I. Tuning indicator
J. KHz for MW and MHz for FM and SW.
K. Lock on
L. Standby radio or buzzer status
M. SW meter band
N. Frequency and time display
O. Radio band and AM/PM (for 12 hour format) indicator
P. FM Stereo indication
Choosing a power supply
This radio can be operated using
4 Alkaline UM-3 (LR6) (AA size) batteries
Household AC adaptor (not supplied)
Installing batteries
- Position the radio face down.
- Press the catch marked "OPEN" and side in the direction shown
3.Insert the 4 UM-3 (LR6) (AA size) batteries - Replace the battery cover
Battery replacement
The battery indicator will display the battery condition for approx. 7 seconds after the radio is switched On. If the indicator shown "□", the batteries should be replaced. After removing the batteries you have approximately 3 minutes to replace the batteries after which clock and memory information will be lost.
Low battery warnings
- Replace batteries if display shows "□".
- Replace batteries if press power button, the radio still not operate.
Using the AC adaptor
Insert the adaptor plug into the socket 6V DC on the left side of the radio. Plug the adaptor into a standard mains socket outlet. Whenever the adaptor is used, the batteries are automatically disconnected.
The mains adaptor should be disconnected from the mains supply when not in use.
We would recommend for economy that ATS-404 be used via the AC adaptor wherever possible with battery operation for occasional or stand-by use only.
Setting the clock
The clock will start running when the batteries are installed or the AC adaptor is plugged in. The display will show "0:00".and "1"real time symbol.
The real time can be set
- When the radio is switched off.
2.If the radio is switched on, press the DISPLAY button to the time status.
3.press the "ENTER" button, the real time symbol will flash in the display. - Whilst the “ 1 0 ” is flashing, set the correct time by pressing the numbered buttons. As you press each button, the corresponding number will show on the display.
- If you press wrong button, after pressing the ENTER button. The radio will beep and ERROR flashes in the display. Reset the correct time by pressing the numbered buttons again.
Note: Time can be adjusted whilst the “ ”real time symbol is flashing.
- Press ENTER button again to complete the clock setting.
Note: a. Time should be entered in 24Hr format e.g .3:00 pm should be entered as 15:00 .
b. You may press SW select (12/24H) to select the 12 Hr format.
Setting the dual time
In addition to real time, a dual time can be programmed into the radio.
- Press MEMO SCAN (DUAL TIME) button, display will flash “ ”
- Press ENTER button within 7 seconds, the display “ ” will stop flashing.
- Press ENTER button again, the “ 2 ” dual time symbol flashes, whilst the “ 2 ” is flashing, set the dual time by pressing the numbered buttons.
- The rest of the operation is same as setting real time.
- Press Dual TIME button again ENTER button to return to real time.
Note: a. To temporarily change between real and dual time mode, press DUAL TIME button. The “ ” dual time symbol and dual time will be shown in the display. After approximately 7 seconds, the display will return to show real time.
b. To permanently change the display to dual time, press DUAL TIME button followed by the ENTER button, “2” Dual time symbol will appear on the display.
c. To permanently change the display back to real time mode, press DUAL TIME button followed by the ENTER button. The “2” symbol will be removed from the display.
Zero secondsset
Press the "0" button for more than 2 seconds the display of seconds will be reset second to 00.
Waveband selection
There are three waveband selection by pressing BAND button
| Waveband | Frequency coverage | Aerial Type |
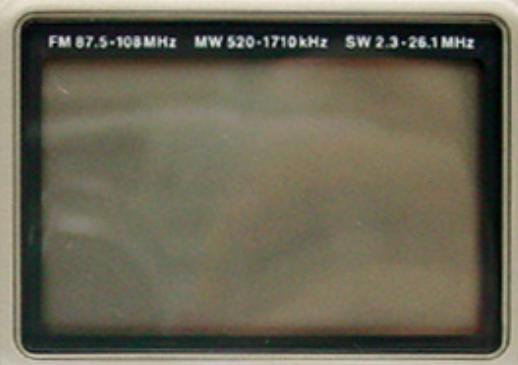
| FM | 87.50-108MHz | Telescopic Fully extend the aerial, angle and rotate for best reception |
| MW | 520--1710kHz | Internal Rotate for best reception |
| SW | 2.3-26.10MHz | Telescopic Fully extend the aerial for best reception |
Stations may be selected by using any of the five different available tuning methods:
Direct Tuning, Manual tuning ,Scan Tuning ,Memory Recall Tuning and APS on MW and FM bands.
Direct tuning
Example : To tune to 100.70MHz on the FM band.
- Press the POWER on/off button to turn on the radio.
- Select the required FM by pressing BAND button.
- Press the button marked ENTER-Freq./Time, display show"---".
- Press the numbered buttons marked 1,0,0,7. Then press ENTER button again, the frequency will now appear in the display.
Note: There is no decimal point, therefore before you press the number button, make sure you have selected the required waveband, otherwise the operation may switch to other waveband.
5. Extend the aerial fully and rotate for best FM reception.
6. Adjust the Volume Control for comfortable listening
7. When selecting a stereo FM station and using stereo earphones, make sure the FM model switch is in the stereo position.
Manual tuning
- Press the POWER on/off button to turn on the radio.
- Select a waveband by pressing BAND button.
- A single press on the either the TUNING UP “ ” or DOWN “ ” buttons will change the frequency up or down.
Note: Each press of the up or down button will change the frequency in increment of
FM 100kHz
MW 9kHz/10KHz
SW 5kHz
Scan tuning
- Turn on the radio by pressing the POWER on/off button.
- Select a waveband.
- Press and hold down either the tuning UP or DOWN buttons for more than half a second to commence scan tuning. The radio will scan all frequencies in the selected band and stop automatically each time it finds an active station.
- Press and hold down either the tuning UP or DOWN buttons for more than half a second to resume scan tuning. When the waveband end is reached, the radio will beep and continue tuning from the opposite waveband end.
- Adjust the Volume Control for comfortable listening.
Memory tuning
You may store up to 45 preset stations in memory.18 on SW, 18on FM and 9 on MW. To store a station in preset memory proceed as follows.
- Turn on the radio by pressing the power on/off button.
2.Tune to the desired frequency using one of the previously described tuning methods. - Press the button marked 'M' (memory), the memory symbol MEMO together with a suggested preset number will flash in the display for 7 seconds.
Note :If some of the presets have already been used. the radio will suggest the next available preset location.
- Press the M button again and your station will be stored in the suggested memory preset.
- Preset stations may be exchanged easily and at any time. Select the preset that is to be changed by pressing the corresponding numbered button. Press the M button, MEMO and current preset location will flash in the display, whilst the display is flashing, press the new selected preset location using one of the numbered buttons for more than 2 seconds. The preset stations will be exchanged.
- The FM and SW bands have 18 presets. However if the selected preset location has been used, you have to press the numbered button for more than 2 seconds. The new stations will be stored in the selected memory location, the original station in this location will be cancelled..
Note :If all the preset memory locations are full, Pushing the M button ,will cause the display to show FUL. If you still want to store a new station ,press any numbered button for more than 2 seconds, the new station will be stored in the selected memory location, the original station in this location will be cancelled.
Recalling a station from preset memory
- Turn on the radio by pressing the POWER on/off button
-
Select the waveband for the station required.
-
Press the numbered button corresponding to the preset memory location for the required station. The radio will instantly tune to the station and the display will show its frequency and memory location.
Select Short Wave Meter band
- Turn on the radio by pressing the POWER on/off button.
- Press BAND button to select the SW waveband.
- Press SW SELECT button to select the required SW meter band, display will appear frequency and SW meter band it belongs to. This radio covers SW 120 to 11 meter band.
APS (Auto Preset System)
This radio provides an easy to use feature called APS (Auto Preset System) which operated on FM and MW bands.
- Turn on the radio by pressing the POWER on/off button.
- Press BAND button to select the required waveband.
- Press Tuning UP and DOWN button at the same time for more than 2 seconds.
The radio will beep and the display will flash APS indicating the radio in APS mode.
- The radio will then scan from the lowest frequency on the selected band, automatically storing stations in preset memory based on signal strength order.
- After APS is completed, a beep will be heard, The display will show MEMO 1 and the station with the strongest signal for your area will be selected.
- IF during APS operation, on stations are found the display show 87.50 MHz on FM band or 520 kHz on MW band.
Note: 1. The maximum number of preset on MW band is 9 and FM band is 18.if during APS operation more than 9(WM) OR 18(FM)are found only 9 or 18 strongest stations will be stored in the preset memories.
- The SW band has no APS function.
- All previously stored preset stations will be erased when APS operation commences.
4.APS operation can be cancelled by pressing the POWER on/off button.
Memory Scan
This radios provides a feature called Memory Scan which when activated will scan the preset memories.
- Turn on the radio by pressing the POWER button .Select the required waveband .
2.Push the MEMO SCAN button, the radio will scan each preset memory in turn-pause for 7 seconds on each memory before continuing on to the next memory. When the required preset station is reached, press any button to stop memory scan.
Setting the alarm (standby)
The alarm can be set with the power on or off.
If the radio is switched on, press the DISPLAY button to display the time.
Radio alarm
- Press ALARM button, display ALARM will flash and show the last alarm time set, press the numbered button to set the alarm on time and press ALARM button again to set radio alarm, display will display “ALARM” (radio alarm), during the flashing, press ENTER to complete.
- To verify the alarm time, press ALARM button to display the alarm time followed by the ENTER button to return to real time mode.
- To cancel the alarm, press ALARM button, display will show previous alarm set status, press.
ALARM button again to cancel the alarm, The alarm symbol will flash for 7 seconds and disappear.
Note:
- When the alarm is sounding, press POWER button to turn off the alarm for 24 hours.
- The radio alarm will last for one hour if not turned off by pushing the POWER button.
- Tune the radio to the required station before setting the alarm. When the alarm operates, the radio will play the last station selected.
Setting the HWS (Humane Wake System) alarm
A repeating beep tone will sound when using the HWS alarm. The alarm beep will increase in volume every 15 seconds for one minute followed by 1 minutes silence before repeating the cycle. The HWS alarm will sound for one hour unless turned off by pushing the POWER button.
- The HWS alarm is set in the same way as the radio alarm except of pushing “ / ” button to select. Push “ / ” button to select HWS alarm.
Display will appear "ALARM _HWS " for HWS alarm.
2. The HWS alarm can be turned off by pressing the POWER button.
Snoopze
When the alarm is on, press any button except POWER and light the alarm will be in Snooze function for an interval of 6 minutes before pressing POWER button to turn off. Display will flash Snooze symbol and alarm status.
Setting the sleep timer
The sleep timer will automatically switch off the radio after a preset time has elapsed.
- Press and continue to hold down the SLEEP button, the display will cycle through the available sleep time 90-60-45-15-90. Release the SLEEP button when the required sleep time appears in the display. The SLEEP symbol together with frequency will appear in the display.
- To cancel the sleep function, press the POWER button, the SLEEP symbol will disappear and the display will revert to show real time.
FM Mono/Stereo
- To listen to FM stereo broadcasts, tune to the required station, plug in headphones and set the FM ST./MO. Switch located on the left side of the radio to the ST. (stereo)position, If the station being received is weak some hiss may be audible, to reduce the hiss set the switch to the MO.(mono) position to return to mono operation.
Note: FM stereo is only available via earphones.
Headphones (or earphones)
Headphones for use with this radio should be stereo and fitted with a 3.5mm stereo jack plug Insert the headphone plug into the socket marked on the left side of the radio. When the headphones are plugged in, the loudspeaker is automatically disconnected.
Lock Switch
The lock switch is used to prevent unintentional operation of the radio.
- Set the LOCK switch located on the bottom side of the radio to the ON position. The Lock symbol will appear in the display. The POWER and all other buttons will be disabled. This will prevent accidental operation when the radio is packed in a suitcase or carrying pouch. To release the LOCK switch, move the switch to OFF position, the LOCK symbol will be
Light
Pressing the light button located on the top of the radio will turn on the light and illuminate the display for approximately 7 seconds.
MW step switch
- This switch located on the bottom side of the radio provides a means of changing the MW step from 9kHz to 10kHz . In Europe and most other parts of the world, set the switch to the 9kHz position. For the USA and Canada, set the switch to the 10kHz position.
Troubleshooting/RESET button
If the radio fails to operate correctly, or some digits on the display are missing or incomplete, carry out the following procedure.
- Switch off the radio and remove the batteries.
- With the aid of a suitable implement (the end of a paper clip or pen), press the RESET button located in the battery compartment for at least 5 seconds, this will reset the microprocessor, clock time and clear all stations stored in the preset memory.
Care and maintenance
Do not allow this radio to be exposed to water, steam or sand, Do not leave the radio where excessive heat could cause damage such as in a parked car where the heat from the sun can build up even though the outside temperature may no Seem too high.
Specifications
Frequency range
| FM | 87.5 | - | 108 | Mhz | |
| MW | 520-1710 or | 522 | - | 1710 | kHz |
| SW | 120m | 2.3 | - | 2.495 | MHz |
| 90m | 3.2 | - | 3.4 | Mhz | |
| 75m | 3.85 | - | 4.0 | MHz | |
| 60m | 4.75 | - | 5.06 | MHz | |
| 49m | 5.9 | - | 6.2 | MHz | |
| 41m | 7.1 | - | 7.35 | MHz | |
| 31m | 9.4 | - | 9.99 | MHz | |
| 25m | 11.6 | - | 12.10 | MHz | |
| 21m | 13.57 | - | 13.87 | MHz | |
| 19m | 15.1 | - | 15.8 | MHz | |
| 16m | 17.48 | - | 17.9 | MHz | |
| 15m | 18.9 | - | 19.02 | MHz | |
| 13m | 21.45 | - | 21.75 | MHz | |
| 11m | 25.6 | - | 26.1 | MHz |
Specification content
Power requirement 6V
Batteries 4 X IEC size Lr6 (AA) (UM-3)
Battery life Approx.16-20 hours of listening when used for 4 hour a day at normal volume using alkaline batteries.
Circuit features
Semiconductors
Aerial system
1 LSI,5IC'S, 2 FET ,39 transistors ,34 diodes,1 LED
MW Built in ferrite aerial
SW Telescopic aerial
FM Telescopic aerial
180 mW
Output Power
Sockets
Headphones socket
DC in
Accessories
3.5 mm dia stereo
6 volts centre pin negative
Carrying pouch and stereo earphones
(Accessories may be different from each market)