INCOGNITO SS20 - Enceintes sans fil CAMBRIDGE AUDIO - Notice d'utilisation et mode d'emploi gratuit
Retrouvez gratuitement la notice de l'appareil INCOGNITO SS20 CAMBRIDGE AUDIO au format PDF.

| Type de produit | Enceinte encastrable |
|---|---|
| Caractéristiques techniques principales | Haut-parleur de 20 cm, tweeter de 1 pouce, réponse en fréquence de 50 Hz à 20 kHz |
| Alimentation électrique | Non applicable (enceinte passive) |
| Dimensions approximatives | Diamètre : 230 mm, profondeur : 100 mm |
| Poids | 2,5 kg par enceinte |
| Compatibilités | Compatible avec la plupart des amplificateurs audio |
| Type de batterie | Non applicable |
| Tension | Non applicable (enceinte passive) |
| Puissance | Puissance nominale de 100 W, puissance maximale de 200 W |
| Fonctions principales | Son de haute qualité, design discret pour une intégration dans les murs ou plafonds |
| Entretien et nettoyage | Essuyer avec un chiffon doux, éviter les produits chimiques agressifs |
| Pièces détachées et réparabilité | Disponibilité de pièces de rechange pour les haut-parleurs et tweeters |
| Informations générales utiles | Idéal pour les installations audio domestiques, sonorisation de salles de réunion, etc. |
FOIRE AUX QUESTIONS - INCOGNITO SS20 CAMBRIDGE AUDIO
Questions des utilisateurs sur INCOGNITO SS20 CAMBRIDGE AUDIO
0 question sur cet appareil. Repondez a celles que vous connaissez ou posez la votre.
Poser une nouvelle question sur cet appareil
Téléchargez la notice de votre Enceintes sans fil au format PDF gratuitement ! Retrouvez votre notice INCOGNITO SS20 - CAMBRIDGE AUDIO et reprennez votre appareil électronique en main. Sur cette page sont publiés tous les documents nécessaires à l'utilisation de votre appareil INCOGNITO SS20 de la marque CAMBRIDGE AUDIO.
MODE D'EMPLOI INCOGNITO SS20 CAMBRIDGE AUDIO
incognito SS20
Premium ceiling speakers
Installation guide
INTRODUCTION
Thank you for purchasing these Cambridge Audio Incognito SS20 premium ceiling speakers. Incognito is a cost-effective, modular based system using standard Cat-5 or Cat-6 cable to distribute hi-fi quality sound and video images around the home. The SS20 are for use primarily in conjunction with the KP10 amplified keypad.
About this unit
Your new Incognito in-ceiling speakers have been designed specifically to enhance the performance of your home entertainment system.
They are the result of an extensive research and development programme undertaken to provide you with accurate, uncompromised reproduction of movie soundtracks and music. With attention to detail second to none, these speakers are designed to deliver maximum enjoyment. They mount flush with the ceiling, and you can paint their frames and grilles to match the room's decor.
Please take time to read this guide, as it contains important installation information. The SS20 can only be as good as the system it is connected to. Please do not compromise on your audio/visual source components. Naturally, we recommend products from the Cambridge Audio Azur range.
Thanks for taking the time to read this manual, we do recommend you keep it for future reference.

Matthew Bramble
Technical Director
PREPARING THE LOCATION
It is advisable to plan all aspects of installation in advance of work beginning, preferably with the house/flat building schematics if available. Great care should be taken to ensure that all building regulations are followed. If in doubt consult an expert.
When placing the SS20 speakers, thought should be given to positions which give the best desired sound coverage throughout a room, while not interfering with existing or planned light fittings or joists. Also, locate speakers taking into account location of furnishings for optimal stereo reproduction.
Follow these steps to prepare the mounting location:
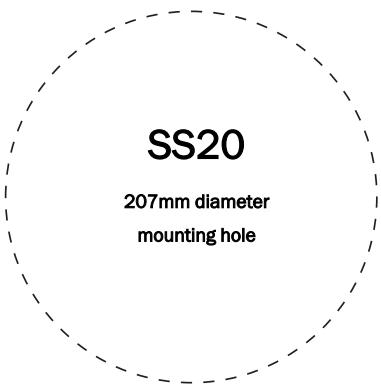
- Remove the round cardboard pad from inside the supplied template (see below).
4 Incognito premium ceiling speakers
- Use the template to mark the position for the mounting hole at the selected location.
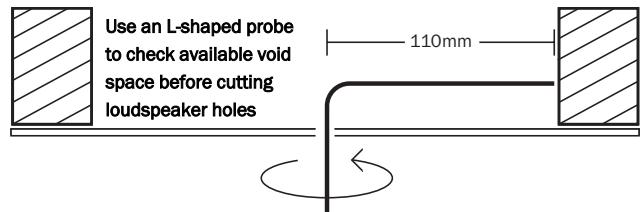
Before cutting ceiling speaker holes, it is suggested that the area is tested for clearance by making an L-shaped probe from strong wire (see illustration below), drilling a small hole in the target area, inserting the probe and slowly turning. Any obstructions will be immediately obvious, and the target area can be moved to a more suitable position.
- Cut the mounting hole with a drywall or keyhole saw.
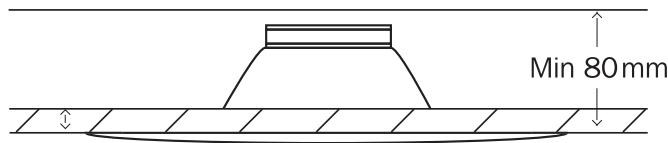
Be sure the mounting surface is between 10 and 30mm thick, and that there is at least 80mm of clearance behind the mounting surface. Also, be sure no wall studs or other objects block the back of the speaker.
Min 10-30mm
PAINTING THE FRAME AND GRILLE
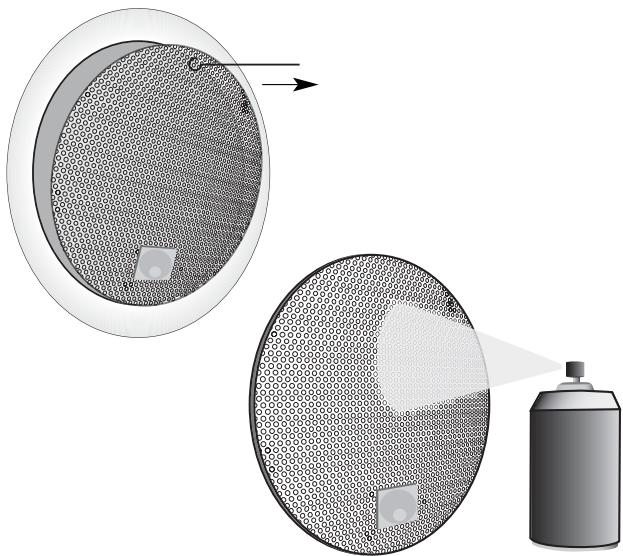
Remove grille by inserting a small hook or similar small implement into one of the grille openings, then pulling on the grille.
Fit the clear plastic painting mask provided when painting the speaker surround to avoid getting paint getting on the speaker cone.
CARE AND MAINTENANCE
Your speakers are an example of superior design and craftsmanship. These suggestions will help you care for them so you can enjoy them for years.
Keep the speakers dry. If they get wet dry immediately. Liquids can contain minerals that can corrode electronic components.
Keep the speakers away from dust or dirt, which can cause premature wear of parts.
Wipe the speaker frame occasionally with a damp cloth to keep it looking new. Do not use harsh chemicals, cleaning solvents or strong detergents.
MOUNTING THE SS20
Before mounting, ensure that the four fixing screws are slackened off so that the red mounting dog-legs can move freely.
Move each red dog-leg foot to the LEFT into it's holding slot, and then insert the speaker into the mounting hole.
Using a cross-head screwdriver, slowly turn each fixing screw clockwise. This will move the mounting dog-legs out of their slots.
Tighten each fixing screw until the mounting dog-legs grip the ceiling.
CONNECTING THE SS20
Do not compromise the performance of your system by using inferior quality speaker cables. We recommend that high quality cables of 16 gauge or higher be used. Your professional dealer will give you good advice. Always unplug all A.C. powered components before making any loudspeaker or component connections. This will avoid the risk of electric shock or damage to your equipment.
Follow these steps to connect the speaker to your amplification system:
-
Route the speaker cable from your amplification system to the speakers.
-
Avoid routing the speaker cable near electrical wires
-
Do not nail or staple the cable
-
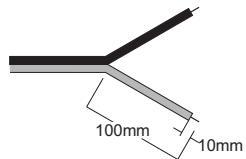
Separate about 100mm of speaker cable at each end.
6 Incognito premium ceiling speakers
- Using a wire stripper, remove about 10mm of insulation from both ends of each conductor, and then twist the strands of each conductor.
- Observing polarity is of the utmost importance while connecting your speakers. Ensure that the red (+) terminals on your amplification system are connected to the red (+) on the speakers, and black (-) on your amplification system to black (-) on your speakers.
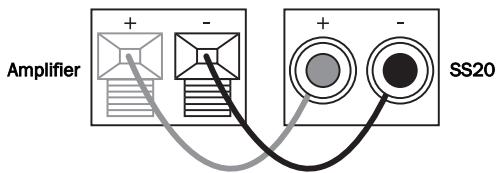
The speaker cable is coded with a bead or stripe down one lead's insulation, or has differently coloured wires. Press the spring-loaded red or black terminal to reveal the connecting hole. Insert the stripped end of the speaker wire, then release.
- If your speakers are wired incorrectly they will be out of phase and sound hollow and indistinct, with a weak bass. Re-check your connections for correct polarity and reverse the connections if necessary.
TROUBLESHOOTING
There is no sound
Ensure that the amplifier is set correctly.
Check that the interconnects are inserted correctly.
The sound is distorted or garbled
Check aerial connections and placements.
There is a hum coming from the speaker
Ensure that all cable connections are secure.
There is unwanted background noise and interference
Move the tuner (or other source) away from any other electrical equipment that may be likely to cause interference.
The remote handset will not function
Check that the batteries have not expired.
Ensure that nothing is blocking the remote sensor.
TECHNICAL SPECIFICATIONS
Frequency response 58Hz-20kHz (+/-2dB)
Impedance 4 Ohms
Operational efficiency 90dB for 2.83V
Weight 1.1kg / 2.4lbs
Dimensions 240 x 75mm (9.4 x 3")
The crossed-out wheeled bin is the European Union symbol for indicating separate collection for electrical and electronic equipment. This product contains electrical and electronic equipment which should be reused, recycled or recovered and should not be disposed of with unsorted regular waste. Please return the unit or contact the authorised dealer from whom you purchased this product for more information.
This product complies with European Low Voltage (73/23/EEC) and Electromagnetic Compatibility (89/336/EEC) Directives when used and installed according to this instruction manual. For continued compliance only Cambridge Audio accessories should be used with this product and servicing must be referred to qualified service personnel.


LIMITED WARRANTY
Cambridge Audio warrants this product to be free from defects in materials and workmanship (subject to the terms set forth below). Cambridge Audio will repair or replace (at Cambridge Audio's option) this product or any defective parts in this product. Warranty periods may vary from country to country. If in doubt consult your dealer and ensure that you retain proof of purchase.
To obtain warranty service, please contact the Cambridge Audio authorised dealer from which you purchased this product. If your dealer is not equipped to perform the repair of your Cambridge Audio product, it can be returned by your dealer to Cambridge Audio or an authorised Cambridge Audio service agent. You will need to ship this product in either its original packaging or packaging affording an equal degree of protection.
Proof of purchase in the form of a bill of sale or receipted invoice, which is evidence that this product is within the warranty period, must be presented to obtain warranty service.
This warranty is invalid if (a) the factory-applied serial number has been altered or removed from this product or (b) this product was not purchased from a Cambridge Audio authorised dealer. You may call Cambridge Audio or your local country Cambridge Audio distributor to confirm that you have an unaltered serial number and/or you purchased from a Cambridge Audio authorised dealer.
This warranty does not cover cosmetic damage or damage due to acts of God, accident, misuse, abuse, negligence, commercial use, or modification of, or to any part of, the product. This warranty does not cover damage due to improper operation, maintenance or installation, or attempted repair by anyone other than Cambridge Audio or a Cambridge
Audio dealer, or authorised service agent which is authorised to do Cambridge Audio warranty work. Any unauthorised repairs will void this warranty. This warranty does not cover products sold AS IS or WITH ALL FAULTS.
REPAIRS OR REPLACEMENTS AS PROVIDED UNDER THIS WARRANTY ARE THE EXCLUSIVE REMEDY OF THE CONSUMER. CAMBRIDGE AUDIO SHALL NOT BE LIABLE FOR ANY INCIDENTAL OR CONSEQUENTIAL DAMAGES FOR BREACH OF ANY EXPRESS OR IMPLIED WARRANTY IN THIS PRODUCT. EXCEPT TO THE EXTENT PROHIBITED BY LAW, THIS WARRANTY IS EXCLUSIVE AND IN LIEU OF ALL OTHER EXPRESS AND IMPLIED WARRANTYES WHATSOEVER INCLUDING, BUT NOT LIMITED TO, THE WARRANTY OF MERCHANTABILITY AND FITNESS FOR A PRACTICAL PURPOSE.
Some countries and US states do not allow the exclusion or limitation of incidental or consequential damages or implied warranties so the above exclusions may not apply to you. This warranty gives you specific legal rights, and you may have other statutory rights, which vary from state to state or country to country.