INCOGNITO AS10 - Enceintes sans fil CAMBRIDGE AUDIO - Notice d'utilisation et mode d'emploi gratuit
Retrouvez gratuitement la notice de l'appareil INCOGNITO AS10 CAMBRIDGE AUDIO au format PDF.

| Type d'enceinte | Active encastrable au plafond |
| Puissance | Non précisé |
| Réponse en fréquence | Non précisé |
| Impédance | Non précisé |
| Connectivité | Non précisé |
| Dimensions | Non précisé |
| Poids | Non précisé |
| Installation | Encastrable au plafond |
| Alimentation | Non précisé |
| Matériau du boîtier | Non précisé |
| Couleur | Non précisé |
| Utilisation recommandée | Audio professionnel ou domestique |
| Type de haut-parleur | Actif |
| Garantie | Non précisé |
| Accessoires inclus | Non précisé |
FOIRE AUX QUESTIONS - INCOGNITO AS10 CAMBRIDGE AUDIO
Questions des utilisateurs sur INCOGNITO AS10 CAMBRIDGE AUDIO
0 question sur cet appareil. Repondez a celles que vous connaissez ou posez la votre.
Poser une nouvelle question sur cet appareil
Téléchargez la notice de votre Enceintes sans fil au format PDF gratuitement ! Retrouvez votre notice INCOGNITO AS10 - CAMBRIDGE AUDIO et reprennez votre appareil électronique en main. Sur cette page sont publiés tous les documents nécessaires à l'utilisation de votre appareil INCOGNITO AS10 de la marque CAMBRIDGE AUDIO.
MODE D'EMPLOI INCOGNITO AS10 CAMBRIDGE AUDIO
incognito AS10
A-BUS Active Ceiling Speakers
Installation Guide
CONTENTS
Introduction 3
Preparing the location 4
Mounting the AS10 5
Painting the frame and grille 5
Care and maintenance 5
AS10-A rear connections 6
Connecting the AS10 7
Wiring guide. 8
Using the remote handset 8
Sound adjustment functions 9
Advanced features 10
AS10-A jumper settings 11
Troubleshooting. 12
INTRODUCTION
Thank you for purchasing these Cambridge Audio Incognito AS10 A-BUS™ Active Ceiling Speakers. Incognito is a cost-effective, modular based system using standard Cat-5 or Cat-6 cable to distribute hi-fi quality sound and video around a home. The AS10 over-paintable ceiling-mounted active speakers have amplifiers and IR sensors built-in, and so do not require an Incognito KP10 keypad to work. These neat components are the only visual clues to an Incognito equipped room.
The AS10 is based on the A-BUS standard and can be used with other manufacturers equipment based on this standard. Note that different modes of operation are possible and it is very important that the instructions within this guide are read and followed or the unit may not operate correctly.
About this unit
The AS10 pair is made up of one speaker with the amplifier attached (active AS10-A) and one conventional (passive AS10-P) speaker. The AS10 is A-BUS compatible for use where an installer wishes to avoid the complication of a separate keypad and speakers. The drive unit and crossover have been designed to take account of the angles, frequencies and energy distribution characteristics of in-wall and in-ceiling applications.
The discreet visual design of this product ensures that it is the quality of the audio performance rather than their appearance that holds the attention. Where required, grilles may also be painted to co-ordinate with existing décor, rendering them virtually invisible.
Please take time to read this guide, as it contains important installation information. The AS10 can only be as good as the system it is connected to. Please do not compromise on your audio/visual source components. Naturally, we recommend products from the Cambridge Audio Azur range.
Now we invite you to sit back, relax and enjoy!

Matthew Bramble
Technical Director
Incognito is a trademark of Cambridge Audio Ltd. All rights reserved.
A-BUS is a registered trademark of LeisureTech Electronics Pty Ltd Australia
PREPARING THE LOCATION
It is advisable to plan all aspects of installation in advance of work beginning, preferably with the house/flat building schematics if available. Great care should be taken to ensure that all building regulations are followed. If in doubt consult an expert.
When placing the AS10 speakers, thought should be given to positions which give the best desired sound coverage throughout a room, while not interfering with existing or planned light fittings or joists. Also, locate speakers taking into account location of furnishings for optimal stereo reproduction.
Follow these steps to prepare the mounting location:
- Remove the round cardboard pad from inside the supplied template (see below).

4 Incognito active ceiling speakers
- Use the template to mark the position for the mounting hole at the selected location.
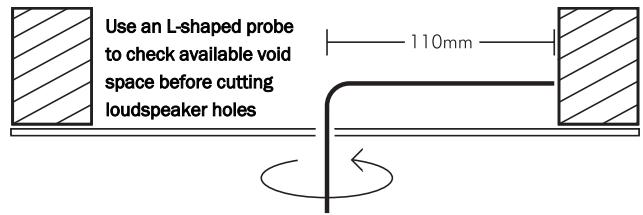
Before cutting ceiling speaker holes, it is suggested that the area is tested for clearance by making an L-shaped probe from strong wire (see illustration below), drilling a small hole in the target area, inserting the probe and slowly turning. Any obstructions will be immediately obvious, and the target area can be moved to a more suitable position.
- Cut the mounting hole with a drywall or keyhole saw.
Be sure the mounting surface is between 10 and 30mm thick, and that there is at least 80mm of clearance behind the mounting surface. Also, be sure no wall studs or other objects block the back of the speaker.
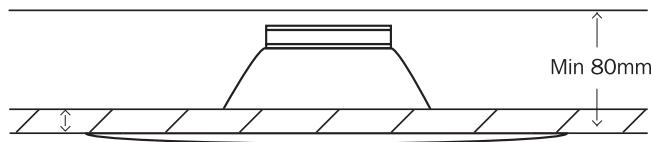
Min 10-30mm
MOUNTING THE AS10
Before mounting, ensure that the four fixing screws are slackened off so that the red mounting dog-legs can move freely.
Move each red dog-leg foot to the LEFT into it's holding slot, and then insert the speaker into the mounting hole.
Using a cross-head screwdriver, slowly turn each fixing screw clockwise, this will move the mounting dog-legs out of their slots.
Tighten each fixing screw until the mounting dog-legs grip the ceiling.
PAINTING THE FRAME AND GRILLE
Remove grille by inserting a small hook or similar small implement into one of the grille openings, then pulling on the grille.
For AS10-A, carefully disconnect the IR connector lead before proceeding (see fig.1 below).
Fit the clear plastic painting mask provided when painting the speaker surround to avoid getting paint getting on the speaker cone.
For AS10-A unscrew IR window assembly before spray painting (see fig. 2 below).
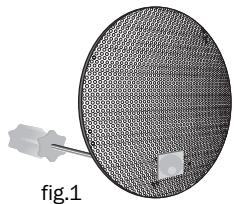
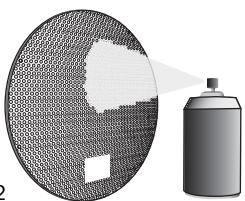
fig.2
CARE AND MAINTENANCE
Your speakers are an example of superior design and craftsmanship. These suggestions will help you care for them so you can enjoy them for years.
Keep the speakers dry. If they get wet dry immediately. Liquids can contain minerals that can corrode electronic components.
Keep the speakers away from dust or dirt, which can cause premature wear of parts.
Wipe the speaker frame occasionally with a damp cloth to keep it looking new. Do not use harsh chemicals, cleaning solvents or strong detergents.
AS10-A REAR CONNECTIONS
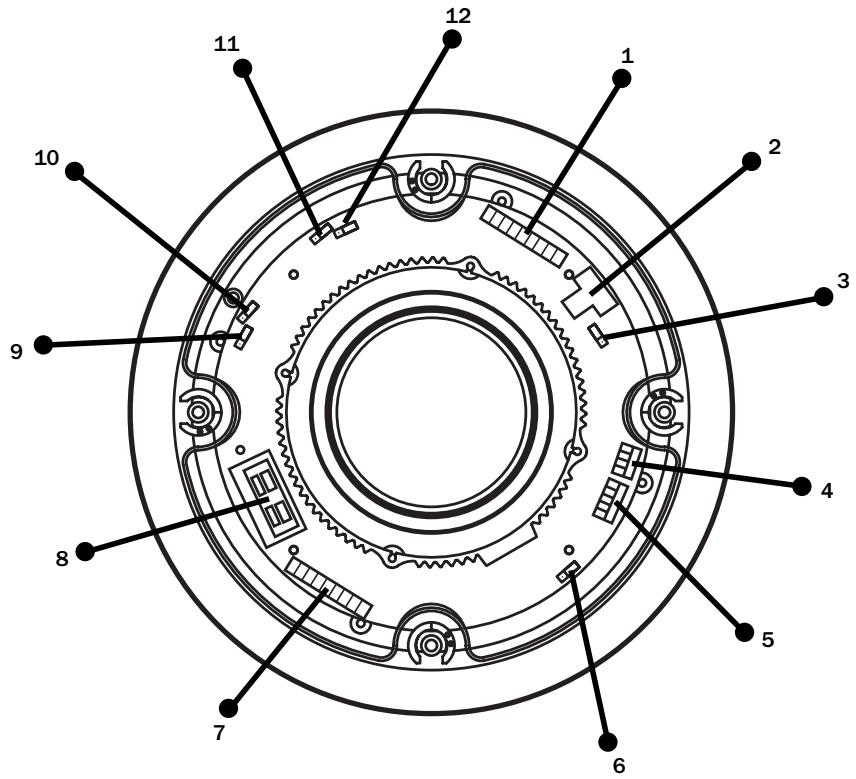
1 - Connection to AH10 or A-BUS ready/Incognito ready socket via Cat-5/5E cable
2 - Optional independent local power socket
3 - Stereo/Mono jumper (CN17)
4 - Local input
5 - Preamp output
6 - Stereo/mono jumper (CN14)
7 - Cat-5e connection to passive speaker
8 - Speaker cable connection to passive speaker
9 - 123 jumper (no current function)
10 - Incognito/A-BUS mode jumper
11 - Local jumper
12 - Fader jumper
CONNECTING THE AS10
- Using a single Cat-5e cable, connect the AS10-A to the AH10/VH10 via an RJ45 plug at the AH10, and the 8-way colour-coded punch-down connection at the AS10-A (see wiring guide below opposite).
The RJ45 hub connection should be wired to EIA/TIA568A standard (see below opposite).
The Cat-5 connection from AH10 to the AS10-A should not exceed 30m / 100 ft.
- The AS10-A is then connected to the AS10-P using either a run of high-quality speaker cable (preferred) or Cat-5e cable (optional) terminated at 8-way colour-coded punch down connections (all eight cores must be connected).
Only one method of connection between the active and passive speaker is necessary.
Do not compromise the performance of your system by using inferior quality speaker cables. We recommend that high quality cables of 16 gauge or higher be used. Your professional dealer will give you good advice. Always unplug all A.C. powered components before making any loudspeaker or component connections. This will avoid the risk of electric shock or damage to your equipment.
Separate about 100mm of speaker cable at each end, then using a wire stripper, remove about 10mm of insulation from both ends of the conductor, and then twist the strands (see fig.1 above opposite).
When connecting the AS10-A to the AS10-P, observing polarity is of the utmost importance. Ensure that the red (+) terminals on your active speaker are connected to the red (+) terminals on the passive speaker,
and black (-) terminals on your active speaker to black (-) terminals on your passive speaker (fig.2 below).
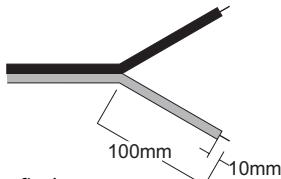
fig.1.
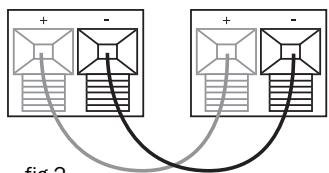
fig.2.
The speaker cable is coded with a bead or stripe down one lead's insulation, or has differently coloured wires. Press the spring-loaded red or black tab to reveal the connecting hole. Insert the stripped end of the speaker wire, then release the tab. If your speakers are wired incorrectly they will be out of phase and sound hollow and indistinct, with a weak bass. Re-check your connections for correct polarity and reverse the connections if necessary.
WIRING GUIDE
EIA/TIA 568A wiring standard (View from contact end)
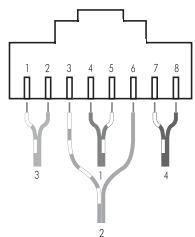
1 white/green
2 green
3 white/orange
4 blue
5 white/blue
6 orange
7 white/brown
8 brown
Cat5e cable terminated at AS10 8-way punch down connector
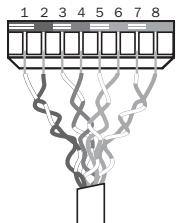
1 white/brown
2 brown
3 white/blue
4 blue
5 white/green
6 green
7 white/orange
8 orange
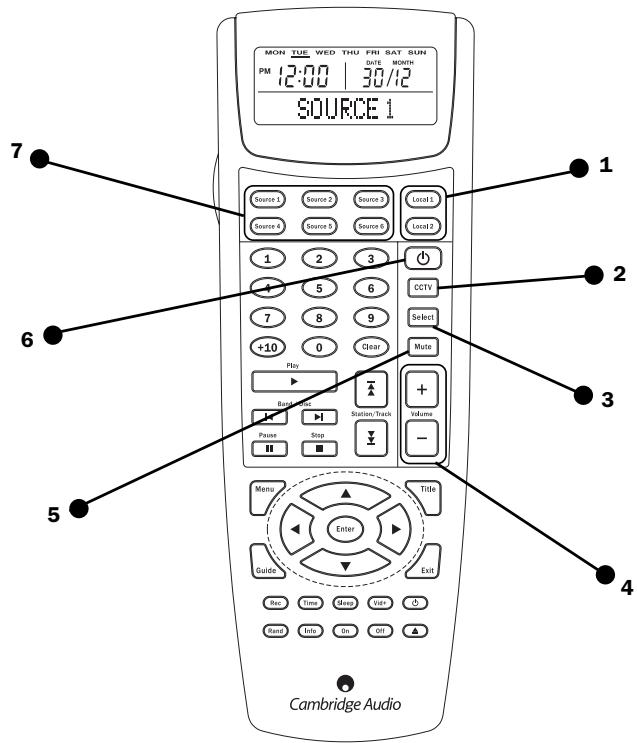
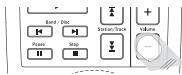
USING THE REMOTE HANDSET
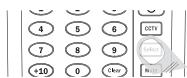
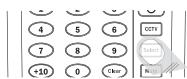
The AS10s are operated via the LR10 which is a learning remote control capable of controlling not only the AS10 but also the source equipment.
- Local Switches to local input (where fitted).
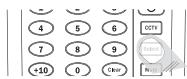
- CCTV Selects CCTV source on the VH10 if fitted.
- Select See opposite page for details.
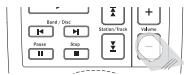
- Volume Controls volume level and sound adjustment functions (see opposite).
- Mute Mutes the audio output of the room.
- Standby symbol Switches the whole system to Standby. Audio is muted and 12V trigger output turned off.
- Source select The LR10 has eight device banks (Tuner, CD etc), six of which are related to the six inputs on the Incognito system plus two further local banks which can be used to control sources local to the room in which the remote is being used.
SOUND ADJUSTMENT FUNCTIONS
Bass
Press the Select button once: One bleep will sound
Adjust Bass level using volume buttons
Treble
Press the Select button twice: Two bleeps will sound
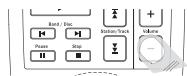
Adjust Treble level using volume buttons
Balance
Press Select button three times: Three bleeps will sound
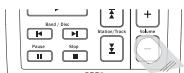
Adjust Balance using volume buttons (Up=towards right, Down=towards left)
Fader (if applicable)

Press Select four times: Four bleeps will sound
Adjust audio levels between main speakers, and any extra equipment connected to the AS10 pre-amp output (Up = Towards main, Down = Towards preamp)
During sound adjustment tones are generated to indicate position within the available range:
A single medium frequency tone indicate a neutral setting.
Two rising tones indicate the upper level of adjustment has been reached.
Two falling tones indicate the lower level of adjustment range has been reached.
ADVANCED FEATURES
Local Source Input
It is possible to install a piece of source equipment to be used local to the room that contains the AS10. This might be a games machine or CD player in the bedroom, for example. There are two ways of connecting a local source:
INCGNITO LM10 WALLPLATE
The LM10 wallplate has a line input and and IR output socket for IR control of the local source via the AH10/VH10.
See dedicated literature for installation instructions.
Local Jumper MUST be set to left and centre pins - see page 11.
AS10 ONBOARD LOCAL INPUT
A local source can be connected directly to the AS10. IR control of the source can only be done 'line-of-sight' in this case as the AS10 does not have an IR output.
Connection to the local input socket on the AS10-A should be via screened audio cable, terminated at a suitable faceplate.
Local jumper MUST be set to centre and right pins - see page 11.
Preamp Output
A preamp output is provided for optional driving of an auxiliary stereo amplifier or active subwoofer etc. Connection from the preamp should be by screened audio cable.
If utilising the preamp output facility you may wish to activate the Fader function. This will allow you to balance the relative output levels between the AS10 and the auxiliary component. Move the Fader jumper switch on the AS10-A to the centre and right pins (see page 11).
Independent 24 V local power supply
The AS10 is powered directly from the AH10/VH10 via the Cat-5 cable. If your installation has very long cable runs from the AH10/VH10 to the AS10 (greater than 30m ) the AS10 must be locally powered instead. This simply involves plugging an Incognito PS10 power supply into the local power socket on the AS10.
IR Window
Receives signals from remote controls.
Blinks red to indicate signal received.
Status LED
Speaker on: Solid green.
Speaker off: Off.
Speaker in mute: Blinks slowly green.
Adjusting volume or sound: Blinks orange.
AS10-A JUMPER SETTINGS
NOTE - INCORRECT JUMPER SETTINGS CAN PREVENT THE UNIT FROM WORKING CORRECTLY!
The AS10-A has five 'push-on jumpers' (shown below - see illustration on page 6 for PCB location) that select between alternative modes of operation.
Fader
Turns Fader function on and off. See page 9 for details.

Fader off (default)

Fader on
Local
Switches between LM10 local and AS10 onboard option. See page 10 for details.

LM10 mode (default)

AS10 onboard
Incognito/A-BUS
Switches between Incognito Enhanced mode for use with Incognito hubs, and normal A-BUS mode.

Incognito Enhanced mode (default)

Standard A-BUS mode
For use with an Incognito AH10 A-BUS hub the jumper MUST be in the INCognito position. For any other use, with standard A-BUS hubs and amplifiers from other manufacturers or Cambridge Audio Incognito ready amplifiers the jumper MUST be in the A-BUS position.
123 jumper
For future software expansion (not currently used).
Stereo/Mono mode
The default mode for the AS10-A is stereo, but there are two optional mono modes:

Stereo mode (default)

Stereo mode (default)
Mono 1 mode (1 channel mode)
In instances where it is desired to fit only one speaker (ie in a small room such as a bathroom), the AS10-A (active) speaker can be set to mono mode, and the AS10-P (passive) speaker not used. The active speaker then reproduces both left and right signals combined. Starting from the default jumper positions on the AS10-A, the CN17 jumper stays on the RIGHT end pins and the CN14 jumper moves to the LEFT end pins.

Mono 1 mode (1 channel mono)

Mono 1 mode (1 channel mono)
Mono 2 mode (2 channel mode)
In instances where two speakers will be installed but due to physical placement stereo imaging will not work effectively (ie in an L-shaped room or corridor etc), the speaker pair can be set to mono mode. The speakers then both reproduce left and right signals combined. Starting from the default jumper positions on the AS10-A, move the CN17 jumper to the LEFT end pins and the CN14 jumper stays on the RIGHT end pins.

Mono 2 mode (2 channel mono)

Mono 2 mode (2 channel mono)
TROUBLESHOOTING
There is no sound
Ensure that the amplifier is set correctly.
Check that the interconnects are inserted correctly.
The sound is distorted or garbled
Check aerial connections and placements.
There is a hum coming from the speaker
Ensure that all cable connections are secure.
There is unwanted background noise and interference
Move the tuner or other source away from electrical equipment that is likely to cause interference.
The remote handset will not function
Check that the batteries have not expired.
Ensure that nothing is blocking the remote sensor.
The crossed-out wheeled bin is the European Union symbol for indicating separate collection for electrical and electronic equipment. This product contains electrical and electronic equipment which should be reused, recycled or recovered and should not be disposed of with unsorted regular waste. Please return the unit or contact the authorised dealer from whom you purchased this product for more information.

SPECIFICATIONS
Frequency response 60Hz-20kHz (+/- 2dB)
THD <0.25% @ 5W, 1kHz
Signal/Noise ratio 80dB
Input impedance (local input) 33K Ohms
Volume control range 0 to -78dB in 31 steps
Treble control range +/- 14dB @ 20kHz, in seven 2.5dB steps (cut and boost)
Bass control range +/- 14dB @ 100kHz, in seven 2.5dB steps (cut and boost)
Balance control range +0 / - 17.5dB @ 20kHz in seven 2.5dB steps (L and R)
Fader control range +0 / - 17.5dB @ 20kHz in seven 2.5dB steps(front and back)
Pre-amp output Variable, following volume setting
IR passthrough 34-40kHz and 54-58kHz frequencies supported
Speaker impedance 4 Ohms
Power requirement +24V DC @ 1A max from hub
Weight (AS10-A) 1.4kg / 3.1lbs
Weight (AS10-P) 1.1kg / 2.4lbs
Dimensions 240 x 75 (mm), 9.4 x 3 (inches)
LIMITED WARRANTY
Cambridge Audio warrants this product to be free from defects in materials and workmanship (subject to the terms set forth below). Cambridge Audio will repair or replace (at Cambridge Audio's option) this product or any defective parts in this product. Warranty periods may vary from country to country. If in doubt consult your dealer and ensure that you retain proof of purchase.
To obtain warranty service, please contact the Cambridge Audio authorised dealer from which you purchased this product. If your dealer is not equipped to perform the repair of your Cambridge Audio product, it can be returned by your dealer to Cambridge Audio or an authorised Cambridge Audio service agent. You will need to ship this product in either its original packaging or packaging affording an equal degree of protection.
Proof of purchase in the form of a bill of sale or receipted invoice, which is evidence that this product is within the warranty period, must be presented to obtain warranty service.
This warranty is invalid if (a) the factory-applied serial number has been altered or removed from this product or (b) this product was not purchased from a Cambridge Audio authorised dealer. You may call Cambridge Audio or your local country Cambridge Audio distributor to confirm that you have an unaltered serial number and/or you purchased from a Cambridge Audio authorised dealer.
This warranty does not cover cosmetic damage or damage due to acts of God, accident, misuse, abuse, negligence, commercial use, or modification of, or to any part of, the product. This warranty does not cover damage due to improper operation, maintenance or installation, or attempted repair by anyone other than Cambridge Audio or a Cambridge
Audio dealer, or authorised service agent which is authorised to do Cambridge Audio warranty work. Any unauthorised repairs will void this warranty. This warranty does not cover products sold AS IS or WITH ALL FAULTS.
REPAIRS OR REPLACEMENTS AS PROVIDED UNDER THIS WARRANTY ARE THE EXCLUSIVE REMEDY OF THE CONSUMER. CAMBRIDGE AUDIO SHALL NOT BE LIABLE FOR ANY INCIDENTAL OR CONSEQUENTIAL DAMAGES FOR BREACH OF ANY EXPRESS OR IMPLIED WARRANTY IN THIS PRODUCT. EXCEPT TO THE EXTENT PROHIBITED BY LAW, THIS WARRANTY IS EXCLUSIVE AND IN LIEU OF ALL OTHER EXPRESS AND IMPLIED WARRANTYES WHATSOEVER INCLUDING, BUT NOT LIMITED TO, THE WARRANTY OF MERCHANTABILITY AND FITNESS FOR A PRACTICAL PURPOSE.
Some countries and US states do not allow the exclusion or limitation of incidental or consequential damages or implied warranties so the above exclusions may not apply to you. This warranty gives you specific legal rights, and you may have other statutory rights, which vary from state to state or country to country.