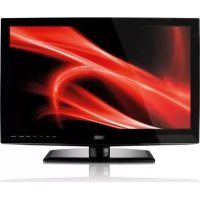
TV019 - Téléviseur SWEEX - Notice d'utilisation et mode d'emploi gratuit
Retrouvez gratuitement la notice de l'appareil TV019 SWEEX au format PDF.

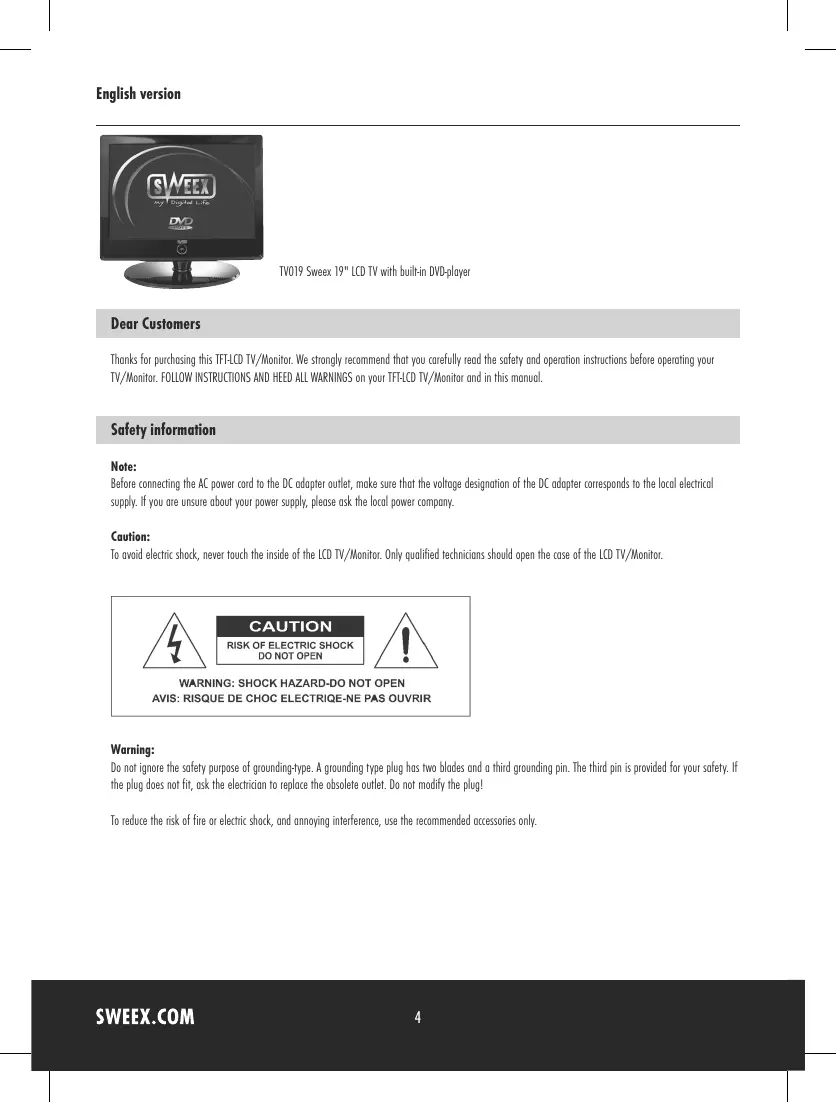

| Type d'écran | LCD |
| Taille de l'écran | 19 pouces |
| Lecteur intégré | DVD |
| Résolution | Non précisé |
| Connectivité | Non précisé |
| Alimentation | Adaptateur DC |
| Consommation électrique | Non précisé |
| Type de montage | Sur pied |
| Langues du manuel | Multilingue |
| Précautions de sécurité | Ne pas ouvrir, risque de choc électrique |
| Garantie | Non précisé |
| Poids | Non précisé |
| Dimensions | Non précisé |
| Compatibilité | Non précisé |
| Accessoires inclus | Non précisé |
FOIRE AUX QUESTIONS - TV019 SWEEX
Questions des utilisateurs sur TV019 SWEEX
0 question sur cet appareil. Repondez a celles que vous connaissez ou posez la votre.
Poser une nouvelle question sur cet appareil
Téléchargez la notice de votre Téléviseur au format PDF gratuitement ! Retrouvez votre notice TV019 - SWEEX et reprennez votre appareil électronique en main. Sur cette page sont publiés tous les documents nécessaires à l'utilisation de votre appareil TV019 de la marque SWEEX.
MODE D'EMPLOI TV019 SWEEX
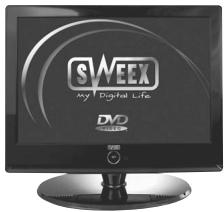
TV019 Sweex 19^ LCD TV with built-in DVD-player
Dear Customers
Thanks for purchasing this TFT-LCD TV/Monitor. We strongly recommend that you carefully read the safety and operation instructions before operating your TV/Monitor. FOLLOW INSTRUCTIONS AND HEED ALL WARNINGS on your TFT-LCD TV/Monitor and in this manual.
Safety information
Note:
Before connecting the AC power cord to the DC adapter outlet, make sure that the voltage designation of the DC adapter corresponds to the local electrical supply. If you are unsure about your power supply, please ask the local power company.
Caution:
To avoid electric shock, never touch the inside of the LCD TV/Monitor. Only qualified technicians should open the case of the LCD TV/Monitor.

CAUTION
RISK OF ELECTRIC SHOCK DO NOT OPEN

WARNING: SHOCK HAZARD-DO NOT OPEN AVIS: RISQUE DE CHOC ELECTRIQE-NE PAS OUVIRM
Warning:
Do not ignore the safety purpose of grounding-type. A grounding type plug has two blades and a third grounding pin. The third pin is provided for your safety. If the plug does not fit, ask the electrician to replace the obsolete outlet. Do not modify the plug!
To reduce the risk of fire or electric shock, and annoying interference, use the recommended accessories only.
Precautions
Please read the below precautions carefully before operating the unit.
Power cord protection:
- Never use your LCD TV/Monitor if the power cord has been damaged. Do not put anything on the power cord, and keep the power cord away from where people can easily trip over it.
- Be sure to hold the plug, do not pull the cord when disconnecting the LCD TV/Monitor from an electric socket.
- Locate your LCD TV/Monitor near an easy accessible AC outlet.
Placement:
- Use only with the cart, stand, tripod, bracket, or table specified by the manufacturer, or sold with the device.
- Never placing the LCD TV/Monitor in areas under direct sun-light, with high temperature or with high humidity or high level of dust which may cause damages on the internal parts of the LCD TV/Monitor.
- Place the LCD TV/Monitor on a solid surface and treat it carefully. The screen is made of thin glass with a plastic front surface and can be damaged by dropping, hitting or scratching.
Non-use periods:
Unplug the LCD TV/Monitor when it will no be used for a long period.
Foreign objects:
Never insert anything metallic into the cabinet openings of the TV/Monitor. Doing so may cause the danger of electric shock.
Keep away from water/magnetic fields:
- Do not expose the LCD TV/Monitor to rain or use it near water source. If the LCD TV/Monitor got wet, unplug it and contact an authorized dealer immediately.
- Do not clean the front panel with Ketone-type materials, ethyl alcohol, toluene, acid, methyl, or chloride since they may cause damage on panel.
- Do not place magnetic objects close to the LCD TV/Monitor.
Stacking:
Opening in the LCD TV/monitor cabinet are provided for ventilation. To prevent overheating, these openings should not be blocked or covered. Never use the unit on a bed, sofa, rug, or other uneven surfaces. Doing so may block the ventilation openings in the bottom of the unit. If you place the LCD TV/Monitor in a bookcase or some other enclosed place, please make sure to provide adequate space for ventilation.
Servicing:
- If the LCD TV/Monitor does not operate normally - In particular, if there are any unusual sounds or smells coming from the unit - just unplug it immediately and contact an authorized dealer or service center.
- Unplug the LCD TV/Monitor from the AC outlet before any service.
- Make sure the service technician uses authorized replacement parts or their equivalents. Unauthorized parts any cause fire, electrical shock, or other hazard.
- Following any service or repair, be sure the service technician performs safety checks to certify that the TFT LCD TV/Monitor is in safe operating order.
Unpacking
Please make sure that the following items are included with your LCD TV/Monitor. If any item is missing, please contact your dealer.
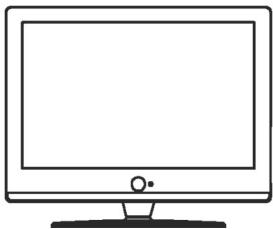
TFTLCDTV/Monitor
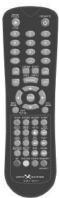
Remote control
Operation manual
DC adapter
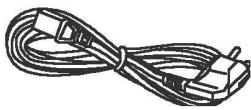
Power cord
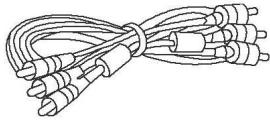
RCA cable
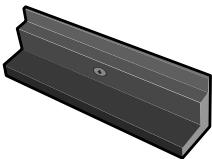
Base replacement for wall mounting
I. View of the TV/Monitor
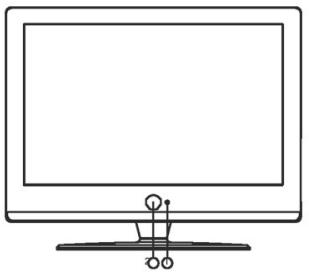
Front view
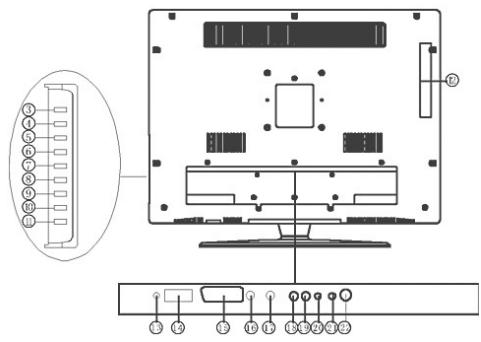
Back view
| 1. Remote sensor | 12. DVD disc slot in |
| 2. Power button & indication light | 13. DC input jack/Car cord input jack |
| 3. DVD play/pause button | 14. VGA jack |
| 4. DVD stop playing button | 15. SCART jack |
| 5. DVD open/close button | 16. S-video jack |
| 6. CH+/Up direction button | 17. Video jack |
| 7. CH-/Down direction button | 18. Audio in (Left) jack |
| 8. VOL+/Right direction button | 19. Audio in (Right) jack |
| 9. VOL-/Left direction button | 20. PC audio in jack |
| 10. Menu button | 21. Earphone |
| 11. TV /AV function switch button | 22. TVRF antenna jack |
II. Remote control reference guide
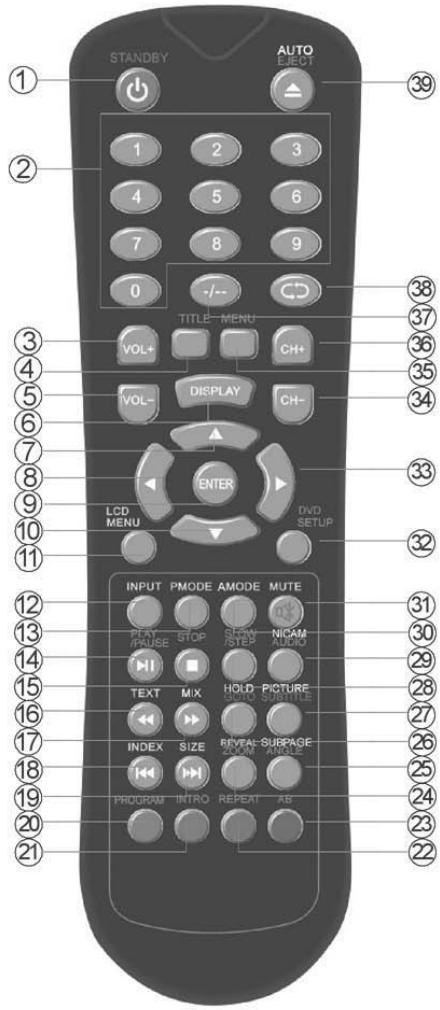
Remote control function
- Unit STANDBY button
- 0-9 Numerical button
- Volume up button
- Display DVD title menu.
- Volume down button
- Display the source and channel's information
- navigation button
- navigation button
- ENTER button
- navigation button
- Display LCD OSD Menu
- Display INPUT source
- Display video picture modes
- Play/Pause DVD playing
- Stop DVD playing
- Enter into teletext mode or DVD fast rewind playing
- View a page of text in teletext mode or DVD fast forward playing.
- Display the index page in teletext mode or replay the current program from the previous chapter or DVD skip backward playing
- Change the display size in teletext mode or advance forward to the next chapter or DVD skip forward playing.
- To select DVD program playback or display red subject in teletext mode.
- Intro/Scan/9 picture display or display green subject of teletext.
- Repeat playback or display yellow subject of teletext.
- Repeat A-B playback or display blue subject of teletext.
- To reveal or hidden the hidden words in teletext mode or select zoom of DVD playback.
- Sub coded page access in teletext mode or select DVD different playback angle
- Go to function in DVD mode or keep page display in teletext mode.
- Exit teletext program in teletext mode or switch the dialogue at the bottom of the screen in DVD mode
- Slow/Step the speed of DVD playing
- Select the NICAM or DVD audio channels
- Select different sound settings
- MUTE button
- Display the setup menu of DVD
- navigation button
- Select previous channel
- Display DVD-disc menu
- Select next channel
- -/-- button
- Cycle between previous and present channel viewed
- Eject the DVD in DVD mode or execute position auto adjust function in PC mode.
Remote control battery installation and cautions
Replace battery by following the below steps: Requires one pair of AAA batteries.
- Open the battery cover as shown below:
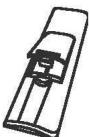
- Install the battery into the battery tray.
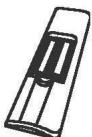
- Close the battery cover
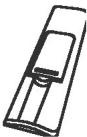
Caution:
- Keep the battery out of children's reach.
- Don't attempt to recharge, short-circuit, disassemble, heat or throw the batteries into the fire.
- Always replace both batteries at the same time. Never mix new and old batteries or batteries of a different type.
- If you don't intend to use the remote control for an extended period, remove the batteries to prevent possible leakage and corrosion.
Notes:
- Do not drop, apply shock or step on the remote control.
- Do not spill water on the remote control.
- Do not use the remote control for other equipments at the same time
- If the TV does not operate even when operating the remote control from a close range, you need to replace the batteries. Refer to the label on the back of the remote control for directions for replacing batteries.
III. Installation and connection
Connect the LCD TV/monitor
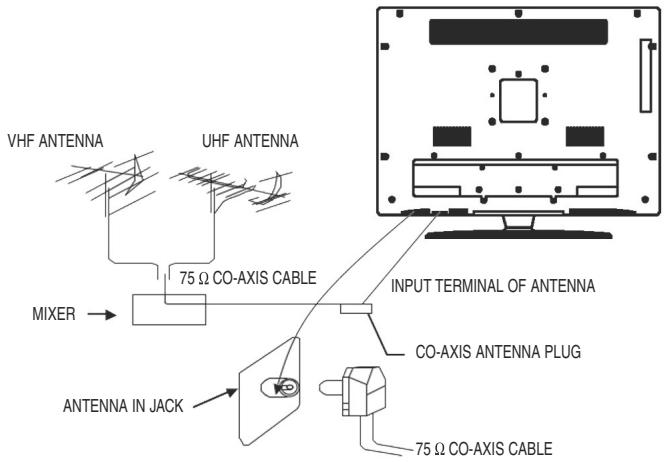
- Connect the TVRF source with the antenna port. TVRF signal including: Receiving antenna /satellite TV/CATV net. You can use 75 coaxial cable to connect the outdoor antenna.
Outdoor Antenna Connection:
Use 75 coaxial cable plug or 300-75 impedance converter to plug in antenna input terminal on the rear of the cabinet.
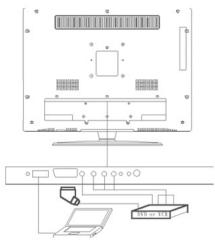
- Connect the audio sources (Including DVD, VCDR, CAMCORDER and PC) to the proper AUDIO input jacks 'L' and 'R'.
- Connect the video source to theVIDEO jack by RCA cable.
- If the video source has a SCART output jack, you can connect the signal to the monitor by the SCART cable.
- Connect the video source to the S-VIDEO input jack of the monitor by the S-video cable (Pretending that the video source has S-video output jack).
- Insert the AC power to the DC adapter, then connect it's DC output jack to the 12V input jack of the monitor.
- When using the LCD as a computer screen, connect the PC to the VGA jack from the monitor by the relevant cable.
IV. TV/Monitor screen operation
(1) Basic operation
- Press the POWER button on the unit or the STANDBY button on the remote control to switch on the power, the indication light will be in blue color. Press the POWER or STANDBY button again to switch off the power, and the light will be in red color.
- The Picture setup, Sound setup, Previous channel can be memorized before you switch off the TV/Monitor. The TV/Monitor will re-start under the previous state when you switch on it again.
- Press the VOL - or VOL + button to adjust the volume output. Press the VOL - button repeatedly to decrease the volume; press the VOL + button repeatedly to increase the volume from 0 to 100.
(2) View the TV plays.
- Press the INPUT button on the remote control to select the TV function mode. Channel '1' will appear on the top left hand corner after channel searching is completed. Press the CH- or CH+ button to select the previous or next channels; or press the 0-9 buttons to enter a channel number directly, or press the -12 button until the screen display 12 or -12 , then use the 0-9 numerical buttons to enter a channel number from 1 to 199.
- Press the button on the remote control to select from the present channel and the previous channel.
- Press the PMODE button repeatedly to cycle through the available video picture modes from the below 4 types

- Press the SMODE button to repeatedly to cycle through the available sound modes from the below 4 types

- Press the MUTE button to cut off the sound output, press this button again to resume sound output.
- Press the DISPLAY button to display the preset channel information
(3) View the AV signal sources (DVD/VCR/CAMCORDER)
Press the INPUT button on the remote control repeatedly to cycle through the available source in following:

(4) View the TELETEXT program
(Optional. If TV has this function.)
- Press the INPUT button to select the TV mode. Then press the CH- or CH + button on the remote control to select TV channel in order to pick up the picture signal of TELETEXT. (Firstly you must view the second part of chapter V to complete the TV channel searching).
- Press TEXT button to enter into picture showing mode. The button can allow you:

- Press the CH- or CH+ button to select the previous page or the next page; use the 0-9 numerical buttons and the - / - button to enter into a numerous page.
- Refer to the chapter of 'Remote control reference guide' to grasp other functions of the TELETEXT buttons.
(5) PC screen
Press the INPUT button to select the VGA input (TV into PC) mode. The will be a 'PC' mark appears on the right of the top corner of the monitor. The unit has a VGA jack for a normal computer. Connect the monitor with a PC by this jack and the unit can be used as the monitor of the PC.
V. Menu setting and adjustment
1. PICTURE SETTING
Press the LCD MENU button on the remote control, there will be a menu displayed on the screen as below:
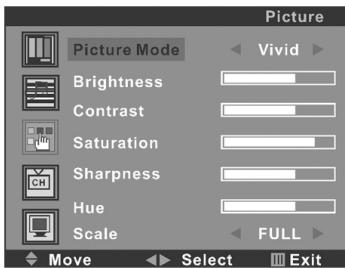
On this menu, the Picture setting icon of is in red frame.
(1). Use the button firstly, the cursor will be on the line of "Picture Mode: Vivid". And then, press the or button repeatedly to select the sound mode from Vivid, Soft, Normal or User.
(2). After select the Picture Mode, you can use the or button to select the item of Brightness, Contrast, Saturation, Sharpness and Hue. And then use the or button to adjust the value of each item respectively from 0~100.
Note:
Only the item of Brightness and Contrast could be operated in the PC signal source.
(3) Move the cursor on the line of "Scale". And then, press the button repeatedly to select the picture screen display mode among FULL, 4:3, Panorama, ZOOM, ZOOM2 etc.
After setting, press the LCD MENU button to return to the root menu or exit the setting
2. SOUND SETTING
Press the LCD MENU button on the remote control, and then press the button to select the Sound setting, the Menu will be shown as below:
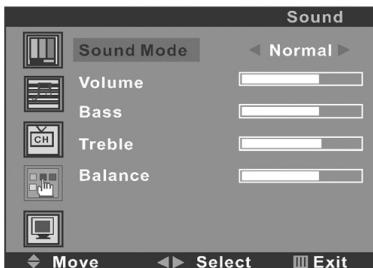
On this menu, the Sound setting icon of is in red frame.
(1). Use the button firstly, the cursor will be on the line of "Sound Mode: Normal". And then, press the or button repeatedly to select the picture mode from Normal, News, Movie or User.
(2). After select the Sound Mode, you can use the or button to select the item of Volume, Bass, Treble and Balance. And then use the or button to adjust the value of each item respectively from 0~100.
After setting, press the LCD MENU button to return to the root menu or exit the setting menu.
3. CHANNEL SETTING (FOR TV SIGNAL SOURCE ONLY)
Press the LCD MENU button on the remote control, and then press the button to select the Channel setting, the Menu will be shown as below:
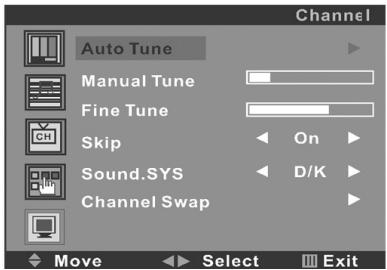
On this menu, the Channel setting icon of CH is in red frame.
(1). Auto Tune
Use the button firstly, the cursor will be on the line of "Auto Tune". And then, press the button again, a menu will be displayed as followed:

As shown on the menu, the TV will automatically search stations. When searching, press the LCD MENU button to cancel searching. After the searching, the TV will begin to play the station 1.
(2). Manual Tune
Select the 'Manual Tune' first, and then press the button:
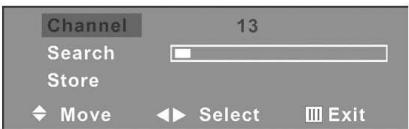
As shown on the menu, the channel number will be displayed on the screen. Press the button repeatedly until you search a required station. Press the or button to move cursor to Search, and press or button to search TV signal. At last press the button to move cursor to store, and press button to save your selected channel.
(3). Fine Tune
Select the 'Fine Tune' first, and then press the or button:
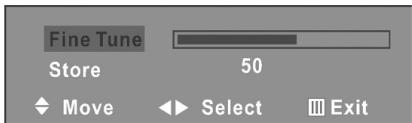
As shown on the menu, the TV signal could be fine tuned by or button repeatedly until you get the best playing effect. Press the ▲ or button to move cursor to Store, and press button to save.
(4).Skip
Press the or button to select the skip setting, and press the or button repeatedly to select On or Off. Setting to "On", the channel will not be selected by Channel Up/Down keys.
(5).Sound SYS.
Press the or button to select the Sound SYS. setting, and press the or button repeatedly to select. You could choose D/K, I, B/G or I according to your local TV sound system.
(6).Swap
Select the "Channel Swap", and then press the button, the screen will display:
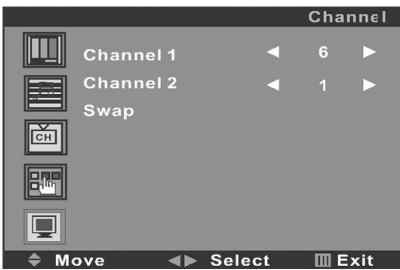
The channels indicated at "Channel 1" and "Channel 2" will swap position. Press or button to move the cursor on the line of "Channel 1" or "Channel 2", you can enter into a station number from 1-200 by the and button as the appointed station number for replacing the current station number. After entered into the number, press button again to move the cursor will on the line of "Swap", then press button. After setting, press the LCD MENU button to return to the root menu or exit the setting menu.
4. FUNCTION SETTING
Press the LCD MENU button on the remote control, and then press the button to select the Function setting, the menu will be shown as below:
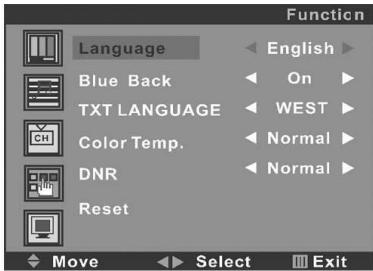
On this menu, the Function setting icon of is in red frame.
(1). Language
Use the button firstly, the cursor will be on the line of "Language English". And then, press the or button repeatedly to select the language you need.
(2). Blue Back
Move the cursor to the line of "Blue Back On". And then, press the or button repeatedly to select the On or Off
(3). TXT LANGUAGE
Move the cursor to the line of "TXT LANGUAGE WEST". And then, press the or button repeatedly to select the West, East, Russian, Arabic or Farsi according to your meaning.
(4).Color Temp.
Move the cursor to the line of "Color Temp. Normal". And then, press the or button, a menu will be displayed as followed:
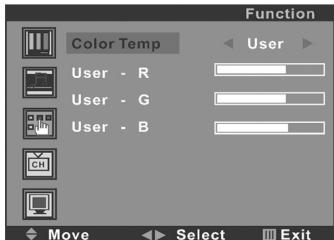
Press the or button repeatedly, you could select User, Normal, Warm or Cool according to your request.
Note: Only if Color Temp. is set to "User", then you can adjust "User - R", "User - G" and "User - B".
(5).DNR
Press the or button repeatedly, you could select Strong, Normal or Weak.
(6)Reset
Press the or button to reset
After setting, press the LCD MENU button to return to the root menu or exit the setting menu.
Note:
a. Only the item of Language, Color Temp. and Reset could be operated in the PC signal source.
b. The item of Blue Back could not be operated in AV, Svideo and SCART signal source.
5. PC SETTING (FOR PC SIGNAL SOURCE ONLY)
Press the LCD MENU button on the remote control to display the menu, and then press the button to select the PC setting, and the menu will be shown on the screen as below:
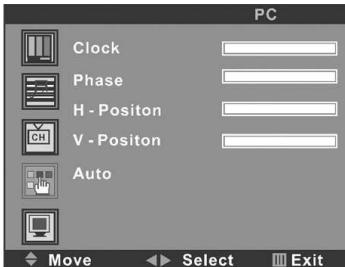
On this menu, the PC setting icon of is in red frame. Press. You can use the or button to select the item of Clock, Phase, H-Position or V-Position. And then use the or button to adjust the value of each item respectively from 0~100.
After setting, press the LCD MENU button to return to the root menu or exit the setting menu.
VI. DVD Player Operation
a. Basic operation
- Press the SOURCE button on the remote control to select the DVD function mode. Insert a disc into the slot of the DVD player and it will start to read the disc automatically.
- Press the button on the remote control, the disc will automatically eject.
Note:
Insert the disc with reflective data side facing to the front of the TV. Some slight picture and sound noise are produced when the disc is loading, unloading and during playback. This is normal and can be ignored.
HOW TO SELECT THE TRACK
If you want to play the second track or chapter, press the number button "2" directly. Then press the ENTER button to play.
HOW TO PAUSE PLAYBACK (STILL PLAYBACK)
Press the PLAY/PAUSE button once during playback.
Press the PLAY/PAUSE button again to resume normal playback.
HOW TO REMOVE THE DISC
Press the button on the remote control.
Wait until the disc is completely ejected before removing.
HOW TO STOP PLAYBACK
Press the STOP button once, the DVD video player will stop. Then press the PLAY button to resume playback of the disc from the same point. Press the STOP button twice, and disc will stop completely. Press the PLAY button to start the DVD playback from the first track.
FAST FORWARD/ BACKWARD
Press the or buttons to toggle between different playback speeds in sequence at x2, x4, x8 or x20. Press the button to return playing at normal speed.
Note: The sound is not available while playing in this mode.
SKIP TO NEXT/ PREVIOUS TRACK
Press the or buttons to select the next track or previous track.
b. Slow Play
Press the SLOW/STEP (>1) button when playing, the disc will play at 1 / 2 , 1 / 3,1 / 4 , 1 / 5,1 / 6 , 1 / 7 of the normal speed. Press the button to return playing at normal speed.
Note:
The sound is not available while playing in this mode.
c. Zoom Picture
This DVD video player allows you to zoom in/out of a picture as well as shift the zoom point. Press the ZOOM button during normal play or when in slow motion. The DVD player magnifies the center of the picture at 2x, 3x, 4x, 1/2, 1/3, 1/4 of the normal picture.
d. Repeat Play
You can use the REPEAT button to repeat the play of various sections of your DVD.
Press the REPEAT button once to repeat playing the present chapter.
Press the REPEAT button again to repeat playing the present title.
Press the REPEAT button third time to repeat playing the whole disc.
Press the REPEAT button for the fourth time to cancel repeat play and return to normal play.
Note:
For different discs, the REPEAT button may have a different function.
REPEAT A to B SPECIFIC SECTION
You can repeat a specific section by the A-B button on the remote control. Firstly press the A-B button at the beginning of the section you want, then press it again at the end of the section. The unit will now repeat playing from A to B. If you want to cancel the repeat section, please press the A-B button once again.
Note:
Some discs will not respond to the A-B repeat function.
e. Mute
Press the MUTE button on the remote control to suppress the sound output while a disc is playing. Press the same button again to resume playing with sound.
f. Menu playback
Press the D.MENU button to display disc menu or return to the root menu when playing the DVD discs.
Note:
For different DVD discs, the D.MENU button may have different menu display information.
g. Title playback
Press the TITLE button when playing the DVD discs, there will be an indication "TITLE" on the screen.
Press the or buttons to select your favourite title and press the ENTER button to play from the first chapter of selected title.
h. Display
During playback, press the D.DISp button on the remote control to show the current information available. The following information will appear - Title Elapsed; Title Remain; Ch. Elapsed; Ch. Remain; Display Off and so on.
Note:
For different discs, D.DISP button may have a different function.
i. Playing in a Favourite Order
Combine your favourite titles, chapters or tracks and play them in your favourite order.
HOW TO SET TITLES, CHAPTERS, OR TRACKS IN A FAVOURITE ORDER
The program playback function will automatically playback titles, chapters or tracks in the order preprogrammed.
- Insert a disc, press the PROG button, the menu will appear on the screen, as following:
| PROGRAM : TT(- -)/CH(- -) | |||
| 01 TT: CH: | 06 TT: CH: | 11 TT: CH: | 16 TT: CH: |
| 02 TT: CH: | 07 TT: CH: | 12 TT: CH: | |
| 03 TT: CH: | 08 TT: CH: | 13 TT: CH: | |
| 04 TT: CH: | 09 TT: CH: | 14 TT: CH: | |
| 05 TT: CH: | 10 TT: CH: | 15 TT: CH: | |
| PLAY | CLEAR | ||
- Input the numbers to select the title and chapter (track) you want, then press the or buttons to move the cursor to input the next one.
- Press the or buttons to select and highlight the word PLAY, then, then press the ENTER button. The DVD video player starts memory playback.
Notes:
- When the DVD video player is switched off, or if the discs are removed, the program item will be removed.
- For different discs, PROG button may have a different function.
- If you press the STOP button once the DVD video player will stop. At this point, press the ENTER button to re-start the disc from the same point.
- If you press the STOP button twice the program playing will be cancelled.
j. Selecting the Camera Angles Setting
This DVD video player allows you to select from several different angles. Press the ANGLE button while playing back a scene recorded with multiple angles. You may only press the ANGLE button when the angle icon appears on the DVD display. Each time you press the ANGLE button, the angle will change.
Notes:
The angle function will not work on DVD video discs that do not contain recorded multiple angles.
During still playback, you are able to change the camera angle. However, when you resume to normal playback, the camera angle changes to the new settings.
The angle icon indicator will illuminate while playing back a title that contains at least one scene recorded with multiple angles.
k. Selecting Subtitles
This DVD video player allows you to display subtitles which are included on the disc.
By Pressing the SUBTITLE button during playback, you have the option to select a preferred subtitle from those included on the DVD video disc.
To turn off the subtitle function, press the SUBTITLE button during playback until the subtitles disappear.
Notes:
With some DVD discs, you may not be able to turn off the subtitles and they will appear on screen automatically.
As you press the SUBTITLE button, the subtitles may not appear immediately during some screens.
I. Selecting languages
This DVD video player allows you to select a preferred languages which are included on the Multi-languages DVD discs.
By Pressing the LANG button once during playback to display current language, press the LANG button again to toggle between different language mode in sequence.
Note:
For MP3/CD discs playback, press the LANG button to switch between different audio channels in sequence.
m. MP3/JPEG playback
- In DVD mode, Insert a MP3 or JPEG CD into the disc slot, the DVD video player will initialize the disc and the directory (folder) will be shown on screen. The first MP3 or JPEG file will be played automatically.
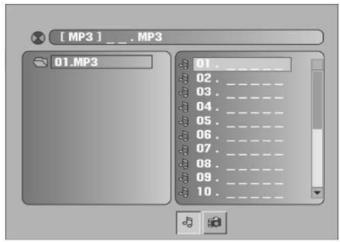
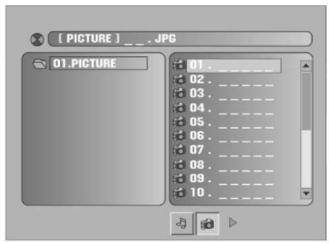
- Press the or buttons to select the folders, MP3/JPEG files or modes and press the ENTER button on the remote control to enter the folder or start playback.
- When playing MP3 files, press the or buttons during playback to skip the tracks.
Notes:
- When playing MP3 Files, there is no picture display, only there is audio output.
- When viewing the JPEG pictures, you could press the or buttons to flip or rotate the picture.
- When viewing the JPEG pictures, you could press D.MENU button to enter into preview mode to display 12 pictures. Press or button to select next or last page or press the numeric buttons to view the corresponding pictures.
n. INTRO playback
Press the INTRO button to play the first 10 seconds of each track when playing CD discs.
o. Customizing the Function Settings
This DVD video player allows you to customise the performance to your personal preference.
DISPLAYING THE SETUP MENU SCREEN:
The DVD SETUP MENU screen asks you to select a setting category from SYSTEM SETUP, LANGUAGE SETUP, AUDIO SETUP and DIGITAL SETUP. The selected category will provide you with the setting details on the TV screen. Please look at the following for more details.
Press the DVD SETUP button to enter the SETUP MENU. Press the or buttons to select and highlight the category. Then press the ENTER button to confirm. Press the DVD SETUP button again to return to the root menu or to exit the setting menu.
Note:
Functions and menu may change without notice.
1. System Setup
SOURCE
This feature is not available on this model
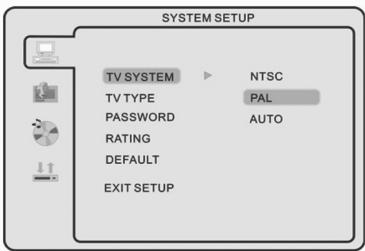
TV SYSTEM
This menu enables you to set the picture format for your TV/DVD between NTSC/ PAL/ AUTO according to your request and local TV system.
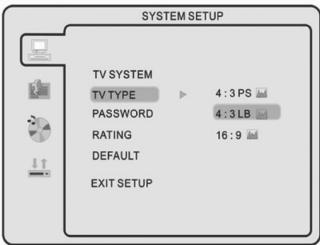
TV TYPE
This menu enables you to select one of the three aspect ratios: 4:3 PS / 4:3LB / 16:9
4:3PS (Normal)
Normal Pan and Scan is used for most normal television broadcasts. It has an aspect ratio of 4:3. Choose this setting when viewing movies, the picture will fill the screen but left and right edges of the picture may be cut off from the screen.

- 4:3LB (Normal)
Choose this setting will allow you to view the movies in its original aspect ratio. The entire frame of the movie will be displayed on screen but will occupy a smaller portion of the screen.
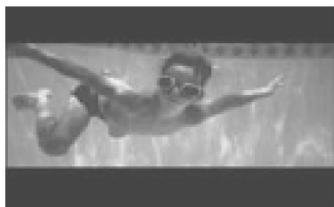
16:9 (Wide)
Choose this setting if you have a wide-screen television, this setting will allow the original aspect ratio to be displayed.
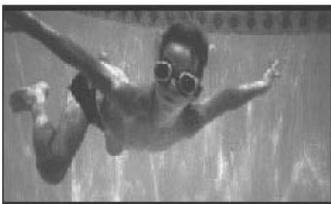
Note:
- Playback screen size may be varied according to the disc contents.
- For discs with 4:3 contents, using any mode would only display 4:3 screen
- Screen ratio selection should be according to the connected TV or display aspect ratio.
PASSWD
This is used to lock and unlock the RATING setting. The default setting is locked. Enter the default password"0000" by numeric buttons, then press ENTER button to unlock. To change the password just input 4 digits you want in unlock mode.

RATING
You could set the rating options according to your preference. The rating restriction divided in eight different category from KID SAFE to ADULT. The default setting is ADULT.
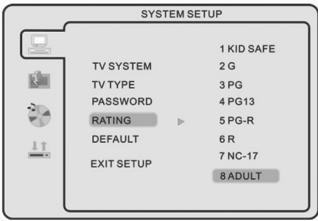
Note:
please refer to PASSWORD to lock/unlock the rating setting.
DEFAULT SETTING
Press the ENTER button to restore factory default.
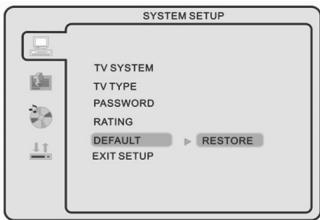
Note:
The password and Rating setting can not be restored.
2. Language Setup
Press the or buttons to select the LANGUAGE setup icon, press ENTER button to confirm. You could choose the available languages as displayed on the screen menu
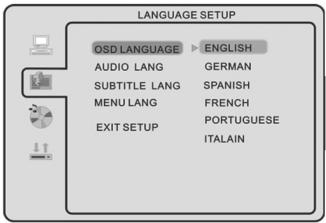
Note:
Audio languages, Subtitle languages and Menu languages are DVD discs specified.
3. Audio Setup
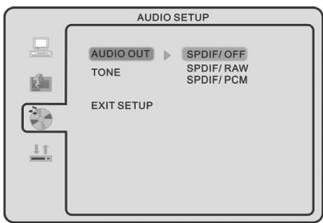
AUDIO OUTPUT
Press the or buttons to select the AUDIO OUT setup icon, press ENTER button to confirm.
SPDIF/OFF: No output is sent to the coaxial output. Use this option if you have not connected the coaxial output to any decoder or amplifier.
SPDIF/RAW: When selected, the raw audio contained on the disc is passed directly to the Coaxial output. Use this setting when connecting the coaxial output to a multi-channel decoder/ amplifier.
SPDIF/PCM: When selected, the audio contained on the disc is passed directly to the coaxial output in PCM format. This format ensures a very high quality but it does not support the surround sound effect. Use this setting when connecting the coaxial output to a receiver-amplifier not capable of decoding multi-channel audio.
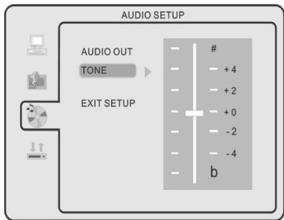
TONE
Press the or buttons to adjust the Tone setting.
4. Digital Setup
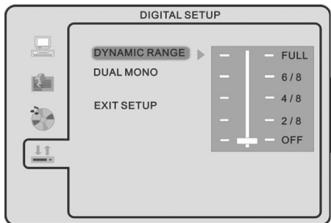
DYNAMIC RANGE
Press the or buttons to adjust the compression ratio for different audio effect, When selected FULL, the peak signal value is smallest; When selected OFF, the peak signal value is biggest.
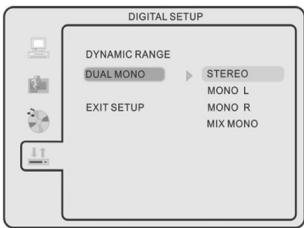
DUAL MONO
Press the or buttons to select 4 different audio output modes: STEREO / MONO L / MONO R / MIX MONO.
VII. Other Operation
PC audio in operation
This unit possesses PC audio in jack. Connect this jack to PC main unit with related audio cable n PC mode and adjust the volume to what you want.
Wall Mounting Accessories
To remove the base from the TV, remove the 5 screws on the lower back of the TV.
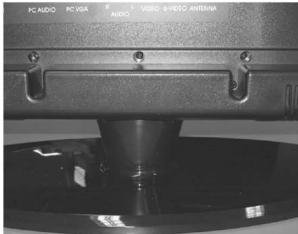
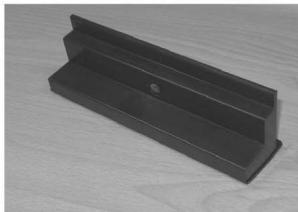
Remove the base.
Place the Base Replacement to cover the hole and fasten the screws.
VIII. Trouble shooting
Should the unit no function, please check the system according to this table to find out the possible problem. If you still can't solve the problem, please ensure the product is repaired by qualified service personnel.
a. DVD player
| SYMPTOM | CAUSE | POSSIBLE CURE |
| No sound | Wrong connection or loose connection: System mute | Checking and correcting all the connections: Canceling mute |
| Disc playing abnormally | Disc dirty or scratched | Cleaning or changing disc |
| Disc not playing | Disc placed upside down | Turn the disc right side up |
| Remote control not working | Obstacles between remote control and the sensor on the unit: Battery no cell: Too far away distance | Clear away obstacles: Changing battery: Operating in an effective distance |
| Can’t operate system | External interference with the CPU | Pull out the plug and insert again |
b. TV/Monitor
| SYMPTOM | REMEDY |
| No power | 1. Check whether the power plug is connected to the power supply. 2. Pull out the plug and wait for 60 seconds, and then insert the power plug again and switch on the TV/monitor. |
| No picture | 1. Check whether the antenna is connected properly. 2. Adjust to another channel. 3. Change the length and the contrast setting. 4. Make sure that the AV picture input cable is connected properly. |
| No sound | 1. Increase the volume value. 2. Check whether the TV is in MUTE mode. 3. Make sure that the sound system setting is proper. 4. Ensure the AV audio signal input cable is connected properly. |
| Color distortion | 1. Ensure that the equipment is connected properly. 2. Ensure that the AV video signal input is connected properly. |
| Pictures/sound are interfered | 1. Check whether the equipment is connected properly. 2. Adjust the antenna if use an outdoor antenna. |
| Remote control no function | 1. Make sure that the batteries are installed with correct polarities. 2. Clean the remote sensor. 3. Ensure that there is no foreign object between the remote control and the sensor. 4. Operate the remote control at a distance not more than 6 meters from the remote sensor |
| Screen glittering under PC mode | Reset the computer and enter into the safety mode, then select the appropriate screen type by consulting the operation manual. |
| Screen traversed under PC mode | Maybe the phase is not appropriate. Enter into the PC setting and change to correct level. |
IX. Notes
(1) Please read these operating instructions carefully before you operate this unit.
(2) When you want to cut off the electricity supply of the whole unit's power, please press the POWER button on the unit. And take out the plug from wall outlet.
(3) Don't press any button if you are not using the unit. Set the POWER button to "OFF", and take out the battery from remote control before long time non usage.
(4) Be cautious of the safe mark
(5) Repairs are to be referred to qualified service personnel. Don't take apart it by yourself.
(6) Because of a sudden change in temperature or humidity, or when warm air comes into contact with any cold parts in the unit, condensation may form. When condensation forms inside, the unit may not function well. Once condensation disappears, the unit will return to normal functioning. Placing the unit in a warm room will help to dry up condensation. This should take 1 to 2 hours, depending on environmental conditions. As condensation may also appear on the disc, it should be wiped from inside towards the outer side using a dry cloth.
(7) It is dangerous to use warped or broken discs since lasers rotate at high speed. Never use discs repaired with plastic tape or glue, as it will lead to damage. After playing, if you hear strange noise or the unit flatters, e.g. the disc does not turn smoothly, please stop playing immediately.
(8) Please remove the discs after use and put them into cases and store them in vertical position. Tilting or piling may lead to warping. Please keep the discs away from direct sunlight, high temperature and humidity.
Do not stick labels onto discs.
Do not scratch the surface of discs.
X. Maintenance
1). Cleaning the cabinet
Use a soft cloth slightly moistened with a mild detergent solution. Do not use a solution containing alcohol, spirits, ammonia or abrasives.
2). Cleaning discs
When a disc becomes dirty, clean it with a cleaning cloth. Wipe the disc from the centre outwards.
Do not use solvents such as benzine, thinners, commercially available cleaners, or antistatic spray intended for analogue records.
WARNING:
To prevent fire or shock hazard, do not expose this unit to rain or moisture.
Do not remove cover, no user serviceable parts inside, refer servicing to qualified service personnel.
XI. Specifications
| CAUTION RISK OF ELECTRIC SHOCK DO NOT OPEN |
| Screen size, visible | 19 inch | |
| Screen format | 16:10 | |
| Resolution | 1440*900 | |
| Minimum contrast ratio | 1000:1 | |
| Minimum brightness | 300 cd/m2 | |
| Display colors | 16.7M | |
| Minimum viewing angle | 170° (horizontal) / 160° (vertical) | |
| Maximum response Time | 5ms | |
| Minimum lifetime background light | 50,000 hours | |
| Video color systems | PAL/NTSC/SECAM | |
| TV FUNCTION | TV Standard | PAL/SECAM/BG/I/DK/L |
| TV tuning system | Auto Preset tuning | |
| Tuner | Integrated and frequency synthesis | |
| CATV (optional) | S1~S41 ch, Hyper Band | |
| Number of channels | 99 | |
| Videotext / Teletext | 10 pages | |
| TERMINALS | Video | Composite video *1 |
| S-Video | S-video *1 | |
| VGA / COAXIAL | 1 | |
| Audio L/R | 1 | |
| PC Audio | 1 | |
| Scart Input Output | Composite video, RGB, Audio L*R Composite video, Audio | |
| OSD language | English / German / French / Spanish / Italian / Portuguese / Russian | |
| Audio output | 3W * 2 | |
| Gross weight | 8 Kgs | |
| Power requirement | DC 12V 5A, AC110~240V, 50Hz/60Hz | |
| Power Consumption | Max 60W | |
- Design and specifications are subject to change without prior notice.
XII. Display modes
| Resolution | Horizontal Freq. (KHz) | Vertical Freq. (Hz) |
| 720x400 | 31.5 | 70 |
| 640x400 | 31.5 | 70 |
| 640x480(VGA) | 31.5 | 60 |
| 640x480(VGA) | 37.9 | 72 |
| 640x480(VGA) | 37.5 | 75 |
| 800x600(SVGA) | 37.9 | 60 |
| 800x600(SVGA) | 47.2 | 72 |
| 800x600(SVGA) | 46.9 | 75 |
| 1024x768(XGA) | 48.4 | 60 |
| 1024x768(XGA) | 56.5 | 70 |
| 1024x768(XGA) | 60.0 | 75 |
| 1280x1024(SXGA) | 63.5 | 60 |
| 1280x1024(SXGA) | 80.0 | 75 |
- Modes, which are not listed in the above table, may not be supported. For an optimal picture it is recommended to choose a mode listed in the table.
- You have 13 available modes compatible with windows.
- It can happen that the image is disrupted. This can occur as a result of a signal from the VGA card, which does not correspond with the usual standard. This is not, however, an error. You can improve this situation by altering any automatic setting or by manually changing the phase setting and the pixel frequency menu.
- If you switch off the TV/monitor, interference lines can occur on your screen. But it's not a problem, no need to concern about it.
- To extend the service life of the product, we recommend that you use your computer's power management function.
Note:
Design and specifications are subject to change without notice.
"ELIMINATION OF RESIDUES OF ELECTRIC AND ELECTRONIC APPLIANCES BY CONSUMERS RESIDENT IN THE EUROPEAN UNION."
This symbol on the product or in its packaging indicates that it must not be disposed off with other household waste produced in the user's residence. It is the responsibility of the user to dispose off these types of appliances by depositing in a "recycling plant" or at a collection point for the recycling plant so that its electrical and electronic parts can be recycled. The selective collection and recycling of the harmful residues of electric and electronic home appliances and parts at the time its disposal will contribute towards the conservation of our natural resources and will guarantee that it will be recycled in a manner most beneficial to the environment and public health. To gain more information on the points of collection of electric and electronic appliances for recycling, please contact the office of your local municipality or with the recycling plant or return it back to the establishment from which the purchase was made.
Warranty
All Swee products are warranted for 2 years. We do not grant support or warranties for any software and/or (rechargeable) batteries included. Settlement of guarantee only takes place via the dealer where you have purchased the product in question.
The rightful owner has and retains title to all brand names and related rights mentioned in this manual.