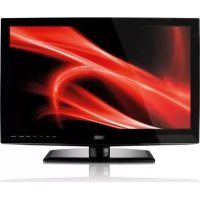
TV134 - Téléviseur SWEEX - Notice d'utilisation et mode d'emploi gratuit
Retrouvez gratuitement la notice de l'appareil TV134 SWEEX au format PDF.

| Type d'écran | LED |
| Taille de l'écran | Non précisé |
| Résolution | Full HD |
| Format d'image | 16:9 |
| Connectivité HDMI | Oui |
| Connectivité USB | Oui |
| Compatibilité Smart TV | Non précisé |
| Fonction enregistrement | Non précisé |
| Haut-parleurs intégrés | Oui |
| Consommation électrique | Non précisé |
| Dimensions (L x H x P) | Non précisé |
| Poids | Non précisé |
| Type de télécommande | Standard |
| Entrée antenne | Oui |
| Fonction veille | Oui |
FOIRE AUX QUESTIONS - TV134 SWEEX
Questions des utilisateurs sur TV134 SWEEX
0 question sur cet appareil. Repondez a celles que vous connaissez ou posez la votre.
Poser une nouvelle question sur cet appareil
Téléchargez la notice de votre Téléviseur au format PDF gratuitement ! Retrouvez votre notice TV134 - SWEEX et reprennez votre appareil électronique en main. Sur cette page sont publiés tous les documents nécessaires à l'utilisation de votre appareil TV134 de la marque SWEEX.
MODE D'EMPLOI TV134 SWEEX
user manual TV132 / TV134

Table of contents
PRECAUTONS E5
CONTROLS E6
FIRST TIME INSTALLATION E9
BASIC OPERATIONS E10
OSD MENU SETTING E11
BUILT-IN DVD PLAYER OPERATIONS E21
MAINTENANCE E24
TROUBLESHOOTING E24
Dear customer,
Thank you for purchasing this LED TV. When opening the box for the first time, please check whether all box contents are present. Before connecting the parts and power, please read this user manual carefully and always keep these instructions handy and close by your LED TV.
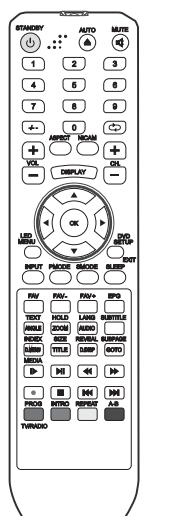
Remote control
Manual
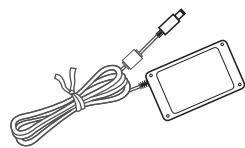
Power adapter
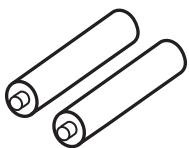
2 x AAA battery
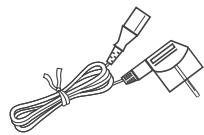
Power cord
If you anything damaged or missing, please return the entire package to the sales point where it was bought.


If at any time in the future you should need to dispose of this product, please note that: Waste electrical products should not be disposed of with household waste. Please recycle where facilities exist. Check with your local authority or retailer for recycling advice (Waste Electrical and Electronic Equipment).
SAFETY PRECAUTIONS
CAUTION
RISK OF ELECTRIC SHOCK DO NOT OPEN

CAUTION: TO PREVENT THE RISK OF ELECTRIC SHOCK, DO NOT REMOVE COVER (OR BACK). NO USER- SERVICEABLE PARTS INSIDE. REFER SERVICING TO QUALIFIED SERVICE PERSONNEL.
| This symbol indicates that dangerous voltage constituting a risk of electric shock is present within this unit. | |
| This symbol indicates that there are important operating and maintenance instructions in the literature accompanying this unit. |
CAUTION
TO ENSURE CONTINUED SAFETY DO NOT REMOVE ANY COVERS OR ATTEMPT TO GAIN ACCESS TO THE INSIDE OF THE PRODUCT.
REFER ALL SERVICING TO QUALIFIED PERSONNEL.
TO PREVENT FIRE OR SHOCK HAZARD, DO NOT EXPOSE THIS APPARATUS TO RAIN OR MOISTURE.
- Do not install the unit in an unstable space.
- Do not exposed the unit to where there are extremes of temperature (below 5^ or exceeding 35^ ) or moisture.
- Do not expose the unit to directly sunlight or heat nearby.
- Do not install this unit in a confined space, such as a bookcase or built-in cabinet. For sufficient ventilation, there should be at least 20~cm distance around the apparatus.
- The ventilation should not be impeded by covering the ventilation openings with items, such as newspapers, table-cloths, curtains, etc..
- Keep liquids away from the unit.
- Keep naked flame sources such as candes away from the unit.
- Never touch the TV screen or antenna / power cord during thunderstorms. Stop use it during thunderstorms.
- Do not step on the power cord, or twist the power cord wire.
This product should not be adjusted or repaired by anyone except properly qualified personnel when an abnormal condition occurs. Please consult with the qualified service person.
Always remove the batteries and store in a dry place if the remote control is not to be used for a long time. - Avoid dropping the remote control.
- Always power this unit from an outlet with the same rating (voltage and frequency) as indicated on the rating label of the power adapter.
- When not in use, disconnect the power cord from the outlet. Grasp the plug, not the cord, when disconnecting the unit.
CONTROLS
MAIN UNIT
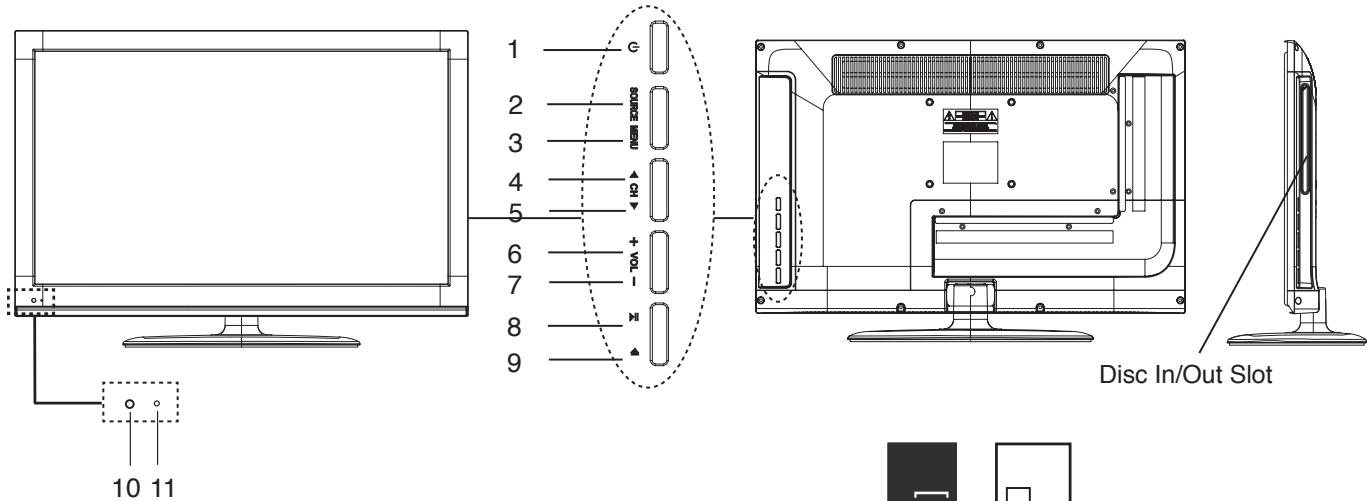
Control buttons
General control buttons
- Power/Standalone button
- Input source select button
- Menu button
- Channel up button
- Channel down button
- Volume increase button
- Volume decrease button
- DVD eject button
- DVD play / pause button
- Remote control sensor
- Power indicator

(SOURCE)
(MENU)


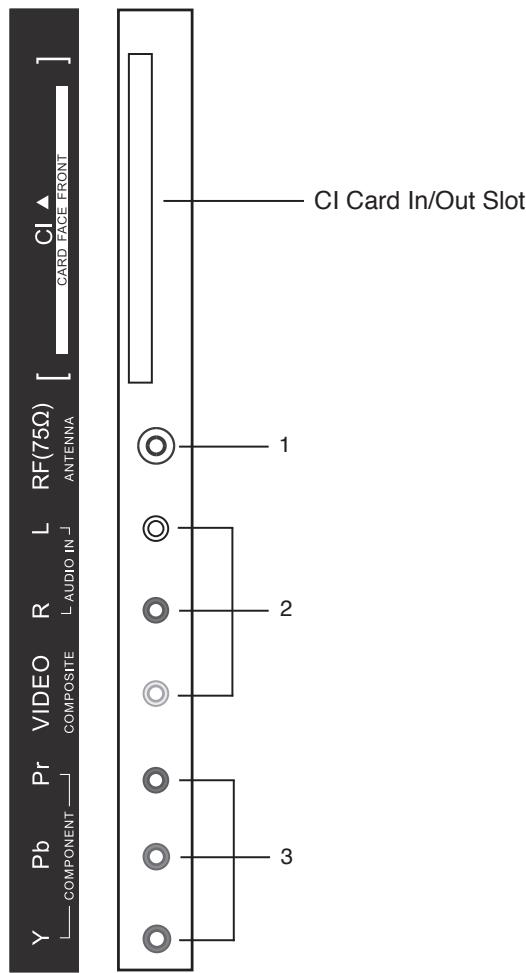
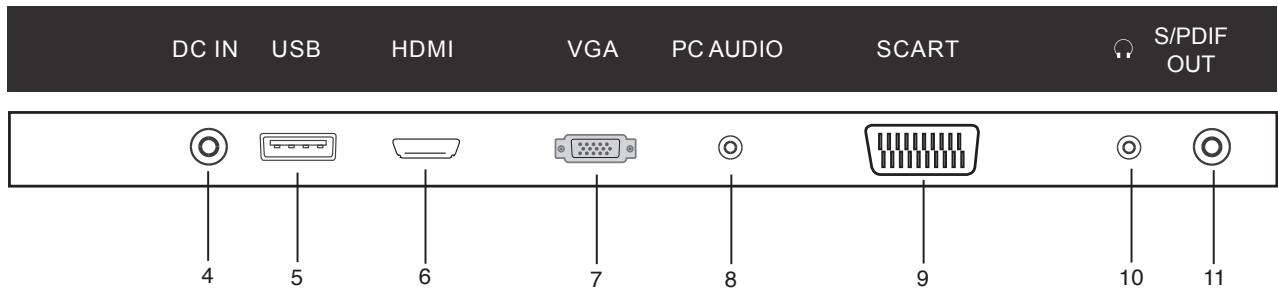
Connections (Rear & Side Panel)
- Antenna/Cable TV input plug
- Composite audio & video input plug
- Component video input
- DC power input terminal
- USB input
- High-Definition Multimedia interface input
- VGA interface input plug
- PC audio input plug
- SCART input plug
- Audio output plug
- Coaxial S/PDIF output

(RF 75 Ω)
(L/R/VIDEO)
(Y Pb Pr)
(DC IN)
(USB)
(HDMI)
(VGA)
(PC AUDIO)
(SCART)
(S/PDIF)
REMOTE CONTROL
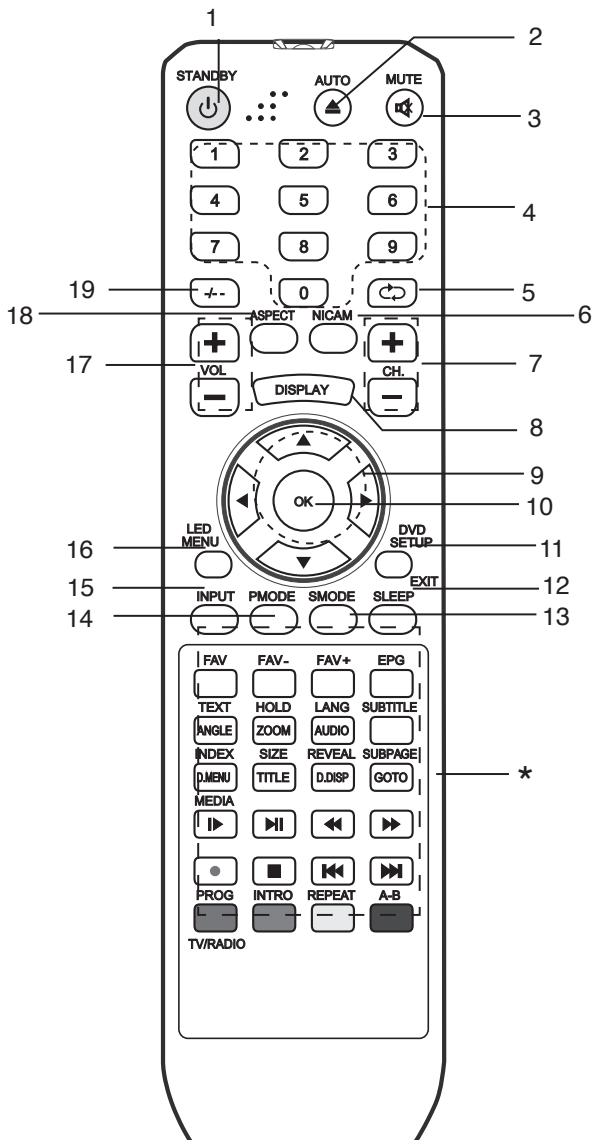
Control buttons
Insert batteries
Two "LR03/AAA" batteries
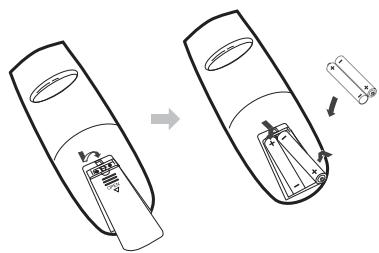
Note:
- Bright sunlight or lighting may cause erratic remote control operation.
- Always remove batteries if the remote control is not to be used for more than a month. Batteries left in it may cause damage.
- The buttons on the remote control perform similar function to similarly marked buttons on the main unit.
- Power/Standby button
- DVD eject button / Auto synchronization in PC mode (AUTO ▲)
- Mute button (MUTE)
- Number buttons (0, 1~9)
- Channel return button (
- NICAM mode select button (NICAM)
- Channel select buttons (+ CH. -)
- Display button (DISPLAY)
- Navigation keys (, , , )
- Confirm button (OK)
- DVD setup menu button/Menu exit button (DVD SETUP/EXIT)
- Sleep timer button (SLEEP)
- Sound mode select button (SMODE)
- Picture mode select button (PMODE)
- Input source select button (INPUT)
- TV menu button (LED MENU)
- Volume control buttons (+ VOL-)
- Display mode select button (ASPECT)
- Double-digits button (- / -)
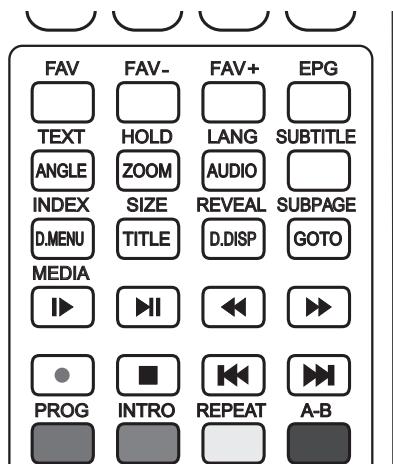
*. Special buttons:
FAV: Favorite program list button
FAV-: Favorite program channel down button
FAV+: Favorite program channel up button
EPG: Electronic program guide button
TEXT/ANGLE: Teletext on/off button / DVD angle button
HOLD/ZOOM: Teletext hold button / DVD zoom in/out button
LANG/AUDIO: Language / Audio language select button
SUBTITLE: DVD subtitle button
INDEX/D.MENU: Teletext index button / Disc menu button
SIZE/TITLE: Teletext size button / Title button
REVEAL/D.DISP: Teletext reveal button / Disc menu display button
SUBPAGE/GOTO: Teletext subpage button / Go to button
MEDIA/▶: Media select button / DVD slow play button
▶ : DVD play/pause button
:Fast-backward button
:Fast-forword button
:Recording button
: DVD stop button
: Previous button
▶ Next button
PROG/TV/RADIO: Red / DVD program button / TV/Radio select button
INTRO: Cyan
REPEAT: Yellow / DVD repeat playback button
A-B: Blue / DVD A-B repeat button
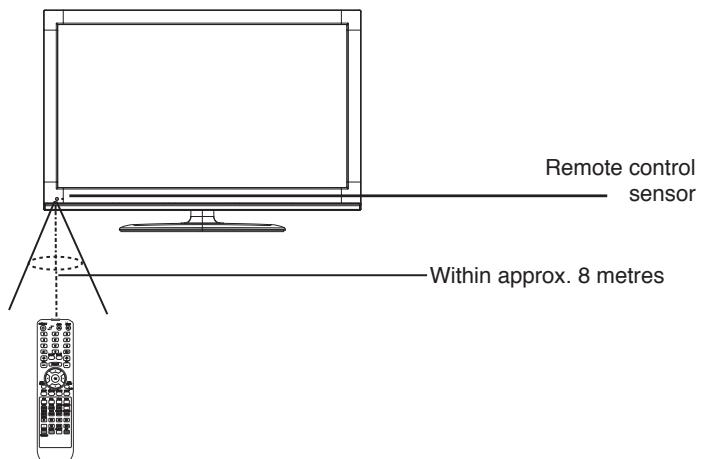
Control Range
Teletext Function
TEXT: Press this button to enter the teletext state and display teletext pages; press this button again to display both the TV picture and the teletext page at the same time. If you want to exit the teletext state, press this button again.
HOLD: Press this button if you want to keep displaying the same page and press it again to exit the hold state.
SUBTITLE: Press this button to enable or disable the subtitle function.
INDEX: Press this button if you want to display the teletext index (page 100).
SIZE: Press this button if you want to enlarge the content on the upper part of the page, and press the second time to enlarge the content on the lower part of the page, and the third time to resume normal display of all the contents on the page.
REVEAL: Press this button if you want to display concealed text. Press it again to close the display of concealed text.
SUBPAGE: Press this button to change the teletext subpage.
Number buttons 0~9 on the remote control can be used to get to a certain page. The “▲/▼” button on the remote control can be used to display the content of previous or next page.
When you press the RED/GREEN/YELLOW/BLUE buttons on the remote control, the page of the same colour displayed on the lower part of the teletext screen will be displayed.
FAST TEXT:
The RED, GREEN, YELLOW & BLUE buttons are used for quick access to color coded pages transmitted by FAST TEXT broadcast.
DVD Function
ANGLE: Press to display current playback angle, press again to toggle between different playback angle code in sequent (DVD mode only).
Note: Selectable playback angle depends on the availability of the DVD contents.
ZOOM: Press to zoom the picture.
AUDIO: Press to select the sound mode (DVD mode only).
SUBTITLE: Press to display current sub-title.
D MENU: Press to display the menu for disc.
TITLE: Press to display the title (only for DVD mode).
D.DISP: Press to display the DVD disc information (DVD mode only).
GOTO: Press to activate the on screen scroll down menu for edit.
Press to adjust playback speed.
▶II: Press to play or pause the DVD display (DVD mode only).
: Press to move backward. There are 5 speeds for backward (DVD mode only).
Press to move forward. There are 5 speeds for forward (DVD mode only).
:Press to stop the DVD display (DVD mode only).
: Press to play last Title/Chapter/Track (DVD mode only).
▶: Press to play next Title/Chapter/Track (DVD mode only).
PROG: Press to edit the program of the disc (DVD mode only).
INTRO: No action in DVD mode.
REPEAT: To playback the portion automatically, you could select one of OFF/CHAPTER/TRACK/REP ALL mode (DVD mode only).
A-B: To start the repeat portion from A-B (DVD mode only).
FIRST TIME INSTALLATION
- Connect the antenna to the RF 75Ω socket.
- Turn on the TV unit.
- The first time installation screen appears as below:
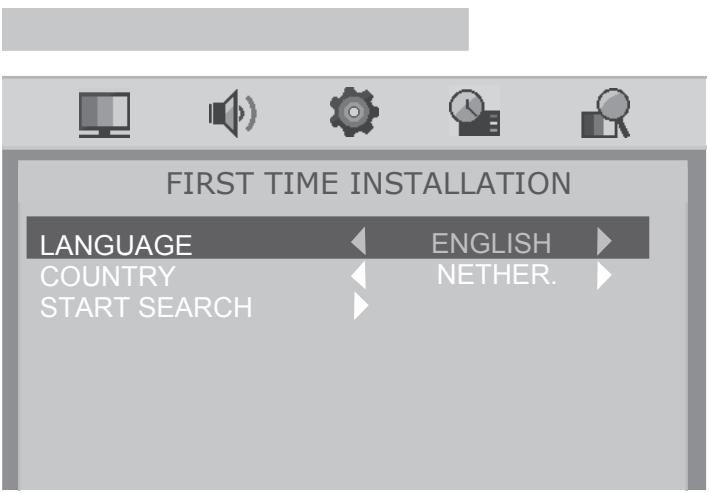
- Press / to select the desired settings.
LANGUAGE: Press / to select language. The default language of the TV is English.
COUNTRY: Press / to select your country.
- Press / to select "START SEARCH", then press or [OK] to start searching channels. The TV will start searching from the lowest frequency. When it finds a station, it will automatically store this in the first location and move to the next. When auto search is completed, the TV will display the first station found.
- Press [LED MENU] or [EXIT] to skip or cancel the auto search.
Note:
When the first time installation has been done, turn the TV off and on again.
TV information
Press [DISPLAY] to display the program information.

BASIC OPERATIONS
Make sure all necessary connections are correctly connected before turning on the power.
The power indicator turns red and the unit is in standby mode.
Turn on the power
Press to turn on the main unit.
The power indicator turns blue.
Turn off the power
Press again can turn off the main unit.
The unit is automatically set standby mode.
The power indicator turns red.
Using the Sleep Timer
The sleep timer automatically switches off the power after a preset time has elapsed. There are 8 time periods available, press [SLEEP] on the remote control repeatedly to select the desired sleep time:
Off v15 (Min) v 30 (Min) v 45 (Min) v 60 (Min)
v 75 (Min) v 90 (Min) v 105 (Min) v 120 (Min) v Off
(The sleep timer starts when the setting is finished.)
To check the remain sleep time
Press [SLEEP] on the remote control, the remain sleep time appears on the screen for a few seconds.
Select the TV channel
After selected "ATV" or "DTV" as input source, you can do either one of followings to select your channel.
- Press [CH-] or [CH+] (or or on the main unit).
- Press [0, 1~9] (combined [-/--] if necessary) to input the channel number directly.
Press [ ] to go back the previous channel you've watched last time.
Selecting the picture mode
Press [PMODE] repeatedly on the remote control to select the desired picture mode.
Select the input source
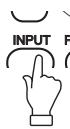
Turn on the connected necessary external device. Press [INPUT] to select the proper input source.
The input source menu appears.
- Press / to move the high-lighted bar to the desired source item.
- Press [OK] (or / ) to confirm.
SOURCE
ATV
DTV
HDMI
SCART
COMPONENT
AV
VGA
DVD
Information of the selected source name appears on the TV for a few seconds.
Information display
Press [DISPLAY] on the remote control, the related information of current source appears on the screen automatically.
Adjusting the volume
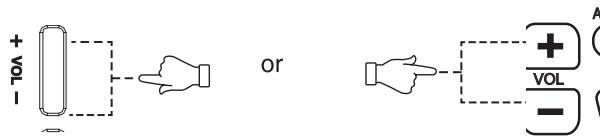
Press [VOL-] to reduce the volume.
Press [VOL + ] to increase the volume.

NICAM Function
Press [NICAM] on the remote control when input source is "TV". This operation do no effect to the channels without NICAM signal.
Once [NICAM] is pressed, it alternates in the different sound options such as mono, stereo, dual I, dual II.
Selecting the audio language
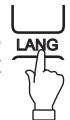
For some programs with audio language options, once [LANG] is pressed, it alternates in the different audio language options.
Mute function
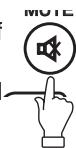
Press [MUTE] on the remote control to switch off the sound temporarily.
Press this button again (or [-VOL + ] ), the sound comes back.
Selecting the sound mode
Press [SMODE] repeatedly on the remote control select the desired sound mode.

Navigating through menus
Press [LED MENU], OSD main menu appears.
Press , the main menu displays sequentially:
PICTURE SOUND SETTING FUNCTION CHANNEL ...
When some menu options are displayed in grey, that means the option is not available in current setting mode.
Common procedure of operation:
- For each main menu, press or [OK] to enter its sub-menu firstly.
- Press / to select the desired adjustable option.
- Press / to set the option to proper value. (If there's only "a" behind, press only.)
After setting of an option is over:
Press [LED MENU] to return to the upper level menu, press [EXIT] to quit the menu screen directly.
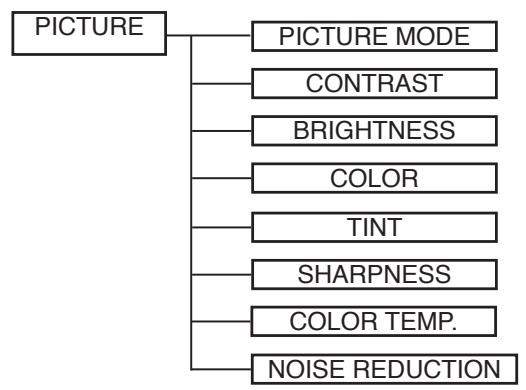
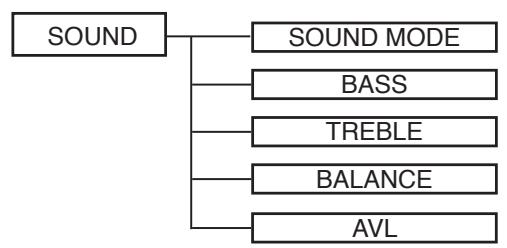
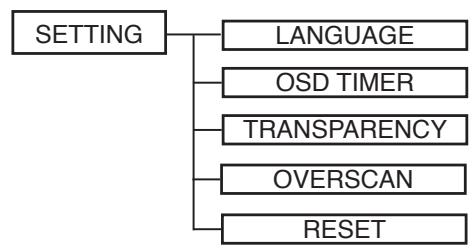
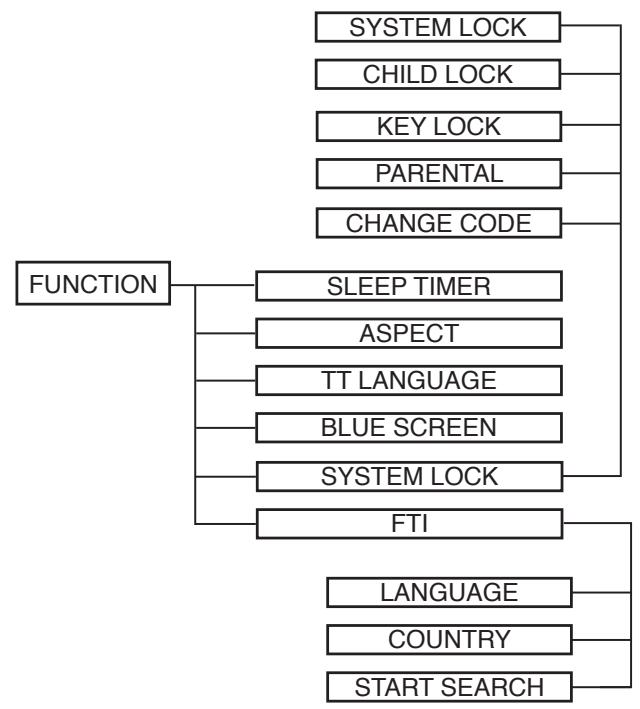
Structure of OSD menu:
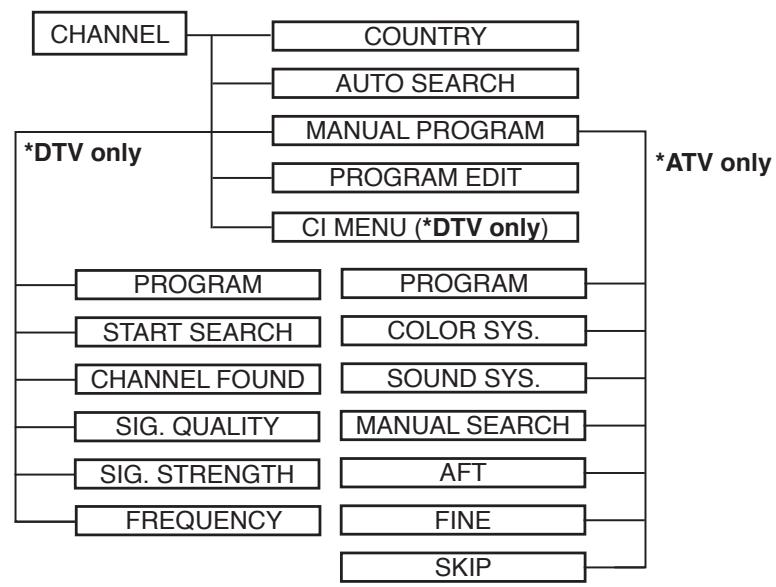
Main OSD:
ATV Mode
PICTURE menu
Press [LED MENU] to display the main menu.
Press / to select "PICTURE" in the main menu, then press or [OK] to enter.
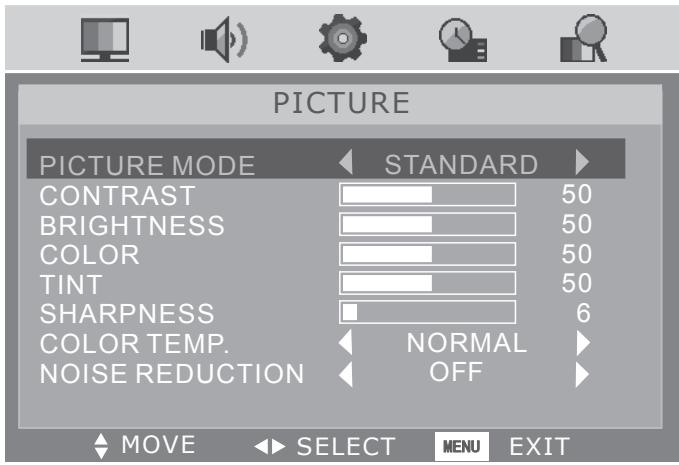
PICTURE MODE: Press to change the picture mode in sequence: STANDARD MOVIE VIVID PERSONAL.
You can press [PMODE] repeatedly on the remote control to change the picture mode directly.
CONTRAST: Set the picture's contrast intensity.
BRIGHTNESS: Set the picture's brightness.
COLOR: Set the picture's color intensity.
TINT: Set the picture's tint. (Available for NTSC video signal only)
SHARPNESS: Set the picture's sharpness.
COLOR TEMP.: Press to change the color temperature in sequence: NORMAL WARM COOL.
NOISE REDUCTION: Set the noise reduction to "ON" or "OFF".
SOUND menu
Press [LED MENU] to display the main menu.
Press to select "SOUND" in the main menu, then press
or [OK] to enter.
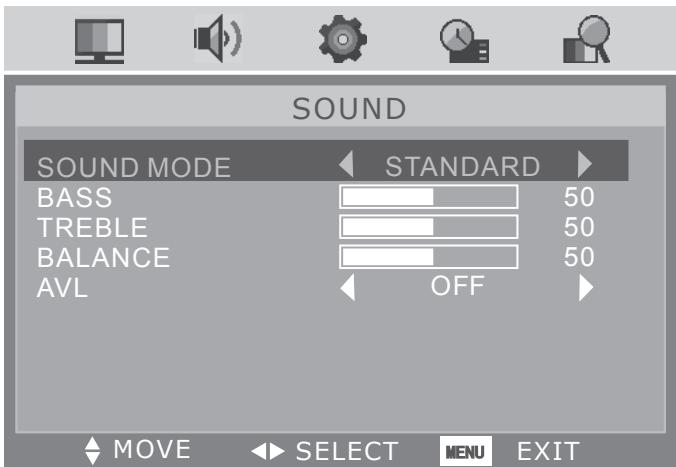
SOUND MODE: Press to change the sound mode in sequence: STANDARD MOVIE MUSIC PERSONAL.
You can press [SMODE] repeatedly on the remote control to change the sound mode directly.
BASS: Set the proper value of bass.
TREBLE: Set the proper value of treble.
BALANCE: Set the proper value of left and right channel speaker's balance.
AVL: Set the automatic volume level to "ON" or "OFF".
SETTING menu
Press [LED MENU] to display the main menu.
Press to select "SETTING" in the main menu, then press or [OK] to enter.
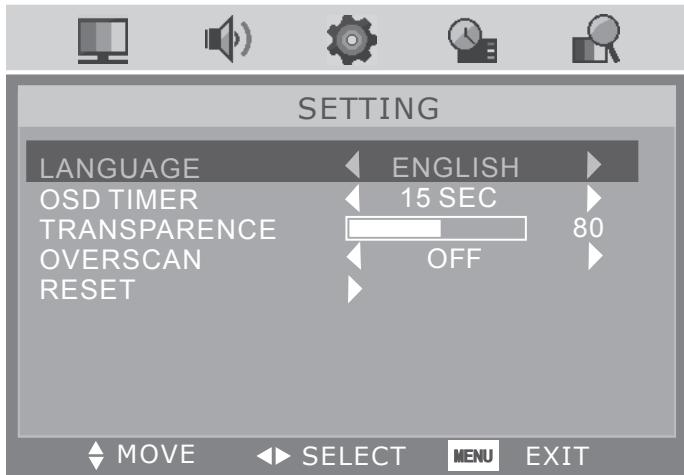
LANGUAGE: Set the on-screen display menu language. The factory setting is English.
OSD TIMER: Press to change the OSD timer as 5 SEC, 10 SEC, 15 SEC, 20 SEC, 25 SEC and 30 SEC.
TRANSPARENCE: Set the proper value of transparency.
OVERSCAN: Set the oversan to "ON" or "OFF". (Available in HDMI source only)
RESET: Press to reset to the original factory setting.
FUNCTION menu
Press [LED MENU] to display the main menu.
Press to select "FUNCTION" in the main menu, then press or [OK] to enter.
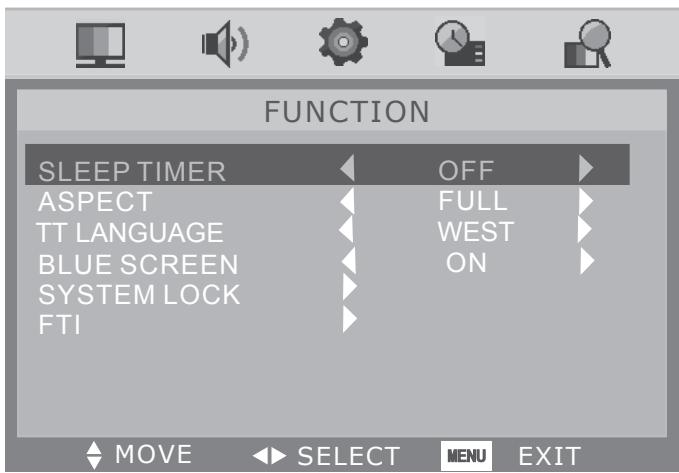
SLEEP TIMER: Press to change the sleep timer as OFF, 15 Min, 30 Min, 45 Min, 60 Min, 75 Min, 90 Min, 105 Min and 120 Min.
You can press [SLEEP] repeatedly on the remote control to change the sleep timer directly.
ASPECT: Press / to change the aspect as FULL, 4:3 and AUTO.
TT LANGUAGE: Press to set the teletext language.
BLUE SCREEN: Set the blue screen to "ON" or "OFF". Set to "ON", blue screen displays; set to "OFF", blue screen disappears.
SYSTEM LOCK: Enter the default password "0000" to go to the system lock submenu if you have set it to "ON".
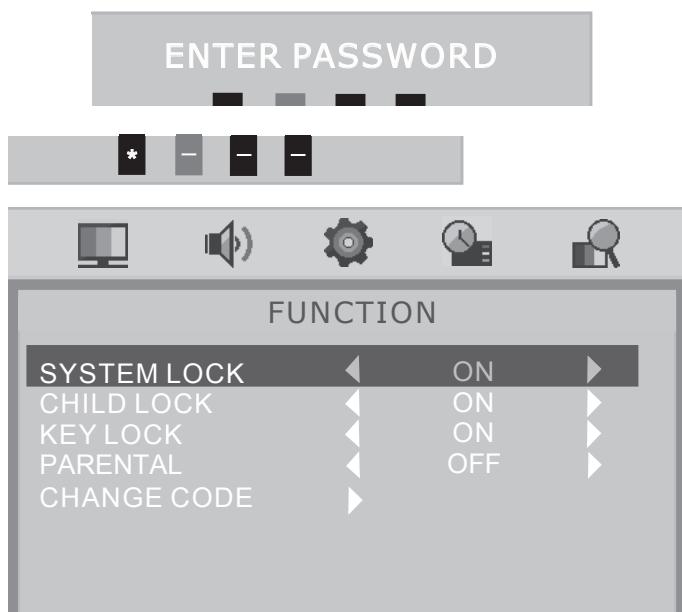
SYSTEM LOCK: Set the system lock to "ON" or "OFF" which enables or disables below lock functions.
CHILD LOCK: Set the child lock to "ON" or "OFF". Set to "ON", the program locked in the PROGRAM EDIT cannot be displayed.
KEY LOCK: Set the key lock to "ON" or "OFF". Set to "ON", the keypad on the main unit cannot work.
PARENTAL: The program will be blocked if the age which it has been assigned is above the age chosen by the user. You can select "OFF, 6, 10 14,18".
CHANGE CODE: Press to enter, input the old password first then input the new password and confirm.
FTI: Press to enter "FIRST TIME INSTALLATION" menu. Please refer to E7 for concrete operations.
HOTEL MODE MENU: Press [LED MENU] + [1] + [2] + [2] + [9] to enter the hotel mode menu screen.
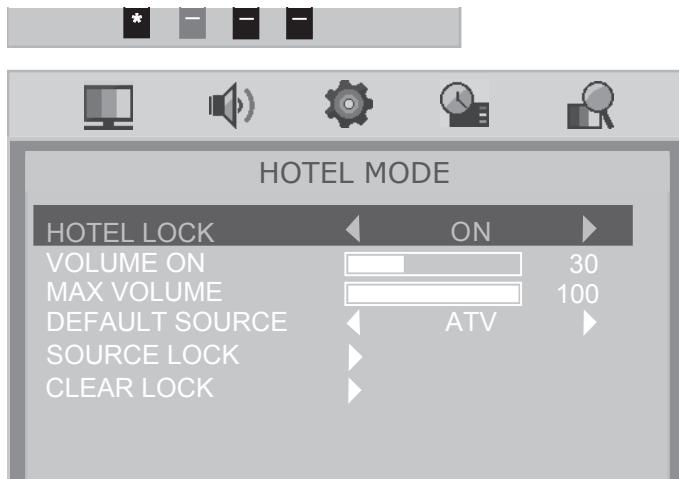
HOTEL LOCK: Set the hotel lock to "ON" or "OFF" which enables or disables below hotel lock functions.
VOLUME ON: Start from the desired volume when the TV is turned on.
MAX VOLUME: Set the maximum volume level.
DEFAULT SOURCE: Select the input source to be displayed when the TV is turned on (ATV, DTV, HDMI, SCART, COMPONENT, AV, VGA, DVD).
SOURCE LOCK: Press to enter, the selected sources are blocked from use.
CLEAR LOCK: Press to clear all of the settings in HOTEL MODE.
CHANNEL menu
Press [LED MENU] to display the main menu.
Press to select "CHANNEL" in the main menu, then press or [OK] to enter.
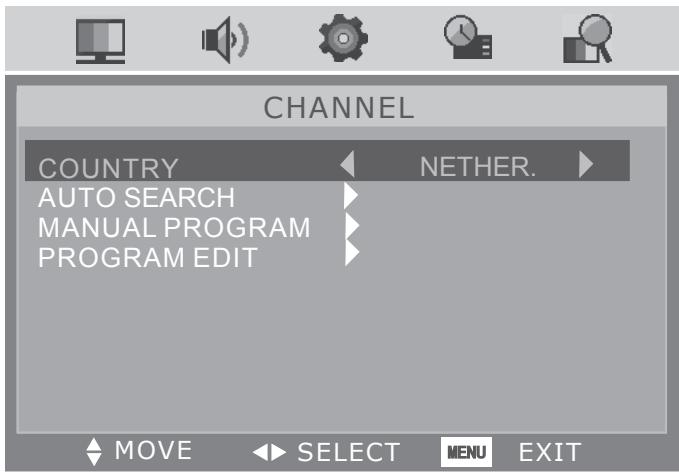
COUNTRY: Press to change country.
AUTO SEARCH: Press to start searching channels automatically.
MANUAL PROGRAM: Press to enter "MANUAL PROGRAM" submenu.
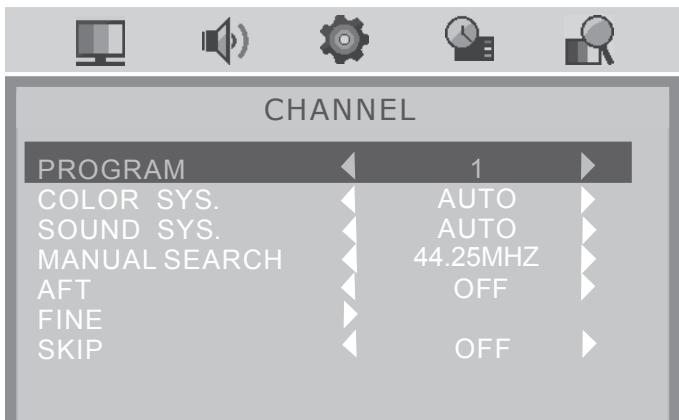
PROGRAM: Press to select the program you want to watch.
COLOR SYS.: Press to change the color system as AUTO, PAL and SECAM.
SOUND SYS.: Press to change the sound system as AUTO, B/G, I, D/K, L and L'.
MANUAL SEARCH: Press select the frequency you want to search.
AFT: Set the automatic frequency tuning to "ON" or "OFF".

FINE: Press to enter "FINE" submenu to scan current program within a frequency range accurately and store the result manually when "AFT" is set to "OFF".
SKIP: Set the skip sign of current channel to "ON" or "OFF".
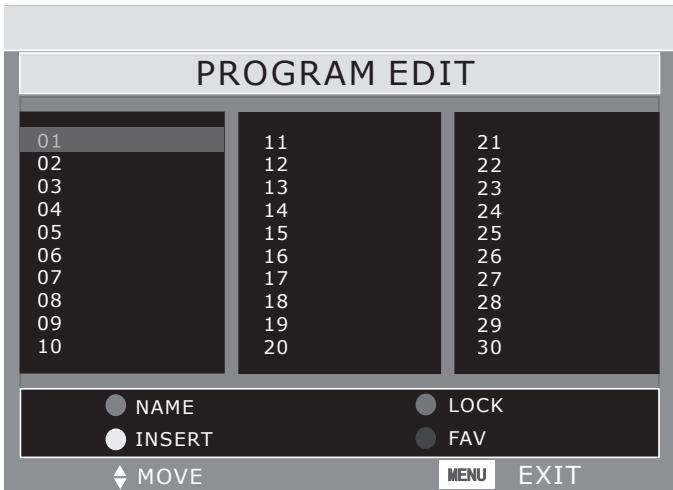
- Press Green button and / to name the current channel.
- Press Yellow button to insert the current channel.
- Press Red button to set the current channel to lock. If the current channel is already lock, press it again will unlock.
- Press Blue button to set the current channel to your favorite channel. If the current channel is already be one of your favorite channel, press it again will set it to a normal one.
DTV Mode
CHANNEL menu
Press [LED MENU] to display the main menu.
Press to select "CHANNEL" in the main menu, then press or [OK] to enter.
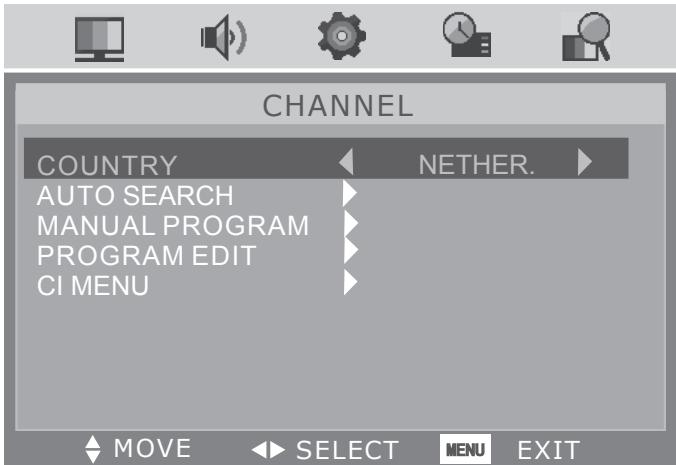
COUNTRY: Press to change country.
AUTO SEARCH: Press to start searching channels automatically.
MANUAL PROGRAM: Press to enter "MANUAL PROGRAM" submenu.
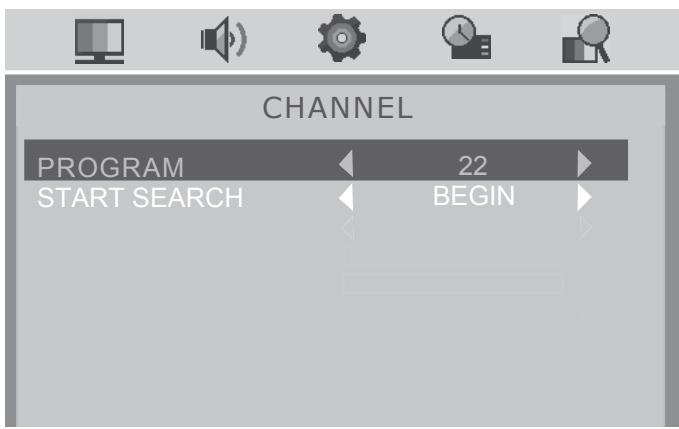
PROGRAM: Press to select the program you want to watch.
START SEARCH: Press to BEGIN searching.
Note: The other options in this menu are unavailable, as these options just display to show the current signal situation. The CHANNEL FOUND shows how many channels are found recently. The SIG. QUALITY and SIG. STRENGTH shows the quality and the strength of the current signal, and the FREQUENCY shows the frequency of the current signal.
PROGRAM EDIT: Press to enter "PROGRAM EDIT" submenu.
Press / to switch among all options as Fav, Lock, Edit, Move, Sort, Skip, Delete and Search, then press [OK] to select.
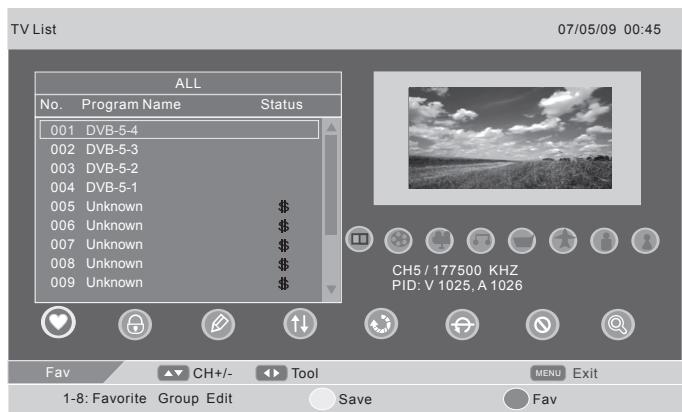
1. Fav:
- Press / to select channel.
- Press [1-8] number buttons to set the current channel to your favorite group 1-8. If the current channel is already be one of your favorite group 1-8, press [1-8] number buttons again will set it to a normal one.
- Press Yellow button on the remote control, there will be a dialogue screen appeared as follows:
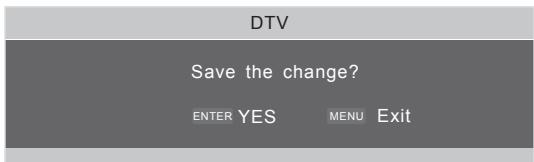
Press [OK] to save the change or press [LED MENU] to return to the previous menu.
Press Blue button, the menu will appear as follows:
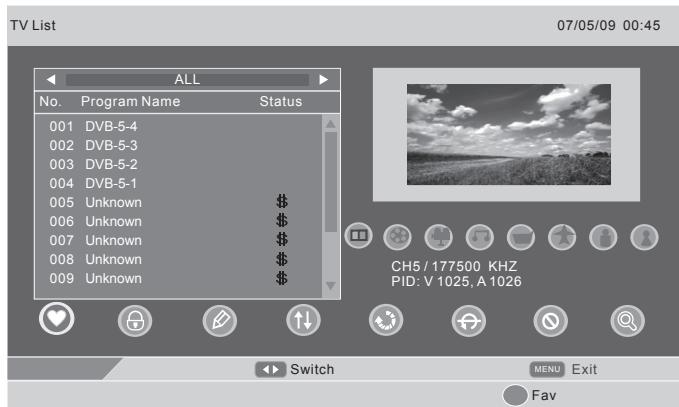
Press to switch between all channel and FAV 1-8 channel.
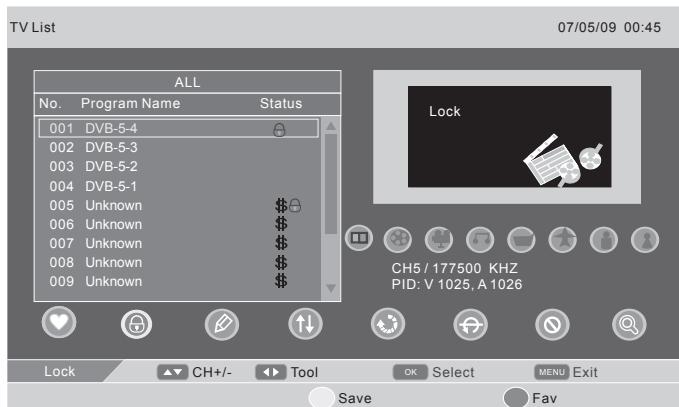
2. Lock:
- Press [OK] set the current channel to lock. If the current channel is already locked, press it again will unlock.
- Press Blue button to return to the previous menu.
- If set the CHILD LOCK to "ON", the program locked cannot be displayed.
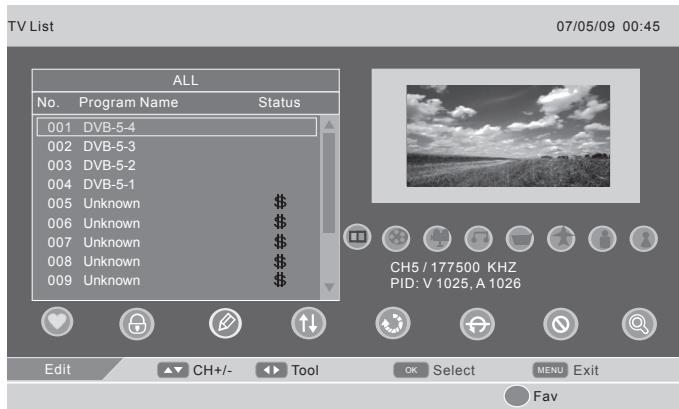
3. Edit:
Press / to select channel, then press [OK] to enter the Program Info menu as follows:
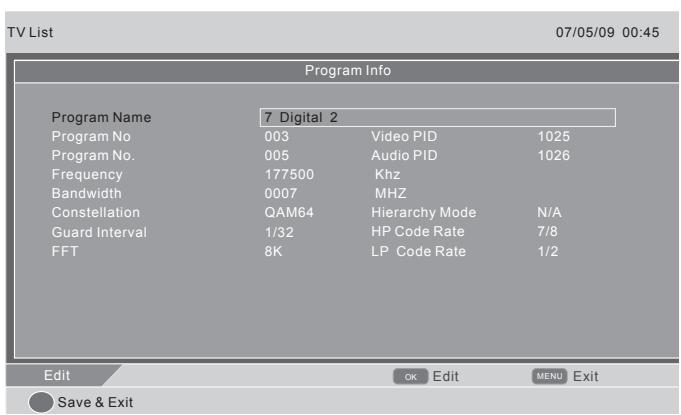
Press / to select channel, then press [OK] to rename the program.
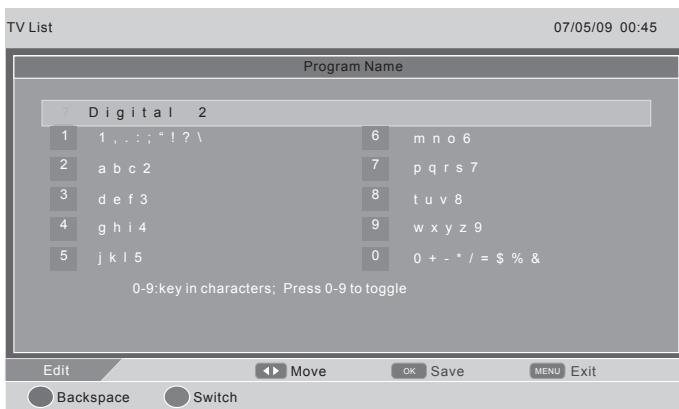
- Press [1-9] number buttons to select different character.
- Press Green button to switch between upper and lower case letters.
e.g. Press the number button 2 repeatedly to select among a, b, c and 2 and press [OK] to save.
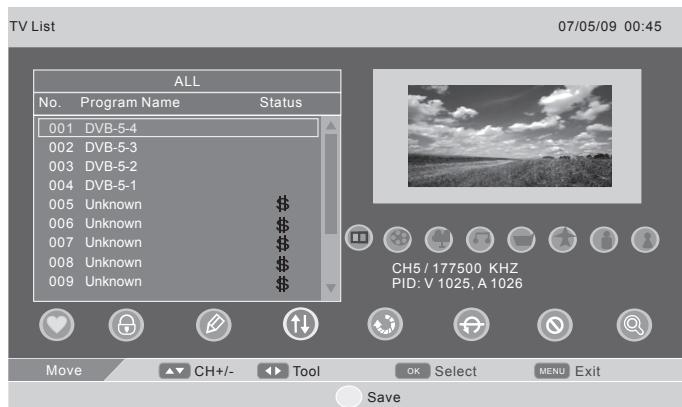
4. Move:
Press / to select the channel you want to move, then press [OK] and a will be shown at the channel selected. To remove the move function, press [OK] again. Press / to select a destination, then press Yellow button to save.
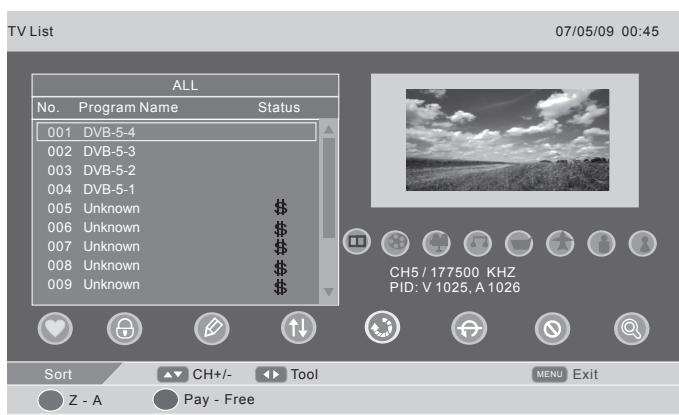
5. Sort:
Press Red button to sort all the programs from "A-Z" or "Z-A", press Green button to sort all the programs from "Pay-Free" to "Free-Pay".
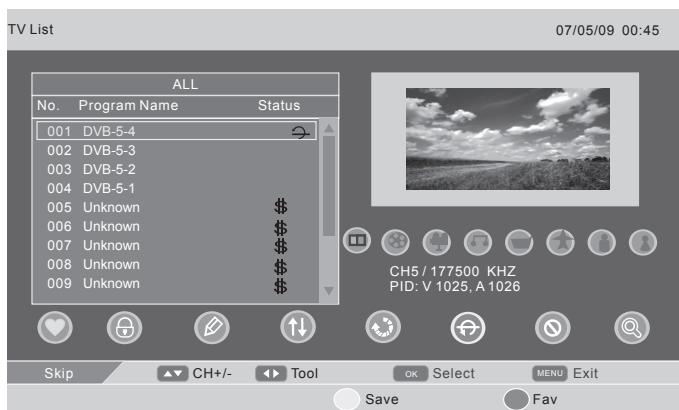
6. Skip:
Press / to select the channel you want to skip, then press [OK] and a will be shown at the channel selected. To remove the skip function, press [OK] again. When a channel has been selected to skip, you still may select that channel with the number buttons.
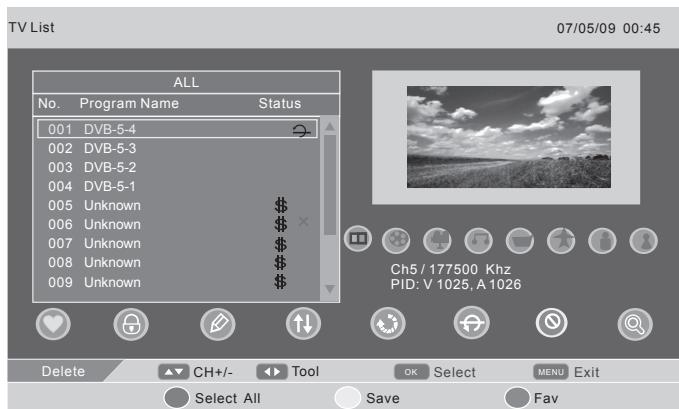
7. Delete:
Press / to select the channel you wish to delete, then press [OK] and a × will be shown at the channel selected. To remove the delete function, press [OK] again.
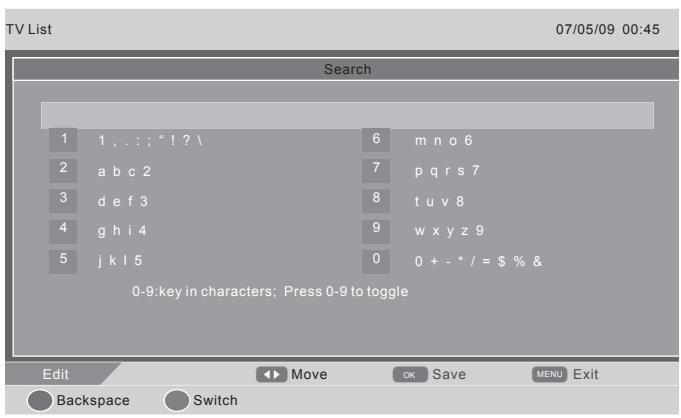
8. Search:
- Press [OK] to enter the search menu.
- Press the number buttons to select the corresponding characters.
Note:
- PICTURE, SOUND, SETTING menu and descriptions are the same as those for ATV mode.
- TT LANGUAGE and BLUE SCREEN are invalid in FUNCTION menu and they will be displayed in grey. Besides, there are only FULL and AUTO available in ASPECT. Other menu and descriptions are the same as those for ATV mode.
EPG menu:
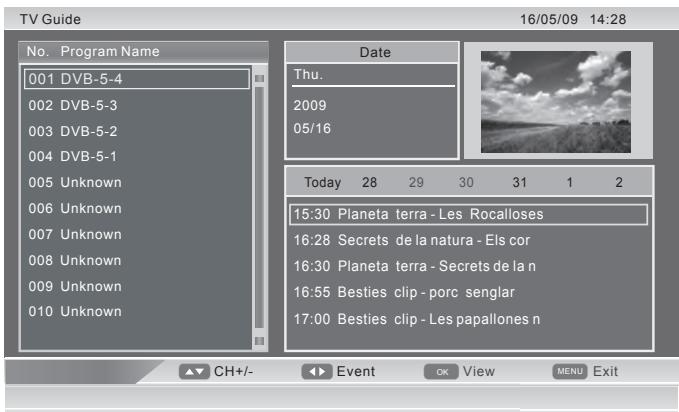
Press [EPG] to enter the electronic program guide which is provided by the program providers. The EPG provides program information for the next number of hours.
CI MENU: Press to enter "CI" submenu.
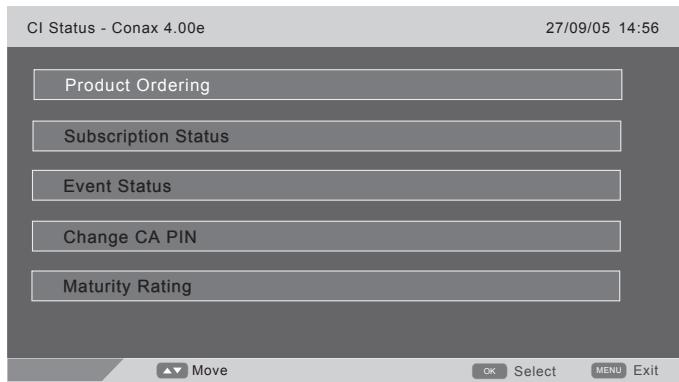
CI (Common Interface) is more properly the term used to describe the slot, into which you then put a Conditional Access Module, or CAM. The CI will usually have a slot in it for a subscription card, which enables you to subscribe to paid services. All you have to do is get the appropriate CAM for the service you want to watch, or you can just leave the slot empty if you wish to do so.
VGA Mode
PICTURE menu
The PICTURE menu has only PICTURE MODE, CONTRAST, BRIGHTNESS and COLOR TEMP. options, the operation and descriptions of which are the same as those for TV mode.
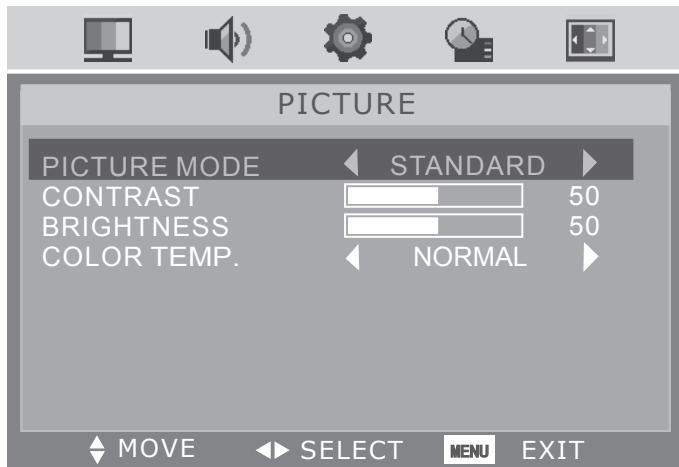
PC SETUP menu
Press [LED MENU] to display the main menu.
Press to select "PC SETUP" in the main menu, then press or [OK] to enter.
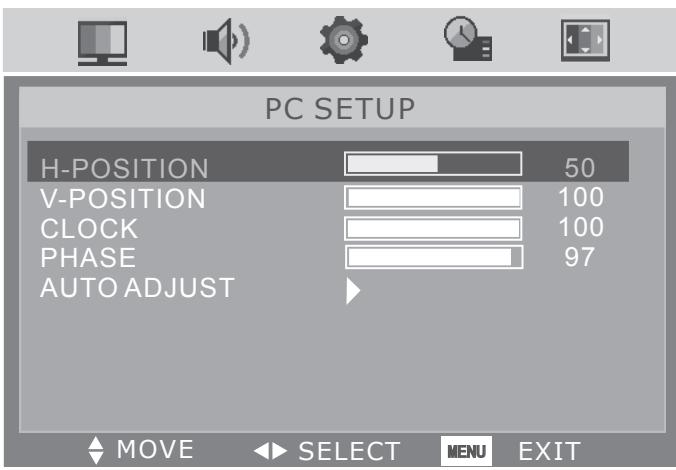
H-POSITION: Adjust the position of picture in horizontal.
V-POSITION: Adjust the position of picture in vertical.
CLOCK: Adjust the clock of the picture.
PHASE: Adjust the phase of picture.
AUTO ADJUST: Press to adjust the above items automatically. Genearly it will adjust the picture's location on the screen, clock and phase according to the signal output from the PC you connected. In some special instance, the auto adjust item may not do effect. You may adjust the position, clock and phase manually.
Note:
- SOUND, SETTING and FUNCTION menu and descriptions are the same as those for TV mode.
VGA mode has not CHANNEL menu.
MULTIMEDIA Mode
Note: Before operating MULTIMEDIA menu, plug in USB device or memory card, then press [INPUT] to set the input source to DTV.
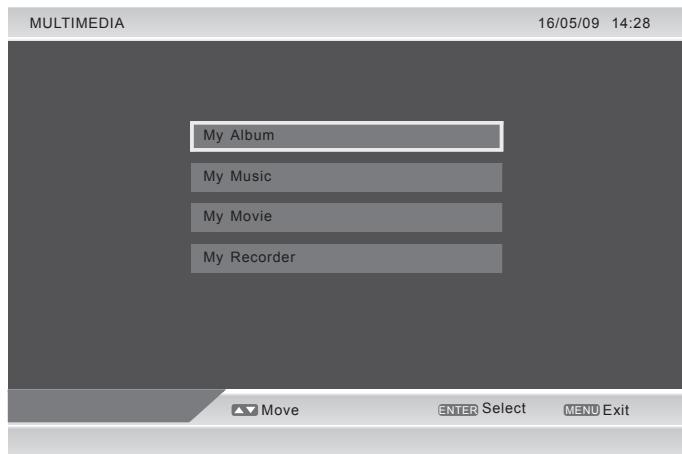
Press [MEDIA] to call out the MULTIMEDIA menu. Press / to select the options including My Album, My Music, My Movie and My Recorder, then press [OK] to enter the submenus.
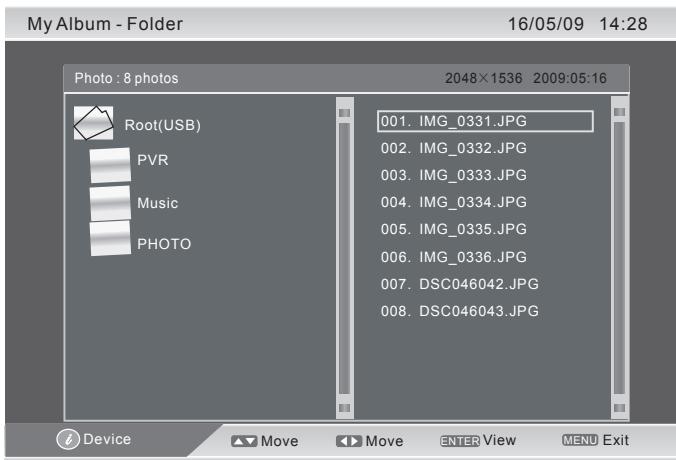
My Album
- Press Blue button to enter the picture folder.
- Press [DISPLAY] button to select device.
- Press / / to move to select picture.
- Press [OK] to view the picture selected.
- Press [LED MENU] to exit the picture preview menu.
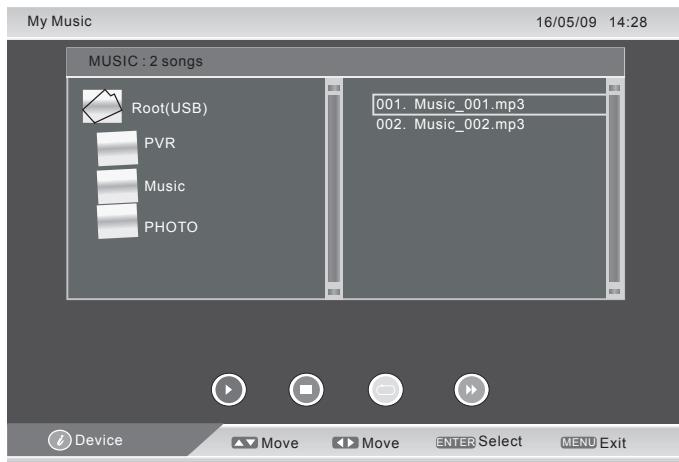
My Music
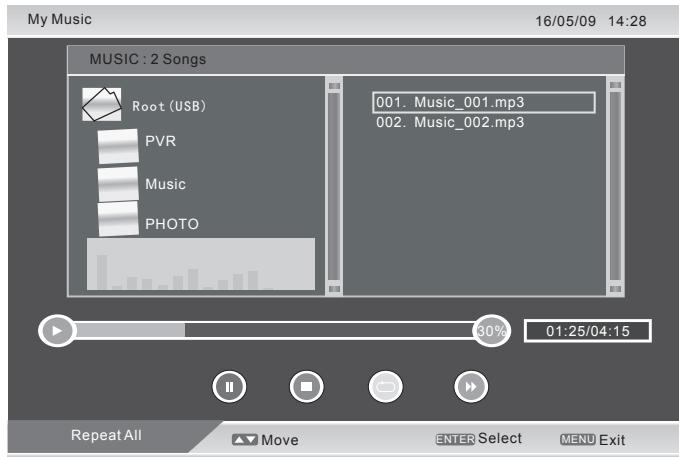
- Press Red button to play or pause the song.
- Press Green button to stop playing songs.
- Press Yellow button to select the play mode: No Repeat, Repeat All and Repeat Once.
- Press Blue button to fast play the song.
- Press [DISPLAY] button to select device.
- Press / / to move to select song.
- Press [OK] to play the movie.
- Press [LED MENU] to exit song play.
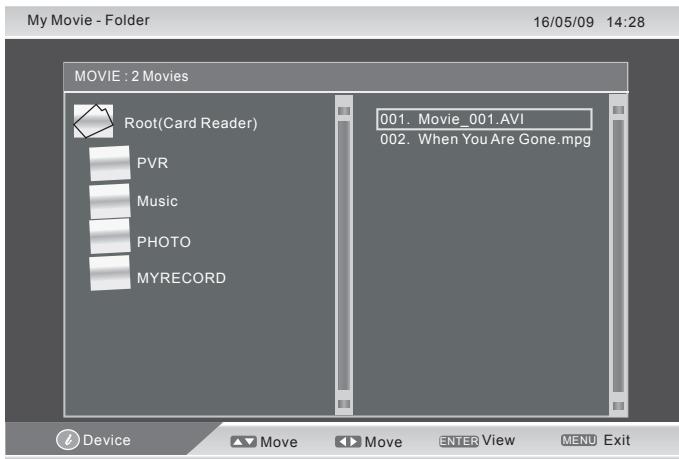
My Movie
- Press [DISPLAY] button to select device.
- Press / / to move to select movie.
- Press [OK] to play the movie.
- Press [LED MENU] to exit movie play.
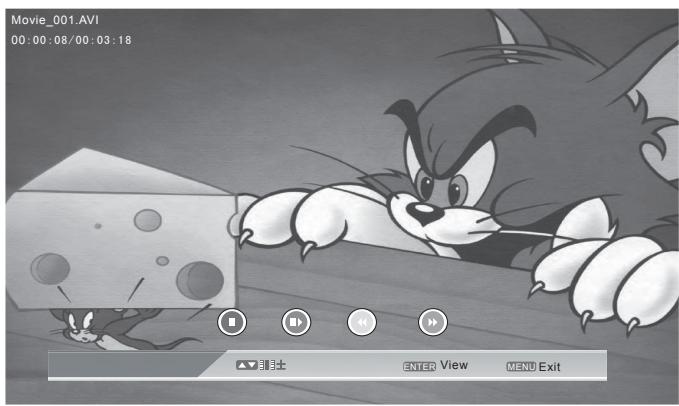
- Press Red button to make a pause, press it again to continue playing the movie.
- Press Green button to one-step-play, press it again to set slow-forward speed to watch the movie.
- Press Yellow button to set the fast-backward speed.
- Press Blue button to set the fast-forward speed.

My Recorder
Press / to select the options including Recorder List, Recording Device and Recording Preference, and then press [OK] to enter the submenus.
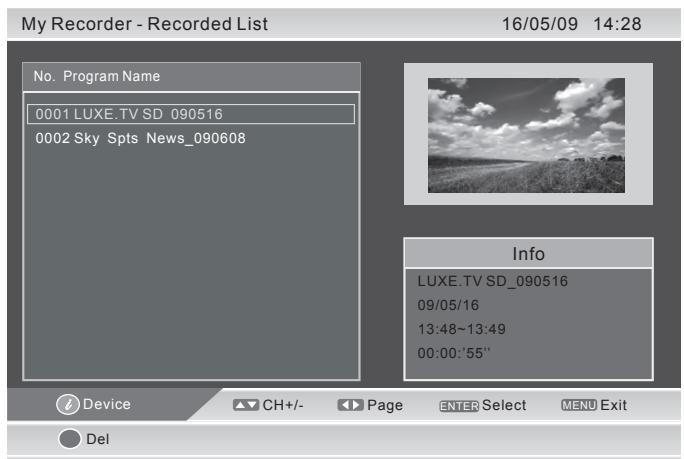
- Press [DISPLAY] button to select device.
- Press / to move to select file recorded.
- Press [OK] to select the file, and press it again to play the file.
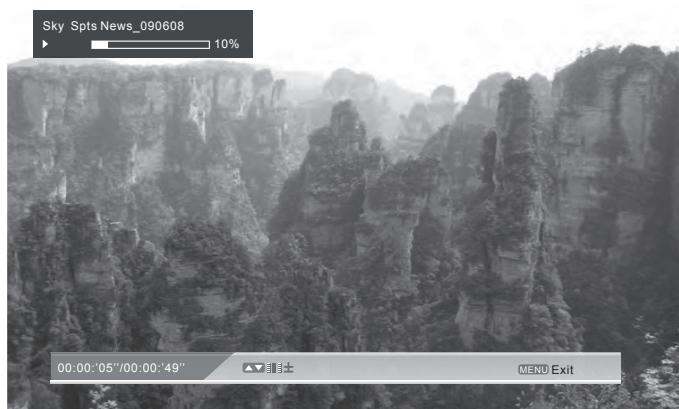
- Press Red button to delete the file selected.
- Press Green button to preview the file selected.
- Press [LED MENU] to exit movie play.
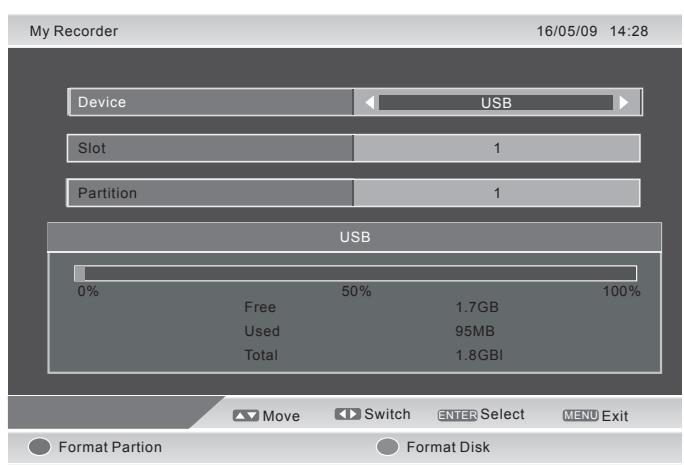
- Press / to move to select the recorder.
- Press to change the recorder.
- Press [OK] to select the recorders.
- Press Red button to format the partition selected.
- Press Green button to format all partitions.
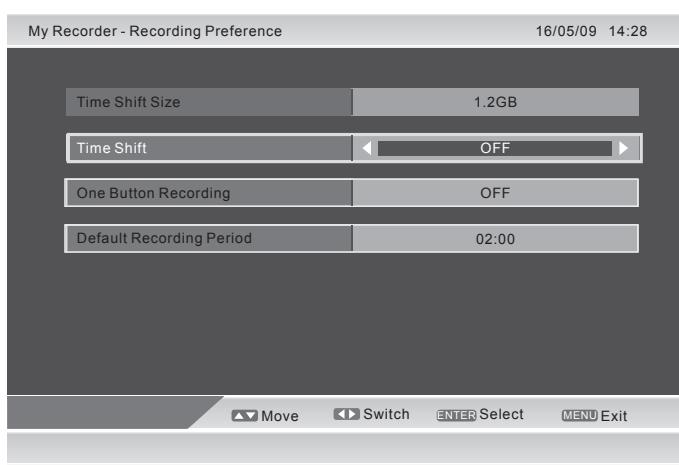
- The device's Time Shift Size is 1.2 GB. This is just an example for reference, different device will have different time shift size.
- Press / to move to select Time Shift, then press / to select among Off, Pause and Auto.
- Press / to move to select One Button Recording, then press / to select between Off and On.
- Press / to move to select Default Recording Period, then press / to set. The longest record duration is 8 hours, the shortest record duration is 15 minutes.
BUILT-IN DVD PLAYER OPERATIONS
The following types of discs can be played on this unit.
| Disc type and logo mark | |
| DVD | DVD VIDEO™ |
| CD | COMPACT DISC DIGITAL AUDIO |
Region Number
Region number (Regional restriction code) is built-in to the unit and DVD video discs Region number "2" of DVD video discs can be used on this unit.

DVD Video Disc
DVD video discs are divided into titles, and the titles are subdivided into chapters.

There are the marks on some DVD video disc package. Examples:
3) Multiple languages 2. Multi-language subtitles 16:9LB Multi-angle Multi-aspect Region number Closed caption
Audio CD Disc
Audio CD discs are divided into tracks.
| Track 1 | Track 2 | Track 3 | Track 4 | Track 5 |
CAUTION:
- Only the above types of discs can be played on this unit.
- This unit can play back the DVD-R that has recorded movie data as well. However, some DVD-Rs cannot be played back depending on the recording conditions.
- The DVD-R that has no movie data cannot be played back.
- The DVD-RW (Video mode) can be played back. However, some DVD-RWs cannot be played back depending on the recording conditions. The DVD-RW (VR mode) cannot be played back.
- The DVD+R/+RW can be played back. However, some DVD+R/+RWs cannot be played back depending on the recording conditions.
Handling, Storing and Cleaning Discs
- Do not touch the disc door while it is moving.
- Never put anything except a 5-inch (12cm) DVD (or CD) into the disc in/out slot. Foreign objects can damage the unit.
- Fingersprints and dust should be carefully wiped from the signal surface of the disc (glossy side) with a soft cloth. Wipe in a straight motion from the center to the outside of the disc.
- Never use chemicals such as record cleaning sprays, antistatic sprays or fluids, benzene or thinner to clean the discs. These chemicals will permanently damage the plastic surface of the disc.
- To remove a disc from its storage case, press down on the center of the case and lift the disc out, holding it carefully by the edges.
- Discs should be returned to their cases after use to protect them from dust and scratches.
- To prevent warping the disc, do not expose it to direct sunlight, high humidity or high temperatures for extended periods of time.
- Do not apply paper or write anything on either side of the disc. Sharp writing instruments, or the inks used in some felt-tip pens, may damage the surfaces of the disc.
BasicPlayback
"☑" may appear on the TV screen during operation. This icon means that the function is not available on the disc now.
Preparations
- Turn on the TV and press [INPUT] to select the input source as "DVD".
- Insert the disc (label facing away from you) to the disc in/ out slot (side panel) until it clicks.
The TV starts to play automatically the first file/track/chapter.
Note:
While in other function, it alternate to "DVD" function and starts playback automatically when insert a playable disc into the disc in/out slot.
StopPlayback
[CD]
Press [▶II] to stop the playing back disc temporarily, press this button again to resume playback.
[DVD]
Press [■] once to stop the playing back disc temporarily.
Press [■] twice to stop the playing back disc completely.
Various disc playing functions
Selecting a DVD menu
Notes:
The operation may differ depending on the disc used.
- Selecting a menu may not be possible on some discs.
1. Press [D.MENU] during playback.
The main menu screen will appear.
2. Press [▲], [▼], [▲] or [▶] (or the number buttons) to select the desired menu.
3. Press [OK]. The selected menu playback starts.
Chapter (Track) Skip

Skipping forward
Press [▶▶] during playback to skip to the next chapter (or track).
Skipping backward
Press [▶] during playback to skip back to the previous chapter (or track).
Note:
You can skip only through the chapters, not over the title on the DVD disc.
Title search [DVD]
Press [GOTO].
Press the number buttons to enter the desired title number.
Example:
T:01/01 C:01/15
Repeat playback
Press [REPEAT] during playback to activate repeat mode:
[DVD]
| If you want to... | Press [REPEAT] ... |
| Repeat chapter ( CHAPTER) | Once |
| Repeat title ( TITLE) | Twice |
| Repeat all ( ALL) | Three times |
| Repeat off | Four times |
[CD]
| If you want to... | Press [REPEAT] ... |
| Repeat current track | Once |
| Repeat all tracks | Twice |
| Repeat off | Three times |
Designated Range Repeat Playback(A-B Repeat)
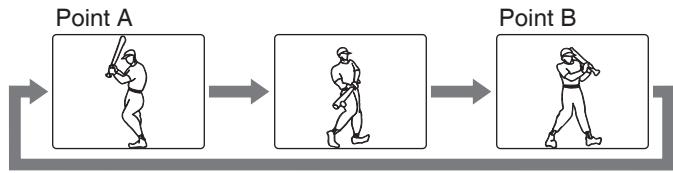
- Press [A-B] during playback at the beginning of the section you want to repeat (Point A).
"CA" appears on the TV screen. - Press [A-B] again at the end of the section you want to repeat (Point B).
"AB" appears briefly on the TV screen. - To return to normal playback, press [A-B] again.
Selecting Subtitle Language [DVD]
Press [SUBTITLE] repeatedly during playback until the desired subtitle language appears on the TV screen.
Example:
SUBTITLE 01/03 ENG
Note:
Not all disc supports this function.
Selecting Audio Soundtrack Language(Multi-Language) [DVD]
This operation works only with discs on which multiple audiosoundtrack languages are recorded.
![SWEEX TV134 - Selecting Audio Soundtrack Language(Multi-Language) [DVD] - 1](/content/2025/01/171948/images/0cc5336a3051c8ca552a21e6084ccebff97b8880924f61ec87425f03a8eb9ee7.jpg)
Press [AUDIO] repeatedly during playback until the desired language appears on the TV screen.
Notes:
- When the desired language is not selected even if the button is pressed, the language is not available on the disc.
- When the power is turned on or the disc is replaced, select the language again.
- If the language is not recorded on the disc, only the available language on the disc will be heard.
Selecting On-Screen Information
Press [D.DIS] repeatedly to show the disc information(Title, Chapter, Title elapsed playing time, Language, etc.).
KODAK Picture/JPEG CD Playback
To start the slide show from the thumbnail pictures:
- Press [A], [B], [V] or [A] to select the desired picture.
- To go to the next or previous thumbnail pictures, press▶▶] or [▶▶].
- Press [OK] or [▶] (Play) to start the slide show from the selected picture.
During the slide show:
- Press [H] to pause. Press [▶] (Play) to continue.
- Press [▶▶] or [▶▲], it skips to the next or previous file.
- If the picture appears upside down or sideways, press [▲],
[>, [▼] or [←] to flip / rotate the picture.
Initial settings
Once the initial settings have been completed, the unit canalways be operated under the same conditions. The settings will be retained in the memory until they are changed, even if the power is turned off.
- Press [DVD SETUP] to activate the DVD player OSD menu.
- Press [▶] or [◁] to move and highlight between different sub-menu.
- Press [] or [] to enter the highlighted sub-menu.
- Press [DVD SETUP] to exit the OSD menu.
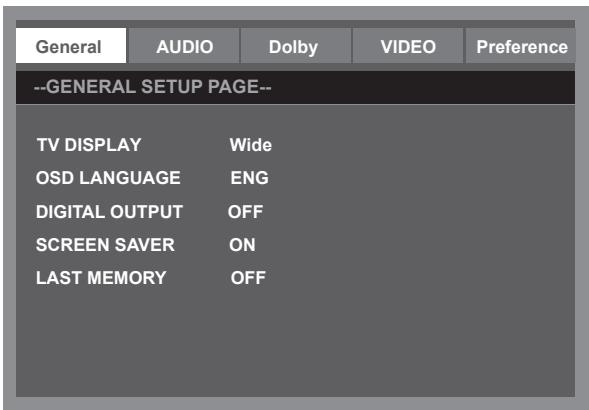
General setup menu
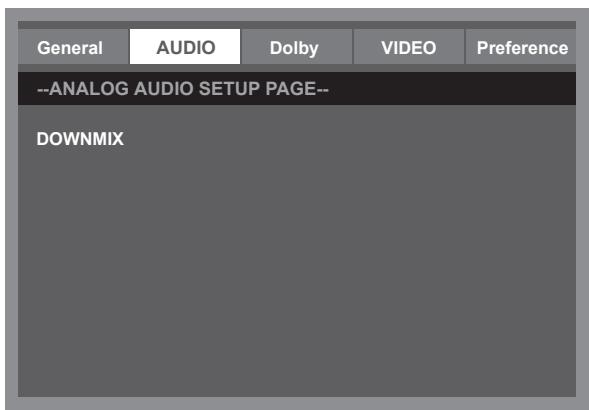
Audio setup menu
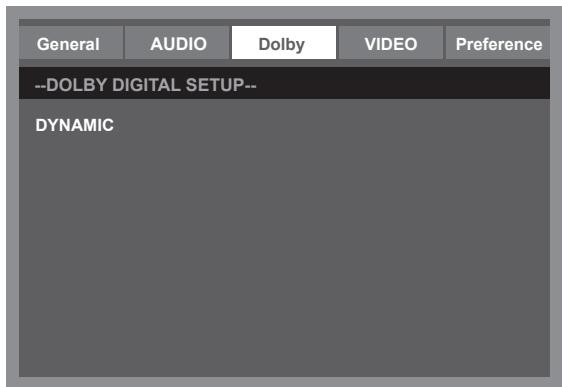
Dolby Digital setup menu
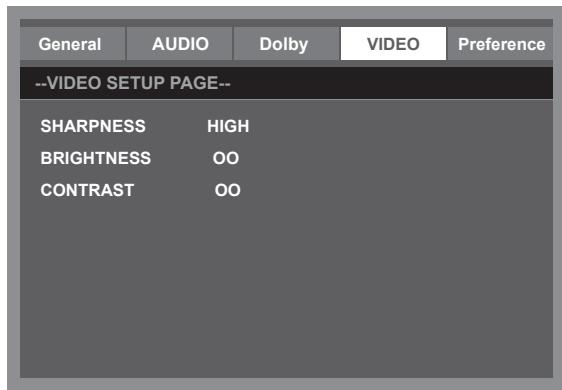
Video setup menu
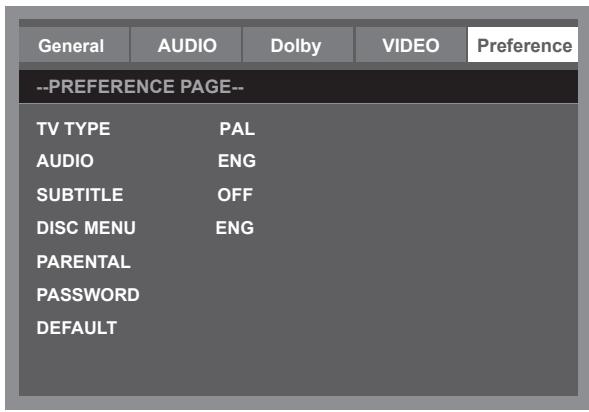
Preference setup menu
IMPORTANT NOTICE
The factory setting of PIN Code is "0000". If you forgot the password you've set, input the initial password "8888".
MAINTENANCE
WARNING:
FOR YOUR PERSONAL SAFETY, BE SURE TO DISCONNECT THE AC POWER CORD BEFORE PROCEEDING WITH ANY MAINTENANCE OR CLEANING.
Cleaning the LED Panel
The LED panel should not be touched with sharp objects. If dust and fingerprints is on the LED panel surface, wipe them off with a clean soft cloth.
Wipe in a straight motion from the center to the outside of the LED panel.
Never use chemicals such as record cleaning sprays, antistatic sprays or fluids, benzene or thinner to clean the LED panel.
Cleaning the main unit
Clean the outside of the unit with a clean soft cloth moistened with luke-warm water. Do not use benzene, thinner or alcohol since they will mar the finish of the surface.
TROUBLESHOOTING
Symptom
Possible cause
Corrective active
No Picture and sound.
Power cord is not correctly connected with the main unit.
Connected the power cord with the main unit.
Power cord is not plugged into an AC outlet.
Plug the power cord into an AC outlet.
The wrong input source is selected.
Select a correct input source.
The input source is failed to connect with the TV.
Make correct connections.
No sound only.
Volume control is set to minimum.
Press the VOL+ button to increase the volume.
The button on the remote control is pressed.
Press the (or VOL + / - ) button to release the volume.
An incorrect sound system mode is setted.
Set a correct sound system from the main menu to match your TV.
Symptom
Possible cause
Corrective active
No picture only, or monochrome picture.
The color system setting doesn't match the program.
Set the proper color system setting.
The sound system setting doesn't match the program.
Set the proper sound system setting.
Interfered sound or picture.
Some equipment that brings interference is nearby the TV.
Keep these things away from the TV.
Multi devices plug into the same one AC outlet collections.
Plug the power cord into another AC outlet.
An incorrect sound system mode is setted.
Set a correct sound system from the main menu to match your TV.
Note:
A few bright dots and dark dots may appear on the TV screen, that is normal appearance.