
SA005 - Carte d'extension informatique SWEEX - Notice d'utilisation et mode d'emploi gratuit
Retrouvez gratuitement la notice de l'appareil SA005 SWEEX au format PDF.


| Type de produit | Adaptateur USB |
| Caractéristiques techniques principales | Connectivité USB 2.0, prise en charge des périphériques jusqu'à 480 Mbps |
| Alimentation électrique | Alimentation par le port USB |
| Dimensions approximatives | 10 x 5 x 2 cm |
| Poids | 150 g |
| Compatibilités | Compatible avec Windows, Mac OS, et Linux |
| Type de batterie | Non applicable |
| Tension | 5 V |
| Puissance | Max 500 mA |
| Fonctions principales | Connexion de périphériques USB, transfert de données |
| Entretien et nettoyage | Essuyer avec un chiffon doux, éviter l'exposition à l'humidité |
| Pièces détachées et réparabilité | Pas de pièces détachées disponibles, produit non réparable |
FOIRE AUX QUESTIONS - SA005 SWEEX
Questions des utilisateurs sur SA005 SWEEX
0 question sur cet appareil. Repondez a celles que vous connaissez ou posez la votre.
Poser une nouvelle question sur cet appareil
Téléchargez la notice de votre Carte d'extension informatique au format PDF gratuitement ! Retrouvez votre notice SA005 - SWEEX et reprennez votre appareil électronique en main. Sur cette page sont publiés tous les documents nécessaires à l'utilisation de votre appareil SA005 de la marque SWEEX.
MODE D'EMPLOI SA005 SWEEX
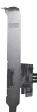
PU202 Sweex 2 port internal & external SATA II PCI Express Cord
Introduction
- Do not expose the Sweex Express Card to extreme temperatures. Do not place the device in direct sun light or close to heating elements.
- Do not use the Sweex PCI Express Card in extremely dusty or moist environments.
- Prevent hard shocks or impacts of the device, as this can cause damage to the internal electronics.
- Never try to open the device yourself, this voids the warranty.
Prior to installing the hardware, follow these precautionary instructions:
- Make sure the PC is turned off and that there is no networking current.
- Disconnect the printer and monitor cable as these have their own power supply, to be sure that the PC is current free.
- Now unscrew the computer casing.
- Make sure that you undo yourself of possible static electricity. This can be done by grabbing a (naked) central heating pipe or an unpointed water pipe. Pay attention not to use a magnetic screwdriver. Briefly touch the iron frame of the PC casing. Touch the contact points and the memory as little as possible.
- Locate a free PCIe slot and remove the metal protection plate that is in the computer casing for the intended slot. It is possible that the card does not easily fit in the PCIe slot. When this occurs, do not force it but try a different free slot.
- When the card is mounted successfully, check if the other cards are still fitted properly in their slots.
- Replace the removed casing and connect all cables correctly.
- Turn the PC back on.
Installation Windows 2000 and XP
After detection of the hardware, Windows shows the following screen:
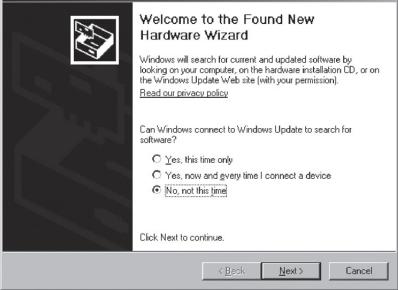
Found New Hardware Wizard
Choose for the option "No, not this time" and Press "Next".
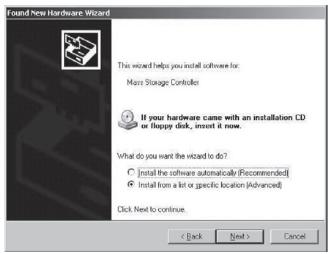
In the next screen choose "Install from a list or specific location" and press "Next".
Check the second option: "include this location". Place the Sweex CD-ROM in the player. Thereafter go to the Sweex CD-ROM via "Browse" and select the "Drivers" folder. In this folder choose the correct operating system; winxp or win2k. Press "Next".
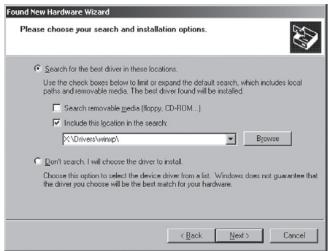
Pay attention: In the picture the X is the letter of our CD-ROM station. This letter can be different! The hardware is now installed successfully. To complete press "Finish".
Installation Windows Vista
The drivers on the Sweex CD-ROM are located in the "Drivers" folder.
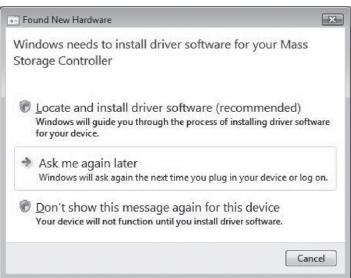
After detection of the hardware Windows shows the following screen: Here choose to locate and install the drivers.
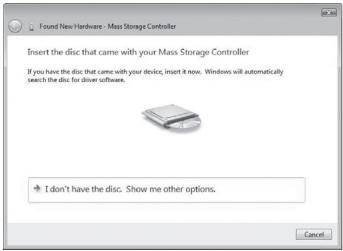
Place the Sweeex CD-ROM in the computer. If it was already, open the CD-ROM tray and then close it. Windows will automatically search and install the driver.
Warranty
For all Sweex products a warranty period of 3 years applies. We do not give support or warranty on supplied software, rechargeable batteries and batteries. Transaction of warranty only takes place at the sales point where the product is bought.
All brand names and associated rights mentioned in this manual are and stay property of the rightful owner.