
PU102 - Carte d'extension informatique SWEEX - Notice d'utilisation et mode d'emploi gratuit
Retrouvez gratuitement la notice de l'appareil PU102 SWEEX au format PDF.

| Type de produit | Carte d'extension PCI |
| Marque | SWEEX |
| Modèle | PU102 |
| Catégorie | Contrôleur Serial ATA |
| Nombre de ports | 2 ports SATA |
| Interface | PCI |
| Dimensions approx. | 120 x 80 x 20 mm |
| Poids approx. | 100 g |
| Alimentation | Alimenté par le slot PCI |
| Systèmes d'exploitation supportés | Windows 2000, XP, Vista |
| Fonctions principales | Ajouter deux ports SATA internes ou externes à un PC |
| Installation | Insérer dans un slot PCI libre, installer les pilotes |
| Entretien et nettoyage | Débrancher avant nettoyage, utiliser un chiffon sec et doux |
| Sécurité | Éteindre et débrancher le PC avant installation; éviter l'électricité statique |
| Pièces détachées et réparabilité | Aucune pièce détachée disponible; réparation non prévue |
| Garantie | 3 ans |
| Contenu de l'emballage | Carte PU102, CD de pilotes, manuel |
FOIRE AUX QUESTIONS - PU102 SWEEX
Questions des utilisateurs sur PU102 SWEEX
0 question sur cet appareil. Repondez a celles que vous connaissez ou posez la votre.
Poser une nouvelle question sur cet appareil
Téléchargez la notice de votre Carte d'extension informatique au format PDF gratuitement ! Retrouvez votre notice PU102 - SWEEX et reprennez votre appareil électronique en main. Sur cette page sont publiés tous les documents nécessaires à l'utilisation de votre appareil PU102 de la marque SWEEX.
MODE D'EMPLOI PU102 SWEEX
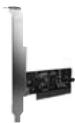
PU102 Sweex 2 Port Serial ATA PCI Card
Introduction
First of all, many thanks for purchasing this Sweex 2 Port Serial ATA PCI Card. This card enables you to simply add two Serial ATA ports to your PC. This card at the same time offers you the option of using these externally, internally or a combination of the two.
To ensure this product operates correctly, we advise you to carefully read this manual first. If despite this manual you still experience problems during installation or operation of this product, go to www.sweex.com and look under the heading service & support.
Hardware
Take the following precautionary measures prior to installing the hardware:
- Ensure the PC is switched off and disconnected from the mains.
- Also, disconnect the printer and monitor cables (they have their own power supplies) to make absolutely sure the PC is not live.
- Now unscrew the computer casing.
- Subsequently, remove any static electricity you may carry on your body. Do this by touching a (neutral) pipe of the central heating system or an unpainted water pipe, among other things. Please note that you must not use a magnetic screwdriver for this. Before you proceed any further, briefly touch the iron frame of the PC casing. Make sure that you minimise contact with any contact points of the PC, PCI card or the memory.
- Find a vacant PCI slot and remove the metal guard plate part of the computer casing in front of the relevant slot. On occasion the card does not allow for it to be inserted in the PCI slot smoothly. Should this be the case, do not force anything, but try another available slot.
- Once the card has been successfully installed, check whether all other cards are still properly inserted in the PCI slots. It is possible that the other PCI cards are lifted up slightly when installing a new PCI card; as a result, the relevant cards or even the entire PC may no longer operate correctly.
- Replace the casing on the computer base and correctly reconnect all cables.
- Switch on the PC again.
Installation under Windows 2000 and XP
We advise you to ensure the operating system is up-to-date before starting the installation. This can be easily checked by starting up Internet Explorer and selecting the option "Windows Update" in the "Extra" menu.
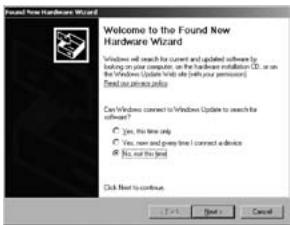
Once the hardware has been detected, Windows shows the following screen:
text_image
Found New Hardware Wizard Welcome to the Found New Hardware Wizard Windows will search for current and updated software by lending on your computer, on the hardware installation (CD), or on the Windows Update needs file (with your permission). Find our access policy Can Windows connect to Windows Update to search the software? • Yes, this new only • No, now and given time I connect a device • No, not this next Click Next to continue. F 4 Next > CancelSelect "No, not this time" and click "Next".
text_image
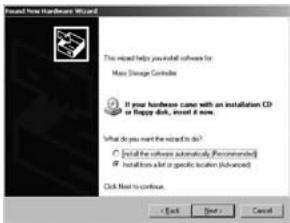
Found New Hardware Wizard This related help you install software for Mac Storage Controls If your hardware came with an installation CD or floppy disk, insert it now. What do you want the related to do? Install the software automatically (Recommended) Install how a bit or specific location (Advanced) Click Next to continue. Back Next > CancelIn the next screen, select "Install from a list or specific location" and click "Next".
text_image
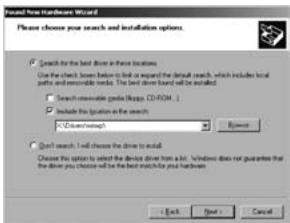
Found new hardware Wizard Please choose your search and installation options. ✓ Search for the best drive in these locations. Use the check point before to find it to expand the default search, which includes local links and remote link. The best drive based on its installed. ✓ Search available via https://CD-ROM /... ✓ Include this location in the search ✓ Create search Browse ✓ Get search to add the drive to install. Choose the option to install the device driven from a bit. Windows does not guarantee that the drive you should be the best drive for your hardware. Back Next > CancelTick the second option: "Include this location". Insert the Sweex CD-ROM in the CD-ROM player. Go to the Sweex CD-ROM via "Browse", and select the folder "Drivers". In this folder, select the relevant operating system; winxp or win2k. Then click "Next".
Note: In the illustration, "X" stands for our CD-ROM drive. This may be a different drive letter!
Now the hardware has been installed successfully. Finally click "Finish".
Installation of Windows Vista
Ensure the computer is connected to the Internet. Vista downloads and installs the drivers automatically.
Warranty
All products under the Sweex brand are warranted for a period of three years. We do not grant support or warranties for any software and/or (rechargeable) batteries included. Warranty claims are only settled via the dealer where the product concerned was purchased.
The rightful owner has and retains title to all brand names and related rights mentioned in this manual.