
EASITRIM EHT420 - Débroussailleuse FLYMO - Notice d'utilisation et mode d'emploi gratuit
Retrouvez gratuitement la notice de l'appareil EASITRIM EHT420 FLYMO au format PDF.

| Type de produit | Taille-haies électrique |
| Marque | FLYMO |
| Modèle | EASITRIM EHT420 |
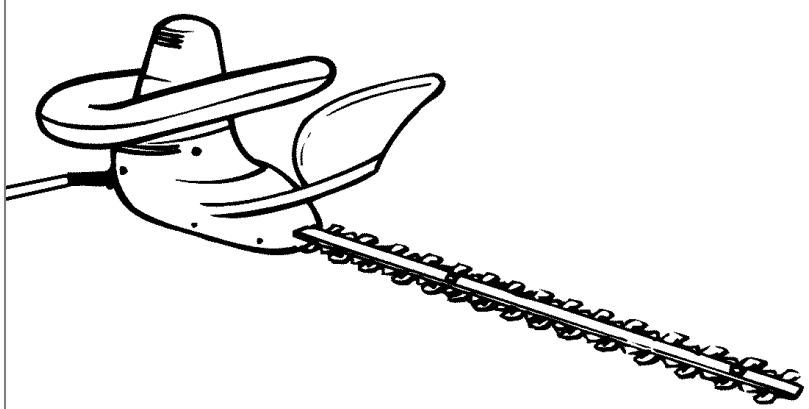
| Longueur de lame | 42 cm |
| Poids | 2,5 kg |
| Alimentation | Électrique avec câble secteur |
| Tension nominale | 230 V AC |
| Puissance sonore garantie | 95 dB(A) |
| Puissance sonore mesurée | 92 dB(A) |
| Vibration maximale (main) | 4,22 m/s² |
| Double isolation | Oui (EN60335) |
| Dispositif de sécurité | Double interrupteur marche/arrêt, protection lame |
| Fonctions principales | Coupe de haies, taille latérale et supérieure |
| Entretien et nettoyage | Brossage des lames, nettoyage à sec, lubrification avant/après utilisation |
| Pièces détachées et réparabilité | Pièces d'origine Flymo, service après-vente agréé |
| Garantie | Garantie constructeur selon conditions (pièces d'usure exclues) |
| Informations environnementales | ISO 14001, emballage recyclable |
| Accessoires fournis | Protège-lame/range-lame, support de câble |
FOIRE AUX QUESTIONS - EASITRIM EHT420 FLYMO
Questions des utilisateurs sur EASITRIM EHT420 FLYMO
0 question sur cet appareil. Repondez a celles que vous connaissez ou posez la votre.
Poser une nouvelle question sur cet appareil
Téléchargez la notice de votre Débroussailleuse au format PDF gratuitement ! Retrouvez votre notice EASITRIM EHT420 - FLYMO et reprennez votre appareil électronique en main. Sur cette page sont publiés tous les documents nécessaires à l'utilisation de votre appareil EASITRIM EHT420 de la marque FLYMO.
MODE D'EMPLOI EASITRIM EHT420 FLYMO

WARNING
IMPORTANT INFORMATION before use reference
MPORTAL Read before use & retain for future reference
For all customer enquiries or for replacement parts, contact:-

01325 300303

www.flymo.com

eop/customer.servicese@electrolux.co.uk
Carton Contents
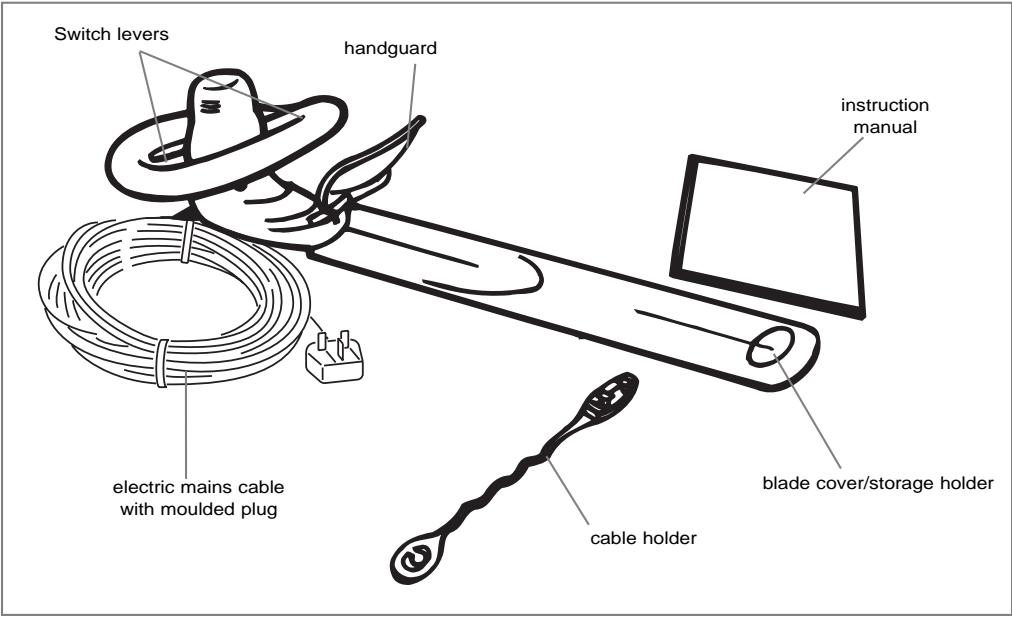
IMPORTANT!
Please check the contents of the carton are correct BEFORE assembling your new Flymo product. IF ANY PARTS ARE MISSING CONTACT:-
Electrolux Outdoor Products Customer Service Department direct
Telephone: 01325 300303
Fax: 01325 318193

Explanation of Symbols on the Easi-Trim 420, 450s, 530, 530s.

Warning.
Read the user instructions carefully to make sure you understand all the controls and what they do.
Switch off! Remove plug from mains before adjusting, cleaning or if cable is entangled or damaged. Keep the cable away from the blade.
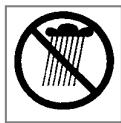
Do not use in the rain or leave the Hedgetrimmer outdoors while raining.

The use of eye protection is recommended.
General
- Never allow children or people unfamiliar with these instructions to use the Hedgetrimmer. Local regulations may restrict the age of the operator.
- Only use the Hedgetrimmer in the manner and for the functions described in these instructions.
- Never operate the Hedgetrimmer when you are tired, ill or under the influence of alcohol, drugs or medicine.
- The operator or user is responsible for accidents or hazards occurring to other people or their property.
Electrical
- The British Standards Institute recommend the use of a Residual Current Device (R.C.D.) with a tripping current of not more than 30mA . Even with a R.C.D. installed 100% safety cannot be guaranteed and safe working practice must be followed at all times. Check your R.C.D. every time you use it.
- Before use, examine cable for damage, replace it if there are signs of damage or ageing.
- Do not use the Hedgetrimmer if the electric cables are damaged or worn.
- Immediately disconnect from the mains electricity supply if the cable is cut, or the insulation is damaged. Do not touch the electric cable until the electrical supply has been disconnected. Do not repair a cut or damaged cable. Replace it with a new one.
- Your electric cable must be uncoiled, coiled cables can overheat and reduce the efficiency of your Hedgetrimmer.
- Keep cable away from the cutting area.
- Never carry the product by the cable
- Never pull on the cable to disconnect any of the plugs
- Do not pull cable around sharp objects.
- Always switch off at the mains before disconnecting any plug, cable connector or extension cable.
- Switch off, remove plug from mains and examine electric supply cable for damage or ageing before winding cable for storage. Do not repair a damaged cable, replace it with a new one. Use only Flymo replacement cable.
- Always wind cable carefully, avoiding kinking.
- Use only on AC mains supply voltage shown on the product rating label.
- Our products are double insulated to EN60335. Under no circumstance should an earth be connected to any part of the product.
Preparation
- Always wear suitable clothing, gloves, and stout shoes. The use of safety glasses is recommended. Do not wear loose clothing or jewellery which can be caught in moving parts.
- Thoroughly inspect the area where the Hedgetrimmer is to be used and remove all wires and other foreign objects.
- Before using the machine and after any impact, check for signs of wear or damage and repair as necessary.
- Always ensure the hand guard supplied is fitted before using the Hedgetrimmer. Never attempt to use an incomplete Hedgetrimmer or one with an unauthorised modification.
Use
- Use the Hedgetrimmer only in daylight or good artificial light.
- Avoid operating your Hedgetrimmer on a wet hedge, where feasible.
- Know how to stop the Hedgetrimmer quickly in an emergency.
- Never hold the Hedgetrimmer by the guard.
- Never operate the Hedgetrimmer with damaged guards or without guards in place.
- Remove plug from mains before passing Hedgetrimmer to another person.
- Avoid operating while people especially children are nearby.
- Whilst using the Hedgetrimmer always be sure of a safe and secure operating position.
- Keep hands and feet away from the cutting means at all times and especially when switching on the motor.
- Do not use stepladders whilst operating the Hedgetrimmer.
-
Remove the plug from the mains :-
-
before leaving the Hedgetrimmer unattended for any period;
- before clearing a blockage;
- before checking, cleaning or working on the appliance;
- if you hit an object. Do not use your Hedgetrimmer until you are sure that the entire Hedgetrimmer is in a safe operating condition;
- if the Hedgetrimmer starts to vibrate abnormally. Check immediately. Excessive vibration can cause injury;
- before passing to another person.
Maintenance and storage
- Keep all nuts, bolts and screws tight to be sure the Hedgetrimmer is in safe working condition.
- Replace worn or damaged parts for safety.
- Be careful during adjustment of the Hedgetrimmer to prevent entrapment of the fingers between moving blades and fixed parts of the machine.
- After use the Hedgetrimmer should be stored using the blade cover/storage holder provided.
CABLES
IMPORTANT
- Use only 1.00mm^2 size cable up to 30 metres length maximum.
Maximum rating :
1.00mm^2 size cable, 10 amps 250 volts AC.
- THE EASI-TRIM IS SUPPLIED WITH CABLE WIRED DIRECTLY INTO THE PRODUCT.
1. Flymo Mains Cables and Extension Cables are available from your local Electrolux Outdoor Products Approved Service Centre.
2. Do not wire an extension cable directly to your product yourself. Please contact your local Electrolux Outdoor Products Approved Service Centre for further information on the connectors and kits available.
3. Only use extension cables specifically designed for outdoor use.
CONNECTORS
IMPORTANT
- Flymo connectors are suitable for use with 2 core cable only. Under no circumstances should these connectors be used for earthed products.
- All Flymo connectors and cables are of splashproof construction. They are not waterproof and must not be left outside permanently nor should they be submerged or immersed in water. Do not let cable lay or trail through pools of water or splashed with water from hose pipes.
MAINS PLUG REPLACEMENT
IMPORTANT
- If the plug supplied is cut off it should be destroyed. There is an electric shock hazard if a cut off plug is inserted into a 13 amp socket.
- No earth required. Flymo products are double insulated to EN60335 and under no circumstances should an earth be connected to any part of the product.
- Ensure the mains voltage suits your product
3. IMPORTANT!
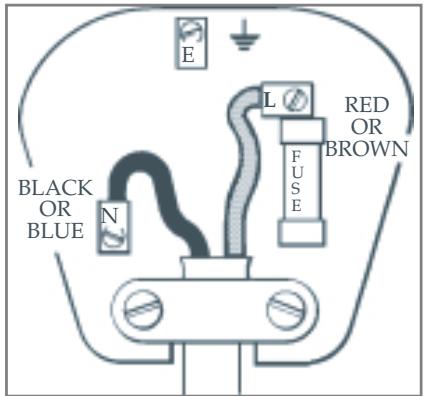
The wires in the mains lead are coloured in accordance with the following code: BLUE NEUTRAL BROWN LIVE
The wire which is coloured BLUE must be connected to the Terminal which is marked with the letter 'N' or coloured BLACK. The wire which is coloured BROWN must be connected to the Terminal which is marked with the letter 'L' or coloured RED.
- It is important that the outer sheath is clamped correctly into the 3-pin plug.
- If in doubt consult your local Service Repairer or qualified electrician before the machine is used.
- A 13 Amp fuse must be fitted to the Mains Plug.
- The normal plug fuse and household fuse only protect the electrical equipment and are not a safeguard against electrocution.
If your product is hard wired i.e. nondetachable mains electric cable, a conversion kit and extension cable is available from all Electrolux Outdoor Products Approved Service Centres which can be found in your local Yellow Pages.
Preparation Instructions
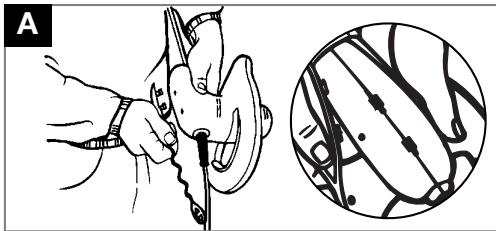
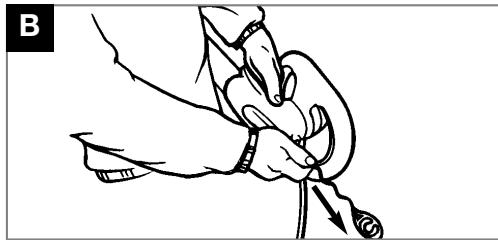
Fitting the Cable Holder to Your Hedgetrimmer (A) and (B)
- Insert T-shaped hooks of cable holder into T-shaped holes on the underside of your Hedgetrimmer. (See Fig. A)
- Secure by pulling the cable holder, in the direction shown, away from the Hedgetrimmer, blades until it locks into position. (See Fig. B)
Starting and Stopping
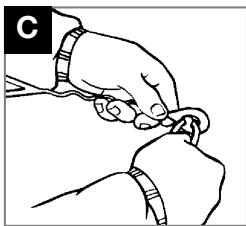
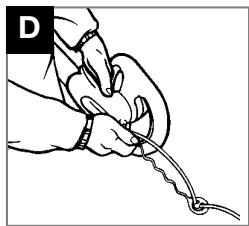
Before starting your Hedgetrimmer.
- Form a loop in mains cable and push the loop through the hole in the cable holder as illustrated in Fig. C.
- To secure, position the loop around the hook as illustrated in Fig. D.
- Connect to mains and switch on
- Remove blade cover/storage holder as illustrated in Fig. E.
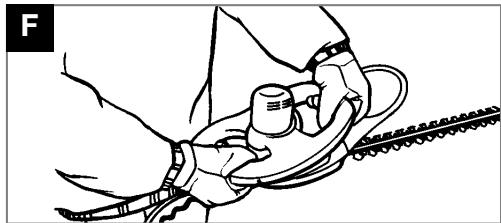
To start your Hedgetrimmer (F)
- There are two switch levers fitted to your Hedgetrimmer.
- Both switch levers need to be held in the operating position (See Fig F) for the product to start.
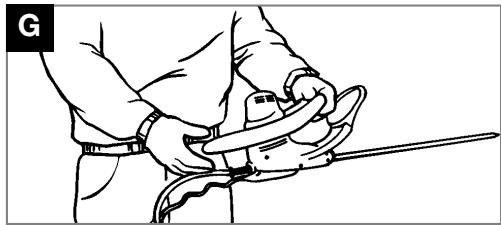
To stop your Hedgetrimmer (G)
- Move Hedgetrimmer away from cutting area before stopping.
- To stop, release one of the switch levers.

How to Use your Hedgetrimmer
- Inspect area to be cut before each use - remove objects which can be thrown or become entangled in the cutting blades.
- Always keep the Hedgetrimmer in front of your body. Hold handle firmly with both hands and stand in a secure and stable position.
- Allow the cutting blades to reach full speed before entering the material to be cut.
- Always work going away from people and solid objects such as walls, large stones, trees, vehicles etc.
- If blade stalls, immediately stop the Hedgetrimmer. Disconnect the Hedgetrimmer from the power source and clear jammed debris from the cutting blades. Inspect blades and repair or replace as needed.
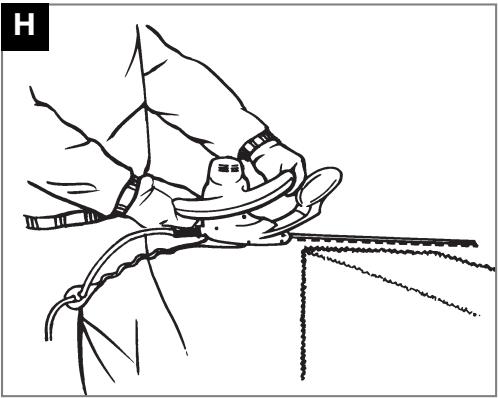
Top Cutting (H)
Use a wide sweeping motion. See Fig. H. A slight downward tilt of the cutting blades in the direction of motion gives the best cutting results.
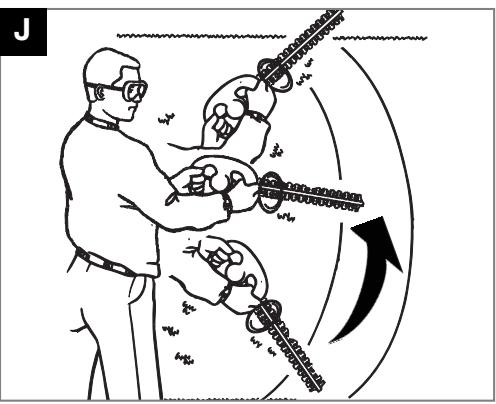
Side Cutting (J)
When trimming the sides of the hedge, begin at the bottom and cut upwards (See Fig. J), tapering the hedge inward at the top. This shape will expose more of the hedge, resulting in more uniformed growth.
Caring for your Hedgetrimmer
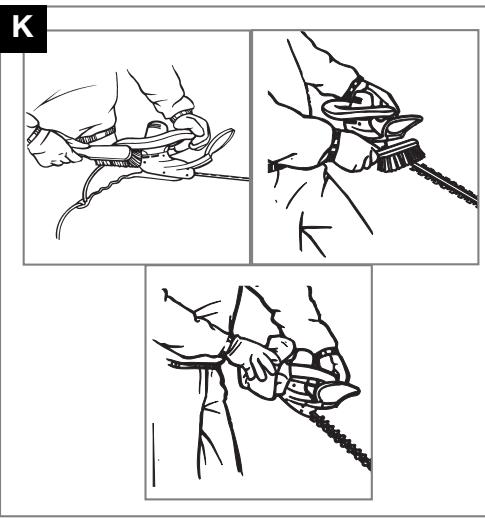
Cleaning (K)
USE GLOVES
- Using a soft brush - remove debris from all air intakes and cutting blade.
- Wipe over surface of your hedgetrimmer with a dry cloth.
IMPORTANT
Never use water for cleaning your hedgetrimmer. Do not clean with chemicals, including petrol, or solvents - some can destroy critical plastic parts.
Caring for your Hedgetrimmer
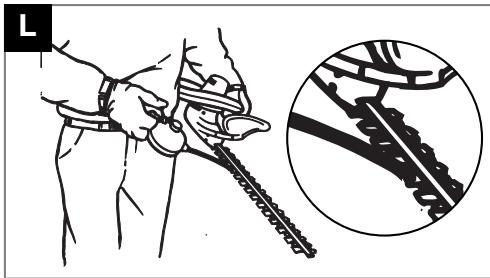
Lubricating the Cutting Blade
For easier operation and longer life, lubricate the cutter blades before and after use. Apply the oil so that it runs between the two blades. See Pic L. At the end of the Cutting Season.
- Clean your Hedgetrimmer thoroughly.
- Check that all nuts and bolts are tight.
- Visually inspect the Hedgetrimmer for any worn or damaged parts, contact your local Service Centre if any parts require replacement.
To store your Hedgetrimmer
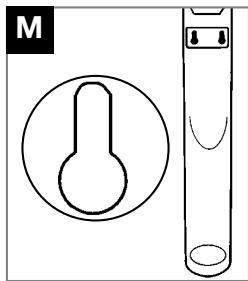
- The Hedgetrimmer blade cover/storage holder is provided with 2 hanging slots for storing the Hedgetrimmer on the wall. (See Pic M)
- Ensure the blade cover is fitted before storage.
- Remove cable from cable holder before storage.
- The use of 2 number 10 screws (40mm in length) and the appropriate wall fixing plugs is recommended
- Drill 2 holes 48mm horizontally apart.
- Fit wall plugs.
- Fit screw ensuring enough length is available for secure location into hanging slot.
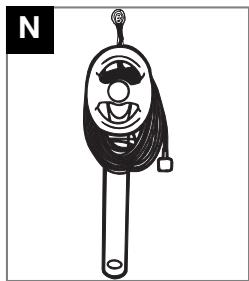
- Store as illustrated in Pic N.
Store in a dry place where your hedgetrimmer is protected from damage.
Fault Finding Hints
Fails to Operate
- Is the Power Turned On?
- Check the fuse in the plug, if blown replace.
- Fuse continues to blow?
Immediately disconnect from the mains electricity supply and consult your local approved Service Centre.
Cutting blade stops under load
- Cut at a slower pace.
- If cutting blade still stops under load?
Disconnect from the mains electricity supply and consult your local approved Service Centre.
Fails to stop when one switch lever is released.
Immediately disconnect from the mains electricity supply and consult your local approved Service Centre.
Poor cut quality
- Ensure the product is being used correctly (see How to Use)
-
Ensure blades are free from trapped debris
-
Damaged Blades?
Immediately disconnect from the mains electricity supply and consult your local approved Service Centre.
Excessive Vibration
Immediately disconnect from the mains electricity supply and consult your local approved Service Centre.
Environmental Information
Electrolux Outdoor Products are manufactured under an Environmental Management System (ISO 14001) using, where practical, components manufactured in the most environmentally responsible manner, according to company procedures, and with the potential for recycling at the end of the products' life.
- Packaging is recyclable and plastic components have been labelled (where practical) for categorised recycling.
- Awareness of the environment must be considered when disposing of 'end-of-life' product.
If necessary, contact your local authority for disposal information.
Service Recommendations
- We strongly recommend that your product is serviced at least every twelve months, more often in a professional application.
- Always use genuine Flymo Spare Parts.
- Prepacked spares are available from most Electrolux Outdoor Products stockists.
- Your product is uniquely identified by a silver and black product rating label
- If you have a problem with your machine contact your local Approved Service Centre ensuring you have full details of your product as described on the product rating label.
- Should it be necessary for work to be carried out by your
Service Centre, it is important to take your complete
machine including cable and any extension cables used.
A network of specialist dealers can be found in your local Yellow Pages. To obtain service on your Flymo product simply telephone or visit your local Service Centre. Should you require service under the terms of our guarantee the Service Centre will require proof of purchase.
All of the centres listed stock genuine Flymo Spare Parts.
NOTE: Our Service Repairers act on their own behalf and are not empowered to commit or legally bind
Electrolux Outdoor Products in any manner whatsoever.
Guarantee & Guarantee Policy
If any part is found to be defective due to faulty manufacture within the guarantee period, Electrolux Outdoor Products, through its Authorised Service Repairers will effect the repair or replacement to the customer free of charge providing:
(a) The fault is reported directly to the Authorised Repairer.
(b) Proof of purchase is provided.
(c) The fault is not caused by misuse, neglect or faulty adjustment by the user.
(d) The failure has not occurred through fair wear and tear.
(e) The machine has not been serviced or repaired, taken apart or tampered with by any person not authorised by Electrolux Outdoor Products.
(f) The machine has not been used for hire.
(g) The machine is owned by the original purchaser.
(h) The product has not been used outside of the country in which it was purchased.
(i) The machine has not been used commercially.
* This guarantee is additional to, and in no way diminishes the customers statutory rights.
Failures due to the following are not covered, therefore it is important that you read the instructions contained in this Operator's Manual and understand how to operate and maintain your machine:
Failures not covered by guarantee
-
Replacing worn or damaged blades
-
Failures as a result of not reporting an initial fault.
-
Failures as a result of sudden impact.
-
Failures as a result of not using the product in accordance with the instructions and recommendations contained in this Operator's Manual.
-
Machines used for hire are not covered by this guarantee.
-
The following items listed are considered as wearing parts and their life is dependent on regular maintenance and are, therefore not normally subject to a valid warranty claim: Blades, Electric Mains cable.
* Caution!
Electrolux Outdoor Products does not accept liability under the warranty for defects caused in whole or part, directly or indirectly by the fitting of replacement parts or additional parts that are not either manufactured or approved by Electrolux Outdoor Products, or by the machine having been modified in any way
EC Declaration of Conformity
I, the undersigned M. Bowden of Electrolux Outdoor Products, Aycliffe Industrial Park, NEWTON AYCLIFFE, Co. Durham. DL5 6UP. Certify that the product- Category..... Hedgeitrimmer Make.. .Electrolux Outdoor Products
Conforms to the specifications of Directive 2000/14/EEC
I, the undersigned M. Bowden of Electroliux Outdoor Products, Aycliffe Industrial Park, NEWTON AYCLFFE, Co. Durham. DL5 6UP Certify that a sample of the above product has been tested using directive 81/1051/EEC as a guide. The maximum A-weighted sound pressure level recorded at operator position under free field semi anechoic chamber conditions was : -
I, the undersigned M. Bowden of Electrolux Outdoor Products, Aycliffe Industrial Park, NEWTON AYCLIFFE, Co. Durham. DL5 6UP Certify that a sample of the above product has been tested using ISO 5349 as a guide. The maximum weighted root mean square value of vibration recorded at operator's hand position was:-
Identification of Series....See Product Rating Label Conformity Assessment Procedure...ANNEX VI Notified Body. I.T.S.Cleeve Road, Leatherhead, Surrey, KT22 7SB. England
Other Directives:---,98/37/EEC,89/336/EEC,73/23/EEC & applicable standards:---EN60555-2:1987, EN60555-3:1987, EN55014:1:993, EN55014:1995, EN774:1996, EN50144-1:1995, EN50144-2:15:1997
Type EHT420 EHT450s EHT530 EHT530s Blade Length 42cm 45cm 53cm 53cm Guaranteed sound power level. 95 dB(A) 96 dB(A) 95 dB(A) 95 dB(A) Measured Sound Power Level. 92 dB(A) 94 dB(A) 92 dB(A) 92 dB(A) Level. 92.0 dB(A) 92.0 dB(A) 88.8 dB(A) 88.8 dB(A) Value. 4.22m / s^2 4.22m / s^2 4.57m / s^2 4.57m / s^2 Weight. 2.5 kg 2.6 kg 2.6 kg
Electrolux Outdoor Products
Aycliffe Industrial Park
NEWTON AYCLIFFE
Co.Durham DL5 6UP
ENGLAND
Telephone - (00) 44 1325 300303 Fax - (00) 44 1325 310339

Newton Aycliffe, 31/01/2003
M. Bowden,
Research & Development Director
Our policy of continuous improvement means that the specification of products may be altered from time to time without prior notice.
Electrolux Outdoor Products manufacture products for a number of well known brands under various registered patents, designs and trademarks in several countries.
Electrolux Outdoor Products Ltd. Registered Office, Electrolux Works, Oakley Road, Luton LU4 9QQ
Registered number 974979 England

The Electrolux Group. The world's No.1 choice.
The Electrolux Group is the world's largest producer of powered appliances for kitchen, cleaning and outdoor use. More than 55 million Electrolux Group products (such as refrigerators, cookers, washing machines, vacuum cleaners, chain saws and lawn mowers) are sold each year to a value of approx. USD 14 billion in more than 150 countries around the world.
- Carton Contents
- IMPORTANT!
- General
- Electrical
- Preparation
- Use
- Maintenance and storage
- CABLES
- IMPORTANT
- Maximum rating :
- CONNECTORS
- MAINS PLUG REPLACEMENT
- IMPORTANT!
- Preparation Instructions
- Fitting the Cable Holder to Your Hedgetrimmer (A) and (B)
- Starting and Stopping
- Before starting your Hedgetrimmer.
- To start your Hedgetrimmer (F)
- To stop your Hedgetrimmer (G)
- How to Use your Hedgetrimmer
- Top Cutting (H)
- Side Cutting (J)
- Caring for your Hedgetrimmer
- Cleaning (K)
- USE GLOVES
- Lubricating the Cutting Blade
- To store your Hedgetrimmer
- Fault Finding Hints
- Fails to Operate
- Cutting blade stops under load
- Poor cut quality
- Excessive Vibration
- Environmental Information
- Service Recommendations
- Guarantee & Guarantee Policy
- Failures not covered by guarantee
- * Caution!
- EC Declaration of Conformity
- The Electrolux Group. The world's No.1 choice.
Marque : FLYMO
Modèle : EASITRIM EHT420
Catégorie : Débroussailleuse