
MEDIA DISK DNX - Disque dur multimédia MEMUP - Notice d'utilisation et mode d'emploi gratuit
Retrouvez gratuitement la notice de l'appareil MEDIA DISK DNX MEMUP au format PDF.


| Intitulé | Description |
|---|---|
| Type de produit | Disque dur multimédia |
| Capacité de stockage | Jusqu'à 1 To |
| Connectivité | USB 2.0, USB 3.0 |
| Formats supportés | JPEG, MP3, AVI, MKV, etc. |
| Alimentation électrique | Alimentation par USB |
| Dimensions approximatives | 210 x 130 x 30 mm |
| Poids | Environ 800 g |
| Compatibilités | Compatible avec Windows, Mac OS, et certains appareils multimédias |
| Fonctions principales | Lecture de fichiers multimédias, stockage de données |
| Entretien et nettoyage | Essuyer avec un chiffon doux, éviter l'humidité |
| Pièces détachées et réparabilité | Réparabilité limitée, pièces non facilement accessibles |
| Sécurité | Ne pas exposer à des températures extrêmes, éviter les chocs |
| Informations générales | Vérifier la compatibilité avec les appareils avant l'achat |
FOIRE AUX QUESTIONS - MEDIA DISK DNX MEMUP
Questions des utilisateurs sur MEDIA DISK DNX MEMUP
0 question sur cet appareil. Repondez a celles que vous connaissez ou posez la votre.
Poser une nouvelle question sur cet appareil
Téléchargez la notice de votre Disque dur multimédia au format PDF gratuitement ! Retrouvez votre notice MEDIA DISK DNX - MEMUP et reprennez votre appareil électronique en main. Sur cette page sont publiés tous les documents nécessaires à l'utilisation de votre appareil MEDIA DISK DNX de la marque MEMUP.
MODE D'EMPLOI MEDIA DISK DNX MEMUP
USERGUIDE
- SAFETY AND OTHER INSTRUCTIONS 1
- SPECIFICATIONS 2
- REMOTE CONTROL 3
- TV CONNECTION 4
5.LAN CONNECTION 5 - SETUP MENU 6
- MULTIMEDIA PLAY 10
- BACKUP FUNCTION AND PLAYLIST 12
- NETWORK BASED DATA SHARING WITH PC 13
10.DNX NETWORK SETTINGS 17 - SPECIFICATIONS 18
- TROUBLESHOOTING 19
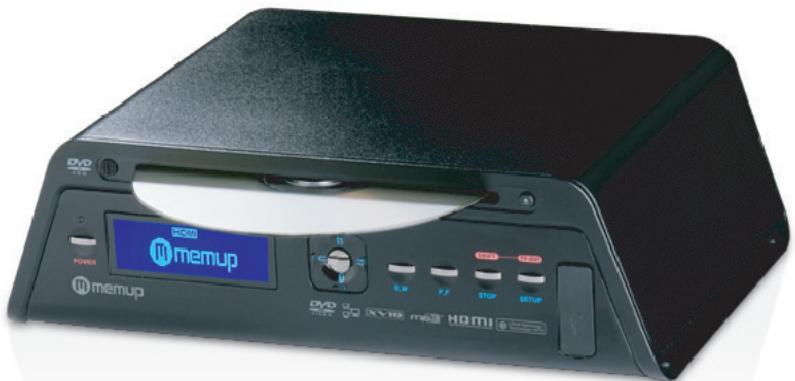
Mediadisk DNX Series is a Home Media Center, with a built-in 3.5" HDD, can record and play media files (movies, audios and photos) through TV and when connected to PC, can also play shared files via network.
SAFETY AND OTHER INSTRUCTIONS
Please use DNX carefully and read following instructions.
Copyright
Software, audio, video or any intellectual properties are protected by copyright and international laws.
It is user's responsibility when reproducing or distributing content(s).
-Codec Check
This product may not support some media formats.
Please check available codec types.
- Data Backup
Please backup datas stored in this product in a safe place. We are not responsible for any data loss or damage.
- Drop / Shock
Do not give shock or drop the DNX. This may damage it.
- Foreign Substance
Do not insert any metal or inflammable foreign substances into player. This may damage it.
- Disassembly / Modification
Do not attempt to disassemble or modify any part of DNX. This may damage it.
Any product modification may void the warranty.
-Load
Do not place any heavy object on the top of the DNX. This may damage it.
- Chemicals
Do not clean product using chemicals cleaners.
This may damage the DNX.
- Water / Moisture
Do not contact the DNX with water or liquid.
This may cause fire or electric shock. If any conductive liquid enters, turn off the DNX and disconnect power adapter immediately.
- Magnet or Magnetic Properties
Do not place the DNX near a magnetic field. This may cause a malfunction or damage stored data.
- Heat
Do not place the DNX under direct sunlight or near a heat source. Do not keep it for long time in high temperature. This may damage it.
- Vision / Hearing
Do not watch TV or hear loud sound for long time.
This may cause vision or hearing problem.
- Fire
During DNX use, if you detect smoke or unusual smell, turn off product, disconnect adapter immediately, and call the aftersales department if required.
- Children
Do not let children touch the DNX. They may damage it.
- Power
Do not use many electronic products with single outlet.
Firmly insert power plug. When working, do not unplug.
SPECIFICATIONS
Product view:
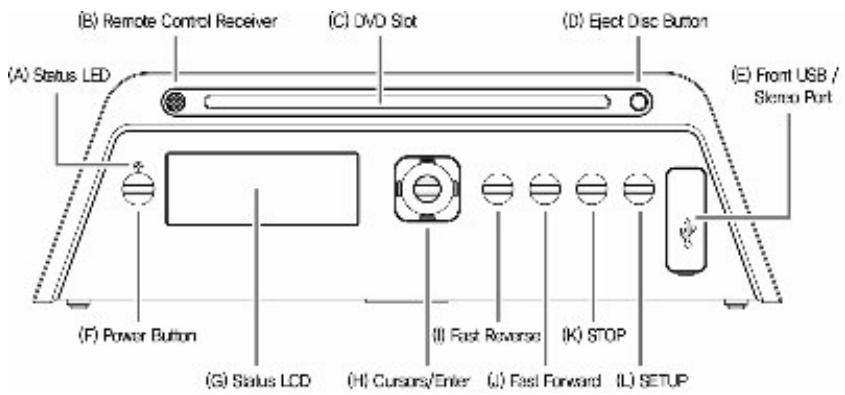
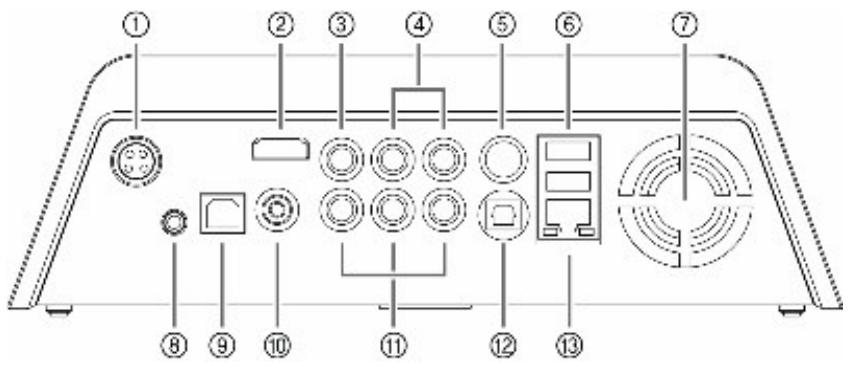
① Power (connect to power adapter)
② HDMI Output
③ Composite Output
④ Audio Output (stereo)
⑤ S-VIDEO Output
USB-M (Host)
⑦ Cooling fan
⑧ Extension IR Receiver (option)
USB-S (Slave)
S/PDIF (Coaxial)
① Component Output (YPbPr)
S/PDIF (Optical)
③ LAN (wireless LAN is option)
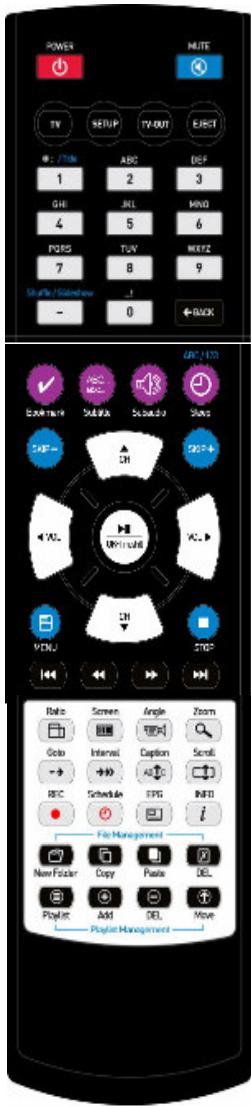
REMOTE CONTROL
| BUTTONS | FUNCTIONS |
| [Power] | Turn on/off the DNX. |
| [Mute] | Mute on/off in media playback. |
| [Setup] | Move to setup menu. |
| [TV-out] | Change the Video Out mode. |
| [Eject] | Eject DVD/CD. |
| [Numeric] | English/Number input function in folder creation. |
| [- button] | In Photo playback, start/stop photo slideshow. In Audio playback (Play/File Repeat/Folder Repeat/Shuffle). |
| [← Back] | Delete previous letter in folder name creation. |
| [Bookmark] | In media file playback. Start from the bookmark position. |
| [Subtitle] | Display subtitle during movie playback. Press again to change languages subtitles. |
| [Subaudio] | Press to change audio with available languages. |
| [Sleep] | Set up the sleep time (120-90-60-30-Off). |
| [SKIP +/-] | Skip the frame in certain interval during playback. |
| [CH ▲/▼] | Move Up/Down in List and Menu. |
| [< /> ] | Move Left/Right in List and Menu. |
| [OK] | File Play/Pause/Select function. |
| [MENU] | Go to Main Menu. |
| [STOP] | Stop playback/Go. |
| [I< ▲ ] | Play previous file or play previous chapter in DVD mode. |
| [▷ ▲ I] | Play next file and or play previous chapter in DVD mode. |
| [< ▲ ] | Rewind the media file. |
| [▷ ▲ ] | Fast forward the media file. |
| [Ratio] | Change media file ratio. |
| [Screen] | Setup Screen Brightness, Darkness and Color Depth. |
| [Angle] | Photo: Rotate 90 degrees clockwise. DVD: angle change. |
| [Zoom] | Zoom screen. Press 'Stop' and go back standard screen. |
| [Goto] | Start playback from the position you want. |
| [Interval] | Change skips interval time. |
| [Caption] | Adjust and select location/size/color of subtitle. |
| [Scroll] | Re-position function on/off. |
| [INFO] | Display media file information. |
| [F1], [F2] | No function buttons but for future usage |
| [New Folder] | Make new folder and change mode (capital, small letter or Number) by pressing [Sleep] button. |
| [Copy] | Copy selected file. |
| [Paste] | Paste copied file in current folder. |
| [DEL] | Delete folder or file. |
| [Playlist] | Switch Playlist or Normal mode. |
| [Add] | Add file to Playlist. |
| [DEL] | Delete file in Playlist. |
| [Move] | Move files location in Playlist. |
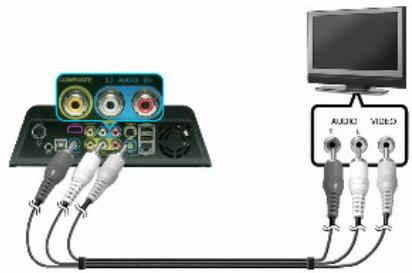
TV CONNECTION
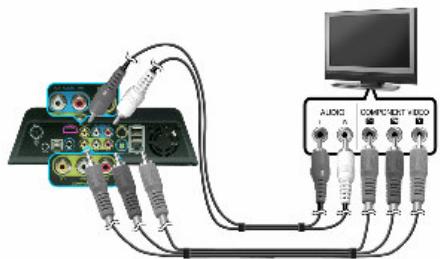
The DNX supports four different types of video output (Component, HDMI, SVHS, CVBS).
Composite Cable Connection
- Connect DNX and your TV using a composite video cable (Yellow).
- Select correct 'AV' as video input on your TV.
- Press the 'TV-OUT' button on DNX Remote Control until image appears.
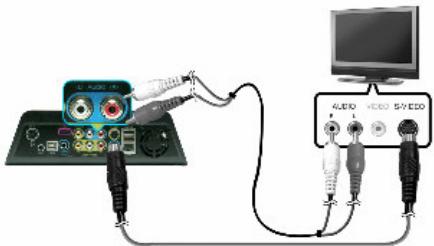
S-VHS Cable Connection (Optional)
- Connect DNX and your TV using a S-Video Cable, connect audio with L/R RCA cable
- Press the 'TV-OUT' button on the DNX Remote Control until image appears.
Component Cable Connection (Optional)
- Connect DNX to your TV using a component video cable (YPbPr - green, blue, red)
- Select correct 'AV' as video input on your TV.
- Press the 'TV-OUT' button on DNX Remote Control until image appears.
You can choose and select the correct display resolution (1080i, 720P, 480P) in AV setting.
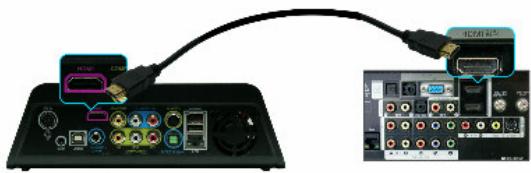
HDMI Cable Connection (Optional)
- Connect DNX and your TV using an HDMI Video/Audio cable.
- Select 'HDMI' as video input on your TV.
Press the 'TV-OUT' button on DNX Remote Control until image appears.
You can select display resolution (1080P, 1080i, 720P, 480P) in the AV setting.
Digital Audio - Cable Connection
2.6.1 Connection to a 5.1 CH receiver
If you use the DNX with a multi-channel decoder/amplifier with optical/coaxial input
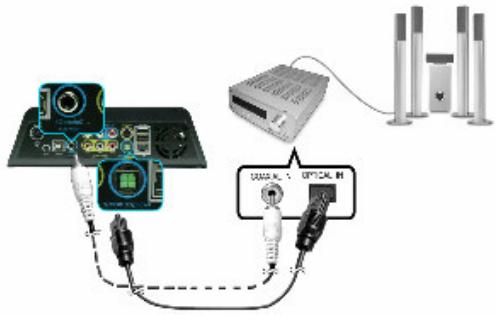
If there is no sound after connection the optical cable, you have to change the A/V setup into Digital via the SETUP menu.
LAN CONNECTION
Direct connection
Connect a LAN cable directly to the LAN ports of the DNX and a PC.

LAN cable should be cross cable type.
Connection via the Internet IP Router or Hub
Connect by using a direct type LAN cable.
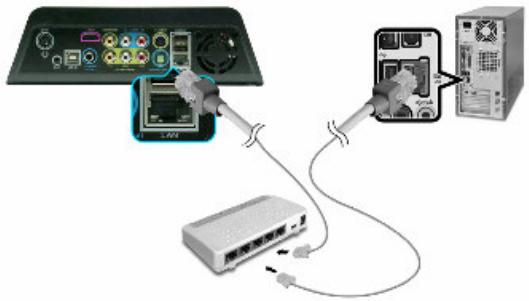
To use a PC network:
- Set your PC's folder sharing and authority
- The same IP address must be used for both devices.
Please refer to Network settings for parameters
Connecting to other Terminals
An external Infrared receiver for car can make it easier to use DNX outside.
SETUP MENU
Main Menu will be displayed as follow.
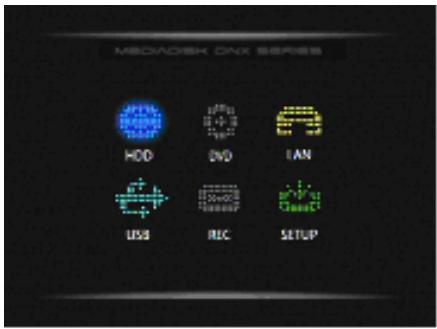
Enter [SETUP].
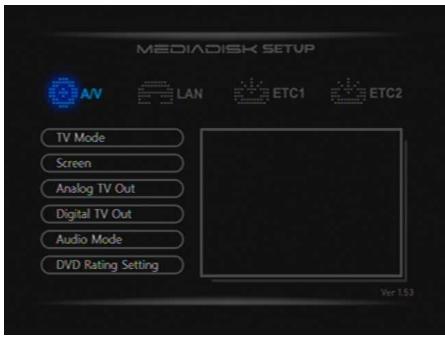
A/V Menu
TV mode
PAL/NTSC
Screen
Change aspect ratio according to the type of TV connected.
Analog TV Out
Set up composite and S-Video connections with 'VIDEO'. Choose resolution according to your TV features.
Digital TV Out
Setup the HDMI TV out resolution. Choose Auto/480p/720p/1080i/1080p according to your TV features. Auto is a function which auto-runs the optimum setting of TV.
Audio Mode
The DNX supports a variety of audio-out options via analogue (stereo), digital (SPDIF), HDMI (analogue/Digital).
- Digital: Connect a coaxial or optical cable and enjoy 5.1 channel DTS/Dolby digital sound.
- Analogue: Connect to TV with audio cable (red, white) for two channel Audio out.
DNX supports two channel stereo down-mix for DTS audio.
-HDMI Audio out.
- Most digital TVs do not support DTS decoder. If you do not have a multi-channel receiver connected, it may not support audio-out for DTS-coded media files.
DVD Rating Setting
The DNX supports DVD rating setting (Parental Management Level).
DVD Rating setting: There are six rating levels.
- When selecting the menu and rating setting, a window will pop up for a password. Default is '0000'.
To change password, please click 'password setting'.
LAN Menu
The DNX can play back and copy files through network.
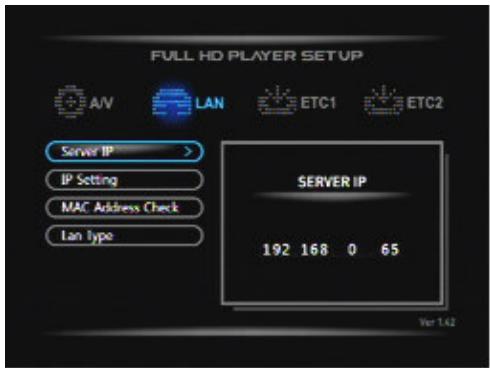
Server IP
The server IP is the PC's IP address which has the shared folder. Input the IP via the numeric keys.
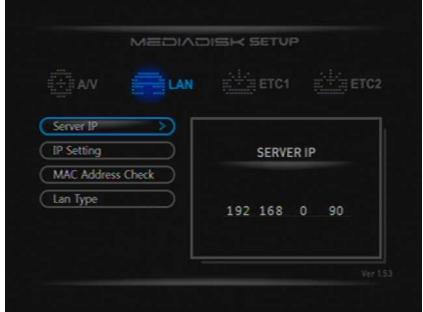
IP Setup
Users can set up the IP automatically or manually.
- Automatic setting: It supports DCHP. When using a router or hub, it is a convenient way to assign IP.
- Manual setting: Get assigned IP address, Subnet mask and default gateway from network manager and enter them manually.
MAC Address Check
It shows the MAC Address which DNX's wired LAN has. Each device has different MAC address and it can manage the MAC addresses which are connected to IP router or hub.
ETC1 Menu
ETC1 menu is some added setup functions.
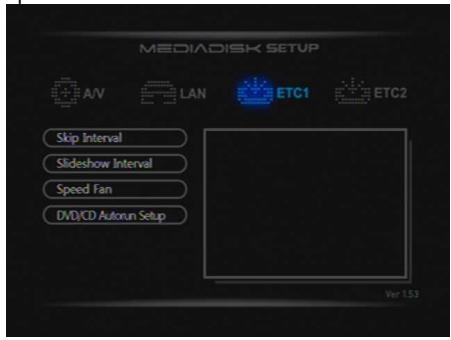
Skip Interval
While playing movies, skip backward (SKIP -) or forward (SKIP +) by desired time interval (1/3/5/10~mn) By pressing "Interval" button on remote control while playing a movie, you can change the interval duration.
Slideshowhow Interval
Set the JPEG file slide show time interval (5/7/9/User Input).
FAN Speed
Control the fan speed (normal/slow/off) to manage the heat generated by HDD.
DVD/CD Autorun setup
Set Auto-Run function.
The DNX can play DVD or CD automatically when inserted in the DVD ROM.
ETC2 Menu
More added settings functions.
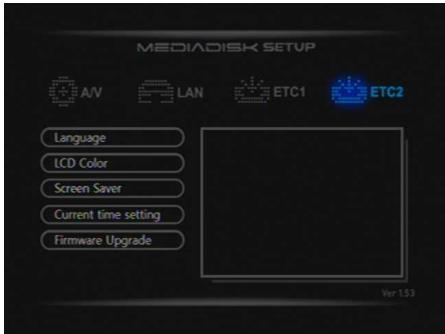
Language Setting
Set up the language. Once selected, press 'SETUP' to use the selected language.
LCD Color Setting
Change front LCD color with letters and background or set it off.
Screen Saver Setting
Screen saver duration: 5 mn / 10 mn / User Input / Off
Current Time Setting
Set time and date
Firmware Upgrade
The DNX can be upgraded via firmware to improve its performance. Upgrade the firmware upgrade or set up initialization (Factory Default) in this menu.
Firmware process
User can upgrade the firmware via media (USB, HDD or LAN).
- Copy the latest firmware into media
- Go to 'SETUP' mode.
- Move to 'ETC2' Firmware Upgrade and start the upgrade.
- Start firmware upgrade by following instructions in the pop up message. Do not turn off power while upgrade. It can cause damage on the DNX. After firmware upgraded, DNX will restart automatically.
MULTIMEDIA PLAY
Video File Playback
The DNX can play back files in HDD, DVD, CD and USB devices.
- Select and click the device icon on the main menu which includes video files you want to playback.
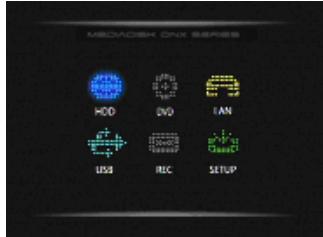
- Select folder which includes video files.
- To play file Press [OK]. If you select subtitle, subtitle file must have same name as video file.
- Set subtitle display by pressing [Caption].
'POSITION': move subtitle location with [ / ] buttons.
'SIZE': change subtitle size with [ / ] buttons.
'SUBTITLE COLOR': change subtitle colors with [ / ] buttons.
Select On or Off by pressing [Subtitle] again.
5. Audio Setting:
If media file support multi channel sounds, select proper settings by pressing [SubAudio].
6. File Information:
Show detailed file information by pressing [INFO]. To close, press button again.
7. Resume (Bookmark) function:
Start movie from previous marked position by pressing [BOOKMARK].
You can resume by pressing [BOOKMARK] when you restart movie playback.
8. Aspect Ratio function:
Adjust media file display ratio: 4:3, 16:9
9. Color Changing Function:
Change Brightness/Contrast/Color of current media file by pressing [Screen].
In each stage, adjust setting by pressing [ / ] .
10. Zoom Function:
Press [ZOOM], enter the ZOOM mode, then adjust by pressing [] / [] and apply setting by pressing [OK].
11. Time Searching (Goto) function:
Move to the appointed time of the movie.
Press [Goto] button and set time you want to start, then press [OK].
12. Interval setting:
Change SKIP interval by pressing [Interval]: adjust from 1minute to 10minutes.
13. Display Location:
Move file display location by pressing [Scroll] and arrows / / .
14. Sleep Mode setting:
Turn off at appointed time. Press [Sleep] to enter mode. Select sleep time and press [OK].
15. Sound Setting.
Adjust your preferences
DVD play
- Select TV input mode.
- Select [TV out] in the DNX
- Insert DVD with printed side up.
- When DVD icon is activated, select it
- Start playback DVD title.
Audio CD Playback
Press [OK] to play one by one or move to the track you want to play.
The DNX can play back audio files from HDD, DVD, CD and USB device.
- Select and click the device icon with your audio files content.
- Select folder with desired audio file.
- Select audio file to play.
- Move to other audio file by pressing the [ / ]
Press [-] to change audio playback mode accordingly:
:Repeat files in current folder.
: Randomly play files in current folder.
:Play individual files in current folder
Repeat playback file.
The DNX support Lyric files (LRC format). Name files and .lrc files must be same.
Photo File Playback
The DNX can play photos (JPG files) in HDD, DVD, CD and USB device up to a max. of 80 million pixels.
- Select and click device icon with photo files content.
- Select folder which includes photo files
- After moving to folder, press [OK] to open photo file.
- Press [Stop] to stop the photo playback and go back to photo list.
- Slide Show: Press [-] to start photo files slide show of in folder.
- Photo Rotate: Rotate Vertical/Horizontal type pictures 90 degree by pressing [Angle].
BACKUP FUNCTION AND PLAYLIST
The DNX supports authentic DVD and DVD backup titles playback.
To playback a DVD backup title:
1/ Copy all related DVD files into one folder.
2/ Play VIDEO_TS.IFO file.
If there are several DVD Backup titles, each DVD Backup title should be copied into different folders.
If there is no Video_TS.IFO file, it may not play back it normally.
DVD Backup process
- Insert DVD in DVD ROM.
- Select 'DVD' icon on Main Menu.
- Press [Copy]. "DVD copy is set" message shows.
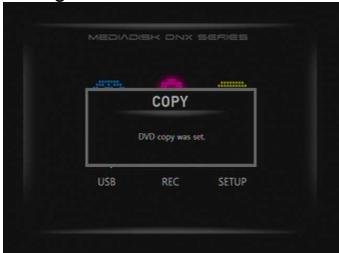
- Move to HDD or USB device where you want to make copy.
- Create new folder by pressing [New Folder]. Input folder name by using numeric buttons.
- Move to new folder.
- Press [Paste] on remote control. Confirm the copy to users' folder.
- Check file copy process via 'Progress Bar'
WARNING:
DVD backup is for private use. Any intellectual properties are protected by copyright and international laws.
It is user's responsibility when reproducing or distributing content(s)
Audio CD backup
The DNX supports CD backup through MP3 files whether into HDD or USB memory.
- Insert audio CD into DVD ROM.
- Press 'REC' icon on Main Menu.
- Go to 'AUDIO REORDER'
- Select the audio CD tracks you want to save.
- Once finished, press [REC]. Select device where you want to save your datas.
- Once selected, MP3 backup will start automatically and save in new folder.
The MP3 data will be saved in folder named 'RecordedMP3_000x'.
[ \text{Playlist} ]
You can select and enjoy your own playlist. Select music files and save them in playlist.
Making a playlist
- In main menu, press [List] and move to playlist menu.
- Press [ADD] and move to playlist edit menu. Press [DEL] to delete file in playlist.
- Change Playlist Order.
In playlist menu, press [Move] and select file. Change order by pressing [ / ]
- After creating playlist, press [ Playlist] to save it and switch to main menu.
Photo Slide Show
- First set interval time In 'SETUP' mode.
- Move to 'Slide show interval' by pressing [ / ]
- Press [Setup] to apply settings and go back to Main Menu.
- In Main Menu, move to 'HDD' icon and press [OK]
- Play back photos by pressing [OK] and press [-] button to start Photo Slide Show
- Press [-, Slide Show] to stop.
Photo Slide Show with background music
- Make background music via Play List.
- Move to photo folder and start Photo Slideshow by pressing [-] button.
- In photo slideshow mode, press [List] and start background music. Control volume by pressing [Vol + / - ] .
NETWORK BASED DATA SHARING WITH PC
Network-based Data Sharing with PC
After LAN cable is connected, according to your system environment, set up windows network as follows.
To establish network communication between DNX and your computer, two requirements should be satisfied:
1) Folder sharing and security setup
2) Using same IP address band and Subnet Mask
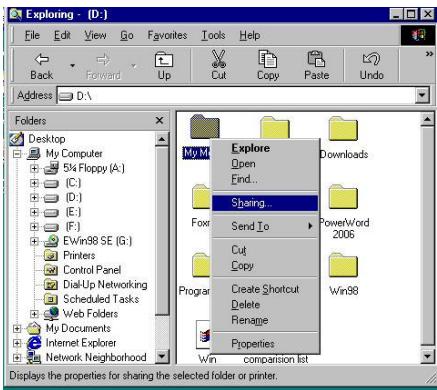
Data sharing Setup for Windows XP
- Select folder you want to share and select "Sharing and security" with right mouse button.
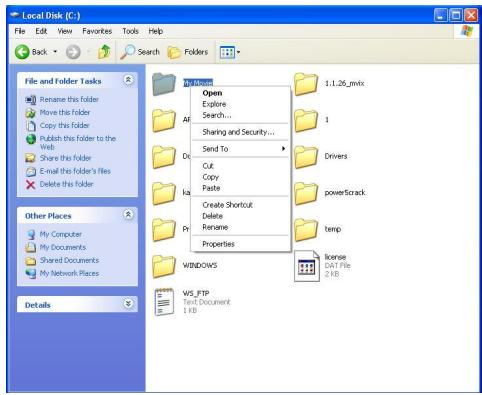
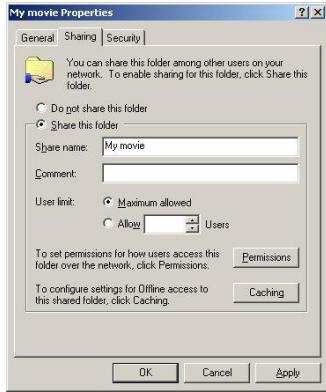
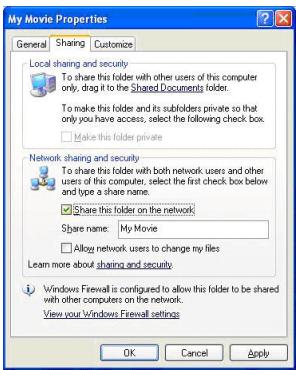
- Check "Sharing this folder on the network" and type "Share Name". Ex: My Movie
WARNING! "Share Name" should be less than 12 characters.
- If folder is shared, you will see a hand mark on folder icon. Ex: My Movie
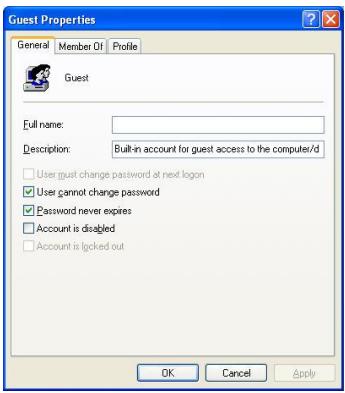
- Go to "Control Panel -Administrative Tools -Computer Management -Local Users and Group" and among displayed items, double-click "Guest" item.
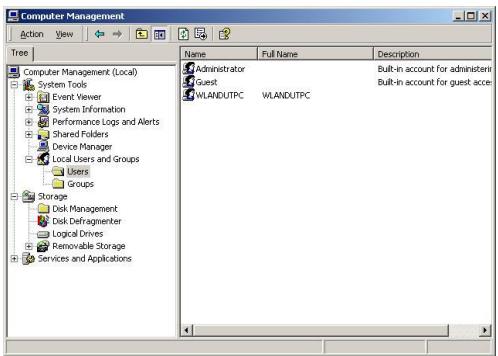
WARNING!
- Permission setting is only required for Windows XP Pro users. If you are an XP home user, go directly to step "6".
-
If you cannot see "Administrative Tools", click on "Switch to Classic view" on left corner.
-
After checking "User cannot change password" and "Password never expires", keep the other checkboxes unchecked.
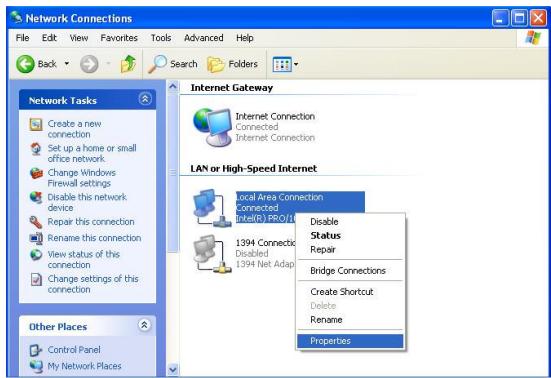
- Go to "Control Panel—Network Connections". Select "Local Area Connections".
Select "Properties" using right mouse button.
WARNING!
- If you cannot see any "Network connections", click on "Switch to Classic View" on the upper left corner
-
If there are more than two "Local Area Connections", select the LAN card connected to DNX.
-
Among displayed items, double-click "Internet Protocol (TCP/IP)".
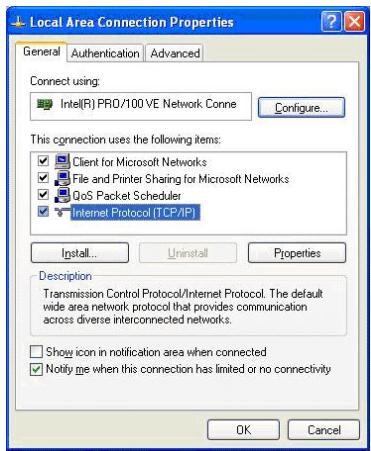
After checking "Specify an IP address" enter your IP address and subnet mask.
Ex: IP address: 192.168.1.3 Subnet Mask: 255.255.255.0.
WARNING!
If your PC already has "Obtain IP address automatically" checked and IP automatically assigned from an Internet router or DHCP server, you may not need this setup.
If you want a manual IP setup, please obtain an available IP address and subnet mask from the router manufacturer or network administrator.
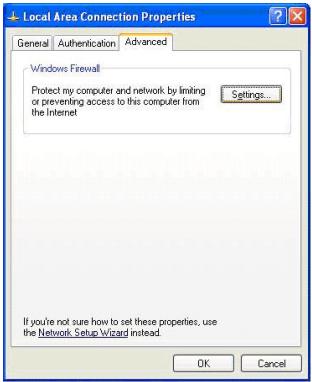
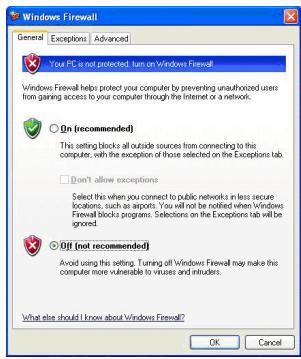
If "Internet Connection Firewall" option is checked, cancel this option.
For Windows Service Pack 2 in "Window Firewall" Section click on "Settings".
After selecting off, click on "ok".
- Configure DNX network environment.
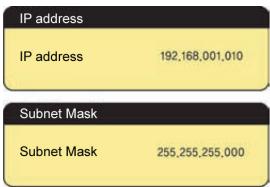
After pressing "Setup", select "IP SETUP" among "NETWORK" setup items and set this to manual setup. Then enter your IP address and subnet mask.
Ex) IP address:192.168.1.10 / Subnet Mask: 255.255.255.0.
DNX NETWORK SETTINGS
IP through SETUP menu.
-
IP setting means IP to which the DNX gets assigned.
-
If using IP router/Hub, each device gets automatically assigned.
-
If a server manager assigns IP, set up IP, subnet mask and gateway by 'manual settings'
-
When setting is finished, press [Setup] to apply and return to main menu.
- 'LAN' icon in main menu is activated after couple of seconds.
- Play media files in shared folder via LAN.
SPECIFICATIONS
CONTENT FORMAT SUPPORTED:
| DVD player | DVD ROM (DVD, SVCD, VCD, Audio CD, Data CD) |
| Video format | mpg, ifo, vob, tp, ts, mp4, avi, asf, wmv |
| Video CODECs | MPEG 1/2/4, DivX, XVID, WMV9 |
| Photos | JPEG / JPG |
| Audio CODEcs | MP3, OGG, WMA, WAV, AAC and AC3 |
| Compression rate | between 32 kbps and 320 kbps |
VIDEO OUTPUT SPECIFICATION
| Composite Components Output | Output 1 Vpp @ 75 Ohm Y:1 Vpp @ 75 Ohm Cb:0.7 Vpp @ 75 Ohm Cr:0.7 Vpp @ 75 Ohm |
AUDIO PERFORMANCE
| DA Converter | 24-bit/192kHz |
| AD Converter | 24-bit/96kHz |
| Signal-Noise (1kHz) | ≥ 85dB |
| Dynamic Range | ≥90dB (1kHz) |
| Separation Channel | ≥95dB |
| Total Harmonic Distortion (1kHz) | ≤ 2% |
NETWORK
| Ethernet connection | 10/100 Mbps (1EA) |
| CONNECTIONS | |
| USB | USB Port x 3 |
| HDD | Sata x 1 |
| Video Output | RCA, HDMI, S-Vide |
| Audio L/R | RCA, HDMI |
| Component / Progressive | YPbPr |
GENERAL
| Power Supply | AC 100~240V - 50~60Hz |
| Power | Approx. 35 W |
| Operating | +5°C to +40°C (+36°F to +104°F) |
| Operating Humidity | 5% to 80% RH |
| Dimensions (W/H/D) | 230 x 70 x 170 mm |
| Net Weight | Approx. 1500 grs |
Note: The specifications and design of this product are subject to change without any notice
TROUBLESHOOTING
For detailed troubleshooting information, please visit www.memup.com and consult FAQ
-
When power is on, nothing appears or screen is shaking:
-
Video output mode is not properly set, press [TV OUT] on remote control to change output mode until it is properly set.
-
While playing movie file, subtitle is not shown.
-
Make sure movie file name matches to subtitle file name.
-
While playing movie, there is no audio output.
-
In SETUP menu, check if audio output mode is properly set.
- Check volume level.
- Check if [MUTE] is activated.
-
Display different TV output to check if none are available
-
I can't connect DNX to network.
-
Please refer to Network settings part and follow step by step
It could depend on your Operating system, for other OS, please check our FAQ in www.memup.com - Make sure your personal firewallis deactivated or correctly set to function with DNX
Make sure your network cable is correctly plugged -
Shared files must be activated in your domestic network
-
I can't backup my DVD
Make sure you have enough free space
-
The DNX can't read my files (h.264, mkv, rmvb, png, bmp ...).
-
DNX chipset can't read some files, even some firmware couldn't correct, reading files are mentioned on giftbox and in "specifications" part. Some will be added and available in www.memup.com
- Some Remote control buttons have no functions.
- Some functions will be added and will be available thanks to firmware in www.memup.com