
WS7038 - Station météorologique LA CROSSE TECHNOLOGY - Notice d'utilisation et mode d'emploi gratuit
Retrouvez gratuitement la notice de l'appareil WS7038 LA CROSSE TECHNOLOGY au format PDF.

| Type de produit | Station météorologique (Rain Monitor) |
| Marque | LA CROSSE TECHNOLOGY |
| Modèle | WS7038 |
| Dimensions de la station de base (sans support) | 90 x 21 x 105 mm |
| Dimensions du pluviomètre | 132 mm de diamètre x 185 mm |
| Poids | Non spécifié dans la notice |
| Alimentation station de base | 2 piles AAA (IEC LR3) 1,5 V |
| Alimentation pluviomètre | 2 piles AA (IEC LR6) 1,5 V |
| Fréquence de transmission | 433,92 MHz |
| Portée maximale de transmission | 25 mètres en espace libre |
| Plage de température de fonctionnement | 0 °C à +50 °C (station de base et pluviomètre) |
| Fonctions principales | Mesure des précipitations, alarme de pluie, histogrammes des 6 derniers jours/semaines/mois, horloge 24 h avec date, affichage numérique des valeurs |
| Affichage | LCD avec barres graphiques et valeurs numériques |
| Entretien et nettoyage | Nettoyer la station de base avec un chiffon doux et humide. Nettoyer régulièrement l'entonnoir du pluviomètre à l'eau claire. Ne pas immerger la station de base dans l'eau. |
| Sécurité | Ne pas exposer la station de base à l'humidité, aux températures élevées ou aux vibrations. Respecter la polarité des piles. Tenir hors de portée des enfants. |
| Pièces détachées et réparabilité | Ne pas tenter de réparer soi-même. Confier toute réparation à un personnel qualifié. L'ouverture du produit annule la garantie. |
| Informations générales | Conforme à la directive R&TTE 1999/5/CE. Marquage CE. Utilisation intérieure pour la station de base, extérieure pour le pluviomètre. |
FOIRE AUX QUESTIONS - WS7038 LA CROSSE TECHNOLOGY
Questions des utilisateurs sur WS7038 LA CROSSE TECHNOLOGY
0 question sur cet appareil. Repondez a celles que vous connaissez ou posez la votre.
Poser une nouvelle question sur cet appareil
Téléchargez la notice de votre Station météorologique au format PDF gratuitement ! Retrouvez votre notice WS7038 - LA CROSSE TECHNOLOGY et reprennez votre appareil électronique en main. Sur cette page sont publiés tous les documents nécessaires à l'utilisation de votre appareil WS7038 de la marque LA CROSSE TECHNOLOGY.
MODE D'EMPLOI WS7038 LA CROSSE TECHNOLOGY
Rain Monitor
Instruction Manual
This operation manual is part of this product package. It contains important notes for setup and operation. Therefore please keep this manual in a safe place for later reference.
Please ensure furthermore that this operation manual stays with the product in case it is forwarded to any third party.
Introduction
Dear Customer,
We want to thank you for purchasing this Rain Monitor.
The construction of this unit corresponds to National and European requirements with regard to electro magnetic compatibility.
This unit carries the CE marking. Conformity has been proven; the respective commentaries and documents are deposited with the manufacturer.
In order to maintain this condition and guarantee safe operation you as the user are requested to pay attention to this operation manual!
With this product you have purchased a product laid out and manufactured using state-of-the-art technologies. The operation of this product is simple and straightforward. Nevertheless please read this operation manual carefully for better understanding and optimum benefits of all its features.
Intended Use
The Rain Monitor (Base Station and Rain Gauge) is used to measure the rainfall volume around the home. This product is designed to operate on two 1.5V batteries per unit (battery types see item "Specifications"). Operation of the Base Station is only allowed in closed and dry rooms, i.e. not in open space. Contact to humidity must be avoided.
Any other use but the one described in this chapter will lead to damage of the product. Furthermore this may lead to dangers, as there are short circuit, fire, electrical shock, etc. The entire product may not be opened, altered or modified in any way.
Table of Contents
Page
Introduction 11
Intended Use 11
Table of Contents 12
Safety Notes 13
Product Description 13
Function Keys 13
RAIN/SET Key 14
HISTORY/+Key 14
Numeric Display 14
Setting up 15
Positioning the Rain Gauge 15
Positioning the Base Station 15
Getting started 16
Programming Mode 17
Resetting of all Data 18
Resetting 18
Battery Change 18
Data Transmission and Reception 18
Reception Criteria 18
433MHz Reception 19
Care and Maintenance 19
Disposal 19
Technical Specifications 20
Additional Notes 20
Safety Notes

Garantee will expire in case of damages caused by any incorrect reading of this operation manual!
We will not accept any responsibility for consequential damages due to the above!
We further will not accept any responsibility for personal injuries or material damages caused by faulty handling or failure to comply with the safety notes in this manual. Guarantee will expire in any such case.
- Unauthorized alteration and/or modification of the Rain Monitor is strictly forbidden due to safety and approval reasons (CE).
Only two 1.5V batteries per unit of the product package may be used for power supply. - Do not expose the Base Station to high temperatures, humidity or severe vibrations as well as mechanical stress or shock.
- Do not leave any used up batteries in the unit. Even leak proof batteries may corrode and set free chemicals destroying the battery compartment or even endangering your health.
Incorrect polarity of the batteries will without any question immediately ruin the units.
This product as well as the inserted batteries are not a toy. Keep out of the reach of children. - Don't throw batteries in fire. Danger of explosion!
This product may not be used for medical purposes or public information. - Never put this Base Station into operation immediately after it has been transferred from any cold vicinity into a warm room. The then developing water of condensation will under unfavorable conditions damage the unit. Keep the unit switched off until it has reached room temperature.
Product Description
This Rain Monitor serves to measure the amount of rainfall around the home. The funnel in the Rain Gauge will lead the collected precipitation onto a seesaw formed like a spoon which will then in turn send an impulse to the Base Station. Transmission of data between Rain Gauge and Base Staion is performed via wireless 433MHz technique.
On the Base Station the amount of rain of the last rainfall, the last hour or the last 24 hours can be polled. An integrated bar graph shows the amount of rain of the last 7 days, 7 weeks or 7 months respectively. All measured value is stored in EEPROM and will thus not be lost even in case of a battery change. The Base Station furthermore provides a programmable rain alarm function as well as an integrated 24 hour clock with date display.
The Base Station is designed for either table standing or wall mounting.
The Rain Gauge will constantly drain itself and is thus safe against any frost damage.
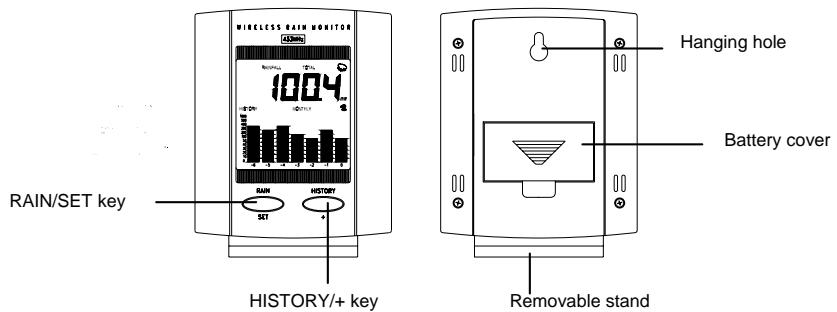
Function Keys
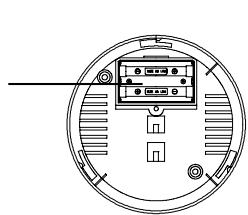
Battery compartment
With its "RAIN/SET" and "HISTORY/+” keys the Rain Monitor is equipped with only two operating elements and thus promises a very simple operation. The functions of each key are described in the following:
RAIN/SET Key
When the "RAIN/SET" key is pressed, the following functions will sequentially be displayed in the upper part of the LCD and will then be repeated:
TIME
DATE
TOTAL rainfall since the Rain Monitor was put into operation
Amount of rain during the last hour (1H)
Amount of rain during the last 24 hours (24H)
Amount of rain since the beginning of the last rainfall (small rain symbol)
HISTORY/+Key
When the "HISTORY/+” key is pressed, the following bar graph functions will sequentially be displayed in the lower part of the LCD and will then be repeated:
DAILY
DAILY shows the rainfall progress in form of vertical bars running from right to left for the past 6 days and the current day. Every day at midnight (00:00 hours) the bars will shift one place to the left.
WEEKLY
WEEKLY shows the rainfall progress in form of vertical bars running from right to left for the past 6 weeks and the current week. Every Monday at midnight (00:00 hours) the bars will shift one place to the left.
MONTHLY
MONTHLY shows the rainfall progress in form of vertical bars running from right to left for the past 6 months and the current month. On every first day of the month at midnight (00:00 hours) the bars will shift one place to the left.
Note!
Under normal circumstances the scaling of the graph bars shows the rainfall up to an amount of 100 millimeters (0, 1, 2, 3, 4, 5, 10, 20, 30, 40, 50 und 100mm ). If the rainfall exceeds an amount of 100mm , the scaling of the entire bar graph will automatically switch to a higher range (0, 10, 20, 30, 40, 50, 100, 200, 300, 400, 500 und 1000mm ).
Numeric Display
If in normal display mode the "HISTORY/+” key is pressed for longer than 2 seconds, the numeric value of the first bar in the bar graph will be displayed in millimeters in the top section of the LCD screen. Pressing the "HISTORY/+” key again will move to the next bar and so on until the values of all bars have been displayed.
Note!
If after display of the value of the last bar of the respective bar graph the "HISTORY/+" key is pressed one more time or if no key is pressed for 30 seconds then the LCD screen will return to the normal display mode.
Setting Up
Remove all components from the packaging and lay them on a table in front of you. Check that the following items are included:
- Base Station of Rain Monitor and table stand
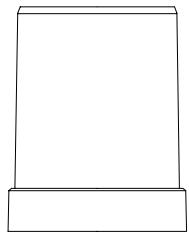
Rain Gauge - Operating Manual

Before setting up the Intended Use as well as the Safety Notes and the Technical Specifications included in this manual have to be observed closely.
Before putting into operation ensure that the Rain Monitor will fit the purpose it is intended to be used for.
Positioning the Rain Gauge
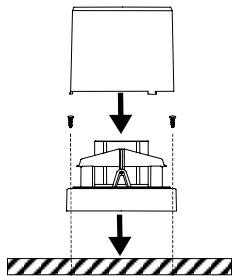
Locate the Rain Gauge outdoors on a convenient place (e.g. on a terrace, a lawn or in the garden) where it can collect rain freely and directly. Ensure that the unit is protected from wind so it cannot tip over. Screws provided with the shipment allow secure mounting.
Important Note!
It is recommended to position the Rain Gauge somewhat above ground level to ensure better data transmission.
Adjust the Rain Gauge evenly (e.g. by use of a spirit-level) in order to ensure safe operation of the internal seesaw.
Positioning the Base Station
The Base Station of the Rain Monitor is shipped with an attached removable table stand, which provides the option of table standing or wall mounting.
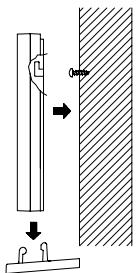
To wall mount proceed as follows:
-
Fix a fitting screw (not supplied) into the desired wall, leaving the head of the screw standing out by about 5mm.
-
Remove the table stand from the Base Station by pulling it away from its base. Hang the station onto the screw by use of the hanging hole on the back. Remember to ensure that it locks safely into place before releasing.
Getting started
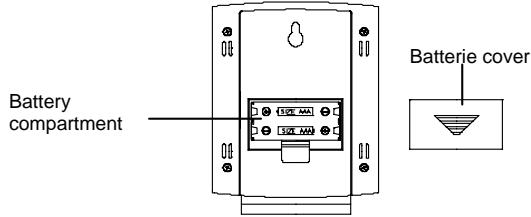
- Open the battery compartment on the back of the Base Station as shown above.
- Observing the correct polarity insert two type AAA, IEC LR3, 1.5V batteries into the battery compartment. The correct polarity is printed inside the battery compartment. After inserting the batteries all segments of the LCD screen will light up briefly (appr. 3 seconds).
- Replace the battery cover of the Base Station.
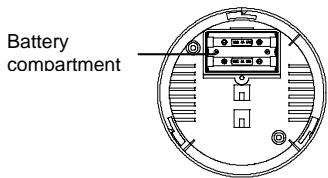
Using a coin or an appropriate tool (screwdriver) open the battery compartment in the base of the Rain Gauge.
- Observing the correct polarity insert two type AA, IEC LR6, 1.5V batteries into the battery compartment. The correct polarity is printed inside the battery compartment.
- Rescrew the battery cover of the Rain Gauge. Ensure that the cover is flat and sufficiently tight secured. This will prevent humidity from entering the battery compartment and subsequently damage the unit.
- Hold the body of the Rain Gauge and unlock the lower part by turning it counter clockwise and separate it carefully from the body.
- Hold the seesaw and make sure it stays without movement for at least another five seconds after inserting batteries into the rain gauge since this may cause false readings and bad signal transmission.
After completing the above steps, re-assemble the body and base of the Rain Gauge.
The Base Station and the Rain Gauge are now fully operational.
Important Note!
Always insert the batteries in the Base Station first, otherwise start up problems may occur. Note further that the batteries in the Rain Gauge must be inserted no later than 2 - 3 minutes after the insertion of the batteries into the Base Station. During this time periode the reception symbol (antenna) is displayed on the Base Station.
Programming Mode
Note!
After insertion of the batteries the minutes digits will start flashing in the time display. To enter the programming mode from the normal display mode (rain volume) press and hold the "RAIN/SET" key for at least 2 seconds.
If, in programming mode, no key is pressed for at least 40 seconds, the LCD will automatically switch back to normal display mode
Press the "RAIN/SET" key to enter the programming mode. The minutes digits will start flashing.
Setting of Time/Date/Weekday
- Use the "HISTORY/+ key to set the minutes, then press the "RAIN/SET" key for confirmation. The display switches to the hours. The hour digits start flashing.
- Use the "HISTORY/+ key to set the hours, then press the "RAIN/SET" key for confirmation. The display switches to the date. The month digits start flashing.
- Use the "HISTORY/+" key to set the month, then press the "RAIN/SET" key for confirmation. The date of day digits start flashing.
Use the "HISTORY/+ key to set the current date of day, then press the "RAIN/SET" key for confirmation. The display switches to the weekday mode. The weekday digits start flashing. - Use the "HISTORY/+ key to set the day of the week. Days of the week are expressed numerically, i.e. 1 = Monday, 2 = Tuesday, etc. Press the "RAIN/SET" key for confirmation. This will automatically enter the "RAIN ALARM ON/OFF" setting mode.
Rain Alarm ON/OFF
After confirmation of the weekday setting with the "RAIN/SET" key the display will show a flashing "AL/OFF" (rain alarm switched OFF).
Using the "HISTORY/4" key the alarm can now be switched "ON" or "OFF" as desired.
- Press the "RAIN/SET" key for confirmation. This will automatically enter the "Resetting Total Rain Amount" mode.
Note!
If the alarm is switched ON, an alarm will sound if it starts to rain. This alarm will switch off automatically after about 150 seconds. It can however be switched off ahead this time by pressing any key.
If it starts to rain again after a raining break, the alarm will only sound if the break has been longer than 80 minutes.
Resetting Total Rain Amount
After confirmation of the Rain Alarm ON/OFF setting with the "RAIN/SET" key the display will show the flashing total rain balance (TOTAL).
If desired, the total rain amount can be reset to zero by use of the "HISTORY/4" key.
After this final setting has been entered, the programming mode can be exited by pressing the "RAIN/SET" key one more time.
Note!
The total rain amount (TOTAL) will constantly accumulate unless the value of the total rain amount of the Rain Monitor is reset or its batteries need to be changed.
A random value of total rain amount may be displayed at first start up due to initialization of the Rain Gauge. For this reason it is recommended to reset the total rain amount after first start up or after a battery change.
Resetting of all Data
All rain data with the exception of the rain amount of the last hour is stored in the Rain Monitor's non volatile EEPROM. This data will not be lost even if the batteries need to be changed and will be used again at any resetting.
If all data need to be reset proceed as follows:
After insertion of the batteries into the Base Station all LCD segments will light up momentarily. Right after this the number "267" will be displayed. These preset digits represent the most accurate programming code for the rain multiplicator. It is therefore not necessary to assign any other rain multiplicator code.
- Press the "HISTORY/+" key at the immediate instant when all LCD segments light up briefly after insertion of the batteries. Do not release the key until the preset rain multiplicator ("267") is shown with digit "7" flashing.
- Confirm the preset value by twice pressing the "RAIN/SET" key => The digit "2" is flashing.
- Hold the "RAIN/SET" key pressed until all stored data have been reset to zero (appr. 8 seconds).
- Do now repeat the procedure described in item "Programming Mode".
Resetting
- Remove the batteries from both the Base Station and the Rain Gauge.
- Wait at least 30 seconds and then repeat the procedure specified in item "Getting started".
Always wait at least 30 seconds after removing the batteries before reinserting them, otherwise start up and transmission problems may occur. Also remember, when inserting the batteries, that both units have to be reset and to always reinsert the batteries to the Base Station first.
Battery Change
It is recommended to replace the batteries in all units on an annual basis to ensure optimum accuracy of these units.
A battery change should also be performed when the transmission distance of the 433MHz signal starts to decrease or the Rain Gauge is no longer recognized by the Base Station.
Note!
In the event of resetting, i.e. changing batteries in any of the units, all units need to be reset. This is because a random security code is assigned by the Rain Gauge at start-up and this code must be received and stored by the Base Station in the first three minutes of power being supplied to it.
After inserting batteries into the rain gauge, please wait at least 5 seconds, before proceeding to the testing of the tipping bucket of the rain gauge.
If inserting the batteries within 5 seconds to test the rain gauge, it may cause reading errors of the rain gauge.

According to the Used Battery Regulation the end user is committed by law to return all used up batteries (button cell to lead storage battery). Disposal through the garbage is strictly forbidden.
Please participate in the preservation of the environment and dispose of your used up batteries only at your point of purchase or the authorized depot of your community.
Data Transmission and Reception
Reception Criteria
- During normal operation the Base Station of the Rain Monitor attempts to receive the current data from the Rain Gauge every 5 minutes. At any reception attempt the reception symbol (Antenna) is displayed
on the LCD. All data gathered by the Rain Gauge will only be taken over by the Base Station if this reception symbol is shown.
The Rain Gauge however transmits data every one minute as long as there is no rain and immediately when it senses rain. If rain data cannot be received at three attempts in a row, then the symbol - - - will be shown on the LCD. If this is the case, a reset as described in Item "Resetting" must be performed.
- During programming mode and during numeric display of the rainfall bar graphs (see "Numeric Display") there is no reception of the transmitted data.
If any key is being pressed there will be no reception of data until the key is released again.
433MHz Reception
The Base Station of the Rain Monitor will automatically receive the data transmitted by the Rain Gauge after insertion of batteries. If the rain data is not being received latest 15 minutes after setting up or after it starts to rain (the display shows "---"), then please check the following points:
- The distance of the Rain Monitor (Base Station and Rain Gauge) to any interfering sources such as computer monitors or TV sets should be at least 1.5 to 2 meters.
- Avoid placing the Rain Monitor onto or in the immediate proximity of metal window frames.
- Using other electrical products such as headphones or speakers operating on the same signal frequency (433MHz) may prevent correct signal transmission and reception.
- Neighbours using electrical devices operating on the same 433MHz signal frequency can also cause interferences.
Note:
When the 433MHz signal is received correctly, do not re-open the battery covers of either the Base Station or Rain Gauge, as the batteries may spring free from the contacts and force a false reset of all data. Should this happen accidentally then reset all units (see "Resetting") otherwise transmission problems may occur.
The transmission range in open space is around 20 - 25 m from the Rain Gauge to the Base Station. However, this depends on the surrounding environment and interference levels. If no reception is possible despite the observation of above factors, all units have to be reset (see "Resetting"). In such a case do also check the batteries.
Important Note!
Before permanently mounting the Rain Monitor, it is recommended to ensure that the 433MHZ signal can be sufficiently received. If reception is not possible from the desired locations, a slight relocation will be sufficient in most any case. Once the signal is correctly received, both units can be mounted permanently.
Care and Maintenance
- Clean the housing and screen of the Base Station only with a soft, damp cloth. Do not use abrasives or solvents.
Ensure that the Rain Gauge does not collect leaves or other dirt. Remove the funnel from the Rain Gauge every now and then and clean it under running water. Also clean the seesaw of the sensor with a damp cloth and check by lightly tapping with your finger that it can move freely from side to side. - Do not clean the bottom part of the Rain Gauge under running water. This may bear the danger of water entering the unit's electronic parts.
- Do not immerse the Base Station in water.
Please do not attempt any repairs on your own. It is recommended to have repairs only performed by trained personnel at the point of purchase. Opening or improper handling of the units will void the warranty.
Disposal
Dispos of the no longer operable Rain Monitor only in accordance with the valid legal regulations.
Technical Specifications
Recommended Operating Temperature
Base Station
0^ to +50^
Rain Gauge
0^ C to +50^ C
Rainfall Bar Graphs
For the past 6 days, weeks or months plus the current day, week or month
Data Checking Intervals
Base Station (Signal Reception)
Every 5 minutes
Rain Gauge
At no rain every minute, immediately if raining
Transmission Frequency
433.92MHz
Transmission Range (max.)
25 meters
Power Supply
(Alkaline batteries recommended)
Base Station
2xTypeAAA,IECLR3,1.5Vbatteries
Rain Gauge
: 2 x Type AA, IEC LR6, 1.5V batteries
Dimensions (L x W x H)
Base Station (without stand)
90x21x105mm
Rain Gauge
132mm Dia. x 185mm
Additional Notes
The technical specifications of this product may at any time be changed without prior notice.
No part of this operation manual may be copied or reproduced without written consent of the manufacturer.
R&TTE Directive 1999/5/EC
Summary of the Declaration of Conformity: We hereby declare that this wireless transmission device does comply with the essential requirements of R&TTE Directive 1999/5/EC.
- Rain Monitor
- Instruction Manual
- Introduction
- Intended Use
- Table of Contents
- Safety Notes
- Product Description
- Function Keys
- RAIN/SET Key
- HISTORY/+Key
- Numeric Display
- Setting Up
- Positioning the Rain Gauge
- Important Note!
- Positioning the Base Station
- Getting started
- Programming Mode
- Note!
- Setting of Time/Date/Weekday
- Rain Alarm ON/OFF
- Resetting Total Rain Amount
- Resetting of all Data
- Resetting
- Battery Change
- Data Transmission and Reception
- Reception Criteria
- 433MHz Reception
- Note:
- Care and Maintenance
- Disposal
- Technical Specifications
- Recommended Operating Temperature
- Data Checking Intervals
- Power Supply
- (Alkaline batteries recommended)
- Dimensions (L x W x H)
- Additional Notes
Marque : LA CROSSE TECHNOLOGY
Modèle : WS7038
Catégorie : Station météorologique