MODE D'EMPLOI WS7033 LA CROSSE TECHNOLOGY
Operating manual
The Thermo Clock with indoor & outdoor temperature reading
Introduction:
Congratulations on purchasing the Thermo Clock as an example of good design and engineering. The operation of this product is simple and straightforward. Please read this operating manual to help you get a better understanding of this product and all its features.
The Thermo Clock:
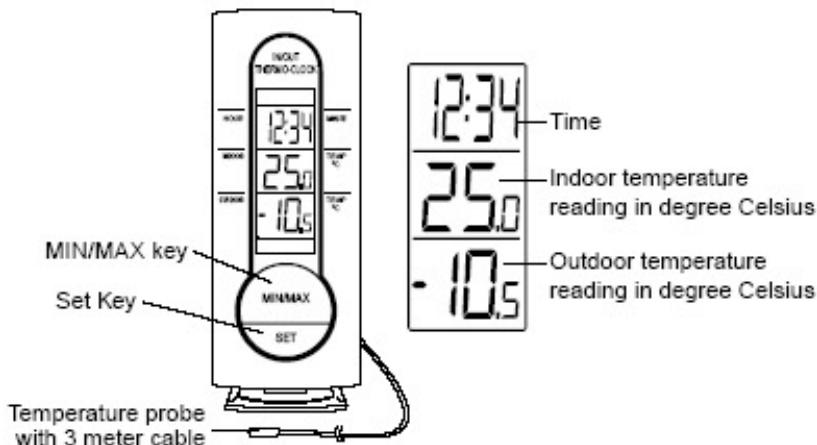
Features:
3 line LCD
- Indoor and outdoor temperature reading in degree Celsius.
Minimum and maximum indoor & outdoor temperature recordings.
- 3 meter cable with sensing probe for the outdoor temperature.
- Accurate LCD clock in 24 hour display.
- Wall mountable or table standing.
Getting Started:
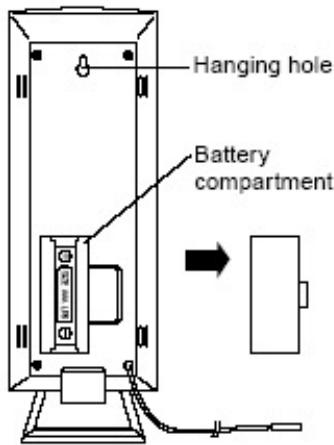
- Checking the correct polarization, insert 1 x AAA, IEC, LR3, 1.5V battery into the battery compartment.
- Check that the Thermo Clock has received the reading in the outdoor section (this will be from the temperature probe).
- Once the temperature is received, carefully thread the cable outdoor, to a suitable location and secure into place.
- Now place your Thermo Clock onto a flat surface or hang it onto a wall of your choice (see Positioning the Thermo Clock below).
Note: When securing the cable, remember to keep it away from moisture, rain, direct sunlight or other extreme conditions as these may cause damage or inaccurate readings.
Using the Thermo Clock:
The 3 line LCD shows the information as follows:
Line 1: Displays the time in hours and minutes.
Line 2: Displays the indoor temperature reading in degree Celsius.
Line 3: Displays the outdoor temperature from the temperature probe in degree Celsius.
MIN/MAX key: When this is pressed, the LCD will alternate between the current, minimum or maximum temperatures for both indoor and outdoor readings.
If the MIN/MAX key is pressed and held down, both the minimum and maximum recorded temperatures for indoor and outdoor will reset to the current indoor and outdoor temperature readings.
Setting the time:
Once the battery is inserted, the time will require setting. To set the time, simply follow these steps:
- Press and hold down the "SET" key until the hours in the time section start flashing.
- Using the "MIN/MAX" key, set the time in hours and once set, press the "SET" key once more to enter the minutes setting.
- Following on from the hours setting, the minutes section will now start flashing. Again, using the "MIN/MAX" key, set the minutes required. Once the minutes are set, press the "SET" key to return back to the original time mode.
Your Thermo Clock is now fully functional and should be place onto a flat surface or hung onto the desired wall (see below in Positioning the Thermo Clock).
What to do when the time or temperature readings are not shown on the LCD:
- Check that the battery is inserted in the correct polarization
- Remove the battery and re-insert it after waiting at least 30 seconds.
- Make sure the battery used is new and of the correct size.
Positioning the Thermo Clock:
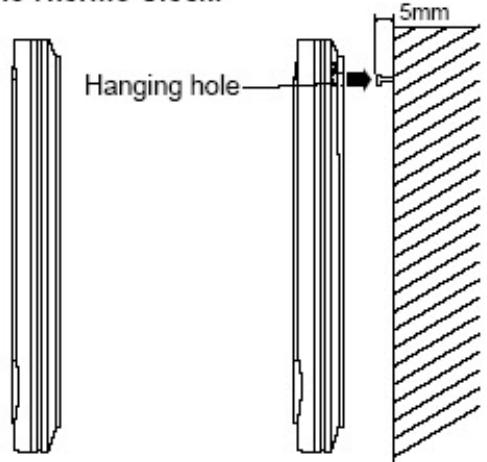
The Thermo Clock comes attached with a removable table stand, which provides the option of table standing or wall mounting the unit. Before wall mounting, please check that the outdoor temperature can be received from the desired locations. To wall mount:
- Fix a screw (not supplied) into the desired wall, leaving the head extended out the by about 5mm.
- Remove the stand from the Thermo Clock by pulling it way from the base and hang the Thermo Clock onto the screw. Remember to ensure that it locks into place before releasing.
Maintenance:
Extreme/sudden changes in temperatures (i.e. direct sunlight and extreme cold), vibration and shock should be avoided. This will help prevent inaccurate readings and any possible damage to the unit.
- When cleaning the LCD and casing, use a soft damp cloth only. Do not use solvents or scouring agents as they may mark surfaces.
- Do not submerge the unit in water.
- Immediately remove all low powered batteries to avoid leakage and damage. Replace only with new batteries of the recommended size.
- Do not make or attempt to make any repairs to the unit. Return it to its original point of purchase for repair by a qualified engineer. Opening and tampering with the unit may invalidate its guarantee.
Replacing batteries:
For best performance, the battery should be replaced at least once a year to maintain maximum running accuracy.

Please help in the preservation of the environment and return used batteries to an authorized depot.
Specification:
Recommended operating temperature:
Thermo Clock
Temperature probe
Temperature measuring range:
Indoor
Outdoor
Temperature reading interval
Power source
Battery life cycle
Cable with outdoor temperature probe
Dimensions (L x W x H)
:0°C to +50°C
-20°C to +60°C
: 0^ to +50^ with 0.5^ resolution
(--) displayed if outside this range)
-20°C to +60°C with 0.5°C resolution
(--) displayed if outside this range)
every 10 seconds
: 1 x Micro - AAA, IEC LR3 1.5V batteries
approx.12 months
(alkaline battery recommended)
approx. 3 meters
:60x30x150mm
Liability Disclaimer:
- The manufacturer and supplier cannot accept any responsibility for any incorrect readings and any consequences that occur should an inaccurate reading take place.
This product is not to be used for medical purposes or for public information.
This product is only designed to be used in the home and only as indicator of the indoor and outdoor temperatures. Readings given by this product should be taken only as an indication.
The specifications of this product may change without prior notice.
This product is not a toy. Keep out of the reach of children.
No part of this manual may be reproduced without written consent of the manufacturer.