
ST-X902LA - Récepteur audio TECHNICS - Notice d'utilisation et mode d'emploi gratuit
Retrouvez gratuitement la notice de l'appareil ST-X902LA TECHNICS au format PDF.


| Type de produit | Récepteur audio stéréo |
| Marque | Technics |
| Modèle | ST-X902LA |
| Dimensions (L x H x P) | 430 x 125 x 350 mm |
| Poids | 7,2 kg |
| Alimentation | 220-240 V, 50/60 Hz |
| Consommation électrique | 150 W |
| Puissance de sortie (RMS) | 2 x 40 W (8 Ω) |
| Gammes de fréquences tuner | FM 87,5-108 MHz, AM 520-1610 kHz |
| Nombre de stations préréglées | 16 (FM) / 8 (AM) |
| Entrées | Phono, CD/Aux, Tuner, Tape 1/2 |
| Sorties | Enceintes A/B, Casque, Tape Out |
| Fonctions principales | Radio FM/AM, amplificateur intégré, sélecteur d'entrée, contrôle de tonalité, balance |
| Entretien et nettoyage | Débrancher l'appareil, nettoyer avec un chiffon doux et sec. Ne pas utiliser de produits abrasifs. |
| Sécurité | Ne pas exposer à l'humidité ou à des températures extrêmes. Assurer une ventilation adéquate. |
| Pièces détachées et réparabilité | Disponibles auprès de revendeurs agréés Technics. Réparation recommandée par un professionnel. |
| Informations générales | Récepteur stéréo de la série Technics, idéal pour les systèmes hi-fi. |
FOIRE AUX QUESTIONS - ST-X902LA TECHNICS
Questions des utilisateurs sur ST-X902LA TECHNICS
0 question sur cet appareil. Repondez a celles que vous connaissez ou posez la votre.
Poser une nouvelle question sur cet appareil
Téléchargez la notice de votre Récepteur audio au format PDF gratuitement ! Retrouvez votre notice ST-X902LA - TECHNICS et reprennez votre appareil électronique en main. Sur cette page sont publiés tous les documents nécessaires à l'utilisation de votre appareil ST-X902LA de la marque TECHNICS.
MODE D'EMPLOI ST-X902LA TECHNICS
Technics
STEREO SYNTHESIZER TUNER
ST-X902LA
STEREO INTEGRATED AMPLIFIER
SU-X920D/SU-X520D
STEREO DOUBLE-CASSETTE DECK
RS-X920/RS-X520
OPERATING INSTRUCTIONS

Notes:
- Specifications differ according to the area code.
- The "EB" area code, for example, indicates United Kingdom specifications.
- The "EB" indication is shown on the packing case and serial number tag.
Before operating this unit, please read these instructions completely.
Dear Stereo Fan
We want to thank you for selecting this product and to welcome you to the growing family of satisfied Technics product owners around the world.
We feel certain you will get maximum enjoyment from this new addition to your home.
Please read these operating instructions carefully, and be sure to keep them handy for convenient reference.
These operating instructions are applicable to the following models.
These operating instructions, however, fundamentally explain the operation of models ST-X902LA, SU-X920D and RS-X920.
| Tuner | Amplifier | Cassette Deck |
| ST-X902LA | SU-X920DSU-X520D | RS-X920RS-X520 |
Contents
• For United Kingdom.... 2
- Suggestions for Safety 3
- Accessories 4
- Connections 5
- Front Panel Controls and Functions ..... 10
- Basic Operating Procedure....15
- Setting the Time 17
- Listening to Radio Broadcasts ..... 18
- Listening to Tapes 21
- Recording 25
- Tape-to-Tape Recording 29
• To Use the Timer....31
• Using an External Unit 37 - Remote-Control Transmitter 38
• Remote-Control Operation.... 39 - About Cassette Tapes 41
- Maintenance.... 42
• Technical Specifications 43 - Troubleshooting Guide 45
THIS TUNER/RECEIVER IS CAPABLE OF RECEIVING THE NEW AM STEREO BROADCASTS FROM THE AM BAND RADIO STATIONS HOWEVER LIKE MANY TUNERS AND RECEIVERS CURRENTLY AVAILABLE ON THE MARKET IT WILL REPRODUCE THIS AM STEREO SIGNAL ONLY IN AM MONO, WHICH, IN EFFECT, IS OF NO LESSER QUALITY THAN YOUR EXISTING AM MONO TUNER/RECEIVER.
For United Kingdom
("EB" area code model only)
The "EB" indication is shown on the serial number tag
Important
THE WIRES IN THIS MAINS LEAD ARE COLOURED IN ACCORDANCE WITH THE FOLLOWING CODE.
BLUE: NEUTRAL
BROWN: LIVE
As the colours of the wires in the mains lead of this apparatus may not correspond with the coloured markings identifying the terminals in your plug proceed as follows. The wire which is coloured BLUE must be connected to the terminal which is marked with the letter N or coloured BLACK.
The wire which is coloured BROWN must be connected to the terminal which is marked with the letter L or coloured RED.
Under no circumstances must either of the above wires be connected to the earth terminal of a three pin plug.
(For amplifier and cassette deck) Notes:
- The AC power supply cords supplied with these units have both the appliance connector and the AC plug at its ends. The AC power supply cord is intended to be used with other system components, such as tuner or etc.
- If you need to connect this AC power supply cord to the household AC outlet, follow the instruction below.
(1) Cut off and dispose the plug at the end where the caution label is attached.
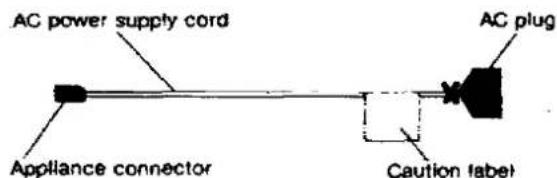
(2) Fit a suitable plug to the AC power supply cord following the instruction indicated on the caution label.
Suggestions for Safety
■Use a standard AC wall outlet
- Use from an AC power source of high voltage, such as for an air conditioner, is very dangerous. There is the possibility that a fire might be caused by making such a connection.
- A DC power source cannot be used. Be sure to check the power source carefully, especially on a ship or other place where DC is used.
■ Grasp the plug when disconnecting the power supply cord
- Wet hands are dangerous.
A dangerous electric shock may result if the plug is touched by wet hands. - Never place heavy items on top of the power supply cord, and never force it to bend sharply.
■AC outlet on rear panel (not equipped for some countries)
- Any equipment connected here should have the specified power consumption or less.
This outlet is exclusively for the connection of other audio equipment, such as a tape deck. Be sure the power consumption does not exceed the wattage specified near the AC outlet. - Never connect other electrical appliances, such as an iron or toaster.
If appliances with a large power consumption are connected, an accident might occur as a result of overheating.
Place the unit where it will be well ventilated Place this unit at least 10 cm (4") away from wall surfaces, etc. Be careful that curtains and similar materials do not obstruct the ventilation holes.
■ Avoid places such as the following: in direct sunlight or in other places where the temperature is high.
In places where there is excessive vibration or humidity. Such conditions might damage the cabinet and/or other component parts and thereby shorten the unit's service life.
■ Be sure to place the unit on a flat, level surface.
If the surface is inclined, a malfunction may result.
■ Never attempt to repair or reconstruct this unit
A serious electric shock might occur if this unit is repaired, disassembled or reconstructed by unauthorized persons, or if the internal parts are accidentally touched.
■Take particular care if children are present
Never permit children to put anything, especially metal, inside this unit. A serious electric shock or malfunction could occur if articles such as coins, needles, screwdrivers, etc. are inserted through the ventilation holes, etc. of this unit.
■ If water is spilled on the unit
Be extremely careful if water is spilled on the unit, because a fire or serious electric shock might occur. Immediately disconnect the power cord plug, and consult with your dealer.
■ Avoid spray-type insecticides
Insecticides might cause cracks or "cloudiness" in the cabinet and plastic parts of this unit. The gas used in such sprays might, moreover, be ignited suddenly.
■ Never use alcohol or paint thinner
These and similar chemicals should never be used, because they might cause flaking or cloudiness of the cabinet finish.
■ Disconnect the power supply cord if the unit will not be used for a long time
If the unit is left for a long time with the power ON, this will not only shorten its useful operation life, but may also cause other troubles.
■ If trouble occurs
If, during operation, the sound is interrupted or indicators no longer illuminate, or if abnormal odor or smoke is detected, immediately disconnect the power cord plug, and contact your dealer or an Authorized Service Center.
Accessories
(Refer to pages 5–7 and 38.)
Tuner ST-X902LA
- Stereo connection cable..... 1
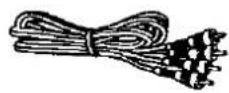
• FM indoor antenna.... 1

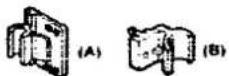
- AM antenna holders ..... 2
- L-type cable....1

- Attachment plug .... 1 (For United Kingdom)

- Screws 2

- AC power supply cord (long) 1

- AM loop antenna .... 1

- Remote-control transmitter (RAK-SC508W) 1

- AC power supply cord (short) 1

- Batteries 2

Note: Configuration of AC power supply cord and FM indoor antenna differ according to area.
Cassette deck RS-X920/RS-X520
- Stereo connection cables.... 2

• L-type cable ..... 1
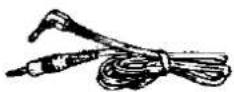
• AC power supply cord .... 1


Note: Configuration of AC power supply cord differs according to area.
Connections
Connections of each unit

flowchart
graph TD
    A["Tumtable (not included)"] --> B["1"]
    B --> C["OUT PUT"]
    C --> D["SYSTEM CONTROL OUT"]
    D --> E["2-1"]
    E --> F["1"]
    F --> G["1-2"]
    G --> H["1-1"]
    H --> I["1"]
    I --> J["(R)(L)"]
    J --> K["PHONO"]
    K --> L["TUNER"]
    L --> M["(F0(L)(F0(L)(F0(L)(F0(L))"]
    IN] --> N["(R)(L)"]
    N --> O["(R)(L)"]
    O --> P["LINE OUT"]
    P --> Q["1"]
    Q --> R["1"]
    R --> S["1"]
    S --> T["(R)(L)"]
    T --> U["(R)(L)"]
    U --> V["OUT"]
    V --> W["3-1"]
    W --> X["Amplifier (included)"]
    X --> Y["CD"]
    Y --> Z["Stereo sound processor (not included)"]
    Z --> AA["1"]
    AA --> AB["1"]
    AB --> AC["2"]
    AC --> AD["2"]
    AD --> AE["3"]
    AE --> AF["3"]
    AF --> AG["COMPACT disc player (not included)"]
    AG --> AH["2"]
    AH --> AI["(F0(L)(F0(L))"]
    AI --> AJ["RECA (IN)"]
    AJ --> AK["PLAY (OUT)"]
    AK --> AL["SYSTEM CONTROL IN OUT"]
    AL --> AM["CONTROL 2-2"]
Connection diagrams shown are for connections to a Technics hi-fi component system. Make connections in the numbered sequential order.
1 Connect the stereo connection cables (included with the turntable, tuner, stereo sound processor, and cassette tape deck).

1.1
"GND" terminal of the amplifier
This terminal is for use with a turntable which has a ground wire.
1-2
"EXT" terminals of the amplifier
When these terminals are not in use, be sure to insert the "shorting" pins (included).

2 Connect the L-type cable (included with the turntable, tuner, stereo sound processor, compact disc player, and cassette tape deck).
2-1
"REMOTE OUT" terminal
This terminal is used to connect to the "REMOTE IN" terminal of the Technics multi-compact disc player (not included).
2-2
"CONTROL" terminal
Make a connection from this terminal to the "CONTROL" terminal for a cassette deck on a Technics multi compact disc player.
(For detailed information, refer to the operating instructions of the Technics multi compact disc player.)
3 Connect the optical-fiber cable (included with the compact disc player).
3.1
"DIGITAL IN" (CD, DAT) terminals of the amplifier
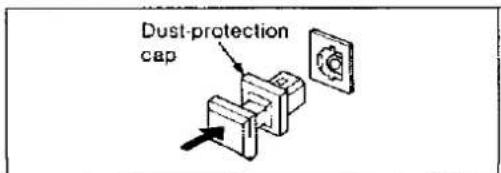
These terminals are protected by the dust-protection caps to avoid damage by the dust, etc. Remove the caps only when the "DIGITAL IN" terminals are to be used.
When these terminals are not being used, attach the caps as shown in the illustration below.
Connections of each unit (continued)

flowchart
graph TD
    A["Tumtable (not included)"] --> B["4-1"]
    B --> C["Tuner (Included)"]
    C --> D["5-1"]
    D --> E["AC OUTLET AC IN ~ 0.0"]
    E --> F["4-2"]
    F --> G["4-3"]
    G --> H["Household AC outlet"]
    C --> I["Amplifier (included)"]
    I --> J["5-2"]
    J --> K["AC OUTLET AC IN ~ 0.0"]
    K --> L["4-1"]
    L --> M["4-2"]
    M --> N["AC IN ~ AC OUTLET"]
    C --> O["Stereo sound processor (not included)"]
    O --> P["4-1"]
    P --> Q["Compact disc player (not included)"]
    Q --> R["5-3"]
    R --> S["4-1"]
    S --> T["4-2"]
    T --> U["AC IN ~ AC OUTLET"]
    C --> V["Cassette tape deck (included)"]
    V --> W["5-3"]
    W --> X["AC IN ~ AC OUTLET"]
4 Connect the AC power supply cords.
4-1 Connect the AC power supply cords (not included).
4-2 Connect the AC power supply cords (short) (included).
4-3 Connect the AC power supply cord (long) (included).
① Connect this cord only after all other cables have been connected.
For United Kingdom
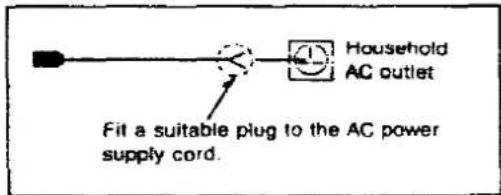
Notes:
- Configuration of the AC outlets and AC power supply cords differ according to area.
- If the compact disc player is not used in combination with these components, connect the AC power supply cord of the stereo sound processor to the AC outlet of the cassette deck.
5 "AC OUTLET"
5-1 "SWITCHED" outlet
Power is controlled by the power switch. Audio equipment rated up to 500 W can be connected here.
5-2 "UNSWITCHED" outlet:
Power is always available, regardless of power switch. Audio equipment rated up to 60 W can be connected here.
6-3 "UNSWITCHED" outlet:
Power is always available, regardless of power switch. Audio equipment rated up to 100 W can be connected here.
Note:
If other audio equipments are to be connected to these outlets, make sure that the total power consumption does not exceed the rating of each outlet.
After other units have been connected, tie up the cords in a bundle with a clip, etc. and place them behind the units.
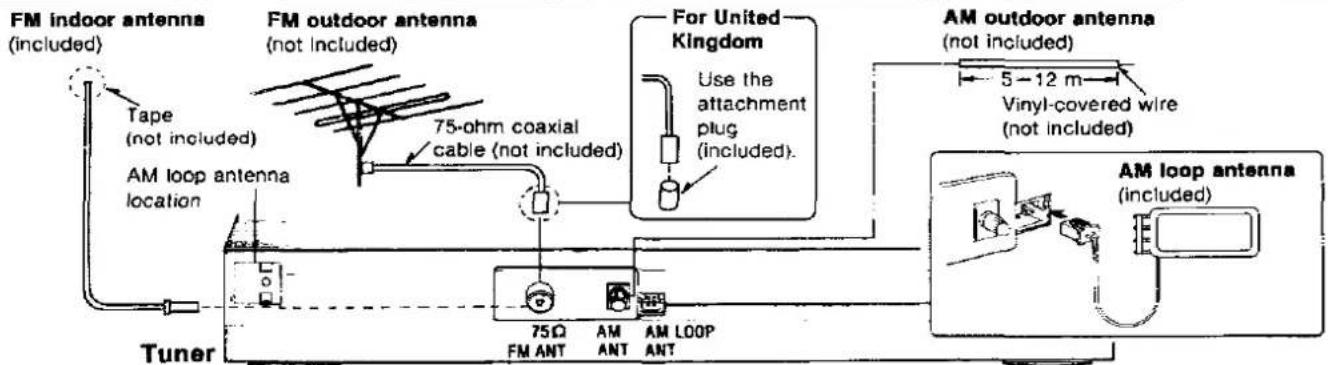
Note: An outdoor antenna should be installed by a competent technician only.
FM antenna
■ FM Indoor antenna
Attach to a wall (using tape) facing in the direction of best reception.
For best reception sound quality:
An FM outdoor antenna is recommended.
Note:
Disconnect this antenna if an FM outdoor antenna is installed.
FM outdoor antenna
If the FM indoor antenna does not provide satisfactory reception of FM broadcasts, an outdoor antenna should be used.
The outdoor antenna may be required in a mountainous region, or if this unit is located inside a reinforced-concrete building, etc.
If FM antenna terminal is as shown below
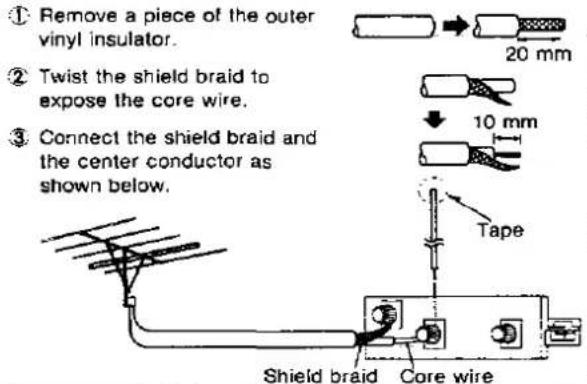
AM antenna
■AM loop antenna
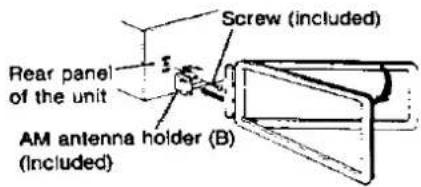
Connect the AM loop antenna to the AM antenna terminals, and attach it to a column, rack or this unit (facing in the direction of best reception).
Notes:
- If this antenna is not properly installed, AM broadcasts will not be received.
- Be sure to connect the AM loop antenna even when an outdoor antenna is used.
Pay attention to the following points when attaching the antenna.
- Do not attach it horizontally (to do so would impair reception).
- Do not attach it close to power cords, speaker wires or metal surfaces (to do so would result in noise).
- Do not attach it close to a tape deck (when the tape deck is being used, chirping or beeping sounds may be received).
When attaching the antenna to a column, a wall or rack
Affix it vertically.

When attaching the antenna to the unit
This type of installation may cause impaired reception or result in signal noise. If possible, attach the antenna to a rack, a wall, or a column.
Move the antenna toward the right or left to find the point of best reception.
■AM outdoor antenna
The outdoor antenna may be required in a mountainous region, or if this unit is located inside a reinforced-concrete building, etc. Use 5–12 m (16–40 ft.) of vinyl-covered wire horizontally at the window.
Connections
(continued)

Connection of speaker systems
SPEAKERS
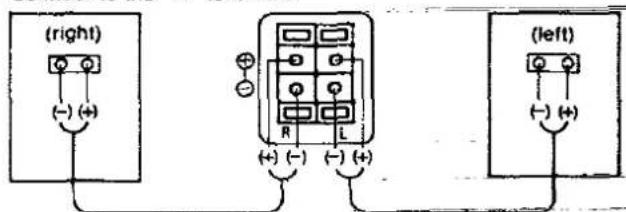
Three pairs of speaker systems (main, second, surround-sound) can be connected to this unit
Speaker systems that can be connected to any of the speaker connection terminals of this unit are speaker systems with an impedance of 8 to 16 ohms.
Make connections to each speaker system by using speaker cords (not included).
Main speaker systems (not Included)
Connect to the "A" terminals.
Second speaker systems (not included)
Connect to the "B" terminals.

Surround-sound speaker systems (not included)
Connect to the "SURROUND" terminals
- Be sure to connect both speaker systems. If only one side is connected, no sound will be heard.

To connect cords to terminals
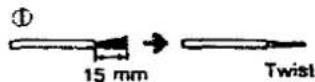
① Strip off the outer covering, and twist the center conductor
② Tilt the lever back and insert the cord.
③ Close the lever and pull the cord gently to be sure that it is secure.

Note:
Be sure to only connect positive (+) cords to positive (+) terminals, and negative (−) cords to negative (−) terminals.
Note:
To prevent damage to circuitry, never short-circuit the plus (+) and minus (-) speaker wire.

How to use the active current sensor.
ACTIVE CURRENT SENSOR
The selector is used to enjoy powerful super-bass sound
ON: Switch ON when connecting the Technics system speakers (SU-X920D SB-CS95. SU-X520D SB-CS95/CS75).
OFF: Switch OFF when connecting speakers other than Technics system speakers.
Notes:
- When connecting speakers other than system speakers, sound from the speakers may not be heard if the selector is pressed ON, because the protecting circuit on the amplifier becomes active.
- The active current sensor activates only for the speaker systems connected to the "A" terminals.

External unit connection
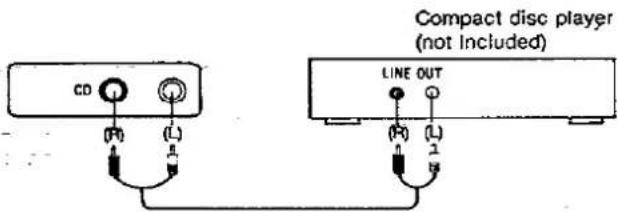
Make connections to each component by using stereo connection cables (not included) and video connection cables (not included).

Connect a compact disc player.

Connect a digital audio tape deck.
Recordings can be made to the digital audio tape deck.


Connect a second compact disc player, etc.

flowchart
graph TD
    A["Digital IN AUX"] --> B["Coaxial cable (not included)"]
    C["Second compact disc player (not included)"] --> D["COAXIAL OUT"]

Connect a VCR.


Connect a video disc player.


Connect a TV.

Front Panel Controls and Functions
The indication AM used here includes both MW and LW.
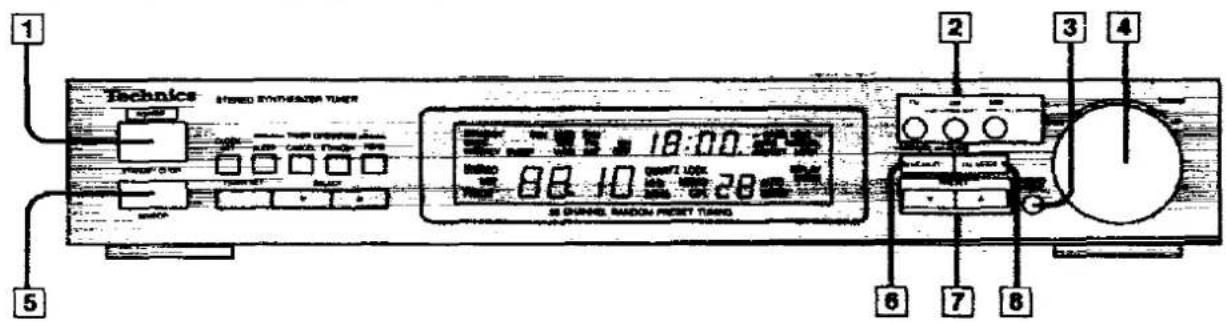
Tuner section
1 Power "STANDBY ⏻/ON" switch (POWER, STANDBY ⏻/ON)
This switch switches ON and OFF the secondary circuit power only. The unit is in the "standby" condition when this switch is set to the STANDBY position. Regardless of the switch setting, the primary circuit is always "live" as long as the power cord is connected to an electrical outlet.
2 Band selectors
FM: Press this button to listen to an FM broadcast.
MW: Press this button to listen to an MW broadcast.
ALLOCATION: When the MW button is pressed for about 3 seconds, the MW frequency step will change to 10 kHz per step. (This unit is set to 9 kHz before shipment.) In order to return to the original frequency indication, press this button for about 3 seconds again.
LW: Press this button to listen to an LW broadcast.
FREQ SHIFT: When the LW button is pressed for about 3 seconds during reception of an LW broadcast, the LW frequency will increase by 2 kHz. In order to return to the original frequency indication, press this button for about 3 seconds again.
3 Tuning-mode selector (TUNING MODE)
Each time this selector is pressed, the selection changes, in sequence, to "AUTO", "MANUAL", "PRESET" and "LOCK". AUTO:
At this position, broadcast stations are automatically found when the tuning control is turned to the left or right until the frequency changes.
MANUAL:
At this position, the tuning control can be used to locate the desired station.
PRESET:
At this position, a broadcast station already preset in the memory can be selected.
LOCK:
At this position, the broadcast station now being heard is locked in, and other broadcast stations cannot be tuned to, even if the tuning control is turned.
4 Tuning control (TUNING)
This control is used to select an FM or AM broadcast.
When the control is turned to the left, the frequency changes downward. When the control is turned to the right, the frequency changes upward.
5 Remote-control signal receptor (SENSOR)
8 Memory button (MEMORY)
This button can be used when presetting broadcast station frequencies into the memory. (Refer to pages 18–19.)
7 Preset-channel buttons (PRESET)
These buttons are used to preset broadcast frequencies into the memory of this unit, and are also pressed to recall the desired preset stations. (Refer to pages 18–20.)
Each time a button is pressed, a frequency and "channel" number are displayed; if the button is pressed and held, the display will continue to be shown.
8 FM mode selector (FM MODE)
This unit automatically switches to the stereo mode when an FM stereo broadcast is received. This selector is used to select the mode (stereo or monaural) of FM broadcast signals manually.

Timer section
1 Clock set button (CLOCK SET)
This button can be used, when setting the unit to the present day and time, to select the item (day, hour and minute) to be set next.
2 Sleep button (SLEEP)
This button can be used to set the time at which the power will be switched OFF.
3 Cancel button (CANCEL)
This button can be used to erase the timer setting or to cancel a setting that is being made, if, for example, you decide to do something else.
4 Stand-by button (STANDBY)
This button can be used to temporarily cancel the timer setting.
5 Read button (READ)
This button can be used to check the programmed setting.
6 Timer set button (TIMER SET)
This button can be used, when making the timer setting, to select the type of timer operation, the day, the time, etc.
7 Select buttons (SELECT)
These buttons can be used to set the unit to the present day and time, and for setting the day, time, etc. for timer operation.
Display section
A Timer-mode indicator (ONCE/WEEKLY/SLEE)
This indicator shows the type of timer operation that has been selected.
B Stand-by indicator (STANDBY)
This indicator shows that the timer has been set to operate at the programmed time.
C Day display
This display shows the present day, and (if the timer has been set) the day it has been set for.
D Timer ON/OFF indicator (ON/OFF)
This indicator shows whether the times for timer switch-ON and switch-OFF have been set.
E Time display
This display shows the present time, and (if the timer has been set) the time it has been set for.
F Colon Indicator
This indicator shows, by flashing continuously, that the clock is operating.
G Tuning-mode indicator
(AUTO/MANUAL/PRESET/LOCK)
The words "AUTO", "MANUAL", "PRESET" and "LOCK" illuminate in succession each time the tuning-mode selector is pressed.
H FM stereo indicator (STEREO)
This indicator automatically illuminates when an FM stereo broadcast is being received. It will not illuminate if the FM mode selector is set to the monaural mode.
I Digital frequency display
For timer operation, "CD" and "TAPE" are displayed.
J Quartz-lock Indicator (QUARTZ LOCK)
This indicator illuminates when the unit is tuned precisely to a broadcast station.
K Memory indicator (MEMO)
This indicator illuminates when the memory button is pressed.
L Channel display
This display shows the channel number selected by one of the preset-channel buttons.
M FM mode indicator (AUTO/MONO)
When FM broadcasts are being received, usually the "AUTO" indication is illuminated. When the FM mode selector is used to select monaural reception, the word "MONO" illuminates.
N Timer play/rec Indicator (PLAY/REC)
Front Panel Controls and Functions
(continued)

Amplifier section
1 Power switch (POWER)
2 Speaker selectors (SPEAKERS)
These selectors are used to select the speaker systems to be used.
A: Sound can be heard from the speakers connected to the "A" and "SURROUND" terminals.
B: Sound can be heard from the speaker systems connected to the "B" terminals.
When this selector is pressed, sound cannot be heard from the speaker systems connected to the "SUR-ROUND" terminals.
Note:
When only one speaker system is connected to the amplifier, no sound will be heard if both speaker selectors are pressed.
3 Muting indicator (MUTING)
The indicator illuminates when the muting switch of the remote-control transmitter is pressed to temporarily turn down the volume.
When releasing the muting with this unit, turn down the volume level to the minimum.
4 Volume-level indicator (VOLUME LEVEL)
The volume level is indicated in decibels (dB).
The dB indication numerically shows the attenuation characteristic of the amplifier; the indication ranges from “-- dB” (minimum) to “0 dB” (maximum).
The volume level becomes greater as the indication changes from -78 to -77 to -76 dB.
5 Volume control (VOLUME)
6 Sampling frequency indicators (SAMPLING FREQUENCY)
The appropriate indicator will illuminate whenever a digital signal with one of the sampling frequencies listed below is detected at the "DIGITAL IN" terminals on the rear panel of this unit.
Note that some digital components (compact disc players, etc.) emit digital signals whenever their power switches are ON.
32 kHz: For digital signals with the 32 kHz mode sampling frequency
44.1 kHz: CD and others
48 kHz: For digital signals with the 48 kHz mode sampling frequency
7 Surround-sound button/indicator (SURROUND)
This button is used to switch the surround-sound effect ON and OFF. (The indicator will illuminate when the button is pressed to ON.)
8 Tone controls (BASS/TREBLE)
The bass control is used to adjust the low-frequency sound range, and the treble control is used to adjust the high-frequency sound range.
9 Balance control (BALANCE)
This control is used to adjust the left/right volume balance.
10 Volume preset button (VOLUME PRESET)
This button can be used to retain the volume level for timer operation in the memory.
11 Input selectors/indicators
These selectors are used to select the sound source to be heard, such as a disc, radio broadcasts, etc. The corresponding indicator illuminates during operation to indicate the selected sound source.
12 Super bass level control buttons/indicators (SUPER BASS LEVEL)
These buttons are used to adjust the strength of bass sounds in the super bass control. The adjustment level is also displayed.
13 Super dynamic sound button/Indicator (S. DYNAMIC SOUND)
This button is used to emphasize bass sound at low volume. The button itself illuminates when turned ON
14 Super bass button/indicator (SUPER BASS)
The low-range sound can be reinforced when this button is pressed.
The button itself illuminates when turned ON
15 Headphones jack (PHONES)

Cassette deck section
Controls common to both tape decks
1 Power "STANDBY ⏻/ON" switch (POWER, STANDBY ⏻/ON)
This switch switches ON and OFF the secondary circuit power only. The unit is in the "standby" condition when this switch is set to the STANDBY position. Regardless of the switch setting, the primary circuit is always "live" as long as the power cord is connected to an electrical outlet.
2 Meter-range selector (METER RANGE)
This selector can be used to select the meter-range display of the input level meter.
3 Dolby noise-reduction selector (DOLBY NR)
This selector can be used to reduce the hiss noise that is characteristic of tape. This unit is provided with both the B-type and C-type noise-reduction systems.
4 Reverse-mode selector (REVERSE MODE)
This selector can be used for selection of the reverse mode (for either playback or recording).
5 Tape-to-tape recording tape-speed selector (TAPE EDIT SPEED)
This selector can be used to select the recording speed when a tape-to-tape recording is made.
8 Recording-level control (REC LEVEL)
This control can be used to regulate the recording level of both tape decks.
7 Synchro-start button (SYNCHRO START)
This button can be used to start a tape-to-tape recording, simultaneously starting tape deck 1 (the playback deck) and tape deck 2 (the recording deck).
Indicators common to both tape decks

A Input level meter
During playback, this meter indicates the level of the recorded sound source.
During recording, it indicates the level being recorded, adjusted by the recording-level control.
B Edit-recording indicators (EDIT MODE, CD, ×1, ×2)
The words "EDIT MODE" and "×1" (or "×2") indicator will illuminate when a tape-to-tape recording is made. The words "EDIT MODE" and "CD" indicator will illuminate when a CD edit-recording is made.
C Reverse-mode Indicators (≡, ⇌, ∞)
One of these indicators illuminates to show which of the reverse modes was selected by the reverse-mode selector.
D Dolby noise-reduction indicators (B, C)
One of these indicators illuminates to show the type of Dolby noise-reduction system selected by pressing the Dolby noise-reduction selector
Front Panel Controls and Functions (continued)
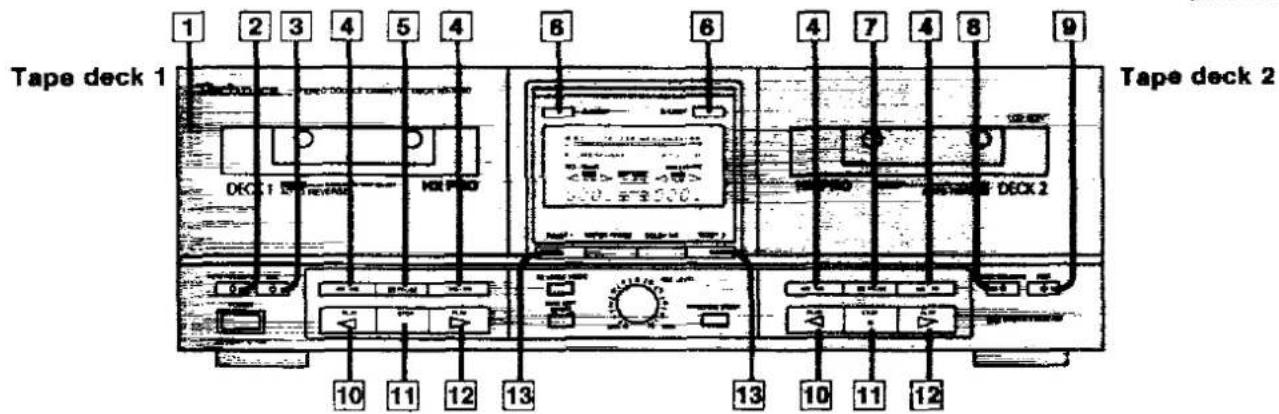
Cassette deck section
Controls applicable to tape decks 1 and 2
1 Cassette holder
2 Automatic-record-muting button
(● AUTO REC MUTE) For RS-X920 only
3 Record button (● REC) For RS-X920 only
4 Fast-forward/rewind/search buttons
[◀◀ (MS), (MS) ▶▶]
These buttons can be used to fast-forward or rewind the tape, or to easily search for a tune's beginning quickly.
5 Pause button (II PAUSE) For RS-X920 only
6 Eject button (▲ EJECT)
This button can be used to open the cassette holder.
7 Pause button (II PAUSE)
This button can be used to temporarily stop the tape playback or recording of the tape deck 2.
8 Automatic-record-muting button
(○ AUTO REC MUTE)
This button can be used to make a silent interval on the tape being recorded on the tape deck 2.
9 Record button (● REC)
This button can be used to change tape deck 2 to the recording stand-by mode.
10 Reverse-side playback button (< PLAY)
This button can be used to start the playback or recording of side "B" of the cassette
(The tape will then begin moving in the right-to-left direction.)
11 Stop button (STOP)
This button can be used to stop tape movement.
12 Forward-side playback button (▷ PLAY)
This button can be used to start the playback or recording of side "A" of the cassette.
(The tape will then begin moving in the left-to-right direction.)
13 Tape counter reset button (RESET 1, RESET 2)
This button can be used to reset the tape counter indication to "000".
indicators applicable to tape decks 1 and 2

flowchart
graph TD
    A["Terminal A"] --> Display["Display"]
    B["Terminal B"] --> Display
    C["Terminal C"] --> Display
    D["Terminal D"] --> Display
    E["Terminal E"] --> Display
    F["Terminal F"] --> Display
    G["Terminal G"] --> Display
    H["Terminal H"] --> Display
    I["Terminal I"] --> Display
    J["Terminal J"] --> Display
    K["Terminal K"] --> Display
    L["Terminal L"] --> Display
    M["Terminal M"] --> Display
    N["Terminal N"] --> Display
    O["Terminal O"] --> Display
    P["Terminal P"] --> Display
    Q["Terminal Q"] --> Display
    R["Terminal R"] --> Display
    S["Terminal S"] --> Display
    T["Terminal T"] --> Display
    U["Terminal U"] --> Display
    V["Terminal V"] --> Display
    W["Terminal W"] --> Display
    X["Terminal X"] --> Display
    Y["Terminal Y"] --> Display
    Z["Terminal Z"] --> Display
A Tape counter
Indicates the amount of tape movement (separately for tape deck 1 and tape deck 2).
B Reverse-side indicator (◀)
Illuminates during playback or recording to indicate that side "B" of the tape is being used.
C Recording Indicator (REC) For RS-X920 only
This indicator illuminates to indicate that this tape deck is in the recording stand-by mode, or is recording.
D Remote-control indicator (DECK 1 REMOTE, DECK 2 REMOTE)
This indicator illuminates to indicate that this tape deck can now be controlled by the remote-control transmitter (included).
E Playback Indicator (PLAY)
When this Indicator illuminates steadily, it indicates that this tape deck is in the playback mode or the recording mode. When it flashes continually, this is an indication that tape deck is in the pause mode or the recording stand by mode. When it flashes rapidly, this is an indication that this tape deck is in the search mode.
F Forward-side Indicator (D)
illuminates during playback or recording to indicate that side "A" of the tape is being used.
G Recording Indicator (REC)
Basic Operating Procedure
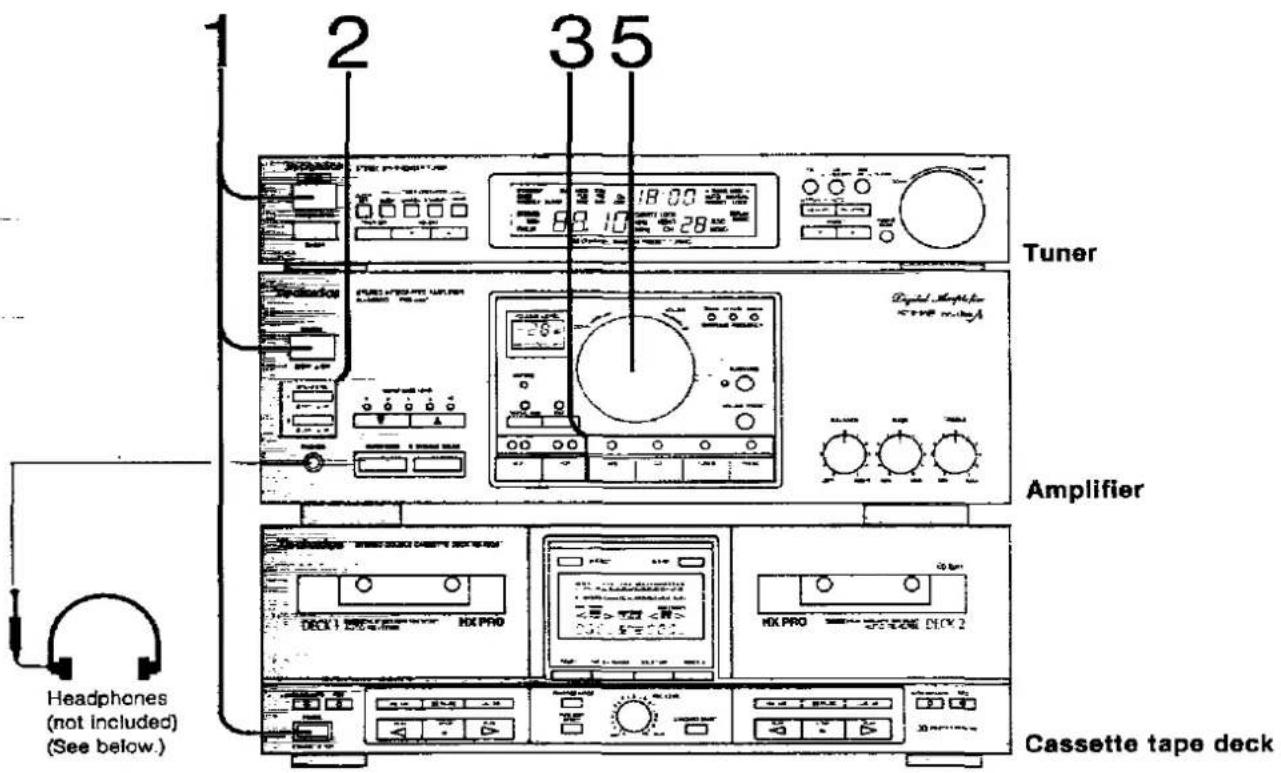
1 Switch ON the power of each unit.
The entire system can thereafter be switched ON and OFF by using the power "STANDBY ⏻/ON" switch of the tuner.
2 Select the speaker systems [main (A)/surround-sound and/or second (B)] to be used.
3 Select the sound source.
TAPE: Press to listen to laps
CD: Press to listen to compact discs.
Note:
If there is analog input simultaneously with digital input, the digital input takes precedence.
When the compact disc player connected to the "ANALOG" terminals is to be played back, switch OFF the power of the compact disc player connected to the "DIGITAL" terminals.
TUNER: Press to listen to radio broadcasts.
PHONO: Press to listen to phono discs.
4 Begin operation of the system component(s) to be used.
Refer to the operating instructions of each component
5 Adjust the volume level.
When listening through headphones
- Reduce the volume level before connecting headphones.
- Sound from the speakers will not be heard when the headphones are connected to the headphones jack.
- Avoid listening for prolonged periods of time to prevent hearing damage.
Basic Operating Procedure
(continued)
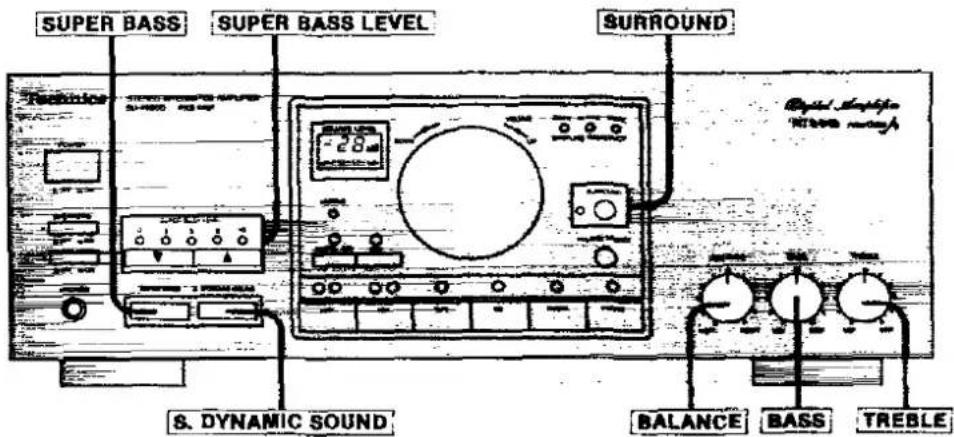
When listening to music
SURROUND
Press this button to activate the surround-sound effect. (The indicator will illuminate)
Note:
The surround-sound effect is only effective for phone discs, compact discs, tapes that are recorded in stereo, and for FM and other broadcasts that are broadcast in stereo. It has no effect for monaural AM broadcasts, or for any other monaural source. When listening to a sound source recorded by the surround-sound method, press this button so that the illumination stops. Note that the surround-sound effect is not recorded by a digital audio tape deck.
The effect by using surround-sound speaker systems

An effect similar to the dynamic sound of a concert hall
SUPER BASS / SUPER BASS LEVEL
① Press the super bass button to boost super low-frequency sound.
(The button itself will illuminate.)
② Adjust the super bass level control buttons to the desired level.
(Adjusted level will be displayed.)
S. DYNAMIC SOUND
Press this button to emphasize the bass sound at low volume. (The switch itself illuminates.)
BALANCE
Adjust the balance for the left/right volume.
BASS
Adjust the low-frequency sound to the desired tone quality.
TREBLE
Adjust the high-frequency sound to the desired tone quality.
During recording:
Operation of controls or switches other than the surround-sound button has no influence upon recording.
About the Direct-Operation Function
The direct-operation function is a convenient function for changing from one performance to another by simply beginning the performance to be heard next at that component, without the necessity of pressing the corresponding input selector of this unit.
- This function can be used only when connected to another Technics component equipped with a control terminal. (Refer to page 5.)
- Be sure to refer to the operating instructions for each component to assure proper connection
The sound source can be selected by using the following buttons on the components.
■ Listening to phono discs
Press the start button of the turntable
■ Listening to radio broadcasts
Press the desired preset-channel button of the tuner.
■ Listening to tapes
Press the playback button of the cassette tape deck
■ Listening to compact discs
Press the play button of the compact disc player.
After listening is finished
Use the volume control to reduce the volume level, and then switch OFF the power of each unit.
Setting the Time

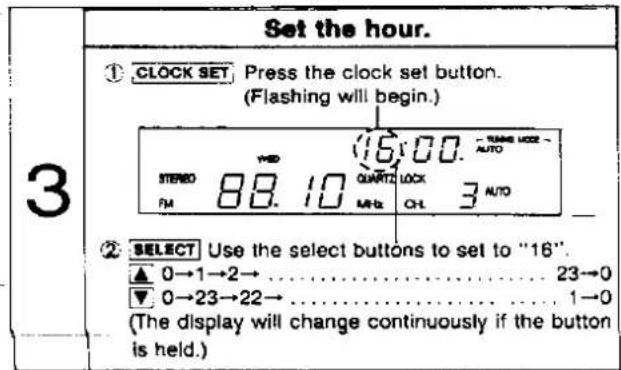
Example: To set to 16:45 on Wednesday


Notes
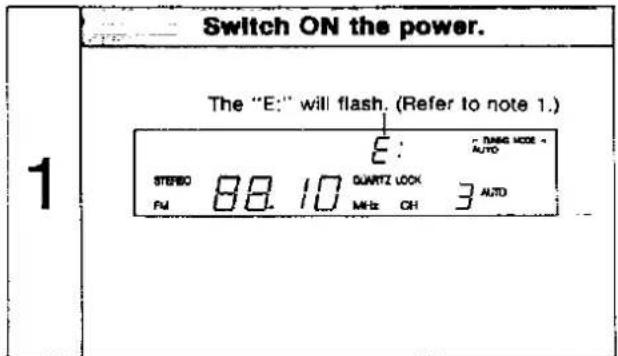
- Note that the "E:" in the display will flash continuously when the unit is connected to a power source for the first time, or if the power cord is disconnected or there is any other interruption of power to the unit. (Note that timer function memory will be retained for approximately three seconds after the power supply is interrupted.)
- Other operations, such as selecting the desired broadcast station, etc., cannot be done while the time is being set. To do so, first press the cancel button, then perform the desired operation. Note that the time will start from the time displayed when the button was pressed
- If a mistake is made while making the setting, press the clock set button; then press one of the select buttons (while the day, hour or minute is flashing) in order to make the resetting.
- If the CLOCK SET button is mistakenly pressed after setting the time, press the CANCEL button to return to the previous state.
Listening to Radio Broadcasts
When broadcast frequencies have been preset to the memory, any of those broadcast frequencies can thereafter be easily selected by simply pressing one of the preset-channel buttons. There are two methods for presetting broadcast frequencies in the memory: the automatic method (see below) and the manual method (refer to page 19); select whichever method you prefer.
Automatic memory presetting

When this method is used, the frequencies of the selected broadcast stations are automatically preset (in sequence to higher frequencies) into the memory: "channels" 1 to 28 are available for the presetting of FM stations, "channels" 21 to 28 are available for MW stations, and "channels" 27 to 28 are available for LW stations. When a presetting is made to a channel that has already been preset, the prior presetting will be erased.
- Press the desired band selector.
FM: for FM broadcasts
MW: for MW broadcasts
LW: for LW broadcasts
Before presetting broadcast stations, press to select the appropriate frequency step for your locality.
(Refer to item 2 on page 10.)
2 Set to the frequency from which you want to start automatic memory presetting.
(Refer to "Frequency tuning", below.)
3 Press and hold the memory button; release it when the display frequency begins to change.
(The memory indicator will flash, and the automatic memory presetting is activated.)
4 Confirm the stations which are preset to each channel, and write them in the station log (page 20).
• To confirm the preset contents by tuning control
1. Set the tuning-mode selector to the "PRESET" position.
2. Turn the tuning control to the left or right to verify the broadcast station.
Notes
- For automatic presetting in areas where there are fewer than 28 FM stations, the remaining channels (through channel 28) will be left unoccupied. The unoccupied channels can be filled by using manual memory presettings.
- For AM broadcasts with extremely strong signal transmissions, the frequency memorized may be slightly different than the correct frequency. If this occurs, make a manual presetting.
Frequency tuning
DOWN: Turn to the left to lower the frequency
UP: Turn to the right to increase the frequency.
- Set the tuning-mode selector to the "AUTO" position.
-
Turn the tuning control to the left or the right until the frequency changes.
-
When the displayed frequency approaches the desired frequency, press the tuning-mode selector to select the "MANUAL" position. (The displayed frequency will stop changing.)
Note:
The changing of the displayed frequency will be automatically stopped (by the automatic tuning function) if a broadcast station frequency is located during the tuning process. If the frequency at which it stops is not close to the desired frequency, repeat step 2 at the left.
4. After stopping at step 3, turn the tuning control so as to tune to the desired frequency.
Note:
If a new broadcast station is preset into a channel, the broadcast station which was previously entered in that channel will be automatically erased.
Manual memory presetting

Stations can be freely preset to any desired channel.
A maximum of 28 broadcast stations can be memorized.
1 Press the desired band selector. FM: for FM broadcasts
MW: for MW broadcasts
LW: for LW broadcasts
Before presetting broadcast stations, press to select the appropriate frequency step for your locality
(Refer to item 2 on page 10.)
2 Turn the tuning control so as to tune to the desired frequency.
(Refer to "Frequency tuning" at the bottom of the previous page.)
3 Press the memory button momentarily.

(The memory indicator will illuminate and the "CH" indication will flash on and off continuously.)
Note:
If the memory button is pressed continuously, the automatic memory presetting will be activated. To stop the automatic memory presetting, once again press the memory button. Then begin again from step 2.
4 Press "▼" or "▲" to select the desired "channel".
"Channel"

5 Press the memory button momentarily.

(The memory indicator illumination will stop and the flashing of "CH" indication changes to illumination.)
6 Repeat the above procedures to make memory presettings; write the presettings in the station log (page 20).
FM mode (FM AUTO, MONO) memory
With this unit, it is possible to enter into the memory FM broadcast stations in the monaural mode. This is convenient when entering into the memory an FM broadcast station that is broadcasting FM stereo signals in which there is much noise.
① Press the FM mode selector to select the "MONO" (The "MONO" FM mode indicator will illuminate.)
⑦ Follow steps 3 through 5 above.
Listening to Radio Broadcasts
(continued)
Note:
To prevent noise while listening to a broadcast station, switch OFF the compact disc player and turntable.

Have you completed the steps of "Automatic memory presetting" on page 18 or "Manual memory presetting" on page 19?
If not, follow the appropriate steps (on page 18 or 19), and then select the desired station by following the step below, or tune by using the tuning control and the tuning mode selector. (Refer to "Manual tuning" below.)
Memory tuner operation
1 Press "▼" or "▲" to select the desired "channel".
The FM stereo indicator automatically illuminates when an FM stereo broadcast is being received.
• To use the tuning control to select the "channel":
1. Set the tuning-mode selector to the "PRESET" position.
2. Turn the tuning control to the left or right to select the "channel".
Manual tuning
1 Select the desired band.
2 Select the desired broadcast station by using the tuning control and the tuning-mode selector.
(Refer to "Frequency tuning", at the bottom of page 18.)
If noise is excessive in FM broadcasts FM MODE:
Press the FM mode selector.
The sound will then be heard as monaural sound and the FM stereo indicator will not illuminate; the "MONO" FM mode indicator will then illuminate instead of the "AUTO" indicator. If the broadcast signal is weak, sounds can be heard more clearly (than in the stereo mode) by pressing the FM mode selector.
■ Back-up memory
The back-up function maintains the preset memory and the most recent memory (see below) when the unit is switched OFF, in the event of a power failure, or if the power cord is disconnected. The memory will be maintained for as long as approximately one week.
Most-recent memory
The most-recent memory system "remembers" the broadcast station last tuned to when the unit was switched OFF. That station will be automatically tuned in when the power is switched ON.
■ If frequency presettings are accidentally erased
Make the frequency presettings (on page 18 or 19) once again. The power cord should remain connected for one hour or more for the memory back-up to be effective.
Station Log
| 1 | 8 | 15 | 22 | ||||
| 2 | 9 | 16 | 23 | ||||
| 3 | 10 | 17 | 24 | ||||
| 4 | 11 | 18 | 25 | ||||
| 5 | 12 | 19 | 26 | ||||
| 6 | 13 | 20 | 27 | ||||
| 7 | 14 | 21 | 28 |
Listening to Tapes
Either normal, CrO_2 or metal type cassettes can be used

1 Press the eject button for the tape deck ("1" or "2") to be used for playback, and then insert the cassette tape.
(The part of the cassette where the tape is exposed should face downward.)

4 Press the forward- (or reverse-) side play-back button to select the side ("A" or "B").
PLAY/D: Plays side "A" (side facing outward).
PLAY/◄: Plays side "B"
(The playback indicator will illuminate, and playback will begin.)
2 Press the Dolby noise-reduction selector to select the Dolby NR system.
Each time this selector is pressed, the display of the Dolby noise-reduction indicator changes from "B"→"C"→OFF.
3 Press the reverse-mode selector to select the playback functions.
Each time this selector is pressed, the display of the reverse-mode indicator changes from “==”→“∅”→“∞”.
One side only will be played, and then the tape will automatically stop.
Both sides will be played eight times for each side continuously (unless the stop button is pressed sooner).
Both sides (from side "A" to side "B") will be played, and then the tape will automatically stop. (When a cassette tape is loaded in only one deck.)
Notes
- Tape deck 1 and tape deck 2 cannot be used for playback at the same time.
- Do not press the eject button while the tape is moving; to do so might cause a malfunction or damage the tape.
- When either tape deck 1 or tape deck 2 is in the playback or tune search mode, it will stop if a recording or playback is started on the other deck.
- When setting the reverse-mode selector to the "C⊃" position, If playback is started from side "B", side "A" will be played only seven times.
To temporarily stop playback PAUSE Press the pause button.
(The playback indicator will begin flashing.) To resume playback, press the playback button corresponding to the side of the tape being played back.
■ To stop playback STOP Press the stop button.
(The playback indicator will switch OFF.)
Listening to Tapes
(continued)
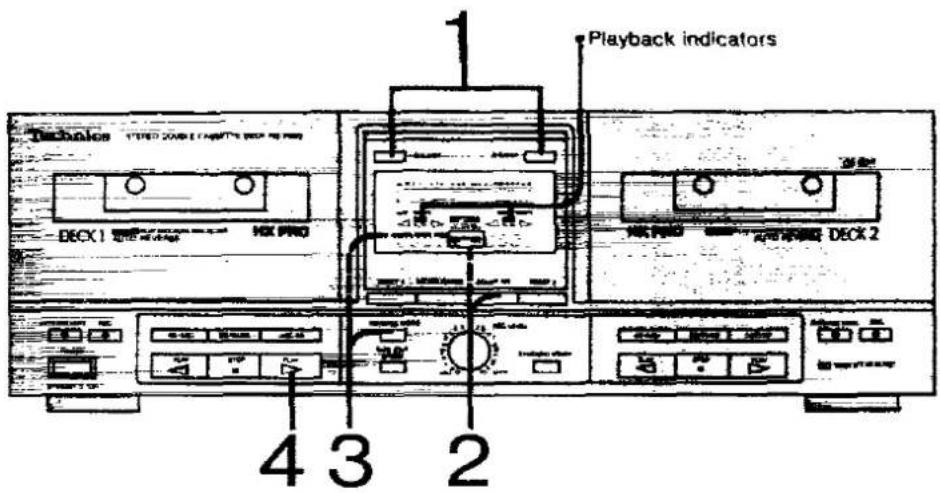
Playback two cassette tapes continuously
Two tapes will be played eight times continuously as follows:

flowchart
graph LR
    A["Side A in tape deck 1"] --> B["Side B in tape deck 1"]
    B --> C["Side A in tape deck 2"]
    C --> D["Side B in tape deck 2"]
1 Insert the cassettes to be used for playback into tape deck 1 and tape deck 2.
2 Select the Dolby NR system.
3 Set the reverse-mode selector to the "∞" position.
4 Press the forward-side playback button in tape deck 1.
(The playback indicator will illuminate, and playback will begin.)
Notes
- You can also start playback from a position other than side "A" in tape deck 1.
- If playback is started from tape deck 2, the tape in tape deck 1 will be played only seven times.
Likewise, if playback is started from side "B" of the tape in tape deck 1, side "A" of the tape in tape deck 1 will be played only seven times. - For the best performance, it is advisable to use tapes recorded in the same Dotby NR mode.
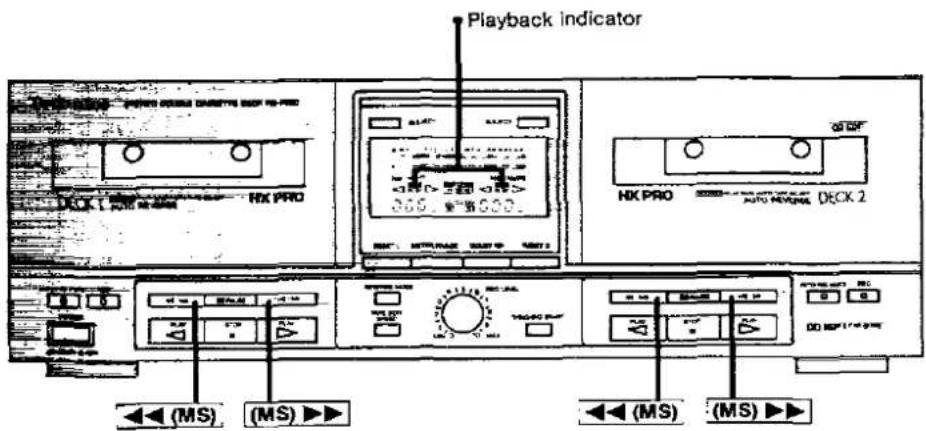
To locate and play a certain tune
■ To find a tune's beginning
[MS ("Music Select" function)]
Press the fast-forward/rewind/search buttons during playback.
After the tune's beginning is located, the tune will begin playing. (The playback indicator will flash rapidly while the tune's beginning is being located.)
During playback of side "A" (forward) (▷):

Next tune

For tune now playing
(for previous tune if pressed again)
During playback of side "B" (reverse) (◀):

For tune now playing
(for previous tune if pressed again)
Next tune
To locate a certain tune that is several tunes before (or after) the tune now playing, repeat the same steps as many times as necessary.
If the reverse-mode selector setting is "CD" or "CD", the tape will reverse its direction of movement when it reaches its end, and the search will continue.
(If, after the tape reverses direction, the tune is not located, the tape will stop when it reaches its end.)
Notes:
- If the tape-to-tape recording is being made, the tape will stop after the beginning of the tune is located. (Refer to page 30.)
- Note that this feature might not function correctly under the following circumstances:
If there is noise between tunes.
If the silent interval between tunes is less than 4 seconds.
If there is a particularly low level of sound, or a silent interval, at any place within the tune.
■ To fast-forward or rewind the tape While in the stop mode, press the appropriate button according to the following.
If the forward-side indicator (▷) is illuminated:

Press to last-forward.

Press to rewind
If the reverse-side indicator (◀) is illuminated:

Press to rewind.
Press to fast-forward.
Note:
Cassette tapes in tape deck 1 and tape deck 2 can be advanced or rewound at the same time.
Listening to Tapes
About the Dolby noise-reduction recording/playback system
The Dolby noise-reduction system is a system designed to effectively reduce the annoying high-frequency "hissing" noise typically heard from tapes if this system is not used. During recording, the system functions to increase the level of the high-frequency part of the sound, and then, during playback, that same portion is weakened and returned to the previous level. This unit includes two types of Dolby noise-reduction systems, the Dolby B NR-type and C NR-type, as well as the Dolby HX PRO headroom extension system
■ Dolby B-type noise-reduction system
Noise is reduced to about one-third.
Use this system when playing back tapes recorded by the Dolby B noise-reduction system, such as prerecorded music tapes, etc
■ Dolby C-type noise-reduction system
Noise is reduced to about one-tenth.
Use this system for the recording and playback of sound sources that have a wide dynamic range and good tone quality, such as FM broadcasts of live performances, etc., and for playing back such tapes.
■ Dolby HX PRO headroom extension system
By functioning to improve the maximum output level of the tape's high-frequency range, this system permits recordings to be made without a drop of the level of the sound source's high-frequency range. In addition, by using the system in parallel with this unit's noise-reduction system, recording and playback with a greatly extended dynamic range is possible.
Dolby noise reduction and HX Pro headroom extension manufactured under license from Dolby Laboratories Licensing Corporation. HX Pro originated by Bang & Olufsen.
"DOLBY", the double-D symbol ☐ and "HX PRO" are trademarks of Dolby Laboratories Licensing Corporation.
(continued)
Quick-reverse function
This is a function by which the unit detects the leader tape (the transparent tape at both ends of the magnetic tape) and then automatically reverses (in about one second) the direction of the tape during playback (or recording).
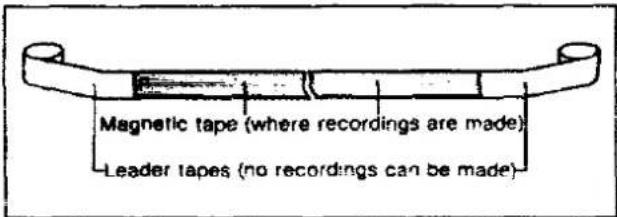
- In order to avoid an operational error, this function is not first effective until about 15 seconds after playback (or recording) first starts.
- This function does not operate for tapes that do not have leader tapes.
- This function may not function correctly: If the leader tapes are colored.
If there is dirt or dust on the tape.
If the magnetic part of the tape is thin
If a strong light (direct sunlight, a spotlight, etc) is shining into the cassette holder.
When the unit is subjected to a strong impact - When the quick-reverse function is not activated, the tape's direction of movement will reverse when the tape reaches its end.
Automatic-tape-select function
This unit is equipped with the automatic-tape-select feature; it automatically detects the type of tape being used, and then makes the suitable adjustments of the bias for recording and equalization accordingly.
Recording
To record from a sound source _ other than another tape
Either normal, CrO_2 or metal type cassettes can be used.

The steps described below are an example for recording on tape deck 2; to make the recording on tape deck 1, the corresponding buttons for tape deck 1 should be used in steps 2, 6 and 9. For RS-X520 recording can be made on tape deck 2 only.
1 Set the amplifier to select the input source to be recorded.
2 Press the eject button, and then insert the cassette to be used for recording.
(The part of the cassette where the tape is exposed should face downward)
3 Set the selector corresponding to the Dolby noise-reduction system (B or C) to be used. Each time this selector is pressed, the display of the Dolby noise-reduction indicator changes from "B"→"C"→OFF. If no noise-reduction system is to be used, switch OFF the indicator by pressing the Dolby noise-reduction selector.
4 Select the side(s) of the tape (one side only or both sides) upon which the recording is to be made.
Each time this selector is pressed, the display of the reverse-mode indicator changes from “==”→“∅”→“∞”.
= Make this setting to record on one side only.
At this setting, the recording will stop at the end of one side of the tape
Make this setting to record on both sides.
The recording will be made on side "B" after recording on side "A": the tape will stop at the end of side "B".
5 The sound source to be recorded should be played before the recording is started in order to adjust the recording level.
6 Press the record button.
(The recording indicator will illuminate and the playback indicator will flash continuously, the unit will be in the recording stand-by mode.)
Note:
If the edit-recording indicator is illuminated, switch OFF the indicator by pressing the tape-to-tape recording tape-speed selector.
7 Adjust the recording level.
Refer to "Adjustment of the recording level" on page 26 for details.
8 Stop the play being done so as to adjust the recording level.
9 Start recording, then start playing the source to be recorded from the beginning.
- If only one side of the tape (reverse mode position: ) is to be recorded, press the playback button that corresponds to that side.
- To record on both sides of the tape (reverse mode position: ), press the "A"-side playback button ( ).
If the compact disc player or turntable being used has the Technics synchro-recording feature, the recording will begin precisely when the play begins.
(Refer to "Synchro-recording" on page 26.)
(The playback indicator will illuminate steadily, and the recording will begin)
Note:
Do not switch to another sound source by using an input selector on the amplifier during recording, because to do so will cause the recorded sound to be interrupted.
■ To temporarily stop recording
PAUSE Press the pause button.
(The playback indicator will begin flashing.)
To resume recording, press the playback button corresponding to the side of the tape being recorded upon.
For RS-X520 recording can be made on tape deck 2 only.
■ To stop recording
STOP Press the stop button.
Recording
(continued)

Adjustment of the recording level
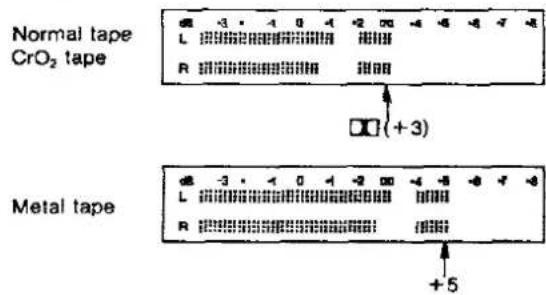
1 Press to change the meter-range display. (The range which is used for adjustment is expanded.)

Press again to return to the -20 to 8 range.
2 Adjust so that the indication of the input level meter occasionally is as high as shown below.
Synchro-recording
This is a convenient feature that, when this unit is in the recording stand-by mode, will start the recording automatically when the compact disc player or turntable begins playing. When the play stops, a silent interval of about 4 seconds will be made, and the tape deck(s) will change to the recording stand-by mode. This synchro-recording feature can only be used in combination with a Technics compact disc player or turntable that also has the synchro-recording function
To erase recorded sounds
When new recordings are made on a recorded tape, all sounds recorded on that portion of the tape are automatically erased. To erase a tape without making a new recording, follow the steps below.
- Insert the recorded cassette into the cassette holder of the tape deck.
- Set the recording-level control to "0".
- Switch OFF the Dolby noise-reduction indicator by pressing the Dolby noise-reduction selector.
- Set the reverse-mode selector to either one-side only (==) or both sides (<=).
- Press the record button.
- Press the playback button corresponding to the side to be erased.
Two cassettes can in this way be erased at the same time by using the parallel recording method. (Refer to page 28) For RS-X520 recording can be made on tape deck 2 only.

Automatic-record-muting function
By simply pressing the automatic-record-muting button while a recording is being made, a silent interval (which is necessary for automatically locating the beginning of a tune) can be made.
This feature is also convenient for omitting, during recording unwanted material such as commercial messages, etc.
The steps described below are an example for recording on tape deck 2; to make the recording on tape deck 1, the corresponding buttons for tape deck 1 should be used in steps 1 and 2.
For RS-X520 recording can be made on tape deck 2 only.
1 During the recording, press the automatic-record-muting button one time.
A silent interval of about 4 seconds will be made on the tape, and then the unit will change to the recording stand-by mode.
2 To resume recording, press the playback button corresponding to the side being recorded.

flowchart
graph TD
    A["Press the automatic-record-muting button."] --> B["FM broadcasts"]
    C["Press the playback button"] --> D["Commercial announcements, etc."]
    B --> E["Record mode"]
    D --> E
    E --> F["A silent interval (4 seconds long)"]
■ To make a silent interval of more than 4 seconds on the tape
Press and hold the automatic-record-muting button for the necessary number of seconds.
The unit will change to the recording stand-by mode when the button is released.
CD edit-recording (for tape deck 2 only)
When a Technics compact disc player with "SYSTEM CONTROL" terminal (SL-PJ38/PJ38A/PJ28/PJ28A) is used in combination with this unit, convenient recordings can be made
Convenient features:
- Recordings can be made on side "A" and side "B" of the tape, without interruptions of tracks, and in conjunction with the tape length.
- The ATLS function (see below) will be activated to adjust the recording level.
Follow the operating instructions of the compact disc player concerning operation steps.
[During CD edit-recording, edit-recording indicators ("EDIT MODE" and "CD") will illuminate.]
ATLS function
The compact disc player searches for the peak point of the disc automatically.
When the peak point is found, the peak signal will be sent to this unit, and the recording level will be set automatically at this unit.
After searching for the peak point of the disc automatically, the recording level can be set manually as desired (MTLS function). (See the operating instructions of the compact disc player for details.)
Recording
(continued) (For RS-X920 only)

Series recording
Recordings can be made first on side "A" and then side "B" of the cassette in either tape deck 1 or tape deck 2, and then continued to side "A" and side "B" of the cassette in the other tape deck. This means, for example, if two 90-minute cassettes are used, that a long recording (total length 3 hours) can be made.
1 insert the cassettes to be used for recording into tape deck 1 and tape deck 2.
Be sure that the forward-side indicators of both tape decks are illuminated.
2 Set the reverse-mode selector to the "∞" position.
3 Press the record buttons of tape deck 1 and tape deck 2.
(Both tape decks will then change to the recording stand-by mode.)
4 Begin the play of the sound source and make the adjustment of the recording level.
(Refer to "Adjustment of the recording level" on page 26 for details.)
After that, stop the play being done so as to adjust the recording level.
5 Press the forward-side playback button (▷) of the tape deck to be started from, then start playing the source to be recorded from the beginning.
(The series recording will begin.)
Note:
To stop the recording before it has finished, press the stop button for each tape deck.
Parallel recordings
The same sound source can be recorded simultaneously to both tape deck 1 and tape deck 2.
1 insert the cassettes to be used for recording into tape deck 1 and tape deck 2.
To avoid making the recording incorrectly, the same direction of tape movement for recording should be selected for each tape deck.
2 Select the side(s) of the tape [one side only (=) or both sides (∞)] upon which the
3 Press the record buttons of tape deck 1 and tape deck 2.
(Both tape decks will then change to the recording stand-by mode.)
4 Begin the play of the sound source and make the adjustment of the recording level.
(Refer to "Adjustment of the recording level" on page 26 for details.)
After that, stop the play being done so as to adjust the recording level.
5 Press the playback buttons of tape deck 1 and of tape deck 2 at the same time, then start playing the source to be recorded from the beginning.
(Be sure that they are both for the same direction.)
Note:
Different sound sources cannot be separately recorded to tape deck 1 and tape deck 2 at the same time
Tape-to-Tape Recording
Either normal, CrO_2 or metal type cassette can be used.
Changes can be made while recording from one tape to another

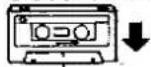
1 Insert the cassette to be used for recording into tape deck 2, and then insert the cassette to be played back (as the source of the recording) into tape deck 1.
(The part of the cassette where the tape is exposed should face downward.)—
2 Select the side(s) of the tape (one side only or both sides) upon which the recording is to be made.
Each time this selector is pressed, the display of the reverse-mode indicator changes from: “==”→“CD”→“OD”.
Make this setting to record on one side only. At this setting, the recording will stop at the end of one side of the tape.
Make this setting to record on both sides.
The recording will be made on side "B" after recording on side "A": the tape will stop at the end of side "B".
In the "⊂⊃" mode:
If the tape for recording in tape deck 2 is longer than the tape to be played back in tape deck 1, the tape in tape deck 1 will continue to playback eight times (unless the stop button is pressed sooner) until the tape in tape deck 2 reaches the end of side "B".
3 Select the speed at which the recording will be made.
Each time this selector is pressed, the display of the edit-recording indicator changes from "EDIT MODE" and "×1"→"EDIT MODE" and "×2"→OFF.
x1: For operation at the normal tape speed
×2: For operation at the high tape speed
4 Press the synchro-start button. (The tape-to-tape recording will begin.)
When tape-to-tape recording is not required, to avoid mis-operation, switch OFF the selected tape speed by pressing the tape-to-tape recording tape-speed selector. (The indicator will then switch OFF.)
Notes
- Tape-to-tape recordings cannot be made from tape deck 2 to tape deck 1.
- The recording level of the original (playback) tape, and the noise-reduction effect on the original tape, will be recorded to the new tape just as they were in the original recording.
- Because the noise-reduction system has no effect during tape-to-tape recording, the treble control on the amplifier should be set to a reduced setting if you want to listen to the sounds of a tape originally recorded by a noise-reduction system while making a tape-to-tape recording.
- While a tape-to-tape recording is in progress, you can enjoy some other source. Select the desired sound source by using an input selector on the amplifier, and start the performance.
■ To temporarily stop recording
PAUSE Press the pause button on tape deck 2. (The playback indicator on tape deck 2 will begin flashing, and playback will continue on tape deck 1.)
To resume recording, press the playback button on tape deck 2 corresponding to the side of the tape being recorded upon.
For RS-X920 only
PAUSE Press the pause button on tape deck 1.
The tape in tape deck 1 will then stop temporarily and a silent interval of about 4 seconds will be made on the tape in tape deck 2, after which tape deck 2 will change to the recording stand-by mode.
To resume recording, press the synchro-start button.
■ To stop recording
STOP Press the stop button of tape deck 2.
Tape-to-Tape Recording
(continued)
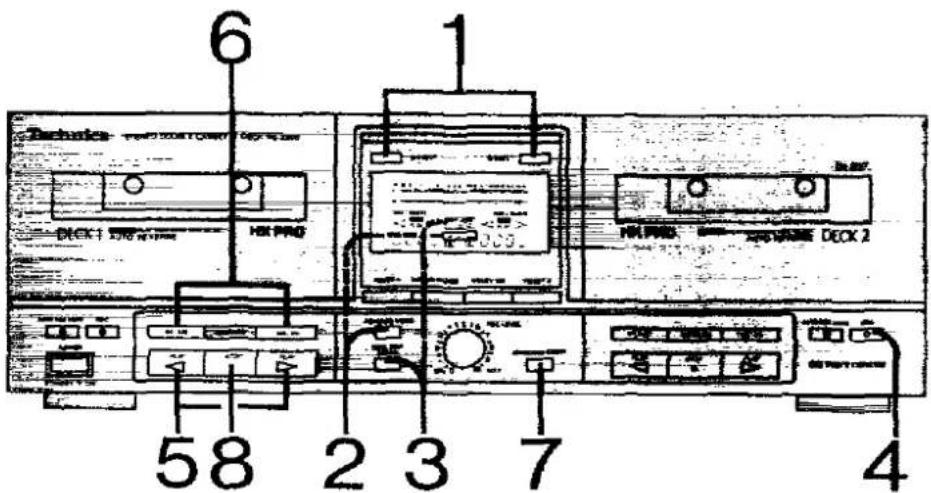
Tape-to-tape recording of certain tunes of your choice
1 Insert the cassette to be used for recording into tape deck 2, and then insert the cassette to be played back (as the source of the recording) into tape deck 1.
2 Select the side(s) of the tape (one side only or both sides) upon which the recording is to be made.
3 Set the tape-to-tape recording tape-speed selector to the "×1" position.
4 Press the record button of tape deck 2. (The unit will be in the recording stand-by mode.)
5 Press the playback button of tape deck 1.
6 Press the fast-forward/rewind/search button of tape deck 1.
The unit stops automatically at the beginning of the present (or the next) tune.
Repeat steps 5 and 6 until the desired tune is located.
7 Press the synchro-start button. (The tape-to-tape recording will begin)
8 Press the stop button of tape deck 1 after recording the tune.
(A silent interval of about 4 seconds will then be made on the tape in tape deck 2, and then tape deck 2 will change to the recording stand-by mode.)
9 Locate the beginning of the next tune of your choice, and start tape-to-tape recording.
(Repeat steps 5 to 8.)
Your attention is drawn to the fact that recording pre-recorded tapes or discs on other published or broadcast material may infringe copyright laws.
To Use the Timer
Types of timer operation
One-time timer function (ONCE)
This timer function can be used to switch the power ON and to the stand-by condition at a desired day and time (one day only). This is convenient for recording broadcasts while you are away. (Programmed settings are canceled when this timer function is used.)
Weekly timer function (WEEKLY)
• Every week on the same day, (one day from Sunday to Saturday)
- Every day (from Sunday to Saturday)
• Every day except Sunday (from Monday to Saturday)
- Every day except Saturday and Sunday (from Monday to Friday). The power will be switched ON and to the stand-by condition at the desired times (among those choices described above). This feature is convenient for listening to and/or recording the same program at regular intervals.
(The programming remains in effect until canceled)
Sleep timer function (SLEEP)
This timer function can be used to switch the power to the stand-by condition at the desired time (within a range of 120 to 1 minute from the present time). Use this timer to switch the power to the stand-by condition automatically even if you fall asleep while listening. (Programmed settings are canceled when this timer function is used.)
Timer sequence of priority
If programmed times overlap, timer operation priority is as follows: "SLEEP", "ONCE" and "WEEKLY" settings.
: Timer is functioning. : Timer is not functioning.
In the following example, the "WEEKLY" setting will be stopped mid-way.

Not activated because the "ONCE" switch-ON time has priority.
2 In the following example, the "WEEKLY" setting will not be activated.

Not activated because the "ONCE" switch-OFF time has priority.
To Use the Timer
(continued)

Operation of the one-time timer (ONCE) and weekly timer (WEEKLY) functions
Have you completed "Setting the Time" on page 17 and "Automatic memory presetting" or "Manual memory Presetting" on page 18-19?
Example: To set the one-time timer function for listening to FM "channel" 3 from 18:30 until 21:00 on Saturday



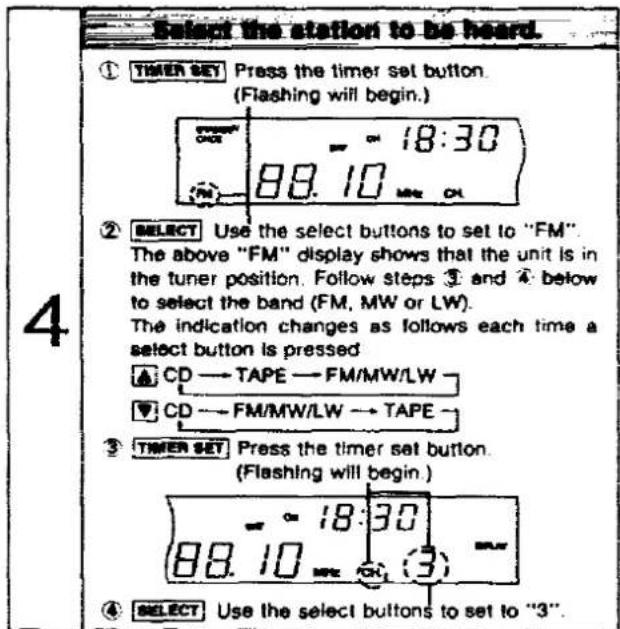
![Select timer play or timer recording. 1: TIMER SET Press the timer set button. (Flashing will begin) 2 SELECT Use the select buttons to set to " [PLAY]](/content/2026/06/1307192/images/c04f45567742d0baea9c7c3f364cc7ca96d0d3a2ad34724eabcea85f01ab24d6.jpg)
Notes
- If a mistake is made while making the setting, press the cancel button and begin again from step 1.
2 To use the tuner to listen to FM while making the timer setting, press the cancel button and allow the display to return to the display of the present time (the colon flashes continuously) before doing so.


To Use the Timer
(continued)

CD or TAPE timer play
1 Prepare the cassette tape deck or compact disc player for playback.
2 Follow steps 1 through 3 on page 32.
3 ① Press the timer set button.
(Flashing will begin.)
EPMON BLN LCKI THU ON 6:00.
WEGLY YUE WM SET
SPUN
CD
② Use the select buttons to set to "CD" or "TAPE".
4 Follow steps 6 through 8 on page 33.
Notes:
- When the unit is connected with the Technics multi-compact disc player SL-PK26 and the timer play is used, insert one disc only.
- If there are tape cassettes in both tape decks, deck 1 will have priority.
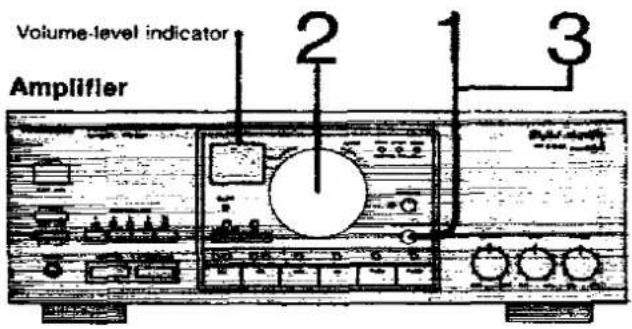
Volume level setting for timer operation
You can preset the desired volume level for timer operation by following the procedures below.
This preset level can be recalled with "fade-in" during the timer operation even if the volume level has been changed after it was first set.
1 Press the volume preset button. (The volume-level indicator will flash on and off continuously.)
2 Adjust the volume level.
3 Press the volume preset button again. (The preset level will be retained in the memory.)
Notes:
- Refer to the operating instructions of the appropriate unit(s) for details of timer operation.
- The volume-preset function is for timer use only
Timer recording from the tuner
1 Prepare the cassette tape deck for recording.
2 Follow steps 1 through 4 on page 32.
① Press the timer set button.
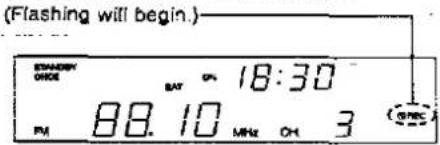
② Use the select buttons to set to "☐ REC".
4 Follow steps 6 through 8 on page 33.
Notes:
- While a timer recording is being made, sound cannot be heard from the speaker systems. To listen to the sound, adjust the volume level on the amplifier.
For RS-X920
- Series recordings (first on tape deck 1 and then continuing to tape deck 2) and parallel recordings are also possible. (Refer to page 28.)
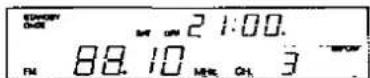
To confirm the setting
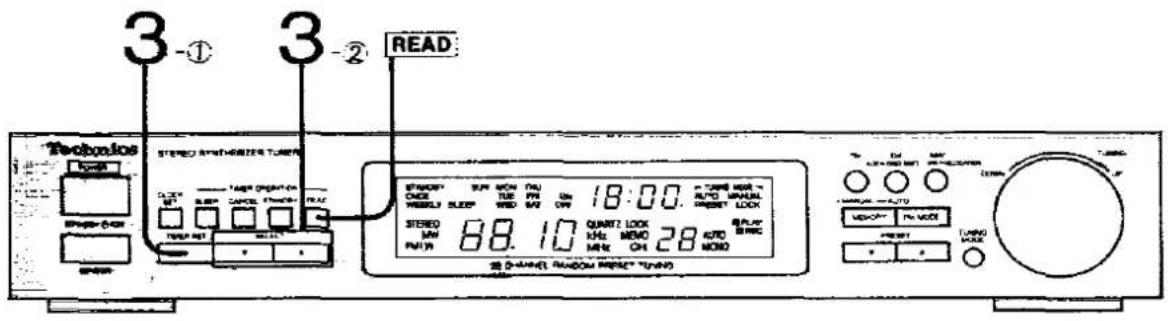
READ Press the read button.
(The display will change each time the button is pressed. The display changes in order, even if the timer is not set.)
① "ONCE" power-ON time
② "ONCE" power-OFF time
③ "WEEKLY" power-ON time
④ "WEEKLY" power-OFF time
5 Present time
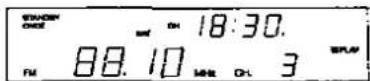


Note:
When the volume level is preset on the amplifier, the preset level will flash on the volume-level indicator of the amplifier.
To Use the Timer
(continued)
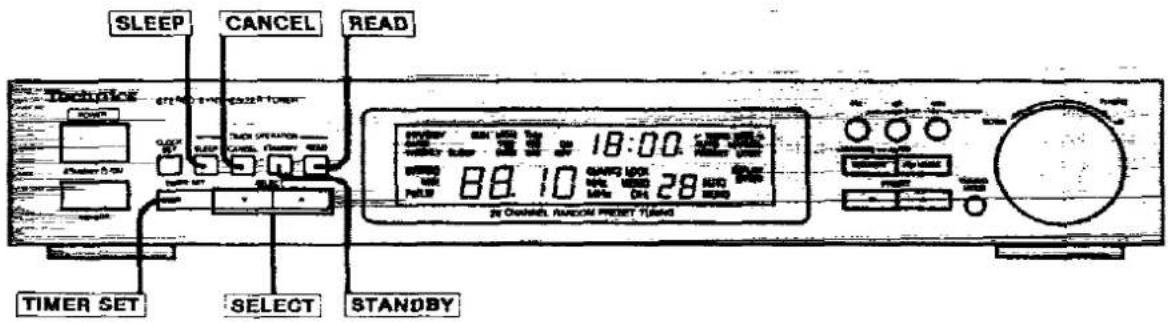
To cancel a setting
- TIMER SET Press the timer set button.
- SELECT Use the select buttons to select "ONCE" or "WEEKLY".
- CANCEL Press the cancel button. (The display will return to the display of the present time.)
■ To temporarily cancel a setting
- READ Press the read button so as to display the program mode (1 or 3 on page 35) to be canceled.
- STANDBY Press the stand-by button. (The stand-by indicator illumination will stop.)
- CANCEL Press the cancel button. (The display will return to the display of the present time.)
Note:
To activate the timer again, repeat steps. 1, 2 and 3 above.
Sleep timer operation (SLEEP)


To cancel a setting
CANCEL Press the cancel button. The display will return to indication of the present time.
Note:
The display will return to the display of the present time after about one minute after the sleep timer is set.
- Press the READ button to display the "sleep" time. To return to the display of the present time, press the READ button once again.
Using an External Unit

To enjoy an external source
-1 Select the desired source.
DIGITAL AUX: Press to listen to sound from equipment connected to the "DIGITAL IN: AUX" terminal.
- —— DAT: Press to listen to digital audio tapes.
VCR: Press to watch the video.
VDP: Press to watch video discs.
Note:
The video indicator (orange colour) indicates the selected video source.
2 Play back the selected source.
■ To record on a DAT tape or a video tape
After selecting the desired source, follow the procedures above, and then start recording.
For details, refer to the DAT or the video deck instruction manual.
To enjoy playback with the BGV (Back Ground Visual) function
Using BGV, the sound from compact discs, etc., and the video images from video discs, etc., can be combined and played back.

Select the desired video source.

Select the desired audio source.

Playback the selected audio and video sources.
■ To record on the VCR using the BGV function
Using BGV, the sound from compact discs, etc., and the video images from video discs can be combined and recorded.
- Press the "VDP" input selector.
- Select the desired audio source.
- Begin recording on the VCR and start playing back the video disc and audio source.
Refer to the operating instructions of each component.
Remote-Control Transmitter
Insertion of remote-control transmitter batteries
- Open the cover.
-
Insert the batteries.
-
Be sure to insert according to the (+) and (−) indications in the battery compartment.
- Use two UM-4, "AAA" (R03;1.5V) size batteries

- Close the cover.
Battery life
Battery life is about one year. (Battery life may vary depending upon the frequency of use and other conditions of use.)
The batteries should be replaced if the unit cannot be operated even when the remote-control transmitter is brought close to the unit.
Battery notes
- Be sure that batteries are inserted so that they are placed correctly with respect to the (+) and (-) indications in the battery compartment. If the batteries are not inserted correctly, they may leak and damage the remote-control transmitter.
-
Do not use rechargeable (nickel-cadmium) type batteries.
-
Do not mix old and new batteries, or batteries of different types (carbon and alkaline, etc.).
- If the remote-control transmitter is not to be used for a long period of time, take out the batteries and store them in a cool, dark place.
- Remove and dispose of worn-out batteries.
- Never attempt to recharge or short-circuit the batteries, and do not disassemble them or expose them to excessive heat or throw them into a fire
- If a battery leaks, remove both batteries and dispose of them, and then thoroughly clean the battery compartment before inserting new batteries.
Remote-control transmitter operation notes
Use the remote-control transmitter within 6 meters (20 ft.).
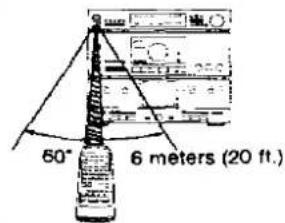
Face it toward the remote-control signal receptor of this unit.

Be sure the transmitter part of the remote-control transmitter and the receptor part of this unit are free from dust.
Excessive dust might prevent reception.

Other notes
-
Do not expose the receptor (on this unit) to direct sunlight or other strong light, because to do so might result in incorrect operation.
-
Do not use a remote-control transmitter for a TV set, a VCR or other video component at the same time as this remote-control transmitter is being used, because to do so might result in incorrect operation.
-
If this unit is installed in a rack with glass doors, the glass doors' thickness or color might make it necessary to use the remote-control transmitter at a shorter distance from the unit.
Remote-Control Operation
- This remote-control transmitter can be used for control of a Technics tuner, amplifier, stereo sound processor, compact disc player, cassette tape deck, and a turntable with a remote-control terminal. Consult your dealer for details.
- For detailed information concerning operation steps, etc., please refer to the appropriate page for each unit and the respective operating instructions. For this system, you can listen to tapes or compact discs, etc., by operating the remote-control transmitter without using the amplifier's input selectors.
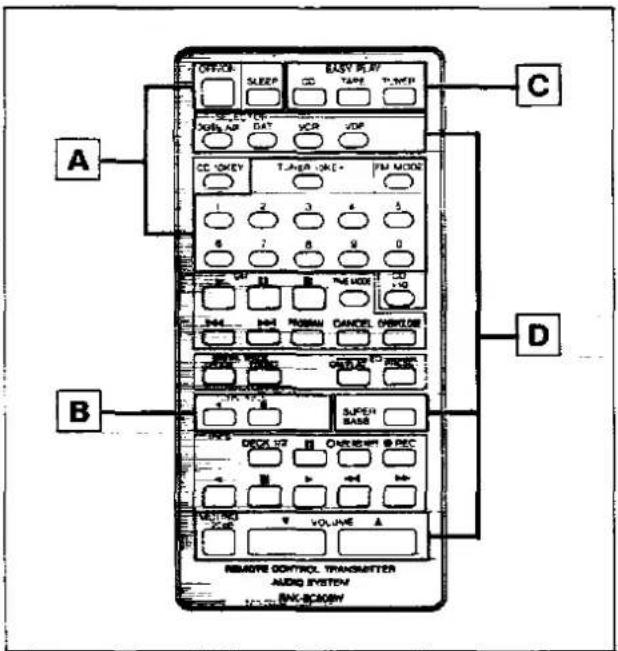

Tuner keys

Press this key to switch the tuner ON or to the stand-by condition.
Note that there is no need to press this key if the tuner's power is ON. (If it is pressed, the tuner will be switched to the stand-by mode.)

Press this key to activate the sleep timer. Press once again to cancel a setting.
Note:
After approximately one minute after the sleep timer is activated, the tuner display will return to showing the present time.
If the button is pressed in this condition, the time remaining on the sleep timer will be displayed for approximately 10 seconds, and if the button is pressed once more while the time remaining on the sleep timer is being displayed, the sleep timer will be cancelled.

Press this key to use numeric keys (1\~0).
Also, the input selectors of the amplifier will be switched to the "TUNER" position by pressing this key.


Press this key to select the desired preset channel.
When these keys are used, be sure to first press the key marked "TUNER 10 KEY".
• To designate channels 1-9: Press the appropriate (1-9) preset-tuning key.
Note: When selecting channel 1 or channel 2, enter the selection "01" or "02". If only "1" or "2" is pressed, channel access will be delayed by two seconds.
• To designate channels 10–28:
① Press the key for the tens digit (1 or 2).
② Press the key for the units digit (1-0) within 2 seconds after pressing the first key.
Example: To designate channel 12
Press the "1" key and then the "2" key.

This unit automatically switches to the stereo mode when an FM stereo broadcast is received. This key is used to select the mode (stereo or monaural) of FM broadcast signals manually.

Turntable keys

Press this key to start play

Press this key to stop play.
Note:
Only Technics turntables (e.g., SL-J110R, etc.) equipped with a "REMOTE/SYNCHRO REC" terminal can be remote-controlled by the transmitter included with this unit, and only when connected by the proper cable.

Easy play keys

When these keys are pressed, the power is automatically switched ON, and the compact disc player, tape deck and this unit are automatically activated.
Notes:
- If there are tape cassettes in both tape decks, deck 1 will have priority.
- For the tape deck, the tuner and the compact disc player, the sound will fade in to a level of -60 dB.
If, however, the volume level was greater than -60 dB when the power was previously switched OFF, the fade-in volume level will be to that greater value. - When the unit is connected with the Technics multi-compact disc player SL-PK26, the fade-in function will not operate.

Amplifier keys

Press one of these keys to select the desired input source.

Press this key to switch the super bass function ON. Press once again to switch the function OFF.

Press this key to adjust the volume level.

Press this key to temporarily reduce the volume level. The volume level is attenuated by 20 dB (approx. 1/10). Press once again to return to the previous volume level.
Remote-Control Operation
(continued)
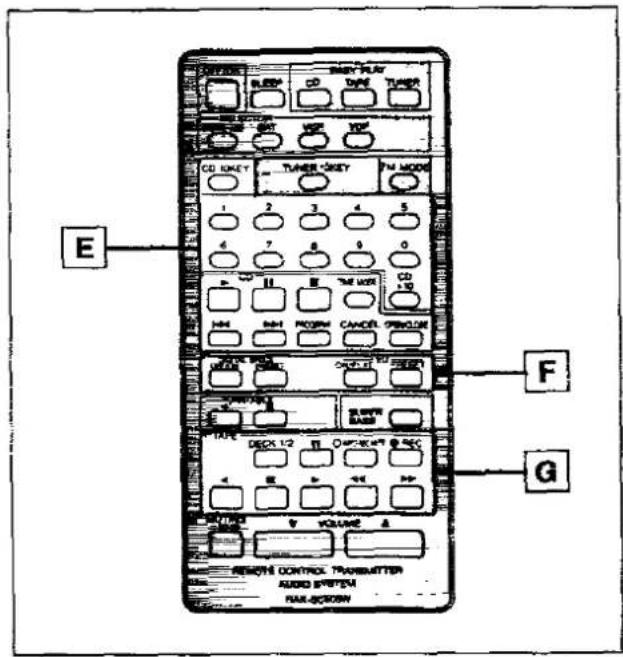

Compact disc player keys

Press this key to use numeric keys (1-0 and "CD >10")
Also, the input selectors of the amplifier will be switched to the "CD" position by pressing this key.

Press this key to select the desired tune. Playback begins from the track selected.
To select two-digit track number over 10, first press the "CD >10" key and then press the desired track number.
The selection of a two-digit track number greater than 10 is available with the following Technics CD players: SL-PJ28, SL-PJ28A, SL-PJ38, SL-PJ38A.

Press this key to start play.

Press this key to temporarily stop play. Press the play key to resume play.

Press this key to stop play.

Press this key to select the desired time mode during play.
The display information will change as follows each time the button is pressed.
① Number of track in play and elapsed time
② Total remaining time on disc
③ Time remaining in track in play
④ Total elapsed time since beginning of disc
(Only applicable to a Technics compact disc player SL-PJ28, SL-PJ28A, SL-PJ38 and SL-PJ38A)

Press momentarily to search for the beginning of the track now playing. Repeat this step the necessary number of times to search for a previous track.

Press momentarily to search for the next track.

Press this key to select the program play mode. To specify the desired tracks, press the "CD 10 KEY" and then press the numeric keys (1-0, CD >10) in the desired order.
To cancel program mode in the stop mode, press the stop key (☐).
To cancel program mode during play, press this key. For Technics multi-compact disc player (SL-PK26):
• The selection of a two-digit track number greater than 10 is not possible.
- To cancel program mode in the stop mode, press the program key (☐).
- To cancel program mode during play, press the stop key (☐) and then press the program key (☐).

Press this key to select the program cancel mode. To cancel the programmed tracks, first press this key and then specify the tracks to be cancelled by pressing appropriate numeric keys (1-0, CD >10) Press once again to cancel the program cancel mode. (Only applicable to a Technics compact disc player SL-PJ28, SL-PJ28A, SL-PJ38 and SL-PJ38A)

Press this key to open the disc holder. To close the disc holder, press this key once again. (Only applicable to a Technics compact disc player SL-PJ28, SL-PJ28A, SL-PJ38 and SL-PJ38A)

Sound processor controls

Press this key to switch the equalizer correction ON. Press once again to switch to the flat setting Press this key to retrieve a memorized curve or fixed curve.

Press this key to switch the DIGITAL SPACE CONTROL function ON. Press once again to switch the function OFF.

Press this key to retrieve a memorized mode or fixed mode.

Cassette tape deck keys

Press this key to select the deck ("DECK 1" or "DECK 2") to be controlled.

For the "forward (A)" side of the tape For the "reverse (B)" side of the tape

Press one of these keys to begin playback or recording, pressing the key corresponding to the side of the tape to be played back (or recorded).

Press this key to stop tape movement

Press this key to make a silent interval during recording.
(After 4 seconds, the tape deck will automatically change to the recording stand-by mode.)
To start the recording again, press the playback key.
Note: For some Technics tape decks (RS-X520, etc.). "DECK 1" has no recording capability.


Press this key to advance or rewind the tape while the unit is in the stop mode.
Press this key to select the desired tune while the unit is in the play mode.

Press this key to temporarily stop playback or recording. Press the playback key to resume playback or recording

Press this key to change to the recording stand-by mode.
Note: For some Technics tape decks (RS-X520, etc.), "DECK 1" has no recording capability.
About Cassette Tapes
Avoid the following types of tapes
- 120-minute (or longer) tapes
Because this tape is very thin, it might stretch during use, become tangled with rotating parts in this unit, and/or tape movement might not be stable.
- Fe-Cr tape (TYPE Ⅲ)
The high range will be emphasized and a flat frequency response characteristic cannot be obtained.
- Metal tape without detection holes in the cassette
Recordings will be very distorted. (There is no playback problem, however.)

Notes about the handling of cassettes
If the tape in the cassette is loose, the tape can easily break during use or otherwise be damaged.
Never touch the tape itself, or attempt to pull it out of the cassette.
Use a pencil or similar object to take up the slack.

natural_image
Illustration of a cassette tape with a stylus and control knob (no text or symbols)To prevent erasure of recorded sounds
Remove the erase-prevention tabs (thus preventing recording)

Tab for side "B"
Use a screwdriver or similar object to break out the tab.
■ To re-record on a protected cassette
Cover the slot with adhesive tape.

Avoid tape storage in the following places
Tape can be damaged if it is stored in places such as described below.
- Where the temperature is high (95°F/35°C or higher) or where the humidity is high (80% or higher).
- Where there is a strong magnetic field (near a speaker, on top of a TV, etc.).
• In direct sunlight.
Maintenance
Head care
To assure good sound quality for recording and playback, be sure to clean the heads after approximately every 10 hours of use.
1) Switch the power of this unit to standby mode.
2) Press the eject button.
3) Clean the heads, pinch roller and the capstan shaft of each deck with a cotton swab (or with a soft, lint-free cloth) slightly moistened with alcohol.
Do not use any solution other than alcohol for head cleaning.
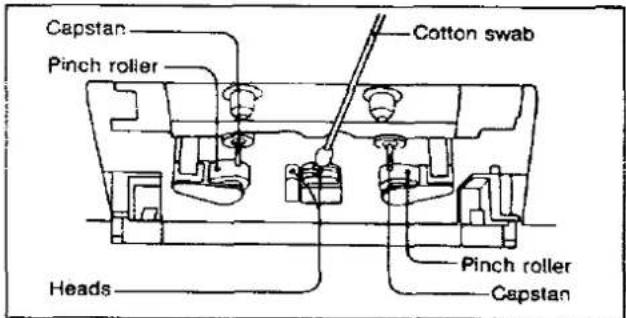
Head demagnetization
In order to maintain good sound quality during recording and playback, it is recommended that the heads should be demagnetized if distortion or poor sound quality persist after cleaning the heads.
If the heads become magnetized, they could create noise in recordings, loss of high-frequency response, or erasure of valuable recordings. Several types of head demagnetizers are available and may be purchased at local electronics supply stores. Follow the instructions that are supplied with the device.
- Do not bring any type of metal objects or tools such as magnetic screwdrivers in contact with the head assembly.
Maintenance of external surfaces
To clean this unit, use a soft, dry cloth.
For very dirty surfaces, dip a soft cloth in a weak soap-and-water solution and wring well. After cleaning, wipe with a soft, dry cloth. Never use alcohol, paint thinner, benzine, or a chemically treated cloth to clean this unit.
Such chemicals may damage the unit's finish
Technical Specifications (DIN 45 500)
Tuner (ST-X902LA)
FM TUNER SECTION
| Frequency range | 87.50~108.00 MHz (0.05 MHz steps) |
| Sensitivity | 1.5 μV (IHF, usable) |
| S/N 30 dB | 1.3 μV (75 Ω) |
| S/N 26 dB | 1.2 μV (75 Ω) |
| S/N 20 dB | 0.9 μV (75 Ω) |
| IHF 48 dB stereo quieting sensitivity | 28 μV/75 Ω |
| Total harmonic distortion | |
| MONO | 0.15 % |
| STEREO | 0.3 % |
| S/N | |
| MONO | 70 dB (78 dB, IHF) |
| STEREO | 65 dB (70 dB, IHF) |
| Frequency response | 20 Hz~15 kHz, +0.5 dB~ -1.5 dB |
| Alternate channel selectivity | |
| ±400 kHz | 55 dB |
| Capture ratio | 1.0 dB |
| Image rejection at 98 MHz | 45 dB |
| IF rejection at 98 MHz | 90 dB |
| Spurious response rejection at 98 MHz | 75 dB |
| AM suppression | 55 dB |
| Stereo separation | |
| 1 kHz | 40 dB |
| 10 kHz | 30 dB |
| Carrier leak | |
| 19 kHz | -30 dB (-35 dB, IHF) |
| 38 kHz | -45 dB (-50 dB, IHF) |
| Channel balance (250 Hz - 6,300 Hz) | ±1.5 dB |
| Limiting point | 1.2 μV |
| Bandwidth | |
| IF amplifier | 180 kHz |
| FM demodulator | 1000 kHz |
| Antenna terminals | 75 Ω (unbalanced) |
AM TUNER SECTION
Frequency range
| MW | 522 kHz~1611 kHz (9-kHz steps) |
| 530 kHz~1620 kHz (10-kHz steps) | |
| LW | 144 kHz~288 kHz (9-kHz steps) |
| 146 kHz~290 kHz (+2-kHz shift) | |
| sensitivity (S/N 20 dB) | |
| MW | 20 μV, 300 μV/m |
| LW | 50 μV |
Selectivity (±9 kHz)
| MW (at 999 kHz) | 50 dB |
| LW (at 216 kHz) | 50 dB |
| Image rejection | |
| MW (at 999 kHz) | 40 dB |
| LW (at 216 kHz) | 40 dB |
| rejection | |
| MW (at 999 kHz) | 60 dB |
| LW (at 216 kHz) | 60 dB |
TIMER SECTION
| Clock | Quartz-lock type |
| 24-hour indication | |
| Functions | 24-hour programmable;weekly (1 setting)once only (1 setting)sleep (at 1~120 min, 1-min. intervals) |
| Programmable content | |
| Program source (FM, MW, LW, CD, TAPE)Timer rec/timer play/power ON/OFF settingDesignation of preset station | |
| Setting intervals | 1 minute ~23-hours, 59 minutes(at 1-min. Intervals) |
| Priority order | sleep, once, weekly |
GENERAL
| Output voltage | 0.3 V (0.6 V IHF) |
| Power consumption | 9 W (Standby 6 W) |
| Power supply | AC 50 Hz/60 Hz, 230 – 240 V |
| Dimensions (W × H × D) | 360 × 64.5 × 304 mm |
| Weight | 2.3 kg |
Notes:
- Specifications are subject to change without notice. Weight and dimensions are approximate.
- Total harmonic distortion is measured by the digital spectrum analyzer.
Technical Specifications
(DIN 45 500) (continued)
Amplifier (SU-X920D/SU-X520D)
| ■ AMPLIFIER SECTION | Muting | -20 dB | |
| DIN power output | Super base | 60 Hz, +8 dB | |
| SU-X920D | Output voltage | ||
| 1 kHz THD: 1% | 2×100 W (8 Ω) | TAPE, VCR OUT | 150 mV |
| SU-X520D | Channel balance, TUNER, 250 Hz~6,300 Hz | ±1.0 dB | |
| Channel separation, (TUNER, 1 kHz) (A SPEAKER) | 55 dB | ||
| Headphones output level and impedance | |||
| 1 kHz THD: 1% | 2×60 W (8 Ω) | SU-X920D | 660 mV/330 Ω |
| Total harmonic distortion | SU-X520D | 520 mV/330 Ω | |
| rated power at 1 kHz | 1% (8 Ω) | Load impedance | |
| Harmonic distortion | A or B, A and B | 8 Ω~16 Ω | |
| half power at 1 kHz (analog section) | 0.009% (8 Ω) | SURROUND | 8 Ω~16 Ω |
| Residual hum and noise | 0.3 mV | ||
| Damping factor | 30 (8 Ω) | ||
| Input sensitivity and impedance | VIDEO SECTION | ||
| PHONO | 3 mV/47 kΩ | VIDEO OUT | 1 Vpp/75 Ω |
| TUNER, TAPE | 150 mV/22 kΩ | VCR TV MONITOR OUT | 1 Vpp/75 Ω |
| CD, VDP, VCR | 200 mV/22 kΩ | ||
| Maximum input voltage (1 kHz, RMS) | GENERAL | ||
| PHONO | 100 mV | Power consumption | |
| S/N (rated power 8 Ω) | SU-X920D | 450 W | |
| PHONO | 75 dB (IHF, A: 79 dB) | SU-X520D | 330 W |
| TUNER, CD, TAPE, VDP, VCR | 82 dB (IHF, A: 83 dB) | ||
| Frequency response | Power supply | AC 50 Hz/60 Hz, 230~240 V | |
| PHONO | RIAA standard curve ±0.8 dB (30 Hz~15 kHz) | Dimensions (W × H × D) | 360 × 129 × 305 mm |
| SU-X920D | Weight | ||
| TUNER, CD, TAPE, VDP, VCR | 15 Hz~60 kHz (-3 dB) | SU-X920D | 7.5 kg |
| CD, DAT, AUX, (digital section) | 15 Hz~20 kHz (-0.5 dB) | SU-X520D | 6.5 kg |
| SU-X520D | Notes: | ||
| TUNER, CD, TAPE, VDP, VCR | 15 Hz~55 kHz (-3 dB) | 1. Specifications are subject to change without notice Weight and dimensions are approximate. | |
| CD, DAT, AUX, (digital section) | 15 Hz~20 kHz (-0.5 dB) | 2. Total harmonic distortion is measured by the digital spectrum analyzer. | |
| Tone controls | |||
| BASS | 50 Hz, +10 dB ~ -10 dB | ||
| TREBLE | 20 kHz, +10 dB ~ -10 dB | This apparatus was produced to BS 800. | |
Cassette deck (RS-X920/RS-X520)
| ■ CASSETTE DECK SECTION | ||
| Deck system | Stereo cassette deck | S/N (signal level = max recording level, CrO2type tape) |
| Track system | 4-track, 2-channel | Dolby C NR on 74 dB (CCIR) |
| Heads | Dolby B NR on 66 dB (CCIR) | |
| Dolby NR off 56 dB (A weighted) | ||
| (tape deck 1) RS-X920 | Wow and flutter 0.07% (WRMS) ±0.2% (DIN) | |
| Rec/play | Permalloy head | Fast forward and rewind times |
| Erasing | Double-gap ferrite head | Approx 110 seconds with C-60 cassette tape |
| RS-X520 | Input sensitivity and impedance | |
| REC (IN) 60 mV/47 kΩ | ||
| Play | Permalloy head | Output voltage and impedance |
| (tape deck 2) Rec/play | Permalloy head | PLAY (OUT) 400 mV/800 Ω |
| Erasing | Double-gap ferrite head | |
| Motors | ||
| (tape deck 1) Capstan | DC servo motor | GENERAL |
| (tape deck 2) Capstan | DC servo motor | Power consumption 20 W |
| Recording system | AC bias | Power supply AC 50 Hz:50 Hz, 230-240 V |
| Bias frequency | 80 kHz | Dimensions (W × H × D) 360 × 129 × 297 mm |
| Erasing system | AC erase | Weight 4.6 kg |
| Tape speeds | 4.8 cm/sec. (1-7/8 ips) | |
| Frequency response | ||
| NORMAL | 30 Hz~16 kHz | Note: |
| 40 Hz~15 kHz (DIN) | ||
| CrO2 | 30 Hz~17 kHz | Specifications are subject to change without notice Weight and dimensions are approximate |
| 40 Hz~16 kHz (DIN) | ||
| METAL | 30 Hz~18 kHz | This apparatus was produced to BS 800 |
| 40 Hz~17 kHz (DIN) | ||
Troubleshooting Guide
Before requesting service for this unit, check the chart below for a possible cause of the problem you are experiencing. Some simple checks or a minor adjustment on your part may eliminate the problem and restore proper operation.
If you are in doubt about some of the check points, or if the remedies indicated in the chart do not solve the problem, refer to the directory of Authorized service centers (enclosed with this unit) to locate a convenient service center, or consult your Technics dealer for instructions.
| Problem | Probable cause(s) | Suggested remedy |
| Problems noted at all times | ||
| No sound is heard when the power is switched ON. | The power cord plug is not completely inserted. | · Confirm that the power cord plug is connected completely. |
| Connections are incomplete or incorrect to the speaker systems, etc. | · Check to be sure that all connection wires are correctly connected. | |
| The incorrect input selector has been pressed. | · Check to be sure that the correct selector is pressed. | |
| The speaker selector is set incorrectly. | · Set it to the correct position. | |
| When listening to stereo sound, the sound lacks depth (i.e. thin bass, tinny sound). | One of the speakers is connected out of phase [(+) (-), (-) (+)] . | · Reconnect the speakers, maintaining proper polarity [i.e., (+) (+), (-) (-) ]. |
| When listening to stereo sound, the left and right sounds are reversed. | The left and right speaker connections, source connections, or stereo sound processor connections are reversed. | · Check all connections and correct them if necessary. |
| A low-pitched noise (“hum” or “buzz”) is heard. | The power cord or a fluorescent light, etc., is near the connection wires. | · Try separating this unit as far as possible from the electric appliance. |
| Sound is not heard from one of the speaker systems. | The speaker wires are disconnected. | · Check and correct the connections of the speaker wires. |
| The balance control is set too far to one side. | · Set so that sounds are heard at the center, between the speaker systems. | |
| Sound stops during a performance, or no sound is heard when the power is switched ON. | The protection circuitry has functioned because the positive and negative speaker connection wires are “shorted” or speaker systems with an impedance less than the indicated rated impedance of the amplifier are used. | · Switch OFF the power, and, after determining and correcting the cause, switch ON the power once again.· Use speaker systems of the proper impedance rating. |
| While using the tape deck | ||
| Tape moves but no sound is heard. | The volume control of the amplifier is set to its minimum position | • Adjust the volume control to the desired level. |
| Distorted sound. | The recording level is too high | • Select the appropriate recording level. |
| Previously recorded sound has not been erased. | Erase head is dirty. | • Clean the head. |
| Sound output is hoarse or unsteady. | Heads are dirty | • Clean the heads. |
| Tape is damaged. | • Try operation with a new cassette, if there is no problem with the new cassette, discard the damaged cassette. | |
| Poor sound quality (especially in the high treble and low bass ranges) | The correct Dolby noise-reduction button is not set. | • Set it to the correct position |
| Sound is low, poor tone, intermittent sound, noise. | Heads, capstan and/or pinch roller are dirty or tape is damaged. | • Clean the heads, capstan and/or pinch roller, or try a new cassette. |
| Recording is not possible. | The recording level control is at the "0" position. | • Select the appropriate recording level. |
| One of the edit-recording Indicators is illuminated. | • Switch OFF the indicator by pressing the tape-to-tape recording tape-speed selector. | |
Troubleshooting Guide
(continued)
| Problem | Probable cause(s) | Suggested remedy |
| While listening to FM broadcasts | ||
| An unusual hissing noise is heard when listening to broadcasts in stereo, but not heard when listening monaurally. | Due to the differences between a monaural and a stereo signal, a higher level of signal strength is required for proper stereo reception. If the signal level is low, a hissing noise may be produced on the stereo channel. | Try reducing the treble sound by using the treble control of the amplifier.Set for monaural reception to reduce the hiss.Note, however, that the broadcast will not be heard as stereo.Try changing the location, height and/or direction of the antenna.If an indoor antenna is being used, change to an outdoor antenna.Try using an antenna with more elements. |
| Noise is excessive in both stereo and monaural broadcasts. | Poor location and/or direction of the antenna. | |
| Transmitting station is too far away | ||
| The FM stereo indicator or the quartz lock indicator flickers, without completely illuminating. | Poor location and/or direction of the antenna. | Try changing the location, height and/or direction of the antenna.If an indoor antenna is being used, change to an outdoor antenna.Try using an antenna with more elements. |
| Transmitting station is too far away | ||
| Excessive distortion in the sound of stereo broadcasts. | Nearby building or mountain.[Multipath distortion is being caused by the mutual interference of broadcast signals received directly from the transmitting station (direct waves) and signals being reflected from nearby buildings or mountains (reflected waves).] | |
| Sound is distorted, "popping" noise is heard, and/or the volume level becomes low. | Broadcast signals are being disturbed by nearby automobile traffic or airplanes. | Relocate the antenna and the connection wires to a place farther away from where automobiles pass. |
| While listening to AM broadcasts | ||
| An unusual "beat" sound is heard. | Unit is being used at the same time as the television set. | Switch OFF the television set, or use this unit farther away from it. |
| A low-pitched "hum" sound is heard when the broadcast is tuned. | The AM loop antenna connection wires are too close to the power cord. | Place the antenna connection wires and the power cord farther apart. |
| The power supply frequency from the power cord is modulated and heard from the speakers. | Install a special outdoor antenna. | |
| A strange hissing noise is produced continuously or intermittently. | Caused by the "discharge phenomenon" and the "oscillation phenomenon" of electric appliances (such as fluorescent lights, TV, small series-type motors, rectification equipment, etc.) | Try placing this unit farther away from such equipment.Install noise-prevention equipment on this unit or on the electric appliance. |
| While using the remote-control transmitter | ||
| The remote-control transmitter does not function. | Batteries are incorrectly placed. | • Insert the batteries so that the positive (+) and negative (−) polarities are correct. |
| The remote-control transmitter batteries are consumed. | • Replace them with new batteries. | |
| There is an obstruction between the remote-control transmitter and this unit. | • Remove the obstruction. | |
| The remote-control transmitter is not correctly facing this unit | • Face the remote-control transmitter correctly toward this unit. | |
- Technics
- STEREO SYNTHESIZER TUNER
- ST-X902LA
- STEREO INTEGRATED AMPLIFIER
- SU-X920D/SU-X520D
- STEREO DOUBLE-CASSETTE DECK
- RS-X920/RS-X520
- OPERATING INSTRUCTIONS
- Notes:
- Dear Stereo Fan
- Contents
- For United Kingdom
- Important
- Suggestions for Safety
- ■Use a standard AC wall outlet
- ■ Grasp the plug when disconnecting the power supply cord
- ■AC outlet on rear panel (not equipped for some countries)
- ■ Avoid places such as the following: in direct sunlight or in other places where the temperature is high.
- ■ Never attempt to repair or reconstruct this unit
- ■Take particular care if children are present
- ■ If water is spilled on the unit
- ■ Avoid spray-type insecticides
- ■ Never use alcohol or paint thinner
- ■ Disconnect the power supply cord if the unit will not be used for a long time
- ■ If trouble occurs
- Accessories
- Tuner ST-X902LA
- Cassette deck RS-X920/RS-X520
- Connections
- Connections of each unit (continued)
- Connect the AC power supply cords.
- "AC OUTLET"
- Note:
- FM antenna
- ■ FM Indoor antenna
- FM outdoor antenna
- AM antenna
- ■AM loop antenna
- When attaching the antenna to a column, a wall or rack
- When attaching the antenna to the unit
- ■AM outdoor antenna
- Connection of speaker systems
- SPEAKERS
- Main speaker systems (not Included)
- Second speaker systems (not included)
- Surround-sound speaker systems (not included)
- To connect cords to terminals
- How to use the active current sensor.
- ACTIVE CURRENT SENSOR
- External unit connection
- Front Panel Controls and Functions
- Tuner section
- Power "STANDBY ⏻/ON" switch (POWER, STANDBY ⏻/ON)
- Band selectors
- Tuning-mode selector (TUNING MODE)
- MANUAL:
- PRESET:
- LOCK:
- Tuning control (TUNING)
- Remote-control signal receptor (SENSOR)
- Memory button (MEMORY)
- Preset-channel buttons (PRESET)
- FM mode selector (FM MODE)
- Timer section
- Display section
- Amplifier section
- Cassette deck section
- Controls common to both tape decks
- Meter-range selector (METER RANGE)
- Dolby noise-reduction selector (DOLBY NR)
- Reverse-mode selector (REVERSE MODE)
- Tape-to-tape recording tape-speed selector (TAPE EDIT SPEED)
- Recording-level control (REC LEVEL)
- Synchro-start button (SYNCHRO START)
- A Input level meter
- B Edit-recording indicators (EDIT MODE, CD, ×1, ×2)
- C Reverse-mode Indicators (≡, ⇌, ∞)
- D Dolby noise-reduction indicators (B, C)
- Front Panel Controls and Functions (continued)
- Basic Operating Procedure
- When listening through headphones
- When listening to music
- SURROUND
- SUPER BASS / SUPER BASS LEVEL
- DYNAMIC SOUND
- BALANCE
- BASS
- TREBLE
- During recording:
- About the Direct-Operation Function
- ■ Listening to phono discs
- ■ Listening to radio broadcasts
- ■ Listening to tapes
- ■ Listening to compact discs
- After listening is finished
- Setting the Time
- Notes
- Listening to Radio Broadcasts
- Automatic memory presetting
- Channel Window Mode Tuno
- - Press the desired band selector.
- Set to the frequency from which you want to start automatic memory presetting.
- Press and hold the memory button; release it when the display frequency begins to change.
- Confirm the stations which are preset to each channel, and write them in the station log (page 20).
- Frequency tuning
- Manual memory presetting
- Press the desired band selector. FM: for FM broadcasts
- Turn the tuning control so as to tune to the desired frequency.
- Press the memory button momentarily.
- Press "▼" or "▲" to select the desired "channel".
- Press the memory button momentarily.
- Repeat the above procedures to make memory presettings; write the presettings in the station log (page 20).
- FM mode (FM AUTO, MONO) memory
- Memory tuner operation
- Press "▼" or "▲" to select the desired "channel".
- Manual tuning
- Select the desired band.
- Select the desired broadcast station by using the tuning control and the tuning-mode selector.
- If noise is excessive in FM broadcasts FM MODE:
- Press the FM mode selector.
- ■ Back-up memory
- Most-recent memory
- ■ If frequency presettings are accidentally erased
- Listening to Tapes
- Press the eject button for the tape deck ("1" or "2") to be used for playback, and then insert the cassette tape.
- Press the forward- (or reverse-) side play-back button to select the side ("A" or "B").
- Press the Dolby noise-reduction selector to select the Dolby NR system.
- Press the reverse-mode selector to select the playback functions.
- To temporarily stop playback PAUSE Press the pause button.
- ■ To stop playback STOP Press the stop button.
- Playback two cassette tapes continuously
- To locate and play a certain tune
- ■ To find a tune's beginning
- During playback of side "A" (forward) (▷):
- During playback of side "B" (reverse) (◀):
- If the forward-side indicator (▷) is illuminated:
- If the reverse-side indicator (◀) is illuminated:
- About the Dolby noise-reduction recording/playback system
- ■ Dolby B-type noise-reduction system
- ■ Dolby C-type noise-reduction system
- ■ Dolby HX PRO headroom extension system
- Quick-reverse function
- Automatic-tape-select function
- Recording
- Adjustment of the recording level
- Synchro-recording
- To erase recorded sounds
- Automatic-record-muting function
- During the recording, press the automatic-record-muting button one time.
- To resume recording, press the playback button corresponding to the side being recorded.
- ■ To make a silent interval of more than 4 seconds on the tape
- CD edit-recording (for tape deck 2 only)
- Convenient features:
- Follow the operating instructions of the compact disc player concerning operation steps.
- ATLS function
- Series recording
- Parallel recordings
- Tape-to-Tape Recording
- Insert the cassette to be used for recording into tape deck 2, and then insert the cassette to be played back (as the source of the recording) into tape deck 1.
- Select the side(s) of the tape (one side only or both sides) upon which the recording is to be made.
- Select the speed at which the recording will be made.
- Press the synchro-start button. (The tape-to-tape recording will begin.)
- ■ To temporarily stop recording
- For RS-X920 only
- PAUSE Press the pause button on tape deck 1.
- ■ To stop recording
- Tape-to-tape recording of certain tunes of your choice
- To Use the Timer
- Types of timer operation
- One-time timer function (ONCE)
- Weekly timer function (WEEKLY)
- Sleep timer function (SLEEP)
- Timer sequence of priority
- Operation of the one-time timer (ONCE) and weekly timer (WEEKLY) functions
- CD or TAPE timer play
- Volume level setting for timer operation
- Timer recording from the tuner
- For RS-X920
- To confirm the setting
- To cancel a setting
- ■ To temporarily cancel a setting
- Sleep timer operation (SLEEP)
- Using an External Unit
- To enjoy an external source
- -1 Select the desired source.
- Play back the selected source.
- ■ To record on a DAT tape or a video tape
- To enjoy playback with the BGV (Back Ground Visual) function
- ■ To record on the VCR using the BGV function
- Remote-Control Transmitter
- Insertion of remote-control transmitter batteries
- Battery life
- Battery notes
- Remote-control transmitter operation notes
- Other notes
- Remote-Control Operation
- Tuner keys
- Turntable keys
- Easy play keys
- Amplifier keys
- Compact disc player keys
- Sound processor controls
- Cassette tape deck keys
- About Cassette Tapes
- Avoid the following types of tapes
- - 120-minute (or longer) tapes
- - Fe-Cr tape (TYPE Ⅲ)
- - Metal tape without detection holes in the cassette
- Notes about the handling of cassettes
- To prevent erasure of recorded sounds
- ■ To re-record on a protected cassette
- Avoid tape storage in the following places
- Maintenance
- Head care
- Head demagnetization
- Maintenance of external surfaces
- Technical Specifications (DIN 45 500)
- Tuner (ST-X902LA)
- AM TUNER SECTION
- GENERAL
- Technical Specifications
- Troubleshooting Guide
Marque : TECHNICS
Modèle : ST-X902LA
Catégorie : Récepteur audio