
ST-X999L - Récepteur audio TECHNICS - Notice d'utilisation et mode d'emploi gratuit
Retrouvez gratuitement la notice de l'appareil ST-X999L TECHNICS au format PDF.


| Type de produit | Récepteur audio |
| Marque | Technics |
| Modèle | ST-X999L |
| Dimensions (L x H x P) | 430 x 140 x 360 mm |
| Poids | 8 kg |
| Alimentation | 220-240 V, 50 Hz |
| Puissance de sortie | 2 x 100 W sous 8 ohms |
| Tuner | FM/AM avec syntoniseur numérique |
| Entrées audio | 4 entrées ligne (RCA), 1 entrée phono, 1 entrée magnétophone |
| Sorties audio | 2 paires d'enceintes, 1 sortie casque, 1 sortie magnétophone |
| Fonctions principales | Amplificateur intégré, tuner FM/AM, commandes de tonalité, filtre subsonique |
| Entretien et nettoyage | Nettoyer avec un chiffon doux et sec. Ne pas utiliser de produits chimiques. |
| Sécurité | Ne pas exposer à l'humidité. Débrancher avant tout nettoyage. |
| Pièces détachées et réparabilité | Contacter un technicien agréé Technics pour toute réparation. |
| Informations générales | Notice d'utilisation de 20 pages disponible en téléchargement. |
FOIRE AUX QUESTIONS - ST-X999L TECHNICS
Questions des utilisateurs sur ST-X999L TECHNICS
0 question sur cet appareil. Repondez a celles que vous connaissez ou posez la votre.
Poser une nouvelle question sur cet appareil
Téléchargez la notice de votre Récepteur audio au format PDF gratuitement ! Retrouvez votre notice ST-X999L - TECHNICS et reprennez votre appareil électronique en main. Sur cette page sont publiés tous les documents nécessaires à l'utilisation de votre appareil ST-X999L de la marque TECHNICS.
MODE D'EMPLOI ST-X999L TECHNICS
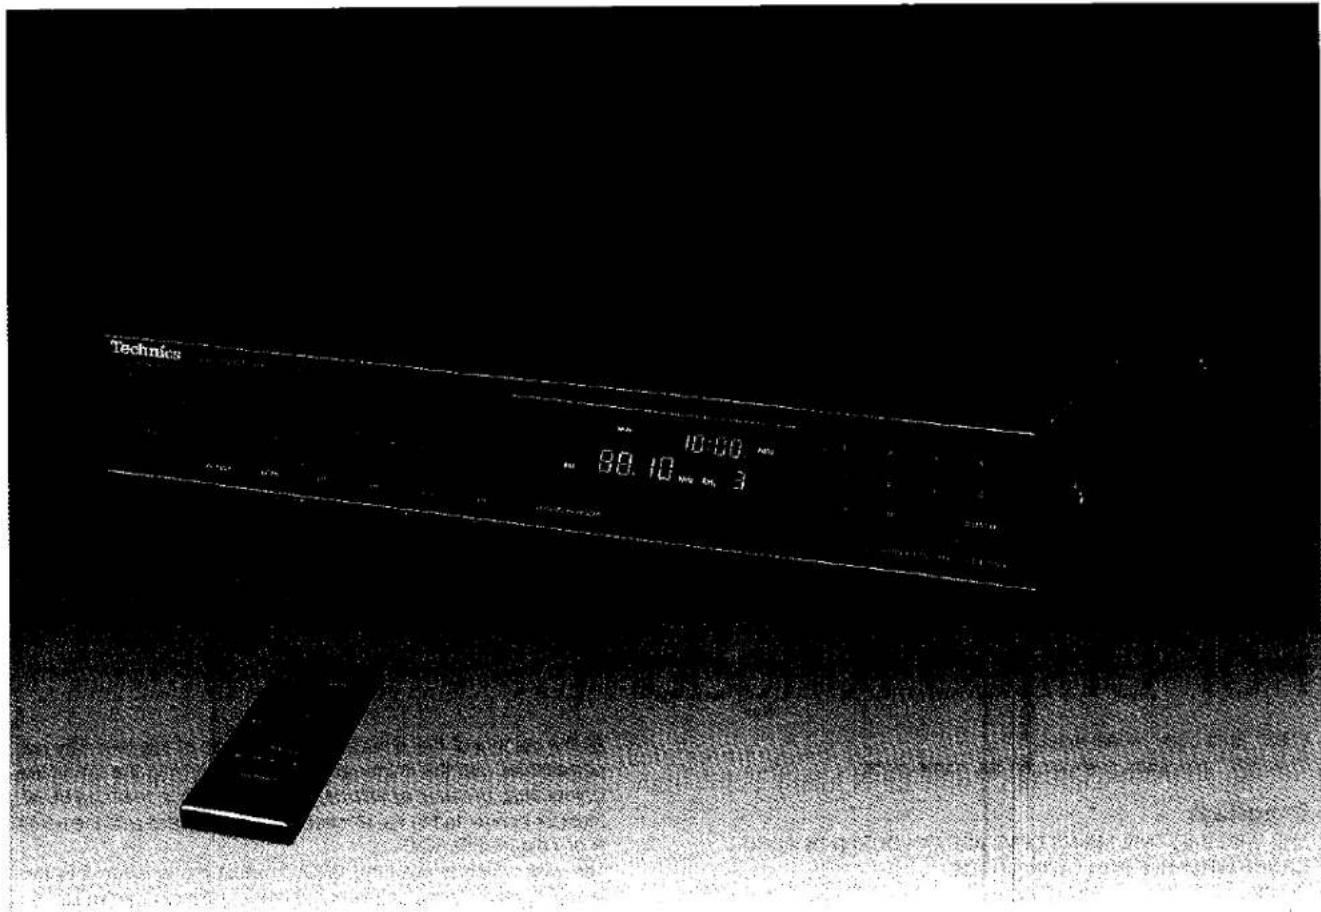
Technics
QUARTZ SYNTHESIZER LW/MW/FM
STEREO TUNER
ST-X999L
OPERATING INSTRUCTIONS
Notes:
- Specifications differ according to the area code.
- The "EB" area code, for example, indicates United Kingdom specifications.
- The "EB" indication is shown on the packing case and serial number tag.
Before operating this unit, please read these instructions completely.
Dear Stereo Fan
We want to thank you for selecting this product and to welcome you to the growing family of satisfied Technics product owners around the world.
We feel certain you will get maximum enjoyment
from this new addition to your home.
Please read these operating instructions carefully, and be sure to keep them handy for convenient reference.
Contents
• For United Kingdom 2
- Suggestions for Safety 3
• Accessories.... 4
- Connections 4
- Antenna Connections.... 5
- Front Panel Controls and Functions ..... 6
• Memory Presettings 8
• Listening to Radio Broadcasts ..... 10
- Setting the Time....11
• To Use the Timer....12 - Remote-Control Transmitter 15
- Remote-Control Operation .... 16
• Technical Specifications....17 - Troubleshooting Guide .... 18
- Maintenance 18
For United Kingdom
("EB" area code model only)
The "EB" Indication is shown on the name plate.
Important
THE WIRES IN THIS MAINS LEAD ARE COLOURED IN ACCORDANCE WITH THE FOLLOWING CODE.
BLUE: NEUTRAL BROWN: LIVE
As the colours of the wires in the mains lead of this unit may not correspond with the coloured markings identifying the terminals in your plug, proceed as follows. The wire which is coloured BLUE must be connected to the terminal which is marked with the letter N or coloured BLACK.
The wire which is coloured BROWN must be connected to the terminal which is marked with the letter L or coloured RED.
Suggestions for Safety
■ Use a standard AC wall outlet
- Use from an AC power source of high voltage, such as for an air conditioner, is very dangerous.
There is the possibility that a fire might be caused by making such a connection. - A DC power source cannot be used.
Be sure to check the power source carefully, especially on a ship or other place where DC is used.
■ Grasp the plug when disconnecting the power supply cord
- Wet hands are dangerous.
A dangerous electric shock may result if the plug is touched by wet hands. - Never place heavy items on top of the power supply cord, and never force it to bend sharply.
■ AC outlet on rear panel (not equipped for some countries)
- Any equipment connected here should have the specified power consumption or less.
This outlet is exclusively for the connection of other audio equipment, such as a tape deck. Be sure the power consumption does not exceed the wattage specified near the AC outlet. - Never connect other electrical appliances, such as an iron or toaster.
If appliances with a large power consumption are connected, an accident might occur as a result of overheating.
■ Place the unit where it will be well ventilated
Place this unit at least 10 cm (4") away from wall surfaces, etc.
■ Avoid places such as the following:
In direct sunlight or in other places where the temperature is high.
in places where there is excessive vibration or humidity.
Such conditions might damage the cabinet and/or other component parts and thereby shorten the unit's service life.
■ Be sure to place the unit on a flat, level surface.
If the surface is inclined, a malfunction may result.
■ Never attempt to repair or reconstruct this unit
A serious electric shock might occur if this unit is repaired, disassembled or reconstructed by unauthorized persons, or if the internal parts are accidentally touched.
■Take particular care if children are present
Never permit children to put anything, especially metal, inside this unit. A serious electric shock or malfunction could occur if articles such as coins, needles, screwdrivers, etc. are inserted through the ventilation holes, etc. of this unit.
■If water is spilled on the unit
Be extremely careful if water is spilled on the unit, because a fire or serious electric shock might occur. Immediately disconnect the power cord plug, and consult with your dealer.
■ Avoid spray-type Insecticides
Insecticides might cause cracks or "cloudiness" in the cabinet and plastic parts of this unit. The gas used in such sprays might, moreover, be ignited suddenly.
■ Never use alcohol or paint thinner
These and similar chemicals should never be used, because they might cause flaking or cloudiness of the cabinet finish.
■ Disconnect the power supply cord If the unit will not be used for a long time
If the unit is left for a long time with the power ON, this will not only shorten its useful operation life, but may also cause other troubles.
■ If trouble occurs
If, during operation, the sound is interrupted or indicators no longer illuminate, or if abnormal odor or smoke is detected, immediately disconnect the power cord plug, and contact your dealer or an Authorized Service Center.
Accessories
(Refer to pages 4, 5 and 15)
- Stereo connection cable ..... 1

• FM indoor antenna ..... 1

• AM antenna holders ..... 2

• 3-core flat cable ..... 1

- Attachment plug .... 1

- Screws.... 2

- Remote-control transmitter (EUR64754) ..... 1

• AC power supply cord ..... 1

• AM loop antenna ..... 1

- Batteries 2


Connections
Make connections in the numbered sequence by using the included cables and power cord.

1 Connect the stereo connection cable.
2 Connect the 3-core flat cable.
3 Connect the AC power supply cord.
① Connect this cord only after all other cables have been connected.
② For United Kingdom

4 "AC OUTLET"
This outlet is a "SWITCHED" outlet; the power is controlled by the power switch of this unit.
This outlet is only for use with other audio equipment. Also, do not exceed the indicated power rating when connecting to this outlet.
Antenna Connections
The Indication AM used here includes both MW and LW.
FM Indoor antenna

AM loop antenna location
Note: An outdoor antenna should be installed by a competent technician only.
FM antenna
■ FM indoor antenna (included)
Attach to a wall (using tack or tape) facing in the direction of best reception.
For best reception sound quality:
An FM outdoor antenna is recommended.
Notes:
• The tack should not contact the internal antenna wire.
- Disconnect this antenna if an FM outdoor antenna is installed.
AM antenna
■ AM loop antenna (included)
Connect the AM loop antenna to the AM antenna terminals, and attach it to a column, rack or this unit (facing in the direction of best reception).
Notes:
- If this antenna is not properly installed, AM broadcasts will not be received.
- Be sure to connect the AM loop antenna even when an outdoor antenna is used.
Pay attention to the following points when attaching the antenna.
- Do not attach It horizontally (to do so would impair reception).
- Do not attach it close to power cords, speaker wires or metal surfaces (to do so would result in noise).
- Do not attach it close to a tape deck (when the tape deck is being used, chirping or beeping sounds may be received).
When attaching the antenna to a column, a wall or rack
Affix it vertically.

■ FM outdoor antenna (not included)
If the FM Indoor antenna does not provide satisfactory reception of FM broadcasts, an outdoor antenna should be used.
The outdoor antenna may be required in a mountainous region, or if this unit is located inside a reinforced-concrete building, etc.
When attaching the antenna to the unit
This type of installation may cause impaired reception or result in signal noise. If possible, attach the antenna to a rack, a wall, or a column.
Move the antenna toward the right or left to find the point of best reception

■AM outdoor antenna (not included)
The outdoor antenna may be required in a mountainous region, or if this unit is located inside a reinforced-concrete building, etc. Use 5–12 m (16–40 ft.) of vinyl-covered wire horizontally at the window.
Front Panel Controls and Functions
The indication AM used here includes both MW and LW.
Tuner section


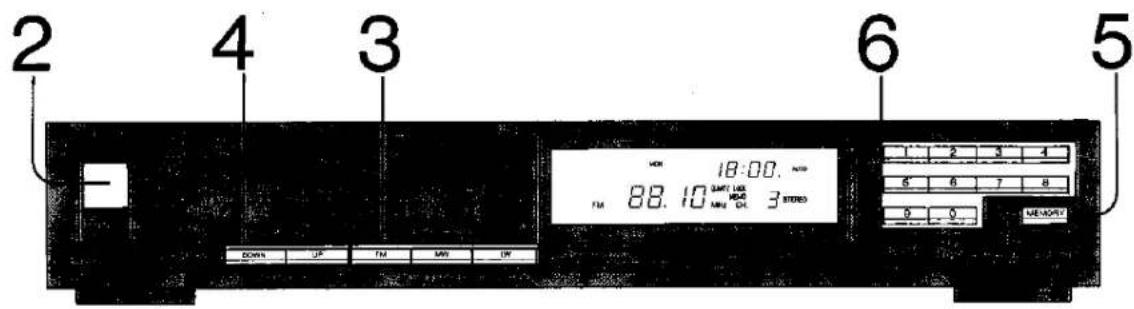
① Power "STANDBY ⏻/ON" switch (POWER "ON/STANDBY ⏻")
This switch switches ON and OFF the secondary circuit power only. The unit is in the stand-by condition when this switch is set to the "STANDBY "position. Regardless of the switch setting, the primary circuit is always "live" as long as the power cord is connected to an electrical outlet.
2 Remote-control signal receptor (SENSOR)
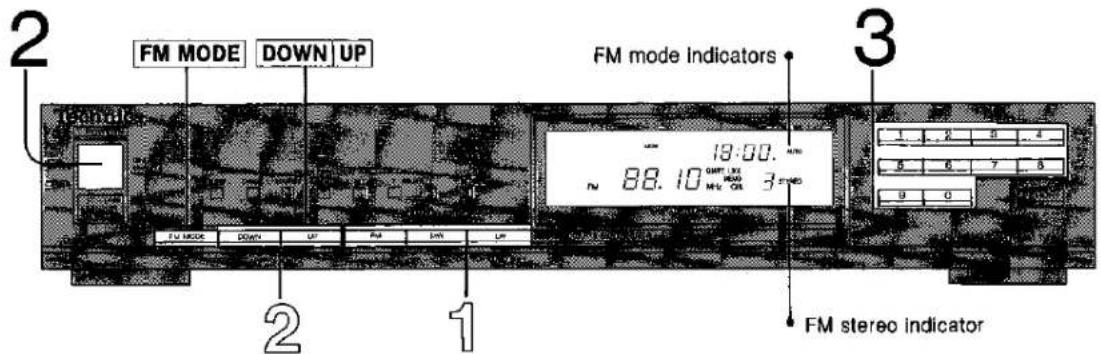
3 FM mode selector (FM MODE)
This unit automatically switches to the stereo mode when an FM stereo broadcast is received. This selector is used to select the mode (stereo or monaural) of FM broadcast signals.
4 Tuning buttons (TUNING)
These buttons can be used for tuning to the desired broadcast station. If the button is pressed momentarily and then released, the frequency will change at intervals of 0.05 MHz for FM and 9 kHz (or 10 kHz) for AM.
5 Band selectors (BAND SELECTOR)
FM: Press this button to listen to an FM broadcast. MW: Press this button to listen to an MW broadcast.
ALLOCATION: When the MW button is pressed for about 3 seconds, the MW frequency step will change to 10 kHz per step. (This unit is set to 9 kHz before shipment.) In order to return to the original frequency indication, press this button for about 3 seconds again.
LW: Press this button to listen to an LW broadcast.
FREQ SHIFT: When the LW button is pressed for about 3 seconds during reception of an LW broadcast, the LW frequency will decrease by 2 kHz. In order to return to the original frequency indication, press this button for about 3 seconds again.
6 Preset-tuning buttons (1-0) (28 CHANNEL RANDOM PRESET TUNING)
These buttons are used to preset broadcast frequencies into the memory of this unit, and are also pressed to recall the desired preset stations. (Refer to pages 8–10.)
7 Memory button (MEMORY)
This button can be used when presetting broadcast station frequencies to the memory. (Refer to pages 8–9.)

A Digital frequency display
B Quartz-lock Indicator (QUARTZ LOCK)
This indicator illuminates when the unit is tuned precisely to a broadcast station.
© Memory indicator (MEMO)
This Indicator Illuminates when the memory button is pressed.
D Channel display
This display shows the channel number selected by one of the preset-tuning buttons.
E FM stereo Indicator (STEREO)
This indicator automatically illuminates when an FM stereo broadcast is being received.
It will not illuminate if the FM mode selector is set to the monaural mode.
F FM mode indicators
When FM broadcasts are being received, usually the "AUTO" indication is illuminated.
When the FM mode selector is used to select monaural reception, the word "MONO" illuminates.
Timer section


① Sleep button (SLEEP)
This button can be used to set the time at which the power will be switched OFF.
5 Set button (SET)
This button can be used, when making the timer setting, to select the type of timer operation, the day, the time, etc.
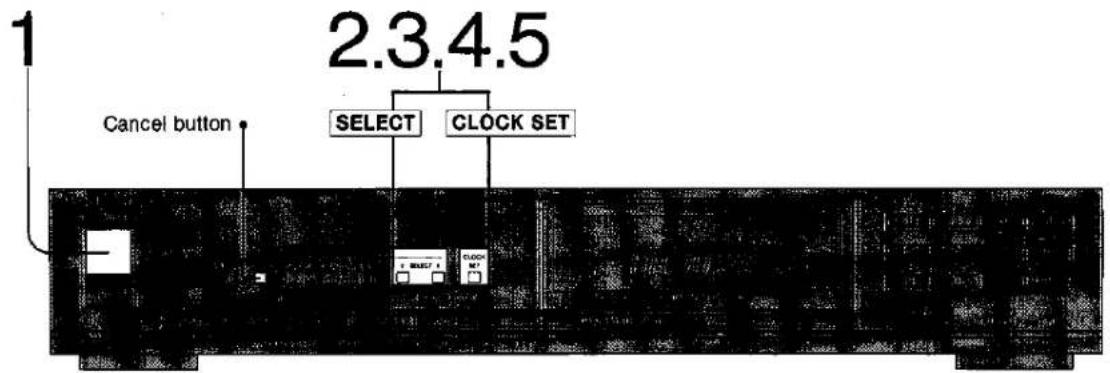
2 Cancel button (CANCEL)
This button can be used to erase the timer setting or to cancel a setting that is being made, If, for example, you decide to do something else.
6 Select buttons (SELECT)
These buttons can be used to set the unit to the present day and time, and for setting the day, time, etc. for timer operation.
3 Stand-by button (STANDBY)
This button can be used to temporarily cancel the timer setting.
7 Clock set button (CLOCK SET)
This button can be used, when setting the unit to the present day and time, to select the item (day, hour and minute) to be set next.
4 Read button (READ)
This button can be used to check the programmed setting.

A Stand-by Indicator (STANDBY)
This indicator shows that the timer has been set to operate at the programmed time.
D Time display
This display shows the present time, and (if the timer has been set) the time it has been set for.
B Day display
This display shows the present day, and (if the timer has been set) the day it has been set for.
E Colon Indicator
This indicator shows, by flashing continuously, that the clock is operating.
C Timer ON/OFF Indicator (ON/OFF)
This Indicator shows whether the times for timer switch-ON and switch-OFF have been set.
F Timer-mode indicator (ONCE/WEEKLY/SLEEP)
This indicator shows the type of timer operation that has been selected.
Memory Presettings
The indication AM used here includes both MW and LW.
When broadcast frequencies have been preset to the memory, any of those broadcast frequencies can thereafter be easily selected by simply pressing one of the preset-tuning buttons. There are two methods for presetting broadcast frequencies in the memory: the automatic method (see below) and the manual method (refer to page 9); select whichever method you prefer.
Automatic memory presetting

When this method is used, the frequencies of the selected broadcast stations are automatically preset (in sequence to higher frequencies) into the memory: "channels" 1 to 28 are available for the presetting of FM stations, "channels" 15 to 28 are available for MW stations, and "channels" 22 to 28 are available for LW stations. When a presetting is made to a channel that has already been preset, the prior presetting will be erased.
1 Switch the amplifier ON, and set it for listening to radio broadcasts.
2 POWER Switch ON the power switch.
(The frequency will be displayed on the digital frequency display.)
3 FM MW LW Press the desired band selector.
FM: for FM broadcasts
MW: for MW broadcasts
LW: for LW broadcasts
Before presetting broadcast stations, press to select the appropriate frequency step for your locality.
(Refer to page 6.)
4 DOWN UP Set to the frequency from which you want to start automatic memory presetting. (Refer to "Frequency tuning", below.)
5 MEMORY Press and hold the memory button; release it when the display frequency begins to change. (The memory indicator will flash, and the automatic memory presetting is activated.)
6 1-0 Confirm the stations which are preset to each channel, and write them in the station log (page 10). (Refer to "How to designate preset channels", at the bottom of the next page.)
Notes
- For automatic presetting in areas where there are fewer than 28 FM stations, the remaining channels (through channel 28) will be left unoccupied. The unoccupied channels can be filled by using manual memory presettings.
- For AM broadcasts with extremely strong signal transmissions, the frequency memorized may be slightly different than the correct frequency. If this occurs, make a manual presetting.
The following table is in Chinese:
DOWN Press to change the frequency downward.
UP Press to change the frequency upward.
-
Press and hold one of the tuning buttons, then release the button when the displayed frequency begins to change.
-
When the displayed frequency approaches the desired frequency, press the button momentarily. (The displayed frequency will stop changing.)
The changing of the displayed frequency will be automatically stopped (by the automatic tuning function) if a broadcast station frequency is located during the tuning process. If the frequency at which it stops is not close to the desired frequency, repeat step 1 at the left. - After stopping at step 2, tap one of the tuning buttons a few times until the desired frequency is reached.
Note:
Note:
If a new broadcast station is preset into a channel, the broadcast station which was previously entered in that channel will be automatically erased.
Manual memory presetting
Stations can be freely preset to any desired channel. A maximum of 28 broadcast stations can be memorized.
1 Switch the amplifier ON, and set it for listening to radio broadcasts.
2 POWER Switch
(The frequency will be displayed on the digital frequency display.)
3 FM MW LW Press the d
FM: for FM broadcasts
MW: for MW broadcasts
LW: for LW broadcasts
Before presetting broadcast stations, press to select the appropriate frequency step for your locality.
(Refer to page 6.)
4 DOWN UP Press the
Press the appropriate tuning button to tune to the desired broadcast.
(Refer to "Frequency tuning" at the bottom of the previous page.)
5 MEMORY Press the
MEMORY Press the memory button momentarily.
(The memory indicator will illuminate.) Note:
If the memory button is pressed continuously, the automatic memory presetting is activated. To stop the automatic memory presetting, once again press the tuning button. Then begin again from step 4.
6 1-0 Select
1-0 Select the desired "channel". "channel" 18:00 89.10 3
(Refer to "How to designate preset channels", below.)
7 Repeat the above procedures to make memory presettings; write the presettings in the station log (page 10).

- To designate channels 1–9: Press the appropriate (1–9) preset-tuning button.
Note: When selecting channel 1 or channel 2, enter the selection "01" or "02". If only "1" or "2" is pressed, channel access will be delayed by two seconds.
• To designate channels 10–28:
① Press the button for the left digit (1 or 2).
② Press the button for the right digit (1-0) within 2 seconds after pressing the first button.
Example: To designate channel 12
Press the "1" button and then the "2" button.

Note:
If the interval between pressing the first button and pressing the second button is more than about 2 seconds, the setting may not be made correctly. If this happens, make the setting once again. When making a memory presetting manually, once again designate the channel to be selected after pressing the memory button.
Listening to Radio Broadcasts
Have you completed the steps (on page 8 or 9) of "Memory Presettings"?
Note:
To prevent noise while listening to a broadcast station, switch OFF the compact disc player and turntable.
If not, follow the appropriate steps (on page 8 or 9), and then select the desired station by following the steps below, or tune by using the tuning buttons. (Refer to "Manual tuning", below.)
1 Switch the amplifier ON, and set it for listening to radio broadcasts.
POWER
Switch ON the power switch.
(The frequency will be displayed on the digital frequency display.)
21-0
Press the button for the desired channel (1 - 28).
(Refer to "How to designate preset channels" at the bottom of page 9.)
The FM stereo indicator automatically illuminates when an FM stereo broadcast is being received.
Notes:
- If, for channels 10 - 28, the interval between pressing the first button and pressing the second button is more than about 2 seconds, the setting may not be made correctly. If this happens, make the setting once again.
- When selecting channel 1 or channel 2, enter the selection "01" or "02". If only "1" or "2" is pressed, channel access will be delayed by two seconds.
Manual tuning
Follow the steps above, except that, for step 3, follow the steps below.
FM MW LW
Select the desired band. (Refer to page 6.)
DOWN UP
Select the desired broadcast station by using one of the tuning buttons.
(Refer to "Frequency tuning", at the bottom of page 8.)
If noise is excessive in FM broadcasts
FM MODE
Press the FM mode selector.
The sound will then be heard as monaural sound and the FM stereo indicator will not illuminate; the "MONO" FM mode indicator will then illuminate instead of the "AUTO" indicator. If the broadcast signal is weak, sounds can be heard more clearly (than in the stereo mode) by pressing the FM mode selector.
Back-up memory
The back-up function maintains the preset memory and the most-recent memory (see below) when the power is switched OFF, in the event of a power failure, or if the power cord is disconnected. The memory will be maintained for as long as approximately one week.
Most-recent memory
The most-recent memory system "remembers" the broadcast station last tuned to when the unit was switched OFF. That station will be automatically tuned to when the power is switched ON.
■If frequency presettings are accidentally erased
-
Switch ON the power switch for an hour or longer.
-
Make the frequency presettings (on page 8 or 9) once again.
Station Log
| 1 | 8 | 15 | 22 | ||||
| 2 | 9 | 16 | 23 | ||||
| 3 | 10 | 17 | 24 | ||||
| 4 | 11 | 18 | 25 | ||||
| 5 | 12 | 19 | 26 | ||||
| 6 | 13 | 20 | 27 | ||||
| 7 | 14 | 21 | 28 |
Setting the Time
Example: To set to 16:45 on Wednesday


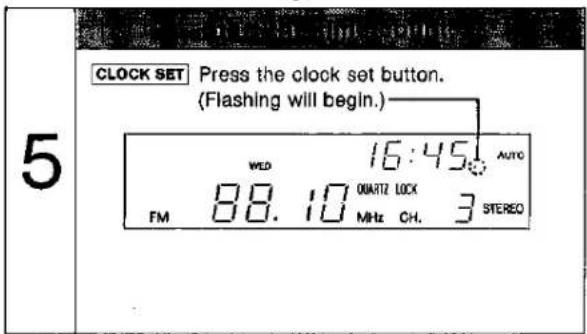

-Notes
- Note that the "E:" in the display will flash continuously when the unit is connected to a power source for the first time, or if the power cord is disconnected or there is any other interruption of power to the unit.
(Note that timer function memory will be retained for approximately ten minutes after the power supply is interrupted.)
- Other operations, such as switching OFF the unit, etc., cannot be done while the time is being set. To do so, first press the cancel button, then perform the desired operation. Note that the time will start from the time displayed when the button was pressed.
- If a mistake is made while making the setting, press the clock set button; then press one of the select buttons (while the day, hour or minute is flashing) in order to make the resetting.
To Use the Timer
Types of timer operations

This timer function can be used to switch the power ON and to the stand-by condition at a desired day and time (one day only). This is convenient for recording broadcasts while you are away.
(Programmed settings are canceled when this timer function is used.)

• Every week on the same day, (one day from Sunday to Saturday)
• Every day (from Sunday to Saturday)
- Every day except Saturday and Sunday (from Monday to Friday). The power will be switched ON and to the stand-by condition at the desired times (among those choices described above). This feature is convenient for listening to and/or recording the same program at regular intervals.
(The programming remains in effect until canceled.)

This timer function can be used to switch the power to the stand-by condition at the desired time (within a range of 60 to 10 minutes from the present time). Use this timer to switch the power to the stand-by condition automatically even if you fall asleep while listening.
(Programmed settings are canceled when this timer function is used.)
Timer sequence of priority
If programmed times overlap, timer operation priority is as follows: "SLEEP", "ONCE" and "WEEKLY" settings.

: Timer is functioning.
: Timer is not functioning.
1 In the following example, the "ONCE" and "WEEKLY" settings will not be activated.

Not activated because the "ONCE" switch-OFF time has priority.
② In the following example, the "WEEKLY" setting will be stopped mid-way.
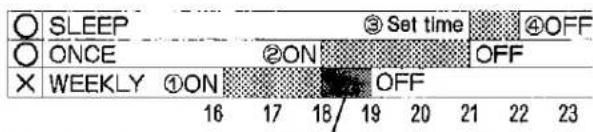
Not activated because the "ONCE" switch-ON time has priority.
3 In the following example, the "WEEKLY" setting will not be activated.

Not activated because the "ONCE" switch-OFF time has priority.
Operation of the one-time timer (ONCE) and

Have you completed the steps described in the section "Memory Presettings" (pages 8–9) and "Setting the Time" (page 11)?
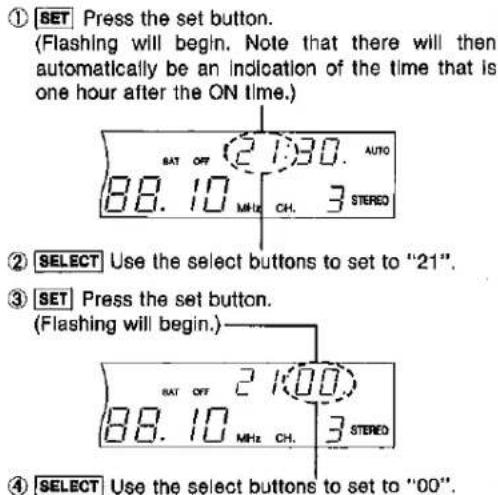
Example: To set the one-time timer function for listening to FM "channel" 3 from 18:30 until 21:00 on Saturday
| 1 | POWER Set the power "STANDBY d/ON" switch to "ON". |


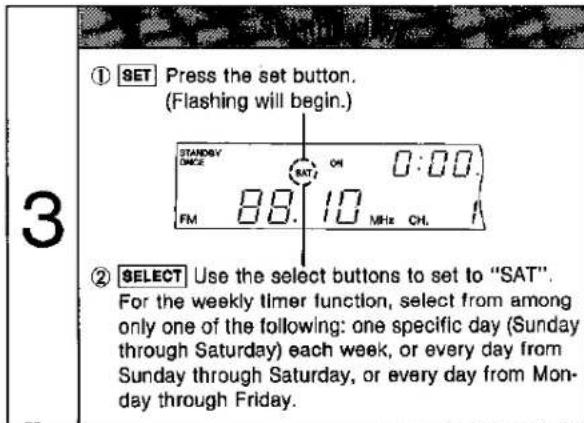

weekly timer (WEEKLY) functions
4
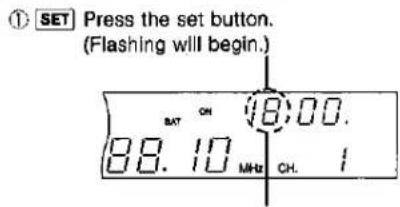
② SELECT: Use the select buttons to set to "18".

④ SELECT Use the select buttons to set to "30".
5


6


In addition to timer settings for radio broadcasts, it is also possible to set for timer play from a cassette tape deck or a compact disc player (if that deck or player has a timer switch). To do so, follow the steps 1–8 shown on these pages, except that, for step 5, follow the steps below.
① Prepare the cassette tape deck or compact disc player for play.
② Set the timer switch of the cassette tape deck or compact disc player to the "PLAY" position.
③ SET Press the set button of this unit.
To Use the Timer
(continued)
Operation of the one-time timer function (ONCE) and weekly timer function (WEEKLY) (continued)

to contiunho a filn
READ Press the read button.
(The display will change each time it is pressed. The display change in order, even if the timers are not set.).
① "ONCE" power-ON time

② "ONCE" power-OFF time

③ "WEEKLY" power-ON time

④ "WEEKLY" power-OFF time

⑤ Present time

To temporarily cancel
- READ Press the read button so as to display the program mode (① or ③ above) to be canceled.
- STANDBY Press the stand-by button. (The stand-by indicator illumination will stop.)
- CANCEL Press the cancel button. (The display will return to the display of the present time.)
Note:
To activate the timer again, repeat steps 1, 2 and 3 above.
Pro-cancel-positing
- SET Press the set button.
- SELECT Use the select buttons to select "ONCE" or "WEEKLY".
- CANCEL Press the cancel button. (The display will return to the display of the present time.)
Sleep timer operation (SLEEP)

1
SLEEP Press the sleep button while listening to music.

Here, the setting is already made to 60 minutes, so the power will be switched to the stand-by condition 60 minutes later. To change the 60 minutes to a different length of time, follow step 2.
2
\$LEEP Press the sleep button to select the time.
At the desired time, release the button. The sleep timer operation will begin when the button is released.

The English word in the script is to write the following text: "I am I'll be long enough to make a new language."
Set only the OFF time of the one-time timer. (Refer to page 13.)
to cancel a setting
CANCEL Press the cancel button.
The display will return to indication of the present time.
Timer recording
- Prepare the cassette tape deck for recording.
- Select either the one-time timer function or the weekly timer function and set the timer. (Refer to pages 12 and 13.)
- Set the timer switch on the cassette tape deck to the "REC" position.
- Check to be sure that the amplifier's "TUNER" input selector has been selected; then switch the tuner's power to the stand-by condition. Leave the power switch of the amplifier and of the cassette tape deck at the ON setting.
Remote-Control Transmitter
Insertion of remote-control transmitter batteries
1. Open the cover.
2. Insert the batteries.
- Be sure to insert according to the (+) and (−) indications in the battery compartment.
- Use two UM-4, "AAA"(R03;1.5V) size batteries.

- Close the cover.
Battery life
Battery life is about one year. (Battery life may vary depending upon the frequency of use and other conditions of use.)
The batteries should be replaced if the unit cannot be operated even when the remote-control transmitter is brought close to the unit.
Battery notes
- Be sure that batteries are inserted so that they are placed correctly with respect to the (+) and (−) indications in the battery compartment. If the batteries are not inserted correctly, they make leak and damage the remote-control transmitter.
-
Do not use rechargeable (nickel-cadmium) type batteries.
-
Do not mix old and new batteries, or batteries of different types (carbon and alkaline, etc.).
- If the remote-control transmitter is not to be used for a long period of time, take out the batteries and store them in a cool, dark place.
- Remove and dispose of worn-out batteries.
- Never attempt to recharge or short-circuit the batteries, and do not disassemble them or expose them to excessive heat or throw them into a fire.
- If a battery leaks, remove both batteries and dispose of them, and then thoroughly clean the battery compartment before inserting new batteries.
Remote-control transmitter operation notes
Use the remote-control transmitter within 6 meters (20 ft.).

Face it toward the remote-control signal receptor of this unit.

Be sure the transmitter part of the remote-control transmitter and the receptor part of this unit are free from dust.
Excessive dust might prevent reception.

Other notes
- Do not expose the receptor (on this unit) to direct sunlight or other strong light, because to do so might result in incorrect operation.
-
Do not use a remote-control transmitter for a TV set, a VCR or other video component at the same time as this remote-control transmitter is being used, because to do so might result in incorrect operation.
-
If this unit is installed in a rack with glass doors, the glass doors' thickness or color might make it necessary to use the remote-control transmitter a shorter distance from the unit.
-
The control panel of the remote-control transmitter may be covered by a clear plastic protective sheet. This sheet can be removed if desired.
Remote-Control Operation
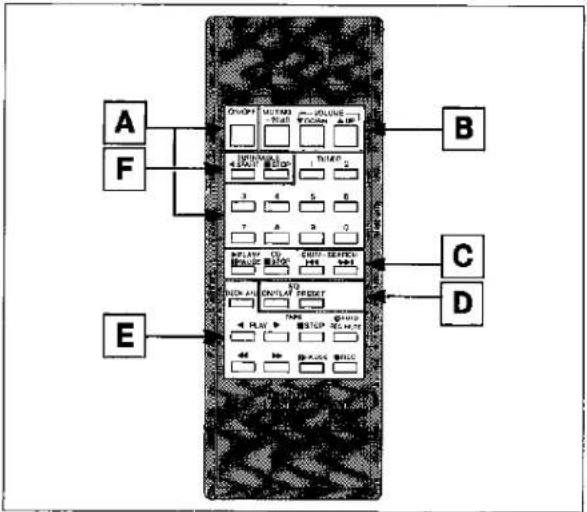
- This remote-control transmitter can be used for control of a Technics amplifier with a control terminal, as well as a cassette tape deck, turntable, compact disc player, or a graphic equalizer with a remote-control terminal. Consult your dealer for details.
- For detailed information concerning operation steps, etc., please refer to the appropriate page for each unit and the respective operating instructions. For this system, you can listen to tapes or compact discs, etc., by operating the remote-control transmitter without using the amplifier's input selectors. (Refer to the Technics amplifier's operating instructions.)
flowchart
graph TD
    A["A"] --> B["B"]
    F["F"] --> B
    E["E"] --> C["C"]
    D["D"] --> C
    B --> D
    C --> D
    style A fill:#f9f,stroke:#333
    style F fill:#f9f,stroke:#333
    style E fill:#f9f,stroke:#333
    style D fill:#f9f,stroke:#333
A
Press this key to switch the tuner ON or to the stand-by condition. Note that there is no need to press this key if the tuner's power is ON. (If it is pressed, the tuner will be switched to the stand-by mode.)
Press this key to select the desired preset channel.
B
Press this key to adjust the volume level.
-30dB Press this key to temporarily reduce the volume level. The volume level is attenuated by 20 dB (approx. 1/10). Press once again to return to the previous volume level.
C
- Press this key to start the play. - Press this key to temporarily stop play. Press once again to resume play.
Press this key to stop play.
- Press momentarily to search for the beginning of the track now playing. Repeat this step the necessary number of times to search for a previous track. - Press and hold to quickly move backward on the disc, and then release at the desired position.
- Press momentarily to search for the next track. - Press and hold to quickly move forward on the disc, and then release at the desired position.
D
ON:FLAT Press this key to switch the equalizer correction ON. Please once again to switch to the flat position. PRESET Press this key to retrieve a memorized curve. (Only applicable to a Technics graphic equalizer with the preset memory function.)
E
Press this key to select the deck ("DECK A" or "DECK B") to be used.
PLAY: For the "forward (A)" side of the tape ◀: For the "reverse (B)" side of the tape
Press one of these keys to begin the playback or recording, pressing the key corresponding to the side of the tape to be played (or recorded).
TAPE STOP Press this key to stop tape movement.
Press this key to make a silent interval during recording. (After 4 seconds, the tape deck will automatically change to the recording stand-by mode.) To start the recording again, press the playback key.
Note: For some Technics tape decks (RS-X980, etc.), "DECK B" has no recording capability.
←
Press this key to advance or rewind the tape while the unit is in the stop mode.
Press this key to select the desired tune while the unit is in the play mode.
(Only applicable to a Technics tape deck with the "music select" functions.)
■PHASE Press this key to temporarily stop playback or recording. Press the playback key to resume the play or recording.
●REC Press this key to change to the recording stand-by mode.
Note: For some Technics tape decks (RS-X980, etc.), "DECK B" has no recording capability.
F
START Press this key to start the play.
TURNTABLE ■ STOP Press this key to stop the play.
Note:
Only Technics turntables (e.g., SL-J110R, SL-J300R etc.) equipped with a remote terminal can be remote-controlled by the transmitter included with this unit, and only when connected by the proper cable.
Technical Specifications (DIN 45 500)
FM TUNER SECTION
| Frequency range | 87.50~108.00 MHz (0.05 MHz steps) |
| Sensitivity | 1.5 μV (IHF, usable) |
| S/N 30 dB | 1.3 μV (75 Ω) |
| S/N 26 dB | 1.2 μV (75 Ω) |
| S/N 20 dB | 0.9 μV (75 Ω) |
| IHF 46 dB stereo quieting sensitivity | 28 μV/75 Ω |
| Total harmonic distortion | |
| MONO | 0.15 % |
| STEREO | 0.3 % |
| S/N | |
| MONO | 70 dB (78 dB, IHF) |
| STEREO | 65 dB (71 dB, IHF) |
| Frequency response | 20 Hz~15 kHz, +0.5 dB~ -1.5 dB |
| Alternate channel selectivity | |
| ±400 kHz | 65 dB |
| Capture ratio | 1.0 dB |
| Image rejection at 98 MHz | 46 dB |
| IF rejection at 98 MHz | 70 dB |
| Spurious response rejection at 98 MHz | 70 dB |
| AM suppression | 55 dB |
| Stereo separation | |
| 1 kHz | 40 dB |
| 10 kHz | 30 dB |
| Carrier leak | |
| 19 kHz | -30 dB (-35 dB, IHF) |
| 36 kHz | -45 dB (-50 dB, IHF) |
| Channel balance (250 Hz~6,300 Hz) | ±1.5 dB |
| Limiting point | 1.2 μV |
| Bandwidth | |
| IF amplifier | 180 kHz |
| FM demodulator | 1000 kHz |
| Antenna terminals | 75 Ω (unbalanced) |
■ AM TUNER SECTION
| Frequency range | |
| MW | 522 kHz~1611 kHz (9-kHz steps) |
| 530 kHz~1620 kHz (10-kHz steps) | |
| LW | 155 kHz~353 kHz (9-kHz steps) |
| 153 kHz~351 kHz (-2-kHz shift) | |
| Sensitivity (S/N 20 dB) | |
| MW | 20 μV, 300 μV/m |
| LW | 50 μV |
| Selectivity (±9 kHz) | |
| MW (at 999 kHz) | 55 dB |
| LW (at 254 kHz) | 55 dB |
| Image rejection | |
| MW (at 999 kHz) | 40 dB |
| LW (at 254 kHz) | 40 dB |
| IF rejection | |
| MW (at 999 kHz) | 60 dB |
| LW (at 254 kHz) | 60 dB |
TIMER SECTION
| Clock | Quartz-lock type24-hours indication |
| Precision | Within 0 sec.~ ± 10 sec.monthly (at 25°C) |
| Functions | 24-hours programmable;weekly (1 setting)once only (1 setting)sleep (at 10~60 min. 10-min. Intervals) |
| Programmable content | Program source (FM, MW, LW)Power ON/OFF settingDesignation of preset station |
| Setting intervals | 1 minute~23-hours, 59 minutes(at 1-min. intervals) |
| Priority order | sleep, once, weekly |
GENERAL
| Output voltage | 0.3 V (0.6V IHF) |
| Power consumption | 9 W (clock 5 W) |
| Power supply | AC 50 Hz/60 Hz, 240V |
| Dimensions (W × H × D) | 360 × 64.5 × 288 mm(14-3/16" × 2-17/32" × 11-11/32") |
| Weight | 2.1 kg (4.6 lb.) |
Note:
Specifications are subject to change without notice. Weight and dimensions are approximate.
Troubleshooting Guide
Before requesting service for this unit, check the chart below for a possible cause of the problem you are experiencing. Some simple checks or a minor adjustment on your part may eliminate the problem and restore proper operation.
If you are in doubt about some of the check points, or if the remedies indicated In the chart do not solve the problem, refer to the directory of Authorized Service Centers (enclosed with this unit) to locate a convenient service center, or consult your Technics dealer for instructions.
| Problem | Probable cause(s) | Suggested remedy |
| While listening to FM broadcasts | ||
| An unusual hissing noise is heard when listening to the broadcast in stereo, but not heard when listening monaurally. | Due to the differences between a monaural and a stereo signal, a higher level of signal strength is required for proper stereo reception. If the signal level is low, a hissing noise may be produced on the stereo channel. | Try reducing the treble sound by using the treble control of the amplifier.Set for monaural reception to reduce the hiss.Note, however, that the broadcast will not be heard as stereo.Try changing the location, height and/or direction of the antenna.If an indoor antenna is being used, change to an outdoor antenna.Try using an antenna with more elements. |
| Noise is excessive in both stereo and monaural broadcasts. | Poor location and/or direction of the antenna. | |
| Transmitting station is too far away. | ||
| The FM stereo indicator or the quartz lock indicator flickers, without completely illuminating. | Poor location and/or direction of the antenna. | Try changing the location, height and/or direction of the antenna.If an indoor antenna is being used, change to an outdoor antenna.Try using an antenna with more elements. |
| Transmitting station is too far away. | ||
| Excessive distortion in the sound of stereo broadcasts. | Nearby building or mountain.[Multipath distortion is being caused by the mutual Interference of broadcast signals received directly from the transmitting station (direct waves) and signals being reflected from nearby buildings or mountains (reflected waves).] | |
| Sound is distorted,"popping" noise is heard, and/or the volume level becomes low. | Broadcast signals are being disturbed by nearby automobile traffic or airplanes. | Relocate the antenna and the connection wires to a place farther away from where automobiles pass. |
| While listening to AM broadcasts | ||
| An unusual “beat” sound is heard. | Unit is being used at the same time as the television set. | Switch OFF the television set, or use this unit farther away from it. |
| A low-pitched “hum” sound is heard when the broadcast is tuned. | The AM loop antenna connection wires are too close to the power cord. | Place the antenna connection wires and the power cord farther apart. |
| The power supply frequency from the power cord is modulated and heard from the speakers. | Install a special outdoor antenna. | |
| A strange hissing noise is produced continuously or intermittently. | Caused by the “discharge phenomenon” and the “oscillation phenomenon” of electric appliances (such as fluorescent lights, TV, small series-type motors, rectification equipment, etc.). | Try placing this unit farther away from such equipment.Install noise-prevention equipment on this unit or on the electric appliance. |
| While using the remote-control transmitter | ||
| The remote-control transmitter does not function. | Batteries are incorrectly placed. | • Insert the batteries so that the positive (+) and negative (−) polarities are correct. |
| The remote-control transmitter batteries are consumed. | • Replace them with new batteries. | |
| There is an obstruction between the remote-control transmitter and this unit. | • Remove the obstruction. | |
| The remote-control transmitter is not correctly facing this unit. | • Face the remote-control transmitter correctly toward this unit. | |
Maintenance
To clean this unit, use a soft, dry cloth.
For very dirty surfaces, dip a soft cloth in a weak soap-and-water solution and wring well. After cleaning, wipe with a soft, dry cloth.
Never use alcohol, paint thinner, benzine, or a chemically treated cloth to clean this unit.
Such chemicals may damage the unit's finish.
MEMO
Matsushita Electric Industrial Co., Ltd.
Central P.O. Box 288, Osaka 530-91, Japan
- Technics
- OPERATING INSTRUCTIONS
- Notes:
- Dear Stereo Fan
- Contents
- For United Kingdom
- Important
- Suggestions for Safety
- ■ Use a standard AC wall outlet
- ■ Grasp the plug when disconnecting the power supply cord
- ■ AC outlet on rear panel (not equipped for some countries)
- ■ Place the unit where it will be well ventilated
- ■ Avoid places such as the following:
- ■ Be sure to place the unit on a flat, level surface.
- ■ Never attempt to repair or reconstruct this unit
- ■Take particular care if children are present
- ■If water is spilled on the unit
- ■ Avoid spray-type Insecticides
- ■ Never use alcohol or paint thinner
- ■ Disconnect the power supply cord If the unit will not be used for a long time
- ■ If trouble occurs
- Accessories
- Connections
- Antenna Connections
- FM antenna
- ■ FM indoor antenna (included)
- For best reception sound quality:
- AM antenna
- ■ AM loop antenna (included)
- Pay attention to the following points when attaching the antenna.
- When attaching the antenna to a column, a wall or rack
- ■ FM outdoor antenna (not included)
- When attaching the antenna to the unit
- ■AM outdoor antenna (not included)
- Front Panel Controls and Functions
- ① Power "STANDBY ⏻/ON" switch (POWER "ON/STANDBY ⏻")
- Remote-control signal receptor (SENSOR)
- FM mode selector (FM MODE)
- Tuning buttons (TUNING)
- Band selectors (BAND SELECTOR)
- Preset-tuning buttons (1-0) (28 CHANNEL RANDOM PRESET TUNING)
- Memory button (MEMORY)
- A Digital frequency display
- B Quartz-lock Indicator (QUARTZ LOCK)
- © Memory indicator (MEMO)
- D Channel display
- E FM stereo Indicator (STEREO)
- F FM mode indicators
- Timer section
- ① Sleep button (SLEEP)
- Set button (SET)
- Cancel button (CANCEL)
- Select buttons (SELECT)
- Stand-by button (STANDBY)
- Clock set button (CLOCK SET)
- Read button (READ)
- A Stand-by Indicator (STANDBY)
- D Time display
- B Day display
- E Colon Indicator
- C Timer ON/OFF Indicator (ON/OFF)
- F Timer-mode indicator (ONCE/WEEKLY/SLEEP)
- Memory Presettings
- Notes
- The following table is in Chinese:
- Note:
- Listening to Radio Broadcasts
- Manual tuning
- If noise is excessive in FM broadcasts
- Back-up memory
- Most-recent memory
- -Notes
- To Use the Timer
- Types of timer operations
- Timer sequence of priority
- Operation of the one-time timer (ONCE) and
- weekly timer (WEEKLY) functions
- 4
- 5
- 6
- to contiunho a filn
- To temporarily cancel
- Pro-cancel-positing
- 1
- 2
- The English word in the script is to write the following text: "I am I'll be long enough to make a new language."
- to cancel a setting
- Timer recording
- Remote-Control Transmitter
- Insertion of remote-control transmitter batteries
- Open the cover.
- Insert the batteries.
- Battery life
- Battery notes
- Remote-control transmitter operation notes
- Other notes
- Remote-Control Operation
- A
- B
- C
- D
- E
- ←
- F
- Technical Specifications (DIN 45 500)
- Troubleshooting Guide
- Maintenance
- MEMO
Marque : TECHNICS
Modèle : ST-X999L
Catégorie : Récepteur audio