
ART30 - Débroussailleuse BOSCH - Notice d'utilisation et mode d'emploi gratuit
Retrouvez gratuitement la notice de l'appareil ART30 BOSCH au format PDF.

| Type de produit | Débroussailleuse électrique |
| Marque | BOSCH |
| Modèle | ART30 |
| Puissance nominale | 500 W |
| Vitesse à vide | 10 500 tr/min |
| Diamètre de coupe | 30 cm |
| Diamètre du fil de coupe | 1,6 mm (standard) / 2,4 mm (Extra Strong) |
| Capacité de la bobine | 8 m de fil |
| Alimentation | 230 V AC, 50 Hz (secteur) |
| Classe de protection | II (double isolation) |
| Poids | 3,2 kg |
| Alimentation automatique du fil | Oui (Pro tap) |
| Poignée ajustable | Oui |
| Réglage de la tête de coupe | Inclinaison et position de bordure |
| Roues intégrées | Oui (sur modèle ART30) |
| Accessoires inclus | Fil Extra Strong, bobine de rechange, protecteur de plantes, roues |
FOIRE AUX QUESTIONS - ART30 BOSCH
Questions des utilisateurs sur ART30 BOSCH
0 question sur cet appareil. Repondez a celles que vous connaissez ou posez la votre.
Poser une nouvelle question sur cet appareil
Téléchargez la notice de votre Débroussailleuse au format PDF gratuitement ! Retrouvez votre notice ART30 - BOSCH et reprennez votre appareil électronique en main. Sur cette page sont publiés tous les documents nécessaires à l'utilisation de votre appareil ART30 de la marque BOSCH.
MODE D'EMPLOI ART30 BOSCH
Originalbetriebsanleitung
Original instructions
Notice originale
Manual original
Manual original
Istruzioni originali
Oorspronkelijke
gebruiksaanwijzing
Original brugsanvising
Bruksanvisning i original
Original driftsinstruks
Alkuperäiset ohjeet
Ppwrtoo oyniyov
Xpnon
Original isletme talimati
Instrukcja oryginalna
Puvodni navod k použivani
Póvodny námov na použitie
Eredeti használati utasítás
Опигинальhoe руководТВО NO 3КСПлуаТAUИ
Opurihalbha iHctpykuiz 3 ekcnnyataqii
Instruktiuni originale
OpunHaJIHa HNCTpyKcua
Originalno uputstvo za rad
Izvirna navodila
Originalne upute za rad
Algupärane kasutusjuhend
Instrukcijas originalvaloda
Originali instrukcija
Deutsch Polski
English Cesky
Français Slovensky
Espanol Magyar
Portugués Pycckn
Italiano yKpaHcbKa
Nederlands Romana
Dansk BbIrapckn
Svenska Srpski
Norsk Slovensko
Suomi Hrvatski
Eληνικα Eesti
Türkce Latviešu
Lietuviskai

BOSCH
ART COMBITRIM


2·F 016 L70 621·09.11
3·F016L70621·09.11
4·F016L70621·09.11
6·F016 L70 621·09.11
F 016 800 178
F 016 800 175
F016800176
10x
F016800174
(ART 23/2300 COMBITRIM)
F016800181
(ART 26/2600 COMBITRIM)
F 016 800 182
(ART 30/3000 COMBITRIM)
F 016 800 172
F016800173

Safety Notes
Warning! Read these instructions carefully, be familiar with the controls and the proper use of the line trimmer. Please keep the instructions safe for later use.
Explanation of symbols on the line trimmer

General hazard safety alert.

Read instruction manual.

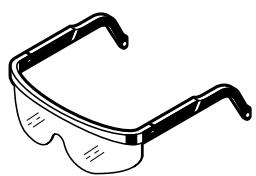
Wear eye protection.

Beware of thrown or flying objects to bystanders. Keep bystanders a safe distance away from the n chine.

Switch off and remove plug from mains before adjusting, cleaning or if the cable is entangled and before leaving the trimmer unattended for any period. Keep the supply flexible cord away from the cutting line.
Do not work in the rain or leave the trimmer outdoors whilst it is raining.

- Never operate the trimmer with damaged guards or shields or without guards or shields in position.
Before use check the supply and extension cord for signs of damage or ageing. If the cord becomes damaged during use, disconnect the cord from the supply immediately. DO NOT TOUCH THE CORD BEFORE DISCONNECTING THE SUPPLY. Do not use the trimmer if the cord is damaged or worn.
Before using the machine and after impact, check for signs of wear or damage and repair if necessary. - Do not operate the trimmer when barefoot or wearing open sandals, always wear substantial footwear and long trousers.
- Keep extension cords away from cutting elements.
- Never allow children or people unfamiliar with these instructions to use the trimmer. Local regulations may restrict the age of the operator. When not in use store the trimmer out of reach of children.
This appliance is not intended for used by persons (including children) with reduced physical, sensory or mental capabilities, or lack of experience and knowledge, unless they have been given supervision or instruction concerning use of the appliance by a person responsible for their safety.
Children should be supervised to ensure that they do not play with the appliance.
■ Never work with this trimmer while people, especially children or pets are nearby.
The operator or user is responsible for accidents or hazards occurring to other people or their property.
Wait until the rotating line has completely stopped before touching it. The line continues to rotate after the trimmer is switched off, a rotating line can cause injury.
Work only in daylight or in good artificial light.
Avoid operating the trimmer in wet grass, where feasible.
- Switch off when transporting the trimmer to and from the area to be worked on.
- Switch on the trimmer with hands and feet well away from the rotating line.
Do not put hands or feet near the rotating line.
- Never fit metal cutting elements to this trimmer.
Inspect and maintain the trimmer regularly.
Have the trimmer repaired only by an authorized customer service agent.
Always ensure that the ventilation slots are kept clear of debris.
Take care against injury from the blade fitted for cutting the nylon line length. After feeding line always return the trimmer to its horizontal operating position before switching on.
- Do not feed and cut off excess line in edging position.
- Switch off and remove the plug from the socket:
whenever you leave the machine unattended for any period
- before replacing the spool
- if the cable is entangled
- before cleaning or working on the line trimmer.
Store the machine in a secure dry place out of reach of children. Do not place other objects on top of the machine.
Replace worn or damaged parts for safety.
■ Ensure replacement parts fitted are Bosch approved.
Technical data
| Line trimmer | ART 23 COMBITRIM/ ART 2300 COMBITRIM | ART 26 COMBITRIM/ ART 2600 COMBITRIM | ART 30 COMBITRIM/ ART 3000 COMBITRIM | |
| Part number (typ) | 3 600 H78 B.. | 3 600 H78 C.. | 3 600 H78 D.. | |
| Rated power | [W] | 400 | 450 | 500 |
| No-load speed | [mi n-1] | 12 000 | 11 500 | 10 500 |
| Cutting line feed | Pro tap automatic | Pro tap automatic | Pro tap automatic | |
| Adjustable handle | ● | ● | ● | |
| Cutting Head angle adjustment/edging adjustment | ● | ● | ● | |
| Cutting line | [mm] | Ø 1.6 | Ø 1.6 | Ø 1.6 |
| Cutting circle | [cm] | 23 | 26 | 30 |
| Cutting spool capacity | [m] | 8 | 8 | 8 |
| Extra Strong Line Weight (without optional extras) | [mm] | Ø 2.4 | Ø 2.4 | Ø 2.4 |
| [kg] | 2.7 | 3.0 | 3.2 | |
| Protection class | ☐ / II | ☐ / II | ☐ / II | |
| Serial Number | See serial No 16 (rating plate) on machine. | |||
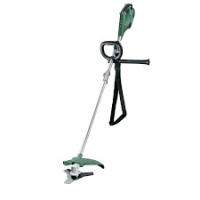
Intended Use
The product is intended for the cutting of grass and weeds under bushes, as well as on slopes and edges that can not be reached with the lawn mower. Intended Use is related to operation within 0^ and 40^ ambient temperature.
Introduction
This manual gives instructions on the correct assembly and safe use of your machine. It is important that you read these instructions carefully.
Delivered Items
Carefully remove the machine from its packaging and check that you have all the following items:
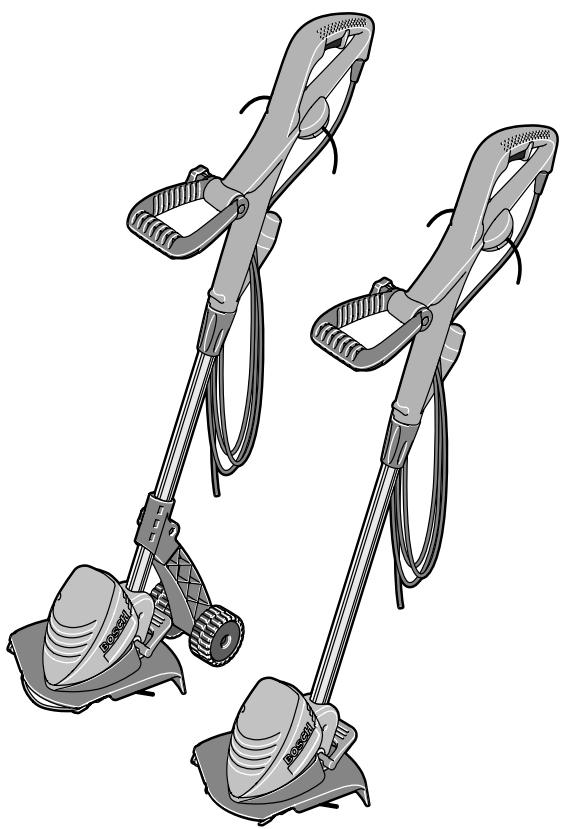
- Line trimmer
Cutting guard - Adjustable handle (fitted)
- Wheels (ART 30/3000 COMBITRIM only)
- Plant protector (ART 30/3000 COMBITRIM only)
-ExtraStrongLine - Operating instructions
When parts are missing or damaged, please contact your dealer.
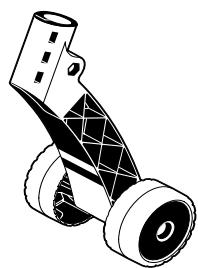
Operating Controls
1 On/Off switch
2 Handle
3 Handle wing nut
4 Adjustable handle
5 Adjusting collar
6 Shaft
7 Trimmer head
8 Ventilation slots
9 Plant protector
(ART 30/3000 COMBITRIM only)
10 Cutting guard
11 Wheels (ART 30/3000 COMBITRIM only)
12 Foot pedal for head angle adjustment
13 Extra Strong Line
14 Extra Strong Line spool
15 Mains plug**
16 Serial Number
**Country specific
Not all of the accessories illustrated or described are included as standard delivery.
16·F016L70621·09.11


For Your Safety
Warning! Switch off, remove plug from mains before adjusting, cleaning or if cable is cut, damaged or entangled.
The cutting line continues to rotate for a few seconds after the trimmer is switched off.
Caution - do not touch rotating cutting line.
Electrical Safety
Your machine is double insulated for safety and requires no earth connection. The operating voltage is 230V AC, 50Hz (for non-EU countries 220V , 240V as applicable). Only use approved extension cables. Contact your Bosch Service Center for details.
It is recommended for increased electrical safety to use a Residual Current Device (RCD) with a tripping current of not more than 30mA . Always check your RCD every time you use it.
WARNING: For safety, it is essential that the mains plug 15 attached to the machine is fitted to the power supply cable 17.
The couplings of connection leads must be protected against splashes and the coupling sockets on the leads must be made of rubber or coated with rubber.
Fixing means for the connection leads must be used.
The connection lead must be inspected for signs of damage at regular intervals and may only be used if in perfect condition.
If the supply cord is damaged, it must be replaced by a Bosch Service Centre.
Extension cords/leads should only be used if they comply with H05VV-F or H05RN-F types.
Products sold in GB only: Your machine is fitted with an approved 13 A (BS 1363/A) electric plug and is protected by a 13 A fuse (ASTA Approved to BS 1362).
If the fitted plug is not suitable for your socket outlets, it should be cut off and an appropriate plug fitted in its place by an authorized customer service agent.
The severed plug must be disposed of to avoid a possible shock hazard and should never be inserted into a 13 A socket elsewhere.
Assembly

Do not connect the machine to the mains socket before it is completely assembled.
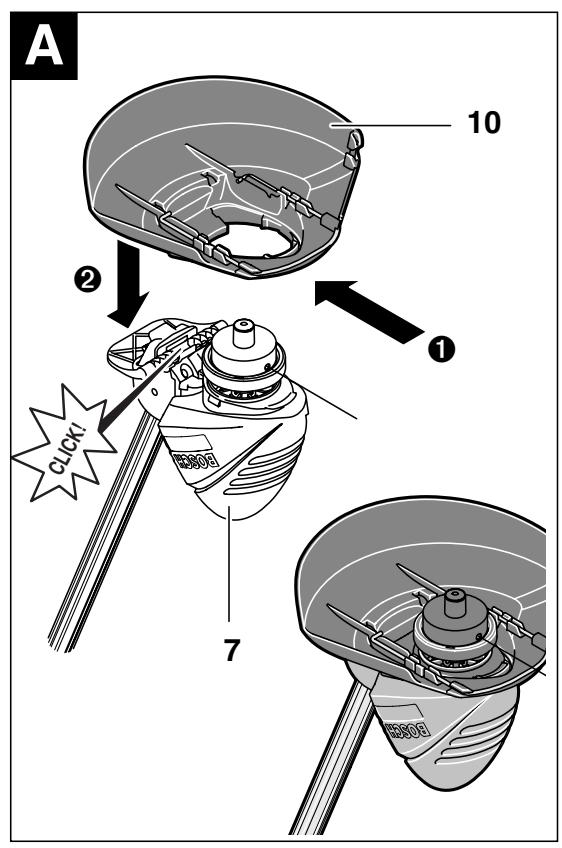
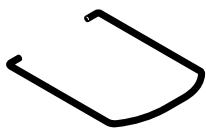
A Mounting the Cutting Guard
Place the cutting guard 10 on the trimmer head 7.
Hook the guard onto trimmer head and push until secure fitting.
Push rear of guard until secure (click).
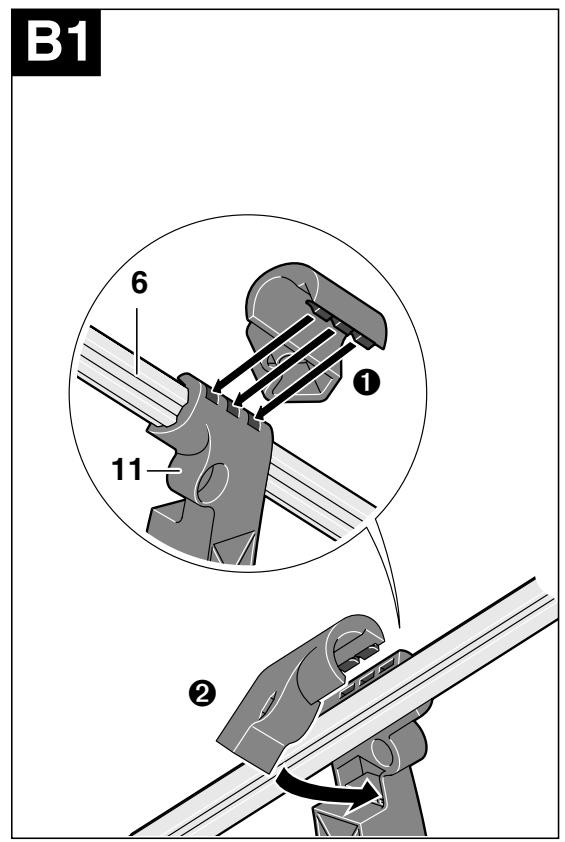
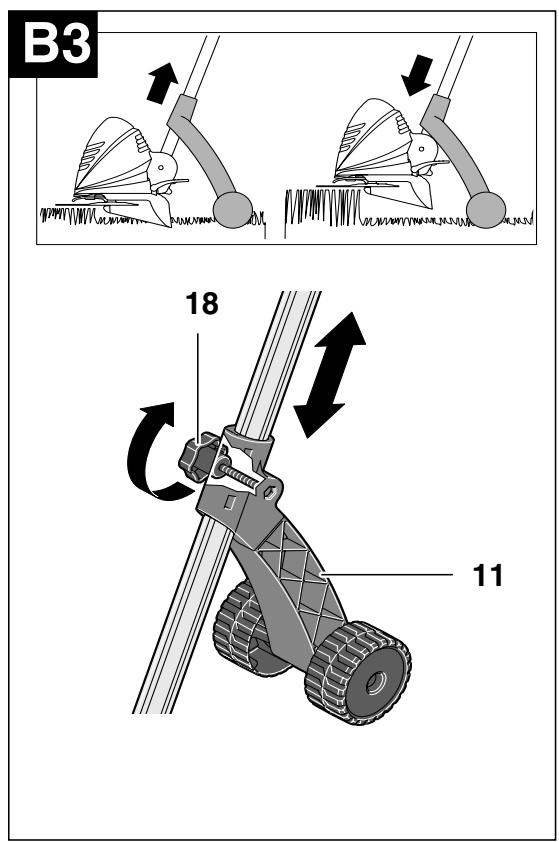
Mounting the Wheels
(ART 30/3000 COMBITRIM only)
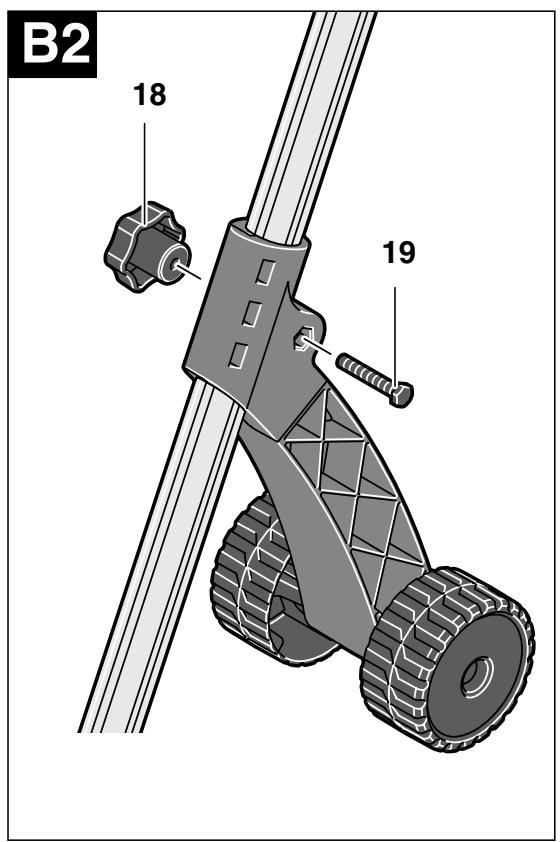
Fit the wheels 11 onto the shaft 6.
32 Fit the bolt 19 and the wingnut 18.
Note: The position of the wheels can be adjusted by loosening the wingnut 18 and moving to the desired position.
33 The wheels can be moved up and down the shaft 6 depending on the height of cut required.
Adjustment
Using Adjustable Handle
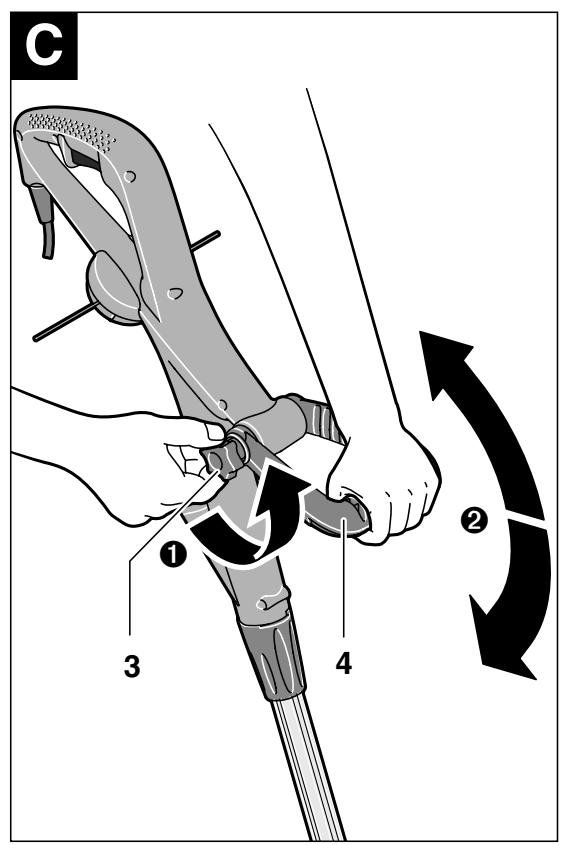
The adjustable handle 4 can be set in various positions:
To change the position undo the handle wing nut 3 and move the adjustable handle 4.
2 Tighten the handle wing nut 3 securely to fix the adjustable handle 4 in the adjusted position.
Adjusting Product Length
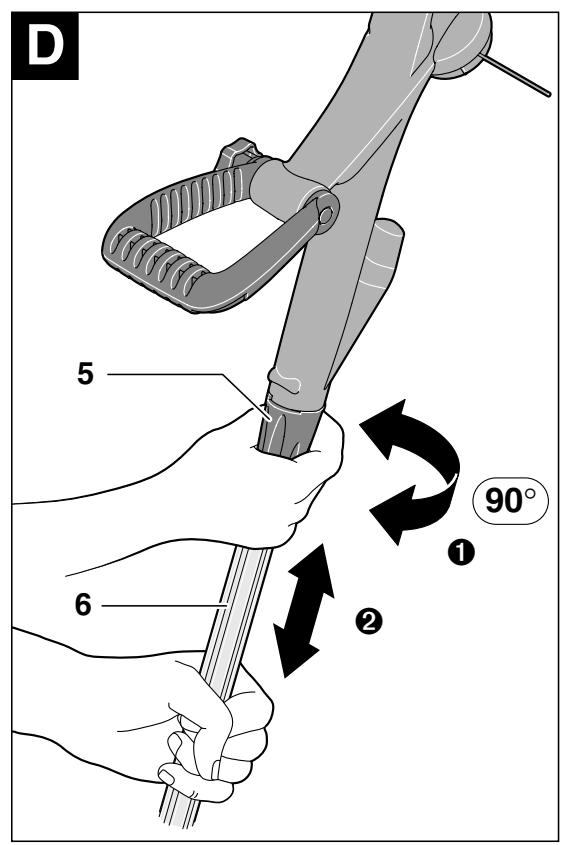
1 Loosen the adjustment collar 590^
Pull the shaft out to increase the height, or push the shaft in to decrease the height. Re-tighten adjustment collar 5.
Adjusting cutting head angle:
To change the angle depress the foot pedal 12 and move the shaft 6 to the desired position.
Release the foot pedal 12.
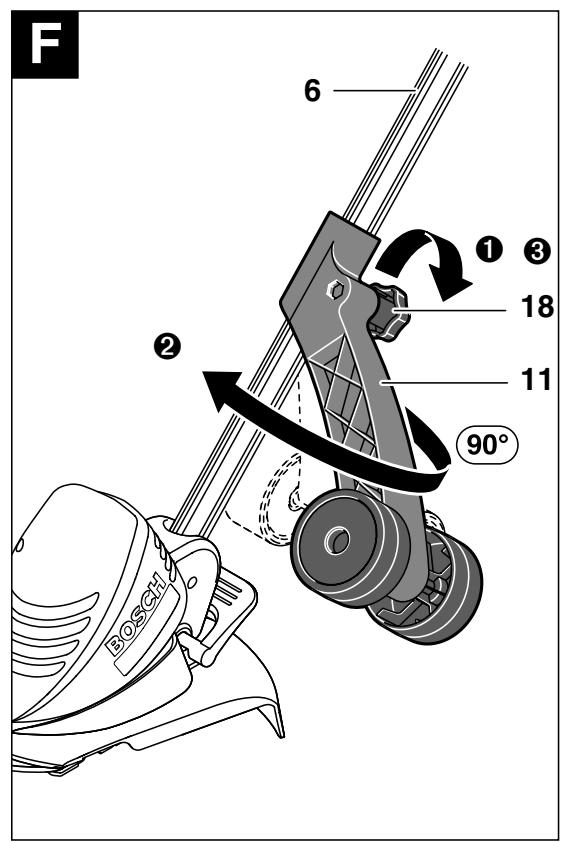
Adjusting for Edging Mode
F Moving wheels (where fitted):
1 Loosen wingnut 18.
Twist wheels 11 90^ as shown.
3 Tighten wingnut 18.
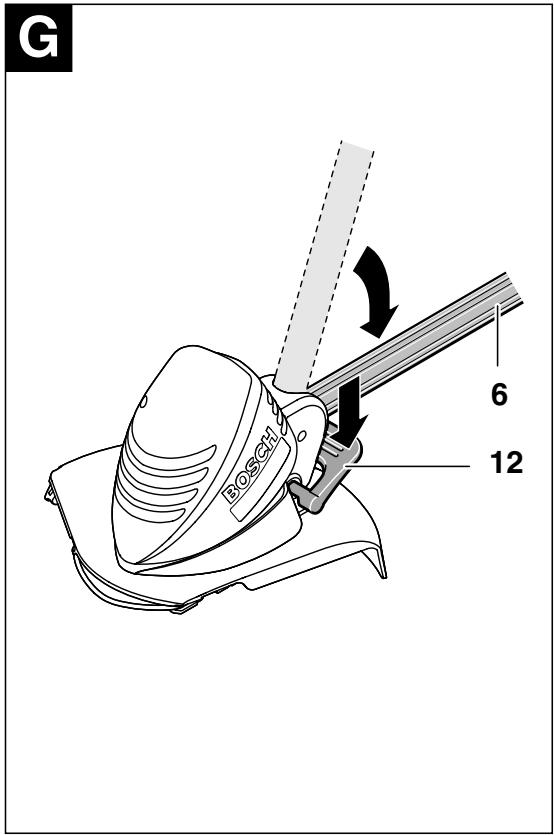
Adjusting cutting head angle:
Depress the foot pedal 12.
2 Move the shaft 6 to the lowest position. Release the foot pedal 12.
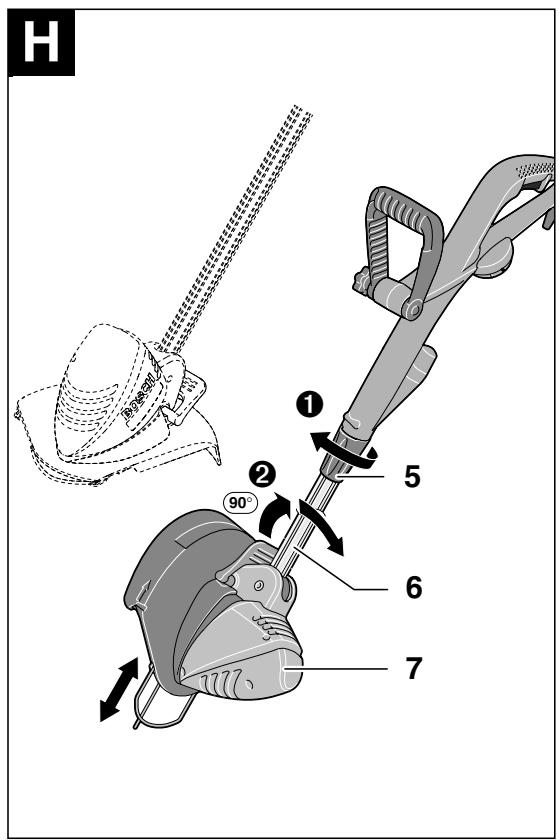
H Move trimmer head:
1 Loosen the adjustment collar 5.
Turn the shaft 6 90^ to position the trimmer head 7 for trimming/edging as shown. Re-tighten adjustment collar 5.
Cutting and Edging
Remove stones, loose pieces of wood and other objects from the cutting area.
The cutting line continues to rotate for a few seconds after the trimmer is switched off. Allow the motor/cutting line to stop rotating before switching "on" again.
Do not rapidly switch off and on.
Switching On and Off
Press switch 1 and hold depressed. Release switch 1 for switching off.
Cutting Grass
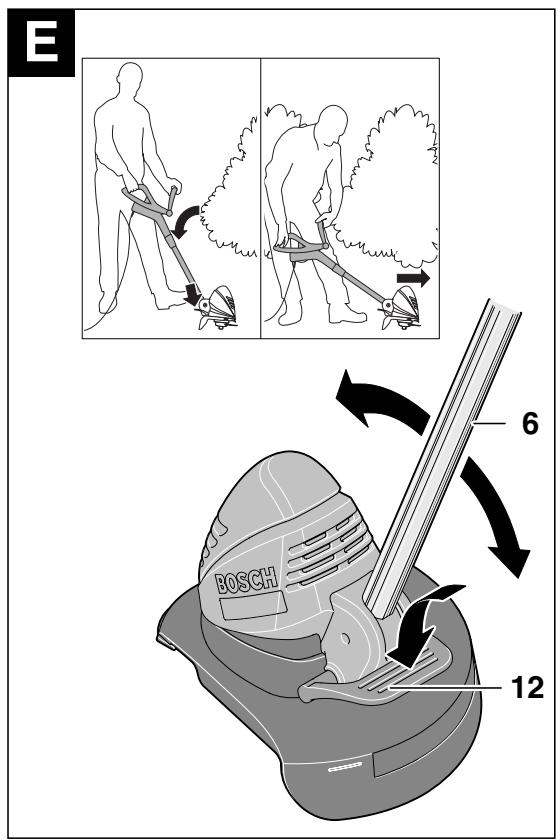
Move the trimmer left and right, keeping it well away from the body.
The trimmer can efficiently cut grass up to a height of 15 cm. Cut taller grass in stages.
Remove the wheels when cutting long grass (ART 30/3000 COMBITRIM only).
Cutting Very Long Grass/Weeds
The product is supplied with Extra Strong Line and a fixing spool, fit as described in spool maintenance.
Fitting the Extra Strong Line for very long tough conditions will improve the performance and give better results.
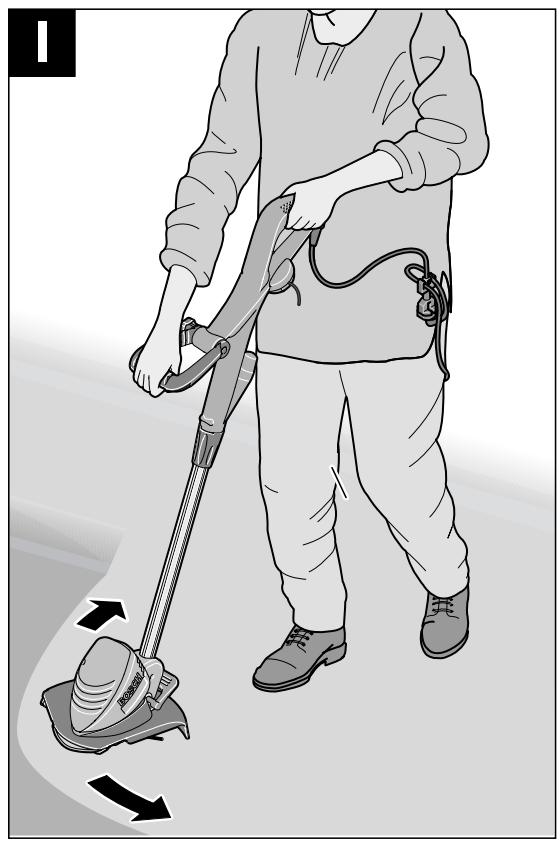
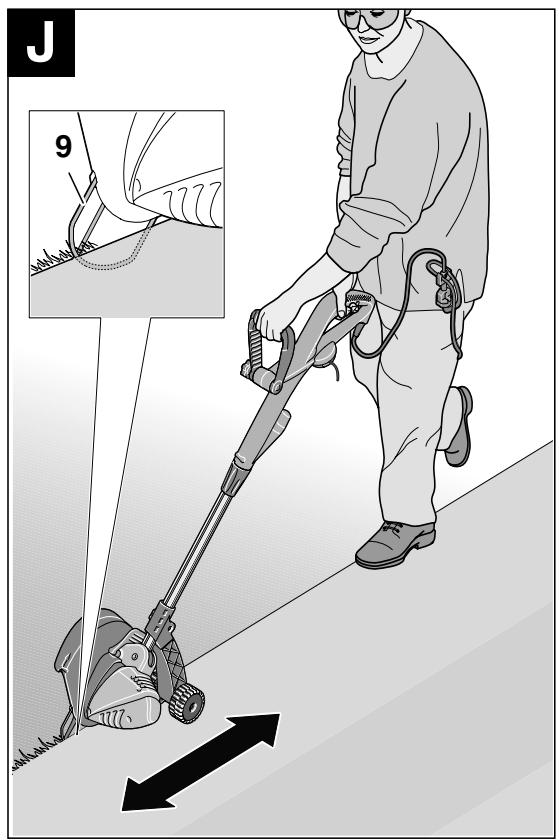
J Trimming Edges
Guide the trimmer along the edge of the lawn. Do not allow the cutting line to contact paved surfaces, stones or garden walls, since this will wear the line rapidly.
For better control use the plant protector 9 (ART 30/3000 COMBITRIM only - available as an accessory for ART 23/26/2300/2600 COMBITRIM) as a guide.
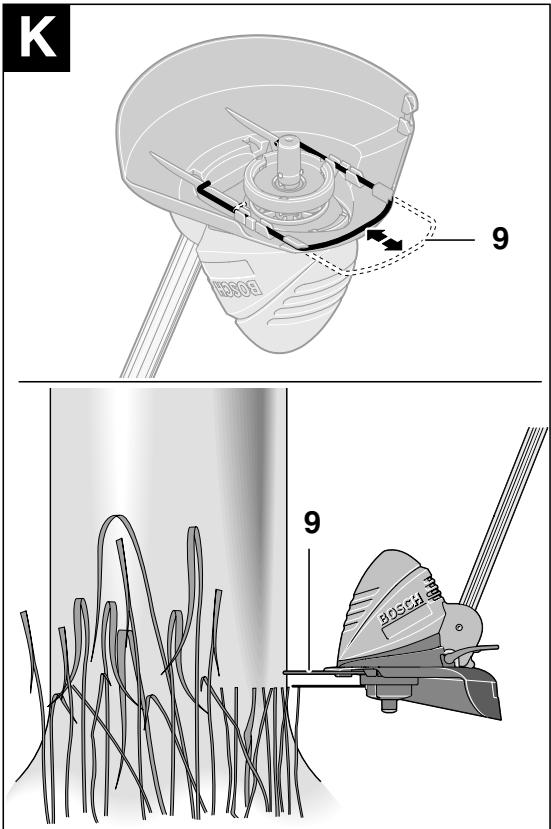
K Cutting Around Trees and Bushes
Carefully cut around trees and bushes so that they do not come into contact with the cutting line.
Plants can die if you damage the bark.
For better control use adjustable handle and use the plant protector 9 (ART 30/3000 COMBITRIM only – available as an accessory for ART 23/26/2300/2600 COMBITRIM).
Feeding the Line

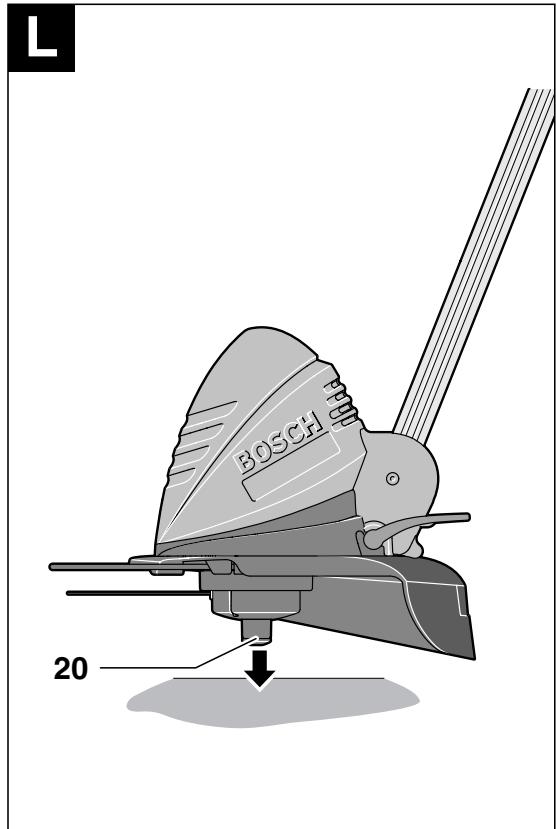
Do not feed and cut off excess line in edging position (see figure J). Feed button 20 may become hot.
The rotating line can wear or break. You will notice when the motor runs without load and no grass is cut.
While operating the trimmer press the ground or a solid surface, then release (necessary pressure approx. 3kg ). This action will allow the feed button 20 to release the line out. The spool will release approx. 4cm of line per action.
When the line breaks off completely, feed twice to regain the full cutting circle.
M If the line is exceeding the maximum cutting circle it will be cut by the blade 24 integrated in the cutting guard 10.
Maintenance

Stop and remove plug from the power supply.
Note: To ensure long and reliable service, carry out the following maintenance regularly.
Regularly check for obvious defects such as loose fixings, and worn or damaged components.
Check that covers and guards are undamaged and correctly fitted. Carry out necessary maintenance or repairs before using.
If the trimmer should happen to fail despite the care taken in manufacture and testing, repair should be carried out by an authorized customer service agent for Bosch garden products.
For all correspondence and spare parts orders, always include the 10-digit part number (TYP) from the nameplate of the machine!
Spool Maintenance

Stop and remove plug from the power supply.
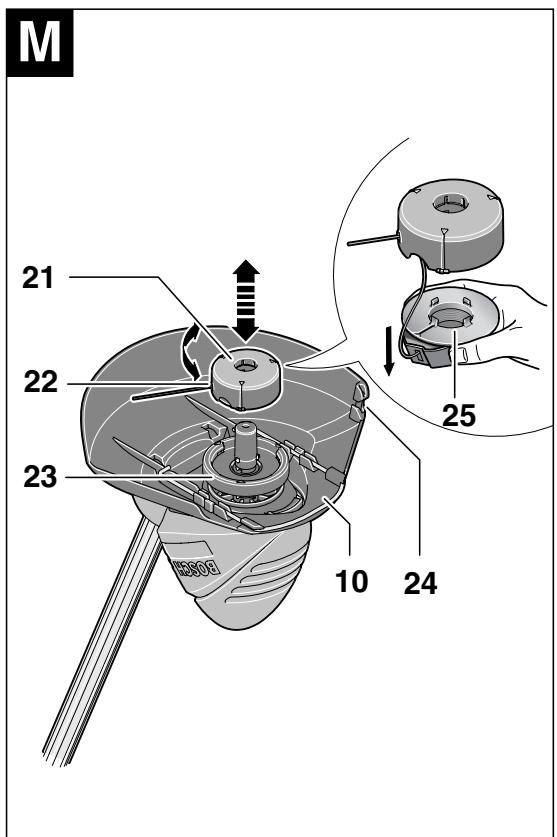
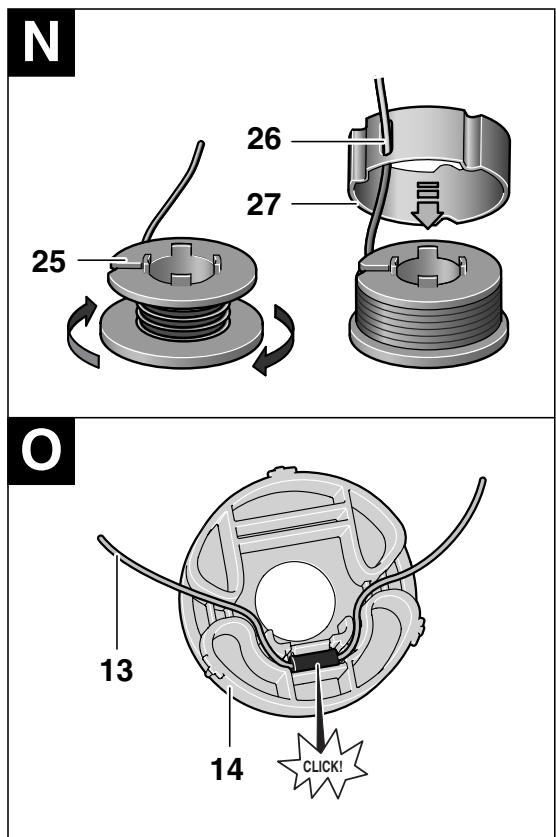
M Replacing the Line Spool
Hold the spool plate 23 in position.
Turn the spool cover 21 counter-clockwise and remove.
Take the empty spool 25 out from the spool cover.
Thread the line of the new/refilled spool through the eyehole 22 and place the spool in the spool cover 21.
Pull approx. 9 cm of line out of the spool.
Place spool with cover 21 on the spool plate in the correct position (bayonet fastening), press down and turn fully clockwise (click).
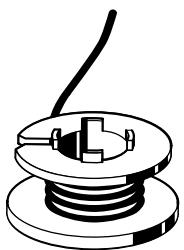
Fitting Extra Strong Line Spool
Hold the spool plate 23 in position.
Turn the spool cover 21 counter-clockwise and remove.
Place the Extra Strong Line spool 14 on the spool plate in the correct position (bayonet fastening), press down and turn fully clockwise (click).
When the Extra Strong Line breaks, us the above procedure to remove the spool and fit the Extra Strong replacement Line 13 as shown to the spool.
Replacement Extra Strong Line can be stored on the product as shown in main figure.
N Refilling Line
Take out the spool 25 as described above.
Press the cover ring 27 together, push it forward and detach over the smaller diameter of the spool.
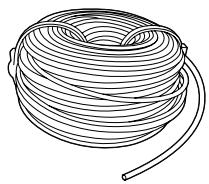
Cut off approx. 8 m line from the refill roll. Press one end into the notch of the spool so that it stands out approx. 4 mm.
Wind on the line tightly and in orderly layers in arrow direction.
Thread the line's end through the slot 26 in the cover ring 27 from the inside.
Keep the line tight and slide the cover ring 27 over the smaller diameter of the spool.
Build in the spool as described above.
Note: Only use Bosch replacement line. It has been developed specially for improved cutting and feeding performance. The use of other line will lead to a deterioration in performance.
After Trimming/Storage

Stop and remove plug from the power supply.
Clean the exterior of the machine thoroughly using a soft brush and cloth. Do not use water, solvents or polishes. Remove all grass and debris, especially from the ventilation slots 8.
Turn the machine on its side and clean the cutting guard 10 inside. If grass cuttings are compacted, remove with a wooden or plastic implement.
Hang the cable on the hook provided. DO NOT wrap/loop the supply/extension cable around the hook and the guard together – this will cause the cable to be in contact with the guard blade which can damage the cable. ONLY hang the cable on the hook provided.
Fault Finding
The following table gives checks and actions that you can perform if your machine does not operate correctly. If these do not identify/remedy the problem, contact your service agent.
Warning: Switch off and remove plug from mains before investigating fault.
| Symptom | Possible Cause | Remedy |
| Machine fails to operate | Power turned off | Turn power on |
| Mains socket faulty | Use another socket | |
| Extension cable damaged | Inspect cable, replace if damaged | |
| Fuse faulty/blown | Replace fuse | |
| Machine functions intermittently | Extension cable damaged | Inspect cable, replace if damaged |
| Machines internal wiring damaged | Contact Service Agent | |
| Contact Service Agent | ||
| Machine labours | Grass too high | Cut in stages |
| Machine is not cutting | Line too short/broken off | Feed the line manually/automatically |
| Line can not be fed | Spool empty | Replace the spool |
| Line inside the spool entangled | Inspect the spool, rewind if necessary | |
| Line keeps breaking | Line inside the spool entangled | Inspect the spool, rewind if necessary |
| Trimmer used incorrectly | Only trim with the tip of the line, avoid stones, walls and other hard objects. Feed the line regularly to maintain full cutting width. |
Disposal
Power tools, accessories and packaging should be sorted for environmental-friendly recycling.
Only for EC countries:
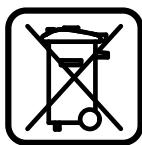
Do not dispose of power tools into household waste!
According to the European Directive 2002/96/EC on waste electrical and electronic equipment and its incorporation into national law, products that
are no longer suitable for use must be separately collected and sent for recovery in an environmentally-friendly manner.
After-Sales Service and Customer Assistance
Our after-sales service responds to your questions concerning maintenance and repair of your product as well as spare parts. Exploded views and information on spare parts can also be found under:
www.bosch-pt.com
Our customer consultants answer your questions concerning best buy, application and adjustment of products and accessories.
Great Britain
Robert Bosch Ltd. (B.S.C.)
P.O.Box 98
Broadwater Park
North Orbital Road
Denham
Uxbridge
UB 95HJ
Tel. Service: +44 (0844) 736 0109
Fax: +44 (0844) 736 0146
E-Mail: SPT-Technical.de@de.bosch.com
Ireland
Origo Ltd.
Unit 23 Magna Drive
Magna Business Park
City West
Dublin 24
Tel. Service: +353 (01) 466 67 00
Fax: +353 (01) 466 68 88
Australia, New Zealand and Pacific Islands
Robert Bosch Australia Pty.Ltd.
Power Tools
Locked Bag 66
Clayton South VIC 3169
Customer Contact Center
Inside Australia:
Phone: +61 (01300) 307 044
Fax: + 61 (01300) 307 045
Inside New Zealand:
Phone: +64 (0800) 543 353
Fax: +64 (0800) 428 570
Outside AU and NZ:
Phone: +61 (03) 9541 5555
www.bosch.com.au
Declaration of Conformity
Measured sound values determined according to 2000/14/EC (1.60 m height, 1 m distance away).
Typically the A-weighted noise levels of the product are: sound pressure level 85 dB(A); sound power level 95 dB(A). Uncertainty K = 1 dB.
Wear hearing protection!
Vibration total values (triax vector sum) determined according to EN 60335:
Vibration emission value a_h = 3.5 m/s^2 , Uncertainty K = 2 m/s^2 .
We declare under our sole responsibility that the product described under „Technical data" is in conformity with the following standards or standardization documents: EN 60335 according to the provisions of the directives 2004/108/EC, 98/37/EC (until 28 Dec 2009), 2006/42/EC (from 29 Dec 2009), 2000/14/EC.
2000/14/EC: Guaranteed sound power level 96 dB(A).
Conformity assessment procedure according to Annex VI.
Equipment category: 33
Notified body: SRL, Sudbury, England, Nr. 1088
Technical file at: Bosch Lawn and Garden Ltd., PTLG/EAE, Stowmarket, Suffolk IP14 1EY, England
Leinfelden, 21.10.2009
Dr. Egbert Schneider
Senior Vice President
Engineering
Dr. Eckerhard Strötgen
Head of Product
Certification


Robert Bosch GmbH, Power Tools Division
Subject to change without notice

20·F 016 L70 621·09.11
English - 6
- BOSCH
- ART COMBITRIM
- Safety Notes
- Intended Use
- Introduction
- Delivered Items
- Operating Controls
- For Your Safety
- Electrical Safety
- Assembly
- A Mounting the Cutting Guard
- Mounting the Wheels
- (ART 30/3000 COMBITRIM only)
- Adjustment
- Using Adjustable Handle
- Adjusting Product Length
- Adjusting cutting head angle:
- Adjusting for Edging Mode
- Cutting and Edging
- Switching On and Off
- Cutting Very Long Grass/Weeds
- Plants can die if you damage the bark.
- Feeding the Line
- Maintenance
- Spool Maintenance
- N Refilling Line
- After Trimming/Storage
- Fault Finding
- Disposal
- Only for EC countries:
- After-Sales Service and Customer Assistance
- www.bosch-pt.com
- Great Britain
- Ireland
- Australia, New Zealand and Pacific Islands
- Declaration of Conformity
- Wear hearing protection!
Marque : BOSCH
Modèle : ART30
Catégorie : Débroussailleuse