
Avent SCF282 - Esterilizador de biberones PHILIPS - Manual de uso y guía de instrucciones gratis
Encuentra gratis el manual del aparato Avent SCF282 PHILIPS en formato PDF.
| Tipo de producto | Esterilizador microondas |
| Marca | Philips |
| Modelo | Avent SCF282 |
| Capacidad estándar | 4 biberones Philips AVENT |
| Capacidad biberones grandes | 2 biberones de 330 ml |
| Capacidad recipientes | 4 recipientes y tapas |
| Capacidad sacaleches | 2 sacaleches + 2 biberones |
| Volumen de agua requerido | 200 ml exactamente |
| Potencia microondas compatible | 500 W a 1850 W |
| Tiempo de esterilización | 2 a 6 minutos según potencia |
| Tiempo de enfriamiento recomendado | 2 minutos mínimo |
| Duración de esterilidad después del ciclo | Hasta 24 horas (tapa cerrada) |
| Función principal | Esterilización al vapor en microondas |
| Mantenimiento y limpieza | Lavado en lavavajillas o a mano con líquido lavavajillas; secar después de cada uso |
| Precauciones de seguridad | No usar objetos metálicos; dejar enfriar antes de abrir; usar solo agua sin aditivos |
| Piezas de repuesto | Tapa, cesta, base (disponibles a través del servicio técnico Philips) |
| Servicio posventa | Contacte al Servicio de Atención al Consumidor Philips de su país |
| Garantía | Garantía internacional (ver folleto) |
Preguntas frecuentes - Avent SCF282 PHILIPS
Preguntas de los usuarios sobre Avent SCF282 PHILIPS
0 pregunta sobre este aparato. Responde a las que conoces o haz la tuya.
Hacer una nueva pregunta sobre este aparato
Descarga las instrucciones para tu Esterilizador de biberones en formato PDF gratis! Encuentra tus instrucciones Avent SCF282 - PHILIPS y toma tu dispositivo electrónico nuevamente en la mano. En esta página están publicados todos los documentos necesarios para el uso de su dispositivo. Avent SCF282 de la marca PHILIPS.
MANUAL DE USUARIO Avent SCF282 PHILIPS
Enhorabuena por la compra de este producto y bienvenido a Philips. Para sacar el mayor partido de la asistencia que Philips le-ofrece, registre su producto en www.philips.com/welcome.
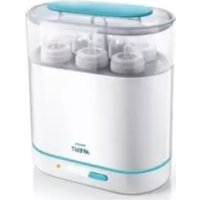
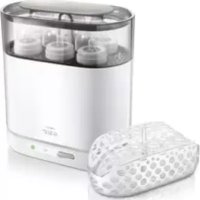
Descripción general (fig. 1)
1 Tapa
2 Cierres
3 Cesta
4 Base
5 Huecos para los biberones
6 Huecos para las tetinas
7 Soportes para las tapas
8 Ranuras para biberones grandes
9 Ranuras para extractores de leche
Important
Antes de usar el esterilizador para microondas, lea atentamente este manual de usuario y consévelo por sinecessary consultarlo en el futuro.
Advertencia
- Deje que el esterilizador se enfré antes de retirarlo del microondas. Tenga cuidado cuandofresho or abra el esterilizador, ya que el agua de su interior aun peut estar caliente.
- No retire la tapa del esterilizador inmediamente afterwards de la esterilización, ya que el vapor que sale está muy caliente. Deje que el esterilizador se enfríe, ya que el vapor pueda provocar quemaduras.
- Utilice únicamente agua, sin aditivos.
- Asegürese sempre de que la base se hallenado con agua cuando utilise el esterilizador en el microondas.
- No ponga lejía u otros productos químicos en el esterilizador.
- No coloque articulos metálicos en el esterilizador, ya que this could provocar daños en el microondas.
- No sobrecargue el esterilizador o de lo contrario los objetos no se esterilizarán correctamente.
- Esterilice solo los biberones y otros objetivos apropiados para los esterilizadores. Consulte en el manual del usuario los objetivos que desea esterilizar para asegurar de que son apropiados para los esterilizadores.
- Este esterilizador es solo para uso dométrico.
Precaución
- Asegúrese de que los niños no juguen con el esterilizador.
- Asegúrese siempre de que la base se hallenado con 200 ml de agua antes de comendarla esterilización.
- Después de cada uso, vierta el agua restante del esterilizador cuando se haya enfiado.
- Deje siempre que el esterilizador se enfré antes de guardarlo.
- Lávese bien las manos antes de tocar los objetivos esterilizados.
- No exponga el esterilizador a altas temperativas ni a la luz solar directa.
- No cologne el esterilizador sobre una superficie caliente.
- Si utilizes unorno combinado (con funcion de grill), aseguresse de que el hora o el grill está apagados y se han enfiado antes de introducir el esterilizador.
Antes de utiliserlo por primera vez
Antes de utiliser el esterilizador por primera vez, límpielo Completely tal y como se describe a continua.
1 Saque la cesta de la base.
2 Llene un biberón o un vaso medidor con exactamente 200 ml de agua del grifo y viertalo en la base (fig. 2).
LaULD de agua debe ser exactamente 200 ml. Si la base contiene demasiada agua, los articulos no se esterilizaran correctamente. Si la base no contiene sufiente agua, thise pue caesar daños al esterilizador o el microondas.
3 Coloque la cesta en la base (fig. 3).
4 Coloque la taps en el esterilizador (1) y presione los cierras para bloquear la tapa en su lugar (2). (fig. 4)
5 Coloque el esterilizador en el microondas. (fig. 5)
Nota: Asegúrese de que el microondas está limpio y seco antes de起初 la esterilización.
Nota: Si tiene un hora combinado, asegúrese de que el hora o el grill está apagados y se han enfiado antes de introducir el esterilizador.
6 Selección el voltaje y el tiempo apropiado en el microondas (consulte la tabla del capítulo "Utilización del esterilizador para microondas") ycede que este funciona.
7 Cuando el microondas haya terminado, abralo ycede que el esterilizador se enfié antes de retirarlo del microondas.
8 Tire de los cierras para abrirlos (1) y retire la tapa (2) (fig. 6).
9 Vierta el agua restante y enjuague bien la base y la cesta.
Preparación para su uso
Llenado de la cesta
Antes de colocar los objetos que se van a esterilizar en la cesta, lávelos en el lavavajillas o a mano con agua caliente y un poco de detergente liquido. Asegúrese de que limpia todos los restos de leche.
Nota: Asegúrese de que todas las piezas que deben esterilizarse se hayan desmontado Completely y colóquelas en la cesta con las aberturas hacía bajo para evaporar que se llen de agua.
Note: No coloque los objetivos demasiado cerca它们. El vapor debe circular alrededor de los objetos para asegurar una esterilizacion efectiva.
Hay varias maneras de llenar la cesta:
Cuatro biberones de Philips AVENT
1 Coloque los biberones Boca abajo en los huecos para los biberones. (fig. 7)
2 Coloque las tetinas en los huecos para las tetinas (fig. 8).
3 Coloque los anillos de cierre sin apretar encima de las tetinas (fig. 9).
Nota: Los anillos de cierre más grandes sólo encajan si se colocan en una posición inclinada sobre las tetinas.
4 Coloque las tapas en los soportes para las tapas (fig. 10).
Dos biberones de Philips AVENT grandes (330 ml)
1 Introduzca el borde de los biberones en las ranuras para biberones grandes (fig. 11).
2 Coloque las tetinas en los huecos para las tetinas (fig. 12).
3 Coloque los anillos de cierre sin apretar encima de las tetinas (fig. 13).
Nota: Los anillos de cierre más grandes sólo encajan si se colocan en una posición inclinada sobre las tetinas.
4 Coloque las tapas en los soportes para las tapas (fig. 14).
Cuatro vasos de almacenimiento y tapas de Philips AVENT
1 Coloque los vasos de almacenimiento Boca abajo en la cesta (fig. 15).
2 Coloque las tapas verticalmente alrededor de los biberones. (fig. 16)
Dos extractores de leche de Philips AVENT y dos biberones de Philips AVENT
No coloque las piezas electricas en el esterilizador.
1 Desmonte completeness el extractor de leche.
2 Introduzca el borde del cuerpo del extractor en las ranuras del extractor de leche de la parte inferior de la cesta (fig. 17).
3 Coloque los biberones Boca abajo en los huecos para los biberones (fig. 18).
4 Coloque las piezas restantes que no sean electricas del extractor de leche en?.
algun espio libre de la cesta (fig. 19).
Nota: Asegürese de que el vapor pueda circular alrededor de estas piezas.
Utilización del esterilizador para microondas
Colque sólo objetos que Sean apropiados para la esterilizacion en el esterilizador. No esterilice la escobilla del biberon o elementos que esten llenos de liquido, como por exemple un mordedor refrigerante.
Nota: Antes de esterilizar biberones y otros objetos, limpielos primo.
Saque la cesta de la base.
2 Llene un biberón o un vaso medidor con exactamente 200 ml de agua del grifo y viertalo en la base (fig. 2).
Lacantidad de aguadebeser exactamente200ml.Si la base contiene demasiada
agua,los articulos no se esterilizarancorrectamente.Si la base no contiene
suficiente agua,esto pueedcausardanos al esterilizador o el microondas.
3 Coloque la cesta en la base (fig. 3).
4 Coloque los objetos que se van a esterilizar en la cesta (consulte el capitulo "Preparacion para su uso").
5 Colque la tapa en el esterilizador (1) y presione los cierras para bloquear la tapa en su lugar (2) (fig. 4).
6 Coloque el esterilizador en el microondas. (fig. 5)
Nota: Asegúrese de que el microondas está limpio y seco antes de iniciaar la esterilización.
7 Selección el voltaje y el tiempo apropiado en el microondas (consulte la tabla que aparece a continuación) ycede que este funciona.
Nota: Si tiene un hora combinado, asegúrese de que elorno o el grill está apagados y se han enfiado antes de introducir el esterilizador.
Nota: No supere el tiempo de esterilización indicado en la tabla. Especillas del microondas
Vacios Tiempo de esterilización Tiempo de
enfriamento
8 Cuando el microondas haya terminado, abralo ycede que el esterilizador se enfié antes de retirarlo del microondas.
Tenga cuidado, pode salir vapor caliente del microondas.
14 ESPANOL
9 Retire el esterilizador del microondas.
Nota: Asegürese de que mantiene el nivel del esterilizador para estar que gotee o derrame agua caliente.
Note: Los objetos esterilizados permanecen estériles hasta 24 horas en el esterilizador para microondas si no retina la taps.
10 Tire de los cierras para abrirlos (1) y retire la taps (2) (fig. 6).
11 Retire los biberones y otros objetivos de la cesta. Utilice las pinzas para retirar los objetivos más(PC).
Tenga cuidado, puede salir vape caliente del esterilizador y los objetivos esterilizados aun你能 estar calientes.
12 Cuando retire los objetos esterilizados, vierta el agua restante, enjuague bien la base y la cesta y seque todas las piezas.
Limpieza
Limpie la tapa, la cesta y la base afterwards de cada uso para evaporar que se acumule cal. No utilise estropajos, agentes abrasivos ni liquidos agresivos, como lejía, gasolina o acetona, para limpar el esterilizador.
Nota: Deje que el esterilizador se enfrie antes de guardarlo.
1 Lave las piezas del esterilizador con agua caliente y un poco de detergente liquido.
Note: Internacionalmente, como el esterilizador en el lavavajillas.
2 Tras la limpieza, seque todas las piezas correctamente.
Nota: Tras la limpieza, guarde el esterilizador en un lugar limpio y seco.
Garantía y servicios
Si necesita informacion oiene某个 problema, visite la page Web de Philips en www.philips.com opongase en contacto con el Servicio de Atencion al Cliente de Philips en su pais (hallar a numero de téléphone en el folleto de la garantia mundial). Si no hay Servicio de Atencion al Cliente de Philips en su pais, dirijase a su distribuidor local Philips.
Introduction
(19 J) aull u gauo jy s y d y d y d y d y d y d y d y d y d y d y d y d y d y d y d y d y d y d y d y d y d y d y d y d y d y d y d y d y d y
.1j 21 oio jg jll jgg aol 00 sJb:abdo
aeggally gaaill jpl plsiil
aiglaal clwgloljg jll 1wippei jlgll gssu wx .paeill awlio paeell jgclwul
Jilw Jilw Jilw Jilw
.8g14aabci yolialg cIyjll paei jia
aclll aalll aljg
.(rJC)aclllgaggssssallcfo ballylllo 1 jalllgjolol
cluii pi j clll no ayus daas je gniu uclall cui ig. bually llo r... clall aos j
g 1 g aill jge 35 4 3 3 3 3 3 3 3 3 3 3 3 3 3 3 3 3 3 3 3 3 3 3 3 3 3 3 3 3 3 3 3 3 3 3
( a + b) ( a^2 - ab + b^2) = a^3 + b^3
(rJC)aclall aalll
(“plssuuljzull"JolSjll)alllgaaeeJrallclx
(2) (r) aLco eIboll cttll Jawx dIaill jaoiljge Ic boll
(0)gjglj
aaii i 1
aeggssalln g (olj lgl jgllg) aeggssalln g f g gglg ygall pslal sgswall
S OBC = S BOC + S_ BOC
aill jg g oog jy lgl nog algall gl jll jusu uusu cis1j:abdo
14 × 2 =
Jgall gagall paoill cog sbssx yu:abso
aagssalln
piaill cog
| الجعaultالجعaultالجعaultالجعaultالجعaultالجعaultالجعaultالجعault | ||
| الجعaultY | الجعaultY | الجعaultNo-الجعaultY… |
| الجعaultY | الجعaultY | الجعaultY…-الجعaultNo… |
| الجعaultY | الجعaultY | الجعaultY…-الجعaultNo… |
A
aagaae aee
9
. 15ll clll lgl yll jyil gaiu g aaii jge i bll no sul
aill yogai p j aeggall jge ae w re Jl Jai dll jaaeall cai x1: abxlo
(1)(2)
aallllgljfbalallgssil.aillln no gdsollaeog jll
aiaawaaeaalclwai jg paeilljge no slll jll g jy
11
#
g 1 g c w l y 1 y 1 y 1 y 1 y 1 y 1 y 1 y 1 y 1 y 1 y 1 y 1 y 1 y 1 y 1 y 1 y 1 y 1 y 1 y 1 y 1 y
uuiu uuiu uuiu uuiu uuiu uuiu uuiu uuiu uuiu uuiu uuiu uuiu uuiu uuiu uuiu uuiu uuiu uuiu uuiu uuiu uuiu uuiu uuiu uuiu uuiu uuiu uuiu uuiu uuiu uuiu uuiu uuiu uuiu uuiu uaiu uaiu uaiu uaiu uaiu uaiu uaiu uaiu uaiu uaiu uaiu uaiu uaiu uaiu uaiu uaiu uaiu uaiu uaiu uaiu uaiu uaiu uaiu
iil sla ajjg,ds jj g jil gai jil sols iis jil wll ay dsl slaas
1
jai jai jai jai jai jai jai jai jai jai jai jai jai jai jai jai jai jai jai jai jai jai jai jai jai jai jai jai jai jai jai jai jai jai jai jai jai jai jai jai jai jai jai jai jai jai jai jai jai jai jai
1
()
100 100
aLjwol dIwU aCwJfao uily auulu 15 y ay 5 collio uiai gxi Jywl jao jb a
JgJgGwJgJgLo
(rJ)
(1)
(r)(r)g 1
()
J 15
y
dis jjuiol duiu uui jui g uogolgai gaii iaboo oiaaiui sji jil
. 0
Jgj j 1005 Jy j 00000000000000000000000000000000
g9g yfo claxio
J 1
Marca : PHILIPS
Modelo : Avent SCF282
Categoría : Esterilizador de biberones