Gigaset Micro 4000s - Teléfono inalámbrico SIEMENS - Manual de uso y guía de instrucciones gratis
Encuentra gratis el manual del aparato Gigaset Micro 4000s SIEMENS en formato PDF.
| Tipo de producto | Teléfono inalámbrico |
| Marca | Siemens / Gigaset |
| Modelo | Gigaset Micro 4000s |
| Pantalla | Pantalla con símbolos e indicador LED |
| Directorio | Hasta 200 entradas |
| Funciones telefónicas | Manos libres, doble llamada interna, transferencia de llamada, repetición de llamada (5 últimos números) |
| Despertador | Programable con selección de tono |
| Citas | Con aviso sonoro y visual |
| Vigilancia de habitación | Sí, con llamada automática |
| Vibrador | Activable individualmente |
| Bloqueo de teclado | Sí, pulsación larga en tecla de almohadilla (#) |
| Tipo de batería | NiMH recargable, 500 mAh |
| Autonomía en conversación | Aproximadamente 16 horas |
| Autonomía en espera | Hasta 300 horas |
| Tiempo de carga | Aproximadamente 5,5 horas |
| Alcance exterior | Hasta 300 m |
| Alcance interior | Hasta 50 m |
| Alimentación de la base | Adaptador de corriente incluido |
| Accesorios incluidos | Clip para cinturón, batería, cargador |
| Peso aproximado | 155 g |
| Idiomas de pantalla | Francés, inglés, alemán, italiano, español |
| Mantenimiento | Limpiar con un paño húmedo o antiestático |
| Seguridad | Usar exclusivamente batería homologada y adaptador de corriente incluido |
| Piezas de repuesto | Batería de repuesto (ref. V30145-K1310-X229), cargador de mesa opcional |
Preguntas frecuentes - Gigaset Micro 4000s SIEMENS
Preguntas de los usuarios sobre Gigaset Micro 4000s SIEMENS
0 pregunta sobre este aparato. Responde a las que conoces o haz la tuya.
Hacer una nueva pregunta sobre este aparato
Descarga las instrucciones para tu Teléfono inalámbrico en formato PDF gratis! Encuentra tus instrucciones Gigaset Micro 4000s - SIEMENS y toma tu dispositivo electrónico nuevamente en la mano. En esta página están publicados todos los documentos necesarios para el uso de su dispositivo. Gigaset Micro 4000s de la marca SIEMENS.
MANUAL DE USUARIO Gigaset Micro 4000s SIEMENS
la Gigaset Communications GmbH es derechohabiente de la Siemens Home and Office Communication Devices GmbH & Co. KG (SHC) que por su parte continuó elUGCigaset de la Siemens AG. Las posibles declaraciones de la Siemens AG o de la SHC en las instrucciones de uso se deben tenerpero lo tanto comodeclaracionesde la Giga set Communications GmbH.
Le desamos que disfrute con su Gigaset.
PTSCaros clients,
Enregisterr un numero.


Instrucciones de manejo
eindicaciones deseguidad


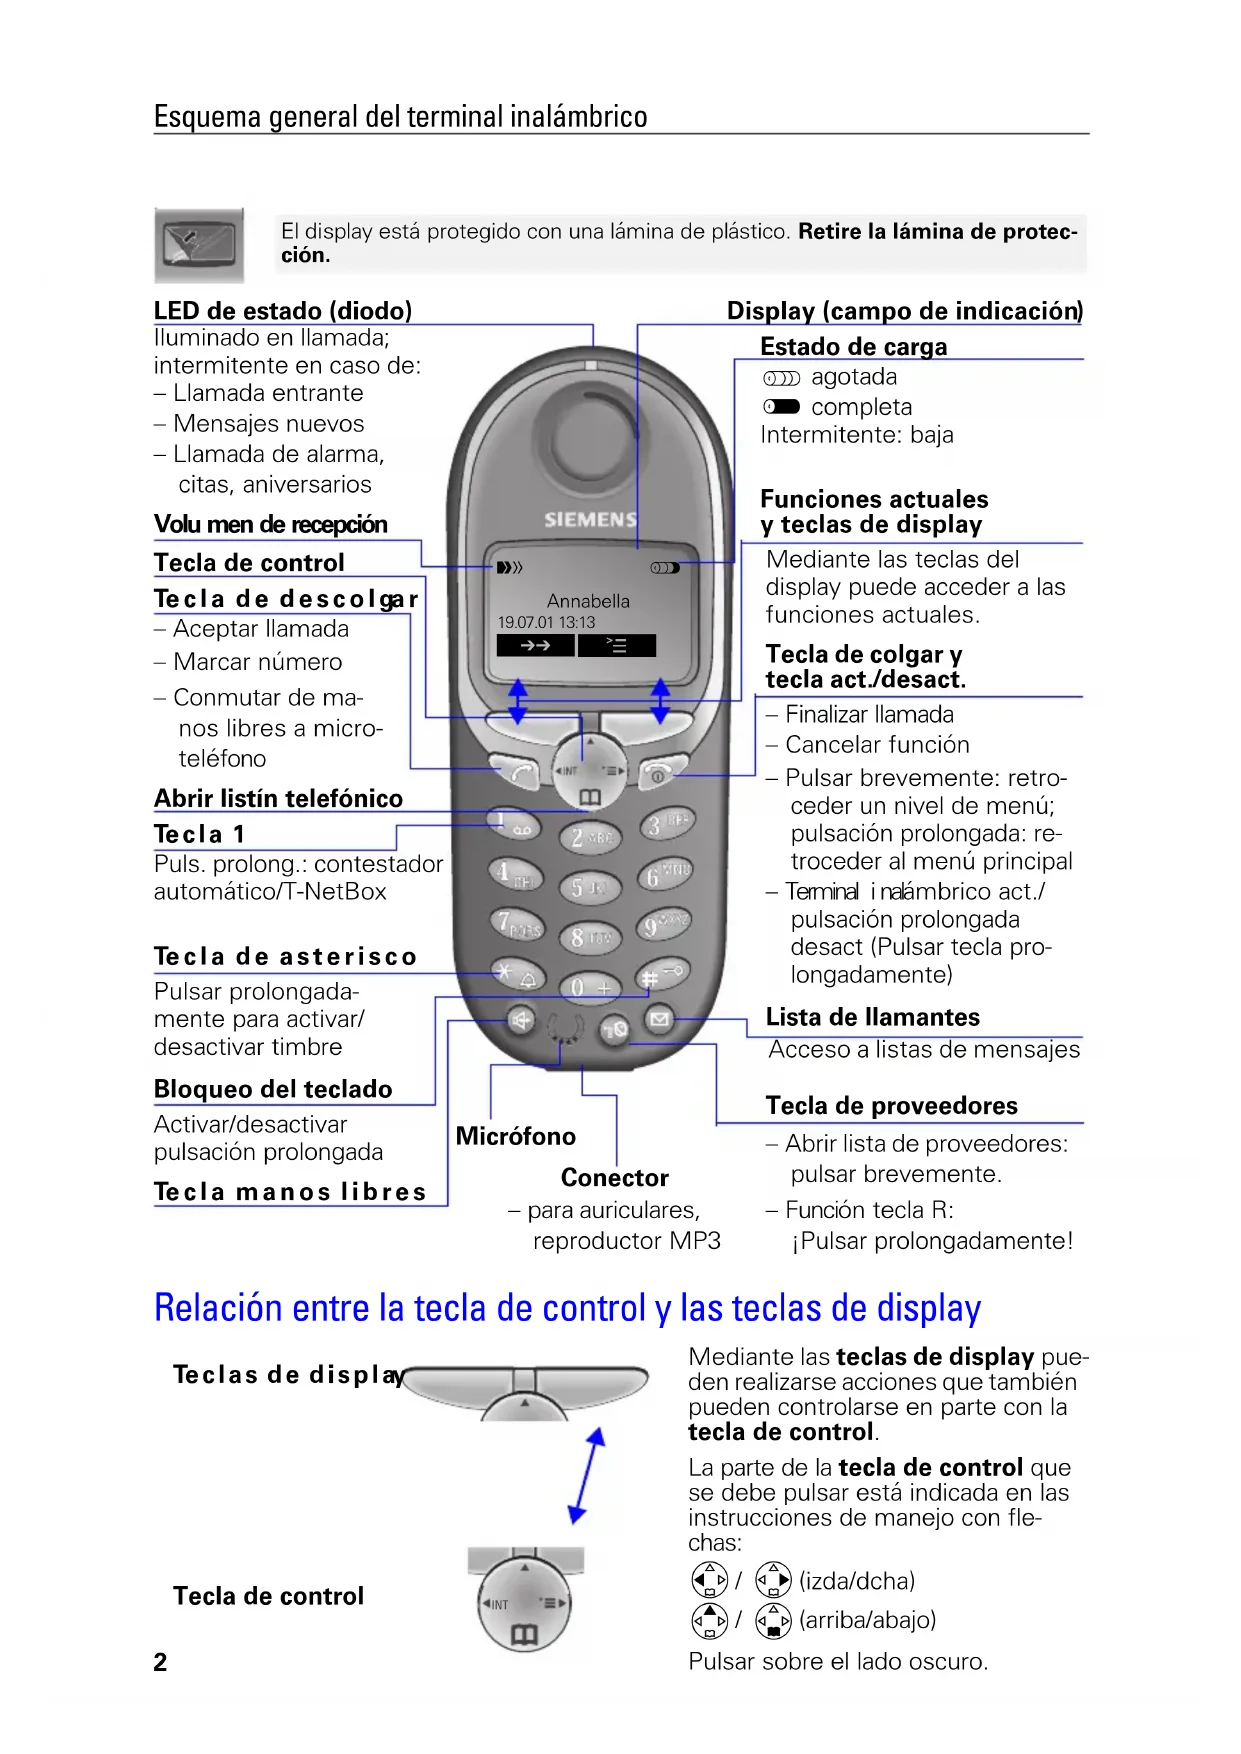
El display está protegado con una lámina de plástico. Retire la lámina de protección.
Relación entre la tecla de control y las teclas de display
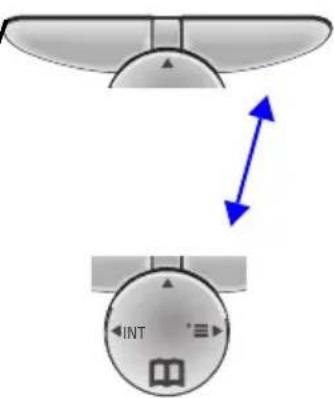
Teclas de display
Tecla de control
Mediante las teclas de display mue- den realizarseaxones que también mueben controlarse en parte con la tecla de control.
La parte de la tecla de control que se debe pulsar está indicada en las instrucciones de manejo con flechas:


Pulsar sobre el lado oscuro.
Menús importantes
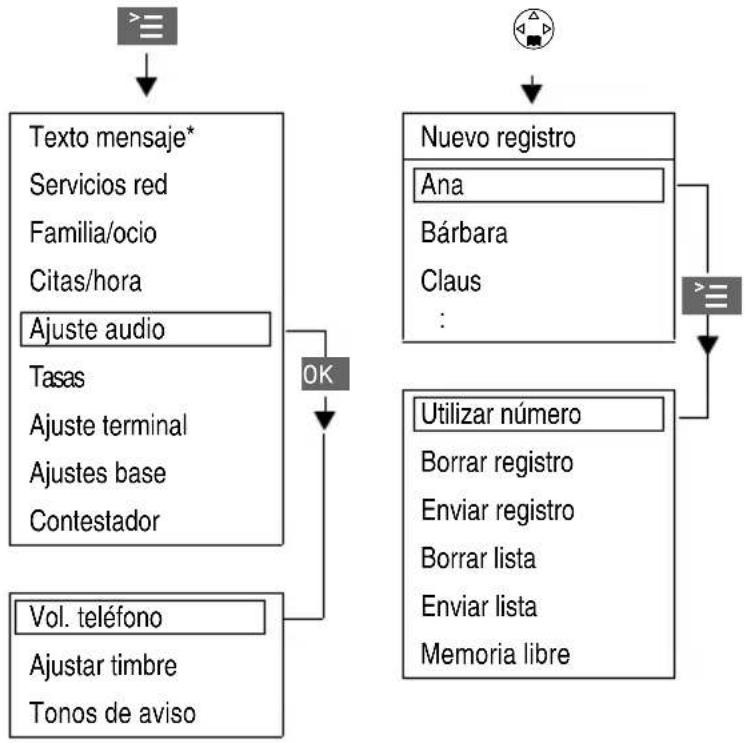
Símbolos del display
Según la situación aparecen sobre las teclas de display los siguientes SYMBOLOS:
| Teclas display | SignIFICado |
| = | Tecla de menú:Abrir en estado de reposo el menú general. Abrir@msteadas se realiza una llama un menú dependiente de la situación. |
| OK | Confirmar y selección función de menú. Finalizar y guardar entradas. |
| ←H | Tecla de borrar (backspace):borrar entradas de derecha a izquierda. |
| → | Tecla derellamada:Abrir lista de los 5 ultimos númeroos de teléfono. |
| M | Indicación para contestador, T-Net-Box, lista de llamantes |
| S | Retroceder un nivel de menú, cancelar |
- no está disponible en todos los países
Indicaciones de seguridad
Utilice exclusivamente el alimentador enchufable incluido en el suministro, tal y como se indica en la parte inferior del equipo.

Utilice solo baterias recargables homologadas y del mesmo tipo. No utilise en ningún caso pilas normales (no recargables), ya que estas podrián dañar la salute y causar daños personales.
Cologne la bateria recargables con la polaridad correcta

Utilice los temas de batería indicados en estas instrucciones de manejo

Puede surgir anomalías en el funciona de equipos Médicos. Observe las conditiones sociales del entorno de aplicación (p. ej. consultas Médicas).

El terminal inalámbrico puede occasionar un zumbido muy molesto en equipos auditivos.

No utilise el téléphone en enternos expuestos aPEGro de explosion (p.ej. talleres de pintura).

El terminal inalámbrico no es resistente a las salpicaduras (v. pág. 25).

Durante la conducccion el conductor no debe Telefonear (funcion walkie-talkie).

Desconecte el téléphone@msteadas se encuentra en un avion (funciOn walkietalkie). Evite que se active de forma involuntaria.

Si transfiere su Gigaset a terceros, entregaelo永远不会+junto con las instrucciones de manejo.

Elimine las baterias y el Telefono Respectando el medio ambiente.
Algunas de las functions descriñas en estas instruciones de manejo no está disponible en todos los páíses.
Indice
Esquema general del terminal inalábrico 2
Relacion entre la tecla de control y las teclas de display. 2
Menus importantes 3
Simbolos del display 3
Indicaciones de seguridad 4
Preparar el terminal. 6
Contenido del embalaje. 6
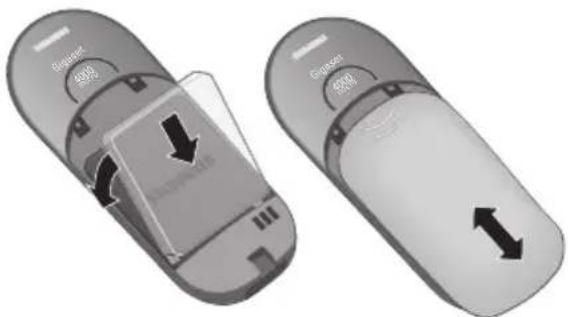
Colocar la bateria
6
Alta del terminal inalámbrico 6
Cargar la bateria. 7
SujeciOn del clip para el cinturón 7
Ajustar Fecha y hora. 8
Modificar el idioma del display 8
Realizarllamadas. 9
Llamadas externas. 9
Llamadas internas 9
Contestar llamadas 10
Lista de llamantes/de mensajes 10
Manos libres 10
Transferir una llamada externa, consulta. 11
Rellamada 11
Listin telefonico y lista de proveedores de red. 12
Marcación rápida de la lista de proveedores de red 13
Marcar con marcación rápida 14
Ajustes 17
Ajustar el descentador 17
Desactivarelaspertador. 18
Desactivar la llamada de alarma 18
Ajustar.cita. 18
Volumen del microtelefono y del altovoz. 19
Activar/desactivar tonos de avis y senales acusticas 21
Activar/desactivar la alarma por vibracion 21
Activar/desactivar aceptacion automatica de Ilamada. 22
Reposicion del estado de suministro 22
Babyphone (vigilancia de habitacion) 23
Ajustar babyphone. 23
Modo walkie-talkie 24
Anexo 25
Operación con estaciones base de la gama Gigaset. 25
Cuidados 25
Contacto con liquido 25
Alcance 26
Idiomas de display 27
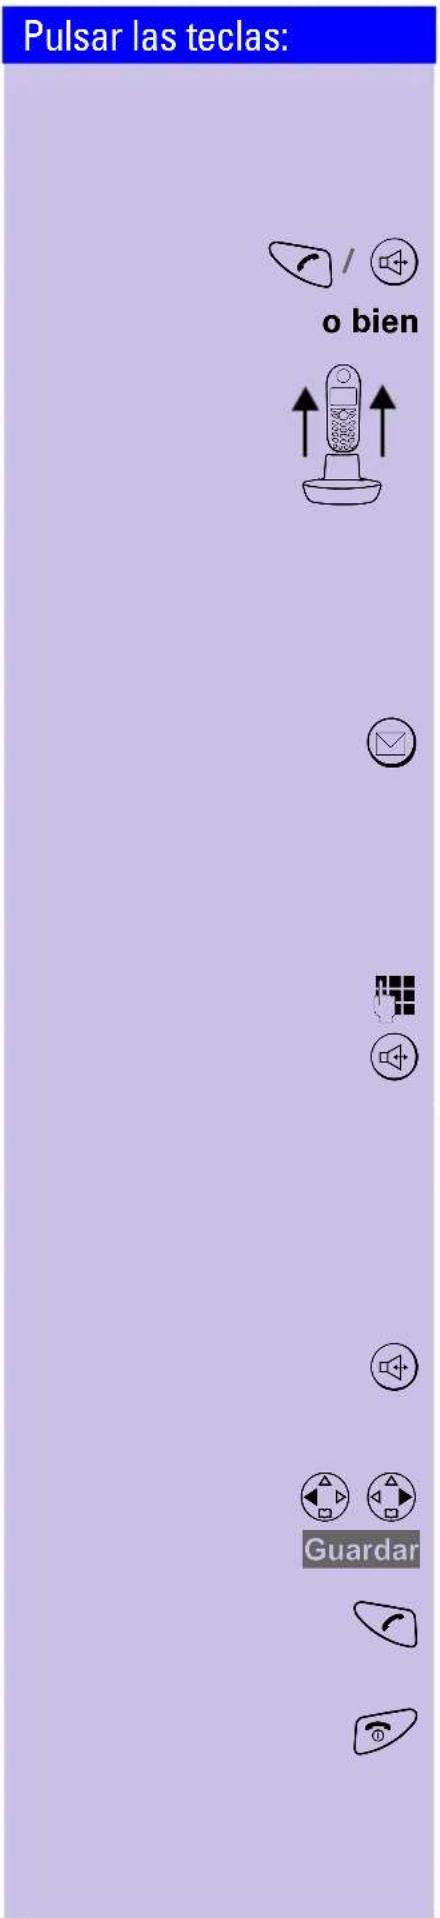
Pulsar las teclas:
Preparar el terminal
Contenido del embalaje
Terminal Gigaset 4000i Micro, una bateria, soporte carrgador, clip para cinturón, instrucciones de manejo.
Colocar la bateria
El ajuste de suministro del idioma en el display de su terminal inalámbrico es el italiano. Para configurar el idioma deseado ver la頁a 8.
Alta del terminal inalámbrico
Paso 1:
Abrir menu.
Selección y confirmar.
Selección y confirmar.
Selección la estación base (Base 1 Base 2 Base 3 Base 4
Introducir y confirmar el PIN ( estado de entrega: 0000) - se indica p. ej. Proceso de alta Base 1
Paso 2:
Pulsar prolongadamente la tecla situada en la cara posterior de la base. De forma automatica se le asigna al terminal inalámbrico el siguientes número interno libre (1-3). En el caso de que todos los;puestos se他们在 3.
Tras la realizacion exitosa del alta, el terminal inalambrio regresa al estado inactivo. En el display se indica el numero interno (p. ej. "INT1").

Ajuste terminal
Regist. equipo

OK


Pulsar las teclas:
| Gigaset | Preparación en estación base/telefon |
| 4010/4015 | Pulsar prolongadamente la tecla de la parte inferior de la estación base. |
| 3010/3015 | Pulsar la tecla paging ● de la estación base hasta que se escuchen una sénales acústicas. |
| 3020/25 | Selección en el menu del téléphone base |
| 3030/35 | Ajustes, Ajustes sistemas y Registrarequipo y confirmar con OK |
| 4030/35 | |
| 3070/75 | Pulsar la indicación (LED) que parpadea durante el proceso de registrar. |
| 4070/75 | |
| Bases deothers fabricantes | Para el registrar en "estaciones base GAP", siga las instrucciones de manejo correspondientes (paso 2 y 3). |
Cargar la bateria

Para cargarla bateria, mantenga el terminal aprox. 5,5 horas en la estacion soporte carrgador. La bateria no se suministran carradas. El proceso de carga se indica en el terminal mediante el parpadeo de la indicacion del estado de carga:
En el anexo se offers a这样一ccion de los tips de bateria recomendados.
- La bateria se calientan durante el proceso dearga; esta alteracion es normal y no representa ningun peligro.
- Para una correcta indicación del estado de energia, evite abrir el compartmento de batería innecasariente.
Sujeción del clip para el cinturón
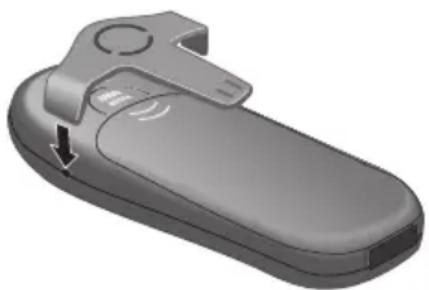
Empujé el clip para el cinturón sobre la parte posterior del terminal hasta que los "resaltes" laterales encajen en las perforaciones.
Pulsar las teclas:

Citas/hora
Fecha/hora


Ajustar Fecha y hora
El ajuste de la Fecha y la hora esnecessary para Obtener unaindicacioncorrecta de la hora de entrada de lasllamadas/losmensajes.
Abrir el menú.
Selección y confirmar.
Seleccionar y confirmar. Se visualiza el ajuste actual.
Introducir la Fecha
Introducir dia/mes/año. En el exemple: 20.05.2001. p.ej. 2^ABC0 + 0 + 5^KL0 + 1_a,b
Saltar una linea hacía abajo.
Introducir la hora
Introducir horas/minutos. En el exemple: 19.05 horas. p.ej. 1_ 9Wx2 0+ 5JKL
Saltar una linea hacía abajo.
Selecciónar modo de indicación
Selección con el extremo izquierdo de la tecla de control entre el modo de 12 horas (am o pm) o bien el modo de 24 horas ( estado de suministro).
GuardarGuGuaarlosajustes.


Ajuste terminal

Idiomaa


Modificar el idioma del display
Abrir el menú.
Confirmar funciona.
Elidioma activo está marcado con
Seleccionar el idioma deseado y confirmar.
Encontrará una tabla en laULTima página de este manual.
Marcar número de emergencia
Con el bloqueo del teclado activado se pueda marcar los nombres de emergencia programados en la estación base, v. instructuciones de manejo de la estación base.
Pulsar las teclas:

Realizar llamadas
Llamadas externas
Introducir el número de téléphone.
Si esnecessary,corregirdigitos con la tecla de display

Pulsar la tecla de descolgar.
Pulsar la tecla de colgar para finalizar lacomingsacion.
- Internacional es possible pulsar primero la tecla de descogdar e introducir a continuacion el numero de téléphone, las cifras se marcaran其中之一 de inmediato.
- Con la tecla de colgarSEOSEOSEOSEOSEOSEOSEOSEOSEOSEOSEOSEOSEOSEOSEOSEOSEOSEOSEOSEOSEOSEOSEOSEOSEOSEOSEOSEOSEOSEOSEOSEOSEOSEOSEOSEOSEOSEOSEOSEOSEOSEOSEOSEOSEOSEOSEOSEOSEOSEOSEOSEOSEOSEOSEOSEOSEOSEOSEOSEOSEOSEOSEOSEOSEOSEOSEOSEOSEOSEOSEOSEOSEOSEOSEOSEOSEOSEOSEOSEOSEOSEOSEOSEOSEOSEOSEOSEOSEOSEOSEOSEOSEOSEOSEOSEOSEOSEOSEOSEO SEOEO SEOEO SEOEO SEOEO SEOEO SEOEO SEOEO SEOEO SEOEO SEOEO SEOEO SEOEO SEOEO SEOEO SEOEO SEOEO SEOEO SEOEO SEOEO SEOEO SEOEO SEOEO SEOEO SEOEO SEOEO SEOEO SEOEO SEOEO SEOEO SEOEO SEOEO SEOEO SEOEO SEOEO SEOEO SEOEO SEOEO SEOEO SEOEO SEOEO SEOEO SEOEO SEOEO SEOEO SEOEO SEOEO SEOEO SEOEO SEOEO SEOEO SEOEQ
- Puede insertar una pausa de marcación: tras introducir el prefijo, abra con la tecla de display el menu adicional y seleccione "Insertar pausa."
Llamadas internas

Abrir lista de extensiones internas. El terminal inalámbrico propio está marcado con "<".
Selección ar el terminal deseado y pulsar la tecla de descolgar.

Introducir el número de téléphone interno del terminal inalámbrico.

Suenan todos los terminales.

Pulsar la tecla de colgar para finalizar lacomingsacion.
Contestar llamadas
El Telefono suena (tombre de llamada) y el LED de estado parpadea.
Pulsar la tecla de descolgar o de manos libres.
retirar simplemente el terminal de la estación soporte cargador ( estado suministro: "Aceptación automatica de llamadas").
Lista de llamantes/de mensajes
Las llamadas/mensajes nuevos se penalizarán mediante unaindrónica en el display y el parpadeo del LED de estado.
Pulsar
Manos libres
Marcar con manos libres
Marcar número.
Pulsar la tecla de manos libres.
Si estáactivada lafunciánanoslibres,seencidenla tecla manoslibres yelLEDde estado.
Manos libres durante la llamada
Activar manos libres.
Ajustar volumen:
Pulsar-Newamente la tecla manos libres
Ajustar volumen.
Guardar volumen ajustado.
Commutar de manos libres al service con microtelefono
Finalizar la Ilamada.
Pulsar las teclas:
Transferir una llamada externa, consulta
Es possible transferir llamadas externas a除外 terminal inalámbrico o realizar llamadas internas de consulta.
Abrir lista de extensiones internas.
Selecciónar extension interna y llamar.
Al contestar el usuario interno:
- Pasar la llamada: pulsar la tecla de colgar.
- Terminar consulta: Conmutar conFin al usuario enreshera.
Rellamada
Rellamada manual
Puede acceder a los 5 ultimos númeroos de téléphone marcados.
Mostrar número de téléphone y selecciónr.
Pulsar la tecla de descolgar.
Rellamada automatica
Estamericano no está disponible en todos los paises.
La tecla de manos libres parpadea y se activa la escucha por altovoz. La funciona se desactiva tras diezintentos sin resultado o bien si entretanto se realiza una llamada.
Si su interlocutor no está localizable, pulse No orialquier tecla.
Mostrar número de téléphone y selecciónr.
Abrir el menu.
Activar.
Si el usuario contesta: pulsar la tecla de descolgar.
Borrar número de téléphone de la lista de rellamada
Mostrar número de téléphone y selecciónr.
Abrir el menú.
El número de téléphone se borra.

Rellam. autom.


Borrar registrar

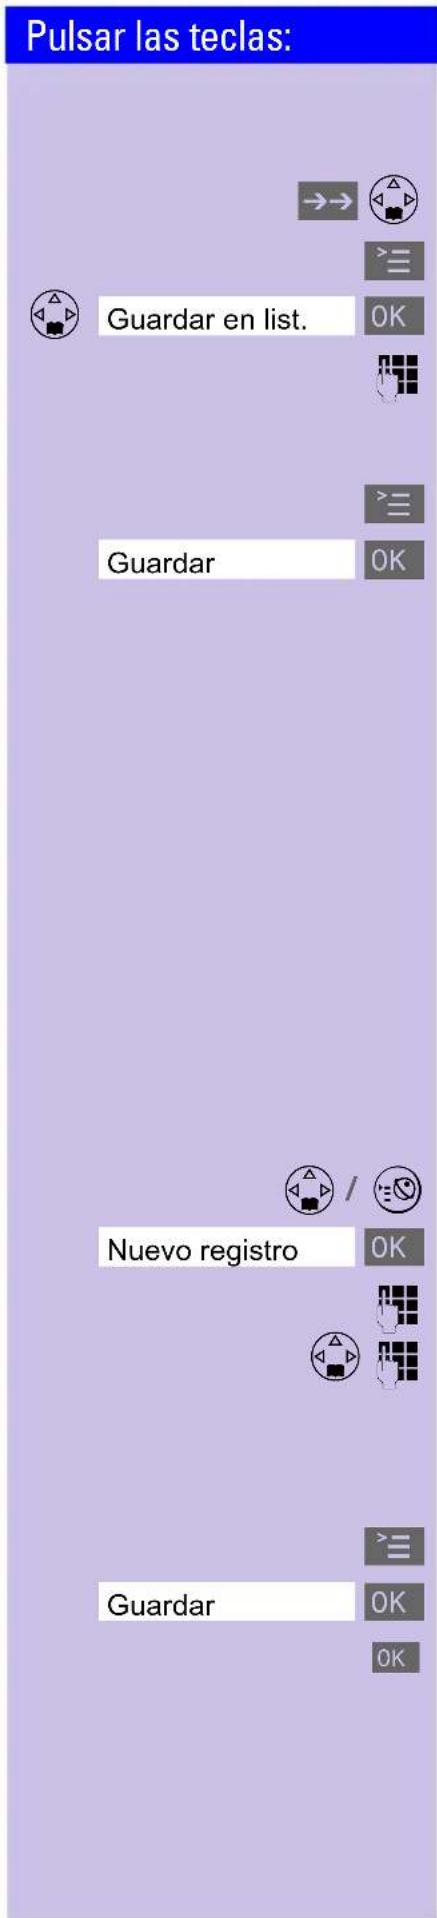
Guardar número de téléphone en el listín telefónica
Mostrar número de téléphone y selecciónr.
Abrir el menú.
El número de téléphone se registra.
Si es Neededo, modifier el n° de téléphone, introducir el nombre (si se desea, con el cumpleanos v. pag. 17). Introduccion de characteres y nombres, v. pag. 14.
Abrir el menu.
Guardar el registrar.
Listín Telefonico y lista deproveadores de red
El listín telefónica (4) le Facilita la MARCación de hasta 200 número de téléphone.
En la lista deproveadores de red se pueda programar los prefiños (call-by-call)* de differedes compat-. nias Telefonicas. El manejo del listin Telefonico y de la lista de proveadores de red es identico.
Guardar registrar
Abrir el listín Telefonico/la lista de proveedores de red.
Selección y confirmar.
Introducir el número de téléphone (max. 32 digitos).
Saltar al campo del nombre e introducir el nombre.
En el listín Telefonico: si se desea, aggregator cumpleanos, v. también pág. 17.
Abrir el menú.
Guardar el registrar.
Guardar registrar.
Pulsar las teclas:

p. ej. ③DEF ③DEF
Marcar desdeelistintelefmonico
Abrir el listín Telefonico.
Introducir la inicial del nombre, p. ej. para "E", pulse dos veces la tecla 3 DEF u hojee con la tecla

Pulsar la tecla de descolgar.
Tras seleccionar el nombre, pueda abrir también el menu, seleccionar, Utilizapledanmodificar el numero y marcar con la tecla de descolgar
- no está disponible en todos los Países
Marcar con la lista de proveedores de red (call-by-call)
Abrir la lista de proveedores de red.
Selectionar numero call-by-call yAbrir el menu.
OK SeLECTIONAR y confirmar.
Introducir el n° de téléphone del usuario deseado.
o bien


OK
Selección ar número de téléphone del listín Telefonico y confirmar.

Pulsar la tecla de descolgar. Semarca el número de téléphone.
Marcación
En la lista de proveedores de red se pueda guardar ochoeros para lamarcacionrapa. Para ello, deberaintroducirantes del nombre del proveedor de red la cifra para lamarcacionrapa (2-9).
Ejemplo:Numero de marcacionrapida2yacountua- cion el nombre del proveedor de red.
Pulsar las teclas:
p.ej. 2ABC
p.ej. o bien


Marcar con marcación
Pulsar la tecla prolongadamente: se visualiza el nombre del proveedor de red programado.
Introducir el número de téléphone
Selección un registrar del listín Telefonico y confirmar.
Pulsar.
Tabla de simbolos
Pulsar la tecla correspondiente varias vezes o de forma prolongada:
1 x 2 x 3 x 4 x 5 x 6 x 7 x 8 x 9 x 10x 1000 Espacios en blanco 1 € f $ ¥ a 2ABC a b c 2 ä á à á ã ã ç 3DEF d e f 3 ë é è ê 4GH g h i 4 i í i i 5JKL j k l 5 6MWD m n o 6 ö ñ ó ò ô ō 7PORS p q r s 7 β 8TUV t u v 8 ü ú ù ú 9WXY w x y z 9 ý ý æ ø à * a→A * / ( ) < = > % 0+ . , ? ! 0 + - : i i* # # @ \ & §
Otrossymbolodesesta tecla:“
La prima letra del nombre se写道 automatically en mayusculas, le signen minusculas.
Cambi a mayusculas/minusculas para un paracter : pulsar 念
Controlar el cursor con 空 Borrar caracte con
Pulsar las teclas:
La insertión de los caracteres se efectúa siempre a la izquierda del cursor.
Anteponiendo un espacio en blanco, el registrar correspondiente salta a la 1^a posicion (ej.: " Carla").
Organ de clasificacion:
1. Espacios en blanco 3. Letras (pororden alfábé-tico) 2. Cifarás (0-9) 4. Otros caracteres
Mostrar, modificar o borrar registrar
Abrir el listín Telefonico/la lista de proveedores de red.
Selección ar registrar deseado.
Mostrar todos los datos relativos al registrar.
Abrir el camino de entrada y efectuar los Cambios necessarios.
Modificar el número de téléphone.
Saltar al Campo de nombre y cambiar el nombre.
Introduccion de characteres y nombres, v. pag. 14.
En el listín telefónica: si se desea,/agregar cumpleaños,v.pag.17.
Abrir el menu.
Confirmar los Cambios.
Abrir el listín Telefonico/la lista deproveadores de red. Seccionar el registrar deseado.
Abrir el menu.
Suena un tono de confirmacion. El registrar se borra.

Borrar registrar

Enviar registrar a除外 terminal inalámbrico
Es possible enviar un registrar a uno terminal inalámbrico Comfort.
Abrir el listín Telefonico/la lista deproveadores de red.
Seleccionar el registrar deseado.
Abrir el menú.
Selección y confirmar.
Selecciónar extension interna (terminal inalámbrico del receptor) y confirmar.
Enviar registros adicondales:
Pulsar.
Seleccionar el registrar deseado.
Iniciarceso de transmisión.
Enviar listín Telefonico/lista deproveadores de red
Alternatively, you can use the list in the following exercises.
Véase "Enviar registrar aOTHER terminal inalámbrico."
La transmisión se interrupse si:
- La memoria del terminal receptor está agotada.
- Ud. obtiene una llamada.
La transmisión eneware de un registrar se leva a cabo,.
hasta el final.
Borrar listín Telefonico/lista de proveedores de red
Abrir el listín Telefonico/la lista de proveedores de red.
Seleccionar el registrar deseado.
Abrir el menú.
Selección y confirmar.
Confirmar borbado de todos los registros.
Pulsar las teclas:

Ver
Cambiar

Cambiar


#
OK
Introducir aniversarios (p.ej. cumpleanos)
Puede introducir la Fecha y la hora para los datos de cumpleanos/aniversarios y hacer que el Telefono le avise.
Abrir el listín Telefonico.
Selección ar registrar desedo y做不到.
Abrir camino de entrada.
Mover el cursor al campo del cumpleanos/aniversario.
Confirmar.
Introducir o modifierla Fecha (dia/mes).
Saltar una linea hacía abajo e introducir la hora.
Saltar una linea hacía abajo.
Selecciónar sealsization.
Guardar entradas.
Mediante la tecla de display Borrar puede borrar los aniversarios.
Ajustes
Ajustar el descentador
Si ha ajustado una hora en el descentador de su terminal inalámbrico (simpilo), el tiempo sonará todos los días a la mesma hora.
El Telefono se encuesta en estado de reposo:
Abrir el menú.
Seleccionar y confirmar.
Seleccionar y confirmar.
Elajusteactualsevisualiza.
Seleccionar Si.
Saltar una linea hacía abajo.
Introducir horas/minutos. En el ejempo: 6.00 horas.
Saltar una linea hacía abajo.
Selecciónar melodia de descentador.
Guardar los ajustes.


Citas/hora
Despertador


Gua


dar
Pulsar las teclas:

Citas/hora

Despertador
三
OK
OK


Guardar
No se emitiráaculara llamada de alarmasisi estáactivada lafunciondebabyphone(vigilancia dehabitatacion) o la rellamada automatica.
Desactivar el descentador
El despertador está ajustado, pero no desea que sue ne.
Abrir el menú.
Selección y confirmar.
Selección y confirmar.
Seleccionar No.
Guardar los ajustes.
Desactivar la llamada de alarma
La llamada de alarma se indica como una llamada entrante. Pulse该如何 tecla para apagar el tiempo de alarma.
Ajustar cita
Puede ajustar su terminal movable para que le recuerde una citing. Si ha ajustado una citing, esta se visualizará con el symbolo .
El Telefono se encuesta en estado de reposo.
三
OK
OK


Guardan
Abrir el menú.
Selección y confirmar.
Selección y confirmar.
Selecciónar Si para activar la funciona de Citation.
Saltar una linea hacía abajo.
Introducir dia/mes, en el exemple: 20 de mayo.
Saltar una linea hacía abajo.
Introducir horas/minutos, en el ejempo: 9.30 horas.
Saltar una linea hacía abajo.
Selecciónar melodia del tiempo para la función de Citation.
Guardar los ajustes.
Pulsar las teclas:
La llamada de citing solo se activa si el terminal inalámbrico se incluye en estado de reposo. No se emitirá ninguna llamada de citing si está activada la función debabyphone (vigilancia de habitación) o la rellamada automatística.
Desactivar llamada de vita
La llamada de citing se Penaliza como una llamada entrante y se desactiva pulsandorialquier tecla.
Indicar Citation y aniversarios no aceptados
Las citing y aniversarios que el terminal inalábrico ha indicado pero que Ud. no ha aceptado se guardan en una lista.
Las citing/aniversarios nuevos no aceptados se indicate con Cita. Pulsar la tecla derecha del display, se muestra la lista de aniversarios.
Selección a continuación Citas vencidas OK
Si desea volver a consultar las CITAS ya visualizadas, proceda del suiviente modo:

Citas/hora


Citas vencidas


Abrir el menú.
Selección y confirmar.
Selección y confirmar.
Selección cita o aniversario no aceptados. Se muestra la información correspondiente.
Mediante la tecla de display
Borrar可以把borrarlascitas/aniversarios.
Volumen del microtelefon y del altovoz

Ajuste audio

Vol. téléfono


Abrir el menu.
Selecciónarmenú.
El tiempo de llamada suena con el volumen actual.
Ajustar volumen de manos libres.
Saltar una linea hacía abajo.
Selección ar nivel deseado del volumen del altovoz y confirmar.


Guardan

Ajustar volumen del timbre/melodia
Puede elegir entre cinco niveles de volumen de tiempo, la llamada "progresiva" (volumen en aumento), tiempo desactivado, y diez melodías de时间和:
Abrir el menu.
Selección y confirmar.
Se reproduce el volumen del tiempo actual y se visualiza.
Seleccionar volumen del tiempo.
Saltar una linea hacía abajo.
Selecciónar la melodia del timbre deseada (1-10) y confirmar.
Control de tiempo para el volumen del时间和
Puede ajustar un volumen del tiempo différente para un intervalo determinado.
Abrir el menú.
Selección y confirmar.
Se reproduce el volumen del tiempo actual y se visualiza.
Pulsar.
Activar/desactivar control de tiempo.
Introducir intervalo para el tiempo de llamada deseado
para 11:00 hasta 15:00 horas.
Saltar una linea hacía abajo y selecciónar el volumen del tiempo.
Guardar los ajustes.
Pulsar las teclas:

Ajuste audio
Tonos de avis

OK
OK


Guardan

Ajuste audio
Vibración

OK
OK
Activar/desactivar tonos de avis y señales acústicas
- Tono de confirmacion de teclas: se confirma cada pulsacion de tecla.
- Tonos de confirmación: Tono de confirmación (se cuencia de tonos ascendente) al final de las entradas/ajustes y al depositar el terminal en la estación base; tono de error (secuencia de tonos descendente) en el caso de entradas erroneas.
- Tono de avis de bateria: la bateria debe cargarse.
Abrir el menú.
Selección y confirmar.
Selección y confirmar.
Selecciónarfunciendesada.
Selecciónar Si No o (tonblata.asi)so de bateria en llamada).
Guardar los ajustes.
Activar/desactivar la alarma por vibracion
Para no ser molestado por un tono de llama,ould activar, en su lugar, la alarma por vibracion del terminal inalambrico. Dicha alarma también se pueda activar en combinacion con el tono de llama (p.ej. en un entorno ruidoso).
Abrir menu.
Selección y confirmar.
Selección y confirmar.

El ajuste actual está marcado mediante✔
Mediante una pusación prolongada de la tecla *puede desactivar el tono de llamada. De este modo solo se enquirytra activa la alarma por vibracion.
Pulsar las teclas:


Ajuste terminal


Acep.Ilamad.aut
OK Activar/desactivar con OK ( funciona ct.).
Activar/desactivar aceptación automática de llamada
Si está activada esta funciona, para contestar una llama basta con retirar el terminal inalámbrico del soporte cargador ( estado de suministro), sin necessities de pulsar la tecla.
Abrir el menú.
Selección y confirmar.
Activar/desactivar con OK ( funcion act.).
Reposicion del estado de suministro
El listín Telefonico, la lista deproveadores de red y la lista de llamantes no se borran en la reposión. El registrar en la estación base se mantiene.


Ajuste terminal


Reponer teléf.


Abrir el menú.
Selección y confirmar.
Selección y confirmar.
Confirmar la consulta de seguridad.
Función Estado de su- ministro Volumen del microtelefono 1 Volumen del timbre ("tono del timbre", ) 5 Melodia del timbre 1 Aceptación automatística de llama da act. Tono de avis de bateria act. Volumen de manos libres 3 Nivel de babyphone alto Control de tiempo desact. Idioma del display他们在 Alarma por vibración desact.
Pulsar las teclas:
Babyphone (vigilancia de habitacion)
Mediate su terminal inalábrico puede supervasar los ruidos de la habitación de su bebé desde otro lugar. La distancia entre el terminal inalábrico y su bebédebeser de, como min., 1 a 2 metros.Si se alcanza un nivel de ruidodeterminado (p.ej.,el bebé llora),el terminal inalábricomarca automaticallye el número de Telefono programado (interno/externo).Con la función babyphone activada las lllamadas entrantes se indican solamente en el display del terminal.
Ajustar babyphone

Familia/ocio
Vigilan. habit.


OK


Cambiar


o bien


OK

OK


Abrir el menu.
Selección y confirmar.
Selección y confirmar.
SeLECTIONAR Si No
Saltar una linea hacía abajo.
Abrir camino de entrada para el n° de téléphone. Borrar un número externo ya programado.
Borrar un numero externo ya programado con
Borrar un número interno ya programado con S1 (consulta de seguridad).
Abrir la lista de extensiones internas e seleccionar numero interno.
Guardar el número de téléphone.
Abrir el listín Telefonico.
Selecciónar extension externa.
Abrir el menú.
Confirmar los ajustes.
Saltar una linea hacía abajo.
Ajustar nivel de sensibilitad "alto" o "bajo."
Guardar los ajustes.
Con la tecla del display de desactivar la func tion babyphone.
Pulsar las teclas:
Ud. puede desactivar desde el exterior (p.ej., desde el Telefono movil) la funciona babyphone. Atienda la llamada activada por la funciona babyphone.
Desactivar con 9Wx7
Ahora la funciona babynophone se encontrar desactivada. Ya no se activan más llamadas por el babynophone.
Modo walkie-talkie
Requisito:
Los TERMINales tienen los mismos ajustes de estación base (p. ej. mejor estación), o todas no está registrados en ninguna estación base. (El modo walkietalkie reduce considerablemente el tiempo de servicios del terminal).
En el modo walkie-talkie, los terminales no peuvent recibir llamadas entrantes.
Activar modo walkie-talkie en un terminal inalámbrico
Abrir el menu.
Selecciónar funciona.
Activar modo walkie-talkie.
Con la tecla del display No quede desactivar el modo walkie-talkie.
Utilizar modo walkie-talkie
Dos TERMINALES inalábricos se.Encuentran en el modo walkie-talkie:
Terminal inalábrico Ilamante:
Pulsar.
Terminal inalámbrico llamado:
La Ilamada se indica en el display con un avis.
El tiempo de llamada se desactiva.
Pulsar.
Ambos terminales inalámbricos quedan interconectados.
Pulsar. Finaliza lacomingsacion.

Familia/ocio
Walky-Talky

OK
OK


Anexo
Operación con estaciones base de la gama Gigaset
Gigaset 1000/2000/3000
Las siguientes functions de su téléphone inalámbrico 4000i Micro/Comfort no se Ofrecen en las estaciones base de esta gama Gigaset.
- Ajuste de la hora (tras apagar el terminal inalámbrico, la hora deja de visualizarse)
- Marcación por voz
- Babyphone (no puede desactivarse desde el exterior)
Gigaset 4010/4015 Classic
Las siguientesuciones de su téléphone inalámbrico 4000i Micro/Comfort no se Offercen en estas estaciones base.
- Marcación por voz
- Ajuste de niveles de autorización
Cuidados
Limpie la estación base y el terminal inalámbrico con un paño humedo o un paño antiestálico. No utilise en ningún caso un paño seco. Existe peligro de que se forme carga esta.
Contacto con liquido
Contacto con liquido:
Si el terminal inalámbrico entra en contacto con liquido: no conectar en ningún caso el aparato.
Retirar inmediamente todas las baterías.
Deje que el liquido escurra fuera del aparato y seque antes todas las piezas.
Almacene el terminal inalámbrico sin baterías durante un minimo de 72 horas en un lugar seco y caliente
Después es possible en是多么 casos la nuevo puesta en función.
miento.
Baterías recomendadas:
Hibrido niqueI-metal (NiMH), 500 mAh.
N^o de pedido V30145-K1310-X125 o
N^o de pedido V30145-K1310-X229
Tiempos de servicios/de energia del terminal:
Capacidad (mAh) Tiempo de autonomía (horas) Tiempo de conversación (horas) Tiempo de entrega (horas) 500 hasta 300 aprox. 16 aprox. $,5
La capacité dearga se reduce por el desgaste normal al cabo de uno años.
Alcance
El alcance en espacios abiertos es de aprox. 300m . Dentro de edificios se registrarancas de hasta 50m .
Cargador de sobremesa
El cargador de sobremesa para Telefonos móvil Siemens también se pueda usar para cargar su terminal inalámbrico.
(Accesorio para los Telefonos móvil Siemens C45, ME45, S45)
N^o de pedido L36880-N4501-A101)

Al realizar la entrega de un terminal inalámbrico Gigaset en el cargador de sobremesa, la bateria de réserve no se cargará mienntras el terminal inalámbrico se incluye emplazado en el cargador.
El LED indicator de energia siempre está encendido.
Customer Care (Service)
Obtendrá una asistencia sencilla y sin complicaciones en caso de cuestiones技术水平 y de manejo de su aparato atramés de是我国 soporte en linea en la pagina de Internet
www.my-siemens.com/customercare
En caso de ser necesaria una reparacion, sirvase dirigirse a uno de nuestros centros de service.
Numeros de téléphone del serviceo专业技术 v. contraportada.
El sello CE corrobora la conformidad del equipo con losrequireimientos Basics de la directiva R&TTE.
El terminal inalámbrico 4000i Micro está homologado para toda la UE y Suiza.
Idiomas de display
Al registrarse en la estacion base 4010i poderenajustarse los idiomas marcados con \*:
Einstellungen Sprache Deutsch H/Set Settings Language English Réglages comb. Langue François Impostazioni Lingua Italiano Ajuste terminal Idioma Espanol
SIEMENS
Be inspired

Operating instructions
and safety precautions

The display is protected by a plastic film. Remove the plastic film.
Status LED (light-emitting diode)
lights up during a call; flashes at:
- Incoming call
- New messages
- Alarm call, appointments, anniversaries
Reception strength
Control key
Talk key
-Accept call
- Dial number
- Switch from hands-free talking to handset
Open the directory
Key 1
Hold down to select Answer. machine/Postalbox
Asterisk key
Hold down to activate and deactivate the ringer
Keypad protection
On/off hold key down!
Handsfree key

Microphone
Socket
- for Headset, MP3-Player
Display (display field)
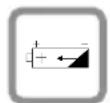
Charging status
empty
full
flashes: Battery low
Current functions and display keys
With the display keys, you have access to the current functions.
End call and On/ Off key
- End call
- Cancelling function
- One menu level back (press briefly)
- Return to idle state (hold down)
- Handset on/off (hold key down)
Caller list
Access to message lists
Sel Services key
- Open network access list: press briefly!
R key function: hold key down!
Interaction between control key and display keys
Display keys

With the display keys you can carry out functions that can also be partly controlled with the control key.
The side of the control key which you must press is indicated in the operating instructions by arrows:
Control key

left/right)

top/bottom)
Important menus

Display symbols
The following symbols appear above the display keys depending on the situation:
Displaykeys Meaning = Menu key: Activates the main menu when the phone is idle. During a call, it activates a menu for the particular situation. OK Selects and confirms the menu function.
Ends and saves an entry. ←H Delete key (Backspace): Deletes characters from right to left. →→ Automatic radial key: Opens a list of the last five numbers dialled. M Displayed if SMS*, answering machine, mail service box or caller list is active S One menu level back, cancel
* Not available in all countries
Safety precautions

Only use the power supply unit supplied as indicated on the underside of the device.

Only insert approved rechargeable batteries of the same type. Never use ordinary (non-rechargeable) batteries as they may pose a health hazard or cause injury.

Make sure the rechargeable battery is inserted the right way round

Use the battery specified in these operating instructions

The phone may affect medical equipment so always switch your phone off before entering hospitals or doctors' practices.

The handset may cause an unpleasant humming noise in hearing aids.

Do not operate the phone in places where there is a risk of explosion (such as paint workshops).

The handset is not splash-proof (see page 25).

Drivers must not use the phone while driving (including the Walk and Talk function).

The phone must be switched off at all times in an aircraft (including the Walk and Talk function). Make sure it cannot be switched on accidentally.

If you give your Gigaset to someone else you should also give them the operating instructions.

Dispose of batteries and the phone carefully. Do not pollute the environment.
Not all the functions described in these operating instructions are available in all countries.
Contents
Brief overview of the handset 2
Interaction between control key and display keys. 2
Important menus 3
Display symbols 3
Safety precautions 4
Preparing the handset. 6
Delivery package 6
Inserting the battery 6
Registering the handset 6
Charging the battery 7
Attaching the belt clip 7
Setting the date and time 8
Changing the display language 8
Making calls 9
Making an external call 9
Making internal calls 9
Answering a call 9
Open caller list/message list 10
Handsfree talking. 10
Forwarding an external call, enquiry call 10
Automatic redial 11
Directory and network access list 12
Speed dialling from the network access list 13
Dialling with speed dialling 13
Settings 17
Setting the alarm clock 17
Deactivating the alarm clock 17
Turning off the alarm call. 17
Setting an appointment 18
Handset and loudspeaker volume. 19
Activating/deactivating warning and signal tones 20
Activating/deactivating the vibration alarm 21
Auto talk feature on/off 21
Resetting to the factory defaults 22
Room monitoring (babyphone). 22
Setting the room monitor 23
Walk and Talk mode 24
Appendix 25
Operating on base stations in the Gigaset family 25
Contact with liquid. 25
Range 26
Guarantee 26
Customer Care Service 29
Display languages 30
Press Keys:
Preparing the handset
Delivery package
Gigaset 4000 Micro handset, one battery, charging unit, belt clip, operating instructions.
Inserting the battery

The default display language on your handset is Italian. To set the desired language, see page 8.
Registering the handset
Step 1:
Open the menu.
Select and confirm.
Select and confirm.
Select Base1Base2Base3Base4
Key in PIN and confirm (as supplied: 0000): Regstr.Procedure Base 1 is displayed, for example.
Step 2:
Press down the key on the back of the Gigaset 4010i Micro base and keep it pressed down for a while. The handset will be automatically assigned the next free internal number (1-3). The internal number 6 will be overwritten if all positions are already occupied. The handset will return to the idle condition following successful registration. The internal number (e.g. "INT1") is displayed.
Gigaset On the base station or base telephone

H/Set Settings
Register H/Set

OK


Press Keys:
4010/4015 Hold down the key on the underside of the base station. 3010/3015 Hold down the paging-key on the base station until you hear signal tones. 3020/25 Select settings, system settings and regi-ster handset in the menu at the base sta-tion telephone and confirm with OK. 3030/35 4030/35 3070/75 Press the LED - it will flash during regist-ration. 4070/75 Non-Sie-mens base stations To register at "GAP base stations,"follow the relevant operating instructions (steps 2 and 3).
Charging the battery

Leave the handset for approx. 5,5 hours in the charging unit to charge the battery, as they are not charged when they leave the factory. The charging status icon flashes on the handset to indicate that the battery are being charged:
See the appendix for a list of recommended battery.
- The battery heat up during charging. This is normal and not dangerous.
- Opening the battery compartment unnecessarily may cause the wrong charging status to be displayed.
Attaching the belt clip

Push the belt clip onto the back of the handset until the lugs at the side click into place.
Press Keys:

Calendar/Clock
Date/Time

OK
OK
Setting the date and time
You need to set the date and time so that the time that messages and calls are received is shown correctly.
Open the menu.
Select and confirm.
Select and confirm.
The current setting is shown.
Enter the date
Enter the day/month/year.
In this case 20.05.2001. e.g. 2^ABC 0 + 0 + 5^MC 0 + 1_CD
Go down one line.
Enter the time
Enter hours and minutes.
In this case 19:05
e.g. ①⑨⑩+⑤
Go down one line.
Select the display mode
use the left side of the control key to select the 12-hour mode (am or pm) or the 24-hour mode (default).
Save the settings.
Changing the display language
OK

OK
OK
OK
Open the menu.
Confirm the function.
The current language is marked with a .
Select the language you want and confirm.
You will find a.table on the last page of this booklet.
Dialling an emergency number
You can dial the emergency numbers saved in the base station even if the telephone lock is activated. Please refer to the operating instructions for your base station.
Save

H/Set Settings
Language

OK
OK
Press Keys:
Making calls
Making an external call

Enter the telephone number. If you make a mistake use the key to correct individual digits.

Press the talk key.

Press the end call key to end the call.

- You can also press the talk key first and then enter the telephone number - each digit will be dialled immediately.
- You can cancel the dialling operation by pressing the end call key.
- You can insert a pause: After entering the prefix, open the menu using the display key and select "insert pause".
Making internal calls
Open the list of internal users. Your own handset is identified by " <" .
Select the handset you want and press the talk key.
Enter the internal number of the handset.
All handsets are called.
Press the end call key to end the call.
Answering a call
Your telephone will ring (ringing tone) and the status LED will flash.
Press the talk key or handsfree key.
Simply remove the handset from the charging unit (factory setting: "Auto talk").


or

Press Keys: Open caller list/message list* A message appears in the display and the status LED flashes to indicate that there are new calls/messages. Press Handsfree talking Handsfree talking when dialling Dial the telephone number. Press the handsfree key. When handsfree talking is activated, the handsfree key and the status LED are lit. Handsfree talking during a call Activate handsfree talking. To setthe volume: Press the handsfree key once more. Raise or lower the volume. Save the volume level. Change from handsfree talking to the handset End the call. Forwarding an external call, enquiry call You can forward an external call to another handset or make an internal enquiry call. Open the list of internal users. Select the internal user and call. If the internal user answers: • To forward the call: Press the end call key. • Toend the enquiry call: Use End to return to the waiting party. * Not available in all countries
Press Keys:
Automatic redial
Manual redial
You have access to the last five telephone numbers dialled.
Display and select the telephone number.
Press the talk key.
Automatic redial
This function is not available in all countries.
The handsfree key flashes and open listening is activated. The function is deactivated after ten unsuccessful call attempts or if a call was made in the meantime.
Press Off or any key if the person you called is not available.
Display and select the telephone number.
Open the menu.
Activate.
If the other person answers press the talk key.
Deleting a number from the redalling list
Display and select the telephone number.
Open the menu.
The telephone number is deleted.
Copying a telephone number to the directory
Display and select the telephone number.
Open the menu.
The telephone number is entered.
you like you can change the number and enter a name (you can also enter an anniversary s. page 16). For notes on how to enter letters and characters s. page 14.
Open the menu.
Save the entry.


Directory and network access list
With the directory you can store up to 200 telephone numbers and then dial them at the push of a button.
You can save the prefixes (Call-by-Call) of telephone companies in the network access list. The directory and network access list are used in exactly the same way.
Storing an entry
Open the directory/network access list.
Select the menu item and confirm.
Enter the telephone number (no more than 32 digits).
Scroll to the name field and enter the name. You can also enter an anniversary in the directory, see also page 16.
Open the menu.
Store the entry
Dialling with the directory
Open the directory.
Enter the first letter of the name. For example for "E" press the 3 key twice or scroll with the key.
Press the talk key.
After selecting the name you can also open the menu, select Dispteyntive the number and dial with the talk key
Press Keys:
Display Number


Dialling with the network access list (Call-by-Call)
Open the network access list.
Select call-by-call number and open the menu.
Select the menu item and confirm.
Enter the telephone number of the person you want to call.
or


Select the telephone number in directory and confirm.
Press the talk key. The telephone number is dialled.
Speed dialling from the network access list
You can store 8 speed dialling numbers in the network access list. Enter a speed dialling number (2-9) before the name.
Example: Press speed dial key 2 and then enter the network provider's name.
Dialling with speed dialling
e.g.

Hold down the key:
The stored network provider's name is displayed.
Enter the telephone number
or


Select an entry from the directory and confirm.
Press.
Press Keys:
Character map
Press the relevant key repeatedly or hold down:
1 x 2 x 3 x 4 x 5 x 6 x 7 x 8 x 9 x 10 x 1.0 blank 1 € f ¥ a 2ABC a b c 2 à à â āç 3NEF d e f 3 é é è eê 4GHII g h i 4 i i i i 5JKL j k l 5 6MNO m n o 6 ñ nó o o o 7PONS p q r s 7 β 8TUV t u v 8 ü u u 9NXV7 w x y z 9 y y æ ø Å * a→A * / () < = > % 0+ . , ? ! 0 + - : i i* # # @ & \
\* Other characters on this key: \*\*
The first letter of the name is automatically written in uppercase and the rest in lowercase.
To change one letter from uppercase to lowercase or vice versa press 串 _ 串
Control the cursor with .Delete characters with
Letters are always inserted to the left of the cursor.
Inserting a blank before a name takes that name to the top of the directory (for example "Karla").
Sort sequence:
1. Blank 3. Letters (alphabetical) 2. Digits (0-9) 4. Other characters
Press Keys:
Displaying, changing or deleting an entry
Open the directory/network access list.
Select the entry you want.
View
View all the information for the entry.
Change
Open the input field and make the necessary changes.


Change the number if necessary.
Go to the name field and change the name.
For notes on entering letters and characters. s. page 14.
For the directory enter an anniversary if necessary. s. page 16.
Open the menu.
Confirm the changes.
or
Save Entry

Open the directory/network access list.

Select the relevant entry.
三
Open the menu.

Delete Entry
OK
You will hear a confirmation tone. The entry has been deleted.
Copying an entry to another handset
You can copy an entry to another Micro/Comfort handset.
Open the directory/network access list.
Select the required entry.

Open the menu.
三
Select the menu item and confirm.
Select the internal user (receiving handset) and confirm.
Copying a further entry:
#
Press.
YES

Select the required number.
opy
Initiate the copy process.
Press Keys:
Copying the directory/network access list
You can copy the entire directory/network access list to another Micro/Comfort handset.
See "Copying an entry to another handset."
Transmission is interrupted:
- if the memory of the receiving handset is full.
- if you receive a call.
Copying of an entry is terminated.
Deleting the directory/network access list
Open the directory/network access list.
Select the required entry.
Open the menu.
Select the menu item and confirm.
Confirm delete all entries.
Entering anniversaries (bolidays and so on)
You can store the date and time of anniversaries so you can be reminded of them.

Open the directory.

Select and display the entry.
Open the input field.
Move the cursor into the birthday/anniversary field.
Confirm.

Enter or change the date (day/month).
Scroll forward one line and enter the time.

Scroll forward one line.


Choose the indicator for the alarm.
OK
Store entries.
Use the display keyDelete to delete the anniversary alarm.

Delete List
Press Keys:

Calendar/Clock

Alarm Clock


Settings
Setting the alarm clock
If activated, the alarm clock (icon) on your handset will ring every day at the time entered.
With the handset idle:
Open the menu.
Select the menu item and confirm.
Select the menu item and confirm.
The current setting is displayed.
Select On
Scroll forward one line.
Enter the hours/minutes. The example here is 06.00.
Scroll forward one line.
Choose the ringer melody for the alarm call.
Save the settings.
An alarm call will not be made if room monitoring (babyphone) is activated or during automatic redialling.
Deactivating the alarm clock
The alarm clock is set but you do not want it to ring.
Open the menu.
Select the menu item and confirm.
Select the menu item and confirm.
Select Off
Save the settings.
Turning off the alarm call
An alarm call is signalled like an incoming call. Press any key to turn it off.

Calendar/Clock

Alarm Clock


An alarm call is signalled like an incoming call. Press any key to turn it off.

Setting an appointment
Your handset is able to remind you of one appointment. If you have set an appointment, this is indicated by the icon in the display.
With the handset idle.
Open the menu.
Select the menu item and confirm.
Select the menu item and confirm.
Select On to activate the appointment alarm.
Scroll forward one line.
Enter the day/month. The example here is 20th May.
Scroll forward one line.
Enter the hours/minutes. The example here is: 9.30.
Scroll forward one line.
Choosing the ringer melody for the appointment alarm.
Save the settings.
An appointment alarm will only ring when the handset is idle. An appointment alarm is not made when room monitoring is activated or during automatic redial.
Turning off the appointment alarm
An appointment alarm is signalled in the same way as an incoming call; press any key to turn it off.
Press Keys:

Calendar/Clock
Missed Dates

三
OK
OK
OK
Missed appointments and anniversaries
An appointment and anniversaries that have been signalled on the handset but not been accepted are saved in a list.
A new missed appointment/anniversary is indicated by Appt. Press the right display key to display the list Events list. Then select Missed Appoint. OK
If you want to view your appointment again, proceed as follows:
Open the menu.
Select the menu item and confirm.
Select the menu item and confirm.
Select a missed appointment or anniversary Information on this entry is displayed.
Use the display keyDelete to delete the appointment/ anniversary.
Handset and loudspeaker volume
三
OK
OK
Open the menu.
Select the submenu.
You will hear the current handset volume.
Set the required handsfree talking volume.
Scroll forward one line.
Select the required level for the handset volume and confirm.
Setting the ringer volume/melody
You can choose from five ringer volumes, "crescendo" ring (increasing volume), ringer off and any of ten ringer melodies:
三
OK
OK
Open the menu.
Select the menu item and confirm.
You will hear the current ringer volume and its level will be displayed.
Select the ringer volume.
Scroll forward one line.
Select the required ringer melody (1-10) and confirm.

Sound Settings
Handset Volume

Set the required handsfree talking volume

save


Save

Sound Settings
Ringer Settings
s


save


Save

Time control for ringer volume
You can set a different ringer volume for a particular time of day.
Open the menu.
Select the menu item and confirm.
You will hear the current ringer volume and its level will be displayed.
Press.
Activate/deactivate time control.
Enter the period for the different ringer
from 11:00 to 15:00.
Scroll forward one line and select the ringer volume
Save the settings.
Press.
Activating/deactivating warning and signal tones
Key beeps: Every keystroke is confirmed.
- Confirmation beeps: Confirmation beep (a rising tone sequence) when you make entries/settings and when you replace the handset in the charging station.
- Battery low beep: The battery must be recharged.
Open the menu.
Select the menu item and confirm.
Select the menu item and confirm.
Select the required function.
On Off Ior Cactect (battery low beep in the call).
Save the settings.
Press Keys:

Sound Settings
Silent alert


Activating/deactivating the vibration alarm
If you do not wish to be disturbed by the ringing tone you can activate the handset's vibration alarm instead. This can also be activated in addition to the ringing tone (in noisy surroundings, for instance).
Open the menu.
Select and confirm.
Select and confirm.

The current setting is marked with a
You can deactivate the ringing tone by keeping the _ key pressed down for a while. Only the vibration alarm will then be active.
Auto talk feature on/off
When this function is activated you can remove the handset from the charging unit without pressing the key to accept a call (factory setting).

Open the menu.

H/Set Settings

Auto Answer

Select the menu item and confirm.

Activate/deactivate with OK (√ = function on).
Press Keys:

H/Set Settings
Reset Handset

OK
OK

Resetting to the factory defaults
The directory, the network access list and the caller list are not deleted when you reset the handset. Registration at the base station is not affected.
Open the menu.
Select the menu item and confirm.
Select the menu item and confirm.
Confirm.
Function Factory setting Handset volume 1 Ringer volume ("ring tone") 5 Ringer melody 1 Auto talk On Battery low beep On Handsfree volume 3 Room monitor level high Time control off Display language local Vibration alarm off
Room monitoring (babyphone)
You can use your handset as a baby monitor.
The handset should be placed at least 1 to 2 meters away from your baby. If a certain noise level is reached (for example if your baby is crying) the handset will automatically dial the number you stored (internal or external).
When the room monitor is active, incoming calls are merely displayed.
Press Keys:

Add. Features
Room Monitor.


Change


OK


OK


Save
Setting the room monitor
Open the menu.
Select the menu item and confirm.
Select the menu item and confirm.
SelectOnOff
Scroll forward one line.
Open the entry field for the telephone number.
Delete an existing external number with
Delete an existing internal number with YES (you will be asked to confirm).
Open the list of internal users and select the internal number.
Save the number.
Open the directory.
Select an external user.
Open the menu.
Confirm the setting.
Go down one line.
Set sensitivity to "high" or "low."
Save the setting.
Room monitoring can be deactivated with the display key Off
You can deactivate the room monitor from an external number (from your mobile phone for example). Answer a call made from the room monitor.
Deactivate with 9Wxy?
The room monitor is now deactivated. The room monitor will no longer call.
Press Keys:
Walk and Talk mode
Requirements:
The handsets must have the same base settings (e.g. best base station) or they must not be registered at any base station. (Walk and Talk mode reduces the handset's talk time considerably).
In Walk and Talk mode, handsets are not available for incoming calls.
Activating Walk and Talk mode on the handset

Add. Features
Walk and Talk


Open the menu.
Select the function.
Activate Walk and Talk mode.
Walk and Talk mode can be deactivated with the display key Off
Using Walk and Talk mode
Two handsets are in Walk and Talk mode:
Calling handset:

Press.
Called handset:
The call is indicated by a message on the display. Press.

Press.
The two handsets are connected to one another.

Press. The call is ended.
Appendix
Operating on base stations in the Gigaset family
Gigaset 1000/2000/3000
The following functions on your 4000i Micro/Comfort handset are not supported by base stations in this Gigaset family:
- Setting the time (the time is not transferred after the handset has been switched off)
- Changing the display language
- Room monitoring (cannot be switched off externally)
- SMS transfer (SMS-compatible base stations only)*
Gigaset 4010/4015 Classic
The following functions on your 4000i Micro/Comfort handset are not supported by the above-mentioned base stations:
- Changing the display language
- SMS transfer*
- Setting authorisation stages
* Not available in all countries
Looking after your phone
Wipe the base station and handset with a damp cloth or an antistatic wipe. Never use a dry cloth as this can cause static discharge.
Contact with liquid
If the handset should come into contact with liquid, on no account switch the device on. Remove all batteries immediately.
Allow the liquid to drip out of the device, and then dab all parts of the device dry.
Keep the handset with the batteries removed in a warm, dray place for at least 72 hours. In many cases, you will then be able to use it again.
Recommended batteries:
Nickel-Metal-Hydride (NiMH), 500 mAh.
Order No. V30145-K1310-X125 or
Order No. V30145-K1310-X229
The handset's operating times/charging time:
Capacity (mAh) Standby time (hours) Talk time (hours) Charging time (hours) 500 up to 300 approx. 16 approx. 5.5
Battery charging capacity falls after a number of years.
Range
The handset will operate away from the base station up to about 300 m outdoors and up to 50 m indoors.
Desktop charging station
The desktop charging station for Siemens mobile telephones can also be used to charge your handset.
(Accessory for Siemens C45, ME45, S45 mobile telephones)
Order No. L36880-N4501-A101

When a Gigaset handset is being charged in the desktop charging station, a spare battery will not be charged up while the handset is in the charging station.
The charge display LED is always lit.
Guarantee
Scope
- This equipment guarantee applies to end users ("customers"). This guarantee does not in any way affect the customer's statutory rights.
- The guarantee applies to the supplied devices and all their components but not to their installation or configuration or to the services provided by the dealer. Manuals and any software supplied on a separate data medium are excluded from the guarantee. This guarantee does not apply to decorative covers or any other personalised parts or software not included in the scope of supply. The guarantee also does not apply to decorative top or bottom shells for special editions.
- The guarantee provides for devices or components that, despite proper care and use, have demonstrably developed defects due to faulty workmanship and/or faulty materials to be replaced or repaired at our discretion free of charge. The guarantee does not cover normal wear and tear. Alternatively, we reserve the right to replace the defective device with a successor model or reimburse the original purchase price on return of the defective device. Our decision is final. Any legal claims are excluded.
- Claims under the guarantee cannot be made if
- the defect or damage was caused by improper care or use.
Improper care or use includes the following:
- Opening the device (this is classed as third-party intervention)
- Manipulating components on the printed circuit board
- Manipulating the software
- Defects or damage caused by dropping, breaking, lightning or ingress of moisture. This also applies if defects or damage was caused by mechanical, chemical, radio interference or thermal factors (e.g. microwave, sauna, etc.).
- Repairs or other work done by persons not authorised by us.
Devices fitted with accessories not authorised by Siemens.
- Any further claims due to damage are excluded, such as damage arising outside the device, provided this was not due to gross negligence and/or intent on our part.
- Claims under the guarantee must be made as soon as the defect is noticed.
- A till receipt showing the date of purchase must be presented as proof. Each claim under the guarantee is accepted with the express reservation that subsequent investigations confirm the validity of the claim.
- Any devices or components that are replaced become our property.
- The costs of materials and labour will be borne by us, but not the costs of transport, postage or freight.
- We are entitled, at our discretion, to make technical changes (such as firmware updates) beyond repair or replacement in order to upgrade the device to the latest state of the art. There is no additional charge to the customer for this work. Our decision is final. Any legal claims are excluded.
- The guarantee is valid in the country of purchase. It applies only if the device is operated in the relevant geographical area in accordance with the information on the packaging and in the operating instructions.
- Any further claims are excluded. Siemens is not liable in any circumstances for downtime, loss of profits, loss of data or loss of any other information. The customer alone is responsible for safeguarding such data and information.
- Changes to this guarantee require prior approval by Siemens in writing.
Guarantee period
- The guarantee applies in countries in the EU from 1 January 2002 for a period of 24 months.
- In all other countries the guarantee period shall be the relevant minimum statutory guarantee period, but no longer than 24 months.
- The guarantee period starts on the day of purchase by the customer.
- A successful claim under the guarantee does not extend the guarantee period.
- Work under the guarantee is handled by our Customer Care Centers.
The guarantor is Siemens Aktiengesellschaft Deutschland, Schlavenhorst 88, D-46395 Bocholt.

To redeem the guarantee please contact your local Customer Care Center (see back cover).
Customer Care Service
You can get assistance easily when you have technical questions or questions about how to use your device by using our online support service on the Internet at:
www.my-siemens.com/customercare
If the device needs to be repaired, please contact one of our service centers:
Service telephone number see back cover.
The CE symbol indicates that the telephone complies with the essential requirements of the R&TTE directive.
The 4000i Micro handset is approved for use in Switzerland and throughout the EU.
Display languages
When registering the handset with the Gigaset 4010i base station, the languages marked with an * can be set:
Einstellungen Sprache Deutsch H/Set Settings Language English Réglages comb. Langue François Impostazioni Lingua Italiano Ajuste terminal Idioma Español
We, Siemens AG, declare, that the above mentioned product is manufactured according to our Full Quality Assurance System certified by CE-TECOM ICT Services GmbH with the registration number „Q810820M" in compliance with ANNEX V of the R&TTE-Directive 99/05/EC. The presumption of conformity with the essential requirements regarding Council Directive 99/05/EC is ensured.
Senior Approval Manager
The Declaration of Conformity (DoC) has been signed. In case of need, a copy of the original DoC can be made available via the company hotline.
C∈0682
Issued by
Information and Communication mobile
Haidenaupplatz 1
D-81667 München
Siemens AG 2002
All rights reserved. Subject to availability.
Right of modification reserved.
Printed in Germany (05/2002).
Siemens AG
http://www.my-siemens.com
Best.-Nr.: A31008-G4000-B027-1-6419

A31008-G4000-B027-1-6419
Pulsar las teclas:
p.ej. 2ABC p.ej. o bien   Marcar con marcación
Pulsar la tecla prolongadamente: se visualiza el nombre del proveedor de red programado.
Introducir el número de téléphone
Selección un registrar del listín Telefonico y confirmar.
Pulsar.
Tabla de simbolos
Pulsar la tecla correspondiente varias vezes o de forma prolongada:| 1 x 2 x 3 x 4 x 5 x 6 x 7 x 8 x 9 x | 10x | ||||||||||
| 1000 | Espacios en blanco | 1 | € | f | $ | ¥ | a | ||||
| 2ABC | a | b | c | 2 | ä | á | à | á | ã | ã | ç |
| 3DEF | d | e | f | 3 | ë | é | è | ê | |||
| 4GH | g | h | i | 4 | i | í | i | i | |||
| 5JKL | j | k | l | 5 | |||||||
| 6MWD | m | n | o | 6 | ö | ñ | ó | ò | ô | ō | |
| 7PORS | p | q | r | s | 7 | β | |||||
| 8TUV | t | u | v | 8 | ü | ú | ù | ú | |||
| 9WXY | w | x | y | z | 9 | ý | ý | æ | ø | à | |
| * | a→A | * | / | ( | ) | < = | > | % | |||
| 0+ | . | , | ? | ! | 0 | + | - | : | i | i* | |
| # | # | @ | \ | & | § | ||||||
Pulsar las teclas:
La insertión de los caracteres se efectúa siempre a la izquierda del cursor. Anteponiendo un espacio en blanco, el registrar correspondiente salta a la 1^a posicion (ej.: " Carla"). Organ de clasificacion:| 1. Espacios en blanco | 3. Letras (pororden alfábé-tico) |
| 2. Cifarás (0-9) | 4. Otros caracteres |
Mostrar, modificar o borrar registrar
Abrir el listín Telefonico/la lista de proveedores de red. Selección ar registrar deseado. Mostrar todos los datos relativos al registrar. Abrir el camino de entrada y efectuar los Cambios necessarios. Modificar el número de téléphone. Saltar al Campo de nombre y cambiar el nombre. Introduccion de characteres y nombres, v. pag. 14. En el listín telefónica: si se desea,/agregar cumpleaños,v.pag.17. Abrir el menu. Confirmar los Cambios. Abrir el listín Telefonico/la lista deproveadores de red. Seccionar el registrar deseado. Abrir el menu. Suena un tono de confirmacion. El registrar se borra.  Borrar registrar Enviar registrar a除外 terminal inalámbrico
Es possible enviar un registrar a uno terminal inalámbrico Comfort. Abrir el listín Telefonico/la lista deproveadores de red. Seleccionar el registrar deseado. Abrir el menú. Selección y confirmar. Selecciónar extension interna (terminal inalámbrico del receptor) y confirmar.Enviar registros adicondales:
Pulsar. Seleccionar el registrar deseado. Iniciarceso de transmisión.Enviar listín Telefonico/lista deproveadores de red
Alternatively, you can use the list in the following exercises. Véase "Enviar registrar aOTHER terminal inalámbrico." La transmisión se interrupse si: - La memoria del terminal receptor está agotada. - Ud. obtiene una llamada. La transmisión eneware de un registrar se leva a cabo,. hasta el final.Borrar listín Telefonico/lista de proveedores de red
Abrir el listín Telefonico/la lista de proveedores de red. Seleccionar el registrar deseado. Abrir el menú. Selección y confirmar. Confirmar borbado de todos los registros.Pulsar las teclas:
 VerCambiar
Cambiar
       #OK
Introducir aniversarios (p.ej. cumpleanos)
Puede introducir la Fecha y la hora para los datos de cumpleanos/aniversarios y hacer que el Telefono le avise. Abrir el listín Telefonico. Selección ar registrar desedo y做不到. Abrir camino de entrada. Mover el cursor al campo del cumpleanos/aniversario. Confirmar. Introducir o modifierla Fecha (dia/mes). Saltar una linea hacía abajo e introducir la hora. Saltar una linea hacía abajo. Selecciónar sealsization. Guardar entradas. Mediante la tecla de display Borrar puede borrar los aniversarios.Ajustes
Ajustar el descentador
Si ha ajustado una hora en el descentador de su terminal inalámbrico (simpilo), el tiempo sonará todos los días a la mesma hora. El Telefono se encuesta en estado de reposo: Abrir el menú. Seleccionar y confirmar. Seleccionar y confirmar. Elajusteactualsevisualiza. Seleccionar Si. Saltar una linea hacía abajo. Introducir horas/minutos. En el ejempo: 6.00 horas. Saltar una linea hacía abajo. Selecciónar melodia de descentador. Guardar los ajustes.   Citas/hora Despertador     Gua
    dar
Pulsar las teclas:
 Citas/hora  Despertador三
OK
OK
 Guardar
No se emitiráaculara llamada de alarmasisi estáactivada lafunciondebabyphone(vigilancia dehabitatacion) o la rellamada automatica.Desactivar el descentador
El despertador está ajustado, pero no desea que sue ne. Abrir el menú. Selección y confirmar. Selección y confirmar. Seleccionar No. Guardar los ajustes.Desactivar la llamada de alarma
La llamada de alarma se indica como una llamada entrante. Pulse该如何 tecla para apagar el tiempo de alarma.Ajustar cita
Puede ajustar su terminal movable para que le recuerde una citing. Si ha ajustado una citing, esta se visualizará con el symbolo . El Telefono se encuesta en estado de reposo.三
OK
OK
            Guardan
Abrir el menú. Selección y confirmar. Selección y confirmar. Selecciónar Si para activar la funciona de Citation. Saltar una linea hacía abajo. Introducir dia/mes, en el exemple: 20 de mayo. Saltar una linea hacía abajo. Introducir horas/minutos, en el ejempo: 9.30 horas. Saltar una linea hacía abajo. Selecciónar melodia del tiempo para la función de Citation. Guardar los ajustes.Pulsar las teclas:
La llamada de citing solo se activa si el terminal inalámbrico se incluye en estado de reposo. No se emitirá ninguna llamada de citing si está activada la función debabyphone (vigilancia de habitación) o la rellamada automatística.Desactivar llamada de vita
La llamada de citing se Penaliza como una llamada entrante y se desactiva pulsandorialquier tecla.Indicar Citation y aniversarios no aceptados
Las citing y aniversarios que el terminal inalábrico ha indicado pero que Ud. no ha aceptado se guardan en una lista. Las citing/aniversarios nuevos no aceptados se indicate con Cita. Pulsar la tecla derecha del display, se muestra la lista de aniversarios. Selección a continuación Citas vencidas OK Si desea volver a consultar las CITAS ya visualizadas, proceda del suiviente modo:  Citas/hora   Citas vencidas     Abrir el menú. Selección y confirmar. Selección y confirmar. Selección cita o aniversario no aceptados. Se muestra la información correspondiente. Mediante la tecla de display Borrar可以把borrarlascitas/aniversarios.Volumen del microtelefon y del altovoz
 Ajuste audio  Vol. téléfono      Abrir el menu. Selecciónarmenú. El tiempo de llamada suena con el volumen actual. Ajustar volumen de manos libres. Saltar una linea hacía abajo. Selección ar nivel deseado del volumen del altovoz y confirmar.   Guardan Ajustar volumen del timbre/melodia
Puede elegir entre cinco niveles de volumen de tiempo, la llamada "progresiva" (volumen en aumento), tiempo desactivado, y diez melodías de时间和: Abrir el menu. Selección y confirmar. Se reproduce el volumen del tiempo actual y se visualiza. Seleccionar volumen del tiempo. Saltar una linea hacía abajo. Selecciónar la melodia del timbre deseada (1-10) y confirmar.Control de tiempo para el volumen del时间和
Puede ajustar un volumen del tiempo différente para un intervalo determinado. Abrir el menú. Selección y confirmar. Se reproduce el volumen del tiempo actual y se visualiza. Pulsar. Activar/desactivar control de tiempo. Introducir intervalo para el tiempo de llamada deseado para 11:00 hasta 15:00 horas. Saltar una linea hacía abajo y selecciónar el volumen del tiempo. Guardar los ajustes.Pulsar las teclas:
 Ajuste audio Tonos de avis  OK OK   Guardan  Ajuste audio Vibración  OK OKActivar/desactivar tonos de avis y señales acústicas
- Tono de confirmacion de teclas: se confirma cada pulsacion de tecla. - Tonos de confirmación: Tono de confirmación (se cuencia de tonos ascendente) al final de las entradas/ajustes y al depositar el terminal en la estación base; tono de error (secuencia de tonos descendente) en el caso de entradas erroneas. - Tono de avis de bateria: la bateria debe cargarse. Abrir el menú. Selección y confirmar. Selección y confirmar. Selecciónarfunciendesada. Selecciónar Si No o (tonblata.asi)so de bateria en llamada). Guardar los ajustes.Activar/desactivar la alarma por vibracion
Para no ser molestado por un tono de llama,ould activar, en su lugar, la alarma por vibracion del terminal inalambrico. Dicha alarma también se pueda activar en combinacion con el tono de llama (p.ej. en un entorno ruidoso). Abrir menu. Selección y confirmar. Selección y confirmar.  El ajuste actual está marcado mediante✔ Mediante una pusación prolongada de la tecla *puede desactivar el tono de llamada. De este modo solo se enquirytra activa la alarma por vibracion.Pulsar las teclas:
  Ajuste terminal   Acep.Ilamad.aut OK Activar/desactivar con OK ( funciona ct.).Activar/desactivar aceptación automática de llamada
Si está activada esta funciona, para contestar una llama basta con retirar el terminal inalámbrico del soporte cargador ( estado de suministro), sin necessities de pulsar la tecla. Abrir el menú. Selección y confirmar. Activar/desactivar con OK ( funcion act.).Reposicion del estado de suministro
El listín Telefonico, la lista deproveadores de red y la lista de llamantes no se borran en la reposión. El registrar en la estación base se mantiene.   Ajuste terminal   Reponer teléf.   Abrir el menú. Selección y confirmar. Selección y confirmar. Confirmar la consulta de seguridad.| Función Estado de su- | ministro |
| Volumen del microtelefono | 1 |
| Volumen del timbre ("tono del timbre", ) | 5 |
| Melodia del timbre 1 | |
| Aceptación automatística de llama da | act. |
| Tono de avis de bateria | act. |
| Volumen de manos libres 3 | |
| Nivel de babyphone alto | |
| Control de tiempo desact. | |
| Idioma del display他们在 | |
| Alarma por vibración desact. |
Pulsar las teclas:
Babyphone (vigilancia de habitacion)
Mediate su terminal inalábrico puede supervasar los ruidos de la habitación de su bebé desde otro lugar. La distancia entre el terminal inalábrico y su bebédebeser de, como min., 1 a 2 metros.Si se alcanza un nivel de ruidodeterminado (p.ej.,el bebé llora),el terminal inalábricomarca automaticallye el número de Telefono programado (interno/externo).Con la función babyphone activada las lllamadas entrantes se indican solamente en el display del terminal.Ajustar babyphone
 Familia/ocio Vigilan. habit.   OK   Cambiar
  o bien
  OK  OK    Abrir el menu. Selección y confirmar. Selección y confirmar. SeLECTIONAR Si No Saltar una linea hacía abajo. Abrir camino de entrada para el n° de téléphone. Borrar un número externo ya programado. Borrar un numero externo ya programado con Borrar un número interno ya programado con S1 (consulta de seguridad). Abrir la lista de extensiones internas e seleccionar numero interno. Guardar el número de téléphone. Abrir el listín Telefonico. Selecciónar extension externa. Abrir el menú. Confirmar los ajustes. Saltar una linea hacía abajo. Ajustar nivel de sensibilitad "alto" o "bajo." Guardar los ajustes. Con la tecla del display de desactivar la func tion babyphone.Pulsar las teclas:
Ud. puede desactivar desde el exterior (p.ej., desde el Telefono movil) la funciona babyphone. Atienda la llamada activada por la funciona babyphone. Desactivar con 9Wx7 Ahora la funciona babynophone se encontrar desactivada. Ya no se activan más llamadas por el babynophone.Modo walkie-talkie
Requisito:
Los TERMINales tienen los mismos ajustes de estación base (p. ej. mejor estación), o todas no está registrados en ninguna estación base. (El modo walkietalkie reduce considerablemente el tiempo de servicios del terminal). En el modo walkie-talkie, los terminales no peuvent recibir llamadas entrantes.Activar modo walkie-talkie en un terminal inalámbrico
Abrir el menu. Selecciónar funciona. Activar modo walkie-talkie. Con la tecla del display No quede desactivar el modo walkie-talkie.Utilizar modo walkie-talkie
Dos TERMINALES inalábricos se.Encuentran en el modo walkie-talkie:Terminal inalábrico Ilamante:
Pulsar.Terminal inalámbrico llamado:
La Ilamada se indica en el display con un avis. El tiempo de llamada se desactiva. Pulsar. Ambos terminales inalámbricos quedan interconectados. Pulsar. Finaliza lacomingsacion.  Familia/ocio Walky-Talky  OK OK    Anexo
Operación con estaciones base de la gama Gigaset
Gigaset 1000/2000/3000
Las siguientes functions de su téléphone inalámbrico 4000i Micro/Comfort no se Ofrecen en las estaciones base de esta gama Gigaset. - Ajuste de la hora (tras apagar el terminal inalámbrico, la hora deja de visualizarse) - Marcación por voz - Babyphone (no puede desactivarse desde el exterior)Gigaset 4010/4015 Classic
Las siguientesuciones de su téléphone inalámbrico 4000i Micro/Comfort no se Offercen en estas estaciones base. - Marcación por voz - Ajuste de niveles de autorizaciónCuidados
Limpie la estación base y el terminal inalámbrico con un paño humedo o un paño antiestálico. No utilise en ningún caso un paño seco. Existe peligro de que se forme carga esta.Contacto con liquido
Contacto con liquido: Si el terminal inalámbrico entra en contacto con liquido: no conectar en ningún caso el aparato. Retirar inmediamente todas las baterías. Deje que el liquido escurra fuera del aparato y seque antes todas las piezas. Almacene el terminal inalámbrico sin baterías durante un minimo de 72 horas en un lugar seco y caliente Después es possible en是多么 casos la nuevo puesta en función. miento.Baterías recomendadas:
Hibrido niqueI-metal (NiMH), 500 mAh.
N^o de pedido V30145-K1310-X125 o N^o de pedido V30145-K1310-X229Tiempos de servicios/de energia del terminal:
| Capacidad (mAh) | Tiempo de autonomía (horas) | Tiempo de conversación (horas) | Tiempo de entrega (horas) |
| 500 hasta 300 | aprox. 16 aprox. | $,5 |
Alcance
El alcance en espacios abiertos es de aprox. 300m . Dentro de edificios se registrarancas de hasta 50m .Cargador de sobremesa
El cargador de sobremesa para Telefonos móvil Siemens también se pueda usar para cargar su terminal inalámbrico. (Accesorio para los Telefonos móvil Siemens C45, ME45, S45) N^o de pedido L36880-N4501-A101)  Al realizar la entrega de un terminal inalámbrico Gigaset en el cargador de sobremesa, la bateria de réserve no se cargará mienntras el terminal inalámbrico se incluye emplazado en el cargador. El LED indicator de energia siempre está encendido.Customer Care (Service)
Obtendrá una asistencia sencilla y sin complicaciones en caso de cuestiones技术水平 y de manejo de su aparato atramés de是我国 soporte en linea en la pagina de Internetwww.my-siemens.com/customercare
En caso de ser necesaria una reparacion, sirvase dirigirse a uno de nuestros centros de service. Numeros de téléphone del serviceo专业技术 v. contraportada. El sello CE corrobora la conformidad del equipo con losrequireimientos Basics de la directiva R&TTE. El terminal inalámbrico 4000i Micro está homologado para toda la UE y Suiza.Idiomas de display
Al registrarse en la estacion base 4010i poderenajustarse los idiomas marcados con \*:| Einstellungen Sprache | Deutsch |
| H/Set Settings Language | English |
| Réglages comb. Langue | François |
| Impostazioni Lingua | Italiano |
| Ajuste terminal Idioma | Espanol |
SIEMENS
Be inspired  Operating instructions and safety precautions  The display is protected by a plastic film. Remove the plastic film.Status LED (light-emitting diode)
lights up during a call; flashes at: - Incoming call - New messages - Alarm call, appointments, anniversariesReception strength
Control key
Talk key
-Accept call - Dial number - Switch from hands-free talking to handsetOpen the directory
Key 1
Hold down to select Answer. machine/PostalboxAsterisk key
Hold down to activate and deactivate the ringerKeypad protection
On/off hold key down!Handsfree key
Microphone
Socket
- for Headset, MP3-PlayerDisplay (display field)
Charging status
empty full flashes: Battery lowCurrent functions and display keys
With the display keys, you have access to the current functions.End call and On/ Off key
- End call - Cancelling function - One menu level back (press briefly) - Return to idle state (hold down) - Handset on/off (hold key down)Caller list
Access to message listsSel Services key
- Open network access list: press briefly! R key function: hold key down!Interaction between control key and display keys
Display keys
 With the display keys you can carry out functions that can also be partly controlled with the control key. The side of the control key which you must press is indicated in the operating instructions by arrows:Control key
 left/right)  top/bottom)Important menus
Display symbols
The following symbols appear above the display keys depending on the situation:| Displaykeys | Meaning |
| = | Menu key: Activates the main menu when the phone is idle. During a call, it activates a menu for the particular situation. |
| OK | Selects and confirms the menu function. Ends and saves an entry. |
| ←H | Delete key (Backspace): Deletes characters from right to left. |
| →→ | Automatic radial key: Opens a list of the last five numbers dialled. |
| M | Displayed if SMS*, answering machine, mail service box or caller list is active |
| S | One menu level back, cancel |
Safety precautions
 Only use the power supply unit supplied as indicated on the underside of the device.  Only insert approved rechargeable batteries of the same type. Never use ordinary (non-rechargeable) batteries as they may pose a health hazard or cause injury.  Make sure the rechargeable battery is inserted the right way round  Use the battery specified in these operating instructions  The phone may affect medical equipment so always switch your phone off before entering hospitals or doctors' practices.  The handset may cause an unpleasant humming noise in hearing aids.  Do not operate the phone in places where there is a risk of explosion (such as paint workshops).  The handset is not splash-proof (see page 25).  Drivers must not use the phone while driving (including the Walk and Talk function).  The phone must be switched off at all times in an aircraft (including the Walk and Talk function). Make sure it cannot be switched on accidentally.  If you give your Gigaset to someone else you should also give them the operating instructions.  Dispose of batteries and the phone carefully. Do not pollute the environment. Not all the functions described in these operating instructions are available in all countries.Contents
Brief overview of the handset 2
Interaction between control key and display keys. 2 Important menus 3 Display symbols 3Safety precautions 4
Preparing the handset. 6
Delivery package 6 Inserting the battery 6 Registering the handset 6 Charging the battery 7 Attaching the belt clip 7 Setting the date and time 8 Changing the display language 8Making calls 9
Making an external call 9 Making internal calls 9 Answering a call 9 Open caller list/message list 10 Handsfree talking. 10 Forwarding an external call, enquiry call 10Automatic redial 11
Directory and network access list 12
Speed dialling from the network access list 13 Dialling with speed dialling 13Settings 17
Setting the alarm clock 17 Deactivating the alarm clock 17 Turning off the alarm call. 17 Setting an appointment 18 Handset and loudspeaker volume. 19 Activating/deactivating warning and signal tones 20 Activating/deactivating the vibration alarm 21 Auto talk feature on/off 21 Resetting to the factory defaults 22Room monitoring (babyphone). 22
Setting the room monitor 23Walk and Talk mode 24
Appendix 25
Operating on base stations in the Gigaset family 25 Contact with liquid. 25 Range 26 Guarantee 26 Customer Care Service 29 Display languages 30Press Keys:
Preparing the handset
Delivery package
Gigaset 4000 Micro handset, one battery, charging unit, belt clip, operating instructions.Inserting the battery
 The default display language on your handset is Italian. To set the desired language, see page 8.Registering the handset
Step 1:
Open the menu. Select and confirm. Select and confirm. Select Base1Base2Base3Base4 Key in PIN and confirm (as supplied: 0000): Regstr.Procedure Base 1 is displayed, for example.Step 2:
Press down the key on the back of the Gigaset 4010i Micro base and keep it pressed down for a while. The handset will be automatically assigned the next free internal number (1-3). The internal number 6 will be overwritten if all positions are already occupied. The handset will return to the idle condition following successful registration. The internal number (e.g. "INT1") is displayed. Gigaset On the base station or base telephone  H/Set Settings Register H/Set  OK  Press Keys:
| 4010/4015 | Hold down the key on the underside of the base station. |
| 3010/3015 | Hold down the paging-key on the base station until you hear signal tones. |
| 3020/25 | Select settings, system settings and regi-ster handset in the menu at the base sta-tion telephone and confirm with OK. |
| 3030/35 | |
| 4030/35 | |
| 3070/75 | Press the LED - it will flash during regist-ration. |
| 4070/75 | |
| Non-Sie-mens base stations | To register at "GAP base stations,"follow the relevant operating instructions (steps 2 and 3). |
Charging the battery
 Leave the handset for approx. 5,5 hours in the charging unit to charge the battery, as they are not charged when they leave the factory. The charging status icon flashes on the handset to indicate that the battery are being charged: See the appendix for a list of recommended battery. - The battery heat up during charging. This is normal and not dangerous. - Opening the battery compartment unnecessarily may cause the wrong charging status to be displayed.Attaching the belt clip
 Push the belt clip onto the back of the handset until the lugs at the side click into place.Press Keys:
 Calendar/Clock Date/Time  OK OKSetting the date and time
You need to set the date and time so that the time that messages and calls are received is shown correctly. Open the menu. Select and confirm. Select and confirm. The current setting is shown.Enter the date
Enter the day/month/year. In this case 20.05.2001. e.g. 2^ABC 0 + 0 + 5^MC 0 + 1_CD Go down one line.Enter the time
Enter hours and minutes. In this case 19:05 e.g. ①⑨⑩+⑤ Go down one line.Select the display mode
use the left side of the control key to select the 12-hour mode (am or pm) or the 24-hour mode (default). Save the settings.Changing the display language
OK  OK OK OK Open the menu. Confirm the function. The current language is marked with a . Select the language you want and confirm. You will find a.table on the last page of this booklet.Dialling an emergency number
You can dial the emergency numbers saved in the base station even if the telephone lock is activated. Please refer to the operating instructions for your base station. Save  H/Set Settings Language  OK OKPress Keys:
Making calls
Making an external call
 Enter the telephone number. If you make a mistake use the key to correct individual digits.  Press the talk key.  Press the end call key to end the call.  - You can also press the talk key first and then enter the telephone number - each digit will be dialled immediately. - You can cancel the dialling operation by pressing the end call key. - You can insert a pause: After entering the prefix, open the menu using the display key and select "insert pause".Making internal calls
Open the list of internal users. Your own handset is identified by " <" . Select the handset you want and press the talk key. Enter the internal number of the handset. All handsets are called. Press the end call key to end the call.Answering a call
Your telephone will ring (ringing tone) and the status LED will flash. Press the talk key or handsfree key. Simply remove the handset from the charging unit (factory setting: "Auto talk").     or | Press Keys: | Open caller list/message list* |
| A message appears in the display and the status LED flashes to indicate that there are new calls/messages. Press | |
| Handsfree talking | |
| Handsfree talking when dialling | |
| Dial the telephone number. | |
| Press the handsfree key. | |
| When handsfree talking is activated, the handsfree key and the status LED are lit. | |
| Handsfree talking during a call | |
| Activate handsfree talking. | |
| To setthe volume: | |
| Press the handsfree key once more. | |
| Raise or lower the volume. | |
| Save the volume level. | |
| Change from handsfree talking to the handset | |
| End the call. | |
| Forwarding an external call, enquiry call | |
| You can forward an external call to another handset or make an internal enquiry call. | |
| Open the list of internal users. | |
| Select the internal user and call. | |
| If the internal user answers: | |
| • To forward the call: Press the end call key. | |
| • Toend the enquiry call: Use End to return to the waiting party. | |
| * Not available in all countries |
Press Keys:
Automatic redial
Manual redial
You have access to the last five telephone numbers dialled. Display and select the telephone number. Press the talk key.Automatic redial
This function is not available in all countries. The handsfree key flashes and open listening is activated. The function is deactivated after ten unsuccessful call attempts or if a call was made in the meantime. Press Off or any key if the person you called is not available. Display and select the telephone number. Open the menu. Activate. If the other person answers press the talk key.Deleting a number from the redalling list
Display and select the telephone number. Open the menu. The telephone number is deleted.Copying a telephone number to the directory
Display and select the telephone number. Open the menu. The telephone number is entered. you like you can change the number and enter a name (you can also enter an anniversary s. page 16). For notes on how to enter letters and characters s. page 14. Open the menu. Save the entry.  Directory and network access list
With the directory you can store up to 200 telephone numbers and then dial them at the push of a button. You can save the prefixes (Call-by-Call) of telephone companies in the network access list. The directory and network access list are used in exactly the same way.Storing an entry
Open the directory/network access list. Select the menu item and confirm. Enter the telephone number (no more than 32 digits). Scroll to the name field and enter the name. You can also enter an anniversary in the directory, see also page 16. Open the menu. Store the entryDialling with the directory
Open the directory. Enter the first letter of the name. For example for "E" press the 3 key twice or scroll with the key. Press the talk key. After selecting the name you can also open the menu, select Dispteyntive the number and dial with the talk keyPress Keys:
Display Number    Dialling with the network access list (Call-by-Call)
Open the network access list. Select call-by-call number and open the menu. Select the menu item and confirm. Enter the telephone number of the person you want to call.or
    Select the telephone number in directory and confirm. Press the talk key. The telephone number is dialled.Speed dialling from the network access list
You can store 8 speed dialling numbers in the network access list. Enter a speed dialling number (2-9) before the name. Example: Press speed dial key 2 and then enter the network provider's name.Dialling with speed dialling
e.g.  Hold down the key: The stored network provider's name is displayed. Enter the telephone numberor
   Select an entry from the directory and confirm. Press.Press Keys:
Character map
Press the relevant key repeatedly or hold down:| 1 x 2 x 3 x 4 x 5 x 6 x 7 x 8 x 9 x 10 x | |
| 1.0 | blank 1 € f ¥ a |
| 2ABC | a b c 2 à à â āç |
| 3NEF | d e f 3 é é è eê |
| 4GHII | g h i 4 i i i i |
| 5JKL | j k l 5 |
| 6MNO | m n o 6 ñ nó o o o |
| 7PONS | p q r s 7 β |
| 8TUV | t u v 8 ü u u |
| 9NXV7 | w x y z 9 y y æ ø Å |
| * | a→A * / () < = > % |
| 0+ | . , ? ! 0 + - : i i* |
| # | # @ & \ |
| 1. Blank | 3. Letters (alphabetical) |
| 2. Digits (0-9) | 4. Other characters |
Press Keys:
Displaying, changing or deleting an entry
Open the directory/network access list. Select the entry you want.View
View all the information for the entry.Change
Open the input field and make the necessary changes.    Change the number if necessary. Go to the name field and change the name. For notes on entering letters and characters. s. page 14. For the directory enter an anniversary if necessary. s. page 16. Open the menu. Confirm the changes.or
Save Entry
 Open the directory/network access list.  Select the relevant entry.三
Open the menu. Delete Entry
OK
You will hear a confirmation tone. The entry has been deleted.Copying an entry to another handset
You can copy an entry to another Micro/Comfort handset. Open the directory/network access list. Select the required entry.  Open the menu.三
Select the menu item and confirm. Select the internal user (receiving handset) and confirm.Copying a further entry:
# Press.YES
 Select the required number.opy
Initiate the copy process.Press Keys:
Copying the directory/network access list
You can copy the entire directory/network access list to another Micro/Comfort handset. See "Copying an entry to another handset." Transmission is interrupted: - if the memory of the receiving handset is full. - if you receive a call. Copying of an entry is terminated.Deleting the directory/network access list
Open the directory/network access list. Select the required entry. Open the menu. Select the menu item and confirm. Confirm delete all entries.Entering anniversaries (bolidays and so on)
You can store the date and time of anniversaries so you can be reminded of them.  Open the directory.  Select and display the entry. Open the input field. Move the cursor into the birthday/anniversary field. Confirm.  Enter or change the date (day/month). Scroll forward one line and enter the time.  Scroll forward one line.   Choose the indicator for the alarm. OK Store entries. Use the display keyDelete to delete the anniversary alarm.  Delete ListPress Keys:
 Calendar/Clock  Alarm Clock             Settings
Setting the alarm clock
If activated, the alarm clock (icon) on your handset will ring every day at the time entered. With the handset idle: Open the menu. Select the menu item and confirm. Select the menu item and confirm. The current setting is displayed. Select On Scroll forward one line. Enter the hours/minutes. The example here is 06.00. Scroll forward one line. Choose the ringer melody for the alarm call. Save the settings. An alarm call will not be made if room monitoring (babyphone) is activated or during automatic redialling.Deactivating the alarm clock
The alarm clock is set but you do not want it to ring. Open the menu. Select the menu item and confirm. Select the menu item and confirm. Select Off Save the settings.Turning off the alarm call
An alarm call is signalled like an incoming call. Press any key to turn it off.  Calendar/Clock  Alarm Clock    An alarm call is signalled like an incoming call. Press any key to turn it off. Setting an appointment
Your handset is able to remind you of one appointment. If you have set an appointment, this is indicated by the icon in the display. With the handset idle. Open the menu. Select the menu item and confirm. Select the menu item and confirm. Select On to activate the appointment alarm. Scroll forward one line. Enter the day/month. The example here is 20th May. Scroll forward one line. Enter the hours/minutes. The example here is: 9.30. Scroll forward one line. Choosing the ringer melody for the appointment alarm. Save the settings. An appointment alarm will only ring when the handset is idle. An appointment alarm is not made when room monitoring is activated or during automatic redial.Turning off the appointment alarm
An appointment alarm is signalled in the same way as an incoming call; press any key to turn it off.Press Keys:
 Calendar/Clock Missed Dates 三
OK
OK
OK
Missed appointments and anniversaries
An appointment and anniversaries that have been signalled on the handset but not been accepted are saved in a list. A new missed appointment/anniversary is indicated by Appt. Press the right display key to display the list Events list. Then select Missed Appoint. OK If you want to view your appointment again, proceed as follows: Open the menu. Select the menu item and confirm. Select the menu item and confirm. Select a missed appointment or anniversary Information on this entry is displayed. Use the display keyDelete to delete the appointment/ anniversary.Handset and loudspeaker volume
三
OK
OK
Open the menu. Select the submenu. You will hear the current handset volume. Set the required handsfree talking volume. Scroll forward one line. Select the required level for the handset volume and confirm.Setting the ringer volume/melody
You can choose from five ringer volumes, "crescendo" ring (increasing volume), ringer off and any of ten ringer melodies:三
OK
OK
Open the menu. Select the menu item and confirm. You will hear the current ringer volume and its level will be displayed. Select the ringer volume. Scroll forward one line. Select the required ringer melody (1-10) and confirm.  Sound Settings Handset Volume  Set the required handsfree talking volume save
 Save
 Sound Settings Ringer Settingss
 save
  Save
Time control for ringer volume
You can set a different ringer volume for a particular time of day. Open the menu. Select the menu item and confirm. You will hear the current ringer volume and its level will be displayed. Press. Activate/deactivate time control. Enter the period for the different ringer from 11:00 to 15:00. Scroll forward one line and select the ringer volume Save the settings. Press.Activating/deactivating warning and signal tones
Key beeps: Every keystroke is confirmed. - Confirmation beeps: Confirmation beep (a rising tone sequence) when you make entries/settings and when you replace the handset in the charging station. - Battery low beep: The battery must be recharged. Open the menu. Select the menu item and confirm. Select the menu item and confirm. Select the required function. On Off Ior Cactect (battery low beep in the call). Save the settings.Press Keys:
 Sound Settings Silent alert   Activating/deactivating the vibration alarm
If you do not wish to be disturbed by the ringing tone you can activate the handset's vibration alarm instead. This can also be activated in addition to the ringing tone (in noisy surroundings, for instance). Open the menu. Select and confirm. Select and confirm.  The current setting is marked with a You can deactivate the ringing tone by keeping the _ key pressed down for a while. Only the vibration alarm will then be active.Auto talk feature on/off
When this function is activated you can remove the handset from the charging unit without pressing the key to accept a call (factory setting).  Open the menu.  H/Set Settings  Auto Answer  Select the menu item and confirm.  Activate/deactivate with OK (√ = function on).Press Keys:
 H/Set Settings Reset Handset  OK OK Resetting to the factory defaults
The directory, the network access list and the caller list are not deleted when you reset the handset. Registration at the base station is not affected. Open the menu. Select the menu item and confirm. Select the menu item and confirm. Confirm.| Function Factory setting | |
| Handset volume 1 | |
| Ringer volume ("ring tone") | 5 |
| Ringer melody 1 | |
| Auto talk On | |
| Battery low beep On | |
| Handsfree volume 3 | |
| Room monitor level high | |
| Time control off | |
| Display language local | |
| Vibration alarm off |
Room monitoring (babyphone)
You can use your handset as a baby monitor. The handset should be placed at least 1 to 2 meters away from your baby. If a certain noise level is reached (for example if your baby is crying) the handset will automatically dial the number you stored (internal or external). When the room monitor is active, incoming calls are merely displayed.Press Keys:
 Add. Features Room Monitor.   Change
 OK
  OK
 Save
Setting the room monitor
Open the menu. Select the menu item and confirm. Select the menu item and confirm. SelectOnOff Scroll forward one line. Open the entry field for the telephone number. Delete an existing external number with Delete an existing internal number with YES (you will be asked to confirm). Open the list of internal users and select the internal number. Save the number. Open the directory. Select an external user. Open the menu. Confirm the setting. Go down one line. Set sensitivity to "high" or "low." Save the setting. Room monitoring can be deactivated with the display key Off You can deactivate the room monitor from an external number (from your mobile phone for example). Answer a call made from the room monitor. Deactivate with 9Wxy? The room monitor is now deactivated. The room monitor will no longer call.Press Keys:
Walk and Talk mode
Requirements:
The handsets must have the same base settings (e.g. best base station) or they must not be registered at any base station. (Walk and Talk mode reduces the handset's talk time considerably). In Walk and Talk mode, handsets are not available for incoming calls.Activating Walk and Talk mode on the handset
 Add. Features Walk and Talk    Open the menu. Select the function. Activate Walk and Talk mode. Walk and Talk mode can be deactivated with the display key OffUsing Walk and Talk mode
Two handsets are in Walk and Talk mode:Calling handset:
 Press.Called handset:
The call is indicated by a message on the display. Press.  Press. The two handsets are connected to one another.  Press. The call is ended.Appendix
Operating on base stations in the Gigaset family
Gigaset 1000/2000/3000
The following functions on your 4000i Micro/Comfort handset are not supported by base stations in this Gigaset family: - Setting the time (the time is not transferred after the handset has been switched off) - Changing the display language - Room monitoring (cannot be switched off externally) - SMS transfer (SMS-compatible base stations only)*Gigaset 4010/4015 Classic
The following functions on your 4000i Micro/Comfort handset are not supported by the above-mentioned base stations: - Changing the display language - SMS transfer* - Setting authorisation stages * Not available in all countriesLooking after your phone
Wipe the base station and handset with a damp cloth or an antistatic wipe. Never use a dry cloth as this can cause static discharge.Contact with liquid
If the handset should come into contact with liquid, on no account switch the device on. Remove all batteries immediately. Allow the liquid to drip out of the device, and then dab all parts of the device dry. Keep the handset with the batteries removed in a warm, dray place for at least 72 hours. In many cases, you will then be able to use it again.Recommended batteries:
Nickel-Metal-Hydride (NiMH), 500 mAh.
Order No. V30145-K1310-X125 or Order No. V30145-K1310-X229The handset's operating times/charging time:
| Capacity (mAh) | Standby time (hours) | Talk time (hours) | Charging time (hours) |
| 500 up to 300 | approx. 16 approx. | 5.5 |
Range
The handset will operate away from the base station up to about 300 m outdoors and up to 50 m indoors.Desktop charging station
The desktop charging station for Siemens mobile telephones can also be used to charge your handset. (Accessory for Siemens C45, ME45, S45 mobile telephones) Order No. L36880-N4501-A101  When a Gigaset handset is being charged in the desktop charging station, a spare battery will not be charged up while the handset is in the charging station. The charge display LED is always lit.Guarantee
Scope
- This equipment guarantee applies to end users ("customers"). This guarantee does not in any way affect the customer's statutory rights. - The guarantee applies to the supplied devices and all their components but not to their installation or configuration or to the services provided by the dealer. Manuals and any software supplied on a separate data medium are excluded from the guarantee. This guarantee does not apply to decorative covers or any other personalised parts or software not included in the scope of supply. The guarantee also does not apply to decorative top or bottom shells for special editions. - The guarantee provides for devices or components that, despite proper care and use, have demonstrably developed defects due to faulty workmanship and/or faulty materials to be replaced or repaired at our discretion free of charge. The guarantee does not cover normal wear and tear. Alternatively, we reserve the right to replace the defective device with a successor model or reimburse the original purchase price on return of the defective device. Our decision is final. Any legal claims are excluded. - Claims under the guarantee cannot be made if - the defect or damage was caused by improper care or use. Improper care or use includes the following: - Opening the device (this is classed as third-party intervention) - Manipulating components on the printed circuit board - Manipulating the software - Defects or damage caused by dropping, breaking, lightning or ingress of moisture. This also applies if defects or damage was caused by mechanical, chemical, radio interference or thermal factors (e.g. microwave, sauna, etc.). - Repairs or other work done by persons not authorised by us. Devices fitted with accessories not authorised by Siemens. - Any further claims due to damage are excluded, such as damage arising outside the device, provided this was not due to gross negligence and/or intent on our part. - Claims under the guarantee must be made as soon as the defect is noticed. - A till receipt showing the date of purchase must be presented as proof. Each claim under the guarantee is accepted with the express reservation that subsequent investigations confirm the validity of the claim. - Any devices or components that are replaced become our property. - The costs of materials and labour will be borne by us, but not the costs of transport, postage or freight. - We are entitled, at our discretion, to make technical changes (such as firmware updates) beyond repair or replacement in order to upgrade the device to the latest state of the art. There is no additional charge to the customer for this work. Our decision is final. Any legal claims are excluded. - The guarantee is valid in the country of purchase. It applies only if the device is operated in the relevant geographical area in accordance with the information on the packaging and in the operating instructions. - Any further claims are excluded. Siemens is not liable in any circumstances for downtime, loss of profits, loss of data or loss of any other information. The customer alone is responsible for safeguarding such data and information. - Changes to this guarantee require prior approval by Siemens in writing.Guarantee period
- The guarantee applies in countries in the EU from 1 January 2002 for a period of 24 months. - In all other countries the guarantee period shall be the relevant minimum statutory guarantee period, but no longer than 24 months. - The guarantee period starts on the day of purchase by the customer. - A successful claim under the guarantee does not extend the guarantee period. - Work under the guarantee is handled by our Customer Care Centers. The guarantor is Siemens Aktiengesellschaft Deutschland, Schlavenhorst 88, D-46395 Bocholt.  To redeem the guarantee please contact your local Customer Care Center (see back cover).Customer Care Service
You can get assistance easily when you have technical questions or questions about how to use your device by using our online support service on the Internet at:www.my-siemens.com/customercare
If the device needs to be repaired, please contact one of our service centers: Service telephone number see back cover. The CE symbol indicates that the telephone complies with the essential requirements of the R&TTE directive. The 4000i Micro handset is approved for use in Switzerland and throughout the EU.Display languages
When registering the handset with the Gigaset 4010i base station, the languages marked with an * can be set:| Einstellungen Sprache | Deutsch |
| H/Set Settings Language | English |
| Réglages comb. Langue | François |
| Impostazioni Lingua | Italiano |
| Ajuste terminal Idioma | Español |