071031 - Stapler Meec Tools - Free user manual and instructions
Find the device manual for free 071031 Meec Tools in PDF.


| Product Type | Stapler |
| Brand | Meec Tools |
| Model | 071031 |
| Power Source | Manual (hand-operated) |
| Staple Type | Standard 24/6 or 26/6 staples |
| Staple Capacity | Up to 100 staples |
| Loading Type | Spring-loaded top-loading |
| Throat Depth | Approx. 60 mm (2.4 inches) |
| Adjustable Staple Depth | Yes, adjustable for different paper thicknesses |
| Stapling Capacity | Up to 25 sheets of 80 g/m² paper |
| Weight | Approx. 0.5 kg (1.1 lbs) |
| Dimensions (L x W x H) | Approx. 190 x 60 x 150 mm (7.5 x 2.4 x 5.9 inches) |
| Color | Black and red |
| Material | Metal body with plastic handle |
| Safety Features | Safety lock to prevent accidental firing |
| Maintenance | Clean with dry cloth; lubricate moving parts occasionally |
| Repairability | Parts available; user-replaceable staple magazine |
| Included Accessories | 1 box of staples (optional) |
| Warranty | 2 years |
Frequently Asked Questions - 071031 Meec Tools
User questions about 071031 Meec Tools
0 question about this device. Answer the ones you know or ask your own.
Ask a new question about this device
Download the instructions for your Stapler in PDF format for free! Find your manual 071031 - Meec Tools and take your electronic device back in hand. On this page are published all the documents necessary for the use of your device. 071031 by Meec Tools.
USER MANUAL 071031 Meec Tools
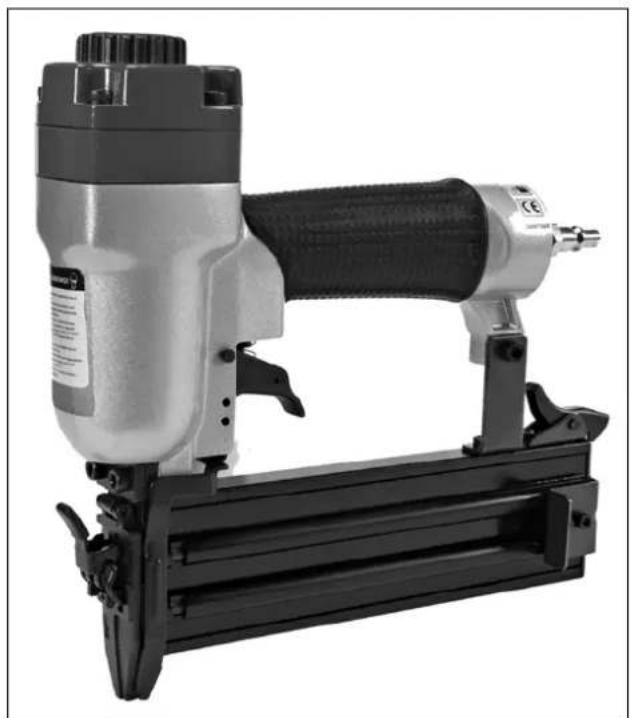
Installation Instructions for Nail Gun 20-50 mm
071031
natural_image
Exterior view of a black-and-white photo of a high-voltage nitriller (no visible text or symbols)
Värna om miljön!
Care for the environment!
Must not be discarded with household waste! This product contains electrical or electronic components that should be recycled. Leave the product for recycling at the designated station e.g. the local authority's recycling station.
SE - Bruksanvisning i original
EN - Operating instructions (Translation of the original instructions)
Jula reserves the right to make changes. In the event of problems, please contact our service department. www.jula.com
Tillverkare/ Produsent / Produenci/ Manufacturer
Jula AB, Box 363, 532 24 SKARA
Distributör/ Distributör/ Dystrybutor/ Distributor
Jula Poland Sp. z o.o., ul. Malborska 49, 03-286 Warszawa, Polska
natural_image
Technical line drawing of a mechanical assembly or device (no visible text or symbols)Fig 2
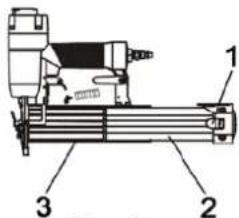
Fig 3
MONTERING
natural_image
Technical line drawing of a mechanical device with no visible text or symbolsFig 2
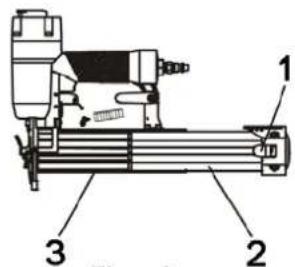
Fig 3
MONTERING
natural_image
Technical line drawing of a mechanical device with no visible text or symbolsFig 2
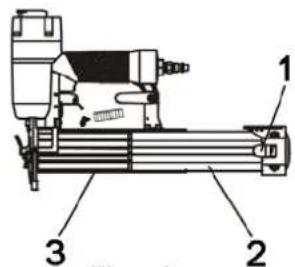
Fig 3
MONTAŻ
Read these instructions carefully before use!
WARNING! Always take basic safety precautions when using compressed air tools to safeguard against the risk of personal injury. This power tool is intended for specific applications. The equipment MUST NOT BE MODIFIED and/or used for anything but its intended purpose. Contact your dealer if you have any questions about using the equipment.
- Keep the work area clean. Cluttered work areas increase the risk of injury.
- Keep children away from the work area. Do not allow children to operate the tool.
- Never use the tool if you are under the influence of alcohol, medication or drugs. If you are taking medication, read its warning text to check whether it may affect your judgement and reflexes. Do not use the tool if you are in any doubt.
- Wear eye protection. Safety glasses must meet ANSI Z87.1 standards. Safety glasses will protect against flying particles from in front and from the sides. Wear eye protection when you are loading, using or servicing the tool.
- Wear ear protection. High noise levels in the work area can cause hearing impairment.
- Do not use oxygen, flammable gases, gases in cylinders or pressurised gases to power the tool. The tool can explode and cause serious injuries.
- Wear appropriate clothing. Wear protective clothing and non-slip shoes or safety shoes when you are working with the tool. Do not wear loose-fitting clothing or jewellery. They can get caught in moving parts. Wear a hair net to prevent your hair from becoming caught in the tool.
- Do not fire the tool at hard materials. Do not attempt to fire the tool at hard or fragile materials such as concrete, steel or tiles.
- Stand correctly when using the tool. Always maintain a firm footing and good balance in order to avoid injuries.
- Check for damaged parts. Carefully check that none of the parts are damaged before using the tool.
- Replacement of parts and accessories. Only use approved spare parts and accessories for servicing.
- Pay attention to what you are doing. Always be careful when using the equipment. Use your common sense. Do not use the tool when you are tired.
- Storing the tool. When not in use, store the tool in a dry place, properly cleaned and assembled, to reduce the risk of corrosion. Keep out of the reach of children.
- Extension cord for outdoor use. If using the compressor outdoors, only use an earthed extension cord intended for outdoor use. See the manufacturer's instructions on the required cross-section area for the compressor's power consumption.
• Take care with the air hose and its connections. Do not trip over the hose. Check that all connections are properly tightened. - Never point the tool at yourself or others when it is loaded.
- Use the correct compressed air connection. It must not be possible for the connection on the tool to be pressurised after the compressed air supply has been disconnected. If you use the wrong connection, the tool can be pressurised after the compressed air supply has been disconnected, and the fasteners can still be fired.
- When you connect compressed air, the tool can fire fasteners. You must therefore remove all fasteners before connecting compressed air.
- Do not squeeze the trigger and the safety mechanism when you are loading fasteners.
- If fasteners become stuck, disconnect the compressed air supply and remove the jammed fasteners.
WARNING! Warnings and instructions in this manual do not cover all the situations that could possibly arise. The person operating the tool must use common sense and care.
TECHNICAL DATA
| Min. operating air pressure | 4.2 bar |
| Max. operating air pressure | 6.9 bar |
| Nail length | 19 – 50 mm |
| Nail size | 1.2 mm |
| Nail capacity | 100 |
| Air intake | 1/4" NPT |
| Air consumption | 511/min |
| Weight | 1.4 kg |
| Sound pressure level, LpA | 81 dB(A), K= 3 dB |
| Sound power level, LwA | 94 dB(A), K= 3 dB |
| Vibration level | 72 m/s2, K= 1,5 m/s2 |
Always use hearing protection!
The declared vibration and noise value, which has been measured by a standardised test method, can be used to compare different tools with each other and for a preliminary assessment of exposure. The measurement values have been determined in accordance with EN 792-13+A1:2008.
Warning: The actual vibration and noise level when using power tools may differ from the specified maximum value, depending on how the tool is used and what kind of workpiece is processed. It is therefore necessary to determine which safety precautions are required to protect the user, based on an estimate of exposure in actual operating conditions (taking into account all stages of the work cycle, e.g. the time when the tool is switched off and when it is idling, in addition to the start-up time).
DESCRIPTION
When unpacking, use the list below to check that all the parts are included. Contact Customer Services if any parts are missing or damaged.
- Nail gun
- S3 hex key
- S4 hex key
- Operating Instructions
ILLUSTRATIONS
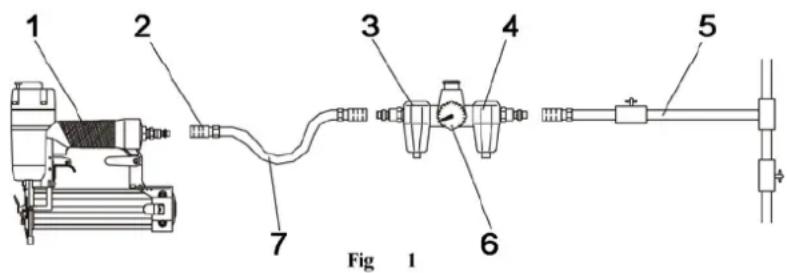
- Nail gun
- Quick-release coupling
- Lubricating unit
- Filter
- Compressed air supply
- Regulator
- Air hose
- Lock
- Movable magazine
- Fixed magazine
natural_image
Technical line drawing of a mechanical device with no visible text or symbolsFig 2
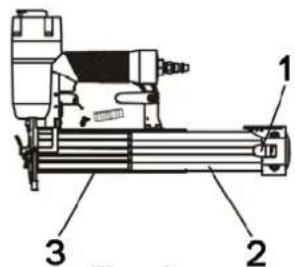
Fig 3
ASSEMBLY
The compressed air tool is supplied fully assembled. Before using the tool, connect the compressed air supply and the required compressed air accessories. See fig. 1 for recommended accessories and order of connection. Check that the air hose is not pressurised when you install or dismantle adapters for the compressed air supply.
Connect the tool to the compressed air supply
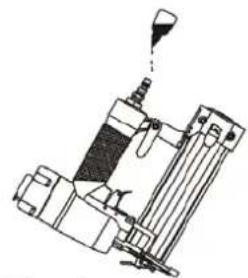
- Check whether the tool needs to be lubricated. If necessary, add two drops of oil into the compressed air connection, see fig. 2. If you are using a lubricator, check whether you need to top up with oil.
- Turn on the compressor and set the correct pressure on the regulator for the type of fastener being used.
- Connect the tool to the compressed air supply (see recommended setting).
Loading fasteners
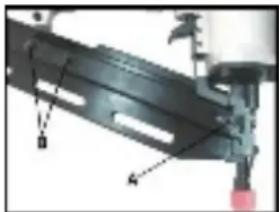
- Press down the lock to release the movable magazine and pull out the magazine fully, see fig. 3.
- Place a set of fasteners of the right type and size in the fixed magazine (39). The magazine holds up to 100 fasteners.
- Press the movable magazine forwards until it locks into place.
OPERATION
Use a sample piece to check how deep the fasteners are driven in before you start using the tool. If the fasteners are driven in too deep or not deep enough, adjust the air pressure using the regulator.
- Connect the tool to the compressed air supply. Check that the air pressure is within the correct interval (see Technical Data).
- Load fasteners as instructed above in the 'Loading fasteners' section.
- Hold the housing and press the drive control against the work surface. Check that the tool is straight and then gently squeeze the trigger to fire a fastener.
- Lift the tool from the work surface.
- There are two ways of using the tool:
- Place the nose on the work surface, then gently exert pressure until the safety mechanism is pressed down. Then squeeze the trigger to fire a fastener.
- Squeeze the trigger and then press in the safety mechanism several times to fire several fasteners. The tool fires a fastener every time the safety mechanism is pressed.
MAINTENANCE
- Regular (although not excessive) lubrication is important in order for the tool to work. Oil that is applied through the air intake lubricates the internal parts. We recommend that you install a lubricator, although you can also lubricate manually each time before using the tool as well as after 1 hour of continuous use. You only need to apply a couple of drops of oil each time. Excess oil gathers on the inside of the tool and is blown off during the next blow-off cycle. ONLY USE COMPRESSED AIR OIL Do not use solvents or additives, as these cause the seal in the tool to wear prematurely.
- Lubricate all moving and rotating parts with a little oil.
- Dirt and water in the compressed air are common causes of compressed air tools becoming worn. A filter/lubricating unit provides improved performance and a longer life. The filter must have the correct flow capacity.
- Keep cutting tools sharp and clean for better and safer work. Do not use a flammable cleaning solution. IMPORTANT! Such solutions can damage the O-ring and other parts of the tool, and should only be used if necessary. DO NOT IMMERSE THE TOOL.
TROUBLESHOOTING
natural_image
Mechanical assembly diagram showing a metal bracket with mounting holes and a red component (no text or symbols visible)Stop using the tool immediately if any of the following problems occur. Serious personal injury can otherwise occur. Repairs and replacements may only be performed by authorised personnel or an approved service centre.
| PROBLEM | CAUSE | ACTION |
| Air leak by the trigger | 1. The O-ring in the trigger valve is damaged.2. The trigger valve head is damaged.3. The valve spindle, seal or O-ring in the trigger is damaged. | 1. Check and replace the O-ring.2. Check and replace the valve head in the trigger.3. Check and replace the valve spindle, seal or O-ring in the trigger. |
| Air leak between housing and front plate | Damaged piston, O-ring or shock absorber. | Check and replace the O-ring or shock absorber. |
| Air leak between housing and cylinder head | 1. Loose screw connection.2. Damaged gasket. | 1. Tighten screw connections.2. Check and replace gasket. |
| The fastener is driven in too deeply | 1. Worn shock absorber.2. Air pressure too high. | 1. Replace shock absorber.2. Correct the air pressure. |
| Works slowly or without power | 1. Too little oil.2. Insufficient compressed air supply.3. Damaged spring in the cylinder head.4. Blow-off in the cylinder head blocked. | 1. Lubricate in accordance with instructions.2. Check the compressed air supply.3. Replace the spring.4. Replace damaged internal parts. |
| The tool skips over fasteners | 1. Worn shock absorber or damaged spring.2. Dirt in the front plate.3. Insufficient compressed air supply.4. Worn or dry O- ring on the piston.5. Damaged O- ring on the trigger valve.6. The cylinder head seal leaks. | 1. Replace the shock absorber or feed spring.2. Clean the drive control's drive duct.3. Check hose and compression connections.4. Replace or lubricate the O-ring.5. Replace the O-ring.6. Replace the seal. |
| Fasteners have become caught | 1. Worn controller.2. Damaged fasteners or fasteners of the wrong size.3. Loose screw connections for magazine or front plate.4. The piston's drive tip is damaged. | 1. Replace the controller.2. Use undamaged fasteners of the recommended type.3. Tighten screw connections.4. Replace the piston. |
| The fastener is not driven in sufficiently deeply | 1. The piston's drive tip slips off the fastener.2. Low air pressure.3. Low work sp eed and output. | 1. Replace the piston.2. Correct the air pressure.3. Check that a suitable, undamaged cylinder head spring is installed. Check whether the blow-off in the cylinder head is blocked. |
CE
EC DECLARATION OF CONFORMITY
EG FÖRSÄKRAN OM ÖVERENSSTÄMMELSE
EF SAMSVARSERKLÆRING
DEKLARACJA ZGODNOŚCI WE

Jula Postorder AB, Box 363, SE-532 24 SKARA, SWEDEN
Machinery Directive 2006/42/EC
EN 792-13:2000+A1:2008
This product was CE marked in year -10
Name and address of the person
authorised to compile the technical file.
Sebastian Ilczuk
Box 363, SE-532 37 Skara, Sweden
Skara
2010-12-21
Bo Eriksson
PRODUCT MANAGER
- Värna om miljön!
- Care for the environment!
- MONTERING
- MONTAŻ
- Read these instructions carefully before use!
- Always use hearing protection!
- DESCRIPTION
- ILLUSTRATIONS
- ASSEMBLY
- Connect the tool to the compressed air supply
- Loading fasteners
- OPERATION
- MAINTENANCE
- TROUBLESHOOTING
- CE
- EC DECLARATION OF CONFORMITY
- EG FÖRSÄKRAN OM ÖVERENSSTÄMMELSE
- EF SAMSVARSERKLÆRING
- DEKLARACJA ZGODNOŚCI WE
Brand : Meec Tools
Model : 071031
Category : Stapler