
T5070 - Printer EPSON - Free user manual and instructions
Find the device manual for free T5070 EPSON in PDF.


| Product Type | Printer |
| Brand | Epson |
| Model | T5070 |
| Dimensions (W x D x H) | 460 x 380 x 250 mm |
| Weight | 12 kg |
| Power Supply | AC 100-240V, 50/60Hz |
| Power Consumption (operating) | Approx. 20 W |
| Functions | Print, Scan, Copy, Fax |
| Print Technology | Inkjet |
| Print Speed (black) | Up to 20 ppm |
| Paper Capacity (standard) | 250 sheets |
| Connectivity | USB 2.0, Ethernet, Wi-Fi |
| Display | LCD |
| Operating System Compatibility | Windows, macOS, Linux |
| Monthly Duty Cycle | Up to 5000 pages |
| Maintenance | Clean print head regularly; use recommended paper |
| Safety | Do not block vents; use original power cord |
Frequently Asked Questions - T5070 EPSON
User questions about T5070 EPSON
0 question about this device. Answer the ones you know or ask your own.
Ask a new question about this device
Download the instructions for your Printer in PDF format for free! Find your manual T5070 - EPSON and take your electronic device back in hand. On this page are published all the documents necessary for the use of your device. T5070 by EPSON.
USER MANUAL T5070 EPSON
Epson® SureColor T-Series
Control panel

Contents
- SureColor T3070 - 112 lb (51 kg) • SureColor T5070 - 165 lb (75 kg)
- SureColor T7070 - 180 lb (82 kg)


SureColor T5070/T7070


×2 (SureColor T3070) ×3 (SureColor T5070) ×4 (SureColor T7070)
×2 (SureColor T3070)
×3 (SureColor T5070)
×4 (SureColor T7070)
| C(Cian) (Amarillo) (Magenta) | Y(Magenta) (Negro mate) (Negro | M(Negro mate) (Negro | M(Kfotográfico) | / | M |

© 2012 Epson America, Inc. 12/12
Contents
- SureColor T3070 - 51 kg (112 lb)
- SureColor T5070 - 75 kg (165 lb)
- SureColor T7070 - 82 kg (180 lb)


SureColor T5070/T7070



×2 (SureColor T3070) ×3 (SureColor T5070) ×4 (SureColor T7070)
- Use two screws to secure the lever in place.
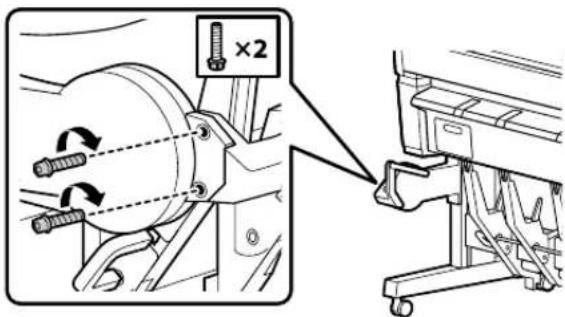
×2 (SureColor T3070)
×3 (SureColor T5070)
×4 (SureColor T7070)
| C(Ciano) (Amarelo) (Magenta) (Preto fosco) | M(Preto | M | K(fotográfico) |
/ M
- Raise the roll lock lever.
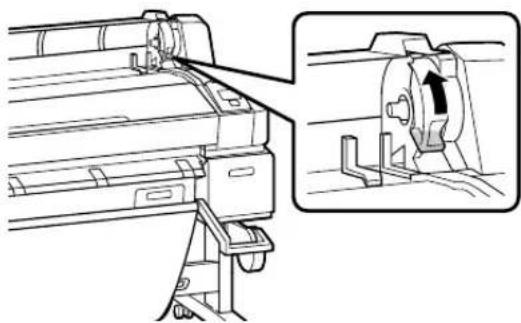
- Lower the roll lock lever.

Contents
Unpacking and Assembling the Printer ....3
Connecting the Power Cord 12
Installing Ink Cartridges 13
Loading Roll Paper 14
Performing a Test Print 20
Aligning the Print Head 21
Installing Software 21
Updating Your Printer Firmware 22
Limited Warranty 24
Unpacking and Assembling the Printer
Note: Unless otherwise indicated, the illustrations in this manual show the SureColor® T7070, but the instructions apply to all three models.
Before beginning assembly, make sure you have sufficient space to set up and use the printer. The following illustration shows the minimum space required for using the printer:

When choosing a place for the printer, leave adequate room for easy access and ventilation. Avoid locations subject to direct sunlight, excessive heat, humidity, or dust. Be sure the printer is placed on a flat, stable location that can support the following weight for each printer:
- SureColor T3070 - 112 lb (51 kg)
- SureColor T5070 - 165 lb (75 kg)
- SureColor T7070 - 180 lb (82 kg)
WARNING: Two people are required to unpack and install the SureColor T3070 printer; four people are recommended to unpack and install the SureColor T5070 or SureColor T7070 printer.
You need an even larger floor space to assemble the printer and stand, so be sure to prepare a large, clear area before unpacking them. Also make sure you save the box and packaging in case you need to ship the printer later.
The following items are included with your printer:

Note: For information on the optional hard disk and the Take up Reel, see the online User's Guide.
Assembling the Stand
- Unpack the stand and make sure you have all of these items.

- Slide the horizontal strut into both of the legs as shown.

- Use the long end of the hex wrench to tighten the pre-placed screws on each side of the horizontal strut.

- Lock the casters to fix the stand in place. (When moving the printer, unlock the casters.)

Mounting the Printer on the Stand
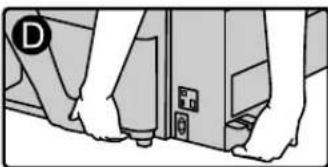
You need at least two people (SureColor T3070) or four people (SureColor T5070/T7070) to install the printer and position it on the stand. When lifting the printer, only hold the areas shown below. Otherwise, damage may occur.
SureColor T3070


SureColor T5070/T7070


Caution: Before installing the printer, lock the casters to make sure the stand is fixed in place.
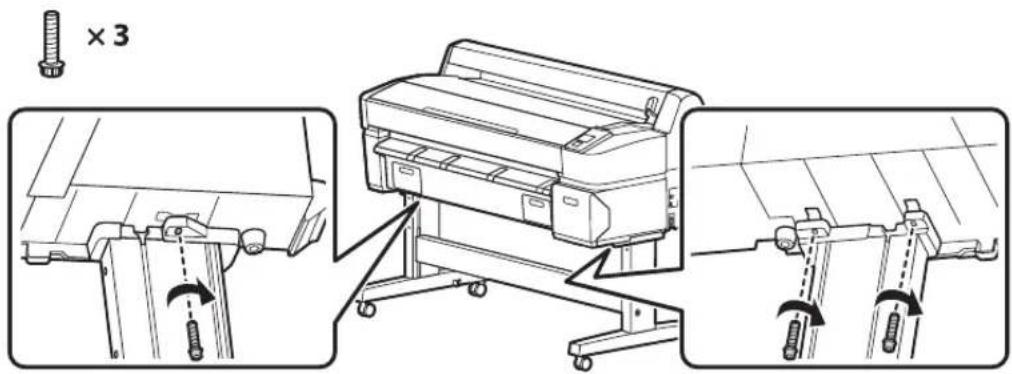
- Lift the printer onto the stand. Line up the marks on the bottom of the printer with the arrows on the top of the stand legs before setting the printer down.
![graph LR A["Printer"] --> B["Printer"] B --> C["Printer"] C --> D["Printer"] D --> E["Printer"] style A fill:#f9f,stroke:#333 style B fill:#ccf,stroke:#333 style C fill:#cfc,stroke:#333 style D fill:#fcc,stroke:#333 style E fill:#ffc,stroke:#333](/content/2026/05/999573/images/63f8f517ba81a8c9ad0306a498da0268a1f24a112a077d82f3d649e510dc2867.jpg)
- Attach the printer to the stand using three bolts.
Attaching the Paper Basket
The paper basket is a cloth sheet that attaches to the printer stand and catches your prints as they come out. You need the following parts to assemble and attach the paper basket:

- Attach the two basket holders as shown, one on each side of the stand. Use four bolts to fasten the holders in place.

- Attach the stack guides to the bottom of the printer. Make sure each guide snaps securely into place.
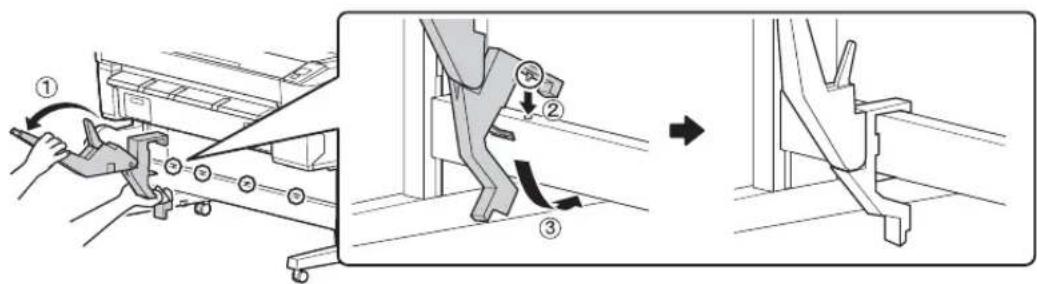
×2 (SureColor T3070) ×3 (SureColor T5070) ×4 (SureColor T7070)
- Insert a plastic connector into one end of the square pole.

- Slide the pole through the holes in the stack guides and attach the other plastic connector to the end of the pole. Then, fasten the plastic connectors in place on each side of the stand as shown.

- Attach the shorter arm to the inside of the basket holder on the left side of the printer. Use two nuts to hold the arm in place.

- Use two bolts to fasten the arm in place.

- Insert the longer arm into the rounded pole as shown.

- Slide the pole through the basket cloth until it comes out the other end. The small hole in the cloth will be on the right side as shown below.

- Flip up the basket holder on the right side of the printer.

- Insert the end of the rounded pole into the arm on the left side of the printer. Then, flip down the basket holder on the right side of the printer and insert the right-side basket arm as shown.
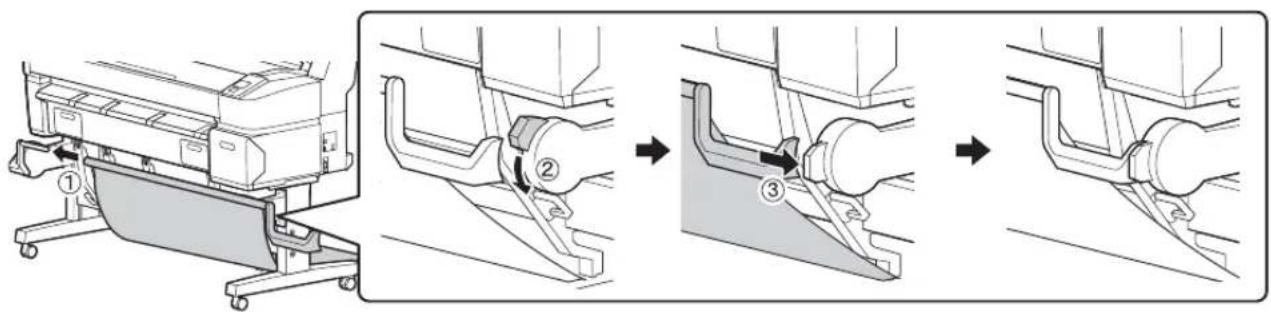
- Use two nuts and two bolts to fasten the arm in place.

- On the back side of the printer, pull the paper basket up so that the stack guides fit into the slots as shown. Then, hook the loops around the pins on the back of the stack guides to hold the basket in place.

×2 (SureColor T3070)
×3 (SureColor T5070)
×4 (SureColor T7070)
- Hook the loops on the sides of the basket to the pins on the back of the stand legs to secure the basket to the printer.

- On the front side of the printer, slide the basket's fabric all the way to the ends of the rounded pole as shown.

Connecting the Power Cord
- Unlock the casters. Then, move the printer to the place of use. (The casters are meant for moving the printer for only a short distance.) Lock the casters after moving.
- Connect the power cord to the AC inlet on the side of the printer.

- Plug the power cord into a properly grounded electrical outlet.
Installing Ink Cartridges
Use the ink cartridges that came with your printer for initial ink charging. During the initial installation process, it is normal for most of the ink in each cartridge to be used.
- Turn on the power and configure the initial settings, such as the language and date. Then, follow the instructions on the control panel to install the ink cartridges.
- Unpack the ink cartridges and shake each 30 times (about 10 seconds).

Note: Do not touch the IC chip on the cartridge.
- Install the ink cartridges in the printer. Hold each cartridge with the arrow pointing toward the printer, then insert it into its slot until it clicks into place. Make sure you insert each cartridge all the way into the correct slot.

| C(Cyan) (Yel ow) (Magenta) | Y(Matte Black) (Photo Black) | M | M | K |
- Close the ink cover and wait for the ink to charge. The ink charging process takes about 22 minutes.

Caution: Do not turn off the printer or open the ink cover when it is charging or you may waste ink. When the ink charging is completed, press □-□ and Load paper will be displayed on the control panel. Do not perform operations other than those specified on the screen.
Loading Roll Paper
Before you start, you may want to close the paper basket. This will make it easier to access the top of the printer during the paper loading process.

- Open the roll paper cover.

- Raise the roll lock lever.

- Place the roll on top of the printer.

- If necessary, adjust the roll media adapters to fit the core size of the roll paper.

- Release the tension lever on both adapters.

- Push the adapters into the paper core at both ends of the roll. Press the adapters in until they are fully inserted into the roll.

- Push down the tension lever on both adapters to secure them.
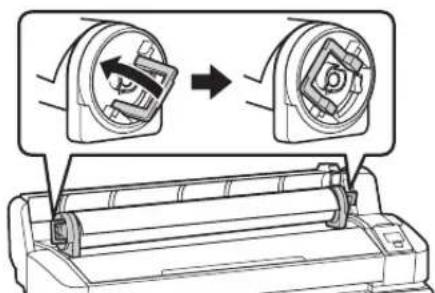
- Slide the roll paper all the way to the right until it lines up with the adapter guides.

- Press the ☐·☐ button on the control panel. Confirm that Roll Paper is highlighted in the display, then press the OK button.

- Insert the end of the roll paper into the paper slot and pull it through. Make sure the paper is free of slack and that the end is not folded.

- Pull the paper straight through until the leading edge reaches the front of the printer.

- Lower the roll lock lever.

- Following the instructions on the control panel, press the OK button. The paper will be fed into the printer.

- Close the roll paper cover.

- Check the message on the control panel.
- If the paper type was automatically detected, the printer will display Ready on the LCD screen. The printer is ready to print.
- If the paper type was not detected, the printer will display the Paper Type and Roll Paper Remaining settings for the paper currently selected. Follow the instructions on the control panel to change or confirm the current settings. Press OK when finished.
- Before printing, open the paper basket, if necessary.

Note: See the User's Guide for information on loading cut sheets and poster board.
Performing a Test Print
You can print a nozzle check from the control panel and examine it to determine whether any nozzles are clogged or deflected. Then you can run a cleaning cycle if necessary.
- Make sure the paper source and media type settings are correct for the type of paper loaded.
- Confirm that the printer is ready to print, then press the ⚠A button on the control panel. The Maintenance menu will be displayed.
- Confirm that Nozzle Check is highlighted and press the OK button. A confirmation message will be displayed.
- Press OK to print a nozzle check pattern.
- Examine the printed pattern.
- If the pattern looks good, as shown below, the print head is clean.

- If any dots or segments are missing or deflected, as shown below, follow the instructions on the control panel to run a cleaning cycle. Then print another nozzle check pattern to make sure the nozzles are clean.

Aligning the Print Head
Follow the steps below to align the print head using the printer's control panel. Make sure the paper source and media type settings are correct for the type of paper loaded.
- Confirm that the printer is ready to print. Press ◀ or ▶ on the control panel to highlight 📋 settings and press OK. The Maintenance menu will be displayed.
- Press ▼ to select Head Alignment, then press OK.
- Press ▼ to select Auto (Bi-D), then press OK.
- Press OK again to begin the head alignment. The printer will automatically align the head as it prints the head alignment pattern. When alignment is complete, the Maintenance menu will be displayed.
Note: See the User's Guide for instructions on performing a manual head alignment.
Installing Software
Insert the software CD that came with your printer into your computer and follow the on-screen instructions.
Connecting to Your System
You can use USB and/or Ethernet network connections.
For USB connection, make sure your system has the appropriate port and that you have a standard, shielded cable, 10 feet (3 m) long or less.
Note: Do not connect the printer until a software installation screen prompts you to do so.
To connect to a network hub or directly to your computer's network interface, you need a standard RJ-45 CAT-6 network cable.
- Plug the interface cable into the appropriate port on the printer.

- Plug the other end of the cable into the appropriate port on your computer or network switch or hub.
Updating Your Printer Firmware
To keep your printer features and functionality up to date, you should check for a new version of firmware on the Epson support site and update your printer, if necessary.
Checking the Current Firmware Version
- Press the ▶ button twice to highlight 📋 settings.
- Press the Menu button.
- Press the ▼ button until Printer Status is highlighted, then press OK.
- Press OK again. Note the firmware version displayed. When finished, press the II button.
Updating the Firmware
Before updating your printer's firmware, make sure your printer is turned on and connected to your computer or network.
- Click the EPSON LFP Remote Panel 2 icon on your desktop. You see the EPSON LFP Remote Panel 2. Make sure your printer is selected from the drop-down menu.
- Click the Firmware Updater button. You see the Firmware Updater window.
- Click Acquire Latest Information to automatically download the latest firmware version for your printer from the internet. If there is a firmware update, the message “Found the latest firmware information. Do you want to download the firmware file?” appears. Click Yes to download the file.
Note: If the Acquire Latest Information button fails to download the latest firmware, you can also find it by visiting Epson's support site epson.com/support (US) or global.latin.epson.com/Soporte (Latin America; website available in Spanish and Portuguese). You will need to download the latest version and upload it by clicking Browse and locating the file, then continue from step 5.
- When the message "File download complete" appears, click OK. The file you just downloaded should automatically be selected and appear in the File Name window.
- Click Update and follow the on-screen instructions.
- If the firmware version of the file is newer than what is currently installed, click Update to start the firmware updating process.
Caution: Don't turn off the printer while the firmware is updating.
- When the update is complete, close the Firmware Updater window and EPSON LFP Remote Panel 2 window.
Notices
Limited Warranty
1. Limited Warranty for Epson Products
Epson products are covered by warranty against defects in workmanship and materials when operated under normal use and handling conditions, as indicated in the product documentation, for the period specified in section “Limited Warranty Coverage”. Coverage begins as of the date of delivery to the purchaser by Epson or by an authorized Epson dealer (see “Epson Subsidiaries and Offices in Latin America Technical Support Service”), in the country of purchase.
Epson also guarantees that the consumables (ink cartridges, toner, batteries) included with the product, will perform according to the usage specifications as long as they are used prior to the expiration of their warranty period.
2. Scope of Warranty
Should Epson receive notice of a defect during the warranty period, it may, at its discretion, repair or replace the defective product at no cost to the purchaser. In the event of a replacement, the replaced equipment will become property of Epson. The replaced item may be new or previously repaired to the Epson standard of quality, and will assume the remaining warranty period of the product that was originally purchased.
This warranty does not include any compensation or damages whatsoever, resulting from the operating failures of the Epson product. In any event, Epson's maximum liability toward the purchaser will be limited to the purchase price paid to Epson or to the authorized dealer.
Epson's warranty does not cover any software not manufactured by Epson, even when delivered with an Epson product. The software may have a warranty provided by the manufacturer, as indicated in the documentation attached thereto.
3. Limitations and Exclusions
The warranty will be invalid in the following cases:
3.1 When the product's serial number has been removed or altered. 3.2 When the product has been misused, has undergone unauthorized modifications, has been used or stored in ways that are not in compliance with the environmental specifications of the product. 3.3 When the damage resulted from the use of refilled supplies or consumables, or when damages are the result of use of media that does not meet the product's specifications. 3.4 When damages resulted from the inappropriate transport of the equipment (packaging, installation, maintenance, transportation). 3.5 When damages were caused by natural or intentional disasters (fire, floods, lightning, earthquakes, etc.), power surges, or interaction with other brand products. 3.6 When the product has been totally or partially disassembled, or has been repaired other than by an Epson Authorized Service Center. 3.7 When substances have been spilled on the product. 3.8 When the external plastic case has been scratched or abused. 3.9 When damages resulted from inappropriate tests, installation, maintenance or adjustments.
The warranty does not extend to accessories (lids, covers, trays) or replenishing supplies and consumables (ink cartridges, toner, ink ribbons, batteries, photosensitive units, knobs, print heads, lamps), which, due to their nature, must be regularly purchased through authorized dealers.
4. How to Obtain Warranty Service
Please refer to the user documentation to ensure that the product settings have been properly set and to perform the diagnostic tests indicated therein. Furthermore, in order for the unit to operate optimally, always use original Epson supplies and consumables.
To obtain warranty service, the purchaser may take the product to any Authorized Epson Service Center, along with proof of purchase, or call any of the Epson Technical Assistance Centers (see country list starting on page 78).
Upon calling an Authorized Epson Service Center, the purchaser will be asked to provide the product model and serial numbers, and may be asked to provide information on the location and the date of purchase (the warranty is only valid in the country of purchase).
If there are no Authorized Service Centers in your area, call the Technical Assistance Center for service referral.
5. Responsibilities of Purchaser
The purchaser is responsible for the safety of all confidential and proprietary information stored on the product, as well as for recovery backup files in case of damage. Any activity related with the re-installation or resetting of the software that was delivered with the equipment, will be billed to the purchaser at the rates in effect at the Epson Service Center. This also applies if the failure was the result of a defect in the purchaser's proprietary software or of a computer "virus".
In order to obtain on-site service, the latter will be required to provide: access to the product; an appropriate working area; access to electrical facilities; access to the resources that may be necessary for the installation, repair or maintenance of the unit; a safety environment for Epson staff and their work tools.
6. Limited Warranty Coverage
| Product Model Coverage Conditions | ||
| Printer SureColor One Year Service Center |
Technical Support Service
Epson offers technical assistance through electronic and telephone services. Before calling Epson, refer to the documentation included with your product. If you do not find the solution to your problem, visit Epson's website at: global.latin.epson.com/Soporte or call the local Epson office or an authorized dealer.
Epson Subsidiaries and Offices in Latin America Technical Support Service
Epson offers technical assistance through electronic and telephone services. Before calling Epson, refer to the documentation included with your product. If you do not find the solution to your problem, visit Epson's website at: global.latin.epson.com/Soporte or call the local Epson office or an authorized dealer.
Service Centers
| Country Telephone Number Country Telephone | Number | ||
| Argentina (54 11) 5167-0300 Mexico | Mexico CityOther Cities | (52 55) 1323-205201-800-087-1080 | |
| Bolivia* 800-100-116 | |||
| Chile (56 2) 484-3400 | |||
| Colombia (57 1) 523-500 Nicaragua* 00-1-800-226-0368 | |||
| Costa Rica 800-377-6627 Panama* 00-800-052-1376 | |||
| Dominican Republic* 1-888-760-0068 Peru | LimaOther cities | (51 1) 418-02100800-10126 | |
| Ecuador* | 1-800-000-044 | ||
| El Salvador* | 800-6570 | Uruguay | 00040-5210067 |
| Guatemala* | 1-800-835-0358 Venezuela | (58 212) 240-1111 | |
| Honduras** | 800-0122Code: 8320 | ||
* Contact your local phone company to call this toll free number from a mobile phone. ** Dial first 7 digits, wait for a message, then enter code.
If your country does not appear on the preceding list, please contact the dealer where you purchased the product.
You may receive help or consult information on-screen for all Epson products. Register your Epson equipment on our website, at global.latin.epson.com/Soporte.
Extended Warranty Support and Service
In some countries, Epson offers warranty extension services. You may purchase this service by calling the Technical Service Center.
Epson Argentina S.A.
Avenida Belgrano 964/970
(1092), Buenos Aires,
Argentina
Tel: (54 11) 5167-0300
Fax: (54 11) 5167-0333
Epson Colombia, Ltda.
Calle 100, No. 21-64 piso 7
Bogotá, Colombia
Tel: (57 1) 523-5000
Fax: (57 1) 523-4180
Epson México, S.A. de C.V.
Blvd. Manuel Avila Camacho
Epson Venezuela, S.A.
Epson Costa Rica, S.A
102 Avenida Escazú
Torre 1, Piso 4, Suite 401/402
Escazú, San José, Costa Rica
Tel: (506) 2588-7855
Fax: (506) 2588-7888
Epson Perú, S.A.
EPSON and SureColor are registered trademarks, and EPSON Exceed Your Vision is a registered logomark of Seiko Epson Corporation.
General Notice: Other product names used herein are for identification purposes only and may be trademarks of their respective owners. Epson disclaims any and all rights in those marks.
This information is subject to change without notice.
© 2012 Epson America, Inc. 12/12 CPD-38797
- CONTROL PANEL
- CONTENTS
- UNPACKING AND ASSEMBLING THE PRINTER
- ASSEMBLING THE STAND
- MOUNTING THE PRINTER ON THE STAND
- ATTACHING THE PAPER BASKET
- CONNECTING THE POWER CORD
- INSTALLING INK CARTRIDGES
- LOADING ROLL PAPER
- PERFORMING A TEST PRINT
- ALIGNING THE PRINT HEAD
- INSTALLING SOFTWARE
- CONNECTING TO YOUR SYSTEM
- UPDATING YOUR PRINTER FIRMWARE
- CHECKING THE CURRENT FIRMWARE VERSION
- UPDATING THE FIRMWARE
- NOTICES
- LIMITED WARRANTY
- LIMITED WARRANTY FOR EPSON PRODUCTS
- SCOPE OF WARRANTY
- LIMITATIONS AND EXCLUSIONS
- HOW TO OBTAIN WARRANTY SERVICE
- RESPONSIBILITIES OF PURCHASER
- LIMITED WARRANTY COVERAGE
- TECHNICAL SUPPORT SERVICE
- EPSON SUBSIDIARIES AND OFFICES IN LATIN AMERICA TECHNICAL SUPPORT SERVICE
- EXTENDED WARRANTY SUPPORT AND SERVICE
Brand : EPSON
Model : T5070
Category : Printer