
NVD-V004 - GPS Navigation System ALPINE - Free user manual and instructions
Find the device manual for free NVD-V004 ALPINE in PDF.
User questions about NVD-V004 ALPINE
0 question about this device. Answer the ones you know or ask your own.
Ask a new question about this device
Download the instructions for your GPS Navigation System in PDF format for free! Find your manual NVD-V004 - ALPINE and take your electronic device back in hand. On this page are published all the documents necessary for the use of your device. NVD-V004 by ALPINE.
USER MANUAL NVD-V004 ALPINE
Please read before using this disc.
MODE D'EMPLOI
Searching for a destination from its post code 2
Customizing Setups
Setting the Current Time....3
Setting the arrival time display ....3
Others
Automatic dial operation 4
Automatic Dialling from a Point of Interest item ....4
Automatic Dialling from a Memory Point 4
Viewing GPS screens ....5

Traffic Information in the UK provided by ITIS Holdings Plc.
Before Using the Disc
- This Supplementary Owner's Manual explains about the newly added functions to the new-version of the map disc.
Please thoroughly read this Manual before starting operation.
- Operating System Programme Rewriting
1) Insert the upgrade disc into your navigation system.
2) The operating system will automatically be rewritten.
3) The opening screen appears in the display.
Confirm that the programme version is changed.
Note:
If you want to use an earlier disc having already inserted the upgrade disc, insert the earlier disc and then turn off the car's ignition once before using.
- Please be aware that titles and messages shown on the screen may vary slightly from those of Prog. Ver.2.00 due to improvements and updates. These differences do not affect operation.
- The RDS-TMC receiver box TMC-001P can be connected to utilize RDS-TMC. For details of operation, please refer to the TMC-001P Owner's Manual.
- Expanded the recording area of the map Maps of Ireland, North Ireland and Norway have been added.
- The "Motorway Allow" setting is recommended when searching for a long distance route.
Searching For Destination
Searching for a destination from its post code
You can search for a destination by inputting the post code. (This function may not be used in some regions.)
1 Press the MENU button to display the main menu. Select "Destination" from the main menu by tilting the joystick and press ENTER.
2 The sub-menu for "Destination" appears. Select "Post code" by tilting the joystick and press ENTER.
3 The post code input screen appears. Input the desired post code by tilting the joystick.
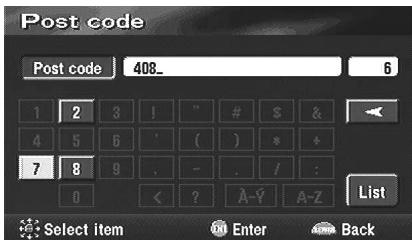
text_image
Post code Post code 408_ 6 1 2 3 ! " # $ & 4 5 6 ' ( ) * + 7 8 9 . - . i : 0 < ? A-Z A-Z List Select item Enter Back4 The inputted post code list is displayed. Select a desired post code and press ENTER.

text_image
Post code Post code 40878 1 40878 Select item Enter Back5 The street input screen appears. Input a desired street name by tilting the joystick.
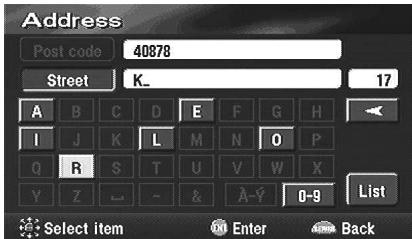
text_image
Address Post code 40878 Street K_ 17 A B C D E F G H I J K L M N O P Q R S T U V W X Y Z - & A-? 0-9 List Select item Enter Back6 The street list is displayed. Select a desired street by tilting the joystick and press ENTER.
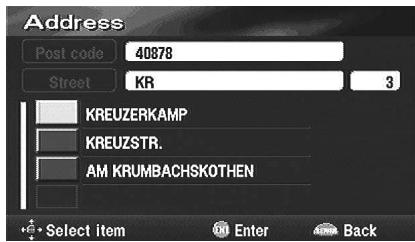
text_image
Address Post code 40878 Street KR 3 KREUZERKAMP KREUZSTR. AM KRUMBACHSKOTHEN Select item Enter BackNote:
If the post code and street cover more than one city, first the city list is displayed and then select a desired city.
7 The house no. input screen appears. Tilt the joystick to input the house no., select "OK" and then press ENTER.
Note:
If a house no. searched from post code or street name has not been memorized in the database, a map of the vicinity is displayed.
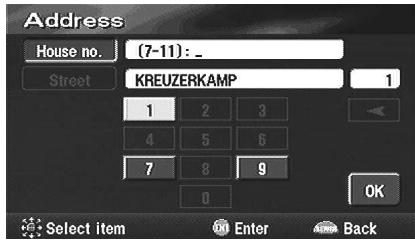
text_image
Address House no. (7-11): _ Street KREUZERKAMP 1 1 2 3 4 5 6 7 8 9 OK Select item Enter Back8 The searched destination with the point setting menu is displayed.
Customizing Setups
Setting the Current Time
You can display the current time calculated from GPS information.
You can also correct the time difference from Greenwich Mean Time.
1 Press the MENU button to display the main menu. Select "Set up" from the main menu by tilting the joystick and press ENTER.
2 The "Set up" screen appears.
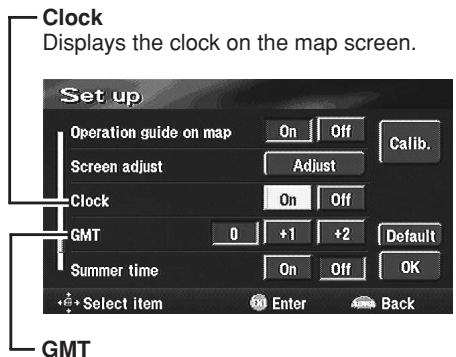
text_image
Clock Displays the clock on the map screen. Set up Operation guide on map On Off Calib. Screen adjust Adjust Clock On Off GMT 0 +1 +2 Default Summer time On Off OK Select item Enter Back GMTCorrects the current time if there is any time difference from GMT.
3 When the settings have been completed, select "OK" by tilting the joystick and press ENTER.
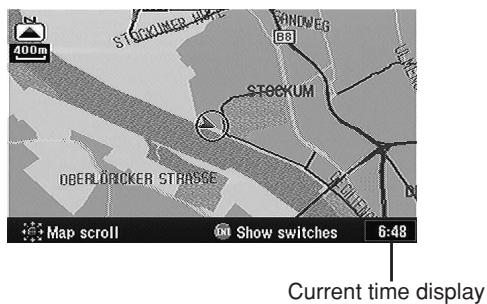
text_image
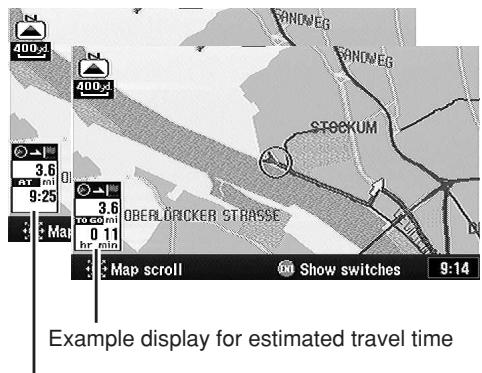
STOCKUMER STOCKUM DB DB DB DB DB DB DB DB DB DB DB DB DB DB DB DB DB DB DB DB DB DB DB DB DB DB DB DB DB DB DB DB DB DB DB DB DB DB DB DB DB DB DB DB DB DB DB DB DB DB 400m DB DB DB DB DB DB DB DB DB DB DB DB DB DB DB DB DB DB DB DB DB DB DB DB DB DB DB DB DB DB DB DB DB DB DB DB DB DB DB DB DB DB DB DB DB DB DB DB DB DVERLOCKER STRASSESetting the arrival time display
When "Estimated travel time" is set to "On," you can select the setting between "Estimated travel time" and "Est. time to Destination" on the screen display.
1 Press the MENU button to display the main menu. Select "Set up" from the main menu by tilting the joystick and press ENTER.
2 The "Set up" screen appears.
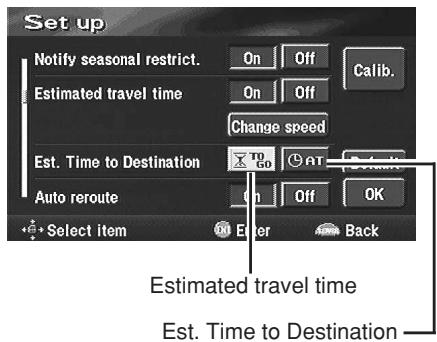
text_image
Set up Notify seasonal restrict. On Off Estimated travel time On Off Change speed Est. Time to Destination To Go At Auto reroute On Off OK Select item Enter Back Estimated travel time Est. Time to Destination3 When the settings have been completed, select "OK" by tilting the joystick and press ENTER.
text_image
400.3 400.4 3.6 at mi 9:25 3.8 to 60 mi 0 11 hr min OBER DRICKER STRASSE STOCKUM Map scroll Show switches 9:14 Example display for estimated travel timeExample display for Estimated time to destination
Automatic dial operation
If your navigation system is connected to the Nokia 6090 (GSM 900 Car Phone), you can automatically dial to the "Point of Interest" (POI) and "Memory Points" that you have already placed in memory.
Note:
To connect the navigation system, you need a Navi-Nokia 6090 cable (KCE-6090P). Please be aware that the telephone numbers of items registered on the disc may change day by day, and they are not always correct.
Automatic Dialling from a Point of Interest item
1 Press the MENU button to display the main menu. Select "Destination" from the main menu by tilting the joystick and press ENTER. Select "POI" from the sub-menu by tilting the joystick and press ENTER.
2 Refer to "Searching for a point of interest (POI)" in the Owner's Manual (Prog. Ver. 2.00) and search for a desired POI item. Then display the screen map.
3 Select "Call" by tilting the joystick and press ENTER.
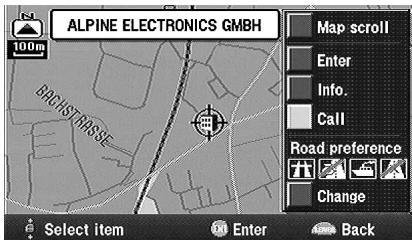
text_image
ALPINE ELECTRONICS GMBH 100m BHUST/DRASSE Map scroll Enter Info. Call Road preference Change Select item Enter BackNote:
You can also "Call" from the "POI information" screen after selecting "Info."
4 The number is automatically dialled, and the telephone is connected.
5 To disconnect the telephone, press RETURN.
Note:
If the telephone is not connected due to busy line or some other cause, a message will be displayed. To delete the message, press RETURN.
Automatic Dialling from a Memory Point
1 Press the MENU button to display the main menu. Select "Destination" from the main menu by tilting the joystick and press ENTER. Select "Memory point" from the sub-menu by tilting the joystick and press ENTER.
2 Refer to "Searching from memory points" in the Owner's Manual (Prog. Ver. 2.00) and search for a desired Memory Point. Then display the screen map.
3 Select "Call" by tilting the joystick and press ENTER.
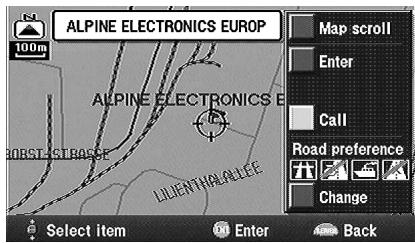
text_image
ALPINE ELECTRONICS EUROPE 100m ALPINE ELECTRONICS B ORSTEGROSE LIUENTHALADEE Map scroll Enter Call Road preference Change Select item Enter BackNote:
You cannot "Call" when the telephone number is not registered to Memory Points.
4 The number is automatically dialled, and the telephone is connected.
5 To disconnect the telephone, press RETURN.
Note:
If the telephone is not connected due to busy line or some other cause, a message will be displayed.
Viewing GPS screens
GPS satellite information being received is displayed on the screen. If the error for the vehicle's current position is too large, check how many GPS satellites you are receiving. Furthermore, you can confirm the status of the Speed Pulse, ACC Power, Parking brake, illumination (status of the vehicle lights) etc.
1 Press the MENU button to display the main menu. Select "GPS mark" from the main menu by tilting the joystick and press ENTER.
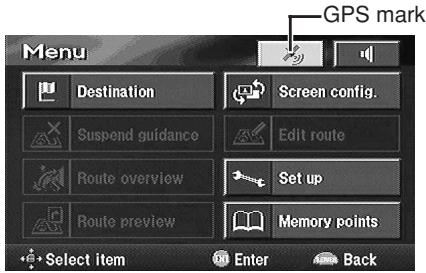
text_image
GPS mark Menu Destination Screen config. Suspend guidance Edit route Route overview Set up Route preview Memory points Select item Enter Back2 The GPS information screen is displayed. Confirm the setting of each item.
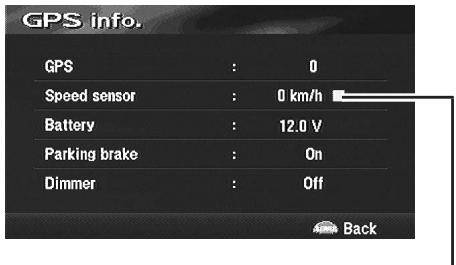
text_image
GPS info. GPS : 0 Speed sensor : 0 km/h Battery : 12.0 V Parking brake : On Dimmer : Off BackBlinks when the Speed Pulse signal is being input.
Tip
"GPS" indicates the number of GPS satellites being received.
3 Press the POS. button to return to the current vehicle position screen.
ALPINE®
ALPINE ELECTRONICS MARKETING, INC.
1-1-8 Nishi Gotanda,
Shinagawa-ku, Tokyo 141-0031, Japan
Phone 03-5496-8231
ALPINE ELECTRONICS OF AMERICA, INC.
19145 Gramercy Place, Torrance,
California 90501, U.S.A.
Phone 1-800-ALPINE-1 (1-800-257-4631)
1-888-NAV-HELP (1-888-628-4357)
ALPINE ELECTRONICS OF CANADA, INC.
777 Supertest Road, Toronto,
Ontario M3J 2M9, Canada
Phone 1-800-ALPINE-1 (1-800-257-4631)
1-888-NAV-HELP (1-888-628-4357)
ALPINE ELECTRONICS OF AUSTRALIA PTY. LTD.
161-165 Princes Highway, Hallam
Victoria 3803, Australia
Phone 03-8787-1200
ALPINE ELECTRONICS GmbH
Frankfurter Ring 117,
80807 München, Germany
Phone 089-32 42 640
ALPINE ELECTRONICS OF U.K. LTD.
Alpine House
Fletchamstead Highway,
Coventry CV4 9TW, U.K.
Phone 0870-33 33 763
ALPINE ELECTRONICS FRANCE S.A.R.L.
(RCS PONTOISE B 338 101 280)
98, Rue de la Belle Etoile, Z.I. Paris Nord II,
B.P. 50016, 95945 Roissy Charles de Gaulle Cedex, France
Phone 01-48638989
© 2004 NAVTEQ All Rights Reserved.
© 2005 Zenrin Europe B.V., All Rights Reserved.