
NVD-Z001 - GPS Navigation System ALPINE - Free user manual and instructions
Find the device manual for free NVD-Z001 ALPINE in PDF.
User questions about NVD-Z001 ALPINE
0 question about this device. Answer the ones you know or ask your own.
Ask a new question about this device
Download the instructions for your GPS Navigation System in PDF format for free! Find your manual NVD-Z001 - ALPINE and take your electronic device back in hand. On this page are published all the documents necessary for the use of your device. NVD-Z001 by ALPINE.
USER MANUAL NVD-Z001 ALPINE
Please read before using this disc.
MODE D'EMPLOI
IMPORTANT INFORMATION, PLEASE READ CAREFULLY BEFORE USING THIS PRODUCT.
This product is intended to safely provide turn by turn instruction to get you to a desired destination. Please read the following precautions to ensure that you use your navigation system correctly.
This product is not a substitute for your personal judgment. Any route suggestions made by the navigation system may never supersede any local traffic regulations or your personal judgment and/or knowledge of safe driving practices. Do not follow route suggestions if the navigation system instructs you to perform an unsafe or illegal maneuver, places you in an unsafe situation, or routes you into an area which you consider unsafe.
Glance at the monitor screen only when necessary and safe to do so. If prolonged viewing of the screen is necessary, stop the vehicle in a safe and legal manner and location.
- Do not input destinations, change settings, or access any functions requiring a prolonged view of the monitor and/or remote control while you are driving. Stop the vehicle in a safe and legal manner and location before attempting to access the system.
Do not use the navigation system to route you to emergency services. Not all locations of emergency service providers such as police and fire stations, hospitals, and clinics are contained in the database. Please use your own judgment and your ability to ask for directions in these situations.
The map database contained within the media (DVD ROM) in which it is stored is the most recent map data available at the time of production. Because of changes in streets and neighbourhoods, there may be situations where the navigation system may not be able to route you to your desired destination. In these cases, use your own personal judgment.
The map database is designed to provide you with route suggestions, it does not take account of the relative safety of a suggested route, or of factors which may affect the time required to reach your destination. The database does not reflect road closures or construction, road characteristics (i.e. type of road surface, slope or grade, weight or height restrictions, etc.), traffic congestion, weather conditions, or any other factors which may affect the safety or timing of your driving experience. Use your personal judgment if the navigation system is unable to provide you with an alternate route.
There may be situations where the navigation system may display the vehicle's location erroneously. Use your own driving judgment in this situation, taking into account current driving conditions. Please be aware that in this situation, the navigation system should correct the vehicle's position automatically; however, there may be times where you may have to correct the position yourself. If this is the case, stop the vehicle in a safe and legal manner and location before attempting operation.
■ Make certain that the volume level of the monitor is set to a level which still allows you to hear outside traffic and emergency vehicles. Driving while unable to hear outside sounds could cause an accident.
■ Please make certain that any other person who intends on using the navigation system reads these precautions and the following instructions carefully.
If there is anything in the manual which you do not understand, or are uncertain about the operation of the navigation system, please contact an authorized Alpine representative before using the navigation system.
- Read the manuals for this disc and the system components carefully before using your navigation system. They contain instructions on how to use the system in a safe and effective manner. Alpine cannot be responsible for problems resulting from failure to observe the instructions in these manuals.
- This manual uses various pictorial displays to show you how to use this product safely and to alert you to potential dangers resulting from improper connections and operation. Following are the meanings of these pictorial displays. It is important to fully understand the meanings of these pictorial displays in order to use this manual and the system properly.
● Meaning of displays
  | This symbol means important instructions. Failure to heed them can result in serious injury or death. |
  | This symbol means important instructions. Failure to heed them can result in injury or material property damage. |

Warning
DO NOT OPERATE ANY FUNCTION THAT TAKES YOUR ATTENTION AWAY FROM SAFELY DRIVING YOUR VEHICLE.
Any function that requires your prolonged attention should only be performed after coming to a complete stop. Always stop the vehicle in a safe location before performing these functions. Failure to do so may result in an accident.
DO NOT DISASSEMBLE OR ALTER THIS PRODUCT.
Doing so may result in an accident, fire or electric shock.
KEEP SMALL OBJECTS SUCH AS BATTERIES OUT OF THE REACH OF CHILDREN.
Swallowing them may result in serious injury. If swallowed, consult a physician immediately.
USE THIS PRODUCT FOR MOBILE 12V APPLICATIONS.
Use for other than its designed application may result in fire, electric shock or other injury.
DO NOT PLACE HANDS, FINGERS OR FOREIGN OBJECTS IN INSERTION SLOTS OR GAPS.
Doing so may result in personal injury or damage to the product.
MINIMIZE DISPLAY VIEWING WHILE DRIVING.
Viewing the display may distract the driver from looking ahead of the vehicle and cause an accident.
DO NOT FOLLOW ROUTE SUGGESTIONS IF THE NAVIGATION SYSTEM INSTRUCTS YOU TO PERFORM AN UNSAFE OR ILLEGAL MANEUVER, OR PLACES YOU IN AN UNSAFE SITUATION OR AREA.
This product is not a substitute for your personal judgment. Any route suggestions by this system should never supersede any local traffic regulations or your personal judgment or knowledge of safe driving practice.

Caution
HALT USE IMMEDIATELY IF A PROBLEM APPEARS.
Failure to do so may cause personal injury or damage to the product. Return it to your authorized Alpine dealer or the nearest Alpine Service Centre for repairing.
KEEP FINGERS AWAY WHILE THE MOTORIZED FRONT PANEL OR MOVING MONITOR IS IN MOTION.
Failure to do so may result in personal injury or damage to the product.
User Agreement
In using this DVD-ROM “SMART MAP PRO” (hereinafter referred to as “Disk”), as part of the Aisin AW Co., Ltd. (“Aisin AW”) and Navigation Technologies Corporation (“NavTech”) Database (hereinafter referred to as “Database”), you are bound by the terms and conditions set forth below. By breaking the seal on this package, and using your copy of the Database and Disk, you have demonstrated your agreement to the terms and conditions of this Agreement. You should therefore, make sure that you read and understand the following provisions.
- The Disk and Database may not be copied, duplicated, processed, or otherwise modified, in whole or in part, without the express written permission of Aisin AW, NavTech and Alpine Electronics, Inc. ("Alpine").
- Neither the Disk nor the Database may be transferred or sublicensed to any third party for profit, rent or loan, or licensed for reuse in any manners.
- The Disk and/or Database may not be decompiled, reverse engineered or otherwise disassembled, in whole or in part.
- The Disk and Database may not be used in a network or by any other manner of simultaneous use in multiple systems.
- The Disk and Database are intended solely for personal use (or internal use where the end-user business), or the consumer. The Disk and Database are not to be used for commercial purposes.
- Neither Aisin AW, Alpine nor NavTech guarantees to the customer that the functions included in the Disk and Database meet a specific objective of user.
- Neither Aisin AW, Alpine nor NavTech shall be responsible for any damages caused by the use of the Disk and/or Database to the actual user and to any third party.
- The Warranty on the Disk and Database shall not extend to an exchange or refund due to misspelling, omission of letters, or any other cosmetic discrepancy in layout found in Disk and/or Database.
- The right to use the Disk and Database shall expire either when the user destroys this software, or when any of the terms for use is violated and Aisin AW, Alpine and/or NavTech exercises the option to revoke the license to use this software.
- The terms and conditions hereof apply to all subsequent users and owners as well as to the actual purchaser.
iTMC
Traffic Information in the UK provided by ITIS Holdings Plc.
→V-Trafic
V-Trafic informations in France are provided by Mediamobile company.

WARNING
- Operation of the system while driving is dangerous. Users should stop vehicle before operating the software.
- Road conditions and regulations take precedence over information contained on the map display: observe actual traffic restrictions and circumstances while driving.
- This software is designed for use exclusively in the NVE-N099P series. It cannot and may not be used in conjunction with other hardware.
Precautions
IMPORTANT INFORMATION, PLEASE READ CAREFULLY BEFORE USING THIS PRODUCT. 2
Points to Observe for Safe Usage 3
User Agreement 4
Preface
Navigation terminology 6
Features 7
Before Using The System
Rewriting operating system programme...... 8
Switching the display on or off....9
Touch operation 10
How to switch the map displays 12
Main menu and sub-menu 13
Point setting menu 14
Change the map scale 15
Basic Operation
Deciding the route 16
Selecting from the route menu (three routes searching) 18
Suspending or resuming the route guidance ..... 19
Erasing the route 19
Registering your home 20
Searching For Destinations
Searching for a destination from its address ..... 22
Searching for a point of interest (POI) 24
Searching from postcode 25
Setting the local point icon display 26
Searching for the local POIs using the their icons ... 26
Searching from Telephone number 27
Searching from memory points 28
Searching by Quick access points 28
Searching for home 28
Searching from previous destinations searched 29
Searching from intersection 29
Searching from motorway entrance/exit...... 30
Searching from start point 30
Searching from Coordinates 31
Searching by scrolling displayed map ...... 31
Route Checking
Overviewing the searched route 32
Previewing the searched route 33
Guidance Screen Configuration
Guidance map display 34
Dual-screen display 35
Route Editing
Adding destinations 36
Reordering destinations 36
Deleting destinations 37
Searching for a detour 37
Changing the conditions for the route searching ... 38
Setting the route options 38
Memory Points
Storing locations in memory 39
Deleting the memory points 39
Editing the memory points 40
Deleting the stored previous destinations ..... 42
TMC Operation
Setting the RDS-TMC 43
Displaying the Traffic event information on route ... 44
Displaying all Receiving Traffic event information 45
Displaying the TMC event list 45
Detailed display of traffic event 45
Customizing Setups
How to change the setups 46
Screen position adjustment 47
Others
Vehicle position/direction correction 48
Resetting after tyre replacement 48
Adjusting the volume level for the navigation system 49
Drive simulation 49
Viewing GPS screens 50
Automatic dial operation 50
Automatic Dialling from a Point of Interest item ... 50
Automatic Dialling from a Memory Point ..... 51
Reference
Buttons and functions of remote controls ..... 52
Remote control button and touch button .... 53
In case of difficulty 54
If this message appears 55
Preface
Navigation terminology
Navigation
The navigation system displays and tracks the vehicle's position and movement on a moving map display. When a destination is input, the navigation system quickly calculates a route and guides you along the route with pictorial displays and voice prompts.
Current vehicle position

The navigation system integrates the GPS (Global Positioning Satellite) signals received and the map information stored on the DVD ROM to display the position and direction of the vehicle. The system also includes a gyroscope and a speed sensor that enable it to display the present position even in locations where the GPS signals may be blocked.
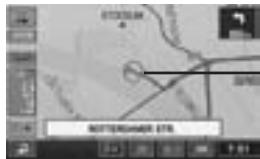
text_image
BOTTERGAMER ETRCurrent vehicle position
Map matching
Since GPS navigation has an error of 100 – 655 feet (30 m – 200 m), the position of your vehicle may be displayed off the road. Map matching automatically corrects this error so that the position of your vehicle is displayed on the road.
Destination

The point on the map that is your destination is specified and displayed with the destination icon. You can set up to 5 destinations for the same journey.
Route

When a destination is input, the navigation system automatically calculates a route and displays it in blue on the map.
Destination icon
text_image
Scanned document page with faint urban map and navigation controlsRoute (Blue)
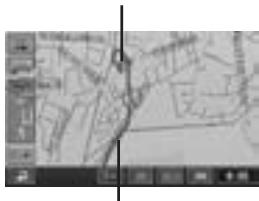
Memory points
Locations you go to frequently can be stored into memory and marked on the map. The system can store up to 200 points. You can add icons at the memory points so that the system also displays the icons on the map.
text_image
Scanned map image with location markers and a cursor pointing to a specific area, likely from a map or data visualization tool.Memory point mark
Motorway-preference selection
When searching for routes with the navigation system, you can switch between searching for routes that give priority to motorways and those that give priority to ordinary roads. When you specify motorway preference, the navigation system automatically searches for a route that gives priority to motorways and guides you along that route.

natural_image
Line drawing of a car driving on a curved road with a directional sign (no text or symbols)• Automatic Route Calculation
Just select the destination and your navigation system does the rest, automatically searching for the route you need.
• Real Time Voice Guide
A voice guide informs you of the distance and direction until your course changes, giving advice timed to match road conditions. The VOICE button lets you repeat the last voice guide when needed by just pushing the button. The voice guidance may not be given if the vehicle's present position is too near the destination.
- Dual-screen Display
Two different maps or guidance screens can be displayed simultaneously. For example, the map screen and the arrow-guide screen, or the map screen and the motorway screen.
- Direct Inputting of Phone Number \_\_\_\_
By inputting the phone number of a memory point you have stored, the system can search for it as the destination.
• Voice Guidance and 3-D Junction View Display at an Exit or Junction on Motorways \_\_\_\_
When you approach an exit or junction on the motorway, the system gives you voice guidance using the same name as shown on the road signboards. An exit or junction is shown on the display in real appearance.
- Map Zooming
You can change the map display in 14 magnification scales (50,100, 200, 400, 800, 1.6K, 3K, 7K, 13K, 20K, 50K, 100K, 200K and 400K metres) to show more detailed or wider views by pressing the ∨ or ∧ button on the remote control.
- Direct Input of Name of Place of Interest
Input only the name of a place of interest (without inputting the city name) to search for the route to the place of interest.
- Eight Languages Selectable for the Voice Guidance \_\_\_\_
You can choose one of the eight languages
(English, German, French, Italian, Dutch, Spanish, Swedish or Danish) for the voice route guidance.
- Multiple-Destination Setting
You can set up to 5 destinations in any order you like for the same journey.
- Intersection Zoom
As you near intersections and cross points, the map display automatically zooms in to show a more detailed view that you will need. This means there is no need to press the zoom buttons.
• Built-in Gyroscope and Speed Sensors \_\_\_\_
The gyroscope for sensing direction and the speed pulse sensor for detecting distance provide data which allows the vehicle position and direction to be displayed even in locations where the GPS signals cannot be received such as between high buildings or in tunnels.
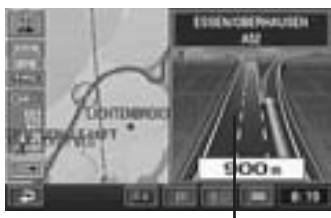
- Motorway Information Display
When you travel on motorways, the basic guidance display (with an arrow) automatically shows the distances to the next fuel station/restaurant/parking/junction (except exit).
• Built-in RDS-TMC Receiver
Real time traffic information from the Traffic Message Channel (TMC) will be automatically received. In the event of a traffic jam or traffic restriction, etc., you will be informed by voice and visual guidance.
TMC traffic information is already broadcast in Germany, UK, France, Italy, Belgium (Flanders region), Denmark, the Netherlands, Spain, Sweden and Switzerland.
This service will soon be available in Austria and Belgium (Wallonia region).
- RDS-TMC information may not be received depending on FM radio reception conditions.
- Two Types of Operation
The operation for the navigation system can be performed with both the supplied remote control (RUE-4141) or touch button.*
* Touch button operation can be performed only when you connect to Alpine Touch panel-compatible monitor IVA-D300R, IVA-D300RB or TME-M770, etc. For details, refer to “Touch operation” on page 10. See also the Owner’s Manual of the touch panel-compatible monitor.
Before Using The System
Rewriting operating system programme
If a different version of the map disc is used with your navigation system, the operating system programme installed will be rewritten automatically to read this SMART MAP PRO disc.

Insert this SMART MAP PRO disc into the NVE-N099P. (For removing and inserting procedures, refer to the Owner's Manual of the system.)
The system starts rewriting of the operation system programme. While the programme is being rewritten, do not turn the power off and on to the system, or do not eject the disc.

The opening screen appears in the display.

text_image
ALPINENote:
For the locations and functions of the remote control's buttons, see pages 52 and 53.
With the Alpine navigation system, when the ignition key is turned to ACC or ON and the display monitor is set in navigation display mode or external input display mode, the opening screen will be automatically displayed. For operation of the remote control, see pages 52 and 53 and the Owner's Manual for your system.
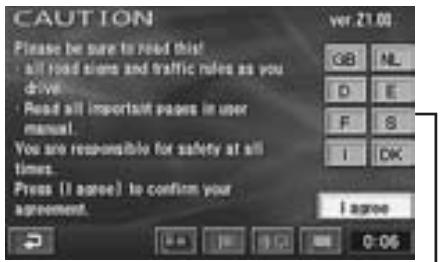
1 After the opening screen is displayed, important information saying “CAUTION” and the language selection menu are automatically displayed. There are eight languages to choose from. Select (highlight) your desired language for the picture/voice guidance and texts by tilting the joystick on the remote control, then press the ENTER button on the top of the joystick to execute the selection. The important information changes to the selected language. Be sure to read the important information.
text_image
CAUTION Please be sure to read this! • all road signs and traffic rules as you drive. • Read all important pages in user manual. You are responsible for safety at all times. Press (I agree) to confirm your agreement. ver 21.00 GB NL D E F S I DK I agree 0-06Language selection menu
2 After you have read this important information, select "I agree" and press the ENTER button.
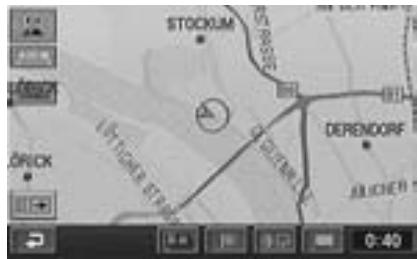
The map screen is displayed.
text_image
STOCKUM DERENDORF OPRICK 0:403 To turn off the display monitor, press the ON/OFF button on the remote control.
When you press the ON/OFF button again, the display monitor is turned on and the opening screen is displayed.
Tips:
- If there is no disc in the navigation system, "No DVD. Please insert map DVD." is displayed. For details on how to load or remove the disc, refer to the "Inserting the DVD-ROM" and "Removing the DVD-ROM" sections in the manual for the navigation system.
- If the inserted disc cannot be read, the "Unable to read data. Check if map DVD is correct." message is displayed. Load the correct disc.
- If the monitor is kept on with the engine off for an extended period of time, the battery may discharge.
Touch operation
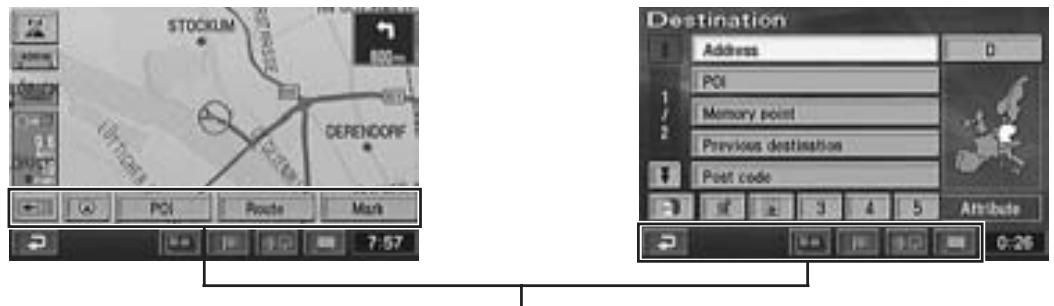
If the navigation system is connected to Alpine touch panel-compatible monitor IVA-D300R, IVA-D300RB or TME-M770, etc., touch operation can be performed by directly touching the monitor.
text_image
STOCKLIM DERENDORF PCI Route Mark Destination Address 0 PCI Memory point Previous destination Post code Attribute 0:26Touch Button Operation
Notes:
- Be sure to touch the button lightly with the pad of your finger on the display to protect the display.
- If you touch a button and there is no reaction, remove your finger from the display once, and try again.
- Touch buttons that cannot be operated appear dull in colour.
■ Remote Control and Touch Button Operation
This manual explains operation using the remote control. Operate the touch panel as you would the joystick or ENTER button on the remote control. In addition, the touch buttons that are displayed on the lower part of the screen are provided only for touch panel use. These buttons function the same as the shortcut buttons on the remote control. For details, refer to the comparison table of the remote control buttons and the touch buttons, on page 53.
Remote Control Operation
Ex.1
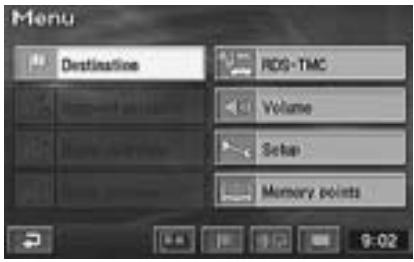
Press the MENU button on the remote control to display the main menu.
Touch Button Operation
Touch “ [icon] ” to display the main menu.
text_image
Menu Destination RDS-TMC Volume Setup Memory points 9:02Ex.2
Select (highlight) “Destination” from the main menu by tilting the joystick on the remote control and press the ENTER button on the top of the joystick.
Touch “Destination” from the main menu.

text_image
Menu Destination RDS-TMC Volume Setup Memory points 9:02Ex.3
Search for a desired destination by scrolling the map with the joystick. The map scrolls in the direction in which the joystick is tilted. Bring the destination point on the map under the reticule icon and press ENTER. The point setting menu appears.
Touch on the display and scroll the map. Align a desired point in the centre of the map by touching “☐”. The point setting menu appears.
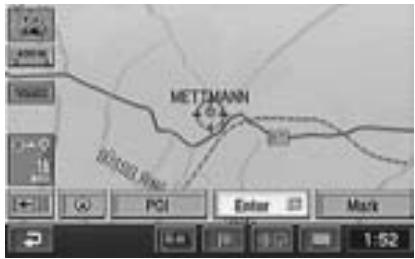
text_image
METTMANN 1:52Note:
Touch operation is described as "Touch."
How to switch the map displays
Once the route setting has been performed and travelling started, the navigation system provides the driver all of the major route information with real time voice directions and guidance displays. You can manually select the desired guidance displays for your convenience.
The Current Vehicle Position Display is automatically displayed when travelling starts. Pressing the or button on the remote control while the map is being displayed the map will be zoom in or out. To return to the current vehicle position screen display from other screen displays, press the POS. button.
■ Current Vehicle Position Display
Scale
400 m The distance between the arrows on the screen is 400 metres ( 14 mile).
GPS signal state
No icon:
No satellite information being received or satellite signals are being calculated.
Icon is displayed:
Receiving GPS signals (in 2-dimensional or 3-dimensional).
TMC indicator
For details, see page 43.
Distance to the destination.
Estimated required time.
1 25 : Estimated remaining time before arrival
9:30 : Anticipated arrival time
Point setting menu on or off.
For details, see page 14.
text_image
STOCKUM SPRING SPRING SPRING SPRING SPRING SPRING SPRING SPRING SPRING SPRING SPRING SPRING SPRING SPRING SPRING SPRING SPRING SPRING SPRING SPRING SPRING SPRING SPRING SPRING SPRING SPRING SPRING SPRING SPRING SPRING SPRING SPRING SPRING SPRINGMap orientation
Shows the map orientation for up on the current map.


(The arrowhead shows the direction of north. To change the map orientation, see page 14.)
Information on the next intersection.
Current vehicle position icon.
Route.
Current time display.
Street name.
Touch buttons are used only for touch operation (These buttons are lit when you press the corresponding button on the remote control.)
■ Point Display
Reticule icon
Distance in a straight line from the current vehicle position.
text_image
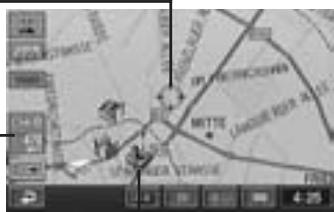
Scanned map image with labeled locations including 'MITTLE' and 'LAUREA BISN ROAD', showing road networks and annotations.3D landmark icon
For details, see page 15.
■ 3-D Display for Motorway Junction
text_image
LENTENBROCK 500 mMotorway junction
Note:
Applicable to some areas in Germany, UK, France, Belgium, The Netherlands, Luxembourg and Italy.
■ Zoomed Intersection Map Display
During navigation, when your vehicle approaches an intersection, the Zoomed Intersection Map of that intersection is displayed. This enlarged Intersection Map gives you further information via voice guidance. (Sometimes, the enlarged crossroads map is displayed even when you are going to go straight.)
Ordinary Road:
Name of next road ahead.
Motorway:
Name of next junction ahead.

text_image
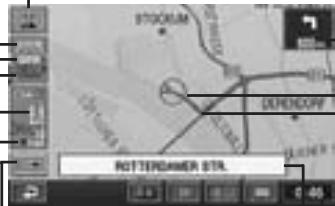
URDINGER STR. 200 m 0 - 43Distance to the intersection (Red point on the route)
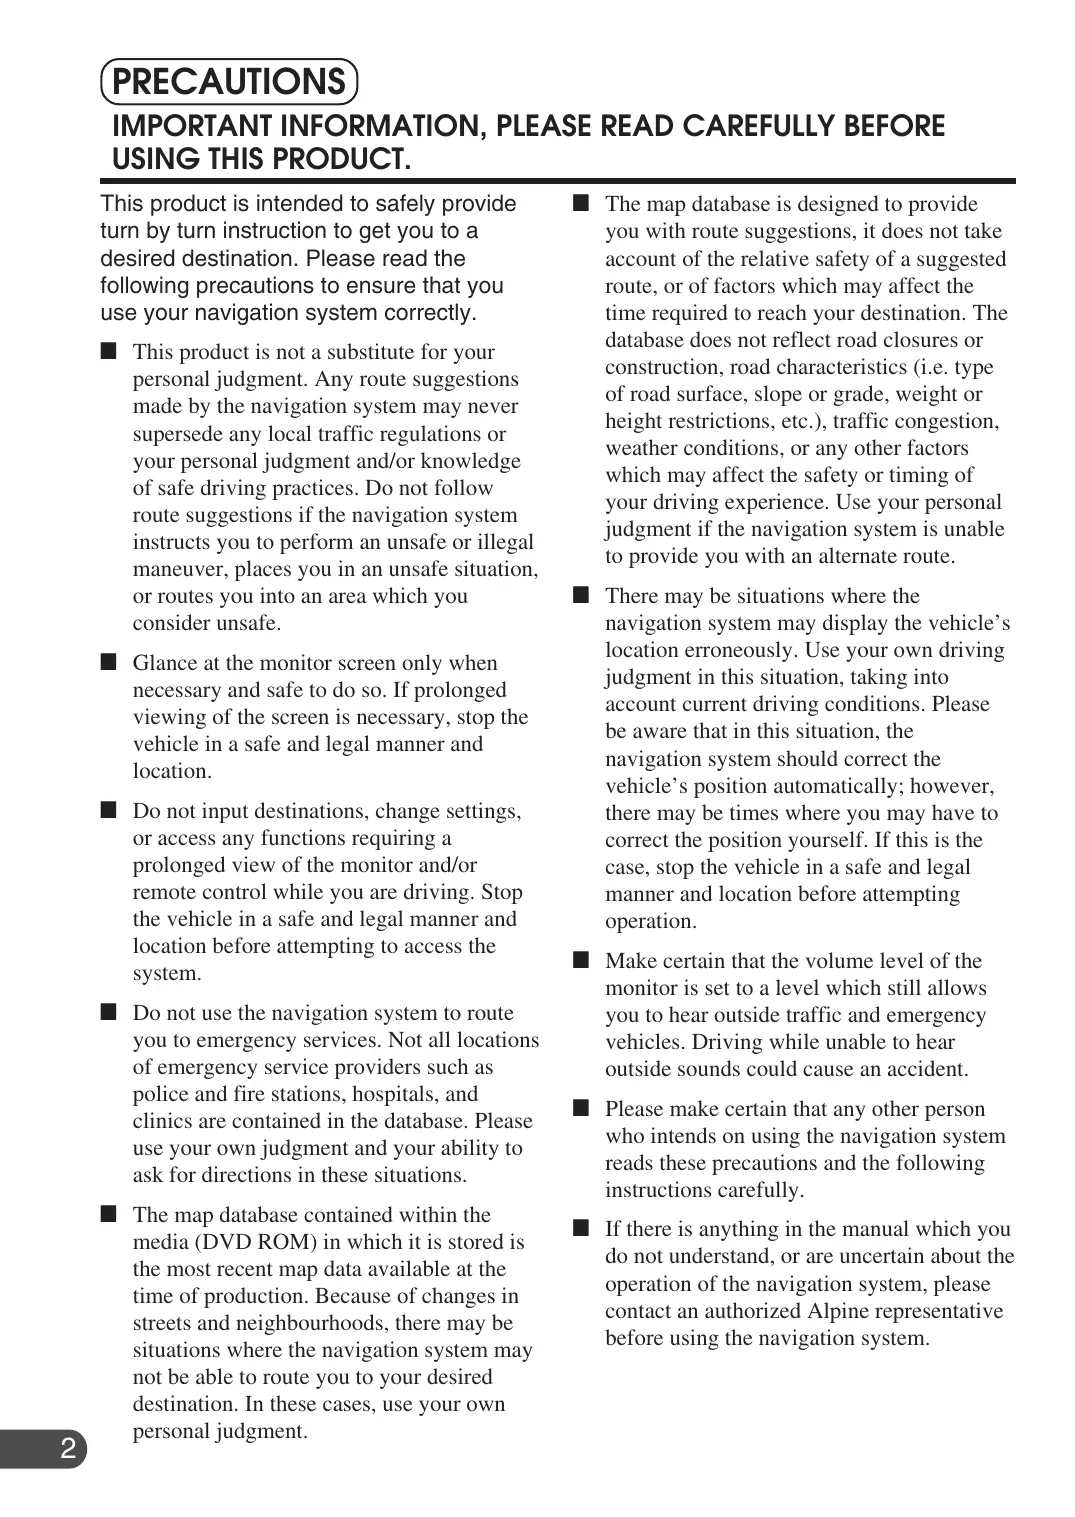
■ Dual - Screen Display
text_image
ROTTERDAMER STR.Left screen
Right screen
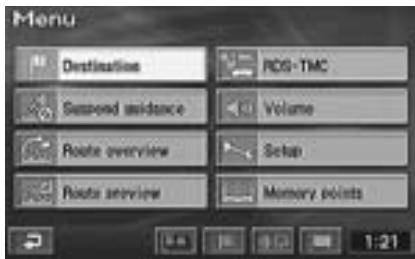
Use the main menu to select a variety of the system's functions. Select (highlight) a desired main menu item and press the ENTER button. The sub-menu for the selected main menu item automatically appears in the display.
1 Press the MENU button on the remote control to display the main menu when the navigation system is on.
For the locations of the buttons on the remote control, see pages 52 and 53.
text_image
STOCKUM DERENDORF ROTTEROAMER STR. 0-552 The main menu appears on the display.

text_image
Menu Destination RDS-TMC Volume Setup Memory points 0-55Tilt the joystick to select (highlight) a desired main menu item.
3 Make sure that the desired main menu item is highlighted, then press the ENTER button on the top of the joystick to execute the selection of the menu item.
text_image
Menu Destination RDG-TMC Volume Setup Memory points 0-554 The display shows the sub-menu for the selected main menu item. Highlight (select) a desired sub-menu item by tilting the joystick and press the ENTER button.
The screen example shows when "Destination" is selected.
text_image
Destination Address 0 POI Memory point Previous destination Post code 1 2 3 4 5 Attribute 0:56 Searching country (For details, see page 16.)Register frequently used memory points in Quick access points (1 through 5) for easy selection of a single button to set your destination. (For details, see page 28.)
Register your home for easy selection of a single button to set your destination. (For details, see page 28)
These arrows indicate that the list contains further pages. The number indicates the page. To scroll the page of the list, select “▼” or “▲” by tilting the joystick and press ENTER.
Note:
Press the POS. button to return to the current vehicle position screen.
Point setting menu
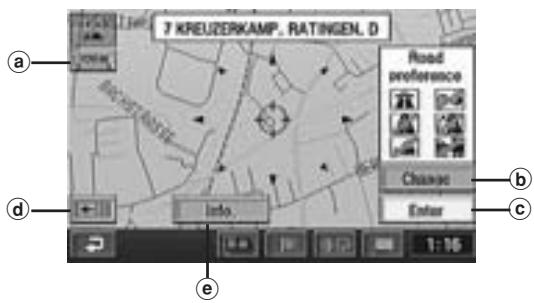
When a desired point is searched for using the Destination or Memory points menu etc. and the map for the point area is displayed, the point setting menu is displayed. This menu is very
When the point map is displayed using the Destination menu
text_image
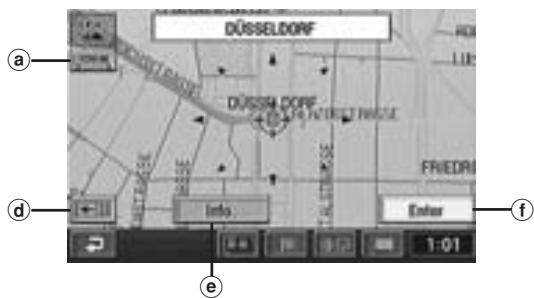
7 KREUZERKAMP, RATINGEN, D Road preference Change Enter a b c d e InfoWhen the point map is displayed using the Memory points menu
text_image
DÜSSELDORF a b c d e info. f Enter 1:01When the ENTER button is pressed while a map screen without the point setting menu is displayed
text_image
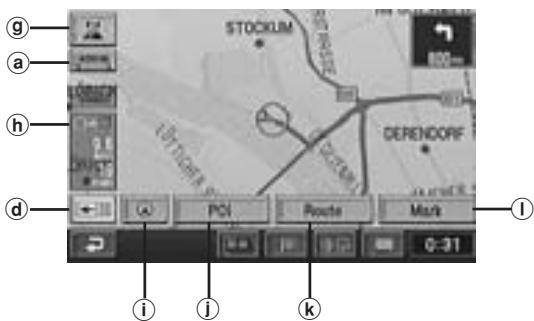
g a h d POI Route Mark ① ① ② ③ ④useful when you set the searched point as a destination or memory point.
After selecting a menu item, press ENTER.
a SCALE: The scale screen is displayed by selecting this menu. You can change the map scale by selecting zoom-in) or zoom out) and pressing ENTER within 2 seconds. For details, see page 15.
⑥ Change: Select this menu when you want to change the conditions in searching for a route, such as motorway preference.
© Enter: Use this menu when you set the point as a destination or an additional destination, and calculate the route.
To set the selected point as an additional destination, select "Enter" from the point setting menu and press ENTER. The Add destination menu appears, select "Add" and press ENTER.
Select "Replace" and press ENTER to replace the current destination with a new one.
(d) : Select to turn the point setting menu display off. You can scroll the map manually with the joystick. (e) : Select to display the point setting menu.
e Info.: Choose this menu when you want to get some information about the point such as address, phone number, etc. when the point is searched for using POI menu.
f Enter: Use this menu when you set the point as a memory point.
⑨ Map orient.: Select this menu when you want to change the map orientation for the current map display.
h: This menu appears only when multiple destinations are set. Use it when you specify the desired destination.
Screen configuration: The screen configuration selection menu is displayed by selecting this menu. You can select from various map displays. (For details, see page 34.)
POI: Use this menu when you want to display the POI icons on the map or to display the "Local POI list" for the displayed POIs.
Route: Choose this menu when you want to change to another route (this menu is displayed only when the route has already been set).
① Mark: You can store the point as a memory point.
Change the map magnification ratio upwards or downwards (in 14 steps).
■ Remote control operation
1 Press the ∧ or ∨ button while displaying the map screen. Each press of the button changes the map scale. This changes rapidly by pressing and holding either button.
■ Touch operation
1 Touch ☐ on the screen to display the point setting menu.
2 Touch “(SCALE)” Change the map magnification ratio by touching “(zoom in)” or “(zoom out)” within 2 seconds. This changes rapidly by pressing and holding either button.
text_image
STOCKLIM O'JICK DEFENDORF 4:18Notes:
- The 3D landmark icon cannot be displayed on the map when map scale is more than 400m.
If you select the 3D landmark icon on the map by tilting the joystick and press ENTER, the point setting menu appears.
For details of the point setting menu, see page 14.
Touch: In the case of touch operation, touch the 3D landmark icon. - The local POI icon cannot be displayed when map scale is more than 800m. For details, see page 26.
Basic Operation
Deciding the route
There are three procedures to decide an appropriate route to your desired destination; searching for the location, searching for the route, and deciding the route. This section describes the operational procedures when a destination is searched for using its address as an example.
1 Press the MENU button on the remote control to display the main menu.
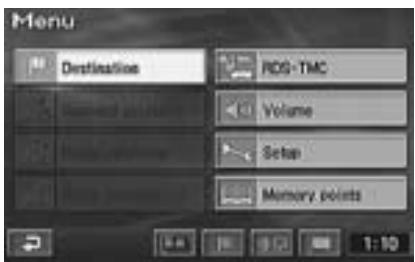
text_image
Menu Destination ROS-TMC Volume Setup Memory points 1:102 Select (highlight) “Destination” from the main menu by tilting the joystick on the remote control and press the ENTER button on the top of the joystick.
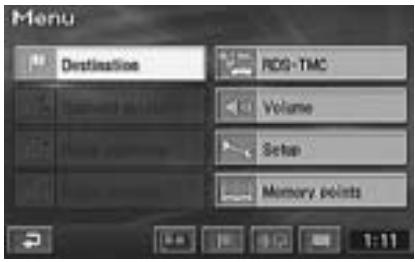
text_image
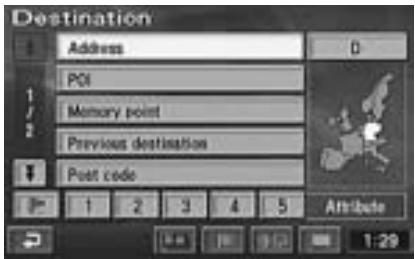
Menu Destination RDS-TMC Volume Setup Memory points 1:113 The Destination search menu automatically appears. Select "Address" from the Destination search menu by tilting the joystick and press the ENTER button.
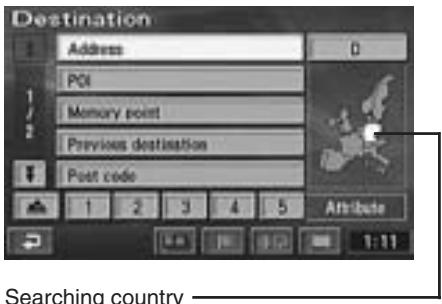
text_image
Destination Address PCI Memory point Previous destination Post code 1 2 3 4 5 Attribute Searching countrySearching country ____ (This example shows when Germany is selected.)
Note:
When you search for a location in another country (area), you should change the search country (area). In this case, select “Country initial (D, GB, etc.)” by tilting the joystick, and press ENTER. The Search area menu appears, select the desired area (country) by tilting the joystick and press ENTER. (Select the “▲” or “▼” indicator on the display and press ENTER to scroll the area list.) When you have selected the desired area, choose “OK” by tilting the joystick and press ENTER.
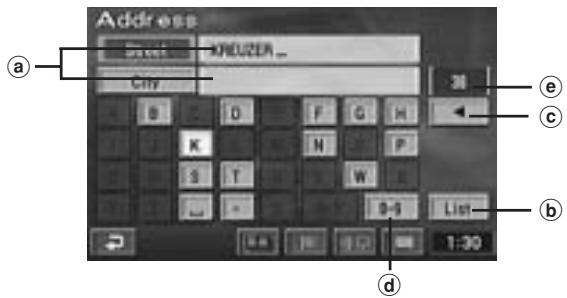
4 The street or city name input alphabet table automatically appears. Tilt the joystick to select the desired character for the first position of the street name and press ENTER. The input character appears at the first position of the text window. Repeat this procedure to input the entire street name.
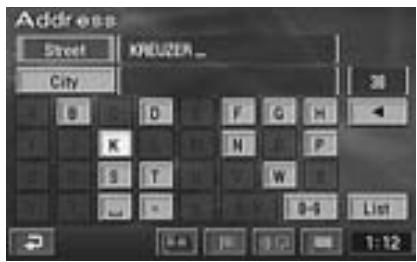
text_image
Address Street KREUZER_ City B D F G H K H P S T W L - 0-5 List 1:12Tips:
- When 1 character is input, the candidates for the next character are narrowed down.
- Selecting “◀” returns to the previous numeral and erases it.
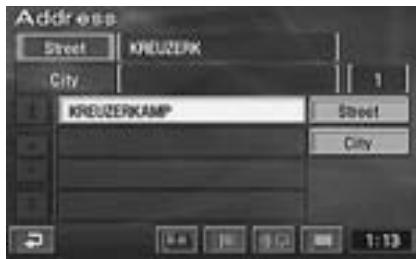
5 When the street name inputtings have been completed, the list of the input street names appears. Select the desired street name by tilting the joystick and press ENTER.
text_image
Address Street | KREUZERK City 1 KREUZERKAMP Street City 1:13Note:
If there are other streets with the same name in other cities when the desired street name is searched for in “All cities” mode, the list of the city names will be displayed. Select the desired city name and press ENTER.
6
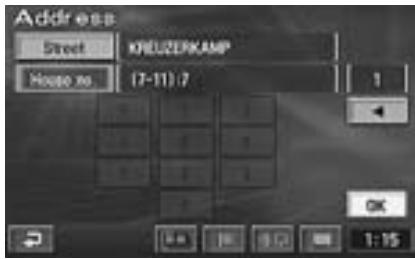
The house number input table appears automatically. Input the house number in the same manner as step 4 above. When the house number inputtings have been completed, select “OK” by tilting the joystick and press ENTER.
text_image
Address Street KREUZERKAMP House No (7-11):7 1 OK 1:157
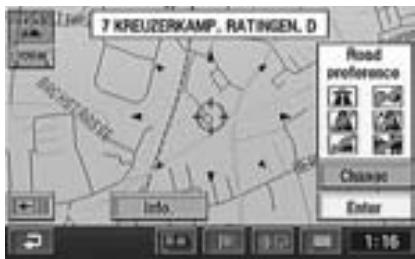
The map showing the area of the input address with the point setting menu appears. Select “Enter” by tilting the joystick and press ENTER.
text_image
7 KREUZERKAMP, RATINGEN, D Road preference Choose Enter8
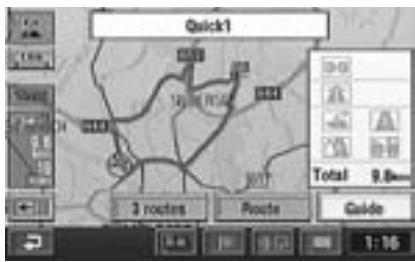
The system starts calculation of the route. When the calculation is completed, the whole route and route menu are displayed. Select “Guide” by tilting the joystick and press ENTER.
text_image
Quick1 3 routes Route Guide Total 9.8mm 1:169
When you start driving this route, the system displays the map with the current vehicle position and begins guidance.
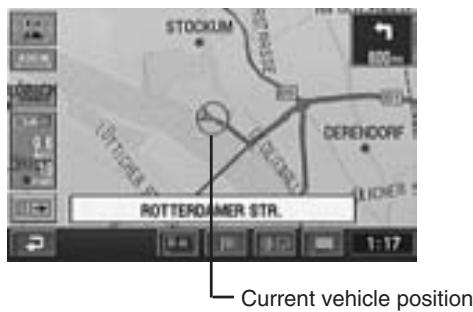
text_image
STOCKUM DERENDORF ROTTEROMER STR. Current vehicle positionTips:
You can search for a location from various items as shown below.
| Searching from | Page No. |
| Address | P22 |
| POI | P24 |
| Postcode | P25 |
| Local POI | P26 |
| Telephone number | P27 |
| Memory point | P28 |
| Quick access point | P28 |
| Home | P28 |
| Previous destination | P29 |
| Intersection | P29 |
| Motorway entrance/exit | P30 |
| Previous starting point | P30 |
| Coordinates | P31 |
| Map | P31 |
Selecting from the route menu (three routes searching)
The system calculates up to three routes simultaneously including the recommended route. You can choose any one of the routes.
When you have selected a desired destination, the navigation system calculates up to 3 routes and the system automatically displays the "All-route" screen and route menu.
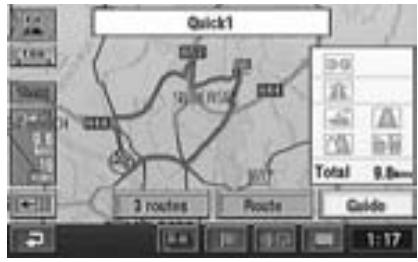
text_image
Quick1 Total 9.8mm 3 routes Route Guide2 Select the desired route menu item and press ENTER.
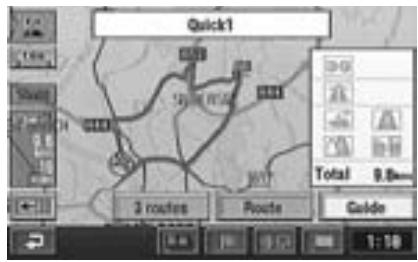
text_image
Quick1 3 routes Route Guide Total 9.0mmThe route menu items:
● Guide: Starts the route guidance.
Note:
If you want to view the drive simulation to check the details of the route, select "Guide" then press and hold the ENTER button for at least 5 seconds while the whole route screen is displayed. (For more information, see page 49.)
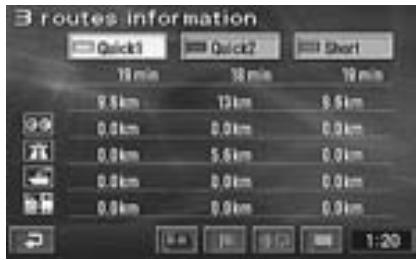
- 3 routes: Displays the 3 Routes screen. Select a desired route by tilting the joystick and press ENTER.
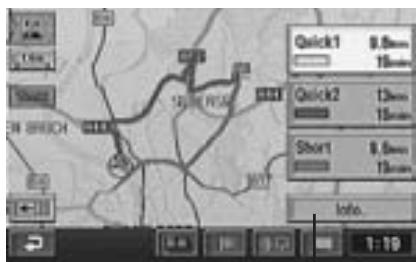
text_image
Quick1 9.8mm 15mm Quick2 13mm 15mm Short 9.6mm 15mm Info.The list showing information about the distance and required time to the destination is displayed.
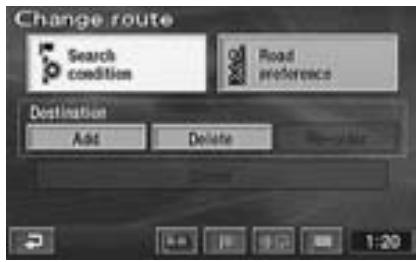
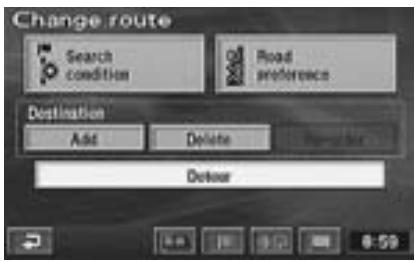
- Route: Displays the Change route screen. For details, see page 36.
text_image
Change route Search condition Road preferences Destination Add Delete Regulate 1:20Suspending or resuming the route guidance
You can very easily suspend the route guidance temporarily and resume it.
Note:
The route information remains in memory even if the route is cancelled. To erase the route information delete the destination, see “Erasing the route” (next section).
1 Press the MENU button to display the main menu.
text_image
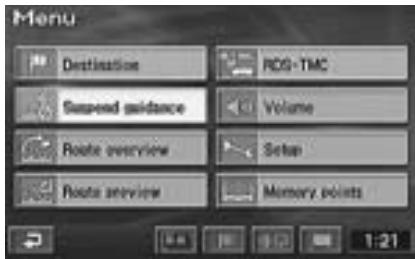
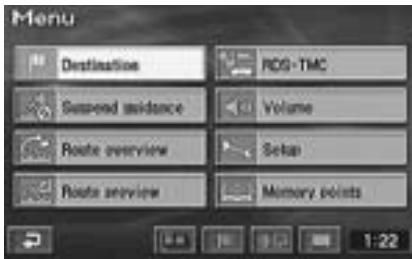
Menu Destination RDG-TMC Suspend guidance Volume Route overview Setup Route overview Memory points 1:212 To temporarily suspend the route guidance, select “Suspend guidance” in the main menu by tilting the joystick and press ENTER.
text_image
Menu Destination RCS-TMC Suspend guidance Volume Route overview Setup Route overview Memory points 1:21Note:
When the guidance is suspended, the main menu automatically changes to show "Resume guidance."
3 To resume the route guidance, select "Resume guidance" in the main menu by tilting the joystick and press ENTER.
Erasing the route
1 Press the MENU button to display the main menu.
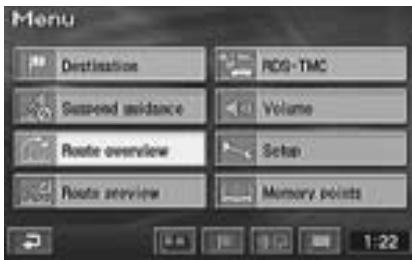
text_image
Menu Destination RDG-TMC Suspend guidance Volume Route overview Setup Route overview Memory points 1:222 Select "Route overview" from the main menu by tilting the joystick and press ENTER.
text_image
Menu Destination RDG-TMC Suspended guidance Volume Route overview Setup Route overview Memory points 1:223 The “Route overview” screen appears. Select “Route” by tilting the joystick and press ENTER.
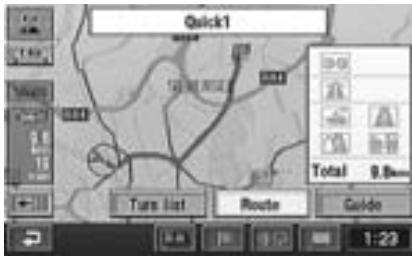
text_image
Quick1 Total 9.8mm Turn list Route Guide 1:23(To be continued)

The “Change route” screen appears. Select “Delete” and press ENTER.
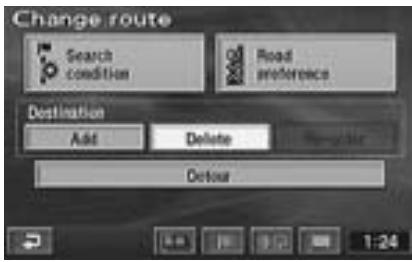
text_image
Change route Search condition Road preference Destination Add Delete Regulator Detour 1:24Note:
If multiple destinations are set, the “Delete destination” screen showing the list of the destinations appears. Select the destination to be deleted (or “Delete all” to delete all destinations) by tilting the joystick and press ENTER.

The confirmation dialogue message appears. Select “Yes” by tilting the joystick and press ENTER if you want to delete the destination(s) and route.
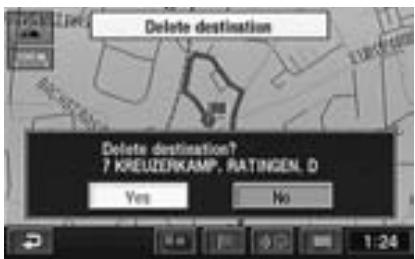
text_image
Delete destination Delete destination? 7 KREUZERKAMP, RATINGEN D Yes NoRegistering your home
Register your home first. When your home is registered, you can recall it very quickly and setting the route for returning home is simple.

Press the MENU button to display the main menu.
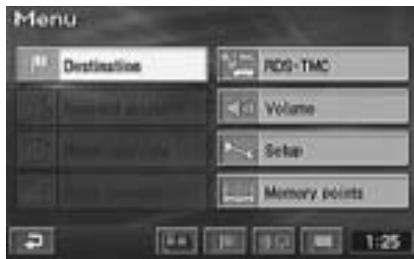
text_image
Menu Destination ROS-TMC Volume Setup Memory points 1:25
Select “Memory points” from the main menu by tilting the joystick and press ENTER.
text_image
Menu Destination RCS-TMC Volume Setup Memory points 1:25
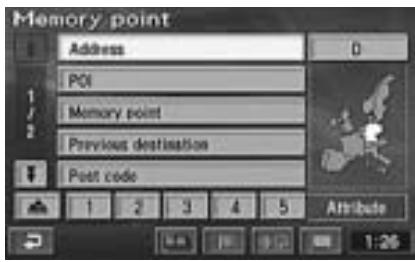
The sub-menu appears. Select "Register" by tilting the joystick and press ENTER.
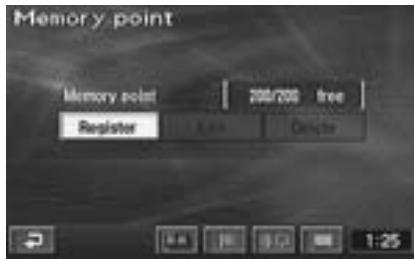
text_image
Memory point Memory point 200/200 free Register Cancel 1:254 To search for your home location, select the searching method described in the Searching for a Destination section on page 22.
text_image
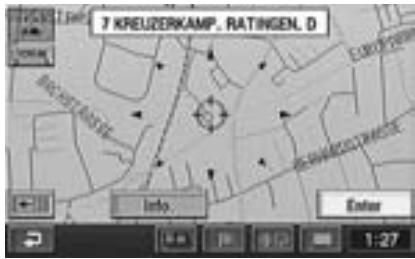
Memory point Address 0 POI 1/ 2 Memory point Previous destination Post code 1 2 3 4 5 Attribute 1:265 When the map showing the area of your home is displayed, Select "Enter" by tilting the joystick and press ENTER.
text_image
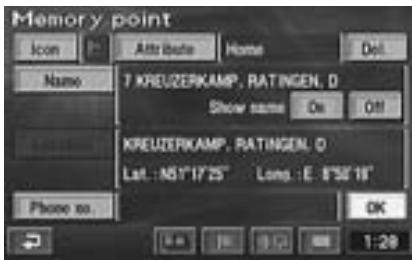
7 KREUZERKAMP, RATINGEN, D Info. Enter 1-276 The “Memory point” screen appears. Select “Attribute” by tilting the joystick and press ENTER.
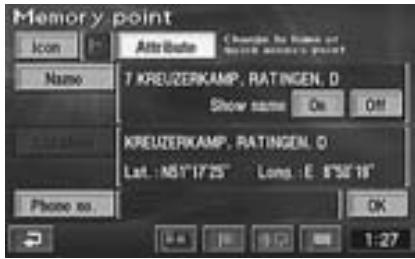
text_image
Memory point Icon Attri Before Changes the Name or Show Name: 1000 Name 7 KREUZERKAMP, RATINGEN, D Show name On Off KREUZERKAMP, RATINGEN, D Lat.: M51°17'25" Long: E F5E'18" Please no. OK 1-277 The “Change attribute” screen appears. Select “▲” by tilting the joystick and press ENTER.
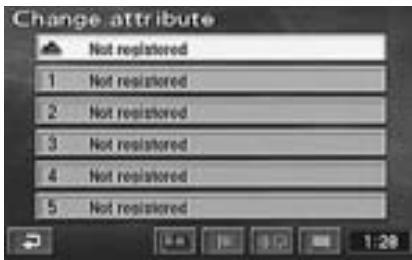
text_image
Change attribute Not registered 1 Not registered 2 Not registered 3 Not registered 4 Not registered 5 Not registeredNote:
You can register only one home.
8 Select "OK" by tilting the joystick and press ENTER.
text_image
Memory point Icon Name Attn Bate Home Del 7 KREUZERKAMP, RATINGEN, D Show name On Off KREUZERKAMP, RATINGEN, O Lat.: M51°17'25" Long: E 8°56'19" Place no. OK 1:28Note:
You can change icons or names displayed on the map.
For details, see page 40.
9 Press the POS. button to return to the current vehicle position map.
Searching For Destinations
Searching for a destination from its address
If you know the address of the desired destination, you can easily display that point on the map by just inputting the address.
1 Press the MENU button to display the main menu. Select “Destination” from the main menu by tilting the joystick and press ENTER.
2 The sub-menu for Destination screen appears. Select “Address” by tilting the joystick and press ENTER.
text_image
Destination Address POI Memory point Previous destination Post code 1 2 3 4 5 Attribute 1:29Notes:
- If your destination is located in other country than that currently selected one, be sure to change the searching country.
- To change the searching country, choose “Country initial (D, GB, etc.).” The menu appears, select the desired searching country.
3 The street name input table for the destination appears. Select the character for the first position of the street name by tilting the joystick and press ENTER. The entered character appears at the first position of the text window. Repeat this procedure to complete the character inputtings of the street name.
text_image
Address City XNEUSER_ City 0 D F G H K N P S T W L List 0-3 1:30 ① ② ③ ④a Text windows
Display the selected characters/numerals.
b List
Displays a list of the candidate names for the selected characters/numerals.
©
Returns to the previous character/numeral and erases it.
d Character with diacritical mark/numeric pallet
Select the desired pallet.
e Number of candidates
Tips:
- When 1 character/numeral is input, the candidates for the next character/numeral are narrowed down (and the others are shaded).
- You can also search for a location by inputting just the start of its name and selecting "List" and pressing ENTER.
- If the number of candidate locations is narrowed down, the list of the candidate locations will be displayed automatically. Select the desired location from the list and press ENTER.
- If you want to display the list of candidate street names, select “List” and press ENTER.
When “City” is selected and ENTER is pressed, the city selection menu appears. Select the desired menu item.
- When “Input city name” is selected, input the city name and press ENTER.
- When “5 near cities” is selected, the names of 5 near cities appears in the display. Select the desired city name and press ENTER.
- When a city name is directly selected from the list displayed, press ENTER.
- When “All cities” is selected, the character input pallet will be displayed. Input the city name.
- When "Input post code" is selected, the postcode input pallet will be displayed. Input the postcode.
4 The list of street names will be displayed. Select the desired street name and press ENTER.

text_image
Address Street KREUZERK City 1 KREUZERKAMP Street City 1:31Notes:
- If there are other streets with the same name in other cities when the desired street name is searched for in “All cities” mode, the list of the city names will be displayed. Select the desired city name and press ENTER.
- If there is no location with the input spelling, locations with similar spelling are displayed.
5 The house number input table appears. Input the house number in the same manner as for inputting the street name (step 3 above). When the house number inputtings have been completed, select “OK” by tilting the joystick and press ENTER.

text_image
Address Street KREUZERKAMP House No (7-11):7 1 OK 1:31Notes:
- Your desired destination can be searched for more precisely by inputting the house number.
- The house number can also be input using the numeric keypad on the remote control. For operation, see the Remote Control Reference Guide page 52.
- If there is no house number or no data in the disc, the system displays the map showing the area of the input street name.
6 The map screen showing the selected area with the point setting menu appears.
Note:
For details of the point setting menu, see page 14.
Searching for a point of interest (POI)
If you know the name of the desired point of interest (POI), you can easily display that point of interest on the map by just inputting its name.
1 Press the MENU button to display the main menu. Select “Destination” by tilting the joystick and press ENTER.
2 The sub-menu appears. Select "POI" by tilting the joystick and press ENTER.
3 There are three ways in searching for your desired POI. The Input POI name screen with the character input table appears.
- By inputting the name:
- Input the name of a POI you want to search for by tilting the joystick and pressing ENTER in the same manner as inputting the street name (see page 22).
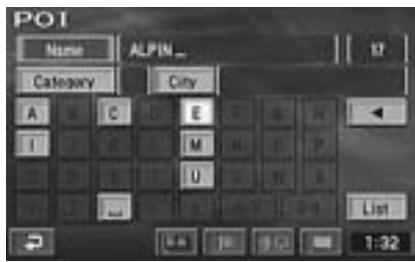
text_image
POT Name ALPIN_ 17 Category City A C E I M U P U List 1:32• From the category
- Select "Category" by tilting the joystick and press ENTER.
- The category selection menu appears. Select the desired category by tilting the joystick and press ENTER.
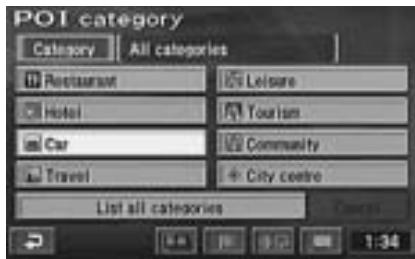
text_image
POI category Category All categories Restaurant Leisure Hotel Tourism Car Community Travel City centre List all categories- When “List all categories” is selected, all categories are displayed in the list. Select the desired category and press ENTER.
- If the category is not selected, any or all categories can be set.
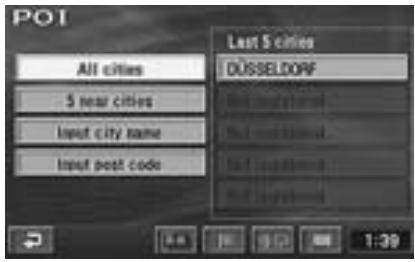
- From the city name
- Select “City” by tilting the joystick and press ENTER. The city selection menu appears, select the desired menu item.
text_image
POI All cities 5 near cities Input city name Input post code Last 5 cities DÜSSELDORF Net additional Net additional Net additional Net additional 1:39- When “Input city name” is selected, input the city name.
- When “5 near cities” is selected, the names of 5 near cities appear in the display. Select the desired city name and press ENTER.
- When a city name is directly selected from the list displayed, press the ENTER button.
- When “All cities” is selected, the character input pallet will be displayed. Input the city name.
- When “Input post code” is selected, the post code input pallet will be displayed. Input the postcode.
4 Select "List" by tilting the joystick and press ENTER. The list of the candidate POIs and the number of the POIs appear. Select the desired POI by tilting the joystick and press ENTER.
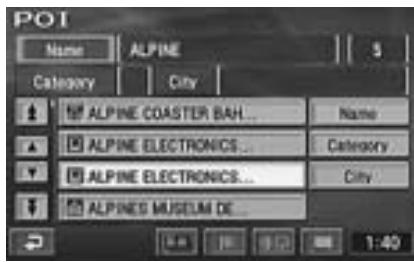
text_image
POT Name ALPINE Category City ALPINE COASTER BAH... Name ALPINE ELECTRONICS... Category ALPINE ELECTRONICS... City ALPINES MUSEUM DE... 1:40Note:
If you select "Name," "Category" or "City," you can narrow down the number of the candidates.
5 The map screen showing the area of the selected POI and the point setting menu appears.
Note:
For details of the point setting menu, see page 14.
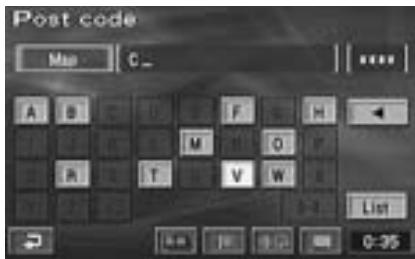
You can search for a destination by inputting the postcode. (This function may not be used in some regions.)
1 Press the MENU button to display the main menu. Select “Destination” by tilting the joystick and press ENTER.
2 The sub-menu appears. Select "Post code" by tilting the joystick and press ENTER.
3 The postcode input screen appears. Input the desired postcode by tilting the joystick.
text_image
Post code Map C_ ...... A B F H M O H T V W List 0-35Tips:
- When 1 character/numeral is input, the candidates for the next character/numeral are narrowed down (and the others are shaded).
- Selecting “◀” returns to the previous character/numeral and erases it.
- If you want to display the list of candidate postcode, select "List" and press ENTER.
4 The inputted postcode list is displayed. Select a desired postcode and press ENTER.
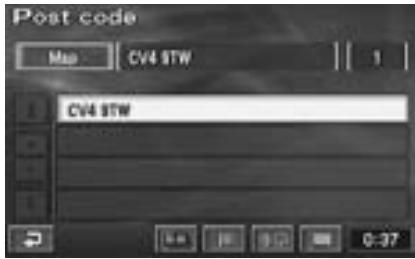
text_image
Post code Map CV4 STW 1 CV4 STW 0-375 The map screen showing the selected area with the point setting menu appears.
Note:
For details of the point setting menu, see page 14.
Setting the local point icon display
The system can display on the map the icons for the points of interest such as petrol stations, restaurants, parking lots, etc.
1 While a map screen is being displayed, press ENTER.
Touch:
In the case of touch operation, touch “☐”.
2 The point setting menu appears. Select "POI" from the point setting menu by tilting the joystick and press ENTER.
text_image
STOCKUM DERENOOREF POLI Pol3 The show POI icons screen is displayed. Select a desired POI icon by tilting the joystick and press ENTER.
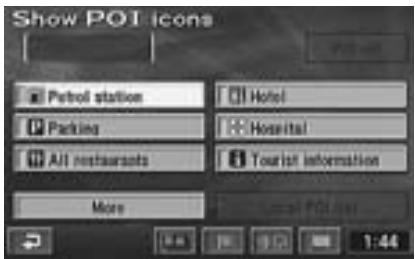
text_image
Show POI icons Petrol station Hotel Parking Hospital All restaurants Tourist information More Local POI class 1:44Notes:
- If you want to display multiple icons, select "More" by tilting the joystick and press ENTER. Then, select the desired icons one by one. When all selections have been completed, select "OK" and press ENTER.
- You can set up to 5 POI icons.
- If you select "POI off," the POI icons do not appear on the map.
- POI icons cannot be displayed if the map scale is more than 800m.
- If you select the POI icon on the map by tilting the joystick and press ENTER, the point setting menu appears. The “Info.” menu of the point setting menu is displayed only for 5 seconds.
For details of the point setting menu, see page 14.
Touch: In the case of touch operation, touch the POI icon.
Searching for the local POIs using the their icons
The system can search for the POIs in a range of 30 km (19 miles) around the reticule icon and when POI icons are set you can display their icons with the distance to the POIs. The system can also display only the POIs along the set route.
1 Press the MENU button to display the main menu. Select “Destination” by tilting the joystick and press ENTER.
2 The sub-menu appears. Select "Local POI" by tilting the joystick and press ENTER.
3 The Local POI icons screen appears. Select a desired POI icon by tilting the joystick and press ENTER.
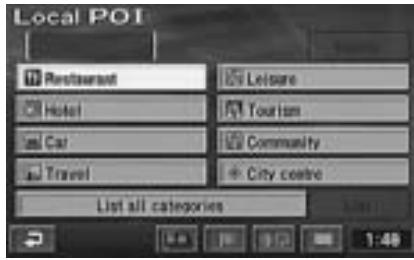
text_image
Local POI Restaurant Hotel Car Travel Leisure Tourism Community City centre List all categories 1:484 The list of the desired Local POI icons screen appears. Select the POI icon by tilting the joystick and press ENTER.
text_image
Local POI All restaurants Chinese Fast food French Italian
Select "List" by tilting the joystick and press ENTER.
text_image
Local POI All restaurants Chinese Fast food French Italian Delete OK List 1:51Note:
If you want to add a local POI, select "OK" and press ENTER, then repeat step 3 to 4.

The list of the Local POIs appears.
text_image
Local POI list BELLE ETOILE 1.4km Dist. LE DOC 2.8km Icon MARCEL'S 3.7km Name VICTORIAN 3.5km CALVADOS 3.6km On route 1:50When this menu is selected, the system can list the POIs along the set route.
You can sort the list by distance, icons or names.
Notes:
- You can sort the list by distance, icons or names.
- You can list up to 200 places to display.

Select the desired local POI by tilting the joystick and press ENTER. The map showing the area of the selected POI with the point setting menu appears.
Note:
For details of the point setting menu, see page 14.
Searching from Telephone number
If you have input phone number in your memory points, you can easily display a desired memory point as your destination by just inputting the phone number. For inputting phone numbers for the memory points, see page 41.

Press the MENU button to display the main menu. Select “Destination” from the main menu by tilting the joystick and press ENTER.

The sub-menu appears. Select "Telephone number" by tilting the joystick and press ENTER. The numeric input table appears.

Input the phone number including the area code by tilting the joystick and pressing ENTER. (For details of inputting number, see step 5 on page 23.) When the desired phone number has been input, select "OK" and press ENTER.
text_image
Telephone number 4821_ 1 2 3 4 5 6 7 8 OK 1:23Tips:
- The phone number can also be input using the numeric keypad on the remote control. For operation, see the Remote Control Reference Guide page 52.
- When 1 numeral is input, the candidates for the next numeral are narrowed down (and the others are shaded).
- Selecting “◀” returns to the previous numeral and erases it.

The area map of the location with the input phone number is displayed with the point setting menu.
Note:
For details of the point setting menu, see page 14.
Searching from memory points
If memory points have already been registered, you can call them out with a simple operation and choose a desired location as the destination. For details on the registration method, see page 39.
1 Press the MENU button to display the main menu. Select “Destination” from the main menu by tilting the joystick and press ENTER. Select “Memory point” from the sub-menu by tilting the joystick and press ENTER.
2 The list of the memory points is displayed. Select the memory point you wish to display by tilting the joystick and press ENTER.
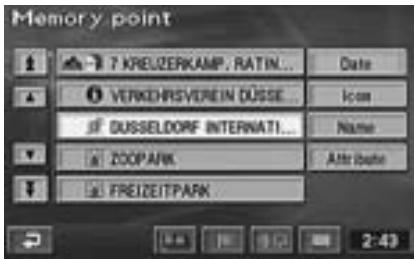
text_image
Memory point 7 KREUZERKAMP, RATIN... VERKOHRSVEREIN DÜSSE DUSSELDORF INTERNATI... ZOOPARK FREIZEITPARK Date Icon Name Attrition 2:433 The reticule icon appears at the selected memory point on the map with the point setting menu.
Note:
For details of the point setting menu, see page 14.
Searching by Quick access points
If quick access points have already been registered, you can call them out with a simple operation and choose a desired location as the destination. For details on the registration method, see page 41.
1 Press the MENU button to display the main menu. Select “Destination” from the main menu by tilting the joystick and press ENTER.
2 The sub-menu appears. Select the desired quick access point icon by tilting the joystick and press ENTER.
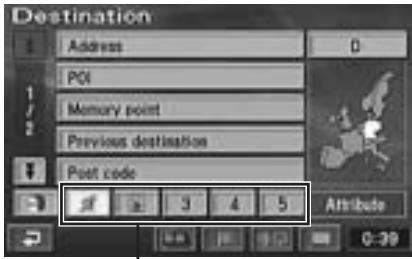
text_image
Destination Address D POI Memory point Previous destination Post code Attribute 0-39Quick access point icons
3 The reticule icon appears at the selected quick access point on the map with the point setting menu.
Note:
For details of the point setting menu, see page 14.
Searching for home
If your home has already been registered, you can call it out with a simple operation. For details about the registration method, see page 20.
1 Press the MENU button to display the main menu. Select "Destination" from the main menu by tilting the joystick and press ENTER.
2 The sub-menu appears. Select "Home icon" by tilting the joystick and press ENTER.
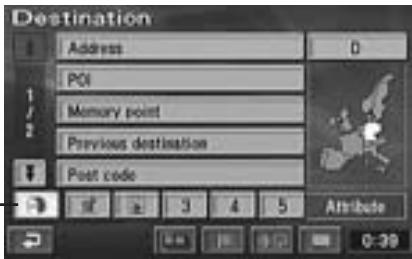
text_image
Destination Address 0 POI Memory point Previous destination Post code Attribute 0-39Home icon
3 The reticule icon appears at the selected home point on the map with the point setting menu.
Note:
For details of the point setting menu, see page 14.
Searching from previous destinations searched
The system automatically stores up to 99 locations the system have searched for as destinations.
1 Press the MENU button to display the main menu. Select “Destination” from the main menu by tilting the joystick and press ENTER.
2 The sub-menu appears. Select "Previous destination" by tilting the joystick and press ENTER.
3 The list showing the destinations stored in memory is displayed. Select the desired destination from the list by tilting the joystick and press ENTER.
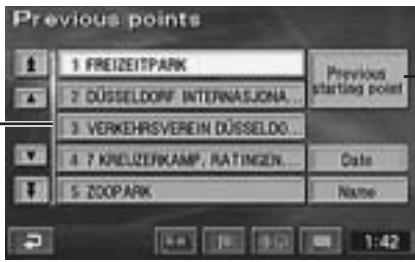
text_image
Previous points 1 FREIZEITPARK 2 DÜSSELDORF INTERNASJONA... 3 VERKEHRSVEREIN DÜSSELDOR... 4 7 KREUZERKAMP, RATINGEN... 5 ZOOPARK Previous starting point Date Name 1:42If you select this area of the screen and press ENTER, you can easily call out the start point when you want to return to the start point. For details, see page 30.
This bar indicates that there is a continuation of the list. To scroll the list, select “Arrow” by tilting the joystick and press ENTER.
“▲” or “▼”: Scrolls the list page.
“▲” or “▼”: Scrolls the list one by one.
4 The map of the selected destination appears with the point setting menu.
Notes:
- For details of the point setting menu, see page 14.
- The stored location in memory can be erased. For details, see page 42.
- If the destination was searched from Home or a Quick access point, the point is not recorded in the previous point list.
Searching from intersection
If you know an intersection near where you want to go, you can input two cross streets as your destination. This section describes how to locate a destination by entering two cross street names.
1 Press MENU button to display the main menu. Select "Destination" from the main menu by tilting the joystick and press ENTER.
2 The sub-menu appears. Select "Intersection" by tilting the joystick and press ENTER.
3 The intersection input table for the 1st street name and 2nd street name appears. Input the 1st street name by tilting the joystick and pressing ENTER in the same manner as for inputting the address for Searching For Destinations (step 3 on page 22).
4 The 2nd street name input table appears. Input the 2nd street name.
Note:
When the 1st street name is input, the candidate for the 2nd street name is narrowed down.
5 When two street names have been input, the map screen showing the area of the selected intersection with the point setting menu appears.
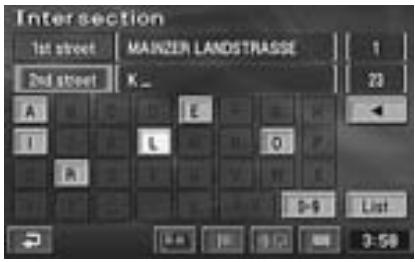
text_image
Intersection 1st street MAINZER LANDSTRASSE 2nd street K_ A E I L O A D-9 List 3:58Note:
For details of the point setting menu, see page 14.
Searching from motorway entrance/exit
You can search for a location from the motorway entrance or exit.
1 Press the MENU button to display the main menu. Select “Destination” from the main menu by tilting the joystick and press ENTER.
2 The sub-menu appears. Select "Motorway entrance/exit" by tilting the joystick and press ENTER. The Motorway Ent./Exit input pallet appears.
3 Input the desired motorway name by tilting the joystick and press ENTER.
4 When the inputtings of the motorway name have been completed, the list of the input motorways appears. Select the correct motorway by tilting the joystick and press ENTER.
Note:
When the number of candidates narrows down, the list of candidates is displayed automatically.
5 The “Motorway Ent./Exit” screen appears. Select “Entrance” or “Exit” as desired by tilting the joystick and press ENTER.
6 The list of the entrances or exits of the selected motorway appears. Select the desired entrance or exit by tilting the joystick and press ENTER.
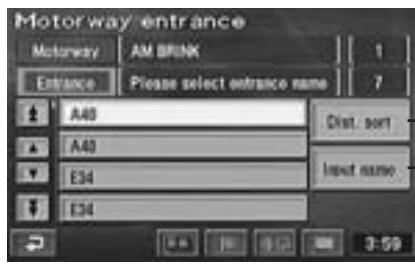
text_image
Motorway entrance Motorway | AM BRINK | 1 Entrance | Please select entrance name | 7 A40 A40 E34 E34 Dist. sort Input name 3:59The screen appears to input the entrance/exit name.
You can sort the list.
Dist. sort: sort in order of nearest entrance or exit of a motorway.
Name sort: sort in order of name.
7 The map showing the area of the selected entrance or exit of the motorway with the point setting menu is displayed.
Note:
For details of the point setting menu, see page 14.
Searching from start point
When a route has been set, the start point of the route is stored in memory. You can easily call out the start point when you want to return to the start point.
1 Press the MENU button to display the main menu. Select "Destination" from the main menu by tilting the joystick and press ENTER.
2 The sub-menu appears. Select "Previous destination" by tilting the joystick and press ENTER.
3 The previous points screen appears. Select “Previous starting point” by tilting the joystick and press ENTER.

text_image
Previous points 1 FREIZEITPARK 2 DÜSSELDORF INTERNASJONA... 3 VERKEHRSVEREIN DÜSSELDOR... 4 7 KREUZERKAMP, RATINGEN... 5 ZOOPARK Previous starting point Date Name 1:494 The map showing the previous start point and the point setting menu appears.
Note:
For details of the point setting menu, see page 14.
Searching from Coordinates
If you know the latitude and longitude of the desired location, you can display that location by just inputting those numbers.

Press the MENU button to display the main menu. Select “Destination” from the main menu by tilting the joystick and press ENTER.

The sub-menu appears. Select “Coordinates” by tilting the joystick and press ENTER. The Latitude and Longitude input pallet appears.

Select “N” (North) from the Lat. (Latitude) by tilting the joystick and press ENTER. Input the North Latitude by tilting the joystick and pressing ENTER.

Select “W” (West) or “E” (East) from the Long. (Longitude) by tilting the joystick and press ENTER. Input the Longitude by tilting the joystick and pressing ENTER. When the desired Latitude and Longitude has been input, select “OK” and press ENTER.
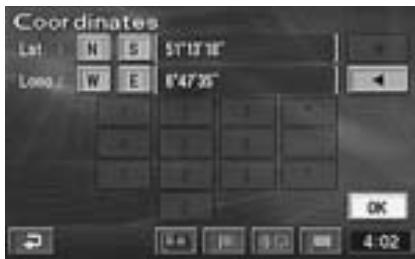
text_image
Coordinates List: N E 57°15'18" Long: W E 6°47'35" OK
The map screen showing the area of the selected coordinate with the point setting menu appears.
Note:
For details of the point setting menu, see page 14.
Searching by scrolling displayed map
The displayed map can be freely scrolled with the joystick in eight directions to search for a desired destination.
The best way to find a location is first to display the wide range map and specify the approx. location. You can find the desired location efficiently by specifying more and more detailed maps. (Press the or button to change the map magnification.)

Search for a desired destination by scrolling the map with the joystick. The map scrolls in the direction in which the joystick is tilted. Bring the destination point on the map under the reticule icon and press ENTER. The point setting menu appears.
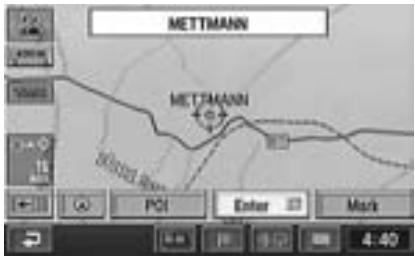
text_image
METTMANN METTMANN 80503 Rm PCI Enter Mark 4:40Notes:
- For details of the point setting menu, see page 14.
- There are three map scrolling speeds, depending on how long the joystick is tilted.
- To return to the current vehicle position, press the POS. button.
- You cannot scroll the map by the joystick while displaying the point setting menu.
Route Checking
Overviewing the searched route
We recommend that before you begin driving the route, you look at the entire route in the overview display.
3 When you press the POS. button, the system return to the current vehicle position map screen.
1 Press the MENU button to display the main menu. Select “Route overview” from the main menu by tilting the joystick and press ENTER.
2 The entire route is displayed on a map with a large enough view that you can view the entire route.
text_image
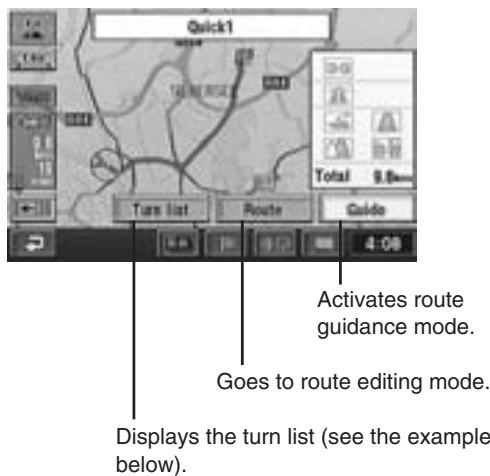
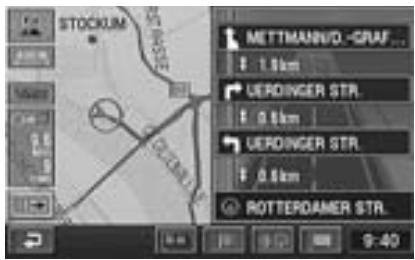
Quick1 Turn list Route Guide 4:08 Activates route guidance mode. Goes to route editing mode. Displays the turn list (see the example below).Example of turn list
text_image
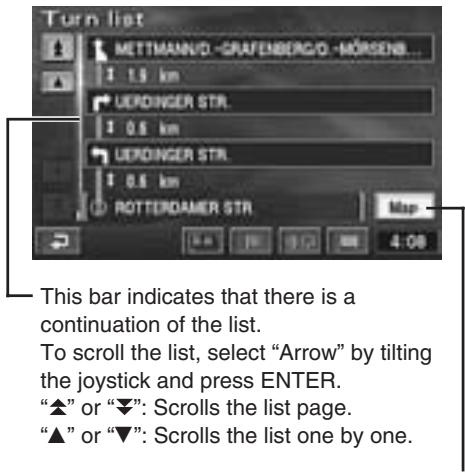
Turn list METTMANN/D -GRAFENBERG/O -MÖRSENS... 1 1.5 km UERDINGER STR. 1 0.5 km UERDINGER STR. 1 0.5 km ROTTERDAMER STR. Map - 4:08 This bar indicates that there is a continuation of the list. To scroll the list, select "Arrow" by tilting the joystick and press ENTER. "▲" or "▼": Scrolls the list page. "▲" or "▼": Scrolls the list one by one.Displays the map with your starting point or destination(s). To register a point as a memory point, tilt the joystick to select "Mark" then press ENTER.
When this mode is selected, the reticule icon for the current vehicle position moves along the searched route so that you can preview the route. You can also search for the POIs along the route.
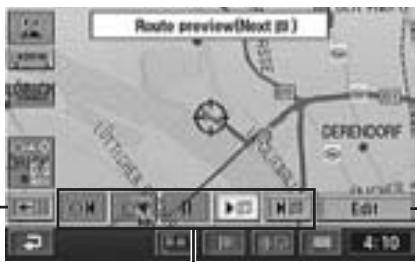
1 Press the MENU button to display the main menu. Select “Route preview” from the main menu by tilting the joystick and press ENTER.
The route preview screen with operation menu is displayed.
text_image
Route preview(Next 20) DEFENDORF EditSelect this menu to display the Edit route preview menu as shown below.

text_image
Edit route preview To next Delete Petrol station Parking All restaurants Others To next PCI Hotel Hospital Tourist information OK 4:10Previews for a destination.
Searches for POIs along the route. Select a POI first.
Select the desired menu to move the reticule icon along the route to go to the destination/POI selected or to return to the current vehicle position.
Select this menu to scroll the map using the joystick.
Note:
“Info.” menu appears for 5 seconds only when there are POI icons along the route.
You can display the POI information.
3 Press the POS. button to return to the current vehicle position screen.
Guidance Screen Configuration
Guidance map display
Your desired guidance map display modes can be selected for your convenience as follows.
1 While a map screen is being displayed, press ENTER.
Touch:
In the case of touch operation, touch “☐.”
2 The point setting menu appears. Select "Screen configuration (☐)" by tilting the joystick and press ENTER.
3 The Screen configuration selection menu is displayed. Select a desired menu item by tilting the joystick and press ENTER.
Note:
The screen configuration selection menu is displayed also by pressing the ☐ button on the remote control.
Screen configuration menu
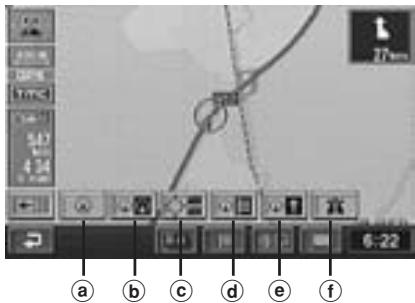
text_image
27mm 6-22 a b c d e fa Single screen display
text_image
STOCKUM DERENDORF ROTTERDAMER STR. 0:46b Dual-screen display
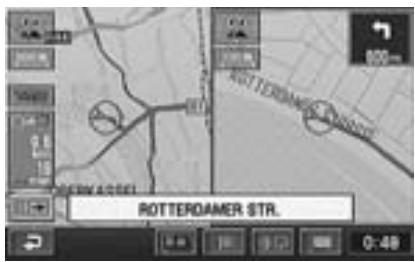
text_image
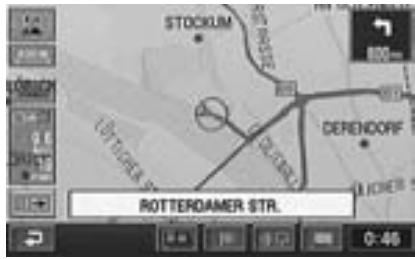
ROTTEROAMER STR. 0:48© Current vehicle position information display
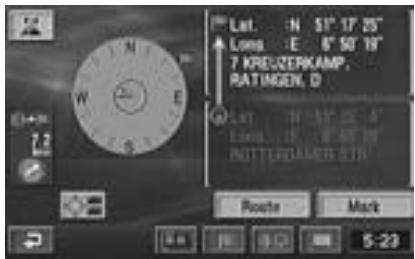
text_image
Lot. : N 51° 17' 25" Longs : E 8" 50' 19" 7 KREUZERKAMP, RATINGEN, D Lot. : N 51° 17' 25' Longs : E 8" 50' 19" ROTTERGAMER SIN Route Mark S-23(d) Turn list display (Displayed only when driving on the route.)
text_image
STOCKUM METTMANN/D-GRAF... $ 1.0km LERDINGER STR. $ 0.6km LERDINGER STR. $ 0.6km ROTTERDAMER STR. 9-40(e) Arrow screen display (Displayed only when driving on the route.)
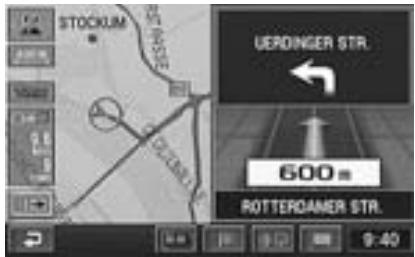
text_image
STOCKUM UERDINGER STR. 600 m ROTTERODAMER STR.f Motorway information display (Displayed only when driving on a motorway.)
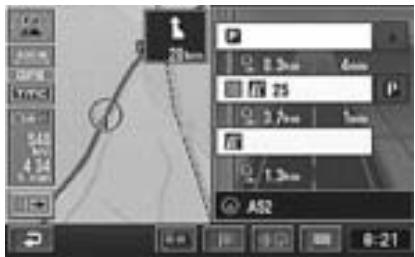
text_image
28 km 0.3mm 25 3.7mm 1.3mm AS2 0-21The system can display two different screens simultaneously for your convenience. For example, a detailed map and a wide range map can be displayed at the same time so that you can view a detailed map around the present vehicle position and a wide range map along the route.

While a map screen is being displayed, press ENTER.
Touch:
In the case of touch operation, touch "☐."

The point setting menu appears. Select "Screen configuration (☐)" by tilting the joystick and press ENTER.

The Screen configuration selection menu appears (see page 34). Select "☐" by tilting the joystick and press ENTER.
Note:
The screen configuration selection menu is displayed also by pressing the ☐ button on the remote control.

The System changes to dual-screen mode and displays two screens simultaneously.

To change display mode of the right screen, press RIGHT MAP button.
Touch:
In the case of touch operation, touch the right screen.

The Edit right screen menu appears.
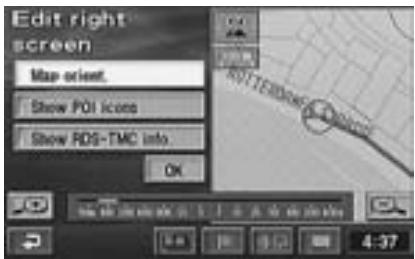
text_image
Edit right screen Map orient. Show POI icon Show RDS-TMC info OKNotes:
- To change the map orientation, select “Map orient.” menu by tilting the joystick and press ENTER. Each pressing of ENTER toggles between north-up and heading-up modes.
- To display the set local POI icons, select "Show POI icons" by tilting the joystick and press ENTER. If a local POI icon(s) is not displayed, this menu cannot be selected. To display a local POI icon(s), refer to page 26.
- To display the set RDS-TMC icons, select "Show RDS-TMC info." by tilting the joystick and press ENTER. When "Show RDS-TMC info." in Setting the RDS-TMC (see page 43) is set to OFF, this menu cannot be selected.
- To change the map magnification range, press the or button. Touch: In the case of touch operation, touch "zoom in" or "zoom out".
- If a map that is bigger than 800m scale is being displayed, the POI icons cannot be displayed. In this case, change to a detailed map by pressing the V button.

When the settings have been completed, select “OK” by tilting the joystick and press ENTER to return to the current vehicle position map. Now, the system displays two different screens.
Route Editing
Adding destinations
This operation is for setting multiple destinations for the same journey (up to 5).
1 Press MENU button to display the main menu. Select “Route overview” from the main menu by tilting the joystick and press ENTER.
2 The “Route overview” screen appears. Select “Route” by tilting the joystick and press ENTER.
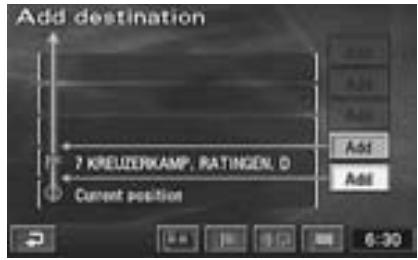
3 The “Change route” screen appears. Select “Add” under “Destination” by tilting the joystick and press ENTER.
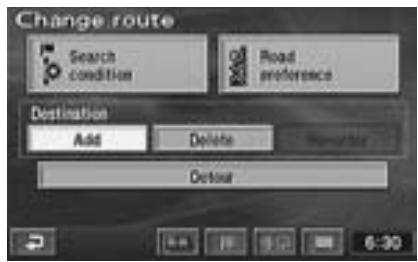
text_image
Change route Search condition Road preference Destination Add Delete Remove Detour 6-304 The “Destination searching” screen is displayed. For details of searching for the desired destinations, see pages 22 to 31.
5 When the map showing the area of the selected destination with the point setting menu is displayed, select "Enter" by tilting the joystick and press ENTER.
6 The “Add destination” screen showing the sequence of the destinations is displayed. Select “Add” at the place where the new destination should be added by tilting the joystick and press ENTER.
text_image
Add destination 7 KREUZERKAMP, RATINGEN, D Current position Add Add 6-307 The “Route on search condition” screen appears. Select “Guide” by tilting the joystick and press ENTER.
Note:
To add more destinations (up to 5 in all), select “Route” then press ENTER, and repeat steps 3 to 6. When you have set all the destinations, select “Guide” and press ENTER.
Reordering destinations
The sequence of the destinations to go can be changed in any order you like.
1 Press the MENU button to display the main menu. Select “Route overview” from the main menu by tilting the joystick and press ENTER.
2 The “Route overview” screen appears. Select “Route” by tilting the joystick and press ENTER.
3 The “Change route” screen appears. Select “Re-order” under “Destination” by tilting the joystick and press ENTER.
4 The list of the Input destinations appears. Select the destinations one by one in the desired sequence of arrival by tilting the joystick and pressing ENTER.
5 When the sequence of the destinations has been changed, select "OK" by tilting the joystick and press ENTER.

text_image
Re-order destinations Please select destinations in arrival order Cancel 1 7 KREUERKAMP. RATINGE 2 FREZEITPARK OK6 When the settings have been completed, select "Guide" by tilting the joystick and press ENTER.
Deleting destinations
This section describes how to delete an input destination or all of the input destinations at the same time.
1 Press the MENU button to display the main menu. Select “Route overview” from the main menu by tilting the joystick and press ENTER.
2 The “Route overview” screen appears. Select “Route” by tilting the joystick and press ENTER.
3 The “Change route” screen appears. Select “Delete” under “Destination” by tilting the joystick and press ENTER.
4 The list of the Input destinations appears. Select the destination you want to delete by tilting the joystick and press ENTER.
(If you want to delete all of the destinations at the same time, select "Delete all" by tilting the joystick and press ENTER.)
Note:
If only one destination is set, the list will not appear.
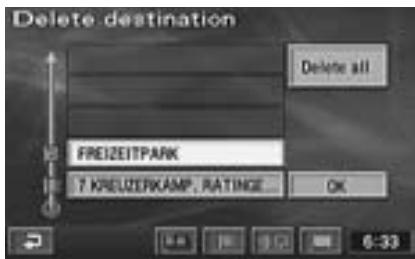
text_image
Delete destination Delete all FREIZEITPARK 7 KREUZERKAMP. RATING... OK 6-335 The confirmation dialog screen appears. Select "Yes" by tilting the joystick and press ENTER. The selected destination (or all of the destinations) will be deleted.
Note:
If all the destinations are deleted, the screen returns to the current vehicle position.
6 When the sequence of the destinations has been changed, select "OK" by tilting the joystick and press ENTER.
7 Select "Guide" by tilting the joystick and press ENTER.
Searching for a detour
You can search for a detour around your current position on the route. If there is a construction site ahead, for example, search for a detour by selecting the distance difference from your current position.
1 Press the MENU button to display the main menu. Select “Route overview” from the main menu by tilting the joystick and press ENTER.
2 The “Route overview” screen appears. Select “Route” by tilting the joystick and press ENTER.
3 The “Change route” screen appears. Select “Detour” by tilting the joystick and press ENTER.
text_image
Change route Search condition Road preferences Destination Add Delete Remove Delete4 Select the distance difference of the detour. Tilt the joystick to select “1km,” “3km,” “5km” or “Whole route” and press ENTER. A detour will be searched for.
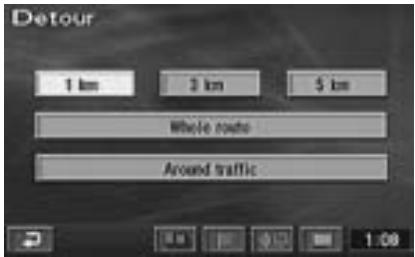
text_image
Detour 1 km 2 km 5 km Whole route Around trafficNotes:
- You can search for a detour only when your are on a route.
- “Around traffic” is displayed only when the RDS-TMC information is received. Search for a congestion evasion route is automatically started when “Dynamic nav.” is activated in the RDS-TMC setting. To manually start search for a congestion evasion route, select “Around traffic” and press ENTER.
Changing the conditions for the route searching
You can change the conditions for the route searching between the current vehicle position to a destination or only a portion of the route.
1 Press the MENU button to display the main menu. Select “Route overview” from the main menu by tilting the joystick and press ENTER.
2 The “Route overview” screen appears. Select “Route” by tilting the joystick and press ENTER.
3 The “Change route” screen appears. Select “Search condition” by tilting the joystick and press ENTER.
4 The search condition list screen appears. Select the route between the points to be edited and choose the desired condition (Quick, Short, etc.) by tilting the joystick and press ENTER. You can specify the searching condition for other portions of the route as well.
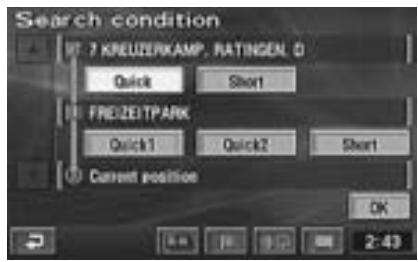
text_image
Search condition 7 KREUSERKAMP, RATINGEN 0 Quick Short FREZEITPARK Quick1 Quick2 Short Current position OK 2:435 When the searching conditions have been specified, select "OK" by tilting the joystick and press ENTER.
6 Select "Guide" by tilting the joystick and press ENTER.
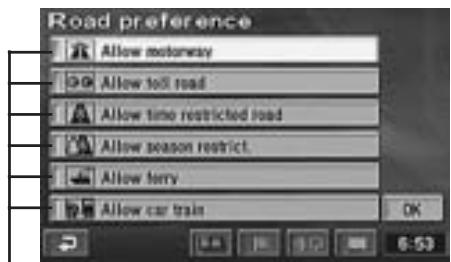
Setting the route options
The navigation system can search for 6 different types of routes: using motorway, toll road, ferry and restricted road.
1 Press the MENU button to display the main menu. Select “Route overview” from the main menu by tilting the joystick and press ENTER.
2 The “Route overview” screen appears. Select “Route” by tilting the joystick and press ENTER.
3 The “Change route” menu appears. Select “Road preference” by tilting the joystick and press ENTER.
4 The “Road preference” menu appears. Select the item to be edited by tilting the joystick and press ENTER.
text_image
Road preference Allow motorway Allow toll road Allow time restricted road Allow season restrict. Allow ferry Allow car train OKThe selected item will be ticked.
Ticked: Allow
Unticked: Detour
5 When the editing for the route option has been completed, select "OK" by tilting the joystick and press ENTER.
6 Select "Guide" by tilting the joystick and press ENTER.
Memory Points
Storing locations in memory
You can store up to 200 special points on the map in memory, such as locations you go to frequently or scenic locations. The locations stored in memory can be recalled quickly.
1 Press the MENU button to display the main menu. Select “Memory points” from the main menu by tilting the joystick and press ENTER.
2 The “Memory point” menu appears. Select “Register” by tilting the joystick and press ENTER.
3 The “Register memory points” with the searching menu appears. Search for a desired point. To search for a point, see pages 22 to 31.
4 When the point searched for and the point setting menu is displayed, select "Enter" by tilting the joystick and press ENTER.
5 The “Memory point” screen is displayed. Select “OK” by tilting the joystick and press ENTER.
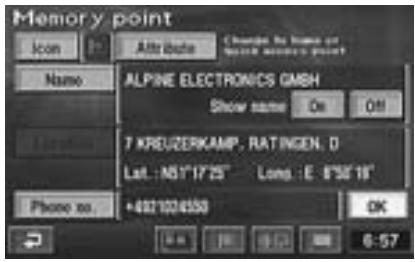
text_image
Memory point Icon Name ALPINE ELECTRONICS GMSH Show name On Off 7 KREUZERKAMP, RATINGEN, D Lat.: N51°17'25" Long: E 8'56'18" Phone to: +4021024550 OK 6-576 Press the POS. button to return to the present vehicle position screen.
Deleting the memory points
1 Press the MENU button to display the main menu. Select “Memory points” from the main menu by tilting the joystick and press ENTER.
2 The “Memory point” menu appears. Select “Delete” by tilting the joystick and press ENTER.
3 The list of the “Delete memory points” appears. Select the memory point to be deleted by tilting the joystick and press ENTER. (To delete all of the memory points at the same time, select “Delete all” by tilting the joystick and press ENTER.)
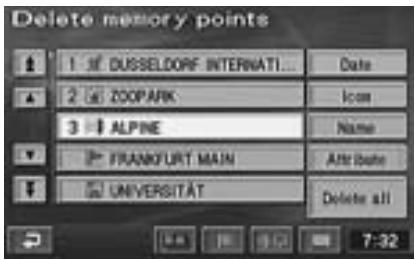
text_image
Delete memory points 1 DUSSELDORF INTERNATI... Date 2 ZOOPARK Icon 3 ALPINE Name FRANKFURT MAIN After Issue UNIVERSITÄT Delete all 7-324 The confirmation dialogue message is displayed. Select "Yes" by tilting the joystick and press ENTER to execute the deletion.
5 Press the POS. button to return to the current vehicle position screen.
Note:
If a memory point that is registered in Attribute (as Home or a Quick access point) is deleted, the point will be automatically deleted from Attribute as well.
Editing the memory points
You can change the point marks, names, phone numbers, etc. of the memory points. You can also register a memory point as a Quick access point (up to 5), or as Home.
1 Press the MENU button to display the main menu. Select “Memory points” from the main menu by tilting the joystick and press ENTER.
2 The “Memory point” menu appears. Select “Edit” by tilting the joystick and press ENTER.
3 The list of the memory points appears. Select the memory point to be edited by tilting the joystick and press ENTER.
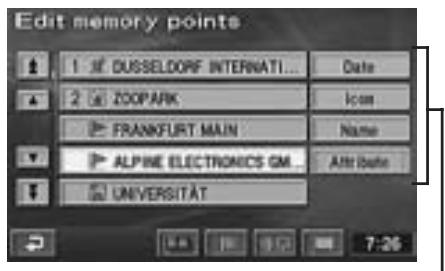
text_image
Edit memory points 1 DUSSELDORF INTERNATI... Date 2 ZOOPARK Icon FRANKFURT MAIN Name ALPINE ELECTRONICS GM Afti Iberin UNIVERSITÄTYou can sort by the date, icons, names or attributes.
4 The “Memory point” screen appears. Select the item to be edited by tilting the joystick and press ENTER.
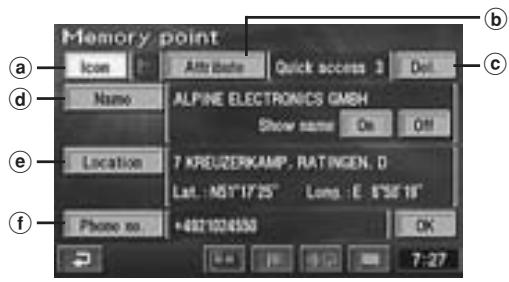
text_image
Memory point Icon Name Location Phone no. Alfa Date Quick access 3 Show name On 7 KREUZERKAMP, RATINGEN, D Long: E 8"50'16" +4021024550 OK 7-27a Icon
You can select an icon for the registered point from a number of icons.
Go to a1 Icon change.
b Attribute
You can register a registered point as Home or as a Quick access point (up to 5). It enables you to easily select these points as a destination.
⇒ Go to b1 Attribute Register and Change
© Del. (Displayed only when something is registered in attribute)
You can delete a registered point from attribute.
The point will not be deleted from memory point.
→ Go to c1 Attribute Delete.
d Name
You can give a name to a registered point and set to show it or not.
Go to d1 Name change.
© Location
The location of a memory point can be moved.
Go to el Location Change.
f Phone no.
Phone number can be added to a registered point.
Select "Icon" and press ENTER.

The icon list appears. Select the desired icon and press ENTER.
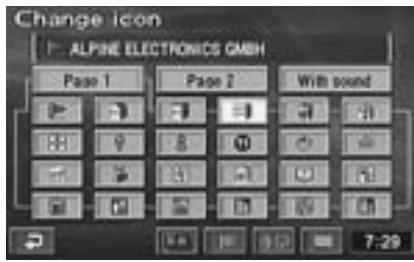
text_image
Change icon ALPINE ELECTRONICS GMBH Page 1 Page 2 With sound 7-29Note:
When you select “With sound” and press ENTER, the sound menu appears. Select your desired sound to be produced when you come near the memory point. If the voice guidance and the memory point sound happened to come at the same time, the voice guidance has priority.
Attribute Register and Change

Select "Attribute" and press ENTER.

The attribute menu appears. Select the desired number and press ENTER.
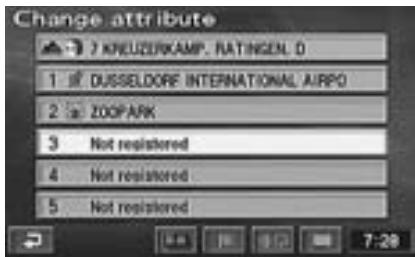
text_image
Change attribute 7 KNEUZERKAMP, RATINGEN. D 1 DUSSELDORF INTERNATIONAL AIRPO 2 ZOO PARK 3 Not registered 4 Not registered 5 Not registeredAttribute Delete

Select "Del." and press ENTER.

The confirmation dialogue message is displayed. Select "Yes" and press ENTER.
Name Change

Select "Name" and press ENTER.

The character input pallet is displayed.
Select the desired characters one by one and press ENTER each time you select a character.
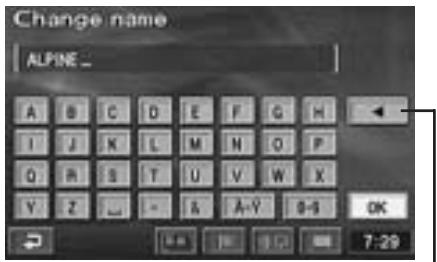
text_image
Change name ALPINE_Backspace Erases the previous character

When character inputtings have been completed, select "OK" and press ENTER.
Note:
To show the name, select "On" and press ENTER. If you do not want to show the name, select "Off" and press ENTER.
Location Change

Select "Location" and press ENTER.

The location to be corrected is indicated by the reticule icon. Tilt the joystick and move the map to the correct location, press ENTER.
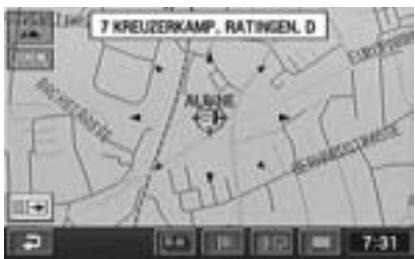
text_image
7 KREUZERKAMP, RATINGEN, D ALBONE ALBONE STANCE
The point setting menu appears. Select “Enter” by tilting the joystick and press ENTER.
Phone Number Change

Select "Phone no." and press ENTER.

The numeric input pallet is displayed. Select the desired numeral and press ENTER. Repeat this procedure to complete the editing.
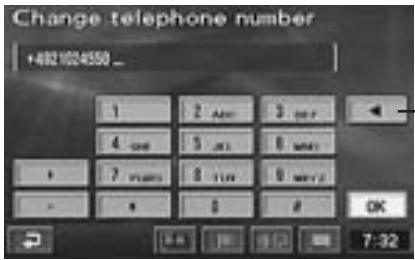
text_image
Change telephone number +4821024550_Backspace Erases the previous numeral

When the new phone number has been input, select "OK" and press ENTER.
Tips:
Phone Number Editing:
You can search for a desired destination or point of interest using the phone number that is input or edited here. (See page 27.)

When the editing has been completed, select “OK” by tilting the joystick and press ENTER.

Press the POS. button to return to the current vehicle position screen.
Deleting the stored previous destinations
1 Press the MENU button to display the main menu. Select "Setup" from the main menu by tilting the joystick and press ENTER.
2 The “Setup” screen appears. Tilt the joystick to select “▲” or “▼” and press ENTER, to scroll pages and display “Previous point.”
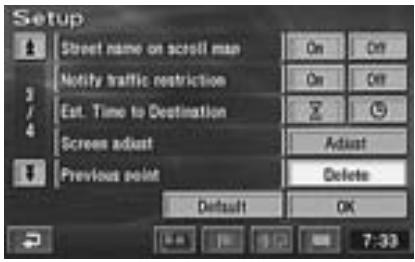
text_image
Setup Street name on scroll man Notify traffic restriction Est. Time to Destination Screen adjust Previous point Default On On Z Adjust Delete OK 7:333 Tilt the joystick to select "Delete" under "Previous point" and press ENTER.
4 The “Delete previous point” screen showing the list of the previous destinations appears. Select the previous destination to be deleted by tilting the joystick and press ENTER. (If you want to delete all of the previous destinations, select “Delete all” by tilting the joystick and press ENTER.)
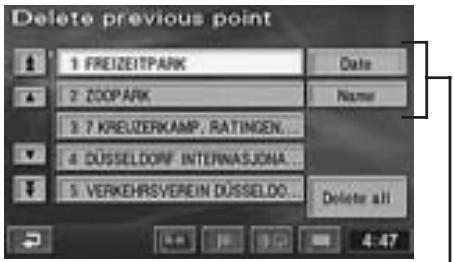
text_image
Delete previous point 1 FREIZEITPARK Date 2 ZOOPARK Name 3 7 KREIZERKAMP, RATINGEN... 4 DÜSSELDOWF INTERNASJONA... 5 VERKEHRSVEREIN DÜSSELDQ Delete all 4:47You can sort by the date or names.
Note:
If the destination was searched from Home or a Quick access point, the point is not recorded in the previous point list.
5 The confirmation dialogue message appears, select "Yes" by tilting the joystick and press ENTER.
6 Press the POS. button to return to the current vehicle position screen.
TMC Operation
About the TMC indicator
This indicator displays the reception status.
| TMC | While TMC data available | No TMC data available |
| There is traffic information on the route.(Receiving information of “Stationary Traffic,” “Traffic Jam,” “Accidents,” “Closed Road,” “Road Works” or “Danger” within 30km ahead on the route.) | Red | Red/Grey |
| There is other information on the route.(Receiving information of “Road Conditions,” “Weather” or “Delays” within 30km ahead on the route.) | Yellow | Yellow/Grey |
| There is information outside of the route. | Blue | Grey |
| No information (No traffic snarl) |
Setting the RDS-TMC

Press the MENU button to display the main menu. Select “RDS-TMC” from the main menu by tilting the joystick and press ENTER.

RDS-TMC setting screen is displayed. Select each item with the joystick, and press ENTER to execute the setting.
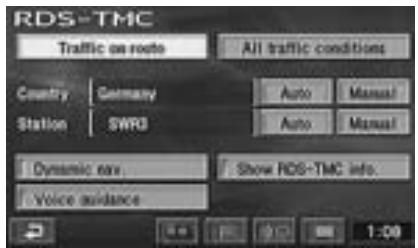
text_image
RDS-TMC Traffic on route All traffic conditions Country | Germany Station | SWR3 Auto Manual Auto Manual Dynamic row. Show RDS-TMC info. Voice guidance 1:00
Country
Use this to set the country.
"Auto":
The country is automatically set.
"Manual":
You can select a country from the country list.

Station
You can select the station from which you receive information.
"Auto":
You can receive the information automatically from a station.
"Manual":
Select a desired broadcasting station (A list of stations from which you can receive information is displayed.)

Dynamic nav.
This sets if you seek for dynamic route (seek for evasion route) or not.
Dynamic Route Seek (Seek for Evasion Route)
If you set the “Dynamic nav.” ON, the route, you can seek for a route in consideration of the traffic event given through the RDS-TMC in the initial route seeking. If a new evasion route is found, the confirmation dialogue screen appears. If you select “Yes” by tilting the joystick and press ENTER, you can find a new route, considering the traffic event.
Note:
If “Dynamic nav.” is set to ON, the event evasion route automatically searches a fixed distance. This can also be searched manually.
For details, refer to the section “Searching for a detour” (page 37).
(To be continued)

Show RDS-TMC info.
This sets if you display the RDS-TMC icon on the map or not.
| Symbol | Legend | Symbol | Legend |
 | Stationary traffic |  | Road Conditions |
 | Traffic jam |  | Weather |
| [6728] | Accidents |  | Delays |
 | Closed road |  | Parking |
 | Road works |  | Information |
 | Danger |
Notes:
- Thick arrows show the distance between traffic events. These appear in red, orange or yellow, depending on the kind of traffic event.
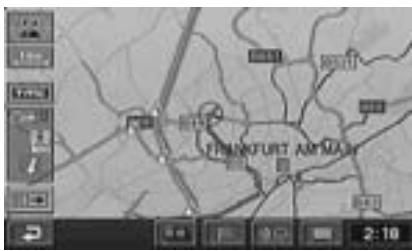
text_image
FRANKFURT AM MAIN- The applicable section is between the marks shown on the road.
- There may be displayed a pale mark, which means an estimated information instead of confirmed information.
- RDS-TMC icon can be displayed when the map contraction is between 50m and 13km.

Voice guidance
The 10km and 800m in advance traffic event information on the route is given by voice guidance.

When each item is set the screen returns to the current vehicle position.
Displaying the Traffic event information on route
1 Press the MENU button to display the main menu. Select "RDS-TMC" from the main menu by tilting the joystick and press ENTER.
2 RDS-TMC setting screen is displayed. Select “Traffic on route” by tilting the joystick and press ENTER.
3 If there is any traffic event on the route, the status information will be displayed in order of distance from the current position.
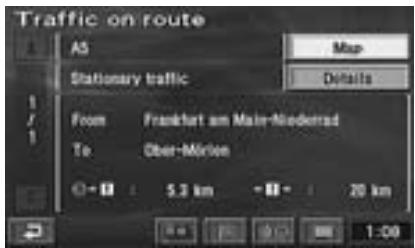
text_image
Traffic on route AS Map Stationary traffic Details From Frankfurt am Main-Norderrad To Ober-Möller 0+0 5.3 km -0+ 20 km 1-09Notes:
- Select “Map” and press ENTER to display the map with the traffic event status information.
- Select “Detail” and press ENTER to display traffic event status information details.
- Depending on the capital you are in (Paris, etc.) street name may be displayed as "Others."

Press the POS. button to return to the current vehicle position screen.
Displaying all Receiving Traffic event information
1 Press the MENU button to display the main menu. Select "RDS-TMC" from the main menu by tilting the joystick and press ENTER.
2 RDS-TMC setting screen is displayed. Select “All traffic conditions” by tilting the joystick and press ENTER.
3 The street name list for all traffic events is displayed. Tilt the joystick to select the desired street name and press ENTER.
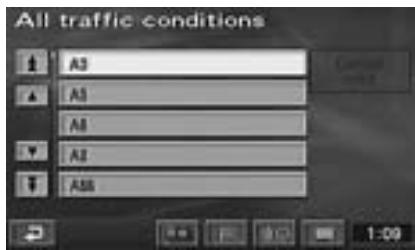
text_image
All traffic conditions A3 A5 A8 A2 A5Notes:
- Select “Current Road” and press ENTER. If there is any traffic event on the route, the status information in order of distance from the current position is displayed.
- Depending on the capital you are in (Paris, etc.) street name may be displayed as "Others."
4 The status information of a traffic event on the selected street is displayed in order of distance from the current position.
Notes:
- Select “Map” and press ENTER to display the map with the traffic event status information.
- Select “Details” and press ENTER to display traffic event status information details.
5 Press the POS. button to return to the current vehicle position screen.
Displaying the TMC event list
1 Press the TMC button to display the TMC event list.
Touch:
In the case of touch operation, touch "TMC."
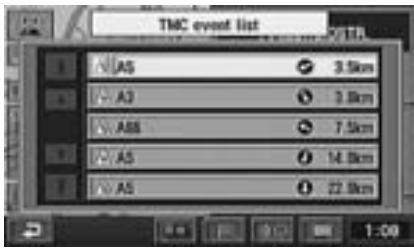
text_image
TMC event list AS 3.5km A3 2.8km ASS 7.5km AS 14.8km AS 22.5km 1:002 Tilt the joystick to select the desired street name and press ENTER. The status information of a traffic event on the selected street is displayed in order of distance from the current position.
Notes:
- Select “Map” and press ENTER to display the map with the traffic event status information.
- Select “Details” and press ENTER to display traffic event status information details.
3 Press the POS. button to return to the current vehicle position screen.
Detailed display of traffic event
You can display the detailed information of RDS-TMC icon displayed on the map.
1 Put the Reticule icon on the RDS-TMC icon displayed on the map with the joystick and press ENTER.
Touch:
In the case of touch operation, touch the desired RDS-TMC icon.
2 The point setting menu is displayed. Select the "Info." and press ENTER.
3 The Status information of a traffic event is displayed on the screen.
Note:
Select “Details” and press ENTER to display traffic event status information details.
4 Press the POS. button to return to the current vehicle position screen.
Customizing Setups
How to change the setups
1 Press the MENU button to display the main menu. Select "Setup" from the main menu by tilting the joystick and press ENTER.
2 The "Setup" screen appears. Select the desired item to be customized by tilting the joystick and press ENTER.
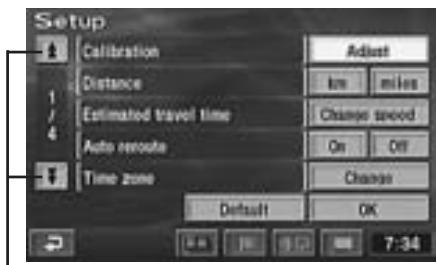
text_image
Setup Calibration Distance Estimated travel time Auto remote Time zone Adjust km miles Change speed On Off Change Default OK 7:34To scroll the page of the list, select “▼” or “▲” by tilting the joystick and press ENTER.
3a "Calibration" Use after adjusting the current position or changing tyres. For details, see page 48.
3b "Distance" Selects km or miles.
Note:
For English, you can select the distance indications in either miles or km. For other languages, only kilometres are used for the distance indications.
3c "Estimated travel time" When "Change speed" is selected, the graphic screen appears in the display. Select "◀" or "▶" of the desired menu item and press ENTER to increase or decrease the average speed. When settings have been finished, select "OK" by tilting the joystick and press ENTER to end the setting procedure.
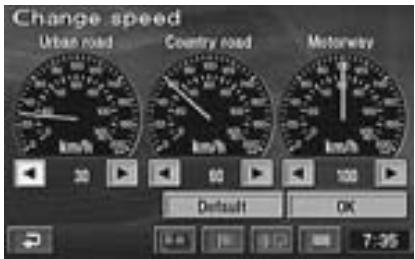
text_image
Change speed Urban road Country road Motorway km/h km/h km/h km/h 30 60 100 Default OK 7-35Note:
To go back to the original settings, select "Default."
3d "Auto reroute" Turns on or off the automatic rerouting function when the vehicle deviated from the original route.
3e "Time zone" When "Change" is selected, the "Time zone" screen appears. Select the desired time zone and press ENTER. Also select "On" or "Off" for daylight saving time depending on your situation. When setting is finished, select "OK" by tilting the joystick and press ENTER to end the setting procedure.
3f "Auto voice guidance" Turns the voice guidance on the route on or off.
text_image
Setup 1 Auto voice guidance On Off 2 Voice guidance in all modes On Off 3 Border guidance On Off 4 Intersection guidance On Off 1 Guidance screen on M-way On Off Default OK 7-373g "Voice guidance in all modes" When the search screen, etc., is displayed during driving on the route, you can turn the voice guidance or guidance screen interruption on or off.
3h "Border guidance" Displays the national flag of the country you have entered for about 10 seconds when you cross the border. Turn it on or off.
3i "Intersection guidance" Turns the display of the intersection guidance on or off.
37 "Guidance screen on M-way" Turns the display of the 3-D junction view at an exit or junction on motorways on or off.
3k "Street name on scroll map" Tilt the joystick to set "On" or "Off" to show the street name of where the reticule icon is when the map is scrolled.
text_image
Setup Street name on scroll man Notify traffic restriction Est. Time to Destination Screen adjust Previous point On On Adjust Delete Default OK 7-383l "Notify traffic restriction" Turns the display of the traffic restrictions on or off.
3m "Est. Time to Destination" Selects " (Estimated remaining time before arrival)" or " (Anticipated arrival time)" of the Estimated required time display. See page 12 for details.
3n "Screen adjust" Use when you adjust the screen position. For details, see next section.
30 "Previous point" Use to delete the previous destination point. See page 42 for details.
3p "Map colour (day), (night)" Selects normal colour (1) or special colour (2 to 4).
text_image
Setup 1 Max colour (dry) 2 3 4 4 Max colour (night) 5 1 2 6 3 4 GPS Info. Info. Default OK 7:40Note:
“day” means when the head lamps are off and “night” means the head lamps are on.
39 "GPS info." GPS satellite information being received is displayed on the screen. For details, see page 50.
4 When the settings have been completed, select "OK" by tilting the joystick and press ENTER.
Note:
To return to the initial settings, select "Default" by tilting the joystick and press ENTER.
Screen position adjustment
For some TV monitors that can be connected to the navigation system, the screen display will be out of place. Adjust the display position to match the TV monitor you connect to the system.
1 Press the MENU button to display the main menu. Select "Setup" from the main menu by tilting the joystick.
2 The "Setup" screen appears. Select "Adjust" under "Screen adjust" by tilting the joystick and press ENTER.
3 The screen position adjustment screen is displayed.
Adjust the display position by tilting the joystick.
The display screen moves the way you tilt the joystick.
Touch:
In the case of touch operation, touch “◀”, “▶”, “▲” or “▼” on the screen.
When the adjustment has been completed, press ENTER.
Touch:
In the case of touch operation, touch "OK".
text_image
X: -68 Y: 00 OKThe screen is displayed at the adjusted position.
Others
Vehicle position/direction correction
If the actual position/direction of your vehicle and the position/direction of the current vehicle position icon on the map differ (for example, when you moved on a ferry boat), you can manually correct the position/direction of the current vehicle position icon with the following method. The system's map matching feature automatically corrects the error when you drive the vehicle several miles in good GPS signal reception area.
1 Press the MENU button to display the main menu. Select "Setup" from the main menu by tilting the joystick and press ENTER.
2 The “Setup” screen appears. Select “Adjust” under “Calibration” by tilting the joystick and press ENTER.
3 The “Calibration” screen is displayed. Select “Pos./Direction” by tilting the joystick and press ENTER.
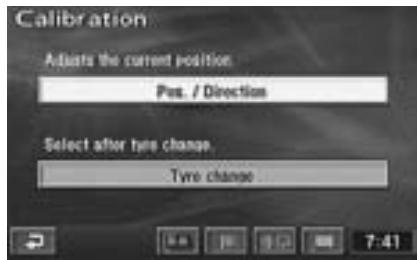
text_image
Calibration Adjusts the current position Pos. / Direction Select after type change Tyre change4 Tilt the joystick in 8 directions to correct the position. When the correction has been completed, press ENTER.
Touch:
In the case of touch operation, touch "Arrow" in 8 directions.
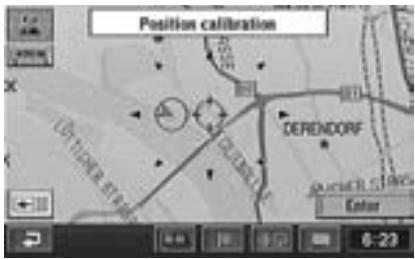
text_image
Position calibration DERENDORF Enter 6-235 Select "Enter" by tilting the joystick and press ENTER.
6 The Direction calibration screen appears. Tilt the joystick to select “☐” or “☐” and press ENTER to correct the direction.
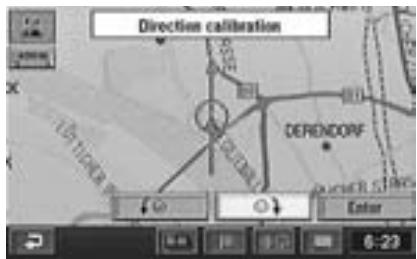
text_image
Direction calibration DERENDORF DUTCH7 When the correction has been completed, Select “Enter” by tilting the joystick and press ENTER.
Resetting after tyre replacement
Resetting is required when the vehicle's tyres are replaced. Be sure to perform the following resetting procedure when the vehicle's tyres are replaced.
1 Press the MENU button to display the main menu. Select "Setup" from the main menu by tilting the joystick and press ENTER.
2 The “Setup” screen appears. Select “Adjust” under “Calibration” by tilting the joystick and press ENTER.
3 The “Calibration” screen appears. Select “Tyre change” by tilting the joystick and press ENTER.
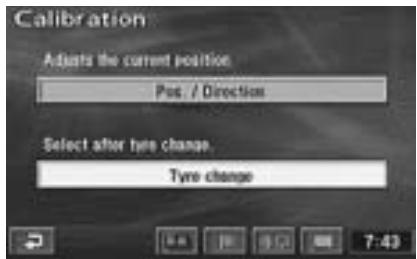
text_image
Calibration Adjusts the current position Pos. / Direction Select after tyre change Tyre changeAdjusting the volume level for the navigation system
You can adjust the volume level of the beep sound that is produced when the remote control is operated and the volume level of the voice guide.
1 Press the MENU button to display the main menu. Select “Volume” from the main menu by tilting the joystick and press ENTER.

text_image
Menu Destination RDG-TMC Volume Setup Memory points 6:442 The volume adjustment screen appears. You can adjust the volume level in seven steps from 1 to 7. Select the desired level by tilting the joystick and press ENTER.
Notes:
- When you want to turn off the sound of the navigation system, select "Off" and press ENTER.
- You can temporarily turn up the volume for voice guidance while driving on a motorway by activating (ticking) “Automatic volume level control”. Tilt the joystick to select “Automatic volume level control” and press ENTER.
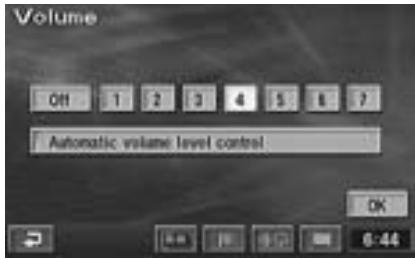
text_image
Volume Off 1 2 3 4 5 6 7 Automatic volume level control OK 6:443 When the settings have been completed, select "OK" by tilting the joystick and press ENTER.
Drive simulation
To check the searched route, you can carry out a drive simulation. The icon for the current vehicle position moves along the searched route indicating the contents of guidance that will be provided.
1 When the calculation of the route has been completed, the display shows the entire route on the map and the point setting menu. For details, see the searching for a route on page 16.
2 Select "Guide" from the point setting menu by tilting the joystick, then press and hold ENTER for at least 5 seconds.

text_image
Quick1 Total 9.8mm 3 routes Route Guide 7:453 The drive simulation starts. To stop the drive simulation, press the RETURN button. The display returns to the current vehicle position screen.
Viewing GPS screens
GPS satellite information being received is displayed on the screen. If the error for the vehicle's current position is too large, check how many GPS satellites you are receiving. Furthermore, you can confirm the status of the Speed Pulse, ACC Power, Parking brake, illumination (status of the vehicle lights) etc.
1 Press the MENU button to display the main menu. Select "Setup" from the main menu by tilting the joystick and press ENTER.
2 The "Setup" screen appears. Select "GPS info." under "Info." by tilting the joystick and press ENTER.
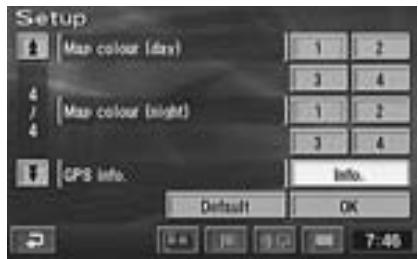
text_image
Setup 1 Max colour (dry) 2 3 4 4 Max colour (night) 5 6 7 GPS info. 8 Info. 9 Default OK 10 11 12 13 14 15 16 17 18 19 20 21 22 23 24 25 26 27 28 29 30 31 32 33 34 35 36 37 38 39 40 41 42 43 44 45 46 47 48 49 50 51 52 53 54 55 56 57 58 59 60 61 62 63 64 65 66 67 68 69 70 Default OK 7:463 The GPS information screen is displayed. Confirm the setting of each item.

text_image
GPS info: GPS Speed sensor : 0 mm Battery : 13.2 V Parttime brake : On Dimmer : Off 7:11Blinks when the Speed Pulse signal is being input.
Lights in blue when satellite signals for 3D GPS are being calculated.
Tip:
The number of satellites that are highlighted indicates the number of GPS satellites being received.
4 Press the POS. button to return to the current vehicle position screen.
Automatic dial operation
If your navigation system is connected to the Nokia 6090 (GSM 900 Car Phone), you can automatically dial to the “Point of Interest” (POI) and “Memory Points” that you have already placed in memory.
Note:
To connect the navigation system, you need a Navi-Nokia 6090 cable (KCE-6090P).
Please be aware that the telephone numbers of items registered on the disc may change day by day, and they are not always correct.
Automatic Dialling from a Point of Interest item
1 Press the MENU button to display the main menu. Select “Destination” from the main menu by tilting the joystick and press ENTER. Select “POI” from the sub-menu by tilting the joystick and press ENTER.
2 Refer to “Searching for a point of interest (POI)” (page 24) and search for a desired POI item. Then display the screen map.
3 Select "Info" by tilting the joystick and press ENTER.
4 The information screen appears. Select “☐ (Call)” by tilting the joystick and press ENTER.
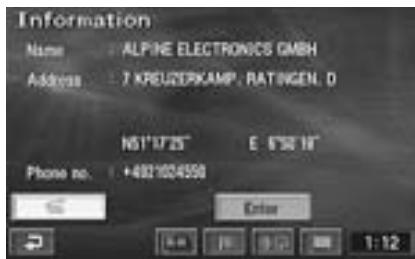
text_image
Information Name : ALPINE ELECTRONICS GMBH Address : 7 KREUZERKAMP, RATINGEN, D N51°07'25" E 6'30'18" Phone no. : +4021024550 Enter 1:12Notes:
- You cannot call if a telephone number is not registered to the point of interest (POI).
- The “ [icon] ” menu is not displayed if the Nokia 6090 (GSM 900 Car phone) is not connected.
5 The number is automatically dialled, and the telephone is connected.
6 To disconnect the telephone, press ≈ button.
Note:
If the telephone is not connected due to busy line or some other cause, a message will be displayed.
To delete the message, press the RETURN button.
Touch:
In the case of touch operation, the “☐” button is displayed in the touch button area only during a call. Touch this button to finish the call.
Automatic Dialling from a Memory Point
1 Press the MENU button to display the main menu. Select “Destination” from the main menu by tilting the joystick and press ENTER. Select “Memory point” from the sub-menu by tilting the joystick and press ENTER.
2 Refer to “Searching from memory points” (page 28) and search for a desired Memory Point. Then display the screen map.
3 Select "Info" by tilting the joystick and press ENTER.
4 The information screen appears. Select “☐ (Call)” by tilting the joystick and press ENTER.
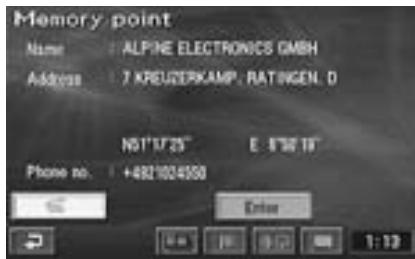
text_image
Memory point Name: ALPINE ELECTRONICS GMBH Address: 7 KREUZERKAMP, RATINGEN, D N01'17'25" E: $36'18" Phone no. +4921024550 Enter 1:13Notes:
- You cannot call when the telephone number is not registered to Memory Points.
- The “ [icon] ” menu is not displayed if the Nokia 6090 (GSM 900 Car phone) is not connected.
5 The number is automatically dialled, and the telephone is connected.
6 To disconnect the telephone, press the ≈ button.
Touch:
In the case of touch operation, the “ [icon] ” button is displayed in the touch button area only during a call. Touch this button to finish the call.
Note:
If the telephone is not connected due to busy line or some other cause, a message will be displayed.
To delete the message, press the RETURN button.
RUE-4141
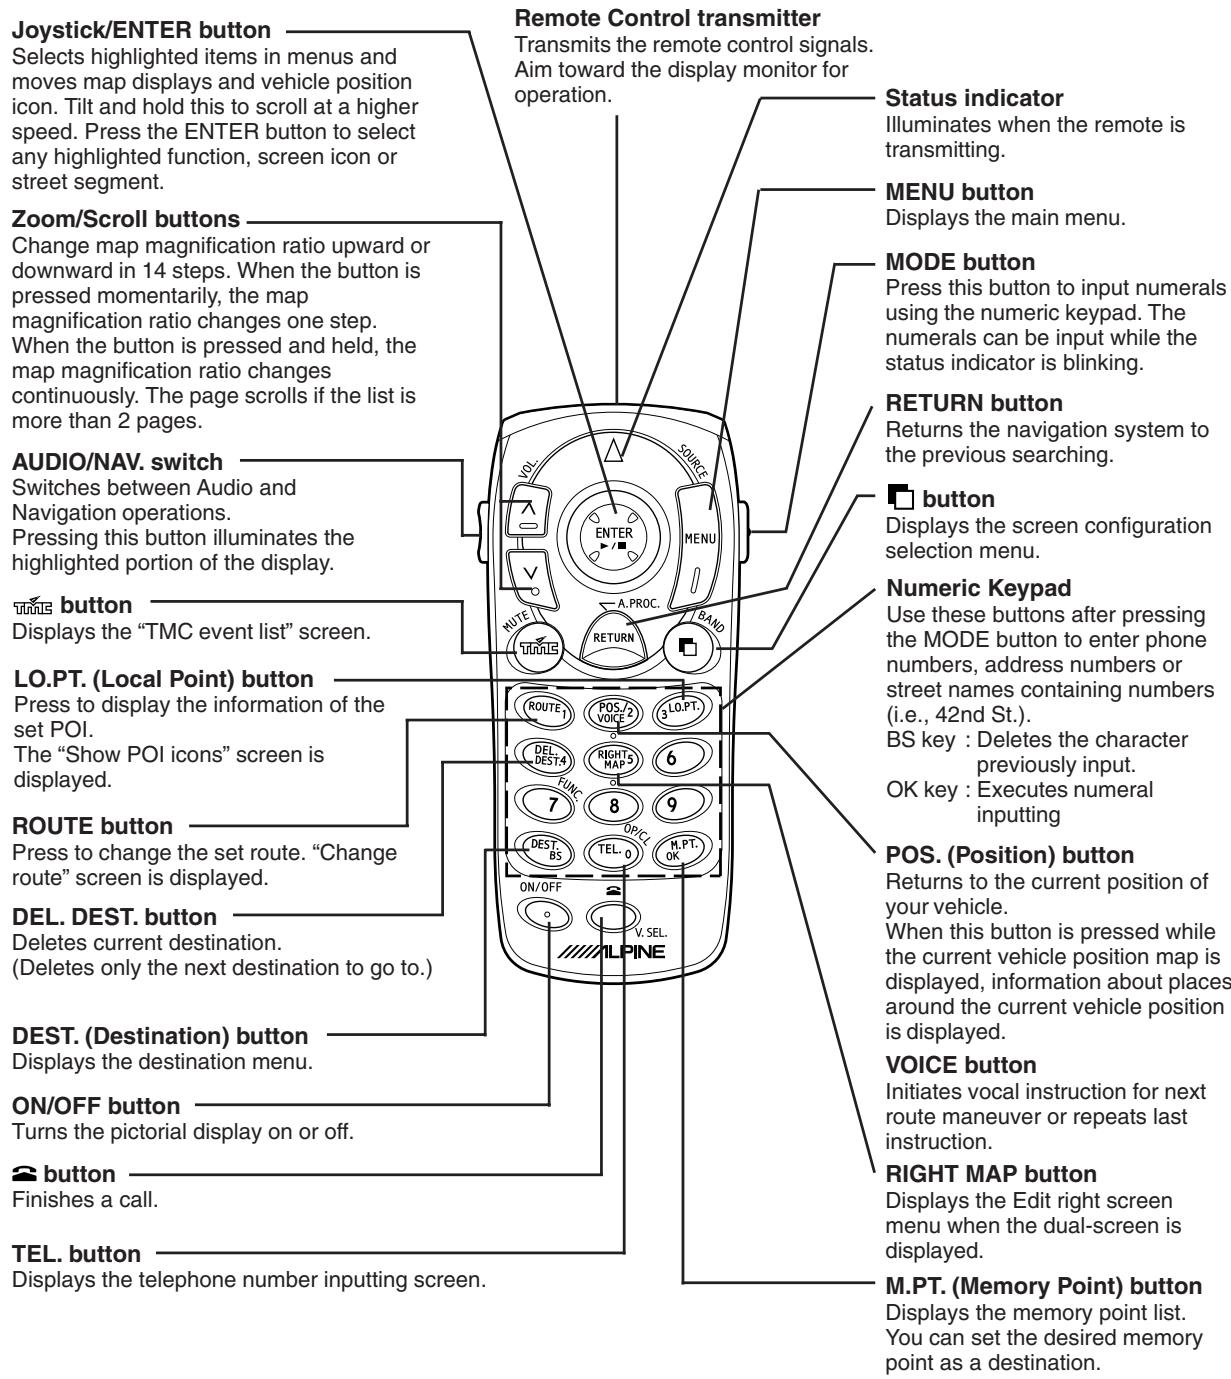
text_image
Joystick/ENTER button Selects highlighted items in menus and moves map displays and vehicle position icon. Tilt and hold this to scroll at a higher speed. Press the ENTER button to select any highlighted function, screen icon or street segment. Zoom/Scroll buttons Change map magnification ratio upward or downward in 14 steps. When the button is pressed momentarily, the map magnification ratio changes one step. When the button is pressed and held, the map magnification ratio changes continuously. The page scrolls if the list is more than 2 pages. AUDIO/NAV. switch Switches between Audio and Navigation operations. Pressing this button illuminates the highlighted portion of the display. TIME button Displays the "TMC event list" screen. LO.PT. (Local Point) button Press to display the information of the set POI. The "Show POI icons" screen is displayed. ROUTE button Press to change the set route. "Change route" screen is displayed. DEL. DEST. button Deletes current destination. (Deletes only the next destination to go to.) DEST. (Destination) button Displays the destination menu. ON/OFF button Turns the pictorial display on or off. button Finishes a call. TEL. button Displays the telephone number inputting screen. Remote Control transmitter Transmits the remote control signals. Aim toward the display monitor for operation. Status indicator Illuminates when the remote is transmitting. MENU button Displays the main menu. MODE button Press this button to input numerals using the numeric keypad. The numerals can be input while the status indicator is blinking. RETURN button Returns the navigation system to the previous searching. button Displays the screen configuration selection menu. Numeric Keypad Use these buttons after pressing the MODE button to enter phone numbers, address numbers or street names containing numbers (i.e., 42nd St.). BS key : Deletes the character previously input. OK key : Executes numeral inputting POS. (Position) button Returns to the current position of your vehicle. When this button is pressed while the current vehicle position map is displayed, information about places around the current vehicle position is displayed. VOICE button Initiates vocal instruction for next route maneuver or repeats last instruction. RIGHT MAP button Displays the Edit right screen menu when the dual-screen is displayed. M.PT. (Memory Point) button Displays the memory point list. You can set the desired memory point as a destination.Tips:
After pressing the MODE button, press the following buttons while the status indicator is blinking : numerals (0 to 9), BS. and OK.
Note: Due to continuous product improvement, specifications are subject to change.
The table below shows the various functions and their respective remote control (RUE-4141) and touch buttons.
Remote Control RUE-4141
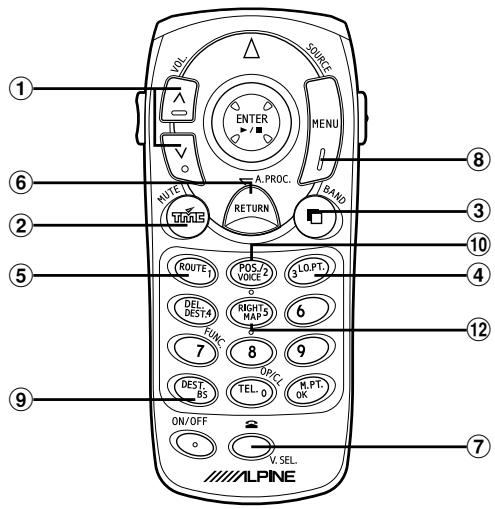
text_image
1 VOL. SOURCE ENTER MENU NOTE RETURN A.PROC. BAND ROUTE1 POS/2 VOICE 3 LO.PT. DEL. DEST# RUN. RIGHTS MAP 6 7 8 9 OPT.C. TEL.0 R.PT. OK DEST. BS ON/OFF V.SEL. ALPINE ① ⑥ ② ⑤ ③ ④ ⑧ ⑩ ⑫ ⑭ ⑦Touch Button
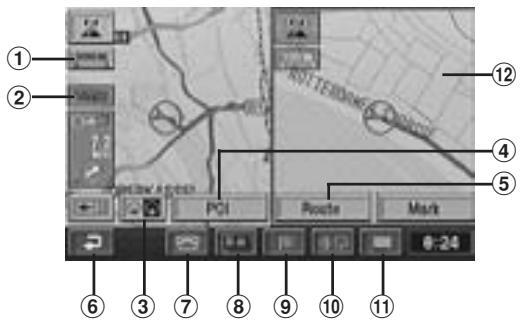
text_image
Diagram of a map interface with numbered annotations pointing to various locations and navigation controls| No. | Remote Control RUE-4141 | Touch Button | Feature |
| 1 | V ∧ | Changes the map magnification ratio upward or downward. | |
| 2 | Displays the “TMC event list” screen. | ||
| 3 | Displays the screen configuration selection menu. | ||
| 4 | LO.P.T. | POI | Press or touch to display the information of the set POI.The “Show POI icons” screen displayed. |
| 5 | ROUTE | Route | Press or touch to change the set route. “Change route” screen is displayed. |
| 6 | RETURN | Returns the navigation system to the previous searching. | |
| 7 | Finishes a call. Displayed only during a call. | ||
| 8 | MENU | Displays the main menu screen. | |
| 9 | DEST. | Displays the destination menu. | |
| 10 | POS./VOICE | Returns to the current position of your vehicle.When this button is pressed or touched while the current vehicle position map is displayed, information about places around the current vehicle position is displayed.Initiates vocal instruction for next route maneuver or repeats last instruction. | |
| 11 | — | Displays the buttons for the touch operation compatible monitor. | |
| 12 | RIGHT MAP | Right side map | Displays the Edit right screen menu when the dual-screen is displayed. |
In case of difficulty
If you encounter a problem, please review the items in the following checklist. This guide will help you isolate the problem if the system is at fault. Otherwise, make sure the system is properly connected or consult your authorized Alpine dealer.
| Symptom | Cause | Solution |
| No operation | Blown fuse | Replace with a fuse of the prescribed rating. |
| Ambient temperature over 50°C | Lower the temperature in the vehicle below 50°C, for example by running for a while with the window open or by using the air conditioner. | |
| Moisture condensation | Allow enough time for the condensation to evaporate (about 1 hour). | |
| The present vehicle position cannot be measured correctly. | The vehicle position changed after the ignition was switched off.Movement on a ferry boatRotation of a parking lot turntableMovement by tow truck | Drive for a while with GPS signal reception. |
| The measurement error is too large. | Poor satellite configuration | Move to a location where GPS satellite reception is easy. |
| Measurement is 2 dimensional | ||
| Screen not displayed | The navigation screen is off. | Press the ON (ON/OFF) button on the remote control. |
| Cannot read disc is displayed for a certain operation. | The disc is dirty. | Clean the disc. |
| The pickup lens is dirty. | Consult your Alpine dealer. (Do not use a lens cleaner disc sold in the market.) | |
| Unstable operation | The remote control batteries are wearing out. | Replace the remote control batteries. |
| Cannot operate menu | While driving on the route, some menu operations cannot be carried out. | Move the vehicle to a safe location, stop, and engage the parking brake, then carry out this operation. |
| No auto reroute | Auto reroute mode is not set. | Select “Setup” from the main menu, then select ON for Auto reroute. (See page 46.) |
Various messages are displayed on the monitor screen during operation. In addition to the messages telling you the current status or providing guidance for the next operation, there are also the following error messages. If one of these error messages is displayed, carefully follow the instructions in the solution column.
| Message | Cause | Solution |
| No DVD.Please insert map DVD. | The disc has been removed.There was no disc in the system when the power was switched on. | Insert the disc. |
| Unable to read data.Check if map DVD is correct. | A disc that the system cannot read has been loaded.The disc is dirty or upside down.The disc cannot be read because of condensation. | Insert the map disc.Take out the disc, check if it was upside down, clean it if necessary, then re-insert it.Take out the disc, allow enough time for condensation to evaporate (about 1 hour), then re-insert the disc. |
| Home is not registered.Register in menu Memory points. | An attempt was made to search the map from home with no home registered. | Register your home, then search the map. |
| No memory point registered.Register in menu Memory points. | An attempt was made to search the map from a memory point with no memory point registered. | Register a memory point, then search the map. |
| Unable to set additional points.Perform operation again after deleting unnecessary points. | An attempt was made to register more than 200 points in memory.An attempt was made to set more than 5 destinations. | Erase unnecessary points, then register. |
| No roads possible for guidance near destination. Please refer to map. | When the destination or waypoint was specified, there was no road in the area, so no route could be found. | Focus on a nearby major road, then specify the destination or waypoint again. |
| Route could not be found. | Route could not be found for some reason. | Try to search for route again, or set another location as destination. |
ALPINE®
ALPINE ELECTRONICS MARKETING, INC.
1-1-8 Nishi Gotanda,
Shinagawa-ku, Tokyo 141-0031, Japan
Phone 03-5496-8231
ALPINE ELECTRONICS OF AMERICA, INC.
19145 Gramercy Place, Torrance,
California 90501, U.S.A.
Phone 1-800-ALPINE-1 (1-800-257-4631)
1-888-NAV-HELP (1-888-628-4357)
ALPINE ELECTRONICS OF CANADA, INC.
7300 Warden Ave., Suite 203, Markham,
Ontario L3R 9Z6, Canada
Phone 1-800-ALPINE-1 (1-800-257-4631)
1-888-NAV-HELP (1-888-628-4357)
ALPINE ELECTRONICS OF AUSTRALIA PTY. LTD.
6-8 Fifeways Boulevarde Keysborough,
Victoria 3173, Australia
Phone 03-9769-0000
ALPINE ELECTRONICS GmbH
Frankfurter Ring 117,
80807 München, Germany
Phone 089-32 42 640
ALPINE ELECTRONICS OF U.K. LTD.
Alpine House
Fletchamstead Highway,
Coventry CV4 9TW, U.K.
Phone 0870-33 33 763
ALPINE ELECTRONICS FRANCE S.A.R.L.
(RCS PONTOISE B 338 101 280)
98, Rue de la Belle Etoile, Z.I. Paris Nord II,
B.P. 50016, 95945 Roissy Charles de Gaulle
Cedex, France
Phone 01-48638989