PA2250T - Receiver Audibax - Free user manual and instructions
Find the device manual for free PA2250T Audibax in PDF.


| Product Type | Audio Receiver |
| Model | PA2250T |
| Brand | Audibax |
| Dimensions (W x H x D) | Approx. 430 x 105 x 300 mm |
| Weight | Approx. 7.5 kg |
| Power Supply | AC 230V, 50 Hz |
| Power Consumption | 400 W max |
| Output Power | 2 x 250 W RMS @ 4 Ω |
| Inputs | 3x RCA, 1x XLR, 1x 6.3 mm Jack |
| Outputs | 2x Speakon, 2x 6.3 mm Jack |
| Frequency Response | 20 Hz – 20 kHz (±0.5 dB) |
| Signal-to-Noise Ratio | > 95 dB |
| Total Harmonic Distortion | < 0.05% |
| Cooling | Variable speed fan, rear exhaust |
| Protection Features | Short circuit, thermal, overvoltage |
| Maintenance | Clean with dry cloth, avoid liquids |
| Spare Parts Availability | Contact Audibax support for parts |
| Warranty | 2 years limited warranty |
| Manual Language | English, Spanish, French |
Frequently Asked Questions - PA2250T Audibax
User questions about PA2250T Audibax
0 question about this device. Answer the ones you know or ask your own.
Ask a new question about this device
Download the instructions for your Receiver in PDF format for free! Find your manual PA2250T - Audibax and take your electronic device back in hand. On this page are published all the documents necessary for the use of your device. PA2250T by Audibax.
USER MANUAL PA2250T Audibax
WELCOME TO AUDIBAX....1
SAFETY INSTRUCTIONS....1
IMPORTANT INFORMATION......2
PACKAGE CONTENT....3
SPECIFICATION......3
PRODUCT DESCRIPTION....3
FEATURES......4
FRONT PANEL....4
REAL PANEL....5
SPEAKER CONNECTION......6
DISPOSAL....7
ESPAÑOL
BIENVENIDOS A AUDIBAX....8
Thank you very much for choosing Audibax. We hope you enjoy your new product.
It has been developed and designed paying attention to the smallest details, with quality control with European standards supervised by our great team of professional technicians, who work every day to offer our customers the best quality.
We make sure that every Audibax product is built to last long. All our references are made with long lasting materials and our specialists are dedicated to constantly doing quality controls to guarantee the best result.
Please read carefully this manual in order to use your Audibax product in the best way. Do not hesitate to visit our website for further information: www.audibax.com
SAFETY INSTRUCTIONS
GENERAL INFORMATION
- It is important to read and follow the instructions carefully.
- Keep all information and instructions in a secure location.
- Always follow the instructions provided.
- Take note of all safety warnings and never remove them from the equipment.
- Use the equipment only as intended and for its intended purpose.
- Ensure that the stands and/or mounts used are sufficiently stable and compatible for fixed installations. Wall mounts should be properly installed and secured, and the equipment should be installed securely to prevent falls.
- When installing the equipment, be sure to observe the relevant safety regulations in your country.
- Do not install or operate the equipment near sources of heat, such as radiators, heat registers, or ovens, and ensure that it is always cooled sufficiently and cannot overheat.
- Do not place sources of ignition, such as burning candles, on the equipment.
- Keep ventilation slits unobstructed.
- For equipment designed for indoor use only should not be used near water, flammable materials, fluids, or gases. Special outdoor equipment should be used in accordance with the manufacturer's instructions.
- Ensure that no dripping or splashed water can enter the equipment and do not place containers filled with liquids on the equipment.
- Prevent objects from falling into the equipment.
- Use the equipment only with recommended accessories intended by the manufacturer.
- Do not attempt to open or modify the equipment.
- Check all cables after connecting the equipment to prevent accidents or damage due to tripping hazards.
- During transport, take steps to prevent the equipment from falling and causing damage or injury.
- If the equipment is not functioning properly, fluids or objects have gotten inside, or is otherwise damaged, switch it off immediately and unplug it from the power outlet (if applicable). Only authorized, qualified personnel should repair the equipment.
- Clean the equipment with a dry cloth.
- Comply with all applicable disposal laws and separate plastic and paper/cardboard during packaging disposal.
- Keep plastic bags out of the reach of children.
FOR DEVICES DESIGNED TO BE CONNECTED TO THE MAIN POWER SUPPLY:
- ATTENTION: If your equipment has a power cord with a grounding plug, it must be connected to a wall outlet with a ground connection. Never remove the grounding plug from the power cord.
- If your equipment has been exposed to extreme temperature changes, allow it to reach room temperature before turning it on. Otherwise, moisture and condensation may damage the equipment.
- Before plugging in the equipment, make sure that the voltage and frequency of the power outlet match the specifications of the equipment. If the equipment has a voltage selector, only connect it to the power outlet if the values match. If the power cord or adapter does not fit your outlet, contact an electrician.
- Do not step on the power cord. Make sure it is not pinched at the outlet, adapter, or equipment connection.
- Keep the power cord or adapter within reach and disconnect the equipment from the power supply when not in use or when cleaning it. Always unplug the cord or adapter by pulling the plug or adapter, not the cord. Never touch the cord or adapter with wet hands.
- Avoid frequently turning the equipment on and off, as this can reduce its useful life.
- IMPORTANT: Only replace fuses with those of the same type and rating. If a fuse repeatedly blows, contact an authorized service center.
- To completely disconnect the equipment from the power mains, unplug the power cord or adapter from the outlet.
- If your device has a Volex power connector, the mating Volex connector must be unlocked before it can be removed. Be careful when laying cables, as the equipment can slide or fall if the power cord is pulled.
- Unplug the power cord or adapter before an extended period of disuse or in case of lightning strike risk.
- Only install the equipment when it is disconnected from the power source.
- To prevent damage and overheating, qualified personnel should regularly clean and service the equipment depending on ambient conditions like dust, nicotine, and fog.
If the product contains the following symbols, please, read carefully:
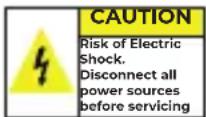
CAUTION: To reduce the risk of electric shock, do not remove cover (or back). There are no user serviceable parts inside. Maintenance and repairs should be exclusively carried out by qualified service personnel.

The warning triangle with lightning symbol indicates dangerous uninsulated voltage inside the unit, which may cause an electrical shock.
The warning triangle with exclamation mark indicates important operating and maintenance instructions.
IMPORTANT INFORMATION
CAUTION! HIGH VOLUMES IN AUDIO PRODUCTS!
This equipment is designed for professional purposes and its commercial use must comply with the applicable national rules and regulations for accident prevention.
As the manufacturer of this product, Audibax has the responsibility to inform you about the potential health risks associated with its use. One such risk is hearing damage caused by prolonged exposure to high volume.
When this product is in use, it can generate high sound-pressure levels that may cause irreversible hearing damage to performers, employees, and audience members.
To prevent this, it is important to avoid exposing yourself or others to volumes exceeding 90 dB for an extended period of time.
PACKAGE CONTENT
1x PA2250T / PA2500T 1x User's manual
SPECIFICATION
| Model | PA2250T | PA2500T |
| Description | 2 Channel Class 3 Power Amplifier | |
| Rated Power at 100V | 2x240W | 2x500W |
| Rated Power at 8 ohm | 2x240W | 2x350W |
| Frequency Response | Bypass 20Hz-20KHzHigh pass filter /0Hz-20KHz | |
| Input | 0.775V, 6dBu, balanced Furob ock connector by four channels | |
| Input Imoodance | 10KΩ | |
| THD | <0.1% (1KHz/-3dBv, 100W) | |
| S/N Ratio | >80dB | |
| Power Consumption | 250W | 1050W |
| Power Supply | AC 100-240V, 50-60Hz | |
| Dimension | 484x420x44 mm | |
| Weight | 7.3kg | 82kg |
PRODUCT DESCRIPTION
The class D digital power amplifier, featuring minimal power consumption and much higher efficiency up to 85%; In addition, it helps save space in the installation rack and generates less heat to extend its useful life as an amplifier. result.
Class D digital amplifiers have a rated output power of 240W/350W/500W (depending on version) per two channels, so they could be used as a two-zone multi-source public address system at minimal cost. Versatile 100V high-impedance and 8-ohm low-impedance speaker outputs let you tackle PA fixtures and high-fidelity stereo installation jobs.
There are two balanced inputs per Euroblock connector for each channel with gain control. Four separate zone speaker outputs, both 100V and 4-16 ohms. The built-in four-channel separate high-pass filters can be enabled or disabled via DIP switch presetting.
Automatic standby mode is enabled after detecting no input signal for one minute, activated when receiving signal on any input. Visual working status indicators include guard, clip, entry and exit for easy monitoring. With full protection against short circuit, overload, high temperature, clip and DC.
Wide AC power supply from 115V to 230V, thus supporting equipment installation anywhere in the world.
FEATURES
- Digital power amplifier with switching source technology.
- Class D PA power amplifier with minimal energy consumption.
- Reduced space with better heat dissipation.
- Two-channel power amplifier in 19" rack-mount unit.
- Nominal output power of 240w/350W/500W for 2 channels.
- Independent two-channel 4-16Ω/100V speaker outputs.
- Balanced XLR input via Euroblock connector for two channels.
- Gain control per channel.
- High pass filter adjustment per channel
- Built-in auto standby function to save power consumption.
- Two separate channel indicators for protection, clip, entry and exit.
- Complete protection against short circuit, overload, high temperature, clip and DC.
- Wide 110V to 230V AC input.
- DC 24V battery input upon request with additional cost.
FRONT PANEL
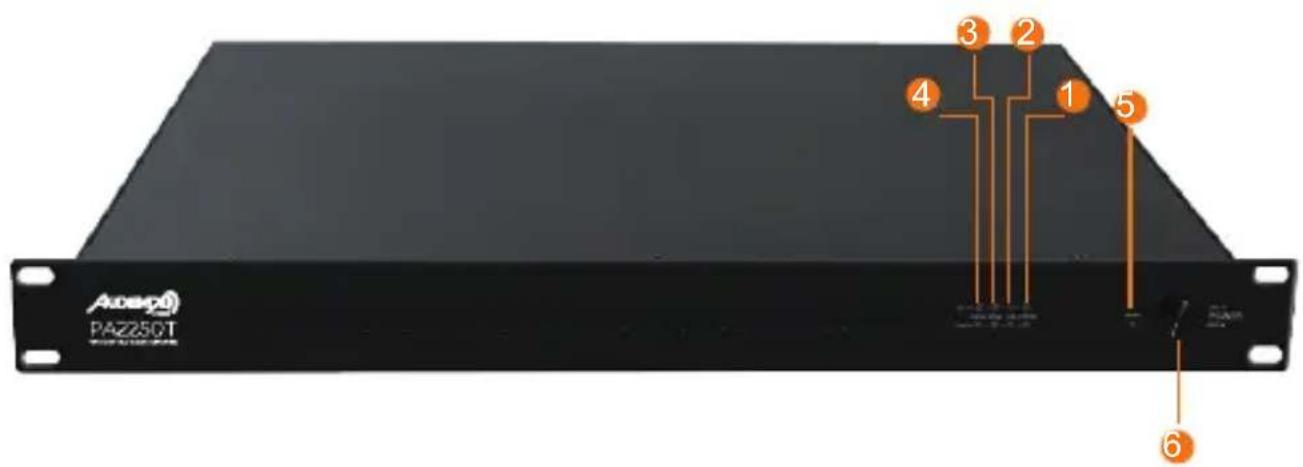
1. PROT
Protection indicator will light on in orange once the amplifier comes into protection status. The protection maybe resulted from speaker line short circuit, speaker line open circuit, amplifier overload and inner working temperature over 55°C, this indicator give visually guidance ask for repair and It will light offonce these failures been repaired. There are two separate protection indicators for each two channels.
2. CLIP
Clip indicator will light on in red once the input or output is too high. There are two separate CLIP indicators for each two channels.
3. INPUT
Input indicator will light on in green once there is any input signal has been detected. There are two separate input indicators for each two channels.
4. OUTPUT
Output indicator will light on in green once there is output signal has been passed. There are two separate output indicators for each two channels.
5. POWER
The power indicator will turn blue once the unit has been powered.
6. POWER SWITCH
Power switch used to power on and power off the equipment.
REAR PANEL
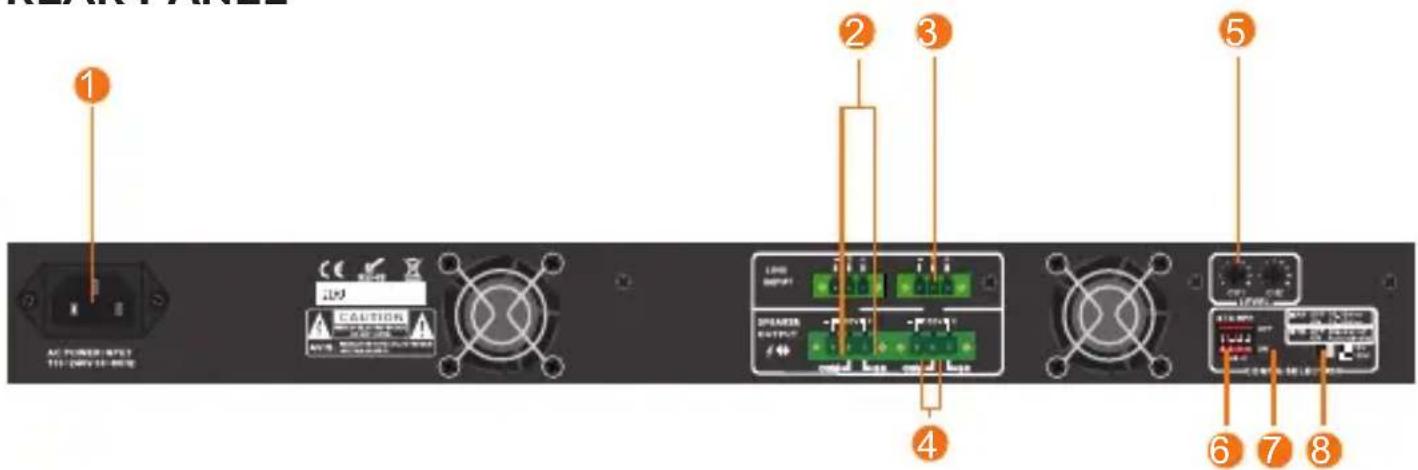
1. AC POWER Socket
AC power cord for 110V to 230V input, the supply voltage is automatically switched between 100V to 230V.
2. 100V SPEAKER OUTPUT
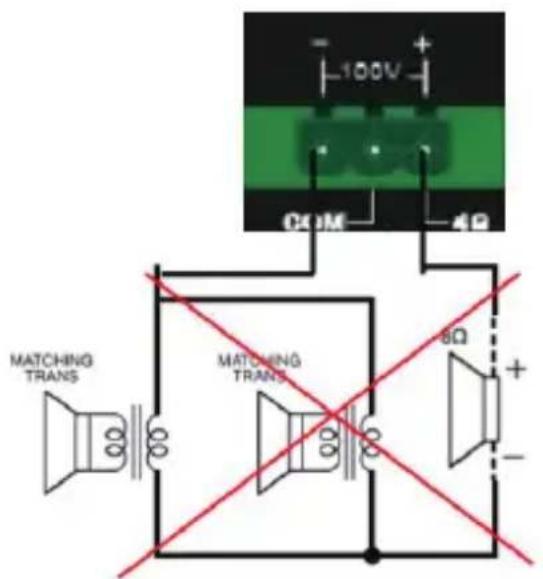
The 100V output mode is only and explicitly for high impedance speakers, avoid connecting low impedance speakers in this format. There are two independent 100V speaker outputs that can be managed respectively. The output of these speakers is supplied in a Euroblock connector.
Always connect the correct polarity between speaker and amplifier to avoid short circuits. Never connect low impedance speakers to the 100V format, it may cause it to break.
3. LINE INPUT
The line input accepts balanced or unbalanced inputs, these inputs are supplied on Euroblock connectors.
There are two independent line input channels that can be managed respectively.
4. 8Ω SPEAKER OUTPUT
The speaker outputs will be connected to low impedance speakers of 4/8/16 Ohms, pin 2 of the connector to the negative pole of the speaker and pin 3 of the connector to the positive pole of the speaker. There are two independent 8 Ω speaker outputs that can be managed respectively. The output of these speakers is supplied in a Euroblock connector. Never mix the negative and positive end, which may cause short circuit protection. Never connect your 100V line speaker to these 8 Ω ends as they can burn out the speaker or cause heavy distortion.
5. Volume control
Signal input level adjustment per channel.
6. HIGH PASS FILTER
The high pass filter function will be enabled or disabled by presetting the separate two-channel DIP switch. There are separate two-channel high-pass filters that can be managed respectively.
7. AUTOMATIC STANDBY
The auto standby function will be enabled or disabled by presetting the separate two-channel DIP switch. The auto standby feature enabled will automatically enter standby once no input has been detected within 2 minutes. The amplifier will activate immediately once the input signal is detected.
8. 100V and 70V line switch
Switch to toggle high impedance output between 70V or 100V
SPEAKER CONNECTION
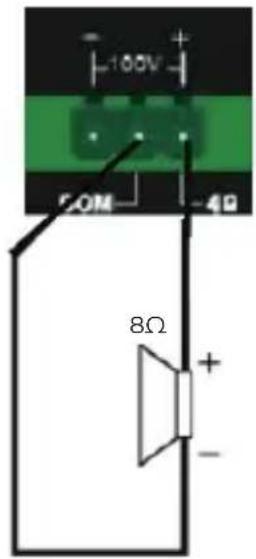
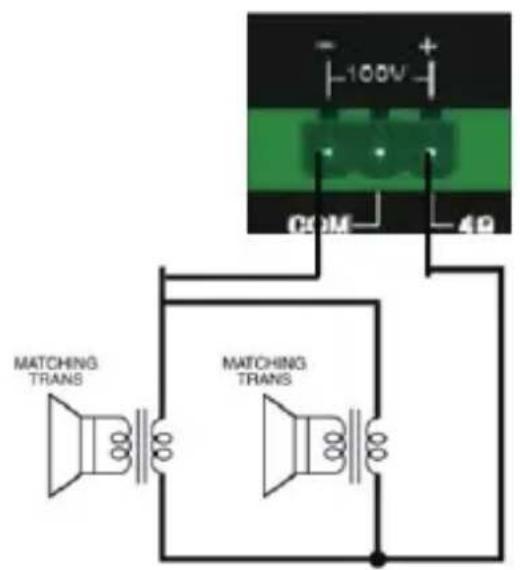
Before connecting the speakers, disconnect the AC power cord. Please note the proper connection terminals as shown below. Make sure the total impedance is not less than the stated nominal impedance.
- Connection of speaker systems from 4 to 16 Ω
When connecting conventional 4 to 16 Ω speaker systems, connect the positive (+) side of the speaker to the terminal labeled 4 to 16 Ω. Connect the negative (-) side of the speaker to the terminal labeled COM (pin 2)
- Connecting high impedance distributed speaker systems
When connecting a high impedance (100V) speaker system in parallel, connect the positive (+) side of the speaker to the terminal labeled 100V (pin 3). Connect the negative (-) side of the speaker to the terminal labeled - (pin 1)
FOR 8 ohms LOW IMPEDANCE SPEAKER CONNECTION
FOR 100V SPEAKER WITH TRANSFORMER CONNECTION
WRONG SPEAKER CONNECTION
DISPOSAL
Packaging:

-
The packaging can be recycled using standard disposal methods and reintroduced into the reusable material cycle.
-
Please follow the laws and regulations regarding disposal and recycling of packaging in your country.
Device:
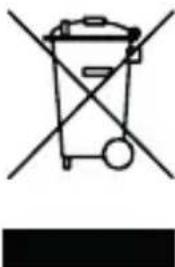
natural_image
Simple line drawing of a trash bin with two crossed lines indicating no waste or prohibition (no text or symbols)-
This device is subject to the Waste Electrical and Electronic Equipment (WEEE) Directive of the European Union. Used appliances should not be disposed of with household waste. Used device must be disposed of through an approved disposal company or a municipal disposal facility. Please comply with the applicable regulations in your country.
-
Please follow all the disposal laws and regulations in your country.
-
As a customer, you can obtain information on environmentally-friendly disposal options from the product seller or the appropriate regional authorities.
BIENVENIDO A AUDIBAX
1. Toma de corriente CA
RECICLAJE
Embalaje:

- ESPAÑOL
- SAFETY INSTRUCTIONS
- GENERAL INFORMATION
- FOR DEVICES DESIGNED TO BE CONNECTED TO THE MAIN POWER SUPPLY:
- IMPORTANT INFORMATION
- CAUTION! HIGH VOLUMES IN AUDIO PRODUCTS!
- PACKAGE CONTENT
- SPECIFICATION
- PRODUCT DESCRIPTION
- FEATURES
- FRONT PANEL
- PROT
- CLIP
- INPUT
- OUTPUT
- POWER
- POWER SWITCH
- REAR PANEL
- AC POWER Socket
- 100V SPEAKER OUTPUT
- LINE INPUT
- 8Ω SPEAKER OUTPUT
- Volume control
- HIGH PASS FILTER
- AUTOMATIC STANDBY
- 100V and 70V line switch
- SPEAKER CONNECTION
- DISPOSAL
- Packaging:
- Device:
- BIENVENIDO A AUDIBAX
- Toma de corriente CA
- RECICLAJE
- Embalaje:
Brand : Audibax
Model : PA2250T
Category : Receiver