IWD-1160S - Water dispenser Imarflex - Free user manual and instructions
Find the device manual for free IWD-1160S Imarflex in PDF.


| Product Type | Water Dispenser |
| Brand | Imarflex |
| Model | IWD-1160S |
| Dimensions (approx.) | 30 x 30 x 100 cm |
| Weight (approx.) | 10 kg |
| Power Supply | AC 220-240V, 50/60Hz |
| Power Consumption | 500 W (heating and cooling) |
| Hot Water Tank Capacity | 3 L |
| Cold Water Tank Capacity | 2 L |
| Hot Water Temperature | ≥ 85°C |
| Cold Water Temperature | ≤ 15°C |
| Dispensing Modes | Hot and cold water |
| Safety Features | Child safety lock, overheat protection |
| Materials | Plastic body, stainless steel heating element |
| Maintenance | Clean water tank regularly, descale every 3 months |
| Repairability | Spare parts available; repairable with standard tools |
Frequently Asked Questions - IWD-1160S Imarflex
User questions about IWD-1160S Imarflex
0 question about this device. Answer the ones you know or ask your own.
Ask a new question about this device
Download the instructions for your Water dispenser in PDF format for free! Find your manual IWD-1160S - Imarflex and take your electronic device back in hand. On this page are published all the documents necessary for the use of your device. IWD-1160S by Imarflex.
USER MANUAL IWD-1160S Imarflex
IWD-1160S
imarflex®
HOT and COLD WATER DISPENSER


WATER TANK CAPACITY 1L Hot 3L Cold




SPECIFICATION:
MODEL NO. : IWD-1160S
When using electrical appliances, basic safety precautions should always be followed, including the following:
- Read all instructions thoroughly.
- Before using the Water Dispenser, check if the voltage indicated corresponds with the convenience outlet (230Va.c.).
-
Do not use two-way socket with another appliance.
-
Do not use any appliance with a damaged cord or plug. If the cord is damaged, it must be replaced with the same type and size of a qualified person or bring the unit to the manufacturer or to the nearest lmarflex Authorized Service Center to avoid hazard.
-
To avoid a hazard due to instability of the appliance, it must be fixed in accordance with the instructions.
-
Do not place the Water Dispenser near gas stove, electric burner or heated oven.
-
Children should be supervised to ensure that they do not play with the appliance.
-
This appliance is not intended for use by persons (including children) with reduced physical, sensory or mental capabilities, or lack of experience and knowledge, unless they have been given supervision or instruction concerning use of the appliances by a person responsible for their safety.
-
Keep the water dispenser in a dry and cool place and avoid direct sunlight. Rearward of the machine should be at least 20cm far from the wall. Never put the machine on the paper or foam, which may cause unstable condition, such as store water or cause creepage. Never put anything flammable beside this machine.
-
To avoid damage, do not plug the power cord or turn on the heating switch until 3 minutes after you put the filled water gallon.
-
This water dispenser must be used with third-prong grounding plug and creepage protection switch. If two flat plugs will use, the grounding wire must be properly grounded before use.
-
In case the unit will not use for a long time, turn off the switch and pull the plug out from the socket then drain the remaining water through drain hole.
-
Never use organic liquid to clean the machine. Splashing of water to the body is strictly prohibited.
-
You should use the ON/OFF switch to turn on or off the unit. It is prohibited to turn on or off the unit through plugging or unplugging the power cord. Never extend the length of the power supply cord to avoid fire.
-
Never turn the machine upside down or lean it more than 45^ .
-
Do not adjust the thermostat of the unit by yourself.
-
Power cord or other parts of the unit must be replaced by authorized service center personnel.
-
The cooling time of the unit might take longer when the environment temperature is higher than the normal.
-
Save this instruction for future reference.
DESCRIPTION OF PARTS:
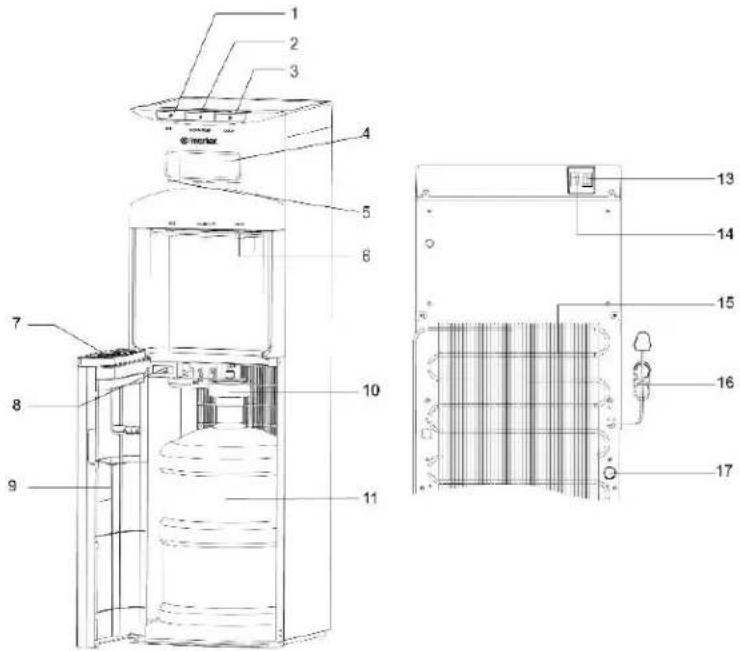
| NO. | DESCRIPTION |
| 1 | Hot Water Button |
| 2 | Room Temp Water Button |
| 3 | Cold Water Button |
| 4 | Cooling Light Indicator |
| 5 | Refill Tank Light Indicator |
| 6 | Boiling Light Indicator |
| 7 | Water Tap |
| 8 | Removable Water Collector |
| 9 | Reset Button |
| 10 | Cabinet Door |
| 11 | Water Pump |
| 12 | Water Gallon |
| 13 | Hot Power Switch |
| 14 | Cold Power Switch |
| 15 | Condenser |
| 16 | Power Cord |
| 17 | Drain Valve |
HOW TO USE:
- Tear the label from the water gallon.
- Put the water pump rod inside the gallon and place slowly inside the unit.
- Insert the plug to the socket and wait for about 5 minutes before you turn ON the power switch.
- Press the Hot, Cold and Room Temp Water button. Once, there is water flows out in every water tap you may now turn ON the hot & cold power switch located at the back portion of the unit. The indicator lights up accordingly once the machine works.
- The refill water light indicator will be flashing once the water gallon needs to be refill.
For Initial Use:
- Clean the unit.
a. Put the water pump rod inside the gallon and place slowly inside the unit.
a. Press the cold, room temp and hot tap until the water flows out of the faucet for about 20 minutes.
b. Pull off the water pump rod into the gallon and turn on the drain valve to empty the water inside the unit.
CLEANING AND MAINTENANCE:
- Turn off and unplug the unit.
- Wait until the hot water in the water tank cools down.
- Open the hot tank drain valve until the water tank gets empty.
- Cleaning of the unit should be done regularly.
- Wipe the body of the water dispenser with damp cloth.
- Do not use abrasive materials to avoid scratches.
TROUBLE SHOOTING:
| PROBLEM | POSSIBLE CAUSE | REMEDY |
| No hot or cold water | Over Consumption of hot or cold water in short timeNo power supply | The hot and cold water will be available after a whileConnect the plug and turn on heating or cooling switch |
| No running water from the taps | Empty gallonInlet of gallon supporter blocked by gallon seal | Replace it with a new water gallon |
| Leakage from gallon supporter | Broken water gallon | Replace it with a new water gallon |
| Noise Operation | No placid installation | Place the unit on placid & solid surface |
| The hot tap do not provide hot water and cold tap do not provide cold water | Excessive use of hot and cold water in a short period of timeThe unit is unplugThe cold cooling time is not enoughThe cold and hot switch is off | Wait for a few minutes to have cold and hot waterCheck if the hot and cold switch is onWait for about 2 hours before getting a cold water |
REMINDER: Please do not forget to fill up and send the warranty card with receipt to our email address imarflexfb@evergoodinc.com
Distributed By: Topgadget Distributions, Inc.
2120 A. Linao St. Malate, Manila
Made in China
Brand : Imarflex
Model : IWD-1160S
Category : Water dispenser