JEACV60B - Range hood Jocel - Free user manual and instructions
Find the device manual for free JEACV60B Jocel in PDF.


| Product Type | Range Hood |
| Brand | Jocel |
| Model | JEACV60B |
| Width | 60 cm |
| Depth | 50 cm |
| Height (Min - Max) | 65 - 110 cm |
| Weight | 12 kg |
| Power Supply | 230 V ~ 50 Hz |
| Motor Power | 150 W |
| Max Extraction Rate | 300 m³/h |
| Noise Level (Max) | 58 dB |
| Number of Speeds | 3 |
| Lighting | 2 x 1.5 W LED |
| Filter Type | Aluminum Grease Filter |
| Control Type | Push Buttons |
| Ducting Diameter | 150 mm |
| Installation Type | Wall-Mounted / Ducted or Recirculating |
| Energy Class | A |
| Warranty | 2 Years |
| Recommended Room Size | Up to 15 m² |
| Features | Removable Grease Filter, LED Lighting |
Frequently Asked Questions - JEACV60B Jocel
User questions about JEACV60B Jocel
0 question about this device. Answer the ones you know or ask your own.
Ask a new question about this device
Download the instructions for your Range hood in PDF format for free! Find your manual JEACV60B - Jocel and take your electronic device back in hand. On this page are published all the documents necessary for the use of your device. JEACV60B by Jocel.
USER MANUAL JEACV60B Jocel
EXAUSTOR CAMPANA EXTRACTORA COOKER HOOD
JEACV60B
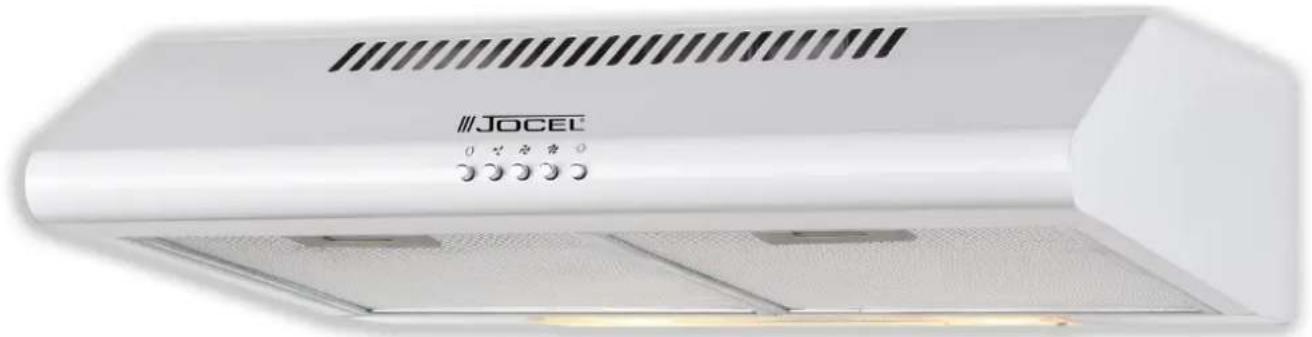
natural_image
Exterior view of a white JOCEL air purifier with ventilation grilles and control buttons (no text or symbols on the device itself)Read the Instruction Manual carefully.
1. GERAL
natural_image
Simple line drawing of a box with two circular objects on top, placed on a brick wall (no text or symbols)Imagem 2
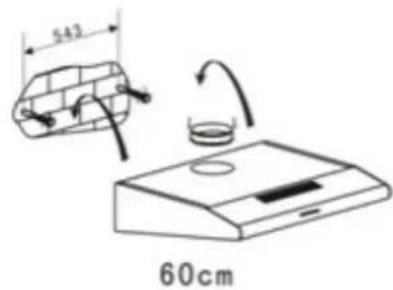
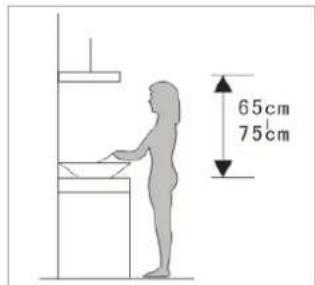
Imagem 1
60cm
Imagem 3
natural_image
Simple line drawing of a rectangular box with circular cutouts and mounting holes (no text or symbols)A
natural_image
Simple line drawing of a rectangular box with two circular cutouts and directional arrows indicating movement (no text or symbols)B
Imagem 4
5. VENTILAÇÃO DO AR
natural_image
Technical line drawing of a mechanical device with internal components (no text or symbols)A
natural_image
Simple line drawing of a rectangular box with a circular hole and directional arrows, no text or symbols present.C
Imagem 5
natural_image
Technical line drawing of a device interior with no visible text or symbolsB
natural_image
Technical line drawing of a mechanical component with mounting holes and a curved arrow indicating rotation (no text or symbols)D
6. FUNCIONAMENTO
natural_image
Diagram of a mechanical or electrical component with internal channels and directional arrows (no text or symbols)Imagem 7
natural_image
Technical line drawing of a mechanical assembly with an inset showing a close-up of a component (no text or symbols present)Imagem 8
natural_image
Diagram of a mechanical device with labeled parts (1 and 2), showing internal components without any readable text or symbols.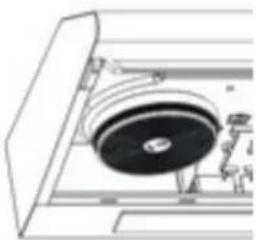
natural_image
Technical line drawing of a mechanical component with a circular component and a person standing (no text or symbols)Imagem 9
Telef. 00 351 252 910351
Fax: 00 351 252 910367
E-mail: assistencia@jocel.pt
http://www.jocel.pt
natural_image
Simple line drawing of a brick wall with three hanging items, no text or symbols presentImagen 2
natural_image
Simple line drawing of a rectangular box with circular cutouts and mounting holes, labeled 'A' at bottom (no text or symbols on the diagram itself)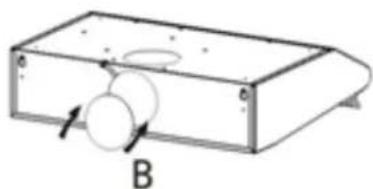
natural_image
Simple line drawing of a rectangular box with two circular components and an arrow indicating direction (no text or symbols)Imagen 4
natural_image
Technical line drawings of a device showing internal components and airflow paths (no text or symbols)Imagen 5
natural_image
Technical line drawing of a device with internal components and a base plate, labeled B and D (no text or symbols present)6. FUNCIONAMIENTO
Imagen 6
7. MANTENIMIENTO
natural_image
Diagram of a mechanical or electrical component with internal channels and directional arrows (no text or symbols)Imagen 7
natural_image
Technical line drawing of a mechanical assembly with an inset showing a component (no text or symbols)Imagen 8
natural_image
Technical diagram of a washing machine with labeled parts (no text or symbols present)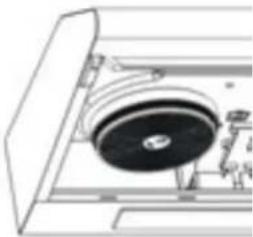
natural_image
Technical line drawing of a mechanical component with a circular component and mounting bracket (no text or symbols)Imagen 9
Carefully read the following important information regarding installation safety and maintenance. Keep this information booklet accessible for further consultations.
The appliance has been designed as a exhausting version (external exhaust) or as a filter version (internal air recycle) cooker hood.
2. SAFETY PRECAUTION
Take care when the cooker hood is operating simultaneously with an open fireplace or burner that depend on the environment and are supplied by other than electrical energy, as the cooker hood removes the air from the environment which a burner or fireplace need for combustion.
Provide adequate ventilation in the environment for a safe operation of the cooker hood.
Follow the local laws applicable for external air evacuation.
5. WARNING
In certain circumstances electrical appliances may be a danger hazard.
- Keep electrical appliances out of reach from Children or infirm persons. Do not let them use the appliances without supervision.
- This appliance is not intended for use by persons (including children) with reduced physical. Sensory or mental capabilities, or lack of experience and knowledge, unless they have been given supervision or instruction concerning use of the appliance by a person responsible for their safety.
- Do not touch the light bulbs when/after appliance use.
- Do not check the status of the filters while the cooker hood is operating
- Flame cooking is prohibited underneath the cooker hood
- Avoid free flame, as it is damaging for the filters and fire hazard
- Constantly check food frying to avoid that the overheated oil may become a fire hazard
- Your cooker hood is for domestic use only, not suitable for barbecue, roast shop and other commercial use.
- Any installation work must be carried out by a qualified electrician or competent person.
- The cooker hood and its filter mesh should be cleaned regularly in order to keep in good working order.
- Before cleaning, always ensure that you have switched your cooker hood off.
- Clean the cooker hood according to the instruction manual and keep the cooker hood from the danger of burning.
- No fire for drying your cooker hood.
• If there is any fault with your cooker hood, please call the Technical Service for servicing.
- If the power cord is damaged, it must be replaced by the manufacturer or a qualified service engineer in order to avoid a hazard.
- Please keep the room draughty when your cooker hood and gas hob are working.
- Do not exhaust the gas from cooker hood through the same heated flue which is for the gas from gas hob and other kitchen appliances.
- Before installation and usage read all the instructions and make sure that the voltage (V) and the frequency (Hz) indicated on your cooker hood are exactly the same as the voltage (V) and the frequency (Hz) in your home.
- In order to get the most out of your cooker hood, please read the instruction manual before installing & using, and keep it in a safe place.
- Contact your local government for information regarding the collection systems available
- If electrical appliances are disposed of in landfills or dumps, hazardous substances can leak into the groundwater and get into the food chain, damaging your health and well-being.
• Children should be supervised to ensure that they do not play with the appliance. - Regulations concerning the discharge of air have to be fulfilled.
- CAUTION: Accessible parts may become hot when used with cooking appliances.
- Attention! Observe the warning in the instruction sheet concerning the operation of the appliance when air is discharged from the room.
4. INSTALLATION INSTRUCTIONS
Method A
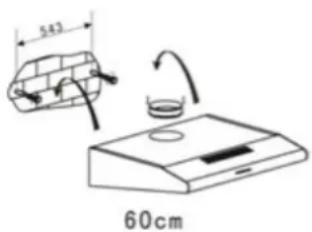
1) The cooker hoods should be placed at a distance of 65-75cm from the cooking surface for best effect. See Pic 1
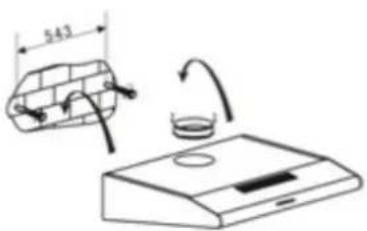
2) To install onto the wall, drill 4 holes of ∅ 8mm on a suitable place according with the centre distance of hole in the back of the cooker hood. See Pic 2
3) Insert the nut into the holes.
4) Insert the screws into the nuts and tight.
5) Put up the cooker hood onto the fixed screws.
6) Then use the attached accessories enclosed to turn the screws into the two holes of inside the hood, and then fix the screws to tighten the hood onto the wall.
7) Put the one way valve to the air outlet of cooker hood.
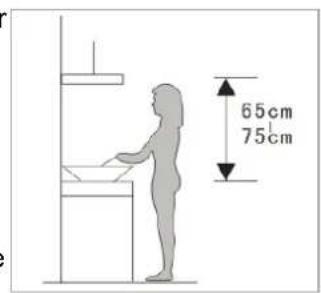
Pic.1
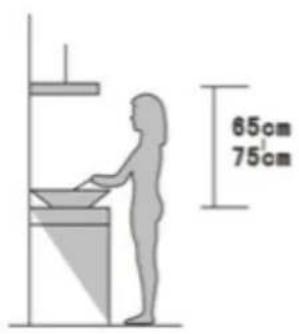
PIC 1
natural_image
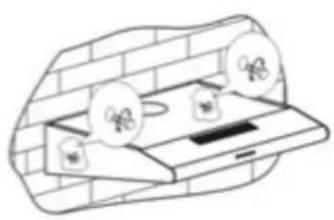
Simple line drawing of a device with two circular components on top, no text or symbols presentPIC2
60cm
Method B See Pic3:
1) Drill 4 holes of ∅ 6mm at the bottom of the hanging cupboard
2) Put the one way valve on the air outlet of cooker hood, then install the cooker hood on the bottom of the cupboard, tighten the cooker hood with enclosed 4 screws.
3) Install the adjusted board on the bottom of the hood in order to keep out the gap between hood back and cupboard.
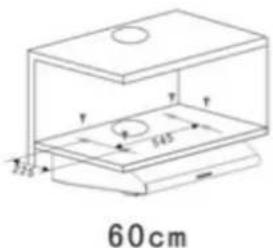
Pic 3
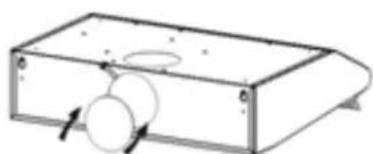
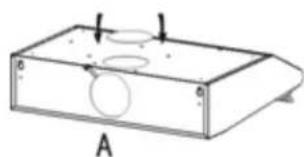
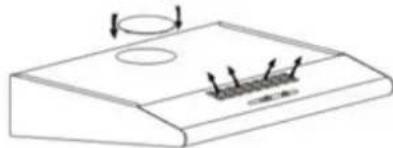
Note: There are 2 methods for ventilation, including 'horizontal ventilation' and 'vertical ventilation'. Please pay attention to the ventilation method when installation.
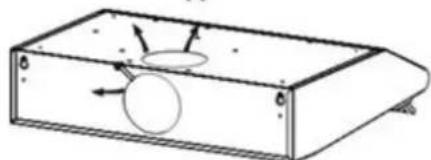
Horizontal ventilation: See Pic 4A, please use the cover to seal the outlet on the top, then the air can be vented from back.
Vertical ventilation: See Pic 4B, please use the cover to seal the outlet on the back, then the air can be vented from top.
natural_image
Technical line drawing of a rectangular electronic component with circular cutouts and mounting holes (no text or symbols)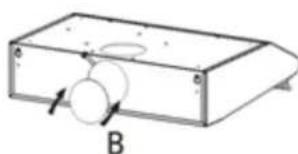
natural_image
Simple line drawing of a rectangular box with a circular component and an arrow labeled B (no text or symbols)Pic 4
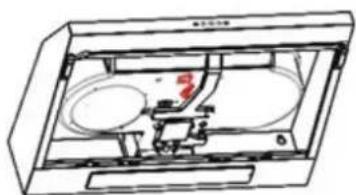
5. Air ventilation setting
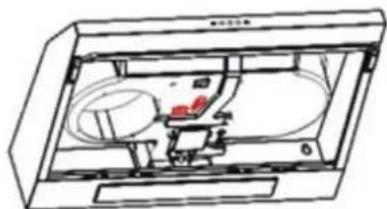
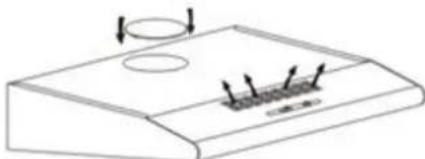
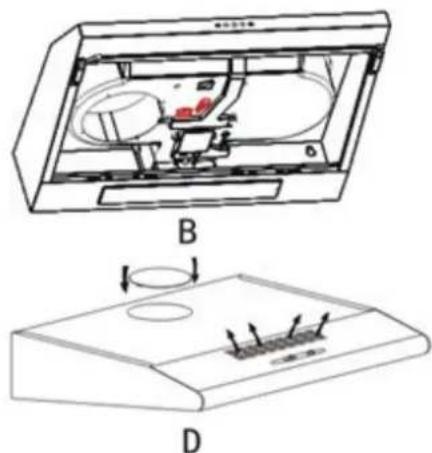
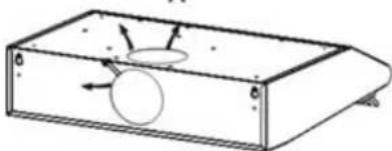
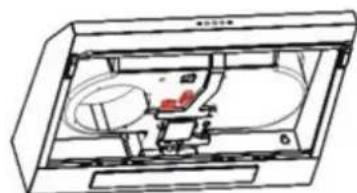
-Outdoor air ventilation: Turn the adjuster to outdoor position (pic.5A), install the outlet, turn on the cooker hood, then the air will be vented from the outside outlet.
-Indoor air ventilation: Turn the adjuster to indoor position (pic.5B), install the outlet cover, turn on the cooker hood, then the air can be vented from the inside outlet.
natural_image
Technical line drawing of a mechanical device with internal components (no text or symbols)A
natural_image
Simple line drawing of a rectangular electronic device with a circular component and directional arrows indicating motion (no text or symbols)C
natural_image
Technical line drawing of a device interior with no visible text or symbolsB
natural_image
Technical line drawing of a mechanical component with mounting holes and a circular feature (no text or symbols)D
Pic 5
6. OPERATION
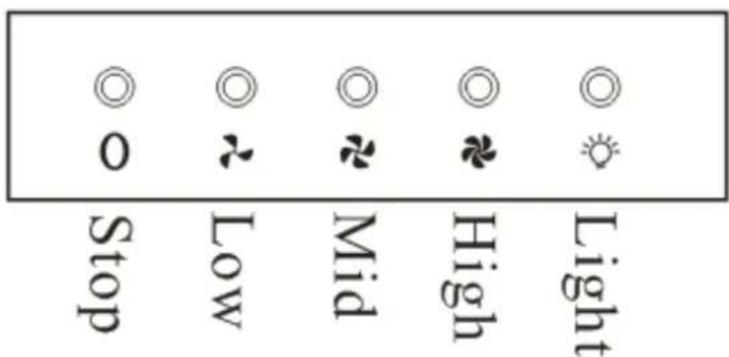
How to use the control panel (mechanical push button), see Pic. 6:
a. Press the button "Stop", the motor is stopped then.
b. Press the button "Low", the motor is running at low speed.
c. Press the button "Mid", the motor is running at medium speed.
d. Press the button "High", the motor is running at high speed.
e. Press the button "Light", both lights are switched on. Press the button again; the lights are switched off then.
Pic 6
7. MAINTENANCE
7.1 It is recommended to operate the appliance prior to cooking.
7.2 It is recommended to leave the appliance in operation for 15 minutes after cooking is terminated in order to completely eliminate cooking vapors and odors.
7.3 The proper function of the cooker hood is conditioned by the regularity of the maintenance operations, in particular, the active carbon filter.
7.4 The anti-grease filters capture the grease particles suspended in the air, and are therefore subject to clogging according to the frequency of the use of the appliance.
7.5 The cooker hood must regularly cleaned on both the inside and outside with hot water plus non corrosive detergent (AT LEAST ONCE A MONTH) To protect the main body from corrosion over a long period of time
Attention! Please do not use abrasive detergent or alcohol as it will damage the body.
Attention! Keep the motor and other spare parts free from water, as this will cause damage to the appliance.
Attention! Before cleaning the appliance please remember to cut off the power.
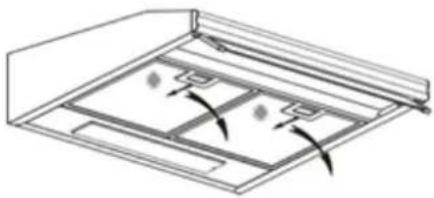
7.6 Changing and cleaning the anti-grease filters
-Removing the filters as the instruction in Pic. 7;
-You can clean the filter as below measure:
-
Soak them for about 3 minute in hot water (40-50 degrees) with a grease-loosening detergent then brush it gently with a soft brush. Please do not apply too much pressure, avoid damaging it.
-
It can be put into a dishwasher with detergent, set the temperature at around 60 degrees.
-
Soak them for about 3 minute in hot water (40-50 degrees) with a grease-loosening detergent then brush it gently with a soft brush. Please do not apply too much pressure, avoid damaging it.
- It can be put into a dishwasher with detergent, set the temperature at around 60 degrees.
Note: Please do not use abrasive detergent for it will damage the hood;
Note: Make sure that the hood is shut off before cleaning;
natural_image
Diagram of a mechanical or electrical component with directional arrows indicating movement or flow (no text or symbols)Pic 7
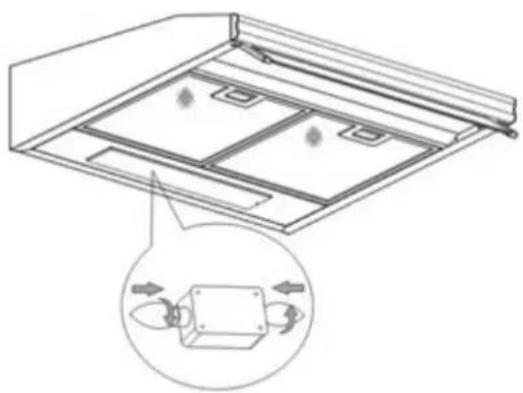
7.7 Changing the light See Pic 8
-Before changing the lights, ensure that the appliance is not live (i.e., ensure that you have switched it off at the wall switch).
-Press the handle of the Aluminium filter towards the rear part of the unit until it is released from the front housing, and remove it by pressing downwards.
-Change the incandescent bulb using only Max. 40W E14 olive-shaped bulb
-Replace the AI filter to the original position
natural_image
Technical line drawing of a mechanical assembly with internal components and a magnified inset showing internal flow paths (no text or symbols)Pic 8
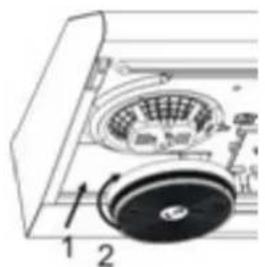
7.8 Installing the carbon filter (not supplied), see Pic. 9;
Activated carbon filter can be used to trap odors. Normally the activated carbon filter should be changed at three or six months according to your cooking habit. Activated carbon filter cannot be washed or recycled. The installation procedure of activated carbon filter is as below.
1 Remove the al filters see Pic.7
2 Turn the charcoal filter clockwise until it is fixed
3 Apply reverse procedure to uninstall the charcoal filter
Note: When the activated carbon filter attached, the suction power will be lowered.
natural_image
Diagram of a washing machine with labeled parts (no text or symbols present)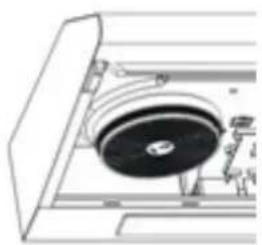
natural_image
Technical line drawing of a mechanical component with a central circular component and surrounding components (no text or symbols)Pic 9
8. Trouble shooting
| Symptom | Solution |
| The cooker hood does not start. | Check that the hood is connected to the electricity supply.Check that the fan speed control is set properly. |
| The cooker hood is not working Effectively. | The fan speed is not set high enough.The grease filter is dirty.The kitchen is not ventilated well enough.If the hood is set for recirculation, check that the carbon filters have not expired.If the hood is set for extraction, check that the ducting and outlets are not blocked. |
| The cooker hood has switched off during operation. | The safety cut-out device has been tripped.Turn off the hob and then wait for the device to reset.Note that if you have installed your cooker hood too low, this will happen.If it happens frequently, it will be damaged. |
CORRECT DISPOSAL OF THIS PRODUCT
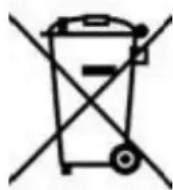

This marking indicates that this product should not be dispose with other household wastes throughout the EU. To prevent possible harm to the environment or human health from uncontrolled waste disposal, recycle it responsibly to promote the sustainable reuse of material resources. To return your used device, please use the return and collection systems or contact the retailer where the product was purchased. They can take this product for environmental safe recycling.
GENERAL WARRANTY TERMS
- The warranty is valid only on presentation of invoice of purchase.
- This WARRANTY is limited exclusively to parts substitution ineffective due to faulty manufacture, made in our workshops.
- The elimination of several faults of the scope of the guarantee is made for repair or replacement of defective parts, according to the discretion of our technical services. Defective parts are our property.
- Are not covered under warranty damage caused by transportation, neglect or poor use, improper assembly or installation, as well as external influences such as: lightning strikes or power, flooding, humidity, etc..
- Lose warranty, all appliances that are not being used according to the instructions, or connected to FEEDING NETWORKS not guarantee a constant voltage of 220/240V.
- The warranty does not cover damages for personal injury or damage caused directly or indirectly in any capacity whatsoever.
- This warranty terminates when it is found to have been undergoing repairs, alterations or interventions by any person not authorized by Jocel.
THE WARRANTY EXPIRES
- With the modification or disappearance of the nameplate of the appliance.
- Exceeded the period of 2 years for home appliances and 06 months for industrial appliances, warranty expires and assistance will be made by charging the costs of manpower, according to current fees.
TECHNICAL ASSISTANCE
For technical assistance request, our services are available through the following contacts:
Telef. 00 351 252 910351
Fax: 00 351 252 910367
E-mail: assistencia@jocel.pt
http://www.jocel.pt
DECLARATION OF CONFORMITY

We declare on our own responsibility that the machine indicated below
Product COOKER HOOD
Brand JOCEL
Model JEACV60B
Complies with the following European directives and standards implementation
Low Voltage
2006/95/EC
EN 60335-1:2002+A1:2004+A11:2004+
A11:2004+A2:2006+A12:2006+A13:
2008+A14:2010+A12:20011
EN 60335-2-31:2003+A1:2006+A2:2009
EN 62233:2008
Electromagnetic Compatibility
2004/108/EC
EN 55014-1:2006+A1:2009+A2:2011
EN 55014-2:1997+A1:2001+A2:2008
EN 55015:2006+A1:2007+A2:2009
EN 61547:2009
EN 61000-3-2:2006+A1:2009+A2:2009
EN61000-3-3:2008
Ecodesign
2009/125/EC
EN 61591:1997+A1:2006+A2:2011+A11:2014
EN 60714-1:2010
EN 60704-2-13:2011
EN 50564:2011
- EXAUSTOR CAMPANA EXTRACTORA COOKER HOOD
- GERAL
- VENTILAÇÃO DO AR
- FUNCIONAMENTO
- FUNCIONAMIENTO
- MANTENIMIENTO
- SAFETY PRECAUTION
- WARNING
- INSTALLATION INSTRUCTIONS
- Method A
- Method B See Pic3:
- Air ventilation setting
- OPERATION
- MAINTENANCE
- Changing the light See Pic 8
- Installing the carbon filter (not supplied), see Pic. 9;
- Trouble shooting
- CORRECT DISPOSAL OF THIS PRODUCT
- GENERAL WARRANTY TERMS
- THE WARRANTY EXPIRES
- TECHNICAL ASSISTANCE
- DECLARATION OF CONFORMITY
Brand : Jocel
Model : JEACV60B
Category : Range hood