JEGA007957 - Range hood Jocel - Free user manual and instructions
Find the device manual for free JEGA007957 Jocel in PDF.


| Product Type | Range Hood (Cooker Hood) |
| Brand | Jocel |
| Model | JEGA007957 |
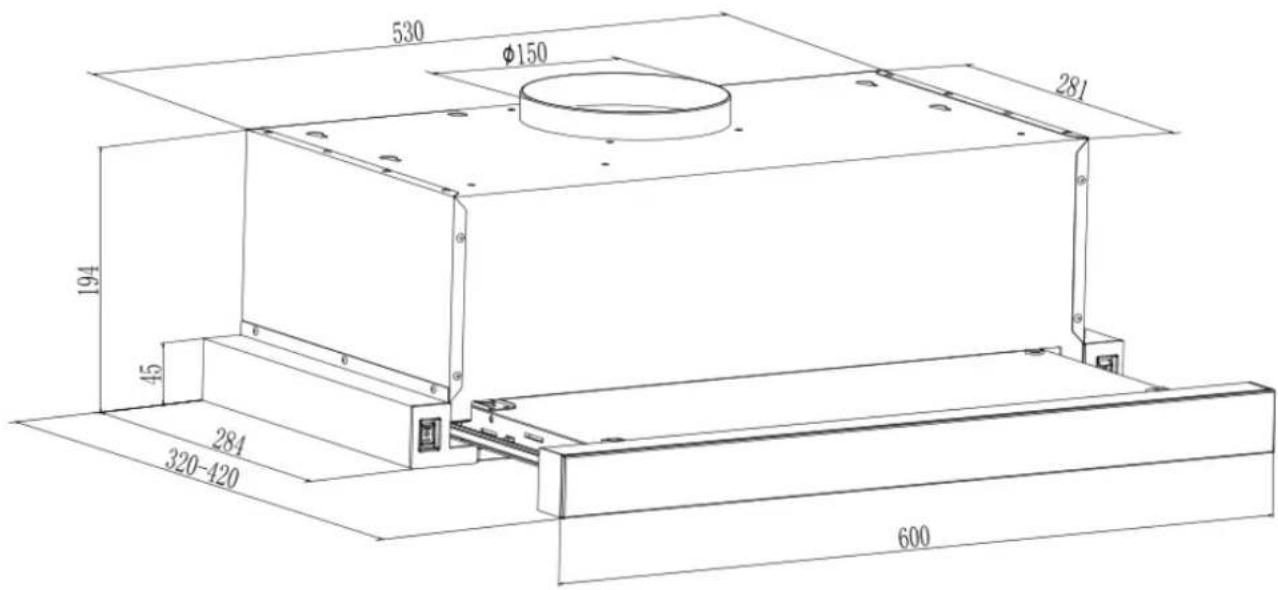
| Width | 600 mm |
| Depth | 530 mm |
| Height | 281 mm |
| Duct Diameter | 150 mm |
| Installation Height Above Cooking Surface | 65-75 cm |
| Power Supply | AC 220-240V, 50Hz |
| Motor Speeds | 2 (High and Low) |
| Control Type | Rocker switch |
| Lighting | On/Off lamp switch |
| Grease Filter | Metal mesh, washable |
| Charcoal Filter | Optional, replace every 2-3 months |
| Exhaust Type | Ducted (recirculation possible with charcoal filter) |
| Installation Type | Under cabinet |
| Material | Stainless steel (presumed) |
| Suitable Use | Home use only; not for commercial |
| Safety Features | Earthing required, shock hazard warning |
| Warranty | Limited warranty (see manual) |
| Compliance | CE, 2014/35/EU, 2014/30/EU |
| Disposal | WEEE recycling (2012/19/EU) |
Frequently Asked Questions - JEGA007957 Jocel
User questions about JEGA007957 Jocel
0 question about this device. Answer the ones you know or ask your own.
Ask a new question about this device
Download the instructions for your Range hood in PDF format for free! Find your manual JEGA007957 - Jocel and take your electronic device back in hand. On this page are published all the documents necessary for the use of your device. JEGA007957 by Jocel.
USER MANUAL JEGA007957 Jocel
CAMPANA EXTRACTORA EXAUSTOR DE GAVETA COOKER HOOD
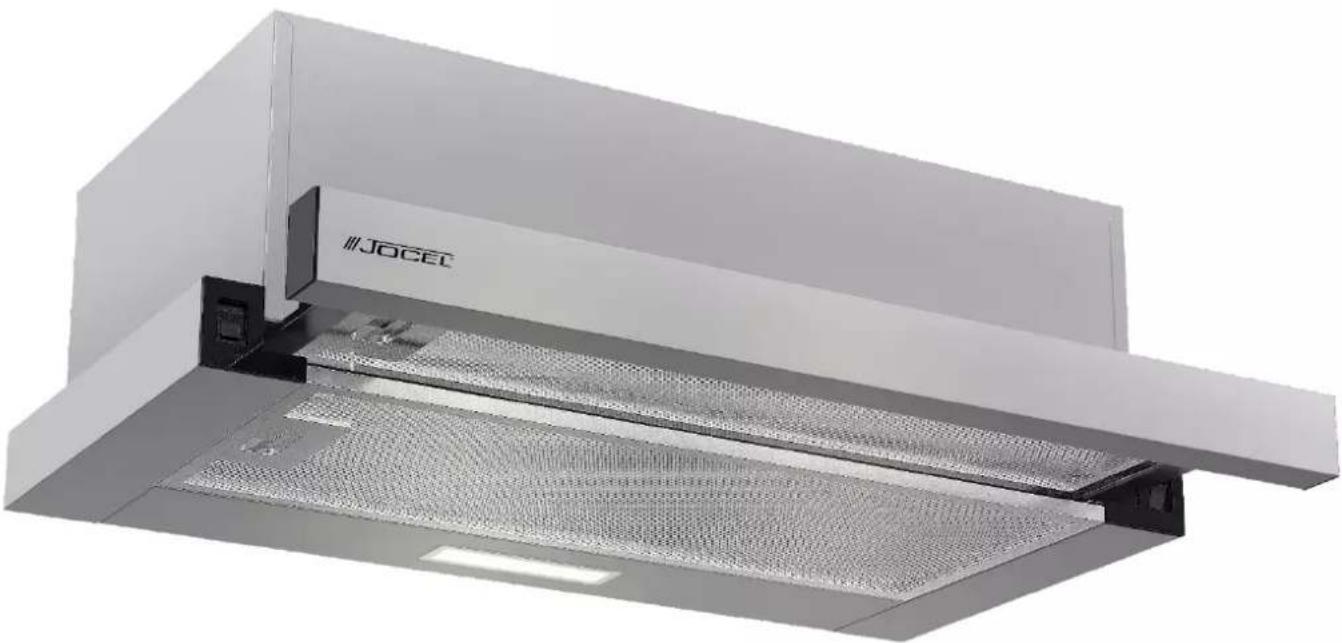
natural_image
Exterior view of a modern kitchen air conditioner unit (no signage or text visible)JEGA007957
MANUAL DE INSTRUCCIONES MANUAL DE INSTRUÇÕES INSTRUCTION MANUAL
DIMENSIONES DEL PRODUCTO
INSTALACIÓN
natural_image
Simple line drawing of a hand holding a small object, with dashed lines indicating hidden edges (no text or symbols)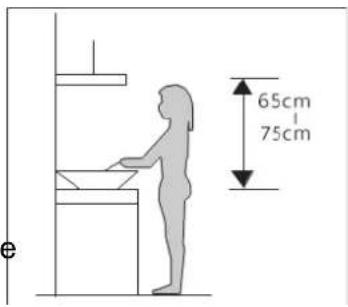
Fig. 1
natural_image
Hand holding a tablet device with a finger pointing at it, enclosed in a circular frame (no text or symbols visible)AVISO DE LIMPIEZA DE LA CAMPANA EXTRACTORA
Telef. 00 34 914 879 573
E-mail: posventa@jocel.es
http://www.jocel.es
SEDE:
Rua Alto do Curro, n.º 280
4770-569 S. COSME DO VALE
V.N. de FAMALICÃO
Telef: 252 910 350/2
Fax: 252 910 368/9
email: jocel@jocel.pt
http://www.jocel.pt
natural_image
Diagram of a hand holding a cylindrical object with dashed outline, labeled 'Figura 4' (no other text or symbols)INSTRUÇÕES DO INTERRUPTOR
Interruptor basculante:
natural_image
Illustration of a hand interacting with a tablet device (no text or symbols visible)AVISO DE LIMPEZA DO EXAUSTOR
PROBLEMAS E SOLUÇÕES
- Never let the children operate the machine.
- The cooker hood is for home use only, not suitable for barbecue, roast shop and other commercial purpose.
- The cooker hood and its filter should be clean regularly in order to keep in good working condition.
- Clean the cooker hood according to the instruction manual and keep the unit from danger of burning.
- Forbid the direct baking from the gas cooker.
- Please keep the kitchen room a good convection.
- Before connecting this appliance check that the power supply cord is not damaged. A damage supply cord must be replaced by qualified service personnel only.
- There shall be adequate ventilation of the room when the range hood is used at the same time as appliances burning gas or other fuels.
- The air must not be discharged into a flue that is used for exhausting fumes from appliances burning gas or other fuels.
• Regulations concerning the discharge of air have to be fulfilled. - Do not flame under the range hood.
- The range hood is not intended to be installed over a hob having more than four hob elements.
- This appliance is not intended for use by persons (including children) with reduced physical, sensory or mental capabilities, or lack of experience and knowledge, unless they have been given supervision or instruction concerning use of the appliance by a person responsible for their safety.
• Children should be supervised to ensure that they do not play with the appliance. - The air must not be discharged into a flue that is used for exhausting fumes from appliances burning gas or other fuels.
- When the range hood and appliances supplied with energy other than electricity are simultaneously in operation, the negative pressure in the room must not exceed 4 Pa (4 x 10⁻⁵ bar).
- CAUTION: Accessible parts may become hot when used with cooking appliances.
- Always disconnect the power supply before cleaning the filter or the appliance exterior or doing maintenance.
ELECTRICAL SHOCK HAZARD
- Only plug this unit into a properly earthed outlet. If in doubt, seek advice from a suitably qualified engineer.
- Failure to follow these instructions can result in death, fire, or electrical shock.
NOTICE
- Thank you for choosing our cooker hood. Please read the instruction manual carefully before use.
- The installation work must be undertaken by a qualified and competent fitter.
- The manufacturer disclaims all liability for any damage or injury caused as a result of not following instructions for installation contained in the following text. The cooker hood is used on AC220-240V, 50Hz.
NOTICE OF INSTALLATION
- Before installation, please ensure the area is clean to avoid suction of the remaining bits of broken wood and dust.
- It cannot share the same air ventilation tube with other appliance such as gas tube, warmer tube, and hot wind tube.
- The bending of ventilation tube should be ≥slant 120^ , parallel or above the start point and should be connected to the external wall.
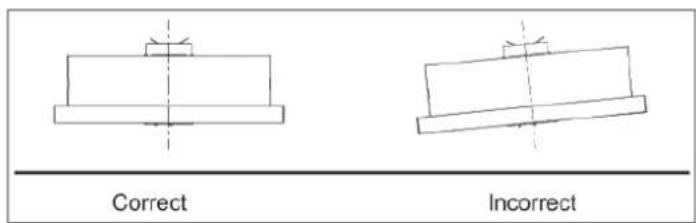
- After installation, make sure that the extractor is level to avoid grease collection at one end.
PRODUCT DIMENSION
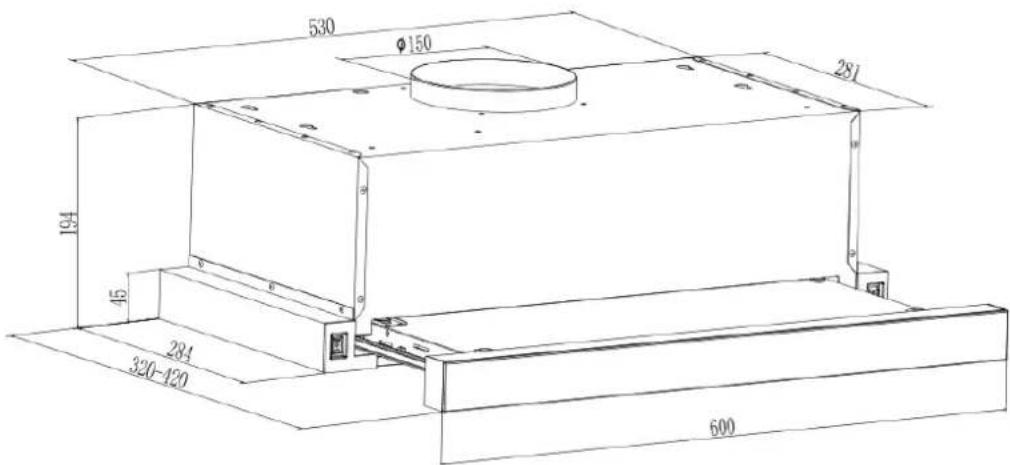
INSTALLATION
- The cooker hood should be placed at a distance of 65-75 cm from the cooking surface for the best effect. See Pic.1.
- Drill 4 holes of ∅ 5mm and one hole of ∅170mm at the bottom of the hanging cupboard according to Pic.2.& Pic.3.
- Open filters, keep the hood in line, insert screws and swelling rubber plug, tighten the screws. Fix filters.
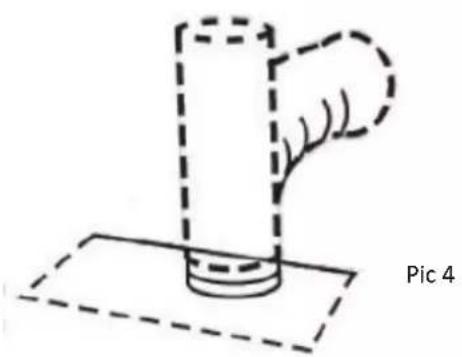
- After the hood has been hung, install the optional flexible outlet duct ( 150 mm) to the vent on the top of the cooker hood(Pic. 4). If required. Insert the second part of the flexible duct in the opening prepared in the wall.
- Plug the power cord into the wall outlet.
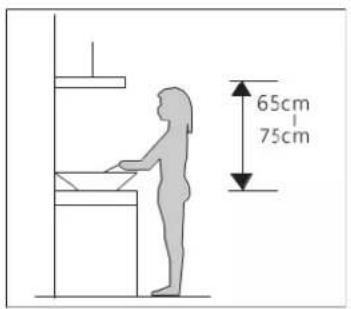
Pic 1
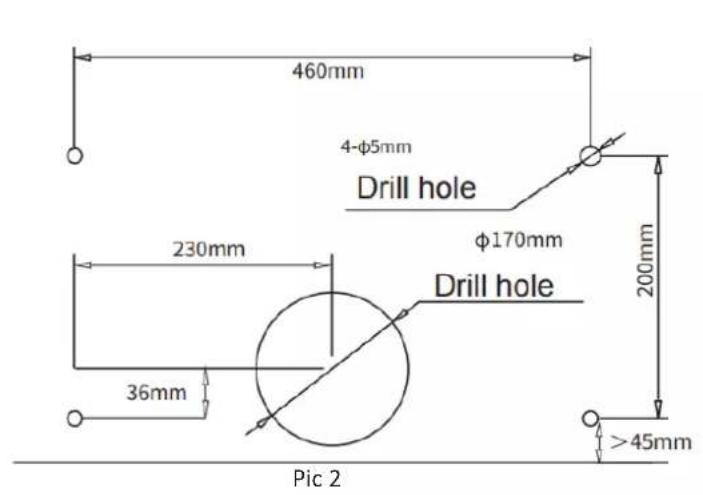
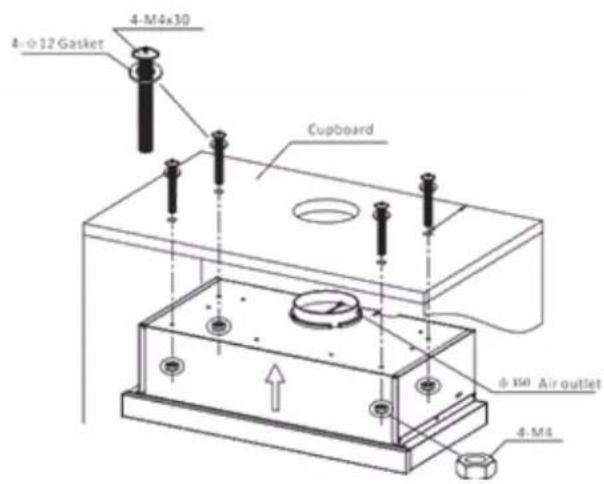
Pic 3
natural_image
Simple line drawing of a hand holding a cylindrical object on a base, with dashed lines indicating hidden edges (no text or symbols)SWITCH INSTRUCTION
Rocker Switch:
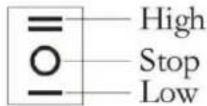
- motor switch
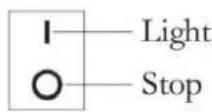
- lamp switch
- Motor switch is with a high and a low speed, the middle is stop button.
- Lamp switch control the lamp on or off.
MAINTENANCE
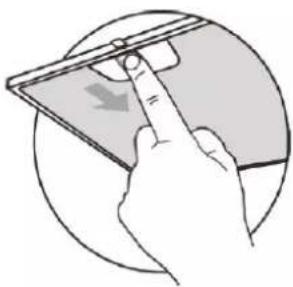
THE CLEANING OF THE GREASE FILTER MESH
Please do not use the corrosive detergent on it. Keeping this filter clean will keep the appliance running correctly. Please strictly follow the guidelines below.
Method 1: Put the mesh into 40-50 c clean water, pour on detergent, and soak for 2-3 minutes. Wear gloves and clean with a soft brush. Please do not apply too much pressure, as the mesh is delicate and will damage easy.
Method 2: If instructed to do so, it can be put into a dishwasher, set the temperature at around 60 degrees.
natural_image
Illustration of a hand interacting with a tablet device (no text or symbols visible)NOTICE OF CLEANING COOKER HOOD
Before cleaning, please remember to cut off power of appliance.
A. To protect the main body from corrosion over a long period of time, the cooker hood should be cleaned with hot water with non corrosive detergent every two months.
B. Please do not use abrasive detergent, or it will damage the body.
C. Keep the motor and other spare parts free from water, as this will cause damage to the appliance.
D. The carbon filter shouldn't be exposed to heat.
CHARCOAL FILTER (TO BE PURCHASED)
The filter contains an active carbon absorbing the smell being discharged. The active carbon will be saturated after some time, hence the absorption capacity will be shortened. This filter cannot be washed or cleaned in any other way.
When the appliance is in common use, the charcoal filter should be replaced every 2-3 months. In case of more frequent frying or deep frying, shorten this interval.
-
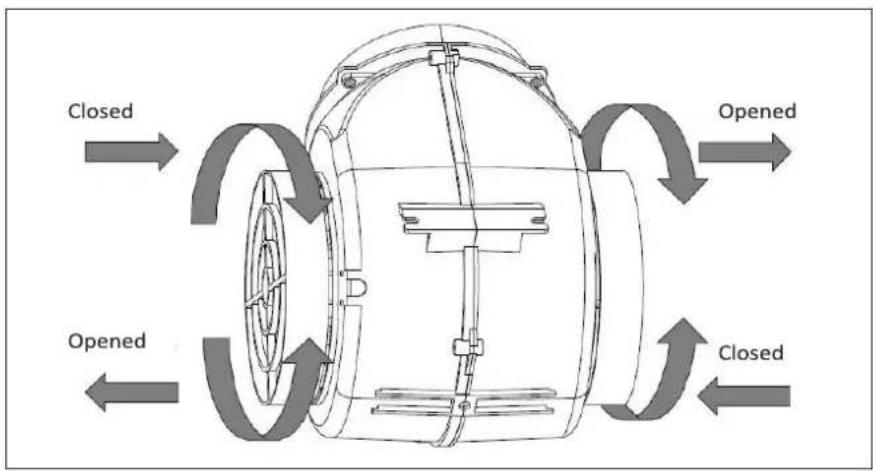
Remove the metal filters.
-
The charcoal filters are situated on both sides of the motor. Turn the filters, until they are secured (see Fig. 2).
-
To replace the charcoal filter, proceed in reverse order.
ABNORMITY AND SOLUTION
| Fault | Cause | Solution |
| Light on, but motor does not work | The leaf blocked | Get rid of the blocking |
| The capacitor damaged | Replace capacitor | |
| The motor jammed bearing damaged | Replace motor | |
| The internal with of motor off or a bad smell from the motor | Replace motor | |
| Light does not work, motor does not work | Beside the above mentioned, check the following: | |
| Light damaged | Replace lights | |
| Power cord looses | Connect the wires as per the electric diagram | |
| Oil drops from the metal grease filter | Heavily fouled filter | Immediately clean or replace the metal grease filter |
| Shake of the body | The leaf damaged and causes shaking | Replace the leaf |
| The motor is not tightly hanged | Lock the motor tightly | |
| The body is not tightly hanged | Fixed the body tightly | |
| Insufficient suction | The distance between the body and the gas top too long | Readjust the distance |
| Too much ventilation from open doors or windows | Choose a new place and resemble the machine | |
| The machine inclines | The fixing screw not tight enough | Tighten the hanging screw and make it horizontal |
| The hanging screw not tight enough | Tighten the hanging screw and make it horizontal | |
ENVIRONMENT PROTECTION
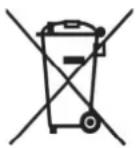
According to the European waste regulation 2012/19/EU this symbol on the product or on its packaging indicates that this product may not be treated as household waste. Instead it should be taken to the appropriate collection point for the recycling of electrical and electronic equipment. By ensuring this product is disposed of correctly, you will help prevent potential negative consequences for the environment and human health, which could otherwise be caused by inappropriate waste handling of this product. For more
detailed information about recycling of this product, please check with your Local Authority or retailer for recycling advice.
GENERAL WARRANTY TERMS
- The warranty is valid only on presentation of invoice of purchase.
- This WARRANTY is limited exclusively to parts substitution ineffective due to faulty manufacture, made in our workshops.
- The elimination of several faults of the scope of the guarantee is made for repair or replacement of defective parts, according to the discretion of our technical services. Defective parts are our property.
- Are not covered under warranty damage caused by transportation, neglect or poor use, improper assembly or installation, as well as external influences such as: lightning strikes or power, flooding, humidity, etc..
- Lose warranty, all appliances that are not being used according to the instructions or connected to FEEDING NETWORKS not guarantee a constant voltage of 220/240V.
- The warranty does not cover damages for personal injury or damage caused directly or indirectly in any capacity whatsoever.
- This warranty terminates when it is found to have been undergoing repairs, alterations or interventions by any person not authorized by Jocel.
THE WARRANTY EXPIRES
- If the appliance has not been installed by an Accredited Technician.
- Exceeded the period for home appliances and for industrial appliances, warranty expires and assistance will be made by charging the costs of manpower, according to current fees.
- With the modification or disappearance of the nameplate of the appliance.
TECHNICAL ASSISTANCE
For technical assistance request, our services are available through the following contacts:
Telef. 00 351 252 910351
Fax: 00 351 252 910367
E-mail: assistencia@jocel.pt
http://www.jocel.pt
DECLARATION OF CONFORMITY
CE
We declare on our own responsibility that the machine indicated below
Product COOKER HOOD
Brand JOCEL
Model JEGA007957
Complies with the following European directives and standards implementation:
Low Voltage
2014/35/EU
EN 60335-1:2012+A11:2014+A13:2017
+A14:2019+A1:2019+A2:2019
+A15:2021
EN 60335-2-31:2014
EN 62233:2008
Electromagnetic Compatibility
2014/30/EU
EN 55014-1:2017+A11:2020
EN 55014-2:2015
EN IEC 61000-3-2:2019
EN IEC 55014-1:2021
EN IEC 55014-2:2021
EN 61000-3-3:2013+A1:2019
MADE P.R.C.
- CAMPANA EXTRACTORA EXAUSTOR DE GAVETA COOKER HOOD
- DIMENSIONES DEL PRODUCTO
- INSTALACIÓN
- AVISO DE LIMPIEZA DE LA CAMPANA EXTRACTORA
- INSTRUÇÕES DO INTERRUPTOR
- Interruptor basculante:
- AVISO DE LIMPEZA DO EXAUSTOR
- PROBLEMAS E SOLUÇÕES
- ELECTRICAL SHOCK HAZARD
- NOTICE
- NOTICE OF INSTALLATION
- PRODUCT DIMENSION
- INSTALLATION
- SWITCH INSTRUCTION
- Rocker Switch:
- MAINTENANCE
- THE CLEANING OF THE GREASE FILTER MESH
- NOTICE OF CLEANING COOKER HOOD
- CHARCOAL FILTER (TO BE PURCHASED)
- ABNORMITY AND SOLUTION
- ENVIRONMENT PROTECTION
- GENERAL WARRANTY TERMS
- THE WARRANTY EXPIRES
- TECHNICAL ASSISTANCE
- DECLARATION OF CONFORMITY
- CE
Brand : Jocel
Model : JEGA007957
Category : Range hood