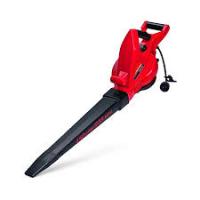
TB197BV - Electric blower/vacuum MTD - Free user manual and instructions
Find the device manual for free TB197BV MTD in PDF.


| Product Type | Corded Electric Blower/Vacuum |
| Brand | MTD |
| Model | TB197BV |
| Power Supply | Mains, 120 V AC, 12 A |
| Motor Type | Electric, Variable Speed |
| Motor Speed (Blower) | 17,000 RPM |
| Motor Speed (Vacuum) | 14,000 RPM |
| Max Airflow (Blower) | 450 CFM |
| Max Air Speed | 240 mph (386 km/h) |
| Mulching Ratio | 16:1 |
| Vacuum Bag Capacity | 45 Liters |
| Weight (Blower Mode) | 3 kg (6 lb 12 oz) |
| Double Insulation | Yes |
| Recommended Extension Cord Length | Up to 50 ft (15 m) with AWG 14 wire |
| GFCI Protection | Recommended on outlet |
| Usage | Domestic, Outdoor |
| Warranty | 2 years limited (parts and labor) |
| Spare Parts Available | Blower tube, nozzle, vacuum tubes, vacuum bag |
| Noise Level | Hearing protection recommended |
| Storage Temperature | Dry place, frost-free |
Frequently Asked Questions - TB197BV MTD
User questions about TB197BV MTD
0 question about this device. Answer the ones you know or ask your own.
Ask a new question about this device
Download the instructions for your Electric blower/vacuum in PDF format for free! Find your manual TB197BV - MTD and take your electronic device back in hand. On this page are published all the documents necessary for the use of your device. TB197BV by MTD.
USER MANUAL TB197BV MTD
Assembly Instructions
Starting and Stopping Instructions
Operating Instructions
Maintenance and Repair Instructions
Cleaning and Storage
Cleaning and Storage Troubleshooting
Troubleshooting Specification
Specifications
Warranty Information
REUSE In an effort to reduce the impact on forests, and reduce carbon and greenhouse gas emissions, MTD is using less paper by reducing the text size of this manual. REDUCE RECYCLE
All information, illustrations and specifications in this manual are based on the latest product information available at the time of printing. We reserve the right to make changes at any time without notice. Copyright © 2010 MTD SOUTHWEST INC, All Rights Reserved.
SAVE THESE INSTRUCTIONS
SERVICE INFORMATION
STOP
DO NOT RETURN THIS
PRODUCT
Please call the Customer Support Department or visit our website for assistance:
U.S.
1-800-828-5500
or
Canada
www.troybilt.com
1-800-668-1238
www.troybilt.ca
DO NOT RETURN THIS UNIT TO THE RETAILER. PROOF OF PURCHASE WILL BE REQUIRED FOR WARRANTY SERVICE.
For assistance regarding the assembly, controls, operation or maintenance of the unit, please call the Customer Support Department. Additional information about the unit can be found on our website.
For service, please call the Customer Support Department to obtain a list of authorized service dealers near you. Service on this unit, both within and after the warranty period, should only be performed by an authorized and approved service dealer. When servicing, use only identical replacement parts.
Before beginning, locate the unit's model plate, which lists the model and serial numbers of your unit. Refer to the sample plate below and copy the information for future reference.
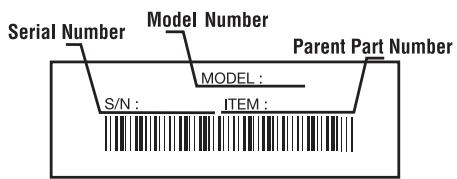
Copy the model and parent part numbers here:
Copy the serial number here:
SAFETY INFORMATION
- SAFETY ALERT SYMBOLS
Safety alert symbols are used to draw your attention to possible dangers. These symbols, and their explanations, deserve your careful attention and understanding. The safety warnings do not by themselves eliminate any danger. The instructions or warnings they give are not substitutes for proper accident prevention measures. These safety instructions are not meant to cover every possible condition that may occur. If questions arise, please call the Customer Support Department at 1-800-828-5500 (U.S.) or 1-800-668-1238 (Canada).
SYMBOL MEANING

DANGER: Signals an EXTREME hazard.
Failure to obey a safety DANGER signal WILL result in serious injury or death to yourself or to others.

WARNING: Signals a SERIOUS hazard.
Failure to obey a safety WARNING signal CAN result in serious injury to yourself or to others.

CAUTION: Signals a MODERATE hazard.
Failure to obey a safety CAUTION signal MAY result in property damage or injury to yourself or to others.
IMPORTANT! Signals special mechanical information.
NOTE: Signals additional important general information.
- IMPORTANT SAFETY INSTRUCTIONS
READ ALL INSTRUCTIONS BEFORE OPERATING

WARNING: When using an electric unit, basic safety precautions should always be followed to reduce the risk of fire, electric shock and injury to persons, including the following.
BASIC SAFETY PRECAUTIONS
-
DO NOT rely exclusively upon the safety devices built into the unit.
-
Please read the entire operator's manual carefully before attempting to assemble, operate or maintain the unit.
-
Follow all safety instructions. Failure to do so can result in property damage or serious injury to yourself and/or others.
-
Be thoroughly familiar with the controls and the proper use of the unit. Know how to stop the unit and disengage the controls quickly.
-
Stay alert! Do not operate the unit when tired, ill or under the influence of alcohol, drugs or medication.
-
Never allow children to operate the unit. Never allow adults to operate the unit without proper instruction.
-
Do not allow the unit to be used as a toy.
- Make sure that all guards and safety attachments are properly installed before operating the unit.
- Keep these instructions. Refer to them often and use them to instruct other users. If loaning someone this unit, also loan them these instructions.
- Keep bystanders, especially children and pets, at least 50 feet (15 m) away. If anyone enters the work area, stop the unit!
- Keep the work area clean. Cluttered areas invite injuries. Do not start the operation until the work area is clear and free from obstructions and there is secure footing.
- Always wear appropriate eye and ear protection when operating this unit. Wear safety goggles, or safety glasses with side shields, that are marked as meeting ANSI Z87.1-1989 standards. Failure to do so could result in serious eye injury caused by thrown objects. If the operation is dusty, wear a facemask or dust mask.
- Dress appropriately. Wear non-slip protective gloves and boots. Do not wear loose clothing, jewelry, short pants, sandals or go barefoot. Secure hair above shoulder level to prevent entanglement in moving parts.
- Only use the unit in daylight or good artificial light.
- Only use the unit for the purpose intended. Only use the unit as described in this manual. Only use the manufacturer's recommended attachments with this unit.
BLOWER / VACUUM SPECIFIC SAFETY PRECAUTIONS
- DO NOT insert anything into the air openings, blower tube or nozzle.
- DO NOT operate the unit if any of the air openings or tubes are blocked.
- DO NOT operate the unit without the blower tubes or vacuum tubes and vacuum bag attached.
- DO NOT use the unit to pick up or spray liquids, especially flammable or combustible liquids, such as gasoline. Do not use the unit in areas where such liquids are present.
- Keep the air openings free from dust, lint, hair and anything else that may reduce airflow.
- Inspect the work area before using the unit. Remove any hard and/or sharp objects, such as metal, glass, wire, etc. If blown, such objects could cause property damage or injury to the operator or bystanders. If vacuumed, these objects can damage the unit.
While Operating the Unit as a Blower
- DO NOT use the unit for spreading chemicals, fertilizer or any other substance that may contain toxic materials.
- DO NOT set the unit down on any surface while the motor is running. Debris can be picked up by the air intake and thrown out the discharge opening, resulting in damage to the unit or property or causing serious injury to bystanders or the operator.
- During operation, never point the unit in the direction of people, pets or windows. Always direct blowing debris away from people, pets and windows.
- Use extra caution when blowing debris near solid objects, such trees, automobiles, walls, fences, etc. When possible, blow away from such objects, not toward them.
- Take care when working near valuable plants. The force of the blown air could damage tender plants.
While Operating the Unit as a Vacuum
DO NOT vacuum wet debris or water. Doing so can damage the unit and cause serious injury to the operator. The unit is designed to pick up dry material, such as leaves, grass, small twigs or bits of paper.
- Avoid situations that could cause the vacuum bag to catch fire. Do not operate the unit near an open flame. Do not use the unit to pick up anything that is burning or smoking, such as cigarettes, matches or hot ashes. Do not vacuum discarded cigars or cigarettes unless the cinders are completely cool.
GENERAL SAFETY PRECAUTIONS
- DO NOT handle the unit, plug(s) or cord(s) with wet hands.
DO NOT over reach. - DO NOT operate the unit on unstable surfaces, such as trees, ladders, slopes or rooftops. Be very careful when using the unit on stairs.
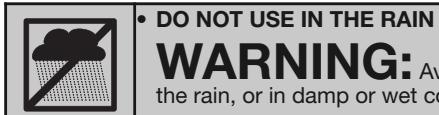
- DO NOT expose the unit to rain. Do not use the unit in damp or wet locations or conditions.
- DO NOT operate the unit on wet surfaces.
- DO NOT use the unit in the presence of flammable liquids or gases.
- DO NOT operate a unit that is damaged, improperly adjusted or not completely and securely assembled. Be sure that the unit stops when the switch is set to OFF. Do not use the unit if the switch does not turn the unit on and off properly. Have defective switches replaced by an authorized service center.
- DO NOT attempt operations beyond the operator's capacity or experience.
- DO NOT operate the unit with one hand when the unit is in vacuum mode! Serious injury to the operator, helpers or bystanders may result from one-handed operation. This unit is intended for two-handed use. Grip the unit firmly with both hands when the motor is running. Keep the left hand on the front handle and the right hand on the rear handle. Use a firm grip with thumbs and fingers encircling the handles.
- DO NOT force the unit. It will do a better, safer job when used at the intended rate.
- DO NOT leave the unit unattended while the unit is connected to the power source. Unplug the unit from the power source when not in use.
- Keep hair, loose clothing, fingers and all other body parts away from openings and moving parts.
- Keep proper footing and balance at all times.
- Always stop the motor when operation is delayed, before setting down the unit or when walking from one location to another. Make sure the unit comes to a complete stop.
- To avoid accidental starting, never carry the unit with fingers on the switch.
- Always make sure the switch is in the OFF position before connecting or disconnecting the unit from the power source.
- Always carry the unit by the central / main handle with the unit disconnected from the power source and finger off the switch.
- This unit is intended for infrequent use by homeowners. It is not intended for prolonged use.
ELECTRICAL SAFETY PRECAUTIONS
- DO NOT abuse the extension cord or the power cord on the unit. Never pull or carry the unit by the cord(s), use the cord(s) as a handle, close a door on a cord, pull the cord(s) around sharp edges or corners or yank the cord(s) to disconnect the unit. Grasp the plug(s), not the cord(s), to disconnect the unit.
- DO NOT modify the power cord, extension cord, power cord plug, extension cord plug or wall outlet in any way.
- DO NOT use multiple extension cords.
- Keep the cords away from oil, water, sharp objects and heated surfaces.
- Keep the cords away from the cutting area and position the cords so that they will not be caught on branches or other obstacles that may bind or entangle the cords during operation.
- Keep the cords away from the operator's feet to prevent tripping.
- Make sure the cords are in good condition. Inspect the power cord and extension cord periodically. Look closely for deterioration, cuts or cracks in the insulation. If the power cord is damaged, have it repaired by an authorized service center. If the extension cord is damaged, replace it. Do not use a damaged cord or plug.
- If the extension cord is damaged in any manner while plugged in, disconnect the extension cord from the receptacle.
- Since the unit is double-insulated, a 2-wire extension cord (one without a ground) may be used. However, a 3-wire extension cord (one with a ground) that uses a NEMA-type connector (parallel blade, U ground) is recommended. Extension cords are available from local retailers. Use only round-jacketed extension cords approved for outdoor use.
- Make sure the extension cord is heavy enough to carry the current drawn by the unit. An undersized cord will cause a drop in line voltage resulting in loss of power and overheating. If in doubt, use the next heavier gauge cord. The smaller the gauge number, the heavier the cord.
| MINIMUM WIRE SIZE FOR EXTENSION CORDS FOR 120 VOLT APPLIANCES USING 12-16 AMPS | ||||
| CORD LENGTH (FEET) | 25 | 50 | 100 | 150 |
| WIRE SIZE (AWG) | 14 | 12 | * | * |
- Cord lengths of 100 or 150 feet are not recommended for units using 12 to 16 amps.

WARNING: To reduce the risk of electric shock, only use extension cords suitable for outdoor use, such as SW-A, SOW-A, STW-A, STOW-A, SJW-A, SJOW-A, SJTW-A or SJTOW-A cord types.
- To reduce the risk of electrical shock, this unit has a polarized plug (one blade is wider than the other) and will require the use of a polarized extension cord. The power cord plug will fit into a polarized extension cord only one way. If the plug does not fit fully into the extension cord, reverse the plug. If the plug still does not fit, obtain another polarized extension cord. A polarized extension cord will require the use of a polarized wall outlet. This plug will fit into the polarized wall outlet only one way. If the plug does not fit fully into the wall outlet, reverse the plug. If the plug still does not fit, contact a qualified electrician to install the proper wall outlet.
- A nameplate on your unit indicates the voltage used. Never connect the unit to an AC voltage that differs from this voltage.
- Ground Fault Circuit Interruption (GFCI) protection should be provided on the circuit(s) or outlet(s) that will be used with the unit. For an extra measure of safety, use receptacles with built-in GFCI protection.
- To reduce the likelihood of disconnecting the extension cord from the unit, be sure to use the cord retainer provided.
- To reduce the risk of electric shock, avoid body contact with grounded conductors, such as metal pipes or wire fences.
SERVICING A DOUBLE-INSULATED UNIT
- This is a double-insulated unit. Two systems of insulation are provided instead of grounding. There is no grounding provided and no means of grounding should be added to the unit. Servicing a double-insulated unit requires extreme care and knowledge of the system and should only be done by qualified service personnel. Replacement parts for a double-insulated unit must be identical to the parts they replace. Failure to have a double-insulated unit repaired by an authorized service technician with identical replacement parts could result in serious injury.
MAINTENANCE AND STORAGE SAFETY
- If the unit is not working as it should, has been dropped, damaged, left outdoors or dropped into water, do not use the unit. Have the unit serviced by an authorized service center.
- All service, other than the maintenance procedures described in this manual, should be performed by an authorized service center. Do not attempt to repair; there are no user serviceable parts inside
- Follow all maintenance instructions in this manual.
-
Before inspecting, servicing, cleaning, storing, transporting or replacing any parts on the unit: 1. Make sure the switch is in the OFF position.
-
Make sure all moving parts have stopped.
- Disconnect the unit from the power source.
-
Allow the unit to cool.
-
Never remove, modify or make inoperative any safety device furnished with the unit.
- Frequently inspect the unit for damage. Before further use, any damaged part should be carefully checked to determine that it will operate properly and perform its intended function. Check for alignment of moving parts, binding of moving parts, breakage of parts and any other conditions that may affect its operation. Damaged parts should be properly repaired or replaced by an authorized service center, unless otherwise indicated in this manual.
- Use only original manufacturer replacement parts and accessories, which are designed specifically to enhance the performance and maximize the safe operation of the product. Failure to do so may cause poor performance and possible injury.
- Be sure to secure the unit while transporting.
- When not in use, store the unit indoors in a locked-up and dry, or high and dry, place to prevent unauthorized use or damage. Keep out of the reach of children.
- Keep the handles dry, clean and free from debris, oil and grease. Clean the unit after each use. Never douse or spray the unit with water or any other liquid. Do not use solvents or strong detergents.
SAFETY AND INTERNATIONAL SYMBOLS
This operator's manual describes safety and international symbols and pictographs that may appear on this product. Read the operator's manual for complete safety, assembly, operating, maintenance and repair information.
SYMBOL MEANING
| · SAFETY ALERT SYMBOL Indicates danger, warning or caution. May be used in conjunction with other symbols or pictographs. |

| ·Wear EYE AND HEARING PROTECTION WARNING: Thrown objects and loud noise can cause severe eye injury and hearing loss. Wear eye protection meeting ANSI Z87.1-1989 standards and ear protection when operating this unit. Use a full face shield when needed. |
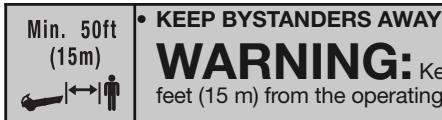
| ·THROW OBJECTS CAN CAUSE SEVERE INJURY WARNING: Keep clear of the blower outlet. Objects can be thrown by the blower. Never point the blower at anyone. |
| ROTATING IMPELLER BLADES CAN CAUSE SEVERE INJURY WARNING: Stop the motor and allow the impeller to stop before opening the vacuum door, installing or changing the tubes or bag, or before cleaning or performing any maintenance. |


| • DOUBLE INSULATED Two systems of insulation are provided instead of grounding. There is no grounding provided and no means of grounding should be added to the unit. |
SAVE THESE INSTRUCTIONS
APPLICATIONS
This unit may be used for the purposes listed below: As a blower:
- Cleaning yards, garages, driveways, porches, patios, sidewalks, around walls, fences, etc.
As a vacuum:
- Picking up leaves, grass and other light debris.
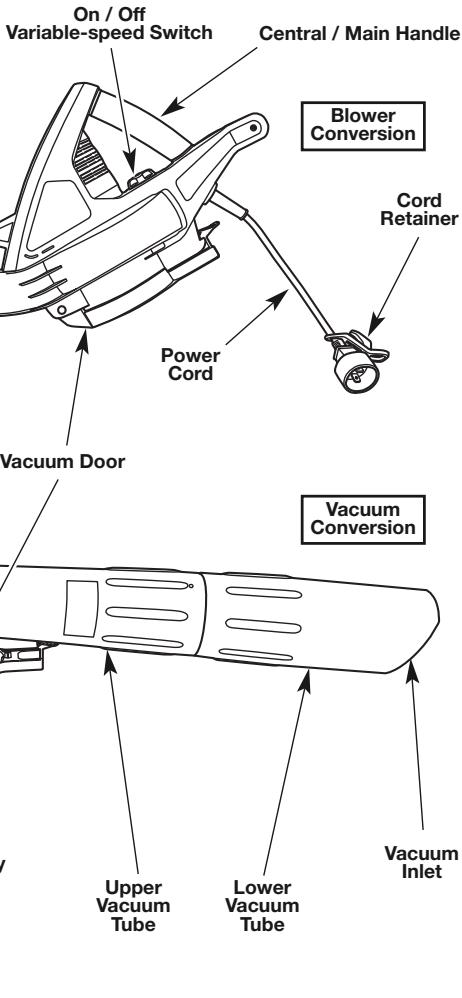
ASSEMBLY INSTRUCTIONS
This unit requires assembly.
UNPACKING
- Carefully remove the product and any accessories from the box.
- Inspect the product carefully to make sure no breakage or damage occurred during shipping.
- Do not discard the packing material until you have carefully inspected and satisfactorily operated the product.
- If any parts are damaged or missing, please call 1-800-828-5500 (U.S.) or 1-800-668-1238 (Canada) for assistance.
BLOWER ASSEMBLY

WARNING: Make sure the unit is disconnected from the power source and the variable-speed switch is in the OFF position before assembling or disassembling any components.
The blower tube and nozzle extend the reach of the blower and concentrate the flow of air it delivers.
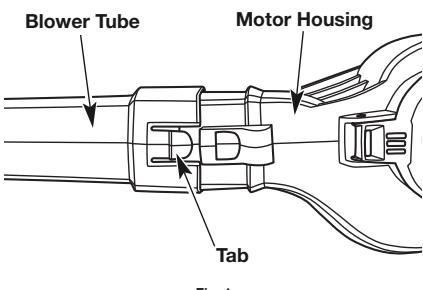
- Slide the widest end of the blower tube over the front opening on the motor housing until the tab on the blower tube is inserted into the opening on the motor housing and locks into place (Fig. 1).
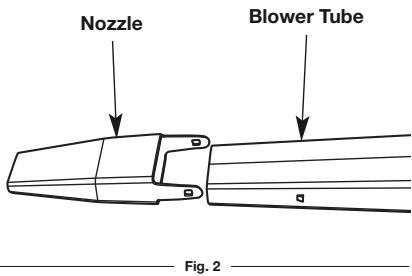
- Slide the nozzle over the end of the blower tube until the latches on both sides of the blower tube and nozzle lock into place (Fig. 2).
NOTE: The blower tube must be used at all times during blower mode to prevent overheating the motor.
VACUUM ASSEMBLY

WARNING: When used as a vacuum, the unit cannot be operated without both the lower and upper vacuum tubes attached. To avoid serious personal injury, do not attempt to use the unit with only one vacuum tube or no vacuum tubes attached.

WARNING: The vacuum bag assembly must be used at all times during vacuum mode to prevent serious personal injury from objects being discharged from the blower outlet and to prevent overheating the motor.
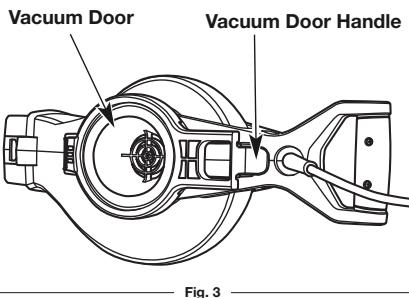
- With the unit off and unplugged, open the vacuum door by pulling the vacuum door handle away from the motor housing (Fig. 3).
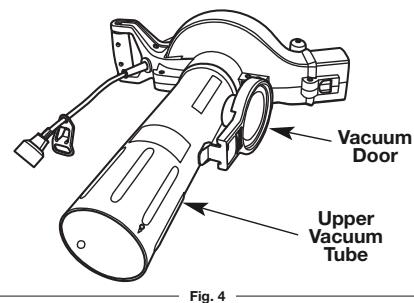
- Align the arrow on the upper vacuum tube with the arrow on the motor housing. Note that the flat section on the upper vacuum tube faces the vacuum door.
- Slide the upper vacuum tube into the motor housing (Fig. 4).
- Turn the upper vacuum tube clockwise with both hands until the dot on the upper vacuum tube aligns with the dot on the motor housing.
- Align the arrow on the lower vacuum tube with the arrow on the upper vacuum tube (Fig. 5).
- Slide the lower vacuum tube into the upper vacuum tube.
- Turn the lower vacuum tube clockwise with both hands until the dot on the lower vacuum tube aligns with the dot on the upper vacuum tube.
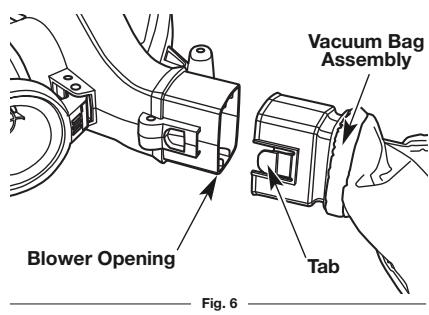
- Insert the blower opening into the vacuum bag assembly until the tab on the vacuum bag assembly is inserted into the opening on the motor housing and locks into place (Fig. 6).
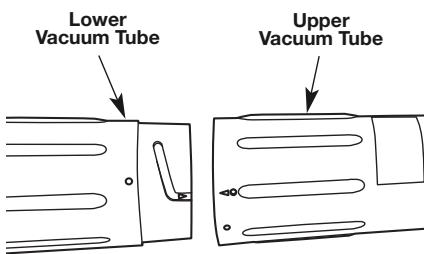
Fig. 5
CONNECTING AND DISCONNECTING THE POWER SOURCE
Follow these instructions in order to avoid injury and to reduce the risk of electric shock or fire:
- Verify that the variable-speed switch is in the OFF position before connecting or disconnecting the power source. Refer to Starting and Stopping Instructions.
- Verify that the unit is disconnected from the power source and the variable-speed switch is in the OFF position before inspecting, adjusting or performing maintenance on any part of the unit.
Connecting the Power Source
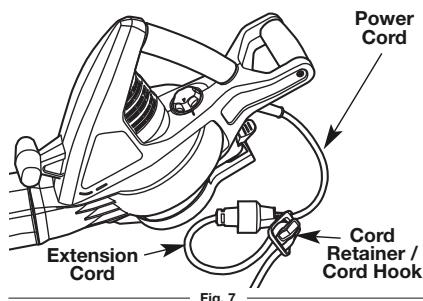
- Connect the power cord plug to the extension cord (Fig. 7).
- Make a narrow loop with the extension cord and push the loop through the lower opening in the cord retainer (Fig. 7).
-
Move the loop onto the cord hook and pull the cord gently to secure the loop over the hook (Fig. 7). This helps prevent accidental disconnection.
-
Connect the extension cord plug to the outlet.
Disconnecting the Power Source
- Disconnect the extension cord plug from the outlet.
- Remove the loop in the extension cord from the cord hook.
- Disconnect the power cord plug from the extension cord (Fig. 7).
STARTING AND STOPPING INSTRUCTIONS
STARTING THE MOTOR
The unit is equipped with a variable-speed switch. 1. Connect the unit to the power source. Refer to Connecting and Disconnecting the Power Source.
2. Turn the variable-speed switch clockwise to start the motor (Fig. 8).
3. Continue turning the variable-speed switch clockwise to increase the motor speed as needed (Fig. 8).
STOPPING THE MOTOR
- Turn the variable-speed switch counter-clockwise to reduce the motor speed. When the variable-speed switch cannot be turned counter-clockwise any more, the motor should stop (Fig. 8).
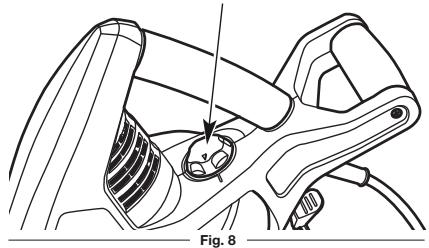
On/Off Variable-speed Switch
OPERATING INSTRUCTIONS

WARNING: Do not allow familiarity with this unit to promote carelessness. Remember that a careless fraction of a second is enough to inflict serious injury.

WARNING: If any parts are damaged or missing, do not operate the unit until the parts are replaced. Failure to heed this warning could result in serious personal injury.

WARNING: Always wear appropriate eye and ear protection when operating this unit. Wear safety goggles, or safety glasses with side shields, that are marked as meeting ANSI Z87.1-1989 standards. Failure to do so could result in serious eye injury caused by thrown objects. If the operation is dusty, wear a facemask or dust mask.

WARNING: Wear non-slip gloves for maximum grip and protection. Refer to the Safety Information section for appropriate safety equipment.
PROPER GRIP ON HANDLE
- Always maintain a proper grip on the handle(s) whenever the motor is running. When using the unit as a blower, hold the unit by the central/main handle. When using the unit as a vacuum, hold the unit firmly with both hands: always keep the left hand on the front handle and the right hand on the rear handle. The fingers should encircle the handle(s) and the thumb(s) should wrap under the handle(s).
PROPER STANCE
- Balance body weight securely, with both feet on solid ground.
WORK AREA PRECAUTIONS

WARNING: Do not expose the unit to rain. Do not use the unit in damp or wet locations or conditions.
- Keep everyone - helpers, bystanders, children and animals - at least 50 feet (15 m) away from the work area. If anyone enters the work area, stop the unit!
- Only operate the unit when visibility and light are adequate to see clearly.
- Use rakes and brooms to loosen debris before operating the unit.
- Remove stones, nails, glass and wire from the area before operating the unit.
- Take care when operating the unit near windows and vehicles.
- To reduce noise levels, operate the unit at the lowest speed needed to do the job.
- Only operate the unit during reasonable hours. Comply with times listed in local ordinances.
- Start the motor. Refer to Starting and Stopping Instructions.
- Hold the unit with the blower outlet several inches above the floor or ground (Fig. 9).
-
Sweep the blower outlet from side to side while slowly advancing, directing the accumulated pile of debris ahead of the operator.
-
Dispose of debris appropriately.
NOTE: Most dry blowing operations are better suited to low speed. High speed is better for moving heavier items such as large debris or gravel.
- Use the blower for trees, shrubs, flower beds and hard-to-clean areas.
- Use the blower around buildings and for other normal cleaning.
- Use the blower for walls, overhangs and screens.
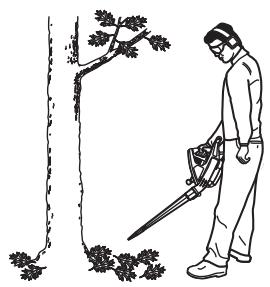
Fig. 9
WARNING: To avoid serious injury, do not wear loose fitting garments, such as scarves, strings, chains or ties, which could be drawn into the air intake. Long hair must be pulled back and secured at the shoulders and neck.

WARNING: To avoid serious injury, never disconnect the vacuum bag without first turning off the motor and disconnecting the unit from the power source.

WARNING: To avoid serious injury, do not vacuum wet debris or water as this may result in damage to the unit and possible electric shock. The unit is designed to pick up dry material such as leaves, grass, small twigs and bits of paper. To avoid severe damage to the impeller, do not vacuum metal, broken glass, etc.

WARNING: When the upper and lower vacuum tubes are removed, always make sure the vacuum door is snapped closed before connecting the unit to the power source. Failure to do so could result in serious injury from the impeller.
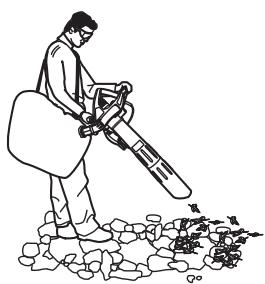
Fig. 10
- Start the motor. Refer to Starting and Stopping Instructions.
- Hold the unit with the vacuum inlet several inches above the floor or ground (Fig. 10).
- Sweep the vacuum inlet from side to side while slowly advancing to collect light debris (Fig. 10). The debris will flow into the vacuum bag. Items such as small leaves and small twigs will be mulched as they pass through the fan housing, allowing the vacuum bag to hold a substantial amount of debris.
- When the vacuum bag is full, suction will noticeably decrease. Stop the motor, disconnect the unit from the power source and then disconnect the vacuum bag from the unit. Unzip the vacuum bag and empty the contents. Dispose of debris appropriately.
Adjusting the Shoulder Strap
- Make sure the variable-speed switch is in the OFF position and the unit is disconnected from the power source.
- With the left hand, hold the unit in an upright position. Support the lower vacuum tube on the ground.
- Place the shoulder harness over the head and onto the left shoulder.
- With the right hand, adjust the shoulder harness until the vacuum bag and shoulder harness are comfortable and well-balanced. Make sure the shoulder harness is adjusted to allow a free flow of air. If the bag is kinked, the unit will not operate properly.

WARNING: Do not let brake fluids, gasoline, petroleum-based products, penetrating oils, etc., come in contact with plastic parts. These chemicals may damage, weaken and destroy plastic, which may result in serious personal injury.
CLEANING INSTRUCTIONS
Cleaning the Motor Housing and Tubes
- Stop the motor and disconnect the unit from the power source.
- Wait for all moving parts to stop. Allow the unit to cool.
- Use a firm-bristled, non-wire, brush or the air discharge of a vacuum cleaner brush to remove debris from the tubes, air openings and impeller.
- Wipe the unit down with a damp cloth. Do not douse the unit with water. Do not use solvents or strong detergents.
Cleaning the Vacuum Bag
Cleaning the vacuum bag helps prevent deterioration and air flow obstruction, which will reduce the performance of the vacuum.
- Wear eye protection and a dust mask when cleaning the vacuum bag.
- Clean the vacuum bag after each use or more often if needed:
-
Empty the vacuum bag.
-
Turn the vacuum bag inside out.
- Vigorously shake out any remaining dust and debris.
-
Turn the vacuum bag right side out.
-
Wash the vacuum bag once per year or more often if needed:
-
Turn the vacuum bag inside out.
- Hang the vacuum bag up.
- Hose down the vacuum bag thoroughly.
-
Hang the vacuum bag up and allow to dry.
-
Turn the vacuum bag right side out.
STORAGE INSTRUCTIONS
- Follow the Cleaning Instructions listed above.
- Store the unit indoors in a dry, high and/or locked location, out of the reach of children and other unauthorized persons.
TROUBLESHOOTING
| THE MOTOR WILL NOT RUN | |
| CAUSE | SOLUTION |
| The cord is not securely connected to the unit or power source | Make sure each plug is securely connected |
| The GFCI in the outlet has tripped (if used) | Reset the GFCI |
| THE MOTOR RUNS, BUT THE UNIT WILL NOT BLOW OR VACUUM | |
| CAUSE | SOLUTION |
| The impeller (fan) is damaged | Have the unit serviced by an authorized service center |
| The tubes, blower opening or impeller is blocked | Clear the blockage. Refer to Clearing a Blocked Tube or Impeller in the Maintenance and Repair Instructions section. |
| The vacuum bag is full | Empty the vacuum bag |
| The vacuum bag is dirty | Clean the vacuum bag |
| The vacuum bag is torn | Replace the vacuum bag |
| The vacuum bag is unzipped | Zip up the vacuum bag |
NOTE: For maintenance beyond the minor adjustments listed above, or for replacement parts, please call the Customer Support Department at 1-800-828-5500 (U.S.) or 1-800-668-1238 (Canada).
SPECIFICATIONS
BLOWER / VACUUM*
| Motor Type | Electric, Cored |
| Motor Voltage | 120 VAC |
| Motor Amperage | 12 Amps |
| Motor Speed | 17,000 rpm (Blower) / 14,000 rpm (Vacuum) |
| Maximum Blower Air Volume | 450 CFM |
| Maximum Blower Air Speed | 240 mph (386 km/h) |
| Mulching Ratio | 16/1 |
| Vacuum Bag Capacity | 1.28 bushels (45 l) |
| Weight (as Blower) | 6 lb 12 oz (3 kg) |
| * All specifications are based on the latest product information available at the time of printing. We reserve the right to make changes at any time without notice. | |
REPLACEMENT PARTS
Part # Description
731-07323. Blower Tube
731-07324 .Nozzle
731-07325 . Upper Vacuum Tube
731-07326 ......... Lower Vacuum Tube
764-04081 .Vacuum Bag Assembly
SAISIE CORRECTE DE LA POIGNEE
MAINTENANCE AND REPAIR INSTRUCTIONS
NETTOYER UN TUBE BOUCHÉ OU UNE HÉLICE BLOQUÉE

The limited warranty set forth below is given by Troy-Bilt LLC with respect to new merchandise purchased and used in the United States, its possessions and territories.
Troy-Bilt LLC warrants this product against defects in material and workmanship for a period of two (2) years commencing on the date of original purchase and will, at its option, repair or replace, free of charge, any part found to be defective in material or workmanship. This limited warranty shall only apply if this product has been operated and maintained in accordance with the Operator's Manual furnished with the product, and has not been subject to misuse, abuse, commercial use, neglect, accident, improper maintenance, alteration, vandalism, theft, fire, water or damage because of other peril or natural disaster. Damage resulting from the installation or use of any accessory or attachment not approved by Troy-Bilt LLC for use with the product(s) covered by this manual will void your warranty as to any resulting damage. This warranty is limited to ninety (90) days from the date of original retail purchase for any Troy-Bilt product that is used for rental or commercial purposes, or any other income-producing purpose.
HOW TO OBTAIN SERVICE: Warranty service is available, WITH PROOF OF PURCHASE THROUGH YOUR LOCAL AUTHORIZED SERVICE DEALER. To locate the dealer in your area, visit our website at www.troybilt.com or www.troybilt.ca, check for a listing in the Yellow Pages, call 1-800-828-5500 in the United States or 1-800-668-1238 in Canada, or write to P.O. Box 361131, Cleveland, OH 44136-0019.
This limited warranty does not provide coverage in the following cases:
A. Tune-ups - Spark Plugs, Carburetor Adjustments, Filters
B. Wear items - Bump Knobs, Outer Spools, Cutting Line, Inner Reels, Starter Pulley, Starter Ropes, Drive Belts
C. Troy-Bilt LLC does not extend any warranty for products sold or exported outside of the United States of America, its possessions and territories, except those sold through Troy-Bilt's authorized channels of export distribution.
Troy-Bilt LLC reserves the right to change or improve the design of any Troy-Bilt Product without assuming any obligation to modify any product previously manufactured
t states do not allow limitations on how long an implied warranty lasts, so the above limitation may not apply to you.)
The pro t t t t t t t t t t t t t t t t t t t t t t t t t t t t t t t t t t t t t t t t t t t t t t t t t t t t
In no event shall recovery of any kind be greater than the amount of the purchase price of the product sold. Alteration of the safety features of the product shall void this Warranty. You assume the risk and liability for loss, damage, or injury to you and your property and/or to others and their property arising out of the use or misuse or inability to use the product.
This limited warranty shall not extend to anyone other than the original purchaser, original lessee or the person for whom it was purchased as a gift.
How State Law Relates to this Warranty: This warranty gives you specific legal rights, and you may also have other rights which vary from state to state.
To locate your nearest service dealer dial 1-800-828-5500 in the United States or 1-800-668-1238 in Canada.
Pour obtaining the distribution of the distribution of the distribution of the distribution of the distribution of the distribution of the distribution of the distribution of the distribution of the distribution of the distribution of the distribution of the distribution of the distribution of the distribution of the distribution of the distribution of the distribution of the distribution of the distribution of the distribution of the distribution of the distribution of the distribution of the distribution of the distribution of the distribution of the distribution of the distribution of the distribution of the distribution of the distribution of the distribution of the distribution of

- SAVE THESE INSTRUCTIONS
- SERVICE INFORMATION
- DO NOT RETURN THIS
- PRODUCT
- DO NOT RETURN THIS UNIT TO THE RETAILER. PROOF OF PURCHASE WILL BE REQUIRED FOR WARRANTY SERVICE
- SAFETY INFORMATION
- SAFETY ALERT SYMBOLS
- SYMBOL MEANING
- IMPORTANT SAFETY INSTRUCTIONS
- BASIC SAFETY PRECAUTIONS
- BLOWER / VACUUM SPECIFIC SAFETY PRECAUTIONS
- WHILE OPERATING THE UNIT AS A BLOWER
- GENERAL SAFETY PRECAUTIONS
- ELECTRICAL SAFETY PRECAUTIONS
- WARNING: TO REDUCE THE RISK OF ELECTRIC SHOCK, ONLY USE EXTENSION CORDS SUITABLE FOR OUTDOOR USE, SUCH AS SW-A, SOW-A, STW-A, STOW-A, SJW-A, SJOW-A, SJTW-A OR SJTOW-A CORD TYPES
- SERVICING A DOUBLE-INSULATED UNIT
- MAINTENANCE AND STORAGE SAFETY
- SAFETY AND INTERNATIONAL SYMBOLS
- APPLICATIONS
- ASSEMBLY INSTRUCTIONS
- UNPACKING
- BLOWER ASSEMBLY
- VACUUM ASSEMBLY
- CONNECTING AND DISCONNECTING THE POWER SOURCE
- CONNECTING THE POWER SOURCE
- STARTING AND STOPPING INSTRUCTIONS
- STARTING THE MOTOR
- STOPPING THE MOTOR
- OPERATING INSTRUCTIONS
- PROPER GRIP ON HANDLE
- PROPER STANCE
- WORK AREA PRECAUTIONS
- ADJUSTING THE SHOULDER STRAP
- CLEANING INSTRUCTIONS
- CLEANING THE MOTOR HOUSING AND TUBES
- CLEANING THE VACUUM BAG
- STORAGE INSTRUCTIONS
- SPECIFICATIONS
- REPLACEMENT PARTS
- PART # DESCRIPTION
- SAISIE CORRECTE DE LA POIGNEE
- MAINTENANCE AND REPAIR INSTRUCTIONS
- NETTOYER UN TUBE BOUCHÉ OU UNE HÉLICE BLOQUÉE
Brand : MTD
Model : TB197BV
Category : Electric blower/vacuum