
DW-D20A - Humidifier SHARP - Free user manual and instructions
Find the device manual for free DW-D20A SHARP in PDF.


| Product Type | Ultrasonic Humidifier |
| Brand | Sharp |
| Model | DW-D20A |
| Dimensions (W x D x H) | Approx. 25.0 x 25.0 x 40.0 cm |
| Weight | Approx. 3.0 kg |
| Power Supply | AC 220-240 V, 50/60 Hz |
| Power Consumption | Approx. 30 W |
| Water Tank Capacity | Approx. 3.5 L |
| Mist Output | Up to 300 ml/h |
| Coverage Area | Up to 30 m² |
| Operation Modes | Continuous, Humidistat, Sleep, Timer |
| Humidistat Control | Yes, with adjustable humidity levels (40-70%) |
| Timer Function | 1-12 hours |
| Filter Type | Replaceable demineralization filter (optional) |
| Noise Level | ≤ 35 dB (Low mode) |
| Safety Features | Auto shut-off when water empty; overheat protection |
| Display | Digital LED with humidity and mode indicators |
| Water Level Indicator | Transparent water tank with level markings |
| Cleaning and Maintenance | Regular descaling required; tank and tray washable with mild detergent |
| Accessories Included | User manual, warranty card |
| Repairability | Spare parts available through Sharp service centers; user-replaceable filter |
| Country of Origin | China |
| Certifications | CE, RoHS |
Frequently Asked Questions - DW-D20A SHARP
User questions about DW-D20A SHARP
0 question about this device. Answer the ones you know or ask your own.
Ask a new question about this device
Download the instructions for your Humidifier in PDF format for free! Find your manual DW-D20A - SHARP and take your electronic device back in hand. On this page are published all the documents necessary for the use of your device. DW-D20A by SHARP.
USER MANUAL DW-D20A SHARP
natural_image
Illustration of a white portable air purifier with a label '空' and 'SPARP' on its side (no other text or symbols)* The number in this technology mark refers to the approximate quantity of tons per cm ^3 of air released from the dehumidifier equipped with a high concentration Plasmacluster on generating unit which was measured at the center point (1.2 meter height above the floor) of high concentration Plasmacluster 7,000 applicable floor area room (temperature 20°C, humidity 50%) when the dehumidifier was placed against the wall and runs in laundry discontaining mode with vertical swing "down" and horizontal swing "oil".

Device of this mark is a trademark of Sharp Corporation. Plasmacluster is a registered trademark or a trademark of Sharp Corporation.
CONTENTS
PAGE
| GETTING STARTED | FEATURES | 2 |
| FAQS | 3 | |
| SAFETY PRECAUTIONS | 4 | |
| PARTS NAME | 8 | |
| BEFORE USE | 10 | |
| HOW TO USE | HOW TO OPERATE | 12 |
| ● LAUNDRY DRYING / DEODORIZING | 12 | |
| ● DEHUMIDIFYING | 13 | |
| ● STOP | 13 | |
| EASY-TO-USE FUNCTIONS | 14 | |
| ● SWING LOUVER | 14 | |
| ● CHILD LOCK | 14 | |
| ● OFF TIMER | 15 | |
| ● PLASMACLUSTER ION ON/OFF | 15 | |
| ● NOTIFICATION SOUND OFF | 15 | |
| HOW TO DRAIN | 16 | |
| ● WATER TANK | 16 | |
| ● CONTINUOUS DRAINAGE | 17 | |
| CARE AND MAINTENANCE | CARE AND MAINTENANCE | 18 |
| ● FILTER/SENSOR | 18 | |
| ● WATER TANK | 19 | |
| ● MAIN UNIT | 20 | |
| ● WHEN NOT USING FOR A LONG PERIOD OF TIME | 20 | |
| WHEN NECESSARY | SPECIFICATIONS | 21 |
| TROUBLESHOOTING | 22 |
Thank you for purchasing this SHARP product.
Please read this Operation Manual carefully for proper usage.
Please be sure to read "SAFETY PRECAUTIONS" before use.
Keep this manual properly for future reference.
FEATURES

A Powerful Dehumidifier with a High Concentration of Plasmacluster Ions for Cleaning, Quick Drying, and Deodorizing Room-dried Laundry

QUICK LAUNDRY DRYING
Quickly dry laundry with maximum air flow, and stop automatically.
LAUNDRY DRYING

ECO LAUNDRY DRYING
Effectively dry laundry by combining dehumidity and ventilation, and stop automatically.
LAUNDRY DRYING
Maintain desired humidity for a pleasant room atmosphere.
AUTO DEHUMIDIFYING

LARGE WATER TANK
Ensure plenty of dehumidification with a 4.2L tank.
Also able to continuously drain.

160° VERTICAL 90° HORIZONTAL \* AUTO LOUVER
Widely dry and dehumidify laundry with wide louvers.
* This shows the air flow range when vertical swing is set to WIDE and horizontal swing is set to ON, which is different from the lower swing range.

- The number in this technology mark refers to the approximate quantity of ions per cm³ of air released from this product which was measured at the center point (1.2 meter height above the floor) of high concentration Piasmcluster 7,000 applicable floor area room (temperature 20°C, humidity 50%) when the dehumidifier was placed against the wall and runs in laundry deodorizing mode with vertical swing "down" and horizontal swing "off".
FAQs

Will the room get warm?

Warm air will be coming out from the front air outlet, and when used in an enclosed room, the room temperature will go up.

I would like to continuously operate the unit in dehumidifying mode. Is continuous drainage possible?

Continuous drainage is possible by using a commercially available hose (inner diameter 15mm). Pages 11, 17

The water does not accumulate in the tank. Is the unit dehumidifying?

When the temperature is high, or when the temperature or humidity is low, air flow mode will operate, and the unit will not dehumidify. The water will not be collected in the tank during this time. Page 22

The sound seems too loud?

There is a sound at the start of operation/during operation/when the unit stops It is the sound of compressor operation or refrigerant (coolant) circulation. Page 23

The CURRENT HUMIDITY display seems wrong?

The CURRENT HUMIDITY display is only for reference. (The value will not necessarily be the same with other devices.) When the humidity suddenly changes immediately after the laundry dry mode starts, the display might be different from the actual humidity. When the humidity is 31% or lower, the display will show [Lo]; and 91% or above will show [Hi].

The air flow seems to get stronger on its own?

Even if the dehumidifying (Auto/Lo) operation is set, the air flow will increase automatically during the following situations: - When the room temperature is 38°C or above ..... (Air flow only) in order to lower the internal temperature. - When the room temperature is 15°C or lower ..... (Air flow only) in order to prevent frost forming inside.

lease read "TROUBLESHOOTING" for further details. Pages 22, 23
SAFETY PRECAUTIONS
To prevent any possible injury to persons or damage to property, be sure to follow the basic safety precautions, including the following:
The degree of injury or damage resulting from incorrect use or operation while ignoring the indicated matters is classified and explained with the following symbols.
WARNING Indicates a potentially hazardous situation which, if not avoided, could result in serious injuries or even death.
CAUTION Indicates a potentially hazardous situation which, if not avoided, could result in injury to persons or damage to property.
■ The precautions to be observed are indicated with the following symbols and signs.
This symbol indicates a prohibited action. This symbol indicates a mandatory action.

WARNING To prevent fire, electric shock or injury
Power Plug, Power Cord

● Do not damage the power cord.
● Do not process, forcibly bend, pull by force, twist or bind the power cord.
● Do not place heavy objects on the power cord, or apply too much force to it.
- Do not damage the power cord while moving the unit on its casters. (Otherwise, fire or electric shock may be caused.)
- Do not plug/unplug the power cord with wet hands. (Otherwise, electric shock may be caused.)
- Do not connect the unit from extension cord or multiple wiring with other electronic appliances. (Otherwise, electric shock, fire or heat may be caused.)
● Do not use other than the rated voltage (220-240V).
- Do not operate or stop the unit by using the power plug. (Otherwise, electric shock or fire may be caused.)

- Make sure there is no dust on the power plug and insert it into the outlet completely. Any dust around the power plug should be wiped off with a dry cloth periodically. (Accumulated dust may result in poor insulation from humidity, etc., thereby causing fire or electric shock.)
During Usage

- Do not put fingers or foreign objects (pin, needle, stick, etc.) into the air outlet or air intake. (The fan is rotating at high speed inside. Injury, electric shock and malfunction may occur.)
- Do not make modifications. Disassembly, repairing, modifications shall not be made by a person other than the service engineer. (Otherwise, fire, electric shock or injury may be caused.)
- Do not place spray cans close to the main unit. Do not use flammable hazardous materials (gasoline, thinner, etc.) near the main unit. (Otherwise, ignition of fire, explosion may occur.)
- Do not directly apply air to human bodies for a long period of time. (Otherwise, sickness or health problem may occur.)
- Do not place the unit near heating appliances. (Otherwise, plastic parts will melt and fire ignition may occur.)
In Case Of An Exception (e.g., burnt smell)

- Be sure to immediately shut down the product, remove its power plug and contact customer service center for repair. (Otherwise, electric shock or fire may be caused.)
- For repairs, please consult the store where you purchased the product or the nearest customer service center. (An incomplete repair may cause electric shock, fire or injury.)
Before Maintenance
- Be sure to shut the unit down and remove its power plug. (The inner fan is rotating at high speed and may cause injury.)
Be sure to follow...


CAUTION
In order to prevent electric leakage and injury, and protect your household goods
Power Plug, Power Cord
● Always hold the power plug. when unplugging the unit. (Otherwise, fire, electric shock, short circuit may be caused.)
- If you are planning not to use the unit for a long time, unplug the power plug from outlet for safety.
(Otherwise, electric shock, electric leakage or fire may be caused.)
During Usage
- Do not knock down or drop the main unit. Do not store or move with the main unit down on its side (Otherwise, equipment damage or malfunction such as water/electric leakage may be caused.)
- Do not use the unit in a tight enclosed space such as closet or in between furniture.
- Do not block the air outlet or air intake. (otherwise, air flow will be obstructed, resulting in overheating or ignition.)
- Do not use the product in a place where it can easily get wet or in the bathroom.
- Do not wash the product directly with water.
- Do not place an object with water such as a vase on top of the main unit.
- For indoor use only. Do not use the unit under direct sunlight or in any location exposed to rain and wind.
- Do not leave the unit where oil or flammable gas may leak. (Otherwise, electric shock, over-heating, electric leakage or fire may be caused.)
- Do not use on a high place such as on the table. (When the main unit falls, injury may be caused.)
- Do not sit on or lean on to the product. (Otherwise, injury may be caused from moving or falling.)
- Do not use the drained water for drinking or feeding. (Otherwise, health problems may be caused.)
- Do not expose the air from this product directly to heating appliances. (Otherwise, incomplete combustion of heating may be caused.)
- Do not use for storage/special purpose for artworks or academic materials. (Otherwise, quality degradation of stored materials may be caused.)
- Do not use for long hours in a room with people. Heat will generate during "(QUICK AUTO/ECO AUTO/CONTINUOUS) laundry drying" "dehumidifying". Increased room temperature and dryness may cause health problems. Look out when the following type of people is in the room. (Baby, children, elderly, person who cannot operate this product.)

● Always have plenty of room around the main unit. (Poor ventilation may cause over-heating, fire, malfunction.)

- This appliance is not intended for use by persons (include children) with reduced physical, sensory or mental capabilities or lack of experience and knowledge, unless they have been given supervision or instruction concerning use of the appliance by a person responsible for their safety.
●Children should be supervised to ensure that they do not play with the appliance.
●Lift up the main unit and move on easily scratched floors like tatami, rough places and thick carpets.
Do not drag the casters to change the direction of the main unit. (Otherwise, floor surface or carpet may be damaged.)
Do not drag the casters to change the direction of the main unit. (Otherwise, floor surface or carpet may be damaged.)
●Before moving the main unit, always stop the operation and dispose the water in the water tank.
- Operate the unit only on level, stable surfaces.
- Check for bent hose/falling height when conducting continuous drainage and place the hose where it will securely drain. (Inner water may leak in the room and dampen the furniture or may cause electric shock/leakage, fire.)
- When using drain hose, make sure the surrounding environment will not fall below freezing point.
- Be sure to clean the product, floor and surroundings when using the product in a same place for a long period of time.

- If there is a noise in TV/radio or radio clock does not display the correct time, move the product away as far as possible. (Otherwise, radio disturbance may be caused.)
PARTS NAME
The device starts when the button with ★ is pressed.
MAIN UNIT AND CONTROL PANEL
Control Panel
Plasmacluster Ion ON/OFF button
Turn Plasmacluster ion operation on/off. Page 15
Plasmacluster lon indicator light (blue)
Lighting -- Plasmacluster lon is running.
CURRENT HUMIDITY display (green)
Displays the current humidity (estimate).
Lo 31% or below
32 90 Current humidity (est.) is disclosed in the unit of 1%
H1 displayed in the unit of 1%. 91% or above.
CHILD LOCK button (Page 14)
Enable/Disable Child Lock
CHILD LOCK indicator light (green)
Lighting... Child Lock is enabled
OFF TIMER button Page 15
Sets the time for OFF TIMER
OFF TIMER indicator light (green)
"2h" lighting ... 2 hours is set for OFF TIMER.
*4h* lighting ... 4 hours is set for OFF TIMER.
'6h' lighting ... 6 hours is set for
operals (Page 11)

Turn horizontal swing of the louver on/off.
HORIZONTAL SWING indicator light (green)
Lighting.....Louver automatically swings right and left.
| DEHUMIDIFY button ★ Page 13 Change the mode of dehumidtyling operation. Dehumidifying mode indicator light (green) Display the operation state. | |
| >0≤ HIGH | |
| >0≤ LOW | |
| >0≤ AUTO | |
Tank FULL indicator light (red) Page 16
Blinking ...... The water drainage tank is full.
STOP button Page 13
Stop the operation.
LAUNDRY button ★ Page 12
Change to laundry operation
mode.
Laundry mode
indicator light (green)
Display the operation status.
BOECEODORZE
CONTRIO
ECO
→30← quick
VERTICAL SWING button Page 14
Switch the vertical swing mode
of the louver
VERTICAL SWING indicator
light (green)
Show the swing status.
Page 14
Light off Off
Light 20
102 UP
30 DOWN
→ 205 WIDE
Front View
Louver (Air Outlet) Page 14
Water tank Pages 16.19

Tank lid
Tank handle
Elept
Do not take off the expanded polystyrene. (Otherwise, the sensor does not detect filling of the tank.)
Water level window
Tank knob

Sensor
(temperature and humidity sensor)

Casters (four)
Back View
Filter (Air Inlet)


natural_image
Illustration of a portable air conditioner unit with ventilation grilles and power plug (no text or symbols)Knob (Both Sides) Page 11
Continuous drainage
hole (Rubber Cap)
Power cord
Power plug
BEFORE USE
WHEN USING FOR THE FIRST TIME
There might be some water left in the water tank from the factory product inspection. This is not a malfunction.

Take out the product from the box
● Always hold the knob and take out from the box.
- Keep the box and packaging materials for future product storage.
● The louver will automatically move and close.

Place it on a level, stable place and insert the power plug into outlet
INSTALLATION LOCATION
Avoid places with direct sunlight.
- May cause deformation or safety device activation.
If there is a noise in TV/radio or radio clock does not display the correct time, move the product away as far as possible.
Level, stable place
● Thick carpel or futon is a very unstable place.
Operate it in a room with temperature from 3°C to 38°C.
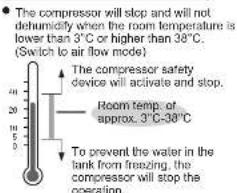

Do not use in the following places
- With a lot of salt such as seaside area.
- With a lot of machine oil.
- With a lot of sulfide gas such as hot-spring area.
- With a lot of steam or oily smokes.
Do not use any cosmetic products * formulated with fluororesin or silicone near the dehumidifier. - Plasmaduster ion may not generate if fluororesin or silicone gets into the main unit.
*Hair care products (hair coating solution, hair mousse, hair treatment), cosmetic products, antiperspirant, antistatic products, waterproof spray, waxing products, glass cleaner, chemical cloth, wax, etc.
WHAT YOU NEED TO KNOW
When moving
1
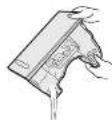
Stop the operation and dispose water in the tank
- Bundle the power cord and hold along with the knob to move. Pulling on the power cord will damage the cord.
-
Knob (both sides)
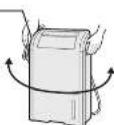
Hold the knob to move

Defrosting
When the room temperature falls below 15^ C, the unit will automatically start defrosting in order to prevent frost from forming inside the main unit.
- Once every 45 minutes, the compressor will stop and "HIGH" air flow mode will operate (for about 12 minutes). The lower the room temperature, the longer the compressor stop time.
●The compressor will stop and will not dehumidify during defrost, and water will not be collected in the tank.
Auto Off function
The operation will stop automatically after 12 hours in case the unit has been forgotten to be turned off. (The OFF TIMER "6h" indicator light blinks)
Start
operating

To operate again, press the STOP button to release the blinking indicator light.
To cancel the Auto Off function (For continuous drainage)
The Auto Off function is set when the power plug is plugged in.
Operation stopped
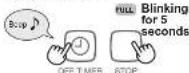
Press both for 3 seconds
●The Auto Off timer will turn off when you press and hold both the OFF TIMER button and STOP button for 3 seconds.
- Once the power plug is pulled, the Auto Off function will be set again.
- Press and hold both OFF TIME button and STOP button for 3 seconds to restart the Auto off function.
It will take about 3 minutes to start dehumidifying again for re-operation
- In order to protect the unit, the compressor will not operate for 3 minutes immediately after plugging in the power plug or stopping (QUICK/ECO/CONTINUOUS) laundry drying/dehumidifying operation. Air flow mode will operate and the unit will not dehumidity.
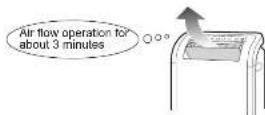
HOW TO OPERATE
LAUNDRY DRYING / LAUNDRY DEODORIZING

desired operation
- "QUICK AUTO" will operate immediately after the power plug is plugged in.
- Unless the power plug is unplugged, the unit will operate in the last mode that was selected.
Auto Operation
QUICK AUTO (Auto Stop)
When you want to dry your laundry quickly
Dry your laundry with "Full Power" air flow. (Dry and dehumidify)
- The operation will automatically stop when the humidity level falls below 55% after about 30 minutes of operation or when the unit has operated for about 3 hours. (A beep will sound when the operation stops and the QUICK indicator light will blink)
ECO AUTO (Auto stop)
When you want to dry your laundry but with less power consumption
Dehumidifying operation (compressor operation) and Air Flow operation (compressor stopped) will alternately repeat with "HIGH" air flow and dry the laundry. ● The operation will automatically stop when the humidity level falls below 60% after about 30 minutes of operation or when the unit has operated for about 3 hours. (A beep will sound when the operation stops and ECO indicator light will blink)
Continuous
When you want to dry your laundry with continuous operation
dry your laundry
continuously with 'Full Power' air flow. (Dry and dehumidify)

Deodorizing
When you want to deodorize your laundry (Air Flow Operation)
Decolorize your laundry with "Full Power" air flow. (Air Flow Operation) ●Plasmacluster ion will be "ON" even if it is set to be "OFF". (Plasmacluster "OFF" is not available.)
1
2

H. SWING

V. SWNG
Select a louver
swing mode
Page 14
Make sure the air
blowing out from air outlet is directly point to your laundry.
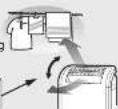
The distance between air outlet and laundry should be 10cm or more.

- Stretch the wrinkles of wet laundry and dry in an airy place.
● Dry thick laundry in a well ventilated place.
- The drying time will be longer for low temperature room, large room, and when the quantity of laundry is large. Auto operation (QUICK AUTO/ECO AUTO) may stop even the laundry has not been dried. Conduct Auto operation again for more drying time.

CAUTION

Do not block the air outlet with clothes
[Otherwise, over-heating, fire or malfunction may be caused]
DEHUMIDIFYING

Select your desired operation
● The unit will operate in AUTO immediately after the power plug is inserted.
● Unless the power plug is unplugged: the unit will operate in the last mode that was selected
1

AUTO When you want to automatically dehumidify
AUTO
The temperature and humidity sensor will adjust the dehumidification amount for proper humidity level according to room temperature. When the room temperature is too low or too high, it might not reach the appropriate humidity level. (Page 22)
| Room temperature | Appropriate humidity |
| 3°C~26°C | 60% |
| 26°C~38°C | 55% |

tuielly dehumidify with "LOW" air flow.
O ≤ LOW
* The air flow might increase depending on the room temperature. Page 3

HIGH
O HIGH
Dehumidify with continuous operation of "HIGH" air flow.
2

H. SWING

V SWING
Select a louver swing mode Page 14
STOP
1

● The indicator light will go off and kouver will shut automatically.
- Run the internal drying operation (laundry deodorizing operation) when planning not to use for a long time. (Page 20)
EASY-TO-USE FUNCTIONS
SWING LOUVER
Do not forcibly move the louver with hands. Otherwise, malfunction may be caused.
RIGHT/LEFT
Swing "ON" Swin


- Press the button and set the louver at the desired position. Then the indicator light turns off.
UP/DOWN
During operation


Louver movement angle: Approx. 160° (Reach of wind: Approx. 180°)
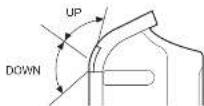
"WIDE" repeats "UP" and "DOWN" movements.
CHILD LOCK
To prevent incorrect operation by children.
ENABLE/DISABLE
"Enable"


- Only the following operations can be performed when the child lock is enabled:
During operation --Stop operation, disabling the child lock.
- Stopped -- Disabling the child lock. The child lock will be disabled when the power plug is unplugged.
OFF TIMER
During operation

Select the desired time

- You will hear a notification sound (Long beep) once the preset time is reached and the operation will stop.
● The OFF TIMER indicator light will change as the operation time progresses. - When the water tank becomes full during off timer operation, the operation will stop but the off timer counting will continue. (You may continue the timer operation after draining.)
● To disable the off timer, press the off timer button and turn the indicator light off (i.e. cancel it).
PLASMACLUSTER ION ON/OFF
Turn the Plasmacluster ion on/off.
During operation
1


NOTIFICATION SOUND OFF (Tank full/End of Off Timer/End of Auto Off function)
Use this function when you do not want the notification sound to sound, such as night time.
1
Operation stoppe


NOTE
will be canceled once the power plug and notification sound will sound.
●A beep will sound and setting is complete.
- When both the VERTICAL SWING button and STOP button are pressed and held for 3 seconds again, "beep beep" will sound and notification sound will be set to sound again.
HOW TO DRAIN
WATER TANK
When the water tank becomes full (approx. 4.2L), the operation will automatically stop (Full tank stop device)
● Laundry Deodorizing may be operated with a full tank. The Tank FULL indicator light (red) will not blink during this time.
- When the water tank is placed back after draining, the Tank FULL indicator light (red) will go off and operation will start again.

1
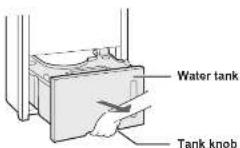
Take out the water tank
- Pull out straight while holding down the main unit.
● Gently pull out and carefully carry without tilting or dropping so no water will spill.

2
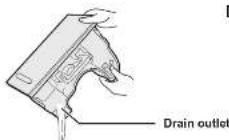
Dispose water
3
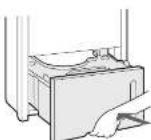
Set the water
tank to the
main unit
- Push In completely. - Gently push in. (Rough handling may cause malfunction.)
NOTE
● Always stop the operation and dispose water before moving the main unit. (Water in the tank may spill and damage household goods.)
Clean the inside of water tank periodically (about once a week). (Falling to clean for a long period of time may increase mold and bacteria which causes bad odor.)
If there is a place you can drain nearby, continuous drainage is possible.

CONTINUOUS DRAINAGE
Important Notices When Using Continuous Draining Operation.
- This dehumidifier is made for household use. When conducting Continuous Drainage, check for dirty filters (once every two weeks) and clogging of drain hoses periodically.
- Place the drain nose where the temperature will not fall below zero.
(When the water in the hose freezes, the water inside the main unit may leak into the room and soak household goods) - Put a net over the hose tip to prevent from insects coming in.
- Auto Off function will operate after 12 hours for Continuous Drainage as well. To release the Auto Off function, please read 'To cancel the Auto Off function' on (Page 11).
How to pipe the hose
Always have Do not bend the tip slanted
Do not put the hose tip into the water.


To stop continuous drainage and restore the original position Take the hose off from drain outlet and put the rubber cap on.
1

The image is too blurry to recognize any text content.


Rubber cap
Unplug the power plug
Take out the water tank and take off the rubber cap on the back side
The image is too blurry to recognize any text content.

3

Press with your right finger

Insert with your left hand Commercial hose inner diameter 15mm (outer diameter up to 21mm)

* Make sure the hose is inserted all the way in.
While pressing the drain stopper with your right finger, run the hose through the continuous drainage hole on the back of the main unit and securely insert into drain outlet
* Do not use an old hose with wide opening. (Otherwise, water may leak.)
4
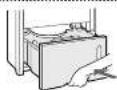
Set the water tank to the main unit
CARE AND MAINTENANCE
We recommend periodical cleaning for a long, clean and sanitary use!

IMPORTANT NOTICES DURING CLEANING
Please use the specified cleaners
Do not use the following. (Otherwise, the surface may be damaged or cracked.)

Thinner
Benzina

Over cleaner
Cleans

Housing and furniture
synthetic emergent

Spray cleanser
Steel wool
FILTER/SENSOR
Once every two weeks
1
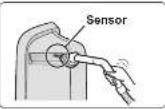

Vacuum cleaner
Remove the dust with vacuum cleaner
For heavy dust
Take off the filter cover
Take the filter off from the cover
Wash off the dust from the net and dry it
(Remove gently with a small brush)
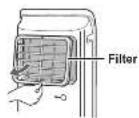

Use mild detergent (dishwashing soap) in lukewarm water for heavier dusts.

Attach the filter to the cover Reattach to the original place
(Securely place the 4 filter tabs)
Tab (4 places)
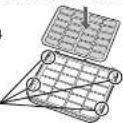

Hole In main unit
Filter tab
- Attach the filter with mark upwards.
NOTE
- Clogged filler may cause reduced dehumidification or consume more electricity.
- Dust will accumulate inside the main unit without the filter which may cause malfunctions.

WARNING
Always turn the operation "OFF" and unplug the power plug.
[Otherwise, electric shock or injury may be caused]
WATER TANK
Once a week
1

Tank lid
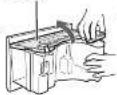
Dispose water and take the tank lid off
- Remove the lid slowly from the corner.
2
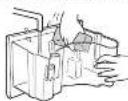
Wash the inside of the tank
- Wash the tank with dishwashing sponge.
- Use mild detergent (dishwashing soap) with lukewarm water if necessary.
3
If float comes off
① Check the direction of float, and then insert the float.
(Magnel: Facing up Facing outside


Dry the tank with soft cloth
- Check to see if the float is securely attached.
4
Tank lid

Put the tank lid on
- Be sure to lightly close the tank lid. (To prevent water leakage)
NOTE
- Be careful not to damage the float.
CARE AND MAINTENANCE
(Continued)
We recommend periodical cleaning for a long, clean and sanitary use!

MAIN UNIT
Once a month
1

Soak a soft cloth in lukewarm water (40°C or lower) or mild detergent to wipe dirt off
- Wipe off any excessive detergent with a damp cloth thoroughly. - Do not forget to clean air inlet, air outlet, and casters as well.
NOTE
- Poor insulation or rust may occur if the main unit gets wet. - When using chemical agent, please follow the direction for use.
WHEN NOT USING FOR A LONG PERIOD OF TIME
1
AUTO ECO DEODORIZE QUICK CONTINUOUS

Conduct internal drying operation (Laundry deodorizing mode)
Internal drying
- Sometimes there are moistures on the cooler inside the main unit. Run the laundry deodorizing operation (air flow mode) for about 2 hours. (Using the OFF TIMER is useful) This will dry the inside of main unit and prevents mold from forming.
2

Dispose water Page 19
● Take the tank lid off and wipe off any water on the tank.
3

Drain outlet
Page 18
4

Store in a dry place with no direct sunlight
- Put in the original box or place a cover (plastic bag) over the unit to prevent dust and store. - If dust get in, the main unit may shoot out dust the next time it is operated.
SPECIFICATIONS
| Model | DW-D20A | |
| Power Supply | 220V-240V/50Hz | |
| Dehumidifying Capacity | 30°C/80%RH | 20L/day |
| 26.7°C/60%RH | 12.5L/day | |
| Power Consumption | 26.7°C/60%RH | 270W |
| Standby Status | 0.45W | |
| Dehumidification Area | 25-50m2 | |
| Water Tank Capacity | Approx. 4.2L | |
| Length of Power Cord | Approx. 1.8m | |
| Dimensions | 374mm(W)*250mm(D)*620mm(H) | |
| Weight | About 15kg | |
- Dehumidifying Capacity: the amount of humidity that a dehumidifier removes from the air in a day when room temperature and relative humidity are kept at 30°C/80%RH and 26.7°C/60%RH respectively.
● Power Consumption: the consumption value when fan speed reaches the highest. - Dehumidifying Area: according to standards of JEMA. ※Standby Status: the power plug is plugged in the socket while the Power ON/Off button is set at "Off".
TROUBLESHOOTING
Please check one more time before calling for services.

During operation
| Problem | Solution | Reference Page |
| The room becomes hot | Warm air will come out from the air outlet during (ECO/QUICK/CONTINUOUS) laundry drying operation and dehumidifying operation, and if used in an enclosed room, the room temperature will go up. | — |
| The unit does not dehumidifyDehumidification amount is low (Water does not accumulate in the tank) | The dehumidification level varies with the size, structure, temperature and humidity level of the room.When room temperature or humidity level is low, the dehumidification level will be low in general.Low humidity of less than 50% cannot be maintained.Air flow mode will operate during auto dehumidifying operation when room temperature or humidity level is low, and the unit will not dehumidify.When the room temperature is below 3°C, air flow mode will operate to prevent the water tank a water from freezing, and the unit will not dehumidify.When the room temperature is higher than 38°C, the protective device will activate, the air flow mode will operate, and the unit will not dehumidify.When the room temperature is 15°C or under, the unit automatically defrosts by switching to air flow mode which makes water harder to collect.Check to see if the unit runs in laundry deodorizing operation.Switch to (ECO/QUICK/CONTINUOUS) laundry drying and dehumidifying operation.Check to see if the filter is clean.If dirty, clean the filter.Check to see if the air outlet or air inlet is blocked.Remove whatever blocks the port. | ——101011—18— |
| The water leaks | Make sure you do not tilt, knock over or drop the main unit.Use the unit at a level, stable place with iron of vibration.Check to see if the hose is disconnected from the drain outlet of the main unit during continuous drainage.Install the hose by pushing it all the way in. | —17 |
| The humidity level does not go down | The room may be too big.The opening/closing of windows and doors may be too frequent.Check to see if anything that release steam is in use such as an oil heater. | ——— |
| Laundry does not dry | Check to see if AUTO mode (QUICK/ECO laundry drying) is operating.The AUTO operation will stop automatically after a maximum of 3 hours.Laundry may not be dried enough depending on the room situation. Operate AUTO mode again or switch to the CONTINUOUS laundry drying operation. | 12 |
| Problem | Solution | Reference Page | |
| Sound | There is a sound at the start of operationiduring operationwhen the unit stops | Buzzing sound...This is the operating sound of the compressor.Whipping, howling sound... This is the sound of refrigerant (coolant) circulation. | 33 |
| The sound is too loud | The unit will sound loudly for the first few seconds upon power-on when the room temperature is low. (This duration will vary with the temperature.)Check to see if the dehumidifier is properly placed on the floor or if the floor is unstable.Use the unit at a level, stable place with free of vibration.Check to see if the filter is clogged.Clean the filter. | 31018 | |
| The unit does not operate | The unit cannot operate Buttons do not work | Check the CHILD LOCK setting.If locked, release the child lock. | 14 |
| The operation stops | Check the power plug.If not inserted, insert the power plug into an outlet.Check to see if there is a power outage.If there is a power outage, wait until the power is resumed. | — | |
| The tank FULL indicator light is blinking | Check to see if the water tank is properly placed.If not, place the water tank correctly.Check to see if the water tank is full.If the tank is full, drain the water.Check to see if the float is properly placed.If not, place the float properly. | 161619 | |
| The OFF TIMER “6h” indicator light is blinkingLong beep | The operation has stopped with the Auto Off function.Press the STOP button to stop the indicator light from blinking, and start the operation again.When using continuously, disable the Auto Off function. | 11 | |
| The tank FULL indicator light and the OFF TIMER "6h" Indicator light are blinking | The water tank became full and the operation has slopped with the Auto Off function.Empty the water tank, press the STOP button to stop the indicator light from blinking, and start the operation again. | 10,16 | |
| The QUICK indicator light is blinkingLong beep | QUICK (AUTO) laundry drying operation has completed and the operation has slopped.Press the STOP button to stop the indicator light from blinking, and start the operation again. | 12 | |
| The ECO indicator light is blinkingLong beep | ECO (AUTO) laundry drying has completed and the operation has slopped.Press the STOP button to stop the indicator light from blinking, and start the operation again. | 12 | |
| Other indicator lights blinking | The unit may malfunction.Please consult the store where you purchased the product or SHARP authorized service center. | — | |
SHARP®
抽濕機
使用說明書
型號
DW-D20A

High-Density 7000
*

natural_image
Illustration of a white portable electronic device with a lid and control panel (no visible text or symbols)感測器(溫濕度感測器)

脚輪(4個)
背面
過濾網(吸入口)
返還網

通滤钢钢罩

手柄(左右两侧)
[Non-Text]
[Non-Text]
连续排水孔
(墨頭)
電源銀
[Non-Text]
電源插頭
使用前
初次使用時


- FEATURES
- QUICK LAUNDRY DRYING
- ECO LAUNDRY DRYING
- LARGE WATER TANK
- 160° VERTICAL 90° HORIZONTAL \* AUTO LOUVER
- FAQs
- SAFETY PRECAUTIONS
- WARNING To prevent fire, electric shock or injury
- Power Plug, Power Cord
- During Usage
- In Case Of An Exception (e.g., burnt smell)
- Before Maintenance
- CAUTION
- PARTS NAME
- MAIN UNIT AND CONTROL PANEL
- Control Panel
- Front View
- Back View
- BEFORE USE
- WHEN USING FOR THE FIRST TIME
- INSTALLATION LOCATION
- Avoid places with direct sunlight.
- Level, stable place
- Operate it in a room with temperature from 3°C to 38°C.
- Do not use in the following places
- WHAT YOU NEED TO KNOW
- Defrosting
- Auto Off function
- The operation will stop automatically after 12 hours in case the unit has been forgotten to be turned off. (The OFF TIMER "6h" indicator light blinks)
- To cancel the Auto Off function (For continuous drainage)
- It will take about 3 minutes to start dehumidifying again for re-operation
- HOW TO OPERATE
- LAUNDRY DRYING / LAUNDRY DEODORIZING
- Auto Operation
- DEHUMIDIFYING
- STOP
- EASY-TO-USE FUNCTIONS
- SWING LOUVER
- RIGHT/LEFT
- UP/DOWN
- CHILD LOCK
- ENABLE/DISABLE
- OFF TIMER
- PLASMACLUSTER ION ON/OFF
- 1
- NOTIFICATION SOUND OFF (Tank full/End of Off Timer/End of Auto Off function)
- NOTE
- HOW TO DRAIN
- WATER TANK
- CONTINUOUS DRAINAGE
- Important Notices When Using Continuous Draining Operation.
- CARE AND MAINTENANCE
- IMPORTANT NOTICES DURING CLEANING
- FILTER/SENSOR
- For heavy dust
- WARNING
- MAIN UNIT
- WHEN NOT USING FOR A LONG PERIOD OF TIME
- Internal drying
- SPECIFICATIONS
- TROUBLESHOOTING
- SHARP®
- 使用說明書
- 背面
- 使用前
- 初次使用時
Brand : SHARP
Model : DW-D20A
Category : Humidifier