
KC-F30J - Humidifier SHARP - Free user manual and instructions
Find the device manual for free KC-F30J SHARP in PDF.


| Product Type | Air Purifier with Humidifying Function |
| Model | KC-F30J |
| Brand | Sharp |
| Dimensions (W x D x H) | 380 x 197 x 570 mm |
| Weight | 7.2 kg |
| Power Supply | 220-240 V, 50/60 Hz |
| Fan Speed Settings | MAX, MED, SLEEP (AUTO also available) |
| Airflow (Clean Air Mode) | MAX: 180 m³/h, MED: 125 m³/h, SLEEP: 52 m³/h |
| Power Consumption (Clean Air Mode) | MAX: 27 W, MED: 12 W, SLEEP: 4.1 W |
| Noise Level (Clean Air Mode) | MAX: 48 dBA, MED: 38 dBA, SLEEP: 21 dBA |
| Humidification Rate (Clean Air & Humidify Mode) | MAX: 350 mL/h, MED: 280 mL/h, SLEEP: 140 mL/h |
| Recommended Room Size (Humidification) | Up to 21 m² |
| Recommended Room Size (Plasmacluster Ions) | Up to 17 m² |
| Humidifying Tray Capacity | 1.8 L |
| Filters | Pre-Filter, HEPA Filter (99.97% at 0.3 µm), Deodorizing Filter, Humidifying Filter |
| Plasmacluster Ion Generation | High-Density 7000 (ions/cm³) |
| Sensors | Dust, Temperature & Humidity |
| Cord Length | 2.0 m |
| Auto Restart | Yes (after power failure) |
| Off Timer | 1, 2, 4, or 8 hours |
| Clean Ion Shower Mode | 60 minutes (high-density ions + strong airflow) |
| Light Control | Can turn off front panel indicators |
| Filter Life (HEPA/Deodorizing) | Approximately 2 years |
| Filter Life (Humidifying) | Approximately 5 years |
Frequently Asked Questions - KC-F30J SHARP
User questions about KC-F30J SHARP
0 question about this device. Answer the ones you know or ask your own.
Ask a new question about this device
Download the instructions for your Humidifier in PDF format for free! Find your manual KC-F30J - SHARP and take your electronic device back in hand. On this page are published all the documents necessary for the use of your device. KC-F30J by SHARP.
USER MANUAL KC-F30J SHARP
HIGH-DENSITY 7000 *
"Plasmacluster" and "Device of a cluster of grapes" are trademarks of Sharp Corporation.

natural_image
Line drawing of a white electronic device with control panel and ventilation slots (no text or symbols)Free standing type
AIR PURIFIER with Humidifying Function OPERATION MANUAL
*The number in this technology mark indicates the approximate number of ions supplied into 1 cm ^3 of air, which is measured around the center of a room (with the "High-Density Plasmacluster 7000" applicable floor area), at a height of 1.2m above the floor, at the MAX wind volume setting in air purifying mode, and when a humidifier & air purifier or an air purifier using the high-density plasmacluster ion evolving device is placed close to a wall. This product is equipped with a device of corresponding capacity.
Before operating your new air purifier, please read the following
The air purifier draws in room air through the air intake, circulates it through a Pre-Filter, a Deodorizing Filter and a HEPA Filter inside the unit, and then discharges it through the air outlet. The HEPA Filter can remove 99.97% of dust particles as small as 0.3 microns that pass through the filter and also helps absorb odors. The Deodorizing Filter gradually absorbs odors as they pass through the filter.
Some odors absorbed by the filters will break down over time, causing additional odors. Depending on usage conditions, and especially if the product is used in environments significantly more severe than a normal household, these odors may become noticeable sooner than expected. If these odors persist, replace the filters. (Ref. E-14)
NOTE
- The air purifier is designed to remove air-suspended dust and the odors. The air purifier is not designed to remove harmful gases such as carbon monoxide contained in cigarette smoke. The air purifier may not completely remove an odor if the source of the odor is still present.

ENGLISH
FEATURES
A Unique Combination of Air Treatment Technologies
Triple Filtration System + Plasmacluster + Humidification
TRAPS DUST*
Pre-Filter traps dust and other large airborne particles.
DECREASES ODORS
Deodorizing filter absorbs many common household odors.
REDUCES POLLEN & MOLD*
HEPA filter traps 99.97% of particles as small as 0.3 microns.
FRESHENS
By emitting a balance of positive and negative ions, Plasmacluster air treatment is a natural process.
HUMIDIFIES
Can operate up to 5 hours per filling.**
*When air is circulated through the filter system. **Room size: up to 16 m²
Sensor technology continuously monitors air quality and automatically adjusts operation based on air purity and humidity level.
CONTENTS
IMPORTANT SAFETY INSTRUCTIONS ..... E-2
PART NAMES.....E-4
PREPARATION.....E-6
OPERATION......E-8
USEFUL FUNCTION ......E-9
CARE AND MAINTENANCE ...... E-11
TROUBLESHOOTING ...... E-16
SPECIFICATIONS..... E-17
FOR CUSTOMER ASSISTANCE ...... E-18
IMPORTANT SAFETY INSTRUCTIONS
Always follow basic safety precautions when using electrical appliances, including the following:
WARNING - Always observe the following to reduce the risk of electrical shock, fire, or injury:
- Read all instructions before using the unit.
- Use only a 220-240 volt outlet.
- Do not use the unit if the power cord or plug is damaged or if the connection to the wall outlet is loosened.
- Periodically remove dust from the power plug.
- Do not insert fingers or foreign objects into the air intake or air outlet.
- When removing the power plug, always hold the plug and never pull the cord. Failure to do so can cause a short circuit resulting in electrical shock or fire.
- Do not remove the plug when your hands are wet.
- Do not use this unit near gas appliances or fireplaces.
- Always unplug the unit when refilling the Humidifying Tray, cleaning the unit, or when the unit is not in use. Failure to do so can cause a short circuit resulting in electrical shock or fire.
- In order to avoid safety hazards, if the power cord is damaged, it must be replaced by either the manufacturer, a service agent, a Sharp authorized Service Center or a similarly qualified service provider.
- Only a Sharp Authorized Service Center should service this air purifier. Contact the nearest Service Center for any problems, adjustments, or repairs.
- Do not operate the unit in rooms where aerosol insecticides are present. Do not operate the unit in rooms where there is oily residue, incense, sparks from lit cigarettes, or chemical fumes in the air. Do not operate the unit in places where it may get wet, such as a bathroom.
- Be cautious when cleaning the unit. Strong corrosive cleansers can damage the exterior.
- When carrying / moving the unit, first remove the Humidifying Tray, and then hold the unit by the handles on both sides.
- Carrying / moving the unit when there is water in the Humidifying Tray can cause the following:
- Electrical shock.
- Damage to the unit caused by internal spillage.
- Water spillage.
- Do not drink the water in the Humidifying Tray.
- Replace the water in the Humidifying Tray daily with fresh tap water, and regularly clean it (Ref. E-12 and E-13). When the unit is not in use, dispose of the water in the Humidifying Tray. Leaving water in the Humidifying Tray can cause mold, bacteria, and bad odors. In rare cases, such bacteria can be a health hazard.
- This appliance is not intended for use by persons (including children) with reduced physical, sensory, or mental capabilities, nor by persons with insufficient experience and knowledge of how to operate the unit, unless they are given proper supervision and instruction on how to use the unit by a person responsible for their safety. Do not allow children to play with the unit.
NOTE - What to do if the unit interferes with radio or TV reception
If the air purifier interferes with radio or television reception, try one or more of the following measures:
- Adjust or reposition the receiving antenna.
- Increase the distance between the unit and the radio or TV.
- Connect the equipment into an outlet on a circuit different from that of the radio or TV receiver.
- Consult the dealer or an experienced radio/TV technician for help.
CAUTIONS CONCERNING OPERATION
- Do not operate the unit without the filters and the Humidifying Tray properly installed.
- Keep the unit away from water.
- Do not wash and reuse the HEPA filter and Deodorizing filter.
Doing so will not improve filter performance and can also cause electric shock or operating malfunctions.
- Clean the exterior with a soft cloth only.
Do not use volatile liquids or detergents. Doing so can damage or crack the exterior of the unit. In addition, doing so can cause sensor malfunctions.
- The frequency of descaling maintenance will depend on the hardness of and the impurities in the water that you use; the harder the water the more often descaling will be necessary.
- Before moving the unit, make sure it is not operating, and remove the Humidifying Tray while holding the side handle of the unit.
- When removing / reattaching the Humidifying Tray, be careful not to get your fingers caught inside the unit.
- When moving the unit, use the handles on both sides.
Do not move the unit when it is in operation.
- Do not block the air intake or air outlet.
- Do not place the unit near or on hot objects, such as stoves or heaters, or where it may come into contact with steam.
• Always operate the unit in an upright position.
INSTALLATION GUIDELINES
- When using the unit, place it at least 2 meters away from equipment that emits electric waves, such as televisions or radios, to avoid electrical interference.
- Avoid locations where the sensors are exposed to direct wind.
Failure to do so can cause the unit to malfunction.
- Avoid locations where furniture, fabrics, or other objects can come in contact with the unit and interfere with the intake and outtake of air.
- Avoid locations where the unit is exposed to condensation or drastic changes in temperature. Appropriate room temperature is between 0 – 35 °C.
- Place the unit on a level and stable surface with sufficient air circulation.
When placed on heavy carpet, the unit may vibrate slightly.
Place the unit on a level surface to avoid water leakage from the Humidifying Tray.
- Avoid locations that generate grease or oily smoke.
Failure to do so can cause the unit exterior to crack and the sensors to malfunction.
- The dust collecting ability of the unit is effective even when the unit is as close to 3 cm from the wall, the surrounding walls and floor may get dirty. Please place the unit at a distance from the wall.
The wall directly behind the air outlet may become dirty over time. When using the unit for an extended period of time at the same location, periodically clean the walls adjacent to it.
FILTER GUIDELINES
- Follow the instructions in this manual for proper filter care and maintenance.
PART NAMES
FRONT / BACK
FRONT

BACK

| 1 | Operation Panel / Display (Ref.E-5) | 9 | Humidifying Tray |
| 2 | Handle (2 Locations) | 10 | Float |
| 3 | Main Unit | 11 | HEPA Filter |
| 4 | Air Outlet | 12 | Deodorizing Fiter |
| 5 | Filter Frame | 13 | Sensor (internal) |
| 6 | Humidifying Filter | 14 | Back Panel (Pre-Filter) |
| 7 | Float (in Filter Frame) | 15 | Air Inlet |
| 8 | Tray Handle | 16 | Power Cord / Plug |
flowchart
graph TD
    A["60°C"] --> B["Display"]
    B --> C["60°C"]
    C --> D["Humidity Light"]
    D --> E["Green: Humidify ON"]
    D --> F["Green: Unit needs water (Flashing)"]
    D --> G["Off: Humidify OFF"]
    H["MODE"] --> I["DUST SIGN"]
    J["ON/OFF (Press 3 sec.)"] --> K["DUST SIGN"]
    L["ON/OFF (Press 3 sec.)"] --> M["DUST SIGN"]
    N["CLEAN ON SHOWER"] --> O["DUST SIGN"]
    P["Dust Sign"] --> Q["Indicates the air purify level 3 colors."]
    R["Humidity / Temperature monitor"] --> S["Temperature 0 to 50°C is displayed at 1°C-intervals"]
    S --> T["-1°C or less 51°C or more"]
    T --> U["humidity 6 to 99% is displayed at 1%-intervals"]
    U --> V["6 % 55 % 99 %"]
| 1 | POWER ON/OFF Button | 5 | OFF Timer Button |
| 2 | CLEAN ION SHOWER Button/ Indicator Light (green) | 6 | Display Select Button |
| (Press 3 sec.) LIGHT ON/OFF Button (Press 3 sec.) FILTER RESET Button | |||
| 3 | MODE Button | 7 | Filter Indicator Light (Orange) |
| (Press 3 sec.) Plasmacluster Ion ON/OFF Button | 8 | Plasmacluster Ion Indicator Light (blue) | |
| 4 | Fan Speed Indicator Lights (green) | 9 | OFF Timer Indicator Light (green) |
PREPARATION

Always be sure to remove the power plug from the wall outlet.
FILTER INSTALLATION
1
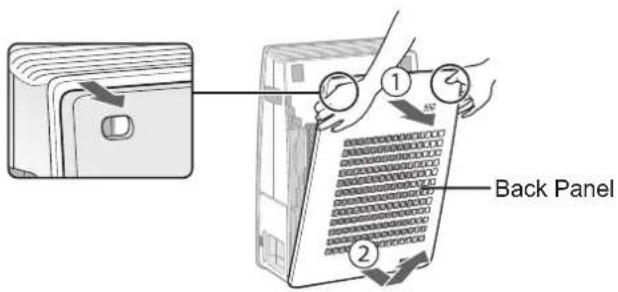
Remove the Back Panel.
2

natural_image
Diagram of a grid structure with an upward arrow, no text or symbols presentDeodorizing filterHEPA filter

natural_image
Diagram of a rectangular object with an upward arrow, resting on a surface (no text or symbols)Remove the Filters from the plastic bag.
3
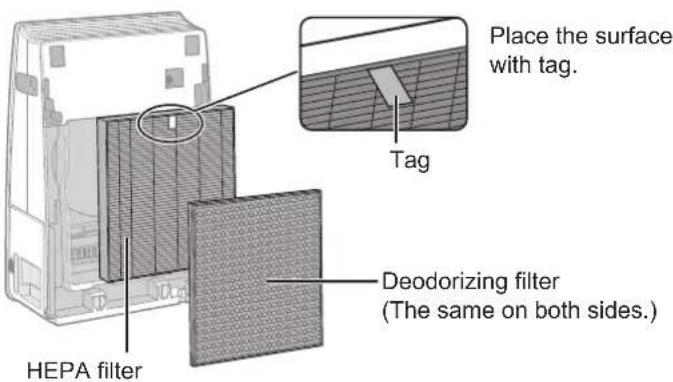
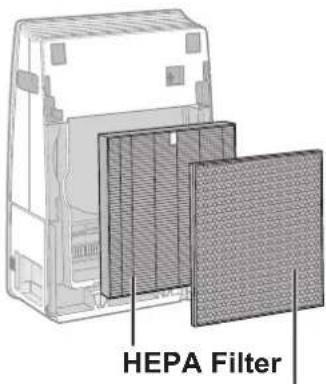
Install the Filters in the correct order as shown.
4

Install the Back Panel.
E-6
Humidify air passed through by vaporizing water pumped up from Humidifying Tray. The unit can be used even without water in the Humidifying Tray.
1

Pull out the Humidifying Tray.
CAUTION
Clean the Humidifying Tray if it becomes dirty or there is a noticeable odor. (Ref. E-12, E-13)
2
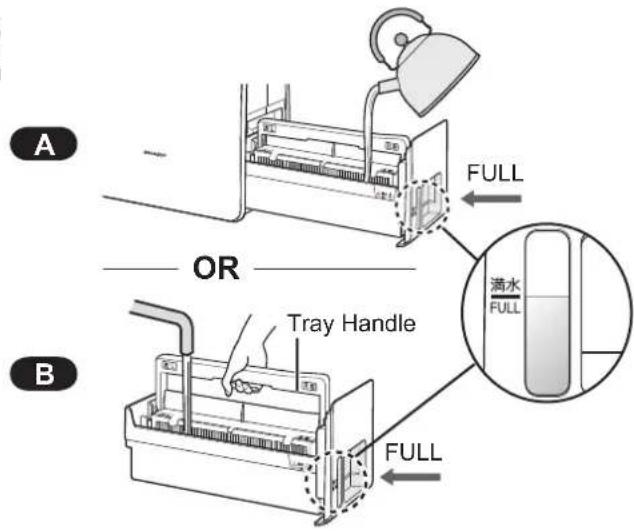
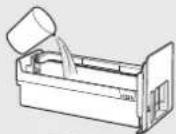
Fill the Humidifying Tray with tap water by method A or B.
CAUTION
• The Filter Frame is floated up when water is filled.
- When carrying the Humidifying Tray, hold it with both hands or grip the Tray Handle.
• Gently fill it with water to avoid splashing water.
- Do not fill beyond the "FULL" indicator. The Humidifying Tray will not fit into the unit if it is filled above the 'FULL' indicator.
3

natural_image
Illustration of a device being inserted into a rack, showing internal components and an arrow indicating insertion (no text or symbols present)Install the Humidifying Tray.
CAUTION

- Return the Tray Handle to its original position before installing.

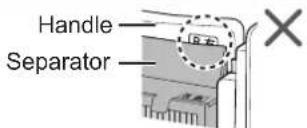
Locate the Handle in front of Separator.
Do not locate the Handle on or behind Separator.
CAUTION
- Do not expose the unit to water. Doing so can cause a short circuit or electrical shock.
- Use only fresh tap water. Using other water sources risks the growth of molds, fungi, or bacteria.
- Do not use hot water (40 °C), chemical agents, aromatic substances. Doing so can deform the unit or cause it to malfunction.
- When removing and installing the Humidifying Tray, be careful not to spill any water.
OPERATION
Power ON / OFF
START STOP
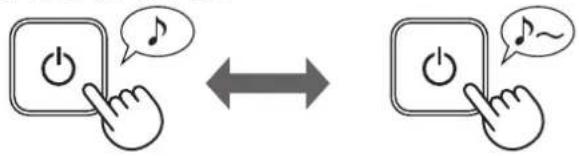
- Select the desired fan speed by MODE
- Unless the power cord has been unplugged, the operation starts in the previous mode it was operated in.
CLEAN ION SHOWER
Releases high-density Plasmacluster ions and discharges strong air flow for 60 minutes.
START
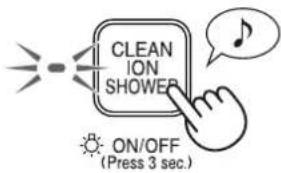
NOTE
- When the operation finishes, the unit will return to the prior operation mode. It is able to change the other mode during this mode.
FAN SPEED
Select the desired fan speed.


flowchart
graph LR
    A["→ AUTO"] --> B["→ *"]
    B --> C["→"]
    C --> D["→"]
    D --> E["→"]
NOTE
SLEEP

- Front surface Indicators go off automatically.
AUTO

- The fan speed is automatically switched between HIGH and LOW depending on the humidity and the amount of impurities in the room.
USEFUL FUNCTION
LIGHT CONTROL
You can set the front surface Indicators to OFF when the Indicator is too bright.

Plasmacluster Ion ON/OFF
When Plasmacluster Ion is ON, the Plasmacluster Ion Indicator Light is on. (blue)

flowchart
graph LR
    A["MODE ON/OFF (Press 3 sec.)"] -->|Press more than 3 seconds.| B["MODE ON/OFF (Press 3 sec.)"]
    B -->|Press more than 3 seconds.| C["NOTE ON OFF"]
Changing display (humidity / temperature)
You can select either humidity or temperature at the time to be displayed.
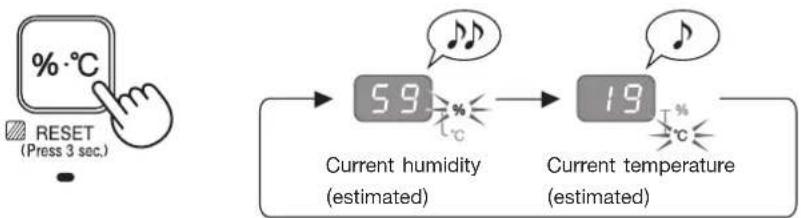
flowchart
graph LR
    A["RESET (Press 3 sec.)"] --> B["5.9 %"]
    B --> C["1.9 %"]
    C --> D["Current humidity (estimated)"]
    C --> E["Current temperature (estimated)"]
NOTE
Current temperature and current humidity indicate the estimated values.
The values may be different from values indicated by other temperature gauge hygrometer.
• There is no function for adjusting the temperature.
• Humidity setting cannot be adjusted.
- Cannot dehumidify.
USEFUL FUNCTION
Off TIMER
Select the length of time you want. The unit automatically stops once the selected time is reached.


flowchart
graph LR
    A["1H"] --> B["2H"]
    B --> C["4H"]
    C --> D["8H"]
    D --> E["CANCELLATION"]
    F["+"] --> G["-"]
    H["+"] --> I["-"]
    J["+"] --> K["-"]
    L["+"] --> M["-"]
    N["+"] --> O["-"]
    P["+"] --> Q["+"] & R["+"] & S["+"] & T["+"] & U["+"] & V["+"] & W["+"] & X["+"] & Y["+"] & Z["+"] & AA["+"] & AB["+"] & AC["+"] & AD["+"] & AE["+"] & AF["+"] & AG["+"] & AH["+"] & AI["+"] & AJ["+"] & AK["+"] & AL["+"] & AM["+"] & AN["+"] & AO["+"] & AP["+"] & AQ["+"] & AR["+"] & AS["+"] & AT["+"] & AU["+"] & AV["+"] & AW["+"] & AX["+"] & AY["+"] & AZ["+"] & BA["+"] & BB["+"] & BC["+"] & BD["+"] & BE["+"] & BF["+"] & BG["+"] & BH["+"] & BI["+"] & BJ["+"] & BK["+"] & BL["+"] & BM["+"] & BN["+"] & BO["+"] & BP["+"] & BPB["+"] & BPC["+"] & BPD["+"] & BPE["+"] & BPF["+"] & BPG["+"] & BPH["+"] & BPI["+"] & BPJ["+"] & BPK["+"] & BPL["+"] & BPM["+"] & BPN["+"] & BP_O["+"] & BP_P["+"] & BP_Q["+"] & BP_R["+"] & BP_S["+"] & BP_T["+"] & BP_U["+"] & BP_V["+"] & BP_W["+"] & BP_X["+"] & BP_Y["+"] & BP_Z["+"] & BP_AA["+"] & BP_AB["+"] & BP_AC["+"] & BP_AD["+"] & BP_AE["+"] & BP_AF["+"] & BP_AG["+"] & BP_AH["+"] & BP_AI["+"] & BP_AJ["+"] & BP_AK["+"] & BP_AL["+"] & BP_AM["+"] & BP_AN["+"] & BP_AO["+"] & BP_AP["+"] & BP_AQ["+"] & BP_AR["+"] & BP_AS["+"]]
NOTE
- Pressing ⓓ displays the remaining time.
- To reset the operating time, press ☐ while the remaining time is being displayed.
Auto RESTART
If the unit is unplugged or if there is a power failure, the unit will resume operation with the previous settings after power is restored. The default setting is ON.
OFFON
(with the unit OFF) (with the unit OFF)


Press both buttons at the same time for 3 seconds or more.
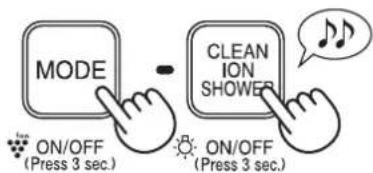
Press both buttons at the same time for 3 seconds or more.

If the ⓗ, and

indicators light up for 10 seconds, the setting is completed.
CARE AND MAINTENANCE
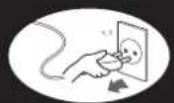
FILTER INDICATOR


The filter Indicator Light will turn on after approximately 720 hours. (30 days × 24 hours = 720 hours)
This is a reminder to perform the maintenance described below.
(Ref.E-11,E-12,E-13,E-14)

After performing maintenance, reset the Filter Indicator.

Press more than 3 seconds.
CARE INDEX
In case of using at the location where air pollution and odor are significant, maintain frequently even if Filter Indicator Light is not ON.


BACK PANEL
SENSOR
Gently remove dust with an appropriate cleaning tool, such as a vacuum cleaner with the proper attachment.
Sensor (internal)
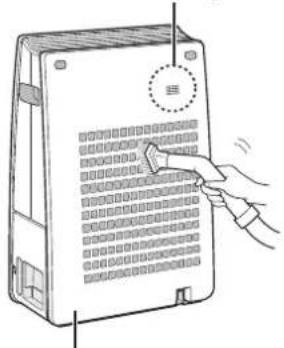
Back Panel
NOTE How to clean when overly dirty
BACK PANEL

natural_image
Line drawing of a rectangular container with a grid-patterned interior (no text or symbols)- Add a small amount of kitchen detergent to water and soak for about 10 minutes.
CAUTION
- DO NOT apply excessive pressure when scrubbing the back panel.
-
Rinse off the kitchen detergent with clean water.
-
Completely dry the filter in a well-ventilated area.
SENSOR

Sensor Filter
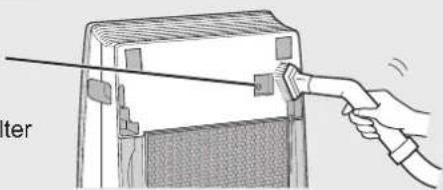
natural_image
Illustration of a hand using a tool to adjust or install a device component (no text or symbols visible)-
Remove the Back Panel and remove the Sensor Filter.
-
Gently remove dust from the Sensor with an appropriate cleaning tool, such as a vacuum cleaner with the proper attachment.
-
If the Sensor Filter is overly dirty, wash it with water and dry it thoroughly.
CARE AND MAINTENANCE

HUMIDIFYING FILTER / TRAY
Odor occurrence may be suppressed when washing Humidifying Filter and Humidifying Tray with water carefully even if the Filter Indicator Light is not ON.
1
Remove the Humidifying Filter from the Tray.

Turn the handle down on the reverse side.
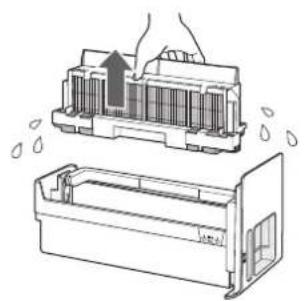
natural_image
Diagram showing a hand pressing down on a device into a smaller container, with water droplets visible (no text or symbols)Remove the Filter Frame.
② Remove

① Open
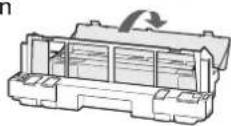
Remove the Humidifying Filter.
CAUTION
- Drops of water may drip from the Humidifying Filter and the Filter Frame.
Rinse the Humidifying Tray, the Filter Frame and the Humidifying Filter.

Humidifying Tray
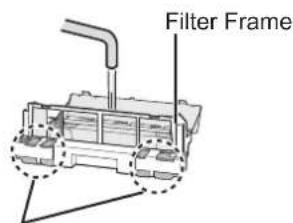
Float (Styrofoam)

natural_image
Illustration of a hand washing a rectangular soap block into a basin (no text or symbols)Humidifying Filter
CAUTION
- Do not remove the Floats.
- If the Float comes off from the Humidifying Tray, install it in the order shown below.

E-12
2
NOTE
How to remove the water scale
Recommended descaling solutions
• Citric acid (available at some drugstores)
• 100% bottled lemon juice with no pulp.
2 ^1/2 cups of water
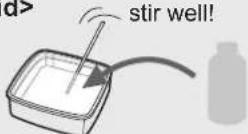
3 tea-
spoons
3 cups of water

- Soak in water with a descaling solution for about 30 minutes.
CAUTION
- When using lemon juice as your descaling solution, allow to soak for longer.
- Rinse off the descaling solution with plenty of water.

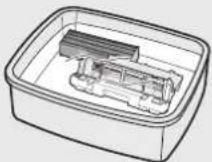
NOTE
How to clean the Humidifying Tray and the Filter Frame when overly dirty
- Remove the Filter Frame from the Humidifying Tray and fill it with water until the "FULL" indicator.
- Put the Filter Frame in water.
- Add a small amount of kitchen detergent to the water.
- Soak for 30 minutes.
- Rinse off the kitchen detergent with clean water.
- Clean any hard-to-reach parts which with a cotton swab or toothbrush.

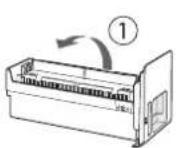
After maintenance, correctly reattach the parts.
① Install
② Close


Hook latches of cover (3 positions).
①
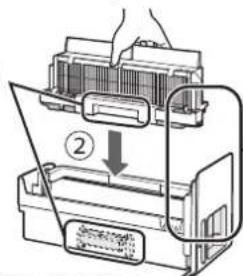
① Align the directions.
② Install the Humidifying Filter by fitting the grooves at left and right side to the guides on the Humidifying Tray.
[Non-Text]

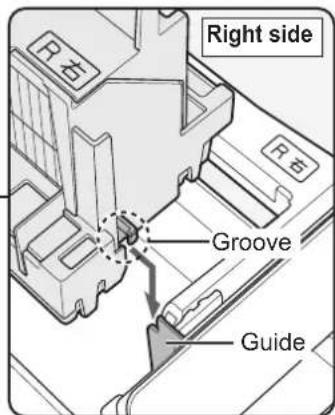
Also in the same left side.
① Lift the Tray Handle.
② Return it to its original position.
CARE AND MAINTENANCE
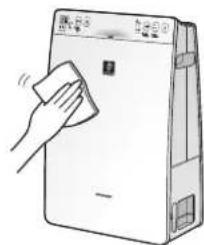
UNIT
natural_image
Illustration of a hand cleaning a rectangular electronic device with a cloth (no text or symbols visible)Wipe with a dry, soft cloth.
CAUTION
- Do not use volatile fluids.
Benzene paint thinner or polishing powder can damage the surface. - Do not use detergents.
Detergent ingredients can damage the unit.
CLEANING FILTERS
Gently remove dust with an appropriate cleaning tool, such as a vacuum cleaner with the proper attachment.
In case of using at the location where air pollution and odor are significant, maintain frequently even if Filter Indicator Light is not ON.
DEODORIZING FILTER
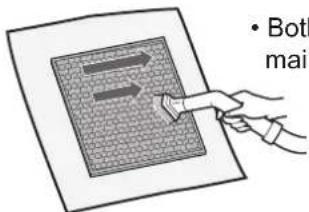
- Both surfaces can be maintained.
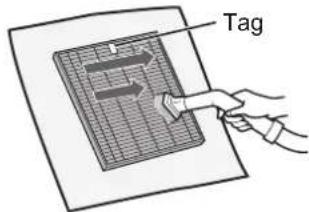
- Maintain only the tagged surface. Do not clean up the opposite surface.
- CAUTION Do not wash the filters. Do not expose to the sun.
Some odors absorbed by the filters will break down over time, causing additional odors. Depending on usage conditions, and especially if the product is used in environments significantly more severe than a normal household, these odors may become noticeable sooner than expected.
Replace the filter in those cases or if dust is unable to be removed after maintenance.
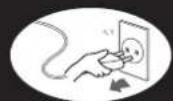
Always be sure to remove the power plug from the wall outlet.
FILTER REPLACEMENT
LIFE OF FILTERS
Filter life varies depending on the room environment, usage conditions, and location of the unit. Lifespan of HEPA filter and Deodorizing filter and replacement suggestions are based on purifying a room in which 5 cigarettes are smoked per day and the unit's dust collection and deodorizing performance has declined to half the level of a new filter.
We recommend replacing the filter more frequently if the unit is used in conditions significantly more severe (HAZE etc.,) than a normal household.
•HEPA Filter About 2 years after first use
•Deodorizing Filter About 2 years after first use
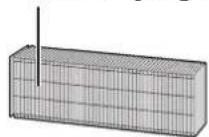
• Humidifying Filter About 5 years after first use
Replacement Filter Model
Consult your dealer when purchasing a replacement filter.
| AIR PURIFIER MODEL | REPLACEMENT FILTER MODEL | ||
| HEPA Filter : 1 unit | Deodorizing Filter : 1 unit | Humidifying Filter : 1 unit | |
| KC-F30J | FZ-F30HFE | FZ-F30DFE | FZ-F30MFE |
NOTE
Use the date label to remind you when to replace the filter. There is the date label on the left side of the unit.
Disposing of filters
Dispose of used filters according to local laws and regulations.
HEPA Filter material :
- Filter : Polypropylene
- Frame : Polyester
Deodorizing Filter material : - Filter : Activated charcoal, Polyrthylene terephthalate, Polypropylene
- Frame : Paper
Humidifying Filter material : - Filter : Rayon, Polyester
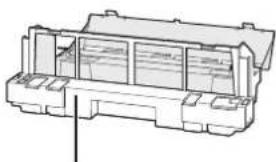
Humidifying Filter
natural_image
Technical line drawing of a mechanical housing or enclosure component (no text or symbols)Do not throw away the Filter Frame (gray)
Deodorizing Filter
TROUBLESHOOTING
Before calling for service, review the troubleshooting chart below to make sure that the problem is not a unit malfunction.
| SYMPTOM | REMEDY (the following are not due to a malfunction) |
| Odor and smoke persists. | · Check the filters. If they appear to be extremely dirty, clean or replace them. (Ref. E-11,E-12,E-13,E-14,E-15) |
| The Dust Sign light is green even when the air is not clean. | · The air may have been dirty when the unit was plugged in. Unplug the unit, wait one minute, and then plug the unit in again. |
| The Dust Sign light is orange or red even when the air is clean. | · Dirty or clogged dust sensor openings interfere with sensor operation. Gently clean the back panel. (Ref. E-11). |
| The unit makes a clicking or ticking sound. | · The unit may make clicking or ticking sounds when it is generating ions. |
| Air discharged from the unit has an odor. | · Check to see if the filters are extremely dirty.· Clean or replace the filters.· Plasmacluster Air Purifiers emit small traces of ozone that can produce an odor. |
| The unit does not operate when cigarette smoke is in the air. | · Check to see if the unit is installed in a location that makes it difficult for the sensors to detect cigarette smoke.· Check to see if the dust sensor openings are blocked or clogged. If they are blocked or clogged, clean the back panel. (Ref. E-11) |
| The Filter Indicator Light is on. | · Whenever replacing the filters, connect the power cord to an outlet and then press the Filter Reset Button. |
| The Dust Sign lights are turned off. | · Check to see if the Lights OFF Mode is selected. If it is selected, press the Light ON/OFF Button to turn the indicator lights on. (Ref. E-9)· Check to see if the SLEEP mode is selected. (Ref. E-8) |
| The Humidify Light does not light off when the Humidifying Tray is empty. | · Clean the Humidifying Tray. Make sure that the unit is on a level surface. |
| The water level in the Humidifying Tray does not decrease or decreases slowly. | · Check to see if the Humidifying Tray is correctly installed. Check the Humidifying Filter.· If the Humidifying Filter is extremely dirty, clean or replace it. (Ref. E-12, E-13, E-15).· Humidification amount gets lower when humidity reaches to the proper amount (55 ~ 65%) by the actuation of humidity sensor in the case of fan speed automatic. |
| The Dust Sign lights change color frequently. | · The Dust Sign lights automatically change color when the dust sensor detect impurities. |
| There is a discrepancy between the unit's Humidity Monitor and another hygrometer in the room. | · There is a difference in the humidity level within the same room.· The sensor have different measurement parameters.· If the monitor indicates TEMPERATURE, press the Display Select Button. (Ref. E-9) |
ERROR DISPLAY If the error continues to occur, contact a Sharp Service Center.
| DIGITAL INDICATION | ERROR DETAILS | REMEDY |
| Fan motor error. | Unplug the unit, wait one minute, then plug he unit in again. | |
| Temperature-humidity sensor error. |
SPECIFICATIONS
| Power supply | 220-240V 50-60Hz | |||
| Fan Speed Adjustment MAX MED SLEEP | ||||
| CLEAN AIR | Fan Speed (m3/hour) | 180 125 52 | ||
| Rated Power (W) | 27 12 4.1 | |||
| Noise Level (dBA) | 48 38 21 | |||
| CLEAN AIR &HUMIDIFY | Fan Speed (m3/hour) | 180 125 52 | ||
| Rated Power (W) | 27 12 4.1 | |||
| Noise Level (dBA) | 48 38 21 | |||
| Humidification (mL/hour)*1 | 350 280 140 | |||
| Recommended Room Size (m2)*2 | ~21 | |||
| High density Plasmacluster ion recommended room size (m2)*3 | ~17 | |||
| Humidifying Tray Capacity (L) | 1.8 | |||
| Sensors Dust / Temperature & Humidity | ||||
| Filter type | Dust collection HEPA *4 | |||
| Deodorization Deodorizing | ||||
| Cord Length (m) 2.0 | ||||
| Dimensions (mm) | 380 (W) × 197 (D) × 570 (H) | |||
| Weight (kg) | 7.2 | |||
*1 • The amount of humidification changes in accordance with indoor and outdoor temperature and humidity.
The amount of humidification increases as temperatures rises or humidity decreases.
The amount of humidification decreases as temperatures decrease or humidity rises.
- Measurement Conditions: 20^ , 30% humidity (JEM1426)
*2 • The recommended room size is appropriate for operating the unit of maximum fan speed.
- The recommended room size is an area in which a given amount of dust particles can be removed in 30 minutes.
*3 • Room size in which approximately 7000 ions per cubic centimeter can be measured in the center of the room when the unit is placed next to a wall, is running at maximum settings, and is at a height of approximately 1.2 meters from the floor.
*4 • The filter removes more than 99.97% of particles at least 0.3-microns in size. (JEM1467)
Standby Power
When the unit's power plug is inserted in a wall outlet it consumes about 0.9 watts of standby power in order to operate electrical circuits.
To conserve energy, unplug the power cord when the unit is not in use.
Information on Disposal
This product should not be disposed of in a general waste bin as it contains materials that should be recycled, which is good for the environment.
If you are in doubt about the correct disposal method, contact your local counsel.
FOR CUSTOMER ASSISTANCE
SHARP
WARRANTY
Consumer Electronic Products
Congratulations on Your Purchase!
This Sharp product is warranted against faults in material and manufacture for the period as stated in the table below.
If service is required during the warranty period, please contact your nearest Sharp Approved Service Centre. These repairs would be carried out at no charge to the owner, subject to the conditions specified herein.
This warranty does not extend to defects or injuries caused by or resulting from causes not attributable to faulty parts or the manufacture of the product, including but not limited to, defect or injury caused by or resulting from misuse, abuse, neglect, lack of maintenance, accidental damage, improper voltage, liquid spillage, vermin infestation, software, or any alterations made to the product which are not authorised by Sharp.
Please retain your sales documentation, as this should be produced to validate a warranty claim. This warranty is in addition to and in no way limits, varies or excludes any implied rights and remedies under any relevant legislation in the country of sale.
This warranty does not cover transportation to and from the Sharp Approved Service Centre. Goods presented for repair may be replaced by refurbished goods of the same type rather than being repaired. Refurbished parts may be used to repair the goods. The repair of your goods may result in the loss of user generated data, please ensure that you have saved this data elsewhere prior to repair.
Australian customers: Our goods come with guarantees that cannot be excluded under the Australian Consumer Law. You are entitled to a replacement or refund for a major failure and for compensation for any other reasonably foreseeable loss or damage. You are also entitled to have the goods repaired or replaced if the goods fail to be of acceptable quality and the failure does not amount to a major failure. The criteria of a major failure is defined in the Australian Consumer Law. Should you require any assistance with a major failure please contact Sharp Customer Care.
WARRANTY PERIODS
Home Theatre Projector 12 months (excluding lamps and air filters)
Audio/Home Theatre 12 months
Microwave / Steam Oven 12 months
Slow Juicer 12 months
Refrigerator 24 months
DVD/Blu-ray 12 months
Washing Machine 24 months
Ultrasonic Washer 12 months
LCD Television 12 months
Air Purifier 12 months
Coffee Machine 12 months

IMPORTANT NOTICE: This warranty applies only to products sold in Australia & New Zealand
SHARP
FOR LOCATION ENQUIRIES WITHIN
AUSTRALIA
SHARP APPROVED SERVICE CENTRE
SHARP CORPORATION OF AUSTRALIA PTY LTD
SHARP
FOR PRODUCTS PURCHASED
NEW ZEALAND
CONTACT YOUR SELLING DEALER/RETAILER
OR CALL
SHARP CUSTOMER SERVICES
TELEPHONE: 09 573 0111
FACSIMILE: 09 573 0113
WEB: www.sharpnz.co.nz
SHARP CORPORATION OF NEW ZEALAND LIMITED
SPform019(NOV 2016)
E-19
SHARP
SHARP CORPORATION OF AUSTRALIA PTY.LTD.
A. B. N. 40 003 039 405
2 JULIUS AVENUE, NORTH RYDE, N.S.W. 2113
P.O.BOX 84, MACQUARIE PARK. N.S.W 2113
SHARP CORPORATION OF NEW ZEALAND LIMITED
59 HUGO JOHNSTON DRIVE PENROSE, AUCKLAND
FACTORY
USE ONLY
Printed in China
TINS-A000KKRZ 18J-①



- AIR PURIFIER with Humidifying Function OPERATION MANUAL
- Before operating your new air purifier, please read the following
- NOTE
- ENGLISH
- FEATURES
- CONTENTS
- IMPORTANT SAFETY INSTRUCTIONS
- NOTE - What to do if the unit interferes with radio or TV reception
- CAUTIONS CONCERNING OPERATION
- INSTALLATION GUIDELINES
- FILTER GUIDELINES
- PART NAMES
- FRONT / BACK
- PREPARATION
- FILTER INSTALLATION
- Pull out the Humidifying Tray.
- CAUTION
- Fill the Humidifying Tray with tap water by method A or B.
- Install the Humidifying Tray.
- OPERATION
- Power ON / OFF
- CLEAN ION SHOWER
- FAN SPEED
- SLEEP
- AUTO
- USEFUL FUNCTION
- LIGHT CONTROL
- Plasmacluster Ion ON/OFF
- Changing display (humidity / temperature)
- Off TIMER
- Auto RESTART
- OFFON
- CARE AND MAINTENANCE
- FILTER INDICATOR
- CARE INDEX
- BACK PANEL
- SENSOR
- NOTE How to clean when overly dirty
- HUMIDIFYING FILTER / TRAY
- Remove the Humidifying Filter from the Tray.
- Rinse the Humidifying Tray, the Filter Frame and the Humidifying Filter.
- How to remove the water scale
- Recommended descaling solutions
- How to clean the Humidifying Tray and the Filter Frame when overly dirty
- After maintenance, correctly reattach the parts.
- UNIT
- CLEANING FILTERS
- DEODORIZING FILTER
- FILTER REPLACEMENT
- LIFE OF FILTERS
- Replacement Filter Model
- Disposing of filters
- TROUBLESHOOTING
- SPECIFICATIONS
- Standby Power
- Information on Disposal
- FOR CUSTOMER ASSISTANCE
- SHARP
- WARRANTY
- Consumer Electronic Products
- Congratulations on Your Purchase!
- WARRANTY PERIODS
Brand : SHARP
Model : KC-F30J
Category : Humidifier