
DW-R268A - Humidifier SHARP - Free user manual and instructions
Find the device manual for free DW-R268A SHARP in PDF.


| Product Type | Dehumidifier |
| Brand | Sharp |
| Model | DW-R268A |
| Dimensions (approx.) | 36 cm (W) x 28 cm (D) x 55 cm (H) |
| Weight (approx.) | 12 kg |
| Power Supply | 220V ~ 50Hz |
| Power Consumption (approx.) | 250 W |
| Water Tank Capacity | 6.0 L |
| Dehumidification Capacity (at 30°C, 80% RH) | 25 L/day |
| Operating Temperature Range | 5°C to 35°C |
| Modes | Auto Dehumidify, Continuous Dehumidify, Dry Clothes, Mold Attack, Prevent Condensation |
| Plasmacluster Ion | Yes, can be turned on/off |
| Timer | On/Off timer, up to 9 hours |
| Air Flow Direction | Wide swing louver (Up, Rear, Wide, Off) |
| Continuous Drainage | Yes, with drain hose (not included) |
| Auto Shut-off | When tank full or after 12 hours in continuous drainage |
| Filter Cleaning | Every 2 weeks; removable and washable |
| Water Tank Cleaning | Weekly; removable tank with float |
| Safety Protection | Overheat protection, auto shut-off on full tank, 3-min compressor delay |
Frequently Asked Questions - DW-R268A SHARP
User questions about DW-R268A SHARP
0 question about this device. Answer the ones you know or ask your own.
Ask a new question about this device
Download the instructions for your Humidifier in PDF format for free! Find your manual DW-R268A - SHARP and take your electronic device back in hand. On this page are published all the documents necessary for the use of your device. DW-R268A by SHARP.
USER MANUAL DW-R268A SHARP
Thank you very much for purchasing this SHARP dehumidifier.
Please read this manual carefully to ensure safe, effective use of your dehumidifier.
Please read carefully through "Precautions" before commencing to use this product. Please keep this manual within easy reach so that you can refer to it at any time you need.
CONTENTS
● Precautions.....E-2
● Proper Uses.... E-5
● Part Names and Functions...... E-6
● Preparations Before Using.....E-8
● Operation Procedure ...... E-9
● Dehumidifying auto operation
● Continuous dehumidify operation
● Dry clothes operation
● Changing the air flow direction.....E-12
● How to Operate the Timer .....E-13
● Emptying the Water Tank ..... E-14
● Continuous Drainage.....E-15
● Maintenance ....E-16
● Things to remember.....E-17
● Defrosting E-17
● Before calling for Service.....E-18
Precautions
Various symbols are used throughout this manual and on the product to alert you to points relating to safe use of this product.
These symbols are classified according to the seriousness of the risk involved if they are ignored and explained below.
Please read this section carefully and follow the instructions.

Warning
Failure to follow this instruction may result in death or serious injury.

Cautions
Failure to follow this instruction may result in injury or damage to property.

Warning

Prohibited
Do not operate the unit at voltages other than the rated voltage of 220V. Using this product at any other voltage may result in electric shock or fire.

Prohibited
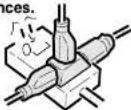
Do not connect this product using joined electric cords or extension cords, or sharing a power socket with other electrical appliances.
Otherwise there is a risk of electric shock, heat or fire.

Prohibited
Do not modify or cause damage to the power cord in any way.
Handle the power cord with care. Avoid damaging it, bending it sharply, pulling, twisting, bundling or heating it, placing heavy objects on it or getting it caught between objects. Otherwise the


Prohibited
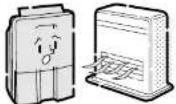
Do not place the unit near any heat sources.
Otherwise resin material in the product may melt and catch fire.

Prohibited
Do not modify the unit. This unit should not be disassembled or repaired by persons other than a qualified technician.
Otherwise fire, electric shock or injury may result.
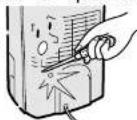

When any abnormality (e.g. a burning smell) is noticed, turn the power off, unplug the unit and consult the SHARP
Meaning of the Symbols

Prohibited
Actions that should be strictly avoided.

Musts
Actions that must be taken.
● Take care to read through the safety cautions before commencing to use this product. Keep this manual within easy reach so that you can refer to it at any time.


Cautions

Prohibited
Do not move the unit on its casters on an uneven surface.
Lift the unit up to move it on an uneven surface to prevent damage to the casters or the floor. This also applies to moving the unit on a thick-piled carpet. The casters could leave marks on floors and carpets.

Prohibited
Do not knock over the unit or drop it. Do not store or move the unit on its side.
This could damage the unit or result in water leakage and short circuit.

Prohibited
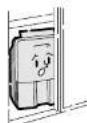
Do not operate the unit in a closet or in a narrow, confined space between furniture.
Insufficient ventilation can result in overheating or combustion.

Prohibited
Do not use the drained water as drinking water for humans or pets.
The drained water may be harmful to health.
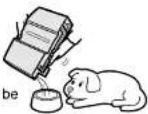

Prohibited
Do not stand on the unit or lean against it.
Otherwise the unit could move or fall over, resulting in personal injur


Prohibited
Do not place a combustion device (e.g. stove) near the air outlet of the dehumidifier.
Otherwise incomplete combustion may result.

Prohibited
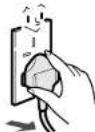
Take care to hold the plug firmly when unplugging the unit.
Pulling the cord may cause the wire inside to break, resulting in overheating.
Precautions
⚠️ Cautions

When water is to be drained continuously, take care that the hose is not bent and that the hose outlet is positioned below the unit.
Otherwise drained water may spill and make household appliances or furniture wet.

Do not bend the drain hose.

If a drain hose is used, take care that the temperature around the hose does not fall below 0°C.
Otherwise, water in the hose may freeze causing undrained water to leak from the unit and make household furniture or appliances wet.

Before moving the unit make sure that the power is turned off and that the tank is emptied.
Otherwise spilled water may wet household appliances resulting in electric shock, short circuits or fire.

Leave a clearance around the unit of at least the size shown in the drawing below. Insufficient ventilation can result in overheating or combustion.
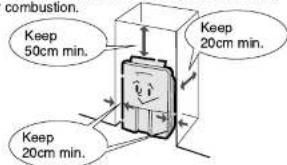

When moving the unit, drain water first from the tank. Move its caster
by grasping the carrying handle firmly so that the dehumidifier may not be inclined.
Otherwise this can cause injuries or damage to the floor.


Make sure to operate this product only on level, stable surfaces.
An uneven surface may cause stored water to spill and to make household furniture or appliances wet, or to cause electric shock, short circuits or fire.

If the unit is continuously being used for a long period of time, make sure to inspect it regularly. Otherwise overheating or electrical short circuits may result.

When operating the unit for a prolonged period in the same location, check for dirt under and around the unit. Move the unit occasionally and clean the floor under it.

Whenever the unit is to be left unused for a long period, make sure to unplug the unit for safety.
Otherwise, electric shock or fire may result.
Proper Uses
To ensure good operating efficiency, avoid repeatedly opening doors and windows in the room where the unit is operating.
Lowering room humidity
● To maintain room humidity at a comfortable level.
• Automatically maintain the room humidity in the range 55% to 60%.

AUTO DEHUMIDITY

● Preventing mold formation.
- For the rooms on the north side or store rooms where people are normally not present.

AUTO MOLD ATTACK

● Prevent condensation on ceilings, walls and windows.

AUTO PREVENT CONDENSATION

● To reduce the humidity of rooms where no one is present.
- For drying carpet.
- For drying the insides of cupboards and closets. (Open the closet door to dry out the closet)

CONTINUOUS DEHUMIDIFY
Drying washing
When you want to quickly dry clothes.

DRY CLOTHES

Effective uses
- Dry washing
Seen from the front of the unit, the air flow exits slightly to the right. When drying clothes, use the WIDE SWING louver to make sure the air flow is directed toward the laundry and dries it quickly. In winter when the room temperature is low (below 10°C), use the dehumidifier in combination with a room heater to reduce the drying
● While you are away
Set timer before you leave. Come home and experience the pleasant surroundings.
● Living room or kitchen
Dehumidify while you rest.
- Dry hodding

Stand-type rack for doing clothes
Part Names and Functions


The numbers inside page refer to the page where a detailed explanation of the item is given.
Control panel
(For explanatory purposes, all of the LED indicators are shown.)

Preparations Before Using
There may occasionally be water in the water tank when the unit is operated for the first time. This is the drain water generated when the product was inspected at the factory and does not indicate a problem with the unit.
Before operating
Do not remove the blue part inside the float.
Insert the plug into the power socket.
If the "Full Tank indicator" blinks, empty the water tank and reinstall the tank properly.
- While in operation, the unit operates in PLASMACLUSTER ION operation in all modes.
PLASMACLUSTER ION operation alone is not possible. - To stop PLASMACLUSTER ION operation, press the PLASMACLUSTER ION button. The PLASMACLUSTER (Clean) indicator will go off. To resume operation, press the PLASMACLUSTER ION button again.
HUMIDITY indicator (The humidity in the indication example is 68%.)
PLASMACLUSTER button
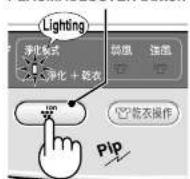

When ON of the POWER ON/OFF button is pressed, the humidity is indicated.
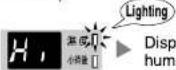
Caution After plugging the power plug into the wall outlet and pressing ON of the POWER ON/OFF button, the humidity sensor activates for about 1 minute. During this period, the HUMIDITY indicator will blink.


The displayed humidity is a guideline value, and may differ from the actual room humidity.
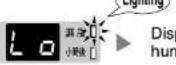
Displayed when the room humidity is below 39%.
TEMPERATURE indicator
Normally the room temperature is not displayed, but when it rises above 41°C or drops below 0°C, the display blinks as shown
Room temperature more than 41°C

▶ 「H,」Blinking
Operation Procedure
AUTO DEHUMIDIFY operation
(Indication example) AUTO DEHUMIDIFY mode, slightly high humidity, WIDE SWING louver in air flow direction "Up".

1 Press the POWER ON/OFF button.
The OPERATION indicator lights and AUTO DEHUMIDIFY operation starts.
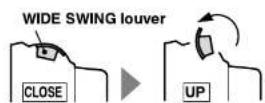
- With the start of operation, the WIDE SWING louver rotates from "Close" to "Up" and stops in that position.
2 Press the AUTO DEHUMIDIFY button and select operation mode.
Operation mode is switched in order.

The unit stops dehumidifying and blows air only when the humidity is about less than 60% at temperatures up to 27°C, and when the humidity is about less than 55% at temperatures of 28°C or higher. (Right figure) However, depending on the room size and construction, the unit may not stop dehumidifying.

line
| Temperature °C | Humidity % | | -------------- | ---------- | | 27 | 60 | | 28 | 60 | | 330 | 55 |CONTINUOUS DEHUMIDIFY operation
(Indication example) CONTINUOUS DEHUMIDIFY mode, air flow rate "Low", slightly high humidity, WIDE SWING louver in air flow direction "Up".

1 Press the POWER ON/OFF button.
The OPERATION indicator lights and AUTO DEHUMIDIFY operation starts.
- With the start of operation, the WIDE SWING louver rotates from "Close" to "Up" and stops in that position.
Press the CONTINUOUS DEHUMIDIFY button.
The "Low" air flow indicator for CONTINUOUS DEHUMIDIFY lights, and the unit starts CONTINUOUS DEHUMIDIFY operation at "Low" air flow.

In the cases below, the unit stops dehumidifying and blows air only. E-9 page
- When the room humidity is below 40% at temperatures over 35°C
- When the room humidity is less than 30% at temperatures more than 28°C but less than 35°C
This causes the room temperature to rise and the air to dry out. Do not operate the unit for long periods in rooms where people are present.
Changing the air flow rate ● Press the CONTINUOUS DEHUMIDIFY button again and select Air Flow mode. The CONTINUOUS
••• Operation Procedure
DRY CLOTHES operation
(Indication example) DRY CLOTHES mode, slightly high humidity, WIDE SWING louver in air flow direction "Up"

1 Press the POWER ON/OFF button.
The OPERATION indicator lights and AUTO DEHUMIDIFY operation starts.
- With the start of operation, the WIDE SWING louver rotates from "Close" to "Up" and stops in that position.
2 Press the DRY CLOTHES button.
The "Low" indicator for DRY CLOTHES mode lights, and the unit starts DRY CLOTHES operation at "Low" air flow.

In the cases below, the unit stops dehumidifying and blows air only.

- When the room humidity is below 40% at temperatures over 35°C
- When the room humidity is less than 30% at temperatures more than 28°C but less than 35°C
Changing the air flow rate ● Press the DRY CLOTHES button again and select Air Flow mode.
The DRY CLOTHES Air Flow indicator lights and the air flow rate
changes in the sequence shown below
Changing the air flow direction
The WIDE SWING button allows you to select "Up", "Rear" or "Wide" for the air flow direction, or stopping (Off) it at a desired angle.
Press the WIDE SWING button during operation.
By repeatedly pressing the WIDE SWING button, the position of the WIDE SWING louver can be changed in the sequence shown below. To stop the WIDE SWING louver at a desired angle, press the button again (Off) when the louver has reached the desired angle.

(Indication example)
AUTO DEHUMIDIFY
Operation in Wide Air Flow position

- When operation stops, the WIDE SWING louver returns to "Close" position. To restart operation, press the WIDE SWING button again and select the air flow direction.
- Do not expose the WIDE SWING louver to impact or rotate it by force. Otherwise the louver may be damaged.
● After a change in air flow direction, the WIDE SWING louver is determining its position, so it may
How to Operate the Timer
To set on timer / It can be set only when the unit is shut down.
Confirm that the OPERATION indicator has gone out and operation has stopped.

Press the TIMER button.
- The ON TIMER indicator, [ / ] on the LED display and the TIMER SETTING indicator light. At the same time, the indicator for the previously selected mode lights.
When the POWER ON/OFF button is pressed after the power plug has been plugged in, or when the POWER ON/OFF button is pressed after a power outage, the unit is preset to start operation in AUTO DEHUMIDIFY mode.
- When the TIMER button is kept pressed, the indication on the LED display changes automatically. While pressing the TIMER button, the timer setting time changes as shown below in 1-hour increments. Select the setting time.
$$ \rightarrow 1 \rightarrow 2 \rightarrow 3 \dots \rightarrow 8 \rightarrow 9 \rightarrow \text { No indication } \tag {set release} $$
TIMER ON indicator TIMER SETTING indicator

TIMER SETTING button

Select the desired operating mode.
- Select the desired operating mode by pressing the AUTO DEHUMIDIFY button, CONTINUOUS DEHUMIDIFY button or DRY CLOTHES button.
The following settings can be changed as desired.
- When AUTO DEHUMIDIFY is selected, the DEHUMIDIFY mode can be changed by pressing the AUTO DEHUMIDIFY button. E-9 page
- When CONTINUOUS DEHUMIDIFY or DRY CLOTHES is selected, the air flow mode can be selected with the respective selector button. E.10e.E.11 none
••• How to Operate the Timer
To set off timer
it can be set when the unit is in operation
Confirm that the OPERATION indicator is on and the unit is in operation.

Press TIMER SETTING button
- Indications change simultaneously as follows: the OFF TIMER indicator lights, the LED display changes to [ / ], the HUMIDITY indicator goes off, and the TIMER SETTING indicator lights. The OFF TIMER setting time is indicated as [Off after 1 hour].
- Indicating set-time of OFF TIMER as "OFF after 1 hour".
Select set-time of TIMER since the TIMER shifts sequentially in order as follows. (one-hour interval) 1 2 3 ·s 8 9 Room humidity (set release)
● The indication automatically shifts by continuously pressing TIMER SETTING button.

If you set OFF TIMER operation as "after 5 hours"
The timer indication changes every hour from 5→4→3→2→1, and after 5 hours operation stops.

Caution
- When the OFF TIMER works (operation stops), a beep sounds for about 1 second. - You can change the time to stop operation after having set the OFF TIMER. Press the TIMER button again.
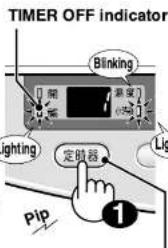
TIMER SETTING button
To cancel Off Timer
To release the OFF TIMER, either press the TIMER button until the LED display indicates the room humidity, say [ 68 ], or press the POWER ON/OFF button to stop operation.
Emptying the Water Tank
When taking out the water tank, the front full tank green lamp will blink up and the unit stops its operation.
If the water tank fills to a level of approx. 6.0 liters, the operation stops automatically. Then an electronic beep sound will be emitted for 8 seconds, and the "full" indicator light will blink showing that the water tank is full. Empty the tank as shown below.
4 Remove the water tank
Water tank
Continuous Drainage
Cautions when using the unit with continuous drainage
- This dehumidifier is for home use. If you use it with continuous drainage, make sure to check the unit at least once every 2 weeks for a dirty filter or clogged drain hose.
- If you are using a drain hose, make sure that the temperature around the hose does not drop below 0°C. Water in the hose might freeze causing water to spill and wet the floor and the unit.
● Cover the end of the hose with netting to prevent insects from entering. - The AUTO OFF function also works during CONTINUOUS DRAINAGE. 12 hours after the start of operation, the unit will automatically stop. The AUTO OFF function can be canceled as described below.
Canceling the AUTO OFF function
Before using CONTINUOUS DRAINAGE
As explained in "Preparations before use" (E8 page) the AUTO OFF function will shut down the unit automatically after 12 hours of normal operation. If you do not wish this function to work during continuous drainage, you can cancel it as described below.
① Plug in the power plug.
② While pressing the WIDE SWING button in stopped condition, keep the POWER ON/OFF button pressed for at least 3 seconds.
③ When setting is completed, there will be a beep sound, the LED display indicates [12] and the FULL TANK indicator lights for 5 seconds.
④ To reactivate the AUTO OFF function, disconnect the power plug from the wall outlet and carry out the procedure described in ② above. After 3 seconds, the beep sounds to indicate that setting is completed.
CONTINUOUS DRAINAGE is possible, if there is a place to drain water nearby. Make sure to stop operation, disconnect the power plug from the wall outlet and carry out the following procedure.
1 Open a drain hose hole.
Remove the water tank. Using a screwdriver, punch a hole at the drain hose hole located at the back of the unit. Smoothen the edge of the hole with a file etc.
WIDE SWING button POWER ON/OFF button

Drain hose hole
2 Attach the elbow joint to the other end of the hose inserted into the continuous drainage hole.
- Remove the drainage tank. Pull down the drain stopper located at the upper right inside the casing. - Put your finger behind the rubber packing on the drain stopper. Then pull the rubber packing off toward the front and remove the drain seat at the same time.
Maintenance
- For safety purposes, turn off and unplug the unit before carrying out any maintenance.
- For clean, sanitary and pro-long use, regular maintenance is recommended.
Water tank (About once a week)
1 Removing and installing the tank lid, tank handle, and tank float.
(1) Detach the tank lid gradually from the left or right toward the opposite side.
(2) Drop the tank handle to the front position as shown in the illustration on the right, and slightly spread out the left and right side arms of the handle so that the shafts come out, and remove the handle from the water tank.
(3) Push the float in the direction ① shown in the diagram and remove it from the hole. With the float in this state, pull it out in direction ②
(4) To reinstall, follow the above procedure in reverse (②→①).
If you do not insert the tank float securely, the tank can overflow, and the unit will not stop. Take due care.
Wash the inside of the water tank.
- After prolonged use, the drain water may cause the tank to go black. If this happens, wash the tank with a sponge, warm water and a mild detergent.
Lever

Wipe the water tank with a soft cloth, and install the tank lid, tank handle, and tank float.
* After having reinstalled these parts, make sure to move the float lever up and down with your finger to confirm that it moves smoothly. If the float sticks, the overflow protection device located behind the lever will not work and the tank may overflow.
Filter
(About once 2 weeks)
* This filter is not intended for air purification.
● A clogged filter will result in reduced dehumidification efficiency and higher power consumption. It can also cause odor.
- If you operate the unit without the filter, dust will accumulate in the unit, which may result in malfunction.
Cleaning the filter
Remove dust and dirt with the corner tool of your vacuum cleaner. If the filter is very dirty, wash it with neutral detergent diluted in warm water. Rinse it off and let it dry well in the shade.

Main body
(About once a month)
Things to remember
The temperature at which the unit can be operated is 5°C to 35°C.
If the room temperature is over 35^ C, the built-in protection system will automatically turn off the unit.
Dehumidifying operation increases room temperature. (The dehumidifier does not have a cooling function.)
The unit generates heat during operation and will become warm. It will blow out warm air, but this is normal and does not indicate a problem with the unit.
Dehumidification capacity will vary based on room temperature and humidity.
● Dehumidification capacity will increase as temperature rises (as shown in the chart on the right).
- In winter when the room temperature is low (below 10°C), use the dehumidifier in combination with a room heater to reduce the drying time.

line
| Room temperature (°C) | Dehumidifying capacity (L/day) | | --------------------- | ----------------------------- | | 0 | 0 | | 15 | 15 | | 20 | 20 | | 30 | 25 |Wait for 3 minutes before restarting the unit
If the unit is turned off, wait for at least 3 minutes before restarting operation.
If the unit is restarted immediately, the compressor will wait for 3 minutes to start up as part of the unit's self-protection system.
Canceling the beeps indicating FULL TANK and OFF TIMER end
(Operation stopped by AUTO OFF function)
WIDE SWING button PLASMACLUSTER button
Before Calling for Service
| Symptoms | Check Points |
| Unit does not operate when power ON/OFF button is pressed. | Is the water tank installed properly?Is the water tank full?Is the unit plugged in properly?Has there been a power failure?Is the LED display displaying [ ]?If it is, disconnect the power plug and contact the shop where you purchased the unit. |
| Dehumidification capacity has dropped. | Is the filter clogged?Is the air outlet or intake obstructed?Is the temperature and humidity of your room too low? |
| Humidity does not reduce in any of the operating mode. | Is the room too large?Are there much opening and closing of a window or an entrance?Are there any appliances which make steam such as an oilstove? |
| Displayed humidity is different from actual humidity. | Displayed humidity is changed suddenly by opening and closing of a window or an entrance, changing the wind direction when operation is beginning. It is normal.Displayed humidity indicates the ambient humidity around the unit.This may be different to the humidity in a different location in the same room. |
| Intermittent operating sound. | This sound is generated during CLUSTER ION operation.If the sound bothers you at bedtime, move the unit further away.Depending on the humidity in the room, the operating noise may become louder or less loud, or at times no sound may be heard at all. There is no relationship with the CLUSTER ION effect. |
| Operation is noisy. | Is the dehumidifier properly installed on a stable base?Is the floor flat?When the unit starts its operation at a low temperature, the sound might increase for several seconds. (The time depends on the temperature condition.) |
| Water is leaking. | Has the unit been knocked over, or has it been tilted or dropped?Is the pipe connection or hose connection for continuous drainage in place? |
| The unit repeats operating and stopping. | Is the humidity being automatically controlled using AUTO DEHUMIDIFY, MOLD ATTACK, CONTINUOUS DEHUMIDIFY, or DRY CLOTHES mode?(See page 5-8-5-11) |
中文
多謝選購SHARP聲寶牌抽瀉機。


- CONTENTS
- Precautions
- Warning
- Meaning of the Symbols
- Cautions
- ⚠️ Cautions
- Proper Uses
- Lowering room humidity
- Drying washing
- Effective uses
- Part Names and Functions
- Preparations Before Using
- Before operating
- Insert the plug into the power socket.
- TEMPERATURE indicator
- Operation Procedure
- AUTO DEHUMIDIFY operation
- Press the POWER ON/OFF button.
- Press the AUTO DEHUMIDIFY button and select operation mode.
- CONTINUOUS DEHUMIDIFY operation
- Press the CONTINUOUS DEHUMIDIFY button.
- ••• Operation Procedure
- DRY CLOTHES operation
- Press the DRY CLOTHES button.
- Changing the air flow direction
- Press the WIDE SWING button during operation.
- (Indication example)
- How to Operate the Timer
- Press the TIMER button.
- Select the desired operating mode.
- ••• How to Operate the Timer
- To set off timer
- Press TIMER SETTING button
- To cancel Off Timer
- Emptying the Water Tank
- Continuous Drainage
- Cautions when using the unit with continuous drainage
- Canceling the AUTO OFF function
- Before using CONTINUOUS DRAINAGE
- Open a drain hose hole.
- Attach the elbow joint to the other end of the hose inserted into the continuous drainage hole.
- Maintenance
- Water tank (About once a week)
- Filter
- Main body
- Things to remember
- The temperature at which the unit can be operated is 5°C to 35°C.
- Dehumidification capacity will vary based on room temperature and humidity.
- Wait for 3 minutes before restarting the unit
- Canceling the beeps indicating FULL TANK and OFF TIMER end
- Before Calling for Service
- 中文
Brand : SHARP
Model : DW-R268A
Category : Humidifier