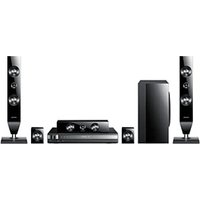
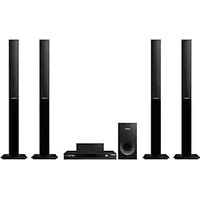
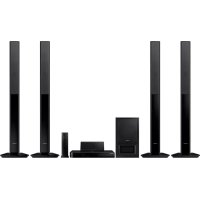
HT-D450 - Home Theater System SAMSUNG - Free user manual and instructions
Find the device manual for free HT-D450 SAMSUNG in PDF.


| Product Type | Home theater system with soundbar and wireless subwoofer |
| Brand | SAMSUNG |
| Model | HT-D450 |
| Dimensions (W x H x D) | Main unit: 957 x 91.9 x 44.9 mm; Subwoofer: 175 x 350 x 295 mm |
| Weight | Main unit: 2.3 kg; Subwoofer: 5.4 kg |
| Power Consumption | Main unit: 45 W; Subwoofer: 20 W; Standby: 0.75 W |
| Output Power | Main unit: 80 W per channel (4 Ω, 1 kHz, 10% THD); Subwoofer: 120 W (4 Ω, 100 Hz, 10% THD) |
| Audio Inputs | 2 digital optical inputs, 1 analog input (RCA), 1 USB port (for firmware update) |
| Subwoofer Connectivity | Wireless (5.2 GHz / 5.8 GHz) with automatic pairing |
| Supported Audio Formats | Dolby Digital, DTS |
| Sound Modes | MUSIC, NEWS, DRAMA, CINEMA, SPORTS, GAME, PASS (original sound) |
| Special Features | 3D Depth Sound, Smart Volume, Auto Power Link, AV Sync, DRC, DIMMER, S/W Level |
| iPod/iPhone Compatibility | Via optional wireless dock HT-WDC10 (sold separately) |
| Remote Control | Multifunction, can control Samsung TVs |
| Wall Mounting | Wall mount bracket provided for vertical installation |
| Operating Temperature | +5°C to +35°C |
| Operating Humidity | 10% to 75% |
| Care and Cleaning | Unplug before cleaning; use a soft dry cloth; avoid chemicals |
| Safety | Do not expose to rain or moisture; do not open the cabinet; unplug during storms |
| Spare Parts and Repairability | No user-serviceable parts; contact Samsung customer service for repairs |
| Warranty | 2 years (varies by country; registration recommended at www.samsung.com/register) |
Frequently Asked Questions - HT-D450 SAMSUNG
User questions about HT-D450 SAMSUNG
0 question about this device. Answer the ones you know or ask your own.
Ask a new question about this device
Download the instructions for your Home Theater System in PDF format for free! Find your manual HT-D450 - SAMSUNG and take your electronic device back in hand. On this page are published all the documents necessary for the use of your device. HT-D450 by SAMSUNG.
USER MANUAL HT-D450 SAMSUNG
Crystal Surround Air Track (Active Speaker System) user manual
imagine the possibilities
Thank you for purchasing this Samsung product.
To receive more complete service,
please register your product at
www.samsung.com/register
Active Speaker System
This unit features an Active Speaker System that provides high sound quality in a single slim unit. This unit does not require any satellite loudspeakers or speaker cabling, which are normally associated with conventional surround sound systems.
Multi-function Remote Control
The supplied remote control can be used to control the TV connected to this unit.
The remote control has a TV hotkey that enables you to perform various operations with the simple press of a button.
Special Sound mode
You can select from 7 different sound modes (MUSIC, NEWS, DRAMA, CINEMA, SPORTS, GAME, PASS (Original Sound)) depending on the type of content you want to enjoy.
Compatibility with various audio Technologies
This unit employs decoders compatible with Dolby Digital and DTS (Digital Theater Systems).
Dolby Digital
This is the standard audio signal format used on DVDs and other purely digital media. This surround technology delivers high-quality digital audio of up to 5.1 discrete channels to produce a directional and more realistic effect.
- DTS (Digital Theater Systems)
DTS provides a discrete 5.1 CH digital audio signal for both music and movie content and uses less compression than Dolby Digital for richer sound.
Wireless Subwoofer
Samsung's wireless module does away with cables running between the main unit and the subwoofer. Instead, the subwoofer connects to a compact wireless module that communicates with the main unit.
3D Depth Sound
The 3D sound feature adds depth and spaciousness to your listening experience.
WHAT'S INCLUDED
Check for the supplied accessories below.
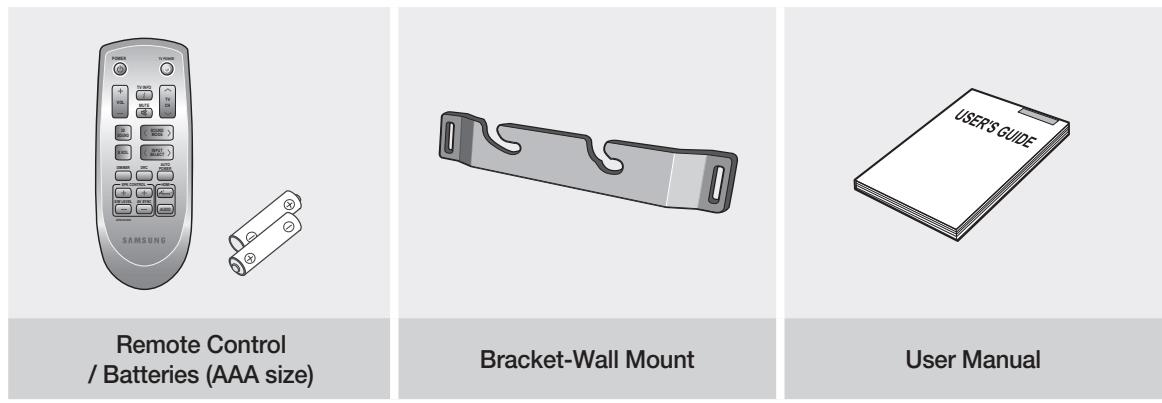
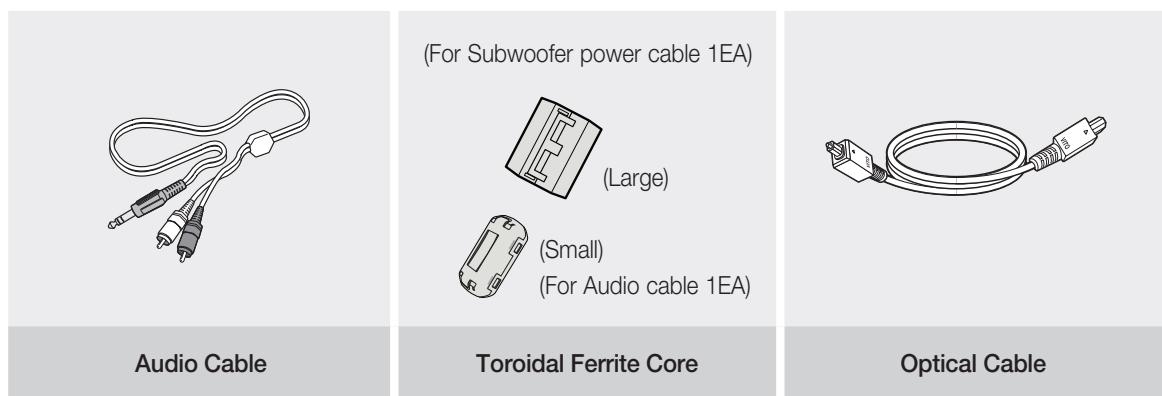

- The accessories may look slightly different than those pictured above.
safety information
SAFETYWARNINGS
TO REDUCE THE RISK OF ELECTRIC SHOCK, DO NOT REMOVE THE COVER(OR BACK).
NO USER-SERVICEABLE PARTS ARE INSIDE. REFER SERVICING TO QUALIFIED SERVICE PERSONNEL.
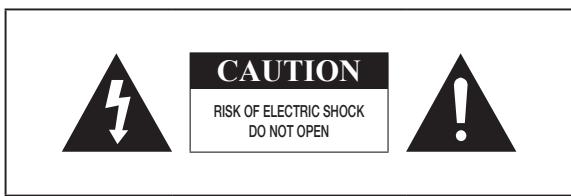
This symbol indicates "dangerous voltage" inside the product that presents a risk of electric shock or personal injury.
This symbol indicates important instructions accompanying the product.
WARNING : To reduce the risk of fire or electric shock, do not expose this appliance to rain or moisture.
CAUTION : TO PREVENT ELECTRIC SHOCK, MATCH WIDE BLADE OF PLUG TO WIDE SLOT, FULLY INSERT.
- This apparatus shall always be connected to a AC outlet with a protective grounding connection.
- To disconnect the apparatus from the mains, the plug must be pulled out from the mains socket, therefore the mains plug shall be readily operable.
CAUTION
- Apparatus shall not be exposed to dripping or splashing and no objects filled with liquids, such as vases, shall be placed on the apparatus.
- The Mains plug is used as a disconnect device and shall stay readily operable at any time.
Wiring the Main Power Supply Plug (UK Only)
IMPORTANT NOTICE
The mains lead on this equipment is supplied with a moulded plug incorporating a fuse. The value of the fuse is indicated on the pin face of the plug and if it requires replacing, a fuse approved to BS1362 of the same rating must be used. Never use the plug with the fuse cover removed. If the cover is detachable and a replacement is required, it must be of the same colour as the fuse fitted in the plug. Replacement covers are available from your dealer.
If the fitted plug is not suitable for the power points in your house or the cable is not long enough to reach a power point, you should obtain a suitable safety approved extension lead or consult your dealer for assistance.
However, if there is no alternative to cutting off the plug, remove the fuse and then safely dispose of the plug. Do not connect the plug to a mains socket as there is a risk of shock hazard from the bared flexible cord.
Never attempt to insert bare wires directly into a mains socket. A plug and fuse must be used at all times.
IMPORTANT
The wires in the mains lead are coloured in accordance with the following code:-- BLUE = NEUTRAL BROWN = LIVE As these colours may not correspond to the coloured markings identifying the terminals in your plug, proceed as follows:- The wire coloured BLUE must be connected to the terminal marked with the letter N or coloured BLUE or BLACK. The wire coloured BROWN must be connected to the terminal marked with the letter L or coloured BROWN or RED.
WARNING:DO NOT CONNECT EITHER WIRE TO THE EARTH TERMINAL WHICH IS MARKED WITH THE LETTER E OR BY THE EARTH SYMBOL ,OR COLOURED GREEN OR GREEN AND YELLOW.
PRECAUTIONS
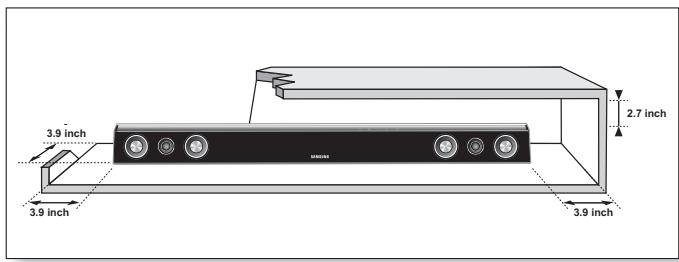
Ensure that the AC power supply in your house complies with the identification sticker located on the back of your product. Install your product horizontally, on a suitable base (furniture), with enough space around it for ventilation (3~4 inches). Make sure the ventilation slots are not covered. Do not place the unit on amplifiers or other equipment which may become hot. This unit is designed for continuous use. In order to disconnect the unit completely from the power supply, remove the main plug from the wall outlet, especially when left unused for a long period of time.
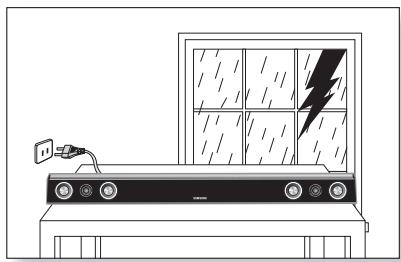
During thunderstorms, disconnect the AC main plug from the wall outlet. Voltage peaks due to lightning could damage the unit.
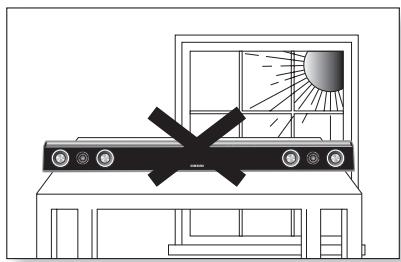
Do not expose the unit to direct sunlight or other heat sources. This could lead to overheating and malfunction of the unit.
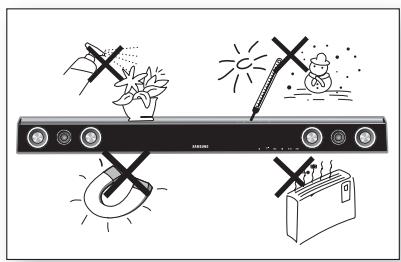
Protect the product from moisture (i.e. vases), and excess heat (e.g. fireplace) or equipment creating strong magnetic or electric fields Disconnect the power cable from the AC supply if the unit malfunctions. Your product is not intended for industrial use. Use of this product is for personal use only.
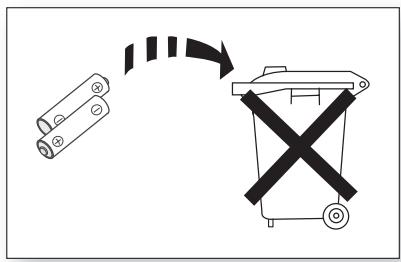
The batteries used with this product contain chemicals that are harmful to the environment.
Do not dispose of batteries in the general household trash.
Condensation may occur if your product has been stored in cold temperatures. If transporting the unit during the winter, wait approximately 2 hours until the unit has reached room temperature before using.
contents
FEATURES 2
2 Features
3 What's included
SAFETY INFORMATION
4 Safety warnings
5 Precautions
GETTING STARTED
7 Before reading the user's manual
DESCRIPTIONS
8 Front panel
9 Rear panel
REMOTE CONTROL
10 Tour of the remote control
10
CONNECTIONS
11 Installing the wall mount
12 Connecting the wireless subwoofer
13 Attaching the toroidal ferrite core to the power cord of the subwoofer
13 Installing toroidal ferrite to subwoofer
13 Installing ferrite core to audio cable
14 Use iPod/iPhone with a wireless dock cradle for iPod/iPhone (sold separately (HT-WDC10))
14 How to link the wireless transmitter with the main unit
15 Connecting the Crystal Surround Air Track
FUNCTIONS
16 Basic functions
16 Advanced functions
19 Software upgrade
TROUBLESHOOTING
20 Troubleshooting
20
APPENDIX
21 Specifications
21
getting started
BEFORE READING THE USER'S MANUAL
Make sure to check the following terms before reading the user manual.
Icons that will be used in manual
| Icon | Term | Definition |
| ! | Caution | This involves a case where a function does not operate or settings may be canceled. |
| Note | This involves tips or instructions on the page that help each function operate. |
About the use of this user's manual
1) Be sure to be familiar with Safety Instructions before using this product. (See page 4)
2) If a problem occurs, check the Troubleshooting. (See page 20)
Copyright
©2011 Samsung Electronics Co., Ltd.
All rights reserved; no part or whole of this user's manual may be reproduced or copied without the prior written permission of Samsung Electronics Co., Ltd.
descriptions
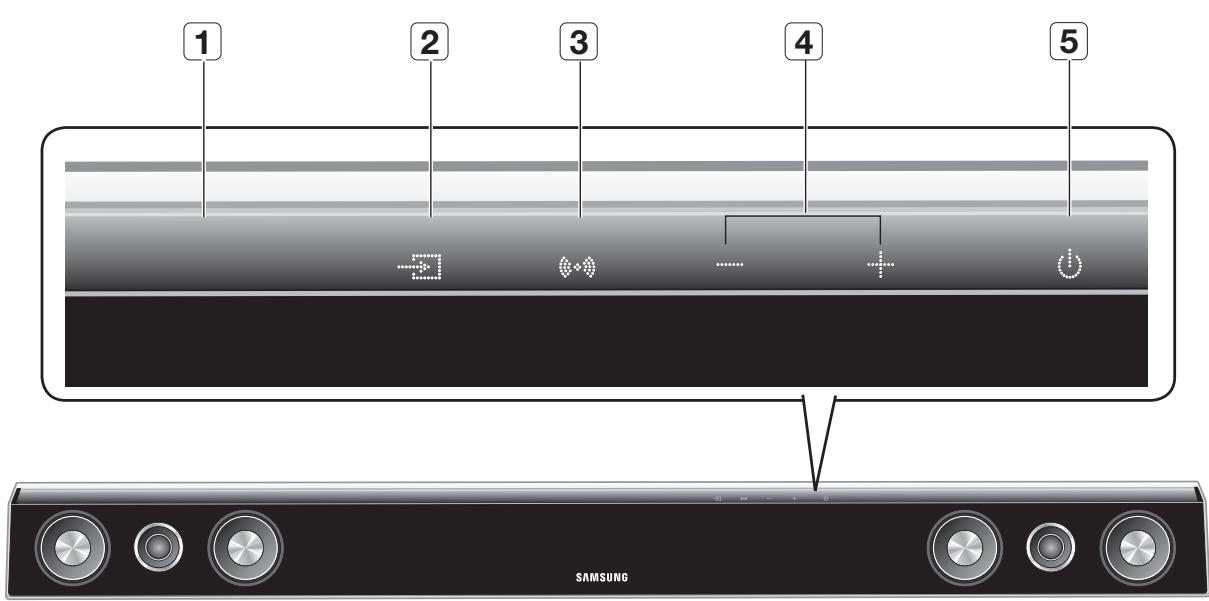
FRONT PANEL
| 1 | DISPLAY | Displays the current mode. |
| 2 | INPUT MODE | Selects the Optical, Audio or W.iPod input. |
| 3 | SOUND MODE | Selects the sound mode. (MUSIC, NEWS, DRAMA, CINEMA, SPORTS, GAME, PASS (Original Sound)) |
| 4 | VOLUME +/- | Controls the volume level. |
| 5 | POWER BUTTON | Turns the Crystal Surround Air Track on and off. |

- When you turn on the power of this unit, there will be a 4 to 5 second delay before it reproduces sound.
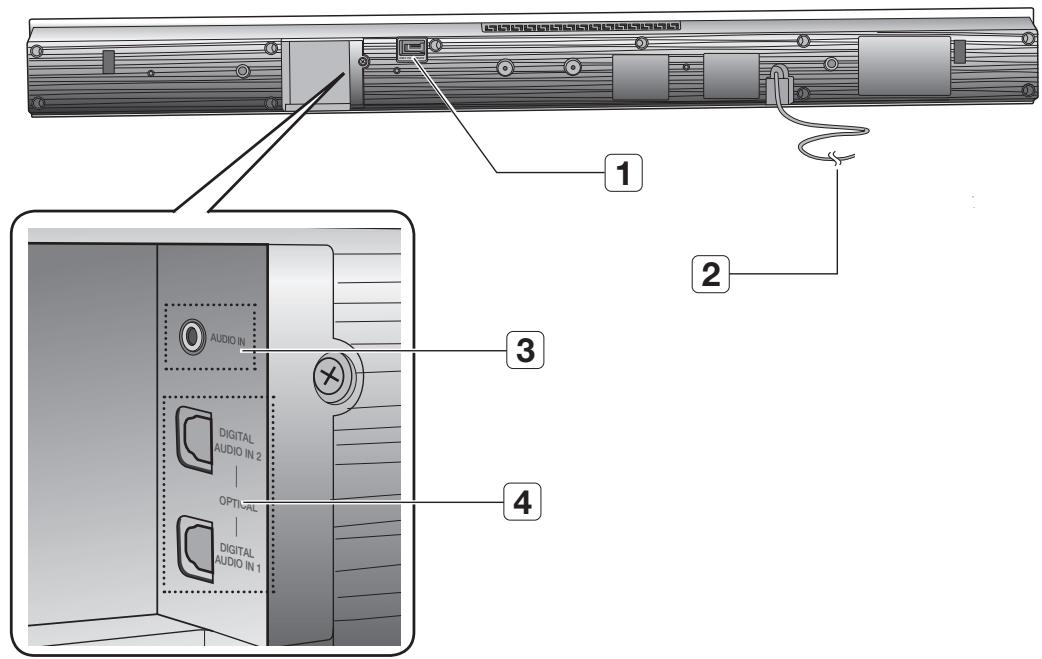
| 1 | USB PORT | You can update this unit's software through the USB port. |
| 2 | POWER SUPPLY CABLE | Plug the power supply cable into the AC wall outlet. |
| 3 | AUDIO IN JACK | Connect to the analog output of an external device. |
| 4 | DIGITAL AUDIO IN 1,2 | Connect to the digital (optical) output of an external device. |

- When disconnecting the power cable from the wall outlet, hold the plug. Do not pull the cable.
- Do not connect this unit or other components to the main power until all connections between components are complete.
TOUR OF THE REMOTE CONTROL
POWER BUTTON
Turns the Crystal Surround Air Track on and off.
TV INFO
Use this to display the TV channel information.
VOLUME
Adjusts the volume level of the unit.
MUTE
Mutes the sound from the unit. Press again to restore the sound to the previous volume level.
3D SOUND
This feature adds depth and spaciousness to the sound.
SMART VOLUME
Regulates and stabilizes the volume level against a drastic volume change.
DIMMER, DRC
You can control the brightness of the Display.
You can use this function to enjoy Dolby Digital sound when watching movies at low volume at night (Standard, MAX, MIN).
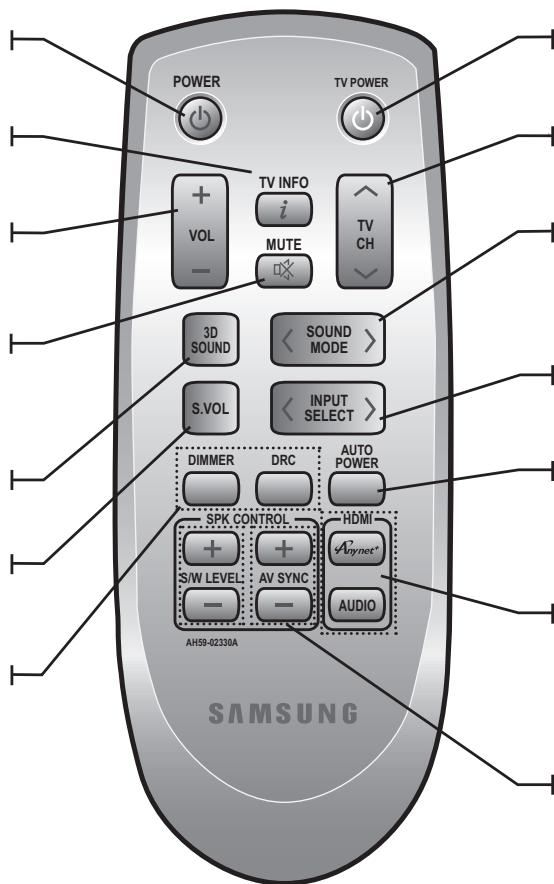
TV POWER BUTTON
Turns your Samsung TV on and off.
TV CHANNEL
Switches between the available TV channels.
SOUND MODE
Selects the sound mode.
(MUSIC, NEWS, DRAMA,
CINEMA, SPORTS, GAME,
PASS (Original Sound))
INPUT SELECT
Selects the Digital (Optical), the Audio or the W.iPod input.
AUTO POWER
Synchronizes the Air Track via Optical connection via the Optical jack so it turns on automatically when you turn on your TV.
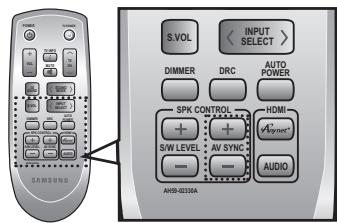
Anynet+, AUDIO (NOT AVAILABLE)
This button is disabled. If you press this button, you will see a message of "NOT AVAILABLE" on the main unit.
S/W LEVEL, AV SYNC
Adjusts the Subwoofer level. Used to help sync video to audio when connected to a digital TV.

- The remote control can operate TVs made by SAMSUNG only.
- Depending on the TV you are using, you may not be able to operate your TV with this remote control. In this case, operate the TV using the TV's remote control.
Installing batteries in the Remote Control
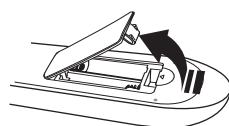

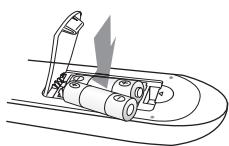

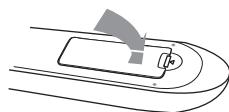
-
Lift the cover at the back of the remote control upward as shown.
-
Install two AAA size batteries. Make sure to match the “+” and “-” ends of the batteries with the diagram inside the compartment.
-
Replace the cover. Assuming typical TV usage, the batteries last for about one year.
Operation Range of the Remote Control
The remote control can be used up to approximately 23 feet (7 meters) in a straight line. It can also be operated at a horizontal angle of up to 30^ from the remote control sensor.
INSTALLING THE WALL MOUNT
You can use the wall mount bracket to mount this unit on a wall.
Installation Precautions
- Do not install on a place other than a vertical wall.
- For the installation, avoid a location with high temperature or humidity, or wall that cannot sustain the weight of the set.
- Check the strength of the wall. If the strength of the wall is insufficient for the product installation, make sure to reinforce the wall before the installation.
- Check the material of the wall. If the wall is made of plaster board, marble, or iron board, purchase and use the appropriate fixing screws.
- Cables connecting to external devices need to be connected to the set before installing.
-
Be sure to turn off and unplug the unit before installation. Otherwise, it may cause electric shock.
-
Place the wall mount bracket on a wall surface and then secure it with two screws (not supplied).
- Then, fit the unit into the corresponding slots of the wall mount bracket. For secure installation, make sure the mounting studs slide firmly down into the bottom of the slots.
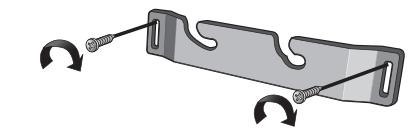
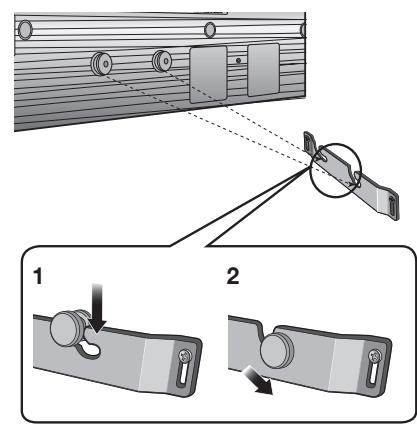
- This is the completion of the suggested wall mount installation.

- Do not hang onto the installed unit and avoid any impact to the unit.
- Secure the unit firmly to the wall so that it does not fall off. If the unit falls off, it may result in an injury or damage to the product.
- When the unit is installed on a wall, please make sure that a child does not pull any of connecting cables, as it may cause it to fall.
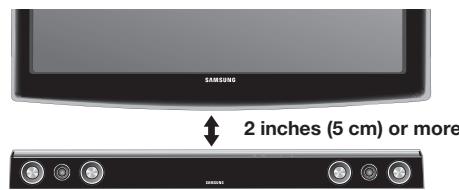
- For the optimal performance in a wall mount installation, keep the speaker system at least 2 inches (5 cm) distant from the TV.
CONNECTING THE WIRELESS SUBWOOFER
The Subwoofer's linking ID is preset at the factory and the main unit and sub should link (connect wirelessly) automatically when main unit is turned on. If the link indicator does not light when main unit and subwoofer are turned on, please set the ID by following the process below.
-
Plug the power cords of the main unit and subwoofer into an AC power supply.
-
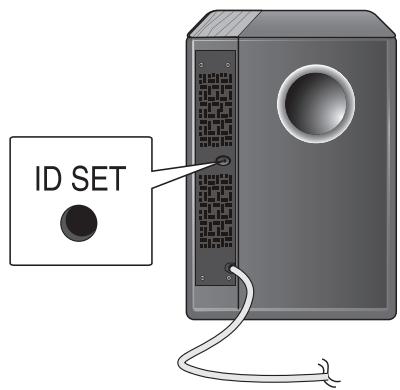
Press the ID SET button on the back of the subwoofer with a small, pointed object for 5 seconds.
-
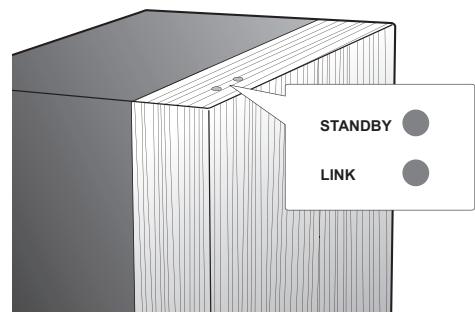
The STANDBY indicator is turned off and the LINK indicator (Blue LED) blinks quickly.
- While the main unit is powered off (STANDBY mode), press MUTE on the remote control for 5 seconds.
-
The Power Indicator on the main unit lights off and on, then returns to STANDBY mode.
-
The main unit and the subwoofer are now linked (connected).
- The Link indicator (blue LED) on the subwoofer is turned on.
- You can enjoy better sound from the wireless subwoofer by selecting the sound mode. (See page 17)
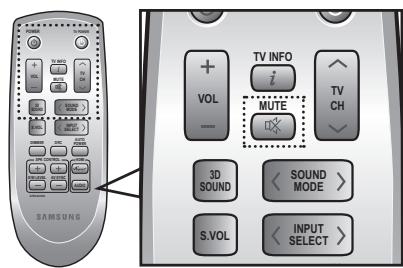

- Before moving or installing the product, be sure to turn off the power and disconnect the power cord.
- If the main unit is powered off, the wireless subwoofer will be in the standby mode and the STANDBY LED on the upper side will come on after 30 seconds Link indicator (Blue LED) blinking.
- If you use a device that uses the same frequency (5.2GHz or 5.8GHz) near the system, some sound interruption may be heard due to interference.
- The transmission distance of the wireless signal between the main unit and sub is about 33 ft., but may vary depending on your operating environment. If a steel-concrete or metallic wall is between the main unit and the wireless subwoofer, the system may not operate at all, because the wireless signal cannot penetrate metal.
- If the main unit doesn't make wireless connection, follow steps 1-4 above to retry the connection between the main unit and wireless subwoofer.

- The wireless receiving antenna is built into the wireless subwoofer. Keep the unit away from water and moisture.
- For optimal listening performance, make sure that the area around the wireless subwoofer location is clear of any obstructions.
ATTACHING THE TOROIDAL FERRITE CORE TO THE POWER CORD OF THE SUBWOOFER
If you attach a Toroidal ferrite core to the power cord of the Subwoofer, it will help to prevent RF interference from radio signals.
- Pull the fixing tab of the Toroidal ferrite core to open it.
- Make three loops in the power cable of the subwoofer.
- Attach the Toroidal ferrite core to the Subwoofer power cord as the figure shows and press it until it clicks.
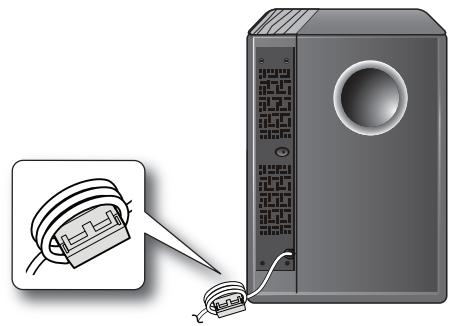
INSTALLING TOROIDAL FERRITE TO SUBWOOFER
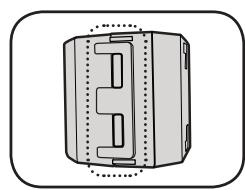
Lift up to release the lock and open the core.
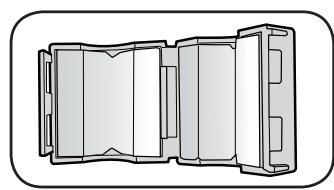

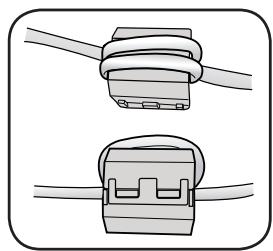
Close the lock back.

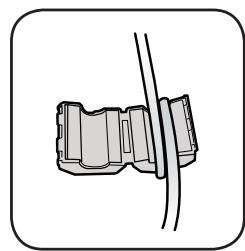
Make three rounds on the coil with the power cable. (Start winding at 5-10cm away from the switch)
INSTALLING FERRITE CORE TO AUDIO CABLE
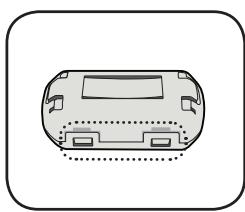
Lift up to release the lock and open the core.

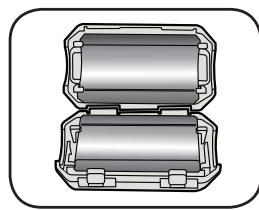

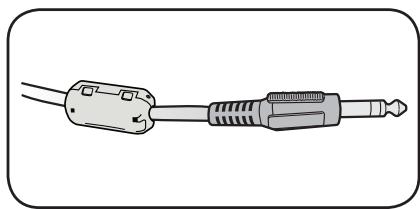
Close the lock back.

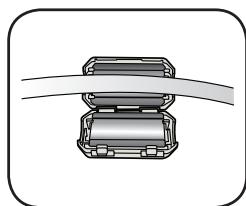
Place the audio cable on the opened core.
USE iPod/iPhone WITH A WIRELESS DOCK CRADLE FOR iPod/iPhone (Sold Separately (HT-WDC10))
You can enjoy finer quality of music through the speaker by sending iPod/iPhone's audio signal using a Wireless Transmitter.
To link the main unit with wireless transmitter, you have to make ID setting when both main unit and wireless transmitter are standby.
Turn on the main unit and connect the iPod/iPhone to the Wireless transmitter.
Then press INPUT SELECT button on the remote control to select "W iPod" mode.
The INPUT SELECT mode of the main unit will switches as follows.
Repeatedly press DIGl.1 DIGl.2 ANALOG WiPod (See page 18)
The Sound bar will not be turned off if iPod/iPhone is not connected to the Wireless Transmitter.
For more information on HT-WDC10, refer to the HT-WDC10's user manual.
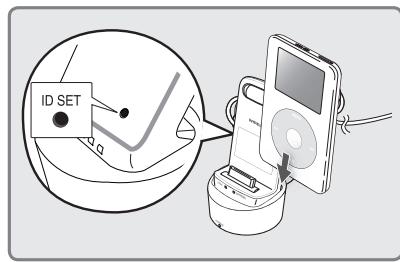
HOW TO LINK THE WIRELESS TRANSMITTER WITH THE MAIN UNIT
Set an ID of the Subwoofer before setting a Transmitter ID. ( See page 12 )
- Turn off your Home Theater (HW-D450, HW-D451).
- Press the hold "3D SOUND" button on the remote control for 5 seconds. The standby light on the HW-D450, HW-D451 will blink once.
- Connect the iPod/iPhone to the Wireless transmitter.
- Turn on the iPod/iPhone. Press the "ID SET" button on the back of the Wireless transmitter for 5 seconds. The link light on the wireless transmitter will blink fast.
-
Turn on your Home Theater(make sure the wireless transmitter's Link LED in ON). To listen to music from your iPod/iPhone over the Home Theater, select the iPod mode as the Home Theater's source.
-
You can control the speaker volume of iPod/iPhone with a volume wheel or a volume bar.
- When iPod/iPhone is stopped or in a power saving mode, a Wireless transmitter is turned to the Sleep Mode. When iPod/iPhone is turned to the Deep Sleep Mode, the Wireless transmitter is off.

- If you use the main unit nearby a wireless device such as a laptop computer, an AP, or WiFi, any unstable operation error can happen.
- Do not pairing the subwoofer and iPod/iPhone at the same time. If you pairing at the same time, iPod/iPhone and subwoofer may not connect to the Sound bar.
iPod/iPhone MODELS THAT CAN BE USED WITH THIS PRODUCT
| iPod touch (1st, 2nd, 3rd, and 4th generation) | iPod classic | iPod with video |
| iPod nano (1st, 2nd, 3rd, 4th, 5th, and 6th generation) | iPhone 4 | iPhone 3GS |
| iPhone 3G | iPhone |

- "Made for iPod," and "Made for iPhone" mean that an electronic accessory has been designed to connect specifically to iPod or iPhone, respectively, and has been certified by the developer to
Made for

iPhone
meet Apple performance standards. Apple is not responsible for the operation of this device or its compliance with safety and regulatory standards. Please note that the use of this accessory with iPod or iPhone may affect wireless performance.
- iPhone, iPod, iPod classic, iPod nano, and iPod touch are trademarks of Apple Inc., registered in the U.S. and other countries.
- The volume control may not be operated normally except at the referred models. If there is any error happened at the models above, please update the software of iPod/iPhone at the latest version.
This section explains two ways (digital and analog) of connecting the unit to the TV.
This unit is equipped with two optical digital jacks and one audio analog jack for connecting a TV.
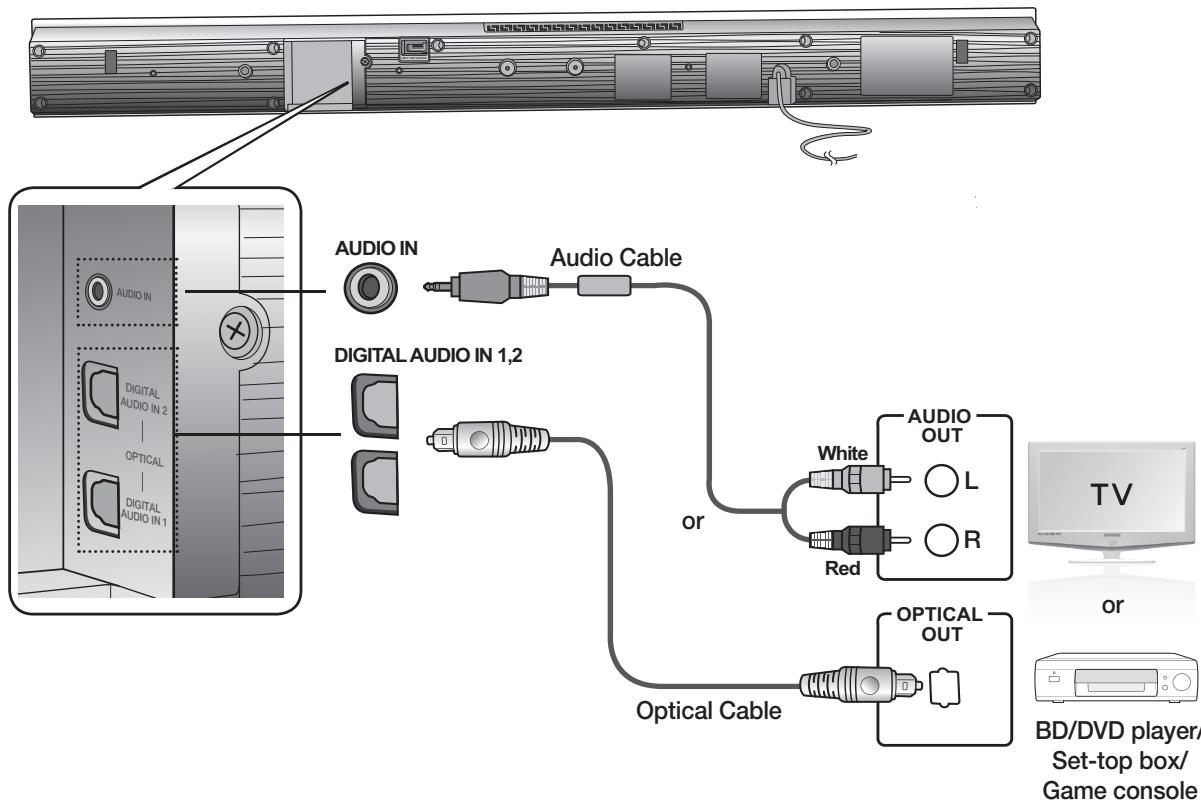
AUDIO IN
Connect AUDIO IN on the main unit to the AUDIO OUT of the TV or Source Device.
Be sure to match connector colors.
or,
OPTICAL DIGITAL IN 1,2
Connect the Digital Input on the main unit to the OPTICAL OUT of the TV or Source Device.

- Do not connect the power cord of this product or your TV to the wall outlet until all connections between components are complete.
- Before moving or installing this product, be sure to turn off the power and disconnect the power cord.
- If you select 'ANALOG' without connecting the Audio Cable, the set is turned off automatically after 20 minutes.
- If a TV or any device connected to Air Track with the optical cable is off and there is no digital input, the Air Track is turned off after 20 minutes. (If there has been no input signal for over 20 minutes from DIGITAL AUDIO IN 1 or 2, the Air Track will be turned off.)
- When Air Track isn't linked with HT-WDC10 model in the W.iPod mode, Air Track will turn off after 20 minutes.
BASIC FUNCTIONS
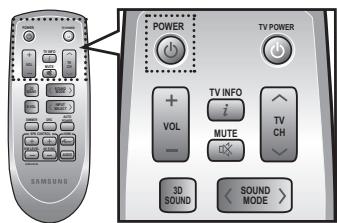
Turning the power on/off
- Touch POWER ( ) on the front panel.
or,
Press POWER on the remote control to turn on the power.
- Touch POWER ( ) on the front panel.
or,
Press POWER on the remote control again to turn off the power.
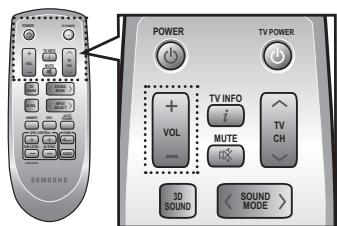
Adjusting the volume
Touch VOLUME + / - on the front panel.
or,
Press VOLUME +/- on the remote control to increase or decrease the volume level.
- The numeric value of the volume level appears in the front panel display.

- The volume level increases or decreases when you press VOLUME +/-
- If you want to enjoy the sound only from the Crystal Surround Air Track, you must turn off the TV's speakers in the Audio Setup menu of your TV. Refer to the owner's manual supplied with your TV.
ADVANCED FUNCTIONS
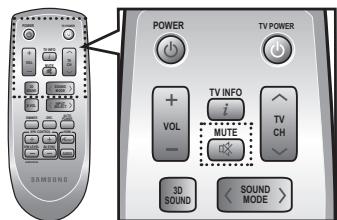
Muting the sound
This is useful when answering a doorbell or telephone call.
- Press MUTE (×) on the remote control to mute the sound.
- Press MUTE on the remote control again (or press VOLUME +/- ) to restore the sound.
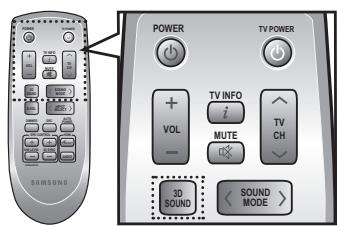
Using the 3D Depth Sound function
The 3D sound feature adds depth and spaciousness to the sound by using 3D SOUND button.
Press 3D SOUND on the remote control.
Each time the button is pressed, the selection changes as follows:
3D SOUND ON 3D SOUND OFF

- When you turn on the 3D Depth Sound, the Sound Mode will automatically change to PASS.
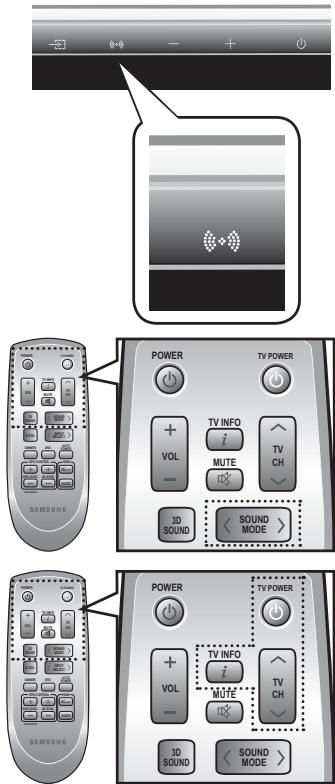
Using the sound mode
You can select from 7 different sound modes (MUSIC, NEWS, DRAMA, CINEMA, SPORTS, GAME, PASS (Original Sound)) depending on the type of sources you want to enjoy.
Press SOUND MODE on the remote control , or touch SOUND MODE (on the front panel repeatedly to select the sound mode you want.
- Select PASS mode if you want to enjoy the original sound.

- It is recommended that you select a Sound Mode based on the source material and your personal taste.
- When you choose the Sound Mode (except PASS), the 3D Depth Sound will automatically be turned OFF.
Using the TV functions
- Press TV POWER on the remote control of this unit.
- Press TV INFO on the remote control to display the TV channel information.
- Press TV CH on the remote control to select the TV channel.

- The remote control can operate TVs made by SAMSUNG only.
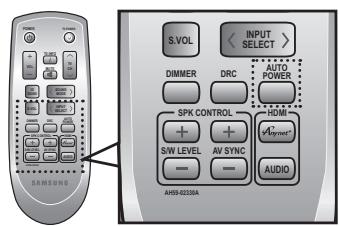
Using the AUTO POWER LINK function
The Crystal Surround Air Track is automatically turned on when you turn the power on of a TV or any device connected to the Air Track with the optical cable.
Press AUTO POWER on the remote control of this unit.
- Auto power link function turns on and off each time you press AUTO POWER.
| AUTO POWER LINK | Display |
| ON | POWER LINK ON |
| OFF | POWER LINK OFF |

- If a TV or any device connected to Air Track with the optical cable is off and there is no digital input, the Air Track is turned off after 20 minutes.
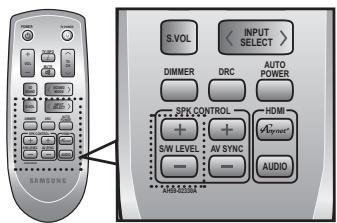
Using the S/W LEVEL function
You can control the base volume with S/W Level button on the Remote control.
- Press the S/W Level button on the Remote control.
- "SW 00" is appeared on the Display.
- Press "+" on the LEVEL key if you want to increase the subwoofer volume. You can set it from SW+01 to SW+06.
- Press “-” on the LEVEL key if you want to decrease the subwoofer volume. You can set it from SW-01 to SW-06.
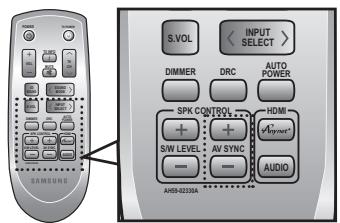
Using the AV SYNC function
Video may look slower than the audio if it is connected with digital TV. If this occurs, adjust the audio delay time to match the video.
Press AV SYNC +/- button on the remote control of this unit.
- You can use + , - button to set the audio delay time between 0 ms and 300 ms.
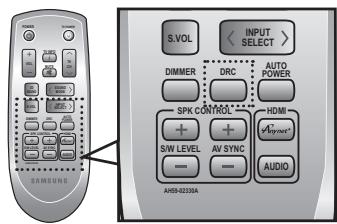
Using the DRC function
This feature balances the range between the loudest and quietest sounds. You can use this function to enjoy Dolby Digital sound when watching movies at low volume at night.
Press DRC on the remote control of this unit.
Each time the button is pressed, the selection changes as follows: DRC MIN DRC STANDARD DRC MAX
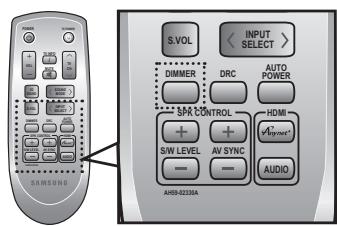
Using the DIMMER function
This feature control the brightness of the Display.
Press DIMMER on the remote control of this unit.
Each time the button is pressed, the selection changes as follows : DIMMER ON DIMMER OFF
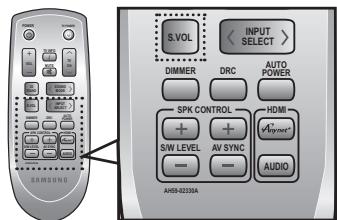
Using the S.VOLUME function
This will regulate and stabilize the volume level against a drastic volume change in case of a channel change or scene transition.
Press S.VOL on the remote control of this unit.
Each time the button is pressed, the selection changes as follows: SMART VOLUME ON SMART VOLUME OFF
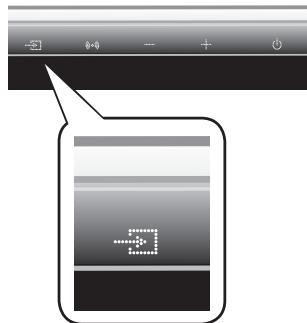
Using the input mode
You can select either Optical Digital, Audio input or W.iPod input.
Press INPUT SELECT on the remote control , or touch INPUT SELECT () on the front panel repeatedly to select the Optical Digital, Audio input or W.iPod input.
| Input mode | Display |
| Optical Digital input | DIGI.1 |
| DIGI.2 | |
| Audio input | ANALOG |
| iPod mode | W.iPod |
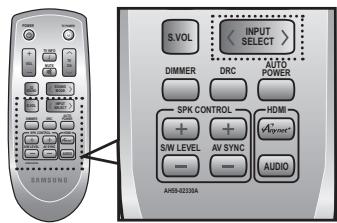
Although it appears on the input mode display, iPod connection is not possible with this model. It is only available with model HT-WDC10 (sold separately)
SOFTWARE UPGRADE
Samsung may offer upgrades for the Crystal Surround Air Track's system's firmware in the future.
Please visit Samsung.com or contact the Samsung call center to receive information about downloading upgrades and using a USB drive.
Upgrades will be possible by connecting a USB drive to the USB port located on your Air Track.
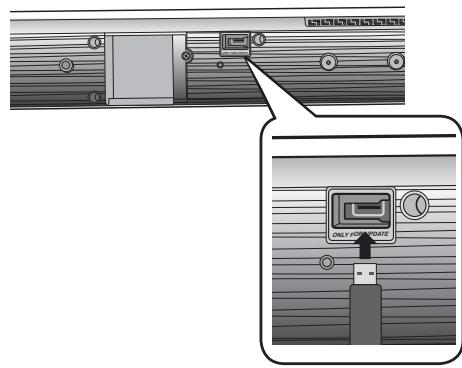

- Insert a USB drive containing the firmware upgrade into the USB port on the back of the main unit.
- Please be careful to not disconnect the power or remove the USB drive while upgrades are being applied. The main unit will turn off automatically after completing the firmware upgrade.
When software is upgraded, settings you have made will return to their default (factory) settings. We recommend you write down your settings so that you can easily reset them after the upgrade.
If the firmware fails to upgrade, we recommend formatting the USB data in FAT16 and trying again.
- For upgrading purposes, do not format USB data in NTFS because it is not a supported file system.
Depending on the manufacturer, the USB may not be supported.
troubleshooting
Before requesting service, please check the following.
| Symptom | Check | Remedy |
| The unit will not turn on. | ·Is the power cord plugged into the outlet? | ·Connect the power plug to the outlet. |
| A function does not work when the button is pressed. | ·Is there static electricity in the air? | ·Disconnect the power plug and connect it again. |
| Sound is not produced. | ·Is the unit properly connected to your TV? ·Is the Mute function on? ·Is the volume set to minimum? | ·Connect it correctly. ·Press the Mute button to cancel the function. ·Adjust the volume. |
| Picture does not appear on a TV when the function is selected. | ·Is the TV connected properly? | ·Connect it correctly. |
| Remote control does not work. | ·Are the batteries drained? ·Is the distance between remote control and main unit too far? | ·Replace with new batteries. ·Operate at a close distance. |
| The sound from the left/right channels is reversed. | ·Are the left/right audio output cables from the TV connected properly? | ·Check the left/right channel and connect it/them correctly. |
SPECIFICATIONS
| GENERAL | Standby power consumption | 0.75W | |
| Power consumption | Main unit | 45W | |
| Subwoofer | 20W | ||
| Weight | Main unit | 2.3 kg | |
| Subwoofer | 5.4 kg | ||
| Dimensions (W x H x D) | Main unit | 957 x 91.9 x 44.9 mm | |
| Subwoofer | 175 x 350 x 295 mm | ||
| Operating temperature range | + 5 °C to 35 °C | ||
| Operating humidity range | 10 % to 75 % | ||
| AMPLIFIER | Rated output power | Main unit | 80W/CH, 4Ω, THD = 10%, 1kHz |
| Subwoofer | 120W, 4Ω, THD = 10%, 100Hz | ||
| Input sensitivity/Impedance | 570mV/20KΩ | ||
| S/N ratio (analog input) | 70dB | ||
| Separation(1kHz) | 70dB | ||
| FREQUENCY RESPONSE | Analog input | 20Hz~20kHz(±3dB) | |
| Digital input/48kHz PCM | 20Hz~20kHz(±3dB) | ||
- S/N ratio, distortion, separation and usable sensitivity are based on measurement using AES (Audio Engineering Society) guidelines.
*: Nominal specification
Samsung Electronics Co., Ltd reserves the right to change the specifications without notice. - Weight and dimensions are approximate.
- For the power supply and Power Consumption, refer to the label attached to the product.
| Česky [Czech] | Samsung tímo prohlášuje, ze tento Crystal Surround Air Track je ve shodě se základními požadavyk a dalšimi příslušnými ustanoveními směrnice 1999/5/ES. |
| Dansk [Danish] | Undertegnede Samsung erklær herved, at følgende udstyr Crystal Surround Air Track overholder de væsentlige krav og ørige relevante krav i direktiv 1999/5/EF. |
| Deutsch [German] | Hiermit erklart Samsung, dass sich das Gerät Crystal Surround Air Track in Übereinstimmung mit den grundlegenden Anforderungen und den übrigen einschlögigen Bestimmungen der Richtlinie 1999/5/EG befindet. |
| Eesti [Estonian] | Käesolevaga kinnitab Samsung seadme Crystal Surround Air Track vastavust direktiivi 1999/5/EU põhinöutele ja nimetatud direktivist tulenevatele teistele asjakohastele sätetele. |
| English | Hereby, Samsung, declares that this Crystal Surround Air Track is in compliance with the essential requirements and other relevant provisions of Directive 1999/5/EC. |
| Espanol [Spanish] | Por medio de la presente Samsung Declare que el Crystal Surround Air Track cumple con los requisitos esenciales y cualesquieraorasdispositions aplicables o exigibles de la Direcva 1999/5/CE. |
| Еληνική [Greek] | ME THN ΠΑΥΟΥΣΑ Samsung ΔΗλΩNEΙ OTI Crystal Surround Air Track ΣΥΜΜΟΦΩNETΑ ΠΙΝΟ ΠΙΣ OΥΣΙΩΔΕΙ ΑΝΑΙΤΗΣΕΙΣ KAI TΙΣ ΑΟΙΝΕΣ ΣχETAΙΚΕΣ ΣΙΑΤΑΞΕΙΣ ΘΗ ΕΟΗΓΙΑΣ 1999/5/EK. |
| François [French] | Par laprésente Samsung déclare que l'appareil Crystal Surround Air Track est conforme aux exigences essentielles et aux autres dispositions pertinentes de la directive 1999/5/CE. |
| Italiano [Italian] | Con la presente Samsung dichiara che questo Crystal Surround Air Track è conforme ai requisiti essenziali ed alle autre disposizioni pertinenti stabilite dalla direttiva 1999/5/CE. |
| Latviski [Latvian] | Ar šo Samsung deklare, ka Crystal Surround Air Track atbilist Direktivas 1999/5/EK būtiskajām prasibām un citiem ar to saistītajemi noteikumiem. |
| Lietuviu [Lithuanian] | Šiuo Samsung deklarojuja, kad šis Crystal Surround Air Track attinka esminius reikalavimus ir kitas 1999/5/EB Direktyvos nuostatas. |
| Nederlands [Dutch] | Hierbij verkaart Samsung dat het toestel Crystal Surround Air Track in overeenstemming is met de essentièle eisen en de andere relevante bepalingen van richtlijn 1999/5/EG. |
| Mali [Maltese] | Hawnhekk, Samsung, jiddikjara li dan Crystal Surround Air Track jikkonforma mal-ḥṭigijet essenzjali u ma provvedimenti Úhrajn relevanti li hemm fid-Dirrettiva 1999/5/EC. |
| Magyar [Hungarian] | Aluliřott, Samsung nyilatkozom, hagy a Crystal Surround Air Track megfelel a vonatkoź alapvető kóvetelményeknek és az 1999/5/EC irányelv egyè előirásainak. |
| Polski [Polish] | Niniejszym Samsung oswiadczna, ze Crystal Surround Air Track jest zgodny z zasadniczymi wymogami oraz pozostalymi stosownymi postanowieniami Dyrektywy 1999/5/EC. |
| Portugués [Portuguese] | Samsung declara que este Crystal Surround Air Track está conforme com os requisitos essenciais e outras dispositions da Direcva 1999/5/CE. |
| Slovensko [Slovenian] | Samsung izjavla, da je ta Crystal Surround Air Track v skladu z bistvenimi zahtevami in ostalimi relevantnimi dolocili direktive 1999/5/ES. |
| Slovensky [Slovak] | Samsung týmtvo vyhlasuje, ze Crystal Surround Air Track spíha základné požiadavyk a všétky príslušné ustanovenia Smerince 1999/5/ES. |
| Suomi [Finnish] | Samsung vakuuttaa täten että Crystal Surround Air Track typpinen laite on direktivin 1999/5/ERY oleellisten vaatimusten ja sitä koskevien direktivin muiden ehtojen mukainen. |
| Svenska [Swedish]SS | Härmed intygår Samsung att denna Crystal Surround Air Track stár I överensstammelse med de väsentiga eigenskapskrav och øvriga relevanta bestämelse som framgår av direktiv 1999/5/EG. |
| Ślenska [Icelandic] | Hér með lysir Samsung yfir bvi að Crystal Surround Air Track er i samraemi við grunnkröfur og aörar kröfur, sem geröar eru i tilskipun 1999/5/EC. |
| Norsk [Norwegian] | Samsung erkræer herved at utstyret Crystal Surround Air Track er i samsvar med de grunnleggende krav og øvrige relevante krav i direktiv 1999/5/EF. |
| Türkije[Türkçë] | Bu belge ile, Samsung bu Crystal Surround Air Track'nin 1999/5/EC Yönemeliginin temel:gerekliliklerine ve ilgili hülkümüllerine uygün oldugunu Beyaned. |
- In the frequency range between 2454MH and 2483.5MHz, this product should be operated indoors only in France
Contact SAMSUNG WORLD WIDE
If you have any questions or comments relating to Samsung products, please contact the SAMSUNG customer care center.
| Area | Contact Center | Web Site |
| ■ North America | ||
| Canada | 1-800-SAMSUNG (726-7864) | www.samsung.com |
| Mexico | 01-800-SAMSUNG (726-7864) | www.samsung.com |
| U.S.A | 1-800-SAMSUNG (726-7864) | www.samsung.com |
| ■ Latin America | ||
| Argentine | 0800-333-3733 | www.samsung.com |
| Brazil | 0800-124-421 / 4004-0000 | www.samsung.com |
| Chile | 800-SAMSUNG (726-7864) | www.samsung.com |
| Colombia | 01-8000112112 | www.samsung.com |
| Costa Rica | 0-800-507-7267 | www.samsung.com |
| Dominica | 1-800-751-2676 | www.samsung.com |
| Ecuador | 1-800-10-7267 | www.samsung.com |
| El Salvador | 800-6225 | www.samsung.com |
| Guatemala | 1-800-299-0013 | www.samsung.com |
| Honduras | 800-7919267 | www.samsung.com |
| Jamaica | 1-800-234-7267 | www.samsung.com |
| Nicaragua | 00-1800-5077267 | www.samsung.com |
| Panama | 800-7267 | www.samsung.com |
| Peru | 0-800-777-08 | www.samsung.com |
| Puerto Rico | 1-800-682-3180 | www.samsung.com |
| Trinidad & Tobago | 1-800-SAMSUNG (726-7864) | www.samsung.com |
| Venezuela | 0-800-100-5303 | www.samsung.com |
| ■ Europe | ||
| Albania | 42 27 5755 | - |
| Austria | 0810 - SAMSUNG (7267864, € 0.07/min) | www.samsung.com |
| Belgium | 02-201-24-18 | www.samsung.com/be (Dutch) www.samsung.com/be_fr (French) |
| Bosnia | 05 133 1999 | - |
| Bulgaria | 07001 33 11 | www.samsung.com |
| Croatia | 062 SAMSUNG (062 726 7864) | www.samsung.com |
| Czech | 800-SAMSUNG (800-726786) | |
| Samsung Zrt., Česká organizáčni složka, Oasis Florenc, Soko-lovská394/17, 180 00, Praha 8 | www.samsung.com | |
| Denmark | 70 70 19 70 | www.samsung.com |
| Finland | 030 - 6227 515 | www.samsung.com |
| France | 01 48 63 00 00 | www.samsung.com |
| Germany | 01805 - SAMSUNG (726-7864 € 0,14/Min) | www.samsung.com |
| Hungary | 06-80-SAMSUNG (726-7864) | www.samsung.com |
| Italia | 800-SAMSUNG (726-7864) | www.samsung.com |
| Kosovo | +381 0113216899 | - |
| Luxemburg | 261 03 710 | www.samsung.com |
| Macedonia | 023 207 777 | - |
| Montenegro | 020 405 888 | - |
| Netherlands | 0900-SAMSUNG (0900-7267864) (€ 0,10/Min) | www.samsung.com |
| Norway | 815-56 480 | www.samsung.com |
| Poland | 0 801 1SAMSUNG (172678) / 022-607-93-33 | www.samsung.com |
| Portugal | 80820-SAMSUNG (726-7864) | www.samsung.com |
| Rumania | 1. 08010 SAMSUNG (72678) - doar din rețeau Romtelecom, tariff local 2. 021.206.01.10 - din orice rețea, tariff normal | www.samsung.com |
| Serbia | 0700 Samsung (0700 726 7864) | www.samsung.com |
| Slovakia | 0800-SAMSUNG (726-7864) | www.samsung.com |
| Area | Contact Center | Web Site |
| Spain | 902-1-SAMSUNG (902 172 678) | www.samsung.com |
| Sweden | 0771 726 7864 (SAMSUNG) | www.samsung.com |
| Switzerland | 0848-SAMSUNG (7267864, CHF 0.08/min) | www.samsung.com/ch_fr/(French) |
| U.K | 0330 SAMSUNG (7267864) | www.samsung.com |
| Eire | 0818 717100 | www.samsung.com |
| Lithuania | 8-800-77777 | www.samsung.com |
| Latvia | 8000-7267 | www.samsung.com |
| Estonia | 800-7267 | www.samsung.com |
| ■ CIS | ||
| Russia | 8-800-555-55-55 | www.samsung.com |
| Georgia | 8-800-555-555 | - |
| Armenia | 0-800-05-555 | - |
| Azerbaijan | 088-55-55-555 | - |
| Kazakhstan | 8-10-800-500-55-500 (GSM: 7799) | www.samsung.com |
| Uzbekistan | 8-10-800-500-55-500 | www.samsung.com |
| Kyrgyzstan | 00-800-500-55-500 | www.samsung.com |
| Tadjikistan | 8-10-800-500-55-500 | www.samsung.com |
| Ukraine | 0-800-502-000 | www.samsung.ua www.samsung.com/ua_ru |
| Belarus | 810-800-500-55-500 | - |
| Moldova | 00-800-500-55-500 | - |
| ■ Asia Pacific | ||
| Australia | 1300 362 603 | www.samsung.com |
| New Zealand | 0800 SAMSUNG (0800 726 786) | www.samsung.com |
| China | 400-810-5858 / 010-6475 1880 | www.samsung.com |
| Hong Kong | (852) 3698 4698 | www.samsung.com/hk www.samsung.com/hk_en/ |
| India | 3030 8282 / 1800 110011 / 1800 3000 8282 / 1800 266 8282 | www.samsung.com |
| Indonesia | 0800-112-8888 / 021-5699-7777 | www.samsung.com |
| Japan | 0120-327-527 | www.samsung.com |
| Malaysia | 1800-88-9999 | www.samsung.com |
| Philippines | 1-800-10-SAMSUNG(726-7864)/1-800-3-SAMSUNG(726-7864)/1-800-8-SAMSUNG(726-7864)/02-5805777 | www.samsung.com |
| Singapore | 1800-SAMSUNG (726-7864) | www.samsung.com |
| Thailand | 1800-29-3232 / 02-689-3232 | www.samsung.com |
| Taiwan | 0800-329-999 | www.samsung.com |
| Vietnam | 1 800 588 889 | www.samsung.com |
| ■ Middle East | ||
| Bahrain | 8000-4726 | www.samsung.com |
| Egypt | 08000-726786 | www.samsung.com |
| Jordan | 800-22273 | www.samsung.com |
| Morocco | 080 100 2255 | www.samsung.com |
| Oman | 800-SAMSUNG (726-7864) | www.samsung.com |
| Saudi Arabia | 9200-21230 | www.samsung.com |
| Turkey | 444 77 11 | www.samsung.com |
| U.A.E | 800-SAMSUNG (726-7864) | www.samsung.com |
| ■ Africa | ||
| Nigeria | 0800-SAMSUNG (726-7864) | www.samsung.com |
| South Africa | 0860-SAMSUNG (726-7864) | www.samsung.com |
SAMSUNG

Correct disposal of batteries in this product
(Applicable in the European Union and other European countries with separate battery return systems.)
This marking on the battery, manual or packaging indicates that the batteries in this product should not be disposed of with other household waste at the end of their working life. Where marked, the chemical symbols Hg, Cd or Pb indicate that the battery contains mercury, cadmium or lead above the reference levels in EC Directive 2006/66. If batteries are not properly disposed of, these substances can cause harm to human health or the environment.
To protect natural resources and to promote material reuse, please separate batteries from other types of waste and recycle them through your local, free battery return system.
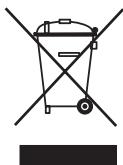
Correct Disposal of This Product (Waste Electrical & Electronic Equipment)
(Applicable in the European Union and other European countries with separate collection systems)
This marking on the product, accessories or literature indicates that the product and its electronic accessories (e.g. charger, headset, USB cable) should not be disposed of with other household waste at the end of their working life. To prevent possible harm to the environment or human health from uncontrolled waste disposal, please separate these items from other types of waste and recycle them responsibly to promote the sustainable reuse of material resources.
Household users should contact either the retailer where they purchased this product, or their local government office, for details of where and how they can take these items for environmentally safe recycling.
Business users should contact their supplier and check the terms and conditions of the purchase contract. This product and its electronic accessories should not be mixed with other commercial wastes for disposal.