Beta Plus - Car seat Lorelli - Free user manual and instructions
Find the device manual for free Beta Plus Lorelli in PDF.


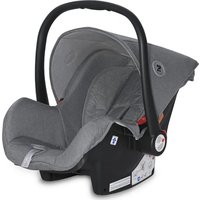
| Product Type | Car Seat |
| Brand | Lorelli |
| Model | Beta Plus |
| Installation Type | Forward-facing and rear-facing using vehicle seat belt |
| Weight Group | 0-36 kg (Group 0+/1/2/3) |
| Dimensions (H x W x D) | 65 x 45 x 40 cm |
| Weight | 6.5 kg |
| Harness Type | 5-point harness |
| Seat Orientation | Rear-facing (birth to 13 kg), Forward-facing (9-36 kg) |
| Safety Standards | ECE R44/04 |
| Cover Material | Polyester |
| Cleaning Instructions | Machine wash cover at 30°C; hand wash harness straps; air dry |
| Main Features | Adjustable headrest, side impact protection, multiple recline positions, padded insert for newborns |
| Warranty | 2 years |
| Spare Parts Availability | Contact Lorelli customer service or authorized retailers |
Frequently Asked Questions - Beta Plus Lorelli
User questions about Beta Plus Lorelli
0 question about this device. Answer the ones you know or ask your own.
Ask a new question about this device
Download the instructions for your Car seat in PDF format for free! Find your manual Beta Plus - Lorelli and take your electronic device back in hand. On this page are published all the documents necessary for the use of your device. Beta Plus by Lorelli.
USER MANUAL Beta Plus Lorelli
natural_image
Illustration of a car seatbelt with blue straps and a magnified inset showing the seatbelt being installed (no text or symbols present)


natural_image
Illustration of a hand adjusting a red belt on a car seatbelt (no text or symbols)


natural_image
Illustration of a car seatbelt being lifted, showing red arrows indicating pressure or force (no text or symbols)


IMPORTANT! KEEP FOR FURTHER REFERENCES. READ CAREFULLY!
NOTICE
- This is an "universally" securing device for children. It is approved in accordance with Rule No 44 for general use in vehicles and is suitable for most but not all seats in cars.
- Placing is correct if the vehicle manufacturer has declared in the Manual for the use of the vehicle that in the vehicle may be placed "Universal" Safety devices for children of this age group.
- This securing device for children is classified as "universal" under more stringent conditions than those applied in previous structures, which don't have this remark.
- If you have doubt, consult the manufacturer of safety equipment for children or the seller.
Only suitable if the approved vehicles are fitted with 3-points static or 3-point retractor safety-belts. Approved to UN/ECER Regulation No. 16 or other equivalent standards.

EXTREME HAZARD
Do not use in passenger seats equipped with Airbags (SRS)
CHILD'S CAR SEAT
From birth to 4 years
Groups 0 & 1 from birth to 18 kg
Please read these instructions carefully before use and keep the guide for future reference. Failure to follow these instructions could compromise the child's safety.
INSTALLATION
1. Group 0. Rear-facing position. From birth to 10 kg.
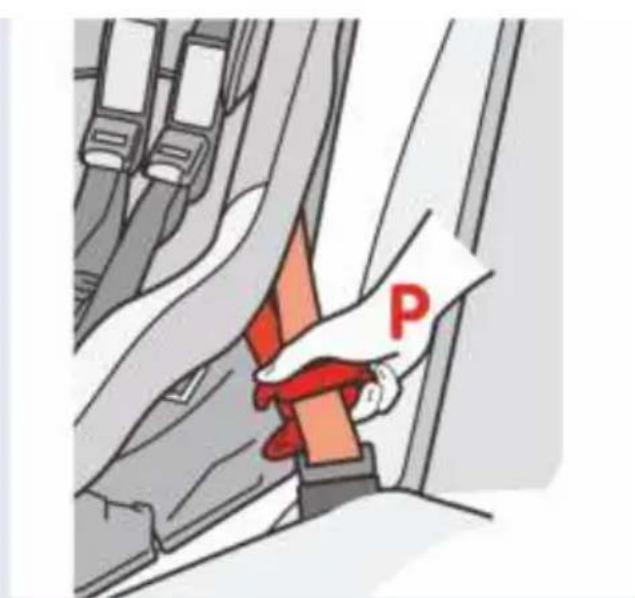
Use only with a three-point lap and diagonal seatbelt. Recline the child seat to its maximum position (fig. 1). Place it on the front passenger seat or on the back seat, with the back of child seat facing the road. Pull the vehicle seatbelt tight and pass the lap part under the base of the child seat (fig. 2). Pass the shoulder part of the vehicle seatbelt through the strap holders on the back of the child seat. Fasten the seatbelt and pull it tight (fig. 3). Position the lock-off (P) on the diagonal part of the belt, behind the rear guide of the shell, as shown in diagram. Ensure that the seatbelt is not twisted or damaged and that it is taut (fig. 4).
2. Group 1. Forward-facing position. From 9 kg to 18 kg.
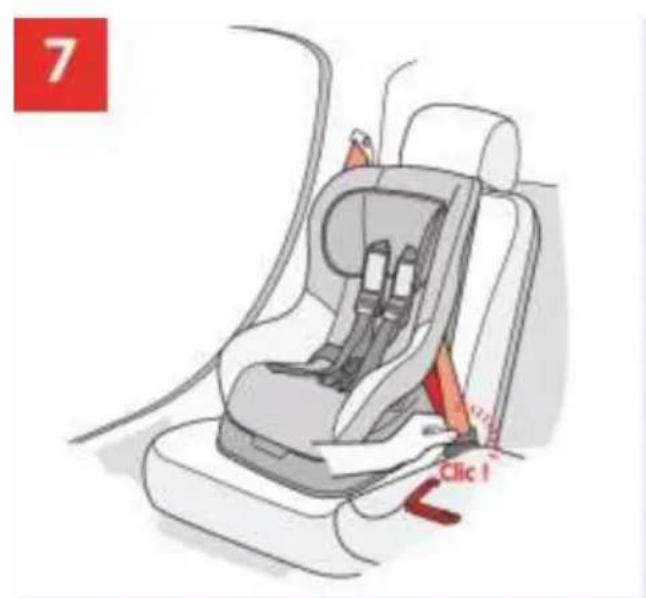
Use only with a three-point lap and diagonal seatbelt. Place the child seat in the upright position facing the road (fig. 5). Pull the vehicle seatbelt and pass the buckle through the back unit of the child seat between the plastic body and the foam padding (fig. 6). Fasten the seatbelt. Pull the seatbelt tight, at the same time pushing on the child seat in order to block it against the vehicle seat (fig. 7). Fix the plastic clip P onto the vehicle seatbelt, close to the buckle on the shoulder part. Ensure that the seatbelt is not twisted or damaged and that it is taut.
3. The child seat harness
3.1. Fastening the buckle.
Join the two ends of the buckle together (fig. 8). Fasten the two ends in the buckle until they click (fig. 9 and 10). To unfasten, press the red button on the buckle. Check regularly that the buckle is fastened correctly.
3.2. Adjustment of the harness.
To tighten the harness: Pull on the adjusting straps positioned on the harness. You do not need to press on the adjuster buttons (fig. 11).
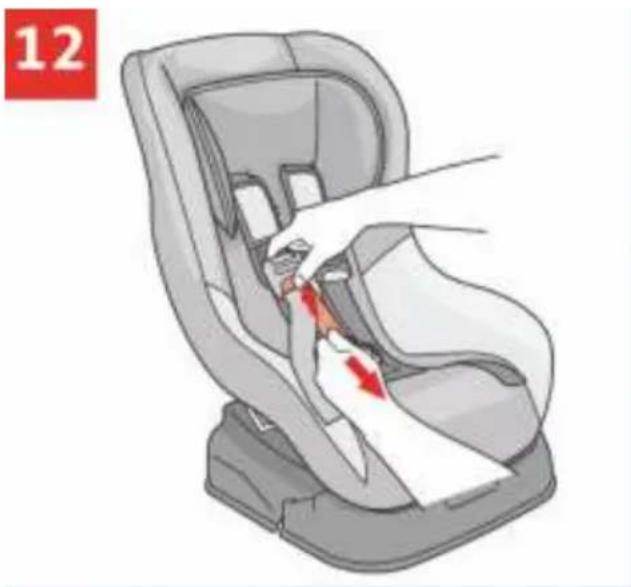
To loosen the harness: Press on the adjuster buttons positioned on the upper section of the harness, grasp the lower section and pull simultaneously (fig. 12).
3.3.Adjusting harness height according to the child's shoulder height.
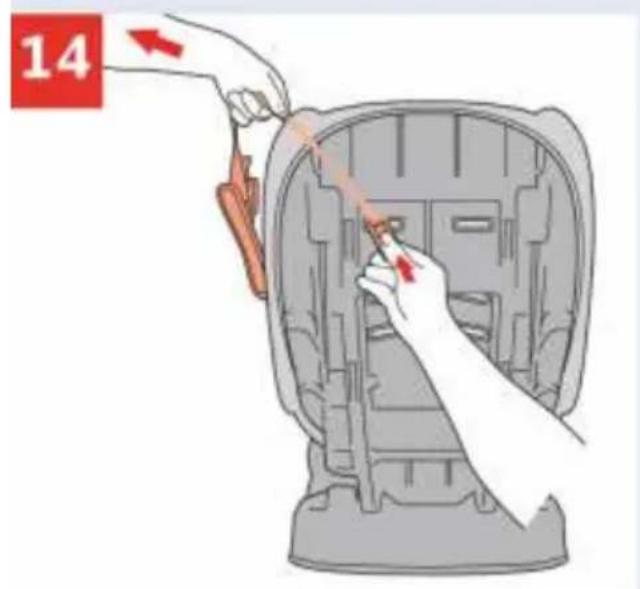
The harness can be adjusted to three different heights (fig. 13). To adjust the height of the harnesses, remove the upper section of one of the harness straps by pivoting the metal anchor located behind the back rest and then pulling it through the slots of the shell and cover (fig. 14). Repeat the operation on the upper section of the second strap. Feed the ends of the harness straps through the slots at identical level in both the cover and the shell, according to the chosen configuration:
- for a rear-facing configuration (Group 0, from 0 to 10 kg) - (fig. 15).
- for a front-facing position (Group 1, from 9 to 18 kg) - (fig. 16).
Make sure that the straps under the stomach are as lowas possible, in order to support the pelvis.
4. Removal and reassembly of the harness and cover
Carry out the same steps as when adjusting the height of the harness but remove it completely. Remove the crotch buckle by passing the strap through the seat base and the cover. Remove the cover as well as any fabric accessories, (according to the model: sleeves, padding etc.). To reassemble, carry out the same steps in the reverse order. Ensure that the harness is correctly fitted and that the straps are not twisted or damaged.
5. Reclining the child seat
The child seat can be reclined for the child's comfort. Use the handle located at the front of the child seat between the base and the body (fig. 17). Each time the reclining position is changed, ensure that the vehicle's seatbelt is taut and that the harness is in the correct position.
6. Warnings
- Never leave a child in the seat in the vehicle alone and unsupervised.
- Follow closely the instructions for installation. Failure can result in injury to the child!
• The stop notches of the back and passenger seats must be locked.
• The car seat should no longer be used after an accident. - Use the car seat even for short journeys: more accidents occur during this type of journey than any other.
- For safety reasons, attach the car seat in your car even when not carrying a child.
- The rigid and plastic parts of the car seat must be positioned and installed so that, through normal use of the vehicle, they cannot become trapped under a mobile seat or in the vehicle door.
- Do not use the car seat without the cover.
- Only replace the car seat cover with one recommended by the manufacturer, as the cover has a direct effect on the performance of the car seat.
- Do not leave anything on the back seat or parcel shelf: sudden braking could cause injury to the child.
• The car seat must not be altered or added to in any way.
• The car seat can not be used in forward facing position before the child's weight exceeds 9 kg! - Reversed system for securing children must not be installed on places protected by air bags.
- Safety can only be guaranteed if the seat has been correctly fitted according to these instructions and if it has not been altered in any way.
•Wash in soapy water at 30°C.
BG
- IMPORTANT! KEEP FOR FURTHER REFERENCES. READ CAREFULLY!
- NOTICE
- EXTREME HAZARD
- CHILD'S CAR SEAT
- INSTALLATION
- Group 0. Rear-facing position. From birth to 10 kg.
- Group 1. Forward-facing position. From 9 kg to 18 kg.
- The child seat harness
- Fastening the buckle.
- Adjustment of the harness.
- 3.3.Adjusting harness height according to the child's shoulder height.
- Removal and reassembly of the harness and cover
- Reclining the child seat
- Warnings
- BG
Brand : Lorelli
Model : Beta Plus
Category : Car seat