Delta - Car seat Lorelli - Free user manual and instructions
Find the device manual for free Delta Lorelli in PDF.


| Product Type | Car Seat |
| Brand | Lorelli |
| Model | Delta |
| Dimensions (L x W x H) | Approx. 44 x 38 x 60 cm |
| Weight | Approx. 5.5 kg |
| Weight Range | Group 0+/1: up to 18 kg (approx. 0-4 years) |
| Installation | Forward-facing and rear-facing using vehicle seat belt |
| Harness Type | 5-point harness |
| Headrest Adjustment | Yes, adjustable headrest height |
| Recline Positions | Multiple recline positions for comfort and safety |
| Side Impact Protection | Integrated with deep side wings |
| Cover Material | Polyester fabric, removable and washable |
| Cleaning Instructions | Hand wash cover with mild detergent, air dry |
| Safety Standards | ECE R44/04 approved |
| Expiry Date | Typically 6 years from manufacture date |
| Accessories Included | Instruction manual, harness pads, crotch buckle |
Frequently Asked Questions - Delta Lorelli
User questions about Delta Lorelli
0 question about this device. Answer the ones you know or ask your own.
Ask a new question about this device
Download the instructions for your Car seat in PDF format for free! Find your manual Delta - Lorelli and take your electronic device back in hand. On this page are published all the documents necessary for the use of your device. Delta by Lorelli.
USER MANUAL Delta Lorelli
natural_image
Black and white photo of a baby car seat with checkered pattern and matching straps (no text or symbols visible)GROUP 0+ (0 - 13 kg)
ECE R44/04
MANUAL INSTRUCTION ИНСТРУКЦИЯ ЗА УПОТРЕБА
СЪДЪРЖАНИЕ / CONTENT
EN Manual Instruction....6
BG Инструкция за употреба....9
RO Instructiuni de utilizare....12


natural_image
Illustration of a hand holding a cable inside a device, with no text or symbols present


natural_image
Line drawing of a car seat with straps and seatbelt (no text or symbols)
natural_image
Line drawing of a medical or anatomical component with a red marker, no text or symbols present
natural_image
Simple line drawing of a flower with a red center, no text or symbols present
natural_image
Line drawing of a flower-like shape with a red center, no text or symbols present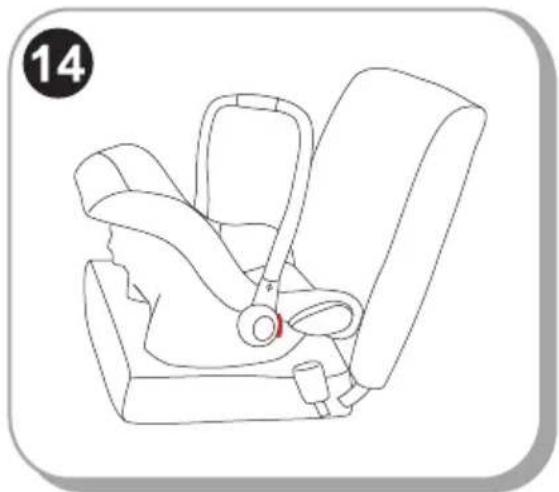
natural_image
Line drawing of a car seatbelt device with a red accent marking (no text or symbols)


natural_image
Illustration of a car seatbelt buckle with a magnified inset showing the detail (no text or symbols)
natural_image
Line drawing of a mechanical component with a red accent, no text or symbols present
natural_image
Illustration of hands holding a folded garment with a curved arrow indicating rotation (no text or symbols)
natural_image
Diagram of a mechanical assembly with a pin and lever mechanism, no text or symbols present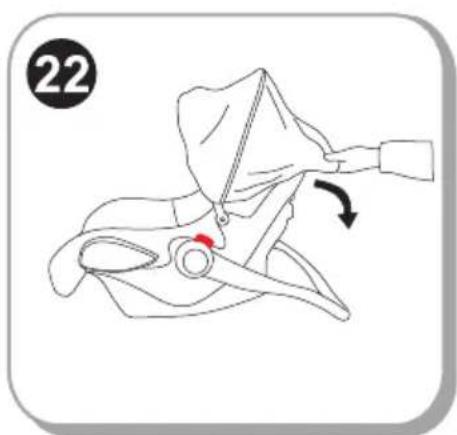

natural_image
Illustration of a mechanical device with directional arrows indicating motion (no text or symbols)
natural_image
Illustration of a medical device with a red arrow indicating rotation (no text or symbols)
IMPORTANT! KEEP FOR FUTURE REFERENCE! READ CAREFULLY!
NOTICE
- This is an "universally" securing device for children. It is approved in accordance with Rule No 44 for general use in vehicles and is suitable for most but not all seats in cars.
- Placing is correct if the vehicle manufacturer has declared in the Manual for the use of the vehicle that in the vehicle may be placed "Universal" Safety devices for children of this age group.
- This securing device for children is classified as "universal" under more stringent conditions than those applied in previous structures, which don't have this remark.
- If you have doubt, consult the manufacturer of safety equipment for children or the seller.
Only suitable if the approved vehicles are fitted with 3-points static or 3-point retractor safety-belts. Approved to UN/ECER Regulation No. 16 or other equivalent standards.

Do not use in passenger seats equipped with airbags.
Important safety instructions!
WARNING! It is appropriate only if approved vehicles are equipped with a 3-point holding device of safety belt, approved in accordance with Rule No 16 of the ECE at the UN or other equivalent standards.
WARNING! The hard components or plastic parts of safety device for children should be deployed and installed in way that during everyday use of the vehicle not be jammed by the movable seats or doors.
WARNING! All belts fastening car chair must be tight, belts restrain the child, must be adjusted to his body and not twisted.
WARNING! The device must be replaced if it has undergone significant load of an accident.
WARNING! It is dangerous to make changes or to supplement safety device without approval of the competent authority!
WARNING! Follow closely the instructions for installation. Failure can result in injury to the child!
WARNING! Do not leave the child unattended in the safety device!
WARNING! Any luggage or other items that can cause injury if a collision should be properly secured!
WARNING! Safety device for children should not be used without case!
WARNING! Cases of seat should not be replaced with another, unless recommended by the manufacturer, because it is an integral part of the system for securing children!
WARNING! Your child seat can only be fitted into the passengers seat of a car with a lap and diagonal seat belt. Do not use any load bearing contact points other than those described in the instructions and marked on the child restraint. Ensure the vehicle seat buckle is not positioned in or in front of the specified (labelled) belt guide of the child restraint system.
WARNING! Rearward child restraint systems should not be used in seats protected by an airbag.
WARNING! The interior of the car can become very hot when exposed to direct sunlight. Therefore, it is recommended that the child seat is covered when not used. This prevents heating of upholstery and components, and especially those attached to the child seat and scorching the child!
WARNING! Do not use the car seat in the house. It is not designed for home use and should only be used in the vehicle!
WARNING! Before you set any mobile or adjustable part of the child seat, you need to remove your child from the child seat!
WARNING! Periodically check the belts for wear, paying special attention to the points of attachment, protections and regulating devices.
WARNING! Do not leave the buckle in a partially closed position and it must only lock when all parts are engaged. It must be possible to release the child from the restraint immediately in an emergency.
WASHING INSTRUCTIONS
- The car seat can be cleaned using lukewarm water and soap. Do not use aggressive cleaners like abrasives or thinner.
- The cover should be washed by hand at a maximum temperature of 30^ C. Do not put in the dryer, just airing it.
- The plastic parts can be cleaned by using a wettish drapery. Please, do not use any solvate.
TYPES OF APPROVED BELTS TO HAVE IN THE CAR
Your child seat can be installed ONLY with the help of 3-point belts!!! ONLY in the OPPOSITE direction of movement of the car!

Ability to install only on seat without active AIRBAG!

Possibility to install ONLY on seats with 3-point seat belts!
CAN NOT BE USED FOR SEATS with 2-point belt!


Parts
Picture 1
- Carrying handle
- Belt softener
- Belt buckles
- Strap for belts adjustment
-
Button for adjusting the belt (under the cover)
-
Lap belt guide
- Red button for handle adjusting
- Diagonal belt guide
- Openings for shoulder straps
- Holder of the canopy
- Shoulder straps
- Canopy frame
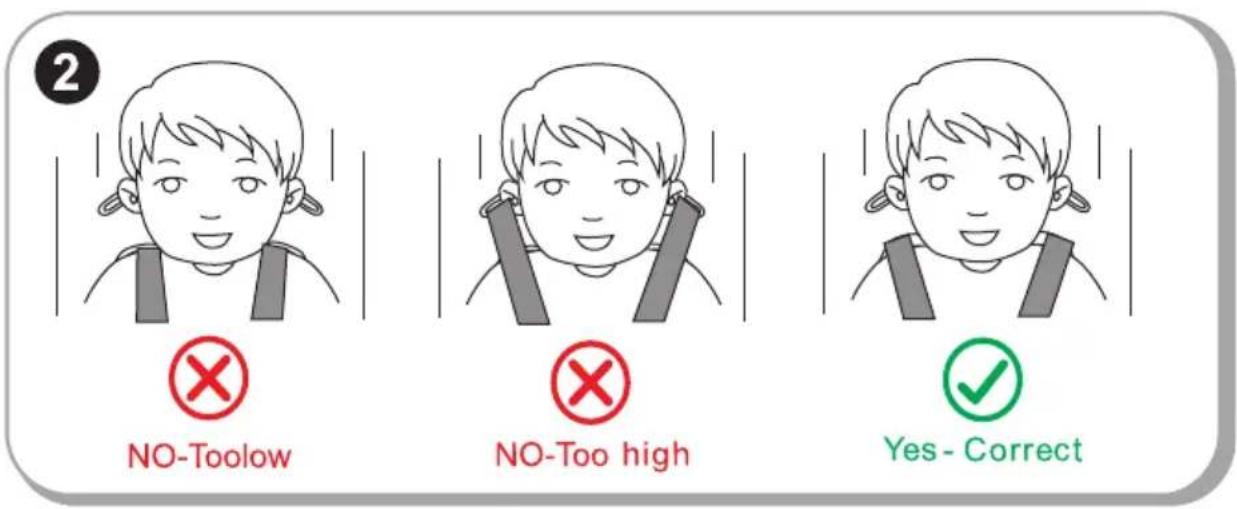
Check the height of the shoulder belts
Always check that the shoulder belts are placed at the correct height for your child. Select the height of the straps according to the child's height. The position of the straps should be at or slightly above the shoulders of the child. Warning: Do not place the straps too high or so that the child can lean on them! In the back of the safety seat, there are 2 pairs of holes, which can be used to adjust the shoulder straps to suit your child's weight (Fig. 2)
Adjusting the height of seat belts
- Press the button for belts adjusting "5" and at the same time pull both shoulder straps. (Picture 3)
- Take out the belts "11" of the holes on the back from the front of the seat.
- Place back the belts in the desired holes on the front side of the backrest and connect them behind the back with the adjusting strap "4". Make sure the straps are placed on the same level and are not twisted.
Fastening the seat belt
- Combine the two pieces "E" and "F" at the end of the belt (Picture 6) and place them in the central buckle "3" until it clicks into place. (Picture 7)
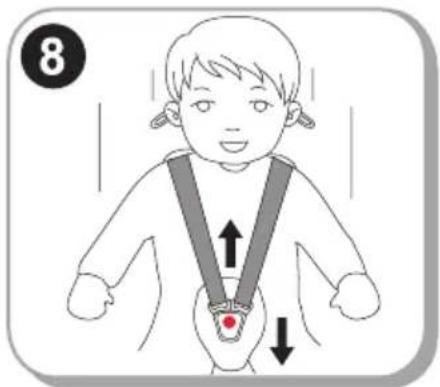
- Make sure the belt is locked by pulling the shoulder straps up. (Picture 8)
- To release belt, press down the red button on the central buckle "3".
Adjusting the length of the belts
- Slack the belts: Press the button for belts adjusting "5" and at the same time pull both shoulder straps. (Picture 3)
- Tightening the belt: Place your child in the seat, fasten both belts in the buckle in the center and pull the strap "4" in the middle of the seat. (Picture 5)
Adjusting of the carry handle
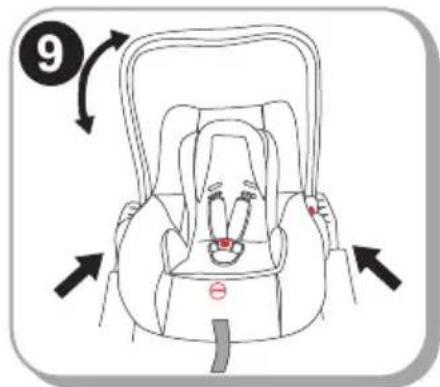
The carry handle of the car seat, can be adjusted in 4 stable positions.
To adjust the handle, please press the red button on handle on both side at the same time. Now it can be rotated. (Picture 9)
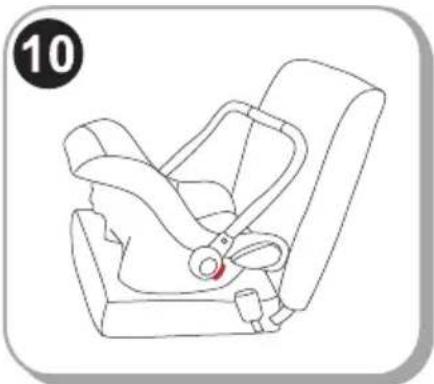
1 Position - Forward facing installed in the car .This position (only this position) is suitable for the baby car seat installed on the vehicle seat . (Picture 10)
2 Position - Straight up for carrying. (Picture 11)
3 Position - Handle clicked back to initiate the rocking feature . (Picture 12)
4 Position - Down to support baby for feeding. (Picture 13)
Ensure that the handle is locked in a position, the harness is correctly fitted and buckle fastened before carrying your car seat.
INSTALLATION OF SEAT
"Group 0+" / newborn and weighing up to 13 kg.
Please use 3-point safety belts of the car to ensure the safety of the child and to secure the child seat!
Your child seat can be installed ONLY with the help of 3-point belts!!! ONLY in the OPPOSITE direction of movement of the car!
Step 1. Adjust the handle to the upright position . (Picture14)
Step 2. Place the child seat on the seat of the car in the OPPOSITE direction of movement of the car, ensuring it is firmly pressed against the car seat backrest. If your car has an air bag on the passenger seat, the child seat should be used only in the rear of the car!
Стъпка 3. Slide the lap belt of the vehicle's 3-point seatbelt through both Lap belt guides. Let the tongue plate snap in the belt lock with a clearly audible "click". (Picture 15) Pull the shoulder belt in arrow direction to tighten the lap belt. Check to make sure the tongue plate is locked by pulling on the belt.
Step 4. Place the diagonal belt in the diagonal belt guide at the back of the seat (Picture 16)
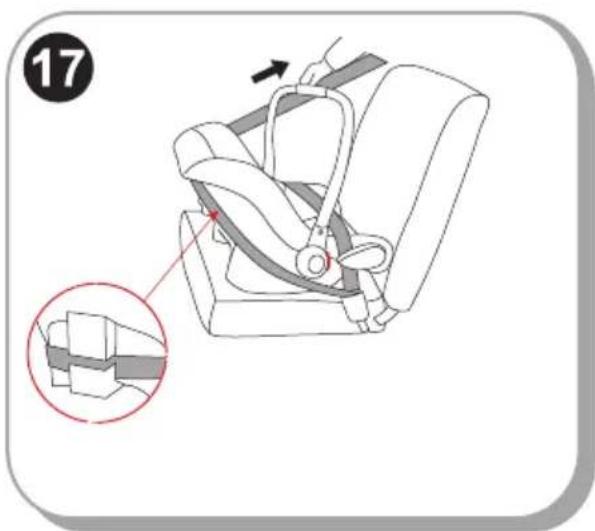
Step 5. Tighten the vehicle's own 3-pointseatbelt by pulling hard on the positions . (Picture 17)
Step 6. Adjust the handle to the forward position! Place the child safety seat on the vehicle's seat ensuring its handle must be firmly against the car seat backrest.(Picture 18)
Step 7. Make sure that the belt is not twisted and strongly tightened. Make sure the seat is fixed firmly on the car seat.
Step 8. Place the child in the seat. Check the height of the shoulder belts. Make sure the straps are not twisted or hanging somewhere. Fasten the seat belts on the child, making sure that they are well placed and pull the strap in the center of the seat to tighten.
Assembling of the canopy.
- Insert frame "12" through sleeve of canopy. (Picture 19)
- Adjust the handle to the down position behind the back. (Picture 20)
- Insert both ends of canopy frame into the canopy frame joint "10" parts which locate on the both side of the car seat and above the handle. (Picture 21)
- Fix the bottom of the canopy cover to the top of the car seat back. (Picture 22)
- Rotate the canopy frame joint parts and the canopy will reach the proper position you want (Picture 23), after that rotate the carry handle in the desired position (Picture 24)
BG
Части:
Снимка 1
COMPONENTE
Figura 1
COMPONENTE
Zdjęcie 1
PIÈCES
Photo 1
PARTI
Foto 1
E≡APTHMATA
Φωτογραφία 1

ДЕЛОВИ
Слика 1
Части:
ФОТО 1

DELOVI
Slika 1
- Drška za nošenje
- Zaštitnik za pojaseve
- Kopče za kaiš
- Kaiš za podešavanje pojaseva
-
Dugme za podešavanje pojaseva (ispod presvlaka)
-
Vođica za pojas preko krila
- Crveno dugme za podešavanje drške
- Vođica za dijagonalni pojas
- Otvori za podešavanje pojaseva za ramena
- Vođice za suncobran
- Pojasevi za ramena
- Osnova za suncobran
PARÇALARI
Resim 1
ALKATRÉSZEK
PJESA
Fotografia 1
- СЪДЪРЖАНИЕ / CONTENT
- IMPORTANT! KEEP FOR FUTURE REFERENCE! READ CAREFULLY!
- NOTICE
- Important safety instructions!
- WASHING INSTRUCTIONS
- TYPES OF APPROVED BELTS TO HAVE IN THE CAR
- Parts
- Check the height of the shoulder belts
- Adjusting the height of seat belts
- Fastening the seat belt
- Adjusting the length of the belts
- Adjusting of the carry handle
- INSTALLATION OF SEAT
- Assembling of the canopy.
- BG
- Части:
- COMPONENTE
- Figura 1
- PIÈCES
- PARTI
- E≡APTHMATA
- ДЕЛОВИ
- DELOVI
- PARÇALARI
- ALKATRÉSZEK
- PJESA
Brand : Lorelli
Model : Delta
Category : Car seat